

Page 1
BD-101
INFRARED
FOREHEAD
THERMOMETER
TERMOMETR CZOŁOWY NA PODCZERWIEŃ
INFRAROT-STIRNTHERMOMETER
EN
Instructions manual
Read and follow the instructions before installation and use. Keep the instructions for
future reference.
PL
Instrukcja obsługi
Przed montażem i użyciem zapoznaj się z instrukcją i zastosuj się do jej zasad. Zachowaj
instrukcję do późniejszego wglądu.
DE
Bedienungsanleitung
Bitte lesen Sie diese Bedienungsanleitung und bewahren Sie diese zum Nachschlagen im
Bedarfsfall auf.
310100 / V. 1.0
www.berdsen.pl
0123
Page 2
Product Description
1
4
5
6
3
2
Page 3
3
Sound si gn
Unit sig n: ℃ o r ℉
Rea l Tim e Clo ck
For ehead M ode
Obj ect Mod e
Mem ory Mod e
/ Swi tch℃ ℉
Bee p Hint
Sou nd on/o ff
Volta ge s ign
5
a
i
b
h
c
g
f
e
d
Page 4

4
INSTRUCTION MANUAL
EN
Please read these instructions carefully and thoroughly before
using this product.
The BD-101 infrared forehead thermometer has been specially
designed for safe use on the forehead. It is a device capable of measuring body temperature by detecting the intensity of infrared light
emitted from the forehead area. It works by converting the recorded
heat into a temperature reading, which is then displayed on an LCD
screen. With proper operation, the thermometer will quickly and accurately assess the user's body temperature. It is a practical device that
enables accurate temperature monitoring safely and conveniently.
The device is dedicated to the non-invasive measurement of human
body temperature, carried out through the skin of the forehead. It
is ideal for both home and clinical use, enabling measurements for
people of all ages. Thanks to its safe and convenient application on
the forehead area, this thermometer provides an eective tool for
monitoring body temperature in a variety of environments.
Indications for use: the infrared forehead thermometer is used to
measure body temperature by measuring the temperature on the
forehead.
This device is compatible with the following standards:
ISO 80601-2-56 Medical electrical equipment - Part 2-56: Detailed
requirements for basic safety and essential performance of clinical
thermometers for measuring body temperature,
IEC 60601-1-11 Medical electrical equipment - Part 1-11: General
requirements for basic safety and essential performance - Collateral
standard: Requirements for medical electrical equipment and medical
Page 5

5
electrical systems used in the home healthcare environment and
complies with the requirements of IEC 60601-1-2(EMC),
IEC 60601-1(Safety). The manufacturer is ISO 13485 certied.
The product complies with the requirements of MDD Directive 93/42/
EEC, "0123" is the identication number of the notifying body.
WARNING
⚠
• Use of the infrared thermometer is not restricted by gender or age.
• Do not touch the temperature probe with your hands.
• Use of this forehead thermometer is not a substitute for consul-
tation with a doctor.
• Do not allow children to take the temperature unsupervised, as
some parts are small enough to be swallowed.
• Never immerse the device in water or other liquids.
• Do not modify the device without the manufacturer's approval.
• Do not expose the thermometer to extreme temperatures (below
-25°C/-13°F or above 55°C/131°F) or excessive humidity (>95%
relative humidity).
• Keep the battery away from children.
• Remove the battery if the device is not used for an extended
period of time.
• Do not place the thermometer in direct sunlight or with cotton
wool, otherwise the accuracy of the measurement will be aected.
• Portable and mobile RF (Radio Frequency) communications may
aect the performance of this device. It is therefore necessary to
take special precautions and follow the recommendations regarding electromagnetic compatibility (EMC). Detailed information on
Page 6

6
the application of EMC precautions can be found at the end of the
manual included in the device documentation.
• ME equipment should not be cleaned or wiped down during use.
• Any serious incident related to the equipment should be reported
to the manufacturer and to the competent authority of the Member State where the user and/or patient is located.
• The ME equipment probe should not be serviced or maintained
during use with the patient.
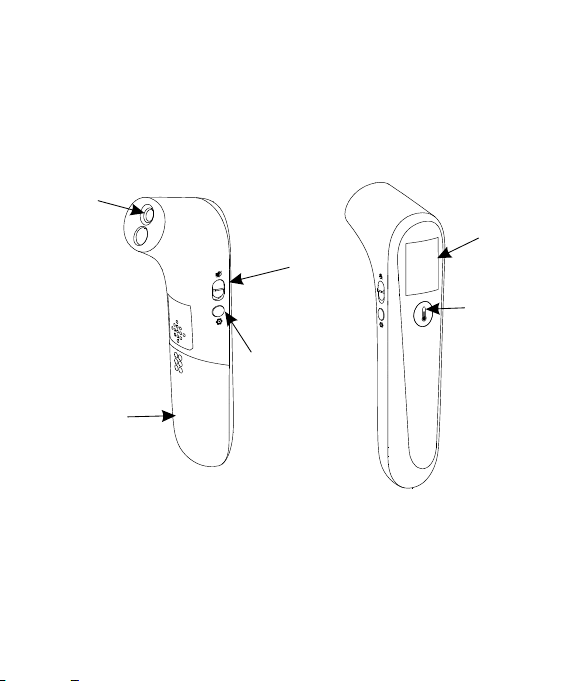
DEVICE
Design of the device
1. Probe
2. Test button
3. Sound switch
4. Settings button
5. Battery cover
6. Display
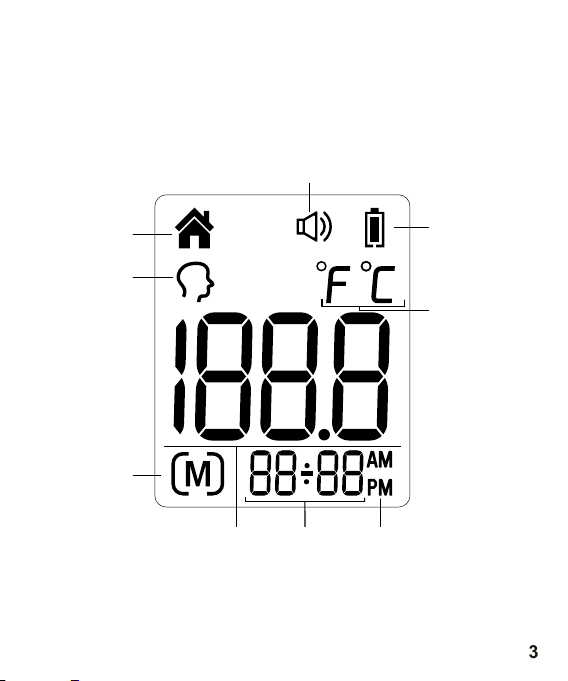
Icons on the display
a. Sound sign
b. Battery sign
c. Unit sign: °C or °F
d. AM and PM sign in time mode
e. Time and date
f. Temperature result
g. Memory mode
h. Front temperature mode
i. Object mode
Page 7

7
BASIC FUNCTIONS
CLOCK
The real-time clock will function in memory and help support the
measurement results.
Refer to the Clock Settings section to learn how to congure the
time when using it for the rst time.
FOREHEAD MODE
The thermometer has been designed for practical use. It is not a substitute for visiting your doctor. You should also remember to compare
the measurement result with your regular body temperature.
To learn how to measure your body temperature, refer to the
Features section.
OBJECT MODE
The object mode shows the actual uncorrected surface temperature, which diers from the body temperature. This can help monitor
whether the object temperature is appropriate for a baby or patient,
such as baby milk.
Measurement range of object mode: 0°C~100°C (32°F~212°F).
Laboratory accuracy of object mode: ±4% or ±2 °C (4 °F), whichever is
greater.
Page 8

8
To learn how to measure the object temperature, refer to the
Features section.
MEMORY MODE
There are 30 memory sets available for forehead and object measurements. Each memory also stores the measurement date/time/mode icon.
BEEP
One short beep will sound when testing is complete.
°C/ °F SWITCH
To learn how to switch between degrees Celsius and Fahrenheit, refer
to the Clock Settings section.
SWITCHING THE SOUND ON/OFF
Use the button to select whether the sound should be switched on or o.
Page 9
9
Ear Thermometer Advantages
Clinical studi es have shown that the ear is an e xcellent site for
temperature me asurement because temp eratures taken in the ear
,
reflect the body s core temperatu re. Body temperature is re gulated
by the hypothala mus, which shares the same b lood supply as the
tympanic membr ane. Changes in core body te mperature are usually
seen sooner at the t ympanic membrane than at o ther sites, such as
the rectum, mout h or under the arm.
Advantages of ta king temperatures at the e ar versus other sites:
● Axillary temperature rea dings only reflect skin temperature
which may not i
● Rectal tempera tures often lag signific antly behind internal bo dy
temperature ch anges, especially at tim es of rapidly changing
temperatures .
● Oral temperatu res are often influenced b y eating, drinking,
thermometer pl acement, breathing thr ough the mouth, or the
inability of the p erson to close their mouth c ompletely.
Vital Organs
ADVANTAGES OF THE THERMOMETER
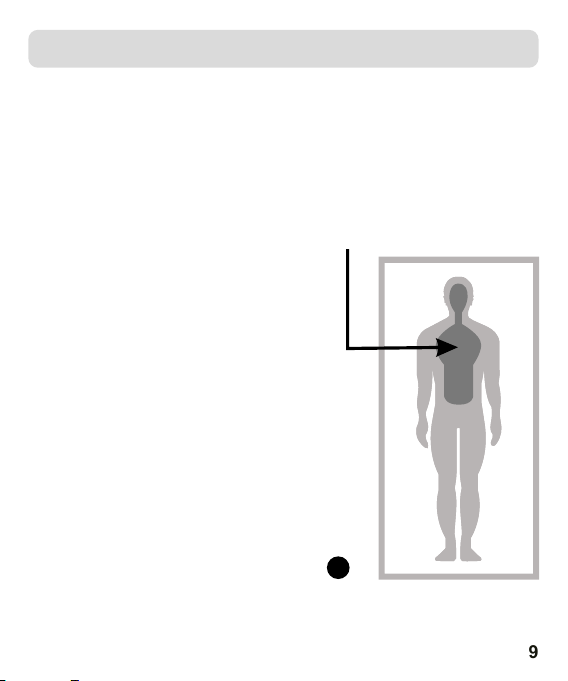
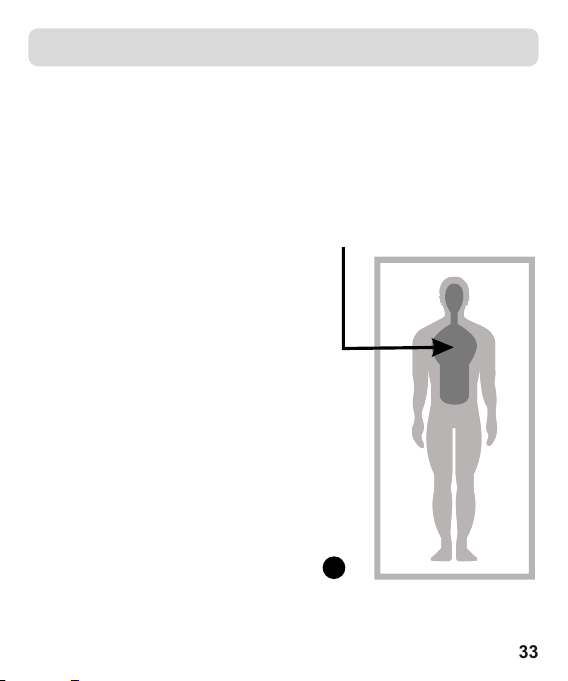
The infrared forehead thermometer accurately measures body
temperature, focusing on the area of key organs (see Figure 1). Its
use involves measuring the temperature of the skin surface over the
temporal artery, which is the main artery of the head.
The temporal artery, which is a direct extension of the aorta - the
main trunk of the arterial system - connects to the heart via the
carotid artery. It provides a constant
ow of blood, making it a particularly
representative site for overall body
temperature. Therefore, changes in
body temperature are reected more
rapidly in the forehead than in other
areas such as the mouth, rectum or
armpit.
Vital organs
1
Page 10
10
Real Time Clock Setting
8
the re ctum, mout h or unde r the a rm.
Adva ntages of ta king te mpe ratur es at the ear ve rsus other s ites:
● Axill ary tem perature r eadings on ly refl ect s kin tem perature
whic h may not i
ndic ate the inte rnal bo dy te mpera ture.
● Rect al tempera tures o fte n lag sig nificant ly behind in terna l bod y
temp erature ch anges , esp ecial ly at times of r apidly cha nging
temp eratures .
● Oral t emperatu res are o fte n influ enced by eat ing, drink ing,
ther mometer pl aceme nt, b reath ing throug h the mouth, o r the
inab ility of the p erson t o clo se thei r mouth comp letely.
①Set th e unit
Pres s Setting Bu tton to s ele ct the
unit y ou want.
Afte r the unit is se t
,pre ss Mode
Butt on ,the time f ormat f igu re will
appe ar .
When u sing therm omete r for t he firs t time, plea se set the par amete rs
of the t hermomet er. With the therm ometer off, pr ess and hold
Mode B UTTON to enter i nto settin g mode.
Real Time Clock Setting
8
temp erature ch anges , esp ecial ly at times of r apidly cha nging
temp eratures .
● Oral t emperatu res are o fte n influ enced by eat ing, drink ing,
ther mometer pl aceme nt, b reath ing throug h the mouth, o r the
inab ility of the p erson t o clo se thei r mouth comp letely.
①Set th e unit
Pres s Setting Bu tton to s ele ct the
unit y ou want.
Afte r the unit is se t
,pre ss Mode
Butt on ,the time f ormat f igu re will
appe ar .
② Set th e time forma t
The de vi ce can di splay t he time in ei ther
an AM/PM (1 2-hou r) or a 24:00
(24- ho ur) for mat. Pr ess and rel ease
Sett in g butto n to sele ct the form at.
With th e prefe rred time f ormat o n the
disp la y, pr ess Mod e Butto n, the Hour
When u sing therm omete r for t he firs t time, plea se set the par amete rs
of the t hermomet er. With the therm ometer off, pr ess and hold
Mode B UTTON to enter i nto settin g mode.
Real Time Clock Setting
8
①Set th e unit
Pres s Setting Bu tton to s ele ct the
unit y ou want.
Afte r the unit is se t
,pre ss Mode
Butt on ,the time f ormat f igu re will
appe ar .
② Set th e time forma t
The de vi ce can di splay t he time in ei ther
an AM/PM (1 2-hou r) or a 24:00
(24- ho ur) for mat. Pr ess and rel ease
Sett in g butto n to sele ct the form at.
With th e prefe rred time f ormat o n the
disp la y, pr ess Mod e Butto n, the Hour
figu re i s flash ing aut omatica lly.
③ Set th e hour
Pres s an d relea se the Se tting But ton to ad vance
one ho ur u ntil th e corre ct hour app ears.
Afte r th e hour is s et, pre ss Mode But ton, th e Minut e
figu re i s flash ing aut omatica lly.
When u sing therm omete r for t he firs t time, plea se set the par amete rs
of the t hermomet er. With the therm ometer off, pr ess and hold
Mode B UTTON to enter i nto settin g mode.
SETTING THE CLOCK
When using the thermometer for the rst time, set the device parameters. With the thermometer o, press and hold the settings button
to enter the settings mode.
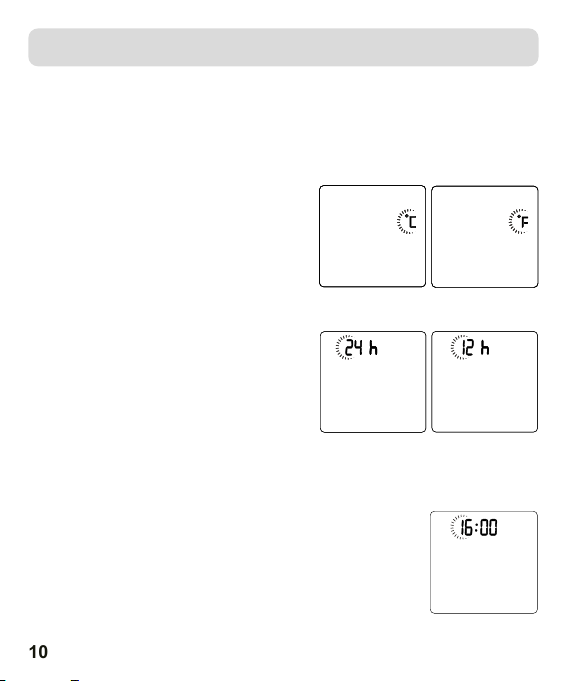
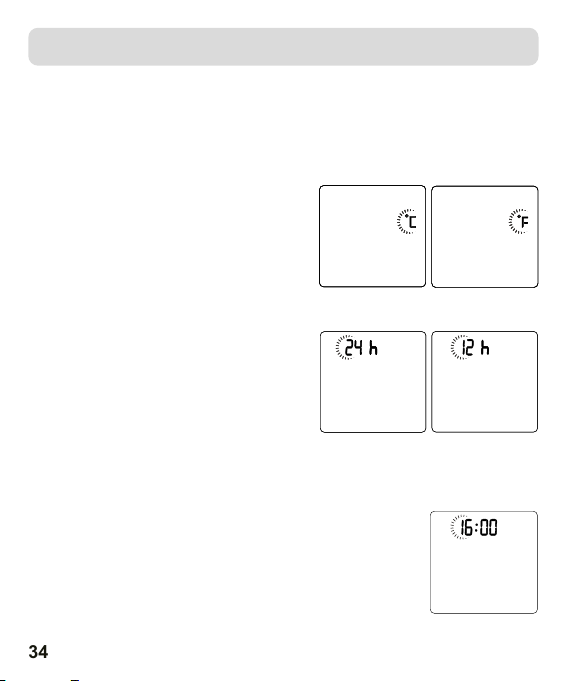
1. Setting the unit
Press the test button to select the
desired unit.
Once the unit is set, press the set-
tings button, the time format will be
displayed.
2. Setting the time format
The unit can display the time in
12-hour (AM/PM) or 24-hour format.
Press and release the test button
to select the format. Once the
preferred time format has been
selected, press the settings button,
the hour digit will start ashing automatically.
3. Setting the time
Press and release the test button to advance one
hour until the correct time is displayed.
Once the hour is set, press the settings button and
the minute value will start ashing automatically.
Page 11
11
4. Setting the minute
sure a n ew, clean pr obe cover i s in plac e befor e each
meas ureme nt. Place a n ew prob e cover o n the pro be firm ly;
maki ng sure t he probe an d the inn er port ion of th e probe c over
1. To achi eve acc urate r eadin gs
To measure ea r te mpe rat ure:
Real Time Clock Setting
④ Set th e minut e
Press an d re lease t he S etting Bu tt on to adv an ce
one minu te u ntil th e co rrect min ut e appea rs .
After th e mi nute is s et , press Mod e Bu tton, t he Year
figure i s fl ashin g au tomatic al ly.
sure a n ew, clean pr obe cover i s in plac e befor e each
meas ureme nt. Place a n ew prob e cover o n the pro be firm ly;
maki ng sure t he probe an d the inn er port ion of th e probe c over
fit sn ugly.
2. Pre ss the , The disp lay is acti vated t o show al l
segm ents.
1. To achi eve acc urate r eadin gs
scre en with b eeps, so yo u can sta rt a new me asure ment. I f error
mess ages ap pears, it m eans th e therm omete r is not re ady for
To measure ea r te mpe rat ure:
Real Time Clock Setting
④ Set th e minut e
Press an d re lease t he S etting Bu tt on to adv an ce
one minu te u ntil th e co rrect min ut e appea rs .
After th e mi nute is s et , press Mod e Bu tton, t he Year
figure i s fl ashin g au tomatic al ly.
⑤ Set th e year
Press an d re lease t he S etting Bu tt on to adv an ce
one year u nt il the co rr ect year ap pe ars.
After th e ye ar is set , pr ess Mode Bu tt on, the M on th
figure w il l appea r.
sure a n ew, clean pr obe cover i s in plac e befor e each
meas ureme nt. Place a n ew prob e cover o n the pro be firm ly;
maki ng sure t he probe an d the inn er port ion of th e probe c over
fit sn ugly.
2. Pre ss the , The disp lay is acti vated t o show al l
segm ents.
Rema rks:
a. Pro be cove r sign stan d for tak ing the e ar temp eratu re with
prob e cover n ow and vice v ersa.
1. To achi eve acc urate r eadin gs
scre en with b eeps, so yo u can sta rt a new me asure ment. I f error
mess ages ap pears, it m eans th e therm omete r is not re ady for
meas ureme nt.
To measure ea r te mpe rat ure:
Real Time Clock Setting
④ Set th e minut e
Press an d re lease t he S etting Bu tt on to adv an ce
one minu te u ntil th e co rrect min ut e appea rs .
After th e mi nute is s et , press Mod e Bu tton, t he Year
figure i s fl ashin g au tomatic al ly.
⑤ Set th e year
Press an d re lease t he S etting Bu tt on to adv an ce
one year u nt il the co rr ect year ap pe ars.
After th e ye ar is set , pr ess Mode Bu tt on, the M on th
figure w il l appea r.
⑥ Set th e month
Press an d re lease t he S etting Bu tt on to adv an ce
one mont h un til the c or rect mont h ap pears .
After th e mo nth is se t, p ress Mode B ut ton, th e Da te
figure i s fl ashin g au tomatic al ly.
sure a n ew, clean pr obe cover i s in plac e befor e each
meas ureme nt. Place a n ew prob e cover o n the pro be firm ly;
maki ng sure t he probe an d the inn er port ion of th e probe c over
fit sn ugly.
2. Pre ss the , The disp lay is acti vated t o show al l
segm ents.
Rema rks:
a. Pro be cove r sign stan d for tak ing the e ar temp eratu re with
prob e cover n ow and vice v ersa.
b. To avoi d the ris k of cros s conta minat ion, it i s recom mende d
that y ou alwa ys measur e the ear t emper ature w ith pro be cove r.
1. To achi eve acc urate r eadin gs
scre en with b eeps, so yo u can sta rt a new me asure ment. I f error
mess ages ap pears, it m eans th e therm omete r is not re ady for
meas ureme nt.
To measure ea r te mpe rat ure:
Real Time Clock Setting
④ Set th e minut e
Press an d re lease t he S etting Bu tt on to adv an ce
one minu te u ntil th e co rrect min ut e appea rs .
After th e mi nute is s et , press Mod e Bu tton, t he Year
figure i s fl ashin g au tomatic al ly.
⑤ Set th e year
Press an d re lease t he S etting Bu tt on to adv an ce
one year u nt il the co rr ect year ap pe ars.
After th e ye ar is set , pr ess Mode Bu tt on, the M on th
figure w il l appea r.
⑥ Set th e month
Press an d re lease t he S etting Bu tt on to adv an ce
one mont h un til the c or rect mont h ap pears .
After th e mo nth is se t, p ress Mode B ut ton, th e Da te
figure i s fl ashin g au tomatic al ly.
⑦ Set th e date
Press an d re lease t he S etting Bu tt on to adv an ce
one day un ti l the cor re ct month ap pe ars.
After th e da y is set, p re ss Mode But to n to exit t he
settin g mo de.
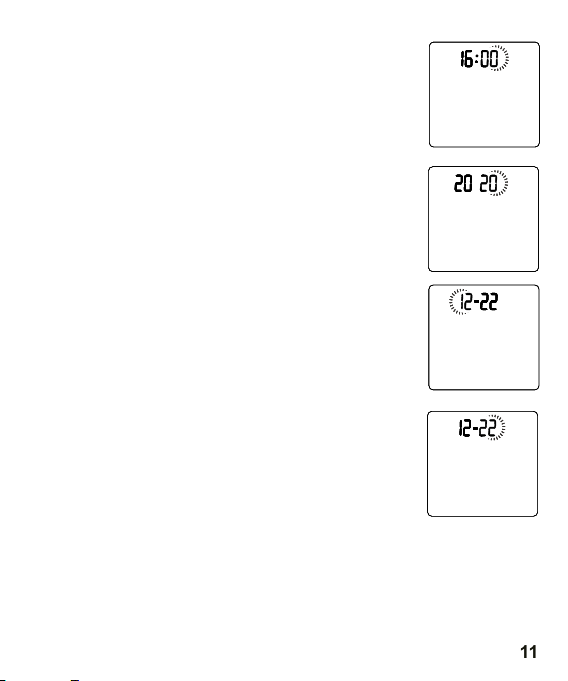
Press and release the test button to advance one
minute until the correct minute appears.
Once the minute is set, press the settings button and
the year digit will start ashing automatically.
5. Setting the year
Press and release the test button to advance one year
until the correct year appears.
After setting the year, press the setting button, the
month digit will appear.
6. Setting the month
Press and release the test button to advance one
month until the correct month appears.
After setting the month, press the settings button to
display the Date digit.
7. Setting the date
Press and release the test button to advance one day
until the correct month appears.
Once the day has been set, press the setting button
to exit the setting mode.
Page 12

12
TEMPERATURE MEASUREMENT TIPS
To ensure an accurate reading of body temperature with an infrared
forehead thermometer, it is useful to consider the following factors
that can aect the accuracy of the measurement:
1. Knowing each person's normal body temperature when they feel
well is crucial for an accurate diagnosis of fever. To determine
this baseline temperature, it is advisable to take several measurements when the patient is well. To conrm the readings, it is
useful to take an additional measurement with a standard digital
thermometer.
2. Users must be in the room for 30 minutes before taking a measurement.
Note: Users and the thermometer should be at the same ambient
temperature for at least 10 minutes before taking a reading.
3. Users should not drink, eat or be physically active, such as bathing, showering, shampooing and drying their hair before/during
the measurement. Remove cap and wait 10 minutes before taking
a reading.
4. Oils or cosmetics on the forehead may give a lower temperature
reading than the actual reading. Remove dirt from the forehead
before taking the measurement. Wait at least 10 minutes after
washing the forehead before taking a measurement.
5. Keeping your hand on your forehead for a long time will aect the
temperature reading.
6. Do not take the temperature on scars, open wounds or abrasions.
7. Do not use the thermometer on a sweaty or perspiring forehead
as this may aect the reading.
Page 13
13
8. Do not measure during or immediately after feeding your baby.
Illustration For Use
9. Do not measure the temperature with this thermometer near
areas that are very hot, such as replaces and cookers.
10. The probe window of the thermometer is the most delicate part
of the device. Do not touch the probe window. Damage or dirt to
the probe window can aect the accuracy of the reading.
11. If the thermometer is stored in an environment signicantly different from the test site, place it in the test site for approximately
30 minutes before use.
12. It is not intended for use in oxygen-rich environments or in the
presence of ammable anaesthetic mixtures with air, oxygen or
nitrous oxide.
FUNCTIONS
FOREHEAD TEMPERATURE
MEASUREMENT
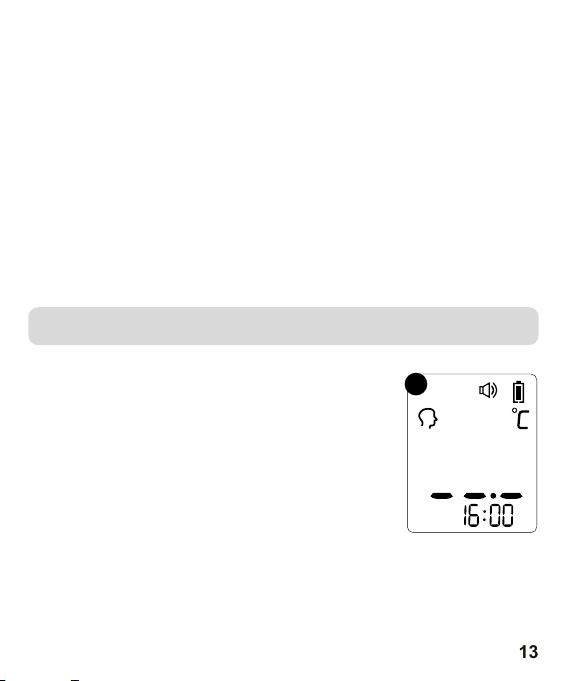
1. Press the test button, the display will be
activated to show all segments. After the
self-test, the display will show the icons as
in gure 2 along with beeps to start a new
measurement.
2
Page 14
14
2. Point the thermometer at the centre of the
Illustration For Use
After measurem ent :
1. Pow er off: Dev ice wil l autom atica lly shu t off if left i dle for
more t han 30 se conds t o exten d batte ry life .
2. Cle an the pr obe aft er each u se to ens ure an ac curat e reading an d
avoi d cross c ontam inati on.
(See t he sect ion of Ca re and Cl eanin g for det ails. )
BackLight:
In For ehead m ode:
1. The dis play wi ll be lig hted GR EEN for 3 s econd s when th e unit is
read y for mea surem ent and t he disp lay wil l be ligh ted GREEN fo r
3 seco nds whe n a measu remen t is comp leted w ith a rea ding less
than 3 7.3℃(99 .1
℉).
2. The dis play wi ll be lig hted YELLOW for 3 s econd s when a
meas ureme nt is com plete d with a re ading l ess tha n 37.8℃(100. 0
3. The dis play wi ll be lig hted RE D for 3 sec onds wh en a meas urement
is com plete d with a re ading e qual to o r highe r than 37 .8℃(100.0
In Obj ect mod e:
The di splay w ill onl y be ligh ted GRE EN for 3 se conds w hen the
unit i s ready f or meas ure
ment a nd a meas ureme nt is com plete d.
forehead at a distance of less than 5 cm (see
gure 3) and then press the test button.
Note: Do not remove the thermometer from
the forehead before the beep sounds.
3. Read the temperature on the display.
4. The unit will automatically switch o if left idle
for 30 seconds.
TURN THE SOUND ON/OFF
You can ick the sound switch to turn the sound on or o.
SWITCHING FRONT AND OBJECT MODE
Press and hold the settings button to switch between forehead mode
and object mode.
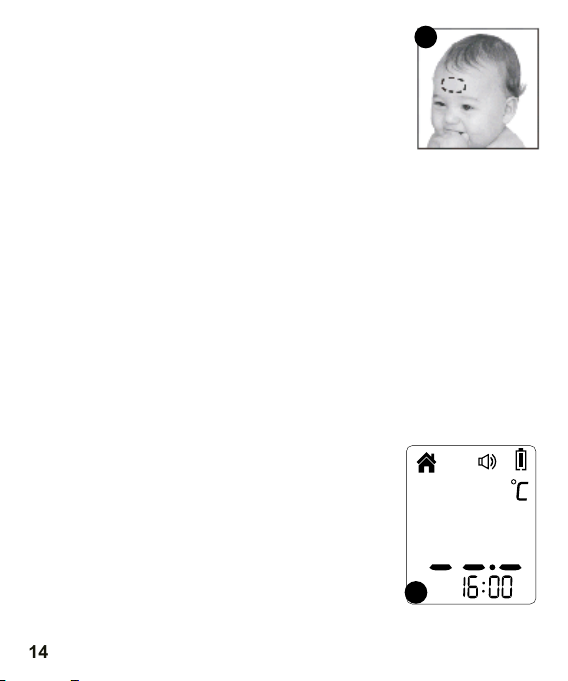
MEASURING OBJECT TEMPERATURE
1. Press the test button to switch the thermometer on, and once
in measurement mode you can measure the temperature of an
object (see gure 4).
2. Point the thermometer at the centre of
the object whose temperature you want to
measure, from a distance of less than 5 cm.
3. Press the test button and then read the temperature on the display.
4. The device will automatically switch o if left
idle for 30 seconds.
3
4
Page 15

15
AFTER MEASUREMENT
1. Switch o the power. After 30 seconds of inactivity, the device will
automatically enter power saving mode and switch o. This is a
feature designed to extend battery life.
2. Clean the probe after each use to ensure accurate readings and
avoid cross contamination.
(See Care and cleaning section for details).
BACKLIGHTING
In forehead mode:
1. The display will illuminate GREEN for 3 seconds when the unit
is ready to measure, and the display will illuminate GREEN for
3 seconds when the measurement is completed with a reading
below 37.3 °C (99.1 °F).
2. The display will light up YELLOW for 3 seconds when the measurement is completed with a reading below 37.8 °C (100.0 °F).
3. The display will light RED for 3 seconds after the measurement is
completed with a reading equal to or higher than 37.8 °C (100.0
°F).
In object mode:
The display will illuminate GREEN for 3 seconds when the instrument
is ready for measurement and the measurement is complete.
Page 16
16
MEMORY MODE
Memory Mode
Each m emory also r eco rds the
1. The pro be window must be ke pt clea n, dry, and un damag ed at all
time s to ensu re accu rate readings. The a ccura cy of tem perat ure
read ings ca n be affected b y damag e to the pr obe win dow, or the
pres ence of d irt, fi ngerprints, du st and ot her soi ling
comp ounds o n the pro be window. Degrad ed sensor s can deg rade
perf orman ce or cau se other problem s.
2. The pro be window is the mos t delic ate par t of the th ermom eter.
Use a so ft clot h sligh tly moistened wi th a 75% is oprop yl alco hol
solu tion to w ipe pro be window and the th ermom eter. Do n ot
use ab
rasi ve clea ners. Afte r clean ing, al low at le ast 10 mi nutes
dryi ng time b efore t aking temperat ures.
Note : Do not us e any che mical other than i sopro pyl alc ohol to
clea n the pro be wind ow.
3. Use a s oft, dr y cloth t o clean the thermo meter d ispla y and
exte rior.
4. Do no t put the t hermo meter into water d irect ly.
5. Sto re the th ermom eter in a dry locati on, fre e from du st and
cont amina tion an d away from direct s unlig ht.
6. Put t he ther momet er back to the origi nal pac kagin g after u sing.
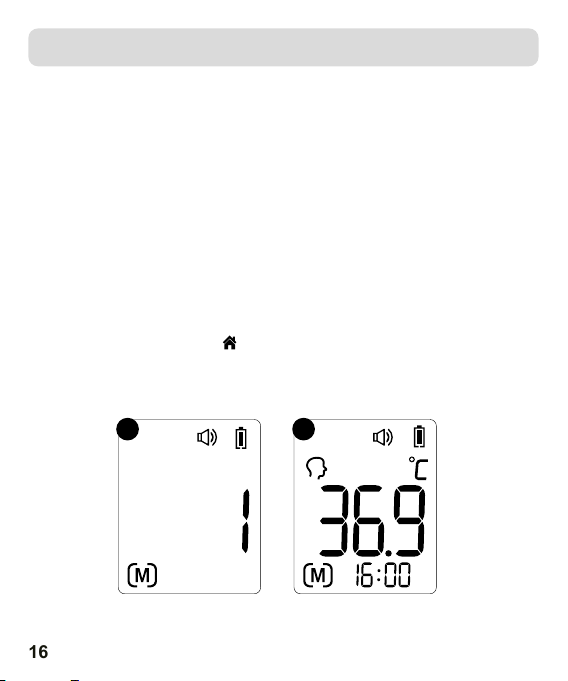
1. The memory mode can be accessed in the forehead mode or in
the object mode:
After switching on the thermometer and following the steps
shown in Figures 2-4 or completing the test, press the settings
button. The letter M will appear in the lower left corner of the
display (see gure 5).
2. The thermometer will automatically store the last 30 temperature readings. A measurement mode icon is also stored in each
memory. Each time the settings button is pressed, the screen
displays the previous readings corresponding to numbers 1 to 30.
The number 1 reects the most recent reading, while the number
30 indicates the oldest reading stored in memory (see Figure 6).
3. In memory mode, the " " or "" marker will not change. The user
can press the test button to take new measurements.
5 6
Page 17

17
CARE AND CLEANING
1. To ensure accurate readings, the probe window must always be
kept clean, dry and free of damage. The accuracy of temperature
measurements can be aected by the presence of dirt, ngerprints, dust and other debris on the surface of the probe window.
Damage to this area can signicantly aect the performance of
the instrument, leading to erroneous readings or other problems.
2. The probe window is the most delicate part of the thermometer.
Use a soft cloth lightly moistened with a 75% isopropyl alcohol
solution to disinfect the probe window and thermometer. Do not
use abrasive cleaners. After thorough cleaning, it is recommended
to wait at least 10 minutes for it to dry before taking a temperature measurement.
Note: Do not use chemicals other than isopropyl alcohol to clean
the probe window.
3. Use a soft, dry cloth to clean the thermometer display and its
exterior.
4. Do not put the thermometer directly into water.
5. Store the thermometer in a dry place, free from dust and dirt and
away from direct sunlight.
6. Place the thermometer back in its original packaging after use.
Page 18
18
BATTERY REPLACEMENT
Measuring range
Laboratory accur acy
Display resoluti on
Measure time
Operating temper ature
range:
Storage and transp ort
temperature rang e
Clinical accurac y
Measuring site For ehead(Forehead Mod e)
Reference body sit e
Operation mode For ehead mode(Adjust mo de)
Figure 7
Figure 8
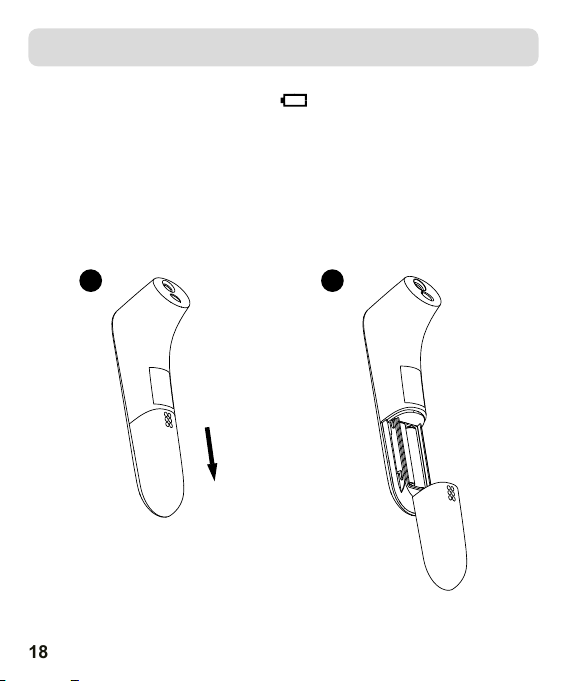
1. Replace the battery when the " " appears in the upper right
corner of the LCD display.
2. Slide the battery cover down as shown in Figure 7.
3. Remove the battery and install 2 new AAA alkaline batteries as
shown in Figure 8.
4. Slide the battery cover back.
7 8
Page 19
19
SPECIFICATIONS
Measuring range Front mode: 34.0°C~43.0°C (93.2°F~109.4°F)
Place of measurement Forehead (Forehead mode)
Manufacturer model DET-3017 (Ref. BD-100)
Reference site
Operating mode Forehead mode (adjustment mode)
Laboratory accuracy
Display resolution 0.1 °C or 0.1 °F
Measurement time Approximately one second
Operating tempera-
ture range
Storage and transport
temperature range
Clinical accuracy
Shock resistance to a fall from a height of 3 feet
Dimension 155*39.2*49.4mm
Weight approx. 97 grams (with batteries)
Battery DC3V (2×AAA battery)
Battery life Approximately 6000 readings
Part used Probe
Expected service life Three years
Degree of protection IP22
Accessories Battery
Contraindications Non
Oral (This thermometer converts the reference forehead temperature to
display its "oral equivalent").
Front mode: ±0.2 °C (0.4 °F) during 35.5 °C~42.0 °C (95.9 °F~107.6 °F) over
the operating temperature range 15 °C ~ 35 °C (59.0 °F ~ 95.0 °F) ±0.3 °C
(0.5 °F) for other measurements and operating temperature range
5°C~40°C (41°F~104°F), 15%~85% relative humidity, non-condensing.
Atmospheric pressure: 70 kPa ~ 106 kPa
-25 °C ~ 55 °C (-13 °F ~ 131 °F), 15% ~ 95% relative humidity, non-condensing Atmospheric pressure: 70 kPa ~ 106 kPa
0-1 year: Clinical deviation: -0.19 °C (- 0.34 °F) ; Clinical repeatability:
0.06°C (0.11°F) ; Compliance limits: 0.68°C (1.22°F);
1- 5 years: Clinical bias: -0.25°C (- 0.45°F) ; Clinical repeatability: 0.07°C
(0.13°F) ; Compliance limits: 0.73°C (1.31°F)
Over 5 years: Clinical deviation: -0.25°C (- 0.45 °F) ; Clinical repeatability:
0.17°C (0.31°F) ; Compliance limits: 0.60°C (1.08°F)
Page 20
20
TROUBLESHOOTING
Tro ub le sh oo ti ng
Prob lem
Solu tion
Erro r messa ge
Remo ve prob e cover i n
obje ct temp eratu re mode .
In obj ect tem perat ure
mode , measu remen t
with p robe co ver.
Tro ub le sh oo ti ng
Prob lem
Solu tion
Erro r messa ge
Take a me asure ment
unti l or appe ars
on the d ispla y.
Meas ureme nt befo re
ther momet er is rea dy
Tro ub le sh oo ti ng
In Ear m ode:
Tempe ratur e taken i s
high er than 4 3.0 ℃
(109 .4℉).
Prob lem
Solu tion
Erro r messa ge
Read Tem perat ure Taki ng
Hint s Thoro ughly, t hen
chec k the int egrit y of the
Remo ve prob e cover i n
obje ct temp eratu re mode .
In obj ect tem perat ure
mode , measu remen t
with p robe co ver.
Tro ub le sh oo ti ng
Prob lem
Solu tion
The am bient t emper ature
is not w ithin t he rang e
betw een 10℃ an d 40℃
(50℉
~104℉) .
Plac e the
in a room f or at leas t 30
minu tes at roo m
temp eratur e betwee n
10℃ and 40℃
ther momete r
Erro r messa ge
Take a me asure ment
unti l or appe ars
on the d ispla y.
Meas ureme nt befo re
ther momet er is rea dy
Tro ub le sh oo ti ng
In Ear m ode:
Tempe ratur e taken i s
high er than 4 3.0 ℃
(109 .4℉).
In Obj ect mod e:
Tempe ratur e taken i s
Prob lem
Solu tion
Erro r messa ge
Read Tem perat ure Taki ng
Hint s Thoro ughly, t hen
chec k the int egrit y of the
prob e cover a nd take a n ew
Remo ve prob e cover i n
obje ct temp eratu re mode .
In obj ect tem perat ure
mode , measu remen t
with p robe co ver.
Tro ub le sh oo ti ng
In Ear m ode:
Tempe ratur e taken i s
high er than 4 3.0 ℃
(109 .4℉).
In Obj ect mod e:
Tempe ratur e taken i s
high er than 1 00 ℃
(212℉) .
Prob lem
Solu tion
Read Tem perat ure
Takin g Hints t horou ghly ,
then m ake sur e the pro be
cove r and len s filte r are
clea n, then t ake a new
Erro r messa ge
Read Tem perat ure Taki ng
Hint s Thoro ughly, t hen
chec k the int egrit y of the
prob e cover a nd take a n ew
temp eratu re meas ureme nt.
Remo ve prob e cover i n
obje ct temp eratu re mode .
In obj ect tem perat ure
mode , measu remen t
with p robe co ver.
In Ear m ode:
Tempe ratur e taken i s
lowe r than 32 .0 ℃
(89. 6℉).
In Obj ect mod e:
Tempe ratur e taken i s
Tro ub le sh oo ti ng
In Ear m ode:
Tempe ratur e taken i s
high er than 4 3.0 ℃
(109 .4℉).
In Obj ect mod e:
Tempe ratur e taken i s
high er than 1 00 ℃
(212℉) .
Prob lem
Solu tion
Read Tem perat ure
Takin g Hints t horou ghly ,
then m ake sur e the pro be
cove r and len s filte r are
clea n, then t ake a new
temp eratu re meas ureme nt.
Erro r messa ge
Read Tem perat ure Taki ng
Hint s Thoro ughly, t hen
chec k the int egrit y of the
prob e cover a nd take a n ew
temp eratu re meas ureme nt.
Remo ve prob e cover i n
obje ct temp eratu re mode .
In obj ect tem perat ure
mode , measu remen t
with p robe co ver.
In Ear m ode:
Tempe ratur e taken i s
lowe r than 32 .0 ℃
(89. 6℉).
In Obj ect mod e:
Tempe ratur e taken i s
lowe r than 0 ℃
(32℉).
The th ermom eter wo rks
prop erly.
Use th e therm omete r
norm ally
Tro ub le sh oo ti ng
In Ear m ode:
Tempe ratur e taken i s
high er than 4 3.0 ℃
(109 .4℉).
In Obj ect mod e:
Tempe ratur e taken i s
high er than 1 00 ℃
(212℉) .
Prob lem
Solu tion
Read Tem perat ure
Takin g Hints t horou ghly ,
then m ake sur e the pro be
cove r and len s filte r are
clea n, then t ake a new
temp eratu re meas ureme nt.
Erro r messa ge
Read Tem perat ure Taki ng
Hint s Thoro ughly, t hen
chec k the int egrit y of the
prob e cover a nd take a n ew
temp eratu re meas ureme nt.
Remo ve prob e cover i n
obje ct temp eratu re mode .
In obj ect tem perat ure
mode , measu remen t
with p robe co ver.
In Ear m ode:
Tempe ratur e taken i s
lowe r than 32 .0 ℃
(89. 6℉).
In Obj ect mod e:
Tempe ratur e taken i s
lowe r than 0 ℃
(32℉).
When b atter y outli ne
flas hes, it i ndica tes tha t
the po wer is lo w, but you
The th ermom eter wo rks
prop erly.
Use th e therm omete r
norm ally
The th ermom eter wi ll take
a prop er meas ureme nt but
batt eries m ust be re place d
Tro ub le sh oo ti ng
In Ear m ode:
Tempe ratur e taken i s
high er than 4 3.0 ℃
(109 .4℉).
In Obj ect mod e:
Tempe ratur e taken i s
high er than 1 00 ℃
(212℉) .
Prob lem
Solu tion
Read Tem perat ure
Takin g Hints t horou ghly ,
then m ake sur e the pro be
cove r and len s filte r are
clea n, then t ake a new
temp eratu re meas ureme nt.
Erro r messa ge
Read Tem perat ure Taki ng
Hint s Thoro ughly, t hen
chec k the int egrit y of the
prob e cover a nd take a n ew
temp eratu re meas ureme nt.
Remo ve prob e cover i n
obje ct temp eratu re mode .
In obj ect tem perat ure
mode , measu remen t
with p robe co ver.
In Ear m ode:
Tempe ratur e taken i s
lowe r than 32 .0 ℃
(89. 6℉).
In Obj ect mod e:
Tempe ratur e taken i s
lowe r than 0 ℃
(32℉).
The th ermom eter co uld
not
work d ue to low
Repl ace two n ew
alka line ba tteri es
When b atter y outli ne
flas hes, it i ndica tes tha t
the po wer is lo w, but you
can co ntinu e to meas ure.
The th ermom eter wo rks
prop erly.
Use th e therm omete r
norm ally
The th ermom eter wi ll take
a prop er meas ureme nt but
batt eries m ust be re place d
soon .
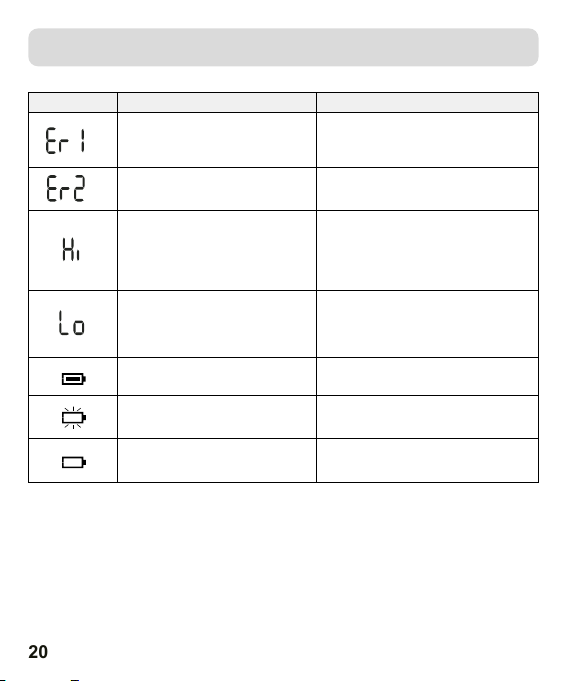
Komunikat Problem Solution
The thermometer is not working
properly.
The ambient temperature is not
between 5°C and 40°C (41°F~104°F).
In forehead mode: The measured
temperature is higher than 43.0 °C
(109.4 °F).
In object mode: the measured
temperature is higher than 100 °C
(212 °F).
In front mode: The measured
temperature is lower than 34.0 °C
(93.2 °F).
In object mode: the measured temperature is lower than 0 °C (32 °F).
The thermometer is functioning
properly.
When the battery indicator ashes,
it means that the battery level is low,
but you can continue measuring.
The thermometer cannot operate
due to low battery level.
Discharge the battery, wait 1 minute
and power it up again. If the message
reappears, contact your dealer for
assistance.
Place the thermometer indoors for at
least 30 minutes at a room temperature
between 5°C and 40°C (41°F~104°F).
Carefully read the temperature measurement instructions, then take a new
temperature measurement.
Carefully read the temperature measurement instructions, then make sure
the lens lter is clean and take a new
temperature measurement.
The thermometer can be used normally
The thermometer will take a correct
measurement, but the batteries should
be replaced soon.
Replace with two new AAA size alkaline
batteries.
Page 21
21
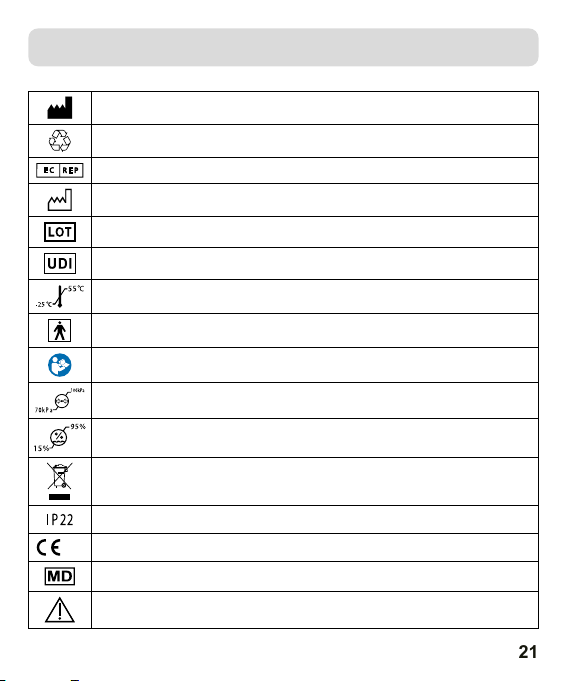
SYMBOL EXPLANATION
Manufacturer
General symbol for recovery/ recyclable
Authorized representative in the European Community
Date Of manufacture
Batch Code
Unique device identier
Storage and Transportation Temperature Limit:
TYPE BF APPLIED PART
Refer to instruction manual/ booklet
Atmospheric pressure limitation
Storage and Transportation Humidity limitation:
Disposal of this product and used batteries should be carried out in accordance with the national
regulations for the disposal of electronic products.
The rst num.2:Protected against solid foreign objects of 12,5mm Ø and greater. The second num.2:
Protection against vertically falling water drops when ENCLOSURE tilted upto 150
The product conforms to the requirements of the EC Directive MDR(EU) 2017/745 on medical
devices.
0123
Medical Device
Caution
Page 22

22
INFORMATION FOR USERS ON HOW TO DEAL WITH WASTE
ELECTRICAL AND ELECTRONIC EQUIPMENT.
If the device, packaging, instruction manual and the like are marked with the symbol
of acrossed-out wheeled waste container, it means that the device is subject to
separate waste collection in accordance with Directive 2012/19/EU of the European
Parliament and of the Council. The used device should not be disposed of with other
household waste and should not be treated as municipal waste. By disposing of
electro-waste in the container you pose athreat to the environment. Take the used
device to aseparate collection point for electrical and electronic equipment organized by the public administration. By segregating and submitting used electrical and
electronic equipment for processing, recovery, recycling and disposal, you protect
the environment from pollution and contamination, contribute to reducing the use
of natural resources and lowering the cost of producing new equipment. Proper
disposal and scrapping helps eliminate the adverse eects of scrapped products on
the environment and human health. For details on the recyclability of this product,
please contact your local municipality, city cleaning services or the store where you
purchased the product.
Page 23
23
INFORMATION ON ELECTROMAGNETIC COMPATIBILITY
The device complies with the requirements of the international standard IEC 60601-1-2 for electromagnetic compatibility. The requirements are met under the conditions described in the table
below. The device is an electrical medical product and is subject to special precautions with regard
to EMC, which must be published in the operating instructions. Portable and mobile HF communication equipment can aect the device.Using the device in combination with unapproved accessories
may adversely aect the device and alter electromagnetic compatibility. The device should not be
used directly near or between other electrical equipment.
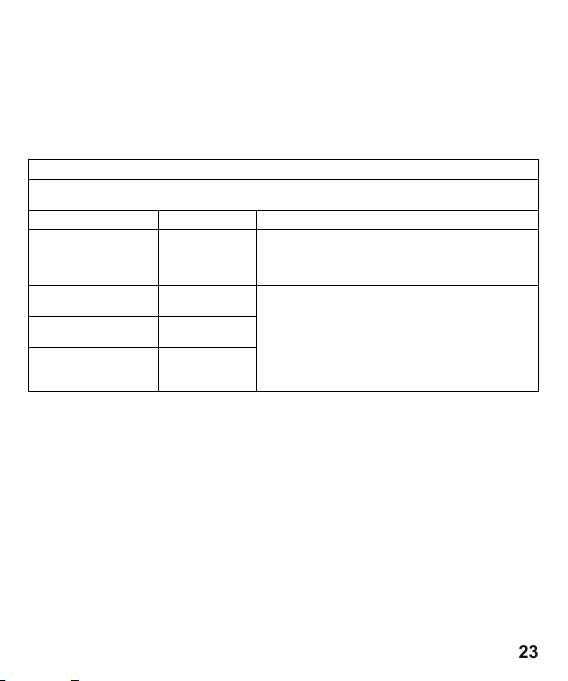
Table 1
Guidelines and manufacturer's declaration - electromagnetic emissions
The device is intended for use in the electromagnetic environment specied below. The custo-
mer or user of the device should ensure that it is used in such an environment.
Emission test Compliance Electromagnetic environment - guidance
Conducted emission
CISPR 11
Radiated emission
CISPR 11
Acoustic emissions
IEC 61000-3-2
Voltage uctuation /
Flicker emissions
IBC 61000-3-3
Not applicable
Group 1 Class B
N/A
N/A
The device uses RF energy exclusively for its internal
functions. Therefore, RF emissions are very low
and should not cause any interference to nearby
electronic equipment.
The device uses RF energy exclusively for its internal
functions. Therefore, the RF emissions are very low
and should not cause any interference to nearby
electronic equipment.
Page 24
24
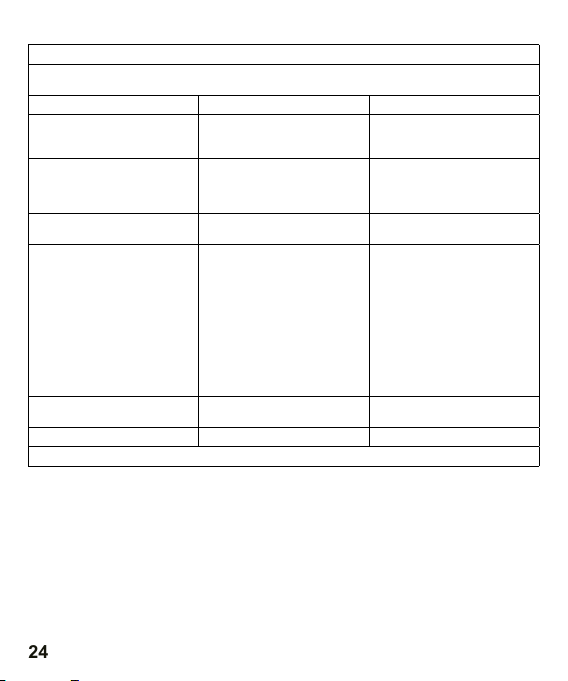
Table 2
Guidance and manufacturer's declaration - electromagnetic immunity
The device is intended for use in the electromagnetic environment specied below. The cus-
tomer or user of the equipment should ensure that it is used in such an environment.
Immunity test IEC 60601 test level Compliance level
Electrostatic discharge (ESD)
IEC 61000-4-2
Electrostatic transients/
impacts IEC 61000-4-4
Overvoltages IEC 61000-4-5
Voltage drops, short interruptions and voltage uctuations
on power input lines IEC
61000-4-11
Power frequency magnetic
eld (50/60 Hz) IEC 61000-4-8
Proximity magnetic elds IEC 61000-4-39 See Table 3
NOTE: UT is the mains voltage before the test level is applied.
±8 kV contact
±2 kV, ±4kV, ±8 kV air
±2 kV for supply lines
Repetition rate
100 kHz ±1kV for input/output
0.5 cycle at 0°, 45º, 90º, 135º,
70% UT (30% drop in UT) for
lines
±0,5kV, ±1kV in line-to-line
dierential mode
0% UT (100% UT drop) for
180º, 225º, 270º and 315°
0% UT (100% UT decrease)
0% UT (100% UT drop) for
for 1 cycle at 0º
25/30 cycles at 0º
250/300 cycles at 0º
30 A/m, 50/60Hz 30 A/m, 50/60Hz
±2 kV, ±4kV, ±8 kV, ±15 kV air
±8 kV contact
N/A
N/A
N/A
Page 25
25
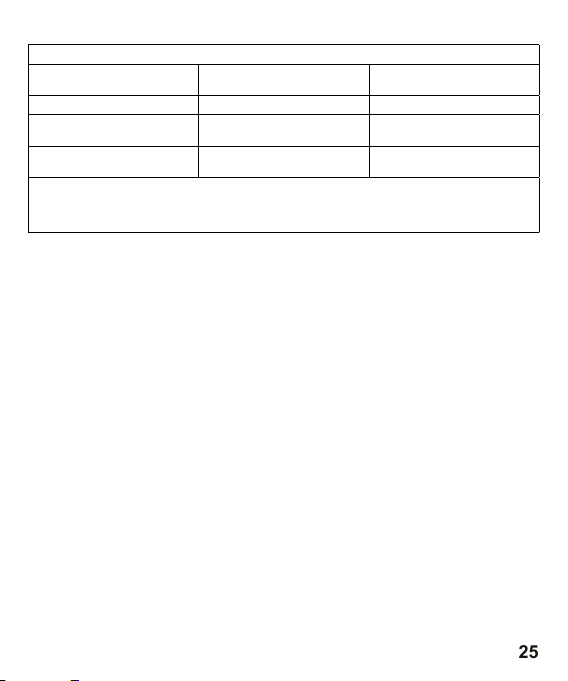
Table 3
ENCLOSURE PORT IMMUNITY test specications for proximity magnetic elds
IMMUNITY TEST LEVEL
(A/m)
65 c)
c)
7,5
Test frequency Modulation
a)
30 kHz
134,2 kHz
13,56 MHz
a) This test is only applicable to MEDICAL DEVICES AND SYSTEMS intended for use in HOME
CARE ENVIRONMENTS.
(b) The carrier shall be modulated using a 50% duty cycle square wave signal.
(c) r.m.s. before modulation is applied.
CW 8
50 kHz
b)
b)
Pulse modulation
2,1 kHz
Pulse modulation
Page 26
26
Table 4
Guidance and manufacturer's declaration - electromagnetic immunity
The device is intended for use in the electromagnetic environment specied below. The cus-
tomer or user of the equipment should ensure that it is used in such an environment.
Immunity test IEC 60601 test level Compliance level
RF conducted
IEC 61000-4-6
RF radiated
IEC 61000-4-3
NOTE 1 At 80 MHz and 800 MHz the higher frequency range applies. NOTE 2 These guidelines
may not apply in all situations. The propagation of electromagnetic waves is aected by absorption and reection from structures, objects and people.
a The ISM (industrial, scientic and medical) bands between 0.15 MHz and 80 MHz are 6.765 MHz
to 6.795 MHz; 13.553 MHz to 13.567 MHZ; 26.957 MHz to 27.283 MHz; and 40.66 MHz to 40.70
MHz. Amateur radio bands from 0.15 MHz to 80 MHz are 1.8 MHz to 2.0 MHz, 3.5 MHz to 4.0 MHz,
5.3 MHz to 5.4 MHz, 7 MHz to 7.3 MHz, 10.1 MHz to 10.15 MHz, 14 MHz to 14.2 MHz, 18.07 MHz
to 18.17 MHz, 21.0 MHz to 1.4 MHz, 24.89 MHz to 24.99 MHz, 28.0 MHz to 29.7 MHz and 50.0
MHz to 54.0 MHZ.
b The compliance levels in the ISM frequency bands 150 kHz to 80 MHz and in the frequency
range 80 MHz to 2.7 GHz are intended to reduce the likelihood that mobile/portable communication equipment could cause interference if accidentally brought into patient areas. For this
reason, an additional factor of 10/3 has been included in the formulae used to calculate the
recommended distance for transmitters in these frequency bands.
c Field strengths from xed transmitters, such as mobile/wireless phone base stations and xed
mobile radios, amateur radio stations, AM and FM radio stations and TV stations, cannot be
accurately predicted theoretically. To assess the electromagnetic environment due to xed RF
transmitters, an electromagnetic survey of the site should be considered. If the measured eld
strength at the site where the device is used exceeds the relevant RF compliance level above,
the device should be observed to check normal operation. If abnormal operation is observed,
additional measures such as changing the orientation or location of the device may be necessary.
d In the frequency range 150 kHz to 80 MHz, the eld strength should be less than 3 V/m.
3 Vrms
150 kHz up to 80 MHz
6 Vrms 150 kHz to 80 MHz
outside the ISM bands
10 V/m
80 MHz to 2,7 GHz
N/A
10 V/m
Page 27
27
Table 5
Recommended distances between RF wireless communication devices
The device is intended for use in an electromagnetic environment where RF interference is
controlled. The customer or user of the device can help prevent electromagnetic interference
by maintaining a minimum distance between the RF wireless communication equipment and the
device, according to the following recommendations, depending on the maximum output power
Frequency
MHz
385 1.8 0.3 27 27
450 2 0.3 28 28
710
780
810
930
1720
1970
2450 2 0.3 28 28
5240
5785
Note 1: These guidelines may not apply in all situations. The propagation of electromagnetic
waves is aected by absorption and reection from structures, objects and people.
Maximum power WDistance Test level IEC
of the communication equipment.
0.2 0.3 9 9745
2 0.3 28 28870
2 0.3 28 281845
0.2 0.3 9 95500
60601
Compliance level
Page 28

28
INSTRUKCJA OBSŁUGI
PL
Przed użyciem tego produktu należy uważnie i dokładnie przeczytać niniejszą instrukcję.
Termometr czołowy na podczerwień BD-101 został specjalnie
zaprojektowany z myślą o bezpiecznym stosowaniu na czole. Jest to
urządzenie umożliwiające pomiar temperatury ciała poprzez wykrywanie intensywności światła podczerwonego emitowanego z obszaru
czoła. Działa poprzez przekształcanie zarejestrowanego ciepła w odczyt
temperatury, który następnie jest wyświetlany na ekranie LCD. Dzięki
właściwej eksploatacji termometr szybko i dokładnie oceni temperaturę ciała użytkownika. Jest to praktyczne urządzenie, które umożliwia
precyzyjne monitorowanie temperatury bezpiecznie i wygodnie.
Urządzenie jest dedykowane do nieinwazyjnego pomiaru temperatury
ludzkiego ciała, przeprowadzanego poprzez skórę czoła. Jest idealne
zarówno do użytku domowego, jak i klinicznego, umożliwiając pomiary
dla osób w każdym wieku. Dzięki bezpiecznemu i wygodnemu stosowaniu na obszarze czoła, termometr ten zapewnia skuteczne narzędzie do
monitorowania temperatury ciała w różnych środowiskach.
Wskazania do stosowania: Termometr czołowy na podczerwień służy
do pomiaru temperatury ciała poprzez pomiar temperatury na czole.
To urządzenie jest zgodne z następującymi normami:
ISO 80601-2-56 Medyczne urządzenia elektryczne - Część 2-56:
Szczegółowe wymagania dotyczące podstawowego bezpieczeństwa i
zasadniczych parametrów termometrów klinicznych do pomiaru temperatury ciała,
IEC 60601-1-11 Medyczne urządzenia elektryczne - Część 1-11:
Wymagania ogólne dotyczące podstawowego bezpieczeństwa i zasad-
Page 29

29
niczych parametrów funkcjonalnych - Norma uzupełniająca: Wymagania dotyczące medycznych urządzeń elektrycznych i medycznych
systemów elektrycznych stosowanych w środowisku domowej opieki
zdrowotnej i jest zgodna z wymaganiami normy IEC 60601-1-2(EMC),
IEC 60601-1 (Bezpieczeństwo). Producent posiada certykat ISO 13485.
Produkt jest zgodny z wymaganiami dyrektywy MDD 93/42/EWG,
"0123" to numer identykacyjny jednostki notykującej.
OSTRZEŻENIE
⚠
• Korzystanie z termometru na podczerwień nie jest ograniczone ze
względu na płeć lub wiek.
• Nie należy dotykać sondy i okienka sondy rękami.
• Korzystanie z tego termometru czołowego nie zastępuje konsul-
tacji z lekarzem.
• Nie należy pozwalać dzieciom na pomiar temperatury bez nadzoru, ponieważ istnieje niebezpieczeństwo połknięcia.
• Nigdy nie zanurzać urządzenia w wodzie lub innych płynach.
• Nie należy modykować urządzenia bez zgody producenta.
• Nie wystawiać termometru na działanie skrajnych temperatur
(poniżej -25°C/-13°F lub powyżej 55°C/131°F) ani nadmiernej
wilgotności (>95% wilgotności względnej).
• Baterie należy trzymać z dala od dzieci.
• Jeśli urządzenie nie jest używane przez dłuższy czas, należy wyjąć
z niego baterie.
• Nie należy umieszczać termometru w bezpośrednim świetle
słonecznym. Także kontakt termometru z watą może wpłynąć na
dokładność pomiaru.
Page 30

30
• Przenośna i mobilna komunikacja RF (Radio Frequency) może
wpływać na działanie tego urządzenia. Dlatego też konieczne jest
zachowanie szczególnej ostrożności i przestrzeganie zaleceń
dotyczących kompatybilności elektromagnetycznej (EMC). Szczegółowe informacje na temat zastosowania środków ostrożności
w zakresie EMC można znaleźć na końcu instrukcji dołączonej do
dokumentacji urządzenia.
• Sprzęt nie powinien być czyszczony i wycierany podczas użytkowania.
• Wszelkie poważne incydenty związane z urządzeniem należy
zgłaszać producentowi i właściwemu organowi państwa członkowskiego, w którym znajduje się użytkownik i/lub pacjent.
• Sonda urządzenia nie powinna być serwisowana ani konserwowana podczas użytkowania.
URZĄDZENIE
Budowa urządzenia
1. Sonda
2. Przycisk testu
3. Przełącznik dźwięku
4. Przycisk ustawień
5. Pokrywa baterii
6. Wyświetlacz
Ikony na wyświetlaczu:
a. Znak dźwięku
b. Znak baterii
c. Znak jednostki: °C lub °F
d. Znak AM i PM w trybie czasu
e. Czas i data
f. Wynik temperatury
g. Tryb pamięci
h. Tryb temperatury czoła
i. Tryb obiektu
Page 31

31
PODSTAWOWE FUNKCJE
ZEGAR
Zegar czasu rzeczywistego będzie funkcjonował w pamięci i będzie
wspomagał informacje o wynikach pomiaru.
Zapoznaj się z sekcją Ustawienia zegara, aby dowiedzieć się, jak
skongurować czas przy pierwszym użyciu.
TRYB CZOŁA
Termometr został zaprojektowany do praktycznego użytku. Nie
zastępuje on wizyty u lekarza. Należy również pamiętać, aby porównać
wynik pomiaru z regularną temperaturą ciała.
Aby dowiedzieć się, jak mierzyć temperaturę ciała, zapoznaj się z
sekcją Funkcje.
TRYB OBIEKTU
Tryb obiektu pokazuje rzeczywistą, nieskorygowaną temperaturę
powierzchni, która różni się od temperatury ciała. Może to pomóc w
monitorowaniu, czy temperatura obiektu jest odpowiednia dla dziecka
lub pacjenta. Przykładem jest pomiar temperatury mleka dla dziecka.
Zakres pomiarowy trybu obiektu: 0°C~100°C (32°F~212°F).
Dokładność laboratoryjna trybu obiektowego: ±4% lub ±2 °C (4 °F), w
zależności od tego, która wartość jest większa.
Page 32

32
Aby dowiedzieć się, jak zmierzyć temperaturę obiektu, zapoznaj się
z sekcją Funkcje.
TRYB PAMIĘCI
Dostępnych jest 30 zestawów pamięci dla pomiarów na czole i obiekcie. W każdym wpisie pamięci zapisywana jest również data/godzina
pomiaru/ikona trybu.
SYGNAŁ DŹWIĘKOWY
Po zakończeniu testowania zostanie wyemitowany jeden krótki sygnał
dźwiękowy.
PRZEŁĄCZNIK °C/°F
Aby dowiedzieć się, jak przełączać między stopniami Celsjusza
i Fahrenheita, zapoznaj się z sekcją Ustawienia zegara.
WŁĄCZANIE/WYŁĄCZANIE DŹWIĘKU
Za pomocą przycisku można wybrać, czy dźwięk ma być włączony czy
wyłączony.
Page 33
33
Ear Thermometer Advantages
Clinical studi es have shown that the ear is an e xcellent site for
temperature me asurement because temp eratures taken in the ear
,
reflect the body s core temperatu re. Body temperature is re gulated
by the hypothala mus, which shares the same b lood supply as the
tympanic membr ane. Changes in core body te mperature are usually
seen sooner at the t ympanic membrane than at o ther sites, such as
the rectum, mout h or under the arm.
Advantages of ta king temperatures at the e ar versus other sites:
● Axillary temperature rea dings only reflect skin temperature
which may not i
● Rectal tempera tures often lag signific antly behind internal bo dy
temperature ch anges, especially at tim es of rapidly changing
temperatures .
● Oral temperatu res are often influenced b y eating, drinking,
thermometer pl acement, breathing thr ough the mouth, or the
inability of the p erson to close their mouth c ompletely.
Vital Organs
ZALETY TERMOMETRU NA CZOŁO
Termometr na podczerwień na czoło precyzyjnie mierzy temperaturę
ciała, koncentrując się na obszarze kluczowych organów (zob. rys. 1).
Jego zastosowanie obejmuje pomiar temperatury powierzchni skóry
nad tętnicą skroniową, która jest główną tętnicą głowy.
Tętnica skroniowa, będąca bezpośrednim przedłużeniem aorty głównego pnia układu tętniczego - łączy się z sercem poprzez tętnicę
szyjną. Zapewnia ona stały przepływ
krwi, co czyni ją miejscem szczególnie reprezentatywnym dla ogólnej
temperatury ciała. Dlatego też zmiany
temperatury ciała są odzwierciedlane
szybciej na czole niż w innych obszarach, takich jak jama ustna, odbytnica
czy pacha.
Narządy istotne życiowo
1
Page 34
34
Real Time Clock Setting
8
the re ctum, mout h or unde r the a rm.
Adva ntages of ta king te mpe ratur es at the ear ve rsus other s ites:
● Axill ary tem perature r eadings on ly refl ect s kin tem perature
whic h may not i
ndic ate the inte rnal bo dy te mpera ture.
● Rect al tempera tures o fte n lag sig nificant ly behind in terna l bod y
temp erature ch anges , esp ecial ly at times of r apidly cha nging
temp eratures .
● Oral t emperatu res are o fte n influ enced by eat ing, drink ing,
ther mometer pl aceme nt, b reath ing throug h the mouth, o r the
inab ility of the p erson t o clo se thei r mouth comp letely.
①Set th e unit
Pres s Setting Bu tton to s ele ct the
unit y ou want.
Afte r the unit is se t
,pre ss Mode
Butt on ,the time f ormat f igu re will
appe ar .
When u sing therm omete r for t he firs t time, plea se set the par amete rs
of the t hermomet er. With the therm ometer off, pr ess and hold
Mode B UTTON to enter i nto settin g mode.
Real Time Clock Setting
8
temp erature ch anges , esp ecial ly at times of r apidly cha nging
temp eratures .
● Oral t emperatu res are o fte n influ enced by eat ing, drink ing,
ther mometer pl aceme nt, b reath ing throug h the mouth, o r the
inab ility of the p erson t o clo se thei r mouth comp letely.
①Set th e unit
Pres s Setting Bu tton to s ele ct the
unit y ou want.
Afte r the unit is se t
,pre ss Mode
Butt on ,the time f ormat f igu re will
appe ar .
② Set th e time forma t
The de vi ce can di splay t he time in ei ther
an AM/PM (1 2-hou r) or a 24:00
(24- ho ur) for mat. Pr ess and rel ease
Sett in g butto n to sele ct the form at.
With th e prefe rred time f ormat o n the
disp la y, pr ess Mod e Butto n, the Hour
When u sing therm omete r for t he firs t time, plea se set the par amete rs
of the t hermomet er. With the therm ometer off, pr ess and hold
Mode B UTTON to enter i nto settin g mode.
Real Time Clock Setting
8
①Set th e unit
Pres s Setting Bu tton to s ele ct the
unit y ou want.
Afte r the unit is se t
,pre ss Mode
Butt on ,the time f ormat f igu re will
appe ar .
② Set th e time forma t
The de vi ce can di splay t he time in ei ther
an AM/PM (1 2-hou r) or a 24:00
(24- ho ur) for mat. Pr ess and rel ease
Sett in g butto n to sele ct the form at.
With th e prefe rred time f ormat o n the
disp la y, pr ess Mod e Butto n, the Hour
figu re i s flash ing aut omatica lly.
③ Set th e hour
Pres s an d relea se the Se tting But ton to ad vance
one ho ur u ntil th e corre ct hour app ears.
Afte r th e hour is s et, pre ss Mode But ton, th e Minut e
figu re i s flash ing aut omatica lly.
When u sing therm omete r for t he firs t time, plea se set the par amete rs
of the t hermomet er. With the therm ometer off, pr ess and hold
Mode B UTTON to enter i nto settin g mode.
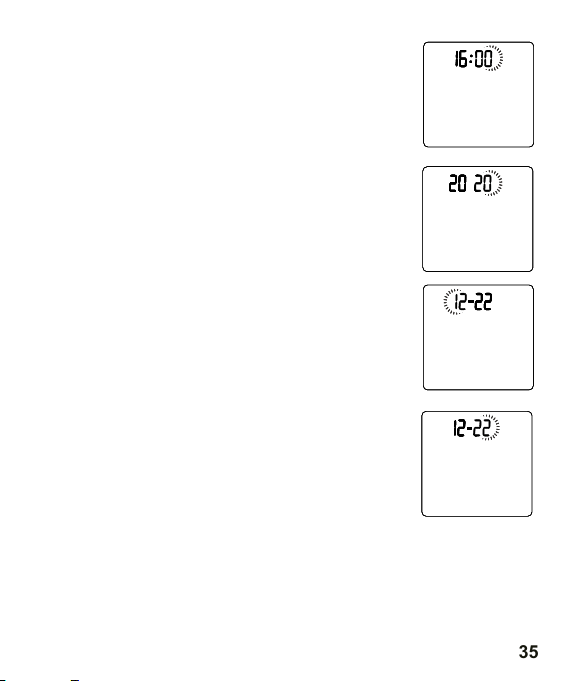
USTAWIENIE ZEGARA
Podczas korzystania z termometru po raz pierwszy należy ustawić
parametry urządzenia. Przy wyłączonym termometrze naciśnij i przytrzymaj przycisk ustawień, aby przejść do trybu ustawień.
1. Ustawianie jednostki
Naciśnij przycisk testu, aby wybrać
żądaną jednostkę.
Po ustawieniu jednostki naciśnij przy-
cisk ustawień, wyświetlony zostanie
format czasu.
2. Ustawianie formatu czasu
Urządzenie może wyświetlać godzinę
w formacie 12-godzinnym (AM/PM)
lub 24-godzinnym. Naciśnij i zwolnij
przycisk testu, aby wybrać format.
Po wybraniu preferowanego formatu
godziny naciśnij na przycisk usta-
wień, cyfra godziny zacznie migać automatycznie.
3. Ustawianie godziny
Naciśnij i zwolnij przycisk testu, aby przejść o jedną
godzinę do przodu, aż pojawi się prawidłowa godzina.
Po ustawieniu godziny naciśnij przycisk ustawień, a
wartość minuty zacznie migać automatycznie.
Page 35
35
4. Ustawianie minuty
sure a n ew, clean pr obe cover i s in plac e befor e each
meas ureme nt. Place a n ew prob e cover o n the pro be firm ly;
maki ng sure t he probe an d the inn er port ion of th e probe c over
1. To achi eve acc urate r eadin gs
To measure ea r te mpe rat ure:
Real Time Clock Setting
④ Set th e minut e
Press an d re lease t he S etting Bu tt on to adv an ce
one minu te u ntil th e co rrect min ut e appea rs .
After th e mi nute is s et , press Mod e Bu tton, t he Year
figure i s fl ashin g au tomatic al ly.
sure a n ew, clean pr obe cover i s in plac e befor e each
meas ureme nt. Place a n ew prob e cover o n the pro be firm ly;
maki ng sure t he probe an d the inn er port ion of th e probe c over
fit sn ugly.
2. Pre ss the , The disp lay is acti vated t o show al l
segm ents.
1. To achi eve acc urate r eadin gs
scre en with b eeps, so yo u can sta rt a new me asure ment. I f error
mess ages ap pears, it m eans th e therm omete r is not re ady for
To measure ea r te mpe rat ure:
Real Time Clock Setting
④ Set th e minut e
Press an d re lease t he S etting Bu tt on to adv an ce
one minu te u ntil th e co rrect min ut e appea rs .
After th e mi nute is s et , press Mod e Bu tton, t he Year
figure i s fl ashin g au tomatic al ly.
⑤ Set th e year
Press an d re lease t he S etting Bu tt on to adv an ce
one year u nt il the co rr ect year ap pe ars.
After th e ye ar is set , pr ess Mode Bu tt on, the M on th
figure w il l appea r.
sure a n ew, clean pr obe cover i s in plac e befor e each
meas ureme nt. Place a n ew prob e cover o n the pro be firm ly;
maki ng sure t he probe an d the inn er port ion of th e probe c over
fit sn ugly.
2. Pre ss the , The disp lay is acti vated t o show al l
segm ents.
Rema rks:
a. Pro be cove r sign stan d for tak ing the e ar temp eratu re with
prob e cover n ow and vice v ersa.
1. To achi eve acc urate r eadin gs
scre en with b eeps, so yo u can sta rt a new me asure ment. I f error
mess ages ap pears, it m eans th e therm omete r is not re ady for
meas ureme nt.
To measure ea r te mpe rat ure:
Real Time Clock Setting
④ Set th e minut e
Press an d re lease t he S etting Bu tt on to adv an ce
one minu te u ntil th e co rrect min ut e appea rs .
After th e mi nute is s et , press Mod e Bu tton, t he Year
figure i s fl ashin g au tomatic al ly.
⑤ Set th e year
Press an d re lease t he S etting Bu tt on to adv an ce
one year u nt il the co rr ect year ap pe ars.
After th e ye ar is set , pr ess Mode Bu tt on, the M on th
figure w il l appea r.
⑥ Set th e month
Press an d re lease t he S etting Bu tt on to adv an ce
one mont h un til the c or rect mont h ap pears .
After th e mo nth is se t, p ress Mode B ut ton, th e Da te
figure i s fl ashin g au tomatic al ly.
sure a n ew, clean pr obe cover i s in plac e befor e each
meas ureme nt. Place a n ew prob e cover o n the pro be firm ly;
maki ng sure t he probe an d the inn er port ion of th e probe c over
fit sn ugly.
2. Pre ss the , The disp lay is acti vated t o show al l
segm ents.
Rema rks:
a. Pro be cove r sign stan d for tak ing the e ar temp eratu re with
prob e cover n ow and vice v ersa.
b. To avoi d the ris k of cros s conta minat ion, it i s recom mende d
that y ou alwa ys measur e the ear t emper ature w ith pro be cove r.
1. To achi eve acc urate r eadin gs
scre en with b eeps, so yo u can sta rt a new me asure ment. I f error
mess ages ap pears, it m eans th e therm omete r is not re ady for
meas ureme nt.
To measure ea r te mpe rat ure:
Real Time Clock Setting
④ Set th e minut e
Press an d re lease t he S etting Bu tt on to adv an ce
one minu te u ntil th e co rrect min ut e appea rs .
After th e mi nute is s et , press Mod e Bu tton, t he Year
figure i s fl ashin g au tomatic al ly.
⑤ Set th e year
Press an d re lease t he S etting Bu tt on to adv an ce
one year u nt il the co rr ect year ap pe ars.
After th e ye ar is set , pr ess Mode Bu tt on, the M on th
figure w il l appea r.
⑥ Set th e month
Press an d re lease t he S etting Bu tt on to adv an ce
one mont h un til the c or rect mont h ap pears .
After th e mo nth is se t, p ress Mode B ut ton, th e Da te
figure i s fl ashin g au tomatic al ly.
⑦ Set th e date
Press an d re lease t he S etting Bu tt on to adv an ce
one day un ti l the cor re ct month ap pe ars.
After th e da y is set, p re ss Mode But to n to exit t he
settin g mo de.
Naciśnij i zwolnij przycisk testu, aby przejść o jedną
minutę do przodu, aż pojawi się prawidłowa minuta.
Po ustawieniu minuty naciśnij przycisk ustawień, a
cyfra roku zacznie migać automatycznie.
5. Ustawianie roku
Naciśnij i zwolnij przycisk testu, aby przejść o jeden
rok do przodu, aż pojawi się prawidłowy rok.
Po ustawieniu roku naciśnij przycisk ustawień, pojawi
się cyfra miesiąca.
6. Ustawianie miesiąca
Naciśnij i zwolnij przycisk testu, aby przejść o jeden
miesiąc do przodu, aż pojawi się prawidłowy miesiąc.
Po ustawieniu miesiąca naciśnij przycisk ustawień,
aby wyświetlić cyfrę Date (Data).
7. Ustawianie daty
Naciśnij i zwolnij przycisk testu, aby przejść o jeden
dzień do przodu, aż pojawi się właściwy miesiąc.
Po ustawieniu dnia naciśnij przycisk ustawień, aby
wyjść z trybu ustawień.
Page 36

36
WSKAZÓWKI POMIARU TEMPERATURY
Aby zapewnić dokładny odczyt temperatury ciała za pomocą termometra na podczerwień na czole, warto wziąć pod uwagę następujące
czynniki, które mogą mieć wpływ na dokładność pomiaru:
1. Znajomość normalnej temperatury ciała każdej osoby, gdy ta
czuje się dobrze, jest kluczowa dla dokładnej diagnozy gorączki.
Aby określić tę bazową temperaturę, zaleca się przeprowadzenie
kilku pomiarów, gdy pacjent jest w stanie zdrowia. Aby potwierdzić
odczyty, warto wykonać dodatkowy pomiar za pomocą standardowego termometru cyfrowego.
2. Użytkownicy muszą przebywać w pomieszczeniu przez 30 minut
przed dokonaniem pomiaru.
Uwaga: Użytkownicy i termometr powinni znajdować się w tej
samej temperaturze otoczenia przez co najmniej 10 minut przed
dokonaniem odczytu.
3. Użytkownicy nie powinni pić, jeść ani być aktywni zycznie, np.
kąpać się, brać prysznica, myć szamponem i suszyć włosów
przed/w trakcie wykonywania pomiaru. Zdejmij czapkę i odczekaj
10 minut przed dokonaniem odczytu.
4. Oleje lub kosmetyki na czole mogą dawać niższy odczyt temperatury niż rzeczywisty. Przed dokonaniem pomiaru należy usunąć
brud z czoła. Przed dokonaniem pomiaru należy odczekać co
najmniej 10 minut po umyciu czoła.
5. Trzymanie dłoni na czole przez dłuższy czas wpłynie na odczyt
temperatury.
6. Nie należy mierzyć temperatury na bliznach, otwartych ranach lub
otarciach.
Page 37
37
7. Nie używaj termometru na spoconym lub pocącym się czole,
Illustration For Use
ponieważ może to wpłynąć na odczyt.
8. Nie należy dokonywać pomiaru podczas lub bezpośrednio po
karmieniu dziecka.
9. Nie należy mierzyć temperatury za pomocą tego termometru w
pobliżu miejsc, które są bardzo gorące, takich jak kominki i piece.
10. Okienko sondy termometru jest najdelikatniejszą częścią urządzenia. Nie należy dotykać okienka sondy. Uszkodzenie lub zabrudzenie okienka sondy może mieć wpływ na dokładność odczytu.
11. Jeśli termometr jest przechowywany w środowisku znacznie różniącym się od miejsca testowania, należy umieścić go w miejscu
testowania na około 30 minut przed użyciem.
12. Nie jest przeznaczony do użytku w środowisku bogatym w tlen i
w obecności łatwopalnej mieszaniny anestetyków z powietrzem,
tlenem lub podtlenkiem azotu.
FUNKCJE
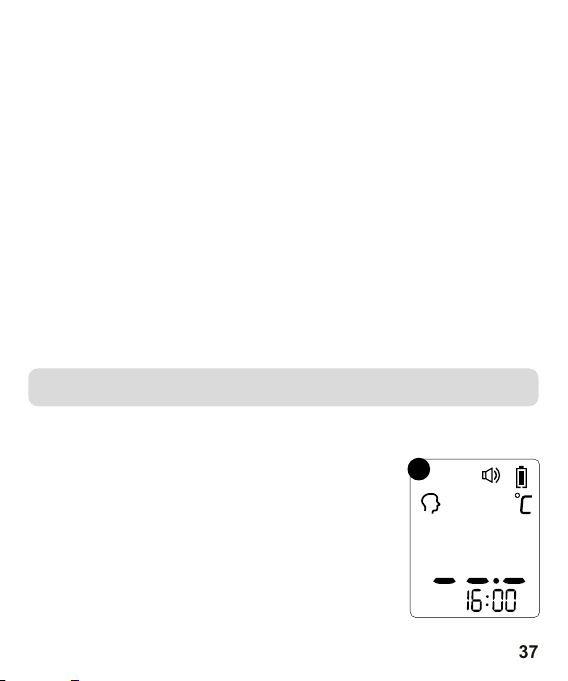
POMIAR TEMPERATURY NA CZOLE
1. Naciśnij przycisk testu, wyświetlacz zostanie
aktywowany, aby pokazać wszystkie segmenty. Po samokontroli na wyświetlaczu ukażą
się ikony jak na rysunku 2 wraz z sygnałami
dźwiękowymi, co umożliwi rozpoczęcie
nowego pomiaru.
2
Page 38
38
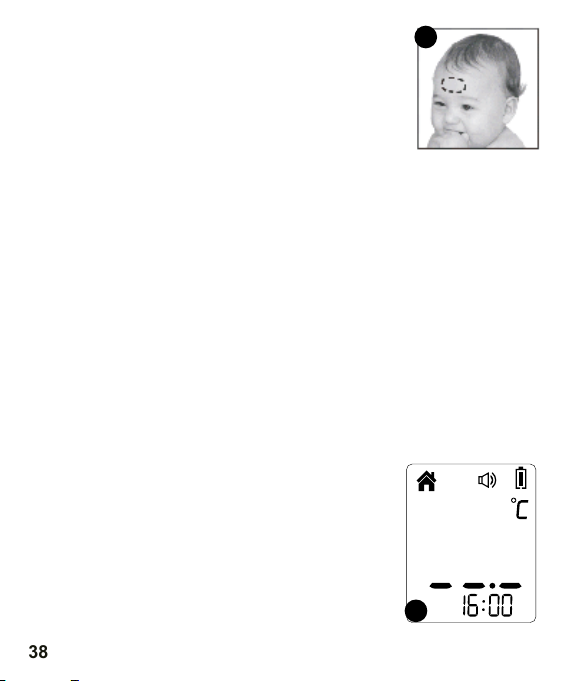
2. Skieruj termometr na środek czoła w odległości
Illustration For Use
After measurem ent :
1. Pow er off: Dev ice wil l autom atica lly shu t off if left i dle for
more t han 30 se conds t o exten d batte ry life .
2. Cle an the pr obe aft er each u se to ens ure an ac curat e reading an d
avoi d cross c ontam inati on.
(See t he sect ion of Ca re and Cl eanin g for det ails. )
BackLight:
In For ehead m ode:
1. The dis play wi ll be lig hted GR EEN for 3 s econd s when th e unit is
read y for mea surem ent and t he disp lay wil l be ligh ted GREEN fo r
3 seco nds whe n a measu remen t is comp leted w ith a rea ding less
than 3 7.3℃(99 .1
℉).
2. The dis play wi ll be lig hted YELLOW for 3 s econd s when a
meas ureme nt is com plete d with a re ading l ess tha n 37.8℃(100. 0
3. The dis play wi ll be lig hted RE D for 3 sec onds wh en a meas urement
is com plete d with a re ading e qual to o r highe r than 37 .8℃(100.0
In Obj ect mod e:
The di splay w ill onl y be ligh ted GRE EN for 3 se conds w hen the
unit i s ready f or meas ure
ment a nd a meas ureme nt is com plete d.
mniejszej niż 5 cm (zob. rys. 3), a następnie naciśnij przycisk testu.
Uwaga: Nie usuwaj termometru z czoła przed
usłyszeniem sygnału dźwiękowego.
3. Odczytaj temperaturę na wyświetlaczu.
4. Urządzenie wyłączy się automatycznie, jeśli
pozostanie bezczynne przez 30 sekund.
WŁĄCZENIE / WYŁĄCZENIE DŹWIĘKU
Możesz przesunąć przełącznik dźwięku, aby włączyć lub wyłączyć
dźwięk.
PRZEŁĄCZANIE TRYBU CZOŁA I TRYBU OBIEKTU
Naciśnij i przytrzymaj przycisk ustawień, aby przełączyć między try-
bem czoła a trybem obiektu.
POMIAR TEMPERATURY OBIEKTU
1. Naciśnij przycisk testu, aby włączyć termometr, a po przejściu do
trybu pomiaru możesz zmierzyć temperaturę obiektu (zob. rys. 4).
2. Skieruj termometr na środek obiektu, którego
temperaturę chcesz zmierzyć, z odległości
mniejszej niż 5 cm.
3. Naciśnij przycisk testu, a następnie odczytaj
temperaturę na wyświetlaczu.
4. Urządzenie wyłączy się automatycznie, jeśli
pozostanie bezczynne przez 30 sekund.
3
4
Page 39

39
PO POMIARZE
1. Wyłącz zasilanie. Po 30 sekundach nieaktywności, urządzenie automatycznie przejdzie w tryb oszczędzania energii i wyłączy się. Jest
to funkcja zaprojektowana w celu przedłużenia żywotności baterii.
2. Wyczyść sondę po każdym użyciu, aby zapewnić dokładny odczyt i
uniknąć zanieczyszczenia krzyżowego.
(Szczegółowe informacje znajdują się w sekcji Pielęgnacja i czyszczenie).
PODŚWIETLENIE
W trybie czoła:
1. Wyświetlacz będzie świecił na ZIELONO przez 3 sekundy, gdy
urządzenie będzie gotowe do pomiaru, a wyświetlacz będzie świecił na ZIELONO przez 3 sekundy, gdy pomiar zostanie zakończony
z odczytem poniżej 37,3 °C (99,1 °F).
2. Wyświetlacz zaświeci się na ŻÓŁTO na 3 sekundy po zakończeniu
pomiaru z odczytem poniżej 37,8 °C (100,0 °F).
3. Wyświetlacz zaświeci się na CZERWONO na 3 sekundy po zakończeniu pomiaru z odczytem równym lub wyższym niż 37,8 °C
(100,0 °F).
W trybie obiektu:
Wyświetlacz będzie świecił na ZIELONO przez 3 sekundy, gdy urządzenie będzie gotowe do pomiaru i pomiar zostanie zakończony.
Page 40
40
TRYB PAMIĘCI
Memory Mode
Each m emory also r eco rds the
1. The pro be window must be ke pt clea n, dry, and un damag ed at all
time s to ensu re accu rate readings. The a ccura cy of tem perat ure
read ings ca n be affected b y damag e to the pr obe win dow, or the
pres ence of d irt, fi ngerprints, du st and ot her soi ling
comp ounds o n the pro be window. Degrad ed sensor s can deg rade
perf orman ce or cau se other problem s.
2. The pro be window is the mos t delic ate par t of the th ermom eter.
Use a so ft clot h sligh tly moistened wi th a 75% is oprop yl alco hol
solu tion to w ipe pro be window and the th ermom eter. Do n ot
use ab
rasi ve clea ners. Afte r clean ing, al low at le ast 10 mi nutes
dryi ng time b efore t aking temperat ures.
Note : Do not us e any che mical other than i sopro pyl alc ohol to
clea n the pro be wind ow.
3. Use a s oft, dr y cloth t o clean the thermo meter d ispla y and
exte rior.
4. Do no t put the t hermo meter into water d irect ly.
5. Sto re the th ermom eter in a dry locati on, fre e from du st and
cont amina tion an d away from direct s unlig ht.
6. Put t he ther momet er back to the origi nal pac kagin g after u sing.
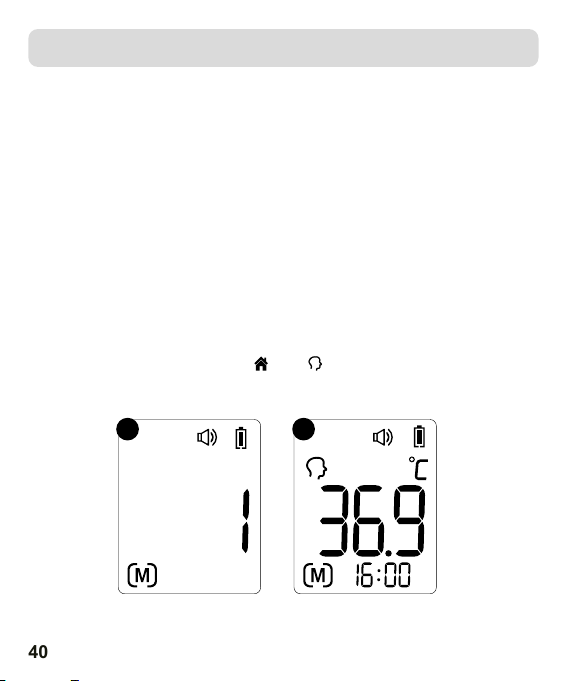
1. Dostęp do trybu pamięci można uzyskać w trybie czoła lub w
trybie obiektu:
Po włączeniu termometru i wykonaniu czynności przedstawionych
na rysunkach 2-4 lub zakończeniu testowania należy nacisnąć
przycisk ustawień. W lewym dolnym rogu wyświetlacza pojawi się
litera M (zob. rys. 5).
2. Termometr automatycznie zapamięta 30 ostatnich odczytów
temperatury. W każdej pamięci zapisywana jest również ikona
trybu pomiaru. Po każdym naciśnięciu przycisku ustawień na
ekranie wyświetlane są poprzednie odczyty odpowiadające numerom od 1 do 30. Liczba 1 odzwierciedla najnowszy odczyt, podczas
gdy liczba 30 wskazuje najstarszy odczyt zapisany w pamięci
(zob. rys. 6).
3. W trybie pamięci znacznik " " lub " " nie zmieni się. Użytkownik
może nacisnąć przycisk testu, aby wykonać nowe pomiary.
5 6
Page 41

41
PIELĘGNACJA I CZYSZCZENIE
1. W celu zapewnienia precyzyjnych odczytów, okienko sondy
musi być zawsze utrzymane w czystości, suchości i bez uszkodzeń. Wpływ na dokładność pomiarów temperatury może mieć
obecność brudu, odcisków palców, kurzu i innych zabrudzeń na
powierzchni okienka sondy. Uszkodzenia tego obszaru mogą znacząco wpłynąć na wydajność urządzenia, prowadząc do błędnych
odczytów lub innych problemów.
2. Okienko sondy jest najdelikatniejszą częścią termometru. Do
dezynfekcji okienka sondy i termometru należy używać miękkiej
ściereczki lekko zwilżonej 75% roztworem alkoholu izopropylowego. Nie należy używać ściernych środków czyszczących. Po
dokładnym wyczyszczeniu, zaleca się poczekać co najmniej 10
minut na wyschnięcie przed przystąpieniem do pomiaru temperatury.
Uwaga: Do czyszczenia okienka sondy nie należy używać środków
chemicznych innych niż alkohol izopropylowy.
3. Użyć miękkiej, suchej ściereczki do wyczyszczenia wyświetlacza
termometru i jego zewnętrznej części.
4. Nie wkładać termometru bezpośrednio do wody.
5. Termometr należy przechowywać w suchym miejscu, wolnym
od kurzu i zanieczyszczeń oraz z dala od bezpośredniego światła
słonecznego.
6. Po użyciu termometr należy umieścić z powrotem w oryginalnym
opakowaniu.
Page 42
42
WYMIANA BATERII
Measuring range
Laboratory accur acy
Display resoluti on
Measure time
Operating temper ature
range:
Storage and transp ort
temperature rang e
Clinical accurac y
Measuring site For ehead(Forehead Mod e)
Reference body sit e
Operation mode For ehead mode(Adjust mo de)
Figure 7
Figure 8
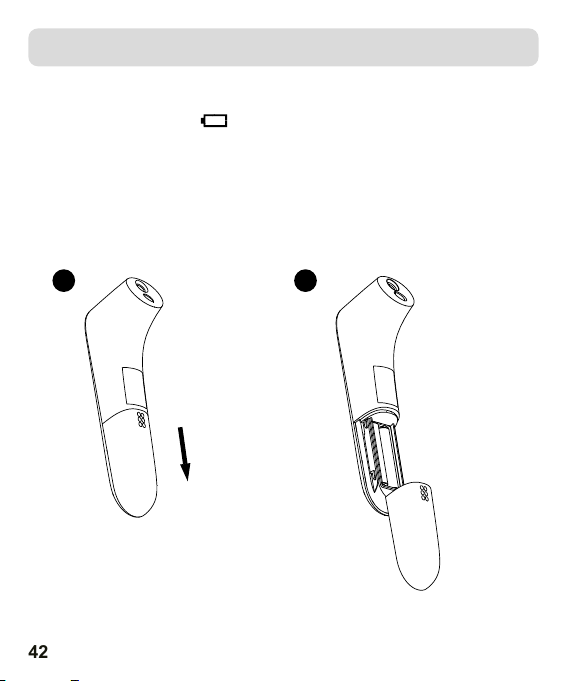
1. Baterię należy wymienić, gdy w prawym górnym rogu wyświetlacza LCD pojawi się " ".
2. Przesuń pokrywę baterii w dół, jak pokazano na rysunku 7.
3. Wyjmij baterię i zainstaluj 2 nowe baterie alkaliczne AAA, jak pokazano na rysunku 8.
4. Przesuń pokrywę baterii z powrotem.
7 8
Page 43
43
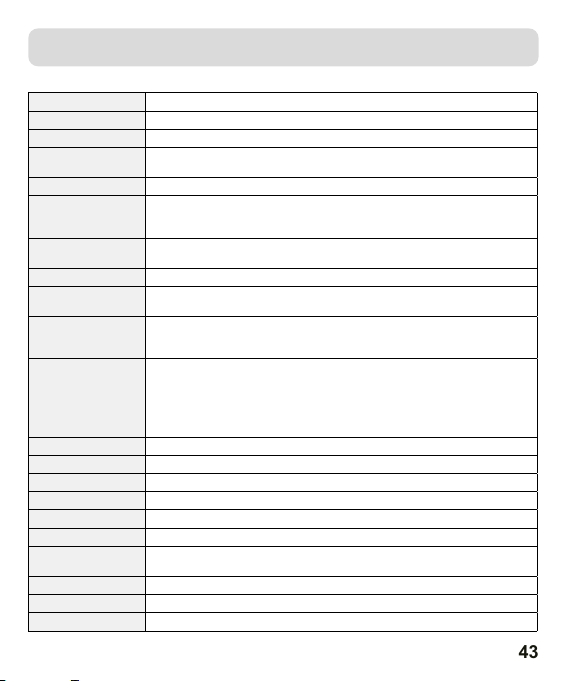
SPECYFIKACJA
Zakres pomiarowy Tryb czoła: 34.0°C~43.0°C (93.2°F~109.4°F)
Miejsce pomiaru Czoło (tryb czoła)
Model producenta DET-3017 (Ref. BD-101)
Miejsce odniesienia
Tryb pracy Tryb czoła (tryb regulacji)
Dokładność laboratoryjna
Rozdzielczość
wyświetlacza
Czas pomiaru Około jednej sekundy
Zakres tempera-
tury pracy:
Zakres temperatur
przechowywania i
transportu
Dokładność
kliniczna
Wstrząs wytrzymuje upadek z wysokości 3 stóp
Wymiar 155*39.2*49.4mm
Waga około 97 gramów (z bateriami)
Bateria DC3V (2×AAA bateria)
Żywotność baterii Około 6000 odczytów
Zastosowana część Sonda
Przewidywany
okres użytkowania
Stopień ochrony IP22
Akcesoria Bateria
Przeciwwskazania Brak
Doustny (Ten termometr konwertuje temperaturę czoła referencyjną
w celu wyświetlenia jej "odpowiednika ustnego").
Tryb czoła: ±0,2 °C (0,4 °F) podczas 35,5 °C~42,0 °C (95,9 °F~107,6 °F)
w zakresie temperatur roboczych 15 °C ~ 35 °C (59,0 °F ~ 95,0 °F)
±0,3 °C (0,5 °F) dla innych pomiarów i pracy zakres temperatur
0,1 °C lub 0,1 °F
5°C~40°C (41°F~104°F), 15%~85% wilgotności względnej, bez kondensacji
Ciśnienie atmosferyczne: 70 kPa ~ 106 kPa
-25 °C ~ 55 °C (-13 °F ~ 131 °F), 15% ~ 95% wilgotności względnej, bez kondensacji Ciśnienie atmosferyczne: 70 kPa ~ 106 kPa
0-1 rok: Odchylenie kliniczne: -0,19 °C (- 0,34 °F) ; Powtarzalność kliniczna:
0.06°C (0.11°F) ; Granice zgodności: 0.68°C (1.22°F);
1- 5 lat: Stronniczość kliniczna: -0,25°C (- 0,45°F) ; Powtarzalność kliniczna:
0,07°C (0,13°F) ; Granice zgodności: 0.73°C (1.31°F)
w ciągu 5 lat: Odchylenie kliniczne: -0,25 °C (- 0,45 °F) ; Powtarzalność
kliniczna: 0.17°C (0.31°F) ; Granice zgodności: 0.60°C (1.08°F)
Trzy lata
Page 44
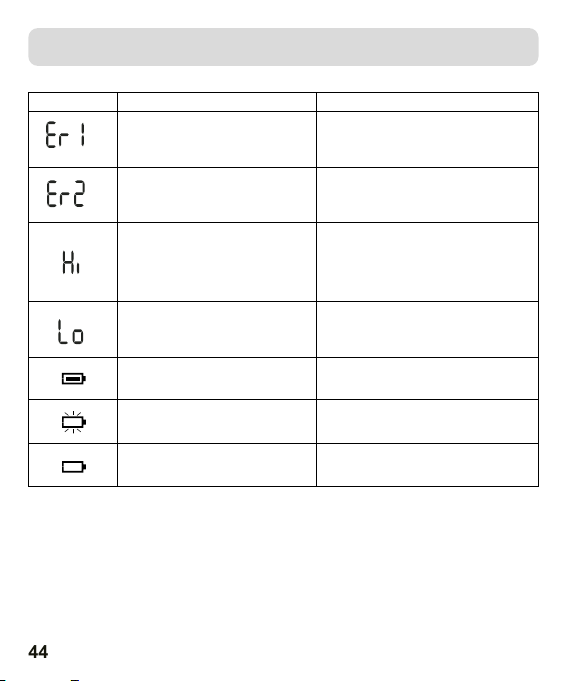
44
ROZWIĄZYWANIE PROBLEMÓW
Tro ub le sh oo ti ng
Prob lem
Solu tion
Erro r messa ge
Remo ve prob e cover i n
obje ct temp eratu re mode .
In obj ect tem perat ure
mode , measu remen t
with p robe co ver.
Tro ub le sh oo ti ng
Prob lem
Solu tion
Erro r messa ge
Take a me asure ment
unti l or appe ars
on the d ispla y.
Meas ureme nt befo re
ther momet er is rea dy
Tro ub le sh oo ti ng
In Ear m ode:
Tempe ratur e taken i s
high er than 4 3.0 ℃
(109 .4℉).
Prob lem
Solu tion
Erro r messa ge
Read Tem perat ure Taki ng
Hint s Thoro ughly, t hen
chec k the int egrit y of the
Remo ve prob e cover i n
obje ct temp eratu re mode .
In obj ect tem perat ure
mode , measu remen t
with p robe co ver.
Tro ub le sh oo ti ng
Prob lem
Solu tion
The am bient t emper ature
is not w ithin t he rang e
betw een 10℃ an d 40℃
(50℉
~104℉) .
Plac e the
in a room f or at leas t 30
minu tes at roo m
temp eratur e betwee n
10℃ and 40℃
ther momete r
Erro r messa ge
Take a me asure ment
unti l or appe ars
on the d ispla y.
Meas ureme nt befo re
ther momet er is rea dy
Tro ub le sh oo ti ng
In Ear m ode:
Tempe ratur e taken i s
high er than 4 3.0 ℃
(109 .4℉).
In Obj ect mod e:
Tempe ratur e taken i s
high er than 1 00 ℃
(212℉) .
Prob lem
Solu tion
Read Tem perat ure
Takin g Hints t horou ghly ,
then m ake sur e the pro be
cove r and len s filte r are
clea n, then t ake a new
temp eratu re meas ureme nt.
Erro r messa ge
Read Tem perat ure Taki ng
Hint s Thoro ughly, t hen
chec k the int egrit y of the
prob e cover a nd take a n ew
temp eratu re meas ureme nt.
Remo ve prob e cover i n
obje ct temp eratu re mode .
In obj ect tem perat ure
mode , measu remen t
with p robe co ver.
In Ear m ode:
Tempe ratur e taken i s
lowe r than 32 .0 ℃
(89. 6℉).
In Obj ect mod e:
Tempe ratur e taken i s
lowe r than 0 ℃
(32℉).
The th ermom eter wo rks
prop erly.
Use th e therm omete r
norm ally
Tro ub le sh oo ti ng
In Ear m ode:
Tempe ratur e taken i s
high er than 4 3.0 ℃
(109 .4℉).
In Obj ect mod e:
Tempe ratur e taken i s
high er than 1 00 ℃
(212℉) .
Prob lem
Solu tion
Read Tem perat ure
Takin g Hints t horou ghly ,
then m ake sur e the pro be
cove r and len s filte r are
clea n, then t ake a new
temp eratu re meas ureme nt.
Erro r messa ge
Read Tem perat ure Taki ng
Hint s Thoro ughly, t hen
chec k the int egrit y of the
prob e cover a nd take a n ew
temp eratu re meas ureme nt.
Remo ve prob e cover i n
obje ct temp eratu re mode .
In obj ect tem perat ure
mode , measu remen t
with p robe co ver.
In Ear m ode:
Tempe ratur e taken i s
lowe r than 32 .0 ℃
(89. 6℉).
In Obj ect mod e:
Tempe ratur e taken i s
lowe r than 0 ℃
(32℉).
When b atter y outli ne
flas hes, it i ndica tes tha t
the po wer is lo w, but you
The th ermom eter wo rks
prop erly.
Use th e therm omete r
norm ally
The th ermom eter wi ll take
a prop er meas ureme nt but
batt eries m ust be re place d
Tro ub le sh oo ti ng
In Ear m ode:
Tempe ratur e taken i s
high er than 4 3.0 ℃
(109 .4℉).
In Obj ect mod e:
Tempe ratur e taken i s
high er than 1 00 ℃
(212℉) .
Prob lem
Solu tion
Read Tem perat ure
Takin g Hints t horou ghly ,
then m ake sur e the pro be
cove r and len s filte r are
clea n, then t ake a new
temp eratu re meas ureme nt.
Erro r messa ge
Read Tem perat ure Taki ng
Hint s Thoro ughly, t hen
chec k the int egrit y of the
prob e cover a nd take a n ew
temp eratu re meas ureme nt.
24
Remo ve prob e cover i n
obje ct temp eratu re mode .
In obj ect tem perat ure
mode , measu remen t
with p robe co ver.
In Ear m ode:
Tempe ratur e taken i s
lowe r than 32 .0 ℃
(89. 6℉).
In Obj ect mod e:
Tempe ratur e taken i s
lowe r than 0 ℃
(32℉).
The th ermom eter co uld
not
work d ue to low
Repl ace two n ew
alka line ba tteri es
When b atter y outli ne
flas hes, it i ndica tes tha t
the po wer is lo w, but you
can co ntinu e to meas ure.
The th ermom eter wo rks
prop erly.
Use th e therm omete r
norm ally
The th ermom eter wi ll take
a prop er meas ureme nt but
batt eries m ust be re place d
soon .
Tro ub le sh oo ti ng
In Ear m ode:
Tempe ratur e taken i s
high er than 4 3.0 ℃
(109 .4℉).
In Obj ect mod e:
Tempe ratur e taken i s
Prob lem
Solu tion
Erro r messa ge
Read Tem perat ure Taki ng
Hint s Thoro ughly, t hen
chec k the int egrit y of the
prob e cover a nd take a n ew
Remo ve prob e cover i n
obje ct temp eratu re mode .
In obj ect tem perat ure
mode , measu remen t
with p robe co ver.
Tro ub le sh oo ti ng
In Ear m ode:
Tempe ratur e taken i s
high er than 4 3.0 ℃
(109 .4℉).
In Obj ect mod e:
Tempe ratur e taken i s
high er than 1 00 ℃
(212℉) .
Prob lem
Solu tion
Read Tem perat ure
Takin g Hints t horou ghly ,
then m ake sur e the pro be
cove r and len s filte r are
clea n, then t ake a new
Erro r messa ge
Read Tem perat ure Taki ng
Hint s Thoro ughly, t hen
chec k the int egrit y of the
prob e cover a nd take a n ew
temp eratu re meas ureme nt.
Remo ve prob e cover i n
obje ct temp eratu re mode .
In obj ect tem perat ure
mode , measu remen t
with p robe co ver.
In Ear m ode:
Tempe ratur e taken i s
lowe r than 32 .0 ℃
(89. 6℉).
In Obj ect mod e:
Tempe ratur e taken i s
Komunikat Problem Rozwiązanie
Termometr nie działa prawidłowo. Rozładuj baterię, odczekaj 1 minutę i
Temperatura otoczenia nie mieści
się w zakresie od 5°C do 40°C
(41°F~104°F).
W trybie czoła: Zmierzona temperatura jest wyższa niż 43,0 °C
(109,4 °F).
W trybie obiektu: Zmierzona
temperatura jest wyższa niż 100 °C
(212 °F).
W trybie czoła: Zmierzona temperatura jest niższa niż 34,0 °C (93,2 °F).
W trybie obiektu: Zmierzona temperatura jest niższa niż 0 °C (32 °F).
Termometr działa prawidłowo. Z termometru można korzystać
Gdy miga wskaźnik baterii, oznacza
to, że poziom naładowania baterii jest
niski, ale można kontynuować pomiar.
Termometr nie może działać z
powodu niskiego poziomu naładowania baterii.
ponownie ją zasil. Jeśli komunikat pojawi
się ponownie, skontaktuj się ze sprzedawcą w celu uzyskania pomocy.
Umieść termometr w pomieszczeniu
na co najmniej 30 minut w temperaturze pokojowej pomiędzy 5°C a 40°C
(41°F~104°F).
Dokładnie przeczytaj wskazówki dotyczące pomiaru temperatury, a następnie
wykonaj nowy pomiar temperatury.
Dokładnie przeczytaj wskazówki dotyczące pomiaru temperatury, a następnie
upewnij się, że ltr obiektywu jest czysty
i wykonaj nowy pomiar temperatury.
normalnie
Termometr wykona prawidłowy pomiar,
ale baterie należy wkrótce wymienić.
Wymień na dwie nowe baterie alkaliczne
rozmiaru AAA.
Page 45
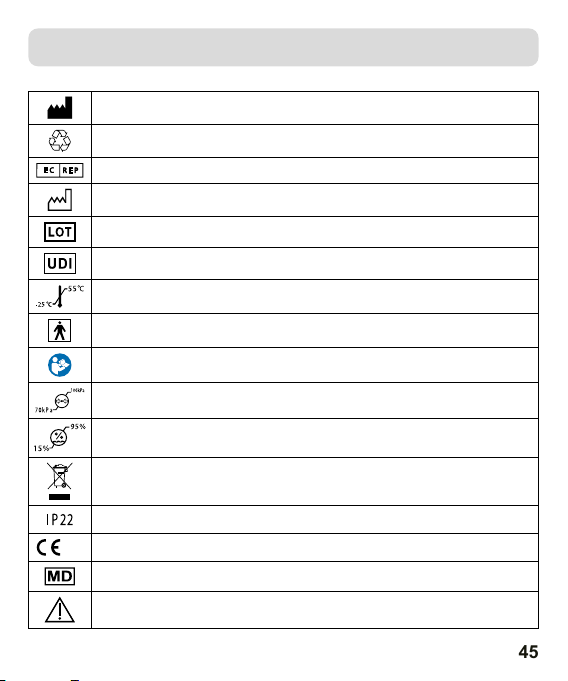
45
OBJAŚNIENIE SYMBOLI
Producent
Ogólny symbol odzysku/recyklingu
Autoryzowany przedstawiciel we Wspólnocie Europejskiej
Data produkcji
Kod partii
Unikalny identykator urządzenia
Limit temperatury przechowywania i transportu:
TYP BF ZASTOSOWANA CZĘŚĆ
Patrz instrukcja obsługi/ broszura
Ograniczenie ciśnienia atmosferycznego
Ograniczenie wilgotności podczas przechowywania i transportu:
Utylizacja tego produktu i zużytych baterii powinna odbywać się zgodnie z krajowymi przepisami
dotyczącymi utylizacji produktów elektronicznych.
Pierwsza cyfra 2: Ochrona przed ciałami stałymi o średnicy 12,5 mm i większej. Drugi numer 2:
Ochrona przed pionowo spadającymi kroplami wody, gdy obudowa jest przechylona do 150°.
Produkt jest zgodny z wymogami dyrektywy WE MDR (UE) 2017/745 w sprawie wyrobów medycznych.
0123
Wyrób medyczny
Uwaga
Page 46

46
INFORMACJA DLA UŻYTKOWNIKÓW OSPOSOBIE POSTĘPOWANIA
ZE ZUŻYTYM SPRZĘTEM ELEKTRYCZNYM IELEKTRONICZNYM.
Jeżeli urządzenie, opakowanie, instrukcja obsługi itym podobne zostały opatrzone
symbolem przekreślonego kołowego kontenera na odpady, oznacza to, że urządzenie podlega selektywnej zbiórce odpadów zgodnie zdyrektywą Parlamentu
Europejskiego iRady 2012/19/EU. Zużytego urządzenia nie należy wyrzucać wraz
zpozostałymi odpadami gospodarstwa domowego inie należy traktować go jako
odpad komunalny. Wyrzucając elektrośmieci do kontenera stwarzasz zagrożenie dla
środowiska.
Zużyte urządzenie należy dostarczyć do punktu zbiórki selektywnej sprzętu
elektrycznego ielektronicznego zorganizowanego przez administrację publiczną.
Segregując iprzekazując do przetworzenia, odzysku, recyklingu oraz utylizacji
zużyte urządzenia elektryczne ielektroniczne chronisz środowisko przed zanieczyszczeniem iskażeniem, przyczyniasz się do zmniejszenia stopnia wykorzystania
zasobów naturalnych oraz obniżenia kosztów produkcji nowych urządzeń. Właściwa
utylizacja izłomowanie pomaga eliminować niekorzystny wpływ złomowanych
produktów na środowisko naturalne oraz zdrowie człowieka.
Aby uzyskać szczegółowe informacje dotyczące możliwości ponownego przetworzenia niniejszego produktu, należy skontaktować się zmiejscowym urzędem
miasta, służbami oczyszczania miasta lub sklepem, wktórym zakupiono produkt.
Page 47
47
INFORMACJE DOTYCZĄCE KOMPATYBILNOŚCI ELEKTROMAGNETYCZNEJ
Urządzenie spełnia wymagania międzynarodowej normy IEC 60601-1-2 w zakresie kompatybilności elektromagnetycznej. Wymagania są spełnione w warunkach opisanych w poniższej tabeli.
Urządzenie jest elektrycznym produktem medycznym i podlega specjalnym środkom ostrożności
w odniesieniu do EMC, które muszą być opublikowane w instrukcji obsługi. Przenośny i mobilny
sprzęt komunikacyjny HF może mieć wpływ na urządzenie. Używanie urządzenia w połączeniu z niezatwierdzonymi akcesoriami może mieć negatywny wpływ na urządzenie i zmienić kompatybilność
elektromagnetyczną. Urządzenie nie powinno być używane bezpośrednio w pobliżu lub pomiędzy
innymi urządzeniami elektrycznymi.
Tabela 1
Urządzenie jest przeznaczone do użytku w środowisku elektromagnetycznym określonym
poniżej. Klient lub użytkownik urządzenia powinien upewnić się, że jest ono używane w takim
Emisja przewodzona
Emisja promieniowana
Emisje akustyczne
Wahania napięcia /
emisje migotania
Wytyczne i deklaracja producenta - emisja elektromagnetyczna
Test emisji Zgodność Środowisko elektromagnetyczne - wskazówki
CISPR 11
CISPR 11
IEC 61000-3-2
IBC 61000-3-3
Nie dotyczy
Grupa 1 klasa B
Nie dotyczy
Nie dotyczy
środowisku.
Urządzenie wykorzystuje energię RF wyłącznie do
swoich wewnętrznych funkcji. W związku z tym
emisja fal radiowych jest bardzo niska i nie powinna
powodować żadnych zakłóceń w pobliskim sprzęcie elektronicznym.
Urządzenie wykorzystuje energię RF wyłącznie do
swoich wewnętrznych funkcji. W związku z tym
emisja fal radiowych jest bardzo niska i nie powinna
powodować żadnych zakłóceń w pobliskim sprzęcie elektronicznym.
Page 48
48
Tabela 2
Wytyczne i deklaracja producenta - odporność elektromagnetyczna
Urządzenie jest przeznaczone do użytku w środowisku elektromagnetycznym określonym
poniżej. Klient lub użytkownik urządzenia powinien upewnić się, że jest ono używane w takim
Test odporności Poziom testu IEC 60601 Poziom zgodności
Wyładowanie elektrosta-
tyczne (ESD)
IEC 61000-4-2
Elektrostatyczne stany
przejściowe / udarowe IEC
61000-4-4
Przepięcia IEC 61000-4-5 ±0,5kV, ±1kV w trybie różnico-
Spadki napięcia, krótkie
przerwy i wahania napięcia na
liniach wejściowych zasilania
IEC 61000-4-11
Pole magnetyczne o często-
tliwości zasilania (50/60 Hz)
IEC 61000-4-8
Zbliżeniowe pola magne-
UWAGA: UT to napięcie sieciowe przed zastosowaniem poziomu testowego.
tyczne
środowisku.
±8 kV kontakt
±2 kV, ±4kV, ±8 kV, ±15 kV
powietrze
±2 kV dla linii zasilania
Częstotliwość powtarzania
100 kHz ±1kV dla linii wejścio-
wych/wyjściowych
wym linia-linia
0% UT (100% spadek UT) dla
0,5 cyklu przy 0°, 45º, 90º, 135°,
180º, 225°, 270º i 315°
0% UT (100% spadek UT) dla 1
cyklu przy 0º
70% UT (30% spadek UT) dla
25/30 cykli przy 0º
0% UT (100% spadek UT) dla
250/300 cykli przy 0º
30 A/m, 50/60Hz 30 A/m, 50/60Hz
IEC 61000-4-39 Patrz Tabela 3
±2 kV, ±4kV, ±8 kV, ±15 kV
±8 kV kontakt
powietrze
Nie dotyczy
Nie dotyczy
Nie dotyczy
Page 49
49
Tabela 3
Specykacje testu IMMUNITY PORTU ENCLOSURE na zbliżeniowe pola magnetyczne
Częstotliwość testowa Modulacja POZIOM TESTU IMMUNITY
a)
30 kHz
134,2 kHz
13,56 MHz
a) Ten test ma zastosowanie wyłącznie do URZĄDZEŃ I SYSTEMÓW MEDYCZNYCH przeznaczonych do użytku w DOMOWYM ŚRODOWISKU OPIEKI ZDROWOTNEJ.
b) Nośna powinna być modulowana przy użyciu sygnału fali prostokątnej o 50% cyklu pracy.
c) r.m.s. przed zastosowaniem modulacji.
CW 8
Modulacja impulsowa
2,1 kHz
Modulacja impulsowa b)
50 kHz
b)
(A/m)
65
7,5
c)
c)
Page 50
50
Tabela 4
Wytyczne i deklaracja producenta - odporność elektromagnetyczna
Urządzenie jest przeznaczone do użytku w środowisku elektromagnetycznym określonym
poniżej. Klient lub użytkownik urządzenia powinien upewnić się, że jest ono używane w takim
Test odporności Poziom testu IEC 60601 Poziom zgodności
Przewodzone RF
IEC 61000-4-6
Promieniowane RF
IEC 61000-4-3
UWAGA 1 Przy 80 MHz i 800 MHz obowiązuje wyższy zakres częstotliwości. UWAGA 2 Te
wytyczne mogą nie mieć zastosowania we wszystkich sytuacjach. Na rozchodzenie się fal elektromagnetycznych ma wpływ pochłanianie i odbijanie ich od struktur, obiektów i ludzi.
a. Pasma ISM (przemysłowe, naukowe i medyczne) między 0,15 MHz a 80 MHz to 6,765 MHz do
6,795 MHz; 13,553 MHz do 13,567 MHZ; 26,957 MHz do 27,283 MHz; oraz 40,66 MHz do 40,70
MHz. Amatorskie pasma radiowe od 0,15 MHz do 80 MHz to 1,8 MHz do 2,0 MHz, 3,5 MHz do
4,0 MHz, 5,3 MHz do 5,4 MHz, 7 MHz do 7,3 MHz, 10,1 MHz do 10,15 MHz, 14 MHz do 14,2 MHz,
18,07 MHz do 18,17 MHz, 21,0 MHz do 1,4 MHz, 24,89 MHz do 24,99 MHz, 28,0 MHz do 29,7 MHz
i 50,0 MHz do 54,0 MHZ.
b. Poziomy zgodności w pasmach częstotliwości ISM od 150 kHz do 80 MHz oraz w zakresie częstotliwości od 80 MHz do 2,7 GHz mają na celu zmniejszenie prawdopodobieństwa, że mobilny/
przenośny sprzęt komunikacyjny może powodować zakłócenia, jeśli zostanie przypadkowo
wniesiony do obszarów przebywania pacjentów. Z tego powodu do wzorów stosowanych do obliczania zalecanej odległości dla nadajników w tych zakresach częstotliwości włączono dodatkowy
współczynnik 10/3.
c. Natężenia pola pochodzącego od nadajników stacjonarnych, takich jak stacje bazowe telefonów komórkowych/bezprzewodowych i stacjonarnych radiotelefonów przenośnych, amatorskich
stacji radiowych, stacji radiowych AM i FM oraz stacji telewizyjnych, nie można dokładnie przewidzieć teoretycznie. Aby ocenić środowisko elektromagnetyczne ze względu na stałe nadajniki RF,
należy rozważyć badanie elektromagnetyczne terenu. Jeśli zmierzone natężenie pola w miejscu,
w którym urządzenie jest używane, przekracza odpowiedni poziom zgodności RF powyżej,
urządzenie powinno być obserwowane w celu sprawdzenia normalnego działania. W przypadku
zaobserwowania nieprawidłowego działania konieczne może być podjęcie dodatkowych środków,
takich jak zmiana orientacji lub umiejscowienia urządzenia.
d. W zakresie częstotliwości od 150 kHz do 80 MHz natężenie pola powinno być mniejsze niż 3
V/m .
środowisku.
3 Vrms
150 kHz do 80 MHz
6 Vrms 150 kHz do 80 MHz
poza pasmami ISM
10 V/m
80 MHz do 2,7 GHz
Nie dotyczy
10 V/m
Page 51
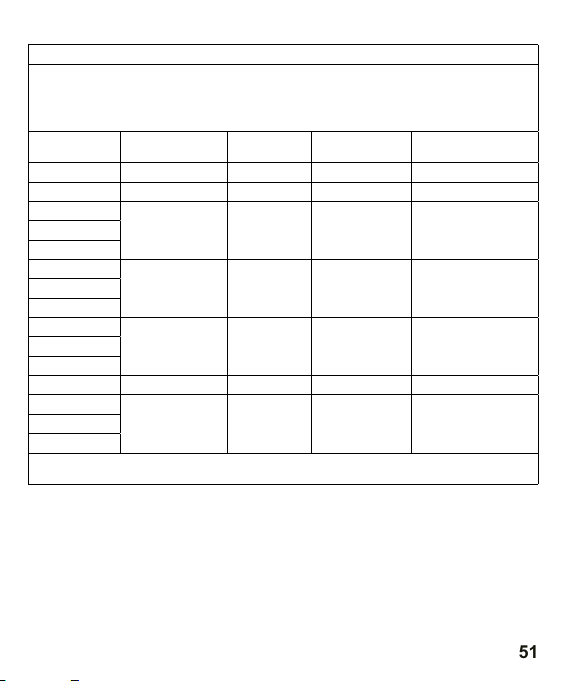
51
Tabela 5
Zalecane odległości pomiędzy urządzeniami komunikacji bezprzewodowej RF
Urządzenie jest przeznaczone do użytku w środowisku elektromagnetycznym, w którym zakłócenia radiowe są kontrolowane. Klient lub użytkownik urządzenia może pomóc w zapobieganiu
zakłóceniom elektromagnetycznym, zachowując minimalną odległość między bezprzewodowym
sprzętem komunikacyjnym RF a urządzeniem, zgodnie z poniższymi zaleceniami, w zależności od
maksymalnej mocy wyjściowej sprzętu komunikacyjnego.
Częstotliwość
MHz
385 1.8 0.3 27 27
450 2 0.3 28 28
710
780
810
930
1720
1970
2450 2 0.3 28 28
5240
5785
Uwaga 1: Te wytyczne mogą nie mieć zastosowania we wszystkich sytuacjach. Na rozchodzenie
się fal elektromagnetycznych ma wpływ absorpcja i odbicie od struktur, obiektów i ludzi.
Maksymalna moc W Odległość Poziom testowy
0.2 0.3 9 9745
2 0.3 28 28870
2 0.3 28 281845
0.2 0.3 9 95500
IEC 60601
Poziom zgodności
Page 52

52
BEDIENUNGSANLEITUNG
DE
Bitte lesen Sie diese Anleitung vor der Verwendung dieses Produkts
sorgfältig und gründlich durch.
Das Infrarot-Stirnthermometer BD-101 wurde speziell für die sichere
Anwendung an der Stirn entwickelt. Es ist ein Gerät, das die Körpertemperatur durch Erfassen der Intensität des vom Stirnbereich abgestrahlten Infrarotlichts messen kann. Es wandelt die erfasste Wärme in
einen Temperaturwert um, der dann auf einem LCD-Bildschirm angezeigt wird. Bei ordnungsgemäßem Betrieb kann das Thermometer die
Körpertemperatur des Benutzers schnell und genau bestimmen. Es ist
ein praktisches Gerät, das eine genaue Temperaturüberwachung auf
sichere und bequeme Weise ermöglicht.
Das Gerät dient der nicht-invasiven Messung der menschlichen
Körpertemperatur durch die Haut der Stirn. Es eignet sich sowohl für
den Heimgebrauch als auch für die klinische Anwendung und ermöglicht Messungen für Menschen jeden Alters. Dank seiner sicheren und
bequemen Anwendung im Stirnbereich ist dieses Thermometer ein
wirksames Instrument zur Überwachung der Körpertemperatur in
verschiedenen Umgebungen.
Gebrauchsanweisung: Das Infrarot-Stirnthermometer dient zur Messung
der Körpertemperatur durch Messung der Temperatur an der Stirn.
Dieses Gerät ist mit den folgenden Normen kompatibel:
ISO 80601-2-56 Medizinische elektrische Geräte - Teil 2-56: Detaillierte Anforderungen an die grundlegende Sicherheit und die wesentlichen Leistungsmerkmale von Fieberthermometern zur Messung der Körpertemperatur,
IEC 60601-1-11 Medizinische elektrische Geräte - Teil 1-11: Allgemeine Festlegungen für die Sicherheit und die wesentlichen Leis-
Page 53

53
tungsmerkmale - Ergänzungsnorm: Anforderungen an medizinische
elektrische Geräte und medizinische elektrische Systeme, die in der
häuslichen Pege verwendet werden, und entspricht den Anforderungen von IEC 60601-1-2(EMV),
IEC 60601-1(Sicherheit). Der Hersteller ist nach ISO 13485 zertiziert.
Das Produkt entspricht den Anforderungen der MDD-Richtlinie
93/42/EWG, "0123" ist die Kennnummer der notizierenden Stelle.
WARNUNG
⚠
• Die Verwendung des Infrarot-Thermometers ist nicht durch
Geschlecht oder Alter eingeschränkt.
• Berühren Sie den Sensor nicht mit Ihren Händen.
• Die Verwendung dieses Stirnthermometers ist kein Ersatz für die
Konsultation eines Arztes.
• Erlauben Sie Kindern nicht, die Temperatur unbeaufsichtigt zu messen, da einige Teile so klein sind, dass sie verschluckt werden können.
• Tauchen Sie das Gerät niemals in Wasser oder andere Flüssigkeiten ein.
• Nehmen Sie keine Veränderungen am Gerät vor, die nicht vom
Hersteller genehmigt wurden.
• Setzen Sie das Thermometer keinen extremen Temperaturen
(unter -25°C/-13°F oder über 55°C/131°F) oder übermäßiger
Luftfeuchtigkeit (>95% relative Luftfeuchtigkeit) aus.
• Halten Sie die Batterie von Kindern fern.
• Wenn das Gerät längere Zeit nicht benutzt wird, nehmen Sie die
Batterie heraus.
• Legen Sie das Thermometer nicht in direktes Sonnenlicht oder in
Watte, da sonst die Genauigkeit der Messung beeinträchtigt wird.
Page 54

54
• Tragbare und mobile HF-Kommunikation (Radiofrequenz) kann die
Leistung dieses Geräts beeinträchtigen. Es ist daher notwendig,
besondere Vorsichtsmaßnahmen zu treen und die Empfehlungen zur elektromagnetischen Verträglichkeit (EMV) zu befolgen.
Ausführliche Informationen über die Anwendung der EMV-Vorsichtsmaßnahmen nden Sie am Ende des Handbuchs, das der
Gerätedokumentation beiliegt.
• ME-Geräte sollten während des Gebrauchs nicht gereinigt oder
abgewischt werden.
• Jeder schwerwiegende Zwischenfall im Zusammenhang mit dem
Gerät sollte dem Hersteller und der zuständigen Behörde des Mitgliedstaates, in dem sich der Benutzer und/oder Patient bendet,
gemeldet werden.
• Der Sensor des ME-Geräts sollte während der Verwendung am
Patienten nicht gewartet oder gepegt werden.
GERÄT
Bau des Geräts
1. Sensor
2. Messknopf
3. Ton-Schalter
4. Taste für Einstellungen
5. Batteriefachdeckel
6. Anzeige
Symbole auf dem Display
a. Ton-Zeichen
b. Batterie-Zeichen
c. Temperatureinheit:
Fahrenheit/Celsius
d. Zeitmodus
e. Uhrzeit und Datum
f. Temperaturwert
g. Speicher-Modus
h. Stirntemperaturmodus
i. Objekttemperaturmodus
Page 55

55
BASISFUNKTIONEN
UHR
Die Echtzeituhr funktioniert im Speicher und unterstützt die Messergebnisinformationen.
Im Abschnitt Uhr-Einstellungen erfahren Sie, wie Sie die Uhrzeit
einstellen können, wenn Sie das Gerät zum ersten Mal verwenden.
STIRNMODUS
Das Thermometer wurde für den praktischen Gebrauch entwickelt.
Es ist kein Ersatz für den Besuch beim Arzt. Sie sollten auch daran
denken, das Messergebnis mit Ihrer normalen Körpertemperatur zu
vergleichen.
Wie Sie Ihre Körpertemperatur messen können, erfahren Sie im
Abschnitt Funktionen.
OBJEKT-MODUS
Der Objektmodus zeigt die tatsächliche, unkorrigierte Oberächentemperatur an, die von der Körpertemperatur abweicht. Dies kann
helfen zu überwachen, ob die Objekttemperatur für das Kind oder den
Patienten geeignet ist. Ein Beispiel ist die Messung der Temperatur
der Milch für ein Baby.
Messbereich des Objektmodus: 0°C~100°C (32°F~212°F).
Laborgenauigkeit des Objektmodus: ±4 % oder ±2 °C (4 °F), je nachdem, welcher Wert größer ist.
Page 56

56
Wie Sie die Objekttemperatur messen, erfahren Sie im Abschnitt
Funktionen.
SPEICHERMODUS
Es stehen 30 Speichersätze für Stirn- und Objektmessungen zur
Verfügung. Das Datum/Uhrzeit der Messung/Modussymbol wird
ebenfalls in jedem Speichereintrag gespeichert.
SIGNALTON
Sobald die Messung abgeschlossen ist, wird ein kurzer Signalton
ertönen.
UMSCHALTEN ZWISCHEN °C UND °F
Um zu erfahren, wie Sie zwischen Grad Celsius
und Fahrenheit umzuschalten, lesen Sie den Abschnitt über die Uhrzeiteinstellungen.
TON EIN-/AUSSCHALTEN
Wählen Sie mit der Taste aus, ob der Ton ein- oder ausgeschaltet sein
soll.
Page 57
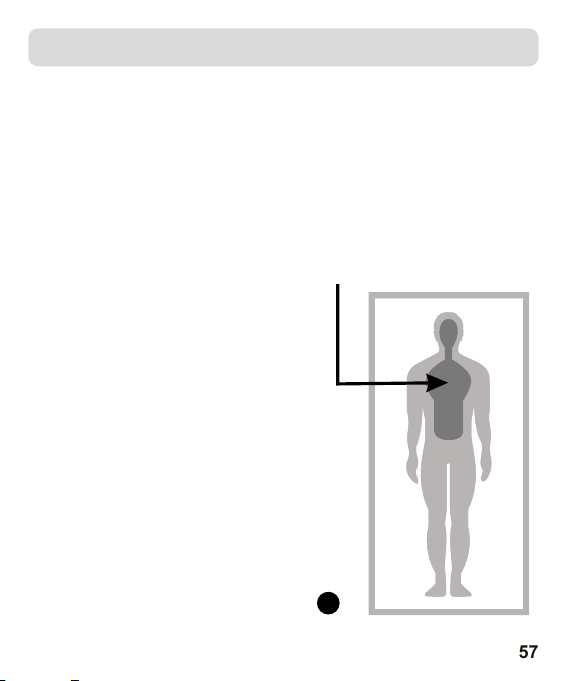
57
Ear Thermometer Advantages
Clinical studi es have shown that the ear is an e xcellent site for
temperature me asurement because temp eratures taken in the ear
,
reflect the body s core temperatu re. Body temperature is re gulated
by the hypothala mus, which shares the same b lood supply as the
tympanic membr ane. Changes in core body te mperature are usually
seen sooner at the t ympanic membrane than at o ther sites, such as
the rectum, mout h or under the arm.
Advantages of ta king temperatures at the e ar versus other sites:
● Axillary temperature rea dings only reflect skin temperature
which may not i
● Rectal tempera tures often lag signific antly behind internal bo dy
temperature ch anges, especially at tim es of rapidly changing
temperatures .
● Oral temperatu res are often influenced b y eating, drinking,
thermometer pl acement, breathing thr ough the mouth, or the
inability of the p erson to close their mouth c ompletely.
Vital Organs
VORTEILE DES STIRNTHERMOMETERS
Das Infrarot-Stirnthermometer misst die Körpertemperatur genau
und konzentriert sich auf den Bereich der wichtigsten Organe (siehe
Abb. 1). Bei seiner Verwendung wird die Temperatur der Hautoberäche über der Arteria temporalis, der Hauptschlagader des Kopfes,
gemessen.
Die Schläfenarterie, die eine direkte Verlängerung der Aorta - des
Hauptstammes des arteriellen Systems - ist, ist über die Halsschlagader mit dem Herzen verbunden. Sie
sorgt für einen konstanten Blutuss
und ist damit ein besonders repräsentativer Ort für die Gesamtkörpertemperatur. Daher werden Änderungen der Körpertemperatur in der
Stirn schneller widergespiegelt als in
anderen Bereichen wie dem Mund,
dem Rektum oder der Achselhöhle.
Lebenswichtige Organe
1
Page 58
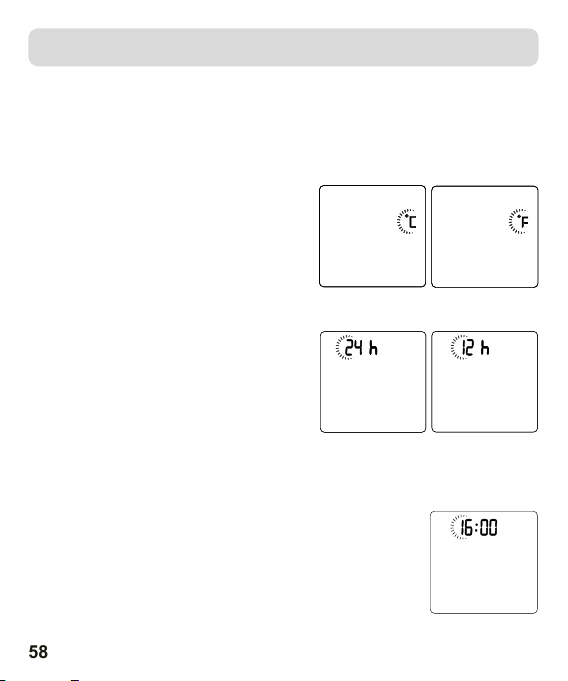
58
Real Time Clock Setting
8
the re ctum, mout h or unde r the a rm.
Adva ntages of ta king te mpe ratur es at the ear ve rsus other s ites:
● Axill ary tem perature r eadings on ly refl ect s kin tem perature
whic h may not i
ndic ate the inte rnal bo dy te mpera ture.
● Rect al tempera tures o fte n lag sig nificant ly behind in terna l bod y
temp erature ch anges , esp ecial ly at times of r apidly cha nging
temp eratures .
● Oral t emperatu res are o fte n influ enced by eat ing, drink ing,
ther mometer pl aceme nt, b reath ing throug h the mouth, o r the
inab ility of the p erson t o clo se thei r mouth comp letely.
①Set th e unit
Pres s Setting Bu tton to s ele ct the
unit y ou want.
Afte r the unit is se t
,pre ss Mode
Butt on ,the time f ormat f igu re will
appe ar .
When u sing therm omete r for t he firs t time, plea se set the par amete rs
of the t hermomet er. With the therm ometer off, pr ess and hold
Mode B UTTON to enter i nto settin g mode.
Real Time Clock Setting
8
temp erature ch anges , esp ecial ly at times of r apidly cha nging
temp eratures .
● Oral t emperatu res are o fte n influ enced by eat ing, drink ing,
ther mometer pl aceme nt, b reath ing throug h the mouth, o r the
inab ility of the p erson t o clo se thei r mouth comp letely.
①Set th e unit
Pres s Setting Bu tton to s ele ct the
unit y ou want.
Afte r the unit is se t
,pre ss Mode
Butt on ,the time f ormat f igu re will
appe ar .
② Set th e time forma t
The de vi ce can di splay t he time in ei ther
an AM/PM (1 2-hou r) or a 24:00
(24- ho ur) for mat. Pr ess and rel ease
Sett in g butto n to sele ct the form at.
With th e prefe rred time f ormat o n the
disp la y, pr ess Mod e Butto n, the Hour
When u sing therm omete r for t he firs t time, plea se set the par amete rs
of the t hermomet er. With the therm ometer off, pr ess and hold
Mode B UTTON to enter i nto settin g mode.
Real Time Clock Setting
8
①Set th e unit
Pres s Setting Bu tton to s ele ct the
unit y ou want.
Afte r the unit is se t
,pre ss Mode
Butt on ,the time f ormat f igu re will
appe ar .
② Set th e time forma t
The de vi ce can di splay t he time in ei ther
an AM/PM (1 2-hou r) or a 24:00
(24- ho ur) for mat. Pr ess and rel ease
Sett in g butto n to sele ct the form at.
With th e prefe rred time f ormat o n the
disp la y, pr ess Mod e Butto n, the Hour
figu re i s flash ing aut omatica lly.
③ Set th e hour
Pres s an d relea se the Se tting But ton to ad vance
one ho ur u ntil th e corre ct hour app ears.
Afte r th e hour is s et, pre ss Mode But ton, th e Minut e
figu re i s flash ing aut omatica lly.
When u sing therm omete r for t he firs t time, plea se set the par amete rs
of the t hermomet er. With the therm ometer off, pr ess and hold
Mode B UTTON to enter i nto settin g mode.
UHREINSTELLUNG
Wenn Sie das Thermometer zum ersten Mal verwenden, stellen Sie die
Geräteparameter ein. Halten Sie bei ausgeschaltetem Thermometer
die Einstelltaste gedrückt, um in den Einstellungsmodus zu gelangen.
1. Temperatureinheit einstellen
Drücken Sie die Testtaste, um die
gewünschte Einheit auszuwählen.
Sobald die Einheit eingestellt ist, drücken Sie die Set-Taste, die gewünschte
Temperatureinheit wird angezeigt.
2. Zeitformat einstellen
Das Gerät kann die Zeit im 12-Stunden- (AM/PM) oder 24-Stunden-Format
anzeigen. Drücken Sie die Testtaste und
lassen Sie sie wieder los, um das Format
zu wählen. Wenn Sie das gewünschte
Zeitformat gewählt haben, drücken
Sie die Einstelltaste, die Stundenzier beginnt automatisch zu blinken.
3. Uhrzeit einstellen
Drücken Sie die Testtaste und lassen Sie sie wieder
los, um eine Stunde weiterzuschalten, bis die richtige
Uhrzeit angezeigt wird.
Sobald die Stunde eingestellt ist, drücken Sie die Einstelltaste und die Minutenanzeige beginnt automatisch zu blinken.
Page 59
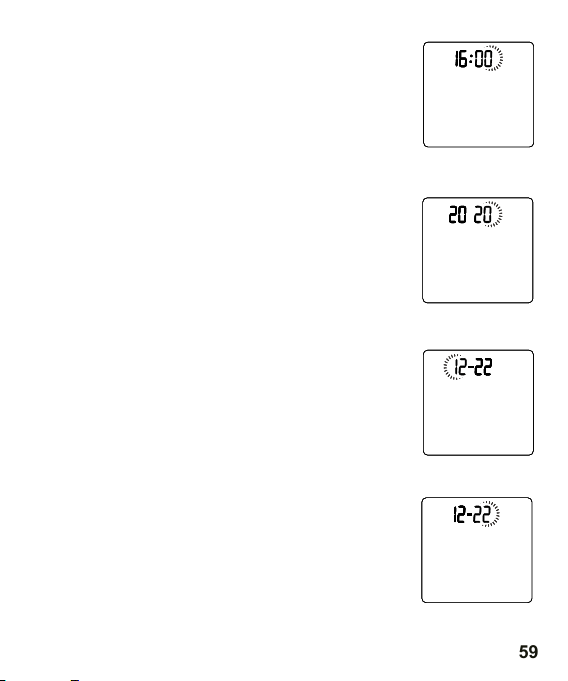
59
4. Minuten einstellen
sure a n ew, clean pr obe cover i s in plac e befor e each
meas ureme nt. Place a n ew prob e cover o n the pro be firm ly;
maki ng sure t he probe an d the inn er port ion of th e probe c over
1. To achi eve acc urate r eadin gs
To measure ea r te mpe rat ure:
Real Time Clock Setting
④ Set th e minut e
Press an d re lease t he S etting Bu tt on to adv an ce
one minu te u ntil th e co rrect min ut e appea rs .
After th e mi nute is s et , press Mod e Bu tton, t he Year
figure i s fl ashin g au tomatic al ly.
sure a n ew, clean pr obe cover i s in plac e befor e each
meas ureme nt. Place a n ew prob e cover o n the pro be firm ly;
maki ng sure t he probe an d the inn er port ion of th e probe c over
fit sn ugly.
2. Pre ss the , The disp lay is acti vated t o show al l
segm ents.
1. To achi eve acc urate r eadin gs
scre en with b eeps, so yo u can sta rt a new me asure ment. I f error
mess ages ap pears, it m eans th e therm omete r is not re ady for
To measure ea r te mpe rat ure:
Real Time Clock Setting
④ Set th e minut e
Press an d re lease t he S etting Bu tt on to adv an ce
one minu te u ntil th e co rrect min ut e appea rs .
After th e mi nute is s et , press Mod e Bu tton, t he Year
figure i s fl ashin g au tomatic al ly.
⑤ Set th e year
Press an d re lease t he S etting Bu tt on to adv an ce
one year u nt il the co rr ect year ap pe ars.
After th e ye ar is set , pr ess Mode Bu tt on, the M on th
figure w il l appea r.
sure a n ew, clean pr obe cover i s in plac e befor e each
meas ureme nt. Place a n ew prob e cover o n the pro be firm ly;
maki ng sure t he probe an d the inn er port ion of th e probe c over
fit sn ugly.
2. Pre ss the , The disp lay is acti vated t o show al l
segm ents.
Rema rks:
a. Pro be cove r sign stan d for tak ing the e ar temp eratu re with
prob e cover n ow and vice v ersa.
1. To achi eve acc urate r eadin gs
scre en with b eeps, so yo u can sta rt a new me asure ment. I f error
mess ages ap pears, it m eans th e therm omete r is not re ady for
meas ureme nt.
To measure ea r te mpe rat ure:
Real Time Clock Setting
④ Set th e minut e
Press an d re lease t he S etting Bu tt on to adv an ce
one minu te u ntil th e co rrect min ut e appea rs .
After th e mi nute is s et , press Mod e Bu tton, t he Year
figure i s fl ashin g au tomatic al ly.
⑤ Set th e year
Press an d re lease t he S etting Bu tt on to adv an ce
one year u nt il the co rr ect year ap pe ars.
After th e ye ar is set , pr ess Mode Bu tt on, the M on th
figure w il l appea r.
⑥ Set th e month
Press an d re lease t he S etting Bu tt on to adv an ce
one mont h un til the c or rect mont h ap pears .
After th e mo nth is se t, p ress Mode B ut ton, th e Da te
figure i s fl ashin g au tomatic al ly.
sure a n ew, clean pr obe cover i s in plac e befor e each
meas ureme nt. Place a n ew prob e cover o n the pro be firm ly;
maki ng sure t he probe an d the inn er port ion of th e probe c over
fit sn ugly.
2. Pre ss the , The disp lay is acti vated t o show al l
segm ents.
Rema rks:
a. Pro be cove r sign stan d for tak ing the e ar temp eratu re with
prob e cover n ow and vice v ersa.
b. To avoi d the ris k of cros s conta minat ion, it i s recom mende d
that y ou alwa ys measur e the ear t emper ature w ith pro be cove r.
1. To achi eve acc urate r eadin gs
scre en with b eeps, so yo u can sta rt a new me asure ment. I f error
mess ages ap pears, it m eans th e therm omete r is not re ady for
meas ureme nt.
To measure ea r te mpe rat ure:
Real Time Clock Setting
④ Set th e minut e
Press an d re lease t he S etting Bu tt on to adv an ce
one minu te u ntil th e co rrect min ut e appea rs .
After th e mi nute is s et , press Mod e Bu tton, t he Year
figure i s fl ashin g au tomatic al ly.
⑤ Set th e year
Press an d re lease t he S etting Bu tt on to adv an ce
one year u nt il the co rr ect year ap pe ars.
After th e ye ar is set , pr ess Mode Bu tt on, the M on th
figure w il l appea r.
⑥ Set th e month
Press an d re lease t he S etting Bu tt on to adv an ce
one mont h un til the c or rect mont h ap pears .
After th e mo nth is se t, p ress Mode B ut ton, th e Da te
figure i s fl ashin g au tomatic al ly.
⑦ Set th e date
Press an d re lease t he S etting Bu tt on to adv an ce
one day un ti l the cor re ct month ap pe ars.
After th e da y is set, p re ss Mode But to n to exit t he
settin g mo de.
Drücken Sie die Testtaste und lassen Sie sie wieder
los, um eine Minute weiterzuschalten, bis die richtige
Minute angezeigt wird.
Sobald die Minuten eingeschtelt werden, drücken Sie
die Einstelltaste und die Jahreszahl beginnt automatisch zu blinken.
5. Jahr einstellen
Drücken Sie die Testtaste und lassen Sie sie wieder
los, um ein Jahr weiterzuschalten, bis das richtige
Jahr erscheint.
Nachdem Sie das Jahr eingestellt haben, drücken Sie
die Einstelltaste und die Monatszier erscheint.
6. Monat einstellen
Drücken Sie die Testtaste und lassen Sie sie wieder
los, um einen Monat weiterzuschalten, bis der richtige Monat angezeigt wird.
Nachdem Sie den Monat eingestellt haben, drücken
Sie die Einstellungstaste, um die Datumszier anzuzeigen.
7. Tag einstellen
Drücken Sie die Testtaste und lassen Sie sie wieder
los, um einen Tag weiterzuschalten, bis der richtige
Monat angezeigt wird.
Sobald der Tag eingestellt ist, drücken Sie die SetupTaste, um den Setup-Modus zu verlassen.
Page 60

60
TIPPS ZUR TEMPERATURMESSUNG
Um sicherzustellen, dass Ihre Messung immer genau Ihre Körpertemperatur widerspiegelt, ist es wichtig, die folgenden Faktoren zu
berücksichtigen, die eine genaue Messung beeinussen können.
1. Es ist wichtig, die normale Körpertemperatur jeder Person zu kennen,
wenn sie sich wohl fühlt. Nur so lässt sich ein Fieber genau diagnostizieren. Um die Normaltemperatur zu bestimmen, sollten Sie mehrere
Messungen vornehmen, wenn es dem Patienten gut geht. Zur Bestätigung messen Sie erneut mit einem digitalen Standardthermometer.
2. Der Benutzer muss sich 30 Minuten lang im Raum aufhalten, bevor
er eine Messung vornimmt.
Hinweis: Der Benutzer und das Thermometer sollten mindestens
10 Minuten lang dieselbe Umgebungstemperatur haben, bevor
eine Messung durchgeführt wird.
3. Der Benutzer sollte vor und während der Messung nichts trinken,
essen oder sich körperlich betätigen, z. B. baden, duschen,
shampoonieren oder die Haare föhnen. Nehmen Sie Mütze ab und
warten Sie 10 Minuten, bevor Sie eine Messung durchführen.
4. Öle oder Kosmetika auf der Stirn können zu einem niedrigeren
Temperaturwert als dem tatsächlichen Messwert führen. Entfernen Sie vor der Messung Schmutz von der Stirn. Warten Sie nach
dem Waschen der Stirn mindestens 10 Minuten, bevor Sie eine
Messung vornehmen.
5. Wenn Sie Ihre Hand längere Zeit auf der Stirn halten, wird die
Temperaturmessung beeinträchtigt.
6. Messen Sie die Temperatur nicht auf Narben, oenen Wunden
oder Schürfwunden.
Page 61
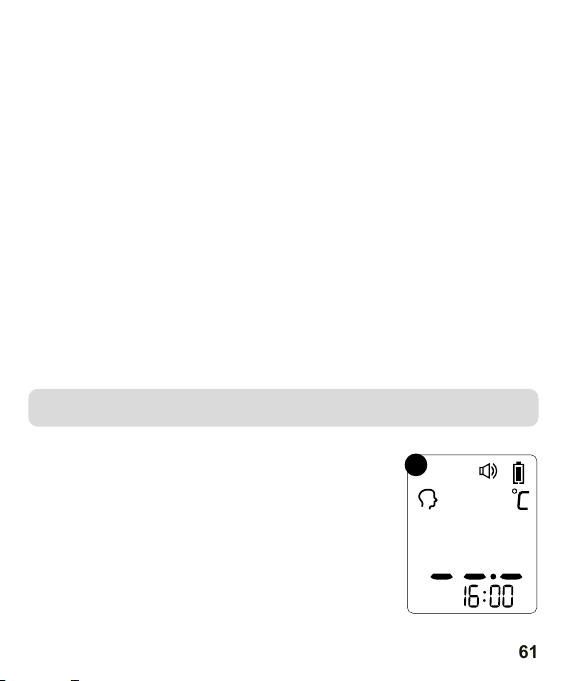
61
7. Verwenden Sie das Thermometer nicht auf einer verschwitzten
Illustration For Use
oder schwitzenden Stirn, da dies den Messwert beeinussen kann.
8. Messen Sie nicht während oder unmittelbar nach dem Füttern
Ihres Babys.
9. Messen Sie die Temperatur mit diesem Thermometer nicht in der
Nähe sehr heißer Orte wie Kamine oder Herde.
10. Das Sondenfenster des Thermometers ist der empndlichste Teil
des Geräts. Berühren Sie das Sondenfenster nicht. Eine Beschädigung oder Verschmutzung des Messfensters kann die Genauigkeit der Messung beeinträchtigen.
11. Wenn das Thermometer in einer Umgebung aufbewahrt wird, die
sich deutlich vom Prüfgelände unterscheidet, ist es vor der Verwendung etwa 30 Minuten lang in das Prüfgelände zu legen.
12. Es ist nicht für die Verwendung in sauerstoreichen Umgebungen
oder in Gegenwart von entammbaren Anästhesiegemischen mit
Luft, Sauersto oder Distickstooxid vorgesehen.
FUNKTIONEN
MESSUNG DER STIRNTEMPERATUR
1. Drücken Sie den Messknopf, das Display wird
aktiviert und zeigt alle Simbole an. Nach der
Geräteselbstüberwachung werden auf dem
Display die in Abb. 2 dargestellten Symbole
sowie Signaltöne zum Starten einer neuen
Messung angezeigt.
2
Page 62
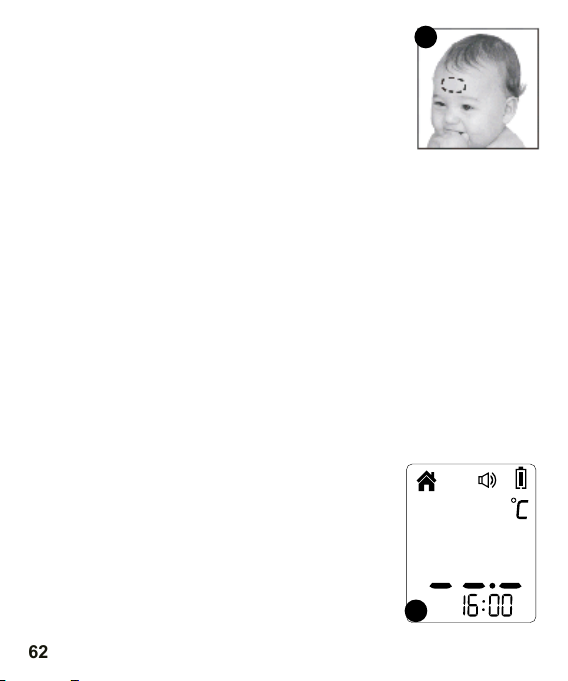
62
2. Richten Sie das Thermometer in einem Abstand von
Illustration For Use
After measurem ent :
1. Pow er off: Dev ice wil l autom atica lly shu t off if left i dle for
more t han 30 se conds t o exten d batte ry life .
2. Cle an the pr obe aft er each u se to ens ure an ac curat e reading an d
avoi d cross c ontam inati on.
(See t he sect ion of Ca re and Cl eanin g for det ails. )
BackLight:
In For ehead m ode:
1. The dis play wi ll be lig hted GR EEN for 3 s econd s when th e unit is
read y for mea surem ent and t he disp lay wil l be ligh ted GREEN fo r
3 seco nds whe n a measu remen t is comp leted w ith a rea ding less
than 3 7.3℃(99 .1
2. The dis play wi ll be lig hted YELLOW for 3 s econd s when a
meas ureme nt is com plete d with a re ading l ess tha n 37.8℃(100. 0
3. The dis play wi ll be lig hted RE D for 3 sec onds wh en a meas urement
is com plete d with a re ading e qual to o r highe r than 37 .8℃(100.0
In Obj ect mod e:
The di splay w ill onl y be ligh ted GRE EN for 3 se conds w hen the
unit i s ready f or meas ure
ment a nd a meas ureme nt is com plete d.
weniger als 5 cm auf die Mitte der Stirn (siehe Abb. 3)
und drücken Sie dann den Messknopf.
Hinweis: Entfernen Sie das Thermometer nicht
von der Stirn, bevor der Signalton ertönt.
3. Lesen Sie die Temperatur auf dem Display ab.
4. Das Gerät schaltet sich automatisch aus, wenn
es 30 Sekunden lang nicht benutzt wird.
TON EIN-/AUSSCHALTEN
Mit dem Tonschalter können Sie den Ton ein- oder ausschalten.
UMSCHALTEN ZWISCHEN STIRNMODUS UND OBJEKTMODUS
Halten Sie die Einstelltaste gedrückt, um zwischen dem Gesichtsmodus und dem Objektmodus zu wechseln.
MESSEN DER OBJEKTTEMPERATUR
1. Drücken Sie den Messknopf, um das Thermometer einzuschalten.
Sobald Sie sich im Messmodus benden, können Sie die Temperatur eines Objekts messen (siehe Abb. 4).
2. Richten Sie das Thermometer aus einem Abstand
von weniger als 5 cm auf die Mitte des Objekts,
dessen Temperatur Sie messen möchten.
3. Drücken Sie den Messknopf und lesen Sie
dann die Temperatur auf dem Display ab.
4. Das Gerät schaltet sich automatisch ab, wenn
es 30 Sekunden lang nicht benutzt wird.
3
4
Page 63

63
NACH DER MESSUNG
1. Schalten Sie die Stromzufuhr aus. Nach 30 Sekunden Inaktivität
geht das Gerät automatisch in den Energiesparmodus über und
schaltet sich aus. Dies ist eine Funktion zur Verlängerung der
Batterielebensdauer.
2. Reinigen Sie den Sensor nach jedem Gebrauch, um eine genaue
Messung zu gewährleisten und eine Kreuzkontamination zu
vermeiden.
(Einzelheiten nden Sie im Abschnitt Pege und Reinigung).
HINTERGRUNDBELEUCHTUNG
Im Stirnmodus:
1. Die Anzeige leuchtet 3 Sekunden lang GRÜN, wenn das Gerät zur
Messung bereit ist, und die Anzeige leuchtet 3 Sekunden lang
GRÜN, wenn die Messung mit einem Messwert unter 37,3 °C (99,1
°F) abgeschlossen ist.
2. Die Anzeige leuchtet 3 Sekunden lang GELB, wenn die Messung
mit einem Messwert unter 37,8 °C (100,0 °F) abgeschlossen ist.
3. Das Display leuchtet 3 Sekunden lang ROT, wenn die Messung mit
einem Wert von 37,8 °C (100,0 °F) oder mehr abgeschlossen ist.
Im Objektmodus:
Die Anzeige leuchtet 3 Sekunden lang GRÜN, wenn das Gerät für die
Messung bereit ist und die Messung abgeschlossen ist.
Page 64
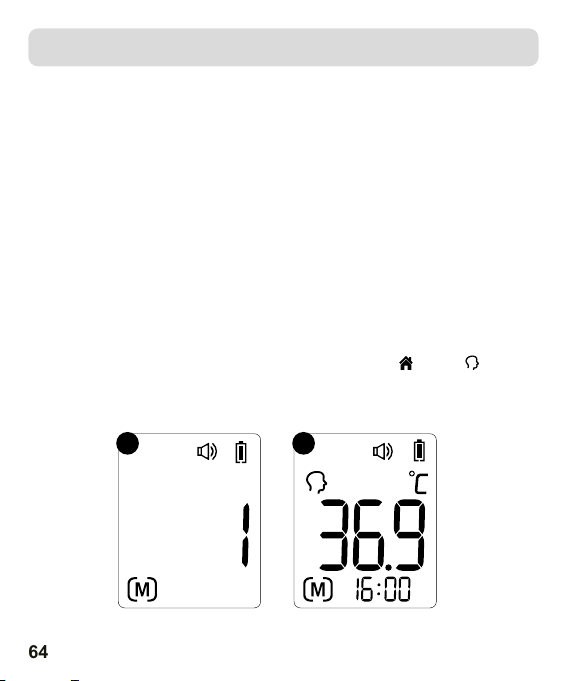
64
SPEICHERMODUS
Memory Mode
Each m emory also r eco rds the
1. The pro be window must be ke pt clea n, dry, and un damag ed at all
time s to ensu re accu rate readings. The a ccura cy of tem perat ure
read ings ca n be affected b y damag e to the pr obe win dow, or the
pres ence of d irt, fi ngerprints, du st and ot her soi ling
comp ounds o n the pro be window. Degrad ed sensor s can deg rade
perf orman ce or cau se other problem s.
2. The pro be window is the mos t delic ate par t of the th ermom eter.
Use a so ft clot h sligh tly moistened wi th a 75% is oprop yl alco hol
solu tion to w ipe pro be window and the th ermom eter. Do n ot
use ab
rasi ve clea ners. Afte r clean ing, al low at le ast 10 mi nutes
dryi ng time b efore t aking temperat ures.
Note : Do not us e any che mical other than i sopro pyl alc ohol to
clea n the pro be wind ow.
3. Use a s oft, dr y cloth t o clean the thermo meter d ispla y and
exte rior.
4. Do no t put the t hermo meter into water d irect ly.
5. Sto re the th ermom eter in a dry locati on, fre e from du st and
cont amina tion an d away from direct s unlig ht.
6. Put t he ther momet er back to the origi nal pac kagin g after u sing.
1. Der Speichermodus kann im Stirnmodus oder im Objektmodus
aufgerufen werden:
Nach dem Einschalten des Thermometers und dem Befolgen
der in den Abb. 2-4 gezeigten Schritte oder nach Abschluss der
Messung drücken Sie die Einstelltaste. Der Buchstabe M erscheint
in der unteren linken Ecke des Displays (siehe Abb. 5).
2. Das Thermometer speichert automatisch die letzten 30 Temperaturmesswerte. Das Symbol für den Messmodus wird ebenfalls
in jedem Speicher abgelegt. Jedes Mal, wenn die Einstelltaste
gedrückt wird, zeigt der Bildschirm die vorherigen Messwerte an,
die den Nummern 1 bis 30 entsprechen. Die Nummer 1 steht für
den jüngsten Messwert, während die Nummer 30 den ältesten
gespeicherten Messwert anzeigt (siehe Abb. 6).
3. Im Speichermodus ändert sich die Markierung " " oder " " nicht.
Der Benutzer kann den Messknopf drücken, um neue Messungen
vorzunehmen.
5 6
Page 65

65
REINIGUNG UND PFLEGE
1. Um genaue Messwerte zu gewährleisten, muss das Sensorfenster
sauber, trocken und frei von Beschädigungen gehalten werden.
Die Genauigkeit der Temperaturmessungen kann durch Schmutz,
Fingerabdrücke, Staub und andere Verunreinigungen auf der
Oberäche des Sondenfensters beeinträchtigt werden. Beschädigungen in diesem Bereich können die Leistung des Geräts
erheblich beeinträchtigen und zu fehlerhaften Messwerten oder
anderen Problemen führen.
2. Das Sensorfenster ist der empndlichste Teil des Thermometers.
Verwenden Sie ein weiches Tuch, das leicht mit einer 75%igen
Isopropylalkohollösung angefeuchtet ist, um das Sensorfenster
und das Thermometer zu desinzieren. Verwenden Sie keine
scheuernden Reinigungsmittel. Nach der gründlichen Reinigung wird empfohlen, mindestens 10 Minuten zu warten, bis es
getrocknet ist, bevor Sie eine Temperaturmessung vornehmen.
Hinweis: Verwenden Sie zum Reinigen des Sensorfensters keine
anderen Chemikalien als Isopropylalkohol.
3. Verwenden Sie ein weiches, trockenes Tuch, um das Display und
das Äußere des Thermometers zu reinigen.
4. Legen Sie das Thermometer nicht direkt ins Wasser.
5. Lagern Sie das Thermometer an einem trockenen, staub- und
schmutzfreien Ort und schützen Sie es vor direkter Sonneneinstrahlung.
6. Legen Sie das Thermometer nach Gebrauch wieder in die Originalverpackung zurück.
Page 66
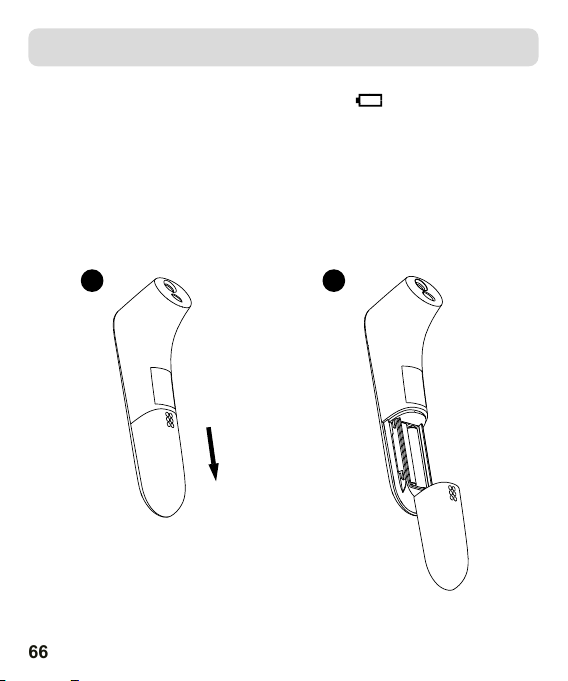
66
BATTERIEWECHSEL
Measuring range
Laboratory accur acy
Display resoluti on
Measure time
Operating temper ature
range:
Storage and transp ort
temperature rang e
Clinical accurac y
Measuring site For ehead(Forehead Mod e)
Reference body sit e
Operation mode For ehead mode(Adjust mo de)
Figure 7
Figure 8
1. Wechseln Sie die Batterie aus, wenn das " " in der oberen rechten Ecke der LCD-Anzeige erscheint.
2. Schieben Sie die Batterieabdeckung wie in Abb. 7 gezeigt nach
unten.
3. Nehmen Sie die Batterie heraus und legen Sie 2 neue AAA-Alkalibatterien ein, wie in Abb. 8 dargestellt.
4. Schieben Sie die Batterieabdeckung wieder zurück.
7 8
Page 67
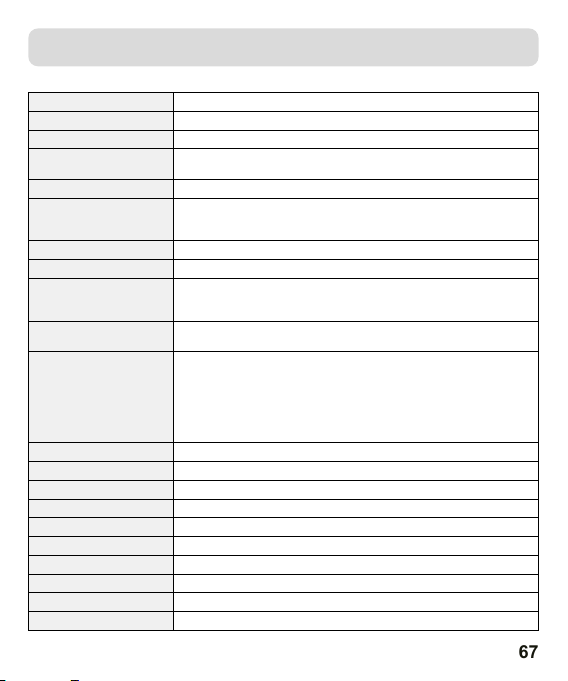
67
TECHNISCHE DATEN
Messbereich Frontmodus 34.0°C~43.0°C (93.2°F~109.4°F)
Ort der Messung Stirn (Stirnmodus)
Hersteller-Modell DET-3017 (Ref. BD-101)
Referenzort Oral
Betriebsmodus Stirnmodus (Einstellmodus)
Laborgenauigkeit
Anzeigeauösung 0,1 °C oder 0,1 °F
Messzeit Ungefähr eine Sekunde
Betriebstemperaturbereich
Lager- und Transporttemperaturbereich
Klinische Genauigkeit
Stoßfestigkeit übersteht einen Sturz aus einer Höhe von 3 Fuß
Abmessungen 155*39.2*49.4mm
Gewicht ca. 97 Gramm (mit Batterien)
Batterie DC3V (2×AAA Batterie)
Batterielebensdauer Ungefähr 6000 Messwerte
Verwendetes Teil Sensor
Erwartete Nutzungsdauer Drei Jahre
Schutzart IP22
Zubehör Batterie
Kontraindikationen Keine
(Dieses Thermometer wandelt die Referenztemperatur der Stirn um,
um das "orale Äquivalent" anzuzeigen).
Stirnmodus: ±0,2 °C (0,4 °F) während 35,5 °C~42,0 °C (95,9 °F~107,6 °F)
über den Betriebstemperaturbereich 15 °C ~ 35 °C (59.0 °F ~ 95.0 °F)
±0,3 °C (0,5 °F) für andere Messungen und den Betriebstemperaturbereich
5°C~40°C (41°F~104°F), 15%~85% relative Luftfeuchtigkeit, nicht
kondensierend
Atmosphärischer Druck: 70 kPa ~ 106 kPa
-25 °C ~ 55 °C (-13 °F ~ 131 °F), 15% ~ 95% relative Luftfeuchtigkeit,
nicht kondensierend Luftdruck: 70 kPa ~ 106 kPa
0-1 Jahr: Klinische Abweichung: -0.19 °C (- 0.34 °F); Klinische Wiederholbarkeit:
0.06°C (0.11°F); Konformitätsgrenzen: 0.68°C (1.22°F);
1- 5 Jahre: Klinische Abweichung: -0.25°C (- 0.45°F) ; Klinische Wiederholbarkeit:
0.07°C (0.13°F) ; Konformitätsgrenzen: 0.73°C (1.31°F)
Über 5 Jahre: Klinische Abweichung: -0.25°C (- 0.45 °F) ; Klinische Wiederholbarkeit: 0.17°C (0.31°F); Konformitätsgrenzen: 0.60°C (1.08°F)
Page 68
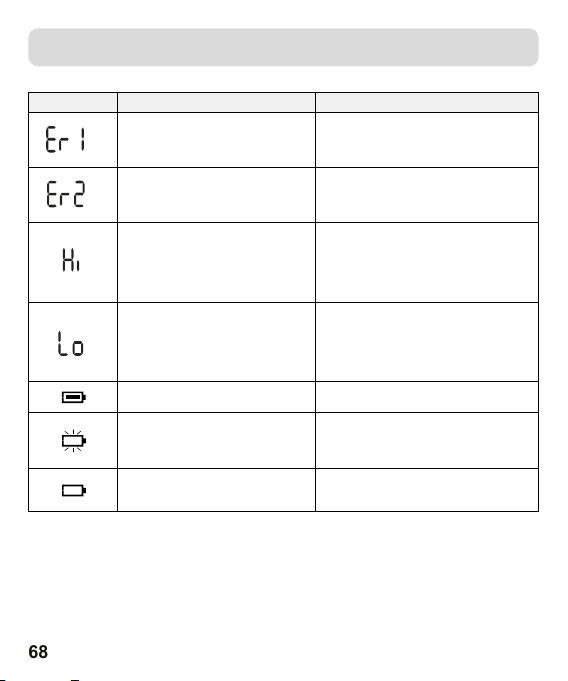
68
PROBLEME KLÄREN
Tro ub le sh oo ti ng
Prob lem
Solu tion
Erro r messa ge
Remo ve prob e cover i n
obje ct temp eratu re mode .
In obj ect tem perat ure
mode , measu remen t
with p robe co ver.
Tro ub le sh oo ti ng
Prob lem
Solu tion
Erro r messa ge
Take a me asure ment
unti l or appe ars
on the d ispla y.
Meas ureme nt befo re
ther momet er is rea dy
Tro ub le sh oo ti ng
In Ear m ode:
Tempe ratur e taken i s
high er than 4 3.0 ℃
(109 .4℉).
Prob lem
Solu tion
Erro r messa ge
Read Tem perat ure Taki ng
Hint s Thoro ughly, t hen
chec k the int egrit y of the
Remo ve prob e cover i n
obje ct temp eratu re mode .
In obj ect tem perat ure
mode , measu remen t
with p robe co ver.
Tro ub le sh oo ti ng
Prob lem
Solu tion
The am bient t emper ature
is not w ithin t he rang e
betw een 10℃ an d 40℃
(50℉
~104℉) .
Plac e the
in a room f or at leas t 30
minu tes at roo m
temp eratur e betwee n
10℃ and 40℃
ther momete r
Erro r messa ge
Take a me asure ment
unti l or appe ars
on the d ispla y.
Meas ureme nt befo re
ther momet er is rea dy
Tro ub le sh oo ti ng
In Ear m ode:
Tempe ratur e taken i s
high er than 4 3.0 ℃
(109 .4℉).
In Obj ect mod e:
Tempe ratur e taken i s
Prob lem
Solu tion
Erro r messa ge
Read Tem perat ure Taki ng
Hint s Thoro ughly, t hen
chec k the int egrit y of the
prob e cover a nd take a n ew
Remo ve prob e cover i n
obje ct temp eratu re mode .
In obj ect tem perat ure
mode , measu remen t
with p robe co ver.
Tro ub le sh oo ti ng
In Ear m ode:
Tempe ratur e taken i s
high er than 4 3.0 ℃
(109 .4℉).
In Obj ect mod e:
Tempe ratur e taken i s
high er than 1 00 ℃
(212℉) .
Prob lem
Solu tion
Read Tem perat ure
Takin g Hints t horou ghly ,
then m ake sur e the pro be
cove r and len s filte r are
clea n, then t ake a new
Erro r messa ge
Read Tem perat ure Taki ng
Hint s Thoro ughly, t hen
chec k the int egrit y of the
prob e cover a nd take a n ew
temp eratu re meas ureme nt.
Remo ve prob e cover i n
obje ct temp eratu re mode .
In obj ect tem perat ure
mode , measu remen t
with p robe co ver.
In Ear m ode:
Tempe ratur e taken i s
lowe r than 32 .0 ℃
(89. 6℉).
In Obj ect mod e:
Tempe ratur e taken i s
Tro ub le sh oo ti ng
In Ear m ode:
Tempe ratur e taken i s
high er than 4 3.0 ℃
(109 .4℉).
In Obj ect mod e:
Tempe ratur e taken i s
high er than 1 00 ℃
(212℉) .
Prob lem
Solu tion
Read Tem perat ure
Takin g Hints t horou ghly ,
then m ake sur e the pro be
cove r and len s filte r are
clea n, then t ake a new
temp eratu re meas ureme nt.
Erro r messa ge
Read Tem perat ure Taki ng
Hint s Thoro ughly, t hen
chec k the int egrit y of the
prob e cover a nd take a n ew
temp eratu re meas ureme nt.
Remo ve prob e cover i n
obje ct temp eratu re mode .
In obj ect tem perat ure
mode , measu remen t
with p robe co ver.
In Ear m ode:
Tempe ratur e taken i s
lowe r than 32 .0 ℃
(89. 6℉).
In Obj ect mod e:
Tempe ratur e taken i s
lowe r than 0 ℃
(32℉).
The th ermom eter wo rks
prop erly.
Use th e therm omete r
norm ally
Tro ub le sh oo ti ng
In Ear m ode:
Tempe ratur e taken i s
high er than 4 3.0 ℃
(109 .4℉).
In Obj ect mod e:
Tempe ratur e taken i s
high er than 1 00 ℃
(212℉) .
Prob lem
Solu tion
Read Tem perat ure
Takin g Hints t horou ghly ,
then m ake sur e the pro be
cove r and len s filte r are
clea n, then t ake a new
temp eratu re meas ureme nt.
Erro r messa ge
Read Tem perat ure Taki ng
Hint s Thoro ughly, t hen
chec k the int egrit y of the
prob e cover a nd take a n ew
temp eratu re meas ureme nt.
Remo ve prob e cover i n
obje ct temp eratu re mode .
In obj ect tem perat ure
mode , measu remen t
with p robe co ver.
In Ear m ode:
Tempe ratur e taken i s
lowe r than 32 .0 ℃
(89. 6℉).
In Obj ect mod e:
Tempe ratur e taken i s
lowe r than 0 ℃
(32℉).
When b atter y outli ne
flas hes, it i ndica tes tha t
the po wer is lo w, but you
The th ermom eter wo rks
prop erly.
Use th e therm omete r
norm ally
The th ermom eter wi ll take
a prop er meas ureme nt but
batt eries m ust be re place d
Tro ub le sh oo ti ng
In Ear m ode:
Tempe ratur e taken i s
high er than 4 3.0 ℃
(109 .4℉).
In Obj ect mod e:
Tempe ratur e taken i s
high er than 1 00 ℃
(212℉) .
Prob lem
Solu tion
Read Tem perat ure
Takin g Hints t horou ghly ,
then m ake sur e the pro be
cove r and len s filte r are
clea n, then t ake a new
temp eratu re meas ureme nt.
Erro r messa ge
Read Tem perat ure Taki ng
Hint s Thoro ughly, t hen
chec k the int egrit y of the
prob e cover a nd take a n ew
temp eratu re meas ureme nt.
Remo ve prob e cover i n
obje ct temp eratu re mode .
In obj ect tem perat ure
mode , measu remen t
with p robe co ver.
In Ear m ode:
Tempe ratur e taken i s
lowe r than 32 .0 ℃
(89. 6℉).
In Obj ect mod e:
Tempe ratur e taken i s
lowe r than 0 ℃
(32℉).
The th ermom eter co uld
not
work d ue to low
Repl ace two n ew
alka line ba tteri es
When b atter y outli ne
flas hes, it i ndica tes tha t
the po wer is lo w, but you
can co ntinu e to meas ure.
The th ermom eter wo rks
prop erly.
Use th e therm omete r
norm ally
The th ermom eter wi ll take
a prop er meas ureme nt but
batt eries m ust be re place d
soon .
Meldung Problem Problemlösung
Das Thermometer funktioniert
nicht richtig.
Die Umgebungstemperatur liegt
nicht zwischen 5°C und 40°C
(41°F~104°F).
Im Frontmodus: Die gemessene
Temperatur ist höher als 43,0 °C
(109,4 °F).
Im Objektmodus: Die gemessene
Temperatur ist höher als 100 °C
(212 °F).
Im Frontmodus: Die gemessene
Temperatur ist niedriger als 34,0
°C (93,2 °F).
Im Objektmodus: Die gemessene
Temperatur ist niedriger als 0 °C
(32 °F).
Das Thermometer funktioniert
ordnungsgemäß.
Wenn die Batterieanzeige blinkt,
bedeutet dies, dass der Batteriestand niedrig ist, Sie aber weiter
messen können.
Das Thermometer funktioniert
nicht, weil der Batteriestand niedrig
ist.
Entladen Sie die Batterie, warten Sie 1
Minute und schalten Sie es erneut ein.
Wenn die Meldung erneut erscheint,
wenden Sie sich an Ihren Händler.
Legen Sie das Thermometer für mindestens 30 Minuten bei einer Raumtemperatur zwischen 5°C und 40°C (41°F~104°F)
in einen Innenraum.
Lesen Sie die Anweisungen zur Temperaturmessung sorgfältig durch und
führen Sie dann eine neue Temperaturmessung durch.
Lesen Sie die Anweisungen zur
Temperaturmessung sorgfältig durch,
vergewissern Sie sich dann, dass der Linsenlter sauber ist, und führen Sie eine
neue Temperaturmessung durch.
Das Thermometer kann normal verwendet werden.
Das Thermometer führt eine korrekte
Messung durch, aber die Batterien
sollten bald ersetzt werden.
Ersetzen Sie die Batterien durch zwei
neue Alkalibatterien der Größe AAA.
Page 69
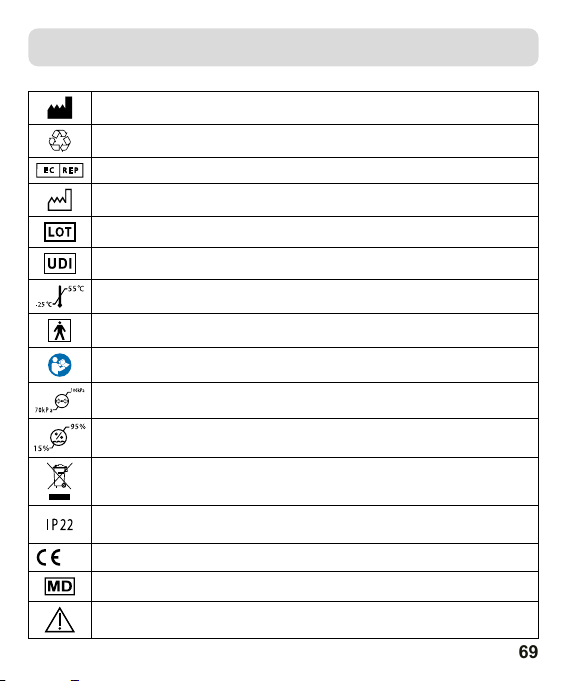
69
SYMBOL ERKLÄRUNG
Hersteller
Allgemeines Symbol für Verwertung/ Recyceln
Bevollmächtigter Vertreter in der Europäischen Gemeinschaft
Datum der Herstellung
Chargennummer
Eindeutige Kennung des Geräts
Temperaturgrenze für Lagerung und Transport:
TYP BF ANWENDUNGSTEIL
Siehe Gebrauchsanweisung/Broschüre
Begrenzung des atmosphärischen Drucks
Lagerung und Transport Feuchtigkeitsbegrenzung:
Die Entsorgung dieses Produkts und der verbrauchten Batterien sollte in Übereinstimmung mit den
nationalen Vorschriften für die Entsorgung von elektronischen Produkten erfolgen.
Die erste Zier 2: Geschützt gegen feste Fremdkörper mit einem Durchmesser von 12,5 mm und
mehr. Die zweite Zier 2: Schutz gegen senkrecht fallende Wassertropfen bei einer Neigung des
Gehäuses von bis zu 150
Das Produkt entspricht den Anforderungen der EU-Richtlinie MDR(EU) 2017/745 über Medizinprodukte.
0123
Medizinisches Gerät
Warnung
Page 70

70
INFORMATIONEN FÜR NUTZER ÜBER DEN UMGANG MIT ELEKTRO-
UND ELEKTRONIK-ALTGERÄTEN.
Wenn das Gerät, die Verpackung, das Benutzerhandbuch und dergleichen das
Symbol eines durchgestrichenen Abfallbehälters auf Rädern tragen, bedeutet dies,
dass das Gerät einer getrennten Sammlung gemäß der Richtlinie 2012/19/EU des
Europäischen Parlaments und des Rates unterliegt. Das gebrauchte Gerät darf nicht
mit dem Hausmüll entsorgt werden und sollte nicht als Haushaltsmüll behandelt
werden. Elektroschrott in einen Container zu werfen, ist eine Bedrohung für die
Umwelt. Dank der ordnungsgemäßigen Entsorgung den gebrauchten elektrischen
und elektronischen Geräte, schützen Sie den Umwelt und tragen dazu bei, die
Nutzung natürlicher Ressourcen zu verringern, sowie helfen die Produktionskosten neuer Geräte zu senken. Eine ordnungsgemäße Entsorgung und Abwrackung
trägt dazu bei, die negativen Auswirkungen von verschrotteten Produkten auf die
natürliche Umwelt und die menschliche Gesundheit zu beseitigen. Um weitere
Informationen zur Recyclingfähigkeit dieses Produkts zu erhalten, wenden Sie sich
bitte an Ihr örtliches Stadtbüro, den Stadtreinigungsdienst oder das Geschäft, in
dem Sie das Produkt gekauft haben.
Page 71
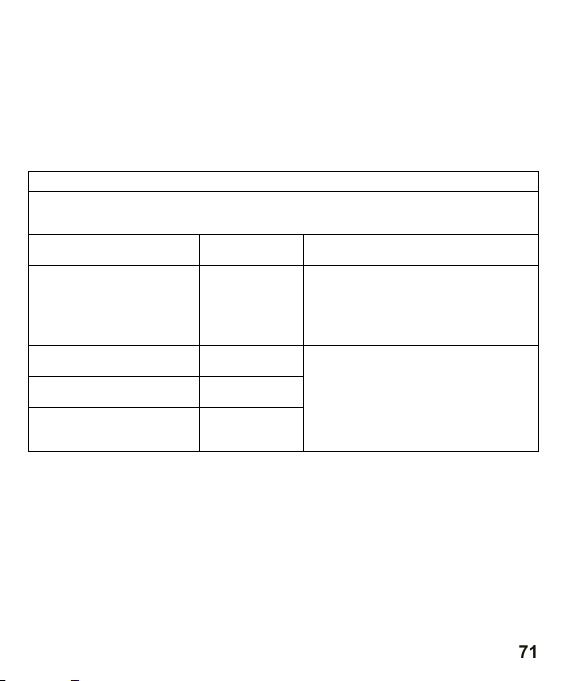
71
INFORMATIONEN ZUR ELEKTROMAGNETISCHEN VERTRÄGLICHKEIT
Das Gerät entspricht den Anforderungen der internationalen Norm IEC 60601-1-2 für elektromagnetische Verträglichkeit. Die Anforderungen werden unter den in der nachstehenden
Tabelle beschriebenen Bedingungen erfüllt. Das Gerät ist ein elektrisches Medizinprodukt und
unterliegt besonderen Vorsichtsmaßnahmen hinsichtlich der EMV, die in der Gebrauchsanweisung
veröentlicht werden müssen. Tragbare und mobile HF-Kommunikationsgeräte können das Gerät
beeinträchtigen. Die Verwendung des Geräts in Kombination mit nicht zugelassenem Zubehör
kann das Gerät beeinträchtigen und die elektromagnetische Verträglichkeit verändern. Das Gerät
sollte nicht direkt in der Nähe oder zwischen anderen elektrischen Geräten verwendet werden.
Tabelle 1
Das Gerät ist für die Verwendung in der unten angegebenen elektromagnetischen Umgebung
Leitungsgebundene Emission
Leitlinien und Herstellererklärung - Elektromagnetische Emissionen
bestimmt. Der Kunde oder Benutzer des Geräts sollte sicherstellen, dass es in einer solchen
Störaussendungstest Einhaltung Elektromagnetische Umgebung
CISPR 11
Gestrahlte Emission
CISPR 11
Akustische Emissionen
IEC 61000-3-2
Spannungsschwankung /
Flicker-Emissionen
IBC 61000-3-3
Umgebung verwendet wird.
Das Gerät verwendet HF-Energie
ausschließlich für seine internen Funk-
Nicht anwendbar
Gruppe 1
Klasse B
Nicht anwendbar
Nicht anwendbar
tionen. Daher sind die HF-Emissionen
sehr gering und sollten keine Störungen
bei elektronischen Geräten in der Nähe
verursachen.
Das Gerät verwendet HF-Energie
ausschließlich für seine internen Funktionen. Daher sind die HF-Emissionen
sehr gering und sollten keine Störungen
bei elektronischen Geräten in der Nähe
verursachen.
- Anleitung
Page 72
72
Tabelle 2
Hinweise und Erklärung des Herstellers - Elektromagnetische Störfestigkeit
Das Gerät ist für die Verwendung in der unten angegebenen elektromagnetischen Umgebung
bestimmt. Der Kunde oder Benutzer des Geräts sollte sicherstellen, dass es in einer solchen
Prüfung der Störfestigkeit IEC 60601 Prüfstufe Stufe der Konformität
Elektrostatische Entladung
(ESD)
IEC 61000-4-2
Elektrostatische Transienten/
Impulse IEC 61000-4-4
Überspannungen IEC 61000-
Spannungsschwankungen auf
Stromeingangsleitungen IEC
ANMERKUNG: UT ist die Netzspannung vor dem Anlegen des Prüfpegels.
4-5
Spannungsabfälle,
Kurzunterbrechungen und
61000-4-11
Netzfrequenz-Magnetfeld
(50/60 Hz) IEC 61000-4-8
Näherungsmagnetfelder IEC 61000-4-39 Siehe Tabelle 3
Umgebung verwendet wird.
±8 kV Kontakt
±2 kV, ±4kV, ±8 kV
Luft
±2 kV für Versorgungslei-
tungen
Wiederholrate
100 kHz ±1 kV für Eingangs-/
Ausgangsleitungen
±0,5kV, ±1kV im Lei-
tung-zu-Leitung-Dierenz-
betrieb
0% UT (100% UT-Abfall) für
0,5 Zyklen bei 0°, 45º, 90º,
135º, 180º, 225º, 270º und
315°
0% UT (100% UT-Abnahme)
70% UT (30% UT-Abnahme)
0% UT (100% UT-Abfall) für
für 1 Zyklus bei 0º
für 25/30 Zyklen bei 0º
250/300 Zyklen bei 0º
30 A/m, 50/60Hz 30 A/m, 50/60Hz
±8 kV Kontakt
±2 kV, ±4kV, ±8 kV, ±15 kV
Nicht anwendbar
Nicht zutreend
Nicht anwendbar
Luft
Page 73
73
Tabelle 3
ENCLOSURE PORT IMMUNITY Prüfvorschriften für magnetische Nahfelder
Testfrequenz Modulation IMMUNITÄTSTESTPEGEL
a)
30 kHz
134,2 kHz
13,56 MHz
a) Diese Prüfung gilt nur für MEDIZINISCHE GERÄTE UND SYSTEME, die zur Verwendung in
HÄUSLICHEN PFLEGEUMGEBUNGEN bestimmt sind.
(b) Der Träger wird mit einem Rechtecksignal mit 50 % Tastverhältnis moduliert.
(c) Eektivwert vor Anwendung der Modulation.
CW 8
b)
Impulsmodulation
2,1 kHz
Impulsmodulation
50 kHz
b)
(A/m)
65 c)
7,5
c)
Page 74
74
Tabelle 4
Hinweise und Erklärung des Herstellers - elektromagnetische Störfestigkeit
Das Gerät ist für die Verwendung in der unten angegebenen elektromagnetischen Umgebung
bestimmt. Der Kunde oder Benutzer des Geräts sollte sicherstellen, dass es in einer solchen
Prüfung der Störfestigkeit IEC 60601 Prüfstufe Stufe der Konformität
Geleitete RF
IEC 61000-4-6
RF gestrahlt
IEC 61000-4-3
ANMERKUNG 1 Bei 80 MHz und 800 MHz gilt der höhere Frequenzbereich. ANMERKUNG 2
Diese Richtlinien sind möglicherweise nicht in allen Situationen anwendbar. Die Ausbreitung
elektromagnetischer Wellen wird durch Absorption und Reexion an Strukturen, Gegenständen
und Personen beeinusst.
aDie ISM-Bänder (Industrie, Wissenschaft und Medizin) zwischen 0,15 MHz und 80 MHz sind
6,765 MHz bis 6,795 MHz, 13,553 MHz bis 13,567 MHZ, 26,957 MHz bis 27,283 MHz und 40,66
MHz bis 40,70 MHz. Amateurfunkbänder von 0,15 MHz bis 80 MHz sind 1,8 MHz bis 2,0 MHz, 3,5
MHz bis 4,0 MHz, 5,3 MHz bis 5,4 MHz, 7 MHz bis 7,3 MHz, 10,1 MHz bis 10,15 MHz, 14 MHz bis
14,2 MHz, 18,07 MHz bis 18,17 MHz, 21,0 MHz bis 1,4 MHz, 24,89 MHz bis 24,99 MHz, 28,0 MHz
bis 29,7 MHz und 50,0 MHz bis 54,0 MHZ.
b Die Konformitätsgrade in den ISM-Frequenzbändern 150 kHz bis 80 MHz und im Frequenzbereich 80 MHz bis 2,7 GHz sollen die Wahrscheinlichkeit verringern, dass mobile/tragbare Kommunikationsgeräte Störungen verursachen könnten, wenn sie versehentlich in Patientenbereiche
gebracht werden. Aus diesem Grund wurde in die Formeln zur Berechnung des empfohlenen
Abstands für Sender in diesen Frequenzbändern ein zusätzlicher Faktor von 10/3 aufgenommen.
c Feldstärken von ortsfesten Sendern, wie z. B. Basisstationen von Mobil- und Schnurlostelefonen und ortsfesten Mobilfunkgeräten, Amateurfunkstationen, AM- und FM-Radiosendern und
Fernsehsendern, können theoretisch nicht genau vorhergesagt werden. Um die elektromagnetische Umgebung durch ortsfeste HF-Sender zu beurteilen, sollte eine elektromagnetische
Untersuchung des Standorts in Betracht gezogen werden. Wenn die gemessene Feldstärke an
dem Standort, an dem das Gerät verwendet wird, den oben genannten relevanten HF-Konformitätspegel überschreitet, sollte das Gerät beobachtet werden, um den normalen Betrieb zu
überprüfen. Wird ein abnormaler Betrieb festgestellt, können zusätzliche Maßnahmen wie eine
Änderung der Ausrichtung oder des Standorts des Geräts erforderlich sein.
d Im Frequenzbereich von 150 kHz bis 80 MHz sollte die Feldstärke weniger als 3 V/m betragen.
Umgebung verwendet wird.
3 Vrms
150 kHz bis zu 80 MHz
6 Vrms 150 kHz bis 80 MHz
außerhalb der ISM-Bänder
10 V/m
80 MHz bis 2,7 GHz
Nicht anwendbar
10 V/m
Page 75
75
Tabelle 5
Empfohlene Abstände zwischen drahtlosen HF-Kommunikationsgeräten
Das Gerät ist für den Einsatz in einer elektromagnetischen Umgebung vorgesehen, in der
HF-Interferenzen kontrolliert werden. Der Kunde oder Benutzer des Geräts kann dazu beitragen,
elektromagnetische Störungen zu vermeiden, indem er einen Mindestabstand zwischen den
drahtlosen HF-Kommunikationsgeräten und dem Gerät gemäß den folgenden Empfehlungen
einhält, abhängig von der maximalen Ausgangsleistung der Kommunikationsgeräte.
Frequenz MHz Maximale
385 1.8 0.3 27 27
450 2 0.3 28 28
710
780
810
930
1720
1970
2450 2 0.3 28 28
5240
5785
Anmerkung 1: Diese Richtlinien sind nicht in allen Situationen anwendbar. Die Ausbreitung
elektromagnetischer Wellen wird durch Absorption und Reexion an Strukturen, Gegenständen
und Personen beeinusst.
Leistung
W
0.2 0.3 9 9745
2 0.3 28 28870
2 0.3 28 281845
0.2 0.3 9 95500
Abstand Teststufe IEC
60601
Konformitätsstufe
Page 76
Manufactured in China for:
Wyprodukowano wChinach dla:
Hergestellt in China für:
Global Income sp. zo.o.
ul. Chwaszczyńska 135B
81-571 Gdynia, Poland
www.berdsen.pl
JOY TECH Healthcare Co., Ltd.
No.365, Wuzhou Road,311100 Hangzhou, Zhejiang Province,
PEOPLE'S REPUBLIC OF CHINA
The product is in compliance with the requirements
of MDR(EU) 2017/745, "0123" is the identication number
of notify body
0123
EC REP
European Authorized Representative:
EC REP Shanghai International Holding Corp. GmbH (Europe)
Eiestrasse 80, 20537 Hamburg, Germany
Document No.: JDET-1704-008
Article No.: 003
Version: Z
Date of Issue: 2024-02
 Loading...