

Page 1
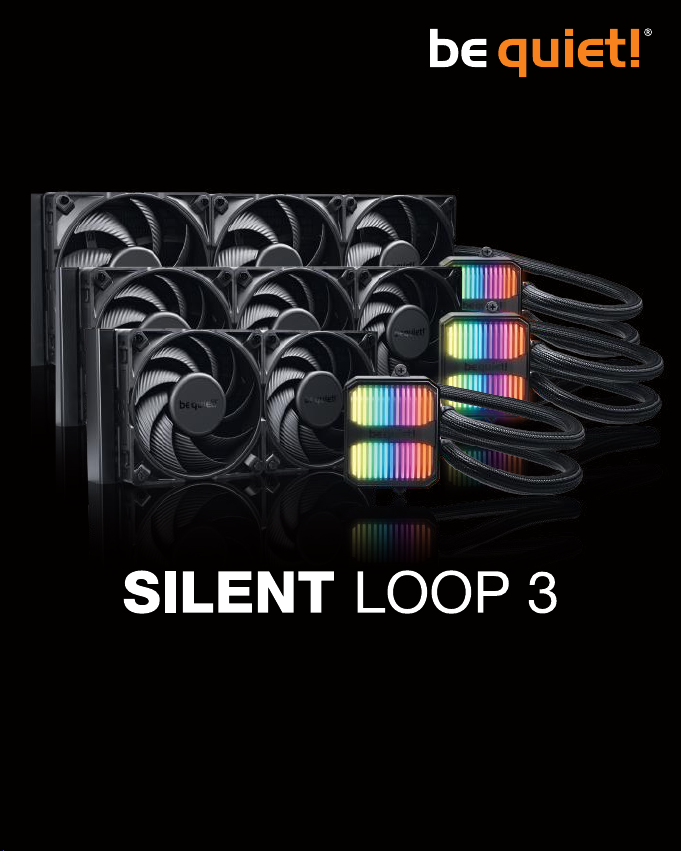
420mm
360mm
240mm
Page 2

EN
Introduction: Thank you for deciding to purchase a
be quiet! product. The following instructions will guide
you through the installation process. If you do encounter
installation problems, please don't hesitate to contact our
customer services by mailing [email protected]. Please
note that be quiet! cannot accept liability for damage caused
by compatibility problems.
DE
Einleitung: Vielen Dank, dass du dich für ein be quiet!
Produkt entschieden hast. Diese Anleitung wird dir beim
Installationsprozess helfen. Kontaktiere bitte unseren Kundenservice unter [email protected], sollten bei der Installation
Schwierigkeiten auftreten. be quiet! kann keinerlei Haftung
für durch Kompatibilitätsprobleme bedingte Schäden
übernehmen.
FR
Introduction : Nous vous remercions d’avoir choisi
un produit de qualité be quiet!. Cette notice est conçue
pour vous aider à installer votre matériel. Si vous
rencontrez des difficultés au cours de cette installation,
n’hésitez pas à nous contacter à [email protected].
Nous attirons votre attention : be quiet! ne peut assumer
la responsabilité des dommages résultants de problèmes
d’incompatibilité.
PL
Wprowadzenie: Dziękujemy za wybór produktu be quiet!.
Instrukcja przeprowadzi Cię przez proces montażu. Jeśli
napotkasz jakieś problemy w trakcie instalacji, skontaktuj
się z naszym serwisem poprzez wiadomość e-mail na
adres: [email protected]. Pamiętaj jednak, że be quiet! nie
ponosi odpowiedzialności za uszkodzenia spowodowane
problemami z kompatybilnością.
UA
Вступ: Дякуємо за вибір на користь be quiet! Інструкція
допоможе вам у процесі встановлення. Якщо виникнуть
труднощі під час встановлення, будь ласка, зв’яжіться з
нашою службою підтримки за допомогою електронної
пошти ([email protected]).Зверніть увагу: be
quiet! не несе відповідальності за пошкодження, що
виникли через проблеми сумісності.
CNTr.
簡介: 感謝您選擇購買 be quiet! 產品。 以下說明將引導您完
成 安裝程序。 如果您遇到安裝問題,請立即與我們的客戶服
務聯 繫,電子郵件地址為[email protected]。請注意,若
因相容 性問題造成損壞,be quiet! 不負任何責任。
2
ES
Introducción : Gracias por comprar un producto be quiet!
Las siguientes instrucciones le guiarán a través del proceso
de instalación. Si encuentra algún problema durante la
instalación, póngase en contacto con nuestro servicio de
atención al cliente mediante correo electrónico en service@
bequiet.com. Tenga en cuenta que be quiet! no puede
aceptar la responsabilidad por los daños causados por
problemas de compatibilidad.
RU
Введение: Спасибо за выбор в пользу be quiet!
Инструкция поможет вам в процессе установки. Если
возникнут трудности при установке, пожалуйста
свяжитесь с нашей службой поддержки с помощью
электронной почты ([email protected]). Обратите
внимание: be quiet! не несет ответственности за
повреждения, возникшие из-за проблем совместимости.
JP
はじめに: be quiet!製品をご購入いただき,ありがとうござ
います。 以下の手順で,インストールプロセスを段階的に説明
します。 インストール上の問題が発生した場合は,service@
bequiet.com 宛にお気軽にお問い合わせください。互換性の
問題によって引き起こされる損害については,be quiet! は,責
任を負うことができないことにご注 意ください。.
CNSi.
前言: 感谢您决定购买 be quiet!产品。 以下说明将指导您完
成 安装过程。 如果您在安装过程中遇到问题,请发送电子邮
件到[email protected] 以联系我们的客户服务部门。请
注意:be quiet! 不会负责兼容性问题造成的损失。
Page 3

420mm
360mm
www.bequiet.com/BW026
www.bequiet.com/BW025
240mm
www.bequiet.com/BW024
Product information for this CPU cooler
Produktinformationen zu diesem CPU-Kühler
Informations produit pour ce système de refroidissement
Información del producto para este refrigerador de CPU
Informacje produktowe dla tego coolera CPU
Подробнаяинформацияоданномкулередляпроцессора
Детальнаінформаціяпроцейкулер
NL
Engelstalige productinformatie voor deze processorkoeler
SE
Produktinformation för den här processorkylaren, på engelska
製品情報CPUクーラー
此CPU散熱器的產品資訊
此CPU散热器的产品信息
V4/25
3
Page 4
Warranty:
• 3-year manufacturer guarantee for consumers (original
purchase from authorized be quiet! dealers only)
• Guarantee work can only be processed with a copy in
cluded of the purchase receipt from an authorized be
quiet! dealer
• Manipulation and structural changes of any kind, includ
ing any damage caused by external mechanical force,
will lead to a complete voiding of the guarantee
• Our General Warranty Conditions apply, which can be
viewed on bequiet.com
Listan GmbH · Wilhelm-Bergner-Straße 11c · 21509 Glinde ·
Germany. For further information contact us via e-mail:
[email protected]
UK Authorised Representative (for authorities only) ·
ProductIP (UK) Ltd.8, Northumberland Av. London WC2N 5BY
We recommend preparatory mounting of the cooler outside the PC
!
case for subsequent installation. The cooler should be removed
prior to transportation as well.
Garantie:
• 3 Jahre Herstellergarantie für Endkonsumenten (nur
Ersterwerb vom autorisierten be quiet! Händler), ab Da
-
tum des Kaufbelegs
• Eine Garantieabwicklung ist nur in Verbinung mit einer
beigefügten Kopie des Kaufbeleges eines autorisier
-
ten be quiet! Händlers möglich
• Manipulationen und bauliche Veränderungen jeglicher
Art, sowie Beschädigungen durch äußere mecha
nische Einwirkungen führen zum totalen Garantieverlust
• Es gelten unsere Allgemeinen Garantiebestimmungen, die
du unter www.bequiet.com im Internet abrufen kannst.
Listan GmbH · Wilhelm-Bergner-Straße 11c · 21509 Glinde ·
Deutschland. Für weitere Unterstützung erreichst du uns
via E-Mail: [email protected]
Für die Montage des Kühlers empfehlen wir die Installation
!
außerhalb des Gehäuses. Für einen Transport sollte der Kühler
ausgebaut werden.
-
-
-
Garantie :
• 3 ans de garantie constructeur pour le client final
(uniquement pour un premier achat auprès d’un dis
tributeur be quiet! agréé)
• La prise en charge de la garantie est assujettie à la
fourniture d’une copie de la preuve d’achat auprès
d’un distributeur be quiet! agréé
• Les manipulations et modifications de construction
de tous types ainsi que les dommages causés par
des actions mécaniques extérieures entraînent la
perte totale de la garantie
• Les conditions détaillées de garantie peuvent être
consultées sur le site web bequiet.com
Listan GmbH · Wilhelm-Bergner-Straße 11c · 21509 Glinde ·
Allemagne. Pour toute question sur nos produits, veuillez
nous contacter par mail a l’adresse suivante :
[email protected]
Nous recommandons le montage préparatoire du radiateur à
!
l’extérieur du boîtier PC pour une installation ultérieure. Nous
préconisons aussi d’enlever le radiateur avant le transport.
4
Garantía :
• 3 años de garantía del fabricante para el consumidor
final a partir de la fecha de compra (sólo para com
pra original endistribuidores autorizados be quiet!)
• Sólo se podrán ejercer los derechos de la garantía
presentando una copia del comprobante de compra
expedido por un distribuidor autorizado de be quiet!
• La manipulación de cualquier tipo, las modifica
ciones estructurales de cualquier tipo y los daños
por influencias mecánicasexternas provocarán la
pérdida total de la garantía
• Los términos y condiciones íntegros de la garantía se
pueden consultar en la página web www.bequiet.com
Listan GmbH · Wilhelm-Bergner-Straße 11c · 21509 Glinde ·
Alemania. Correo electrónico del servicio de atención :
[email protected]
Recomendamos el montaje preparatorio del refrigerador fuera de la
!
caja del ordenador para la posterior instalación.
-
-
Page 5
Gwarancja:
• 3 lata gwarancji producenta dla klienta końcowego (tylko
pierwszy zakup u autoryzowanego dystrybutora be quiet!)
• Rozpatrzenie gwarancji jest możliwe jedynie na
podstawie dołaczonej kopii dowodu zakupu u auto
ryzowanego dystrybutora be quiet!
• Jakiekolwiek manipulacje i zmiany w budowie, jak
również uszkodzenia powstałe w wyniku mechanicznych działań zewnętrznych prowadzą do całkow
itej utraty gwarancji
• Obowiązujące Ogólne warunki gwarancji na nasze pro
dukty można znaleźć pod adresem www.bequiet.com
LISTAN Poland Sp. z o.o. · Astrum Business Park ·
Łopuszańska 95 · 02-457 Warsaw · Poland. Na terenie
Polski szersze wsparcie mogą Państwo uzyskać pod
adresem e-mail: [email protected]
Rekomendujemy demontaż coolera przed transportem.
!
Гарантия:
• 3 года гарантии от производителя для конечного
покупателя (от первоначальной покупки у официального дилера be quiet!)
• Гарантийный ремонт может быть выполнен
-
только при наличии копии документа о покупке
устройства у официального дилера be quiet!
• Манипуляции и структурные изменения любого
рода, а также наличие внешних механических
-
повреждений автоматически приводит к лишению
гарантии
-
• На продукт распространяются наши стандартные
условия гарантии, которые можно посмотреть в
интернете на сайте www.bequiet.com
Listan GmbH · Wilhelm-Bergner-Straße 11c · 21509 Glinde ·
Germany. Для получения дополнительной информации
вы можете связаться с нами по электронной почте:
Мы рекомендуем демонтировать кулер перед транспортировкой.
!
Гарантія:
• 3 роки гарантії від виробника для кінцевого
споживача (від первісної купівлі у офіційного
дилера be quiet!)
• Гарантійний ремонт може бути виконаний
лише за наявності копії документа про купівлю
пристрою у офіційного дилера be quiet!
• Маніпуляції та структурні зміни будь-якого роду, а
також наявність зовнішніх механічних пошкоджень
автоматично призводить до анулювання гарантії.
• На продукт поширюються наші стандартні умови
гарантії, які можна переглянути в інтернеті на
сайті www.bequiet.com
Listan GmbH · Wilhelm-Bergner-Straße 11c · 21509 Glinde ·
Germany. Для отримання додаткової інформації ви
можете зв’язатися з нами: [email protected]
[email protected]
Ми рекомендуємо демонтувати кулер перед транспортуванням.
!
5
Page 6
JP
Points de collecte sur www.quefairedemesdechets.fr
保 証:
•
消費者のための3年間メーカーの保証(be quiet! 正規代理
店 からの最初の購入の場合)
•
be quiet!正規代理店からの購入領収書のコピーが付属さ
れている場合のみ,保証が提供されます
•
あらゆる種類の改ざん,あらゆる種類の構造変更,および,
外部の機械的な力による損傷の場合,保証は完全に無効
になります
•
当社の一般的な保証条件が適用されます。これは,www.
bequiet.comで確認することができます
Listan GmbH · Wilhelm-Bergner-Straße 11c · 21509 Glinde ·
Germany.
詳しくは,メールにてお問 い合わ せください。アドレ
スは, [email protected]です。
後続の取り付けを見越してクーラーをPCケースの外に
!
取り付 けること ! をお 勧めします。
保固:
•
提供顧客 3 年原廠保固(僅限原始購買處為 be quiet! 授
權經 銷商)
•
進行保固作業前,需提供於 be quiet! 授權經銷商購買商
品的 收據影本
•
任何類型的操作或改裝,或因施加機械外力而造成的損壞,
將 使保固完全失效
•
關於適用的一般保固條件,您可瀏覽
www.bequiet.com 網 站
Listan GmbH · Wilhelm-Bergner-Straße 11c · 21509 Glinde ·
Germany.
如需進一步的資訊,請透過電子郵件與我們聯絡:
後続の取り付けを見越してクーラーをPCケースの外に
!
取り付 けること ! をお 勧めします。
保固:
•
制造商为用户提供3年保固(仅限直接从be quiet!授权经
销商处购买的产品)
•
申请保固时必须出示由be quiet!授权经销商提供的购买
收据 副本
•
禁止任何篡改和结构改变以及机械外力造成的损坏,否则
会 导致保固完全失效
•
该产品适用我们的通用保固条款,可以登录
www.bequiet.com 查询
6
Listan GmbH · Wilhelm-Bergner-Straße 11c · 21509 Glinde ·
Germany.
有关详情,可以通过以下电子邮件联系我们:
我们建议开始时在PC机箱外预装散热器,以便于后续
!
安装。
FR
Cet appareil
se recycle
À DÉPOSER
EN MAGASIN
À DÉPOSER
EN DÉCHÈTERIE
OU
Page 7

TABLE OF CONTENTS
Scope of delivery 8
Recommended Installation 10
Installation for AMD AM5 / AM4 11
Installation for AMD Threadripper 19
Installation for Intel 25
Illumination 35
Refilling the system 36
INHALTSVERZEICHNIS • TABLE DES MATIÈRES • ÍNDICE •
SPIS TREŚCI • ОГЛАВЛЕНИЕ • ЗМІСТ • 目次 • 目錄 •
目录
7
Page 8
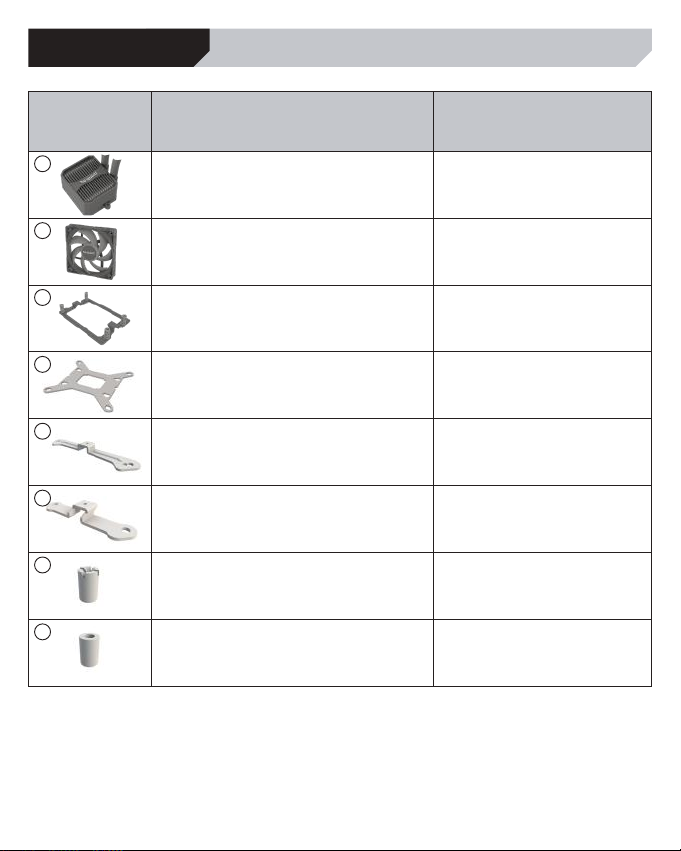
SCOPE OF DELIVERY
LIEFERUMFANG • ÉLÉMENTS FOURNIS • CONTENIDO • ZAWARTOŚĆ •
НАБОР АКСЕССУАРОВ • НАБІР АКСЕСУАРІВ •
付属品
•
內含配件
•
內含配件
1
del componente • Nazwa części • Наименование •
Найменування •
部品名
•
配件名稱
•
配件名称
be quiet! Silent Loop 3 CPU cooler
Part name • Bezeichnung • Nom de la pièce • Nombre
2
Silent Wings 4 fan
3
AMD Threadripper mounting frame
4
Intel backplate
5
Intel mounting brackets
6
Short AMD mounting brackets
7
Intel spacer nut A
8
AMD Spacer nuts
Quantity • Anzahl • Quantité • Cantidad •
Ilość • Количество • Кількість •
部品名数量
• 數量 •
数量
1
240mm: 2
420mm/360mm: 3
240mm: -
420mm/360mm: 1
1
2
2
4
4
8
Page 9
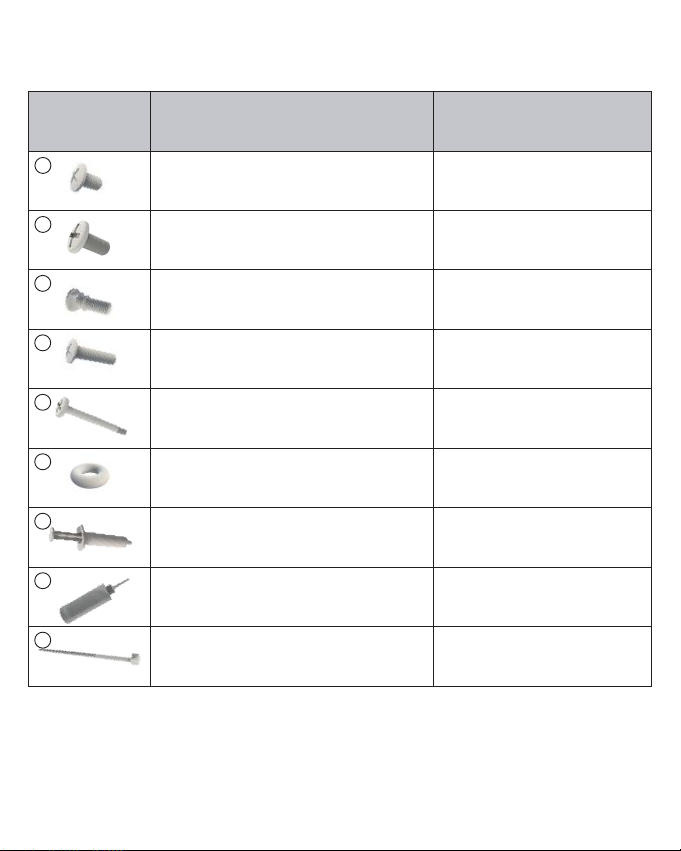
9
del componente • Nazwa części • Наименование •
Найменування •
部品名
•
配件名稱
•
配件名称
Mounting bracket fastening screws
Part name • Bezeichnung • Nom de la pièce • Nombre
Quantity • Anzahl • Quantité • Cantidad •
Ilość • Количество • Кількість •
部品名数量
• 數量 •
数量
4
10
11
12
13
14
15
16
17
Radiator mounting screws
Intel backplate screws
AMD backplate screws
Fan mounting screws
O-Rings
Thermal paste
Bottle of coolant
Small Cable Tie
240mm: 8
420mm/360mm: 12
4
4
240mm: 8
420mm/360mm: 12
4
1
1
3
9
Page 10
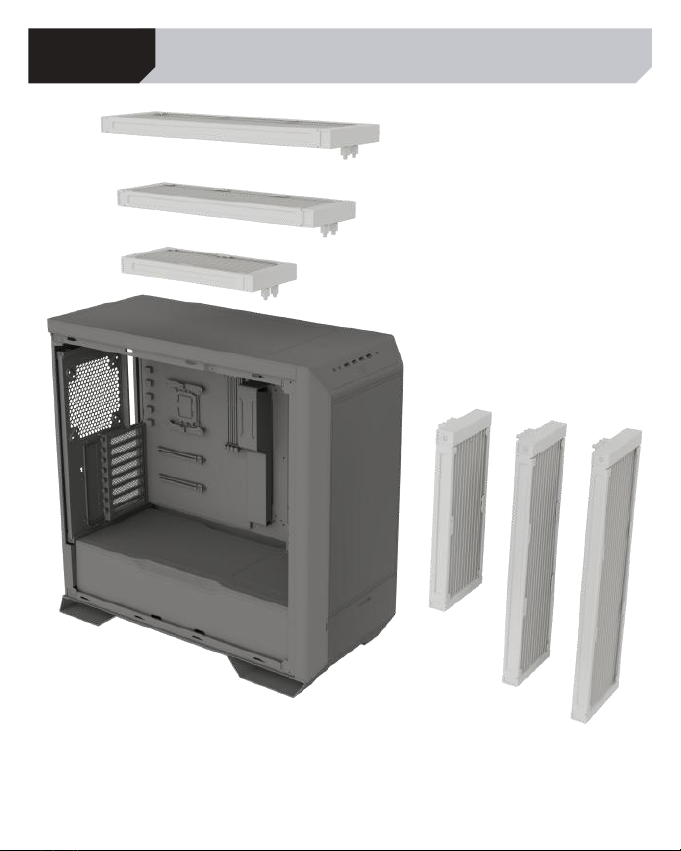
RECOMMENDED
INSTALLATION
EMPFOHLENE EINBAUPOSITION • INSTALLATION RECOMMANDÉE • INSTALACIÓN
RECOMENDADA • ZALECANA INSTALACJA • РЕКОМЕНДАЦИЯ ПО УСТАНОВКЕ •
РЕКОМЕНДАЦІЇ ЩОДО ВСТАНОВЛЕННЯ •
推奨される設置
•
建議安裝方式
•
建议安装方式
10
Page 11
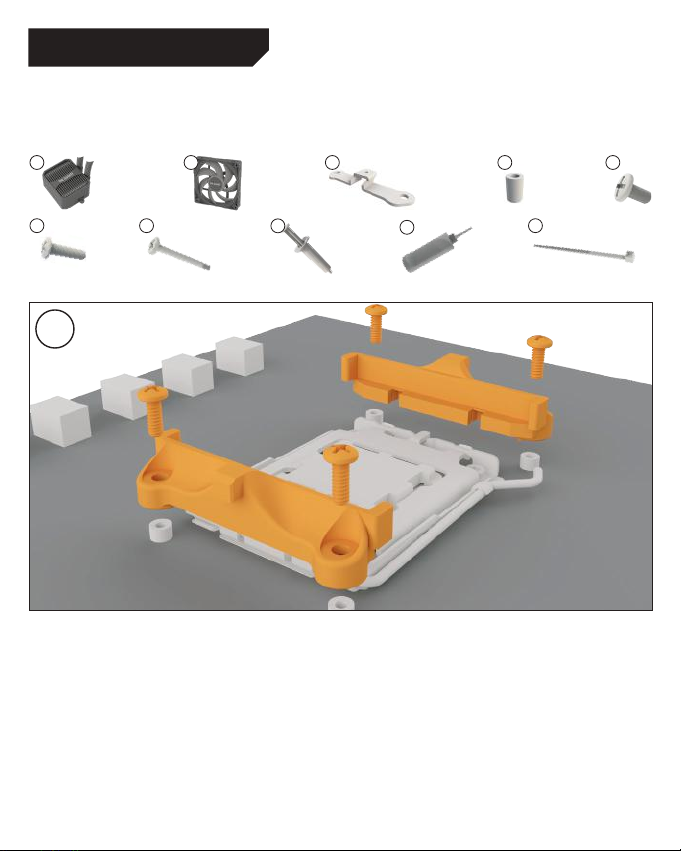
AMD: AM5 / AM4
The following parts are needed for this: • Es werden folgende Bauteile benötigt: • Les composants suivants sont
nécessaires : • Se requieren los siguientes componentes : • Wymagane są następujące elementy: • Необходимы
следующие крепежные элементы: • Необхідні наступні елементи кріплення: •
次のコンポーネントは必須です: •
需要下列零件: • 需要以下组件:
1
6 82
10
12
13
15
1
Assembly of the cooler mounting frame
Detach both plastic holders of the AMD retention module.
Assemblage du cadre de montage du ventilateur
Avant d’installer le ventilateur, veuillez retirer les deux
supports en plastique du module de rétention AMD.
Instalacja ramy montażowej coolera
Przed montażem coolera należy zdjąć oba plastikowe
uchwyty modułu retencyjnego AMD.
16
17
Aufbau des Kühlerbefestigungsrahmens
Entferne zur Kühlermontage die beiden Kunststoffhalterungen des AMD-Retentionmoduls.
Ensamblaje del bastidor de montaje del refrigerador
Antes de montar el refrigerador, retire ambos soportes de
plástico del módulo de retención AMD.
Сборка крепежной рамки кулера
Предварительно демонтируйте пластиковые фиксаторы
крепежного модуля AMD.
11
Page 12
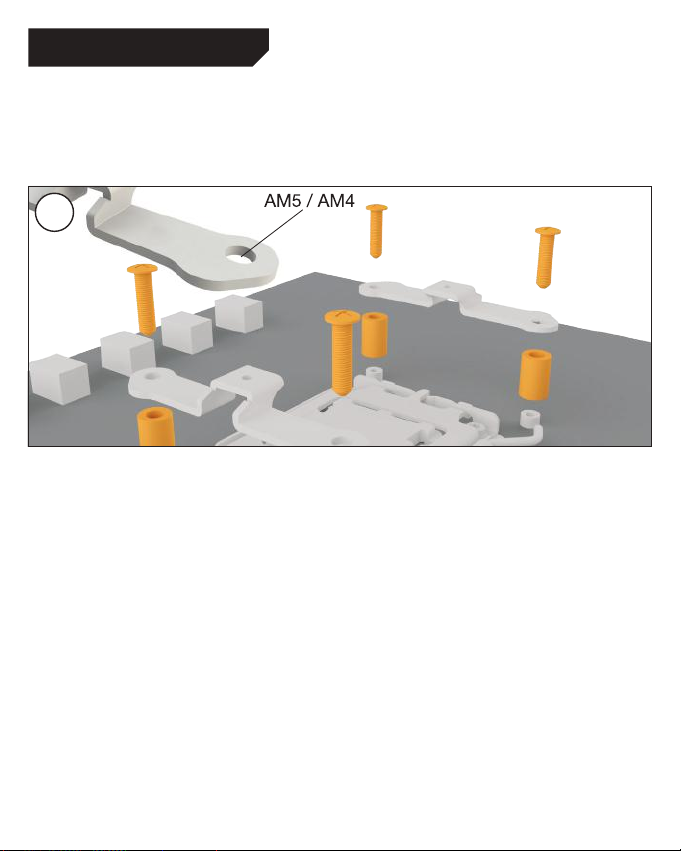
AMD: AM5 / AM4
Збірка рамки кріплення кулера
Попередньо демонтуйте пластикові фіксатори модуля
кріплення AMD.
散熱器安裝框架的組裝方法
分離AMD固定模組的兩塊塑膠支架。
2
クーラー 取り付けフレームの組立
A MD のプラスチック製リテンションブラケットを2つ取 り外し
ます。
组装散热器安装架
分离AMD固定模块的两个塑料支架。
Place the four AMD spacer nuts onto the backplate bolts
protruding through the front side and affix short AMD
mounting brackets with the AMD backplate screws.
Placez les quatre entretoises AMD sur les boulons de la
plaque arrière qui dépassent à l’avant et fixez les supports de
montage AMD courts à l’aide des vis de la plaque arrière AMD.
Umieścić cztery nakrętki dystansowe AMD na śrubach
backplate wystających z przedniej strony i przymocować
oba krótkie wsporniki montażowe AMD z pomocą śrub
backplate AMD.
Наживіть 4 проставки AMD на болти задньої панелі, що
виступають через передню частину материнської плати,
і закріпіть кронштейни AMD гвинтами задньої пластини AMD.
将四个AMD垫片螺母拧在从主板前端露出的背板螺栓上,然
后使用AMD背板螺钉固定两副AMD长安装支架。
12
Platziere über die Vorderseite die vier AMD Abstandsbolzen über
den Gewinden der Backplate und fixiere die beiden kurzen AMD
Montagebrücken mit Hilfe der AMD Backplate-Schrauben.
Coloque las cuatro tuercas espaciadoras AMD en los pernos
de la placa posterior que sobresalen a través de la parte
delantera, y fije los dos soportes de montaje AMD largos
con los tornillos de placa posterior AMD.
Наживите 4 распорные гайки AMD на выступающие
через переднюю часть материнской платы болты
задней панели и закрепите короткие кронштейны
AMD винтами задней пластины AMD.
マザーボード表面にあるバックプレートのボルトねじの上に
AMD スペーシングボルト を 4 つ置き、AMD 取り付けブリッジ
を 4 つとも AMD バックプレートねじ で固定します。
将四个AMD间距螺栓放置到正面背板的螺栓螺纹
上,然后使用AMD背板螺丝固定两个AMD安装桥 。
Page 13
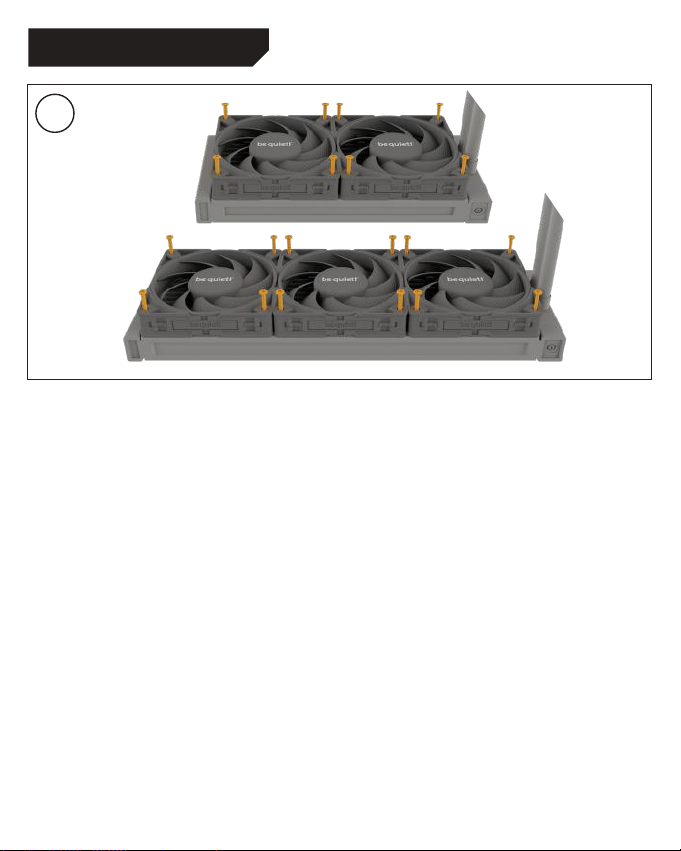
AMD: AM5 / AM4
3
Mounting the fans on the radiator
Affix the fans to the radiator. We recommend installation in
a push configuration. Next, mount the fans on the hose side.
Montage des ventilateurs sur le radiateur
Fixez les ventilateurs au radiateur. Nous recommandons
une installation en mode extraction (push). Montez les
ventilateurs sur la face côté tuyau.
Montaż wentylatorów na radiatorze
Przymocuj wentylatory do radiatora. Zalecamy instalację
w konfiguracji push. Następnie zamontuj wentylatory po
stronie węży.
Встановлення вентиляторів на радіатор
Прикріпіть вентилятори до радіатора зі сторони
шлангів. Ми рекомендуємо встановлювати їх
повітряним потоком на радіатор.
在散熱片上安裝風扇
將風扇固定到散熱器上。我們建議以送風方式進行安裝。接下
來,將風扇安裝在軟管側。
Befestigung der Lüfter am Radiator
Befestige die Lüfter am Radiator. Wir empfehlen die
Installation in einer Push Konfiguration. Montiere die Lüfter
auf der Schlauchseite.
Montaje de los ventiladores en el radiador
Fije los ventiladores al radiador. Recomendamos la instalación en una configuración de empuje. A continuación, monte
los ventiladores en el lado de la conexión de la manguera.
Монтаж вентиляторов на радиатор
Прикрепите вентиляторы к радиатору со стороны
шлангов. Мы рекомендуем устанавливать их
воздушным потоком на радиатор.
ラジエーター にファン を取り付 ける
次にファンをホース側に取り付けます。吹きつけ方向での取り
付けを推 奨します。
在散热器上安装风扇
将风扇固定到散热器上。我们建议以送风方式进行安装。接下
来,将风扇安装在软管侧。
13
Page 14
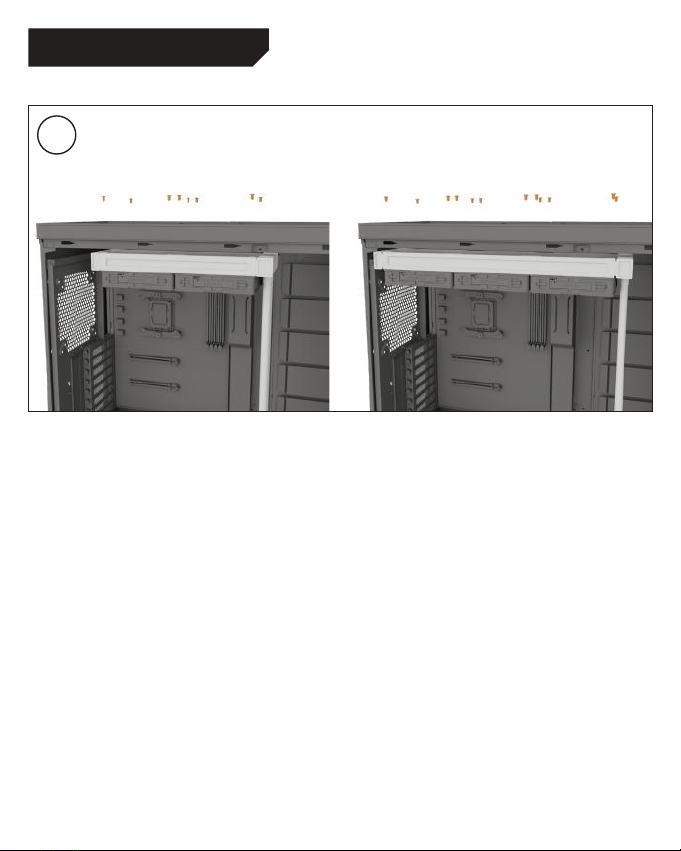
AMD: AM5 / AM4
4
Affixing the radiator to the case
Fix the radiator with the radiator mounting screws.
Fixation du radiateur au boîtier
Fixez le radiateur du Silent Loop 3 au boîtier à l’aide des vis
de fixation du radiateur.
Mocowanie radiatora do obudowy
Przymocuj radiator Silent Loop 3 za pomocą śrub mocujących
do obudowy.
Монтаж радіатора в корпусі
Закріпіть радіатор Silent Loop 3 у корпусі за допомогою
гвинтів кріплення радіатора.
將散熱片裝在機箱上
使用散熱器固定螺釘固定Silent Loop 3散熱器。
14
Befestigung des Radiators am Gehäuse
Befestige den Radiator mit den Radiator-Befestigungsschrauben.
Fijación del radiador a la caja
Fije el radiador de la caja utilizando los tornillos de fijación
del radiador.
Установка радиатора в корпусе
Закрепите радиатор Silent Loop 3 в корпусе при помощи
крепежных винтов радиатора.
ラジエーターをケースに固定する
ラジエーターをネジで固定します。
将散热器固定到机箱
使用散热器固定螺钉固定Silent Loop 3散热器。
Page 15
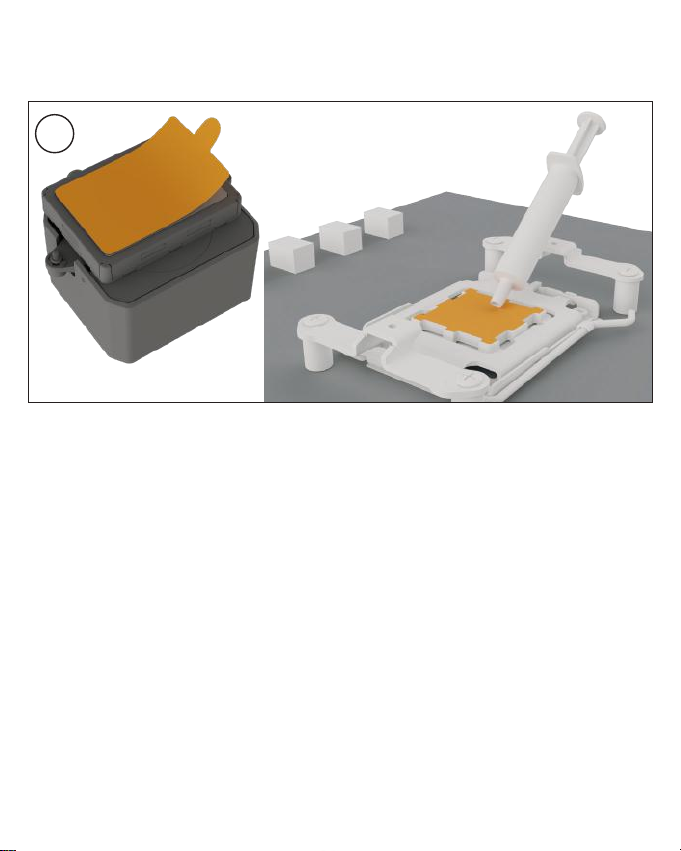
5
Mounting of the CPU block
First peel off the protective film from the underside of the
cooler. Apply thermal paste on the CPU surface.
Caution: The thermal paste supplied should not be
swallowed. If any is swallowed, drink lots of water and
urgently seek the advice of a doctor. Store it beyond the
reach of children. Avoid contact with skin and eyes.
Montage du bloc CPU
Retirez le film protecteur situé sous le refroidisseur.
Appliquez la pâte thermique sur la surface du processeur.
Attention : Ne pas ingérer la pâte thermique fournie.
En cas d’ingestion, boire beaucoup d’eau et consulter
un médecin en urgence. À conserver hors de portée
des enfants. Éviter tout contact avec la peau et les yeux.
Montage des CPU-Blocks
Entferne zunächst die Schutzfolie von der Unterseite des Kühlers. Trage die Wärmeleitpaste auf die
CPU-Oberfläche auf.
Vorsicht: Die mitgelieferte Wärmeleitpaste ist nicht
zum Verzehr geeignet. Bei Verzehr ausreichend Wasser
trinken und umgehend einen Arzt aufsuchen. Außerhalb
der Reichweite von Kindern aufbewahren. Vermeide Hautund Augenkontakt.
Montaje del bloque de CPU
Retire primero la película protectora de la parte inferior del
refrigerador. Aplique pasta térmica en la superficie de la CPU.
Precaución : No se debe ingerir la pasta térmica suministrada. Si se ingiere, es necesario beber agua
abundante y recurrir de inmediato a un médico. Almacenar fuera del alcance de los niños. Evite el contacto
con la piel y los ojos.
15
Page 16

AMD: AM5 / AM4
Montaż bloku CPU
Najpierw zdejmij folię ochronną ze spodu coolera. Nałoż
pastę termoprzewodzącą na powierzchnię procesora.
Uwaga: dostarczonej pasty termoprzewodzącej nie należy
połykać. W przypadku połknięcia należy wypić dużo wody i
niezwłocznie zasięgnąć porady lekarza. Przechowuj pastę
poza zasięgiem dzieci. Unikaj kontaktu ze skórą i oczami.
Встановлення блоку охолодження CPU
Перед встановленням блоку охолодження необхідно
зняти захисну плівку з його нижньої частини. Нанесіть
термопасту на поверхню процесора.
Увага: термопаста є небезпечною для людського
організму. Якщо ви проковтнули терпомасту, випийте
велику кількість води та терміново зверніться за
медичною допомогою. Зберігайте її у недоступному
для дітей місці. Уникайте потрапляння на шкіру та очі.
安裝 CPU 區塊
先,撕下散熱器底側的保護膜。在 CPU 表面上塗上散熱膏 。
注意: 避免吞食散熱膏。若不慎吞食,請飲用大量清水並緊急
送醫治療。請將物品存放在兒童無法取得之 處。避免接觸皮膚
和眼睛。
Монтаж блока охлаждения CPU
Перед установкой кулера необходимо снять защитное
покрытие с его нижней части. Нанесите термопасту
на поверхность процессора.
Внимание: термопаста опасна для человеческого
организма. В случае проглатывания, выпейте большое
количество воды и срочно обратитесь за медицинской
помощью. Храните ее в недоступном для детей
месте. Избегайте попадания на кожу и глаза.
CPU ブロックの取り付け
まず、クーラー の下 側から保 護フィルムを 剥がします。サ ーマル
ペースト を CPU の表面に塗ります。
注 意: 付属のサーマルペーストは口に入らないようにしてくだ
さい。飲み込んでしまった場合、多量の水を 飲み、すぐに意思の
助言を求めてください。子供の手の届かない場所に保管してく
ださい。皮 膚や眼に触 れ ないようにしてください 。
安装CPU块
首先从散热器底部剥下保护膜。将导热硅脂 涂到CPU表面。
警示: 严禁吞咽导热硅脂。如果误吞,请大量喝水,并紧急求
医。把它放在孩子够不到的地方。避免与皮肤 和眼睛接触。
16
Page 17
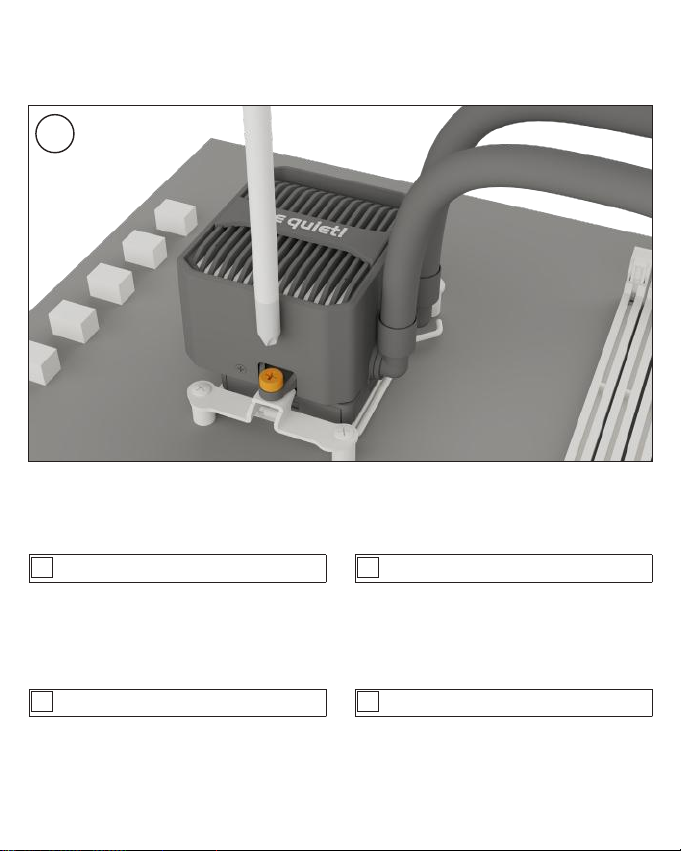
6
Place the CPU block centrally over the short AMD
mounting brackets, such that these allow the CPU block
to be screwed down. For this you can use a normal
crosshead screwdriver.
Please continue on page 35.
!
Placez le bloc processeur au centre des supports de
fixation de montage courts AMD de manière à ce que le
bloc processeur puisse être vissé à ces derniers. Pour ce faire,
vous pouvez utiliser un tournevis cruciforme classique.
Pour continuer, merci de passer à la page 35.
!
Lege den CPU-Block mittig auf die kurzen AMD Montagebrücken, sodass sich der CPU-Block mit selbigen
verschrauben lässt. Hierzu kannst du einen üblichen
Kreuzschraubendreher nutzen.
Lies bitte auf Seite 35 weiter.
!
Coloque el bloque de CPU en una posición central sobre los
soportes de montaje AMD cortos, de forma que permitan
desatornillar el bloque de CPU. Para ello, puede usar un
destornillador de estrella convencional.
Continúe en la página 35.
!
17
Page 18
AMD: AM5 / AM4
Umieść blok CPU centralnie nad krótkimi uchwytami
montażowymi AMD, tak aby umożliwić przykręcenie
bloku CPU. W tym celu możesz użyć zwykłego śrubokręta
krzyżakowego.
Kontynuuj na stronie 35.
!
Розташуйте блок охолодження процесора по центру
над монтажними кронштейнами AMD та закріпіть
його. Для цього ви можете використовувати відповідну
хрестоподібну викрутку.
Будь ласка, продовження на сторінці 35.
!
將CPU冷頭居中放置在AMD安裝支架上,以便鎖緊CPU冷頭。
為此,您可以使用普通十字螺絲起子。
請翻閱至第35頁。
!
Разместите блок охлаждения процессора по центру
над монтажными кронштейнами AMD и закрепите его.
Для этого вы можете использовать обычную крестовую
отвертку.
Перейдите на страницу 35 данной инструкции.
!
短いAMD取り付けブラケット上の中央にCPUブロックに配置し
ます。これ により、C PUブロックをネジ留 めで きます。 これ には
標準のプラスドライバーをご利用ください。
35 ページにお進みください。
!
将CPU冷头居中放置在AMD安装支架上,以便拧紧CPU冷
头。为此,您可以使用普通十字螺丝刀。
请翻阅至第35页。
!
18
Page 19
AMD THREADRIPPER (420mm & 360mm)
The following parts are needed for this: • Es werden folgende Bauteile benötigt: • Les composants suivants sont
nécessaires : • Se requieren los siguientes componentes : • Wymagane są następujące elementy: • Необходимы
следующие крепежные элементы: • Необхідні наступні елементи кріплення: •
次のコンポーネントは必須です: •
需要下列零件: • 需要以下组件:
1
3 10
13
15
1
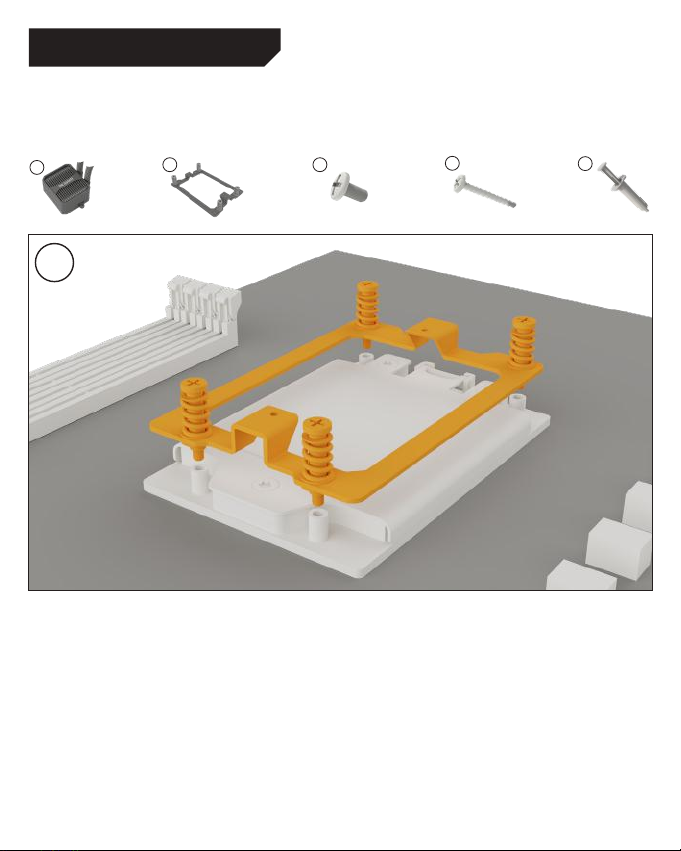
Position the AMD Threadripper mounting frame over
the socket. Lightly tighten all screws.
Positionnez le cadre de montage AMD Threadripper sur
le socket. Serrez légèrement les vis.
Positioniere den AMD Threadripper Montagerahmen
über den Sockel. Ziehe alle Schrauben leicht an.
Coloca el marco de montaje de AMD Threadripper sobre el
zócalo. Ajusta ligeramente todos los tornillos.
19
Page 20
AMD THREADRIPPER (420mm & 360mm)
Umieść ramę montażową AMD Threadripper nad
gniazdem. Lekko dokręć wszystkie śruby.
Закріпіть монтажну рамку AMD Threadripper на сокеті,
затягнувши усі гвинти без надмірних зусиль.
將AMD Threadripper安裝框架放置在插座上,輕輕擰緊
所有螺絲。
2
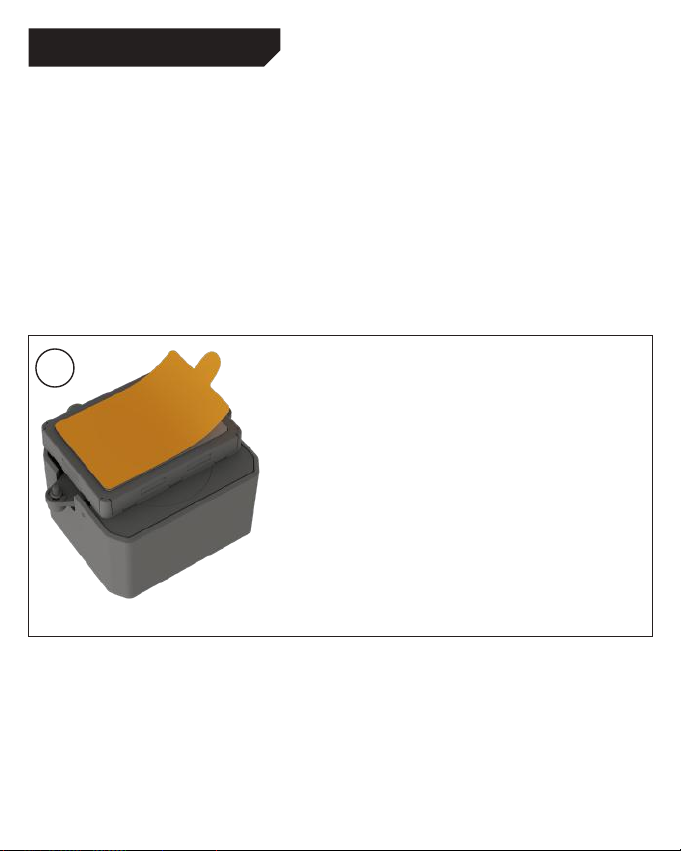
First peel off the protective film from the underside of
the cooler. Apply thermal paste on the CPU surface.
Caution: The thermal paste supplied should not be
swallowed. If any is swallowed, drink lots of water and
urgently seek the advice of a doctor. Store it beyond
the reach of children. Avoid contact with skin and eyes.
20
Закрепите монтажную рамку AMD Threadripper на
сокете, затянув все винты без чрезмерных усилий.
AMD Threadripper マウントフレームをソケットの上に配置す
る。すべてのネジを軽く締める。
将AMD Threadripper安装框架放置在插座上,轻轻拧紧
所有螺钉。
Entferne zunächst die Schutzfolie von der Unterseite
des Kühlers.Trage die Wärmeleitpaste auf die
CPU-Oberfläche auf.
Vorsicht: Die mitgelieferte Wärmeleitpaste ist nicht
zum Verzehr geeignet. Bei Verzehr ausreichend Wasser
trinken und umgehend einen Arzt aufsuchen. Außerhalb der Reichweite von Kindern aufbewahren. Vermeide
Haut und Augenkontakt.
Page 21

Retirez le film protecteur situé sous le refroidisseur.
Appliquez la pâte thermique sur la surface du processeur.
Attention : Ne pas ingérer la pâte thermique fournie.
En cas d’ingestion, boire beaucoup d’eau et consulter
un médecin en urgence. À conserver hors de portée
des enfants. Éviter tout contact avec la peau et les yeux.
Najpierw zdejmij folię ochronną ze spodu coolera. Nałoż
pastę termoprzewodzącą na powierzchnię procesora.
Uwaga: dostarczonej pasty termoprzewodzącej nie należy
połykać. W przypadku połknięcia należy wypić dużo wody i
niezwłocznie zasięgnąć porady lekarza. Przechowuj pastę
poza zasięgiem dzieci. Unikaj kontaktu ze skórą i oczami.
Перед встановленням блоку охолодження необхідно
зняти захисну плівку з його нижньої частини. Нанесіть
термопасту на поверхню процесора.
Увага: термопаста є небезпечною для людського
організму. Якщо ви проковтнули терпомасту, випийте
велику кількість води та терміново зверніться за
медичною допомогою. Зберігайте її у недоступному
для дітей місці. Уникайте потрапляння на шкіру та очі.
先,撕下散熱器底側的保護膜。在 CPU 表面上塗上散熱膏 。
注意: 避免吞食散熱膏。若不慎吞食,請飲用大量清水並緊急
送醫治療。請將物品存放在兒童無法取得之 處。避免接觸皮膚
和眼睛。
Retire primero la película protectora de la parte inferior del
refrigerador. Aplique pasta térmica en la superficie de la CPU.
Precaución : No se debe ingerir la pasta térmica suministrada. Si se ingiere, es necesario beber agua abundante
y recurrir de inmediato a un médico. Almacenar fuera
del alcance de los niños. Evite el contacto con la piel
y los ojos.
Перед установкой кулера необходимо снять защитное
покрытие с его нижней части. Нанесите термопасту
на поверхность процессора.
Внимание: термопаста опасна для человеческого
организма. В случае проглатывания, выпейте большое
количество воды и срочно обратитесь за медицинской
помощью. Храните ее в недоступном для детей
месте. Избегайте попадания на кожу и глаза.
まず、クーラー の下 側から保 護フィルムを 剥がします。サ ーマル
ペースト を CPU の表面に塗ります。
注 意: 付属のサーマルペーストは口に入らないようにしてくだ
さい。飲み込んでしまった場合、多量の水を 飲み、すぐに意思の
助言を求めてください。子供の手の届かない場所に保管してく
ださい。皮 膚や眼に触 れ ないようにしてください 。
首先从散热器底部剥下保护膜。将导热硅脂 涂到CPU表面。
警示: 严禁吞咽导热硅脂。如果误吞,请大量喝水,并紧急求
医。把它放在孩子够不到的地方。避免与皮肤 和眼睛接触。
21
Page 22

AMD THREADRIPPER (420mm & 360mm)
3
Place the CPU block of Silent Loop 3 onto the CPU unit.
Then screw the screws alternately tight. You can use a
crosstip screwdriver for this.
Placez le bloc CPU du Silent Loop 3 sur le processeur.
Ensuite, serrez les deux vis en alternance. Vous pouvez
utiliser un tournevis cruciforme.
Umieść blok CPU Silent Loop 3 na jednostce CPU.
Następnie dokręć śruby naprzemiennie. Możesz użyć
do tego śrubokręta krzyżakowego.
Розташуйте блок охолодження Silent Loop 3 над
процесором та по черзі затягніть гвинти. Для цього
ви можете використовувати відповідну хрестоподібну
викрутку.
將 Silent Loop 3 的 CPU 冷頭放置在CPU上,然後交替
擰緊螺絲。為此,您可以使用普通十字螺絲起子。
22
Platziere den CPU-Block der Silent Loop 3 auf der CPU.
Drehe anschließend beide Schrauben abwechseln fest. Hierzu kannst du einen üblichen Kreuzschraubendreher nutzen.
Coloca el bloque de CPU del Silent Loop 3 sobre la unidad
de CPU. Luego, atornilla los tornillos de manera alternada.
Puedes usar un destornillador de cruz para esto.
Разместите блок охлаждения Silent Loop 3 над
процессором и поочередно затяните винты. Для
этого вы можете использовать соответствующую
крестообразную отвертку.
サイレントループ3のCPUブロックをCPUユニットに配置する。
その後、交互にネジを締める。
この作業には、マイナスドライバーを使用する。
将 Silent Loop 3 的 CPU 冷头放置在CPU上,然后交替
拧紧螺钉。为此,您可以使用普通十字螺丝刀。
Page 23
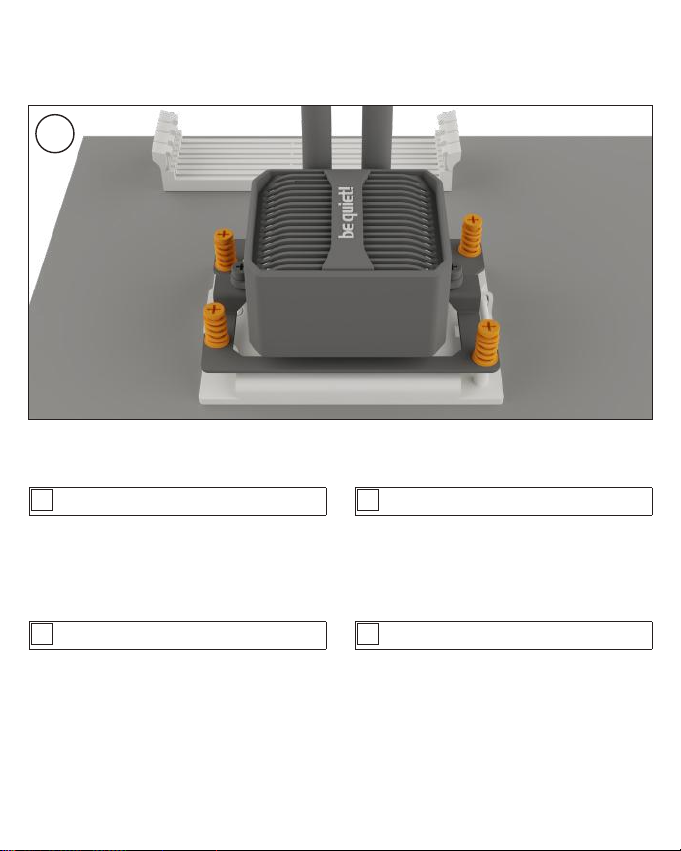
4
Then tighten the screws on the AMD Threadripper
mounting frame completely.
Please continue on page 35.
!
Serrez ensuite complètement les vis sur le cadre de
montage AMD Threadripper.
Pour continuer, merci de passer à la page 35.
!
Drehe anschließend die Schrauben des AMD Threadripper
Montagerahmens vollständig fest.
Lies bitte auf Seite 35 weiter.
!
Luego, aprieta completamente los tornillos en el marco de
montaje del AMD Threadripper.
Continúe en la página 35.
!
23
Page 24
AMD THREADRIPPER (420mm & 360mm)
Następnie dokręć śruby na ramce montażowej AMD
Threadripper całkowicie.
Kontynuuj na stronie 35.
!
Потім затягніть гвинти кронштейну AMD Threadripper
повністю.
Будь ласка, продовження на сторінці 35.
!
然後完全擰緊 AMD Threadripper 安裝框架上的螺絲。
請翻閱至第35頁。
!
Затем затяните полностью винты кронштейна AMD
Threadripper.
Перейдите на страницу 35 данной инструкции.
!
次に、AMD Threadripperの取り付けフレームのネジを完全に
締める。
35 ページにお進みください。
!
然后完全拧紧AMD Threadripper安装框架上的螺钉。
请翻阅至第35页。
!
24
Page 25
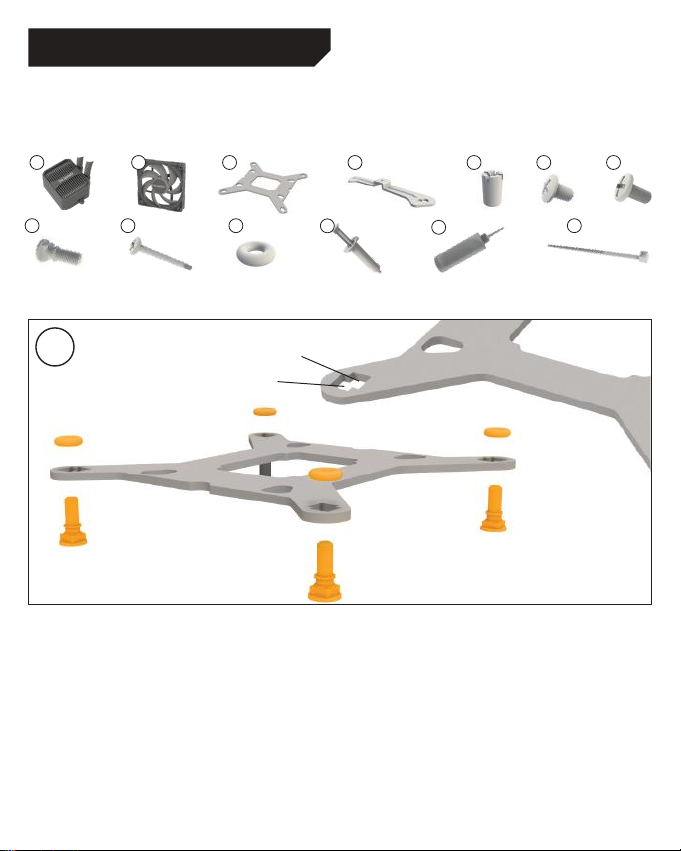
Intel LGA 1851 / 1700 / 1200 / 1150 / 1151 / 1155
The following parts are needed for this: • Es werden folgende Bauteile benötigt: • Les composants suivants sont
nécessaires : • Se requieren los siguientes componentes : • Wymagane są następujące elementy: • Необходимы
следующие крепежные элементы: • Необхідні наступні елементи кріплення: •
次のコンポーネントは必須です: •
需要下列零件: • 需要以下组件:
1
52 3
7
109
11
1
13
1200, 1150, 1151, 1155
14
1851, 1700
Affixing the backplate
Position the Intel backplate screws in the notches situated
on the rear side of the Intel backplate. Pay attention
doing so to align with the holes drilled for each socket.
For fixing the backplate screws onto the Intel backplate
use the O-rings. Once assembly of the Intel backplate for
the respective Intel socket has been completed, position
it under the motherboard. In so doing make sure that the
Intel backplate screws are precisely located within the
motherboard holes.
15
16
17
Befestigung der Backplate
Platziere die Intel Backplate Schrauben in die auf
der Rückseite der Intel Backplate befindlichen
Aussparungen. Beachte hierzu die Bohrlöcher für
den jeweiligen Sockel. Verwende zur Befestigung der
Backplate- Schrauben auf der Intel Backplate die
O-Ringe. Sobald die Intel Backplate für den jeweiligen
Intel-Sockel zusammengebaut ist, positioniere
es unter dem Mainboard. Achte dabei darauf,
dass die Intel Backplate-Schrauben genau in den
Mainboardlöchern positioniert sind.
25
Page 26
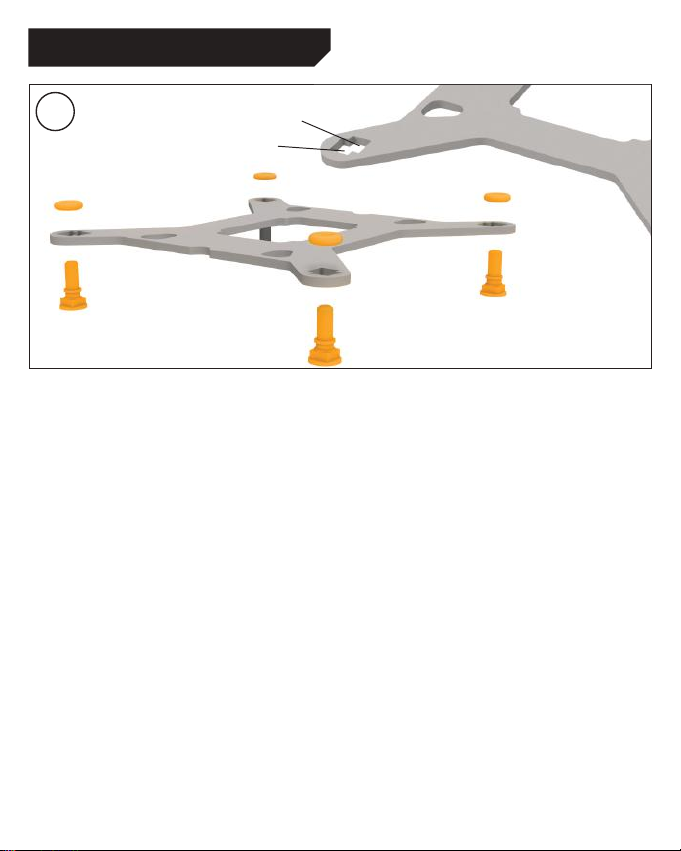
Intel LGA 1851 / 1700 / 1200 / 1150 / 1151 / 1155
1
1200, 1150, 1151, 1155
1851, 1700
Fixation de la plaque arrière
Placez les vis de la plaque arrière Intel dans les
encoches situées à l’arrière de celle-ci. Repérez les trous
destinés au connecteur du processeur existant. Utilisez
les joints toriques pour fixer les vis sur la plaque arrière
Intel. Une fois que la plaque arrière Intel est assemblée
pour le connecteur Intel existant, positionnez-la en
dessous de la carte mère. Assurez-vous que les vis de
la plaque arrière Intel coïncident exactement avec les
trous de la carte mère.
Mocowanie backplate
Umieść śruby Intel backplate w wycięciach z tyłu Intel
backplate. Wybierz wywiercone otwory do właściwego
socketu procesora. Z pomocą o-ringów przykręć śruby
backplate do Intel backplate. Po zamontowaniu backplate
Intel dla właściwego gniazda Intel umieść go pod płytą
główną. Upewnij się, że śruby backplate Intel dokładnie
odpowiadają pozycjom otworów w płycie głównej.
Fijación de la placa trasera
Coloca los tornillos de la placa trasera de Intel en las
muescas situadas en la parte posterior de la placa trasera
de Intel. Presta atención al hacerlo para alinearlos con los
agujeros perforados para cada zócalo. Para fijar los tornillos
de la placa trasera a la placa trasera de Intel, usa los
anillos O. Una vez que se haya completado el ensamblaje
de la placa trasera de Intel para el zócalo correspondiente,
colócala debajo de la placa base. Asegúrate de que los
tornillos de la placa trasera de Intel estén correctamente
ubicados dentro de los agujeros de la placa base.
Монтаж задней пластины
Зафиксируйте винты задней пластины Intel в
соотвествующих типу процессорного сокета отверстиях
задней пластины Intel с помощью уплотнительных
колец и разместите собранную заднюю пластину
Intel под материнской платой. Убедитесь, что
винты задней пластины Intel точно соответствуют
отверстиям на материнской плате.
26
Page 27
Монтаж задньої пластини
Зафіксуйте гвинти задньої пластини Intel у відповідних
до типу процесорного сокету отворах задньої пластини
Intel за допомогою ущільнюючих кілець і розташуйте
зібрану задню пластину Intel під материнською
платою. Переконайтеся, що гвинти задньої пластини
Intel відповідають отворам на материнській платі.
固定背板
将Intel背板螺丝放入Intel背板后部的槽口中。查看实际CPU
插槽的钻孔。使用O形环将背板螺丝拧紧到 Intel背板上。为实
际Intel插槽组装Intel背板后,将其放置在主板下面。确保Intel
背板螺丝与主板孔的位置 完全匹配。
2
1851, 1700
バックプ レート の固 定
Intel バックプレート用のねじ を Intel バックプレートt の背面
にある刻み目に配置します。実際の CPU ソ ケットで、ドリルで
開けられた穴をよく見てください。O型リングを使用し、Intel
バックプ レートを バックプレ ートねじで 固定します。実 際 の
Intel ソケットで Intel バックプレートが組み立てられたら、マ
ザーボードの 下にそれを配置します。Intel バックプレートね
じ がマザ ーボードの 穴の位置 にぴったり合っていることを
確 認してくだ さい 。
固定背板
將 Intel 背板螺絲 置於 Intel 背板 後方的凹口上。依循實際
CPU 插槽的鑽孔插入。使用 O 形環 以固定背板 螺絲至 Intel
背板上。待組裝實際 Intel 插槽的 Intel 背板後,將其固定在主
機板下方。確定背板螺絲 精準固 定在主機板螺絲孔的位置。
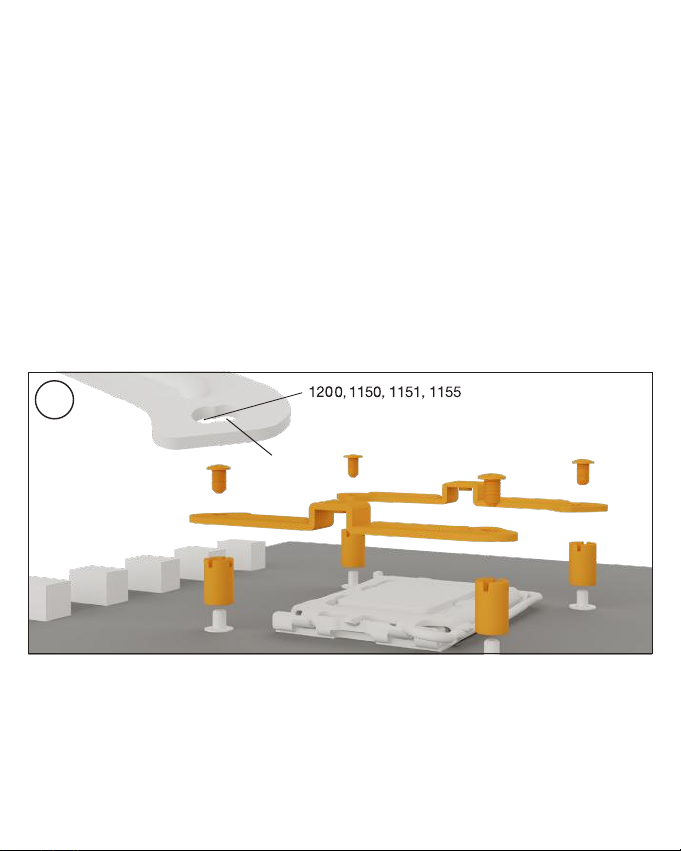
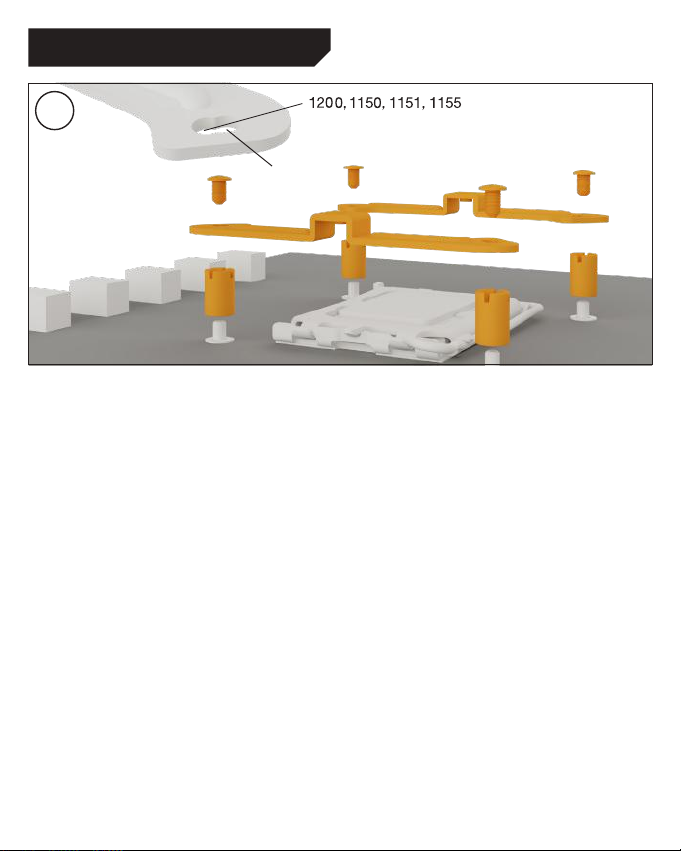
Installation of the mounting bridges
Screw the Intel spacer nut A onto the Intel backplate. Then
position the Intel mounting brackets over the Intel spacer
nut A and affix these with the mounting bracket fastening
screws. You can use any cross-tip screwdriver for this.
Installation der Montagebrücken
Schraube den Intel Gewindebolzen A auf die Intel Backplate.
Positioniere dann die Intel Montagebrücken auf den Intel
Gewindebolzen A, um sie mit den Befestigungsschrauben
für die Montagebrücke zu fixieren. Hierzu kannst du einen
üblichen Kreuzschraubendreher nutzen.
27
Page 28
Intel LGA 1851 / 1700 / 1200 / 1150 / 1151 / 1155
2
1851, 1700
Installation des ponts de montage
Vissez les entretoises sur la plaque arrière Intel placée
précédemment, puis positionnez les supports de fixation
Intel sur les entretoises afin de les fixer avec les vis de
fixation du support. Pour ce faire, vous pouvez utiliser
un tournevis cruciforme classique.
Instalacja mostków montażowych
Nakręć nakrętkę dystansową Intel A na wcześniej ustawiony
backplate Intel. Następnie umieść wsporniki montażowe
Intel nad nakrętką dystansową Intel A i przymocuj je za
pomocą śrub mocujących wspornik montażowy. Możesz
do tego użyć dowolnego śrubokręta krzyżakowego.
Збірка кронштейнів кріплення
Нагвинтіть проставки Intel на гвинти попередньо
встановленої задньої пластини Intel. Потім встановіть на
них кронштейни Intel і зафіксуйте гвинтами кріплення
кронштейнів. Використовуйте для цього відповідну
хрестоподібну викрутку.
28
Instalación de los puentes de montaje
Atornille la tuerca espaciadora Intel A en la placa posterior
Intel previamente colocada. A continuación, coloque los
soportes de montaje Intel sobre la tuerca espaciadora Intel
A y fíjelos con los tornillos de fijación de los soportes de
montaje. Para ello puede utilizar cualquier destornillador
de punta en cruz.
Сборка крепежных кронштейнов
Вкрутите проставки Intel А на установленную
заднюю пластину Intel. Затем установите на них
кронштейны Intel и закрепите их винтами крепежных
кронштейнов. Используйте для этого соответствующую
крестообразную отвертку.
マ ウン ティン グブ リッジ の 取 付 け
IntelスペーサーナットAをIntelバックプレートに固定します。
次にインテルマウンティングブラケットをインテルスペーサー
ナット A の上に配置し、マウンティングブラケット用ネジで固定
し ま す 。プ ラ ス ド ラ イ バ ー を 使 用 。
Page 29
安裝固定支架
將Intel間隔螺帽A固定在先前定位的Intel背板上。 然後將Intel
安裝支架放置在Intel間隔螺帽A上,並使用 安裝支架鎖緊螺絲
做固定。 您可以使用任何十字螺絲起子來進行固定。
3
安装固定桥
将Intel间隔螺母A拧到先前定位的Intel背板上。然后将Intel安
装支架放置在Intel间隔螺母A上,并用安装支架紧固螺钉固
定。您可以用任何十字螺丝刀进行固定。
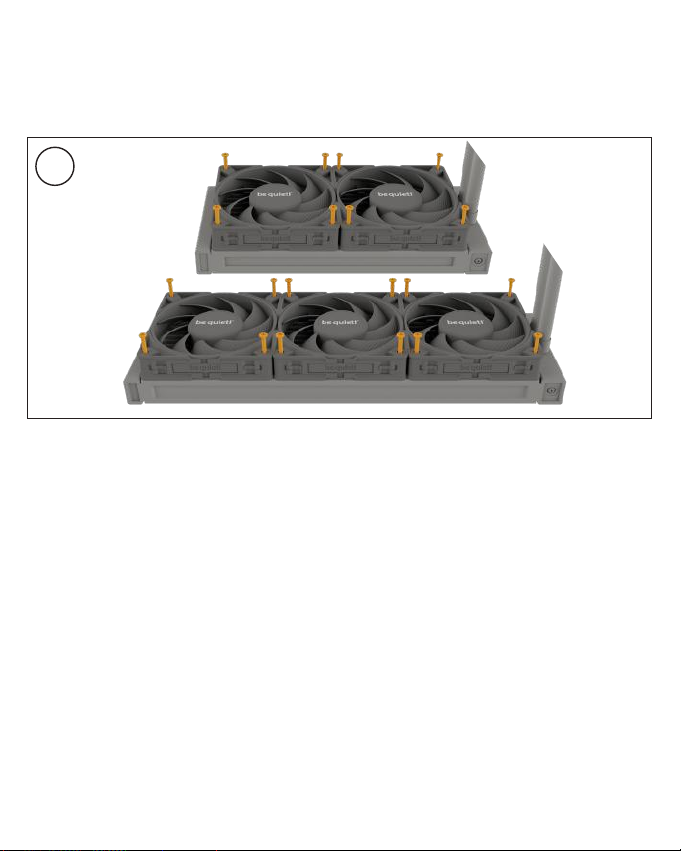
Mounting the fans on the radiator
Affix the fans to the radiator. We recommend installation in
a push configuration. Next, mount the fans on the hose side.
Montage des ventilateurs sur le radiateur
Fixez les ventilateurs au radiateur. Nous recommandons une
installation en mode extraction (push). Montez les ventilateurs
sur la face côté tuyau.
Montaż wentylatorów na radiatorze
Przymocuj wentylatory do radiatora. Zalecamy instalację
w konfiguracji push. Następnie zamontuj wentylatory po
stronie węży.
Встановлення вентиляторів на радіатор
Прикріпіть вентилятори до радіатора зі сторони
шлангів. Ми рекомендуємо встановлювати їх
повітряним потоком на радіатор.
在散熱片上安裝風扇
將風扇固定到散熱器上。我們建議以送風方式進行安裝。接下
來,將風扇安裝在軟管側。
Befestigung der Lüfter am Radiator
Befestige die Lüfter am Radiator. Wir empfehlen die
Installation in einer Push Konfiguration. Montiere die Lüfter
auf der Schlauchseite.
Montaje de los ventiladores en el radiador
Fije los ventiladores al radiador. Recomendamos la instalación
en una configuración de empuje. A continuación, monte
los ventiladores en el lado de la conexión de la manguera.
Монтаж вентиляторов на радиатор
Прикрепите вентиляторы к радиатору со стороны
шлангов. Мы рекомендуем устанавливать их воздушным потоком на радиатор.
ラジエーター にファン を取り付 ける
次にファンをホース側に取り付けます。吹きつけ方向での取り
付けを推 奨します。
在散热器上安装风扇
将风扇固定到散热器上。我们建议以送风方式进行安装。接下
来,将风扇安装在软管侧。
29
Page 30
Intel LGA 1851 / 1700 / 1200 / 1150 / 1151 / 1155
4
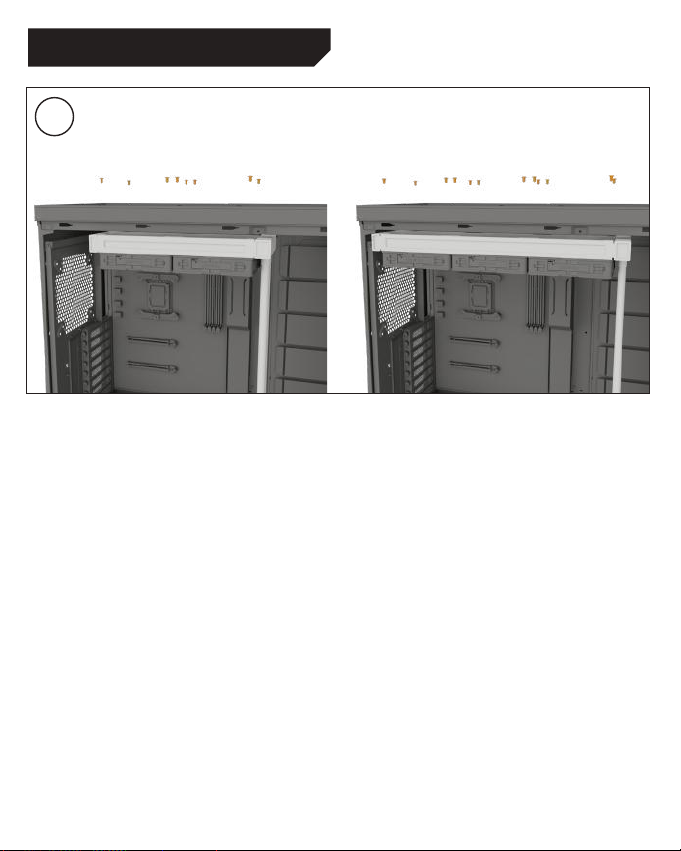
Affixing the radiator to the case
Fix the radiator with the radiator mounting screws.
Fixation du radiateur au boîtier
Fixez le radiateur du Silent Loop 3 au boîtier à l’aide des vis
de fixation du radiateur.
Mocowanie radiatora do obudowy
Przymocuj radiator Silent Loop 3 za pomocą śrub
mocujących do obudowy.
Монтаж радіатора в корпусі
Закріпіть радіатор Silent Loop 3 у корпусі за допомогою
гвинтів кріплення радіатора.
將散熱片裝在機箱上
使用散熱器固定螺釘固定Silent Loop 3散熱器。
30
Befestigung des Radiators am Gehäuse
Befestige den Radiator mit den Radiator-Befestigungsschrauben.
Fijación del radiador a la caja
Fije el radiador a la caja utilizando los tornillos de fijación
del radiador
Установка радиатора в корпусе
Закрепите радиатор Silent Loop 3 в корпусе при помощи
крепежных винтов радиатора.
ラジエーターをケースに固定する
ラジエーターをネジで固定します。
将散热器固定到机箱
使用散热器固定螺钉固定Silent Loop 3散热器。
Page 31
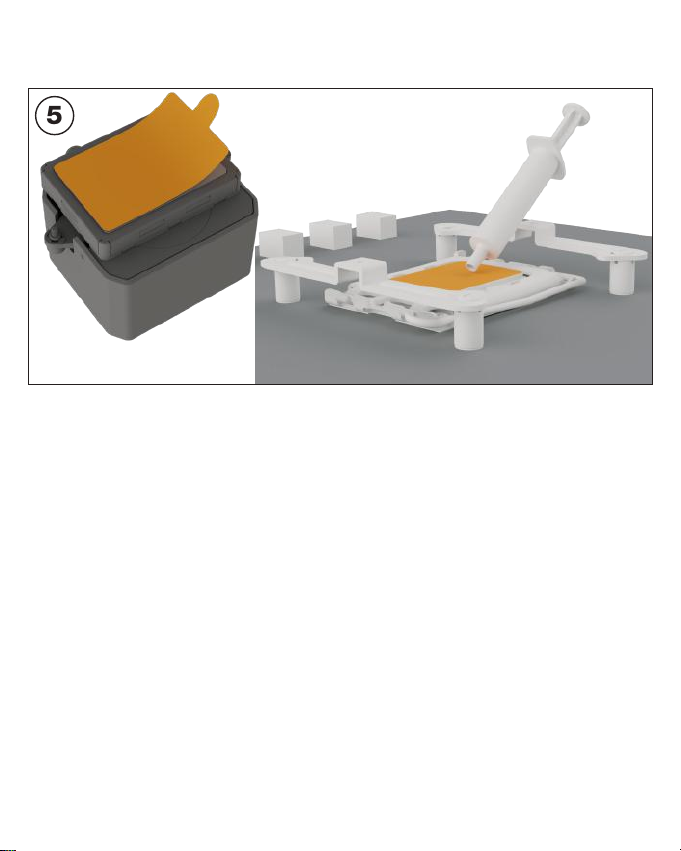
5
Mounting of the CPU block
First peel off the protective film from the underside of the
cooler. Apply thermal paste on the CPU surface.
Caution: The thermal paste supplied should not be
swallowed. If any is swallowed, drink lots of water and
urgently seek the advice of a doctor. Store it beyond the
reach of children. Avoid contact with skin and eyes.
Montage du bloc CPU
Retirez le film protecteur situé sous le refroidisseur.
Appliquez la pâte thermique sur la surface du processeur.
Attention : Ne pas ingérer la pâte thermique fournie.
En cas d’ingestion, boire beaucoup d’eau et consulter
un médecin en urgence. À conserver hors de portée
des enfants. Éviter tout contact avec la peau et les yeux.
Montage des CPU-Blocks
Entferne zunächst die Schutzfolie von der Unterseite des Kühlers. Trage die Wärmeleitpaste auf die
CPU-Oberfläche auf.
Vorsicht: Die mitgelieferte Wärmeleitpaste ist nicht
zum Verzehr geeignet. Bei Verzehr ausreichend Wasser
trinken und umgehend einen Arzt aufsuchen. Außerhalb
der Reichweite von Kindern aufbewahren. Vermeide Hautund Augenkontakt.
Montaje del bloque de CPU
Retire primero la película protectora de la parte inferior del
refrigerador. Aplique pasta térmica en la superficie de la CPU.
Precaución : No se debe ingerir la pasta térmica suministrada. Si se ingiere, es necesario beber agua abundante
y recurrir de inmediato a un médico. Almacenar fuera
del alcance de los niños. Evite el contacto con la piel
y los ojos.
31
Page 32
Intel LGA 1851 / 1700 / 1200 / 1150 / 1151 / 1155
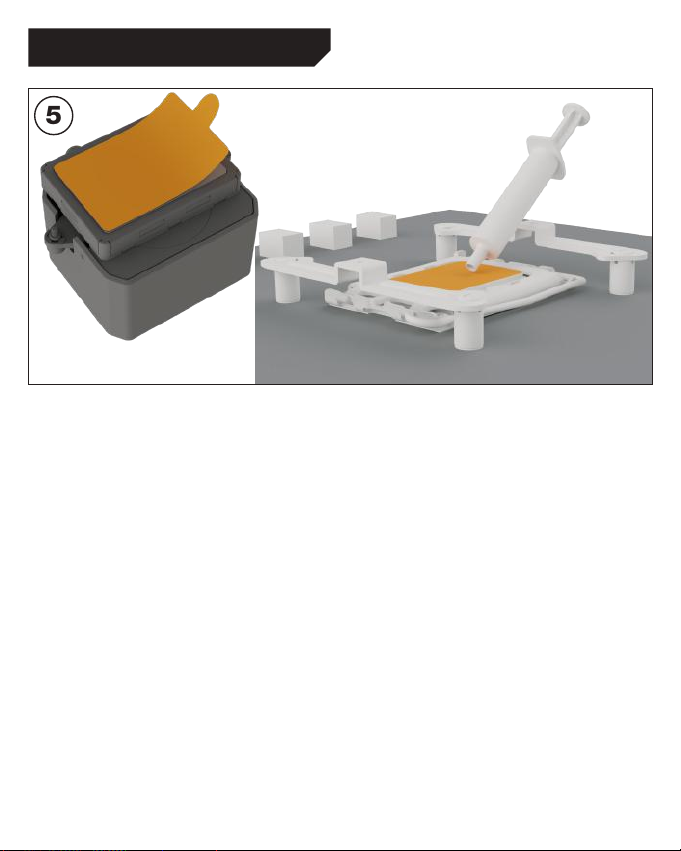
5
Montaż bloku CPU
Najpierw zdejmij folię ochronną ze spodu coolera. Nałoż
pastę termoprzewodzącą na powierzchnię procesora.
Uwaga: dostarczonej pasty termoprzewodzącej nie należy
połykać. W przypadku połknięcia należy wypić dużo wody i
niezwłocznie zasięgnąć porady lekarza. Przechowuj pastę
poza zasięgiem dzieci. Unikaj kontaktu ze skórą i oczami.
Встановлення блоку охолодження CPU
Перед встановленням блоку охолодження необхідно
зняти захисну плівку з його нижньої частини. Нанесіть
термопасту на поверхню процесора.
Увага: термопаста є небезпечною для людського
організму. Якщо ви проковтнули терпомасту, випийте
велику кількість води та терміново зверніться за
медичною допомогою. Зберігайте її у недоступному
для дітей місці. Уникайте потрапляння на шкіру та очі.
安裝 CPU 區塊
先,撕下散熱器底側的保護膜。在 CPU 表面上塗上散熱膏 。
注意: 避免吞食散熱膏。若不慎吞食,請飲用大量清水並緊急
送醫治療。請將物品存放在兒童無法取得之 處。避免接觸皮膚
和眼睛。
32
Монтаж блока охлаждения CPU
Перед установкой кулера необходимо снять
защитное покрытие с его нижней части. Нанесите
термопасту на поверхность процессора.
Внимание: термопаста опасна для человеческого
организма. В случае проглатывания, выпейте большое
количество воды и срочно обратитесь за медицинской
помощью. Храните ее в недоступном для детей
месте. Избегайте попадания на кожу и глаза.
CPU ブロックの取り付け
まず、クーラー の下 側から保 護フィルムを 剥がします。サ ーマル
ペースト を CPU の表面に塗ります。
注 意: 付属のサーマルペーストは口に入らないようにしてくだ
さい。飲み込んでしまった場合、多量の水を 飲み、すぐに意思の
助言を求めてください。子供の手の届かない場所に保管してく
ださい。皮 膚や眼に触 れ ないようにしてください 。
安装CPU块
首先从散热器底部剥下保护膜。将导热硅脂 涂到CPU表面。
警示: 严禁吞咽导热硅脂。如果误吞,请大量喝水,并紧急求
医。把它放在孩子够不到的地方。避免与皮肤 和眼睛接触。
Page 33
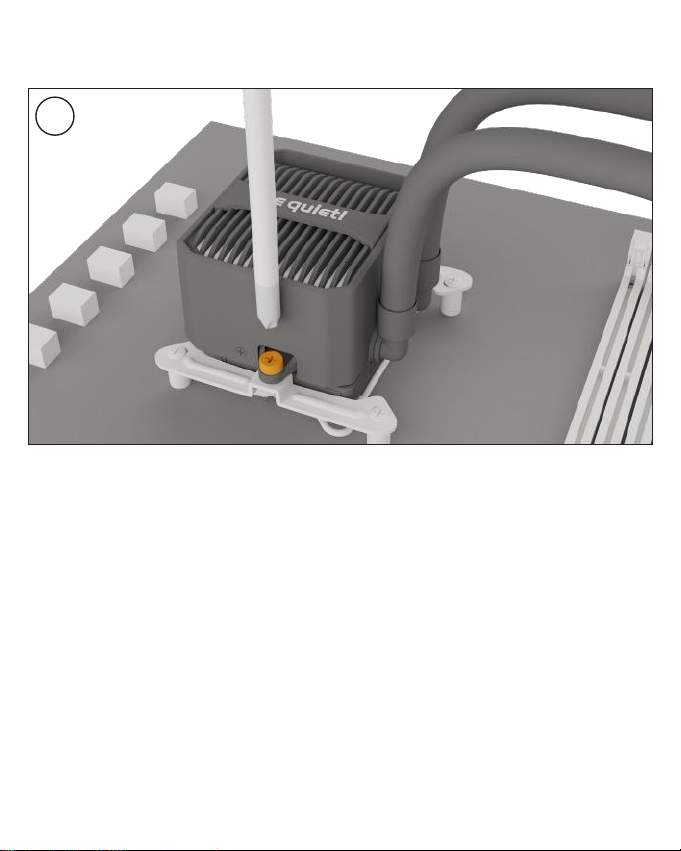
6
Place the CPU block centrally over the Intel mounting
brackets, such that these allow the CPU block to
be screwed down. For this you can use a normal
crosshead screwdriver.
Placez le bloc processeur au centre des supports de
fixation de montage Intel de manière à ce que le bloc
processeur puisse être vissé à ces derniers. Pour ce faire,
vous pouvez utiliser un tournevis cruciforme classique.
Lege den CPU-Block mittig auf die Intel Montagebrücken, sodass sich der CPU-Block mit selbigen
verschrauben lässt. Hierzu kannst du einen üblichen
Kreuzschraubendreher nutzen.
Coloque el bloque de CPU en una posición central sobre
los soportes de montaje Intel, de forma que permitan
desatornillar el bloque de CPU. Para ello, puede usar un
destornillador de estrella convencional.
33
Page 34
Intel LGA 1851 / 1700 / 1200 / 1150 / 1151 / 1155
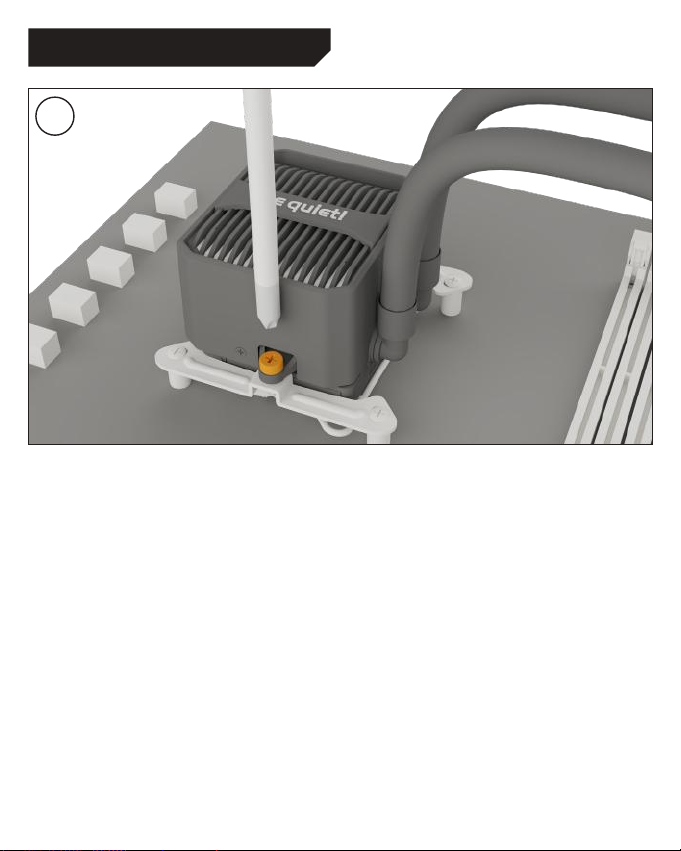
6
Umieść blok procesora centralnie nad wspornikami
montażowymi Intel, tak aby umożliwić przykręcenie. W
tym celu możesz użyć zwykłego śrubokręta krzyżakowego.
Розташуйте блок охолодження по центру кріплень Intel
і затягніть гвинти. Використовуйте для цього відповідну
хрестоподібну викрутку.
將CPU水冷頭居中放置在Intel安裝支架上,以便將CPU水冷
頭擰緊。為此,您可以使用普通的十字頭螺絲起子。
34
Разместите блок охлаждения по центру креплений
Intel и затяните крепежные винты. Используйте для
этого соответствующую крестовую отвертку.
CPU冷却ヘッドをIntelのマウンティング・ブラケットの中央に置
き、ネジで固定します。プラスドライバーを使用。
将CPU冷头居中放置在Intel安装支架上,以便将CPU冷头拧
紧。为此,您可以使用普通的十字头螺丝刀。
Page 35

ILLUMINATION
BELEUCHTUNG • ÉCLAIRAGE • ILUMINACIÓN • PODŚWIETLENIE • ПОДСВЕТКА •
ПІДСВІЧУВАННЯ •
イル ミネ ーション
• 光效 •
灯效
Synchronization of ARGB illumination with the
motherboard
Silent Loop 3 enables you to synchronize the ARGB
illumination directly via your motherboard. To do that switch
off your system prior to installation. Next connect the ARGB
connector with your motherboard. Now the ARGB illumination
is being controlled by the software of the motherboard.
Warning: The ARGB connector may only be connected to
a 5V ARGB header.
Synchronisation de l’éclairage ARGB avec la carte mère
Le Silent Loop 3 vous permet de synchroniser directement
l’éclairage ARGB via votre carte mère. Pour ce faire,
mettez votre système hors tension avant de procéder à
l’installation. Raccordez tout d’abord le connecteur ARGB
à votre carte mère. L’éclairage ARGB est maintenant
commandé par le logiciel de la carte mère.
Attention : Le connecteur ARGB peut être uniquement
raccordé à un en-tête ARGB de 5 V.
Synchronisation der ARGB Beleuchtung mit dem
Mainboard
Silent Loop 3 bietet dir die Möglichkeit, die ARGBBeleuchtung über dein Mainboard zu synchronisieren.
Schalte hierzu vor der Installation dein System aus.
Verbinde anschließend den ARGB-Stecker mit dem
Mainboard. Nun ist die Steuerung der ARGB-Beleuchtung
über die Bediensoftware des Mainboards geregelt.
Achtung: Der ARGB-Anschluss darf nur an einem
5V ARGB-Anschluss angeschlossen werden.
Sincronización de la iluminación ARGB con la placa base
Silent Loop 3 le permite sincronizar la iluminación ARGB
directamente a través de su placa base. Para ello, debe
apagar su sistema antes de la instalación. A continuación,
conecte a su placa base el conector ARGB. Ahora la iluminación ARGB está controlada por el software de la placa base.
Precaución : El conector ARGB solo se puede conectar a
un ARGB Header de 5 V.
35
Page 36
Synchronizacja podświetlenia ARGB z płytą główną
Silent Loop 3 umożliwia synchronizację podświetlenia
ARGB bezpośrednio przez płytę głowną. W tym celu
wyłącz system przed instalacją. Następnie podłącz złącze
ARGB do płyty głównej. Teraz podświetlenie ARGB jest
kontrolowane przez oprogramowanie płyty głównej.
UWAGA: Złącze ARGB może być podłączone tylko do
złącza 5V ARGB.
Синхронізація ARGB підсвічування з материнською платою
Silent Loop 3 дозволяє синхронізувати ARGB підсвічування з контролером вашої материнської плати.
Для цього вимкніть ПК і під’єднайте роз’єм ARGB
до відповідного роз’єму материнської плати.
Тепер ARGB підсвічуванням можна керувати через
програмне забезпечення материнської плати.
УВАГА: Роз’єм ARGB підсвічування дозволяється
підключати тільки до адресного роз’єму з живленням
5 Вольт (ARGB).
Синхронизация ARGB подсветки с материнской платой
Silent Loop 3 позволяет синхронизировать ARGB
подсветку с контроллером вашей материнской платы.
Для этого выключите ваш ПК и подключите разъем
ARGB к соответствующему разъему материнской платы.
Теперь ARGB подсветкой можно управлять через
программное обеспечение материнской платы.
ВНИМАНИЕ: Разъем ARGB подсветки допускается
подключать только к адресному разъему с питанием
5В (ARGB).
マザーボードと ARGB イルミネーションの同期
Silent Loop 3 では、マザーボード経由で直接、ARGB イルミ
ネー ションを同 期できます。これ を行うに は、取 り付け前 にシ
ステムをオフに切り替えてください。次に ARGB コネクタとマ
ザーボードを接続しま す。これ で、ARGB イルミネーションが
マザーボードのソフトウェアによって制御されるようになります。
注 意: ARGB コネクタは 5V の ARGB ヘッダにのみ接続で
きます。
ARGB 燈光與主機板同步
Silent Loop 3 上的ARGB光效可與主機板連動同步。設置
前請先將您的主機系統關機,接著將ARGB接頭連接至主機
板上,連接後您的ARGB光效即可透過主機板相容的軟體進
行光效控制。
注意: ARGB控制器僅能安裝至5V的ARGB接頭上。
REFILLING THE
SYSTEM
NACHFÜLLEN DES SYSTEMS • RECHARGE DU SYSTÈME • RELLENO DEL SISTEMA •
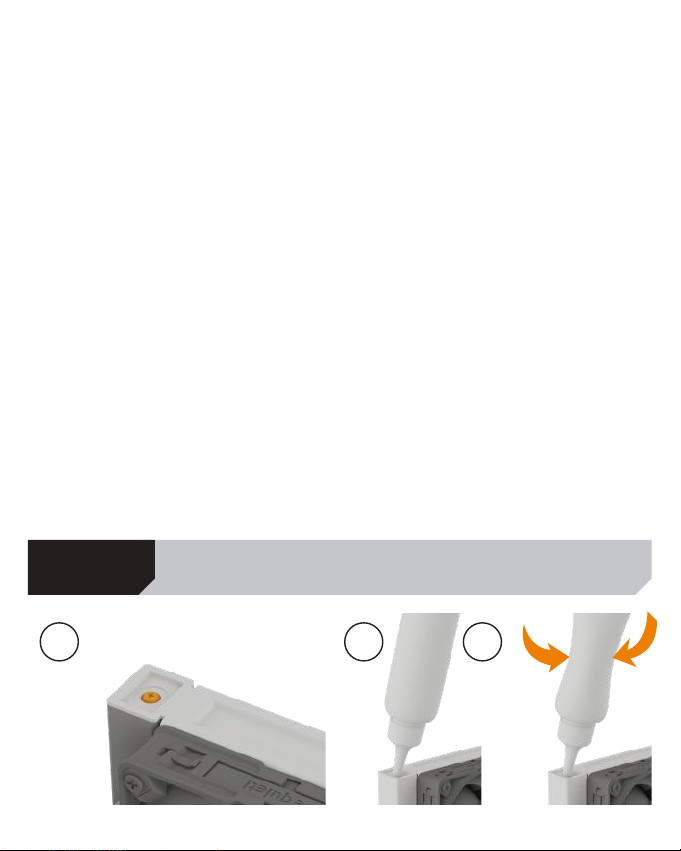
NAPEŁNIANIE SYSTEMU • ДОБАВЛЕНИЕ ЖИДКОСТИ В СИСТЕМУ • ДОДАВАННЯ
РІДИНИ ДО СИСТЕМИ •
ARGB照明灯与主板同步
Silent Loop 3 上的ARGB灯效可通过主板控制进行同步。设
置前请先关机,接这将ARGB接头连接至主板上,连接后您的
ARGB光效即可透過主板相容的软件进行灯效控制。
警示: ARGB控制器仅能安装至5V的ARGB接头上。
システム の補 充
36
•
重重新填充水冷液
•
重新填充水冷液
31 2
Page 37

Topup the system after about two years of use.
CAUTION: The coolant fluid supplied is not a drink. Keep
out of reach of children. Be careful not to get it on your
eyes or skin. If it does adhere, rinse immediately with
water.
Rechargez le système après environ deux ans d’utilisation.
ATTENTION: Le liquide de refroidissement fourni n’est pas
une boisson. Tenir hors de portée des enfants. Évitez tout
contact avec les yeux ou la peau. En cas de contact, rincez
immédiatement à l’eau.
Uzupełnij system po około dwóch latach użytkowania.
UWAGA: Dostarczony płyn chłodzący nie jest napojem.
Przechowywać w miejscu niedostępnym dla dzieci.
Uważać, aby nie dostał się do oczu lub na skórę. W
razie kontaktu, natychmiast przemyć wodą.
За необхідності доливайте охолоджуючу рідину до
системи приблизно кожні два роки використання.
УВАГА: охолоджуюча рідина у комплекті поставки не
є напоєм! Зберігати у недоступному для дітей місці.
Будьте обережні, уникайте потрапляння рідини на
очі чи шкіру. Якщо ж це сталося, негайно промийте
водою.
系統約運作 2 年後就必須加冷卻液。若要補充。
注意:所提供的水冷液不是飲料。請存放在兒童接觸不到的地
方。小心不要濺到眼睛或皮膚上。如果濺到眼睛或皮膚上,請
立即用水沖洗。
TROUBLESHOOTING
FEHLERBEHEBUNG • DÉPANNAGE • RESOLUCIÓN DE PROBLEMAS •
ROZWIĄZYWANIE PROBLEMÓW • УСТРАНЕНИЕ НЕИСПРАВНОСТЕЙ •
УСУНЕННЯ НЕСПРАВНОСТЕЙ•
Fülle das System nach ca. zwei Jahren Gebrauch nach.
ACHTUNG: Die mitgelieferte Kühlflüssigkeit ist nicht
zum Verzehr geeignet. Außer Reichweite von Kindern
aufbewahren. Vermeide Haut- und Augenkontakt. Bei
Kontakt sofort mit Wasser ausspülen.
Ajuste el sistema tras unos dos años de uso.
CUIDADO: El líquido refrigerante suministrado no es apto
para el consumo. Manténgalo fuera del alcance de los
niños. Tenga cuidado de no contactarlo con los ojos o la
piel. Si entra en contacto, enjuague inmediatamente con
agua.
При необходимости доливайте охлаждающую жидкость
в систему примерно каждые двагода использования.
ВНИМАНИЕ: охлаждающая жидкость в комплекте
поставки не является напитком! Хранить в недоступном
для детей месте. Будьте осторожны, избегайте
попадания жидкости в глаза или кожу. Если это
произошло, немедленно промойте водой.
約 2 年間使用したら、冷却液を補充します。
注意:付属するクーラント液は、飲み物ではありません。子ど
もの手の届く範囲に置かないでください。目や皮膚に付着し
ないよう注意ください。もし付着した場合はすぐに水で洗い流
して下さい 。
系统运行大约2年后,需要加注冷却液。
注意:提供的冷却液不是饮料。请放在儿童接触不到的地方。注
意不要让其溅到眼睛或皮肤上。如果溅到眼睛或皮肤上,请立即
用水冲洗。
トラ ブル シュー ティン グ
•
故障诊断
•
故障診斷
37
Page 38

LIMITED WARRANTY
I. APPLICABILITY
This non-transferable warranty is applicable to
newly purchased, previously unopened be quiet!
products and is enforceable by only the original
consumer purchaser. Proof of purchase is required
for warranty service, so should be retained. be quiet!
does not provide warranty registration services.
II. WARRANTY PERIOD
For eligible products, parts and labor are warranted
for the applicable warranty period from the date of
purchase. The applicable warranty period varies
by product model, and is identified in your user
documentation, on the product package, or as
listed below. Should any of these warranty periods
differ, the longest specified warranty period will
apply. Replaced products will be warranted for the
remainder of the original warranty period or thirty
days, whichever is longer.
III. EXCLUSIONS
The following are not covered by the warranty:
1. Normal wear and tear.
2. Any product which has been modified without
permission from be quiet!, or on which the serial
number or warranty sticker has been defaced,
modified, or removed.
3. Damage, deterioration or malfunction resulting
from: Accident, abuse, misuse or improper use,
neglect, connection to an improper voltage
source, unauthorized product modification, or
failure to follow instructions included with the
product. Fire, water, lightning, or other acts of
nature. Repair or attempted repair by anyone not
authorized by be quiet!. Shipping or transport
damage (claims must be made with the carrier).
Any other cause which does not relate to a defect
in materials or manufacturing workmanship.
4. Cartons, cases, batteries, cabinets, tapes,
accessories or other consumables used with this
product.
5. be quiet!, Inc. does not warrant that this
product will meet your requirements. It is your
responsibility to determine the suitability of this
product for your purpose.
6. Removal or installation charges.
7. Shipping charges.
8. Any incidental charges.
IV. EXCLUSION OF DAMAGES
be quiet!‘s sole obligation and liability under this
warranty is limited to the repair or replacement of
a defective product at its option. be quiet! shall not,
in any event, be liable for any special, incidental,
indirect, or consequential damages whatsoever,
including but not limited to loss of profits, revenue,
or data (whether direct or indirect), damages
resulting from interruption of service and loss
of business, or for liability in tort relating to this
product or resulting from its use
or possession, even if be quiet! has been advised
previously of the possibility of such damages.
V. LIMITATIONS OF IMPLIED WARRANTIES
There are no other warranties, expressed or implied,
including but not limited to those of merchantability
or fitness for a particular purpose. The duration of
implied warranties is limited to the warranty length
specified in Paragraph II.
VI. LOCAL LAW AND YOUR WARRANTY
This warranty gives you specific legal rights. You
may also have other rights granted under local law.
These rights may vary.
VII. NO OTHER WARRANTY
No be quiet! employee, dealer, or other agent is
authorized to make any modification, extension, or
addition to this warranty.
VIII. TO OBTAIN TECHNICAL SUPPORT OR
WARRANTY SERVICE
Please see your product owner’s manual or visit the
Online Support section at www.bequiet.com
38
Page 39

NOTES
NOTIZEN • NOTES • NOTAS • NOTATKI • ЗАМЕТКИ • НОТАТКИ •
注釈
• 備註 •
备注
39
Page 40

bequiet.com
 Loading...