

Page 1
Introduction: Thank you for deciding to purchase a be quiet!
product. The following instructions will guide you through the
installation process. If you do encounter installation problems,
please don't hesitate to contact our customer services by
mailing [email protected]. Please note that be quiet!
cannot accept liability for damage caused by compatibility
problems.
Einleitung: Vielen Dank, dass Sie sich für ein be quiet!
Produkt entschieden haben. Diese Anleitung wird Ihnen beim
Installationsprozess behilfl ich sein. Sollten bei der Installation
Schwierigkeiten auftreten, kontaktieren Sie bitte unseren
Kundenservice unter [email protected]. be quiet! kann
keinerlei Haftung für durch Kompatibilitätsprobleme bedingte
Schäden übernehmen.
www.bequiet.com/bk031
» Product information for this CPU cooler
» Produktinformationen zu diesem CPU-Kühler
» Informations produit pour ce système de refroidissement
» Información del producto para este refrigerador de CPU
» Informacje produktowe dla tego coolera CPU
NL
» Engelstalige productinformatie voor deze processorkoeler
SE
» Produktinformation för den här processorkylaren, på
engelska
» Подробная информация о данном кулере для
процессора
» 此CPU散熱器的產品資訊
» 此CPU散热器的产品信息
» 製品情報CPUクーラー
Warranty:
• 3-year manufacturer guarantee for consumers (original
purchase from authorized be quiet! dealers only)
• Guarantee work can only be processed with a copy
included of the purchase receipt from an authorized be
quiet! dealer
• Manipulation and structural changes of any kind, including
any damage caused by external mechanical force, will lead
to a complete voiding of the guarantee
• Our General Warranty Conditions apply, which can be
viewed on bequiet.com
Listan GmbH . Wilhelm-Bergner-Straße 11c . 21509 Glinde
Germany
For further information please visit our website:
www.bequiet.com
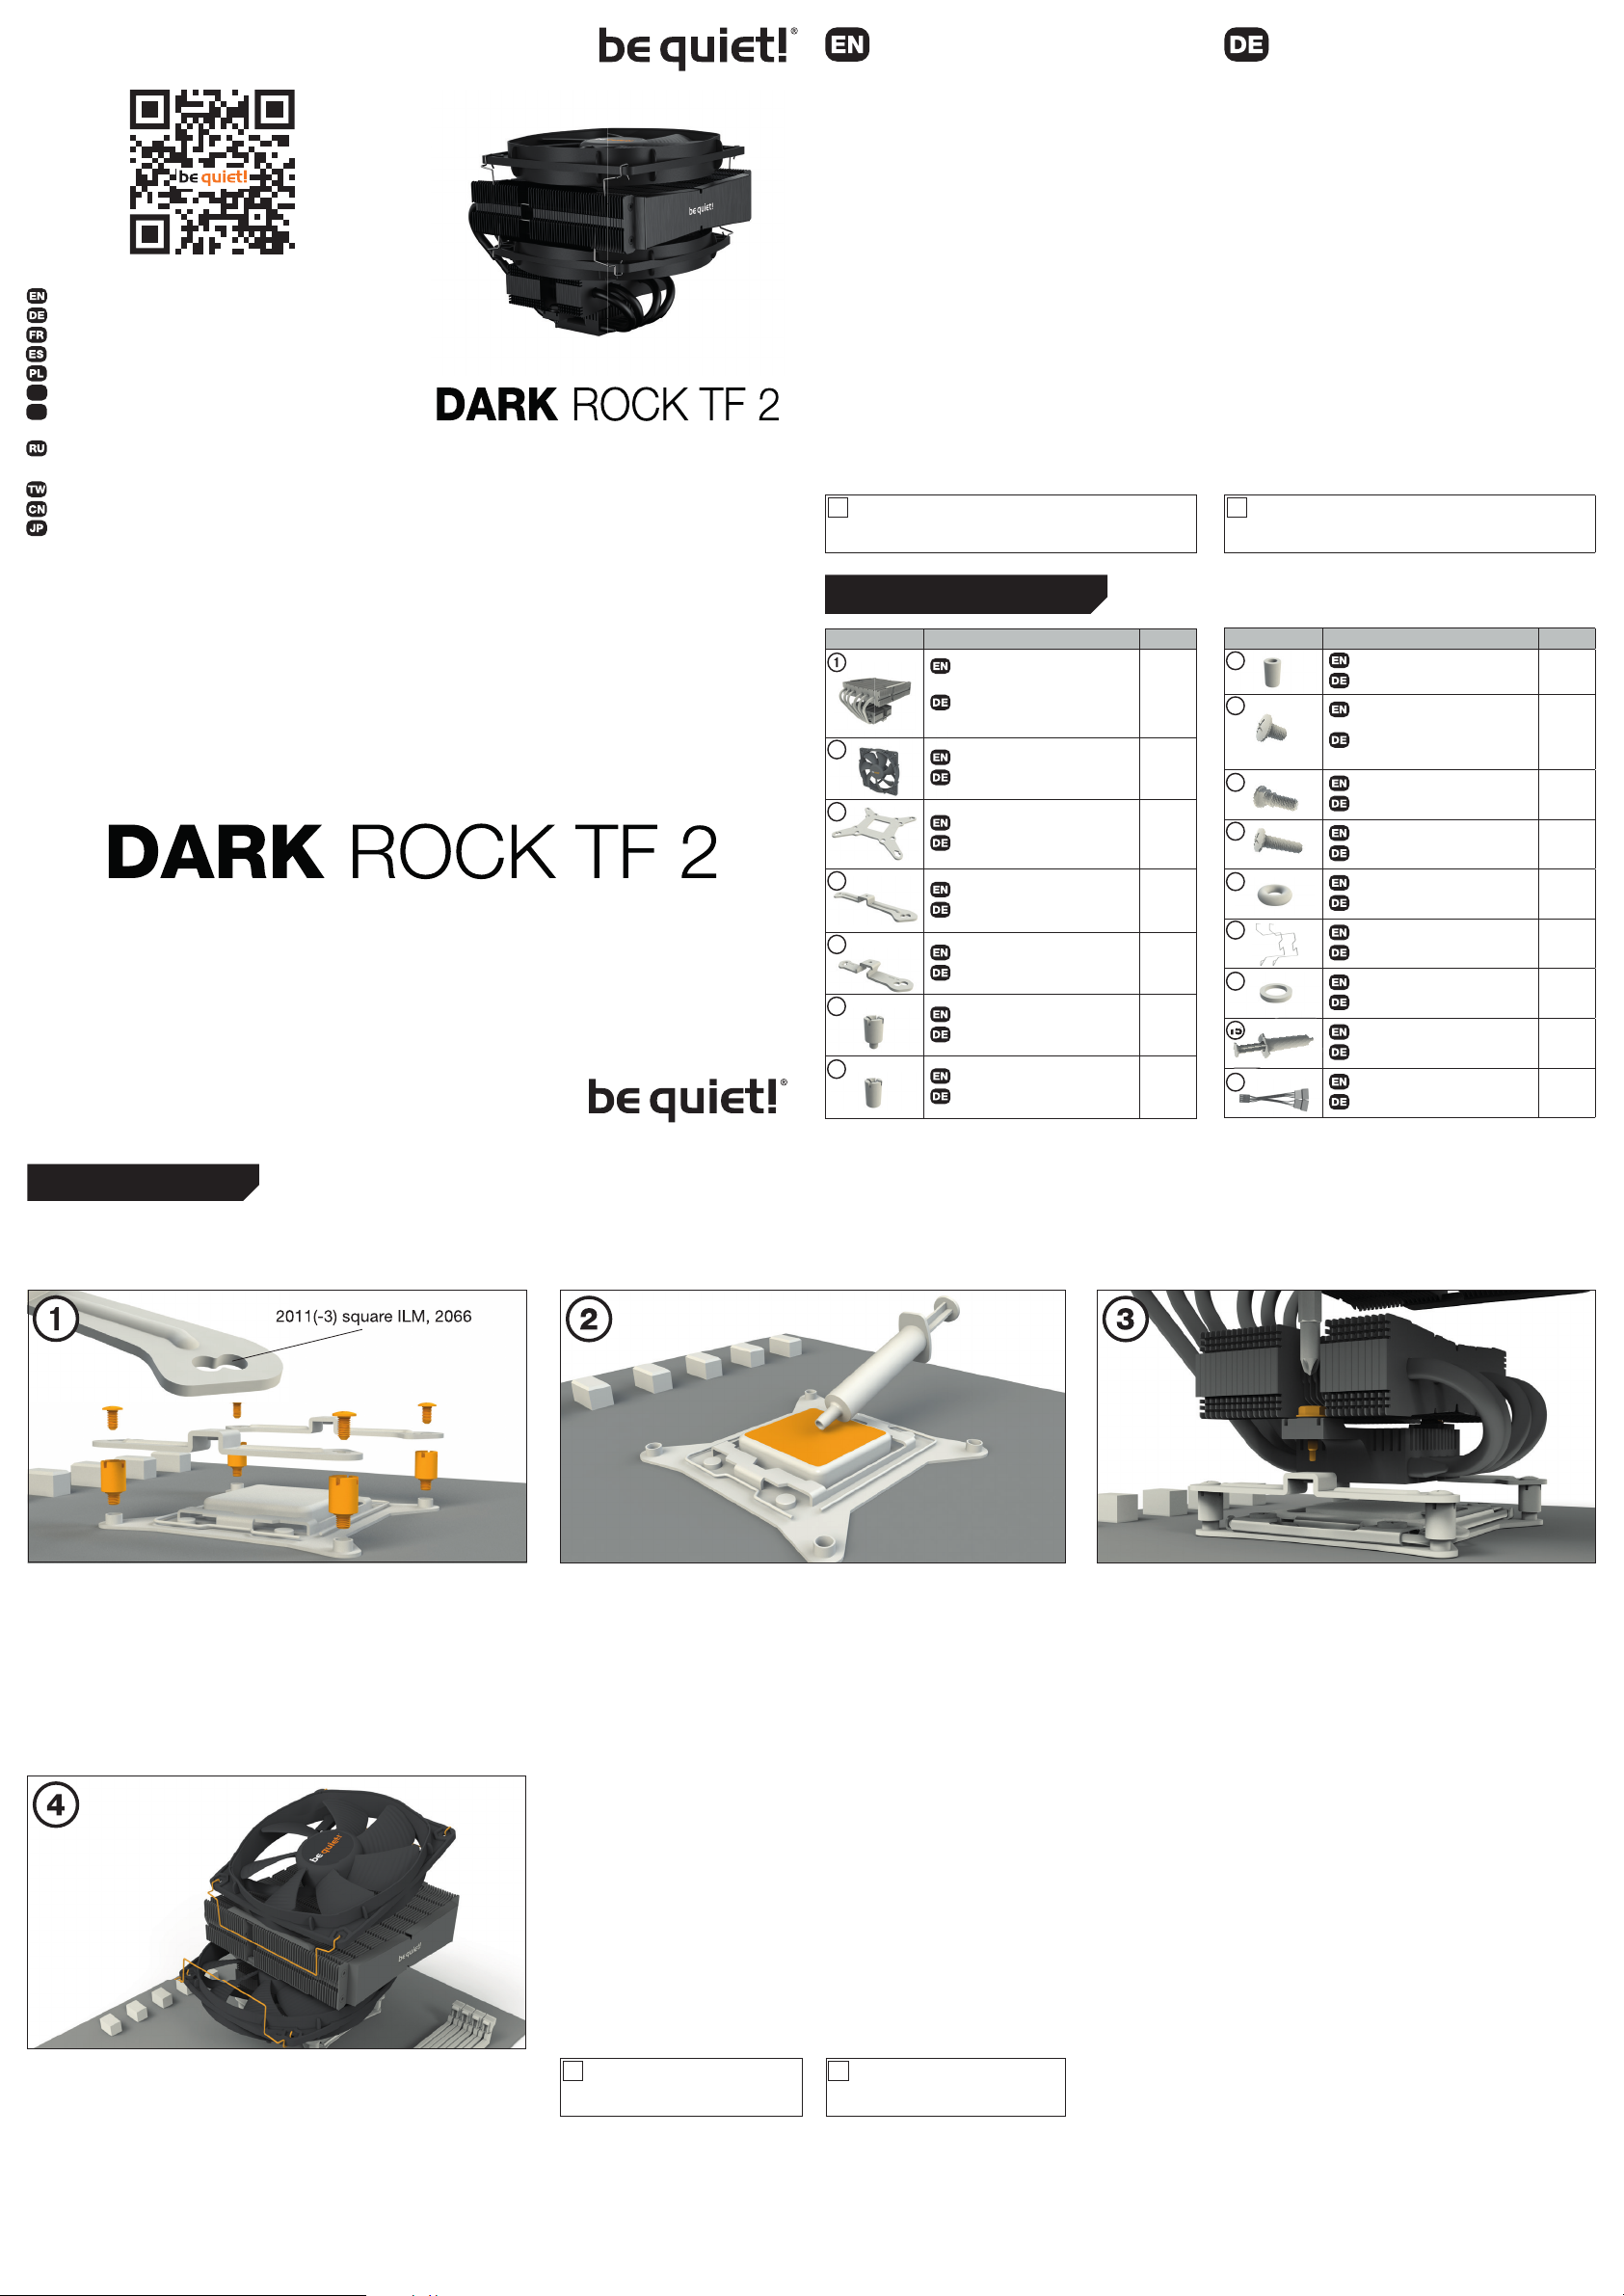
We recommend preparatory mounting of the cooler outside
!
the PC case for subsequent installation. The cooler should be
removed prior to transportation as well.
SCOPE OF DELIVERY / LIEFERUMFANG
Part name Quantity
be quiet! Dark Rock TF 2
CPU cooler
be quiet! Dark Rock TF 2
1
CPU-Kühler
2
3
4
5
6
7
135mm fan
135mm Lüfter
Intel backplate
Intel Backplate
Intel mounting brackets
Intel Montagebrücken
Short AMD mounting brackets
Kurze AMD Montagebrücken
Intel spacer nut A
Intel Gewindebolzen A
Intel spacer nut B
Intel Gewindebolzen B
2
1
2
2
4
4
Garantie:
• 3 Jahre Herstellergarantie für Endkonsumenten (nur Ersterwerb vom autorisierten be quiet! Händler), ab Datum des
Kaufbelegs
• Eine Garantieabwicklung ist nur in Verbindung mit einer
beigefügten Kopie des Kaufbeleges eines autorisierten
be quiet! Händlers möglich
• Manipulationen und bauliche Veränderungen jeglicher
Art, sowie Beschädigungen durch äußere mechanische
Einwirkungen führen zum totalen Garantieverlust
• Es gelten unsere allgemeinen Garantiebestimmungen, die
Sie unter www.bequiet.com im Internet abrufen können
Listan GmbH.Wilhelm-Bergner-Straße 11c.21509 Glinde
Germany
Für weitere Unterstützung besuchen Sie unsere Webseite:
www.bequiet.com
Für die Montage des Kühlers empfehlen wir die Installation
!
außerhalb des Gehäuses. Für einen Transport sollte der Kühler
ausgebaut werden.
Part name Quantity
8
9
10
11
12
13
14
15
16
AMD spacer nuts
AMD Abstandsbolzen
Mounting bracket fastening
screws
Befestigungsschrauben für
die Montagebrücke
Intel backplate screws
Intel Backplate-Schrauben
AMD backplate screws
AMD Backplate-Schrauben
O-rings
O-Ringe
Fan clips
Lüfterklammern
AM3 washers
AM3 Unterlegscheiben
Thermal paste
Wärmeleitpaste
Y-cable
Y-Kabel
4
4
4
4
4
4
4
1
1
V1/21
Intel: LGA 2011(-3) square ILM / LGA 2066
The following parts are needed for this:
1x Dark Rock TF 2 CPU cooler (1), 2x 135mm fan (2), 2x Intel mounting brackets (4), 4x Intel spacer nut A (6), 4x mounting bracket
fastening screws (9), 4x fan clips (13), 1x thermal paste (15), 1x Y-cable (16)
Assembly of the cooler mounting
frame
First screw the Intel spacer nut A (6) onto
the threads of the socket frame. Place
the Intel mounting brackets (4) over the
Intel spacer nuts (6) and screw these
tight with the mounting bracket fastening
screws (9). You can use any cross-tip
screwdriver for this.
Aufbau des
Kühlerbefestigungsrahmens
Schrauben Sie zuerst die Intel Gewindebolzen A (6) in die Gewinde des Sockelrahmens. Platzieren Sie die beiden Intel
Montagebrücken (4) auf den Intel Gewindebolzen (6) und schrauben Sie diese mit
den Befestigungsschrauben für die Intel
Montagebrücken (9) fest. Hierfür können
Sie einen Kreuzschraubenzieher verwenden.
Mounting the CPU cooler
Remove the protective foil from the
underside of the cooler. Spread the
thermal paste (15) on the surface of the
CPU. The amount supplied is suffi cient
for one or two applications.
Caution: The thermal paste supplied
is not suitable for human consumption.
If swallowed, drink lots of water and
urgently seek medical attention. Keep
it out of the reach of children. Avoid
contact with skin and eyes.
Es werden folgende Bauteile benötigt:
1x Dark Rock TF 2 CPU-Kühler (1), 2x 135mm Lüfter (2), 2x Intel Montagebrücken (4), 4x Intel Gewindebolzen A (6), 4x
Befestigungsschrauben für die Montagebrücke (9), 4x Lüfterklammern (13), 1x Wärmeleitpaste (15), 1x Y-Kabel (16)
Montage des CPU-Kühlers
Entfernen Sie zunächst die Schutzfolie
von der Unterseite des Kühlers. Tragen
Place the cooler onto the CPU unit. Then
screw the mounting bridge alternately
tight.
Platzieren Sie den Kühler auf der
CPU und schrauben Sie die KühlerMontagebrücke von oben fest.
Sie die Wärmeleitpaste (15) auf die CPUOberfl äche auf. Der Inhalt reicht für ca.
1 – 2 Anwendungen.
Vorsicht: Die mitgelieferte Wärmeleitpaste
ist nicht zum Verzehr geeignet. Bei Verzehr ausreichend Wasser trinken und umgehend einen Arzt aufsuchen. Außerhalb
der Reichweite von Kindern aufbewahren.
Vermeiden Sie Haut- und Augenkontakt.
Place the 135mm fan (2) with the fan
clips (13) on the rubber elements so you
can see the be quiet! logo. The funnelshaped Silent Wings 3 135mm fan (2)
is mounted above. Next connect the
135mm fans (2) with the Y-cable (16) to
the right connectors on the motherboard.
Platzieren Sie die 135mm Lüfter (2) mit
den Lüfterklammern (13) so auf den
Gummielementen, dass Sie das be
quiet! Logo sehen können. Der Silent
Wings 3 mit der Trichterform wird oben
verbaut. Schließen Sie anschließend die
135mm Lüfter (2) mit dem Y-Kabel (16)
an den entsprechenden Anschluss Ihres
Mainboards an.
When dismantling the fan (2), push
!
the notches of the fan clips (13) away
from the fan.
Zur Demontage des 135mm Lüfters
!
(2) drücken Sie die Kerben der Lüfterklammern (13) vom Lüfter weg.
Page 2
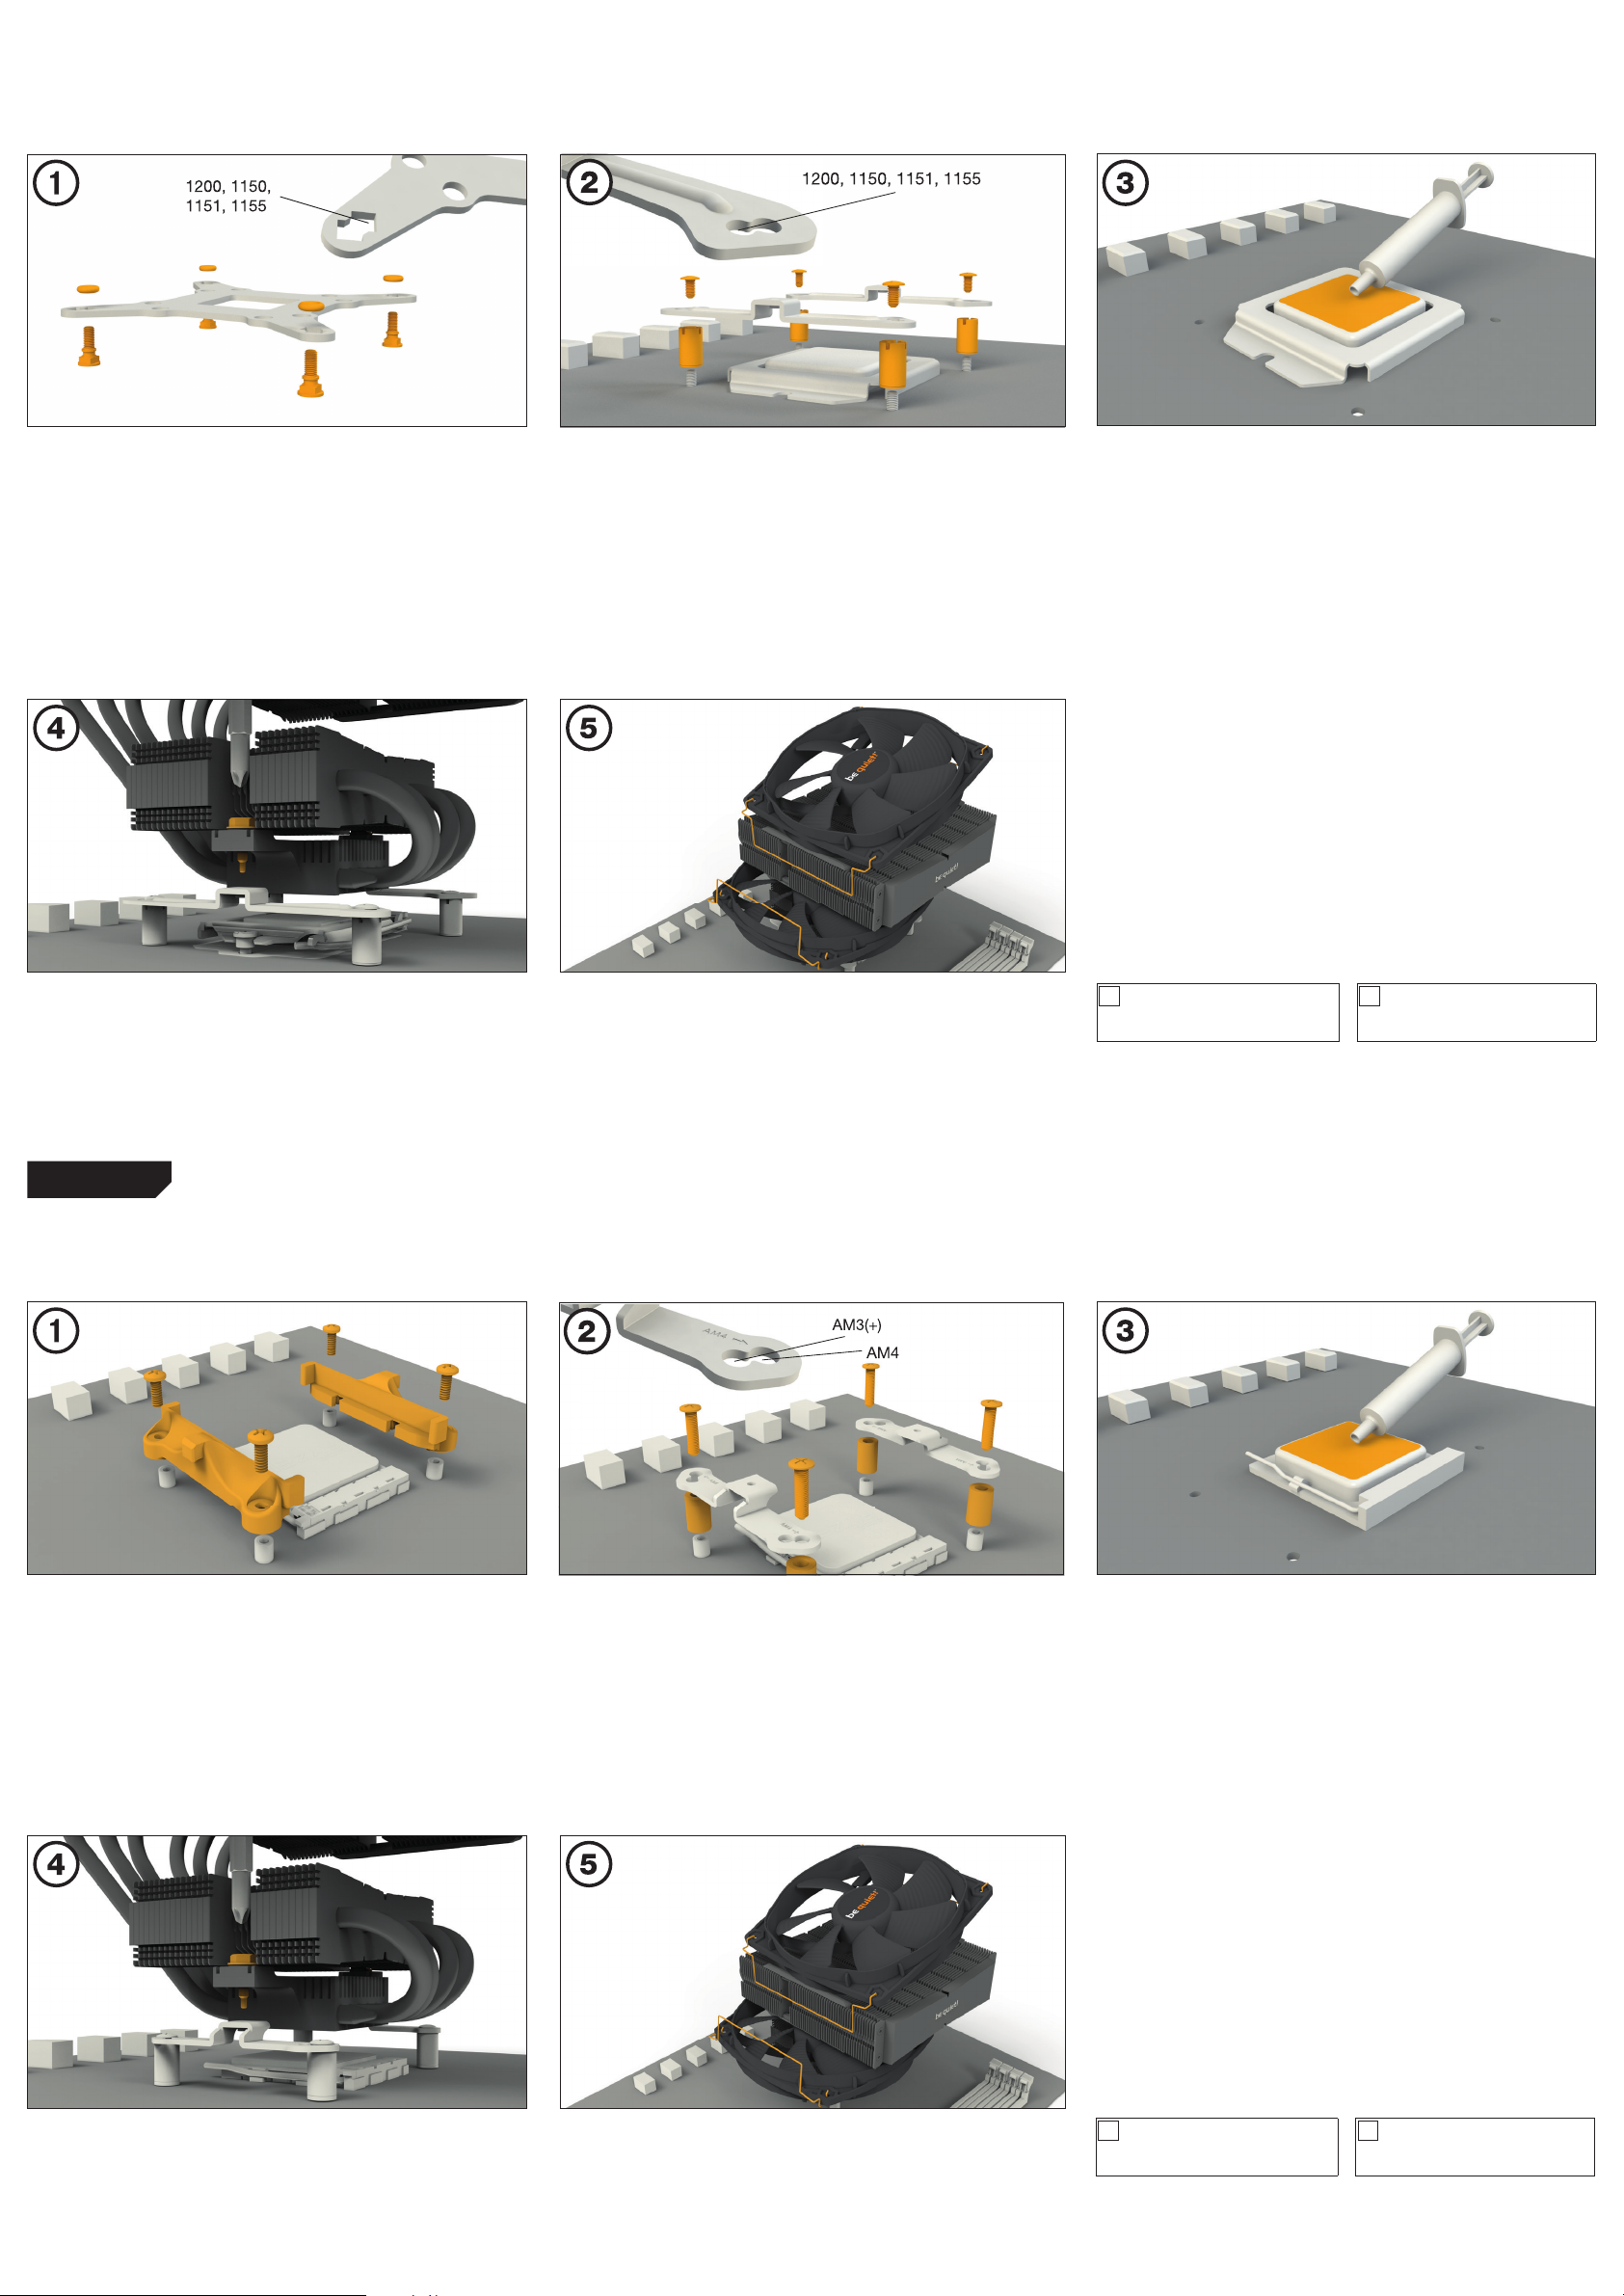
The following parts are needed for this:
1x Dark Rock TF 2 CPU cooler (1), 2x 135mm fan (2), 1x Intel backplate (3), 2x Intel mounting brackets (4), 4x Intel spacer nut B
(7), 4x mounting bracket fastening screws (9), 4x Intel backplate screws (10), 4x O-rings (12), 4x fan clips (13), 1x thermal paste
(15), 1x Y-cable (16)
Es werden folgende Bauteile benötigt:
1x Dark Rock TF 2 CPU-Kühler (1), 2x 135mm Lüfter (2), 1x Intel Backplate (3), 2x Intel Montagebrücken (4), 4x Intel Gewindebolzen
B (7), 4x Befestigungsschrauben für die Montagebrücke (9), 4x Intel Backplate-Schrauben (10), 4x O-Ringe (12), 4x Lüfterklammern
(13), 1x Wärmeleitpaste (15), 1x Y-Kabel (16)
Mounting the backplate
Position the Intel backplate screws (10)
in the notches situated on the rear side
of the Intel backplate (3). Pay attention
in so doing to align with the holes drilled
for each socket.
For fi xing the backplate screws (10)
onto the Intel backplate (3) use the
O-rings (12). Once assembly of the Intel
backplate (3) for the respective Intel
socket has been completed, position
it under the motherboard. In so doing
make sure that the Intel backplate
screws (10) are precisely located within
the motherboard holes.
Place the cooler onto the CPU unit. Then
screw the mounting bridge alternately
tight.
Befestigung der Backplate
Platzieren Sie die Intel Backplate Schrauben
(10) in die auf der Rückseite der IntelBackplate (3) befi ndlichen Aussparungen.
Beachten Sie hierzu die Bohrlöcher für den
jeweiligen Sockel.
Verwenden Sie zur Befestigung der
Backplate-Schrauben (10) auf der Intel
Backplate (3) die O-Ringe (12). Sobald
die Intel Backplate (3) für den jeweiligen
Intel-Sockel zusammengebaut ist, positionieren Sie es unter dem Mainboard.
Achten Sie dabei darauf, dass die Intel
Backplate-Schrauben (10) genau in den
Mainboardlöchern positioniert sind.
Platzieren Sie den Kühler auf der
CPU und schrauben Sie die KühlerMontagebrücke von oben fest.
Installation of the mounting
brackets
Screw the Intel spacer nut B (7) onto the
previously positioned Intel backplate
(3). Then position the Intel mounting
brackets (4) over the Intel spacer nut B (7)
and affi x these with the mounting bracket
fastening srews (9). You can use any
cross-tip screwdriver for this.
Place the 135mm fan (2) with the fan
clips (13) on the rubber elements so
you can see the be quiet! logo. The
funnel-shaped Silent Wings 3 135mm
fan (2) is mounted above. Next connect
the 135mm fans (2) with the Y-cable
(16) to the right con-nectors on the
motherboard.
Installation der Montagebrücken
Schrauben Sie die Intel Gewindebolzen B
(7) auf die zuvor platzierte Intel-Backplate (3). Dann platzieren Sie die Intel
Montagebrücken (4) auf den Intel Gewindebolzen B (7), um sie dann mit den Befestigungsschrauben für die Montagebrücke
(9) zu fi xieren. Hierfür können Sie einen
Kreuzschraubendreher verwenden.
Platzieren Sie die 135mm Lüfter (2) mit
den Lüfterklammern (13) so auf den
Gummielementen, dass Sie das be
quiet! Logo sehen können. Der Silent
Wings 3 mit der Trichterform wird oben
verbaut. Schließen Sie anschließend die
135mm Lüfter (2) mit dem Y-Kabel (16)
an den entsprechenden Anschluss Ihres
Mainboards an.
Mounting the CPU cooler
First remove the protective foil from
the underside of the cooler. Spread the
thermal paste (15) on the surface of the
CPU. The amount supplied is suffi cient
for one or two applications.
Caution: The thermal paste supplied
is not suitable for human consumption.
If swallowed, drink lots of water and
urgently seek medical attention. Keep
it out of the reach of children. Avoid
contact with skin and eyes.
When dismantling the fan (2), push
!
the notches of the fan clips (13) away
from the fan.
Montage des CPU-Kühlers
Entfernen Sie zunächst die Schutzfolie
von der Unterseite des Kühlers. Tragen
Sie die Wärmeleitpaste (15) auf die
CPU-Oberfl äche auf. Der Inhalt reicht
für ca. 1 – 2 Anwendungen.
Vorsicht: Die mitgelieferte Wärmeleitpaste ist nicht zum Verzehr geeignet.
Bei Verzehr ausreichend Wasser trinken
und umgehend einen Arzt aufsuchen.
Außerhalb der Reichweite von Kindern
aufbewahren. Vermeiden Sie Haut- und
Augenkontakt.
Zur Demontage des 135mm Lüfters
!
(2) drücken Sie die Kerben der Lüfterklammern (13) vom Lüfter weg.
AMD: AM4 / AM3(+)
The following parts are needed for this:
1x Dark Rock TF 2 CPU cooler (1), 2x 135mm fan (2), 2x short AMD mounting brackets (5), 4x AMD spacer nuts (8), 4x AMD
backplate screws (11), 4x fan clips (13), 4x AM3 washers (14), 1x thermal paste (15), 1x Y-cable (16)
Assembly of the cooler mounting
frame
To permit mounting of the cooler please
remove both the plastic retainers of the
AMD retention module. The factoryfi tted
backplate affi xed to the rear side of the
motherboard will be needed for subsequent installation of the cooler.
Note: To mount the Dark Rock TF 2
(1) on an AM3 motherboard, please
use the four AM3 washers (14), placing
these below the backplate bolts
protruding through the front side of the
motherboard.
Aufbau des Kühlerbefestigungsrahmens
Bitte entfernen Sie zur Kühlermontage
die beiden Künststoffhalterungen des
AMD-Retentionmoduls. Die werkseitig
auf der Mainboard-Rückseite befestigte
Backplate wird für die weitere Installation des Kühlers benötigt.
Hinweis: Zur Installation des Dark Rock
TF 2 (1) auf einem AM3 Mainboard nutzen
Sie bitte die vier AM3 Unterlegscheiben
(14) und legen diese auf die Bolzen der
werkseitig montierten Backplate über
die Mainboard Vorderseite.
Place the four AMD spacer nuts (8) onto
the backplate bolts protruding through
the front side and affix short AMD
mounting brackets (5) with the AMD
backplate screws (11).
Es werden folgende Bauteile benötigt:
1x Dark Rock TF 2 CPU-Kühler (1), 2x 135mm Lüfter (2), 2x Kurze AMD Montagebrücken (5), 4x AMD Abstandsbolzen (8), 4x
AMD Backplate-Schrauben (11), 4x Lüfterklammern (13), 4x AM3 Unterlegscheiben (14), 1x Wärmeleitpaste (15), 1x Y-Kabel (16)
Platzieren Sie über die Vorderseite die
vier AMD Abstandsbolzen (8) auf die
Bolzen der Backplate und fi xieren Sie die
beiden kurzen AMD Montagebrücken (5)
mit Hilfe der AMD Backplate-Schrauben
(11).
Mounting the CPU cooler
First remove the protective foil from the
underside of the cooler. Spread the
thermal paste (15) on the surface of the
CPU. The amount supplied is suffi cient
for one or two applications.
Caution: The thermal paste supplied
is not suitable for human consumption.
If swallowed, drink lots of water and
urgently seek medical attention. Keep it
out of the reach of children. Avoid contact with skin and eyes.
Montage des CPU-Kühlers
Entfernen Sie zunächst die Schutzfolie
von der Unterseite des Kühlers. Tragen
Sie die Wärmeleitpaste (15) auf die
CPU-Oberfl äche auf. Der Inhalt reicht
für ca. 1 – 2 Anwendungen.
Vorsicht: Die mitgelieferte Wärmeleitpaste ist nicht zum Verzehr geeignet.
Bei Verzehr ausreichend Wasser trinken
und umgehend einen Arzt aufsuchen.
Außerhalb der Reichweite von Kindern
aufbewahren. Vermeiden Sie Haut- und
Augenkontakt.
Place the cooler onto the CPU unit. Then
screw the mounting bridge alternately
tight.
Platzieren Sie den Kühler auf der
CPU und schrauben Sie die KühlerMontagebrücke von oben fest.
Place the 135mm fan (2) with the fan
clips (13) on the rubber elements so
you can see the be quiet! logo. The
funnel-shaped Silent Wings 3 135mm
fan (2) is mounted above. Next connect
the 135mm fans (2) with the Y-cable
(16) to the right connectors on the
motherboard.
Platzieren Sie die 135mm Lüfter (2) mit
den Lüfterklammern (13) so auf den
Gummielementen, dass Sie das be
quiet! Logo sehen können. Der Silent
Wings 3 mit der Trichterform wird oben
verbaut. Schließen Sie anschließend die
135mm Lüfter (2) mit dem Y-Kabel (16)
an den entsprechenden Anschluss Ihres
Mainboards an.
When dismantling the fan (2), push
!
the notches of the fan clips (13) away
from the fan.
Zur Demontage des 135mm Lüfters
!
(2) drücken Sie die Kerben der Lüfterklammern (13) vom Lüfter weg.
 Loading...