

Page 1
www.bequiet.com/bk030
» Product information for this CPU cooler
» Produktinformationen zu diesem CPU-Kühler
» Informations produit pour ce système de refroidissement
» Información del producto para este refrigerador de CPU
» Informacje produktowe dla tego coolera CPU
NL
» Engelstalige productinformatie voor deze processorkoeler
SE
» Produktinformation för den här processorkylaren, på
engelska
» Подробная информация о данном кулере для
процессора
» 此CPU散熱器的產品資訊
» 此CPU散热器的产品信息
» 製品情報(クーラー)
Introduction: Thank you for deciding to purchase a be quiet!
product. The following instructions will guide you through the
installation process. If you do encounter installation problems,
please don't hesitate to contact our customer services by
mailing [email protected]. Please note that be quiet!
cannot accept liability for damage caused by compatibility
problems.
Warranty:
• 3-year manufacturer guarantee for consumers (original
purchase from authorized be quiet! dealers only)
• Guarantee work can only be processed with a copy
included of the purchase receipt from an authorized be
quiet! dealer
• Manipulation and structural changes of any kind, including
any damage caused by external mechanical force, will lead
to a complete voiding of the guarantee
• Our General Warranty Conditions apply, which can be
viewed on bequiet.com
Listan GmbH
.
Wilhelm-Bergner-Straße 11c
.
21509 Glinde
Germany
For further information contact us via e-mail:
[email protected]
General: With preassembled motherboards we recommend
!
installing the cooler inside the PC case.
SCOPE OF DELIVERY / LIEFERUMFANG
Part name Quantity
Pure Rock Slim 2
CPU cooler
1
be quiet! Pure Rock
Slim 2 CPU-Kühler
Einleitung: Vielen Dank, dass Sie sich für ein be quiet!
Produkt entschieden haben. Diese Anleitung wird Ihnen beim
Installationsprozess behilfl ich sein. Sollten bei der Installation
Schwierigkeiten auftreten, kontaktieren Sie bitte unseren
Kundenservice unter [email protected]. be quiet! kann
keinerlei Haftung für durch Kompatibilitätsprobleme bedingte
Schäden übernehmen.
Garantie:
• 3 Jahre Herstellergarantie für Endkonsumenten (nur Ersterwerb vom autorisierten be quiet! Händler), ab Datum des
Kaufbelegs
• Eine Garantieabwicklung ist nur in Verbindung mit einer
beigefügten Kopie des Kaufbeleges eines autorisierten
be quiet! Händlers möglich
• Manipulationen und bauliche Veränderungen jeglicher
Art, sowie Beschädigungen durch äußere mechanische
Einwirkungen führen zum totalen Garantieverlust
• Es gelten unsere allgemeinen Garantiebestimmungen, die
Sie unter www.bequiet.com im Internet abrufen können
Listan GmbH . Wilhelm-Bergner-Straße 11c . 21509 Glinde
Deutschland
Für weitere Unterstützung erreichen Sie uns via E-Mail:
[email protected]
Allgemein: Für die Montage des Kühlers empfehlen wir die
!
Installation bei vormontiertem Mainboard im Gehäuse.
Intel LGA 1200 / 1150 / 1151 / 1155
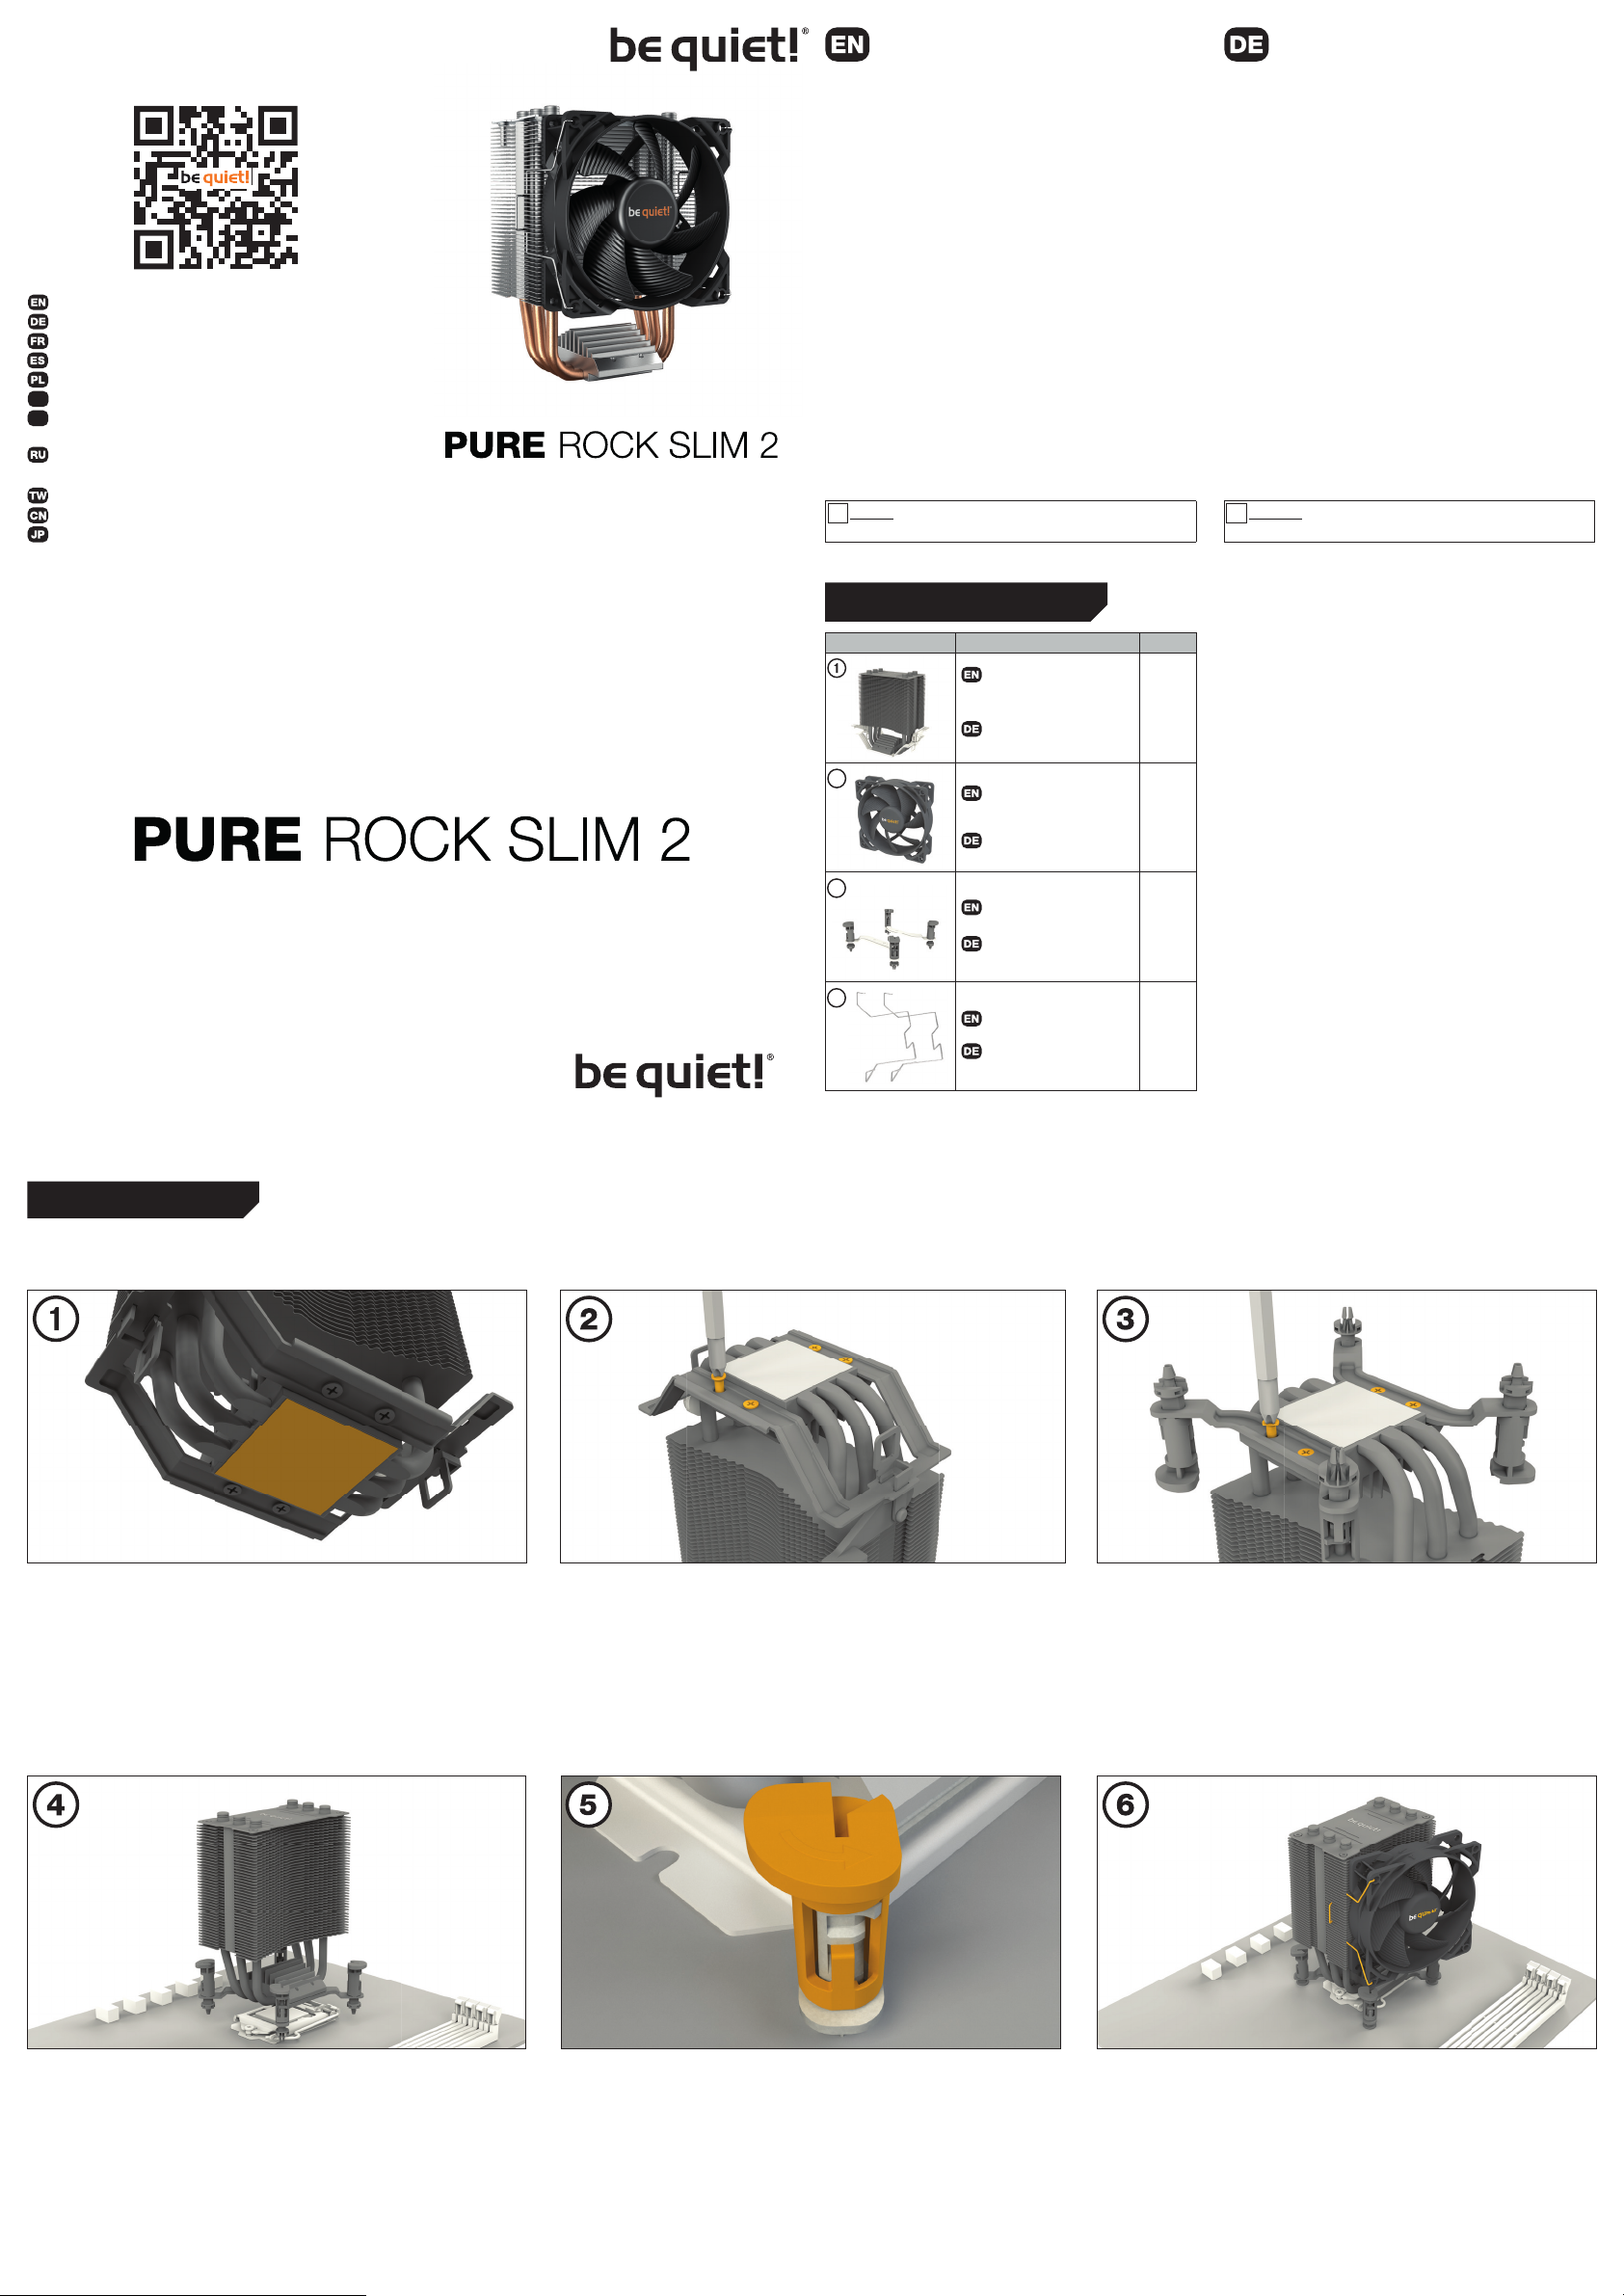
The following parts are needed for this:
1x Pure Rock Slim 2 (1), 1x 92mm fan (2), 1x Intel push-pins (3), 2x fan clips (4)
2
92mm fan
1
92mm Lüfter
3
Intel push-pins
2
Intel Push-Pins
4
Fan clips
2
Lüfterklammern
V1/21
Es werden folgende Bauteile benötigt:
1x Pure Rock Slim 2 CPU-Kühler (1), 1x 92mm Lüfter (2), 1x Intel Push-Pins (3), 2x Lüfterklammern (4)
Mounting the CPU cooler
The protective covering on the underneath of the cooler must be removed
prior to installation against the CPU.
Montage des CPU-Kühlers
Vor der Montage muss zunächst die
Schutzkappe von der Unterseite des
CPU-Kühlers entfernt werden.
Place the cooler onto the CPU unit. Platzieren Sie den Kühler auf der
CPU.
Mounting the CPU cooler
To mount the CPU cooler unit (1) on
an Intel motherboard, fi rst remove
the preassembled AMD mounting by
unscrewing the recessed M3x3 screws
in the underside. You can use any crosstip screwdriver for this.
To install the be quiet! Pure Rock Slim 2
(1) press the Intel push-pins (3) into the
matching sockets.
To remove the cooler unit (1), fi rst
rotate the Intel push-pins counterclockwise and then lift them up.
Montage des CPU-Kühlers
Um den CPU-Kühler (1) auf einem Intel
Mainboard zu montieren, entfernen Sie
zunächst das vorinstallierte AMD
Montagemodul. Lösen Sie dafür die
M3x3 Schrauben auf der Unterseite.
Dafür können Sie einen handelsüblichen
Kreuz-Schraubendreher verwenden.
Um den be quiet! Pure Rock Slim 2 (1) zu
befestigen, drücken Sie die Intel Push-Pins
(3) in die vorgesehenen Aussparungen.
Um den Kühlkörper (1) zu entfernen,
drehen Sie die Intel Push-Pins gegen
den Uhrzeigersinn und ziehen diese dann
hoch.
Fasten the Intel push-pins (3) mounting
on the cooler. You can use any cross-tip
screwdriver for this.
Fasten the 92mm fan (2) onto the cooler
unit (1) using the fan clips (4). Connect
the fan to the motherboard´s PWM
signal.
When dismantling the 92mm fan (2),
push the notches of the fan clips (4)
away from the fan.
Befestigen Sie die beiden Intel Push-Pin (3)
Halterungen am Kühler. Dafür können Sie
einen handelsüblichen Kreuzschraubendreher verwenden.
Befestigen Sie den 92mm Lüfter (2) mit
Hilfe der Lüfterklammern (4) am Kühler
(1). Anschließend verbinden Sie den
Lüfter mit dem CPU-Lüfteranschluss des
Mainboards.
Zur Demontage des 92mm Lüfters
(2) drücken Sie die Kerben der
Lüfterklammern (4) vom Lüfter weg.
Page 2
AMD AM4 / AM3(+)
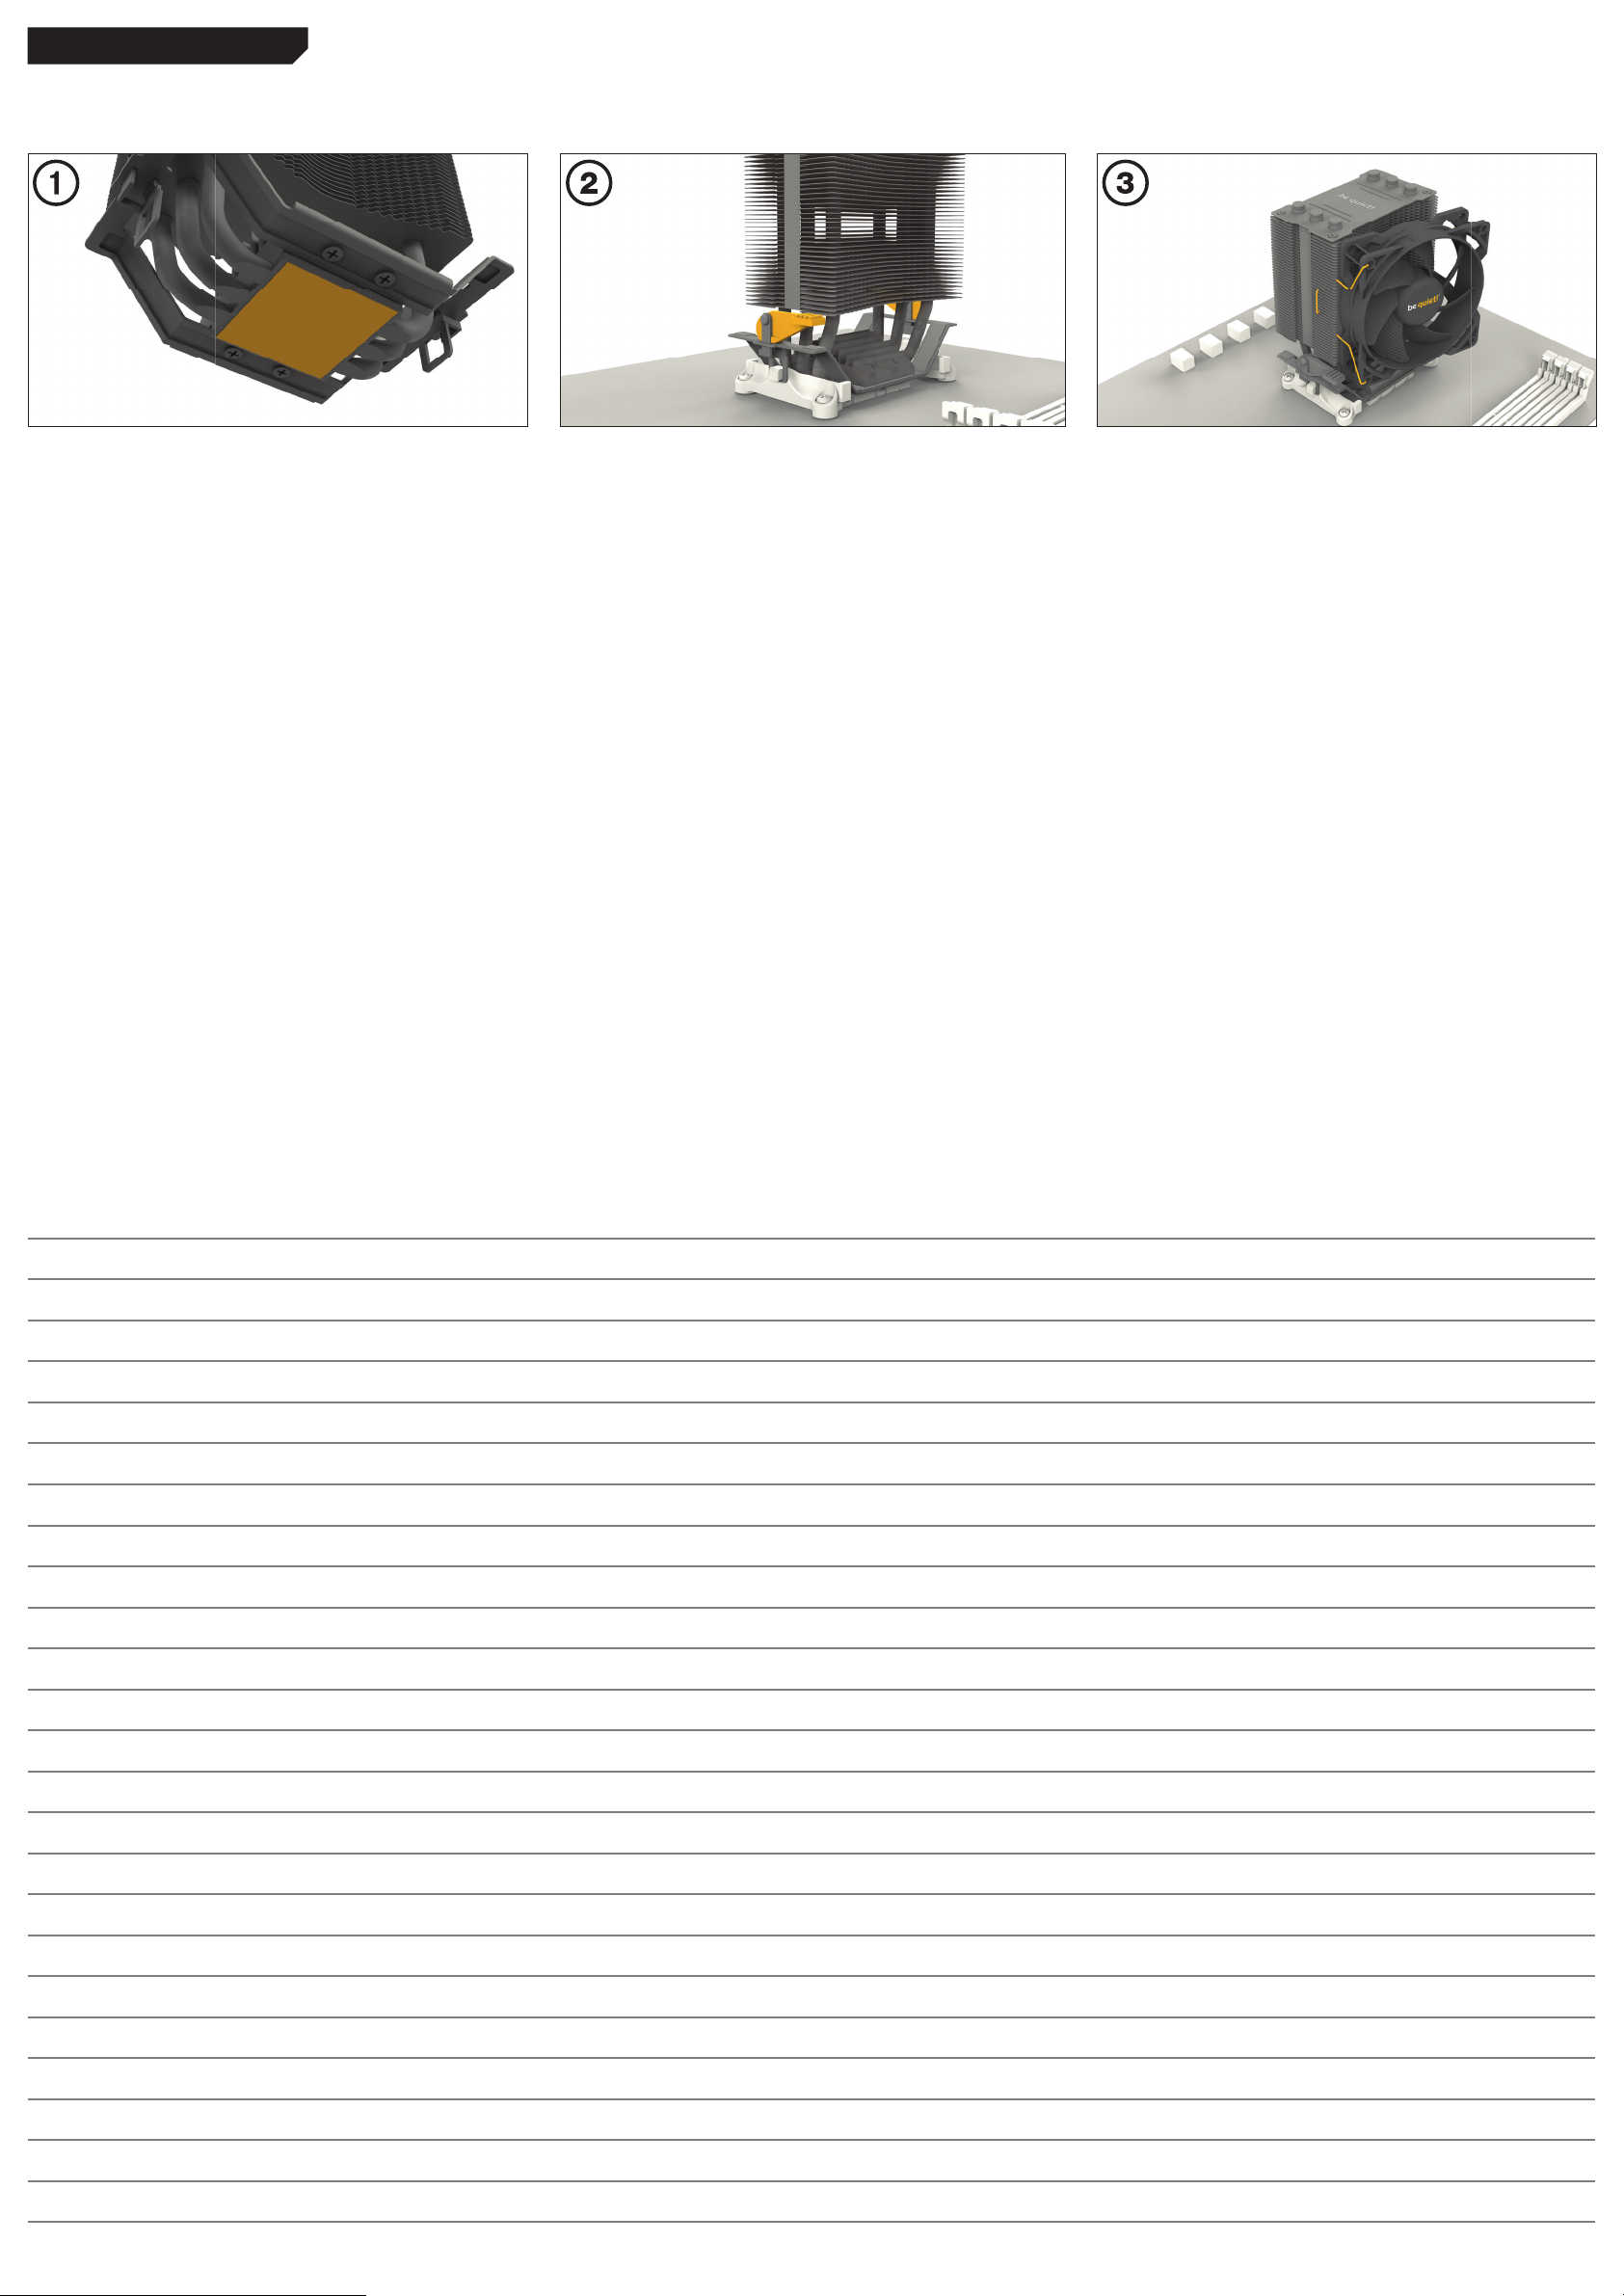
The following parts are needed for this:
1x Pure Rock Slim 2 CPU cooler (1), 1x 92mm fan (2), 2x fan clips (4)
The protective covering on the underneath of the cooler must be removed
prior to installation against the CPU.
Vor der Montage muss zunächst die
Schutzkappe von der Unterseite des
CPU-Kühlers entfernt werden.
Mount the CPU cooler by rotating the
AMD levers on both sides.
Es werden folgende Bauteile benötigt:
1x Pure Rock Slim 2 CPU-Kühler (1), 1x 92mm Lüfter (2), 2x Lüfterklammern (4)
Befestigen Sie den CPU-Kühler (1) beidseitig mit dem AMD Bügel. Ziehen Sie
dazu beide Hebel fest.
Fasten the 92mm fan (2) onto the cooler
unit (1) unsing fan clips (4). Connect the
fan to the motherboard´s PWM signal.
When dismantling the fan (2), push the
notches of the fan clips (4) away from
the fan.
Befestigen Sie den 92mm Lüfter (2) mit
Hilfe der Lüfterklammern (4) am Kühler (1).
Anschließend verbinden Sie den Lüfter
mit dem CPU-Lüfteranschluss des
Mainboards.
Zur Demontage des 92mm Lüfters
(2) drücken Sie die Kerben der
Lüfterklammern (4) vom Lüfter weg.
Notes / Notizen
bequiet.com
 Loading...