

Page 1
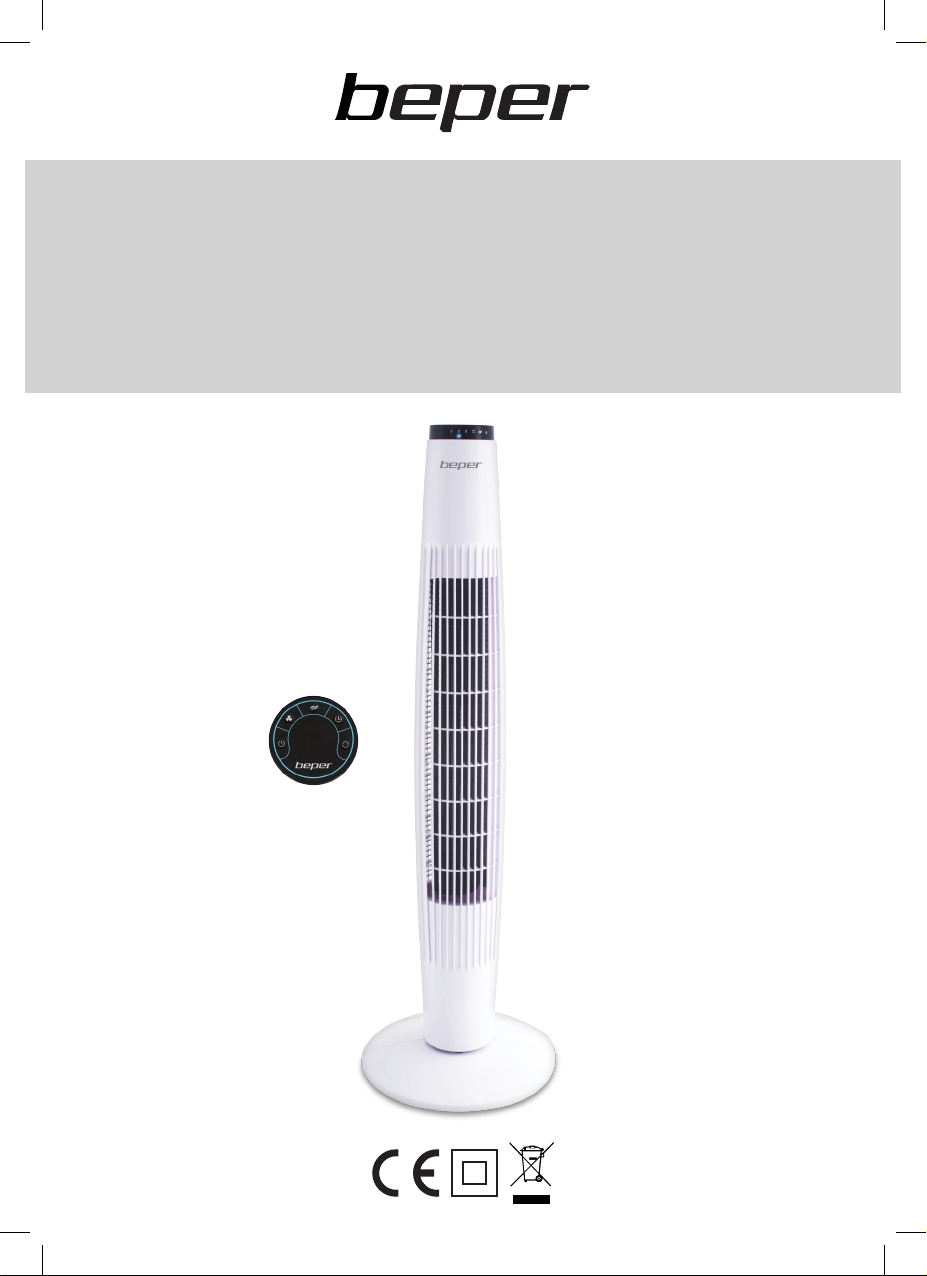
• VENTILATORE TORRETTA - MANUALE DI ISTRUZIONI
• TOWER FAN - USE INSTRUCTIONS
• VENTILATEUR DE TOUR - MANUEL D’INSTRUCTIONS
• TURMVENTILATOR - BETRIEBSANLEITUNG
• VENTILADOR DE TORRE - MANUAL DE INSTRUCCIONES
Cod.: VE.300B
Page 2
ITALIANO
pag. 3
ENGLISH
FRANÇAIS
DEUTSCH
ESPAÑOL
For further information and/or for instructions for use in other languages , please visit:
beper.com
pag. 7
pag. 11
pag. 15
pag. 19
Page 3
Ventilatore torretta Manuale di istruzioni
LEGGERE ATTENTAMENTE QUESTE ISTRUZIONI PRIMA DI PROCEDERE CON L’UTILIZZO
DEL VENTILATORE
Quando si utilizzano apparecchi elettrici, è importante seguire le precauzioni che si trovano di seguito per ridurre eventuali rischi di incendio, shock elettrico o danni a persone e/o cose.
1 Utilizzare il ventilatore seguendo le istruzioni previste dal manuale. Eventuali altri utilizzi non raccomandati potrebbero causare incendi, shock elettrici o danni a persone e/o a cose.
2 Questo prodotto è pensato solamente per essere utilizzato in casa, non a ni commerciali, industriali o per l’utilizzo fuori dalle mura domestiche.
3 Per proteggersi contro shock elettrici: non posizionare l’apparecchio accanto alle nestre, non
immergerlo nell’acqua o spruzzare/lavare con liquidi.
4 Per ridurre rischi di eventuali danni, la spina dev’essere ben collegata e deve aderire perfettamente alla presa di corrente.
5 La supervisione di un adulto è necessaria quando l’apparechhio è utilizzato da bambini
6 Spegnere l’apparecchio e staccare il ventilatore dalla presa di corrente quando non in uso, in caso
di trasporto del prodotto e durante la pulizia dello stesso.
7 Per disconnettere l’apparecchio, prima posizionare l’unità su OFF e poi disconnettere l’apparecchio dalla presa di corrente. Non scollegare mai l’apparecchio tirando il cavo di alimentazione.
8 Non azionare l’apparecchio in presenza di esplosivi o liquidi inammabili.
9 Non azionare il ventilatore in prossimità di amme o apparecchi da cucina.
10 Non azionare il ventilatore qualora la corda o la presa sia danneggiata, o nel caso in cui l’apparecchio non funzioni correttamente.
11 Evitare il contatto con le parti mobili del ventilatore.
12L’utilizzo di parti non raccomandate/previste dal produttore possono essere azzardate.
13 Posizionare il ventilatore su una supercie asciutta
14 Non appendere o montare l’apparecchio su un muro o su un’altitudine
15 Non azionare se il corpo dell’apparecchio è danneggiato
16 Utilizzare solo in una presa di corrente 220-230VAC, 50Hz.
ATTENZIONE:
1. Quest’apparecchio non può essere utilizzato da persone (inclusi bambini) con capacità siche,
visive, mentali ridotte, o con eventuale mancanza di esperienza e conoscenza, senza la supervisione di un adulto o di un supervisore.
2. I bambini devono essere sorvegliati durante l’utilizzo dell’apparecchio.
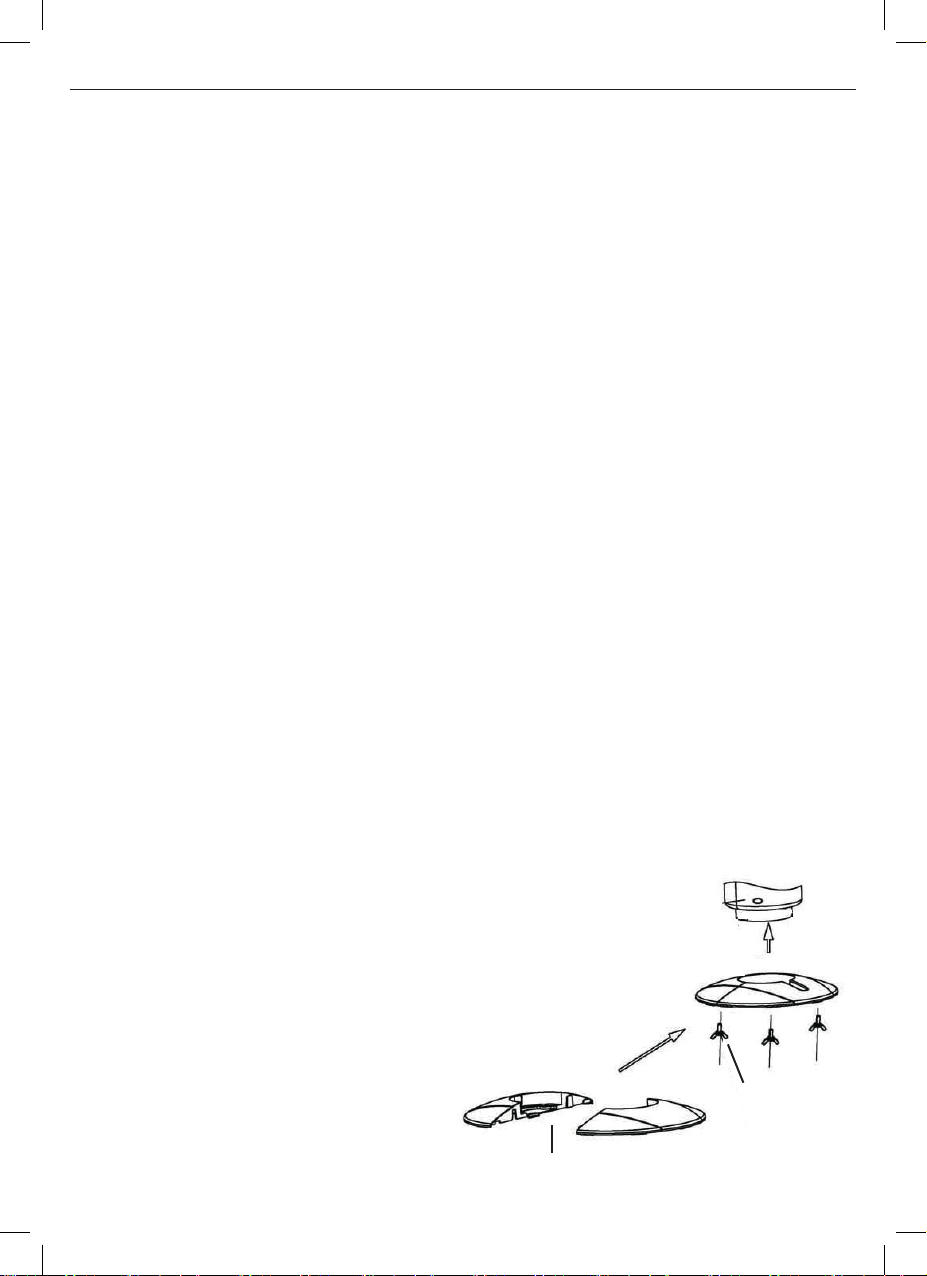
ASSEMBLAGGIO DEL PRODOTTO
Non usare l’apparecchio prima di aver terminato l’assemblaggio della base.
Assemblaggio della base:
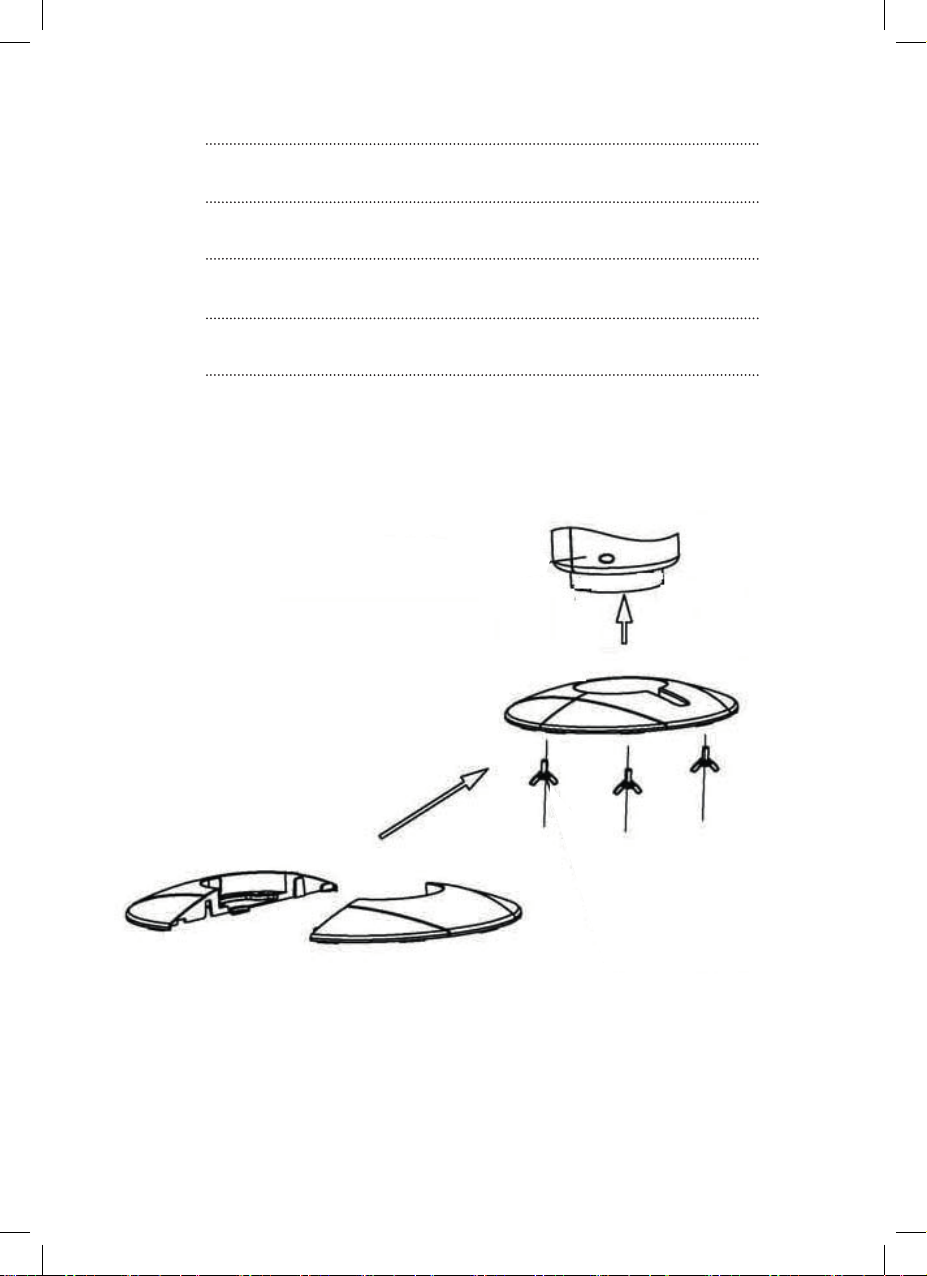
Unire le due metà che compongono la base, facendo attenzione che il
cavo di alimentazione sia inserito al centro delle stesse
Posizionare la base sul corpo ventilatore facendo corrispondere i fori per
le viti previsti
Inserire ed avvitare le tre viti a farfalla
Posizionare il cavo nell’apposito alloggio
Posizionare il ventilatore in posizione verticale
BASE
VITI A FARFALLA
3
Page 4
Ventilatore torretta Manuale di istruzioni
UTILIZZO DEL PRODOTTO:
Collegare l’apparecchio alla presa elettrica assicurandosi che la spina sia ben collegata.
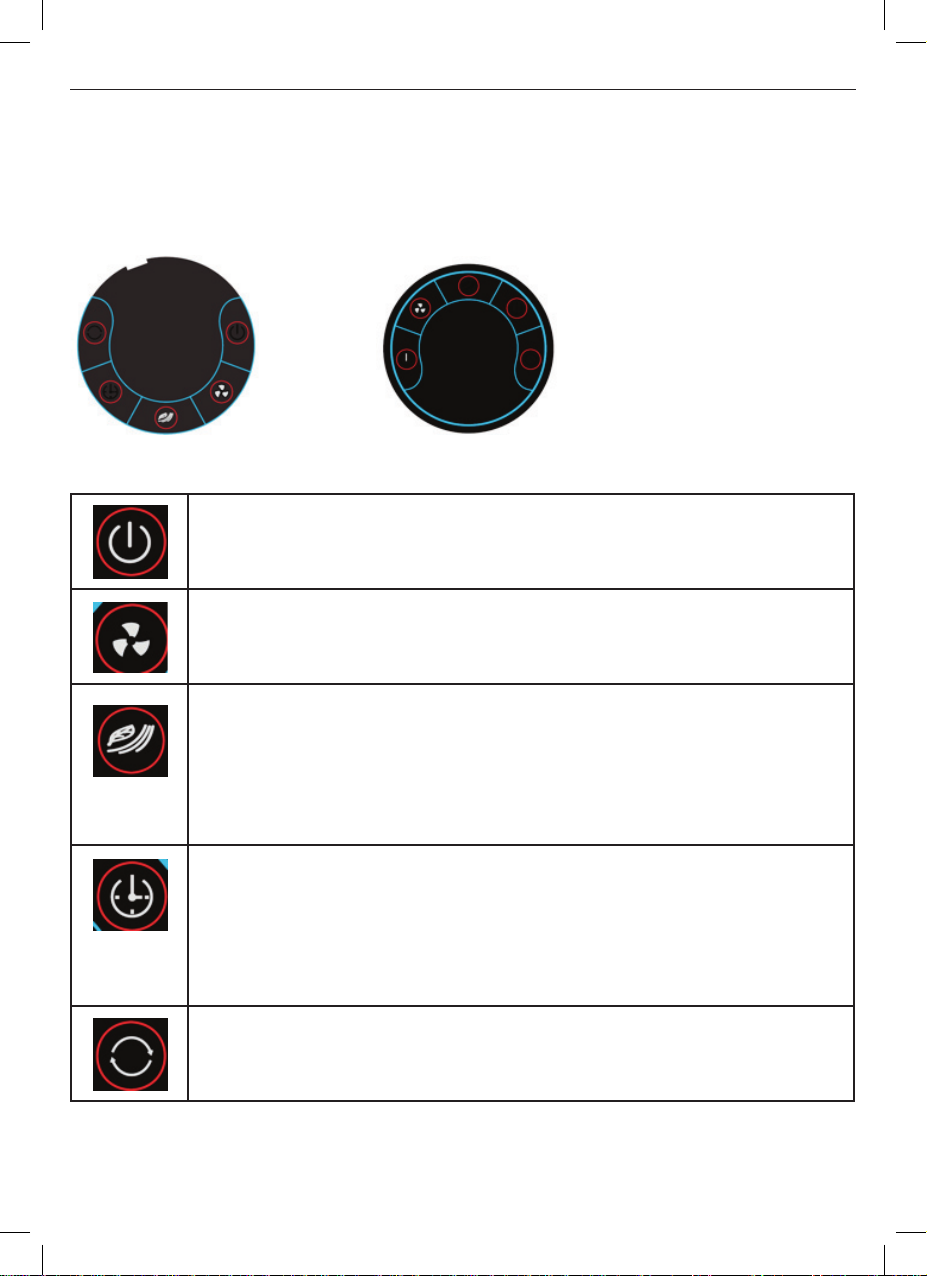
L’apparecchio può funzionare sia tramite il pannello di controllo che tramite il telecomando.
Pannello di controllo Telecomando
Pulsante ON/OFF:
Premendo il pulsante ON/OFF, il ventilatore si avvierà alla velocità LOW (BASSA)
ed in modalità NORMAL.
Premere nuovamente il pulsante per spegnere il ventilatore.
Pulsante SPEED (VELOCITA’):
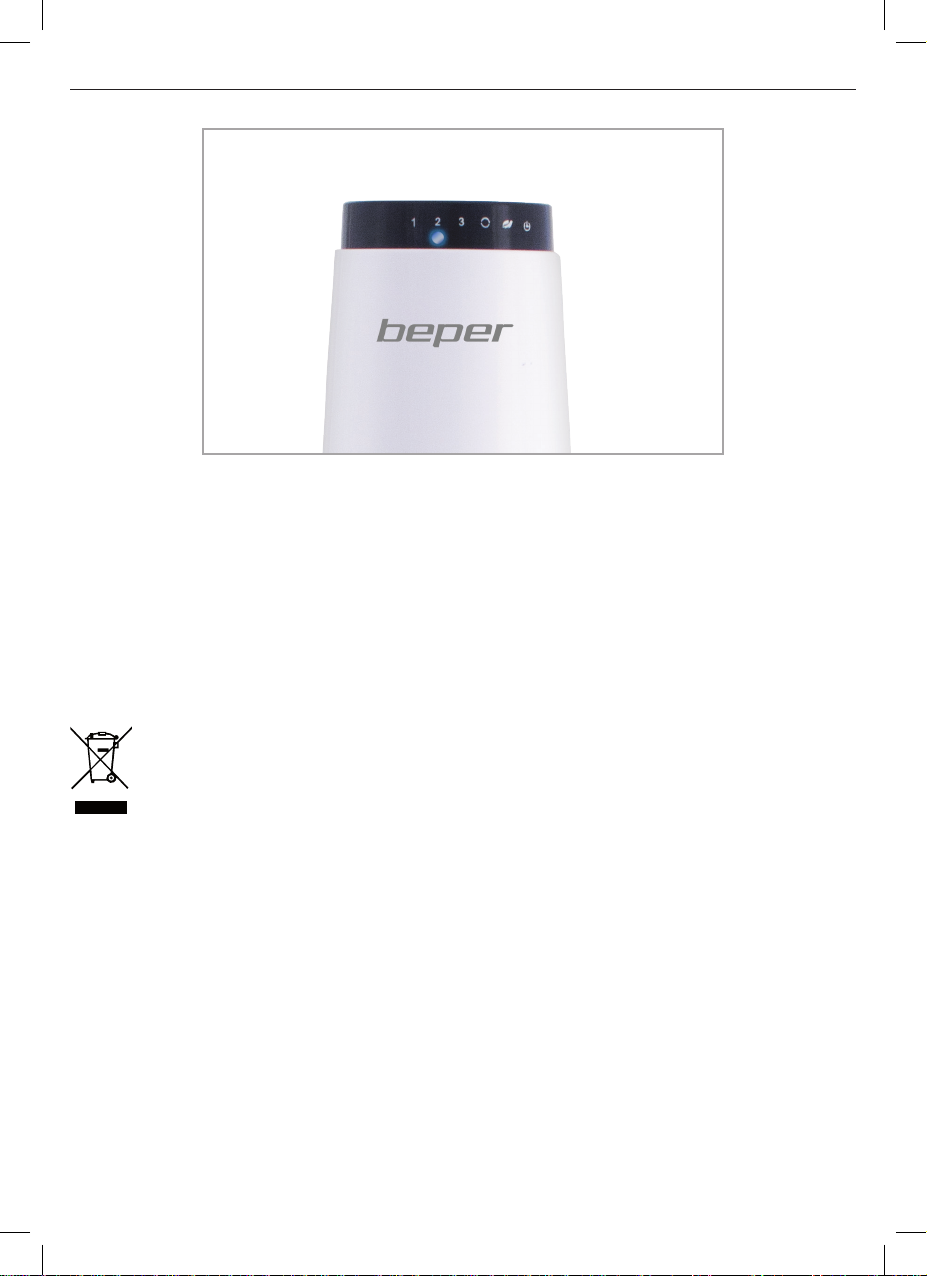
Premendo questo tasto si andrà ad impostare la velocità desiderata. Sul display
si accenderà il led corrispondente alla velocità selezionata ( 1: LOW 2:MED 3:
HIGH)
Scelta tra NORMAL WIND MODE o NATURAL WIND MODE.
Premere una sola volta il pulsante per scegliere la modalità NATURAL. Il led
corrispondente si accenderà . Premere nuovamente il tasto per passare alla
modalità
NORMAL.
NATURAL mode: l’apparecchio opererà alternando automaticamente ad intervalli
i 3 diversi livelli di velocità.
TIMER:
Attraverso la funzione timer, è possibile impostare l’ora di spegnimento automatico dell’apparecchio. Premere il tasto TIMER per scegliere l’intervallo di tempo
desiderato (1,2 o 4 ore). Il colore del LED cambierà di conseguenza:
ROSSO=1 ore
ARANCIONE=2 ore
VERDE=4 ore
OSC (OSCILLAZIONE):
Per attivare la modalità oscillazione, premere il bottone OSC.
Per azzerare l’impostazione, premere nuovamente il pulsante OSC.
Nella modalità oscillazione, la ventilazione è automatica.
4
Page 5
Ventilatore torretta Manuale di istruzioni
DATI TECNICI
Potenza: 50W
Alimentazione: 220V ~ 50Hz
TELECOMANDO
Batteria al litio 3V
1x CR 2032
In un’ottica di miglioramento continuo Beper si riserva la facoltà di apportare modiche e
migliorie al prodotto in oggetto senza previo preavviso.
Il simbolo del cestino barrato riportato sull’apparecchio indica che il prodotto, alla ne
della propria vita utile, dovendo essere trattato separatamente dai riuti domestici, deve
essere conferito in un centro di raccolta differenziata per apparecchiature elettriche ed
elettroniche oppure riconsegnato al rivenditore al momento dell’acquisto di una nuova ap-
parecchiatura equivalente.
L’adeguata raccolta differenziata per l’avvio successivo dell’apparecchio al riciclaggio, al trattamento e allo smaltimento ambientalmente compatibile contribuisce ad evitare possibili effetti negativi
sull’ambiente e sulla salute e favorisce il recupero dei materiali di cui è composto.
L’utente è responsabile del conferimento dell’apparecchio a ne vita alle appropriate strutture di
raccolta. Per informazioni più dettagliate inerenti i sistemi di raccolta disponibili, rivolgersi al servizio
locale di smaltimento riuti, o al negozio dove è stato effettuato l’acquisto.
Chiunque abbandona o cestina questo apparecchio e non lo riporta in un centro di raccolta differen-
ziata per riuti elettrici-elettronici è punito con la sanzione amministrativa pecuniaria prevista dalla
normativa vigente in materia di smaltimento abusivo di riuti
5
Page 6

CERTIFICATO DI GARANZIA
Questo apparecchio è stato controllato in fabbrica. La garanzia di applicazione è valida 24 mesi
dalla data di acquisto per difetti di materiale o di fabbricazione.
La garanzia è valida unicamente presentando il certicato di garanzia e il documento di
acquisto (scontrino scale) che certichi la data di acquisto e il nome del modello dell’apparecchio acquistato.
Se l’apparecchio dovesse richiedere assistenza tecnica rivolgersi al venditore o presso la nostra
sede. Questo per conservare inalterata l’efcienza del vostro apparecchio e per NON invalidare la
garanzia. Eventuali manomissioni dell’apparecchio da parte di personale non autorizzato invalideranno automaticamente la garanzia.
Condizioni di garanzia
Se ci sono guasti a causa di difetti di materiale e/o fabbricazione durante il periodo di garanzia,
garantiamo la riparazione del prodotto gratuitamente, a patto che:
- l’apparecchio sia stato usato in modo corretto ed ai ni per cui è stato costruito;
- l’apparecchio non sia stato manomesso: il prodotto non è manutenzionabile.
- venga presentato lo scontrino;
- non rientrano in garanzia le parti che dimostrano un normale logoramento.
Sono quindi escluse tutte le parti che hanno subito rotture accidentali o che sono soggette ad usura
(tra le quali lampade, batterie, resistenze) le parti estetiche e difetti derivanti da un utilizzo non domestico dell’apparecchio, negligenza nell’uso, incuria, istallazione errata o impropria o nella manutenzione, danni da trasporto e tutti quei danni non imputabili direttamente al produttore.
Se entro il periodo di garanzia emerge un difetto che non può essere riparato, l’apparecchio viene
cambiato gratuitamente.
In ogni caso, se la parte da sostituire per difetto, rottura o malfunzionamento è un accessorio e/o
una parte staccabile del prodotto, Beper si riserva la facoltà di sostituire solo il pezzo interessato e
non l’intero prodotto.
Assistenza tecnica
Anche dopo il periodo di garanzia prestiamo molta attenzione alle riparazioni.
Per l’assistenza tecnica e/o riparazioni fuori dal periodo di garanzia ci si può rivolgere direttamente
all’indirizzo sottostante.
BEPER SRL
Via Salieri, 30
37050 - Vallese di Oppeano - Verona
Tel. 045/7134674 – Fax 045/6984019
e-mail: [email protected]
Page 7
ENGLISH
Tower Fan Use instructions
READ AND SAVE THIESE SAFETY INSTRUCTIONS BEFORE USING THIS FAN
When using electrical appliances, basic precautions should always be followed to reduce
the risk of re, electric shock, and injury to persons, including the following:
1 Use this fan only as described in this manual. Other use not recommended may cause
re, electric shock or injury to persons.
2 This product is intended for household use ONLY and not for commercial, industrial or
outdoor use.
3 To protect against electric shock: do not place fan on windowsills, immerse unit, plug or cord in
water or spray with liquids.
4 To reduce the risk of shock, this plug is intended to t the outlet. If the plug does not t fully in the
outlet, reverse the plug. If it still does not t, contact a qualied electrician. DO NOT attempt to defeat
this safety feature.
5 Close supervision is necessary when any appliance is used by or near children.
6 Turn the fan OFF and unplug the fan from the outlet when not in use, when moving the fan from
one location to another and before cleaning.
7 To disconnect the fan, rst turn the unit OFF, grip the plug and pull it from the wall outlet. Never
pull the plug by the cord.
8 Do not operate the fan in the presence of explosive and/or ammable fumes.
9 Do not place the fan or any parts near an open ame, cooking or other heating appliance.
10 Do not operate fan with a damaged cord or plug, or if the product malfunctions, or dropped and
damaged in any manner.
11 Avoid contact with moving fan parts.
12 The use of attachments not recommended by the manufacturer may be hazardous.
13 Place the fan on a dry level surface.
14 Do not hang or mount fan on a wall or ceiling.
15 Do not operate if the fan housing is damaged.
16 Only use on 220-230VAC, 50Hz power supply.
WARNING:
1. This appliance is not intended for use by person (including children) with reduced physical,
sensory or mental capabilities, or lack of experience and knowledge, unless they have been given
supervision or instruction concerning use of the appliance by a person responsible for their safety.
2 Children should be supervised to ensure that they do not play with the appliance
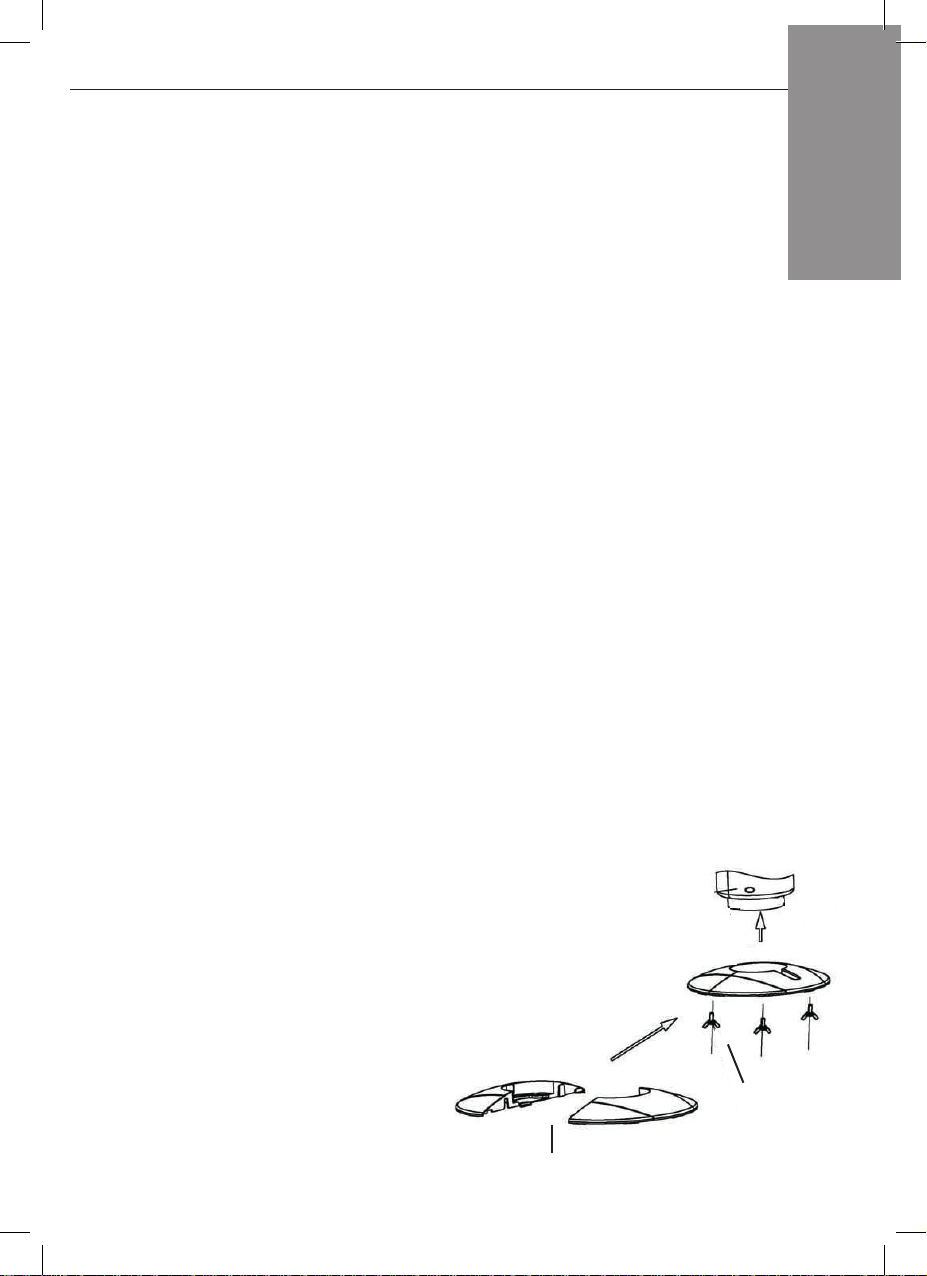
ASSEMBLY INSTRUCTIONS
WARNING: Do not use this fan before nish assembling the base.
Base Assembly:
Join the two halwes of the base, paying attention the power cord is inserted at the center of them
Place the base on the fan body, matching the holes with the buttery nuts
Insert the buttery nuts
Place the power cord in the housing
Place the fan upright
BASE
7
BUTTERFLY
NUT
Page 8
Tower Fan Use instructions
FAN OPERATION
Plug into any AC 220230V, 50Hz source, insure that the plug and the socket t well.
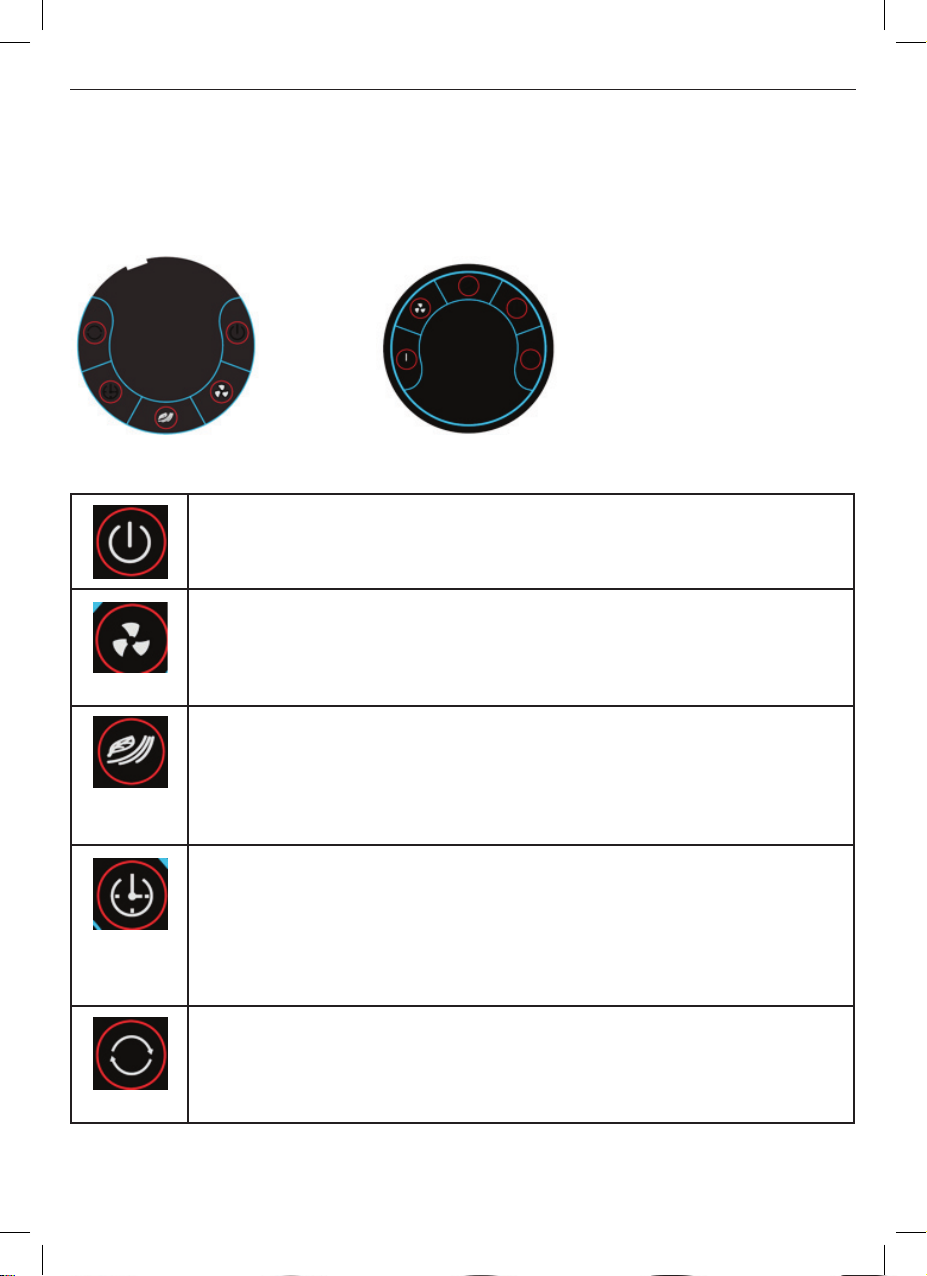
You can operate the appliance by the control panel or remote controller
Control panel Remote
ON/OFF button:
Press the button once, the fan will start at LOW speed mode and normal wind
mode.
Press again to turn the fan off.
SPEED button:
Fan speed adjust:
Press once to to set MED fan speed.
Press the third time to set HIGH fan speed.
Press the fourth time return to LOW fan speed.
Select normal wind mode, or natural wind mode.
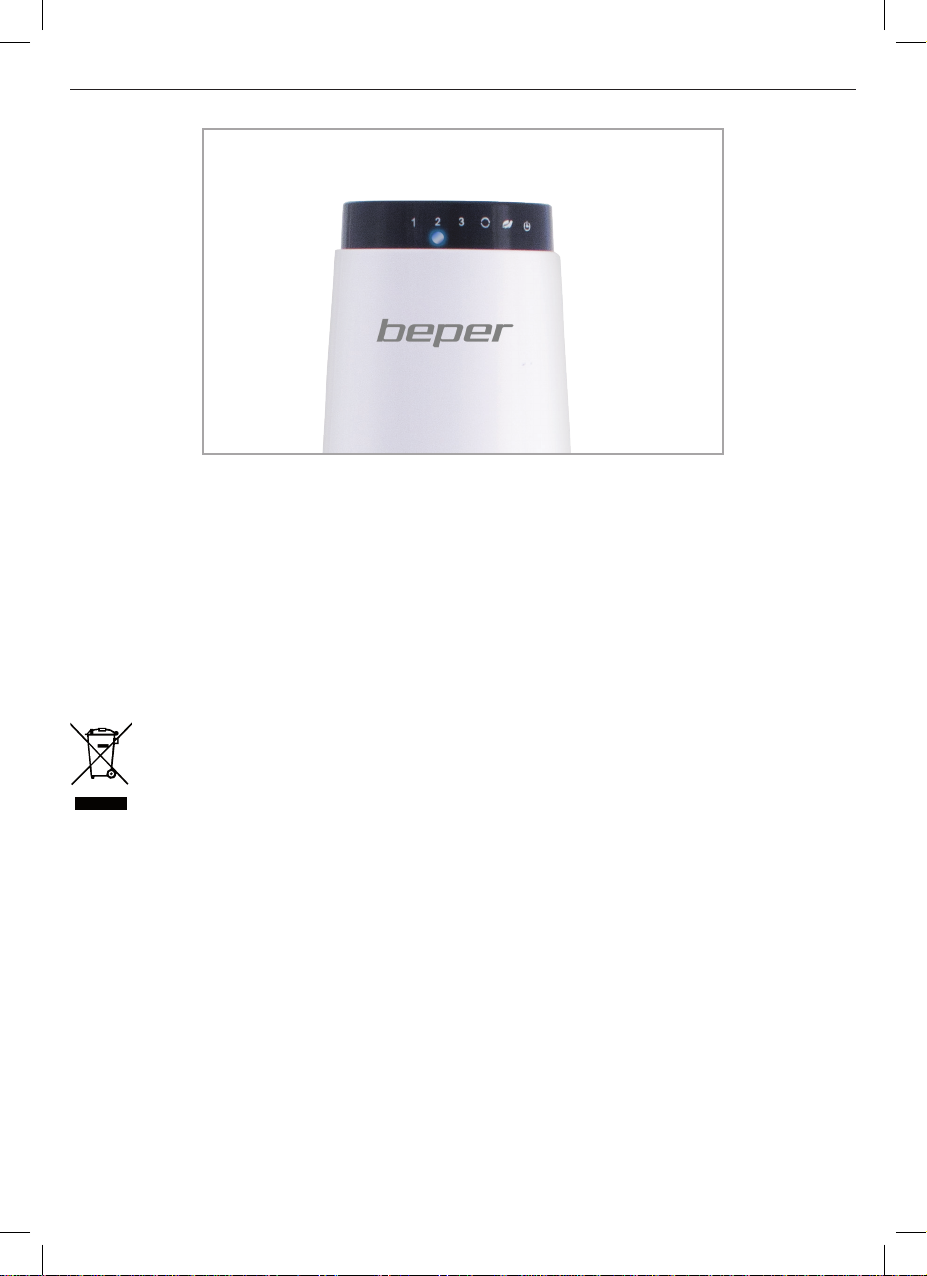
Press the button once to select NATURAL mode and the “NAT” LED indicator will
be on, press again to switch to NORMAL mode.
NORMAL(Default): unit operates in selected fan speed, High, Medium or Low
NATURAL mode: unit operates according to computerized intervals of changing
speeds;
TIMER button:
When the fan is in use, you can set the time to close the appliance. Press this
button to select 1, 2 or 4 hours.
When select different time, the TIME led will display different color:
RED=1 hour;
ORANGE=2 hours;
GREEN=4 hours;
OSC button
To activate the Oscillation feature, press the OSC button once.
Press again to cancel
In the oscillating mode the fan is automatically turning approximately about 30
degrees to the left and to the right
8
Page 9
Tower Fan Use instructions
TECHNICAL DATA
Power : 50W
Power supply. 220V ~ 50Hz
REMOTE CONTROL
Lithium battery 3V
1xCR2032
For any improvement reasons, Beper reserves the right to modify or improve the product
without any notice.
The European directive 2011/65/EU on Waste Electrical and Electronic Equipment (WEEE),
requires that old household electrical appliances must not be disposed of in the normal
unsorted municipal waste stream. Old appliances must be collected separately in order to
optimize the recovery and recycling of the materials they contain, and reduce the impact on
human health and the environment. The crossed out “wheeled bin” symbol on the product
reminds you of your obligation, that when you dispose of the appliance, it must be separately collected.
9
Page 10

GUARANTEE CERTIFICATE
This appliance has been checked in the factory. From the date of original purchase a 24 month
guarantee applies to material and production defects. The purchase receipt and the guarantee cer-
ticate must be submitted together in case of claim to guarantee.
The guarantee is valid only with a guaranty certicate and proof of purchase (scal receipt)
indicating the date of purchase and the model of the appliance
For any technical assistance, please contact directly the seller or our head ofce in order to preserve
the appliance’s efciency and NOT TO void the guarantee. Any intervention on this appliance by
non-authorized persons will automatically void the guarantee.
Guarantee conditions
If the appliance shows defects as a result of faulty material and/or production during the period of
guarantee, we guarantee repair free of charge on condition that:
- The appliance has been used properly and for the purpose for which it has been intended.
- The appliance has not been tampered with, otherwise it is not maintainable.
- The purchase receipt shall be presented.
- The appliance showing a fair wear and tear shall not be covered by this guarantee.
Therefore, any part that could be accidentally broken or having visible signs of use in consumable
products (such as lamps, batteries, heating elements…) the aesthetic parts are excluded from the
guarantee, and any defect whatsoever resulting from non-respect of the rules for use, negligence in
usage and/or maintenance of the appliance, carelessness, wrong or improper installation, damage
during transport and any other damage not attributable the supplier.
For every defect that could not be repaired within the guarantee period, the appliance will be replaced free of charge.
In any case, if the part to be replaced for defect, breakage or malfunction is an accessory and/or a
detachable part of the product, Beper reserves the right to replace only the very part in question and
not the entire product
Technical assistance
Even after the guarantee period we will always pay attention to repairs for defected appliances.
For technical assistance and/or repairs after the guarantee period you can directly contact the below
address:
CONTACT YOUR DISTRIBUTOR IN YOUR COUNTRY OR AFTER SALES DEPARTMENT
BEPER. E-MAIL [email protected]
WHICH WILL FORWARD YOUR ENQUIRIES TO YOUR DISTRIBUTOR.
Page 11
FRANÇAIS
Ventilateur de tour Manuel d’instructions
LIRE ATTENTIVEMENT CES INSTRUCTIONS AVANT DE PROCÉDER AVEC L’UTILISATION DU
VENTILATEUR
Quand on utilise des appareils électriques, il est important de suivre les précautions qui se trouvent
ci-dessous pour réduire des éventuels risques d’incendie, de décharges électriques ou de dommages à des personnes et/ou des choses.
1 Utiliser le ventilateur en suivant les instructions prévues du manuel. D’autres éventuelles utilisations non recommandées pourraient causer des incendies, des décharges
électriques ou des dommages à des personnes et/ou à des choses.
2 Ce produit a été étudié seulement pour être utilisé dans une maison, non à des ns
commerciales, industrielles ou pour l’utilisation en dehors des murs domestiques.
3 Pour se protéger contre des décharges électriques : ne pas positionner l’appareil à côté
des fenêtres, ne pas le plonger dans de l’eau ou vaporiser /laver avec des liquides.
4 Pour réduire les risques des éventuels dommages, la che doit être bien débranchée et
elle doit adhérer parfaitement à la prise de courant.
5 Le contrôle d’un adulte est nécessaire quand l’appareil est utilisé par des enfants.
6 Éteindre l’appareil et débrancher le ventilateur de la prise de courant quand il n’est pas
utilisé, en cas de transport du produit et pendant le nettoyage de lui-même.
7 Pour débrancher l’appareil, avant positionner l’unité sur OFF et ensuite débrancher
l’appareil de la prise de courant. Ne jamais débrancher l’appareil en tirant le câble d’alimentation.
8 Ne pas actionner l’appareil en présence d’explosifs ou de liquides inammables.
9 Ne pas actionner le ventilateur à proximité de ammes ou d’appareils de cuisine.
10 Ne jamais actionner le ventilateur quand la corde ou la prise est endommagée, ou dans le cas
où l’appareil ne fonctionne pas correctement.
11 Éviter le contact avec les parties mobiles du ventilateur.
12 L’utilisation des parties non recommandées/prévues du produit peuvent être hasardées.
13 Positionner le ventilateur sur une supercie sèche.
14 Ne pas accrocher ou monter l’appareil sur un mur ou sur une altitude.
15 Ne pas actionner si le corps de l’appareil est endommagé.
16 Utiliser seulement une prise de courant 220-230 VAC, 50 Hz.
ATTENTION :
1. Cet appareil ne peut pas être utilisé par des personnes (inclus des enfants) avec des capacités
physiques, visuelles, mentales réduites ou avec un éventuelle manque d’expérience et de connaissance, sans le contrôle d’un adulte ou d’un superviseur.
2 Les enfants doivent être surveillés pendant l’utilisation de l’appareil.
ASSEMBLAGE DU PRODUIT
Ne pas utiliser l’appareil avant d’avoir terminé l’assemblage de la base.
Assemblage de la base :
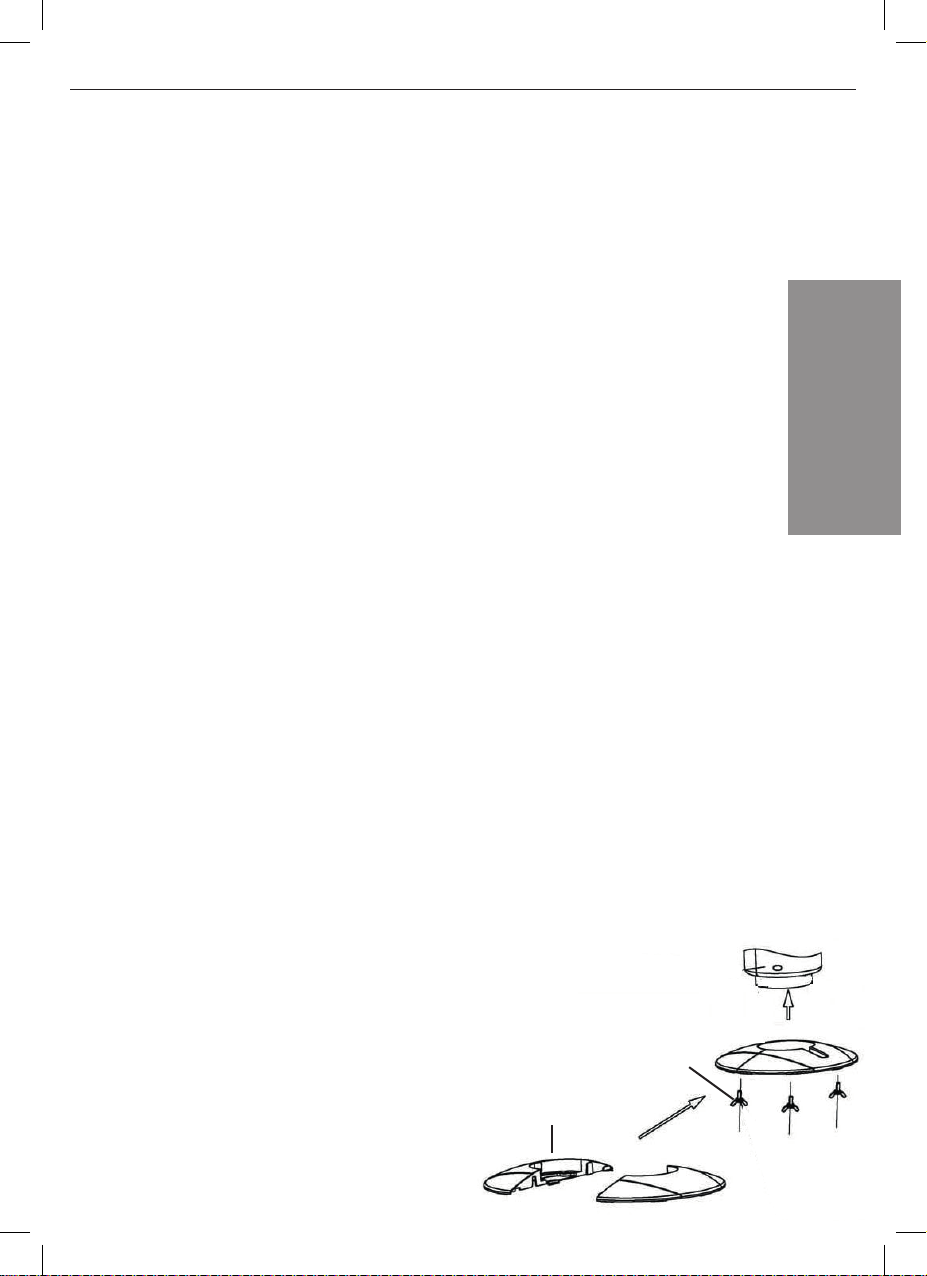
Unir les deux moitiés qui composent la base, en faisant
attention que le câble d’alimentation soit inséré au centre. Positionner la base sur le corps ventilateur en faisant
correspondre les trous pour les visses prévues.
Insérer et visser les trois visses au papillon
Positionner le câble dans le logement spécial
Positionner le ventilateur en position verticale
BASE
VISSES À
PAPILLON
11
Page 12
Ventilateur de tour Manuel d’instructions
UTILISATION DU PRODUIT :
Brancher l’appareil à la prise électrique en s’assurant que la che soit bien branchée.
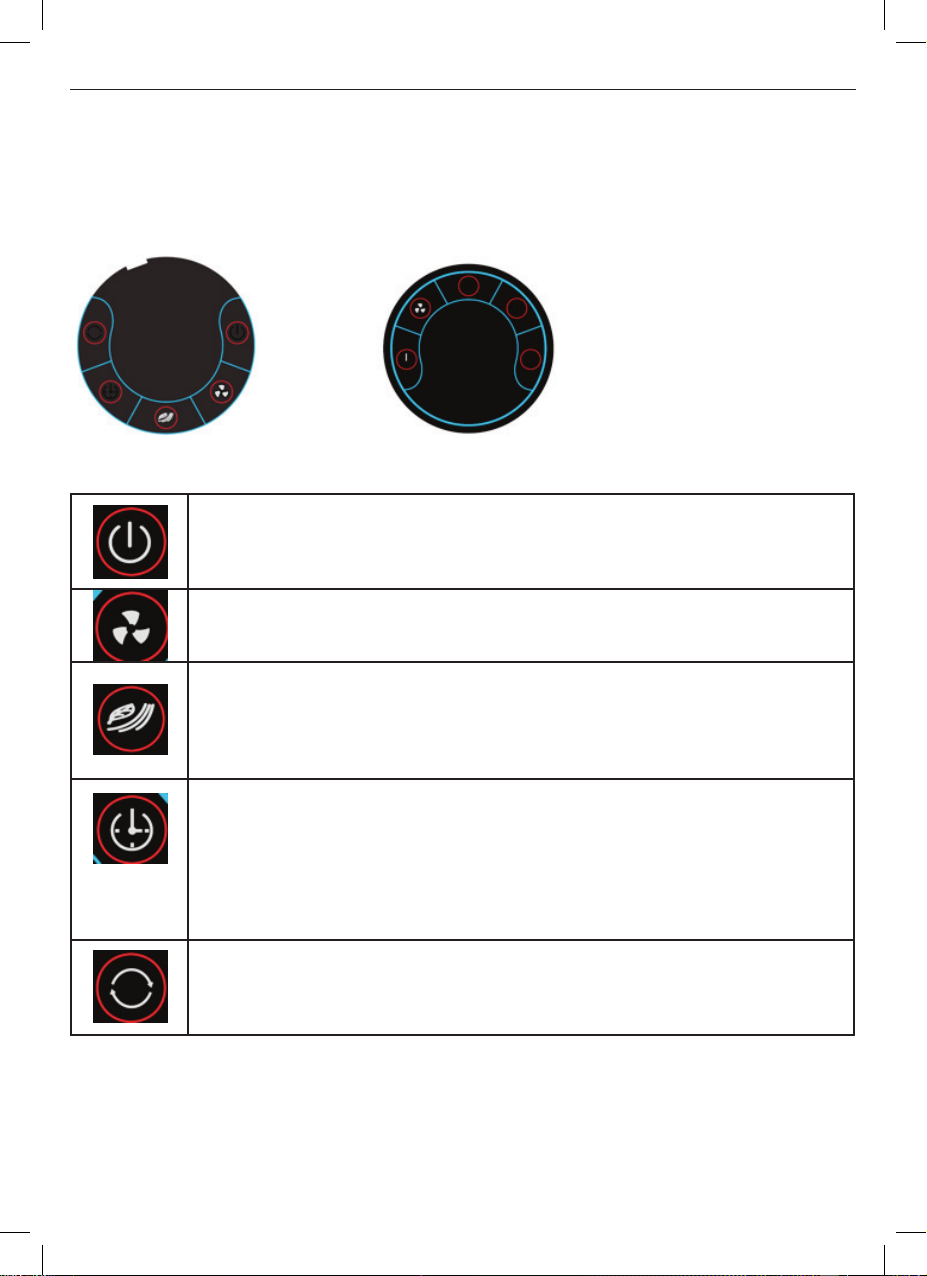
L’appareil peut fonctionner que ce soit par l panneau de contrôle que par la télécommande.
Panneau de contrôle Télécommande
Pulsant ON/OFF:
En appuyant le pulsant ON/OFF, le ventilateur s’actionnera à la vitesse LOW
(BASSE) et dans la modalité NORMALE.
Appuyer de nouveau le pulsant pour éteindre le ventilateur.
Pulsant SPEED (VITESSE):
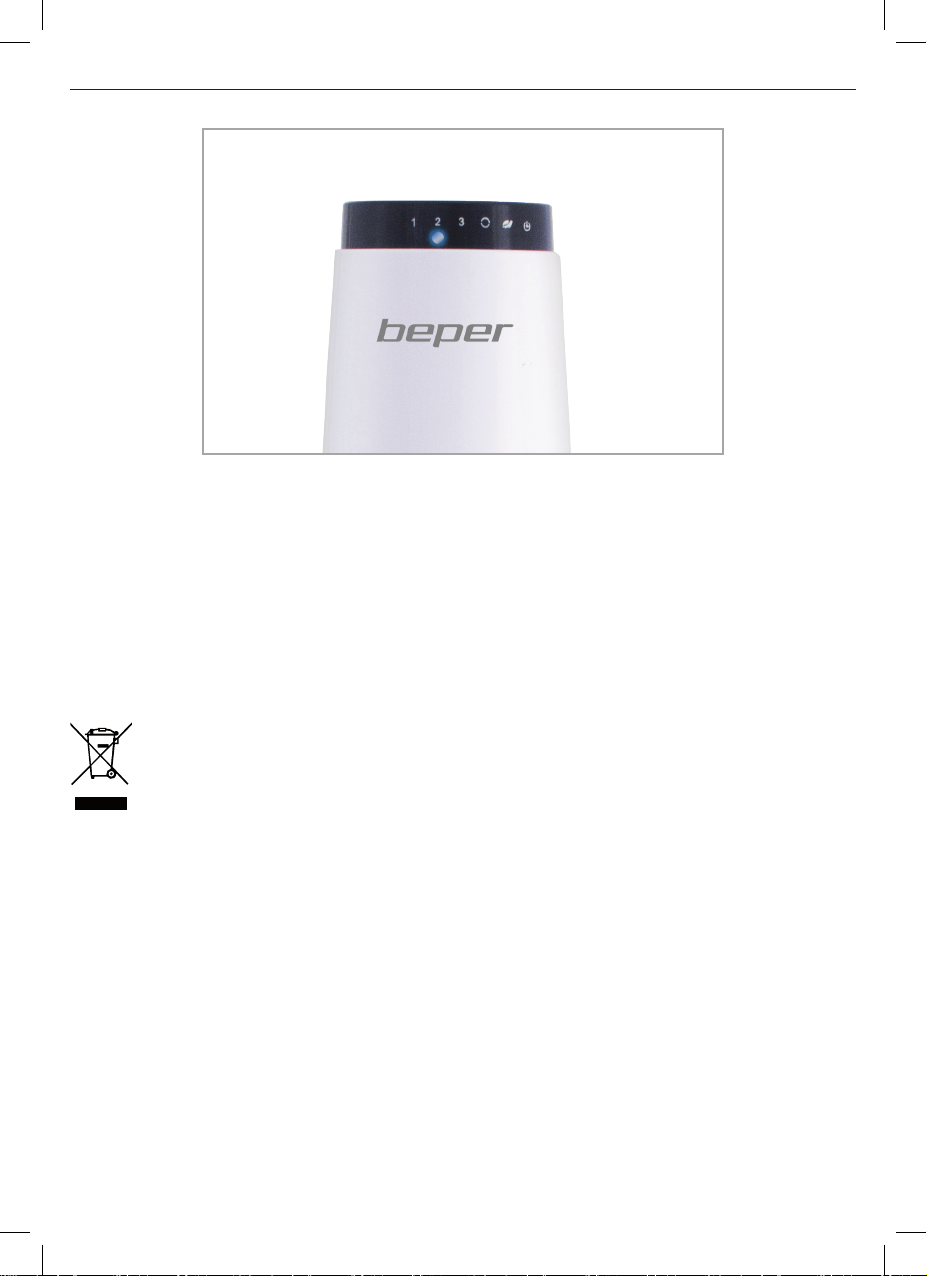
En appuyant sur ce pulsant on imposera la vitesse désirée. Sur l’écran s’allumera
le led correspondant à la vitesse sélectionnée ( 1: LOW 2: MED 3: HIGH)
Choix entre NORMAL WIND MODE ou NATURAL WIND MODE.
Appuyer une seule fois le pulsant pour choisir la modalité NATURELLE. Le led
correspondant s’allumera. Appuyer de nouveau sur le pulsant pour passer à la
modalité NORMALE. NATURAL mode: l’appareil opèrera en alternant automatiquement à des intervalles les 3 différents niveaux de vitesse.
TIMER:
À travers la fonction TIMER, il est possible d’imposer l’heure d’éteignement automatique de l’appareil. Appuyer le pulsant TIMER pour choisir l’intervalle de temps
désiré (1, 2 ou 4 heures). La couleur du LED changera par conséquence :
ROUGE =1 heure
ORANGE =2 heures
VERT = 4 heures
OSC (OSCILLATION):
Pour activer la modalité d’oscillation, appuyer le pulsant OSC.
Pour mettre à zéro l’imposition, appuyer de nouveau sur le pulsant OSC.
Dans la modalité d’oscillation, la ventilation est automatique
12
Page 13
Ventilateur de tour Manuel d’instructions
DONNEES TECHNIQUES
Puissance : 50W
Alimentation. 220V ~ 50Hz
TÉLÉCOMMANDE
3V PILE AU LITHIUM
1xCR2032
Dans une optique d’amélioration constante Beper se réserve le droit de modier ou améliorer cet appareil sans préavis.
Le produit en n de vie doit être détruit selon les normes en vigueur relatives à l’élimination
des déchets et ne peut être traité comme simple déchet ménagé.
Le produit doit être détruit dans un centre d’élimination des déchets adapté ou être restitué
au revendeur dans le cas d’une substitution avec un autre produit équivalent neuf.
Le fabricant prendra à sa charge les frais occasionnés pour la destruction du produit selon
les termes de la loi en vigeur.
Le produit est composé de pièces non biodégradables et substances qui peuvent polluer l’environnement si détruites de façon inapropriée . Par ailleurs, certaines parties de ces matières peuvent
être recyclées évitant ainsi toute pollution pour l’environnement. Il est de votre et notre devoir de
préserver la santé de l’environnement.
Le symbole indique que le produit répond aux normes requises par les nouvelles
directives introduites en faveur de l’environnement (2011/65/EU) et que le produit doit être détruit de
façon appropriée au terme du cycle de vie.
Si besoin, informez-vous auprès des autorités locales compétentes en matière d’élimination des
déchets de votre commune.
Toute personne qui ne tiendra pas compte de ces règles d’élimination des déchets indiquées dans
ce paragraphe en répondra selon la loi en vigueur.
13
Page 14

CERTIFICAT DE GARANTIE
Cet appareil a été contrôlé en usine. La garantie est valable 24 mois à partir de la date d’achat pour
tout défaut de matériel ou de fabrication. En cas de réclamation, le ticket de caisse et la garantie
devront être présentés ensemble.
La garantie est valide seulement si vous montrez le certicat de garantie et la récépissé
d’achat qui doit demontrer la date de l’achat et le nom du model acheté.
En cas de besoin et pour toute assistance technique, veuillez contacter votre revendeur ou vous
adresser à notre siège. Cela vous permettra de conserver votre appareil dans de meilleures conditions et de NE PAS invalider la garantie. Toute manipulation de l’appareil par une personne non
autorisée ou non qualiée annulera automatiquement la garantie.
Conditions de garantie
Pendant la durée de garantie, si des pannes provenant d’un défaut de materiel et/ou de fabrication
apparaissent, nous assurons gratuitement la réparation aux conditions énoncées ci-dessous :
- l’appareil a été correctement utilisé et ce uniquement à l’usage pour lequel il a été fabriqué ;
- L’appareil ne doit pas être etait altéré: on ne peux pas remédier l’appareil.
- la présentation du ticket de caisse est obligatoire;
- les pièces présentant les signes évidents d’usure ne sont pas pris en compte dans la garantie.
En conséquence, sont exclus de la garantie toutes les pièces qui auraient subi des dommages
accidentels ou présentant des signes d’usure normale (parmi lesquelles, ampoules, batteries, piles, résistances), les accessoires esthétiques, toutes les pièces comportant des défauts dus à la
non utilisation domestique, la négligence dans la manipulation, insouciance, incorrecte ou impropre
installation et l’entretien, les dommages lors du transport et tous les dommages non imputables
directement au producteur.
Si un défaut survient lors de la période de garantie et ne peut être réparé, l’appareil sera remplacé
gratuitement.
Si la partie qui doit être remplacer parce que ne marche pas bien ou puor défaut ou rupture est
une pièce détachée ou un accessoire, Beper remplacera seulement l’accessoire/la pièce mais non
l’appareil entier.
Assistance technique
Même après la n de la garantie, nous accordons toujours une grande importance à la reparation.
Pour toute assistance technique et/ou reparations en dehors de la garantie, veuillez vous adresser
directement à l’adresse ci-desous :
LE SERVICE APRÈS-VENTE EST EFFECTUÉ PAR VOTRE REVENDEUR OU PAR
L’IMPORTATEUR/DISTRIBUTEUR DES PRODUITS BEPER.
ÉCRIVEZ UN E-MAIL AU [email protected] POUR CONNAITRE LE CENTRE SERVICE
AGRÉE BEPER LE PLUS PROCHE DE CHEZ VOUS.
Page 15
DEUTSCH
Turmventilator Betriebsanleitung
VOR DEM GEBRAUCH DES STANDVENTILATORS
LESEN SIE BITTE GRÜNDLICH DIESE ANLEITUNGEN
Bei der Verwendung von Elektrogeräten, ist es wichtig, auf folgende Vorsichtsmaßnahmen zu
achten, um die Gefahr von Brand, Stromschlag oder Verletzungen von Personen und / oder Sachschäden zu reduzieren.
1. Verwenden Sie den Ventilator den Anweisungen im Handbuch entsprechend. Jede andere
Verwendung ist nicht ratsam, da sie Brand, elektrischen Schlag oder Verletzungen von Personen
und / oder Sachschäden verursachen könnte.
2. Dieses Produkt ist nur zum häuslichen Gebrauch gedacht und nicht für kommerzielle, oder industrielle Zwecke oder für den Einsatz außerhalb des Hauses.
3. Schutz vor Stromschlägen: stellen Sie das Gerät nicht in der Nähe des Fensters, nicht ins Wasser
tauchen oder mit Waschüssigkeiten spritzen bzw. waschen.
4. Um das Risiko von Schäden zu verringern, muss der Stecker gut angebracht sein und perfekt in
der Steckdose sitzen.
5. Kinder dürfen das Gerät nur in Begleitung eines Erwachsenen benützen.
6. Schalten Sie das Gerät aus und ziehen Sie den Stecker aus der Steckdose heraus beim Nichtgebrauch, Transport und während der Reinigung.
7. Bevor Sie das Gerät vom Stromnetz trennen, schalten Sie ihn erst auf OFF um. Niemals am Kabel ziehen, um das Gerät vom Stromnetz zu trennen.
8. Das Gerät nicht in der Nähe von explosiven oder brennbaren Flüssigkeiten betreiben.
9. Betreiben Sie nicht den Ventilator in der Nähe von Feuer oder Küchengeräte.
10. Setzen Sie den Ventilator nicht in Betrieb, wenn das Netzkabel oder der Stecker beschädigt sind, oder wenn das Gerät nicht richtig funktioniert.
11. Vermeiden Sie bitte die Berührung der beweglichen Teilen des Ventilators.
12. Die Verwendung von Teilen, die nicht vom Hersteller empfohlen oder vorgesehen
sind, kann gefährlich sein.
13. Stellen Sie den Ventilator auf eine trockene Fläche hin.
14. Hängen Sie oder montieren Sie das Gerät nicht an einer Wand oder auf der Höhe.
15. Betreiben Sie das Gerät nicht, wenn das Gehäuse beschädigt ist.
16. Verwenden Sie nur eine 220-230VAC, 50 Hz Fassung.
ACHTUNG:
1. Dieses Gerät darf nicht von Personen (einschließlich Kindern) mit körperlichen, visuellen oder
geistigen eingeschränkten Fähigkeiten oder mit möglichen Mangel an Erfahrung und Kenntnisse
benutzt werden, ohne die Aufsicht eines Erwachsenen oder eines Aufsehers.
2. Kinder sollten bei der Verwendung des Gerätes überwacht werden.
MONTAGE DES PRODUKTES
Gerät nicht vor abschlossener Montage der Basis verwenden.
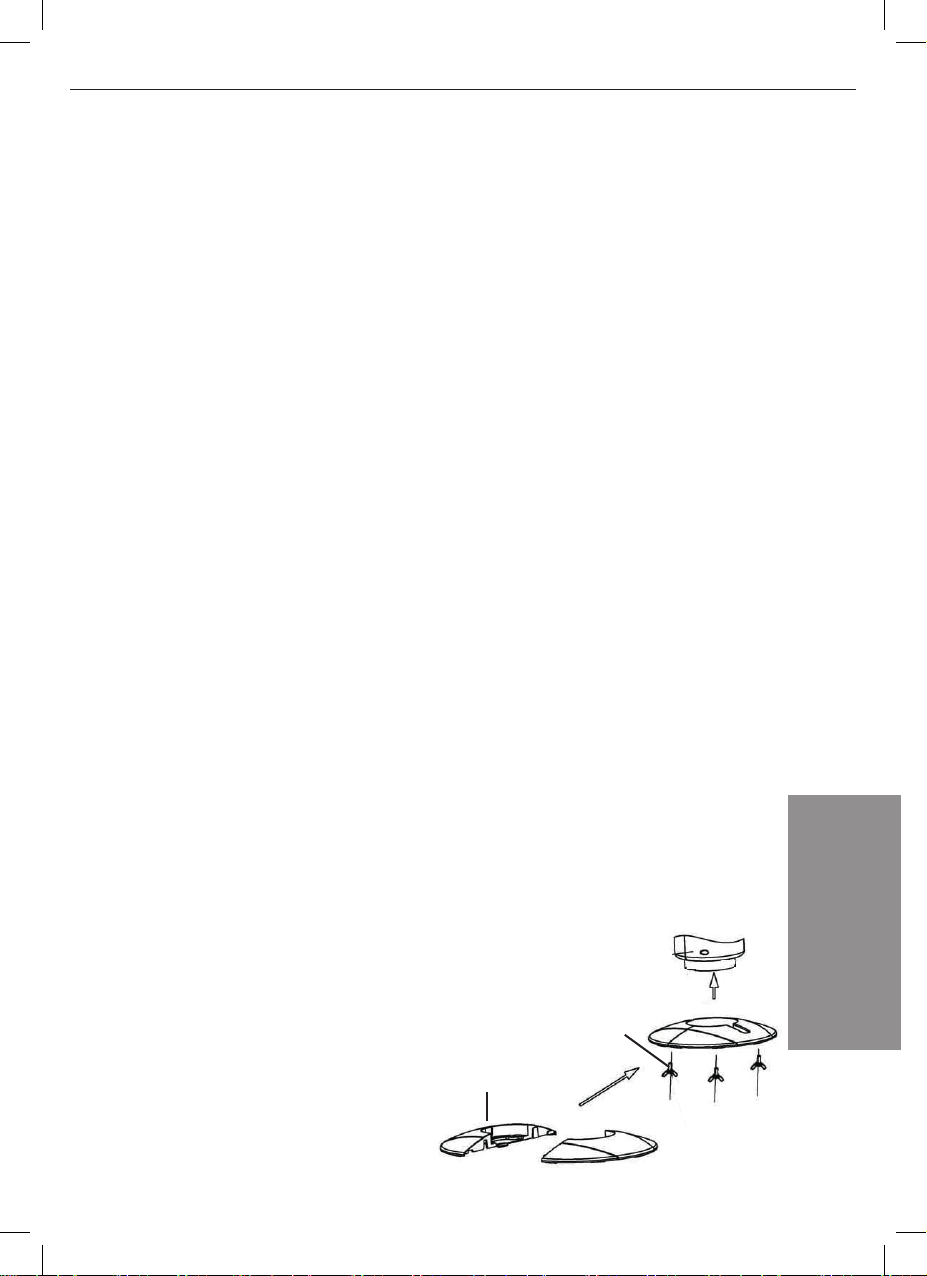
Montage der Basis:
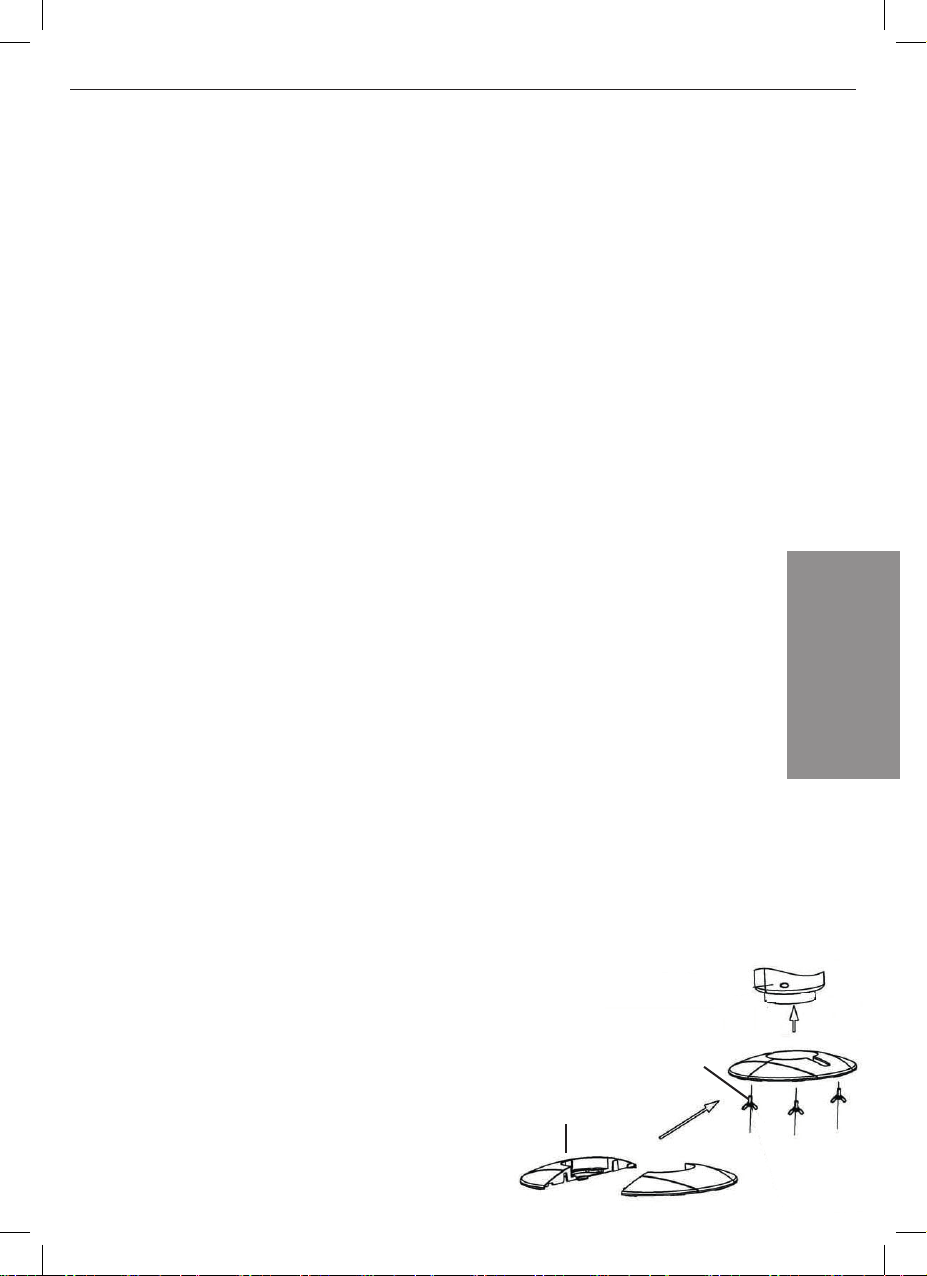
Verbinden Sie die beiden Hälften der Basis und
achten dabei darauf, dass das Netzkabel in die Mitte
desselben eingeführt ist.
Legen Sie die Basis auf dem Ventilatorgehäuse und
achten dabei darauf, dass die Schraubenlöcher zusammenpassen
FLÜGELSCHRAUBEN
15
BASIS
Page 16
Turmventilator Betriebsanleitung
Die drei Fliegenschrauben einführen und zuschrauben.
Legen Sie das Kabel in dem passenden Gehäuse
Stellen Sie den Ventilator in einer aufrechten Position
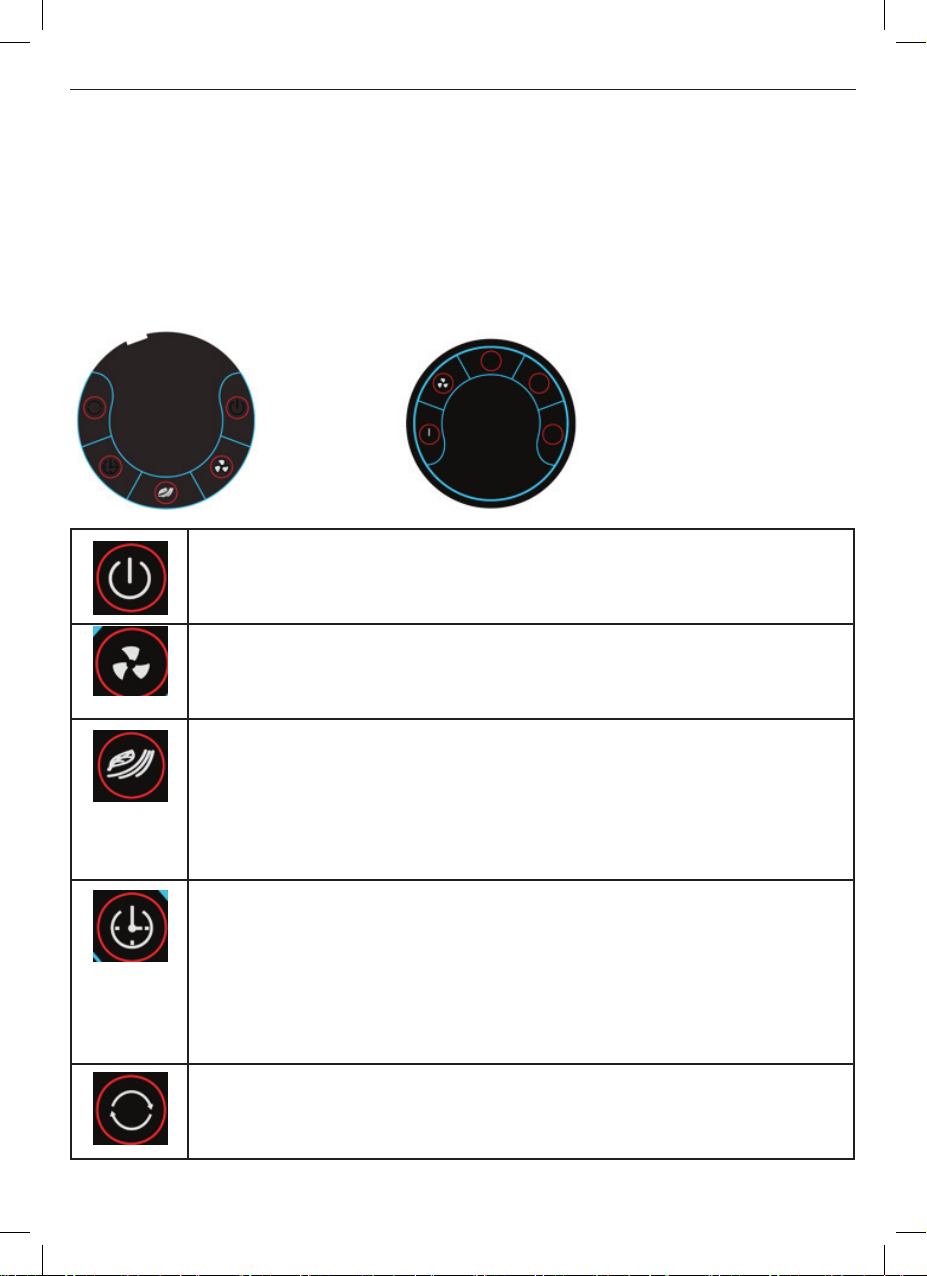
GEBRAUCHSANWEISUNGEN:
Schließen Sie das Gerät an das Stromnetz an und stellen Sie dabei sicher, dass der Stecker fest
sitzt. Das Gerät kann sowohl mit Bedienungsdisplay als auch mit Fernbedienung gesteuert werden.
Bedienungsdisplay Fernbedienung
ON / OFF – Taste:
Durch Drücken der ON / OFF - Taste, wird der Ventilator mit Geschwindigkeitsgrad
LOW (NIEDRIG) und im NORMAL Modus angehen.
Drücken Sie erneut die Taste, um den Ventilator auszumachen.
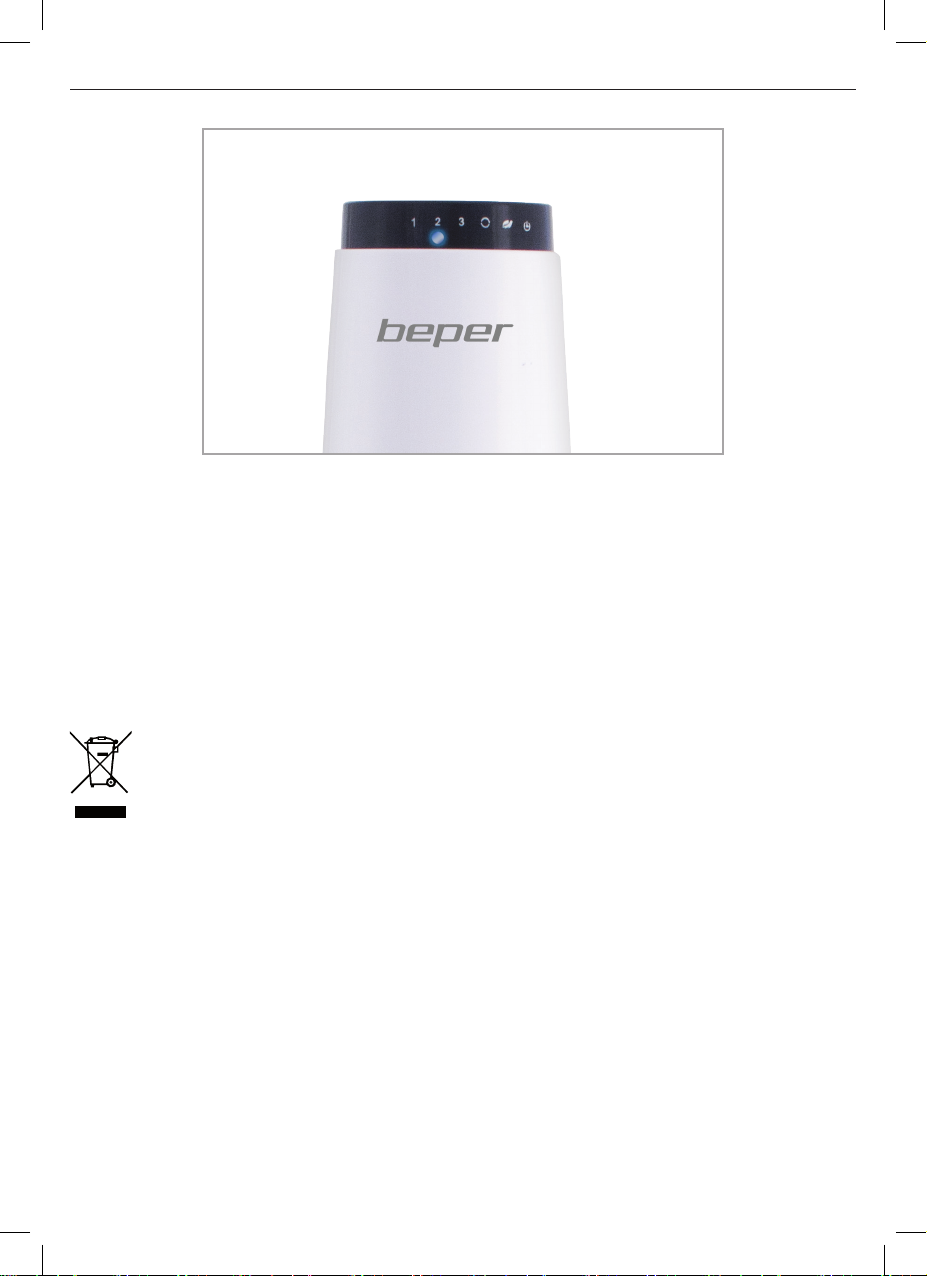
SPEED-Taste (GESCHWINDIGKEIT):
Durch Drücken dieser Taste kann man die gewünschte Geschwindigkeit einstel-
len. Auf dem Display wird die entsprechende LED- Anzeige aueuchten, je nach
gewählter Geschwindigkeit (1: LOW 2: MED 3: HIGH)
Wahl zwischen NORMAL WIND MODE oder NATURAL WIND MODE.
Drücken Sie die Taste nur einmal, um den Modus NATURAL auszuwählen. Die
entsprechende LED-Anzeige wird aueuchten. Drücken Sie die Taste erneut, um
zum
NORMAL Modus umzuschalten.
NATURAL-Modus: das Gerät wird in Intervallen abwechselnd zwischen den 3 verschiedenen Geschwindigkeitslevel automatisch wechseln.
TIMER:
Durch die Timer-Funktion können Sie die Zeit für die automatische Abschaltung
des Gerätes einstellen. Drücken Sie die Taste TIMER, um das gewünschte Zeitintervall (1,2 oder 4 Stunden) auszuwählen. Die Farbe der LED-Anzeige wird sich
entsprechend ändern:
ROT = 1 Stunde
ORANGE = 2 Stunden
GRÜN = 4 Stunden
OSC (Schwingung):
Um die Schwingung Funktion zu aktivieren, drücken Sie die Taste OSC.
Um die Einstellung zurückzusetzen, drücken Sie erneut die Taste OSC.
In dem Schwingungsmodus ist die Belüftung automatisch.
16
Page 17
Turmventilator Betriebsanleitung
TECHNISCHE DATEN
Leistung: 50W
Betriebsspannung: 220V ~ 50Hz
FERNBEDIENUNG
1xCR2032
3V Lithium Batterie
In Hinblick auf eine Verbesserungsperspektive behält sich Beper das Recht vor, das betreffende Produkt ohne Voranmeldung zu ändern bzw. umzubauen.
Die WEEE-Richtlinie (von engl.: Waste Electrical and Electronic Equipment; deutsch:
(Elektro- und Elektronikgeräte-Abfall) ist die EG-Richtlinie 2011/65/EU zur Reduktion der
zunehmenden Menge an Elektronikschrott aus nicht mehr benutzten Elektro- und Elektro-
nikgeräten. Ziel ist das Vermeiden, Verringern sowie umweltverträgliche Entsorgen der zu-
nehmenden Mengen an Elektronikschrott durch eine erweiterte Herstellerverantwortung.
Ihr Gerät enthält wertvolle Rohstoffe, die wieder verwertet werden können.
Bringen Sie das Gerät zur Entsorgung zu einer Sammelstelle Ihrer Stadt oder Gemeinde.
Elektro- und Elektronikgeräte mit folgender Kennzeichnung versehen und dürfen nicht mehr über
Restmüll, sondern nur noch über die öffentlichen Entsorgungsträger und anschließende Rückgabe
an die Hersteller und Importeure entsorgt werden.
17
Page 18

GARANTIE
Garantie-Anwendung gilt für 24 Monate ab Kaufdatum gegen Material- und Herstellungsfehler
Kaufbeleg und Garantieschein sind wesentlich für die Gültigkeit der Garantie.
Die Garantie ist gültig nur bei Darstellung des Garantieschein und Kaufbeleg
(Rechnung), die das Kaufdatum und den Modellnamen des gekauften Gerätes
beweist.
Ohne diesen Nachweis kann ein kostenloser Austausch oder eine kostenlose Reparatur nicht erfolgen.
Im Garantiefall geben Sie bitte das komplette Gerät in der Originalverpackung zusammen mit dem
Kassenbon an Ihren Händler.
Die Garantie erlischt bei Fremdeingriff.
Garantiebedingungen
Wenn es Mängel während der Garantiezeit aufgrund von Material- und / oder Herstellung, garantieren wir die Reparatur des Produkts kostenlos, sofern:
- das Gerät ist richtig für die Zwecke, für die sie gebaut wurde, verwendet ist
- das Gerät wurde nicht manipuliert/verändert
Garantieleistungen bewirken weder eine Verlängerung der Garantiefrist, noch beginnt dadurch ein
Anspruch auf eine neue Garantie!
Kaufbeleg und Garantieschein sind wesentlich für die Gültigkeit der Garantie. Ohne diesen Nachweis kann ein kostenloser Austausch oder eine kostenlose Reparatur nicht erfolgen, sowie auch
bei einer normalen Verschlechterung des Gerät.
Alle Teile sind daher ausgeschlossen wenn die versehentliche Beschädigungen unterzogen wurden oder die einem Verschleiß unterliegen (einschließlich Lampen, Batterien, Widerstände), als
auch ästhetischen Teile, und Mängel, die durch unsachgemäßen Gebrauch von Haushaltsgeräten,
Fahrlässigkeit, Unachtsamkeit, Nachlässigkeit oder unsachgemäße Installation und Wartung, Transportschäden und alle Schäden, für den der Hersteller nicht schuldig ist, fallen nicht unter die Ga-
rantie und sind deshalb kostenpichtig!
Wenn innerhalb der Garantiezeit eine Mängel aufweist, die nicht repariert werden kann, wird das
Gerät kostenlos gewechselt.
In jedem Fall, wenn der Ersatzteil, ein Zubehör ist, der wegen Brechen, Mängel oder Fehlfunktion
umgetauscht werden soll, behält Beper sich das Recht vor, nur das Stück in Frage und nicht das
gesamte Produkt zu ersetzten.
Nach der Garantie
Auch nach Ablauf der Garantiezeitraums zahlen wir viel Aufmerksamkeit auf Reparaturen.
Für technische Unterstützung und / oder Reparaturen außerhalb der Garantiezeit, wenden Sie bitte
direkt an der folgenden E-Mail Anschrift:
TRETEN SIE BITTE IN VERBINDUNG MIT IHREN HÄNDLER IN IHREM LAND
ODER POST SALES ABTEILUNG
VON FA. BEPER. E-MAIL [email protected] DIE IHREN HÄNDLER NENNEN WIRD
Page 19
Ventilador de torre Manual de instrucciones
Lea con atenciÓn estas instrucciones antes del empleo del ventilador
Cuando se emplean aparatos eléctricos, es importante seguir las precauciones que están aquí a
continuación para reducir eventuales riesgos de incendios, choques eléctricos o daños a personas
y/o cosas.
1. Emplee el ventilador como indicado en las instrucciones. Otros empleos no contemplados pueden provocar incendios, choques eléctricos o daños a personas y/o cosas.
2. Este aparato es creado sólo para uso doméstico, ni para usos comerciales e industriales, ni para
el uso fuera de su casa.
3. Para protegerse contra los choques eléctricos: no coloque el aparato cerca de ventanas, no lo
sumerja en agua ni lo salpique o lave con sustancias líquidas.
4. Para reducir el riesgo de eventuales daños, el enchufe tiene que ser bien conectado y adherir
perfectamente a la toma de corriente.
5. Es necesaria la supervisión de una persona mayor cuando el aparato está empleado por los
niños.
6. Apague el aparato y lo desconecte de la toma de corriente cuando no está en uso, en caso de
transporte del aparato y durante su limpieza.
7. Para desconectar el aparato, lo posicione antes encima del OFF y luego lo desconecte de la
toma de corriente.
8. No encienda el aparato en presencia de explosivos o líquidos inamables.
9. No encienda el ventilador en las proximidades de llamas o aparatos para la cocina.
10. No encienda el ventilador en el caso de que la cuerda o la toma sean dañadas, o el aparato no
funcione correctamente.
11. Evite el contacto con los componientes extraibles del ventilador
12. El empleo de componientes no autorizados/contemplados por el productor puede ser peligroso
13. Coloque el ventilador encima de una supercie seca
14. No cuelgues y no monte el aparato a la pared o en alto
15. No encienda el aparato si su base está dañada
16. Lo emplee solamente en una toma de corriente de 220-230VAC, 50Hz.
ATENCIÓN:
1. Este aparato no está predispuesto al empleo por personas (incluso niños) con reducidas capacidades físicas, visuales o mentales, o por personas con poca experiencia o
conocimiento del aparato, sin la supervisión de una persona adulta o de un supervisor.
2. Los niños tienen que ser vigilados durante el empleo del aparato.
ENSAMBLAJE DEL APARATO
No emplee el aparato antes de terminar el ensamblaje de la base.
Ensamblaje de la base:
Una las dos mitades que componen
la base, haciendo mucha atención a
que el cable de alimentación sea introducido en el medio de las mismas.
Posicione la base encima del cuerpo
del ventilador haciendo coincidir los
agujeros apropiados para los tornillos.
Introduzca y atornille los tres tornillos
de mariposa. Coloque el cable en su
alojamiento Posicione el ventilador en
posición vertical
TORNILLOS DE MARIPOSA
BASE
19
ESPAÑOL
Page 20
Ventilador de torre Manual de instrucciones
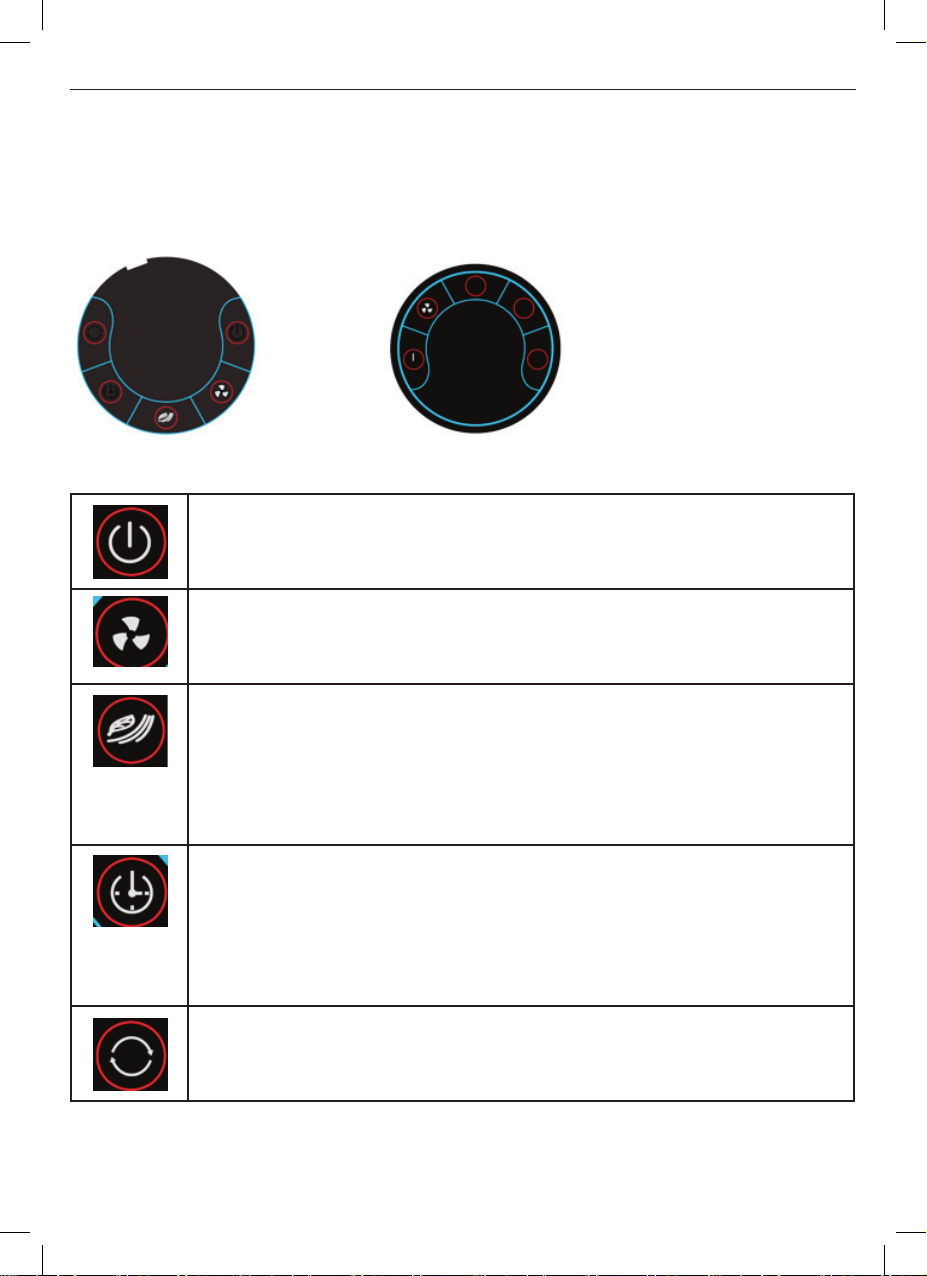
EMPLEO DEL APARATO:
Conecte el aparato a la toma de corriente asegurádose que el enchufe sea conectado correctamente. El aparato puede funcionar sea a través del panel de control que del telemando.
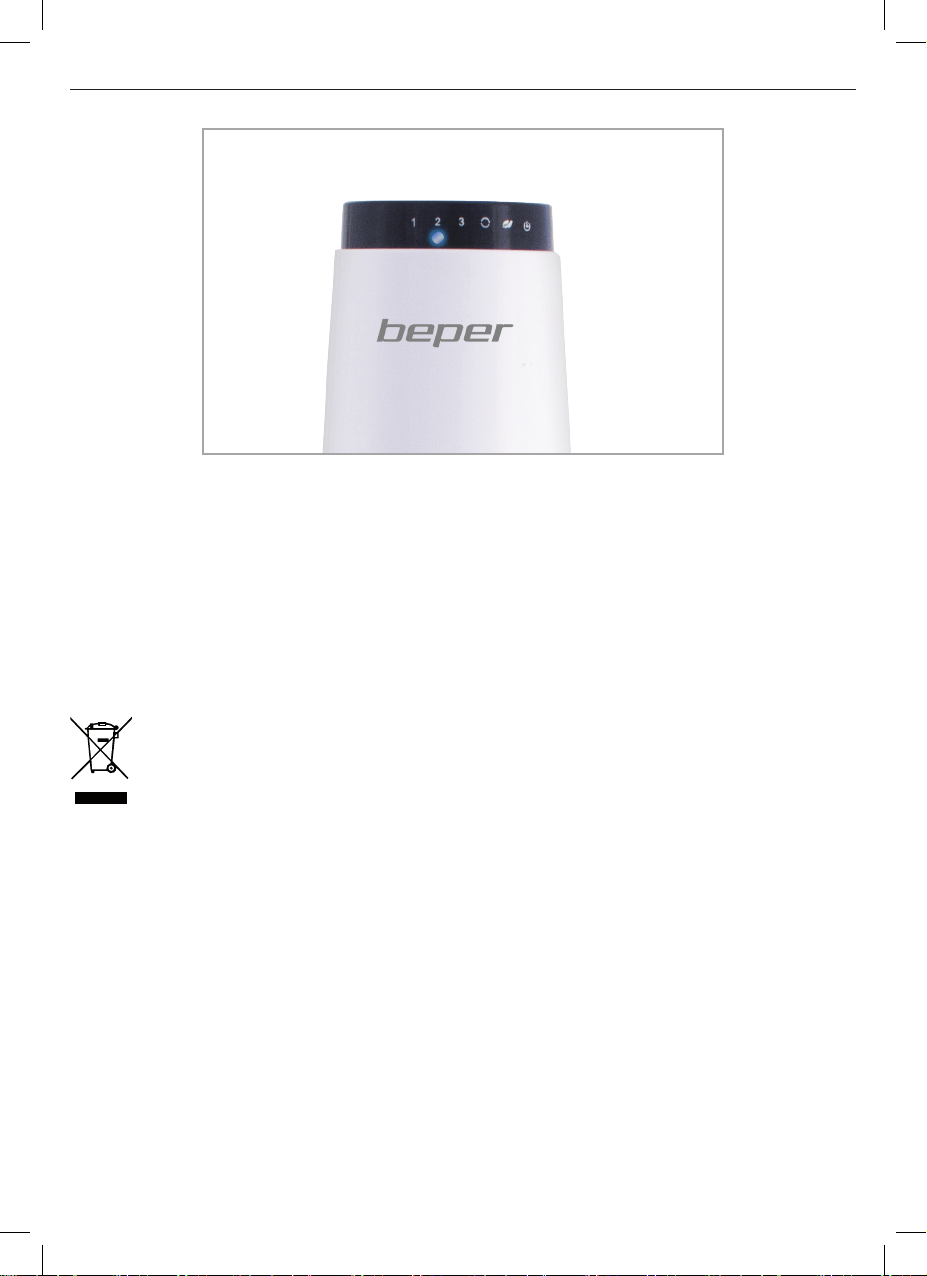
Panel de control Telemando
Botón/OFF:
Pulse el botón ON/OFF, el ventilador se acciona a la velocidad LOW (BAJA) y en
modalidad NORMAL.
Pulse otra vez el botón para apagar el ventilador.
Botón SPEED (VELOCIDAD):
Pulsando este botón puede seleccionar la velocidad deseada. En la pantalla se
enciende el led correspondiente a la velocidad seleccionada ( 1: BAJA 2: MEDIA
3: ALTA)
Seleccione entre MODALIDAD NORMAL DE VIENTO o MODALIDAD NATURAL DE VIENTO.
Pulse una vez solamente el botón para seleccionar la modalidad NATURAL. El led
correspondiente se enciende. Pulse otra vez el botón para pasar a la modalidad
NORMAL.
Modalidad NATURAL: el aparato trabaja alternando automáticamente a intervalos
3 distintos niveles de velocidad.
TEMPORIZADOR:
A través de esta función, es posible programar la hora de apagamiento automático del aparato. Pulse el botón TEMPORIZADOR para seleccionar el intervalo de
tiempo deseado (1, 2 o 4 horas). El color del LED cambia en consecuencia:
ROJO=1 hora
NARANJA= 2 horas
VERDE= 4 horas
OSC (OSCILACIÓN):
Para activar esta modalidad, pulse el botón OSC.
Para anular este programa, pulse otra vez el botón OSC.
En la modalidad oscilación, la ventilación es automática.
20
Page 21
Ventilador de torre Manual de instrucciones
DATOS TECNICOS
Potencia 50W
Alimentación 220V ~ 50Hz
TELEMANDO
PILA REMOTA Modelo: CR 2032
3V PILAS DE LITIO
Con el objetivo de una mejora continua, Beper se reserva el derecho de añadir cambios y
mejoras al producto sin previo aviso.
Al término de la vida útil del aparato, no eliminar como residuo municipal sólido mixto sino
eliminarlo en un centro de recogida especíco colocado en vuestra zona o entregarlo al
distribuidor a la hora de comprar un nuevo aparato del mismo tipo y destinado a las mismas
funciones. El distribudor se cargarà el costo de eliminación de los equipos siguendo las
normas actuales.
Este procedimiento de recogida separada de los equipos eléctricos y electrónicos se realiza con el
propósito de una política del medioambiente comunitaria con objetivos de salvaguardia, defensa
y mejoramiento de la calidad del medioambiente y para evitar efectos potenciales en la salud de
los seres humanos debido a la presencia de dentro de estos equipos o a un uso inapropiado de
los mismos o de algunas de sus partes. Està Vuestra y nuestra competencia aiudar la defensa del
medioambiente.
El símbolo indica que este producto respecta la normativa europea de mdioam biente ( 2011/65/
EU) y le recuerda que todos los productos electrónicos y eléctricos deben ser objeto de recogida por separado al nalizar su ciclo de vida. Para obtener información sobre el reciclaje de este
producto y dónde encontrar puntos de recogida llame las supuestas autoridades locales. Una
eliminación no correcta de este producto podría conllevar sanciones.
21
Page 22

CERTIFICADO DE GARANTĺA
Este aparato ha sido controlado en fábrica. La garantía es valida 24 meses a partir de la fecha de
compra para todos los defectos de material o de fabricación. En caso de reclamación, tiene que
presentar juntos el recibo scal y la garantía.
La garantía es válida sólo se presenta la tarjeta de garantía y el documento de compra (reci-
bo) que demuestra la fecha de compra y el nombre del modelo de la unidad adquirida.
Para la asistencia técnica, es necesario contactar su revendedor o nuestra empresa. Eso le per-
mitirá conservar su aparato en mejores condiciones y no invalidar la garantía. Toda manipulación
del aparato por una persona no autorizada o no cualicada cancelará automáticamente la garantía.
Condiciones de garantía
Durante la garantía, si algunas averías aparecen a causa de un defecto de material y/o fabricación,
garantizamos gratuitamente la reparación a las condiciones siguientes :
- El aparato ha sido utilizado correctamente y esto solamente al uso para el cual ha sido fabricado ;
- El dispositivo no ha sido manipulado: el producto no es mantenible.
- Es obligatorio de presentar el recibo scal;
- Las partes que presentan señales evidentes de desgaste no se tienen en cuenta en la garantía.
En consecuencia, todas las partes que habrían sufrido daños accidentales o que presentaban
señales de uso normal se excluyen de la garantía (entre las cuales, bombillas, baterías, pilas,
resistencias), las partes estéticas, todas las partes implicando defectos debidos a la no utilización
doméstica, negligencia, instalación incorrecta o inadecuada, la negligencia en la manipulación y el
mantenimiento, los daños en el transporte y todos los daños no imputables directamente al fabri-
cante.
Si un defecto aparece durante la garantía y no puede estar reparado, el aparato se sustituirá gra-
tuitamente.
En cualquier caso, si la parte que necesita ser sustituida por defecto, rotura o mal funcionamiento
es un accesorio y / o una parte desmontable del producto, beper se reserva el derecho de reempla-
zar sólo la pieza en cuestión y no todo el producto.
Asistencia técnica
Después del nal de la garantía, concedemos siempre una gran importancia a la reparación.
Para la asistencia técnica y/o reparaciones fuera de la garantía, es necesario contactar directamente la dirección siguiente :
CONTACTE CON EL DISTRIBUIDOR DE SU PAIS O EL DEPARTAMENTO
DE POST VENTA DE BEPER .
ENVIE UN E-MAIL [email protected] Y LE ENVIAREMOS
DATOS DE SU SERVICIO TECNICO EN SU PAIS.
Page 23
Page 24

BEPER SRL
Via Salieri, 30
37050 - Vallese di Oppeano - Verona
Tel. 045/7134674 – Fax 045/6984019
e-mail: [email protected]
beper.com
 Loading...