

Page 1
• VENTILATORE A PIANTANA - MANUALE DI ISTRUZIONI
• STAND FAN - USE INSTRUCTIONS
• VENTILATEUR À PIED - MANUEL D’INSTRUCTIONS
• TURMVENTILATOR - BETRIEBSANLEITUNG
• VENTILADOR DE PIE - MANUAL DE INSTRUCCIONES
• ΑΝΕΜΙΣΤΗΡΑΣ ΟΡΘΟΣΤΑΤΗΣ - ΕΓΧΕΙΡΊΔΙΟ ΟΔΗΓΙΏΝ
• VENTILATOR TURN - MANUAL DE INSTRUCȚIUNI
• 4 BLADES STAND FAN - POKYNY PRO BEZPEČNOST A POUŽITÍ
• STAANDE VENTILATOR MET 4 BLADEN - HANDLEIDING
Cod.: VE.150
Page 2
ITALIANO
pag. 4
ENGLISH
FRANÇAIS
DEUTSCH
ESPAÑOL
ΕΛΛΗΝΙΚΗ
ROMÂNĂ
CZECH
NEDERLANDS
For further information and/or for instructions for use in other languages , please visit: beper.com
Fig. 1
pag. 8
pag. 12
pag. 17
pag. 21
pag. 26
pag. 31
pag. 35
pag. 39
2
Page 3
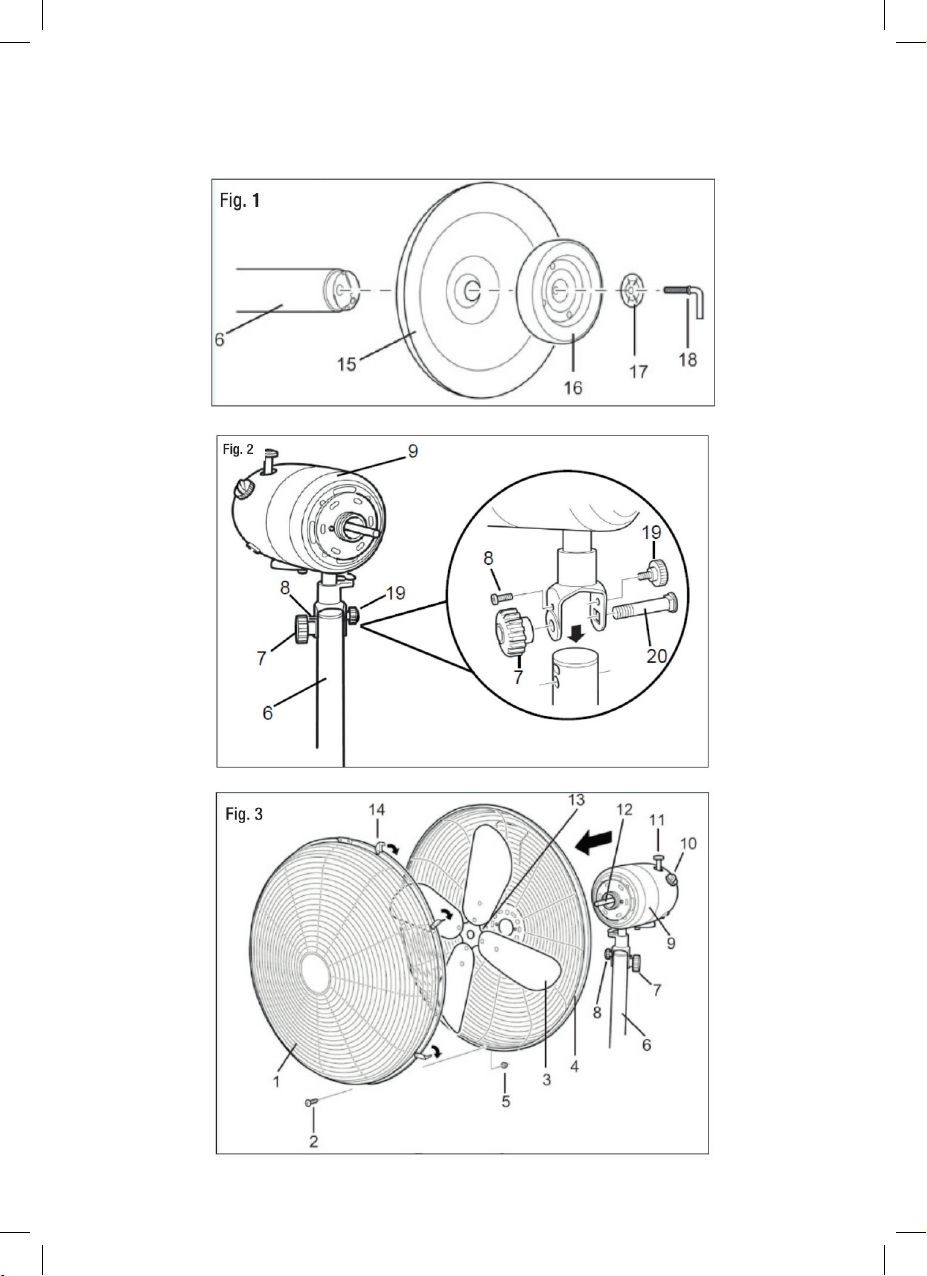
Fig. 2
3
3
Page 4

Ventilatore a piantana Manuale di istruzioni
AVVERTENZE GENERALI
LEGGERE QUESTE ISTRUZIONI PRIMA DI USARE L’APPARECCHIO.
Prima e durante l’uso dell’apparecchio è necessario seguire alcune
precauzioni elementari.
Dopo aver tolto l’imballaggio assicurarsi dell’integrità dell’apparecchio. In caso di dubbio non utiliz zare l’apparecchio e rivolgersi a per-
sonale professionalmente qualicato. Gli elementi dell’imbal laggio
(sacchetti di plastica, polistirolo, ecc.) non devono essere lasciati alla
portata dei bambini, in quanto potenziali fonti di pericolo.
Assicurarsi sempre che la tensione di rete elettrica sia uguale a quella indicata nell’etichetta dati tecnici e che l’impianto sia compatibile
con la potenza dell’apparecchio.
Non tirare mai il cavo per scollegarlo dalla presa di corrente elettrica.
Assicurarsi che il cavo non sia in contatto con superci calde o taglienti.
Non utilizzare l’apparecchio con il cavo danneggiato.
Se il cavo di alimentazione è danneggiato, esso deve essere sostituito dal Costruttore o dal suo Servizio Assistenza Tecnica o comunque
da una persona con qualica similare, in modo da pre venire ogni
rischio.
Collegare l’apparecchio esclusivamente ad una presa di corrente
elettrica alternata.
In generale è sconsigliabile l’uso di adattatori, prese multiple e/o prolunghe. Qualora il loro uso si rendesse indispensabile è necessario
utilizzare solamente adattatori e prolunghe conformi alle vigenti norme di sicurezza.
Questo apparecchio dovrà essere destinato solo all’uso per il quale
è stato espressamente con cepito. Ogni altro uso è da considerarsi
improprio e quindi pericoloso, nonché far decadere la garanzia. Il
costruttore non può essere considerato responsabile per eventuali
danni derivati da usi impropri, erronei ed irragionevoli.
Per evitare surriscaldamenti pericolosi si raccomanda di svolgere in
tutta la sua lunghezza il cavo di alimentazione.
Prima di effettuare qualsiasi operazione di cambio degli accessori o
di pulizia disinserire l’apparec chio dalla rete di alimentazione elettrica.
Non lasciare esposto l’apparecchio ad agenti atmosferici (pioggia,
sole, etc.).
4
Page 5

Ventilatore a piantana Manuale di istruzioni
IT
Non tenere l’apparecchio vicino a fonti di calore (es. termosifone).
Questo apparecchio non deve essere utilizzato da persone (compresi i bambini) con capacità siche, sensoriali o mentali ridotte; da persone che manchino di esperienza e conoscenza del l’apparecchio, a
meno che siano attentamente sorvegliate o ben istruite relativamente
all’utilizzo dell’apparecchio stesso da parte di una persona responsabile della loro sicurezza.
Assicurarsi che i bambini non giochino con l’apparecchio.
Allorché si decida di smaltire come riuto questo apparecchio, si raccomanda di renderlo inoperan te.
SI RACCOMANDA INOLTRE DI RENDERE INNOCUE
QUELLE PARTI DELL’APPARECCHIO SUSCETTIBILI
DI COSTITUIRE UN PERICOLO. QUESTO APPARECCHIO NON DEVE ESSERE UTILIZZATO DAI BAMBINI.
TENERE L’APPARECCHIO ED IL SUO CAVO FUORI
DALLA PORTATA DEI BAMBINI.
AVVERTENZE D’USO
Non collegare la spina di alimentazione senza prima aver assemblato correttamente ogni parte del ventilatore.
Prima di ogni utilizzo vericare l’integrità del cavo di alimentazione e
liberarlo da eventuali grovigli.
Posizionare il ventilatore soltanto su superci piane e stabili.
Non posizionare il ventilatore in ambienti molto umidi.
Mantenere il ventilatore ad un’adeguata distanza da pareti, porte, nestre e oggetti che potrebbero ostacolare il movimento oscillante.
Non coprire in alcun modo il corpo e la griglia del ventilatore durante
il funzionamento.
Non inlare oggetti nella griglia e nelle fessure del corpo del ventilatore.
Non staccare la spina tirando il cavo di alimentazione.
Dopo ogni utilizzo del ventilatore scollegare la spina dalla presa di
corrente.
Se il ventilatore deve essere immagazzinato per lungo tempo e non
usato regolarmente, riporre il ventilatore nel suo imballo originale e
metterlo in un luogo secco ed asciutto. Quando lo si usa per la prima
volta dopo un lungo tempo di inutilizzo, controllare che il ventilatore
sia pulito e che le pale del motore girino liberamente (a motore spento) senza alcun freno.
5
Page 6

Ventilatore a piantana Manuale di istruzioni
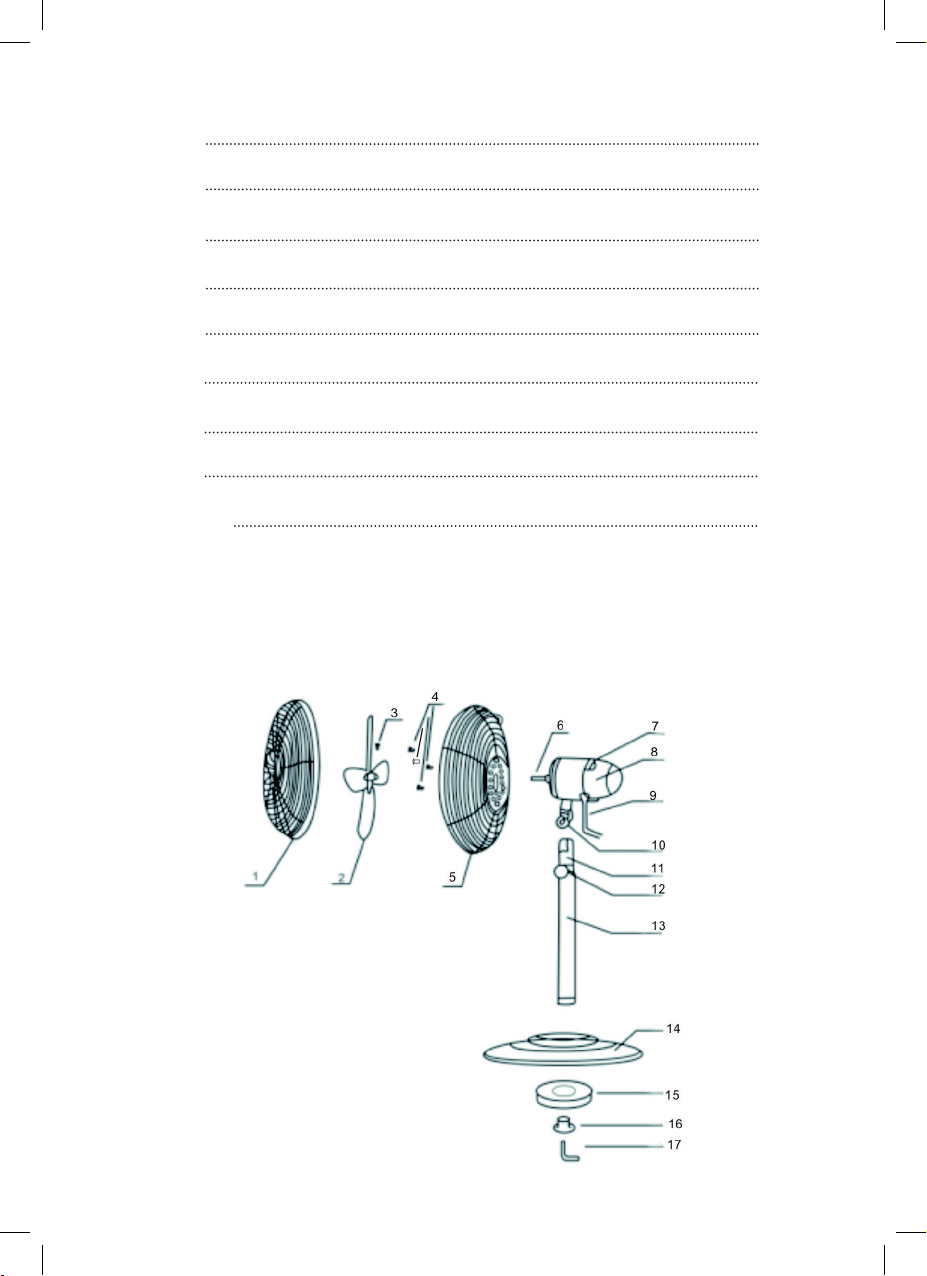
PRODOTTO E ACCESSORI Fig.1
1 Griglia anteriore
2 Pale
3 Fermo per le pale
4 Vite di ssaggio
5 Griglia posteriore
6 Albero motore
7 Controllo di velocità
8 Motore del ventilatore
9 Cavo di alimentazione
ASSEMBLAGGIO DEL VENTILATORE Fig.2
1. Posizionare la base di appoggio sul pavimento e agganciare il tubo esterno ssando anche il peso tramite la
rondella di bloccaggio e la vite di chiusura.
Importante: Saldare fermamente tutti i componenti della base di appoggio in modo da garantire una buona
stabilità del ventilatore, in caso contrario il ventilatore oscillerebbe pericolosamente.
2. Estrarre il tubo interno, alzare no alla misura desiderata.
3. Inlare l’albero motore (del ventilatore) sul tubo completamente.
4. Avvitare completamente la vite (12) in modo che il pannello sia ben saldo al tubo interno.
5. Posizionare la griglia posteriore a contatto con la angia del corpo motore, in modo che i fori della griglia si
incastrino con i perni situati sul corpo motore del ventilatore.
6. Avvitare il fermo della griglia posteriore completamente in modo da bloccare la griglia al corpo motore.
7. Inlare la ventola con le pale sull’albero motore e avvitare il fermo delle pale completamente sull’albero motore, in modo da bloccare la ventola al corpo del motore (per avvitare il fermo ruotare in senso anti-orario).
8. Portare a contatto le due griglie anteriore e posteriore, inserendo i ganci di chiusura, posizionati sulla griglia
anteriore, sulla griglia posteriore. Chiudere i ganci in modo da bloccare le griglie.
SCELTA DELLA VELOCITA’
In posizione 0 il ventilatore è spento.
In posizione 1 velocità bassa.
In posizione 2 velocità media.
In posizione 3 velocità alta.
10 Manopola
11 Tubo interno
12 Vite di regolazione altezza
13 Tubo esterno
14 Base
15 Peso
16 Rondella di bloccaggio
17 Vite di chiusura
INCLINAZIONE DELLA TESTA
E’ possibile inclinare la testa del ventilatore in differenti posizioni, permettendo di cambiare inclinazione del
usso dell’aria.
Prima di cambiare l’inclinazione spegnere il ventilatore.
Impugnare il corpo motore ed inclinare la testa del ventilatore.
OSCILLAZIONE DELLA TESTA
Agendo sul perno di oscillazione è possibile attivare o disattivare l’oscillazione della testa del ventilatore. L’oscillazione permette di distribuire uniformemente l’aria nell’ambiente.
Per attivare l’oscillazione spingere il perno di oscillazione verso il basso no a completo bloccaggio; la testa del
ventilatore ruota automaticamente a destra e a sinistra.
Per disattivare l’oscillazione sollevare completamente il perno verso l’alto.
PULIZIA
Prima di effettuare qualsiasi operazione di pulizia spegnere il ventilatore e scollegare la spina dalla presa di
corrente.
Per pulire il ventilatore utilizzare un panno morbido, eventualmente inumidito con acqua.
Non utilizzare alcool o agenti chimici come diluenti, prodotti abrasivi in genere.
Non spruzzare acqua e liquidi sul ventilatore, previo inltrazioni dannose.
Asciugare bene tutte le parti interessate dalla pulizia prima di accendere il ventilatore.
6
Page 7
Ventilatore a piantana Manuale di istruzioni
IT
DATI TECNICI
Potenza: 50W
Alimentazione: 230V~ 50/60Hz
In un’ottica di miglioramento continuo Beper si riserva la facoltà di apportare modiche e migliorie al
prodotto in oggetto senza previo preavviso.
Il simbolo del cestino barrato riportato sull’apparecchio indica che il prodotto, alla ne della propria vita
utile, dovendo essere trattato separatamente dai riuti domestici, deve essere conferito in un centro di
raccolta differenziata per apparecchiature elettriche ed elettroniche oppure riconsegnato al rivenditore
al momento dell’acquisto di una nuova apparecchiatura equivalente.
L’adeguata raccolta differenziata per l’avvio successivo dell’apparecchio al riciclaggio, al trattamento e allo smaltimento ambientalmente compatibile contribuisce ad evitare possibili effetti negativi sull’ambiente e sulla salute e
favorisce il recupero dei materiali di cui è composto.
L’utente è responsabile del conferimento dell’apparecchio a ne vita alle appropriate strutture di raccolta. Per
informazioni più dettagliate inerenti i sistemi di raccolta disponibili, rivolgersi al servizio locale di smaltimento
riuti, o al negozio dove è stato effettuato l’acquisto.
Chiunque abbandona o cestina questo apparecchio e non lo riporta in un centro di raccolta differenziata per riuti
elettrici-elettronici è punito con la sanzione amministrativa pecuniaria prevista dalla normativa vigente in materia
di smaltimento abusivo di riuti
CERTIFICATO DI GARANZIA
La garanzia di applicazione è valida 24 mesi dalla data di acquisto per difetti di materiale o di fabbricazione.
La garanzia è valida unicamente presentando il certicato di garanzia e il documento di acquisto (scontrino scale) che certichi la data di acquisto e il nome del modello dell’apparecchio acquistato.
Se l’apparecchio dovesse richiedere assistenza tecnica rivolgersi al venditore o presso la nostra sede. Questo
per conservare inalterata l’efcienza del vostro apparecchio e per NON invalidare la garanzia. Eventuali manomissioni dell’apparecchio da parte di personale non autorizzato invalideranno automaticamente la garanzia.
Condizioni di garanzia
Se ci sono guasti a causa di difetti di materiale e/o fabbricazione durante il periodo di garanzia, garantiamo la
riparazione del prodotto gratuitamente.
Non sono coperte dalla garanzia tutte le parti che dovessero risultare difettose a causa di:
a. Danni da trasporto o da cadute accidentali,
b. Errata installazione o inadeguatezza impianto elettrico,
c. Riparazioni o modiche operate da personale non autorizzato,
d. Mancata o non corretta manutenzione e pulizia,
e. Prodotto e/o parti di prodotto soggette a usura e/o consumabili (es.: lampade, batterie, lame)
f. Mancata osservanza delle istruzioni per il funzionamento dell’apparecchio, negligenza
o trascuratezza nell’uso.
L’elenco di cui sopra è a titolo meramente esemplicativo e non esaustivo, in quanto la presente garanzia è
comunque esclusa per tutte quelle circostanze che non possono farsi risalire a difetti di fabbricazione dell’apparecchio.
La garanzia è inoltre esclusa in tutti i casi di uso improprio dell’apparecchio ed in caso di uso professionale.
Beper Srl declina ogni responsabilità per eventuali danni che possano direttamente o indirettamente derivare a
persone, cose ed animali domestici in conseguenza della mancata osservanza di tutte le prescrizioni indicate
nell’apposito “Libretto Istruzioni ed avvertenze” in tema di installazione, uso e manutenzione dell’apparecchio.
Assistenza tecnica
Per l’assistenza tecnica e/o riparazioni fuori dal periodo di garanzia ci si può rivolgere direttamente all’indirizzo
sottostante.
BEPER SRL
Via Salieri, 30
37050 - Vallese di Oppeano - Verona
Tel. 045/7134674 – Fax 045/6984019
e-mail: [email protected]
7
Page 8

Stand Fan Use instructions
GENERAL SAFETY ADVICE
READ THE OPERATING INSTRUCTIONS CAREFULLY BEFORE
FIRST USE OF THE APPLIANCE.
Read the following instructions carefully, since they give you useful
safety information about installation, use and maintenance and help
you avoid mishaps and possible accidents.
Remove the packing and make sure that the appliance is intact, with
special attention to the supply cable. The elements of the packing
(plastic bags, polystyrene, etc) do not have to be accessible to the
children, in order to preserve them from danger sources.
It is recommended not to throw these packing material in the domestic waste, but to deliver them to the appropriate station of collection
or destruction refusals, asking eventually information to the manager
of the Sanitation Department of your own municipality.
Before connecting the appliance make sure that the mains voltage
corresponds to the data specied on the label.
If the plug does not suit the socket, let it be replaced with another
suitable plug by qualied personnel only, which shall also ensure that
the section of the socket cables is suitable for your appliance power
absorption.
Never pull the supply cord to unplug the appliance.
Make sure that the supply cord never comes into contact with hot or
cutting surfaces
Do not use this appliance if the supply cord is damaged. In case of
damage, it must be replaced by the manufacturer, its service agent or
similarly qualied persons in order to avoid a hazard.
Only connect this appliance on alternating current
Generally, the use adaptors multiple plugs and/or extensions is not
recommended; should they be necessary, please use only simple or
multiple adaptors and extensions in compliance with the safety rules
in force, making sure that the capacity absorption limit marked on the
simple adaptors and the extensions and the maximum power limit
marked on the multiple adaptor are not exceeded.
This appliance is to be destined to its special purpose only.
Any other use is to be considered as improper and thus dangerous.
The manufacturer cannot be responsible for any damages deriving
from improper, wrong or incautious use.
To avoid any heating risk, it is recommended to unroll completely the
supply cord and to unplug the appliance, when not used.
8
Page 9

Stand Fan Use instructions
EN
Before cleaning, always unplug the appliance.
To protect against electric shock, do not immerse cord, plug or any
parts of the appliance into water or other uids.
Do not hold the appliance with wet hands or feet.
Do not hold the appliance with naked feet.
Do not expose the appliance to atmospheric agents such as rain,
wind, snow, hail.
Do not use the appliance near explosives, highly ammable materials, gases, burning ames, heaters.
Do not allow children, disabled people or every people without experience or technical ability to use the appliance if they are not properly
watched over. Close supervision is necessary when any appliance
used by or near children.
Make sure that children do not play with this appliance.
If you decide not to use the appliance any longer, make it unserviceable by simply cutting the supply cable after disconnecting the plug
from the socket.
ALSO MAKE ANY DANGEROUS PARTS UNSERVICEABLE, ESPECIALLY FOR CHILDREN WHO COULD
PLAY WITH THE APPLIANCE.
USE INSTRUCTIONS
Do not plug the supply cord before assembly every the parts of the
fan.
Before using, check the integrity of the supply cord and eventually
remove possible nodes.
Place the fan on a at and stable surface in a dry place.
Keep away to a reasonable distance the fan from walls, doors, windows or every object that could avoid the appliance to work in the
correct way.
Do not cover the body or grid of the fan when the appliance is working.
Do not plug objects into the grid or inside the appliance.
Do not pull on the supply cord to unplug the appliance.
After using the fan, unplug the cord supply.
If the fan must be stored for a long period or non-used, replace the
fan in the original packaging in a dry place. For every next use, check
that the fan is clean and that the blades turn in the correct way (motor
off).
9
Page 10

Stand Fan Use instructions
PRODUCT AND ACCESSORIES Fig.1
1 – Front guard
2 – Fan blades
3 – Fan blades screw
4 – Fixation screw
5 - Rear guard
6 – Motor shaft
7 – Speed control
8 – Fan motor
9 – Power cord
FAN ASSEMBLY Fig.2
Attaching the telescopic stand to the stand base.
First unscrew the L-shaped screw and remove it and the clamping washer from the bottom of the telescopic
stand.
• Turn over the stand base. Place the weighted base centre in its place on the underside of the base and the
clamping washer in the centre of the weighted base.
• Thread the L-shaped screw through the assembly and into the thread in the telescopic stand. Tighten rmly,
but do not overtighten.
• Loosen the height adjustment knob and pull he inner tube out the telescopic stand to the desired height, then
retighten the knob. Attaching the motor housing to the top of the telescopic stand.
• First remove the pivot knob and the bolt from the top of the telescopic stand, then remove the neck retaining
screw and small adjustment knob from the motor housing bracket.
• Place the motor housing on the top of the stand and thread the large pivot bolt through the bracket. Screw in
the small retaining screw and tighten, but do not overtighten.
• Fit the large pivot knob onto the end of the bolt and the small adjustment knob at the other side above the bolt.
Tighten the knobs while holding the fan motor upright.
Attaching the guards and fan blade
• First remove any protective sleeve from the motor shaft and the four rear guard retaining screws from the motor
housing. Attach the rear guard to the motor housing using the four screws you just removed. Ensure the handle
is at the top. Place the fan blade over the motor shaft and tighten the fan blade retaining screw, ensuring that it
tightens against the at part on the motor shaft.
• Remove the front guard screw and nut from the front guard and turn the guard retaining clips around the outside
edge outwards. Hang the front guard by its hook over the top of the rear guard. Bring the front guard down to
meet the rear guard and push the clips inwards until the front guard is fastened to the rear guard. Finally t the
guard screw through the holes in the bottom edge of the guard and tighten with the nut.
10 – Knob
11 - Inner tube
12 – Height adjustment Screw
13 – Outer tube
14 – Base
15 – Wheight
16 – Fastener
17 – Locking screw
SPEED SELECTION
Choose the speed desired pressing on the buttons of the control panels.
Position 0 the fan switch off.
Position 1 low speed.
Position 2 medium speed.
Position 3 high speed.
HEAD INCLINATION
It is possible to choose various positions and change the air ow swing.
Before changing it, switch off the fan.
Take the motor body, unscrew the regulation axis and change the inclination of the fan as desired and screw the
air strongly.
Attention : do not try to force the inclination position in order to avoid any failure.
SWING
It is possible to activate or disconnect the swing of the fan, by touching the swing axis (8). Swing allow to provide
the air uniformly.
To activate the push the swig axis (8) down until completely blocked ; the head fan turns automatically from right
to left.
To disconnect the swing raise completely the axis (8).
10
Page 11
Stand Fan Use instructions
EN
CLEANING
Before cleaning, switch off and unplug the fan.
For cleaning use a soft cloth, that may be softly wet.
Do not use alcohol or chemical substances, or any detergent that could damaged this appliance.
Do not ush water or other liquids on the fan in order to protect it.
After cleaning, dry every parts before using the appliance.
During the winter and when not used, keep this appliance in a dry and clean place.
TECHNICAL DATA
Power : 50W
Power supply. 230V ~ 50/60Hz
For any improvement reasons, Beper reserves the right to modify or improve the product without any
notice.
The European directive 2011/65/EU on Waste Electrical and Electronic Equipment (WEEE), requires
that old household electrical appliances must not be disposed of in the normal unsorted municipal
waste stream. Old appliances must be collected separately in order to optimize the recovery and
recycling of the materials they contain, and reduce the impact on human health and the environment.
The crossed out “wheeled bin” symbol on the product reminds you of your obligation, that when you
dispose of the appliance, it must be separately collected.
GUARANTEE CERTIFICATE
This appliance has been checked in the factory. From the date of original purchase a 24 month guarantee ap-
plies to material and production defects. The purchase receipt and the guarantee certicate must be submitted
together in case of claim to guarantee.
The guarantee is valid only with a guaranty certicate and proof of purchase (scal receipt) indicating
the date of purchase and the model of the appliance
For any technical assistance, please contact directly the seller or our head ofce in order to preserve the appliance’s efciency and NOT TO void the guarantee. Any intervention on this appliance by non-authorized persons
will automatically void the guarantee.
GUARANTEE CONDITIONS
If the appliance shows defects as a result of faulty material and/or production during the period of guarantee, we
guarantee repair free of charge on condition that:
- The appliance has been used properly and for the purpose for which it has been intended.
- The appliance has not been tampered with, otherwise it is not maintainable.
- The purchase receipt shall be presented.
- The appliance showing a fair wear and tear shall not be covered by this guarantee.
Therefore, any part that could be accidentally broken or having visible signs of use in consumable products
(such as lamps, batteries, heating elements…) the aesthetic parts are excluded from the guarantee, and any
defect whatsoever resulting from non-respect of the rules for use, negligence in usage and/or maintenance of
the appliance, carelessness, wrong or improper installation, damage during transport and any other damage not
attributable the supplier.
For every defect that could not be repaired within the guarantee period, the appliance will be replaced free of
charge.
In any case, if the part to be replaced for defect, breakage or malfunction is an accessory and/or a detachable
part of the product, Beper reserves the right to replace only the very part in question and not the entire product
TECHNICAL ASSISTANCE
Even after the guarantee period we will always pay attention to repairs for defected appliances.
For technical assistance and/or repairs after the guarantee period you can directly contact the below address:
CONTACT YOUR DISTRIBUTOR IN YOUR COUNTRY OR ATER SALES DEPARTMENT BEPER. E-MAIL as[email protected] WHICH WILL FORWARD YOUR ENQUIRIES TO YOUR DISTRIBUTOR.
11
Page 12

Ventilateur à pied Manuel d’instructions
PRECAUTIONS GENERALES
LIRE ATTENTIVEMENT LES INSTRUCTIONS SUIVANTES AVANT
LA PREMIERE UTILISATION DE L’APPAREIL.
Avant et durant l’utilisation de cet appareil il est nécessaire de suivre
précautions élémentaires suivantes.
Après avoir enlever l’emballage, s’assurer de l’intégrité de l’appareil.
En cas de doute ne pas utiliser l’appareil et s’adresser à un pro-
fessionnel qualié. Les éléments d’emballage (sachets plastique,
polystyrène, etc.) ne doivent pas être laissés à la portée des enfants,
car potentiellement dangereux.
Il est recommandé de ne pas jeter les éléments d’emballage dans les
déchets ménagers, mais de les déposer dans les centres de traitement des déchets appropriés, en demandant éventuellement conseil
au gérant du centre de sa commune de résidence.
Toujours s’assurer que la tension électrique soit la même que celle indiquée sur l’étiquette des données techniques et que le réseau
électrique soit compatible avec la puissance de l’appareil.
En cas d’incompatibilité entre la prise électrique murale et celle de
l’appareil faire changer la prise de l’appareil par un professionnel
qualié. Ce dernier devra s’assurer que la section des câbles de la
prise soit adaptée à la puissance absorbée par l’appareil.
Ne jamais tirer sur le câble d’alimentation pour débrancher la prise
électrique.
S’assurer que le câble n’entre pas en contact avec des supercies
chaudes ou coupantes.
Ne pas utiliser l’appareil si le câble d’alimentation est abîmé.
Si le câble d’alimentation est endommagé, pour éviter tout risque, il
devra être substitué par le constructeur, par son service d’assistance
technique ou toute autre personne de même qualication.
Brancher l’appareil exclusivement sur une prise de courant alterné.
Il est en général déconseiller d’utiliser des adaptateurs, prises multiples et/ou rallonges. En cas de nécessité, utiliser seulement des
adaptateurs ou rallonges conformes aux normes de sécurité en vigueur.
Cet appareil ne devra être utilisé que pour l’usage pour lequel il a été
conçu.
Tout autre usage sera considéré comme inapproprié et donc dangereux, et engendrera l’annulation de la garantie.
12
Page 13

ES
Ventilateur à pied Manuel d’instructions
ESFR
Le constructeur ne peut être tenu pour responsable en cas de dommages causés par une utilisation incorrecte, inappropriée et déraisonnable.
Pour éviter tout risque d’échauffement il est recommandé de dérouler
entièrement le câble d’alimentation et de débrancher l’appareil de la
prise de courant en cas d’inutilisation.
Avant d’effectuer toute opération de nettoyage ou entretien, débrancher l’appareil de la prise de courant électrique.
Ne jamais immerger l’appareil dans l’eau ou d’autres liquides.
Ne pas toucher l’appareil avec les mains et pieds mouillés ou humides.
Ne pas utiliser l’appareil si vous êtes pieds nus.
Ne pas laisser l’appareil exposé aux agents atmosphériques comme
la pluie, le soleil …
Ne pas laisser l’appareil près d’une source de chaleur (ex. Radiateur)
Ne pas laisser les enfants, les personnes avec des capacités physiques, sensorielles ou mentales réduites, ou manquant d’expérience
ou de connaissance technique, utiliser cet appareil sans surveillance
S’assurer que les enfants ne jouent pas avec cet appareil.
DÈS LORS QUE L’APPAREIL DOIT ÊTRE DÉTRUIT, IL
EST RECOMMANDÉ DE COUPER LE CÂBLE D’ALIMENTATION, ET DE RETIRER TOUTES LES PARTIES
SUSCEPTIBLES DE PRÉSENTER UN QUELCONQUE
DANGER, EN PARTICULIER POUR LES ENFANTS
QUI POURRAIENT UTILISER CET APPAREIL COMME
UN JEU.
PRÉCAUTIONS D’EMPLOI
Ne pas brancher la prise d’alimentation sans avoir auparavant assemblé correctement chaque partie du ventilateur.
Pour chaque utilisation vérier l’intégrité du câble d’alimentation et de
libérer des éventuels enchevêtrements.
Positionner le ventilateur seulement sur des supercies plates et stables.
Ne pas positionner le ventilateur dans des environnements très humides.
Maintenir le ventilateur à une distance appropriée des parois, des
portes, des fenêtres et des objets qui pourraient empêcher le mouvement oscillant.
13
Page 14

Ventilateur à pied Manuel d’instructions
Ne pas couvrir en aucune façon le corps et la grille du ventilateur
pendant le fonctionnement.
Ne pas enler des objets dans la grille et dans les ssures du corps
du ventilateur.
Ne pas débrancher la prise en tirant le câble d’alimentation.
Après chaque utilisation du ventilateur débrancher le che de la prise
de courant.
Si le ventilateur doit être emmagasiné pour une longue période et
pas utilisé régulièrement, placer le ventilateur dans son emballage
original et le mettre dans un lieu sec. Quand vous l’utilisez pour la
première fois après une longue période de non utilisation, contrôlez
que le ventilateur soit propre et que les pales du moteur tournent librement (à moteur éteint) sans aucun frein.
PRODUIT ET ACCESSOIRES Fig.1
1 Grille antérieure
2 Pale
3 Arrêt pour les pales
4 Vis de xage
5 Grille postérieure
6 Arbre de transmission
7 Contrôle de vitesse
8 Moteur du ventilateur
9 Câble d’alimentation
10 Poignée
11 Tube interne
12 Vis de régularisation pour la hauteur
13 Tube externe
14 Base
15 Poids
16 Rondelle de blocage
17 Vis de fermeture
ASSEMBLAGE DU VENTILATEUR Fig.2
1. Positionner la base d’appui sur le sol et mettre le tube externe en xant aussi le poids par la rondelle de blocage et la vis de fermeture.
Important : Souder fermement tous les composants de la base d’appui de façon à garantir une bonne stabilité
du ventilateur, dans le cas contraire le ventilateur oscillerait dangereusement.
2. Extraire le tube interne, le régler jusqu’à la mesure désirée.
3. Enler l’arbre de transmission (du ventilateur) sur le tube complètement.
4. Visser complètement la vis (12) de façon que le panneau soit bien soudé au tube interne.
5. Positionner la grille postérieure au contact avec l’embout du corps moteur, de façon que les trous de la grille
s’encastrent avec les boulons situés sur le corps moteur du ventilateur.
6. Visser complètement l’arrêt de la grille postérieure de façon à bloquer la grille eau corps moteur.
7. Enler l’hélice avec les pales sur l’arbre de transmission et visser complètement l’arrêt des pales sur l’arbre
moteur, de façon à bloquer le ventilateur au corps moteur (pour visser l’arrêt tourner dans le sens contraire des
aiguilles d’une montre).
8. Mettre au contact les deux grilles antérieures et postérieures, en insérant les crochets de fermeture, positionnés sur la grille antérieure et sur celle postérieure. Fermer les crochets de façon à bloquer les grilles.
CHOIX DE LA VITESSE
En position 0 le ventilateur est éteint.
En position 1 vitesse basse.
En position 2 vitesse moyenne.
En position 3 vitesse haute.
INCLINATION DE LA TÊTE
Il est possible d’incliner la tête du ventilateur dans différentes positions, en permettant de changer l’inclination du
ux d’air. Avant de changer l’inclination éteindre le ventilateur.
Prendre le corps moteur et incliner la tête du ventilateur.
14
Page 15
ES
Ventilateur à pied Manuel d’instructions
ESFR
OSCILLATION DE LA TÊTE
En agissant sur le pivot d’oscillation il est possible d’activer ou de désactiver l’oscillation de la tête du ventilateur.
L’oscillation permet de distribuer uniformément l’air dans l’environnement.
Pour activer l’oscillation pousser le pivot d’oscillation vers le bas jusqu’au blocage complet ; la tête du ventilateur
tourne automatiquement à droite et à gauche.
Pour désactiver l’oscillation soulever complètement le pivot vers le haut.
NETTOYAGE
Avant d’effectuer n’importe quelle opération de nettoyage éteindre le ventilateur et débrancher la che de la
prise de courant.
Pour nettoyer le ventilateur utiliser un chiffon souple, éventuellement mouillé avec de l’eau.
Ne pas utiliser de l’alcool ou des agents chimiques comme des diluants, des produits abrasifs en général.
Ne pas pulvériser de l’eau et des liquides sur le ventilateur, sous réserve d’inltrations dommageables.
Bien sécher toutes les parties intéressées par le nettoyage avant d’allumer le ventilateur.
DONNÉES TECHNIQUES
Puissance : 50 W
Alimentation : 230 V~ 50/60 Hz
Dans une optique d’amélioration continue Beper se réserve la faculté d’apporter des modications et
des améliorations au produit en objet sans donner de préavis.
Le produit en n de vie doit être détruit selon les normes en vigueur relatives à l’élimination des
déchets et ne peut être traité comme simple déchet ménagé.
Le produit doit être détruit dans un centre d’élimination des déchets adapté ou être restitué au reven-
deur dans le cas d’une substitution avec un autre produit équivalent neuf.
Le fabricant prendra à sa charge les frais occasionnés pour la destruction du produit selon les termes
de la loi en vigeur.
Le produit est composé de pièces non biodégradables et substances qui peuvent polluer l’environnement si
détruites de façon inapropriée . Par ailleurs, certaines parties de ces matières peuvent être recyclées évitant ainsi toute pollution pour l’environnement. Il est de votre et notre devoir de préserver la santé de l’environnement.
Le symbole indique que le produit répond aux normes requises par les nouvelles
directives introduites en faveur de l’environnement (2011/65/EU) et que le produit doit être détruit de façon appropriée au terme du cycle de vie.
15
Page 16

Ventilateur à pied Manuel d’instructions
CERTIFICAT DE GARANTIE
La garantie d’application est valable pour 24 mois à partir de la date d’achat pour des défauts de matériel ou de
fabrication.
La garantie est valable uniquement en présentant le certicat de garantie et le document d’achat (ticket
de caisse) qui certie la date d’achat et le nom du modèle de l’appareil acheté
Si l’appareil devrait demander l‘assistance technique s’adresser au vendeur ou auprès de notre siège. Ceci pour
conserver inaltérée l ‘efcacité de votre appareil et pour NON invalider la garantie. Des éventuelles manipulations de l’appareil de la part du personnel non autorisé invalident automatiquement a garantie.
CONDITIONS DE GARANTIE
S’il y a des pannes à cause des défauts de matériel et/ou de fabrication pendant la période de garantie, nous
garantissons la réparation du produit gratuitement.
Elles ne sont pas couvertes de la garantie toutes les parties qui devraient résulter défectueuses à cause de :
a. Dommages de transport ou de chutes accidentelles,
b. Installation erronée ou inadaptation de l’installation électrique,
c. Réparations ou modications effectuées par un personnel non autorisé,
d. Manque ou incorrect entretien et nettoyage,
e. Produit et/ou parties du produit relevant de l’usure et/ou consommables (ex : lampes piles, lames)
f. Manque d’observation des instructions pour le fonctionnement de l’appareil, négligence dans l’utilisation
La liste indiquée ci-dessus est à titre purement exemplaire et non exhaustif, car la présente garantie est donc
exclue pour toutes les circonstances qui ne peuvent pas dériver des défauts de fabrication de l’appareil.
En outre la garantie est exclue dans tous les cas d’usage impropre de l’appareil et en cas d’usage professionnel.
Beper S.R.L. décline chaque responsabilité pour des éventuels dommages qui peuvent directement ou indirectement dériver à des personnes, des choses et des animaux domestiques, en conséquence au non-respect
de toutes les prescriptions indiquées dans le « livret des instructions et des précautions » approprié, en thème
d’installation, d’utilisation et d’entretien de l’appareil.
ASSISTANCE TECHNIQUE
Pour l’assistance technique et/ou des réparations en dehors de la période de garantie, vous pouvez vous adresser directement à l’adresse indiquée ci-dessous:
LE SERVICE APRÈS-VENTE EST EFFECTUÉ PAR VOTRE REVENDEUR OU PAR
L’IMPORTATEUR/DISTRIBUTEUR DES PRODUITS BEPER.
ÉCRIVEZ UN E-MAIL AU [email protected] POUR CONNAITRE LE CENTRE SERVICE AGRÉE BEPER
LE PLUS PROCHE DE CHEZ VOUS.
16
Page 17

ES17ES
Turmventilator Betriebsanleitung
DE
ALLGEMEINE ANLElTUNGEN
1. Diese Anleitungen aufmerksam lesen, denn sie geben wichtige
Hinweise zu Ihrer eigenen Sicherheit bei Installation, Benutzung und
Service. Sie können dadurch Störungen und Unfalle vermeiden, die
u.U. Ihre Sicherheit beeintrachtigen können.
2. Beim Auspacken überprüfen, ob das Gerät unversehrt ist, insbesondere Anschlußkabel.
3. Im Falls der Kabel ist zerstört, die Reparierung oder die Ersetzung
dürfen nur von Fachkräfter durchgeführt warden oder sie können
erhbeliche Gefahren für den Benutzer entstehen.
4. Vor Geräteanschluß überprüfen, ob der Netzstrom und die
Schildwerte übereinstimmen. Das Gerät kann Schäden erleiden,
wenn einer nicht geeigneten Spannung unterliegt.
5. Bei Nichtubereinstimmung von Gerätestecker und Steckdose lassen Sie die Steckdose durch einen geeigneten Typ von qualizier-
tem Fachpersonal ersetzen, das auch überprüfen soll, ob der Dur-
chschnitt der Steckerkabel der vom Gerät aufgenommenen Leistung
entspricht.
6. Die Benutzung von Paßstücken, Vielfrachsteckdosen und/oder
Verlangerungskabel ist in der Regel nicht ratsam, insbesondere in
Badezimmer oder Duschraum. Müssen diese Teile unbedingt verwendet werden, so benutzen Sie nur Einfach-oder Vielfrachpaßstücke
bzw. Verlangerungskabel, die den geltenden Sicherheitsvorschriften
entsprechen.
Darauf achten, daß die auf dem Einfachpaß stuck bzw. Verlangerungskabel angegebene Stromleistungsgrenze und die auf dem Vielfachpaßstück angegebene Hochstleistungsgrenze nicht uberschritten werden.
7. Gerät bei beschädigtem Anschlußkabel oder Stecker nicht benutzen.
8. Bei Störung und/oder Fehlbetrieb Gerät ausschalten und nicht
eingreifen. Zur eventuellen Reparatur das Gerät nur zu einer Beper
Vertragsservicestelle bringen und nur den Einsatz von Originalersatzteiler, verlangen. Die Nichtbeachtung dieser Anleitungen kann
die Sicherheit des Gerätes beeintrachtigen.
9. Gerät nur für der vorgesehenen Zweck, einsetzen. Jede andersartige Benutzung ist ungeeignet und deswegen gefährlich. Für Schaden, die durch unsachgemäße und unvernunftige Handhabung ve-
rursacht werden, wird nicht gehaftet.
17
Page 18

Turmventilator Betriebsanleitung
10. Gerät keinesfalls ins Wasser bzw. in andere Flüssigkeiten tauchen.
11. Gerät nicht in der Nähe von Sprengstoffen, stark brennbaren Materialien, Gasen oder Flammen bedienen.
12. Gerät nicht von Kindern oder Ungeschickten unbewacht bedie-
nen lassen.
13. Gerät nicht mit nassen oder feuchten Händen und Füßen berühren.
14. Für absolute Betriebssicherheit nur vorgesehene Zubehörteile
verwenden..
15. Gerät nicht im Duschraum und bei Badewanne oder beim Waschbecken benutzen: die Anwesenheit von Wasser könnte le-
bensgefährlich sein.
16. Stecker niemals an der Leitung bzw. an dem Gerät aus der
Steckdose ziehen.
17. Das Kabel nicht herabhängen lassen.
18. Gerät nicht den Witterungseinüssen (Regen, Wind, Schnee, Ha-
gen usw.) aussetzen.
19. Bei Nicht benutzen bzw. Reinigen den Gerätestecker aus der
Steckdose ziehen.
20. Falls Sie entscheiden, das Gerät nicht mehr zu verwenden,
dann ist es empfehlenswert, das Gerät durch Abschneiden des An-
schlußkabel außer Betrieb zu setzen, nachdem der Stecker aus der
Steckdose gezogen wurde. Es wird ferner empfohlen, die Geräteteile, die lebensgefährlich sein können, außer Betrieb zu setzen, besonders für die Kinder, die mit dem Gerät außer Gebrauch spielen
können.
21. Beim Nichtgebrauch, vor dem Einfügen oder Entnehmen seiner
Bestandteile und vor dem Durchführung von Reinigungsarbeiten
muß das Gerät vom Strom abgeschaltet werden.
22. Es wird empfohlen das Gerät sauber zu halten um die o.g.
Funktionsstörungen und Feuer -Gefahr zu vermeiden.
23. Achten Sie darauf, dass alle die das Gerät benutzen, diese Anlei-
tungen lesen.
24. Diese Anleitungen aufbewahren.
18
18
Page 19

ES19ES
Turmventilator Betriebsanleitung
DE
PRODUKT UND ZUBEHÖR Fig.1
1 Vorderes Gitter
2 Drehügel
3 Drehügelbremse
4 Befestigungsschraube
5 Hinteres Gitter
6 Kurbelwelle
7 Drehzahlregelung
8 Lüftungsmotor
9 Netzkabel
ZUSAMMENBAU DES VENTILATORS Fig.2
1. Legen Sie die Grundplatte auf dem Boden und befestigen Sie das Außenrohr durch die Sicherungsscheibe
und die Klemmschraube.
Wichtig: Befestigen Sie alle Komponenten der Trägerbasis ganz sorgfältig, um eine gute Stabilität des Lüfters zu
gewährleisten, da er sonst gefährlich schwingen würde.
2. Ziehen Sie das innere Rohr heraus, bis auf die gewünschte Höhe.
3. Stecken Sie die Kurbelwelle (des Lüfters) vollständig in das Rohr.
4. Die Schraube (12) festschrauben, damit die Platte sicher an dem Innenrohr befestigt ist.
5. Bringen Sie das hintere Gitter in Kontakt mit der Motoransche, so dass die Gitterlöcher zu den Stiften passen
die sich an dem Motor des Ventilators benden .
6. Schrauben Sie die Verbindungselemente des hinteren Gitters fest um das Gitter an dem Motorkörper zu
xieren.
7. Schieben Sie das Gebläse mit den Drehügeln auf der Kurbelwelle und schrauben Sie die Klemmschraube
der Drehügel vollständig an der Kurbelwelle fest, um den Gebläse an dem Motorgehäuse zu befestigen (um die
Klemmschraube festschrauben zu können bitte gegen den Uhrzeigersinn drehen).
8. Bringen Sie die beiden Gitter, das Vordere und das Hintere, zusammen durch das Einsetzen der Verriegelungshaken, die auf dem vorderen und auf dem hinteren Gitter positioniert sind. Befestigen Sie die Haken, um
die Gitter zu blockieren.
10 Handgriff
11 Innenrohr
12 Höhenverstellschraube
13 Außenrohr
14 Basis
15 Gewicht
16 Sicherungsscheibe
17 Klemmschraube
GESCHWINDIGKEITSWAHL
Bei 0 ist der Lüfter ausgeschaltet.
Bei 1 niedrige Geschwindigkeit.
Bei 2 Durchschnittsgeschwindigkeit.
Bei 3 hohe Geschwindigkeit.
AUSRICHTUNG DES VENTILATOR-KOPFES
E s ist möglich den Kopf des Lüfters in verschiedenen Positionen zu kippen und somit die Richtung des
Luftstroms zu ändern.
Bevor Sie die Ausrichtung ändern, schalten Sie den Lüfter aus.
Fassen Sie das Motorgehäuse und kippen Sie den Ventilator-Kopf.
SCHWENKUNG DES KOPFES
In dem Sie auf der Schwenkachse einwirken, ist es möglich die Schwingung des Ventilator-Kopfes ein- oder
auszuschalten. Die Schwenkung ermöglicht die gleichmäßige Verteilung der Luft in der Umgebung.
Zur Aktivierung der Schwenkung drücken Sie den Schwenkungsstift nach unten, bis er vollständig einrastet; der
Ventilator-Kopf dreht sich automatisch nach rechts und nach links.
Um die Schwenkung zu deaktivieren heben Sie den Stift vollständig nach oben.
REINIGUNG
Vor dem Reinigen schalten Sie den Lüfter aus und ziehen Sie den Stecker aus der Steckdose heraus.
Reinigen Sie den Lüfter mit einem weichen Tuch, das mit Wasser angefeuchtet ist.
Verwenden Sie keinen Alkohol oder chemischen Mitteln wie Lösungsmittel und Scheuermittel im Allgemeinen.
Nicht mit Wasser und Flüssigkeit auf dem Lüfter sprühen, um schädliche Inltrationen zu vermeiden.
Trocknen Sie all die gereinigten Teile bevor Sie den Lüfter einschalten.
19
Page 20
Turmventilator Betriebsanleitung
TECHNISCHE DATEN
Leistung: 50 W
Spannung: 230V ~ 50 / 60Hz
In einem kontinuierlichen Verbesserungsbestreben behält sich Beper das Recht auf Änderungen und
Verbesserungen des Produktes vor, ohne vorherige Ankündigung.
Die WEEE-Richtlinie (von engl.: Waste Electrical and Electronic Equipment; deutsch: (Elektro- und
Elektronikgeräte-Abfall) ist die EG-Richtlinie 2011/65/EU zur Reduktion der zunehmenden Menge
an Elektronikschrott aus nicht mehr benutzten Elektro- und Elektronikgeräten. Ziel ist das Vermei-
den, Verringern sowie umweltverträgliche Entsorgen der zunehmenden Mengen an Elektronikschrott
Ihr Gerät enthält wertvolle Rohstoffe, die wieder verwertet werden können.
Bringen Sie das Gerät zur Entsorgung zu einer Sammelstelle Ihrer Stadt oder Gemeinde.
Elektro- und Elektronikgeräte mit folgender Kennzeichnung versehen und dürfen nicht mehr über Restmüll,
sondern nur noch über die öffentlichen Entsorgungsträger und anschließende Rückgabe an die Hersteller und
Importeure entsorgt werden.
GARANTIESCHEIN
Die Gewährleistung gilt 24 Monate ab Kaufdatum für Material- und Herstellungsfehler.
Die Garantie gilt nur wenn der Garantieschein vom Kaufbeleg (Quittung), mit Kaufdatum und Name des
gekauften Gerätemodells, begleitet wird.
Sollte das Gerät einmal technische Unterstützung benötigen, wenden Sie sich bitte an dem Verkäufer oder
an unserem Firmensitz. Dies um die Efzienz des Gerätes aufrechtzuerhalten und damit die Garantie NICHT
erlischt. Bei eventuellen Beschädigungen des Gerätes durch nicht autorisierte Personen, erlischt die Garantie
automatisch.
GARANTIEBEDINGUNGEN
Sollte es zu Funktionsstörungen aufgrund von Fehlern in Material und / oder Verarbeitung während der Garantiezeit kommen, garantieren wir die Reparatur des Produkts kostenlos.
durch eine erweiterte Herstellerverantwortung.
Alle Teile die nicht durch Garantie gedeckt sind, sind die, die sich als defekt erweisen aufgrund von:
a. Transportschäden oder Stürze,
b. Falscher Installation oder ungeeigneter elektrischer Anlage,
c. Reparaturen oder Änderungen durch nicht autorisierte Personen,
d. Fehlender oder falscher Wartung und Reinigung,
e. Produkt und / oder Teile des Produkts, die dem Verschleiß unterliegen und / oder Verbrauchsmaterial (z. B.:
Lampen, Batterien, Klingen) darstellen
f. Nicht befolgen der Gebrauchsanweisungen des Gerätes, Fahrlässigkeit oder unvorsichtigem Gebrauch.
Die obige Liste ist beispielhaft und nicht erschöpfend, da diese Garantie für all jene Situationen ausgeschlossen
ist, den keinem Produktionsfehler zuzuweisen sind.
Die Garantie ist auch in allen Fällen von missbräuchlichen Verwendung des Gerätes und im Falle vom beruichen Einsatz ausgeschlossen.
Beper Srl übernimmt keine Verantwortung für Schäden, die direkt oder indirekt Personen, Gegenstände und
Haustieren betreffen könnten, als Folge der Nicht-Einhaltung aller in der Broschüre „Gebrauchsanweisungen
und Warnungen” enthaltenen Anweisungen in Bezug auf Installation, Bedienung und Wartung.
KUNDENDIENST
Für technische Unterstützung und / oder Reparaturen außerhalb der Garantiezeit, können Sie direkt unten
stehende Adresse kontaktieren.
TRETEN SIE BITTE IN VERBINDUNG MIT IHREN HÄNDLER IN IHREM LAND ODER POST SALES ABTEILUNG VON FA. BEPER. E-MAIL [email protected] DIE IHREN HÄNDLER NENNEN WIRD
20
20
Page 21

Ventilador de pie Manual de instrucciones
ES
ADVERTENCIAS GENERALES
LEER ESTAS INSTRUCCIONES ANTES DE USAR EL APARATO
Antes y durante el uso del artículo es necesario seguir algunas precauciones básicas.
Tras haber quitado el embalaje, asegurarse de la integridad del
artículo. En caso de duda, no utilizar el artículo y dirigirse a personal
profesionalmente cualicado.
Los elementos del embalaje (bolsas de plástico, polistirolo, etc.) no
deben dejarse cerca del alcance de los niños al representar un peligro para ellos.
Se recomienda no tirar junto con los residuos domésticos los materiales presentes en el embalaje sino depositarlos en centros de
recogida de residuos, solicitando información adicional al gestor del
punto de recogida urbano del propio ayuntamiento donde se resida.
Asegurarse siempre de que la tensión de la red eléctrica sea igual a
la indicada en la etiqueta de los datos técnicos que y que la instalación sea compatible con la potencia del aparato.
En caso de incompatibilidad entre el enchufe del aparato y la toma
de corriente, sustituir el enchufe por otro por una persona profesionalmente cualicada. En concreto, este último, deberá también corroborar que la sección de cables de presa sea la idónea a la potencia
necesaria para el aparato.
No tirar nunca el cable para desenchufarlo de la corriente eléctrica.
Asegurarse de que el cable no esté en contacto con supercies calientes o cortantes.
No utilizar el aparato con el cable dañado.
Conectar el aparato exclusivamente a una presa de corriente alterna.
En general, se desaconseja el uso de adaptadores, presas múltiples
y prolongadores. Si el uso fuera indispensable, es necesario utilizar
sólamente adaptadores y prolongadores de acuerdo a las normas
vigentes de seguridad.
Este aparato deberá destinarse sólo al uso para el que ha sido fabricado. Cualquier otro tipo de uso será considerado inapropiado y, por
lo tanto, peligroso y hará perder la garantía del mismo. El fabricante
no podrá ser considerado el responsable de los posibles daños derivados de usos inadecuados, erróneos e irracionales.
Para evitar sobrecalentamientos peligrosos, se recomienda estirar
totalmente el cable de alimentación y de desenchufar el enchufe de
la red de alimentación eléctrica cuando el aparato no esté siendo
utilizado.
21
Page 22

Ventilador de pie Manual de instrucciones
Para evitar calentamientos peligrosos, se recomienda estirar completamente el cable de alimentación y desenchufarlo de la red eléctrica cuando no esté siendo utilizado.
No introducir nunca el aparato en agua u otros líquidos.
No tocar el aparato con las manos o pies mojados o húmedos.
No utilizar el aparato con los pies desnudos.
No dejar el aparato expuesto a los agentes atmosféricos (lluvia, sol,
etc.)
No dejar el aparato cerca de fuente de calor (ej.radiador)
Este aparato no debe ser utilizado por personas (incluido niños) con
capacidad física, sensorial o mental reducida o personas con falta de
experiencia y conocimiento del aparato salvo que estén controladas
o bien instruidas respecto al uso del propio aparato por parte de la
persona responsable de su seguridad.
Asegurarse de que no niños no jueguen con el aparato.
Cuando se decida tirar a la basura este aparato, se recomienda convertirlo en inoperante previamente cortando el cable de alimentación.
SE, RECOMIENDA ADEMÁS CONVERTIR EN
INÓCUAS LAS PARTES DEL APARATO SUSCEPTIBLES DE CONSTITUIR UN PROBLEMA, ESPECIALMENTE PARA LOS NIÑOS QUE PODRÍAN UTILIZAR
EL APARATO PARA JUGAR.
ADVERTENCIAS PARA EL USO
No conecte la toma de alimentación sin haber ensamblado correctamente cada pieza del ventilador.
Antes de cada uso verique la integridad del cable de alimentación y
lo libere de eventuales enredos.
Coloque el ventilador solamente encima de supercies llanas y estables.
No coloque el ventilador en lugares muy húmedos.
Mantenga el ventilador lejos de paredes, puertas, ventanas y objetos
que pueden impedir la oscilación.
No cubra de ninguna manera el cuerpo y la rejilla del ventilador mientras este funciona.
No introduzca objetos dentro la rejilla y las suras del cuerpo del
ventilador.
No desconecte el enchufe estirando el cable de alimentación.
22
Page 23

Ventilador de pie Manual de instrucciones
ES
Después cada uso del ventilador desconecte el enchufe de la toma
de corriente.
Si tiene que guardar por mucho tiempo el ventilador y no lo usa con
regularidad, lo reponga en su embalaje original y lo guarde en un
lugar seco y no húmedo. Cuando lo emplea por primera vez después
un largo período, controle que sea limpio y que las paletas del motor
giren libremente (con el motor apagado) sin problemas.
PRODUCTO Y ACCESORIOS Fig.1
1 Rejilla anterior
2 Paletas
3 Bloqueo para paletas
4 Tornillo de jación
5 Rejilla posterior
6 Eje motor
7 Control de la velocidad
8 Motor del ventilador
9 Cable de alimentación
10 Pomo
MONTAJE DEL VENTILADOR Fig.2
1. Coloque la base de apoyo al suelo y enganche el tubo exterior jando también el peso a través de la arandela
de bloqueo y del tornillo de cierre.
Importante: Enlace rmemente todas las piezas de la base de apoyo de modo que sea garantizada una buena
estabilidad al ventilador, en caso contrario este oscila peligrosamente.
2. Extraiga el tubo interior, levante hasta la medida que desea.
3. Introduzca el eje motor (del ventilador) completamente dentro del tubo.
4. Atornille completamente el tornillo (12) de modo que el panel sea muy rme al tubo interior.
5. Coloque la rejilla posterior en contacto con la brida del cuerpo motor, de modo que los agujeros de la rejilla
se encastren con los pivotes colocados encima del cuerpo motor del ventilador.
6. Atornille el bloqueo de la rejilla posterior completamente de modo que la rejilla se je al cuerpo motor.
7. Introduzca el molinete con las paletas dentro del eje motor y atornille el bloqueo para paletas completamente
al eje motor, de modo que el molinete sea jado al cuerpo motor (para atornillar el bloqueo gire en sentido inverso a las agujas del reloj).
8. Ponga en contacto las rejillas anterior y posterior, introduciendo los ganchos de cierre, colocados encima de
las dos rejillas. Cierre los ganchos de modo que se bloquen las rejillas.
11 Tubo interior
12 Tornillo para la regulación de la altura
13 Tubo exterior
14 Base
15 Peso
16 Arandela de bloqueo
17 Tornillo de cierre
SELECCIÓN DE LA VELOCIDAD
En posición 0 el ventilador está apagado.
En posición 1velocidad baja.
En posición 2 velocidad media.
En posición 3 velocidad alta.
INCLINACIÓN DE LA CABEZA
Es posible inclinar la cabeza del ventilador en distintas posiciones, permitiendo el cambio del ujo del aire.
Antes de cambiar inclinación apague el ventilador.
Empuñe el cuerpo motor e incline la cabeza del ventilador.
OSCILACIÓN DE LA CABEZA
Si obra con el pivote para la oscilación puede activar o desactivar la oscilación de la cabeza del ventilador. La
oscilación permite de distribuir uniformemente el aire en el ambiente.
Para activar la oscilación empuje el pivote para la oscilación hacia abajo hasta que no se bloquee completamen-
te; la cabeza del ventilador rueda automáticanmente a la derecha y a la izquierda.
Para desactivar la oscilación levante completamente el pivote hacia el alto.
23
Page 24
Ventilador de pie Manual de instrucciones
LIMPIEZA
Antes de efectuar cualquiera operación de limpieza apague el ventilador y desconecte el enchufe de la toma
de corriente.
Para limpiar el ventilador emplee un paño mórbido, eventualmente humedecido en agua.
No emplee alcohol o agentes químicos como diluyentes, productos abrasivos en general.
No salpique agua y líquidos encima del ventilador, para evitar inltraciones dañosas.
Seque bien todas las piezas que tiene que limpiar antes de encender el ventilador.
DATOS TÉCNICOS
Potencia: 50W
Alimentación: 230V~ 50/60Hz
Con el objetivo de una mejora continua, Beper se reserva el derecho de añadir cambios y mejoras al
aparato sin previo aviso.
Al término de la vida útil del aparato, no eliminar como residuo municipal sólido mixto sino eliminarlo
en un centro de recogida especíco colocado en vuestra zona o entregarlo al distribuidor a la hora
de comprar un nuevo aparato del mismo tipo y destinado a las mismas funciones. El distribudor se
Este procedimiento de recogida separada de los equipos eléctricos y electrónicos se realiza con el propósito de
una política del medioambiente comunitaria con objetivos de salvaguardia, defensa y mejoramiento de la calidad del medioambiente y para evitar efectos potenciales en la salud de los seres humanos debido a la presencia
de dentro de estos equipos o a un uso inapropiado de los mismos o de algunas de sus partes. Està Vuestra y
nuestra competencia aiudar la defensa del medioambiente.
El símbolo indica que este producto respecta la normativa europea de mdioam biente ( 2011/65/EU) y le re-
cuerda que todos los productos electrónicos y eléctricos deben ser objeto de recogida por separado al nalizar
su ciclo de vida. Para obtener información sobre el reciclaje de este producto y dónde encontrar puntos de recogida llame las supuestas autoridades locales. Una eliminación no correcta de este producto podría conllevar
sanciones.
cargarà el costo de eliminación de los equipos siguendo las normas actuales.
24
Page 25

Ventilador de pie Manual de instrucciones
ES
CERTIFICADO DE GARANTĺA
La garantía es valida 24 meses a partir de la fecha de compra para todos los defectos de material o de fabricación.
La garantía es valida sólo si presenta el recibo scal con la fecha de compra y el nombre del modelo del
aparato comprado.
Si el aparato requiere asistencia, contacte su vendedor o nuestra empresa. Eso para preservar el rendimiento
de su aparato y NO invalidar la garantía. Toda manipulación del aparato por una persona no autorizada anula
automáticamente la garantía.
CONDICIONES DE GARANTÍA
Si aparecen averías a causa de un defecto de material y/o fabricación durante la garantía garantizamos gratuitamente la reparación del aparato.
No se tienen en cuenta en la garantía todas las partes que sean defectuosas debidas a:
a. Daños en el transporte o caídas accidentales.
b. Instalación eléctrica incorrecta y no conforme.
c. Reparaciones o modicaziones realizadas por personal no especializado.
d. Falta o incorrectos limpieza y mantenimiento.
e. Aparato y/o partes del aparato expuestas a deterioro y/o consumo (lámparas, pilas, cuchillas).
f. Falta de cumplimiento de las instrucciones para el funcionamiento del aparato, negligencia en el uso.
Esta lista es simplicada y no completa ya que esta garantía se anula para todas aquellas circunstancias que
no permiten remontar a defectos de fabricación del aparato.
La garantía se anula en cada caso de uso impropio del aparato y en caso de un uso profesional.
Beper Srl declina toda responsabilidad por cualquier daño que puede directamente o indirectamente resultar de
personas, cosas o animales domésticos en consecuencia de la falta de cumplimiento de todas las instrucciones
indicadas en este “Manual de Instrucciones y Advertencias” en términos de instalación, uso y mantenimiento
del aparato.
ASISTENCIA TÉCNICA
Para la asistencia técnica y/o reparaciones fuera de la garantía, puede contactar directamente la dirección
siguiente:
CONTACTE CON EL DISTRIBUDOR DE SU PAIS O EL DEPARTAMENTO DE POST VENTA DE BEPER.
ENVIE UN E-MAIL A [email protected] Y LE ENVIAREMOS DATOS DE SU SERVICIO TECNICO EN SU
PAIS.
25
Page 26

ΑΝΕΜΙΣΤΗΡΑΣ ΟΡΘΟΣΤΑΤΗΣ Εγχειρίδιο οδηγιών
ΣΗΜΑΝΤΙΚΕΣ ΠΡΟΕΙΔΟΠΟΙΗΣΕΙΣ ΑΣΦΑΛΕΙΑΣ
Πριν χρησιμοποιήσετε την συσκευή διαβάστε προσεκτικά τις
παρακάτω οδηγίες χρήσεως και φυλάξτε τις για μελλοντική χρήση.
Διαβάστε προσεκτικά τις παρακάτω οδηγίες, δεδομένου ότι θα σας
δώσουν χρήσιμες πληροφορίες για την ασφάλεια σχετικά με την
εγκατάσταση, τη χρήση και τη συντήρηση και θα σας βοηθήσουν να
αποφύγετε ατυχίες και πιθανά ατυχήματα.
Αφαιρέστε τη συσκευασία και βεβαιωθείτε ότι η συσκευή είναι
άθικτη με ιδιαίτερη προσοχή στο καλώδιο τροφοδοσίας. Τα στοιχεία
της συσκευασίας (πλαστικές σακούλες κλπ.) δεν πρέπει να είναι
προσβάσιμα στα παιδιά, προκειμένου να προφυλαχθούν από τις
πηγές κινδύνου. Συνιστάται να μην ρίξετε τα στοιχεία της συσκευασίας
σε οικιακά απορρίμματα, αλλά να τα τοποθετήσετε στο κατάλληλο
σημείο συλλογής ή καταστροφής των απορριμμάτων του τμήματος
καθαριότητας του Δήμου σας.
Εάν το καλώδιο τροφοδοσίας έχει υποστεί ζημιά πρέπει να
αντικατασταθεί από τον κατασκευαστή, τον αντιπρόσωπο ή από
εξίσου ειδικευμένα άτομα προς αποφυγή κινδύνου.
Πριν συνδέσετε τη συσκευή, βεβαιωθείτε ότι η τάση του δικτύου
αντιστοιχεί στα στοιχεία που αναγράφονται στην ετικέτα. Η συσκευή
μπορεί να καταστραφεί αν η τάση δεν είναι σωστή.
Αν το φις δεν ταιριάζει στην πρίζα απευθυνθείτε σε ειδικευμένο άτομο
προκειμένου να αντικαταστήσει το βύσμα με το κατάλληλο και να
διασφαλίσει ότι το τμήμα καλωδίων της πρίζας είναι κατάλληλο για
την απορρόφηση της ενέργειας της συσκευής σας.
Γενικά, η χρήση προσαρμογέα πολλαπλών βυσμάτων και / ή
επεκτάσεων δεν συνιστάται. Αν είναι απαραίτητο, χρησιμοποιείστε
μόνο απλό ή πολλαπλό προσαρμογέα και επέκταση σύμφωνα
με τους κανόνες ασφαλείας που ισχύουν, διασφαλίστε ότι τα όρια
ισχύος τα οποία είναι σημειωμένα στον απλό προσαρμογέα και στις
επεκτάσεις και η μέγιστη ισχύς που είναι σημειωμένη στον πολλαπλό
προσαρμογέα δεν υπερβαίνονται.
Μην χρησιμοποιείτε την συσκευή αν το καλώδιο τροφοδοσίας έχει
υποστεί ζημία.
Μην χρησιμοποιείτε τη συσκευή μετά από μια μη σωστή λειτουργία.
Σε αυτή την περίπτωση, απενεργοποιήστε την για μην ανοίξει και
σπάσει και επικοινωνήστε με ένα εξουσιοδοτημένο κατάστημα για την
επισκευή της συσκευής γιατί απαιτούνται γνήσια ανταλλακτικά. Η μη
σωστή τήρηση των οδηγιών μπορεί να επηρεάσει την ασφάλεια της
συσκευής σας.
26
Page 27

ΑΝΕΜΙΣΤΗΡΑΣ ΟΡΘΟΣΤΑΤΗΣ Εγχειρίδιο οδηγιών
GR
Αυτή η συσκευή πρέπει να προορίζεται για την χρήση για την οποία
κατασκευάστηκε.
Κάθε άλλη χρήση πρέπει να θεωρείται ως ακατάλληλη και κατά
συνέπεια επικίνδυνη.
Ο κατασκευαστής δεν μπορεί να θεωρηθεί υπεύθυνος για τυχόν
ζημιές που οφείλονται σε ακατάλληλη, λανθασμένη ή απερίσκεπτη
χρήση. Η συσκευή αυτή προορίζεται ΜΟΝΟ ΓΙΑ ΟΙΚΙΑΚΗ ΧΡΗΣΗ.
Για την προστασία από ηλεκτροπληξία, μη βυθίζετε το καλώδιο, το
βύσμα ή οποιοδήποτε άλλο μέρος της συσκευής σε νερό ή άλλο υγρό.
Μη χρησιμοποιείτε τη συσκευή κοντά σε εκρηκτικές ύλες, εύφλεκτα
υλικά, αέρια και φλόγες.
Μην αφήνετε τα παιδιά, τα άτομα με αναπηρία ή ανθρώπους
χωρίς εμπειρία ή τεχνική ικανότητα να χρησιμοποιούν τη
συσκευή, εάν δεν έχουν σωστή επίβλεψη. Η στενή επίβλεψη
είναι απαραίτητη όταν οποιαδήποτε συσκευή χρησιμοποιείται
από ή κοντά σε παιδιά. Βεβαιωθείτε ότι τα παιδία δεν παίζουν
με την συσκευή.
Μη κρατάτε τη συσκευή με βρεγμένα χέρια ή πόδια. Μη κρατάτε τη
συσκευή με γυμνά πόδια.
Ποτέ μην χρησιμοποιείτε άλλα εξαρτήματα εκτός από εκείνα που
προβλέπονται από Beper. Η χρήση εξαρτημάτων που δεν συνιστώνται
από τον κατασκευαστή της συσκευής μπορεί να προκαλέσουν κίνδυνο
ή τραυματισμό.
Μην χρησιμοποιείτε την συσκευή στον άμεσο περιβάλλοντα χώρο
του μπάνιου, του ντους ή της πισίνας.
Ποτέ μην τραβάτε το καλώδιο τροφοδοσίας για να αποσυνδέσετε την
συσκευή.
Βεβαιωθείτε ότι το καλώδιο δεν κρέμεται από την άκρη του τραπεζιού
ή από τον πάγκο της κουζίνας και δεν έρχεται σε επαφή με θερμές
επιφάνειες
ΟΔΗΓΙΕΣ ΚΑΤΑ ΤΗ ΧΡΗΣΗ
Μην συνδέετε το καλώδιο τροφοδοσίας πριν τη συναρμολόγηση
του ανεμιστήρα. Πριν από τη χρήση, ελέγξτε την ακεραιότητα του
καλωδίου τροφοδοσίας. Τοποθετήστε τον ανεμιστήρα σε μια επίπεδη
και σταθερή επιφάνεια σε ξηρό μέρος. Κρατήστε μακριά σε μια λογική
απόσταση τον ανεμιστήρα από τους τοίχους, πόρτες, παράθυρα ή
κάθε αντικείμενο που θα μπορούσε να εμποδίσει τη συσκευή να
λειτουργεί με το σωστό τρόπο.
27
Page 28

ΑΝΕΜΙΣΤΗΡΑΣ ΟΡΘΟΣΤΑΤΗΣ Εγχειρίδιο οδηγιών
βεβαιωθείτε ότι ο ανεμιστήρας είναι καθαρός και ότι οι λεπίδες γυρίζουν
Μην συνδέετε αντικείμενα στο πλέγμα ή στο εσωτερικό της συσκευής.
Μην τραβάτε το καλώδιο τροφοδοσίας για να αποσυνδέσετε τη
συσκευή. Μετά τη χρήση του ανεμιστήρα, αποσυνδέστε την παροχή
ρεύματος. Αν ο ανεμιστήρας πρέπει να αποθηκευτεί για μεγάλο
χρονικό διάστημα ή δεν χρησιμοποιείται, επανατοποθετείστε τον στην
αρχική συσκευασία του, σε ξηρό μέρος. Για κάθε επόμενη χρήση,
με το σωστό τρόπο (έχοντας τον ανεμιστήρα απενεργοποιημένο).
ΣΥΣΚΕΥΗ ΚΑΙ ΑΞΕΣΟΥΑΡ Fig.1
1 – Μπροστινό Πλέγμα
2 – Λεπίδες (φτερωτή) ανεμιστήρα
3 – Βίδα φτερωτής
4 – Βίδα συναρμολόγησης
5 – Πίσω πλέγμα
6 – Άξονας μοτέρ
7 – Επιλογέας ταχυτήταν
8 – Μοτέρ ανεμιστήρα
9 – Καλώδιο τροφοδοσίας
ΟΔΗΓΙΕΣ ΣΥΝΑΡΜΟΛΟΓΗΣΗΣ Fig.2
Τοποθέτηση της τηλεσκοπικής βάσης στη βάση εδάφους.
Πρώτα ξεβιδώστε τη βίδα σχήματος L και αφαιρέστε και τη ροδέλα σύσφιξης από το κάτω μέρος της τηλεσκοπικής
βάσης • Γυρίστε ανάποδα τη βάση στήριξης. Τοποθετήστε το σταθμισμένο κέντρο βάσης στη θέση του στην κάτω
πλευρά της βάσης και τη ροδέλα σύσφιξης στο κέντρο της σταθμισμένης βάσης.
• Περάστε τη βίδα σχήματος L μέσω του συγκροτήματος και στο σπείρωμα στην τηλεσκοπική στάση. Σφίξτε
καλά, αλλά μην σφίξετε υπερβολικά.
• Χαλαρώστε τον κοχλία ρύθμισης ύψους και τραβήξτε ώσπου ο εσωτερικός σωλήνας από το τηλεσκοπικό
σταθεί στο επιθυμητό ύψος, στη συνέχεια, σφίξτε ξανά το κουμπί.
Τοποθέτηση του περιβλήματος του μοτέρ στην κορυφή της τηλεσκοπικής βάσης.
• Πρώτα αφαιρέστε το κουμπί περιστροφής και το μπουλόνι από την κορυφή της τηλεσκοπικής βάσης , στη
συνέχεια, αφαιρέστε τη βίδα συγκράτησης του λαιμού και το μικρό κουμπί ρύθμισης από το στήριγμα του
περιβλήματος του κινητήρα.
• Τοποθετήστε το περίβλημα του μοτέρ στην κορυφή της βάσης και περάστε το μεγάλο μπουλόνι περιστροφής
μέσω του βραχίονα. Βιδώστε τη μικρή βίδα συγκράτησης και σφίξτε, αλλά μην σφίξετε υπερβολικά.
• Τοποθετήστε το μεγάλο κουμπί περιστροφής στο άκρο του κοχλία και το κουμπί μικρή προσαρμογή στην άλλη
πλευρά πάνω από το μπουλόνι. Σφίξτε τους κοχλίες ενώ κρατάτε το μοτέρ ανεμιστήρα σε όρθια θέση.
10 – Διακόπτης
11 – Εσωτερικός σωλήνας
12 – Βίδα ρύθμισης ύψους
13 – Εξωτερικός σωλήνας
14 – Βάση
15 – Βάρος βάσης
16 – Εφαρμοστής βάρους
17 – Βίδα εφαρμογής βάρους
ΕΠΙΛΟΓΗ ΤΑΧΥΤΗΤΑΣ
Επιλέξτε την επιθυμητή ταχύτητα πατώντας τα πλήκτρα του πάνελ ελέγχου ταχύτητας.
Θέση 0 ο ανεμιστήρας απενεργοποιείται.
Θέση 1 χαμηλή ταχύτητα.
Θέση 2 μέτρια ταχύτητα.
Θέση 3 υψηλή ταχύτητα.
ΚΛΙΣΗ
Είναι δυνατό να επιλέξετε διάφορες θέσεις και να αλλάξετε την περιστροφή της ροής του αέρα.
Πριν από την αλλαγή αυτή, σβήστε τον ανεμιστήρα.
Πάρτε το σώμα του κινητήρα, ξεβιδώστε τον άξονα ρύθμισης και αλλάξτε την κλίση του ανεμιστήρα όπως θέλετε
και βιδώστε ξανά τη βίδα.
Προσοχή: μην προσπαθήσετε να αλλάξετε τη θέση κλίσης βάζοντας υπερβολική δύναμη, ώστε να αποφευχθεί
οποιαδήποτε βλάβη.
28
Page 29
ΑΝΕΜΙΣΤΗΡΑΣ ΟΡΘΟΣΤΑΤΗΣ Εγχειρίδιο οδηγιών
GR
ΠΕΡΙΣΤΡΟΦΗ
Είναι δυνατόν να ενεργοποιήσετε την περιστροφή του ανεμιστήρα, αγγίζοντας τον άξονα περιστροφής (8). Η
περιστροφή επιτρέπει την κατανομή του αέρα ομοιόμορφα.
Για να ενεργοποιήσετε την περιστροφή, πιέστε το αξονάκι (8) προς τα κάτω πλήρως μέχρι να μπλοκαριστεί
εντελώς. Ο ανεμιστήρας γυρίζει αυτόματα από δεξιά προς τα αριστερά.
Για να σταματήσετε την περιστροφή, σηκώστε το αξονάκι (8) πλήρως.
ΚΑΘΑΡΙΣΜΟΣ
Πριν τον καθαρισμό, σβήστε και αποσυνδέστε τον ανεμιστήρα από την πρίζα.
Για τον καθαρισμό χρησιμοποιήστε ένα μαλακό πανί, ελαφρώς βρεγμένο.
Μην χρησιμοποιείτε οινόπνευμα ή χημικές ουσίες, ή οποιοδήποτε απορρυπαντικό που θα μπορούσε να επιφέρει
βλάβες στο περίβλημα της συσκευής.
Μην ρίξετε νερό ή άλλα υγρά στον ανεμιστήρα.
Μετά τον καθαρισμό, στεγνώστε κάθε μέρος πριν χρησιμοποιήσετε τη συσκευή.
Κατά τη διάρκεια του χειμώνα και όταν δεν χρησιμοποιείται, κρατήστε τη συσκευή σε ξηρό και καθαρό χώρο.
ΤΕΧΝΙΚΕΣ ΠΡΟΔΙΑΓΡΑΦΕΣ
Power : 50W
Power supply. 230V ~ 50/60Hz
Για οποιουσδήποτε λόγους βελτίωσης, η εταιρεία Beper διατηρεί το δικαίωμα να τροποποιήσει ή να
βελτιώσει το προϊόν χωρίς καμία προειδοποίηση.
Η Ευρωπαϊκή Οδηγία 2011/65/EU σχετικά με τα απόβλητα ειδών ηλεκτρικού και ηλεκτρονικού
εξοπλισμού, προβλέπει ότι παλαιές οικιακές ηλεκτρικές συσκευές δεν πρέπει να απορρίπτονται μαζί
με τα υπόλοιπα αστικά απόβλητα. Οι παλιές συσκευές πρέπει να συλλέγονται χωριστά, προκειμένου
να βελτιστοποιηθεί η ανάκτηση και ανακύκλωση των υλικών που περιέχουν, καθώς και τη μείωση των
επιπτώσεων στην ανθρώπινη υγεία και το περιβάλλον. Το σύμβολο διαγραμμένο “δοχείο αποβλήτων”
στο προϊόν υπενθυμίζει σε σας την υποχρέωσή σας, πως όταν επιθυμείτε να πετάξετε τη συσκευή,
πρέπει να συλλέγεται ξεχωριστά.
29
Page 30

ΑΝΕΜΙΣΤΗΡΑΣ ΟΡΘΟΣΤΑΤΗΣ Εγχειρίδιο οδηγιών
ΌΡΟΙ ΕΓΓΎΗΣΗΣ
Αγαπητέ/ή πελάτη,
Σας ευχαριστούμε που αγοράσατε αυτό το προϊόν. Σε περίπτωση που το προϊόν που διαθέτετε απαιτεί service
βάσει εγγύησης, επικοινωνήστε με το κεντρικό service μας.
Για την αποφυγή της άσκοπης αναστάτωσης, σας συμβουλεύουμε να διαβάσετε προσεκτικά τα
εγχειρίδια χρήστη πριν να επικοινωνήσετε με το service μας.
Τα προϊόντα καλύπτονται με εγγύηση έναντι οποιουδήποτε κατασκευαστικού ελαττώματος για 2 χρόνια από την
ημερομηνία της αρχικής αγοράς. Εάν κατά τη διάρκεια αυτής της περιόδου το προϊόν αποδειχθεί ελαττωματικό
λόγω ακαταλληλότητας υλικού ή ποιότητας εργασίας, το κεντρικό service θα επιδιορθώσει ή θα αντικαταστήσει
(κατά την αποκλειστική του κρίση) το προϊόν βάσει των ορίων και συνθηκών που ορίζονται πιο κάτω, χωρίς
χρέωση για την εργασία και τα ανταλλακτικά:
1. Η εγγύηση ισχύει υπό την προϋπόθεση ότι το προϊόν χρησιμοποιείται και συντηρείται σύμφωνα με τις οδηγίες
της κατασκευαστικής εταιρείας.
1. Η εγγύηση παρέχεται μόνο με την προσκόμιση του προϊόντος μαζί με το αρχικό τιμολόγιο ή την απόδειξη
αγοράς, όπου θα δηλώνεται η ημερομηνία αγοράς και ο τύπος του προϊόντος.
2. Η εγγύηση δεν θα ισχύσει σε περίπτωση :
Ζημίας που προκαλείται λόγω κακής χρήσης συμπεριλαμβανομένης, ενδεικτικά, της μη χρήσης του προϊόντος
για το σκοπό για τον οποίο προορίζεται ή σύμφωνα με τις οδηγίες χρήστη που αφορούν τη σωστή χρήση και
συντήρηση, καθώς και της εγκατάστασης ή χρήσης του προϊόντος χωρίς να τηρούνται τα ισχύοντα πρότυπα
ασφαλείας στη χώρα που χρησιμοποιείται.
Ζημίας που προκαλείται λόγω ατυχημάτων, συμπεριλαμβανομένων, ενδεικτικά, κεραυνού, ύδατος, πυρός,
κατάχρησης ή αμέλειας.
Μετατροπής, παραμόρφωσης, μη δυνατότητας ανάγνωσης ή αφαίρεσης του μοντέλου ή του σειριακού αριθμού
από το προϊόν.
Ζημίας που προκαλείται από επιδιορθώσεις ή ρυθμίσεις που έχουν πραγματοποιηθεί από μη εξουσιοδοτημένα
άτομα ή εταιρείες service.
Ελαττωμάτων σε οποιοδήποτε σύστημα με το οποίο έχει ενοποιηθεί ή χρησιμοποιείται το προϊόν.
ΕΠΙΚΟΙΝΩΝΗΣΤΕ ΜΕ ΤΟΝ ΕΠΙΣΗΜΟ ΔΙΑΝΟΜΕΑ ΤΗΣ BEPER ΣΤΗΝ ΧΩΡΑ ΣΑΣ
Ή ME ΤΟ ΤΜΗΜΑ ΥΠΟΣΤΗΡΙΞΗΣ ΤΗΣ BEPER ΣΤΟ E-MAIL [email protected]
TO ΟΠΟΙΟ ΘΑ ΠΡΟΩΘΗΣΕΙ ΤΟ ΑΙΤΗΜΑ ΣΑΣ ΣΤΟΝ ΕΠΙΣΗΜΟ ΔΙΑΝΟΜΕΑ ΤΗΣ BEPER ΤΗΣ ΧΩΡΑΣ ΣΑΣ.
30
Page 31

Ventilator turn Manual de instrucțiuni
RO
INSTRUCȚIUNI GENERALE PRIVIND SIGURANȚA
CITIȚI CU ATENȚIE INSTRUCȚIUNILE DE FOLOSIRE ÎNAINTE DE
PRIMA FOLOSIRE A APARATULUI.
Citiți cu atenție următoarele instrucțiuni, deoarece ele vă oferă
informații utile de siguranță în legătură cu instalarea, folosirea și
întreținerea și vă ajută să evitați posibilele accidente.
Îndepărtați ambalajul și asigurați-vă, că aparatul este intact, acordând
atenție specială cablului de curent. Ambalajul conține (pungi de plastic, polistiren, etc.) nu au voie să e accesibile pentru copii, pentru
a-i feri de sursele de pericol.
Se recomandă să nu aruncați aceste ambalaje în gunoiul menajer,
însă ele se pot transporta la centrol de colectare din apropiere sau
cerând informații la primărie.
Înainte de conectarea aparatului asigurați-vă că tensiunea rețelei corespunde cu cea trecută pe plăcuța aparatului.
În cazul în care ștecherul nu este potrivit pentru priza dvs, acesta
trebuie înlocuit cu altul potrivit de un personal calicat autorizat specializat, care ar trebui să se asigure, că secțiunea ștecherului cablului
este potrivit pentru tensiunea aparatului dvs.
Pentru a scoate ștecherul din priză nu trageți niciodată de cablu, doar
de ștecher.
Trebuie să vă asigurați că niciodată nu intră cablul în contact cu
suprafețe erbinți sau ascuțite.
Nu folosiți aparatul dacă cablul de curent este deteriorat. În cazul
unei deteriorări, acesta trebuie înlocuit de producător, de un agent
service sau orice altă persoană asemănătoare calicată autorizată
pentru evitarea unui pericol.
Doar conectați aparatul la curent alternativ.
În general nu este recomandată folosirea prizelor multiple și/sau
prelungitoarelor; dacă totuși folosirea lor este necesară, folosiți vă
rugăm adaptoare simple sau multiple în conformitate cu regulile de
siguranță în vigoare și limita maximă de putere trecută pe adaptorul
multiplu să nu e depășită.
Acest aparat poate folosit numai pentru scopul pentru care a fost
creat.
Orice altă folosire se consideră a improprie și de asemenea
periculoasă. Producătorul nu poate responsabil pentru niciun fel
de deteriorare a aparatului apărută în urma folosirii improprii, greșite
sau neatentă.
31
Page 32

Ventilator turn Manual de instrucțiuni
Pentru a evita orice risc de încălzire, se recomandă să derulați complet cablul de rețea și să scoateți ștecherul din priză când nu îl folosiți.
Înainte de curățare scoateți ștecherul din priză.
Pentru protecție împotriva electrocutării, nu cufundați cablul, ștecherul
sau orice altă parte a aparatului în apă sau alte lichide.
Nu țineți aparatul cu mâinile sau picioarele ude.
Nu țineți aparatul când sunteți în picioarele goale.
Nu expuneți aparatul fenomenelor naturii cum sunt ploaia, vântul,
ninsoarea.
Nu folosiți aparatul lângă materiale explozive, inamabile, gaze,
ăcări, încălzitoare.
NU PERMITEȚI COPIILOR, PERSOANELOR CU DIZABILITĂȚI
SAU ORICĂREI PERSOANE FĂRĂ EXPERIENȚĂ SAU ABILITATE TEHNICĂ SĂ FOLOSEASCĂ APARATUL DACĂ NU SUNT
SUPRAVEGHEAȚI CORESPUNZĂTOR. ESTE NECESARĂ SUPRAVEGHEREA ATENTĂ CÂND APARATUL ESTE FOLOSIT
LÂNGĂ SAU DE COPII.
ASIGURAȚI-VĂ, CĂ AL DVS COPIL NU SE JOACĂ CU APARATUL.
ÎN CAZUL ÎN CARE DECIDEȚI SĂ NU MAI FOLOSIȚI VREODATĂ
APARATUL, FACEȚI-L IREPARABIL TĂIND CABLUL DE CURENT
DUPĂ SCOATEREA ȘTECHERULUI DIN PRIZĂ.
DECI TOATE PĂRȚILE PERICULOASE ALE APARATULUI TREBUIE SĂ FIE FĂCUTE IREPARABILE, ÎN SPECIAL PENTRU COPIII
CARE S-AR PUTEA JUCA CU APARATUL.
INSTRUCȚIUNI DE FOLOSIRE
Nu conectați ștecherul la priză înainte de asamblarea tuturor părților
ventilatorului.
Înainte de folosire, vericați integritatea cablului de alimentare și
îndepărtați eventualele noduri dacă este necesar.
Puneți ventilatorul într-un loc uscat pe o suprafață netedă și stabilă.
Păstrați o distanță rezonabilă între ventilator și pereți, uși, ferestre și
orice obiect care ar putera împiedica aparatul să funcționeze corect.
Nu acoperiți carcasa sau grilajul ventilatorului când aparatul este pus
în funcțiune.
Nu inserați obiecte în grilaj sau în interiorul aparatului.
Nu trageți de cablul de alimentare pentru a deconecta aparatul.
După folosirea ventilatorului scoateți ștecherul din priză.
32
Page 33

Ventilator turn Manual de instrucțiuni
RO
Dacă ventilatorul trebuie depozitat pentru a perioadă mai lungă de
timp respectiv urmează să nu e folosit mai mult timp, puneți ventilatorul în ambalajul original într-un loc uscat. La ecare următoare
folosire vericați ventilatorul să e curat iar elicele să se învârtă în
direcția corectă (motor oprit).
DESCRIEREA PRODUSULUI Fig.1
1. Grilajul din față
2. Elice ventilator
3. Șurub elice ventilator
4. Șurub pentru xare
5. Grilajul din spate
6. Axul motorului
7. Control viteză
8. Motorul ventilatorului
9. Cablu de curent
ASAMBLAREA VENTILATORULUI Fig. 2
Atașarea suportului telescopic de baza suportului.
Întâi deșurubați șurubul în formă de L și scoateți-l, de asemenea și cleștele de prindere de pe partea inferioară
a suportului telescopic.
- Întoarceți baza suportului. Puneți centrul bazei cu greutate la locul său de pe partea inferioară a bazei iar
cleștele de prindere în centrul bazei cu greutate.
- Înletați șurubul în formă de L și în suportul telescopic. Strâmtați ferm însă nu prea tare.
- Slăbiți butonul de ajustare a înălțimii și trageți tubul intern din suportul telescopic la înălțimea dorită, apoi
strângeți din nou butonul. Atașați carcasa motorului de partea superioară a suportului telescopic.
- Întâi îndepărtați butonul pivotant și bolțul de pe partea superioară a suportului telescopic, apoi îndepărtați
șurubul care ține gâtul și butonul mic de ajustare de pe brațele carcasei motorului.
- Puneți carcasa motorului pe partea superioară a suportului și înletați șurubul mare prin cele două brațe.
Înșurubați șurubul mic și xați-l, dar nu exagerat.
- Fixați șurubul mare de capătul șurubului iar butonul mic de ajustare de cealaltă parte deasupra șurubului. Fixați
butoanele în timp ce țineți motorul ventilatorului în sus.
Atașarea apărătoarelor și a elicei ventilatorului
- Întâi îndepărtați orice material de protecție de pe carcasa motorului și cele 4 șuruburi de pe grilajele de pe carcasa motorului. Atașați grilajul de carcasa motorului folosind cele patru șuruburi pe care tocmai le-ați îndepărtat.
Asigurați-vă că mânerul este deasupra. Puneți elicea ventilatorului peste axul motorului și xați șurubul de
susținere a elicei ventilatorului, asigurându-vă, că se xează bine.
- Îndepărtați șurubul carcasei de protecție din față și întoarceți clema de susținere a grilajului în jurul colțului
exterior. Agățați grilajul din față de cârligul său deasupra grilajului de protecție din spate.
Coborâți grilajul din față ca să se unească cu cel din față și împingeți clema înspre interior până grilajul din față
se xează de cel din spate. În nal xați șurubul de protecție prin oriciile din colțul inferior al grilajului și xați-le
cu piulița.
ALEGEREA VITEZEI
Alegeți viteza dorită apăsând butoanele de pe panoul de control.
Poziția 0 – ventilatorul este oprit.
Poziția 1 – viteză redusă.
Poziția 2 – viteză medie.
Poziția 3 – viteză ridicată.
ÎNCLINAREA CAPULUI
Este posibil să alegeți poziții variabile și să schimbați uxul de aer.
Înainte de modicarea acestuia, opriți ventilatorul.
Luați carcasa motorului, deșurubați axul și schimbați înclinarea ventilatorului cum doriți dvs și înșurubați ferm.
Atenție: nu încercați să forțați poziția de înclinare pentru a evita orice eșuare.
10. Buton
11. Tub intern
12. Șurub pentru ajustarea înălțimii
13. Tub extern
14. Bază
15. Greutate
16. Element de xare
17. Șurub de blocare
33
Page 34
Ventilator turn Manual de instrucțiuni
OSCILAREA
Este posibil să activați sau să dezactivați funcția de oscilare a ventilatorului, prin atingerea axului (8). Oscilarea
permite furnizarea uniformă a aerului.
Pentru activare apăsați în jos axul oscilant până se blochează complet; capul ventilatorului se rotește automat
de la dreapta la stânga.
Pentru dezactivarea funcției de oscilare ridicați complet axul (8).
CURĂȚARE
Înainte de curățare opriți și deconectați ventilatorul.
Pentru curățare folosiți un prosop moale care poate ușor umezit.
Nu folosiți alcool sau substanțe chimice, sau orice detergent care ar putea deteriora acest aparat.
Nu stropiți apă sau alte lichide pe ventilator pentru a-l proteja.
După curățare, uscați toate părțile înainte de folosirea aparatului.
În timpul iernii și când nu este folosit, țineți acest aparat într-un loc uscat și curat.
DATE TEHNICE
Putere: 50W
Tensiune: 230V – 50/60Hz
În scopul îmbunătățirii perspectivei Beper își rezervă dreptul de a modica produsul în cauză fără noticare sau reconstruire.
Directiva Europeană 2011/65/EU privind Deșeurile de echipamente electrice și electronice (DEEE),
pretinde ca electrocasnicele să nu pot scoase din uz prin deșeurile normale nesortate. Aparatele
vechi trebuie colectate separat pentru a optimiza restabilirea și reciclarea materialelor pe care le
conține și pentru a reduce impactul asupra sănătății umane și asupra mediului. Simbolul tomberonului
cu roți barat de pe produs vă amintește de obligația dvs referitoare la scoaterea din uz a unui aparat,
și anume că acesta trebuie colectat separat.
CERTIFICAT DE GARANȚIE
Acest aparat a fost vericat în fabrică. De la data achiziționării originale se aplică o garanție de 24 luni la material
și defecte de producție. Bonul scal trebuie predat împreună cu certicatul de garanție în cazul unei reclamații.
Garanția este valabilă numai cu un certicat de garanție și bon scal pe care apare data achiziționării și modelul
aparatului.
Pentru orice asistență tehnică, vă rugăm contactați direct vânzătorul sau sediul nostru central pentru a păstra
eciența aparatului și pentru a NU anula garanția.
CONDIȚII DE GARANȚIE
Dacă aparatul prezintă defecțiuni ale materialelor defecte și/sau producție în timpul perioadei de garanție, noi vă
garantăm reparația gratuită în condițiile în care:
- Aparatul a fost folosit corespunzător și conform scopului pentru care a fost creat.
- Aparatul nu a fost modicat.
- Bonul scal trebuie prezentat.
- Uzura normală și excesivp nu face obiectul garanției.
De aceea orice parte care ar putea ruptă accidental sau prezintă semne vizibile de uzură la produsele consumabile (precum la lămpi, baterii, elemente de încălzire ...) părțile estetice sunt excluse din garanție și orice
defect rezultat din nerespectarea regulilor privind utilizarea, neglijența în folosire și/sau întreținerea aparatului,
nepăsare, greșeală sau instalare improprie, deteriorare în timpul transportului și orice altă deteriorare neatribu-
tabile pentru furnizor.
Pentru orice defecțiune care nu poate reparată în perioada de garanție, aparatul va înlocuit gratuit. În orice
caz, dacă partea care trebuie înlocuită din cauza defecțiunilor, ruperii sau funcționării eronate este un accesoriu
și/sau o parte detașabilă a produsului, Beper își rezervă dreptul de a înlocui numai partea defectată și nu întreg
produsul.
ASISTENȚĂ TEHNICĂ
Chiar și după expirarea garanției acordăm întotdeauna atenție reparațiilor aparatelor defectate. Pentru suport
tehnic și/sau reparații după perioada de garanție ne puteți contacta direct la adresa de mai jos: CONTACTAȚI
DISTRIBUITORUL DIN ȚARA DVS. SAU DEPARTAMENTUL DE VÂNZĂRI BEPER. E-MAIL assistenza@be-
per.com CARE VA TRIMITE MAI DEPARTE ANCHETA LA DISTRIBUITORUL DVS.
34
Page 35

4 blades stand fan Pokyny pro bezpečnost a použití
CZ
VŠEOBECNÉ BEZPEČNOSTNÍ INFORMACE
PŘED PRVNÍM POUŽITÍM ZAŘÍZENÍ SI POZORNĚ PŘEČTĚTE
TYTO POKYNY.
Přečtěte si pečlivě následující pokyny, protože vám poskytují užitečné
bezpečnostní informace o instalaci, používání a údržbě a pomohou
vám vyhnout se chybám a možným nehodám.
Odstraňte ochranný obal a ujistěte se, že je spotřebič neporušený.
Prvky balení (plastové sáčky, polystyren, atd.) by se neměli dostat
k dětem, mohou být pro ně nebezpečné.
Obalový materiál odevzdejte ve sběrném dvoře nebo uložte na
místo určené obcí pro sběr tříděného odpadu. Tímto místem jsou
většinou sběrné kontejnery.
Před připojením zařízení se ujistěte, že napětí v zásuvce odpovídá
napětí uvedenému na výrobku. Zařízení může být poškozeno, pokud
si napětí neodpovídá.
Pokud zástrčka nepasuje do vaší zásuvky, nechte si ji vyměnit za
jinou kvalikovaným pracovníkem, který také zkontroluje, jestli jsou
vaše zásuvky vhodné k napájení tohoto přístroje.
Neodpojujte spotřebič od zásuvky tahem za síťový kabel, hrozí
nebezpečí poškození síťového kabelu či zásuvky. Kabel odpojujte od
zásuvky tahem za vidlici síťového kabelu.
Nepokládejte síťový kabel spotřebiče v blízkosti horkých ploch, nebo
přes ostré předměty.
Dbejte na to, aby síťový kabel nevisel přes okraj pracovní plochy,
protože to může vést k nehodám, např. za něj mohou zatáhnout malé
děti.
Nepoužívejte přístroj s poškozeným síťovým kabelem. Je-li přívodní
vedení tohoto přístroje poškozeno, musí být vyměněno výrobcem,
jeho servisem nebo podobně kvalikovanou osobou, aby se předešlo
ohrožení.
Přístroj připojujte pouze na střídavý proud s napětím podle typového
štítku.
V případě použití prodlužovacích kabelů musí být tyto kabely vhodné
pro napájení zařízení, aby nedošlo k ohrožení obsluhy a byla
zabezpečena bezpečnost prostředí, ve kterém je přístroj používán.
Nevhodné prodlužovací kabely mohou způsobit provozní anomálie.
Tento přístroj je určen pouze pro jeho zvláštní účel. Jakékoliv jiné
použití je považováno za nevhodné a tedy nebezpečné. Výrobce
nemůže být zodpovědný za jakékoliv škody vyplývající z nesprávného,
špatného či neopatrného použití. Toto zařízení je určeno pouze pro
domácí potřebu.
35
Page 36

4 blades stand fan Pokyny pro bezpečnost a použití
Abyste předešli riziku vznícení, úplně rozmotejte přívodní šňůru a
také vypojte spotřebič ze zásuvky, pokud jej nepoužíváte.
Po použití a před čištěním výrobek vždy vypojte ze zásuvky.
Pro ochranu proti úrazu elektrickým proudem nedávejte a nepokládajte kabel nebo jiné části přístroje do vody nebo jiných tekutin.
Nedotýkejte se přístroje mokrýma rukama nebo nohama.
Nevystavujte přístroj působení atmosférických vlivů jako např. déšť,
vítr nebo sníh.
Nepoužívejte přístroj v blízkosti výbušnin, vysoce hořlavých materiálů,
plynů, hořících plamenů nebo ohřívačů.
Tento spotřebič není určen pro osoby (včetně dětí) se sníženou
fyzickou, smyslovou nebo mentální schopností nebo osobám s
omezenými zkušenostmi a znalostmi, pokud nad nimi není veden
odborný dohled nebo podány instrukce zahrnující použití tohoto
spotřebiče osobou odpovědnou za jejich bezpečnost. Zvláštní dohled
je vyžadován, pokud je přístroj používán v blízkosti dětí nebo přímo
dítětem.
POKUD SE ROZHODNETE PŘÍSTROJ DÁLE NEVYUŽÍVAT,
ODPOJTE JEJ OD NAPĚTÍ A PŘEŘÍZNĚTE NAPÁJECÍ KABEL,
ABY SE PŘÍSTROJ STAL NEFUNKČNÍM. UČIŇTE TAKÉ
NEFUNKČNÍMI NEBEZPEČNÉ ČÁSTI VÝROBKU, ZEJMÉNA
KVŮLI DĚTEM, KTERÉ SI MOHOU S VÝROBKEM HRÁT.
VÝROBEK A PŘÍSLUŠENSTVÍ
Obrázek 1
1. Přední mřížka
2. Lopatky
3. Matice lopatky
4. Uzavírací matice
5. Zadní mřížka
6. Hřídel
7. Tlačítko rychlosti ventilátoru
8. Tělo motoru
9. Napájecí kabel
10. Kolečko
11. Vnitřní trubka
12. Nastavení výšky
13. Vnější trubka
14. Základna
15. Kotouč
16. Spojovací materiál
17. Zajišťovací šroub
36
Page 37
4 blades stand fan Pokyny pro bezpečnost a použití
CZ
POKYNY K MONTÁŽI
Obrázek 2
Umístěte základnu na podlahu. Připojte trubku k základně stojanu. Zašroubujte šroub ve tvaru písmene L a
vložte kotouč a upínací podložku do spodní části základny. Povolte nastavení výšky a vytáhněte vnitřní trubku
z teleskopické tyče do požadované výšky, poté znovu utáhněte. Připojte motor k horní části teleskopické tyče.
Nasaďte uchycení na tyč a zajistěte šrouby a kolečkem. Utáhněte a zkontrolujte, zda je motor ve vzpřímené
poloze.
Připevnění krytu a lopatku ventilátoru
Připevněte zadní mřížku k motoru pomocí čtyř šroubů. Ujistěte se, že rukojeť je nahoře. Umístěte lopatky ventilátoru na hřídel motoru a dotáhněte upevňovací šroub ventilátoru. Ujistěte se, že se dotýká ploché části hřídele
motoru.
Odstraňte ochranný šroub a matici z předního krytu a otočte přídržné svorky ochranného krytu kolem vnějšího
okraje směrem ven. Zavěste přední kryt hákem přes horní část zadního krytu. Přiložte přední kryt dolů, aby se
setkal se zadním krytem a zatlačte svorky směrem dovnitř, dokud není přední kryt připevněn k zadnímu krytu.
Nakonec namontujte ochranný šroub přes otvory ve spodní hraně krytu a dotáhněte maticí.
NASTAVENÍ RYCHLOSTI
Zvolte požadovanou rychlost stisknutím tlačítka na ovládacím panelu.
Poloha 0 Vypnutí ventilátoru
Poloha 1 Nízká rychlost
Poloha 2 Střední rychlost
Poloha 3 Vysoká rychlost
NASTAVENÍ SKLONU
Je možné zvolit různé nastavení sklonu ventilátoru. Před změnou vypněte ventilátor!
Vezměte tělo motoru, povolte šroub regulace sklonu a nastavte požadovaný sklon. Opět utáhněte šroub.
Pozor: pozici náklonu nastavujte opatrně, nikoliv „přes sílu“. Zabráníte tak poškození ventilátoru.
NASTAVENÍ ROTACE
Chcete-li nastavit rotaci ventilátoru (kontinuální otáčení zprava doleva), stiskněte páčku otáčení směrem dolů.
Hlava ventilátoru se otáčí zleva doprava. Pro vypnutí nastavte tlačítko nahoru.
ÚDRŽBA
Vždy vypněte přístroj přepínačem OFF, pokud se chystáte výrobek vyčistit.
K čištění ventilátoru použijte suchý měkký hadřík.
Nepoužívejte alkohol ani chemické látky, jako jsou ředidla nebo jakékoliv abrazivní detergentu.
Na ventilátor nestříkejte vodu ani jiné kapaliny.
Vyčkejte, dokud není přístroj kompletně suchý a uložte jej na suché a chladné místo, mimo zdrojů tepla,
slunečního světla a ostrých předmětů.
Pokud nebudete spotřebič používat, uložte jej na suchém místě mimo dosah dětí.
TECHNICKÁ DATA
Výkon: 50W
Napájení: 230V ~ 50/60Hz
Z důvodů zlepšování si Beper vyhrazuje právo na změnu nebo vylepšení produktu bez předchozího
upozornění.
Evropská směrnice 2011/65 / EU o odpadních elektrických a elektronických zařízení (OEEZ), vyžaduje,
aby staré domácí elektrické spotřebiče nebyly odkládány do běžného netříděného komunálního odpadu. Staré spotřebiče musí být shromažďovány odděleně za účelem optimalizace obnovy a recyklace
materiálů, které obsahují, a snížení dopadu na lidské zdraví a životní prostředí. Symbol “Přeškrtnuté
popelnice” na výrobku vás upozorňuje na povinnost, že při likvidaci spotřebiče musí být shromažďovány
odděleně.
37
Page 38

4 blades stand fan Pokyny pro bezpečnost a použití
OBECNÉ PODMÍNKY ZÁRUKY
Tento spotřebič byl zkontrolován v továrně. Od data původního nákupu se na materiálové a výrobní vady
vztahuje záruka 24 měsíců. Záruční doba začíná běžet od data nabytí spotřebiče koupí, jak je uvedeno na
záručním listu (popř. účtence) nebo faktuře
a potvrzeném razítkem prodejce. Práva odpovědnosti za vady lze uplatňovat u prodejce, u kterého byl výrobek
zakoupen.
Záruka je platná pouze se záručním listem nebo s dokladem o koupi (daňový doklad) s uvedením data nákupu
a modelu spotřebiče
Pokud potřebujete technickou pomoc, obraťte se na prodejce nebo na naše ústředí, aby se zachovala efektivita
zařízení a aby se záruka nezrušila. Jakékoli zásahy na tomto zařízení neoprávněnými osobami automaticky ruší
záruku.
ZÁRUČNÍ PODMÍNKY
Pokud se na zařízení během záruční doby projeví vady v důsledku vadného materiálu a / nebo výroby, garantujeme bezplatnou opravu za předpokladu, že:
- Spotřebič byl používán správně a pro účel, pro který byl určen.
- Zařízení nebylo poškozeno a bylo pravidelně a správně udržováno.
- Byl předložen doklad o koupi.
Záruka se nevztahuje na opotřebení věci (výrobku) způsobené jejím obvyklým používáním. (§ 619 odst.
2 Občanského zákoníku). Záruka se též nevztahuje na závady výrobku, způsobené jiným, než obvyklým
používáním výrobku.
Za obvyklé používání v tomto smyslu rma BEPER považuje zejména, pokud výrobek:
Je používán pouze k účelu, ke kterému je určen a který je popsán v přiloženém návodu k použití. Pouze návod
v českém jazyce vydaný rmou BEPER je pro spotřebitele závazný.
Je používán a správně udržován podle tohoto návodu, používán šetrně, pozorně a nepřetěžován.
Je používán v čistém, bezprašném a nezakouřeném prostředí, je chráněn pouzdrem nebo krytkou, pokud je
přiložena. Výrobek je určen výhradně pro jiný účel než pro podnikání s tímto výrobkem.
Je používán za pokojové teploty, dostatečného větrání a s nezakrytými větracími otvory.
Nebyl vystaven nepříznivému vnějšímu vlivu, např. slunečnímu a jinému záření či elektromagnetickému poli,
vniknutí tekutiny, vniknutí předmětu, přepětí v síti, přepětí nebo zkratu na vstupech či výstupech, napětí vzniklému
při elektrostatickém výboji (včetně blesku), chybnému napájecímu nebo vstupnímu napětí a nevhodnému
vniknutí předmětu, přepětí v síti, přepětí nebo zkratu na vstupech či výstupech, napětí vzniklému při elektrostatickém výboji (včetně blesku), chybnému napájecímu nebo vstupnímu napětí a nevhodné polaritě tohoto napětí,
vlivu chemických procesů např. použitých napájecích článků apod.
Nebyl udržován a čištěn nevhodnými způsoby nebo nesprávně použitými čistícími prostředky (např. chemický
a mechanický vliv).
Nebyly kýmkoliv provedeny úpravy, modikace, změny konstrukce nebo adaptace ke změně nebo rozšíření
funkcí výrobku oproti zakoupenému provedení nebo pro možnost jeho provozu v jiné zemi, než pro kterou byl
navržen, vyroben a schválen.
Je používán s doporučeným čistým neopotřebovaným příslušenstvím a je mu pravidelně vyměňováno
příslušenství, podléhající rychlejšímu opotřebení (např. baterie). Firma BEPER nenese odpovědnost za nesprávný chod a případné vady výrobku vzniklé vlivem použitého příslušenství a náplní jiných výrobců, stejně
jako použitím poškozeného, opotřebovaného a znečistěného příslušenství a náplní.
Není mechanicky, tepelně nebo chemicky poškozen; neměl sejmutý ochranný kryt, nemá odstraněny nebo
smazány štítky, poškozeny plomby a šrouby nebo není poškozen otřesy pádem, teplem, tekutinou (i z baterií),
zlomením nebo přetržením kabelu, konektoru, spínače, krytu či jiné části, včetně poškození v průběhu přepravy
od okamžiku zakoupení a předání výrobku ze strany prodávajícího.
Je používán v souladu se zákony, technickými normami a bezpečnostními předpisy platnými v České republice,
a též na vstupy výrobku je připojeno napětí odpovídající těmto normám a charakteru výrobku.
Je používán s intenzitou a v prostředí odpovídajícím provozu v domácnosti.
Záruka se nevztahuje na žádnou část, která by mohla být náhodně rozbitá nebo měla viditelné známky použití
v spotřebních výrobcích (jako jsou lampy, baterie, topné články a podobně), a jakákoliv závada způsobená
nedodržením pravidel z neznalosti při používání a / nebo údržbě spotřebiče, nedbalosti, nesprávném použití
nebo nesprávné instalaci, poškozením při přepravě a jakýchkoliv jiných škod, které nelze dodavateli přičíst.
Pokud bude mít výrobek vadu, kterou je možno rychle a bez následků odstranit, vyhrazuje si společnost Beper
právo řešit reklamační nárok spotřebitele jejím odstraněním (opravou) nebo výměnou části výrobku. Nárok na
výměnu věci při výskytu odstranitelné vady vzniká spotřebiteli pouze v případě, že to není vzhledem k povaze
vady neúměrné.
KONTAKTUJTE DISTRIBUTORA VE VAŠÍ ZEMI PŘÍPADNĚ KONTAKTUJTE PRODEJNÍ ODDĚLENÍ BEPER,
E-MAIL [email protected], KTERÝ PŘEDÁ VÁŠ POŽADAVEK NA LOKÁLNÍHO DISTRIBUTORA.
38
Page 39

Staande ventilator met 4 bladen Handleiding
NL
ALGEMEEN VEILIGHEIDSADVIES
LEES DE GEBRUIKSAANWIJZING ZORGVULDIG DOOR VOORDAT U HET APPARAAT VOOR DE EERSTE KEER IN GEBRUIK
NEEMT.
Lees de volgende instructies aandachtig door aangezien ze nuttige
veiligheidsinformatie bevatten over de installatie, het gebruik en het
onderhoud. Hiermee kunt u ongevallen en ongelukken voorkomen.
Verwijder de verpakking en controleer of het apparaat volledig intact
is. De onderdelen van de verpakking (plastic zakken, polystyreen,
enz.) mogen niet in het bezit komen van kinderen ten einde hen te
beschermen tegen gevaren.
We raden u aan om dit verpakkingsmateriaal niet met het huisafval
weg te gooien maar om het, in verband met vernietiging of verwerking, af te leveren op het juiste verzamelpunt. Hiertoe kunt u informatie opvragen bij het management van de Vuilverwerking van uw
gemeente.
Controleer, voordat u het apparaat aansluit, of de netspanning overeenkomt met de gegevens op het etiket.
Als de stekker niet in het stopcontact past, laat dan een geschikte
stekker monteren door een gekwaliceerde persoon die er ook voor
kan zorgen dat de aansluitkabels van het stopcontact geschikt zijn
voor het gebruik van uw apparaat.
Trek nooit aan het netsnoer om de stekker van het apparaat uit het
stopcontact te trekken.
Zorg ervoor dat het netsnoer nooit in contact komt met hete of scherpe oppervlakken.
Gebruik dit apparaat niet als het netsnoer beschadigd is. In geval
van schade moet het netsnoer, om gevaar te voorkomen, worden
vervangen door de fabrikant, zijn onderhoudsvertegenwoordiger of
soortgelijke gekwaliceerde personen.
Sluit dit apparaat alleen aan op wisselstroom.
Over het algemeen wordt het gebruik van adapters met meerdere
connectoren en/ of verlengingsunits niet aanbevolen; mochten deze
toch nodig zijn, gebruik dan alleen enkelvoudige of multi-adapters en
verlengingsunits in overeenstemming met de van kracht zijnde veiligheidsregels, waarbij ervoor gezorgd dient te worden dat de limiet,
zoals aangegeven op de enkelvoudige adapters en de verlengingsunits, de maximale vermogenslimiet zoals aangegeven op de multiadapter niet overschrijdt.
39
Page 40

Staande ventilator met 4 bladen Handleiding
Dit apparaat dient alleen te worden gebruikt voor het daarvoor bestemde doel.
Elk ander gebruik moet als ongepast en dus gevaarlijk worden beschouwd. De fabrikant kan niet aansprakelijk worden gesteld voor
schade die voortvloeit uit onjuist, verkeerd of onzorgvuldig gebruik.
Om elk risico op oververhitting te voorkomen, wordt aangeraden het
netsnoer volledig af te rollen en het apparaat los te koppelen wanneer het niet wordt gebruikt.
Haal de stekker altijd uit het stopcontact voordat u het apparaat schoonmaakt.
Ter voorkoming van elektrische schokken mag u het snoer, de stekker
of onderdelen van het apparaat niet onderdompelen in water of andere vloeistoffen.
Raak het apparaat niet aan met natte handen of voeten.
Raak het apparaat niet aan met blote voeten.
Stel het apparaat niet bloot aan weersinvloeden zoals regen, wind,
sneeuw en hagel.
Gebruik het apparaat niet in de buurt van explosieven, licht ontvlambare stoffen, gassen, vuur en kachels.
Sta niet toe dat kinderen, mensen met een handicap, of mensen zonder ervaring of technische bekwaamheid het apparaat zonder begeleiding gebruiken. Wanneer een apparaat door of in de buurt van
kinderen wordt gebruikt is nauwgezet toezicht noodzakelijk.
Zorg ervoor dat kinderen niet met dit apparaat gaan spelen.
Als u van plan bent om het apparaat nooit meer te gebruiken, maak
het dan onbruikbaar door de voedingskabel door te snijden nadat u
de stekker uit het stopcontact heeft gehaald.
ZORG ER OOK VOOR DAT ALLE GEVAARLIJKE ONDERDELEN
ONBRUIKBAAR WORDEN GEMAAKT, MET NAME MET HET OOG
OP KINDEREN DIE MET HET APPARAAT ZOUDEN KUNNEN
GAAN SPELEN.
40
Page 41
Staande ventilator met 4 bladen Handleiding
NL
De Europese richtlijn 2011/65/EU inzake afgedankte elektrische en elektronische apparaten (AEEA)
vereist dat oude elektrische huishoudapparaten niet mogen worden vernietigd via de normale ongesorteerde gemeentelijke afvalstroom. Oude apparaten moeten apart worden ingezameld om hergebruik
en recycling van de materialen die ze bevatten te optimaliseren, en de gevolgen voor de menselijke
gezondheid en het milieu te minimaliseren. Het symbool met de doorgekruiste “afvalcontainer” op het
product herinnert u aan uw verplichting om het afgedankte product apart in te leveren.
GARANTIECERTIFICAAT
Dit apparaat is in de fabriek gecontroleerd. Vanaf de datum van oorspronkelijke aankoop geldt een garantie van
24 maanden op materiaal- en productiefouten. Het aankoopbewijs en het garantiebewijs moeten samen worden
toegezonden in geval van een aanspraak op de garantie.
De garantie is alleen geldig met een garantiecerticaat en een aankoopbewijs (scaal ontvangstbewijs) met
vermelding van de aankoopdatum en het model van het apparaat.
Neem voor technische assistentie rechtstreeks contact op met de verkoper of ons hoofdkantoor ten einde de ef-
ciëntie van het apparaat te waarborgen en ervoor te zorgen dat de garantie NIET ongeldig wordt. Elke ingreep
aan dit apparaat door niet-geautoriseerde personen maakt de garantie automatisch ongeldig.
GARANTIEVOORWAARDEN
Als het apparaat tijdens de garantieperiode gebreken vertoont als gevolg van defecte materialen en/ of productiefouten garanderen wij gratis reparatie op voorwaarde dat:
- Het apparaat correct is gebruikt voor het doel waarvoor het is bedoeld.
- Er niet aan het apparaat is geknoeid omdat het anders niet te onderhouden is.
- Het aankoopbewijs kan worden getoond.
- Normale slijtage aan het apparaat niet onder deze garantie valt.
Daarom zijn alle onderdelen die per ongeluk kapot kunnen gaan, die zichtbare tekenen van gebruik met betrekking tot verbruiksartikelen kunnen vertonen (zoals lampen, batterijen, verwarmingselementen, ...) en esthetische
onderdelen uitgesloten van garantie, alsook elk defect ten gevolge van niet-naleving van de regels voor gebruik,
nalatigheid van gebruik en/ of onderhoud van het apparaat, onzorgvuldigheid, verkeerde of onjuiste installatie,
schade tijdens transport, en alle andere schades die de leverancier niet aan te rekenen zijn.
Voor elk defect dat niet binnen de garantieperiode kan worden gerepareerd, wordt het apparaat gratis vervangen.
Als het in verband met een defect, breuk of storing te vervangen onderdeel een accessoire en/ of een afneembaar onderdeel van het product betreft, behoudt Beper zich het recht voor om alleen het betreffende onderdeel
te vervangen en niet het volledige product.
NEEM CONTACT OP MET DE DISTRIBUTEUR IN UW LAND OF DE AFTER SALES-AFDELING VAN BEPER.
E-MAIL [email protected] EN WE ZORGEN ERVOOR DAT UW BERICHT BIJ UW DISTRIBUTEUR TE-
RECHT KOMT.
41
Page 42
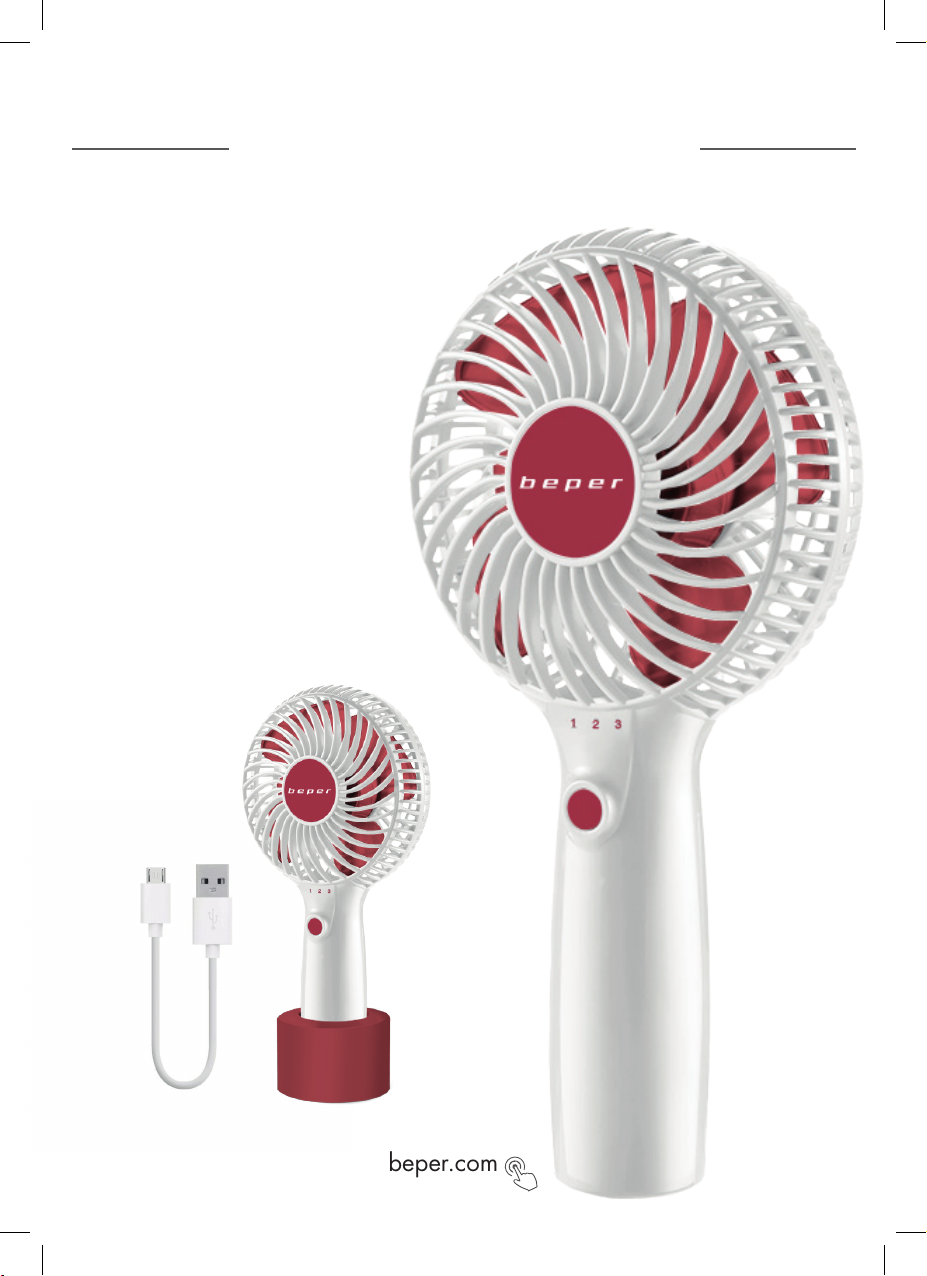
YOU MIGHT ALSO LIKE
Mini rechargeable
portable fan
Cod.: VE.403H
3 SPEEDS
LITHIUM BATTERY
4 HOURS AUTONOMY
USB CHARGE
beper.com
Page 43

beper.com
Page 44

BEPER SRL
Via Salieri, 30
37050 - Vallese di Oppeano - Verona
Tel. 045/7134674 – Fax 045/6984019
e-mail: [email protected]
beper.com
 Loading...