

Page 1

Reference book
BeoVision Avant DVD
Page 2
This product fulfils the conditions stated in the
EEU directives 89/336 and 73/23.
The black and yellow label on the compact disc
player serves as a warning that the apparatus
contains a laser system and is classified as a class 1
laser product. In case any difficulties arise with the
compact disc player, please contact a Bang &
Olufsen retailer. The apparatus must be opened by
qualified service personnel only.
CAUTION: The use of any controls, adjustments or
procedures other than those specified herein may
result in hazardous radiation exposure.
This product incorporates copyright protection
technology that is protected by claims of certain
US patents and other intellectual property rights
owned by Macrovision Corporation, and other
rights owners. Use of this copyright protection
technology must be authorized by Macrovision
Corporation, and is intended for home and other
limited viewing uses only unless otherwise
authorized by Macrovision Corporation. Reverse
engineering or disassembly is prohibited.
The DVD Video logo is a registered trademark.
Manufactured under license from Dolby
Laboratories. Confidential unpublished works.
Copyright 1992-1997. All rights reserved.
DOLBY, DOLBY DIGITAL, PRO LOGIC and the
double-D symbol are trademarks of Dolby
Laboratories Licensing Corporation.
Til det norske marked:
Mekaniske og elektroniske komponenter i
produktene slites ved bruk. Det må derfor
påregnes reparasjoner og utskiftning af
komponenter innenfor kjøpslovens reklamasjonstid, som må regnes som vedlikehold av
produktene. Slik vedligehold gir ikke grunnlag for
å rette mangelskrav mot forhandler eller
leverandør, og må bekostes af kjøper.
NL
Batterij niet
weggooien, maar
inleveren als KCA.
CLASS 1
LASER PRODUCT
Page 3

BeoVision Avant DVD – your Home Theatre
With one push on a Beo4 remote
control button, BeoVision Avant
turns towards you, offering you a
genuine wide-screen experience and
optimum picture and sound quality.
You don’t have to worry about
placing your DVD player or running
cables across the floor – it’s all
integrated into the BeoVision Avant.
The DVD loader, placed on top of the
television, allows for easy access to
load both DVDs, video CDs and
audio CDs.
Add four Bang & Olufsen BeoLab
speakers and a BeoLab 2 subwoofer
for genuine surround sound. An
integrated digital surround sound
module makes superior sound
performance a reality.
If you want to connect additional
equipment to your BeoVision Avant,
the options are varied and many. You
don’t need a variety of remote
controls lying around. Set up your
Beo4 remote control to access extra
equipment – and Beo4 controls it all.
3
Page 4
Contents of the Reference book
Set up your BeoVision Avant
6 Handling your BeoVision Avant
6 Placing your BeoVision Avant in your
home
7 Mounting the base plate
7 Overview of display, close-up operation
and connection panels
7 Running the cables
8 Completing connections
Loudspeaker connections – surround
sound
9 Placing loudspeakers
10 Connect external speakers
11 Set speaker distance
12 Calibrate the sound level
Surround sound is only available if your
BeoVision Avant is equipped with the
surround sound module
Connect a set-top box
13 AV connection
13 IR transmitter
Connect a decoder
14 Connect an AV or RF decoder
14 Connect two decoders
Connect other equipment
15 Satellite dish, Video tape recorder, AV 2
Expander, Video game, CamCorder etc.
Connect your audio and video
systems
16 Connect your audio system to BeoVision
Avant
16 Choose settings
Set up to distribute sound and
picture
17 Link systems throughout your home –
BeoLink
17 The system modulator
Set up BeoVision Avant in a link
room
18 Before you start…
19 Connections
19 Link frequency
Register extra equipment
20 Equipment connected permanently
Tune in TV or satellite channels
22 Find available channels
Satellite channels are only available if your
BeoVision Avant is equipped with the built-in
satellite receiver module
Add new TV or satellite channels
23 Add new channels
Edit tuned TV or satellite channels
24 Adjust tuned TV channels
26 Adjust tuned satellite channels
28 Move tuned channels
28 Name tuned channels
29 Delete tuned channels
Set the time and date
30 Enter settings for the built-in clock
Set positions for BeoVision Avant
to turn to
31 Preset positions for viewing and stand-by
Adjust picture and sound settings
32 Change brilliance, colour or contrast
33 Change volume, bass, treble or balance
Gain access to extra functions via
Beo4
34 Add to the Beo4 list of functions
4
Key to using this guide
Use this Key to identify what a button,
source or status display looks like in an
instruction sequence:
Buttons on the Beo4 remote
control
Display on the television
screen
Displays on the Beo4
remote control
RADIO
▲
ssGOtt
▼
TV 12
SPEAKER
FORMAT
Page 5

Set video tape recorder preferences
35 Call up the BeoCord V 8000 main menu
Daily operations
36 Select a TV or satellite channel
36 See a channel list
37 Adjust viewing position
37 Adjust or mute the sound volume
37 Change sound type or language
Look up Teletext information
38 Main Teletext functions
39 Store frequently read pages
39 Day-to-day use of memory pages
39 Activate subtitles from Teletext
40 Preset a recording from Teletext TV
listings
40 See updated Teletext pages
41 Go directly to a page via Fastext
Use the DVD player
42 DVD loading and playback
43 While the DVD is playing…
43 While the DVD is paused…
43 Change chapter or track on a DVD or
audio CD
44 The DVD disc menu
44 The on-screen tool bar
46 Play audio CD
46 Change picture, sound or language
Home Theatre viewing with
BeoVision Avant
48 Select speakers for movie sound
49 Make the picture fill out the screen
See two sources at the same time
50 Picture within a picture
The display bar
51 Overview of the display bar
Switch BeoVision Avant on or off
automatically
52 Timed play and timed stand-by
Use an integrated audio/video
system
54 Switch on audio or video system speakers
Use BeoVision Avant in a link room
55 Switch on main room and link room
sources
The socket panels
56 Overview of sockets
Close-up operation
58 Overview of operation panel
59 Copy from a CamCorder to BeoVision
Avant
59 Connect a set-top box
Maintenance of your BeoVision
Avant
60 Day-to-day maintenance
The PIN-code system
61 Activate the PIN-code system
61 Change or delete your PIN-code
62 Use your PIN-code
62 Did you forget your PIN-code?
For your information…
63 Contact Bang & Olufsen
5
Page 6
6
We recommend that you follow the
procedure described below when
you set up your BeoVision Avant:
– Unpack the BeoVision Avant and
place it as described and
illustrated to the right;
– Consider the appropriate
surroundings for your Avant.
Guidelines are included to the
right;
– Mount the base plate as
described;
– Connect the cables, additional
equipment, and speakers as
described in the following
chapters. For information of how
to fasten and run the cables on
the rear of BeoVision Avant, refer
to the opposite page.
For an overview of the display, closeup operation and socket panels, refer
to the opposite page and the
chapters The display bar, page 51,
The socket panels, page 56 and
Close-up operation panel, page 58.
Set up your BeoVision Avant
CC
B
B
BB
A
C
B
A A
Handling your BeoVision Avant
Due to the weight of the BeoVision Avant,
any moving/lifting of the system should
always be done by two persons.
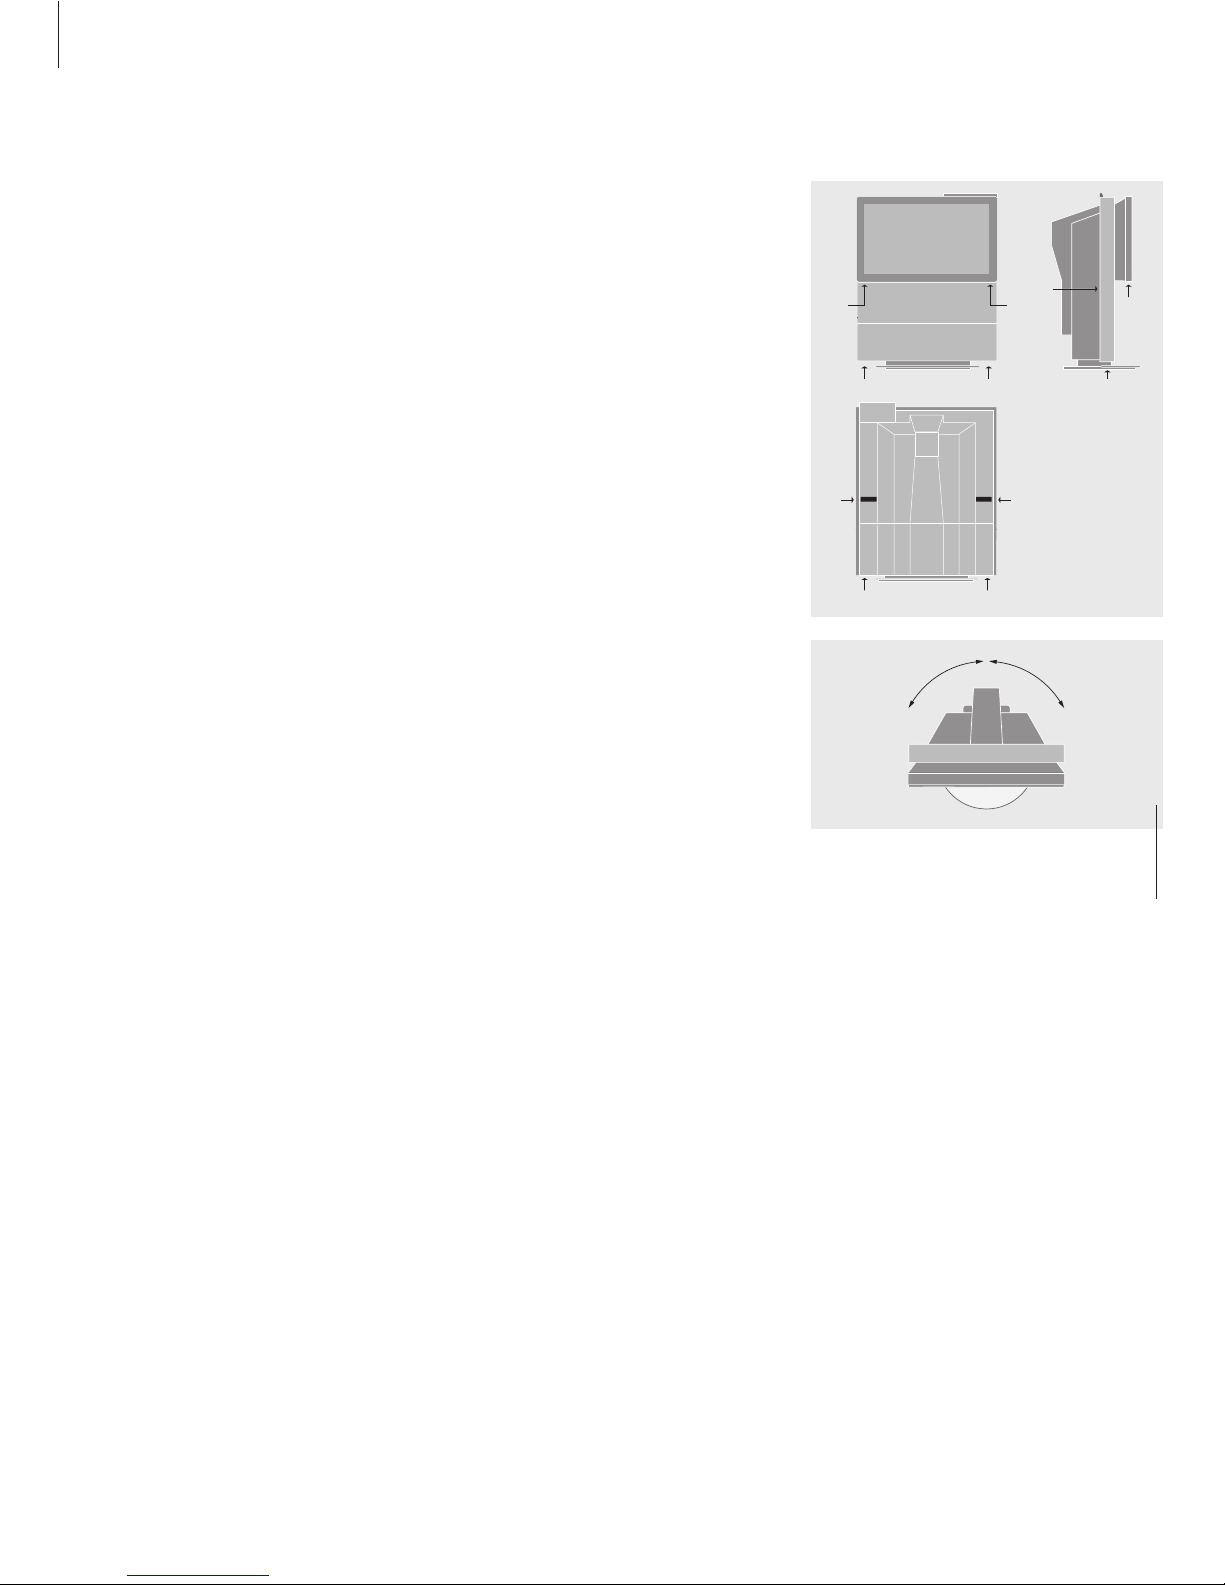
The BeoVision Avant has three sets of recesses
for lifting the system. The illustrations show
the placement of each recess (A, B and C).
Do not attempt to lift the BeoVision Avant holding
on to any other parts of the cabinet or rear panel!
Placing your BeoVision Avant in
your home
– Avoid placing your BeoVision Avant in direct
sunlight or direct artificial light (e.g. a spotlight),
as this may reduce the sensitivity of the remote
control receiver.
– Make sure that the BeoVision Avant is set up,
placed and connected in accordance with this
guide.
– The BeoVision Avant is developed for indoor
use in dry, domestic environments only, and for
use within a temperature range of 10–40ºC
(50–105ºF).
– Do not place any items on top of the BeoVision
Avant.
– Do not attempt to open the BeoVision Avant.
Leave such operations to qualified service
personnel.
– The motorised stand will turn the BeoVision
Avant to a preset position when you switch it
on.
Leave enough space around the TV to allow it to
turn freely. The television can also be turned by
hand.
Page 7
7
Mounting the base plate
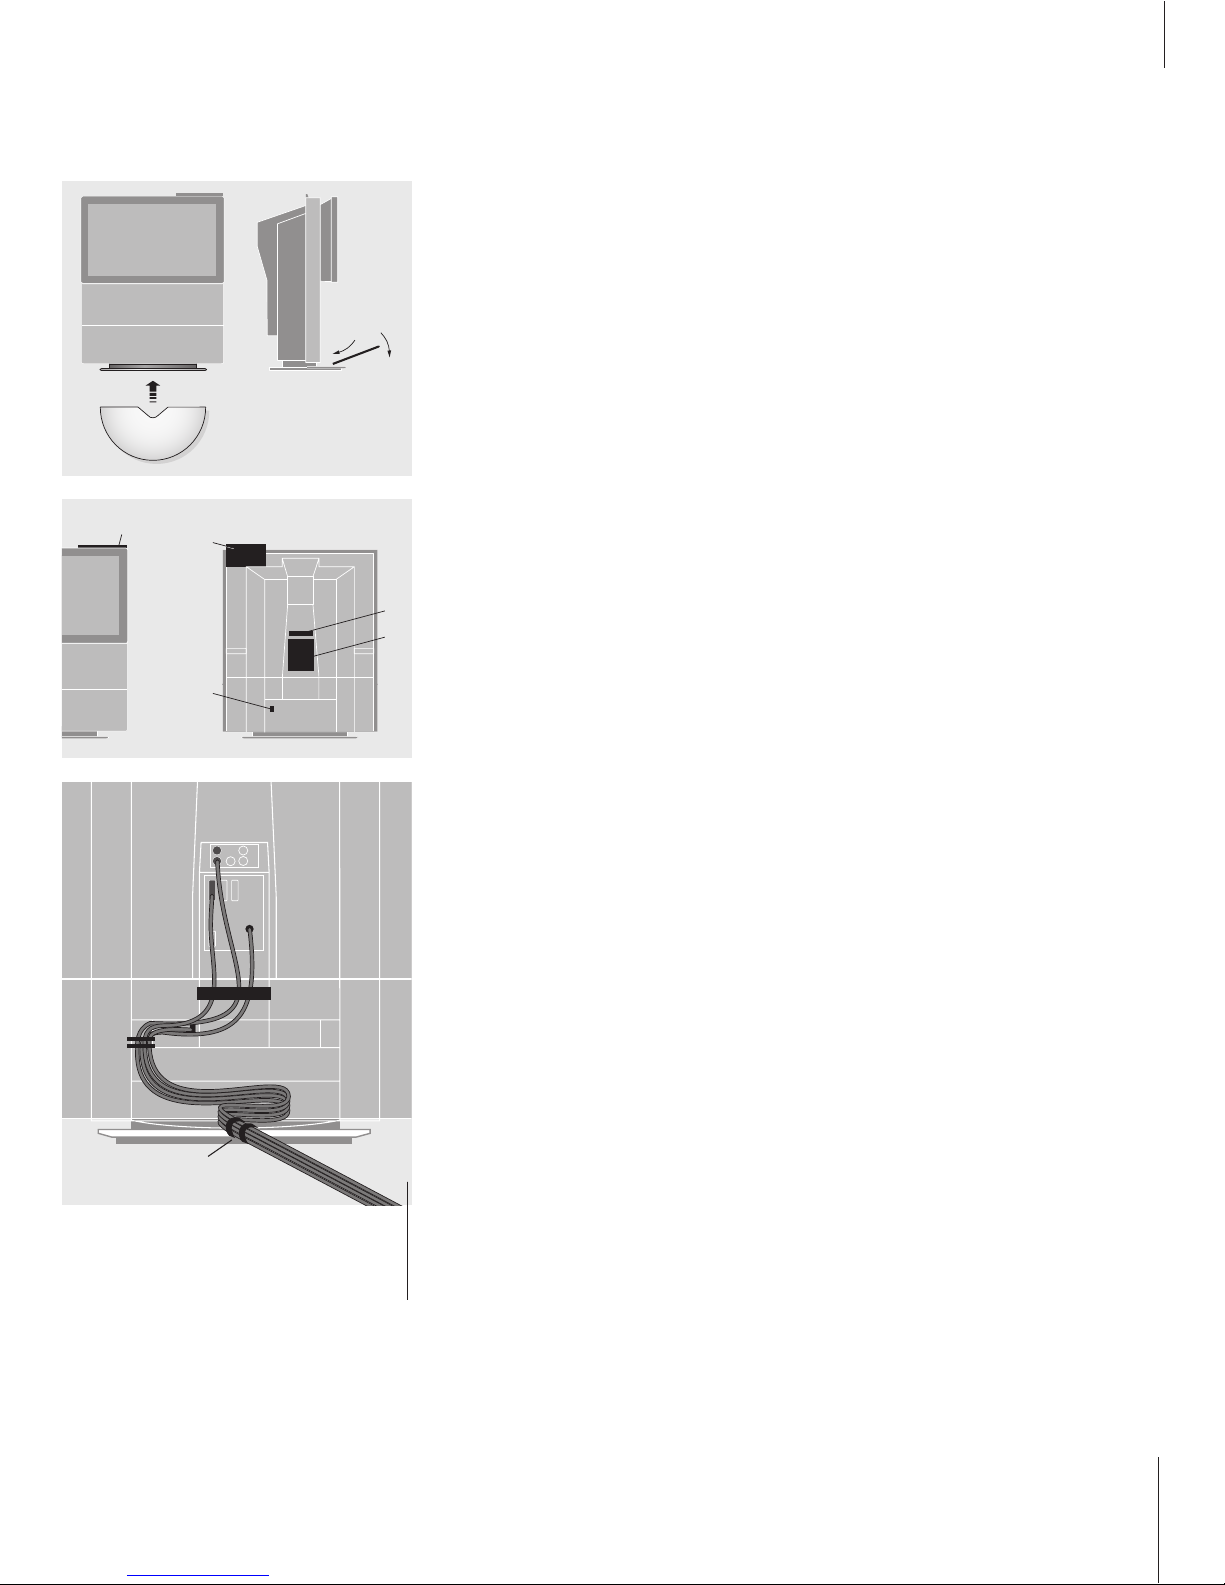
When you have placed the BeoVision Avant,
you must fasten the base plate cover:
> The cover has been furnished with strips of
double-coated tape. Before you fasten the cover
permanently, try putting it into place first
without removing the tape backing.
> Lift off the cover again, remove the tape
backing, and fasten the cover to the base plate.
1
2
2
1
3
4
5
Overview of display, close-up
operation and connection panels
The illustrations show the placement of the
display, the mains connection and the various
socket and connection panels on the
BeoVision Avant:
1 Avant display bar
2 Close-up operation and socket panels
3 Mains connection
4 Power Link and digital input socket panel*
5 AV and aerial socket panel
Running the cables
To allow for the movement when the
BeoVision Avant turns, it is essential that the
cables are run and fastened as depicted:
> Turn the BeoVision Avant all the way to the left.
> Run the cables from the AV panel (and the
speakers panel) behind the bracket (A) and in a
loop to the bracket (B).
> Fasten all cables neatly to the bracket (B) with
two cable bands.
> Run the cable bundle in a broad loop to the small
bracket protruding from the base plate, and
fasten the cables neatly to it with two cable
bands (C).
> Tug the loop of cables neatly into the space
provided.
Mains lead
The supplied mains lead and plug are specially
designed for the TV. If you change the plug or in
any way damage the mains lead, it will affect the
TV picture adversely!
*NOTE! These sockets are only available if your
BeoVision Avant is equipped with the built-in
surround sound module.
B
A
C
The cables should be handled with care. When
running any cable, avoid bending it sharply or
twisting it. Avoid subjecting the cables to
pressure or impact.
Page 8
8
Completing connections
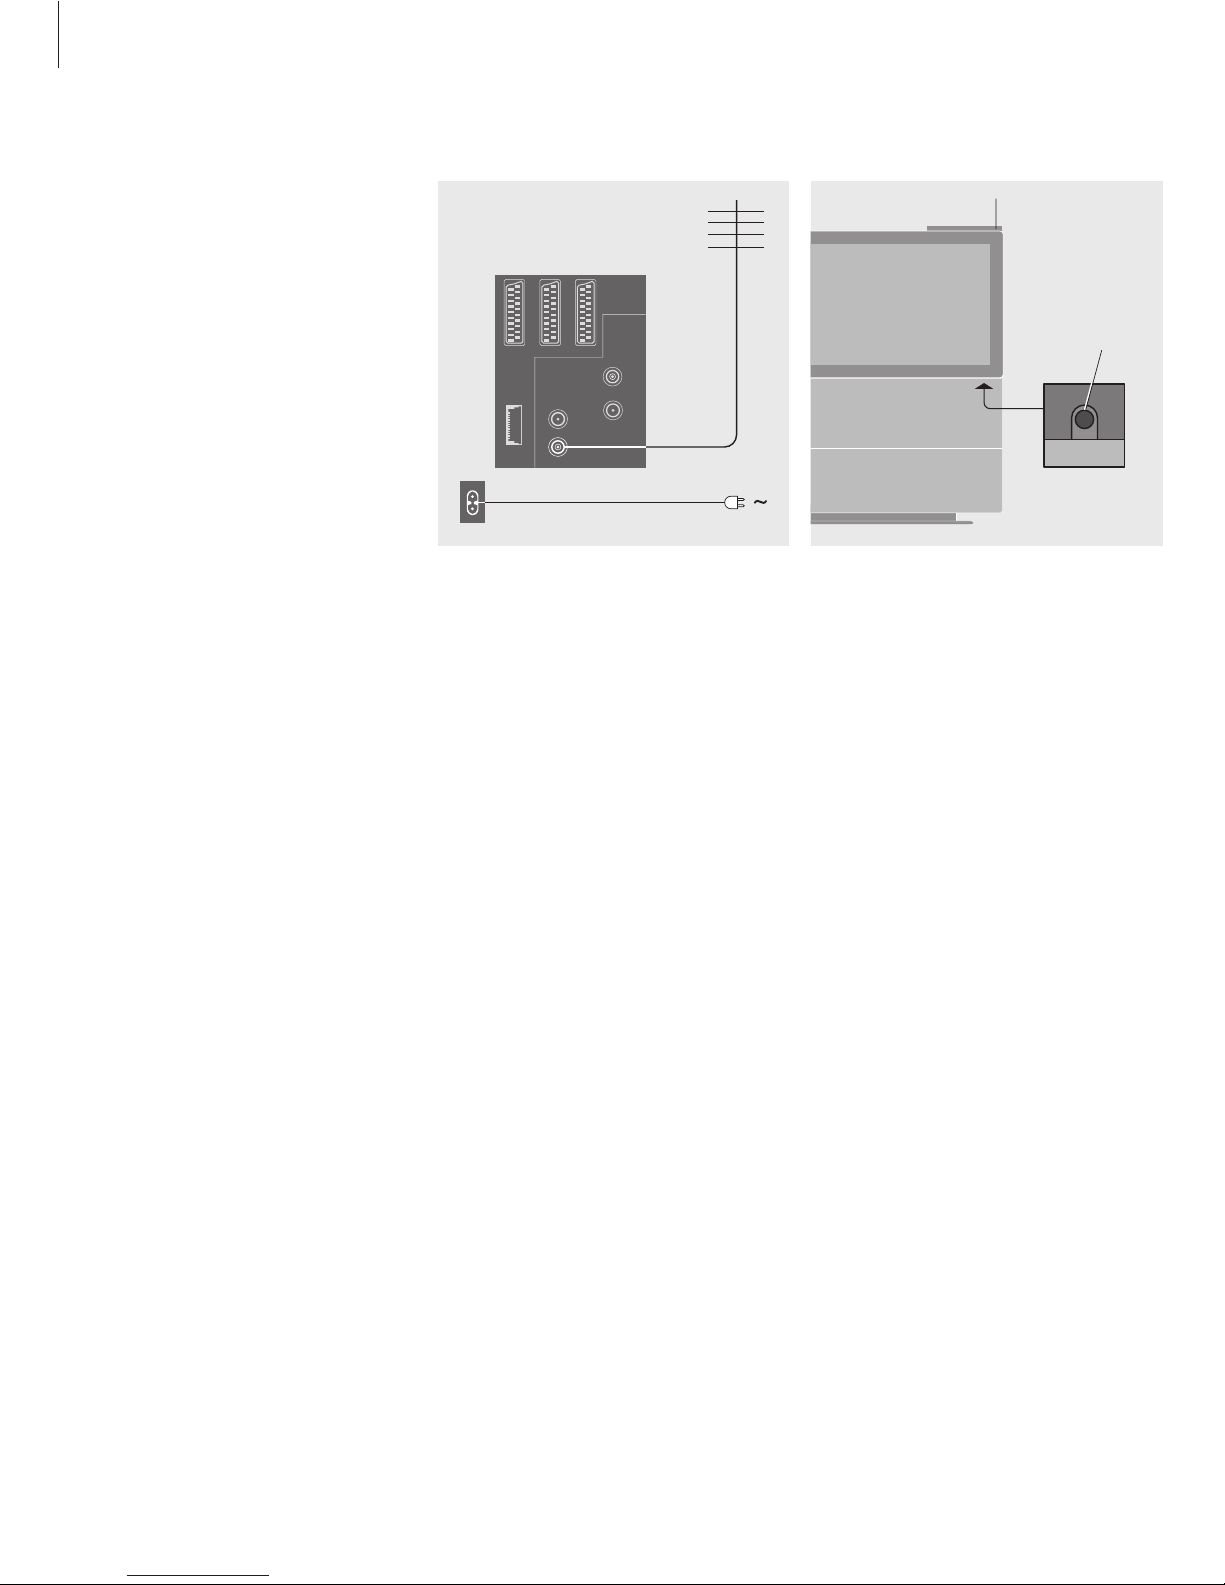
When you set BeoVision Avant up on its own,
simply connect the aerial and connect the
system to the mains. If you wish to connect
any other equipment, please refer to the
chapters on connections as well as Register
extra equipment on page 20.
>> Setting up your BeoVision Avant
Aerial connection
Using an aerial cable, connect your external
aerial (or a cable TV network) to the socket
marked VHF/UHF on the BeoVision Avant rear
socket panel.
Mains connection
Using the mains cord supplied, connect one
end to the socket marked ~ on the rear of the
BeoVision Avant, then plug the other end into
a wall socket.
Your BeoVision Avant was designed to be left
in stand-by mode when not in use. Therefore,
to facilitate remote control operation, etc., it
is essential that you leave the mains switch
on, once you have turned it on.
However, if you are going to connect speakers,
an audio system or any other equipment to
BeoVision Avant, do not switch on at the mains
yet!
After you connect and fasten the cables as
explained on the previous page, you can connect
Avant to the mains. Switch on the mains switch
on the front of BeoVision Avant. A tiny, red light
appears in the display panel. The system is in
stand-by mode and ready to be used. If your
Avant is set up on its own, you can now start to
use it as explained in the chapter ‘Watch
television’ on page 6 in the Guide.
BeoVision Avant
Stand-by indicator
Mains switch
Page 9
9
Placing loudspeakers
It is important that you find out where you
wish to place your loudspeakers before you
connect the speakers. Once they are
connected, you can make the presets
necessary to give you the ultimate sound
experience.
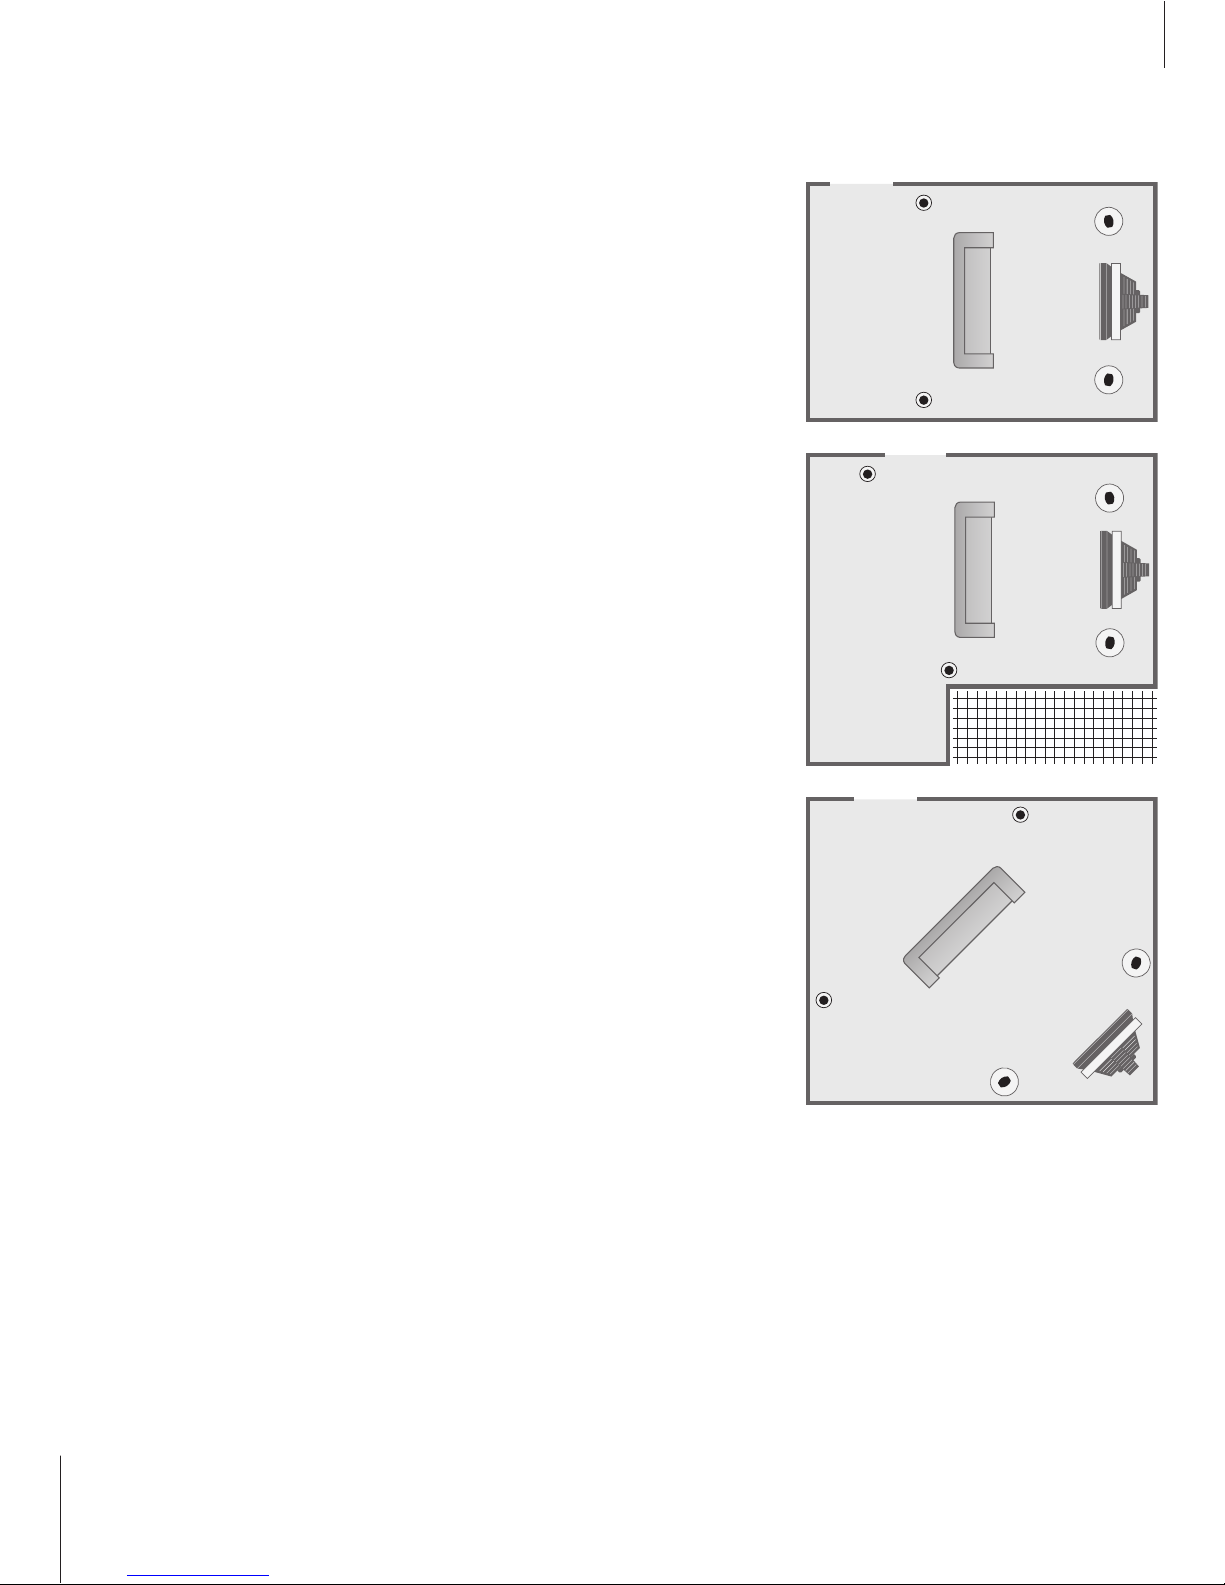
The following guidelines apply for all speaker
setups:
– The best placement for the rear speakers is on
either side behind your favourite listening
position.
– The front and rear sets of speakers do not
necessarily have to be placed in the corners of
the room.
– We recommend that you use your most
powerful speakers as your front speakers.
– If you connect a BeoLab 2 subwoofer, refer to
the subwoofer’s own Guide for information
about placement possibilities.
A surround sound* setup with
BeoVision Avant is easy to fit into
your living room. Determine your
ideal listening and viewing position
by the picture rather than by the
sound. The performance of your
speakers is unaltered.
Measure and preset the distances to
each speaker from your favourite
listening and viewing position. The
surround sound experience will be
noticeable as long as you stay within
the area created by the speakers.
In a surround sound setup, you will
have to perform a speaker balance
calibration. This entails presetting the
sound balance between the speakers
in your particular setup. Refer to the
following pages for further
instruction.
Loudspeaker connections – surround sound
*NOTE! This function is only available if your
BeoVision Avant is equipped with the surround
sound module.
The three diagrams above show examples of
BeoVision Avant and loudspeakers placed in various
types and sizes of rooms.
Page 10
10
>> Loudspeaker connections
LR
L
R
FRONT
SUBWOOFER
REAR
Connect external speakers
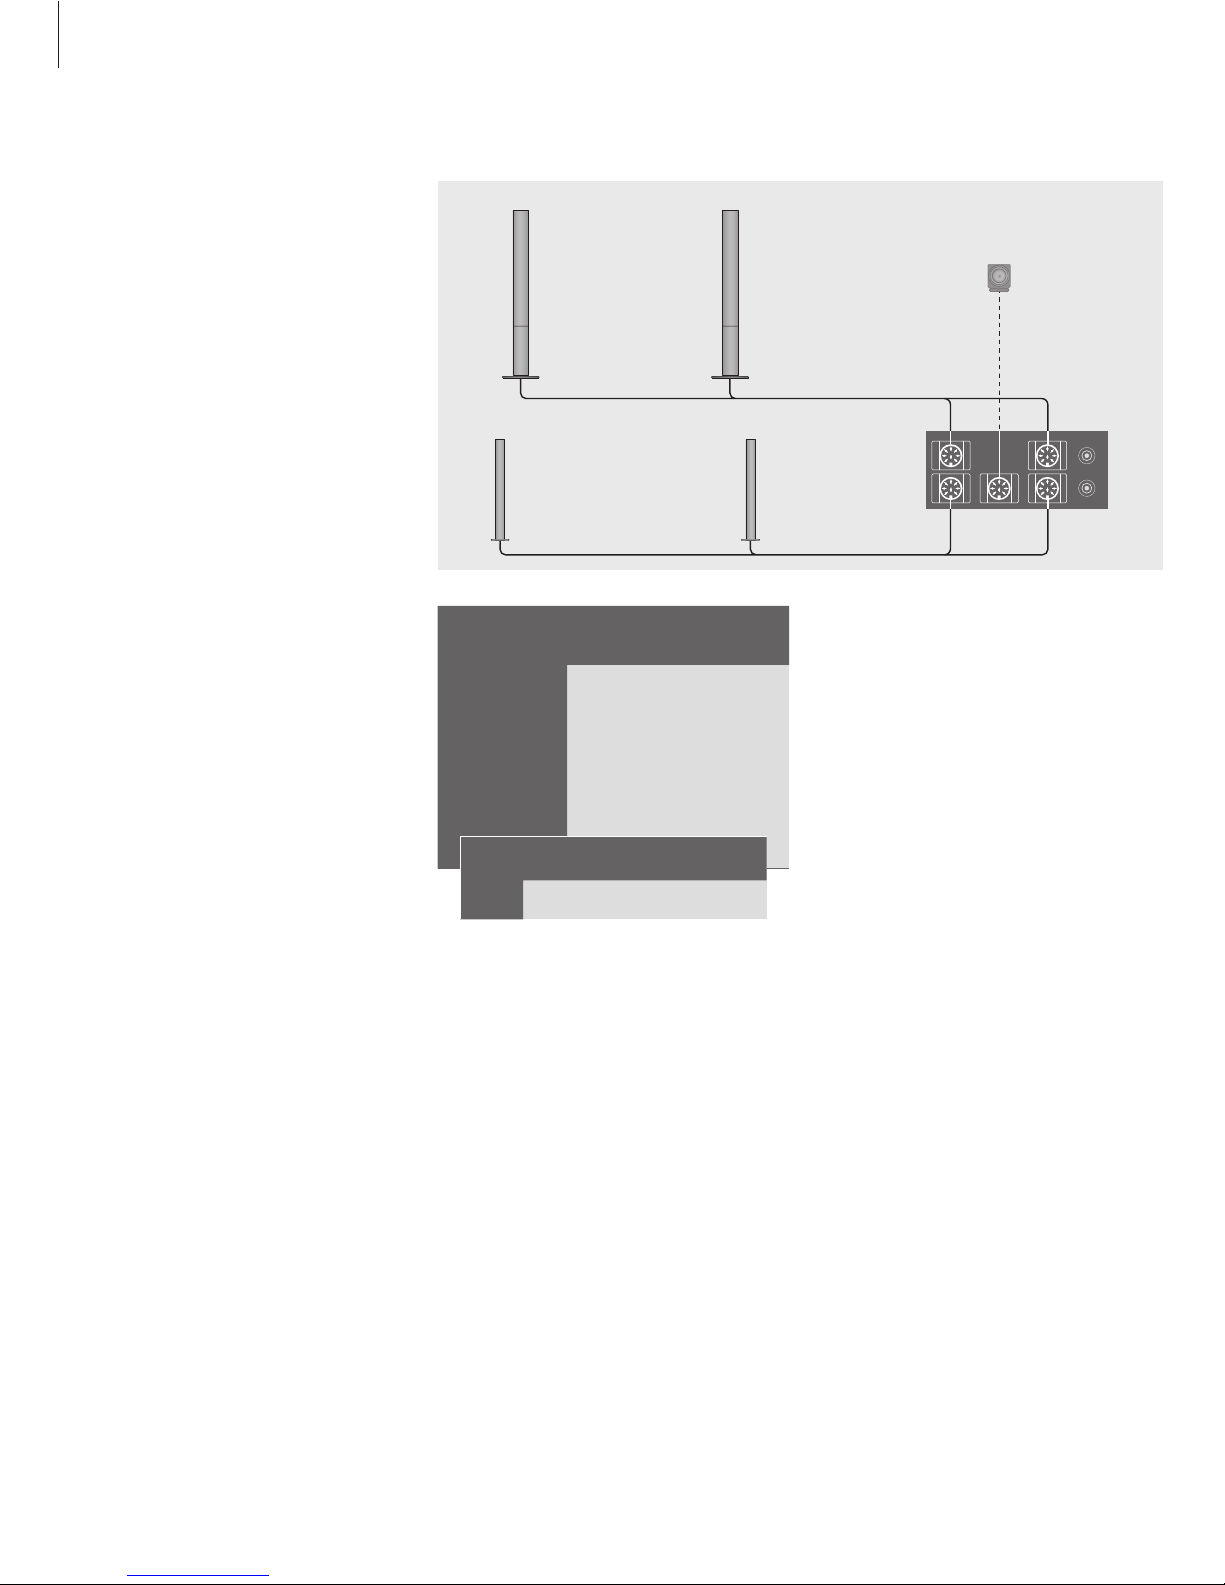
You can connect Bang & Olufsen speakers and
a BeoLab 2 subwoofer to BeoVision Avant via
the socket panel on the rear of the television.
The speakers must be from the range of Bang
& Olufsen speakers.
Using the cables enclosed with the speakers,
make the following connections:
> Connect the two front speakers to the sockets
marked FRONT.
> Connect the two rear speakers to the sockets
marked REAR.
> Connect the subwoofer to the socket marked
SUBWOOFER.
You may choose to loop the signals through from
speaker to speaker (as described in the Guide
enclosed with your speakers), or you may connect
one speaker to each of the sockets. If necessary,
longer cables and adaptors are available from your
Bang & Olufsen retailer.
Regardless of what you choose, remember to set
the L • R • LINE switch on both the front and rear
set of speakers to L or R (left and right channel) to
indicate their relative position in each set. Set the
left front speaker to L, the right rear speaker to R,
and so on.
Sound
1 Adjustment
2 Speaker type
3 Speaker distance
4 Speaker level
Front Rear Subwoofer
Beolab 1 Beolab 6000 Yes
Options on the Speaker Type menu
FRONT
Select the speakers you have connected:
BEOLAB 1, BEOLAB PENTA, BEOLAB 8000,
BEOLAB 6000, BEOLAB 4000, or NONE.
REAR
Select the speakers you have connected:
BEOLAB 1, BEOLAB PENTA, BEOLAB 8000,
BEOLAB 6000, BEOLAB 4000, or NONE.
SUBWOOFER
Indicate whether you have connected a
BeoLab 2 subwoofer. Options are YES or NO.
> Switch on the system and press MENU to call
up the main menu.
> Press 4 to call up the Setup menu (5 if Sat is
available).
> Press 2 to call up the Sound menu.
> Press 2 again to call up the Speaker Type menu.
> Press
▼
or ▲to reveal your speaker type and
tt
to move on to the next speaker set. Choose
NONE if there are no speakers connected.
> If you have a BeoLab 2 subwoofer, press
tt
to
move the cursor to Subwoofer and press
▼
to
change the field to Yes.
> Press GO to store your choices or EXIT to leave
the menu.
Page 11
11
Set speaker distance
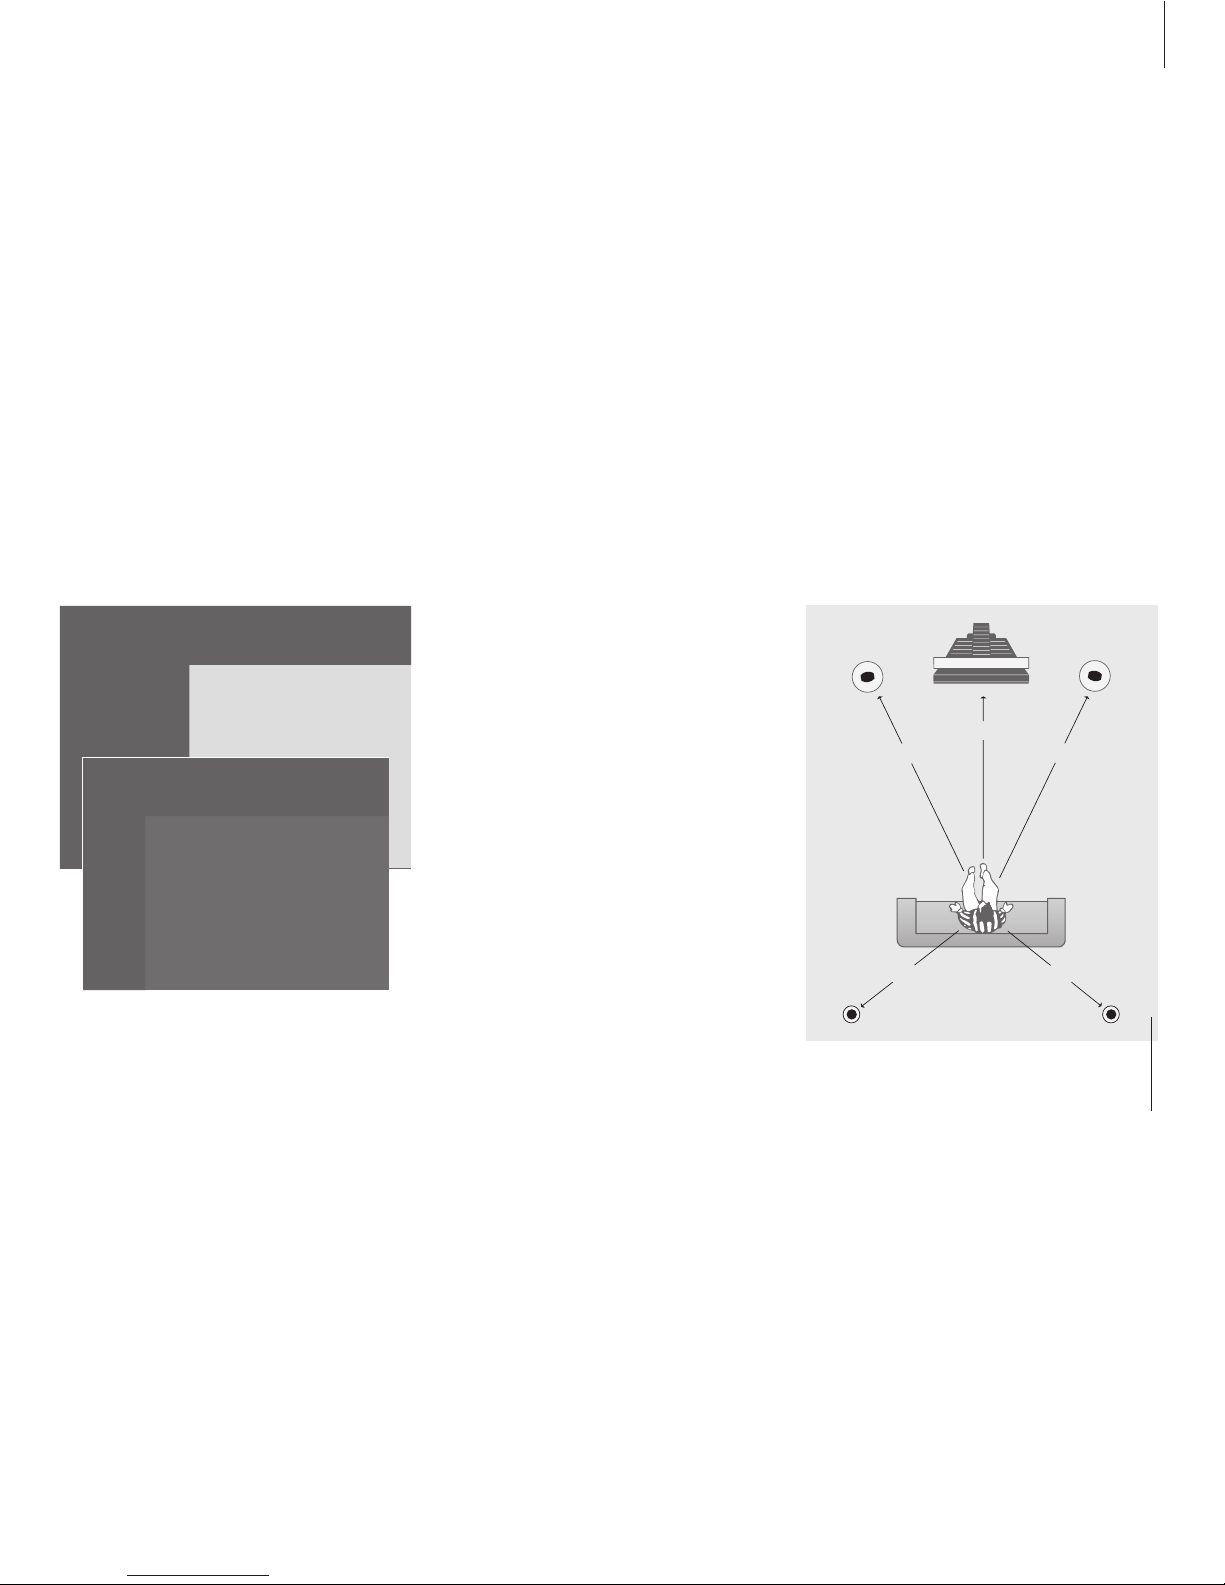
To achieve the best possible surround sound,
customise your setup by setting the speaker
distance. Place yourself in your favourite
television viewing position and turn on the
system, enter the straight-line distances in
meters between your position and the
individual speakers.
> Switch on the system and press MENU to call
up the main menu.
> Press 3 to call up the Setup menu (4 if Sat is
available).
> Press 2 to call up the Sound menu.
> Press 3 to call up the Speaker distance menu.
The connected speakers are shown.
> Press
ss
or ttto move the cursor from speaker
to speaker and press
▲
or ▼to select the
approximate straight-line distance in meters
between your viewing position and each of the
speakers.
> When you have entered the appropriate speaker
distances, press GO to store your settings or
press EXIT to leave the menu.
Sound
1 Adjustment
2 Speaker type
3 Speaker distance
4 Speaker level
Front TV Front
4 meters 3 meters 4 meters
Rear Rear
1 meter 1 meter
Distance to viewing position
TV
FRONT FRONT
REAR
REAR
You do not have to enter a distance for a
BeoLab 2 subwoofer, as subwoofer placement
has little impact on the sound.
Page 12

12
Calibrate the sound level
When you have connected the necessary
speakers in a surround sound setup to the
BeoVision Avant, you will have to perform a
speaker calibration.
A calibration sound is produced alternately in
each of the speakers you have connected in
your surround sound setup. Your task is to
adjust the sound level from all the connected
speakers to match the sound level from Avant
DVD’s own speakers. You can choose whether
you want the sound sequence to occur
automatically or manually. Your Avant DVD is
set for manual sound reproduction, but you
can start the automatic sound sequence by
pressing MENU on Beo4.
It is not necessary to calibrate subwoofer sound in
a surround sound setup. If you still wish to adjust
subwoofer sound when your speaker calibration is
complete, please refer to the chapter ‘Adjust
picture and sound settings’ on page 32.
>> Loudspeaker connections
Sound
1 Adjustment
2 Speaker type
3 Speaker distance
4 Speaker level
Front TV Front
0 (0) 0
Rear Rear
0 0
Press MENU for automatic sequence
The two sound sequence options
AUTOMATIC
If you select the automatic sequence, the sound
shifts automatically between the external
speakers every 2–3 seconds. To adjust the
speaker levels, you must move the cursor to the
speaker you want to adjust first.
MANUAL
If you select the manual sequence, the sound
follows the speaker you highlight on the menu.
You can then adjust the sound accordingly.
The sound level from the BeoVision Avant
speakers functions as your point of comparison
with the external speakers and can not be
adjusted here.
> Switch on the system and press MENU to call
up the main menu.
> Press 3 to call up the Setup menu (4 if Sat is
available).
> Press 2 to call up the Sound menu.
> Press 4 to call up the Speaker level menu. TV is
highlighted and sound is cut in on the
BeoVision Avant speakers.
> Press
▲
or ▼to adjust the speaker sound and
ss
or ttto move to another speaker.
> When you have adjusted the sound for all the
speakers in your surround sound setup, press
GO to store your settings or press EXIT to leave
the menu.
Once you have performed your speaker calibration,
you will only need to re-calibrate the speaker
sound if you make changes to the setup, e.g. if
you move one or more of the speakers.
Page 13
13
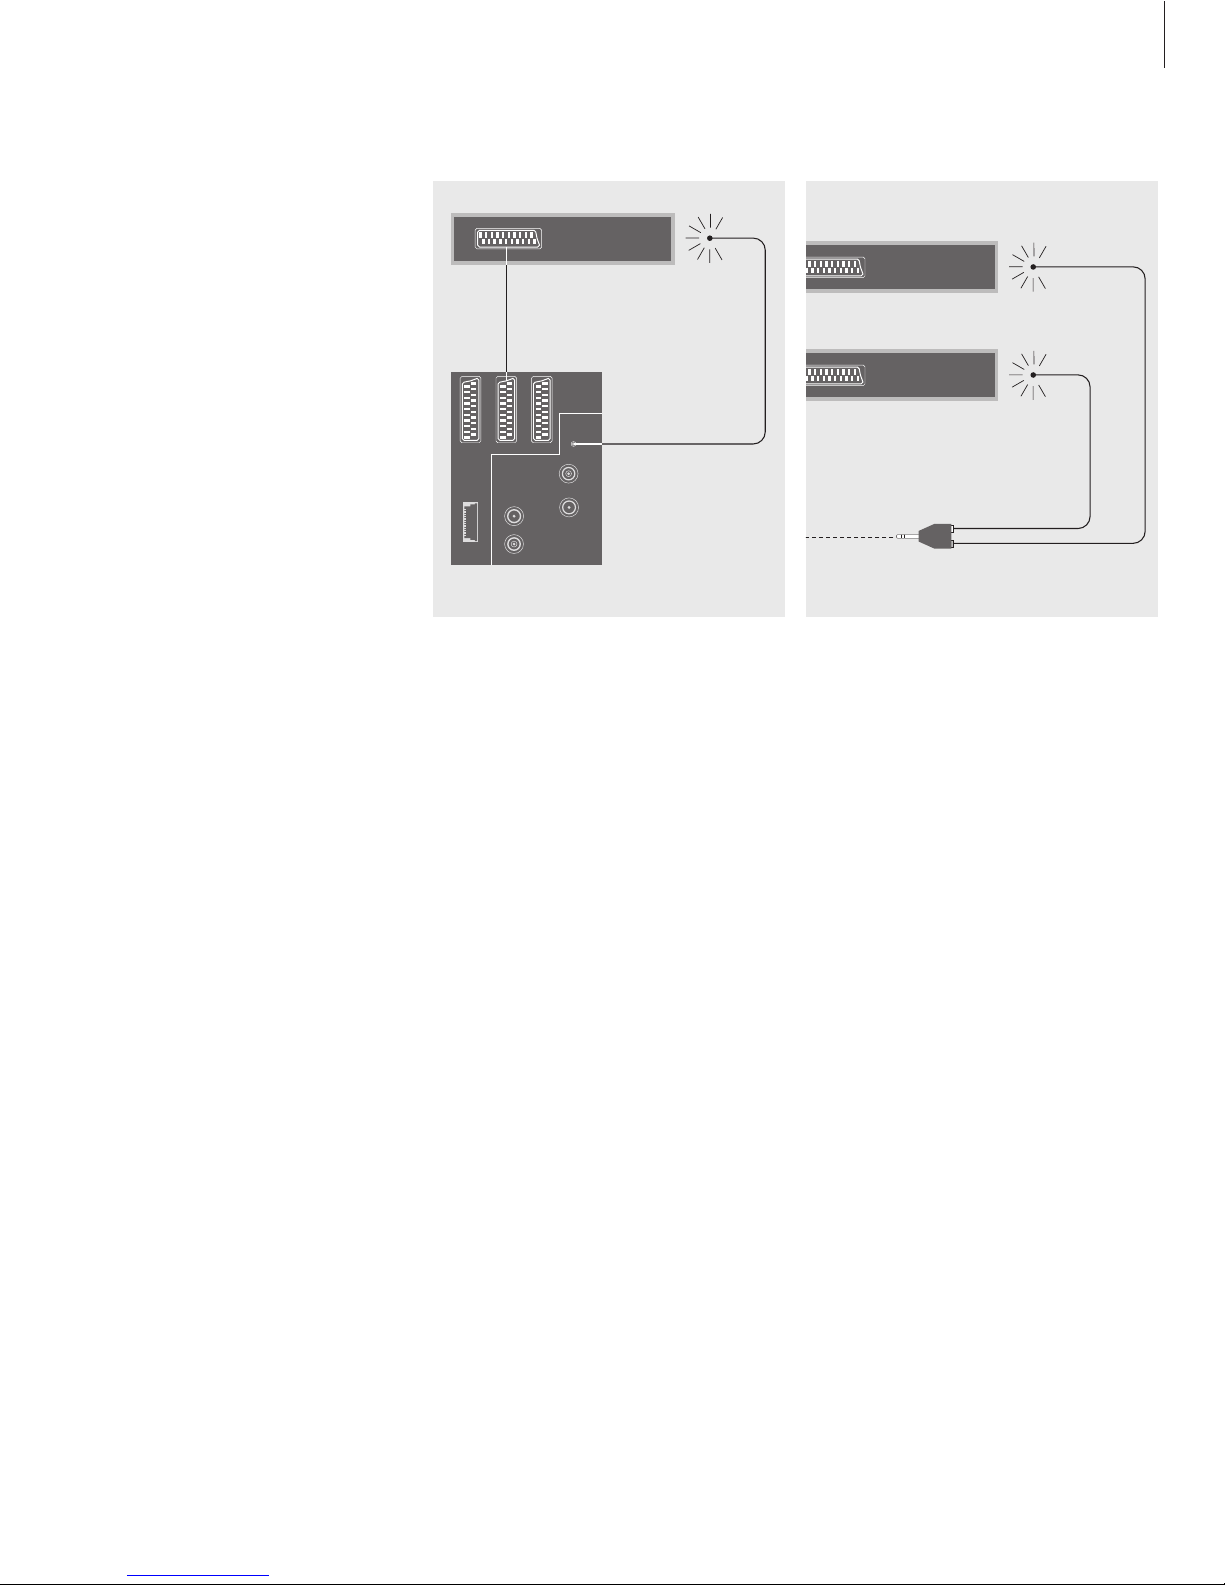
If you connect a set-top box to
BeoVision Avant and wish to control
it with your Beo4, your television
must be equipped with the Set-top
Box Controller module.
You can connect a set-top box to the
DECODER, AV or V.TAPE sockets on
BeoVision Avant. You can also
connect two set-top boxes, but only
if your BeoVision Avant is not
equipped with the built-in satellite
receiver module.
Furthermore, you can connect a
second set-top box to BeoVision
Avant via the CamCorder socket. For
more information, refer to the
chapter The socket panels on page
56.
Make sure that all connected
equipment is registered in the
Connections menu. Refer to the
chapter Register extra equipment on
page 20 for further information.
Connect a set-top box
BeoVision Avant
Set-top box (SAT or V.AUX)
AV
connection
IR transmitter
connection
Primary set-top box
STB (SAT)
Secondary set-top box
STB (V.AUX)
IR transmitter
connections
AV connection
Disconnect all involved systems from the mains
before you connect external equipment. Use
the 21-pin AV cable to connect the set-top box
to your BeoVision Avant:
> Connect one end to the set-top box.
> Run the cable to the AV, DECODER or V.TAPE
socket on the back of BeoVision Avant.
IR transmitter
In order to enable remote control operation of
your set-top box with the Beo4 remote
control, you must connect the enclosed lowpower IR transmitter:
> Connect the IR transmitter to the IR OUTPUT
socket on BeoVision Avant.
> Fasten the IR transmitter to the IR receiver of the
set-top box (please follow the instructions
enclosed with the IR transmitter).
To be able to use the remote control included with
your set-top box, do not cover its IR receiver
entirely.
If you connect two set-top boxes…
You will need an IR Y-adaptor (index number
6174171) to connect two set-top boxes to your
BeoVision Avant. Please contact your Bang &
Olufsen retailer. Follow the procedure described
below to connect two set-top boxes to BeoVision
Avant:
> Connect your primary and secondary set-top
boxes to the AV and DECODER sockets on
BeoVision Avant (or the DECODER and V.TAPE
sockets if you have connected equipment to the
AV socket) via 21-pin AV cables as shown.
> Connect the IR Y-adaptor to the IR OUTPUT
socket on BeoVision Avant.
> Connect the IR transmitter for your primary
set-top box to the chrome socket on the IR
Y-adaptor, and fasten the other end to the IR
receiver on your primary set-top box.
> Connect the IR transmitter for your secondary
set-top box to the gold socket on the IR
Y-adaptor, and fasten the other end to the IR
receiver on your secondary set-top box.
> Register your primary set-top box in the
Connections menu as STB (SAT) and your
secondary set-top box as STB (V.AUX). Refer to
the chapter Register extra equipment for further
instruction.
Page 14
14
The connections described on this
page assume a setup with an AV
decoder (a baseband decoder, e.g.
Canal+, or a MAC decoder, etc.) and
BeoVision Avant.
It is possible to connect a decoder to
both the DECODER and AV socket
on BeoVision Avant.
Regardless of the setup you choose,
you must register it in the
Connections menu.
Please refer to the chapter Register
extra equipment on page 20 for
further information about connection
and registration of external
equipment.
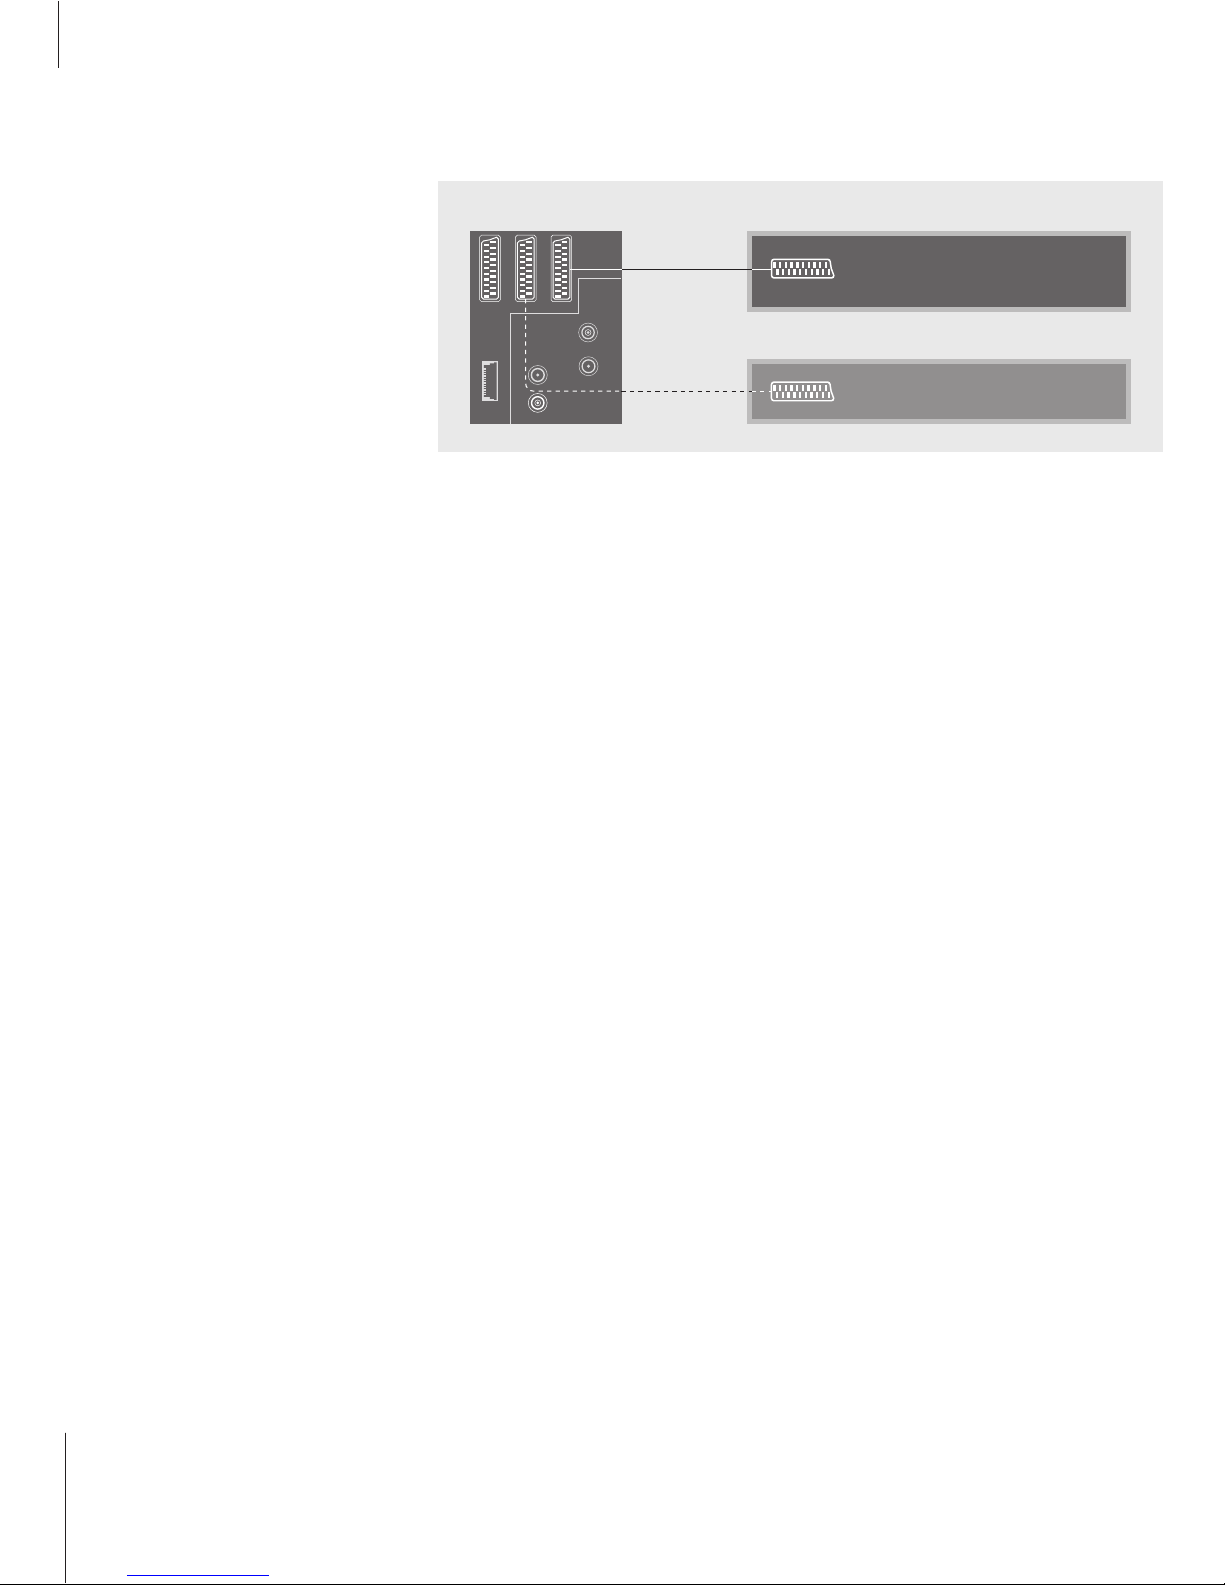
BeoVision Avant
Connect a decoder
Decoder 1
Decoder 2
Connect an AV or RF decoder
To connect an AV decoder (a baseband
decoder, e.g. Canal+, or a MAC decoder, etc.),
connect the cable from the aerial to the
BeoVision Avant. Connect the AV decoder to
the 21-pin socket marked DECODER on the
BeoVision Avant.
If you wish to connect an RF decoder, then
remember to connect the external aerial cable
to the decoder input socket and then forward
the signal or cable to the BeoVision Avant
aerial socket (marked VHF/UHF). Connect the
RF decoder to the 21-pin socket marked
DECODER on the BeoVision Avant.
Once the decoder is registered in the
Connections menu…
> Find an empty channel in the TV list, where you
want the decoded programs to be located.
> Select a TV channel with a 24–hour transmission
(e.g CNN).
> Call up the TV Tuning menu.
> Call up the Manual tuning menu.
> Change the program number (Pr) to the channel
number you decided to place decoded
programs on.
> Move the cursor to More and press GO.
> Move the cursor to Decoder and change the
setting to ON.
> Press EXIT to leave all menus.
Select this stored program number when you want
to watch your decoded programs.
Connect two decoders
If you connect two decoders to BeoVision
Avant, connect your primary decoder to the
DECODER socket and your secondary decoder
to the AV socket on BeoVision Avant.
The decoder you connect to the AV socket in this
case must not be a MAC or baseband decoder!
NOTE! If your decoder has two 21-pin sockets, it
is important that you use the socket intended for
a video tape recorder and not the socket which
may be marked TV!
Page 15

15
You can connect different types of
audio and video equipment to
BeoVision Avant, such as a satellite
dish, a video tape recorder or a
CamCorder.
When connecting equipment to your
BeoVision Avant, use the AV socket
on BeoVision Avant first, if it is
vacant. However, a video tape
recorder must be connected to the
V.TAPE socket.
Please refer to the User’s Guide
included with your equipment to
make sure it is connected properly.
Remember to register all connected
equipment. Refer to Register extra
equipment on page 20 and The
socket panels on page 56 for more
information.
Satellite dish
The connection of an analogue satellite dish
to the BeoVision Avant requires a built-in
satellite receiver module. Likewise, if you
want to connect a polarotor, etc., your
BeoVision Avant must have an external
positioner box. Please contact your Bang &
Olufsen retailer.
For specific information about how to set up
and use your satellite system, please refer to
the guide enclosed with the satellite module
(BeoSat – dish and decoder setup) and to the
BeoVision Avant Guide.
Video tape recorder
Use a 21-pin cable to connect a BeoCord
V 8000 video tape recorder to the V.TAPE
socket on BeoVision Avant. Connect the cable
from the aerial to the input socket on the
video tape recorder. Forward the aerial signal
to the aerial socket on BeoVision Avant.
Video game, CamCorder, etc.
We recommend that you use the close-up
sockets for equipment you connect on a
temporary basis, e.g. video games or
CamCorders. These sockets are placed directly
below the close-up operation panel. The use
of close-up sockets is explained in the chapter
The close-up socket panel.
AV 2 Expander
The optional AV 2 Expander accessory enables
you to connect more than one piece of extra
equipment to one socket on BeoVision Avant.
You can connect a decoder, a compact video
disc player, and other equipment to
BeoVision Avant via the AV 2 Expander.
Use a 21-pin cable to connect one plug to the
socket marked TV on the Expander box, and
connect the other plug to the socket marked
DECODER on BeoVision Avant.
Connect other equipment
Page 16
16
Connect your audio and video systems
If you connect a compatible Bang &
Olufsen audio system to the
BeoVision Avant using a Master Link
cable, you will obtain the benefits of
an integrated audio/video system.
Switch on radio on your audio
system using your BeoVision Avant
speakers, or turn on a TV program
and send the sound to your audio
system speakers.
Your AV system can be placed
together in one room, or in two
rooms with the BeoVision Avant
(with or without external speakers)
placed in one room, and the audio
system with a set of speakers placed
in another.
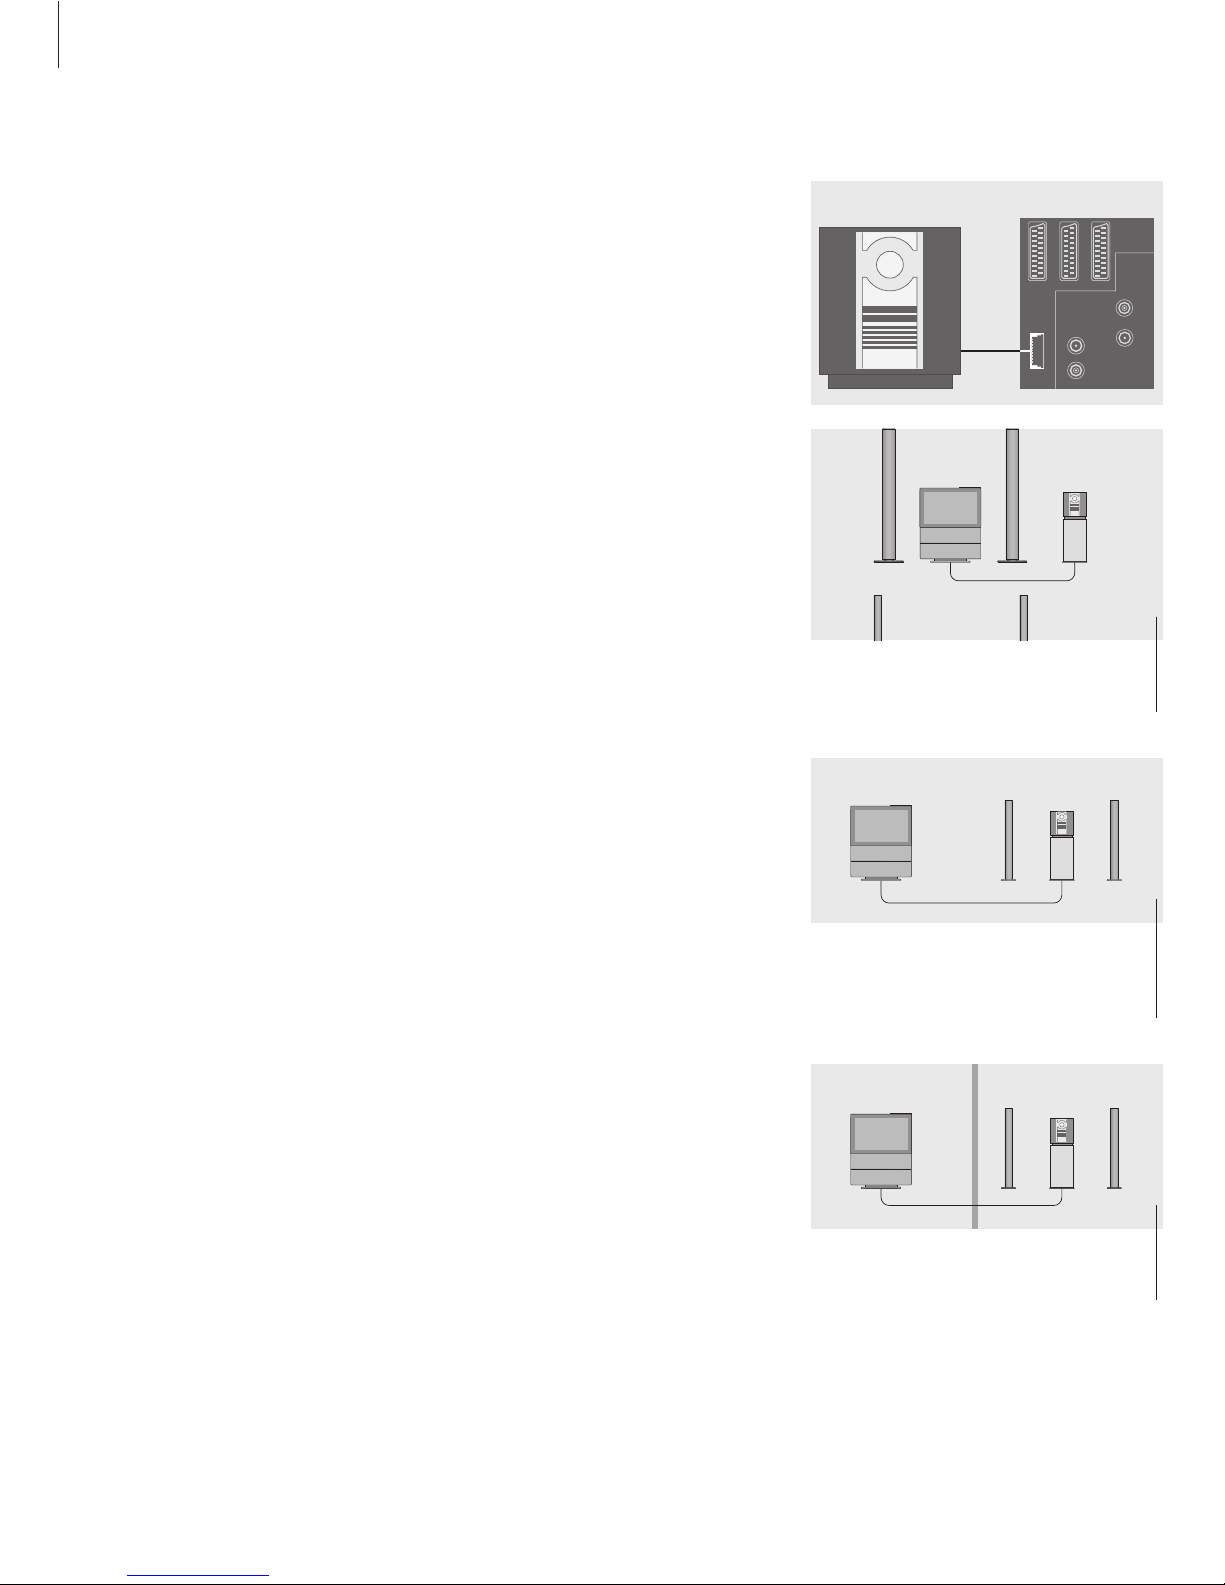
Connect your audio system to
BeoVision Avant
Using a Master Link cable, connect the one
multi-pin plug to the socket marked
MASTER LINK on BeoVision Avant, and the
other multi-pin plug to the socket marked
MASTER LINK on the audio system. Please
refer to the chapter The socket panel on the
rear for more information.
Choose settings
If your BeoVision Avant has been set up in an
AV system, you may need to program it to the
correct Option. Option programming is done
with the Beo4 remote control and with the
entire system switched to stand-by.
Option programming for BeoVision Avant
> While holding down the • button, press LIST.
> Let go of both buttons.
> Press LIST until the Beo4 display reads OPTION?
and then press GO.
> Press LIST to display V.OPT and then key in the
appropriate number (0, 1 or 2).
Option programming for the audio system
> While holding down the • button, press LIST.
> Let go of both buttons.
> Press LIST until the Beo4 display reads OPTION?
and then press GO.
> Press LIST to display A.OPT and then key in the
appropriate number (0, 1, or 2).
MASTER
LINK
BeoVision Avant
Audio system
Option 2 Option 0
BeoVision Avant and an audio system set up in
one room – all speakers are connected to the
BeoVision Avant.
Option 1 Option 1
You can choose to set up your BeoVision Avant
(with or without connected speakers) and the
audio system (with a connected set of speakers)
in the same room.
Option 2 Option 2
You can choose to set up your audio system in
one room, and the BeoVision Avant (with or
without connected speakers) in another.
Page 17
17
The BeoLink system makes it possible
to distribute picture and/or sound to
other rooms throughout the house.
You can connect your BeoVision
Avant in e.g. the living room to
another video system or set of
speakers in another room, thereby
making it possible to ‘move’ picture
or sound to other rooms.
Distribute sound and pictures with BeoLink
Link systems throughout your home
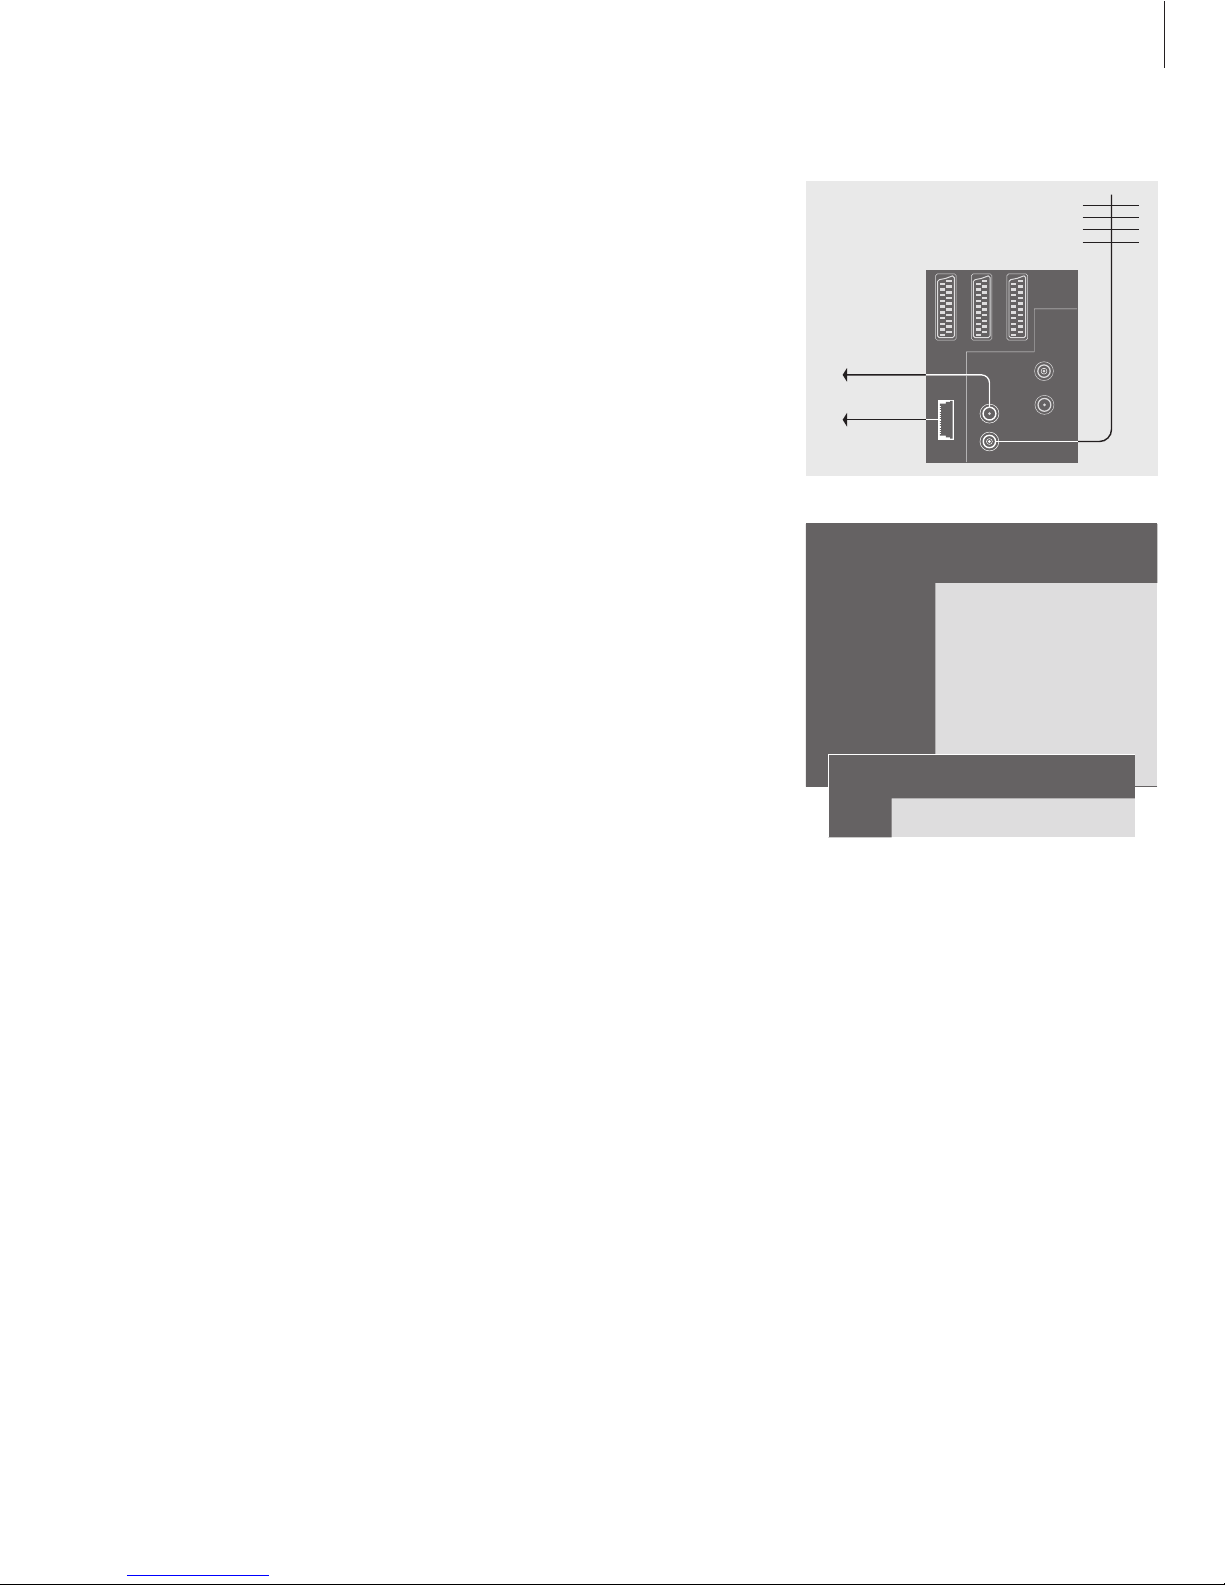
The link room system must be connected via a
Master Link cable to the system in the main
room.
> Connect the Master Link cable to the socket
marked MASTER LINK on BeoVision Avant.
> If you want to distribute video signals as well,
connect an ordinary aerial cable to the socket
marked LINK on BeoVision Avant. Then run both
cables to the link room and follow the
instructions enclosed with the link room
equipment.
> If the Master Link socket on the BeoVision Avant
already has an audio system connected, you
must split the Master Link cable in two and join
them with the cable from the link room using a
special junction box. Please consult your Bang &
Olufsen retailer for assistance.
The system modulator
The system modulator ensures that TV signals
can be sent to a connected television in a link
room. Under special circumstances, it may be
necessary to enter modulator settings:
– If your link room is an audio setup, e.g. a BeoLink
Active/Passive, and you choose to set up a nonlinkable TV as well, you must set the system
modulator to On, as described to the right (the
factory setting is Off, which must be used if you
are using a linkable Bang & Olufsen TV).
– If, for example, a TV channel in your area is
broadcasted at the same signal frequency the
BeoLink system uses, 599 MHz, you must tune
the system modulator to an unoccupied
frequency, as described in the following chapter
under Link Frequency.
BeoVision Avant
LINK
MASTER
LINK
Tuning
1 TV
2 Sat
3 Modulator
Modulator
On
To switch on the BeoVision Avant system
modulator…
> Switch on the system and press MENU to call
up the main menu.
> Press 3 to call up the Setup menu (4 if Sat is
available). Tuning is already highlighted.
> Press GO to call up the Tuning menu.
> Press
▼
to move the cursor down to the
Link frequency menu.
> Press MENU to reveal the item Modulator.
> Press GO to call up the Modulator menu.
> Press
▲
or ▼to change from Off to On.
> Press GO to store the setting, or EXIT to leave
all menus.
Page 18
18
If you have a BeoLink distribution
system installed, you can either use
your BeoVision Avant in the main
room, such as a living room, or in a
link room, such as a study or
bedroom.
If you choose to use your BeoVision
Avant in a link room, you can sit in
the link room and enjoy not only all
the BeoVision Avant features, but
also audio or video from the main
room.
You can, for example, listen to radio
programs from a main room
audio system on your link room
BeoVision Avant or watch a
videotape played on a main room
video tape recorder.
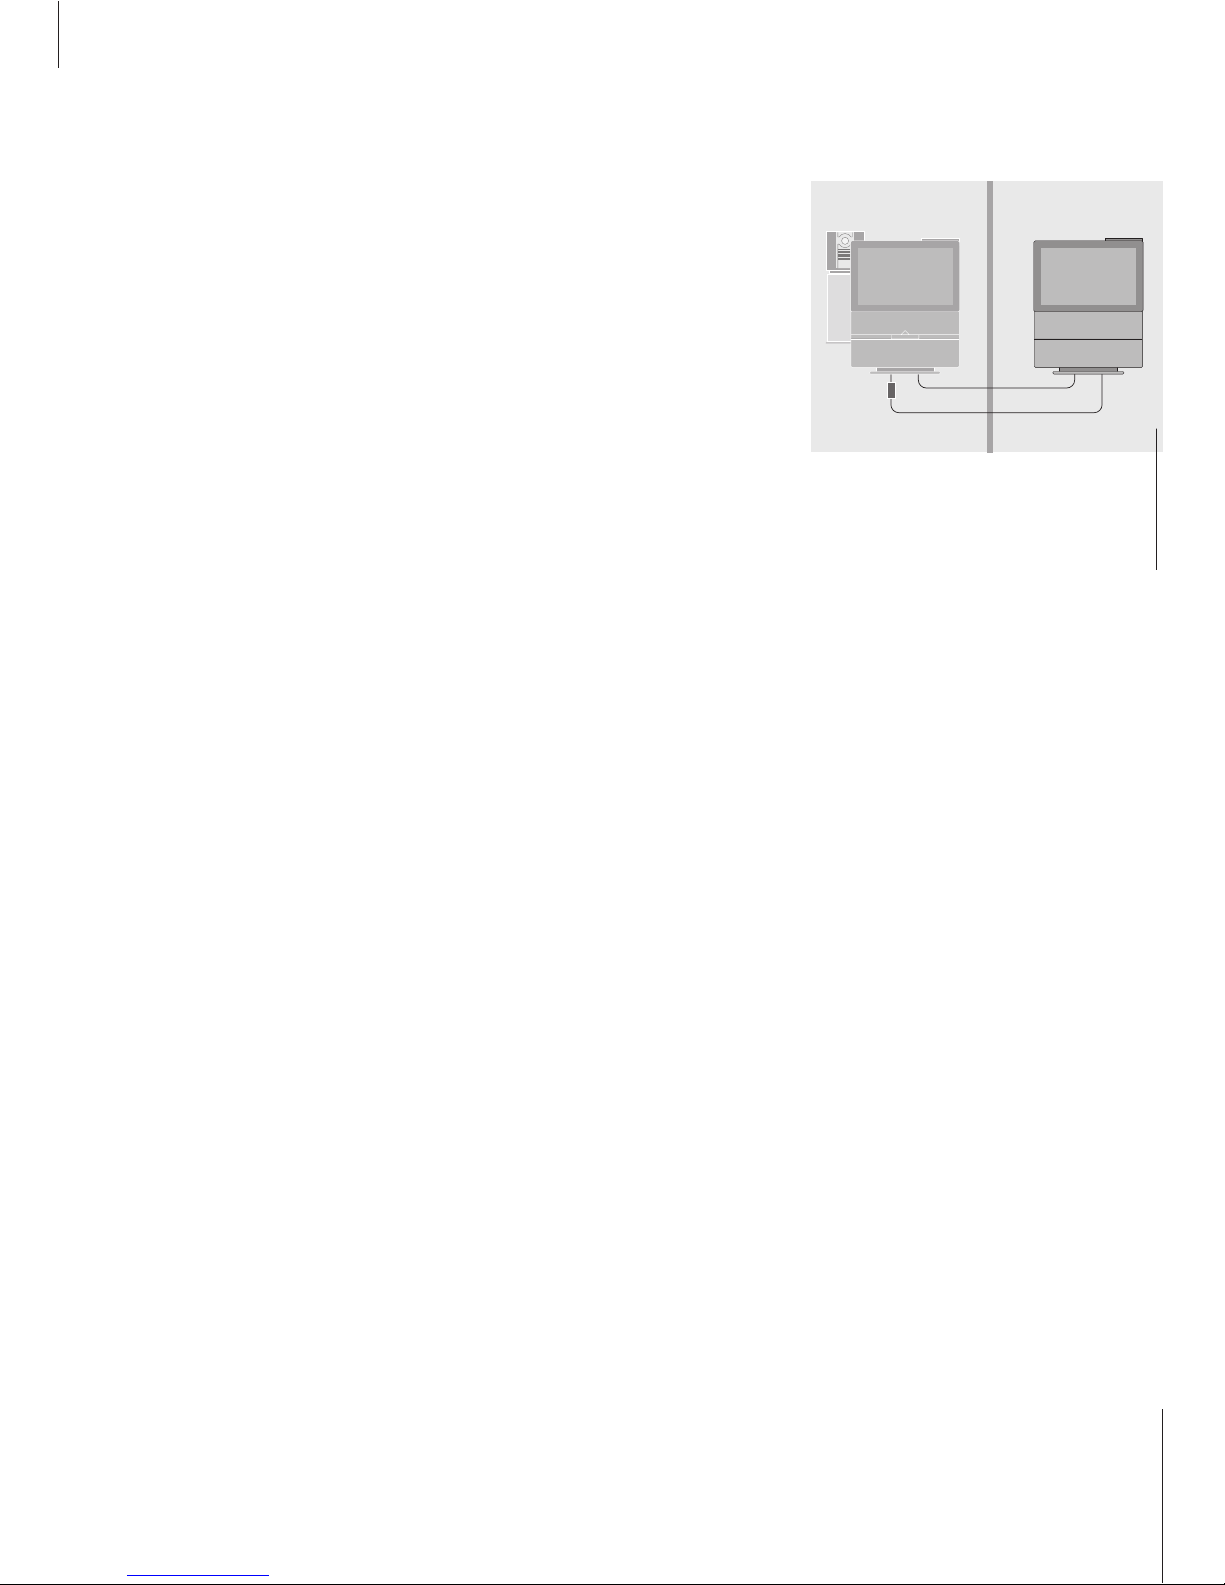
Set up BeoVision Avant in a link room
Before you start…
If you choose to use your BeoVision Avant in a
link room, the setup procedure differs from
setup of a stand-alone BeoVision Avant. The
differences are outlined below. You must
follow the procedure described below when
you connect your BeoVision Avant for use in a
link room:
1 Connect the system to the mains;
2 Using the Beo4 remote control, program the link
room BeoVision Avant to Option 6* as described
below;
3 Disconnect BeoVision Avant from the mains;
4 Make the connections described on these pages;
5 Reconnect BeoVision Avant to the mains.
Program BeoVision Avant for link room use
> Hold the • button down on Beo4 while pressing
LIST.
> Release both buttons.
> Press LIST repeatedly until OPTION? is shown in
the Beo4 display and press GO.
> Press LIST repeatedly until V.OPT is shown in the
Beo4 display and press 6*.
Option 6
Main room Link room
For your entire system to function properly, it is
essential that the BeoVision Avant in the link
room is programmed to the correct Option
before you connect it to the system in the main
room!
*NOTE! If you connect BeoVision Avant for use
in a link room where other link systems are
already connected, such as loudspeakers, then
you must program BeoVision Avant to Option 5
instead.
Page 19

19
Connections
Your BeoVision Avant in the link room must
be connected to your main room system using
two different cables:
– BeoLink connection (using a Master Link
cable and a junction box).
– Aerial connection (using an ordinary aerial
cable).
BeoLink connection
In the main room: Connect the Master Link cable
to the socket marked MASTER LINK on the
main system. Run the cable to the junction box,
and cut the cable to an appropriate length.
In the link room: Connect the Master Link cable
to the socket marked MASTER LINK on the
BeoVision Avant. Run the cable to the junction
box, and cut the cable to an appropriate length.
Inside the junction box: Join the cables as
explained in the folder enclosed with the
box/cable. This folder explains all the
possibilities for the box, and how to join the
cables.
Aerial connection
Using an ordinary TV aerial cable (coaxial cable),
connect one end to the socket marked LINK on
the main system, and the other end to the aerial
input socket on the link room TV.
Link frequency
If a TV channel is broadcasting on the same
frequency that the main room system uses to
send video to the link room (set from the
factory to 599 MHz), you may need to adjust
the main room system’s video transmission
frequency.
When the connections are complete, you can
begin tuning in the TV channels in your area,
presetting the sound and picture levels, etc., as
described on the following pages.
Tuning
1 TV
2 Sat
3 Link frequency
Frequency
599
> Press MENU to call up the main menu.
> Press 3 to call up the Setup menu (4 if Sat is
available).
> Press GO to call up the Tuning menu.
> Press 2 to call up the Link frequency menu (3 if
Sat is available).
> Press
▲
or ▼to find an available frequency.
Alternatively, key in the frequency, e.g. 599,
using the number keys on the Beo4 remote
control.
> Press GO to store your setting, or EXIT to leave
all menus.
Page 20

20
Register extra equipment
If you connect additional video sources
or equipment to your BeoVision Avant,
then you must register the equipment
in the Connections menu.
The Connections menu registers what is
connected to the sockets on the rear of
BeoVision Avant.
For information about where and how
to connect extra equipment, please
refer to the chapters on connections as
well as The socket panels on page 56.
> Switch on the system and press MENU to call
up the main menu.
> Press 3 to call up the Setup menu (4 if Sat is
available).
> Press 5 to call up the Connections menu.
> The three main sockets for extra equipment,
V.Tape, AV and Decoder, are shown, as well as
the default settings for those sockets, V. Tap e ,
None and Decoder.
> Press
tt
to select a socket.
> Press
▲
or ▼to step through the list of
available equipment types until you find what
you have connected. Select None if nothing is
connected.
> When you have selected your equipment types,
press GO to store your settings or press EXIT to
leave all menus.
A single source type, such as a video tape
recorder, can not be registered twice in the
Connections menu, with the exceptions of two
decoders or two set-top boxes. See the chapters
‘Connect a set-top box’ and ‘Connect a decoder’
on pages 13-14 for further information.
Registering the equipment connected to
BeoVision Avant enables you to operate it
with the Beo4 remote control.
Setup
1 Tuning
2 Sound
3 Picture
4 Stand
5 Connections
6 Menu
7 Clock
V. Tape AV Decoder
V.Tape None Decoder
Page 21

21
If you have connected a set-top-box…
The set-top box options only appear if your
BeoVision Avant is equipped with the built-in
Set-top Box Controller module. Two set-top boxes
can only be connected to BeoVision Avant if your
BeoVision Avant does not have the built-in satellite
receiver module. If your AV socket is in use, you
can connect a second set-top box to the
CamCorder socket. Please refer to the chapter The
close-up socket panel for more information.
> Press
▼
to move down the list.
> Press GO to select your STB type.
Equipment you can connect to each socket
V.TAPE
V.Tape… for a Bang & Olufsen video tape
recorder
STB(SAT), STB(V.AUX)… for a set-top box
None… if nothing is connected
AV
STB(SAT), STB(V.AUX)… for a set-top box.
Choose STB(SAT) if you have a secondary
set-top box connected to the DECODER socket
V.AUX… for other equipment
Non B&O V.Tape2… for a non-Bang & Olufsen
video tape recorder
V.Tape2… for a Bang & Olufsen video tape
recorder
S-VHS V.TP2… for a Super-VHS video tape
recorder
Decoder(2)… for a second decoder. Attach your
primary decoder to the DECODER socket
None… if nothing is connected
DECODER
Decoder(1)… for a primary decoder or expander
box
STB(SAT), STB(V.AUX)… for a set-top box.
Choose STB(V.AUX) if you have a primary
set-top box connected to the AV socket
V.AUX… for other non-Bang & Olufsen
equipment
Non B&O V.Tape2… for a non-Bang & Olufsen
video tape recorder
None… if nothing is connected
1 SELECTOR
2 NOKIA 9800S/02S
3 NOKIA 9602S
4 NOKIA 9820T
5 NOKIA 9200
6 NOKIA D-BOX II
7 NOKIA D-BOX
8 NOKIA 9850T
9 PACE DTR730-IM
10 PHILIPS DTX637x
11 PACE DSR600
12 SKY DIGITAL
13 CANALdig DK/S/N
14 CANAL+ SAT r2
15 CANALdigital I
16 CANALdigital E
17 CANALdigital NL
18 CANALdigital B+
19 MACAB DCB-101
STB (V.AUX)
If you select STB in the ‘Connections’ menu, you
will be prompted to choose your STB type from a
list on the screen.
Get access to extra equipment
> To switch on a connected video tape recorder,
press V TAPE on Beo4.
> To switch on a second connected video tape
recorder, press LIST on your Beo4 remote
control until V.TAPE2 is shown in the Beo4
display, and then press GO.
> If you wish to gain access to your set-top box
functions and your BeoVision Avant is not
equipped with the built-in satellite receiver
module, press the SAT button on Beo4.
Otherwise, press LIST on Beo4 until V.AUX is
shown in the display, and then press GO.
> For all other external equipment, press LIST on
Beo4 until V.AUX is shown in the display, and
then press GO. This equipment can not be used
if your set-top box is registered as STB(V.AUX).
In order to display V.AUX or V.TAPE2 on Beo4,
these options must be added to the Beo4 list of
functions. Please refer to the chapter ‘Gain access
to extra functions via Beo4’ on page 34, for more
information.
Page 22

22
You can make BeoVision Avant find
your TV and satellite* channels for
you, or you can key in the exact
frequency yourself.
You can preset 99 different TV
channels and 119 different satellite
channels on channel numbers of
their own. Furthermore, you can give
each channel a distinct name.
Tune in TV or satellite channels
When you set up BeoVision Avant for the first
time, you can tune in those TV and satellite
channels that are available in your area via
the TV tuning and Sat tuning menus.
BeoVision Avant finds available channels and
stores them by number and name.
> Switch on the system and press MENU to call
up the main menu.
> Press 3 to call up the Setup menu (4 if Sat is
available).
> Press GO to call up the Tuning menu.
If your BeoVision Avant is not equipped with the
built-in satellite receiver module or the system
modulator, the TV tuning menu will appear
automatically. Otherwise,
Press GO again to call up the TV tuning menu,
or press 2 to call up the Sat tuning menu.
> Press 3 to call up the Auto tuning menu. The
Freq (frequency) and Pr (program) fields are
shown.
> Press
▲
to start automatic tuning. The content
of the frequency and program fields will show
your progress.
When tuning is completed, you can rearrange,
delete or rename channels from a channel list. This
list also appears if you press STOP during auto
tuning. Refer to the chapter ‘Edit tuned TV or
satellite channels’ on page 24 for information
about editing the channel list.
*NOTE! It is only possible to tune in satellite
channels if your BeoVision Avant is equipped
with the built-in satellite receiver module.
TV tuning
1 Edit TV list
2 Add program
3 Auto tuning
4 Manual tuning
Freq Pr
210 12
Page 23

23
You can tune in new channels or
re-tune previously deleted channels.
During this tuning process, your
previously tuned channels are left
alone. This allows you to keep
channel names, their order in the
channel list, and any special settings
you may have stored for those
channels, such as decoder or
broadcast system settings.
Add new TV or satellite channels
You can add new or previously deleted TV and
satellite channels to your channel lists at any
time using the Add program menu.
TV tuning
1 Edit TV list
2 Add program
3 Auto tuning
4 Manual tuning
Freq Pr
210 12
> Switch on the system and press MENU to call
up the main menu.
> Press 3 to call up the Setup menu (4 if Sat is
available).
> Press GO to call up the Tuning menu.
> Press GO again to call up the TV tuning menu.
To add satellite channels, press 2 to call up the
Sat menu.
> Press 2 to call up the Add program menu.
> Press
▲
to begin adding new channels. The Freq
(frequency) and Pr (program) fields will show
tuning progress.
> Press STOP to stop adding channels. You can
then move, rename or delete channels from a
list, as described in the following chapter.
> Press EXIT when your channels have been tuned
in, named and placed in the order you choose.
Page 24

24
You can make adjustments to your
tuned TV and satellite channels at
any time.
You can tune in channels not stored
during auto tuning by entering the
channel frequency and channel
number.
You can also enter settings before
you tune in channels. These may
include choosing a broadcast system
for certain types of channels, or
setting up a connected decoder to
be switched on automatically
whenever a coded channel is
switched on.
In addition, you can edit your list of
channels by renaming channels,
moving them around in the list, or
deleting them.
Finally, you can make adjustments to
the individual channels by choosing a
suitable picture format or sound
type.
Edit tuned TV or satellite channels
Adjust tuned TV channels
You can store TV channels on their own
numbers, fine tune the channel reception,
indicate the presence of coded channels and
choose appropriate sound types for the
individual channels.
TV tuning
1 Edit TV list
2 Add program
3 Auto tuning
4 Manual tuning
Freq Pr Name
210 1 . . . . . . . . More
Fine Decoder Sound Format
0 Off Stereo-2 15:9
> Switch on the system and press MENU to call
up the main menu.
> Press 3 to call up the Setup menu (4 if Sat is
available).
> Press GO to call up the Tuning menu.
> Press GO again to call up the TV tuning menu.
> Press 4 to call up the Manual tuning menu*.
> Press
ss
or ttto move between items on the
menu and
▲
or ▼to view your choices for each
item. Numeric values can be entered using the
number keys on Beo4.
> To view further options, press
tt
to move the
cursor to More and press GO.
> Press GO when you have entered your settings,
or press EXIT to leave all menus.
*If the item ‘System’ appears on the menu, then
make sure that the correct broadcast system is
displayed before you begin tuning.
NOTE! satellite channels are only available if your
BeoVision Avant is equipped with the built-in
satellite receiver module.
Page 25

25
What’s on the first TV manual tuning menu...
Freq (frequency)
Searching stops at the first channel producing
an acceptable signal. If you know a channel’s
exact frequency number, key it in directly using
the number keys on the Beo4 remote control.
(System)
If System appears in the menu, make sure that
the correct broadcast system is displayed before
you start tuning:
B/G… for PAL/SECAM B/G
I… for PAL I
L… for SECAM L
M… for NTSC
D/K… for PAL/SECAM D/K
All options may not be available, as this depends
on the television type.
Pr (program number)
Key in the program number (1–99) you wish to
give the channel.
Name
The name you give a channel will appear in the
TV channel list. A name may contain up to eight
characters, including the letters A–Z, numbers
and full stop. Press
▲
or ▼to reveal the
character you want. Then press
tt
to move on
to the next character position. Please refer to
Name tuned channels for more information.
More
If it is necessary to fill in extra information, move
to More and press GO. A second manual tuning
menu appears.
The second TV manual tuning menu…
Fine (fine tuning)
The TV automatically tunes to the best possible
picture. However, neighbouring channels may
blur the picture slightly, in which case fine tuning
may be required. The fine tuning range is ±8.
Decoder
If you have only one decoder connected, your
options are ON or OFF. If you have two
decoders connected to BeoVision Avant, you
can choose between Dec1, Dec2, or OFF.
Sound (mono/stereo/language)
Several types of sound may be available for a TV
channel. Examples can be stereo sound, mono
sound, or other languages. Press
▲
or ▼ to
switch between the sound modes currently
transmitted, when the sound you wish to store
is heard/displayed, press GO.
Refer to ‘Change sound type or language’ on
page 37 for more information about the various
types of sound available.
Format
Two picture format settings are available. You
can store a format for each TV channel. The
default setting is 15:9, but if ‘noise’ appears to
the right and left of the picture, choose the 14:9
format instead. This enables the curtains on the
TV screen to hide the ‘noise’.
Refer to ‘Make the picture fill out the screen’ on
page 49 for more information.
Page 26

26
>> Edit tuned TV or satellite channels
Adjust tuned satellite channels
You can store satellite channels on their own
channel numbers, fine tune the channel
reception, indicate the presence of coded
channels and choose appropriate sound types
for the individual channels.
SAT tuning
1 Edit SAT list
2 Add program
3 Auto tuning
4 Manual tuning
Freq Pol LNB Pr Name
11.374 Vert Astra 1 . . . . . . . . More
Fine Decoder System Format Sound
0 Off PAL 15:9 7.02/7.20
> Switch on the system and press MENU to call
up the main menu.
> Press 4 to call up the Setup menu.
> Press GO to call up the Tuning menu.
> Press 2 to call up the Sat tuning menu.
> Press 4 to call up the Manual tuning menu.
> Press
ss
or ttto move between items on the
menu and
▲
or ▼to view your choices for each
item. Numeric values can be entered using the
number keys on the Beo4 remote control.
> To view further options, press
tt
to move the
cursor to More and press GO.
> Press GO when you have entered your settings,
or press EXIT to leave all menus.
What’s on the first Sat manual tuning menu…
Freq (frequency)
Searching stops at the first acceptable signal. If
this is not a channel you want, press
▲
or
▼
again to continue searching, or key in the exact
frequency number.
Pol (polarity)
Pol can be set to Vert (vertical polarisation), Hor
(horizontal polarisation), or 00 - 63 (numerical
indication of polarisation). The last is relevant
only if polarity is set to Skew in the ODU (Out
Door Unit) setup menu. Refer to the ODU
Setting-up guide for further information about
the ODU setup menu.
(Pos (dish position))
Only available if your ODU setup also includes a
motor-controlled dish.
(LNB (Low Noise Block Converter))
Only available if you have registered more than
one LNB in the ODU setup menu. Options are:
Astra, 1°West, 5°East, Hot Bird, Uni-LNB,
Telecom, SMATV, Custom, and None. The LNB
options you choose will appear in the first Sat
manual tuning menu.
Pr (program number)
The numbers 1–119 are available.
Name (channel naming)
You can give a channel a name containing up to
eight characters, including A–Z, numbers and
full stop. Press
▲
or ▼to reveal a character.
Press
tt
to move to the next character position.
If you have tuned in a satellite radio station, you
can indicate this in the name (e.g. R for radio) to
distinguish between satellite radio station and
TV channels.
More
Press GO to call up the second Sat manual
tuning menu.
Page 27

27
The second Sat manual tuning menu…
Fine (fine tuning)
Fine tune within a range of ±7 to find the best
possible picture quality.
Decoder
If you have only one decoder connected, your
options are ON or OFF. If you have two
decoders connected to BeoVision Avant, you
can choose between Dec1, Dec2, or OFF.
System (satellite broadcast system)
You can switch between the following systems,
PAL , MAC or BB (BaseBand). If you set System
up to the MAC or BB options, it will not be
possible to select or set options for Sound.
Format
Two settings are available. You can store a
picture format for each satellite channel. The
default setting is 15:9, but if ‘noise’ appears in
the right and left side of the picture, choose the
14:9 format instead. The curtains on the TV
screen will hide the ‘noise’.
Refer to ‘Make the picture fill out the screen’ on
page 49 for more information.
Sound (mono/stereo/language)
Several types of sound may be available for a
particular satellite channel, e.g. both stereo and
mono sound, or several different languages.
Press
▲
or ▼to switch between the options
currently transmitted, and stop when the sound
you wish to store is heard and/or displayed.
Alternatively, you may have to call up a sound
tuning menu to tune in the appropriate sound
frequency. Call up the Sound tuning menu by
pressing MENU when Sound is highlighted.
Refer to ‘Change sound type or language’ on
page 37 for more information about the various
types of sound available.
What’s on the Sound menu…
Sound
Stereo and Mono sound are available.
(Freq (Frequency))
Only applies for when Mono sound is selected.
Tune in the mono sound frequency.
(Left – Right)
Only applies if Stereo sound is selected. Press
▼
or ▲to select a frequency for the left channel,
and the right channel will be adjusted
automatically.
(Bandwidth)
Only applies if Mono sound is selected. The
following options are available: 130 KHz,
280 KHz, and 450 KHz. Use
▲
or ▼to reveal
options. If Sound is set to Stereo, the bandwidth
is set to 130 KHz automatically.
Deemphasis
De-emphasise the sound signal, so that it
corresponds with the degree of emphasis with
which it was transmitted. Options are 50, 75, or
J17.
Expand
Expand the sound signal. Applies if the
transmitted sound is a stereo signal. Expand
compensates for the deviations bass and treble
undergo during transmission. Options are On
and Off.
Sound level
Select a sound level for a channel. As some
channels broadcast programmes with different
sound levels, you can e.g. choose to turn the
preprogrammed sound level down. Options are
Normal and Low.
Picture
Indicates whether the channel is a satellite Radio
station or TV channel. On indicates that the
picture screen will be switched on for satellite
TV channels, and Off indicates that the picture
screen will not be switched on, as only radio
sound is available.
Page 28

28
>> Edit tuned TV or satellite channels
Move tuned channels
You can rearrange the order in which your
channels appear when you switch channels, as
well as in the on-screen channel list.
Name tuned channels
BeoVision Avant will name your tuned
channels automatically during auto tuning,
but you can rename your channels at any
time.
TV tuning
1 Edit TV list
2 Add program
3 Auto tuning
4 Manual tuning
1 BBC 1
2 BBC 2
3 ITV
4 SUPER CH
5 Sky
6 ZDF
7 CHILDREN
8 CNN
9 . . . . . . . .
10 . . . . . . . .
11 . . . . . . . .
12 EUROSPRT
13 . . . . . . . .
14 . . . . . . . .
15 MTV
16
17
18
19
Press
>>
to
move
> Switch on the system and press MENU to call
up the main menu.
> Press 3 to call up the Setup menu (4 if Sat is
available).
> Press GO to call up the Tuning menu.
> Press GO again to call up the TV tuning menu.
To move satellite channels, press 2 to call up the
Sat tuning menu.
> Press GO to call up the channel list.
> Press
▼
or ▲to move through your list of
channels.
> When you find a channel you wish to move,
press
tt
to move it out of the list.
> Press
▼
or ▲to move the channel to its new
location, or press the number of the new
location.
> Press
ss
to move the channel back into the list. If
it changes places with another channel, this
channel is moved out of the list and can be
placed elsewhere.
> When you have moved your channels, press
EXIT to leave all menus.
You can select a channel for viewing while another
channel is out of the list, but make sure you return
the moved channel to the list before exiting the
menu.
TV tuning
1 Edit TV list
2 Add program
3 Auto tuning
4 Manual tuning
1 BBC 1
2 BBC 2
3 ITV
4 SUPER CH
5 SKY
6 ZDF
7 CHILDREN
8 CNN
9 . . . . . . . .
10 . . . . . . . .
11 . . . . . . . .
12 EUROSPRT
13 . . . . . . . .
14 . . . . . . . .
15 MTV
16
17
18
19
Press
>>
to
move
Freq Pr Name
48 1 BBC 1 More
Page 29

29
Delete tuned channels
You can remove all your unwanted tuned
channels from the channel list, thereby
reducing the time you spend changing
channels.
> Switch on the system and press MENU to call
up the main menu.
> Press 3 to call up the Setup menu (4 if Sat is
available).
> Press GO to call up the Tuning menu.
> Press GO a second time to call up the TV tuning
menu. To name satellite channels, press 2 to call
up the Sat tuning menu.
> Press GO to call up the channel list.
> Press
▼
or ▲to move through your list of
channels.
> When you have found a channel you wish to
name, press GO. The cursor will be located on
the first character in the channel name.
> Press
ss
or ttto move between characters, and
▲
or ▼to choose characters.
> Press GO to store a name and return to the list,
or press STOP to return to the list without
storing the name.
> Press EXIT to leave all menus.
> Switch on the system and press MENU to call
up the main menu.
> Press 3 to call up the Setup menu (4 if Sat is
available).
> Press GO to call up the Tuning menu.
> Press GO again to call up the TV tuning menu.
To delete satellite channels, press 2 to call up
the Sat tuning menu.
> Press GO to call up the channel list.
> Press
▼
or ▲to move through your list of
channels.
> When you have found a channel you wish to
delete, press MENU. Del? appears next to the
channel name.
> Press GO to delete the channel, or press STOP
to return to the list without deleting the
channel.
> Press EXIT to leave all menus.
TV tuning
1 Edit TV list
2 Add program
3 Auto tuning
4 Manual tuning
1 BBC 1 Del?
2 BBC 2
3 ITV
4 SUPER CH
5 SKY
6 ZDF
7 CHILDREN
8 CNN
9 . . . . . . . .
10 . . . . . . . .
11 . . . . . . . .
12 EUROSPRT
13 . . . . . . . .
14 . . . . . . . .
15 MTV
16
17
18
19
Press GO
to delete
Page 30

30
BeoVision Avant has a built-in
24-hour clock that can display the
time on request.
When you preset BeoVision Avant to
switch itself on or off at a particular
time, or when you preset a Timer
recording of a programme on a
connected BeoCord V 8000 video
tape recorder, the clock ensures that
these features are switched on and
off at the right times.
The simplest way to set the clock is
to synchronise it with a tuned TV
channel’s Teletext service via
BeoVision Avant’s Clock menu. It is
only possible to synchronise the clock
with the Teletext service offered by
the current TV channel. If a Teletext
service is not available, you can set
the clock manually.
Set the time and date
Before synchronising the clock with a tuned
channel, make sure that the channel in
question offers a Teletext service.
Setup
1 Tuning
2 Sound
3 Picture
4 Stand
5 Connections
6 Menu
7 Clock
Time Date Year Synch Display
14:25 Thu 2 Nov 2000 No Yes
What’s on the Clock menu…
TIME
Indicates the time. Enter the current time
manually by pressing the number keys on Beo4.
DATE
Indicates the day of the week and the date.
YEAR
Indicates the year.
SYNCH
For synchronisation of the built-in clock with
Teletext. Select the current channel by pressing
▲
or ▼until the channel name is shown. It is
only necessary to enter the time manually if
SYNCH is set to No.
DISPLAY
The following options are available: YES
(displays the current time whenever Avant DVD
is on) and NO (displays the time on request). If
DISPLAY is set to NO, you can see the time in
the Avant DVD display by pressing LIST on Beo4
until CLOCK is shown, and then pressing GO.
To set the time and date…
> Switch on BeoVision Avant and press MENU to
call up the main menu.
> Press 3 to call up the Setup menu (4 if Sat is
available).
> Press 7 to call up the Clock menu. Time is
already highlighted.
> You can enter the current time by pressing the
number keys on Beo4.
> Press
ss
or ttto move through menu items.
> Press
▲
or ▼to see your options for a menu
item.
> Press GO to store your clock and calendar
settings, or EXIT to leave all on-screen menus.
If the clock is not updated in the transition
between summer and winter time, simply select
the channel with which you originally synchronised
the clock.
Abbreviations for month and day of the week
Jan… January Jul… July
Feb… February Aug… August
Mar… March Sep… September
Apr… April Oct… October
May… May Nov… November
Jun… June Dec… December
Mon… Monday
Tue… Tuesday
Wed… Wednesday
Thu… Thursday
Fri… Friday
Sat… Saturday
Sun… Sunday
Page 31

31
Choose one stand position for when you
switch BeoVision Avant on and one for when
you switch it off.
You can also choose a secondary viewing
position, if you have more than one favourite
viewing angle.
With the BeoVision Avant motorised
stand you can turn the entire system
to the left or right using your Beo4
remote control.
Furthermore, you can program the
Avant to rotate automatically to face
your favourite viewing position when
you switch on the TV, and turn away
to a stand-by angle when you switch
it off.
You can also turn BeoVision Avant to
the desired positions manually.
Set positions for BeoVision Avant to turn to
Setup
1 Tuning
2 Sound
3 Picture
4 Stand
5 Connections
6 Menu
7 Clock
Stand position
1
Turn TV to preferred position
Choose stand position 1 for primary viewing
position, 2 for secondary viewing position, or 0
for stand-by position.
> Switch on BeoVision Avant and press MENU to
call up the main menu.
> Press 3 to call up the Setup menu (4 if Sat is
available).
> Press 4 again to call up the Stand menu.
> Press
▼
until the appropriate stand position is
displayed.
> Press
ss
or ttto rotate BeoVision Avant to the
desired position.
> Press GO to store the position.
> Repeat the procedure for other stand positions.
> Press EXIT to leave all on-screen menus.
Page 32

32
Picture and sound settings are preset
at the factory to neutral values which
suit most viewing and listening
situations. However, if you wish, you
can adjust these settings to your
liking.
You can adjust picture brilliance,
colour or contrast. Sound settings
include volume, bass, treble,
loudness and balance. You can also
adjust a BeoLab 2 subwoofer, if it is
part of your setup.
Your can store your picture and
sound settings temporarily – until
BeoVision Avant is switched off – or
you can store them permanently.
To change the picture format, e.g.
from 4:3 to wide screen 16:9, please
refer to the chapter Home Theatre
viewing with BeoVision Avant on
page 48.
Adjust picture and sound settings
Change brilliance, colour or contrast
Adjustment of the picture settings is done via
the BeoVision Avant Picture menu. Temporary
settings are reset to the neutral values when
you switch off BeoVision Avant.
Setup
1 Tuning
2 Sound
3 Picture
4 Stand
5 Connections
6 Menu
7 Clock
Brilliance Colour Contrast
32 32 44
> Switch on BeoVision Avant and press MENU to
call up the main menu.
> Press 3 to call up the Setup menu (4 if Sat is
available).
> Press 3 to call up the Picture menu.
> Press
ss
or ttto move between the items on the
menu.
> Press
▲
or ▼to adjust the settings for each
item.
> Press EXIT to store your settings until you switch
off BeoVision Avant.
> Press GO to store your settings permanently.
What’s on the Picture menu…
Brilliance
Picture brilliance can be adjusted in steps of two
within a range of 00 to 62; 32 is the neutral
setting.
Colour
Colour intensity can be adjusted in steps of two
within a range of 00 to 62; 32 is the neutral
setting.
Contrast
The contrast level in the picture can be adjusted
in steps of one within a range of 00 to 62; 44 is
the neutral setting.
For video sources using the NTSC signal a fourth
option – Tint (colour shade or nuance) – will be
available for adjustment.
Page 33

33
Change volume, bass, treble or
balance
You can adjust sound volume directly on the
Beo4 remote control at any time without
calling up a menu, but you must call up the
Sound menu to be able to adjust bass, treble,
loudness or balance.
Setup
1 Tuning
2 Sound
3 Picture
4 Stand
5 Connections
6 Menu
7 Clock
Sound
1 Adjustment
2 Balance
Counter Tape Speed PDC&VPS Marker
Time used 240 SP On On
Volume Bass Treble Loudness
32 0 0 On
What’s on the Adjustment menu…
Volume
The volume level can be adjusted in steps of two
within a range of 00 to 72.
Bass
Bass tone can be adjusted in steps of one
within a range of -6 to +6. 0 is the neutral
setting.
Treble
Treble tone can be adjusted in steps of one
within a range of -6 to +6. 0 is the neutral
setting.
Loudness
Loudness can be set to On or Off. The loudness
function is used to compensate for the human
ear’s lack of sensitivity to high and low
frequencies. It boosts the low and the high
frequencies when you are listening to low
volume levels so that the music becomes more
dynamic.
Subwoofer (only available if you have connected a
BeoLab 2 subwoofer to BeoVision Avant)
Can be adjusted in steps of one within a range
of -9 to +9. 0 is the neutral setting.
What’s on the Balance menu…
Balance
The speaker balance can be adjusted by a
maximum of 6 steps to the left or to the right.
> < is the neutral setting.
To adjust speaker balance temporarily between
the five speakers in a surround sound setup,
Please refer to the chapter ‘Home Theatre
viewing with BeoVision Avant’ for more
information.
> Switch on BeoVision Avant and press MENU to
call up the main menu.
> Press 3 to call up the Setup menu (4 if Sat is
available).
> Press 2 to call up the Sound* menu.
> Press GO to call up the Adjustment menu.
> Press
ss
or ttto move between menu items.
> Press
▲
or ▼to adjust the settings for each
item.
> Press EXIT to store your settings until you switch
off BeoVision Avant, or press GO to store your
settings permanently.
*NOTE! If your BeoVision Avant is equipped with
a surround sound module, the Sound menu lets
you calibrate your surround sound speaker setup
permanently. Please refer to the chapter
Loudspeaker connections – surround sound on
page 9 for further instruction.
Page 34
34
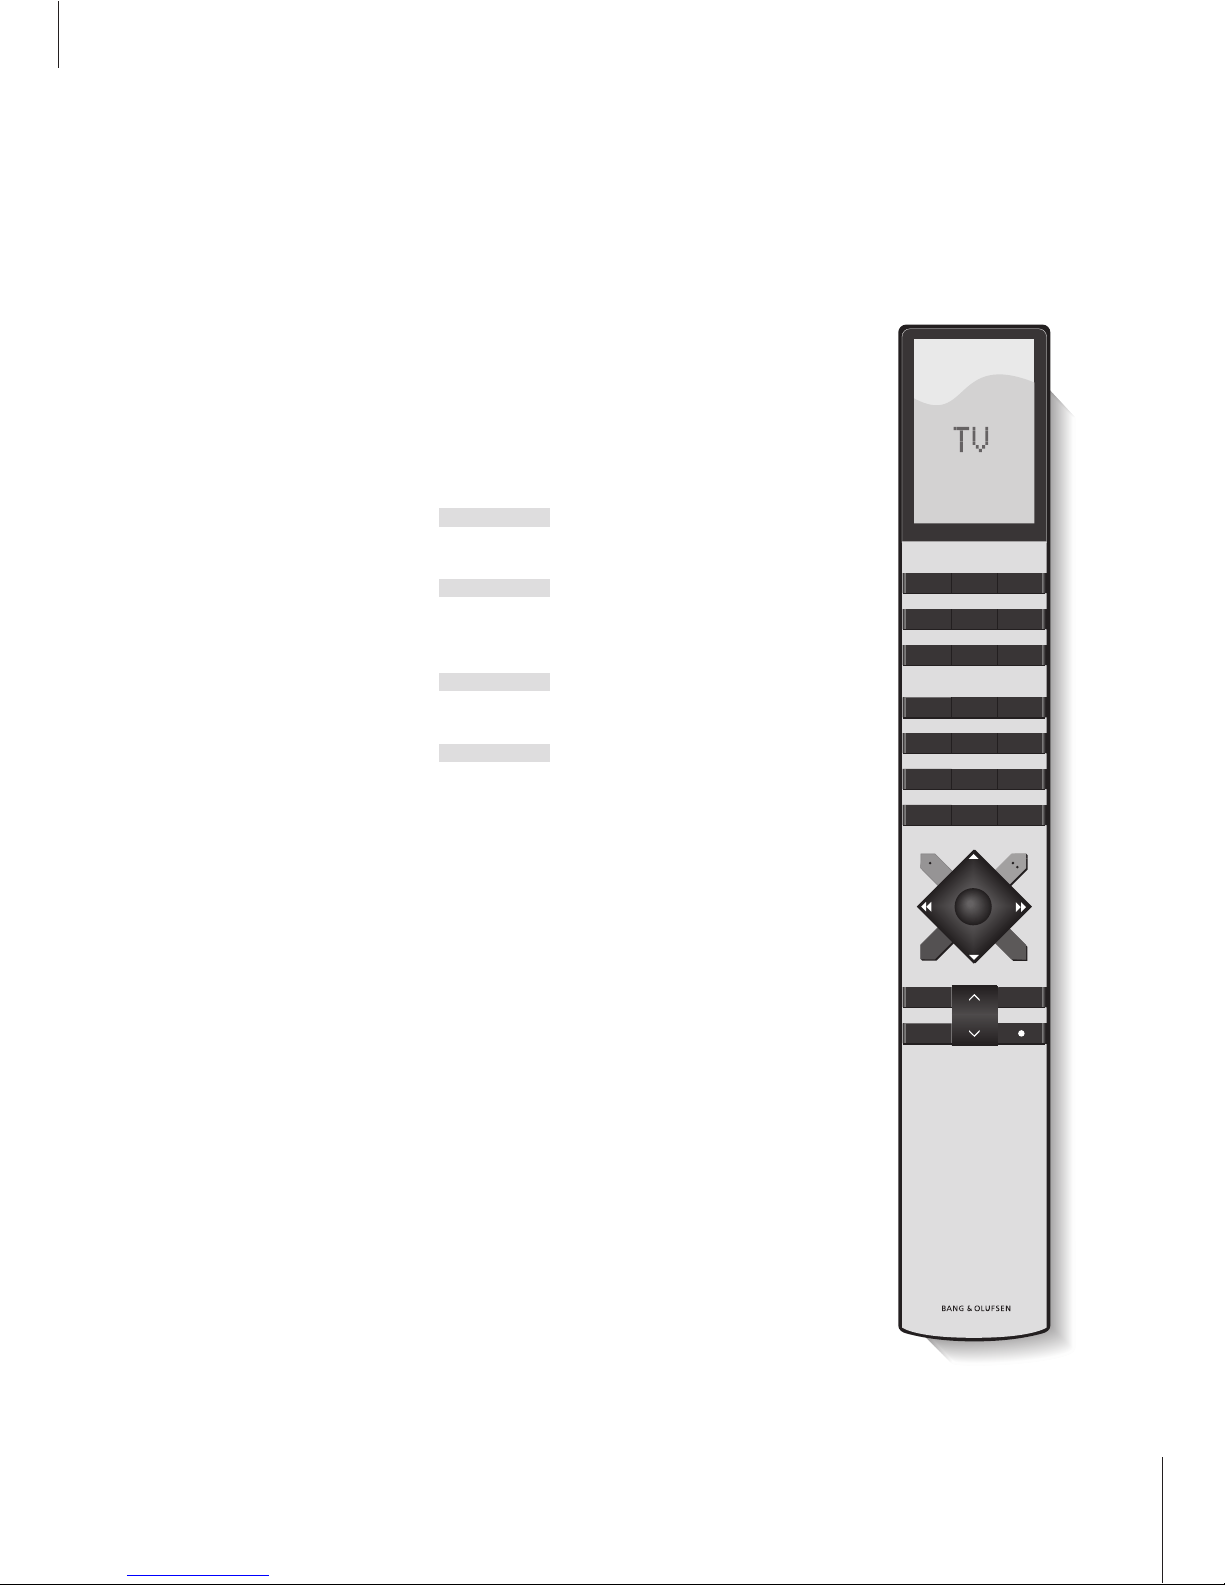
Gain access to extra functions via Beo4
The Beo4 buttons give direct remote
control of a large number of
BeoVision Avant functions, and the
Beo4 display gives you access to even
more functions.
Whenever a source is displayed on
Beo4 (TV, RADIO, etc.), you can press
the LIST button and call up extra
functions in the display to help you
operate that source, just as if you
were calling up extra buttons. You
can also switch on extra equipment
connected to your BeoVision Avant.
Please note that Beo4 contains a list
of all of Bang & Olufsen’s extra audio
and video functions, but only those
functions supported by BeoVision
Avant will work when you call them
up in the Beo4 display.
You can, though, customise your
Beo4 to suit your BeoVision Avant,
and change the order in which these
extra functions appear when you call
them up*.
When a new function is added to the Beo4
list, you can then find this new cue in the
display the next time you operate your
BeoVision Avant.
TV LIGHT RADIO
SAT DVD CD
V TAPE RECORD A TAPE
789
456
TEXT
0
MENU
123
LIST EXIT
STOP
GO
Press and hold the stand-by
button…
…then press LIST
Let go of both buttons
Press until ADD is shown in the
Beo4 display
Press to call up the list of
available cues. The first cue
appears in the display
Press until the desired cue is
shown
Press to add the cue to the list.
A cue is added to the list when
ADDED is shown in the Beo4
display
•
LIST
LIST
ADD
GO
EDIT
LIST
TRACKNG
GO
ADDED
*NOTE! Please refer to Beo4’s own User’s guide
for information about how to customise your list
of extra functions.
Page 35

35
To have full benefit of the functions described
for your BeoCord V 8000 video tape recorder,
you must enter your individual preferences in
the V 8000 Setup menu.
If you have connected a Bang &
Olufsen BeoCord V 8000 video tape
recorder to BeoVision Avant, you can
gain access to the V 8000 main
menu.
Please refer to the guide enclosed
with the BeoCord V 8000 for further
information about the available
settings.
Set video tape recorder preferences
Menu
1 Timer play
2 TV list
3 Setup
4 V.Tape
MENU
TIMER RECORD
SETUP
CAMCORDER
> Switch on BeoVision Avant and press V TAPE to
switch on the video tape recorder.
> Press MENU to call up the main menu.
> Press 4 to call up the V.Tape menu (5 if Sat is
available).
> Press
▲
or ▼to move through menu items.
> Press
ss
or ttto see your options for a menu
item.
> Press GO to store your video tape recorder
preferences, or EXIT to leave all on-screen
menus.
Page 36

36
The operations shown on this page
are functions often used on a daily
basis:
– Choose a TV or satellite* channel;
– Switch to another channel or
source;
– Call up a channel list on the
screen;
– Adjust the position of BeoVision
Avant on its motorised stand;
– Adjust the sound volume or sound
type.
All of these functions can be
performed with the Beo4 remote
control. For information about
watching DVD, refer to the chapter
Use the DVD player on page 42.
*NOTE! Satellite channels are only available if
your BeoVision Avant is equipped with the
built-in satellite receiver module.
Daily operations
Select a TV or satellite channel
To watch a TV or satellite channel, press the
appropriate button on the Beo4 remote
control. BeoVision Avant switches on the last
channel you watched.
See a channel list
All your TV and satellite channels appear on
separate lists, which you can call up on the
screen. The lists contain channel numbers and
names, and can contain up to 99 TV channels
and 119 satellite channels.
Press TV, DVD or SAT to switch
on a source. The last channel
viewed appears on the screen
Press a channel number to go
directly to that channel
Press
▲
or ▼to change
channels one by one
Press another source button, e.g.
DVD, at any time to switch on
that source
Press to switch off BeoVision
Avant
TV
TV2
0 – 9
▲
▼
DVD
•
While BeoVision Avant is turned off... Press TV or SAT to switch on a
source
Press and hold to call up a
channel list on the screen
Press to view the previous or
following page of the channel
list
To select a channel, press the
channel number on Beo4 or
press
▲
or ▼until the cursor
highlights the desired channel
To switch on the chosen channel,
press GO, or press EXIT to leave
the menu
TV
GO
ss tt
0 – 9
▲
▼
GO
EXIT
You can also call up the channel list by pressing
MENU to call up the main menu and pressing
either 2 or 3 to select the appropriate list.
Dotted lines show that a channel has been stored,
but not named. An empty slot in the list shows
that no channel has been stored there.
Page 37

37
Adjust or mute the sound volume
You can adjust or mute television sound at
any time while you are using a source.
Change sound type* or language
The names of the various types of sound
available will be shown on the screen as you
proceed.
Adjust viewing position
You can turn the television to the left or right
using the Beo4 remote control.
Press LIST on Beo4 until STAND is
shown in the Beo4 display
window
Press to turn BeoVision Avant to
the left or right, or…
…press 0, 1 or 2 if you have
preset viewing positions for your
television
LIST
STAND
ss tt
0
1
2
Please refer to ‘Set positions for BeoVision Avant
to turn to’ on page 31 for more information about
how to preset positions for TV viewing.
In order to display SOUND in the Beo4 display, you
must first add it to the Beo4 list of functions.
Please refer to the chapter ‘Gain access to extra
functions via Beo4’ on page 34 for more
information.
Press either end of the button to
adjust the volume up or down
Press the middle of the button to
mute the sound
Press either end of the button to
bring the sound back
∧
∨
∧
∨
While BeoVision Avant is turned on…
Press LIST on Beo4 until SOUND
is shown in the Beo4 display
Press GO to see the current
sound type on your screen
Press GO repeatedly to switch to
another sound type or language
in a multi-language programme
Press to exit the SOUND function
LIST
SOUND
GO
STEREO
GO
GO
EXIT
When you are watching TV or SAT…
*NOTE! You can store your favourite sound type
when tuning in your TV or satellite channels.
Please refer to the chapter Edit tuned TV or
satellite channels on page 24 for further
instruction.
Page 38

38
Teletext is an information system in
video form used by broadcasters to
transmit news, weather forecasts and
other information of general interest.
If you select a channel that offers a
Teletext service, BeoVision Avant
gives you access to Teletext pages.
Sometimes a single page will consist
of several subpages, which appear
one by one in a repeating series.
Store your most frequently used
Teletext pages as memory pages.
These appear first when you switch
on Teletext, thereby saving you time.
If you save the Teletext subtitles page
as memory page number four, you
can activate subtitles for that
particular channel automatically.
If your Teletext broadcaster offers a
Fastext service, you can use the
coloured buttons on Beo4 to step to
one of four linked Teletext pages.
BeoVision Avant can also notify you
when a desired page has been found
or updated.
Look up Teletext information
Main Teletext functions
The index on Teletext page 100 outlines the
major categories of Teletext information and
lists their page numbers to make information
easy to locate. For example, news may start
on page 110, sports on page 200 or TV listings
on page 300.
Press to see the Teletext index
page
Press the number of a Teletext
page you want to see
Press to turn pages
If the current page contains
subpages, you can either view
them in their turn, or press STOP
to pause subpage turning
To view a particular subpage,
enter the four-digit code of the
desired page, or press
▲
or ▼to
step to the page
Press STOP again to resume
subpage turning
Press to leave Teletext and return
to viewing your source
TEXT
0 – 9
▲
▼
STOP
0 – 9
▲
▼
STOP
EXIT
While BeoVision Avant is turned on…
To enlarge the screen text size…
> Press LIST on Beo4 until LARGE is displayed and
then GO. The upper half of the current page is
shown.
> Press GO again to view the lower half.
> Press GO a third time to restore the normal text
size.
To keep the TV picture in Teletext…
> Press LIST on Beo4 until MIX is shown and then
GO to superimpose Teletext information on the
TV picture.
> Press GO again to remove the TV picture.
To reveal hidden text…
> Press LIST on Beo4 until REVEAL is shown and
press GO. If there is concealed text on that
page, it will become visible.
> Press GO again to remove the revealed text.
A typical Teletext page. The current page
number, channel name, date and time appear at
the top of the screen, as well as a three-digit
number showing the progress of the page search
function.
Page 39

39
Store frequently read pages
If you use some Teletext pages frequently, e.g.
TV listings, we recommend that you preset
these pages as memory pages in order to gain
access to them more easily*. You can preset
up to four memory pages per Teletext service.
Day-to-day use of memory pages
You may need to refer to your Teletext
memory pages quickly, e.g. if you are leaving
for work and wish to check traffic information
on a Teletext service.
Activate subtitles from Teletext
If a channel offers Teletext subtitles, you can
activate subtitles for that channel. The
Teletext subtitles page number can often be
found in an index on Teletext page 100.
From Teletext, press the number
keys on Beo4 to enter the
number of a page you refer to
often. You can also press
▲
or ▼to turn to that
particular page
Press LIST on Beo4 until STORE
is shown in the Beo4 display
Press to select the current page
for storing
Press the number keys on Beo4
to enter the number of the
memory page to be used
Press to store the page or…
…press to leave the STORE
function and return to Teletext
0 – 9
▲
▼
LIST
STORE
GO
1 – 4
GO
EXIT
Please note that set-top box Teletext pages can be
viewed, but not stored as memory pages!
From Teletext, press
▲▼
or the
number keys on Beo4 to locate
the Teletext subtitles page.
Subtitles appear on the screen
Press to cancel subtitles
Press LIST on Beo4 until STORE
is shown in the Beo4 display
Press to select the page
Press 4 to store the subtitles
page
To cancel stored subtitles, simply
store another Teletext page as
memory page number 4
Press to return to TV viewing
▲ ▼
0 – 9
EXIT
LIST
STORE
GO
4
TV
To store subtitles permanently from the
Teletext subtitles page…
Press to turn on a TV or satellite
channel which offers a Teletext
service
Press to switch on Teletext. The
page stored as memory page 1
appears automatically
Press
ss
or ttto view other
memory pages
TV
SAT
TEXT
ss tt
To view stored memory pages from another
channel’s Teletext service, press EXIT on Beo4 to
return to channel viewing, press
▲▼
or the
channel number to change channels, and press
TEXT to switch on Teletext.
*NOTE! If your BeoVision Avant is linked via
BeoLink to another television, stored memory
pages will not be shared among linked
televisions. Memory pages must be stored
manually on all linked televisions.
Page 40
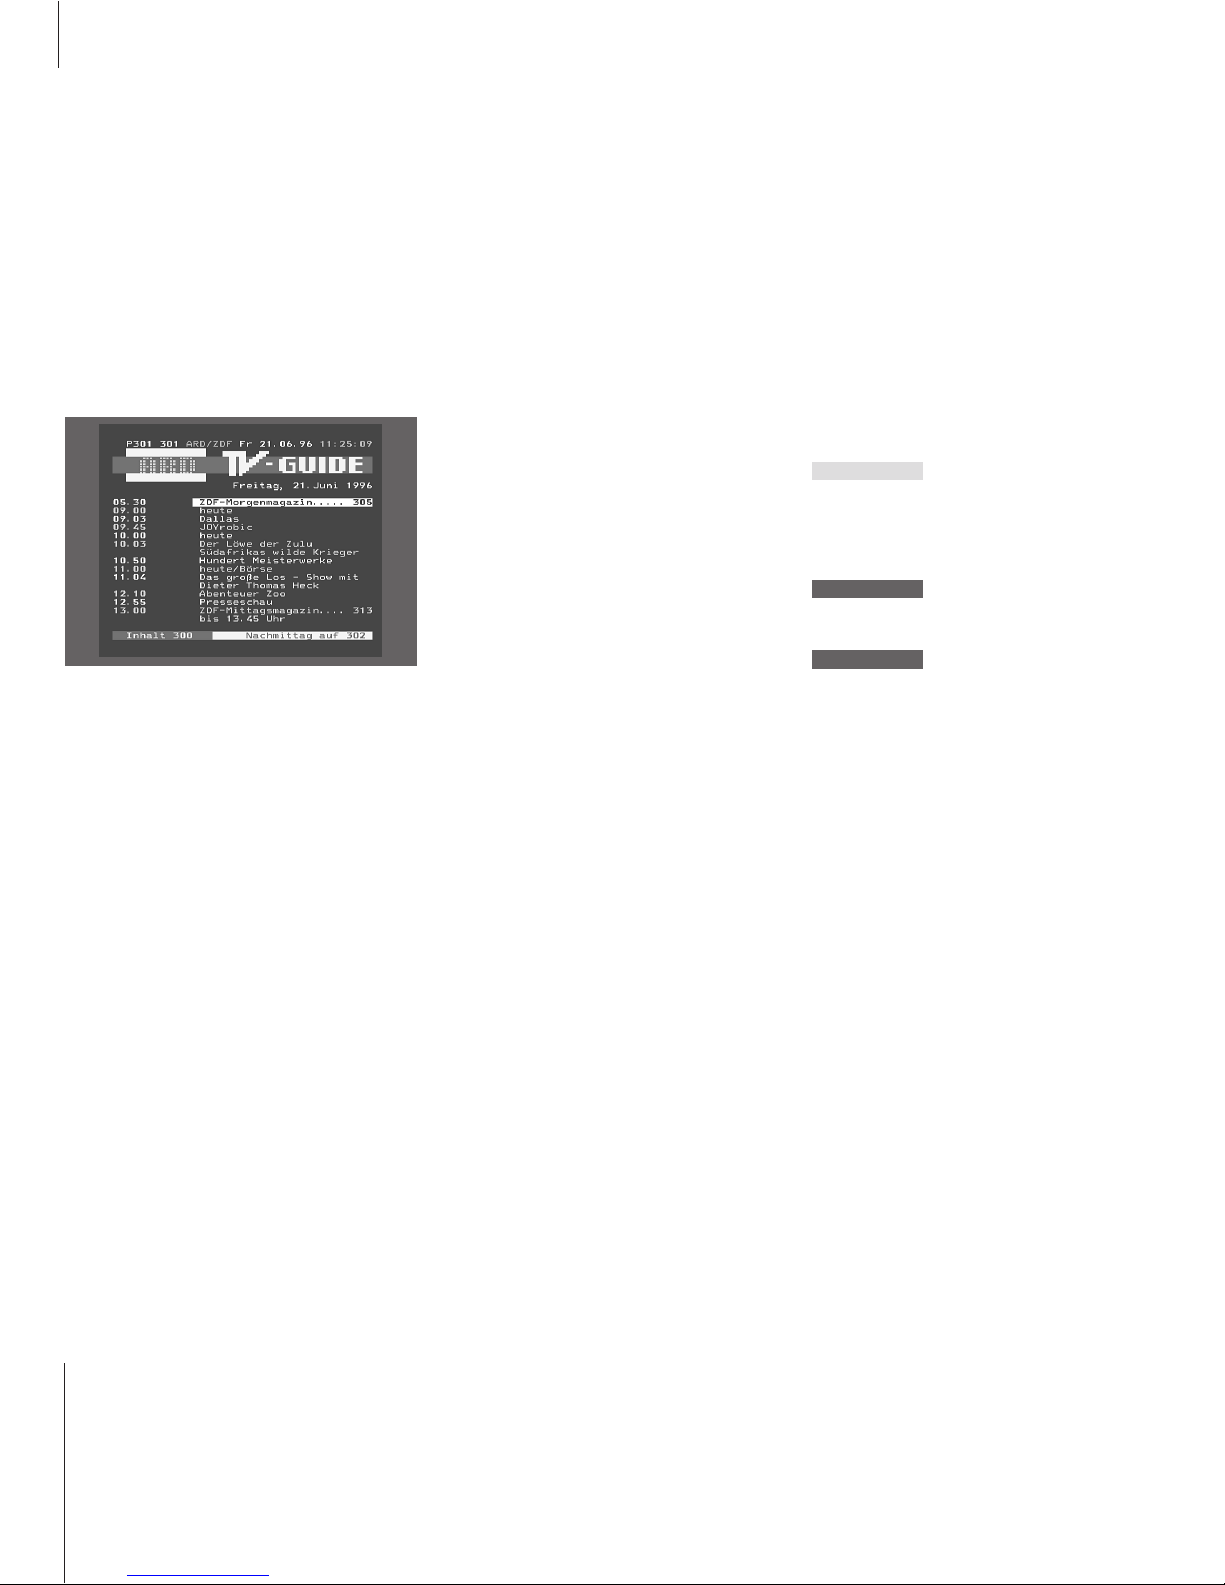
>> Look up Teletext information
Press until UPDATE is shown in
the Beo4 display
Press to switch on the UPDATE
function
When the page is found,
FOUND appears on the screen
When the page has been
updated, UPDATE appears on
the screen
Press to see the located or
updated page
Press to leave Teletext
LIST
UPDATE
GO
FOUND
UPDATE
GO
EXIT
Call up the relevant Teletext page…
40
Preset a recording from Teletext TV
listings
If you have connected a BeoCord V 8000 to
your BeoVision Avant, you can preset a
recording of a future program from a
Teletext TV listings page.
See updated Teletext pages
BeoVision Avant supports the page update
function, provided by some Teletext
broadcasters to announce that a Teletext
page has been updated. This is useful e.g.
if you want to see the latest news headlines
while watching TV.
Note about PDC/VPS and recording
When PDC (Program Delivery Control) or VPS
(Video Programming System) is used, it means that
the broadcaster attaches a coded signal to every
program that is broadcasted, ensuring that a
recording will be recorded in full, even though the
broadcasting of the program in question was
delayed, causing start and stop times to change.
If PDC or VPS signals follow the broadcast
programs you record, and the PDC/VPS facility is
set to On in the video tape recorder’s setup
menu*, then the title of the program you want to
record will be highlighted instead of the start time.
There is no need to consider start and stop times,
just accept the status line which appears instead
of the program title. If necessary, you can, of
course, change the information displayed.
While the TV is turned on…
> Press TEXT to call up Teletext.
> Locate the Teletext TV listings page.
> Press RECORD. A cursor will highlight the first
program name or start time on the list.
> Press
ss tt
▲
or ▼to move the cursor to the
program you wish to record.
> Press GO to select that program. The cursor
highlighting the program will change to show
the date, the channel number and channel
name, followed by ‘OK?’.
> If this information is incorrect, press
ss
or ttto
move through the information and
▲
or ▼to
change the settings.
> Press GO to store your preset Timer recording.
RECORD is shown.
> If you want to record additional programs, you
can continue to highlight listed programs with
the cursor.
If PDC/VPS signals are not broadcast by the current
channel, your recordings are preset by start and
stop times, and will not adapt to broadcast delays
or extensions. You will see the times at the top of
the screen when you store a program to be
recorded.
*NOTE! The PDC/VPS option on the video tape
recorder’s Setup menu must be set to On for
BeoVision Avant to record a delayed or extended
broadcast. Please refer to the chapter Set video
tape recorder preferences on page 35 for
information about the video tape recorder’s
Setup menu.
Page 41
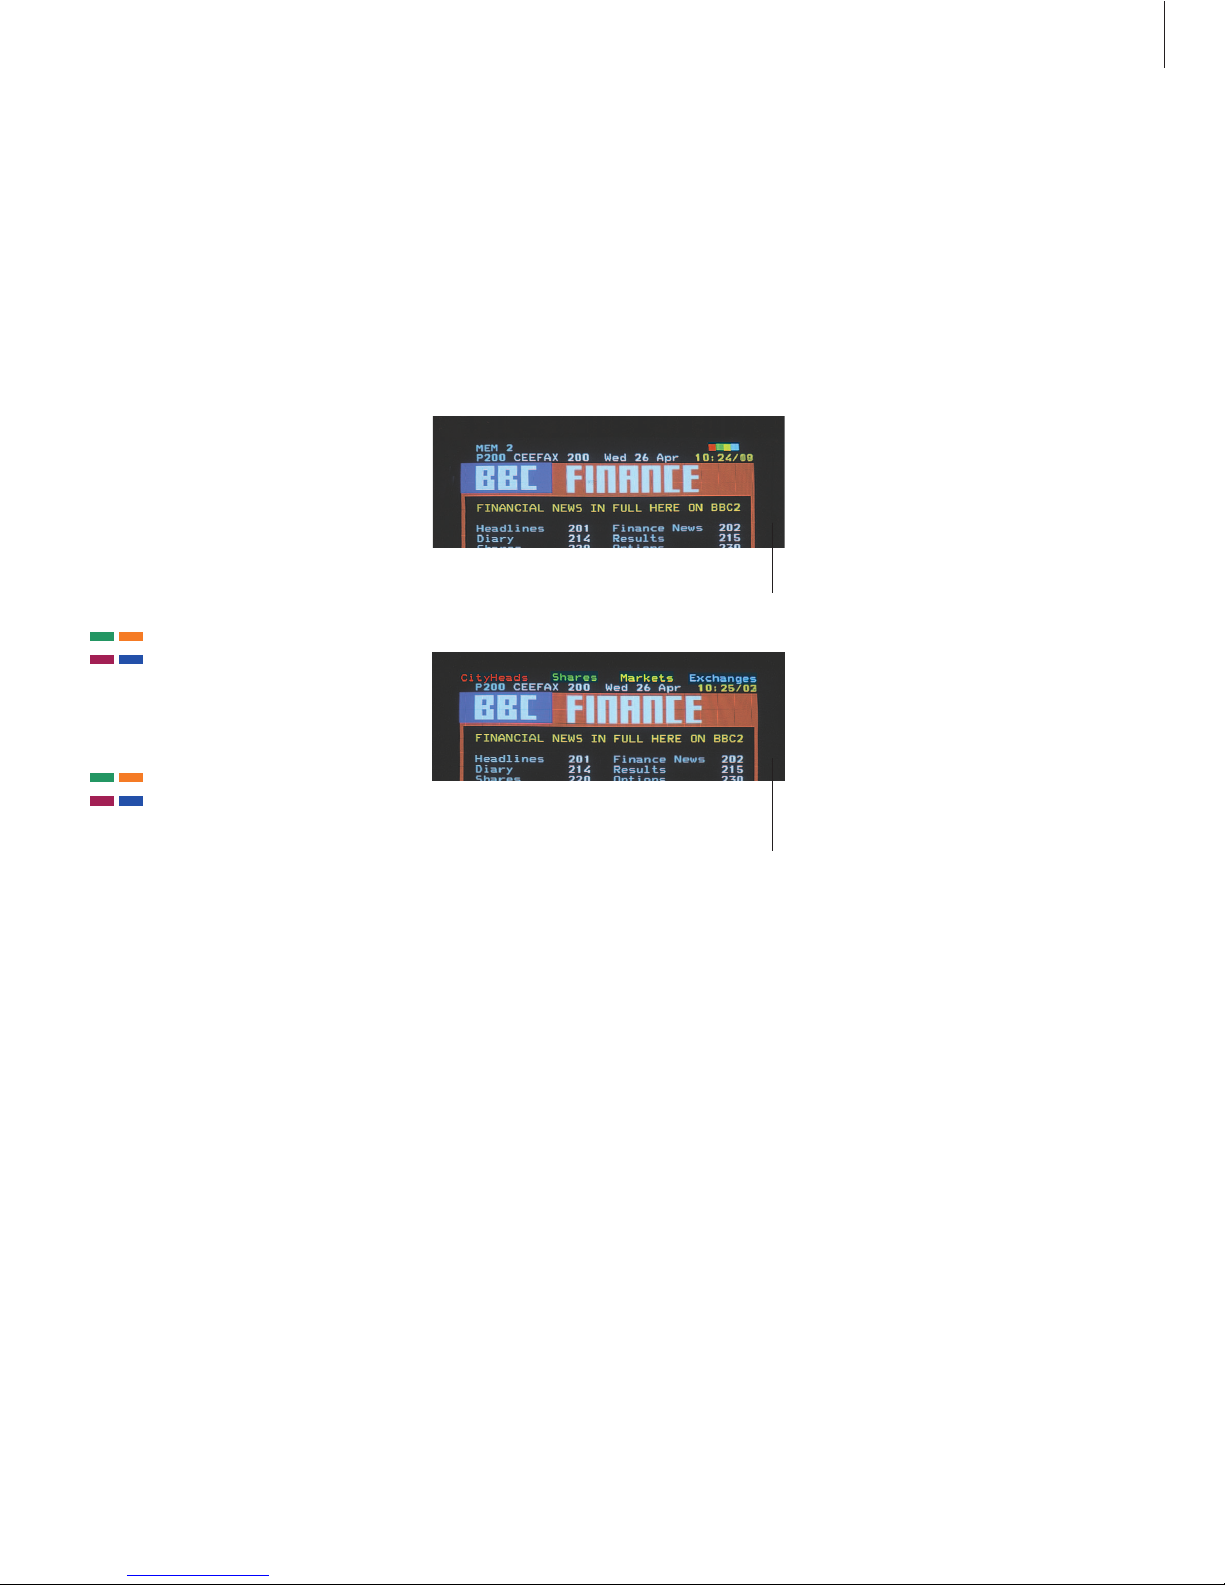
41
Go directly to a page via Fastext
Some Teletext broadcasters offer immediate
access facilities, called Fastext, that enable you
to step directly to one of four linked Teletext
pages. Fastext is supported by the BeoVision
Avant.
While the TV is turned on…
Press TEXT on Beo4 to switch
on Teletext
Press
▲
or ▼to find a Fastext
page. Alternatively, enter the
page number using the number
keys
Press one of the coloured
buttons on Beo4 to gain access
to the Fastext function. The
titles of the four linked pages
appear at the top of the screen
Press the coloured button which
corresponds to the linked page
you wish to see
Press to leave Fastext and return
to normal Teletext viewing, or…
…press to leave Teletext
completely
TEXT
▲ ▼
0 – 9
TEXT
EXIT
A Teletext page with the colour bar at the top
right indicating that it is a Fastext page.
The titles of the four linked pages appear at the
top of the activated Fastext page, each with
their own colour.
Page 42
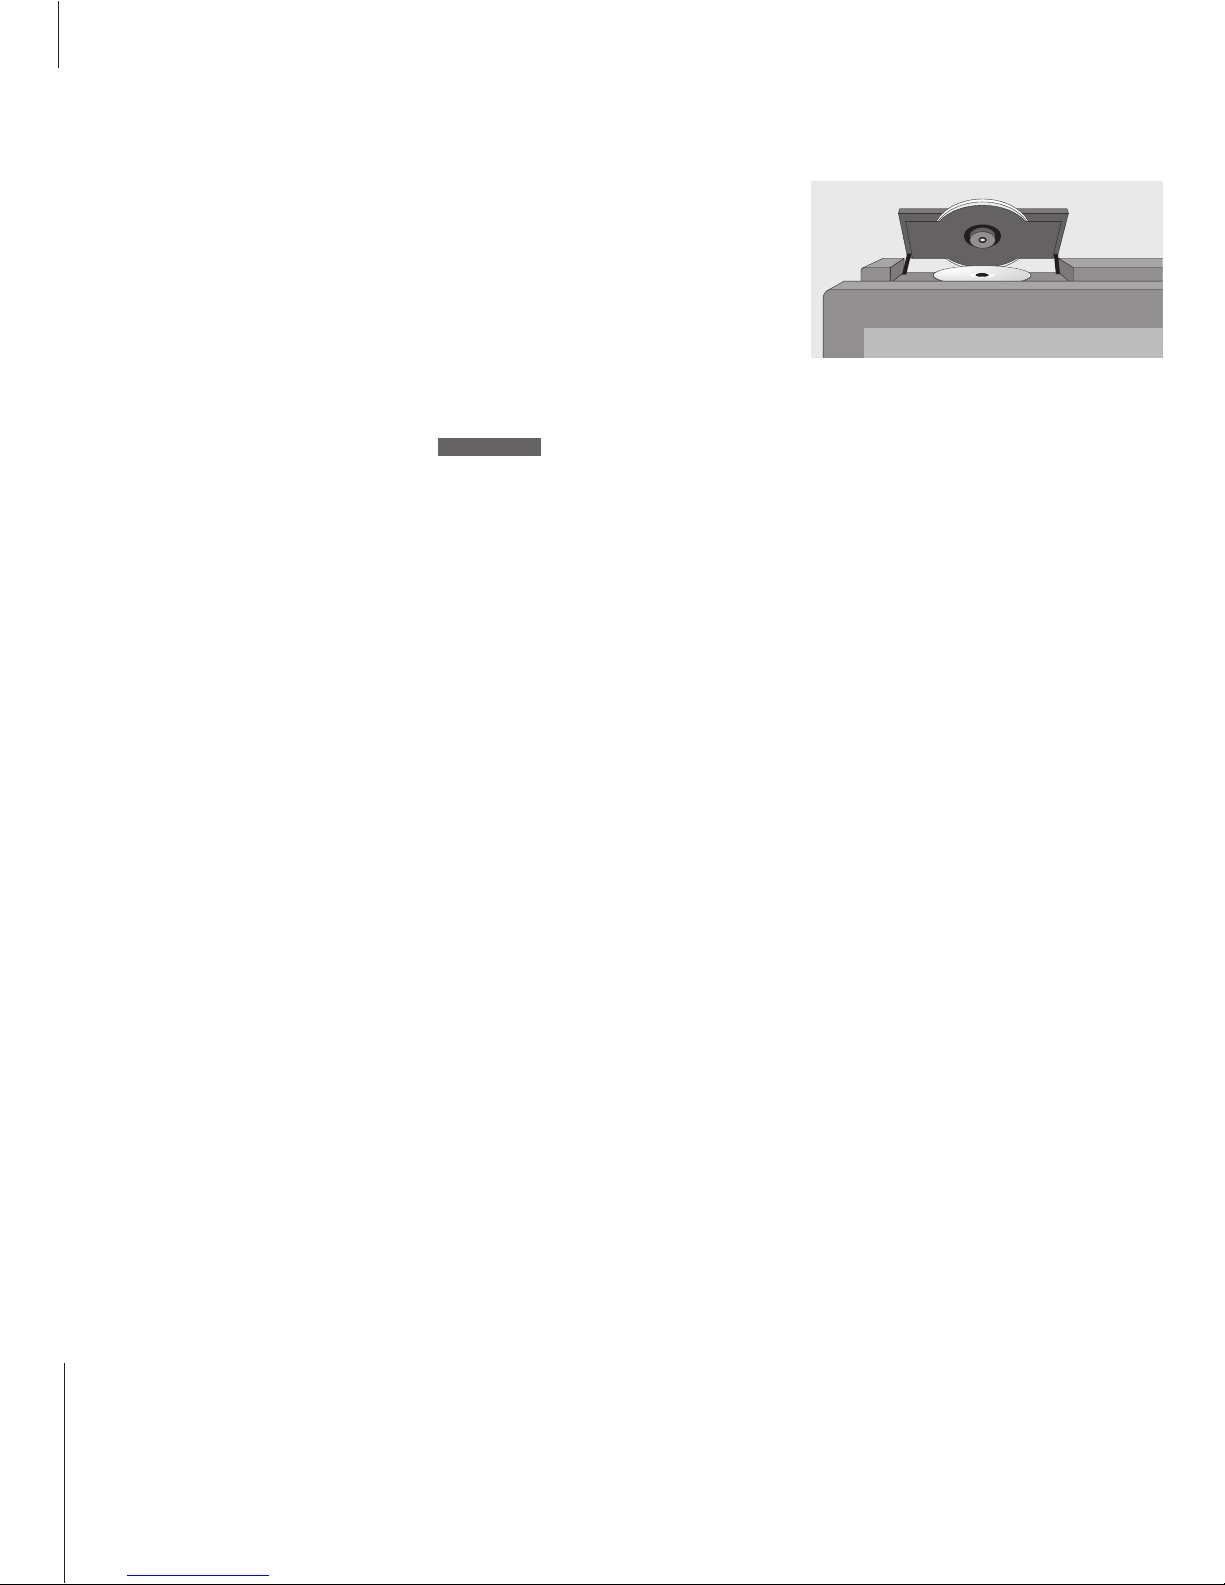
42
BeoVision Avant allows you to play
DVDs, video CDs and audio CDs.
Loading is done via the LOAD button
on the back of the display bar, and
playback functions such as cueing,
changing chapters, opening the DVD
disc menu, pausing playback and
slow motion are performed via the
Beo4 remote control.
The DVD player’s on-screen tool bar
gives you access to additional
functions, such as camera angle or
subtitles, if these are available on
your disc. It informs you of the
current settings for these functions
as well.
NOTE! If the DVD player can not recognise the
format of a loaded disc, the disc is ejected and
DVD LOAD is shown in the display window. This
may be due to disc faults such as dust, dirt,
fingerprints or scratches. Refer to Maintenance of
your BeoVision Avant on page 60 for more
information about handling DVDs.
Use the DVD player
Load and play
Loading a disc in the DVD player is done via
the LOAD button on the close-up operation
panel on BeoVision Avant, above the
television screen.
Press to open the DVD loader.
The display window prompts you
to load a disc
Place a disc in the loader
Press the source button to start
playing the disc
LOAD
LOAD
DVD
From the close-up operation panel… If the disc is a DVD or video CD…
The Avant will turn on automatically, rotate to
your preset viewing position and start playback of
the disc.
If the disc is an audio CD…
The Avant will identify the CD as an audio disc,
turn the screen off automatically, rotate to
stand-by position and start playback of the disc.
BeoVision Avant will always start by turning on
completely as its primary function is a DVD player.
If you play several audio CDs in a row, however,
Avant remembers the last played disc type and
plays the audio CD without activating the screen
or turning to a different position.
The DVD loader will close automatically when you
turn off the television.
Page 43
43
While the DVD is playing…
You can cue back and forth at different
speeds on a disc or stop playback completely
via the Beo4 remote control.
While the DVD is paused…
When you want to be able to see the finest
detail in a single picture, pause the DVD to
move back and forth frame by frame.
Change chapter or track on a DVD
or audio CD
You can switch to a new chapter on a DVD or
a new track on an audio CD at any time.
Press
ss
or ttto cue back and
forth during playback
Press again to change speed
If you wish to resume playback
at a specific point from
cueing… press GO
Press to pause playback of a
DVD or CD temporarily
Press GO to resume paused
playback*, or…
…press STOP again to stop
playback completely
If playback has been completely
stopped, press GO to restart
playback from the beginning
ss tt
tt
GO
STOP
GO
STOP
GO
Press
▲
or ▼to switch to the
next or previous chapter
Press ▲or ▼repeatedly to
jump to another chapter on the
disc
Use the number keys to step
directly to a particular chapter
number
▲ ▼
DVD - 1 3
▲
▼
DVD - 1 5
0 – 9
Press to move back and forth
through frames. Press again to
adjust the speed
Press to resume playback
Press another source button,
e.g. TV to change source – DVD
pauses
▲ ▼
GO
TV
To resume playback or change source…
*NOTE! If you restart playback after a pause of
less than half an hour, BeoVision Avant will
prompt you to resume playback at the point of
interruption. A window on the screen shows
RESUME. Press GO to resume playback. If you do
not press GO, playback begins from the
beginning of the disc. This is also the case if the
playback pause lasts longer than half an hour.
To cue through a DVD…
To pause or stop playback of a DVD or CD…
To search through individual frames… To change chapter or track…
Page 44
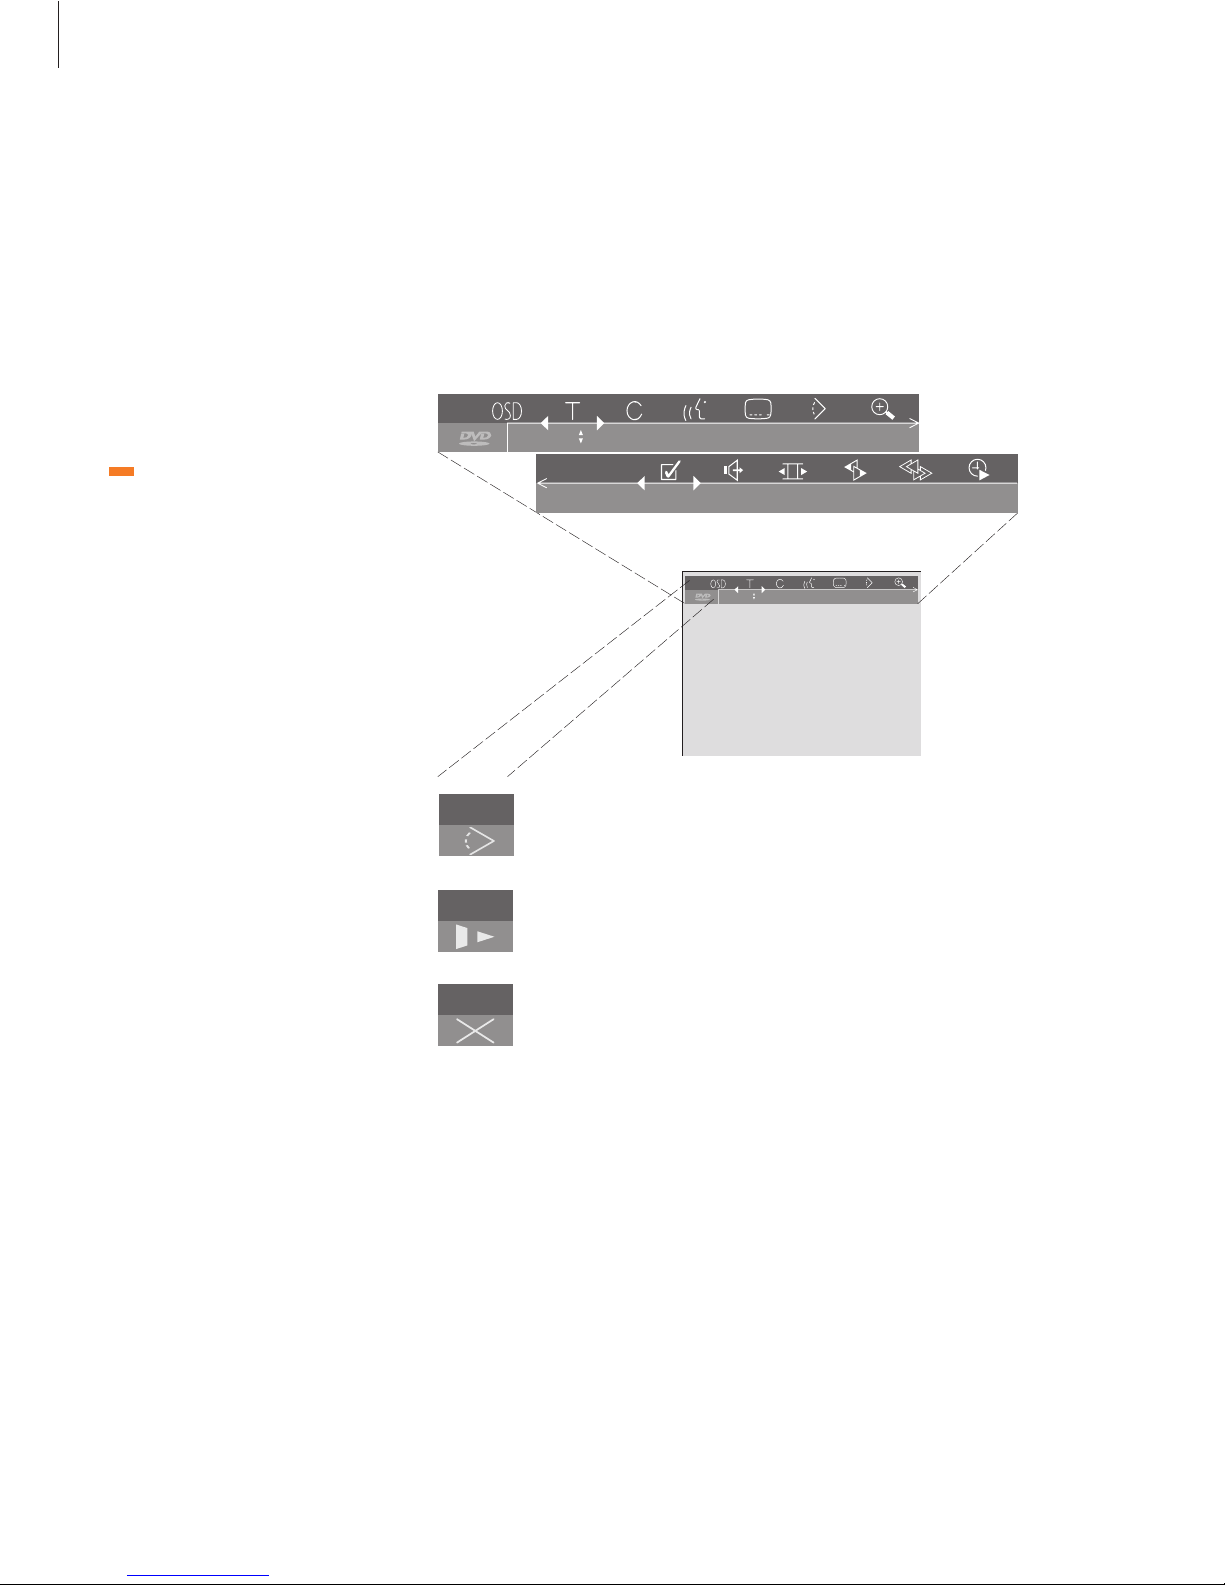
44
The DVD disc menu
DVDs may contain particular functions, such as
selection of individual scenes or chapters,
subtitle language, etc. which are available via
a disc menu.
The on-screen tool bar
The main functions of the DVD player are
accessible via a tool bar along the top of the
screen. Change chapters or titles, cue back
and forth on a disc or change the camera
angle, the sound or subtitle settings.
While DVD is selected…
Press and hold GO until the disc
menu appears on the screen, or
press the yellow button
Use the arrow keys to move
from function to function on
the disc
Press GO to enter your choice
GO
▲
ss tt
▼
GO
>> Use the DVD Player
Some DVDs offer special features which are
temporarily available during playback, e.g.
additional movie sequences. These functions can
be accompanied by a visual cue to let you know
when they are available. In such situations, press
GO twice in rapid succession to make a selection.
1111nooff
off st
1111nooff
To use the tool bar during playback…
> Press MENU and select the menu option DVD to
display the tool bar, or press the blue button.
> Press
ss
or ttto move from function to function.
> Press
▲
or ▼to view setting choices for a
particular function and press GO to enter a
choice.
> Press MENU – or the blue button again, to
deactivate the tool bar.
You can gain quick access to tool bar features, by
using the coloured buttons on your Beo4. Pressing
the blue button opens the tool bar, the green
button leads directly to the ‘subtitles’ feature and
the red button leads to the ‘language’ feature.
Alternate camera angle in use. This is
a disc feature which is only available
on certain DVDs.
Playback of a DVD resumes from the
point where playback was previously
interrupted.
Action is not valid. The symbol will
appear if e.g. you attempt to call up
the tool bar during an obligatory
trailer sequence before a DVD movie.
The Feedback window at the far left end of the
tool bar informs you of the current status of
particular features.
resume
Page 45
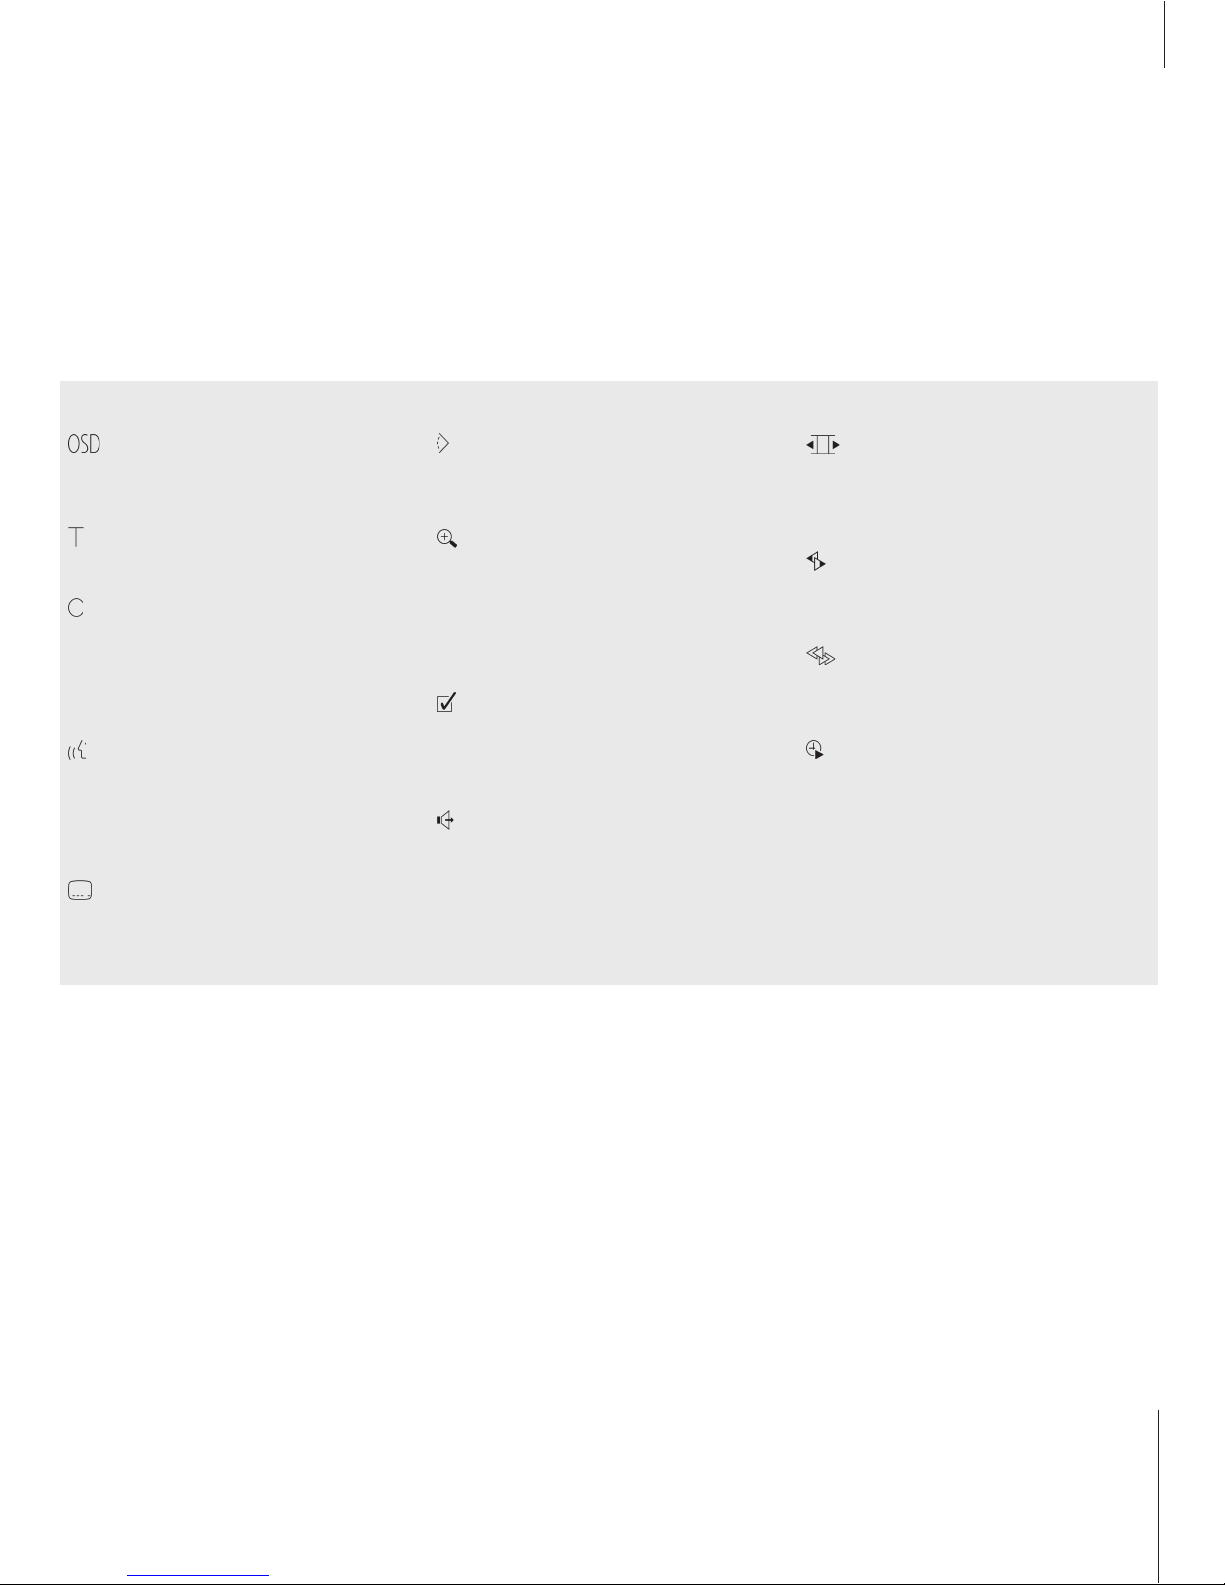
45
The tool bar symbols…
Personal Preferences menu
You can change settings for picture, sound and
language via this menu.
Title number
A single DVD can contain several movie titles.
Chapter number
Each chapter in a DVD movie will contain one
scene, much like individual tracks on an audio CD.
Change tracks during playback by pressing GO
once, followed by
▲
or ▼.
Playback language*
The dialogue in a DVD movie may be dubbed in
several different languages, all stored on the disc.
Choose from the languages available on your
particular disc.
Subtitle language*
Subtitles in different languages are often available
on DVDs. Choose a subtitle language available on
your disc, or choose not to view subtitles.
Camera angle*
It is possible on some DVDs to change to a
different camera angle.
Zoom
Allows you to zoom in on a section of the paused
video picture and pan back and forth. Choose the
magnification, press GO to enter your choice and
use the arrow keys to pan back and forth. Press
GO again to resume playback.
Favourite Track Selection (FTS)
Allows you to identify favourite tracks on a
particular disc and store them in the player’s
memory.
Sound settings
Set to STEREO.
Still mode
Pressing
▲
during playback pauses playback on a
particular frame and allows you to move back and
forth frame by frame.
Slow motion
Allows you to slow playback down to a chosen
speed. Press
ss
or ttto adjust the speed.
Cue forward or backward
Allows you to cue at a chosen speed to a chosen
level. Press
ss
or ttto adjust speed.
Time search
Allows you to start playback from a point in
elapsed time on the disc. If you wish to start
playback one hour into a movie, enter 1:00:00 in
the numeric field.
*NOTE! If a function is inactive or the disc does
not contain a particular option – like camera
angle – the current setting for a function will not
be highlighted and the
▲
or ▼arrows for
changing settings will not appear.
Page 46
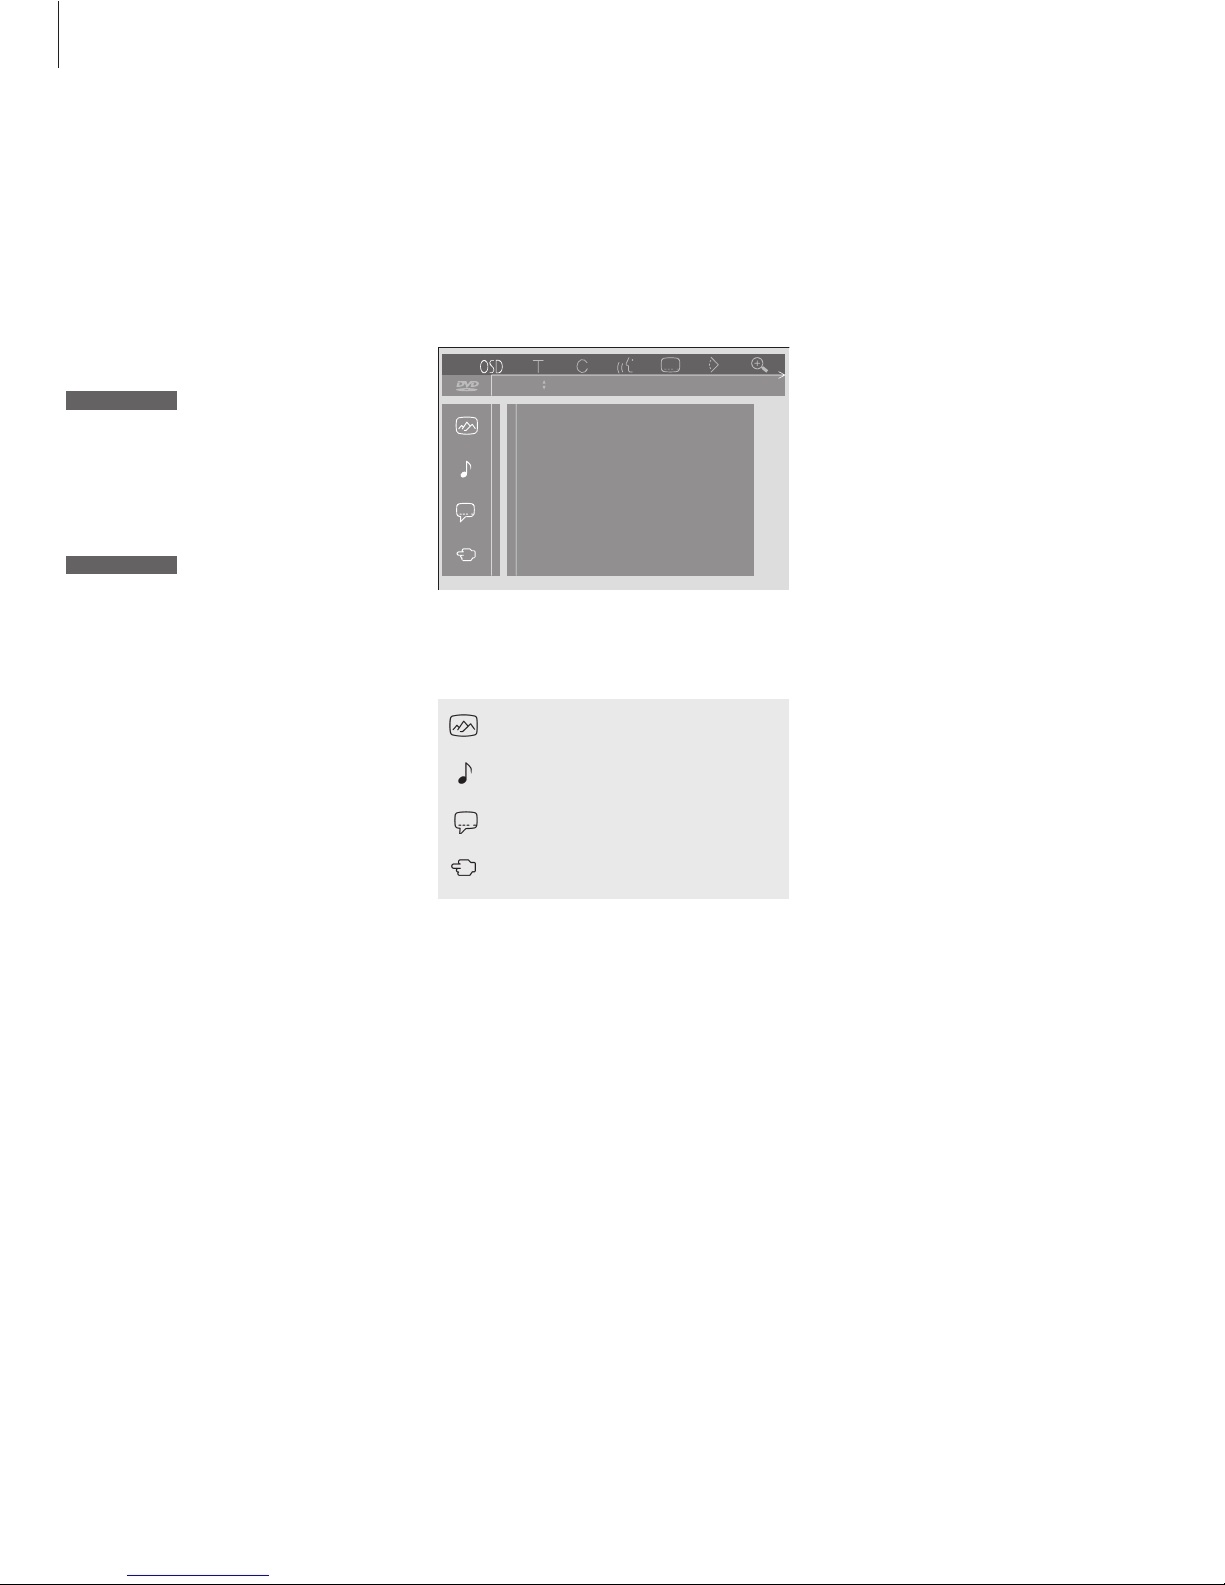
46
Play audio CD
When it is convenient for you, use your
BeoVision Avant to play audio CDs.
Change picture, sound or language
The Personal Preferences menu allows you to
store DVD playback settings for picture, sound
and language.
Press to start playback of the
CD. The display writes DVD
along with the current track
number
Press to cue back and forth
during playback
The display shows the elapsed
time of the track, e.g. 1 minute
and 20 seconds
Press to change between tracks
Use the number keys to step
directly to a track
Press once to pause playback of
the CD…
…press twice to stop playback
completely
GO
DVD 1
ss tt
1:20
▲ ▼
0 – 9
STOP
STOP
>> Use the DVD player
When an audio CD is loaded… To use the Personal Preferences menu…
The Personal Preference menu icons appear along
the left-hand side of the screen. The icons are
explained below.
1111nooff
Picture settings
Sound settings
Audio-, Subtitle- and Menu language
Other functions
> Press MENU and select the menu option DVD
during playback to display the tool bar.
> Press
ss
or ttto move the cursor to OSD and
press
▼
. The Personal Preferences menu appears
along the left-hand side of the screen.
> Press
▲
or ▼to move through the features in
the menu. As you move, feature-related menus
open on the screen.
> Press
tt
to move over to one of the sub-menus.
Available settings appear in a highlighted square
to the right of the current menu.
> Press
tt
to move over to the available settings.
> Press
▲
or ▼to move through the list of
available settings.
> Press GO to make your choice and exit all
on-screen menus or press
ss
to move back
through the previous menus.
Page 47

47
What’s on the Picture menu…
The Picture menu allows you to select a screen
format, select a colour setting, centre the picture
on the screen or change the picture contrast. The
following options are available:
TV SHAPE… Choose the picture format. Options
include: 16:9 (wide screen), 4:3 LETTERBOX (for
a wide screen picture on a standard-size screen,
with black bars on the top and bottom of the
screen), and 4:3 PAN SCAN (the picture scans
horizontally to ensure that the most important
screen action is shown). The default setting for
picture format is 16:9.
BLACK-LEVEL SHIFT… Adjusts the colour dynamic
to ensure sharp contrast. Options are ON and
OFF.
VIDEO SHIFT… Allows you to centre the picture
horizontally on the screen by pressing
ss
or tt.
What’s on the Sound menu…
The Sound menu enables you to choose a sound
setup for DVD playback. The following options are
available:
DIGITAL OUTPUT… Options are ON, OFF and
PCM. Choose ON.
ANALOG OUTPUT… Options are STEREO and
DOLBY SURROUND. Choose STEREO. Surround
Sound is not available.
NIGHT MODE… Optimises the sound dynamic
during playback at low volume. Options are ON
and OFF.
KARAOKE VOCAL… Activates or deactivates music
vocals for karaoke playback. Options are ON or
OFF.
What’s on the Language menu…
The Language menu allows you to select your
preferred languages for on-screen menus, audio
playback and subtitles. The following options are
available:
AUDIO LANGUAGE… Choose the language for
audio playback from the 16 languages shown,
and if your preferred language is available on
your DVDs, then audio playback will be in that
language.
SUBTITLE LANGUAGE… Choose your preferred
subtitle language from the 16 languages shown,
and if your preferred language is available on
your DVDs, then subtitles will be shown in that
language*.
MENU LANGUAGE… Choose the menu language
from the 8 languages shown.
What’s on the Functions menu…
STATUS WINDOW… Activates or deactivates the
window at the left edge of the screen showing
elapsed playing time and loader status. Options
are ON and OFF.
PBC (PlayBack Control)… Activates or deactivates
a special menu for playback of SVCD (Super
Video CD) discs. Options are ON and OFF.
LOW POWER STANDBY… Set to OFF.
The following options, if shown on the Personal
Preference menu, are inactive in BeoVision Avant:
ACCESS CONTROL.
*NOTE! Some DVDs will require you to choose a
subtitle language, even though you have
previously selected a default subtitle language in
the LANGUAGE menu.
Page 48

4848
If your BeoVision Avant is equipped
with a surround sound module, you
can extend your system into a fully
equipped Home Theatre system by
connecting four Bang & Olufsen
speakers and a BeoLab 2 subwoofer.
Please refer to the chapter
Loudspeaker connections – surround
sound on page 9 for more
information about how to connect
speakers to BeoVision Avant.
When you switch on one of your
sources in your BeoVision Avant,
your speakers can be cut in or out,
depending on the kind of sound you
prefer for the source you are using.
BeoVision Avant may switch on a
speaker combination automatically.
This happens if e.g. a broadcasted
program or DVD disc contains i
nformation about the number of
speakers to be switched on. You are
still free to choose the speaker setup
you prefer.
Home Theatre viewing with BeoVision Avant
Select speakers for movie sound
While you are watching a movie or
program, you can choose the speaker
combination you wish to switch on, provided
that the various sound modes are available in
your system.
To choose a speaker combination with Beo4…
To adjust the sound balance for the
program you are watching…
LIST
SPEAKER
1 – 5
▲
▼
ss tt
EXIT
Speaker combinations
SPEAKER 1
Stereo sound in BeoVision Avant speakers only.
For programs with dialogue, e.g. TV news.
SPEAKER 2
Stereo sound in the two external front speakers.
For music CDs.
SPEAKER 3
BeoVision Avant speakers and external front
speakers active. For TV programs in stereo.
SPEAKER 4
Enhanced stereo sound in the external front and
rear speakers. For music CDs or tapes.
SPEAKER 5
Surround sound from all speakers. For programs
in Dolby Surround Sound.
If you have connected only two external front
speakers to BeoVision Avant, you will only be able
to choose SPEAKER 1–3.
Press LIST on Beo4 until
SPEAKER is displayed
Press the number of the
speaker option you want. The
speakers selected will cut in
automatically
…press
▲
or ▼to adjust the
balance between the external
front and rear speakers
Press
ss
or ttto adjust the
balance between the left and
right speakers
Press to remove SPEAKER from
the Beo4 display and to return
to the source you were using
Page 49
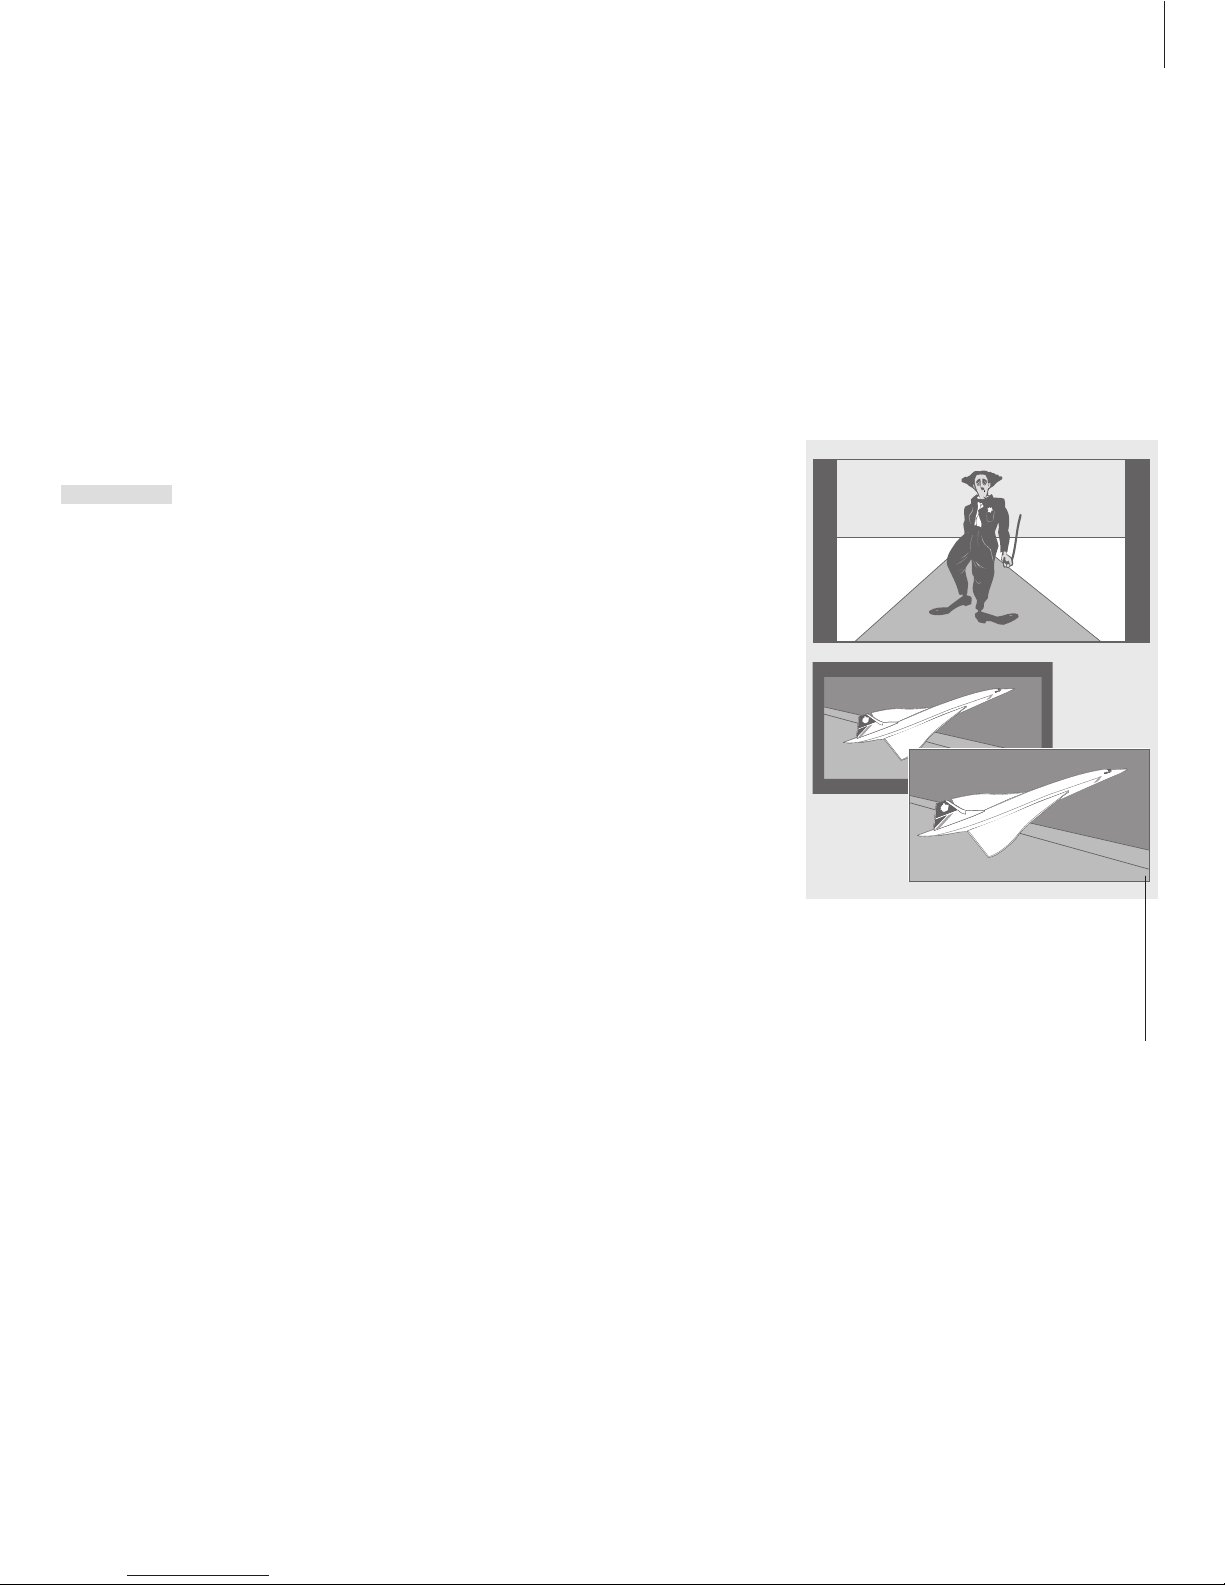
4949
Make the picture fill out the screen
BeoVision Avant always ensures you the best
possible picture. It automatically adapts the
picture so that it fills out as much of the
screen as possible. However, you can still
choose a preferred format for Home Theatre
viewing.
To choose a format…
Press on Beo4 until FORMAT is
shown in the Beo4 display
Press if you want BeoVision
Avant to optimise the picture,
otherwise…
…press the number of the
desired picture format. Refer to
the list to the right
If you have chosen Format 1,
press
▲
or ▼to select
variations of this format
If you have chosen Format 2,
press
▲
or ▼to move the
picture up and down
Press to leave the FORMAT
function
LIST
FORMAT
GO
ss tt
▲ ▼
▲ ▼
EXIT
Picture formats to choose from
FORMAT 1
For standard TV pictures, as shown to the right.
Three variations are available: 15:9 (for the
largest picture), 14:9 and 4:3 (for standard
picture format).
FORMAT 2
For letter-box pictures.
FORMAT 3
For 16:9 wide-screen pictures. FORMAT 3 will
usually be selected automatically. If this is not
the case, you can select it yourself.
The illustration at the top shows the Avant DVD
standard picture format, which is a 15:9
format. The overlapping illustrations above
show what happens to a letter-box picture
when you choose format 2. The picture is
adapted to fill out more of the screen.
Page 50
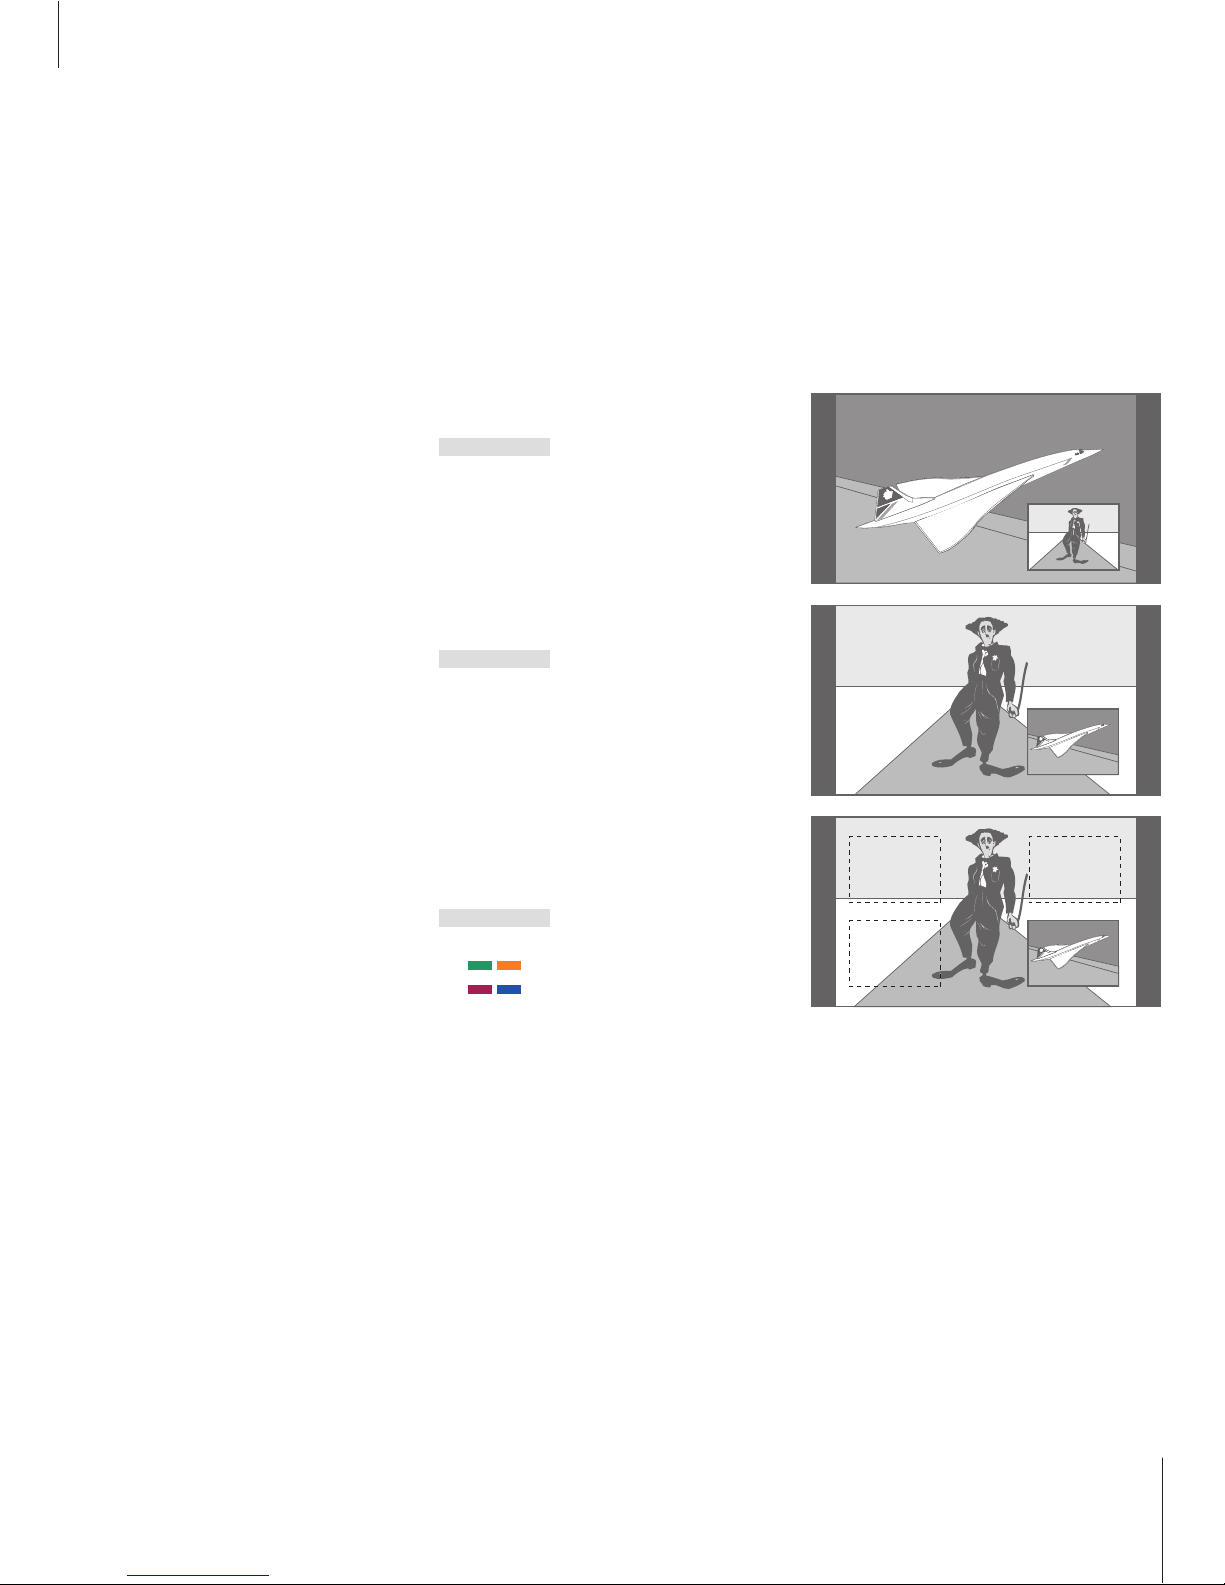
50
The Picture-in-Picture function*
enables you to see two video sources
on-screen simultaneously. For
example, you can view a TV and a
satellite program, a TV and a
set-top box program or a DVD
playback and a TV program at the
same time.
See two sources at the same time
Picture within a picture
While you are watching a program or
recording, you can prompt your BeoVision
Avant to insert a small picture on the screen
showing the source and channel number of
your choice.
While watching e.g. TV…
If P-IN-P is not available on the Beo4 display, you
must add it to the Beo4 list of functions. Please
refer to ‘Gain access to extra functions via Beo4’
on page 34 for further instruction.
LIST
P-IN-P
DVD
P-V.AUX
0
LIST
P-IN-P
TV
•
Press LIST on Beo4 until P-IN-P
is shown in the Beo4 display
Press e.g. DVD to select a
source to view in the window
The sound follows the large
picture, but your Beo4
commands are now directed to
the window
To view a source registered in
the Connections menu as
V.AUX, such as a set-top box,
press LIST until P-V.AUX is
shown in the Beo4 display
instead
Press 0 to swap the large and
small picture
To place the window on the
screen, press LIST until P-IN-P is
displayed, followed by the
coloured button corresponding
to a corner of the screen
Press a source button, such as
TV, to cancel Picture-in-Picture
and return to normal viewing,
or…
…press to switch BeoVision
Avant to stand-by
*NOTE! The Picture-in-Picture function requires
that your BeoVision Avant is equipped with the
built-in Picture-in-Picture module.
Page 51

51
The BeoVision Avant display bar is
located on top of the television.
The display bar informs you about
the sources currently in use, about
timed functions and about the
current status of your system.
Certain sound types broadcast with
TV or satellite programs will also be
displayed, if they are present.
The BeoVision Avant display bar
PT (Play Timer)
Indicates that the BeoVision Avant Timer
function for Timer playback or stand-by is
switched on. Please refer to Switch Avant on or
off automatically for further information.
PT remains on during stand-by.
“TV 12” (Status display)
Status display for the BeoVision Avant. The
display keeps you informed about what the
system is doing or about an on-going
operation.
• (Stand-by indicator)
The red stand-by indicator lights up when you
switch off the BeoVision Avant.
DIGITAL
Dolby Digital surround sound indicator.
PRO LOGIC
Dolby Pro Logic surround sound indicator.
Dolby Digital and Dolby Pro Logic Surround
are only available in BeoVision Avant models
equipped with a surround sound module.
Please contact your Bang & Olufsen retailer
for further information.
RECORD
‘Recording in progress’ indication for a video
tape recorder.
Page 52

5252
You can preset BeoVision Avant to
switch itself on or off automatically
by programming a built-in timer. If
you have connected an audio system
or another Bang & Olufsen TV to
BeoVision Avant with a Master Link
cable, you can program these
systems to switch themselves on or
off as well.
You can preset the timer to switch
BeoVision Avant on or off on a
specific date and time, or at the
same time and day every week.
You can enter as many as eight timer
settings, and call up an on-screen list
of the timer settings you have
entered. From this list, you can edit
or delete your timer settings.
If you wish to enter timer settings,
make sure that the built-in clock is
set to the correct time. Please refer
to the chapter Set the time and date
on page 30 for further information.
To see how to program your system
to start and stop recording
automatically, please refer to Preset a
recording from Teletext TV listings on
page 40.
Switch BeoVision Avant on or off automatically
Menu
1 Timer play
2 TV list
3 Setup
Source Pr Start Stop Date
TV 1 13:30 - 14:30 27 Oct OK
Press MENU for Timer index
Timed play and timed stand-by
Preset BeoVision Avant for timed play if e.g.
there is a program you do not want to miss,
or if you want a morning wake-up call. Preset
the TV for timed stand-by if e.g. you want to
make sure BeoVision Avant is switched off
when you leave for work in the morning.
Before you start…
If you have connected a Bang & Olufsen audio
or video product to BeoVision Avant with a
Master Link cable, and you wish to program
this product to be switched on or off, make
sure to switch on the Play Timer in the
connected product! Please refer to the User’s
Guide enclosed with your audio or video
product.
The actual timed play or timed stand-by
settings for a connected audio or video
product must be entered via the PLAY TIMER
menu in BeoVision Avant. This procedure is
described on the facing page.
The Timer play menu. To see previously entered
timer settings, press MENU…
…and the Timer index appears. Here you can edit
or delete your previously entered timer settings.
Index
TV 1 13:30 - 14:30 27 Oct
TV 3 17:10 - 19:00 27 Oct
Standby 23:10 MTWT . . .
Press MENU to clear timer
Page 53

5353
What’s on the Timer play menu…
Source
Depending upon the option you choose, Source
indicates either that a specific source is to be
switched on or off. Options* are:
TV… to switch on the TV.
SAT… to switch on satellite TV.
STB… to switch on a set-top box programme.
V.TAPE… to switch on a video tape recorder.
CD… to switch on a CD player.
DVD… to switch on the DVD player.
N.MUSIC, N.RADIO… for a connected PC with
BeoLink PC. To play sound files stored on your
PC or radio sites on the Internet.
A.TAPE… to switch on a audio tape recorder.
RADIO… to switch on a radio.
STANDBY… to switch the BeoVision Avant off.
Note that if you have other compatible video or
audio systems connected to your BeoVision
Avant, they will be switched off as well, even if
you have programmed these systems to play.
Pr (Program number)
Once your source is chosen, choose the program
number you want.
Start and Stop (Start and stop times)
Key in the times when you want the system to
start and/or stop playing. If you have chosen
STANDBY as your source (for Timer stand-by),
then enter only the stop time.
To enter Timer play or Timer stand-by
settings…
> Switch on the system and press MENU on Beo4
to call up the main menu.
> Press GO to call up the Timer play menu.
> If you have not switched on the Timer play
function, press GO again to do so. If you have
switched on the Timer play function, press 2 to
be able to enter settings for Timer play or Timer
stand-by.
> Press
ss
or ttto move through menu items.
> Press
▲
or ▼to see your options for a menu
item.
> Press the number keys on Beo4 to fill in e.g. a
channel number or fill in start and stop times.
> If you want to set Timer play for certain days of
the week, press
tt
to highlight Date and then
press MENU to change Date to Days.
> When you have filled in the required
information, press GO to store your timer
settings, or EXIT to leave all on-screen menus.
To view, edit or delete your Timer play
settings…
> Press MENU on Beo4 while Source (source) or Pr
(program) is highlighted to call up a current
Timer index of previously entered timer settings.
> Press
▼
or ▲to move through the list to a
setting you wish to edit or delete.
> To edit a setting, press GO and follow the
procedure described above.
> To be able to delete a setting, press MENU. The
date will be replaced by Clear?
> Press GO to delete the setting, or EXIT to keep
it.
Date or Days
Fill in the date you want the system to start
playing or switch off. Alternatively, press MENU
to change Date into Days. Select the specific
weekday(s) on which you want your Timer
executed. All the weekdays will be displayed –
starting with M for Monday. Press
tt
to move
through the days and press
▼
to remove any
day you do not want. When the weekday(s) you
want are displayed, press GO. OK is then
highlighted. The system writes:
Jan… January Jul… July
Feb… February Aug… August
Mar… March Sep… September
Apr… April Oct… October
May… May Nov… November
Jun… June Dec… December
Mon… Monday
Tue… Tuesday
Wed… Wednesday
Thu… Thursday
Fri… Friday
Sat… Saturday
Sun… Sunday
OK
When OK is highlighted, press GO to store your
Timer play or Timer stand-by settings.
*NOTE! You can only select the options listed if
the source is present in your BeoVision Avant
setup. If RADIO is available, CD and A.TAPE will
also appear, regardless of whether they are
actually present or not.
Page 54
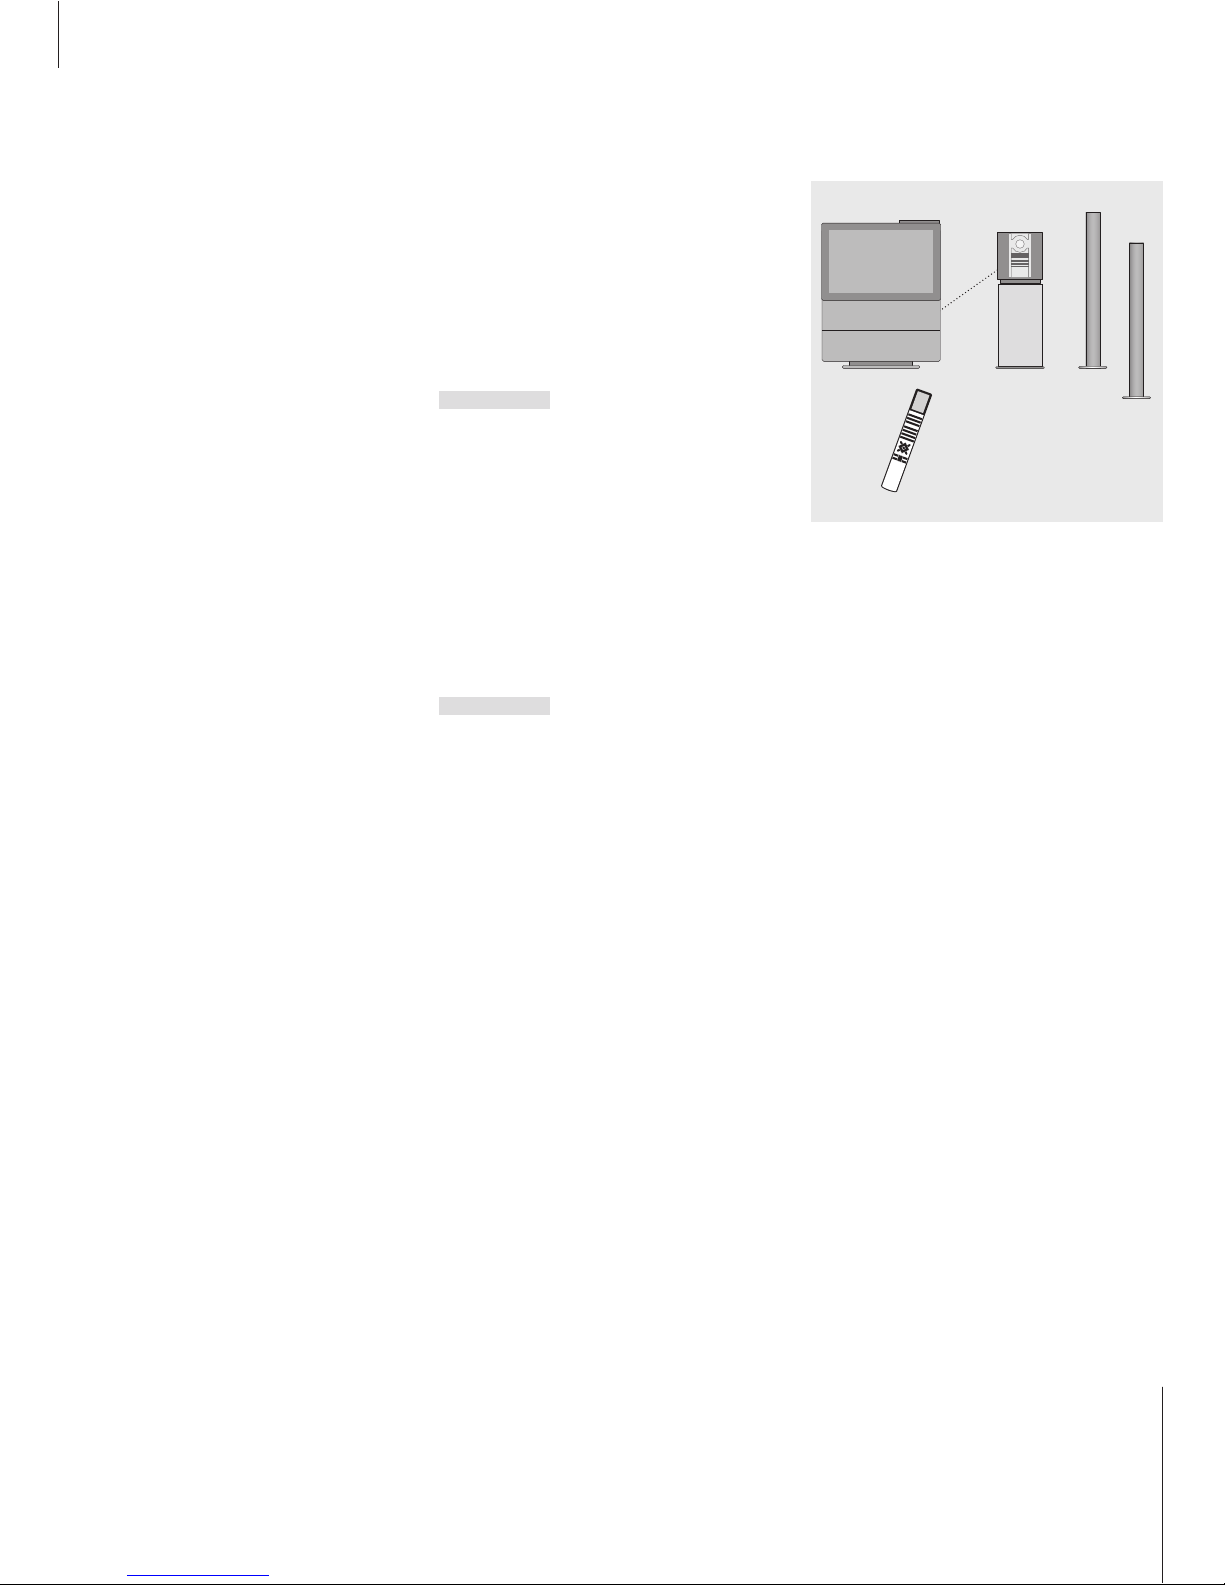
5454
If you connect your Bang & Olufsen
audio system to your BeoVision
Avant and have connected speakers
to the audio system, you can obtain
the benefits of an integrated audio
and video system.
You can listen to any source you like
on the speakers of either system.
You can, for example, listen to a
music video through your audio
system speakers while you watch it
on the TV screen, or you can play the
radio or any other audio source on
the BeoVision Avant speakers.
To enable integration of your
BeoVision Avant and a Bang &
Olufsen audio system, you must
connect the two systems with a
BeoLink cable, available from your
Bang & Olufsen retailer. Please note
that not all Bang & Olufsen audio
systems support integration with the
BeoVision Avant.
Use an integrated audio/video system
Integrating your audio system and BeoVision
Avant lets you choose speakers appropriate to
the current video or audio program, and also
makes it possible for you to record video
sound on the audio system.
Play audio or video sound on either system…
If you press the source button before pressing LIST
as well as after AV is displayed, the screen will be
switched on.
*In order to display AV on Beo4, you must first add
it to the Beo4 list of functions. Please refer to ‘Gain
access to extra features via Beo4’ on page 34 for
further instruction.
To listen to sound from a
BeoVision Avant source on your
audio system speakers without
switching on the screen, press
LIST until AV* is displayed…
…then press a source button,
such as TV
To play audio sound on the
BeoVision Avant speakers, press
LIST until AV* is shown,
followed by an audio source
button, such as RADIO
LIST
AV
TV
LIST
AV
RADIO
Video sound recording
If you listen to sound from your BeoVision Avant
on your Bang & Olufsen audio system’s speakers,
and your audio system has a tape recorder, you
can record BeoVision Avant sound on the audio
tape recorder. Please refer to the User’s guide
enclosed with your audio system for further
instruction.
NOTE! If you have a surround sound system in
which your audio system is linked to BeoVision
Avant and there are front and rear speakers
connected to the BeoVision Avant, please refer to
the chapter Home Theatre viewing with
BeoVision Avant on page 48.
Page 55
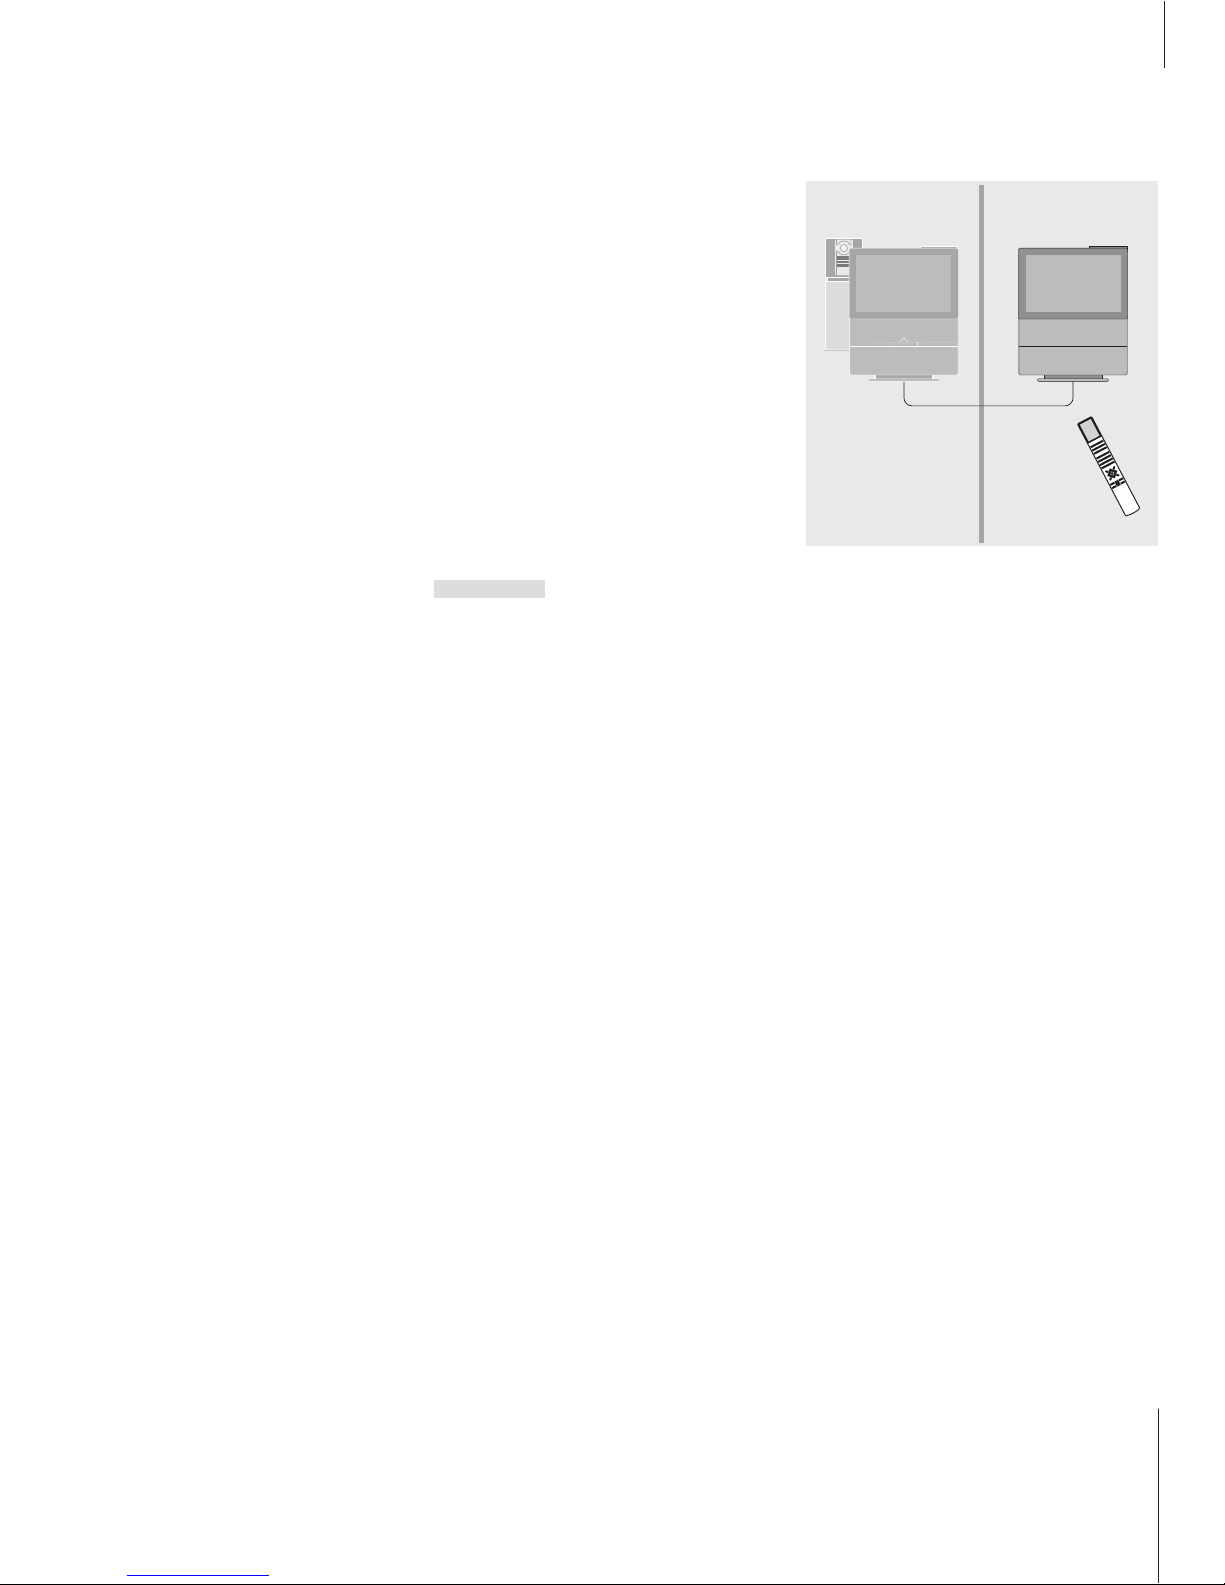
55
Use a main room source – source type present
in both rooms
Use a link room source – source type present in
both rooms
55
You can watch and listen to all of
your available sources on a BeoVision
Avant placed in a link room,
including video and audio sources
from the main room.
Timer play or Timer stand-by
settings, as described in Switch
BeoVision Avant on or off
automatically on page 52, can also
be executed on a link room
BeoVision Avant, but must be
programmed from the system in the
main room.
Please refer to the chapter Set up
BeoVision Avant in a link room on
page 18 for more information about
how to connect BeoVision Avant for
use in a BeoLink system.
Use BeoVision Avant in a link room
If you have BeoLink installed in your home
and choose to place your BeoVision Avant in a
link room, simply operate your BeoVision
Avant as if it were placed in a main room.
Listen to stereo sound in your link room
You can select stereo sound for programs
distributed from your main room sources, such as
a set-top box, to the link room.
> Press LIST on Beo4 until AV* is shown in the
Beo4 display.
> Press e.g. SAT to select a set-top box connected
to the main room system.
Please note that distribution of other main room
sources to other link room systems is not possible
while AV is active!
Use sources only present in one of the rooms
Press the button for the source
you wish to use
Operate the selected source as
usual
Press LIST on Beo4 until LINK*
is shown in the Beo4 display
Press the button for the source
you wish to use
Operate the selected source as
usual
Press the button for the source
you wish to use
Operate the selected source as
usual
RADIO
A TAPE
LIST
LINK
TV
TV
*NOTE! To display LINK or AV on your Beo4
remote control, you must add it to the Beo4 list
of functions. Please refer to the chapter Gain
access to extra functions via Beo4 on page 34 for
further instruction.
Page 56
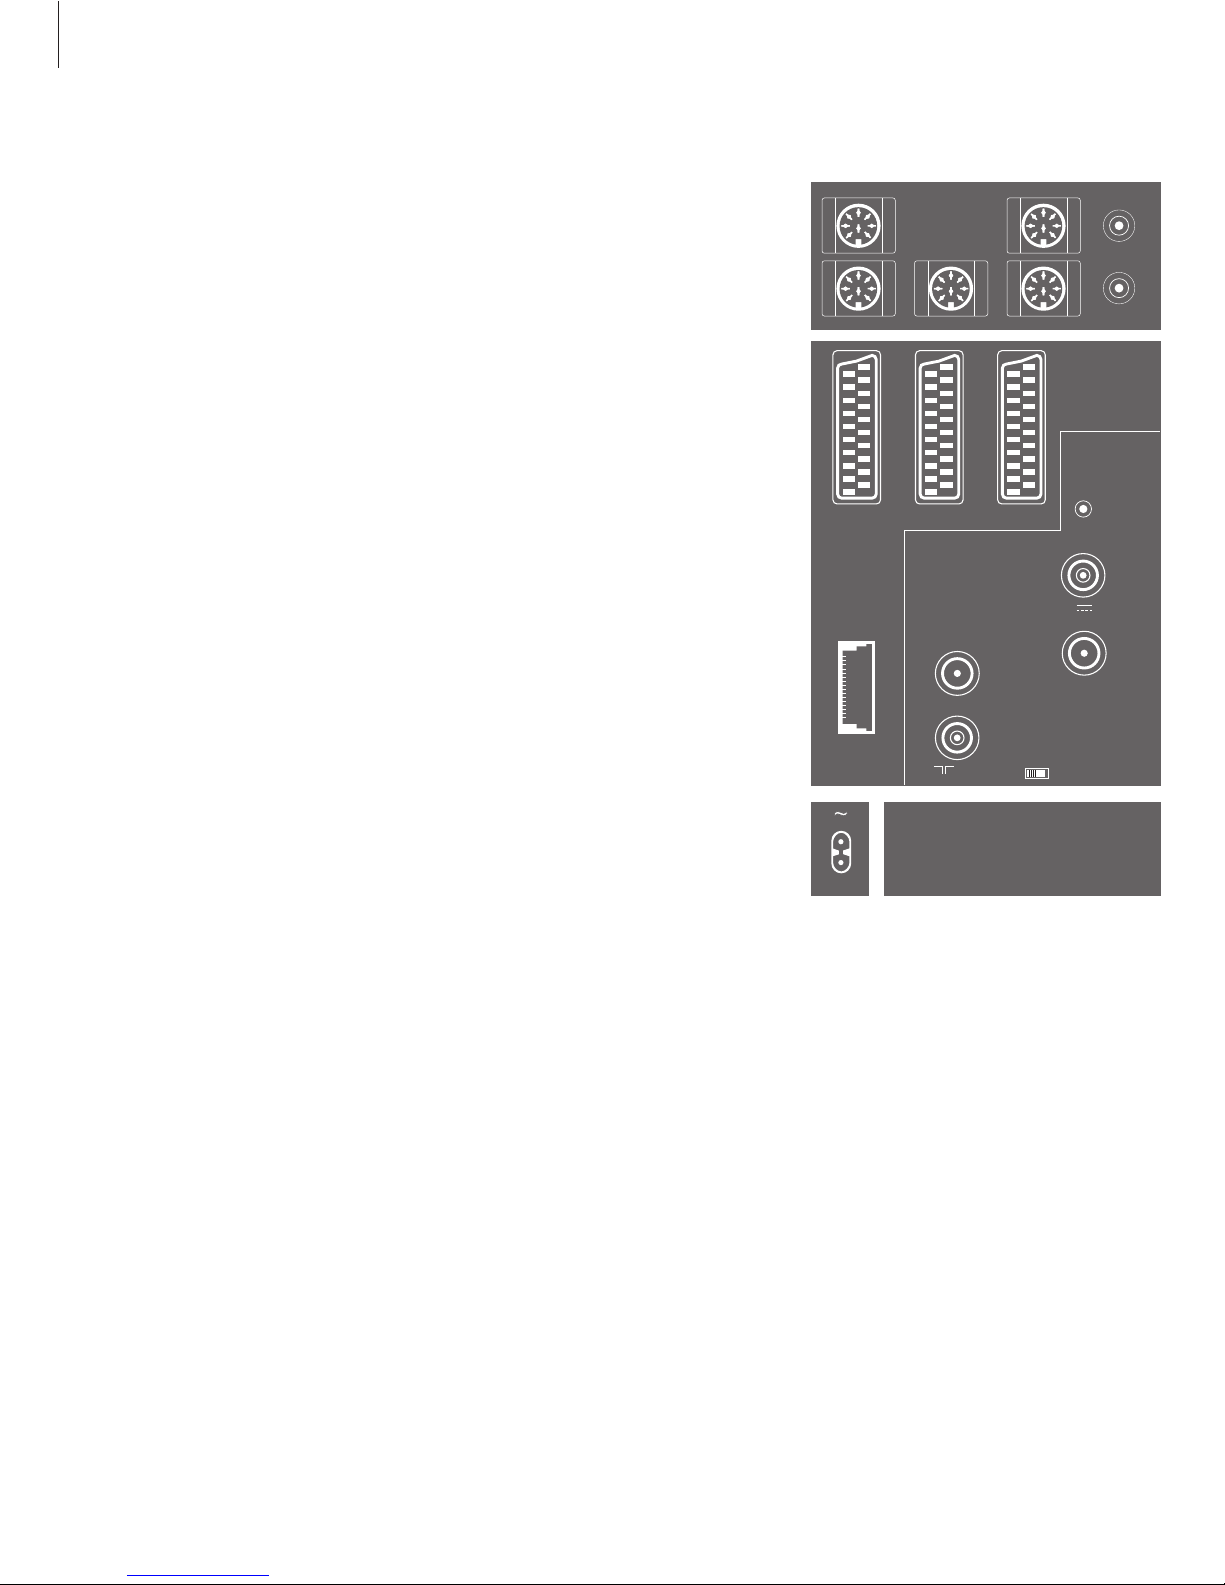
5656
The socket panel on BeoVision Avant
allows you to connect signal input
cables as well as a variety of extra
equipment, such as a video tape
recorder or a linked Bang & Olufsen
audio system.
The V.TAPE, AV and DECODER
sockets are available for connection
of extra equipment.
Any equipment you connect to these
sockets must be registered in the
BeoVision Avant Connections menu.
Please refer to the chapter Register
extra equipment on page 20 for
more information.
There is also a small, covered socket
panel located just below the close-up
operation panel. Here you can
connect headphones and e.g. listen
to a TV program, or you can connect
a CamCorder and watch your home
movies on the Avant DVD.
The socket panels
DECODER
MASTER LINK
AVV.TAPE
SAT. ANT. 1
IR-OUTPUT
VHF/UHF
75 Ω
LINK
ATTN.
OFF ON
14/18 V 300 mA
75 Ω
SAT. ANT. 2
REAR SUBWOOFER REAR
FRONT FRONT INPUT 1
INPUT 2
Speaker and digital input socket
panel
These sockets are only available if your
BeoVision Avant has a built-in surround sound
module!
REAR
The two sockets are used for connecting the
external rear speakers in a surround sound
setup.
FRONT
The two sockets are used for connecting the
external front speakers in a surround sound
setup.
SUBWOOFER
Socket used for connecting a BeoLab 2
subwoofer in a surround sound setup.
INPUT 1
Digital input socket (S/P DIF) for connection of
e.g. a set-top box. INPUT 1 is for digital input
from equipment connected to the AV socket
on BeoVision Avant.
INPUT 2
Digital input sockets (S/P DIF) for connection
of e.g. a set-top box. INPUT 2 is for digital
input from equipment connected to the
V.TAPE socket on BeoVision Avant.
AV and aerial socket panel
V. TAPE
21-pin socket for the connection of a BeoCord
V 8000 video tape recorder.
AV
21-pin socket for the AV connection of other
equipment, e.g. a set-top box or a second
decoder (neither MAC nor baseband decoders
may be connected here).
DECODER
21-pin socket for the connection of a secondary
set-top box or a primary decoder. The socket
provides the opportunity to connect either an
AV decoder or an RF decoder.
The socket may be used for an AV 2 Expander
instead, which gives the opportunity to
connect a decoder or other non-Bang &
Olufsen auxiliary video equipment at the same
time.
MASTER LINK
Socket for connection of a compatible Bang &
Olufsen audio system.
The socket is also used for BeoLink
distribution of sound and picture throughout
the house. In addition, the socket can be used
for an external positioner box (used in a
satellite dish setup).
LINK
Aerial output socket for distribution of video
signals to other rooms.
VHF/UHF
Aerial input socket from your external aerial
or cable TV network.
SAT. ANT. 1
Aerial connection for the primary LNB
(outdoor dish number one). If you have a
motor-controlled dish, it must be connected
to this socket.
Page 57

5757
SAT. ANT. 2
Aerial connection for a second LNB (outdoor
dish number two).
ATTN. ON/OFF
Aerial signal attenuator. Options are:
OFF: Normal setting
ON: Signals damped
IR OUTPUT
For connection of a set-top box. (Only
available if a Set-top Box Controller is built
into your BeoVisionAvant DVD).
~
Connection to the mains.
The close-up socket panel
PHONES
You can connect stereo headphones to the
socket marked PHONES. The BeoVision Avant
speakers can then be cut out by pressing the
Beo4 volume button in the middle.
L R VIDEO
The sockets marked L, R, and VIDEO are for
connection of a video camera. LR sockets: For
audio connection (left and right respectively).
VIDEO socket: For the video signal.
S-VHS socket
For the connection of S-VHS or Hi-8
CamCorders only. To watch your CamCorder
recordings on the BeoVision Avant, connect
the camera and switch the BeoVision Avant
on by pressing, e.g. the TV button on the
Beo4 remote control. Then, when you start
playback on your camera, the BeoVision Avant
automatically registers the signal and you can
see the pictures from the CamCorder on the
screen.
If the signal from the CamCorder is switched off
(accidentally), you must press LIST on Beo4 until
CAMCORD* is shown in the Beo4 display and
press GO.
*NOTE! In order for CAMCORD or V.AUX to be
shown in the Beo4 display, they must first be
added to the Beo4 list of functions. See Gain
access to extra functions via Beo4 on page 34 for
further instruction.
PHONES
L R VIDEO S–VHS
Page 58
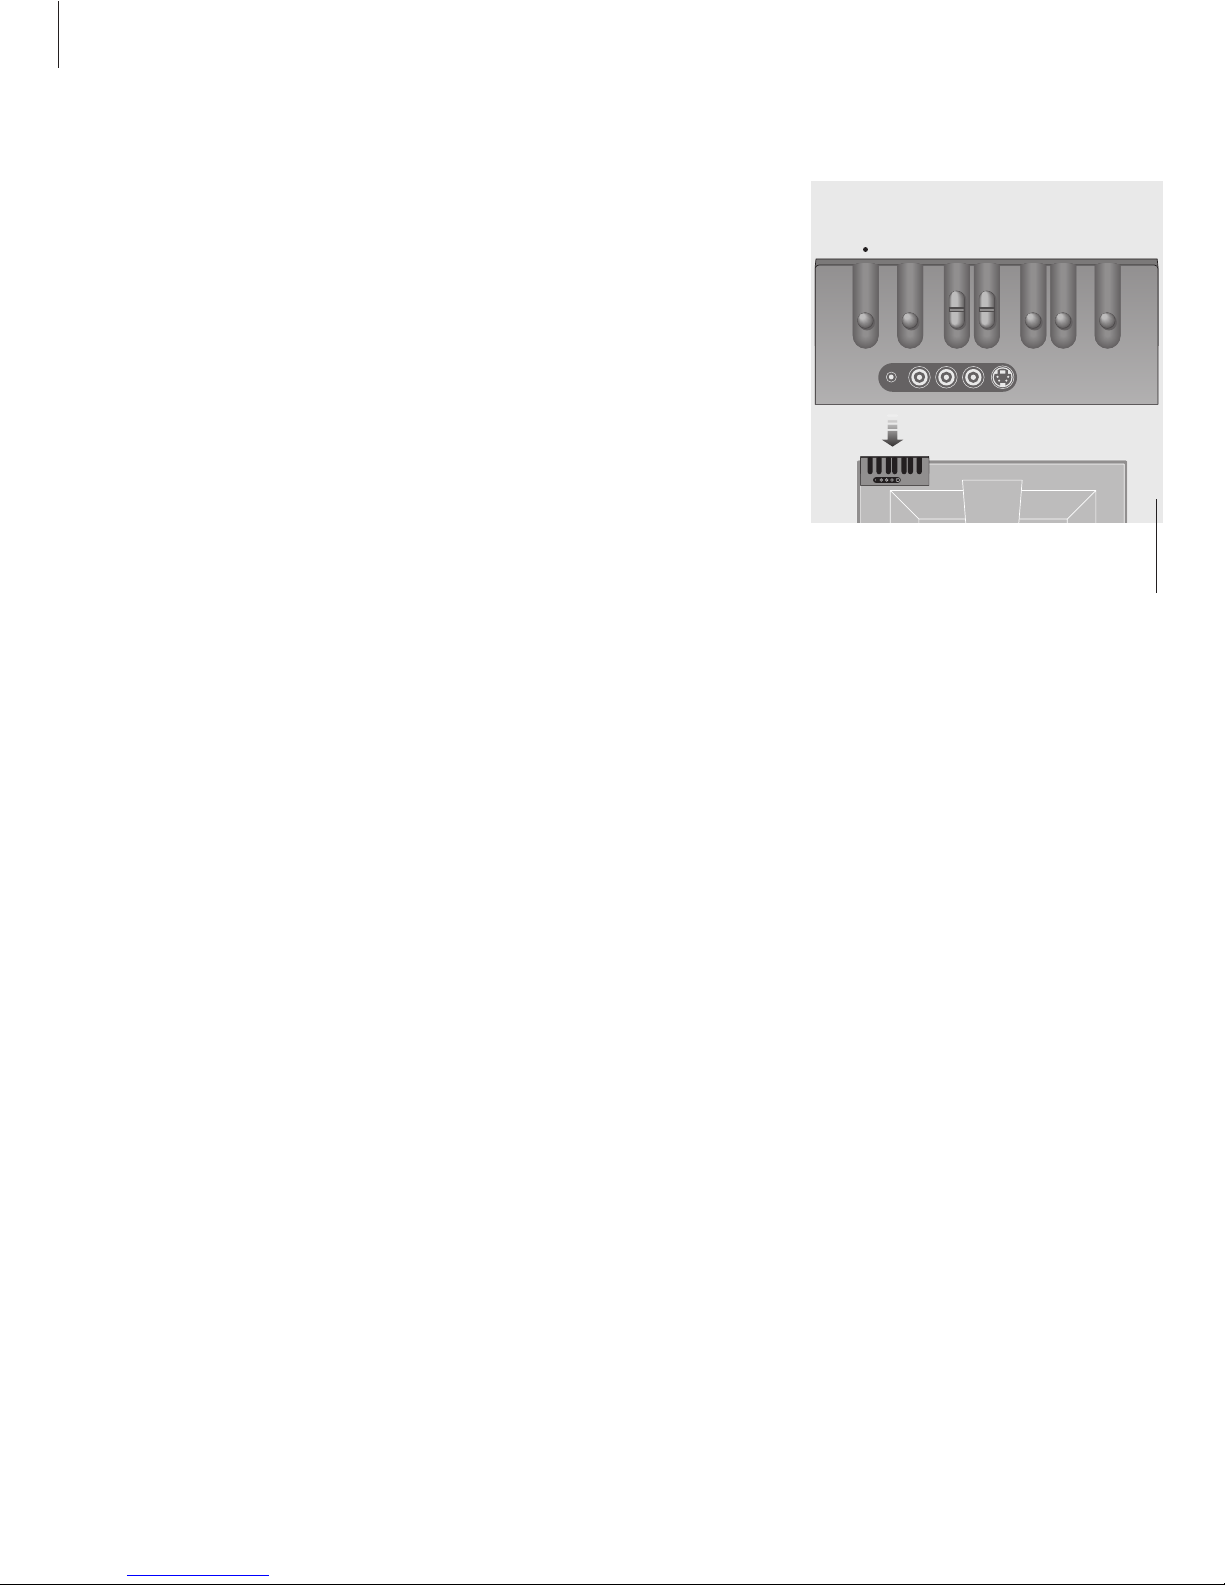
5858
The BeoVision Avant close-up
operation panel is located on top of
the television, behind the display bar.
You will find that the differentiated
spacing between the buttons, as well
as the different button shapes,
makes them easy to find and use,
even when you are standing in front
of BeoVision Avant.
Close-up operation
The close-up operation panel
LOAD
Opens the DVD loader. Press again and the
loader retracts, DVD is activated and playback
begins automatically.
DVD
Activates DVD playback.
TV/SAT
The TV/SAT button enables you to switch to
TV or satellite, if you have satellite access.
Press the button once to switch on the TV
channel you watched last. Press the button
again, and you will switch on the SAT channel
you last watched.
STEP
Steps through channels, tracks and chapters.
VOL
Turns the volume up and down.
PLAY TIMER
Switches on the BeoVision Avant timer
function, which ensures that any timer play
instruction you have programmed into the
system will be executed with the BeoVision
Avant picture screen and/or speakers cut in.
•
Switches the BeoVision Avant to stand-by.
PLAY TIMER
VOL
STEP
TV / SAT
LOAD
DVD
PHONES
L R VIDEO S–VHS
The L R and VIDEO sockets are hidden by a
cover which you must remove before
connecting a video camera.
Page 59

5959
Copy from a CamCorder
If you have connected e.g. a BeoCord V 8000
video tape recorder to your BeoVision Avant,
and you connect your CamCorder to the
close-up sockets on the back of the BeoVision
Avant display panel, you can copy CamCorder
recordings onto a videotape. While the tape is
being copied, you can watch a TV programme
or switch off BeoVision Avant entirely.
Connect a set-top box
If the AV, DECODER or V.TAPE sockets are all
in use, and you would like to connect a
second set-top box, you can connect the
second set-top box to the close-up socket
panel on the back of the Avant display bar.
Even though you register a set-top box to your
CamCorder sockets, you can still connect a
CamCorder to the sockets on a temporary basis,
without changing settings in the Connections
menu.
Press to prepare BeoVision
Avant for recording
Press again to start recording
Press V TAPE and then STOP to
pause a recording
Press to resume a paused
recording, or…
…press a source button, such
as TV, to stop a recording
entirely
RECORD
RECORD
V TAPE
STOP
RECORD
TV
To copy a recording from a CamCorder…
Connect your CamCorder to BeoVision Avant and
start playback of a CamCorder recording.
Setup
1 Tuning
2 Sound
3 Picture
4 Connections
5 Menu
6 Clock
Camcorder
STB (SAT)
If you connect a set-top box to the CamCorder
socket…
> Switch on the system and press MENU to call
up the main menu.
> Press 3 to call up the Setup menu (4 if Sat is
available).
> Press
▼
to move the cursor down to
Connections.
> Press MENU. Connections changes to
CamCorder.
> Press GO to call up the CamCorder menu.
> Press
▲
or ▼to view your options. Select
STB(V.AUX) if your BeoVision Avant is equipped
with a built-in satellite receiver, and STB(SAT) if it
is not. You can, of course, select CamCorder if
you have connected a CamCorder to the
close-up sockets. Press GO.
> When you have registered your set-top box, you
will be asked to select your set-top box type
from an on-screen list. Please refer to ‘Register
extra equipment’ for further information.
> When you have selected your STB type, press
GO to store the settings, or press EXIT to leave
the menu.
You can gain access to a set-top box connected to
the CamCorder socket in one of two ways. If your
set-top box is registered as STB(SAT), press SAT on
Beo4. If it is registered as STB(V.AUX), press LIST
until V.AUX* is shown, and then press GO.
*NOTE! If a Set-top Box Controller is built into
your BeoVision Avant, you may connect the
set-top box to either the DECODER, AV or V.TAPE
socket. Which socket to choose depends on the
other equipment you have connected.
*NOTE! In order for CAMCORD or V.AUX to be
shown in the Beo4 display, they must first be
added to the Beo4 list of functions. See Gain
access to extra functions via Beo4 on page 34 for
further instruction.
Page 60
6060
Maintenance of your BeoVision Avant
Normal maintenance, such as
cleaning the BeoVision Avant, is the
responsibility of the user. To achieve
the best result, follow the
instructions to the right.
Also make sure to treat your DVDs
with care as described to the right.
Any defective parts are covered by
the guarantee during the warranty
period. Please consult your Bang &
Olufsen retailer to determine
recommendations for normal
maintenance.
Wipe dust off the surfaces using a dry, soft
cloth. Remove grease stains or persistent dirt
with a lint-free, firmly wrung cloth, dipped in
a solution of water containing only a few
drops of mild detergent, such as washing-up
liquid.
About the contrast screen…
To clean the picture screen, use a mild window
cleaning fluid to clean the screen. To retain the
optimum performance of the screen, make sure
that no streaks or traces of the cleaning fluid are
left on the screen.
Never use alcohol or other solvents to clean any
part of BeoVision Avant!
If the DVD is always held by its edges and
placed in its original cassette when out of
BeoVision Avant, no cleaning will be required.
Should the DVD become soiled by fingerprints,
dust or dirt, it can be wiped clean with a
lint-free, soft, dry cloth. Avoid extreme heat
and humidity, and never write on your DVDs.
*NOTE! If the front screen glass should crack or
chip, or if it should be damaged in any way, it
must be replaced immediately, as it could
otherwise cause injury. You can order
replacement front screen glass from your Bang &
Olufsen retailer.
Page 61
61
The PIN-code system
You can protect your BeoVision
Avant by entering a four-digit PIN
(Personal Identification Number)
code. Should your BeoVision Avant
be disconnected from the mains for
more than 30 minutes, only those
who know your PIN-code can gain
access to your BeoVision Avant
system.
To activate the PIN-code system, to
change your code or to delete it
altogether, you must call up the
PIN-code setup menu.
If you should lose or forget your
code, contact your Bang & Olufsen
retailer for a Master code that
disables your PIN-code and gives you
access to your BeoVision Avant
system.
Activate the PIN-code system
While the TV is turned on…
Press to call up the main menu
Press sstwice, followed by
STOP. The Pincode menu
appears on the screen
Use the number keys on Beo4
to enter the four digits of your
code
To cancel code entry, press
STOP and the input fields are
cleared
When you have entered your
code once, press
tt
to move the
cursor to Confirm pincode
Re-enter the code
When you have entered the
correct code twice, press GO.
The BeoVision Avant on-screen
display then shows the current
source. If the two codes do not
match, the input fields are
cleared and you must enter the
code again
MENU
ss ss
STOP
0 – 9
STOP
tt
0 – 9
GO
TV 1
PIN _ _ _ _
*NOTE! You can change your PIN-code up to five
times in a three-hour period.
Menu
1 Timer play
3 TV list
4 SAT list
5 Setup
Pincode Confirm pincode
----
----
Change or delete your PIN-code*
While the TV is turned on…
Press to call up the main menu
Press sstwice, followed by
STOP. The BeoVision Avant
on-screen display prompts you
for your PIN-code
Use the number keys on Beo4
to enter your PIN-code
To cancel code entry, press
STOP and the input fields are
cleared
If the code does not match, the
input fields are cleared and you
must enter the code again
When you have entered your
code, the Pincode setup menu
prompts you to delete your
code or enter a new code
Press 1 to delete your code, or
2 to enter a new code
To enter a new code, use the
number keys on Beo4
When you have entered your
code once, press
tt
to move the
cursor to Confirm pincode and
re-enter the code
Press GO to store the new code
MENU
ss ss
STOP
PIN _ _ _ _
0 – 9
PIN**_ _
STOP
PIN _ _ _ _
1
2
0 – 9
tt
GO
Pincode
1 Delete code
2 New code
New pincode Confirm pincode
----
----
Page 62
62
Use your PIN-code
Should your BeoVision Avant get disconnected
from the mains for more than approximately
30 minutes, the BeoVision Avant on-screen
display prompts you for the correct PIN-code
when the system is switched on.
Did you forget your PIN-code?
Contact a Bang & Olufsen retailer to receive a
five-digit Master Code.
Press the number keys on Beo4
to enter the code digits
If you enter an incorrect digit at
any time, simply press STOP to
reset the input fields
BeoVision Avant restarts when
the last digit is entered
If an incorrect code is entered,
ERROR is shown in the
on-screen display. Re-enter the
code
PIN _ _ _ _
0 – 9
PIN**_ _
STOP
PIN _ _ _ _
PIN
****
TV 1
ERROR
PIN _ _ _ _
When your system is switched on…
Five incorrect entries will cause the BeoVision
Avant to shut down for three hours, during which
remote control access is not possible.
When you have received a Master Code…
To start using your PIN-code again…
Connect your system to the
mains
When BeoVision Avant prompts
you for your PIN-code, press
and hold
ss
to call up the
MASTERCODE display
Entering this five-digit code via
the number keys will deactivate
your PIN-code and reactivate
BeoVision Avant. DELETED is
shown in the BeoVision Avant
on-screen display
Enter a new personal PIN-code
and destroy the slip with your
Master code
PIN _ _ _ _
ss
PIN _ _ _ _ _
0 – 9
DELETED
PIN**_ _
>> The PIN-code system
Page 63

For your information…
Your needs as a user are given careful
consideration during the design and
development process of a Bang & Olufsen
product and we strive to make our products
easy and comfortable to operate.
Therefore, we hope that you will take the
time to tell us about your experiences with
your Bang & Olufsen product. Anything
which you consider important – positive or
negative – may help us in our efforts to
refine our products.
Thank you!
Write to: Bang & Olufsen a/s
Customer Service
Dept. 7210
Peter Bangsvej 15
DK–7600 Struer
or fax: Bang & Olufsen
Customer Service
+45 97 85 39 11 (fax)
or Email: [email protected]
Visit our Web-site on…
www.bang-olufsen.com
3503955 0109 Printed in Denmark by Bogtrykkergården a-s, Struer
Page 64

 Loading...