

Page 1
WIFI FAN COIL TOUCH SCREEN THERMOSTAT
VI. Model Spec
I. Product Summary:
WIFI series Fan Coil Th er mo st at is to uch screen thermostat with WIFI Function,
the thermostats can be controlled by phone App.(IOS and Andr oi d ph on e)
It is designed to control the fans and valves in air conditioner a pp li ca ti on s
via comparison of the room temperature an setting temperature as r ea ch in g
the aim of comfort and saving energy.
II. Technical Parameter:
Power Supply
Current Load
Power Consumption
External Material
Sensing Element
Set Temp. R an ge
Accuracy
Dimension
Ambient Temp.
Storage Temp.
Tim in g Er ro r
AC200~240V 50 ~60Hz
3A~5A
<0.5W
PC+ABS (flame retardant)
NTC
10-40℃
±1℃
86x86x13.3mm
0-45℃, 5-95%RH(Non- co nd en si ng)
-5~55℃
<1%
III.Main Functions and Characteristics
1. Heating, cooling, ventilation mode.
2. WIFI for Andriod & Apple IOS phone.
3. Large Glass screen display and touch screen type.
4. 2 pipe and 4 pipe for choose.
. 5 3 fan s pe ed +A ut o.
6. Programmable timing switch function, 4 period a day setting .
7. Temperature compensation when differs from actural temp.
8. Sel ec ta bl e 80 mm x8 0m m Eu ro pe an h id de n bo x.
9. Key Lock function.
10.Fan coil in-control and out-of-control adjustab le .( on ly f or 2 p ip e)
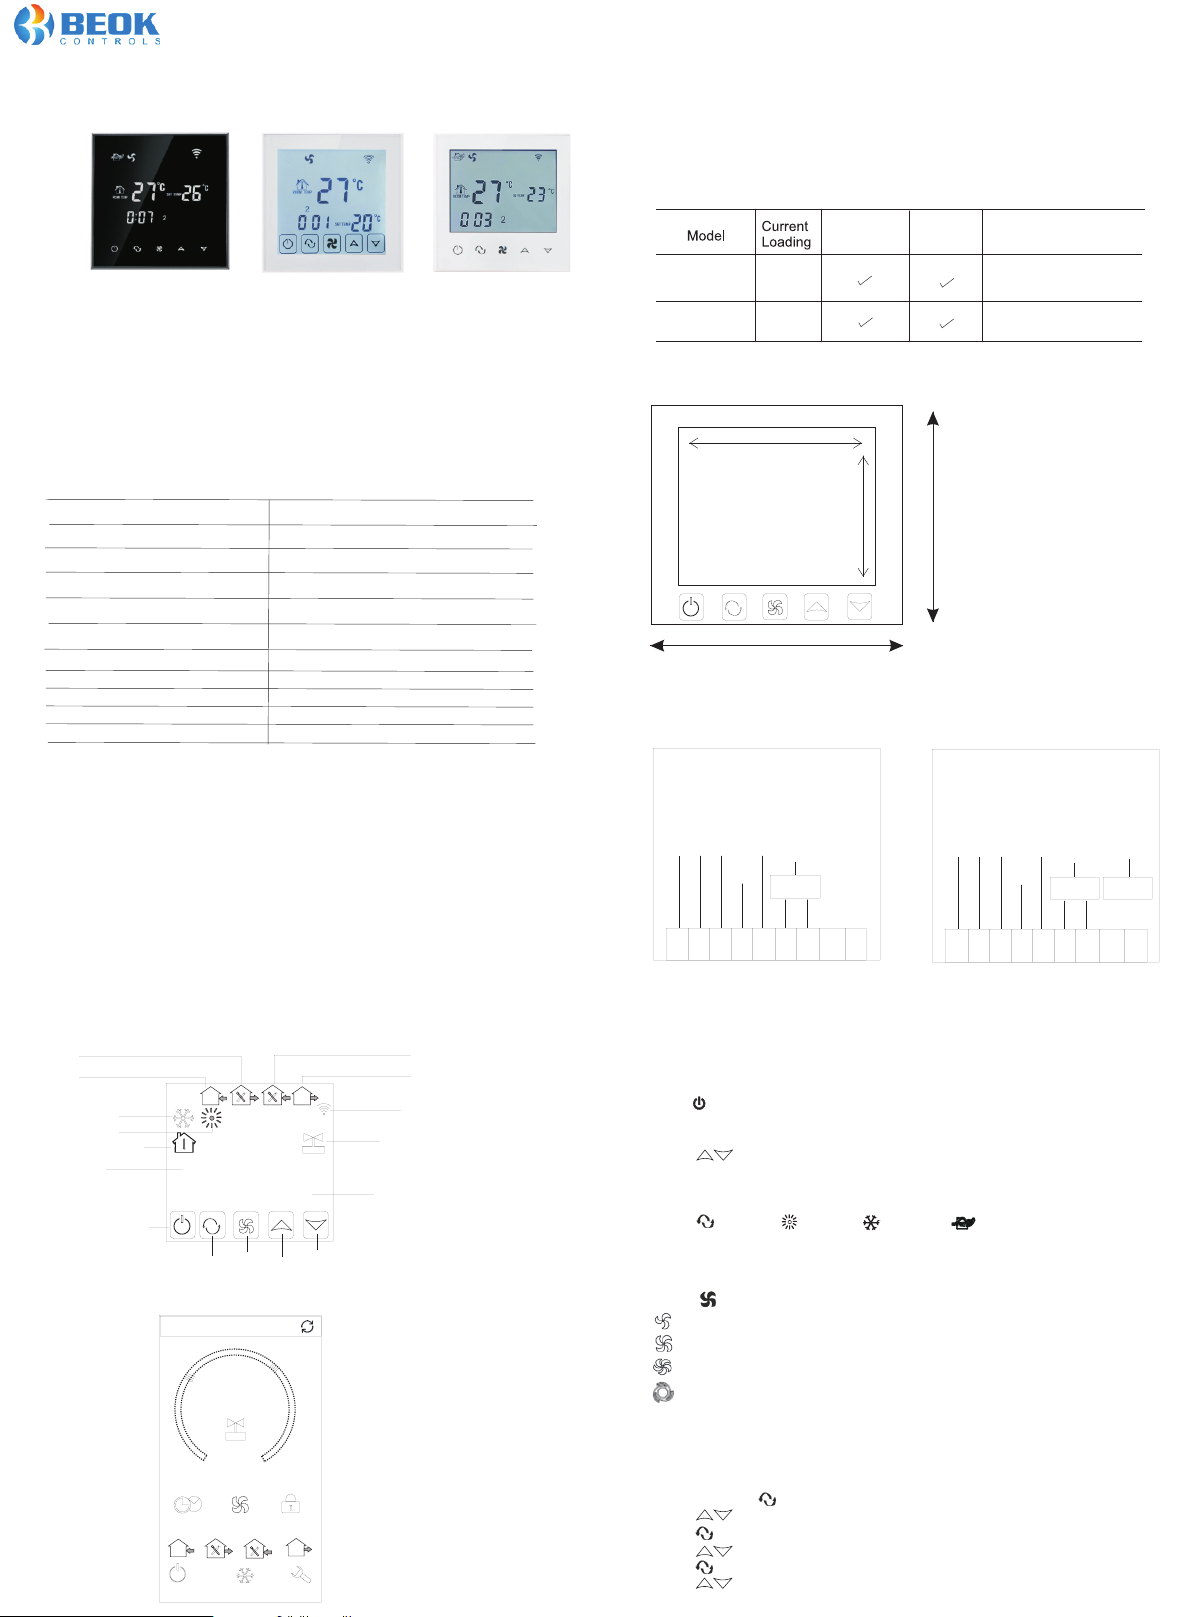
IV. User Interface Explanation(T he rmo st at P ort )
22
12: 32
Tim er on set ti ng 2
Tim er off se tt ing 2
℃
℃
Down
Up
28
17: 03
Sen ior
WIFI
Valv e on
Set Temp
Tim er off se tt ing 1
Tim er on set ti ng 1
Cooli ng
Heati ng
Room Temp
Wee k
Power o n/ off
ROOM
28
TEMP
1 2 3 4 5 6 7
Mode
SET TE MP
Fan
0:01
V. User Interface Explanation(P ho ne Port )
My Therm os tat
<
TEM P.SET.T O
19
<
<
14: 03 Mond ay
11:3 1
8:0 0
Pow er
Mod e
WIF I- AC 2
WIF I- AC 4
3A~5A
3A~5A
Program
Tim e sw it ch
Key Lock
Controlled Objects
2 pipe
central air conditioner
Centr al a ir cond it ioner
4 pipe
VII. Dimension
64mm
48mm
86mm
86mm
VIII.Wiring Digram
AC230V 50/60HZ
N
L
1
Low
Hi
Mid
5
3
4
2
2 pipe
Val 1
NO NC
6
9
8
7
AC230V 50/60HZ
N
L
1
Low
Hi
Mid
3
4
2
4 pipe
Val 1
NO NC
5
6
7
IX. T hermostat Operation Instruction
1. Set ting Powe r on/off
Press to turn on/off th e po we r.
2. Setting Tem pe ra tu re
Press to set the temperature.
3. Setting the System Mode
Press to select heating, cooling or ventilation.
Factory Default is ventilation.
4. Setting the Fan Speed
Press to select the fan speed.
is Low speed(Factory default);
is Mid speed;
is High speed;
is Auto speed.
In auto mode, the fan will run according to the comparison of room
temperature and set temperature.
5. Setting the Real Tim e.
Press and hold for 3 sec., hh will flash in the position of hh: mm.
Press to adjust the current hour.
Press , mm will flash in the position of hh: mm.
Press to adjust the current minute.
Press , 1 will flash in the position of week: 1234567.
Press to adjust the current week.
Val 2
NO NC
9
8
1
Page 2
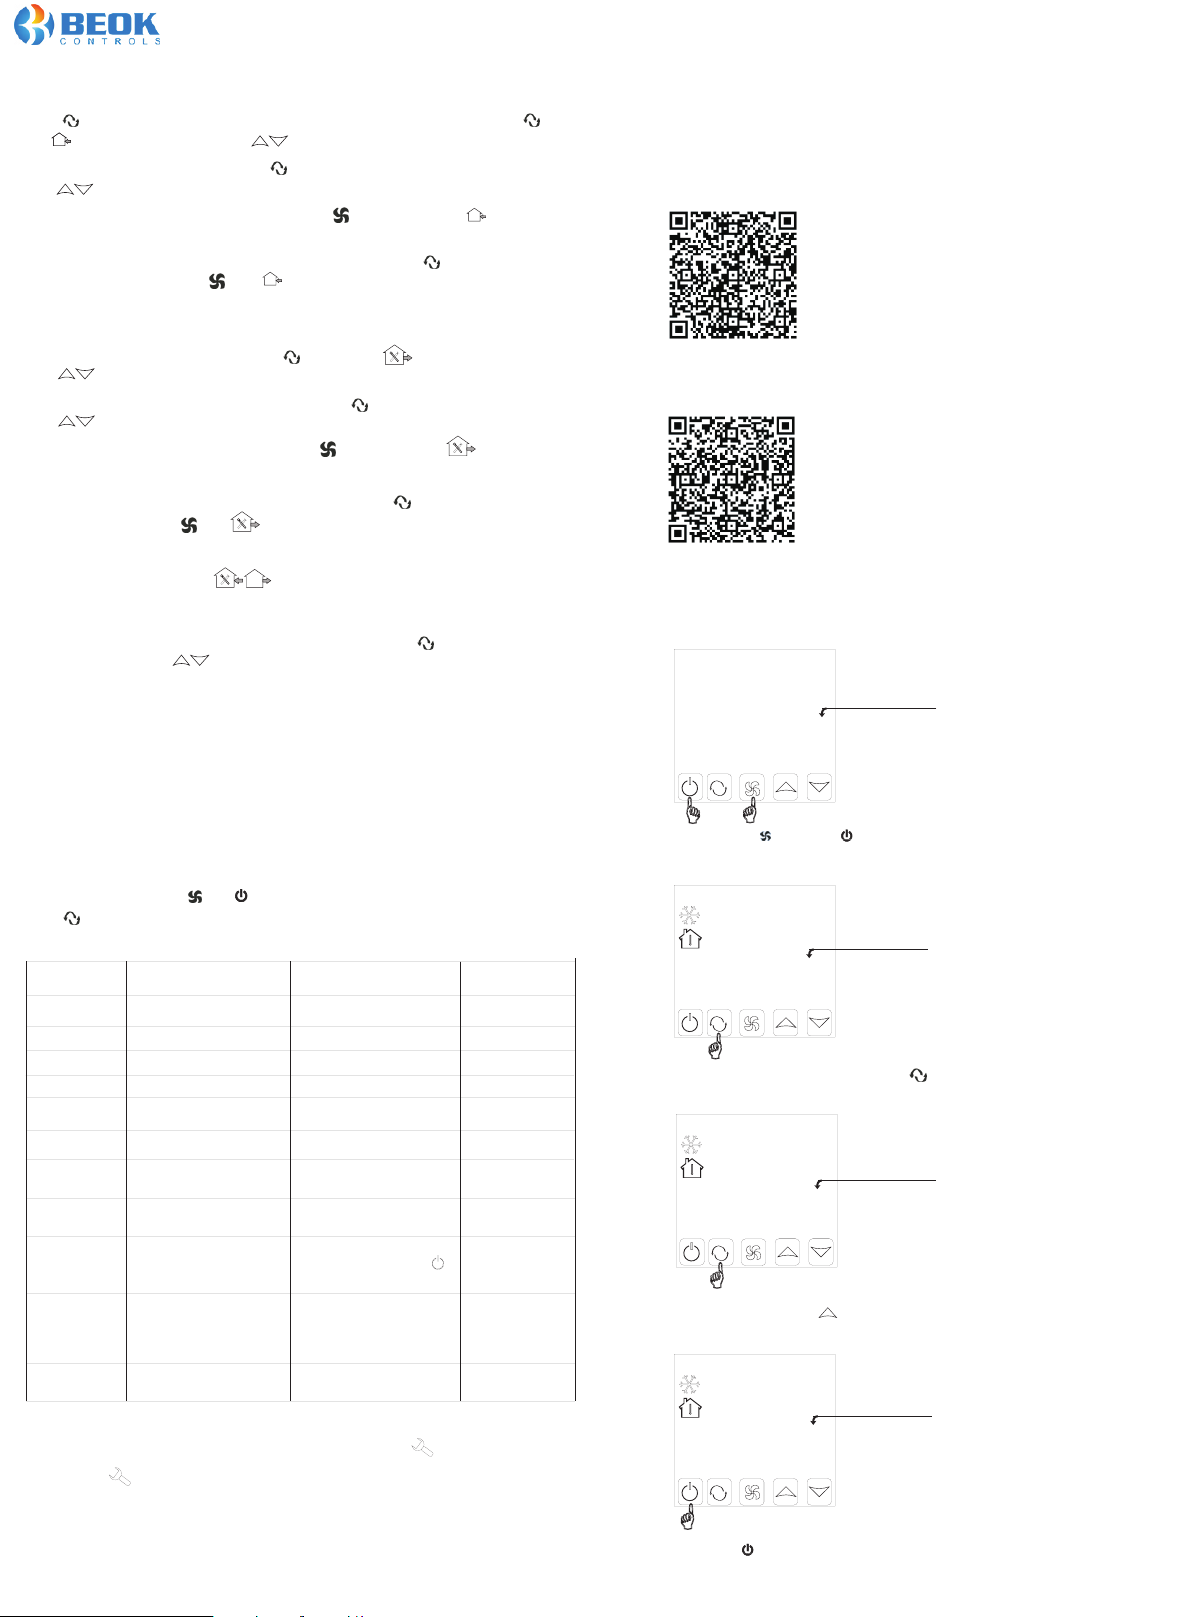
6. Setting the Ti me -o n( Re gu la r Bo ot )
Press for more than 3 seconds, after setting the time, continue to press
until and “hh” twinkling. Press to adjust the hours.
After the adjustment of hours, press until the “mm” twinkling,
press to adjust the minutes.
After the completion of all adjustments ,press to confirm, then does not twinkle,
Regular boot setup is complete.
The operation of canceling Regular boot is the same, pre ss t o th e st at e of
Regular boot, then pressing ,the is twinkling, Regular boot has been canceled.
7. Setting the Ti me r of f
After the setting of Regular boot, press again, until and “hh” twinkli ng ,
press to adjust the hours.
After the adjustment of hours is completed,press until the“mm”twinkling,
press to adjust the minutes.
After the completion of all adjustment, press to confirm, then does
not twinkling, Off ti me r se tu p is c ompleted.
The operation of canceling Off timer is the same, press to the state of
Off t im er, t he n pr es si ng , t he i s tw in kl ing, Off t im er h as b ee n ca nc el ed .
The setting of the third period and forth period are same with the first and
second period, the icons are ( on, off/ in to t he h ou se , ou t of t he h ou se )
8. Setting the Circulation of Tim er S wi tc h
After setting the time of timer switch, continue to press the ,there will
be “LooP”, then press ,week display area will displays the day of
the week, or the transformation of “12345" “123456", or “1234567".
If the screen only displays the day of the week, then the timer switch setting
is valid only for the day.(= “ Ex ec ut e once” in App interface)
If it displays “12345",then the timer switch is valid from Monday ~ Friday,
and Saturday and Sunday will be invalid.
If it displays “123456", then the timer switch is valid from Monday ~Saturday,
and Sunday will be invalid.
If it displays “1234567",then the timer switch is valid from Monday ~ Sunday.
9.Advanced Setting Mode
In power-off st at e, p re ss a nd m ea nw hi le , to e nt er i nto Advanced Setting.
Press to switch dIF, Sh1, Sl2, Sh2, Sl2, ADJ, FAN, FrE, LOC, ADD, FAC.
Display code
dIF
SH1
SL1
SH2
SL2
AdJ
FAN
FrE
LOC
Pon
FAC
Advanced Setting in “BEOK AC”App interface is “Senior”
Touch press for 2 second, you will enter into Advanced Setting interfac e.
Function
Deadzone/hysteresis
Max temp in cooling
Min temp in cooling
Max temp in heating
Min temp in heating
Temp. Calibration
Fan coil control mode
Anti-freeze function
Key lock(button lock)
Wor ki ng s ta te
memory function
Factory setting
Parameters
0.5℃;1℃
10~40℃
10~40℃
10~40℃
10~40℃
-5~5℃
0:fan coil in-control
1:fan coil out off co nt ro l
0:Anti-freeze On
1:Anti-freeze Off
0:Unlock
1:All locked except
2:All button locked
when po we r fails s ud denly,
worki ng s tate me mo ry or not
00: no me mo ry
01: mem or y
00: Factory reset
08:Just display
Factory default
1℃
40℃
10℃
40℃
10℃
0℃
0
0
0
00
08
X. Phone Port Operation Instruction
1. Ins ta ll APP on ph on e
For IOS system: Login in App Store, search “ Be ok AC ”,
you can download it on your iphone.
For Android System: Login in Google Play, search “Be ok AC ”, you can
download it on your phone.
2. Con ne ction T he rmost at with Pho ne
Thermostat part Setting
POW ER O FF S TATE
Pre ss a nd h old , the n pr ess but to n the sam e ti me for 2 se co nds, th en w ill
enter i nt o Advanc ed S ettin g.
℃
ROOM
28
TEMP
22
℃
08
℃
10
℃
SET TE MP
0:01
Aft er e nt er into Ad va nced Se tt ing, pr es s 10 time s un til “FAC ” ap pears .
ROOM
28
TEMP
fac
Whe n FA C ap pe ar s, pr es s to c han ge 0 8 to 1 0 or 32 , ma ke FA C=1 0 or FA C= 32.
ROOM
28
TEMP
fac
Or scan below code to download:
Or scan below code to download:
Step 1
Step 2
Step 3
Step 4
The n, p re ss to p ow er -off st ate.
Page 3
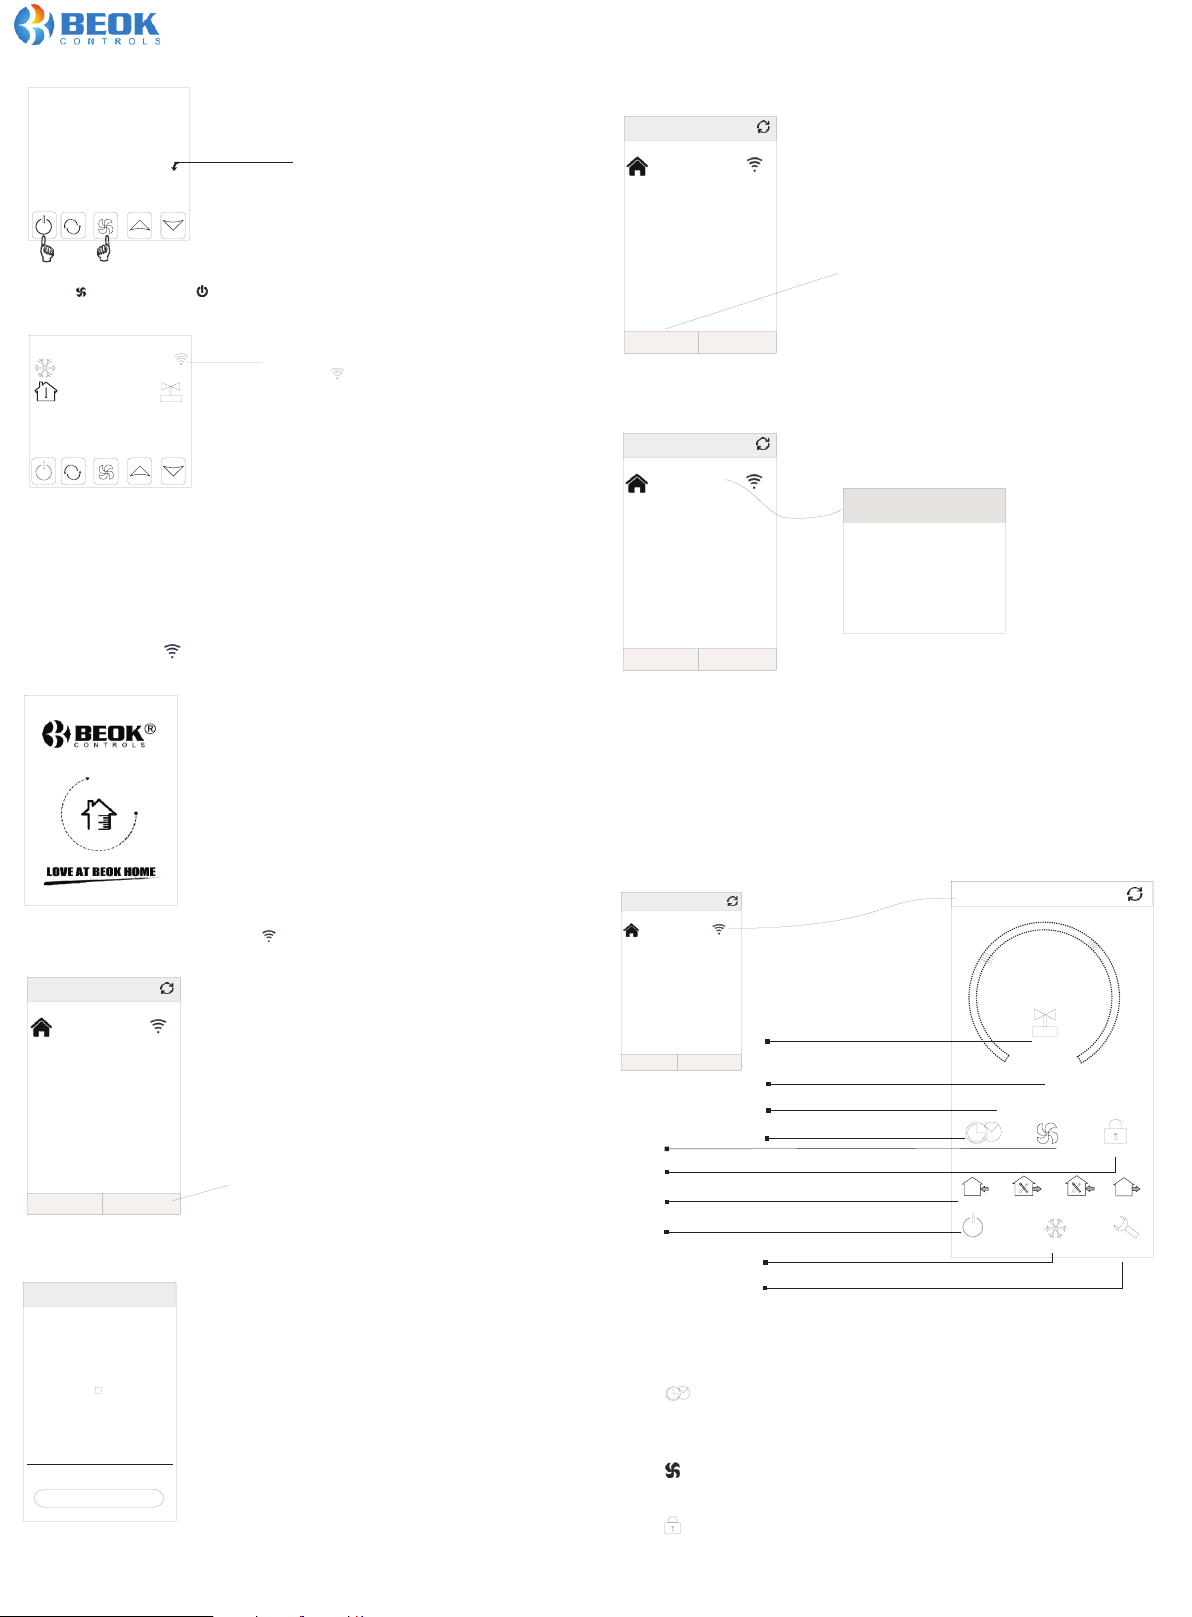
POW ER O FF S TATE
Hold on b ut ton, th en p ress ag ai n for 2 sec on ds, the n yo u can fin d th e WIFI sy mb ol twin kl in g.
℃
28
ROO M
TEM P
SET TE MP
0:01
At th is t im e, wifi s ym bol wil l be t winkl in g quick ly a nd freq ue nt ly.
It me an s, y ou can co nn ect the rm ostat w it h phone n ow.
Whe n wi fi s ymbol s to p twink li ng, it me an s therm os tat is su cc essfu ll y conne ct ed w ith
your ph on e.
22
℃
Whe n the wif i symbo l twink ling qu ickly a nd freq uentl y:
Con necti on can st art
Whe n wifi sy mbol tw inkli ng slow ly: It me ans Off L ine
Whe n twink ling St ops: Co nnect ion suc cesfu lly.
Step 5
Phon e pa rt sett ing
Durin g th e WIFI sy mb ol twin kl ing,
Ope n “B eo k AC” APP on yo ur phon e, y ou can se e APP welc om e pa ge.
3.After connection success, you need press “Search “ key.
Edi t
My Th er mosta t
HVAC-A
34:e a:34: c8:84 :7a
Pre ss Sear ch key
Pre ss Sear ch key
Sea rch Con figur e
4.Then it will appear your wifi thermostat HVAC. HVAC i s th e fa ct or y se tt in g na me ,
when you have more than 2 thermostats, you can change it to any name y ou w an t.
Edi t
My Th er mosta t
HVAC-A
34: ea:34 :c8:8 4:7a
Sea rch Con figur e
Edit Th ermos ta t
34: ea:34 :c8:8 4:7a
Modif y cu rrent t he rmost at
Lock cu rr ent the rm ostat
Delet c ur rent th er mosta t
a. Long press HVAC f or 5 s ec on ds , it w ill appear Edit Th er mo st at p ag e.
(IOS phone: slide to left, to edit.)
b. Press Modify Current The rm ostat.
c. For examples:.
You ca n ch an ge H VAC to room 1, Bedroom Bath room, or anything you lik e.
1.When the thermostat Wifi Symbol twinkling fast and continuely,
you can start the configure on your Phone App.
Edi t
My Th er mosta t
HVAC-A
34: ea:34 :c8:8 4:7a
Sea rch Con figur e
2.Enter your wifi name and password, then press start connection a t be lo w.
When connection successfully, it will appear “Connection Success”.
Pre ss Conf igure k ey
< Add a new dev ic e
Add a n ew devi ce to WIF I netwo rk
WIF I Na me :____ __ __
WIF I Pa ss word: __ ___
Disp lay pas sword
<<Po ssibl e cause o f wifi co nnect ion fal iure> >
Sta rt C on necti on
Attention: Only when the WIFI symbol twinkling continuely, thermostat connection
with phone will be succefully. If wifi twinkling stops but connection didn’t finish,
enter into Advanced setting to adjust wifi symbol again .
APP Inte rf ace on th e Ph one
My Thermostat
Edit
My Th er mosta t
HVAC -A
34: ea:34 :c8:8 4:7a
“<”, ba ck t o th e devic e op en s
and con fi gu re pane l
<
28
TEMP.SE T.TO
19
Valv e On
Sea rch Con figur e
Fan spe ed
Key Loc k
Tim e on/of f se tting
Power o n/ off
Incre as e or d ecrea se t em p.
Clock /C ur rent Tim e
Tim e synch ro no us with p ho ne
Wor ki ng m ode
Advan ce d se tting
8:00
Power
Thermostat Setting through Phone Operation
1. Clock
Press to make the thermostat time synchronize with the current time
(your phone time). You will see the words”Tim e sy nc s uc ce ss ”
2. Fan Speed Setting
Press to select the fan speed(Low speed, Medium speed, High speed, Au to )
3. Key Lock
Press in the App interface, to lock the button of thermostat.
(Go into Advanced setting, you will find 3 locking way.
Unlock; Lock all button except power button; Lock all button )
<
<
14:03 Mo nd ay
12:32
11:31
Mode
17:03
Senior
3
Page 4
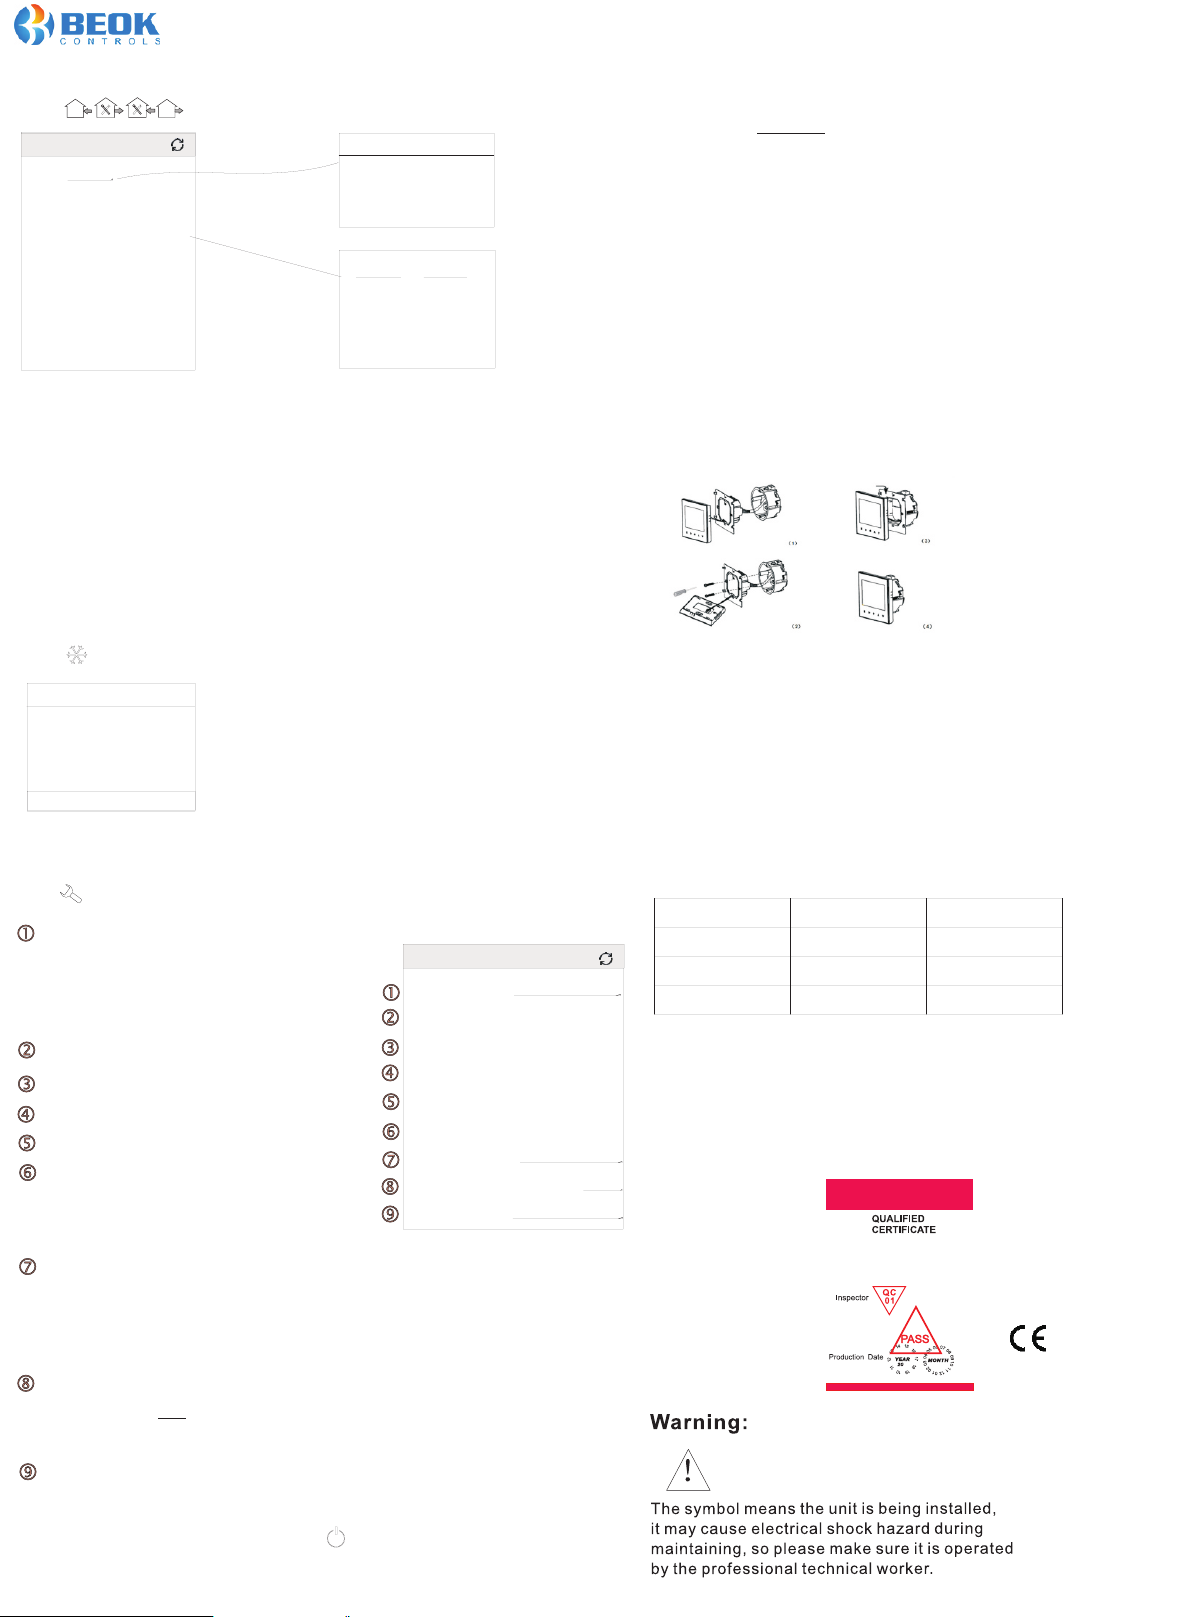
4.Tim e Sw it ch
Press 2 seconds to enter into time switch working, you will find bellows:
My Th er mo st at
<
Loop: Ex ec . .
Week Setting:
Tim e on sett in g 1: 8:00
Tim e off s et ting 1: 11:31
Tim e on sett in g 2:12: 32
Tim e off s et ting 2: 17 :03
Choose l oo p mo de
Exe cu te o nce
12345
12345 6
12345 67
07 59
8 : 00
09 01
Cance l Ok
XI. Attention to Phone WiFi Connection:
After you press Configure, if connection fails, please check the b el lo wi ng s:
01.The first time connection, please confirm your mobile pho ne i s WL AN m od e,
and ensure the (mobile data) 3G/4G turned off.
Please connect to 2.4G WIFI, not 5G WIFI.
02.Please add your WIFI router name, we recommend it does not includ e sp ac e.
03.Please check WIFI router password. We recommend < 32 characters,
no spaces, no blank password, no special symbols excep t le tt er s an d nu mb er s.
04.Please check module is successfully reset . (operate as ins tr uc ti on )
In power-off st at e, F in d FAC m ode, make FAC=10 or 32, then turn off .. .. ..
05.Please confirm WIFI password is correctly filled.
We re co mm en d yo ur W IF I pa ss wo rd displayed, thus to check password easily.
Choose loop mode
Execute once: It means temporary Time on/off for a short time. (serval hours or a day)
12345: It means time on/off s et ti ng, from Monday-Friday the same.
123456: It means time on/off se tting, from Monday-Saturday the same.
123457: It means time on/off se tting, from Monday-Sunday the same.
Wee k se tt in g
You ca n se t 4 ti me o n/ off period. For example,
For example:
8:00am time-on, 11:3 1a m ti me-off .( fi rs t ti me s wi tc h ci rc le )
Thermostat start working automatically from 8:00am-----11:31am
5.Wor ki ng m od e
Press on the app, you will find 3 working mode for choose.
Cont ro l mo de
Venti la ti on
Cool
Heat
Canc el
5. Senior(Advanced setting)
Press for 2 seconds, you will enter into Advanced setting.
dIF
dif=deadzone/ hysteresis for room temp.
Eg, Set=22℃, dif=1℃ ,i n co ol in g mo de .
When temp drop to 21℃, the relay stop outputing.
When temp up to 22℃, relay output again and cooling
SH 1
SL 1
SH 2
SL 2
AdJ
When thermostat temp diff er s fr om the real temp,
you can do some calibration.
Calibration range -5~5℃
FAN
Fan Coil Controlling Mode Setting
(You c an s el ec t th e fa n co il I n co nt ro l & Ou t- of -c on tr ol .)
In “F00” mode, when room temp reaches to the setted temp, the fan coil stops working.
In “F01” mode, when room temp reaches to the setted temp, the fan coil goes on working.
FRE
Anti-freeze function On, when outage, or power-off state, it keep the room temp
between 5-7℃to protect your room Especially for heating mo de w he n in c ol d we at he r..
My Thermostat
<
Settin g di f( di f) :
Max temp i n co ol in g( sh 1) :
Min temp i n co ol in g( sh 1) :
Max temp i n he at in g( sh 2) :
Min temp i n he at in g( sh 2) :
Temp compe ns at io n( ad j) :
Fan mode (f an ):
fan coi l In -cont ro l
Anti-f re ez e fu nc ti on (fre):
Key lock (l oc ):
1.0℃
Unloc k
XII. Installation Instruction
The products suits for standard 80*80mm wall box or 60mm Europ e ro un d bo x.
1.Connect the line of power and valve into the terminals.
Fix the wall plate into the wall box by a screwdrive.
2.Connect the lines with the LCD board.
3.Connect the LCD board into the wall plate.
XIII. Attention
Thank you for buying this product!
Please read this manual for complete instructions on ins ta ll in g an d
operating your thermostat. If you require further assistance, pl ea se
feel free to contact us.
In the box yo u wil l find:
Model
The rm os tat
User Ma nu al
40℃
10℃
40℃
10℃
0℃
Off
Scr ew s
Our Service:
We of fe r th e wa rr an ty o f 24 m on th s fr om t he s al es d ay.
During the warranty, if it i s be lo ng to the quality issue, we will fix or replace
by free after testing.
If it is not quality problem or beyond the warranty time, we will charge f or
the after-sales service.
TGT 70WIF I-AC2
√
√
√
Wifi S eries Tou ch Scre en Ther mosta t
TGT 70 WI FI- AC 4
√
√
√
RoHS
LOC
Lock the button for thermostats. 3 choice:
01: button unlock.
02: lock all button except power on/off button.
03: lock all button.
4
 Loading...