

Page 1
BENZING Express G2 DOC
Quick start Guide
BENZING Express G2 DOC
Quick start Guide
DK_BENZING
-
G2DOC_EN_10.doc
•
Valid as of 11
t
h
December 2008
• Part.No.:
812882 Page 1 / 2
GANTNER Pigeon Systems GmbH • www.benzing.cc
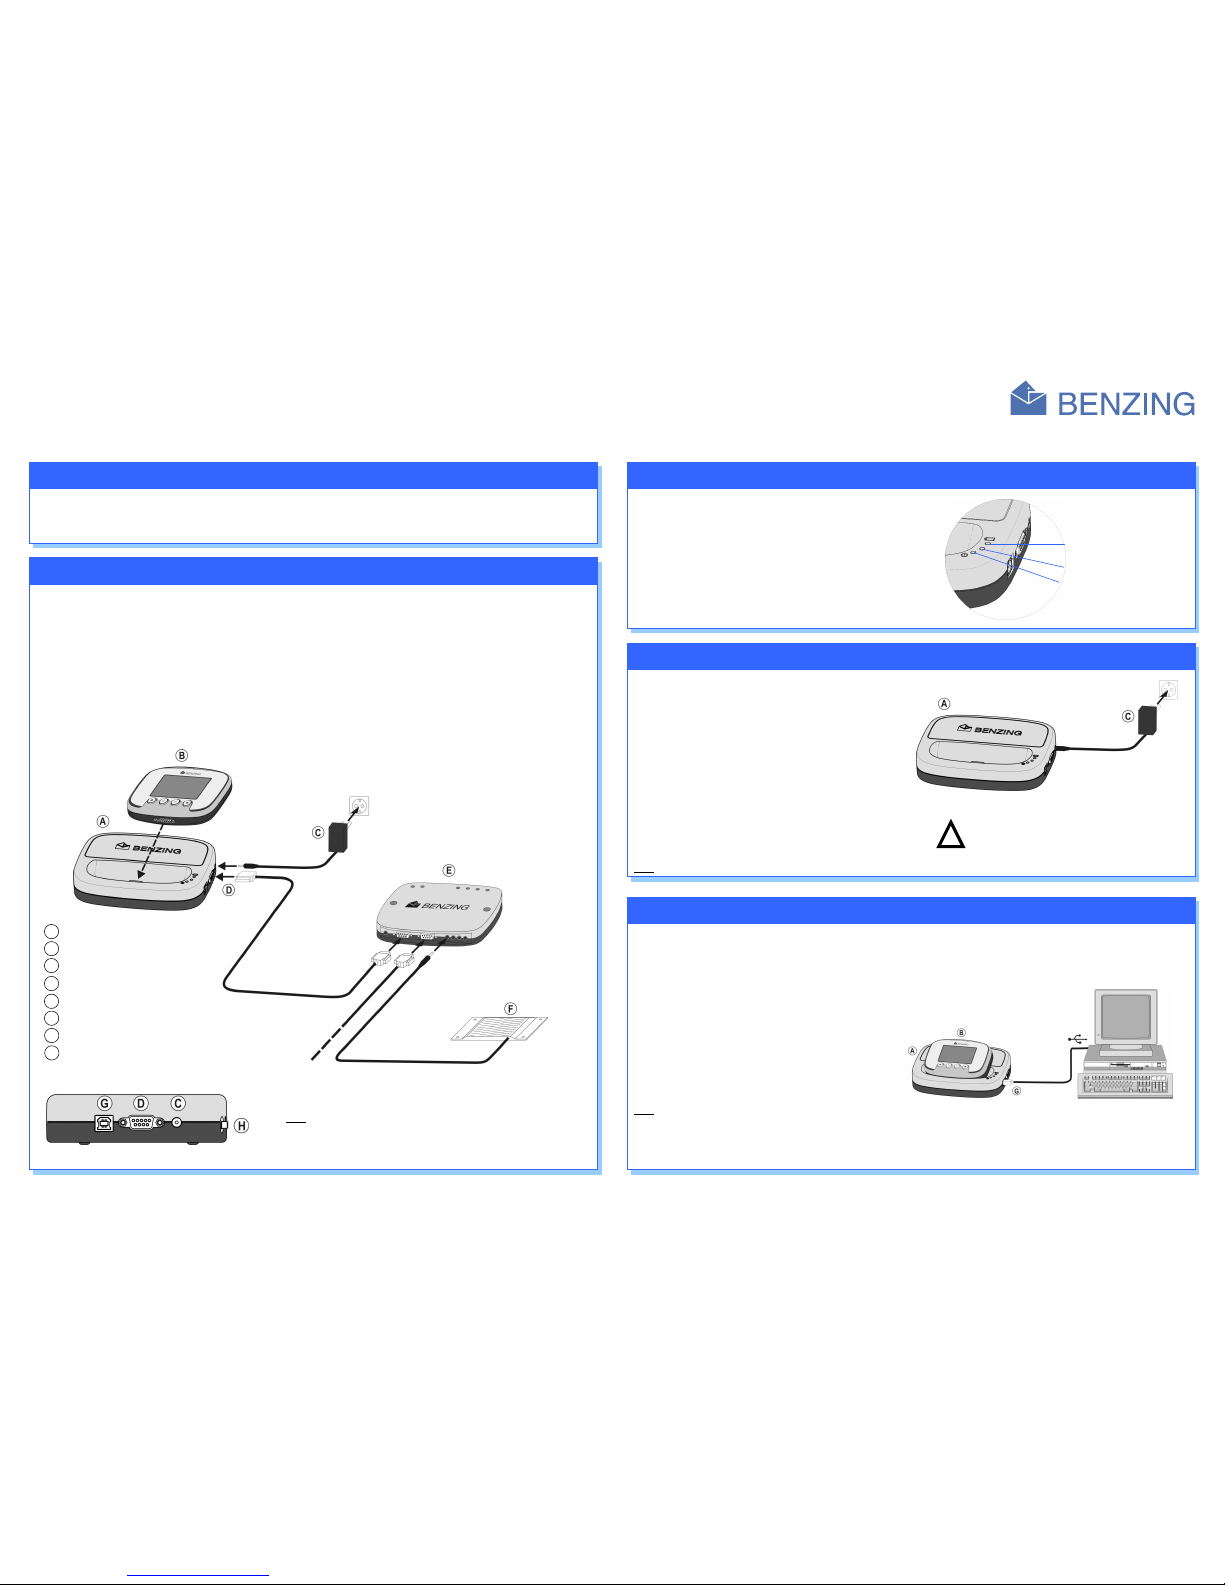
The lights on the top of the BENZING Express G2 DOC indicate the current syst em
status.
Status Description
LED 1:
red permanent Charging of internal battery in progress
g reen permanent Charging of internal battery is complete
LED 2:
blue permanent The extern al power supply is active
b lue flashing Supply by the interna l battery
b lue fast flashing The ba ttery is ne arly empty
Status
information
The battery is d esigned to supply the fanc iers system for approx. 5
hours (i f one Antenna Controller and as many Anten nas as desired are
connected ) resp. 3 hours (if two Antenna Controllers and as many
Antennas as desired are conne cted).
To charge the batter y, perform the follow ing steps :
1.
Plug-in the power supply unit (C) to the B ENZING Express G2
DOC (A) a nd connec t the powe r supply unit to main s.
2.
Switch-on the BEN ZING Express G2 DOC wi th t he O n/Off button
(The butto n remains in On-pos ition).
The light LED 1 on the t op of the docking st ation will light red w hile
the batter y is being charged. The comp letely loa ding time of the
battery w ill take approx. 1 2 hours. When the battery is fully loaded th e
light LED1 colour w ill turn to gr een.
Note: The battery is also loade d in norma l operatio n.
Before the BENZI NG Express G2 DOC is us ed the first time
the inter nal batt ery has to be completel y charge d once. This
takes about 15 hours. Do not interrupt the power supply
(the charg ing) during this time!
Battery
Set-up
of the
BENZING Express G2
DOC
1.
Connect t he BENZIN G Express G2 DOC (A) to the BENZING Antenna C ontroller (E) with the connecti on cable ( D).
2.
Connect t he Loft Ant enna EFA (F) to the BENZING Antenna C ontroller (E). Any o f the four plugs can be used.
3.
a) If th ere is ma ins p ower available, plu g-in the p ower supply unit (C) to th e BE NZING Express G2 DOC (A) and connect the power sup ply unit to
mains. T he syste m will be supplied by mains power and only in ca se of a power surge or outage the BENZING Expres s G2 D OC (A) will t ake-over
the supply of the sys tem.
b) If there is no main s power available, t he BENZIN G Express G2 DOC (A) will sup ply the sy stem.
4.
Plug-in the BENZING Express G2 (B) into the BENZ ING Expr ess G2 DO C. The DB -9 plug m ust sit firm ly.
5.
Switch-on the BENZI NG Expres s G2 DOC (A) with t he On/Off button (H ) (The but ton remai ns in ON- Position).
The BEN ZING E xpress G2 start s up and the lights on the front of the docking station are switched on and they show the system status (see "Status
information ").
General
Clocking o f pigeons with the BENZING Express G2 withou t any gap s, even i n the even t of a po wer surg e or outag e is guar anteed b y the BEN ZING Exp ress
G2 D OC. The BENZIN G Ex press G2 DOC is equipped wit h an int ernal battery and ad ditionally with a USB interfa ce for convenient tr ansfer of statistical
data to the PC at ho me and fo r device u pdates.
For transmissio n of fli ght data from the BENZING Exp ress G2 to a PC
and for loading data or new software from the PC to the BENZING
Express G2 and for printing with the B ENZING Printer Manager (see
backside) perform t he following steps:
1.
Switch-on the BENZI NG Expres s G2 DOC .
2.
Plug-in the USB-Connec tion c able ( G) int o the USB-Connection of
the BENZI NG Express G2 DOC (A).
3.
Plug-in the USB-Con nection ca ble into a free PC US B port.
4.
Plug-in t he BENZI NG Expr ess G2 (B) into the docki ng stati on. The
DB-9 plug must sit f irmly.
Note: If the BENZI NG Expres s G2 DOC is connected the f irst time to
the PC , the USB-driver must be inst alled. (See Soft ware
descriptio n on backs ide).
PC Communication
!
Note: The BEN ZING Ante nna Contr oller does not have t o be
additionall y connecte d with a power sup ply, if the Controller
is connecte d with th e BENZING Express G2 DOC.
LED 1: green/red (Battery status)
Not used
LED 2: blu e (Power supply)
A BENZING E xpress G2 DOC
B BENZING Express G 2
C Power Sup ply unit
D Connection cabl e 5 m (16 feet)
E BENZIN G Antenna Controller
F Loft Antenna (E FA) with 3 m (10 fe et) cable
G USB-socket for PC-connec tion
H On/Off button (at th e back o f the B ENZING
Express G2 DOC)
Page 2
BENZING Express G2 DOC
Quick Start Guide
BENZING Express G2 DOC
Quick Start Guide
Installation
of the
USB-driver
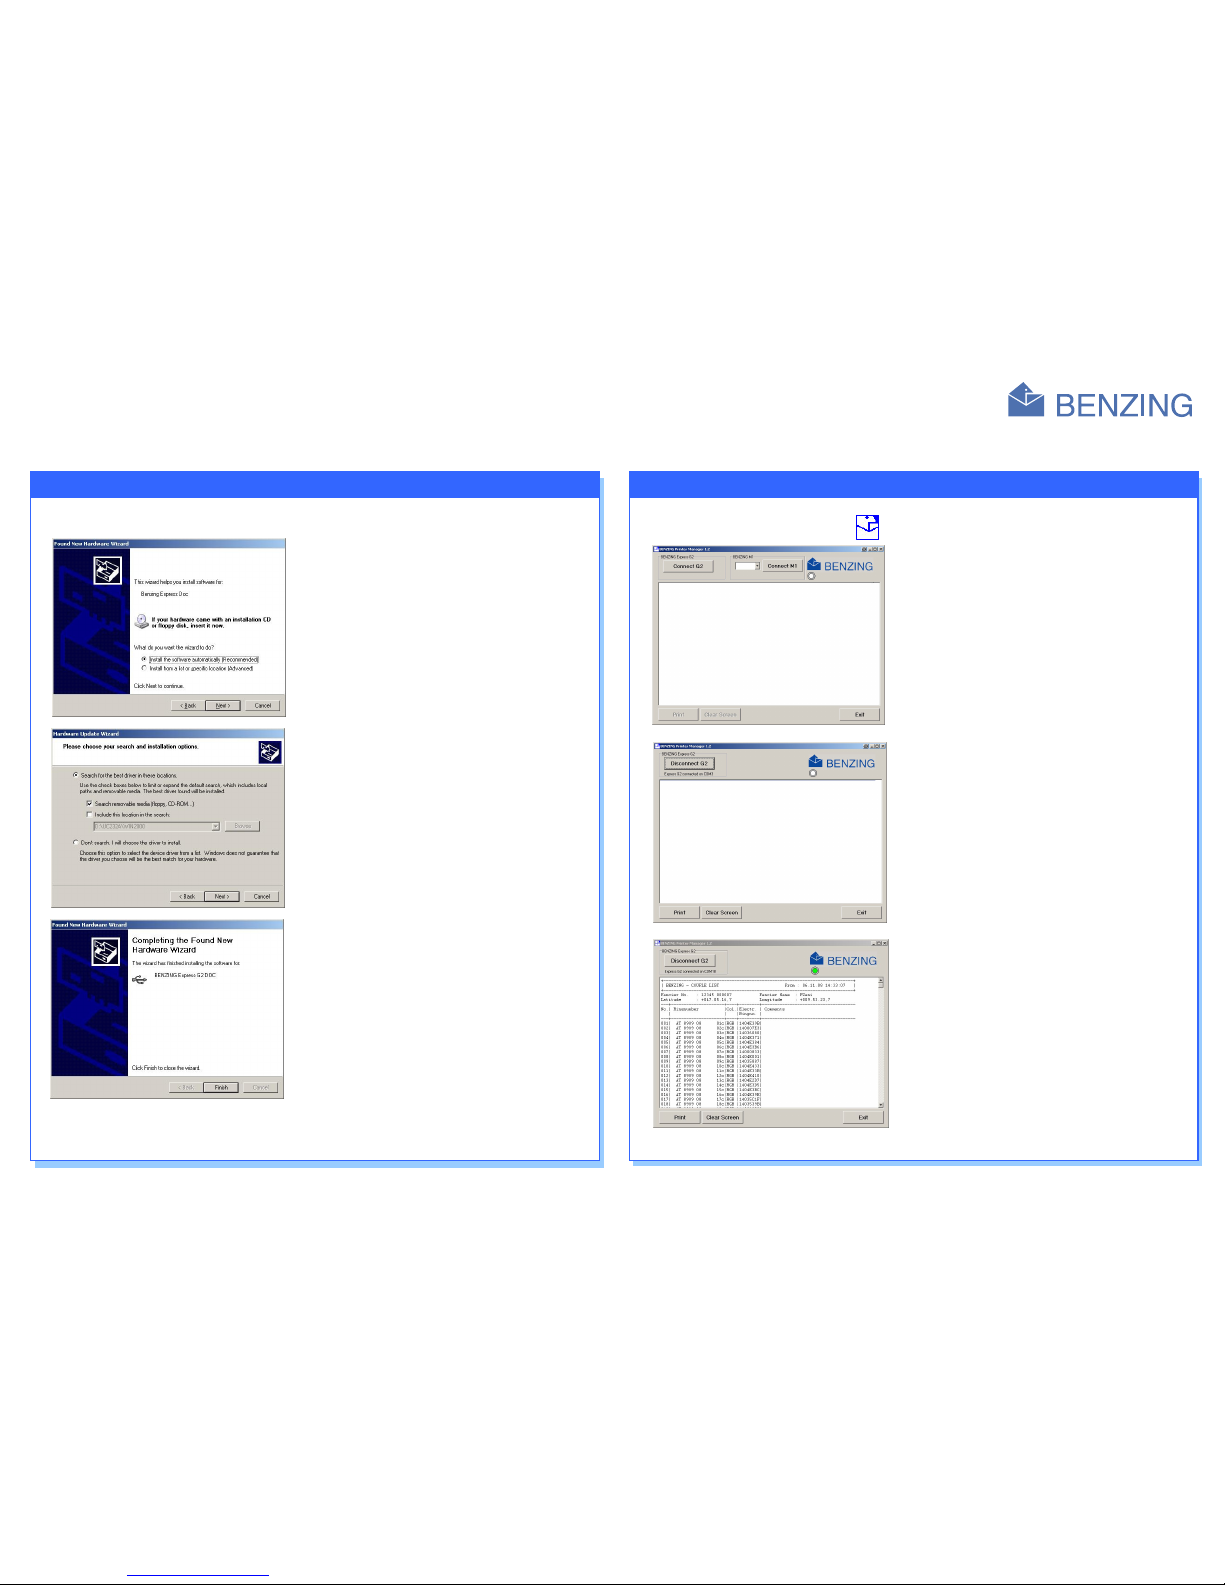
1. If the BENZI NG Expres s G2 DOC is connec ted the fir st time to the PC, at window a ppears au tomatically in order to install t he USB-dr iver.
2. Ma rk the first op tion “Install the software automatically (Recommen ded)“
and click on “Next > ”
3. Fir st of all i nsert the driver CD into the C D-drive. C ontinue t he installat ion by
clicking on “Ne xt >” and the com puter is sear ching the USB-d river on the
CD and in stalls it.
4. In order to complete the installatio n, click on “Finish” . Therefore the U SBdriver is no w installe d on the PC.
5. Af ter the installatio n of th e USB-d river, a window appears again in order to install the “USB Ser ial Port “. This installatio n must be also accompl ished.
After the installation of the drivers, the Software “BENZING Printer Manager“ can register/identify the BENZING Express G2 automatically. The
installation is done b y the sam e procedur e as for t he USB-dri ver
Operation of the
Software
“BENZING Printer Manager”
The installation win dow is s tarted automatically by i nserting the CD. Choose the installation for the Software “BENZING Printer Manager”. T he p rogram
can be st arted throug h a double-click on the progra m symbol a fter the ins tallation of the prog ram.
The main w indow of the Softw are appea rs on the monitor.
1. Fir st o f a ll c onnect the BENZIN G Express G2 via the USB-C onnection ca ble
to the P C (see PC commun ication o n the fron t of the document). In or der to
make a co nnection t o the BEN ZING Exp ress G2, c lick on “Co nnect G2“.
2. Go i nto the fancier menu of the BENZING Express G2 by pressing the left
and righ t button together for 3 seconds. Choose the men u 5 “P rint” and the
respective list (“C ouple list” or “Arrival list”) which you want to print. Thus
the selected list is trans ported/tra nsmitted to the PC and displayed in the
window of the BENZI NG Printe r Manager .
3. By the use of the but ton “Print “ the list is printed r esp. delet ed by the use of
the button “Clear Scr een”
4. Us e the butt on “Exit“ for quitting the prog ram.
DK_BENZING
-
G2DOC_EN_10.doc
•
Valid as of 11
th
December 2008
• Part.No
.:
812882 Page 2 / 2
GANTNER Pigeon Systems GmbH • www.benzing.cc
 Loading...