

Bensussen Deutsch and Associates 1509756DA User Manual
B
LUETOOTH
ONTROLLER
C
ONTRÔLEUR BLUETOOTH
C
R MANUAL / MANUEL DE L’UTILISATEUR
USE
BEDIENUNGSANLEITUNG / MANUA L DE USUARIO
MANUALE PER L’USO / MANUAL DO USUÁRIO
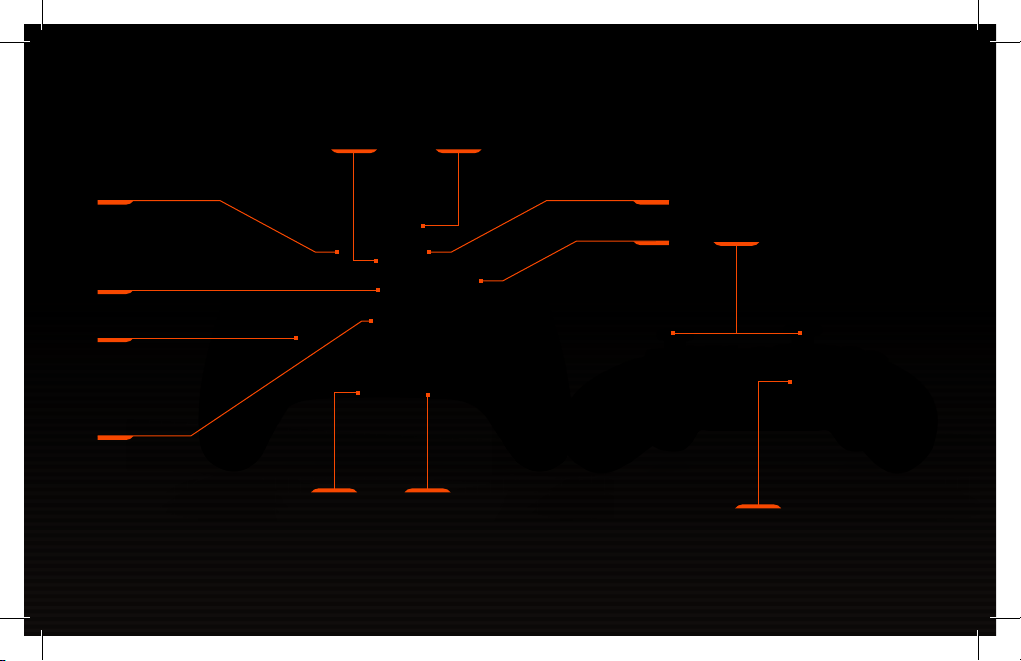
GAMING C LIP SLOTPOWER/PROGRAM LED
SELECT BUTTON
MENU/POWER BUTTON
D-PAD
WIRELESS/WIRED
MODE
CHECK
BATTERY LEVEL
POWER BANK
ON/OFF BUTTON
START BUTTON
A/B/X/ Y BUTTONS
PRECISION
ANALOG STICKS
PROGRAM BUT TON
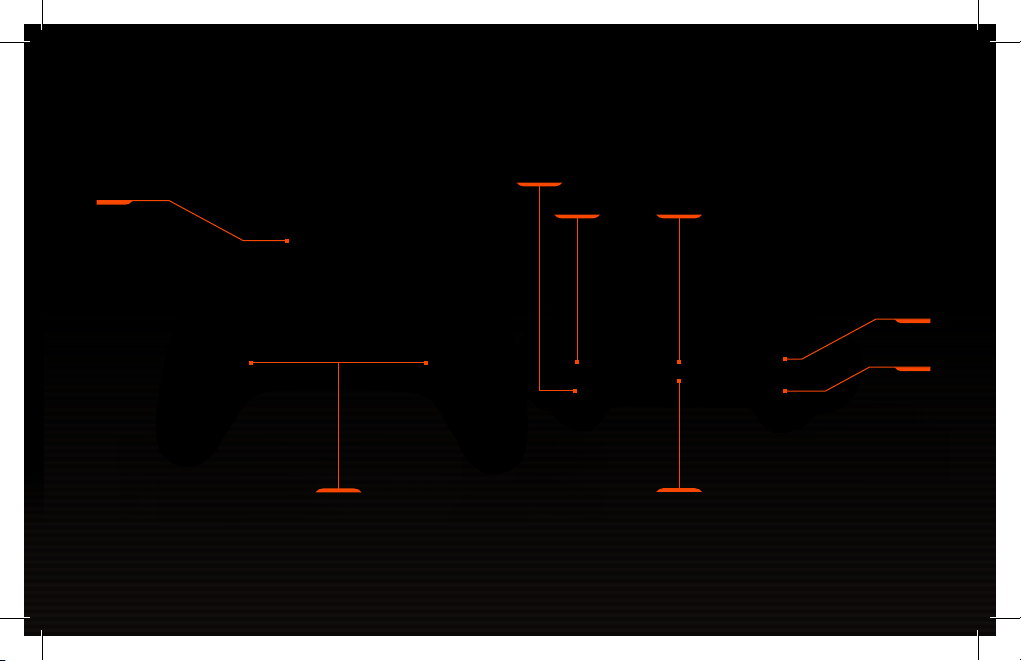
BLUETOOTH
PAIRING BUTTON
RT
RB
STAND ARD USB PORT
LB
LT
ADVANCED GAMING
BUTTONS
MICRO US B PORT
SETUP
For bes t result s, fully cha rge contr oller and po wer bank pr ior to firs t use.
CHARGING CONTROLLER + POWER BANK
• Usin g the includ ed 6.5ft (2 m) U SB Cable, c onnect th e Micro-US B end to lowe r port at top o f the
controller, and connect the Standard USB end to any powered USB source.
• Whe n charging , four LEDs w ill displa y the charg ing level f rom 25-50 -75-100% .
CHARGE LEVEL INDICATOR
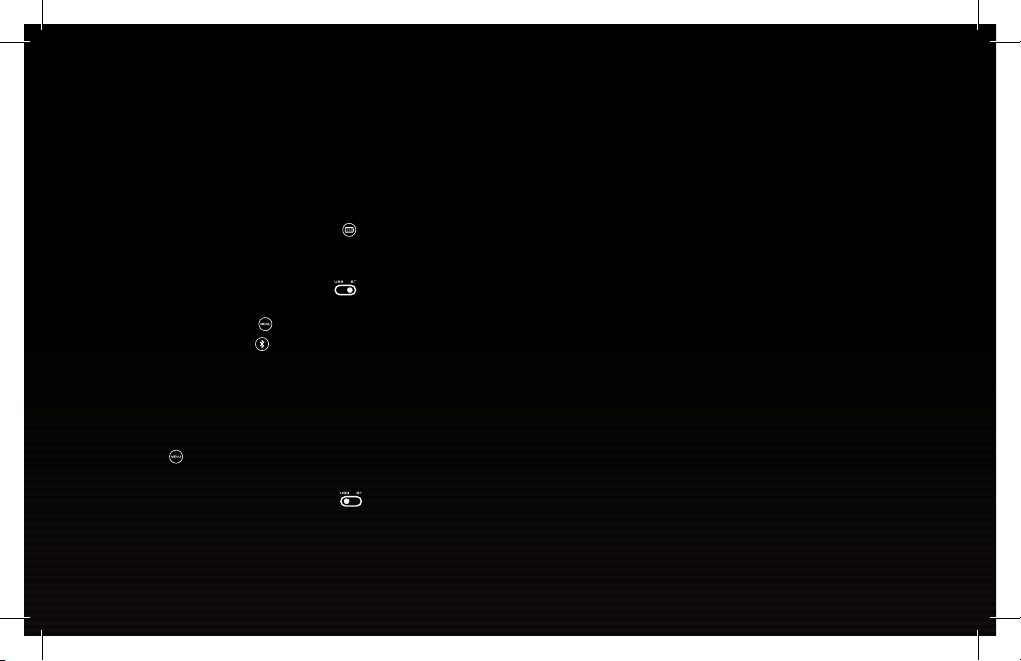
Check b atter y charge lev el by press ing the bat tery st atus but ton ( ) on front lower left of controller.
The LE Ds will indi cate the cu rrent cha rge level f rom 25-100 % even when c ontroll er is off.
WIRELESS MODE
Move Wireless/Wired switch on front center of controller to BT ( ) which i ndicate s Bluetooth
wireless mode.
• If co ntroller i s off, pres s the MENU bu tton (
• Pre ss and hold th e Bluetooth sync button (
mode (L ED will fla sh rapidly) .
• Ent er the Bluetooth settin gs on your dev ice and choo se the MOGA c ontroll er. The pair ing LED will t urn
solid when connected.
NOTE: A previously paired device will automatically pair to the controller when powered on.
POWERING OFF
Hold the menu button ( ) for 5 seco nds to turn c ontrolle r off and sa ve batte ry capaci ty.
WIRED MODE
Move Wireless/Wired switch on front center of controller to USB ( ) which i ndicates w ired mode .
• Conn ect Micro -USB end of t he 7.8” (20 cm) o r 6.5ft (2 m) c able to low er port at to p of contr oller, and
connect other end to your gaming device.
• Gami ng device i nput port s (Standar d USB, Micr o-USB, US B-C) will de termine w hether yo u use short er
or longer micro-USB cable for wired gaming.
) to tur n on (LED will i lluminat e).
) on back o f contro ller for 2 sec onds to ent er pairing
GAMING CLIP
A deta chable gam ing clip is inc luded for us e with gamin g on your phon e. You can use U SB cables wi th
clip attached for charging or wired mode.
1. Sl ide MOGA Con troller i nto gaming c lip by tippin g top edge in fi rst.
2. Push c ontrolle r bottom e dge down int o clip unti l it locks in to notch on f ront edge o f control ler.
3. To inser t phone, pus h top edge of ph one agains t top of phon e grip to exp and upward .
4. Push bo ttom of ph one down fl at into pla ce as you rea ch top limit o f phone grip .
5. Adjust phone horizontally to center alignment over controller, and adjust viewing angle forward or back.
6. Open kickstand on clip when setting controller down between sessions to prevent tipping.
7. Re move clip by p ulling fro nt edge for ward to rel ease from n otch.
INTEGRATED POWER BANK
A Powe r Bank built i nto the con troller al lows you to c harge you r phone durin g gameplay o r while
controller is off.
• Conn ect Stan dard USB end o f the 11.8 ” (30 cm) cable t o upper por t at top of con troller, a nd connect
other end to your mobile device.
• Duri ng gamepla y, move the Po wer Bank sw itch belo w right th umbstick t o the righ t (on) to star t
char ging. If yo u prefer to u se batter y power to e xtend con troller u sage time r ather tha n charge
phone , move swi th to the lef t (off).
• To charge mobile device when controller is not in use, simply connect cable between controller and
devi ce to begin ch arging (P ower Bank S witch mus t be ON).
• Your mo bile devi ce will displ ay charge s tatus onc e connect ed. If char ging does no t begin, th e power
bank ba ttery m ay be too low : recharge c ontroll er.
• The amount of charge available for your phone depends on how much battery capacity remains on the
controller when charging begins.
ASSIGNING THE ADVANCED GAMING BUTTONS
1. Pr ess the Or ange Progr am Butto n on the bott om of the con troller f or 2 seconds . The LED Co nnection
Indic ator will f lash, sign aling the co ntrolle r is in assign m ode.

2. Press 1 of the following buttons (A/B/X/Y/LB/RB/LT/RT/Left Stick Press/Right Stick Press/D-pad)
to re- assign. T hen press t he Advanc ed Gaming Bu tton (AG R or AGL) tha t you wish to a ssign. Th e LED
conne ction indi cator wil l stop flas hing, sign aling the Ad vanced Ga ming Butt on has been s et.
3. Repeat for the remaining Advanced Gaming Button.
NOTE: Advanced Gaming Button assignments will remain in memory even after disconnected.
RESETTING THE ADVANCED GAMING BUTTONS
1. Ho ld the Prog ram Butto n down for 2 se conds. Th e LED Conne ction Indi cator will s lowly fl ash, signa ling
the controller is in assign mode.
2. Pres s the prev iously ass igned but ton for 5 sec onds, and th e function w ill be clea red.
FAQS
For la test FAQs , visit PowerA.com/Suppor t
PROBL EM: My cont roller wil l not power on ?
SOLU TION: Con firm the co ntrolle r is fully cha rged by pre ssing the ba ttery s tatus but ton (
lower left of controller. Plug in to recharge as needed.
PROBL EM: I do not se e MOGA contr oller lis ted in mobil e devices Bluetooth set tings?
SOLU TION: Pre ss and hold th e Bluetooth sync button (
pairi ng mode (LED w ill flash r apidly).
PROBL EM: The int egrate d power bank i s not funct ioning?
SOLU TION: Con firm the co ntrolle r has more tha n 25% charg e and Power B ank butto n is switch ed on.
CONTACT/SUPPORT
For support with your authentic PowerA accessories, please visit PowerA.com/Support .
MANUFACTUR ED BY
Bensu ssen Deut sch & Assoc iates, L LC. (BDA , LLC.)
1552 5 Woodinvi lle-Redm ond Rd. NE Woo dinville , WA 98072. B DAINC.c om | POWERA.com
ADDITIONAL LEGAL
MOGA , the Pow erA logo, a nd the MOG A by Power A logo are tr ademar ks of Ben sussen De utsch a nd Assoc iates, L LC.
TM and © B ensusse n Deutsc h and Asso ciate s, LLC. A ll other t radema rks are t he proper ty of th eir respe ctive o wners .
) on back o f contro ller for 2 sec onds to ent er
) on fro nt
MOTION WARNING
Play ing video ga mes can mak e your muscl es, joint s, skin or ey es hurt. Fo llow thes e instruc tions to av oid
problems such as tendinitis, carpal tunnel syndrome, skin irritation or eyestrain:
• Avoi d excessi ve play. Take a 1 0 to 15-min ute break e very hour, e ven if you do n’t think yo u need it.
Parents should monitor their children for appropriate play.
• If yo ur hands, wr ists, ar ms or eyes be come tired o r sore whil e playing, o r if you feel s ymptoms s uch
as tin gling, num bness, bur ning or sti ffness , stop and re st for seve ral hours b efore pla ying again .
• If yo u continue t o have any of t he above s ymptoms o r other disc omfort d uring or af ter play, st op
play ing and see a doc tor.
FCC STA TEMENT
This d evice comp lies with P art 15 of th e FCC Rules . Operati on is subjec t to the foll owing two c onditio ns:
(1) th is device ma y not cause h armful in terfer ence, and (2 ) this devi ce must acc ept any inte rferen ce
received, including interference that may cause undesired operation.
WARNING: C hanges or mo dificat ions to thi s unit not ex pressly a pproved b y the part y responsi ble for
compliance could void the user’s authority to operate the equipment.
NOTE : This equip ment has bee n tested an d found to com ply with t he limits fo r Class B dig ital devi ce,
pursu ant to Par t 15 of the FC C Rules. Th ese limit s are design ed to provi de reasona ble prote ction aga inst
harmful interference in a residential installation. This equipment generates, uses and can radiate radio
frequency energy and, if not installed and used in accordance with the instructions, may cause harmful
interference to radio communications. However, there is no guarantee that interference will not occur
in a par ticular in stallat ion. If thi s equipment d oes cause h armful in terfer ence to radi o or televi sion
rece ption, wh ich can be det ermined by t urning th e equipment o ff and on, t he user is enc ouraged to t ry
to correct the interference by one or more of the following measures:
• Reorient or relocate the receiving antenna.
• Increase the separation between the equipment and receiver.
• Con nect the eq uipment in to an outle t on a circui t differ ent from t hat to whi ch the rece iver is con nected.
• Consult the dealer or an experienced radio/ TV technician for help.
AUSTRALIAN WARRANTY STATEMENT
This pr oduct com es with gua rantees t hat canno t be exclude d under the A ustrali an Consume r Law.
You are entitled to a replacement or refund for a major failure and for compensation for any other
reasonably foreseeable loss or damage. You are also entitled to have the goods repaired or replaced
if the g oods fail to b e of accept able quali ty and the fa ilure does n ot amount t o a major fail ure. If
purch ased wit hin Austr alia or New Ze aland, thi s product c omes with a O ne-year w arranty f rom date o f
purch ase. Defe cts in the pr oduct mus t have appe ared with in One year fr om date of p urchase, i n order
to cla im the warr anty. All wa rranty c laims mus t be facilit ated back t hrough t he retaile r of purcha se
in acco rdance wi th the ret ailer’s re turn polic ies and proc edures. A ny expens es incurr ed, as a resul t of
retu rning the pr oduct to th e retaile r of purcha se are the fu ll respons ibility o f the consum er.
AU WHOLESALE DISTRIBUT OR
Leve l 2, 2 Darlin g Street S outh Yarr a, Austr alia VIC 3141
bluemouth.com.au Email: support@bluemouth.com. au +61 (3) 9867 2666
REGIONAL COMPLIA NCE SYMBOLS
More information available via web-search of each symbol name.
The WEEE symbol informs the end-user about separate disposal requirements for WEEE
(Was te of elect rical and e lectroni c equipmen t) as requir ed per the Ar ticle 11( 2) of the WEE E
Direc tive and p rescribe d by Europe an standa rd EN5041 9:2005.
CE (Con formité E uropéen e aka Europe an Confor mity) is a ce rtific ation mar k that indic ates
conformity with health, safet y, and environmental protection standards for products sold
within the European Economic Area.
The Re gulator y Complian ce Mark is a vi sible indic ation of a pr oduct’s co mpliance w ith all
applicable ACMA (Australian Communications and Media Authority) regulatory arrangements,
including all technical and record-keeping requirements regarding the electrical safety and/or
electromagnetic compatibility (EMC).
WARRANTY
2-Year L imited War ranty: V isit PowerA.com for details.
INSTALLATION
Pour ob tenir de mei lleurs ré sultats , chargez e ntièrem ent la manet te et la ba tterie de s ecours av ant
la première utilisation.
CHAR GER LA MANE TTE ET LA B ATTERIE DE SECOUR S
• À l’aid e du câble USB d e 2 m fourni, r eliez le conn ecteur Mic ro-USB au p ort infé rieur situ é sur le haut
de la manette et reliez le connecteur USB standard à n’importe quelle source d’alimentation USB.
• Lor s de la charg e, quatre L ED signale ront le niv eau de char ge de 25, 50, 75 e t 100%
INDICATEUR DE NIVEAU DE CHARGE
Véri fiez le niv eau de charg e de la batte rie en appu yant sur le bo uton d’ét at de la batt erie ( ) sur l a
part ie inféri eure gauch e à l’avant de l a manett e. Les LED in diqueron t l’actuel ni veau de cha rge, de 25 à
100%, m ême si la mane tte est é teinte.
MODE SA NS FIL
Plac ez le commut ateur san s fil/fil aire de la par tie cent rale à l’ava nt de la mane tte sur la po sition BT
(
) pour ac tiver le mo de sans fil Bluetooth.
• Si la m anette es t éteint e, appuyez s ur le bouto n MENU (
• Appuyez sur le bouton de synchronisation Bluetooth (
pour activer le mode synchronisation (la LED clignotera rapidement)
• Saisissez les paramètres Bluetooth sur vot re apparei l et sélect ionnez la ma nette MO GA. La LED d e
synchronisation restera allumée une fois la connexion établie.
REMA RQUE: un appareil précédemment synchronisé se synchronisera automatiquement avec la manette
lors de l’al lumage de cette dern ière.
) pour l’a llumer (La L ED s’allume).
) à l’arr ière de la man ette dur ant 2second es
ÉTEI NDRE
Maintenez appuyé le bouton MENU ( ) durant 5s econdes po ur éteindr e la manett e et économ iser la
batterie.
MODE FILAIRE
Plac ez le commut ateur san s fil/fil aire de la par tie cent rale à l’ava nt de la mane tte sur la po sition USB
(
) pour activer le mode filaire.
• Reli ez le connec teur Micr o-USB du câb le de 20cm ou 2 m au po rt infér ieur situé s ur le haut de la
mane tte et reli ez l’autr e extrém ité à votr e appareil d e jeu.
 Loading...