

Bensussen Deutsch and Associates 12325201 User Manual
ENGLISH
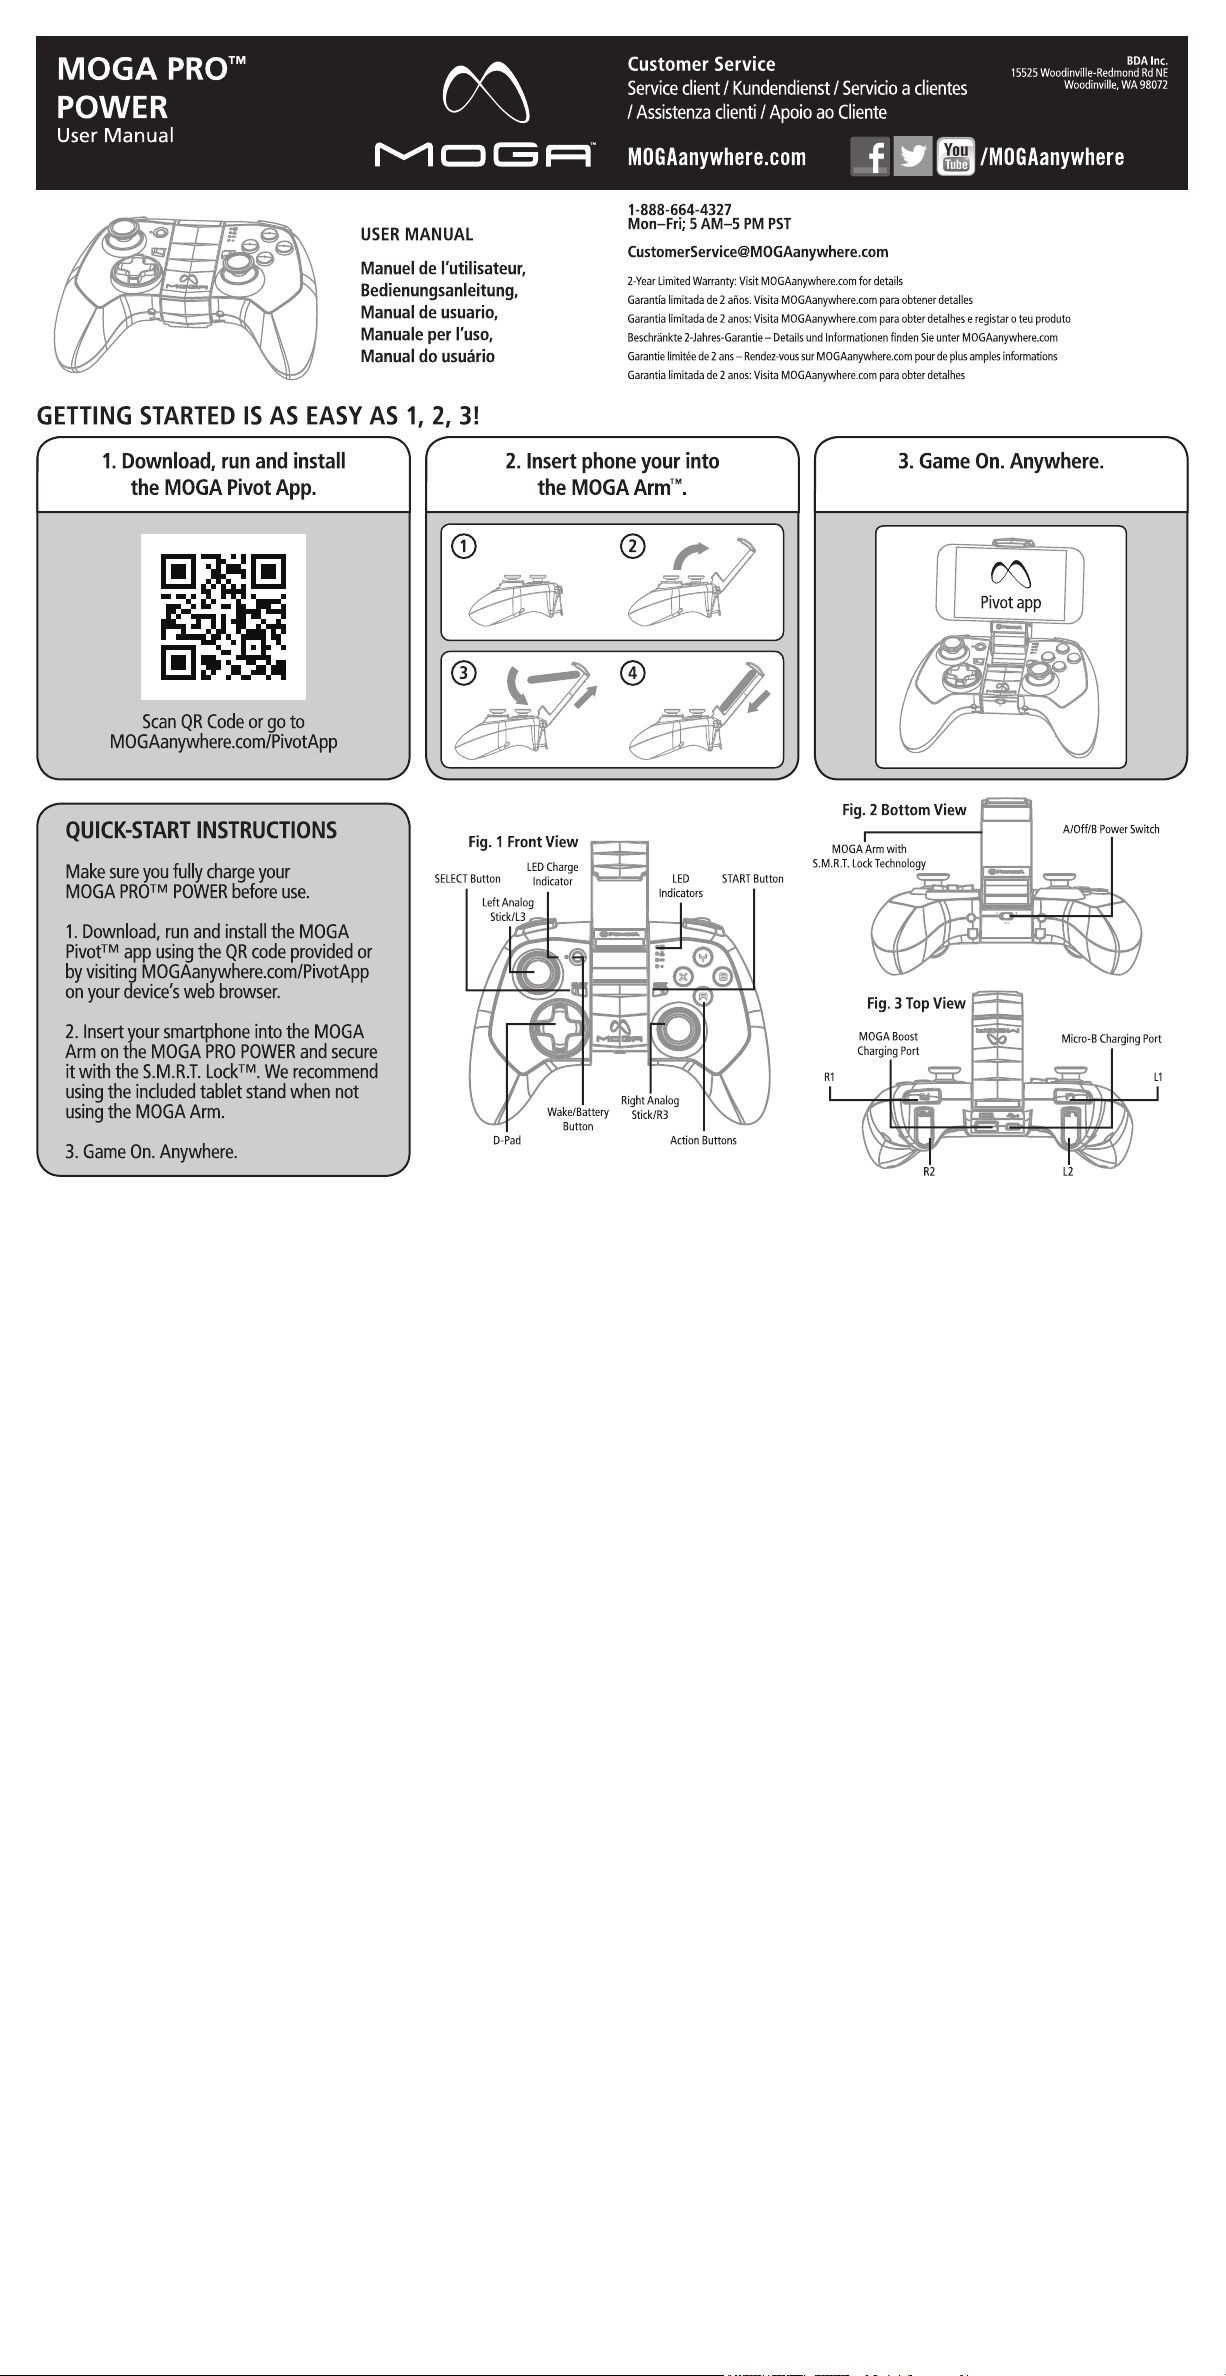
DETAILED SETUP
1. Before using your MOGA Pro Power, fully charge it by
plugging the included Micro-B cable into the Micro-B
charging port on your controller. While charging, the LED
Charge indicator next to the Wake/Battery button flashes
yellow when the controller is off, green while in A-mode,
and orange in B-mode. A solid LED indicates that the
controller is fully charged.
2. Download and install the MOGA Pivot app using the
QR code provided or from visiting MOGAanywhere.com/
Pivotapp on your device’s web browser—make sure the
Pivot app is set to automatically update.
3. Unfold the MOGA Arm. Place your smartphone into
the top of the MOGA Arm, gently push the arm open, and
lock your phone in place. Use the included tablet stand if
you are connecting your MOGA Pro Power to an Android
2.3+ tablet.
4. Slide the switch located under the MOGA Arm from
Off to A.
5. When you slide the Power switch to A, your MOGA is
in Bluetooth® pairing mode. The LED Status indicators
flash blue while in pairing mode. Pairing mode lasts for
180 seconds before the MOGA controller turns off to save
power.
6. Launch the MOGA Pivot app. Pivot will take you step-bystep through the process to ensure that your smartphone’s
Bluetooth service is turned on and your smartphone is
paired with your MOGA Pro Power controller. Follow the
on-screen instructions to start gaming!
USING MOGA BOOST:
To charge your mobile device while you play, plug the
included 8-inch MOGA Boost™ cable into the charging port
on the top of your MOGA controller, then into the Micro-B
port on your device. MOGA Boost will not function if the
MOGA Pro Power controller drops below 25% charge. The
LED Status indicators flash rapidly when the charge drops
below 25%.
LED INDICATORS:
The LED Charge indicator displays solid green when the
controller is powered on in A-mode, solid orange when
powered on in B-mode, and turns off when the controller is
off. While charging, the LED Charge indicator flashes yellow
when the controller is off, green while in A-mode, and
orange in B-mode.
The LED Status indicators all flash in unison while the
controller is pairing. After pairing is complete, the LEDs
display whether the controller is the first, second, third,
or fourth controller paired to the mobile device.
When your MOGA Pro Power is paired to your mobile
device, you can press the Wake/Battery button, and the
LED Status indicators will show battery charge in 25%
increments—one solid and one flashing LED at 25%, two
solid and one flashing LED at 50%, three solid and one
flashing LED at 75%, and all four LEDs solid at 100%. The
Wake/Battery button will not function with your controller
off. In sleep mode, pressing the Wake/Battery button will
wake up your MOGA Pro Power.
A-MODE VS. B-MODE:
A-mode supports all the MOGA Enhanced games in our
massive library. For games that aren’t MOGA
Enhanced, but do support HID (Human Interface Device)
drivers, B-mode will allow you to map the game’s controls
to your MOGA.
GAMING ON YOUR TABLET:
MOGA supports gaming on any Android 2.3+ tablet,
turning your tablet into a portable console!
CONNECTING TO YOUR TV:
You can use MOGA to play mobile games on your television.
If your tablet or phone supports MHL out—most newer
models do via the charging port—and your television
features an HDMI input, simply plug an MHL cable into your
mobile device and your TV for a large screen experience. Go
to meetmhl.com to see diagrams and how-to-videos to get
the most out of your device.
FREQUENTLY ASKED QUESTIONS
Q: I am having trouble pairing my MOGA Pro Power.
A: First, try again. If the LED Status indicators stop flashing,
press the Wake/Battery button. If your MOGA still won’t
pair, turn the switch Off then back to A. Once you see the
LEDs flash blue, try to pair again.
If those options don’t work, you can try to manually pair
with your MOGA Pro Power. Go to your Settings menu,
select Wireless & Networks>Bluetooth Settings, and, with
Bluetooth on, scan for devices. When MOGA Pro 2 appears,
select Pair. Then reopen Pivot—the MOGA controller
should then pair.
Q: I want to pair my MOGA Pro Power to another device,
but it keeps re-pairing with my original device.
A: Launch Pivot and open the Settings menu. Select Add/
Manage Controllers—you must always unpair your MOGA
Pro Power before pairing with another device. Tap Unsync.
Then, using the same menu, pair your MOGA Pro Power
with the new mobile device. You may also unpair your
MOGA controller in the System Settings menu of your
mobile device.
Q: My device is not charging when connected to the MOGA
Boost charging port.
A: Make sure you have more than 25% charge left in your
MOGA Pro Power. Also make sure the MOGA controller is
in A or B mode. MOGA BOOST will not function when the
power switch is set to Off.
Q: I am trying to charge both my MOGA Pro Power and my
mobile device simultaneously, but my device is not charging.
A: You cannot charge your mobile device with MOGA Boost
while your MOGA Pro Power controller is charging.
For answers to more frequently asked questions, check out
MOGAanywhere.com/support.
FCC STATEMENT:
Warning: Changes or modifications to this unit not expressly
approved by the party responsible for compliance could void
the user’s authority to operate the equipment.
NOTE: This equipment has been tested and found to comply
with the limits for a Class B digital device, pursuant to Part 15
of the FCC Rules. These limits are designed to provide
reasonable protection against harmful interference in a
residential installation. This equipment generates, uses and
can radiate radio frequency energy and, if not installed and
used in accordance with the instructions, may cause harmful
interference to radio communications. However, there is no
guarantee that interference will not occur in a particular
installation. If this equipment does cause harmful interference
to radio or television reception, which can be determined by
turning the equipment off and on,the user is encouraged to try
to correct the interference by one or more of the following
measures:
- Reorient or relocate the receiving antenna.
- Increase the separation between the equipment and receiver.
- Connect the equipment into an outlet on a circuit different
from that to which the receiver is connected.
- Consult the dealer or an experienced radio/TV technician for
help.
IC STATEMENT:
This device complies with Industry Canada licence-exempt
RSS standard(s). Operation is subject to the following two
conditions: (1) this device may not cause interference, and
(2) this device must accept any interference, including
interference that may cause undesired operation of the
device.
CARE AND MAINTENANCE
Do not expose your MOGA Pro Power to extreme
temperatures. Your MOGA Pro Power is meant to be stored
and used in average temperatures and should never be
exposed to direct sunlight or freezing temperatures for any
length of time. Normal operating and storage temperature
range is 40F–110F. Do not expose your MOGA Pro Power to
water or other liquids.
MOGA and the MOGA logo are trademarks of Bensussen
Deutsch and Associates, Inc. TM and © Bensussen Deutsch
and Associates, Inc. Android is a trademark of Google
Inc. The Bluetooth® word mark and logos are registered
trademarks owned by Bluetooth SIG, Inc. and any use of
such marks by PowerA is under license. All other trademarks
are property of their respective owners.
FRENCH
INSTALLATION DÉTAILLÉE
1. Avant d’utiliser votre MOGA Pro Power, chargez-le
complètement en branchant le câble micro B au port micro B
de chargement de votre contrôleur. Pendant le chargement,
l’indicateur de charge à DEL situé à côté du bouton Réveil /
Batterie clignote en jaune quand le contrôleur est arrêté, en
vert en mode A et en orange en mode B. Un voyant DEL fixe
indique que le contrôleur est complètement chargé.
2. Téléchargez et installez l’application MOGA Pivot
en utilisant le code QR fourni ou en vous rendant sur
MOGAanywhere.com/Pivotapp sur le navigateur de votre
appareil – veillez à ce que l’application Pivot soit paramétrée
pour effectuer des mises à jour automatiques.
3. Dépliez le bras MOGA Arm. Placez votre smartphone sur
le dessus du MOGA Arm, ouvrez délicatement ce dernier,
mettez votre téléphone en place et bloquez-le. Utilisez le
support de tablette fourni si vous connectez votre MOGA
Pro Power à une tablette Android 2.3+.
4. Faites glisser le bouton d’alimentation situé sous le
MOGA Arm de la position Off (arrêt) à la position A.
5. Votre MOGA passe en mode de synchronisation
Bluetooth® lorsque vous faites glisser le bouton
d’alimentation sur la position A. Les indicateurs d’état à DEL
clignotent en bleu pendant le mode synchronisation. Le
mode synchronisation dure 180 secondes, puis le contrôleur
MOGA s’éteint pour économiser l’énergie.
6. Lancez l’application MOGA Pivot. Pivot vous
accompagnera pas-à-pas dans le déroulement du processus
pour assurer que le service Bluetooth de votre smartphone
est activé et que votre smartphone est synchronisé avec
votre contrôleur MOGA Pro Power. Suivez les instructions à
l’écran et à vous de jouer !
UTILISATION DU MOGA BOOST:
Pour charger votre appareil mobile pendant que vous jouez,
connectez le câble de 20 cm MOGA Boost au port situé
au dos de votre contrôleur MOGA, puis au port micro B d
e votre appareil. MOGA Boost ne fonctionnera pas si la
charge du contrôleur MOGA Pro Power tombe à moins de
25 %. Les indicateurs d’état à DEL clignotent rapidement
lorsque la charge tombe à moins de 25 %.
INDICATEURS À DEL:
L’indicateur de charge à DEL s’allume en vert fixe lorsque le
contrôleur est mis en mode A, en orange fixe lorsqu’il est en
mode B et s’éteint lorsque le contrôleur est arrêté. Pendant
le chargement, l’indicateur de charge à DEL clignote en
jaune quand le contrôleur est arrêté, en vert en mode A et
en orange en mode B.
Les indicateurs d’état à DEL clignotent tous à l’unisson
pendant le processus de synchronisation du contrôleur.
Une fois la synchronisation terminée, les DEL indiquent si
le contrôleur est le premier, le deuxième, le troisième ou le
quatrième à être synchronisé à l’appareil mobile.
Lorsque la MOGA Pro Power est synchronisée à votre
appareil mobile, vous pouvez appuyer sur le bouton Réveil /
Batterie, et les indicateurs d’état à DEL indiqueront la charge
de la batterie par tranches de 25 % – une DEL fixe et une
clignotante pour 25 %, deux fixes et une clignotante pour
50 %, trois fixes et une clignotante pour 75 % et les quatre
fixes pour 100 %. Le bouton Réveil / Batterie ne fonctionne
pas lorsque votre contrôleur est arrêté. En mode de veille,
appuyez sur le bouton Réveil / Batterie pour réactiver votre
MOGA Pro Power.
MODE A OU MODE B?
Le mode A est compatible avec tous les jeux optimisés pour
MOGA de notre vaste collection. Pour les jeux qui ne sont
pas optimisés pour MOGA, mais qui sont compatibles avec
HID (interface personne-machine), le mode B vous permet
d’adapter les commandes du jeu à votre MOGA.
POUR JOUER SUR VOTRE TABLETTE:
La MOGA permet de jouer avec toutes les tablettes Android
2.3+, transformant ainsi votre tablette en console portable!
CONNEXION À VOTRE TÉLÉVISEUR:
Il est possible d’utiliser votre MOGA pour jouer à des jeux
mobiles sur votre téléviseur. Si votre tablette ou votre
téléphone est compatible avec MHL – c’est le cas de la
plupart des modèle récents via le port de chargement – et
que votre téléviseur est doté d’un connecteur HDMI, il vous
suffit de connecter un câble MHL à votre appareil mobile
et à votre téléviseur pour profiter du jeu sur grand écran.
Rendez-vous sur meetmhl.com pour voir des schémas et
des vidéos de démonstration afin de pouvoir profiter au
maximum de votre appareil.
FOIRE AUX QUESTIONS
Q: J’ai du mal à synchroniser ma MOGA Pro Power.
R: Commencez par une nouvelle tentative. Si les indicateurs
d’état à DEL cessent de clignoter, appuyez sur le bouton
Réveil / Batterie.
Si votre MOGA ne se synchronise toujours pas, mettez
le bouton d’alimentation sur Off, puis de nouveau sur A.
Dès que les DEL se mettent à clignoter en bleu, essayez à
nouveau de synchroniser.
Si ces options ne donnent pas de résultat, vous pouvez
essayer de synchroniser manuellement votre MOGA
Pro Power. Allez dans le menu Settings (configuration),
sélectionnez Wireless & Networks>Bluetooth Settings et,
avec Bluetooth activé, recherchez les appareils. Lorsque
MOGA 2 s’affiche, sélectionnez Pair (synchroniser). Rouvrez
ensuite Pivot – le contrôleur MOGA devrait alors se
synchroniser.
Q: Je veux synchroniser ma MOGA Pro Power avec un autre
appareil, mais elle se resynchronise chaque fois avec mon
ancien appareil.
R: Lancez Pivot et ouvrez le menu Settings (configuration).
Sélectionnez Add / Manage Controllers (ajouter / gérer
des contrôleurs) – désynchronisez toujours votre MOGA
Pro Power avant de le synchroniser avec un autre appareil.
Tapotez sur Unsync (désynchroniser). Dans le même menu,
synchronisez ensuite votre MOGA Pro Power avec le nouvel
appareil mobile. Vous pouvez également désynchroniser
votre contrôleur MOGA dans le menu System Settings
(paramètres système) de votre appareil mobile.
Q: Mon appareil ne se charge pas lorsqu’il est connecté au
port de chargement de la MOGA Boost.
R: Vérifiez qu’il reste plus de 25 % de charge dans votre
MOGA Pro Power. Assurez-vous également que le
contrôleur MOGA est bien en mode A ou B MOGA Boost ne
fonctionne pas lorsque le bouton d’alimentation est sur Off.
Q: J’essaye de charger simultanément ma MOGA Pro
Power et mon appareil mobile, mais l’appareil mobile ne
se charge pas.
R: Vous ne pouvez pas charger votre appareil avec la MOGA
Boost pendant que le contrôleur MOGA Pro Power est en
cours de chargement. Rendez-vous sur MOGAanywhere.
com/support pour obtenir des réponses à d’autres questions
fréquemment posées.
ENTRETIEN ET MAINTENANCE
N’exposez pas votre MOGA Pro Power à des températures
extrêmes. Votre MOGA Pro Power doit être entreposée et
utilisée à des températures moyennes et ne doit pas être
exposée à la lumière directe du soleil ou à des températures
sous zéro pendant quelque durée que ce soit.
Les températures normales de fonctionnement et
d’entreposage sont comprises entre 4,5°C et 43°C.
N’exposez pas votre MOGA Pro Power à de l’eau ou à
d’autres liquides.
MOGA et le logo MOGA sont des marques de commerce
de Bensussen Deutsch and Associates, Inc. ™ et ©
Bensussen Deutsch and Associates, Inc. Android est une
marque de commerce de Google Inc. La marque et les logos
Bluetooth® sont des marques déposées de Bluetooth
SIG, Inc. et toute utilisation de ces marques par PowerA
s’effectue sous licence. Toutes les autres marques de
commerce sont la propriété de leurs propriétaires respectifs.
Le présent appareil estconforme aux CNR d’Industrie
Canada applicables aux appareils radio exempts de
licence. L’exploitation est autorisée aux deux conditions
suivantes: (1) L’appareil ne doit pas produire de rouillage
et (2) l’utilisateur de l’appareil doit accepter tout brouillage
radioélectrique subi, meme si le brouillage est susceptible
d’en compromettre le fonctionnement.
GERMAN

DETAILLIERTE EINRICHTUNG
1. Bevor Sie Ih ren MOGA Pro Po wer verwend en, müssen
Sie den Co ntroller volls tändig aufla den. Schließ en Sie dazu
das mitgelieferte Micro-B-Kab el am Micro-B-Lad eanschluss
des Controllers an. Bei ausgeschaltetem Controller blinkt
die LED-Ladeanzeige neben der Weck-/Batterie-Taste
währen d des Ladevor gangs gelb. Im A -Modus blink t die
Anzeig e grün und im B- Modus orange. W enn der Contro ller
aufgeladen ist, leuchtet die LED-Anzeige durchgängig.
2. Laden Sie die MOGA-Pivot-App mithilfe des QR-Codes
herunter, oder indem Sie MOGAanywhere.com/Pivotapp
auf dem Internetbrowser Ihres Geräts aufrufen, und
instal lieren Sie sie. Ach ten Sie darauf, da ss die Pivot-A pp so
eingestellt ist, dass Updates automatisch heruntergeladen
werden.
3. Klapp en Sie den MOGA -Arm auf. Le gen Sie Ihr
Smart phone in den MO GA-Arm, öf fnen Sie den A rm
mit leich tem Druck und la ssen Sie Ihr Hand y einrasten.
Verwenden Sie den mitgelieferten Tablet-Halter, wenn
Sie Ihre n MOGA Pro Power a n ein Android -2.3+-Tablet
anschließen.
4. Schie ben Sie den Scha lter unter dem M OGA Arm von
Aus auf A .
5. Wenn Sie d en Hauptscha lter auf A schie ben, befind et
sich Ihr M OGA im Bluetoo th®-Koppl ungsmodus. D ie LEDStatusleuchten blinken während des Kopplungsvorgangs
blau. Der Kopplungsmodus dauert 180 Sekunden. Danach
schalt et sich der MOGA C ontroller ab, u m Strom zu sparen .
6. Star ten Sie die MOG A-Pivot-A pp. Die Pivot-A pp geleitet
Sie Schr itt für Schr itt durch die nö tigen Einstel lungen,
um sicherzustellen, dass die Bluetooth-Funktion Ihres
Smart phones einge schaltet ist u nd Ihr Smartp hone mit dem
MOGA P ro Power Contro ller gepaar t ist. Folgen Si e den
Bildschirmanweisungen, um loszuspielen!
VERWE NDUNG VON MOG A BOOST:
Um Ihr mob iles Gerät zu lad en während Sie spi elen,
stecken S ie das 20 cm lange MO GA-Boos t-Kabel in den
Steckp latz auf der Rüc kseite Ihre s MOGA-Con trollers un d
dann in de n Micro-B- Anschluss an I hrem Gerät. M OGA
Boost f unktionier t nur, wenn der La dezustand de s MOGA
Pro Powe r Controller s bei wenigsten s 25 % liegt. Die
LED-Statusleuchten blinken schnell, wenn der Ladezustand
unter 25 % fä llt.
LED-ANZEIGEN:
Die LED-Ladeanzeige leuchtet grün, wenn der Controller
im A-Mo dus eingesc haltet wird, un d orange, wenn e r
im B-Modus eingeschaltet wird. Bei ausgeschaltetem
Controller erlischt die Anzeige. Während des Aufladens
blinkt die LED-Ladeanzeige bei ausgeschaltet em Controller
gelb, be i aktivier tem A-Modu s grün und im B-M odus
orange. Die LED-Statusleuchten blinken alle im Gleichtakt,
währen d der Controlle r gekoppelt wir d. Nach der Kopp lung
zeigen di e LEDs an, ob de r Controller de r erste, zwei te,
drit te oder viert e Controller is t, der mit dem mo bilen
Gerät gekoppelt wurde. Nach Herstellung der Verbindung
zwisc hen dem MOGA Pr o Power und Ihre m mobilen
Gerät, kann durch Drücken der Weck-/Batterie-Taste der
Ladezustand der Batterie geprüft werden. Der LED-Balken
zeigt in 25% -Inkreme nte an: eine leuch tende und eine
blinkend e LED = 25 %, zwei le uchtende und ei ne blinkende
LED = 50 %, d rei leuchten de und eine blinken de LED = 75%
und vier l euchtende LE Ds = 100 %. Bei ausg eschaltete m
Controller funktioniert die Weck-/Batterie -Taste nicht. Durch
Drücken der Weck-/Batterie-Taste im Ruhemodus wird Ihr
MOGA P ro Power aktiv iert.
A-MODUS UND B-MODUS:
Der A- Modus unter stützt alle S piele mit MOGA -Erweite rung
in unserer umfangreichen Bibliothek. Spiele, die keine
MOGA -Erweiter ung haben, ab er HID (Human In terface
Device) -Treiber unter stützen, könn en Sie mithilfe d es
B-Mo dus auf Ihrem MO GA spielen.
SPIELEN AUF IHREM TABLET:
Mit MOG A können Sie auf jed em Android -2.3+-Tablet
spielen . MOGA verwa ndelt Ihr Tablet in e ine tragbare
Spielkonsole!
ANSCHLUSS AN IHREN FERNSEHER:
Mit dem M OGA können Sie mob ile Spiele auch a uf Ihrem
Fernseher spielen. Wenn Ihr Tablet oder Handy einen
MHL-Ausgang unterstützt – bei den meisten neueren
Modell e über den Lad eanschluss – un d Ihr Fernsehe r einen
HDMI -Eingang hat , verbinden Si e Ihr mobiles Ger ät und
Ihren Fe rnseher einf ach mit einem MHL-K abel, um Ihr
Spiel au f dem großen Bil dschirm zu geni eßen. Diagra mme
und Anle itungs-Vid eos, wie Sie das B este aus Ihrem G erät
herausholen, finden Sie auf meetmhl.com.
HÄUFIG GESTELLTE FRAGEN
F: Ich hab e Probleme bei m Koppeln meine s MOGA Pro
Power.
A: Prob ieren Sie es zunä chst noch einma l. Drücken Sie die
Wecken/Akku-Taste, falls die LED-Statusleuchten zu blinken
aufhören.
Wenn Ihr M OGA immer noch n icht gekoppel t werden
kann, sc halten Sie den Ha uptschalte r aus und dann wie der
auf A. S obald die LEDs b lau blinken, ver suchen Sie die
Kopplun g noch einmal. Wen n diese Möglic hkeiten nicht
funktionieren, können Sie versuchen, die Verbindung
zu Ihrem M OGA Pro Power ma nuell einzuric hten.
Öff nen Sie Ihr Einste llungsmenü, wä hlen Sie Drahtl os
& Netzwerke>Bluetooth-Einstellungen und, bei
eingeschaltetem Bluetooth, Scan nach Geräten. Drücken Sie
auf „Pair“, wenn M OGA Pro 2 ersc heint. Öff nen Sie dann
wiede r die Pivot-App – d er MOGA-C ontroller müs ste sich
nun koppeln lassen.
F: Ich möc hte meinen MOG A Pro Power mit ei nem anderen
Gerät kop peln, aber er ve rbindet sich im mer wieder mit
meinem ursprünglich verwendeten Gerät.
A: Star ten Sie die Pivot- App und öff nen Sie das
Einstellungsmenü. Wählen Sie Controller hinzufügen/
verwa lten – Sie müssen s tets die Verbin dung Ihres MO GA
Pro Power trennen, bevor Sie ihn mit einem anderen Gerät
koppeln . Tippen Sie auf „Verb indung trenn en“. Koppeln Sie
dann im gle ichen Menü Ihr en MOGA Pro Pow er an das neue
mobile Gerät. Sie können Ihren MOGA-Controller auch im
Systemeinstellungsmenü Ihres mobilen Geräts abkoppeln.
F: Mein Ge rät lädt nicht, w enn es am MOGA Bo ostLadeanschluss angeschlossen ist.
A: Verge wissern Sie sic h, dass der Lad ezustand Ihr es MOGA
Pro[!] Powe r mehr als 25 % beträ gt. Vergewis sern Sie sich
auch, da ss sich der MOG A-Control ler im A- oder B- Modus
befin det. MOGA BO OST funktio niert nicht , wenn der
Hauptschalter auf Aus steht.
F: Ich möc hte meinen MOG A Pro Power und me in mobiles
Gerät gleichzeitig laden, aber mein Gerät wird nicht
geladen.
A: Sie könn en Ihr mobiles Ge rät nicht mit MOG A Boost
laden, w ährend Ihr MOG A Pro Power Cont roller gelade n
wird.
Antworten auf weitere häufig gestellte Fragen finden Sie
auf MOGAanywhere.com/support.
WARTUNG UND PF LEGE
Setze n Sie Ihren MOGA P ro Power nicht e xtremen
Temperat uren aus. Ihr MO GA Pro Power mus s bei
normalen Temperaturen gelagert und benutzt werden und
darf nicht längere Zeit direkter Sonneneinstrahlung oder
Temperaturen unter dem Gefrierpunkt ausgesetzt werden.
Der normale Betriebs- und Lagertemperaturbereich liegt
zwischen 5°C und 43°C.
Bringe n Sie Ihren MOG A Pro Power nicht mi t Wasser oder
anderen Flüssigkeiten in Kontakt.
MOGA un d das MOGA- Logo sind Marken v on Bensussen
Deuts ch and Assoc iates, Inc. T M und © Bensussen
Deuts ch and Assoc iates, Inc. A ndroid ist ein War enzeichen
von Goog le Inc. Die Wor tmarke Blueto oth® und die
entsprechenden Logos sind eingetragene Marken der
Blueto oth SIG Inc. und w erden von Powe rA ausschließli ch
unter Lizenz verwendet. Alle anderen Marken sind das
Eigentum ihrer jeweiligen Inhaber.
SPANISH
Instrucciones detalladas de instalación
1. Antes de u tilizar MOGA P ro Power, cárgal o del todo; para
ello ench ufa el cable Mic ro-B en el pue rto de carga M icro-B
del mand o. Mientras se c arga, el indic ador LED de car ga,
situad o junto al botón de a ctivación /batería, p arpadea en
amarill o si el mando está a pagado, en ver de si está en el
modo A y en na ranja si está en el m odo B. Cuando el m ando
esté tot almente car gado el LED dejar á de parpadea r.
2. Desc arga e instala la a plicación MO GA Pivot; par a
ello util iza el código QR su ministrado o ac cede a
MOGAanywhere.com/Pivotapp desde el navegador web
del disp ositivo. Ase gúrate de que la a plicación Piv ot está
configurada para actualizarse automáticamente.
3. Despl iega el brazo MO GA. Coloca t u smartphon e en la
part e superior del b razo, empuja con c uidado el brazo pa ra
abrirl o y bloquea el tel éfono en su sitio. S i vas a conecta r
tu MOG A Pro Power a una ta bleta Andro id 2.3+, utiliza el
soporte para tabletas incluido.
4. Camb ia el interrupt or situado deb ajo del brazo MO GA de
la posici ón Off a A.
5. Al hace rlo, el MOGA ent rará en modo de e mparejamient o
de Bluet ooth®. En este mo do, los indicad ores LED de
estad o parpadean e n azul. El modo de em parejamient o
dura 180 se gundos; tras currido est e tiempo, el mand o
MOGA se a paga para ahor rar energía.
6. Abr e la aplicación M OGA Pivot. Es ta aplicació n te
guiará pa so a paso en el pro ceso de activ ación del ser vicio
Blueto oth del smart phone y de empar ejamiento del
smart phone con el man do MOGA Pro Pow er. Sigue las
instru cciones en pan talla para empe zar a jugar.
CÓMO USA R MOGA BOOST:
Para car gar el disposit ivo móvil mient ras juegas, ins erta el
cable M OGA Boost de 20 c entímetros e n la ranura situad a
en la par te posterior d el mando MOGA y, a c ontinuación,
en el puer to Micro- B del dispositi vo. MOGA Boos t deja de
funcio nar si la carga del m ando MOGA Pro P ower descien de
por deb ajo del 25 %. Cuand o esto ocurre, l os indicador es
LED de estado comienzan a parpadear rápidamente.
INDICADORES LED:
El indic ador LED de car ga se queda ence ndido en color
verde cu ando el mando es tá en modo A y en col or naranja
cuando e stá en modo B, y se d esactiva c uando el mando
está ap agado. Mient ras se carga, el i ndicador LE D de carga
parpa dea en amarillo si e l mando está ap agado, en verd e si
está en e l modo A y en naranja si e stá en el modo B.
Todos los in dicadores L ED de estado p arpadean al uní sono
mientr as el mando está e mparejándo se. Una vez termin ado
el empar ejamiento, las lu ces LED indic an si el mando
es el prim ero, el segund o, el tercero o el cu arto mando
emparejado con el dispositivo móvil.
Una vez emp arejado el MOG A Pro Power con t u dispositivo
móvil, pu edes ver el est ado de carga d e la batería puls ando
el botón d e activación /batería; l os indicador es LED de
estad o indican la car ga de batería en i ncrementos d e 25
%: una LED f ija y otra parpa deante para el 25% , dos fijas y
una parp adeante para e l 50%, tres fi jas y una parpad eante
para el 75% y la s cuatro LED fij as para el 100%. El b otón de
activ ación/bat ería no funcion a con el mando apa gado. Si
pulsas e l botón de acti vación/ba tería en el modo en r eposo,
el MOGA P ro Power se act iva.
MODO A FR ENTE A MODO B:
El modo A es c ompatible co n todos los jueg os MOGA
optimiz ados de nuest ra inmensa bibl ioteca. Para ju egos
MOGA no o ptimizados p ero que admite n controlador es HID
(Dispo sitivo de Inte rfaz Humana), el m odo B permite u tilizar
los cont roles de jueg o en tu MOGA.
CÓMO JUG AR CON TU TABLE TA:
MOGA e s compatible co n cualquier tab leta Andro id 2.3+,
convirtiéndola en una consola portátil.
CÓMO CONECTAR MOGA AL TELEVISOR:
Puede s utilizar MOG A para disfrut ar de juegos d e móviles
en el tele visor. Si tu table ta o teléfono in cluyen un puer to
de salid a MHL (la mayoría d e los modelos má s recientes
lo tiene n a través del puer to de salida) y t u televisor, un
puer to de entrada HD MI, solo tien es que conect ar un cable
MHL en el di spositivo móv il y en tu televiso r para disfru tar
de una pan talla más grand e. Visita meet mhl.com para ver
esque mas y vídeos exp licativos qu e te ayudarán a sac ar el
máximo p artido de tu d ispositivo.
PREGUNTAS MÁS FRECUENTES
P: Tengo pro blemas para em parejar mi MOG A Pro Power.
R: Ante s de nada, vuelv e a intentarlo . Si los indicado res LED
de esta do dejan de par padear, pulsa el b otón de activa ción/
batería.
Si sigues s in poder empar ejarlo, apága lo con el interr uptor
en posic ión Off y vuel ve a encenderlo e n posición A. C uando
las LED pa rpadeen en az ul, vuelve a inte ntarlo.
Si estas acciones no funcionan, puedes intentar emparejarlo
manualm ente con tu MOG A Pro Power. Ve al menú de
configuración, selecciona Conexiones y redes inalámbricas
> Ajuste s de Bluetooth y, c on el Bluetooth a ctivado, ini cia la
búsque da de disposit ivos. Cuando a parezca MOGA P ro 2,
selecciona Emparejar. Seguidamente vuelve a abrir Pivot; el
mando MO GA debería em parejarse.
P: Quier o emparejar mi MO GA Pro Power co n otro
dispositivo, pero sigue emparejándose con el primer
dispositivo.
R: Inicia Pivot y abre el menú de configuración. Selecciona
Agregar/Administrar mandos. Para emparejar tu MOGA
Pro Power con otro dispositivo debes desemparejarlo
antes. Toca en Interrumpir sincronización. A continuación,
utiliza ndo el mismo menú , empareja tu MO GA Pro
Power co n el nuevo disposi tivo móvil. Tambié n puedes
desem parejar tu mand o MOGA con el men ú de
config uración del sis tema de tu dispo sitivo móvil.
P: El disp ositivo no se car ga cuando lo con ecto al puer to de
carga M OGA Boost.
R: Compr ueba que qued a más del 25 % de carg a en el
MOGA P ro Power. Comprue ba también qu e el mando
MOGA e stá en modo A o B. Re cuerda que MOG A BOOST
no funci ona con el dispos itivo apagad o (interrupt or en
posició n Off).
P: Inten to cargar mi MO GA Pro Power y mi dis positivo móvi l
al mismo ti empo, pero el dis positivo no se c arga.
R: No es po sible cargar el d ispositivo mó vil con MOGA
Boost mi entras el mand o MOGA Pro Power e stá
cargándose.
Para ver má s respuesta s a preguntas má s frecuente s, visita
MOGAanywhere.com/support.
CUIDADO Y MANTENIMIENTO
No expo ngas tu MOGA P ro Power a temper aturas
extr emas. El MOGA Pr o Power está pe nsado para
guarda rse y utilizar se a temperatu ras medias y no de bería
expon erse a la luz dire cta del sol ni a te mperaturas m uy
bajas ni siq uiera durante u n corto espac io de tiempo.
El intervalo de temperatura normal de funcionamiento y
almacen amiento va de los 4 º C hasta los 43 º C.
No expo ngas tu MOGA P ro Power al agua u ot ros líquidos.
MOGA y el l ogotipo de MO GA son marcas c omerciales
de Bensu ssen Deuts ch and Associa tes, Inc. TM y d e ©
Bensussen Deutsch and Associates, Inc.
Andro id es una marca com ercial de Goog le Inc.
La marc a denominativ a y los logos de Blu etooth® son
marcas r egistradas p ropiedad de Bl uetooth SIG , Inc. y
cualqui er uso de dichas ma rcas por PowerA e s bajo licencia.
El resto d e marcas son pro piedad de sus re spectivo s
propietarios.
ITALIAN
CONFIGURAZIONE DETTAGLIATA
1. Prima di ut ilizzare il MOG A Pro Power, cari carlo
completamente collegando il cavo Micro-B in dotazione
alla por ta di aliment azione Micro- B sul controll er. Durante
la caric a, l’indicat ore di carica a L ED vicino al puls ante
Autoaccensione/Batteria lampeggia con luce gialla quando
il contr oller è spento, c on luce verde in mo dalità A e con luce
arancio ne in modalità B . La luce fissa d el LED indica ch e il
controller è completamente carico.
2. Scar icare e install are l’app MOGA Piv ot utilizzand o il
codice Q R in dotazione o ppure visita ndo MOGAany where.
com/ Pivotapp sul br owser web del d ispositivo; ve rificare che
l’app Pivot s ia impostata s ull’aggiorname nto automatic o.
3. Stende re il MOGA Arm . Posizionare lo sm artphone in
cima al MOGA Arm, premendo delicatamente il braccio
aper to, e bloccarl o in posizione. Ut ilizzare il supp orto per
table t incluso in caso d i connessione d el MOGA Pro Pow er a
un tabl et Android 2. 3 o successivo.
4. Far sco rrere l’inter ruttore so tto il MOGA Ar m dalla
posizio ne OFF ad A.
5. Quando l’interruttore di alimentazione è in posizione
A, il MO GA è in modalità d i accoppiamen to Bluetooth ®.
In modal ità di accoppia mento, gli indi catori di stat o a LED
lampeggiano con luce blu. La modalità di accoppiamento
dura 180 se condi prima che i l controller M OGA si spenga
per risparmiare energia.
6. Lanc iare l’app MOGA Pi vot, che forni rà istruzioni
dett agliate duran te la procedur a in modo da garant ire
che il ser vizio Blueto oth dello smar tphone sia at tivato e
lo smar tphone stes so sia accoppiat o al controller M OGA
Pro Powe r. Segui re le istruzion i sullo schermo p er iniziare
a gioc are!
USO DI MO GA BOOST:
Per car icare il dispos itivo mobile du rante il gioco, in serire
un’estre mità del cavo MO GA Boost da 8” nel lo slot sul retro
del cont roller MOGA e l’alt ra estremit à nella port a Micro-B
sul dispo sitivo. MOGA B oost non funzi onerà se la cari ca
del cont roller MOGA P ro Power è inferi ore al 25%. Quando
la caric a è inferiore al 25% , gli indicator i di stato a LED
lampeggiano rapidamente.
INDIC ATORI A LED:
L’indicato re di carica a LE D mostra una luc e verde fissa
quando i l controller è in m odalità A, un a luce arancion e
fissa q uando è in modali tà B e si spegne qua ndo il controll er
è spento . Durante la car ica, l’indica tore di caric a a LED
lampeg gia con luce giall a quando il contr oller è spento, c on
luce ver de in modalità A e co n luce arancion e in modalità B.
Quando i l controller st a eseguend o l’accoppiamen to, tutti gli
indica tori di stato a L ED lampeggian o all’unisono. Una v olta
completato l’accoppiamento, i LED mostrano se il controller
è il primo, i l secondo, il te rzo o il quarto ac coppiato al
dispositivo mobile.
Quando i l MOGA Pro Powe r è accoppiato al di spositivo
mobile, è possibile premere il pulsante Autoaccensione/
Batte ria e gli indicat ori di stato a LE D mostrerann o il livello
di caric a della batte ria con increme nti del 25%: un LED
fisso e u no lampeggian te per il 25%, due LE D fissi e uno
lampeg giante per il 50 %, tre LED fis si e uno lampeggi ante
per il 75% e tu tti e quattr o i LED fissi per il 10 0%. Il
pulsante Autoaccensione/Batteria non funzionerà quando
il controller è spento. In modalità “sospensione” (risparmio
energetico), la pressione del pulsante Autoaccensione/
Batte ria riattive rà il MOGA Pro Po wer.
MODAL ITÀ A / MODALITÀ B:
La moda lità A suppor ta tutti i no stri numeros i giochi
MOGA En hanced dispon ibili. Per gioch i che non sono
MOGA En hanced ma supp ortano dri ver HID (Dispo sitivi a
inter faccia umana), la mo dalità B perm etterà di map pare i
comandi di gioco sul MOGA.
GIOCO SUL TABLET:
MOGA su pporta il gi oco su qualsiasi t ablet Androi d 2.3 o
succes sivo, trasfor mando il table t in una console po rtatile!
CONNESSIONE ALLA TV:
È possib ile utilizzar e il MOGA per gioc are giochi mo bili alla
TV. Se il ta blet o il telefon o supporta u n’uscita MHL (g ran
part e dei modelli più nu ovi utilizzan o allo scopo la por ta di
aliment azione) e la TV pr esenta un ing resso HDMI , basta
inseri re le estremit à di un cavo MHL nel d ispositivo mo bile
e nella T V per giocare su l grande scher mo. Accedere a
meetm hl.com per vede re diagrammi e vi deo tutorial in
modo da ot tenere il mas simo dal propri o dispositivo.
DOMANDE FREQUENTI
D: Sto avend o problemi con l ’accopp iamento del MO GA
Pro Power.
R: Per pri ma cosa, ripr ovare. Se gli indi catori di stat o
a LED smettono di lampeggiare, premere il pulsante
Autoaccensione/Batteria.
Se il MOG A non inizia ancor a l’accopp iamento, spos tare
l’inter ruttore su O FF, quindi di n uovo su A. Quan do i
LED lamp eggiano con lu ce blu, provare nu ovamente
l’accoppiamento.
Se tali s oluzioni non fun zionano, è possi bile provare ad
accopp iare manualmen te il MOGA Pro Po wer. Accedere al
menu del le impostazio ni [Setting s], selezionare W ireless &
Networks>Bluetooth Settings e, con il Bluetooth attivato,
eseguire la ricerca dei dispositivi. Quando appare MOGA
Pro 2, sel ezionare Pair. In se guito, riapr ire Pivot; a que l punto
il contr oller MOGA dov rebbe eseg uire l’accoppiam ento.
D: Voglio ac coppiare il MO GA Pro Power a un al tro
dispos itivo, ma contin ua a rieseguir e l’accop piamento al mio
dispositivo originale.
R: Lanc iare Pivot e apri re il menu delle imp ostazioni.
Selezionare Add/Manage Controllers; è sempre necessario
annullar e l’accoppiamen to al MOGA Pro Po wer prima di
esegu ire l’accoppiame nto a un altro disp ositivo. Toccar e
Unsyn c. In seguito, u tilizzando lo s tesso menu, a ccoppiare
il MOGA P ro Power al nuovo di spositivo mo bile. È inoltre
possibile annullare l’accoppiamento del controller MOGA
nel menu d elle imposta zioni di sistema d el dispositiv o
mobile.
D: Il mio dis positivo non si c arica quando è c ollegato alla
porta di alimentazione MOGA Boost.
R: Verif icare di dispo rre di una caric a superiore al 25% n el
MOGA P ro Power. Inoltre , verificare c he il controlle r MOGA
sia in moda lità A o B. MOGA Bo ost non funzio nerà se
l’inter ruttore di a limentazion e si trova su OFF.
D: Sto tentando di caricare contemporaneamente il MOGA
Pro Powe r e il mio dispositi vo mobile, ma il dis positivo non
si carica.
R: Non è po ssibile caric are il disposit ivo mobile con MO GA
Boost m entre il contro ller MOGA Pro P ower è in carica .
Per risposte ad altre domande frequenti, visitare
MOGAanywhere.com/support.
CURA E MANUTENZIONE
Non esp orre il MOGA Pr o Power a tempera ture estrem e.
Il MOGA P ro Power è proge ttato per e ssere conser vato
e utilizz ato a temperat ure medie e non d eve mai essere
espos to alla luce diret ta del sole o a te mperature tr oppo
fredd e, neanche per b revi periodi . Il campo di temp eratura
di funzionamento e conservazione normale è tra i 4,5°C
e i 43°C. N on esporre il M OGA Pro Power al l’acqua o ad
altri liquidi.
MOGA e il l ogo MOGA sono m archi commerc iali di
Bensus sen Deutsch a nd Associat es, Inc. ™ e © Bens ussen
Deuts ch and Assoc iates, Inc.
Andro id è un marchio comm erciale di Goog le Inc.
Il marchi o e i loghi Blueto oth® sono march i commerciali
registrati di proprietà di Bluetooth SIG, Inc. e vengono
utilizz ati da PowerA su lice nza.
Tutti gli al tri marchi comm erciali appar tengono ai ri spettivi
proprietari.
PORTUGESE
CONFIGURAÇÃO DETALHADA
1. Antes de u tilizares o teu M OGA Pro Power, ca rrega-o
totalmente introduzindo o cabo Micro -B incluído na porta
de carr egamento Mic ro-B do teu co mando. Durant e o
carre gamento, o LED i ndicador de c arregament o junto do
botão R eactivação /Bateria pis ca com a cor amare la quando
o comando está desligado, verde quando está no modo
A e cor-de -laranja no mo do B. Um LED fixo in dica que o
comando está totalmente carregado.
2. Transfir a e instale a aplic ação MOGA Pi vot utilizand o
o código Q R fornecido o u visitando o en dereço
MOGA anywhere.c om/Pivot app no navegado r da web do
seu disp ositivo. Cer tifique- se de que a aplica ção Pivot est á
configurada para se actualizar automaticamente.
3. Abra o M OGA Arm. Colo que o smartp hone no topo do
MOGA A rm, empurre su avemente o braç o para abri-lo e
bloque ie o telefone na po sição. Utilize o s uporte para t ablet
incluíd o se estiver a liga r o seu MOGA Pro P ower a um
table t Android 2.3 o u superior.
4. Fça de slizar o interr uptor locali zado abaixo do M OGA
Arm da po sição Off (D esligado) par a A.
5. Quand o deslizar o inte rruptor de ali mentação par a A, o
MOGA f ica em modo de em parelhament o de Bluetooth ®.
Os LEDs i ndicadore s de estado pis cam a azul enquan to
estiver no modo de emparelhamento. O modo de
empare lhamento dura 18 0 segundos ant es de o controla dor
MOGA se desligar para economizar energia.
6. Inici e a aplicação MO GA Pivot. O Pivo t irá guiá-lo
passo a p asso pelo proc esso para gara ntir que o serv iço
de Bluet ooth do seu smar tphone fiq ue ligado e que sej a
empare lhado com o seu co ntrolador MO GA Pro Power. Siga
as instr uções no ecrã p ara começar a jo gar!
UTILIZAÇÃO DO MOGA BOOST:
Para carregar seu dispositivo móvel enquanto joga, ligue
o cabo do M OGA Boost de 20 c m na ranhura tras eira
do contr olador MOGA . Em seguida , ligue-o a out ra
extr emidade à por ta Micro-B d o dispositivo . O MOGA Boost
não func iona se a carga do c ontrolador M OGA Pro Power
for infe rior a 25%. Os LEDs i ndicadore s de estado pis cam
rapida mente quando a c arga é inferior a 2 5%.
LEDS INDICADORES:
O LED indi cador de car regamento ap resenta- se de cor
verde f ixo quando o coma ndo está ligad o no modo A,
cor-de -laranja fix o quando está li gado no modo B e
desliga-se quando o comando está desligado. Durante o
carregamento, o LED indicador de carregamento pisca com
a cor amar ela quando o coman do está desli gado, verde
quando e stá no modo A e cor- de-laranj a no modo B.
Os LEDs indicadores de estado piscam sincronizadamente
quando o c ontrolador e stiver a empar elhar. Depois de o
empare lhamento est ar concluído, o s LEDs mostra m se
o contro lador é o primeir o, segundo, te rceiro ou quar to
controlador emparelhado com o dispositivo móvel.
Quando o t eu MOGA Pro Pow er é emparelhad o com o
teu disp ositivo móvel, p odes premir o b otão Reacti vação/
Bateri a e os LEDs indica dores de est ado apresen tarão o
carre gamento da bat eria em increme ntos de 25% - um LED
fixo e out ro a piscar a 25%, d ois LEDs fixos e u m a piscar a
50%, tr ês LEDs fixo s e um a piscar a 75% e os qua tro LEDs
fixos a 10 0%. O botão Reac tivação/ Bateria não fu nciona
com o coma ndo desligado . No modo de hiber nação,
premin do o botão Reac tivação/B ateria o teu MOG A Pro
Power é reactivado.
MODO A VS . MODO B:
O Modo A su porta todo s os jogos optim izados para MO GA
da noss a enorme biblio teca. Para jog os que não são
optimiz ados para MOG A, mas que sup ortam cont roladores
de DIH (D ispositivo de I nterface Hu mana), o Modo B
permit ir-lhe-á map ear os controlo s do jogo no seu MO GA.
JOGAR NO TABLET:
O MOGA su porta jog os em qualquer t ablet Androi d 2.3 ou
superior, transformando o seu tablet numa consola portátil!
LIGAÇ ÃO À TV:
Pode ut ilizar o MOGA par a jogar jogos d e dispositivo s
móveis no s eu televisor. Se o s eu tablet ou tel efone
supor tar a saída MHL , a maioria dos mo delos mais rec entes
supor ta-a atravé s da porta de c arregament o, e o seu
televi sor possuir uma e ntrada HDMI , basta ligar um c abo
MHL ao dis positivo móve l e à TV para uma ex periência
em ecrã gr ande. Visite m eetmhl.com pa ra ver diagramas
e vídeos instrutivos sobre o assunto para aproveitar o
dispositivo ao máximo.
PERGUNTAS FREQUENTES
P: Não es tou a conseguir e mparelhar o meu M OGA Pro
Power.
R: Prime iro, tente nova mente. Se os LED s indicadore s de
estad o pararem de pis car, prima o botã o Wake/Batte ry
(Activar/Bateria).
Se seu MO GA ainda assim nã o emparelhar, mov a o
interr uptor de alime ntação para O ff (Desliga do) e depois
para A. Q uando os LED s piscarem a azul , tente empare lhar
novamente.
Se esta s opções não fu ncionarem, p ode tentar emp arelhar
o seu MOG A Pro Power manua lmente. Vá para o men u
Settings (Configurações), seleccione Wireless & Networks
(Sem fi o e redes) >Bluet ooth Settin gs (Configura ções de
Bluetooth) e, com o Bluetooth ligado, procure dispositivos.
Quando o M OGA Pro 2 apar ecer, seleccio ne Pair
(Empar elhar). Depois , reabra o Pivot - o co ntrolador MO GA
deve então emparelhar.
P: Quer o emparelhar o me u MOGA Pro Powe r com outro
dispos itivo, mas ele con tinua a emparel har novamente co m
o meu dispositivo original.
R: Inici e o Pivot e abra o menu S ettings (Con figurações).
Seleccione Add/Manage Controllers (Adicionar/Ger ir
Controladores). Deve cancelar sempre o emparelhamento
do seu MO GA Pro Power ant es de emparelh ar com outro
dispos itivo. Toque em Uns ync (Anular si ncronização).
Depois, utilizando o mesmo menu, faça o emparelhamento
do seu MO GA Pro Power com o n ovo dispositi vo
móvel. Também pode cancelar o emparelhamento
do seu con trolador MO GA no menu System S ettings
(Config urações de sis tema) do seu disp ositivo móvel.
P: O meu dis positivo não ca rrega quand o está ligado à
port a de carrega mento MOGA Bo ost.
R: Cer tifique- se de que tem mais de 2 5% de carga no
seu MOG A Pro Power. Cert ifique-s e, também, de q ue o
contro lador MOGA es tá no modo A ou B. O M OGA BOOST
não func iona quando o int erruptor de al imentação e stá na
posiçã o Off (Desli gado).
P: Esto u a tentar carr egar tanto o meu M OGA Pro Power
como o meu d ispositivo mó vel simultanea mente, mas o
meu disp ositivo não est á a carregar.
R: Não é po ssível carre gar o seu disposi tivo móvel com o
MOGA Bo ost enquanto o s eu controlad or MOGA Pro Pow er
estiver a carregar.
Para enco ntrar respo stas para mais pe rguntas fre quentes,
visite MOGAanywhere.com/support.
CUIDADO E MANUTENÇ ÃO
Não exp onha o MOGA Pro P ower a temperat uras extre mas.
O MOGA P ro Power foi conc ebido para ser ar mazenado e
utiliza do a temperatu ras médias e nunc a deve ser expo sto
à luz solar d irecta ou a te mperaturas d e congelament o
durante qualquer período de tempo.
O intervalo de temperaturas de funcionamento e
armaze namento norma l é de 4 ºC a 43 ºC. Nã o exponha o
MOGA P ro Power a água ou ou tros líquidos .
MOGA e o lo gótipo MOG A são marcas reg istadas
da Bensu ssen Deutsc h and Associa tes, Inc.™ e da ©
Bensussen Deutsch and Associates, Inc.
Andro id é uma marca reg istada da Goog le Inc.
A marca e os l ogótipos Blu etooth® são ma rcas comercia is
registadas da Bluetooth SIG Inc. e qualquer utilização
dessa s marcas pela Pow erA é efectuad a sob licença. Toda s
as outras marcas registadas pertencem aos respectivos
proprietários.
 Loading...