

Page 1

X-Sign
Broadcast
User Manual
Page 2

Copyright
Copyright 2021 by BenQ Corporation. All rights reserved. No part of this publication may be
reproduced, transmitted, transcribed, stored in a retrieval system or translated into any language or
computer language, in any form or by any means, electronic, mechanical, magnetic, optical, chemical,
manual or otherwise, without the prior written permission of BenQ Corporation.
All other logos, products, or company names mentioned in this manual may be the registered
trademarks or copyrights of their respective companies, and are used for informational purposes
only.
Disclaimer
BenQ Corporation makes no representations or warranties, either expressed or implied, with
respect to the contents hereof and specifically disclaims any warranties, merchantability or fitness for
any particular purpose. Further, BenQ Corporation reserves the right to revise this publication and
to make changes from time to time in the contents hereof without obligation of BenQ Corporation
to notify any person of such revision or changes.
2
Page 3

Table of contents
First Establishment ...................................................................................................................... 4
Registering a new account as an administrator ........................................................................................ 4
Accessing X-Sign Broadcast .......................................................................................................................... 7
Creating a new account for regular users ................................................................................................. 9
Account verification ......................................................................................................................................11
X-Sign Broadcast .......................................................................................................................12
Broadcast overview .......................................................................................................................................12
Adding devices ................................................................................................................................................14
Tag management ............................................................................................................................................19
Creating a tag after device binding .........................................................................................................................................19
Creating a tag before device binding ...................................................................................................................................... 20
Editing tags ....................................................................................................................................................................................23
Editing devices ................................................................................................................................................ 25
Equipment update ..........................................................................................................................................27
Publishing messages ....................................................................................................................................... 28
Using Create Schedule............................................................................................................................................................... 29
Using Create interrupt .............................................................................................................................................................. 36
Schedule Management (History) ................................................................................................................42
Device Report ................................................................................................................................................ 44
User management ..........................................................................................................................................45
4/7/21
3
Page 4
First Establishment
Registering a new account as an administrator
With BenQ IAM (Identify and Access Management), you can manage all of your BenQ services
(including X-Sign Manager) in one account. Follow the steps below to register an account and
connect to X-Sign Manager.
With BenQ IAM (Identify and Access Management), you can manage all of your BenQ services
(including X-Sign Manager) in one account. Follow the steps below to register an account and
connect to X-Sign Manager.
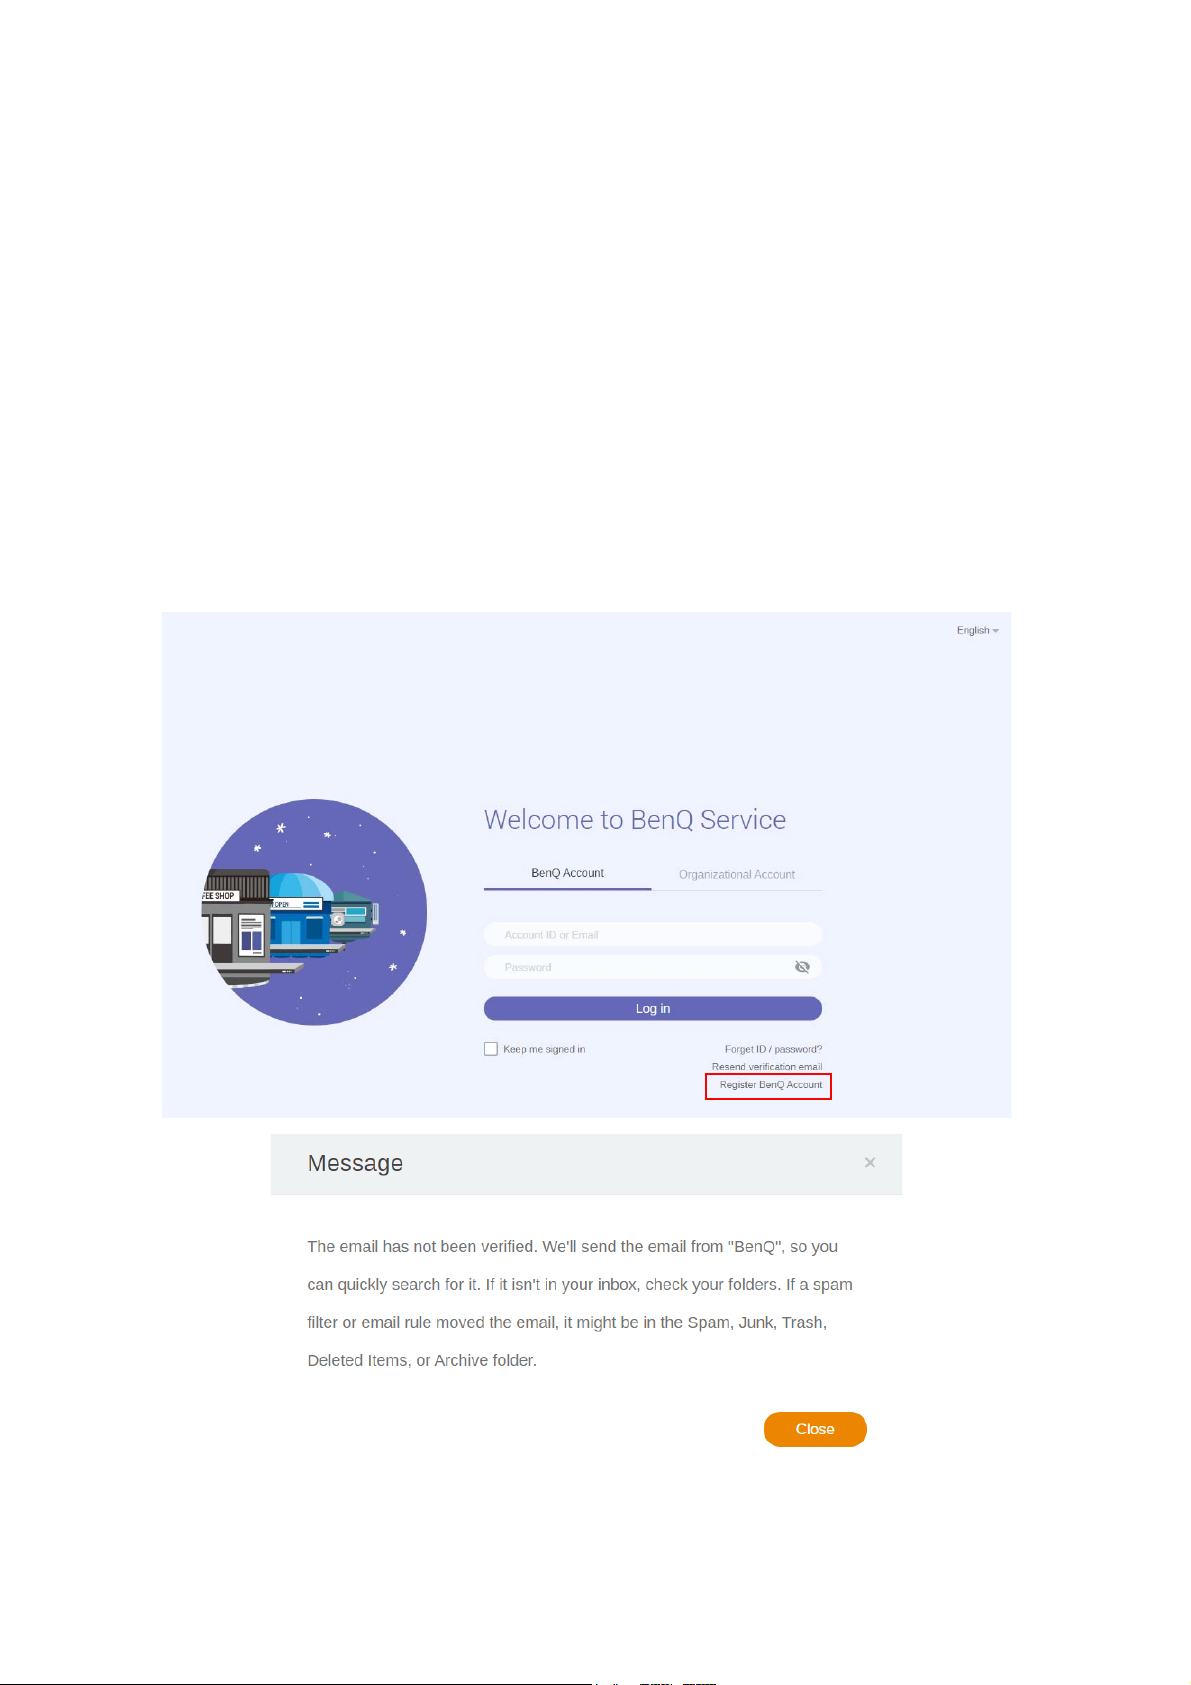
1. Go to BenQ Service website https://service-portal.benq.com/login. Suggested browsers are
Chrome, Firefox.
2. If you are an administrator, click Register BenQ Account to register an Administrator
account for the company.
4 First Establishment
Page 5
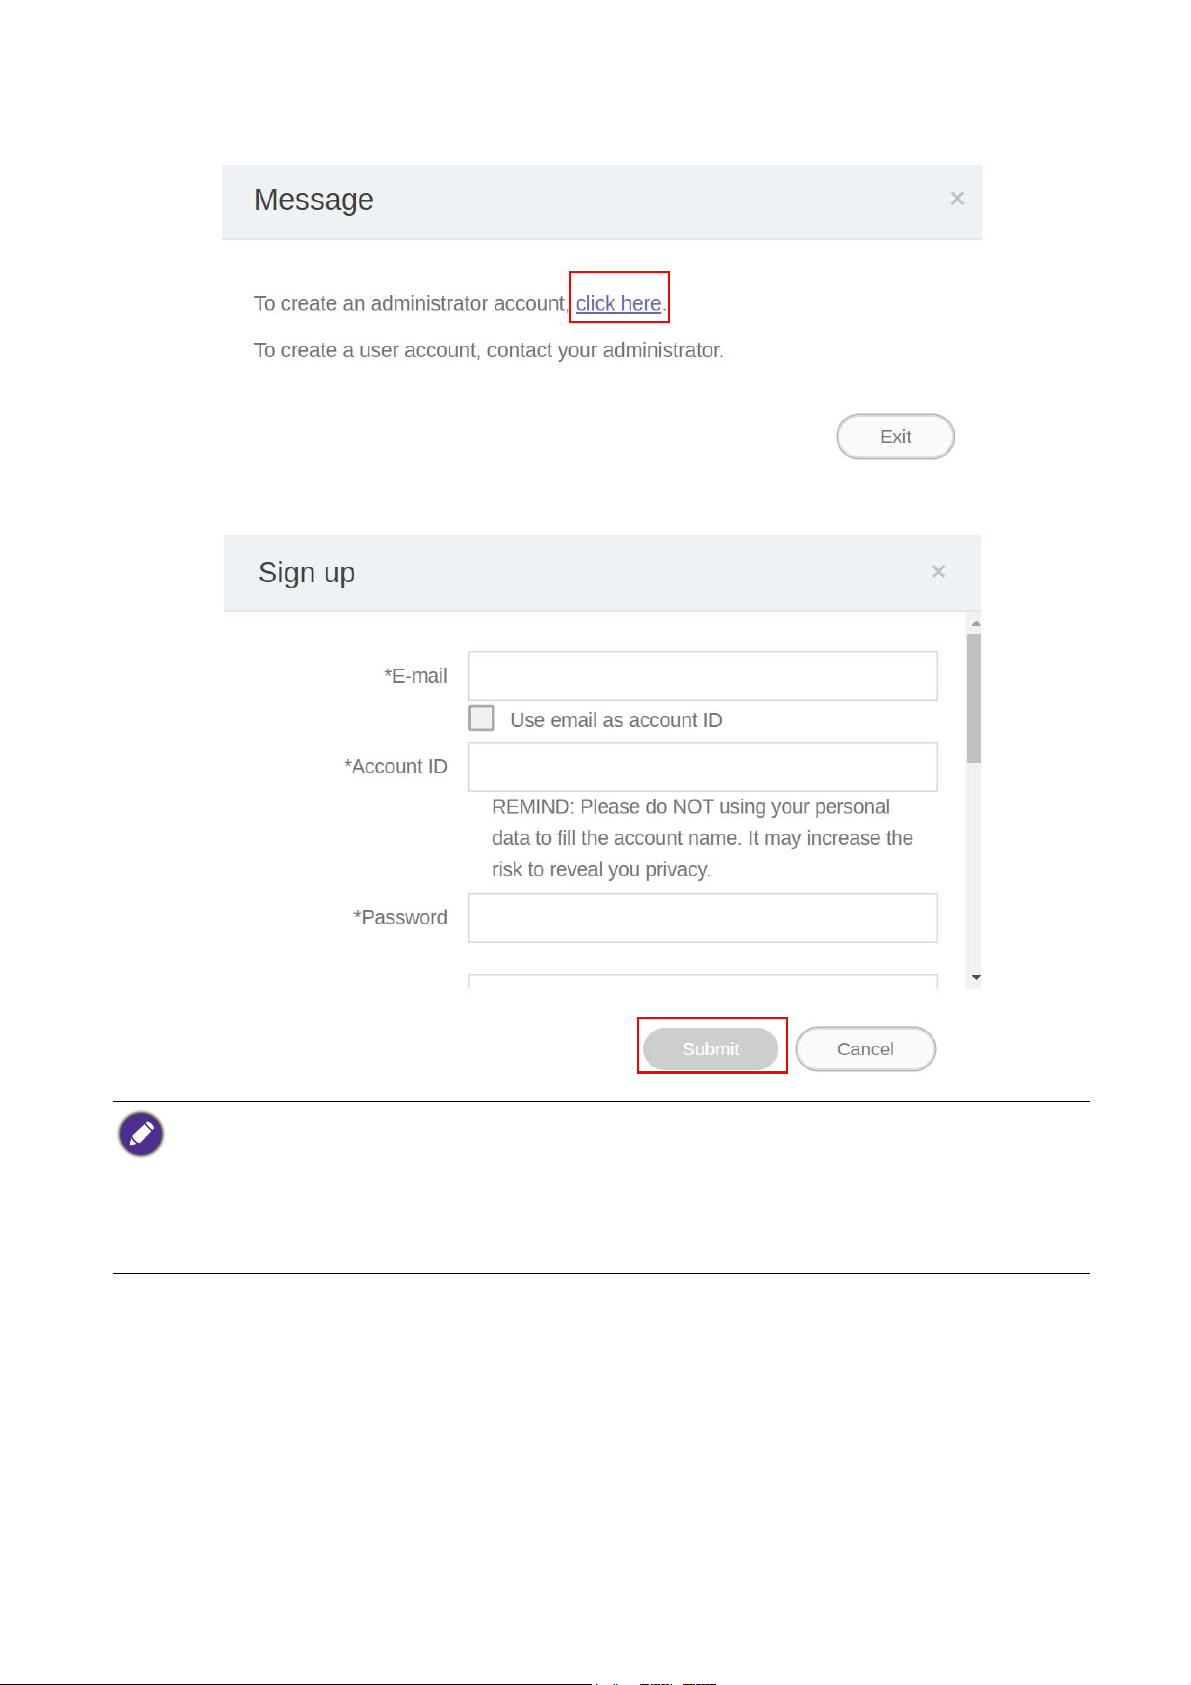
3. After you click Register BenQ Account, you will see the following message. Go to Click
here to proceed.
4. Fill in the following fields and click Submit to create a new Administrator account.
• For the account ID, enter a value between 4 and 20 characters long. Only numbers (0-9), upper and lowercase
alphabets (A-Z, a-z), and the following special characters (-)(.)(_) are allowed in the account ID and name.
• The password must be a combination of alphanumeric and must be between 6-12 characters. Passwords like
“2945678” (all numbers), “eduabsc” (all alphabets), “12ab” (less than 6 characters), and “12abcd345678efg”
(more than 12 characters) are unacceptable.
• Uppercase and lowercase letters don’t need to be typed the same way every time you key in the password.
5 First Establishment
Page 6
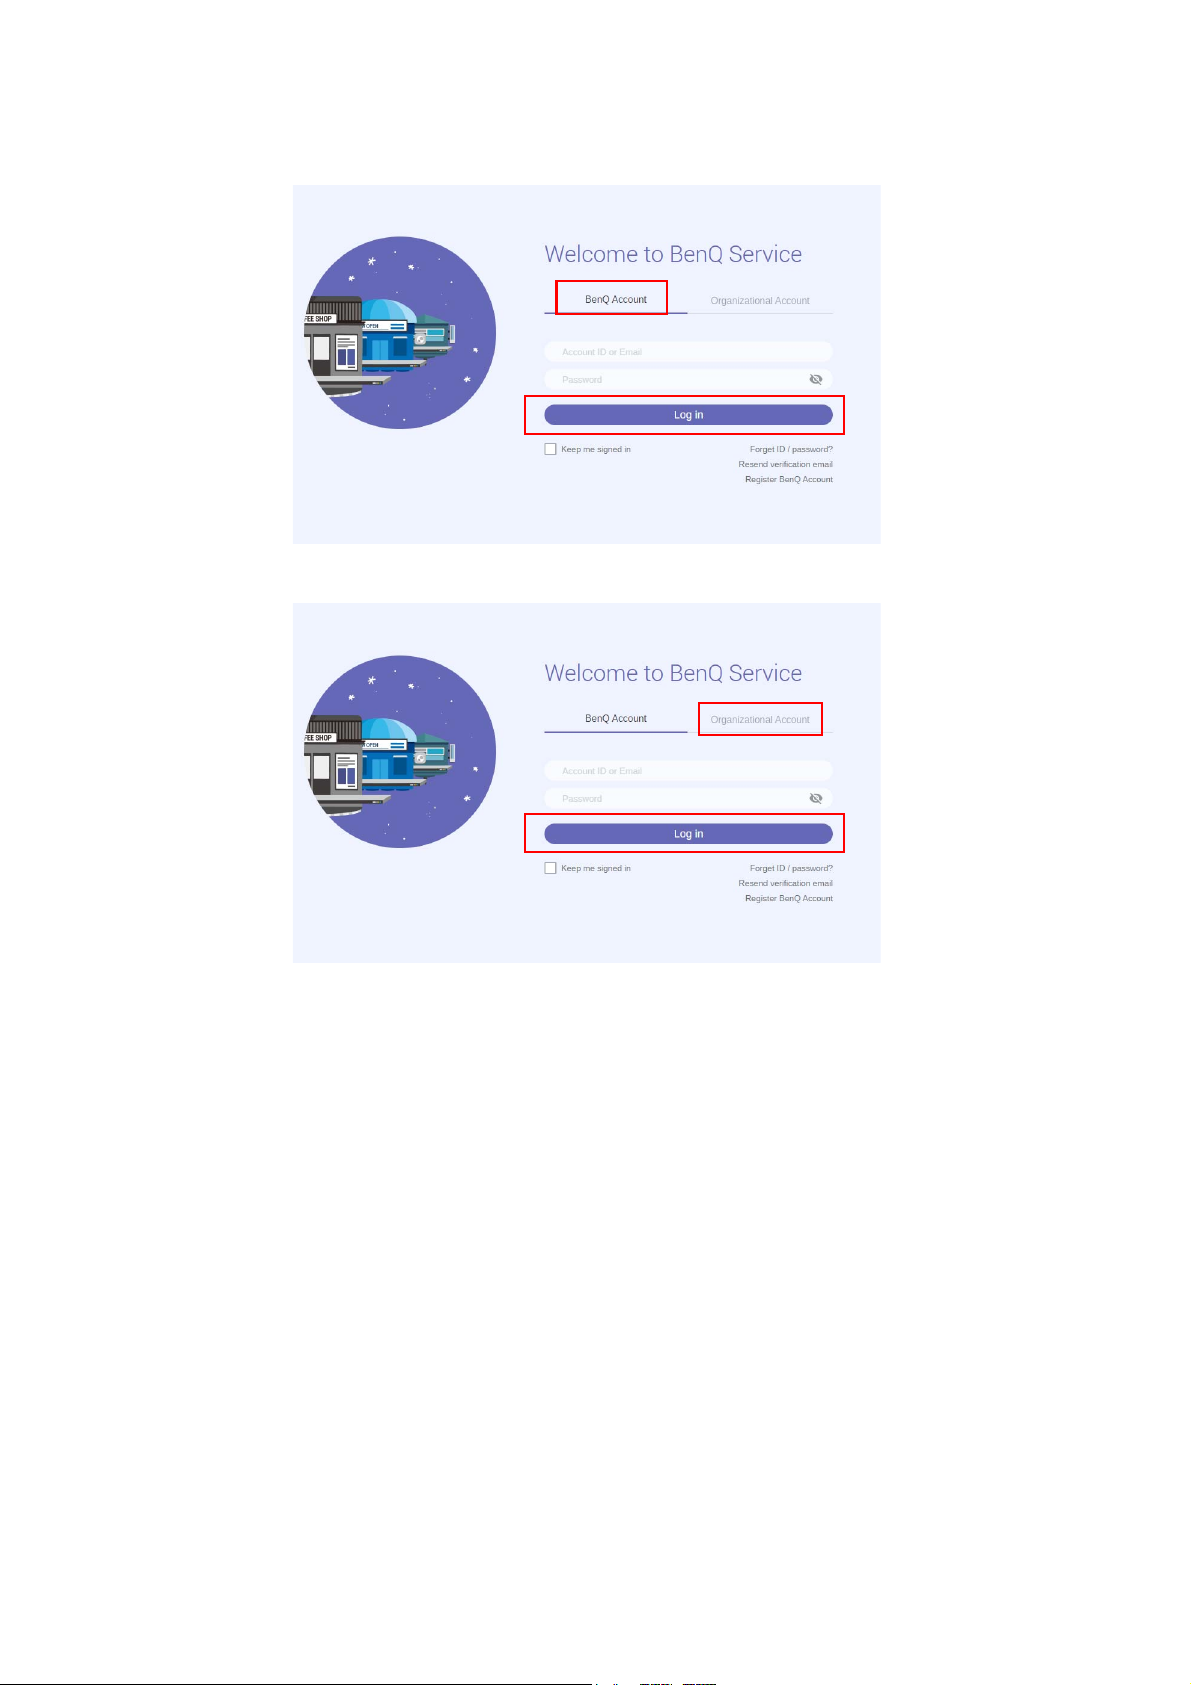
5. If you are a regular user, ask your company’s administrator to create a user account for you.
After you receive the account, click Log in under BenQ Account directly after verifying your
email.
6. If your organization has authenticated AD (Active Directory) server, you can use your own
organizational email and password to login.
6 First Establishment
Page 7
Accessing X-Sign Broadcast
Before you begin, make sure that you have a valid account that has been registered. Two ways are
provided to access your account:
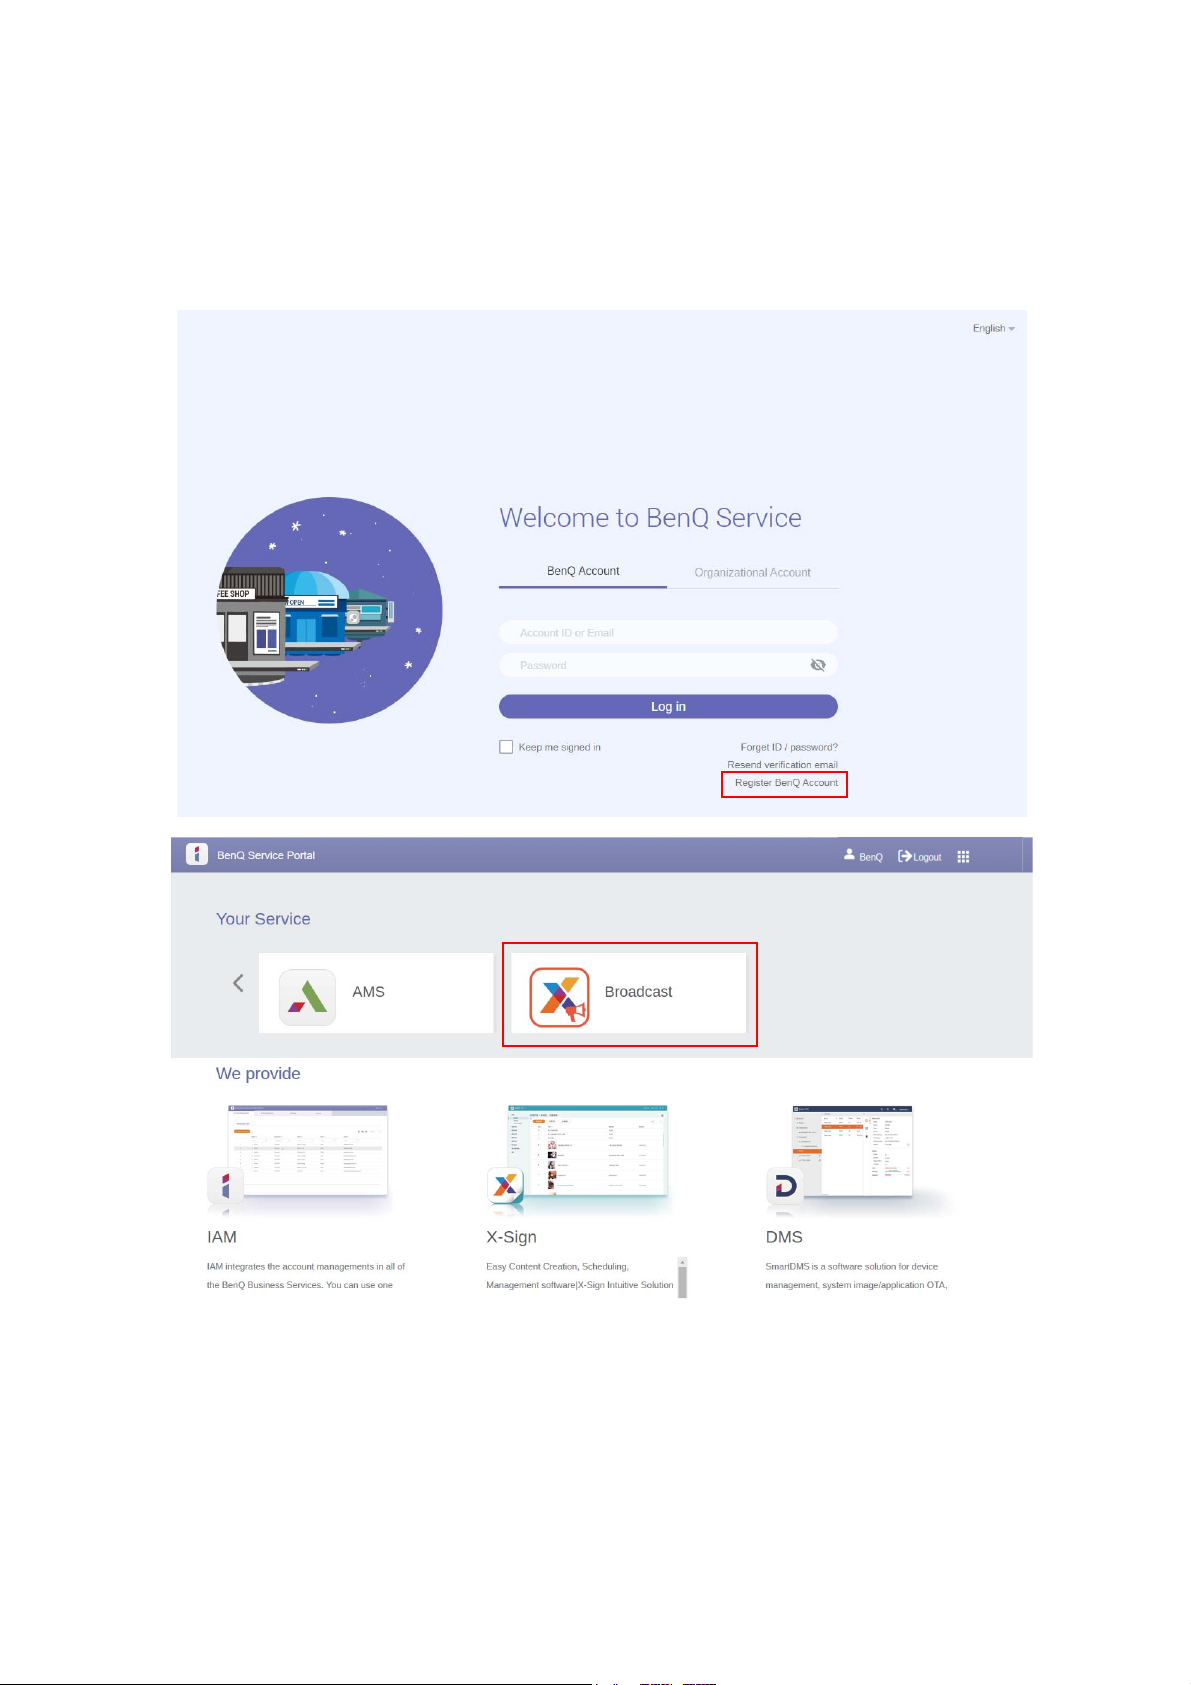
1. Go to BenQ Service website https://service-portal.benq.com/login. Log in and choose Broad-
cast.
7 First Establishment
Page 8
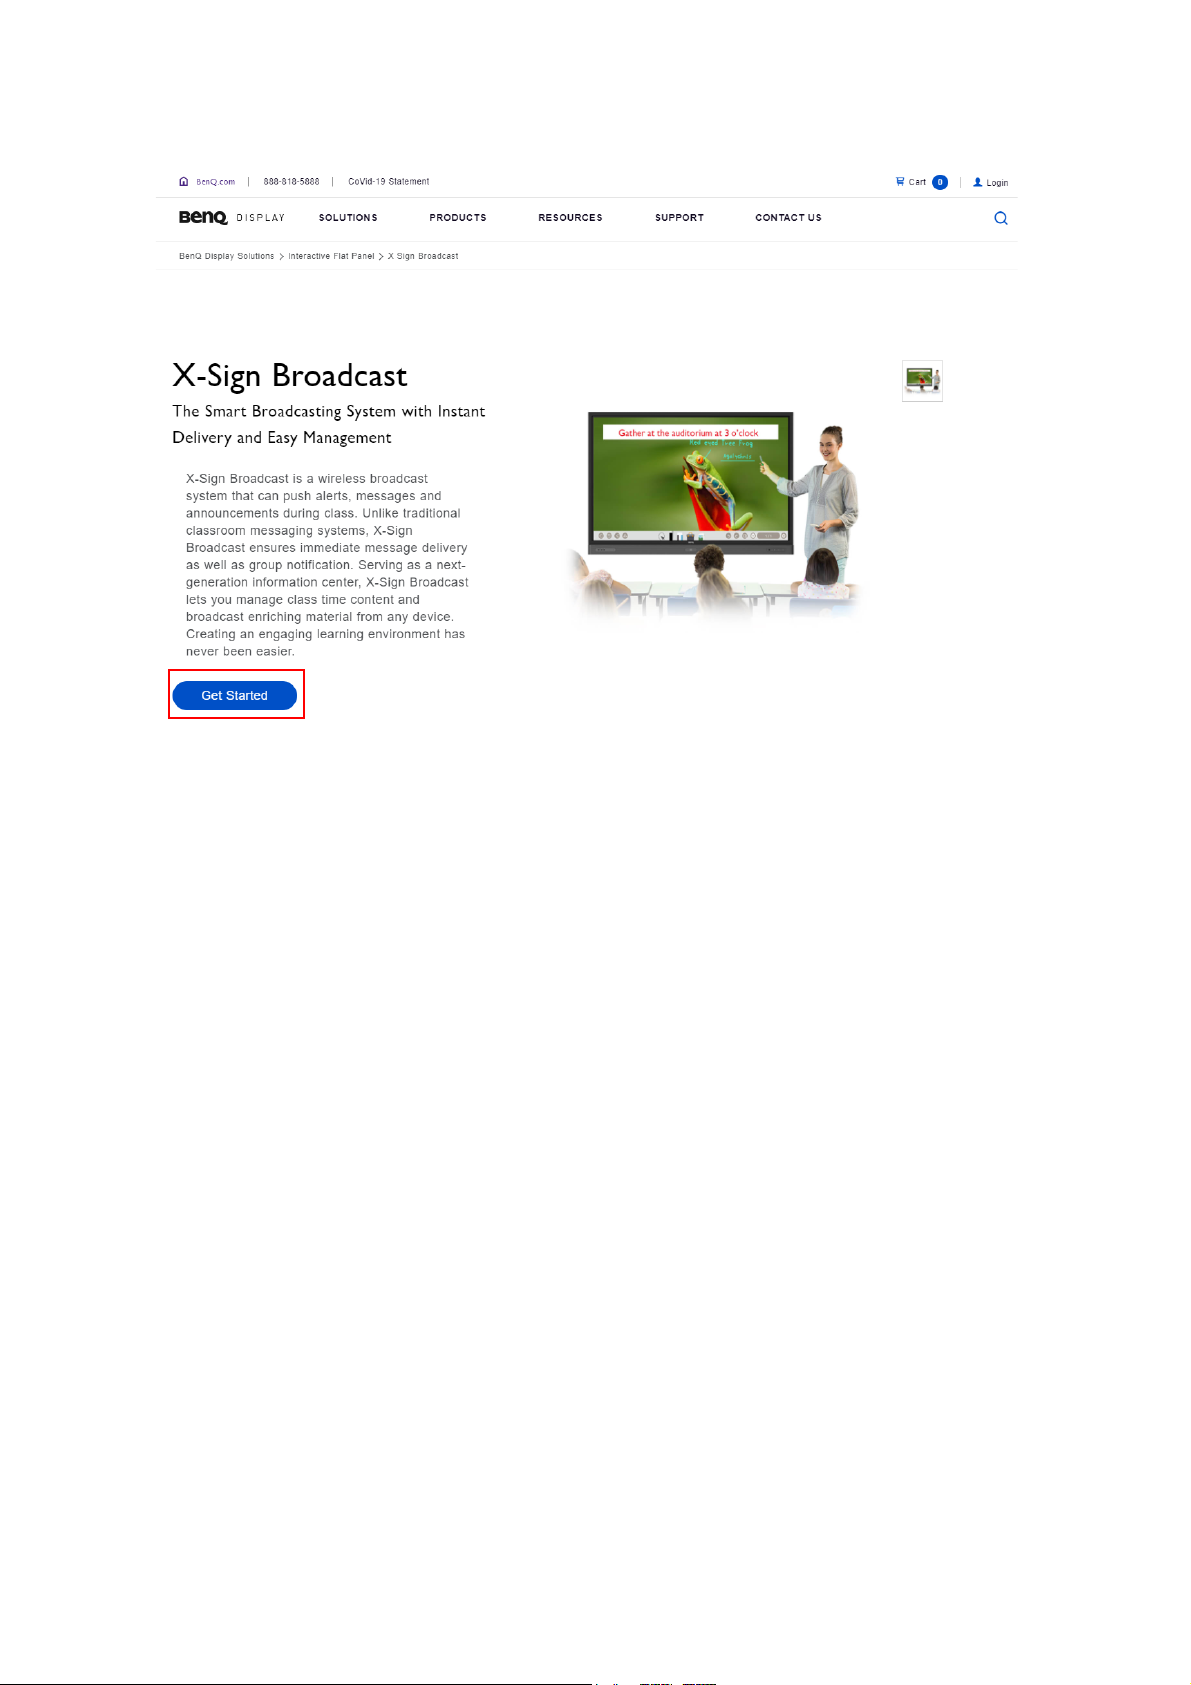
2. Go to X-Sign Broadcast website https://www.benq.com/en-us/business/ifp/x-sign-broadcast.html.
Click Get Started to go to the Broadcast page.
8 First Establishment
Page 9
Creating a new account for regular users
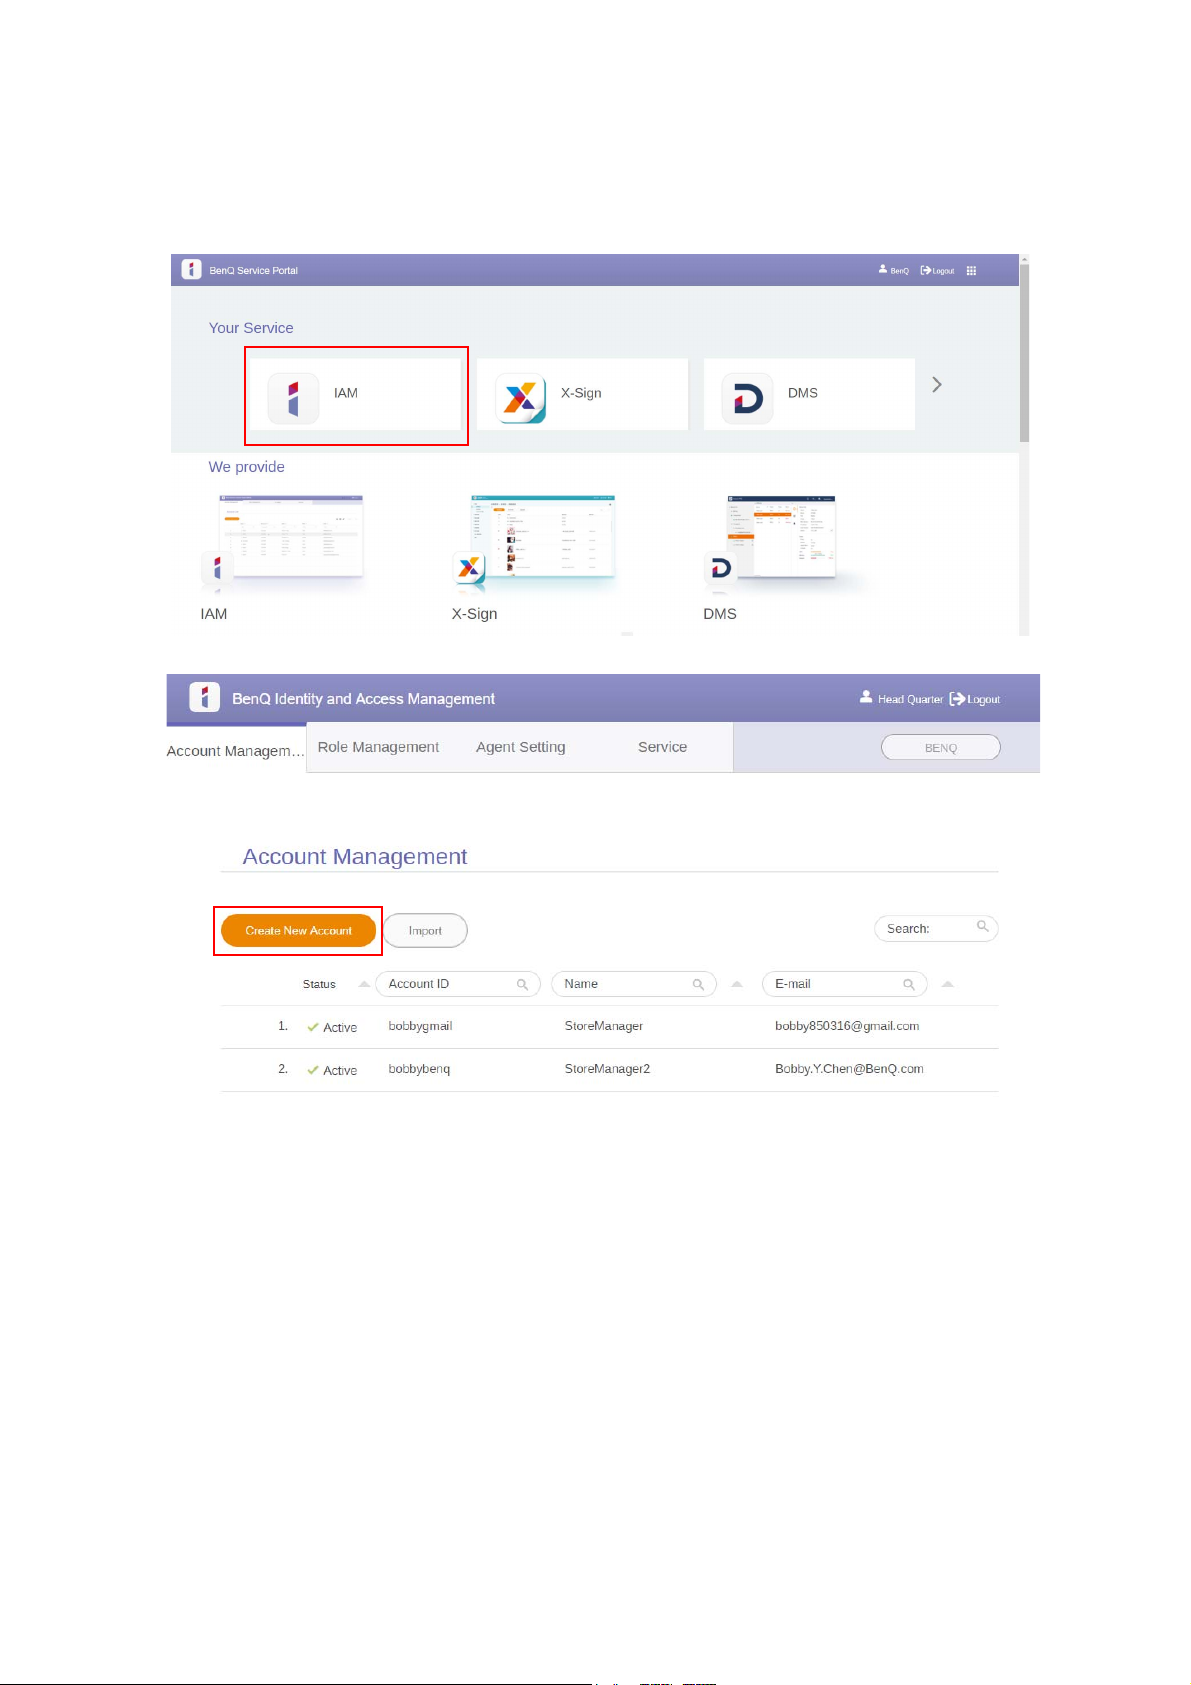
1. As an administrator to create a new account for regular users, go to BenQ Service website:
https://ams.benq.com. Suggested browsers are Chrome, Firefox.
2. Log in and choose IAM.
3. Click Create New Account to continue.
9 First Establishment
Page 10
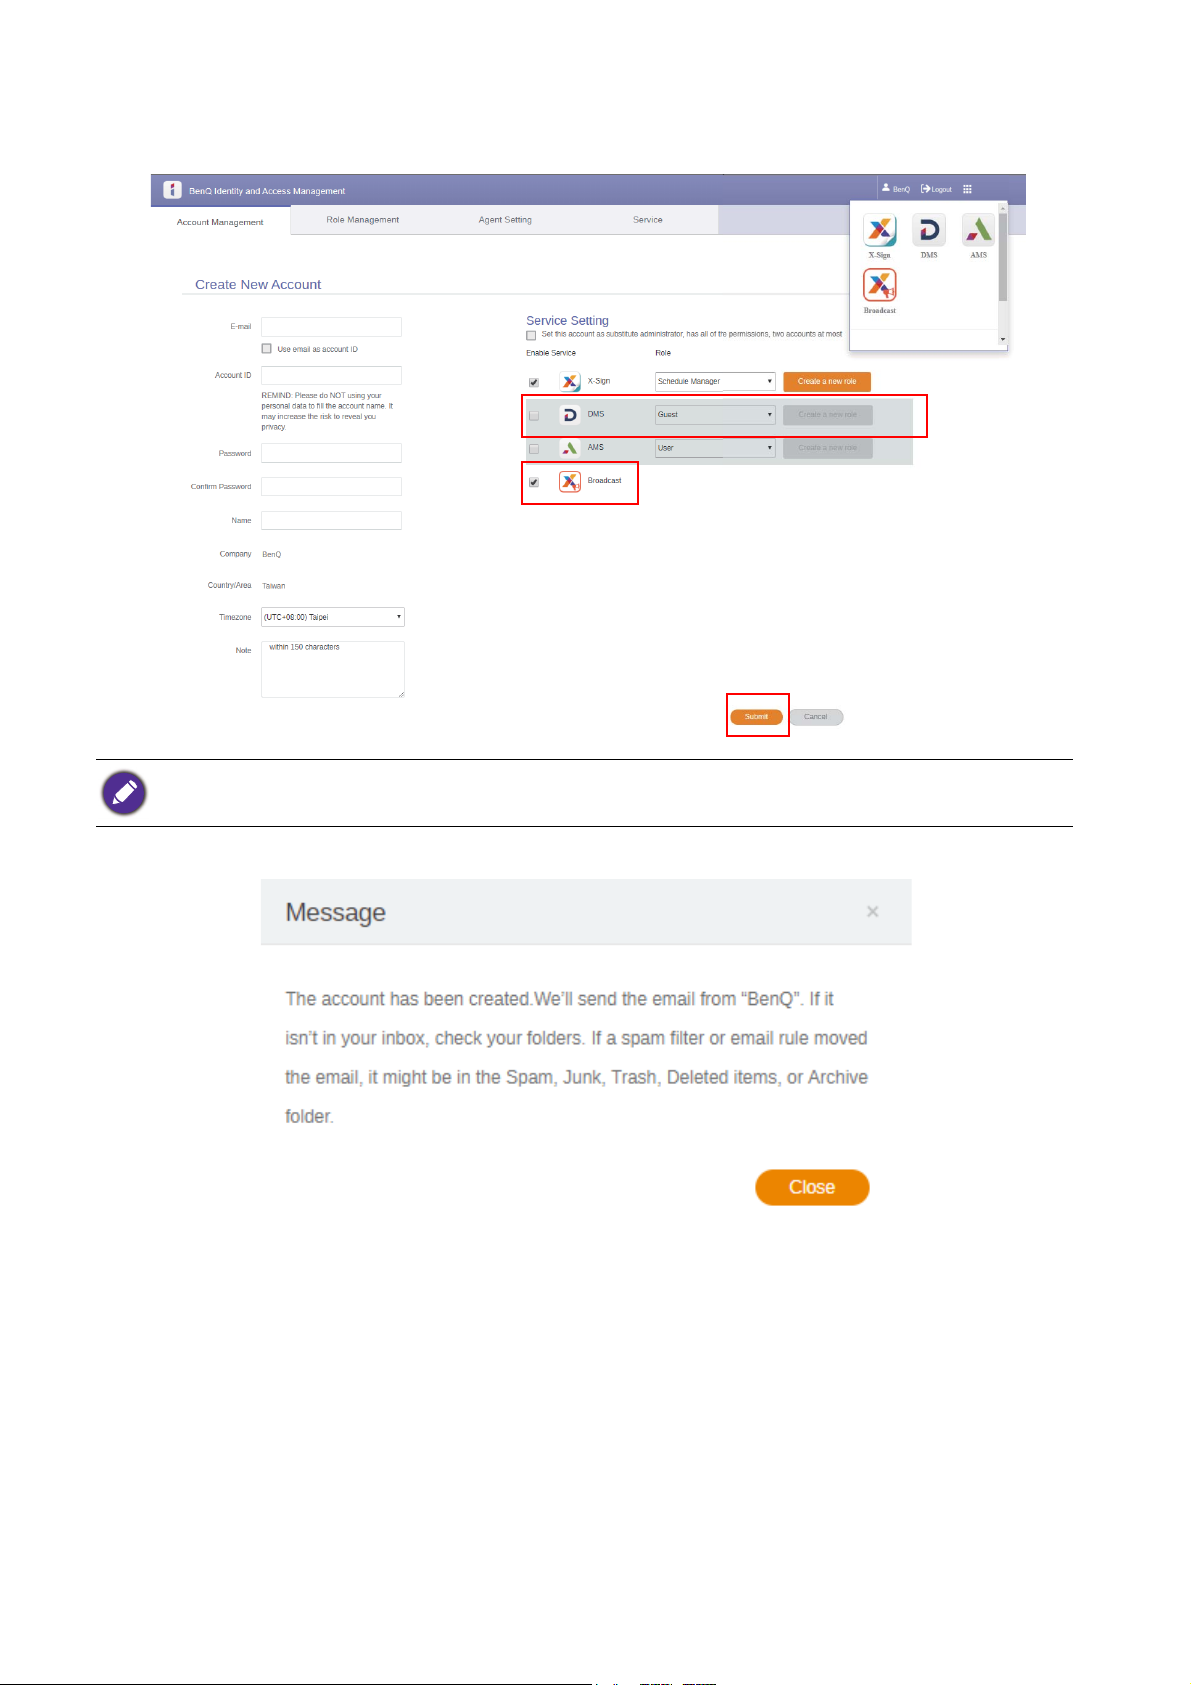
4. Fill in the following fields. Be sure to enter the correct email address and activate the X-Sign and
Broadcast service. Click Submit to create a new account.
You can easily switch to different services, X-Sign, DMS, AMS, Broadcast, by clicking the icon on the upper
right corner.
5. The account has been created and a verifying email is sent to the new account owner.
10 First Establishment
Page 11
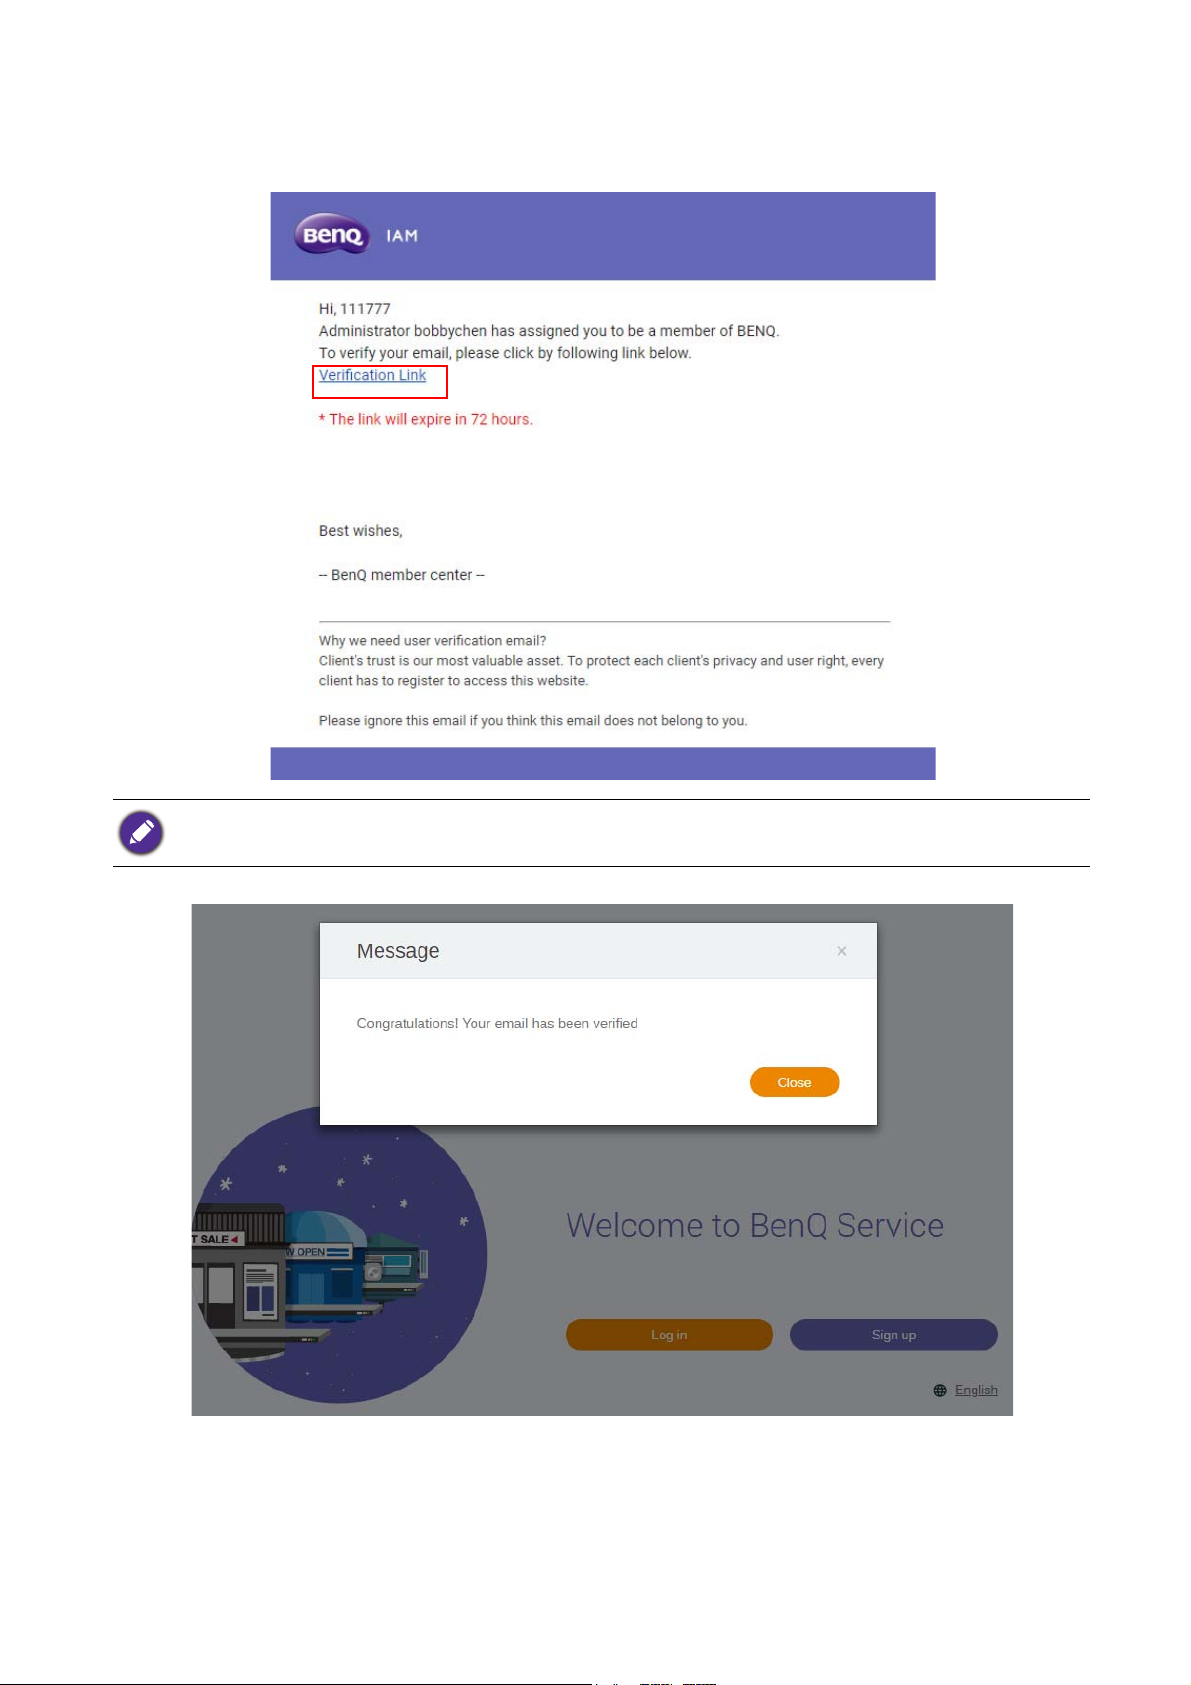
Account verification
1. Users receiving verifying emails should click the verification link in the email within 72 hours.
The account can be created only by the administrator (IT personnel) on BenQ IAM. Users cannot create an
account by themselves.
2. After clicking the link, you will see a message notifying that the email has been verified.
3. Click Log in to access X-Sign Manager. For more information about how to log in, refer to
Accessing X-Sign Broadcast on page 7.
11 First Establishment
Page 12
X-Sign Broadcast
1
2
3
X-Sign Broadcast delivers all kinds of customized messages, including evacuation and emergency
alerts. There are two modes of message delivery: Interrupt and Schedule. Interrupt messages are
delivered to the class immediately, appearing on the display’s screen during class. Schedule messages
can be scheduled beforehand to appear on the display at a certain date and time. And because the
client is connected to the web, it is possible to schedule messages using any computer, Android smart
device, or X-Sign-compatible display.
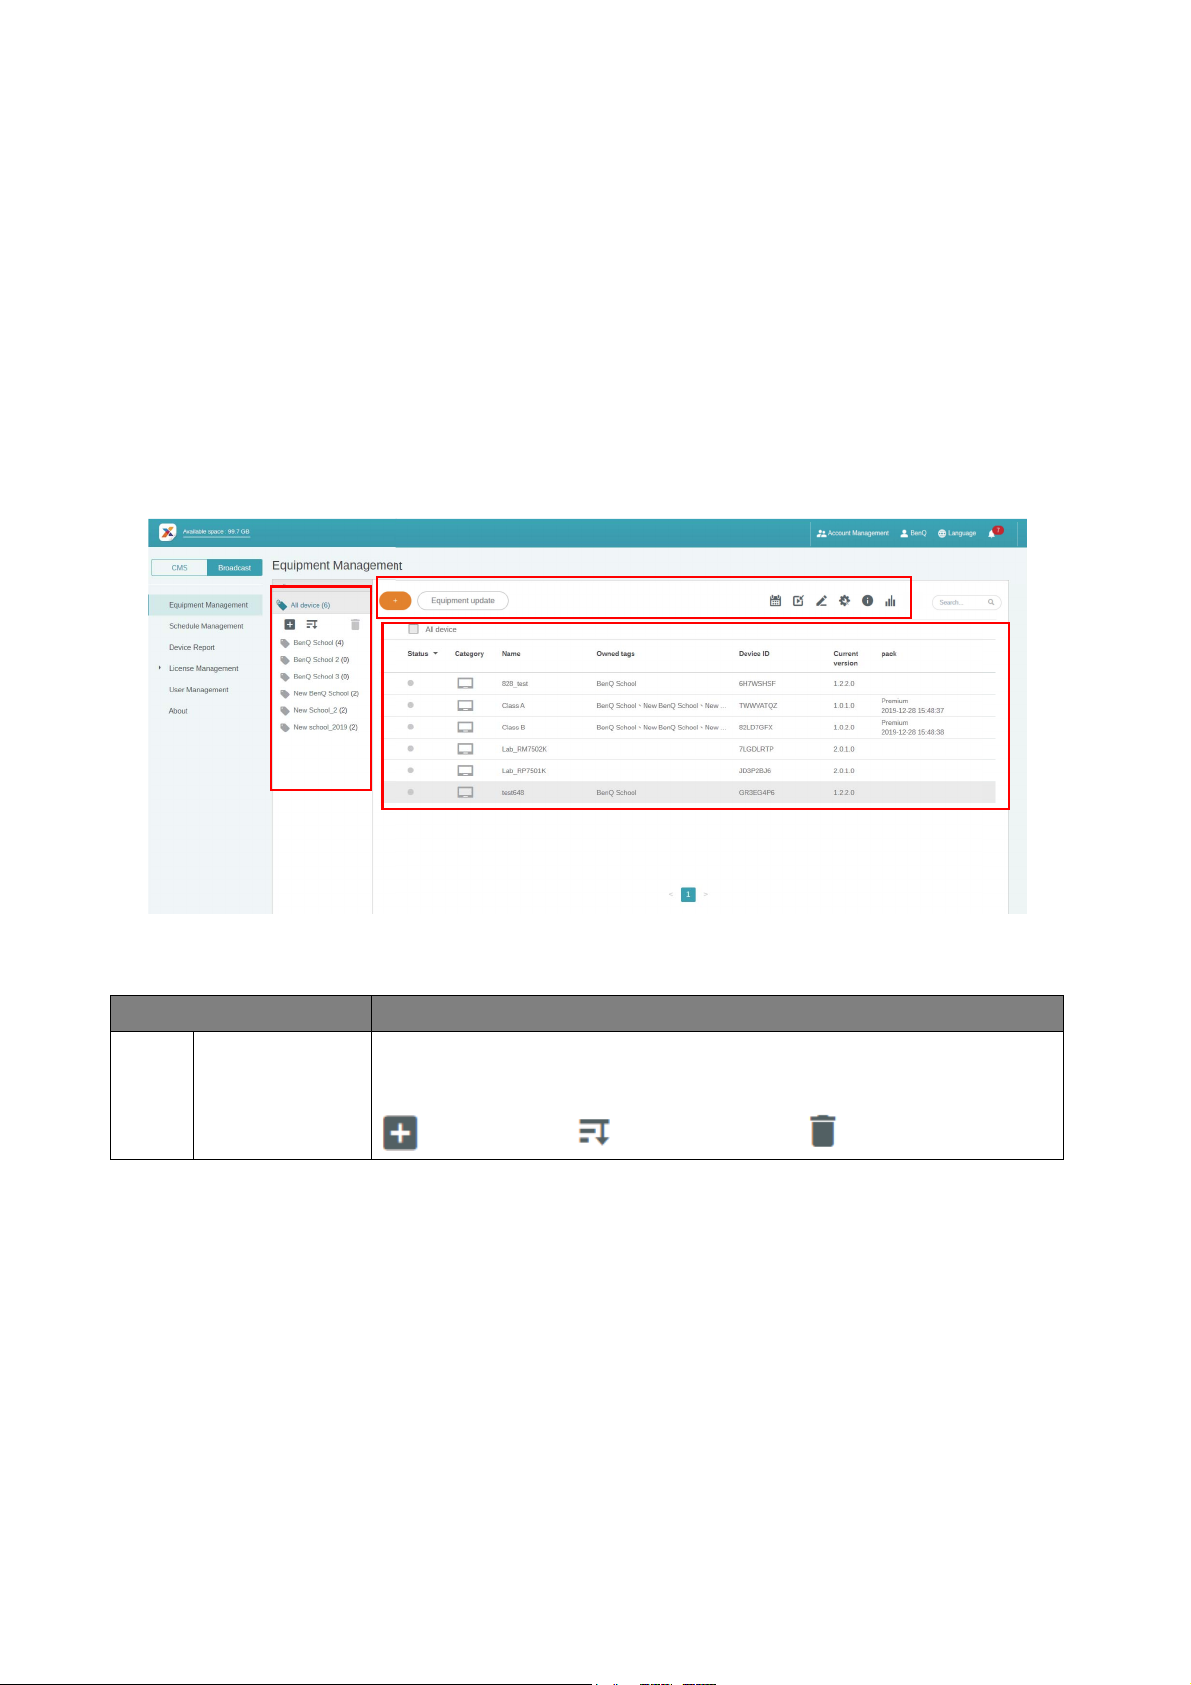
Broadcast overview
While logging in, select Broadcast > Equipment Management. You will see three main parts, as
described in the table below:
Item Description
1. Device Tab You can check the devices/tags here and see the details in the
operation tab.
: Create a tag : Sort Descending : Delete a tag
12 First Establishment
Page 13
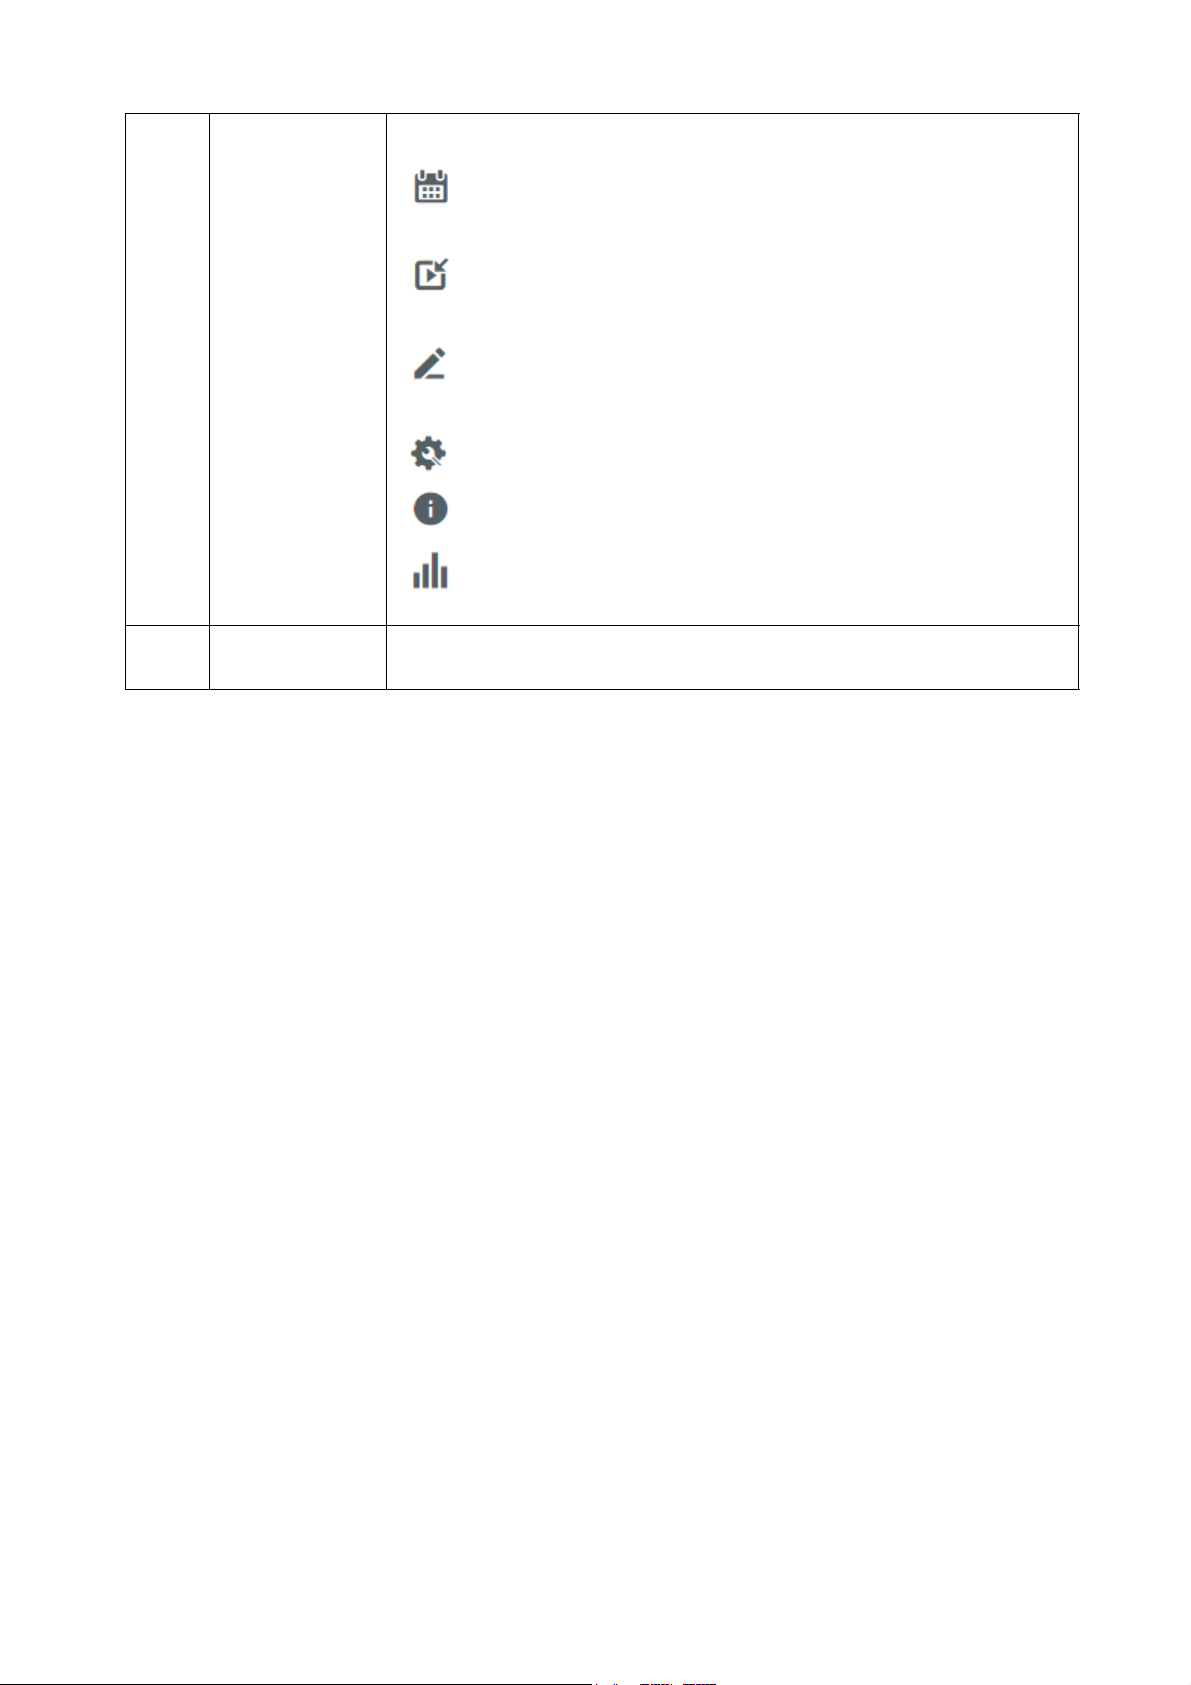
2. Editing Tab You can edit the devices/tags by choosing the buttons in this area.
• Create Schedule: Read Using Create Schedule on page 29 for
more information.
• Create interrupt: Read Using Create interrupt on page 36 for
more information.
• Edit tag/ Edit device: Read Editing tags on page 23 and Editing
devices on page 25 for more information.
• Screen Settings/ Device Control
• Device info
• Inspect report: Read Device Report on page 44 for more
information.
3. Operating Tab You can see the corresponding content while switching the devices/
tags on the device tab.
13 First Establishment
Page 14
Adding devices
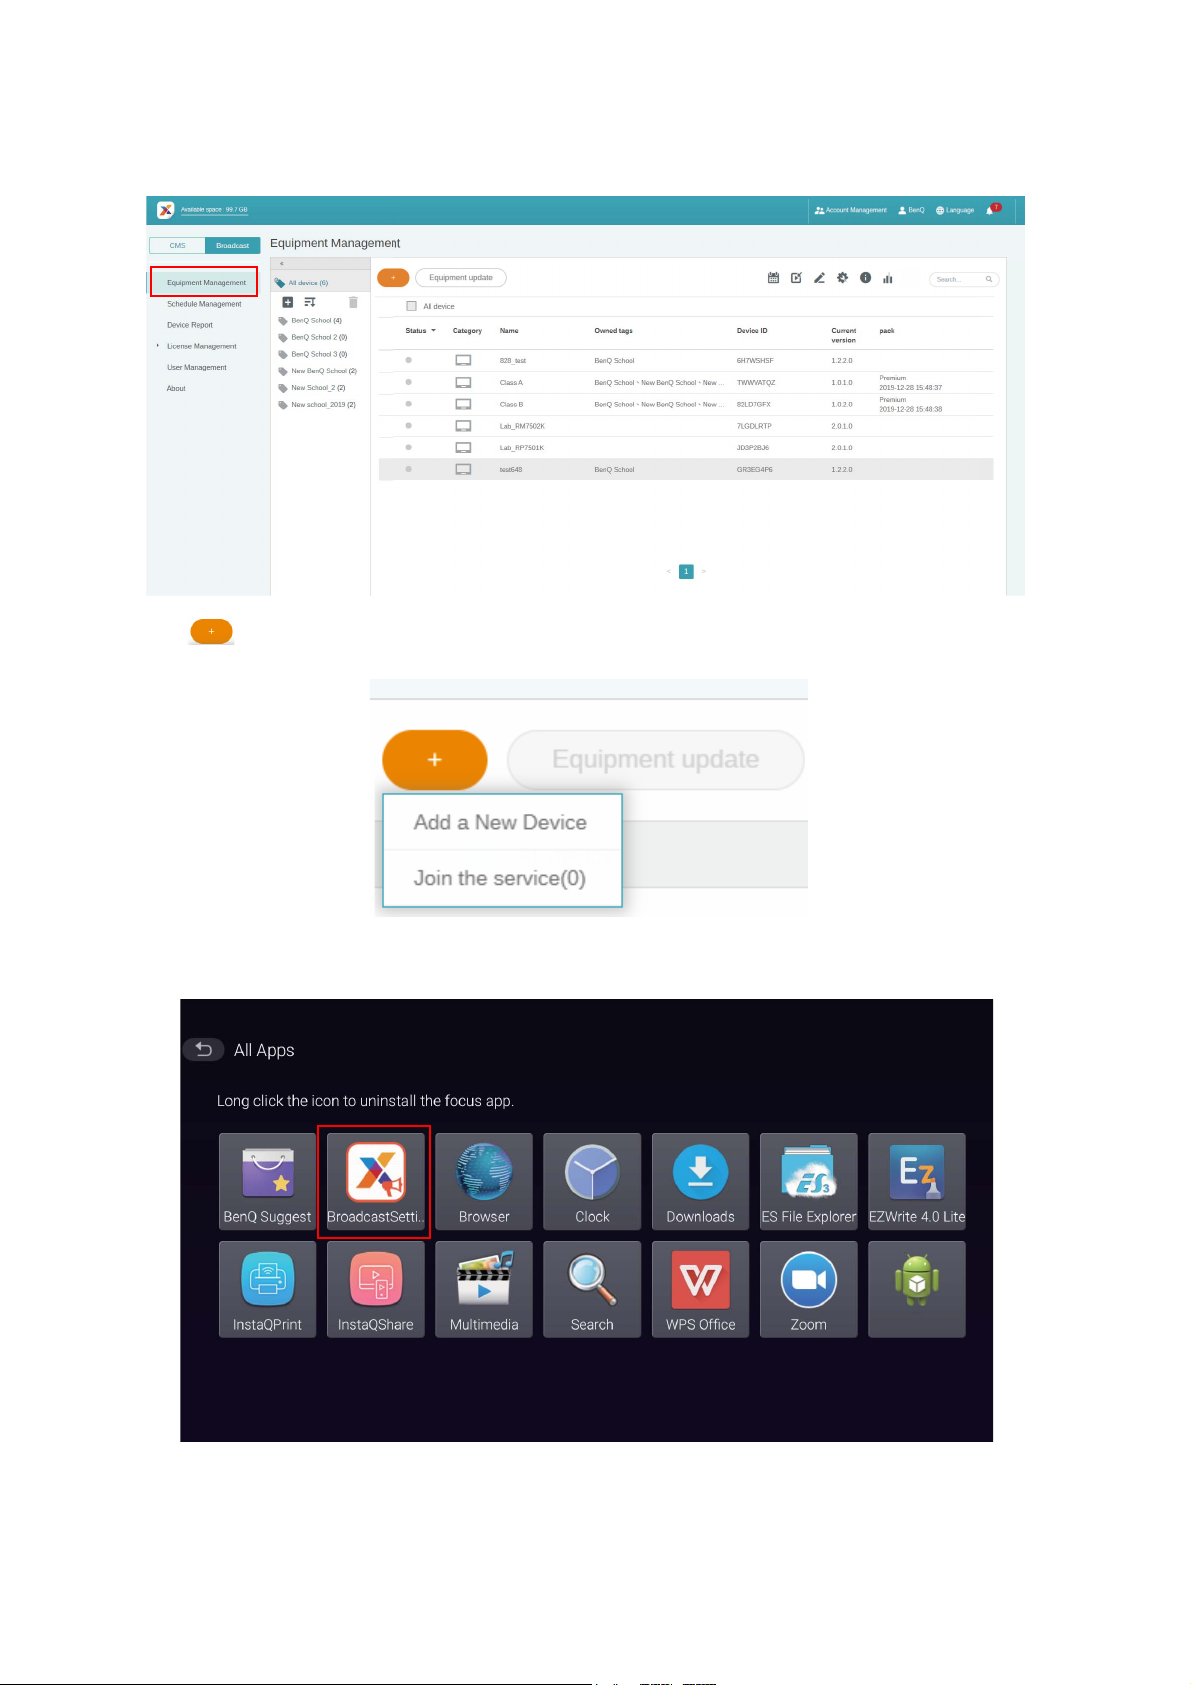
1. To add a new device, go to Broadcast > Equipment Management.
2. Click , and you can select Add a New Device or Join the service. Please be noted that
Join the service is for version v2.3.0.0 or above.
• When selecting Add a New Device:
1. On the display, click BroadcastSetting to start the APP.
14 First Establishment
Page 15

2. Enter the display ID shown on the display to the device ID on the Manager page. Then enter the device
name.
Be sure that the display is connected to the Internet and is set to the correct time zone.
3. The display is successfully paired with X-Sign Manager when the device status shows “Pairing success”
and the device name is correctly displayed.
15 First Establishment
Page 16

• When selecting Join the service (for version v2.3.0.0):
You can see the number of the equipment that has activated AMS or DMS via Join the service.
No device has activated AMS or DMS. One device has activated AMS or DMS.
1. To add a new device, select the device that you want to enable Broadcast.
2. The equipment will automatically be online within five minutes.
• When scanning the QR code directly on the display (for version v2.3.0.0):
16 First Establishment
Page 17

1. Open Broadcast setting. Install the DMS app on your mobile device and scan the QR code.
2. After filling in the setting in DMS app on your mobile device, the Broadcast will be activated
successfully.
17 First Establishment
Page 18

18 First Establishment
Page 19

Tag management
You can create tags to group devices.
Creating a tag after device binding
1. Create a tag by clicking .
2. Enter the tag name, select the corresponding device(s), and click Confirm.
19 First Establishment
Page 20

3. The tag, “New School 3”, is successfully created.
Creating a tag before device binding
You can also create a new tag before a device is paired with X-Sign Manager.
• When selecting Add a New Device:
20 First Establishment
Page 21

1. Fill in the device ID shown on the display and enter the device name. Click Edit to choose a tag.
2. Click OK to confirm.
A device can be put into multiple tags.
3. A warning message will pop up. Click Confirm to proceed.
21 First Establishment
Page 22

4. Click Finish to complete the action.
• When selecting Join the service (for version v2.3.0.0):
1. Select the tag that you want to apply for the equipment. Click Join to confirm.
2. You can see the tag on the main page.
22 First Establishment
Page 23

Editing tags
1. You can edit tags by selecting the tag and clicking .
2. Select new devices to be added to the tag and click Confirm.
23 First Establishment
Page 24

3. New devices are added to the tag.
24 First Establishment
Page 25

Editing devices
1. You can edit the device by selecting the device name and clicking .
2. Click Edit to continue. Choose the tag and click OK.
25 First Establishment
Page 26

3. Click Submit to complete the action.
26 First Establishment
Page 27

Equipment update
1. To update the device, click Equipment update.
2. Select the device you want to update, then click Update.
Update the device software to the latest version before pairing with X-Sign Manager.
27 First Establishment
Page 28

Publishing messages
X-Sign Broadcast makes it easy to share content that is stored either locally or in the cloud, with
support for texts, images, videos, office files, YouTube and more.
You can publish messages using Create Schedule or Create interrupt to suit your
needs.
Create Schedule employs a calendar structure, delivering your message at a designated date or at a
specific time.
Create interrupt can do a quick publish, delivering your message immediately. It is used when you
need to deliver emergent messages.
28 First Establishment
Page 29

Using Create Schedule
1. Choose the tag or device you want to set schedule and click to go to the schedule management page. You can publish your message to all devices or specific tags.
2. You can set schedule by selecting the date and time period. The Create Schedule window will
pop up.
Four schedule creation types are provided: Text, Image, Video, File.
29 First Establishment
Page 30

Te x t ( C r e a t e S c h e d u l e )
1
2
3
Click Te x t . You can edit the content by completing the following fields.
Item Description
1. Text content Type the message you want to share.
2. Style Customize the style by creating your own module. You can add
more styles by choosing the rightmost one.
3. Duration • Set the date and time you want to share the message.
• You can enable Important message and Repeat playback.
• You can set the end date and choose to repeat by day or week.
30 First Establishment
Page 31

Image (Create Schedule)
1
2
3
Click Image. You can edit the content by completing the following fields.
Item Description
1. File choose Click Choose to enter the file uploading page. Then follow the
instructions on screen to upload your image to be shown.
2. Play speed Select the play speed. Options are 3 seconds, 5 seconds, 10 seconds.
3. Duration • Set the date and time you want to share the image.
• You can enable Important message and Repeat playback.
• You can set the end date and choose to repeat by day or week.
31 First Establishment
Page 32

Video (Create Schedule)
1
2
You can edit the content by completing the following fields.
Item Description
1. Choose file • You can upload videos from your computer. Click Choose to
enter the file uploading page. Then follow the instructions on
screen to upload your video to be played.
• You can also enter a YouTube video link to import the video.
2. Duration • Set the date and time you want to share the video.
• You can enable Important message and Repeat playback.
• You can set the end date and choose to repeat by day or week.
32 First Establishment
Page 33

File (Create Schedule)
1
2
3
The basic license cannot use this advanced function. Only the premium license can edit content for
files like PowerPoint, PDF, Microsoft Word, Google Slides on Google Drive, Microsoft PowerPoint on
Google Drive. Please contact the BenQ Administrator and get the license to publish.
Click File. You can edit the content by completing the following fields.
Item Description
1. File choose • You can upload files from your computer. The file formats can be
Microsoft Word, Microsoft PowerPoint, PDF. Click Choose to
enter the file uploading page. Then follow the instructions on
screen to upload your file to be played.
• You can also enter a file link from Google Drive to import the file.
2 Play speed Select the play speed. Options are 10 seconds, 20 seconds, 30
seconds.
3. Duration • Set the date and time you want to share the file.
• You can enable Important message and Repeat playback.
• You can set the end date and choose to repeat by day or week.
33 First Establishment
Page 34

Template (Create Schedule)
1
2
Edit the
text style
Choose the image
Click Template. Edit the content by completing the following fields.
34 First Establishment
Page 35

Item Description
1. Template
content
• You can use the constructed template to create the schedule. The
default texts and images are for coronavirus prevention. You can
change the texts and images by simply clicking them.
• By clicking the texts, you can edit the text style to change the
default ones.
• By clicking the image, you can upload a new image to replace the
default one. The image can be changed one by one.
2. Duration • Set the date and time you want to share the template.
• You can enable Important message and Repeat playback.
• You can set the end date and choose to repeat by day or week.
3. After all configuration is set, click Confirm. You will see the schedule on the schedule
management page.
35 First Establishment
Page 36

Using Create interrupt
3
1
2
1. Choose the tag or device you want to add interrupt and click . You can publish your message
to all devices or specific tags.
Four interrupt creation types are provided: Text, Image, Video, File.
Te x t ( C r e a t e interrupt)
Click Te x t . You can edit the content by completing the following fields.
Item Description
1. Text content Type the message you want to interrupt.
2. Style Customize the style by creating your own module. You can add
more styles by choosing the rightmost one.
3. Play length • You can enable Important message.
• Select the play length. Options are 5/10/15/20/25/30/35/40/45/50/
55 minutes or 1, 2, 3,..., 23 hours.
36 First Establishment
Page 37

Image (Create interrupt)
1
2
3
Click Image. You can edit the content by completing the following fields.
Item Description
1. Choose file Click Choose to enter the file uploading page. Then follow the
instructions on screen to upload your image to be played.
2. Play speed Select the play speed. Options are 3 seconds, 5 seconds, 10 seconds.
3. Play length • You can enable Important message.
• You can set to play once or customize the play time.
37 First Establishment
Page 38

Video (Create interrupt)
1
2
Click Video. You can edit the content by completing the following fields.
Item Description
1. Choose file • You can upload videos from your computer. Click Choose to
enter the file uploading page. Then follow the instructions on
screen to upload your image to be played.
• You can also enter a YouTube video link to import the video.
2. Play length • You can enable Important message.
• You can set to play once or customize the play time.
38 First Establishment
Page 39

File (Create interrupt)
1
2
3
The basic license cannot use this advanced function. Only the premium license can edit content for
files like PowerPoint, PDF, Microsoft Word, Google Slides on Google Drive, Microsoft PowerPoint on
Google Drive. Please contact the BenQ Administrator and get the license to publish.
Click File. You can edit the content by completing the following fields.
Item Description
1. Choose file • You can upload files from your computer. The file formats can be
Microsoft Word, Microsoft PowerPoint, PDF. Click Choose to
enter the file uploading page. Then follow the instructions on
screen to upload your file to be played.
• You can also enter a file link from Google Drive to import the file.
2 Play speed Select the play speed. Options are 10 seconds, 20 seconds, 30
seconds.
3. Play length • You can enable Important message.
• You can set to play once or customize the play time.
39 First Establishment
Page 40

Te m p l a t e ( C r e a t e interrupt)
1
2
Ta p
here
Click Template. You can edit the content by completing the following fields.
Item Description
1. Template
content
You can change texts and images to create interrupt. To change the
texts and images, read Template (Create Schedule) on page 34 for
more information.
3. Play length • You can enable Important message.
• You can set to play once or customize the play time.
2. After all configuration is set, click Confirm. You will find the interrupted message/image/video/
file on the display.
3. You can close the broadcast by tapping the interrupted message area.
40 First Establishment
Page 41

4. A message will pop up. Click Confirm to close the broadcast.
Newly created interrupt will overwrite the previous one.
41 First Establishment
Page 42

Schedule Management (History)
View
process
Retrieve
Edit
You can check and edit your broadcast history by selecting Schedule Management.
1. Select the type (schedule or interrupt) you want to check. You can retrieve or edit the selected
item.
2. After clicking , you will see a warning in a popup window. Click Confirm if you want to
retrieve the schedule or interrupt.
42 First Establishment
Page 43

3. After clicking , you will see an editing window. Click Confirm after all editing is set.
4. If you want to delete a schedule or interrupt, you can also click the remove button.
5. You will see a message in a popup window. Click Confirm if you want to remove the schedule
or interrupt.
43 First Establishment
Page 44

Device Report
1. To access the activity report of the devices, click Device Report.
2. Choose Ta g / E q u i p m e n t and Date range, then click Export Report.
3. The report is exported as a csv file. You can open it with Microsoft Excel.
4. You can also export the report by clicking .
44 First Establishment
Page 45

User management
Set role
Set Permission
Go to User Management and select the account you want to manage.
• As the administrator, you can set the role for the account by clicking . You can set the account
to be Administrator or Teacher.
• As the administrator, you can also set permission for the account by clicking . You can assign
the account to edit broadcasts on devices in specific display groups.
45 First Establishment
 Loading...