

Page 1

Table of Contents i
English
Section 1: Quick Start Guide .................................. 1
1. Please read these instructions ...........................................2
What’s in the Quick Start Guide? .................................................2
What’s in the User Manual? .......................................................... 2
2. Package contents ...............................................................2
3. Select and prepare the installation location .....................3
4. Installing the swivel (VB3233 model only) ......................4
Important safety notes ................................................................... 4
Installing the swivel ....................................................................... 4
5. Connect the antenna cable ................................................5
6. Connect the power cord ...................................................5
7. Adjust the viewing angle ...................................................6
8. Activate the remote control ..............................................6
Remote control usage tips ............................................................. 7
Test the remote control ................................................................ 7
9. Initialize your TV ..............................................................8
10. View the TV programs ....................................................9
Care and cleaning information .............................................9
What's next? ...........................................................................10
Section 2: User Manual ........................................... 11
Introduction ...........................................................................12
Getting to know your TV ......................................................12
Input options ................................................................................. 12
Analog TV source inputs ............................................................... 12
Video source inputs ....................................................................... 13
Graphic source inputs ...................................................................13
Front view ...................................................................................... 13
Control panel (right side view) ..................................................... 14
External AV devices terminal panel (left side view) .................... 15
Rear view ........................................................................................ 16
Getting to know the remote control ..................................... 17
Using the remote control ......................................................20
Power on, off and standby .................................................... 20
Turning the TV on ........................................................................ 20
Putting the TV to standby ............................................................. 20
Selecting an input source ...................................................... 20
Selecting the TV input directly ..................................................... 20
Table of Contents
V32B_V37B_EN.book Page i Wednesday, January 23, 2008 10:55 AM
Page 2
Table of Contentsii
English
Switching to other input sources (except the TV input) ............. 20
Adjusting sound settings ...................................................... 21
Adjusting volume .......................................................................... 21
Mute setting ...................................................................................21
Turning on/off the Surround sound effect .................................. 21
Selecting a preset EQ mode ........................................................... 21
Changing programs ..............................................................21
Selecting a program directly .......................................................... 21
Changing programs sequentially ..................................................21
Returning to the previous viewed program or input ................... 21
Jumping to your favorite channels ...............................................22
Using the freeze function ...................................................... 22
Selecting a picture mode ....................................................... 22
Using the sleep timer ............................................................ 22
Adjusting backlight ............................................................... 23
Using the Teletext function .................................................. 23
Displaying information ........................................................23
Adjusting aspect ratio ........................................................... 24
Connecting audio and video inputs ..................................... 25
Connecting the Composite Video input ......................................25
Connecting the S-Video input ...................................................... 26
Connecting the Component Video input .................................... 26
Connecting the PC D-Sub input ................................................... 27
Connecting the DVI input ............................................................27
Connecting the HDMI input ........................................................28
Connecting the stereo audio output ............................................. 28
Connecting the headset audio output .......................................... 29
OSD (On-Screen Display) menu .......................................... 30
OSD structure .......................................................................30
Navigating the OSD menu ................................................... 31
Operations in the OSD menu .......................................................31
Audio menu .......................................................................... 32
Setting up the Personal EQ Mode ................................................. 33
Picture menu ......................................................................... 34
Using the Picture Modes ............................................................... 35
Adjusting the contrast ...................................................................36
Adjusting the brightness ................................................................ 36
Setting up the Personal Picture Mode .......................................... 36
Senseye menu ........................................................................ 37
TV menu ................................................................................ 38
Performing manual installation .................................................... 38
Editing programs ........................................................................... 39
Setting up favorite channels .......................................................... 41
V32B_V37B_EN.book Page ii Wednesday, January 23, 2008 10:55 AM
Page 3
Table of Contents iii
English
Child Lock ...................................................................................... 42
Setup menu ............................................................................ 43
Reference ................................................................................44
Disclaimer ..............................................................................44
Copyright ...............................................................................44
Battery safety notice ..............................................................44
Dimensions ............................................................................45
Specifications .........................................................................47
Supported PC (D-Sub/DVI) input signal resolutions .........48
Supported Component Video input signal resolutions ...... 48
Supported HDMI input signal resolutions ..........................49
Setting up appropriate output resolution on PC ......................... 49
Troubleshooting ....................................................................50
V32B_V37B_EN.book Page iii Wednesday, January 23, 2008 10:55 AM
Page 4

Table of Contentsiv
English
<Memo>
V32B_V37B_EN.book Page iv Wednesday, January 23, 2008 10:55 AM
Page 5
Welcome
English
VB Series LCD TV
Section 1: Quick Start Guide
V32B_V37B_EN.book Page 1 Wednesday, January 23, 2008 10:55 AM
Page 6

Section 1: Quick Start Guide2
English
1. Please read these instructions
Congratulations on your purchase of the BenQ VB series LCD TV. You have a
state-of-the-art flat widescreen digital LCD TV which should provide you
with years of viewing pleasure. Please take a few minutes to read these quick
start instructions through before installing and using the TV.
What’s in the Quick Start Guide?
Section 1 contains the Quick Start Guide which provides you with enough
information to get familiar with and setup the TV. This is section 1.
What’s in the User Manual?
Section 2 contains the User Manual which details the features and functions
of the TV, and provides product specifications and troubleshooting
information for your further assistance. The User Manual also describes how
to customize the TV settings so that you can gain the best viewing experience
possible to suit your preferences and viewing environment.
2. Package contents
Unpack the TV and check that all the following items are included:
• The separate swivel and plastic rings are only available with the VB3233 model.
The VB3733 model has a factory pre-assembled swivel.
• The type of power cable supplied may differ from that illustrated, dependant
upon your region of purchase.
If any item is missing or damaged, contact your place of purchase
immediately. Please keep the documentation in a safe place for later reference.
Dispose of packaging wisely:
• The cardboard carton (box) can be recycled.
• Do not leave plastic bags within reach of young children or babies.
• Consider storing the packaging (if possible) for future transport of the TV.
• Check that you haven't left any accessory inside the packaging before
discarding.
For the primary safety of yourself and others, this TV should be handled with care
to avoid damage to it or to persons which come into contact with it.
All Liquid Crystal Display (LCD) screens have a very thin protective layer of
glass which is liable to marking or scratching, and cracking if struck or
pressured. The liquid crystal substrate is also liable to damage under excessive
force or extreme temperatures. Please handle with care.
LCD TV (x1) Power cord (x1) Composite Video
(AV) cable (x1)
Swivel* (x1) Plastic ring*
(x2)
Quick Start Guide/
User Manual (x1)
Warranty
information (x1)
Remote control
(x1)
AAA battery (x2)
V32B_V37B_EN.book Page 2 Wednesday, January 23, 2008 10:55 AM
Page 7
Section 1: Quick Start Guide 3
English
3. Select and prepare the installation location
In order to prevent potential dangers and prolong the service life of the TV,
please observe the following points when installing, operating and cleaning
the TV.
Do NOT place the TV on an
uneven, sloping or unstable
surface where it may fall and cause
damage to itself or others. Have a
qualified technician secure the TV
in case there is an earthquake.
Do NOT place the TV in an
enclosed place without allowing
for ventilation.
Observe all warnings and cautions
as labelled on the TV.
Do NOT place the TV near water,
like a spa or pool, or in a position
which will allow the splashing or
spraying of water onto the TV, like
in front of an open window where
rain water may enter.
Do NOT cover or block the vents
and openings while the TV is
switched on, as the heat may
accumulate inside the TV and
result in danger.
Do NOT place the TV near or
above sources of heat, such as
radiators, heaters, fuel stoves and
other heat-generating items
(including audio amplifiers).
Otherwise heat may cause
damages to the outer casing as well
as the components inside.
Do NOT place the TV in direct
sun or where direct sun or spot
lighting will shine onto the TV, as
the heat may damage the TV and
the bright light will make viewing
the TV more difficult than
necessary.
If wall mounting, allow
appropriate space on top for
attaching the TV to the wall
bracket.
If recessed into a wall opening, you
must leave appropriate free space
both top and bottom for
mounting and removing the TV.
If wall mounting, disconnect all
cables and have a suitable qualified
and experienced technician mount
it safely. Use only a recommended
TV wall bracket for this model TV
and ensure that the mounting
brackets (optional accessory) are
securely screw fixed to the wall
structure, and not just the wall
render, lining or cladding. Ensure
the brackets are level horizontally.
Do not glue the brackets to the
wall.
This TV has no power switch.
When installing the TV,
incorporate a readily accessible
disconnect device in the fixed
wiring, or connect the power cord
to socket-outlet which must be
provided near the TV and easily
accessible. If a fault should occur
during operation of the unit,
operate the disconnect device to
switch the power supply off, or
disconnect the power cord.
V32B_V37B_EN.book Page 3 Wednesday, January 23, 2008 10:55 AM
Page 8
Section 1: Quick Start Guide4
English
4. Installing the swivel (VB3233 model only)
Important safety notes
Please pay attention to the following before installing:
• For safety reasons, it is recommended that the installation be carried out by
at least two adult persons.
• The LCD panel of the TV is extremely fragile and subject to damages easily.
Avoid touching the LCD panel when installing or moving the TV, and take
precautions not to let any objects come into contact with the LCD panel. It is
recommended that you use a soft, clean and lint-free towel to protect the TV
and LCD screen when installing.
• Pay attention to the stability of the location where the TV will be placed.
Otherwise the TV may topple over and result in damages and personal
injuries. Have a qualified technician secure the TV in case there is an
earthquake.
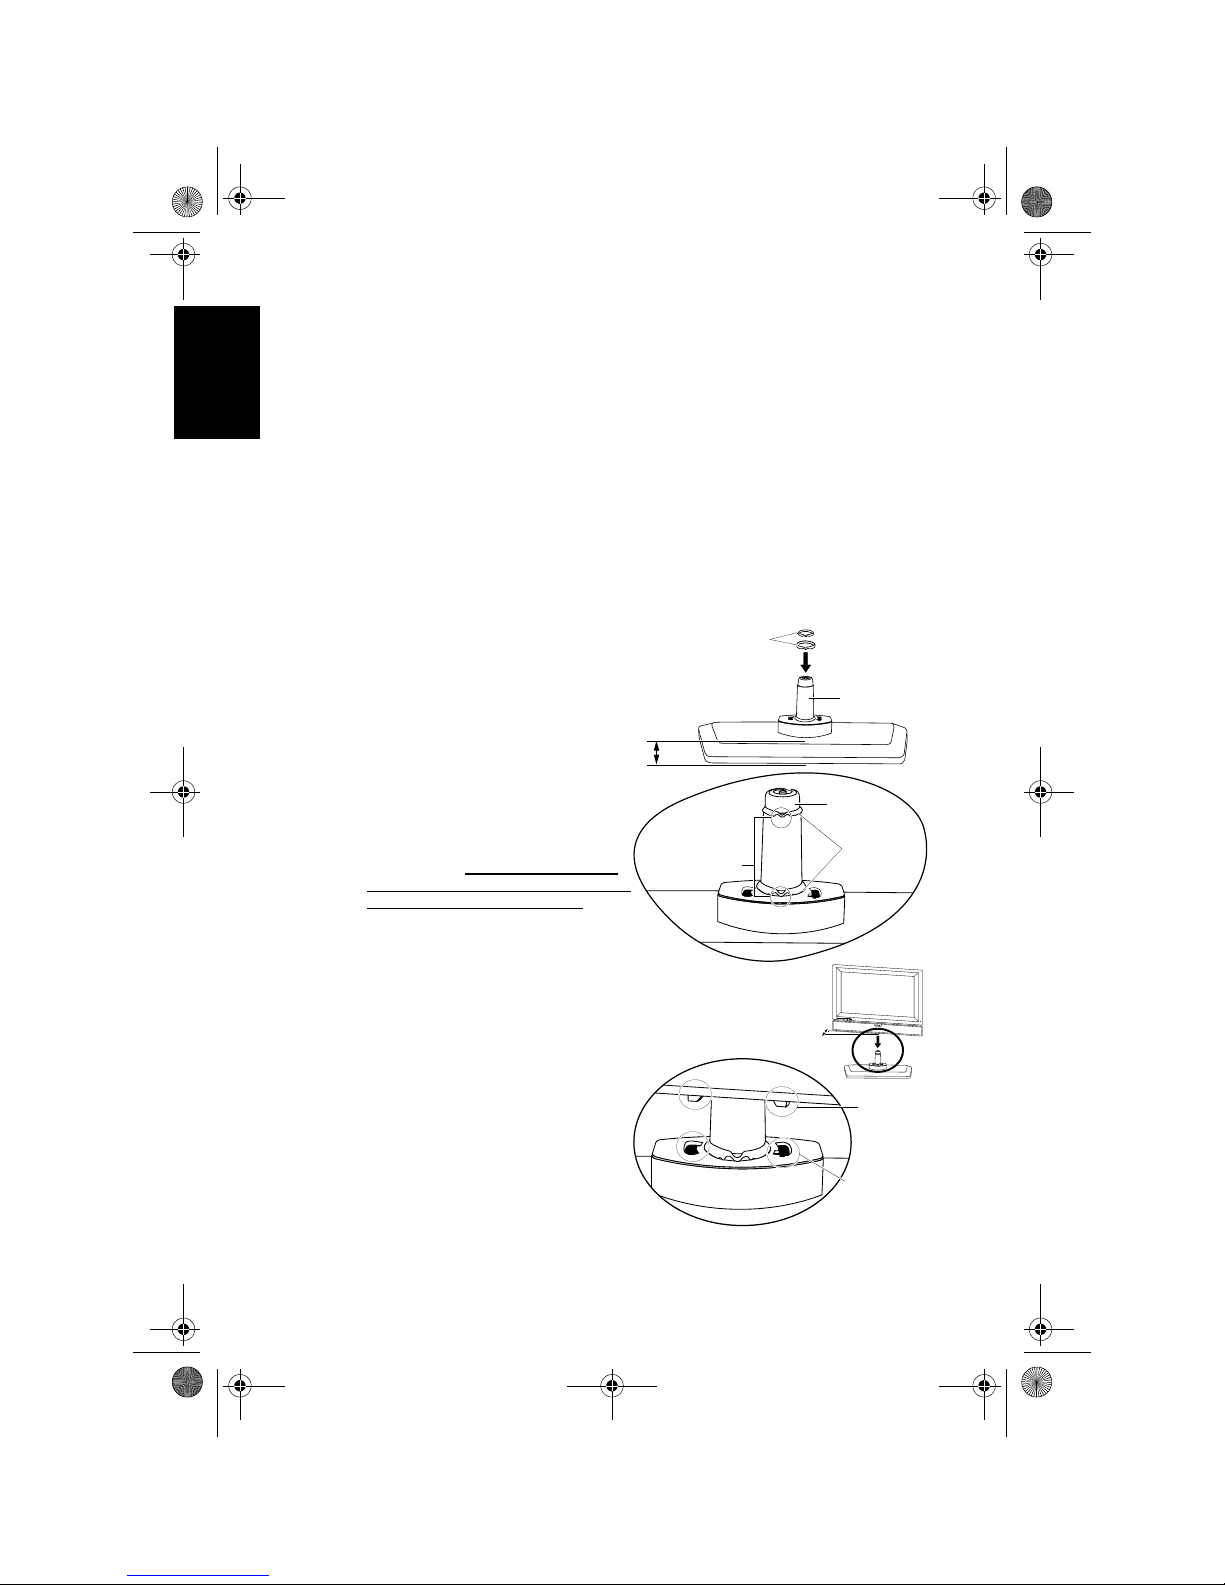
Installing the swivel
1. With the wider side of the swivel
facing forward, install the plastic
rings on the swivel shaft.
2. Refer to the illustration for the
correct position of the plastic rings
on the shaft.
Make sure that the
direction of the V-shaped part of
the plastic rings is correct.
3. Lift the TV up and insert the swivel
shaft into the swivel shaft hole on
the bottom of the TV at an angle of
30 degrees. When inserting, make
sure that the stoppers on the TV
are properly aligned and inserted
into the positioning holes on the
swivel base.
Plastic rings
Shaft
Wider
side
Plastic
rings
Shaft
Pay attention to
the V-shaped
part of the
plastic rings
30
o
Stoppers
Positioning
holes
V32B_V37B_EN.book Page 4 Wednesday, January 23, 2008 10:55 AM
Page 9
Section 1: Quick Start Guide 5
English
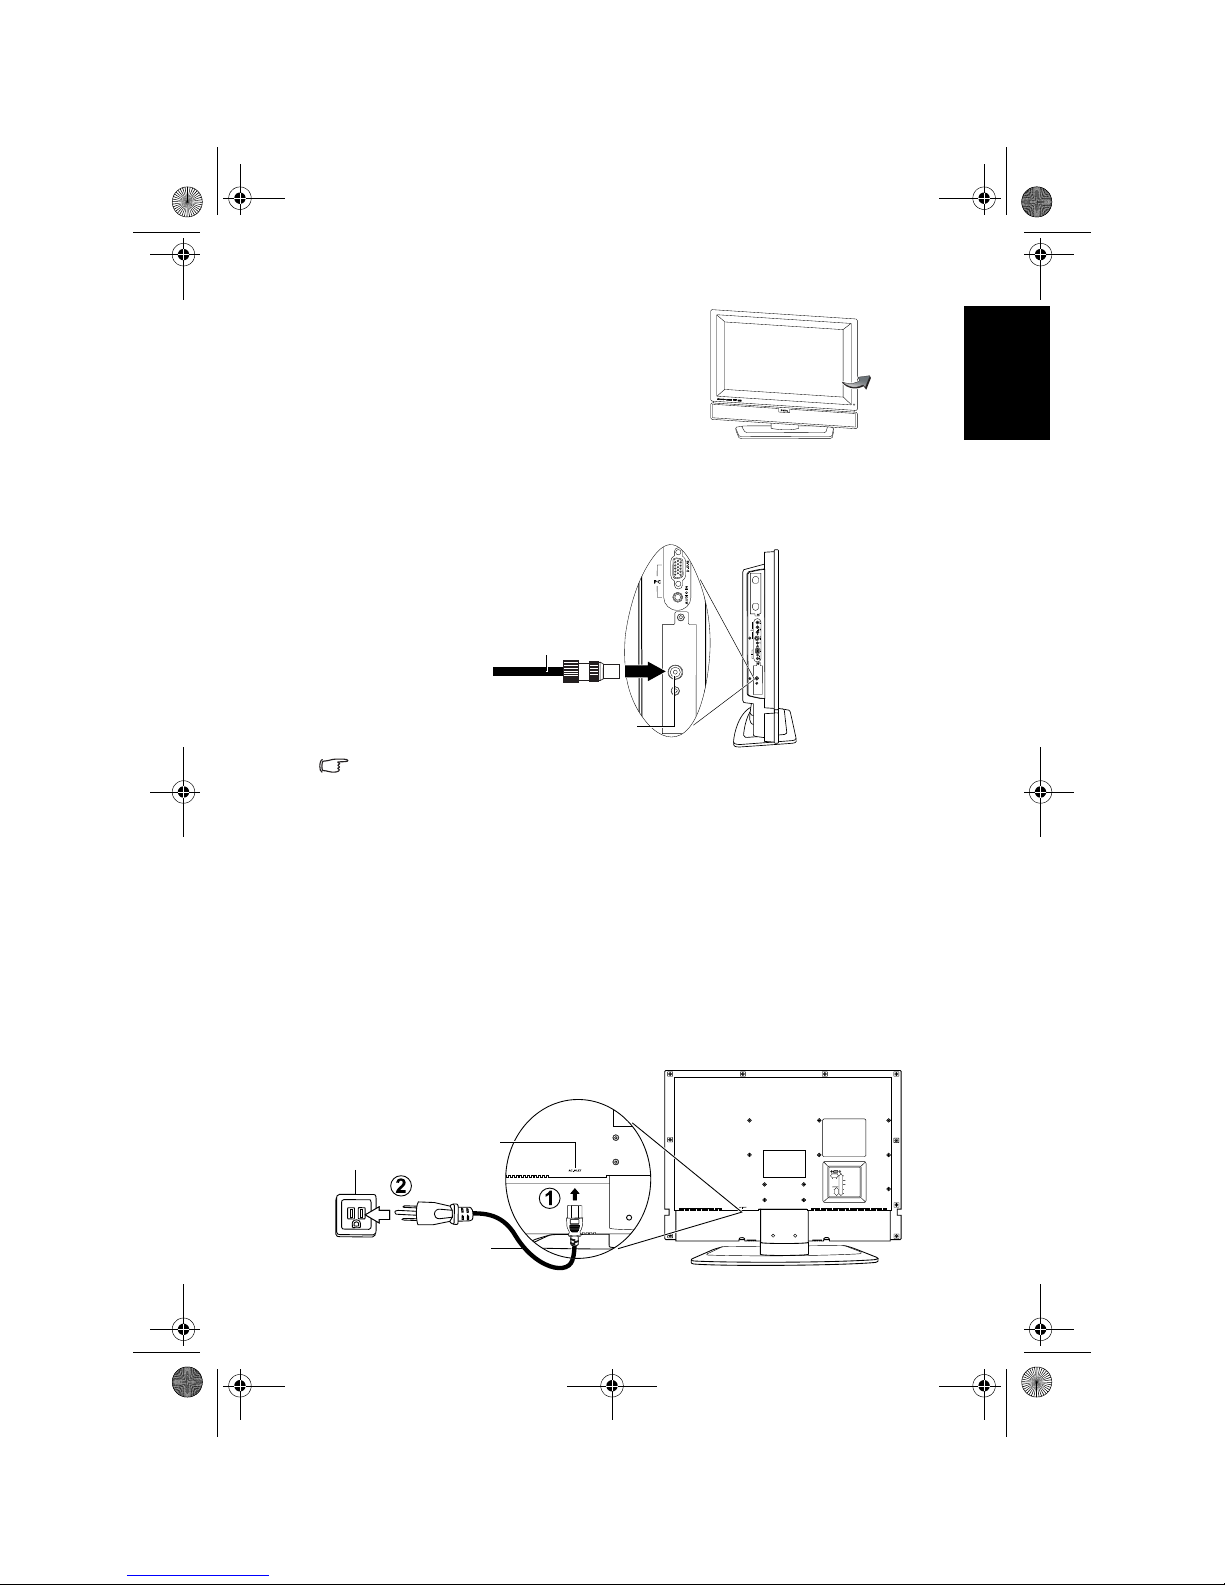
5. Connect the antenna cable
Connect a TV antenna cable fly-lead from your TV antenna system or Cable
TV (CATV) decoder box to the
TV RF input socket on the TV (as shown in
the illustration below). Make sure that the cable connection is firmly in place.
• A poor quality TV signal will produce a poor picture and/or sound on your TV.
For high quality picture and sound, you will need a high quality TV signal.
Depending upon your location, for best TV signal reception, you should have a
properly aligned outdoor TV antenna system. If need be, consult a professional
antenna specialist.
• This TV has a built-in analog TV tuner, which requires the TV antenna cable
connection to an external TV antenna system or CATV decoder. If you wish to
make use of the digital LCD screen to view digital TV, you should connect an
external digital TV tuner (decoder) set top box (STB) to the TV using a digital
signal cable (HDMI or DVI) connection.
6. Connect the power cord
1. Locate the power cord from the packaging, and plug the appropriate end
into the
AC-INLET socket on the rear of the TV (as illustrated below).
2. Plug the other end into an appropriate wall power outlet, and turn on the
switch (if the power outlet is switched). The TV will enter standby mode
and the power indicator (on the front lower right) will light up red.
4. After the shaft is completely
inserted, turn the TV so it faces
forward.
Antenna cable
TV RF input socket
AC-INLET
socket
Power
outlet
Power cord
V32B_V37B_EN.book Page 5 Wednesday, January 23, 2008 10:55 AM
Page 10
Section 1: Quick Start Guide6
English
• The supplied power cord is suitable for use with 110-240V AC power only.
• The type of power cord plug and socket illustrated may differ from the type used
in your region.
• Only use an appropriate power cord for your region. Never use a power cord
which appears damaged or frayed, or change the plug type on the power cord.
• Be aware of the total loading when using extension cords or multiple outlet
power boards.
• This TV has no power switch. When installing the TV, incorporate a readily
accessible disconnect device in the fixed wiring, or connect the power cord to
socket-outlet which must be provided near the TV and easily accessible. If a
fault should occur during operation of the unit, operate the disconnect device to
switch the power supply off, or disconnect the power cord.
• WARNING: This TV has been engineered and manufactured with the highest
priority on safety, however, IMPROPER HANDLING OR USE CAN RESULT IN
POTENTIAL ELECTRICAL SHOCK OR FIRE HAZARD. Please handle this TV with
care. If damaged, turn off the power and unplug the power cord from the TV.
Transport the TV to your nearest BenQ authorised service centre for repair.
• There are no user serviceable parts in this TV. Never unscrew or remove any
covers. There are dangerous voltages inside. Turn off the power and unplug the
power cord before moving the TV.
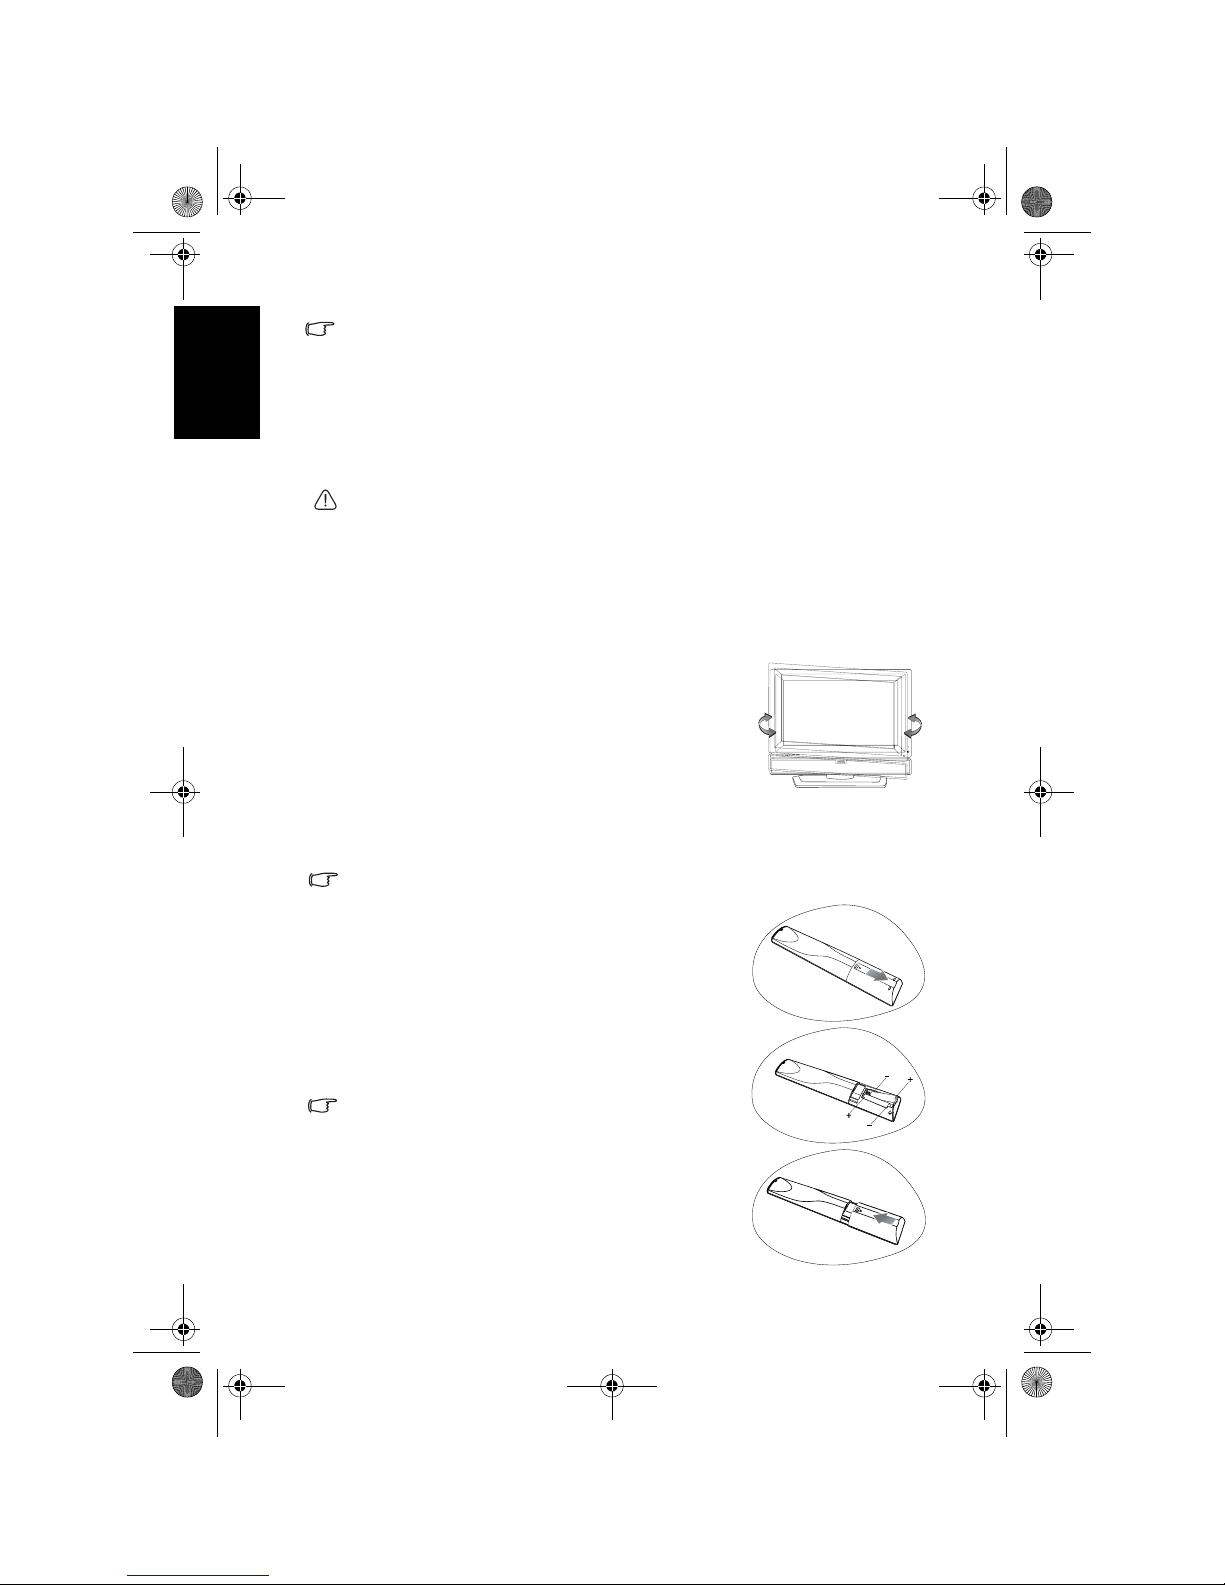
7. Adjust the viewing angle
8. Activate the remote control
1. Locate the remote control and batteries from the packaging, and unwrap
them.
Be cautious when handling batteries. See "Battery safety notice" on page 44 for
more information.
This TV is equipped with a adjustable swivel base. If
necessary, turn the TV screen to an appropriate angle
(maximum 30 degrees left and right) for more
comfortable viewing.
2. Turn the remote control to reveal its back side, and
open the lid of the battery compartment.
3. Insert the batteries (supplied) ensuring that the
positive and negative marked battery terminals
match the (+) and (-) marks in the battery
compartment.
These batteries are provided for your convenience so
that you can operate the TV straight away. You should
replace them as soon as possible.
4. Refit the lid of the battery compartment as shown.
V32B_V37B_EN.book Page 6 Wednesday, January 23, 2008 10:55 AM
Page 11
Section 1: Quick Start Guide 7
English
Remote control usage tips
• Do not cover the sensor window on the front of the TV (below the power
indicator lamp), or place objects in front of it which will block the direct lineof-sight between the remote control and the sensor window on TV.
• Do not let the remote control become wet, or place it in humid environments
(like bathrooms.)
• If the remote control sensor window on the TV is in direct sunlight or strong
light, the remote control may not operate properly. In this situation, change the
light source or readjust the angle of your TV, or operate the remote control from
a location closer to the remote control sensor window on the TV.
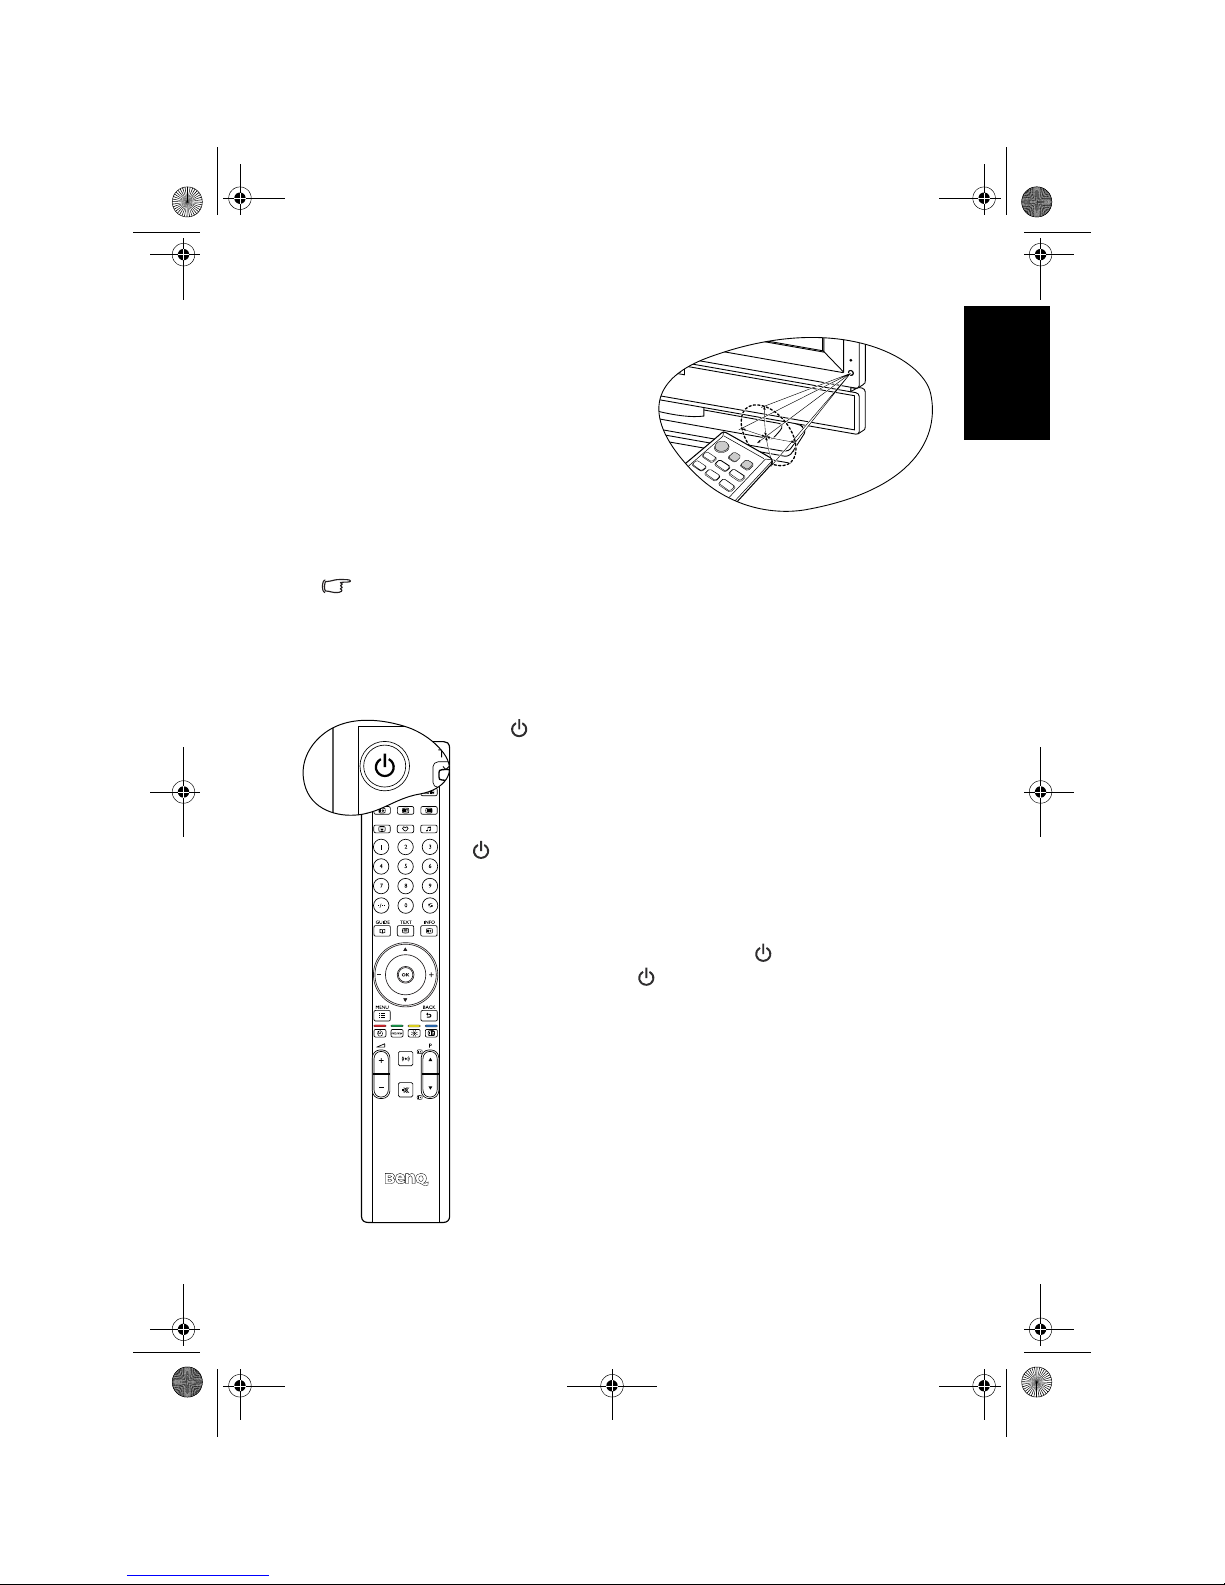
Test the remote control
• Point and aim the top front of the
remote control directly at the TV
when pressing the buttons.
• The remote control must be held at
an angle within 30 degrees of the TV's
remote control sensor window to
function correctly. The distance
between the remote control and the
sensors should not exceed 6 meters.
30 degrees
6 meters
Press (Power/standby) on the remote control (as
highlighted in the illustration). The TV should turn on, and
the power indicator change to green. If so, progress to the next
step ("9. Initialize your TV" on page 8).
If the TV does not turn on, first check that the power is
available (the power indicator will be lit red). If so, try pressing
(Power/standby) on the right side of the TV. If the TV
turns on by this method, the problem lies with the remote
control. In that case, check that the remote control batteries
are properly installed. If need be, replace the batteries with
new ones or known good ones.
To put the TV to standby mode, press
(Power/standby) on
the remote control, or
(Power/standby) on the right side of
the TV again, and the TV will return to standby mode (the
power indicator will turn red.)
V32B_V37B_EN.book Page 7 Wednesday, January 23, 2008 10:55 AM
Page 12
Section 1: Quick Start Guide8
English
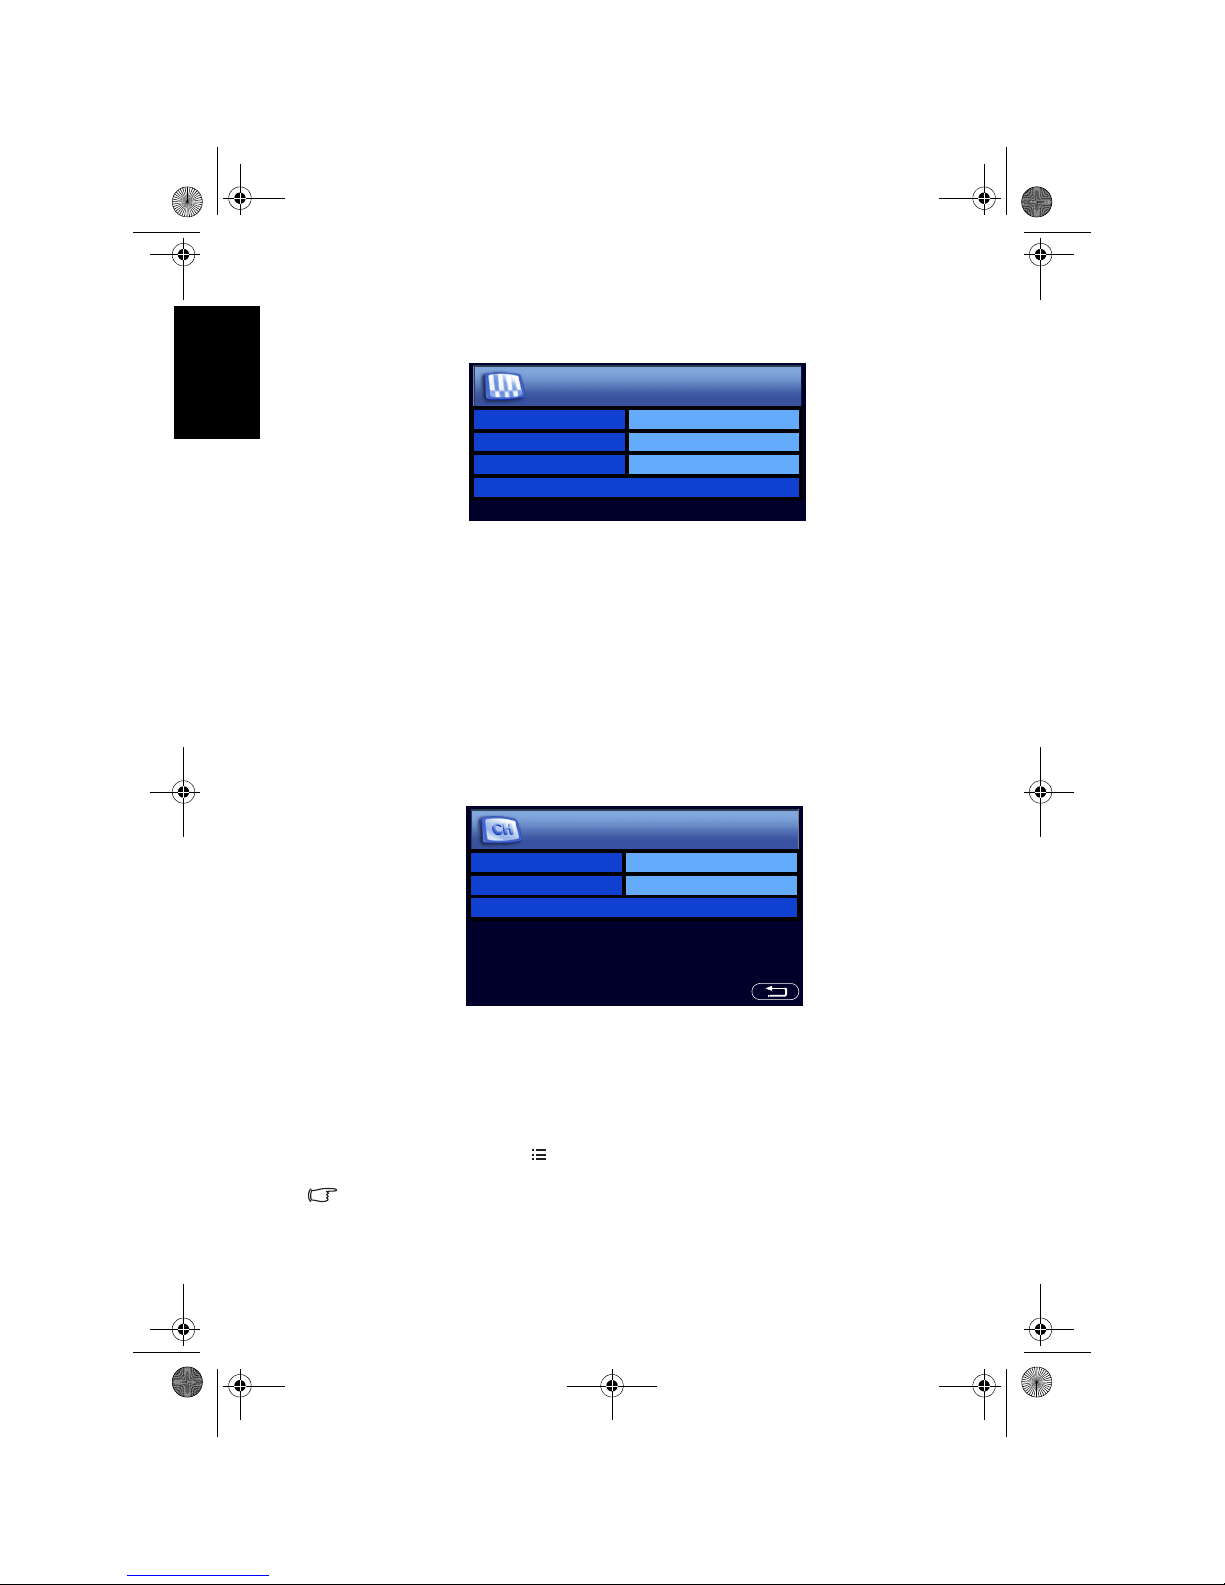
9. Initialize your TV
When first turned on (and until tuned), the First Turn On menu will display:
Before you can use your TV to view TV programs, you need to let it search for
and tune TV station programs appropriate to your region. This process only
needs to be done when the TV is newly installed, or whenever you install it in
a new location. You also need to select your language for the on-screen display
(OSD) menu for convenience of operation.
1. Press or on the remote control to select
Language, and then press +
or - to select your language.
2. When you select a
Language, the Country and TV Standard items will
change automatically to suit. If your country is not displayed in the
Country item, you can press or to select it and then press + or - to
select your country. If
Others is selected as the Country, you will also need
to select the TV broadcast standard suitable for your region (see page 38).
3. Press or to select
Auto Installation and then press OK. The following
menu will display:
4. Press or to select
Start and then press OK. The TV will start searching
for available programs and tune and store them for you. This may take
several minutes, depending on the available TV programs in your local
reception area. Please allow the TV to complete this tuning process. If you
want to stop this auto installation process, press
OK.
5. When the tuning process is complete, the
Program Edit menu will display.
You can now edit the stored programs if you want (see "Editing programs"
on page 39), or press
MENU on the remote control to close it and start
viewing TV programs.
• You can alter the settings in the future using the OSD menu. See "OSD (On-
Screen Display) menu" on page 30 for more information.
• This LCD TV is a high resolution display device. To achieve the best possible
display results, it is recommended that you connect it to a digital video source,
and select an appropriate aspect ratio. See "Adjusting aspect ratio" on page 24.
Language English
Country Middle East
Standard BG
Auto Installation >
First Turn On
Country Middle East
Standard BG
Start
Auto Installation
V32B_V37B_EN.book Page 8 Wednesday, January 23, 2008 10:55 AM
Page 13
Section 1: Quick Start Guide 9
English
10. View the TV programs
Care and cleaning information
• Always turn off the TV and disconnect it from the mains power before
cleaning.
• Do NOT use cream, liquid, aerosol or spray cleaners. Use only a slightly
damp well wrung-out (drip-free) and lint-free, clean soft cloth and lightly
wipe the TV.
• If necessary, use a pH-neutral liquid dish-washing detergent diluted with
water on a separate clean lint-free cloth to remove oil or grease marks. Wipe
over again with a clean dry lint-free cloth to remove any smear marks.
• Under close examination and in certain circumstances, you may notice that a
few non-active pixels appear on the screen as a fixed point of color. Please
note that this does not affect the performance of your product as it is usually
not visible at normal viewing distances.
• If the TV is not going to be used for an extended period of time (like when
you are going away for holidays), it should be switched off and unplugged
from the wall outlet. You should also consider removing the batteries from
the remote control (as they may leak).
• LCD (Liquid Crystal Display) screens, like plasma (PDP) and conventional
CRT (Cathode Ray Tube) screens, are also susceptible to 'screen burn-in' or
'image retention' which can be found on the screen as visible fixed lines and
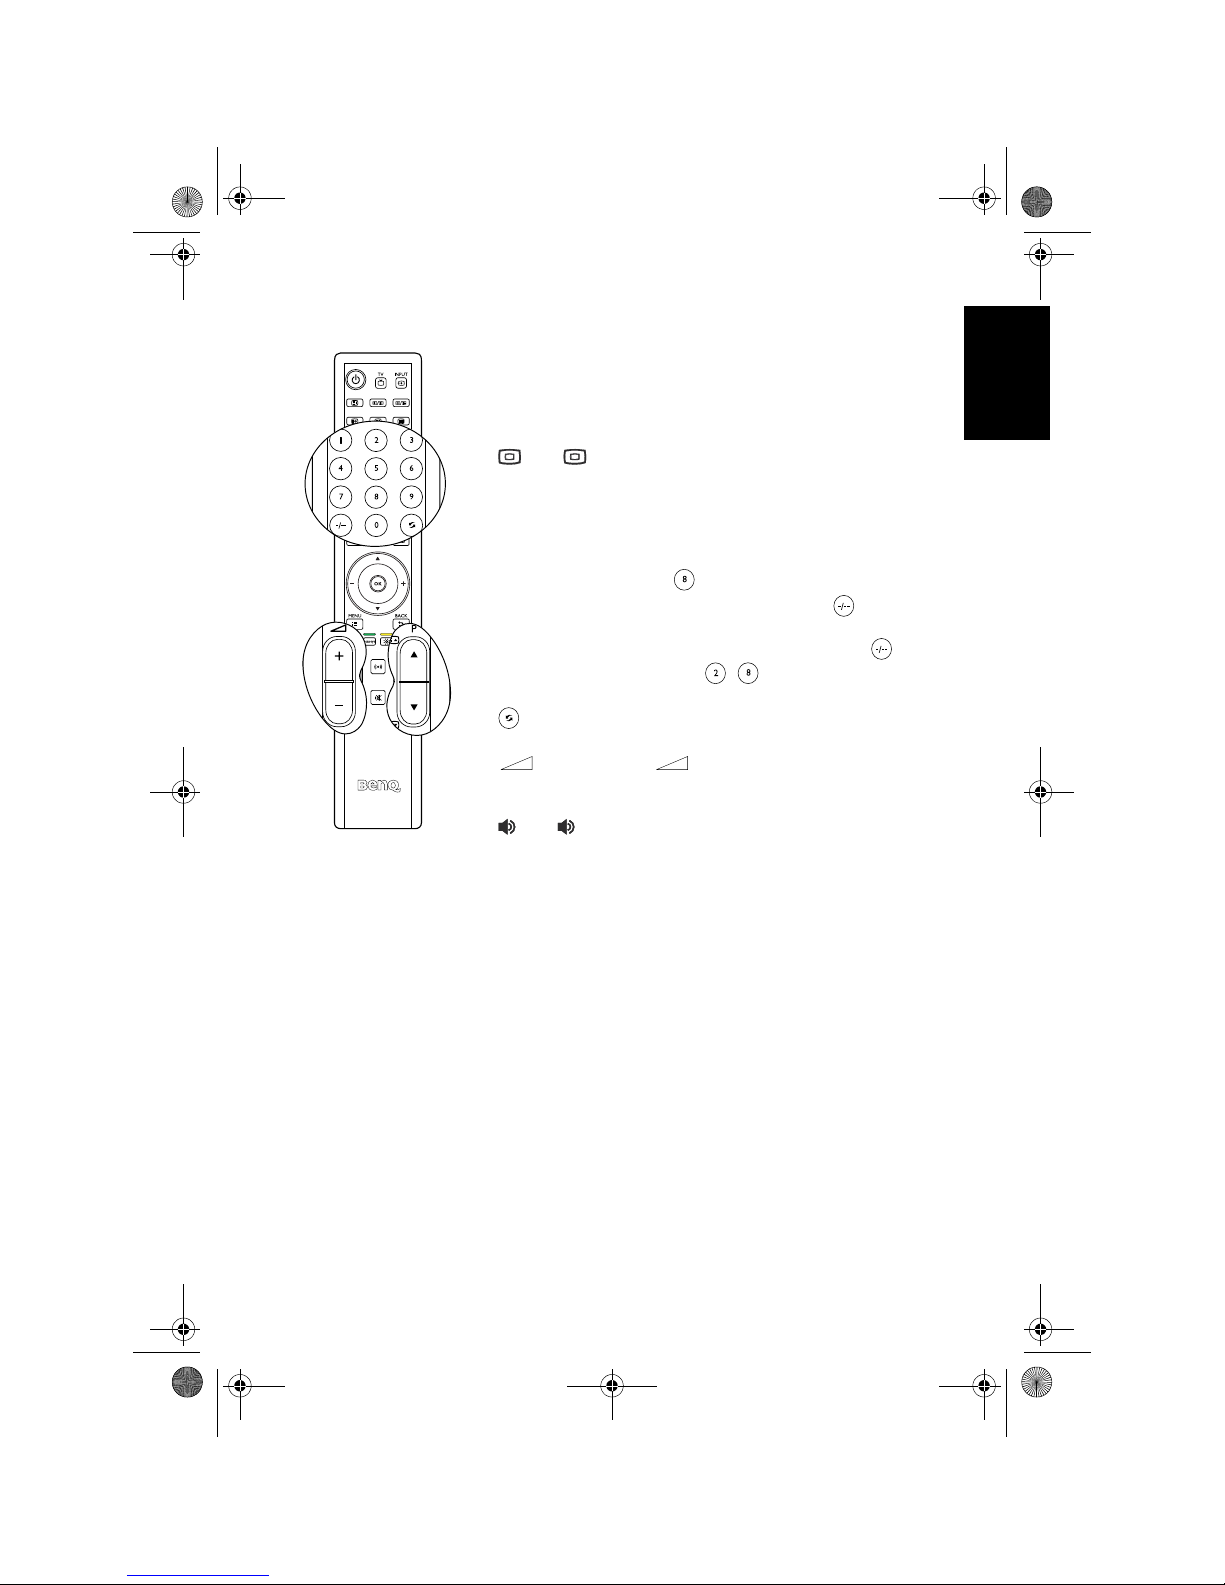
To sequentially change the TV programs available in your area,
press the following buttons:
•
P (Program) or P (Program) on the remote control
(as highlighted in the illustration), or
• or on the remote control, or
• or on the TV.
You can also change to a program directly by selecting the
station number using the numeric program selection
button(s) on the remote control:
• To select a single-digit program number, press the
corresponding program selection button. For example, to
select program 8, press .
• To select a two-digit program number, press
(Program
entry)
, followed by the corresponding program selection
buttons. For example, to select program 28, press
(Program entry)
, and then , .
• To return to the previous viewed program or input, press
(Recall) (also highlighted in the illustration).
To alter the volume, press the following buttons:
•
(Volume) + or (Volume) - on the remote
control (as highlighted in the illustration), or
• + or - on the remote control, or
• or on the TV.
V32B_V37B_EN.book Page 9 Wednesday, January 23, 2008 10:55 AM
Page 14

Section 1: Quick Start Guide10
English
shades and can't be removed. To avoid such permanent damage to the screen,
it is advisable to take the following preventive actions:
• Avoid displaying still (inactive) image s for more than two hours.
• Change the screen image aspect ratio from time to time.
• If it is necessary to display still images for a long time, lower the contrast
and brightness.
• Turn on the
ECO function when displaying PC input image (see "ECO" on
page 43).
What's next?
You have reached the end of Section 1: Quick Start Guide. By now, you should
have a reasonable understanding of your new LCD TV and its controls, know
how to install, connect, turn on and how to care for and maintain it.
Should you wish to maximize your viewing experience pleasure, Section 2 of
this booklet contains the User Manual which describes how to customise the
TV settings to suit your preferences and viewing environment. It details the
features and functions of the TV and provides product specifications and
troubleshooting information for your further assistance.
V32B_V37B_EN.book Page 10 Wednesday, January 23, 2008 10:55 AM
Page 15

Welcome
English
VB Series LCD TV
Section 2: User Manual
V32B_V37B_EN.book Page 11 Wednesday, January 23, 2008 10:55 AM
Page 16

Introduction12
English
Introduction
This booklet is divided into two sections: the Quick Start Guide; and the User
Manual. For details of the Quick Start Guide, see "1. Please read these
instructions" on page 2.
This is section 2, the User Manual which describes how to customize the TV
settings so that you can gain the best viewing experience possible to suit your
preferences and viewing environment. This section details the features and
functions of the TV and the remote control, describes how to connect to
other devices, and provides product specifications and troubleshooting
information for your further assistance.
Getting to know your TV
This LCD TV is a state-of-the-art flat widescreen digital display device. It has a
built-in analog TV tuner which can be used to view standard definition analog
television (TV or ATV), cable television (CATV), or radio frequency (RF)
modulated video through its coaxial TV tuner input socket.
However, the high display quality of a widescreen LCD TV isn’t realized
through analog TV. The highest possible quality display is only possible from
high definition digital video sources like High Definition TV (HDTV) and
High Definition DVD (HD-DVD).
Input options
This TV supports the simultaneous connection of several different types of
TV, Video and Graphic sources, and permits you to select available sources
you wish to view at any time. You can press
INPUT on the remote control
or INPUT on the TV to select an input source.
There are multiple sockets on the TV for analog TV, Video, and Graphic
inputs (see also "External AV devices terminal panel (left side view)" on page
15 and "Rear view" on page 16):
• Analog TV source input includes: 1 × Coaxial analog TV antenna.
• Video source inputs include:
1 × S-Video, 1 × Composite Video (AV) and 1 ×
Component Video.
• Graphic source inputs include: 1 × HDMI/DVI and 1 × PC D-Sub.
You should connect whichever TV, Video or Graphic sources you wish to view
on the TV. You need not connect more than one if that one is all you wish to
view.
The simultaneous display of multiple pictures from different signal sources on
the screen (for example, the picture-in-picture function) is not supported.
Analog TV source inputs
You can connect an aerial VHF or UHF TV antenna (if available) to the TV
RF input socket using an appropriate TV coaxial cable, and select the
ATV
input to view analog TV broadcasts.
If you have cable TV, you can connect your cable TV decoder box to the TV
RF input socket using an appropriate TV coaxial cable, and select the
ATV
input
to view cable TV.
See "5. Connect the antenna cable" on page 5.
V32B_V37B_EN.book Page 12 Wednesday, January 23, 2008 10:55 AM
Page 17
Introduction 13
English
Video source inputs
You can connect an external analog video device (like a VCR or TV game
console) to the TV’s Composite Video (AV) or S-Video input, and select the
AV2 (for Composite Video input) or AV2-S (for S-Video input) as the input
source respectively to view analog video. See "Connecting the Composite
Video input" on page 25 and "Connecting the S-Video input" on page 26.
If the video source device supports it, you could alternatively connect it using
the Component Video inputs and select
AV1 as the input source for the best
possible analog video picture. See "Connecting the Component Video input"
on page 26.
Of the analog video signal types mentioned above, Component Video offers the
best quality.
Graphic source inputs
You can connect the D-Sub output of a PC to the TV’s PC D-Sub input. For
better picture quality, you can alternatively connect the DVI output (if
available) of the PC to the TV’s HDMI/DVI input using a DVI to HDMI
adaptor cable. If your device supports HDMI output, you can also use the
HDMI input on the TV for connection.
Select the
PC, DVI or HDMI input respectively to view the display. See
"Connecting the PC D-Sub input" on page 27, "Connecting the DVI input" on
page 27 and "Connecting the HDMI input" on page 28.
In order to fully utilize the high-definition capability of this TV, you should adjust
the output resolution of the source device (for example, DVD player or PC) to
closely match the native resolution of the TV. For example, 720p for Component/
HDMI video or 1360 x 768 pixels for PC video. For information on how to adjust
output resolution, please refer to the documentations of the device.
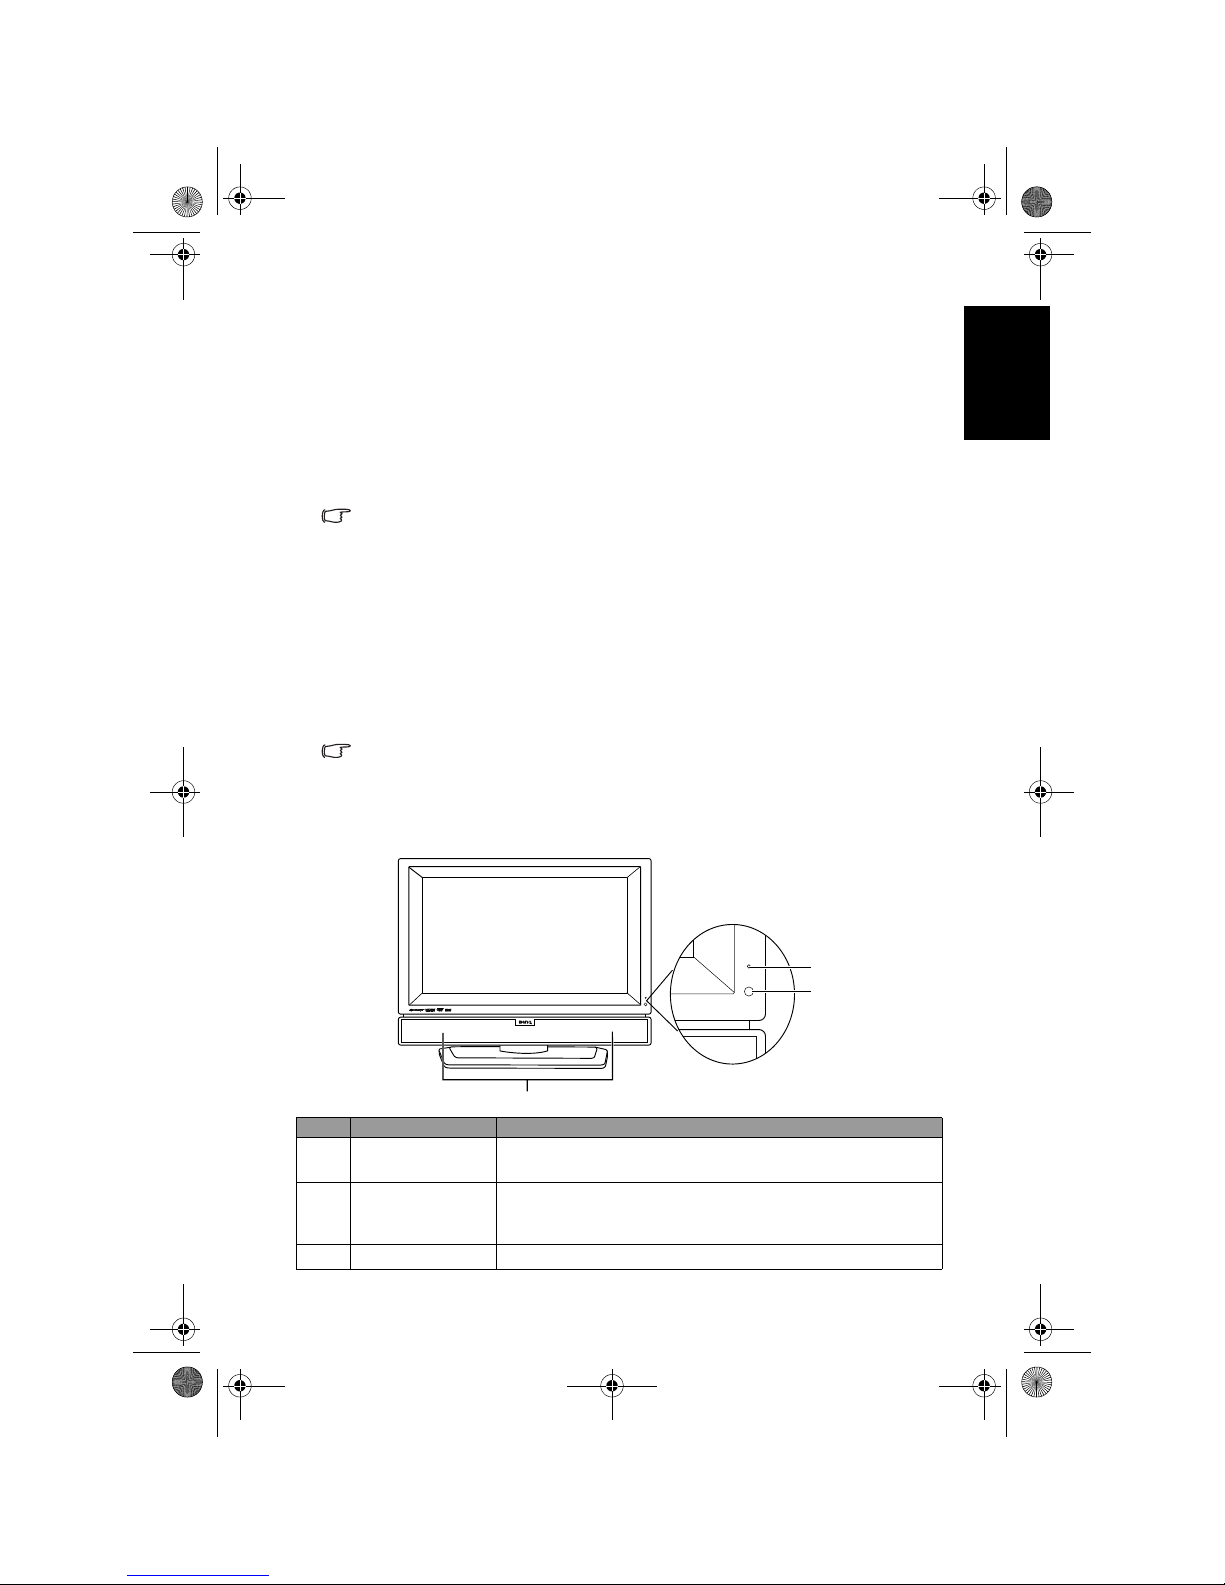
Front view
No. Name Description
1 Power indicator
• Lights up green when the TV is powered on.
• Lights up red when the TV is in standby mode.
2
Remote control
sensor window
Receives command signals from the remote control. Do
not obstruct the sensor by placing any objects in front of
it, which will hinder the reception of signals.
3 Speakers Left and right speakers for reproducing stereo audio.
1
2
3
V32B_V37B_EN.book Page 13 Wednesday, January 23, 2008 10:55 AM
Page 18

Introduction14
English
Control panel (right side view)
No. Name Description
1
(Power/
standby) button
Toggles the TV between standby mode and on. (Performs the
same action as the
Power/standby button on the remote
control.) See "Power on, off and standby" on page 20.
2 MENU button
Displays the On-Screen Display (OSD) menu if not visible,
or exits the current menu if displayed. (Performs the same
action as the
MENU button on the remote control.) See
"Navigating the OSD menu" on page 31.
3
(Volume) /
button
• Adjusts the volume level of the built-in speakers. (Performs
the same action as the
(Volume) +/- buttons on the
remote control.) See "Adjusting volume" on page 21.
• In the OSD menu, moves the selection highlight left or right
or changes settings. See "Navigating the OSD menu" on
page 31.
4
(Program)
/button
• Sequentially selects the previous or next tuned TV program.
(Performs the same action as the
P / buttons on
the remote control.) See "Changing programs" on page 21.
• In the OSD menu, moves the selection highlight up or down
or changes settings. See "Navigating the OSD menu" on
page 31.
5 INPUT button
• Cycles through possible input signal sources. (Performs the
same action as the
INPUT button on the remote
control.) See "Selecting an input source" on page 20.
• In the OSD menu, selects the highlighted menu item or
enters a submenu (if available). See "Navigating the OSD
menu" on page 31.
1
2
3
4
5
V32B_V37B_EN.book Page 14 Wednesday, January 23, 2008 10:55 AM
Page 19
Introduction 15
English
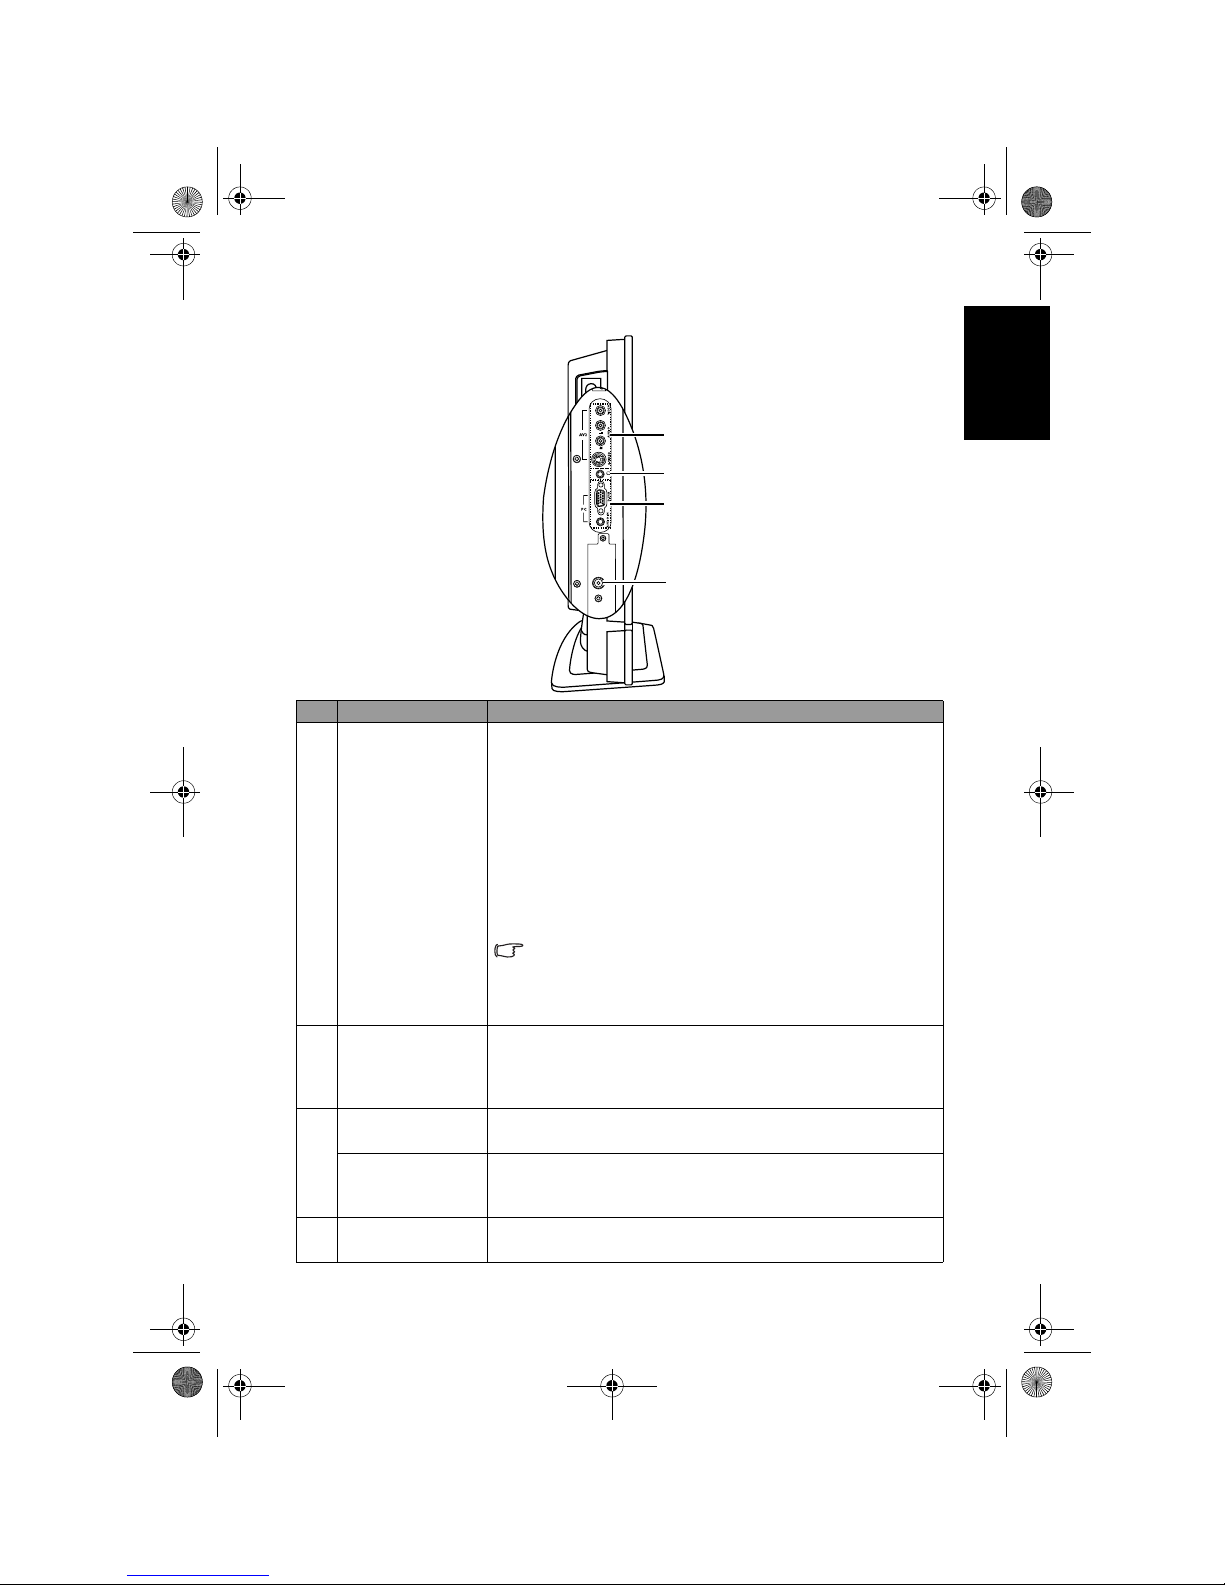
External AV devices terminal panel (left side view)
No. Name Description
1
AV2 (Composite
Video (AV) or SVideo)
•
VIDEO: Connect to the Composite Video (AV) output as
appropriate for your AV source device. See "Connecting
the Composite Video input" on page 25.
•
S-VIDEO: Connect to the S-Video output as appropriate
for your AV source device. See "Connecting the S-Video
input" on page 26.
•
AUDIO L/R: Connect to the audio output of either the
Composite Video or S-Video output as appropriate for
your AV source device. See "Connecting the Composite
Video input" on page 25 and "Connecting the S-Video
input" on page 26.
Connect your external AV device using either the
Composite Video or S-Video inputs. If both are connected
to an AV source at the same time, S-Video input takes
preference over Composite Video input. S-Video will
provide a better quality image.
2 Headset socket
An audio output for connecting an external headset. The
TV’s speakers will be muted whenever the headset socket is
being used. See "Connecting the headset audio output" on
page 29.
3
PC D-SUB
Connect to the video (D-Sub) output of a PC. See
"Connecting the PC D-Sub input" on page 27.
PC AUDIO IN
Connect to the audio output to match that of the video
output on a PC. See "Connecting the PC D-Sub input" on
page 27.
4TV RF
Connect to your antenna TV/CATV cable system. See "5.
Connect the antenna cable" on page 5.
1
2
3
4
V32B_V37B_EN.book Page 15 Wednesday, January 23, 2008 10:55 AM
Page 20
Introduction16
English
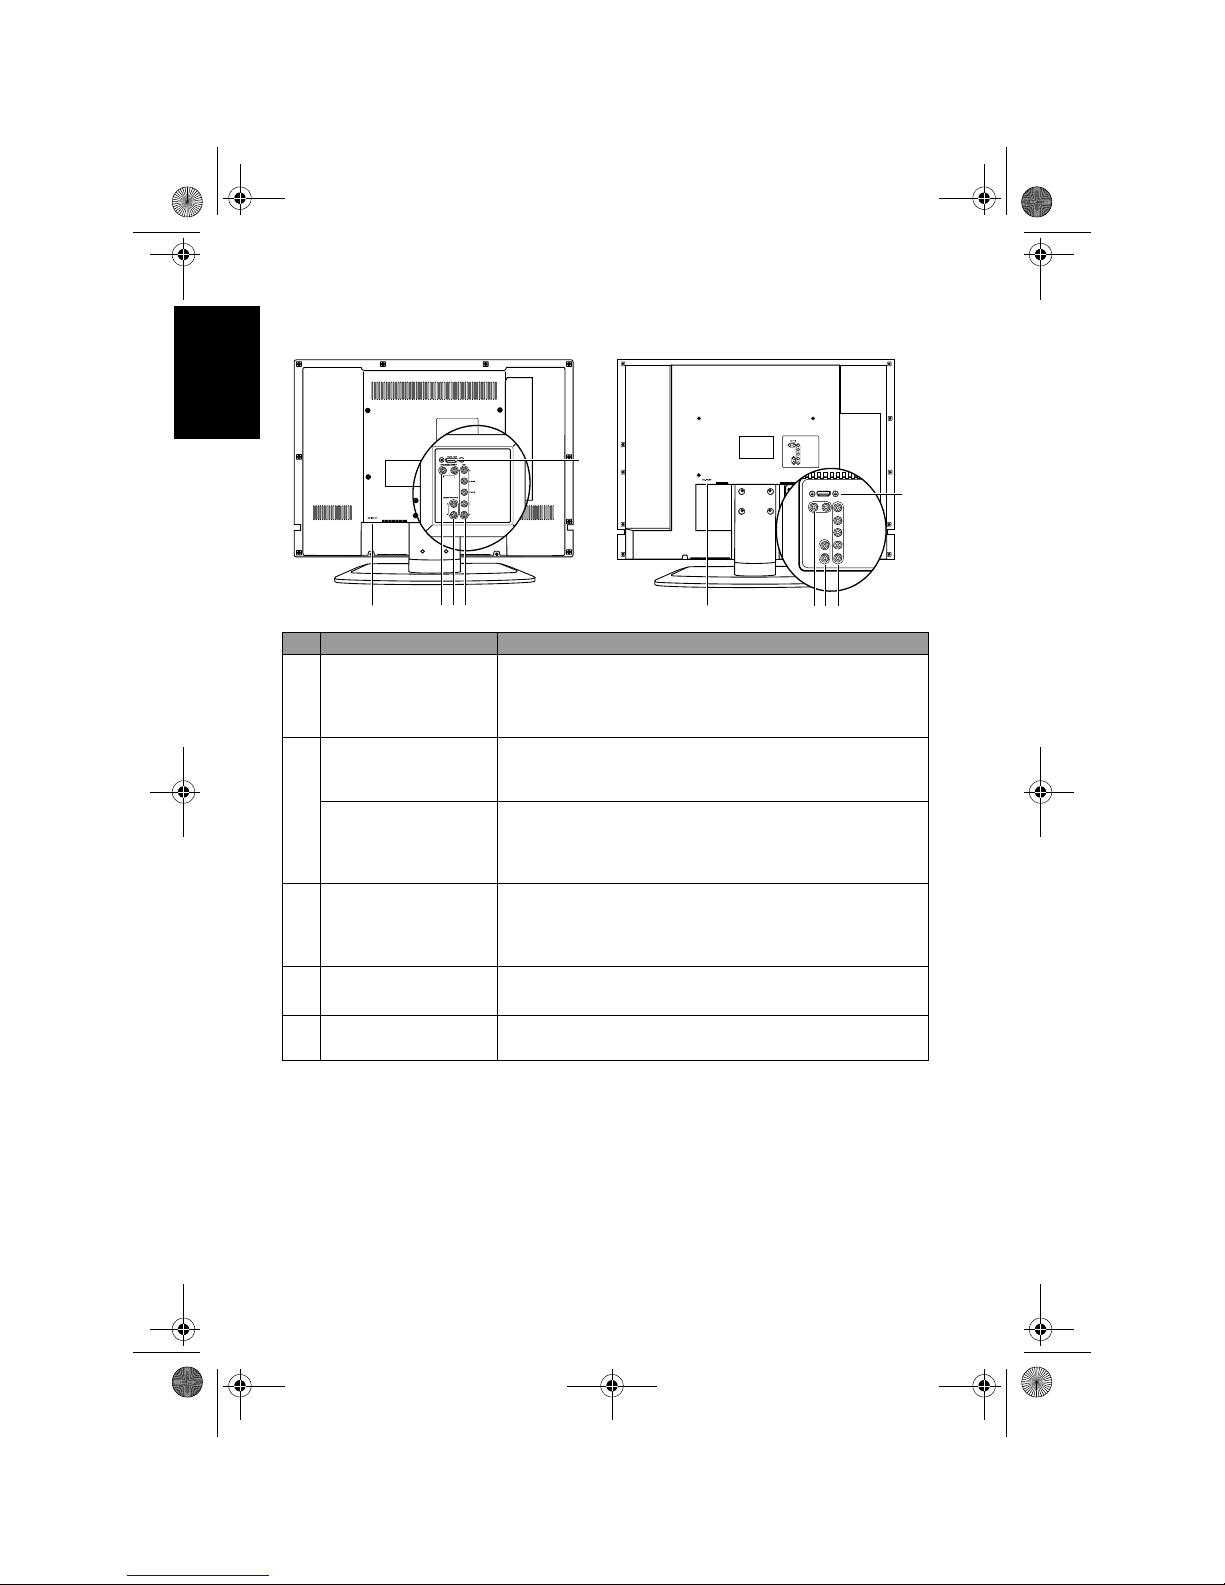
Rear view
No. Name Description
1 HDMI/DVI
Connect to the HDMI digital audio/video or DVI digital
video output of your digital source device. See
"Connecting the HDMI input" on page 28 and
"Connecting the DVI input" on page 27.
2
AV1 Y C
B/PB CR/PR
Connect to the Component Video (Y CB/PB CR/PR)
output of an appropriate video source device. See
"Connecting the Component Video input" on page 26.
AV1 L/R
Connect to the audio output of an appropriate video
source device to match that of the Component Video
input. See "Connecting the Component Video input" on
page 26.
3
AUDIO OUTPUT L/
R
Connect to the audio input of an audio amplifier or
sub-woofer. This output is always available, however, its
level is fixed and cannot be controlled by the Volume.
See "Connecting the stereo audio output" on page 28.
4
DVI-AUDIO INPUT
L/R
Connect to the DVI audio output of your digital source
device. See "Connecting the DVI input" on page 27.
5AC-INLET
For connecting the AC power cable. See "6. Connect the
power cord" on page 5.
VB3233
2
3
4
5
1
VB3733
2
3
4
5
1
V32B_V37B_EN.book Page 16 Wednesday, January 23, 2008 10:55 AM
Page 21
Getting to know the remote control 17
English
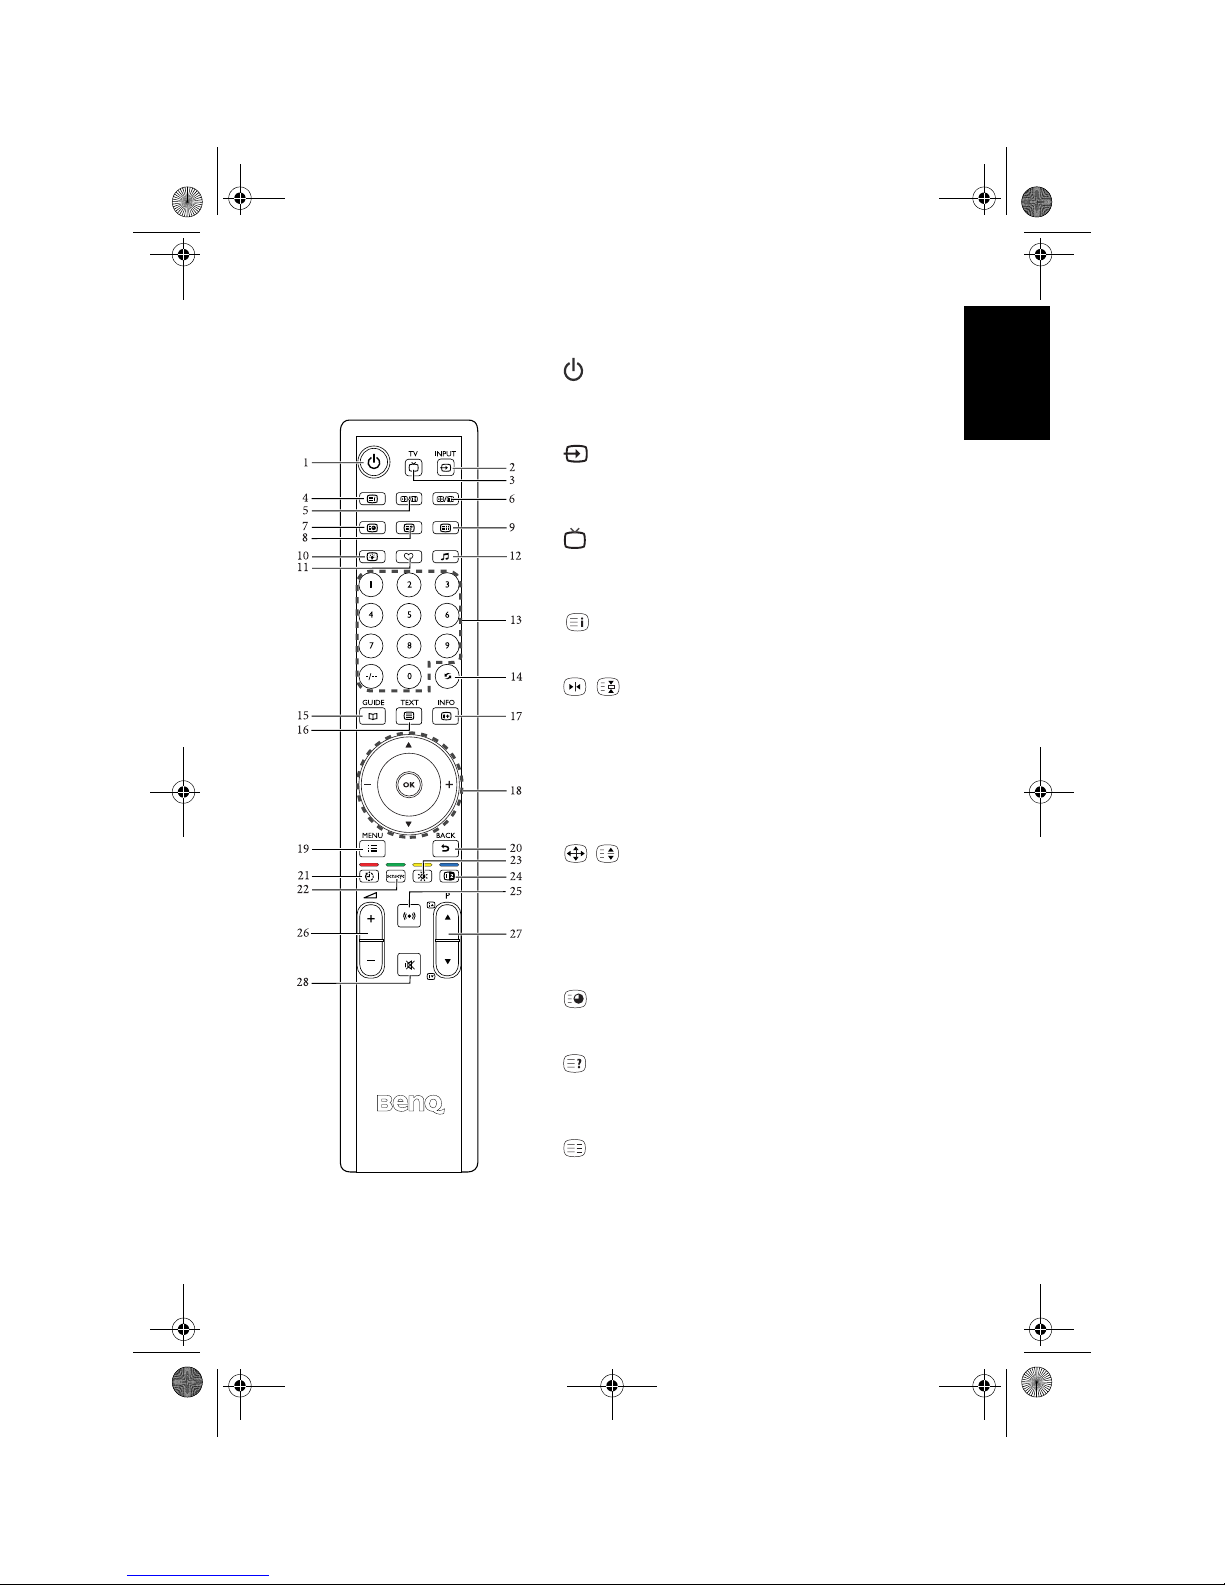
Getting to know the remote control
1. Power/standby
Press this button to power the TV on or put it to the
standby mode. See "Power on, off and standby" on
page 20.
2. INPUT
Press this button to select an input source (except TV
input). See "Switching to other input sources (except
the TV input)" on page 20.
3. TV
Press this button to switch to the TV input directly
and view TV programs. See "Selecting the TV input
directly" on page 20.
4. Index
Press this button to go to the Teletext index page. See
"Using the Teletext function" on page 23.
5. / Freeze/Teletext freeze
• Press this button to freeze the image on the screen.
Press the button again to resume viewing in real
time. See "Using the freeze function" on page 22.
• When Teletext displays on-screen, press this button
to freeze Teletext messages. Press it again to restore
normal update. See "Using the Teletext function" on
page 23.
6. / Aspect/Teletext size
• Press this button to adjust the screen image aspect
ratio. See "Using the Teletext function" on page 23.
• When Teletext displays on-screen, press this button
to enlarge Teletext size. Press it again to resume
normal size. See "Using the Teletext function" on
page 23.
7. Subpage
Press this button to enter the subpage of a Teletext
menu. See "Using the Teletext function" on page 23.
8. Reveal
Press this button to display any concealed Teletext
information (such as answer to a quiz). See "Using
the Teletext function" on page 23.
9. Mode
Press this button to cycle the Teletext display mode
between Teletext only or with Teletext superimposed
on the display. See "Using the Teletext function" on
page 23.
V32B_V37B_EN.book Page 17 Wednesday, January 23, 2008 10:55 AM
Page 22
Getting to know the remote control18
English
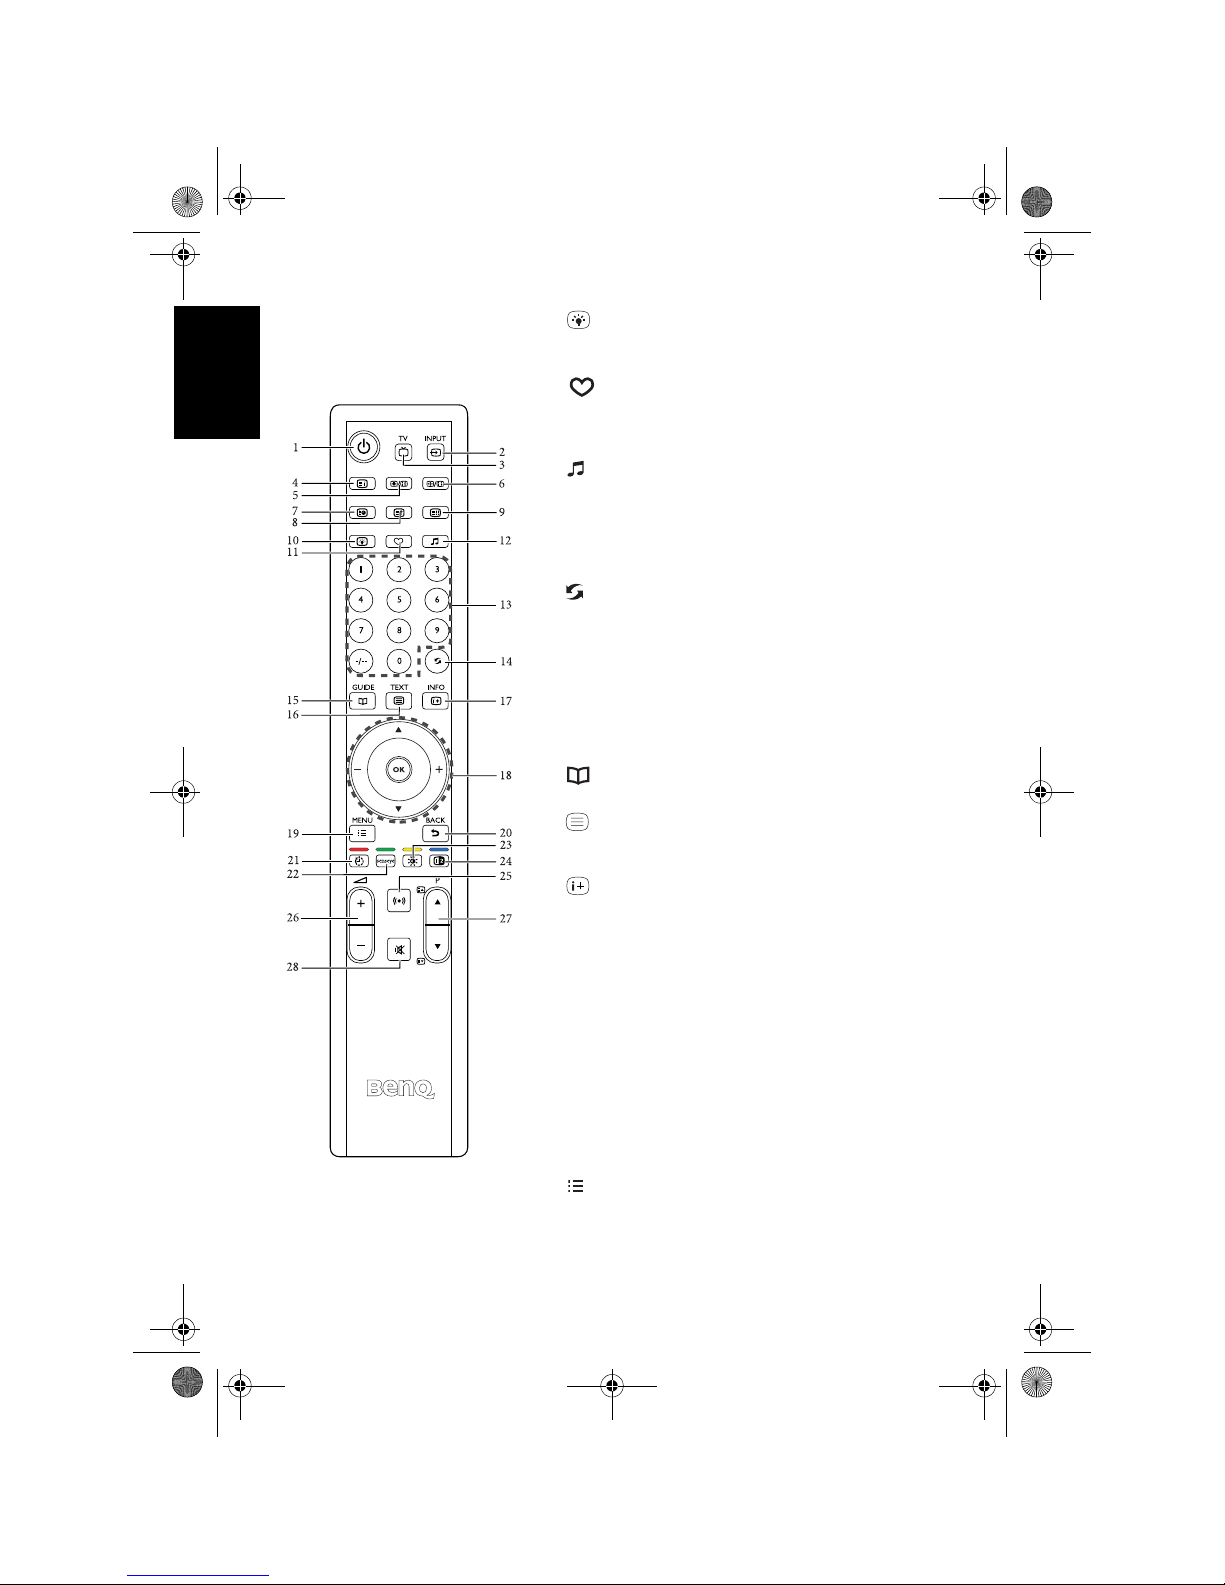
10. Backlight
Press this button to adjust your desired screen
backlight level. See "Adjusting backlight" on page 23.
11. Favorite
Press this button to jump to one of the favorite
channels you have stored. See "Jumping to your
favorite channels" on page 22.
12. EQ Mode
Press this button to select from preset EQ modes. See
"Selecting a preset EQ mode" on page 21.
13. Program selection
Press these buttons to select the program you wish to
view. See "Selecting a program directly" on page 21.
14. Recall
• When viewing TV programs, press this button to
toggle between the current and the previous
program you were viewing. See "Returning to the
previous viewed program or input" on page 21.
• When viewing different input sources, press this
button to toggle between the current and previous
viewed input sources. See "Returning to the
previous viewed program or input" on page 21.
15. GUIDE
(Function not available)
16. TEXT
Press this button to turn the Teletext decoder on or
off. See "Using the Teletext function" on page 23.
17. INFO
Press this button to display the input source
information. See "Displaying information" on page
23.
18. // + / - and OK
• Press or to change TV programs sequentially.
• Press + or - to adjust volume.
When the OSD (On-Screen Display) menu displays
on-screen:
• Press or to select settings.
• Press + or - to adjust settings.
• Press
OK to execute selections, or to enter a
submenu you have selected.
See "Navigating the OSD menu" on page 31.
19. MENU
Press this button to display the OSD menu for
commands and settings. Press it again to close. See
"Navigating the OSD menu" on page 31.
V32B_V37B_EN.book Page 18 Wednesday, January 23, 2008 10:55 AM
Page 23
Getting to know the remote control 19
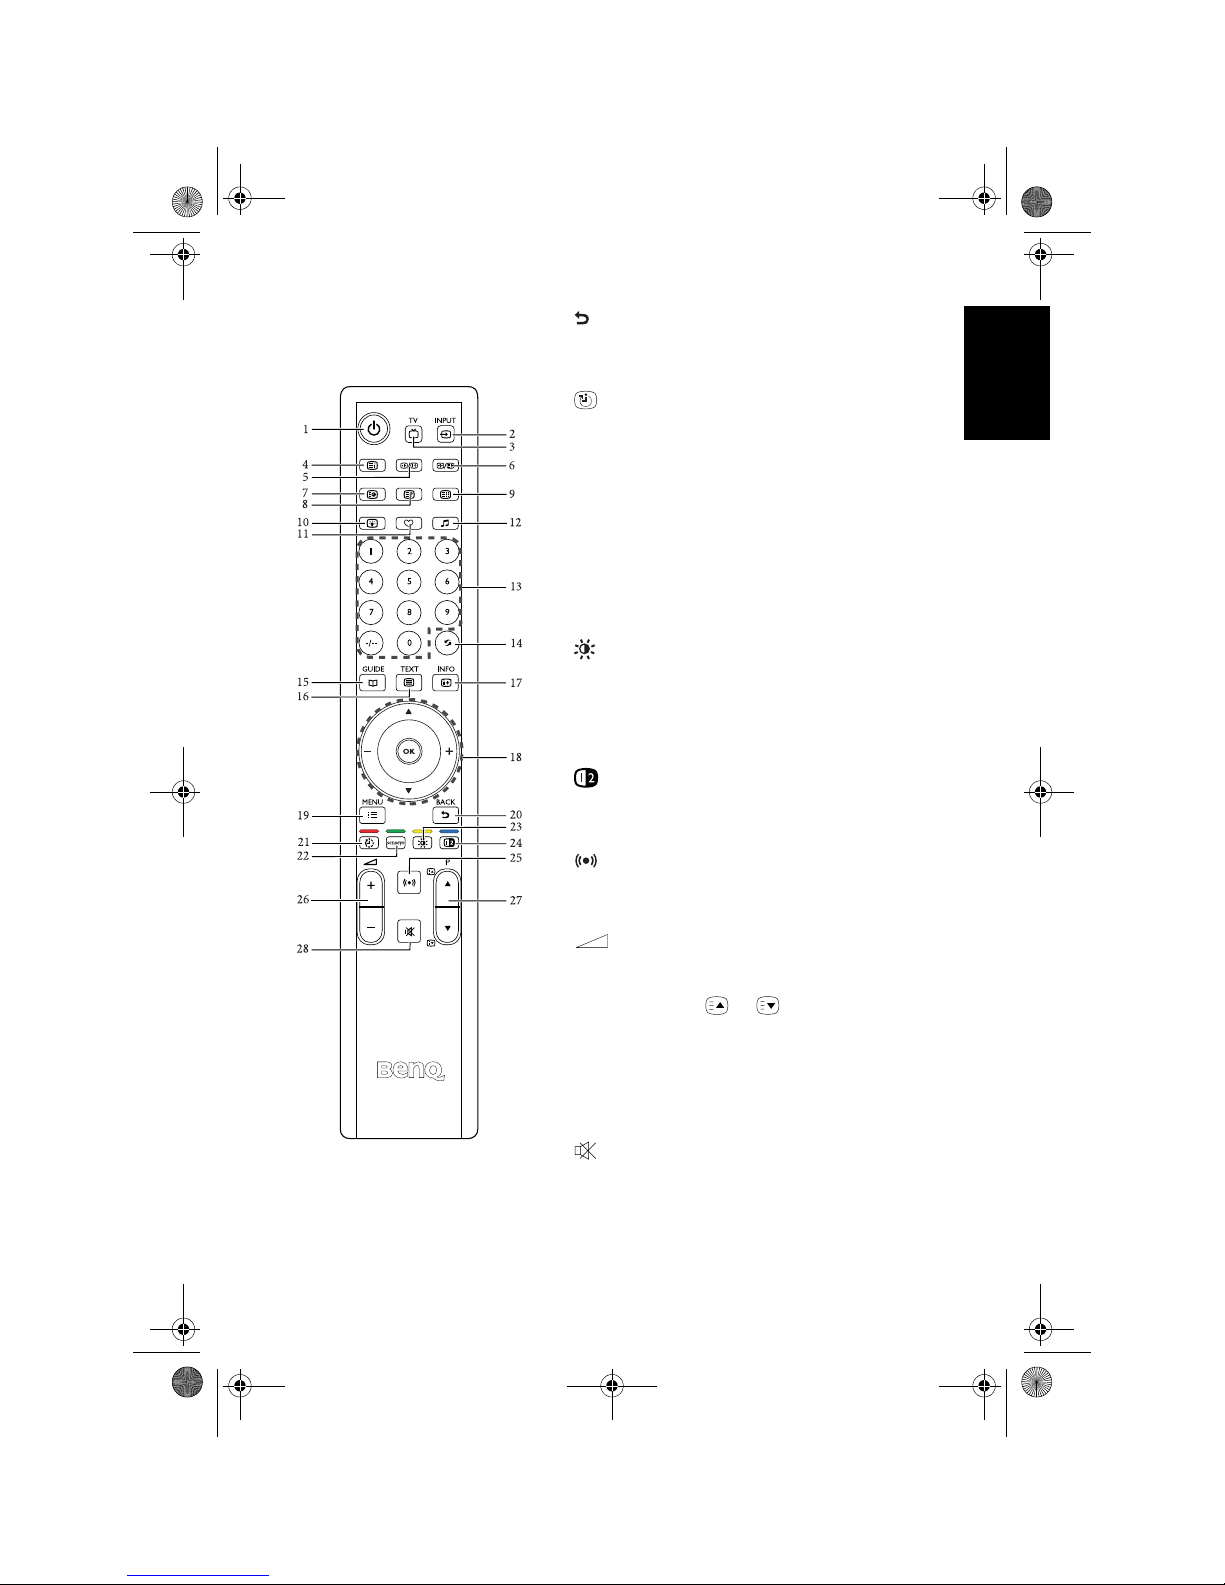
English
20. BACK
In the OSD menu, press this button to return to the
previous menu page. See "Navigating the OSD
menu" on page 31.
21. Sleep/red
• Press this button to set the automatic shut-off timer.
See "Using the sleep timer" on page 22.
• When Teletext displays on-screen, press this button
to select the corresponding color Teletext page. See
"Using the Teletext function" on page 23.
22. senseye/green
• Press this button to display the senseye menu. See
"Senseye menu" on page 37.
• When Teletext displays on-screen, press this button
to select the corresponding color Teletext page. See
"Using the Teletext function" on page 23.
23. Preset/yellow
• Press this button to select a preset picture mode. See
"Selecting a picture mode" on page 22.
• When Teletext displays on-screen, press this button
to select the corresponding color Teletext page. See
"Using the Teletext function" on page 23.
24. PIP/blue
When Teletext displays on-screen, press this button
to select the corresponding color Teletext page. See
"Using the Teletext function" on page 23.
25. Surround
Press this button to turn on or off the surround
sound effect. See "Turning on/off the Surround
sound effect" on page 21.
26. (Volume) +/-
Press these buttons to raise or lower the volume level.
See "Adjusting volume" on page 21.
27. P (Program) /
• Press these buttons to sequentially change programs.
See "Changing programs" on page 21.
• When Teletext displays on-screen, press these
buttons to go to the previous or next page, or go to
the subpage (if available). See "Using the Teletext
function" on page 23.
28. Mute
Press this button to mute the sound output. Press it
again to restore the sound output. See "Mute setting"
on page 21.
V32B_V37B_EN.book Page 19 Wednesday, January 23, 2008 10:55 AM
Page 24
Using the remote control20
English
Using the remote control
Power on, off and standby
Turning the TV on
After plugging the TV's power cord into a wall outlet, the TV will enter
standby mode automatically, and the power indicator will light up red.
Press
(Power/standby) on the TV, or (Power/standby) on the remote
control. The TV will turn on and the power indicator will change to green.
You can also turn the TV on and view TV input by pressing P (Program) , P
(Program)
or any Program selection numeric buttons on the remote control.
Putting the TV to standby
Press (Power/standby) on the TV, or (Power/standby) on the remote
control again, and the TV will return to the standby mode. The power
indicator will turn red.
The TV consumes about 1.5W of power in standby mode.
Selecting an input source
Selecting the TV input directly
Press TV on the remote control to change to TV input directly and view
TV programs.
Switching to other input sources (except the TV input)
1. Turn on the TV. Turn on the connected device and play the video.
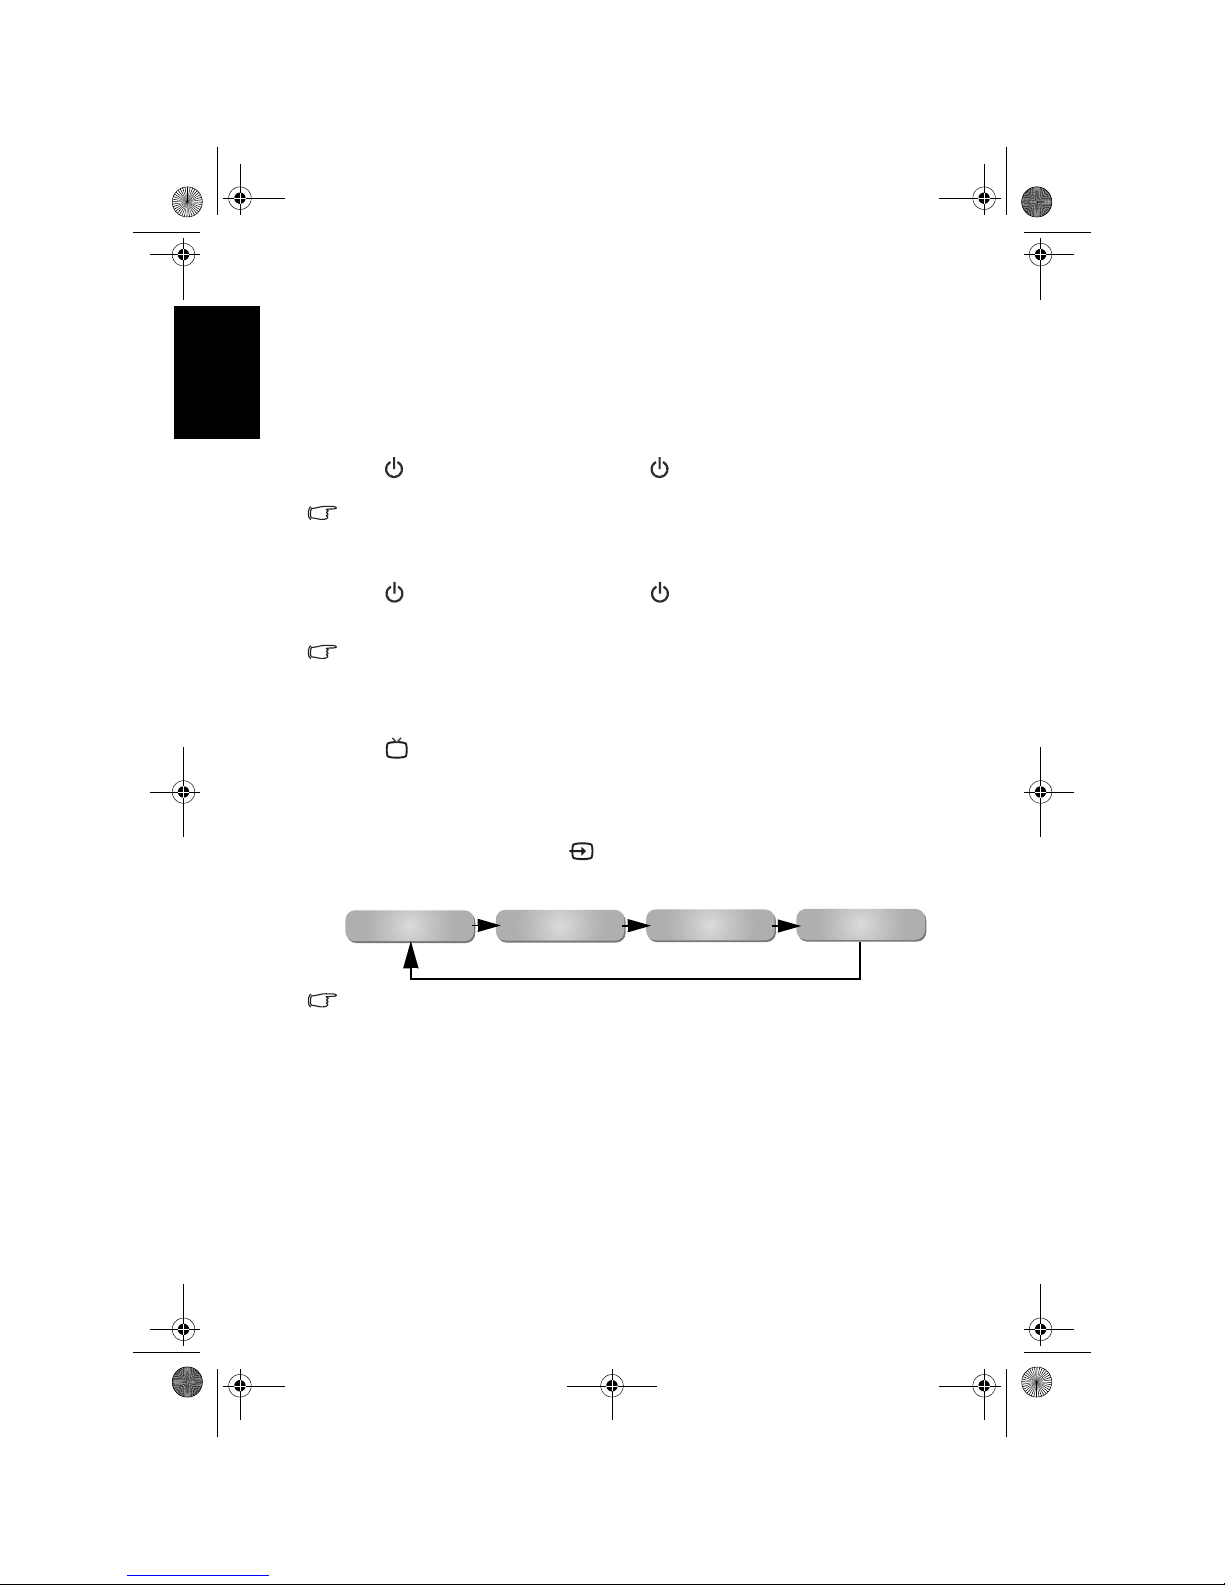
2. Press
INPUT on the TV, or INPUT on the remote control to display the
current selected input. Press the button repeatedly until your desired input
is displayed. The sequence is as follows:
• These options will only appear when corresponding signals are connected to
the TV.
• If both Composite Video (AV) and S-Video signals are connected to the AV2
input at the same time, only the S-Video input will be displayed. If you wish to
view the Composite Video (AV) input in such case, remove the S-Video
connection temporarily.
• Be aware that the HDMI input signal must be HDCP-compliant to be displayed
properly. When switching to the HDMI inputs, the TV needs approximately 3
seconds to detect the HDCP information from the signal source and no image
will be displayed during this period. This is not a malfunction.
• When displaying PC video, remember to switch the PC video output setting
from monitor display to external device. For more information, refer to the
documentations of your PC.
AV1
AV2 ( or AV 2-S )
HDMI (or DVI)
PC
V32B_V37B_EN.book Page 20 Wednesday, January 23, 2008 10:55 AM
Page 25
Using the remote control 21
English
Adjusting sound settings
Adjusting volume
You can adjust audio volume by pressing the following buttons:
•
(Volume) + or (Volume) - on the remote control, or
•
+ or - on the remote control, or
• or on the TV.
The volume indicator increases or decreases in length as volume rises or falls.
Mute setting
• Press (Mute) on the remote control to turn off the audio temporarily.
• Press
(Mute) again, or press (Volume) + on the remote control or
on the TV to restore the sound level.
Turning on/off the Surround sound effect
You can press Surround on the remote control to turn on or off the TV’s
SRS TruSurround XT sound effect. The SRS TruSurround XT sound
technology makes it possible for the TV to deliver true-to-life sounds by
simulating multi-channel audio output. It also helps to enhance the clarity of
verbal conversations.
Selecting a preset EQ mode
Press EQ Mode on the remote control to select a suitable EQ (Equalizer)
mode from Classic, POP, JAZZ, Rock and Personal. You can also customise
the
Personal sound mode according to your preference. See "Setting up the
Personal EQ Mode" on page 33.
Changing programs
Selecting a program directly
• To select a single-digit program number, press the corresponding program
selection button. For example, to select program 8, press .
• To select a double-digit program number, press
(Program entry),
followed by the corresponding program selection buttons. For example, to
select program 28, press
(Program entry), and then , .
Changing programs sequentially
You can sequentially change TV programs by pressing the following buttons:
•
P or P on the remote control, or
• or on the remote control, or
• or on the TV.
Returning to the previous viewed program or input
• When viewing TV input, you can press Recall on the remote control to
quickly return to the previous viewed program. This button can be used to
toggle between the two most recently viewed programs without having to
enter the precise program number.
V32B_V37B_EN.book Page 21 Wednesday, January 23, 2008 10:55 AM
Page 26
Using the remote control22
English
• If you have just switched from a different input source to the current one,
you can also press
Recall on the remote control to toggle between the
current and previous viewed input sources.
Jumping to your favorite channels
Press Favorite on the remote control to jump to your preset favorite
channel 1. Press the button again to jump to the next favorite channel, and so
on. You may select from up to 5 channels to set as your favorites.
For more information about how to set up favorite channels, please refer to
"Setting up favorite channels" on page 41.
Using the freeze function
Press / Freeze/Teletext freeze on the remote control to freeze the
image on the screen. Press it again to restore normal viewing.
This function does not control the input source which will continue normally, but
not be displayed while the image remains frozen. When the image freeze is
stopped, normal play will resume in real time. That is, the displayed image will
jump to the current time and any interim video is not displayed.
Do not leave the screen displaying a static image for an extended period of time
(days) because you may temporarily or permanently damage the screen resulting
in image traces which could remain visible long after the original image has been
removed.
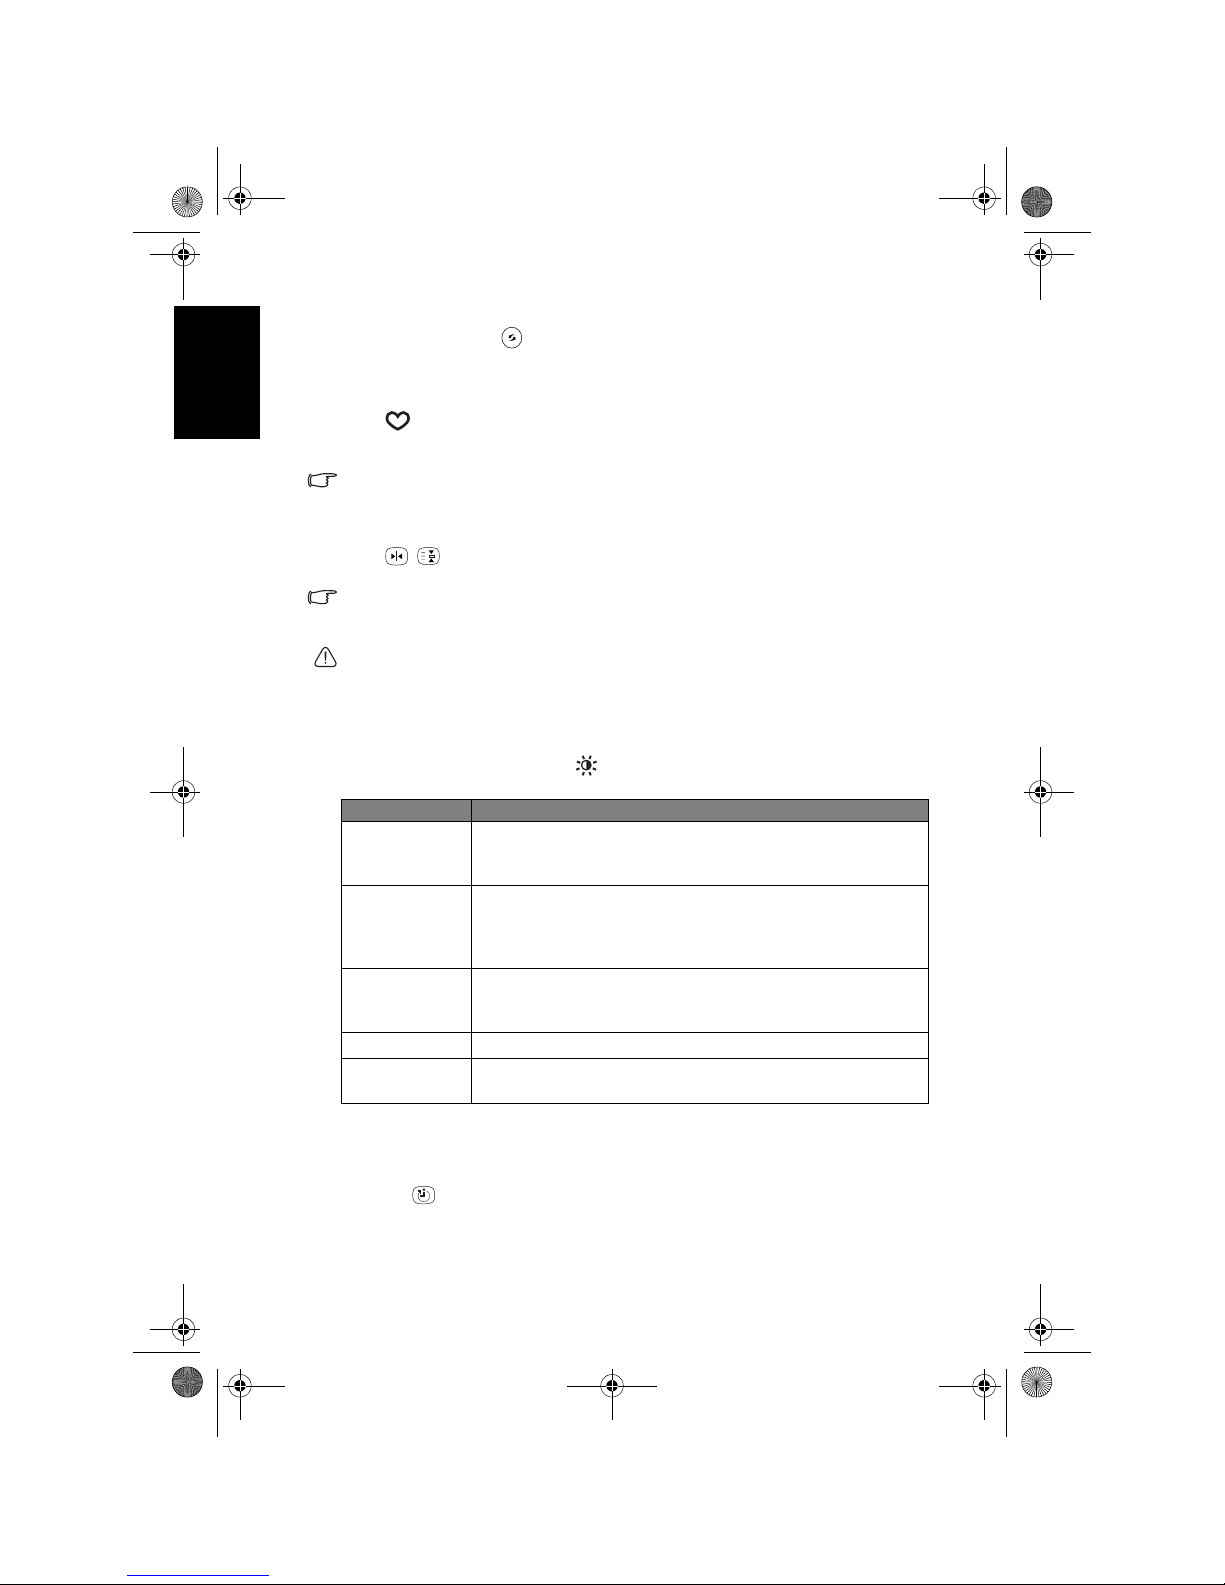
Selecting a picture mode
To select a picture mode, press Preset/yellow on the remote control. This
enables you to select from the following settings:
Using the sleep timer
The sleep timer is useful if you want the TV to automatically to go into
standby mode after a set period of time.
1. Press
Sleep/red on the remote control to activate the sleep timer.
2. Press the button again to set the time interval.
For example, if you set the sleep timer to 30 minutes, the TV will enter
standby mode after 30 minutes of time. You can check the remaining time
Picture mode Description
Dynamic
Suitable for viewing in brighter environments. The colour,
contrast, and brightness of the image is increased to suit the
brighter lighting condition.
Standard
Suitable for viewing in environments with normal lighting
condition. This most closely represents the broadcast
standard quality. No alteration to colour, contract or
brightness has been made.
Cinema
Suitable for viewing movies in darker environments. The
colour has been adjusted to more accurately represent
natural skin tones.
Game
Suitable for playing video games.
Personal
Your own customised picture mode. See "Setting up the
Personal Picture Mode" on page 36.
V32B_V37B_EN.book Page 22 Wednesday, January 23, 2008 10:55 AM
Page 27

Using the remote control 23
English
before expiration in the Sleep Timer item in the Setup menu (See "Sleep
Timer" on page 43). 1 minute before the expiration of the set time, a message
will display on-screen as a reminder. You can press
OK to reset the sleep timer
and the TV will remain on. At the expiration of this time, the TV will be
turned off automatically. To turn off this function, set the time to
Off.
Adjusting backlight
To adjust the intensity of your TV's backlight system, press Backlight on
the remote control, and then press
+ or - to select a suitable level.
When viewing the TV in dimly lit rooms it is recommended to reduce the
backlight which will reduce the image brightness and make the dark areas of
the image darker, thus maintaining a high contrast image in a dark
environment.
Using the Teletext function
Press TEXT on the remote control to display Teletext, and again to turn it
off.
Teletext is only available when ATV is selected as the input source, and a signal
which transmits Teletext is currently displayed. Not all TV stations and video
signals broadcast Teletext. If in doubt, please contact the TV station.
When Teletext displays on-screen, you can:
• Press
Mode to cycle between Teletext only and superimposed on the
video image.
• Press
/ Aspect/Teletext size to enlarge Teletext size. Press it again to
resume normal size.
• Press /
Freeze/Teletext freeze to freeze Teletext messages. Press it
again to restore normal update.
• Press
Index to go to the Teletext index page.
• Press
Reveal to display any concealed Teletext information if available
(for example, the answer to a quiz).
• Press
Subpage to view the subpages when provided.
• Press
Sleep/red, senseye/green, Preset/yellow or PIP/blue to
jump to the corresponding coloured pages as displayed across the bottom of
the Teletext screen.
• Press or to go to the previous or next Teletext page, or to move
between subpages when selected.
Displaying information
Press INFO on the remote control to display the input signal information.
The information displayed varies according to the input source being selected.
V32B_V37B_EN.book Page 23 Wednesday, January 23, 2008 10:55 AM
Page 28
Using the remote control24
English
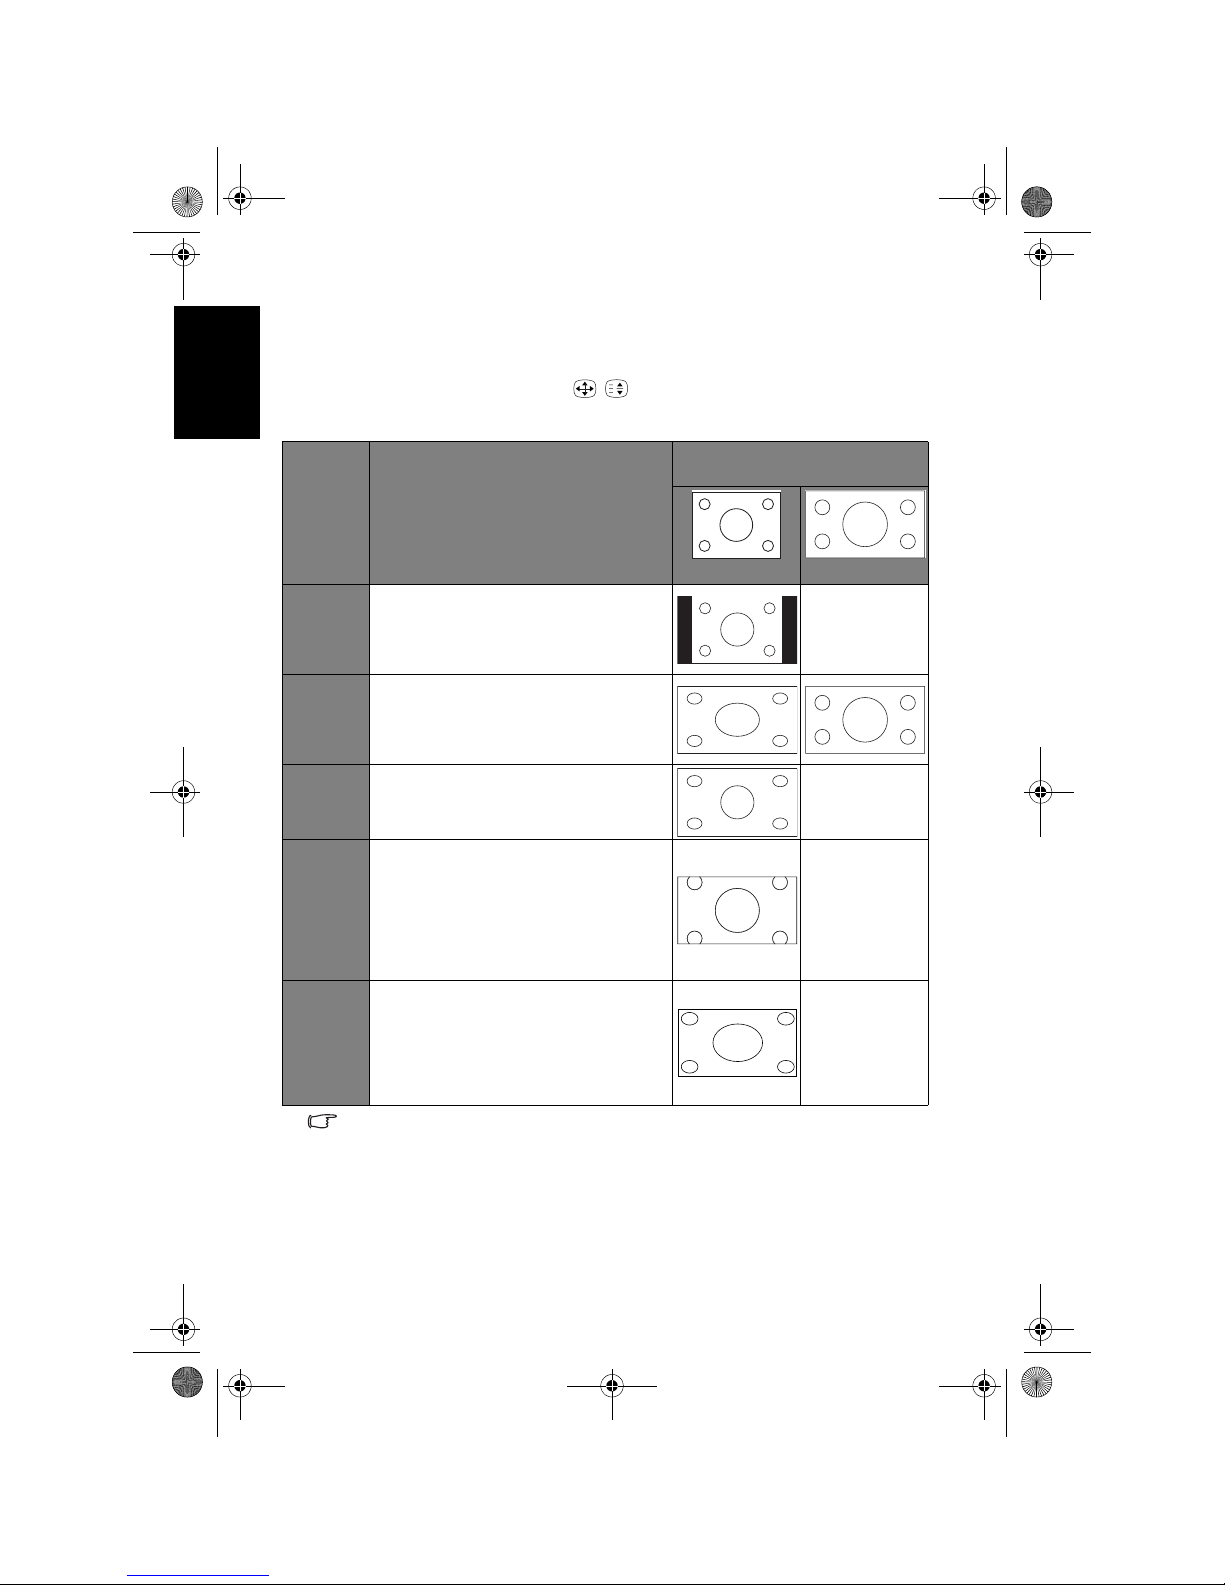
Adjusting aspect ratio
The TV can resize and reshape an image to suit your requirements. The visual
result depends upon the setting your have chosen, and the original aspect
ratio of the input image. Press /
Aspect/Teletext size on the remote
control to cycle through the aspect ratios. The table below shows the resultant
images in relation to the input image when different aspects are selected:
• You can choose an aspect ratio independently for each input source.
• Available aspect ratio options are dependent on the type of input signal being
selected. When viewing PC input (via D-Sub or DVI), only “16:9“ and “4:3“ are
available for selection.
• If the input video signal is in letter box format, select “Letter Box” to obtain a
wider viewable area.
• In order to avoid possible “image retention“ or “screen burn-in“ on the LCD
screen of your TV, it is recommended that you change the aspect ratio from
time to time, and prevent the TV from displaying a static image for a prolonged
period of time.
Aspect
ratio
Description and usage
Aspect ratio of input video
image
4:3
16:9
4:3
Resizes the image to 4:3 aspect
proportions. Recommended for use
when viewing video sources which are
already in 4:3 aspect such as analog TV
and PC video input.
(Not
recommended)
16:9
Stretches a 4:3 image to 16:9 aspect
proportions. Recommended for use
when viewing video sources which are
already in 16:9 aspect such as digital
TV and most widescreen DVDs.
Cinema
Stretches a 4:3 image to the width of a
16:9 aspect image proportions.
recommended for use in filling the
screen with a 4:3 aspect image.
(Not
recommended)
Letter
Box
Resizes a 4:3 image to 16:9 aspect
proportions, and trims off the top and
bottom strips. Recommended for use
when viewing 4:3 aspect video
presenting compressed 16:9 aspect
images in a 4:3 aspect frame in a socalled letterbox format (black strips
along the top and bottom).
(Not
recommended)
16:9 Adj.
(Adjust)
Stretches a 4:3 image to 16:9 aspect
proportions and enlarges the resultant
image on the screen. You can press
or on the remote control to pan the
enlarged image. Recommended for use
when viewing video sources which are
in 4:3 aspect such as analog TV input.
(Not
recommended)
V32B_V37B_EN.book Page 24 Wednesday, January 23, 2008 10:55 AM
Page 29
Connecting audio and video inputs 25
English
Connecting audio and video inputs
Pay attention to the following when making connections:
• Before connecting any devices, please turn all equipment off.
• Familiarize yourself with the connectors and sockets on the equipment you want
to connect and the TV. Be aware that if incorrect connections are made, picture
quality may be adversely affected.
• Do not pull cables out of sockets by grasping the cable itself, as you may
damage the cable. Only ever remove cables from sockets by grasping the plug
on the end of the cable.
• Once connected, please ensure that all plugs are fully inserted and firmly
seated.
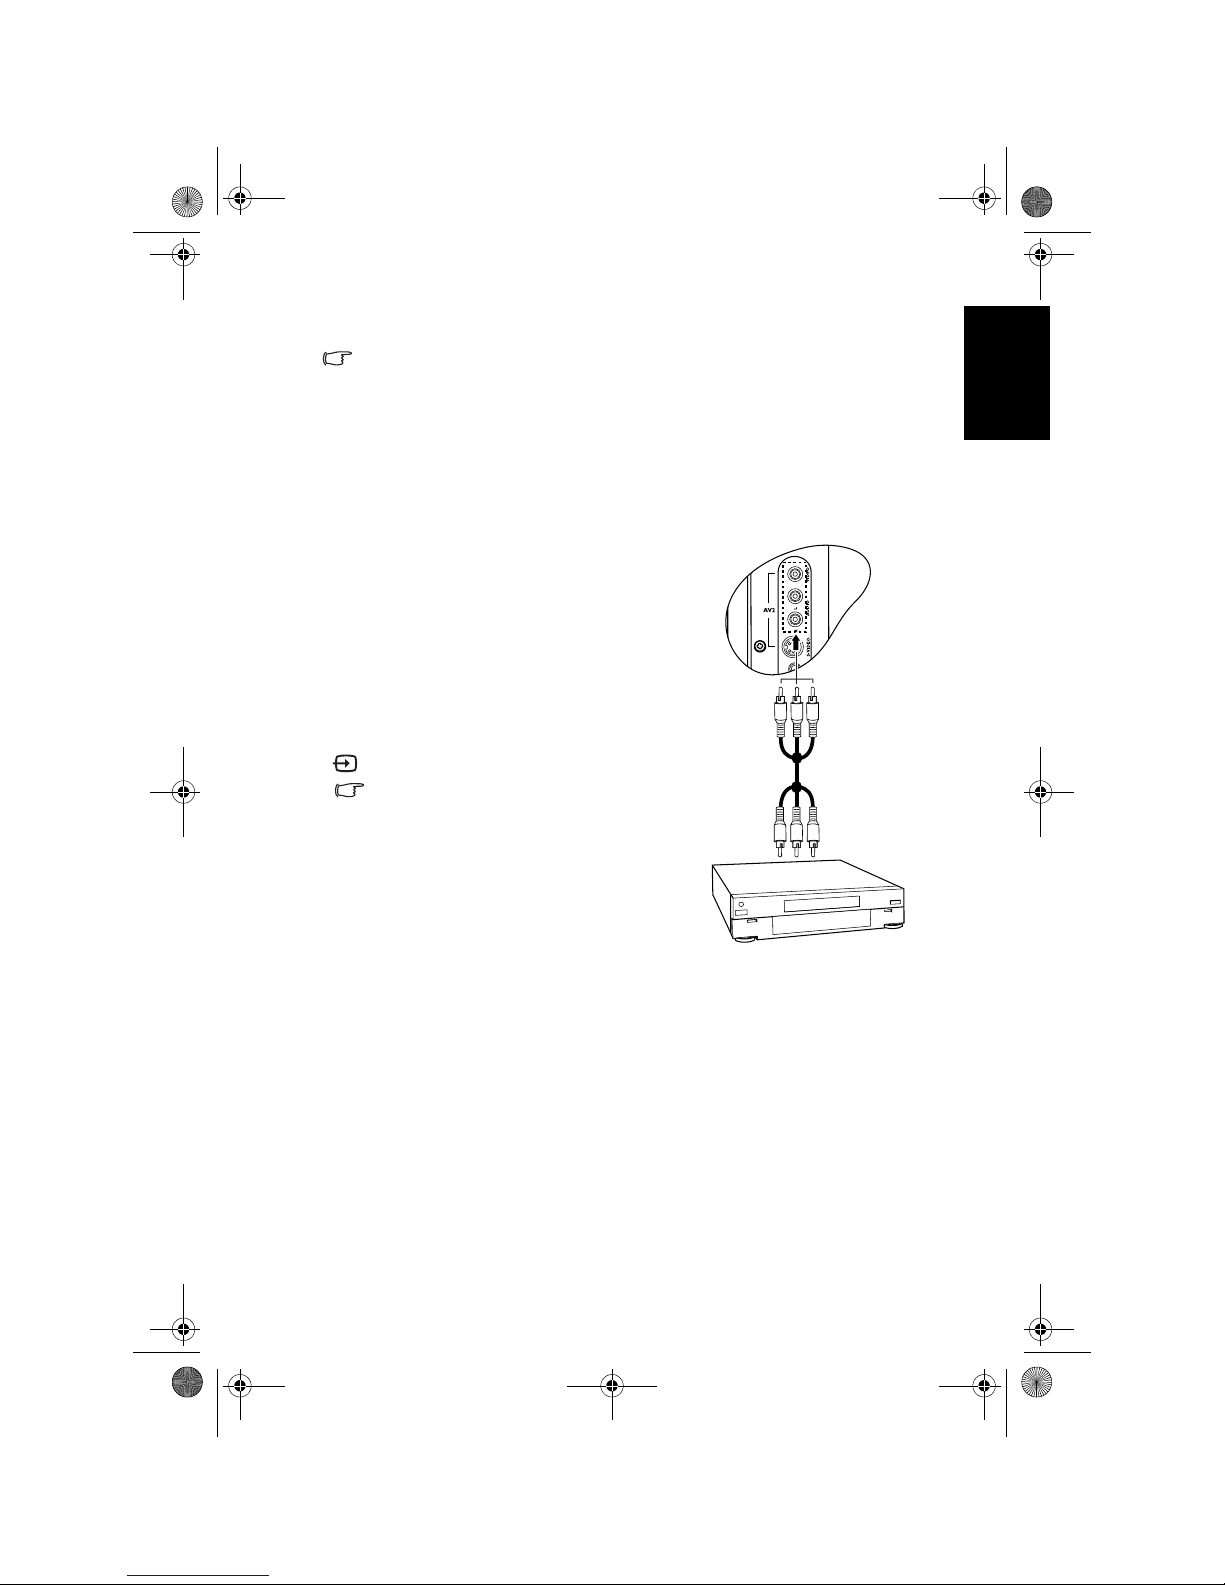
Connecting the Composite Video input
Connect the Composite Video output of your
output equipment (like a VCR) to the
AV2
VIDEO
and AUDIO L (white)/R (red)
terminals on the TV using the Composite
Video cable as illustrated.
A Composite Video cable consists of three
connectors: yellow (video), white (left channel
audio) and red (right channel audio). Ensure
that the colors of the plugs and terminals
match when making connection.
To view video image from this input, press
INPUT and select AV2.
Composite Video provides the least optimal
image quality. Both S-Video and
Component Video provide better quality
video signals.
AV2 supports both Composite Video and SVideo signal inputs. If you use S-Video, you
cannot use Composite Video for that input.
VCR
Composite
Video (AV) cable
V32B_V37B_EN.book Page 25 Wednesday, January 23, 2008 10:55 AM
Page 30
Connecting audio and video inputs26
English
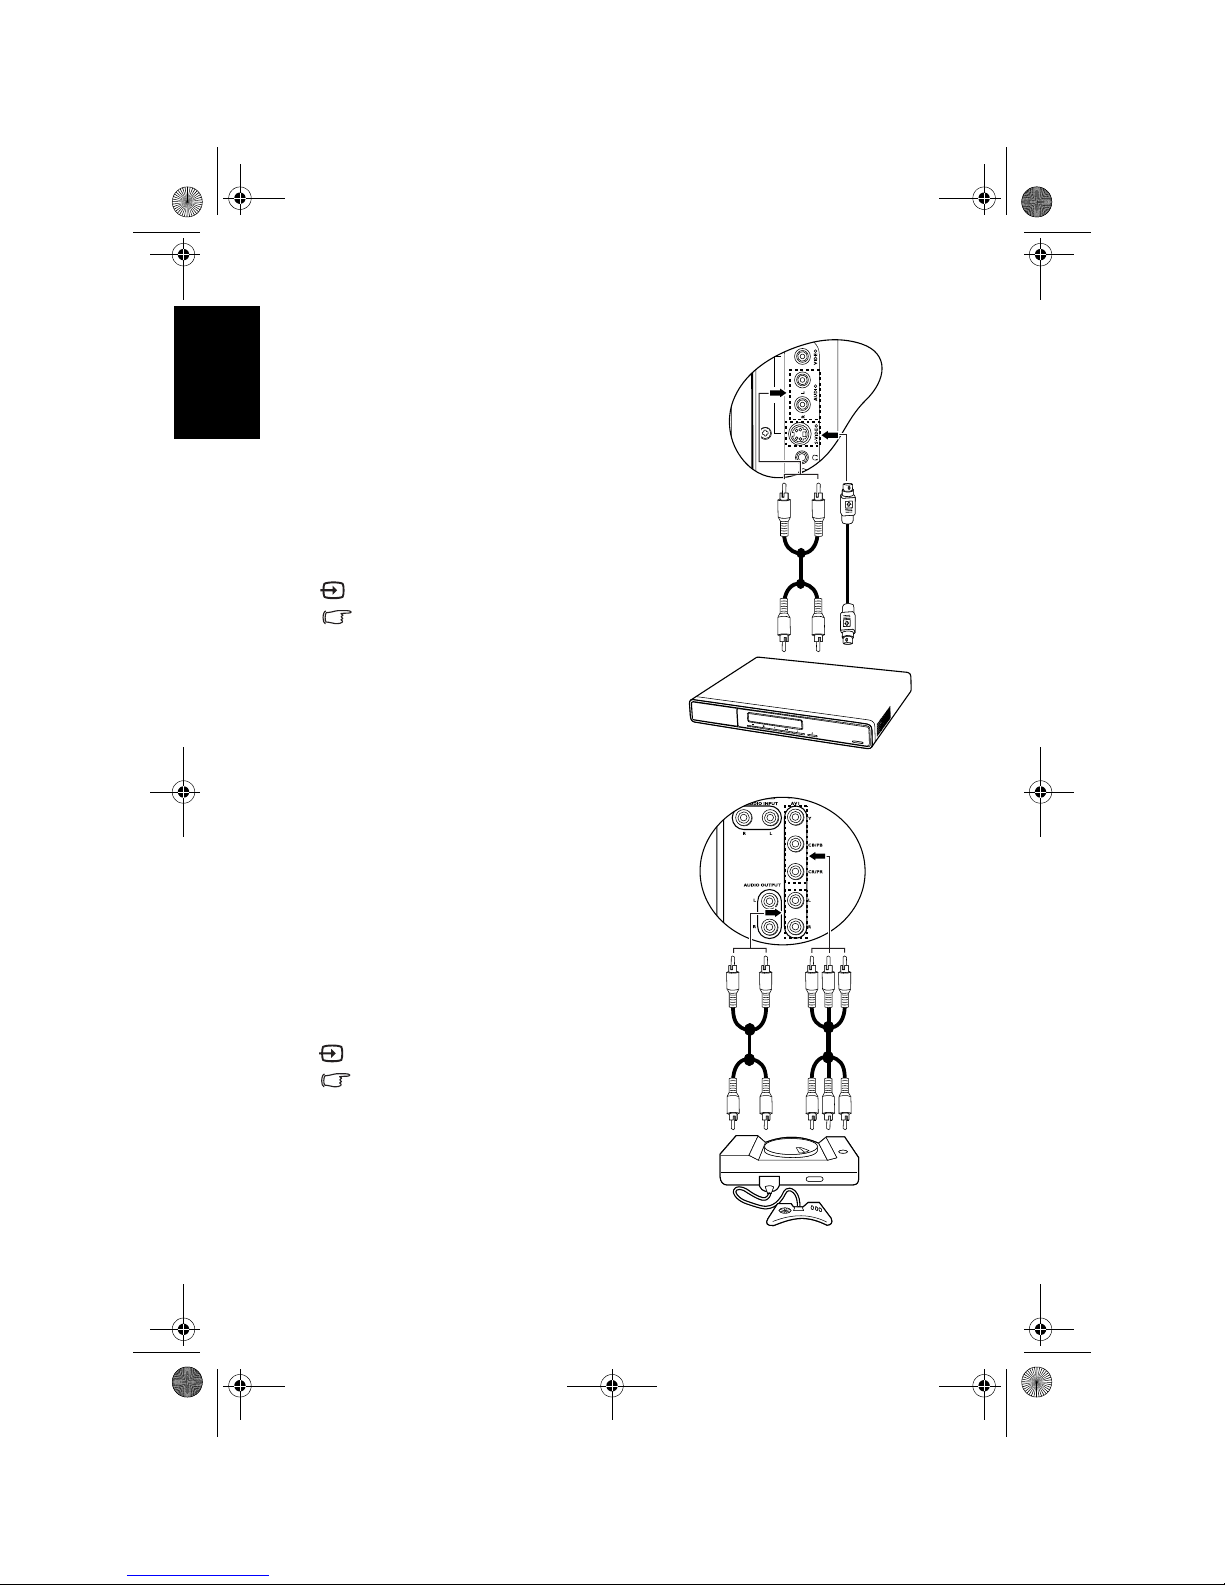
Connecting the S-Video input
Connecting the Component Video input
1. Connect the S-Video output of your
output equipment (like a DVD player) to
the TV's
AV2 S-VIDEO terminal using an
S-Video cable (not provided). Pay
attention to the alignment of the plugs on
the S-Video cable when inserting so as not
to damage any pins.
2. Connect the S-Video audio output of the
output equipment to the TV’s
AV2 AUDIO
L
(white)/R (red) input terminals using a
suitable RCA type audio cable.
To view video image from this input, press
INPUT and select AV2 -S.
You should not connect both a composite
Video and an S-Video from the same
device; just one or the other. If you have
the choice, use the S-Video instead of
composite Video as an S-video signal
provides a higher quality signal to that of
composite Video.
1. Connect the Component Video output of
your output equipment (like a TV game
console) to the TV's
AV1 Y, CB/PB and
CR/PR terminals using a Component
Video cable (not provided). A Component
Video cable consists of three plugs: green
(Y), blue (C
B/PB) and red (CR/PR).
2. Connect the Component Video audio
output of your output equipment to the
TV’s
AV1 L (white)/R (red) input
terminals on the TV using a suitable RCA
type audio cable.
To view video image from this input, press
INPUT and select AV1 .
Of the analog video signal types,
Component Video offers the best quality.
Ensure that the colors of the plugs and
terminals match when making connection.
For best display results, set the output
resolution of the Component Video source
device to 720p.
See "Supported Component Video input
signal resolutions" on page 48 for
supported resolutions.
Audio cable
S-Video
cable
DVD
player
TV game
console
Component
Video cable
Audio
cable
V32B_V37B_EN.book Page 26 Wednesday, January 23, 2008 10:55 AM
Page 31

Connecting audio and video inputs 27
English
Connecting the PC D-Sub input
Connecting the DVI input
1. Connect the D-Sub video output of your
PC to the
PC D-SUB terminal on the TV
using a mini D-Sub (15-pin) cable (not
provided).
2. Connect the audio output of your PC to
the
PC AUDIO IN terminal on the TV using
an appropriate 3.5mm-diameter Mini-jack
stereo audio cable (not provided).
To view video image from this input, press
INPUT and select PC.
When you connect the TV to a PC, you
should adjust the resolution in the display
properties of the computer to closely
match the native resolution of the TV (for
example, 1360 x 768 pixels).
See "Supported PC (D-Sub/DVI) input
signal resolutions" on page 48 on other
supported resolutions and "Setting up
appropriate output resolution on PC" on
page 49 on how to set up PC video output.
1. Connect the digital video output of your
output equipment (like a PC or DVD
player) to the
HDMI/DVI terminal on the
TV using a DVI to HDMI adaptor cable
(not provided).
2. Connect the DVI audio output of your
output equipment to the
DVI-AUDIO
INPUT L/R
input terminals on the TV
using a suitable RCA type audio cable.
3. Set the type of DVI input according to the
device connected. See "HDMI/DVI Input"
on page 43.
To view video image from this input, press
INPUT and select DVI.
When connected to a PC, you should
adjust the resolution in the display
properties of the computer to closely
match the native resolution of the TV (for
example, 1360 x 768 pixels). See
"Supported PC (D-Sub/DVI) input signal
resolutions" on page 48 on other
supported resolutions and "Setting up
appropriate output resolution on PC" on
page 49 on how to set up PC video output.
PC
Audio
cable
Mini D-Sub
cable
DVI to HDMI
adaptor
cable
PC
Audio
cable
V32B_V37B_EN.book Page 27 Wednesday, January 23, 2008 10:55 AM
Page 32

Connecting audio and video inputs28
English
Connecting the HDMI input
Connecting the stereo audio output
Connect the HDMI output of your output
equipment to the
HDMI/DVI terminal on the
TV using an HDMI cable (not provided).
To view video image from this input, press
INPUT and select HDMI.
HDMI (High-Definition Multimedia Interface)
is an uncompressed and all-digital audio/
video interface. HDMI provides an interface
between any audio/video source, such as a
set-top box, DVD player or A/V receiver
over a single cable.
To ensure the performance and stability of
HDMI signal transmission, it is
recommended that you use high-quality
and HDMI certified cable for connection
Be aware that HDMI input must be HDCPcompliant to be displayed.
The TV’s HDMI input is compliant with the
HDMI 1.2 standard, and supports display
resolution up to 1080i. See "Supported
HDMI input signal resolutions" on page 49
for all supported HDMI resolutions.
This TV provides a set of stereo audio output
terminals (RCA type) for delivering the audio
signal to a sound system or other audio devices.
1. Connect the audio input terminals of an
amplifier or other audio device to the
AUDIO OUTPUT L/R terminals on the TV
using a suitable RCA type audio cable.
2. Set the
Speaker Out option in the Audio
menu to
Off.
This output is always available. Its level is
fixed and cannot be adjusted by the Volume
setting of the TV.
HDMI cable
DVD
player
Audio cable
Audio
amplifier
V32B_V37B_EN.book Page 28 Wednesday, January 23, 2008 10:55 AM
Page 33

Connecting audio and video inputs 29
English
Connecting the headset audio output
This TV provides a stereo headset output
socket for delivering the audio signal to a
stereo headset.
Connect the stereo headset plug (3.5mm
Mini-jack type) to the stereo headset output
socket on the TV using a suitable audio cable.
Once connected, the TV’s speakers will be
muted automatically. The volume level can
be adjusted by pressing the (Volume)
andbuttons on the TV, or the
(Volume) + and - buttons on the remote
control.
Avoid prolonged use of the headset or
listening in an excessive volume level,
otherwise your hearing will be damaged.
Headset
V32B_V37B_EN.book Page 29 Wednesday, January 23, 2008 10:55 AM
Page 34

OSD (On-Screen Display) menu30
English
OSD (On-Screen Display) menu
OSD structure
• The available menu items are dependent on the input source being selected.
Unavailable items will be greyed out (as indicated by the grey items in the table
above) or not displayed.
• Settings under different input sources can be adjusted independently. For
example, the Picture settings for the AV1 input will not affect the Picture
settings for the AV2 (or AV2-S) input.
OSD
Menu
Input signal type
ATV AV1
AV2 (AV2-S)
PC
HDMI/DVI
NTSC
video
PAL video PC mode
Video
mode
Audio
• Volume
• Balance
• Sound Type
• Steady Sound
• Surround
• Speaker Out
• Advanced Audio Settings
Picture
• Picture
Mode
• Contrast
• Brightness
• Color
• Sharpness
• Color
TEMP.
• Backlight
• NTSC Tint
• Picture
Mode
• Contrast
• Brightness
• Color
• Sharpness
• Color
TEMP.
• Backlight
• Picture
Mode
• Contrast
• Brightness
• Color
• Sharpness
• Color
TEMP.
• Backlight
• NTSC Tint
• NTSC
Setup
• Picture
Mode
• Contrast
• Brightness
• Color
• Sharpness
• Color
TEMP.
• Backlight
• Contrast
• Brightness
• Color
TEMP.
• Backlight
• Auto Adjust
• Frequency
• Phase
• H. Position
• V. Position
• Contrast
• Brightness
• Color
TEMP.
• Backlight
• Picture
Mode
• Contrast
• Brightness
• Color
• Sharpness
• Color
TEMP.
• Backlight
Senseye
• Black Extension
• ACE
• Noise Reduction
(Not available)
• Black
Extension
• ACE
• Noise
Reduction
TV
• Auto
Installation
• Manual
Installation
• Program
Edit
• Favorite
Channels
• Child Lock
(Not available)
Setup
• Language
• Sleep Timer
• ECO
• HDMI/DVI Input
• Blue Screen
• Reset All Settings
• Language
• Sleep
Timer
• ECO
• HDMI/
DVI Input
• Blue
Screen
• Reset All
Settings
V32B_V37B_EN.book Page 30 Wednesday, January 23, 2008 10:55 AM
Page 35

OSD (On-Screen Display) menu 31
English
Navigating the OSD menu
You can use the On-Screen Display (OSD) menu to adjust the settings of your
TV. To display the OSD menu, press
MENU on the TV, or MENU on the
remote control.
Operations in the OSD menu
For example, to adjust picture sharpness using the remote control:
For details see:
• "Audio menu" on page 32
• "Picture menu" on page 34
• "Senseye menu" on page 37
• "TV menu" on page 38
• "Setup menu" on page 43
Audio
TV Setup
Senseye
Picture
• Press + / - on the remote control, or / on the TV to
select an item in the menu.
• Press
OK on the remote control, or INPUT on the TV to
enter the submenu.
• Press
/ on the remote control, or / on the
TV to select an item in the submenu.
• Press
+ / - on the remote control, or / on the TV to
adjust settings. Press
OK on the remote control, or INPUT
on the TV to enter the submenu if available.
• Press
BACK on the remote control to return to the
previous menu layer
• Press
MENU on the TV, or MENU on the remote control
to close the OSD menu.
1. Press MENU to display the OSD menu on-screen.
2. Press
+/- to select Picture.
3. Press
OK to enter the Picture menu.
4. Press / to select
Sharpness.
5. Press
+/- to adjust setting.
6. Press
MENU to close the OSD menu.
V32B_V37B_EN.book Page 31 Wednesday, January 23, 2008 10:55 AM
Page 36

OSD (On-Screen Display) menu32
English
Audio menu
The available menu items are
dependent on the input source
being selected.
The illustration is for reference
only.
Item Function Operation Range
Volume
Adjusts the volume level of
the TV’s built-in speakers.
Press
+ to increase or - to
decrease volume.
0 to 47
Balance
Adjusts left or right speaker
volume level.
Press
+ to increase right
speaker volume, - to
increase left speaker
volume level.
-12 to 12
Sound Type
Selects a sound type when
viewing programs or videos
that support multiple
sounds.
Available options are
dependent upon the
received signal.
Press + or - to change
selection.
• Automatic
• Stereo
• Mono
• Sound1
• Sound2
• Language1
• Language2
Steady
Sound
If set to
Auto, the TV
automatically adjusts the
sound level to be constant
amongst different channels.
• Auto
• Off
Surround
Activates or deactivates the
SRS TruSurround XT
sound effect.
• SRS
TruSurround
XT
• Off
Speaker
Out
Enables (On) or disables
(Off) sound output to the
built-in speakers of the TV.
• On
• Off
Advanced Audio Settings - Press OK to enter.
This menu item becomes unavailable if the Surround item is set to SRS TruSurround
XT.
Vol ume
Balance
Sound Type Automatic
Steady Sound Off
Surround Off
Speaker Out On
Advanced Audio Settings >
16
0
Audio
V32B_V37B_EN.book Page 32 Wednesday, January 23, 2008 10:55 AM
Page 37

OSD (On-Screen Display) menu 33
English
Setting up the Personal EQ Mode
You can adjust the settings in the Advanced Audio Settings menu and save
them as your Personal EQ Mode.
1. Press
MENU to display the OSD menu on-screen.
2. Press
+ or - to select Audio, and then press OK to enter the Audio menu.
3. Press or to select
Advanced Audio Settings, and then press OK to
enter the
Advanced Audio Settings menu.
4. Press or to select
EQ Mode, and then press + or - to select Personal.
5. Press or to select
Trebl e, Mid Treble, Middle, Mid Bass or Bass, and
then press + or - to adjust the settings to your satisfaction.
6. Press
MENU to save the settings and close the OSD menu.
EQ Mode
To restore a factory preset
or user customized EQ
Mode.
You can choose an EQ
Mode independently for
each input source.
Press + or - to change
selection.
• Rock
• JAZZ
• Classic
• POP
• Personal
Treble
Adjusts treble tones for the
Personal EQ Mode.
Press
+ or - to make
adjustment.
-12 to 12
Mid Treble
Adjusts mid-treble tones for
the
Personal EQ Mode.
Middle
Adjusts mid tones for the
Personal EQ Mode.
Mid Bass
Adjusts mid-bass tones for
the
Personal EQ Mode.
Bass
Adjusts bass tones for the
Personal EQ Mode.
V32B_V37B_EN.book Page 33 Wednesday, January 23, 2008 10:55 AM
Page 38

OSD (On-Screen Display) menu34
English
Picture menu
The available menu items are
dependent on the input source
being selected.
The illustration is for reference
only.
Item Function Operation Range
Picture
Mode
Provides complete preferred
setups adjusted for color,
contrast, brightness and
sharpness to suit various
viewing situations. If
Personal
is selected, you can customize
individual picture setting to
your satisfaction.
For more information about
when to use these modes and
how to setup the
Personal
picture mode, see "Using the
Picture Modes" on page 35
and "Setting up the Personal
Picture Mode" on page 36.
Press
+ or - to
change selection.
• Standard
• Cinema
• Game
• Dynamic
• Personal
Contrast
Adjusts image white level so
that whites do not wash out
surrounding colors. See
"Adjusting the contrast" on
page 36.
Press
+ for brighter
whites, - for darker
whites.
0 to 64
Brightness
Adjusts image black level, so
that detail in the dark areas of
an image can be seen. See
"Adjusting the brightness" on
page 36.
Press
+ for brighter
blacks,
- for darker
blacks.
Color Adjusts image color intensity.
Press
+ for more
intense colors,
- for
less intense colors.
Picture Mode Dynamic
Contrast
Brightness
Color
Sharpness
Color TEMP. Cool
Backlight
NTSC Tint
NTSC Setup 7.5 IRE
48324535
32
Picture
V32B_V37B_EN.book Page 34 Wednesday, January 23, 2008 10:55 AM
Page 39

OSD (On-Screen Display) menu 35
English
Using the Picture Modes
You can choose a Picture Mode to suit your viewing condition.
You can choose a Picture Mode independently for each input source.
Sharpness Adjusts image sharpness level.
Press
+ for sharper
image,
- for softer
image.
0 to 6
Color
TEMP.
Adjusts the color tint of the
black and white part of the
image.
Press
+ or - to make
adjustment.
• Warm
• Normal
• Cool
Backlight Adjusts backlight intensity. 0 to 10
NTSC Tint
Adjusts color tint in NTSC
video.
This option is only
available for NTSC video
sources.
Press + for redder
tones,
- for greener
tones.
0 to 64
NTSC
Setup
Sets up the NTSC video
display format to match that
of the input NTSC video input
from other devices (such as a
DVD player).
This option is only
available for NTSC video
sources.
Press + or - to
change selection.
• 0 IRE
• 7.5 IRE
Auto
Adjust
Automatically adjusts
Frequency, Phase, H. Position
and V. Position to place the PC
input image on the screen.
Press
OK to begin the auto adjustment
function.
Frequency Adjusts the display clock
frequency and phase to correct
shimmering or distortion of
the image.
Press
+ or - to make
adjustment.
-16 to 16
Phase
H. Position Adjusts the horizontal and
vertical positions of the image
in order to center it on the
screen.
-50 to 50
V. Position
Mode Description
Standard
Suitable for viewing in environments with normal lighting condition.
Cinema
In this mode, the contrast and levels of colors are optimized in order
to display more details in the bright and dark areas of images.
Dynamic
The contrast, brightness and color saturation are enhanced for
displaying vivid images in public areas.
Game
Images are displayed with moderate brightness and contrast, making
it suitable for prolonged viewing.
Personal
Your own customised picture mode. See "Setting up the Personal
Picture Mode" on page 36.
V32B_V37B_EN.book Page 35 Wednesday, January 23, 2008 10:55 AM
Page 40

OSD (On-Screen Display) menu36
English
Adjusting the contrast
1. Set the contrast to the highest level.
2. Gradually decrease the contrast level until you reach the point where the
details in the bright areas of the image can be seen clearly. Do not further
decrease the contrast level to avoid losing the saturation of colors.
Adjusting the brightness
1. Set the brightness to the lowest level.
2. Gradually increase the brightness level until you reach the point where the
details in the dark areas of the image can be seen clearly. Do not further
increase the brightness level to avoid the black areas from looking grayish.
Setting up the Personal Picture Mode
You can adjust the settings in the Picture menu and save them as your
Personal Picture Mode.
1. Press
MENU to display the OSD menu on-screen.
2. Press
+ or - to select Picture, and then press OK to enter the Picture menu.
3. Press or to select
Picture Mode, and then press + or - to select
Personal.
4. Press or to select
Contrast, Brightness, Color, Sharpness..., etc.,
and then press
+ or - to adjust the settings to your satisfaction.
5. Press
MENU to save the settings and close the OSD menu.
V32B_V37B_EN.book Page 36 Wednesday, January 23, 2008 10:55 AM
Page 41

OSD (On-Screen Display) menu 37
English
Senseye menu
The available menu items are
dependent on the input source
being selected.
The illustration is for reference
only.
Item Function Operation Range
Black
Extension
Enhances the contrast among
details when viewing dark
images.
This option will not be
available if the ACE
function is set to Low,
Middle or High.
Press + or - to
change selection.
• Low
• Middle
• High
• Off
ACE (Auto
Contrast
Enhancement)
Adjusts the auto contrast
enhancement function that
optimizes the image contrast
ratio for dark scenes.
• Low
• Middle
• High
• Off
Noise
Reduction
Adjusts the image noise
reduction function that helps
to remove noise in images.
This function is only
available when AV1 or
AV2 (AV2-S) is the input
source with the
resolution no higher than
480i and 576i.
• Low
• Middle
• High
• Off
Black Extension Low
ACE Off
Noise Reduction Low
V32B_V37B_EN.book Page 37 Wednesday, January 23, 2008 10:55 AM
Page 42

OSD (On-Screen Display) menu38
English
Performing manual installation
The Manual Installation feature allows you to add programs to the sequential
programs list.
This option is not possible when the Child Lock is activated. See "Child Lock" on
page 42.
1. From the TV menu, press or to select Manual Installation and then
press
OK. The following menu will display:
2. Press to highlight
Standard, and then press + or - to select a TV
standard according to your country or region:
TV menu
The available menu items are
dependent on the input source
being selected.
The illustration is for reference only.
Item Function Operation Range
Auto Installation See "9. Initialize your TV" on page 8.
Manual Installation See "Performing manual installation" below.
Program Edit See "Editing programs" on page 39.
Favorite Channels See "Setting up favorite channels" on page 41.
Child Lock See "Child Lock" on page 42.
Auto Installation >
Manual Installation >
Program Edit >
Favorite Channels >
Child Lock >
TV
Country or region Standard
Bahrain, Kuwait, Oman, Qatar, United Arab Emirates, Yemen,
Indonesia, Malaysia, Singapore, Thailand, India, etc.
BG
China, Vietnam, etc. DK
Hong Kong, etc. I
Islamic Republic of Iran, Lebanon, Saudi Arabia, etc. BG
Philippines, Myanmar, etc. M
Standard BG
Frequency ___.__MHz
PR Name
Fine Tune
Text Code Char.1
Store on PROG. 02
Manual Installation
V32B_V37B_EN.book Page 38 Wednesday, January 23, 2008 10:55 AM
Page 43

OSD (On-Screen Display) menu 39
English
3. Press to highlight Frequency and then press + or - to start the tuning
system. The tuning result will display on-screen in real-time. If the tuned
program is incorrect, press
+ or - again until your desired program is
located. You can directly input the frequency using the Program selection
numeric buttons on the remote control if you wish.
4. Press to highlight
Fine Tune and then press + or - to adjust the
reception of TV signal (only necessary where the image or sound reception
is poor).
5. Press to highlight
Text Code and then press + or - to select a code
format for the Teletext function according to the table below:
6. Press to highlight
Store on PROG., and then press the Program
selection numeric buttons on the remote control to enter the number
(location) for this program. Press
OK to confirm.
7. Press
MENU to save the program and close the menu.
Editing programs
After the TV programs are scanned and stored in the TV’s memory during the
First Turn On operation (see "9. Initialize your TV" on page 8) or after using
the Auto Installation function, you can edit these programs by deleting
unwanted programs, adding a program name or changing the program
position number.
This option is not possible when the Child Lock is activated. See "Child Lock" on
page 42.
Text code Language
Char.1 West European languages
Char.2 East European languages
Char.3 Turkish/Greek
Char.4 Cyrillic languages
Char.5 Arabic languages
Char.6 Farsi languages
V32B_V37B_EN.book Page 39 Wednesday, January 23, 2008 10:55 AM
Page 44

OSD (On-Screen Display) menu40
English
Naming a program
You can give each TV program a 6-character name using this function. Once
set, the name displays on the upper right corner of the screen below the
program number when the program is selected.
1. In the
TV menu, press or to select Program Edit and then press OK.
The following menu will display:
2. Press to select
Select PR, and then press + or - to select the program
you wish to name. You can also press the Program selection numeric
buttons on the remote control to select the program directly. Two digit
entry is required. For example, press "0", "2" to select program 2.
3. Press to highlight
Edit Name, and then press + or - to highlight the
character you want to edit, or to change it to your desired character.
4. Repeat step 3 to edit other characters.
5. Press
OK to store the name.
6. Press
MENU to close the menu.
Swapping programs
You can use this function to quickly swap two programs.
1. In the
TV menu, press or to select Program Edit and then press OK.
2. Press to select Select PR, and then press + or - to select the program
you wish to relocate to a different position. You can also press the Program
selection numeric buttons on the remote control to select the program
directly. Two digit entry is required. For example, press "0", "2" to select
program 2.
3. Press to highlight
PR Swap, and then press the Program selection
numeric buttons on the remote control to select the new location for the
program. Two digit entry is required. For example, press "0", "5" to select
program location 5.
4. Press
OK and the current program is changed to the new location.
5. Press
MENU to close the menu.
Select PR 12
Edit Name -----PR Swap -PR Lock Off
PR Delete 12
Program Edit
Select a Program Number
by Using Keys PR+, PR- or 0 to 9
V32B_V37B_EN.book Page 40 Wednesday, January 23, 2008 10:55 AM
Page 45

OSD (On-Screen Display) menu 41
English
Locking/unlocking a program for the Child Lock function
See "Child Lock" on page 42 for information about the Child Lock function.
1. In the TV menu, press or to select Program Edit and then press OK.
2. Press to select
Select PR, and then press + or - to select the program
you wish to lock. You can also press the Program selection numeric
buttons on the remote control to select the program directly. Two digit
entry is required. For example, press "0", "2" to select program 2.
3. Press to highlight
PR Lock, and then press + or - to select from the
following options:
•
On: Lock the selected program.
• Off: Unlock the selected program.
4. Press
MENU to close the menu.
When the Child Lock function is enabled and a locked program is selected,
“Lock“ appears on-screen and the program cannot be viewed unless you unlock
the program or disable the Child Lock function using the correct Child Lock
password.
Deleting a program
1. In the TV menu, press or to select Program Edit and then press OK.
2. Press to select
Select PR, and then press + or - to select the program
you wish to delete. You can also press the Program selection numeric
buttons on the remote control to select the program directly. Two digit
entry is required. For example, press "0", "2" to select program 2.
3. Press to highlight
PR Delete and then press OK to delete the program.
4. Press
MENU to close the menu.
Setting up favorite channels
You can use this function to set your 5 most frequently viewed programs as
favorite channels. Once set, you can press
Favorite on the remote control
to jump to these programs quickly.
This option is not possible when the Child Lock is activated. See "Child Lock" on
page 42.
1. In the TV menu, press or to select Favorite Channels, and then press
OK.
2. Press or to select an item (
Favorite 1, Favorite 2... Favorite 5), then
press the Program selection numeric buttons on the remote control to
enter the channel number that you desire.
3. Repeat the steps above if you want to set up more favorite channels.
4. Press
MENU to close the menu.
V32B_V37B_EN.book Page 41 Wednesday, January 23, 2008 10:55 AM
Page 46

OSD (On-Screen Display) menu42
English
Child Lock
The Child Lock function can be used to prevent access to certain programs.
For example, to prevent children from viewing inappropriate programs such
as adult-only programs. This Child Lock only affects the TV/CATV input (not
AV and Graphic inputs), and prohibits the selection or display of every
program which has had its
PR Lock menu item set to On (see "Locking/
unlocking a program for the Child Lock function" on page 41).
When the Child Lock function is enabled and a locked program is selected,
“
Lock“ appears on-screen and the program cannot be viewed unless you
unlock the program or disable the Child Lock function using the correct Child
Lock password.
WARNING: You will be inconvenienced if you activate the password functionality
and subsequently forget the password. Write the password you use in this
manual, and keep it in a safe place for later recall.
Enabling/disabling Child Lock
1. In the TV menu, press or to select Child Lock, and then press OK.
The following menu will display:
2. Enter the 4-digit password using the Program selection numeric buttons
(default password: 0000)
. When entering, you can press - to clear a wrong
character. If you enter the wrong password, try again.
3. Press to select
Activation and then press + or - to select from the
following options:
•
On: Enables the Child Lock. Once enabled, the program will be locked.
•
Off: Disables the Child Lock.
4. Press
MENU to close the menu.
Changing Child Lock password
1. In the TV menu, press or to select Child Lock and then press OK.
2. Enter the password using the Program selection numeric buttons
(default
password: 0000)
. When entering, you can press - to clear a wrong
character. If you enter the wrong password, try again.
3. Press to select
Change Password and then press OK.
4. Enter a new 4-digit password using the Program selection numeric
buttons.
IMPORTANT: Write your selected password down here in this manual and keep
this manual in a safe place so that it is available to you should you ever forget it
Password: __ __ __ __
5. Enter the new password again using the Program selection numeric
buttons.
6. Press
MENU to close the menu.
Enter Password - - - -
Change Password
Activation Off
Enter Password by Using Keys 0 to 9.
Child Lock
V32B_V37B_EN.book Page 42 Wednesday, January 23, 2008 10:55 AM
Page 47

OSD (On-Screen Display) menu 43
English
Setup menu
The available menu items are
dependent on the input source
being selected.
The illustration is for reference
only.
Item Function Operation Range
Language
Select your desired language for the OSD
menu.
Press
+ or - to
change selection.
• English
•
Sleep
Timer
Set the Sleep Timer to automatically turn
off the TV. 1 minute before shutdown, a
message will display on-screen. At this
time, if you wish to cancel the function,
press any button on the remote control.
Once the time expires, the TV will be put
to the standby mode automatically.
Off, 15, 30,
45, 60, 90,
120
(minutes)
ECO
Once set to
On, the TV will activate the
Display Power Management System
(DPMS) and enter power saving mode
when no PC input signal is detected for 5
seconds, or enter standby mode
automatically if no Video signal is
detected for 10 minutes.
• Off
• On
HDMI/DVI
Input
Select the DVI input mode according to
the device connected. Select
PC if a PC is
connected. If a video device (for example,
a digital Set Top Box) is connected, select
Video.
• PC
• Video
Blue
Screen
Once set to
On, if no input signal is
detected, a blue screen will be displayed
automatically.
• Off
• On
Reset All
Settings
Restore all settings to their default values.
The TV program memory will not be
cleared. That is, you do not need to
scan and store the TV programs again
after the reset.
Press OK to activate the reset.
Language English
Sleep Timer Off
ECO On
HDMI/DVI Input Video
Blue Screen Off
Reset All Settings
Setup
V32B_V37B_EN.book Page 43 Wednesday, January 23, 2008 10:55 AM
Page 48

Reference44
English
Reference
Disclaimer
BenQ Corporation makes no representations or warranties, either expressed
or implied, with respect to the contents of this document. BenQ Corporation
reserves the right to revise this publication and to make changes from time to
time in the contents thereof without obligation to notify any person of such
revision or changes.
Copyright
Copyright 2008 BenQ Corporation. All rights reserved. No part of this
publication may be reproduced, transmitted, transcribed, stored in a retrieval
system or translated into any language or computer language, in any form or
by any means, electronic, mechanical, magnetic, optical, chemical, manual or
otherwise, without the prior written permission of BenQ Corporation.
is a trademark of SRS Labs, Inc. TruSurround XT technology is
incorporated under license from SRS Labs, Inc.
Battery safety notice
The use of the wrong type of batteries may cause chemical leaks and/or
explosion. Please note the following:
• Always ensure that the batteries are inserted with the positive and negative
terminals in the correct direction as shown in the battery compartment.
• Different types of batteries have different characteristics. Do not mix
different types.
• Do not mix old and new batteries. Mixing old and new batteries will shorten
battery life and/or cause chemical leaks from the old batteries.
• When batteries fail to function, replace them immediately.
• Chemicals which leak from batteries may cause skin irritation. If any
chemical matter seeps out of the batteries, wipe it up immediately using a dry
cloth.
• Due to varying storage conditions, the battery life for the batteries included
with your TV may be shortened. Replace them within 3 months or as soon as
you can after initial use.
V32B_V37B_EN.book Page 44 Wednesday, January 23, 2008 10:55 AM
Page 49

Reference 45
English
Dimensions
Unit: mm
VB3233
V32B_V37B_EN.book Page 45 Wednesday, January 23, 2008 10:55 AM
Page 50

Reference46
English
Unit: mm
VB3733
V32B_V37B_EN.book Page 46 Wednesday, January 23, 2008 10:55 AM
Page 51

Reference 47
English
Specifications
Design and specifications are subject to change without notice.
Model VB3233 VB3733
We i gh t
With swivel 15.04 Kg 24 Kg
Without swivel 14.34 Kg 19.5 Kg
Dimensions
(W × H × D)
With swivel 845.2 × 655.3× 220 mm 970 × 747.2× 295.6 mm
Without swivel 845.2 × 598.2 × 114 mm 970 × 697.4 × 109 mm
LCD panel size (approx. value) 32 inches 37 inches
Aspect ratio 16:9
Native resolution 1366 × 768
LCD panel brightness
(typical)
500 cd/m
2
LCD panel contrast ratio
(typical)
1500:1
Viewing angle
(Left/Right/Up/Down)
89 /89 /89 /89
Response time (Gray to Gray) 6.5 ms
Built-in speakers 8W × 2, 80Hz ~ 20KHz
Signal input
• TV RF coaxial × 1
• Composite Video (AV) × 1
• S-Video × 1
• Composite Video/S-Video audio × 1
• Component Video (Y C
B/PB CR/PR) × 1
• Component Video audio × 1
• HDMI/DVI × 1
• DVI audio × 1
• PC D-Sub × 1
• PC audio × 1
Signal output
• Stereo audio × 1
• Headset × 1
Power supply AC 100 - 240V, 50/60 Hz
Power consumption 160W 250W
Operating temperature
0C~40C (at sea level)
Storage temperature
-20 C ~ 50 C (at sea level)
Video system Supports NTSC/PAL/SECAM formats
Remote control model
number (marked in the
battery compartment)
RC-H072
V32B_V37B_EN.book Page 47 Wednesday, January 23, 2008 10:55 AM
Page 52

Reference48
English
Supported PC (D-Sub/DVI) input signal resolutions
Supported Component Video input signal resolutions
Resolution
Horizontal
Frequency
(KHz)
Vertical
Frequency
(Hz)
Dot Clock
Frequency
(MHz)
Note
720 × 400 31.47 70.08 28.322
DOS
640 × 480 31.5 60 25.18
640 × 480 37.5 75 31.5
VESA
640 × 480 37.86 72.81 31.5
800 × 600 37.9 60.32 40
800 × 600 46.9 75 49.5
800 × 600 48.08 72.19 50
1024 × 768 48.4 60 65
1024 × 768 56.5 70 75
1024 × 768 60.023 75 78.75
1280 × 768 47.8 60 79.5
1280 × 768 60.3 75 102.25
1360 × 768 47.7 60 85.5
Resolution
Horizontal
Frequency
(KHz)
Vertical
Frequency
(Hz)
Dot Clock
Frequency
(MHz)
Note
720 × 480i 15.735 60i 13.5 SDTV 480i
720 × 480p 31.25 60p 27 EDTV 480p
720 × 576i 15.625 50i 13.5 EDTV 576i
720 × 576p 31.25 50p 27 EDTV 576p
1280 × 720p 45 60p 74.25
HDTV720p
1280 × 720p 37.5 50p 74.25
1920 × 1080i 33.75 60i 74.25
HDTV1080i
1920 × 1080i 28.13 50i 74.25
V32B_V37B_EN.book Page 48 Wednesday, January 23, 2008 10:55 AM
Page 53

Reference 49
English
Supported HDMI input signal resolutions
• Resolutions outside of these tables are not recognized and will not be
displayed.
• When you connect the TV to a PC, you should adjust the resolution in the
display properties of the computer to closely match the native resolution of the
TV (for example, 1360 x 768 pixels).
• To view the best quality picture when using the PC input, you will then need to
instruct the TV to calibrate itself to the PC signal timing. To do so, select 'Auto'
in the 'Picture' menu. See "Auto Adjust" on page 35.
Setting up appropriate output resolution on PC
Before connecting the TV to a PC to display PC video, please follow the
instructions below (in Windows XP for example) to setup appropriate output
resolution.
1. On Windows Desktop, right-click and select
Properties from the menu
that appears.
2. Click the
Settings tab in the window that follows.
3. Drag the
Resolution slider and select a compatible resolution according to
"Supported PC (D-Sub/DVI) input signal resolutions" on page 48. If your
PC supports it, select 1360 × 768 as the output resolution for the best
result.
4. Click
OK to save the setting and close the window.
5. Switch the PC video output from monitor to the TV.
6. Press
INPUT and select the PC input.
Resolution
Horizontal
Frequency
(KHz)
Vertical
Frequency
(Hz)
Dot Clock
Frequency
(MHz)
Note
720 × 480i 15.735 60i 27 SDTV 480i
720 × 480p 31.47 60p 74.25 EDTV 480p
720 × 576i 15.625 50i 27 EDTV 576i
720 × 576p 31.25 50p 74.25 EDTV 576p
1280 × 720p 45 60p 74.25
HDTV720p
1280 × 720p 37.5 50p 74.25
1920 × 1080i 28.13 50i 74.25
HDTV1080i
1920 × 1080i 33.75 60i 74.25
V32B_V37B_EN.book Page 49 Wednesday, January 23, 2008 10:55 AM
Page 54

Reference50
English
Troubleshooting
There are many external influences and circumstances beyond the control of
BenQ which may be causing problems with your TV. Some of the more
common and user fixable problems are listed below for your information.
Please check the following list before calling your nearest BenQ Customer
Service Center, and attempt the following steps to diagnose and fix the
problem yourself:
Symptoms Possible causes
The TV does not turn
ON
• Check that the power switch on the power outlet is
turned on.
• Check that the power plug is securely inserted into both
the
AC-INLET socket on the TV and the wall outlet, and
that the wall outlet is switched on (if switched).
• Check that power is available from the power outlet by
trying another known working appliance (e.g. desk
lamp) from that same power outlet.
There is no picture or
sound
• Check that the TV is turned on (The power indicator
should be green).
• Try a different input source to confirm if the symptom is
still present or whether the source is at fault.
• Check for mis-connection of cables for that input.
• Adjust the volume control to check that isn't turned
down.
• Make sure that the
Speaker Out option in the Audio
menu is not set to
Off.
• If the TV is connected to a PC, make sure that the PC is
not in standby or hibernation mode, and the PC’s video
display is switch to external output.
• Make sure that the TV program is not child-locked.
The cable connection
is correct, but there is
only sound and no
picture is displayed
• Check to make sure that the cables are firmly connected
to the terminals on the TV.
• According to the type of input signal connected, refer to
"Supported PC (D-Sub/DVI) input signal resolutions" on
page 48, "Supported Component Video input signal
resolutions" on page 48 or "Supported HDMI input
signal resolutions" on page 49 to ensure that the input
signal resolution from the signal source device (e.g., the
PC or TV game console) is supported by the TV
(maximum 1080i for HDMI and Component Video
inputs, and 1360 × 768 @ 60Hz for PC and DVI inputs).
If the input signal resolution is too high or not
supported, the picture will not be displayed. Lower or
select a compatible signal resolution on the signal source
device and try again.
V32B_V37B_EN.book Page 50 Wednesday, January 23, 2008 10:55 AM
Page 55

Reference 51
English
The image appears
distorted
• Ensure the TV's aspect ratio is correctly set to suit the
image source.
• Try a different input source to confirm if the symptom is
still present or whether the source is at fault.
The image appears
too 'washed out', or
the darkest areas of
the image appear too
bright
• Lower the
Contrast setting.
• The output resolution of the source device (e.g. DVD
player) may be set too high. Reduce its output resolution.
• The video signal has not been terminated properly
somewhere in the external equipment. Check the
connection and try again.
• Reduce the brightness level until the black areas of the
picture appear as black.
• The input source device (e.g. DVD player) brightness
level may be set too high. Reduce its brightness level.
Picture is not clear, or
there is no image
display when viewing
PC input
• Check the connection of cables.
• The PC video output resolution is not supported by the
TV and cannot be displayed. Refer to "Supported PC (D-
Sub/DVI) input signal resolutions" on page 48 and
"Setting up appropriate output resolution on PC" on
page 49 to select a compatible output resolution on the
PC and try again.
• The PC output resolution is set too high. 1360 × 768 @
60Hz is the highest acceptable PC timing.
• If the displayed image appears to be shimmering and
unclear, use the
Auto Adjust function in the Picture
menu to let the TV adjust the picture settings
automatically.
Remote control does
not function properly
• Check for incorrect battery orientation.
• Check for dead batteries.
• Check your distance and angle from the TV.
• Check whether remote control is properly being pointed
at the TV's remote control sensor window.
• Check for any obstacle between the remote control and
the remote control sensor window.
• Check that the remote control sensor window is not
under strong fluorescent lighting. or in direct sunlight.
• Check for any devices (PC or personal digital assistant,
PDA) nearby that transmit infrared signals which may
cause interference to signal transmission between the
remote control and the TV. Turn off the infrared function
of these devices.
The Child Lock
password is lost
Use the
Reset All Settings function (see page 43) to reset
the Child Lock password to the default value (
0000), and
change it to your own preferred password.
V32B_V37B_EN.book Page 51 Wednesday, January 23, 2008 10:55 AM
Page 56

Reference52
English
<Memo>
V32B_V37B_EN.book Page 52 Wednesday, January 23, 2008 10:55 AM
Page 57

UVfd
¥¬‘G HglPj‘¢hJ
HgŒsL 1: ¬g¢G Hgjay¢G HgsV¢v .....................................1
1- ¢V¥n rVHxM £ƒI Hgjug¢lhJ ................................................ 2
lh lPj‘¢hJ ¬g¢G Hgjay¢G HgsV¢v€ ...................................................2
lh lPj‘¢hJ ¬g¢G HBsjO¬HL€ .......................................................... 2
2- lPj‘¢hJ Hguf‘M ............................................................ 2
3- HOj¢hV l”hK HgjV”¢F ‘j¥§¢«I ........................................... 3
4- jV”¢F HgŒhU¬M Hg¬‘HVM )¨VH« 3323BV tŒ¨( ........................ 4
lbP±hJ £hlm ggsblm ............................................................... 4
jV”¢F HgŒhU¬M Hg¬‘HVM .................................................................4
5- j‘w¢G ”fG Hg§‘Hzd .......................................................5
6- j‘w¢G ”fG Hg¨hrm .........................................................5
7- qf¨ «H‘¢m Hglah£¬M ...................................................... 6
8- jka¢¨ ‘P¬M HgjP”L UK fu¬ ...............................................6
jug¢lhJ fa¶K HsjO¬HL ‘P¬M HgjP”L UK fu¬ ........................................7
HOjfhV ‘P¬M HgjP”L UK fu¬ .......................................................... 7
9- îU¬H¬ ¥§h« Hgjg…«¢‘K ...................................................... 8
01- UVQ fVHlµ Hgjg…«¢‘K ................................................. 9
lug‘lhJ Hgukh¢m ‘Hgjk±¢T .................................................... 9
lhƒH fu¬€ ........................................................................ 01
HgŒsL 2: ¬g¢G HBsjO¬HL ............................................11
lŒ¬lm ............................................................................ 21
HgjuVT Ugn Hgjg…«¢‘K ........................................................ 21
O¢hVHJ Hg¬OG ..........................................................................21
lkhtƒ ¬OG lw¬V Hgjg…«¢‘K Hgjkh±VD ............................................... 21
lkhtƒ ¬OG lw¬V îahVM Hg…¢¬¢‘ ...................................................... 31
lkhtƒ ¬OG lw¬V Vs‘L Hg¥VHt¢“ ................................................... 31
Hg¥hkF H®lhld .........................................................................31
g‘Pm HgjP”L )Hglk±V Hg¥hkfd H®¢lK( ................................................41
Hgg‘Pm Hg¨Vt¢m ®¥§«M Hgw‘J ‘Hgw‘VM HgOhV¥¢m )Hglk±V Hg¥hkfd H®¢sV( ..51
Hglk±V HgOg…d .......................................................................... 61
HgjuVT Ugn ‘P¬M HgjP”L UK fu¬ ............................................ 71
HsjO¬HL ‘P¬M HgjP”L UK fu¬ ................................................. 02
Hgjay¢G ‘hT Hgjay¢G ‘HBsju¬H¬ ..........................................02
jay¢G ¥§h« Hgjg…«¢‘K ................................................................02
î¬OhG Hgjg…«¢‘K td ‘qv HBsju¬H¬ ................................................. 02
HOj¢hV lw¬V ¬OG ............................................................02
HOj¢hV ¬OG Hgjg…«¢‘K lfhaVM ........................................................02
¥¬‘G HglPj‘¢hJ
i
V32B_V37B_AR.book Page i Monday, February 4, 2008 4:03 PM
Page 58

UVfd
¥¬‘G HglPj‘¢hJ
HBkjŒhG îgn lwh¬V ¬OG •OVN )fhsjekhx ¬OG Hgjg…«¢‘K( ........................ 02
qf¨ îU¬H¬HJ Hgw‘J ........................................................12
qf¨ lsj‘N Hgw‘J ................................................................. 12
îU¬H¬HJ ”jL Hgw‘J .................................................................. 12
jay¢G/hT jay¢G lCeVHJ Hgw‘J HglP¢¨ ....................................... 12
HOj¢hV ‘qv Hgl‘H«K Hglu¬ lsfŒ‰h ................................................... 12
jy¢¢V HgfVHlµ ...................................................................12
HOj¢hV fVkhlµ lfhaVM ................................................................ 12
jy¢¢V HgfVHlµ jsgsg¢h‰ ................................................................. 12
HgV¥‘c îgn HgfVkhlµ •‘ Hg¬OG HgshfR HgƒD jL UVqi ............................ 12
HBkjŒhG îgn HgŒk‘HJ Hgl…qgm ......................................................... 22
HsjO¬HL ‘±¢…m Hgjef¢J .........................................................22
HOj¢hV ‘qv Hgw‘VM ..........................................................22
HsjO¬HL lCrJ Hgs”‘K .........................................................22
qf¨ H™qhxM HgOg…¢m ..........................................................32
HsjO¬HL ‘±¢…m rkhM Hglug‘lhJ ................................................32
UVQ Hglug‘lhJ ..............................................................32
qf¨ ksfm HgŒf‘G ..............................................................42
j‘w¢G ¬OG Hgw‘J ‘Hgw‘VM ................................................ 52
j‘w¢G ¬OG Hg…¢¬¢‘ HglCgT .......................................................... 52
j‘w¢G ¬OG Hg…¢¬¢‘ thzR Hg¥‘¬M ..................................................... 62
j‘w¢G ¬OG Hg…¢¬¢‘ HglV”F ......................................................... 62
j‘w¢G lk…ƒ ¬OG BUS-D CP ................................................... 72
j‘w¢G lk…ƒ ¬OG IVD ............................................................... 72
j‘w¢G lk…ƒ ¬OG IMDH ........................................................... 82
j‘w¢G OVœ w‘J HBsjV¢‘ ....................................................... 82
j‘w¢G OVœ slhUm HgV•S .......................................................... 92
rhzlm DSO )Hglug‘lhJ HgluV‘qm Ugn Hgaham( ......................... 03
fk¢m rhzlm DSO ..............................................................03
HgjkŒG ObG rhzlm DSO ......................................................13
Ulg¢hJ rhzlm DSO ................................................................. 13
rhzlm Hgw‘J ...................................................................23
îU¬H¬ ‘qv QE HgaOwd ........................................................... 33
rhzlm Hgw‘VM ...................................................................43
HsjO¬HL •‘qhc Hgw‘VM .............................................................. 53
qf¨ Hgjfh¢K ........................................................................... 63
qf¨ Hgs¨‘c ......................................................................... 63
îU¬H¬ ‘qv Hgw‘VM HgaOwd ....................................................... 63
rhzlm eyesneS ..............................................................73
rhzlm Hgjg…«¢‘K .................................................................83
î¥VHx Hgjef¢J Hg¢¬‘D .................................................................. 83
jPV¢V HgfVHlµ ......................................................................... 93
îU¬H¬ HgŒk‘HJ Hgl…qgm ................................................................ 14
ii
V32B_V37B_AR.book Page ii Monday, February 4, 2008 4:03 PM
Page 59

UVfd
¥¬‘G HglPj‘¢hJ
îr…hG g©¨…hG ...........................................................................24
rhzlm H™U¬H¬ .................................................................... 34
lug‘lhJ lV¥u¢m ............................................................... 44
f¢hK îObx HglsC‘g¢m .......................................................... 44
PŒ‘R Hg¨fv ‘HgkaV ........................................................... 44
lbP±hJ P‘G sblm Hgf¨hV¢m ..............................................44
H®fuh¬H®fuh¬ .................................................................... 54
Hgl‘Hw…hJ ..................................................................... 74
¬rm îahVM ¬OG Hg”lf¢‘jV )IVD/buS-D( Hgl¬U‘lm ......................84
¬rm îahVM ¬OG Hg…¢¬¢‘ HglV”F Hgl¬U‘lm ................................... 84
¬rm îahVM ¬OG IMDH Hgl¬U‘lm ........................................... 94
îU¬H¬ ¬rm OVœ lkhsfm Ugn ¥§h« Hg”lf¢‘jV ........................................ 94
Hsj”ahT H®U¨hG ‘îwbP§h ................................................05
iii
V32B_V37B_AR.book Page iii Monday, February 4, 2008 4:03 PM
Page 60

UVfd
¥¬‘G HglPj‘¢hJ
>lƒ”VM<
vi
V32B_V37B_AR.book Page iv Monday, February 4, 2008 4:03 PM
Page 61

lVPfh‰
UVfd
VT DCL seireS BV
HgŒsL 1: ¬g¢G Hgjay¢G HgsV¢v
V32B_V37B_AR.book Page 1 Monday, February 4, 2008 4:03 PM
Page 62

UVfd
HgŒsL 1: ¬g¢G Hgjay¢G HgsV¢v
2
1- ¢V¥n rVHxM £ƒI Hgjug¢lhJ
j§hk¢kh gaVHz“ jg…«¢‘K VT DCL seires BV QneB’ tf¢K ¢¬¢“ H·K •P¬E jŒk¢hJ •¥§«M
Hgjg…«¢‘K ƒHJ ahahJ HguVQ Hgfg‘V¢m DCL HgVrl¢m Hgls¨Pm Hgjd j‘tV g“ ljum Hglah£¬M
gsk‘HJ U¬¢¬M. ¢V¥n jOw¢W fqv ¬rhzR gŒVHxM Hgjug¢lhJ Hg‘HV¬M td £ƒH Hg¬g¢G rfG jV”¢F
Hg¥§h« ‘HsjO¬Hli.
lh lPj‘¢hJ ¬g¢G Hgjay¢G HgsV¢v€
¢Pj‘D HgŒsL 1 Ugn ¬g¢G Hgjay¢G HgsV¢v HgƒD ¢‘tV g“ Hglug‘lhJ Hgb«lm ggjuVT Ugn Hg¥§h«
‘îU¬H¬I’ £ƒH fhgksfm ggŒsL 1.
lh lPj‘¢hJ ¬g¢G HBsjO¬HL€
¢Pj‘D HgŒsL 2 Ugn ¬g¢G HBsjO¬HL HgƒD ¢jkh‘G fhgj…w¢G OwhzW ¥§h« Hgjg…«¢‘K ‘‘±hz…i’
”lh ¢‘qp l‘Hw…hJ Hglkjµ ‘¨VR Hsj”ahT H®U¨hG ‘îwbP§h ™l¬H¬“ fhgl«¢¬ lK HglshU¬M.
‘¢wT ¬g¢G HBsjO¬HL •¢qh‰ ”¢…¢m jOw¢W îU¬H¬HJ Hg¥§h« fhg¨V¢Œm Hgjd j‘tV •tqG ¥‘¬M
ll”km gglah£¬M Pjn jjkhsF lv •‘qhc HguVQ Hgjd j…qg§h ‘f¢zm HguVQ HglP¢¨m.
2- lPj‘¢hJ Hguf‘M
•OVœ ¥§h« Hgjg…«¢‘K lK Hguf‘M ‘j¶”¬ lK ‘¥‘¬ ”htm HgukhwV Hgjhg¢m:
• B jj‘tV HgŒhU¬M Hg¬‘HVM Hglk…wgm ‘HgPgŒjhK Hgfbsj¢”¢jhK îB lv ¨VH« 3323BV. ¢Pj‘D ¨VH« 3373BV Ugn rhU¬M
¬‘HVM lsfŒm HgjV”¢F lK rfG Hglwkv.
• or¬ ¢OjgT k‘c ”fG Hg¨hrm HglVtR UK Hga”G Hgl‘qp td Hg¬g¢G ‘ƒg“ PsF l”hK HgaVHx.
td PhG tŒ¬HK •‘ jgT •D lK jg“ Hgl”‘khJ’ ¢V¥n HBjwhG fhgl‘«c HgƒD HajV¢J lki Hguf‘M
Ugn Hg…‘V. ‘¢V¥n HBPj…h± f‘ehzR Hglkjµ td l”hK ›lK Pjn ¢jskn HgV¥‘c îg¢§h Uk¬ HgPh¥m.
HgjOgW lK Hguf‘M f¨V¢Œm sg¢lm:
• Hg”Vj‘K )Hgwk¬‘R( lK H®a¢hx Hgjd ¢l”K îUh¬M j¬‘¢V£h.
• B jjV“ HgPŒhzF Hgfbsj¢”¢m td ljkh‘G H®¨…hG •‘ HgVqv.
• HPVW Ugn jO«¢K Hguf‘M )îK •l”K( BsjO¬Hl§h td kŒG Hgjg…«¢‘K lsjŒfb‰.
• j¶”¬ lK U¬L jV“ •D lgPŒhJ ¬HOG Hguf‘M rfG HgjOgW lk§h.
gqlhK sblj“ HgaOw¢m ‘sblm H·OV¢K’ ¢kfyd HgjuhlG lv £ƒH Hgjg…«¢‘K fukh¢m gj…h¬D juVqi ggjgT •‘ lK ¢blsi ggO¨V.
jPj‘N ”htm ahahJ HguVQ Hgfg‘V¢m )DCL( Ugn ¨fŒm Vr¢Œm ‘Hr¢m lK Hg«¥hœ’ ‘£ƒI Hg¨fŒm
UVqm ggO¬A •‘ HgeŒF’ ‘r¬ jj§aL Uk¬ HgjuVQ gw¬lm •‘ gqy¨. ”lh •K Hg¨fŒm Hg¬HOg¢m
Hgfg‘V¢m Hgshzgm r¬ jjP¨L kj¢¥m HgjuVQ gŒ‘M l…V¨m •‘ ¬V¥hJ HgPVHVM Hga¬¢¬M. gƒH’ ¢V¥n
HgjuhlG lu§h fukh¢m.
U¬¬ 1 ¥§h« jg…«¢‘K DCL U¬¬ 1 ”fG ¨hrm U¬¬ 1 ”fG t¢¬¢‘ lCgT U¬¬ 1 rhU¬M ¬‘HVM* U¬¬ 2 PgŒm
fbsj¢”¢m
U¬¬ 1 ¬g¢G Hgjay¢G HgsV¢v/
¬g¢G HBsjO¬HL
U¬¬ 1 lug‘lhJ
HgqlhK
U¬¬ 1 ‘P¬M jP”L UK
fu¬
U¬¬ 2 f¨hV¢m lŒhS
AAA
V32B_V37B_AR.book Page 2 Monday, February 4, 2008 4:03 PM
Page 63

UVfd
HgŒsL 1: ¬g¢G Hgjay¢G HgsV¢v
3
3- HOj¢hV l”hK HgjV”¢F ‘j¥§¢«I
¢V¥n lVHUhM HgkŒh¨ Hgjhg¢m •ekhx jV”¢F Hgjg…«¢‘K ‘jay¢gi ‘jk±¢…i÷ ‘ƒg“ gj…h¬D H®O¨hV
HglPjlgm ‘î¨hgm UlV Hg¥§h«.
B jqv Hgjg…«¢‘K Ugn s¨p Y¢V lsj‘¸ •‘
lhzG •‘ Y¢V lsjŒV÷ tŒ¬ ¢C¬D ƒg“ îgn
sŒ‘¨i ‘îgPhR HgqVV fi •‘ fh·OV¢K.
H¨gF j¶l¢K Hg¥§h« lK rfG •P¬ Hg…k¢¢K
HgljOww¢K td PhG P¬‘E «g«HG.
B jqv Hg¥§h« td H®lh”K HglygŒm Hgjd
jku¬L f§h Hgj§‘¢m Hglkhsfm.
¢¥F lVHUhM ¥l¢v HgjPƒ¢VHJ ‘Hgjkf¢§hJ
Hgl‘qPm fhglgwŒhJ Hgl‘¥‘¬M Ugn
Hgjg…«¢‘K.
B jqv Hgjg…«¢‘K fhgŒVF lK •D lw¬V
ggl¢hI’ leG PlhL •‘ P‘Q’ •‘ td •D
l‘qv ¢uVqi ggl¢hI HgljkheVM÷ ”‘qui
•lhL khtƒM l…j‘Pm ¢l”K •K j¬OG lK Obg§h
l¢hI H®l¨hV.
j¥kF jy¨¢m tjPhJ Hgj§‘¢m ‘Hg…jPhJ
H®OVN •‘ s¬£h •ekhx jay¢G Hg¥§h«÷ tŒ¬
¢C¬D ƒg“ îgn HVj…hc ¬V¥m HgPVHVM f¬HOgi
j¬V¢¥¢‰h llh ¢jVjF Ug¢i P¬‘E lOh¨V.
B jqv Hg¥§h« fhgŒVF lK •‘ t‘R •D
lw¬V ggPVHVM ”¶¥§«M H™auhc •‘ HgsOhkhJ
•‘ Hgl‘Hr¬ ‘”ƒH H®¬‘HJ H®OVN Hgl‘g¬M
ggPVHVM )flh t¢§h l”fVHJ Hgw‘J(. tŒ¬
jjsfF HgPVHVM td îgPhR •qVHV fhgybT
HgOhV¥d tqb UK Hgl”‘khJ Hg¬HOg¢m.
B juVQ Hgjg…«¢‘K ®aum HgalS HglfhaVM
•‘ H™qhxM Hgsh¨um÷ tŒ¬ jC¬D HgPVHVM îgn
jg…i ”lh •K H™qhxM Hgsh¨um jjsfF td
wu‘fm Hglah£¬M.
td Phgm Hgjef¢J Ugn HgPhz¨’ ¢¥F jV“
lshtm lkhsfm •Ugn Hg¥§h« Uk¬ ‘qui Ugn
HgPhlG HglefJ fhgPhz¨.
td Phgm jV”¢F Hgjg…«¢‘K td tjPm fhgPhz¨’
¢¥F jV“ lshtm lkhsfm •UbI ‘•s…gi jslp
f‘qui ‘îOVH¥i.
td Hgjef¢J Phgm Hgjef¢J Ugn HgPhz¨’ HtwG
¥l¢v Hg”fbJ ‘HsjuK f…kd¦ ljOwW gjef¢J
Hgjg…«¢‘K f¶lhK. B jsjO¬L s‘N HgPhlG
Hgl‘wn fi g§ƒH Hg¨VH« lK •¥§«M Hgjg…«¢‘K
‘j¶”¬ lK •K PhlG Hgjg…«¢‘K )lgPR
HOj¢hVD( lefJ fïP”hL td HgPhz¨ ‘g¢S tŒ¨
td ¨fŒhJ Hg¥¬HV HgOhV¥¢m. j¶”¬ lK •K
HgPhlG td ‘qv lsj‘¸ •tŒ¢h‰. B jsjO¬L
HgyVHx td jef¢J HgPhlG Ugn HgPhz¨.
B ¢ajlG £ƒH Hgjg…«¢‘K Ugn l…jh– jay¢G.
Uk¬ HgjV”¢F’ rL f¬lµ ¥§h« twG ¢s§G
Hg‘w‘G îg¢i td l‘qv H®sb“ Hgehfjm •‘
rL fj‘w¢G ”fG Hg¨hrm fl¶Oƒ ggj¢hV ¢j‘tV
fhgŒVF lK Hg¥§h« Pjn ¢s§G Hg‘w‘G
îg¢i. td Phgm ‘r‘c O¨¶ lh •ekhx jay¢G
Hg‘P¬M’ rL fjay¢G ¥§h« Hg…wG ™¢ŒhT
lw¬V H™l¬H¬ fhg¨hrm •‘ HtwG ”fG Hg¨hrm.
V32B_V37B_AR.book Page 3 Monday, February 4, 2008 4:03 PM
Page 64

UVfd
HgŒsL 1: ¬g¢G Hgjay¢G HgsV¢v
4
4- jV”¢F HgŒhU¬M Hg¬‘HVM )¨VH« 3323BV tŒ¨(
lbP±hJ £hlm ggsblm
¢V¥n lVHUhM HgkŒh¨ Hgjhg¢m rfG Hgf¬x td HgjV”¢F:
• g¬‘HUd Hgsblm’ ¢‘wn fŒ¢hL aOw¢K fhgy¢K Ugn H®rG fï¥VHx Ulg¢m HgjV”¢F.
• g‘Pm aham DCL fhg¥§h« s§gm Hg”sV ‘r¬ jjuVQ ggjgT fs§‘gm. j¥kF glS Hgg‘Pm •ekhx
jV”¢F Hg¥§h« •‘ jPV¢”i’ lv HgPVW ”ƒg“ Ugn U¬L lblsm •¢m •¥shL YV¢fm g§h. ‘¢kwp
fhsjO¬HL t‘¨m khUlm ‘k±¢…m ‘Ohg¢m lK Hg‘fV gPlh¢m Hg¥§h« ‘Hgaham •ekhx Ulg¢m HgjV”¢F.
• ¢V¥n lVHUhM jV”¢F Hg¥§h« td ‘qv lsjŒV’ ‘îB juVQ ggsŒ‘¨ llh ¢C¬D îgn H™qVHV fi
‘juVQ H®aOhW g´whfm. H¨gF j¶l¢K Hg¥§h« lK rfG tkd ljOwW td PhG P¬‘E «g«HG.
jV”¢F HgŒhU¬M Hg¬‘HVM
1- qv HgŒhU¬M Hg¬‘HVM fP¢E ¢”‘K Hg¥hkF
H®UVQ lk§h g©lhL’ eL V”¦F HgPgŒj¢K
Hgfbsj¢”¢j¢K Ugn lP‘V HgŒhU¬M Hg¬‘HVM.
2- HsjuK fhga”G Hgj‘q¢Pd ggjuVT Ugn
Hg‘qv HgwP¢p gjV”¢F HgPgŒj¢K Ugn
HglP‘V. ¢V¥n Hgj¶”¬ lK wPm Hj¥hI Hg¥«x
HgƒD Ugn a”G td HgPgŒj¢K
3- HVtv ¥§h« Hgjg…«¢‘K îgn •Ugn eL •¬OG
lP‘V HgŒhU¬M td Hg…jPm HgOhwm fi td
Hg¥hkF Hgs…gd lK Hgjg…«¢‘K f«H‘¢m 03
¬V¥m. ‘Uk¬ î¬OhG HglP‘V’ j¶”¬ lK lPhƒHM
HguVH‘D Hgl‘¥‘¬M fhgjg…«¢‘K lv tjPhJ
HgjV”¢F Hgl‘¥‘¬M Ugn HgŒhU¬M Hg¬‘HVM
‘¬O‘g§h t¢§h fa”G sg¢L.
HgPgŒjhK Hgfbsj¢”¢jhK
Hgul‘¬
Hg¥hkF
H®UVQ
HgPgŒjhK
Hgfbsj¢”¢jhK
Hgul‘¬
¢V¥n Hgj¶”¬ lK
wPm Hj¥hI Hg¥«x
HgƒD Ugn a”G v td
HgPgŒj¢K
03 ¬V¥m
HguVH‘D
tjPhJ HgjVӢF
V32B_V37B_AR.book Page 4 Monday, February 4, 2008 4:03 PM
Page 65

UVfd
HgŒsL 1: ¬g¢G Hgjay¢G HgsV¢v
5
5- j‘w¢G ”fG Hg§‘Hzd
‘wG lŒ¬lm ”fG Hg§‘Hzd lK k±hL £‘Hzd Hgjg…«¢‘K •‘ wk¬‘R ¥§h« t“ a…VHJ Hgjg…«¢‘K Hg”fgd
)VTAC( flŒfS ¬OG Hgj¢hV HgljV¬¬ fhg¥§h« )”lh £‘ l‘qp td Hga”G Hgj‘q¢Pd •¬khI(. j¶”¬
lK j‘w¢G Hg”fG ‘jef¢ji fïP”hL td l”hki HgwP¢p.
• jC¬D îahVM Hgjg…«¢‘K V¬¢zm Hg¥‘¬M îgn îOVHœ w‘VM ‘/•‘ w‘J V¬Dx lK Hgjg…«¢‘K. ‘ggPw‘G Ugn w‘VM ‘w‘J
f¥‘¬M Uhg¢m’ B f¬ lK j‘HtV îahVM jg…«¢‘k¢m Uhg¢m Hg¥‘¬M. ggPw‘G Ugn •tqG HsjŒfhG ™ahVM Hgjg…«¢‘K’ ¢¥F •K
¢”‘K k±hL Hg§‘Hzd HgOhV¥d td ‘qv j‘¥¢i wP¢p’ lv HgugL f¶K £ƒH ¢ujl¬ Ugn Hgl‘rv HgOhW fhglsjO¬L. ‘îƒH ”kJ
fPh¥m ggŒ¢hL fƒg“’ tb f¬ lK HgV¥‘c îgn tkd ljOwW td •k±lm Hg§‘Hzd.
• ¢Pj‘D £ƒH Hg¥§h« Ugn l‘HgT jg…«¢‘K jkh±VD lqlK’ ‘£ƒH ¢j¨gF j‘w¢G ”fG £‘Hzd Hgjg…«¢‘K fk±hL £‘Hzd jg…«¢‘K
OhV¥d •‘ ¥§h« t“ a…VHJ Hgjg¢…«¢‘K Hg”fgd VTAC. ‘îƒH ”kJ jVYF td HBsj…h¬M lK aham DCL HgVrl¢m glah£¬M
Hgjg…«¢‘K HgVrld’ ¢kfyd j‘w¢G wk¬‘R jP‘¢G H™ahVHJ )BTS( gl‘HgT jg…«¢‘K Vrld OhV¥d )¥§h« t“ a…VHJ(
f¥§h« Hgjg…«¢‘K fhsjO¬HL ”fG îahVM Vrl¢m )IMDH •‘ IVD(.
6- j‘w¢G ”fG Hg¨hrm
1- P¬¬ l‘qv ”fG Hg¨hrm lK Hguf‘M’ eL ‘wG Hg¨VT HgwP¢p td lŒfS TELNI-CA
Hgl‘¥‘¬ td Hg¥hkF HgOg…d lK Hgjg…«¢‘K )”lh £‘ l‘qp •¬khI(.
2- ‘wG Hg¨VT H·OV fl¶Oƒ j¢hV lkhsF td HgPhz¨’ eL •¬V l…jh– Hg¨hrm f¥§h« Hgjg…«¢‘K îgn
‘qv Hgjay¢G )îƒH ”hK l«‘¬‰h fl…jh– jay¢G(. ‘fƒg“ ¢¬OG ¥§h« Hgjg…«¢‘K td ‘qv HBsju¬H¬
‘¢jP‘G lCaV Hg¨hrm )Hgl‘¥‘¬ •s…G Hg¥hkF H®lhld H®¢lK( îgn Hgg‘K H®PlV.
4- fu¬ î¬OhG HglP‘V fhg”hlG’ •¬V Hgjg…«¢‘K
fP¢E ¢j¥i îgn H®lhL lfhaVM.
”fG Hg§‘Hzd
lŒfS ¬OG FR f¥§h« Hgjg…«¢‘
lŒfS
TELNI-CA
l¶Oƒ
Hgj¢hV
”fG Hg¨hrm
V32B_V37B_AR.book Page 5 Monday, February 4, 2008 4:03 PM
Page 66

UVfd
HgŒsL 1: ¬g¢G Hgjay¢G HgsV¢v
6
• ”fG Hg¨hrm HglVtR lkhsF gbsjO¬HL lv r¬VM 011-042 t‘gJ lK j¢hV ljV¬¬ tŒ¨.
• r¬ ¢OjgT k‘c HglŒfS HgOhW f”fG Hg¨hrm ‘HglŒfS Hgl‘qPhK fhgw‘VM UK Hgk‘c HglsjO¬L td lk¨Œj“.
• B jsjO¬L s‘N ”fG Hg¨hrm HglbzL glk¨Œj“. j¥kF HsjO¬HL ”fG ¨hrm jhgT •‘ l§jV†’ •‘ jy¢¢V k‘c HglŒfS HgOhW
f”fG Hg¨hrm.
• jkfi îgn HgjPl¢G Hg«Hz¬ •ekhx HsjO¬HL ‘wbJ H™¨hgm •‘ l‘wbJ Hg¨hrm lju¬¬M Hglkhtƒ.
• B ¢ajlG £ƒH Hgjg…«¢‘K Ugn l…jh– jay¢G. gƒH Uk¬ HgjV”¢F’ rL f¬lµ ¥§h« twG ¢s§G Hg‘w‘G îg¢i td l‘qv H®sb“
Hgehfjm •‘ rL fj‘w¢G ”fG Hg¨hrm fl¶Oƒ ggj¢hV fhgŒVF lK Hg¥§h« Pjn ¢s§G Hg‘w‘G îg¢i. td Phgm ‘r‘c O¨¶ lh •ekhx
jay¢G Hg‘P¬M’ rL fjay¢G ¥§h« Hg…wG ™¢ŒhT lw¬V H™l¬H¬ fhg¨hrm •‘ HtwG ”fG Hg¨hrm.
• jPƒ¢V: V½‘Ud td jwl¢L ‘jwk¢v £ƒH Hgjg…«¢‘K HBgj«HL fluh¢¢V whVlm gjPŒ¢R Hgsblm’ Y¢V •K HsjO¬Hli fa”G
Oh¨° r¬ ¢s…V UK P¬‘E w¬lm ”§Vfhz¢m •‘ ka‘F PV¢R. gƒH’ ¢V¥n HgjuhlG fPVW lv £ƒH Hgjg…«¢‘K. ‘td Phgm
P¬‘E •D jg…¢hJ’ HtwG Hgj¢hV Hg”§Vfhzd ‘Hk«c ”fG Hg¨hrm lK Hgjg…«¢‘K. fu¬ ƒg“’ rL fkŒgi îgn •rVF lV”« O¬lm lujl¬
gaV”m QneB ™¥VHx Ulg¢hJ Hgw¢hkm Hgb«lm.
• ¥l¢v •¥«Hx £ƒH Hgjg…«¢‘K Y¢V rhfgm ggw¢hkm lK rfG HglsjO¬L. B jŒL î¨brh‰ f…“ •‘ î«Hgm •¢m •Y¨¢m’ tŒ¬ ¢uVq“ ƒg“
gO¨V Hg…‘gj¢m Hguhg¢m Hgl‘¥‘¬M fhg¬HOG. HtwG Hgj¢hV Hg”§Vfhzd UK Hgjg…«¢‘K ‘Hk«c ”fG Hg¨hrm lki rfG jPV¢”i.
7- qf¨ «H‘¢m Hglah£¬M
8- jka¢¨ ‘P¬M HgjP”L UK fu¬
1- •OVœ ‘P¬M HgjP”L ‘Hgf¨hV¢j¢K lK Hguf‘M ‘rL fï«Hgm Hgl‘H¬ Hglyg…m g§lh.
j‘— HgPƒV Uk¬ HsjulhG Hgf¨hV¢j¢K. ¢V¥n HgV¥‘c îgn "lbP±hJ P‘G sblm Hgf¨hV¢m" fw…Pm 44 gl«¢¬ lK
Hglug‘lhJ.
£ƒH Hgjg…«¢‘K l«‘¬ fŒhU¬M ¬‘HVM rhfgm ggqf¨. îƒH ¬UJ HgqV‘VM’
¢l”k“ j¬‘¢V aham Hgjg…«¢‘K fhg«H‘¢m Hglkhsfm )P¬ •rwn 03
¬V¥m ¢shV‰h ‘¢l¢k‰h( gj‘t¢V ‘qv lV¢p Uk¬ Hglah£¬M.
2- •¬V ‘P¬M HgjP”L UK fu¬ g”aT Hg¥hkF HgOg…d g§h eL Htjp Y¨hx
P¥VM Hgf¨hV¢m.
3- 3.•¬OG Hgf¨hV¢j¢K )HglVtŒj¢K( lv lVHUhM j¨hfR ¨Vt¢§h
Hgll¢«¢K fubljd Hgl‘¥F ‘HgshgF lv Hgublj¢K )+( ‘)-(
¬HOG P¥VM Hgf¨hV¢m.
BP± •ki jL îVthR £hj¢K Hgf¨hV¢j¢K PVwh‰ Ugn VHPj“’ ‘Pjn jjl”K lK jay¢G
¥§h« Hgjg…«¢‘K t‘V Hsjbli. ‘lK eL ¢½kwp fhsjf¬Hg§lh td •rVF ‘rJ ll”K.
4- •U¬ jV”¢F Y¨hx P¥VM Hgf¨hV¢m ”lh £‘ l‘qp.
V32B_V37B_AR.book Page 6 Monday, February 4, 2008 4:03 PM
Page 67

UVfd
HgŒsL 1: ¬g¢G Hgjay¢G HgsV¢v
7
jug¢lhJ fa¶K HsjO¬HL ‘P¬M HgjP”L UK fu¬
• j¥kF jy¨¢m khtƒM HglsjauV td Hg¥hkF H®lhld lK Hgjg…«¢‘K )•s…G lwfh– lCaV Hg¨hrm(’ ‘B
jqv •D adx lK a¶ki îUhrm O¨ HgVC¢m HglfhaV f¢K ‘P¬M HgjP”L UK fu¬ ‘khtƒM HglsjauV.
• B juVQ ‘P¬M HgjP”L UK fu¬ ggfgG’ ‘j¥kF ‘qu§h td •D f¢zm V¨fm )leG HgPlhL(.
• r¬ B julG ‘P¬M HgjP”L UK fu¬ Ugn kP‘ sg¢L îƒH jL juV¢Q khtƒM lsjauV HgjP”L UK fu¬ Hgl‘¥‘¬M Ugn ¥§h«
Hgjg…«¢‘K îgn •aum HgalS HglfhaVM •‘ îqhxM r‘¢m. ‘td £ƒI HgPhgm’ ¢V¥n jy¢¢V lw¬V Hgq‘x •‘ îUh¬M qf¨ «H‘¢m
Hgaham •‘ HsjO¬HL ‘P¬M HgjP”L UK fu¬ lK l‘rv rV¢F lK khtƒM HglsjauV Hgl‘¥‘¬M fhgjg…«¢‘K.
HOjfhV ‘P¬M HgjP”L UK fu¬
• ‘¥i Hg¨VT H®lhld Hgug‘D lK ‘P¬M HgjP”L
lfhaVM w‘F ¥§h« Hgjg…«¢‘K Uk¬ Hgqy¨ Ugn
H®«VHV.
•
¢¥F j‘¥¢i ‘P¬M HgjP”L UK fu¬ f«H‘¢m 03
¬V¥m lK khtƒM lsjauV HgjP”L UK fu¬ Hgl‘¥‘¬M
f¥§h« Hgjg…«¢‘K’ g”d julG Hg‘P¬M fa”G
wP¢p. ¢¥F •B jj¥h‘« Hglshtm f¢K ¥§h«
HgjP”L UK fu¬ ‘HglsjauVHJ lshtm 6 •ljhV.
30 degrees
6 meters
Hqy¨ Ugn «V )Hg¨hrm/HBsju¬H¬( Hgl‘¥‘¬ f‘P¬M HgjP”L UK fu¬ )”lh
£‘ l‘qp(. fu¬£h ¢jL jay¢G Hgjg…«¢‘K ‘¢jP‘G lCaV Hg¨hrm îgn Hgg‘K
H®OqV. Uk¬zƒ ¢l”K Hgl‘Hwgm îgn HgO¨‘M Hgjhg¢m )"9- îU¬H¬ ¥§h« Hgjg…«¢‘K"
fw…Pm 8(.
îƒH juƒV jay¢G Hgjg…«¢‘K’ j¶”¬ •‘B‰ lK j‘w¢G Hgj¢hV Hg”§Vfhzd )¢qdx
lCaV Hg¨hrm fhgg‘K H®PlV(. îƒH jL Hgj¶”¬ lK j‘w¢G Hgj¢hV’ Ph‘G Hgqy¨
Ugn «V )Hg¨hrm/HBsju¬H¬(
Hgl‘¥‘¬ Ugn Hg¥hkF H®¢lK ggjg…«¢‘K. ‘îƒH jL
jay¢G Hgjg…«¢‘K f§ƒI Hg¨V¢Œm’ t§ƒH ¢ukd •K Hgla”gm j”lK td ‘P¬M HgjP”L
UK fu¬. ‘Uk¬zƒ¸’ j¶”¬ lK wPm jV”¢F f¨hV¢jd ‘P¬M HgjP”L UK fu¬. Hsjf¬G
Hgf¨hV¢j¢K f¶OV¢¢K ¥¬¢¬j¢K •‘ fPhgm ¥¢¬M îƒH ¬UJ HgqV‘VM gƒg“.
™¬OhG Hgjg…«¢‘K td ‘qv HBsju¬H¬’ Hqy¨ Ugn «V )Hg¨hrm/HBsju¬H¬(
Hgl‘¥‘¬ f‘P¬M HgjP”L UK fu¬’ •‘ «V )Hg¨hrm/HBsju¬H¬( Hgl‘¥‘¬
fhg¥hkF H®¢lK ggjg…«¢‘K lVM •OVN’ Uk¬zƒ ¢u‘¬ ¥§h« Hgjg…«¢‘K îgn ‘qv
HBsju¬H¬ )P¢E ¢qdx lCaV Hg¨hrm fhgg‘K H®PlV(.
V32B_V37B_AR.book Page 7 Monday, February 4, 2008 4:03 PM
Page 68

UVfd
HgŒsL 1: ¬g¢G Hgjay¢G HgsV¢v
8
9- îU¬H¬ ¥§h« Hgjg…«¢‘K
Uk¬ jay¢G Hg¥§h« gglVM H®‘gn )‘îgn •K ¢jL j‘g¢…i(’ j±§V rhzlm jay¢G •‘G l‘Hg…m:
rfG •K jjl”K lK lah£¬M HgfVHlµ Ugn ¥§h« Hgjg…«¢‘K’ B f¬ lK HgfPE UK fVHlµ HglP¨hJ
Hgjg…«¢‘k¢m ‘j‘g¢…§h Ugn HgkP‘ HglbzL gglk¨Œm Hgjd jŒ¢L f§h. ‘B ¢jL î¥VHx £ƒI Hgulg¢m îB Uk¬
jV”¢F Hgjg…«¢‘K gglVM H®‘gn’ •‘ td ”G lVM ¢jL jV”¢fi td l”hK ¥¬¢¬. ‘B f¬ •¢qh‰ lK HOj¢hV
Hggym Hgjd sj±§V f§h rhzlm Hglug‘lhJ HgluV‘qm Ugn Hgaham )DSO( gj¢s¢V Ulg¢m Hgjay¢G.
1- Hqy¨ Ugn «V •‘ lK ‘P¬M HgjP”L UK fu¬ BOj¢hV Hggym’ eL Hqy¨ Ugn «V
+ •‘ - BOj¢hV Hggym Hgjd jV¢¬£h.
2- Uk¬ jP¬¢¬ Hggym’ ¢jy¢V UkwV Hgfg¬ ‘UkwV r¢hsd HgOhW fhgjg…«¢‘K jgŒhz¢h‰ g¢jkhsfh lu§h. îƒH
”hK HsL fg¬“ Y¢V luV‘Q qlK UkwV Hgfg¬’ ¢l”k“ Hgqy¨ Ugn «V •‘ BOj¢hVI eL
Hgqy¨ Ugn + •‘ - BOj¢hV fg¬“. •lh td PhG HOj¢hV •OVN ”O¢hV Hgfg¬’ tïk“ sjPjhœ •¢qh‰
îgn HOj¢hV lu¢hV HgfE Hgjg…«¢‘kd HglkhsF gglk¨Œm Hgjd jŒ¢L f§h )Hk±V w…Pm 83(.
3- Hqy¨ Ugn «V •‘ BOj¢hV jef¢J jgŒhzd eL Hqy¨ Ugn KO. Uk¬zƒ’ j±§V HgŒhzlm
Hgjhg¢m:
4- Hqy¨ Ugn «V •‘
BOj¢hV Hgf¬H¢m eL Hqy¨ Ugn
KO.
¢f¬• Hgjg…«¢‘K td HgfPE UK
HgfVHlµ HgljhPm eL ¢Œ‘L fl‘Hg…j§h ‘jO«¢k§h. r¬ ¢sjyVR £ƒH H™¥VHx fqv ¬rhzR’ ‘ƒg“ jfuh‰
ggfVHlµ Hgjg…«¢‘k¢m HgljhPm td lk¨Œm HBsjŒfhG HglPg¢m. ¢V¥n Hgjl§G fuQ Hg‘rJ Pjn ¢jskn
ggjg…«¢‘K îk§hx Ulg¢m Hgj‘g¢T. îƒH ”kJ jVYF td îk§hx Ulg¢m Hgjef¢J HgjgŒhzd’ Hqy¨ Ugn
KO.
5- Uk¬ H”jlhG Ulg¢m Hgj‘g¢T’ j±§V rhzlm jPV¢V HgfVkhlµ Ugn Hgaham. ¢l”k“ H·K jPV¢V
HgfVHlµ HglO«km îƒH •V¬J )Hk±V "jPV¢V HgfVHlµ" fw…Pm 93(’ •‘ Hqy¨ Ugn «V UNEM
)HgŒhzlm( f‘P¬M HgjP”L UK fu¬ ™YbR HgŒhzlm ‘f¬x lah£¬M fVHlµ Hgjg…«¢‘K.
• ¢l”k“ jy¢¢V H™U¬H¬HJ lsjŒfb‰ fhsjO¬HL rhzlm DSO. Hk±V "rhzlm DSO )Hglug‘lhJ HgluV‘qm Ugn Hgaham("
fw…Pm 03 gl«¢¬ lK Hglug‘lhJ.
• £ƒH Hgjg…«¢‘K Hgl«‘¬ faham DCL £‘ ¥§h« UVQ Uhgd Hg¬rm. ‘ggPw‘G Ugn •tqG kjhzµ HguVQ Hgll”km’ ¢‘wn
fj‘w¢G Hg¥§h« flw¬V t¢¬¢‘ Vrld’ eL HOj¢hV ksfm HgŒf‘G Hglkhsfm. Hk±V "qf¨ ksfm HgŒf‘G" fw…Pm 42.
UVf¢m Hggym
HgaVR H®‘s¨ Hgfg¬
GB r¢hsd
jef¢J jgŒhzd
jay¢G •‘G l‘Hg…m
HgaVR H®‘s¨ Hgfg¬
GB r¢hsd
Hgf¬H¢m
jef¢J jgŒhzd
V32B_V37B_AR.book Page 8 Monday, February 4, 2008 4:03 PM
Page 69

UVfd
HgŒsL 1: ¬g¢G Hgjay¢G HgsV¢v
9
01- UVQ fVHlµ Hgjg…«¢‘K
lug‘lhJ Hgukh¢m ‘Hgjk±¢T
• HPVW ¬Hzlh‰ Ugn hT jay¢G Hgjg…«¢‘K ‘twgi UK Hgj¢hV Hg”§Vfhzd rfG HgaV‘c td jk±¢…i.
• B jsjO¬L Hglk±…hJ Hgshzgm •‘ Hglj¨h¢VM •‘ HgVaham’ fG HsjO¬L tŒ¨ r¨um rlhA k±¢…m khUlm
‘lfggm Ugn kP‘ O…¢T )luw‘VM ¥¢¬‰h( ‘Ohg¢m lK Hg‘fV ‘Hlsp f§h Hg¥§h« fVtR.
• ‘îƒH ¬UJ HgqV‘VM’ qv shzG jk±¢T ljuh¬G ‘lO…T fhglhx Ugn r¨um rlhA Ohg¢m lK Hg‘fV
‘rL fï«Hgm ›ehV Hg«¢‘J •‘ HgaP‘L. ”VV jg“ Hgulg¢m ehk¢m fhsjO¬HL r¨um rlhA ¥htm Ohg¢m lK
Hg‘fV ™«Hgm •D ›ehV ggfŒv.
• r¬ jbP± td PhBJ j¬r¢R Hgk±V td Hgaham ‘td fuQ H®P‘HG HglP¬¬M ±§‘V U¬¬ rg¢G Y¢V
ka¨ lK UkhwV Hgw‘VM Ugn £¢zm kŒh¨ •g‘HK ehfjm. ¢V¥n lbP±m •K £ƒH B ¢CeV Ugn •¬Hx
Hg¥§h« P¢E îk§h B ¢l”K lah£¬j§h Uh¬M lK lshthJ Hglah£¬M Hguh¬¢m.
• td Phgm U¬L HgVYfm td HsjO¬HL Hgjg…«¢‘K g…jVM ¨‘¢gm )”hgƒ£hF gŒqhx H™¥h«HJ OhVœ
Hglk«G(’ ¢¥F îYbri ‘twG sg“ j‘w¢G Hg¨hrm lK Hgl¶Oƒ Hgl‘¥‘¬ fhgPhz¨. ”lh ¢kfyd îOVHœ
Hgf¨hV¢j¢K lK ‘P¬M HgjP”L UK fu¬’ )tŒ¬ ¢jsfF jV”§h td P¬‘E jsVF(.
• ‘jjuVQ •¢qh‰ ahahJ DCL )Hgjd julG fjŒk¢m Hgfg‘V HgshzG( ”lh £‘ HgPhG lv ahahJ Hgfb«lh
‘ahahJ TRC HgjŒg¢¬¢m )Hgjd julG fjŒk¢m •kf‘F •aum Hg”he‘¬(’ îgn "HPjVHR Hgaham" •‘
"HPj¥h« Hgw‘VM" HgƒD r¬ ¢±§V •eVI Ugn Hgaham td £¢zm O¨‘¨ ehfjm ‘±bG B ¢l”K î«Hgj§h.
‘gj¥kF £ƒH HgOgG HgƒD B ¢l”K îwbPi’ ¢‘wn fhjfhc HgO¨‘HJ Hg‘rhz¢m H·j¢m:
gjy¢¢V fVHlµ Hgjg…«¢‘K HgljhPm td lk¨Œj“ fa”G jsgsgd’ Hqy¨ Ugn
H®«VHV Hgjhg¢m:
• Hqy¨ Ugn «V P )fVkhlµ( •‘ P )fVkhlµ( f‘P¬M HgjP”L UK fu¬
)”lh £‘ l‘qp(.
• Hqy¨ Ugn «V •‘ lK ‘P¬M HgjP”L UK fu¬’ •‘
• •‘ Hgl‘¥‘¬¢K fhgjg…«¢‘K.
¢l”k“ •¢qh‰ Hgjy¢¢V îgn •P¬ HgfVHlµ lfhaVM lK ObG HOj¢hV VrL HglP¨m
lsjO¬lh‰ «V )•«VHV( H®VrhL f‘P¬M HgjP”L UK fu¬:
• BOj¢hV fVkhlµ •Ph¬D HgVrL’ Hqy¨ Ugn «V HOj¢hV HgfVkhlµ HglŒhfG. Ugn
sf¢G HglehG’ BOj¢hV HgfVkhlµ VrL 8’ Hqy¨ Ugn .
• BOj¢hV fVkhlµ ekhzd HgVrL’ Hqy¨ Ugn î¬OhG fVkhlµ’ eL Hqy¨ Ugn
•«VHV HOj¢hV HgfVkhlµ HglŒhfgm. Ugn sf¢G HglehG’ BOj¢hV HgfVkhlµ 82’
Hqy¨ Ugn î¬OhG fVkhlµ’ eL Hqy¨ Ugn ‘ .
• ggu‘¬M îgn ›OV fVkhlµ •‘ ¬OG jL UVqi’ Hqy¨ Ugn «V Hsjuh¬M
)l‘qp •¢qh‰ fhgVsL(.
gjy¢¢V lsj‘N Hgw‘J’ Hqy¨ Ugn H®«VHV Hgjhg¢m:S
•
(lsj‘N Hgw‘J) + •‘ (lsj‘N Hgw‘J) - td ‘P¬M HgjP”L
UK fu¬’ •‘
• + •‘ - lK ‘P¬M HgjP”L UK fu¬’ •‘
• •‘ Hgl‘¥‘¬¢K fhgjg…«¢‘K.
V32B_V37B_AR.book Page 9 Monday, February 4, 2008 4:03 PM
Page 70

UVfd
HgŒsL 1: ¬g¢G Hgjay¢G HgsV¢v
10
• j¥kF UVQ Hgw‘V Hgsh”km )Y¢V Hgka¨m( ®”eV lK shUj¢K.
• HPVW Ugn jy¢¢V ksfm HgŒf‘G ggw‘V HgluV‘qm Ugn Hgaham lK P¢K ·OV.
• îƒH g«L H®lV UVQ Hgw‘V Hgsh”km g…jVM ¨‘¢gm’ HO…Q ¬V¥m Hgjfh¢K ‘Hgs¨‘c.
•
rL fjay¢G ‘±¢…m OCE
Uk¬ UVQ w‘VM ¬OG ¥§h« ”lf¢‘jV )Hk±V
"OCE"
fw…Pm 34(.
lhƒH fu¬€
gŒ¬ fgyJ k§h¢m HgŒsL 1: ¬g¢G Hgjay¢G HgsV¢v. ‘lK Hgl…jVQ •k“ r¬ •wfPJ H·K Ugn ¬V¥m
”f¢VM lK H™glhL f”htm ¥‘HkF Hgjg…«¢‘K Hgl«‘¬ faham DCL ‘lh fi lK l…hj¢p jP”L’ îqhtm îgn
luVtm ”¢…¢m jV”¢fi ‘j‘w¢gi ‘jay¢gi’ ‘”ƒg“ ”¢…¢m Hgukh¢m fi ‘HglPht±m Ug¢i.
îƒH ”kJ jVYF td «¢h¬M ljum Hglah£¬M’ tïK HgŒsL 2 lK £ƒH Hg”j¢F ¢Pj‘N Ugn ¬g¢G HBsjO¬HL
HgƒD ¢‘qp ”¢…¢m jOw¢W îU¬H¬HJ Hgjg…«¢‘K fhg¨V¢Œm Hgjd j…qg§h ‘f¢zm HguVQ HglP¢¨m. ”lh
¢ajlG Ugn aV– l…wG gOwhzW ‘‘±hzT ¥§h« Hgjg…«¢‘K Ub‘M Ugn jŒ¬¢L l‘Hw…hJ Hglkjµ
‘lug‘lhJ Hsj”ahT H®U¨hG ‘îwbP§h f§¬T jŒ¬¢L Hgl«¢¬ lK HglshU¬M.
V32B_V37B_AR.book Page 10 Monday, February 4, 2008 4:03 PM
Page 71

lVPfh‰
UVfd
VT DCL seireS BV
HgŒsL 2: ¬g¢G HBsjO¬HL
V32B_V37B_AR.book Page 11 Monday, February 4, 2008 4:03 PM
Page 72

UVfd
UVfd
lŒ¬lm
12
lŒ¬lm
¢kŒsL £ƒH Hg”j¢F îgn rsl¢K: ¬g¢G Hgjay¢G HgsV¢v ‘¬g¢G HBsjO¬HL. ggPw‘G Ugn j…hw¢G ¬g¢G
Hgjay¢G HgsV¢v’ VH¥v "1- ¢V¥n rVHxM £ƒI Hgjug¢lhJ" td w…Pm 2.
£ƒH £‘ HgŒsL Hgehkd lK Hg”j¢F’ ‘£‘ UfhVM UK ¬g¢G HBsjO¬HL HgƒD ¢f¢K ”¢…¢m jOw¢W îU¬H¬HJ
¥§h« Hgjg…«¢‘K fhg¨V¢Œm Hgjd j‘tV •tqG ¥‘¬M ll”km gglah£¬M Pjn jjkhsF lv •‘qhc HguVQ
Hgjd j…qg§h ‘f¢zm HguVQ HglP¢¨m. ‘¢jkh‘G £ƒH HgŒsL fhgj…w¢G OwhzW ‘‘±hzT ¥§h«
Hgjg…«¢‘K ‘‘P¬M HgjP”L UK fu¬’ ”lh ¢‘qp ¨V¢Œm j‘w¢G Hg¥§h« fh®¥§«M H®OVN Ub‘M Ugn
jŒ¬¢L l‘Hw…hJ Hglkjµ ‘lug‘lhJ Hsj”ahT H®U¨hG ‘îwbP§h f§¬T jŒ¬¢L Hgl«¢¬ lK HglshU¬M.
HgjuVT Ugn Hgjg…«¢‘K
¢ujfV £ƒH Hg¥§h« Hgl«‘¬ faham DCL kl‘ƒ¥h‰ ®P¬E jŒk¢hJ •¥§«M HguVQ HgVrl¢m Hgls¨Pm
UV¢qm Hgaham’ t§‘ ¢Pj‘D Ugn l‘HgT jg…«¢‘K jkh±VD lqlK ¢l”K HsjO¬Hli lv •¥§«M
Hgjg…«¢‘K Hgjkh±V¢m ƒHJ Hg¬rm HgŒ¢hs¢m )VT •‘VTA( •‘ Hgjg…«¢‘K Hg”fgd )VTAC( •‘ Hg…¢¬¢‘
Hglu¬G fjV¬¬HJ HgVH¬¢‘ )FR( lK ObG lŒfS ¬OG l‘HgT Hgjg…«¢‘K ljP¬ HglP‘V.
îB îki B ¢l”K HgPw‘G Ugn ¥‘¬M HguVQ Hguhg¢m Hgjd j‘tV£h •¥§«M Hgjg…«¢‘K Hgl«‘¬M fahahJ
DCL UV¢qm lK ObG HsjO¬HL ¥§h« jg…«¢‘K jkh±VD. Uglh‰ f¶ki B ¢l”K HgPw‘G Ugn •Ugn
¬V¥hJ ¥‘¬M HguVQ îB lK ObG lwh¬V Hg…¢¬¢‘ HgVrl¢m Uhg¢m Hg¬rm leG •¥§«M Hgjg…«¢‘K Uhg¢m
Hg¬rm )VTDH( ‘layG Hs¨‘HkhJ DVD Uhg¢m Hg¬rm )DVD-DH(.
O¢hVHJ Hg¬OG
¢¬UL £ƒH Hgjg…«¢‘K îl”hk¢m Hgj‘w¢G Hglj«HlK ®k‘Hc lOjg…m lK lwh¬V îahVHJ H™VshG HgOhwm
fhgjg…«¢‘K ‘Hg…¢¬¢‘ ‘Vs‘L Hg¥VHt¢“’ ‘¢j¢p îl”hk¢m HOj¢hV lwh¬V îahVHJ ljhPm ‘UVq§h td
•D ‘rJ. ¢l”k“ Hgqy¨ Ugn «V TUPNI )Hg¬OG( Hgl‘¥‘¬ f‘P¬M HgjP”L UK fu¬ •‘ «V
TUPNI Hgl‘¥‘¬ fhgjg…«¢‘K gjP¬¢¬ lw¬V ¬OG.
¢‘¥¬ Hgu¬¢¬ lK HglŒhfS fhgjg…«¢‘K Ohwm flwh¬V ¬OG Hgjg…«¢‘K Hgjkh±VD ‘Hg…¢¬¢‘ ‘Vs‘L
Hg¥VHt¢“ )¢V¥n HgV¥‘c •¢qh‰ îgn "Hgg‘Pm Hg¨Vt¢m ®¥§«M Hgw‘J ‘Hgw‘VM HgOhV¥¢m )Hglk±V
Hg¥hkfd H®¢sV(" fw…Pm 51 ‘"Hglk±V HgOg…d" fw…Pm 61(:
• ¢ajlG ¬OG lw¬V Hgjg…«¢‘K Hgjkh±VD Ugn: U¬¬ 1 £‘Hzd jg…«¢‘K jkh±VD ljP¬ HglP‘V.
• ¢ajlG ¬OG lw¬V Hg…¢¬¢‘ Ugn: U¬¬ 1 lk…ƒ ¬OG oediV-S )t¢¬¢‘ thzR Hg¥‘¬M( ‘U¬¬ 1 lk…ƒ
¬OG oediV etisopmoC )t¢¬¢‘ lCgT( )VA( ‘U¬¬ 1 lk…ƒ ¬OG
oediV tnenopmoC )t¢¬¢‘ lV”F(.
•
¢ajlG ¬OG lw¬V Vs‘L Hg¥VHt¢“ Ugn: U¬¬ 1 lk…ƒ ¬OG
IVD/IMDH
‘U¬¬ 1 lk…ƒ
buS-D CP.
¢kfyd j‘w¢G lwh¬V H™ahVM Hgjd jVYF td UVq§h Ugn Hgjg…«¢‘K s‘Hx ”hkJ îahVM jg…«¢‘K
•‘ t¢¬¢‘ •‘ Vs‘L ¥VHt¢“. ‘gsJ fPh¥m gj‘w¢G •”eV lK lw¬V îƒH ”hK £ƒH Hglw¬V £‘ ”G lh
jVYF td UVqi.
HguVQ Hglj«HlK ggw‘V Hglju¬¬M lK lwh¬V H™ahVM HglOjg…m Ugn Hgaham )leG ‘±¢…m Hgw‘VM ¬HOG Hgw‘VM( Y¢V l¬U‘L.
lkhtƒ ¬OG lw¬V Hgjg…«¢‘K Hgjkh±VD
¢l”K j‘w¢G £‘Hzd jg…«¢‘K OhV¥d lK k‘c FHV •‘ FHU )îƒH ”hK ljhPh‰( flŒfS ¬OG FR
f¥§h« Hgjg…«¢‘K fhsjO¬HL ”fG jg…«¢‘K lkhsF ljP¬ HglP‘V’ ‘HOj¢hV ¬OG VTA guVQ fE
Hgjg…«¢‘K Hgjkh±VD.
îƒH ”hK g¬¢“ jg…«¢‘K ”fgd’ ¢l”k“ j‘w¢G ‘P¬M t“ a…VHJ Hgjg…«¢‘K Hg”fgd flŒfS ¬OG
FR
f¥§h«
Hgjg…«¢‘K UK ¨V¢R HsjO¬HL ”fG jg…«¢‘K ljP¬ HglP‘V lkhsF’ ‘HOj¢hV ¬OG
VTA
guVQ îahVM
Hgjg…«¢‘K Hg”fgd.
¢V¥n HgV¥‘c îgn "5- j‘w¢G ”fG Hg§‘Hzd" fw…Pm 5.
V32B_V37B_AR.book Page 12 Monday, February 4, 2008 4:03 PM
Page 73

UVfd
lŒ¬lm
13
lkhtƒ ¬OG lw¬V îahVM Hg…¢¬¢‘
¢l”k“ j‘w¢G ¥§h« t¢¬¢‘ jkh±VD OhV¥d )leG
RCV
•‘ ‘P¬M •guhF jg…«¢‘K( flk…ƒ
oediV etisopmoC
)Hg…¢¬¢‘ HglCgT(
)VA(
HgOhW f¥§h« Hgjg…«¢‘K •‘
oediV-S
)Hg…¢¬¢‘ thzR
Hg¥‘¬M(’ ‘HOj¢hV
2VA
)fhgksfm glk…ƒ ¬OG
oediV etisopmoC
)Hg…¢¬¢‘ HglCgT(( •‘ S-2VA
)fhgksfm glk…ƒ ¬OG
oediV-S
)Hg…¢¬¢‘ thzR Hg¥‘¬M(( Ugn Hgj‘Hgd ”lw¬V gg¬OG ‘ƒg“ guVQ îahVM
Hg…¢¬¢‘ Hgjkh±VD. Hk±V "j‘w¢G lk…ƒ ¬OG
oediV etisopmoC
)Hg…¢¬¢‘ HglCgT(" fw…Pm 52
‘"j‘w¢G lk…ƒ
oediV-S
¬OG )Hg…¢¬¢‘ thzR Hg¥‘¬M(" fw…Pm 62.
îƒH ”hK ¥§h« lw¬V Hg…¢¬¢‘ ¢¬UL £ƒH Hg¥§h«’ tfïl”hk“ j‘w¢gi f¬¢b‰ UK ƒg“ fhsjO¬HL lkhtƒ ¬OG
oediV tnenopmoC )Hg…¢¬¢‘ HglV”F( ‘HOj¢hV 1VA ”lw¬V gg¬OG ggPw‘G Ugn •tqG
w‘VM t¢¬¢‘ jkh±VD ll”km. Hk±V "j‘w¢G lk…ƒ ¬OG oediV tnenopmoC )Hg…¢¬¢‘ HglV”F("
fw…Pm 62.
ju¬ îahVM Hg…¢¬¢‘ HglV”F •tqG •k‘Hc îahVHJ Hg…¢¬¢‘ Hgjkh±V¢m Hglƒ”‘VM lK P¢E Hg¥‘¬M.
lkhtƒ ¬OG lw¬V Vs‘L Hg¥VHt¢“
¢l”k“ j‘w¢G lk…ƒ OVœ buS-D Hgl‘¥‘¬ f¥§h« ”lf¢‘jV flk…ƒ ¬OG buS-D CP HgOhW
f¥§h« Hgjg…«¢‘K. ‘ggPw‘G Ugn w‘VM ƒHJ ¥‘¬M •tqG’ ¢l”k“ j‘w¢G lk…ƒ OVœ IVD )îƒH
”hK ljhPh‰( Hgl‘¥‘¬ f¥§h« Hg”lf¢‘jV f¬¢b‰ UK Hglk…ƒ HgshfR flk…ƒ ¬OG IVD/IMDH HgOhW
f¥§h« Hgjg…«¢‘K UK ¨V¢R HsjO¬HL ”fG l§h¢° ggj‘w¢G f¢K IVD ‘IMDH. îƒH ”hK ¥§h«“
¢¬UL OVœ IMDH’ ¢l”k“ •¢qh‰ HsjO¬HL ¬OG IMDH td Hgjg…«¢‘K ™¥VHx Ulg¢m Hgj‘w¢G.
HOjV lkhtƒ ¬OG CP •‘ IVD •‘ IMDH Ugn Hgj‘Hgd guVQ Hgaham. VH¥v "j‘w¢G ¬OG
buS-D CP" fw…Pm 72 ‘"j‘w¢G lk…ƒ ¬OG IVD" fw…Pm 72 ‘"j‘w¢G lk…ƒ ¬OG
IMDH" fw…Pm 82.
gjPŒ¢R HBsj…h¬M Hg”hlgm lK ”…hxM £ƒH Hg¥§h« ƒHJ Hg¬rm Hguhg¢m’ ¢kfyd qf¨ ¬rm HgOVœ g¥§h« Hglw¬V )leG layG •rVHW
DVD •‘ ¥§h« Hg”lf¢‘jV(’ Pjn jjbxL r¬V H™l”hK lv Hg¬rm H®wg¢m g¥§h« Hgjg…«¢‘K. Ugn sf¢G HglehG’ 027 f”sG
gOVœ Hg…¢¬¢‘ HglV”F/IMDH •‘ 0631 x 867 f”sG g…¢¬¢‘ CP. gl«¢¬ lK Hglug‘lhJ P‘G ”¢…¢m qf¨ ¬rm HgOVœ’
¢V¥n HgV¥‘c îgn ‘ehzR Hg¥§h«.
Hg¥hkF H®lhld
HgVrL HBsL Hg‘wT
1lCaV Hg¨hrm
• ¢qdx fhgg‘K H®OqV Uk¬ jay¢G Hgjg…«¢‘K.
• ¢qdx fhgg‘K H®PlV Uk¬lh ¢”‘K Hgjg…«¢‘K td ‘qv HBsju¬H¬.
2
khtƒM lsjauV ‘P¬M
HgjP”L UK fu¬
¢sjŒfG H™ahVHJ Hgwh¬VM UK ‘P¬M HgjP”L UK fu¬. HPVW Ugn U¬L
HUjVHQ HglsjauV f‘qv •D adx •lhli’ tïK ƒg“ lK a¶ki îUhrm
HsjŒfhG H™ahVHJ.
3 HgslhUhJ slhUjhK ¢sVN ‘¢lkn ™OVHœ w‘J HsjV¢‘.
1
2
3
V32B_V37B_AR.book Page 13 Monday, February 4, 2008 4:03 PM
Page 74

UVfd
UVfd
lŒ¬lm
14
g‘Pm HgjP”L )Hglk±V Hg¥hkfd H®¢lK(
HgVrL HBsL Hg‘wT
1
«V
)Hg¨hrm/HBsju¬H¬(
jf¬¢G ¥§h« Hgjg…«¢‘K f¢K ‘qud HBsju¬H¬ ‘Hgjay¢G. )¢Œ‘L fk…S l§lm «V
Hg¨hrm/HBsju¬H¬ Hgl‘¥‘¬ Ugn ‘P¬M HgjP”L UK fu¬(. Hk±V "Hgjay¢G
‘hT Hgjay¢G ‘HBsju¬H¬" fw…Pm 02.
2«V HgŒhzlm
UVQ rhzlm HguVQ Ugn Hgaham )DSO( îƒH gL j”K lVz¢m •‘ HgOV‘œ lK
HgŒhzlm HgPhg¢m îƒH ”hkJ luV‘qm. )¢Œ‘L fk…S l§lm «V HgŒhzlm Hgl‘¥‘¬
Ugn ‘P¬M HgjP”L UK fu¬(. Hk±V "HgjkŒG ObG rhzlm DSO" fw…Pm 13.
3
«V Vtv/O…Q
)lsj‘N Hgw‘J(
/
• qf¨ lsj‘N w‘J HgslhUhJ Hglqlkm. )¢Œ‘L fk…S l§lm «VD Vtv/
O…Q )lsj‘N Hgw‘J( +/- f‘P¬M HgjP”L UK fu¬(. Hk±V "qf¨
lsj‘N Hgw‘J" fw…Pm 12.
• td rhzlm DSO’ ¢Œ‘L fjPV¢“ lCaV HgjP¬¢¬ ¢shV‰H •‘ ¢l¢k‰h •‘ jy¢¢V
H™U¬H¬HJ. Hk±V "HgjkŒG ObG rhzlm DSO" fw…Pm 13.
4
«V )HgfVkhlµ(
HgshfR/HgbPR
/
• jP¬¢¬ fVkhlµ Hgjg…«¢‘K HgshfR •‘ HgbPR HgƒD jL j‘g¢…i Ugn kP‘
jsgsgd. )¢Œ‘L fk…S l§lm «V HgfVkhlµ HgshfR/HgbPR /
f‘P¬M HgjP”L UK fu¬(. Hk±V "jy¢¢V HgfVHlµ" fw…Pm 12.
• td rhzlm DSO’ ¢Œ‘L fjPV¢“ lCaV HgjP¬¢¬ ®Ugn •‘ ®s…G •‘ jy¢¢V
H™U¬H¬HJ. Hk±V "HgjkŒG ObG rhzlm DSO" fw…Pm 13.
5
«V
Hg¬OG
•
HgjkŒG f¢K lwh¬V îahVM Hg¬OG Hgll”km. )¢Œ‘L fk…S l§lm «V Hg¬OG
Hgl‘¥‘¬ f‘P¬M HgjP”L UK fu¬(. Hk±V "jP¬¢¬ lw¬V ¬OG" fw…Pm 02.
• td rhzlm DSO’ HOj¢hV UkwV HgŒhzlm HglP¬¬ •‘ ¬O‘G rhzlm tVU¢m )îƒH
”hkJ ljhPm(. Hk±V "HgjkŒG ObG rhzlm DSO" fw…Pm 13.
1
2
3
4
5
V32B_V37B_AR.fm Page 14 Tuesday, February 5, 2008 11:00 AM
Page 75

UVfd
lŒ¬lm
15
Hgg‘Pm Hg¨Vt¢m ®¥§«M Hgw‘J ‘Hgw‘VM HgOhV¥¢m )Hglk±V Hg¥hkfd H®¢sV(
HgVrL HBsL Hg‘wT
1
2VA )Hg…¢¬¢‘ HglCgT(
•‘ )VA( )Hg…¢¬¢‘ thzR
Hg¥‘¬M(
•
Hg…¢¬¢‘: Hgj‘w¢G flk…ƒ OVœ Hg…¢¬¢‘ HglCgT )VA( ‘tŒh‰ glh ¢jkhsF lv
¥§h« lw¬V îahVM Hgw‘J ‘Hgw‘VM. Hk±V "j‘w¢G lk…ƒ ¬OG
oediV etisopmoC )Hg…¢¬¢‘ HglCgT(" fw…Pm 52.
•
Hg…¢¬¢‘ thzR Hg¥‘¬M: Hgj‘w¢G flk…ƒ OVœ Hg…¢¬¢‘ thzR Hg¥‘¬M ‘tŒh‰ glh
¢jkhsF lv ¥§h« lw¬V îahVM Hgw‘J ‘Hgw‘VM. Hk±V "j‘w¢G lk…ƒ
¬OG Hg…¢¬¢‘ thzR Hg¥‘¬M" fw…Pm 62.
•
Hgw‘J ¢l¢K/¢shV: Hgj‘w¢G fOVœ Hgw‘J HgOhW fhg…¢¬¢‘ HglCgT •‘
Hg…¢¬¢‘ thzR Hg¥‘¬M flh ¢jkhsF lv ¥§h« lw¬V îahVM Hgw‘J
‘Hgw‘VM. Hk±V "j‘w¢G lk…ƒ ¬OG Hg…¢¬¢‘ HglCgT" fw…Pm 52
‘"j‘w¢G lk…ƒ ¬OG Hg…¢¬¢‘ thzR Hg¥‘¬M" fw…Pm 62.
rL fj‘w¢G ¥§h« Hgw‘J ‘Hgw‘VM HgOhV¥d fhsjO¬HL lkhtƒ ¬OG Hg…¢¬¢‘ HglCgT •‘
Hg…¢¬¢‘ thzR Hg¥‘¬M’ ‘td PhG j‘w¢G ”b Hglk…ƒ¢K td k…S Hg‘rJ flw¬V îahVM
w‘J ‘w‘VM’ j”‘K •‘g‘¢m HguVQ glk…ƒ ¬OG Hg…¢¬¢‘ thzR Hg¥‘¬M’ P¢E îki ¢‘tV
w‘VM ƒHJ ¥‘¬M •tqG.
2lŒfS slhUm HgV•S
lk…ƒ OVœ w‘J gj‘w¢G slhUm V•S OhV¥¢m. lv HgugL f¶ki ¢jL ”jL
w‘J slhUjd Hgjg…«¢‘K Uk¬ HsjO¬HL lŒfS j‘w¢G slhUm HgV•S. Hk±V
"j‘w¢G lk…ƒ OVœ w‘J slhUm HgV•S" fw…Pm 92.
3
lk…ƒ BUS-D CP
Hgj‘w¢G fOVœ )buS-D( HgOhW fhg…¢¬¢‘ Hgl‘¥‘¬ f¥§h« ”lf¢‘jV
aOwd. Hk±V "j‘w¢G lk…ƒ ¬OG buS-D CP" fw…Pm 72.
lk…ƒ ¬OG w‘J
Hg”lf¢‘jV
Hgj‘w¢G fOVœ Hgw‘J g¢jkhsF lv OVœ Hg…¢¬¢‘ f¥§h« ”lf¢‘jV aOwd.
Hk±V "j‘w¢G lk…ƒ ¬OG buS-D CP" fw…Pm 72.
4 FR VT
Hgj‘w¢G fk±hL ”fG Hg§‘Hzd VTAC/VT. Hk±V "5- j‘w¢G ”fG Hg§‘Hzd"
fw…Pm 5.
1
2
3
4
V32B_V37B_AR.book Page 15 Monday, February 4, 2008 4:03 PM
Page 76

UVfd
UVfd
lŒ¬lm
16
Hglk±V HgOg…d
HgVrL HBsL Hg‘wT
1 IVD/IMDH
Hgj‘w¢G fOVœ Hg…¢¬¢‘/Hgw‘J HgVrld IMDH •‘ OVœ Hg…¢¬¢‘ HgVrld
IVD HgOhW f¥§h« Hglw¬V HgVrld. Hk±V "j‘w¢G lk…ƒ ¬OG
IMDH" fw…Pm 82 ‘"j‘w¢G lk…ƒ ¬OG IVD" fw…Pm 72.
2
RP/RC BP/BC Y 1VA
Hgj‘w¢G flk…ƒ OVœ )RP/RC BP/BC Y( td Hg…¢¬¢‘ HglV”F g¥§h«
lw¬V îahVM t¢¬¢‘ lkhsF. Hk±V "j‘w¢G lk…ƒ ¬OG Hg…¢¬¢‘ HglV”F"
fw…Pm 62.
1VA ¢shV/¢l¢K
Hgj‘w¢G flk…ƒ OVœ Hgw‘J HgOhW f¥§h« lw¬V t¢¬¢‘ lkhsF
ggj‘HtR lv le¢gj§h td Hg…¢¬¢‘ HglV”F. Hk±V "j‘w¢G lk…ƒ ¬OG Hg…¢¬¢‘
HglV”F" fw…Pm 62.
3
lk…ƒ OVœ Hgw‘J ¢shV/
¢l¢K
Hgj‘w¢G flk…ƒ ¬OG Hgw‘J gl”fV w‘J •‘ refoow-bus. Uglh‰ f¶ki
¬Hzlh lh ¢”‘K £ƒH HgOVœ ljhPh‰’ ‘îK ”hK lsj‘N Hgw‘J Hgwh¬V Uki
ehfj‰h ‘B ¢l”K HgjP”L t¢i fhsjO¬HL •«VHV qf¨ lsj‘N Hgw‘J. Hk±V
"j‘w¢G lk…ƒ OVœ w‘J HBsjV¢‘" fw…Pm 82.
4
lk…ƒ ¬OG
R/L OIDUA-IVD
Hgj‘w¢G fOVœ Hgw‘J IVD HgOhW f¥§h« Hglw¬V HgVrld. Hk±V
"j‘w¢G lk…ƒ ¬OG Hgw‘J IVD" fw…Pm 72.
5 TELNI-CA gj‘w¢G ”fG Hgj¢hV HgljV¬¬. Hk±V "6- j‘w¢G ”fG Hg¨hrm" fw…Pm 5.
3323BV
234
5
1
3373BV
234
5
1
V32B_V37B_AR.book Page 16 Monday, February 4, 2008 4:03 PM
Page 77

UVfd
HgjuVT Ugn ‘P¬M HgjP”L UK fu¬
17
HgjuVT Ugn ‘P¬M HgjP”L UK fu¬
1- Hg¨hrm/HBsju¬H¬
Hqy¨ Ugn £ƒH Hg«V gjay¢G Hgjg…«¢‘K •‘ î¬Ohgi td ‘qv
HBsju¬H¬. Hk±V "Hgjay¢G ‘hT Hgjay¢G ‘HBsju¬H¬" fw…Pm 02.
2- TUPNI )Hg¬OG(
Hqy¨ Ugn £ƒH Hg«V gjP¬¢¬ •P¬ lwh¬V Hg¬OG )fhsjekhx ¬OG
Hgjg…«¢‘K(. Hk±V "HBkjŒhG îgn lwh¬V ¬OG •OVN )fhsjekhx ¬OG
Hgjg…«¢‘K(" fw…Pm 02.
3- VT )Hgjg…«¢‘K(
Hqy¨ Ugn £ƒH Hg«V gbkjŒhG îgn ¬OG Hgjg…«¢‘K lfhaVM ‘UVQ
fVHlµ Hgjg…«¢‘K. Hk±V "HOj¢hV ¬OG Hgjg…«¢‘K lfhaVM" fw…Pm 02.
4- Hg…§VS
Hqy¨ Ugn £ƒH Hg«V gbkjŒhG îgn w…Pm t§VS rkhM Hglug‘lhJ.
Hk±V "HsjO¬HL ‘±¢…m rkhM Hglug‘lhJ" fw…Pm 32.
5- / Hgjef¢J/jef¢J rkhM Hglug‘lhJ
• Hqy¨ Ugn £ƒH Hg«V gjef¢J Hgw‘VM HgluV‘qm Ugn Hgaham.
Hqy¨ Ugn Hg«V lVM •OVN BsjzkhT Hglah£¬M td Hg‘rJ
Hg…ugd. Hk±V "HsjO¬HL ‘±¢…m Hgjef¢J" fw…Pm 22
•
Uk¬ UVQ rkhM Hglug‘lhJ Ugn Hgaham’ Hqy¨ Ugn £ƒH Hg«V
gjef¢J VshzG rkhM Hglug‘lhJ. ‘Hqy¨ Ug¢i lVM •OVN
Bsjuh¬M HgjP¬¢E Hguh¬D. Hk±V "HsjO¬HL ‘±¢…m rkhM
Hglug‘lhJ" fw…Pm 32.
6- / ksfm H®fuh¬/rkhM Hglug‘lhJ
• Hqy¨ Ugn £ƒH Hg«V gqf¨ ksfm HguVQ îgn HBVj…hc ggw‘VM
HgluV‘qm Ugn Hgaham. Hk±V "HsjO¬HL ‘±¢…m rkhM Hglug‘lhJ"
fw…Pm 32.
• Uk¬ UVQ rkhM Hglug‘lhJ Ugn Hgaham’ Hqy¨ Ugn £ƒH Hg«V
gj”f¢V P¥l§h. ‘Hqy¨ Ug¢i lVM •OVN Bsjuh¬M HgP¥L Hguh¬D.
Hk±V "HsjO¬HL ‘±¢…m rkhM Hglug‘lhJ" fw…Pm 32.
7- Hgw…Pm Hg…VU¢m
Hqy¨ Ugn £ƒH Hg«V gg¬O‘G îgn Hgw…Pm Hg…VU¢m fïP¬N r‘HzL rkhM
Hglug‘lhJ. Hk±V "HsjO¬HL ‘±¢…m rkhM Hglug‘lhJ" fw…Pm 32.
8- H™±§hV
Hqy¨ Ugn £ƒH Hg«V guVQ •¢m lug‘lhJ Y¢V ±h£VM fŒkhM
Hglug‘lhJ. Hk±V "HsjO¬HL ‘±¢…m rkhM Hglug‘lhJ" fw…Pm 32.
9- Hg‘qv
Hqy¨ Ugn £ƒH Hg«V ggjf¬¢G f¢K •‘qhc rkhM Hglug‘lhJ tŒ¨ •‘ rkhM
Hglug‘lhJ HglV”fm Ugn Hgaham. Hk±V "HsjO¬HL ‘±¢…m rkhM
Hglug‘lhJ" fw…Pm 32.
V32B_V37B_AR.book Page 17 Monday, February 4, 2008 4:03 PM
Page 78

UVfd
UVfd
HgjuVT Ugn ‘P¬M HgjP”L UK fu¬
18
01- H™qhxM HgOg…¢m
Hqy¨ Ugn £ƒH Hg«V gqf¨ Hglsj‘N Hgl¨g‘F g´qhxM HgOg…¢m
ggaham. Hk±V "qf¨ H™qhxM HgOg…¢m" fw…Pm 32.
11- Hgl…qgm
Hqy¨ Ugn £ƒH Hg«V gbkjŒhG HgsV¢v îgn îP¬N HgŒk‘HJ Hgl…qgm
Hgjd rlJ fjO«¢k§h. Hk±V "HBkjŒhG HgsV¢v îgn HgŒk‘HJ Hgl…qgm"
fw…Pm 22.
21- ‘qv Hgl‘H«K
Hqy¨ Ugn £ƒH Hg«V gbOj¢hV lK f¢K •‘qhc Hgl‘H«K HglP¬¬M
sg…‰h. Hk±V "HOj¢hV ‘qv l‘H«K lu¬ lsfŒ‰h" fw…Pm 12.
31- HOj¢hV HgfVHlµ
Hqy¨ Ugn £ƒI H®«VHV BOj¢hV HgfVkhlµ HgƒD jVYF td UVqi.
Hk±V "HOj¢hV •P¬ HgfVHlµ lfhaVM" fw…Pm 12.
41- HBsjuh¬M
•
Uk¬ UVQ fVHlµ Hgjg…«¢‘K’ Hqy¨ Ugn £ƒH Hg«V ggjf¬¢G f¢K
HgfVkhlµ HgPhgd ‘HgfVkhlµ HgshfR HgƒD rlJ fuVqi. Hk±V
"HgV¥‘c îgn HgfVkhlµ •‘ Hg¬OG HgshfR HgƒD jL UVqi"
fw…Pm 12.
• Uk¬ UVQ lwh¬V ¬OG lOjg…m’ Hqy¨ Ugn £ƒH Hg«V ggjf¬¢G
f¢K lw¬V Hg¬OG HgPhgd •‘ HgshfR. Hk±V "HgV¥‘c îgn HgfVkhlµ
•‘ Hg¬OG HgshfR HgƒD jL UVqi" fw…Pm 12.
51- EDIUG )Hg¬g¢G(
)£ƒI Hg‘±¢…m Y¢V ljhPm(
61- TXET )HgkW(
Hqy¨ Ugn £ƒH Hg«V gjay¢G ¥§h« t“ a…VHJ rkhM Hglug‘lhJ •‘
hti. Hk±V "HsjO¬HL ‘±¢…m rkhM Hglug‘lhJ" fw…Pm 32.
71- OFNI )Hglug‘lhJ(
Hqy¨ Ugn £ƒH Hg«V guVQ lug‘lhJ P‘G lw¬V ¬OG Hgw‘VM.
Hk±V "UVQ Hglug‘lhJ" fw…Pm 32.
81- // + / - ‘KO )l‘HtR(
•
Hqy¨ Ugn •‘ gjy¢¢V fVHlµ Hgjg…«¢‘K Ugn kP‘ jsgsgd.
• Hqy¨ Ugn + •‘ - gqf¨ lsj‘N Hgw‘J.
Uk¬ UVQ DSO rhzlm )Hgjug¢lhJ HgluV‘qm Ugn Hgaham( Ugn
Hgaham:
• Hqy¨ Ugn •‘ BOj¢hV H™U¬H¬HJ.
• Hqy¨ Ugn + •‘ - gqf¨ H™U¬H¬HJ.
• Hqy¨ Ugn KO )l‘HtR( gjk…¢ƒ HBOj¢hVHJ •‘ Hg¬O‘G td rhzlm
tVU¢m jL HOj¢hV£h.
Hk±V "HgjkŒG ObG rhzlm DSO" fw…Pm 13.
91- UNEM )HgŒhzlm(
Hqy¨ Ugn £ƒH Hg«V ™±§hV rhzlm DSO g©‘HlV ‘H™U¬H¬HJ.
‘Hqy¨ Ug¢i lVM •OVN ™YbR HgŒhzlm. Hk±V "HgjkŒG ObG rhzlm
DSO" fw…Pm 13.
V32B_V37B_AR.book Page 18 Monday, February 4, 2008 4:03 PM
Page 79

UVfd
HgjuVT Ugn ‘P¬M HgjP”L UK fu¬
19
02- KCAB )HgV¥‘c(
"td rhzlm DSO’ Hqy¨ Ugn £ƒH Hg«V ggu‘¬M îgn Hgw…Pm HgshfŒm
lK HgŒhzlm. Hk±V "HgjkŒG ObG rhzlm DSO fw…Pm 13.
12- s”‘K/•PlV
• Hqy¨ Ugn £ƒH Hg«V gqf¨ l‘rJ hT Hgjay¢G HgjgŒhzd. Hk±V
"HsjO¬HL lCrJ Hgs”‘K" fw…Pm 22.
• Uk¬ UVQ rkhM Hglug‘lhJ Ugn Hgaham’ Hqy¨ Ugn £ƒH Hg«V
BOj¢hV w…Pm rkhM Hglug‘lhJ Hglg‘km HglŒhfgm. Hk±V "HsjO¬HL
‘±¢…m rkhM Hglug‘lhJ" fw…Pm 32.
22- eyesnes/•OqV
• Hqy¨ Ugn £ƒH Hg«V guVQ rhzlm eyesnes Hk±V "rhzlm
eyesnes fw…Pm" 73.
• Uk¬ UVQ rkhM Hglug‘lhJ Ugn Hgaham’ Hqy¨ Ugn £ƒH Hg«V
BOj¢hV w…Pm rkhM Hglug‘lhJ Hglg‘km HglŒhfgm. Hk±V "HsjO¬HL
‘±¢…m rkhM Hglug‘lhJ" fw…Pm 32.
32 H™U¬H¬ HglsfR/•w…V
• Hqy¨ Ugn £ƒH Hg«V BOj¢hV •P¬ •‘qhc Hgw‘VM Hglu¬M lsfŒ‰h.
Hk±V "HOj¢hV ‘qv Hgw‘VM" fw…Pm 22.
• Uk¬ UVQ rkhM Hglug‘lhJ Ugn Hgaham’ Hqy¨ Ugn £ƒH Hg«V
BOj¢hV w…Pm rkhM Hglug‘lhJ Hglg‘km HglŒhfgm. Hk±V "HsjO¬HL
‘±¢…m rkhM Hglug‘lhJ" fw…Pm 32.
42- w‘VM ¬HOG w‘VM/•«VR
Uk¬ UVQ rkhM Hglug‘lhJ Ugn Hgaham’ Hqy¨ Ugn £ƒH Hg«V
BOj¢hV w…Pm rkhM Hglug‘lhJ Hglg‘km HglŒhfgm. Hk±V "HsjO¬HL
‘±¢…m rkhM Hglug‘lhJ" fw…Pm 32.
52- Hgw‘J HglP¢¨
Hqy¨ Ugn £ƒH Hg«V gjay¢G lCeVHJ Hgw‘J HglP¢¨ •‘ ht§h.
Hk±V "jay¢G/hT lCeVHJ Hgw‘J HglP¢¨" fw…Pm 12.
62- «V )lsj‘N Hgw‘J( +/-
Hqy¨ Ugn £ƒ¢K Hg«V¢K gVtv lsj‘N Hgw‘J •‘ O…qi. Hk±V
"qf¨ lsj‘N Hgw‘J" fw…Pm 12.
72- P )HgfVkhlµ( /
• Hqy¨ Ugn £ƒ¢K Hg«V¢K gjy¢¢V HgfVHlµ Ugn kP‘ jsgsgd. Hk±V
"jy¢¢V HgfVHlµ" fw…Pm 12.
• Uk¬ UVQ rkhM Hglug‘lhJ Ugn Hgaham’ Hqy¨ Ugn £ƒ¢K
Hg«V¢K gbkjŒhG îgn Hgw…Pm HgshfŒm •‘ HgbPŒm •‘ gbkjŒhG îgn
Hgw…Pm Hg…VU¢m )îƒH ”hkJ ljhPm(. Hk±V "HsjO¬HL ‘±¢…m rkhM
Hglug‘lhJ" fw…Pm 32.
82- ”jL Hgw‘J
Hqy¨ Ugn £ƒH Hg«V g”jL OVœ Hgw‘J. ‘Hqy¨ Ug¢i lVM •OVN
Bsjuh¬M OVœ Hgw‘J. Hk±V "îU¬H¬ ”jL Hgw‘J" fw…Pm 12.
V32B_V37B_AR.book Page 19 Monday, February 4, 2008 4:03 PM
Page 80

UVfd
UVfd
HsjO¬HL ‘P¬M HgjP”L UK fu¬
20
HsjO¬HL ‘P¬M HgjP”L UK fu¬
Hgjay¢G ‘hT Hgjay¢G ‘HBsju¬H¬
jay¢G ¥§h« Hgjg…«¢‘K
fu¬ j‘w¢G ”fG Hg¨hrm HgOhW fhgjg…«¢‘K f¶P¬ l‡Oƒ Hgj¢hV Hgl‘¥‘¬M fhgPhz¨’ ¢¬OG Hgjg…«¢‘K
jgŒhz¢‰h td ‘qv HBsju¬H¬ lv îqhxM lCaV Hg¨hrm fhgg‘K H®PlV.
Hqy¨ Ugn «V )Hg¨hrm/HBsju¬H¬( f¥§h« Hgjg…«¢‘K’ •‘ «V )Hg¨hrm/HBsju¬H¬( f‘P¬M HgjP”L
UK fu¬. Uk¬zƒ¸ ¢jL jay¢G Hgjg…«¢‘K lv jP‘G lCaV Hg¨hrm îgn Hgg‘K H®OqV.
¢l”k“ •¢qh‰ jay¢G Hgjg…«¢‘K ‘UVQ Hg¬OG HgOhW fi fhgqy¨ Ugn «V P )HgfVkhlµ( ’ •‘ «V P )HgfVkhlµ(
•‘ •D lK •«VHV HOj¢hV HgfVHlµ HgVrl¢m f‘P¬M HgjP”L UK fu¬.
î¬OhG Hgjg…«¢‘K td ‘qv HBsju¬H¬
Hqy¨ Ugn «V )Hg¨hrm/HBsju¬H¬( fhgjg…«¢‘K’ •‘ «V )Hg¨hrm/HBsju¬H¬( f‘P¬M HgjP”L UK
fu¬ l¥¬¬‰h’ ‘s‘T ¢u‘¬ Hgjg…«¢‘K g‘qv HBsju¬H¬’ lv jP‘G lCaV Hg¨hrm îgn Hgg‘K H®PlV.
¢sj§g“ Hgjg…«¢‘K kP‘ 5,1 ‘HJ lK Hg¨hrm td ‘qv HBsju¬H¬.
HOj¢hV lw¬V ¬OG
HOj¢hV ¬OG Hgjg…«¢‘K lfhaVM
Hqy¨ Ugn «V VT Hgl‘¥‘¬ f‘P¬M HgjP”L UK fu¬ ggjP‘G îgn ¬OG Hgjg…«¢‘K lfhaVM
‘UVQ fVHlµ Hgjg…«¢‘K.
HBkjŒhG îgn lwh¬V ¬OG •OVN )fhsjekhx ¬OG Hgjg…«¢‘K(
1- rL fjay¢G ¥§h« Hgjg…«¢‘K rL fjay¢G Hg¥§h« HgljwG lv jay¢G Hg…¢¬¢‘.
2- Hqy¨ Ugn «V TUPNI )Hg¬OG( Hgl‘¥‘¬ f¥§h« Hgjg…«¢‘K’ •‘ Ugn «V TUPNI
)Hg¬OG( Hgl‘¥‘¬ f‘P¬M HgjP”L UK fu¬ guVQ îahVM Hg¬OG HglP¬¬M Phg¢h‰. Hqy¨ Ugn £ƒH
Hg«V qy¨‰h lj”VV‰H îgn •K ¢jL UVQ îahVM Hg¬OG Hgl¨g‘fm. ‘t¢lh ¢gd jsgsG ±§‘V îahVHJ
Hg¬OG:
• j±§V £ƒI HgO¢hVHJ tŒ¨ Uk¬ HjwhG H™ahVHJ HglŒhfgm fhgjg…«¢‘K.
• îƒH ”hkJ îahVjh ¬OG Hg…¢¬¢‘ HglCgT )VA ( ‘Hg…¢¬¢‘ thzR Hg¥‘¬M ljwgj¢K f¬OG 2VA td k…S Hg‘rJ’ ts¢jL UVQ
îahVM ¬OG Hg…¢¬¢‘ thzR Hg¥‘¬M tŒ¨. ‘îƒH ”kJ jVYF td UVQ îahVM ¬OG Hg…¢¬¢‘ HglCgT )VA( td leG £ƒI HgPhgm’
tb f¬ lK twG îahVM Hg…¢¬¢‘ thzR Hg¥‘¬M lCrjh‰.
• ¢¥F lVHUhM •K j”‘K îahVM ¬OG IMDH lj‘HtŒm lv PCDH g”d ¢jL UVq§h Ugn kP‘ sg¢L. Uk¬ HBkjŒhG îgn
îahVHJ ¬OG IMDH’ ¢Pjhœ Hgjg…«¢‘K ebE e‘HK jŒV¢fh B”jahT lug‘lhJ IMDH lK lw¬V H™ahVHJ ‘gK ¢jL
UVQ •D w‘VM ObG jg“ Hg…jVM. ‘B ¢u¬ ƒg“ Ogb‰ ‘±¢…¢‰h fhg¥§h«.
• Uk¬ UVQ t¢¬¢‘ Hg”lf¢‘jV’ jƒ”V jP‘¢G îU¬H¬ OVœ t¢¬¢‘ Hg”lf¢‘jV lK UVQ Ugn Hgaham îgn ¥§h« OhV¥d. gl«¢¬
lK Hglug‘lhJ’ ¢V¥n HgV¥‘c îgn ¬g¢G ¥§h« Hg”lf¢‘jV.
1VA
)S-2VA •‘( 2VA
)IVD •‘( IMDH
CP
V32B_V37B_AR.book Page 20 Monday, February 4, 2008 4:03 PM
Page 81

UVfd
HsjO¬HL ‘P¬M HgjP”L UK fu¬
21
qf¨ îU¬H¬HJ Hgw‘J
qf¨ lsj‘N Hgw‘J
¢l”K qf¨ lsj‘N Hgw‘J fhgqy¨ Ugn H®«VHV Hgjhg¢m:
•
)emuloV( + •‘ (emuloV) - td ‘P¬M HgjP”L UK fu¬’ •‘
•
+ •‘ - Hgl‘¥‘¬¢K f‘P¬M HgjP”L UK fu¬’ •‘
• •‘ Hgl‘¥‘¬¢K fhgjg…«¢‘K.
¢«¬H¬ ¨‘G lCaV Hgw‘J ‘¢ŒG ”glh HVj…v lsj‘N Hgw‘J •‘ HkO…Q.
îU¬H¬HJ ”jL Hgw‘J
• Hqy¨ Ugn «V ”jL Hgw‘J f‘P¬M HgjP”L UK fu¬ ™¢ŒhT Hgw‘J lCrjh‰.
• Hqy¨ Ugn «V ”jL Hgw‘J l¥¬¬‰H’ •‘ Hqy¨ Ugn «V
+ )emuloV( f‘P¬M
HgjP”L UK fu¬’ •‘ Ugn «V fhgjg…«¢‘K Bsjuh¬M lsj‘N Hgw‘J.
jay¢G/hT jay¢G lCeVHJ Hgw‘J HglP¢¨
¢l”k“ Hgqy¨ Ugn «V Hgw‘J HglP¢¨ f‘P¬M HgjP”L UK fu¬ gjay¢G lCeVHJ Hgw‘J
TX dnuorruSurT SRS fhgjg…«¢‘K •‘ ht§h. jslp j”k‘g‘¥¢h Hgw‘J
TX dnuorruSurT SRS ggjg…«¢‘K fïOVHœ •w‘HJ PŒ¢Œ¢m lK ObG lPh”hM OVœ Hgw‘J
lju¬¬ HgŒk‘HJ. ”lh jshU¬ •¢qh Ugn jPs¢K ‘q‘– HglPh¬ehJ Hgw‘j¢m.
HOj¢hV ‘qv Hgl‘H«K Hglu¬ lsfŒ‰h
Hqy¨ Ugn «V )‘qv Hgl‘H«K( f‘P¬M HgjP”L UK fu¬ BOj¢hV ‘qv l‘H«K lkhsF lK f¢K
”bs¢”d ‘f‘F ‘¥h« ‘V‘“ ‘aOwd. ¢l”k“ •¢qh‰ jOw¢W ‘qv Hgw‘J HgaOwd PsF
j…q¢bj“. Hk±V "îU¬H¬ ‘qv Hgl‘H«K HgaOwd" fw…Pm 33.
jy¢¢V HgfVHlµ
HOj¢hV fVkhlµ lfhaVM
• BOj¢hV fVkhlµ •Ph¬D HgVrL’ Hqy¨ Ugn Hg«V HglŒhfG BOj¢hV HgfVkhlµ. Ugn sf¢G HglehG’
BOj¢hV HgfVkhlµ 8’ Hqy¨ Ugn .
• BOj¢hV fVkhlµ ekhzd HgVrL’ Hqy¨ Ugn
)î¬OhG fVHlµ(’ eL Hqy¨ Ugn •«VHV HOj¢hV
HgfVkhlµ Hglkh±VM. Ugn sf¢G HglehG’ BOj¢hV HgfVkhlµ 82’ Hqy¨ Ugn
)î¬OhG fVHlµ(’
eL Hqy¨ Ugn ‘ .
jy¢¢V HgfVHlµ jsgsg¢h‰
¢l”K jy¢¢V fVHlµ Hgjg…«¢‘K fa”G jsgsgd fhgqy¨ Ugn H®«VHV Hgjhg¢m:
•
P •‘ P f‘P¬M HgjP”L UK fu¬’ •‘
• •‘ Hgl‘¥‘¬¢K f‘P¬M HgjP”L UK fu¬’ •‘
• •‘ Hgl‘¥‘¬¢K fhgjg…«¢‘K.
HgV¥‘c îgn HgfVkhlµ •‘ Hg¬OG HgshfR HgƒD jL UVqi
• Uk¬ UVQ îahVM ¬OG jg…«¢‘k¢m’ ¢l”k“ Hgqy¨ Ugn «V HBsjuh¬M Hgl‘¥‘¬ f‘P¬M HgjP”L
UK fu¬ ggV¥‘c fsVUm îgn HgfVkhlµ HgshfR HgƒD jL UVqi. ¢l”K HsjO¬HL £ƒH Hg«V ggjf¬¢G
f¢K ›OV fVkhl¥¢K jL UVq§lh ¬‘K HgPh¥m îgn î¬OhG VrL HgfVkhlµ HglP¬¬.
V32B_V37B_AR.book Page 21 Monday, February 4, 2008 4:03 PM
Page 82

UVfd
UVfd
HsjO¬HL ‘P¬M HgjP”L UK fu¬
22
• îƒH ”kJ r¬ rlJ gj‘“ fhBkjŒhG lK lw¬V ¬OG lOjgT îgn lw¬V Hg¬OG HgPhgd’ t¢l”K •¢qh‰
Hgqy¨ Ugn «V HBsjuh¬M Hgl‘¥‘¬ f‘P¬M HgjP”L UK fu¬ ggjf¬¢G f¢K lw¬VD Hg¬OG
HgPhgd ‘HgshfR Hggƒ¢K jL UVq§lh.
HBkjŒhG îgn HgŒk‘HJ Hgl…qgm
Hqy¨ Ugn «V Hgl…qgm f‘P¬M HgjP”L UK fu¬ gbkjŒhG îgn HgŒkhM 1 Hgl…qgm Hglu¬M lsfŒ‰h. eL
Hqy¨ Ugn £ƒH Hg«V lVM •OVN gbkjŒhG îgn HgŒkhM Hgjhg¢m Hgl…qgm’ ‘£”ƒH. ¢l”k“ HBOj¢hV lK f¢K
5 rk‘HJ gqf¨§h ”Œk‘HJ l…qgm.
gl«¢¬ lK Hglug‘lhJ P‘G ”¢…¢m qf¨ HgŒk‘HJ Hgl…qgm’ ¢V¥n HgV¥‘c îgn "îU¬H¬ HgŒk‘HJ Hgl…qgm" fw…Pm 14.
HsjO¬HL ‘±¢…m Hgjef¢J
Hqy¨ Ugn «V / Hgjef¢J/jef¢J rkhM Hglug‘lhJ f‘P¬M HgjP”L UK fu¬ gjef¢J Hgw‘VM Ugn
Hgaham. Hqy¨ Ugn k…S Hg«V lVM •OVN Bsjuh¬M HguVQ Hguh¬D.
B jjP”L £ƒI Hg‘±¢…m td lw¬V Hg¬OG HgƒD s¢sjlV fa”G Uh¬D’ ‘g”K gK ¢jL UVqi •ekhx jef¢J Hgw‘VM. ‘Uk¬ hT
‘±¢…m jef¢J Hgw‘VM’ ¢jL HsjzkhT ‘qv Hgjay¢G Hguh¬D td Hg‘rJ Hg…ugd. flukn •K Hgw‘VM HgluV‘qm sjkjŒG îgn
Hg‘rJ HgPhgd ¬‘K UVQ •¢m lŒh¨v t¢¬¢‘ lCrjm.
B jjV“ Hgaham juVQ w‘V sh”km g…jVM «lk¢m ¨‘¢gm )•¢hL(÷ îƒ r¬ ¢jsfF ƒg“ td P¬‘E jgT lCrJ •‘ ¬HzL fhgaham
¢C¬D f¬‘VI îgn jV“ •eV ggw‘VM r¬ ¢±G lVz¢h‰ g…jVM ¨‘¢gm fu¬ î«Hgm Hgw‘VM H®wg¢m.
HOj¢hV ‘qv Hgw‘VM
BOj¢hV •P¬ •‘qhc Hgw‘VM’ Hqy¨ Ugn «V H™U¬H¬ HglsfR/•w…V Hgl‘¥‘¬ f‘P¬M HgjP”L
UK fu¬’ llh ¢j¢p g“ îl”hk¢m HBOj¢hV lK f¢K H™U¬H¬HJ Hgjhg¢m:
HsjO¬HL lCrJ Hgs”‘K
jj¥gn •£l¢m lCrJ Hgs”‘K Uk¬ HgVYfm td î¬OhG Hgjg…«¢‘K jgŒhz¢h‰ td ‘qv HBsju¬H¬ fu¬ tjVM
«lk¢m lP¬¬M.
1- Hqy¨ Ugn «V s”‘K/•PlV f‘P¬M HgjP”L UK fu¬ gjka¢¨ ‘±¢…m lCrJ Hgs”‘K.
2- Hqy¨ Ugn £ƒH Hg«V lVM •OVN gqf¨ Hg…hwG Hg«lkd.
Ugn sf¢G HglehG’ îƒH rlJ fqf¨ l‘rJ Hgs”‘K Ugn 03 ¬r¢Œm’ ts¢¬OG Hgjg…«¢‘K ‘qv HBsju¬H¬
fu¬ lV‘V 03 ¬r¢Œm. ¢l”K HgjPŒR lK Hg‘rJ HgljfŒd rfG Hkj§hzi td UkwV lCrJ Hgs”‘K Hgl‘¥‘¬
fŒhzlm H™U¬H¬ )Hk±V "lCrJ Hgs”‘K" fw…Pm 34(. ‘rfG Hkj§hx Hg‘rJ HglP¬¬ f¬r¢Œm ‘HP¬M’ j±§V
Vshgm jƒ”¢V Ugn Hgaham. ¢l”K Hgqy¨ Ugn )KO( ™Uh¬M qf¨ lCrJ Hgs”‘K P¢E ¢±G
Hgjg…«¢‘K td ‘qv Hgjay¢G. ‘Uk¬ Hkj§hx £ƒH Hg‘rJ’ s¢jL hT jay¢G Hgjg…«¢‘K jgŒhz¢h‰. ‘™¢ŒhT
jg“ Hg‘±¢…m’ rL fqf¨ Hgj‘r¢J Ugn ‘qv hT.
)‘qv Hgw‘VM( Hg‘wT
ljPV“
lbzL gguVQ td Hgf¢zhJ H®”eV s¨‘Uh‰. ¢jL «¢h¬M lsj‘N H®g‘HK ‘Hgjfh¢K
‘s¨‘c Hgw‘VM gjjkhsF lv ±V‘T H™qhxM H®”eV s¨‘Uh‰.
r¢hsd
lbzL gguVQ td f¢zhJ ƒHJ ±V‘T îqhxM ¨f¢u¢m. ‘¢leG £ƒH Hg‘qv
f¬V¥m ”f¢VM Hg¥‘¬M HgŒ¢hs¢m ggfE. gL ¢jL î¥VHx •D jy¢¢V td H®g‘HK •‘
Hgjfh¢K •‘ Hgs¨‘c td £ƒH Hg‘qv.
s¢klhzd
lbzL guVQ H®tbL td Hgf¢zhJ H®”eV ±glm. ‘r¬ jL qf¨ Hgg‘K td £ƒH
Hg‘qv Pjn ¢jL UVQ ¬V¥hJ •g‘HK HgfaVM Hg¨f¢u¢m f¬rm •”fV.
•guhF
lbzL gjay¢G •guhF Hg…¢¬¢‘.
aOwd
‘qv Hgw‘VM HgƒD rlJ fjOw¢wi. Hk±V "îU¬H¬ ‘qv Hgw‘VM
HgaOwd" fw…Pm 63.
V32B_V37B_AR.book Page 22 Monday, February 4, 2008 4:03 PM
Page 83

UVfd
HsjO¬HL ‘P¬M HgjP”L UK fu¬
23
qf¨ H™qhxM HgOg…¢m
gqf¨ r‘M k±hL H™qhxM HgOg…¢m HgOhW fhgjg…«¢‘K’ Hqy¨ Ugn «V H™qhxM HgOg…¢m Hgl‘¥‘¬
f‘P¬M HgjP”L UK fu¬’ eL Hqy¨ Ugn + •‘ - BOj¢hV lsj‘N H™qhxM HglkhsF.
Uk¬ lah£¬M Hgjg…«¢‘K td YVT Ohtjm H™qhxM’ ¢½‘wn fjŒg¢G H™qhxM HgOg…¢m îƒ ¢C¬D £ƒH H™¥VHx
îgn O…Q s¨‘c Hgw‘VM ‘¥uG Hglkh¨R Hglujlm f§h j±§V •”eV îUjhlh‰ llh ¢C¬D îgn îfŒhx ¬V¥m
jfh¢K Hgw‘VM Uhg¢m td f¢zm lujlm.
HsjO¬HL ‘±¢…m rkhM Hglug‘lhJ
Hqy¨ Ugn «V TXET f‘P¬M HgjP”L UK fu¬ guVQ rkhM Hglug‘lhJ’ ‘Hqy¨ Ug¢i lVM
•OVN ™¢ŒhT jay¢g§h.
B jjh– ‘±¢…m rkhM Hglug‘lhJ îB td Phgm HOj¢hV VTA ”lw¬V ¬OG’ ‘”ƒg“ HOj¢hV H™ahVM Hgjd jkŒG rkhM Hglug‘lhJ. B
j½fE rkhM Hglug‘lhJ îB lK ObG lP¨hJ jg…«¢‘k¢m ‘îahVHJ t¢¬¢‘ lu¢km. ‘td Phgm ‘¥‘¬ •¢m a”‘“’ ¢½V¥n HBjwhG
fhglP¨m Hgjg…«¢‘k¢m.
Uk¬ UVQ rkhM Hglug‘lhJ Ugn Hgaham’ ¢l”k“:
•
Hgqy¨ Ugn «V
Hg‘qv
ggjf¬¢G f¢K •‘qhc rkhM Hglug‘lhJ tŒ¨ ‘HglV”fm Ugn w‘VM Hg…¢¬¢‘.
• Hgqy¨ Ugn «V ksfm H®fuh¬/rkhM Hglug‘lhJ / gj”f¢V P¥L rkhM Hglug‘lhJ. ¢C¬D
Hgqy¨ Ugn £ƒH Hg«V lVM •OVN îgn Hsjuh¬M HgP¥L Hg¨f¢ud.
• Hgqy¨ Ugn «V Hgjef¢J/jef¢J rkhM Hglug‘lhJ /
gjef¢J HgVshzG HgOhwm fŒkhM
Hglug‘lhJ ‘¢C¬D Hgqy¨ Ugn £ƒH Hg«V lVM •OVN îgn Hsjuh¬M HgjP¬¢E Hguh¬D.
• Hgqy¨ Ugn «V Hg…§VS
gbkjŒhG îgn Hgw…Pm HgOhwm f…§VS rkhM Hglug‘lhJ.
• Hgqy¨ Ugn «V H™±§hV guVQ •¢m lug‘lhJ Y¢V ±h£VM ƒHJ wgm fŒkhM Hglug‘lhJ îƒH
”hkJ lj‘tVM )leG H™¥hfm Ugn HOjfhV lh(.
• Hgqy¨ Ugn «V Hgw…Pm Hg…VU¢m guVQ Hgw…PhJ Hg…VU¢m PhG j‘HtV£h.
• Hgqy¨ Ugn «V Hgs”‘K/•PlV
•‘ eyesnes/•OqV •‘ H™U¬H¬ HglsfR/•w…V •‘
w‘VM ¬HOG w‘VM/•«VR gbkjŒhG sV¢uh‰ îgn Hgw…PhJ Hglg‘km Hglkh±VM Hgjd j±§V
fuVQ Hg¥«x Hgs…gd lK aham rkhM Hglug‘lhJ.
• Hgqy¨ Ugn «V •‘ gbkjŒhG îgn w…Pm rkhM Hglug‘lhJ HgshfŒm •‘ Hgjhg¢m’ •‘
ggjkŒG f¢K Hgw…PhJ Hg…VU¢m Uk¬ HOj¢hV£h.
UVQ Hglug‘lhJ
Hqy¨ Ugn «V OFNI )Hglug‘lhJ( Hgl‘¥‘¬ f‘P¬M HgjP”L UK fu¬ guVQ Hglug‘lhJ ƒHJ
Hgwgm fïahVM Hg¬OG’ Uglh‰ f¶K Hglug‘lhJ HgluV‘qm jOjgT fhOjbT lw¬V Hg¬OG HglP¬¬.
V32B_V37B_AR.book Page 23 Monday, February 4, 2008 4:03 PM
Page 84

UVfd
UVfd
HsjO¬HL ‘P¬M HgjP”L UK fu¬
24
qf¨ ksfm HgŒf‘G
¢l”K jy¢¢V lŒhS ‘a”G w‘VM Hgjg…«¢‘K gjjbxL lv lj¨gfhj“ HgOhwm. ‘jujl¬ Hgkjhzµ HglVz¢m
Ugn H™U¬H¬ HgƒD rlJ fhOj¢hVI’ ‘Ugn ksfm HgŒf‘G H®wg¢m HgOhwm f¬OG Hgw‘VM. Hqy¨ Ugn
«V ksfm HgŒf‘G/rkhM Hglug‘lhJ / Hgl‘¥‘¬ f‘P¬M HgjP”L UK fu¬ ggjf¬¢G f¢K ksF
HguVQ îgn HBVj…hc )ksF HgŒf‘G(. ¢‘qp Hg¥¬‘G Hgjhgd lPwgm Hgw‘V fhgksfm g¬OG Hgw‘VM
Uk¬ HOj¢hV ksF rf‘G lOjg…m:
• ¢l”K HOj¢hV ksfm rf‘G g”G lw¬V ¬OG Ugn P¬M.
• jujl¬ O¢hVHJ ksF HgŒf‘G HgljhPm Ugn k‘c îahVM Hg¬OG Hgjd ¢jL HOj¢hV£h. Uk¬ UVQ ¬OG CP
)UfV buS-D •‘ IVD(’ B ¢jh– îB "61:9" ‘"4:3 " gbOj¢hV.
• îƒH ”hkJ îahVM ¬OG Hg…¢¬¢‘ fjks¢R wk¬‘R H®PVT’ tP¬¬ O¢hV "wk¬‘R H®PVT" ggPw‘G Ugn lshPm UVQ •”fV.
• gj…h¬D P¬‘E "HPj¥h« Hgw‘VM" •‘ "HPjVHR Hgaham" Ugn aham DCL’ ¢½‘wn fjy¢¢V ksfm HgŒf‘G lK P¢K ·OV’
‘j¥kF UVQ w‘VM sh”km Ugn aham Hgjg…«¢‘K g…jVHJ ¨‘¢gm.
ksfm HgŒf‘G Hg‘wT ‘HBsjO¬HL
ksfm HgŒf‘G g¬OG w‘VM Hg…¢¬¢‘
4:3
61:9
4:3
jy¢¢V ksfm HgŒf‘G HgOhwm fhgw‘VM îgn 4:3.
¢‘wn fhsjO¬HL £ƒH HgO¢hV Uk¬ UVQ w‘V
jfg» ksfm rf‘g§h 4:3 fhg…uG lK lwh¬V t¢¬¢‘
leG ¬OG Hgjg…«¢‘K Hgjkh±VD ‘t¢¬¢‘ Hg”lf¢‘jV
HgaOwd.
)Y¢V lsjPsK(
61:9
jl¬¢¬ w‘VM ksfm rf‘g§h 4:3 îgn 61:9. ¢‘wn
fhsjO¬HL £ƒH HgO¢hV Uk¬ UVQ w‘V jfg» ksfm
rf‘g§h 61:9 fhg…uG lK lwh¬V t¢¬¢‘ leG •¥§«M
Hgjg…«¢‘K HgVrl¢m ‘•YgF •rVHW DVD ƒHJ
Hgw‘V HguV¢qm.
s¢klh
jl¬¢¬ w‘VM ksfm rf‘g§h 4:3 gjwfp fuVQ
w‘VM ksfm rf‘g§h 61:9. ‘¢‘wn fhsjO¬HL £ƒH
HgO¢hV glGx Hgaham fw‘VM ksfm rf‘g§h 4:3.
)Y¢V lsjPsK(
wk¬‘R
H®PVT
jy¢¢V lŒhS w‘VM ksfm rf‘g§h 4:3 îgn 61:9’
‘HgjOgW lK HgO¨‘¨ Hgug‘¢m ‘Hgs…g¢m lk§h.
¢‘wn fhsjO¬HL £ƒH HgO¢hV Uk¬ UVQ lw¬V
t¢¬¢‘ fksfm rf‘G 4:3 ¢uVQ w‘V‰H lqy‘¨m
fksF rf‘G 61:9 td î¨hV fksfm rf‘G 4:3
fjks¢R jPJ lsln wk¬‘R H®PVT )O¨‘¨
s‘¬Hx f¨‘G Hg¥«x Hgug‘D ‘Hgs…gd lK Hgw‘VM(.
)Y¢V lsjPsK(
.jdA 9:61
)qf¨(
jl¬¢¬ w‘VM ksfm rf‘g§h 4:3 îgn 61:9 ‘j”f¢V
Hgw‘VM HgluV‘qm Ugn Hgaham. ¢l”K Hgqy¨
Ugn «V
•‘ Hgl‘¥‘¬ f‘P¬M HgjP”L UK fu¬
gjPV¢“ Hgw‘VM Hgl”fVM. ¢‘wn fhsjO¬HL £ƒH
HgO¢hV Uk¬ UVQ w‘V jfg» ksfm rf‘g§h 4:3 lK
lwh¬V t¢¬¢‘ leG ¬OG Hgjg…«¢‘K Hgjkh±VD.
)Y¢V lsjPsK(
V32B_V37B_AR.book Page 24 Monday, February 4, 2008 4:03 PM
Page 85

UVfd
j‘w¢G ¬OG Hgw‘J ‘Hgw‘VM
25
j‘w¢G ¬OG Hgw‘J ‘Hgw‘VM
¢½V¥n lVHUhM lh ¢gd Uk¬ Hgj‘w¢G:
• rfG j‘w¢G •¢m •¥§«M’ ¢½V¥n hT jay¢G ¥l¢v H®¥§«M.
• juVT Ugn Hgl‘wbJ ‘HglŒhfS Hgl‘¥‘¬M Ugn Hg¥§h« HgƒD jVYF td j‘w¢gi ‘”ƒg“ Hgjg…«¢‘K. ¢½V¥n lVHUhM •ki îƒH
jL î¥VHx Hgj‘w¢bJ Ugn kP‘ Y¢V wP¢p’ ts‘T ¢CeV ƒg“ sgfh‰ Ugn ¥‘¬M Hgw‘VM.
• B jk«c Hg”fbJ lK HglŒhfS lK ObG H™lsh“ f§h ‘¥ƒf§h fŒ‘M’ tŒ¬ ¢C¬D £ƒH îgn îjbT Hg”fG. HPVW ¬Hzlh‰ Ugn k«c
Hg”fbJ lK HglŒhfS UK ¨V¢R H™lsh“ fhgŒhfS Hgl‘¥‘¬ f¨VT Hg”fG.
• fl¥V¬ HBkj§hx lK Hgj‘w¢G’ ¢½V¥n Hgj¶”¬ lK î¬OhG ¥l¢v HglŒhfS td Hgl‡Oƒ fhg”hlG ‘jef¢j§h fïP”hL.
j‘w¢G ¬OG Hg…¢¬¢‘ HglCgT
‘wG OVœ Hg…¢¬¢‘ HglCgT g¥§h« HgOVœ )leG ¥§h«
RCV( fhg…¢¬¢‘ 2VA ‘•¨VHT j‘w¢G Hgw‘J Hg¢sVN
)Hgf¢qhx( ‘Hg¢lkn )HgPlVHx( Hgl‘¥‘¬M fhgjg…«¢‘K
fhsjO¬HL ”fG Hg…¢¬¢‘ HglCgT ”lh £‘ l‘qp.
¢j”‘K ”fG Hg…¢¬¢‘ HglCgT lK ebem l‘wbJ’ £d:
H®w…V )gg…¢¬¢‘( ‘H®f¢Q )gŒkhM Hgw‘J Hg¢sVN(
‘H®PlV )gŒkhM Hgw‘J Hg¢lkn(. j¶”¬ lK j¨hfR •g‘HK
HglŒhfS ‘•¨VHT Hgj‘w¢G Uk¬ Hgj‘w¢G.
guVQ w‘VM Hg…¢¬¢‘ lK £ƒH Hg¬OG’ Hqy¨ Ugn «V
TUPNI )Hg¬OG( ‘HOjV2VA.
¢Œ¬L Hg…¢¬¢‘ HglCgT •rG ¥‘¬M ggw‘VM. f¢klh ¢Œ¬L ”G lK Hg…¢¬¢‘
thzR Hg¥‘¬M ‘Hg…¢¬¢‘ HglV”F îahVHJ t¢¬¢‘ ƒHJ ¥‘¬M •tqG.
¢¬UL
2VA ¬OG îahVHjd Hg…¢¬¢‘ HglCgT ‘Hg…¢¬¢‘ thzR Hg¥‘¬M.
td Phgm HsjO¬HL Hg…¢¬¢‘ thzR Hg¥‘¬M’ tb ¢l”K HsjO¬HL îahVM
Hg…¢¬¢‘ HglCgT g§ƒH Hg¬OG.
RCV
”fG Hg…¢¬¢‘
HglCgT )VA (
V32B_V37B_AR.book Page 25 Monday, February 4, 2008 4:03 PM
Page 86

UVfd
UVfd
j‘w¢G ¬OG Hgw‘J ‘Hgw‘VM
26
j‘w¢G ¬OG Hg…¢¬¢‘ thzR Hg¥‘¬M
j‘w¢G ¬OG Hg…¢¬¢‘ HglV”F
1- ‘wG OVœ
oediV-S
)Hg…¢¬¢‘ thzR Hg¥‘¬M( HgOhW
f¥§h« OVœ H™ahVM )leG layG •rVHW
DVD(
f¨VT
j‘w¢G Hg…¢¬¢‘ thzR Hg¥‘¬M
OEDIV-S 2VA Hgl‘¥‘¬
fhgjg…«¢‘K fhsjO¬HL ”fG
oediV-S
)Y¢V lVtR(.
HPVW Ugn lPhƒHM HgŒ‘HfS f”fG
oediV-S
Uk¬
î¬Ohg§h glkv juVQ Hg¬fhf¢S ggjgT.
2- ‘wG OVœ w‘J oediV-S )Hg…¢¬¢‘ thzR Hg¥‘¬M(
HgOhW f¥§h« OVœ H™ahVM f¨Vtd ¬OG Hgw‘J
H®¢sV ‘H®¢lK OIDUA 2VA L)•f¢Q(/R )•PlV(
td Hgjg…«¢‘K fhsjO¬HL ”fG w‘J lkhsF lK k‘c
ACR.
guVQ w‘V t¢¬¢‘ lK £ƒH Hg¬OG’ Hqy¨ Ugn
TUPNI )Hg¬OG( ‘HOjV 2VA.
¢kfyd U¬L j‘w¢G H™ahVj¢K Hg…¢¬¢‘ HglCgT ‘Hg…¢¬¢‘ thzR
Hg¥‘¬M oediV-S lK k…S Hg¥§h«÷ P¢E ¢kfyd HB”j…hx
fïP¬H£lh. îƒH ”hK £kh“ l¥hG gbOj¢hV’ tlK H®tqG HsjO¬HL
îahVM Hg…¢¬¢‘ thzR Hg¥‘¬M oediV-S’ P¢E îk§h j‘tV w‘VM
ƒHJ ¥‘¬M •Ugn lK jg“ Hgjd j‘tV£h îahVM Hg…¢¬¢‘ HglCgT.
1- ‘wG OVœ Hg…¢¬¢‘ HglV”F g¥§h« OVœ H™ahVM
)leG ‘P¬M •guhF jg…«¢‘K( f¶¨VHT Hgj‘w¢G
)
1VA Y
’ BP
/BC’
RP
/RC( Hgl‘¥‘¬M f¥§h«
Hgjg…«¢‘K fhsjO¬HL ”fG t¢¬¢‘ lV”F )Y¢V lVtR(.
¢j¶gT ”fG Hg…¢¬¢‘ HglV”F lK ebem lŒhfS’ £d:
H®OqV
)Y(
‘ H®«VR
)BP/
B
C(
‘ H®PlV
)RP/
R
C(
2- ‘wG OVœ w‘J Hg…¢¬¢‘ HglV”F g¥§h« OVœ
H™ahVM f¨Vtd Hg¬OG H®¢sV ‘H®¢lK L 1VA
)•f¢Q(/R )•PlV( fhgjg…«¢‘K fhsjO¬HL ”fG w‘J
lkhsF lK k‘c ACR.
guVQ w‘V t¢¬¢‘ lK £ƒH Hg¬OG’ Hqy¨ Ugn
TUPNI )Hg¬OG( ‘HOjV 1VA.
ju¬ îahVM Hg…¢¬¢‘ HglV”F •tqG •k‘Hc îahVHJ Hg…¢¬¢‘ Hgjkh±V¢m
lK P¢E Hg¥‘¬M.
j¶”¬ lK j¨hfR •g‘HK HglŒhfS ‘•¨VHT Hgj‘w¢G Uk¬ î¥VHx
Ulg¢m Hgj‘w¢G.
ggPw‘G Ugn •tqG kjhzµ HguVQ’ Hqf¨ ¬rm OVœ ¥§h« lw¬V
Hg…¢¬¢‘ HglV”F Ugn p027.
VH¥v "¬rm îahVM ¬OG Hg…¢¬¢‘ HglV”F Hgl¬U‘lm" w…Pm 84
ggjuVT Ugn ¬V¥hJ Hg¬rm Hgl¬U‘lm.
”fG Hgw‘J
”fG
oediV-S
layG •rVHW
DVD
‘P¬M •guhF
jg…«¢‘K
”fG Hg…¢¬¢‘
HglV”F
”fG Hgw‘J
V32B_V37B_AR.book Page 26 Monday, February 4, 2008 4:03 PM
Page 87

UVfd
j‘w¢G ¬OG Hgw‘J ‘Hgw‘VM
27
j‘w¢G lk…ƒ ¬OG BUS-D CP
j‘w¢G lk…ƒ ¬OG IVD
1- ‘wG OVœ Hg…¢¬¢‘
buS-D
Hgl‘¥‘¬ f¥§h« Hg”lf¢‘jV
f¨VT Hgj‘w¢G
BUS-D CP fhgjg…«¢‘K fhsjO¬HL
”fG
buS-D
wy¢V )51 ¬f‘sh‰( )Y¢V lVtR(.
2- ‘wG OVœ Hgw‘J g¥§h« Hg”lf¢‘jV f¨VT Hgj‘w¢G
NI OIDUA CP Hgl‘¥‘¬ fhgjg…«¢‘K fhsjO¬HL ”fG
w‘J HsjV¢‘ lkhsF r¨VI 5,3 lL lK k‘c
kcaj-iniM )Y¢V lVtR(.
guVQ w‘V t¢¬¢‘ lK £ƒH Hg¬OG’ Hqy¨ Ugn
TUPNI )Hg¬OG( ‘HOjV CP.
Uk¬ j‘w¢G Hgjg…«¢‘K f¥§h« ”lf¢‘jV aOwd’ ¢¥F qf¨ Hg¬rm
lK OwhzW HguVQ Hgl‘¥‘¬M f¥§h« Hg”lf¢‘jV Pjn jjbxL r¬V
H™l”hK lv Hg¬rm H®wg¢m ggjg…«¢‘K )”¶K j”‘K Ugn sf¢G HglehG’
0631 x 867 f”sG(.
VH¥v "¬rm îahVM ¬OG ¥§h« Hg”lf¢‘jV )IVD/buS-D(
Hgl¬U‘lm" w…Pm 84 ggjuVT Ugn ¬V¥hJ Hg¬rm Hgl¬U‘lm
‘"îU¬H¬ ¬rm OVœ lkhsfm Ugn ¥§h« Hg”lf¢‘jV" w…Pm 94
ggjuVT Ugn ”¢…¢m îU¬H¬ OVœ Hg…¢¬¢‘ lK ¥§h« Hg”lf¢‘jV.
1- ‘wG OVœ Hg…¢¬¢‘ HgVrld HgOhW f¥§h« OVœ
H™ahVM )leG Hg”lf¢‘jV HgaOwd •‘ layG •rVHW
DVD( f¨VT Hgj‘w¢G IVD/IMDH Hgl‘¥‘¬
fhgjg…«¢‘K fhsjO¬HL ”fG l§h¢° ggj‘w¢G f¢K
IMDH‘ IVD )Y¢V lVtR(.
2- ‘wG OVœ w‘J HgOhW f¥§h« OVœ H™ahVM f¨Vtd
Hg¬OG
R/L TUPNI OIDUA-IVD
f¥§h«
Hgjg…«¢‘K fhsjO¬HL ”fG w‘J lkhsF lK k‘c
ACR.
3- P¬¬ k‘c ¬OG jfuh‰ gg¥§h« Hgl‘w×G. VH¥v "l¬OG
IVD/IMDH IVD" w…Pm 34.
guVQ w‘V t¢¬¢‘ lK £ƒH Hg¬OG’ Hqy¨ Ugn
TUPNI )Hg¬OG( ‘HOjV IVD.
Uk¬ Hgj‘w¢G f¥§h« ”lf¢‘jV aOwd’ ¢¥F qf¨ Hg¬rm lK OwhzW
HguVQ Hgl‘¥‘¬M f¥§h« Hg”lf¢‘jV Pjn jjbxL r¬V H™l”hK lv Hg¬rm
H®wg¢m ggjg…«¢‘K )”¶K j”‘K Ugn sf¢G HglehG’ 0631
x
867
f”sG(. VH¥v "¬rm îahVM ¬OG ¥§h« Hg”lf¢‘jV )
IVD/buS-D
(
Hgl¬U‘lm" w…Pm 84 ggjuVT Ugn ¬V¥hJ Hg¬rm Hgl¬U‘lm ‘"îU¬H¬
¬rm OVœ lkhsfm Ugn ¥§h« Hg”lf¢‘jV" w…Pm 94 ggjuVT Ugn
”¢…¢m îU¬H¬ OVœ Hg…¢¬¢‘ Ugn ¥§h« Hg”lf¢‘jV.
¥§h« ”lf¢‘jV
aOwd
”fG Hgw‘J
”fG wy¢V
buS-D
”fG l§h¢°
ggj‘w¢G f¢K
IMDH ‘IVD
¥§h« ”lf¢‘jV
aOwd
”fG
Hgw‘J
V32B_V37B_AR.book Page 27 Monday, February 4, 2008 4:03 PM
Page 88

UVfd
UVfd
j‘w¢G ¬OG Hgw‘J ‘Hgw‘VM
28
j‘w¢G lk…ƒ ¬OG IMDH
j‘w¢G OVœ w‘J HBsjV¢‘
‘wG OVœ IMDH g¥§h« OVœ H™ahVM f¨VT Hgj‘w¢G
IVD/IMDH Hgl‘¥‘¬ fhgjg…«¢‘K fhsjO¬HL ”fG IMDH
)Y¢V lVtR(.
guVQ w‘V t¢¬¢‘ lK £ƒH Hg¬OG’ Hqy¨ Ugn
TUPNI )Hg¬OG( ‘HOjV IMDH.
ju¬ IMDH )‘s¢gm j‘w¢G ‘shz¨ lju¬¬M Uhg¢m Hg¬rm( ‘s¢gm
j‘w¢G gkŒG lg…hJ Hgw‘J ‘Hgw‘VM HgVrl¢m ‘Y¢V Hglqy‘¨m’
‘£d jj¢p îl”hk¢m Hgj‘w¢G lv •D lw¬V w‘J/w‘VM ”wk¬‘R
jP‘¢G H™ahVHJ •‘ layG •rVHW DVD •‘ ‘P¬M HsjŒfhG w‘J
‘w‘VM lK ObG ”fG l…V¬.
¢‘wn fhsjO¬HL ”fG j‘w¢G Uhgd Hg¥‘¬M lujl¬ lK IMDH
gqlhK •¬Hx ljl¢« ‘kŒG îahVM IMDH fa”G lsjŒV.
¢¥F lVHUhM •K ¢”‘K ¬OG IMDH lj‘HtŒ‰h lv PCDH
g”d ¢jL UVqi.
¢j‘HtR lk…ƒ Hg¬OG IMDH Hgl‘¥‘¬ fhgjg…«¢‘K lv lu¢hV
2.1 IMDH’ ”lh •ki ¢¬UL ¬rm UVQ jwG îgn i0801.
VH¥v "¬rm îahVM ¬OG IMDH Hgl¬U‘lm" w…Pm 94 ggjuVT
Ugn ¬V¥hJ ¬rm IMDH Hgl¬U‘lm.
¢j‘HtV f§ƒH Hg¥§h« l¥l‘Um lK •¨VHT j‘w¢G OVœ
w‘J HsjV¢‘ )lK k‘c ACR( gj‘w¢G H™ahVHJ
Hgw‘j¢m îgn k±hL w‘J •‘ •¥§«M w‘J •OVN.
1- ‘wG •¨VHT j‘w¢G ¬OG Hgw‘J Hgl‘¥‘¬M fl”fV
w‘J •‘ f¶D ¥§h« w‘J ›OV f¨Vtd j‘w¢G OVœ
Hgw‘J H®¢lK/H®¢sV R/L TUPTUO OIDUA
fhgjg…«¢‘K fhsjO¬HL ”fG w‘J lkhsF lK k‘c ACR.
2- Hqf¨ O¢hV lOVœ l”fVHJ Hgw‘J lK rhzlm Hgw‘J
Ugn hT.
¬Hzlh lh ¢”‘K £ƒH HgOVœ ljhP‰h. ‘£‘ ehfJ Hglsj‘N ‘B ¢l”K
qf¨i lK îU¬H¬ lsj‘N Hgw‘J HgOhW fhgjg…«¢‘K.
”fG IMDH
layG •rVHW
DVD
”fG Hgw‘J
l”fV w‘J
V32B_V37B_AR.book Page 28 Monday, February 4, 2008 4:03 PM
Page 89

UVfd
j‘w¢G ¬OG Hgw‘J ‘Hgw‘VM
29
j‘w¢G OVœ slhUm HgV•S
¢j‘HtV f§ƒH Hg¥§h« lŒfS OVœ slhUm HgV•S gj‘w¢G
H™ahVHJ Hgw‘j¢m îgn slhUm V•S HsjV¢‘.
‘wG rhfS slhUm HgV•S HBsjV¢‘ )¢jkhsF lv k‘c
HglŒhfS Hgwy¢VM 5,3 lL( flŒfS OVœ slhUm HgV•S
Hgl‘¥‘¬ fhgjg…«¢‘K fhsjO¬HL ”fG w‘J lkhsF.
fl¥V¬ Hgj‘w¢G’ s¢jL ”jL w‘J slhUhJ Hgjg…«¢‘K jgŒhz¢‰h. ¢l”K
qf¨ lsj‘N Hgw‘J fhgqy¨ Ugn «VD )lsj‘N Hgw‘J(
‘fhgjg…«¢‘K’ •‘ Hg«V¢K )lsj‘N Hgw‘J( + ‘-
f‘P¬M HgjP”L UK fu¬.
j¥kF HBsjO¬HL Hgl¨‘G gslhUm HgV•S •‘ HBsjlhc îgn lsj‘N
w‘J lVj…v ¥¬‰h’ ‘îB s¢j¶eV slu“ sgf‰h.
slhUm V•S
V32B_V37B_AR.book Page 29 Monday, February 4, 2008 4:03 PM
Page 90

UVfd
UVfd
rhzlm DSO )Hglug‘lhJ HgluV‘qm Ugn Hgaham(
30
rhzlm DSO )Hglug‘lhJ HgluV‘qm Ugn Hgaham(
fk¢m rhzlm DSO
• jujl¬ UkhwV HgŒhzlm HgljhPm Ugn lw¬V Hg¬OG HgƒD ¢jL HOj¢hVI. •lh HgukhwV Y¢V HgljhPm’ tj¶Oƒ g‘kh‰ Vlh¬¢h‰
)”lh £‘ l‘qp fhsjO¬HL HgukhwV HgVlh¬¢m td HgŒhzlm •UbI( •‘ B ¢jL UVq§h.
• ¢l”K qf¨ H™U¬H¬HJ Hgl‘¥‘¬M flwh¬V Hg¬OG HglOjg…m fw‘VM lsjŒgm. Ugn sf¢G HglehG’ B jCeV îU¬H¬HJ Hgw‘VM
fhgksfm g¬OG 1VA Ugn îU¬H¬HJ Hgw‘VM HgOhwm f¬OG 2VA )•‘ S-2VA(.
rhzlm DSO
k‘c îahVM Hg¬OG
VTA 1VA
)S-2VA( 2VA
CP
IVD/ IMDH
t¢¬¢‘ CSTN t¢¬¢‘ LAP
‘qv HgPhsF
HgaOwd
‘qv Hg…¢¬¢‘
Hgw‘J
• lsj‘N Hgw‘J
• Hgj‘H«K
• k‘c Hgw‘J
• w‘J ehfJ
• lP¢¨
• lOVœ l”fVHJ Hgw‘J
• îU¬H¬HJ ljŒ¬lm
w‘VM
• ‘qv Hgw‘VM
• jfh¢K
• s¨‘c
• •g‘HK
• P¬M H®g‘HK
• PVHVM Hgg‘K
• îqhxM Og…¢m
• •g‘HK CSTN
• ‘qv
Hgw‘VM
• jfh¢K
• s¨‘c
• •g‘HK
• P¬M H®g‘HK
• PVHVM Hgg‘K
• îqhxM Og…¢m
• ‘qv
Hgw‘VM
• jfh¢K
• s¨‘c
• •g‘HK
• P¬M H®g‘HK
• PVHVM Hgg‘K
• îqhxM Og…¢m
• •g‘HK
CSTN
• îU¬H¬
CSTN
• ‘qv
Hgw‘VM
• jfh¢K
• s¨‘c
• •g‘HK
• P¬M H®g‘HK
• PVHVM Hgg‘K
• îqhxM Og…¢m
• jfh¢K
• s¨‘c
• PVHVM Hgg‘K
• îqhxM Og…¢m
• qf¨ jgŒhzd
• jV¬¬
• lVPgm
• Hg‘qv H®tŒd
•
Hg‘qv HgV•sd
• jfh¢K
• s¨‘c
• PVHVM Hgg‘K
• îqhxM Og…¢m
• ‘qv
Hgw‘VM
• jfh¢K
• s¨‘c
• •g‘HK
• P¬M H®g‘HK
• PVHVM Hgg‘K
• îqhxM Og…¢m
eyesneS
• jl¬¢¬ Hgs‘H¬
• ECA
• O…Q Hgq¥¢µ
)Y¢V ljh–(
• jl¬¢¬ Hgs‘H¬
• ECA
• O…Q
Hgq¥¢µ
VT
• jef¢J jgŒhzd
• jef¢J ¢¬‘D
• jPV¢V
HgfVkhlµ
• HgŒk‘HJ
Hgl…qgm
• îr…hG g©¨…hG
)Y¢V ljh–(
îU¬H¬
• Hggym
• lCrJ Hgs”‘K
• OCE
• l¬OG IVD/IMDH
• Hgaham Hg«Vrhx
• îUh¬M ”G H™U¬H¬HJ
• Hggym
• lCrJ
Hgs”‘K
• OCE
•
l¬OG
IVD/IMDH
• Hgaham
Hg«Vrhx
• îUh¬M ”G
H™U¬H¬HJ
V32B_V37B_AR.book Page 30 Monday, February 4, 2008 4:03 PM
Page 91

UVfd
rhzlm DSO )Hglug‘lhJ HgluV‘qm Ugn Hgaham(
31
HgjkŒG ObG rhzlm DSO
jsjO¬L rhzlm Hglug‘lhJ HgluV‘qm Ugn Hgaham )DSO( td qf¨ ¥l¢v îU¬H¬HJ Hgjg…«¢‘K.
guVQ rhzlm DSO’ Hqy¨ Ugn «V UNEM )HgŒhzlm( f¥§h« Hgjg…«¢‘K •‘ «V UNEM
f‘P¬M HgjP”L UK fu¬.
Ulg¢hJ rhzlm DSO
Ugn sf¢G HglehG’ gqf¨ P¬M •g‘HK Hgw‘VM fhsjO¬HL ‘P¬M HgjP”L UK fu¬’ Hjfv lh ¢gd:
gb¨bc Ugn Hgj…hw¢G’ ¢V¥n HgV¥‘c îgn:
• "rhzlm Hgw‘J" fw…Pm 23
• "rhzlm Hgw‘VM" fw…Pm 43
• "rhzlm eyesneS" fw…Pm 73
• "rhzlm Hgjg…«¢‘K" fw…Pm 83
• "rhzlm H™U¬H¬" fw…Pm 34
îU¬H¬
w‘VM Hgw‘J
eyesneSVT
• Hqy¨ Ugn + / - f‘P¬M HgjP”L UK fu¬ •‘ / f¥§h« Hgjg…«¢‘K
gjP¬¢¬ •P¬ UkhwV HgŒhzlm.
• Hqy¨ Ugn KO f‘P¬M HgjP”L UK fu¬’ •‘ «V TUPNI )Hg¬OG( f¥§h«
Hgjg…«¢‘K g¬O‘G HgŒhzlm Hg…VU¢m.
• Hqy¨ Ugn «VD
/ f‘P¬M HgjP”L UK fu¬ •‘ «VD /
f¥§h« Hgjg…«¢‘K BOj¢hV •P¬ UkhwV HgŒhzlm Hg…VU¢m.
• Hqy¨ Ugn «VD
+ / - f‘P¬M HgjP”L UK fu¬ •‘ «VD /
f¥§h« Hgjg…«¢‘K gqf¨ H™U¬H¬HJ. Hqy¨ KO f‘P¬M HgjP”L UK fu¬’ •‘
«V TUPNI )Hg¬OG( f¥§h« Hgjg…«¢‘K g¬O‘G HgŒhzlm Hg…VU¢m îƒH ”hkJ
ljhPm.
• Hqy¨ Ugn «V KCAB )V¥‘c( f‘P¬M HgjP”L UK fu¬ ggV¥‘c îgn
HgŒhzlm HgshfŒm.
• Hqy¨ Ugn «V UNEM )HgŒhzlm( f¥§h« Hgjg…«¢‘K •‘«V UNEM
f‘P¬M HgjP”L UK fu¬ ™YbR rhzlm DSO
1- Hqy¨ Ugn «V UNEM )HgŒhzlm( guVQ rhzlm DSO Ugn Hgaham.
2- Hqy¨ Ugn «V
+/- BOj¢hV w‘VM.
3- Hqy¨ KO gg¬O‘G îgn rhzlm w‘VM.
4- Hqy¨ Ugn / BOj¢hV P¬M H®g‘HK.
5- Hqy¨ Ugn
+/- gqf¨ H™U¬H¬.
6- Hqy¨ Ugn «V UNEM )HgŒhzlm( ™YbR rhzlm DSO.
V32B_V37B_AR.book Page 31 Monday, February 4, 2008 4:03 PM
Page 92

UVfd
UVfd
rhzlm DSO )Hglug‘lhJ HgluV‘qm Ugn Hgaham(
32
rhzlm Hgw‘J
jujl¬ UkhwV HgŒhzlm HgljhPm Ugn lw¬V Hg¬OG HgƒD
¢jL HOj¢hVI
Hga”G Hgj‘q¢Pd ®YVHQ j‘q¢P¢m tŒ¨.
HgukwV Hg‘±¢…m Hgulg¢m Hgk¨hR
lsj‘N Hgw‘J
qf¨ lsj‘N w‘J HgslhUhJ
Hglqlkm f¥§h« Hgjg…«¢‘K.
Hqy¨ Ugn «V + gVtv lsj‘N
Hgw‘J •‘ Ugn «V - gO…qi.
lK 0 îgn 74
Hgj‘H«K
qf¨ lsj‘N w‘J HgslhUm
Hg¢sVN •‘ Hg¢lkn.
Hqy¨ Ugn «V + gVtv lsj‘N
w‘J HgslhUm Hg¢lkn ‘Ugn «V gVtv lsj‘N w‘J HgslhUm
Hg¢sVN.
lK -21 îgn 21
k‘c Hgw‘J
HOj¢hV k‘c Hgw‘J •ekhx UVQ
HgfVHlµ •‘ lŒh¨v Hg…¢¬¢‘ Hgjd j¬UL
•k‘HU‰h lju¬¬M lK Hgw‘J.
jujl¬ HgO¢hVHJ HgljhPm Ugn
H™ahVM Hgjd ¢jL HsjŒfhg§h.
Hqy¨ Ugn + •‘ - gjy¢¢V HBOj¢hV.
• jgŒhzd
• HsjV¢‘
• •Ph¬D
• Hgw‘J 1
• Hgw‘J 2
• Hggym 1
• Hggym 2
w‘J ehfJ
td Phgm Hgqf¨ Ugn jgŒhzd’ ¢Œ‘L
Hg¥§h« fqf¨ lsj‘N Hgw‘J
jgŒhz¢h‰ fP¢E ¢”‘K ehfjh‰ td rk‘HJ
Hgjg…«¢‘K HglOjg…m.
• jgŒhzd
• hT
Hgw‘J HglP¢¨
jka¢¨ •‘ îgyhx jka¢¨ j¶e¢V w‘J
TX dnuorruSurT SRS.
•
SRS
dnuorruSurT
TX
• hT
OVœ HgslhUhJ
jl”¢K )jay¢G( •‘ ju¨¢G )hT(
OVœ HgslhUhJ Hglqlkm
fhgjg…«¢‘K.
• jay¢G
• hT
îU¬H¬HJ Hgw‘J HgljŒ¬lm - Hqy¨ KO gg¬O‘G.
B ¢”‘K £ƒH HgukwV ljhPh‰ fhgŒhzlm td PhG qf¨ UkwV Hgw‘J HglP¢¨ Ugn TX dnuorruSurT SRS.
lsj‘N Hgw‘J
Hgj‘H«K
jgŒhzd k‘c Hgw‘J
hT w‘J ehfJ
hT lP¢¨
jay¢G lOVœ l”fVHJ Hgw‘J
îU¬H¬HJ ljŒ¬lm
61
0
Hgw‘J
V32B_V37B_AR.book Page 32 Monday, February 4, 2008 4:03 PM
Page 93

UVfd
rhzlm DSO )Hglug‘lhJ HgluV‘qm Ugn Hgaham(
33
îU¬H¬ ‘qv QE HgaOwd
¢l”k“ qf¨ H™U¬H¬HJ td rhzlm îU¬H¬HJ ljŒ¬lm ‘P…±§h ”‘qv QE aOwd.
1- Hqy¨ Ugn «V UNEM )HgŒhzlm( guVQ rhzlm DSO Ugn Hgaham.
2- Hqy¨ Ugn
+ •‘ - BOj¢hV Hgw‘J’ eL Hqy¨ KO gg¬O‘G îgn rhzlm Hgw‘J.
3- Hqy¨ Ugn •‘ BOj¢hV îU¬H¬HJ ljŒ¬lm’ eL Hqy¨ KO gg¬O‘G îgn HgŒhzlm.
4- Hqy¨ Ugn •‘ BOj¢hV ‘qv QE’ eL Hqy¨ Ugn
+ •‘ - BOj¢hV Hg‘qv HgaOwd.
5- Hqy¨ Ugn •‘ gjP¬¢¬ O¢hVHJ ¨fŒm Uhg¢m •‘ ¨fŒm kwT Uhg¢m •‘ ¨fŒm lj‘s¨m •‘
¨fŒm kwT lkO…qm •‘ ¨fŒm lkO…qm’ eL Hqy¨ Ugn
+ •‘ - gqf¨ H™U¬H¬HJ PsF VYfj“
HgaOw¢m.
6- Hqy¨ Ugn «V UNEM )HgŒhzlm( gP…± H™U¬H¬HJ eL rL fïYbR rhzlm DSO.
‘qv QE
Bsjuh¬M îU¬H¬HJ Hglwkv •‘ ‘qv
QE HglOwW lK rfG HglsjO¬L.
¢l”K HOj¢hV ‘qv QE g”G lw¬V
¬OG Ugn P¬M.
Hqy¨ Ugn + •‘- gjy¢¢V HBOj¢hV.
• V‘“
• ¥h«
• ”bs¢”d
• f‘F
• aOwd
¨fŒm Uhg¢m
qf¨ kylhJ Hg¨fŒm Hguhg¢m g‘qv
QE HgaOwd.
Hqy¨ Ugn
+ •‘- ™¥VHx Hgqf¨. lK -21 îgn 21
¨fŒm kwT
Uhg¢m
qf¨ kylhJ Hg¨fŒm kwT Hguhg¢m
g‘qv QE HgaOwd.
¨fŒm lj‘s¨m
qf¨ kylhJ Hg¨fŒm Hglj‘s¨m
g‘qv QE HgaOwd.
¨fŒm kwT
lkO…qm
qf¨ kylhJ Hg¨fŒm kwT
HglkO…qm g‘qv QE HgaOwd.
¨fŒm lkO…qm
qf¨ kylhJ Hg¨fŒm HglkO…qm
g‘qv QE HgaOwd.
V32B_V37B_AR.book Page 33 Monday, February 4, 2008 4:03 PM
Page 94

UVfd
UVfd
rhzlm DSO )Hglug‘lhJ HgluV‘qm Ugn Hgaham(
34
rhzlm Hgw‘VM
jujl¬ UkhwV HgŒhzlm HgljhPm Ugn lw¬V Hg¬OG HgƒD
¢jL HOj¢hVI
Hga”G Hgj‘q¢Pd ®YVHQ j‘q¢P¢m tŒ¨.
HgukwV Hg‘±¢…m Hgulg¢m Hgk¨hR
kl¨ Hgw‘VM
¢Œ¬L ”htm H™U¬H¬HJ Hgl…qgm Hgjd jL
qf¨§h g©g‘HK ‘Hgjfh¢K ‘Hgs¨‘c
‘P¬M H®g‘HK gjjbxL lv ±V‘T
HguVQ HglOjg…m. td Phgm HOj¢hV
‘qv aOwd’ ¢l”k“ jOw¢W îU¬H¬
aOwd ggw‘VM PsF VYfj“
HgaOw¢m.
gl«¢¬ lK Hglug‘lhJ P‘G j‘r¢J
HsjO¬HL £ƒI H®‘qhc ‘”¢…¢m îU¬H¬
‘qv Hgw‘VM HgaOwd’ ¢V¥n
HgV¥‘c îgn "HsjO¬HL qv Hgw‘VM"
fw…Pm 53 ‘"îU¬H¬ ‘qv Hgw‘VM
HgaOwd" w…Pm 63.
Hqy¨ Ugn
+ •‘ - gjy¢¢V
HBOj¢hV.
• r¢hsd
• s¢klhzd
• •guhF
• ljPV“
• aOwd
Hgjfh¢K
qf¨ lsj‘N Hgg‘K H®f¢Q fhgw‘VM
fP¢E B jC¬D H®a¢hx Hgf¢qhx îgn
f§jhK H®g‘HK HglP¢¨m. ¢V¥n HgV¥‘c
îgn "qf¨ Hgjfh¢K" fw…Pm 63.
Hqy¨ Ugn
+ ggPw‘G
Ugn ¬V¥hJ •”eV
s¨‘Uh‰ lK Hgg‘K
H®f¢Q’ ‘Ugn
-
ggPw‘G Ugn ¬V¥hJ
•”eV ¬”km lK Hgg‘K
H®f¢Q.
lK 0 îgn 46
Hgs¨‘c
qf¨ lsj‘N Hgg‘K H®s‘¬ fhgw‘VM
fP¢E ¢l”K VC¢m •¬R Hgj…hw¢G td
Hglkh¨R Hg¬H”km lk§h. ¢V¥n HgV¥‘c
îgn "qf¨ Hgs¨‘c" w…Pm 63.
Hqy¨ Ugn + ggPw‘G
Ugn ¬V¥hJ •”eV
s¨‘Uh‰ lK Hgg‘K
H®s‘¬’ ‘Ugn ggPw‘G Ugn ¬V¥hJ
•”eV ¬”km lK Hgg‘K
H®s‘¬.
Hgg‘K qf¨ ”ehtm •g‘HK Hgw‘VM.
Hqy¨ Ugn
+ ggPw‘G
Ugn •g‘HK •”eV ”ehtm’
‘Ugn
- ggPw‘G Ugn
•g‘HK •rG ”ehtm.
ljPV“ kl¨ Hgw‘VM
jfh¢K
s¨‘c
•g‘HK
P¬M H®g‘HK
fhV¬ PVHVM Hgg‘K
H™qhxM HgOg…¢m
•g‘HK CSTN
ERI 5.7 îU¬H¬ CSTN
84235435
23
w‘VM
V32B_V37B_AR.book Page 34 Monday, February 4, 2008 4:03 PM
Page 95

UVfd
rhzlm DSO )Hglug‘lhJ HgluV‘qm Ugn Hgaham(
35
HsjO¬HL •‘qhc Hgw‘VM
¢l”k“ HOj¢hV ‘qv ggw‘VM flh ¢jkhsF lv ±V‘T Hglah£¬M.
¢l”k“ HOj¢hV ‘qv ggw‘VM g”G lw¬V ¬OG Ugn P¬M.
P¬M H®g‘HK qf¨ lsj‘N P¬M •g‘HK Hgw‘VM.
Hqy¨ Ugn
+ gw‘VM
•”eV P¬M’ ‘Ugn
-
gw‘VM •rG P¬M.
lK 0 îgn 6
PVHVM Hgg‘K
qf¨ ¬V¥hJ H®g‘HK HgO…¢…m td Hg¥«x
H®s‘¬ ‘H®f¢Q lK Hgw‘VM.
Hqy¨ Ugn
+ •‘ -
™¥VHx Ulg¢m Hgqf¨.
• ¬Ht°
• Uh¬D
• fhV¬
H™qhxM HgOg…¢m qf¨ a¬M H™qhxM HgOg…¢m. lK 0 îgn 01
•g‘HK CSTN
qf¨ ¬V¥hJ H®g‘HK HgO…¢…m Uk¬
UVQ Hg…¢¬¢‘ fjks¢R CSTN.
gK ¢”‘K £ƒH HgO¢hV ljhPh‰ îB lv lwh¬V
Hg…¢¬¢‘ fjks¢R CSTN.
Hqy¨ Ugn + ggPw‘G
Ugn ¬V¥hJ •g‘HK •”eV
HPlVHV‰h ‘Ugn
-
ggPw‘G Ugn ¬V¥hJ
•g‘HK •”eV HOqVHV‰h.
lK 0 îgn 46
îU¬H¬ CSTN
îU¬H¬ jks¢R UVQ Hg…¢¬¢‘ fk±hL
CSTN g¢jkhsF lv ¬OG Hg…¢¬¢‘ fk±hL
CSTN lK •¥§«M •OVN )leG
laybJ •rVHW DVD(.
gK ¢”‘K £ƒH HgO¢hV ljhPh‰ îB lv lwh¬V
îahVM Hg…¢¬¢‘ fk±hL CSTN.
Hqy¨ Ugn + •‘ - gjy¢¢V
HBOj¢hV
• ERI 0
• ERI 5.7
Hgqf¨ HgjgŒhzd
qf¨ HgjV¬¬ ‘HglVPgm ‘Hg‘qu¢K
H®tŒd ‘HgV•sd jgŒhz¢h‰ g‘qv w‘VM
¬OG CP Ugn Hgaham.
Hqy¨ KO gf¬x jay¢G ‘±¢…m Hgqf¨ HgjgŒhzd.
HgjV¬¬ qf¨ HgjV¬¬ ‘HglVPgm fshUm HguVQ
gjwP¢p Hg‘l¢Q •‘ Hgja‘A
fhgw‘VM.
Hqy¨ Ugn
+ •‘ -
™¥VHx Ulg¢m Hgqf¨.
lK -61 îgn 61
HglVPgm
Hg‘qv H®tŒd qf¨ Hg‘qu¢K H®tŒd ‘HgV•sd
ggw‘VM g‘qu§h td HglV”« Ugn
Hgaham.
lK -05 îgn 05
Hg‘qv HgV•sd
Hg‘qv Hg‘wT
r¢hsd
lbzL gguVQ td f¢zhJ ƒHJ ±V‘T îqhxM ¨f¢u¢m.
s¢klhzd
td £ƒH Hg‘qv’ ¢jL jPs¢K Hgjfh¢K ‘lsj‘¢hJ H®g‘HK Pjn ¢jskn UVQ Hgl«¢¬ lK
Hgj…hw¢G td Hglkh¨R Hg¬H”km ‘Hgsh¨um lK Hgw‘V.
ljPV“
¢jL jPs¢K lsj‘N Hgjfh¢K ‘Hgs¨‘c ‘Hgjafv g©g‘HK guVQ Hgw‘V HglaVrm td
Hglkh¨R Hguhlm.
•guhF
¢jL UVQ Hgw‘V flsj‘¢hJ s¨‘c ‘jfh¢K luj¬gm llh ¢khsF ±V‘T Hglah£¬M g…jVM
¨‘¢gm.
aOwd
‘qv Hgw‘VM HgƒD rlJ fjOw¢wi’ ¢V¥n HgV¥‘c îgn "îU¬H¬ ‘qv Hgw‘VM
HgaOwd" fw…Pm 63
V32B_V37B_AR.book Page 35 Monday, February 4, 2008 4:03 PM
Page 96

UVfd
UVfd
rhzlm DSO )Hglug‘lhJ HgluV‘qm Ugn Hgaham(
36
qf¨ Hgjfh¢K
1- Hqf¨ Hgjfh¢K Ugn •Ugn lsj‘N.
2- rgG lsj‘N Hgjfh¢K j¬V¢¥¢h‰ Pjn jwG îgn HgkŒ¨m Hgjd ¢l”k“ Uk¬£h VC¢m Hgj…hw¢G f‘q‘–
td Hglkh¨R Hgsh¨um lK Hgw‘VM. B jŒgG lsj‘N Hgjfh¢K •”eV lK ƒg“ gj¥kF tŒ¬ jafv H®g‘HK.
qf¨ Hgs¨‘c
1- Hqf¨ Hgs¨‘c Ugn •rG lsj‘N.
2- rL f«¢h¬M lsj‘N Hgs¨‘c j¬V¢¥¢h‰ Pjn jwG îgn HgkŒ¨m Hgjd ¢l”k“ Uk¬£h VC¢m Hgj…hw¢G
f‘q‘– td Hglkh¨R Hg¬H”km lK Hgw‘VM. B jŒL f«¢h¬M lsj‘N Hgs¨‘c •”eV lK ƒg“ gj¥kF
jP‘G Hglkh¨R Hgs‘¬Hx îgn Hgg‘K HgVlh¬D.
îU¬H¬ ‘qv Hgw‘VM HgaOwd
¢l”k“ qf¨ H™U¬H¬HJ td rhzlm Hgw‘VM ‘P…±§h ”‘qv Hgw‘VM HgaOwd.
1- Hqy¨ Ugn «V UNEM )HgŒhzlm( guVQ rhzlm DSO Ugn Hgaham.
2- Hqy¨ Ugn
+ •‘ - BOj¢hV Hgw‘VM’ eL Hqy¨ KO gg¬O‘G îgn rhzlm Hgw‘VM.
3- Hqy¨ Ugn •‘ BOj¢hV ‘qv Hgw‘VM’ eL Hqy¨ Ugn + •‘ - BOj¢hV
Hg‘qv HgaOwd.
4- Hqy¨ Ugn «V •‘ BOj¢hV Hgjfh¢K •‘ Hgs¨‘c •‘ Hgg‘K •‘ P¬M H®g‘HK •‘ Y¢V ƒg“’ eL
Hqy¨ Ugn
+ •‘ - gqf¨ H™U¬H¬HJ PsF VYfj“ HgaOw¢m.
5- Hqy¨ Ugn «V UNEM )HgŒhzlm( gP…± H™U¬H¬HJ eL rL fïYbR rhzlm DSO.
V32B_V37B_AR.book Page 36 Monday, February 4, 2008 4:03 PM
Page 97

UVfd
rhzlm DSO )Hglug‘lhJ HgluV‘qm Ugn Hgaham(
37
rhzlm eyesneS
UkhwV HgŒhzlm HgljhPm Ugn lw¬V Hg¬OG HgƒD ¢jL
HOj¢hVI
Hga”G Hgj‘q¢Pd ®YVHQ j‘q¢P¢m tŒ¨.
HgukwV Hg‘±¢…m Hgulg¢m Hgk¨hR
jl¬¢¬ Hgs‘H¬
jPs¢K lsj‘N Hgjfh¢K f¢K Hgj…hw¢G
Uk¬ UVQ w‘V ¬H”km.
B ¢jh– £ƒH HgO¢hV îƒH jL qf¨ ‘±¢…m
ECA Ugn lkO…Q •‘ lj‘s¨ •‘
Uhgd.
Hqy¨ Ugn + •‘ gjy¢¢V HBOj¢hV
• lkO…Q
• lj‘s¨
• Uhgd
• hT
ECA )jPs¢K
Hgjfh¢K jgŒhz¢h‰(
qf¨ ‘±¢…m jPs¢K Hgjfh¢K jgŒhz¢h‰
Hgjd j«¢¬ lK ksfm jfh¢K Hgw‘VM lv
Hglkh±V Hg¬H”km.
• lkO…Q
• lj‘s¨
• Uhgd
• hT
O…Q Hgja‘¢A
qf¨ ‘±¢…m O…Q ja‘¢A Hgw‘VM
Hgjd julG Ugn HgP¬ lK P¬‘E
ja‘¢A td Hgw‘VM.
B jjh– £ƒI Hg‘±¢…m îB Uk¬lh ¢”‘K
1VA •‘ 2VA
)S-2VA( £‘ lw¬V Hg¬OG lv U¬L
«¢h¬M Hg¬rm UK i084 ‘i675.
• lkO…Q
• lj‘s¨
• Uhgd
• hT
hT jl¬¢¬ Hgs‘H¬
hT ECA
lkO…Q O…Q Hgq¥¢µ
V32B_V37B_AR.fm Page 37 Monday, February 4, 2008 5:56 PM
Page 98

UVfd
UVfd
rhzlm DSO )Hglug‘lhJ HgluV‘qm Ugn Hgaham(
38
î¥VHx Hgjef¢J Hg¢¬‘D
jj¢p Ohw¢m Hgjef¢J Hg¢¬‘D îl”hk¢m îqhtm fVHlµ îgn rhzlm HgfVHlµ Hgljjhfum.
B ¢”‘K £ƒH HgO¢hV ljhPh‰ Uk¬ jka¢¨ ‘±¢…m îr…hG g©¨…hG. Hk±V "îr…hG g©¨…hG" fw…Pm 24.
1- lK rhzlm Hgjg…«¢‘K’ Hqy¨ Ugn «V •‘ BOj¢hV jef¢J ¢¬‘D eL Hqy¨ Ugn KO
)l‘HtR(. Uk¬zƒ j±§V HgŒhzlm Hgjhg¢m:
2- Hqy¨ Ugn «V gjP¬¢¬ r¢hsd’ eL Hqy¨
+•‘ - BOj¢hV •P¬ lsj‘¢hJ Hgjg…«¢‘K ‘tŒh ggfg¬
•‘ Hglk¨Œm Hgjd jŒ¢L t¢§h.
rhzlm Hgjg…«¢‘K
jujl¬ UkhwV HgŒhzlm HgljhPm Ugn lw¬V Hg¬OG HgƒD
¢jL HOj¢hVI
Hga”G Hgj‘q¢Pd ®YVHQ j‘q¢P¢m tŒ¨.
HgukwV Hg‘±¢…m Hgulg¢m Hgk¨hR
jef¢J jgŒhzd ¢V¥n HgV¥‘c îgn "9- îU¬H¬ ¥§h« Hgjg…«¢‘K" fw…Pm 8.
jef¢J ¢¬‘D ¢V¥n HgV¥‘c îgn "î¥VHx Hgjef¢J Hg¢¬‘D" •¬khI.
jPV¢V HgfVkhlµ ¢V¥n HgV¥‘c îgn "jPV¢V HgfVHlµ" fw…Pm 93.
HgŒk‘HJ Hgl…qgm ¢V¥n HgV¥‘c îgn "îU¬H¬ HgŒk‘HJ Hgl…qgm" w…Pm 14.
îr…hG g©¨…hG ¢V¥n HgV¥‘c îgn "îr…hG g©¨…hG" fw…Pm 24.
jef¢J jgŒhzd
jef¢J ¢¬‘D
jPV¢V HgfVkhlµ
HgŒk‘HJ Hgl…qgm
îr…hG g©¨…hG
VT
Hgfg¬ •‘ Hglk¨Œm r¢hsd
HgfPV¢K’ Hg”‘¢J’ UlhK’ r¨V’ H™lhVHJ HguVf¢m HgljP¬M’ Hg¢lK’ îk¬‘k¢s¢h’
lhg¢«¢h’ skyht‘VM’ jh¢bk¬’ Hg§k¬’ ‘Y¢V£h.
GB
Hgw¢K’ t¢jkhL ‘Y¢V£h. KD
£‘kµ ”‘kµ ‘Y¢V£h. I
¥l§‘V¢m î¢VHK H™sbl¢m’ gfkhK’ Hgllg”m HguVf¢m Hgsu‘¬¢m ‘Y¢V£h. GB
Hg…g¢f¢K’ l¢hklhV ‘Y¢V£h. M
GB r¢hsd
___.__ zHM jV¬¬
HsL HgfVkhlµ
qf¨ ¬r¢R
1.rahC edoC txeT
00 jay¢G P…± HgfVHlµ
jef¢J ¢¬‘D
V32B_V37B_AR.book Page 38 Monday, February 4, 2008 4:03 PM
Page 99

UVfd
rhzlm DSO )Hglug‘lhJ HgluV‘qm Ugn Hgaham(
39
3- Hqy¨ Ugn «V gjP¬¢¬ jV¬¬ eL Hqy¨ Ugn + •‘ - gf¬x k±hL Hgj‘g¢T. Uk¬zƒ j±§V kj¢¥m
Hgj‘g¢T Ugn Hgaham td Hg‘rJ Hg…ugd îƒH ”hK HgfVkhlµ HgƒD jL qf¨i Y¢V wP¢p’ thqy¨
Ugn + •‘ - lVM •OVN Pjn ¢jL Hgue‘V Ugn HgfVkhlµ Hgl¨g‘F. ¢l”K î¬OhG HgjV¬¬ lfhaVM
fhsjO¬HL •«VHV HOj¢hV HgfVkhlµ HgVrl¢m Hgl‘¥‘¬M f‘P¬M HgjP”L UK fu¬ îƒH VYfJ td ƒg“.
4- Hqy¨ Ugn «V gjP¬¢¬ qf¨ ¬r¢R eL Hqy¨ Ugn
+•‘- gqf¨ HsjŒfhG îahVM Hgjg…«¢‘K
)qV‘VD tŒ¨ îƒH ”hK HsjŒfhG Hgw‘VM •‘ Hgw‘J qu¢…h‰(.
5- Hqy¨ Ugn «V gjP¬¢¬ Vl‘« j¢g¢j”sJ eL Hqy¨ Ugn
+ •‘ - BOj¢hV jks¢R HgVl«
HgOhW f‘±¢…m rkhM Hglug‘lhJ ”lh £‘ l‘qp td Hg¥¬‘G •¬khI:
6- Hqy¨ Ugn «V gjP¬¢¬ jay¢G P…± HgfVHlµ eL Hqy¨ Ugn •«VHV HOj¢hV HgfVkhlµ HgVrl¢m
Hgl‘¥‘¬M f‘P¬M HgjP”L UK fu¬ ™¬OhG VrL )l‘qv( £ƒH HgfVkhlµ. Hqy¨ Ugn KO
)l‘HtR( ggj¶”¢¬.
7- Hqy¨ Ugn «V UNEM )HgŒhzlm( gP…± HgfVkhlµ ‘YgR HgŒhzlm.
jPV¢V HgfVHlµ
fu¬ lsp fVHlµ Hgjg…«¢‘K ‘jO«¢k§h td ƒH”VM Hgjg…«¢‘K •ekhx Ulg¢m jay¢G •‘G l‘Hg…m )¢V¥n
HgV¥‘c îgn "9 îU¬H¬ ¥§h« Hgjg…«¢‘K" w…Pm 8( •‘ fu¬ jay¢G Hgjef¢J HgjgŒhzd’ lK Hgll”K jPV¢V
£ƒI HgfVHlµ lK ObG PƒT HgfVHlµ Y¢V Hgl¨g‘fm ‘îqhtm HsL •P¬ HgfVHlµ •‘ jy¢¢V VrL l‘qv
HgfVkhlµ.
B ¢”‘K £ƒH HgO¢hV ljhPh‰ Uk¬ jka¢¨ ‘±¢…m H™r…hG q¬ UfE H®¨…hG. ¢V¥n HgV¥‘c îgn "îr…hG g©¨…hG" fw…Pm 24.
Vl‘« j¢g¢j”sJ Hggym
PVT 1 gyhJ YVF •‘V‘fh
PVT 2 gyhJ aVR •‘V‘fh
PVT 3 HgjV”¢m/Hg¢‘khk¢m
PVT 4 Hgs¢V¢g¢m
PVT 5 HguVf¢m
PVT 6 Hg…hVs¢m
V32B_V37B_AR.book Page 39 Monday, February 4, 2008 4:03 PM
Page 100

UVfd
UVfd
rhzlm DSO )Hglug‘lhJ HgluV‘qm Ugn Hgaham(
40
jsl¢m •P¬ HgfVHlµ
¢l”K jsl¢m •D fVkhlµ fhsL l”‘K lK 6 •PVT lK ObG HsjO¬HL £ƒI Hg‘±¢…m’ ‘fl¥V¬ ‘qv
HBsL’ ¢jL UVqi td HgV”K H®¢lK Hgug‘D lK Hgaham •s…G VrL HgfVkhlµ Uk¬ HOj¢hV HgfVkhlµ.
1- td rhzlm VT’ Hqy¨ Ugn •‘ BOj¢hV eL Hqy¨ Ugn KO )l‘HtR(. Uk¬zƒ j±§V
HgŒhzlm Hgjhg¢m:
2- Hqy¨ Ugn «V BOj¢hV jP¬¢¬ fVkhlµ’ eL Hqy¨ Ugn «V
+ •‘ - BOj¢hV HgfVkhlµ HgƒD
jVYF td jsl¢ji. ¢l”k“ •¢qh Hgqy¨ Ugn •«VHV H®VrhL f‘P¬M HgjP”L UK fu¬ BOj¢hV
HgfVkhlµ lfhaVM. ¢j¨gF ƒg“ î¬OhG VrL ekhzd. Ugn sf¢G HglehG’ BOj¢hV HgfVkhlµ 2’ Hqy¨
Ugn "0"’ "2".
3- Hqy¨ Ugn «V gjP¬¢¬ jPV¢V HBsL’ eL Hqy¨ Ugn + •‘ - gjP¬¢¬ HgPVT HgƒD jV¢¬
jPV¢VI’ eL Hqy¨ Ugn •‘ gjy¢¢VI îgn HgPVT Hgl¨g‘F.
4- ”VV HgO¨‘M VrL 3 gjPV¢V •PVT •OVN.
5- Hqy¨ Ugn «V KO gjO«¢K HBsL.
6- Hqy¨ Ugn «V UNEM )HgŒhzlm( ™YbR HgŒhzlm.
jf¬¢G HgfVHlµ
¢l”k“ HsjO¬HL £ƒI Hg‘±¢…m ggjf¬¢G fsVUm f¢K fVkhl¥¢K
1- td rhzlm VT’ Hqy¨ Ugn •‘ BOj¢hV jPV¢V HgfVkhlµ eL Hqy¨ Ugn KO.
2- Hqy¨ Ugn «V BOj¢hV jP¬¢¬ fVkhlµ’ eL Hqy¨ Ugn «V
+ •‘ - BOj¢hV HgfVkhlµ HgƒD
jVYF td kŒgi îgn l‘qv ›OV. ¢l”k“ •¢qh Hgqy¨ Ugn •«VHV H®VrhL Hgl‘¥‘¬M td ‘P¬M
HgjP”L UK fu¬ BOj¢hV HgfVkhlµ lfhaVM. ¢j¨gF ƒg“ î¬OhG VrL ekhzd. Ugn sf¢G HglehG’
BOj¢hV HgfVkhlµ 2’ Hqy¨ Ugn "0"’ "2".
3- Hqy¨ Ugn «V gjP¬¢¬ jf¬¢G fVkhlµ eL Hqy¨ Ugn •«VHV HOj¢hV HgfVkhlµ HgVrl¢m
Hgl‘¥‘¬M f‘P¬M HgjP”L UK fu¬ BOj¢hV Hgl‘qv Hg¥¬¢¬ ggfVkhlµ. ¢j¨gF ƒg“ î¬OhG VrL
ekhzd. Ugn sf¢G HglehG’ Hqy¨ Ugn «V "0"’ "5" BOj¢hV l‘qv HgfVkhlµ 5.
4- Hqy¨ Ugn KO g¢kjŒG HgfVkhlµ HgPhgd îgn Hgl‘qv Hg¥¬¢¬.
5- Hqy¨ Ugn «V UNEM )HgŒhzlm( ™Ybr§h.
00 jP¬¢¬ fVkhlµ
------ jPV¢V HBsL
-- jf¬¢G HgfVkhlµ
hT îr…hG HgfVkhlµ
00 PƒT HgfVkhlµ
jPV¢V HgfVkhlµ
HOjV VrL HgfVkhlµ
fhsjO¬HL Hgl…hj¢p 9 ot 0 ro -RP, +RP
V32B_V37B_AR.book Page 40 Monday, February 4, 2008 4:03 PM
 Loading...