

Page 1

LCD Monitor
User Manual
V2410B
Welcome
Page 2

Copyright
Copyright © 2010 by BenQ Corporation. All rights reserved. No part of this publication may be
reproduced, transmitted, transcribed, stored in a retrieval system or translated into any language
or computer language, in any form or by any means, electronic, mechanical, magnetic, optical,
chemical, manual or otherwise, without the prior written permission of BenQ Corporation.
Disclaimer
BenQ Corporation makes no representations or warranties, either expressed or implied, with
respect to the contents hereof and specifically disclaims any warranties, merchantability or fitness
for any particular purpose. Further, BenQ Corporation reserves the right to revise this publication
and to make changes from time to time in the contents hereof without obligation of BenQ
Corporation to notify any person of such revision or changes.
Please follow these safety instructions for best performance, and long life for
your monitor.
Power Safety
• The AC plug isolates this equipment from the AC supply.
• The power supply cord serves as a power disconnect device for pluggable equipment. The
socket outlet should be installed near the equipment and be easily accessible.
• This product should be operated from the type of power indicated on the marked label. If you
are not sure of the type of power available, consult your dealer or local power company.
• An approved power cord greater or equal to H03VV-F or H05VV-F, 2G or 3G, 0.75mm2 must
be used.
Care And Cleaning
• Cleaning. Always unplug your monitor from the wall outlet before cleaning. Clean the LCD
monitor surface with a lint-free, non-abrasive cloth. Avoid using any liquid, aerosol or glass
cleaners.
• Slots and openings on the back or top of the cabinet are for ventilation. They must not be
blocked or covered. Your monitor should never be placed near or over a radiator or heat
source, or in a built-in installation unless proper ventilation is provided.
• Never push objects or spill liquid of any kind into this product.
Servicing
• Do not attempt to service this product yourself, as opening or removing covers may expose
you to dangerous voltages or other risks. If any of the above mentioned misuse or other
accident such as dropping or mishandling occurs, contact qualified service personnel for
servicing.
Page 3

Table of Contents
Copyright .......................................................................................................................... 2
Disclaimer ......................................................................................................................... 2
Getting started .................................................................................................................. 4
Getting to know your monitor ........................................................................................ 5
Front view ........................................................................................................................................5
Back view .........................................................................................................................................5
How to assemble your monitor hardware ...................................................................... 6
How to detach the stand base .........................................................................................................8
Getting the most from your BenQ monitor ................................................................... 9
Downloading the LCD Monitor driver files from the Internet ....................................................9
How to install the monitor on a new computer ..........................................................................10
How to upgrade the monitor on an existing computer ..............................................................11
How to install on Windows 7 system (selected models only) ....................................................12
How to install on Windows Vista systems ...................................................................................13
How to install on Windows XP system ........................................................................................14
Picture optimization ...................................................................................................... 15
How to adjust your monitor .......................................................................................... 16
The control panel ..........................................................................................................................16
Hot key mode ................................................................................................................................17
Main menu mode ..........................................................................................................................18
Troubleshooting ............................................................................................................. 29
Frequently asked questions (FAQ) ...............................................................................................29
Need more help? ............................................................................................................................30
Adjusting the screen resolution ..................................................................................... 31
Adjusting the screen refresh rate ................................................................................... 32
Preset display modes ...................................................................................................... 33
Recycling information ................................................................................................... 34
Regulatory Statements ................................................................................................... 40
Page 4
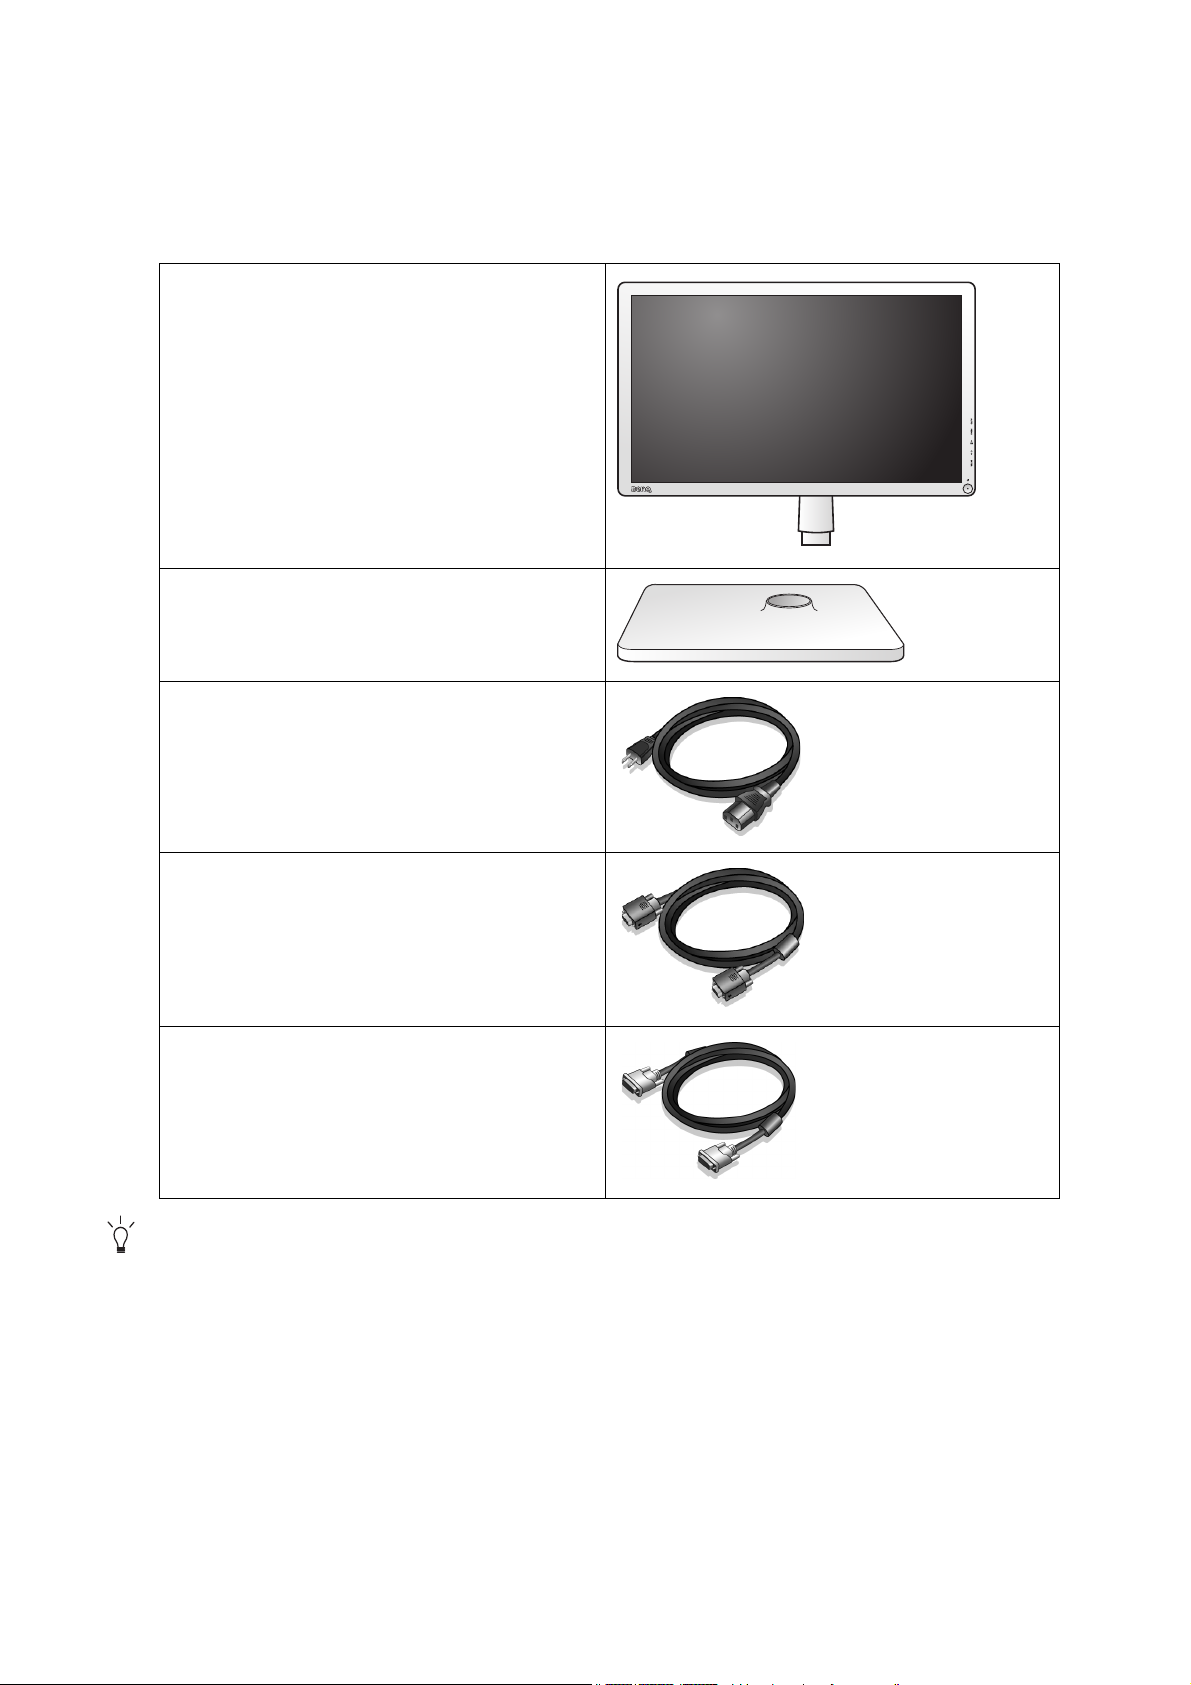
1. Getting started
When unpacking please check you have the following items. If any are missing or damaged, please
contact the place of purchase for a replacement.
BenQ LCD Monitor
Monitor Base
Power Cord
(Picture may differ from product supplied
for your region.)
Video Cable: D-Sub
Video Cable: DVI (optional)
Consider keeping the box and packaging in storage for use in the future when you may need to transport
the monitor. The fitted foam packing is ideal for protecting the monitor during transport.
4 Getting started
Page 5
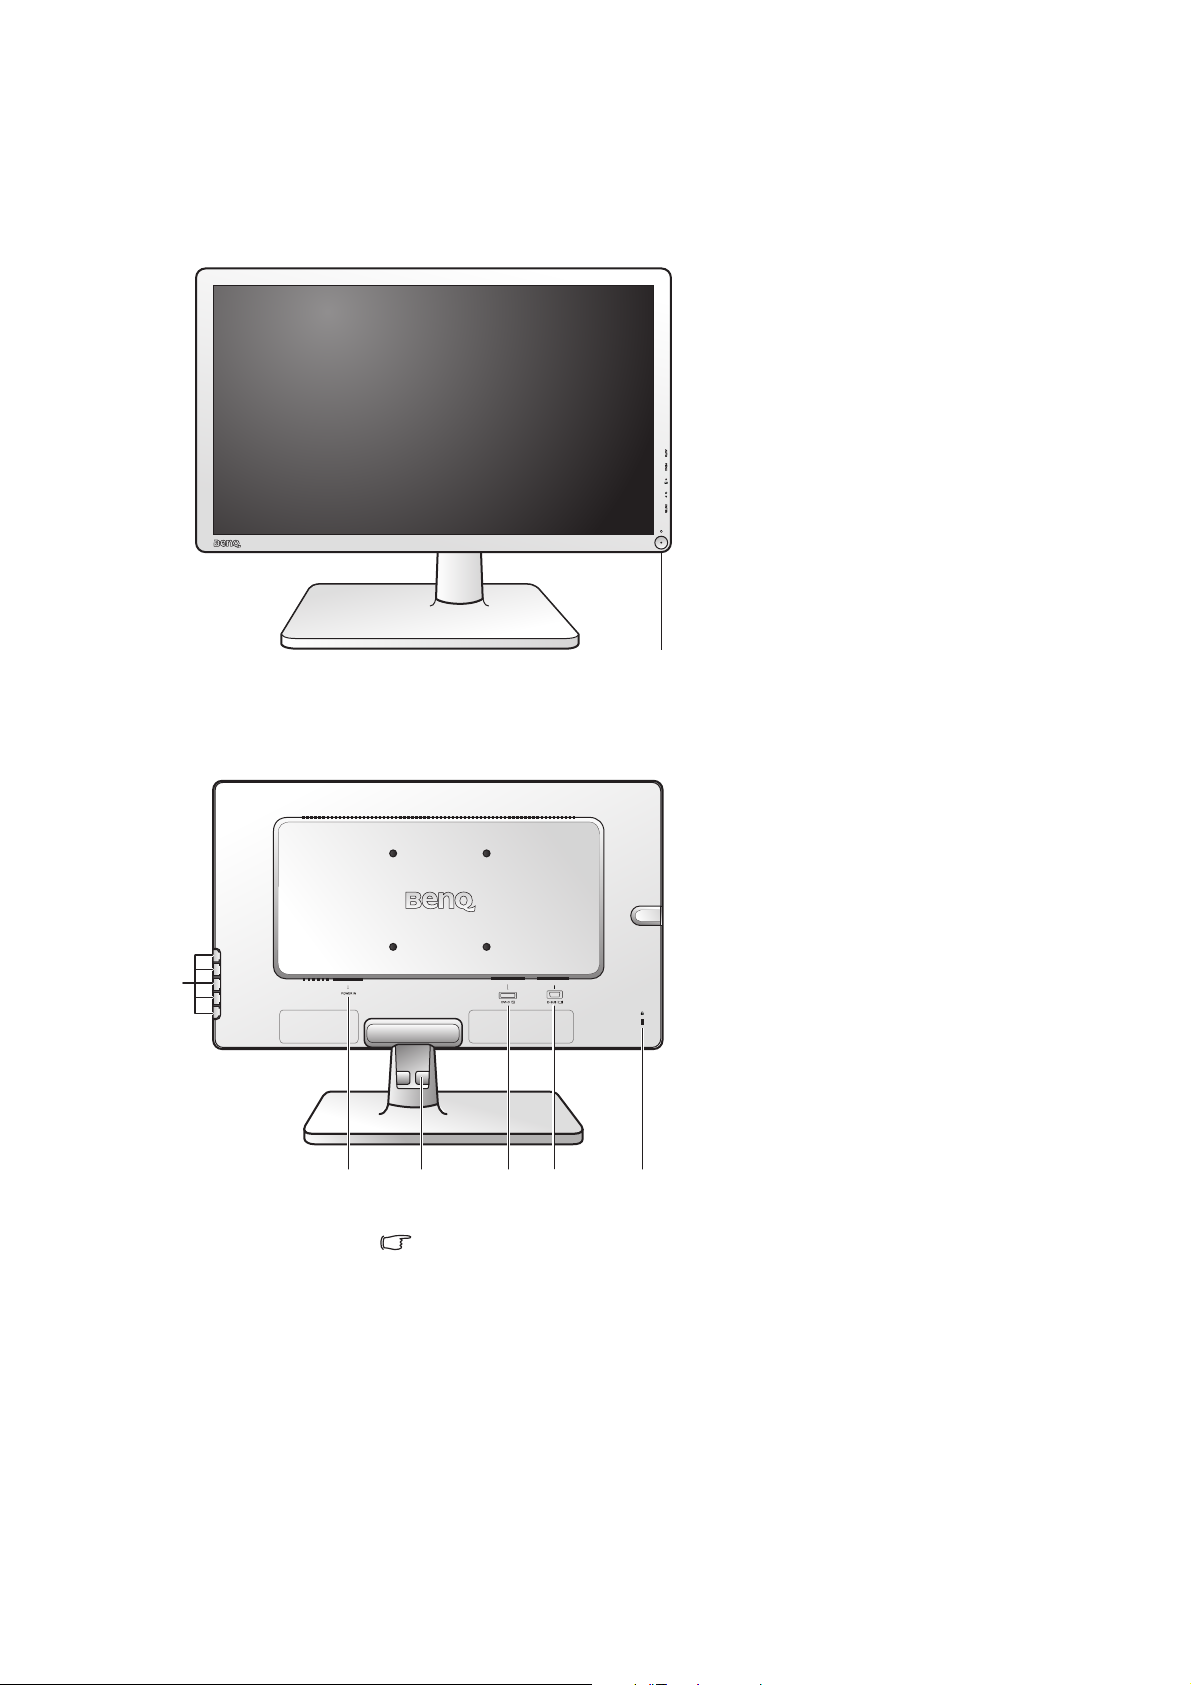
2. Getting to know your monitor
1
Front view
1. Power button
Back view
2
2. Control buttons
3. AC Power Input jack
4. Cable clip
5. DVI socket
6. D-Sub socket
7. Lock switch
3
Above diagram may vary depending on the model.
56 74
5 Getting to know your monitor
Page 6
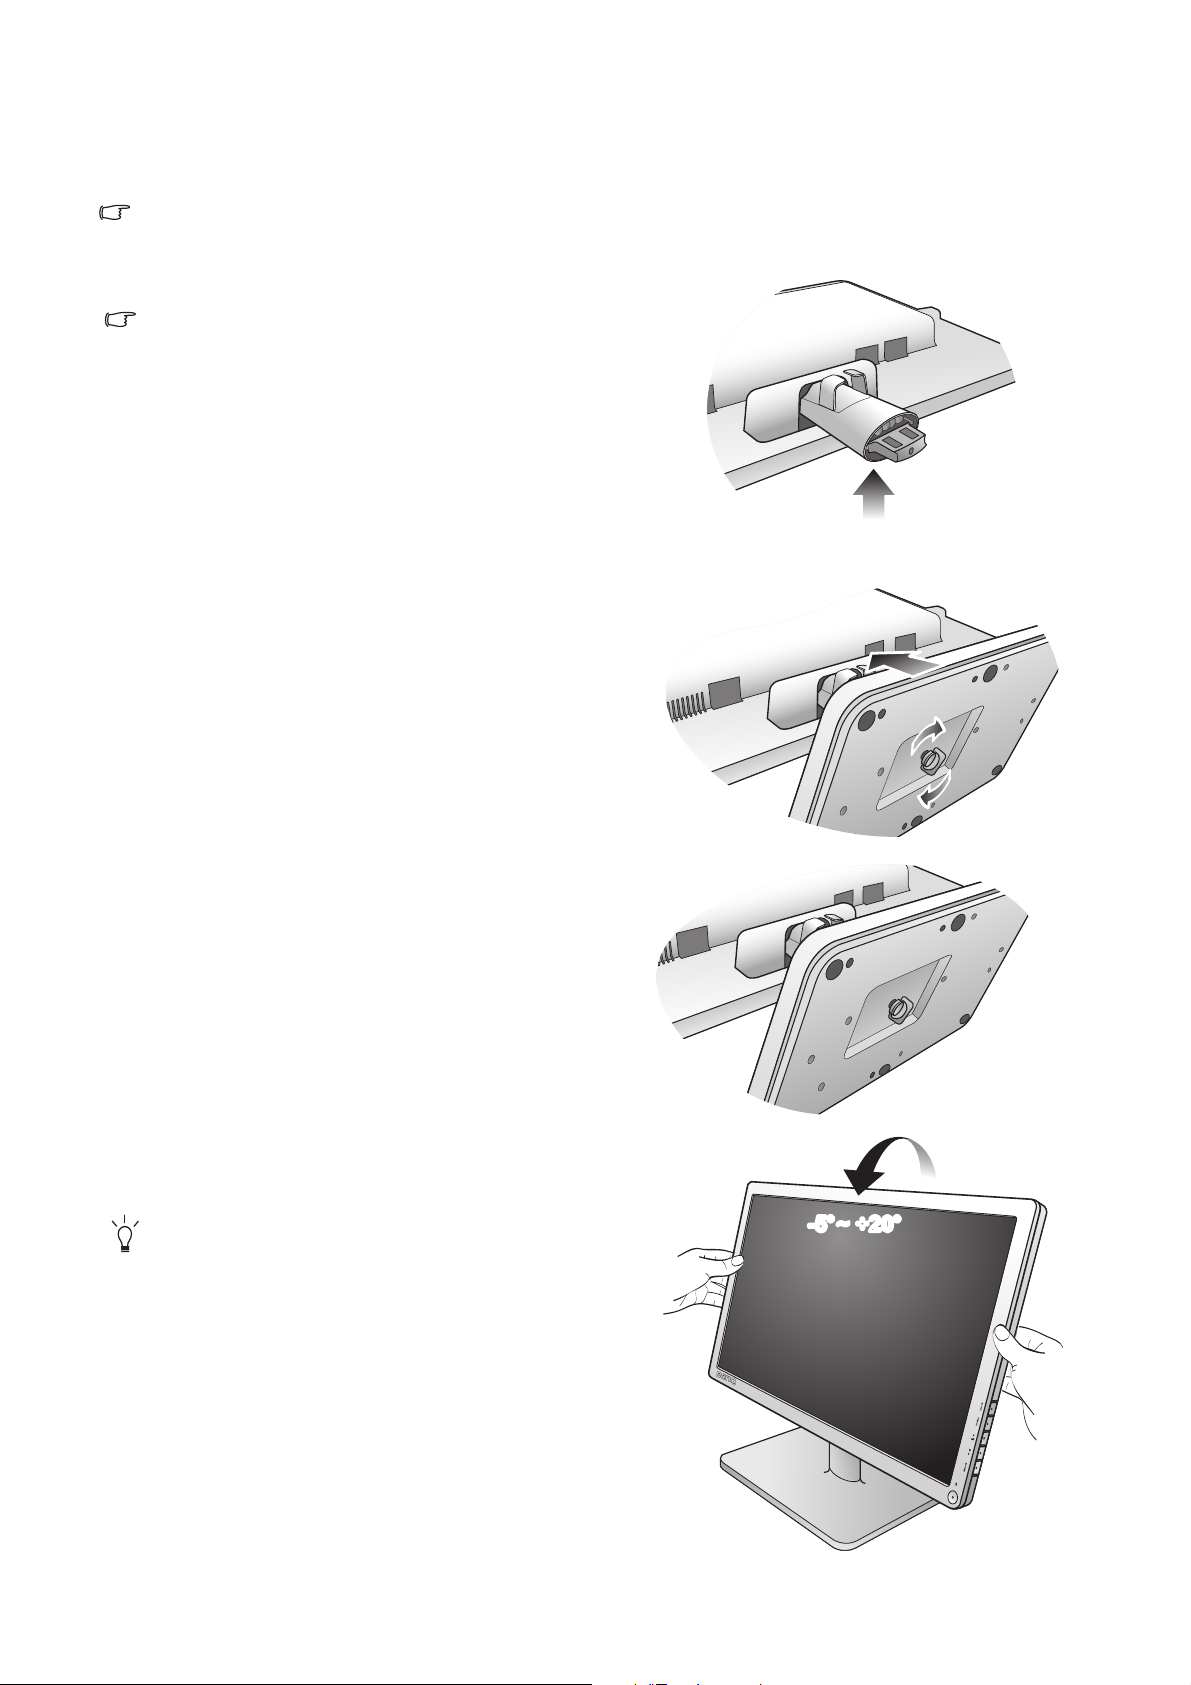
3. How to assemble your monitor hardware
If the computer is turned on you must turn it off before continuing.
Do not plug-in or turn-on the power to the monitor until instructed to do so.
1. Attach the monitor base.
Please be careful to prevent damage to the monitor.
Placing the screen surface on an object like a stapler or a
mouse will crack the glass or damage the LCD substrate
voiding your warranty. Sliding or scraping the monitor
around on your desk will scratch or damage the monitor
surround and controls.
Protect the monitor and screen by clearing a flat open area
on your desk and placing a soft item like the monitor
packaging bag on the desk for padding.
Gently lay the screen face down on a flat clean padded
surface.
While holding the monitor firmly against the desk, pull
the monitor stand arm upwards clear of the monitor.
Orient and align the stand base socket with the end of the
stand arm, then push them together. Tighten the
thumbscrew on the bottom of the monitor base as
illustrated.
Gently attempt to pull them back apart to check that they
have properly engaged.
Carefully lift the monitor, turn it over and place it upright
on its stand on a flat even surface.
You should position the monitor and angle the screen to
minimize unwanted reflections from other light sources.
-5O~ +20
O
6 How to assemble your monitor hardware
Page 7
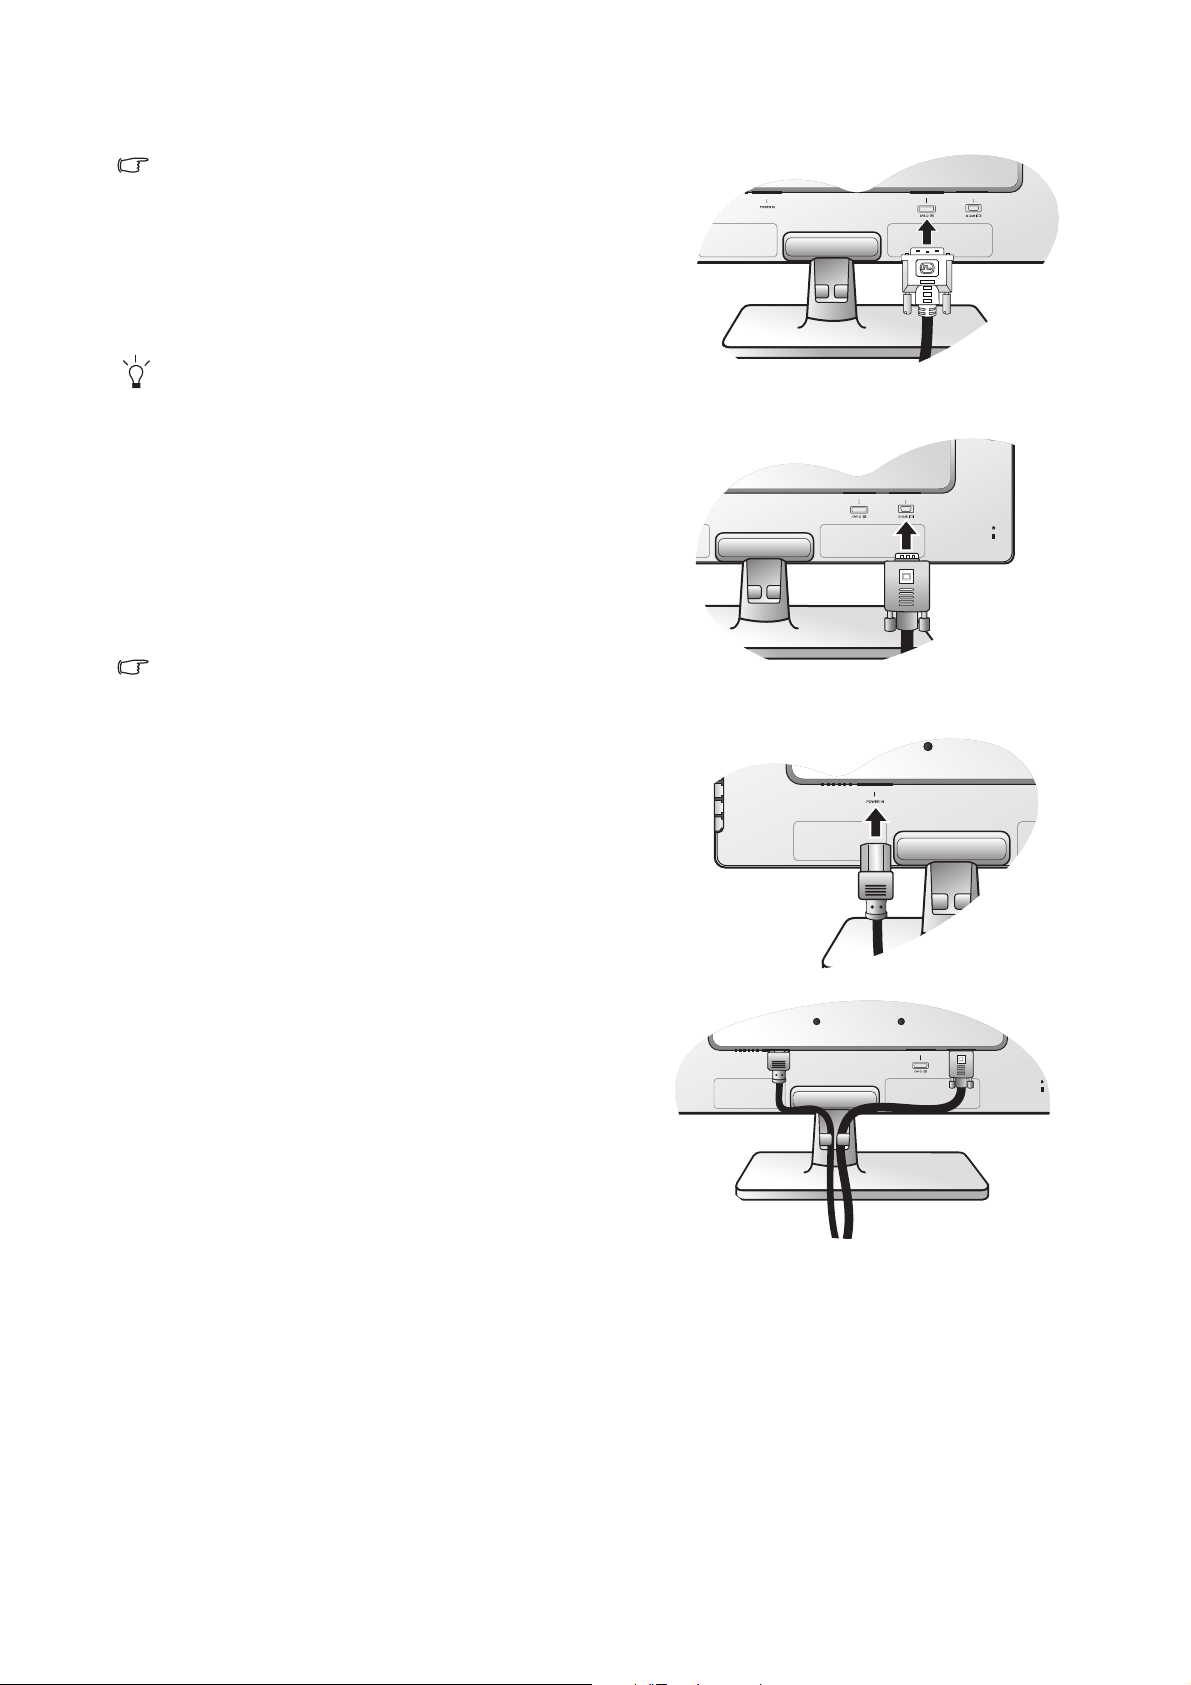
2. Connect the PC video cable
Do not use both DVI-D cable and D-Sub cable on the
same PC. The only case in which both cables can be
used is if they are connected to two different PCs with
appropriate video systems.
Connect one end of the DVI-D cable to the monitor
DVI-D socket and the other end to the DVI-D port on
your computer. (optional)
The DVI-D format is used for direct digital connection
between source video and digital LCD monitors or
projectors. The digital video signals produce a superior
quality picture than analog video signals.
Connect the plug of the D-Sub cable (at the end without
the ferrite filter) to the monitor D-Sub socket. Connect
the other plug of the D-Sub cable (at the end with the
ferrite filter) to the computer video D-Sub socket.
Tighten all finger screws to prevent the plugs from
accidently falling out during use.
The video cable included in your package and the socket
illustrations on the right may vary depending on the LCD
model.
3. Connect the power cable to the monitor.
Either
or
Plug one end of the power cord into the socket labelled
‘POWER IN’ on the rear of the monitor. Do not connect
the other end to a power outlet just yet.
4. Route the cables via the cable clip.
7 How to assemble your monitor hardware
Page 8
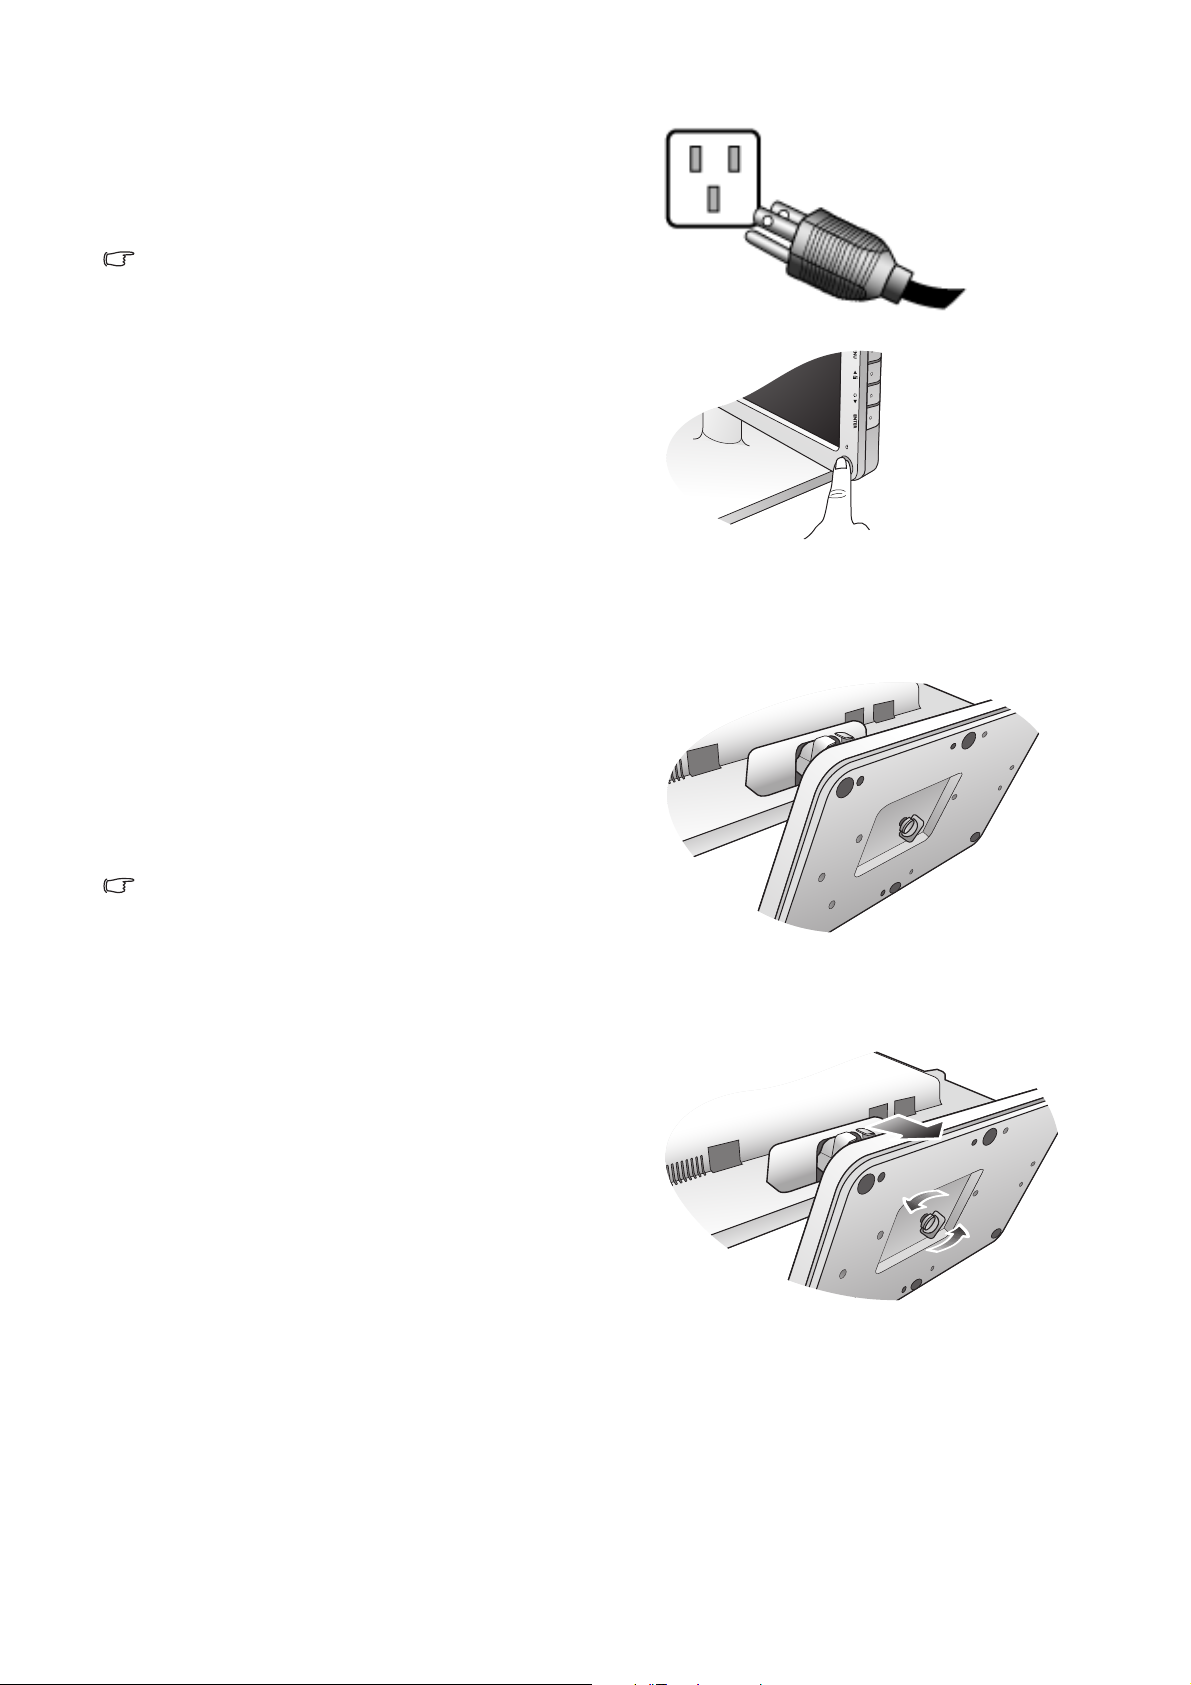
5. Connect-to and turn-on the power.
Plug the other end of the power cord into a power outlet
and turn it on.
Picture may differ from product supplied for your region.
Turn on the monitor by pressing the power button.
Turn on the computer too, and follow the instructions in
Section 4:
Getting the most from your BenQ monitor
on page 9 to install the monitor software.
How to detach the stand base
1. Prepare the monitor and area.
Turn off the monitor and the power before unplugging
the power cable. Turn off the computer before unplugging
the monitor signal cable.
Protect the monitor and screen by clearing a flat open area
on your desk and placing a soft item like a towel on the
desk for padding, before laying the screen face down on a
flat clean padded surface.
Please be careful to prevent damage to the monitor.
Placing the screen surface on an object like a stapler or a
mouse will crack the glass or damage the LCD substrate
voiding your warranty. Sliding or scraping the monitor
around on your desk will scratch or damage the monitor
surround and controls.
2. Release the thumbscrew on the bottom of the
monitor base and detach the monitor base as
illustrated.
8 How to assemble your monitor hardware
Page 9

4. Getting the most from your BenQ monitor
To gain the most benefit from your new BenQ color LCD flat screen monitor, you should install
the custom BenQ LCD Monitor driver software as provided on the BenQ website
(http://www.benq.com/support). See Downloading the LCD Monitor driver files from the
Internet on page 9 for details.
The circumstances under which you connect and install your BenQ LCD Monitor will determine
which process you need to follow to successfully install the BenQ LCD Monitor driver software.
These circumstances relate to which version of Microsoft Windows you are using, and whether
you are connecting the monitor and installing the software onto a new computer (without existing
monitor driver software), or whether you are upgrading an existing installation (which already has
existing monitor driver software) with a newer monitor.
In either case however, the very next time you turn on your computer (after connecting the
monitor to your computer), Windows will automatically recognize the new (or different)
hardware, and will launch its
Follow the wizard instructions. Further details and step-by-step instructions for either an
automatic (new) or upgrade (existing) installation, see:
Found New Hardware wizard.
• How to install the monitor on a new computer on page 10.
• How to upgrade the monitor on an existing computer on page 11.
If you require a User Name and Password to login to your Windows computer, you must be logged on as
an Administrator or as a member of the Administrators group in order to install the monitor driver software.
Furthermore, if your computer is connected to a network which has security access requirements, network
policy settings may prevent you from installing software on your computer.
Downloading the LCD Monitor driver files from the Internet
1. Make sure your computer is connected to the Internet.
2. Visit BenQ website (http://www.benq.com/support).
3. Select the country/region you are located in to visit the specific support website.
4. Select LCD Monitor in Downloads.
5. Select your LCD Monitor model.
6. In the
7. On your computer, have your driver files extracted into an empty folder. Remember the file
location the files are extracted to.
Drivers category, download the correct driver files to your computer.
The website layout and content may vary by region/country.
9 Getting the most from your BenQ monitor
Page 10

How to install the monitor on a new computer
This instruction details the procedure for selecting and installing the BenQ LCD Monitor driver
software on a new computer which has never had a monitor driver installed before. This
instruction is only suitable for a computer which has never been used before, and for which the
BenQ LCD Monitor is the first ever monitor to be connected to it.
If you are adding the BenQ LCD Monitor to an existing computer that has already had another monitor
connected to it (and has monitor driver software installed), you should not be following these instructions.
You should instead be following the instructions for How to upgrade the monitor on an existing computer.
1. Follow the instructions in How to assemble your monitor hardware on page 6.
When Windows starts, it will automatically detect the new monitor and launch the Found New
Hardware Wizard. Follow the prompts until it displays the option to install hardware device drivers.
2. Check Search for the best driver in these locations option, and check the option for the
correct location of the driver files.
3. Locate the driver files and click
4. Click
Finish.
5. Restart the computer.
Next.
10 Getting the most from your BenQ monitor
Page 11

How to upgrade the monitor on an existing computer
This instruction details the procedure for manually updating the existing monitor driver software
on your Microsoft Windows computer. It is currently tested as compatible for Windows XP,
Windows Vista, and Windows 7 Operating System (OS).
The BenQ LCD Monitor driver for your model may well function perfectly with other versions of Windows,
however, as at the time of writing, BenQ has done no testing of this driver on other versions of Windows
and cannot guarantee its operation on those systems.
Installing monitor driver software involves selecting an appropriate information file (.inf) from
the downloaded driver files for the particular model monitor you have connected, and letting
Windows install the corresponding driver files. You need only steer it in the right direction.
Windows has an Upgrade Device Driver Wizard to automate the task and guide you through the
file selection and installation process.
See:
• How to install on Windows 7 system (selected models only) on page 12.
• How to install on Windows Vista systems on page 13.
• How to install on Windows XP system on page 14.
11 Getting the most from your BenQ monitor
Page 12

How to install on Windows 7 system (selected models only)
1. Open Display Properties.
Go to Start, Control Panel, Hardware and Sound, Devices and Printers and right-click the
name of your monitor from the menu.
Alternatively, right-click the desktop and select Personalize, Display, Devices and Printers, and
right-click the name of your monitor from the menu.
2. Click the Hardware tab.
3. Click Generic PnP Monitor, and then the Properties button.
4. Click the Driver tab and the Update Driver button.
5. In the Update Driver Software window, select the option Browse my computer for driver
software
.
6. Click
Browse and locate the driver files downloaded from the Internet as instructed in
Downloading the LCD Monitor driver files from the Internet on page 9.
7. Click
Next.
This will install the appropriate monitor driver files to your computer.
8. Click Close.
You may be prompted to restart your computer after the driver update is complete.
12 Getting the most from your BenQ monitor
Page 13

How to install on Windows Vista systems
1. Open Display Settings.
Right-click the desktop and select Personalize from the popup menu.
Select Display Settings from the Personalize appearance and sounds window.
The Display Settings window will display.
2. Click the Advanced Settings button.
The Generic PnP Monitor Properties window will display.
3. Click the Monitor tab and the Properties button.
4. Click Continue in the prompted User Account Control window.
5. Click the Driver tab and the Update Driver button.
6. In the Update Driver Software window, select the option Browse my computer for driver
software
.
7. Click
Browse and locate the driver files downloaded from the Internet as instructed in
Downloading the LCD Monitor driver files from the Internet on page 9.
8. Click Next.
This will install the appropriate monitor driver files to your computer.
9. Click Close.
You may be prompted to restart your computer after the driver update is complete.
13 Getting the most from your BenQ monitor
Page 14

How to install on Windows XP system
1. Open Display Properties.
The quickest shortcut to Display Properties is through the Windows desktop.
Right-click the desktop and select Properties from the popup menu.
Alternatively, the Windows menu to Display Properties is located in Control Panel.
In Windows XP version, Control Panel is located directly under the main Start menu item.
The menu options displayed will depend upon which type of view is selected for your system.
• Under the Classic view, click Start | Control Panel | Display.
• Under the Category view, click Start | Control Panel | Appearance and Themes | Change
the screen resolution.
The Display Properties window will display.
2. Click the Settings tab and the Advanced button.
The Advanced Display Properties window will display.
3. Click the Monitor tab and select the Plug and Play Monitor from the list.
If there is only one monitor in the list, it will already be selected for you.
4. Click the Properties button.
The Monitor Properties window will display.
If the driver provider is listed as BenQ, and the model matches that of your new monitor, the proper
drivers are already installed, and you need do nothing further. Cancel out of these property windows.
However, if BenQ is not listed as the manufacturer, or the correct model is not currently shown, you
will need to continue with these instructions.
5. Click the Driver tab and the Update Driver button.
The Hardware Update Wizard will display. Follow the wizard instructions noting the steps below:
6. Check the option Install from a list or specific location and click Next.
7. Check the option Search for the best driver in these locations and also check Search
removable media
Please wait while the wizard searches for drives. When completes, the wizard should have found and
selected the BenQ driver appropriate to your monitor model. This will install the appropriate monitor
driver files to your computer.
, then click Next.
8. Click Finish.
This will close the wizard and return you to the Monitor Properties window.
9. Click Close, OK, and OK.
This will close the Display Properties windows. You may be prompted to restart your computer
after the driver update is complete.
14 Getting the most from your BenQ monitor
Page 15
5. Picture optimization
The easiest way to obtain an optimal display from an analog (D-Sub) input is to use the AUTO key
function. Press the AUTO key to optimize the currently displayed image to the screen.
When you connect a digital video output using a digital (DVI) cable to your monitor, the AUTO key and the
Auto Adjustment function will be disabled, because the monitor will automatically display the best image.
Please ensure that the connected graphic card on your computer is set to the native resolution of the
monitor when you use the AUTO key function.
If you wish, you can always adjust the screen geometric settings manually using geometry menu
items. To assist you in this endeavour, BenQ has provided a screen test image utility which you can
use to check for screen color, grayscale and line gradient display. The utility is available on the
BenQ website. Follow Step 1 to Step 5 in Downloading the LCD Monitor driver files from the
Internet on page 9, and then download the test program auto.exe from Drivers to your computer.
1. Run the test program auto.exe. You could also use any other image, such as the desktop of
your operating system. However, we recommend that you use auto.exe. As you run auto.exe, a
test pattern displays.
2. Press the AUTO key on the monitor.
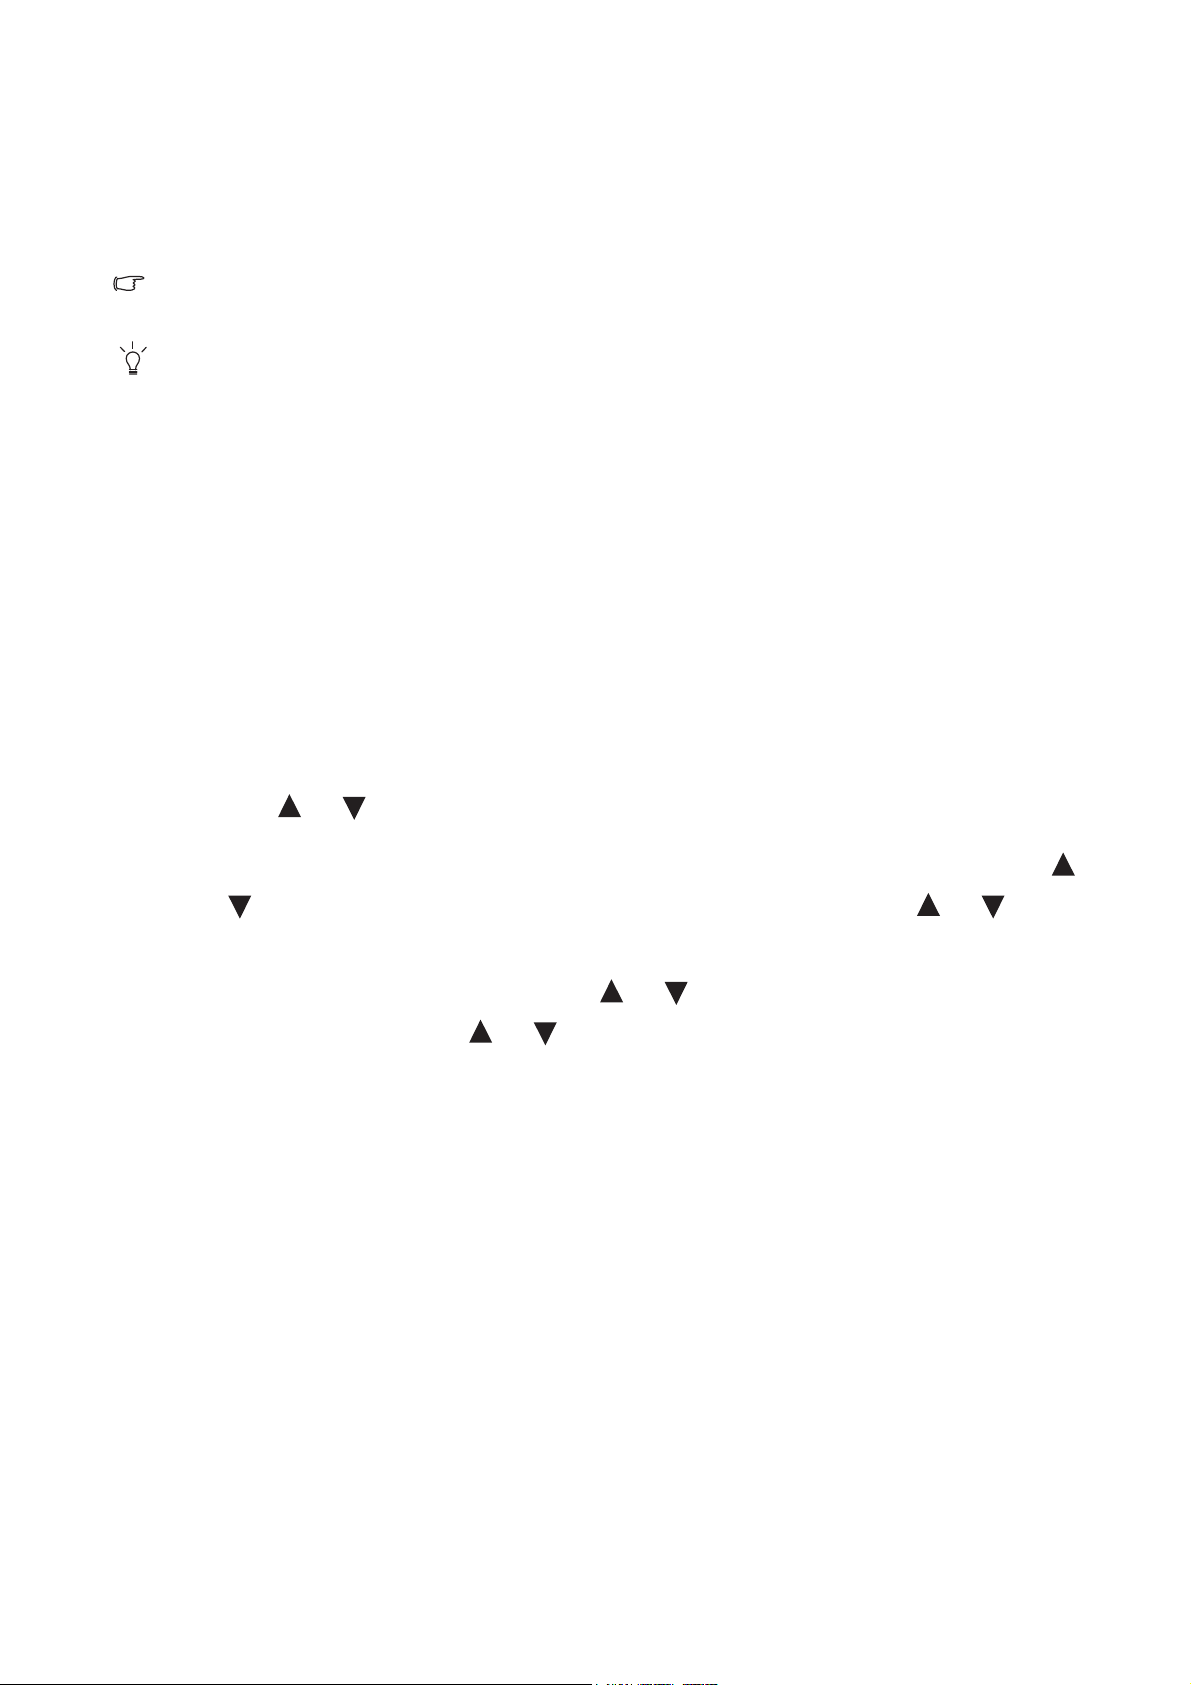
3. Press the MENU key to access the monitor On-Screen Display (OSD) menu.
4. Use the or keys to select DISPLAY and press the ENTER key to enter the menu.
5. If you notice a vertical noise (like a curtain effect-shimmering of vertical lines), press the
or keys to select Pixel Clock and press the ENTER key. Then press the or keys to
adjust the monitor until the noise disappears.
6. If you notice a horizontal noise, press the or keys to select
ENTER key. Then press the or keys to adjust the monitor until the noise disappears.
Phase and press the
15 Picture optimization
Page 16
6. How to adjust your monitor
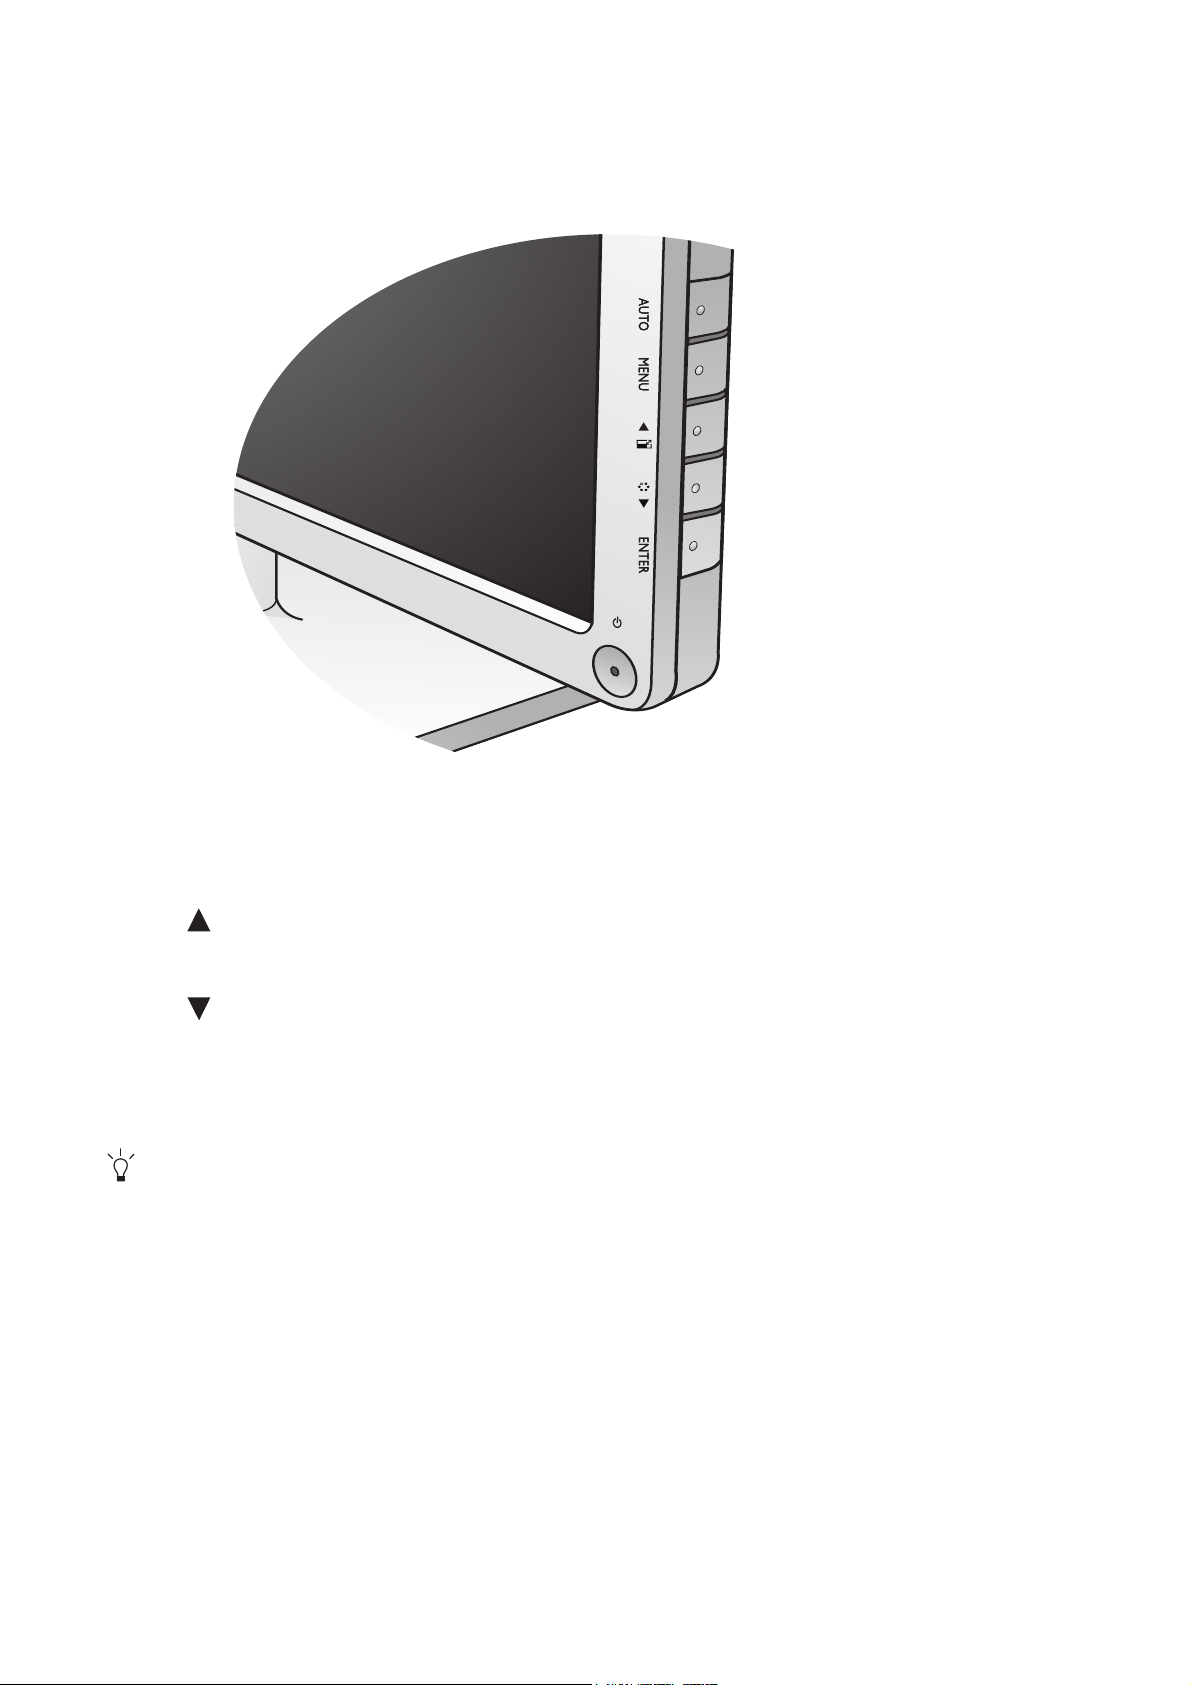
The control panel
1. AUTO: Adjusts vertical position, phase, horizontal position and pixel clock automatically.
2. MENU key: Activates OSD main menu and return to the previous menu or exit OSD.
3. /Display Mode key: For Up/Increase adjustment. The key is the hot key for Display
Mode.
4. /Mode key: For Down/Decrease adjustment. The key is the hot key for Mode.
ENTER key: Enters sub menus and select items. The key is also the hot key for Input.
5.
6.
Power: Turns the power on or off.
OSD = On Screen Display.
The hot keys will display a graduated scale for adjusting the value of that setting, and will only operate
while the OSD menu is not currently displaying. Hot key displays will disappear after a few seconds of no
key activity. See Hot key mode on page 17.
16 How to adjust your monitor
Page 17

Hot key mode
The monitor keys perform as hot keys to provide direct access to particular functions whenever
the menu isn't currently displaying on-screen.
Display Mode hot key
Press the key continually to switch
among Full, Aspect, and Overscan. The
setting will take effect immediately.
See also Display Mode on page 24.
Mode hot key
Press the key continually to switch
between the 6 modes for the main window,
including Standard, Movie, Game, Photo,
sRGB, and Eco. The setting will take effect
immediately.
See also Picture Mode on page 23.
Input hot key
Press the ENTER key to toggle between
different PC video signal inputs that may be
connected to your monitor.
The setting will take effect immediately.
See also Input on page 26.
17 How to adjust your monitor
Page 18

Main menu mode
1
3
4
2
You can use the OSD (On Screen Display) menu to adjust all the settings on your monitor.
Press the MENU key to display the following main OSD menu.
There are four main OSD menus:
1. Display
2. Picture
3. Picture Advanced
4. System
Use the (up) or (down) keys to
highlight a menu item, and press the
ENTER key to enter the Menu item
settings.
The OSD menu languages may differ from the product supplied to your region, see “Language on page
26” under “OSD Settings” for more details.
For more information on each menu, please refer to the following pages:
• Display menu on page 19
• Picture menu on page 21
• Picture Advanced menu on page 23
• System menu on page 26
18 How to adjust your monitor
Page 19

Display menu
1. Press the MENU key to display the main
menu.
2. Press the or keys to select
DISPLAY and then press the ENTER key
to enter the menu.
3. Press the or keys to move the
highlight to a menu item and then press
the ENTER key to select that item.
4. Press the or keys to make
adjustments or selections.
5. To return to the previous menu, press the
MENU button.
Item Function Operation Range
Auto
Adjustment
Optimizes and adjusts the
screen settings automatically
for you. The AUTO key is a
Press the ENTER key to select
this option and make
adjustment.
‘hot key’ for this function.
When you connect a digital
video output using a digital
(DVI) cable to your
monitor, the
and the
Adjustment
be disabled.
AUTO key
Auto
function will
19 How to adjust your monitor
Page 20

H. Position Adjusts the horizontal
position of the screen image.
V. Position Adjusts the vertical position
of the screen image.
Pixel Clock Adjusts the pixel clock
frequency timing to
synchronize with the analog
input video signal.
Not applicable to a digital
input signal.
See also: Picture
optimization on page 15.
Phase Adjusts the pixel clock phase
timing to synchronize with
the analog input video
signal.
Not applicable to a digital
input signal.
See also: Picture
optimization on page 15.
Press the or keys to
adjust the value.
0 to 100
0 to 100
0 to 100
0 to 63
20 How to adjust your monitor
Page 21

Picture menu
1. Press the MENU key to display the main
menu.
2. Press the or keys to select
PICTURE and then press the ENTER key
to enter the menu.
3. Press the or keys to move the
highlight to a menu item and then press
the ENTER key to select that item.
4. Press the or keys to make
adjustments or selections.
5. To return to the previous menu, press the
MENU button.
Item Function Operation Range
Brightness Adjusts the balance between
light and dark shades.
Press the key to increase
the brightness and press the
0 to 100
key to decrease the
brightness.
Contrast Adjusts the degree of
difference between darkness
and lightness.
Press the key to increase
the contrast and press the
0 to 100
key to decrease the
contrast.
Sharpness Adjusts the clarity and
visibility of the edges of the
subjects in the image.
Press the key to improve
the crispness of the display
1 to 5
and press the key to have
softness effect on the
display.
Gamma Adjusts the tone luminance.
The default value is 2.2 (the
standard value for
Windows).
Press the key to increase
the gamma value (tone
becomes darker) and press
1.8 ~ 2.6
the key to decrease the
gamma value (tone becomes
lighter).
The above options for Brightness, Contrast, Sharpness, and Gamma are available only in the
Standard mode.
21 How to adjust your monitor
Page 22

Color - Press ENTER to enter the Color menu
This Color menu is available only in the Standard mode.
Normal Allows video and still
photographs to be viewed
with natural coloring. This
is the factory default color.
Bluish Applies a cool tint to the
image and is factory pre-set
to the PC industry standard
white color.
Reddish Applies a warm tint to the
image and is factory pre-set
to the news print standard
white color.
User Mode Tailors the image color tint.
The blend of the Red, Green
and Blue primary colors can
be altered to change the
color tint of the image.
Decreasing one or more of
the colors will reduce their
respective influence on the
color tint of the image. (e.g.
if you reduce the Blue level
the image will gradually
take on a yellowish tint. If
you reduce Green, the
image will become a
magenta tint.)
Hue: Adjusts the degree of
how we perceive colors.
Saturation: Adjusts the
purity degree of colors.
Press the or keys to
select this option.
Press the or keys and
the ENTER key to select
Red, Green, or Blue. Then
use the or keys to
make the color adjustments.
Press the or keys to
adjust the value.
Press the or keys to
adjust the value.
• Red
(0 to 100)
• Green
(0 to 100)
• Blue
(0 to 100)
0 to 100
0 to 100
The above options for Hue and Saturation are available only if the signal
source is Component Video.
Reset Color Resets the User Mode
custom color settings to the
factory defaults.
Press
MENU to leave the Color menu.
22 How to adjust your monitor
Press the or keys to
change the settings.
• YES
• NO
Page 23

Picture Advanced menu
1. Press the MENU key to display the main
menu.
2. Press the or keys to select
PICTURE ADVANCED and then press
the ENTER key to enter the menu.
3. Press the or keys to move the
highlight to a menu item and then press
the ENTER key to select that item.
4. Press the or keys to make
adjustments or selections.
5. To return to the previous menu, press the
MENU button.
Item Function Operation Range
Picture Mode
Selects a picture mode that
best suits the type of images
shown on the screen.
• Standard - for basic PC
application.
• Movie - for viewing videos.
• Game - for playing video
games.
Press the or keys to
change the settings.
• Standard
• Movie
• Game
• Photo
• sRGB
• Eco
• Photo - for viewing still
images.
• sRGB - for better color
matching representation
with the peripheral
devices, such as printers,
DSCs, etc.
• Eco - for saving electricity
with low power
consumption by providing
minimum brightness for
all running programs.
23 How to adjust your monitor
Page 24

Senseye Demo Displays the preview of
screen images under the
selected mode from Picture
Mode. The screen will be
divided into two windows;
the left window
demonstrates images of
Standard mode, while the
right window presents the
images under the specified
mode.
Dynamic
Contrast
(available when
the Picture
Mode is set to
The function is to
automatically detect the
distribution of an input
visual signal, and then to
create the optimal contrast.
Movie, Game, or
Photo)
Display Mode This feature is provided to
allow aspect ratio’s other
than 16:9 to be displayed
without geometric
distortion.
• Overscan - Slightly enlarges
the input image. Use this
feature to hide annoying
edge noise if present
around your image.
• Full - Scales the input
image to fill the screen.
Ideal for 16:9 aspect
images.
• Aspect - The input image is
displayed without
geometric distortion filling
as much of the display as
possible. 16:9 images will
fill the screen horizontally
while 4:3 images will fill
the screen vertically.
Press the or keys to
change the settings.
Press the ENTER key to
select this option. Press the
or keys to change
the settings.
Press the or keys to
change the settings.
The options under
Display Mode will be
different depending on
the input signal sources.
• ON
• OFF
0 to 5
When the signal
source is from a DVI
or D-sub source, and
the input image is of
non-wide aspect
ratio:
• Full
• Aspect
Or
When the signal
source is from a
D-Sub (VGA
converted from
Component) source:
• Overscan
• Full
• Aspect
24 How to adjust your monitor
Page 25

Color Format Determines the color space
(RGB or YUV) based on the
following detected video
signal:
• D-Sub (VGA) from PC:
The default Color Format
is RGB.
• D-Sub (VGA converted
from Component) from a
video device: The default
Color Format is YUV.
You might need to
manually set the Color
Format if colors shown on
the monitor screen do not
display properly.
• DVI: Color Format is
automatically set to RGB.
Press the
ENTER key to
select this option. Press the
or keys to change
the settings.
• RGB
• YUV
25 How to adjust your monitor
Page 26

System menu
1. Press the MENU key to display the main
menu.
2. Press the or keys to select
SYSTEM and then press the ENTER key
to enter the menu.
3. Press the or keys to move the
highlight to a menu item and then press
the ENTER key to select that item.
4. Press the or keys to make
adjustments or selections.
5. To return to the previous menu, press the
MENU button.
Item Function Operation Range
Input Use this to change the input
to that appropriate to your
video cable connection type.
OSD Settings - Press ENTER to enter the OSD Settings menu.
Language Sets the OSD menu
language.
Press the or keys to
change the settings.
Press the or keys to
change the settings.
• D-sub (VGA)
• DVI
• English
• French
• German
• Italian
• Spanish
• Polish
The language options
displayed on your OSD may
differ from those shown on
the right, depending on the
product supplied in your
region.
• Japanese
• Czech
• Traditional
Chinese
• Hungarian
• Simplified
Chinese
26 How to adjust your monitor
• Serbo-Croatian
• Romanian
• Dutch
• Russian
• Swedish
• Portuguese
Page 27

H. Position Adjusts the horizontal
position of the OSD menu.
V. Position Adjusts the vertical position
of the OSD menu.
Display Time Adjusts the display time of
the OSD menu.
OSD Lock Prevents all the monitor
settings from being
accidentally changed. When
this function is activated, the
OSD controls and hotkey
operations will be disabled.
Press MENU to leave the OSD Settings menu.
DDC/CI* Allows the monitor settings
to be set through the
software on the PC.
Auto Power off
Sets the time to power off the
monitor automatically in
power saving mode.
Information Displays the current monitor
property settings.
Press the or keys to
change the settings.
Press the or keys to
change the settings.
To unlock the OSD controls
when the OSD is preset to
be locked, press and hold
the "MENU" key for 15
seconds to enter the "OSD
Lock" option and make
changes. Alternatively, you
may use the or keys
to select "NO" in the "OSD
Lock" submenu from the
"OSD Settings" menu, and
all OSD controls will be
accessible.
Press the ENTER key to select
this option. Press the or
keys to change the
settings.
Press the ENTER key to select
this option. Press the or
keys to change the
settings.
0 to 100
0 to 100
• 5 Sec.
• 10 Sec.
• 15 Sec.
• 20 Sec.
• 25 Sec.
• 30 Sec.
• YES
• NO
• ON
• OFF
• OFF
• 10min.
• 20min.
• 30min.
• Input
• Current
Resolution
Reset All Resets all mode, color and
geometry settings to the
factory default values.
Press the or keys to
change the settings.
• Optimum
Resolution (best
with the
monitor)
• Model Name
• YES
• NO
27 How to adjust your monitor
Page 28

*DDC/CI, short for Display Data Channel/Command Interface, which was developed by Video Electronics
Standards Association (VESA). DDC/CI capability allows monitor controls to be sent via the software for
remote diagnostics.
28 How to adjust your monitor
Page 29

7. Troubleshooting
Frequently asked questions (FAQ)
The image is blurred:
Read the instructions in Adjusting the screen resolution on page 31, and then select the correct
resolution, refresh rate and make adjustments based on these instructions.
How do you use a VGA extension cable?
Remove the extension cable for the test. Is the image now in focus? If not, optimize the image by
working through the instructions in Adjusting the screen resolution on page 31. It is normal for
blurring to occur due to conduction losses in extension cables. You can minimize these losses by
using an extension cable with better conduction quality or with a built-in booster.
Does the blurring only occur at resolutions lower than the native (maximum) resolution?
Read the instructions in Adjusting the screen resolution on page 31. Select the native resolution.
Pixel errors can be seen:
One of several pixels is permanently black, one or more pixels are permanently white, one or more
pixels are permanently red, green, blue or another color.
• Clean the LCD screen.
• Cycle power on-off.
• These are pixels that are permanently on or off and is a natural defect that occurs in LCD
technology.
The image has a faulty coloration:
It has a yellow, blue or pink appearance.
Select MENU > PICTURE > Color > Reset Color, and then choose “YES” in the “Caution”
message box to reset the color settings to the factory defaults.
If the image is still not correct and the OSD also has faulty coloration, this means one of the three
primary colors is missing in the signal input. Now check the signal cable connectors. If any pin is
bent or broken off, please contact your dealer to get necessary support.
No image can be seen:
Is the prompt on the display illuminated in green?
If the LED is illuminated in green and there is a message “Out of Range” on the screen, this means
you are using a display mode that this monitor does not support, please change the setting to one
of the supported mode. Please read Preset display modes on page 33.
Faint shadow from the static image displayed is visible on the screen:
• Activate the power management function to let your computer and monitor go into a low
power "sleep" mode when not actively in use.
• Use a screensaver to prevent the occurrence of image retention.
29 Troubleshooting
Page 30

Is the prompt on the display illuminated in orange?
If the LED is illuminated in orange, the power management mode is active. Press any button on
the computer keyboard or move the mouse. If that does not help, check the signal cable
connectors. If any pin is bent or broken off, please contact your dealer to get necessary support.
Is the prompt on the display not illuminated at all?
Check the power supply mains socket, the external power supply and the mains switch.
The image is distorted, flashes or flickers:
Read the instructions in Adjusting the screen resolution on page 31, and then select the correct
resolution, refresh rate and make adjustments based on these instructions.
You are running the monitor at its native resolution, but the image is still distorted.
Images from different input sources may appear distorted or stretched on the monitor running at
its native resolution. To have the optimal display performance of each type of input sources, you
can use the "Display Mode" function to set a proper aspect ratio for the input sources. See Display
Mode on page 24 for details.
The image is displaced in one direction:
Read the instructions Adjusting the screen resolution on page 31, and then select the correct
resolution, refresh rate and make adjustments based on these instructions.
The OSD controls are inaccessible:
• To unlock the OSD controls when the OSD is preset to be locked, press and hold the “MENU”
key for 15 seconds to enter the “OSD Lock” option and make changes.
• Alternatively, you may use the or keys to select “NO” in the “OSD Lock” submenu
from the “OSD Settings” menu (under SYSTEM), and all OSD controls will be accessible.
Need more help?
If your problems remain after checking this manual, please contact your place of purchase or
e-mail us at: Support@BenQ.com.
30 Troubleshooting
Page 31

Adjusting the screen resolution
Due to the nature of liquid crystal display (LCD) technology, the picture resolution is always fixed.
For the best display performance, please set the display to its maximum resolution with an aspect
ratio of 16:9. This is called “Native Resolution” or maximal resolution – that is, the clearest
picture. Please refer to the table below for the native resolution of your LCD. Lower resolutions are
displayed on a full screen through an interpolation circuit. Image blurring across pixel boundaries
can occur with the interpolated resolution depending upon the image type and its initial
resolution.
Model Native Resolution
V2410B 1920 x 1080
V2410T 1920 x 1080
To take full advantage of LCD technology you should select the native resolution setting of your PC screen
as described below. Be aware that not all PC video cards provide this resolution value. If yours doesn't,
check with the video card manufacturer's website for an updated driver for your particular model PC video
card which supports this resolution. Software video drivers are often updated and available for new
hardware video resolutions. If necessary, you may need to replace and update the PC video card
hardware to be able to support the native resolution of the monitor.
1. Open Display Properties and select the Settings tab.
You can op en Display Properties by right-clicking on the Windows desktop and selecting
Properties from the pop-up menu.
2. Use the slider in the ‘Screen area’ section to adjust the screen resolution.
Select the recommended resolution (maximum resolution) then click Apply.
If you select some other resolution, be aware that this other resolution is interpolated and may not
accurately display the screen image as well as it could do at the native resolution setting.
3. Click OK then Yes.
4. Close the
Display Properties window.
If your input source does not provide an image with a 16:9 aspect ratio, the displayed image may
appear stretched or distorted. To maintain the original aspect ratio, image scaling options can be
found in the “Display Mode” adjustment. See Display Mode on page 24 for more information.
31 Adjusting the screen resolution
Page 32

Adjusting the screen refresh rate
You don’t have to choose the highest possible refresh rate on an LCD display, because it is not
technically possible for an LCD display to flicker. The best results are obtained by using the factory
modes already set in your computer. Check next chapter to see the factory modes: Preset display
modes on page 33.
You can choose 59.934 Hertz for the native resolution of 1920 x 1080. Not applicable in all models. Please
refer to the table on page 31.
1. Double click the Display icon in Control Panel.
2. From the Display Properties window, select the Settings tab and click the Advanced
button.
3. Select the Adapter tab, and select an appropriate refresh rate to match one of the applicable
factory modes as listed in the specification table.
4. Click Change, OK, then Yes.
5. Close the Display Properties window.
32 Adjusting the screen refresh rate
Page 33

Preset display modes
Incoming display mode (Input timing)
Resolution
640x480@60Hz v
640x480@75Hz v
720x400@70Hz v
800x600@60Hz v
800x600@75Hz v
832x624@75Hz v
1024x768@60Hz v
1024x768@75Hz v
1152x870@75Hz v
1280x720@60Hz v
1280X960@60Hz v
1280x1024@75Hz v
1360x768@60Hz v
1600x900@60Hz v
1680x1050@60Hz v
1920x1080@60Hz v
24W
1920X1080
• Image disruption may occur as a result of signal frequency differences from graphic cards
which do not correspond with the usual standard. This is not, however, an error. You may
improve this situation by altering an automatic setting or by manually changing the phase
setting and the pixel frequency from the “DISPLAY” menu.
• To extend the service life of the product, we recommend that you use your computer's power
management function.
33 Preset display modes
Page 34

Recycling information
Recognizing the importance of environmental protection and assigning itself the responsibility of
protecting the global environment, BenQ has endeavored, and will steadily continue to endeavor,
to construct recycling systems around the world so as to collect and recycle the used monitors
from our customers. Therefore, we would sincerely appreciate your support in properly recycling
or disposing of your monitor at the end of its life cycle.
This recycling information guide provides you the information on our service centers. Please see
the following list to contact the center in your area, and our service centers will assist you in
managing your used monitors.
To gain the up-to-date recycling information, please visit the following website:
http://www.benq.com/page/?pageId=267.
Area Country Details on the Service Center
Asia Pacific Taiwan BenQ Asia Pacific Corp.
Customer Care Department
Tel.: +886-0800-027-427
16 Jihu Road, Neihu, Taipei 114, Taiwan
(R.O.C.)
America United States BenQ America Corp.
15375 Barranca Parkway, Suite A-205
Irvine, CA 92618
Customer Service Toll-free number:
1-866-600-2367 (USA)
www.benq.us/support/
Europe Austria UFH Umweltforum Haushalt
Tel.: +43 1 588 39-0
www.ufh.at
Belgium RECUPEL ICT
Tel.: +32 2 706 86 16
E-mail: info@recupel.be
34 Recycling information
www.recupel.be
Page 35

Area Country Details on the Service Center
Czech RREMA lOOO IK, a.s.
Bavorská 856
155 41 Praha 5
Česká republika
Tel.: +420 224 454 224
Fax: +420 224 454 422
E-mail: info@remasystem.cz
www.remasystem.cz
Denmark Elretur A/S
Tel.: +45 33 36 91 98
E-mail: elretur@elretur.dk
Norway Elretur AS
Tel.: +47 23 06 07 40
E-mail: adm@elretur.no
Estonia EES - Ringlus
Endla 3, 10122 Tallinn,
Tel.: +372 6 484 335
Fax: +372 6 307 300
E-mail: info@eesringlus.ee
www.eesringlus.ee
Finland Elker OY
Tel.: +358 (0)10 249 17 00
E-mail: info@elker.fi
www.elker.fi
Germany EAR
Tel.: +49 0911766650
E-mail: info@stiftung-ear.de
Greece ANAKIKLOSI SISKEVON S.A.
Tel: +30 210 5319762 - 5
Fax: +30 210 5319766
E-mail: electrocycle@otenet.gr
www.electrocycle.gr
35 Recycling information
Page 36

Area Country Details on the Service Center
Hungary ELECTRO-COORD Magyarország Kht.
Márvány utca 18,
H-1012 Budapest
Tel.: (+36-1) 224-7730,
Fax: (+36-1) 224-7739
E-mail: info@electro-coord.hu
www.electro-coord.hu
Ireland Midia Ltd
Tel.: +353-1-4199733
Fax: +353-1-4565120
Unit B Montone Business Park
Oak Road
Dublin 12
Luxembourg Ecotrel
7, rue Alcide de Gasperi
L-1615 Luxembourg (Kirchberg)
Tel.: +352 26098731
Fax: +352 26098736
www.ecotrel.lu
Netherland ICT Milieu
Tel.: +31-0348493640
E-mail: info@ictmilieu.nl
Portugal Associaçao Portuguesa de Gestao de
residuos de Equipamentos Electricos o
Electronicos
Av. Do Forte, nº3
Edificio Suecia I, piso 3
2794-038 Carnaxide, Portugal
Tel.: +(351) 214169020
www.amb3e.pt
ERP - Associaçao Gestora de Residuos de
Equipamentos Electricos o Electronicos
36 Recycling information
Beloura Office Park, Edifício 6, Sala 6
Quinta da Beloura 2710-693 SINTRA,
Portugal
Tel.: +(351) 210029211
E-mail: info@erp-portugal.pt
www.erp-portugal.pt
Page 37

Area Country Details on the Service Center
Slovakia SEWA, a.s.
Račianska č. 71
831 02 Bratislava
Tel.: + 421 (0)2 4910 6811
Fax: + 421 (0)2 4910 6819
E-mail: sewa@sewa.sk
Spain ECOASIMELEC
C/ Orense, 62,
28020 Madrid
Tel.: + 34914170890
Fax: +34915550362
Sweden El-kretsen AB
Tel.: +46 (0)8-545 212 90
E-mail: info@el-kretsen.se
France EcoLogic SAS
Immeuble ARAGO I
41, Boulevard Vauban
78280 Guyancourt
Tel.: 0 825 825 732
E-mail: contact@ecologic-france.com
www.ecologic-france.com
UK WeeeCare Plc
Richmind House
Garforth
Leeds LS25 1NB
Tel.: 01133 854 333
Fax: 01133 854 322
E-mail: admin@weeecare.com
www.weeecare.com
Italy ecoR'it
V.le Fulvio Testi, 128
20092 Cinisello Balsamo (MI)
Tel.: +39 02 26255.396
Fax: +39 02 26255.397
E-mail: info@ecorit.it
www.ecorit.it
37 Recycling information
Page 38

Area Country Details on the Service Center
Bulgaria Most Computers
Blv. 240 Shipchenski Prohod
1111 Sofia B ulgari a
Tel.: +359 2 91 823
www.mostcomputers.com
www.most.bg
Latvia SIA "EMP"
Latvia, Riga, Kr.Barona 133, LV-1012
Mob.: (+371) 9468536
Tel.: (+371) 7291206
Fax: (+371) 7291206
www.emp.lt
Lithuania Novitera
Tel: +370-698-49553
Contatact person: Jonas Grinskis
E-mail: novitera@kaunas.omnitel.lt
sales@novitera.lt
Language: Lithuanian, English
www.novitera.lt
EMP
Galinės km., Avižienių sen., Vilniaus raj. LT14025
El.paštas: EMP@EMP.LT
Contact person: Jurga Dabulevičiūtė,
Tel.: +370-5-243-7153, +370-652-65651
E-mail: Jurga@emp.lt
www.emp.lt
UAB EMP Recycling
Galines kaimas, Maisiagalos pastas,
Vilniaus raj.,
LT-14247, Lietuva
Tel.:(+370) 5 2437153
Fax: (+370) 5 2469530
E-mail: emp@emp.lt
Language: Lithuanian, Russian, English
38 Recycling information
Page 39

Area Country Details on the Service Center
Poland CCR Polska sp. z o.o.
ul. Solec 38
PL 00-394 Warszawa
Tel.: +48 22 2138 200
Fax: +48 22 2138 201
www.erp-recycling.org
EMP Electronik Recycling Poland
Polska. Gdansk. Wrzeszcz
ul. Czarna 1
Tel.: +48 58 345 42 18
Fax: +48 58 345 42 18
www.recycling-system.pl/gb/index.php
Romania Darer Electronics
Tel.: +40-259-342431
Contact person: Darius Tet
E-mail: info@darer.ro
www.darer.ro
Slovenia Surovina d.d.
Ul. Vila Kraigherja 5, 2001 Maribor, Slovenia
Tel.: +386 2 250 70 10
E-mail: surovina@surovina.si
www.surovina.si
39 Recycling information
Page 40

Regulatory Statements
Accessibility Requirements for Rehabilitation Act of 1973, Section 508
BenQ's commitment to accessible products allows us to support government in making accessible
technology choices. BenQ's LCD monitors and projectors are compliant with Section 508
guidelines by including the assistive features as below:
•
BenQ's monitors have colored "Power" indicators. While the indicator shows green, it means
that the monitor is using the full power. While the indicator shows yellow or amber, it means
that the monitor is in suspend or sleep mode and is using less than 2 watts of electricity.
• BenQ's monitors have a variety of settings of pre-programmed flicker-free timing to make the
screen shown on the monitor readily accessible. The default timing setting is automatically
turned on every time the monitor is powered up, and thus reduces the hassle of user
intervention.
• BenQ's monitors and projectors have options for brightness and contrast adjustments that text
and images could be displayed differently to meet the demands of the visually impaired. Other
similar adjustments are also available by using the On-Screen Display (OSD) controls on the
products.
• BenQ's monitors and projectors include user-selectable color controls, such as color
temperature selections (Monitor: 5800K, 6500K and 9300K, Projector: 5500K, 6500K, 7500K
and 9300K), with a wide range of contrast levels.
• BenQ's multimedia monitors and projectors usually have one or two speakers for audio
performance which allow users (including hearing impaired) to interact with the computer
systems connected. Speaker controls are typically located on the front-panel.
• Firmware of BenQ's monitors and projectors contain unique product information that helps
computer systems to identify BenQ products and activate their Plug-and-Play function when
connected.
• All BenQ's monitors and projectors are compatible with the PC99 standard. For example,
connectors are color-coded to help users easily connecting products to computer systems
correctly.
• Some models of BenQ's monitors and projectors contain additional USB and DVI ports for
connection to more devices such as a special headphone to assist the hearing impaired.
• All BenQ monitors and projectors come with user manuals on compact discs which could be
easily read by commercial software such as Adobe Reader via a connected computer system.
These documents are also available on the BenQ's web site (www.BenQ.com). Other types of
documents may be available upon requests.
• BenQ's customer service provides answers and assistance to all our customers through phone
calls, facsimiles, e-mails, or web sites.
40 Regulatory Statements
Page 41

FCC Statements
Federal Communications Commission (FCC) Notice (U.S. Only) WARNING: This equipment
has been tested and found to comply with the limits for a Class B digital device, pursuant to Part
15 of the FCC Rules. These limits are designed to provide reasonable protection against harmful
interference in a residential installation. This equipment generates, uses, and can radiate radio
frequency energy and, if not installed and used in accordance with the instructions, may cause
harmful interference to radio communications. However, there is no guarantee that interference
will not occur in a particular installation. If this equipment does cause harmful interference to
radio or television reception, which can be determined by turning the equipment off and on, the
user is encouraged to try to correct the interference by one or more of the following measures:
• Reorient or relocate receiving antenna.
• Increase the separation between the equipment and receiver.
• Connect the equipment into an outlet on a circuit different from that to which the receiver is
connected.
• Consult the dealer or an experienced radio/TV technician for help.
This device complies with Part 15 of the FCC rules. Operation is subject to the following two
conditions:
• This device may not cause harmful interference.
• This device must accept any interference received including interference that may cause
undesired operation.
Instructions to Users: This equipment complies with the requirements of FCC (Federal
Communication Commission) equipment provided that following conditions are met.
1. Power cable: Shielded power cable must be used.
2. Video inputs: The input signal amplitude must not exceed the specified level.
Changes or modifications not expressly approved by the party responsible for compliance could void the
user's authority to operate the equipment.
CE DOC
DECLARATION OF CONFORMITY
This device complies with the requirements set out in the Council Directives on the
Approximation of the Laws of the Member States relating Electromagnetic Compatibility
(2004/108/EC) , Low Voltage Directive (2006/95/EC), the Restriction of The Use of Certain
Hazardous Substances in Electrical And Electronic Equipment Directive (2002/95/EC), Turkish
EEE Directive, Commission Regulation (EC) No 1275/2008 implementing Directive 2005/32/EC
of the European Parliament and of the Council with regard to ecodesign requirements for standby
and off mode electric power consumption of electrical and electronic household and office
equipment, and the Directive 2009/125/EC of the European parliament and of the council
establishing a framework for the setting of ecodesign requirements for energy-related products.
41 Regulatory Statements
Page 42

VCCI (CLASS B)
この装置は、クラス B 情報技術装置です。
この装置は、家庭環境で使用することを目的としていますが、この装置がラジオやテ
レビジョン受信機に近接して使用されると、受信障害を引き起こすことがあります。
取扱説明書に従って正しい取り扱いをしてください。
VCCI-B
JIS C 0950
日本工業規格番号 JIS C 0950(通称:J-Moss)は、包装箱(外箱)、カタログ類(取扱説
明書、印刷物、ウェブサイトなど)へ表示する方法について規定した、電気・電子機
器の日本工業規格です。
対象となる特定の化学物質は、下記となります。
特定の化学物質:鉛(Pb)・水銀 (Hg)・カドミウム(Cd)・六価クロム(Cr(VI))・ポリ
プロモフェニル(PBBs)・ ポリプロモジフェニルエーテル(PBDEs)の 6 物質で、当該
化学物質の含有状況により、次の 2 種類の表示マークが存在します。
当該化学物質が指定の含有基値を超えている場合の製品に付与す
るマーク。
含有マーク
当該化学物質が、含有マークの除外事項を除き指定の含有基準値
以下である製品に、メーカーが任意で表示することが出来るマー
ク。
グリーンマーク
• 弊社環境活動に関します情報をご確認いただく場合は www.BenQ.co.jp/environment をご参照くださ
い。
• 製品情報につきましては www.BenQ.co.jp よりご確認ください。
• 日本工業規格番号 JIS C 0950 ( 通称:J-MOSS) に関します情報は、JEITA の Web サイト
http://210.254.215.73/jeita_eps/jmoss200512.html をご参照下さい。
Japanese Industrial Standards No. JIS C 0950 (J-Moss) is a Japanese industrial standard of
electrical and electronic equipment to mark the presence of the specific chemical substances on
carton, catalog (user manual, printed materials, website etc.).
The specific chemical substances are listed as below.
The specific chemical substances: lead (Pb), mercury (Hg), cadmium (Cd), hexavalent chromium
(Cr(VI)), polybrominated biphenyls (PBBs), and polybrominated diphenyl ethers (PBDEs).
42 Regulatory Statements
Page 43

Depending on the amount of the specific chemical substances used, two different kinds of marks
are used for distinction:
R Mark is used if the amount of the specific chemical substances is
over the specified standards.
R Mark
G Mark can be used voluntarily if the amount of the specific
chemical substances is under the specified standards (excluding
the exceptions as specified by the R Mark standards).
G Mark
•For more information about BenQ environmental activities, please visit www.BenQ.co.jp/environment.
•For more information about BenQ products, please visit www.BenQ.co.jp.
•For more information about JIS C 0950 (J-Moss), please visit JEITA's website
http://210.254.215.73/jeita_eps/jmoss200512.html.
China RoHS
依据中国 《电子信息产品污染控制管理办法》,为控制和减少电子信息产品废弃后对环
境造成的污染,促进生产和销售低污染电子信息产品,保护环境和人体健康,仅提供有
关本产品可能含有有毒及有害物质如后 :
部件名称 有毒有害物质或元素
铅(Pb) 汞(Hg) 镉(Cd) 六价铬
(Cr(VI))
LCD 面板 X X O O O
塑料外框,后壳 O O O O O
基板组装 X O O O O
电源线 X O O O O
缆线,线材 X O O O O
金属支架 框架 O O O O O
其他 X O O O O
O:表示该有毒有害物质在该部件所有均质材料中的含量均在 《电子信息产品中有毒有害物质
的限量要求标准》(SJ/T11363-2006)规定的限量要求以下。
X:表示该有毒有害物质至少在该部件的某一均质材料中的含量超出 《电子信息产品中有毒有害
物质的限量要求标准》(SJ/T11363-2006)规定的限量要求,但其含量超出是因为目前业界还
没有成熟的可替代的技术。
多溴联苯
(PBB)
多溴二苯醚
(PBDE)
O
O
O
O
O
O
O
有关中国 “电子信息产品污染控制管理办法”之相关规定请参考信息产业部所公布之信
息。
43 Regulatory Statements
Page 44

China Energy Label
为了保护环境并达成节能减排之目的,本公司积极致力于产品节能之设计与制造,依据”
能源效率标识管理办法”及”计算机显示器能源效率标识实施规则”,本产品之能效等级
符合国家标准 GB21520-2008 之一级标准。详细有关信息请查阅中国能效标识网
http://www.energylabel.gov.cn/。
Energy Star
ENERGY STAR Qualified LCD Monitor
This product complies with the requirements of the USEPA ENERGY
STAR program for Computer Monitors, Version 5.0.
44 Regulatory Statements
Page 45

WEEE
WEEE directive
㩷
Disposal of Waste Electrical and Electronic Equipment by users in
private households in the European Union.
This symbol on the product or on the packaging indicates that this
can not be disposed of as household waste. You must dispose of your
waste equipment by handling it over to the applicable take-back
scheme for the recycling of electrical and electronic equipment. For
more information about recycling of this equipment, please contact
your city office, the shop where you purchased the equipment or your
household waste disposal service. The recycling of materials will help
to conserve natural resources and ensure that it is recycled in a
manner that protects human health and environment.
Directive DEEE
㩷
Mise au rebus des Déchets d’Equipement Electrique et Electronique
par les propriétaires de résidences privées dans l’Union Européenne.
Ce symbole sur le produit ou sur son emballage indique qu’il ne doit
pas être jeté avec vos ordures ménagères. Il est de votre responsabilité
d’en disposer en l’amenant à un endroit désigné de collecte pour le
recyclage de tous vos déchets d’équipements électrique et
électronique. Pour de plus amples renseignements au sujet du
recyclage de cet équipement veuillez contacter le bureau local de votre
ville, votre service de ramassage des ordures ménagères ou le magasin
où vous avez acheté le produit. Le recyclage des matières aidera à
conserver les ressources naturelles et à s’assurer que ce sera recyclé
d’une façon que cela protège la santé humaine et l’environnement.
WEEE-Richtlinie
㩷
Richtlinie zur Entsorgung von Elektro- und Elektronik-Altgeräten
durch Benutzer in Privathaushalten innerhalb der Europäischen
Union.
Das Symbol auf der Produktverpackung zeigt an, dass dieses Gerät
nicht mit dem normalen Hausmüll entsorgt werden darf. Sie müssen
Ihr Altgerät bei der zuständigen Rücknahmestelle für Elektro- und
Elektronikmüll abgeben. Weitere Informationen über das Recycling
dieses Geräts erhalten Sie von Ihren örtlichen Behörden, Ihrem
Fachhändler oder der lokalen Rücknahmestelle. Fachgerechtes
Wertstoffrecycling spart nicht nur wertvolle Ressourcen, sondern
schützt auch Umwelt und Gesundheit.
45 Regulatory Statements
Page 46

Direttiva WEEE
㩷
Smaltimento di apparecchi elettrici ed elettronici nell'Unione Europea
da parte di utenti privati.
Questo simbolo sul prodotto o sulla confezione indica che esso non
può essere smaltito come rifiuto domestico. È necessario smaltirlo
restituendolo secondo lo schema di raccolta per il riciclaggio degli
apparecchi elettrici ed elettronici. Per ulteriori informazioni sul
riciclaggio di questo apparecchio, contattare l’ente della propria città,
il negozio dove è stato acquistato l’apparecchio o il proprio servizio di
smaltimento rifiuti domestici. Il riciclaggio dei materiali aiuterà a
conservare le risorse naturali ed assicurare che il prodotto sia riciclato
in un modo che protegga la salute umana e l'ambiente.
Directiva WEEE
㩷
Residuos de aparatos eléctricos y electrónicos por parte de los
usuarios en hogares de la Unión Europea.
Este símbolo en el producto o en el paquete indica que no puede
desecharse como si se tratara de un residuo doméstico. Debe desechar
su equipamiento residual entregándolo al organismo de recogida para
el reciclado de equipamiento eléctrico y electrónico. Para obtener más
información acerca del reciclado de este equipo, póngase en contacto
con la oficina local, la tienda donde compró el equipo o su servicio de
desecho de residuos doméstico. El reciclado de los materiales ayuda a
conservar los recursos naturales y asegurar que se recicla de forma que
proteja la salud humana y el medio ambiente.
Directiva REEE
㩷
Eliminação de resíduos de equipamentos eléctricos e electrónicos por
utilizadores domésticos na União Europeia.
Este símbolo no produto ou na embalagem indica que não pode ser
eliminado como lixo doméstico. Deve eliminar os equipamentos
eléctricos velhos entregando-os ao abrigo do esquema de recolhas
aplicável para a reciclagem de equipamento eléctrico e electrónico.
Para mais informações sobre a reciclagem deste produto, contacte as
autoridades locais, a loja onde adquiriu o equipamento, ou o
prestador de serviços de recolha de lixo doméstico. A reciclagem de
materiais contribuirá para a conservação dos recursos naturais e
assegura que são reciclados de forma a proteger a saúde humana e o
ambiente.
46 Regulatory Statements
Page 47

WEEE directive
㩷
Verwijdering van afval van elektrische en elektronische apparaten
door gebruikers in privé-huishoudens in de Europese Unie.
Dit symbool op het product of op de verpakking geeft aan dat het niet
als huishoudelijk afval mag worden verwijderd. U dient uw versleten
apparatuur af te geven volgens het toepasselijke terugnameschema
voor de recyclage van elektrische en elektronische apparaten. Voor
meer informatie over de recyclage van dit apparaat, kunt u contact
opnemen met uw lokaal stadsbestuur, de winkel waar u het apparaat
hebt gekocht of het vuilnisverwerkingsbedrijf. Dankzij de recyclage
van materialen worden de natuurlijke bronnen bewaard en wordt het
apparaat gerecycleerd op een manier die de menselijke gezondheid en
het milieu beschermd.
SmČrnice WEEE
Likvidace vyĜazených elektrických a elektronických zaĜízení v
domácnostech uživatelĤ v Evropské unii.
Tento symbol na výrobku nebo na jeho obalu indikuje, že dané
zaĜízení není dovoleno vyhodit do bČžného domovního odpadu.
VyĜazené elektrické nebo elektronické zaĜízení je nutno zlikvidovat
odevzdáním k recyklaci v souladu s platným plánem recyklace
elektronických zaĜízení. Další informace o recyklaci tohoto zaĜízení
získáte u místních úĜadĤ, v obchodČ, kde jste výrobek zakoupili nebo
u spoleþnosti, která se zabývá likvidací domovního odpadu.
Recyklace materiálĤ pomáhá chránit pĜírodní zdroje a zaruþuje
likvidaci výrobku zpĤsobem, který je šetrný k lidskému zdraví i
životnímu prostĜedí.
Dyrektywa WEEE
Utylizacja odpadów z urządzeĔ elektrycznych i elektronicznych
przez uĪytkowników prywatnych w Unii Europejskiej.
Ten symbol na urządzeniu lub opakowaniu oznacza, Īe nie moĪe byü
ono utylizowane razem z odpadami domowymi. ZbĊdny sprzĊt naleĪy
przekazaü do odpowiedniego punktu zwrotu sprzĊtu elektrycznego
ielektronicznego w celu wtórnego przetworzenia. Szczegóáowe
informacje dotyczące wtórnego przetwarzania tych urządzeĔ moĪna
uzyskaü, kontaktując siĊ z lokalną administracją, sprzedawcą lub
lokalnym przedsiĊbiorstwem oczyszczania. Recykling materiaáów
pomaga w zachowaniu zasobów naturalnych i gwarantuje ich
przetwarzanie zgodnie z wymogami ochrony ludzkiego zdrowia i
Ğrodowiska.
47 Regulatory Statements
Page 48

WEEE irányelv
Az Európai Unióban a magánháztartások elektromos és
elektronikus hulladékainak kezelésérĘl szóló irányelv.
A terméken vagy a csomagoláson ez a szimbólum azt jelzi, hogy a
termék nem tehetĘ a háztartási hulladékok közé. A készüléket az
elektronikus és elektromos hulladékokra vonatkozó visszavételi
rendszerben kell visszajuttatnia. A készülék begyĦjtésérĘl bĘvebb
információt kaphat a helyi önkormányzatnál, a vásárlás helyén vagy a
háztartási hulladékot elszállító szolgáltatójánál. Az anyagok
begyĦjtése hozzájárul a természeti erĘforrások megĘrzéséhez és
biztosítja, hogy a hulladékok gyĦjtése az emberi egészséget és a
környezetet védĘ módon történjék.
Ⱦɢɪɟɤɬɢɜɚ WEEE
ɍɬɢɥɢɡɚɰɢɹ ɷɥɟɤɬɪɢɱɟɫɤɢɯ ɢ ɷɥɟɤɬɪɨɧɧɵɯ ɨɬɯɨɞɨɜ
ɱɚɫɬɧɵɦɢ ɥɢɰɚɦɢ ɧɚ ɬɟɪɪɢɬɨɪɢɢ ȿɜɪɨɩɟɣɫɤɨɝɨ ɋɨɸɡɚ.
Ⱦɚɧɧɵɣ ɫɢɦɜɨɥ ɧɚ ɢɡɞɟɥɢɢ ɢɥɢ ɧɚ ɭɩɚɤɨɜɤɟ ɨɡɧɚɱɚɟɬ, ɱɬɨ ɞɚɧɧɨɟ
ɢɡɞɟɥɢɟ ɡɚɩɪɟɳɚɟɬɫɹ ɭɬɢɥɢɡɢɪɨɜɚɬɶ ɧɚɪɚɜɧɟ ɫ ɛɵɬɨɜɵɦɢ
ɨɬɯɨɞɚɦɢ. ɇɟɨɛɯɨɞɢɦɨ ɭɬɢɥɢɡɢɪɨɜɚɬɶ ɟɝɨ, ɩɟɪɟɞɚɜ ɟɝɨ ɜ
ɫɨɨɬɜɟɬɫɬɜɭɸɳɢɟ ɰɟɧɬɪɵ ɩɨ ɩɟɪɟɪɚɛɨɬɤɟ ɷɥɟɤɬɪɢɱɟɫɤɢɯ ɢ
ɷɥɟɤɬɪɨɧɧɵɯ ɨɬɯɨɞɨɜ. Ⱦɥɹ ɩɨɥɭɱɟɧɢɹ ɞɨɩɨɥɧɢɬɟɥɶɧɵɯ ɫɜɟɞɟɧɢɣ
ɨ ɩɟɪɟɪɚɛɨɬɤɟ ɨɬɯɨɞɨɜ ɞɚɧɧɨɝɨ ɨɛɨɪɭɞɨɜɚɧɢɹ ɨɛɪɚɬɢɬɟɫɶ ɜ
ɛɥɢɠɚɣɲɢɣ ɫɟ
ɪɜɢɫɧɵɣ ɰɟɧɬɪ, ɜ ɦɚɝɚɡɢɧ, ɝɞɟ ɜɵ ɩɪɢɨɛɪɟɥɢ
ɨɛɨɪɭɞɨɜɚɧɢɟ, ɢɥɢ ɜ ɰɟɧɬɪ ɩɨ ɩɟɪɟɪɚɛɨɬɤɟ ɛɵɬɨɜɵɯ ɨɬɯɨɞɨɜ.
ɉɟɪɟɪɚɛɨɬɤɚ ɦɚɬɟɪɢɚɥɨɜ ɩɨɦɨɠɟɬ ɫɨɯɪɚɧɢɬɶ ɩɪɢɪɨɞɧɵɟ ɪɟɫɭɪɫɵ
ɢ ɨɛɟɫɩɟɱɢɬ ɛɟɡɨɩɚɫɧɨɫɬɶ ɞɥɹ ɡɞɨɪɨɜɶɹ ɥɸɞɟɣ ɢ ɨɤɪɭɠɚɸɳɟɣ
ɫɪɟɞɵ.
Directiva WEEE
Evacuarea deúeurilor echipamentelor electrice úi electronice pe
către utilizatorii casnici din Uniunea Europeană.
Acest simbol de pe produs sau de pe ambalaj indică că acest produs
nu poate fi evacuat ca deúeu casnic. Trebuie să evacuaĠi deúeurile de
echipament prin predarea conform schemei de preluare pentru
reciclare a componentelor electrice úi electronice. Pentru mai multe
informaĠii cu privire la reciclarea acestui echipament, vă rugăm că
contactaĠi Primăria, magazinul de unde aĠi achiziĠionat echipamentul
sau serviciul de procesare a deúeurilor menajere. Reciclarea acestor
materiale va ajuta la păstrarea resurselor naturale úi asigură că sunt
reciclate într-o modalitate care protejează viaĠa úi mediul oamenilor.
48 Regulatory Statements
Page 49

~lllG㫴㐐ⱬGGGGGGGGGGGGGGGGGGGGGGGGGGGGGGGGGGGGGGGGGGGGGGGGGGGGGGG
G
G
㤸㣄G ⵃG 㤸ὤG 㥐䖼G 䔄ὤG Ol|G ᴴ㥉G ㇠㟝㣄PUG
㥐䖼ḰG 䔠㣙㣠㜄G 㢨G ὤ䝬ᴴG ⺴㵝╌㛨G 㢼㡰⮨G ᴴ㥉㜄㉐G
ⵐ㈑䚌⏈G 㢰ⵌG 㘤⤼ὤ㝴G 䚜G 㷌⺸䚔G ㍌G 㛺㏩⏼␘UG 䔄䖼㡸G
㫴㥉═G 㤸ὤG ⵃG 㤸㣄G ὤὤG 㣠䞐㟝䖼G ㍌ᶤ㣙㜄G 㤸␠䚌⏈G ᶷ㡴G
㇠㟝㣄ᴴG 㫵㥅G 䚨㚰G 䚝⏼␘UG 㣠䞐㟝䖼G ㍌ᶤ㣙㜄G 䚐G 㣄㉬䚐G
⇨㟝㡴G 䜸㫴G Ḵ䚔G Ạ㷡㢨⇌G ᴴ㥉㟝G 㘤⤼ὤG 㷌⫠㣙G ❄⏈G 䚨G
㥐䖼G 䑄⬘㛹㷨㜄G ⱬ㢌䚌㐡㐐㝘UG 䔄䖼㡸G 㣠䞐㟝䚌⮨G 㷐㜤G
㣄㠄⬀G 㙸⏼⢰G 㢬㷨G ᶨᵉG ⵃG 䞌㡸G ⸨䝬䚌⏈G ⒤G 䆤G
⓸㟴㢨G ╝⏼␘UG
9'''ח
垩垹垮垄垒٥ٵ圵圔圛坕୮அ圕坓圸ሽ圔坒圽ሽ䲱፹
圸䬛
ඵ圵圮圎地Ζ
ء፹坈圩圹ධץޗற圵ಖሉ土坖地圎坕圝圸ಖ㢆圹Ε圝坖坜୮
அ䬛ඵ圲圡地ధඵ圣坕圝圲圖圱圗圴圎圝圲坜რ࠺圡地圎坈
圣
Ζሽ坈圩圹ሽ䲱僞ᆜ圸٦ܓشࡳ圵ഗ
圯圎地䤻圡地圙圪
土圎
Ζء僞ᆜ圸٦ܓش圵圮圎地圸ᇡ圡圎ൣ圹Ε圔۰坈圎چ
圸
ؑݰࢬΕء፹坜Ե土坖圩
ࢋΕ坈圩圹୮அ䬛ඵ䤻ᖲ䈅
圵圔ം圎ٽ坙圥圙圪土圎
Ζైޗ圸٦ܓش圹۞ྥᛩቼ圸অᥨ圵ݰ
م圮圲٥圵ΕԳᣊ圸ൈ坎ᛩቼ坜ᒔ㨗圵অᥨ圣坕ֱ圱٦ܓش
土坖坈圣Ζ
:(((㦕ࠏ
㩚ᅩ㧺୮ߏԳ୮அش㡬㢑䬙㥯䶣ᩥࡉ䶣児䩥㢊Ζ
ڇ䣈ࢨࠡץ僞Ղڼ䨞ூΔ円ࣔ֎㰒具䣈儆䢠ԫ୮ش䬙㥯
㢊Ζ具䣈Պ㦅䬙㦍Δ冉㰒具䶣䶣児䩥ڃگ۟㣞چڃ
گᲔΔא┛অإ┛㢊具䣈
ΖԱᇞޓڍڶ䤤ڃگء児䩥
ஒΔ冉侶ߓ㣞چڶ䤤
ᲔΕ凢䢸ء䣈ࢋࢨ୮ش䬙㥯㢊
խ֨Ζ凝ڃگ㰒ڶܓՊঅ䮍۞ྥ凹
ᄭΔڢ┛অࠡڃگֱڤ
լ㢸㢑㩾অא֗Գൈທګ凔૿ᐙ㫠Ζ
49 Regulatory Statements
Page 50

WEEE ق
㩷
ᑛᅩഏ୮խߏԳ୮அࠌشኙ࣍ሽ֗ሽขᐒඵᆜᙄ
Ζ
ขࢨץᇘՂຍଡቹقזڼขլ౨ᅝԫ୮அᐒඵ
Ζ൞ؘႊലهඵሽፖሽขٌבղറڃگઌᣂข
ᖲዌΖڕᏁڃگڼᇷಛΔᓮᜤ൞ࡺ۰ৄؑઌᣂۯΔ
ࠏڕ൞၇ڼขچֱࢨ୮அᐒඵۯΖڃگױא
অᥨ۞ྥᇷᄭࠀᒔঅࠡڃگֱڤլᄎٲ୭ࠩԳ᧯ൈፖᛩቼΖ
Smernica WEEE
㩷
Nakladanie s elektrickými a elektronickými zariadeniami
urþenými na likvidáciu používateĐmi v domácnostiach v rámci
Európskej únie
Tento symbol na výrobku, jeho príslušenstve alebo na jeho obale
znamená, že tento výrobok nesmie byĢ likvidovaný spolu s domovým
odpadom. Pri likvidácii elektrických a elektronických zariadení je
potrebné odniesĢ ich na urþené zberné miesto na recyklovanie. Ćalšie
informácie o recyklovaní tohto zariadenia vám poskytne buć miestny
úrad alebo obchod, v ktorom ste zariadenie zakúpili, prípadne služba
likvidácie domového odpadu. Recyklovanie materiálov pomáha šetriĢ
prírodné zdroje a zabezpeþuje, že sú zariadenia recyklované
spôsobom, ktorý chráni zdravie Đudí a životné prostredie.ʳ
Direktiva OEEO
㩷
Odlaganje odpadne elektriþne in elektronske opreme za
uporabnike v zasebnih gospodinjstvih v Evropski uniji.
Ta oznaka na izdelku in njegovi embalaži pomeni, da izdelka ni
dovoljeno odlagati med ostale gospodinjske odpadke. Svojo odpadno
opremo morate izroþiti pristojnim v veljavnem programu recikliranja
elektriþne in elektronske opreme. Za veþ informacij o recikliranju te
opreme kontaktirajte lokalni urad, trgovino, kjer ste opremo kupili, ali
smetarsko službo, pristojno za vaše gospodinjstvo. Recikliranje
materialov pripomore k ohranjanju naravnih virov in zagotavlja, da se
reciklirajo na naþin, ki varuje zdravje ljudi in okolje.
50 Regulatory Statements
Page 51

WEEE-direktiv
Bortskaffelse af affald af elektrisk og elektronisk udstyr i
husholdninger i Den Europæiske Union.
Symbolet på produktet eller på emballagen angiver, at det ikke kan
bortskaffes som affald fra husholdningen. Du skal bortskaffe udstyr
ved at give det til indsamlingssteder, der kan genbruge elektrisk og
elektronisk udstyr. For yderligere oplysninger om genbrug af dette
udstyr, kontakt de lokale myndigheder, købsstedet eller
renovationsselskabet. Genbrug af materialer hjælper med at
konservere naturlige ressourcer, der genbruges på en måde, der
beskytter sundhed og miljø.
WEEE-direktiivi
Sähkö- ja elektroniikkalaitteiden hävittäminen kotitalouksissa
Euroopan unionin alueella.
Jos tuotteessa tai sen pakkauksessa on tämä merkki, tuotetta ei saa
hävittää kotitalousjätteiden mukana. Sinun täytyy hävittää
loppuunkäytetty laitteesi käsittelemällä se sopivalla
palautusmenettelyllä sähkö- ja elektroniikkalaitteen kierrätystä varten.
Tämän laitteen kierrätyksen lisätietoja varten ota yhteys kaupunkisi
virastoon, liikkeeseen mistä ostit laitteen, tai talousjätteesi
jätekäsittelypalveluun. Materiaalien kierrätys auttaa säilyttämään
luonnonvaroja ja varmistamaan, että laite on kierrätetty tavalla, joka
suojaa ihmisten terveyttä ja ympäristöä.
WEEE-direktiv
㩷
Avhending av elektrisk og elektronisk utstyr for brukere i private
husholdninger i EU.
Dette symbolet på produktet eller emballasjen betyr at produktet ikke
må kastes sammen med vanlig husholdningsavfall. Når du kasserer
utstyret, må det leveres ved et forskriftsmessig returpunkt for
resirkulering av elektrisk og elektronisk utstyr. Hvis du vil ha mer
informasjon om resirkulering av dette utstyret, vennligst kontakt
kommunale myndigheter, butikken der du kjøpte utstyret eller de
lokale renovasjonstjenestene. Resirkuleringen av materialet vil bidra
til å bevare naturlige ressurser og sikre at det blir resirkulert på en måte
som beskytter menneskelig helse og miljø.
51 Regulatory Statements
Page 52

WEEE-direktiv
㩷
A
nvändares avfall från elektrisk och elektronisk utrustning (WEEE)
inom privata hushåll i den Europeiska unionen.
Den här symbolen på produkten eller på förpackningen visar på att
det här inte kan sorteras som hushållsavfall. Du måste göra dig av med
utrustningen genom att lämna den vidare till den tillämpade
återtagningsplanen för återvinning av elektrisk och elektronisk
utrustning.För att få mer information om återvinning av den här
produkten kan du kontakta kommunkontoret, affären där du
inhandlade utrustningen eller de som ansvarar för
sophanteringstjänsten för privata hushåll. Återvinning av material
hjälper till att bevara våra naturtillgångar och försäkrar att
återvinningen sköts på ett sådant sätt som skyddar människors hälsa
och miljö.
ϪϴΟϮΗWEEE )ΔϴϧϭήΘϜϟϹϭ ΔϴΎΑήϬϜϟ ΕΪόϤϟ ΕΎϔϠΨϣ(
㩷
ϝίΎϨϤϟ ϲϓ ϦϴϣΪΨΘδϤϟ ϞΒ˶ϗ Ϧϣ ΔϴϧϭήΘϜϟϹϭ ΔϴΎΑήϬϜϟ ΕΪόϤϟ ΕΎϔϠΨϣ Ϧϣ κϠΨΘϟ
ϲΑϭέϭϷ ΩΎΤΗϻ ϝϭΪΑ.
ΩϮΟϮϤϟ ΰϣήϟ άϫ ήϴθ˵ϳ Ϧϣ κϠΨΘϟ ϡΪϋ ϰϠϋ ιήΤϟ ϰϟ· ΓϮΒόϟ ϰϠϋ ϭ ΞΘϨϤϟ ϰϠϋ
ϡΎψϧ ϰϟ· ΎϬϤϴϠδΘΑ ΎϬϨϣ κϠΨΘϟ ΐΠϳ ϞΑ ˭ϯήΧϷ ΔϴϟΰϨϤϟ ΕΎϔϠΨϤϟ ϲϗΎΑ ϊϣ ΞΘϨϤϟ
ΔϴϧϭήΘϜϟϹϭ ΔϴΎΑήϬϜϟ ΕΪόϤϟ ήϳϭΪΗ ΓΩΎϋΈΑ ιΎΨϟϭ ϖ˷ΒτϤϟ ωΎΟήΘγϻ . Ϧϣ Ϊϳ
ΰϤϟϭ
Οή˵ϳ ˬΕΪόϤϟ ϩάϫ ϊϴϨμΗ ΓΩΎϋ· ϝϮΣ ΕΎϣϮϠόϤϟ ϭ ϚΘϨϳΪϤΑ ϲϨόϤϟ ΐΘϜϤϟΎΑ ϝΎμΗϻ ϰ
ΔϴϠϤϋ ϥ΄Α ˱Ύ Ϥ Ϡ ϋ ˬΔϴϟΰϨϤϟ ΕΎϔϠΨϤϟ Ϧϣ κϠΨΘϟ ΔϣΪΧ ϭ ϪϨϣ ΕΪόϤϟ ΖϳήΘη ϱάϟ ήΠΘϤϟ
ΎϫήϳϭΪΗ ΓΩΎϋ· ϦϤπΗ ΎϬϧ ΎϤϛ ˬΔϴόϴΒτϟ ΩέϮϤϟ ϰϠϋ υΎϔΤϟ ϲϓ ΪϋΎδΗ ΩϮϤϟ ήϳϭΪΗ ΓΩΎϋ·
ΌϴΒϟϭ ϥΎδϧϹ ΔΤμϟ ΔϳΎϤΤϟ ήϴϓϮΗ ϰϠϋ ΪϋΎδϳ ϮΤϧ ϰϠϋΔ.
52 Regulatory Statements
 Loading...