


QWrite
Software Manual
Copyright © BenQ All Rights Reserved.
The contents of this manual can be changed for product enhancement.
Part of or all of this manual cannot be changed or transmitted to other parties without permission of BenQ.
Information of QWrite
The latest information and software will be provided at the BenQ website.

INDEX
Chapter 1. Introduction
Chapter 2. Circumstances
A. Cautions Before Use
B. PC requirements
Chapter 3. Installation
Chapter 4. Executing QWrite
A. Executing QWrite with QWrite icon
B. Executing QWrite with program menu
Chapter 5. Screen Constitution and Main Functions
A. type of Toolbar
B. Toolbar type and position
C. Floating toolbar
D. Description of Tools in Floating Toolbar
① Browsing Main Menu
② Selecting Color and Pen thickness
③ Switching Function
④ Choose a Transparent Mode, Pen and Diagram
⑤ Creating a Note
⑥ Page Up/Down
⑦ Recording
⑧ Eraser Tool
E. Description of Fixed Toolbar
① Browsing Main Menu
② Creating a Note
③ Choose a Color
④ Pen thickness control
⑤ Transparent Mode
⑥ Select Pen or Diagram
⑦ Choose an Eraser
⑧ Page Up/Down and Note list
⑨ Magnifying
⑩ Recording
⑪ Switching to Windows OS
⑫ Objects control mode
………………………………………………13
……………………………………………14
…………………………………..…………17
…………………………………….………..18
……………………………………..4
…………………………………..5
……………………………………..5
………………………………………….5
…….…..……………………………6
….………..………………….9
……………………9
…………………..9
……………………………………….….10
………………………………10
…………………………………….……11
………………..11
………………………………...11
………….…………12
…………………………………...12
……..…12
………………………………………..13
………………………………………...13
……………………………14
………………………………...14
……………………………………….15
………………………………………..15
………………………………….16
………………………………………16
……………………..…………..16
………………………………………17
……………….………….17
……………………….......18
…………………………………18
.….10

INDEX
F. Description of Main Menu
Chapter 6. Applications
A. Importing documents
B. Application of ClipArt
C. Note list and delete
D. Save and Print Note
E. Save and Open Presentat i on
F. Object
G. Use Eraser Function
Chapter 7. Configuration
A. Folder
B. Note
C. Recording
D. Volume
E. Options
F. V ersion Information
Chapter 8. Uninstall QWrite
A. Uninstall QWrite using Windows Program menu
B. Uninstall QWrite using Control Panel of Windows
Chapter 9. Notice
………………………………………………………27
……………………….…………………………….30
……………………………………………………..30
……..…………………………………………31
…………….………..………………...................31
……….....…………….…………………………32
………………………….…………….23
……………...…………………………….34
………………………….…….19
………….…………………………..19
……….…………………….……..19
……….…………………………..20
………………………..…………….25
………………………………26
…………………………..................29
……..…………………………….30
………………………………………32
………………..………………33
………..33
….…..33

QWrite
Software Manual
Chapter 1. Introd uction
‘QWrite ’ is board software op timized to IFP. You will have more effective lecture with delic ate writing and
various convenient tools of ‘QWrite ’ and IFP.
‘QWrite ’ has two representative features.
1. Digital Writing Function
2. Contents Authoring Function
‘QWrite ’ provide s fast and stable writing spee d as it optimized to IFP.
Enjoy powerful pre sentat ion, educ atio n and contents aut hori ng with ‘QWrite ’.
Chapter 1. Introduction
4

QWrite
Software Manual
Chapter 2. Circumstances
A. Cautions Before Use
‘QWrite ’ supports W indows XP and Vista, and othe r O S , Mac , Linux are not supported. I t i s al s o opera t e d with IFP.
B. PC requirements
Chapter 2. Circumstances
CPU
RAM
HDD
Graphic Card
OS
Others
Minimum requirement
Pentium 4, 1GHz
512M Byte
70M Byte
128M Byte
Windows XP, Vista, 7, 8
Microphone, Speaker
Recommended Requirement
Dual Core
1G Byte
100M Byte
128M Byte
Windows XP, Vista, 7, 8
Microphone, Speaker
5

QWrite
Software Manual
Chapter 3. Installation
A. Software Installation
Please select the insta ll ation language.
Installation W iza rd pops up and click ‘next’.
Chapter 3. Installation
6

QWrite
Software Manual
At additional function applica ti on, c l ic k one of the blanks for cre ating an icon. Then clic k ‘next’.
→ In this stage, you can create desktop icon or quick launch icon. Select on your preference and click “Next”
Now, it is ready to install ‘QWrite ’. Click ‘installation’ menu.
Chapter 3. Installation
Install “QWrite Printer” clicking “next”
7

QWrite
Software Manual
Chapter 3. Installation
“QWrite Pr inter” installatio n was completed. Please click the Finish button.
The installation is completed. Click ‘Finish’. If you want to finish installation and execute QWrite at once, then click ‘Launch
QWrite ’ and ‘Finish’.
8

QWrite
Software Manual
Chapter 4 . Executing QWrite
Chapter 4. Executing QWrite
A. Executing QWrite with QWrite icon
If you select ‘Create a desktop icon’ or ‘Create a quick launch icon’ during installation, QWrite icon is cre a t e d on bac k g r ound or
quick launch tray. You may execute the QWrite by clicking one of these icons.
You can check QWrite icon at desktop of Window.
B. Executing QWrite with program menu
① In case that the QWrite icon is removed in wi ndows background or y ou did not s e l e c t ‘Crea t e a deskt op ic on’ a nd ‘ C re a t e a
quick launch icon’ dur ing installation, you can exec ute the QWrite through program menu. Follow inst ruct ions be low .
a. Click the “start’ button on window task bar.
b. Click ‘all programs’.
c. Click ‘BenQ’ in the browsed program me nu.
d. Click ‘QWrite’ menu.
e. QWrite menu will be browsed and click ‘QWrite’ icon a nd t he n QWrite will be executed.
9

QWrite
Software Manual
Chapter 5. Scr e en Co nsti tuti o n and Ma in F uncti o ns
Chapter5. Screen Constitution and Main Functions
A. type of Toolbar
Types of Toolbar
Toolbar of QWrite ca n be loca t e d a ny position according t o us e r ’s pre ference. There are stra i g ht t oolba r a nd floating tool bar .
Straight toolbar can be located any side of window and floating toolbar can be floated to any position by the control of user.
Toolbar type and posit ion are select a ble in the main menu of QWrite and type & position of toolbar are stored when you quit
QWrite for next usage.
B. Toolbar type and position
10

QWrite
Software Manual
Chapter 5. Scr e en Co nsti tuti o n and Ma in F uncti o ns
C. Floating toolbar
Floating toolbar comprises 3 sections A, B, C and each section is connected
hierarchically.
A section has two functions.
C
A
B
B section :
Tools and functions of QWrite are grouped ac c or ding t o their similari ty and in the B section, icon for grouped tools a nd func t ions
are listed.
During your usa g e , Diagram, eraser and m ode switching tool are frequently used. For your convenience , t he s e function group can
be switched only by clicking corresponding icon,
In C section, detai l function and tools a re displayed.
When you click any icon in B se c ti on, c or responding icons a r e appe a r s in se c t ion C .
If no selection ac t ions in C se c ti on dur ing 5 seconds, C sec ti on will be disappears.
The first function is to show current tool now in use. If you select Pen tool of object tool,
proper icon w il l be displ a yed.
The second func ti on is to browse main menu of QWrite . If you click the right button in
this area, main menu will be created.
D. Description of Tools in Floating Toolbar
① Browsing Main Menu
To activate main menu on floating mode, Press A section for seconds with an touch
pen or click right butt on of a mouse.
11

QWrite
Software Manual
Chapter 5. Scr e en Co nsti tuti o n and Ma in F uncti o ns
② Selecting Color and Pen thickness
When you click this icon, 16 kinds of color and 4 thick ne s s of pen will be appeared in
section C.
Click color or pen t hic k ness on your prefe r e nc e .
③ Switching Function
When yo u pre ss t his ic o n dur i ng your pres entation . W r it ing m ode will switch t o
Windows OS so that you can run other application S/W of Windows OS.
In this mode, what you draw, clipart, or diagram can be treated as obje ct. So you can
rotate, enlarge, copy , paste the objects.
You can expand Note`s siz e without any limitatio n.
④ Choose a Transparent Mode, Pen and Diagram
When clicked, red underline is dis pl a yed and switched to tr ans par ent mo de. In this mode ,
every new drawing is overlapped to background, diagram and drawings so that you can
see bottom drawings. I f you want to activate transparent mode, click the icon once more .
Pen tools. You can select pen type.
Brush-pen. You can express thickness according to writing-speed.
Straight line
Rectangular
Rectangular filled with color
Circle
Circle filled with color
Straight line with arro w both ends
Straight line with one arrow end
12

QWrite
Software Manual
Chapter 5. Scr e en Co nsti tuti o n and Ma in F uncti o ns
⑤ Creating a Note
New note is be created. Background color of new note can be set in “configuration
menu”
Chalkboard Bac kground
Music Note Background
English Note Background
Creating note, creatin g cl ipart,
importing docum e nt , c apturing scre e n
functions are gr oupe d in t his i c on.
Manuscript Note Background
Graph Note Backgro und
Import any ordinary files.
Insert clipart into note.
Import every images available in P .C.
Show Note List
⑥ Page Up/Down
Note Page Up and down. Activate only when two or more notes are created.
13

QWrite
Software Manual
Chapter 5. Scr e en Co nsti tuti o n and Ma in F uncti o ns
⑦ Recording
What you written on the note during your lecture is recorded in movie file
format in this mode. By means of this function, you can record lecture contents
and provide it by on-line service.
※ Windows Media Encoder provided by Microsoft should be installed to your
computer to use recording function of QWrite.
⑧ Eraser Tool
Tools for erasing object in the note. Erase all and partially are supported.
Erase all obje c ts in the note
Erase object selectively
Erase Region : objects in selected region will be deleted
E. Description of Fixed Toolbar
Toolbar can be positioned 4 sides of window, but shape and function are same.
① Browsing Main Menu
To activate main menu, p r es s the QWrite icon for seconds w it h touch pen or click right
button of PC mouse.
14

QWrite
Software Manual
Chapter 5. Scr e en Co nsti tuti o n and Ma in F uncti o ns
② Creating a Note
Click the icon marked below for 0.3 second and the menu creates a note is opened. To create a note , click the
below icon shortly.
New note is be created. Background color of new note can be set in “configuration
menu”
Chalkboard Bac kground
Music Note Background
English Note Background
Manuscript Note Background
Graph Note Backgro und
Import any ordinary files.
Insert clipart into note.
Import every images available in P .C.
Show Note List
Second menu op tion.
③ Choose a Color
Click the color icon or a color browsing bar next to the color icon then color menu will be opened.
15

QWrite
Software Manual
Chapter 5. Scr e en Co nsti tuti o n and Ma in F uncti o ns
④ Pen thickness control
Click the pen thick ne s s icon i n the pi c tur e a nd t he n c urr e nt pe n thic k ne s s will appear. To control pe n thi c k ne s s , c li c k pen thickness
control icon next to pen thickness icon. Pen thickness control slide will appears and drag the slider.
⑤ Transparent Mo de
When clicked, normal writing mode is switched to transparent mode. In this mode, every new drawing is overlapped to background,
diagram and drawings so that you can see bottom drawings through upper drawing. If you want to release transparent mode, click
the icon once more .
⑥ Select Pen or Diagram
Pen/diagram menu is browsed by two ways. The first is to press Pen/Diagram icon for a while and the second is to click browser
icon next to Pen/Diag r a m icon.
You can select diagrams or pen in the
browsed menu. When pen or diagrams
are selected, selected icon appears in
Pen/Diagram icon.
Pen tools. You can s elect pen type.
Brush-pen. You can express thickness according to writing-speed.
Straight line
Rectangular
Rectangular filled with color
Circle
Circle filled with color
Straight line with arro w both ends
Straight line with one arrow end
Second menu op tion.
16

QWrite
Software Manual
Chapter 5. Scr e en Co nsti tuti o n and Ma in F uncti o ns
⑦ Choose an Eraser
Press eraser icon for a while and then eraser sub menu will be appeared or clicking browser menu bar next to eraser icon do the same.
After you select the type of eraser in
sub menu, the selected eraser icon will
appear in the eraser icon area.
⑧ Page Up/Down and Note list
Function to move previous or next page. This function is activated only when two or more notes are created.
Erase all obje c ts in the note
Erase object selectively
Erase Region : objects in selected region will be deleted
Second menu op tion.
Move to previous note
Move to next note
Note list : in the note list windo w, you can o pe n wanted note by double cl ic king or dele t e
note selectively
⑨ Magnifying
Magnify i ng selec te d note re gion or enlarging all note a r e a to 100% to 400%. Size and position of All objects in the note varies
according to m a g ni fying ratio.
17

active mode for preventing
QWrite
Software Manual
Chapter 5. Scr e en Co nsti tuti o n and Ma in F uncti o ns
⑩ Recording
What you written on the note during your lecture is recorded in movie file format in this mode. By means of this
function, you can record lecture contents and provide it by on-line service.
※ Windows Media Encoder provided
by Microsoft should be installed to
your computer to use recording
function of QWrite.
⑪ Switching to Windows OS
Not quitting QWrite, you can switch to Windows OS and run other application programs.
Record start icon: when clicked this icon becomes in double operation.
Record stop icon: This icon becomes activated only when recording is initiated.
Screen Capture
Capture Region
Writing Mode
⑫ Objects control mode
In this mode, what you draw, clipart, or diagram can be treated as objects. So you can rotate, enlarge, copy, paste the
objects.
18

QWrite
Software Manual
Chapter 6. Applications
F. Descrip ti on of Main Menu
Chapter 6. Applications
New Lecture : Start new pres e ntation
Open : Open store d le ctur e no tes
Save : Save cu rrent presentation
Save as : Save current note with designate name
Save note : Your present ation note s can be save d as pict ur e file fo r m a t.
Print note : Your pr esentation notes can be printed.
Tool : sele c ting virtual keyboard, s po tlight, blind.
Toolbar Position : selecting toolbar position in background frame
Support for Multi Writing : Max 4 users can wr ite simultane ous ly .
Upload contents : Saved notes as contents can be uploaded to server.
Configuration : setting configuration of QWrite.
Close : finishing QWrite
A. Importing documents
QWrite provides 5 kinds of backgrounds (re fer to Chapter5. D-⑤, E-②) for your convenience during presentation. In addition to
this, default 350 number of clipart and your Microsoft Office Documents can be imported for your presentations.
To import Microsoft office documents, follows the instructions hereafter.
a. As described in D-⑤ and E-② of chapter 5, click “import documents”.
b. A dialog box wi ll be appea r e d as fol lowing and the file impor te d w i ll be opened accordingly.
19

QWrite
Software Manual
c. When the selected file opened, click “print” in menu.
d. Close every open applications after completing “print”.
Printer was set as “QWrite Printer” automatically as photo as below when you use “QWrite ”,
Therefore, you can import every avai lable documents regardless of “Windows mode”.
through printing in “QWrite Printer”
d. To import Microsoft office documents, Microsoft O ffice should is nece s s a ry in your PC and works properly .
You can import “Office-Document” as well as “PDF file”
Chapter 6. Applications
*Horizont a l ty pe docum e nt is a lways advised to be made when using importing document.
For example about how to make the horizontal type document in MS Word as below.
MS Word : Page layout => Paper location => Select “horizontal type”
B. Application of Clip Art
QWrite provides 350 c li pa r t for your presentati ons a nd int e rface for adding user clipart.
To use clipart, follow the instructions.
a. Click the clipart icon. Refer to Chapter5. D-⑤ and E-②.
b. Clipart dialog box is opened.
20

QWrite
Software Manual
c. selecting clipart directory and then thumbnail of clipart is displayed on the right. If you click thumbnail, you can see
magnified clipart in preview window.
Chapter 6. Applications
d. Double click clipa r t or dra g one of the clipart into note a r e a and then a nd c l ipa r t is ins e r ted into the note.
21

QWrite 4
Software Manual
e. To set clipart as a background, select a clipart and click ‘set background’ button. Only one clipart can be
designated as background for each note.
Chapter 6. Applications
f. Adding clipart : Click ‘Add’ button to add user clipart to QWrite clipart folder and then dialog box appears.
22

QWrite
Software Manual
g. Add Clipart Folder dialog box appear s .
Designate clipar t folder and input cli pa r t f olde r na me. Click “OK” button.
Clipart folder is now created in the QWrite clipart directory.
Be sure sub folders of designated clipart folder is added to QWrite clipart folder.
h. Added clipart folder is available until when you delete the clipart folder
i. To remove the added clipart folder, select and click ‘delete’. But, the clip art provided by QWrite is not deleted.
C. Note list and delete
Chapter 6. Applications
① During present a ti on, you can check total number of notes and curre nt pa ge in the right upper re g i on of note fram e to know
how many notes are created.
23

QWrite
Software Manual
② Note List : As explained in Chapter5. D-⑤ and E-⑧, click and check all the notes created until now.
Chapter 6. Applications
③ To move to selected note, double-click it w i th touc h pe n or mouse.
④ To delete note, select note to be deleted and click ‘Delete’ of the box.
⑤ To delete number of notes, use drag function of touch Pen or mouse.
Drag a certain region which can cover the notes need to be deleted.
Click ‘Delete’ button.
24
QWrite
Software Manual
D. Save and Print Note
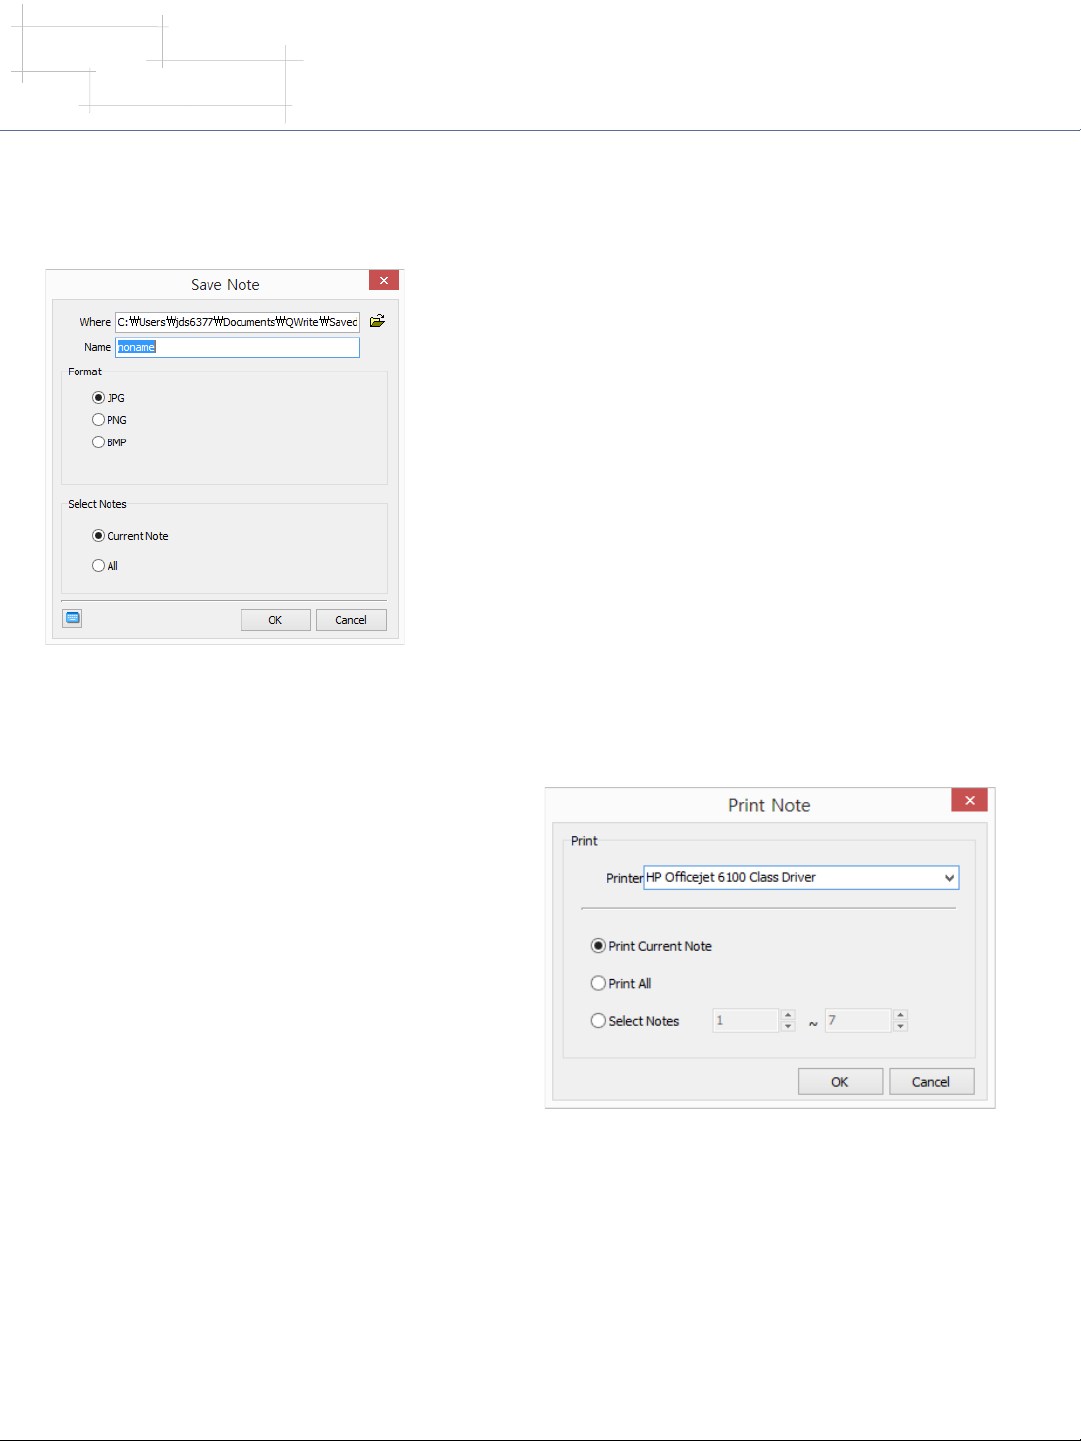
① Save Note
Chapter 6. Applications
a. Your presentation notes can be saved as picture file format. Click main
menu and ‘Save Note’. Refer to Chapter5. F-①
b. Designate folde r to be s a v e d and input file name
c. Select picture file for mat and select current note or all
d. Click ‘OK’.
② Print Note
a. Your presentation notes can be printed. Click main menu
and ‘Print Note’. R e fer to Chapter5. F-①
b. Select printer c onne c t e d t o your computer.
c. Choose notes to be pr int e d. You can select curre nt not e , a l l
notes and selec t e d notes us ing print option.
d. Click ‘OK’.
25

QWrite
Software Manual
Chapter 6. Applications
E. Save and Open Presentation
① Your presentation is saved as a file and the file can be used for your other presentation using other PC. Only requirement of
PC is that QWrite is installed.
a. To save your presentation, click the ‘save’ in main menu. Refer Chapter5. F-①.
b. Dialog box wi ll appear . I n the dialog box, desig nate folder and input file name.
Click ‘Save’, then file is saved on the folder in .ist file format.
c. Open the folder in w hi c h the pre s e nta t ion is saved. You ca n fi nd the file with QWrite file icon.
26

QWrite
Software Manual
Chapter 6. Applications
d. To open the present a t ion, you can use windows search function or ‘ ope n’ menu of QWrite .
When using windows search function, search presentation file in the folder and double click it.
When using ‘Open’ menu of QWrite click ‘Open’ menu. Select file and click ‘Open’ but ton. Refer to Chapter5. F-①.
② ‘Save As’ menu of QWrite will support you to save current presentation with another name.
③ To start new presentation after finishing current presentation, click ‘New Presentation’ Menu and proceed a new presentation.
Refer to Chpater5. F-①. Before new presentati on i s initia t e d, Dialog box that as k s whe t he r to save former present a ti on or not .
Click ‘Yes’ or ‘No’.
F. Obj ect
Clipart or your drawings can be treated as objects so you can adjust size, rotate, drag as you want.
a. To switch to Object Control Mode, click ‘object control menu’ of toolbar. Refer to Chanpter5. D-② and E -⑫.
b. After entering Obje c t C ontr ol Mode, the back g r ound c olor of menu is changed ( )and the cursor shape bec omes is In
object select mode, the button is changed to ( ).
c. Click the object you want to reshape; supporting lines around the selected object appears like Power Point Object. In this state,
you can reshape the obj ect.
d. The below is sample image for showing reshape object. The original shape of cup is change in this mode.
27

QWrite
Software Manual
e. If you want to treat number of objects at the same time, like Power Poin t, drag some area in which target object s ar e included
and reshape them.
Several objects are selected at once.
Chapter 6. Applications
f. QWrite provides object c ontr ol popup menu. Clic k rig ht button on the select e d object a re a. Popup menu will appear.
- Cut: Cut a sele cted object.
- Copy: Copy a selected object.
- Paste: Paste an object copied or cut.
- Delete: Delete selected object.
- Select all: Select all objects in current note.
- Reset to initial shape: Re se t the sele cted obje ct to initial shape .
28

QWrite 4
Software Manual
G. Use an Eraser Function
① QWrite provides three types of eraser. Erase All, Erase Object, Erase Region
a. Erase all
Click ‘Erase all’ button[ ]. All clipart and writings are erased but background is not erased. Refer to Chapter5. D-⑧, E⑦.
b. Erase object
Click ‘Erase object ’[ ] and click clipart or drawing on the note. The clipart or drawings will be erased respectively. Refer
to Chapter5. D-⑧, E-⑦. Refer to Chapter6. F to select objects.
c. Erase region
Click ‘Erase region’[ ] drag region to cover clipart and drawings need to be erased.
When click ‘Erase region’ and then shape of mouse cursor becomes cross( ). If dragged a region, the selected region is displayed
as dotted rectangular. After dragging, all th e objects in the rectangular are disappeared at once.
Chapter 6. Applications
d. Erase by object menu
As explained in F-①-f, objects can be erased by clicking ‘delete’ fun ction in object menu.
29
QWrite
Software Manual
Chapter 7. Configurations
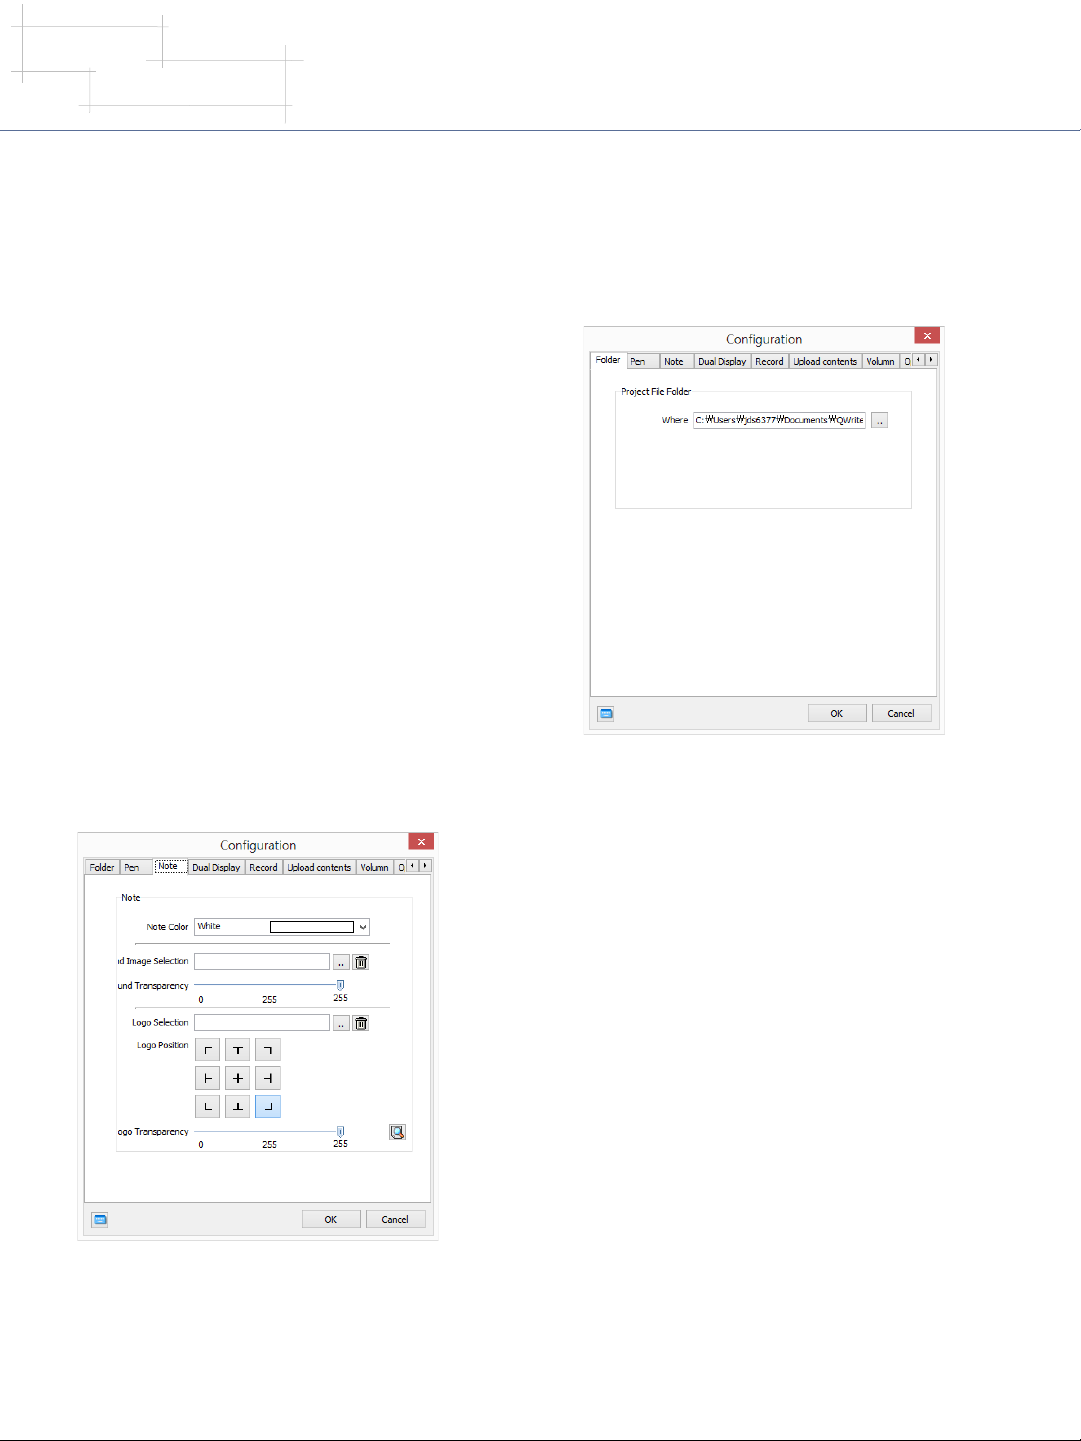
A. Folder
After QWrite is installed in your PC, default folder to save note
and presentation is ‘QWrite Prj’ folder created under “ BenQ/
QWrite ” directory. To change this folder, use Folder
configuration.
In the dialog box, click ‘folder’ and designate folder in your
preference.
Chapter 7 . Configurations
B. Note
① Background of color of new note is changed by this function. Click
‘note’ and chang e color . D e fault color of note is w hit e .
30

QWrite
Software Manual
C. Recording
① For accurate recording operation, you can set attributes of
recording function.
Default folder for saving presentation is ‘QWrite Contents’
folder under BenQ folder in root directory. To change folder,
designate folder in the dialog box.
If you want to designate file name before recording, select ‘Ask
File Name before Recording’.
If you check ‘Confirm message before recording’, confirm
dialog box appea r before recording.
Chapter 7 . Configurations
D. Volume
Mic and Speaker volume are set in this configuration. Adjust volum e and sound by dragging the sli de bar a s below .
31

QWrite
Software Manual
E. Options
Two options are provi de d in t he opti on menu.
① Confirm message at ‘Erase All’: to prevent your mistake,
confirm message box will appear when you click ‘Erase All ’
② Set Toolbar location
You can place tool bar in 5 ways. Select toolbar position
according to your preference. This toolbar position is saved
when you check ‘Storing Toolbar position when QWrite is
finished’
Chapter 7 . Configurations
F. V er sion Information
In the information dialog box, you can check QWrite version information. If the version is not the latest version, click ‘Update’
button.
32

QWrite
Software Manual
Chapter 8. Uninstall QWrite
Chapter 8. Uninstall QWrite
A. Uninstall QWrite using Windows Program menu
In the programs menu of Windows, you can find BenQ folder.. Click BenQ folder and QWrite folder consecutively, you can
find ‘Uninstall QWrite ’ icon. Click it to uninstall QWrite .
※Files created by users are not deleted even though you uninstalled QWrite. If you want to remove QWrite, use Windows
Search Browser.
B. Uninstall QWrite using Control Panel of Windows
Run ’Program A dd/de l e te ’ in the ‘ Prog ra m Add/delete ’ in W i ndows Control Panel.
Select QWrite and click ‘Delete’
33

QWrite
Software Manual
Chapter 9. Notice
Copyright © BenQ. All Rights Reserved.
The contents of this manual can be changed for product enhancement.
Part of or all of this manual cannot be chang e d or tr a ns mitted to other part ie s w i thout pe rmission of BenQ.
Information of QWrite
The late information and software is provided at the BenQ’s website.
Chapter 9. Notice
34
 Loading...