

Page 1

User Manual
HDMI Media Streaming | QS01
V1.00
Page 2

Copyright
© 2020 BenQ Corporation. All rights reserved. No part of this publication may be reproduced, transmitted,
transcribed, stored in a retrieval system or translated into any language or computer language, in any form or by any
means, electronic, mechanical, magnetic, optical, chemical, manual or otherwise, without the prior written permission of
BenQ Corporation.
All other logos, products, or company names mentioned in this document may be the registered trademarks or
copyrights of their respective companies, and are used for informational purposes only.
Disclaimer
BenQ Corporation makes no representations or warranties, either expressed or implied, with respect to the contents
hereof and specically disclaims any warranties, merchantability or tness for any particular purpose. Further, BenQ
Corporation reserves the right to revise this publication and to make changes from time to time in the contents
hereof without obligation of BenQ Corporation to notify any person of such revision or changes.
Screen images and icons in this manual are simulated for illustrative purposes only. Actual displays may vary.
BenQ is not responsible for the content of the websites or of similar resources, which are maintained and controlled
by third parties, that may be linked from this product. Providing links to those websites or to similar resources does
not mean that BenQ makes any warranty or representation to their content by expression or by implication.
Any third party content or service preinstalled in this product is provided “as is”. BenQ does not, by expression or
by implication, make any warrant to the content or to the services provided by third parties. BenQ does not warrant
or guarantee that the content or services provided by third parties are accurate, effective, most up-to-date, legal, or
complete. Under no circumstances shall BenQ be liable for the content or services provided by third parties including
their negligence.
Services provided by third parties may be terminated temporarily or permanently. BenQ does not warrant or
guarantee that the content or services provided by third parties are in good condition at any time, and is not liable for
the termination of the said content and services.
In addition, BenQ is not involved in any transactions you conduct in the websites or similar resources maintained by
third parties.
You should contact the content or service providers for any questions, concerns, or disputes.
2
Page 3
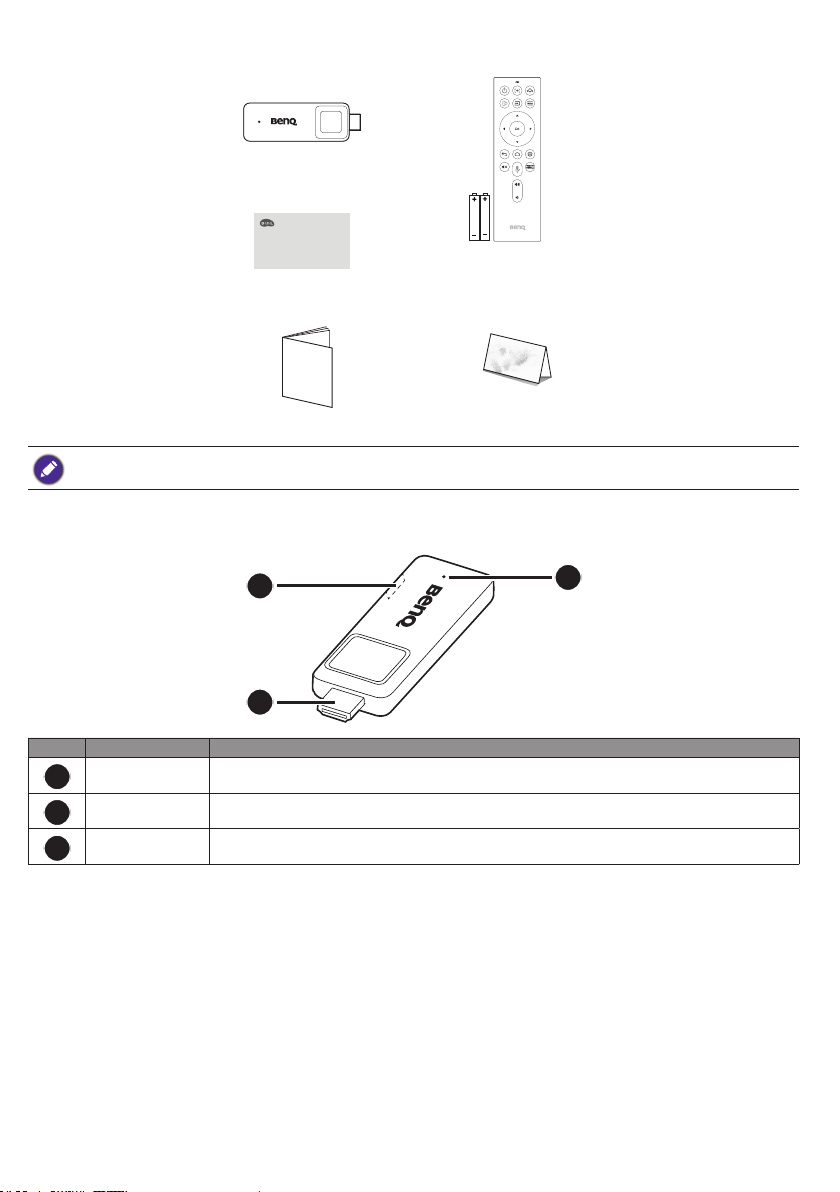
Package contents
QS01
Quick Start Guide
Quick start guide
Regulatory
Statements
Regulatory statements
Available accessories and the pictures shown here may differ from the actual contents and the product supplied for your region.
Remote control
(with 2 AAA batteries)
Warranty card
Overview
1
2
No. Item Descriptions
USB port Connects to the projector’s USB port (or a standard adapter head) via the Micro-USB
1
HDMI connector Connects to the projector.
2
LED indicator Lights up blue when power is supplied.
3
cable to supply the dongle with power.
3
3
Page 4

Remote control
8
1
9
2
3
10
4
11
12
5
6
13
7
14
15
16
17
No. Item Descriptions
Power
1
Auto focus (Available on compatible projectors only)Enables auto focus function.
2
FamiLand
3
Input Selects an input source.
4
Home Returns to the home screen.
5
Back Returns to the previous menu.
6
Mute Toggles the projector’s audio on or off.
7
LED indicator
8
Keystone Displays the keystone correction menu.
9
Amazon Prime
10
video
Arrow keys
11
OK Conrms the selection.
12
Toggles the projector between standby mode and on (after initial power up from the
keypad).
Accesses BenQ FamiLand kid channel. See “BenQ FamiLand” on page 8 for more
information.
Lights up when power is supplied.
• Lights up blue when the remote control and QS01 are properly paired and ready for use.
• Lights up red when the remote control and QS01 are not paired.
Accesses Amazon Prime video. A registered account is required.
Moves through the menu items or toggle through the available options.
When the On-Screen Display (OSD) menu is activated, these keys are used as directional
arrows to select the desired menu items and to make adjustments.
4
Page 5

No. Item Descriptions
Android options Accesses the Android options.
13
Projector menu Brings up the projector’s main menu.
14
Google Assistant Enables Google Voice Search / Google Assistant. A Google account is required.
15
Volume up Increases the volume.
16
Volume down Decreases the volume.
17
Placing the remote control batteries
1. Slide to open the battery cover.
2. Insert the provided batteries to the battery compartment as illustrated. Make sure that the positive and negative
ends are positioned correctly.
3. Replace the battery cover.
1
2
3
Remote control effective range
Effective angle: within 30 degrees
Effective range: within 8 meters (~ 26 feet)
Make sure that there are no obstacles between the remote control and the IR sensor(s) on the dongle or projector
that might obstruct the infra-red beam.
5
Page 6

Connection with a projector and initial setup
1. Connect the Micro-USB cable to the Micro-USB port on the dongle.
2. Connect the dongle to the HDMI port on the projector.
3. Connect the USB type-A connector of the Micro-USB cable to the USB por t on the projector. The USB port on
the projector that you connect the cable to must provide 5V/1A power. If the LED indicator on the dongle does
not light up blue af ter the projector is powered on, the USB port on your projector may not supply enough power
and you may need to connect the cable to a power socket via a standard USB power adapter.
4. Once the projector is powered on, switch the input source on the projector to the HDMI port where the dongle
is connected to.
5. Press and hold the OK key on the dongle's remote control for 3 seconds to pair it with the dongle.
3 seconds
6. Once the pairing is complete, the Home screen is displayed. See "Home screen" on page 7 for more
information.
7. Establish network connection and login to your Google account (or create a new one) to complete the initial
setup.
6
Page 7

Home screen
5 6 7
1
2
3
4
No. Item Descriptions
Google Voice Search / Google
1
Assistant
All apps Access to all the installed apps.
2
YouTube Access to the YouTube app.
3
Customized channels Customizes the app channels.
4
Enables Google Voice Search / Google Assistant.
98 10
Search by text Enables text input to search.
5
Recommended apps or
6
services
Recommended YouTube videos Access to the videos recommended by YouTube.
7
Notications Access to the notication(s).
8
Settings Access to the Android Settings.
9
System time Displays system time.
10
Access to the recommended apps or video on demand services.
7
Page 8

Wireless projection
You can project your mobile device’s screen wirelessly via Wireless Projection.
1. Select Wireless Projection from the Home screen.
2. F oll ow the on-sc ree n instr ucti ons to selec t the op e rati ng sy s tem of your mobi le dev ice .
3. The connection information is displayed. On the wireless network settings of your device, enable Wi-Fi function.
Search for the provided network name and input the provided password to establish the connection.
4. Enable the screencasting function on your device and select QS01 for wireless projection. Your device's screen is
then projected wirelessly.
BenQ FamiLand
BenQ FamiLand provides a quick access to the channels and videos that are suitable for kids. You can customize a
preferred channel list or simply watch the most popular channels FamiLand collects for you.
1. Make sure the dongle is connected to the Internet.
2. Select FamiLand from the Home screen.
3. Finish reading the privacy policy and select Agree to proceed.
4. Follow the on-screen instructions to pair a smart device (e.g., a mobile phone or a tablet) with the dongle to edit
the channel list. Or you can pair a device later as instructed in "Pairing with your mobile device" on page 8 .
32
1
No. Item Descriptions
Personalized channel list
1
Recommended channel list
2
Settings
3
Watch your favorite videos from different channels and edit the list as you
wish. You can add up to 29 channels to the list. See “Creating a channel and
saving videos for kids” on page 9 for more information.
Watch the most popular kids video contents recommended by BenQ.
Available contents may vary by language.
Access to change channel language, manage the paired devices, and check
version information.
Pairing with your mobile device
The channel list can only be edited from a paired mobile device (e.g., mobile phone or tablet). Pair your mobile device
with the dongle rst.
8
Page 9

1. If you did not pair with your mobile device at the rst time the app was launched, go to FamiLand Settings
(indicated as
2. Select Setup mobile control.
3. Go to Download APP, scan the QR code to install the FamiLand app on your mobile device.
4. Launch the FamiLand app just installed on your mobile device, select Add device.
5. You are prompted to input PIN code. Go to Pair device on your projector, a PIN code is displayed. Input the PIN
code on your mobile device.
6. Repeat the steps to pair with more devices. You can manage the devices from FamiLand Settings > Paired
device list if needed.
7. The channel list can be edited on one of the paired devices and it will be synced to all the other paired devices
automatically.
in "BenQ FamiLand" on page 8 ).
3
Creating a channel and saving videos for kids
1. Decide the channel language from FamiLand Settings (indicated as 3 in "BenQ FamiLand" on page 8 ).
Available contents may vary by language.
2. Channel editing can only be done on your mobile device. Make sure it has been paired with the dongle. And launch
the FamiLand app on your device.
3. Go to the Personalized tab. There is nothing but My favorite on the list. Click on the upper-right corner of
the screen and select Add channel.
4. You are required to name the channel. Fill out other elds as desired and click OK to save. A new but empty
channel is added to the list successfully. You can repeat the steps to add up to 29 channels.
5. Launch the YouTube ap p on yo ur mo b ile devi ce. Fi nd a vid eo tha t you'd li ke to save and play fro m yo ur
personalized channel via the dongle.
6. Click
7. Repeat step 5 and 6 to add more YouTube videos to the desired channels.
right under the video on Yo uTu b e and select Share > FamiLand. Select Assign channel to keep and
save the video to the channel just created or to another preferred channel. Or you can select another option to
save.
• Add to my favorite: saves the selected video to Personalized > My favorite.
• Subscribe all videos from this author: subscribes all YouTube videos from the same author.
• Assign channel to keep: saves the selected video to an existing channel under Personalized.
• Create new channel to keep: creates a new channel under Personalized to save the selected video.
Accessing videos quickly from My favorite
1. On the FamiLand app on your device, go to the Personalized tab.
2. Access a video from a channel, and tap the
with a
To remove the video from My favorite, simply click the
original channel.
icon and can be accessed quickly from Personalized > My favorite.
icon next to the video to mark it as your favorite. Now the video is
icon. The video then can only be accessed from the
Editing a personalized channel
To edit a personalized channel, go to the channel and click on the upper-right corner of screen. Select a
preferred option.
• The latest video: sets to show the latest video on the top of the list.
• The oldest video: sets to show the oldest video on the top of the list.
• Edit channel: revises the channel information. After the revision, click OK to save.
• Delete video: deletes the selected video(s). After the selection, click OK on the upper-right corner of the screen for
conrmation.
Deleting a personalized channel from the list
1. On the FamiLand app on your device, go to the Personalized tab.
2. Press and hold the channel you want to delete, and select OK.
Playing a video via your projector
On a paired device, click a video from the FamiLand app for playback via your projector. You can control the
playback from your device directly.
9
Page 10

Limiting the watching time
1. Launch the FamiLand app on your mobile device, and click on the upper-left corner of the screen.
2. Go to Watch time and rest time and switch on the function.
3. Set the time interval.
4. Click SAVE to save the setting. A countdown timer is displayed on the projector's screen. The playback is paused
when the countdown is nished. You have to press
the countdown timer again.
on the remote control to resume the playback and start
10
 Loading...