

Page 1
Q74A
Service Manual
Page 2

Q74A Service Manual
-2-
Contents
PRECAUTIONS................................................................................................. 4
ITEMS ............................................................................................................ 6
HOW TO CONNECT THE SEVERAL CABLES TO THE LCD MONITOR.......................... 7
▶ Setting up the LCD monitor ..................................................................... 7
ADJUSTING THE MONITOR............................................................... ................. 8
Q74A SPECIRICATIONS............................................................... ....................... 9
▶ Q74A Specifications .................................................................................. 9
DISPLAY MODES............................................................... ............................. 10
PowerSaver..................................................................................................... 10
OSD MENU............................................................... ..................................... 11
▶ Menu Tree............................................................................................ 11
FACTORY SET ................................................................................................ 12
BURN-IN MODE ............................................................................................. 12
INVERTER & POWER ...................................................................................... 13
▶ Inverter & POWER(Q74A)........................................................................ 13
▶ Specification ......................................................................................... 13
▶ Electrical Characteristics ........................................................................... 13
▶ Pin Connection ...................................................................................... 14
TROUBLESHOOTING ...................................................................................... 15
▶ No operating at all................................................................................... 15
▶ Doesn’t display on LCD............................................................................ 16
EXPLODE VIEW ............................................................................................. 18
▶
Q74A.................................................................................................. 18
PART LIST ..................................................................................................... 19
▶ Q74A Mechanical Part List........................................................................ 19
▶ Q74A AD B/D Part List ............................................................................ 20
▶ Q74A FUNCTION KEY B/D Part List........................................................... 23
▶ Q74A FUNCTION LED B/D Part List........................................................... 23
▶ Inverter & POWER BD Part List(FLF1742-20A).............................................. 24
▶ Inverter & POWER BD Part List(FLF1742-20A).............................................. 25
CIRCUIT DIAGRAM ........................................................................................ 26
▶ AD B/D(Q74A)...................................................................................... 26
▶ Inverter & POWER B/D(FLF1742-20A) ........................................................ 31
PCB Layout .................................................................................................... 34
▶ AD B/D TOP SILK (Q74 A) ....................................................................... 34
Page 3

Q74A Service Manual
-3-
▶ AD B/D TOP PATTERN (Q74A) ................................................................. 35
▶ AD B/D BOTTOM SILK (Q74A)................................................................36
▶ AD B/D MASK TOP (Q74A) ..................................................................... 37
▶ AD B/D MASK BOTTOM (Q74A) .............................................................. 38
▶ FUNC B/D TOP SILK (Q74A).................................................................... 39
▶ FUNC KEY B/D BOTTOM PATTERN (Q74A)................................................ 39
▶ FUNC LED B/D TOP SILK (Q74A) ............................................................. 39
▶ FUNC LED B/D BOTTOM PATTERN (Q74A)................................................ 39
Page 4

Q74A Service Manual
-4-
Q74A
PRECAUTIONS
Warning : The following information will help you avoid the risk of electric shock,
serious injury, and death.
z Plug the power cord into a properly grounded outlet.
There is the risk of electric shock.
z If you hear a noise or smell smoke from the computer or adaptor, unplug the power cord
immediately, and call the service center.
There is the risk of electric shock or fire.
z Do not overload an electrical outlet with too many devices.
There is the risk of fire.
z Do not unplug from the outlet by pulling the power cord or when your hands are wet.
There is the risk of electric shock or fire.
z Do not bend the power cord excessively or place heavy objects on it. Keep children and pets
away from the power cord as they may damage the power cord. There is the risk of electric
shock or fire.
z Do not use a damaged power cord or plug. Make sure the plug fits snugly into the outlet.
There is the risk of electric shock or fire.
z Do not expose the monitor to the direct sun light.
z Do not block the fan louvers.
There is the risk of fire or damage to the monitor.
z Do not attempt to disassemble, fix, or modify the monitor.
There is the risk of electric shock or fire.
z Keep the monitor away from high temperature, humidity, and dust.
Operating environment = 0 ~ 40 Degrees Celsius
Operating environment = 30 ~ 80 Relative Humidity
z Do not allow any object or liquid to enter inside the monitor.
There is the risk of electric shock, fire, or damage to the monitor.
Page 5

Q74A Service Manual
-5-
Caution : The following information will help you avoid the risk of minor ofr moderate
injury,or damage to the monitor.
z Use a proper voltage/current level indicated.
z Do not clean the LCD with abrasive chemicals.
There is the risk of damage to the LCD.
z Do not scratch and damage the LCD with sharp objects.
z Keep the monitor away from objects and electrical appliances that may generate
electromagnetic fields.
z Place the monitor on a flat, stable surface.
The monitor may fall and there is the risk of damage or injury.
z Unplug the power cord when the monitor is not in use for a prolonged period of time.
Instruction for Cleaning the Monitor
z Make sure the power cord is unplugged.
z Do not spill or pour liquid on the monitor.
z Cleaning the LCD panel
1. Use a clean, soft cloth to wipe off dust from the LCD.
2. If still not clean, wipe the LCD with a clean soft cloth with a small amount of glass cleaner
without alcohol or ammonia.
z Caution
Do not use alcohol or ammonia based cleaning products. Abrasive chemicals, such as alcohol or
ammonia, may damage the monitor. The company is not responsible for the damages to the monitor
caused by the use of alcohol or ammonia based cleaning products.
Page 6
Q74A Service Manual
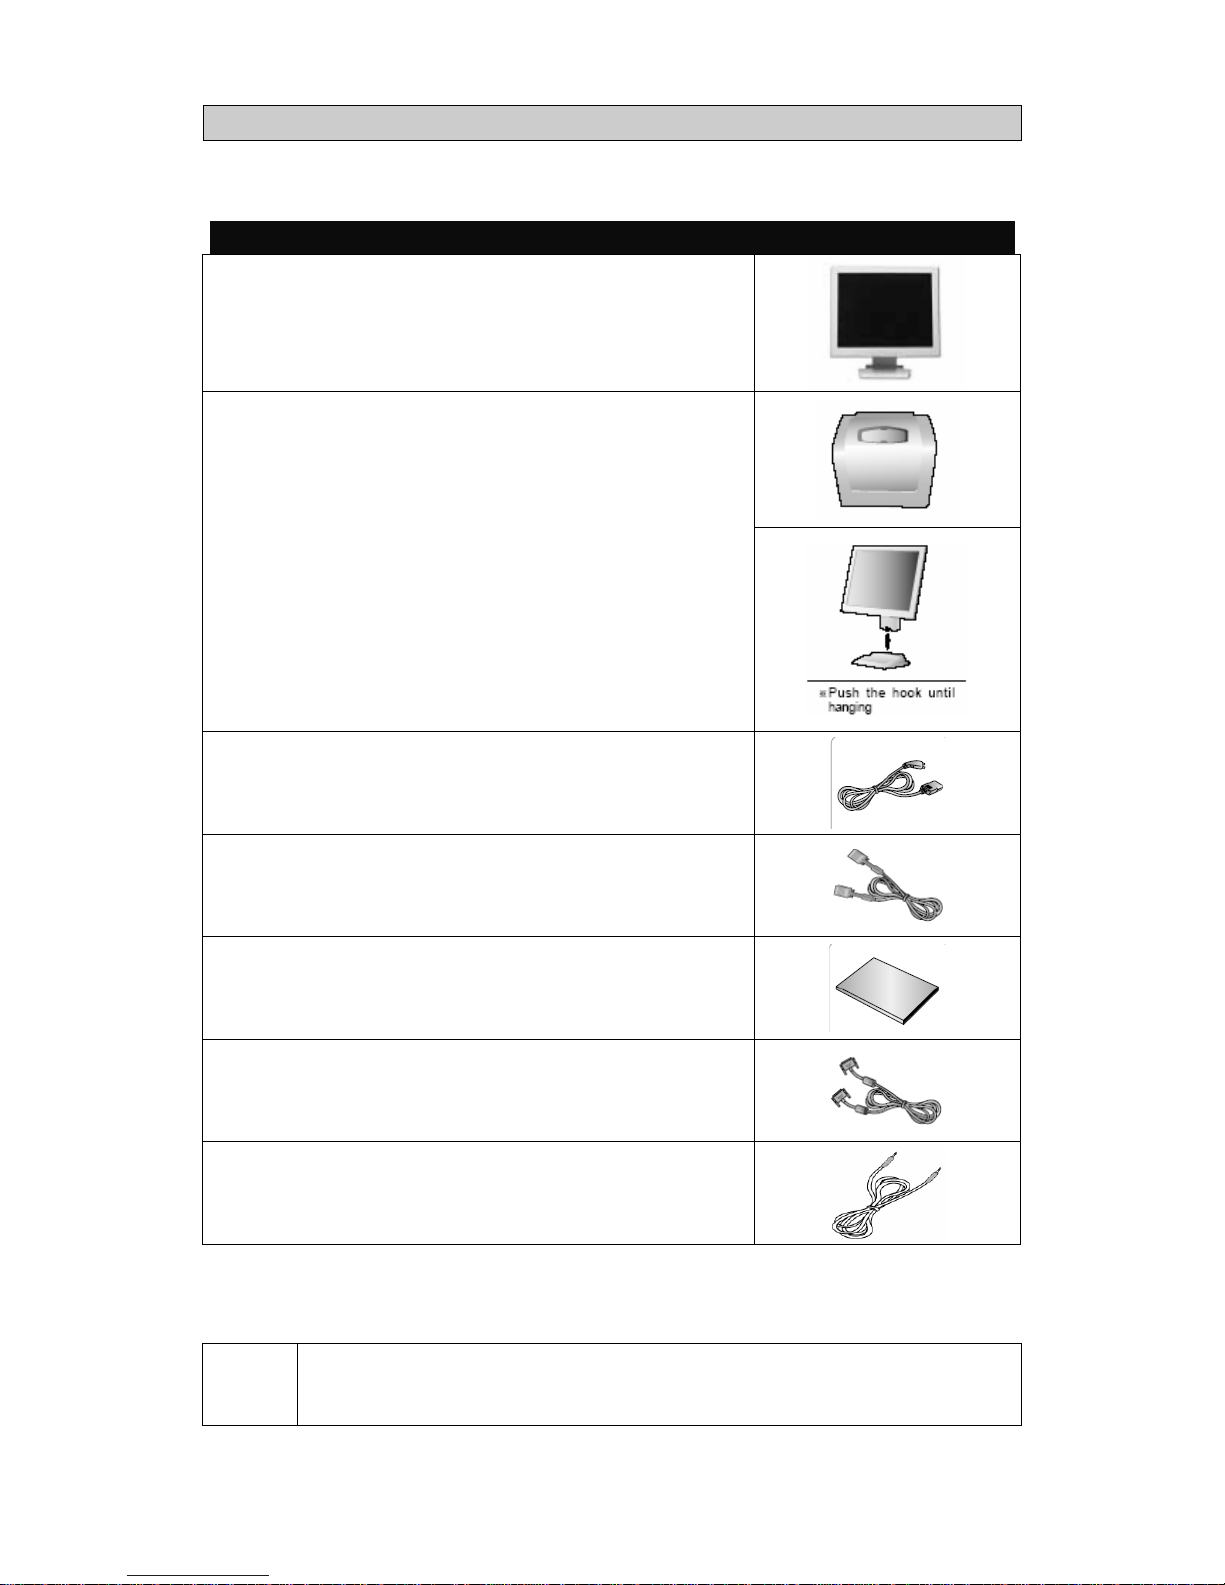
ITEMS
◈ LCD Monitor
◈ Stand
◈ Power Cord
◈ 15pin D-Sub Cable
◈ User Manual
◈ 24pin DVI Cable *1
◈ Audio Cable *2
*1 : For DVI Model Only. *2 : For Audio Model Only.
Notice
Please make sure the following items are included with your monitor.
If any items are missing, contact your dealer. .
-6-
Page 7
Q74A Service Manual
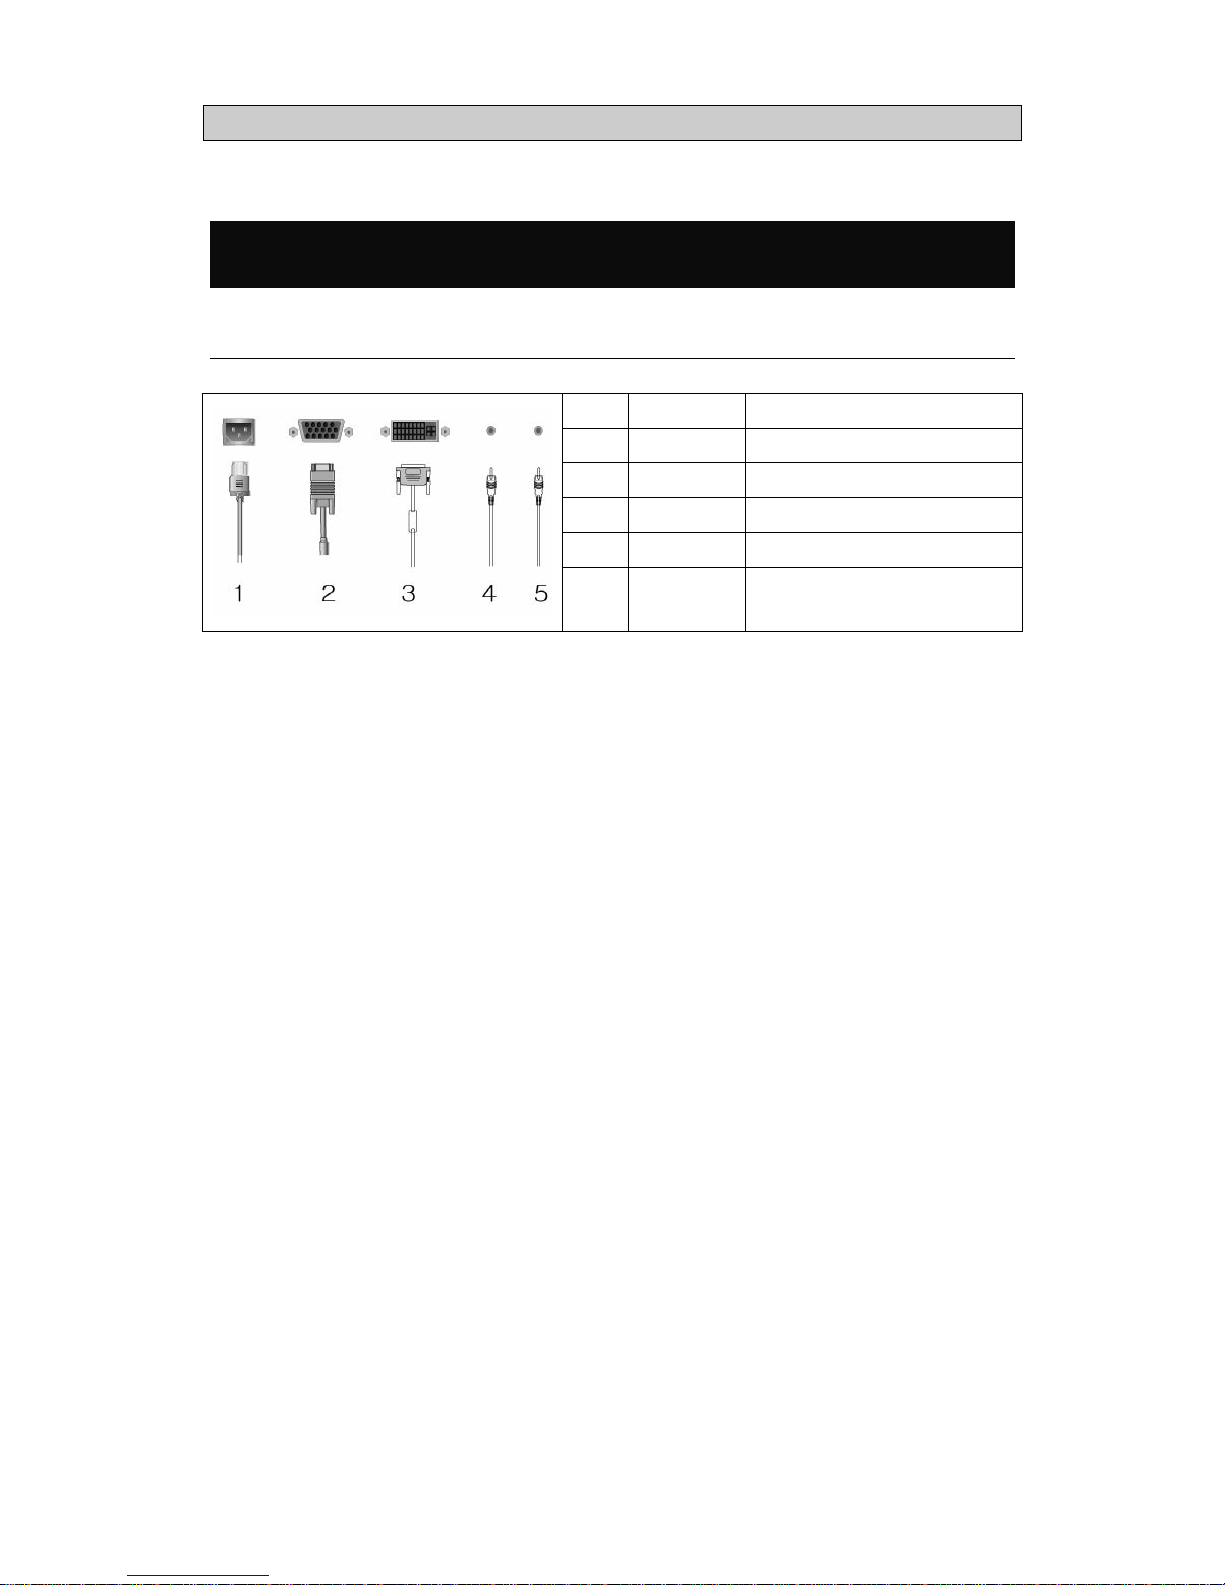
HOW TO CONNECT THE SEVERAL CABLES TO THE LCD
MONITOR
▶ Setting up the LCD monitor
No. Name Cable connections
1 Power Power Cord
2 PC 15-pin D-Sub Signal Cable
3 DVI DVI-D Cable *1
4 SPK IN Audio Cable *2
5 SPK OUT External Speaker Cable *2
*1 : For DVI Model Only
*2 : For Audio Model Only
-7-
Page 8
Q74A Service Manual
ADJUSTING THE MONITOR
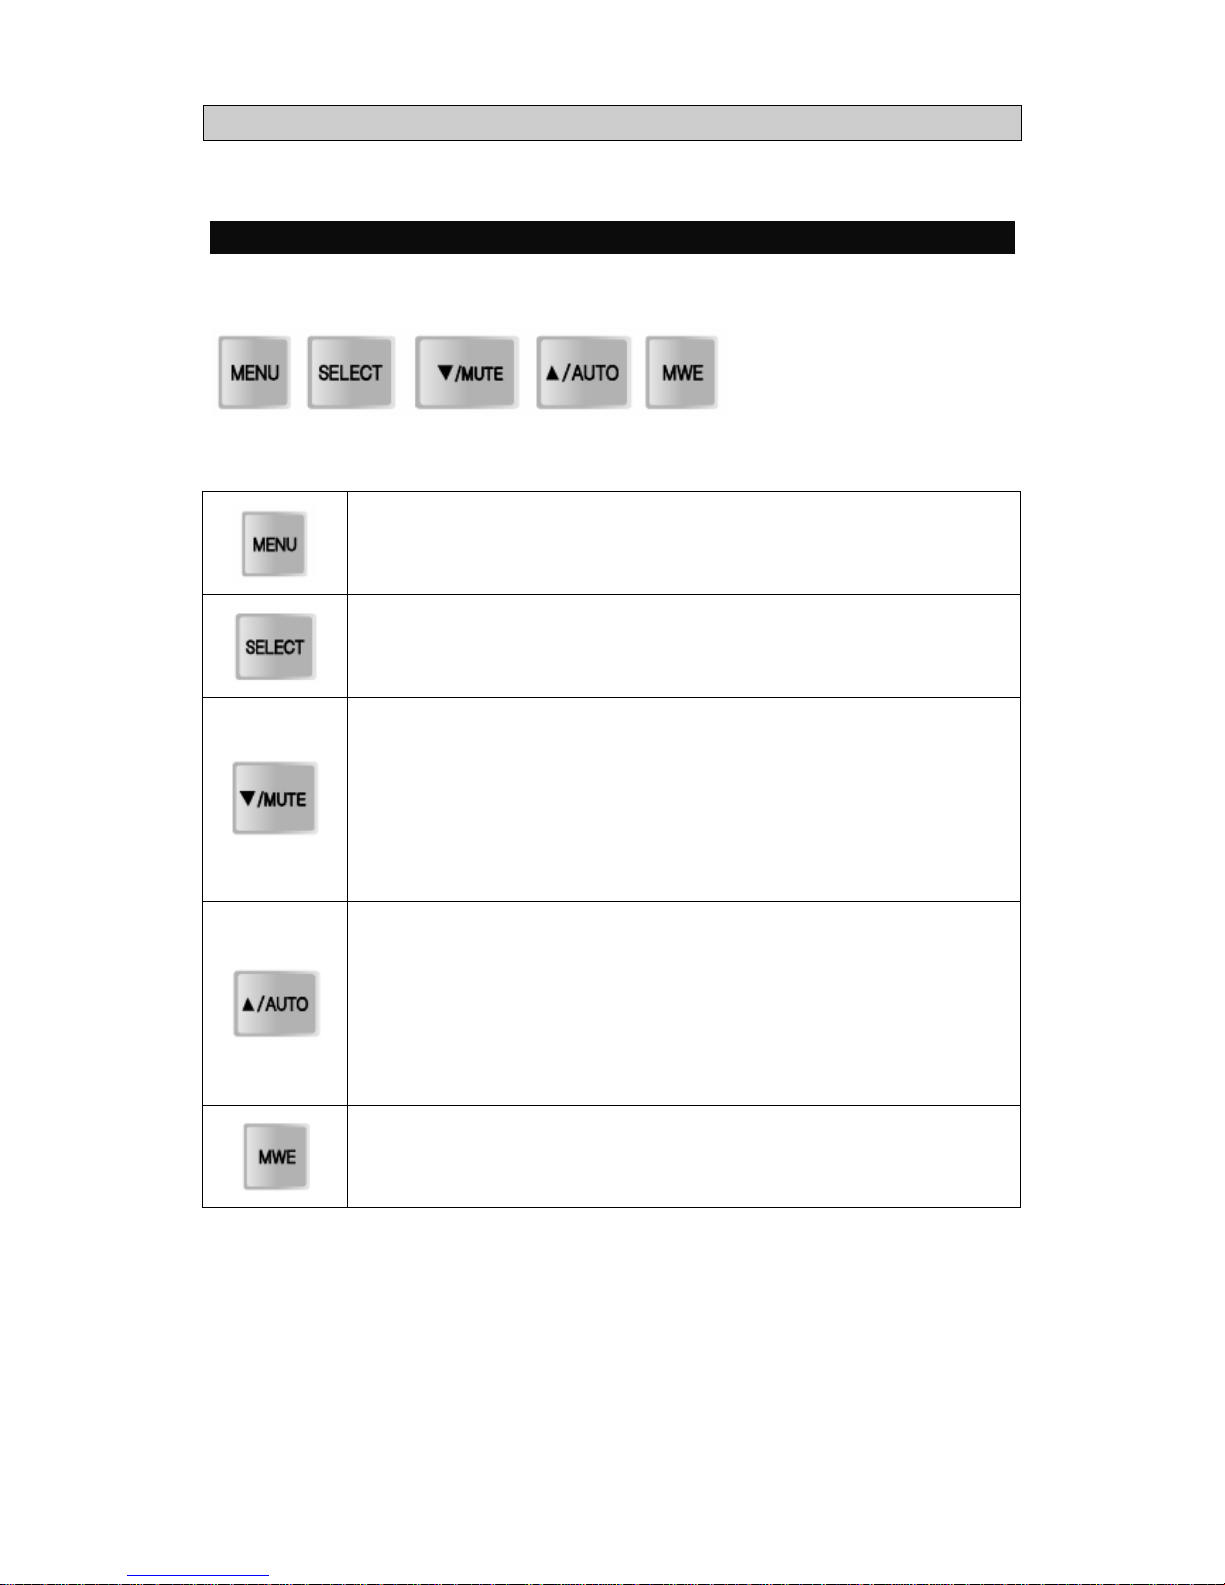
The Function Control Buttons
How to use the Function Key
Menu Key:
1. First click : The OSD main menu appears.
2. Second click : The OSD main menu disappears.
Select Key : Select a command function.
Down Key :
1. Move the on-screen highlighted comand
item to the next one.
2. Decrease the current option value.
Mute Key : *2
Sound MUTE ON/OFF Button.
Up Key :
1. Move the on-screen highlighted comand
item to the previous one.
2. Increase the current option value.
Auto Key : *1
This will optimize image quality automatically.
MWE Key : You can manually adjust the screen to your
environment on the computer.
ex.) Internet, Games, Movies ...
*1 : For Analog Mode Only , *2 : For Audio Model Only.
-8-
Page 9
Q74A Service Manual
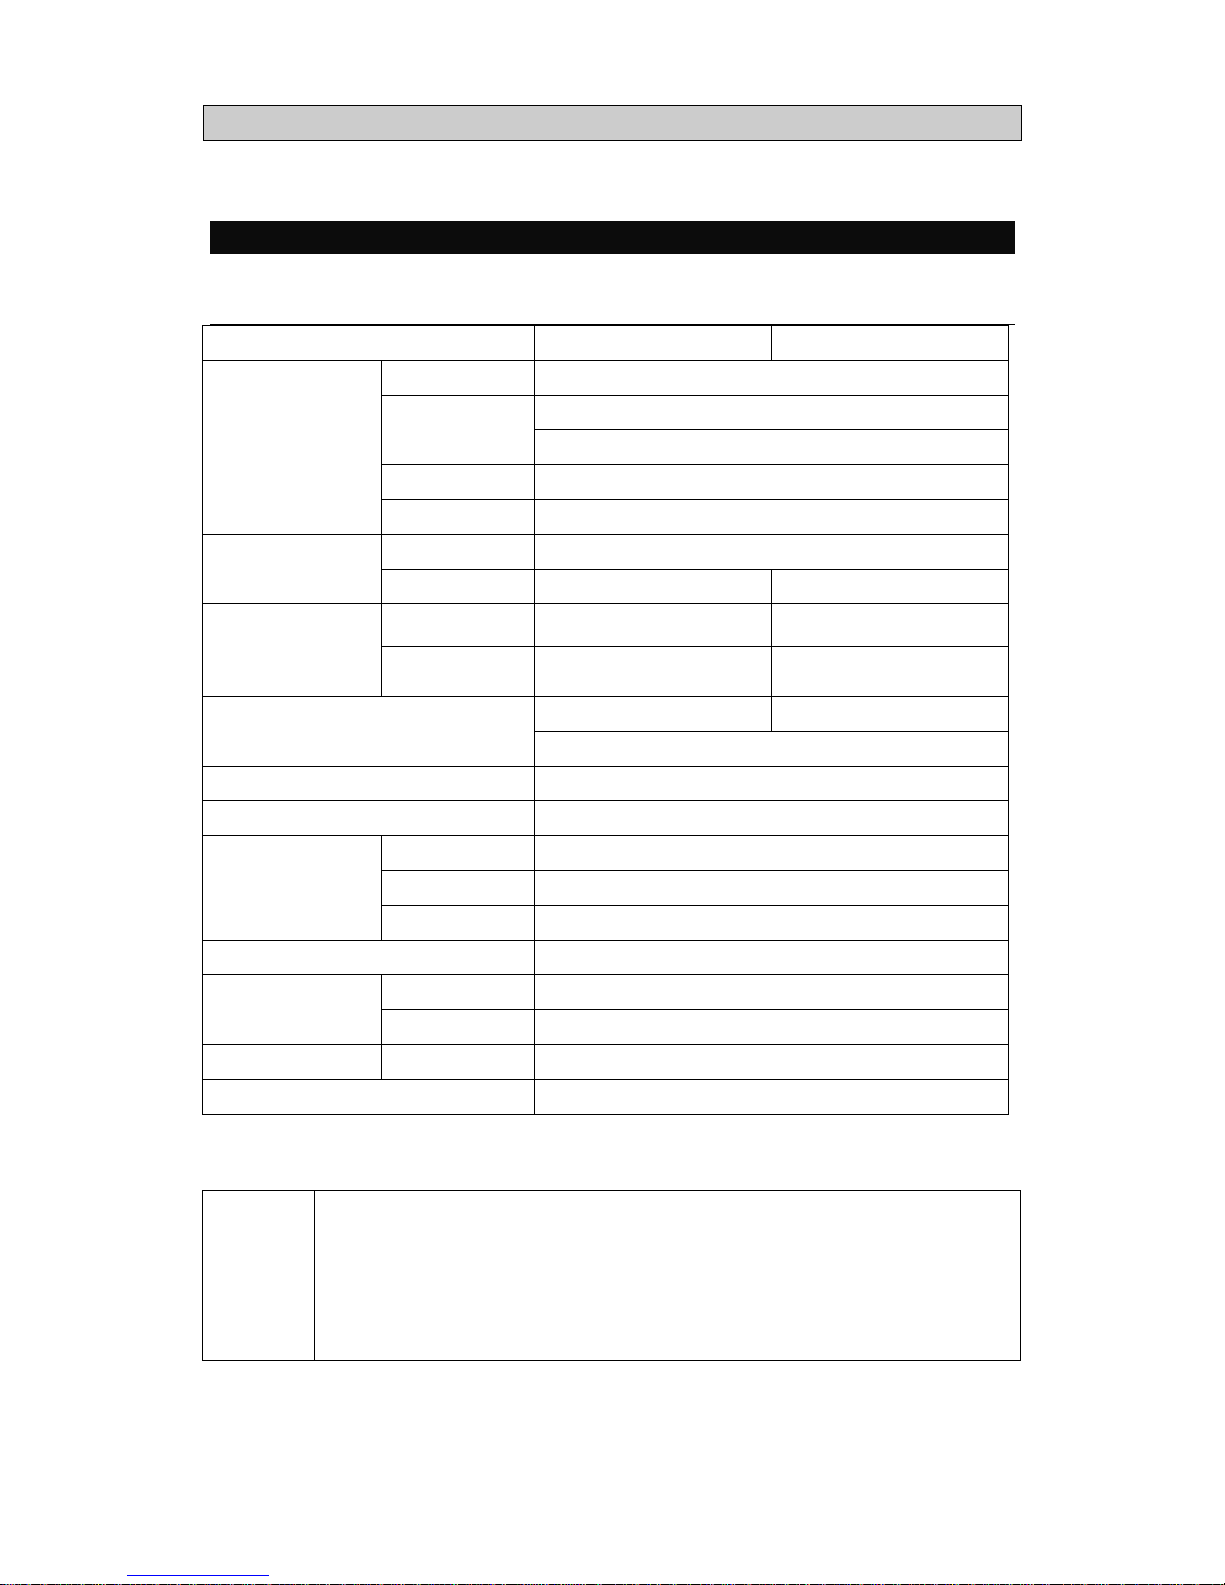
Q74A SPECIRICATIONS
▶ Q74A Specifications
MODE Analog Digital
Type TFT active matrix
17 inch
Size
337.92 X 270.336 (mm)
Pixel Pitch 0.264 X 0.264 (mm)
Panel
Display Color 8-bit (16,777,216 colors)
Basic 1280x1024@60Hz Display
Resolution
Maximum 1280x1024@75Hz 1280x1024@60Hz
Horizontal 31.5 ~ 80KHz 31 ~64KHz
Frequency
vertical 56 ~ 75Hz 59 ~ 61Hz
15 pin D-Sub 24pin DVI-D
Connectors
Speaker Input/Headphone Output(Audio Cable) *1
Tilting Degree (U/D) -5° ~ 20° Degree
Plug&Play VESA DDC 1/2B
Input Internal type : 100~240V AC,50/60Hz, 0.5A
Consumption Under 40W (Speaker Max 4W *1)
Power
Standby mode 1W less
Power Management PowerSaver
Temperature 0~25℃ (32℉~77℉) Environmental
Consideration
Humidity 90% less
Dimensions Outside 387mm * 185mm * 396mm (W*D*H)
Weight 3.9kg
*1 : For Audio Model Only
Notice
This monitor can be installed on any Plug & Play compatible system.
Interaction of the monitor and computer systems will provide the best
operating conditions and monitor settings. In most cases, monitor
installation will proceed automatically, unless the user wishes to select
alternate settings.
-9-
Page 10
Q74A Service Manual
-10-
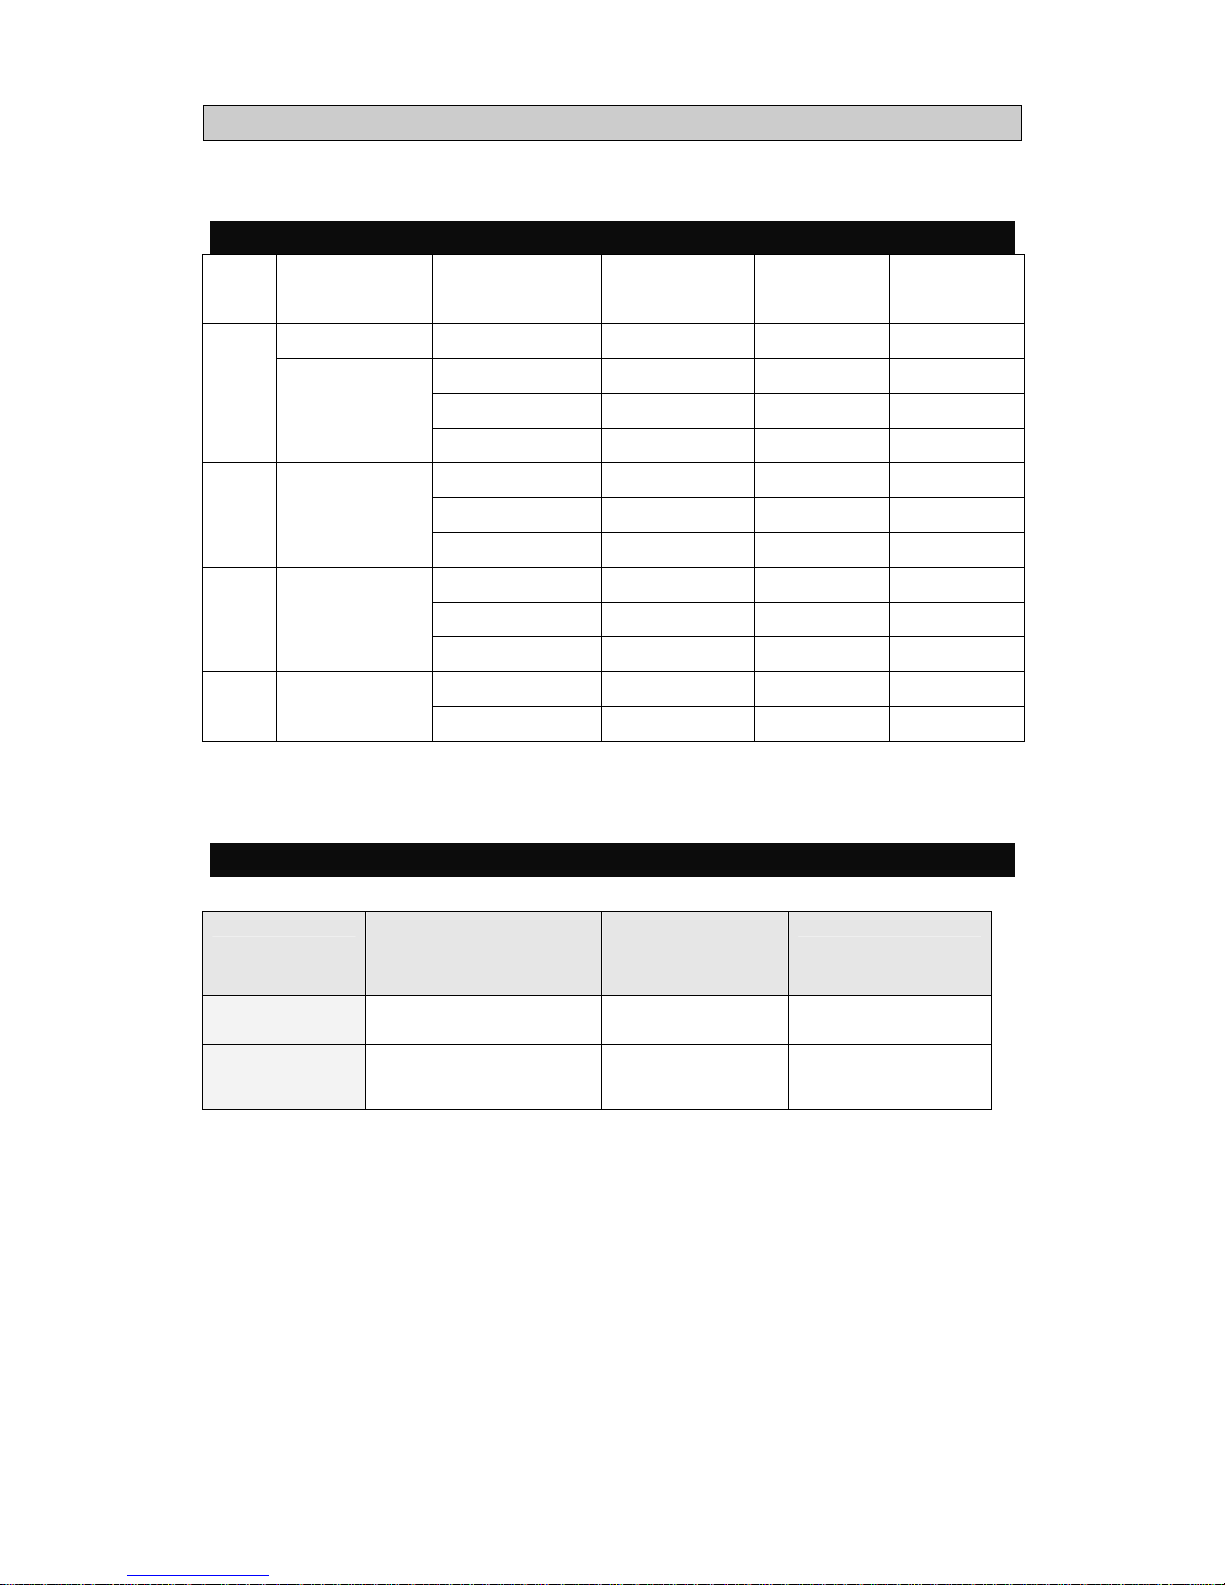
DISPLAY MODES
Mode Resolution
Horizontal
Frequency(KHz)
Vertical
Frequency(Hz)
Pixel Clock
(MHz)
Sync
Polarity(H/V)
720 X 400 31.468 70.087 28.322 -/+
31.468 59.940 25.175 -/-
35.000 66.670 30.240 -/-
VGA
640 X 480
37.500 75.000 31.500 -/-
37.879 60.300 40.000 +/+
48.077 72.188 50.000 +/+
SVGA 800 X 600
46.875 75.000 49.500 +/+
48.363 60.004 65.000 -/-
56.476 70.000 75.000 -/-
XGA 1024 X 768
60.023 75.029 78.750 +/+
63.981 60.020 108.000 +,-/+,-
SXGA 1280 X 1024
79.976 *1 75.025 *1 135.000 *1 +/+ *1
*1 : For Analog Mode Only.
PowerSaver
State
Power
Consumption
Recovery
Time
LED Color
ON Under 40W - Green
OFF Less than 1W Within 2 Sec Amber
Page 11

Q74A Service Manual
-11-
OSD MENU
▶ Menu Tree
Main Menu Sub Menu Function Description
BRIGHTNESS Control of brightness
CONTRAST Control of contrast
H POSITION Control of horizontal position
V POSITION Control of vertical position
PHASE Control of phase
CLOCK Control of horizontal clock
PICTURE
AUTO ADJUST Automatic adjust position
BLUISH Color Temperature 9300k
(some blue color)
REDISH Color Temperature 6500k
(some red color)
USER RED : 0 ~ 100
GREEN : 0 ~ 100
BLUE : 0 ~ 100
COLOR
AUTO COLOR Automatic adjust color
OSD H POSI Moves the OSD Menu
OSD V POSI Moves the OSD Menu
OSD TIMER OSD display time
OSD
TRANSPARENCY OSD Transparency
LANGUAGE Select OSD language
RECALL Factory default values
INPUT SELECT DVI, ANALOG Mode Change
AUDIO Sound Mute On/Off function. *1
MISC
VOLUME You can adjust the volume. *1
*1 : For Audio Model Only
Page 12

Q74A Service Manual
-12-
FACTORY SET
OSD Menu => Misc => Recall => Yes. Every value changes factory setting value.
After factory set executes, power OFF Æ power ON automatically.
You must push the “AUTO” button because of optimum image quality automatically.
When user want factory setting value, you must execute this function.
BURN-IN MODE
If you push the down button more than 5 seconds in disconnected signa l cable status, you can see changed
color.
Burn-In mode displays chaged color continually. (white, red, blue, green etc.)
We can check normal operating status of the monitor under mass production.
If you want to finish Burn-In mode, you can turn off the power by only push the power button.
Page 13

Q74A Service Manual
-13-
INVERTER & POWER
▶ Inverter & POWER(Q74A)
z L.I.P.S : LCD INVERTER POWER SYSTEM(FLF1742-20A)
▶ Specification
z Operate 4 CCFL Lamps.
z Current Feedback Control
z Input Voltage : DC 12V.
z When any lamp doesn’t operate, the panel is under protection status.
Protection status means that circuit protect the other lamp.
z PWM Control.
z Remote Power On/Off control
z High Efficiency
▶ Electrical Characteristics
Description
Min Typ
Max Sign Remark
Input Voltage 11.0 12.0 13 .0 Vin
Input Current 1.5 1.7 1.9 A 12Vdc
Output Current 5.0 6.0 7.0 mArms 1ccfl current
Lamp Frequency 40 47 55 kHz
Normal Operation ON
Vin=12V
ON/OFF=5V
ON/OFF Control
Shunt-down(Lamp off) OFF
Vin=12V
ON/OFF=0V
Kick-Off
Voltage
MORE THAN 1100 Vrms Kick-Off
Page 14

Q74A Service Manual
-14-
▶ Pin Connection
- INPUT CONNECTOR CON1
Pin NO. Symbol Descripition
1,2 VIN 1 Input Voltage : 12V
3,4,7 GND GND
5,6 VIN 2 Inopt Voltage : 5V
8 ON/OFF Power System Return
9 NC NC
- OUTPUT CONNECTOR CN1,2,3,4
Pin NO. Symbol Descripition
1 HV1,2,3,4 HI VOLTAGE TERMINAL
2 LV1,2,3,4 LOV VOLTAGE TERMINAL
Page 15

Q74A Service Manual
-15-
TROUBLESHOOTING
▶ No operating at all
What you see Suggested Actions
Is the power inserted correctly? Insert the plug correctly referring to the User Manual.
Does the Power Adapter operate
correctly?
Check the Power Adapter.
The green LED is OK.
The Power Adapter operates correctly,
but the LCD Monitor does not operate
correctly.
Check the harness of the FUNC. B/D.
Does The Power On/Off and the LED
Operate corretly?
If the program of the MICOM is error, then exchange the
MICOM.
If the AD B/D is error, then exchange the AD B/D.
The Power On/Off and the LED operate
correctly, but the OSD menu doesn’t
display on screen.
First, operate the FACTORY SET.
Second, check the Panel Harness that is connected to the AD
B/D.
Check the LAMP Harness of the Panel.
Lastly, exchange the LIPS.
The OSD menu operates correctly but
the image doesn’t display on screen.
Insert the SIGNAL Cable correctly referring to the User
Manual.
Check the LAMP Harness of Panel and Inverter.
Lastly, Check the LAMP of Panel.
The Power On/Off operates correctly,
but the screen is ‘ALL WHITE’.
The LAMP is OK.
Check the Panel Harness that is connected to the AD B/D.
The Power On/Off operates correctly,
but the screen is ‘ALL BLACK’.
Check the LAMP Cable.
Check or exchange the LIPS.
Check the Panel Cable.
Page 16

Q74A Service Manual
-16-
▶ Doesn’t display on LCD
“VIDEO MODE NOT
SUPPORTED” message
[Windows]
Reboot safe mode. (press the F8 key during bootin g) .
Remove GraphicCard Driver.
Reboot normal mode.
Reinstall GraphicCard Driver.
“No signal” message Check the signal cable.
Check DPMS mode in PC.
Check pins of the signal cable.
If PC keeps DPMS status
Continually
(No signal Input,
LED color amber)
Check the signal cable.
Check pins of the signal cable.
Check HS_VGA and VS_VGA in schematics.
Doesn’t display on screen
Correctly include OSD menu
Check scaler output signal.
Check panel harness between panel and AD B/D.
Check solder status of the scaler.
Doesn’t display on screen
Correctly except OSD menu
Check the signal cable.
Check scaler input signal (RGB,H-SYNC,V-SYNC)
Noise in vertical pattern. Execute Auto Adjust.
According to graphic card.
Check 60Hz vertical frequency in display properties.
Display position error Execute Auto Adjust
Display position error occurred on dark or moving
picture.(like game)
In this case, you must execute Auto Config in windows
screen.
Page 17

Q74A Service Manual
-17-
Color error include OSD menu Check the panel harness.
Check scaler output signal.
Color error except OSD ment. Check the signal cable.
Check pins of the signal cable.
Check input/output signal of the signal cable
Key button error Check the function(key) harness.
Check the function ass’y (mechanical).
Brightness differ between upper and
lower on screen.
Because of viewing angle.
Page 18

Q74A Service Manual
EXPLODE VIEW
▶ Q74A
-18-
Page 19

Q74A Service Manual
PART LIST
▶ Q74A Mechanical Part List
-19-
Page 20

Q74A Service Manual
-20-
▶ Q74A AD B/D Part List
Location
Parts Code
Parts Name Parts Spec. Remar
k
CE16
CEXF1C471A C ELECTRO
16V 470uF 20% 10x12.5 TAP
CE5,CE6,CE12,
CE13,CE14,
CE15
CEXF1C101A
C ELECTRO
16V 100uF 20% 6.3X11 TAP
CE7, CE8, CE9, CE10,
CE11
CEXF1C100A C ELECTRO 16V 10uF 20% 5x11 TAP
CON1 97E6200710 CONN WAFER 12507WR-30000 (30P LVDS)
C6, C7, C8, C10, C11,
C12, C18,C19,
C20, C21, C22, C23,
C24, C25, C26,
C27, C28, C29, C30,
C31, C34, C37,
C38, C39, C40, C41,
C42, C43, C44,
C45, C46, C47, C48, C49
HCCK104ZBA C CHIP CERA 50V 100nF Z 1608
C9 HCCH103KBA C CHIP CERA 25V 10nF K 1608
C13, C14, C15 HCCK200JBA C CHIP CERA 50V 20pF J 1608
HCCK330JBA C CHIP CERA 50V 33pF J 1608
C17 HCCK221JBA C CHIP CERA 50V 220pF J 1608
C35, C36 HCCK101JBA C CHIP CERA 50V 100pF J 1608
C32, C33 HCCK220JBA C CHIP CERA 50V 22pF J 1608
DZ1, DZ2, DZ3 ,DZ4,
DZ5, DZ6
DUDZS5.6B- ZENOR DIODE UDZS 5.6B(SOD-323), ROHS 적용품
DZ7 DZMM55C5V6 ZENER DIODE ZMM55C5V6
D2, D3, D4, D5,
D6, D7, D8,
D9, D10D11, D12, D13,
D14,D15, D16
DBAV99---- CHIP DIODE BAV99 (SOT-23)
FB4, FB5, FB7 HFA1608121 BEAD CHIP
CIM10J121NC(BEAD_120
ohm_1608)
FB3, FB6, R60 HRFS000JBA R CHIP 1/16W 0 ohm J 1608
Page 21

Q74A Service Manual
-21-
FB8 HFA3216121 BEAD CHIP CIM31J121NE (BEAD_120ohm_3216)
J4 97E6200110 15-PIN D-SUB HDR10-15F-RL
J5 97E6200734 CONN WAFER
IBP-07R-20T(GIL-S-7P-S2L2-EF) :
Right angle
J6 97E6200790 DVI_29PIN 361R02-0
J7 99E6203095 CONN WAFER IBP-09S-20T(GIL-S-9P-S2T2-EF) :
Q4, Q5 TSBT3904-B TR CHIP SBT3904
Q2, Q3 TSBT3906-B TR CHIP SBT3906
R21, R24, R26, R41, R42,
R43, R52, R53, R64, R65
HRFS103JBA R CHIP 1/16W 10K J 1608
R20 HRFS222JBA R CHIP 1/16W 2.2K J 1608
R27, R28, R45, R46, R50,
R54, R55, R57, R58, R59,
R61, R66, R100, R101
HRFS472JBA R CHIP 1/16W 4.7K J 1608
R7, R8, R9, R10, R11,
R12, R13, R14
R15, R16, R22, R51
HRFS101JBA R CHIP 1/16W 100 ohm J 1608
R17, R18, R19 HRFS750JBA R CHIP 1/16W 75 ohm J 1608
R23, R25 HRFS201JBA R CHIP 1/16W 200 ohm J 1608
R29, R30, R31, R33, R35,
R36, R37R38, R39, R40
HRFS100JBA R CHIP 1/16W 10 ohm J 1608
R32, R34 HRFS220JBA R CHIP 1/16W 22 ohm J 1608
R44 HRFS821JBA R CHIP 1/16W 820 ohm J 1608
R47, R48, R67, R68 HRFS330JBA R CHIP 1/16W 33 ohm J 1608
R49 HRFS391JBA R CHIP 1/16W 390 ohm J 1608
R56 HRFS223JBA R CHIP 1/16W 22K J 1608
R62 HRFS104JBA R CHIP 1/16W 100K J 1608
R63 HRFS122JBA R CHIP 1/16W 1.2K J 1608
U2
1A111733DC
IC REGULATOR
APL1117-33UC-TR(TO-252)
U3 1AP1117E18 IC REGULATOR AP1117E18A, SOT223-3L
U4 1TSUM56AL- IC SCALER TSUM56AL-LF ( MSTAR )
U5 1AT24C02N- IC EEPROM AT24C02N-10SU-2.7 , LEAD FREE
U6 1FDC6329L- IC LOADSWITCH FDC6329L SUPERSOT TM-6 , ROHS
U7 1PS25LV512 IC FLASH MEMORY PS25LV512 ( MSTAR ) , 512KBIT ,
Page 22

Q74A Service Manual
-22-
U8 1AT24C16--
IC EEPROM
(ATMEL)
AT24C16N-10SU-2.7(SOIC 8P),
ROHS 적용품
X1 5XJ14R318E CRYSTAL QUARTZ 14.3181MHz XTAL2 20pF DIP
CE1, CE4 CEXF1C471A
C ELECTRO 16V 470uF 20% 10x12.5 TAP
CE2, CE3 CEXF1C102A
C ELECTRO 16V 1000uF 20% 10x16 TAP
C1, C2 HCCK104ZBA C CHIP CERA
50V 100nF Z 1608
C5 HCCK105ZBA C CHIP CERA
50V 1uF Z 1608
C3, C4 HCCF474MBA C CHIP CERA
16V 470nF M 1608
C3, C4 HCCF474KBA C CHIP CERA
16V 470nF K 1608
D1 DZN4002---
DIODE 1N4002 100V 1A T-26
FB1, FB2 HFA1608121 BEAD CHIP
CIM10J121NC(BEAD_120
ohm_1608)
J1 97E6200600 CONN WAFER
53014-0410
J2, J3 97E6300220 STEREO JACK
ST-320 (5P 3.5pi)
Q1 TSBT3904-B TR CHIP
SBT3904
R4 HRFS472JBA R CHIP
1/16W 4.7K J 1608
R2 ,R3 HRFS103JBA R CHIP
1/16W 10K J 1608
R5, R6 HRFS303JBA R CHIP
1/16W 30K J 1608
R1 HRFS304JBA R CHIP
1/16W 300K J 1608
U1 1TDA7496L- IC AUDIO
TDA7496L(ST)
-Red Calor : DVI Part
-Blue Calor : AUDIO Part
Page 23

Q74A Service Manual
-23-
▶ Q74A FUNCTION KEY B/D Part List
Location
Parts Code
Parts Name Parts Spec. A/J Remark
PCB 97E6500843-00 FUNCTION_PCB 1 LAYER(102.5*15mm) HL711S/D
J1 99E6203075 CONN WAFER IBP-07S-20T(GIL-S-7P-S2L2-EF)
J2 99E6203045 CONN WAFER IBP-04S-20T(GIL-S-4P-S2T2-EF)
R1,R2 HRFS152JBA R CHIP 1/6W 1.5K J 1608
R3 HRFS302JBA R CHIP 1/6W 3K J 1608
SW1,SW2,
SW3,SW4,
5S51280A6- TACT SWITCH 1280A6 (KNOB-5mm)
▶ Q74A FUNCTION LED B/D Part List
Location
Parts Code
Parts Name Parts Spec. A/J Remark
PCB 97E6500844-00 LED FUNCTION_PCB 2 LAYER(41.5*15mm) HL711S/D
J1 99E6203045 CONN WAFER IBP-04S-20T(GIL-S-4P-S2T2-EF)
LED DLSAM3270- LED LED 3pai 3PIN(2.54-PITCH)
SW5 5S51280A6- TACT SWITCH 1280A6 (KNOB-5mm)
Page 24

Q74A Service Manual
▶ Inverter & POWER BD Part List(FLF1742-20A)
NO. Ref. PART TYPE 1st. Vendor 2nd. Vendor Q,ty
1 L F101 LFL 002A 동 흥 GET 1
2 PC 101 LT V -817B-M ,TC ET 1103 L IT ON Vi s ha y 1
3 BD101 KBP 206G TSC 1
4 D104,105 S B560 V IS HAY -GS DIODE S 2
5 D103 M BR10H150C T VI S HAY -GS 1
6 C105 CE 82u400V 85SD,SHL ,GS 삼영 ,삼 화 ,만 유 1
7 C103,104 KNB1560M KP-334K IS KRA PI L C O,선 일 2
8VS1 VARISTOR 7D471 ILJIN(AMOTECH) CNR 1
9 C101,102 DG102Y 1 두 산 , 동 일 2
10 C106 DG222Y 1 두 산 , 동 일 1
11 C2 CE 220U25V105L XZ ,WL,RT 삼 영 ,삼 화, 만 유 1
12 CN100 SC-8R-F152P 32R-GB S UPE RCOM 1
13 CN101 GI L -S-9P -S2T 2-EF LG전 선 1
14 IC 101 FS DM 0565R FA IRC HIL D 1
15 CN1,2,3,4 35002WR-02, JE 207-B1T-02 연 호 J AEE UN 4
16 T101 T RSL 014A 동흥 GE T 1
17 T3 TR S 1801U - DI P 경 인 ,링 보 다 폰 1
18 U1,2 AP4511GD-DIP APE C 2
19 U3 BIT3105 - DI P BI TE K 1
20 D101 RS 1J , UF4007 TSC S HS 1
21 Z D104 ZY 160 SHS 1
22 D2,4 DAN217,BAV 99 Roh m DI ODE S 2
23 D5 DAP 202U Rohm 1
24 Z D1,2,3 UDZ S5.6B,BZ T52C 5V 6S-7 Rohm DI ODE S 3
25 Z D102 UDZ S10B,BZ T52C 10V 0S Ro h m DI ODE S 1
26 Z D101,103 UDZ S20B,BZ T52C 20V 0S Ro h m DI ODE S 2
27 Q1 2N3904,M MBT 3904 Rohm DI O DES 1
28 C1,17 CC 106Z 10V 3216 삼성 ,T DK 태양유전 2
29 C8 CC 473K50V 2012 삼 성 ,TDK 태양유전 1
30 C13 C C271K50V 2012 삼 성,T DK 태양유전 1
31 C6,7,9,12,20 CC 103K50V 2012 삼 성 ,TDK 태양유전 5
32 C11,22,24,122 CC104K50V 2012 삼 성,TDK 태양유전 4
33 C3,4,14,19,119 C C105Z 16V2012 삼 성 ,TDK 태양유전 5
34 R116,117 C R 2012J200 삼 성 Roh m 2
35 R114,115 C R 2012J181 삼 성 Roh m 2
36 R28,29 C R 2012J221 삼 성 Roh m 2
37 R121 C R2012J122 삼 성 Rohm 1
38
R119,122
CR2012J 332 삼성 Roh m
2
39
R1,16,20,22,24
CR2012J 103 삼성 Roh m
5
40 R2,3,10 CR2012J 183 삼성 Roh m 3
-24-
Page 25

Q74A Service Manual
▶ Inverter & POWER BD Part List(FLF1742-20A)
NO. Ref. PART TYPE 1st. Vendor 2nd. Vendor Q,ty
41 R 12 C R2012J433
삼성 Rohm
1
42 R 26 C R2012J753
삼성 Rohm
1
43 R 11 C R2012J134
삼성 Rohm
1
44 R 5 C R2012J 154
삼성 Rohm
1
45 R 8,25 C R 2012J 224
삼성 Rohm
2
46 R 9 C R2012J 824
삼성 Rohm
1
47 R 27 C R2012J105
삼성 Rohm
1
48 R 15,19 C R2012F3600
삼성 Rohm
2
49 R 126 CR2012F1431
삼성 Rohm
1
50 R 123 CR2012F1801
삼성 Rohm
1
51 R 124 CR2012F2702
삼성 Rohm
1
52 R 101,102,103 C R 3216J 334
삼성 Rohm
3
53 R111 RD 1/ 4W J 3.9 O HM
제일전자 스마트전자
1
54 R105,106 RD 1/ 4W J 33K O HM
제일전자 스마트전자
2
55 C 112 221K 1KV
동일 두산
1
56 C 113 222K 1KV
동일 두산
1
57 C 115
CE 680u 25V105RD,KM 삼 영,삼 화,만 유
1
58 C 117,118
CE 1000u 10V105RD,KM 삼 영,삼 화,만 유
2
59 C 110
CE47U50V 85/CE47U50V 105
삼영,삼화,만유
1
60 I C 102
TL 431A Fai r C hi ld 우 석
1
61 BC 102
EBFL 001A 동 흥전 자 GE T
1
62 C 5,10
CL 100K3K 두 산전 자 동 일
2
63 D102
PR1003, FR104 Di ode s 성호 반도 체
1
64 T H101
SC K08053M S,NT C 5D-9 T h in ki n g 삼경 쎄라 믹
1
65 F101
SR-5 3.15A 세이브퓨즈
1
66 P .W.B FR-1 P L 1742C20 다산 동 명 1
-25-
Page 26

Q74A Service Manual
-26-
CIRCUIT DIAGRAM
▶ AD B/D(Q74A)
Page 27

Q74A Service Manual
-27-
Q74A Service Manual
-27-
Page 28

Q74A Service Manual
-28-
+5V
BT13
1
+
CE11
10uF/16V
BKLT-EN
TP3
1
AVDD_PLL_3.3
+5V
+5V
Q5
SBT3904
3
1
2
R60
0
R26 10K
C32 22p
RXEC-
R24 10K
FLASH_MEMORY
J5
3
2
4
5
1
6
7
KEY1
KEY2
GND
LED_R
GND
LED_G
VCC
GIN
R55
4.7K
RXO3+
R62
100K
D8
BAV99
1
2
3
U8
AT24C16(SOIC)
1
2
3
4
5
6
7
8
A0A1A2
GND SD A
SCL
WP
VCC
BT7
1
AVDD_ADC_3.3
INV_ON
TP29
1
BT4
1
BT9
1
BT12
1
BT5
1
R52 10K
VDDC_1. 8
BT25
1
BT14
1
SDA_DVI
RXE1-
SOGIN
BT16
1
GND_POWER
RXO0-
+5V
BT10
1
R67 33
D7
BAV99
1
2
3
R27 4.7K
DET DVI
BT21
1
BT6
1
BT18
1
VDDP_3.3
TP5
1
RXO0-
R51
100
VDDC_1.8
C39
0.1uF
ST_DET
PANEL_INTERFACE
DSDA
RIN
RXE3+
R25 200
+5V
KEY_INTERFACE
RX1+
R57 4.7K
RXO2-
R68 33
RXEC+ RXE3-
BT20
1
R50
4.7K
TP30
1
MUTE
RINM
VDDP_3.3
R54
4.7K
RXEC-
RXE3-
BT3
1
R59 4.7K
BT22
1
BT8
1
C33 22p
AVDD_MPLL_3.3
RXO1+
BT23
1
RXE0-
R41 10K
R32 22
RXE0+
RXOC+
C41
0.1uF
INV_ON
R64 10K
TP28
1
RXOC-
R100 4. 7K
Q2
SBT3906
2
1
3
ON_Pannel
R42 10K
RXO2+
Q4
SBT3904
BKLT-VBRI
ON_Pannel
RXE0+
CON1
12507WR-30
1234567891011121314151617181920212223242526272829
30
31
32
VDDP_3.3
EEPROM
BIN
RXE3+
RXE0-
BT2
1
RXE2-
RXO2+
R49 390
RX2-
RX2+
+
CE14
100uF/16V
AVDD_DVI_3.3
RXO2-
R28 4.7K
0
SCALER & PANEL
HL720D
Title
Document N um ber Rev
Sheet
of
DESIGN CHEC K APPROVAL
WooYoung Telecom Co., Lt d.
Model
RXC-
C38 0.1uF
SCL_DVI
BT19
1
GINM
R23 200
RXO0+
RXE2-
BT15
1
R53 10K
C44
0.1uF
RXC+
RXO3-
+5V
DSCL
RXEC+
C42
0.1uF
C43
0.1uF
RX0-
RXO1-
RXE2+
R61 4.7K
RXE1+
R34 22
RXO3-
RXO1-
+
CE15
100uF/16V
X1
14.318MHZ
BT1
1
C480.1uF
Q3
SBT3906
2
1
3
DIM_ADJ
U6
FDC6329L
4
5
6
3
2
1
YTN
On-Off
R1_C1
V_Out2
V_Out1
R2
RXE2+
BT26
1
DIM_ADJ
C49
0.1uF
RXOC+
PS25LV512(SOI C)
U7
1
2
3
4
5
6
7
8
CS
SO
WP
GND SI
SCK
HOLD
VCC
BT27
1
C40
0.1uF
RXO3+
RXO0+
R58 4.7K
HSYNC
RX1-
R65 10K
R66
4.7K
SCALER
&
PANEL
TP4
1
+5V
TP31
1
VOLUM
RXOC-
VSYNC
E
R101 4.7K
DVI_INPUT
RXE1+
C37 0.1uF
BT24
1
RX0+
RXO1+
RXE1-
C45
0.1uF
R63
1.2K
VDDP_3.3
R56223
U4
TSUM56AL-LF
33
32
30
29
18
35
34
19
31
41
42
40
16
17
80
81
78
79
55
61
72
82
94
56
62
73
83
95
58
64
85
57
63
84
47
28
27
2
14
11
8
5
25
26
23
24
22
20
21
1
48
49
50
51
52
53
54
15
43
37
36
38
39
76
77
70
71
74
75
96
97
92
93
90
91
86
87
88
89
44
45
46
66
69
3
4
6
7
10
12
13
59
60
65
67
68
100
99
98
9
GND
VDDP
DDCA_SDA
GND
BIN0P
GPIO_P15/PWM0
VDDC
GIN0M
DDCA_SCL
GPIO_P23
GPIO_P22
SDI
AVDD_PLL
BIN0M
BYPASS
VCTRL
LVB0M
GND
LVA3M
LVA2M
LVB2M
VDDC
GPIO_P13
VDDP
LVA1P
LVB1P
GND
GPIO_P14
LVACKP
LVA0P
GPIO_P12
GND
LVA1M
RSTGPIO_P24/PWM2
VSYNC0
HSYNC0
GND
AVDD_DVI
GND
AVDD_DVI
GND
REFM
REFP
RIN0P
AVDD_ADC
RIN0M
GIN0P
SOGIN0
DDCD_SCL
GPIO_P27/PWM1
VDDP
GND
VDDC
MODE[ 0]
MODE[ 1]
LVA3P
REXT
GP IO_P11/I2C_MDA
SDO
NC
CSZ
SCK
GND
LVB0P
LVBCKM
LVB2P
LVB1M
VDDP
XIN
XOUT
GPIO_P07
GPIO_P26/PWM0
GPIO_P02/SAR3
GPIO_P06
GPIO_P25/PWM1
RSTN
GPIO_P00/SAR1
GPIO_P01/SAR2
GP IO_P10/I2C_MCL
NC
NC
VDDC
LVBCKP
R+R-G+G-B-
CK+
CK-
LVACKM
LVA2P
LVA0M
LVB3P
LVB3M
DDCD_SDA
GPIO_P16/PWM2
AVDD_MPLL
B+
BT17
1
VDDP_3.3
BT11
1
C47
0.1uF
BINM
Page 29

Q74A Service Manual
CE4
470uF/16V
FB1
BEAD_120ohm_1608
R5
30K
GND
C2
0.1uF
C4
470nF
FB2
BEAD_120ohm_1608
C3
470nF
R4
4.7K
VOLUME
AIN-R
TP1
1
CE3
1000uF/16V
+5V
AUDIO_PART
R1
300K
D1
1N4002/DIP
1
2
CE2
1000uF/16V
J1
12507WR-04A
1
2
3
4
LEFT
GND
GND
RIGHT
SPEAKER
WAFER
R3
10K
Q1
SBT3904
1
2
3
C5
1uF
AIN-R
CE1
470uF/16V
TP2
1
AIN-L
U1
TDA7496L
12
1
11
2
3
20
19
5
6
7
4
8
10
9
13
16
14
15
18
17
MUTE
G1
STBY
G2
G3
G20
G19
VAROUT-L
VOL
VAROUT-R
LIN
NC
SVR
RIN
P13
VCC
R_OUT
VCC
G18
L_OUT
+12V
MUTE
AIN-L
R2
10K
J2
ST-320
2
3
4
5
1
AUDIO
INPUT
J3
ST-320
2
3
4
5
1
R6
30K
C1
0.1uF
-29-
Page 30

Q74A Service Manual
-30-
D11
BAV99
1
2
3
C35100pF
SDA-DVI
D9
BAV99
1
2
3
9
RX0-
+5V
C4
R31 10
R48 33
D12
BAV99
1
2
3
R46
4.7K
RX2-
D13
BAV99
1
2
3
D16
BAV99
1
2
3
C36100pF
D14
BAV99
1
2
3
DET_DVI
J6
DVI_30P
3
2
1
4
5
6
7
8
9
10
11
12
13
14
15
16
17
18
19
20
21
22
23
24
25
26
27
28
29
31
34
321456789
101112131415161718192021222324
C1C2C3C4C5
31
34
RX2-
R45
4.7K
RX1-
SDA_DVI
RX0+
U5
AT24C02(SOIC)
1
2
3
4
5
6
7
8
A0A1A2
VSSSDA
SCLWPVCC
DZ4
UDZS5.6B
1
2
8
R35 10
R44 820
24
RXC+
C1
RXC-
R29 10
RX0-
DVI(Digtial Visual I nterface) 29P
0
DVI INPUT
HL720D
Titl e
Document Number Rev
Sheet
of
DESIGN CHECK APPROVAL
WooYoung Telecom Co., Ltd.
Model
RX2+
RX0+
R47 33
DVI_INPUT
SCL_DVI
C34 0.1uF
RXC+
R37 10
E
E
P
_
R
O
M
+5V
RXC-
R40 10
RX1-
D10
BAV99
1
2
3
RX1+
DET_DVI
SCL-DVI
DZ5
UDZS5.6B
1
2
16
1
R43 10K
DZ6
UDZS5.6B
1
2
D15
BAV99
1
2
3
+5V
R33 10
C2
RX1+
R36 10
R39 10
RX2+
17
R30 10
C3
R38 10
Page 31

Q74A Service Manual
-31-
LED_GREEN
R2
1.5K
J1
CON8
7
6
5
4
3
2
1
GND
5V
KEY2
LED_RED
SW4
STS-1102A-1
SW2
STS-1102A-1
GND
R3
3K
GND
GND
R carbon
film(T-52
Small)
R1
1.5K
J2
CON4
1
2
3
4
SW1
STS-1102A-1
KEY1
SW3
STS-1102A-1
LED_RED
LED1
SAM5270
3
2
1
LED_Green
SW5
STS-1102A-1
KEY1
GND
J3
CON4
4
3
2
1
Page 32

Q74A Service Manual
▶ Inverter & POWER B/D(FLF1742-20A)
- Adapter Cutcuit
-32-
Page 33

Q74A Service Manual
-Inverter Circuit
-33-
Page 34

Q74A Service Manual
-34-
PCB Layout
▶ AD B/D TOP SILK (Q74A)
Page 35

Q74A Service Manual
▶ AD B/D TOP PATTERN (Q74A)
-35-
Page 36

Q74A Service Manual
▶ AD B/D BOTTOM SILK (Q74A)
-36-
Page 37

Q74A Service Manual
▶ AD B/D MASK TOP (Q74A)
-37-
Page 38

Q74A Service Manual
▶ AD B/D MASK BOTTOM (Q74A)
-38-
Page 39

Q74A Service Manual
▶ FUNC B/D TOP SILK (Q74A)
▶ FUNC KEY B/D BOTTOM PATTERN (Q74A)
▶ FUNC LED B/D TOP SILK (Q74A)
▶ FUNC LED B/D BOTTOM PATTERN (Q74A)
-39-
 Loading...