


PDA Phone
User Manual
P51
Sidebar Signs
Text set off in this manner indicates a note. A note will elaborate the current topic
with further information or mention something a little off topic.
Text set off in this manner indicates a warning. Failure to follow the said warning
could result in damage to equipment or loss of information.
Text set off in this manner indicates a tip. A tip will recommend an action which
helps you better use the product.
Safety Precautions
Information for parents
Please read the operating instructions and safety precautions carefully before use. Explain the content to your
children and the hazards associated with using the phone.
Remember to comply with legal
requirements and local restrictions
when using the phone. For example, in
aeroplanes, petrol stations, hospitals or
while driving.
Mobile phones can interfere with the
functioning of medical devices such as
hearing aids or pacemakers. Keep at
least 20 cm/9 inches between phone and
pacemaker. When using the mobile
phone hold it to the ear which is furthest
away from the pacemaker. For more
information consult your doctor.
Always keep the phone and accessories
out of reach of small children.
Small parts such as the SIM card, dust
cap, lens rin g and lens cap as well a s the
SD Card can be dismantled and
swallowed by small children.
Do not place the phone near to
electromagnetic data carriers such as
credit cards and floppy disks.
Information stored on them could be
lost.
Do not look directly into the LED (e.g.
flash LED) with optical magnifiers
because of radiation.
ii Safety Precautions
Permanent hearing loss may occur if
you use ear- or headphones at high
volume.You can adapt over time to a
higher volume, which may sound
normal but can be damaging to your
hearing. Set your volume to a safe level.
If you experience discomfort or buzzing
in your ears, reduce the volume or
discontinue use of your ear- or
headphones.
Ringtones, info tones and handsfree
talking are reproduced through the
loudspeaker. Do not hold the phone to
the ear when it rings or when you have
switched on the handsfree function.
Otherwise you risk serious permanent
dama ge to your hea ring.
The mains voltage (V) specified on the
power supply unit must not be
exceeded. Otherwis e the charging device
may be damaged.
The power supply must be plugged into
an easily accessible AC mains power
socket when charging the battery. The
only way to turn off the charging device
after charging the battery is to unplug it.
You may only open the ph one to replace
the battery, SIM and SD Card. You must
not open the battery under any
circumstan ces. All other changes to this
device are strictly prohibited and will
invalidate the guarantee.
• Only use original batteries and
charging devices. Otherwise you risk
serious damage to health and
property. The battery could explode,
for instance.
• All batteries can cause property
damage, injury or burns if a
conductive material such as jewelry,
keys or beaded chains touch exposed
terminals. The material m ay complete
an electrical circuit and become quite
hot. Exercise care in handling any
charged battery, particularly when
placing it inside your pocket, purse or
other container with metal objects.
Your batteries are supplied with a
protective cover. Please attach this
cover to your batteries when deta ched
from the phone and not in use.
• Do not dispose of batteries in fire as
they may explode.
The phone may cause interference in the
vicinity of TV sets, radios and PCs.
Use only original accessories. This will
avoid potential risks to health or
property and ensure com pliance with all
relevant regulations.
Safety Precautions iii
All electrical and electronic products
should be disposed of separately from
the municipal waste stream via
designated collection facilities
appointed by the government or the
local authorities.
This crossed-out wheelie bin symbol on
the product means the product is
covered by the European Directive
2002/96/EC.
The correct disposal and separate
collection of your old appliance will help
prevent potential negative
consequences for the environment and
human health. It is a precondition for
re-use and recycling of used electrical
and electronic equipment.
For more detailed information about
disposal of your old appliance, please
contact your local council, waste
disposal service or the shop where you
purchased the product.
Improper use will invalidate the guarantee! These
safety instructions also apply to original accessories.
Bluetooth®
Your phone has a Bluetooth interface. This makes it
possible to establish a wireless connection with your
phone and a headset of a car kit, or other Bluetoothenabled devices.
In order to establish a secure link between the de vices
and to prevent a third party from having access to
your phone, you should observe the following points:
• The initial connection between two devices, what is
called "pairing", should take place in familiar
surroundings.
• Both devices must be able to identify th emselves one
time by using a password/PIN. To ensure sufficient
security, you sh ould choose a 16-digit numb er
iv Safety Precautions
combination for a password that would be difficult
to guess (if a PIN has not been assigned).
• An automatic connection acceptance ("connection
without confirmation") should only be used in
exceptional cases.
• In general, only trustworthy devices should be
linked in order to minimize security risks.
• You should restrict the "visibility" of your phone if
poss ible. This will make i t much more difficult for
unknown devices to establish a connection with
your phone. T o do this , in the W ireless Mana ger
window, tap Menu > Bluetooth Settings and
uncheck the “Make this device discoverable to other
devices” option.
• The name of your phone is transmitted in a
Bluetooth connection. The factory default name is
"Pocket_PC". The first time Bluetooth is activated,
or later in the Bluetooth menu, you can change this
name by tapping Start > Settings > Owner
Information.
• If Bluetooth is not needed, this function should be
deactivated.
• Before using Bluetooth accessories, or a mobile
phone inside a vehicle, check the vehicle user guide
for any limitations on the use of these products.

Table of Contents
Safety Precautions ................................................................................ii
Introduction .........................................................................................1
Phone exterior ...................................................................................... 2
Front view.............................................................................................................. 2
Description of the indicators ........................................................................................4
Top view and bottom view .................................................................................. 5
Left-side view and right-side view........................................................................ 6
Rear view ............................................................................................................... 7
Hardware setup .................................................................................... 8
SIM card installation............................................................................................. 8
Battery installation .............................................................................................. 10
Removing the battery.......................................................................................... 11
Battery charging .................................................................................................. 12
Startup ................................................................................................ 13
First time startup................................................................................................. 13
Using the stylus ................................................................................................... 14
Sleep mode .......................................................................................................... 14
Deep Sleep mode .........................................................................................................14
Soft reset .............................................................................................................. 15
Hard reset ............................................................................................................ 15
Clean boot ........................................................................................................... 15
Today screen....................................................................................... 17
Today screen........................................................................................................ 17
Navigation bar .............................................................................................................18
Table of Contents 1

Start button ..................................................................................................................19
Menu bar ......................................................................................................................19
Input methods.................................................................................... 21
Entering typed text .............................................................................................. 21
Using the QWERTY keyboard ....................................................................................21
Using the Input Panel..................................................................................................22
Virtual keyboard ................................................................................................ 22
Letter Recognizer ............................................................................................... 23
Block Recognizer................................................................................................ 23
Transcriber ......................................................................................................... 23
Writing on the screen.......................................................................................... 24
Selecting a sentence......................................................................................................24
Converting writing to text...........................................................................................25
Drawing on the screen ........................................................................................ 26
Creating a drawing.......................................................................................................26
Selecting a drawing ......................................................................................................26
Settings................................................................................................ 27
Personal settings ..................................................................................................27
Buttons .........................................................................................................................27
Input .............................................................................................................................28
Lock ..............................................................................................................................28
Menus ...........................................................................................................................28
MSN Options ...............................................................................................................28
Owner Information .....................................................................................................28
Phone............................................................................................................................29
Sounds & Notifications................................................................................................29
Speech Commander Settings.......................................................................................30
Today............................................................................................................................30
System settings..................................................................................................... 31
About............................................................................................................................31
2 Table of Contents

Auto Test......................................................................................................................31
Backlight.......................................................................................................................31
Certificates....................................................................................................................32
Clocks & Alarms .......................................................................................................... 32
Device Info ................................................................................................................... 33
Error Reporting............................................................................................................33
GPS ...............................................................................................................................33
Memory........................................................................................................................33
Power............................................................................................................................34
Regional Settings..........................................................................................................34
Remove Programs........................................................................................................35
Screen ...........................................................................................................................35
Connections settings........................................................................................... 35
Beam.............................................................................................................................35
Bluetooth...................................................................................................................... 35
Setting up Bluetooth...........................................................................................36
Using a Bluetooth stereo headset.......................................................................37
Connection Settings.....................................................................................................38
Connections ................................................................................................................. 38
Setting up a GPRS and CSD connection to your ISP .......................................39
Configuring proxy server settings......................................................................41
Setting up a VPN connection to your corporate network................................42
GPRS Authentication .........................................................................................43
Using WLAN.......................................................................................................43
Network Cards - connecting to an existing wireless network...................................43
Adding a new wireless network..........................................................................44
Searching for wireless networks to access..........................................................44
USB to PC ....................................................................................................................44
Wireless Manager ........................................................................................................44
Phone operation................................................................................. 45
Phone screen ....................................................................................................... 45
Table of Contents 3

Making and receiving phone calls ...................................................................... 45
Making a call directly...................................................................................................45
Answering a call ...........................................................................................................46
Ending a call.................................................................................................................46
Making a call from Contacts .......................................................................................46
Making a speed dial call...............................................................................................47
Making a speed dial............................................................................................ 47
Making a conference call .............................................................................................47
Loudspeaker .................................................................................................................48
Associating notes with calls................................................................................. 49
Viewing past phone activity................................................................................ 49
Flight mode.......................................................................................................... 50
Programs............................................................................................. 51
Calendar............................................................................................................... 53
Contacts ............................................................................................................... 54
Internet Explorer................................................................................................. 54
Messaging............................................................................................................. 54
Setting up an MMS connection ........................................................................ 55
Windows Media .................................................................................................. 55
Help...................................................................................................................... 56
Games................................................................................................................... 56
Mobile Security.................................................................................................... 56
Calculator............................................................................................................. 56
Speech Commander ............................................................................................ 56
Download Agent.................................................................................................. 56
Excel Mobile ........................................................................................................ 57
File Explorer ........................................................................................................ 57
Java Manager ....................................................................................................... 57
Modem Link ........................................................................................................ 58
Notes .................................................................................................................... 58
4 Table of Contents

Pictures & Videos................................................................................................ 58
Pocket MSN......................................................................................................... 58
PowerPoint Mobile ............................................................................................. 58
Search................................................................................................................... 59
Set Ringtone ........................................................................................................ 59
SIM Message........................................................................................................ 59
SIM Toolkit ......................................................................................................... 59
Skype.................................................................................................................... 60
Sprite Backup ...................................................................................................... 60
Tasks .................................................................................................................... 61
Terminal Services Client..................................................................................... 61
Digital Media Server ........................................................................................... 61
Word Mobile ....................................................................................................... 61
Recover Storage................................................................................................... 61
Camera/camcorder operation ...........................................................62
Taking photographs............................................................................................ 62
Standard capture mode ............................................................................................63
Color options ............................................................................................................64
Recording motion videos.................................................................................... 65
Shooting videos ........................................................................................................... 66
Browsing and opening image, video, or music files .......................................... 66
Viewing images ............................................................................................................ 67
Viewing videos or playing music ................................................................................67
Editing an image file with Pocket Edit............................................................... 69
Options in Pocket Edit ...............................................................................................70
Microsoft ActiveSync ......................................................................... 71
Installing ActiveSync on PC ............................................................................... 71
Setting up a sync relationship............................................................................. 71
Adding programs ................................................................................................ 72
Table of Contents 5

Removing programs............................................................................................ 73
Push Mail ............................................................................................................. 73
Connect to ActiveSync using Bluetooth............................................................. 74
Webaroo ............................................................................................. 76
Installing Webaroo.............................................................................................. 76
Running Webaroo............................................................................................... 77
Troubleshooting information ........................................................... 78
Call related problems .......................................................................................... 78
Message problems ............................................................................................... 80
Internet problems................................................................................................ 80
Connection problems ......................................................................................... 80
System problems ................................................................................................. 81
Battery charging problems.................................................................................. 81
ActiveSync problems........................................................................................... 82
Care and maintenance ....................................................................... 83
Product data ....................................................................................... 84
SAR ..................................................................................................... 85
License Agreement ............................................................................. 86
6 Table of Contents

Introduction
Thank you for purchasing the BenQ-Siemens PDA phone. This user manual provides
important procedures and information to familiarize yourself with the device. Please keep
this manual in a safe place for future reference.
Introduction 1
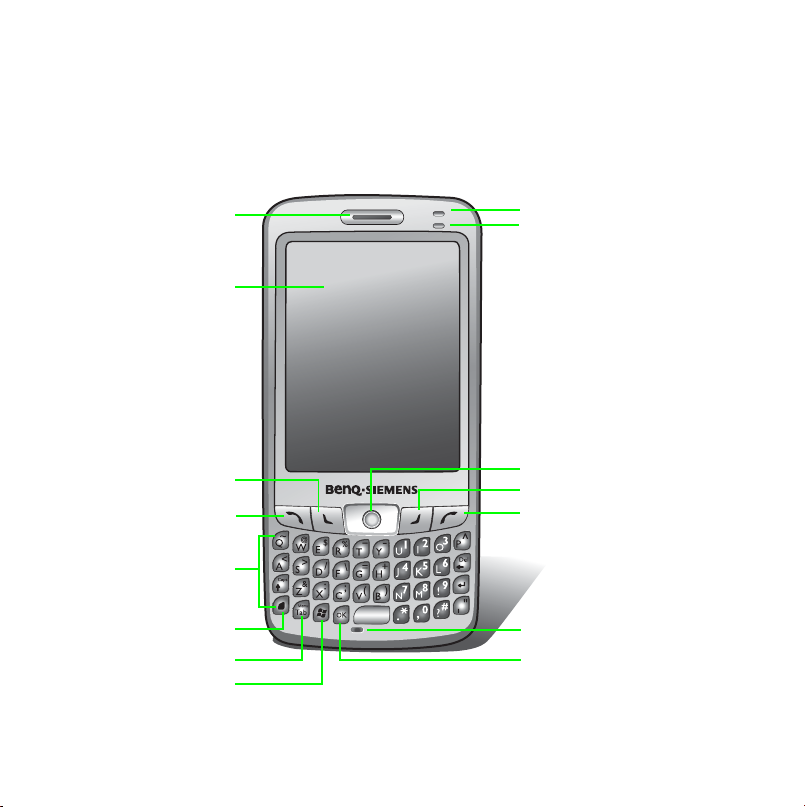
Phone exterior
Front view
2 Phone exterior
1
2
3
4
5
6
7
8
9
10
11
12
13
14
15

No. Name Description
1 Ear piece Listen during phone call.
2 LCD touchscreen
- Shows screen display.
- Tap and write on touchscreen.
3 Left soft key Runs a command as instructed by the screen.
- Press to pick up incoming calls.
4 Send key
- Press to bring up Dial screen.
- Press to place a call after dialing.
- Long press to activate/deactivate loudspeaker.
5 QWERTY keyboard Type text and enter numbers with ease.
6 Function key -
7 Tab key -
8Start key -
9 Power indicator
10 Connection indicator
11 Joystick
See "Description of the indicators" on page 4 for more
information.
See "Description of the indicators" on page 4 for more
information.
- Shift to move selection highlight in a program.
- Press to make a selection.
12 Right soft key Runs a command as instructed by the screen.
13 End key
- Press to reject incoming calls.
- Press to bring up the Today screen.
14 Microphone -
15 OK or X (Close) key -
Phone exterior 3
Description of the indicators
Indicator Color
Red
Power indicator
Green
Orange On The battery is completely drained.
Green Flash
Connection indicator
Blue Flash
Green/Blue
Lighting
Behavior
Flash
On Charging in progress.
Flash The PDA phone is in stand-by mode.
On Charging is complete.
Alternating
Flash
Description
Indicates that a new event (new
message, a new missed call, system
warning, etc.) occurs (indicated by the
appearance of certain icons on the
Navigation bar).
Indicates that the WLAN function has
been enabled.
Indicates that the Bluetooth function has
been enabled.
Indicates that the WLAN and Bluetooth
functions have both been enabled.
4 Phone exterior
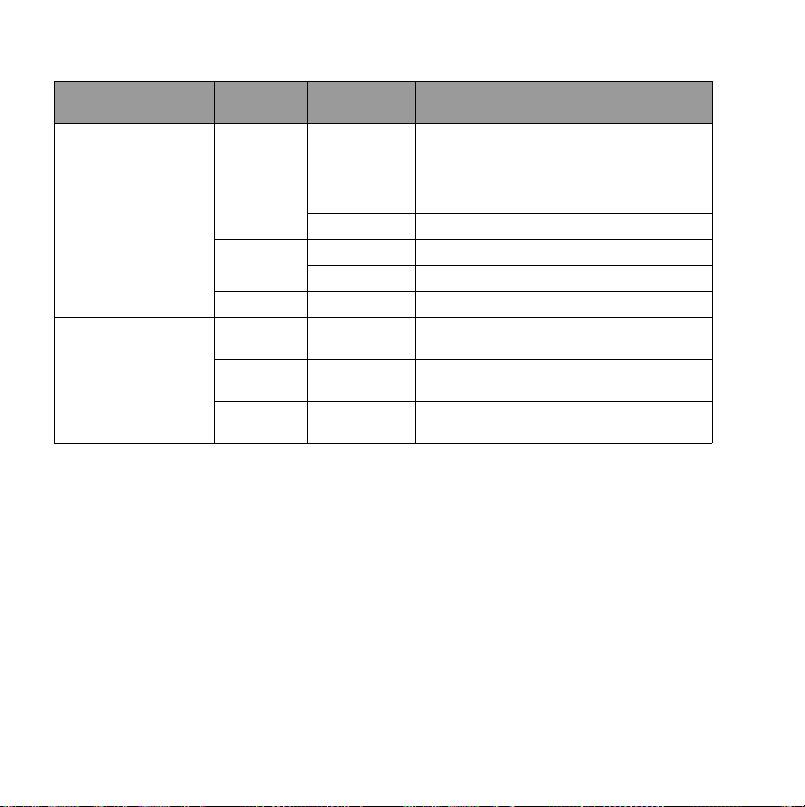
Top view and bottom view
1
.
3
M
E
G
A
P
I
X
E
L
S
D
I
G
I
T
A
L
Z
O
O
M
F
2
.
8
1
2
7
3
4
5 6
No. Name Description
- Press to power off or on (entering or leaving the sleep mode).
1 Power button
- Long press to turn off or on the backlight (consuming more
power than the sleep mode).
Receives GPS signals. For best quality, make sure the GPS is
positioned before driving. Also, always point this antenna to the
2 GPS antenna
sky and use the car holder when driving.
Environmental factors (such as a cloudy or rainy day and
the window film on a windshield) may significantly reduce
the GPS quality when receiving signals.
3 Stylus Device for tapping and writing on the touchscreen
4 Stylus housing Storage area for stylus
Battery charger
5
socket
SD card slot
6
(expansion slot)
Insert the battery charger plug.
Insert an SD memory card (storage card).
7 Reset button Insert a pin into the recess to trigger the reset button.
Phone exterior 5
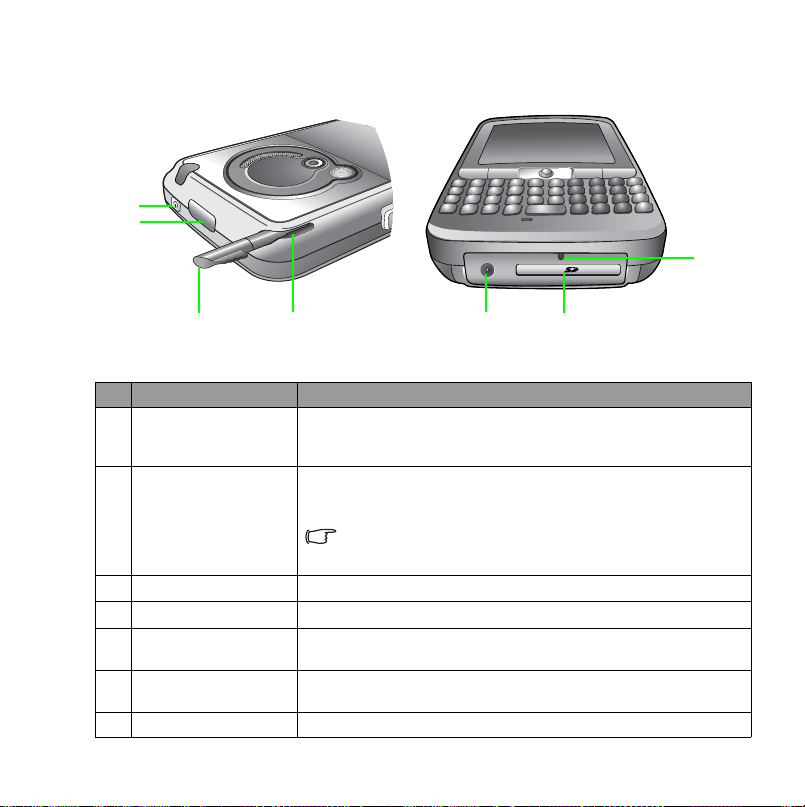
Left-side view and right-side view
12 345
No. Name Description
Audio recorder button/
1
Voice commander
2 Sound level buttons Press to adjust speech and device volume levels.
Camera/Camcorder
3
key
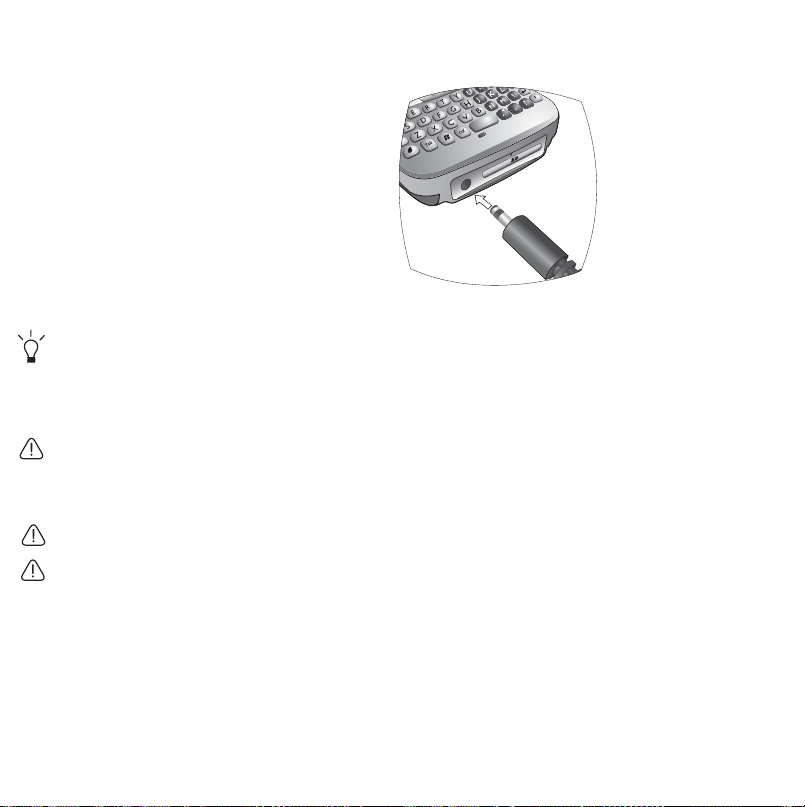
4 mini-USB socket
5 Headset jack Connects to a headset.
- Long press to record audio.
- Short press to use hands-free voice command.
Press to launch Camera/Camcorder.
Insert a data cable for connecting to another device or
charging.
6 Phone exterior
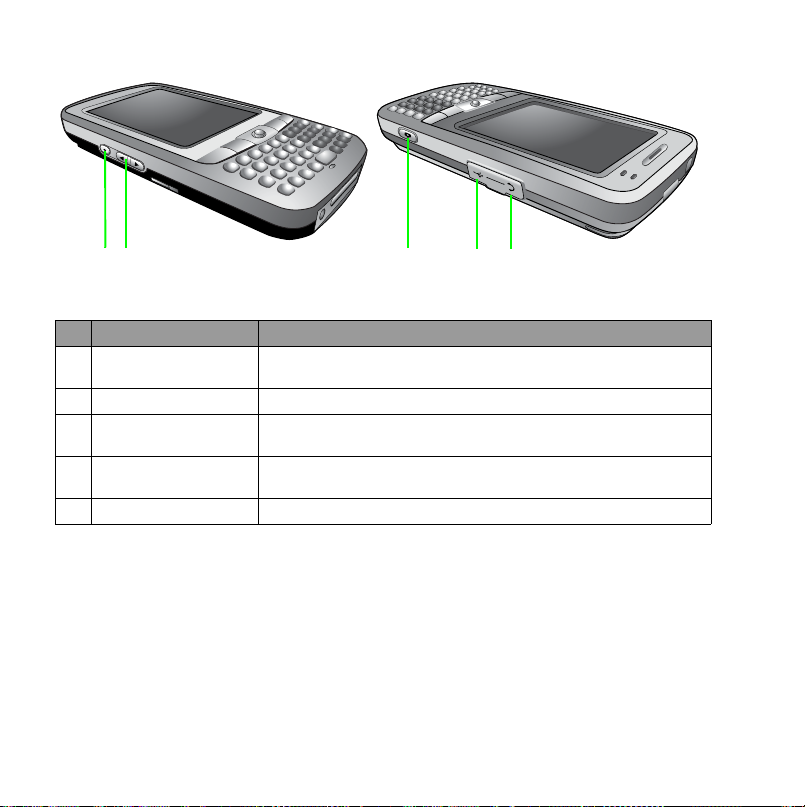
Rear view
O
Z
O
L
M
A
T
F
I
2
G
.
I
8
D
S
L
E
X
I
P
A
G
E
M
3
.
1
2
3
No. Name Description
1 Camera lens
2nd SIM card storage
2
compartment
Aim camera lens at objects of interest when using camera/
camcorder.
Extra storage space available for a second SIM card
3 Battery latch Press to release battery.
External GPS
4
antenna jack
Connects to an external GPS antenna, which is recommended
for best GPS performance.
5 Loudspeaker Generates ring and device audio.
6 SIM card socket Install a SIM card.
7 Battery lock Locks the battery.
1
4
5
6
7
Phone exterior 7
Hardware setup
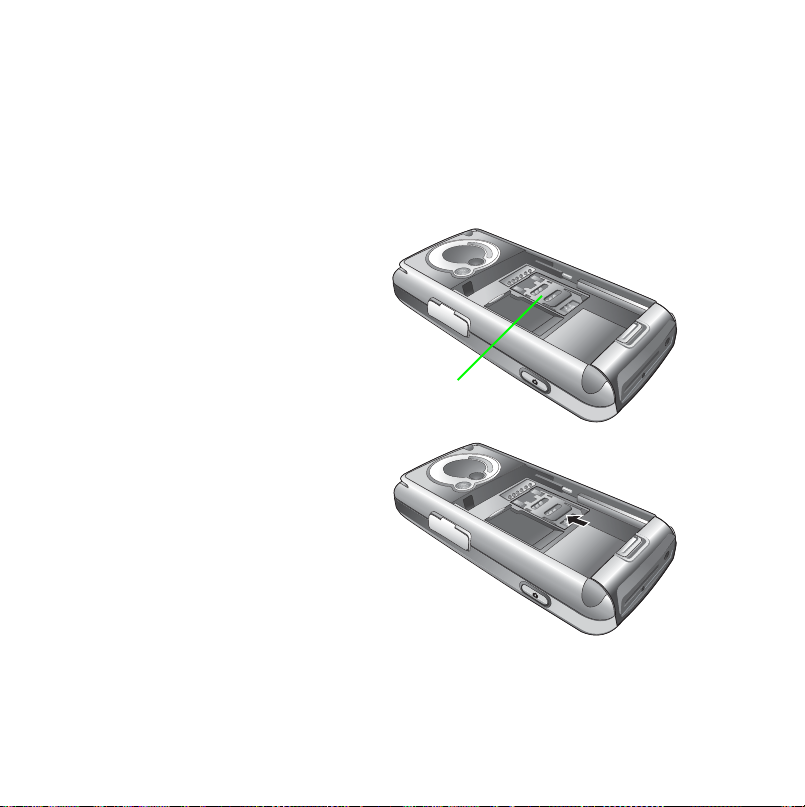
SIM card installation
You can obtain a SIM card from a mobile phone service provider when you sign on as a
subscriber. When you insert a SIM card into your PDA phone, you can begin using it to place
and receive phone calls. Please follow the instructions below to insert a SIM card into the
phone.
1. Locate the SIM card holder.
SIM card holder
2. Push the SIM card holder in the
direction of the arrow (as shown in
the figure to the right) to unlock it.
8 Hardware setup
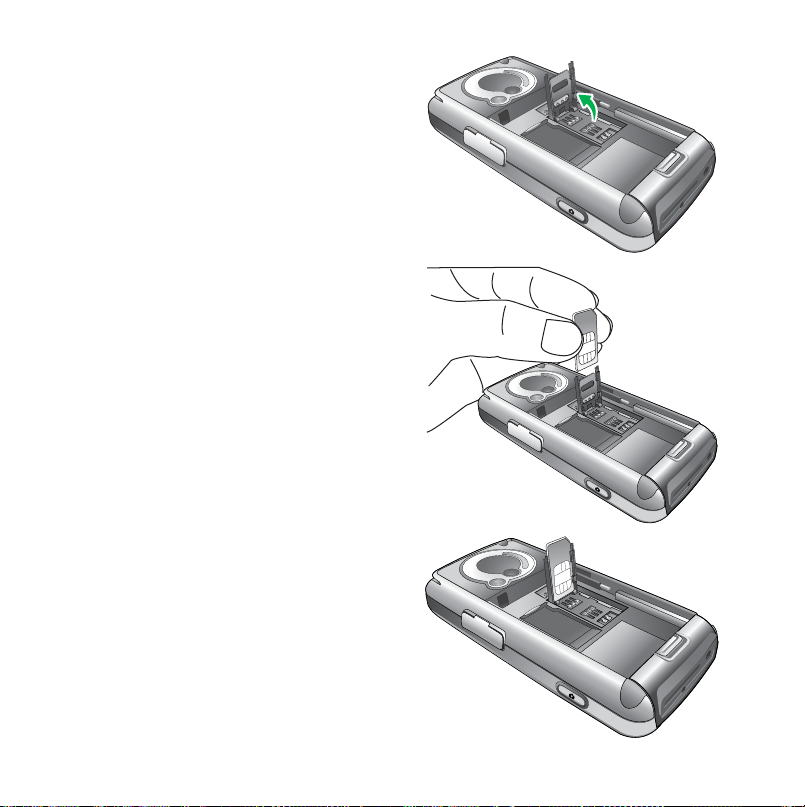
3. Pick and raise the SIM card holder up
in an upright position.
4. Hold the SIM card over the SIM card
holder ready for insert. Make sure
you hold the SIM card so that the side
with the metal contacts will face
down when you close the SIM card
holder. (See the figure to the right for
reference.)
5. Insert the SIM card into the SIM card
holder. Make sure it goes in
completely.
Hardware setup 9
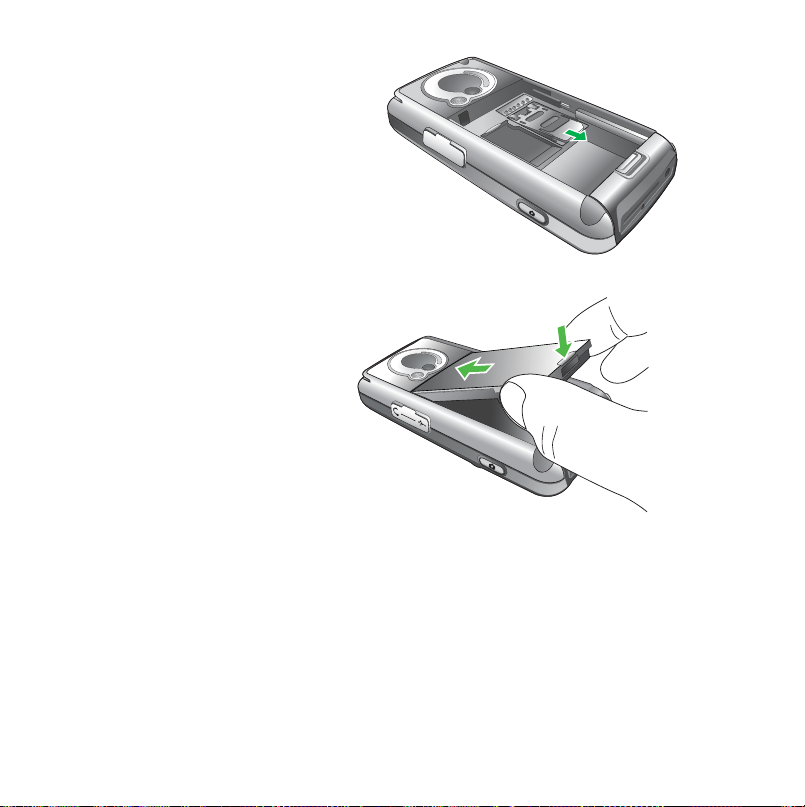
6. Lower the SIM card holder with the
SIM card in it to close it. Push the
SIM card holder in the direction of
arrow (as shown in the figure to the
right) to lock it.
Battery installation
1. The battery goes into the battery
compartment in the back of the
phone. Slip the battery into the
battery compartment top edge first.
2. With the top half in position, push down the remaining battery into the
compartment. The battery latch will click to secure the battery in place.
10 Hardware setup
O
Z
O
L
M
A
T
F
I
2
G
.
I
8
D
S
L
E
X
I
P
A
G
E
M
3
.
1
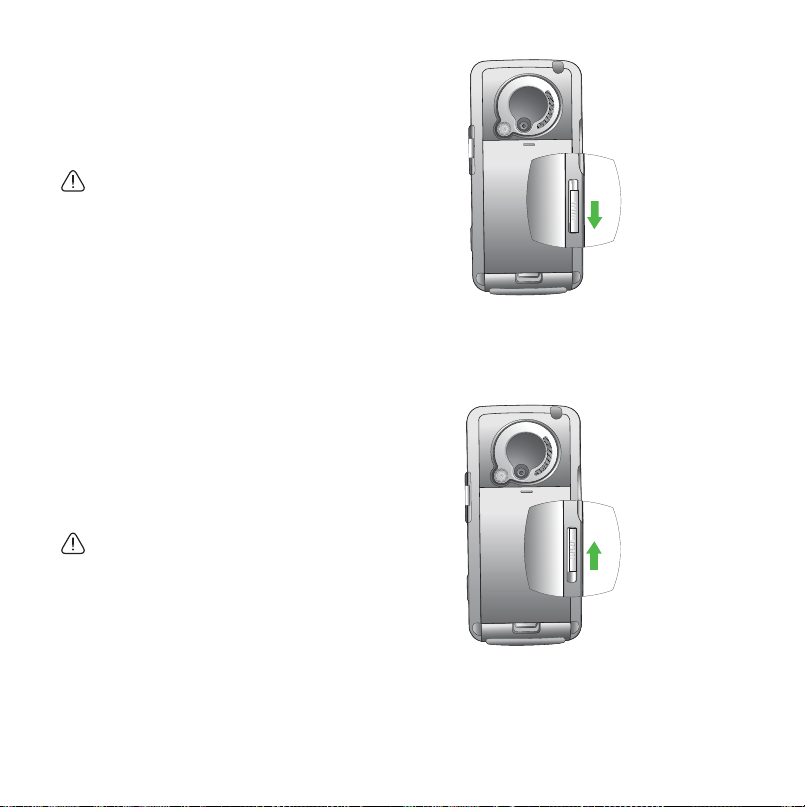
3. Slide the battery lock to the lock
position.
The battery lock must be in the lock
position in order that the phone can
charge or power ON.
Removing the battery
1. We suggest you to power off the PDA phone before you remove the battery.
O
Z
O
L
M
A
T
F
I
2
G
.
I
8
D
S
L
E
X
I
P
A
G
E
M
3
.
2. Slide the battery lock to the unlock
position and you will hear a beep
sound.
The battery lock must be in the unlock
position in order that the battery can be
removed.
1
3. Then remove the battery.
Hardware setup 11
Battery charging
1. Connect the one end of the
charger cable into the PDA
phone and the other into a
wall power outlet to begin
charging.
2. Disconnect the charger cable when charging completes.
• Before using the battery for the first time, make sure that is charged for at least eight hours to
prolong its lifetime.
• It takes at least one charging-discharging cycle for the battery to reach its peak performance.
• You can also charge your phone using the USB data cable while it’s connected to the PC as
an alternative to using the charger cable.
• To avoid possible damage to the battery, please make sure that the battery is unlocked when
inserting or removing it.
• Keep the phone in normal room temperature while charging. For safety precautions, when
the phone temperature is above 55 or below 0 degree Celsius it will automatically stops
charging temporarily.
• Do not remove the battery when charging to avoid possible damage.
• Please make sure that the battery lock is set to the lock position while charging.
12 Hardware setup

Startup
First time startup
After you have installed the battery and finished charging it, you are ready to power ON your
PDA phone. The first time you power ON the phone, you will be guided through a series of
setup screens. Follow the steps below to start up your phone and complete the initial setup.
1. With the battery lock in the lock position, press Power to power ON the phone.
2. Wait for the phone to boot up with the BenQ-Siemens screen.
3. On the Windows Mobile screen, tap the stylus anywhere on the screen to proceed.
4. During the
cross-hair object will move around the screen several times until the screen is aligned. Each
time the cross-hair object moves to a new location, aim and tap it.
5. Select the time zone of your location, and then tap
6. The message shows you how the stylus works. You can single tap to select an item/command,
or tap and hold (long tap) for a menu (where available). Tap
7. Tap and hold the 9 A.M. time slot to bring up a pop-up menu. Select
menu.
8. Tap and hold the 11 A.M. time slot to bring up a pop-up menu. Select
menu. Tap
9. Tap
networks while using the PDA phone. If you do not need the password, tap
10. Tap anywhere on the final screen to exit setup.
align screen process, aim and tap the stylus precisely on the cross-hair object. The
Next.
Next.
Cut from the pop-up
Paste from the pop-up
Next to continue.
Next to enter a password if you want to protect the access to your data and available
Skip.
Startup 13

Using the stylus
The stylus works like a mouse to a PC. You can use the stylus to point and click various
objects on the screen. The following are basic stylus techniques you should learn in order to
efficiently operate your PDA phone.
• Ta p - Touch the screen once with the stylus to open items and select options.
• Drag - Hold the stylus on the screen and drag across the screen to select text and images.
Drag in a list to select multiple items.
• Ta p an d h ol d - Tap and hold the stylus on an item to see a list of actions available for that
item. Before a pop-up menu appears, you will see a blue circle of dots to notify you of where
on the screen you are pressing. On the pop-up menu that appears, tap the action you want
to perform.
Sleep mode
Once the PDA phone is on, you can press Power to put it in the sleep mode. During the sleep
mode, the screen shuts off and the system stands by for incoming phone calls or user input.
Pressing Power will switch ON the phone again.
• Please note that your PDA phone needs about 5 seconds to finish the booting procedure. If
you want to switch the power off right after you power it on, please wait for 5 seconds to
power off your PDA phone.
• The PDA phone will automatically enter the sleep mode if it is inactive for 3 minutes. You can
also customize the length of inactivity before entering the sleep mode.
• See "Backlight" on page 31 and "Power" on page 34 for more on power management.
Deep Sleep mode
The PDA phone will go into the deep sleep mode under two situations:
1. The battery lock is not slided to the lock position. In other words, the battery is not locked.
2. The battery capacity is low.
14 Startup

Soft reset
A soft reset restarts the PDA phone but does not erase any data, program, or system settings.
To p er f or m a s of t re s et :
1. Locate the recessed Reset at the bottom of the phone.
2. Insert the stylus into the recess to trigger
3. Release the stylus from the Reset button to restart the phone.
Reset. Hold Reset down until the screen fades off.
Hard reset
Same as soft reset, a hard reset restarts the PDA phone without erasing any data, program, or
system settings. But, a hard reset also resets the system time to the default value (1 January,
2006).
To p er f or m a h ar d re se t :
1. Locate the recessed Reset at the bottom of the phone.
2. Press and hold down
3. Without releasing
Power and Reset until the screen fades off.
4. When the screen has faded off completely, release both
Power.
Power, insert the stylus into the recess to trigger Reset. Hold down both
Power and the stylus.
Clean boot
A clean boot restarts the PDA phone by erasing all data, programs as well as system settings,
and thus returns to its factory default state.
To p er f or m a c le a n re se t:
1. Locate the recessed Reset at the bottom of the PDA phone.
2. Press and hold down
3. Without releasing
Power and Reset until the screen fades off.
4. When the screen has faded off completely, release both
Power.
Power, insert the stylus into the recess to trigger Reset. Hold down both
Power and the stylus.
Startup 15

5. Long press Send.
6. Press
Y to confirm the clean boot.
16 Startup
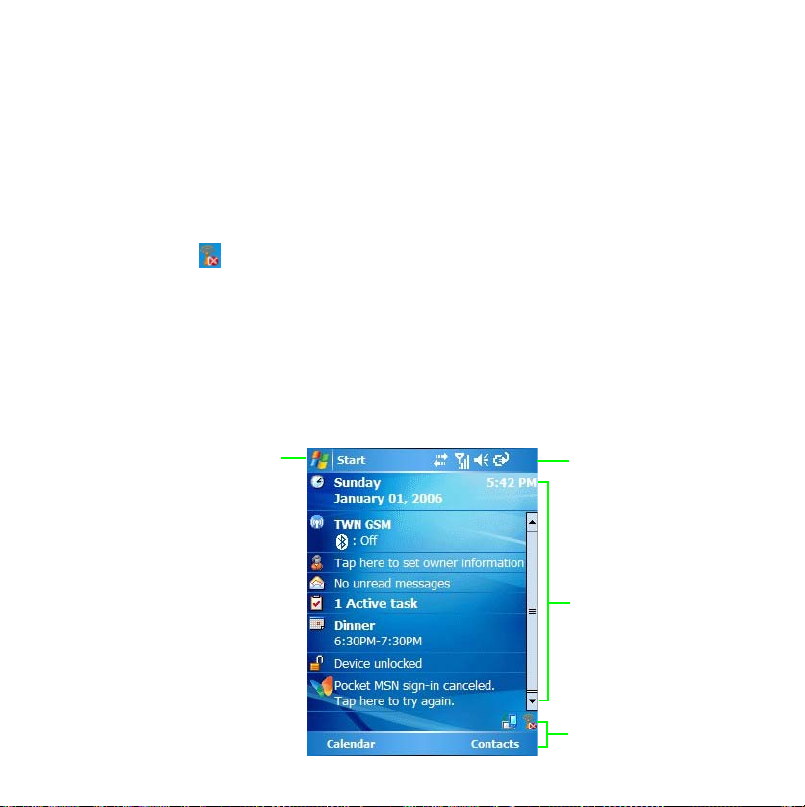
Today screen
Today screen
The Toda y screen is the home screen of your PDA phone. You will enter the Today screen
after you have completed the first-time startup procedure. You can use the Today screen to
view the following information:
• Date and time
• On/Off for Phone carrier and Bluetooth (plus Wi-Fi if
after clicking ).
• Owner information
• Unread messages
• Tasks that need to be completed
• Upcoming appointments
• Device (PDA phone) locked/unlocked status
• Pocket MSN sign-in access
The follow figure shows the various components on the screen.
Start button
Turn on Wireless LAN is checked
Navigation bar
Program window
Menu bar
Today screen 17

Navigation bar
The Navigation bar is located at the top of the screen. It contains the Start button, various
system icons, and (if you have a program open) the OK or X button to close the program
window. The following figure shows the various components of the navigation bar.
Start button
System icons
The following describe some of the icons on the navigation bar.
Icon Meaning
Adjusts the sound on your phone or other sounds such as ringtone and
system sounds. See "Sounds & Notifications" on page 29 for details.
Backup battery is low.
Main battery is charging.
Main battery is low.
Main battery is very low.
Main battery is critically low. Please charge the battery immediately.
Main battery is full.
Notification that one or more MSN instant messages were received.
Notification that one or more e-mail or SMS messages were received.
ActiveSync is active.
Available icons may vary depending on the program you are running and the service available
in your area. For example, a “G” icon is displayed if you have subscribed to a GPRS service
with your SIM card and the GPRS signal is available in the area where your PDA phone is.
18 Today screen
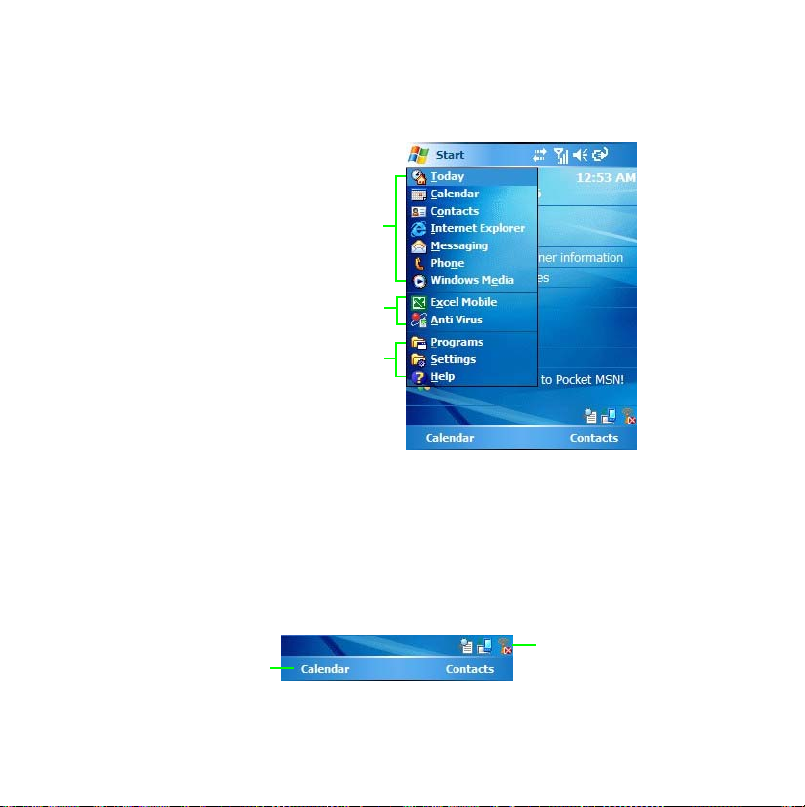
Start button
The Start button is located on the navigation bar. When you tap the Start button, the Start
drop-down menu appears, showing a list of programs and utilities. The figure below shows
the various components of the Start menu.
User Programs
Most Recently Used Programs
System Folders
You can customize which programs appear on the Start menu by changing the values in
Settings.
Menu bar
The Menu bar is located at the bottom of the screen. It contains menu names (related to the
currently opened program), the Input Panel (if the currently opened program requires text
input), and several indicator and shortcut icons such as Wireless LAN. The following figure
shows the various components of the Menu bar.
Soft key
Indicator and Shortcut Icons
Today screen 19
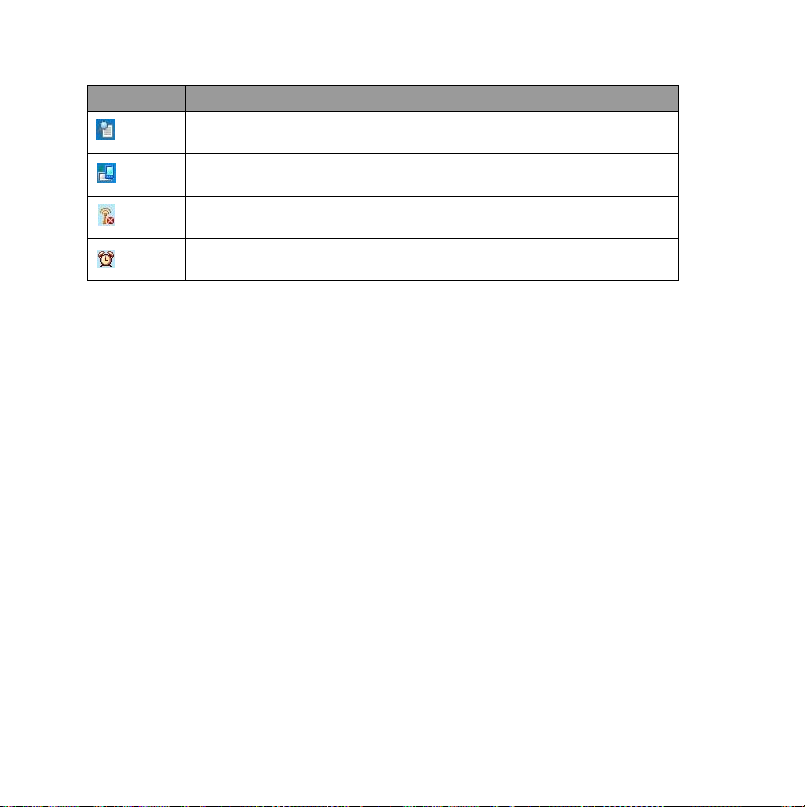
The following describe some of the indicators and shortcut icons.
Icon Meaning
Tap it for the virus protection menu.
Tap this icon to rotate the screen counter-clockwise.
Indicates wireless LAN connection status (the red X indicates
wireless LAN is currently off). Tap it for settings.
Indicates that an alarm clock has been set. You can also tap this icon
to set alarm.
In addition, two soft keys are available at the screen bottom. For example, in the
Tod ay
screen, you can see Calendar and Contacts. As you switch to different screen or program,
names and commands for the two soft keys may vary. To control these two soft keys, use the
stylus or the two keys beside the Joystick.
20 Today screen

Input methods
The PDA phone has a number of input method choices to choose from. When using the
phone function, simply use the QWERTY keyboard to enter the phone number then press
the Send key. When using a program that supports text input, you have the option of using
the QWERTY keyboard or choosing from a number of ‘soft’ input methods from the Input
Panel to enter typed text. The stylus is available as a point-and-click device for navigation.
Finally, you can use the stylus to handwrite or make drawings (for certain programs that
support this) and have the results saved as graphics. For example, in Notes, you can literally
scribble notes on the touchscreen and save it to a file.
Entering typed text
When you need to enter typed text into a program, you can do so either with the QWERTY
keyboard or one of the input methods provided by the Input Panel. The Input Panel is an
icon on the Menu bar when you open a program that supports text input.
Using the QWERTY keyboard
The QWERTY keyboard allows you to enter text conveniently - just type on it. You can use
the QWERTY keyboard anytime you need to type something. For example, use the QWERTY
keyboard to key in the phone number you wish to dial in Phone. Or type in a long block of
text into your Calendar or Word Mobile. The QWERTY keyboard makes text entry very
convenient and is an efficient alternative to the soft input methods as to be described below.
Input methods 21

Using the Input Panel
When you open a program that supports text input, you will see the Input Panel icon appear
on the Menu bar.
Click the arrow icon to
Input Panel icon
Input Panel gives you a number of ways to enter text by either tapping on a virtual keyboard
on the screen or scribbling to a handwriting recognition tool. The following describes the
different methods of text input as provided by the Input Panel.
• Available input methods may vary depending on the language version of the operating
system.
• For some languages like traditional Chinese and simplified Chinese, you can hold the
Function key and press the Tab key to toggle between English and Chinese.
Virtual keyboard
1. Tap the arrow next to Input Panel, and then tap Keyboard.
2. A virtual keyboard will appear on the screen above the Menu bar. Tap the keys on this virtual
keyboard to enter typed text.
You can change the size of the keys on the virtual keyboard by changing Options > Settings.
select an input
method or options.
22 Input methods

Letter Recognizer
Letter Recognizer is a handwriting recognition tool that allows you to handwrite a letter at a
time while it converts it into typed letter.
1. Tap the arrow next to Input Panel, and then tap Letter Recognizer.
2. Write a letter in the box with the stylus.
Letter Recognizer provides three boxes for you to write either a uppercase letter, lowercase
letter or number. This division increases the accuracy of its letter recognition ability.
Block Recognizer
With Block Recognizer, you can use the stylus to input character strokes similar to those used
on other devices. It uses technology similar to that of Palm's Grafitti product.
1. Tap the arrow next to Input Panel, and then tap Block Recognizer.
2. Write a letter in the box.
When you write a letter, it is converted to typed text that appears on the screen. Click the
button to open a panel of symbols and special characters to enter into your text.
Tr a ns c r i be r
With Transcriber, you can write anywhere on the screen using the stylus just as you would on
paper. Unlike Letter Recognizer and Block Recognizer, you can write a sentence or more of
information. Then, pause and let Transcriber change the written characters to typed
characters.
1. Tap the arrow next to Input Panel, and then tap Transcriber.
2. Write anywhere on the screen.
For specific instructions on using Transcriber, with Transcriber open, tap the question mark
in the lower right hand corner of the screen.
Input methods 23

Writing on the screen
In any program that accepts writing such as Notes, you can use your stylus to write directly
on the screen. Write the way you do on paper. You can edit and format what you have written
and convert the information to text at a later time.
To help you write by displaying lines on the screen, open a program like Notes and tap
to create a new note, or tap Menu > Draw to enable the Draw mode.
Selecting a sentence
If you want to edit or format writing, you must select it first.
1. Tap and hold the stylus next to the text you want to select until the insertion point appears.
2. Without lifting, drag the stylus across the text you want to select.
If you accidentally write on the screen, tap Menu > Undo and try again. You can cut, copy,
and paste written text in the same way you work with typed text: tap and hold the selected
words and then tap an editing command from Menu.
New
24 Input methods

Converting writing to text
Ta p Menu > Tools > Recognize.
If you want to convert only certain words, tap
to disable the Draw mode first. Then select these
Draw
words and tap Menu > Tools > Recognize. (or tap and
hold the selected words and then tap Recognize on the
pop-up menu). If a word is not recognized, it is left as
writing.
If the conversion is incorrect, you can select different
words from a list of alternates or return to the original
writing. To do so, tap and hold the incorrect word (tap
one word at a time). On the pop-up menu, tap
Alternates. A menu with a list of alternate words
appears. Tap the word you want to use, or tap the
writing at the top of the menu to return to the original
writing.
Tips for getting good recognition:
• Write neatly.
• Write on the lines and draw descenders below the line.
Write the cross of the “t” and apostrophes below the
top line so that they are not confused with the word above. Write periods and commas above
the line.
• For better recognition, try increasing the zoom level to 300% using Menu > Zoom.
• Write the letters of a word closely and leave big gaps between words so that the device can
easily tell where words begin and end.
• Hyphenated words, foreign words that use special characters such as accents, and some
punctuation cannot be converted.
• If you add writing to a word to change it (such as changing a “3” to an “8”) after you attempt to
recognize the word, the writing you add will not be included if you attempt to recognize the
writing again.
Menu >
Input methods 25

Drawing on the screen
You can draw on the screen in the same way that you
write on the screen. The difference between writing and
drawing on the screen is how you select items and how
they can be edited. For example, selected drawings can be
resized, while writing cannot.
Creating a drawing
Cross three ruled lines on your first stroke. A drawing
box appears. Subsequent strokes in or touching the
drawing box become part of the drawing. Drawings that
do not cross three ruled lines will be treated as writing.
You may want to change the zoom level so that you can
more easily work on or view your drawing. Tap Tools and
then a zoom level.
Selecting a drawing
If you want to edit or format a drawing, disable the Draw mode and then select it.
Tap the stylus on the drawing until the selection handle appears. To select multiple drawings,
tap and hold the stylus and then drag to select the drawings you want.
You can cut, copy, and paste selected drawings by tapping and holding the selected drawing
and then tapping an editing command on the pop-up menu, or by tapping the command
Menu. To resize a drawing, drag a selection handle.
from
26 Input methods

Settings
You can customize how your PDA phone looks and behaves by changing its internal settings.
Ta p Start > Settings, and then tap a tab (Personal, System, or Connections) at the bottom
to select an item and its options.
Personal settings
Ta p Start > Settings > Personal to enter the Personal settings page.
Buttons
This option lets you change button settings from two tabs:
• Program Buttons
• Up/Down Control
Program Buttons lets you map hardware buttons on your PDA phone to functions and
installed programs. Just click the name of a button and then select from
for an associated function or program.
Up/Down Control lets you configure how the up and down control behaves for the joystick.
Delay before first repeat changes the time elapsed before scrolling begins. Repeat rate
changes the time it takes to scroll from one item to the next.
Assign a program
Settings 27

Input
This option lets you set the default input method in Input Panel. You can also configure
various input settings such as whether to use large or small keys for soft keyboard and other
details.
Lock
This option lets you enable a password lock to your PDA phone if it is left unused for a
certain time.
1. Check Prompt if device unused for and tap the arrow beside it to select a time in minutes or
hours.
2. Enter a password in
message as needed.
3. Tap
Yes to save the password.
If password protection is enabled, you will always be prompted for password after a soft reset
or upon power up in addition to the specified frequency.
Password, and then enter it again in Confirm. Tap Hint to enter a hint
Menus
This option lets you select which programs to appear in the Start menu. When you launch
this dialog box, it scans your system for installed programs. Check the programs (maximum
7) you want to appear in the Start menu.
MSN Options
This options lets you set up MSN options such as password, e-mail, display name, SMS, and
switching sign-in name.
Owner Information
Much as it is wise to label valuable assets with your name or e-mail address, so is it important
to stamp your PDA phone with your information.
Fill in your identification and notes to reflect your personal contact information. You can
also choose if to display this information when turning on the PDA phone.
When seeing the Owner Information window, tap anywhere on the screen or press any key
(except soft keys) to close the window and then continue using the PDA phone.
28 Settings

Phone
This option lets you to change phone settings from four tabs:
• Phone
• Services
• Network
• More
1. Phone lets you change settings like the type of ringtone, the tone of ringtone, keypad dial
setting, and security on your PDA phone.
2.
Services lets you change settings like call barring, showing your number, call forwarding, call
waiting, voicemail box and short message, as well as limiting outgoing calls and messages to
designated phone numbers only. Just click an item and tap
3.
Network lets you select an available network to use. Usually the choice of the network that
your phone uses is configured automatically. Yet, when outside the coverage of your regular
network in your home country or when abroad, you might need to manually select the local
network system.
4.
More lets you change settings like auto answering, minute minder (the phone beeps once every
minute during a call), and band setting.
Get Settings for detailed options.
Sounds & Notifications
System sounds provide an excellent visual clue when your attention is needed, whether you
have an upcoming appointment, a phone call is coming, or someone has sent you an instant
message.
This option lets you enable sound for a number of occasions. You can turn on or turn off
event sounds (sounds produced by the operating system like errors), program sounds
(sounds produced by software you have downloaded) and their notifications. You can also
customize the intensity of screen taps or hardware buttons (these can be set to off, soft, or
loud).
Settings 29

From the same screen, choose the Notifications tab to change what sounds are associated
with various system events. To change volume, press the Sound level buttons on the left of
your PDA phone or tap on the Navigation bar.
System sound
Ringtone
Speech Commander Settings
Here you can enable or disable the voice dialing function of an item such as a contact person
or a program. You can also build a custom voice tag by recording your own voice, and thus
replace the default voice tag. Plus, use Digi Training to help your PDA phone adapt to your
voice and thus increase the accuracy when using Speech Commander.
To d a y
Aside from acting as the launch point for most activities on your PDA phone, the Today
screen is a powerful canvas on which you can add third-party modules to display pertinent
information and is customizable to better suit you aesthetically.
Today to begin. First you will see a listing of Today themes installed on your device and
Ta p
available for your use. Today screen themes offer a great way for you to personalize your PDA
phone and reflect your unique interests and tastes. By loading a new theme, you can
completely change the look of your device. To choose a theme, simply highlight its name and
tap
OK. Alternatively, you can Beam a selected theme to a friend’s PDA phone or any Pocket
PC device or delete the theme from memory.
30 Settings

You also have the option of selecting a JPG or GIF image as a background skin for your
device. To do so, check Use this picture as the background and then tap Browse to select
an image file (except those on the storage card).
Items tab lets you configure the individual Today screen components that have been
The
installed on your device. All of these items (except Date) can be moved vertically on the
To d ay sc r ee n.
System settings
Ta p Start > Settings > System to enter the System settings page.
About
This control panel gives you technical details about the version of Microsoft Pocket PC
running, processor type, and total available internal memory.
It also shows expansion slot (storage slot) usage.
In the same screen, tap the
ActiveSync with a desktop PC.
Finally, the
PC.
Copyrights tab reveals licenses being used by your version of Microsoft Pocket
Auto Test
This option lets you perform the self test of your PDA phone. Select the items you want to
perform self test, and then tap Test to start testing. When testing, you may go through
confirmation messages on by one. When you are done, a status (e.g. PAS S) shows to indicate
whether the tested function is working properly.
Backlight
Here you can choose how many minutes of inactivity will result in the backlight going off.
You can also have the backlight automatically turn on when pressing a button or tapping the
screen. The External Power tab provides the same options as the Battery Power tab, but
these settings affect the behavior when external power is used such as an AC adapter or car
power adapter.
Moreover, you can adjust the screen brightness and if to run the screen saver from the
Brightness and the Screen Saver tabs.
Device ID tab to change the name displayed when performing an
Settings 31

• You can also turn off the backlight by long pressing Power. To resume, long press Power
again to turn on the backlight.
• To save more power, you can press Power to put the PDA phone in the sleep mode.
Pressing Power will turn on the phone again. See "Sleep mode" on page 14 for details.
Certificates
Public key certificates let you help establish your identity when you are logging onto a secure
network. Certificates also aide in establishing the identity of other computers that you might
want to connect to. Using certificates helps prevent unauthorized users from accessing your
device or data. There are two types of certificates that can be installed on your device:
personal certificates that identify who you are, and root certificates that identify the servers
you connect to. Both personal and root certificates are managed in the same way. Consult
your IT department for information on certificates and device security.
Personal tab, you will see certificates assigned to your device. Tapping the Root tab
On the
brings you to the root certificates available for your device. By tapping and holding on an
item, you can delete it.
Clocks & Alarms
This option lets you sets system clock and alarms. On the Time tab, select Home and then tap
each item to set the time zone, hour, minute, second, and date of your location. This
information is then used as your system clock. Use arrows or the virtual keyboard to enter
the numerical representation of the time. Similarly, select Visiting and set the time and date
for a different location as needed.
Alarms tab, you can have up to three distinct alarms enabled at a time:
On the
1. Tap the <Description> text to give your alarm a friendly name. When the alarm goes off, this
text will display.
2. Tap
S, M, T, etc. (indicating Sunday, Monday, Tuesday, etc., respectively) to indicate which days
the alarm should go off.
3. Tap the time listed and then use arrows or the virtual keyboard (or tap the time and move the
clock hands) to specify the alarm time.
4. To customize how the alarm behaves, tap to choose the sound played, whether the sound
should be looped and so on.
Make sure Notifications is selected in Sounds & Notifications, so the alarm can sound.
32 Settings

On the More tab, you can decide if to show the clock on the title bar in any program.
Device Info
This option shows your device information such as CPU type, memory, and monitor.
Error Reporting
When the PDA phone detects an error, a text error report - like the one in Windows XP - is
generated and can be sent to Microsoft if you choose to do so.
GPS
This option lets you decide the port that programs use to obtain GPS data, the hardware port
to which your GPS device is connected, and how your PDA phone manages GPS.
You also need to use COM4 and baud rate at 38400 in the GPS navigation program you are
using.
Memory
This option displays total storage and program memory, along with the amount of allocated
memory, in use memory, and free memory for both memory types.
Storage Card tab shows you free memory for any storage cards you have installed in
The
your PDA phone.
Settings 33

The Running Programs shows you the currently running programs. By tapping Activate,
you will bring the highlighted program to the foreground so you can begin work on it
immediately. If you tap Stop, the highlighted program will be terminated. Finally, tapping
Stop All will try to terminate all running programs, though not all will necessarily respond to
being closed in this manner.
Power
This option lets you view the current states of the main battery and the backup battery, check
how much power is left and decide when to turn off the system if it is idle, or select a CPU
performance mode as shown below:
• Automatic mode: adjusts the CPU performance automatically.
• Power saving mode: extends the standby time of your PDA phone, but with less system
efficiency.
• Normal mode: maintains efficiency and power consumption for normal system
performance.
• Optimization mode: maintains the best system performance, but with higher power
consumption.
Regional Settings
This option lets you customize how data appears on your PDA phone, such as currency,
times, dates, and numbers.
Region tab lets you set the region of your choice.
The
Number tab lets you customize every aspect of how numbers appear, including decimal
The
symbol, how digits are grouped, measurement system, and more.
Currency tab lets you customize every aspect of how monetary figures are displayed,
The
including currency symbol, number of decimal places shown, and how negative values are
shown.
Time tab lets you customize every aspect of how time figures are displayed, including
The
display style, separator character, and AM/PM symbols.
Date tab lets you customize every aspect of how dates are displayed.
The
34 Settings

Remove Programs
This options lets you remove a program from the PDA phone. To do so, select a program,
and then tap Remove.
• You can only remove programs you installed on the storage memory.
• Programs that came pre-installed on your PDA phone cannot be removed.
Screen
This option lets you change the screen orientation, align screen (use it when the touch
display does not respond accurately to stylus/finger taps), improve text readability, or change
the text size shown on the PDA phone.
Shortcut to align screen: Press these three keys (Space, the lowest left, and the lowest right)
simultaneously.
Connections settings
Ta p Start > Settings > Connections to enter the Connections settings page.
Beam
Check this option to decide if to allow receiving all incoming beams from other devices.
Bluetooth
The PDA phone comes with built-in Bluetooth technology that
lets you communicate with other Bluetooth devices over a
maximum approximately 10 meters (30 feet).
To turn on/off Bluetooth:
1. Tap the Bluetooth icon in the Today screen.
2. Tap the
When Bluetooth is powered on, the Connection indicator will blink
a blue light.
Bluetooth icon to toggle between the on and off
modes.
Settings 35

Setting up Bluetooth
1. Tap Menu > Bluetooth Settings in the Wireless Manager screen, or tap Start > Settings >
Connections > Bluetooth
2. Select
Turn on Bluetooth and Make this device discoverable to other devices. (The
Bluetooth status in the Wireless Manager screen will show
Bluetooth is on and can be found by other Bluetooth devices.
3. Tap the
4. Tap
Devices tab.
New Partnership to begin searching for possible new Bluetooth devices to bond with in
the surrounding areas.
5. Once searching ends and devices are found, tap a device name to highlight it and tap
.
Discoverable, which means
Next.
6. Enter the Passkey for the device, and then tap
The passkey is device dependent. Please refer to the documentations of the Bluetooth device
for the passkey.
Finish.
7. A pop-up message may appear, asking to if you want to add the Bluetooth device to your device
list. Tap
Yes to establish the connection.
8. At this point you are ready to exchange data with your paired Bluetooth device. To send a data
object to your paired device, tap and hold on the data object (such as a file, contact object,
calendar object, etc) and select
36 Settings
Beam File/Contact/Appointment, etc.

9. The Beam window appears, listing all available neighboring devices ready to receive a beam.
Tap the name of a Bluetooth device to begin sending.
Using a Bluetooth stereo headset
The PDA phone supports Advanced Audio Distribution Profile (A2DP) that sends a stereo
audio stream (such as music) to a Bluetooth stereo headset.
To set up a Bluetooth stereo headset:
1. Turn on your Bluetooth stereo headset.
2. Create a new partnership (see "Setting up Bluetooth" on page 36 for details).
3. Tap the new partnership name and select the services (such as Hands Free, Wireless Stereo, and
Headset) you want (available options vary depending on the headset model). For example,
when you select Wireless Stereo, you can then open a program (such as Windows Media) to
play back a music file from with the PDA phone and listen to the music using your Bluetooth
stereo headset.
Settings 37

Connection Settings
Ta p Start > Settings > Connections > Connection Settings to select presets of GPRS/CSD/
MMS/WAP connections in your area. You only need to select your region, operator, and
service type, then you can quickly connect to an available network without the hassle of
entering lots of setup information.
Connections
The PDA phone can be very easily configured to access the Internet or a corporate network to
perform tasks such as browsing the World Wide Web, sending e-mail, or exchanging instant
messages with friends and co-workers. Connections can be made with a dial-up modem, a
wireless modem that is either General Packet Radio Service (GPRS) or Circuit Switched Data
(CSD), or a Wireless Local Area Network (WLAN) card.
Available connections and methods for setting up may vary depending on your ISP and
country/region.
There are 6 supported groups of connection settings: WAP, MMS, CSD, WEB, My ISP (which
allows you to access the Internet) and My Work Network (which allows you to access private
resources such as your Intranet, VPN, or other protected resources).
My ISP and My Work Network settings cannot be deleted.
Ta p Start > Settings > Connections > Connections to enter the Settings page. On the Tasks
tab, choose an option to set up connections. On the Advanced tab, you can access more
options such as creating a new network profile (with proper settings) and dialing rules.
38 Settings

Setting up a GPRS and CSD connection to your ISP
You can connect via modem dial-up to your ISP (Internet Service Provider), and use the
connection to send and receive e-mail messages and view Web or WAP pages. Your ISP is
usually your SIM card provider.
Creating an ISP profile
Obtain the following information from your ISP:
• ISP access point name (for GPRS service only)
• Dial-up access telephone number (for CSD service only)
• User name
• Password
• TCP/IP settings. (Some ISPs require a domain name in front of the user name, such as
MSN/username.)
To set up a GPRS connection to your ISP:
1. On the Tasks tab of the Settings page, tap Add a new modem connection under My ISP.
2. Enter a name for the connection and select your modem type. Then tap
3. Enter the Access Point Name (APN) of your ISP, and then tap
Next.
Next.
Settings 39

4. Enter any authentication information your ISP requests.
You should not need to change any settings in Advanced,
because most ISPs now use a dynamic IP address.
5. Tap Finish.
To set up a CSD connection to your ISP:
1. On the Tasks tab of the Settings page, tap Add a new modem connection under My ISP.
2. Enter a name for the connection and select your modem type. Then tap
Next.
3. Enter the dial-up number of your ISP. Include any special digits such as * or # as needed. Then
tap
Next.
40 Settings

4. Enter any authentication information your ISP requests.
You should not need to change any settings in Advanced,
because most ISPs now use a dynamic IP address.
5. Tap Finish.
To connect to your ISP:
1. On the Tasks tab of the Settings page, tap Manage
existing connections
under My ISP.
2. Tap and hold on a connection name from the listbox to bring
up a pop-up menu.
3. Tap
Connect on the pop-up menu.
4. Your modem will start dialing out and attempt to create a
connection.
• Network settings and ISP profiles must be set up in
advance.
• When opening a program requiring network connection such
as Internet Explorer, the network connection will be
automatically established.
Configuring proxy server settings
If proxy server settings are needed, contact your ISP or network administrator for the proxy
server name, server type, port, type of Socks protocol used, and your user name and
password.
Settings 41

Setting up a VPN connection to your corporate network
With a Virtual Private Network (VPN) connection, you can connect to a server in your
corporate network via the Internet.
To create a VPN profile:
1. Obtain the following information from the network administrator of your VPN administrator:
• User name
• Password
• Domain name
• TCP/IP settings
• Host name or IP address of the VPN server
• TCP/IP settings. (Some ISPs require a domain name in front of the user name, such as MSN/
username.)
2. On the
3. Enter the host name and follow the instructions on the screen to proceed.
To edit or delete a VPN profile:
1. On the Tasks tab of the Settings page, tap Edit my VPN servers under My Work Network.
2. To edit a VPN profile, tap the profile you wish to edit and
Tasks tab of the Settings page, tap Add a new VPN server connection under My
Work Network
then tap
profile you wish to delete, and the tap
that appears.
.
Edit. To delete a VPN profile, tap and hold the
Delete from the menu
42 Settings

GPRS Authentication
This area lets you select a GPRS authentication method (PAP or CHAP authentication).
Please consult your GPRS service provider to determine an appropriate value.
Using WLAN
WLAN lets your PDA phone connect to the Internet, your VPN, or another WLAN-enabled
device via a wireless access point.
To turn on WLAN detection:
1. From the Today screen, tap the WLAN icon on the Menu bar and bring up the Wireless
screen.
LAN
2. Check
• The Connection indicator will light up green to indicate that WLAN is on.
• Whenever you need to reboot the PDA phone (for example, from the deep sleep mode), you
must check Turn on wireless LAN again to enable WLAN.
Turn on wireless LAN and tap OK to close the window. (You will notice that the
WLAN icon on the Menu bar changes from to
.)
Network Cards - connecting to an existing wireless network
After WLAN is turned on, your phone will automatically try to detect what wireless networks
are available in the surrounding areas. If any are found, the icon will appear on the
Navigation bar and the Wireless item shows Wi-Fi Available (also shown in Wireless
Manager
1. Tap or Notification to see a pop-up message showing all available networks.
2. Tap the network you wish to connect to, and select whether the wireless network connects to
If further settings (such as Network Key and 802.1x) are needed, tap Settings (or tap Start >
Settings > Connections > Network Cards or tap Menu > Wi-Fi Settings in Wireless
Manager) for the Configure Wireless Networks screen. Then, tap a network to set up.
).
the Internet or your work (office) network. Then, tap
required by the network) to complete connection.
Connect (and follow the instructions
Settings 43

Adding a new wireless network
You can add a new wireless network into the listbox.
1. On the Configure Wireless Networks screen, tap Add New.
2. Enter a name in
3. Next to
4. If you want to connect to an ad-hoc connection, tap
connection
5. If authentication information is needed, tap the
setting values. (Check with your network administrator to obtain the setting values for your
specific wireless network.)
6. Tap
OK.
Network name.
Connects to, select where this new network will connect to (The Internet or Work).
This is a device-to-device (ad-hoc)
.
Network key and 802.1x tabs to fill in the
Searching for wireless networks to access
Networks that you have already configured are preferred networks and are listed in the
Configure Wireless Networks screen. You can choose whether to connect only to preferred
networks.
To do so, under
Available
Networks to access, tap the type of network you want to connect to (All
, Only access points, Only computer-to-computer).
USB to PC
This option determines if to enable advanced USB functionality when connecting to a PC by
ActiveSync. If the connection is not stable, disable this option. If the problem still exists,
disable the virus protection program and/or the firewall on the PC.
Wireless Manager
This option determines the settings to connect to a wireless network such as Bluetooth,
Phone, and Wi-Fi.
44 Settings

Phone operation
The PDA phone contains features you would expect from a high-end mobile phone. You can
use your PDA phone to make and receive phone calls and send and receive SMS (Short
Message Service) and MMS (Multimedia Message Service) messages. Your mobile phone
service provider may provide other useful services such as voice mail.
Phone screen
Press Send to bring up the Phone screen.
Making and receiving phone calls
Making a call directly
In the Phone screen, tap the number you want to call (or enter the number by typing on the
QWERTY keyboard), and then press Send or tap to place a call.
To clear a wrong number, either press the delete button on the keyboard, or tap on
the touch screen.
Phone operation 45

Answering a call
When you receive a phone call, the phone rings or vibrates and a message will appear on the
screen. Press
call and ringing by pressing End or tap Ignore.)
To put the current call on hold, press Send or tap . To resume, press Send
again or tap .
Send or tap Answer to answer the call. (Alternatively, you can cancel the
Ending a call
When you are finished with your phone call, press End or tap to end the call.
Making a call from Contacts
You can make a call from Contacts.
1. To open Contacts when you are in the To day screen, press the Right soft key or tap
Contacts. If you are in the Phone screen, press the Left soft key or tap Contacts.
2. Tap and hold on a contact person to bring up the pop-up menu, or tap a contact person see the
data of name, phone number and speed dial key.
3. Tap
Call, Call Work, Call Home, or Call Mobile (depending on how you saved these
numbers) to make the call.
46 Phone operation

Making a speed dial call
Speed dialing allows you to make a call with a single tap of your stylus. The default first speed
dial entry is your voice mail.
Making a speed dial
In the Phone screen, tap Menu > Speed Dial to display a list of available speed dial entries.
Tap the number in front of an entry to dial its number.
To adding a speed dial entry:
1. To open Contacts when you are in the Today screen, press the Right soft key or tap
Contacts. If you are in the Phone screen, press the Left soft key or tap Contacts.
2. Tap and hold on the contact person to bring up the pop-up menu.
3. Tap to select
4. In
Speed Dial, you may change the Location for this contact person in the speed dial list.
5. Tap
Or you may also add a speed dial entry by the following procedure:
1. Press
2. Select a contact person, and then tap the up/down arrows to select a desired location.
3. Tap
Add to Speed Dial to create a speed dial entry for this contact person.
OK on the navigation bar to save and exit.
Send, and then tap Menu > Speed Dial > Menu > New.
OK.
Making a conference call
You can create a three-way conference call between yourself and two or more other parties.
1. Call to the first person.
2. While the first call is engaged, tap
3. Dial a second number to call the second person.
4. While the second call is engaged, tap
with the first and second persons.
5. If you want to speak to more people, repeat steps 3 and 4.
Hold.
Menu > Conference to engage in a three-way conference
Phone operation 47

Loudspeaker
Turn the loudspeaker on and continue your conversation while using other phone functions.
Loudspeaker enables you to make better use of your time.This is also a great feature for
allowing your colleagues to participate in your call.
1. First make a phone call.
2. Tap , Menu > Turn Speakerphone On, or long press Send to turn on
speakerphone.
3. To turn off the loudspeaker, tap , Menu > Turn Speakerphone Off, or long press
Send .
48 Phone operation

Associating notes with calls
Call notes are integrated into Notes as well as the call log. A new folder named Calls will be
created when the first in-call note is made. You can now create a call note.
1. During a phone call, tap or Menu > Create Note.
2. A note will be created with a header containing all pertinent information: caller, company,
phone number, date, and time of the call. Write your notes and tap OK when you are finished.
You will be returned to the previous screen for the duration of the call.
3. You can now access this note by tapping-and-holding on the entry in
choosing
from the call or, if the caller is not in
View Note, or by selecting the Calls folder in Notes. Notes are named by the contact
Contacts, by phone number.
Call History and
Viewing past phone activity
The PDA phone stores information about all voice calls made to and from the phone in a call
log. This is accessed by tapping Call History from the Phone screen.
In this view, at a glance you can see the phone number of all incoming, outgoing, and missed
calls, along with when the activity occurred.
Tap an item once, and a small dialog box will show an exact time and duration of the call.
Tap-and-hold on an item and you will be able to save the entry to
not already in Contacts), view note associated with the call, delete the record, send SMS to
the caller, or call the caller.
Selecting
Menu > Call Timers will bring up a summary of how many minutes were used for
all the calls in the log. Here users also can adjust how many weeks or months of calls will be
kept in the log. Selecting Menu > Delete All Calls will delete the call log screen.
Contacts (so long as it is
Phone operation 49

Flight mode
1. Tap the Wireless item on the Today screen (or tap on the Navigation bar and then tap
Wireless Manager).
2. Tap to the right of the Phone item to set the Phone mode to Off.
If you want to make a phone call, please turn off the flight mode. Please note that when the
battery power is low, the system will turn on the flight mode automatically and will no longer
search for the signal of the base station of your network provider. Therefore, if you want to
make a phone call while the battery power is low, please change the battery or recharge the
battery.
50 Phone operation

Programs
Your PDA phone contains the following built-in programs and tools.
Icon Program name Description Where to find
Today Your Home screen or desktop Page 17
Calendar Schedules appointments. Page 53
Contacts
Internet Explorer
Messaging
Phone Makes and receives calls. Page 45
Windows Media Audio/video file player Page 55
Programs Accesses various programs. See this section.
Settings
Help A complete online help database Page 56
Games Bubble Breaker and Solitaire Page 56
ActiveSync
Mobile Security
An electronic phone book for
managing your contacts
A Web browser for browsing
various on-line contents on the
Internet
Sends and receives E-mail, SMS,
MMS messages.
Sets up custom settings for your
PDA phone.
Synchronizes data between your
PDA phone and a PC (or an
Exchange Sever).
Protects your programs and data
from virus attacks.
Page 54
Page 54
Page 54
Page 27
Page 71
Page 56
Programs 51

Calculator Electronic calculator Page 56
Speech Commander
Download Agent
Uses your voice to control
programs.
Automates download of software
updates and other contents.
Page 56
Page 56
Excel Mobile Powerful spreadsheet program Page 57
File Explorer
Views files and folders in the
phone.
Page 57
Pocket Studio A digital camera and camcorder Page 62
Pocket Edit Edits photos. Page 69
Java Manager
Manages the Java programs
installed in your PDA phone.
Page 57
Modem Link Sets up modem connection. Page 58
Notes Jots down your notes. Page 58
Pictures & Videos Views digital photos or video files. Page 58
Pocket MSN
PowerPoint Mobile
Sends and receives instant MSN
messages.
Opens and views slideshow
presentations.
Page 58
Page 58
Search A file searching tool Page 59
52 Programs
Set Ringtone Sets the ring tone of PDA phone. Page 59
SIM Message
Accesses your SIM card SMS
messages.
Page 59

SIM Toolkit
Skype
Sprite B ackup
Tasks Manages your to-do items. Page 61
Extra services provided by your
SIM card carrier
Connects to the Skype network
for online phone calls and
chatting.
Backs up all data to an SD card
or the internal memory.
Page 59
Page 60
Page 60
Terminal Services
Client
Digital Media Server
Word Mobile Word processor program Page 61
Recover Storage Resets to factory default values. Page 61
Connects to a computer running
Terminal Services.
Connects to another device using
the UPnP protocol.
Page 61
Page 61
You can find help on most of these programs on Start > Help.
Calendar
Use Calendar to schedule appointments, including meetings and other events. You can check
your appointments in one of several views (Day, Week, Month, and Agenda) and set
Calendar to remind you of appointments with sound or other methods.
To o pe n
the Left soft key or tap Calendar.
Calendar, tap Start > Calender. If you are in the Today screen, you can also press
Programs 53

Contacts
Contacts maintains a list of your friends and colleagues so that you can easily find the
information you are looking for, whether you are at home or on the road. You can enter both
personal and business information such as picture, ringtone and company name. If you want
to add a contact to your SIM card, tap Contacts > Menu > New SIM Contact.
To o p en
Contacts. If you are in the Phone screen, press the Left soft key or tap Contacts.
Contacts when you are in the Today screen, press the Right soft key or tap
Internet Explorer
You can use Internet Explorer to view Web pages on your PDA phone in two ways: by
downloading pages through sychronization or by connecting to the Internet. While
browsing, you can also download new files and programs to your PDA phone from within
the Internet. You can also view WAP pages in Internet Explorer.
To launch Pocket Internet Explorer, tap
Start > Internet Explorer.
Messaging
You can receive Internet e-mail, multimedia, and text messages in Messaging. Internet email messages are sent by using an address you receive from your Internet Service Provider
(ISP). Text and multimedia messages are sent and received through your mobile phone
service provider by using a phone number as the message address. Before sending a
multimedia message, you must complete the MMS settings first.
To l a un ch M e ss a gi ng , t a p
Start > Messaging.
54 Programs

Setting up an MMS connection
There are two ways of setting up an MMS connection.
To set up an MMS connection automatically:
1. Tap Start > Settings > Connections > Connection
Settings
2. Select your region, mobile phone service provider, and
service type.
.
To set up an MMS connection manually:
1. Before setting the MMS connection, please finish the GPRS
setting first. As for the GPRS settings, please refer to "Setting
up a GPRS and CSD connection to your ISP" on page 39 for
further information.
2. Tab
Start > Messaging > Menu > MMS Settings, and then
select the
tap
Detailed MMS settings may vary depending on your ISP.
General or Advanced tab for settings. For details,
Change > Edit.
Windows Media
You can use Windows Media Player to play digital audio
and video files stored on your device or a network such as a Web site.
To launch Windows Media Player, tap
Supported file formats include MP3, AAC, AAC+, AMR, WAV, WMA, WMV, MPEG-4, 3GP,
H.263 and H.264.
Start > Windows Media.
Programs 55

Help
Help gives you online help documentation for various built-in programs and tools.
To launch Help, tap
You can display Help for a particular program or tool by opening that application or tool, and
then tapping Start > Help. If Help does not contain an entry for that program or tool, then it will
not come up.
Start > Help.
Games
You have two built-in games in your PDA phone: Bubble Breaker and Solitaire.
To l a un ch Ga me s, ta p
Start > Programs > Games.
Mobile Security
Mobile Security is a program protecting your PDA phone against virus attack. You can scan
files and folders, or update to the latest virus definition at any time.
To l a un ch Mo b il e S ec ur it y, t ap
Start > Programs > Mobile Security.
Calculator
Much like Calculator is a staple on the PC, you have it on your PDA phone.
To launch Calculator, tap
Start > Programs > Calculator.
Speech Commander
Speech Commander allows you to control your PDA phone by voice. You can use voice to
make a phone call, look up contact person's information or start a program.
To launch Speech Commander, press the speech commander hot key or tap
Programs > Speech Commander
.
Start >
Download Agent
Download Agent is a program that lists the current download status and available
downloaded programs for you to install. To launch Download Agent, tap Start > Programs >
Download Agent
56 Programs
.

Excel Mobile
You can use Excel Mobile much the same way you use Excel on your PC. You can enter
formulas and functions, and then filter data to see the subset of information you want. Split
panes to view different parts of a worksheet at the same time. You can also freeze the top and
left-most panes in a worksheet to keep row and column labels or other data visible as you
scroll through a sheet.
To launch Excel Mobile, tap
Start > Programs > Excel Mobile.
File Explorer
Use File Explorer to browse what files and folders are in your PDA phone. Once you find a
file you are interested, tap it to open it up in its associated program application.
To launch File Explorer, tap
Start > Programs > File Explorer.
Java Manager
Java Manager is a Java environment on your PDA phone which allows you to download and
run Java programs. You may either download the desired Java files from the Internet or beam
them in from the PC via ActiveSync or Bluetooth. Once the files are moved to your phone,
you can find them in your File Explorer and proceed to install them from there. The
installation will in turn move the installed Java program application inside the Java Manager.
Thus, when you want to launch a Java program, you will first open up Java Manager and tap
to launch it.
Below is the list of supported Java Specification Request (JSR):
• Connected Limited Device Configuration (CLDC); JSR 30, JSR 139
• Mobile Information Device Profile (MIDP); JSR 37, JSR 118
• Wireless Messaging API (WMA); JSR 120
• Mobile Media API (MMAPI); JSR 135
• Java Technology for the Wireless Industry (JTWI); JSR 185
To launch Java Manager, tap
Start > Programs > Java Manager.
Programs 57

Modem Link
Modem Link is a program that lets you set up modem settings and activate a modem
connection.
To launch Modem Link, tap
Start > Programs > Modem Link.
Notes
Notes helps you quickly capture your ideas, notes, and thoughts. You can create a note using
written and typed text, drawings, and recordings. You can also share your notes with others
through e-mail and synchronization with your PC.
To l a un ch No t es , tap
Start > Program > Notes.
Pictures & Videos
Pictures & Videos is a program where you can view image files such as BMP and JPG or
videos such as WAV stored on your PDA phone or a storage card. You can then edit or send
these files, view a slideshow, or set a picture as the background on the To day screen.
To launch Pictures & Videos, tap
Start > Programs > Pictures & Videos.
Pocket MSN
Pocket MSN on your PDA phone provides the same chat environment as MSN Messenger on
your PC. You can use your Pocket MSN to see who is online, send and receive instant
messages, group chat, tell contacts that you are unavailable, and block contacts from seeing
your status or sending you messages.
To launch Pocket MSN, tap
Start > Programs > Pocket MSN.
PowerPoint Mobile
You can open and view a PowerPoint slideshow presentation as you would in Microsoft
PowerPoint on your PC.
To launch PowerPoint Mobile, tap
Start > Programs > PowerPoint Mobile.
58 Programs

Search
Use Search to find a file or item in your PDA phone. Enter the name of the file or item and
select its data type and tap Search. The matched results will be listed on the screen.
To launch Search, tap
Start > Programs > Search.
Set Ringtone
Set Ringtone assigns a music file as a ringtone. You can choose a file from what is available
on the system, or you can upload a file of your own. Set Ringtone supports the following
music file types: MIDI, Karaoke, Extensible Music, SMAF, Sound, and MP3. When you
assign a music file as a ringtone, your PDA phone will copy the file to the following directory:
Windows/Rings. If the free memory left in your PDA phone is less than 5 MB, a warning
message appears and you are not able to set the ringtone. To set the ringtone, delete the
undesired files in the Rings folder.
To launch Set Ringtone, tap
Start > Programs > Set Ringtone.
SIM Message
SIM Message displays the SMS messages stored on your SIM card. The messages in SIM
Message are separated from the messages in the SMS Inbox of Messaging. The messages in
Messaging are stored in the ROM memory of your PDA phone, whereas the messages in SIM
Message are stored in the SIM card. You can copy data from SIM Message to Messaging by
selecting the items in display and select Copy. Tap INBOX SMS to see what messages are in
Messaging.
To launch SIM Message, tap
Start > Programs > SIM Message.
SIM Toolkit
STK (or SIM Tool Kit) uses the STK services provided by your carrier as part of your
subscription.
To launch STK, tap
Start > Programs > SIM Toolkit.
Programs 59

Skype
Use Skype to start online phone calls or chatting as you would on your PC. You need to
apply for a set of ID and password first before using the service.
To launch Skype, tap
Start > Programs > Skype.
Sprite Backup
To safeguard your data on the PDA phone, use Sprite Backup to back it up to an SD card or
the internal memory on your PDA phone. You can then restore these data back whenever
needed.
To launch Sprite Backup:
1. Tap Start > Programs > Sprite Backup.
2. (Optional) Tap
3. Tap
Backup Now for backup, or Restore Now for bring back the data.
For maximum security, back up your data to an SD card instead of the internal memory.
Options > Switch Advanced Mode for detailed settings as needed.
60 Programs

Ta s k s
Use Tasks to keep track of things you need to do. You can use categories to help you organize
your tasks and set reminders for them.
To launch Tasks, tap
Start > Programs > Tasks.
Terminal Services Client
Use Terminal Services Client to log on to a PC running Terminal Services or Remote
Desktop, so you can use the programs on that PC from your PDA phone.
To launch Terminal Services Client, tap
Start > Programs > Terminal Services Client.
Digital Media Server
With the Universal Plug and Play (UPnP) network protocol, you can connect to another
device without having to set up anything. All you need is to specify the folder you want to
share.
Wor d Mo bile
You can create and edit documents and templates in Microsoft Word Mobile just as you
would in Microsoft Word on your PC. Word Mobile documents are usually saved as doc files,
but you can also save them in other file formats such as dot, rtf, or txt.
You can enter information in a document by typing, writing, drawing, or recording. When
you close a document, it is automatically named and placed in the Word Mobile document
list.
To launch Word Mobile,
Start > Programs > Word Mobile.
Recover Storage
Same as "Clean boot" on page 15, Recover Storage restarts the PDA phone by erasing all
data, programs as well as system settings, and thus returns to its factory default state. To
avoid accidentally removing all information stored on the PDA phone, you must type in a set
of text as instructed by the screen first before activating the function.
Programs 61

Camera/camcorder operation
The PDA phone has a built-in camera/camcorder which allows you to take photographs and
record video clips. In addition, the associated Pictures & Videos, Pocket Studio and Pocket
provide features for browsing, viewing, and editing your image files.
Edit
Taking photographs
1. To enter the camera mode, press the Camera/Camcorder key on the right side of the
PDA phone, tap
using Pictures & Videos.
2. Tap
Menu > Resolution to select an image size.
3. Tap
Menu > Mode to select a shooting mode from Normal (one shot), Multi Shot (burst;
available for 240 x 320 images or smaller), or
Start > Programs > Pocket Studio, or tap the camera icon if you are
Timer Shot (self timer).
4. Customize options such as zoom ratio, white balance, or tap
more color options.
5. The lens is located on the back of the PDA phone. Tap anywhere on the screen or Menu > Full
6. When you are ready to snap a picture, press the Camera/Camcorder key or the
7. To take more pictures, press the Camera/Camcorder key or the joystick, or tap
While taking pictures, the PDA phone will automatically enter the Stand By mode to save
power if it is idle for a while. To resume, tap anywhere on the screen or press any key.
to view the full screen as needed. (Tap anywhere on the screen again to exit full
Screen
screen.)
joystick, or tap
Camera. Then repeat Step 2.
Record to activate the shutter and thus take a picture.
Menu > Effects (or tap ) for
The following figures show the available functions.
62 Camera/camcorder operation

Standard capture mode
1
2
3
4
5
6
7
No. Name Description
1 Zoom in Increases the zoom ratio by one (up to 6X).
2 White Balance Adjusts the lighting condition.
3 Mode status
Shows the currently selected mode (Camera or
Camcorder).
4 Resolution Shows the currently selected image/video size.
5 Record The Shutter button
6 Remaining space
Shows the available size of the internal memory or the
storage card to capture more images or videos.
7 Cancel Exits the program.
8 Flash Turns on/off the flash.
9Effects
Gives an image/video a stylized look by adjusting various
color options.
10 Zoom ratio Shows the current zoom ratio.
11 Zoom out Decreases the zoom ratio by one.
12 Menu Shows more options, including restoring to default.
Camera/camcorder operation 63
8
9
10
11
12

Color options
1
2
5
3
4
No. Name Description
1Contrast
2 Brightness
Adjusts the relative difference between the darkest and
lightest areas of an image.
Adjusts the reflective quality of how bright/dark an image
appears.
3 Color mode Selects a color mode such as sepia or black and white.
4 Frame Selects a frame type such as stamp.
5Hue
Menu toggle
6
button
Adjusts the gradation of a color determined by light
spectrum.
Toggles between the standard capture mode and the
Effects menu.
7 Sharpness Adjusts the degree of clarity in colors.
8 Saturation Adjusts the degree of intensity in colors.
6
7
8
64 Camera/camcorder operation

Recording motion videos
1. To enter the camcorder mode, press the Camera/Camcorder key on the right side of
the PDA phone, tap
are using Pictures & Videos.
2. Tap Menu > Camcorder.
3. Tap
Menu > Settings > Camcorder to decide the time limit, the file format and where to save
the video file, or tap
Start > Programs > Pocket Studio, or tap the camera icon if you
Menu > Profiles and then select a preset.
4. Customize other options such as zoom ratio, white balance, or tap
Menu > Effects (or tap )
for more color options.
5. The lens is located on the back of the PDA phone. Tap anywhere on the screen or
to view the full screen as needed. (Tap anywhere on the screen again to exit full
Screen
Menu > Full
screen.)
6. When you are ready to shoot a video, press the Camera/Camcorder key or the joystick,
or tap
Record to start shooting.
7. To pause, press the
again or tap
or the joystick, or tap
See for the previous sections "Standard capture mode" on page 63 and "Color options" on
page 64 for option descriptions.
Right soft key or tap Pause. To resume, press the Right soft key
Resume. To stop, press the Left soft key , the Camera/Camcorder key
Stop .
Camera/camcorder operation 65

Shooting videos
1
2
No. Name Description
1 Mic on/off Turns on/off the microphone.
2 Duration Shows the total video time you have recorded.
Browsing and opening image, video, or music files
By default, all pictures and videos you have shot are stored in the My Pictures and My
folders respectively of the internal (main) memory. You can use File Explorer,
Videos
Pictures & Videos, or Windows Media (video and music files only) to find the file you want.
Once it is located, you can tap it to open it.
66 Camera/camcorder operation

1
2
No. Name Description
1 Sort By Arranges files in the order of name, date, size, or type.
2 Folder
3 Library
Shows the folder structure and the currently selected
folder.
Shows all available media types. Tap any one to expand
for more categories and selections.
3
Viewing images
1. Tap an image to open from within File Explorer or Pictures & Videos.
2. Tap
Menu and select an option like Zoom or Play Slide Show (for multiple image playback)
as needed.
3. Move the joystick to the right to view the next image, or to the left to view the previous image.
Viewing videos or playing music
1. Tap a video or music file to open from within File Explorer or Windows Media.
2. The selected file starts playing automatically. Available controls are similar to those in
Windows Media Player on your PC or notebook computer. Tap Menu for options like
Repeat or Properties as needed.
Camera/camcorder operation 67

3. Tap Menu > Library or return to File Explorer to select another video or music file for
playback as needed.
1
2
3
8
No. Name Description
1 Timecode Shows the current timecode during playback.
2 Full screen Plays a video in the full screen mode.
Windows Media
3
web site
Connects to the Windows Media web site.
4 Volume on/off Turns the volume on or off.
5 Volume level Shows the current degree of volume.
6 Volume up Turns up the volume.
7 Volume down Turns down the volume.
8 Playback controls Provides a number of navigation buttons.
4
5
6
7
68 Camera/camcorder operation

Editing an image file with Pocket Edit
You can edit an existing image or create a new one using Pocket Edit, which lets you add
color tones, sketches, text overlay and more.
1. Tap Programs > Pocket Edit.
2. Tap
Menu > File > Open and then tap an image file to open, or tap Menu > File > New to
open a blank image file.
3. Tap from the 9 categories as shown below to do editing as needed. When a category is selected,
available options will appear above. Select an option, and then start editing.
For option description, tap and hold an option to see the pop-up message.
4. If you need to cancel the current editing, you can undo once by tapping Menu > Edit > Undo.
To revert the image to its original state, tap
5. Once editing is done, tap Menu > File > Save As, and then select file saving options to save to a
different image file.
In Step 5, if you select Save, the edited file will still be saved as another image file instead of
overwriting the original one.
Menu > Edit > Restore Original.
1
2
3
4
5
6
7
8
9
10
11
Camera/camcorder operation 69

Options in Pocket Edit
No. Name Description
1 Effects Provides color effects such as sepia and negative.
2 Contrast
3 Brightness
4 Crop/Rotate Provides options for resizing.
5 View Provides viewing options such as zoom in/out.
6 Warp/Deform Provides options for deformation.
Navigation
7
Window
8 Frame Selects a frame type such as stamp.
Options for a
9
category
10 Text overlay
11 Pencil/Brush Provides options for drawing such as free hand.
Adjusts the relative difference between the darkest and
lightest areas of an image.
Adjusts the reflective quality of how bright/dark an image
appears.
Provides a compact window for you to easily move to any
location of an image. This is particularly useful when an
image is enlarged.
Provides detailed options for a category. These vary as
you select a different category.
Provides options for typing text. Before typing text, you
need to tap a desired location in an image and draw a text
box first. Then you can type text within the text box.
70 Camera/camcorder operation

Microsoft ActiveSync
Using Microsoft ActiveSync, you can synchronize the information on your desktop computer
with the information on your device. Synchronization compares the data on your device
with your desktop computer and updates both computers with the most recent information.
For example:
• Keep Pocket Outlook data up-to-date by synchronizing your device with Microsoft Outlook
data on your desktop computer.
• Synchronize Microsoft Word and Microsoft Excel files between your device and desktop
computer. Your files are automatically converted to the correct format.
• Back up and restore your device data.
• Copy (rather than synchronize) files between your device and desktop computer.
• Control when synchronization occurs by selecting a synchronization mode. For example,
you can synchronize continually while connected to your desktop computer or only when
you choose the synchronize command.
• Select which information types are synchronized and control how much data is
synchronized. For example, you can choose how many weeks of past appointments you
want synchronized.
Installing ActiveSync on PC
Insert the Companion CD containing ActiveSync into the optical drive of your computer,
and then follow the instructions on the screen to complete installation.
To ensure that synchronization works properly, you must install Microsoft ActiveSync on your
computer before connecting your PDA phone to the computer.
Setting up a sync relationship
After you have installed ActiveSync on your PC, you can begin to connect your PDA phone to
the PC. Take the included data cable and connect the mini-USB end to your PDA phone’s
mini-USB socket and the USB end to your computer’s USB socket.
Once the data cable connects the PDA phone to the PC, the PDA phone will emit a sound
indicating connection found. On the PC side, a Synchronization Setup Wizard will
automatically pop up.
Microsoft ActiveSync 71

To synchronize information:
1. Decide if you want to synchronize your information with a Microsoft Exchange Server, and
then click
2. Select an information type (such as Contacts and Calendar) to synchronize, and then click
Next.
3. Click
examines each of the information types you selected to be synchronized and see which records
are not the same on both the PDA phone and PC. Once both the PDA phone and PC have the
same information, all information types will be listed as
Next.
Finish to close the wizard and start synchronization. During sychronization, ActiveSync
Synchronized.
After synchronization, you can check that information you have stored in Microsoft Outlook
on your PC has been copied to your PDA phone without having to type a word. Disconnect
your PDA phone from your PC and you are ready to go.
Once you have set up ActiveSync and completed the first synchronization process, you can
start synchronization again anytime from your PDA phone or the PC. To do so, connect your
PDA phone to the PC and then synchronization will automatically starts. You can also tap
Start > Programs > ActiveSync > Sync on your PDA phone, or click Synchronize from
within ActiveSync on the PC.
• If the connection between your PDA phone and the PC is not stable, tap Start > Settings >
Connections > USB to PC and uncheck Enable advanced network functionality. If the
problem still exists, disable the virus protection program and/or the firewall on the PC.
• While your PDA phone and the PC are connected, every time the data of an information type
is updated (for example, a new e-mail is available in the Inbox), the same update will be
automatically synchronized to your PDA phone shortly afterwards.
Adding programs
If you want to install a new program to your PDA phone, you will need to first install it on
your PC.
1. Determine your PDA phone’s processor type so that you know which version of the software to
install. To do so, tap
the information in Processor.
2. Download the program to your PC (or insert the CD or disk that contains the program into
your PC). You may see a single *.xip,*.exe, or *.zip file, a Setup.exe file, or several versions of
Start > Settings > System > About > Version, and then make a note of
72 Microsoft ActiveSync

files for different device types and processors. Be sure to select the program designed for
Microsoft Pocket PC and your device processor type.
3. Read any installation instructions, Read Me files, or documentation that comes with the
program. Many programs provide special installation instructions.
4. Connect your PDA phone and PC.
5. Double-click the *.exe file.
• If the file is an installer, the installation wizard will begin. Follow the directions on the
screen. Once the software has been installed on your PC, the installer will automatically
transfer the software to your PDA phone.
• If the file is not an installer, you will see an error message stating that the program is valid
but it is designed for a different type of computer. You will need to move this file to your
PDA phone. If you cannot find any installation instructions for the program in the Read Me
file or documentation, use ActiveSync Explore to copy the program file to the Program Files
folder on your device. For more information on copying files using ActiveSync, see
ActiveSync Help.
• Once installation is complete, tap
Start > Programs > the program icon to switch to it.
Removing programs
1. Tap Start > Settings > System > Remove Programs.
2. Select the program you wish to remove.
3. Click
• After removing a program from your PDA phone, the program might still exist on the PC.
• While your PDA phone and the PC are connected, you can click Start > Control Panel >
Remove, and then follow the instructions on the screen to complete uninstallation.
Add/Remove Programs to remove a program from your PDA phone and/or the PC.
Push Mail
In addition to synchronizing with a PC, you can synchronize with the Exchange Server 2003
Service Pack 2. By doing so, without a data cable, you can still receive mails on your PDA
phone as soon as there are new ones available from your mail server. This feature is often
called “Push Mail”. You can also synchronize Contacts, Calendar, and Tasks.
Microsoft ActiveSync 73

To s e t u p P us h M ai l:
1. Connect to an existing modem connection such as GPRS.
2. Tap
Start > Programs > ActiveSync.
3. Tap
Menu > Add Server Source.
4. Enter the address of your Outlook Web Access server and uncheck
encrypted (SSL) connection
5. Enter your user name, password, and domain name. Then, tap
6. Choose the data types you want to synchronize.
7. Synchronization now starts. Wait for a while to receive mails.
Tap Menu > Schedule to customize the synchronization interval as needed.
. Then tap Next.
This server requires an
Next.
Connect to ActiveSync using Bluetooth
Without a data cable, you can still connect your PDA phone to a computer supporting
Bluetooth (either built-in or with a Bluetooth dongle).
• The computer must use Windows XP Service Pack 2.
• If you are using a Bluetooth dongle, use the default driver that comes with Windows XP.
To set up a Bluetooth connection between a computer and your PDA phone:
1. On the computer, right-click the Bluetooth icon on the Notification area of Windows XP (or
click
Start > Control Panel > Bluetooth Device) to open the Bluetooth Device window.
2. On the
3. On the
4. Select
5. Note down the number of the COM port that was added. It is recommended that the COM
6. Click
7. In ActiveSync on the computer, click
Options tab, select Turn discovery on and Allow Bluetooth devices to connect to
this computer.
Incoming (device initiates the connection) and click OK.
port number is less than 10.
OK.
COM Ports tab, click Add.
File > Connection Settings.
74 Microsoft ActiveSync

8. Check Allow connections to one of the following, and then choose the COM port you
noted in Step 5.
9. Click
OK.
10. On the PDA phone, create a new partnership with the computer.
11.The computer name is displayed. Tap it and make sure ActiveSync is checked.
12. In ActiveSync on the PDA phone, tap
13. Tap
Menu > Connect via Bluetooth.
Media (music and videos) files can be synchronized only by using a cable connection.
Start > Programs > ActiveSync.
Microsoft ActiveSync 75

We ba ro o
Webaroo is a program that provides services for you to search and browse real web pages
without an Internet connection. Therefore, you can take the web with you and find what you
are looking for anywhere and anytime. Webaroo stores searchable web content on your PDA
phone, and the content can be updated when synchronizing with your computer. For more
information, visit http://www.webaroo.com/.
Installing Webaroo
To install Webaroo, you first need to install it (along with imported web content from the
accompanying disc or the Webaroo web site) on a desktop or laptop computer. Next, install
Webaroo on your PDA phone, and then copy the web content from your computer.
To install Webaroo:
1. Insert the accompanying disc to the disc drive of your computer.
2. Locate and run the WebarooSetup.exe file.
3. Follow the instructions on the screen to complete setup.
appear to help you import the web content from the accompanying disc.
4. Use the USB data cable to connect your PDA phone to the computer that already has Webaroo
and ActiveSync installed.
not appear automatically, right-click the Webaroo icon on the Windows taskbar and select
Status Window.
5. In
Webaroo Status Window on your computer, click Install Webaroo to install Webaroo to
your PDA phone.
Webaroo Status Window will then appear automatically. If it does
Once Webaroo is installed, you can copy content to your PDA phone from your computer.
To copy content to your PDA phone:
1. Connect your PDA phone to your computer.
2. Open Webaroo on your computer, and then click
3. Select the web packs or the web sites you want to add.
4. Select
Storage Card from the drop-down list to start copying the content to your PDA phone.
Webaroo Content Setup will then
Content.
76 Webaroo

After copying the content, you can disconnect your PDA phone from the computer, and then
start using Webaroo.
Running Webaroo
You can start Webaroo by clicking the Webaroo icon in the Start menu, or through the
shortcut icon on the screen of your PDA phone.
Alternatively, you can open Webaroo from your Programs folder. Once Webaroo opens in the
browser, you can search and browse for the content in the same way you use Webaroo on
your computer.
For more information on using Webaroo, see the Help section of Webaroo or the Webaroo
user manual on the accompanying disc.
Webaroo 77

Troubleshooting information
If you encounter problems when using your PDA phone, please refer to the troubleshooting
information below to solve them. If the problem still persists after you have tried the
suggested solutions, please contact your dealer or customer service for assistance.
Do not attempt to disassemble the PDA phone by yourself. There are no user serviceable
parts inside.
Call related problems
Cannot make outgoing calls.
Check the following:
• Is your PDA phone in the Flight mode? Change the Phone mode to
call related functions.
• Is there a SIM card in the phone? Install a valid SIM card.
• Is the signal strength strong enough? Try moving to a different location to obtain better
signal reception.
• Is the call barring feature activated? Deactivate the feature if necessary.
Cannot answer incoming calls.
Check the following:
• Is your PDA phone in the Flight mode? Change the Phone mode to
call related functions.
• Is there a SIM card in the phone? Install a valid SIM card.
• Is the signal strength strong enough? Try moving to a different location to obtain better
signal reception.
Cannot use certain call functions (call waiting, call barring, etc).
Depending on your network service provider, some call services may require extra
subscription. Please contact your network service provider for details.
On, so you can use the
On, so you can use the
78 Troubleshooting information

There are noises during a call.
Check the following:
• Are you near a strong electromagnetic source (such as a TV, a microwave oven, etc.) during
the call? Move to another location to reduce the interference effects.
• Check the status of signal reception. If necessary, move to another location where reception
is better.
Poor reception.
Check the following:
• The network signal is too weak at your current location. (For example, in a basement or
near a tall building, wireless transmissions may not effectively reach the signal.)
• The network is busy at the current time. (For example, during peak times, there may be too
much network traffic to handle additional calls.)
• You are too far away from a base station for your network operator.
Echo or noise.
Check the following:
• Poor network trunk quality on the part of your network operator.
• Poor local telephone line quality.
SIM card error.
Check the following:
• SIM card malfunction or damage.
• SIM card inserted improperly.
• Debris on the SIM card contacts.
There are echoes when using VoIP (Voice over IP) phone.
Check the following:
Suggest to use VoIP in a spacious area or with earphones to get the best reception and quality.
Troubleshooting information 79

Message problems
Cannot send or receive text messages.
Check the following:
• Is the phone in the Flight mode? Change the Phone mode to
• Is the signal strength strong enough? Try moving to a different location to obtain better
signal reception.
On.
Cannot send or receive multimedia messages.
Check the following:
• Is the phone in the Flight mode? Change the Phone mode to
• Have you subscribed to the MMS service from your network service provider? The MMS
service may require extra subscription.
• Has the MMS setting been correctly configured? Check the setting with your network
service provider.
• The status of phone memory. Is there enough space? Delete some files if necessary.
On.
Cannot send or receive Email.
Check the following:
• Check your network connection.
• Has the Email setting been correctly configured? Check the setting with your Email service
provider.
Internet problems
Cannot connect to the Internet.
See "Connections settings" on page 35 for details.
Connection problems
Cannot connect the PDA phone to PC using the data cable.
Check the following:
• Is the power of the PDA phone turned on?
• Check the data cable.
• Make sure the ActiveSync is installed.
80 Troubleshooting information

System problems
Cannot turn on the phone.
Check the following:
• Make sure that you have slided the battery lock to the lock position.
• Is the battery fully charged? Check the battery and fully charge it if necessary.
• Are the battery contact terminals clean? Seek your dealer’s help to clean the terminals.
• If the problem remains,
see "Hard reset" on page 15 for more information.
Battery charging problems
Cannot turn on the PDA phone when charging.
Check the following:
This shows that the battery is over-discharged when you find the indicator on the PDA phone
turns to orange and the PDA phone cannot be turned on while charging it. When the battery
is over-discharged, it loses all its electric power. Please charge the phone for over 30 minutes
and the system will boot up automatically.
Cannot turn on the PDA phone after charging for over 30 minutes.
Check the following:
When you find that you still cannot turn on the PDA phone after charging it for over 30
minutes, this means that the PDA phone has entered the deep sleep mode incorrectly and
thus the PDA phone cannot be turned on normally. Please note that if there are still some
programs running and they are not closed correctly before the PDA phone enters the deep
sleep mode, the PDA phone will enter the sleep mode incorrectly.
Solutions:
Step 1. Press
Step 2. If Step 1 does not work, activate soft reset. For details, see "Soft reset" on page 15.
Step 3. If step 2 does not work, activate hard reset. For details, see "Hard reset" on page 15.
When carrying the phone to board a plane:
Check the following:
• Switch the phone to the Flight mode.
• Unlock the battery lock to let the phone enter the deep sleep mode.
Power.
Troubleshooting information 81

ActiveSync problems
Cannot run ActiveSync or connection fails.
Solution:
• Make sure ActiveSync is properly installed and related settings are correct.
• Restart your system.
• Make sure the data cable is connected properly.
Connection is not stable.
Solution:
• Tap
Start > Settings > Connections > USB to PC and uncheck Enable advanced network
functionality
• Disable the virus protection program and/or the firewall on the PC.
Cannot synchronize data.
Solution:
• In ActiveSync on the computer, click
selected.
• Make sure the data cable is connected properly.
.
Tools: Options to make sure at least one data type is
82 Troubleshooting information

Care and maintenance
Your phone has been designed and manufactured to
the highest of standards and should be treated with
great care. The suggestions below will help you to
enjoy your phone for many years.
• Protect your phone from moisture and humidity.
Precipitation, humidity and liquids contain
minerals that will corrode electronic circuits.
Shou ld your p hone bec ome wet, disconnect i t
immediately from the power supply to avoid electric
shock. Do not place your phone (even to dry it) on/
in a source of heat such as a microwave oven, oven
or radiator. T he phone may becom e overheated and
possibly explode.
• Do not use or store the phone in dusty, dirty areas.
Its moving parts may be damaged and the casing
may become deformed and discoloured.
• Do not store your phone in hot environments (e.g.
vehicle instrument panel in the summer). High
temperatures can shorten the life of electronic
devices, damage batteries and warp or melt certain
plastics.
• Do not store your phone in cold environments.
When the phone warms up again (to its normal
ambient temperature), moisture can form inside the
phone, which may damage electronic circuit boards.
• Do not drop, knock or shake your phone. Rough
handling can damage internal circuit boards.
• Do not use harsh chemicals, cleaning solvents, or
strong detergents to clean the phone.
• The phone has better protection against splashes,
dust and knocks if the supplied seals are used.
The suggestions given above apply equally to your
phone, battery, charger and all accessories. If any of
these parts is not working properly, obtain fast and
reliable help at our service centres.
Battery quality statement
The capacity of your mobile phone battery will reduce
each time it is charg ed/emptied. Storage at too high or
low tempera tures will also result in a gradual capacity
loss. As a result t he operating time of y our mobi le
phone may be considerably reduced, even after a full
recharge of the battery.
Regardless of this, the battery has been designed and
manufactu red so that it can be rech arged and used for
six months after the purchase of you mobile phone.
After six months, if the battery is clearly suffering
from loss of perfo rmance, we recom mend tha t you
replace it. Please buy only original batteries.
Display quality statement
For technological reasons, a few small dots with
different colours may appear in the display in
exceptional cases.
Just remember that the appearance of brighter or
darker dots generally does not mean that a fault has
occurred.
Care and maintenance 83

Product data
Declaration of conformity
BenQ Mobile h ereby de clares that t he phone described in this user guide is in compliance with the essential requirements and other relevant provisions of
European Directive 1999/5/EC (R&TTE). The relevant declaration of conformity (DoC) has been signed.
Please call the company hotline if you require a copy
of the original or visit:
www.BenQMobile.com/conformity
This device complies with Part 15
of the FCC Rules. Operation is
subject to the following two
conditions:
1. this device may not cause harmful interference,
and
2. this device must accept any interference received, including interference that may cause
undesired operation.
Changes or modifications not expressly
approved by the party responsible for
compliance could void the user's authority to
operate the equipment.
For body worn operation, this phone has been tested
and meets the FC C RF exposure guidelines when u sed
with the BenQ accessories supplied or designated for
this product. Use of other enhancements may not ensure compliance with FCC RF exposure guidelines. If
you do not use a body-worn accessory and are not
holding the phone at the ear, position the handset a
minimum of 1.5 cm from your body when the phone
is switched on.
Technical data
GSM 850 class:
Frequency range:
E-GSM 900 class:
Frequency range:
DCS 1900 class:
Frequency range:
PCS 1900 class:
Frequency range:
Li-Ion battery: 1320 mAh
Operating temp.: –10 °C… 55 °C
SIM card: 3.0/1.8 V
Phone ID
You will need the following details if you
lose your pho ne or SIM card:
the number of the SIM card (on the card):
..............................................................
15 digit serial number of the phone
(under the battery):
..............................................................
The customer service number of the service provider:
..............................................................
Lost phone
If you lose your phone or SIM card contact
your service provider immediately to
prevent misuse.
4 (2 watt)
824 - 894 MHz
4 (2 watt)
880 - 960 MHz
1 (1 watt)
1710 - 1880 MHz
1 (1 watt)
1850 - 1990 MHz
84 Product data

SAR
European Union (R&TTE) and
international (ICNIRP)
INFORMATION ON RF EXPOSURE / SPECIFIC ABSORPTION RATE (SAR)
THIS MODEL MEETS INTERNATIONAL GUIDELINES FOR EXPOSURE TO RADIO WAVES
Your mobile device is a radio transmitter and receiver. It is designed not to exceed the limits for exposure
to radio waves recommended by international guidelines. These guidelines were developed by the independent scientific organization ICNIRP and include
safety margins d esigned to assure the protect ion of all
persons, regardless of age and health.
The guidelines use a unit of measurement known as
the Specific Absorption Rate, or SAR. The SAR limit
for mobile devices is 2 W/kg an d was adopted into the
European Standard EN 50360 and into other national
standards. The CE mark demonstrates that the EU requirements are met.
The highest SAR value for this device when tested at
the ear was 0.346 W/kg
range of functions, they can be used in positions other
than the head, such as on the body. In this case, a separation distance of 1.5 cm is required.
As SAR is measured utilizing the device's highest
transmitting power, the actual SAR of this device
while operating is typically below that indicated
above. This is due to automatic changes to the power
level of the device to ensure it only uses the minimum
level required to reach the network.
The World Health Organization has stated that
present scientific information does not indicate the
need for any special precautions for the use of mobile
1
. As mobile devices offer a
devices. They note that if you nevertheless want to reduc e you r exp osur e then you c an do s o by l imit ing th e
leng th of calls or using a ' hands-free' devi ce to kee p
the mobile phone away from the head and body.
Additional Information can be found on the websites
of the World Health Organization (www.who.int/
emf) or BenQ Mobile (www.BenQMobile.com).
Maximum SAR measurement for FCC
requirements
Head: 0.508 W/Kg (1g)
Body: 0.706 W/Kg (1g)
1. The tests are carried out in accordance with international
guidelines for testing.
SAR 85

License Agreement
This License Agreement ("Agreement") is between You
and BenQ Mobile GmbH & Co. OHG ("BenQ"). The
Agreement authorizes You to use the Licensed Software,
specified i n Clause 1 below, whi ch may be included in
your phone, stored on a CD-ROM, sent to You by electronic mail or over the air, downloaded from BenQ Web
pages or servers or from other sources under the terms
and conditions set for th below.
Read this Agreement carefully before using your phone.
By using your phone or installing, copying, and/or using
the Licen sed Software, You a cknowledge that Yo u have
read and u nderstood the A greement and agre e to be
bound by all of the terms and conditions stated below.
You further agree that if BenQ or any licensor of BenQ
("Licensor" ) is required to engage in any pro ceeding, legal
or otherwise, to enforce their rights under this Agreemen t, BenQ and/or its Lic ensor s hall be entitl ed to re cover f rom You , in add ition t o any ot her sum s due,
reasonable attorney's fees, costs and disbursements. If
You do not agree to all of the terms and conditions of this
Agreement, do not install or use the Licensed Software.
This Agreement governs any Updates, releases, revisions,
or enhancements to the Licensed Software.
1. L IC EN SED SO FT WAR E. As us ed i n t his Ag re eme nt ,
the term "Licensed Software" means collectively: all the
soft ware in Your p hone, a ll of th e conte nts of t he disk (s),
CD-ROM(s ), electronic mail and its file atta chments, or
other media with which this Agreement is provided and
includes any related BenQ or third party software and upgrades, mo dified versions, up dates, additions an d copies
of the Licensed Software, if any, distributed over the air,
downloaded from BenQ Web pages or servers or from
other sources.
2. COPYRIGHT. The Licensed Software and all related
rights, without limitation including proprietary rights
therein, are owned by BenQ, its Licensors or affiliates and
are protected by international treaty provisions and all
applicable national laws. This Agreement does not convey
to You nor allow You to acquire any title or ownership interest in the Licensed Software or rights therein. The
structure, organization, data and code of the Licensed
Software are the valuable trade secrets and confidential
information of BenQ, its Licensors or affiliates. You must
reproduce and include the copyright notices with any
permitted copies You make of the Licensed Software.
3. LICENSE AND USE. BenQ grants to You a non-exclusive, n on-transferable end user right to install the Licensed Software or use the Licensed Software installed on
the phone. The Licensed Software is licensed with the
phone as a single integrated product an d may be used
with the phone only as set forth in these licensing terms.
4. LIMITATIONS ON LICENSE. You may not copy,
distribute, or make derivative works of the Licensed Software except as follows:
• You may make one copy of the Licensed Software,
excluding the d ocumentation, as an archival bac kup
copy of the original. Any other copies You make of
the Licensed Software are in violation of this
Agreement.
• You may not use, modify, or transfer the rig ht to use
the Licensed Software other than together with the
accompanying hardware or copy the Licensed
Software except as expressly provided in this
Agreement.
• You may not sublicense, rent or lease the Licensed
Software.
• You may not reverse engineer, decompile, modify,
or disassemble those Licensed Software programs
except and only to the extent that such activity is
expressly permitted by applicable law
notwithstanding this limitation.
Part s of th e Licen sed Soft ware m ay be su pplied by thir d
parties and may be subject to separate license terms. Such
terms are set out within the documentation.
5. MISUSE OF THE LICENSED SOFTWARE OR DA-
TA GENERATED BY THE LICENSED SOFTWARE IS
STRICTLY PROHIBITED BY BENQ, MAY VIOLATE
GERMAN, U.S. AND OTHER LAWS AND MAY SUBJECT YOU TO SUBSTANTIAL LIABILITY. You are solely
responsible for any misuse of the Licensed Software u nder this Agreement and for any liability or dama ge related
in a ny way t o your u se of th e Licen sed Sof tware i n viola tion of this Agreement. You are also responsible for using
the Licensed Software in accordance with the limitations
of this Agreement.
86 License Agreement

6. TERMINATION. This Agreement is effective from
the first date You install, copy or otherwise use the Licensed Software. You may terminate this license at any
time by deleting or dest roying the Licensed Software, all
back up copies and all related materials provided to You
by BenQ. Your license rights terminate automatically and
immediately without notice if You fail to comply with any
provision of this Agreement. The rights and obligations
under sections 2, 5, 6, 7, 9, 12 and 13 of this Agreement
shall survive the termination of this Agreement.
7. YOU ACKNOWLEDGE THE LICENSED SOFTWARE IS PROVIDED "AS IS" AND NEITHER BENQ
NOR ANY OF ITS LICENSORS M AKE ANY REPRESENTATIONS OR WARRANTIES, EXPRESS OR IMPLIED,
INCLUDING BUT NOT LIMITED TO THE WARRANTIES OF MERCHANTABILITY OR FITNESS FOR A
PARTICULAR PURPOSE OR THAT THE LICENSED
SOFTWARE WILL NOT INFRIN GE ANY THIRD PARTY
PATENTS, COPYRIGHTS, TRADEMARKS OR OTHER
RIGHTS. THERE IS NO WARRANTY BY BENQ OR ITS
LICENSORS OR BY ANY OTHER PARTY THAT THE
FUNCTIONS CONTAINED IN THE LIC ENSED SOFTWARE WILL MEET YOUR REQUIREMENTS OR THAT
THE OPERATION OF THE LICENSED SOFTWARE
WILL BE UNINTERRUPTED OR ERROR-FREE AND
BENQ AND ITS LICENSORS HEREBY DISCLAIM ANY
AND ALL LIABILITY ON ACCOUNT THEREOF. NO
ORAL OR WRITTEN INFORMATION OR ADVICE GIVEN BY A BENQ REPRESENTATIVE SHALL CREATE A
WARRANTY OR IN ANY WAY AFFECT THIS DISCLAIMER. YOU ASSUME AL L RESPONSIBILITY TO
ACHIEVE YOUR INTENDED RESULTS AND FOR THE
INSTALLATION, USE, AND RESULTS OBTAINED
FROM IT.
8. NO OTHER OBLIGATIONS. This Agreement creates no ob ligations on the p art of BenQ other t han as specifically set forth herein.
9. LIMITATION OF LIABILITY. IN NO EVENT
SHALL BENQ, ITS EMPLOYEES, LICENSORS, AFFILIATES OR AGENTS BE LIABLE FOR ANY DIRECT DAMAGES, LOST PROFITS, DATA OR BUSINESS, OR COSTS
OF PROCUREMENT OF SUBSTITUTE GOODS OR
SERVICES, PROPERTY DAMAGE, IN TERRUPTION OF
BUSINESS OR FOR ANY SP ECIAL, INDIRECT, IN CIDENTAL, EXEMPLARY, ECONOMIC, PUNITIVE OR
CONSEQUENTIAL DAMAGES, HOWEVER CAUSED,
AND WHETHER ARISING UNDER CONTRACT, TORT,
NEGLIGENCE, OR OTHER THEORY OF LIABILITY, OR
ARISING OUT OF THE USE OF OR INABILITY TO USE
THE LICENSED SOFTWARE, EVEN IF BENQ IS ADVISED OF THE POSSIBILITY OF SUCH DAMAGES.
THE LIMITATION OF LIABILITY SHALL NOT APPLY
IF AND TO THE EXTENT B ENQ´s LIABILITY IS MA NDATORY UNDER THE APPLICABLE LAW E.G. ACCORDING TO PRODUCT LIABILITY LAW OR IN THE
EVENT OF INTENTIONAL MISCONDUCT, PERSONAL
INJURY OR DEATH.
10. TECHNICAL SUPPORT. BenQ and its Licensors
have no obli gation to furnish You with technical support
unless separately agreed in writing between You and
BenQ or the applicable Licensor.
BenQ and where applicable its Licensors in the Licensed
Software shall be free to use any feedback received from
You resulting from your access to and use of the Licensed
Software for any purpose including (without limitation)
the manufacture, marketing and maintenance or support
of products and services.
11. EXPORT CONTROL. The Licensed Software may include technical data and cryptographic software and is
subject to German, European Union and U.S. export controls and may be subject to import or export controls in
other countries. You agree to strictly comply with all applicable import and export laws and regulations. Specifically, You agree, to the extent required by U.S. Export
Administration Regulations, that You shall not disclose
or otherwise export or re-export the Licensed Software or
any part thereof delivered under this Agreement to (a)
Cuba, Iran, Iraq, Libya, North Korea, Sudan, Syria or any
other country (including a national or resident of such
country) to which the U.S. has restricted or prohibited the
export of goods or services.
12. APPLICABLE LAW AND FORUM. The laws of Germany govern this Agreement. No choice of law rules of
any jurisdiction will apply. The courts in Munich shall
settle any disputes arising out of or relating to this Agreement provided you are a merchant.
13. MISCELLANEOUS. This Agreement represents the
entire agreement between You and BenQ relating to the
Licensed Software and (i) supersedes all prior or contemporaneous oral or written communications, proposals,
and representations with respect to its subject matter; and
(ii) prevai ls over any conflic ting or additional terms of
License Agreement 87

any acknowledgement or similar communication between the parties during the term of this License. Notwithstanding the foregoing, som e produ cts of B enQ may
require You to agree to additional terms through an online "click-wrap" license, and such terms shall supplement
this Agreement. If any provision of this Agreement is held
invalid, all other provisions shall remain valid unless such
validity would frustrate the purpose of this Agreement,
and this Agreement shall be enforced to the full extent allowable under applicable law. No modification to this
Agreement is binding, unless in writing and signed by a
duly autho rized representative of each party. This Agreement shall be binding on and shall inure to the benefit of
the heirs, successors, and assigns of the parties hereto.
The failure of either party to enforce any right resulting
from the breach of any provision of this Agreement by the
other party will not be deemed a waiver of any right related to a subsequent breach of such provision or any other
right hereunder. Notwithstanding anything to the contrary in this Agreement, BenQ and/or its licensors may enforce its rights, including but not limited to copyright,
trademark or trade names, in accordance with the rules of
law in each country.
88 License Agreement
P/N: 4J.G3D01.001
 Loading...