

Page 1

P50 PDA Phone User’s Manual
P50 PDA Phone User’s Manual
P50 PDA Phone User’s ManualP50 PDA Phone User’s Manual
Welcome
Page 2

Copyright
Copyright 2005 by BenQ Corporation. All rights reserved. No part of this publication may be
reproduced, transmitted, transcribed, stored in a retrieval system or translated into any language
or computer language, in any form or by any means, electronic, mechanical, magnetic, optical,
chemical, manual or otherwise, without the prior written permission of this company.
Disclaimer
BenQ Corporation makes no representations or warranties, either expressed or implied, with
respect to the contents hereof and specifically disclaims any warranties, merchantability or fitness
for any particular purpose. Further, BenQ Corporation reserves the right to revise this publication
and to make changes from time to time in the contents hereof without obligation of this company
to notify any person of such revision or changes.
Sidebar Signs
Text set off in this manner indicates a note. A note will elaborate the current topic with further information or mention something a little off topic.
Text set off in this manner indicates a warning. Failure to follow the said warning could
result in damage to equipment or loss of information.
Text set off in this manner indicates a tip. A tip will recommend an action which helps you
better use the product.
ii Copyright
Page 3

Safety Information
Safety Information
Safety InformationSafety Information
For your safety, please read the guidelines below carefully before you use your phone:
Exposure to radio frequency signals
Your wireless handheld portable telephone is a low power transmitter and receiver. When it is ON,
it receives and also sends out radio frequency (RF) signals.
European and international agencies have set standards and recommendations for the protection
of public exposure to RF electromagnetic energy.
• International Commission on Non-Ionizing Radiation Protection (ICNIRP) 1996
• Verband Deutscher Elektringenieure (VDE) DIN- 0848
• Directives of the European Community, Directorate General V in Matters of Radio Frequency
Electromagnetic Energy
• National Radiological Protection Board of the United Kingdom, GS 11, 1988
• American National Standards Institute (ANSI) IEEE. C95.1- 1992
• National Council on Radiation Protection and Measurements (NCRP). Report 86
• Department of Health and Welfare Canada. Safety Code 6
These standards are based on extensive scientific review. For example, over 120 scientists, engineers and physicians from universities, government health agencies and industry reviewed the
available body of research to develop the updated ANSI Standard.
The design of your phone complies with these standards when used normally.
RF Exposure Information (SAR)
This model phone meets the government's requirements for exposure to radio waves.
This phone is designed and manufactured not to exceed the emission limits for exposure to radio
frequency (RF) energy set by the Federal Communications Commission of the U.S. Government.
The exposure standard for wireless mobile phones employs a unit of measurement known as the
Specific Absorption Rate, or SAR. The SAR limit set by the FCC is 1.6W/kg. *Tests for SAR are
conducted using standard operating positions accepted by the FCC with the phone transmitting at
Safety Information iii
Page 4

its highest certified power level in all tested frequency bands. Although the SAR is determined at
the highest certified power level, the actual SAR level of the phone while operating can be well
below the maximum value. This is because the phone is designed to operate at multiple power
levels so as to use only the poser required to reach the network. In general, the closer you are to a
wireless base station antenna, the lower the power output.
The highest SAR value for the model phone as reported to the FCC when tested for use at the ear is
0.449 W/kg (GSM850) / 0.282 W/kg (PCS1900) / 0.475 W/kg (WLAN) and when worn on the
body, as described in this user guide, is 0.642 W/kg (GSM850) / 0.784 W/kg (PCS1900) / 0.16 W/
kg (WLAN). (Body-worn measurements differ among phone models, depending upon available
enhancements and FCC requirements.)
While there may be differences between the SAR levels of various phones and at various positions,
they all meet the government requirement.
The FCC has granted an Equipment Authorization for this model phone with all reported SAR
levels evaluated as in compliance with the FCC RF exposure guidelines. SAR information on this
model phone is on file with the FCC and can be found under the Display Grant section of http://
www.fcc.gov/oet/fccid after searching on FCC ID: JVP57P50.
For body worn operation, this phone has been tested and meets the FCC RF exposure guidelines
for use with an accessory that contains no metal and the positions the handset a minimum of 1.5
cm from the body. Use of other enhancements may not ensure compliance with FCC RF exposure
guidelines. If you do no t use a body-worn accessory and are not holding the phone at the ear,
position the handset a minimum of 1.5 cm from your body when the phone is switched on.
Antenna care
Use only the supplied or approved replacement antenna. Unauthorized antennas, modifications
or attachments may damage the phone and violate FCC regulations.
Phone operation
Normal Position: Hold the phone as you would any other telephone with the antenna pointed up
and over your shoulder. For your phone to operate most efficiently, do not touch the antenna
unnecessarily when the phone is in use. Contact with the antenna affects call quality and may
cause the phone to operate at higher power level than otherwise needed.
iv Safety Information
Page 5

Batteries
All batteries can cause property damage, injury or burns if a conductive material such as jewelry,
keys or beaded chains touches exposed terminals. The material may complete electrical circuit and
become quite hot. To protect against such unwanted current drain, exercise care in handling any
charged battery, particularly when placing it inside your pocket, purse or other container with
metal objects. When battery is detached from the phone, your batteries are packed with a protective battery cover; please use this cover for storing your batteries when not in use.
Driving
Check the laws and regulations on the use of wireless telephones in the areas where you drive.
Always obey them. Also, if using your phone while driving, please:
• Give full attention to driving--driving safety is your first responsibility.
• Use hands-free operation, if available.
• Pull off the road and park before making or answering a call if driving conditions so require.
Electronic devices
Most modern electronic equipment is shielded from RF signals. However, certain electronic
equipment may not be shielded against the RF signals from your wireless phone.
Pacemakers
The Health Industry Manufacturers Association recommends that a minimum separation of six
(6") inches be maintained between a handheld wireless phone and a pacemaker to avoid potential
interference with the pacemaker. These recommendations are consistent with the independent
research by and recommendations of Wireless Technology Research.
Persons with pacemakers:
Persons with pacemakers:
Persons with pacemakers:Persons with pacemakers:
• Should ALWAYS keep the phone more than six inches from their pacemaker when the phone is
turned ON.
• Should not carry the phone in a breast pocket.
• Should use the ear opposite the pacemaker to minimize the potential for interference.
Safety Information v
Page 6

• If you have any reason to suspect that the interference is taking place, turn your phone OFF
immediately.
Hearing Aids
Hearing Aids
Hearing AidsHearing Aids
Some digital wireless phones may interfere with some hearing aids. In the event of such interfer-
ence you may want to consult your hearing aid manufacturer to discuss alternatives.
Other medical devices
If you use any other personal medical device, consult the manufacturer of your device to determine if they are adequately shielded from external RF energy. Your physician may be able to assist
you in obtaining this information.
Turn your phone OFF in health care facilities when any regulations posted in these areas instruct
you to do so. Hospitals or health care facilities may be using equipment that could be sensitive to
external RF energy.
Ve h ic l es
RF signals may affect improperly installed or inadequately shielded electronic systems in motor
vehicles. Check with the manufacturer or its representative regarding your vehicle. You should
also consult the manufacturer of any equipment that has been added to your vehicle.
Posted facilities
Turn your phone OFF in any facility where posted notice so requires.
Aircraft
FCC regulations prohibit using your phone while in the air. Switch OFF your phone, or change to
the Flight mode before boarding an aircraft.
Blasting areas
To avoid interfering with blasting operations, turn your phone OFF when in a “blasting area” or in
area posted “TURN OFF TWO-WAY RADIO.” Obey all signs and instructions.
vi Safety Information
Page 7

Potentially explosive atmospheres
Turn your phone OFF and do not remove the battery when in any area with a potentially explosive
atmosphere and obey all signs and instructions. Sparks, from your battery, in such areas could
cause an explosion or fire resulting in bodily injury or even death. Areas with a potentially explosive atmosphere are often, but not always clearly marked. They include fueling areas such as gasoline stations; below deck on boats; fuel or chemical transfer or storage facilities; vehicles using
liquefied petroleum gas (such as propane or butane); areas where the air contains chemicals or
particles, such as grain, dust, or metal powders; and any other area where you would normally be
advised to turn off your vehicle engine.
For vehicles equipped with an air bag
An air bag inflates with great force. DO NOT place objects, including both installed or portable
wireless equipment, in the area over the air bag or in the air bag deployment area. If in-vehicle
wireless equipment is improperly installed and the air bag inflates, serious injury could result.
FCC information
This mobile phone complies with part 15 of the FCC Rules. Operation is subject to the following
two conditions: (1) This device may not cause harmful interference, and (2) this device must
accept any interference received, including interference that may cause undesired operation.
This mobile phone has been tested and found to comply with the limits for a Class B digital device,
pursuant to Part 15 of the FCC Rules. These limits are designed to provide reasonable protection
against harmful interference in a residential installation. This equipment generates, uses and can
radiated radio frequency energy and, if not installed and used in accordance with the instructions,
may cause harmful interference to radio communications. However, there is no guarantee that
interference will not occur in a particular installation If this equipment does cause harmful interference to radio or television reception, which can be determined by turning the equipment off
and on, the user is encouraged to try to correct the interference by one or more of the following
measures:
- Reorient or relocate the receiving antenna.
- Increase the separation between the equipment and receiver.
Safety Information vii
Page 8

- Connect the equipment into an outlet on a circuit different from that to which the receiver is
connected.
- Consult the dealer or an experienced radio/TV technician for help.
Changes or modifications not expressly approved by the party responsible for compliance could
void the user's authority to operate the equipment.
viii Safety Information
Page 9

Table of Contents
Phone exterior
Phone exterior ..................................................................................
Phone exteriorPhone exterior
Front view ......................................................................................................... 1
Description of the indicators.............................................................................................. 2
Top view............................................................................................................ 3
Bottom view...................................................................................................... 3
Left-side view.................................................................................................... 4
Right-side view ................................................................................................. 4
Rear view........................................................................................................... 5
Hardware setup
Hardware setup ................................................................................
Hardware setupHardware setup
SIM card installation ........................................................................................ 6
Battery installation ........................................................................................... 9
Removing the battery ....................................................................................... 10
Battery charging................................................................................................ 11
Startup
Startup ..............................................................................................
StartupStartup
Today screen
Today screen.....................................................................................
Today screenToday screen
.............................................................................................. 12
............................................................................................................................................................................................
First time startup .............................................................................................. 12
Using the stylus................................................................................................. 12
Sleep mode........................................................................................................ 13
Deep Sleep mode .............................................................................................................13
Soft reset............................................................................................................ 13
Hard reset.......................................................................................................... 14
Today screen ..................................................................................................... 15
Navigation bar .................................................................................................................16
Menu bar.......................................................................................................................... 16
Start button...................................................................................................................... 18
.................................................................................. 1111
....................................................................................................................................................................
................................................................................ 6666
................................................................................................................................................................
..................................................................................... 15
..........................................................................................................................................................................
12
1212
15
1515
Table of Contents i
Page 10

Input methods
Input methods ..................................................................................
Input methodsInput methods
Entering typed text ........................................................................................... 19
Using the QWERTY keyboard........................................................................................ 19
Using the input panel ...................................................................................................... 20
Writing on the screen....................................................................................... 21
Selecting a sentence .........................................................................................................22
Converting writing to text............................................................................................... 22
Drawing on the screen ..................................................................................... 23
Creating a drawing .......................................................................................................... 23
Selecting a drawing .......................................................................................................... 23
Phone operation
Phone operation...............................................................................
Phone operationPhone operation
Phone screen..................................................................................................... 24
Making and receiving phone calls ................................................................... 24
Making a call directly ...................................................................................................... 24
Answering a call ............................................................................................................... 25
Ending a call..................................................................................................................... 25
Making a call from Contacts ........................................................................................... 25
Making a speed dial call ..................................................................................................25
Making a conference call................................................................................................. 26
Loudspeaker.....................................................................................................................26
Associating notes with calls.............................................................................. 27
Viewing past phone activity ............................................................................. 28
Programs
Programs...........................................................................................
ProgramsPrograms
Calendar............................................................................................................ 31
Contacts ............................................................................................................ 31
Pocket Internet Explorer.................................................................................. 31
Messaging.......................................................................................................... 31
Help................................................................................................................... 33
Games................................................................................................................ 33
Java Manager .................................................................................................... 34
.................................................................................. 19
....................................................................................................................................................................
............................................................................... 24
..............................................................................................................................................................
........................................................................................... 29
......................................................................................................................................................................................
19
1919
24
2424
29
2929
ii Table of Contents
Page 11

MSN Messenger................................................................................................ 35
Pocket Excel...................................................................................................... 35
Pocket Word..................................................................................................... 35
Universal Remocon .......................................................................................... 35
SIM Phonebook................................................................................................ 36
SIM Message ..................................................................................................... 36
SIM Tool Kit ..................................................................................................... 36
Windows Media................................................................................................ 37
Calculator.......................................................................................................... 37
Tasks.................................................................................................................. 37
Photo Caller ID................................................................................................. 37
Set Ringtone...................................................................................................... 37
Notes ................................................................................................................. 38
Find ................................................................................................................... 38
Pictures.............................................................................................................. 38
Speech Commander ......................................................................................... 38
File Explorer...................................................................................................... 39
Camera/camcorder operation
Camera/camcorder operation .........................................................
Camera/camcorder operationCamera/camcorder operation
Taking photographs ......................................................................................... 40
Recording motion videos................................................................................. 42
Browsing your picture and video folders...................................................................43
Viewing your pictures and videos ................................................................... 44
Editing your pictures and video frames .......................................................... 45
Settings menu ................................................................................................... 46
......................................................... 40
..................................................................................................................
40
4040
Connectivity
Connectivity .....................................................................................
ConnectivityConnectivity
Types of connections........................................................................................ 47
Setting up connections..................................................................................... 47
Setting up a GPRS and CSD Connection to your ISP ...................................................47
Connecting to Your ISP ..................................................................................................53
..................................................................................... 47
..........................................................................................................................................................................
Table of Contents iii
47
4747
Page 12

Configuring Proxy Server Settings .................................................................................53
Setting up a VPN connection to your corporate network ............................................ 54
Using Wireless LAN ......................................................................................... 55
Turning on WLAN ..........................................................................................................55
Connecting to an existing wireless network................................................................... 56
Adding a new wireless network ...................................................................................... 57
Searching for wireless networks to access ...................................................................... 58
Using Bluetooth................................................................................................ 58
Using Infrared (IrDA)...................................................................................... 59
Microsoft® ActiveSync®
Microsoft® ActiveSync®...................................................................
Microsoft® ActiveSync®Microsoft® ActiveSync®
................................................................... 60
......................................................................................................................................
Installing ActiveSync® on PC .......................................................................... 60
Creating a new partnership profile.................................................................. 65
Synchronizing the application data................................................................. 66
Adding programs.............................................................................................. 67
Removing programs......................................................................................... 67
Settings
Settings..............................................................................................
SettingsSettings
.............................................................................................. 68
............................................................................................................................................................................................
Personal settings ............................................................................................... 68
Phone ............................................................................................................................... 68
Buttons ............................................................................................................................. 68
Input................................................................................................................................. 69
Menus............................................................................................................................... 69
Owner info ....................................................................................................................... 69
Password ..........................................................................................................................70
Sounds and notification ..................................................................................................70
Today................................................................................................................................ 70
Speech Commander ........................................................................................................71
System settings.................................................................................................. 71
About................................................................................................................................ 71
Backlight........................................................................................................................... 71
Certificates .......................................................................................................................71
Clock ................................................................................................................................72
iv Table of Contents
60
6060
68
6868
Page 13

Memory............................................................................................................................ 73
Power................................................................................................................................ 73
CPU Performance............................................................................................................ 73
Regional settings .............................................................................................................. 74
Screen ...............................................................................................................................74
Self Test ............................................................................................................................74
Device Info....................................................................................................................... 74
Remove Programs ........................................................................................................... 74
Connections settings ........................................................................................ 75
GPRS Authentication ......................................................................................................75
Network Cards................................................................................................................. 75
Connections .....................................................................................................................75
Bluetooth.......................................................................................................................... 75
Beam................................................................................................................................. 75
Troubleshooting Information
Troubleshooting Information .........................................................
Troubleshooting InformationTroubleshooting Information
......................................................... 76
..................................................................................................................
Call Related Problems ...................................................................................... 76
Message Problems ............................................................................................ 77
Internet Problems............................................................................................. 78
Connection Problems ...................................................................................... 78
System Problems .............................................................................................. 78
76
7676
Table of Contents v
Page 14

<Memo>
vi Table of Contents
Page 15
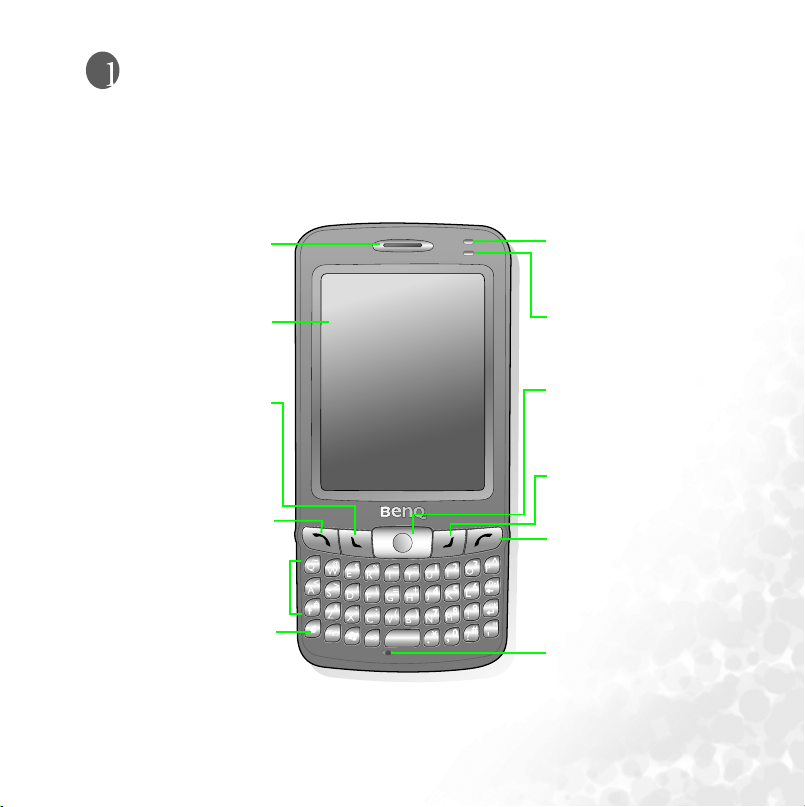
Phone exterior
Phone exterior
Phone exteriorPhone exterior
Front view
Listen during phone call
- Show screen display
- Tap and write on touchscreen
Press to launch Contacts (default
setting). You can also customize
the application it opens
- Press to pick up incoming calls
- Press to bring up Dial screen
- Press to place a call after dialing
-Long press to activate/deactivae
Type text and enter numbers with
Ear Piece
LCD Touchscreen
Left application key
Send Key
loudspeaker
QWERTY Keyboard
Functio Key
ease
Power indicator
(See "Description of the indicators" on page 2 for more information)
Connection indicator
(See "Description of the indicators" on page 2 for more information)
Joystick
- Shift to move selection highlight
in an appli cation
- Press to make a selection
Right application key
Press to launch Calendar (default
setting). You can also customize
the application it opens
End Key
- Press to reject incoming calls
- Press to bring up Today screen
Microphone
Phone exterior 1
Page 16
Description of the indicators
Description of the indicators
Description of the indicatorsDescription of the indicators
Indicator Color
Red
Power indicator
Green
Orange On
Green Flash
Network indicator
Blue Flash
Green/Blue
Lighting
Behavior
Flash
On Charging in progress.
Flash The PDA phone is in stand-by mode.
On Charging is complete.
Alternating
Flash
Description
Indicates that a new event (new message, a
new missed call, system warning..., etc.)
occurs (indicated by the appearance of certain icons on the Navigation bar)
The battery is completely drained.
Indicates that the wireless LAN function has
been enabled.
Indicates that the Bluetooth function has
been enabled.
Indicates that the wireless LAN and Blue-
tooth functions have both been enabled.
2 Phone exterior
Page 17
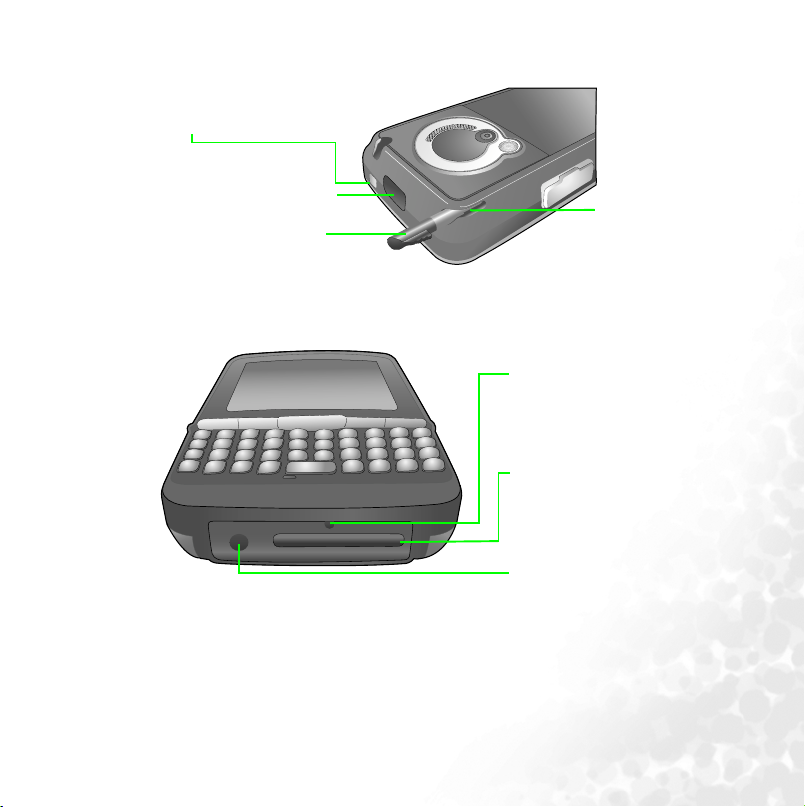
Top view
Power Button
Press to power on/off
Infrared Window
Sends and receives infrared signals
Stylus
Device for tapping and writing on
the touchscreen
Bottom view
8
.
2
F
1
.
3
M
M
O
E
O
G
Z
A
L
P
A
I
X
T
I
E
L
G
I
S
D
Stylus Housing
Storage area for stylus
Reset Button
Insert a pin into the recess to trigger the
reset button
SD Card Slot
Allows you to insert an SD memory card
Battery Charger Socket
Insert the battery charger plug here
Phone exterior 3
Page 18
Left-side view
Right-side view
Camera/Camcorder Key
Press to launch Camera/Camcorder
4 Phone exterior
Audio Recorder Button
Press to record audio
mini-USB socket
Insert data cable here
Sound Level Buttons
Press to adjust speech and device volume levels
Headset Jack
Allows you to connect to a headset
Page 19
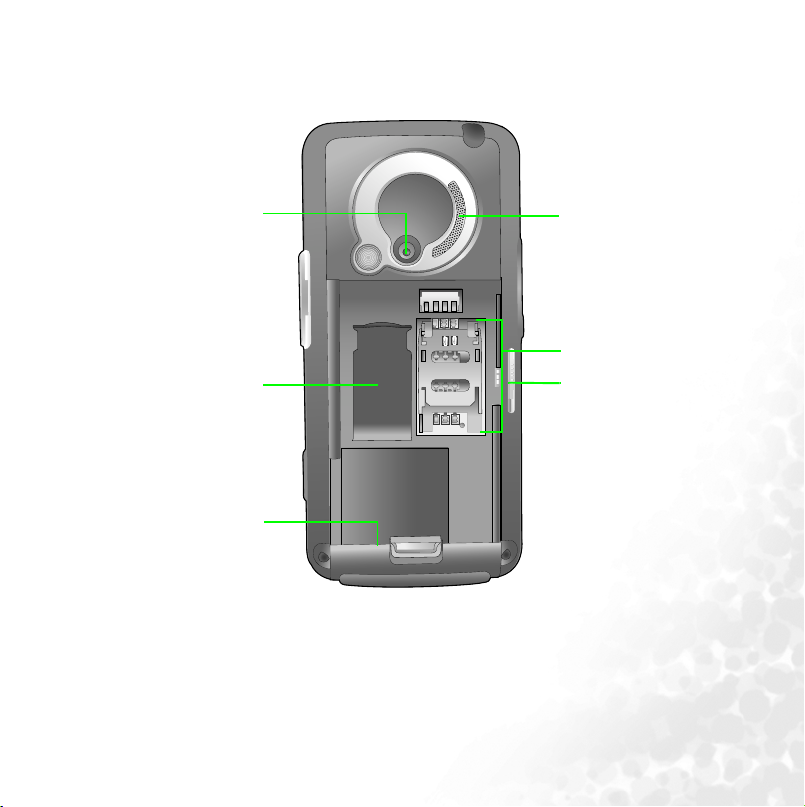
Rear view
Aim camera lens at objects of
interest when using camera/cam-
2nd SIM Card Stora ge Compart-
Extra storage space available for
Camera Lens
corder
ment
a second SIM card
Battery Latch
Press to release battery
O
Z
O
L
M
A
T
F
I
2
G
.
I
8
D
S
L
E
X
I
P
A
G
E
M
3
.
1
Loudspeaker
Generates ring and device audio
SIM Card Socket
Allows you to install a SIM card
Battery lock
Locks the battery
Phone exterior 5
Page 20
Hardware setup
Hardware setup
Hardware setupHardware setup
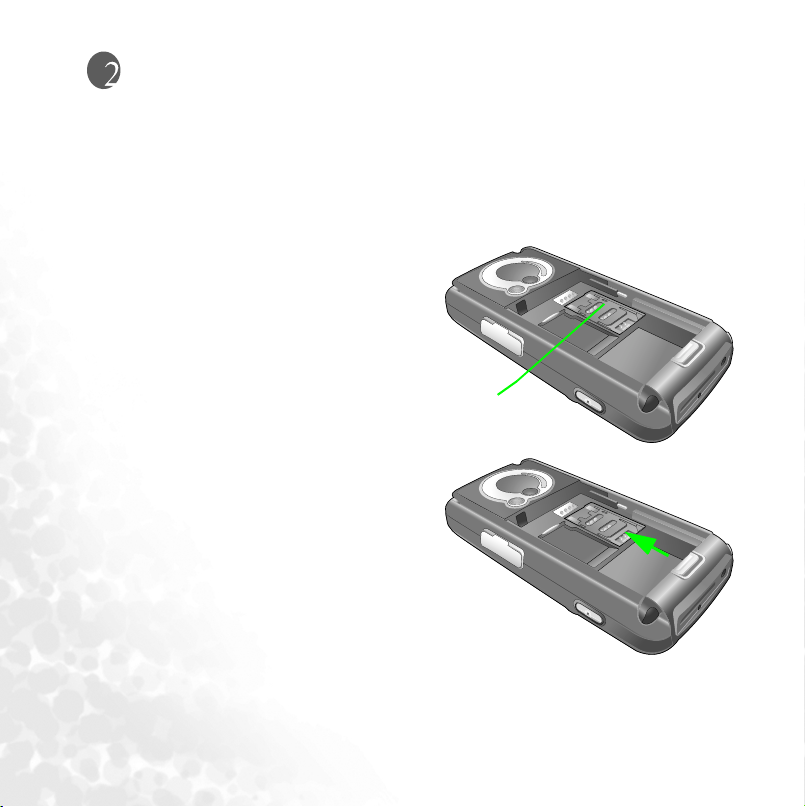
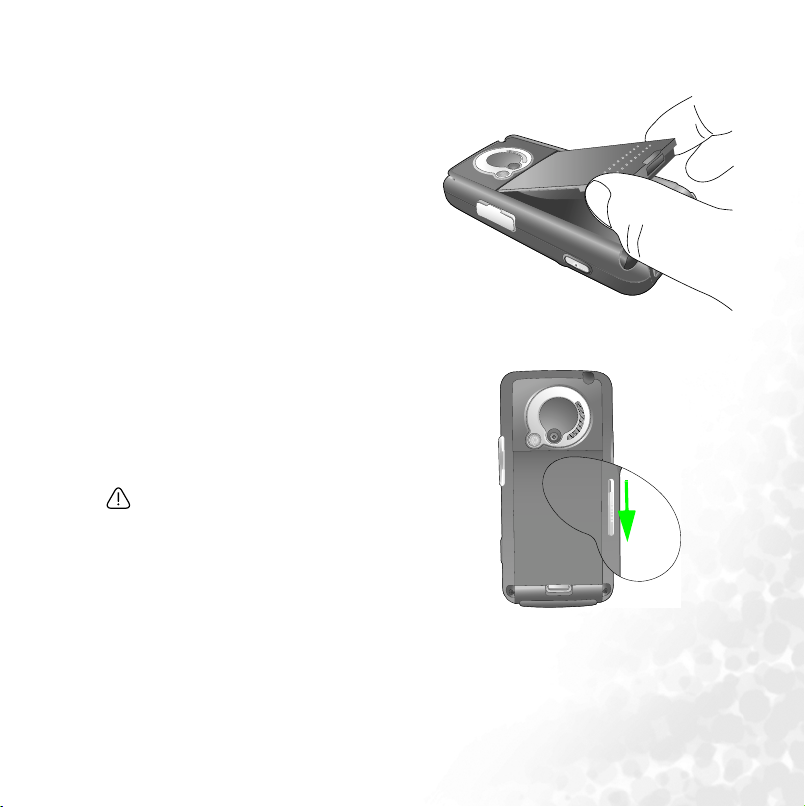
SIM card installation
You can obtain a SIM card from a mobile phone service provider when you sign on as a
subscriber. When you insert a SIM card into your PDA phone, you can begin using it to
place and receive phone calls. Please follow the instructions below to insert a SIM card
into the phone.
1. Locate the SIM card holder.
SIM Card
Holder
2. Push the SIM card holder in the direction of the arrow (as shown in the figure
to the right) to unlock it.
6 Hardware setup
Page 21
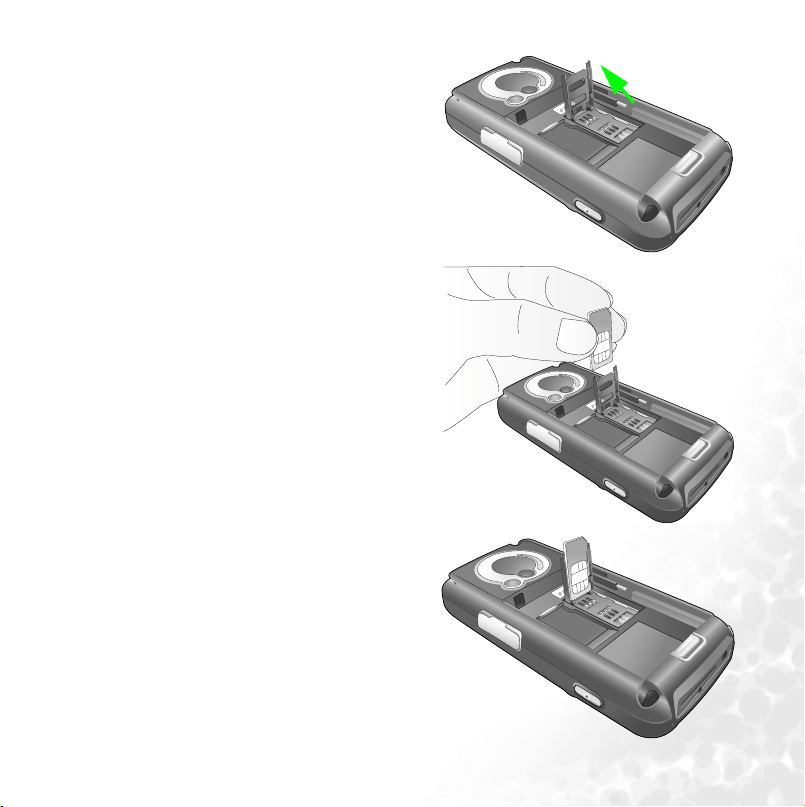
3. Pick and raise the SIM card holder up in
an upright position.
4. Hold the SIM card over the SIM card
holder ready for insert. Make sure you
hold the SIM card so that the side with
the metal contacts will face down when
you close the SIM card holder. (See the
figure to the right for reference.)
5. Insert the SIM card into the SIM card
holder. Make sure it goes in completely.
Hardware setup 7
Page 22
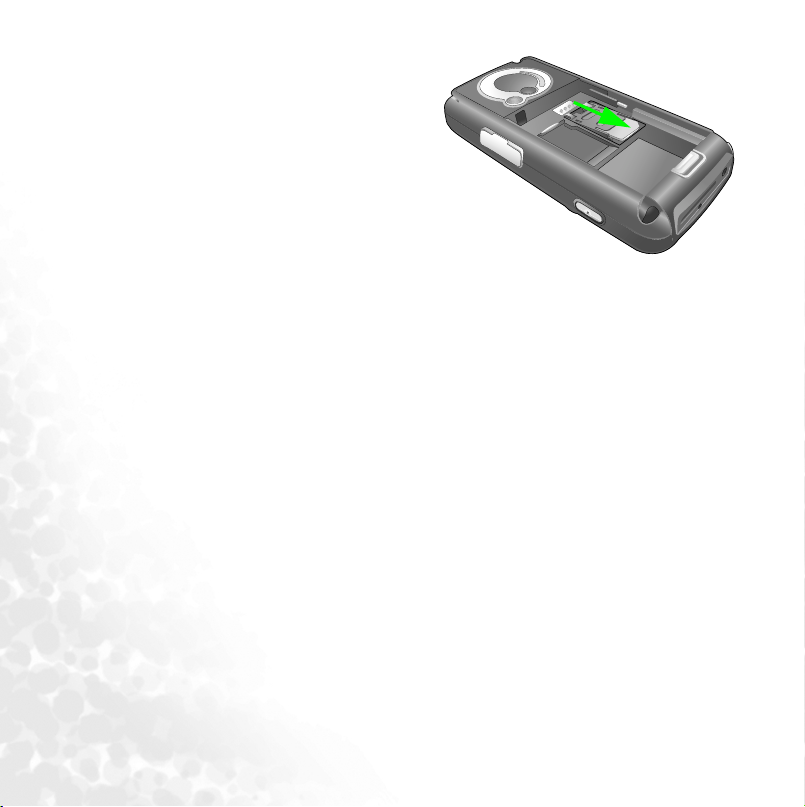
6. Lower the SIM card holder with the SIM
card in it to close it. Push the SIM card
holder in the direction of arrow (as
shown in the figure to the right) to lock
it.
8 Hardware setup
Page 23
Battery installation
1. The battery goes into the battery compartment in the back of the phone. Slip
the battery into the battery compartment top edge first.
2. With the top half in position, push down the remaining battery into the compartment.
The battery latch will click to secure the battery in place.
O
Z
O
L
M
A
T
F
I
2
G
.
I
8
D
S
L
E
X
I
P
A
G
E
M
3
.
1
3. Slide the battery lock to the lock position.
The battery lock must be in the lock position
in order that the phone can charge or power
ON.
Hardware setup 9
Page 24
Removing the battery
1. We suggest you to power off the PDA phone before you remove the battery.
O
Z
O
L
M
A
T
F
I
2
G
.
I
8
D
S
L
E
X
I
P
A
G
E
M
3
.
1
2. Slide the battery lock to the unlock
position and you will hear a beep sound.
The battery lock must be in the unlock
position in order that the battery can be
removed.
3. Meanwhile, a warning picture appears
on the screen of your PDA phone.
4. Then remove the battery.
10 Hardware setup
Page 25
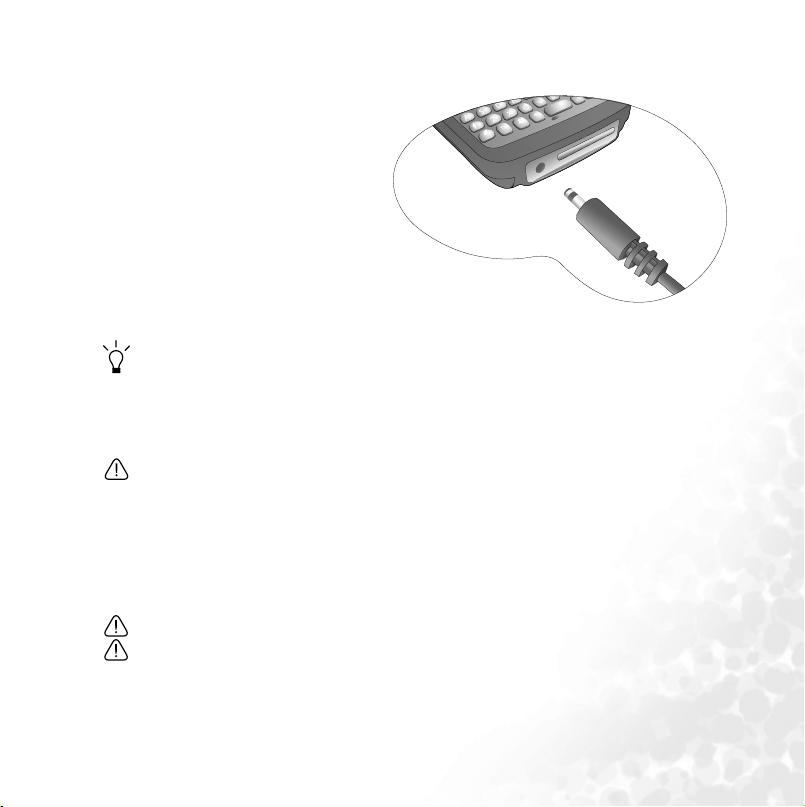
Battery charging
1. Connect the one end of the
charger cable into the PDA
phone and the other into a wall
power outlet to begin charging.
2. Disconnect the charger cable when charging completes.
• Before using the battery for the first time, make sure that is charged for at least eight
hours to prolong its lifetime.
• It takes at least one charging-discharging cycle for the battery to reach its peak performance.
• You can also charge your phone using the USB data cable while it’s connected to the PC
as an alternative to using the charger cable.
• To avoid possible damage to the battery, please make sure that the battery is unlocked
when inserting or removing it.
• Keep the phone in normal room temperature while charging. For safety precautions, when
the phone temperature is above 55 or below 0 degree Celsius it will automatically stops
charging temporarily.
• There is a backup battery inside the phone which you can’t see. This backup battery
allows your phone to keep data stored in RAM intact when you remove the battery temporarily (for example, to change SIM cards). If you remove your phone battery for over 30
minutes the data stored in RAM will be deleted.
• Don't remove the battery when charging, or it may cause hard reset.
• Please make sure that the battery lock is set to the lock position while charging.
Hardware setup 11
Page 26

Startup
Startup
StartupStartup
First time startup
After you have installed the battery and finished charging it, you are ready to power ON
your PDA phone. The first time you power ON the phone, you will be guided through a
series of setup screens. Follow the steps below to start up your phone and complete the
initial setup.
1. With the battery lock in the lock position, press the power button to power ON the
phone.
2. Wait for the phone to boot up with the BenQ splash screen accompanied by the wel-
come sound.
2. On the Windows Mobile screen, tap the stylus anywhere on the screen to proceed.
3. On the ‘align screen’, aim and tap the stylus precisely on the cross-hair object. The
cross-hair object will move around the screen several times until the screen is aligned.
Each time the cross-hair object moves to a new location, aim and tap on it.
4. Tap ‘Next’ to move to the next screen.
5. Tap and hold the 9 A.M. time slot to bring up a pop-up menu. Select ‘Cut’ from the
pop-up menu.
6. Tap and hold the 11 A.M. time slot to bring up a pop-up menu. Select ‘Paste’ from the
pop-up menu. Tap ‘Next’ to continue.
7. Select the time zone of your local area and tap ‘Next’.
8. Tap anywhere on the final screen to exit setup.
Using the stylus
The stylus works like a mouse to a PC. You can use the stylus to point and click various
objects on the screen. The following are basic stylus techniques you should learn in order
to efficiently operate your PDA phone.
• Tap
Tap - Touch the screen once with the stylus to open items and select options.
Ta pTa p
12 Startup
Page 27

• Drag
Drag - Hold the stylus on the screen and drag across the screen to select text and images.
DragDrag
Drag in a list to select multiple items.
• Tap and hold
Tap and hold - Tap and hold the stylus on an item to see a list of actions available for that
Tap a n d ho ldTap a n d ho ld
item. Before a pop-up menu appears, you will see a blue circle of dots to notify you of
where on the screen you are pressing. On the pop-up menu that appears, tap the action
you want to perform.
Sleep mode
Once the PDA phone is on, you can press the power button to put it in sleep mode.
During sleep mode, the screen shuts off and the system stands by for incoming phone
calls or user input. Pressing the power button will switch ON the phone again.
Please note that your PDA phone needs about 5 seconds to finish the booting procedure. If
you want to switch the power off right after you power it on, please wait for 5 seconds to
power off your PDA phone.
Deep Sleep mode
Deep Sleep mode
Deep Sleep modeDeep Sleep mode
The PDA phone will go into deep sleep mode under two situations:
1. The battery lock is not slided to the lock position. The battery is not locked.
2. The battery capacity is low.
The PDA phone will automatically go into sleep mode if it is inactive for 1 minute. You can
also customize the length of inactivity before sleep mode.
Soft reset
A soft reset restarts the PDA phone but does not erase any program data or system settings.
To perform a soft reset:
1. Locate the recessed Reset button at the bottom of the phone.
2. Insert the stylus into the recess to trigger the Reset button. Hold the Reset button down
until the screen fades off.
3. Release the stylus from the Reset button to restart the phone.
Startup 13
Page 28

Hard reset
A hard reset restarts the PDA phone and erases all program data and system settings.
After a hard reset, your phone returns to its default settings and loses all information that is
not recorded in ROM.
To perform a hard reset:
1. Locate the recessed Reset button at the bottom of the phone.
1. Press and hold down the Power button.
2. Without removing the Power button, insert the stylus into the recess to trigger the Reset
button. Hold down both the Power button and the Reset button until the screen fades
off.
3. When the screen has faded off completely, release both the Power button and the stylus.
4. You will notice the Power indicator light up green, at this point, press the Power button
to turn ON the PDA phone.
14 Startup
Page 29
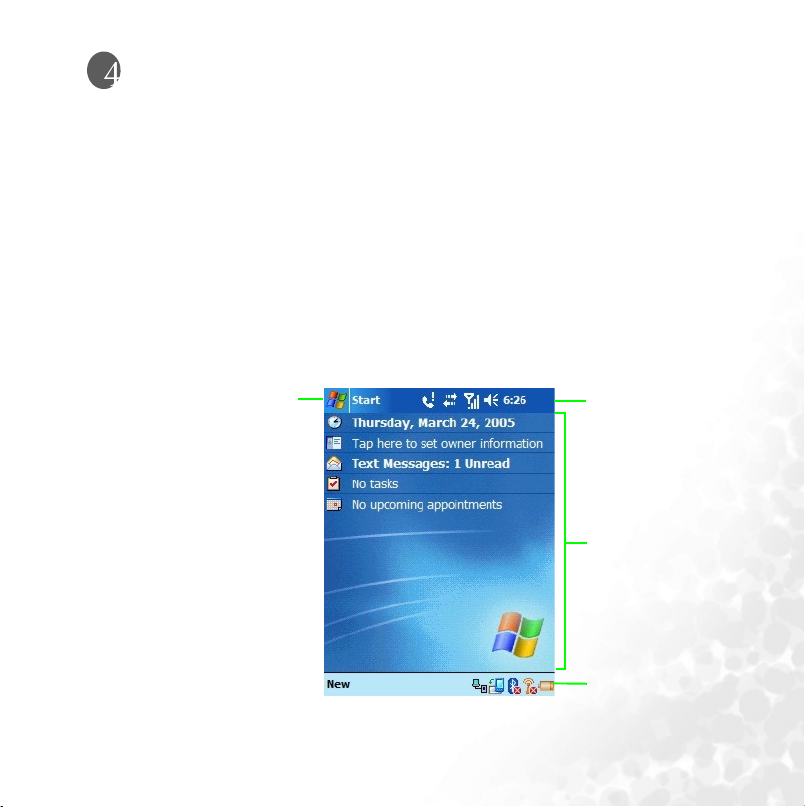
To d a y s c r e en
To d a y s c r e en
To d a y s c r e enTo d a y s c r e en
Today screen
The Today
Today screen is the home screen of your PDA phone. You will enter the Today
To d a yTo d a y
after you’ve completed the first-time startup procedure. You can use the Today
view the following information:
• Date and time
• Owner’s information
• Unread and unsent messages
• Upcoming appointments
• Tasks that need to be completed
The follow figure shows the various components on the screen.
Start Button Navigation Bar
Today screen to
To d ayTo d a y
Program Window
To d ay sc r ee n
To d a yTo d a y
Menu Bar
Today screen 15
Page 30

Navigation bar
Navigation bar
Navigation barNavigation bar
The navigation bar is located at the top of the screen. It contains the Start
system icons, the clock, and (if you have an application open) the ‘OK’ or ‘X’ button to
close the application window. The following figure shows the various components of the
navigation bar.
Start button, various
StartStart
Start Button Program Name System Icons
The following describe some of the icons on the navigation bar.
Icon Meaning
Adjust the sound on your phone or the sound of your ring tone.
Backup battery is low.
Main battery is charging.
Main battery is low.
Main battery is very low.
Main battery is full.
Notification that one or more MSN instant messages were received.
Notification that one or more e-mail or SMS messages were
received.
ActiveSync is active.
Menu bar
Menu bar
Menu barMenu bar
The menu bar is located at the bottom of the screen. It contains menu names (related to
the currently opened application), the Input Panel (if the currently opened application
requires text input), and several indicator and shortcut icons such as Wireless LAN, Blue-
16 Today screen
Clock
Page 31

tooth, rotate, battery life indicator, USB cable connection. The following figure shows the
various components of the menu bar.
Menu Name Indicator and Shortcut Icons
The following describe some of the icons on the menu bar.
Icon Meaning
Indicates that the USB data cable is connected between the phone
and PC.
Tap this icon to rotate the screen counter-clockwise.
Indicates Bluetooth connection status (the red X indicates Bluetooth
is currently off).
Indicates wireless LAN connection status (the red X indicates wireless LAN is currently off).
Indicates battery status.
Indicates that an alarm clock has been set. You can also tap this icon
to set alarm.
Today screen 17
Page 32

Start button
Start button
Start buttonStart button
The Start
Start button is located on the navigation bar. When you tap the Start
StartStart
Start button, the Start
StartStart
Start
StartStart
drop-down menu appears showing a list of applications and utilities. The figure below
shows the various components of the Start
User Programs
Most Recently Used Programs
System Folders
Start menu.
StartStart
You can customize which applications appear on the Start
Settings
Settings. Please see Chapter 11 ‘Settings’ for further information.
SettingsSettings
18 Today screen
Start menu by changing the values in
StartStart
Page 33

Input methods
Input methods
Input methodsInput methods
The PDA phone has a number of input method choices to choose from. When using the
phone function, simply use the QWERTY keyboard to enter the phone number then press
the Send
Send key. When using an application that supports text input, you have the option of
SendSend
using the QWERTY keyboard or choosing from a number of ‘soft’ input methods from
the Input Panel to enter typed text. The stylus is available as a point and click device for
navigation. Finally, you can use the stylus to handwrite or make drawings (for certain
applications that support this) and have the results saved as graphics. For example, in the
Notes
Notes application, you can literally scribble notes on the touchscreen and save it to a file.
NotesNotes
Entering typed text
When you need to enter typed text into an application you can do so either with the
QWERTY keyboard or one of the input methods provided by the Input Panel. The Input
Panel is an icon on the menu bar when you open an application that supports text input.
Using the QWERTY keyboard
Using the QWERTY keyboard
Using the QWERTY keyboardUsing the QWERTY keyboard
The QWERTY keyboard allows you to enter text conveniently - just type on it. You can
use the QWERTY keyboard anytime you need to type something. For example, use the
QWERTY keyboard to key in the phone number you wish to dial in the Phone application. Or type in a long block of text into your Calendar or Pocket Word application. The
QWERTY keyboard makes text entry very convenient and is an efficient alternative to the
soft input methods as to be described below.
Input methods 19
Page 34

Using the input panel
Using the input panel
Using the input panel Using the input panel
When you open an application that supports text input, you will see the Input Panel icon
appear on the menu bar.
Input Panel icon
Input Panel gives you a number of ways to enter text by either tapping on a virtual keyboard on the screen or scribbling to a handwriting recognition tool. The following
describes the different methods of text input as provided by the Input Panel.
Virtual keyboard
Virtual keyboard
Virtual keyboardVirtual keyboard
1. Tap the arrow next to the Input Panel
2. A virtual keyboard will appear on the screen above the menu bar. Tap the keys on this
virtual keyboard to enter typed text.
You can change the size of the keys on the virtual keyboard by changing the Input settings.
See the chapter on Settings
Letter Recognizer
Letter Recognizer
Letter RecognizerLetter Recognizer
Letter Recognizer is a handwriting recognition tool that allows you to handwrite a letter at
a time while it converts it into typed letter.
1. Tap the arrow next to the Input Panel
Input Panel button then tap Keyboard
Input PanelInput Panel
nput Panel button then tap Letter
nput Panelnput Panel
Keyboard.
KeyboardKeyboard
Letter Recognizer
Recognizer.
LetterLetter
RecognizerRecognizer
20 Input methods
Page 35

2. Write a letter in the box with the stylus.
As the figure below shows, the letter recognizer provides three boxes for you to write
either a uppercase letter, lowercase letter or number. This division increases the accuracy
of its letter recognition ability.
Block recognizer
Block recognizer
Block recognizerBlock recognizer
With Block Recognizer you can input character strokes using the stylus that are similar to
those used on other devices. It uses technology similar to that of Palm's Grafitti product.
1. Tap the arrow next to the Input Panel
2. Write a letter in the box.
When you write a letter, it is converted to typed text that appears on the screen. Click on
the button to open a panel of symbols and special characters to enter into your text.
Tr an s c ri b e r
Tr an s c ri b e r
Tr an s c ri b e rTr an s c ri b e r
With Transcriber you can write anywhere on the screen using the stylus just as you would
on paper. Unlike Letter Recognizer and Block Recognizer, you can write a sentence or
more of information. Then, pause and let Transcriber change the written characters to
typed characters.
1. Tap the arrow next to the Input Panel
2. Write anywhere on the screen.
For specific instructions on using Transcriber, with Transcriber open, tap the question
mark in the lower right hand corner of the screen.
Input Panel button and then Block Recognizer
Input PanelInput Panel
Input Panel button and then Transcriber
Input PanelInput Panel
Block Recognizer.
Block RecognizerBlock Recognizer
Transcriber.
Tr an s c ri b erTr a ns c ri b er
Writing on the screen
In any program that accepts writing, such as the Notes program, and in the Notes tab in
Calendar, Contacts, and Tasks, you can use your stylus to write directly on the screen.
Write the way you do on paper. You can edit and format what you've written and convert
the information to text at a later time.
Open an application like Notes and tap the Pen
action displays lines on the screen to help you write.
Pen button to switch to writing mode. This
PenPen
Input methods 21
Page 36

Selecting a sentence
Selecting a sentence
Selecting a sentenceSelecting a sentence
If you want to edit or format writing, you must select it first.
1. Tap and hold the stylus next to the text you want to select until the insertion point
appears.
2. Without lifting, drag the stylus across the text you want to select.
If you accidentally write on the screen, tap Tools
text by tapping the Pen
Pen button to deselect it and then dragging the stylus across the screen.
PenPen
Tools > Undo
Undo and try again. You can also select
ToolsTools
UndoUndo
You can cut, copy, and paste written text in the same way you work with typed text: tap
and hold the selected words and then tap an editing command on the pop-up menu, or
tap the command on the Edit menu.
Converting writing to text
Converting writing to text
Converting writing to textConverting writing to text
• Ta p Too l s
Tools > Recognize
Recognize.
To o l sTo o l s
RecognizeRecognize
If you want to convert only certain words, select them before tapping ‘Recognize’ on the
Tools
Tools menu (or tap and hold the selected words and then tap ‘Recognize’ on the pop-up
ToolsTools
menu). If a word is not recognized, it is left as writing.
If the conversion is incorrect, you can select different words from a list of alternates or
return to the original writing. To do so, tap and hold the incorrect word (tap one word at
a time). On the pop-up menu, tap ‘Alternates’. A menu with a list of alternate words
appears. Tap the word you want to use, or tap the writing at the top of the menu to return
to the original writing.
Tips for getting good recognition:
• Write neatly.
• Write on the lines and draw descenders below the line. Write the cross of the ‘t’ and apos-
trophes below the top line so that they are not confused with the word above. Write periods and commas above the line.
• For better recognition, try increasing the zoom level to 300% using the Tools menu.
• Write the letters of a word closely and leave big gaps between words so that the device
can easily tell where words begin and end.
• Hyphenated words, foreign words that use special characters such as accents, and some
punctuation cannot be converted.
• If you add writing to a word to change it (such as changing a ‘3’ to an ‘8’) after you attempt
to recognize the word, the writing you add will not be included if you attempt to recognize
the writing again.
22 Input methods
Page 37

Drawing on the screen
You can draw on the screen in the same way that you write on the screen. The difference
between writing and drawing on the screen is how you select items and how they can be
edited. For example, selected drawings can be resized, while writing cannot.
Creating a drawing
Creating a drawing
Creating a drawingCreating a drawing
• Cross three ruled lines on your first stroke. A drawing box appears. Subsequent strokes
in or touching the drawing box become part of the drawing. Drawings that do not cross
three ruled lines will be treated as writing.
You may want to change the zoom level so that you can more easily work on or view your
drawing. Tap Tools and then a zoom level.
Selecting a drawing
Selecting a drawing
Selecting a drawingSelecting a drawing
If you want to edit or format a drawing, you must select it first.
• Tap and hold the stylus on the drawing until the selection handle appears. To multiple
drawings, deselect the Pen button and then drag to select the drawings you want.
You can cut, copy, and paste selected drawings by tapping and holding the selected drawing and then tapping an editing command on the pop-up menu, or by tapping the command on the Edit menu. To resize a drawing, make sure the Pen button is not selected,
and drag a selection handle.
Input methods 23
Page 38

Phone operation
Phone operation
Phone operationPhone operation
The PDA phone contains features you would expect from a high-end mobile phone. You
can use your PDA phone to make and receive phone calls and send and receive SMS
(Short Message Service) and MMS (Multimedia Message Service) messages. Your mobile
phone service provider may provide other useful services such as voice mail.
Phone screen
Press the Send
Send key to bring up the Phone
SendSend
Phone screen as follows.
PhonePhone
Making and receiving phone calls
Making a call directly
Making a call directly
Making a call directlyMaking a call directly
In the Phone
Phone screen, tap the number you want to call then tap the Send
PhonePhone
(Alternatively, you can enter the number by typing on the QWERTY keyboard.)
24 Phone operation
Send key to place a call.
SendSend
Page 39

To clear a wrong number, either press the delete button on the keyboard, or tap the
button on the touch screen.
Answering a call
Answering a call
Answering a callAnswering a call
When you receive a phone call, the phone rings or vibrates and a message will appear on
the screen. Press the Send
and ringing by pressing the End
Ending a call
Ending a call
Ending a callEnding a call
When you are finished with your phone call, press the End
Making a call from Contacts
Making a call from Contacts
Making a call from ContactsMaking a call from Contacts
You can make a call from the Contacts application.
1. Press the Left
2. Tap and hold on a contact person to bring up the pop-up menu.
3. Tap either ‘Call Work’, ‘Call Home’, or ‘Call Mobile’ to make the call.
Alternatively, you can tap on the contact person to bring up a detailed view of that person
and tap his/her phone number to make the call.
Making a speed dial call
Making a speed dial call
Making a speed dial callMaking a speed dial call
Speed dialing allows you to make a call with a single tap of your stylus. You can create up
to ten speed dial entries in your phone.
Making a speed dial
Making a speed dial
Making a speed dialMaking a speed dial
In the Phone
Phone application, tap the Speed Dial
PhonePhone
entries. Tap on an entry to dial its number.
Adding a speed dial entry
Adding a speed dial entry
Adding a speed dial entryAdding a speed dial entry
1. Press the Left
2. Tap and hold on the contact person to bring up the pop-up menu.
3. Tap to select ‘Add to Speed Dial...’ to create a speed dial entry for this contact person.
4. In the ‘Speed Dial’ edit screen, you may change the ‘Location’ for this contact person in
the speed dial list.
Send key to answer the call. (Alternatively, you can cancel the call
SendSend
End key.)
EndEnd
End key to end the call.
EndEnd
Left soft-key to open the Contacts
LeftLeft
Left soft-key to bring up Contacts
LeftLeft
Contacts application.
ContactsContacts
Speed Dial button to display a list of available speed dial
Speed Dial Speed Dial
Contacts.
ContactsContacts
Phone operation 25
Page 40

5. Tap OK
OK on the navigation bar to save and exit.
OKOK
Making a conference call
Making a conference call
Making a conference callMaking a conference call
You can create a three-way conference call between yourself and two other parties.
1. First make a phone call.
2. While the first call is still engaged, tap the Hold
3. Dial a second number then tap the Send
4. Tap the Conference
Loudspeaker
Loudspeaker
LoudspeakerLoudspeaker
Turn the loudspeaker on and continue your conversation while using other phone functions. Loudspeaker enables you to make better use of your time.This is also a great feature
for allowing your colleagues to participate in your call, whether in a taxi, in an airport
lounge, just about anywhere wireless service is available!
1. First make a phone call.
2. Press and hold down the Send
Conference button to engage in a three-way conference with the first and sec-
ConferenceConference
ond callers.
Send key until the speakerphone dialog box appears and the
SendSend
speakerphone icon appears on the navigation bar.
Hold button.
HoldHold
Send key.
SendSend
26 Phone operation
Page 41

3. To turn off the loudspeaker, press and hold down the Send
Send key again.
SendSend
Associating notes with calls
Call notes are integrated into the Notes
named ‘Calls’ will be created when the first in-call note is made. You can now create a call
note.
1. During a phone call, be sure the Phone
in the Start
Start menu if necessary). Tap on the Note
StartStart
2. A note will be created with a header containing all pertinent information: the name, the
company phone number, and the date and time of the call. Write your note and tap on
OK
OK when you are finished. You will be returned to the Dialer application for the dura-
OKOK
tion of the call.
3. You can now access this note by tapping-and-holding on the entry in the call log and
choosing ‘View Note’, or by selecting the ‘Calls’ folder in the Notes
are named by the contact from the call or, if the caller is not in Contacts
number.
Notes application as well as the call log. A new folder
NotesNotes
Phone application is in the foreground (tap on Phone
PhonePhone
Note icon on the Command Bar.
NoteNote
Notes application. Notes
NotesNotes
Contacts, by phone
ContactsContacts
Phone
PhonePhone
Phone operation 27
Page 42

Viewing past phone activity
The PDA phone stores information about all voice calls made to and from the phone in
the call log. This is accessed by pressing the Call History
In this view, at a glance you can see the phone number of all incoming, outgoing, and
missed calls, along with when the activity occurred.
Tap on the item once, and a small dialog box will show an exact time and duration of the
call.
Tap-and-hold on an item and you will be able to save the entry to Contacts
not already in Contacts
the caller, or call the caller.
Selecting Tools
many minutes were used for all the calls in the log. Here users also can adjust how many
weeks or months of calls will be kept in the log. Selecting Tools
the call log screen.
Contacts), view note associated with the call, delete the record, send SMS to
ContactsContacts
Tools > Call Timers
Call Timers on the Command Bar will bring up a summary of how
ToolsTools
Call TimersCall Timers
Call History button from the Phone
Call HistoryCall History
Tools > Delete all calls
Delete all calls will delete
To o l sTo o l s
Delete all callsDelete all calls
Phone screen.
PhonePhone
Contacts (so long as it is
ContactsContacts
28 Phone operation
Page 43

Programs
Programs
ProgramsPrograms
Your PDA phone contains the following built-in applications and tools.
Icon Program name Description Where to find
Today Your Home screen or desktop Page 15
ActiveSync
Calendar Scheduling appointments Page 31
Contacts
Pocket Internet
Explorer
Messaging
Phone Make and receive calls Page 24
Help A complete online help database Page 33
Games Jawbreaker and Solitaire Page 33
Java Manager
MSN Messenger
Pocket Excel Powerful spreadsheet applicaion Page 35
Allows you to synchronize data
between your PDA phone and
PC.
An electronic phone book for
managing your contacts
A Web browser for browsing various on-line contents on the Internet
Allows you to send and receive Email, SMS, MMS messages
With this application you can
manage the Java programs
installed in your PDA phone
Allows you to send and receive
instant MSN messages
Page 60
Page 31
Page 31
Page 31
Page 34
Page 35
Pocket Word Word processor application Page 35
Programs 29
Page 44

Pocket Studio
Camera/camcorder application
with photo editor
An application that turns your
Universal Remocon
SIM Phonebook
SIM Message
SIM Tool Kit
PDA phone into an universal
remote control for your home
appliances
Allows you to access your SIM
card phone book
Allows you to access your SIM
card SMS messages
Extra services provided by your
SIM card carrier
Windows Media Audio/video file player Page 37
Calculator Electronic calculator Page 37
Ta sk
Photo Caller ID
An application that allows you to
manage your to do items
Assign pictures to callers in your
phone book
Set Ringtone Set PDA phone’s ring tone Page 37
Notes
With this application you can jot
down your notes
Find A file searching tool application Page 38
Pictures
Speech Commander
File Explorer
You can find help on most of these applications on Start > Help.
A JPEG viewer for viewing digital
pictures
Allows you to use your voice to
control applications
View files and folders in the
phone
Page 40
Page 35
Page 36
Page 36
Page 36
Page 37
Page 37
Page 38
Page 38
Page 38
Page 39
30 Programs
Page 45

Calendar
Use Calendar to schedule appointments, including meetings and other events. You can
check your appointments in one of several views (Day, Week, Month, and Agenda) and
set Calendar to remind you of appointments with sound or other methods.
To launch Calendar, press the Right
Right soft-key or tap Start
RightRight
Start > Calendar
Start Start
Calendar.
CalendarCalendar
Contacts
Contacts maintains a list of your friends and colleagues so that you can easily find the
information you’re looking for, whether you’re at home or on the road. You can enter
both personal and business information. If you want to add a contact to your SIM card,
please refer to "SIM Phonebook" on page 36.
To launch Contacts, press the Left
Left soft-key or tap Start
LeftLeft
Start > Contacts
Start Start
Contacts.
ContactsContacts
Pocket Internet Explorer
You can use Pocket Internet Explorer to view Web pages on your PDA phone in two ways:
by downloading pages through sychronization or by connecting to the Internet. While
browsing, you can also download new files and programs to your PDA phone from within
the Internet. You can also view WAP pages in Pocket Internet Explorer.
To launch Pocket Internet Explorer, tap Start
Start > Internet Explorer
Internet Explorer.
Start Start
Internet Explorer Internet Explorer
Messaging
You can receive Internet e-mail, multimedia, and text messages in Messaging. Internet email messages are sent by using an address you receive from your Internet Service
Provider (ISP). Text and multimedia messages are sent and received through your mobile
phone service provider by using a phone number as the message address.Before sending a
multimedia message, you have to finish MMS settings.
To launch Messaging, tap Start
Please follow the below procedures to finish the MMS setting.
Start > Messaging
Messaging.
StartStart
Messaging Messaging
Programs 31
Page 46

Setting up a MMS Connection
Setting up a MMS Connection
Setting up a MMS ConnectionSetting up a MMS Connection
1. Before setting the MMS connection, please finish the GPRS setting first. As for the
GPRS setting, please refer to "Setting up a GPRS and CSD Connection to your ISP" on
page 47 for further information.
2. Tap Start
Start > Messaging
Messaging >
StartStart
MessagingMessaging
3. Tap Servers> New.
> Inbox
Inbox >
> >
Inbox Inbox
> MMS
MMS >
> >
MMSMMS
> Tools
Tools > MMS
> MMS Settings
> >
ToolsTools
> MMS > MMS
Settings。
SettingsSettings
32 Programs
Page 47

4. Now enter any authentication information your ISP requests.
5. Tap "OK" to complete this wizard.
6. Note that MMS setting value will differ from different ISP providers. Please consult
your ISP provider to determine which value is appropriate for you.
7. Set the new MMS setting as default.
Help
Help gives you online help documentation for various built-in applications and tools.
To launch Help, tap Start
You can display Help for a particular application or tool by opening that application or tool
then tap Start > Help. If Help doesn’t contain an entry for that application or tool, then it
won’t come up.
Start > Help
Help.
StartStart
HelpHelp
Games
You have two built-in games in your PDA phone: Jawbreaker and Solitaire.
To launch Games, tap Start
Start > Programs
Programs > Games
StartStart
ProgramsPrograms
Games.
Games Games
Programs 33
Page 48

Java Manager
Java Manager is a Java environment on your PDA phone which allows you to download
and run Java applications. You may either download the desired Java files from the Internet or beam them in from the PC via ActiveSync, Bluetooth, or IrDa. Once the files are
moved to your phone, you can find them in your File Explorer and proceed to install
them from there. The installation will in turn move the installed Java application inside
the Java Manager. Thus, when you want to launch a Java application, you will first open
up Java Manager and tap to launch it.
Java Manager has four categories inside which installed Java applications are stored. The
four categories are Tools, Games, Applications, and Unfiled. When you install a Java
application, it will end up in one of these four category folders based on the nature of that
application. However, you have a choice to move applications around to different folders
then ones they were installed in. Follow the below procedure to move an application to
different folder.
1. Open Java Manager.
2. Locate the application you wish to move by tapping on the folder inside which it
resides.
3. Tap on the application name to highlight it.
4. Tap Menu
Menu on the command bar to bring up the menu.
MenuMenu
5. Tap Change Category
Change Category on the menu.
Change CategoryChange Category
6. The screen will change to show the folder list, tap on the folder name which will
become the application’s new home.
7. The screen return to the application’s old folder. You will notice the application no
longer reside there.
8. Tap Back on the command bar to go back to the main folder screen.
9. Tap the folder name of the application’s new home to check that it has indeed been
moved there.
To launch Java Manager, tap Start
Start > Programs
Programs > Java Manager
Start Start
Programs Programs
Java Manager.
Java ManagerJava Manager
34 Programs
Page 49

MSN Messenger
MSN Messenger on your PDA phone provides the same chat environment as MSN Messenger on your PC. You can use your MSN messenger to see who is online, send and
receive instant messages, group chat, tell contacts that you are unavailable, and block contacts from seeing your status or sending you messages.
To launch MSN Messenger, tap Start
Start > Programs
Programs > MSN Messenger
Start Start
Programs Programs
MSN Messenger.
MSN MessengerMSN Messenger
Pocket Excel
You can use Pocket Excel much the same way you use Excel on your PC. You can enter
formulas and functions, and then filter data to see the subset of information you want.
Split panes to view different parts of a worksheet at the same time. You can also freeze the
top and left-most panes in a worksheet to keep row and column labels or other data visible as you scroll through a sheet.
To launch Pocket Excel, tap Start
Start > Programs
Programs > Pocket Excel
StartStart
Programs Programs
Pocket Excel.
Pocket ExcelPocket Excel
Pocket Word
You can create and edit documents and templates in Microsoft Pocket Word just as you
do in Microsoft Word on your PC. Pocket Word documents are usually saved as .psw files,
but you can also save them in other file formats, such as .doc, .rtf or .txt.
You can enter information in a document by typing, writing, drawing, or recording.
When you close a document, it is automatically named and placed in the Pocket Word
document list.
To launch Pocket Word, Start
Start > Programs
Programs > Pocket Word
StartStart
ProgramsPrograms
Pocke t Word.
Pocke t WordPo cket Word
Universal Remocon
Univeral Remocon turns your PDA phone into a universal remote control for most every
infrared (IR) device in your home and office. The program contains a built-in RC database containing predefined settings for commonly available devices. In addition, there is a
self-teach/learn mode whereby you can use to set devices not listed in the RC database.
You can store up to 20 devices in Universal Remocon for wireless remote control. The
Programs 35
Page 50

devices are of the following 8 profiles: TV, DVD, VCR, AIRCON, CD, AUDIO, LD/VCD,
and OTHER.
To launch Universal Remocon, Start
Start > Programs
Programs > Universal Remocon
StartStart
ProgramsPrograms
Universal Remocon.
Universal RemoconUniversal Remocon
SIM Phonebook
SIM Phonebook displays the phone book stored on your SIM card. The data in SIM
phone book are separate from the data in Contacts (which also contains a phone book).
The data in Contacts are stored in your PDA phone’s ROM memory area whereas the data
in SIM Phonebook are stored in the SIM card. You can copy data from SIM Phonebook to
Contacts by checking off the items in display and select ‘Copy’. Then tap ‘Contacts’ to see
what data are in Contacts. Also, you can copy data from Contacts to SIM Phonebook by
checking off the items in display and select ‘Copy’. Then tap ‘SIM Phonebook’ to see what
data are in SIM Phonebook.
To launch SIM Phonebook, tap Start
Start > Programs
Programs > SIM Phonebook
StartStart
Programs Programs
SIM Phonebook.
SIM Phonebook SIM Phonebook
SIM Message
SIM Message displays the SMS messages stored on your SIM card. The messages in SIM
Message are separate from the messages in Messaging’s SMS Inbox. The messages in
Messaging are stored in your PDA phone’s ROM memory area whereas the messages in
SIM Message are stored in the SIM card. You can copy data from SIM Message to
Messaging by checking off the items in display and select ‘Copy’. Tap ‘INBOX SMS’ to see
what messages are in Messaging.
To launch SIM Message, tap Start
Start > Programs
Programs > SIM Message
StartStart
Programs Programs
SIM Message.
SIM Message SIM Message
SIM Tool Kit
STK (or SIM Tool Kit) allows you to use the STK services provided by your carrier as part
of your subscription.
To launch STK, tap Start
Start > Programs
Programs > SIM Tool Kit
StartStart
Programs Programs
SIM Tool Kit.
SIM Tool Kit SIM Tool Kit
36 Programs
Page 51

Windows Media
You can use Microsoft Windows Media Player to play digital audio and video files that are
stored on your device or on a network such as on a Web site.
To launch Windows Media Player, Start
Start > Programs
Programs > Windows Media
StartStart
ProgramsPrograms
Windows Media.
Windows MediaWindows Media
Calculator
Much like Calculator is a staple on the PC, you have it on your PDA phone.
To launch Calculator, tap Start
If an error message appears while you are using the Caculator function, please press the
function key twice and then tap the C button on the screen to erase the error message.
Start > Programs
Programs > Calculator
StartStart
ProgramsPrograms
Calculator.
CalculatorCalculator
Ta sk s
Use tasks to keep track of things you need to do. You can use categories to help you organize your tasks and set reminders for them.
To launch Tasks, tap Start
Start > Programs
Programs > Tasks
StartStart
Programs Programs
Tasks.
Ta s k sTa s k s
Photo Caller ID
‘Photo Caller ID’ allows you to assign a photo picture to a caller in your phonebook. After
you have assign a photo to a caller, whenever you now receive a call from this caller, you
will see this photo show up on the display. This is a nice feature to personalize the callers
in your phonebook and see at a glance who is calling you from the picture on the display.
To launch ‘Photo Caller ID’, tap Start
Please note that the picture you use for Photo Caller ID function must be less than 64k.
Start > Programs
Programs > Tasks
StartStart
ProgramsPrograms
Tasks.
Ta s k sTa s k s
Set Ringtone
‘Set Ringtone’ allows you to assign a music file for your phone’s ringtone. You can choose
a file from what is available on the system, or you can upload a file of your own. ‘Set
Ringtone’ supports the following music file types: MIDI, Karaoke, Extensible Music,
Programs 37
Page 52

SMAF, Sound, and MP3. When you assign a music file as a ringtone, your PDA phone will
copy the file to the following directiry: Windows/Rings. If the free memory left in your
PDA phone is less than 5 MB, a warning message appears and you are not able to set the
ringtone. To set the ringtone, delete the undesired files in the Rings folder.
To launch ‘Set Ringtone’, tap Start
Start > Programs
Programs > Set Ringtone
StartStart
Programs Programs
Set Ringtone.
Set Ringtone Set Ringtone
Notes
Notes helps you quickly capture your ideas, notes, and thoughts. You can create a note
using written and typed text, drawings, and recordings. You can also share your notes with
others through e-mail, infrared, and synchronization with your PC.
To launch Tasks, tap Start
Start > Program
Program > Notes
StartStart
ProgramProgram
Notes.
NotesNotes
Find
Use Find to find a file or item in your PDA phone. Enter the name of the file or item and
select its data type and tap ‘Go’. The matched results will be listed on the screen.
To launch Find, tap Start
Start > Programs
Programs > Find
StartStart
ProgramsPrograms
Find.
FindFind
Pictures
Use Pictures to view JPEG pictures stored on your PDA phone or on a storage card, send
pictures to others, view a slideshow of your pictures, or set a picture as the background on
the Today screen.
To launch Tasks, tap Start
Start > Programs
Programs > Pictures
StartStart
ProgramsPrograms
Pictures.
PicturesPictures
Speech Commander
Speech Commander allows you to control your PDA phone by voice. You can use voice to
make a phone call, look up contact person’s information or start a program.
To launch Tasks, tap Start
Start > Programs
Programs > Speech Commander
StartStart
ProgramsPrograms
Speech Commander.
Speech CommanderSpeech Commander
38 Programs
Page 53

File Explorer
Use File Explorer to browse what files and folders are in your PDA phone. Once you find
a file you are interested, tap on it to open it up in its associated application.
To launch File Explorer, tap Start
Start > Programs
Programs > File Explorer
StartStart
ProgramsPrograms
File Explorer.
File ExplorerFile Explorer
Programs 39
Page 54

Camera/camcorder operation
Camera/camcorder operation
Camera/camcorder operationCamera/camcorder operation
The PDA phone has a built-in camera/camcorder which allows you to take photographs
and record video clips. In addition, the associated Pocket Studio application provides features for browsing, viewing, and editing your image files.
Taking photographs
1. Press the Camera/Camcorder key on the side of the phone to enter camera
mode.
2. In this mode, the screen will display the lens view in full-screen. (The lens is located on
the back of the PDA phone). When you are ready to snap a picture, press the Camera/
Camcorder key or the joystick to activate the shutter.
3. The Pocket Studio program window will appear with the preview picture on the screen.
You may press the Camera/Camcorder key again to start taking another
picture. After you’ve finished taking pictures, tap anywhere on the screen to exit out of
full-screen.
4. Once you’ve exited out of full-screen, you will see the Pocket Studio program window.
This is the preview mode. In the window center, the lens view is still visible. You can
still take picture at this point by pressing the Camera/Camcorder key. (Notice
the various function items on the toolbar and menu bar available to you.)
The Pocket Studio’s preview mode allows you to use the camera/camcorder to record still
pictures or motion videos. The following figure shows the functions available to you in
this mode.
40 Camera/camcorder operation
Page 55

(1)
(2)
(17)
(16)
(15)
(14)
(13)
(12)
(18)
(11)
(10)
(3)
(5)
(4)
(9)
(7) (8)
(6)
No. Name Description
(1) Image resolution
Shows the picture resolution the camera/camcorder is
currently set to.
(2) Zoom level Shows current zoom level.
(3) View Lists available view options.
(4) Tool Lists available tools.
Camera or cam-
(5)
corder mode
Toggles between camera and camcorder mode.
(6) Snap/Record Take a snapshot or begin recording a video clip.
Show/Hide tool-
(7)
bar
(8) Restore original
Toggles to show and hide toolbar.
Restore adjustments you have made to brightness, contrast, scene, effects, frame back to their original settings.
(9) Home Helps you manage and access your image files..
(10) Frame Add a frame to the picture from a list of frame selections.
Camera/camcorder operation 41
Page 56

(11) Effects
(12) Zoom up Increase zoom level by one.
(13) Zoom down Decrease zoom level by one.
(14) Full-screen Turn preview window to full-screen.
(15) Brightness Adjust brightness.
(16) Contrast Adjust contrast.
(17) Scene
Lens preview win-
(18)
dow
Give the picture a stylized look; e.g., sepia, black and
white, cool, aqua, negative, green.
Set scene to match current physical environment; e.g.,
dusk, sunlight, fluorescent, cloudy, night.
Shows live feed from camera/camcorder lens.
Recording motion videos
1. To use the camcorder to record motion videos, you can either tap (while in preview
mode) Tool
Too l > M od e
Mode > Camcorder
To o lToo l
to camcorder.
2. Press the Camera/Camcorder key to begin recording. Alternatively, you can
tap the red recording button on the toolbar for the same effect.
3. While the recording is in progress, you will see the red action word ‘REC’ flashing on
and off as an indicator. Tap to pause the recording or to stop it altogether. The
remaining icons on the toolbar are the same as they are in still picture mode. Please
refer to the diagram in the previous section for further information on these similar
functions.
Camcorder or tap the icon on the toolbar to switch the icon
ModeMode
CamcorderCamcorder
42 Camera/camcorder operation
Page 57

Browsing your picture and video folders
In the preview mode, when you tap the icon, you will see the home (or media browsing) window come up. This window allows you to browse both the still picture and video
files you have taken with the camcorder. The files are shown as thumbnails so you can get
a sneak peak at what is inside. The still pictures are located in the Image
already here by default when you tap the icon. The motion videos are in the Video
tab.
(1)
Image tab, you are
ImageImage
Video
VideoVideo
(2)
(4)
(5) (6) (7) (8)
(3)
No. Name Description
(1) Thumbnail Show image or video files in thumbnail size.
(2) Image folder Display only picture files.
(3) Video folder Display only video files.
(4) Tool bar
(5) Preview mode Switch to camera mode.
(6) Browse
Contains commands that allow you to perform specific
operations to a selected picture or video file.
Browse the folder tree in P50 to look for other locations
containing picture or video files.
Camera/camcorder operation 43
Page 58

(7) View Display thumbnails as large, small, detailed icons.
(8) Slideshow
In addition to the function icons located on the toolbar, you can tap and hold on a select
image or video thumbnail file and bring up a pop menu that allows you to perform various
operations to the image or video.
Play a slideshow of all pictures (if you are in the image
folder) or all videos (if in video folder).
Viewing your pictures and videos
When you are in the browse window browsing the Image or Video folder, you can tap on
a thumbnail to open it up for viewing. In the case that the thumbnail is a motion video, it
will begin playing the video clip. The toolbar functions in the view window are described
in the following table.
(5)
(4)
(3)
(2)
(1)
No. Name Description
(1) Zoom in Increase zoom level.
(2) Zoom out Decrease zoom level.
When you zoom a picture to a size larger than the screen
(3) Scroll
itself, this function allows you to scroll around the zoomedin picture to view different portions of it.
(6)
(7)
(8)
44 Camera/camcorder operation
Page 59

(4) Full screen Display picture or video in full screen.
(5) Fit to screen Display picture or video at a size that fits the screen.
(6) Original size Return to original size.
Rotate counter-
(7)
clockwise
Rotate picture or video counter-clockwise.
(8) Rotate clockwise Rotate picture or video clockwise.
Editing your pictures and video frames
You can use the edit feature in Pocket Studio to edit your still pictures. The edit feature
allows you to add color tones, sketches, text overlay, theme overlays and deformation to
your still pictures and even paused video frames from motion videos. The picture edited
will be saved as a new file.
(5)
(4)
(3)
(2)
(1)
(6)
(7)
(8)
(9)
(10)
No. Name Description
(1) Freehand Draw in freehand.
(2) Line Draw a line.
(3) Rectangle Draw a rectangle.
Camera/camcorder operation 45
Page 60

(4) Ellipse Draw an ellipse.
(5) Airbrush Draw with an airbrush.
(6) Pen/Brush size Adjust the pen/brush size.
(7) Line color. Change the pen/line color.
(8) Fill color
(9) Pencil/Brush
(10) Text overlay Type text into a textbox in the picture.
Change the background color. This is useful when drawing
a rectangle or circle. The foreground color is the pen/line
color and the background color is the fill color.
Display the pencil/brush toolbar in order to use the draw
functions.
Settings menu
The settings menu for Preview and file browser are different. Under Preview mode, tap
Tool
Tool > Settings
Settings to open up the settings window. The settings window allows you change
ToolTool
SettingsSettings
the settings for these categories: General
mode, tap Tool
Tool > Settings
Settings to open up the settings window. The settings window allows
To o lToo l
SettingsSettings
you change the settings for these categories: General
Under Camera
Camera, you can change the image quality of the picture you take by adjusting the
CameraCamera
value for Image
Image Resolution
Resolution and Image
ImageImage
ResolutionResolution
320 x 240 (QVGA) or 76.8K pixels. You can set this value to its maximum which is 1280 x
960 (SXGA) or 1.2M pixels. The Image Quality can be set to either Low, Normal, or High.
Under Camcorder
Camcorder, you can change the video quality by adjusting Video Resolution and
CamcorderCamcorder
Video Quality. The default value for Video Resolution is 320 x 240 (QVGA). This is the
maximum value for this setting, the alternative value is 176 x 144 (QCIF).The Video
Quality can be set to either Low, Normal, or High.
Keep in mind that the higher the image or video quality you set, the more memory space the
image or video file will take up.If available memory space becomes an issue, this is a trade
off you need to consider.
Under Slideshow
Slideshow, you can change the value for transition type
SlideshowSlideshow
pictures or videos in the slideshow move from one to the next. This is a special effect that
is part of slideshow to make playback interesting. Play around with different values in this
setting and see which one you like best.
General, Camera
GeneralGeneral
Image Quality
ImageImage
Camera and Camcorder
CameraCamera
General, Player
GeneralGeneral
Quality. The default value for Image Resolution is
QualityQuality
Camcorder. Under file browser
CamcorderCamcorder
Player and Slideshow
Player Player
transition type which determines how the
transition typetransition type
Slideshow.
Slideshow Slideshow
46 Camera/camcorder operation
Page 61

Connectivity
Connectivity
ConnectivityConnectivity
Types of connections
The PDA phone can be very easily configured to access the Internet or a corporate network to perform such tasks as browsing the World Wide Web, sending e-mail, or
exchanging instant messages with friends or co-workers. Connections can be made with a
dial-up modem, wireless modem (GPRS or Circuit Switched Data, CSD) or wireless LAN
(WLAN) card.There are two supported groups of connection settings: My ISP (which
allows you to access the Internet) and My Work Network (which allows you to access private resources such as your Intranet, VPN, or other protected resources).
Tap S ta r t
Start > Settings
Settings > Connections
Start Start
Settings Settings
Connections to enter the Connections settings page.
Connections Connections
Setting up connections
Setting up a GPRS and CSD Connection to your ISP
Setting up a GPRS and CSD Connection to your ISP
Setting up a GPRS and CSD Connection to your ISPSetting up a GPRS and CSD Connection to your ISP
You can connect via modem dial-up to your ISP (Internet Service Provider), and use the
connection to send and receive e-mail messages and view Web or WAP pages. Your ISP is
usually your SIM card provider.
Creating an ISP Profile
Creating an ISP Profile
Creating an ISP ProfileCreating an ISP Profile
Obtain the following information from your ISP:
• ISP access point name (for GPRS service only)
• Dial-up access telephone number (for CSD service only)
• User name
• Password
• TCP/IP settings. (Some ISPs require a domain name in front of the user name, such as
MSN/username.)
Setting up a GPRS Connection to your ISP
Setting up a GPRS Connection to your ISP
Setting up a GPRS Connection to your ISPSetting up a GPRS Connection to your ISP
1. Tap Start
Start > Settings
Settings.
StartStart
SettingsSettings
Connectivity 47
Page 62

2. Tap the ‘Connections’ tab and the ‘Connections’ icon to bring up the Connections Set-
tings
tings screen.
tingstings
Connections Set-
Connections Set-Connections Set-
3. Under ‘My ISP', tap ‘Add a new modem connection’.
48 Connectivity
Page 63

4. Next to ‘Enter a name for the connection’, enter a name for the connection, for exam-
ple, ‘My Connection’. Next to ‘Select a modem’, select your modem type.
5. Enter the Access Point Name (APN) of your ISP.
Connectivity 49
Page 64

6. Now enter any authentication information your ISP requests.
7. You should not need to change any settings in ‘Advanced’. Most ISPs now use a dynam-
ically-assigned address.
8. Tap Finish
Finish to complete this wizard.
FinishFinish
Your PDA phone also provides you a shortcut to set a GPRS connection automatically. Follow the below procedure to set the GPRS connection.
Please tap Programs > File Explorer > Program files > Tool > GPRS AutoSettings。
Setting up a CSD Connection to your ISP
Setting up a CSD Connection to your ISP
Setting up a CSD Connection to your ISPSetting up a CSD Connection to your ISP
1. Tap Start
Start > Settings
Settings.
StartStart
SettingsSettings
50 Connectivity
Page 65

2. Tap the ‘Connections’ tab and the ‘Connections’ icon to bring up the Connections Set-
tings
tings screen.
tingstings
Connections Set-
Connections Set-Connections Set-
3. Under ‘My ISP’, tap ‘Add a new modem connection’.
Connectivity 51
Page 66

4. Next to ‘Enter a name for the connection’, enter a name for the connection, for exam-
ple, ‘My Connection’. Next to ‘Select a modem’, select your modem type.
5. Now enter the dial-up number of your ISP. Include any special digits such as ‘*’ or ‘#’.
52 Connectivity
Page 67

6. Now enter any authentication information your ISP requests.
7. You should not need to change any settings in ‘Advanced’. Most ISPs now use a dynam-
ically-assigned address.
8. Tap Finish
Finish to complete this wizard.
FinishFinish
Connecting to Your ISP
Connecting to Your ISP
Connecting to Your ISPConnecting to Your ISP
1. On the Connections
2. Tap and hold on a connection name from the listbox to bring up a pop-up menu.
3. Tap ‘Connect’ on the pop-up menu.
4. Your modem will start dialing out and attempt to create a connection.
Configuring Proxy Server Settings
Configuring Proxy Server Settings
Configuring Proxy Server SettingsConfiguring Proxy Server Settings
1. Contact your ISP or network administrator for the proxy server name, server type,
2. On the Connections Settings
Connections screen, under ‘Connections’, tap ‘Manage existing connections’.
ConnectionsConnections
port, type of Socks protocol used, and your user name and password.
Connections Settings screen, under ‘My Work Network, tap ‘Edit my proxy
Connections SettingsConnections Settings
server’.
Connectivity 53
Page 68

3. Check the ‘This network connects to the Internet’ and ‘This network uses a proxy
server to connect to the Internet’ checkboxes.
4. Next to ‘Proxy server’ enter the proxy server name into the textbox.
5. If you need to change port number or proxy server type settings, tap the ‘Advanced’
button and change the relevant settings.
6. Tap the OK
Setting up a VPN connection to your corporate network
Setting up a VPN connection to your corporate network
Setting up a VPN connection to your corporate networkSetting up a VPN connection to your corporate network
With a Virtual Private Network (VPN) connection, you can connect to a server in your
corporate network via the Internet.
Creating a VPN profile
Creating a VPN profile
Creating a VPN profileCreating a VPN profile
1. Obtain the following information from the network administrator of your VPN
• User name
• Password
• Domain name
• TCP/IP settings
• Host name or IP address of the VPN server
• TCP/IP settings. (Some ISPs require a domain name in front of the user name, such as
2. Tap Start
3. Tap the ‘Connections’ tab and the ‘Connections’ icon to bring up the Connections
4. Under ‘My Work Network’, tap ‘Add a new VPN server connection’.
5. Enter the host name and follow the instructions on the screen to proceed.
Editing/deleting a VPN profile
Editing/deleting a VPN profile
Editing/deleting a VPN profileEditing/deleting a VPN profile
1. Tap Start
2. Tap the ‘Connections’ tab and the ‘Connections’ icon to bring up the Connections
3. Under ‘My Work Network’, tap ‘Edit my VPN server’.
OK button to save and close the window.
OKOK
administrator:
MSN/username.)
Start > Settings
Settings.
StartStart
SettingsSettings
screen.
Start > Settings
Settings.
StartStart
SettingsSettings
screen.
Connections
ConnectionsConnections
Connections
ConnectionsConnections
54 Connectivity
Page 69

4. To edit a VPN profile, tap the profile you wish to edit and then tap ‘Edit’. To delete a
VPN profile, tap and hold the profile you wish to delete, and the tap ‘Delete’ from the
menu that appears.
Using Wireless LAN
Wireless LAN or WLAN allows your PDA phone to connect to the Internet or your VPN,
provided there is a Wireless Access Point available to you. Your PDA phone can connect to
an 802.11b wireless network or connect directly to other WLAN enabled devices.
Tur ni ng on WLA N
Tur ni ng on WLA N
Tur ni ng on WLA NTu rn in g on WL AN
1. From the Today
Wireless Lan screen.
2. Check the “Turn on wireless lan” checkbox and tap OK
notice that the WLAN icon on the menu bar changes from to .)
The Lower LED will light up green to indicate WLAN on.
Today screen, tap the WLAN icon on the menu bar and bring up the
To d ayTo d a y
OK to close the window. (You will
OKOK
Connectivity 55
Page 70

Connecting to an existing wireless network
Connecting to an existing wireless network
Connecting to an existing wireless networkConnecting to an existing wireless network
After WLAN is turned on, your phone will automatically try to detect what wireless networks are available in the surrounding areas. If any are found, the icon will appear on
the Navigation bar, and a pop-up window will appear indicating them.
Tap the network you wish to connect to, and then select whether the wireless network
connects to Internet or your work (office) network.
You can also go into the Network Card Settings
been detected by your phone.
1. Tap Start
Start > Settings
Settings.
StartStart
SettingsSettings
Network Card Settings screen to see what available networks have
Network Card SettingsNetwork Card Settings
56 Connectivity
Page 71

2. Tap the ‘Connections’ tab and the ‘Network Cards’ icon to bring up the Network Card
Settings
Settings screen.
SettingsSettings
3. If your PDA phone can automatically detect wireless networks in the surrounding
areas, they will show up in the listbox.
4. Tap and hold on a network name in the listbox to bring up a pop-up menu.
5. Select ‘Connect’ from the pop-up menu to make connection to the network.
Adding a new wireless network
Adding a new wireless network
Adding a new wireless networkAdding a new wireless network
You can add a new wireless network into the listbox.
1. On the Network Card Settings
2. Enter a name in the ‘Network Name’ textbox.
3. Next to ‘Connects to’ , select where this new network will connect to (‘The Internet’ or
4. If you want to connect to an ad-hoc connection, tap the ‘This is a device-to-device (ad-
Network Card Settings screen, tap the first item in the listbox which is ‘Add
Network Card SettingsNetwork Card Settings
New’.
‘Work’.
hoc) connection’ checkbox.
Network Card
Network Card Network Card
Connectivity 57
Page 72

5. If authentication information is needed, tap the ‘Network Key’ and ‘802.1x’ tabs to fill
in the setting values. (Check with your network administrator to obtain the setting values for your specific wireless network.)
6. Tap the ‘OK’ icon on the top-left corner to save and close the window.
Searching for wireless networks to access
Searching for wireless networks to access
Searching for wireless networks to accessSearching for wireless networks to access
Networks that you have already configured are preferred networks and are listed in the
Wireless Networks listbox. You can choose whether to connect only to preferred networks
or to have your phone search for and connect to any network (preferred or not).
1. On the Network Card Settings
2. To connect only to networks that have already been configured, clear the ‘Automatically
If you check the ‘Automatically connect to non-preferred networks’ checkbox, your phone
will detect any new network and provide you the opportunity to configure them.
Network Card Settings screen, next to ‘Networks to access’, tap the type of net-
Network Card SettingsNetwork Card Settings
work you want to connect to (‘All Available’, ‘Only access points’, ‘Only computer-tocomputer).
connect to non-preferred networks’ checkbox.
Using Bluetooth
The PDA phone comes with built-in Bluetooth technology which allows you to communicate with other Bluetooth devices over a maximum approximately 10 meters (30 feet).
1. Tap the Bluetooth icon.
2. Check off the’ Turn on Bluetooth’ and ‘Make this device discoverable to other devices’
checkboxes.
When Bluetooth is powered on, the status LED will blink a blue light.
3. Tap the Devices
4. Tap New
5. Once searching ends and devices are found, tap a device name to highlight it and tap
6. Enter the ‘Passkey’ for the device and Tap Finish
Devices tab.
DevicesDevices
New to begin searching for possible new Bluetooth devices to bond with in the sur-
NewNew
rounding areas.
Next
Next.
NextNext
Finish.
FinishFinish
58 Connectivity
Page 73

The passkey is device dependent. Please refer to the documentations of the Bluetooth
device for the passkey.
7. A pop-up dialog appears asking whether or not to designate the paired device as a
hands-free device. Tap Yes
If your paired device is a GPS device, please tap COM
the COM port.
8. At this point you are ready to exchange data with your paired Bluetooth device. To send
a data object to your paired device, tap and hold on the data object (such as a file, contact object, calendar object, etc) and select Beam File/Contact/Appointment, etc.
9. The Beam window appears listing all available neighboring devices ready to receive a
beam. Tap on the name of a Bluetooth device to begin sending.
Yes if the paired device is a hands-free headset, otherwise tap No
Ye sYes
COM Ports
Ports > New Incoming Port
COMCOM
New Incoming Port to set
Ports Ports
New Incoming PortNew Incoming Port
No.
NoNo
Using Infrared (IrDA)
Another way to connect data over short distances and wirelessly is through IrDa or Beaming. The PDA phone allows you to beam files and object (such as contacts and calendar
appointments) to IrDa receiving devices.
1. Beam is turned on by default. To double-check, tap Start
tap the Beam icon to make sure the ‘Receive all incoming beams’ checkbox has been
checked.
2. Place the PDA Phone nearby a second IrDa device where their IrDa windows are in
alignment.
3. To send a data object to the neighboring IrDa device, tap and hold on the data object
(such as a file, contact object, calendar object, etc) and select Beam File/Contact/
Appointment, etc.
4. The Beam window appears listing all available neighboring devices ready to receive a
beam. Tap on the name of an IrDa device to begin sending.
Start > Settings > Connections
Settings > Connections and
StartStart
Settings > ConnectionsSettings > Connections
Connectivity 59
Page 74

Microsoft® ActiveSync®
Microsoft® ActiveSync®
Microsoft® ActiveSync®Microsoft® ActiveSync®
Using Microsoft ActiveSync, you can synchronize the information on your desktop computer with the information on your device. Synchronization compares the data on your
device with your desktop computer and updates both computers with the most recent
information. For example:
• Keep Pocket Outlook data up-to-date by synchronizing your device with Microsoft Out-
look data on your desktop computer.
• Synchronize Microsoft Word and Microsoft Excel files between your device and desktop
computer. Your files are automatically converted to the correct format
• Back up and restore your device data.
• Copy (rather than synchronize) files between your device and desktop computer.
• Control when synchronization occurs by selecting a synchronization mode. For exam-
ple, you can synchronize continually while connected to your desktop computer or only
when you choose the synchronize command.
• Select which information types are synchronized and control how much data is synchro-
nized. For example, you can choose how many weeks of past appointments you want
synchronized.
Installing ActiveSync® on PC
To ensure that synchronization works properly you must install Microsoft ActiveSync on
your computer before connecting your PDA phone to the computer.
1. Insert the Companion CD into the CD-ROM drive in your computer.
60 Microsoft® ActiveSync®
Page 75

2. Run the ActiveSync installer program on the CD to install ActiveSync on your
computer and the following dialogue box appears. Click “Next” to proceed.
3. Click “Next” to install the ActiveSync to the default file folder or select “change” to
install the ActiveSync to the file folder you specify.
Microsoft® ActiveSync® 61
Page 76

4. After the following dialogue box appears, connect your PDA phone to your PC and
click “Next”.
5. The installation program will start to link your PDA phone and PC as the following
dialogue box shows.
62 Microsoft® ActiveSync®
Page 77

6. Click “Next” when the following dialogue box appears.
7. The below dialogue box shows and it allows you to choose data synchronization or data
transmission between your PDA phone and PC. Select your desired item and click
“Next” to proceed.
Microsoft® ActiveSync® 63
Page 78

8. After the following dialogue box appears, choose the type of synchronization you want
to perform and click “Next”.
9. Select the synchronization settings and check the checkbox which you want to perform
data synchronization.
64 Microsoft® ActiveSync®
Page 79

10. Click “Finish” to finish the Microsoft ActiveSync installation.
Creating a new partnership profile
After you’ve installed ActiveSync on your PC, you can begin to connect your PDA phone
to the PC. Take the included data cable and connect the mini-USB end to your PDA
phone’s mini-USB slot and the USB end to your computer’s USB slot.
Once the data cable connects the PDA phone to the PC, the PDA phone will emit a sound
indicating connection found. On the PC side, a ‘New Partnership’ wizard will automatically pop up.
On the wizard, you can choose whether you wish to set up a standard partnership or guest
partnership profile between the PDA phone and PC. A standard partnership profile
allows you to copy and move files between your PDA phone and PC as well as synchronize application data from PC’s Outlook to PDA phone’s Contacts, Inbox, Calendar, etc.
A guest partnership profile allows you to only copy and move files but not synchronize
application data. Follow the steps below to setup a standard partnership between the PDA
phone and a single desktop computer.
1. Select ‘Standard partnership’ and click Next
2. Select ‘Synchronize with this desktop computer’ and click Next
3. Select ‘Yes, I want to synchronize with only this computer’ and click Next
Next.
NextNext
Next.
NextNext
Next.
NextNext
Microsoft® ActiveSync® 65
Page 80

4. Check off from the list which application data types you wish to synchronize and click
Next
Next.
NextNext
5. Click Finish
Finish to complete the wizard.
FinishFinish
Synchronizing the application data
After creating your profile (a new partnership) for the first time, ActiveSync will first
attempt to establish a connection with your PDA phone (so long as there is a physical
connection via USB).
Next ActiveSync will examine each of the application data types you have selected to be
synchronized and see which records are not the same on both the PDA phone and PC.
Once both the PDA phone and PC have the same information, all application data types
will be listed as synchronized.
After your first synchronization, take a look at Calendar, Contacts, and Tasks on your
PDA phone. You'll notice that information you've stored in Microsoft Outlook on your
PC has been copied to your PDA phone, and you didn't have to type a word. Disconnect
your PDA phone from your PC and you're ready to go.
Once you have set up ActiveSync and completed the first synchronization process, you
can initiate synchronization from your PDA phone. To switch to ActiveSync on your PDA
phone, tap Start
Once synchronization begins, a progress bar with indicators will keep you informed as to
the changes being made.
If both Exchange Server and desktop synchronization is enabled, following successful synchronization you will see the above status screen.
Start > ActiveSync
ActiveSync.
StartStart
ActiveSyncActiveSync
Clicking on the icon in the notification area will reveal an active PC connection.
66 Microsoft® ActiveSync®
Page 81

Adding programs
If you want to install a new program to your PDA phone, you will need to first install it on
your PC.
1. Determine your PDA phone’s processor type so that you know which version of the
software to install. Tap Start
tab, make a note of the information in Processor.
2. Download the program to your PC (or insert the CD or disk that contains the program
into your PC). You may see a single *.xip,*.exe, or *.zip file, a Setup.exe file, or several
versions of files for different device types and processors. Be sure to select the program
designed for Microsoft Pocket PC and your device processor type.
3. Read any installation instructions, Read Me files, or documentation that comes with the
program. Many programs provide special installation instructions.
4. Connect your PDA phone and PC.
5. Double-click the *.exe file.
• If the file is an installer, the installation wizard will begin. Follow the directions on the
screen. Once the software has been installed on your PC, the installer will automatically
transfer the software to your PDA phone.
• If the file is not an installer, you will see an error message stating that the program is
valid but it is designed for a different type of computer. You will need to move this file to
your PDA phone. If you cannot find any installation instructions for the program in the
Read Me file or documentation, use ActiveSync Explore to copy the program file to the
Program Files folder on your device. For more information on copying files using
ActiveSync, see ActiveSync Help.
• Once installation is complete, tap Start
to it.
Start > Settings
Settings. On the System
StartStart
SettingsSettings
Start > Programs
StartStart
System tab, tap About
SystemSystem
Programs, and then the program icon to switch
ProgramsPrograms
About. In the Version
AboutAbout
Ve rs i o n
Ve rs i o nVe r si o n
Removing programs
1. Tap Start
Start > Settings
Settings > System
StartStart
Settings Settings
2. Highlight the name of the application you wish to remove from your device.
3. Click Remove
Remove.
RemoveRemove
System > Remove Programs
System System
Remove Programs.
Remove ProgramsRemove Programs
Microsoft® ActiveSync® 67
Page 82

Settings
Settings
SettingsSettings
You can customize how your PDA phone looks and behaves by changing its internal settings. Tap Start
settings that are available: Personal
of the window to get at each settings category.
Start > Settings
Settings to bring up the settings window. There are three categories in
StartStart
SettingsSettings
Personal, System
PersonalPersonal
System, and Connections
SystemSystem
Connections. Tap the tabs at the bottom
ConnectionsConnections
Personal settings
Tap St ar t
Start > Settings
Settings to enter the Personal settings page.
Start Start
Settings Settings
Phone
Phone
PhonePhone
This area allows you to change settings from the following four tabs:
• Phone
• Service
• Network
• More
1. The Phone tab allows you to change the settings of the following four items: the type of
ringtone, the tone of ringtone, keypad dial setting, and security on your PDA phone.
2. The Service tab allows you to change the settings of the following five items: call
barring, show your number, call divert, call waiting, and voicemail box and short
message.
3. Basically the choice of the network that your phone uses is configured automatically. If
you want to change the connection network, this Network tab will allow you to select
the network you want to use. When outside the coverage of your regular network in
your home country or when abroad, you can manually select the local network system.
4. The More tab allows you to change the following settings: answer mode, minute
minder, and band setting.
Buttons
Buttons
ButtonsButtons
This area allows you to change settings from the following two tabs:
• Program Buttons
• Up/Down Control
68 Settings
Page 83

The first tab allows you to map hardware buttons on your PDA phone to functions and
installed applications. First, click the name of a button and then select from the pull-down
menu below Button assignment to choose among system functions and installed applications. Click the Restore Defaults button to reset button mappings to factory settings.
The second tab allows you to configure how the up and down control behaves for the joystick. Delay before first repeat changes the time elapsed before scrolling begins. Repeat
rate changes the time it takes to scroll from one item to the next.
Input
Input
InputInput
This area allows you to set the default input method in Input Panel. You can also configure various input settings such as whether to use large or small keys for soft-keyboard and
other details.
Menus
Menus
MenusMenus
This area allows you to:
• Select which applications appear in the Start menu
• Select which document types appear in the Today screen’s New Item pull-up box.
When you launch this dialog box, it scans your system for installed applications.Check off
the items you want to appear in the Start Menu.Bear in mind that you may only have nine
items selected at any time.
A useful feature, available from the Today screen or any other screen in which a New button appears is the New button menu, a pop-up menu that displays a list of document
types that can be transformed into new documents.
Still in the Menu control panel, via the New Menu tab you can turn this pop-up menu on
(if off, you will only see a New button without any pop-up menu).If New button menu is
enabled, you can select from a variety of document types that will be available from anywhere the New button menu appears.
Owner info
Owner info
Owner infoOwner info
Much as it is wise to label valuable assets with your name or e-mail address, so is it important to stamp your Pocket PC device with your information.
Fill in the fields above to reflect your personal contact information.If you select Show
information when device is turned on, this information will appear whenever you soft
reset or suspend your device.
Settings 69
Page 84

Password
Password
PasswordPassword
This area allows you to enable a password lock to your PDA phone if it is left unused for a
certain time.
1. Check the ‘Prompt if device unused for’ checkbox and tap the arrow beside it to select a
time in minutes or hours from the drop-down menu.
2. Enter a four digit password in the ‘Password’ textbox.
If password protection is enabled, you will always be prompted for password after a soft
reset or upon power up in addition to the specified frequency.
Sounds and notification
Sounds and notification
Sounds and notificationSounds and notification
System sounds provide an excellent visual clue when your attention is needed, whether
you have an upcoming appointment, a phone call is coming through or someone has sent
you an instant message.
This area allows you to enable sound for a number of occasions. You can turn on or turn
off event sounds (sounds produced by the operating system like errors), program sounds
(sounds produced by software you have downloaded) and their notifications. You can also
customize the intensity of screen taps or hardware buttons (these can be set to off, soft, or
loud).
From the same screen, choose the Notifications tab to change what sounds are associated
with various system events. Additionally, it is possible to change the system volume by
pressing in the notification area.
To d a y
To d a y
To d a yTo d a y
Aside from acting as the launch point for most activity on your PDA phone, the Today
screen is a powerful canvas on which you can add third-party modules to display pertinent information and is customizable to better suit you aesthetically.
Tap ‘Today’ to begin. First you will see a listing of Today themes installed on your device
and available for your use. Today screen themes offer a great way for you to personalize
your PDA phone to reflect your unique interests and tastes. By loading a new theme, you
can completely change the look of your device. To choose a theme, simply highlight its
name and tap OK. Alternatively, you can Beam a selected theme to a friend’s PDA phone
or any Pocket PC device or delete the theme from memory.
You also have the option of selecting a JPG or GIF image as a background skin for your
device.First check the Use this picture as the background checkbox. By tapping the
Browse button you will be given a list of available image files on your device.
70 Settings
Page 85

In the same screen, tapping the Items tab allows you to configure the individual Today
screen components that have been installed on your device.Your device will already support Date, Owner Info, Calendar, Inbox, and Tasks.All of these plug-ins with exception of
Date can be Moved Up or Moved Down vertically on the Today screen.Press the appropriate button to the right to move the plug-ins' positions.
Speech Commander
Speech Commander
Speech CommanderSpeech Commander
Here you can enable or disable the voice dialing function of P50. To enable this function,
tap to check the Voice dialing checkbox. Check the Caller name playback checkbox if you
want P50 to play the caller name (voice tag) before dialing.
System settings
Tap S ta r t
Start > Settings
Settings > System
Start Start
Settings Settings
About
About
AboutAbout
This control panel gives you technical details about the version of Microsoft Pocket PC
running, processor type, and total available internal memory.
It also shows expansion slot (storage slot) usage and owner name.
In the same screen, tap the Device ID tab to change the name displayed when performing
an ActiveSync with a desktop PC.
Finally, the Copyrights tab reveals licenses being used by your version of Microsoft Pocket
PC.
Backlight
Backlight
BacklightBacklight
Tapping on Brightness icon presents the following screen. Here you can choose how many
minutes of inactivity will result in the backlight going off when no AC adapter is plugged
into your PDA phone. In the second of the two checkboxes, you can have the backlight
automatically turn on upon tapping the screen. The External Power tab provides the same
options as Battery Power, but these settings affect behavior when external power is used
such as an AC adapter or car power adapter.
Certificates
Certificates
CertificatesCertificates
Public key certificates allow you to help establish your identity when you are logging onto
a secure network. Certificates also aide in establishing the identity of other computers that
you might want to connect to. Using certificates helps prevent unauthorized users from
System to enter the System settings page.
SystemSystem
Settings 71
Page 86

accessing your device or data. There are two types of certificates that can be installed on
your device: personal certificates that identify who you are, and root certificates that identify the servers you connect to. Both personal and root certificates are managed in the
same way. Consult your IT department for information on certificates and device security.
Tapping the Certificates icon will get you started. In the Personal tab, you will see certificates assigned to your device. By tapping and holding on an item, you can delete it.
From the same screen, tapping the Root tab brings you to the root certificates available for
your device.
Clock
Clock
ClockClock
Aside from being a powerful computational device, your PDA phone is also a handy time
keeper and alarm clock. This control panel applet allows you to ensure your system time
is correct.
Tapping Clock icon brings you to this screen. Here you can choose among the world's
time zones, set the hour, minutes, and seconds, and finally choose the date. The time can
be changed by typing in the numerical representation of the time or by manipulating the
clock hands to the left.
On the second half of the screen is a visiting clock, great for when you are traveling and
want to update the system time but be able to jump back to your home time zone when
your travels come to an end.
You can set an early morning wake-up call for yourself with your PDA phone. From the
same screen as above, tap on the Alarms tab. You can have up to four distinct alarms
enabled at a time. Tap on the <Description> text to give your alarm a friendly name.
When the alarm goes off, this text will display as the reasoning behind the alarm. Tap on
the ‘S’, ‘M’, ‘T’, etc. (indicating Sunday, Monday, Tuesday, etc., respectively) to indicate
which days the alarm should go off.
Tap on the time listed and use the time selector to specify the alarm time.
Finally, tapping above the time displayed to the right of an alarm gives you options that
let you customize how the alarm behaves. You can choose the sound played, whether the
sound should be looped, and whether you should be given a message indicating the purpose of the alarm.
Additionally, it is possible to switch from a digital clock in the notification area to an analog clock.
72 Settings
Page 87

Tap-and-hold on the time in the notification area to switch between Analog and Digital.
Memory
Memory
MemoryMemory
You can use the slider bar to assign how much memory to be dedicated to storage or programs. In addition, this screen displays total storage and program memory, along with the
amount of allocated memory, in use memory, and free memory for both memory types.
Selecting the ‘Storage Card’ tab shows you free memory for any storage cards you've
installed in your PDA phone.
Selecting the ‘Running Programs’ shows you the currently running applications. By tapping ‘Activate’, you will bring the highlighted program to the foreground so you can
begin work on it immediately. If you tap ‘Stop’, the highlighted program will be terminated. Finally, tapping ‘Stop All’ will try to terminate all running programs, though not all
will necessarily respond to being closed in this manner.
Power
Power
PowerPower
Here you can see the current state of the battery and how much power it has left.
CPU Performance
CPU Performance
CPU PerformanceCPU Performance
This function allows you to adjust the CPU
performance of your PDA phone.
Automatic mode
Automatic mode: The mode adjusts the system
Automatic modeAutomatic mode
Normal mode
Normal mode: This mode maintains the efficiency and
Normal modeNormal mode
Power saving mode
Power saving mode: This mode extends the standby
Power saving modePower saving mode
Optimization mode
Optimization mode: This mode maintains the best
Optimization modeOptimization mode
performance automatically.
power consumption for the normal
system performance.
time of your PDA phone, but less
system efficiency.
system performance, but higher
power consumption.
Settings 73
Page 88

Regional settings
Regional settings
Regional settingsRegional settings
This control panel allows you to customize how data appears on your PDA phone, such as
currency, times, dates, and numbers.
Selecting the ‘Regional Settings’ tab allows you to set the region of your choice.
Selecting the ‘Number’ tab allows you to customize every aspect of how numbers appear
including decimal symbol, how digits are groups, measurement system, and more.
Selecting the ‘Currency’ tab allows you to customize every aspect of how monetary figures
are displayed, including currency symbol, number of decimal places shown, and how negative values are shown.
Selecting the ‘Time’ tab allows you to customize every aspect of how time figures are displayed, including display style, separator character, and AM/PM symbols.
Selecting the ‘Date’ tab allows you to customize every aspect of how dates are displayed.
Screen
Screen
ScreenScreen
Periodically your touch display may not respond accurately to stylus/finger taps; when
this occurs, it is usually necessary to re-align the screen. This can be done by tapping the
Align Screen button from the Screen control panel icon. Also, you are able to change the
system font size under the Font Size menu.
Hotkey for screen alignment:
Hotkey for screen alignment:
Hotkey for screen alignment:Hotkey for screen alignment:
Press the Function Key
Self Test
Self Test
Self TestSelf Test
Tap the Self Test tab to perform the self test of your PDA pho ne. Select the item s you want
to perform self test and then tap Test.
Device Info
Device Info
Device InfoDevice Info
Tap the Device Info tab to show your device information.
Remove Programs
Remove Programs
Remove ProgramsRemove Programs
If you want to remove the programs installed in your PDA phone, tap the Remove
Programs tab to remove them. Select the programs you want to remove and then tap
Remove.
Function Key and Audio Recorder Button
Function Key Function Key
Audio Recorder Button to align the screen.
Audio Recorder Button Audio Recorder Button
74 Settings
Page 89

Connections settings
Tap S ta r t
Start > Settings
Settings > Connections
StartStart
SettingsSettings
GPRS Authentication
GPRS Authentication
GPRS AuthenticationGPRS Authentication
This area allows you to select which GPRS authentication method to use. You have a
choice of either PAP or CHAP authentication. Please consult your GPRS service provider
to determine which value is appropriate for you.
Network Cards
Network Cards
Network CardsNetwork Cards
Please see "Connecting to an existing wireless network" on page 56.
Connections
Connections
ConnectionsConnections
Please see "Setting up connections" on page 47.
Bluetooth
Bluetooth
BluetoothBluetooth
Please see "Using Bluetooth" on page 58.
Beam
Beam
BeamBeam
Please see "Using Infrared (IrDA)" on page 59.
Connections to enter the Connections settings page.
ConnectionsConnections
Settings 75
Page 90

Troubleshooting Information
Troubleshooting Information
Troubleshooting InformationTroubleshooting Information
If you encounter problems when using your P50, please refer to the troubleshooting
information below to solve them. If the problem still persists after you have tried the
suggested solutions, please contact your dealer or BenQ customer service for assistance.
Do not attempt to disassemble P50 by yourself. There are no user serviceable parts inside.
Call Related Problems
Cannot make outgoing calls.
Cannot make outgoing calls.
Cannot make outgoing calls.Cannot make outgoing calls.
Check the following:
• Is your P50 in the Flight
related functions.
• Is there a SIM card in the phone? Install a valid SIM card.
• Is the signal strength strong enough? Try moving to a different location to obtain better
signal reception.
• Is the call barring feature activated? Deactivate the feature if necessary.
Cannot answer incoming calls.
Cannot answer incoming calls.
Cannot answer incoming calls.Cannot answer incoming calls.
Check the following:
• Is your P50 in the Flight
related functions.
• Is there a SIM card in the phone? Install a valid SIM card.
• Is the signal strength strong enough? Try moving to a different location to obtain better
signal reception.
Can not use certain call functions (call waiting, call barring.., etc).
Can not use certain call functions (call waiting, call barring.., etc).
Can not use certain call functions (call waiting, call barring.., etc).Can not use certain call functions (call waiting, call barring.., etc).
Depending on your network service provider, some call services may require extra subscription. Please contact your network service provider for details.
There are noises during a call.
There are noises during a call.
There are noises during a call.There are noises during a call.
Check the following:
• Are you near a strong electromagnetic source (such as a TV or a microwave oven..., etc.)
during the call? Move to another location to reduce the interference effects.
76 Troubleshooting Information
Flight mode? Change to the Phone on
FlightFlight
Flight mode? Change to the Phone on
FlightFlight
Phone on mode so you can use the call
Phone onPhone on
Phone on mode so you can use the call
Phone onPhone on
Page 91

• Check the status of signal reception. If necessary, move to another location where recep-
tion is better.
Poor reception.
Poor reception.
Poor reception.Poor reception.
Check the following:
• The network signal is too weak at your current location--for example, in a basement or
near a tall building-because wireless transmissions can not effectively reach it.
• The network is busy at the current time (for example, during peak times, there may be
too much network traffic to handle additional calls).
• You are too far away from a base station for your network operator.
Echo or noise.
Echo or noise.
Echo or noise.Echo or noise.
Check the following:
• Poor network trunk quality on the part of your network operator.
• Poor local telephone line quality.
SIM card error.
SIM card error.
SIM card error.SIM card error.
Check the following:
• SIM card malfunction or damage.
• SIM card inserted improperly.
• Debris on the SIM card contacts.
There are echoes when using
There are echoes when using VoIP (Voice over IP)
There are echoes when using There are echoes when using
Check the following:
• Suggest to use VoIP in a spacious area or with earphones in oreder to get the best recep-
tion and quality.
VoIP (Voice over IP) phone.
VoIP (Voice over IP) VoIP (Voice over IP)
phone.
phone.phone.
Message Problems
Cannot send or receive text messages.
Cannot send or receive text messages.
Cannot send or receive text messages.Cannot send or receive text messages.
Check the following:
• Is the phone in the Flight
• Is the signal strength strong enough? Try moving to a different location to obtain better
signal reception.
Cannot send or receive multimedia messages.
Cannot send or receive multimedia messages.
Cannot send or receive multimedia messages.Cannot send or receive multimedia messages.
Flight mode? Switch it to the Phone on
FlightFlight
Phone on mode.
Phone onPhone on
Troubleshooting Information 77
Page 92

Check the following:
• Is the phone in the Flight
• Have you subscribed the MMS service to your network service provider? The MMS ser-
vice may require extra subscription.
• Has the MMS setting been correctly configured? Check the setting with your network
service provider.
• The status of phone memory. Is there enough space? Delete some files if necessary.
Cannot send or receive Email.
Cannot send or receive Email.
Cannot send or receive Email.Cannot send or receive Email.
Check the following:
• Check your Network connection.
• Has the Email setting been correctly configured? Check the setting with your Email ser-
vice provider.
Flight mode? Switch it to the Phone on
FlightFlight
Phone on mode.
Phone onPhone on
Internet Problems
Cannot connect to the Internet.
Cannot connect to the Internet.
Cannot connect to the Internet.Cannot connect to the Internet.
• Please refer to the “Connections settings” illustrtion on P. 46.
Connection Problems
Cannot connect P50 to PC using the Data cable.
Cannot connect P50 to PC using the Data cable.
Cannot connect P50 to PC using the Data cable.Cannot connect P50 to PC using the Data cable.
Check the following:
• Is the power of P50 turned on?
• Check the Data cable.
• Make sure the ActiveSync is installed.
System Problems
Cannot turn on the phone.
Cannot turn on the phone.
Cannot turn on the phone.Cannot turn on the phone.
Check the following:
• Make sure that you have slided the battery lock to the lock position.
• Is the battery fully charged? Check the battery and fully charge it if necessary.
78 Troubleshooting Information
Page 93

• Are the battery contact terminals clean? Seek your dealer’s help to clean the terminals.
• If the problem remains, please refer to the “Hard Reset” information on P.14.
Battery Charging Problems
Can not turn on the P50 when charging.
Can not turn on the P50 when charging.
Can not turn on the P50 when charging.Can not turn on the P50 when charging.
Check the following:
This shows that the battery is over-discharged when you find the indicator on P50 turns
to orange and the P50 can not be turned on while charging it. When the battery is overdischarged, it loses all its electric power. Please charge the phone for over 30 minutes and
the system will boot up automatically.
Can not turn on the P50 after charging for over 30 minutes.
Can not turn on the P50 after charging for over 30 minutes.
Can not turn on the P50 after charging for over 30 minutes.Can not turn on the P50 after charging for over 30 minutes.
Check the following:
When you find that you still can not turn on the P50 after charging it for over 30 minutes,
this means that the P50 system enter the deep sleep mode incorrectly and it makes the P50
can not be turned on normally. Please note that if there are still some programs running
and they are not closed correctly before the P50 system enters the deep sleep mode, the
P50 will enter the sleep mode incorrectly.
Solutions: Step 1. Press the Power button.
Step 2. If step 1 doesn’t work, please activate soft reset. For detail information
about soft reset, please refer to "Soft reset" on page 13 in Chapter 3
Start Up.
Step 3. If step 2 doesn’t work, please activate hard reset.For detail information
about hard reset, please refer to "Hard reset" on page 14 in Chapter 3
Start Up. (Note: If you activate Hard Reset, all your data stored in the
P50 will be deleted. We suggest you to backup your files and data
regularly.)
Troubleshooting Information 79
Page 94

How to avoid data lost caused by over-discharging of P50?
How to avoid data lost caused by over-discharging of P50?
How to avoid data lost caused by over-discharging of P50?How to avoid data lost caused by over-discharging of P50?
Check the following:
A.Please charge your P50 within 72 hours after the system enters deep sleep mode.
B. If you find the P50 system fail to boot up, please charge the P50 within 24 hours and
activate soft reset.
C. The P50 still needs a minimun power supply to perform deep sleep mode. If you need
to remove the battery, please load the charged battery back to the P50 within 30
minutes in order to supply your P50 the power of maintaining deep sleep mode.
D. Please backup your files and data regularly。
When carry the phone to board a plane:
When carry the phone to board a plane:
When carry the phone to board a plane:When carry the phone to board a plane:
Check the following:
A. Switch the phone to Flight mode.
B. Or unlock the battery lock to let the phone enter deep sleep mode.
80 Troubleshooting Information
 Loading...