

Page 1

LU9715
Digital Projector
User Manual
Page 2

Table of Contents
Important safety guidelines .......................................................... 5
Safety notication ................................................................................................................................. 5
Warning to California residents ......................................................................................................... 5
Notication (Canada) ............................................................................................................................ 5
CE notication ........................................................................................................................................ 5
FCC notication ..................................................................................................................................... 6
Light module............................................................................................................................................ 6
Laser safety notication and caution ................................................................................................. 6
Interlock switches protection ............................................................................................................. 7
Laser parameters ................................................................................................................................... 7
Product label ........................................................................................................................................... 8
Hazard warning symbol and aperture label ...................................................................................... 8
Warning .................................................................................................................................................... 9
Important safety instructions ....................................................... 10
Overview ......................................................................................... 13
Shipping contents .......................................................................................................... 13
Projector exterior view ................................................................................................. 14
Front and upper side view ................................................................................................................... 14
Rear and upper side view ..................................................................................................................... 14
IO panel........................................................................................................................... 15
Control panel and functions .......................................................................................... 16
Notes on remote controller operation ............................................................................................ 18
Remote control operation ................................................................................................................... 18
Setup and Operation ..................................................................... 19
Install remote controller battery ................................................................................. 19
Connecting to the projector ......................................................................................... 19
Projection lens selection and Installation .................................................................... 20
Installing the new lens ........................................................................................................................... 20
Removing the existing lens from the projector .............................................................................. 21
Choosing a location ....................................................................................................... 22
Projection distance and screen size ............................................................................. 23
Lens shift adjustable range ............................................................................................ 25
Making connections ....................................................................................................... 26
Preparations ............................................................................................................................................ 26
Connect to PC ....................................................................................................................................... 26
Connect to video equipment .............................................................................................................. 27
Connect to control port ...................................................................................................................... 27
Connect to screen trigger ................................................................................................................... 28
Connect to external digital transmitter ............................................................................................ 29
Using the projector ........................................................................ 30
Preparations ................................................................................................................... 30
Turning the projector on or off..................................................................................... 31
Page 3

Selecting an input source .............................................................................................. 32
Using the menus ............................................................................................................ 33
Adjusting the image position ............................................................................................................... 33
Fine-tuning the image size and clarity ......................................................................... 34
Adjusting the projection angle ..................................................................................... 34
Correcting picture distortion ....................................................................................... 35
Auto-adjusting the image ...................................................................................................................... 35
Turning off the projector ............................................................................................... 36
Using On-Screen Display ............................................................... 37
Using the Menus ..................................................................................................................................... 37
Navigating the OSD ............................................................................................................................... 37
On-Screen Display (OSD) menus ................................................................................. 38
OSD menu - Picture ......................................................................45
OSD menu - Display ...................................................................................................... 46
OSD menu - Setup ......................................................................................................... 50
OSD menu - Advanced .................................................................................................. 53
OSD menu - System ...................................................................................................... 55
OSD menu - Information .............................................................................................. 57
Additional information .................................................................. 58
Cleaning the lens ............................................................................................................ 58
Care of the projector ..................................................................................................... 58
Cleaning the projector case ................................................................................................................. 58
Storing the projector ............................................................................................................................ 58
Specications .................................................................................................................. 59
Dimension ....................................................................................................................... 60
Timing chart ................................................................................................................... 61
3D supported timing ..................................................................................................... 62
RS232 command control ............................................................................................... 63
Control the projector through network ...................................................................... 74
Set up the projector for networking ................................................................................................. 74
Control the projector through web browser ................................................................................. 75
Projector status ...................................................................................................................................... 75
Projector control ................................................................................................................................... 76
Crestron RoomView ............................................................................................................................. 76
Network setup ....................................................................................................................................... 78
Alert mail setup ...................................................................................................................................... 79
Troubleshooting ............................................................................................................. 80
Indicator messages ................................................................................................................................. 80
Common problems and solutions ...................................................................................................... 81
Tips for troubleshooting ....................................................................................................................... 81
Image problems ...................................................................................................................................... 81
Remote control problems .................................................................................................................... 82
BenQ ecoFACTS .................................................................................................................................... 83
Copyright ................................................................................................................................................. 84
Page 4

Disclaimer ................................................................................................................................................ 84
Patents ...................................................................................................................................................... 84
Statement regarding hyperlinks and third-party websites ............................................................ 84
About the BenQ Support .............................................................................................. 85
Page 5
Important safety guidelines
Thank you for purchasing the high quality product! Read the Manual carefully to obtain the best
performance. The Manual provides instructions to use the menu and implement operation.
Safety notication
CAUTION
To turn off main power, ensure to unplug from power outlet.
CAUTION
To prevent electric shock, do not open the cabinet. There are high-voltage components
inside. Refer service to qualied service personnel.
CAUTION
The symbol warns the user about electric shock caused by voltage not insulated.
Therefore, it is dangerous to make any kind of contact with any parts of inside units.
WARNING!
This symbol alerts the user that important information which should be read carefully
to avoid problems concerning the operation and maintenance.
WARNING!
English
To prevent the projector from electrical discharge or electric shock, do not expose
the projector to rain or moist environment. Do not use the plug with an extension
cord or an outlet unless all the prongs can be fully inserted.
Warning to California residents
Handling the cables supplied with this equipment might expose user to a little lead, a chemical
known to the Stage of California, resulting in risks of barrenness. Please remember to wash hands
after handling.
Notication (Canada)
This class A digital equipment complies with Canadian CAN ICES-3 (A).
CE notication
This is a class A product. In a domestic environment this product may cause radio interference in
which case the user may be required to take adequate measures.
5
Page 6
English
FCC notication
This equipment has been tested and found to comply with the limits for a Class A digital device, pursuant to Part 15
of the FCC Rules. These limits are designed to provide reasonable protection against harmful interference when the
equipment is operated in a commercial environment. This equipment generates, uses, and can radiate radio frequency
energy, and if it is not installed and used in accordance with the instruction manual, it may cause harmful interference
to radio communications. Operation of this equipment in a residential area is likely to cause harmful interference, in
which case the user will be required to correct the interference at his own expense.
Operation is subject to the following two conditions:
1) this device may not cause interference and
2) this device must accept any interference received, including interference that may cause undesired operation of the
device
FCC Caution: Any changes or modications not expressly approved by the party responsible for compliance could void
the user’s authority to operate this equipment.
WARNING!
Changes or modications without approval from BenQ could void the users
authorization to operate the product.
Light module
• A light module containing multiple laser diodes acts as the light source in the product
.
• These laser diodes are sealed in the light module. It is recommended to ask dealer for
maintenance or repair services of the light module.
• End user is not allowed to replace the light module.
• Contact distributor who provides the qualied service for light module replacement and further
information.
Laser safety notication and caution
• CLASS 3R LASER PRODUCT
• This Laser Product is designated as Class 3R during all procedures of operation.
• LASER LIGHT - AVOID DIRECT EYE EXPOSURE.
• Do not point laser or allow reected laser light toward other people or reective objects.
• Direct or scattered light can be hazardous to eyes and skin.
• There is a potential hazard of eye exposure to laser radiation if the included instructions are not
followed.
• Caution – use of controls, adjustments or performance of procedures other than those specied
herein may result in hazardous radiation exposure.
6
Page 7
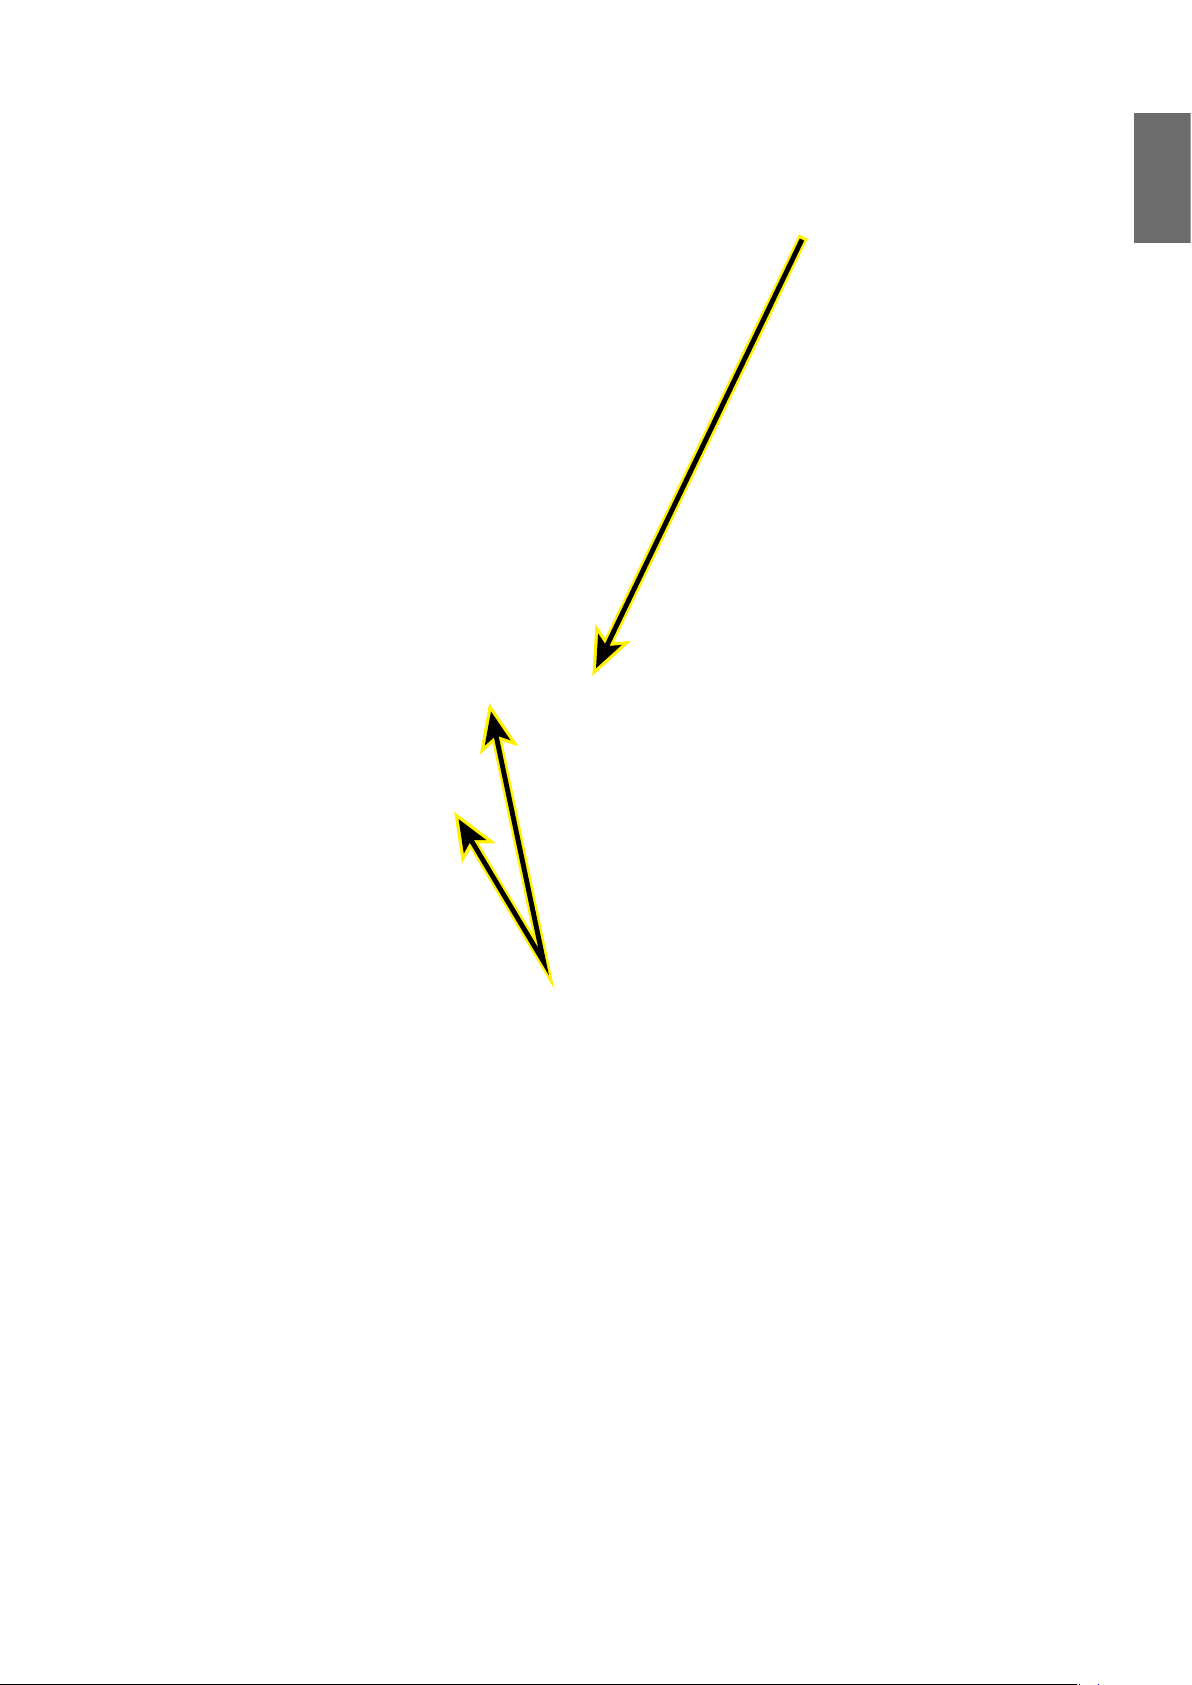
Interlock switches protection
English
SWITCH A:Will be activated when the
top cover is removed. The projector is
then being powered off.
SWITCH B(x2):Will be activated when the projection
lens is removed. The projector is then being powered off.
Laser parameters
Blue Laser Diode Wavelength: 450nm - 460nm
Mode of Operation: Pulsed, due to frame rate
Pulse width: 0.74ms
Pulse repetition rate: 240Hz
Maximum laser energy: 0.376mJ
Total internal power: >100W
Apparent source size: >10mm, at lens stop
Divergence: >100 mili Radian
7
Page 8
English
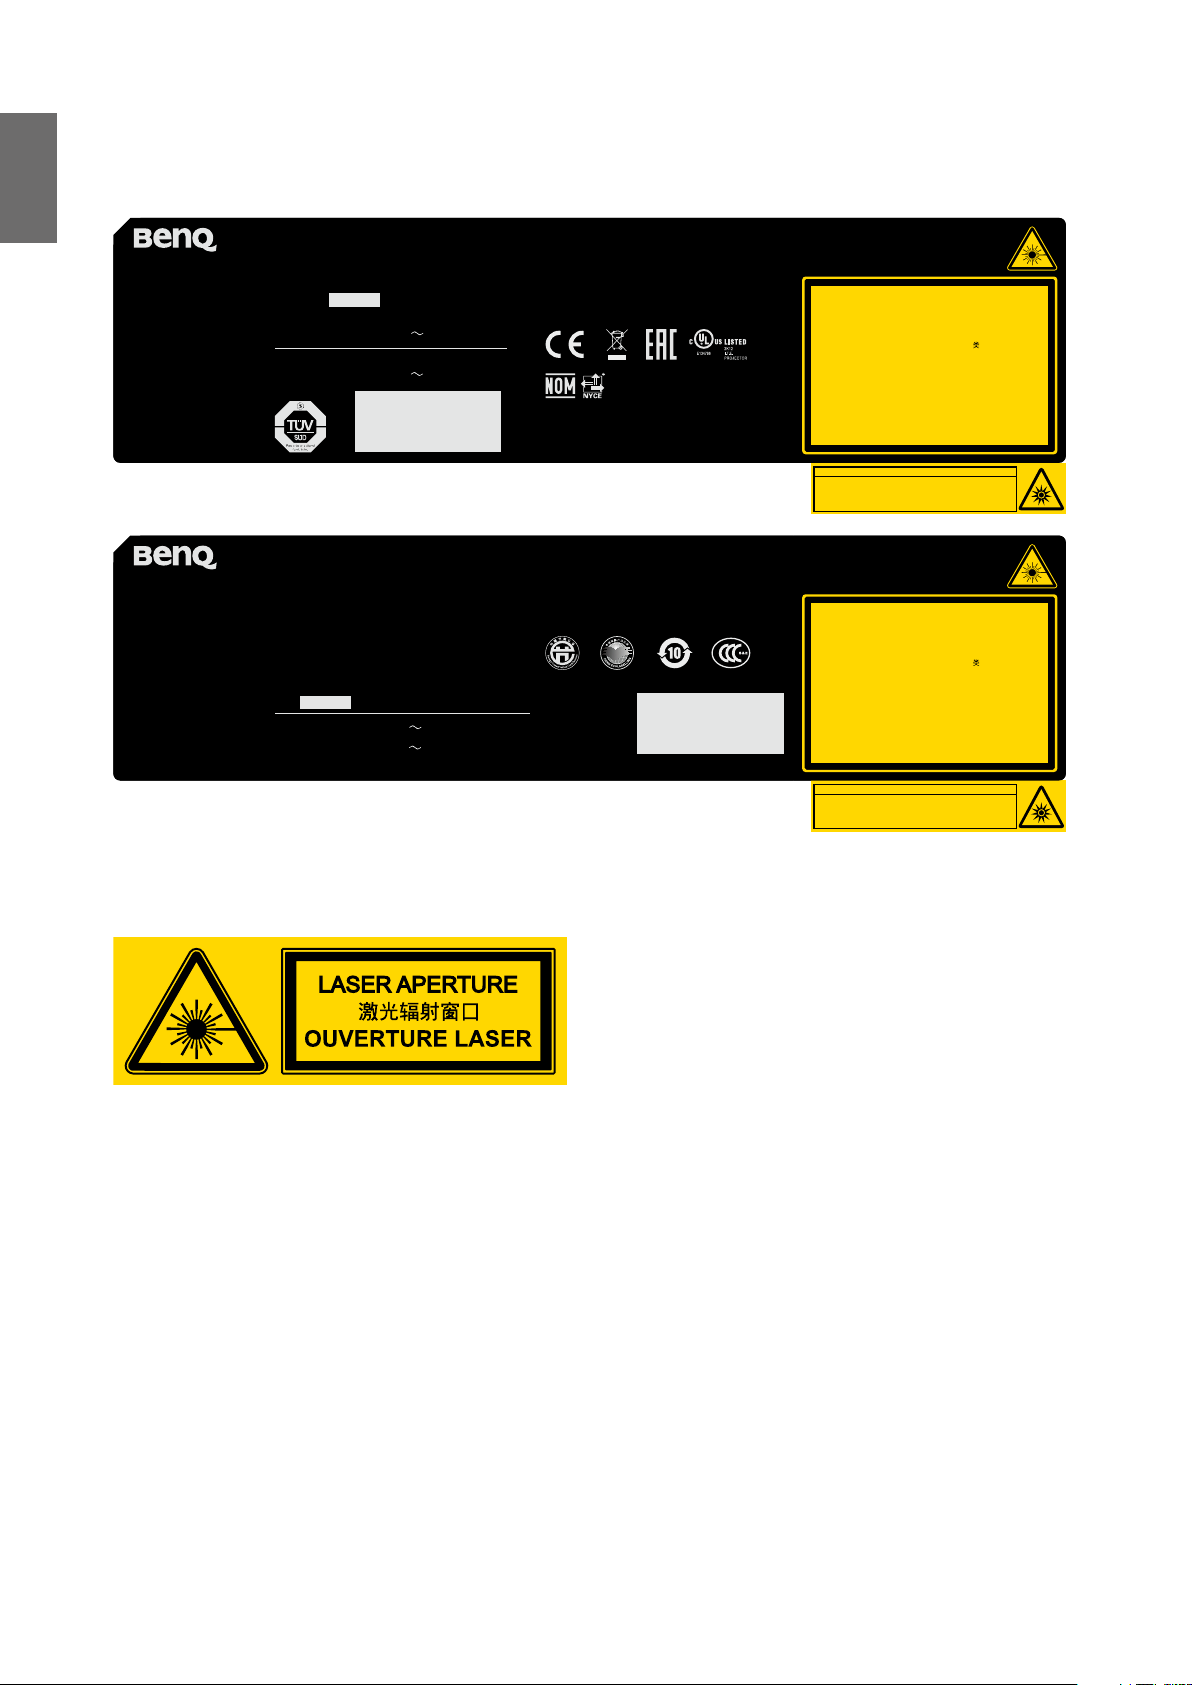
Product label
Manufacturer’s ID Label, Explanatory Label and Certication Statement Label.
BenQ Corporation
16 Jihu Road,Neihu,
Taipei 114, Ta iwan
؎ᄦซ˾થ;ځૄ఼
έΔξ114സડૄസྮ!
16ཱི
(For EU) IMPORTER:
BENQ Europe B.V.
Meerenakkerweg 1-17,
5652 AR, Eindhoven,
the Netherlands
Product Name / Nom du produit / ݡЩ!:
Digital Projector / Projecteur digital / ᇴҜԸᇆ፟
Model Name / Nom du modèle /ݭཱི!: LU9715
P/N / யݡཱི!: 9H.JEV77.26E
Rev. / ۍώ!;
Power Rating / Nilai Daya / Puissance nominale /
ᗝؠᑅ/ᐛத/߹!: 100-130 V , 50/60Hz, 9.50A
Power Rating / Nilai Daya / Puissance nominale /
ᗝؠᑅ/ᐛத/߹!: 200-240 V , 50/60Hz, 4.50A
ݭཱིĈMV:826
ݡЩĈᇴቅԸᇆ፟
ЋຽᇾཱིĈR0TJRC36
யݡཱིĈ:I/KFW88/37D
ᄦౄயгĈ઼
ᄦౄથĈځૄ఼ѣࢨΦ
гӬĈ˯ঔξܜှડࢆྮ318ཱིEഏ2ሁ
ڇચሤቢĈĞ1623ğ79184711
ۍώ;
ᗝؠᑅ0ᐛத0߹;211.241W!!!!-!61071I{-!:/61B
ᗝؠᑅ0ᐛத0߹;311.351W!!!!-!61071I{-!5/61B
Laite on liitettävä suojakoskettimilla varustettuun pistorasiaan
Apparatet må tilkoples jordet stikkontakt
Apparaten skall anslutas till jordat uttag
Apparatets stikprop skal tilsluttes en stikkontakt med jord,
som giver forbindelse til stikproppens jord
CAN ICES-3(A) /NMB-3(A)
Consumo de energía: Wh
En modo de espera: Wh
Made in China / Fabriqué en Chine / ᄦౄயг: ઼
835W
0.25
3264625001 WJ XXXX
ᛋӘ;
ѩࠎB৺யݡĂдϠ߿ᒖဩĂྍயݡΞົౄј
ቢᕘĄдଐڶ˭ĂΞᅮࢋϡ၆ᕘ
ଳפ၁ΞҖ۞ନ߉Ą
3264625101 WJ XXXX
Complies with FDA performance standards for laser
products except for deviations pursuant to Laser
Notice No. 50, dated June 24, 2007
LASER RADIATION
AVOID DIRECT EYE EXPOSURE
CLASS 3R LASER PRODUCT
Emitted wavelength : 450-460 nm
Max. Pulse energy: 0.376 mJ, Pulse duration: 0.74 ms
፬ЍᏬ!!ᔖҺீ༗צזۡତ 3R!!፬Ѝயݡ
ณ: 0.376 mJ, ม: 0.74 ms
EXPOSITION DIRECTE DANGEREUSE POUR LES YEUX
maximum énergie de impulsion : 0.376 mJ,
CAUTION
Possibly hazardous optical radiation emitted
from this product.
Do not stare at operating lamp.
May be harmful to the eyes.
Complies with FDA performance standards for laser
products except for deviations pursuant to Laser
Notice No. 50, dated June 24, 2007
Max. Pulse energy: 0.376 mJ, Pulse duration: 0.74 ms
፬ЍᏬ!!ᔖҺீ༗צזۡତ 3R!!፬Ѝயݡ
ณ: 0.376 mJ, ม: 0.74 ms
EXPOSITION DIRECTE DANGEREUSE POUR LES YEUX
maximum énergie de impulsion : 0.376 mJ,
CAUTION
Possibly hazardous optical radiation emitted
from this product.
Do not stare at operating lamp.
May be harmful to the eyes.
450-460 nm
گܜ!;!
RAYONNEMENT LASER
APPAREIL À LASER DE CLASSE 3R
longueur d'onde : 450-460nm
durée de impulsion : 0.74 ms
GB 7247.1-2012 / IEC/EN 60825-1:2007
RISK GROUP 2
ATTENTION
Ce produit peut émettre des rayonnements
optiques dangereux.
Ne pas fixer la lampe en fonctionnement.
Peut être nocif pour les yeux.
LASER RADIATION
AVOID DIRECT EYE EXPOSURE
CLASS 3R LASER PRODUCT
Emitted wavelength : 450-460 nm
450-460 nm
گܜ!;!
RAYONNEMENT LASER
APPAREIL À LASER DE CLASSE 3R
longueur d'onde : 450-460nm
durée de impulsion : 0.74 ms
GB 7247.1-2012 / IEC/EN 60825-1:2007
RISK GROUP 2
ATTENTION
Ce produit peut émettre des rayonnements
optiques dangereux.
Ne pas fixer la lampe en fonctionnement.
Peut être nocif pour les yeux.
Hazard warning symbol and aperture label
8
Page 9
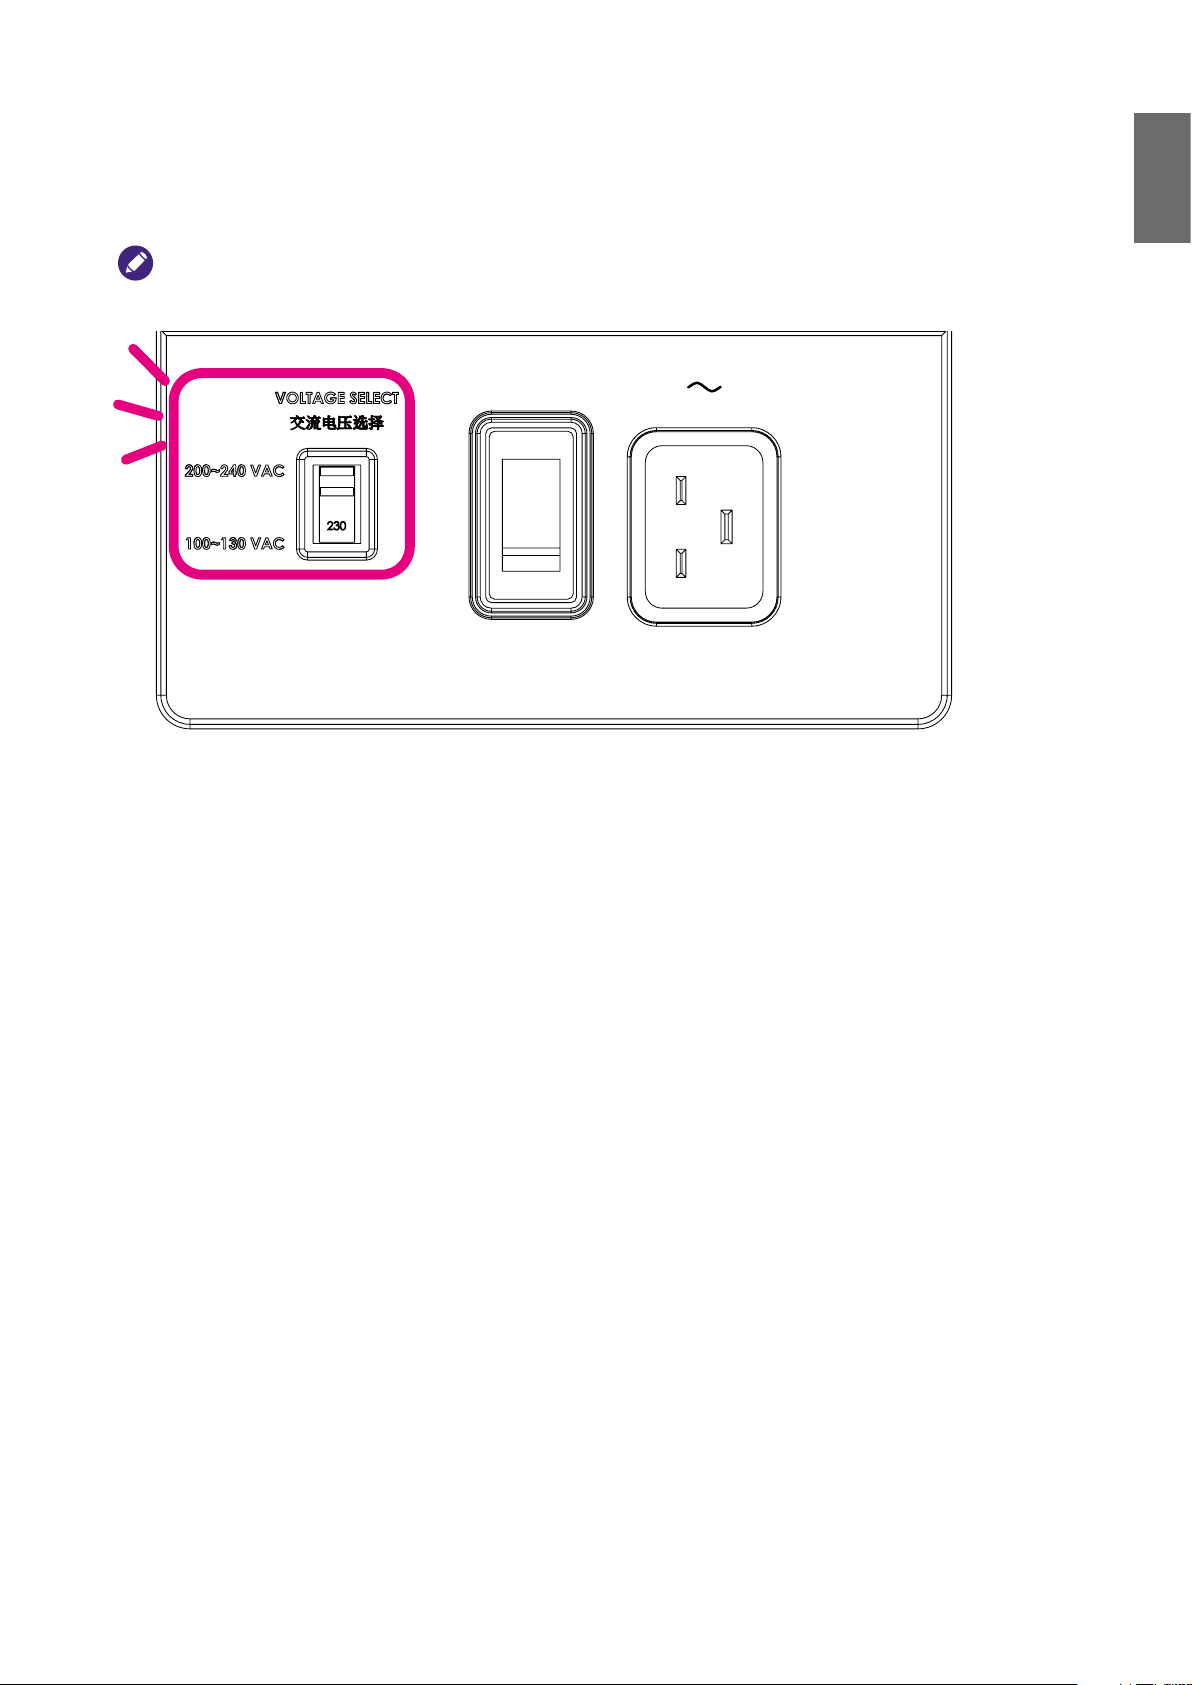
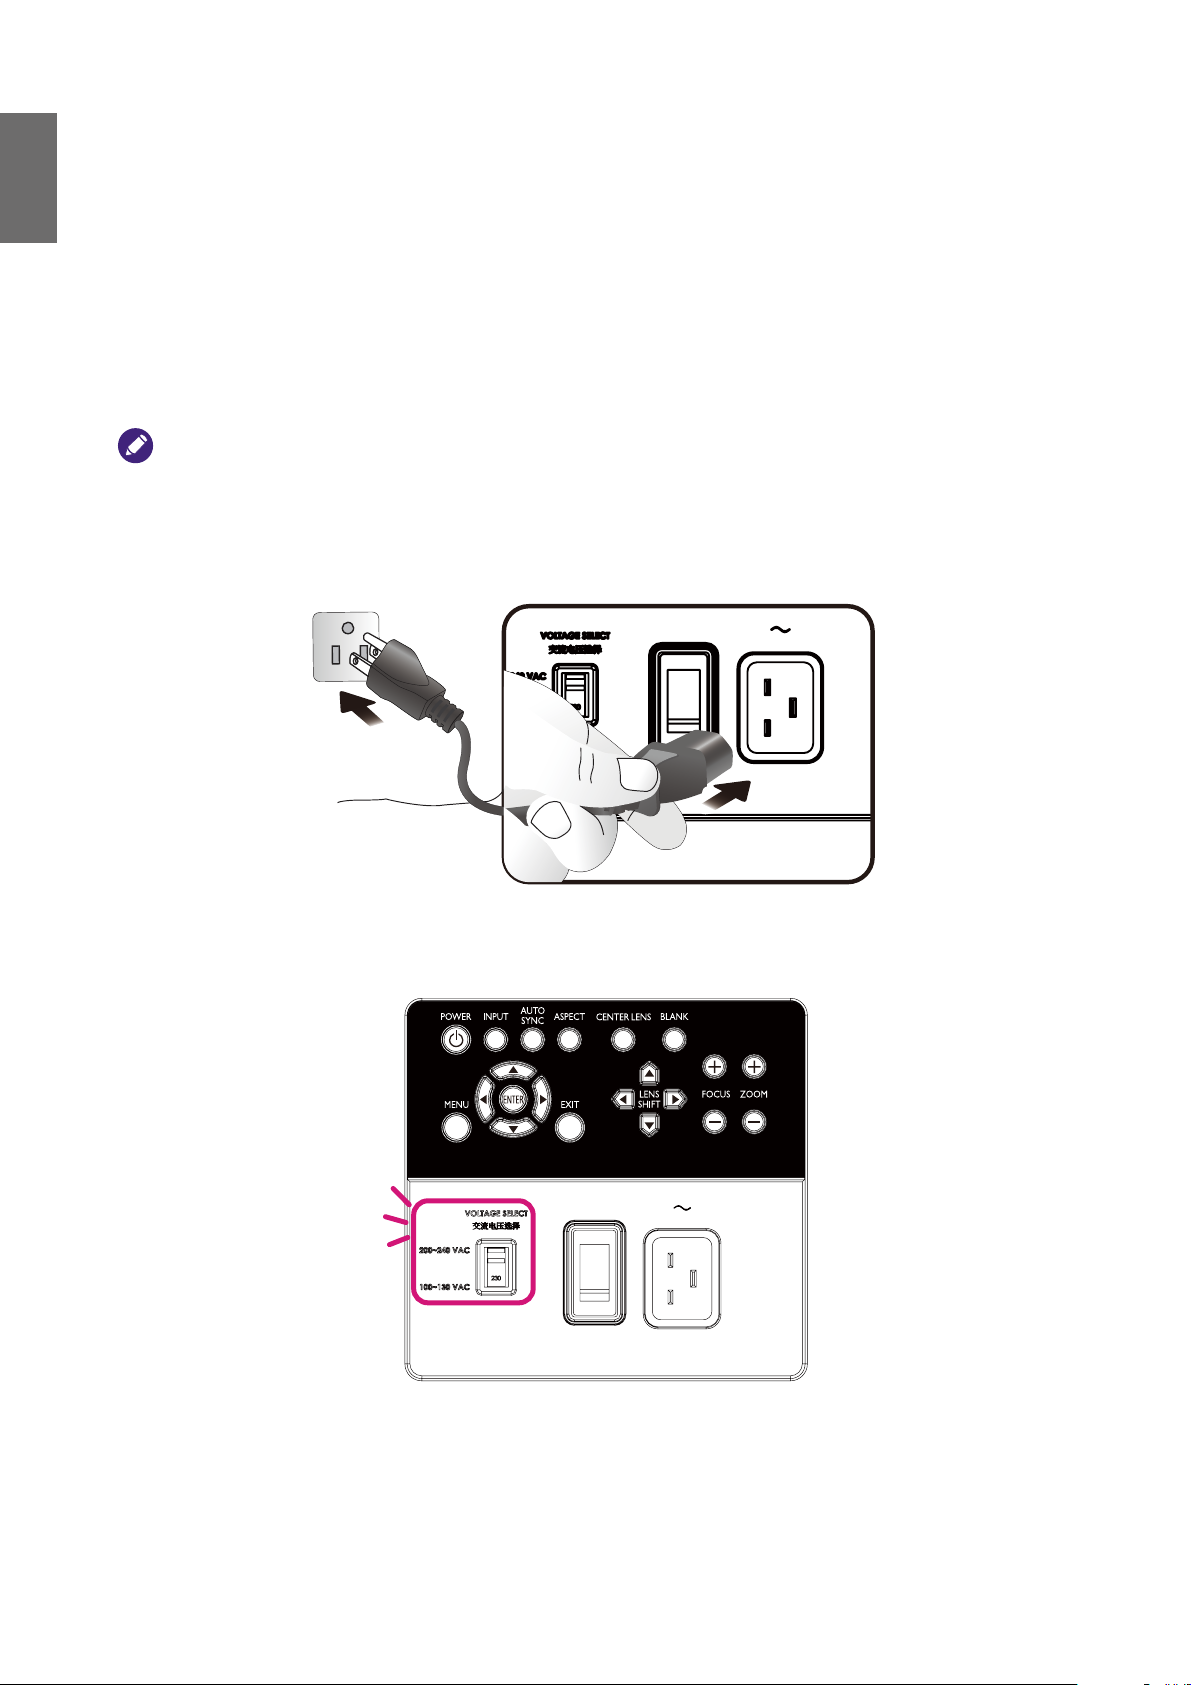
Warning
Please make sure the Voltage Switch is selected at the right voltage in the region where projector is
being used.
Note
Default seting is 230V.
English
9
Page 10
English
Important safety instructions
Thank you for your purchase of this quality BenQ projector. For the best results, please read
through this manual carefully as it is your guide through the control menus and operation.
1. Please read this user manual before you
operate your projector. Keep this manual in
a safe place for future reference.
Read
Manual
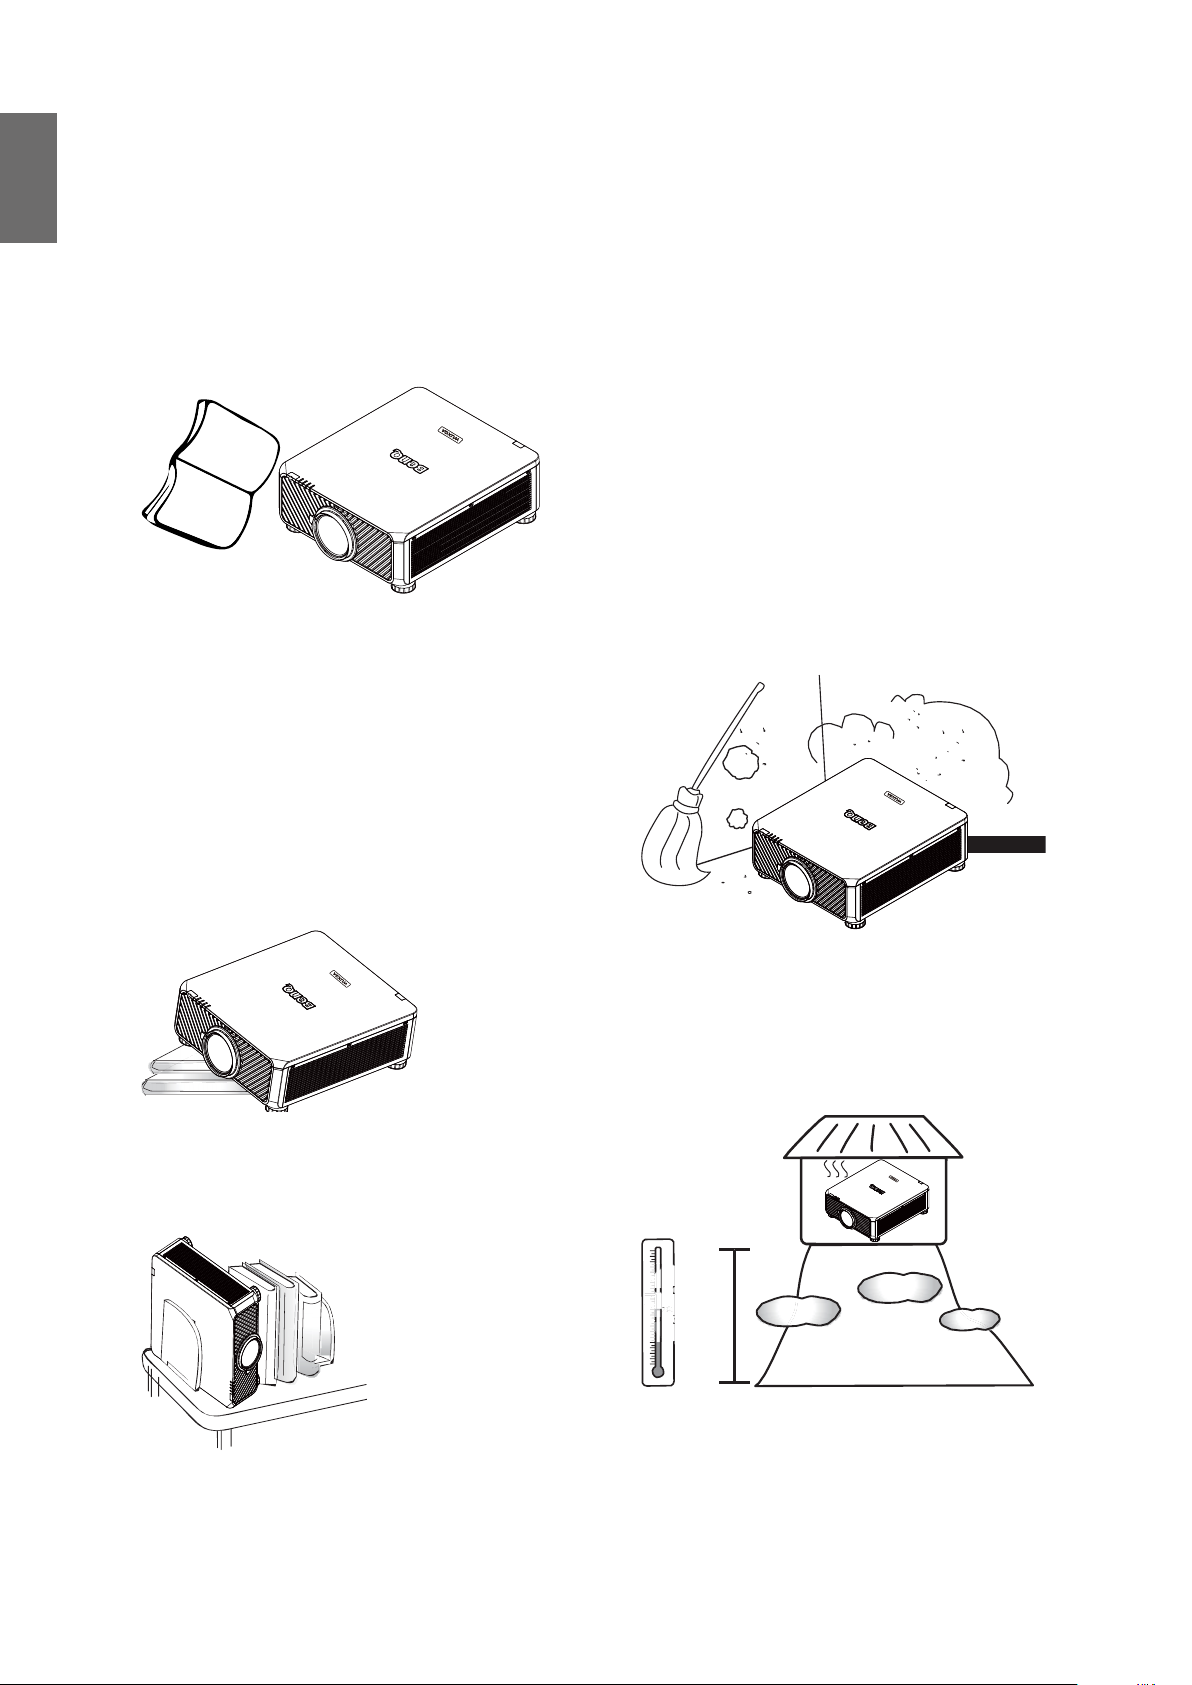
2. Always place the projector on a level,
horizontal surface during operation.
- Do not place the projector on an unstable
cart, stand, or table as it may fall and be
damaged.
- Do not place inammables near the
projector.
- Do not use if tilted at an angle of more
than 10 degrees left to right, nor at angle
of more than 15 degrees front to back.
4. Do not place the projector in any of the
following environments:
- space that is poorly ventilated or conned.
At least 50 cm clearance from walls and
free ow of air around the projector is
recommended.
- locations where temperatures may become
excessively high, such as the inside of a car
with all windows closed.
- locations where excessive humidity, dust, or
cigarette smoke may contaminate optical
components, shorten the projector’s
lifespan and darken the screen.
3. Do not store the projector on end vertically.
Doing so may cause the projector to fall
over, causing injury or resulting in damage.
- locations near re alarms.
- locations with an ambient temperature
above 35°C/95°F.
- locations where altitude is higher than
1500 meters/4920 feet above sea level.
49209840
feet
10
Page 11
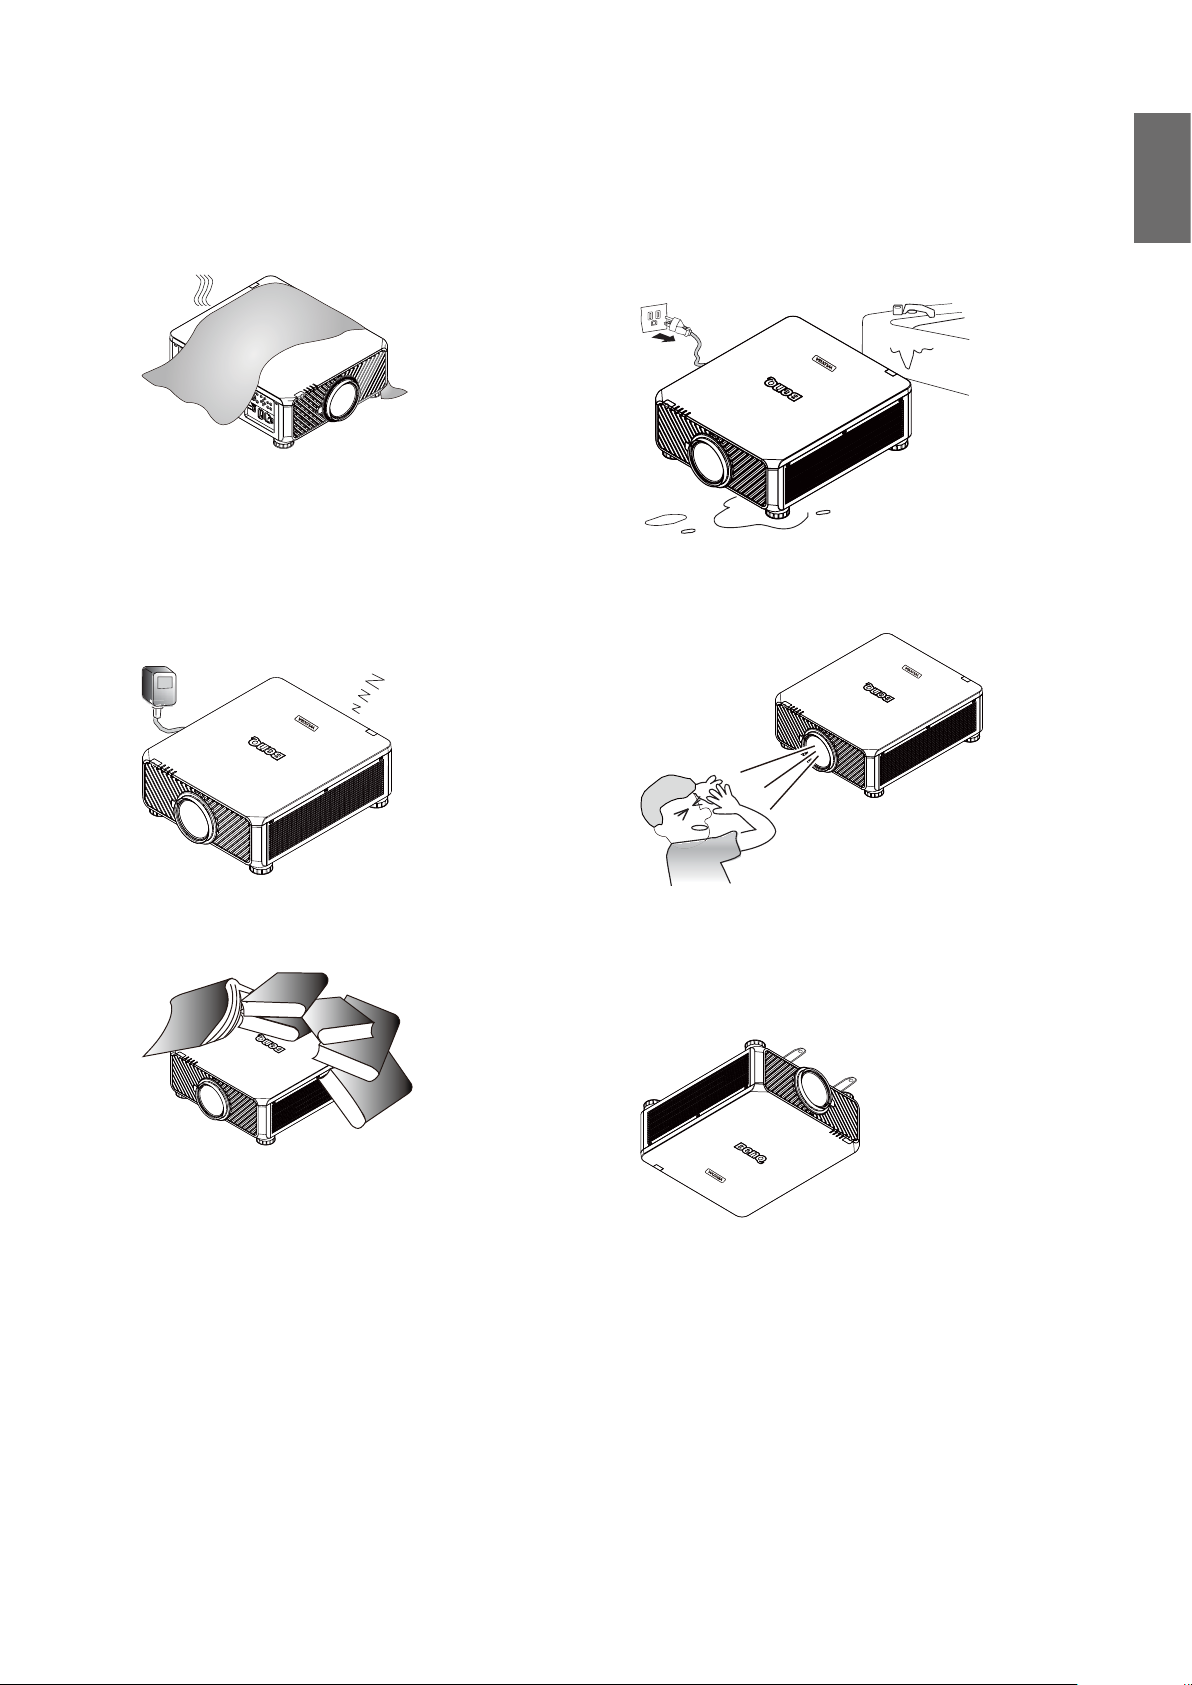
5. Do not block the vents holes while the
projector is on (even in standby mode):
- Do not cover the projector with any item.
- Do not place the projector on a blanket,
bedding or any other soft surface.
6. In areas where the mains power supply
voltage may uctuate by ±10 volts, it is
recommended that you connect your
projector through a power stabilizer, surge
protector or uninterruptible power supply
(UPS) as appropriate to your situation.
UPS
8. Do not place liquids near or on the
projector Liquids spilled into the projector
will void your warranty. If the projector does
become wet, disconnect it from the power
point and call BenQ to have the projector
repaired.
9. Do not look straight to the projector lens
during operation. It may harm your sight.
English
7. Do not step on the projector or place any
objects upon it.
10. This projector is capable of displaying
inverted images for ceiling mount installation.
Use only BenQ's Ceiling Mount Kit for
mounting.
11
Page 12
English
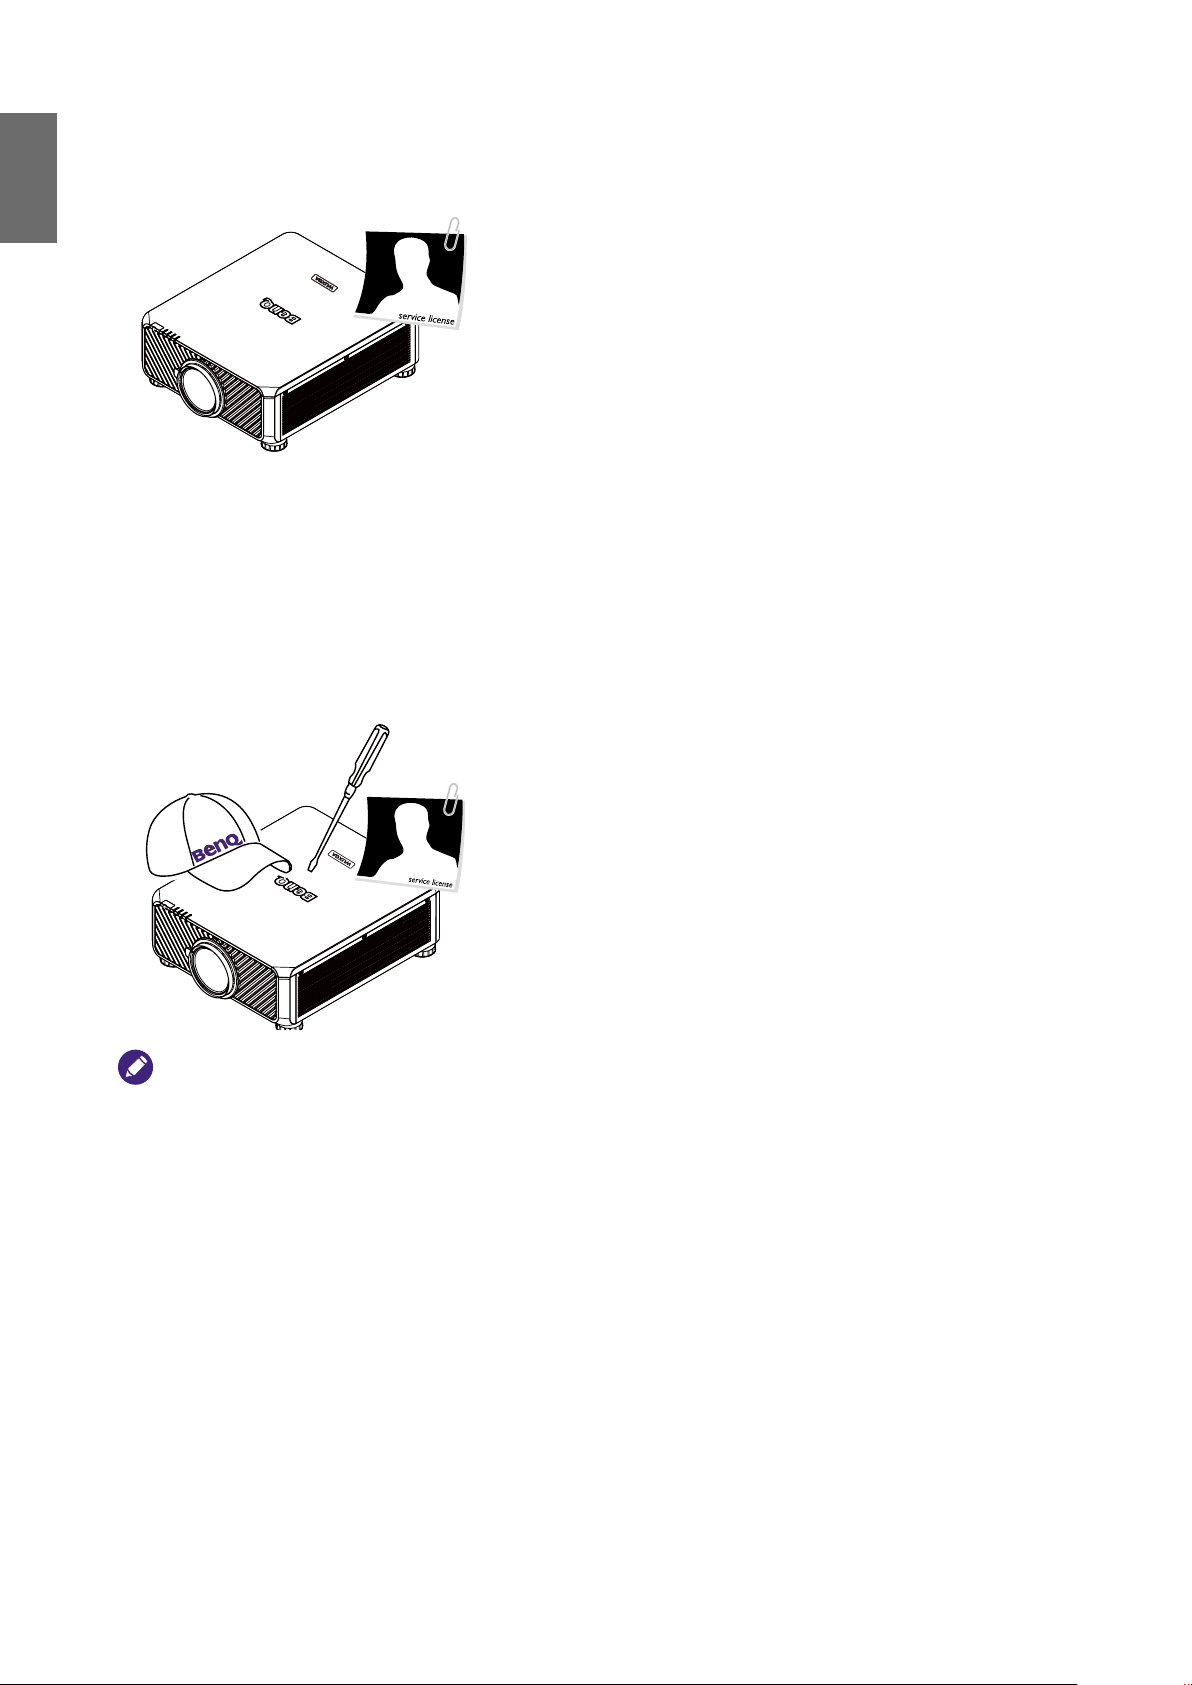
11. When you think service or repair is
required, take the projector only to a
suitably qualied technician.
12. Do not attempt to disassemble this
projector. There are dangerous high voltages
inside which may cause death if you should
come into contact with live parts. Under
no circumstances should you ever undo or
remove any other covers. Refer servicing
only to suitably qualied professional service
personnel.
Please keep the original packing for possible future
shipment.
12
Page 13
Overview
MENU
EXIT
ENTER
1
4
7089
635
2
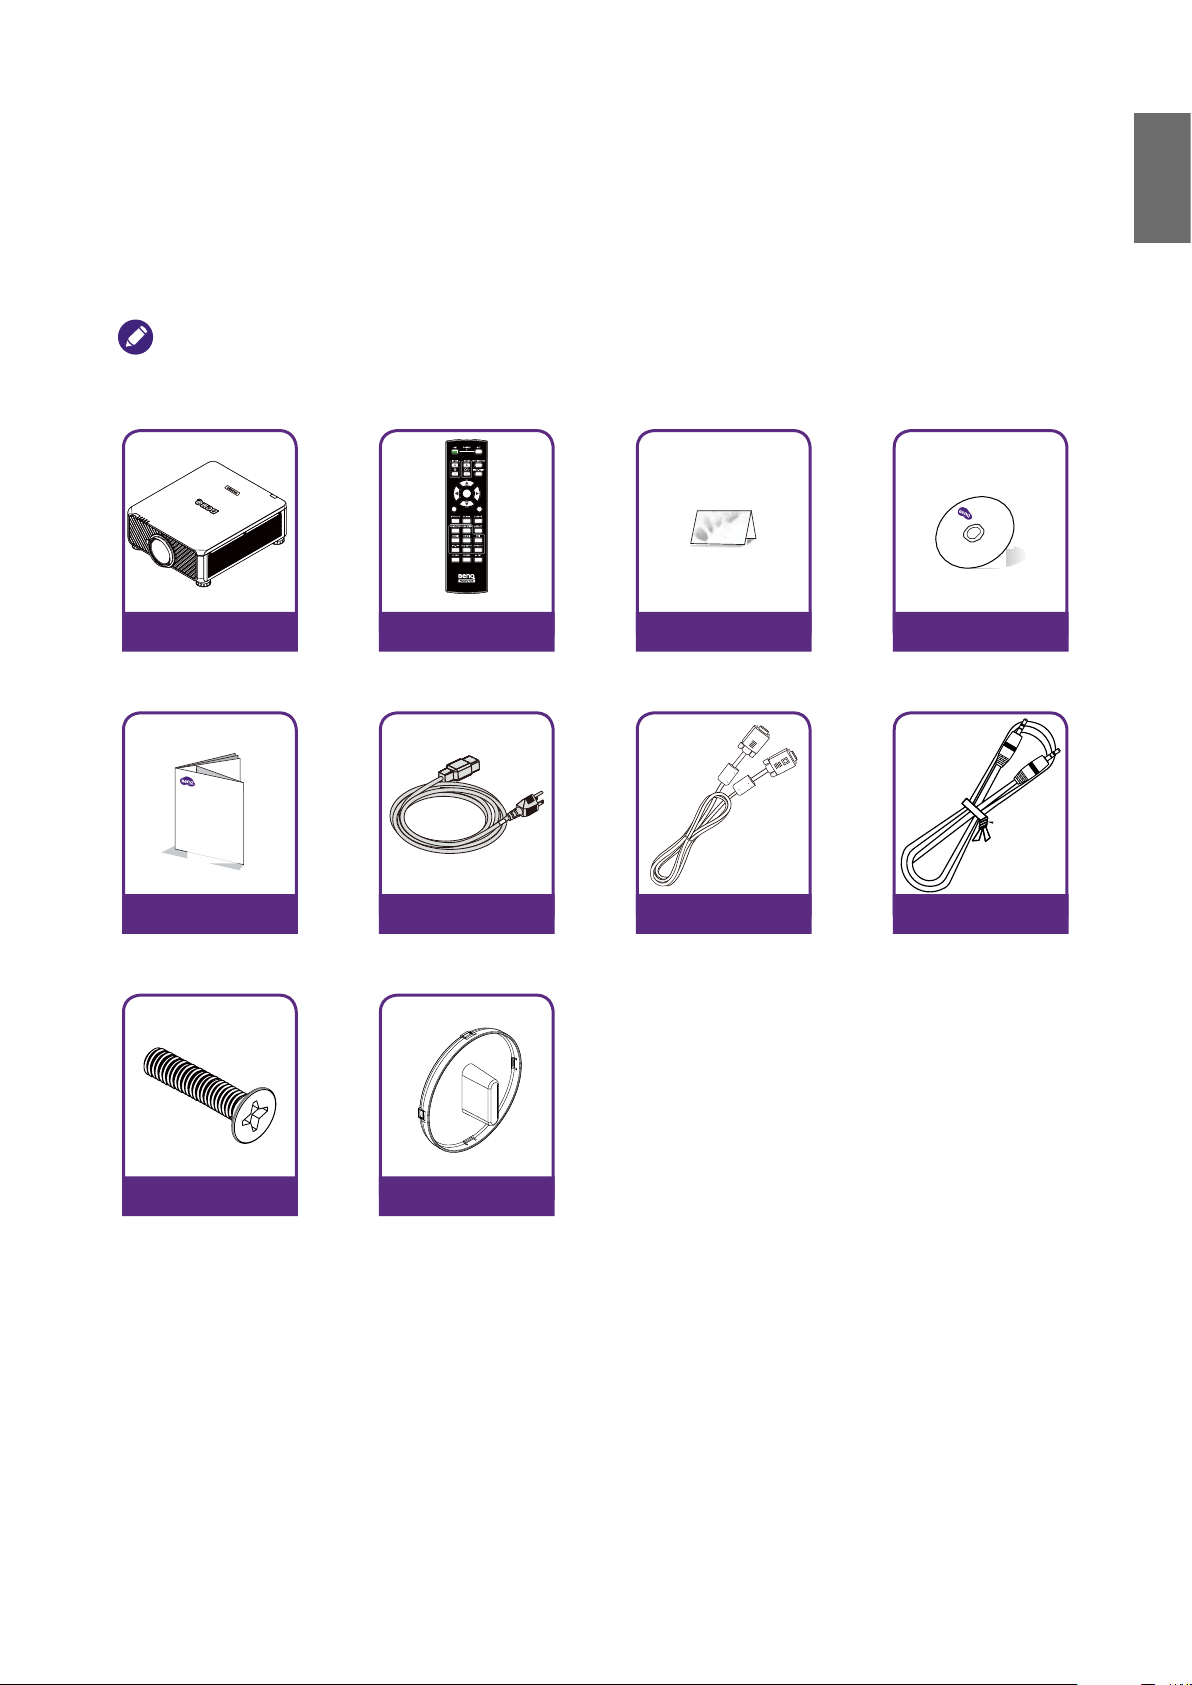
Shipping contents
Carefully unpack and verify that you have the items below. Some of the items may not be available
depending on your region of purchase. Please check with your place of purchase.
Some of the accessories may vary from region to region.
The warranty card is only supplied in some specic regions. Please consult your dealer for detailed information.
English
Projector
without lens
Quick start guide
Remote
Without AA batteries
Power cable VGA cable
Anti-Theft screw Lens hole cap
Warranty card
User manual CD
Wired remote cable
13
Page 14
English
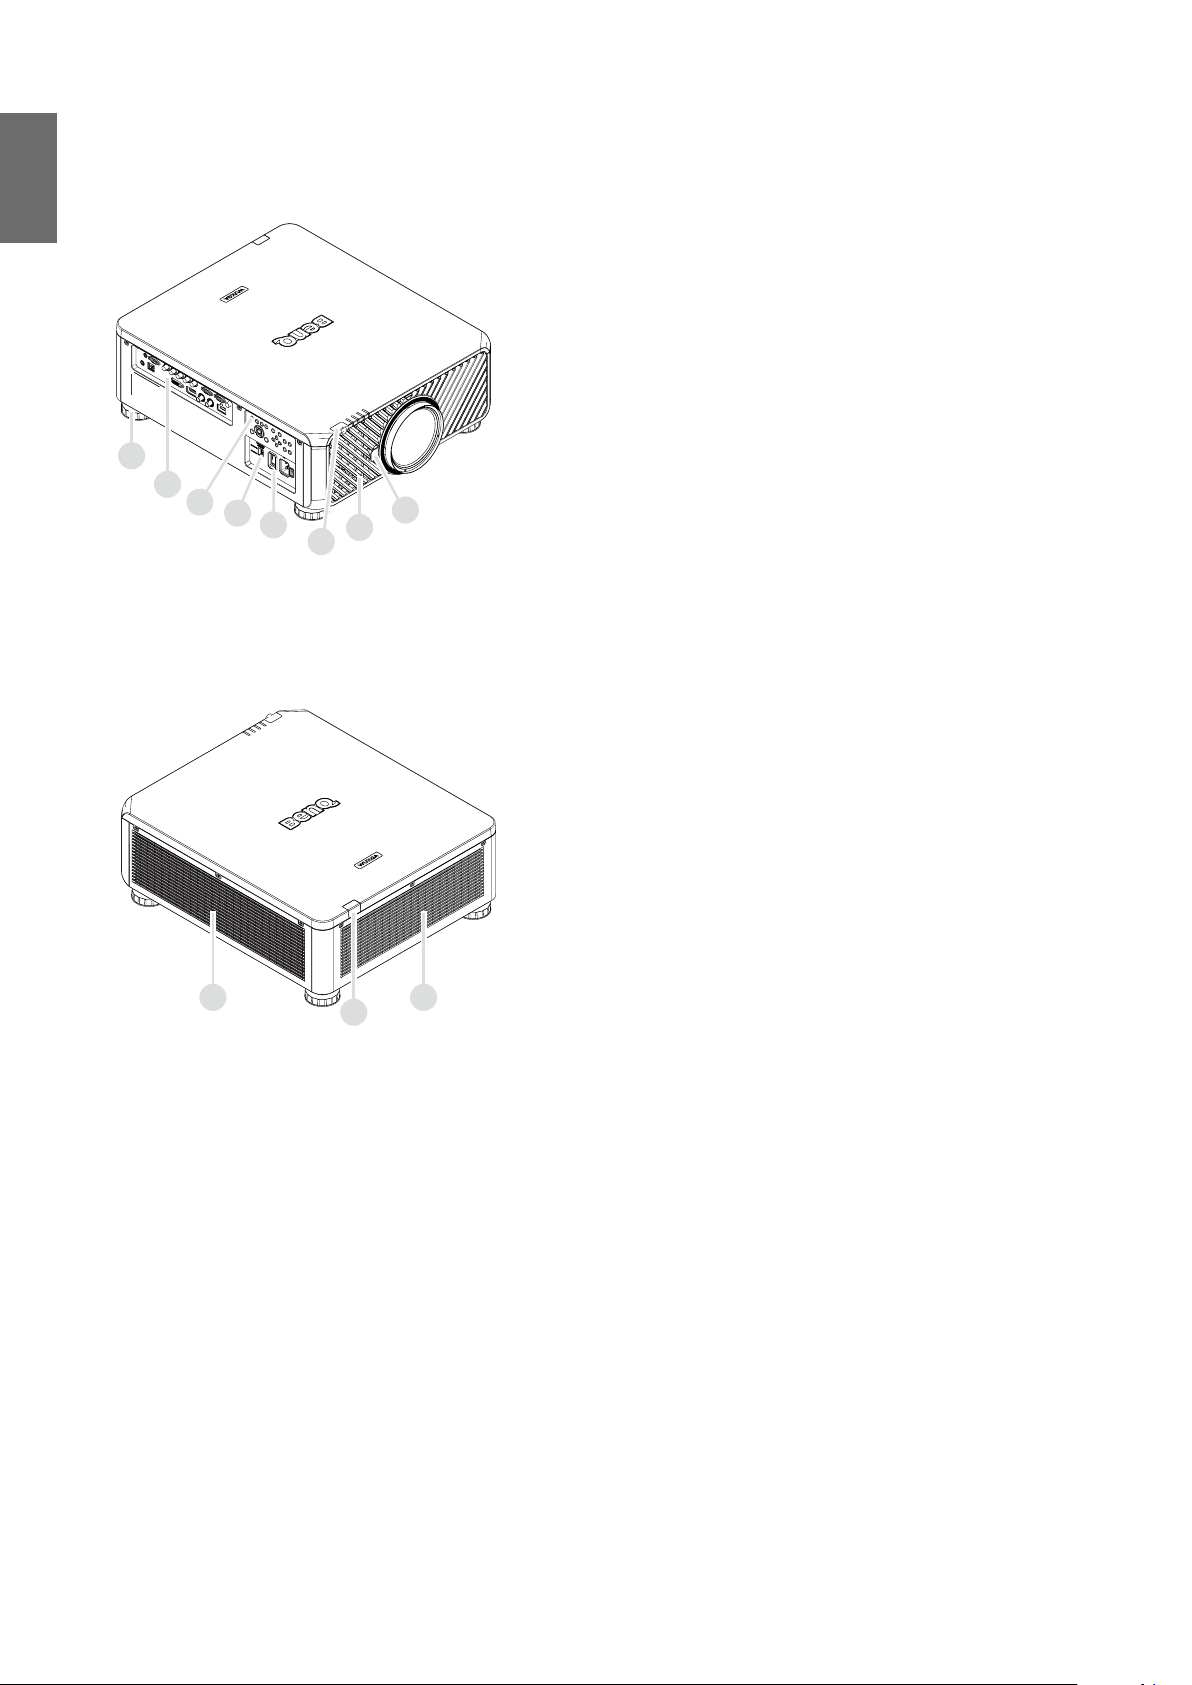
Projector exterior view
Front and upper side view
1
2
3
4
5
6
Rear and upper side view
7
8
1. Foot for adjusting projector level
2. IO panel
3. Control panel
4. Slide switch (voltage selection)
5. AC power switch
6. Front IR sensor
7. Lens release button
8. Air intake
9. Air intake
10. Air exhaust
11. Rear IR sensor
9
11
10
14
Page 15

IO panel
• HDBaseT/LAN
For connection to RJ45 Cat5/Cat6 Enthernet cable to input uncompressed high-denition video
(HD), control signals.
• 3D Sync Out
Connection to 3D IR sync signal transmitter.
• DVI-D
Connection to DVI-D source.
• HDMI
Connection to HDMI source.
• DisplayPort
Connection to device or PC featuring DisplayPort.
• 3G-SDI
Connection to 3G-SDI source.
• Computer 1
15-pin VGA port for connection to RGB, component HD source, or PC.
• Computer 2 (V, H, B/Pb, G/Y, R/Pr)
Connection to RGB or YPbPr/YCbCr output signal with BNC type input terminal.
• Monitor Out
Connection to other display equipment for concurrent playback display.
• RS-232
Standard 9-pin D-sub interface for connection to PC control system and projector maintenance.
• TRIGGER
3.5mm mini earphone jack, employs 350mA display relay to provide 12(+/-1.5)V output and
short circuit protection.
• Wired Remote
Connection to input Niles or Xantech compatible IR repeater system.
English
Caution
Make sure the port is valid before inserting a wired remote controller. The remote controller may be damaged in
case of an invalid port, e.g. a wired remote controller is connected to trigger output.
15
Page 16
English
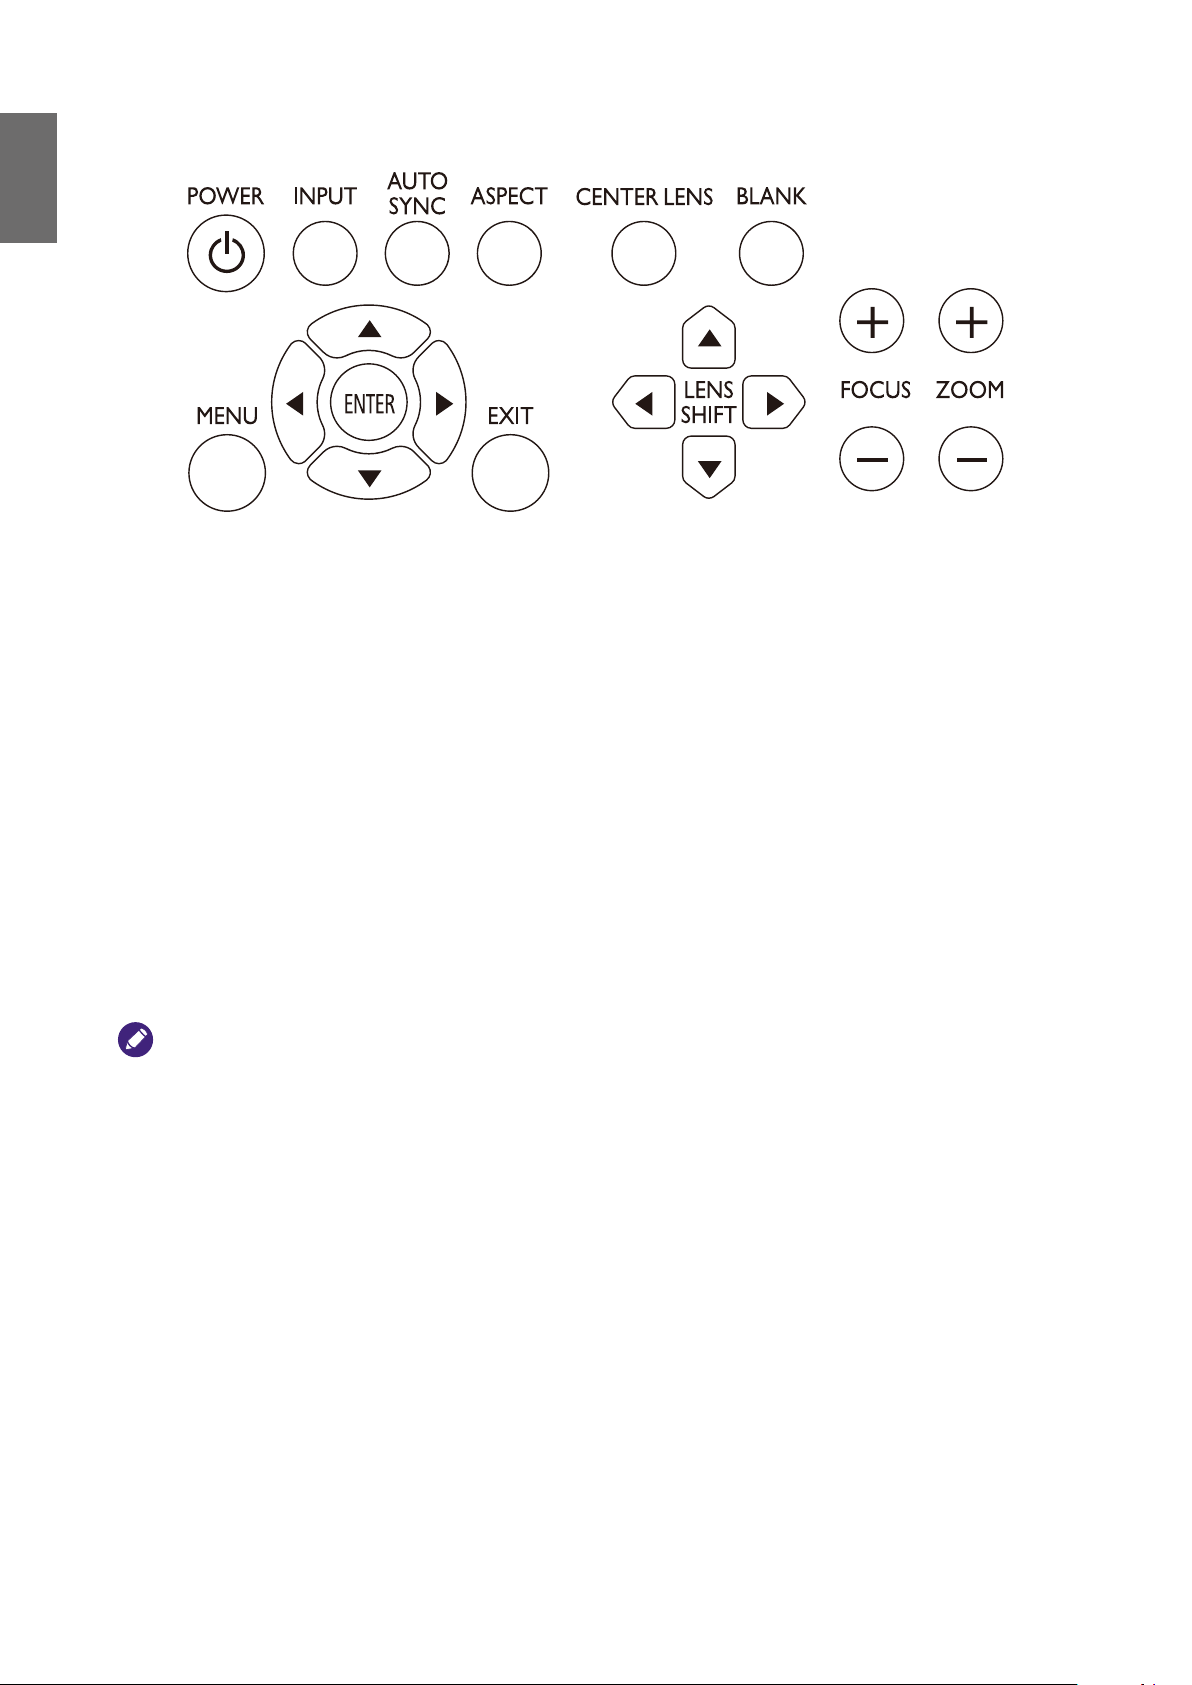
Control panel and functions
• POWER
Press to power on/off your projector.
• INPUT
Press to select video sources including HDMI, DVI-D, Computer 1, Computer 2, DisplayPort and
HDBaseT.
• AUTO SYNC
Press to execute auto signal sync.
• ASPECT
Press to switch aspect ratio of current image.
• MENU
Press to display OSD menu or return to the upper menu level.
• ENTER
Press to select, accept or change settings.
• EXIT
Press to exit OSD menu
• CENTER LENS
Press to center the lens and reset its shift, focus and zoom parameters.
.
Note
The lens memory requires precise lens parameter adjustments. Please re-run the Center Lens function once you install
the lens.
• BLANK
Press the button to temporarily interrupt the projection.
• LENS SHIFT
Press to move lens up, down, left and right.
• FOCUS
Press to adjust focus of projection image.
• ZOOM
Press to zoom in and out on projection image. Remote control and functions.
16
Page 17
MENU
89
1
4
7
ENTER
2
5
0
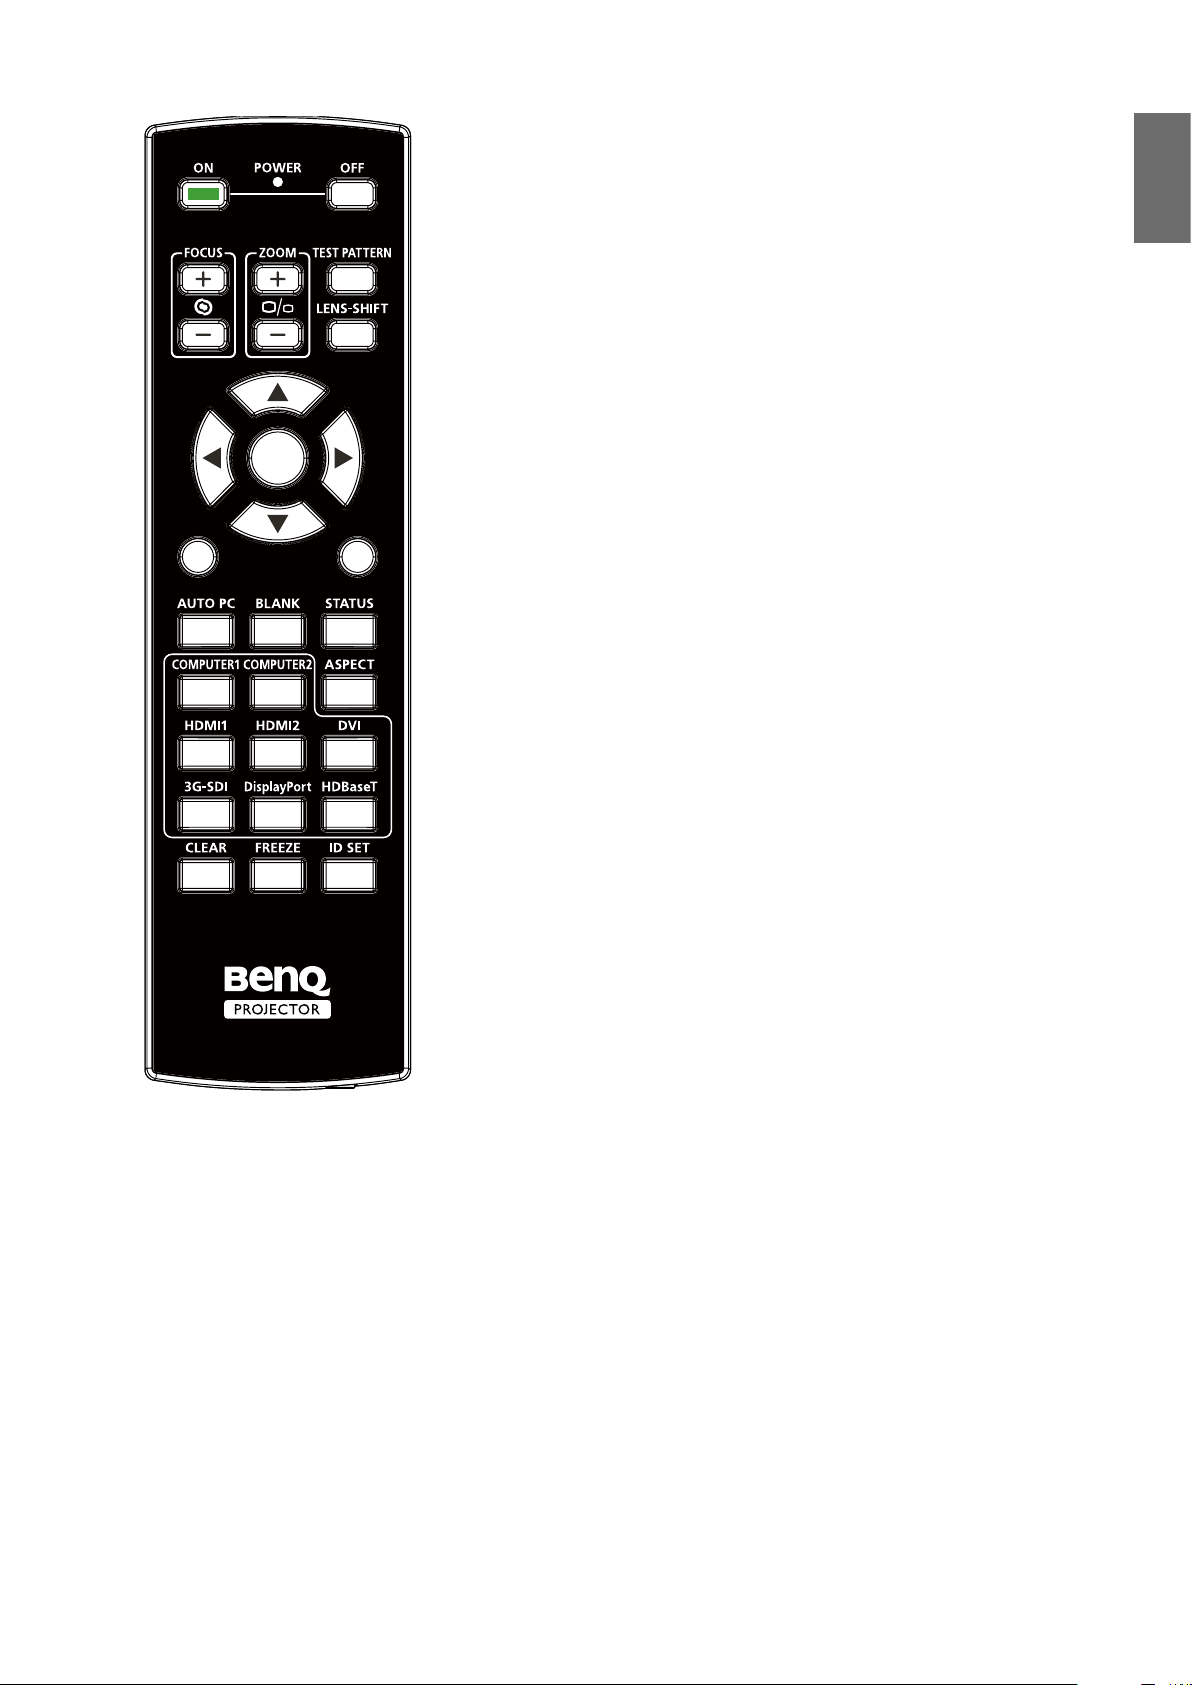
• ON
English
Press to power on projector.
• OFF
Press to power off projector.
• FOCUS +/-
Press to adjust focus of projection image.
• ZOOM +/-
Press to zoom in and out on projection image.
• TEST PATTERN
Press to display embedded test pattern. Press continuously
to scroll through available ones. Press MENU key to exit to
projection image.
• LENS SHIFT
Press to move lens up, down, left and right.
• ENTER
Press to select or accept settings.
EXIT
• MENU
Press to display OSD menu or return to the upper menu
level.
• EXIT
Press to exit OSD menu.
• AUTO PC
3
Press to execute auto signal sync.
• BLANK
6
Press the button to temporarily interrupt the projection.
• STATUS
Show OSD MENU – Information.
• COMPUTER 1
Select COMPUTER 1 input source.
• COMPUTER 2
Select COMPUTER 2 input source.
• ASPECT
Press continuously to scroll through individual aspect ratio.
• HDMI 1
Select HDMI 1 input source.
• HDMI 2
Function same as HDMI 1.
• DVI
Select DVI input source.
• 3G-SDI
Select 3G-SDI input source.
• DisplayPort
Select DisplayPort input source.
• HDBaseT
Select HDBaseT input source.
• CLEAR
Not available with this model.
• FREEZE
Press to toggle switch between freeze and unfreeze.
• ID SET:
Not available for this model.
17
Page 18
English
Notes on remote controller operation
• Some environment factor may hamper the operation of remote controller. If so, point remote
controller at the projector and repeat the operation again.
• In case the effective range of the remote controller is shortened or the remote controller stops
functioning, please replace the battery with a new one.
• The projector enters wired control mode automatically and cannot be controlled by the
remote controller’s IR signal, once the cable terminal of a remote controller is inserted in
the projector’s wired control port. To control the projector with the IR signal of the remote
controller again, remove the wire control terminal from the projector.
• IR signal may be interrupted and rendered useless when the remote controller is exposed to
bright sunlight or fluorescent light. Make sure the installation environment is proper for IR
remote controller.
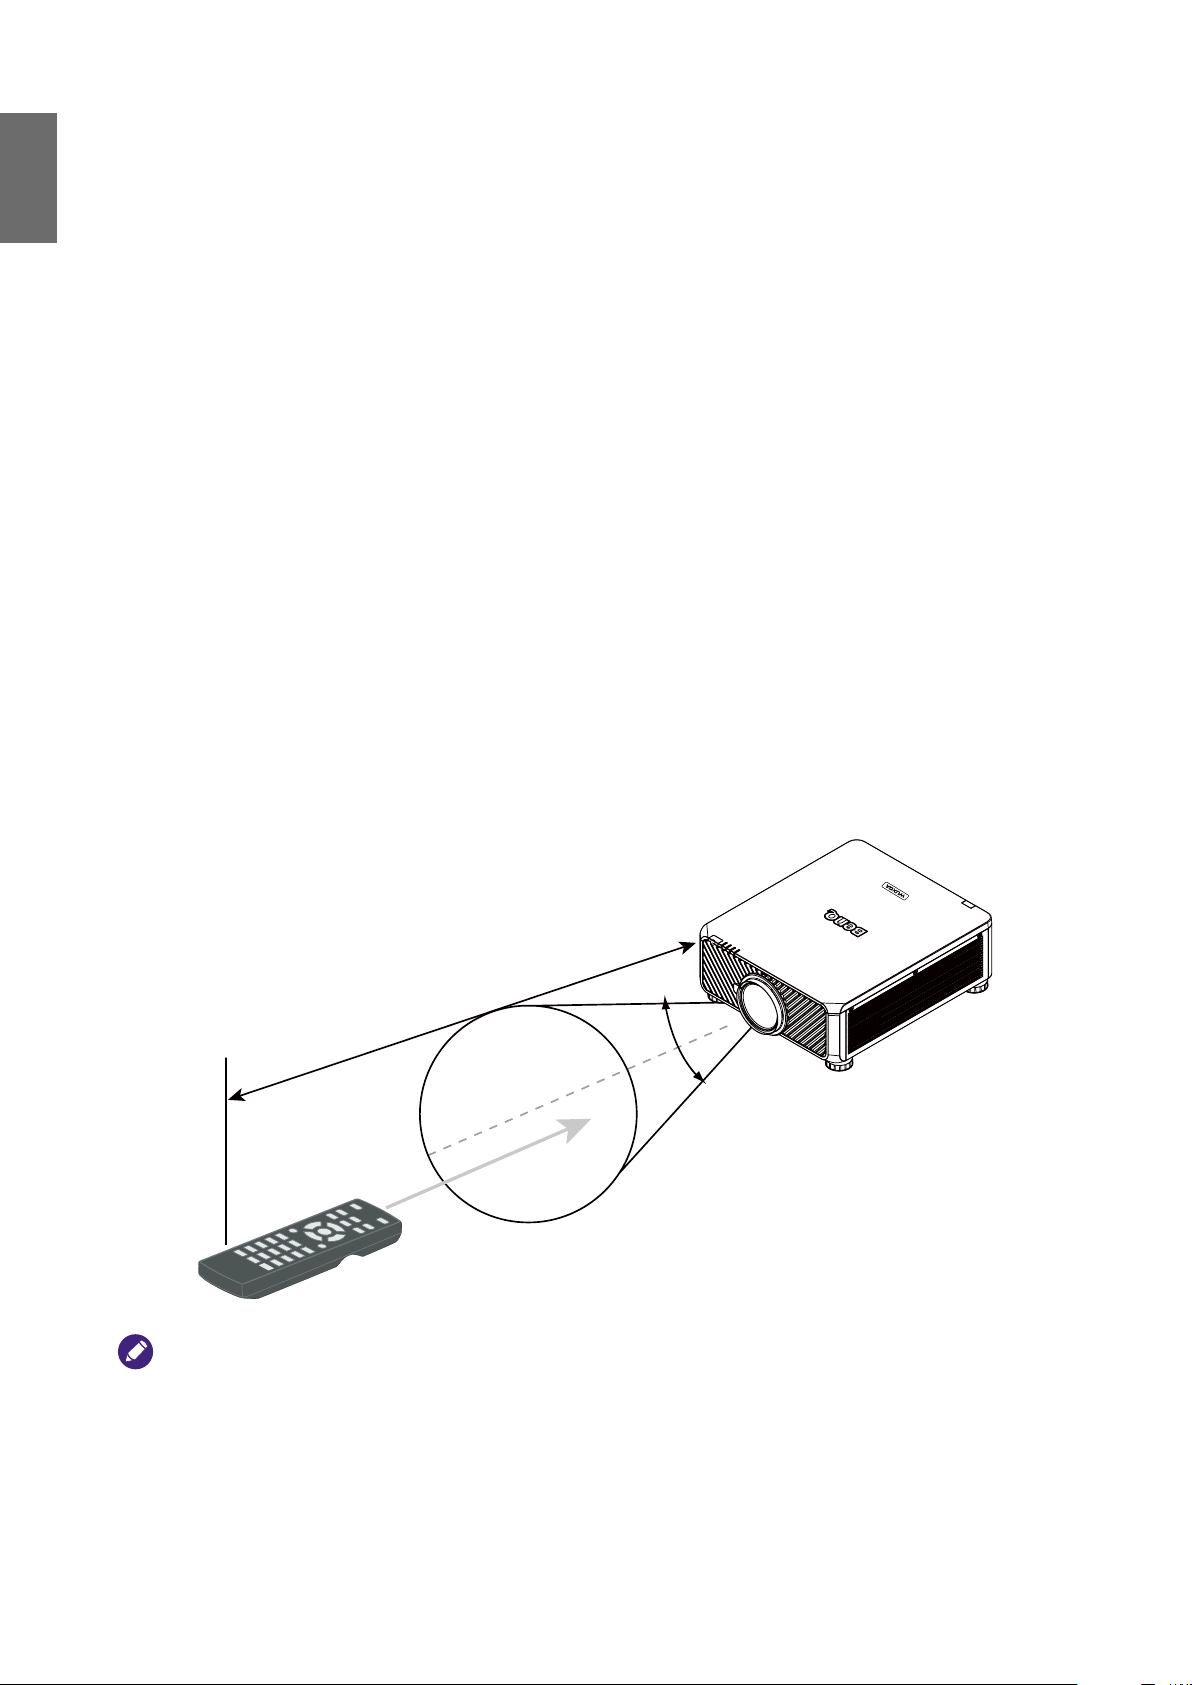
Remote control operation
• Make sure that there is nothing positioned between the remote control and the infrared (IR)
sensors on the projector that might obstruct the IR beam from the remote control reaching the
projector.
• The effective range of the remote control is up to 7 meters, and at an angle within 30 degrees
of the IR beam. Always aim straight at the projector, however most screens will also reect the
IR beam to the projector.
Caution:
DO NOT expose your remote controller to high temperatures or moisture or it may function abnormally.
18
Page 19
Setup and Operation
Install remote controller battery
1. To open the battery cover, turn the remote control over to view its back, push on the nger
grip on the cover and slide it up in the direction of the arrow as illustrated. The cover will slide
off.
2. Remove any existing batteries (if necessary) and install two new AA batteries observing the
battery polarities as indicated in the base of the battery compartment. Positive (+) goes to
positive and negative (-) goes to negative.
3. Ret the cover by aligning it with the case and sliding it back up into position. Stop when it clicks
into place.
1 2 3
English
Precautions relating to batteries
• Do not mix old batteries with new ones, or mix different types of batteries.
• Avoid leaving the remote control and batteries in an excessive hot or humid environment like the kitchen,
bathroom, sauna, sunroom, or a closed car.
• Dispose of used batteries according to the battery manufacturer’s instructions and local environment regulations
for your region.
• If the remote control will not be used for an extended period of time, remove the batteries to avoid damage to
the control from possible battery leakage.
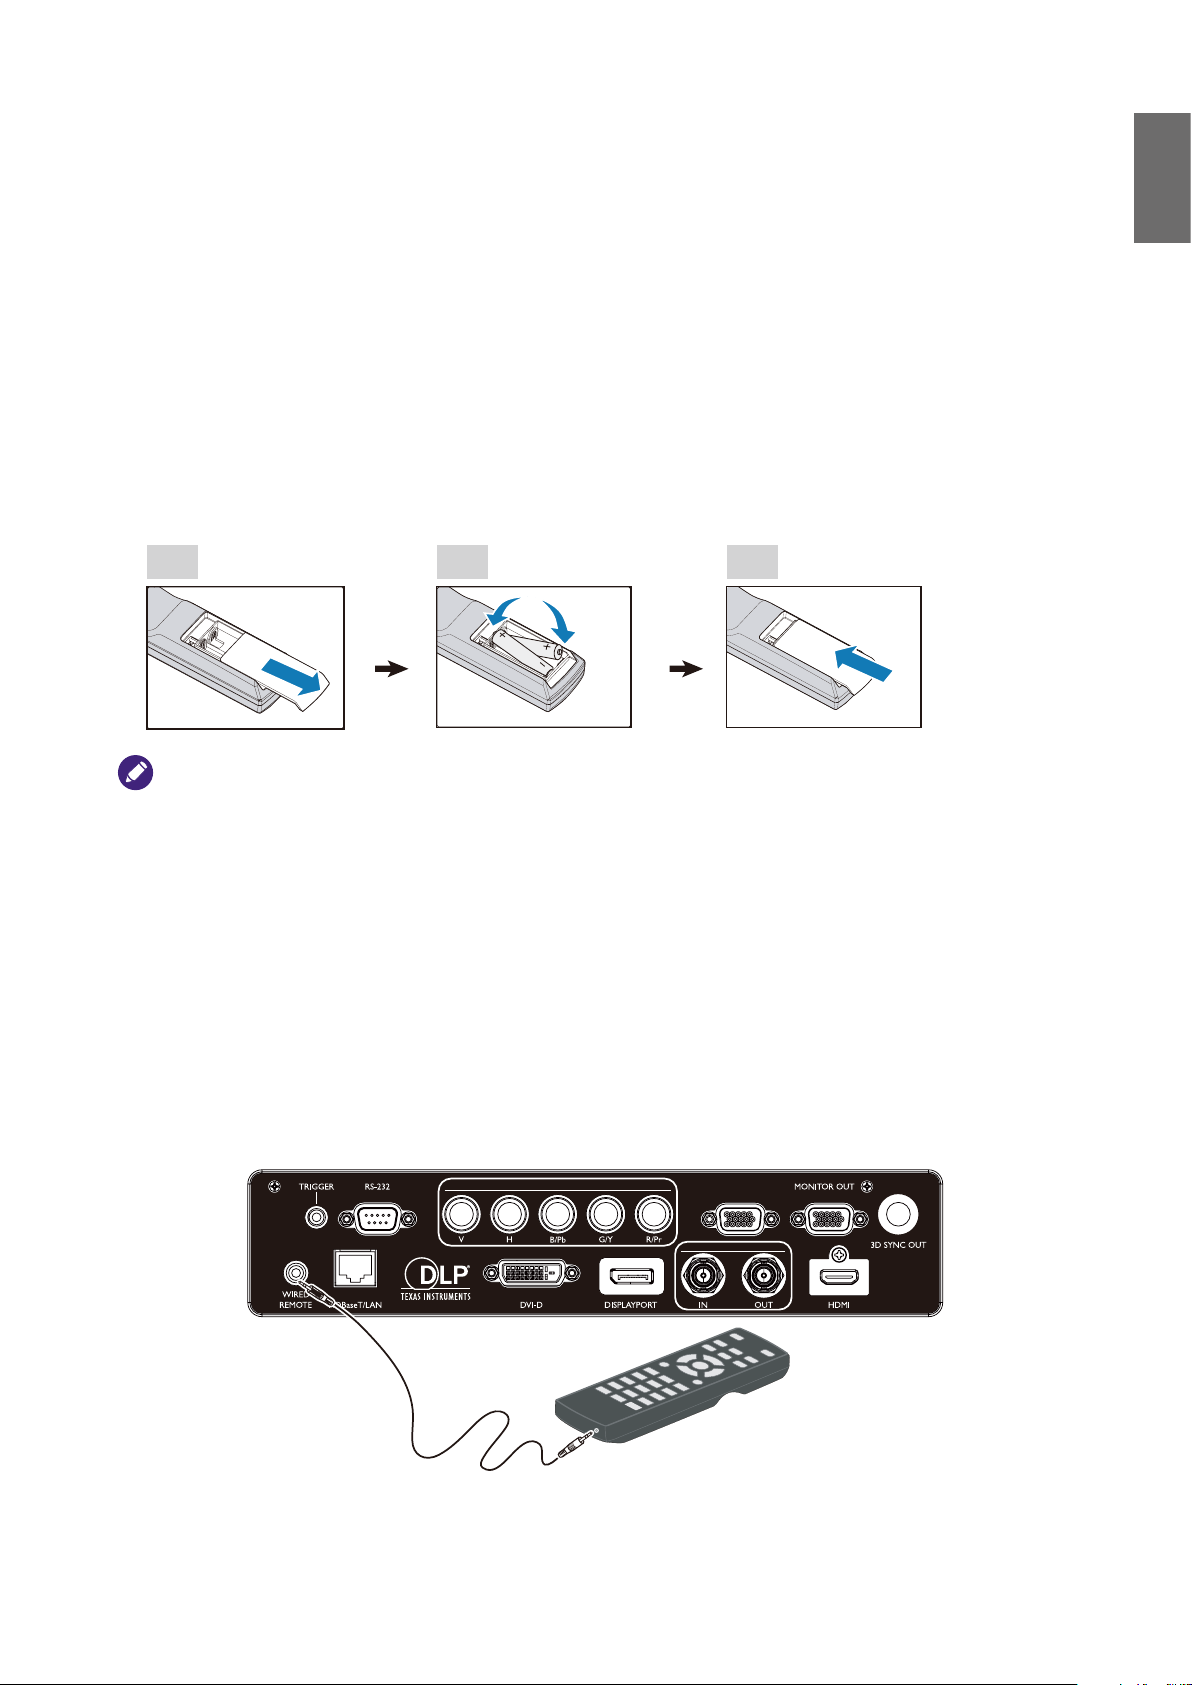
Connecting to the projector
If the path between the remote control and the projector is obstructed or remote control
operation is disrupted by certain high-frequency fluorescent lights, you can connect to the
projector with M3 stereo mini jack cable to operate the projector.
COMPUTER 2
COMPUTER 1
3G-SDI
19
Page 20

English
This side up
Projection lens selection and Installation
Note:
When installing the lens into the projector, be sure to remove the lens cap from the back of the optional lens before
installing the optional lens into the projector. Failure to do so will cause damage to the projector.
Installing the new lens
1. Remove the lens cap.
2. Insert the lens from the direction as arrow marked below then rotate the lens clockwise until
clicking sound twice.
3. Using the anti-theft screw to prevent theft of the lens. Tighten the supplied anti-theft screw on
the front bottom.
Caution
Please install lens rst, and then turn on the projector.
20
Page 21
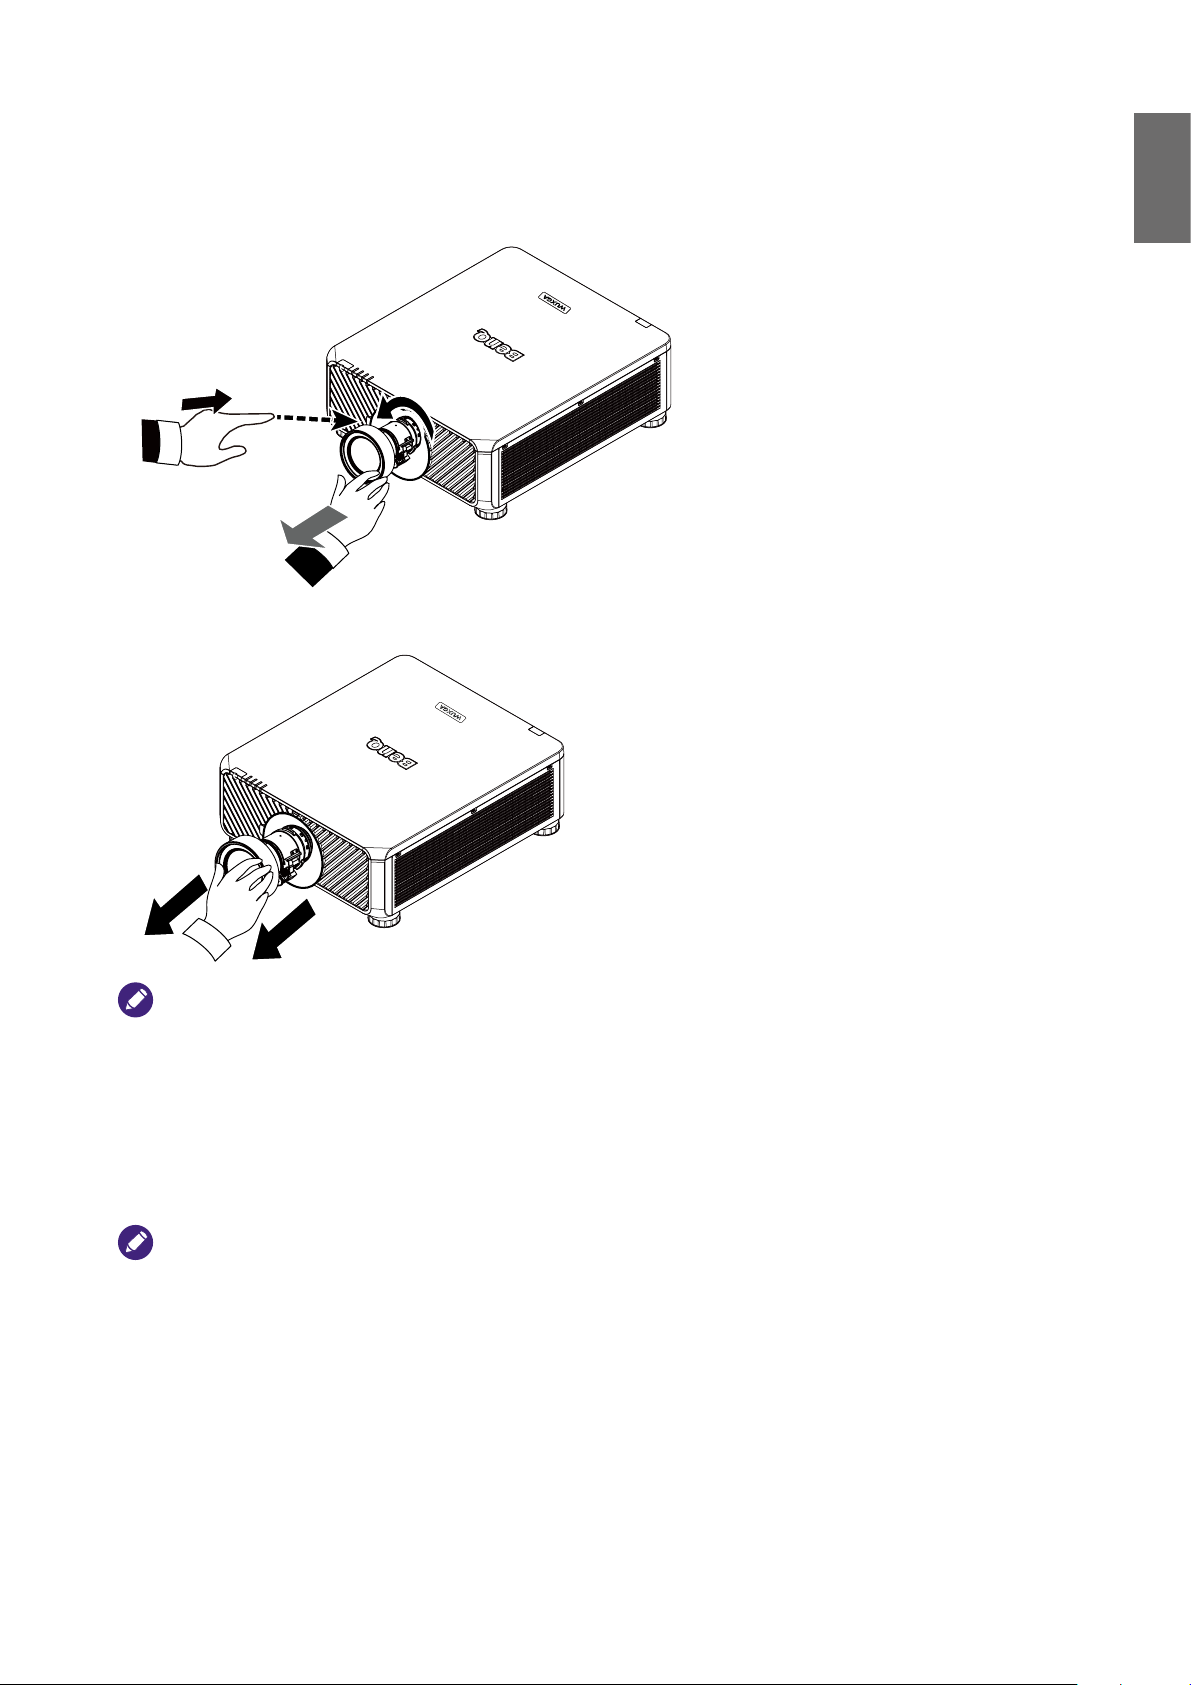
Removing the existing lens from the projector
1. Push the Lens Release button all the way in and rotate the lens counterclockwise, and the
existing lens will be disengaged.
2. Pull out the existing lens slowly.
English
Note:
• Do not shake or place excessive pressure on the projector or the lens components as the projector and lens
components contain precision parts.
• Before removing or installing the lens, be sure to turn off the projector, wait until the cooling fans stop, and turn
off the main power switch.
• Do not touch the lens surface when removing or installing the lens.
• Keep ngerprints, dust or oil off the lens surface. Do not scratch the lens surface.
• If you remove and store the lens, attach the lens cap to the projector to keep off dust and dirt.
Caution
Please turn off projector when changing or removing lens, or it will cause the projector shut down immediately
without normal procedure.
21
Page 22
English
Choosing a location
Your projector is designed to be installed in one of four possible installation locations. Your
room layout or personal preference will dictate which installation location you select. Take into
consideration the size and position of your screen, the location of a suitable power outlet, as well
as the location and distance between the projector and the rest of your equipment.
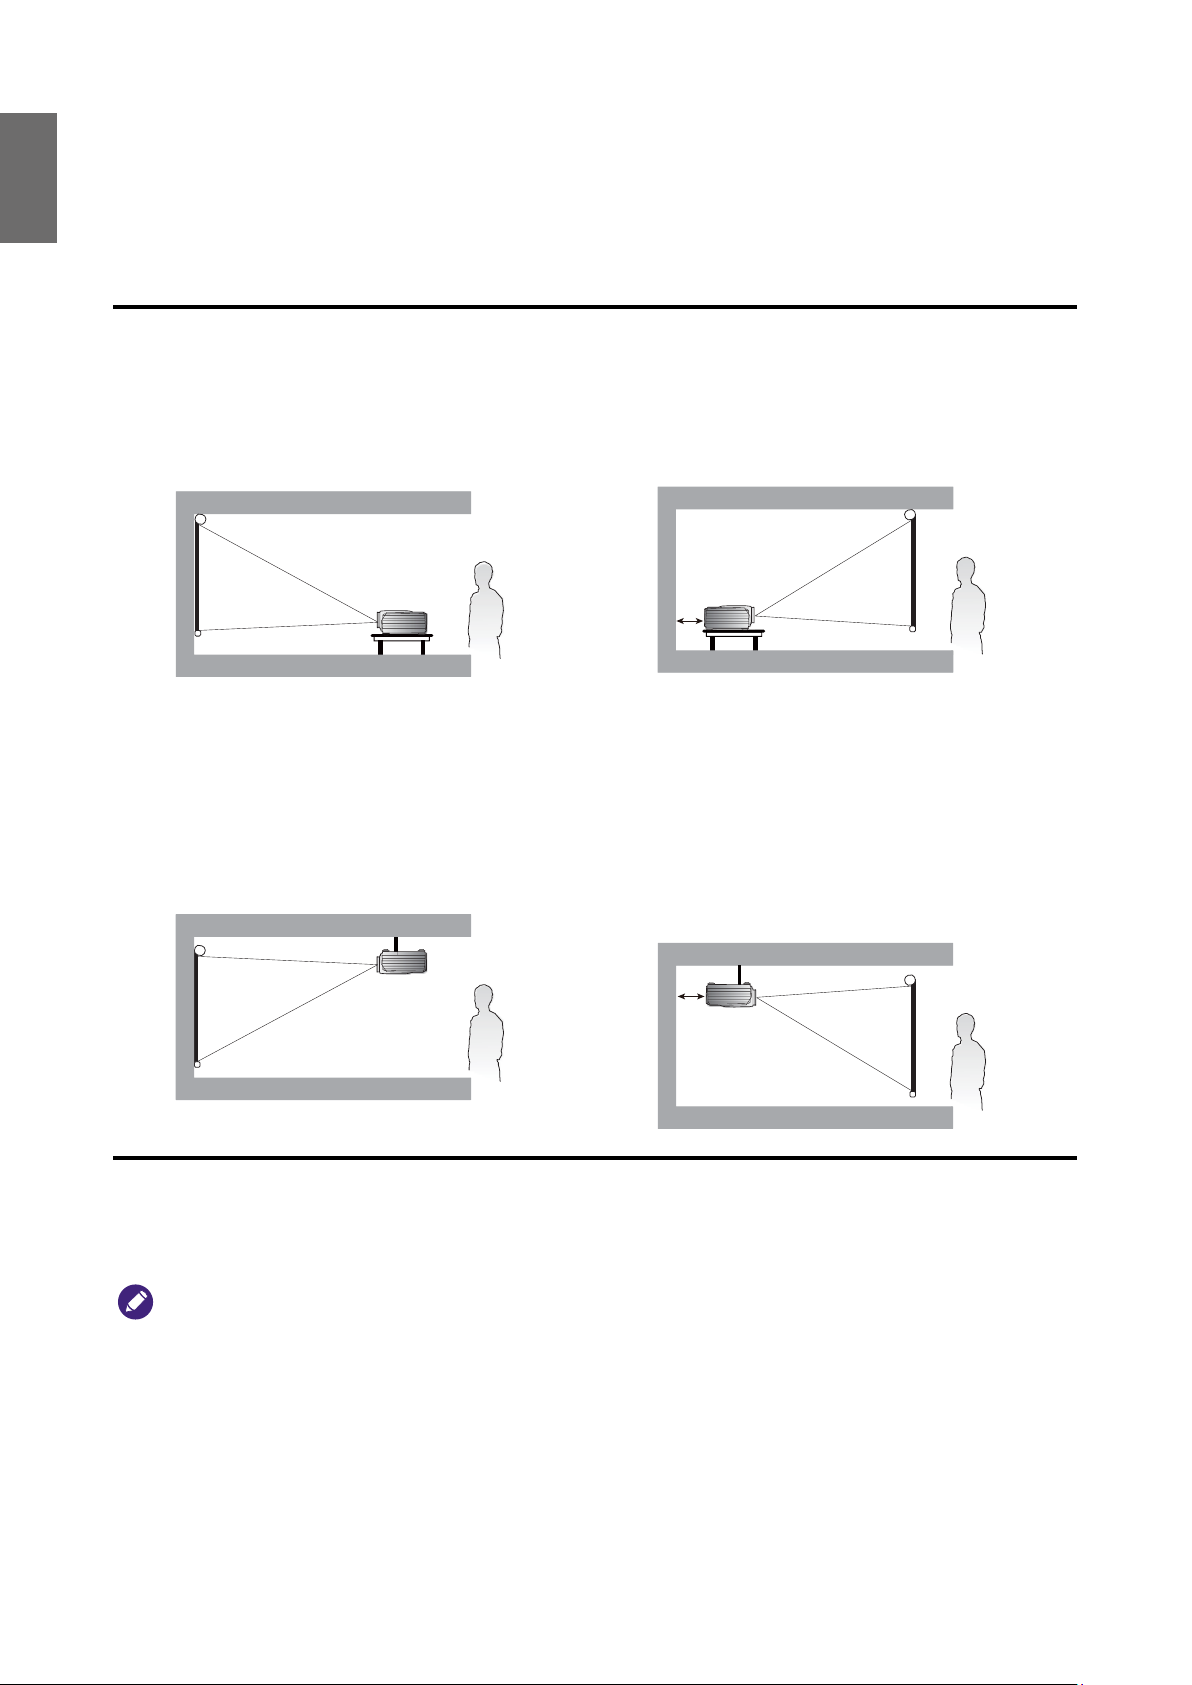
1. Front Table:
Select this location with the projector
placed near the floor in front of the
screen. This is the most common way to
position the projector for quick setup and
portability.
2. Front Ceiling:
Select this location with the projector
suspended from the ceiling in front of
the screen. Purchase the BenQ Projector
Ceiling Mount Kit from your dealer to
mount your projector on the ceiling.
*Set Ceiling Front after you turn the projector on.
3. Rear Table:
Select this location with the projector
placed near the oor behind the screen.
Note that a special rear projection screen
is required.
*Set Rear Table after you turn the projector on.
70cm
4. Rear Ceiling:
Select this location with the projector
suspended from the ceiling behind the
screen.
Note that a special rear projection screen
and the BenQ Projector Ceiling Mount Kit
are required for this installation location.
*Set Ceiling Rear after you turn the projector on.
70cm
* To set the projector position:
Press MENU and then press ◄/► to select Setup menu.
Press ▲/▼ to highlight Projector Installation and press ◄/► until the correct position is selected.
Note:
• Ceiling installation must be done by a qualied professional. Contact your dealer for more information. It is not
recommended you install the projector by yourself.
• Only use the projector on a solid, level surface. Serious injury and damage can occur if the projector is dropped.
• Do not use the projector in an environment where extreme temperature occurs. The projector must be used
at temperatures between 41 degrees Fahrenheit (5 degrees Celsius) and 104 degrees Fahrenheit (40 degrees
Celsius).
• Screen damage will occur if the projector is exposed to moisture, dust or smoke.
• Do not cover the vents on the projector. Proper ventilation is required to dissipate heat. Damage to the
projector will occur if the vents are covered
22
Page 23
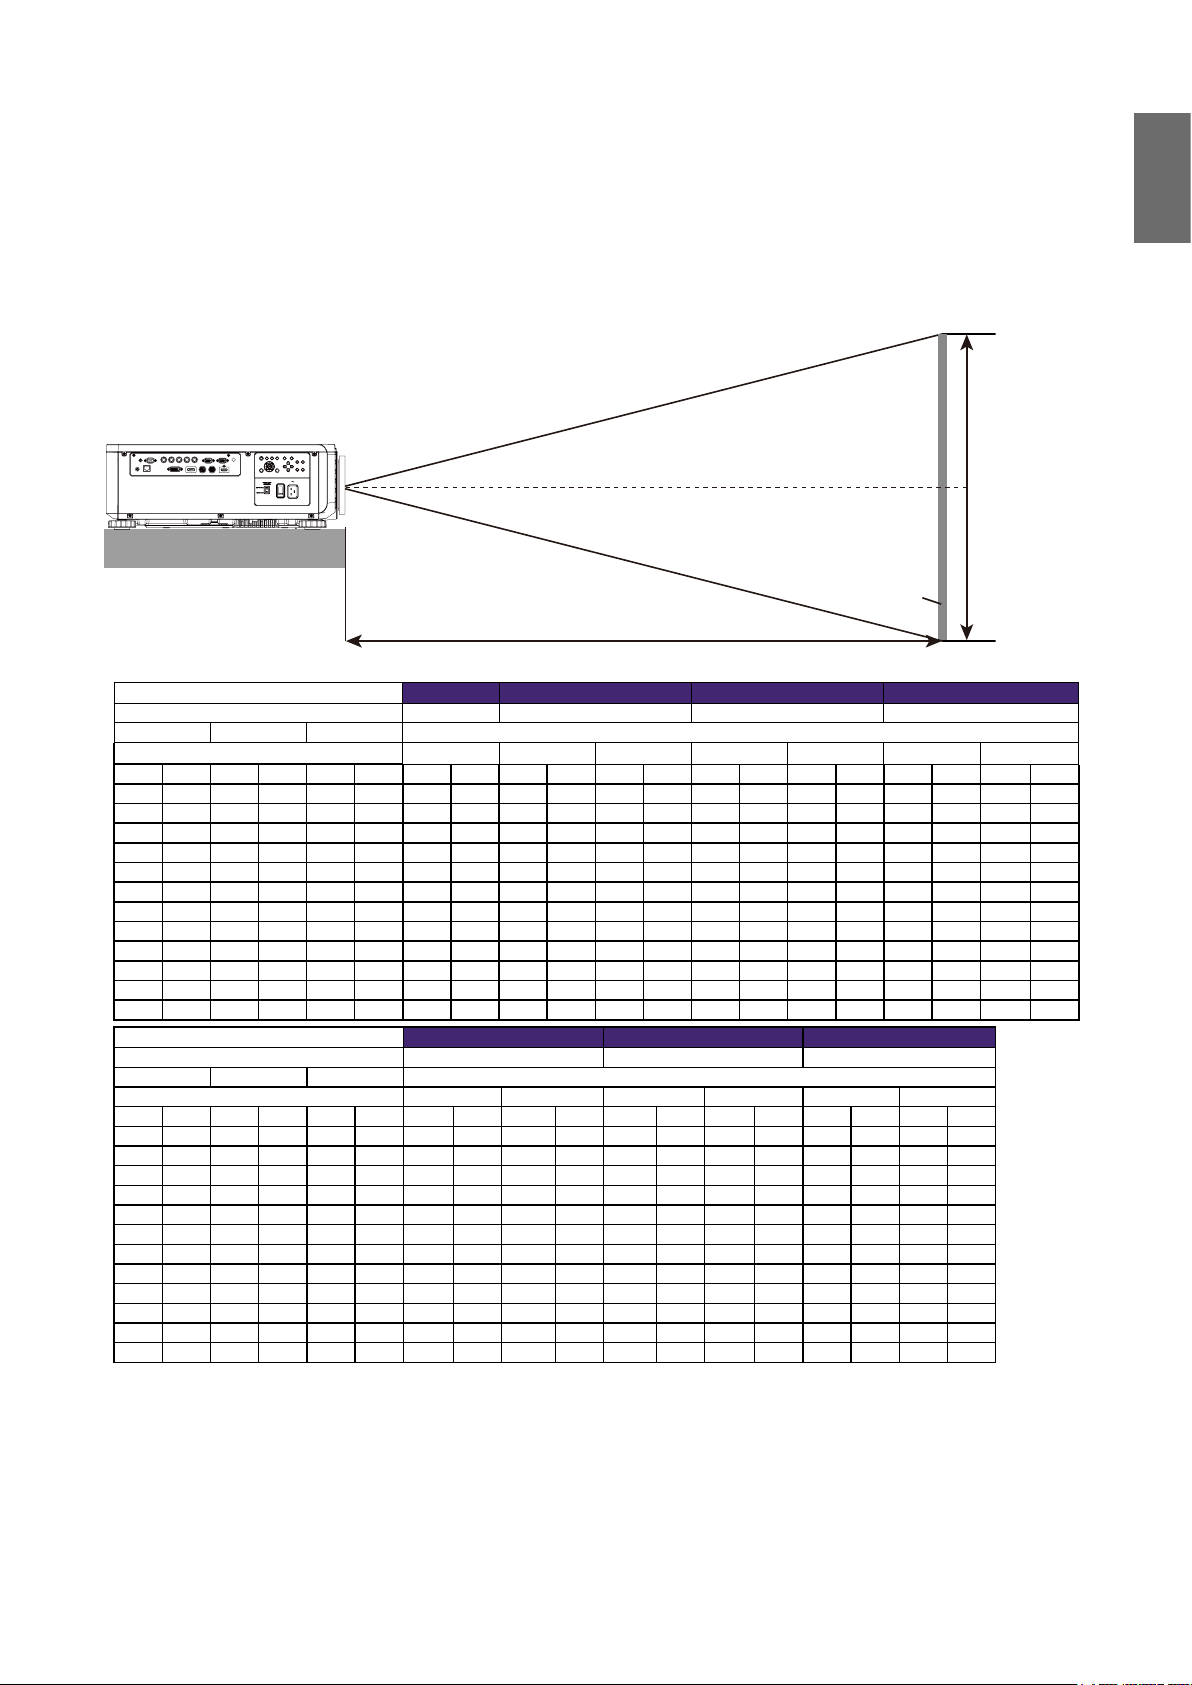
Projection distance and screen size
Example of LU9715 using Standard lens:
The further your projector is from the screen or wall, the larger the image. The minimum size the
image can be is approximately 40 inches (1 m) measured diagonally when the projector is roughly
75.8 inches (1.93 m) from the wall or screen. The largest the image can be is 500 inches (12.7 m)
when the projector is about 978.3 inches (24.85 m) from the wall or screen.
Lens center
Height (B)
SCREEN
Distance (A)
LU9715
Screen Size
Diagonal Width Height (B) Distance (A)
(inch) (m) (inch) (m) (inch) (m) (inch) (m) (inch) (m) (inch) (m) (inch) (m) (inch) (m) (inch) (m) (inch) (m)
40 1.02 34 0.86 21 0.54 25.1 0.64 41.4 1.05 59.9 1.52 57.2 1.45 75.8 1.93 73.6 1.87 124.1 3.15
50 1.27 42 1.08 26 0.67 31.8 0.81 52.3 1.33 75.4 1.92 72.1 1.83 95.5 2.42 92.9 2.36 155.9 3.96
60 1.52 51 1.29 32 0.81 38.5 0.98 63.1 1.60 90.9 2.31 87.1 2.21 115.1 2.92 112.1 2.85 187.8 4.77
80 2.03 68 1.72 42 1.08 52.0 1.32 84.9 2.16 121.8 3.09 117.0 2.97 154.3 3.92 150.5 3.82 251.4 6.39
100 2.54 85 2.15 53 1.35 65.5 1.66 106.6 2.71 152.7 3.88 147.0 3.73 193.5 4.92 188.9 4.80 315.0 8.00
120 3.05 102 2.58 64 1.62 78.9 2.01 128.4 3.26 183.6 4.66 176.9 4.49 232.8 5.91 227.6 5.78 378.6 9.62
150 3.81 127 3.23 79 2.02 99.1 2.52 161.0 4.09 230.0 5.84 221.8 5.63 291.6 7.41 285.0 7.24 474.1 12.04
180 4.57 153 3.88 95 2.42 119.3 3.03 193.6 4.92 276.4 7.02 266.7 6.77 350.5 8.90 342.6 8.70 569.5 14.47
200 5.08 170 4.31 106 2.69 132.8 3.37 215.3 5.47 307.3 7.81 296.6 7.53 389.7 9.90 381.0 9.68 633.1 16.08
300 7.62 254 6.46 159 4.04 200.1 5.08 324.0 8.23 461.9 11.73 446.3 11.34 585.9 14.9 573.2 14.56 951.2 24.16
400 10.16 339 8.62 212 5.38 267.4 6.79 432.7 10.99 616.6 15.66 595.9 15.14 782.3 19.87 765.3 19.44 1269.7 32.25
500 12.70 424 10.77 265 6.73 334.8 8.50 541.5 13.75 771.2 19.59 745.6 18.94 978.3 24.85 957.4 24.32 1587.8 40.33
Screen Size
Diagonal Width (C) Height (B) Distance (A)
(inch) (m) (inch) (m) (inch) (m) (inch) (m) (inch) (m) (inch) (m) (inch) (m) (inch) (m) (inch) (m)
40 1.02 34 0.86 21 0.54 118.7 3.01 181.0 4.60 173.9 4.42 277.7 7.05 24.5 0.62 31.1 0.79
50 1.27 42 1.08 26 0.67 149.7 3.80 227.6 5.78 220.2 5.59 350.0 8.89 31.1 0.79 39.2 1.00
60 1.52 51 1.29 32 0.81 180.7 4.59 274.1 6.96 266.6 6.77 422.3 10.73 37.6 0.96 47.4 1.20
80 2.03 68 1.72 42 1.08 242.7 6.16 367.3 9.33 359.4 9.13 567.0 14.40 50.8 1.29 63.8 1.62
100 2.54 85 2.15 53 1.35 304.3 7.73 460.4 11.70 452.1 11.48 711.6 18.07 63.9 1.62 80.2 2.04
120 3.05 102 2.58 64 1.62 366.7 9.31 553.6 14.06 544.9 13.84 856.2 21.75 77.1 1.96 96.6 2.45
150 3.81 127 3.23 79 2.02 459.4 11.67 693.3 17.61 684.0 17.37 1073.1 27.26 96.8 2.46 121.1 3.08
180 4.57 153 3.88 95 2.42 552.4 14.03 833.0 21.16 823.1 20.91 1290.1 32.77 116.5 2.96 145.7 3.70
200 5.08 170 4.31 106 2.69 614.7 15.6 926.4 23.53 915.9 23.26 1434.7 36.44 129.7 3.29 162.1 4.12
300 7.62 254 6.46 159 4.04 924.0 23.47 1392.1 35.36 1379.6 35.04 2157.8 54.81 195.4 4.96 244.0 6.20
400 10.16 339 8.62 212 5.38 1233.9 31.34 1857.9 47.19 1843.3 46.82 2880.9 73.18 261.2 6.63 325.9 8.28
500 12.70 424 10.77 265 6.73 1543.7 39.21 2323.6 59.02 2307.1 58.60 3604.0 91.54 326.9 8.30 407.7 10.36
5J.JAM37.011 5J.JAM37.021 5J.JAM37.001 5J.JAM37.051
Wide Fix Lens Wide Zoom Lens STD Lens Semi long Zoom1
Fixed Wide Tele Wide Tele Wide Tele
5J.JAM37.031 5J.JAM37.041 5J.JAM37.061
Long Zoom 1 Lens Long zoom 2 Lens Ultra Wide zoom Lens
Wide Tele Wide Tele Wide Tele
English
23
Page 24
English
216
120
285
873
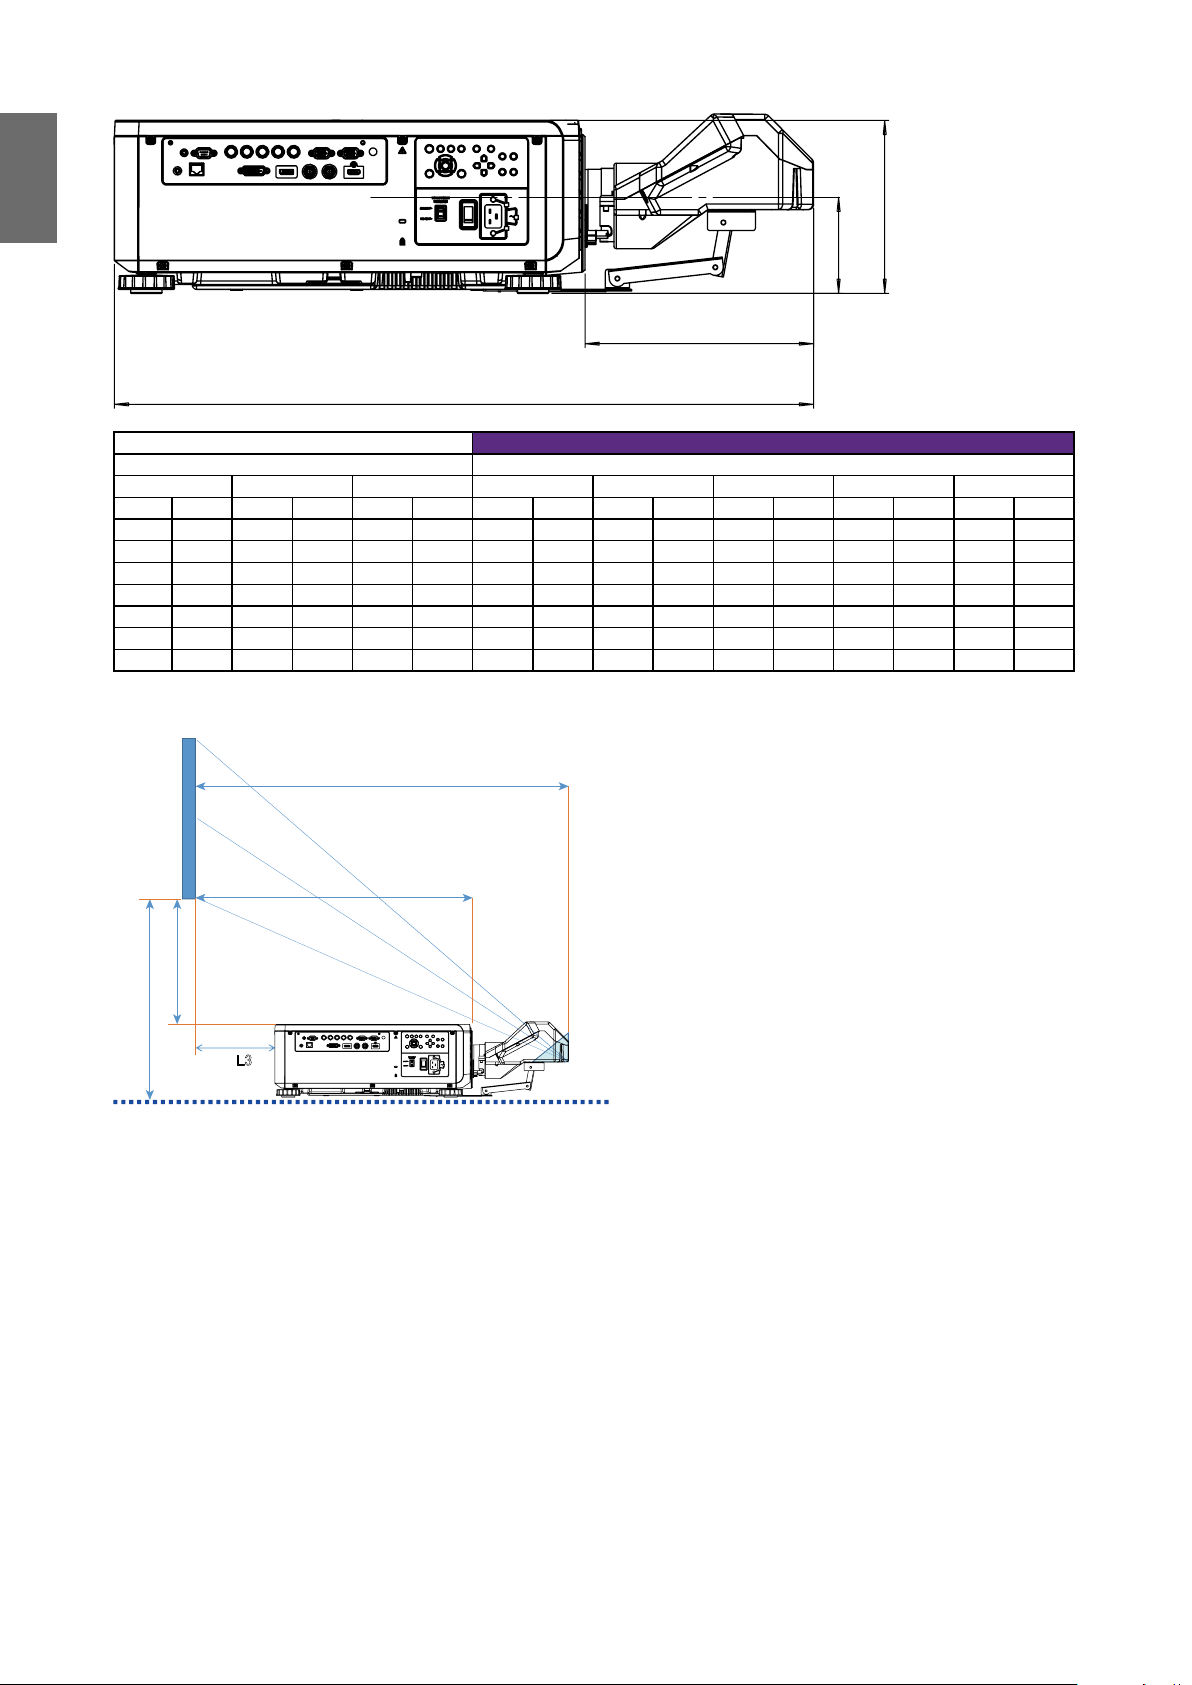
Screen size 5J.JCY37.001
Ultra Short Reection
Diagonal Width Height H1 H2 L1 L2 L3
inch mm inch mm inch mm inch mm inch mm inch mm inch mm inch mm
100 2540 85 2166 53 1355 19 485 28 701 33 849 22 564 -1 -24
120 3048 102 2599 64 1627 23 596 32 812 39 1000 28 715 5 127
150 3810 128 3247 80 2032 30 763 39 979 48 1227 37 942 14 354
200 5080 170 4330 107 2711 41 1041 49 1257 63 1606 52 1321 29 733
250 6350 213 5415 133 3391 52 1320 60 1536 78 1984 67 1699 44 1111
300 7620 256 6500 160 4071 63 1598 71 1814 93 2362 82 2077 59 1489
350 8890 299 7585 187 4752 74 1877 82 2093 108 2741 97 2456 74 1868
Screen
L1
L2
H1
H2
㻸㻟
L1: Screen to the point of mirror
L2: Screen to projector front
L3: Screen to project back
H1: Screen bottom to projector top side
H2: Screen bottom to projector bottom
24
Page 25
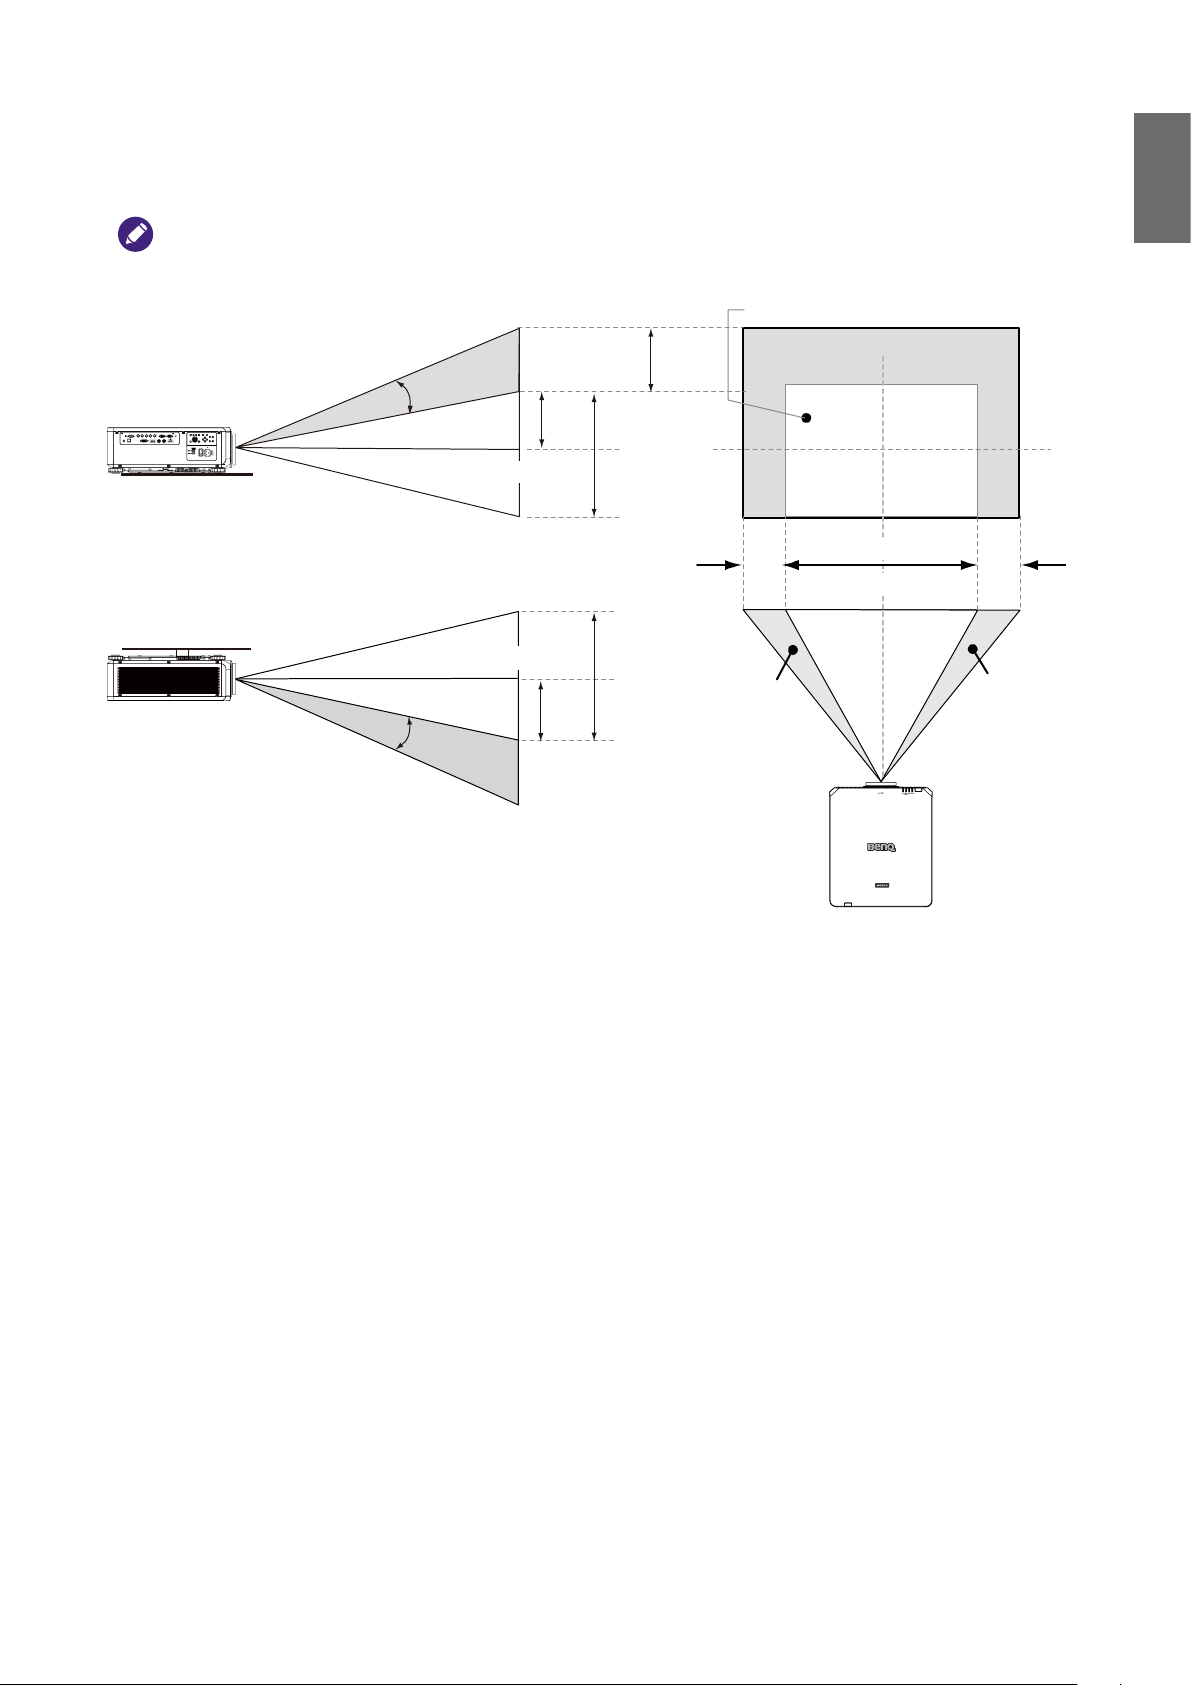
Lens shift adjustable range
The adjustable range for lens shift is tabulated below and subject to the conditions listed.
Note:
The drawings below apply to the standard lens only.
English
Desk-Front Projection
Vertical Shift
Height of projected image
Ceiling Mount-Front Projection
Height of projected image
Vertical Shift
Max
0.5V
Max
0.5V
Normal projection position
1V
0.1H
Width of projected image
1V
Shift to Left
1H
0.1H
Shift to Right
25
Page 26
English
Making connections
Preparations
When connecting a signal source to the projector, be sure to:
1. Turn off all equipment before making any connections.
2. Only use the correct type cables for each source with proper type plugs.
3. Ensure that all cable plugs are rmly tted to the equipment jacks.
Note that all cables shown in the following connection diagrams may not be supplied with the projector (See "Shipping
contents" on page 13 ). Most cables are commercially available from electronics stores.
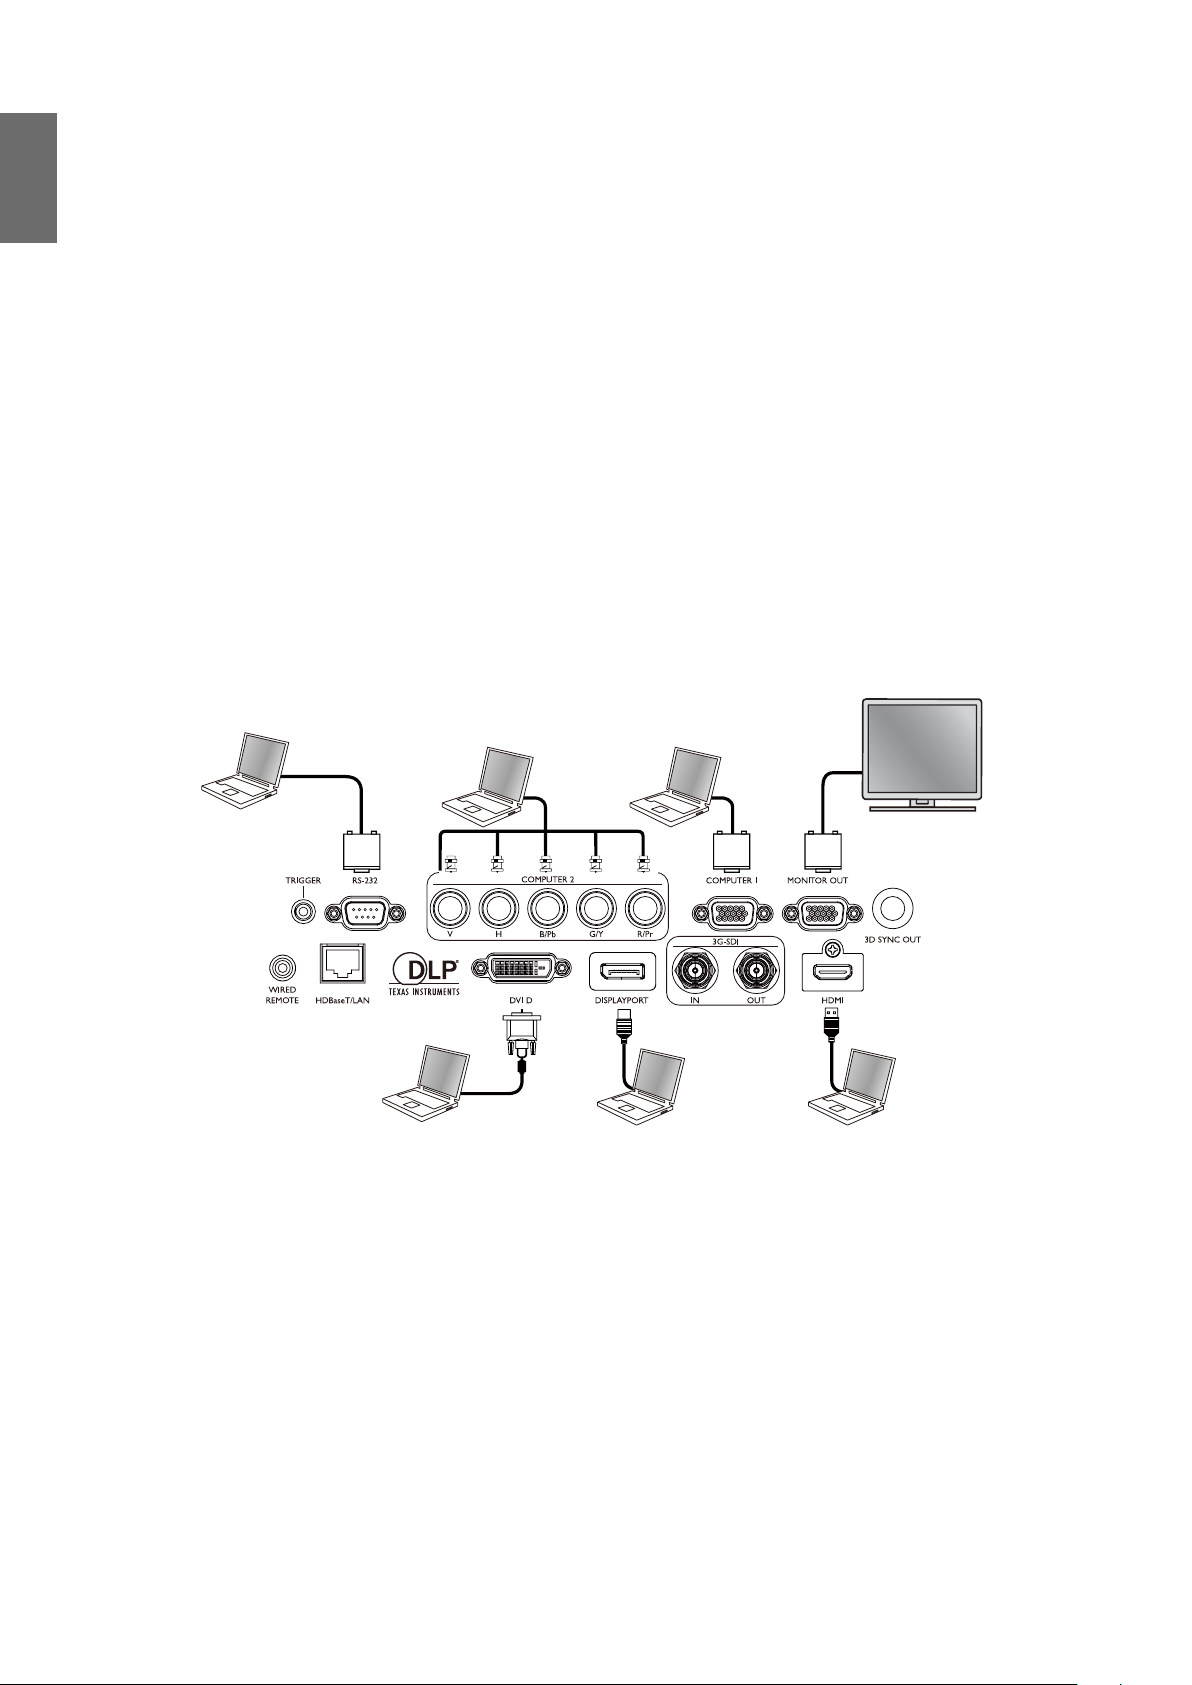
Connect to PC
You may connect a PC to your projector with a DVI-D, HDMI, RGB or RGBHV (BNC) cable for
projection, and connect an external display to your projector for concurrent viewing if the input is
RGB signal.
26
Page 27

Connect to video equipment
You may connect any video equipment to your projector’s input port with a DVI-D, HDMI,
DisplayPort or YPBPR cable.
Camera
Connect to control port
Your projector features the following control ports:
English
• HDBaseT/LAN
Your projector supports network control with shared LAN (network control) and HDBaseT.
• RS-232 (RS-232c control)
Your projector supports RS-232c serial control, you may connect the projector to a PC with
standard 9-pin serial cable (straight through wire) for remote control.
• Wired controller
If the remote controller’s IR signal fails to reach your projector because the two are too far
apart or blocked by any obstacle, you may connect the WIRED REMOTE input port of your
projector to an IR remote controller or an (optional) IR repeater to expand its working area.
• 3D Sync Out
3D IR sync signal transmitter.
27
Page 28

English
Caution:
• The projector enters wired control mode automatically and cannot be controlled by a remote controller’s IR
signal once the terminal of a remote controller is inserted in the projector’s wire port. To control your projector
with the IR signal of a remote controller again, remove the wire control terminal from the projector.
• Make sure the port is valid before inserting a wired remote controller. The remote controller may be damaged if
a port is invalid, e.g. a wired remote controller is connected to trigger output.
Connect to screen trigger
You may connect a projector screen or other 12V trigger device to the projector and turn on
trigger output in OSD Control->Trigger. The trigger port supply the 12 V signal after the projector
is powered on. After the projector is powered on it outputs 12V signal which adheres to current
aspect ratio and screen control settings for projector screen control.
Screen
28
Page 29

Connect to external digital transmitter
The projector features a built-in HDBaseT for you to work with optional digital transmitter
to send video, RS-232, LAN signal to projector with single RJ-45 cable. If the optional digital
transmitter supports IR remote controller I/O, you may also send IR remote controller signal to
LU9715 projector using the same RJ-45 cable.
DVD Player DVD Player
VGA Cable
Digital Transmitter
English
Control PC
Control PC
VGA IN
Hub
RJ-45 Cat5e or above
YPbPr
RS-232c
RJ45
Lan
HDMI RS232 RJ45
HDBaseT
Projector
Caution:
• The HDBaseT of your projector supports to video, RS-232, remote controller, and network control signal
receiving but not Power over Ethernet (PoE) transmission and receiving.
• Effective transmission distance of your digital transmitter is 100 meters. Transmission over 100 meters may lead
to projection screen interruption, interference, or control signal failure.
• Please use Cat.5e RJ-45 cable or better and prevent the cable from becoming twisted. Otherwise the cable may
be damaged and signal transmission quality poor, reducing transmission distance and image quality.
29
Page 30
English
Using the projector
Preparations
1. Plug in and turn all of the connected equipment on.
2. Insert the projection lens.
3. Plug the power cable into a wall power outlet, check the voltage switch placed at right voltage in
the region being used, and turn on AC switch.
Note:
Please use the original accessories (e.g. power cable) only with the device to avoid possible dangers such as electric
shock and re.
Please make sure the Voltage Switch is selected at the right voltage in the region where projector is being used, before
you turn on the power switch.
30
Page 31

Turning the projector on or off
Once the projector is correctly located and the power cable and other connections are in place, it
is important that the projector is connected and powered on correctly in order to avoid possible
dangers such as electric shock and re. Refer to the following guide to power on the projector.
1. Turn on the AC power switch. POWER LED is red after power has been applied.
2. Press the POWER button on the projector or ON button on the remote control to start the
projector. The Power and Light source LED ashes green and the cooling fan start operating.
3. The projected image will be displayed on the screen for a few second while it is warming up.
4. Once the power LED is lit a solid green, the projector is ready for use.
Note: The projector will not respond to further commands while it is warming up.
5. If any of the LEDs remain ashing or blink there may be a problem with the start up. Please refer
to "Indicator messages" on page 80 .
English
31
Page 32

English
Selecting an input source
The projector can be connected to multiple equipment at the same time. When the projector
is rst turned on, it will attempt to reconnect with the input source which was in use when the
projector was last shut down.
The Input Source can be selected from the projector's control panel or from the remote control.
Refer to the following guide to select the desired input source.
1. Press INPUT key on the control panel or use remote controller to select your desired input
source.
2. Press ENTER key to conrm the input selection, it will take few seconds to detect the desired
input signal and display the projected image.
Press EXIT key to projected image if you want to keep current input source.
32
Page 33

Using the menus
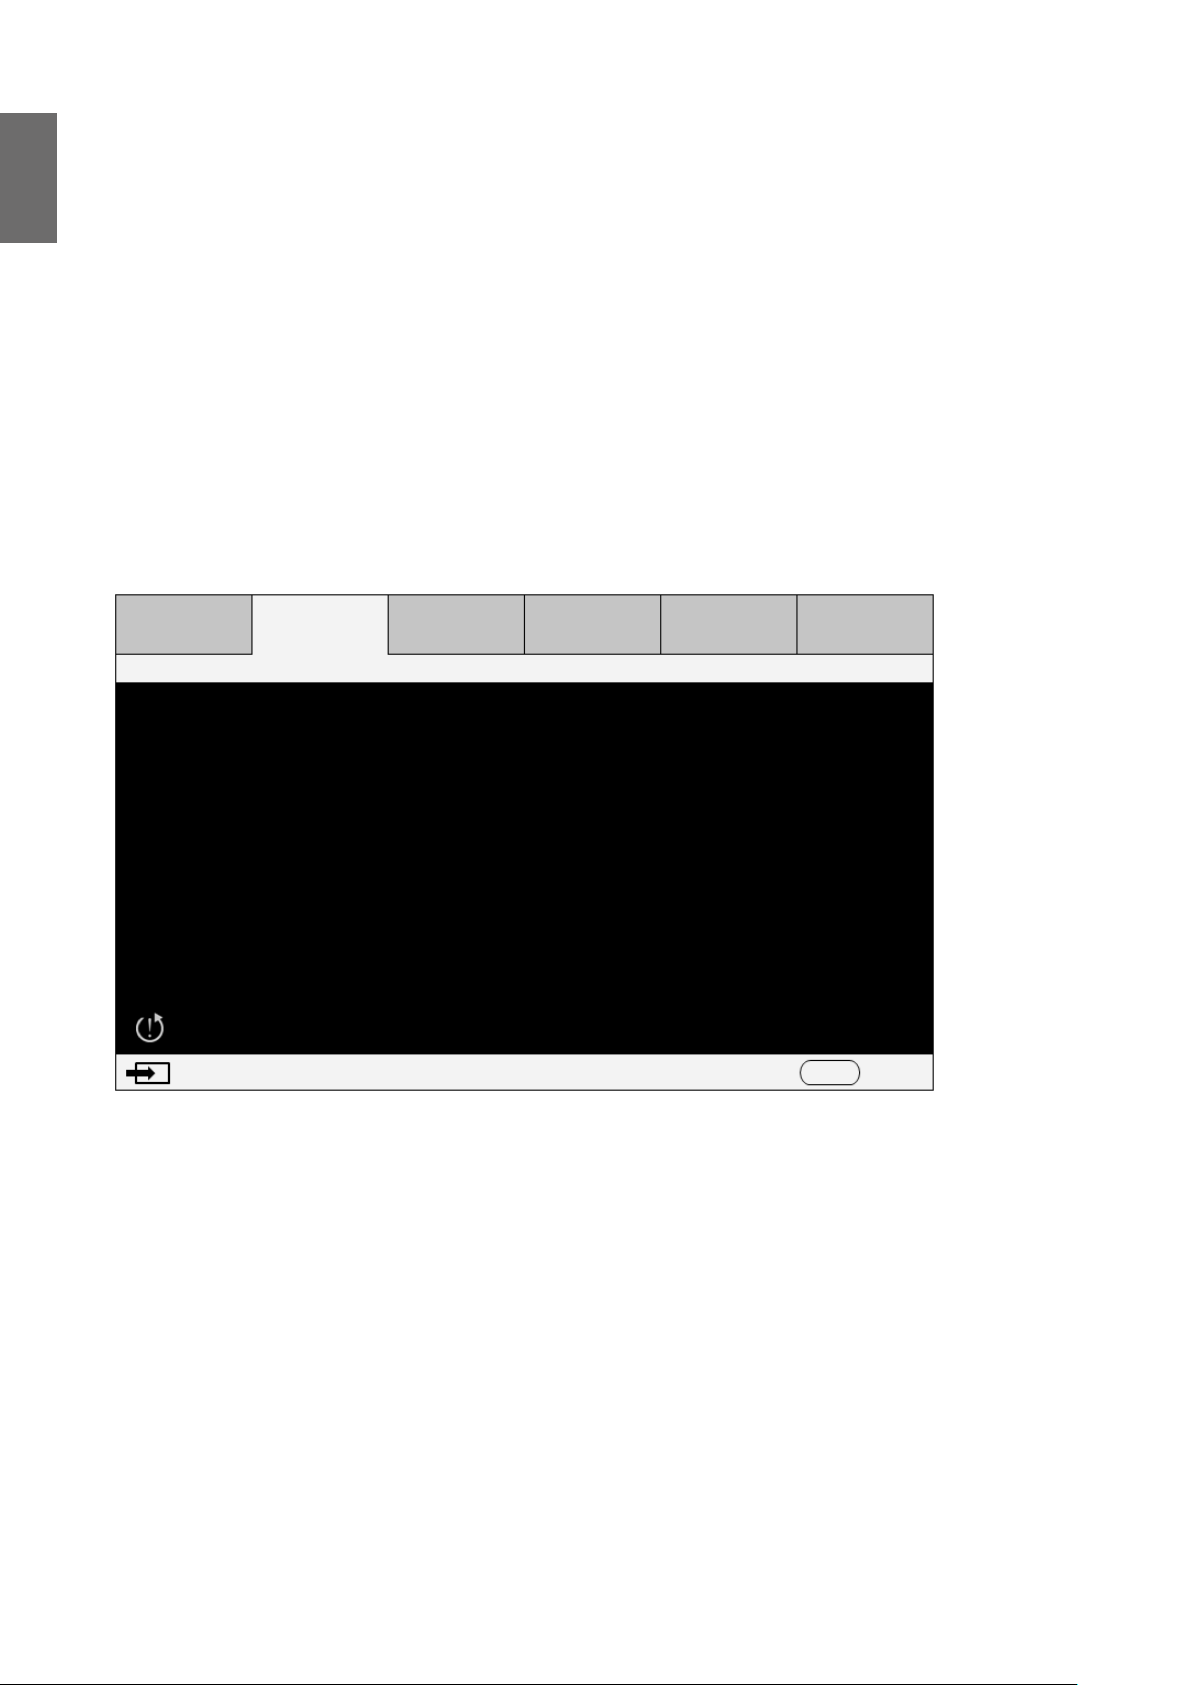
The projector is equipped with multilingual On-Screen Display (OSD) for making various
adjustment and settings. The introduction below is the overview of the OSD menu.
To use the OSD menu, please set the OSD menu to your familiar language.
English
Picture
Setup \ Language
English
Français
Español
Deutsch
Português
簡体中文
繁體中文
日本語
한국어
Svenska
русский
italiano
Computer 1 MENU Exit
Display Setup Advanced System Information
Adjusting the image position
The projected image position and size can be adjusted manually from the control panel or the
remote control unit. Refer to the following guides to adjust Picture Position manually.
Lens Control
Zoom
Focus
[Enter] Shift Adjustment
1. Press the LENS SHIFT key on the projector in any direction or LENS SHIFT key on the remote
control to bring up the Lens Shift window.
2. Press the directional key as required to shift the image.
33
Page 34

English
Fine-tuning the image size and clarity
1. Press the ZOOM + or ZOOM- button on the control panel or the remote control to adjust
the projected imaged as you desired.
2. Sharpen the picture by pressing FOCUS+ or FOCUS- button on the control panel or the
remote control.
Adjusting the projection angle
There are four adjuster feet on the bottom of the projector, these can be used if it is necessary to
change the projection angle. Screw the feet in or out as appropriate to aim and level the projection
angle.
1. Twist the adjusters clockwise to raise the
level of the projector.
Note
2. To lower the level of the projector, lift the
projector and twist the adjusters counter
clockwise.
Adjusting foot will be disassembled after lower the foot more than 4 cm.
34
Page 35

Correcting picture distortion
When the image is projected either from the top or from the bottom towards the screen at angle,
the image becomes distorted trapezoid Keystone function in the Display > Keystone can be used
to correct distortion or ◄ ► to correct vertical distortion, till you are satised with the shape.
When the values reach their maximum or minimum with repeated key presses, the picture’s shape
will stop changing. You will not be able to change the picture further in that direction.
Auto-adjusting the image
In some cases, you may need to optimize the RGB picture quality. To do this, press AUTO PC key
on remote control or AUTO SYNC on panel, the built-in Intelligent Auto Adjustment function will
re-adjust the values of Frequency and Clock to provide the best picture quality.
English
Note:
This function is only available when a PC signal (analog RGB) is selected.
35
Page 36

English
Turning off the projector
If the projector is no longer required, it is important to shut it down correctly to avoid damage or
unnecessary wear and tear to the projector. Refer to the following guide to turn the projector Off.
• Do not unplug the power cable from the wall outlet or projector when the projector is
powered on, it may cause damage to the AC IN connector of the projector and (or) the prong
plug of the power cable.
• Do not turn off the AC power supply while making adjustment or setting changes and closing
the menu, it may cause loss of adjustments and settings and return to default.
1. Press the POWER button on the control panel or OFF button on the remote control.
2. Press the POWER or OFF button again to conrm power off. The power LED ashes orange
during cooling stage; the power LED ashes solid red when projector returns to standby mode.
Power Off?
Press Power again
3. Press the AC switch to the off position (O) to turn off the main power supply without LED
indication.
36
Page 37

Using On-Screen Display
Using the Menus
The projector has an On-Screen Display (OSD) that lets you make image adjustments and change
various settings.
Navigating the OSD
You can use the remote control or the buttons on the top of the projector to navigate and make
changes to the OSD. The following illustration shows the corresponding buttons.
ENTER
English
MENU
EXIT
1
2
4
635
7089
1. To open the OSD, press the Menu button on control panel or remote control. There are six
folders on the menu. Press the cursor ◄ or ► buttons to move through secondary menus.
2. Press ▲ or ▼ to select menu items and ◄ or ► to change values for settings. Press up or
down, Press Enter to conrm the new setting.
Picture
Display
HDMI
DVI-D
COMPUTER 1
COMPUTER 2
DisplayPort
3G-SDI
HDBaseT
Display Setup Advanced System Information
HDMI MENU Exit
3. Press EXIT or MENU to leave a submenu or MENU to close menu.
37
Page 38

English
On-Screen Display (OSD) menus
Use the following illustrations to quickly nd a setting or determine the range for a setting.
Please note that the on-screen display (OSD) menus vary according to the signal type selected.
Main menu Sub-menu
Picture Picture Mode Bright
Presentation
Cinema
Brightness 0 ~ 200
Contrast 0 ~ 200
Saturation 0 ~ 200
Hue 0 ~ 200
Gamma 1.0
1.8
2.0
2.2
2.35
2.5
Color Color Temperature Native
5400K
6500K
7500K
9300K
Color Adjustment Red Offset
Green offset
Blue Offset
Red Gain
Green Gain
Blue Gain
Reset Color Adjustment
Hue Red
Green
Blue
Cyan
Magenta
Yellow
Reset Hue
Saturation Red
Green
Blue
Cyan
Magenta
Yellow
Reset Saturation
Gain Red
Green
38
Page 39

Main menu Sub-menu
Picture Color Gain Blue
Cyan
Magenta
Yellow
Reset Gain
White Balance Red
Green
Blue
Reset White Balance
Reset Color Execute
Sharpness
Noise Reduction
Overscan Off
Crop
Zoom
Reset Picture Execute Reset Picture
Ye s
No
Main menu Sub-menu
Display Source HDMI
DVI-D
COMPUTER1
COMPUTER2
DisplayPort
3G-SDI
HDBaseT
Aspect Ratio 5:4
4:3
16:10
16:9
1.88
2.35
Theaterscope
Source
Unscaled
Keystone Test Pattern
H keystone Horizontal -600 - 600
V keystone Vertical -400 - 400
Rotation -10 ~ 10 (0.25 degree /step)
Reset Execute
Rotation Rotation - 100 ~ 100 (0.25 degree /step)
Reset Execute
Pincushion / Barrel H. Pin./Barrel H and V adjustment, -150
(Pincushion) <= ( H,V ) <= 300
(Barrel)
V. Pin./Barrel H and V adjustment, -150
(Pincushion) <= ( H,V ) <= 300
(Barrel)
English
39
Page 40

English
Main menu Sub-menu
Display Keystone H keystone
V keystone
Rotation
Reset Execute
Four Corner Test Pattern
Top Left 192 <X<-192 , 120 <Y<-120
Top Right 192 <X<-192 , 120 <Y<-120
Bottom Left 192 <X<-192 , 120 <Y<-120
Bottom Right 192 <X<-192 , 120 <Y<-120
Reset Corner Fit Execute
PIP PIP ON
OFF
Source HDMI
DVI-D
COMPUTER1
COMPUTER2
DisplayPort
3G-SDI
HDBaseT
Position Top Left
Top Right
Bottom Left
Bottom Right
PBP
Position and Phase V Position 0 ~ 200
H Position 0 ~ 200
Phase 0 ~ 200
Tracking 0 ~ 200
Sync Level 0 ~ 200
3D 3D Format OFF
Auto
Side by Side (Half)
Top and Bottom
Frame Sequential
DLP Link Off
On
3D Swap Normal
Reverse
Color Space Auto
YPbPr
YCbCr
RGB-PC
RGB-Video
Reset Display Execute Reset Display
Ye s
No
40
Page 41

Main menu Sub-menu
Setup Language English
French
Español
Deutsch
Português
簡体中文
繁體中文
日本語
한국어
Svenska
Русский
Italiano
Projector Installation Front Table
Rear Table
Front Ceiling
Rear Ceiling
Auto Source Search On
Off
Lens Control (Zoom & Focus)
(Shift)
Lens Memory Load Memory Memory 1
Save Memory Memory 1
Clear Memory Memory 1
English
Memory 2
Memory 3
Memory 4
Memory 5
Memory 6
Memory 7
Memory 8
Memory 9
Memory 10
Memory 2
Memory 3
Memory 4
Memory 5
Memory 6
Memory 7
Memory 8
Memory 9
Memory 10
Memory 2
Memory 3
Memory 4
Memory 5
Memory 6
Memory 7
Memory 8
41
Page 42

English
Main menu Sub-menu
Setup Clear Memory Memory 9
Memory 10
Center Lens Execute
Digital Zoom Digital Zoom 0% ~ 100%
Digital Pan 0 ~ 100
Digital Scan 0 ~ 100
Reset Digital Zoom (OK) to execute
Light Settings Light Mode Eco
Normal
Custom
Light Power 20%~100%
High Altitude On
Auto
Test Pattern Off
White
Black
Red
Green
Blue
Checkerboard
CrossHatch
V. Burst
H. Burst
ColorBar
Test Pattern Plunge
Reset Setup Execute Reset Setup
Ye s
No
Main menu Sub-menu
Advanced Blanking To p 0 ~ 360
Bottom 0 ~ 360
Left 0 ~ 534
Right 0 ~ 534
Reset Blanking Execute
Edge Blending Status Off / On
Adjust Lines Off / On
White Level To p 0, 100 ~ 500
Bottom 0, 100 ~ 500
Left 0, 100 ~ 800
Right 0, 100 ~ 800
Black Level To p 0 ~ 32
Bottom 0 ~ 32
Left 0 ~ 32
Right 0 ~ 32
All 0 ~ 255
Red 0 ~ 255
Green 0 ~ 255
42
Page 43

Main menu Sub-menu
Advanced Blue 0 ~ 255
Reset Edge Blending Execute Reset Edge Blending
Ye s
No
Main menu Sub-menu
System Standby Mode Network
Eco
Auto Power Off On
Off
Direct Power on On
Off
Network IP Address 192.168.00.100
Subnet mask 255.255.255.0
Gateway 192.168.00.254
DHCP On
Off
Apply Execute Apply
OK
Cancel
Reset Network Execute Reset Network
Ye s
No
Background Logo
Blue
Black
White
Startup Logo On
Off
Trigger On
Off
Dynamic Black On
Off
Reset System Execute Reset System
Ye s
No
English
43
Page 44

English
Main menu Sub-menu
Information Model BenQ Projector
Serial Number W332AFHCY001
Software Version MP05-0D06-….
BenQ Firmware Version 1.00
Active Source VGA
Pixel Clock 13.50 MHZ
Signal Format NTSC
H/V Refresh Rate H: 15.736 KHZ V: 60 HZ
Light Source Usage
Inlet Ti1/Ti2 Temp.
DMD Temp.
Laser B2/B3 Temp.
Outside Temp.
FAN Speed
Reset to Default Setting Execute Reset All
Ye s
No
44
Page 45

OSD menu - Picture
English
Picture
Picture
Picture Mode
Brightness
Contrast
Saturation
Hue
Gamma
Color
Sharpness
Noise Reduction
Overscan
Reset Picture
No Signal MENU Exit
Display Setup Advanced System Information
Bright
• Picture Mode
Press
arrow key to select display mode.
◄►
Bright: Output in the highest brightness for application that requires higher brightness.
Presentation: Display the best image effect for presentation or static image projection.
Cinema: Display in best color effect for lm playback.
• Brightness
Press
arrow keys to adjust image brightness.
◄►
• Contrast
Press
arrow keys to adjust image contrast.
◄►
Caution:
Brightness and contrast are two mutually dependent factors. To achieve optimized settings you may have to ne tune
brightness settings after contrast adjustment.
• Saturation
Press
arrow keys to adjust saturation level. (The higher the level the more saturated the
◄►
color.)
• Hue
Press
arrow keys to adjust hue level of color.
◄►
• Gamma
Press
arrow keys to adjust 1.0, 1.8, 2.0, 2.2, 2.35 and 2.5 level.
◄►
• Color
Press
arrow keys to adjust color temperature of image.
◄►
Color Temperature: You can choose from 5400K, 6500K, 7500K, 9300K and Native. The
projector’s default color temperature is set at NATIVE and it is suitable for most situations.
Color Adjustment: This function allows users to adjust Gain and offset for Red, Green, and
Blue independently.
Hue: Press ENTER to enter the Hue menu. Press
to adjust settings of red, green, blue,
◄►
cyan, magenta, and yellow.
Saturation: Press ENTER to enter the Saturation menu. Press
to adjust settings of red,
◄►
green, blue, cyan, magenta, and yellow.
45
Page 46
English
Gain: Press ENTER to enter the Gain menu. Press
to adjust settings of red, green, blue,
◄►
cyan, magenta, and yellow.
White Balance: Press ENTER to enter the White Balance menu. Press
to adjust settings
◄►
of red, green, and blue.
• Sharpness
Press ENTER, and use
to adjust the sharpness, which changes the high-frequency details.
◄►
• Noise Reduction
Press
arrow key to adjust noise of projection image. This function helps eliminating image
◄►
noise caused by interlaced scanning input. In general, image noise reduction decreases value of
high frequency details and makes the image looking smoother.
• Overscan
Input source may be not an image with 16:10 ratio and there may be noise at image margin.
Select one of the three options to hide image margin.
OSD menu - Display
Picture
Display
Source
Aspect Ratio
Keystone
Rotation
Pincushion / Barrel
Four Corner
PIP
Position and Phase
3D
Color Space
Reset Picture
No Signal MENU Exit
Display Setup Advanced System Information
• Source
This functions is the same as the Hotkey on your remote controller. You can select the desired
input source with the remote controller or this function.
HDMI
This is the terminal to input HDMI signals from PC or media device.
DVI-D
This is the terminal to input DVI-D signals from PC.
Computer 1
This is the terminal to input RGB signals from PC.
Computer 2
This is the terminal to input YCbCr/YPbPr or RGB singals(RGBHV) from PC or media device.
DisplayPort
This is the terminal to input DisplayPort signal from PC or media device.
3G-SDI
This is the terminal to input uncompressed digital video from media device.
46
Page 47

HDBaseT
This is the terminal to input uncompressed high-denition video (HD) via RJ-45 cable.
• Aspect Ratio
Use this option to adjust aspect ratio.
For normal input of 16:10 the aspect ratio will look like the following images:
Normal output
16:10
Aspect ratio of
output screen
5:4
Aspect ratio of
output screen
4:3
Aspect ratio of
output screen
16:9
Aspect ratio of
output screen
1.88
English
Aspect ratio of
output screen
2.35:1
Aspect ratio of
output screen
Letter Box
Aspect ratio of
output screen
Auto
Aspect ratio of
output screen
Real
For normal input of ratio 4:3, the aspect ratio will look like the following images:
Normal output
4:3
Aspect ratio of
output screen
5:4
Aspect ratio of
output screen
2.35:1
Aspect ratio of
output screen
4:3
Aspect ratio of
output screen
Letter Box
Aspect ratio of
output screen
16:9
Aspect ratio of
output screen
Auto
Aspect ratio of
output screen
1.88
Aspect ratio of
output screen
Real
• Keystone
Select this function and press
arrow keys to correct vertical deformation caused by
◄►
projection angle.
• Rotation
Press
button to rotate the image to desirable position.
◄►
• Pincushion / Barrel
Press
button to correct pincushion/barrel distortion.
◄►
• Four Corner
Under Four Corner, a grid test pattern can be displayed to make sure the adjust change.
Top Left: Press
Top Right: Press
Bottom Left: Press
Bottom Right: Press
buttons to correct distortion at top left corner
◄►
buttons to correct distortion at top right corner
◄►
buttons to correct distortion at bottom left corner
◄►
buttons to correct distortion at bottom right corner
◄►
• PIP
PIP function enables projector to show two different input sources at the same time in the same
display. Before enabling this function, make sure to set “on” in PIP option.
Source: Press ENTER to set PIP “on”, then press ENTER to select sub source.
Note: The available input source of main and sub sources are shown as follows. Some matrixes cannot
be supported.
47
Page 48

English
Main / PIP Matrix
Main Source
COMPUTER1 COMPUTER2 HDMI DisplayPort HDBaseT 3G-SDI DVI-D
PIP source
COMPUTER1 - - ∆ O - O
COMPUTER2 - - ∆ O - O
HDMI - - ∆ O - O
DisplayPort ∆ ∆ ∆ - ∆ -
HDBaseT O O O - - -
3G-SDI - - - ∆ O O
DVI-D O O O - - O
O: Allowed combination
- : Forbidden combination
∆ : Allowed combination (Pixel rate < 165MHz)
Position
Top Left: Selected sub source displays at Top Left position.
Top Right: Selected sub source displays at Top Right position.
Bottom Left: Selected sub source displays at Bottom Left position.
Bottom Right: Selected sub source displays at Bottom Right position.
PBP: Selected sub source displays on the left-half screen.
• Position and Phase
Set up VGA signal display's V Position, H Position, Phase and Tracking.
• 3D
Set up 3D format and sync method. The projector displays options available for 3D format. If
there is no 3D signal, this function will not work. Please that ensure you have connected to
input signal before you setup 3D. DO NOT undertake 3D setup without connecting to an input
source.
Picture
Display \ 3D
3D Format Auto
DLP Link
3D Swap
HDMI MENU Exit
Display Setup Advanced System Information
Off
Normal
3D Format: Point to this option and press Enter key to enable 3D playback and set up 3D
options.
Off: Disable 3D display mode. 3D mode is enabled once Auto, Side by Side (Half), Top and
Bottom or Frame Sequential mode is selected. To disable 3D mode, select Off and then press
Enter.
Auto: Enable 3D format once, Side by Side (Half), Top and Bottom, or Frame Sequential input
format is detected. This function applies to the following input signal only:
48
Page 49

HDMI 1.4a 3D input signal
HDMI 1.4a 3D signal sent to the projector through digital transmitter.
Side by Side (Half): Set 3D format to Side by Side manually. This option applies to HDMI input
signal or HDMI signal through a digital transmitter.
Top and Bottom: Set 3D format to Top and Bottom. This option applies to HDMI, DVI, or
DisplayPort input signals or these signals through digital transmitter.
Frame Sequential: Set input format to Frame Sequential.
DLP Link: Select to disable or enable DLP Link sync.
3D Swap: Set 3D Swap to reverse if left and right eye 3D image inversion by 3D glasses is
needed. If image looks normal, keeps current settings, Normal, intact.
Caution:
The projector supports DLP Link and 3D IR sync. After 3D mode is enabled, you can sync the
signal of 3D glasses with both built-in DLP Link and external 3D IR transmitter or close the
former and rely on the latter for 3D signal sync. Please remember:
• People with the following conditions should view 3D images with great care:
- Children under six years old
- Those with light sensitization disease, history of heart disease, or poor health
- Those experiencing physical fatigue or a lack of sleep
- Those under the inuence of drugs or alcohol
• Under normal conditions it is safe to view 3D images. Some might feel uncomfortable. Please
refer to the guidelines publicized by the 3D alliance on 2008-12-10. Please take at least 5-15
minutes rest for every 30-60 minutes viewing.
• Color Space
This function enables you to change color space of input signal. In most cases, you can select
Auto to adopt the color space automatically set by the projector. You can select one of the
following options to use specic color space instead:
Auto: The projector switches to valid color space by detecting input signal.
YPbPr: Set color space to ITU-R BT.601.
YCbCr: Set color space to ITU-R BT.709.
RGB-PC: Set color space to RGB with black set to 0, 0, 0 and white to 255, 255, 255 (for 8-bit
image).
RGB-Video: Set color space to RGB with black set to 16, 16, 16 and white to 235, 235, 235 (for
8-bit image) to correspond brilliance values with values dened in digital component standard.
• Reset Display
Press “Yes” to reset all setting to default in Display OSD.
English
49
Page 50

English
OSD menu - Setup
Picture
Setup
Language
Projector Installation
Auto Source Search
Lens Control
Lens Memory
Center Lens
Digital Zoom
Light Settings
Test Pattern
Reset Setup
No Signal
Display Setup Advanced System Information
Front Table
Off
MENU Exit
• Language
Select desired language displayed in your OSD menu: English, Français, Español, Deutsch,
Português,
簡体中文
,
繁體中文, 日本語
,
한국어
, Svenska,
Русский
, Italiano.
• Projector Installation
Press
arrow key to select Projector Installation : Front Table, Rear Table, front Ceiling, rear
◄►
Ceiling.
Caution:
The cooling fan speed varies with projection mode to ensure the projector to properly
discharge heat. Be careful to choose the correct projection mode when installing your projector.
• Auto Source Search
Press
arrow key to enable/disable the Auto Source Search.
◄►
• Lens Control
Select this function or press the LENS Shift button on the remote controller to open the lens
control menu to zoom, focus or shift the lens. Press Enter key to switch zoom/focus or lens shift
menu, press
and
[Enter] Shift Adjustment
to zoom the projection size or shift the lens in vertical direction.
◄►
Lens Control
Zoom
Focus
arrow key focus the projected image or shift the lens in horizontal direction,
◄►
Lens Control
Shift
[Enter] Zoom/Focus Adjustment
• Lens Memory
The projector can memorize up to 10 sets of zoom, focus, and lens shift. You can give each
group of settings a unique name with the virtual keyboard. You can save current lens position
(horizontal and vertical), zoom and focus settings as well as retrieve and load saved lens memory
for the projector to apply the newly loaded lens shift, zoom, and focus settings.
Load Memory: To recall saved lens settings: press Enter key to display lens memory list, press
50
Page 51

arrow keys to select desired memory, and press Enter key again to retrieve and to load the
▲▼
saved lens settings. The projector can keep 10 groups of lens settings. The memory position with
lens settings will be marked in a different color and you can select only one of those settings.
English
Picture
Setup \ Lens Memory
Load Memory
Save Memory
Clear Memory
No Signal MENU Exit
Display Setup Advanced System Information
ENTER
Save Memory: Edit memory name and save current memory settings including lens shift, zoom
and focus. Press Enter key to display the virtual keyboard. Press
▲▼◄►
and Enter keys to
select or accept setup values.
Clear Memory: Select the memory set to be cleared and then press ENTER button to conrm
clearing memory set.
Picture
Memory 1 Execute
Memory 2
Memory 3
Memory 4
Memory 5
Memory 6
Memory 7
Memory 8
Memory 9
Memory 10
No Signal MENU Exit
Display Setup Advanced System Information
Setup \ Lens Memory \ Clear Memory
• Center Lens: This is the lens calibration function. The projector calibrates the lens shift, focus
and zoom parameters for the precise lens memory function. After performing this function, the
lens will be moved to the center position as factory default.
Note:
• There are two default center positions for UST (Ultra Short Throw) Lens and non-UST Lens. Make sure Lens
51
Page 52

English
Type setting is correct before performing this function.
• If Ultra Short Throw Lens is installed, make sure the support kit is detached before performing Center Lens.
• Digital Zoom
Picture
Setup \ Digital Zoom
Digital Zoom
Digital Pan
Digital Scan
Reset Digital Zoom
Computer 1 MENU Exit
Digital Zoom: Press
Digital Pan: Press
Display Setup Advanced System Information
◄►
arrow key to pan out on projection image. This is valid only when the
◄►
projected image is enlarged.
arrow key to zoom in the projection image.
Digital Scan: Press
arrow key to tilt projection image. This is valid only when the
◄►
projected image is enlarged.
Reset Digital Zoom: Press to reset Digital Zoom settings to factory default values.
Caution:
Please execute the Center Lens function every time once a lens is installed. It can to ensure that the projector
memorizes the exact lens settings.
• Light Settings
Light Mode
Press
arrow keys to select Eco (power saving), Normal, or Custom Power Level.
◄►
Eco: To project in economic mode for longer life cycle.
Normal: To project at normal power for the highest brightness output.
Custom Power Level:
Press
arrow keys to customize light output power in the range of 20-100% of normal
◄►
mode. This function is valid only when the Power option is set to Custom Power Level mode. In
the other two modes, Normal and Eco, this function is disabled (dimmed).
This function helps for fast installation of multiple projectors and regular maintenance.
High Altitude
You can use this function to turn the option to ON for switching the cooling setting if the
project is installed in a high altitude environment, the default is AUTO.
AUTO: When setting to Auto, system will auto calculate by atmosphere pressure, it may have
calculate biao compare to actual altitude.
When the temperature rises, the cooling fan speeds up, accompanying (higher louder noise)
52
Page 53

to exhaust the internal heat out of the projector ensuring its normal operation. However, the
projector may turn off automatically if it is used in an environment with at excessively high
temperature or in an area at a high altitude. In this case, you can enable this function by setting it
to ON and have the cooling fan speed up to control the internal temperature of the projector.
Note:
An area is considered high altitude when it is above 5000 feet.
• Test Pattern
The projector features a set of test patterns for installation and adjustment. Select the test
pattern function in OSD or press the TEST PATTERN button on your remote controller to
display the first test pattern, press again to display the next one. Repeat to scroll through
available test pattern or press the Exit button to exit.
• Reset Setup
Press “Yes” to reset all settings to default in Setup OSD.
OSD menu - Advanced
English
Picture
Advanced
Blanking
Edge Blending
Reset Advanced
HDMI MENU Exit
Display Setup Advanced System Information
• Blanking
Select the edge you would like to blank (Top, Bottom, Left, and Right).
• Edge Blending
This function enables you to display multiple projection images in on the same screen
simultaneously, using edge blending function to uniform images. To enable this function, please
set status to “on”.
Status: Select on to enable edge blending.
53
Page 54

English
A B
Adjust Lines: Select adjust lines to on, enabling user to adjust overlapping area.
Determine overlapped area (Range)
Green Marker Green Marker
Determine overlapped position (Position)
White Level: White level is to adjust the overlapping area for the blending. By selecting
the areas of Top, Bottom, Left, and Right, the overlapping area can be optimized as the nonoverlapping area to display a seamless picture. Adjust the line to the Edge pixel line of the other
projector.
Black Level: Black level is to compensate the non-overlapping area if the blending region is
brighter. The Red, Green, and Blue of the projector can be adjusted both simultaneously and
independently.
Reset Edge Blending: Reset edge blending settings to default setting values.
Note:
Step for Edge Blending
1. Execute “Reset to Default Setting”, for all setting value back to default.
2. In a scenario projectors being placed side by side, use zoom/focus/lens shift to the most similar
condition. The Four Corner/ Keystone can also be applied to adjust its shape. Use a grid pattern
to conrm if the blending area are overlapped well.
3. Use custom light mode to adjust the brightness level if the brightness of the projectors are not
at the same level.
4. Set edge blending status to “on”.
5. Set Adjust Lines to “on” so as to see the area being adjusted.
6. Set white level for each projector. The blending area is decided by the projected image; take an
example of the following picture, adjust the Right area of projector A, and adjust the left area of
projector B.
7. Set black level to adjust non-overlapping area.
Image 1
Image 2
54
Page 55

OSD menu - System
English
Picture
System
Standby Mode Eco
Auto Power Off
Direct Power On
Network
Background
Startup Logo
Trigger
Dynamic Black
Reset System
No Signal MENU Exit
Display Setup Advanced System Information
Off
Off
Logo
On
Off
Off
• Standby Mode
Press
arrow key to toggle switch between Network and Eco mode.
◄►
Network: The projector maintains in the standby status at the power consumption under 6W,
the projector can be turned on using the power button or network control only, RS-232 control
command and wired remote control signal via external transmitter through RJ45 cable are not
available.
Eco: The projector maintains in the standby status at the lowest power (<0.5W). In this mode,
the projector can be turned on only using the power button on the remote controller or
projector.
Note:
Some of communication ports are turned off if it is set to Eco or Network mode. Please make sure that the standby
mode is set to proper setting.
• Auto Power off
The default setting is Off. The projector powers off automatically after 20 minutes without input
signal when set to On.
• Direct Power on
The default setting is Off. The projector powers on automatically once it is connected to any
AC power supply if set to On.
• Network
You can use the network function to congure a network for projector control.
55
Page 56

English
Picture
System \ Network
Network Mode
IP Address
Subnet Mask
Gateway
DHCP
Apply
Reset Network
Computer 1 MENU Exit
Display Setup Advanced System Information
Projector Control
Off
Press
arrow keys and Enter key to select network and its settings:
▲▼
IP Address: To specify an IP address, press the Enter button to show the IP address input
window. Use the
buttons to select the number in the address to be changed. Use the
◄►
buttons to increase or decrease the number in the IP address.
Subnet Mask: Set up IP address of subnet.
Gateway: Set up IP address of gateway.
DHCP: Set DHCP to On or Off. If this is set to On, the DHCP server of the network domain
assigns an IP address to the projector. That is, the IP address is displayed in the address window
instead of being entered manually. Otherwise, the domain does not or cannot assign an IP
address, and 0. 0. 0. 0 is shown on the IP address window.
Apply: Select this button and press Enter. It takes several seconds to execute the change in
network settings till the following message disappears.
Apply Network
Yes No
For further information on network control connections and settings, please refer to the
Remote control manual.
• Background
▲▼
This function can be used to select pictures or color displayed on the blank screen. The
background colors that you can select include logo, blue, black and white.
• Startup Logo
Press
arrow keys to enable /disable the startup logo function.
◄►
• Trigger
The projector features one trigger output. If the projector comes with an auto screen device,
you can connect it to the trigger to open the screen when the projector powers up. This
function may have a 2-3 second lag before powering up.
• Dynamic Black
This function allows the projector to automatically adjust the contrast of the image during the
projection.
56
Page 57

Press
arrow key to enable/disable dynamic black mode.
◄►
• Reset System
Press “Yes” to reset all settings to default in System OSD.
OSD menu - Information
English
Picture
Information
Model BenQ Projector
Serial Number
Software Version
BenQ Firmware Version
Active Source
Pixel Clock
Signal Format
H/V Refresh Rate
Light Source Usage
Thermal Status
Reset to Default Setting
Displayport MENU Exit
Display Setup Advanced System Information
9876543219876
MP01-SD09-FD19-LD08-22-RP01-3092
1.00
Displayport
74.1B4 MHz
1080i/60Hz
H: 33.750 KHz V: 60.00 Hz
00047 HRS
Display basic information of the projector.
• Model
Projector model number.
• Serial Number
Projector serial number.
• Software Version
Version of software installed in the projector.
• BenQ Firmware Version
Version of rmware installed in the projector.
• Active Source
Display signal source being used.
• Pixel Clock
Display pixel clocking of current input signal.
• Signal Format
Display signal format of current input signal.
• H/V Refresh Rate
Display horizontal and vertical refresh rate of current image.
• Light Source Usage
Display operation hours of the projector.
• Thermal Status
The projector displays thermal detection temperature, also with fan speed RPM.
• Reset to Default Setting
Select this option to reset menu settings, including every user defined value, back to factory
default.
Caution:
Light source usage remain intact when reset settings to factory default.
57
Page 58

English
Additional information
Cleaning the lens
Clean the lens whenever you notice dirt or dust on the surface. Before you attempt to clean
the lens, turn the projector off, unplug the power cable, and leave it several minutes to cool
completely. Use a canister of compressed air to remove dust. (available from building hardware or
photographic suppliers.)
If there is stubborn dirt or smudge marks, use a proper photographic lens brush or moisten a clean
soft lens cloth with lens cleaner to gently wipe the lens surface.
Never use any type of abrasive pad, alkaline/acid cleaner, scouring powder, or volatile solvent, such
as alcohol, benzene, thinner or insecticide. Using such materials or maintaining prolonged contact
with rubber or vinyl materials may result in damage to the projector surface and cabinet material.
Note:
• Never touch the lens with your nger or rub the lens with abrasive materials. Even paper towels can damage the
lens coating. Only ever use a proper photographic lens brush, cloth, and cleaning solution.
• Do not attempt to clean the lens while the projector is switched on or is still hot from previous use. Be sure to
turn off the projector and let it cool down completely before cleaning the lens.
Care of the projector
Your projector needs little maintenance. The only thing you have to do on a regular basis is keep
the lens clean. Never remove any parts of the projector. Contact your dealer or local customer
service center if the projector fails to operate as expected.
Cleaning the projector case
Before you attempt to clean the case, turn the projector off, unplug the power cable, and leave it
several minutes to cool completely.
To remove dirt or dust, wipe the case with a soft, dry, lint-free cloth.
To remove stubborn dirt or stains, moisten a soft cloth with water and a neutral detergent. Then
wipe the case.
Never use wax, alcohol, benzene, thinner any other chemical detergents. These can damage the case.
Storing the projector
If you need to store the projector for an extended time, please:
Make sure the temperature and humidity of the storage area are within the recommended range
for the projector. Please refer to the Spec. page in this manual or consult your dealer about the
range.
Retract the adjuster feet.
58
Page 59

Specications
Model LU9715
Display Device Single Chip 0.67” DLP Technology
Resolution WUXGA
English
Input
Terminals
Output
Terminals
HDMI
(Compatible with HDCP)
DVI-D
(Compatible with HDCP)
Display Port
(Compatible with HDCP)
3G-SDI In
(Compatible with HDCP)
Computer-1
(D-sub 15p)
Computer-2
(5BNC)
HDBaseT
(Shared with RJ-45)
Monitor Out
(D-sub 15 p)
Trigger
(φ3.5mm stereo min jack)
3D IR Sync
(VESA mini din)
1
1
1
1
1
1
1
1
X1(DC 12V Output)
1
Control and
Service
Power Consumption
Operation Temperature 32ºF to 104ºF (0ºC to 40ºC )
Storage Temperature
3G-SDI Out 1
Lan (RJ-45) 1
Wired Remote
(φ3.5mm stereo min jack)
RS-232 1
Power Requirement AC 100-130V AC 200-240V
Input Current 9.50A 4.50A
(Normal Mode)
Dimensions
885W@110 V (max), 845W@220V (max)
14ºF to 140ºF (-10ºC to 60ºC), 5% to 95%
Humidity (non-condensing)
22.95˝ x 19.6˝ x 8.31˝
583mm(L) x 500mm(W) x 211mm(H)
(not including protrusions or feet)
1
Net Weight (Projector Only) 28kg
59
Page 60

English
500
583
211
Dimension
PRESS
Release
Lens
Unit: mm
60
Page 61

Timing chart
The following table shows compatible signal types, their resolution and frequency refresh rates.
Horizontal: 15kHz, 31kHz to 90 kHz, Vertical: 50 Hz to 85 Hz.
Signal
Format
PC
Apple Mac
SDTV
EDTV
Resolution Frame
640x480 59.94 X X X X
640x480 74.99 X X X X
640x480 85 X X X X
800x600 60.32 X X X X
800x600 75 X X X X
800x600 85.06 X X X X
848x480 47.95 X X X X
848x480 59.94 X X X X
1024x768 60 X X X X
1024x768 75 X X X X
1024x768 85 X X X X
1152x864 75 X X X X
1280x720 47.95 X X X X
1280x800 75 X X X X
1280x1024 60.02 X X X X
1280x1024 75.02 X X X X
1280x1024 85.02 X X X X
1366x768 60 X X X X
1600x1200 60 X X X X
1920x1080 47.95 X X X X
1680x1050 59.94 X X X X
1920x1200 RB 50 X X X X
1920x1200 RB 60 X X X X
1400x1050 60 X X X X
1366x768 60 X X X X
1440x900 60 X X X X
1280x768 60 X X X X
1280x800 60 X X X X
1280x960 60 X X X X
640x480 66.59 X X X X
832x624 74.54 X X X X
1024x768 75 X X X X
1152x870 75 X X X X
480i 59.94 X X
1440x480i 60 X X X X
1440x576i 50 X X X X
576i 50 X X
480p 59.94 X X X X X X X X
576p 50 X X X X X X X X
Rate
(Hz)
Computer
1, 2 -SOG
Computer 1, 2
- RGBHV
DisplayPort
/ DVI-D
HDMI /
HD-BaseT
RGB YUV 3G
8-bit 10-bit 12-bit
HD/SDI
English
61
Page 62

English
Signal
Format
HDTV
HDTV
PsF formats
X=support
timing
Resolution Frame
1035i 60 X X X X X X X X X
1080i 50 X X X X X X X X X
1080i 59.94 X X X X X X X X X
1080i 60 X X X X X X X X X
720p 50 X X X X X X X X X
720p 59.94 X X X X X X X X X
720p 60 X X X X X X X X X
1080p 23.98 X X X X X X X X X
1080p 24 X X X X X X X X X
1080p 25 X X X X X X X X X
1080p 29.97 X X X X X X X X X
1080p 30 X X X X X X X X X
1080p 50 X X X X X X X X X
1080p 59.94 X X X X X X X X X
1080p 60 X X X X X X X X X
1080sf 30 X
1080sf 25 X
Rate
(Hz)
Computer
1, 2 -SOG
Computer 1, 2
- RGBHV
DisplayPort
/ DVI-D
HDMI /
HD-BaseT
RGB YUV 3G
8-bit 10-bit 12-bit
HD/SDI
3D supported timing
3D formats Resolution V-Freq (Hz) V-Total
720p50 Frame Packing 1280x720 50 1470 37.5 V
720p59 Frame Packing 1280x720 59.94 1470 44.96 V
720p60 Frame Packing 1280x720 60 1470 45 V
720p50 Top-and-
Bottom
720p59 Top-and-
Bottom
720p60 Top-and-
Bottom
1080p23 Frame Packing 1920x1080 23.98 2205 26.97 V
1080p24 Frame Packing 1920x1080 24 2205 27 V
1080i50 Side-by-Side
(Half)
1080i59 Side-by-Side
(Half)
1080i60 Side-by-Side
(Half)
1080p50 Side-by-Side
(Half)
1080p59 Side-by-Side
(Half)
1080p60 Side-by-Side
(Half)
1080p50 Top-and-
Bottom
1280x720 50 750 37.5 V V
1280x720 59.94 750 44.96 V V
1280x720 60 750 45 V V
1920x1080 50 1125 56.25 V V
1920x1080 59.94 1125 67.43 V V
1920x1080 60 1125 67.5 V V
1920x1080 50 1125 56.25 V V
1920x1080 59.94 1125 67.43 V V
1920x1080 60 1125 67.5 V V
1920x1080 50 1125 56.25 V V
H-Freq
(kHz)
HDMI/
HDBaseT
DisplayPort
/DVI-D
62
Page 63
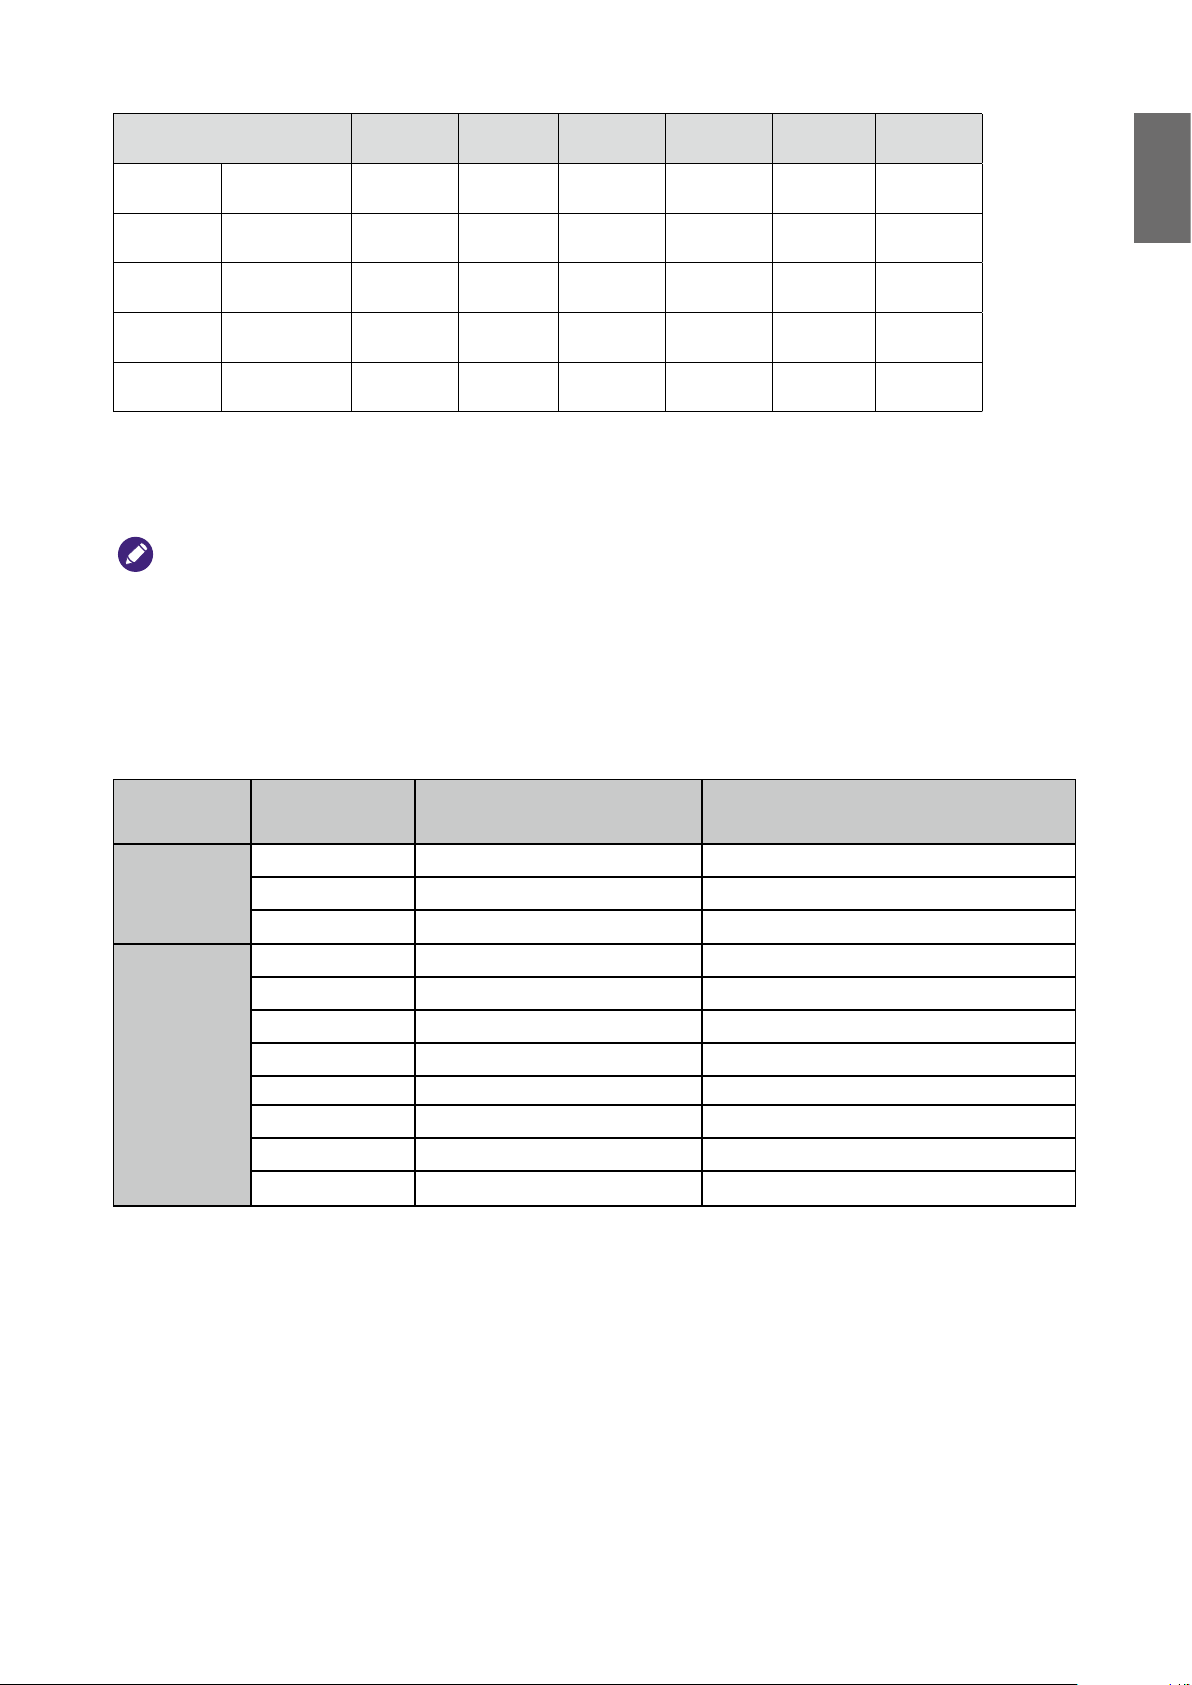
3D formats Resolution V-Freq (Hz) V-Total
1080p59 Top-and-
Bottom
1080p60 Top-and-
Bottom
1080p50 Frame
Sequential
1080p59 Frame
Sequential
1080p60 Frame
Sequential
1920x1080 59.94 1125 67.43 V V
1920x1080 60 1125 67.5 V V
1920x1080 50 1125 56.25 V V
1920x1080 59.94 1125 67.43 V V
1920x1080 60 1125 67.5 V V
H-Freq
(kHz)
HDMI
DisplayPort
/DVI-D
3D Glasses specication
- Refreshing rate: 96/100/120Hz
- Sync operation type: DLP Link / IR
• An image with higher or lower resolution than the projector’s native resolution will be compressed.
• Some Sync on Green signals may not be displayed correctly.
• Signals other than those specied in the table above may not be displayed correctly. If this should happen, change
the refresh rate or resolution on your PC.
English
RS232 command control
Function Type Description ASCII
Write Power On <CR>*pow=on#<CR>
Power
Source Selection
Write Power off <CR>*pow=off#<CR>
Read Power Status <CR>*pow=?#<CR>
Write COMPUTER/YPbPr <CR>*sour=RGB#<CR>
Write COMPUTER 2/YPbPr2 <CR>*sour=RGB2#<CR>
Write DVI-D <CR>*sour=dvid#<CR>
Write HDMI <CR>*sour=hdmi#<CR>
Write DisplayPort <CR>*sour=dp#<CR>
Write 3G-SDI <CR>*sour=sdi#<CR>
Write HDBaseT <CR>*sour=hdbaset#<CR>
Read Current source <CR>*sour=?#<CR>
63
Page 64

English
Picture Setting
Write Bright <CR>*appmod=bright#<CR>
Write Presentation
Write Cinema <CR>*appmod=cine#<CR>
Read Picture Mode <CR>*appmod=?#<CR>
Write Brightness + <CR>*bri=+#<CR>
Write Brightness - <CR>*bri=-#<CR>
Read Brightness value <CR>*bri=?#<CR>
Write Contrast + <CR>*con=+#<CR>
Write Contrast - <CR>*con=-#<CR>
Read Contrast value <CR>*con=?#<CR>
Write Hue + <CR>*hue=+#<CR>
Write Hue - <CR>*hue=-#<CR>
Read Hue value <CR>*hue=?#<CR>
Write Color + <CR>*color=+#<CR>
Write Color - <CR>*color=-#<CR>
Read Color value <CR>*color=?#<CR>
Write Sharpness + <CR>*sharp=+#<CR>
Write Sharpness - <CR>*sharp=-#<CR>
Read Sharpness value <CR>*sharp=?#<CR>
<CR>*appmod=preseT#<CR>
Write Gamma 1.0 <CR>*gm=1.0#<CR>
Write Gamma 1.8 <CR>*gm=1.8#<CR>
Write Gamma 2.0 <CR>*gm=2.0#<CR>
Write
Write Gamma 2.35 <CR>*gm=2.35#<CR>
Write Gamma 2.5 <CR>*gm=2.5#<CR>
Read Gamma Status <CR>*gm=?#<CR>
Write Noise Reduction + <CR>*nr=+#<CR>
Write Noise Reduction - <CR>*nr=-#<CR>
Read Noise Reduction value <CR>*nr=?#<CR>
Gamma 2.2 <CR>*gm=2.2#<CR>
64
Page 65
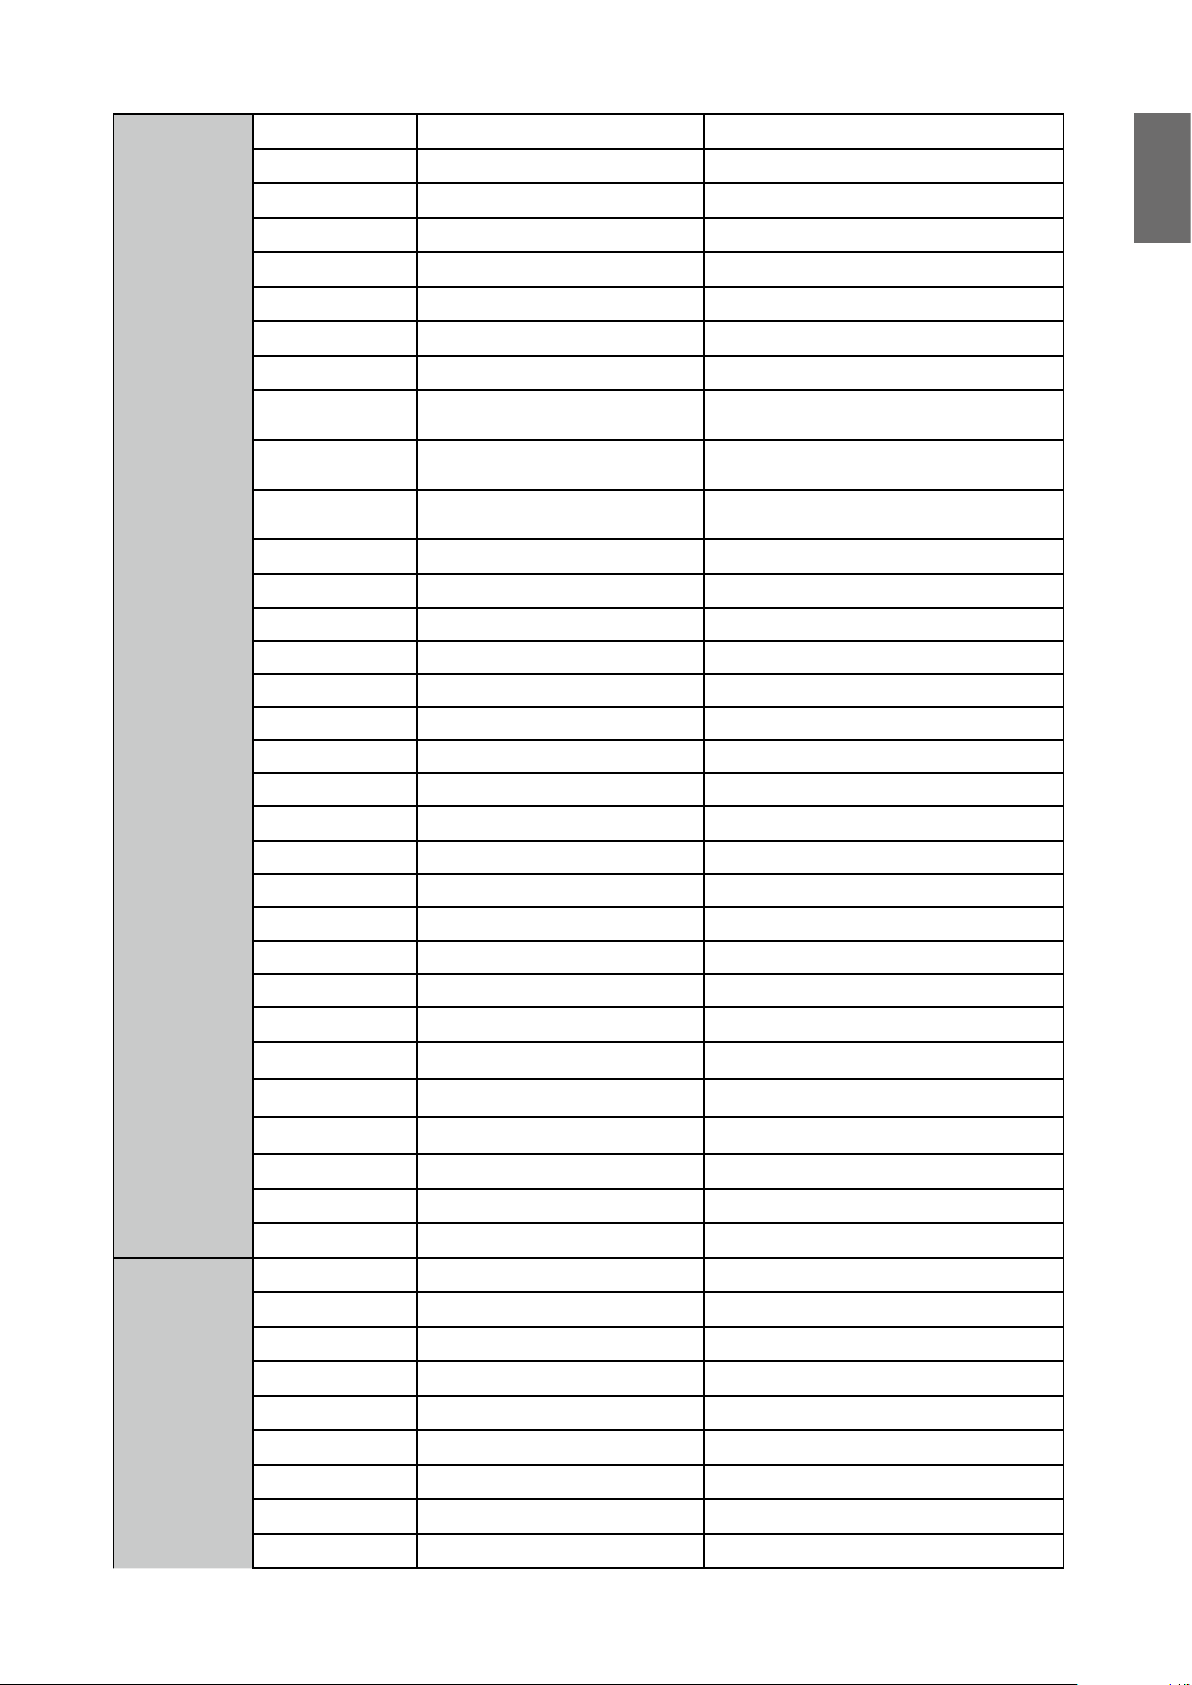
Picture Setting
Write Overscan Off <CR>*ov=off#<CR>
Write Overscan Crop <CR>*ov=crop#<CR>
Write Overscan Zoom <CR>*ov=zoom#<CR>
Read Overscan Status <CR>*ov=?#<CR>
Write Reset picture settings <CR>*picture=reset#<CR>
Write Digital Zoom In <CR>*zoomI#<CR>
Write Digital Zoom out <CR>*zoomO#<CR>
Write Auto <CR>*auto#<CR>
Write Color Tempera-
ture-Warmer(5400K)
Write Color Temperature-Warm
(6500K)
Write Color Temperature-Normal
(7500K)
Write Color Temperature-Cool (9300K) <CR>*ct=cool#<CR>
Write Color Temperature-lamp native <CR>*ct=native#<CR>
Read Color Temperature Status <CR>*ct=?#<CR>
Write Color Red Offset + <CR>*roffset=+#<CR>
Write Color Red Offset - <CR>*roffset=-#<CR>
Read Color Red Offset value <CR>*roffset=?#<CR>
Write Color Green Offset + <CR>*goffset=+#<CR>
Write Color Green Offset - <CR>*goffset=-#<CR>
Read Color Green Offset value <CR>*goffset=?#<CR>
<CR>*ct=warmer#<CR>
<CR>*ct=warm#<CR>
<CR>*ct=normal#<CR>
English
Picture Settings :
Color Adjustment
Picture Settings :
Hue
Write Color Blue Offset + <CR>*boffset=+#<CR>
Write Color Blue Offset - <CR>*boffset=-#<CR>
Read Color Blue Offset value <CR>*boffset=?#<CR>
Write Color Red Gain + <CR>*rgain=+#<CR>
Write Color Red Gain - <CR>*rgain=-#<CR>
Read Color Red Gain value <CR>*rgain=?#<CR>
Write Color Green Gain + <CR>*ggain=+#<CR>
Write Color Green Gain - <CR>*ggain=-#<CR>
Read Color Green Gain value <CR>*ggain=?#<CR>
Write Color Blue Gain + <CR>*bgain=+#<CR>
Write Color Blue Gain - <CR>*bgain=-#<CR>
Read Color Blue Gain value <CR>*bgain=?#<CR>
Write Hue Red + <CR>*huer=+#<CR>
Write Hue Red - <CR>*huer=-#<CR>
Read Hue Red value <CR>*huer=?#<CR>
Write Hue Green + <CR>*hueg=+#<CR>
Write Hue Green - <CR>*hueg=-#<CR>
Read Hue Green value <CR>*hueg=?#<CR>
Write Hue Blue + <CR>*hueb=+#<CR>
Write Hue Blue - <CR>*hueb=-#<CR>
Read Hue Blue value <CR>*hueb=?#<CR>
65
Page 66

English
Write Hue Cyan + <CR>*huec=+#<CR>
Write Hue Cyan - <CR>*huec=-#<CR>
Read Hue Cyan value <CR>*huec=?#<CR>
Picture Settings :
Hue
Picture Settings :
Saturation
Write Hue Magenta + <CR>*huem=+#<CR>
Write Hue Magenta - <CR>*huem=-#<CR>
Read Hue Magenta value <CR>*huem=?#<CR>
Write Hue Yellow + <CR>*huey=+#<CR>
Write Hue Yellow - <CR>*huey=-#<CR>
Read Hue Yellow value <CR>*huey=?#<CR>
Write Saturation Red + <CR>*satr=+#<CR>
Write Saturation Red - <CR>*satr=-#<CR>
Read Saturation Red value <CR>*satr=?#<CR>
Write Saturation Green + <CR>*satg=+#<CR>
Write Saturation Green - <CR>*satg=-#<CR>
Read Saturation Green value <CR>*satg=?#<CR>
Write Saturation Blue + <CR>*satb=+#<CR>
Write Saturation Blue - <CR>*satb=-#<CR>
Read Saturation Blue value <CR>*satb=?#<CR>
Write Saturation Cyan + <CR>*satc=+#<CR>
Write Saturation Cyan - <CR>*satc=-#<CR>
Picture Settings : Gain
Read Saturation Cyan value <CR>*satc=?#<CR>
Write Saturation Magenta + <CR>*satm=+#<CR>
Write Saturation Magenta - <CR>*satm=-#<CR>
Read Saturation Magenta value <CR>*satm=?#<CR>
Write Saturation Yellow + <CR>*saty=+#<CR>
Write Saturation Yellow - <CR>*saty=-#<CR>
Read Saturation Yellow value <CR>*saty=?#<CR>
Write Gain Red + <CR>*gainr=+#<CR>
Write Gain Red - <CR>*gainr=-#<CR>
Read Gain Red value <CR>*gainr=?#<CR>
Write Gain Green + <CR>*gaing=+#<CR>
Write Gain Green - <CR>*gaing=-#<CR>
Read Gain Green value <CR>*gaing=?#<CR>
Write Gain Blue + <CR>*gainb=+#<CR>
Write Gain Blue - <CR>*gainb=-#<CR>
Read Gain Blue value <CR>*gainb=?#<CR>
Write Gain Cyan + <CR>*gainc=+#<CR>
Write Gain Cyan - <CR>*gainc=-#<CR>
Read Gain Cyan value <CR>*gainc=?#<CR>
Write Gain Magenta + <CR>*gainm=+#<CR>
Write Gain Magenta - <CR>*gainm=-#<CR>
Read Gain Magenta value <CR>*gainm=?#<CR>
66
Page 67

Picture Settings : Gain
Write Gain Yellow + <CR>*gainy=+#<CR>
Write Gain Yellow - <CR>*gainy=-#<CR>
Read Gain Yellow value <CR>*gainy=?#<CR>
English
Picture Settings :
White Balance
Picture Settings :
White Balance
Write White balance Red + <CR>*wbr=+#<CR>
Write White balance Red - <CR>*wbr=-#<CR>
Read White balance Red value <CR>*wbr=?#<CR>
Write White balance Green + <CR>*wbg=+#<CR>
Write White balance Green - <CR>*wbg=-#<CR>
Read White balance Green value <CR>*wbg=?#<CR>
Write White balance Blue + <CR>*wbb=+#<CR>
Write White balance Blue - <CR>*wbb=-#<CR>
Read White balance Blue value <CR>*wbb=?#<CR>
Write Aspect 4:3 <CR>*asp=4:3#<CR>
Write Aspect 16:9 <CR>*asp=16:9#<CR>
Write Aspect 16:10 <CR>*asp=16:10#<CR>
Write Aspect Auto (Aspect Source) <CR>*asp=AUTO#<CR>
Write Aspect Real (Aspect Unscaled) <CR>*asp=REAL#<CR>
Write Aspect Theater Scope <CR>*asp=THEA#<CR>
Write Aspect 5:4 <CR>*asp=5:4#<CR>
Write Aspect 1.88 <CR>*asp=1.88#<CR>
Display
Write Aspect 2.35 <CR>*asp=2.35#<CR>
Read Aspect Status <CR>*asp=?#<CR>
Write V Position + <CR>*vpos=+#<CR>
Write V Position - <CR>*vpos=-#<CR>
Read Current V Position <CR>*vpos=?#<CR>
Write H Position + <CR>*hpos=+#<CR>
Write H Position - <CR>*hpos=-#<CR>
Read Current H Position <CR>*hpos=?#<CR>
Write Phase + <CR>*phase=+#<CR>
Write Phase - <CR>*phase=-#<CR>
Read Current Phase <CR>*phase=?#<CR>
Write Tracking + <CR>*tracking=+#<CR>
Write Tracking - <CR>*tracking=-#<CR>
Read Current Tracking <CR>*tracking=?#<CR>
Write Sync level + <CR>*synclevel=+#<CR>
Write Sync level - <CR>*synclevel=-#<CR>
Read Current Sync level <CR>*synclevel=?#<CR>
Write Color space Auto <CR>*cs=auto#<CR>
Write Color space YPbPr <CR>*cs=yp#<CR>
Write Color space YCbCr <CR>*cs=yc#<CR>
Write Color space RGB-PC <CR>*cs=rgbp#<CR>
Write Color space RGB-Video <CR>*cs=rgbv#<CR>
67
Page 68

English
Display
Read Current color space <CR>*cs=?#<CR>
Write Reset display <CR>*display=reset#<CR>
Write 3D Sync Off <CR>*3d=off#<CR>
Display : 3D &
PIP
Display : 3D &
PIP
Write 3D Auto <CR>*3d=auto#<CR>
Write 3D Sync Side by Side <CR>*3d=sbs#<CR>
Write 3D Sync Top Bottom <CR>*3d=tb#<CR>
Write 3D Sync Frame Sequential <CR>*3d=fs#<CR>
Write 3D inverter disable (3D
Swap=Normal)
Write 3D inverter (3D Swap=Reverse) <CR>*3d=iv#<CR>
Read 3D Sync Status <CR>*3d=?#<CR>
Write PIP mode On <CR>*pip=on#<CR>
Write PIP mode Off <CR>*pip=off#<CR>
Write PIP HDMI <CR>*psour=hdmi#<CR>
Write PIP DVI-D (DVI) <CR>*psour=dvid#<CR>
Write PIP COMPUTER/YPbPr (VGA) <CR>*psour=RGB#<CR>
Write PIP COMPUTER 2/YPbPr2 (BNC) <CR>*psour=RGB2#<CR>
Write PIP DisplayPort <CR>*psour=dp#<CR>
Write PIP 3G-SDI <CR>*psour=sdi#<CR>
Write PIP HDBaseT <CR>*psour=hdbaset#<CR>
Read Current PIP source <CR>*psour=?#<CR>
<CR>*3d=da#<CR>
Setup
Write PIP position Top Left <CR>*pippos=tl#<CR>
Write PIP position Top Right <CR>*pippos=tr#<CR>
Write PIP position Bottom Left <CR>*pippos=bl#<CR>
Write PIP position Bottom Right <CR>*pippos=br#<CR>
Write PIP position PBP <CR>*pippos=pbp#<CR>
Read Current PIP position <CR>*pippos=?#<CR>
Write Set language to English <CR>*lang=EN#<CR>
Write Set language to French <CR>*lang=FR#<CR>
Write Set language to Spanish <CR>*lang=SP#<CR>
Write Set language to German <CR>*lang=GE#<CR>
Write Set language to Simplify Chinese <CR>*lang=SC#<CR>
Read Language status <CR>*lang=?#<CR>
Write Projector Position-Front Table <CR>*pp=FT#<CR>
Write Projector Position-Rear Table <CR>*pp=RE#<CR>
Write Projector Position-Rear Ceiling <CR>*pp=RC#<CR>
Write Projector Position-Front Ceiling <CR>*pp=FC#<CR>
Read Projector Position Status <CR>*pp=?#<CR>
Write Quick auto search on (Auto
Search On)
Write Quick auto search off (Auto
Search Off)
Read Quick auto search status <CR>*QAS=?#<CR>
68
<CR>*QAS=on#<CR>
<CR>*QAS=off#<CR>
Page 69

Write Set test pattern Off <CR>*tp=off#<CR>
Write Set test pattern White <CR>*tp=white#<CR>
English
Setup
Setup
Light Settings
Write Set test pattern Black <CR>*tp=black#<CR>
Write Set test pattern Red <CR>*tp=red#<CR>
Write Set test pattern Green <CR>*tp=green#<CR>
Write Set test pattern Blue <CR>*tp=blue#<CR>
Write Set test pattern Checkerboard <CR>*tp=checker#<CR>
Write Set test pattern CrossHatch <CR>*tp=crosshatch#<CR>
Write Set test pattern V Burst <CR>*tp=vburst#<CR>
Write Set test pattern H Burst <CR>*tp=hburst#<CR>
Write Set test pattern Color Bar <CR>*tp=colorbar#<CR>
Read Get test pattern status <CR>*tp=?#<CR>
Write Reset Setup <CR>*setup=reset#<CR>
Write Laser power Normal mode <CR>*lampm=lnor#<CR>
Write Laser power Eco mode <CR>*lampm=eco#<CR>
Write Laser power Custom mode <CR>*lampm=cust#<CR>
Read Get laser power mode <CR>*lampm=?#<CR>
Write Custom power level + <CR>*lampcpl=+#<CR>
Write Custom power level - <CR>*lampcpl=-#<CR>
Warping
Read Custom power level ? <CR>*lampcpl=?#<CR>
Write High Altitude mode on <CR>*Highaltitude=on#<CR>
Write High Altitude mode auto <CR>*Highaltitude=auto#<CR>
Read High Altitude mode status <CR>*Highaltitude=?#<CR>
Write Set Active Warp to Keystone <CR>*warp=keystone#<CR>
Write Set Active Warp to 4 Corners <CR>*warp=4corners#<CR>
Write Set Active Warp to Rotation <CR>*warp=rotation#<CR>
Write Set Active Warp to Pin/Barrel <CR>*warp=pinbarrel#<CR>
Read Active Warp Status <CR>*warp=?#<CR>
Write Warp Reset <CR>*warp=reset#<CR>
Write Keystone-Horizontal Decrease <CR>*hkeyst=-#<CR>
Write Keystone-Horizontal Increase <CR>*hkeyst=+#<CR>
Read Keystone-Horizontal Status <CR>*hkeyst=?#<CR>
Write Keystone-Vertical Decrease <CR>*vkeyst=-#<CR>
Write Keystone-Vertical Increase <CR>*vkeyst=+#<CR>
Read Keystone-Vertical Status <CR>*vkeyst=?#<CR>
Write Rotation Decrease <CR>*rot=-#<CR>
Write Rotation Increase <CR>*rot=+#<CR>
Read Rotation Status <CR>*rot=?#<CR>
Write Horizontal Pin/Barrel Decrease <CR>*hpinba=-#<CR>
Write Horizontal Pin/Barrel Increase <CR>*hpinba=+#<CR>
Read Horizontal Pin/Barrel Status <CR>*hpinba=?#<CR>
Write Vertical Pin/Barrel Decrease <CR>*vpinba=-#<CR>
69
Page 70

English
Write Vertical Pin/Barrel Increase <CR>*vpinba=+#<CR>
Read Vertical Pin/Barrel Status <CR>*vpinba=?#<CR>
Warping
Warping
Write 4 Corners Top-Left-X Decrease <CR>*4ctlx=-#<CR>
Write 4 Corners Top-Left-X Increase <CR>*4ctlx=+#<CR>
Read 4 Corners Top-Left-X Status <CR>*4ctlx=?#<CR>
Write 4 Corners Top-Left-Y Decrease <CR>*4ctly=-#<CR>
Write 4 Corners Top-Left-Y Increase <CR>*4ctly=+#<CR>
Read 4 Corners Top-Left-Y Status <CR>*4ctly=?#<CR>
Write 4 Corners Top-Right-X Decrease <CR>*4ctrx=-#<CR>
Write 4 Corners Top-Right-X Increase <CR>*4ctrx=+#<CR>
Read 4 Corners Top-Right-X Status <CR>*4ctrx=?#<CR>
Write 4 Corners Top-Right-Y Decrease <CR>*4ctry=-#<CR>
Write 4 Corners Top-Right-Y Increase <CR>*4ctry=+#<CR>
Read 4 Corners Top-Right-Y Status <CR>*4ctry=?#<CR>
Write 4 Corners Bottom-Left-X De-
crease
Write 4 Corners Bottom-Left-X Increase <CR>*4cblx=+#<CR>
Read 4 Corners Bottom-Left-X Status <CR>*4cblx=?#<CR>
Write 4 Corners Bottom-Left-Y De-
crease
Write 4 Corners Bottom-Left-Y Increase <CR>*4cbly=+#<CR>
<CR>*4cblx=-#<CR>
<CR>*4cbly=-#<CR>
Blanking
Read 4 Corners Bottom-Left-Y Status <CR>*4cbly=?#<CR>
Write 4 Corners Bottom-Right-X De-
crease
Write 4 Corners Bottom-Right-X In-
crease
Read 4 Corners Bottom-Right-X Status <CR>*4cbrx=?#<CR>
Write 4 Corners Bottom-Right-Y De-
crease
Write 4 Corners Bottom-Right-Y In-
crease
Read 4 Corners Bottom-Right-Y Status <CR>*4cbry=?#<CR>
Write Blanking Reset <CR>*bnk=reset#<CR>
Write Blanking Top Decrease <CR>*bnkt=-#<CR>
Write Blanking Top Increase <CR>*bnkt=+#<CR>
Read Blanking Top Status <CR>*bnkt=?#<CR>
Write Blanking Bottom Decrease <CR>*bnkb=-#<CR>
Write Blanking Bottom Increase <CR>*bnkb=+#<CR>
Read Blanking Bottom Status <CR>*bnkb=?#<CR>
Write Blanking Left Decrease <CR>*bnkl=-#<CR>
Write Blanking Left Increase <CR>*bnkl=+#<CR>
<CR>*4cbrx=-#<CR>
<CR>*4cbrx=+#<CR>
<CR>*4cbry=-#<CR>
<CR>*4cbry=+#<CR>
Read Blanking Left Status <CR>*bnkl=?#<CR>
Write Blanking Right Decrease <CR>*bnkr=-#<CR>
Write Blanking Right Increase <CR>*bnkr=+#<CR>
Read Blanking Right Status <CR>*bnkr=?#<CR>
70
Page 71

Write Edge Blending On <CR>*eb=on#<CR>
Write Edge Blending Off <CR>*eb=off#<CR>
English
Edge Blending
Edge Blending
Read Edge Blending Status <CR>*eb=?#<CR>
Write Edge Blending Reset <CR>*eb=reset#<CR>
Write Edge Blending adjust lines On <CR>*ebadl=on#<CR>
Write Edge Blending adjust lines Off <CR>*ebadl=off#<CR>
Read Edge Blending adjust lines Status <CR>*ebadl=?#<CR>
Write Edge Blending White Level Top
Decrease
Write Edge Blending White Level Top
Increase
Read Edge Blending White Level Top
Status
Write Edge Blending White Level Bottom
Decrease
Write Edge Blending White Level Bottom
Increase
Read Edge Blending White Level Bottom
Status
Write Edge Blending White Level Left
Decrease
Write Edge Blending White Level Left
Increase
Read Edge Blending White Level Left
Status
Write Edge Blending White Level Right
Decrease
Write Edge Blending White Level Right
Increase
Read Edge Blending White Level Right
Status
Write Edge Blending Black Level Top
Decrease
Write Edge Blending Black Level Top
Increase
Read Edge Blending Black Level Top
Status
Write Edge Blending Black Level Bottom
Decrease
Write Edge Blending Black Level Bottom
Increase
Read Edge Blending Black Level Bottom
Status
Write Edge Blending Black Level Left
Decrease
Write Edge Blending Black Level Left
Increase
Read Edge Blending Black Level Left
Status
Write Edge Blending Black Level Right
Decrease
Write Edge Blending Black Level Right
Increase
Read Edge Blending Black Level Right
Status
<CR>*ebwt=-#<CR>
<CR>*ebwt=+#<CR>
<CR>*ebwt=?#<CR>
<CR>*ebwb=-#<CR>
<CR>*ebwb=+#<CR>
<CR>*ebwb=?#<CR>
<CR>*ebwl=-#<CR>
<CR>*ebwl=+#<CR>
<CR>*ebwl=?#<CR>
<CR>*ebwr=-#<CR>
<CR>*ebwr=+#<CR>
<CR>*ebwr=?#<CR>
<CR>*ebbt=-#<CR>
<CR>*ebbt=+#<CR>
<CR>*ebbt=?#<CR>
<CR>*ebbb=-#<CR>
<CR>*ebbb=+#<CR>
<CR>*ebbb=?#<CR>
<CR>*ebbl=-#<CR>
<CR>*ebbl=+#<CR>
<CR>*ebbl=?#<CR>
<CR>*ebbr=-#<CR>
<CR>*ebbr=+#<CR>
<CR>*ebbr=?#<CR>
71
Page 72

English
Edge Blending
Write Edge Blending Black Level All color
Decrease
Write Edge Blending Black Level All color
Increase
Read Edge Blending Black Level All color
Status
Write Edge Blending Black Level Red
Decrease
Write Edge Blending Black Level Red
Increase
Read Edge Blending Black Level Red
Status
Write Edge Blending Black Level Green
Decrease
Write Edge Blending Black Level Green
Increase
Read Edge Blending Black Level Green
Status
Write Edge Blending Black Level Blue
Decrease
Write Edge Blending Black Level Blue
Increase
Read Edge Blending Black Level Blue
Status
Write Standby Settings-Network on
(Network Standby)
Write Standby Settings-Network off
(ECO Standby)
Read Standby Settings-Network Status <CR>*standbynet=?#<CR>
<CR>*ebca=-#<CR>
<CR>*ebca=+#<CR>
<CR>*ebca=?#<CR>
<CR>*ebcr=-#<CR>
<CR>*ebcr=+#<CR>
<CR>*ebcr=?#<CR>
<CR>*ebcg=-#<CR>
<CR>*ebcg=+#<CR>
<CR>*ebcg=?#<CR>
<CR>*ebcb=-#<CR>
<CR>*ebcb=+#<CR>
<CR>*ebcb=?#<CR>
<CR>*standbynet=on#<CR>
<CR>*standbynet=off#<CR>
System
Write Auto Power Off-on (Auto power
off)
Write Auto Power Off-off (Auto power
off)
Read Auto Power Off-Status <CR>*autopoweroff=?#<CR>
Write Direct Power On-on (Auto Power
On )
Write Direct Power On-off (Auto power
off)
Read Direct Power On-Status <CR>*directpower=?#<CR>
Write Set background to Logo <CR>*bg=logo#<CR>
Write Set background to Black <CR>*bg=black#<CR>
Write Set background to Blue <CR>*bg=blue#<CR>
Write Set background to White <CR>*bg=white#<CR>
Read Get background status <CR>*bg=?#<CR>
Write Startup logo off <CR>*startlogo=off#<CR>
Write Startup logo on <CR>*startlogo=on#<CR>
Write Get startup logo status <CR>*startlogo=#<CR>
Write Trigger on <CR>*trigger=on#<CR>
Write Trigger off <CR>*trigger=off#<CR>
<CR>*autopoweroff=on#<CR>
<CR>*autopoweroff=off#<CR>
<CR>*directpower=on#<CR>
<CR>*directpower=off#<CR>
Read Trigger status <CR>*trigger=?#<CR>
Write Dynamic black on <CR>*db=on#<CR>
Write Dynamic black off <CR>*db=off#<CR>
72
Page 73

Read Dynamic black status <CR>*db=?#<CR>
English
System
Information
Information
Write Factory reset <CR>*fact=reset#<CR>
Write System reset <CR>*system=reset#<CR>
Read Get Model Name <CR>*modelname=?#<CR>
Read Get Serial Number <CR>*sn=?#<CR>
Read Get F/W Version <CR>*swver=?#<CR>
Read Get Active source <CR>*activesour=?#<CR>
Read Get Pixel clock <CR>*pixelclock=?#<CR>
Read Get Signal format <CR>*signal=?#<CR>
Read Get H refresh rate <CR>*hfreq=?#<CR>
Read Get V refresh rate <CR>*vfreq=?#<CR>
Read Laser Hour <CR>*lsrtim=?#<CR>
Write Blank On <CR>*blank=on#<CR>
Write Blank Off <CR>*blank=off#<CR>
Read Blank Status <CR>*blank=?#<CR>
Write Freeze On <CR>*freeze=on#<CR>
Write Freeze Off <CR>*freeze=off#<CR>
Read Freeze Status <CR>*freeze=?#<CR>
Miscellaneous
Write Menu On <CR>*menu=on#<CR>
Write Menu Off <CR>*menu=off#<CR>
Read Menu Status <CR>*menu=?#<CR>
Write Up <CR>*up#<CR>
Write Down <CR>*down#<CR>
Write Right <CR>*right#<CR>
Write Left <CR>*left#<CR>
Write Enter <CR>*enter#<CR>
Read Error Code <CR>*error=report#<CR>
Write Lens Shift Up <CR>*lst=up#<CR>
Write Lens Shift Down <CR>*lst=down#<CR>
Write Lens Shift Left <CR>*lst=left#<CR>
Write Lens Shift Right <CR>*lst=right#<CR>
Write Lens Focus Plus <CR>*focus=+#<CR>
Write Lens Focus Minus <CR>*focus=-#<CR>
Write Lens Zoom Plus <CR>*zoom=+#<CR>
Write Lens Zoom Minus <CR>*zoom=-#<CR>
Note:
RS-232 Baud rate: 9600
73
Page 74

English
Control the projector through network
Set up the projector for networking
Picture
System \ Network
Network Mode
IP Address
Subnet Mask
Gateway
DHCP
Apply
Reset Network
Computer 1 MENU Exit
Display Setup Advanced System Information
Projector Contorl
Off
Caution:
Please set DHCP option to Off and select Apply to activate it. The DHCP service assigns an IP address and settings.
The IP address, Subnet Mask and Gateway options will be dimmed and not available for selection. If the LAN does not
support DHCP service, please press ▲▼ and Enter key to select network and its settings:
IP Address: To specify an IP address, press the Enter button to show the IP address input window.
Use the
buttons to select the number in the IP address to be changed. Use the
◄►
▲▼
buttons
to increase or decrease the number in the IP address.
Subnet Mask: Set up the subnet address in the same way as for the IP Address setup.
Gateway: Set up the gateway address in the same way as for the IP Address setup.
DHCP: Set DHCP to On or Off. If this is set to On, the DHCP server of network domain will
assign an IP address to the projector. That is, the IP address will display in the address window
instead of having to be manually entered. Otherwise, the domain does not or cannot assign an IP
address, and 0. 0. 0. 0 is shown on the IP address window.
Apply: Select this button and press Enter. It takes the projector several seconds to execute the
change in network setting until the following message disappears.
Apply Network
Yes No
Please contact your network administrator if the network remains disconnected.
74
Page 75

Control the projector through web browser
Open a web browser and enter the projector's IP address. Its home page with ve options will
display:
Projector Status: Current projector settings.
Projector Control: Control projector via web
Crestron RoomView: Crestron compatible network browser control page.
Network Setup: Setting option for network connection.
Alert Mail Setup: Settings for projector abnormality email reminders. In case of any abnormality the
projector sends emails to preset users.
Projector status
The following illustrates a projector with IP address "192.168.0.100":
English
Model : Model number of the projector
Software Version : Version of projector system software
Power Status : Current projector power on status
Input : Current input signal
Diagnostic status : Display projector error messages
Network control setup information (RJ-45 Version)
LAN Software Version : Version of network control software
MAC address : Current IP address
75
Page 76

English
Projector control
Choose this function to control the projector via the web.
Crestron RoomView
Click the Crestron option in your projector’s home page to display its control page in a new tab.
Power : Press to power on or off your projector.
Source List: Switch among list of available projector input signal sources. Press the ▲ (at top of
screen) or ▼ (at bottom of screen) arrow key to scroll through the list.
76
Page 77

Image adjust options
Press the ◄ (to the left of screen) or ► (to the right of screen) arrow key to scroll through other
adjustment options.
Freeze: Freeze current projection screen. The projection screen prompts "Freeze" message once
the freeze function is enabled. Press the Freeze button again to unfreeze the image.
English
Contrast: Press to display the adjustment window, click
Brightness: Press to display the adjustment window, click
arrow key to adjust contrast.
◄►
arrow key with the mouse to
◄►
adjust brightness.
Sharpness: Press to display the adjustment window, click
arrow key with the mouse to
◄►
adjust sharpness.
Zoom: Zoom in on the projection image. Click "+" key to zoom in and "-" to zoom out. Click the
four arrow keys in the window to move the zoomed projection image.
Control key window
This window simulates keys on the remote controller and control panel.
Enter: Conrm the changes and select the OSD option
Menu: Press to display the OSD menu. Press again to exit it.
Auto: Execute the auto image adjustment function.
Blank: Pause the image projection, i.e. the projection image is masked. Press again to resume the
projection.
Source: Display list of signal sources.
Tools: Set up options to work with Crestron compatible devices. See relevant manuals for detailed
setup steps.
77
Page 78

English
Info: Display current projector status and Crestron settings.
Network setup
Control your projector with following setup.
Network control setup information
IP Address : Current IP address
Subnet Mask : Current subnet setting
Gateway : Current gateway setting
DNS Server : Current DNS server setting
78
Page 79

Alert mail setup
The projector can send alert messages with Email to predened users. Make the following settings.
English
Before enabling this function:
SMTP Sever : Set up name of SMTP server for the projector's sending reminder E-mail Port.
E-mail Port : Set up transmission port.
User Name : Set up user name for the projector's sending reminder email through SMTP
server.
Password : Set up user password.
E-mail Alert : Enable or disable E-mail Alert function.
From : Set up sender's email address.
To : Set up recipient's email address.
CC : Set up CC recipient's email address.
Projector Name : Set up projector name or ID.
Location : Set up installation location of projector.
79
Page 80

English
Troubleshooting
Indicator messages
Several indicator messages are used by the projector to alert users about problems with setup or
system error. The LEDs on top cover of the projector illustrated below.
TEMP LED
LED display Projector status Operation tips
Off Normal status
Flashing Red Over temperature error
Contact with your nearest authorized dealer or service
center.
LIGHT SOURCE LED
LED display Projector status Operation tips
Off Light source is off
Green Projector is turning on
Flashing
On
Red (Cycles of 6) Light source is end-of-life Please call the local service center.
Red Light source problem Please call the local service center.
Green Light source is on
STATUS LED indicator
LED display Projector status Operation tips
Close Normal
Please check whether the top cover is well assembled
Red (once) Safety switch error
Flashing
Red
(quadruple)
Lights up Red System error Call the local service center.
Fan error Call the local service center.
or lens is well installed or not. If the problem persists,
call the local service center.
POWER LED indicator
LED display Projector status Operation tips
Close AC power turned off Check AC power source and power on the projector.
Ready to power on the
projector
The projector is cooling
down
Wait until the projector starts projecting.
To power on the projector, press the ON key on the
remote controller or the Power key on the control
panel.
Flashing
Lights up
Green
Orange
Red Standby mode
Green Projector powered on
80
Page 81

Common problems and solutions
These guidelines provide tips to deal with problems you may encounter while using the projector. If
the problem remains unsolved, contact your dealer for assistance. Often the problem is something
as simple as a loose connection. Check the following before proceeding to the problem-specic
solutions.
• Use some other electrical device to conrm that the electrical outlet is working.
• Ensure the projector is turned on.
• Ensure all connections are securely attached.
• Ensure the attached device is turned on.
• Ensure a connected PC is not in suspend mode.
• Ensure a connected notebook computer is congured for an external display. (This is usually
done by pressing an Fn-key combination on the notebook.)
Tips for troubleshooting
In each problem-specic section, try the steps in the order suggested. This may help you to solve
the problem more quickly.
Try to pinpoint the problem to avoid replacing non-defective parts.
For example, if you replace batteries and the problem remains, put the original batteries back and
go to the next step.
Keep a record of the steps you take when troubleshooting: The information may be useful when
calling for technical support or for passing on to service personnel.
English
Image problems
Problem: No image appears on the screen
1. Verify the settings on your notebook or desktop PC.
2. Turn off all equipment and power up again in the correct order.
Problem: The image is blurred.
1. Adjust the Focus on the projector.
2. Press the AUTO PC button on the remote control or projector.
3. Ensure the projector-to-screen distance is within the specied range.
4. Check that the projector lens is clean.
5. Remove the lens cover.
Problem: The image is wider at the top or bottom (trapezoid effect)
6. Position the projector so it is as perpendicular to the screen as possible.
7. Use the Keystone function on the OSD to correct the problem.
Problem: The image is reversed or upside down
• Check the Ceiling & Rear setting on the Setting menu of the OSD.
Problem: The image is streaked
1. Adjust the Position and Phase on the Display menu of the OSD to the default settings.
2. To ensure the problem is not caused by a connected PC’s video card, connect to another
computer.
81
Page 82

English
Problem: The image is at with no contrast
1. Adjust the Contrast setting on the Picture menu of the OSD.
2. Adjust the Brightness setting on the Picture menu of the OSD.
Problem: The color of the projected image does not match the source image.
Adjust the Color temperature and Picture settings.
Remote control problems
Problem: The projector does not respond to the remote control
1. Direct the remote control towards remote sensor on the projector.
2. Ensure the path between remote and sensor is not obstructed.
3. Turn off any uorescent lights in the room.
4. Check the battery polarity.
5. Replace the batteries.
6. Turn off other Infrared-enabled devices in the vicinity.
7. Have the remote control serviced.
8. Ensure that the remote control code conforms to the projector's code.
9. Ensure that the reset switch in the compartment lid on back of the remote control is set to
use position.
82
Page 83

BenQ ecoFACTS
BenQ has been dedicated to the design and development of greener product as part of its
aspiration to realize the ideal of the "Bringing Enjoyment 'N Quality to Life" corporate vision
with the ultimate goal to achieve a low-carbon society. Besides meeting international regulatory
requirement and standards pertaining to environmental management, BenQ has spared no efforts
in pushing our initiatives further to incorporate life cycle design in the aspects of material selection,
manufacturing, packaging, transportation, using and disposal of the products. BenQ ecoFACTS label
lists key eco-friendly design highlights of each product, hoping to ensure that consumers make
informed green choices at purchase. Check out BenQ's CSR Website at http://csr.BenQ.com/ for
more details on BenQ's environmental commitments and achievements.
English
83
Page 84

English
Copyright
Copyright 2016 BenQ Corporation. All rights reserved. No part of this publication may be
reproduced, transmitted, transcribed, stored in a retrieval system or translated into any language or
computer language, in any form or by any means, electronic, mechanical, magnetic, optical, chemical,
manual or otherwise, without the prior written permission of BenQ Corporation.
All other logos, products, or company names mentioned in this manual may be the registered
trademarks or copyrights of their respective companies, and are used for informational purposes
only.
Disclaimer
BenQ Corporation makes no representations or warranties, either expressed or implied, with
respect to the contents hereof and specically disclaims any warranties, merchantability or tness
for any particular purpose. Further, BenQ Corporation reserves the right to revise this publication
and to make changes from time to time in the contents hereof without obligation of BenQ
Corporation to notify any person of such revision or changes.
This user manual aims to provide the most updated and accurate information to customers, and
thus all contents may be modied from time to time without prior notice. Please visit http://www.
benq.com for the latest version of this manual.
Patents
Please go to http://patmarking.benq.com/ for the details on BenQ projector patent coverage.
Statement regarding hyperlinks and third-party websites
BenQ is not responsible for the content of the websites or of similar resources, which are
maintained and controlled by third parties, that may be linked from this product. Providing links
to those websites or to similar resources does not mean that BenQ makes any warranty or
representation to their content by expression or by implication.
Any third party content or service preinstalled in this product is provided "as is". BenQ does not,
by expression or by implication, make any warrant to the content or to the services provided by
third parties. BenQ does not warrant or guarantee that the content or services provided by third
parties are accurate, effective, most up-to-date, legal, or complete. Under no circumstances shall
BenQ be liable for the content or services provided by third parties including their negligence.
Services provided by third parties may be terminated temporarily or permanently. BenQ does
not warrant or guarantee that the any content or services provided by third parties are in good
condition at any time, and is not liable for the termination of the said content and services. In
addition, BenQ is not involved in any transactions you conduct in the websites or similar resources
maintained by third parties.
You should contact the content or service providers for any questions, concerns, or disputes.
84
Page 85

About the BenQ Support
English
BenQ Corporation-Headquarters
16 Jihu Road Neihu, Taipei
114 Taiwan
+886-2-2727-8899
+886-2-2656-2438
BenQ China
181 Zhuyuan Road, Suzhou New
District, Suzhou, China
+86-512- 68078800
+86-512- 68097010
BenQ Asia Pacic Corp.
12 Jihu Road Neihu, Taipei
114 Taiwan
+886-2-2727-8899
+886-2-2656-2438
BenQ America Corp.
3200 Park Center Drive, Suite 150
Costa Mesa, CA 92626 USA
+1-714-559-4900
+1-714-557-0200
BenQ Latin America Corp.
8200 N.W. 33 Street, Suite 301
Miami, FL 33122 USA
+1-305-4211200
+1-305-4211201
BenQ Europe B.V.
Meerenakkerweg 1-17, 5652 AR
Eindhoven, The Netherlands
+31(0)88 888-9200
+31(0)88 888-9299
85
 Loading...