


LU9715
Projector RS232 Command Control
Installation Guide

Table of Contents
Introduction ............................................................................................................................................. 3
Wire arrangement ........................................................................................................................................................ 3
RS232 pin assignment .................................................................................................................................................. 3
Connections and communication settings ......................................................................................... 4
RS232 serial port with a straight cable .................................................................................................................... 4
Settings .................................................................................................................................................................. 4
RS232 via LAN .............................................................................................................................................................. 6
Settings .................................................................................................................................................................. 6
RS232 via HDBaseT ..................................................................................................................................................... 6
Settings .................................................................................................................................................................. 6
Command table ....................................................................................................................................... 8
2
Introduction
Available functions and commands vary by model. Check the specifications and user manual of the purchased projector for
product functions.
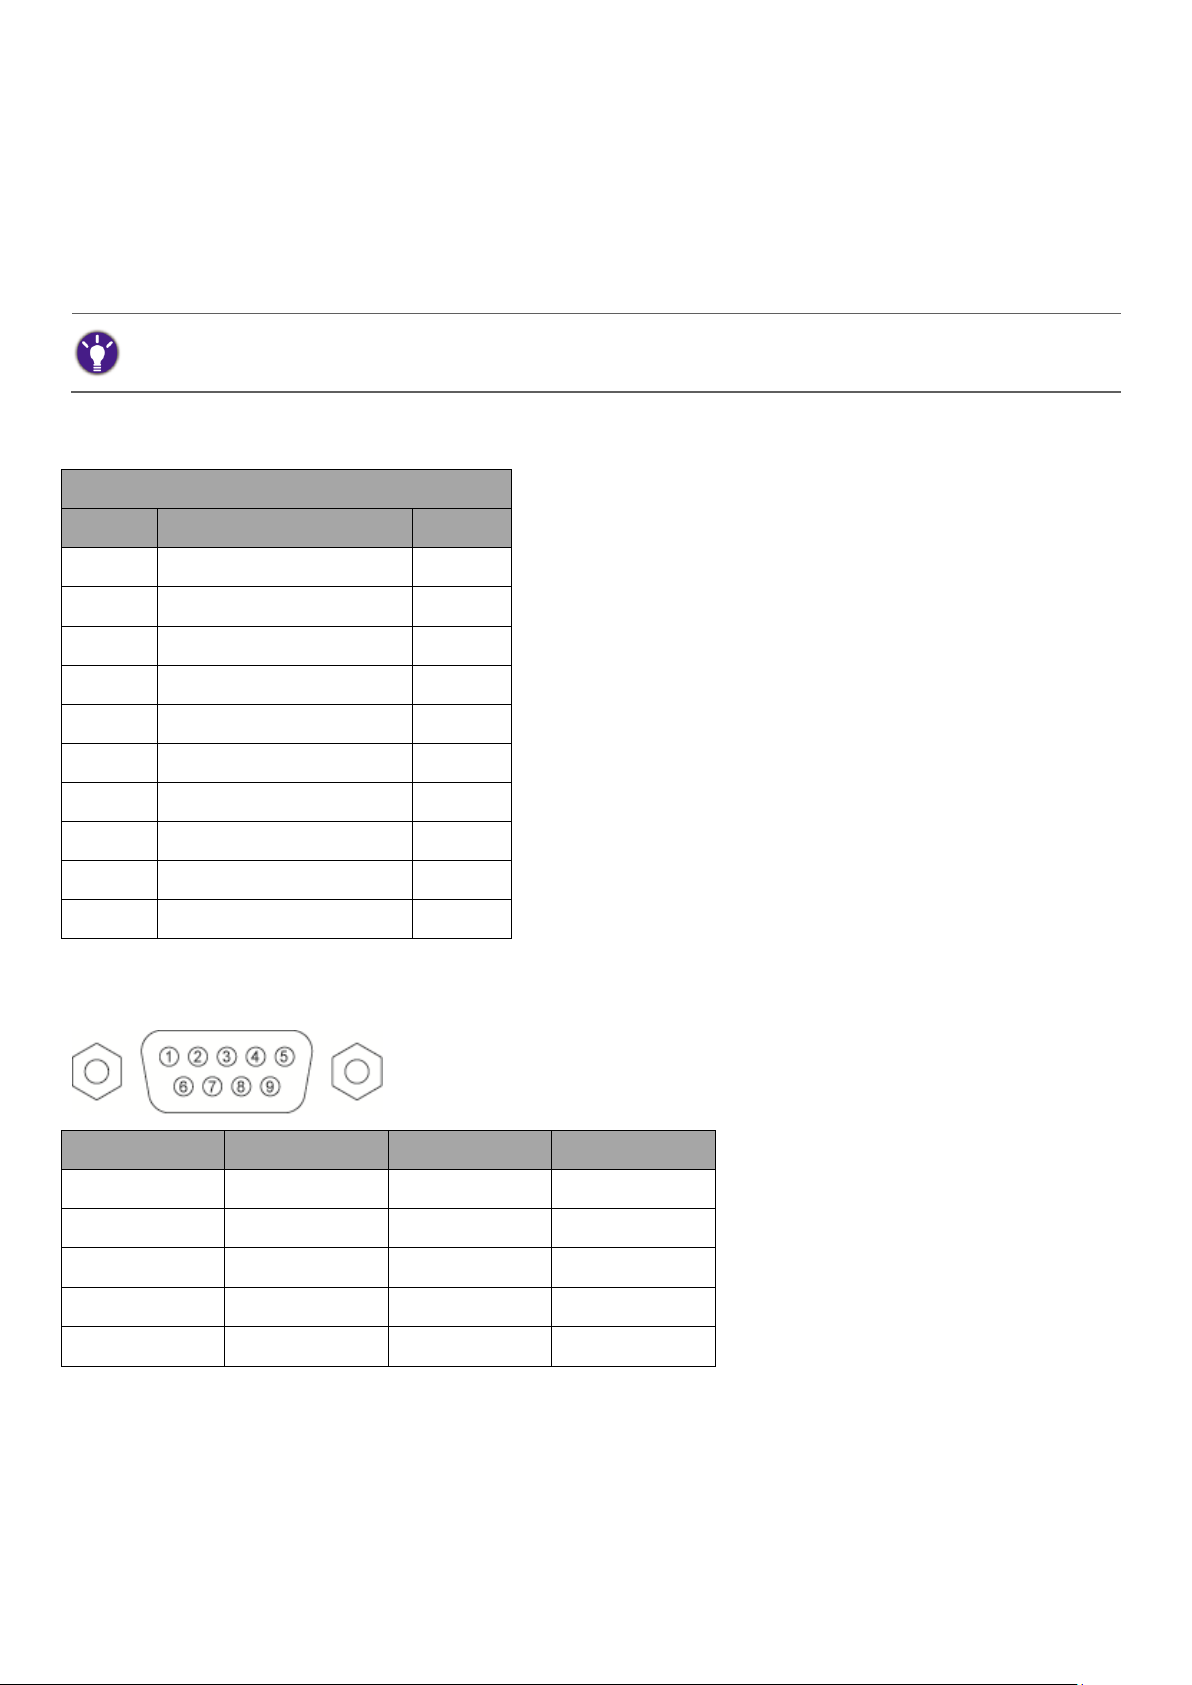
Wire Arrangement
P1
Color
P2 1 Black
1 2 Brown
3
3
Red
2 4 Orange
4 5 Yellow
5
6
Green
6
7
Blue
7 8 Purple
8
9
Gray
9
Case
Drain wire
Case
Pin
Description
Pin
Description
1
NC
2
RXD
3
TXD
4
NC
5
GND
6
NC
7
RTS
8
CTS
9
NC
The document describes how to control your BenQ projector via RS232 from a computer. Follow the
procedures to complete the connection and settings first, and refer to the command table for RS232
commands.
Wire arrangement
RS232 pin assignment
3
Connections and communication settings
On-screen images in this document are for reference only. The screens may vary depending on your Operating System,
I/O ports used for connection, and the specifications of the connected projector.
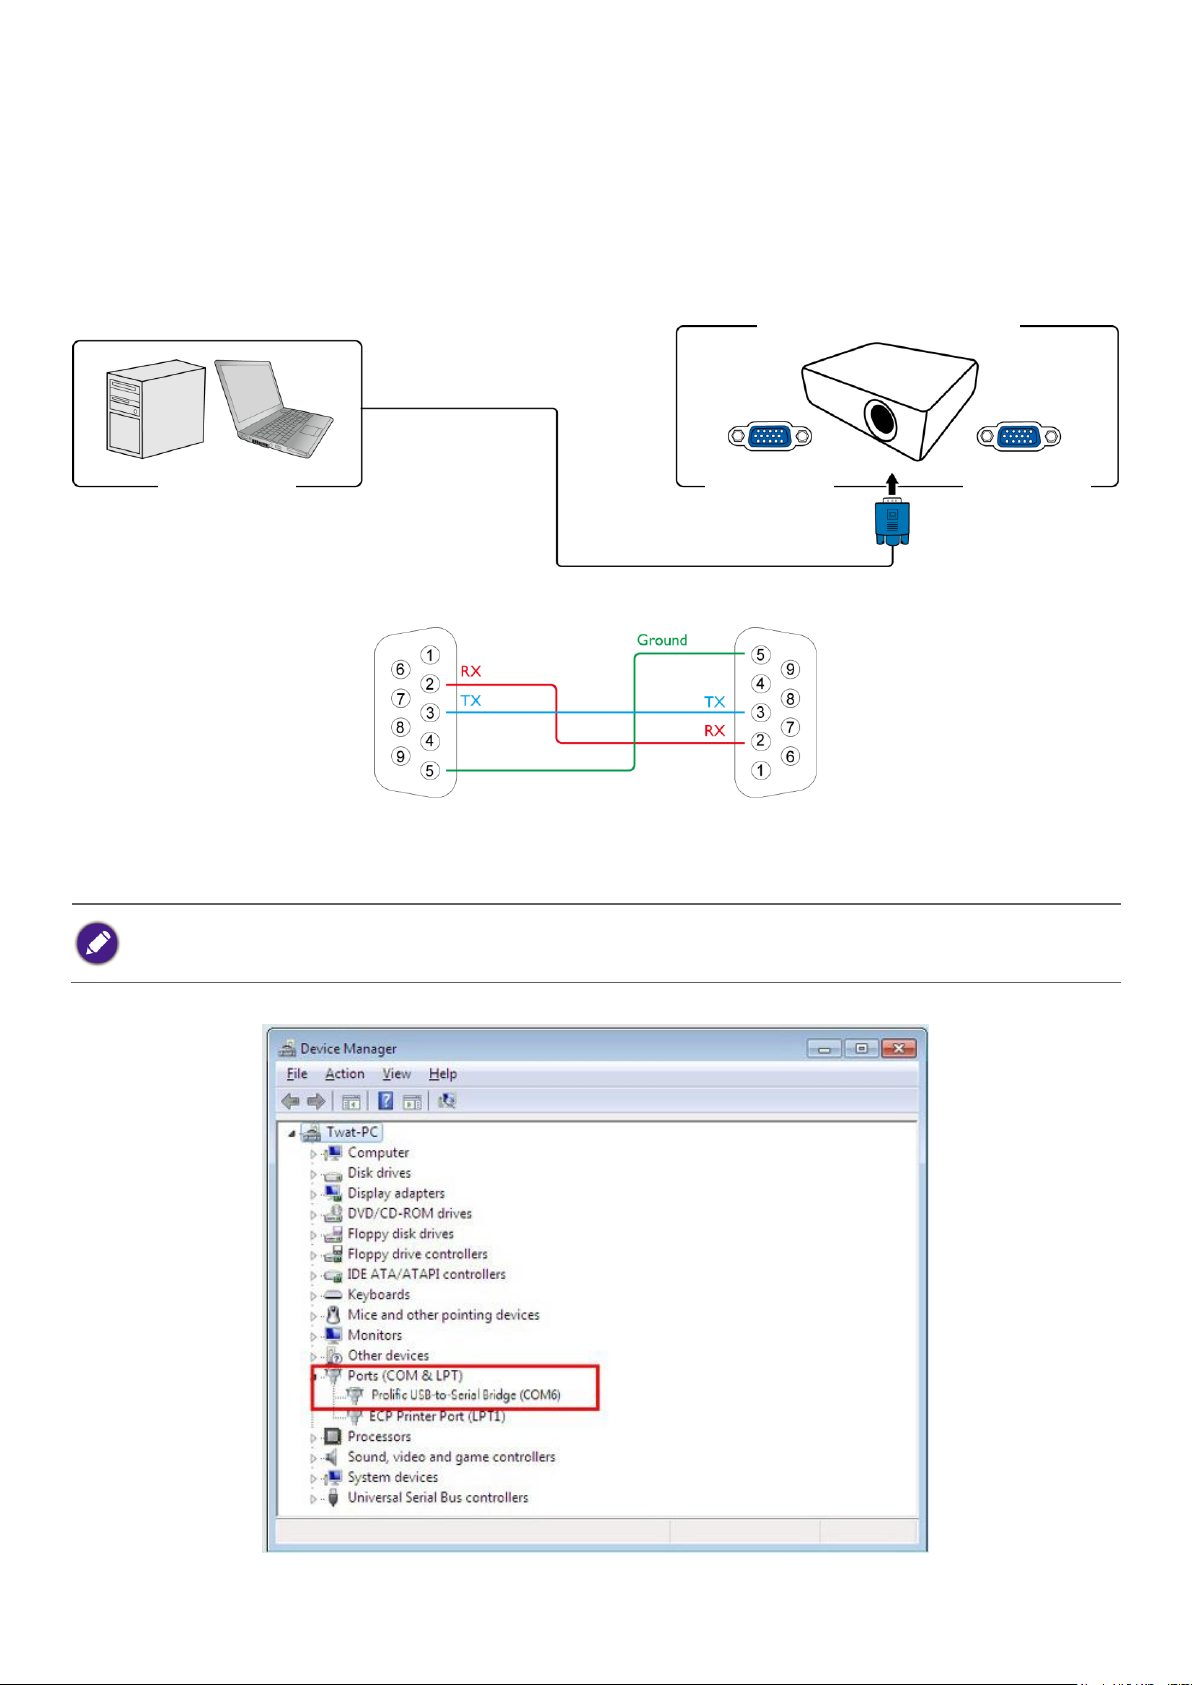
PC or laptop
Communication cable (straight)
D-Sub 9 pin
D-Sub 9 pin
(female)
D-Sub 9 pin
(male)
D-Sub port (male or female)
on a projector
Choose one of the connections and set up properly before RS232 control.
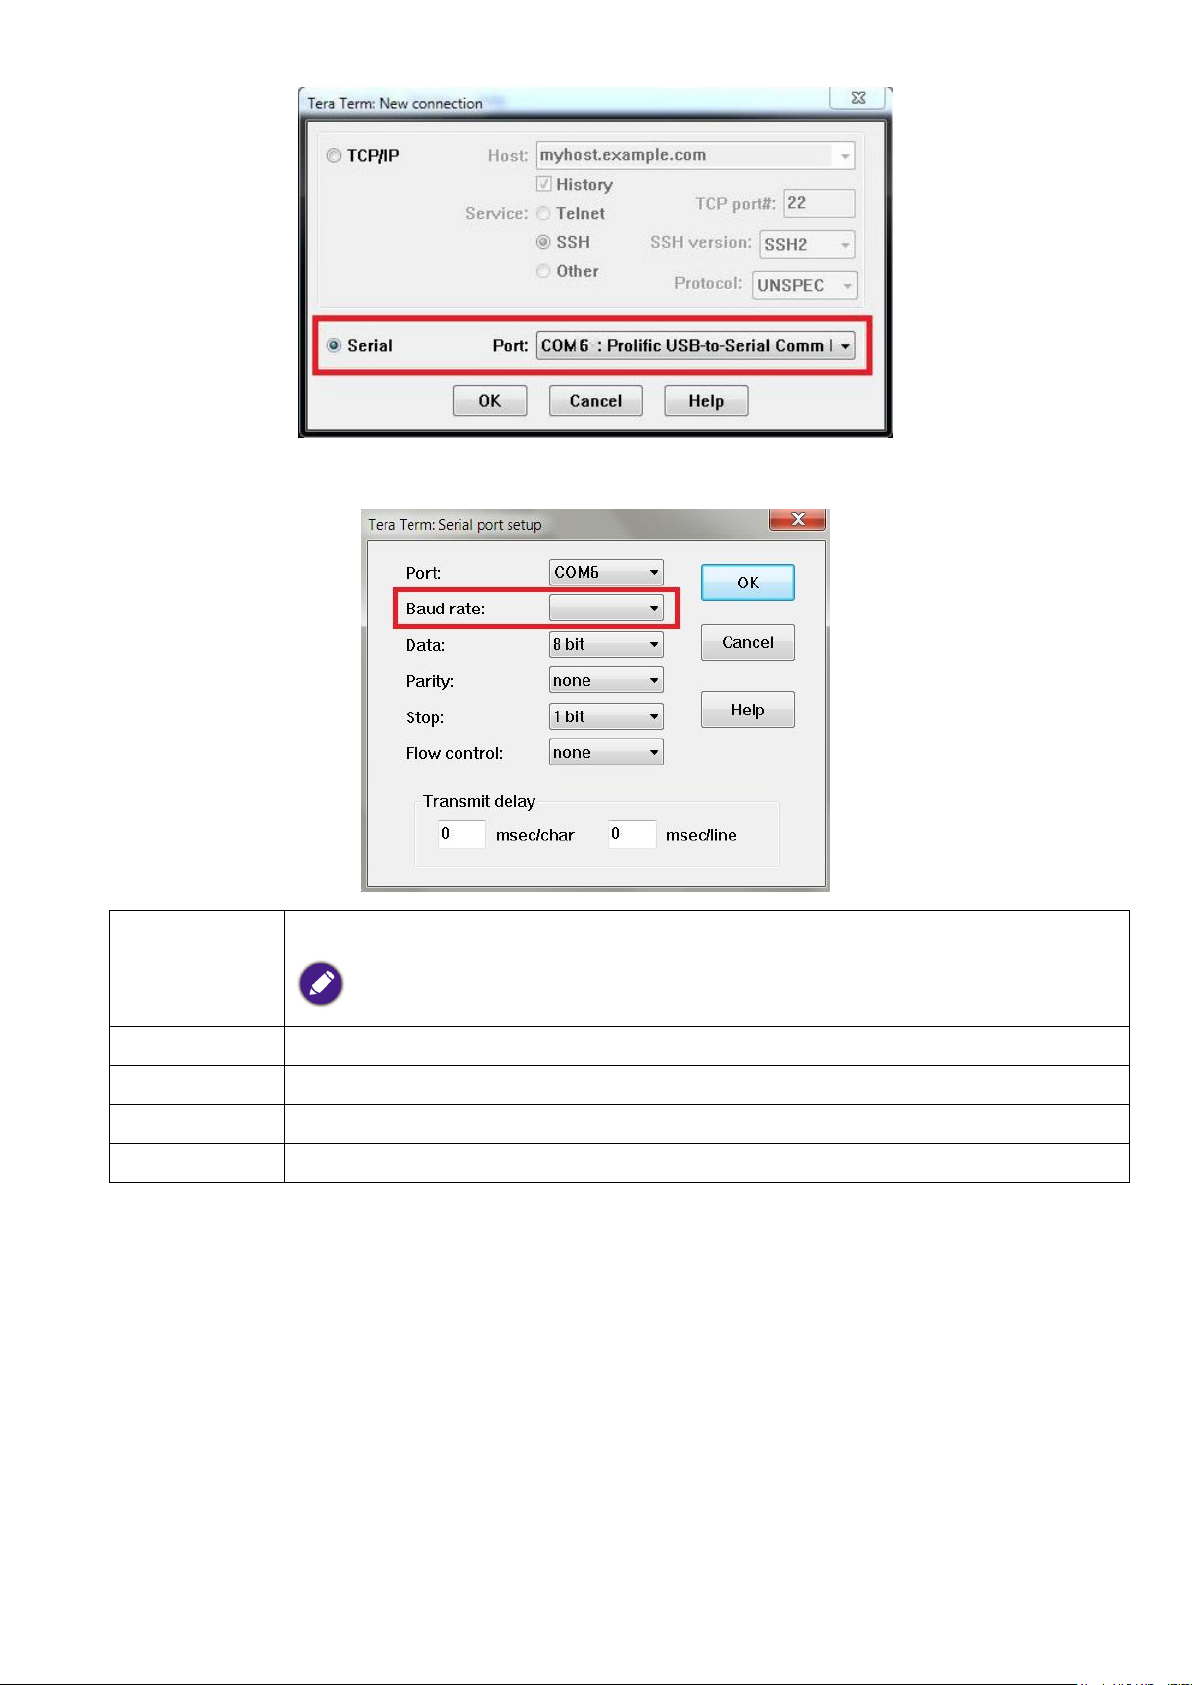
RS232 serial port with a straight cable
Settings
1. Determine the COM Port name used for the RS232 communications in Device Manager.
4
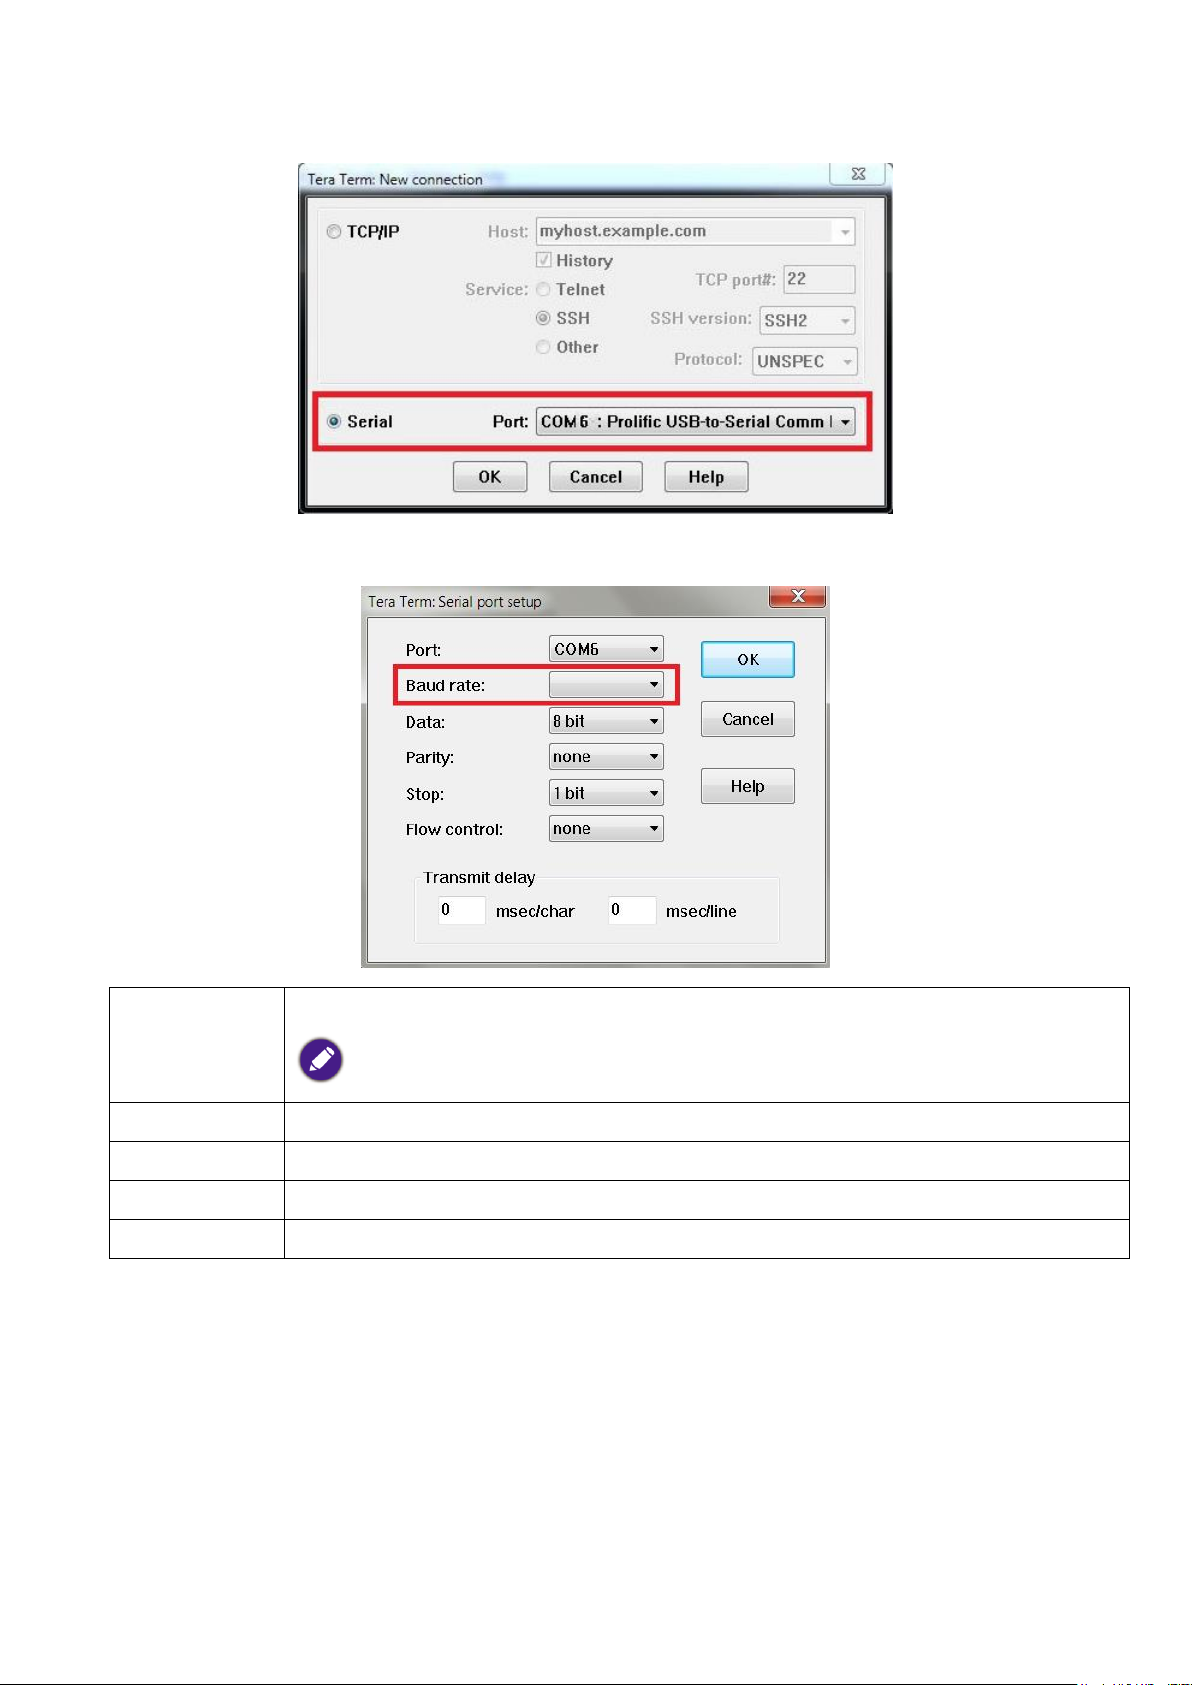
2. Choose Serial and the corresponding COM port as the communication port. In this given example,
Baud rate
9600 / 14400 / 19200 / 38400 / 57600 / 115200 bps
Check the baud rate of the connected projector from its OSD menu.
Data length
8 bit
Parity check
None
Stop bit
1 bit
Flow control
None
COM6 is selected.
3. Finish Serial port setup.
5
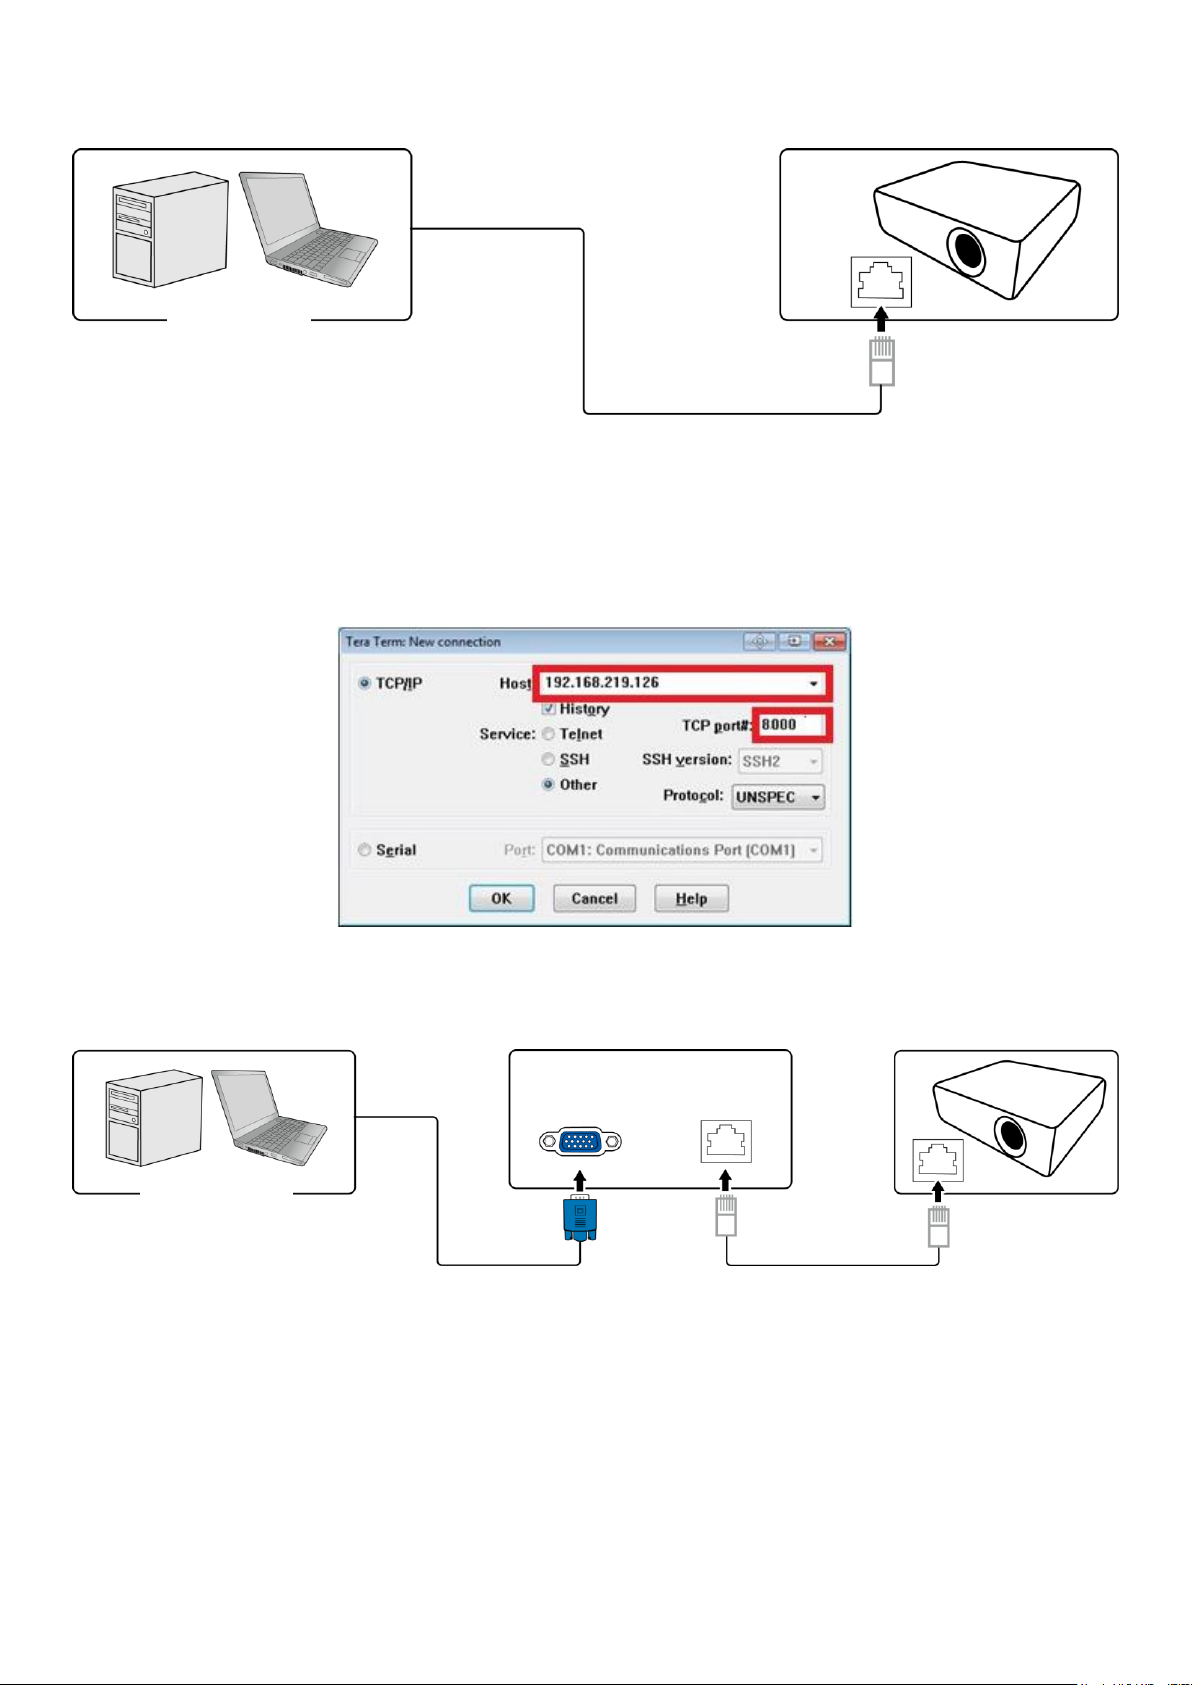
RS232 via LAN
PC or laptop
RJ45 port on a projector
LAN cable
PC or laptop
HDBaseT compatible device
D-Sub 9 pin
RJ45
RJ45 port on a projector
LAN cable
D-Sub 9 pin
Settings
1. Find the Wired LAN IP address of the connected projector from the OSD menu and make sure the
projector and the computer are within the same network.
2. Input 8000 in the TCP port # field.
RS232 via HDBaseT
Settings
1. Determine the COM Port name used for the RS232 communications in Device Manager.
2. Choose Serial and the corresponding COM port as the communication port. In this given example,
COM6 is selected.
6
3. Finish Serial port setup.
Baud rate
9600 / 14400 / 19200 / 38400 / 57600 / 115200 bps
Check the baud rate of the connected projector from its OSD menu.
Data length
8 bit
Parity check
None
Stop bit
1 bit
Flow control
None
7

Command table
Available features differ by projector specification, input sources, settings, etc..
Commands are working if the standby power is 0.5W or a supported baud rate of the projector is set.
Uppercase, lowercase, and a mixture of both types of characters are accepted for a command.
If a command format is illegal, it will echo Illegal format.
If a command with correct format is not valid for the projector model, it will echo Unsupported item.
If a command with correct format cannot be executed under certain condition, it will echo Block item.
If RS232 control is performed via LAN, a command works whether it starts and ends with <CR>. All the commands and
behaviors are identical with the control through a serial port.
Function
Type
Operation
ASCII
Support
Power
Write
Power On
<CR>*pow=on#<CR>
YES
Write
Power off
<CR>*pow=off#<CR>
YES
Read
Power Status
<CR>*pow=?#<CR>
YES
Source Selection
Write
COMPUTER/YPbPr
<CR>*sour=RGB#<CR>
YES
Write
COMPUTER 2/YPbPr2
<CR>*sour=RGB2#<CR>
YES
Write
Component
<CR>*sour=YPbr#<CR>
NO
Write
Component2
<CR>*sour=ypbr2#<CR>
NO
Write
DVI-A
<CR>*sour=dviA#<CR>
NO
Write
DVI-D
<CR>*sour=dvid#<CR>
YES
Write
HDMI
<CR>*sour=hdmi#<CR>
YES
Write
HDMI 2
<CR>*sour=hdmi2#<CR>
NO
Write
Composite
<CR>*sour=vid#<CR>
NO
Write
S-Video
<CR>*sour=svid#<CR>
NO
Write
Network
<CR>*sour=network#<CR>
NO
Write
USB Display
<CR>*sour=usbdisplay#<CR>
NO
Write
USB Reader
<CR>*sour=usbreader#<CR>
NO
Write
Wireless
<CR>*sour=wireless#<CR>
NO
Write
DisplayPort
<CR>*sour=dp#<CR>
YES
Write
3G-SDI
<CR>*sour=sdi#<CR>
YES
Write
HD Connect
<CR>*sour=hdconnect#<CR>
NO
Write
HDBaseT
<CR>*sour=hdbaset#<CR>
YES
Read
Current source
<CR>*sour=?#<CR>
YES
Picture Mode
Write
Dynamic
<CR>*appmod=dynamic#<CR>
NO
Write
Presentation
<CR>*appmod=preset#<CR>
YES
Write
sRGB
<CR>*appmod=srgb#<CR>
NO
Write
Bright
<CR>*appmod=bright#<CR>
YES
Write
Living Room
<CR>*appmod=livingroom#<CR>
NO
8

Write
Game
<CR>*appmod=game#<CR>
NO
Write
Cinema
<CR>*appmod=cine#<CR>
YES
Write
Standard
<CR>*appmod=std#<CR>
NO
Write
User1
<CR>*appmod=user1#<CR>
NO
Write
User2
<CR>*appmod=user2#<CR>
NO
Write
User3
<CR>*appmod=user3#<CR>
NO
Write
ISF Day
<CR>*appmod=isfday#<CR>
NO
Write
ISF Night
<CR>*appmod=isfnight#<CR>
NO
Write
3D
<CR>*appmod=threed#<CR>
NO
Read
Picture Mode
<CR>*appmod=?#<CR>
YES
Picture Settings
Write
Contrast +
<CR>*con=+#<CR>
YES
Write
Contrast -
<CR>*con=-#<CR>
YES
Read
Contrast value
<CR>*con=?#<CR>
YES
Write
Brightness +
<CR>*bri=+#<CR>
YES
Write
Brightness -
<CR>*bri=-#<CR>
YES
Read
Brightness value
<CR>*bri=?#<CR>
YES
Write
Color +
<CR>*color=+#<CR>
YES
Write
Color -
<CR>*color=-#<CR>
YES
Read
Color value
<CR>*color=?#<CR>
YES
Write
Hue +
<CR>*hue=+#<CR>
YES
Write
Hue -
<CR>*hue=-#<CR>
YES
Read
Hue value
<CR>*hue=?#<CR>
YES
Write
Sharpness +
<CR>*sharp=+#<CR>
YES
Write
Sharpness -
<CR>*sharp=-#<CR>
YES
Read
Sharpness value
<CR>*sharp=?#<CR>
YES
Write
Gamma 1.0
<CR>*gm=1.0#<CR>
YES
Write
Gamma 1.8
<CR>*gm=1.8#<CR>
YES
Write
Gamma 2.0
<CR>*gm=2.0#<CR>
YES
Write
Gamma 2.2
<CR>*gm=2.2#<CR>
YES
Write
Gamma 2.35
<CR>*gm=2.35#<CR>
YES
Write
Gamma 2.5
<CR>*gm=2.5#<CR>
YES
Read
Gamma Status
<CR>*gm=?#<CR>
YES
Write
Noise Reduction +
<CR>*nr=+#<CR>
YES
Write
Noise Reduction -
<CR>*nr=-#<CR>
YES
Read
Noise Reduction value
<CR>*nr=?#<CR>
YES
Write
Overscan Off
<CR>*ov=off#<CR>
YES
Write
Overscan Crop
<CR>*ov=crop#<CR>
YES
Write
Overscan Zoom
<CR>*ov=zoom#<CR>
YES
9

Read
Overscan Status
<CR>*ov=?#<CR>
YES
Write
Reset picture settings
<CR>*picture=reset#<CR>
YES
Write
Digital Zoom In
<CR>*zoomI#<CR>
YES
Write
Digital Zoom out
<CR>*zoomO#<CR>
YES
Write
Digital Pan right
<CR>*zoomP=+#<CR>
YES
Write
Digital Pan left
<CR>*zoomP=-#<CR>
YES
Write
Digital Pan value
<CR>*zoomP=?#<CR>
YES
Write
Digital Scan up
<CR>*zoomS=+#<CR>
YES
Write
Digital Scan down
<CR>*zoomS=-#<CR>
YES
Write
Digital Scan value
<CR>*zoomS=?#<CR>
YES
Write
Digital Zoom Reset
<CR>*zoomD=reset#<CR>
YES
Write
Auto PC (Resync current source)
<CR>*auto#<CR>
YES
Write
Color Temperature-Warmer
<CR>*ct=warmer#<CR>
YES
Write
Color Temperature-Warm
<CR>*ct=warm#<CR>
YES
Write
Color Temperature-Normal
<CR>*ct=normal#<CR>
YES
Write
Color Temperature-Cool
<CR>*ct=cool#<CR>
YES
Write
Color Temperature-Cooler
<CR>*ct=cooler#<CR>
NO
Write
Color Temperature-lamp native
<CR>*ct=native#<CR>
YES
Read
Color Temperature Status
<CR>*ct=?#<CR>
YES
Write
Auto
<CR>*auto#<CR>
NO
Picture Settings :
Color Adjustment
Write
Color Red Offset +
<CR>*roffset=+#<CR>
YES
Write
Color Red Offset -
<CR>*roffset=-#<CR>
YES
Read
Color Red Offset value
<CR>*roffset=?#<CR>
YES
Write
Color Green Offset +
<CR>*goffset=+#<CR>
YES
Write
Color Green Offset -
<CR>*goffset=-#<CR>
YES
Read
Color Green Offset value
<CR>*goffset=?#<CR>
YES
Write
Color Blue Offset +
<CR>*boffset=+#<CR>
YES
Write
Color Blue Offset -
<CR>*boffset=-#<CR>
YES
Read
Color Blue Offset value
<CR>*boffset=?#<CR>
YES
Write
Color Red Gain +
<CR>*rgain=+#<CR>
YES
Write
Color Red Gain -
<CR>*rgain=-#<CR>
YES
Read
Color Red Gain value
<CR>*rgain=?#<CR>
YES
Write
Color Green Gain +
<CR>*ggain=+#<CR>
YES
Write
Color Green Gain -
<CR>*ggain=-#<CR>
YES
Read
Color Green Gain value
<CR>*ggain=?#<CR>
YES
Write
Color Blue Gain +
<CR>*bgain=+#<CR>
YES
Write
Color Blue Gain -
<CR>*bgain=-#<CR>
YES
Read
Color Blue Gain value
<CR>*bgain=?#<CR>
YES
10

Picture Settings :
Hue
Write
Hue Red +
<CR>*huer=+#<CR>
YES
Write
Hue Red -
<CR>*huer=-#<CR>
YES
Read
Hue Red value
<CR>*huer=?#<CR>
YES
Write
Hue Green +
<CR>*hueg=+#<CR>
YES
Write
Hue Green -
<CR>*hueg=-#<CR>
YES
Read
Hue Green value
<CR>*hueg=?#<CR>
YES
Write
Hue Blue +
<CR>*hueb=+#<CR>
YES
Write
Hue Blue -
<CR>*hueb=-#<CR>
YES
Read
Hue Blue value
<CR>*hueb=?#<CR>
YES
Write
Hue Cyan +
<CR>*huec=+#<CR>
YES
Write
Hue Cyan -
<CR>*huec=-#<CR>
YES
Read
Hue Cyan value
<CR>*huec=?#<CR>
YES
Write
Hue Magenta +
<CR>*huem=+#<CR>
YES
Write
Hue Magenta -
<CR>*huem=-#<CR>
YES
Read
Hue Magenta value
<CR>*huem=?#<CR>
YES
Write
Hue Yellow +
<CR>*huey=+#<CR>
YES
Write
Hue Yellow -
<CR>*huey=-#<CR>
YES
Read
Hue Yellow value
<CR>*huey=?#<CR>
YES
Picture Settings :
Saturation
Write
Saturation Red +
<CR>*satr=+#<CR>
YES
Write
Saturation Red -
<CR>*satr=-#<CR>
YES
Read
Saturation Red value
<CR>*satr=?#<CR>
YES
Write
Saturation Green +
<CR>*satg=+#<CR>
YES
Write
Saturation Green -
<CR>*satg=-#<CR>
YES
Read
Saturation Green value
<CR>*satg=?#<CR>
YES
Write
Saturation Blue +
<CR>*satb=+#<CR>
YES
Write
Saturation Blue -
<CR>*satb=-#<CR>
YES
Read
Saturation Blue value
<CR>*satb=?#<CR>
YES
Write
Saturation Cyan +
<CR>*satc=+#<CR>
YES
Write
Saturation Cyan -
<CR>*satc=-#<CR>
YES
Read
Saturation Cyan value
<CR>*satc=?#<CR>
YES
Write
Saturation Magenta +
<CR>*satm=+#<CR>
YES
Write
Saturation Magenta -
<CR>*satm=-#<CR>
YES
Read
Saturation Magenta value
<CR>*satm=?#<CR>
YES
Write
Saturation Yellow +
<CR>*saty=+#<CR>
YES
Write
Saturation Yellow -
<CR>*saty=-#<CR>
YES
Read
Saturation Yellow value
<CR>*saty=?#<CR>
YES
Picture Settings : Gain
Write
Gain Red +
<CR>*gainr=+#<CR>
YES
Write
Gain Red -
<CR>*gainr=-#<CR>
YES
11

Read
Gain Red value
<CR>*gainr=?#<CR>
YES
Write
Gain Green +
<CR>*gaing=+#<CR>
YES
Write
Gain Green -
<CR>*gaing=-#<CR>
YES
Read
Gain Green value
<CR>*gaing=?#<CR>
YES
Write
Gain Blue +
<CR>*gainb=+#<CR>
YES
Write
Gain Blue -
<CR>*gainb=-#<CR>
YES
Read
Gain Blue value
<CR>*gainb=?#<CR>
YES
Write
Gain Cyan +
<CR>*gainc=+#<CR>
YES
Write
Gain Cyan -
<CR>*gainc=-#<CR>
YES
Read
Gain Cyan value
<CR>*gainc=?#<CR>
YES
Write
Gain Magenta +
<CR>*gainm=+#<CR>
YES
Write
Gain Magenta -
<CR>*gainm=-#<CR>
YES
Read
Gain Magenta value
<CR>*gainm=?#<CR>
YES
Write
Gain Yellow +
<CR>*gainy=+#<CR>
YES
Write
Gain Yellow -
<CR>*gainy=-#<CR>
YES
Read
Gain Yellow value
<CR>*gainy=?#<CR>
YES
Picture Settings :
White Balance
Write
White balance Red +
<CR>*wbr=+#<CR>
YES
Write
White balance Red -
<CR>*wbr=-#<CR>
YES
Read
White balance Red value
<CR>*wbr=?#<CR>
YES
Write
White balance Green +
<CR>*wbg=+#<CR>
YES
Write
White balance Green -
<CR>*wbg=-#<CR>
YES
Read
White balance Green value
<CR>*wbg=?#<CR>
YES
Write
White balance Blue +
<CR>*wbb=+#<CR>
YES
Write
White balance Blue -
<CR>*wbb=-#<CR>
YES
Read
White balance Blue value
<CR>*wbb=?#<CR>
YES
Write
White balance Cyan +
<CR>*wbc=+#<CR>
NO
Write
White balance Cyan -
<CR>*wbc=-#<CR>
NO
Read
White balance Cyan value
<CR>*wbc=?#<CR>
NO
Write
White balance Magenta +
<CR>*wbm=+#<CR>
NO
Write
White balance Magenta -
<CR>*wbm=-#<CR>
NO
Read
White balance Magenta value
<CR>*wbm=?#<CR>
NO
Write
White balance Yellow +
<CR>*wby=+#<CR>
NO
Write
White balance Yellow -
<CR>*wby=-#<CR>
NO
Read
White balance Yellow value
<CR>*wby=?#<CR>
NO
Display
Write
Aspect 4:3
<CR>*asp=4:3#<CR>
YES
Write
Aspect 16:9
<CR>*asp=16:9#<CR>
YES
Write
Aspect 16:10
<CR>*asp=16:10#<CR>
YES
Write
Aspect Auto (Aspect Source)
<CR>*asp=AUTO#<CR>
YES
12

Write
Aspect Real
<CR>*asp=REAL#<CR>
YES
Write
Aspect Theater Scpoe
<CR>*asp=THEA#<CR>
YES
Write
Aspect 5:4
<CR>*asp=5:4#<CR>
YES
Write
Aspect 1.88
<CR>*asp=1.88#<CR>
YES
Write
Aspect 2.35
<CR>*asp=2.35#<CR>
YES
Read
Aspect Status
<CR>*asp=?#<CR>
YES
Write
V Position +
<CR>*vpos=+#<CR>
YES
Write
V Position -
<CR>*vpos=-#<CR>
YES
Read
Current V Position
<CR>*vpos=?#<CR>
YES
Write
H Position +
<CR>*hpos=+#<CR>
YES
Write
H Position -
<CR>*hpos=-#<CR>
YES
Read
Current H Position
<CR>*hpos=?#<CR>
YES
Write
Phase +
<CR>*phase=+#<CR>
YES
Write
Phase -
<CR>*phase=-#<CR>
YES
Read
Current Phase
<CR>*phase=?#<CR>
YES
Write
Tracking +
<CR>*tracking=+#<CR>
YES
Write
Tracking -
<CR>*tracking=-#<CR>
YES
Read
Current Tracking
<CR>*tracking=?#<CR>
YES
Write
Sync level +
<CR>*synclevel=+#<CR>
YES
Write
Sync level -
<CR>*synclevel=-#<CR>
YES
Read
Current Sync level
<CR>*synclevel=?#<CR>
YES
Write
Color space Auto
<CR>*cs=auto#<CR>
YES
Write
Color space YPbPr
<CR>*cs=yp#<CR>
YES
Write
Color space YCbCr
<CR>*cs=yc#<CR>
YES
Write
Color space RGB-PC
<CR>*cs=rgbp#<CR>
YES
Write
Color space RGB-Video
<CR>*cs=rgbv#<CR>
YES
Read
Current color space
<CR>*cs=?#<CR>
YES
Write
Reset display
<CR>*display=reset#<CR>
YES
Display : 3D & PIP
Write
3D Sync Off
<CR>*3d=off#<CR>
YES
Write
3D Auto
<CR>*3d=auto#<CR>
YES
Write
3D Sync Side by Side
<CR>*3d=sbs#<CR>
YES
Write
3D Sync Top Bottom
<CR>*3d=tb#<CR>
YES
Write
3D Sync Frame Sequential
<CR>*3d=fs#<CR>
YES
Write
3D Frame packing
<CR>*3d=fp#<CR>
NO
Write
3D inverter disable
<CR>*3d=da#<CR>
YES
Write
3D inverter
<CR>*3d=iv#<CR>
YES
Write
2D to 3D
<CR>*3d=2d3d#<CR>
NO
Write
3D nVIDIA
<CR>*3d=nvidia#<CR>
NO
13

Read
3D Sync Status
<CR>*3d=?#<CR>
YES
Read
3D DLP Link On
<CR>*dlplink=on#<CR>
YES
Read
3D DLP Link Off
<CR>*dlplink=off#<CR>
YES
Read
3D DLP Link Status
<CR>*dlplink=?#<CR>
YES
Write
PIP mode On
<CR>*pip=on#<CR>
YES
Write
PIP mode Off
<CR>*pip=off#<CR>
YES
Write
PIP HDMI
<CR>*psour=hdmi#<CR>
YES
Write
PIP DVI-D
<CR>*psour=dvid#<CR>
YES
Write
PIP COMPUTER/YPbPr
<CR>*psour=RGB#<CR>
YES
Write
PIP COMPUTER 2/YPbPr2
<CR>*psour=RGB2#<CR>
YES
Write
PIP DisplayPort
<CR>*psour=dp#<CR>
YES
Write
PIP 3G-SDI
<CR>*psour=sdi#<CR>
YES
Write
PIP HDBaseT
<CR>*psour=hdbaset#<CR>
YES
Read
Current PIP source
<CR>*psour=?#<CR>
YES
Write
PIP position Top Left
<CR>*pippos=tl#<CR>
YES
Write
PIP position Top Right
<CR>*pippos=tr#<CR>
YES
Write
PIP position Bottom Left
<CR>*pippos=bl#<CR>
YES
Write
PIP position Bottom Right
<CR>*pippos=br#<CR>
YES
Write
PIP position PBP
<CR>*pippos=pbp#<CR>
YES
Read
Current PIP position
<CR>*pippos=?#<CR>
YES
Setup
Write
Set language to English
<CR>*lang=EN#<CR>
YES
Write
Set language to French
<CR>*lang=FR#<CR>
YES
Write
Set language to Spanish
<CR>*lang=SP#<CR>
YES
Write
Set language to German
<CR>*lang=GE#<CR>
YES
Write
Set language to Portuguese
<CR>*lang=PO#<CR>
YES
Write
Set language to Simplify Chinese
<CR>*lang=SC#<CR>
YES
Write
Set language to Traditional Chinese
<CR>*lang=TR#<CR>
YES
Write
Set language to Japanese
<CR>*lang=JA#<CR>
YES
Write
Set language to Korean
<CR>*lang=KO#<CR>
YES
Write
Set language to Swedish
<CR>*lang=SW#<CR>
YES
Write
Set language to Russian
<CR>*lang=RU#<CR>
YES
Write
Set language to Italian
<CR>*lang=IT#<CR>
YES
Read
language status
<CR>*lang=?#<CR>
YES
Write
Projector Position-Front Table
<CR>*pp=FT#<CR>
YES
Write
Projector Position-Rear Table
<CR>*pp=RE#<CR>
YES
Write
Projector Position-Rear Ceiling
<CR>*pp=RC#<CR>
YES
Write
Projector Position-Front Ceiling
<CR>*pp=FC#<CR>
YES
Write
Projector Position-Freetilt
<CR>*pp=TF#<CR>
YES
14

Read
Projector Position Status
<CR>*pp=?#<CR>
YES
Write
Quick auto search on
<CR>*QAS=on#<CR>
YES
Write
Quick auto search off
<CR>*QAS=off#<CR>
YES
Read
Quick auto search status
<CR>*QAS=?#<CR>
YES
Write
Set test pattern Off
<CR>*tp=off#<CR>
YES
Write
Set test pattern White
<CR>*tp=white#<CR>
YES
Write
Set test pattern Black
<CR>*tp=black#<CR>
YES
Write
Set test pattern Red
<CR>*tp=red#<CR>
YES
Write
Set test pattern Green
<CR>*tp=green#<CR>
YES
Write
Set test pattern Blue
<CR>*tp=blue#<CR>
YES
Write
Set test pattern Checkerboard
<CR>*tp=checker#<CR>
YES
Write
Set test pattern CrossHatch
<CR>*tp=crosshatch#<CR>
YES
Write
Set test pattern V Burst
<CR>*tp=vburst#<CR>
YES
Write
Set test pattern H Burst
<CR>*tp=hburst#<CR>
YES
Write
Set test pattern ColorBar
<CR>*tp=colorbar#<CR>
YES
Read
Get test pattern status
<CR>*tp=?#<CR>
YES
Write
Reset Setup
<CR>*setup=reset#<CR>
YES
Light Settings(laser)
Write
Laser power Normal mode
<CR>*lampm=lnor#<CR>
YES
Write
Laser power Eco mode
<CR>*lampm=eco#<CR>
YES
Write
Laser power Custom mode
<CR>*lampm=cust#<CR>
YES
Read
Get laser power mode
<CR>*lampm=?#<CR>
YES
Write
Custom power level +
<CR>*lampcpl=+#<CR>
YES
Write
Custom power level -
<CR>*lampcpl=-#<CR>
YES
Read
Custom power level ?
<CR>*lampcpl=?<CR>
YES
Write
High Altitude mode on
<CR>*Highaltitude=on#<CR>
YES
Write
High Altitude mode off
<CR>*Highaltitude=off#<CR>
NO
Write
High Altitude mode auto
<CR>*Highaltitude=auto#<CR>
YES
Read
High Altitude mode status
<CR>*Highaltitude=?#<CR>
YES
Warping
Write
Set Active Warp to Keystone
<CR>*warp=keystone#<CR>
YES
Write
Set Active Warp to 4 Coners
<CR>*warp=4corners#<CR>
YES
Write
Set Active Warp to Rotation
<CR>*warp=rotation#<CR>
YES
Write
Set Active Warp to Pin/Barrel
<CR>*warp=pinbarrel#<CR>
YES
Read
Active Warp Status
<CR>*warp=?#<CR>
YES
Write
Warp Reset
<CR>*warp=reset#<CR>
YES
Write
Keystone-Horizontal Decrease
<CR>*hkeyst=-#<CR>
YES
Write
Keystone-Horizontal Increase
<CR>*hkeyst=+#<CR>
YES
Read
Keystone-Horizontal Status
<CR>*hkeyst=?#<CR>
YES
Write
Keystone-Vertical Decrease
<CR>*vkeyst=-#<CR>
YES
15

Write
Keystone-Vertical Increase
<CR>*vkeyst=+#<CR>
YES
Read
Keystone-Vertical Status
<CR>*vkeyst=?#<CR>
YES
Write
Rotation Decrease
<CR>*rot=-#<CR>
YES
Write
Rotation Increase
<CR>*rot=+#<CR>
YES
Read
Rotation Status
<CR>*rot=?#<CR>
YES
Write
Horizontal Pin/Barrel Decrease
<CR>*hpinba=-#<CR>
YES
Write
Horizontal Pin/Barrel Increase
<CR>*hpinba=+#<CR>
YES
Read
Horizontal Pin/Barrel Status
<CR>*hpinba=?#<CR>
YES
Write
Vertical Pin/Barrel Decrease
<CR>*vpinba=-#<CR>
YES
Write
Vertical Pin/Barrel Increase
<CR>*vpinba=+#<CR>
YES
Read
Vertical Pin/Barrel Status
<CR>*vpinba=?#<CR>
YES
Write
4 Corners Top-Left-X Decrease
<CR>*4ctlx=-#<CR>
YES
Write
4 Corners Top-Left-X Increase
<CR>*4ctlx=+#<CR>
YES
Read
4 Corners Top-Left-X Status
<CR>*4ctlx=?#<CR>
YES
Write
4 Corners Top-Left-Y Decrease
<CR>*4ctly=-#<CR>
YES
Write
4 Corners Top-Left-Y Increase
<CR>*4ctly=+#<CR>
YES
Read
4 Corners Top-Left-Y Status
<CR>*4ctly=?#<CR>
YES
Write
4 Corners Top-Right-X Decrease
<CR>*4ctrx=-#<CR>
YES
Write
4 Corners Top-Right-X Increase
<CR>*4ctrx=+#<CR>
YES
Read
4 Corners Top-Right-X Status
<CR>*4ctrx=?#<CR>
YES
Write
4 Corners Top-Right-Y Decrease
<CR>*4ctry=-#<CR>
YES
Write
4 Corners Top-Right-Y Increase
<CR>*4ctry=+#<CR>
YES
Read
4 Corners Top-Right-Y Status
<CR>*4ctry=?#<CR>
YES
Write
4 Corners Bottom-Left-X Decrease
<CR>*4cblx=-#<CR>
YES
Write
4 Corners Bottom-Left-X Increase
<CR>*4cblx=+#<CR>
YES
Read
4 Corners Bottom-Left-X Status
<CR>*4cblx=?#<CR>
YES
Write
4 Corners Bottom-Left-Y Decrease
<CR>*4cbly=-#<CR>
YES
Write
4 Corners Bottom-Left-Y Increase
<CR>*4cbly=+#<CR>
YES
Read
4 Corners Bottom-Left-Y Status
<CR>*4cbly=?#<CR>
YES
Write
4 Corners Bottom-Right-X Decrease
<CR>*4cbrx=-#<CR>
YES
Write
4 Corners Bottom-Right-X Increase
<CR>*4cbrx=+#<CR>
YES
Read
4 Corners Bottom-Right-X Status
<CR>*4cbrx=?#<CR>
YES
Write
4 Corners Bottom-Right-Y Decrease
<CR>*4cbry=-#<CR>
YES
Write
4 Corners Bottom-Right-Y Increase
<CR>*4cbry=+#<CR>
YES
Read
4 Corners Bottom-Right-Y Status
<CR>*4cbry=?#<CR>
YES
Blanking
Write
Blanking Reset
<CR>*bnk=reset#<CR>
YES
Write
Blanking Top Decrease
<CR>*bnkt=-#<CR>
YES
Write
Blanking Top Increase
<CR>*bnkt=+#<CR>
YES
16

Read
Blanking Top Status
<CR>*bnkt=?#<CR>
YES
Write
Blanking Bottom Decrease
<CR>*bnkb=-#<CR>
YES
Write
Blanking Bottom Increase
<CR>*bnkb=+#<CR>
YES
Read
Blanking Bottom Status
<CR>*bnkb=?#<CR>
YES
Write
Blanking Left Decrease
<CR>*bnkl=-#<CR>
YES
Write
Blanking Left Increase
<CR>*bnkl=+#<CR>
YES
Read
Blanking Left Status
<CR>*bnkl=?#<CR>
YES
Write
Blanking Right Decrease
<CR>*bnkr=-#<CR>
YES
Write
Blanking Right Increase
<CR>*bnkr=+#<CR>
YES
Read
Blanking Right Status
<CR>*bnkr=?#<CR>
YES
Edge Blending
Write
Edge Blending On
<CR>*eb=on#<CR>
YES
Write
Edge Blending Off
<CR>*eb=off#<CR>
YES
Read
Edge Blending Status
<CR>*eb=?#<CR>
YES
Write
Edge Blending Reset
<CR>*eb=reset#<CR>
YES
Write
Edge Blending adjust lines On
<CR>*ebadl=on#<CR>
YES
Write
Edge Blending adjust lines Off
<CR>*ebadl=off#<CR>
YES
Read
Edge Blending adjust lines Status
<CR>*ebadl=?#<CR>
YES
Write
Edge Blending White Level Top
Decrease
<CR>*ebwt=-#<CR>
YES
Write
Edge Blending White Level Top
Increase
<CR>*ebwt=+#<CR>
YES
Read
Edge Blending White Level TopStatus
<CR>*ebwt=?#<CR>
YES
Write
Edge Blending White Level Bottom
Decrease
<CR>*ebwb=-#<CR>
YES
Write
Edge Blending White Level Bottom
Increase
<CR>*ebwb=+#<CR>
YES
Read
Edge Blending White Level Bottom
Status
<CR>*ebwb=?#<CR>
YES
Write
Edge Blending White Level Left
Decrease
<CR>*ebwl=-#<CR>
YES
Write
Edge Blending White Level Left
Increase
<CR>*ebwl=+#<CR>
YES
Read
Edge Blending White Level Left Status
<CR>*ebwl=?#<CR>
YES
Write
Edge Blending White Level Right
Decrease
<CR>*ebwr=-#<CR>
YES
Write
Edge Blending White Level Right
Increase
<CR>*ebwr=+#<CR>
YES
17

Read
Edge Blending White Level Right Status
<CR>*ebwr=?#<CR>
YES
Write
Edge Blending Black Level Top
Decrease
<CR>*ebbt=-#<CR>
YES
Write
Edge Blending Black Level Top Increase
<CR>*ebbt=+#<CR>
YES
Read
Edge Blending Black Level TopStatus
<CR>*ebbt=?#<CR>
YES
Write
Edge Blending Black Level Bottom
Decrease
<CR>*ebbb=-#<CR>
YES
Write
Edge Blending Black Level Bottom
Increase
<CR>*ebbb=+#<CR>
YES
Read
Edge Blending Black Level Bottom
Status
<CR>*ebbb=?#<CR>
YES
Write
Edge Blending Black Level Left
Decrease
<CR>*ebbl=-#<CR>
YES
Write
Edge Blending Black Level Left Increase
<CR>*ebbl=+#<CR>
YES
Read
Edge Blending Black Level Left Status
<CR>*ebbl=?#<CR>
YES
Write
Edge Blending Black Level Right
Decrease
<CR>*ebbr=-#<CR>
YES
Write
Edge Blending Black Level Right
Increase
<CR>*ebbr=+#<CR>
YES
Read
Edge Blending Black Level Right Status
<CR>*ebbr=?#<CR>
YES
Write
Edge Blending Black Level All color
Decrease
<CR>*ebca=-#<CR>
YES
Write
Edge Blending Black Level All color
Increase
<CR>*ebca=+#<CR>
YES
Read
Edge Blending Black Level All color
Status
<CR>*ebca=?#<CR>
YES
Write
Edge Blending Black Level Red
Decrease
<CR>*ebcr=-#<CR>
YES
Write
Edge Blending Black Level Red Increase
<CR>*ebcr=+#<CR>
YES
Read
Edge Blending Black Level Red Status
<CR>*ebcr=?#<CR>
YES
Write
Edge Blending Black Level Green
Decrease
<CR>*ebcg=-#<CR>
YES
Write
Edge Blending Black Level Green
Increase
<CR>*ebcg=+#<CR>
YES
Read
Edge Blending Black Level Green Status
<CR>*ebcg=?#<CR>
YES
18

Write
Edge Blending Black Level Blue
Decrease
<CR>*ebcb=-#<CR>
YES
Write
Edge Blending Black Level Blue Increase
<CR>*ebcb=+#<CR>
YES
Read
Edge Blending Black Level Blue Status
<CR>*ebcb=?#<CR>
YES
System
Write
Standby Settings-Network on
<CR>*standbynet=on#<CR>
YES
Write
Standby Settings-Network off
<CR>*standbynet=off#<CR>
YES
Read
Standby Settings-Network Status
<CR>*standbynet=?#<CR>
YES
Write
Auto Power Off-on
<CR>*autopoweroff=on#<CR>
YES
Write
Auto Power Off-off
<CR>*autopoweroff=off#<CR>
YES
Read
Auto Power Off-Status
<CR>*autopoweroff=?#<CR>
YES
Write
Direct Power On-on
<CR>*directpower=on#<CR>
YES
Write
Direct Power On-off
<CR>*directpower=off#<CR>
YES
Read
Direct Power On-Status
<CR>*directpower=?#<CR>
YES
Write
Set background to Logo
<CR>*bg=logo#<CR>
YES
Write
Set background to Black
<CR>*bg=black#<CR>
YES
Write
Set background to Blue
<CR>*bg=blue#<CR>
YES
Write
Set background to White
<CR>*bg=white#<CR>
YES
Read
Get background status
<CR>*bg=?#<CR>
YES
Write
Startup logo off
<CR>*startlogo=off#<CR>
YES
Write
Startup logo on
<CR>*startlogo=on#<CR>
YES
Write
Get startup logo status
<CR>*startlogo=?#<CR>
YES
Write
Trigger on
<CR>*trigger=on#<CR>
YES
Write
Trigger off
<CR>*trigger=off#<CR>
YES
Read
Trigger status
<CR>*trigger=?#<CR>
YES
Write
Dynamic black on
<CR>*db=on#<CR>
YES
Write
Dynamic blackoff
<CR>*db=off#<CR>
YES
Read
Dynamic black status
<CR>*db=?#<CR>
YES
Write
Factory reset
<CR>*fact=reset#<CR>
YES
Write
System reset
<CR>*system=reset#<CR>
YES
Information
Read
Get Model Name
<CR>*modelname=?#<CR>
YES
Read
Get Serial Number
<CR>*sn=?#<CR>
YES
Read
Get F/W Version
<CR>*swver=?#<CR>
YES
Read
Get BQ F/W Version
<CR>*fwver=?#<CR>
YES
Read
Get Active source
<CR>*activesour=?#<CR>
YES
Read
Get Pixel clock
<CR>*pixelclock=?#<CR>
YES
Read
Get Signal format
<CR>*signal=?#<CR>
YES
Read
Get H refresh rate
<CR>*hfreq=?#<CR>
YES
19

Read
Get V refresh rate
<CR>*vfreq=?#<CR>
YES
Read
Laser Hour
<CR>*lsrtim=?#<CR>
YES
Miscellaneous
Write
Blank On
<CR>*blank=on#<CR>
YES
Write
Blank Off
<CR>*blank=off#<CR>
YES
Read
Blank Status
<CR>*blank=?#<CR>
YES
Write
Freeze On
<CR>*freeze=on#<CR>
YES
Write
Freeze Off
<CR>*freeze=off#<CR>
YES
Read
Freeze Status
<CR>*freeze=?#<CR>
YES
Write
Menu On
<CR>*menu=on#<CR>
YES
Write
Menu Off
<CR>*menu=off#<CR>
YES
Read
Menu Status
<CR>*menu=?#<CR>
YES
Write
Up
<CR>*up#<CR>
YES
Write
Down
<CR>*down#<CR>
YES
Write
Right
<CR>*right#<CR>
YES
Write
Left
<CR>*left#<CR>
YES
Write
Enter
<CR>*enter#<CR>
YES
Write
Remote Set
<CR>*rrset=0#<CR>
YES
Read
Remote Set Status
<CR>*rrset=?#<CR>
YES
Write
Remote Receiver-front+rear
<CR>*rr=fr#<CR>
NO
Write
Remote Receiver-front
<CR>*rr=f#<CR>
NO
Write
Remote Receiver-rear
<CR>*rr=r#<CR>
NO
Write
Remote Receiver-top
<CR>*rr=t#<CR>
NO
Write
Remote Receiver-top+front
<CR>*rr=tf#<CR>
NO
Write
Remote Receiver-top+rear
<CR>*rr=tr#<CR>
NO
Read
Remote Receiver Status
<CR>*rr=?#<CR>
NO
Miscellaneous
Write
Instant On-on
<CR>*ins=on#<CR>
NO
Write
Instant On-off
<CR>*ins=off#<CR>
NO
Read
Instant On Status
<CR>*ins=?#<CR>
NO
Write
Lamp Saver Mode-on
<CR>*lpsaver=on#<CR>
NO
Write
Lamp Saver Mode-off
<CR>*lpsaver=off#<CR>
NO
Read
Lamp Saver Mode Status
<CR>*lpsaver=?#<CR>
NO
Write
Projection Log In Code on
<CR>*prjlogincode=on#<CR>
NO
Write
Projection Log In Code off
<CR>*prjlogincode=off#<CR>
NO
Read
Projection Log In Code Status
<CR>*prjlogincode=?#<CR>
NO
Write
Broadcasting on
<CR>*broadcasting=on#<CR>
NO
Write
Broadcasting off
<CR>*broadcasting=off#<CR>
NO
Read
Broadcasting Status
<CR>*broadcasting=?<CR>
NO
20

Write
AMX Device Discovery-on
<CR>*amxdd=on#<CR>
NO
Write
AMX Device Discovery-off
<CR>*amxdd=off#<CR>
NO
Read
AMX Device Discovery Status
<CR>*amxdd=?#<CR>
NO
Read
Mac Address
<CR>*macaddr=?#<CR>
NO
Read
Error Code
<CR>*error=report#<CR>
YES
Write
Serial Number code1
<CR>*SN=XXX#<CR>
YES
Read
Serial Number Query
<CR>*SN=?#<CR>
YES
Write
Lens Shift Up
<CR>*lst=up#<CR>
YES
Write
Lens Shift Down
<CR>*lst=down#<CR>
YES
Write
Lens Shift Left
<CR>*lst=left#<CR>
YES
Write
Lens Shift Right
<CR>*lst=right#<CR>
YES
Write
Lens Focus Plus
<CR>*focus=+#<CR>
YES
Write
Lens Focus Minus
<CR>*focus=-#<CR>
YES
Write
Lens Zoom Plus
<CR>*zoom=+#<CR>
YES
Write
Lens Zoom Minus
<CR>*zoom=-#<CR>
YES
Write
Lens load memory 1
<CR>*lensload=m1#<CR>
YES
Write
Lens load memory 2
<CR>*lensload=m2#<CR>
YES
Write
Lens load memory 3
<CR>*lensload=m3#<CR>
YES
Write
Lens load memory 4
<CR>*lensload=m4#<CR>
YES
Write
Lens load memory 5
<CR>*lensload=m5#<CR>
YES
Write
Lens load memory 6
<CR>*lensload=m6#<CR>
YES
Write
Lens load memory 7
<CR>*lensload=m7#<CR>
YES
Write
Lens load memory 8
<CR>*lensload=m8#<CR>
YES
Write
Lens load memory 9
<CR>*lensload=m9#<CR>
YES
Write
Lens load memory 10
<CR>*lensload=m10#<CR>
YES
Read
Read Lens memory status
<CR>*lensload=?#<CR>
YES
Write
Lens save memory 1
<CR>*lenssave=m1#<CR>
YES
Write
Lens save memory 2
<CR>*lenssave=m2#<CR>
YES
Write
Lens save memory 3
<CR>*lenssave=m3#<CR>
YES
Write
Lens save memory 4
<CR>*lenssave=m4#<CR>
YES
Write
Lens save memory 5
<CR>*lenssave=m5#<CR>
YES
Write
Lens save memory 6
<CR>*lenssave=m6#<CR>
YES
Write
Lens save memory 7
<CR>*lenssave=m7#<CR>
YES
Write
Lens save memory 8
<CR>*lenssave=m8#<CR>
YES
Write
Lens save memory 9
<CR>*lenssave=m9#<CR>
YES
Write
Lens save memory 10
<CR>*lenssave=m10#<CR>
YES
Write
Reset Lens to center
<CR>*lensreset=center#<CR>
YES
Lamp Control
Read
Lamp Hour
<CR>*ltim=?#<CR>
YES
21

Read
Lamp2 Hour
<CR>*ltim2=?#<CR>
NO
Write
Lamp hour reset
<CR>*ltim=reset#<CR>
YES
Write
Lamp2 hour reset
<CR>*ltim2=reset#<CR>
NO
Write
Total machine hour reset (power on
time)
<CR>*tmhour=reset#<CR>
NO
Read
Total machine hour (power on time)
Query
<CR>*tmhour=?#<CR>
YES
Write
Normal mode
<CR>*lampm=lnor#<CR>
NO
Write
Eco mode
<CR>*lampm=eco#<CR>
NO
Write
Dual lamp
<CR>*lammd=dual#<CR>
NO
Write
number 1 lamp
<CR>*lammd=num1l#<CR>
NO
Write
number 2 lamp
<CR>*lammd=num2#<CR>
NO
Write
Single lamp (minimum)
<CR>*lammd=single#<CR>
NO
Read
Current Lamp status
<CR>*lammd=?#<CR>
NO
Write
Smart Eco mode
<CR>*lampm=seco#<CR>
NO
Write
Smart Eco mode(LampCare)
<CR>*lampm=seco2#<CR>
NO
Write
Smart Eco mode(IumenCare)
<CR>*lampm=seco3#<CR>
NO
Write(雙燈)
Dual Brightest
<CR>* lampm =dualbr#<CR>
NO
Write(雙燈)
Dual Reliable
<CR>* lampm =dualre#<CR>
NO
Write(雙燈)
Single Alternative
<CR>* lampm =single#<CR>
NO
Write(雙燈)
Single Alternative Eco
<CR>* lampm =singleeco#<CR>
NO
Read
Lamp Mode Status
<CR>*lampm=?#<CR>
NO
Audio Control
Write
Mute On
<CR>*mute=on#<CR>
NO
Write
Mute Off
<CR>*mute=off#<CR>
NO
Read
Mute Status
<CR>*mute=?#<CR>
NO
Write
Volume +
<CR>*vol=+#<CR>
NO
Write
Volume -
<CR>*vol=-#<CR>
NO
Read
Volume Status
<CR>*vol=?#<CR>
NO
Write
Mic. Volume +
<CR>*micvol=+#<CR>
NO
Write
Mic. Volume -
<CR>*micvol=-#<CR>
NO
Read
Mic. Volume Status
<CR>*micvol=?#<CR>
NO
Audio source select
Write
Audio pass Through off
<CR>*audiosour=off#<CR>
NO
Write
Audio-Computer1
<CR>*audiosour=RGB#<CR>
NO
Write
Audio-Computer2
<CR>*audiosour=RGB2#<CR>
NO
Write
Audio-Video/S-Video
<CR>*audiosour=vid#<CR>
NO
Write
Audio-Component
<CR>*audiosour=ypbr#<CR>
NO
Write
Audio-HDMI
<CR>*audiosour=hdmi#<CR>
NO
Write
Audio-HDMI2
<CR>*audiosour=hdmi2#<CR>
NO
22

Read
Audio pass Status
<CR>*audiosour=?#<CR>
NO
BenQ.com
© 2018 BenQ Corporation
All rights reserved. Rights of modification reserved.
Version: 1.01-S
23
 Loading...