


Digital Projector
Installation Guide
Installation Projector | LU9245
數位投影機安裝指南
数码投影机安装指南
Guide d’installation du projecteur numérique
Digitalprojektor Installationsanleitung
Guida all'installazione del proiettore digitale
Руководство по установке цифрового проектора
디지털 프로젝터 설치 안내서
デジタルプロジェクタインストールガイド

English
Table of Contents
Notice ..................................................................................................... 2
Notice on laser ............................................................................................................... 2
Cooling notice ................................................................................................................ 3
Product information ............................................................................. 5
Packing content .............................................................................................................. 5
Specication ................................................................................................................... 5
Terminals ........................................................................................................................ 6
Remote control .............................................................................................................. 7
Installation ............................................................................................. 9
Installing removing the optional lens ........................................................................... 9
Lens ................................................................................................................................. 11
Projection table .............................................................................................................. 11
Lens shift range .............................................................................................................. 13
LED indicator ........................................................................................ 15
System message ............................................................................................................. 15
Light source error message .......................................................................................... 15
Filter message ................................................................................................................ 15
Thermal error message ................................................................................................. 16
Projector dimension ............................................................................. 17
Ceilling mount installation diagram .................................................... 18
Size and angle adjustment ............................................................................................ 18
Lens dimension ...................................................................................... 19
RS232 command ................................................................................... 20
RS232 pin assignment .................................................................................................... 20
RS232 serial port with a crossover cable ..................................................................... 20
Please visit below website for latest version of User Manual / Installation Guide.
http://business-display.benq.com/
V1.00
1
English
Notice
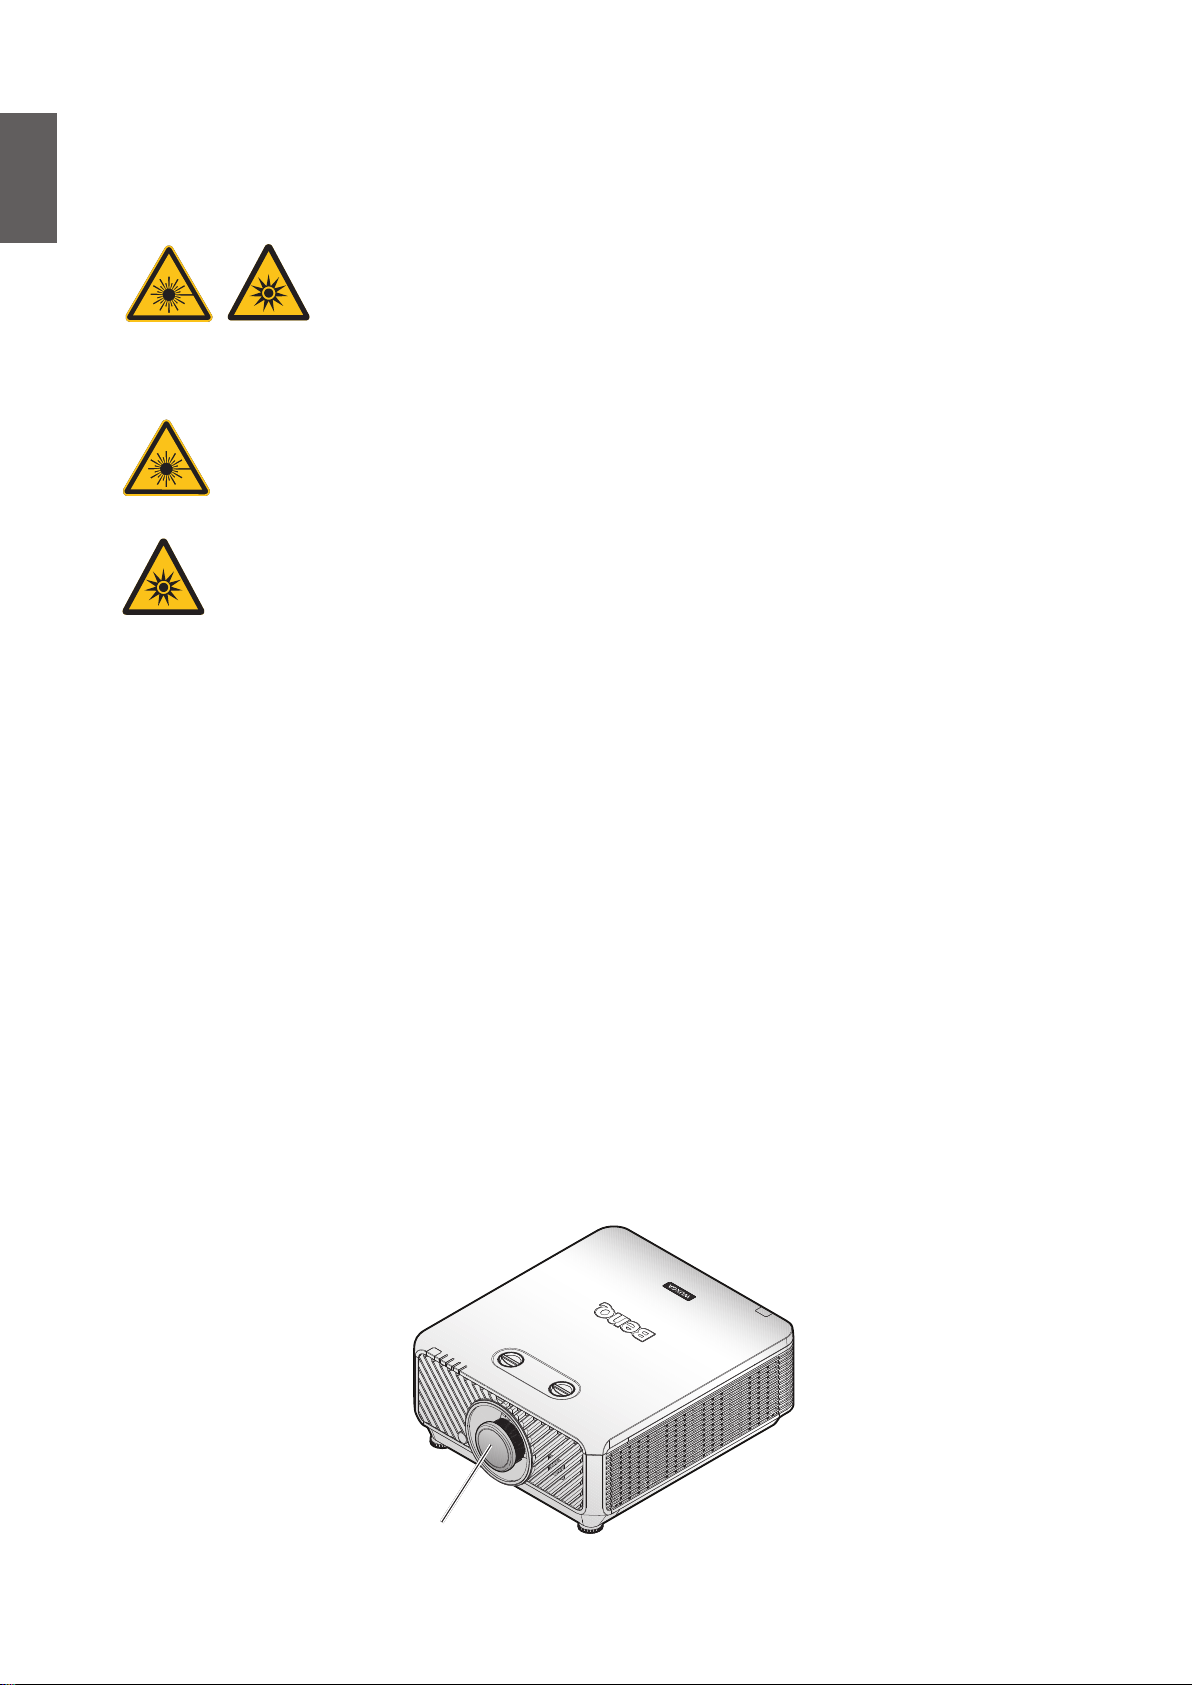
Notice on laser
yLaser class
(for USA) This Laser Product is designated as Class 3R during all procedures of
operation and complies with IEC/EN 60825-1:2007.
(for WW) This Laser Product is designated as Class 1 during all procedures of
operation and complies with IEC/EN 60825-1:2014.
LASER LIGHT - AVOID DIRECT EYE EXPOSURE.
Do not point laser or allow laser light to be directed or reflected t ward other
people or reflecti e objects.
Direct or scattered light can be hazardous to eyes and skin.
There is a potential hazard of eye exposure to laser radiation if the included
instructions are not followed.
Caution – use of controls or adjustments or performance of procedures other than
those specified he ein may result in hazardous radiation exposure.
This symbol indicates that there is a potential hazard of eye exposure to
laser radiation unless the instructions are closely followed.
yLaser parameters
Wavelength 449nm - 461nm (Blue)
Mode of operation Pulsed, due to frame rate
Pulse width 1.34ms
Pulse repetition rate 120Hz
Maximum laser energy 0.698mJ
Total internal power >100w
Apparent source size >10mm, at lens stop
Divergence >100 mili Radian
yLaser light instruction
2
Laser aperture
English
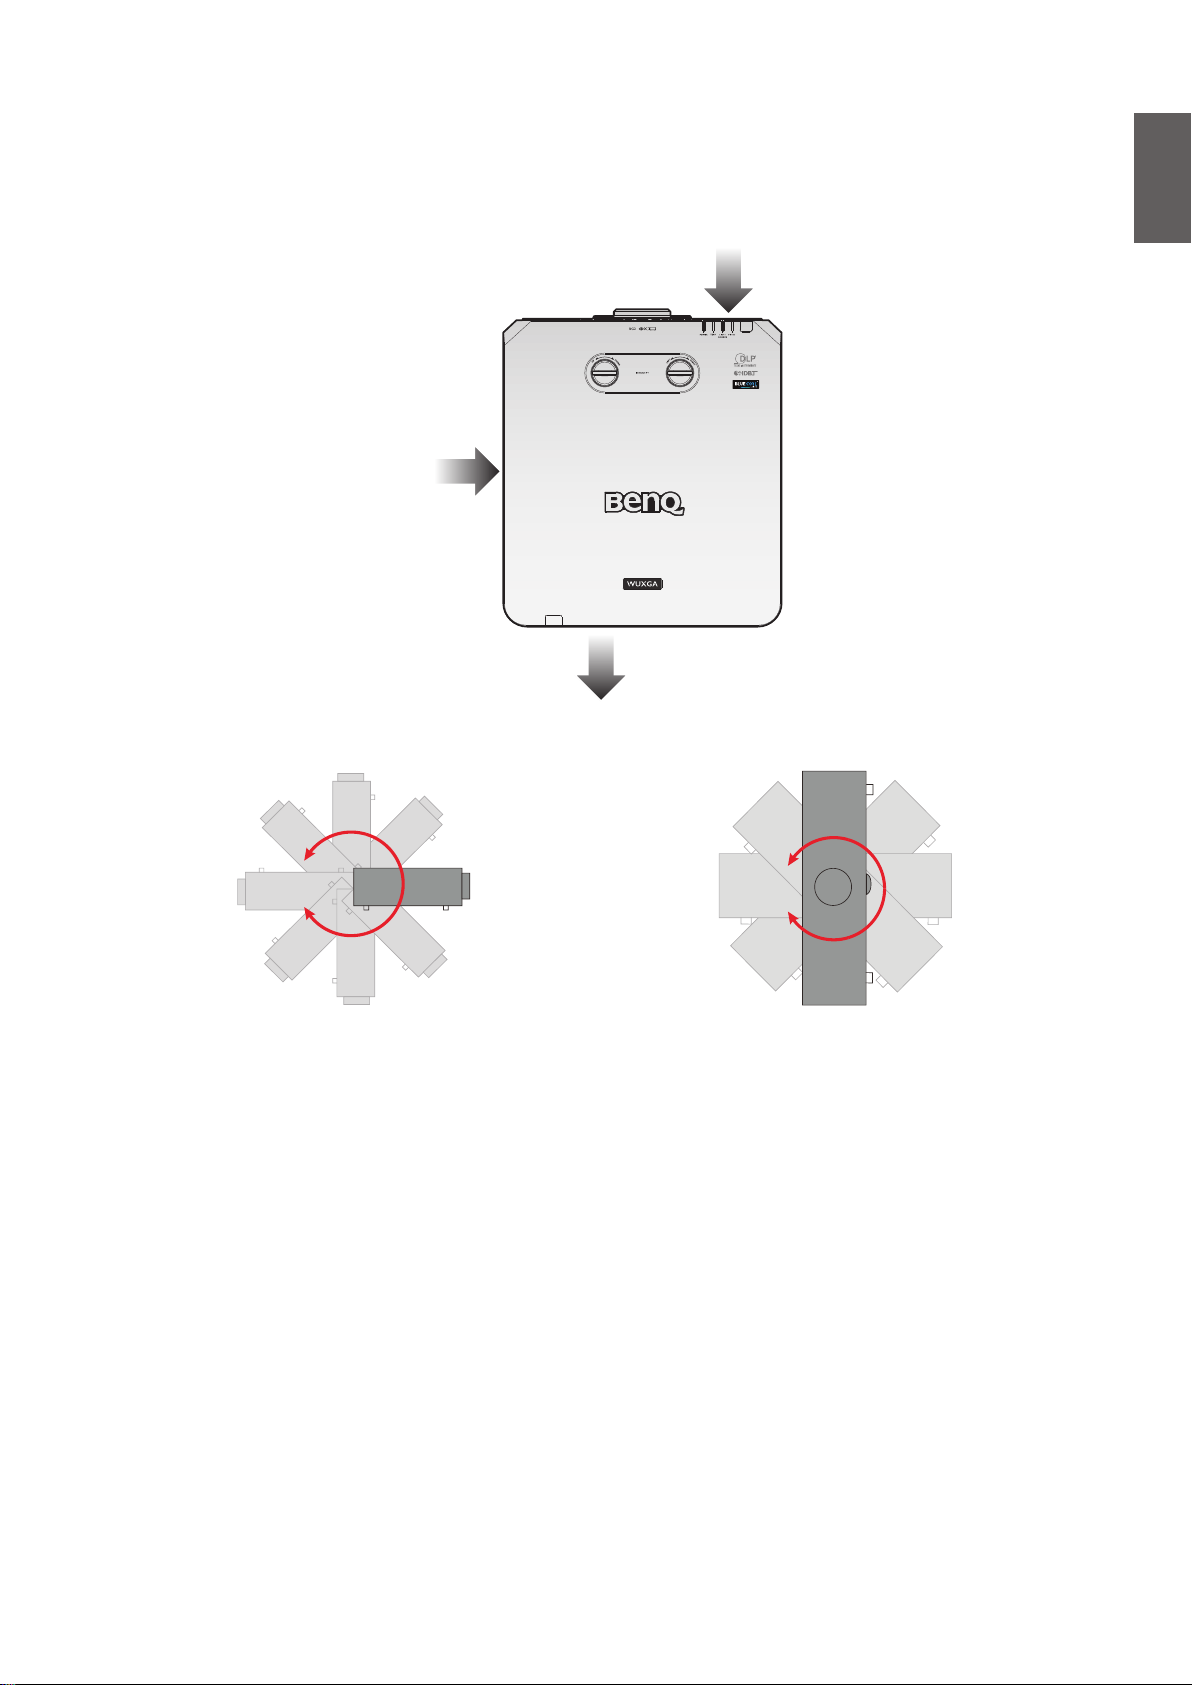
Cooling notice
Allow at least 50 cm (19.7 inch) for clearance around the exhaust vent. Make sure no objects block
air input within 30 cm (11.8 inch).
Keep the outlet at least 1 m away from the inlets of other projectors.
Air inlet
Air inlet
Air outlet
• The projector can be installed at any angle.
3
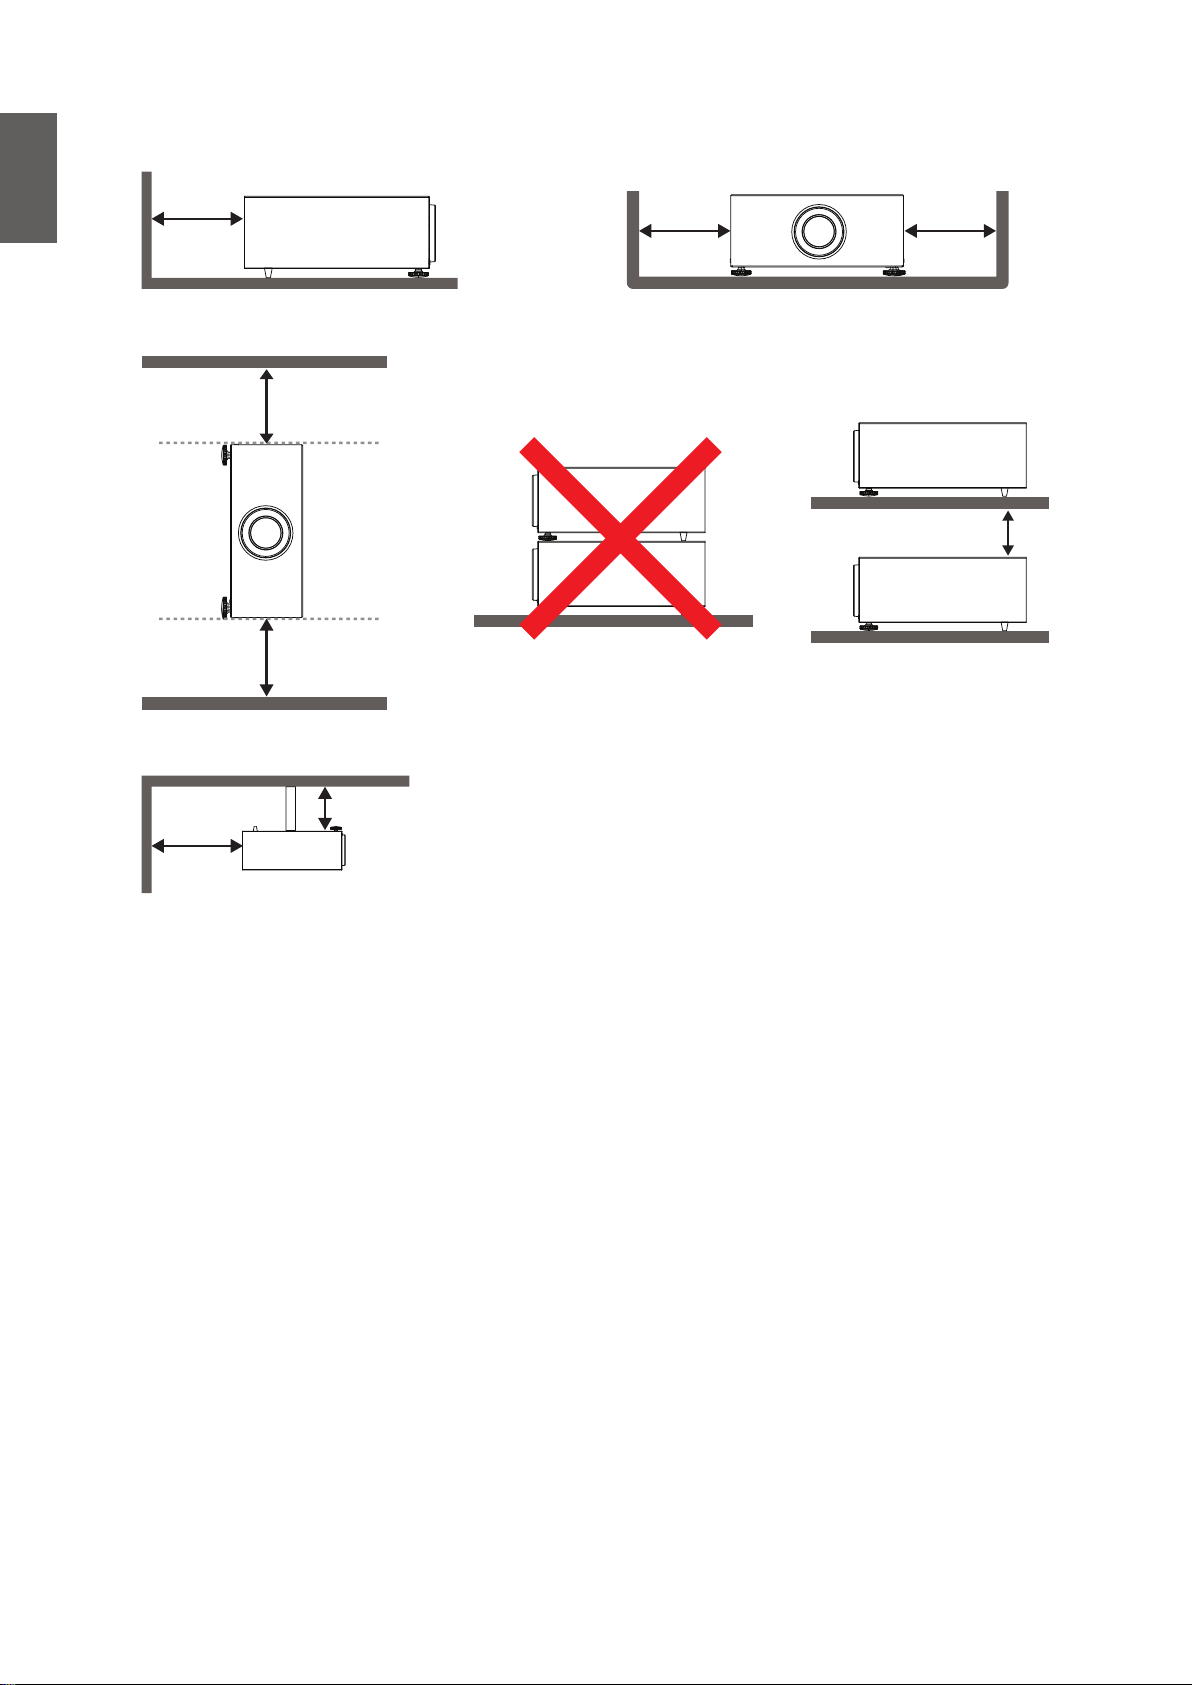
English
• Allow at least 50 cm of clearance around the exhaust vent.
Minimum 50 cm
(19.69 inch)
Minimum 50 cm
(19.69 inch)
Minimum 50 cm
(19.69 inch)
Minimum 50 cm
(19.69 inch)
Minimum 50 cm
(19.69 inch)
Minimum 10 cm
(3.94 inch)
Minimum 30 cm
(11.81 inch)
Minimum 50 cm
(19.69 inch)
• Ensure that the air intake vents do not recycle hot air from the exhaust vent.
• When operating in an enclosed space, make sure that the surrounding air temperature does
not exceed the projector's operating temperature and that the air intake and exhaust vents are
unobstructed.
All enclosures should pass a certified thermal valuation to ensure that the projector does not
recycle exhaust air. Recycling exhaust air may cause the projector to shutdown even if the ambient
temperature is within the acceptable operating temperature range.
4
English
Product information
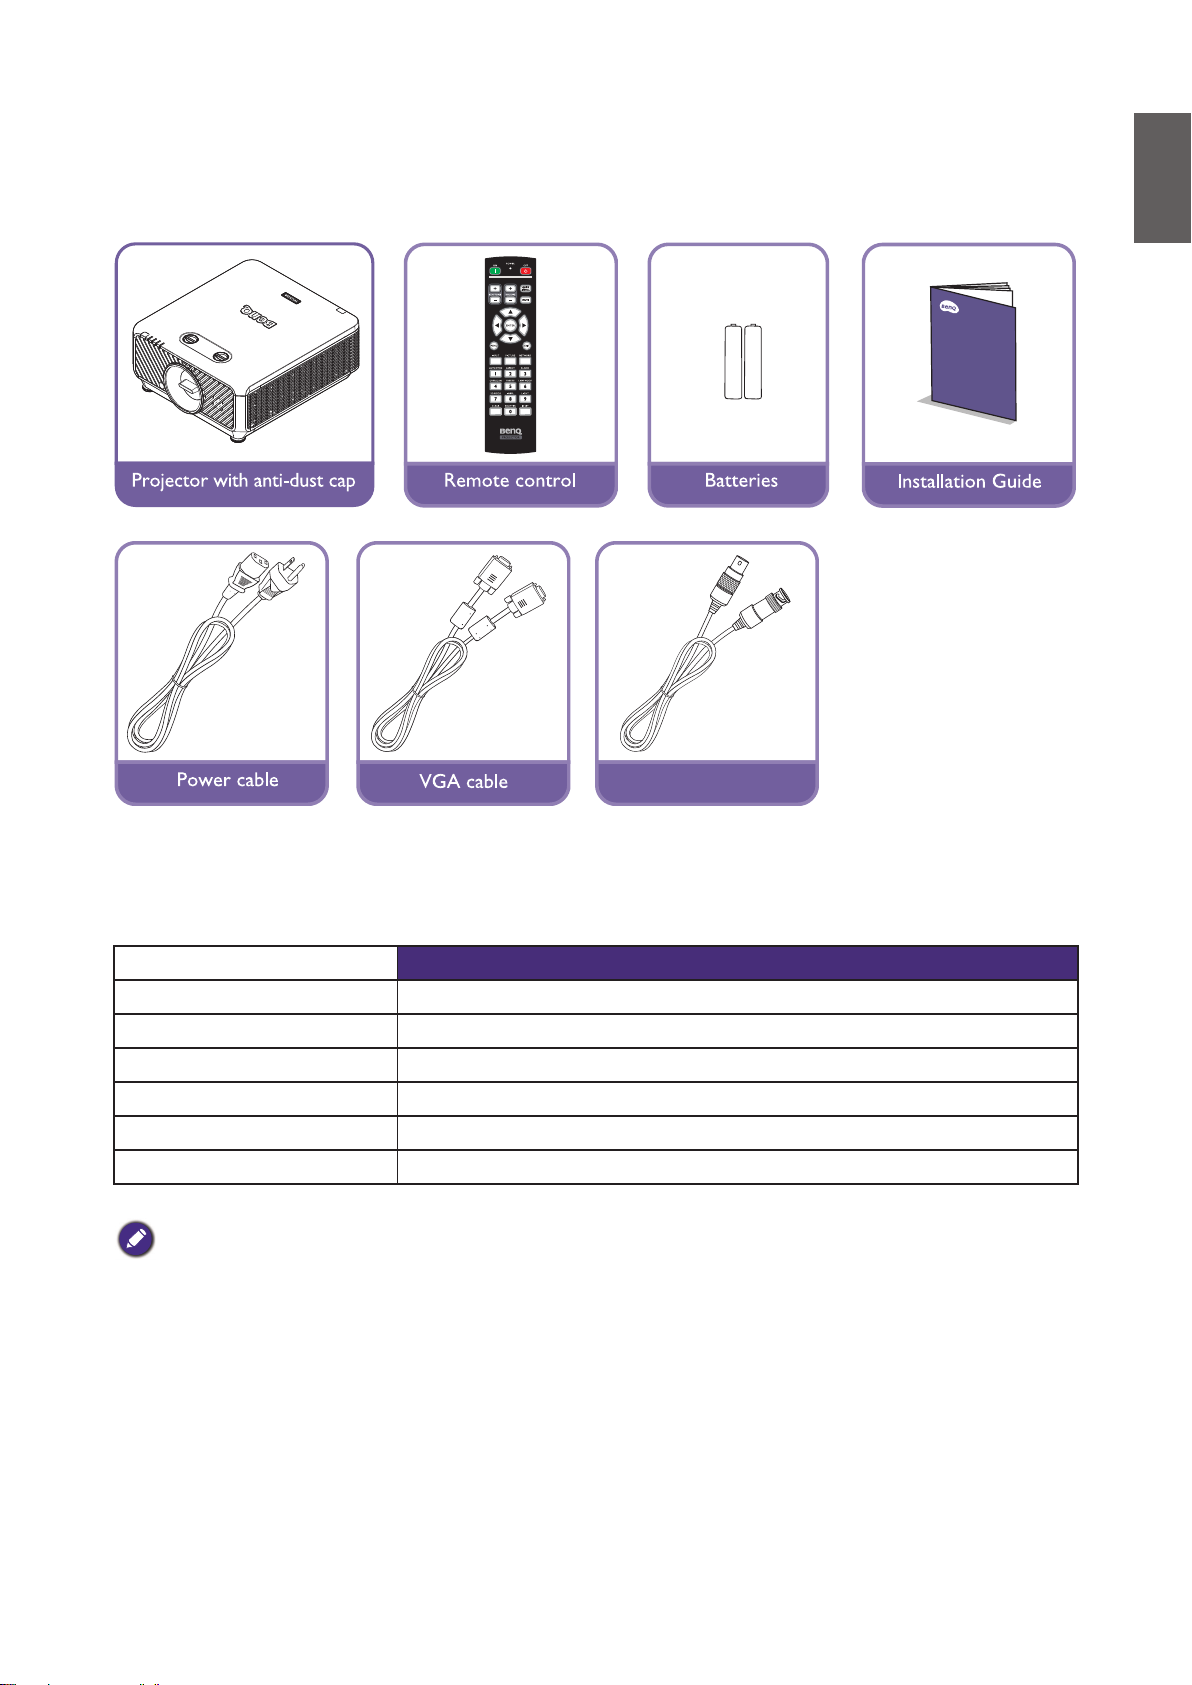
Packing content
3pin VESA to BNC Cable
Specication
LU9245
Projection system DLP Single 0.67 WUXGA DMD Chip
Native resolution 1920*1200 pixels, 16:10
Light source Laser diodes
Power consumption 700Watts (Normal mode)/ 530Watts (Eco mode)
Dimension 470 x 220.5 x 519.5 mm
Weight 24 kg (without lens)
Note:
• The brightness is supplied by standard lens, the value will depends on lenses.
• The brightness output will vary depending on each units and actual usage.
• Please nd the latest user’s manual on the local website.
5

English
Terminals
MONITOR OUT
Connection to other display equipment for concurrent
playback display.
HDB a seT
Connect an Ethernet cable (Cat5/Cat6) from HDBaseT
transmitter with high-denition video (HD), RS232 control and LAN control.
HDMI 1
Connection to HDMI source.
LAN
For connection to RJ45 Cat5/Cat6 Ethernet cable to
control the projector through a network.
3D SYNC OUT
Connection to 3D IR sync signal transmitter.
VIDEO
Connection to a video source.
RS-232 IN
Standard 9-pin D-sub interface for connection to PC control system and projector maintenance.
PC 2 (R/Pr, G/Y, B/Pb, H, V)
Connection to RGB or YPbPr/YCbCr output signal with
BNC type input terminal.
AUDIO OUT (L/R)
Connection to a speaker or headset.
WIRED REMOTE IN
Connection to a speaker or headset.
12V TRIGGE R
3.5mm mini earphone jack, employs 200mA display relay
to provide 12(+/-1.5)V output and short circuit protection.
PC
15-pin VGA port for connection to RGB, component
HD source, or PC.
DVI-D
Connection to DVI source.
HDMI 2
Connection to HDMI source.
USB 1. 5A
Support 5V/1.5A output.
3D SYNC IN
Connect 3D-sync in cable from a computer or an enabled device.
SERVICE
Maintenance exclusive port for authorized maintenance
personnel only.
RS-232 OUT
Connects to another projector (same model) for RS-232
control.
AUDIO IN (L/R)
Connection to an audio input source via an audio or
audio L/R cable.
AUDIO IN
Connection to an audio input source via an audio cable.
WIRED REMOTE OUT
Connection to another projector.
6
Caution:
Make sure the port is valid before inserting a wired remote controller. The remote controller may be damaged in
case of an invalid port, e.g. a wired remote controller is connected to trigger output. For more information about
upgrading rmware via Lan, please contact BenQ service.
English
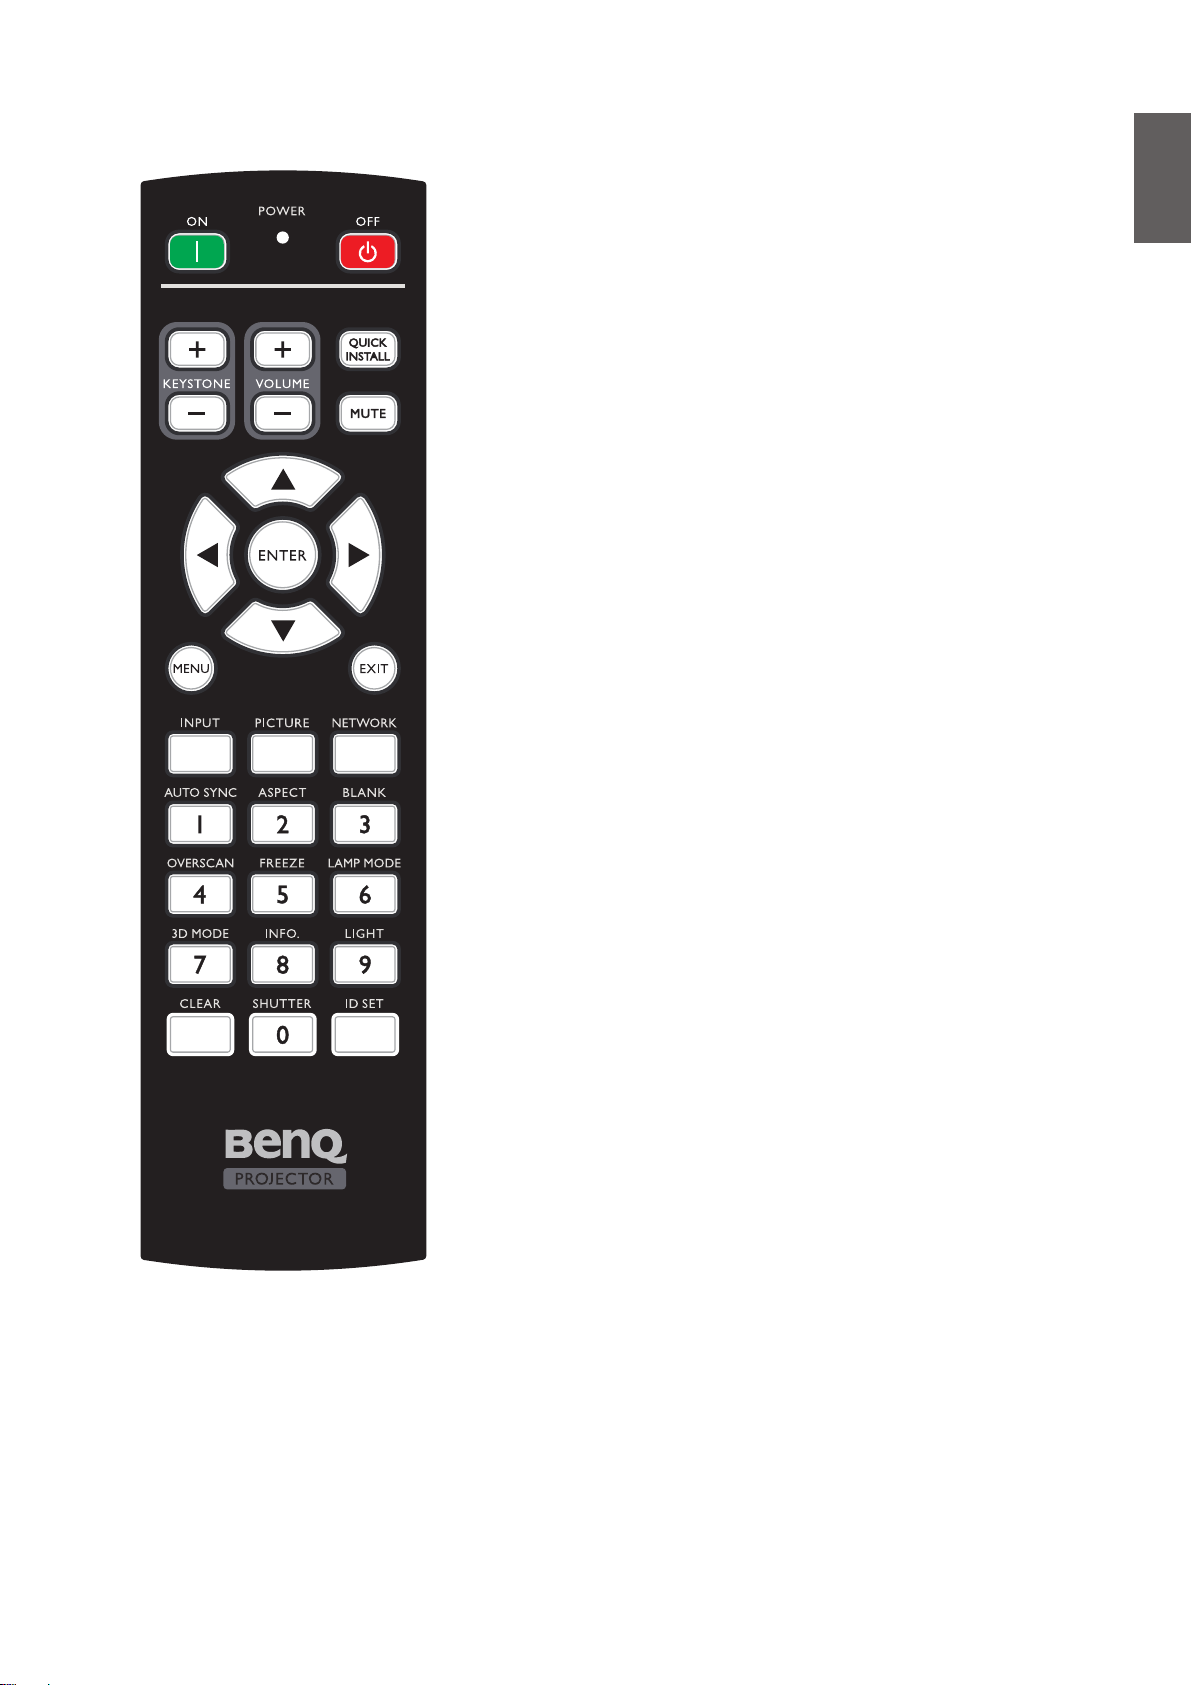
Remote control
ON / OFF
Toggles the projector between standby mode and on.
KEYSTONE+/KEYSTONE-
Manually corrects distorted images resulting from an angled projection.
VOLUME +/VOLUME -
Increases/decreases the projector volume.
QUICK IN S TA LL
Displays the Quick Install OSD menu.
MUTE
Toggles projector audio between on and off.
Arrow keys (▲ Up, ▼ Down, ◄ Left, ► Right)
When the On-Screen Display (OSD) menu is activated, the arrow keys
are used as directional arrows to select the desired menu items and to
make adjustments.
ENTER
Selects an available picture setup mode. Activates the selected OnScreen Display (OSD) menu item.
MENU
Turns on the On-Screen Display (OSD) menu. Goes back to previous
OSD menu, exits and saves menu settings.
EXIT
Goes back to previous OSD menu, exits and saves menu settings.
INPUT
Selects an input source for display.
PCITURE
Press to display Picture menu.
NETWORK
Selects Network Display as the input signal source.
AUTO SYNC
Automatically determines the best picture timings for the displayed image.
ASPECT
Selects the display aspect ratio.
BLANK
Used to hide the screen picture.
7
English
OVERSCAN
Press to select overscan mode.
FREEZE
Freezes the projected image.
LAMP MODE
Press to display OSD menu to select desired light mode.
3D MODE
Press to display 3D setup menu.
INFO.
Press to display INFORMATION menu.
LIGHT
Press to open backlight of remote controller.
CLEAR
Clear remote ID SET assigned to all projectors.
Press CLEAR and ID SET for ve seconds. The LED blinks three times
then the ID setting is cleared.
SHUTTER
The function is not available on this projector.
ID SET
• Remote control ID SET (set the particular remote code)
Press to set remote ID.
Press ID SET for three seconds. The POWER indicator on the remote
control blinks, then press 01~99 to designate an ID.
Note:
The remote control number (Remote control ID) must match the Projector ID Setting number for accurate control.
• Clear Remote ID SET (set remote code to all)
Press CLEAR and ID SET for five seconds. The POWER
indicator on the remote control blinks a single instance to reset
remote code to all,
setting.
Numeric buttons
Enters numbers in network settings.
Numeric buttons 1, 2, 3, 4 cannot be pressed when asked to enter password.
WIRE REMOTE jack
Connect to projector for wire remote control.
can control projector no matter projector id
8
English
Installation
Caution:
To avoid damaging the DLP chips, never aim a high-power laser beam into the projection lens.
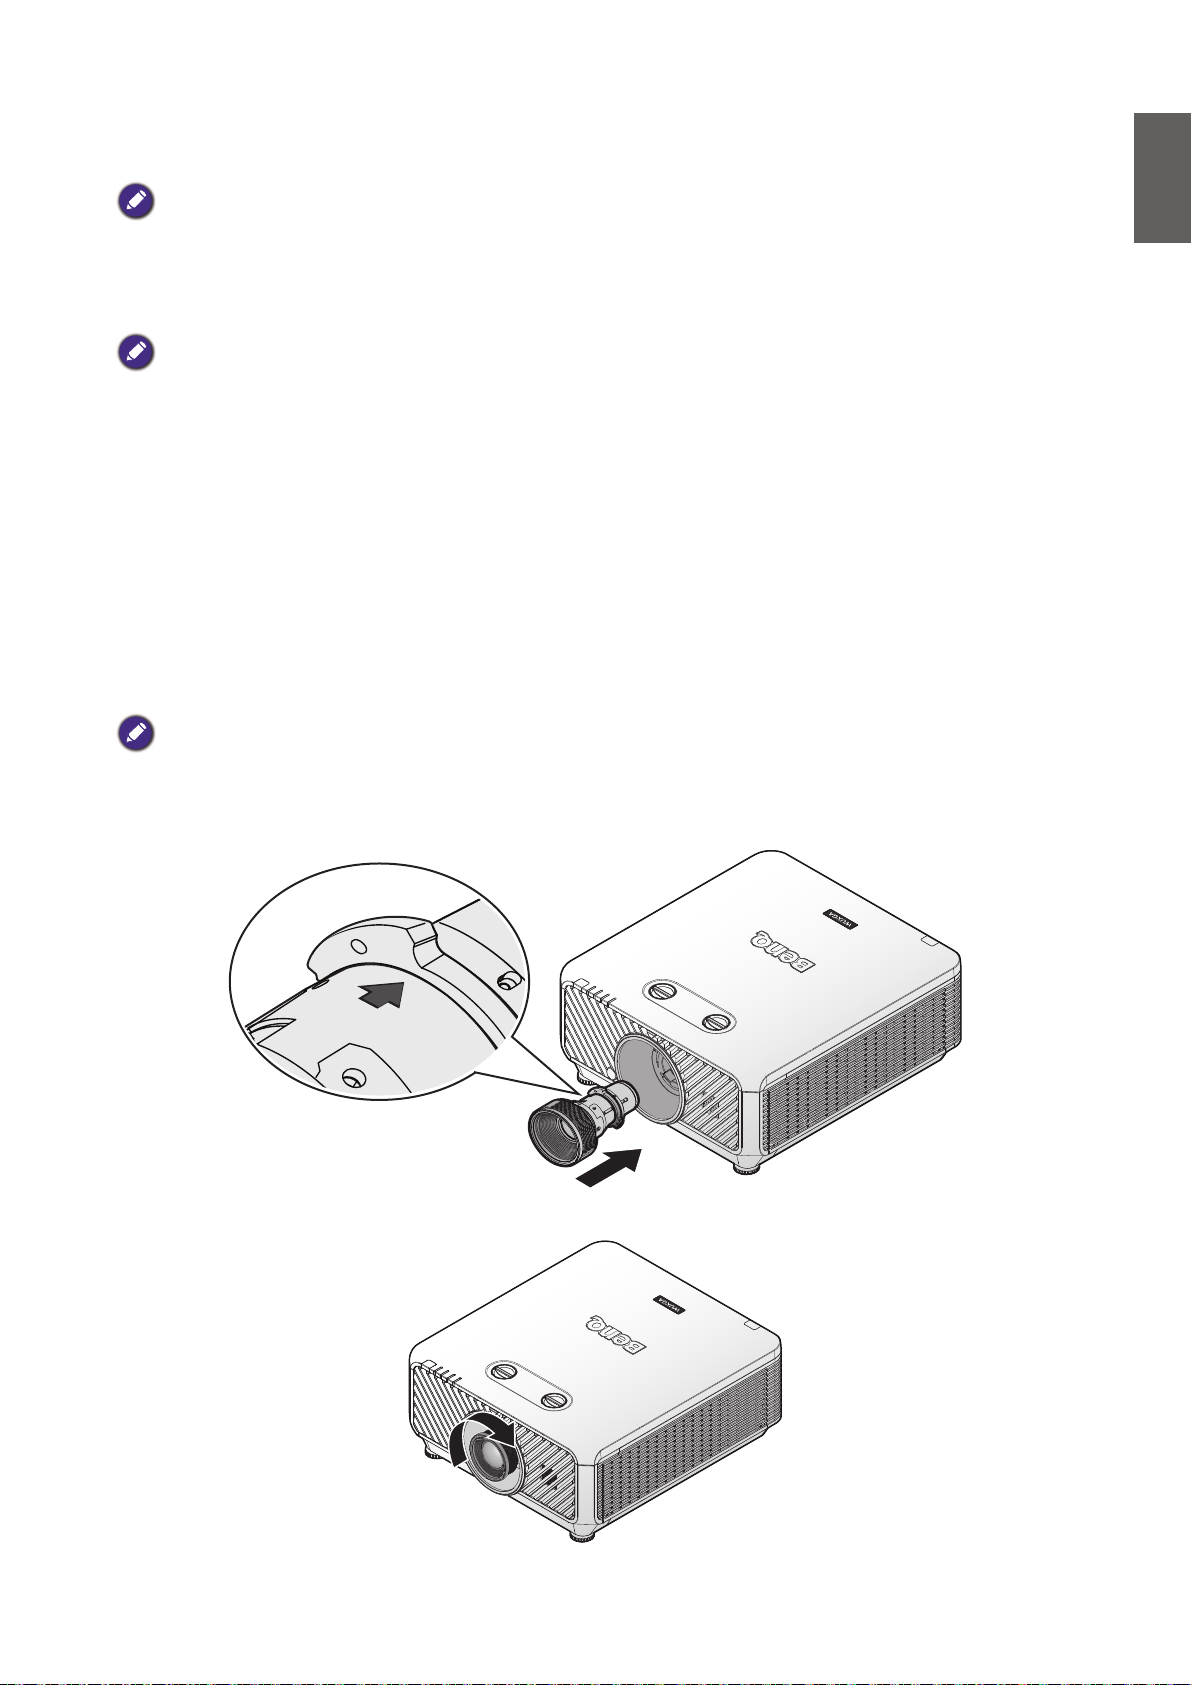
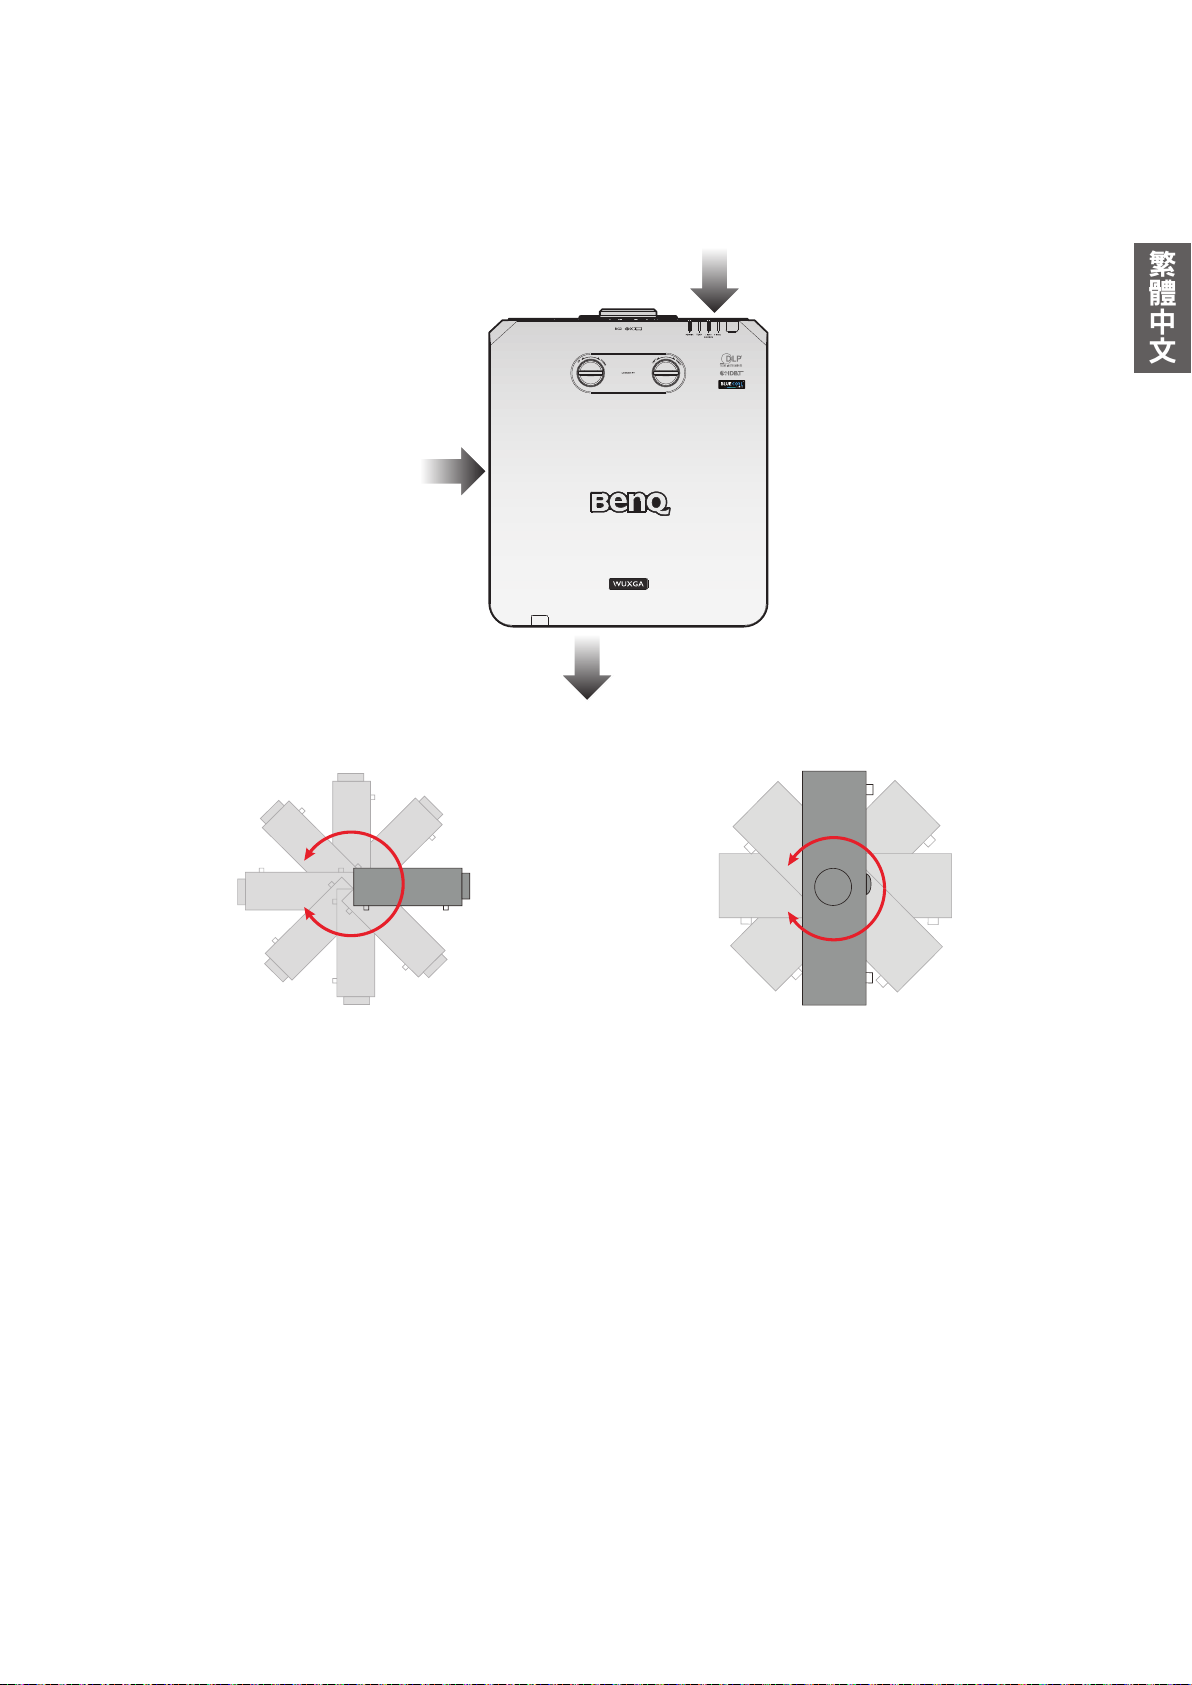
Installing removing the optional lens
Caution:
• Do not shake or place excessive pressure on the projector or the lens components as the projector and lens
components contain precision parts.
• Before removing or installing the lens, be sure to turn off the projector, wait until the cooling fans stop, and turn
off the main power switch.
• Do not touch the lens surface when removing or installing the lens.
• Keep ngerprints, dust or oil off the lens surface. Do not scratch the lens surface.
• Work on a level surface with a soft cloth under it to avoid scratching.
• If you remove and store the lens, attach the lens cap to the projector to keep off dust and dirt.
yInstalling the new lens
Remove both end caps from the lens.
Note:
Removal of the plastic body cap before inserting a lens for the rst time.
1. Orient the lens so that the arrow on the label pasted on its side is facing upward and push the
lens into the lens mount of the unit as far as it will go.
2. Rotate the lens clockwise until you feel it click into place.
9
English
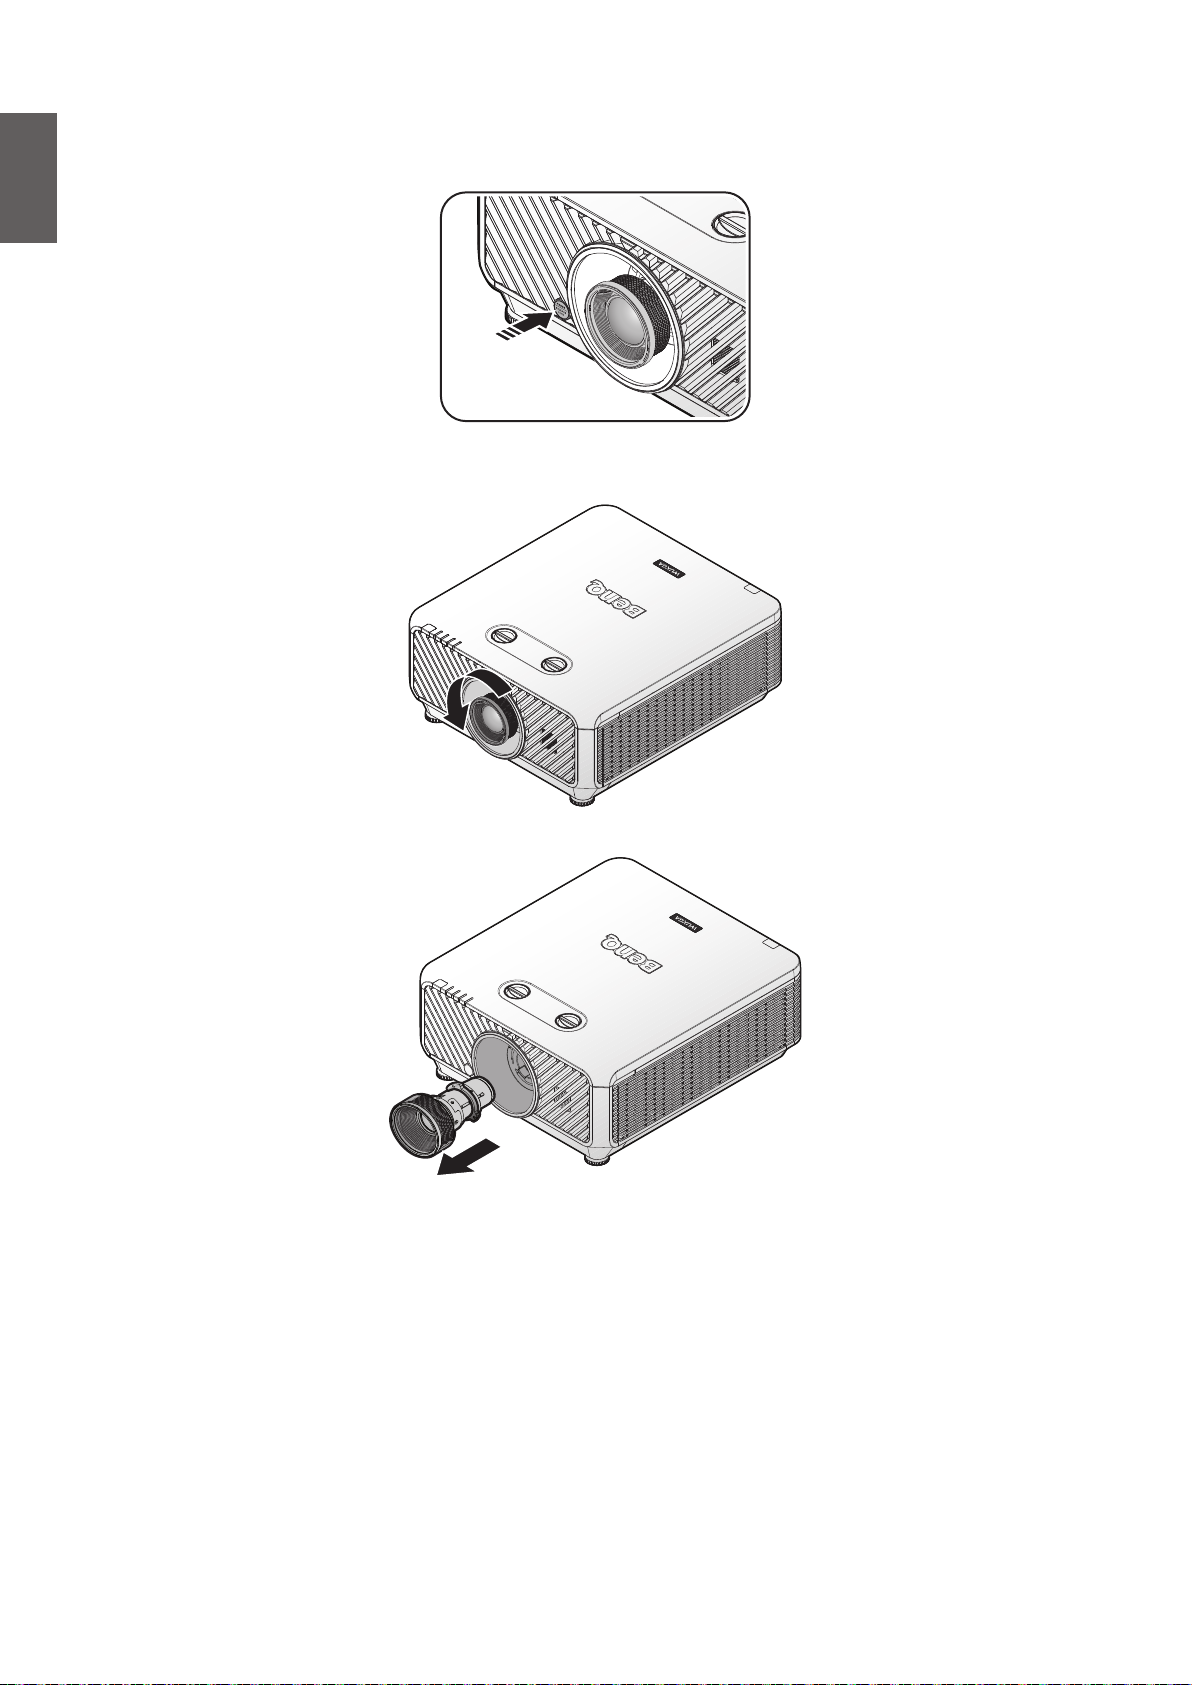
yRemoving the existing lens from the projector
1. Push the LENSE RELEASE button to the unlock position.
2. Grasp the lens.
3. Rotate the lens counterclockwise. The existing lens will be disengaged.
4. Pull out the existing lens slowly.
10
English
Lens
Model Lens Type Part Number Throw Ratio Lens Shift
LS2ST3 Wide x 5J.JDH37.002 WUXGA: 0.778
LS2ST1 Wide zoom 5J.JDH37.011 WUXGA: 1.1-1.3
LS2SD2 Standard 5J.JEN37.001 WUXGA: 1.54-1.93
LS2LT1 Semi long 5J.JDH37.032 WUXGA: 1.93-2.9
LS2LT 2 Long zoom 5J.JDH37.041 WUXGA: 3-5
LS2ST2 Short throw 5A .JK337.001 WUXGA: 0.77-1.1
LS2ST4 Semi throw 5A .J K3 37. 011 WUXGA: 1.25-1.6
Vertical: -15%-55%
Horizontal: -5%-5%
Vertical: -15%-55%
Horizontal: -5%-5%
Vertical: -15%-55%
Horizontal: -5%-5%
Vertical: -15%-55%
Horizontal: -5%-5%
Vertical: -15%-55%
Horizontal: -5%-5%
Vertical: -15%-55%
Horizontal: -5%-5%
Vertical: -15%-55%
Horizontal: -5%-5%
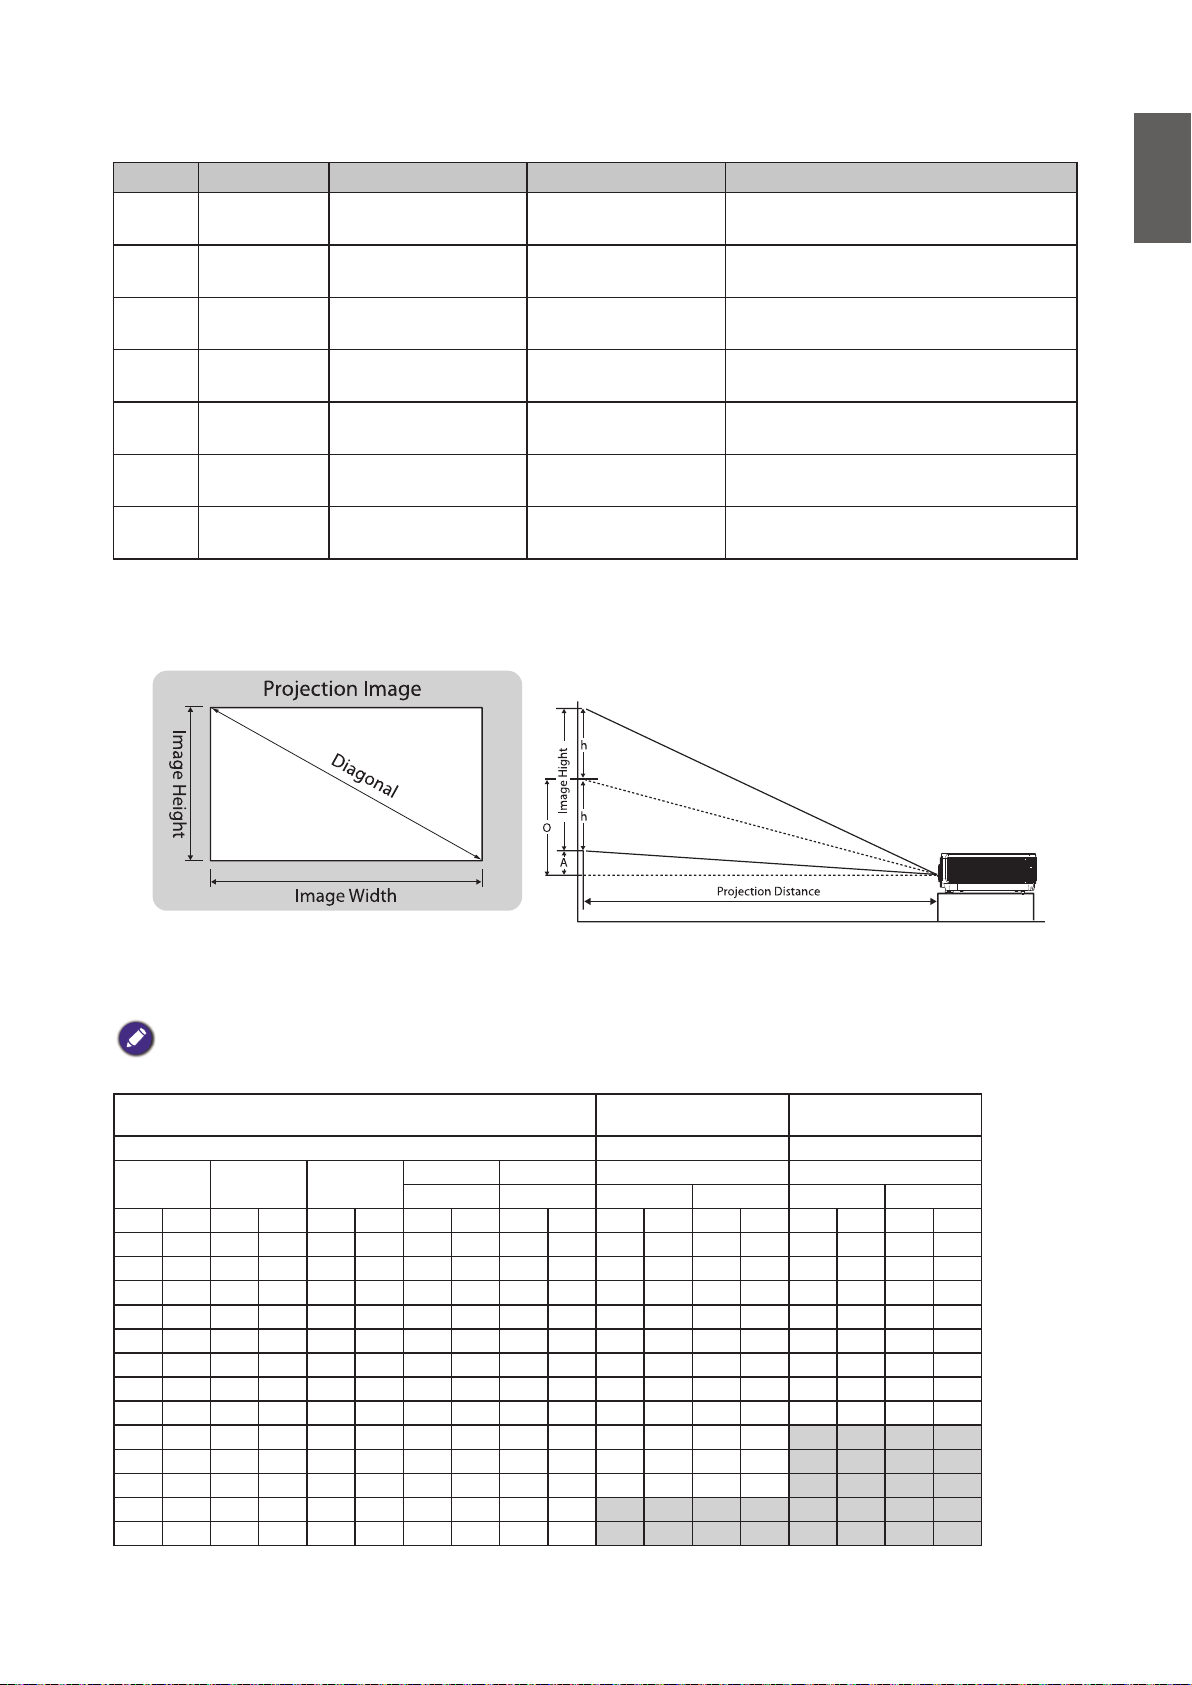
Projection table
• LU9245
The screen aspect ratio is 16:10 and the projected picture is 16:10.
Note:
To optimize the projection quality, we suggest to project images in an area without grayscale.
Lens
Throw ratio 1.1~1.3 1.54 ~1.93
Diagonal Image Width Image Height
(Inch) (m) (Inch) (m) (Inch) (m) (Inch) (m) (Inch) (m) (Inch) (m) (Inch) (m) (Inch) (m) (Inch) (m)
50 1.27 42 1.08 26 0.67 1.3 0.034 14.6 0.370 47 1.18 55 1.40 65 1.66 82 2.08
60 1.52 51 1.29 32 0.81 1.6 0.040 17.5 0.444 56 1.42 66 1.68 78 1.99 98 2.49
80 2.03 68 1.72 42 1.08 2.1 0.054 23.3 0.592 75 1.90 88 2.24 104 2.65 131 3.33
100 2 .54 85 2 .15 53 1.35 2.6 0.067 29.1 0.740 93 2.37 110 2.80 131 3.32 16 4 4.16
120 3.05 102 2.58 64 1.62 3.2 0.081 35.0 0.888 112 2.84 132 3.36 157 3.98 196 4.99
150 3. 81 127 3.23 79 2.02 4.0 0.101 43.7 1.111 140 3.55 165 4.20 196 4.98 245 6.24
180 4.57 153 3.88 95 2.42 4.8 0.121 52.5 1.333 168 4.26 198 5.04 235 5.97 295 7.48
200 5.08 170 4.31 106 2.69 5.3 0.135 58.3 1.481 187 4.74 220 5.60 261 6.63 327 8.31
250 6.35 212 5.38 132 3.37 6.6 0.16 8 72 .9 1.851 233 5.92 276 7. 0 0 326 8.29 409 10.39
300 7. 62 254 6.46 159 4.04 7.9 0.202 87.4 2 . 221 280 7.11 331 8.40 392 9.95 491 12 .47
350 8.89 297 7. 54 185 4 .71 9.3 0.236 102.0 2.591 326 8.29 386 9.8 0 457 11.61 573 14 .55
400 10.16 339 8.62 212 5.38 10.6 0.269 116. 6 2.962 373 9.48 441 11 . 2 0 522 13.27 655 16.63
500 12 .70 424 10.77 265 6.73 13.2 0.337 145.7 3.702 466 11. 8 5 551 14.00 653 16.59 818 20.79
Offset (A) O Distance Distance
Wi de/Tele Wi de/Tele Wide Te le Wide Tele
Wide Zoom
(LS2ST1)
Standard
(LS2SD2)
11
English
Lens
Throw ratio 1.93~2.9 3~5 0.778
Diagonal Image Width Image Height
(Inch) (m) (Inch) (m) (Inch) (m) (Inch) (m) (Inch) (m) (Inch) (m) (Inch) (m) (Inch) (m) (Inch) (m) (Inch) (m)
50 1.27 42 1.0 8 26 0.67 1.3 0.034 14.6 0.370 82 2.08 123 3.12 127 3.23 212 5.38 33 0.84
60 1.52 51 1.29 32 0.81 1.6 0.040 17.5 0.444 98 2.49 148 3.75 153 3.88 254 6.46 40 1.01
80 2.03 68 1.72 42 1.08 2.1 0.054 23.3 0.592 131 3.33 197 5.00 204 5.17 339 8.62 53 1.34
100 2 .54 85 2 .15 53 1.35 2.6 0.067 29.1 0.740 16 4 4.16 246 6.25 254 6.46 424 10.77 66 1.68
120 3.05 102 2.58 64 1.62 3.2 0.081 35.0 0.888 196 4.99 295 7.50 305 7.75 509 12 .92 79 2 .01
150 3. 81 127 3.23 79 2.02 4.0 0.101 43.7 1.111 245 6.24 369 9.37 382 9.69 636 16.15 99 2 . 51
180 4.57 153 3.88 95 2.42 4.8 0.121 52.5 1.333 295 7.48 443 11. 24 458 11. 63 763 19. 39 119 3.02
200 5.08 170 4.31 106 2.69 5.3 0.135 58.3 1.481 327 8.31 492 12 .49 509 12.92 848 21.5 4 132 3.35
250 6.35 212 5.38 132 3.37 6.6 0.16 8 72 .9 1.851 409 10.39 615 15.62 636 16.15 1060 26.92 165 4.19
300 7. 62 254 6.46 159 4.04 7.9 0.202 87.4 2 . 221 491 12 .47 738 18.74 763 19. 39 1272 32.31 198 5.03
350 8.89 297 7. 54 185 4 .71 9.3 0.236 102.0 2.591 573 14.55 861 21.86 890 22.62 1484 37.6 9 231 5.87
400 10.16 339 8.62 212 5.38 10.6 0.269 116. 6 2.962 655 16.63 984 24.99 1018 25.85 1696 43.08 264 6.70
500 12 .70 424 10.77 265 6.73 13.2 0.337 145.7 3.702 818 20.79 1230 31.23 1272 32 . 31 212 0 53.85 330 8.38
Offset (A) O Distance Distance Distance
Wi de/Tele Wi de/Tele Wide Te le Wide Tele NA
Semi Long
(L S 2LT1)
Long Zoom
(L S 2LT2)
Wide Fix
(LS2ST3)
Lens
Throw ratio 0.77~1.1 1.25~1.60
Diagonal Image Width Image Height
(Inch) (m) (Inch) (m) (Inch) (m) (Inch) (m) (Inch) (m) (Inch) (m) (Inch) (m) (Inch) (m) (Inch) (m)
50 1.27 42 1.0 8 26 0.67 1.3 0.034 14.6 0.370 33 0.83 47 1.18 53 1.35 68 1.72
60 1.52 51 1.29 32 0.81 1.6 0.040 17.5 0.444 39 1.00 56 1.42 64 1.62 81 2.07
80 2.03 68 1.72 42 1.08 2.1 0.054 23.3 0.592 52 1. 33 75 1.90 85 2 .15 109 2.76
100 2 .54 85 2 .15 53 1.35 2.6 0.067 29.1 0.740 65 1.66 93 2.37 106 2.69 136 3.45
120 3.05 102 2.58 64 1.62 3.2 0.081 35.0 0.888 78 1.99 112 2.84 127 3.23 163 4.14
150 3. 81 127 3.23 79 2.02 4.0 0.101 43.7 1.111 98 2.49 140 3.55 159 4.04 204 5 .17
180 4.57 153 3.88 95 2.42 4.8 0.121 52.5 1.333 11 8 2.99 168 4.26 191 4.85 244 6.20
200 5.08 170 4.31 106 2.69 5.3 0.135 58.3 1.481 131 3.32 187 4.74 212 5.38 271 6.89
250 6.35 212 5.38 132 3.37 6.6 0.16 8 72 .9 1.851 163 4.15 233 5.92 265 6.73 339 8.62
300 7. 62 254 6.46 159 4.04 7.9 0.202 87.4 2 . 221 196 4.98 280 7.11 318 8.08 407 10.34
350 8.89 297 7. 54 185 4 .71 9.3 0.236 102.0 2.591 229 5.80 326 8.29 371 9.42 475 12 .06
400 10.16 339 8.62 212 5.38 10.6 0.269 116. 6 2.962 261 6.63 373 9.48 424 10.77 543 13.7 9
500 12 .70 424 10.77 265 6.73 13.2 0.337 145.7 3.702 326 8.29 466 11.8 5 530 13.46 678 17. 2 3
Offset (A) O Distance Distance
Wi de/Tele Wi de/Tele Wide Te le Wide Tele
Short Throw
(LS2ST2)
Semi Throw
(LS2ST4)
Note:
• For more visualized instructions, please go to BenQ calculator website http://projectorcalculator.benq.com/.
• Ceiling installation must be done by a qualied professional. Contact your dealer for more information. It is not
recommended you install the projector yourself.
• Only use the projector on a solid, level surface. Serious injury and damage can occur if the projector is dropped.
• Do not use the projector in an environment where extreme temperature occurs. The projector must be used
at temperatures between 41 degrees Fahrenheit (5 degrees Celsius) and 104 degrees Fahrenheit (40 degrees
Celsius).
• Screen damage will occur if the projector is exposed to moisture, dust or smoke.
• Do not cover the vents on the projector. Proper ventilation is required to dissipate heat. Damage to the
projector will occur if the vents are covered.
12
English
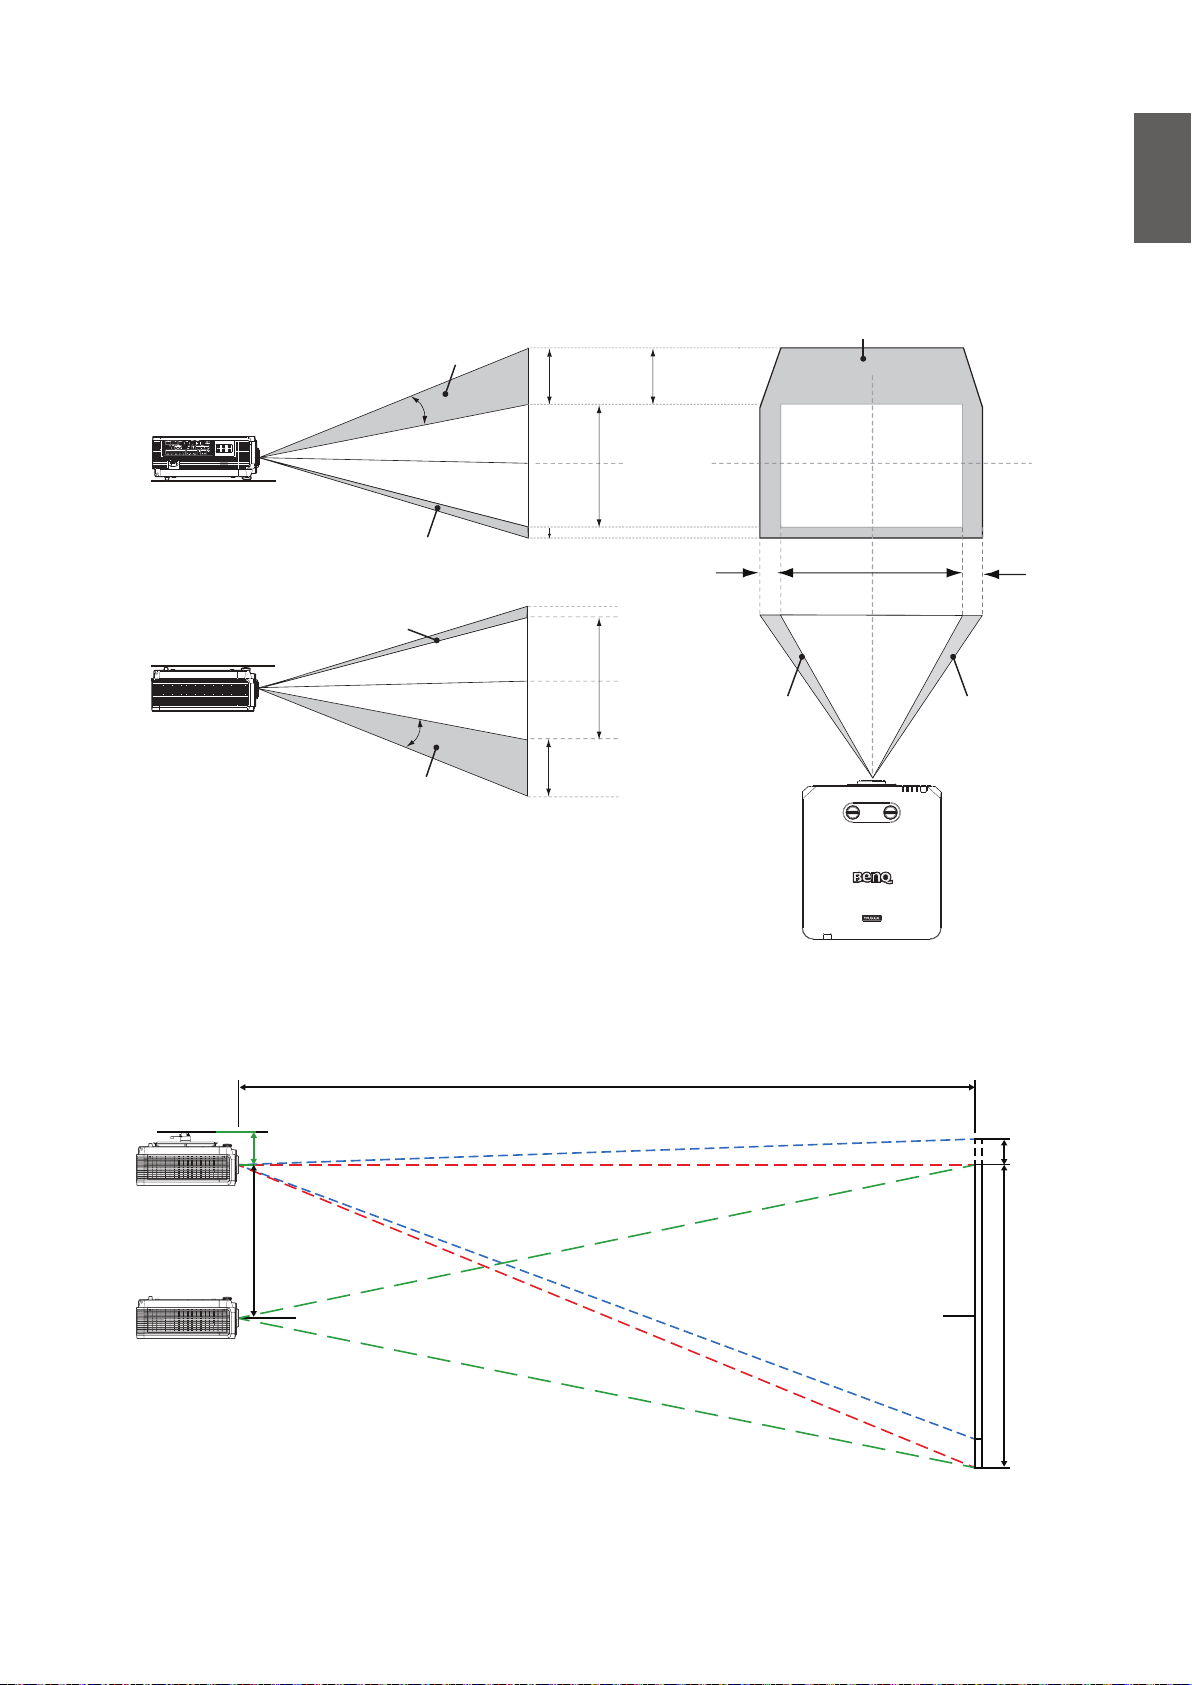
Lens shift range
yLens shift adjustable range
The adjustable range for lens shift is tabulated below and subject to the conditions listed.
• LU9245
Desk-Front Projection
Vertical shift
Max 0.55V
1V
Height of projected image
Normal projection position
Vertical shift
Ceiling Mount-Front Projection
Vertical shift
Height of projected image
Vertical shift
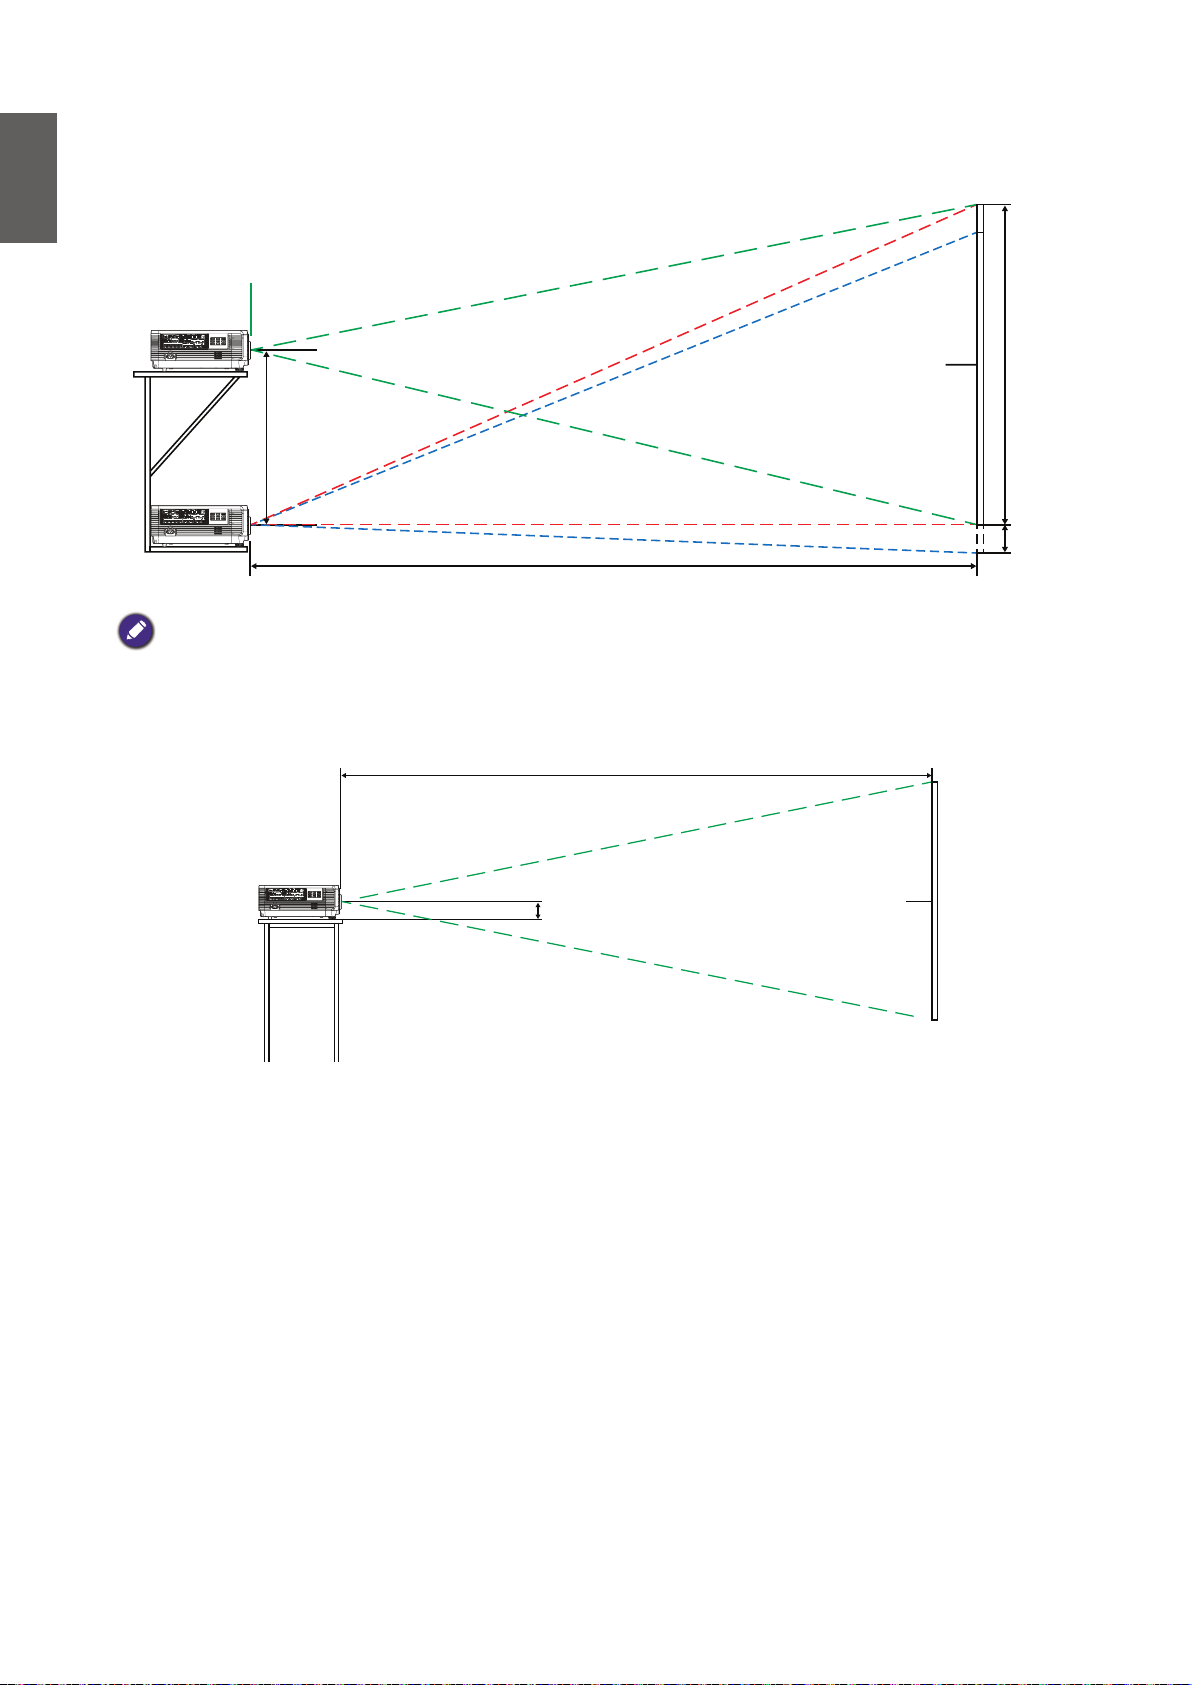
yCeiling Mount Installation
Max 0.15V
1V
Max 0.55V
C
1H 0.05H0.05H
Width of projected image
Shift to Left Shift to Right
Shift Range
C = Distance from lens to screen
Screen Top
Screen Center
0.05H
H
13
English
yDesktop Installation
0.05H
Screen Center
Shift Range
C
H
Note:
• The drawings apply to the standard lens only.
• Lens Shift feature is not available to LS2ST3 (Fix Lens). This lens should be used for "zero degree"/"no-offset"
applications. See below:
C
113.5
Screen Center
14
FOR USE WITH LS2ST3 (FIX LENS) ONLY
English
LED indicator
System message
Power Temp Light Filter Status & Description
Orange - - - Stand-by
Green Flashing - - - Powering up
Green - - - Normal operation
Orange Flashing - - - Normal power down cooling
Red Red Red - Downloading
Green - Red - Color wheel start fail
Green - Red Flashing - Phosphor wheel start fail
Red Flashing - - - Scaler shutdown fail
- Green Red Flashing - Lens release
- Green Red - Case open
Light source error message
Power Temp Light Filter Status & Description
- - Red - Light source error in normal operation
-- - Orange Flashing - Light source is not lit up
Filter message
Power Temp Light Filter Status & Description
Green - - Orange Filter replace warning
15

English
Thermal error message
Power Temp Light Filter Status & Description
Red Red - - Fan 1 error
Red Red Flashing - - Fan 2 error
Red Green - - Fan 3 error
Red Green Flashing - - Fan 4 error
Red Flashing Red - - Fan 5 error
Red Flashing Red Flashing - - Fan 6 error
Red Flashing Green - - Fan 7 error
Red Flashing Green Flashing - - Fan 8 error
Red Red - Green Fan 9 error
Green Red - - Temperature 1 error
Green Red Flashing - - Thermal sensor 1 open error
Green Green - - Thermal sensor 1 short error
Green Green Flashing - - Thermal IC #1 I2C connection error
Green Flashing Red - - Temperature 2 error
Green Flashing Red Flashing - - Thermal sensor 2 open error
Green Flashing Green - - Thermal sensor 2 short error
Green Flashing Green Flashing - - Thermal IC #2 I2C connection error
Green Flashing Green Green - Temperature 3 error
Orange Red Flashing - - Thermal sensor 3 open error
Orange Green - - Thermal sensor 3 short error
Orange Green Flashing - - Thermal IC #3 I2C connection error
Green Flashing Green Green Flashing - Temperature 4 error
Green Flashing Green Flashing Green - Temperature 5 error
Green Red Red - Thermal break warning
16
English
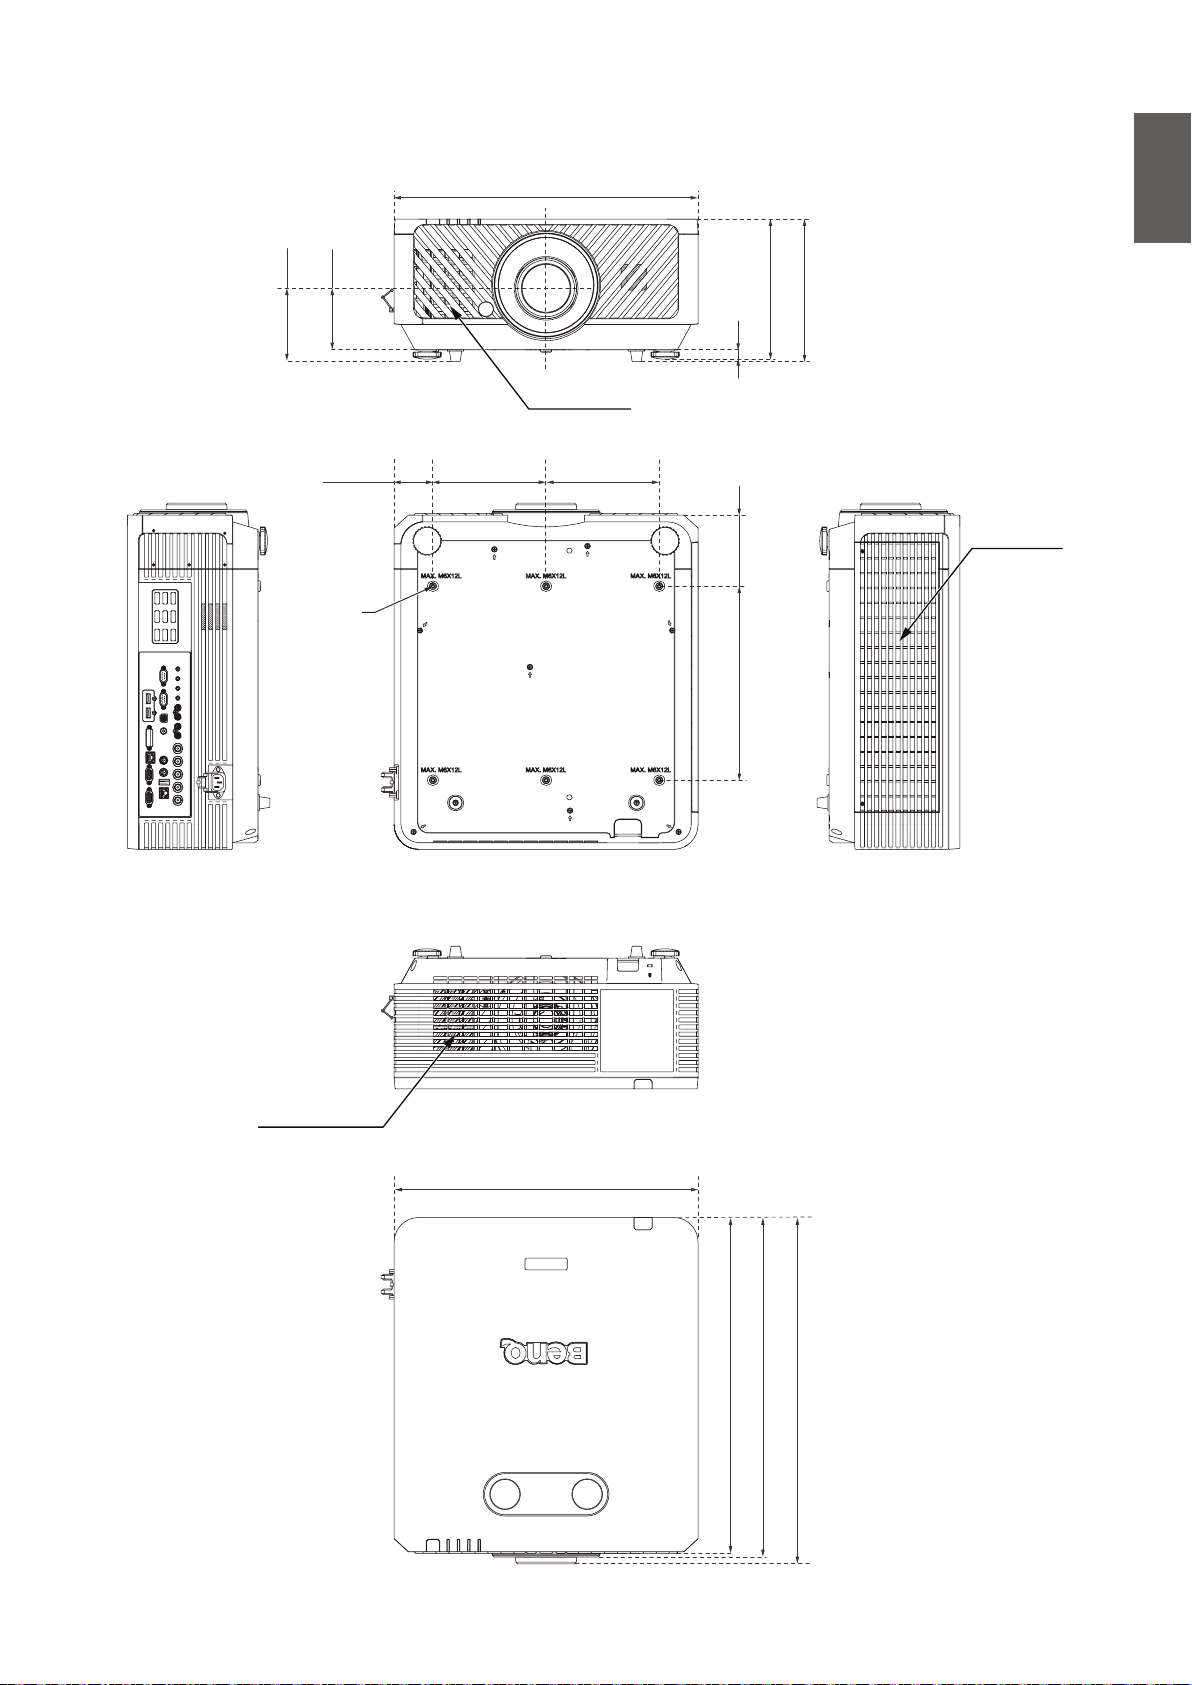
Projector dimension
470 (18.50)
AIR INLET
95.0 (3.74)
113.5 (4.46)
60 (2.36) 175 (6.88) 175 (6.88)
M6x12L
AIR INLET
220.5 (8.68)
216.6 (8.52)
14.6 (0.57)
110 (4.33)300 (11.81)
AIR EXHAUST
470 (18.50)
525 (20.66)
519.5 (20.45)
535.65 (21.08)
17
English
Ceilling mount installation diagram
656.6
300.0
No. BenQ ceilling mount CMG6 (5A.JHS10.001)
Material Steel
Weight 10.5kg (23.1lbs)
Dimension (W x H x D) 410 x 641 x 360 mm (16.14" x 25.24" x 14.17")
Length 491mm ~ 641mm
Tilt Angle Swivel: ±5°
Vertical: +5°/-25°
Horizontal: ±5°
Load 40kg (88lbs)
Screw Type M4, M5, M6, M8
Size and angle adjustment
257.0
525.1
150.0
490.6
300.0
712.1
490.6
506.6
640.6
18
English
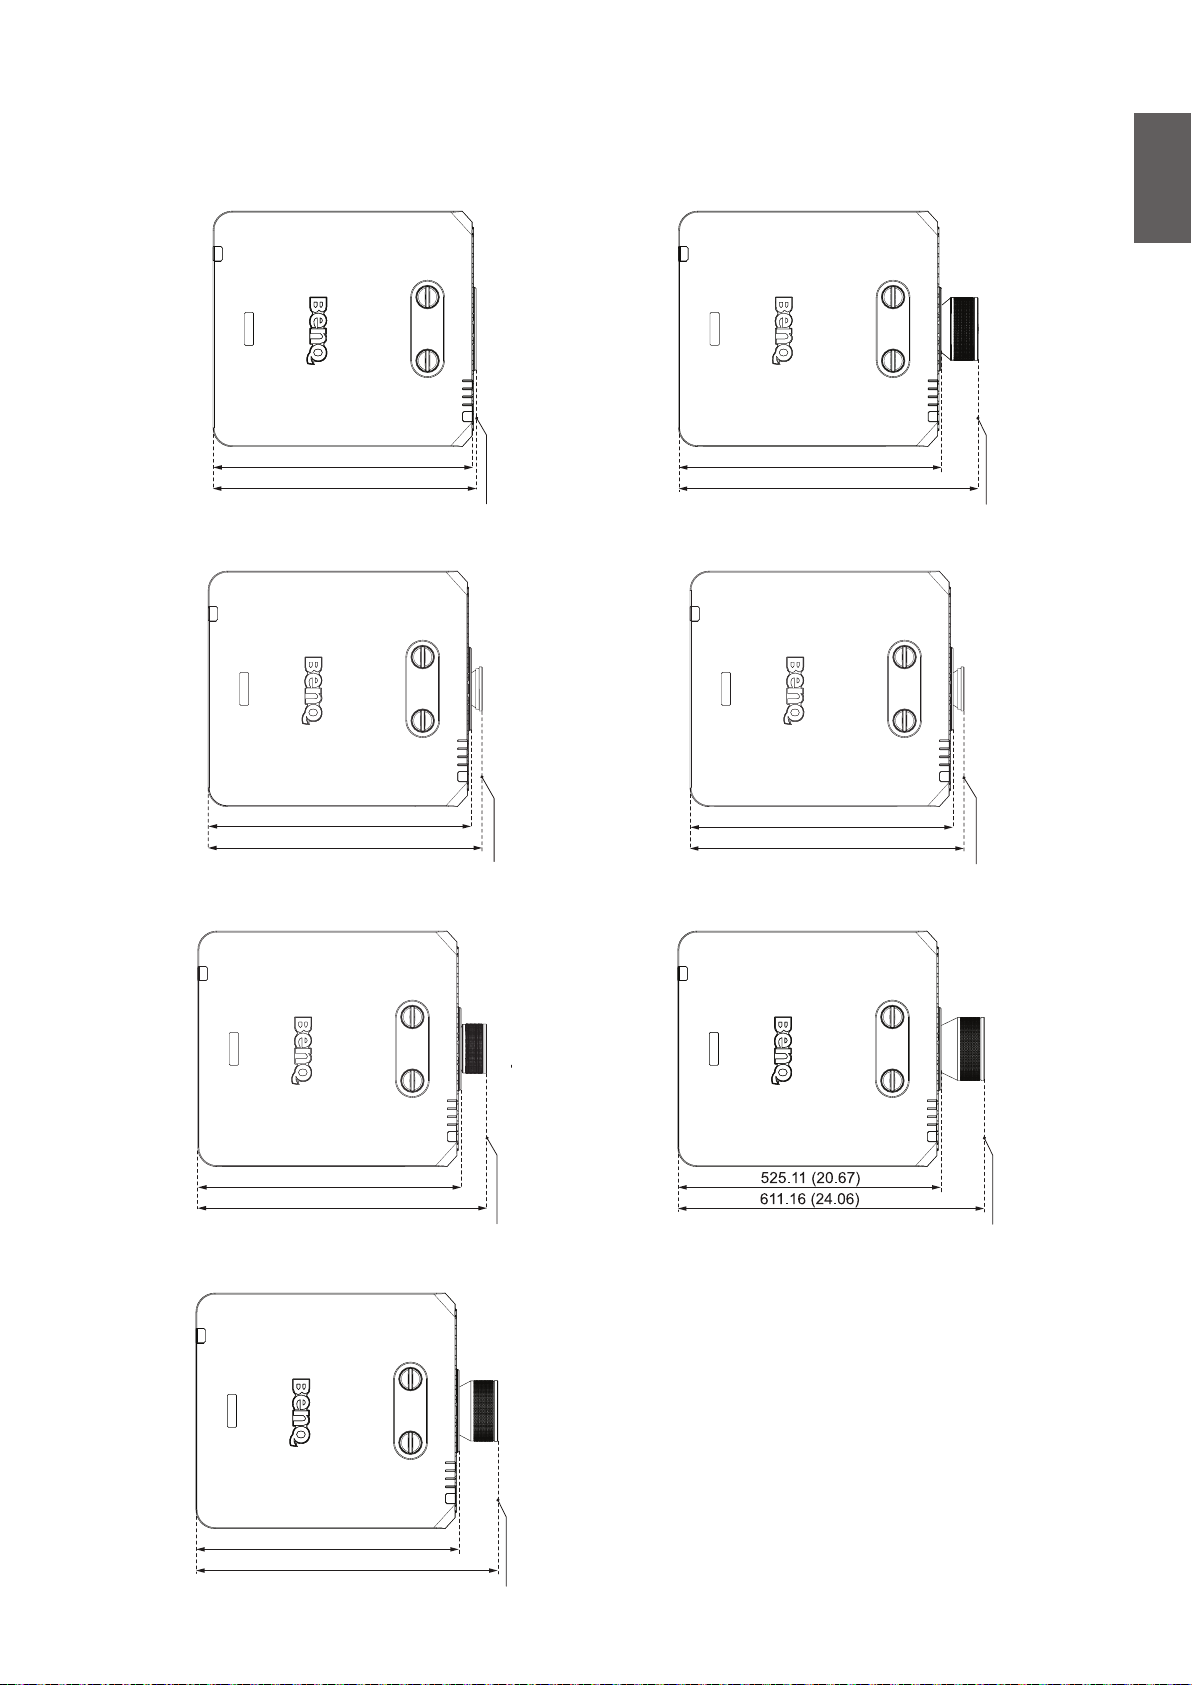
Lens dimension
Wide Fix Lens
Wide Zoom Lens
Standard Lens
Semi Long Throw Lens
Long Zoom Lens
Short Throw Lens
Semi Throw Lens
Optional Lens (Wide Fix: LS2ST3) Optional Lens (Wide Zoom: LS2ST1)
517.41 (20.37)
525.11 (20.67)
525.11 (20.67)
596.90 (23.5)
Optional Lens (Standard: LS2SD2) Optional Lens (Semi Long Throw: LS2LT1)
525.11 (20.67)
531.91 (20.94)
525.11 (20.67)
546.53 (21.51)
Optional Lens (Long Zoom: LS2LT2) Optional Lens (Short Throw: LS2ST2)
525.11 (20.67)
576.50 (22.69)
Optional Lens (Semi Throw: LS2ST4)
525.11 (20.67)
601.76 (23.67)
19
English
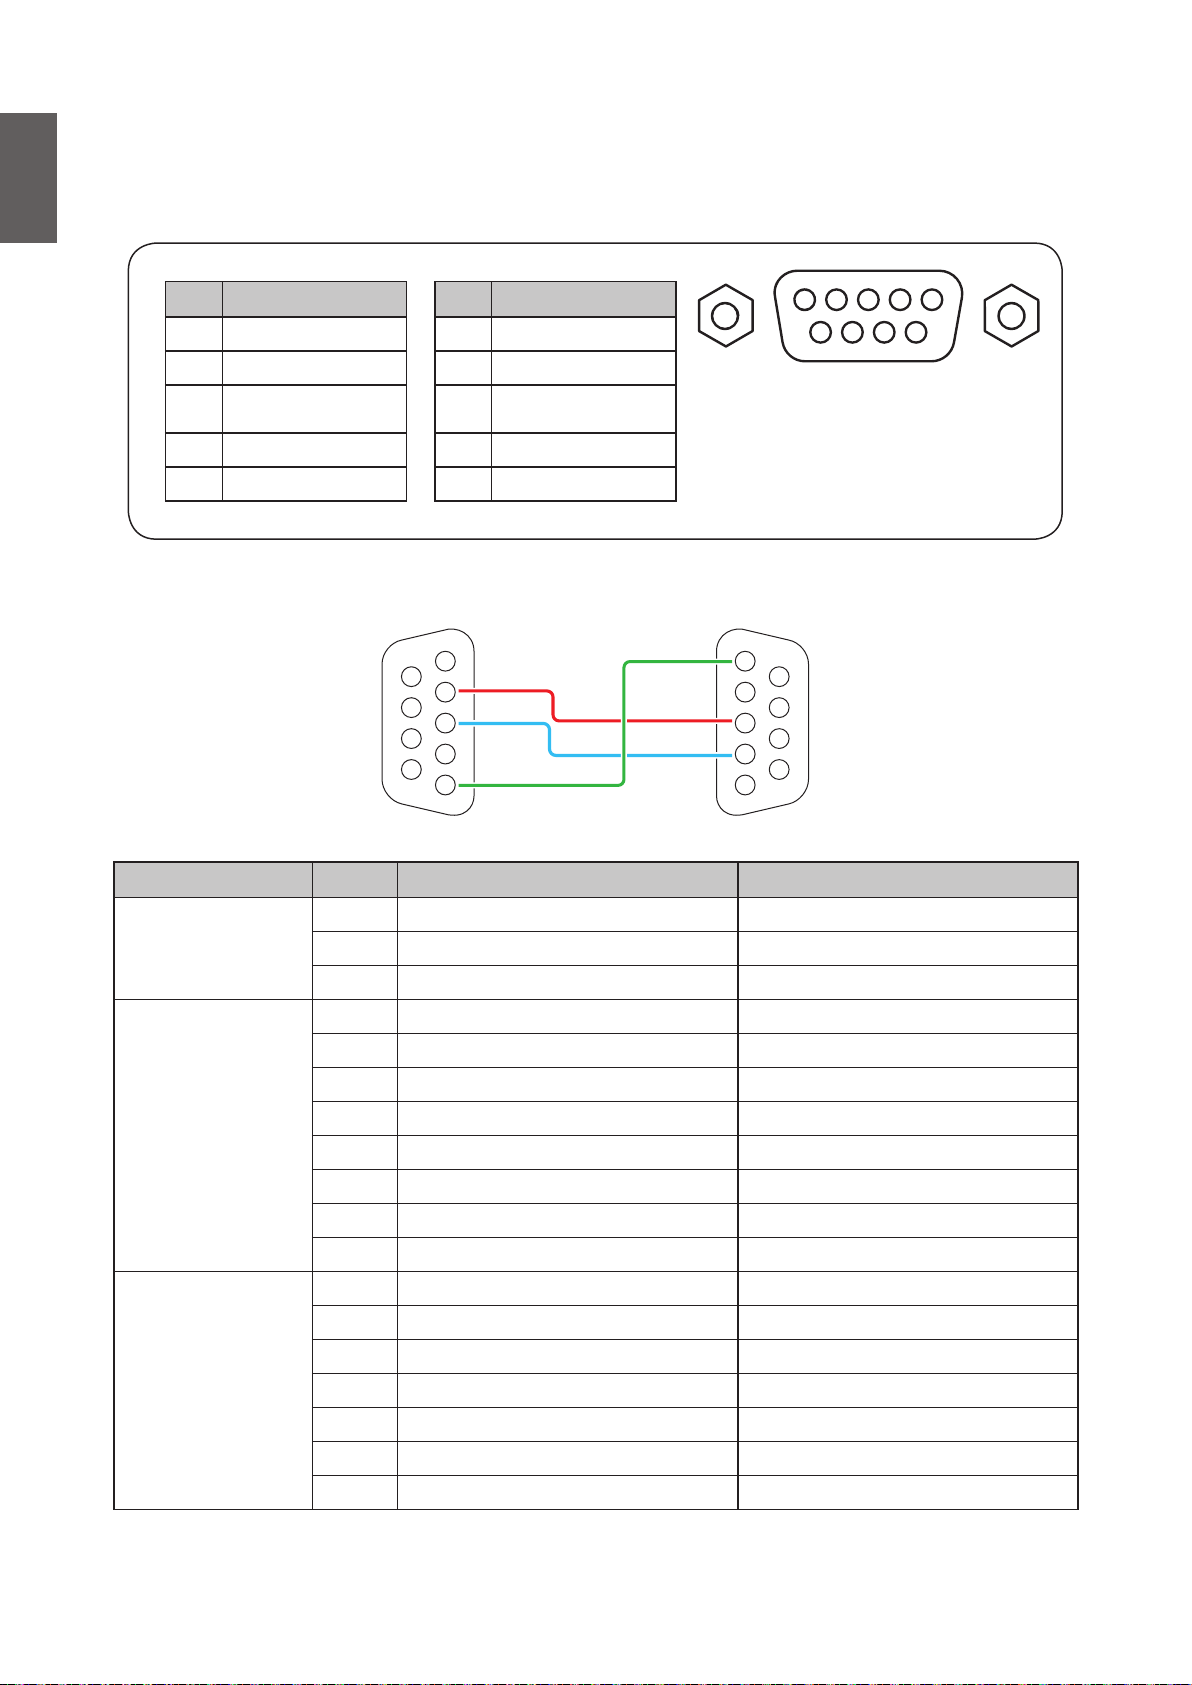
RS232 command
RS232 pin assignment
No. Serial No. Serial
1 N.C 6 N.C
2 RXD 7 Short with pin8
3 TXD 8 Short with pin7
4 N.C 9 N.C
5 Ground
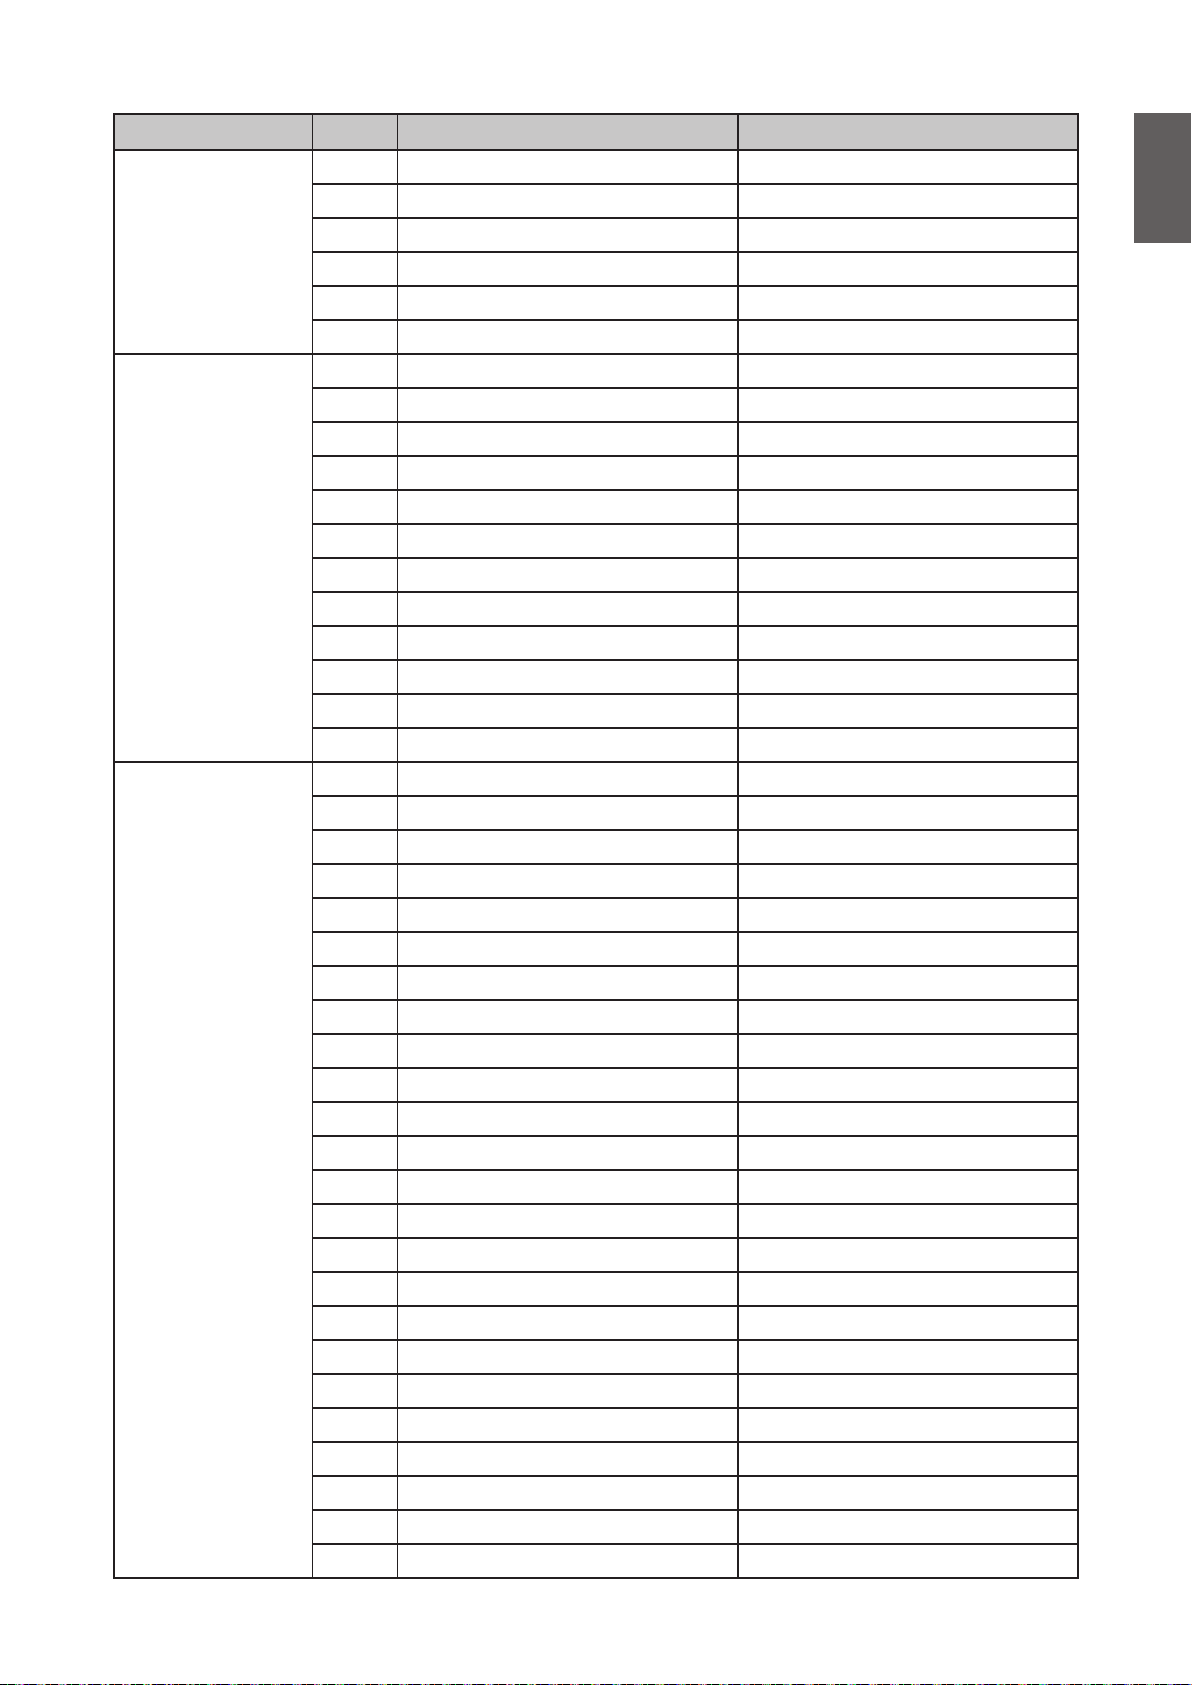
RS232 serial port with a crossover cable
1
6
7
8
9
RX
2
TX
3
4
5
Ground
TX
RX
12345
5
9
4
8
3
7
2
6
1
6789
Function Type Operation ASCII
Power Write Power On <CR>*pow=on#<CR>
Write Power Off <CR>*pow=off#<CR>
Read Power Status <CR>*pow=?#<CR>
Source Selection Write COMPUTER/YPbPr <CR>*sour=RGB#<CR>
Write COMPUTER 2/YPbPr2 <CR>*sour=RGB2#<CR>
Write DVI-D <CR>*sour=dvid#<CR>
Write HDMI (MHL) <CR>*sour=hdmi#<CR>
Write HDMI 2 (MHL2) <CR>*sour=hdmi2#<CR>
Write Composite <CR>*sour=vid#<CR>
Write HDBaseT <CR>*sour=hdbaset#<CR>
Read Current source <CR>*sour=?#<CR>
Audio Control Write Mute On <CR>*mute=on#<CR>
Write Mute Off <CR>*mute=off#<CR>
Read Mute Status <CR>*mute=?#<CR>
Write Volume + <CR>*vol=+#<CR>
Write Volume - <CR>*vol=-#<CR>
Write Volume level for customer <CR>*vol=value#<CR>
Read Volume Status <CR>*vol=?#<CR>
20
English
Function Type Operation ASCII
Audio Source Select Write Audio pass Through off <CR>*audiosour=off#<CR>
Write Audio - Computer1 <CR>*audiosour=RGB#<CR>
Write Audio - Video/S-Video <CR>*audiosour=vid#<CR>
Write Audio - HDMI <CR>*audiosour=hdmi#<CR>
Write Audio - HDMI2 <CR>*audiosour=hdmi2#<CR>
Read Audio pass Status <CR>*audiosour=?#<CR>
Picture Mode Write Presentation <CR>*appmod=preset#<CR>
Write sRGB <CR>*appmod=srgb#<CR>
Write Bright <CR>*appmod=bright#<CR>
Write Cinema (Rec. 709) <CR>*appmod=cine#<CR>
Write DICOM <CR>*appmod=dicom#<CR>
Write Vivid <CR>*appmod=vivid#<CR>
Write User1 <CR>*appmod=user1#<CR>
Write User2 <CR>*appmod=user2#<CR>
Write 3D <CR>*appmod=threed#<CR>
Write HDR10 <CR>*appmod=hdr10<CR>
Write HLG <CR>*appmod=hlg<CR>
Read Picture Mode <CR>*appmod=?#<CR>
Picture Setting Write Contrast + <CR>*con=+#<CR>
Write Contrast - <CR>*con=-#<CR>
Write Set Contrast value <CR>*con=5#<CR>
Read Contrast value <CR>*con=?#<CR>
Write Brightness + <CR>*bri=+#<CR>
Write Brightness - <CR>*bri=-#<CR>
Write Set Brightness value <CR>*bri=5#<CR>
Read Brightness value <CR>*bri=?#<CR>
Write Color + <CR>*color=+#<CR>
Write Color - <CR>*color=-#<CR>
Write Set Color value <CR>*color=5#<CR>
Read Color value <CR>*color=?#<CR>
Write Sharpness + <CR>*sharp=+#<CR>
Write Sharpness - <CR>*sharp=-#<CR>
Write Set Sharpness value <CR>*sharp=5#<CR>
Read Sharpness value <CR>*sharp=?#<CR>
Write Color Temperature - Warm <CR>*ct=warm#<CR>
Write Color Temperature - Normal <CR>*ct=normal#<CR>
Write Color Temperature - Cool <CR>*ct=cool#<CR>
Read Color Temperature Status <CR>*ct=?#<CR>
Write Aspect 4:3 <CR>*asp=4:3#<CR>
Write Aspect 16:9 <CR>*asp=16:9#<CR>
Write Aspect 2.35:1 <CR>*asp=2.35#<CR>
Write Aspect 16:10 <CR>*asp=16:10#<CR>
21

English
Function Type Operation ASCII
Picture Setting Write Aspect Auto <CR>*asp=AUTO#<CR>
Write Aspect Real <CR>*asp=REAL#<CR>
Read Aspect Status <CR>*asp=?#<CR>
Write Vertical Keystone + <CR>*vkeystone=+#<CR>
Write Vertical Keystone - <CR>*vkeystone=-#<CR>
Read Vertical Keystone value <CR>*vkeystone=?#<CR>
Write Horizontal Keystone + <CR>*hkeystone=+#<CR>
Write Horizontal Keystone - <CR>*hkeystone=-#<CR>
Read Horizontal Keystone value <CR>*hkeystone=?#<CR>
Write Overscan Adjustment + <CR>*overscan=+#<CR>
Write Overscan Adjustment - <CR>*overscan=-#<CR>
Read Overscan Adjustment value <CR>*overscan=?#<CR>
Write 4 Corners Top-Left - X Decrease <CR>*cornerttlx=-#<CR>
Write 4 Corners Top-Left - X Increase <CR>*cornerttlx=+#<CR>
Read 4 Corners Top-Left - X Status <CR>*cornerttlx=?#<CR>
Write 4 Corners Top-Left - Y Decrease <CR>*cornerttly=-#<CR>
Write 4 Corners Top-Left - Y Increase <CR>*cornerttly=+#<CR>
Read 4 Corners Top-Left - Y Status <CR>*cornerttly=?#<CR>
Write 4 Corners Top-Right - X Decrease <CR>*cornerttrx=-#<CR>
Write 4 Corners Top-Right - X Increase <CR>*cornerttrx=+#<CR>
Read 4 Corners Top-Right - X Status <CR>*cornerttrx=?#<CR>
Write 4 Corners Top-Right - Y Decrease <CR>*cornerttry=-#<CR>
Write 4 Corners Top-Right - Y Increase <CR>*cornerttry=+#<CR>
Read 4 Corners Top-Right - Y Status <CR>*cornerttry=?#<CR>
Write 4 Corners Bottom-Left - X Decrease <CR>*cornertblx=-#<CR>
Write 4 Corners Bottom-Left - X Increase <CR>*cornertblx=+#<CR>
Read 4 Corners Bottom-Left - X Status <CR>*cornertblx=?#<CR>
Write 4 Corners Bottom-Left - Y Decrease <CR>*cornertbly=-#<CR>
Write 4 Corners Bottom-Left - Y Increase <CR>*cornertbly=+#<CR>
Read 4 Corners Bottom-Left - Y Status <CR>*cornertbly=?#<CR>
Write 4 Corners Bottom-Right - X Decrease <CR>*cornertbrx=-#<CR>
Write 4 Corners Bottom-Right - X Increase <CR>*cornertbrx=+#<CR>
Read 4 Corners Bottom-Right - X Status <CR>*cornertbrx=?#<CR>
Write 4 Corners Bottom-Right - Y Decrease <CR>*cornertbry=-#<CR>
Write 4 Corners Bottom-Right - Y Increase <CR>*cornertbry=+#<CR>
22
Read 4 Corners Bottom-Right - Y Status <CR>*cornertbry=?#<CR>
Write Digital Zoom In <CR>*zoomI#<CR>
Write Digital Zoom out <CR>*zoomO#<CR>
Write Auto <CR>*auto#<CR>
Write Brilliant color on <CR>*BC=on#<CR>
Write Brilliant color off <CR>*BC=off#<CR>
Read Brilliant color status <CR>*BC=?#<CR>

English
Function Type Operation ASCII
Picture Setting Write Reset current picture settings <CR>*rstcurpicsetting#<CR>
Write Reset picture settings <CR>*rstpicsetting#<CR>
Operation Settings Write Projector Position - Front Table <CR>*pp=FT#<CR>
Write Projector Position - Rear Table <CR>*pp=RE#<CR>
Write Projector Position - Rear Ceiling <CR>*pp=RC#<CR>
Write Projector Position - Front Ceiling <CR>*pp=FC#<CR>
Read Projector Position Status <CR>*pp=?#<CR>
Write Quick auto search <CR>*QAS=on#<CR>
Write Quick auto search <CR>*QAS=off#<CR>
Read Quick auto search status <CR>*QAS=?#<CR>
Write Menu Position - Center <CR>*menuposition=center#<CR>
Write Menu Position - Top-Left <CR>*menuposition=tl#<CR>
Write Menu Position - Top-Right <CR>*menuposition=tr#<CR>
Write Menu Position - Bottom-Right <CR>*menuposition=br#<CR>
Write Menu Position - Bottom-Left <CR>*menuposition=bl#<CR>
Read Menu Position Status <CR>*menuposition=?#<CR>
Write Direct Power On - on <CR>*directpower=on#<CR>
Write Direct Power On - off <CR>*directpower=off#<CR>
Read Direct Power On - Status <CR>*directpower=?#<CR>
Write Signal Power On - on <CR>*autopower=on#<CR>
Write Signal Power On - off <CR>*autopower=off#<CR>
Read Signal Power On - Status <CR>*autopower=?#<CR>
Baud Rate Write 2400 <CR>*baud=2400#<CR>
Write 4800 <CR>*baud=4800#<CR>
Write 9600 <CR>*baud=9600#<CR>
Write 14400 <CR>*baud=14400#<CR>
Write 19200 <CR>*baud=19200#<CR>
Write 38400 <CR>*baud=38400#<CR>
Write 57600 <CR>*baud=57600#<CR>
Write 115 20 0 <CR>*baud=115200#<CR>
Read Current Baud Rate <CR>*baud=?#<CR>
Lamp Control Read Lamp Hour <CR>*ltim=?#<CR>
Write Normal mode <CR>*lampm=lnor#<CR>
Write Eco mode <CR>*lampm=eco#<CR>
Write Dimming mode <CR>*lampm=dimming#<CR>
Write Custom mode <CR>*lampm=custom#<CR>
Write Light level for custom mode <CR>*lampcustom=value#<CR>
Read Light level status for custom mode <CR>*lampcustom=?#<CR>
Read Lamp Mode Status <CR>*lampm=?#<CR>
Miscellaneous Read Model Name <CR>*modelname=?#<CR>
Read System F/W Version <CR>*sysfwversion=?#<CR>
Read Scaler F/W Version <CR>*scalerfwversion=?#<CR>
23

English
Function Type Operation ASCII
Miscellaneous Read Lan F/W Version <CR>*lanfwversion=?#<CR>
Read MCU F/W Version <CR>*mcufwversion=?#<CR>
Write Blank On <CR>*blank=on#<CR>
Write Blank Off <CR>*blank=off#<CR>
Read Blank Status <CR>*blank=?#<CR>
Write Freeze On <CR>*freeze=on#<CR>
Write Freeze Off <CR>*freeze=off#<CR>
Read Freeze Status <CR>*freeze=?#<CR>
Write Menu On <CR>*menu=on#<CR>
Write Menu Off <CR>*menu=off#<CR>
Read Menu Status <CR>*menu=?#<CR>
Write Up <CR>*up#<CR>
Write Down <CR>*down#<CR>
Write Right <CR>*right#<CR>
Write Left <CR>*left#<CR>
Write Enter <CR>*enter#<CR>
Write Back <CR>*back#<CR>
Write Source Menu On <CR>*sourmenu=on#<CR>
Write Source Menu Off <CR>*sourmenu=off#<CR>
Read Source Menu Status <CR>*sourmenu=?#<CR>
Write 3D Sync Off <CR>*3d=off#<CR>
Write 3D Auto <CR>*3d=auto#<CR>
Write 3D Sync Top Bottom <CR>*3d=tb#<CR>
Write 3D Sync Frame Sequential <CR>*3d=fs#<CR>
Write 3D Frame packing <CR>*3d=fp#<CR>
Write 3D Side by side <CR>*3d=sbs#<CR>
Write 3D inverter disable <CR>*3d=da#<CR>
Write 3D inverter <CR>*3d=iv#<CR>
Write 3D nVIDIA <CR>*3d=nvidia#<CR>
Read 3D Sync Status <CR>*3d=?#<CR>
Write Remote Receiver-front+rear <CR>*rr=fr#<CR>
Write Remote Receiver-front <CR>*rr=f#<CR>
Write Remote Receiver-rear <CR>*rr=r#<CR>
Read Remote Receiver Status <CR>*rr=?#<CR>
Write AMX Device Discovery-on <CR>*amxdd=on#<CR>
Write AMX Device Discovery-off <CR>*amxdd=off#<CR>
Read AMX Device Discovery Status <CR>*amxdd=?#<CR>
Read Mac Address <CR>*macaddr=?#<CR>
Write High Altitude mode on <CR>*Highaltitude=on#<CR>
Write High Altitude mode off <CR>*Highaltitude=off#<CR>
Read High Altitude mode status <CR>*Highaltitude=?#<CR>
24

English
Function Type Operation ASCII
Color Calibration Write Tint + <CR>*tint=+#<CR>
Write Tint - <CR>*tint=-#<CR>
Write Set Tint value <CR>*tint=value#<CR>
Read Get Tint value <CR>*tint=?#<CR>
Write Set gamma value <CR>*gamma=value#<CR>
Read Gamma value status <CR>*gamma=?#<CR>
Write Set HDR Brightness value <CR>*hdrbri=value#<CR>
Read Get HDR Brightness value <CR>*hdibri=?#<CR>
Write Red Gain + <CR>*RGain=+#<CR>
Write Red Gain - <CR>*RGain=-#<CR>
Write Set Red Gain value <CR>*RGain=value#<CR>
Read Get Red Gain value <CR>*RGain=?#<CR>
Write Green Gain + <CR>*GGain=+#<CR>
Write Green Gain - <CR>*GGain=-#<CR>
Write Set Green Gain value <CR>*GGain=value#<CR>
Read Get Green Gain value <CR>*GGain=?#<CR>
Write Blue Gain + <CR>*BGain=+#<CR>
Write Blue Gain - <CR>*BGain=-#<CR>
Write Set Blue Gain value <CR>*BGain=value#<CR>
Read Get Blue Gain value <CR>*BGain=?#<CR>
Write Red Offset + <CR>*ROffset=+#<CR>
Write Red Offset - <CR>*ROffset=-#<CR>
Write Set Red Offset value <CR>*ROffset=value#<CR>
Read Get Red Offset value <CR>*ROffset=?#<CR>
Write Green Offset + <CR>*GOffset=+#<CR>
Write Green Offset - <CR>*GOffset =-#<CR>
Write Set Green Offset value <CR>*GOffset=value#<CR>
Read Get Green Offset value <CR>*GOffset=?#<CR>
Write Blue Offset + <CR>*BOffset=+#<CR>
Write Blue Offset - <CR>*BOffset=-#<CR>
Write Set Blue Offset value <CR>*BOffset=value#<CR>
Read Get Blue Offset value <CR>*BOffset=?#<CR>
Write Primary Color <CR>*primcr=value#<CR>
Read Primary Color Status <CR>*primcr=?#<CR>
Write Hue + <CR>*hue=+#<CR>
Write Hue - <CR>*hue=-#<CR>
Write Set Hue value <CR>*hue=value#<CR>
Read Get Hue value <CR>*hue=?#<CR>
Write Saturation + <CR>*saturation=+#<CR>
Write Saturation - <CR>*saturation=-#<CR>
Write Set Saturation value <CR>*saturation=value#<CR>
Read Get Saturation value <CR>*saturation=?#<CR>
25
English
Function Type Operation ASCII
Color Calibration Write Gain + <CR>*gain=+#<CR>
Write Gain - <CR>*gain=-#<CR>
Write Set Gain value <CR>*gain=value#<CR>
Read Get Gain value <CR>*gain=?#<CR>
Service Read Error Code report <CR>*error=report#<CR>
Read FAN 1 speed <CR>*fan1=?#<CR>
Read FAN 2 speed <CR>*fan2=?#<CR>
Read FAN 3 speed <CR>*fan3=?#<CR>
Read FAN 4 speed <CR>*fan4=?#<CR>
Read FAN 5 speed <CR>*fan5=?#<CR>
Read Temperature 1 <CR>*tmp1=?#<CR>
Read Temperature 2 <CR>*tmp2=?#<CR>
Read Temperature 3 <CR>*tmp3=?#<CR>
Read LED indicator <CR>*led=?#<CR>
Note:
RS-232 baud rate options are 2400, 4800, 9600, 14400, 19200, 38400, 57600 and 115200 (Default : 115200).
26

繁體中文
目錄
注意 ......................................................................................................... 28
雷射注意事項 ................................................................................................................... 28
冷卻注意事項 ................................................................................................................... 29
包裝內容物 .............................................................................................. 31
標準包裝物品 ................................................................................................................... 31
規格 .................................................................................................................................. 31
控制端子 ........................................................................................................................... 32
遙控器 .............................................................................................................................. 33
安裝 ......................................................................................................... 35
安裝或拆下選購的鏡頭 .................................................................................................... 35
鏡頭 .................................................................................................................................. 37
投影尺寸 ........................................................................................................................... 37
鏡頭位移範圍 ................................................................................................................... 39
LED 指示燈 ............................................................................................. 41
系統訊息 ........................................................................................................................... 41
光源錯誤訊息 ................................................................................................................... 41
濾網訊息 ........................................................................................................................... 41
溫度錯誤訊息 ................................................................................................................... 42
投影機尺寸 .............................................................................................. 43
天花板安裝圖 .......................................................................................... 44
尺寸與角度調整 ............................................................................................................... 44
鏡頭尺寸 .................................................................................................. 45
RS232 指令 ............................................................................................. 46
RS232 針腳分配 ............................................................................................................... 46
包含跳線的 RS232 序列埠 ............................................................................................... 46
如需最新版的使用手冊安裝指南,請造訪以下網站。
http://business-display.benq.com/
V1.00
27
繁體中文
注意
雷射注意事項
y雷射等級
(美國)本雷射產品在所有操作程序中均被指定為 Class 3R,並符合 IEC/EN
60825-1:2007。
(全球)本雷射產品在所有操作程序中均被指定為 Class 1,並符合 IEC/EN
60825-1:2014。
雷射光-請避免眼睛直接暴露。
請勿將雷射指向或讓雷射光對著或反射到他人或反光物體。
直射光或散射光對於眼睛和皮膚有危險。
若未遵循隨附的說明,可能會有眼睛暴露於雷射輻射的危害。
警告-使用本文所述以外的控制、調整或程序,可能會導致危險的輻射暴露。
此符號表示除非密切遵循說明,否則會有眼睛暴露於雷射輻射的危害。
y雷射參數
波長 449 nm - 461 nm(藍光)
運作模式 脈衝,因畫面播放速率
脈衝寬度 1.34ms
脈衝重複率 120Hz
最大雷射能量 0.698mJ
總內部功率 >100w
視在光源大小 >10mm,在鏡頭停止時
發散 >100 mili 弳
y雷射光說明
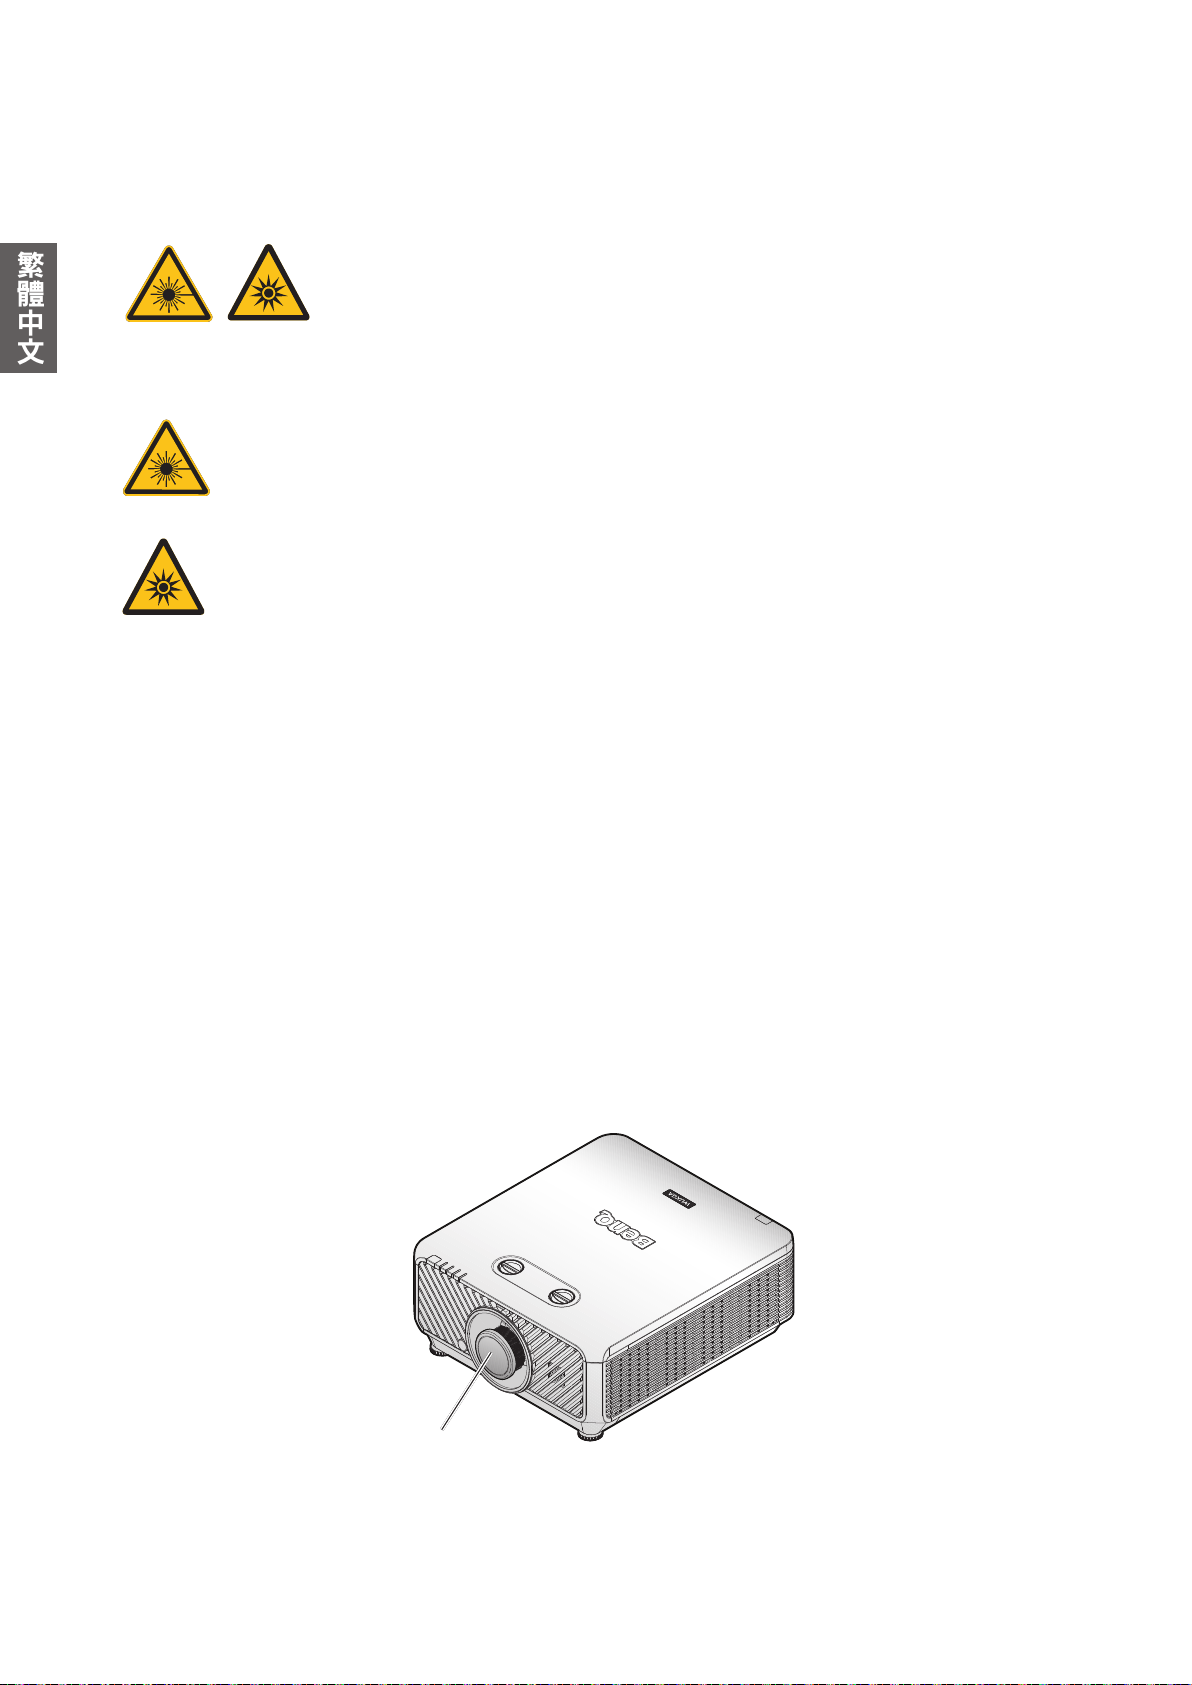
雷射出口
28
繁體中文
冷卻注意事項
散熱孔附近至少留 50 cm(19.69 英寸)的間距。請確定在 30 cm(11.81 英寸)內沒有物體
阻擋進氣。
請使出風口至少距離其他投影機的進氣口 1 公尺。
進氣口
進氣口
出氣口
• 投影機能以任何角度安裝。
29

繁體中文
• 散熱孔附近至少留 50 cm 的間距。
最少 50 cm
(19.69 英寸)
最少 50 cm
(19.69 英寸)
最少 50 cm
(19.69 英寸)
最少 50 cm
(19.69 英寸)
最少 50 cm
(19.69 英寸)
最少 10 cm
(3.94 英寸)
最少 30 cm
(11.81 英寸)
最少 50 cm
(19.69 英寸)
• 請確保進氣孔不會從散熱孔重新循環熱氣。
• 在密閉空間操作時,請確定周圍氣溫未超過投影機的運作溫度,且不會阻塞進氣孔與散
熱孔。
所有外殼應通過認證的散熱評估,以確保投影機不會重新循環排氣。重新循環排氣可能會使
投影機關閉,即使環境溫度在可接受的運作溫度範圍內。
30

繁體中文
包裝內容物
標準包裝物品
規格
投影機及防塵蓋 遙控器
電源線 VGA 連接線 3pin VESA 轉 BNC 連接線
投影系統 DLP 單 0.67 WUXGA DMD 晶片
原始解析度 1920*1200 像 素,16
光源 雷射二極體
耗電量 700 瓦
尺寸 470 x 220.5 x 519.5 mm
重量 24 kg(
( 正 常 模 式 ) 530 瓦(省 電 模 式 )
電池 安裝指南
LU9245
無鏡 頭)
:10
注意事項:
• 亮度由標準鏡頭提供,數值視鏡片而定。
• 亮度輸出將因各裝置及實際用途而異。
• 請查詢當地網站上的最新使用手冊。
31

繁體中文
控制端子
MONITOR OUT
連接其他顯示設備,用於同時播放顯示。
HDB a seT
使用乙太網路線 (
高畫質視訊 (HD)、RS232 控制和 LAN 控 制。.
HDMI 1
連接 H
LAN
用於連接 R
制投影機。
3D SYNC OUT
連接 3
VIDEO
連 接 視 訊 來 源。
RS-232 IN
標準 9
維 護。
PC 2 (R/Pr, G/Y, B/Pb, H, V)
連接 B
號。
AUDIO OUT (L/R)
連 接 喇 叭 或 耳 機。
WIRED REMOTE IN
連接至遙控器進行有線遙控。
12V TRIGGE R
3.5mm mini 耳機插孔,提供 2
短 路 保 護。
DMI 來 源。
D IR 同 步訊 號 發 射 器。
-pin D-sub 介 面,用 於 連 接 PC 控制系統及投影機
NC 式輸入端子的 RGB 或 YPbPr/YCbCr 輸出訊
Cat5/Cat6) 連接 HDBaseT 發射器與
J45 Cat5/Cat6 乙太網路線,以透過網路控
00mA/12(+/-1.5)V 輸出與
PC
15-pin VGA 連接埠,用於連接 RG
PC。
DVI-D
連接 DV
HDMI 2
連接 H
USB 1. 5A
支援 5
3D SYNC IN
連接電腦或啟用裝置的 3
SERVICE
僅供授權之維護人員使用的專用維護連接埠。
RS-232 OUT
連接至另一部投影機(相同型號)進行 R
AUDIO IN (L/R)
透過音訊或音訊左右連接線,連接音訊輸入源。
AUDIO IN
透過音訊連接線連接音訊輸入源。
WIRED REMOTE OUT
連接至另一投影機。
I 來 源。
DMI 來 源。
V/1. 5A 輸 出。
D 同 步 輸 入 訊 號 線。
B、色 差 HD 來源或
S-232 控 制。
警告:
請確定在插入有線遙控器之前,連接埠有效。若是無效的連接埠,如有效遙控器連接至觸發輸出,則遙控器可能
會 損 壞。如 需 透 過 Lan 升級韌體的詳細資訊,請洽詢 BenQ 服務。
32

繁體中文
遙控器
ON / OFF
開啟投影機或切換成待機模式。
KEYSTONE+/KEYSTONE-
手動修正傾斜投影時所造成的失真影像。
VOLUME +/VOLUME -
增加 / 降
QUICK IN S TA LL
顯示「快速安裝」螢幕顯示 (
MUTE
開啟與關閉投影機音訊。
方 向 鍵(▲ 向 上、▼ 向 下、◄ 向 左、► 向 右)
OSD 功能表啟動時,這些按鍵可當作方向鍵,用於選擇所需的功能表
項目並 進 行 調 整。
ENTER
選擇可用的畫面設定模式。執行選擇的 O
MENU
開啟 O
定。
EXIT
返回上一個 O
INPUT
選取顯示的輸入來源。
PCITURE
按 下 可 顯 示「 圖片」功 能 表。
NETWORK
請 選 擇「 網 路 顯 示」作 為 輸 入 訊 號 源。
AUTO SYNC
自動決定所顯示影像的最佳畫面時序。
ASPECT
選 擇 顯 示 縱 橫 比。
BLANK
可用 於 隱 藏 螢 幕 畫 面。
低投影機音量。
OSD) 功 能 表。
SD 功 能 表 項 目。
SD 功 能 表。返 回 上 一 個 OSD 功能表、離開,以及儲存功能表設
SD 功能表、離開,以及儲存功能表設定。
33

繁體中文
OVERSCAN
按 下 以 選 擇 過 掃 描 模 式。
FREEZE
凍 結 投 影 影 像。
LAMP MODE
按下可顯示 O
3D MODE
按下可顯示 3
INFO.
按 下 可 顯 示「資訊」功 能 表。
LIGHT
按下可開啟遙控器背光源。
CLEAR
清除指定投影機的遙控 ID 設
按 住「CLEAR」與「 ID SET」5 秒。LED 閃爍 3 次 後,ID 設 定 即清 除。
SHUTTER
此功能無法在本投影機上使用。
ID SET
• 遙控器 ID 設定(設定特定的遙控器代碼)
按下可設定遙控 ID。
按住「ID SET」3 秒。遙控器上的「電源」指示燈會閃爍,接著按
下 01~99 之間的數字以指定一組 ID。
SD 功能表以選擇所需的燈光模式。
D 設 定 功 能 表。
定後,可控製所有的投影機。
注 意 事 項:
遙控器編號(遙控器 ID)必須與投影機 ID 設 定 編 號 相 符,控 制 才 能 精
準。
• 清除遙控 ID 設定(將遙控器代碼設為全部)
按住「CLEAR」與「ID SET」5 秒。遙控器上的「電源」指示燈
閃爍一次,將遙控器代碼設為全部,即可控制投影機,無論投影
機 ID 設定為何。
數字按鈕
在網路設定中輸入數字。
要 求 輸 入 密 碼 時,無 法 按 下 數 字 按 鈕 1、2、3、4。
WIRED REMOTE 插孔
連接至投影機進行有線遙控。
34

繁體中文
安裝
警告:
為了避 免 損 壞 DLP 晶片,切勿將高功率雷射光束對準投影鏡頭。
安裝或拆下選購的鏡頭
警告:
• 投影機與鏡頭元件都含有精密零件,請勿搖晃投影機或鏡頭元件,或是對其施加過大壓力。
• 拆下或安裝鏡頭前,務必關閉投影機,等待冷卻風扇停止運轉,並關閉主電源開關。
• 拆下或安裝鏡頭時,切勿觸碰鏡片。
• 不能讓鏡片沾上指紋、灰塵或油漬。請勿刮傷鏡片。
• 請在平坦表面上作業,並在鏡頭下方鋪上軟布,以避免鏡頭刮傷。
• 如果要將鏡頭拆下貯存,請將鏡頭蓋裝到投影機上,以預防灰塵髒汙。
y裝上新的鏡頭
移除鏡頭的兩個端蓋。
注意事項:
第一次插入鏡頭前,須先拆下塑膠機身蓋。
1. 調整鏡頭方向,使側面標籤上的箭頭朝上,然後將鏡頭推入裝置的鏡頭座,並推到底。
2. 將鏡頭依順時針方向旋轉,直到卡至定位。
35

繁體中文
y移除投影機現有的鏡頭
1. 將 LENSE RELEASE 按鈕推到解鎖位置。
2. 抓握鏡頭。
3. 將鏡頭依逆時針方向旋轉。鏡頭將會鬆開。
4. 慢慢拉出鏡頭。
36

繁體中文
鏡頭
型號 鏡頭類型 零件編號 投射比 鏡頭位移
LS2ST3 廣角修正 5J.JDH37.002 WUXGA: 0.778
LS2ST1 廣角變焦 5J.JDH37.011 WUXGA: 1.1-1.3
LS2SD2 標準 5J.JEN37.001 WUXGA: 1.54-1.93
LS2LT1 中長 5J.JDH37.032 WUXGA: 1.93-2.9
LS2LT 2 長變焦 5J.JDH37.041 WUXGA: 3-5
LS2ST2
LS2ST4
短投影
中投影
5A.JK337.001 WUXGA: 0.77-1.1
5A.JK337.011 WUXGA: 1.25-1.6
垂直: -15%-55%
水平:-5%-5%
垂直: -15%-55%
水平:-5%-5%
垂直: -15%-55%
水平:-5%-5%
垂直: -15%-55%
水平:-5%-5%
垂直: -15%-55%
水平:-5%-5%
垂直:-15%-55%
水平:-5%-5%
垂直:-15%-55%
水平:-5%-5%
投影尺寸
• LU9245
螢幕縱橫比為 16:10,投影畫面為 16:10。
注意事項:
為了將投影品質最佳化,建議將影像投射在沒有灰階的區域。
鏡頭 廣角變 焦 (LS2ST1) 標準 (LS2SD2)
投射比
)
位移 (A
對角線 影像寬度 影像高度
(英寸) (公尺) (英寸) (公尺) (英寸) (公尺) (英寸) (公尺) (英寸) (公尺) (英寸) (公尺) (英寸) (公尺) (英寸) (公尺) (英寸) (公尺)
50 1.27 42 1.0 8 26 0.67 1.3 0.034 14.6 0.370 47 1.18 55 1.40 65 1.66 82 2.08
60 1.52 51 1.29 32 0.81 1.6 0.040 17.5 0.444 56 1.42 66 1.68 78 1.99 98 2.49
80 2.03 68 1.72 42 1.08 2.1 0.054 23.3 0.592 75 1.90 88
100 2 .54 85 2 .15 53 1.35 2.6 0.067 29.1 0.740 93 2.37 110 2.80 131 3.32 16 4 4.16
120 3.05 102 2.58 64 1.62 3.2 0.081 35.0 0.888 112 2.84 132 3.36 157 3.98 196 4.99
150 3. 81 127 3.23 79 2.02 4.0 0.101 43.7 1.111 140 3.55 165 4.20 196 4.98 245 6.24
180 4.57 153 3.88 95 2.42 4.8 0.121 52.5 1.333 168 4.26 198 5.04 235 5.97 295 7.48
200 5.08 170 4.31 106 2.69 5.3 0.135 58.3 1.481 187 4.74 220 5.60 261 6.63 327 8.31
250 6.35 212 5.38 132 3.37 6.6 0.16 8 72 .9 1.851 233 5.92 276 7. 0 0 326 8.29 409 10.39
300 7. 62 254 6.46 159 4.04 7.9 0.202 87.4 2 . 221 280 7.11 331 8.40 392 9.95 491 12 .47
350 8.89 297
400 10.16 339 8.62 212 5.38 10.6 0.269 116. 6 2.962 373 9.48 441 11 . 2 0 522 13.27 655 16.63
500 12 .70 424 10.77 265 6.73 13.2 0.337 145.7 3.702 466 11. 8 5 551 14.00 653 16.59 818 20.79
7.54 185 4.71 9.3 0.236 102.0 2.591 326 8.29 386 9.80 457 11.61 573 14.55
非線性寬
螢幕
最長焦距
O
非線性寬
螢幕
最長焦距
1.1~1.3 1.54~1.93
距離 距離
非線性寬
螢幕
最長焦距
2.24 104 2.65 131 3.33
非線性寬
螢幕
最長焦距
37

繁體中文
鏡頭 中長 (L S 2LT1) 長變焦 (LS2LT 2)
投射比
)
位移 (A
對角線 影像寬度 影像高度
(英寸) (公尺) (英寸) (公尺) (英寸) (公尺) (英寸) (公尺) (英寸) (公尺) (英寸) (公尺) (英寸) (公尺) (英寸) (公尺) (英寸) (公尺) (英寸) (公尺)
50 1.27 42 1.0 8 26 0.67 1.3 0.034 14.6 0.370 82 2.08 123 3.12 127 3.23 212 5.38 33 0.84
60 1.52 51 1.29 32 0.81 1.6 0.040 17.5 0.444 98 2.49 148 3.75 153 3.88 254 6.46
80 2.03 68 1.72 42 1.08 2.1 0.054 23.3 0.592 131 3.33 197 5.00 204 5.17 339 8.62 53 1.34
100 2 .54 85 2 .15 53 1.35 2.6 0.067 29.1 0.740 16 4 4.16 246 6.25 254 6.46 424 10.77 66 1.68
120 3.05 102 2.58 64 1.62 3.2 0.081 35.0 0.888 196 4.99 295 7.50 305 7.75 509 12 .92 79 2 .01
150 3. 81 127 3.23 79 2.02 4.0 0.101 43.7 1.111 245 6.24 369 9.37 382 9.69 636 16.15 99 2 . 51
180 4.57 153 3.88 95 2.42 4.8 0.121 52.5 1.333 295 7.48 443 11. 24 458 11. 63 763 19. 39 119 3.02
200 5.08 170 4.31 106 2.69 5.3 0.135 58.3 1.481 327 8.31 492 12 .49 509 12.92 848 21.5 4 132 3.35
250 6.35 212 5.38 132 3.37 6.6 0.16 8 72 .9 1.851 409 10.39
300 7. 62 254 6.46 159 4.04 7.9 0.202 87.4 2 . 221 491 12 .47 738 18.74 763 19. 39 1272 32.31 198 5.03
350 8.89 297 7. 54 185 4 .71 9.3 0.236 102.0 2.591 573 14.55 861 21.86 890 22.62 1484 37.6 9 231 5.87
400 10.16 339 8.62 212 5.38 10.6 0.269 116. 6 2.962 655 16.63 984 24.99 1018 25.85 1696 43.08 264 6.70
500 12 .70 424 10.77 265 6.73 13.2 0.337 145.7 3.702 818 20.79 1230 31.23 1272 32 . 31 212 0 53.85 330 8.38
鏡頭 短投影 (LS2ST2) 中投影 (LS2ST4)
投射比
對角線 影像寬度 影像高度
(英寸) (公尺) (英寸) (公尺) (英寸) (公尺) (英寸) (公尺) (英寸) (公尺) (英寸) (公尺) (英寸) (公尺) (英寸) (公尺) (英寸) (公尺)
50 1.27 42 1.0 8 26 0.67 1.3 0.034 14.6 0.370 33 0.83 47 1.18 53 1.35 68 1.72
60 1.52 51 1.29 32 0.81 1.6 0.040 17.5 0.444 39 1.00 56 1.42 64 1.62 81 2.07
80 2.03 68 1.72 42 1.08 2.1 0.054 23.3 0.592 52 1. 33 75 1.90
100 2 .54 85 2 .15 53 1.35 2.6 0.067 29.1 0.740 65 1.66 93 2.37 106 2.69 136 3.45
120 3.05 102 2.58 64 1.62 3.2 0.081 35.0 0.888 78 1.99 112 2.84 127 3.23 163 4.14
150 3. 81 127 3.23 79 2.02 4.0 0.101 43.7 1.111 98 2.49 140 3.55 159 4.04 204 5 .17
180 4.57 153 3.88 95 2.42 4.8 0.121 52.5 1.333 11 8 2.99 168 4.26 191 4.85 244 6.20
200 5.08 170 4.31 106 2.69 5.3 0.135 58.3 1.481 131 3.32 187 4.74 212 5.38 271 6.89
250 6.35 212 5.38 132 3.37 6.6 0.16 8 72 .9 1.851 163 4.15 233 5.92 265 6.73 339 8.62
300 7. 62 254 6.46 159 4.04 7.9 0.202 87.4 2 . 221 196 4.98 280 7.11 318 8.08 407 10.34
350 8.89 297 7. 54
400 10.16 339 8.62 212 5.38 10.6 0.269 116. 6 2.962 261 6.63 373 9.48 424 10.77 543 13.7 9
500 12 .70 424 10.77 265 6.73 13.2 0.337 145.7 3.702 326 8.29 466 11.8 5 530 13.46 678 17. 2 3
185 4.71 9.3 0.236 102.0 2. 591 229 5.80 326 8.29 371 9.42 475 12 .06
非線性寬
螢幕
最長焦距
位移 (A
非線性寬
螢幕
最長焦距
)
O
非線性寬
螢幕
最長焦距
O
非線性寬
螢幕
最長焦距
1.93~2.9 3~5 0.778
距離 距離 距離
非線性寬
螢幕
非線性寬
螢幕
最長焦距
615 15.62 636 16.15 1060 26.92 165 4.19
0.77~1.1 1.25~1.60
距離 距離
最長焦距
非線性寬
螢幕
非線性寬
螢幕
85 2 .15 109 2.76
最長焦距
最長焦距
廣角定焦
(LS2ST3)
NA
40 1.01
注意事項:
• 如需更多圖示說明,請前往 BenQ 計算機網站 http://projectorcalculator.benq.com/。
• 天花板安裝必須由合格專業人員執行。如需詳細資訊,請洽詢您的經銷商。不建議您自行安裝投影機。
• 僅限在堅固的平坦表面上使用投影機。若投影機掉落可能會造成重傷及受損。
• 請勿在極端溫度的環境中使用投影機。投影機必須在介於華氏 41
度( 攝 氏 5 度 )及 華 氏 104 度( 攝 氏 40 度)
之 間 的 溫 度 下 使 用。
• 若投影機接觸濕氣、灰塵或煙霧,將造成螢幕受損。
• 請勿覆蓋投影機的通風口。需適當通風才能散熱。若覆蓋通風口,投影機將會受損。
38

繁體中文
鏡頭位移範圍
y鏡頭位移可調整範圍
鏡頭位移可調整範圍如下表所示,並受表列條件限制。
• LU9245
桌面安裝 - 正面投影
垂直位移
最大 0.55V
1V
投影影像高度
正常投影位置
天花板安裝 - 正面投影
y天花板安裝
垂直位移
投影影像高度
垂直位移
垂直位移
最大 0.15V
1V
最大 0.55V
向左移
1H 0.05H0.05H
投影影像寬度
向右移
螢幕頂端
位移範圍
螢幕中央
C = 鏡頭至螢幕的距離
39

繁體中文
y桌面安裝
位移範圍
注意事項:
• 圖例僅適用於標準鏡頭。
• LS2ST3(
定焦鏡頭)無法使用鏡頭位移功能。此鏡頭應用於「零度」「無位移」應用。請參見以下:
螢幕中央
僅限搭配 LS2ST3(定焦鏡頭)使用
螢幕中央
40

繁體中文
LED 指示燈
系統訊息
電源 溫度 燈光 濾網 狀態與說明
橘色 - - - 待機
閃爍綠燈 - - - 開機中
綠色 - - - 正常運作
閃爍橘燈 - - - 正常關機降溫
紅色 紅色 紅色 - 下載
綠色 - 紅色 - 色輪啟動失敗
綠色 - 閃爍紅燈 - 螢光輪啟動失敗
閃爍紅燈 - - - 分段關機失敗
- 綠色 閃爍紅燈 - 鏡頭鬆開
- 綠色 紅色 - 外殼開啟
光源錯誤訊息
電源 溫度 燈光 濾網 狀態與說明
- - 紅色 - 正常作業中光源錯誤
-- - 閃爍橘燈 - 光源不亮
濾網訊息
電源 溫度 燈光 濾網 狀態與說明
綠色 - - 橘色 濾網更換警告
41

繁體中文
溫度錯誤訊息
電源 溫度 燈光 濾網 狀態與說明
紅色 紅色 - - 風扇 1 錯誤
紅色 閃爍紅燈 - - 風扇 2
紅色 綠色 - - 風扇 3
紅色 閃爍綠燈 - - 風扇 4
閃爍紅燈 紅色 - - 風扇 5
閃爍紅燈 閃爍紅燈 - - 風扇 6
閃爍紅燈 綠色 - - 風扇 7
閃爍紅燈 閃爍綠燈 - - 風扇 8
紅色 紅色 - 綠色 風扇 9
綠色 紅色 - - 溫度 1
綠色 閃爍紅燈 - - 1 號熱感器開啟錯誤
綠色 綠色 - - 1 號熱感器短路錯誤
綠色 閃爍綠燈 - - 熱感 I
閃爍綠燈 紅色 - - 溫度 2
閃爍綠燈 閃爍紅燈 - - 2 號熱感器開啟錯誤
閃爍綠燈 綠色 - - 2 號熱感器短路錯誤
閃爍綠燈 閃爍綠燈 - - 熱感 I
閃爍綠燈 綠色 綠色 - 溫度 3
橘色 閃爍紅燈 - - 3 號熱感器開啟錯誤
橘色 綠色 - - 3 號熱感器短路錯誤
橘色 閃爍綠燈 - - 熱感 I
閃爍綠燈 綠色 閃爍綠燈 - 溫度 4
閃爍綠燈 閃爍綠燈 綠色 - 溫度 5
綠色 紅色 紅色 - 過熱斷路警告
錯誤
錯誤
錯誤
錯誤
錯誤
錯誤
錯誤
錯誤
錯誤
C #1 I2C 連接錯誤
錯誤
C #2 I2C 連接錯誤
錯誤
C #3 I2C 連接錯誤
錯誤
錯誤
42

繁體中文
投影機尺寸
43

繁體中文
天花板安裝圖
編號 天花板安裝 CMG6 (5A.JHS10.001)
材質 鋼
重量 10.5 公斤(23.1 磅)
尺寸(寬 x 高 x 深) 410 x 641 x 360 mm (16.14" x 25.24" x 14.17")
長度 491mm ~ 641mm
傾斜角度
負荷 40 公斤(88 磅)
螺絲類型 M4, M5, M6, M8
旋轉:±5
垂直:+5°/-25
水平:±5
°
°
°
尺寸與角度調整
44

繁體中文
鏡頭尺寸
選購鏡頭(廣角定焦:LS2ST3) 選購鏡頭(廣角變焦:LS2ST1)
選購鏡頭(標準:LS2SD2) 選購鏡頭(中長投影:LS2LT1)
選購鏡頭(長變焦 : LS2LT2) 選購鏡頭(短投影:LS2ST2)
選購鏡頭(中投影:LS2ST4)
45

繁體中文
RS232 指令
RS232 針腳分配
編號 序列 編號 序列
1 N.C 6 N.C
2 RXD 7 以 pin8 短路
3 TXD 8 以 pin7 短路
4 N.C 9 N.C
5 接地
包含跳線的 RS232 序列埠
功能 類型 操作 ASCII
Power Write Power On <CR>*pow=on#<CR>
Write Power Off <CR>*pow=off#<CR>
Read Power Status <CR>*pow=?#<CR>
Source Selection Write COMPUTER/YPbPr <CR>*sour=RGB#<CR>
Write COMPUTER 2/YPbPr2 <CR>*sour=RGB2#<CR>
Write DVI-D <CR>*sour=dvid#<CR>
Write HDMI (MHL) <CR>*sour=hdmi#<CR>
Write HDMI 2 (MHL2) <CR>*sour=hdmi2#<CR>
Write Composite <CR>*sour=vid#<CR>
Write HDBaseT <CR>*sour=hdbaset#<CR>
Read Current source <CR>*sour=?#<CR>
Audio Control Write Mute On <CR>*mute=on#<CR>
Write Mute Off <CR>*mute=off#<CR>
Read Mute Status <CR>*mute=?#<CR>
Write Volume + <CR>*vol=+#<CR>
Write Volume - <CR>*vol=-#<CR>
Write Volume level for customer <CR>*vol=value#<CR>
Read Volume Status <CR>*vol=?#<CR>
46

繁體中文
功能 類型 操作 ASCII
Audio Source Select Write Audio pass Through off <CR>*audiosour=off#<CR>
Write Audio - Computer1 <CR>*audiosour=RGB#<CR>
Write Audio - Video/S-Video <CR>*audiosour=vid#<CR>
Write Audio - HDMI <CR>*audiosour=hdmi#<CR>
Write Audio - HDMI2 <CR>*audiosour=hdmi2#<CR>
Read Audio pass Status <CR>*audiosour=?#<CR>
Picture Mode Write Presentation <CR>*appmod=preset#<CR>
Write sRGB <CR>*appmod=srgb#<CR>
Write Bright <CR>*appmod=bright#<CR>
Write Cinema (Rec. 709) <CR>*appmod=cine#<CR>
Write DICOM <CR>*appmod=dicom#<CR>
Write Vivid <CR>*appmod=vivid#<CR>
Write User1 <CR>*appmod=user1#<CR>
Write User2 <CR>*appmod=user2#<CR>
Write 3D <CR>*appmod=threed#<CR>
Write HDR10 <CR>*appmod=hdr10<CR>
Write HLG <CR>*appmod=hlg<CR>
Read Picture Mode <CR>*appmod=?#<CR>
Picture Setting Write Contrast + <CR>*con=+#<CR>
Write Contrast - <CR>*con=-#<CR>
Write Set Contrast value <CR>*con=5#<CR>
Read Contrast value <CR>*con=?#<CR>
Write Brightness + <CR>*bri=+#<CR>
Write Brightness - <CR>*bri=-#<CR>
Write Set Brightness value <CR>*bri=5#<CR>
Read Brightness value <CR>*bri=?#<CR>
Write Color + <CR>*color=+#<CR>
Write Color - <CR>*color=-#<CR>
Write Set Color value <CR>*color=5#<CR>
Read Color value <CR>*color=?#<CR>
Write Sharpness + <CR>*sharp=+#<CR>
Write Sharpness - <CR>*sharp=-#<CR>
Write Set Sharpness value <CR>*sharp=5#<CR>
Read Sharpness value <CR>*sharp=?#<CR>
Write Color Temperature - Warm <CR>*ct=warm#<CR>
Write Color Temperature - Normal <CR>*ct=normal#<CR>
Write Color Temperature - Cool <CR>*ct=cool#<CR>
Read Color Temperature Status <CR>*ct=?#<CR>
Write Aspect 4:3 <CR>*asp=4:3#<CR>
Write Aspect 16:9 <CR>*asp=16:9#<CR>
Write Aspect 2.35:1 <CR>*asp=2.35#<CR>
Write Aspect 16:10 <CR>*asp=16:10#<CR>
47

繁體中文
功能 類型 操作 ASCII
Picture Setting Write Aspect Auto <CR>*asp=AUTO#<CR>
Write Aspect Real <CR>*asp=REAL#<CR>
Read Aspect Status <CR>*asp=?#<CR>
Write Vertical Keystone + <CR>*vkeystone=+#<CR>
Write Vertical Keystone - <CR>*vkeystone=-#<CR>
Read Vertical Keystone value <CR>*vkeystone=?#<CR>
Write Horizontal Keystone + <CR>*hkeystone=+#<CR>
Write Horizontal Keystone - <CR>*hkeystone=-#<CR>
Read Horizontal Keystone value <CR>*hkeystone=?#<CR>
Write Overscan Adjustment + <CR>*overscan=+#<CR>
Write Overscan Adjustment - <CR>*overscan=-#<CR>
Read Overscan Adjustment value <CR>*overscan=?#<CR>
Write 4 Corners Top-Left - X Decrease <CR>*cornerfittlx=-#<CR>
Write 4 Corners Top-Left - X Increase <CR>*cornerfittlx=+#<CR>
Read 4 Corners Top-Left - X Status <CR>*cornerfittlx=?#<CR>
Write 4 Corners Top-Left - Y Decrease <CR>*cornerfittly=-#<CR>
Write 4 Corners Top-Left - Y Increase <CR>*cornerfittly=+#<CR>
Read 4 Corners Top-Left - Y Status <CR>*cornerfittly=?#<CR>
Write 4 Corners Top-Right - X Decrease <CR>*cornerfittrx=-#<CR>
Write 4 Corners Top-Right - X Increase <CR>*cornerfittrx=+#<CR>
Read 4 Corners Top-Right - X Status <CR>*cornerfittrx=?#<CR>
Write 4 Corners Top-Right - Y Decrease <CR>*cornerfittry=-#<CR>
Write 4 Corners Top-Right - Y Increase <CR>*cornerfittry=+#<CR>
Read 4 Corners Top-Right - Y Status <CR>*cornerfittry=?#<CR>
Write 4 Corners Bottom-Left - X Decrease <CR>*cornerfitblx=-#<CR>
Write 4 Corners Bottom-Left - X Increase <CR>*cornerfitblx=+#<CR>
Read 4 Corners Bottom-Left - X Status <CR>*cornerfitblx=?#<CR>
Write 4 Corners Bottom-Left - Y Decrease <CR>*cornerfitbly=-#<CR>
Write 4 Corners Bottom-Left - Y Increase <CR>*cornerfitbly=+#<CR>
Read 4 Corners Bottom-Left - Y Status <CR>*cornerfitbly=?#<CR>
Write 4 Corners Bottom-Right - X Decrease <CR>*cornerfitbrx=-#<CR>
Write 4 Corners Bottom-Right - X Increase <CR>*cornerfitbrx=+#<CR>
Read 4 Corners Bottom-Right - X Status <CR>*cornerfitbrx=?#<CR>
Write 4 Corners Bottom-Right - Y Decrease <CR>*cornerfitbry=-#<CR>
Write 4 Corners Bottom-Right - Y Increase <CR>*cornerfitbry=+#<CR>
Read 4 Corners Bottom-Right - Y Status <CR>*cornerfitbry=?#<CR>
Write Digital Zoom In <CR>*zoomI#<CR>
Write Digital Zoom out <CR>*zoomO#<CR>
Write Auto <CR>*auto#<CR>
Write Brilliant color on <CR>*BC=on#<CR>
Write Brilliant color off <CR>*BC=off#<CR>
Read Brilliant color status <CR>*BC=?#<CR>
48

繁體中文
功能 類型 操作 ASCII
Picture Setting Write Reset current picture settings <CR>*rstcurpicsetting#<CR>
Write Reset picture settings <CR>*rstpicsetting#<CR>
Operation Settings Write Projector Position - Front Table <CR>*pp=FT#<CR>
Write Projector Position - Rear Table <CR>*pp=RE#<CR>
Write Projector Position - Rear Ceiling <CR>*pp=RC#<CR>
Write Projector Position - Front Ceiling <CR>*pp=FC#<CR>
Read Projector Position Status <CR>*pp=?#<CR>
Write Quick auto search <CR>*QAS=on#<CR>
Write Quick auto search <CR>*QAS=off#<CR>
Read Quick auto search status <CR>*QAS=?#<CR>
Write Menu Position - Center <CR>*menuposition=center#<CR>
Write Menu Position - Top-Left <CR>*menuposition=tl#<CR>
Write Menu Position - Top-Right <CR>*menuposition=tr#<CR>
Write Menu Position - Bottom-Right <CR>*menuposition=br#<CR>
Write Menu Position - Bottom-Left <CR>*menuposition=bl#<CR>
Read Menu Position Status <CR>*menuposition=?#<CR>
Write Direct Power On - on <CR>*directpower=on#<CR>
Write Direct Power On - off <CR>*directpower=off#<CR>
Read Direct Power On - Status <CR>*directpower=?#<CR>
Write Signal Power On - on <CR>*autopower=on#<CR>
Write Signal Power On - off <CR>*autopower=off#<CR>
Read Signal Power On - Status <CR>*autopower=?#<CR>
Baud Rate Write 2400 <CR>*baud=2400#<CR>
Write 4800 <CR>*baud=4800#<CR>
Write 9600 <CR>*baud=9600#<CR>
Write 14400 <CR>*baud=14400#<CR>
Write 19200 <CR>*baud=19200#<CR>
Write 38400 <CR>*baud=38400#<CR>
Write 57600 <CR>*baud=57600#<CR>
Write 115 20 0 <CR>*baud=115200#<CR>
Read Current Baud Rate <CR>*baud=?#<CR>
Lamp Control Read Lamp Hour <CR>*ltim=?#<CR>
Write Normal mode <CR>*lampm=lnor#<CR>
Write Eco mode <CR>*lampm=eco#<CR>
Write Dimming mode <CR>*lampm=dimming#<CR>
Write Custom mode <CR>*lampm=custom#<CR>
Write Light level for custom mode <CR>*lampcustom=value#<CR>
Read Light level status for custom mode <CR>*lampcustom=?#<CR>
Read Lamp Mode Status <CR>*lampm=?#<CR>
Miscellaneous Read Model Name <CR>*modelname=?#<CR>
Read System F/W Version <CR>*sysfwversion=?#<CR>
Read Scaler F/W Version
<CR>*scalerfwversion=?#<CR>
49

繁體中文
功能 類型 操作 ASCII
Miscellaneous Read Lan F/W Version <CR>*lanfwversion=?#<CR>
Read MCU F/W Version <CR>*mcufwversion=?#<CR>
Write Blank On <CR>*blank=on#<CR>
Write Blank Off <CR>*blank=off#<CR>
Read Blank Status <CR>*blank=?#<CR>
Write Freeze On <CR>*freeze=on#<CR>
Write Freeze Off <CR>*freeze=off#<CR>
Read Freeze Status <CR>*freeze=?#<CR>
Write Menu On <CR>*menu=on#<CR>
Write Menu Off <CR>*menu=off#<CR>
Read Menu Status <CR>*menu=?#<CR>
Write Up <CR>*up#<CR>
Write Down <CR>*down#<CR>
Write Right <CR>*right#<CR>
Write Left <CR>*left#<CR>
Write Enter <CR>*enter#<CR>
Write Back <CR>*back#<CR>
Write Source Menu On <CR>*sourmenu=on#<CR>
Write Source Menu Off <CR>*sourmenu=off#<CR>
Read Source Menu Status <CR>*sourmenu=?#<CR>
Write 3D Sync Off <CR>*3d=off#<CR>
Write 3D Auto <CR>*3d=auto#<CR>
Write 3D Sync Top Bottom <CR>*3d=tb#<CR>
Write 3D Sync Frame Sequential <CR>*3d=fs#<CR>
Write 3D Frame packing <CR>*3d=fp#<CR>
Write 3D Side by side <CR>*3d=sbs#<CR>
Write 3D inverter disable <CR>*3d=da#<CR>
Write 3D inverter <CR>*3d=iv#<CR>
Write 3D nVIDIA <CR>*3d=nvidia#<CR>
Read 3D Sync Status <CR>*3d=?#<CR>
Write Remote Receiver-front+rear <CR>*rr=fr#<CR>
Write Remote Receiver-front <CR>*rr=f#<CR>
Write Remote Receiver-rear <CR>*rr=r#<CR>
Read Remote Receiver Status <CR>*rr=?#<CR>
Write AMX Device Discovery-on <CR>*amxdd=on#<CR>
Write AMX Device Discovery-off <CR>*amxdd=off#<CR>
Read AMX Device Discovery Status <CR>*amxdd=?#<CR>
Read Mac Address <CR>*macaddr=?#<CR>
Write High Altitude mode on <CR>*Highaltitude=on#<CR>
Write High Altitude mode off <CR>*Highaltitude=off#<CR>
Read High Altitude mode status <CR>*Highaltitude=?#<CR>
50

繁體中文
功能 類型 操作 ASCII
Color Calibration Write Tint + <CR>*tint=+#<CR>
Write Tint - <CR>*tint=-#<CR>
Write Set Tint value <CR>*tint=value#<CR>
Read Get Tint value <CR>*tint=?#<CR>
Write Set gamma value <CR>*gamma=value#<CR>
Read Gamma value status <CR>*gamma=?#<CR>
Write Set HDR Brightness value <CR>*hdrbri=value#<CR>
Read Get HDR Brightness value <CR>*hdibri=?#<CR>
Write Red Gain + <CR>*RGain=+#<CR>
Write Red Gain - <CR>*RGain=-#<CR>
Write Set Red Gain value <CR>*RGain=value#<CR>
Read Get Red Gain value <CR>*RGain=?#<CR>
Write Green Gain + <CR>*GGain=+#<CR>
Write Green Gain - <CR>*GGain=-#<CR>
Write Set Green Gain value <CR>*GGain=value#<CR>
Read Get Green Gain value <CR>*GGain=?#<CR>
Write Blue Gain + <CR>*BGain=+#<CR>
Write Blue Gain - <CR>*BGain=-#<CR>
Write Set Blue Gain value <CR>*BGain=value#<CR>
Read Get Blue Gain value <CR>*BGain=?#<CR>
Write Red Offset + <CR>*ROffset=+#<CR>
Write Red Offset - <CR>*ROffset=-#<CR>
Write Set Red Offset value <CR>*ROffset=value#<CR>
Read Get Red Offset value <CR>*ROffset=?#<CR>
Write Green Offset + <CR>*GOffset=+#<CR>
Write Green Offset - <CR>*GOffset =-#<CR>
Write Set Green Offset value <CR>*GOffset=value#<CR>
Read Get Green Offset value <CR>*GOffset=?#<CR>
Write Blue Offset + <CR>*BOffset=+#<CR>
Write Blue Offset - <CR>*BOffset=-#<CR>
Write Set Blue Offset value <CR>*BOffset=value#<CR>
Read Get Blue Offset value <CR>*BOffset=?#<CR>
Write Primary Color <CR>*primcr=value#<CR>
Read Primary Color Status <CR>*primcr=?#<CR>
Write Hue + <CR>*hue=+#<CR>
Write Hue - <CR>*hue=-#<CR>
Write Set Hue value <CR>*hue=value#<CR>
Read Get Hue value <CR>*hue=?#<CR>
Write Saturation + <CR>*saturation=+#<CR>
Write Saturation - <CR>*saturation=-#<CR>
Write Set Saturation value <CR>*saturation=value#<CR>
Read Get Saturation value <CR>*saturation=?#<CR>
51

繁體中文
功能 類型 操作 ASCII
Color Calibration Write Gain + <CR>*gain=+#<CR>
Write Gain - <CR>*gain=-#<CR>
Write Set Gain value <CR>*gain=value#<CR>
Read Get Gain value <CR>*gain=?#<CR>
Service Read Error Code report <CR>*error=report#<CR>
Read FAN 1 speed <CR>*fan1=?#<CR>
Read FAN 2 speed <CR>*fan2=?#<CR>
Read FAN 3 speed <CR>*fan3=?#<CR>
Read FAN 4 speed <CR>*fan4=?#<CR>
Read FAN 5 speed <CR>*fan5=?#<CR>
Read Temperature 1 <CR>*tmp1=?#<CR>
Read Temperature 2 <CR>*tmp2=?#<CR>
Read Temperature 3 <CR>*tmp3=?#<CR>
Read LED indicator <CR>*led=?#<CR>
注意事項:
RS-232 傳輸速率選項為 2400、4800、9600、144 00、19200、38400、57600 及 11520 0(預 設:1152 0 0)。
52

简体中文
目录
注意 ......................................................................................................... 54
激光注意事项 ................................................................................................................... 54
散热须知 ........................................................................................................................... 55
产品信息 .................................................................................................. 57
包装清单 ........................................................................................................................... 57
规格 .................................................................................................................................. 57
Terminals ........................................................................................................................ 58
遥控器 .............................................................................................................................. 59
安装 ......................................................................................................... 61
安装或卸下可选镜头 ........................................................................................................ 61
镜头 .................................................................................................................................. 63
Projection table .............................................................................................................. 63
镜头位移范围 ................................................................................................................... 65
LED 指示灯 ............................................................................................. 67
系统信息 ........................................................................................................................... 67
光源错误信息 ................................................................................................................... 67
防尘网信息 ....................................................................................................................... 67
散热错误信息 ................................................................................................................... 68
投影机尺寸 .............................................................................................. 69
吊顶安装图 .............................................................................................. 70
尺寸和角度调整 ............................................................................................................... 70
镜头尺寸 .................................................................................................. 71
RS232 命令 ............................................................................................. 72
RS232 引脚分配 ............................................................................................................... 72
RS232 串行端口(含交叉电缆) ..................................................................................... 72
请访问以下网站获取最新版用户手册 / 安
http://business-display.benq.com/
装指南。
V1.00
53

简体中文
注意
激光注意事项
y3R 类激光产品
(针对美国地区)本激光产品在所有操作程序中被认定为 3R 类产品,
并符合 IEC/EN 60825-1:2007 规定。
(针对 WW 地区)本激光产品在所有操作程序中被认定为 1 类产品,
并符合 IEC/EN 60825-1:2014 规定。
激光 - 避免直射眼睛。
请勿将激光指向或反射到其他人身上或反射的物体上。
直射或散射的激光对眼睛和皮肤很危险。
如果未按照说明操作,则眼睛可能会受到激光辐射。
小心 – 使用本文档中没有指定的控制、调整或步骤可能会造成危险辐射。
此符号表示如果没有严格按照说明操作则存在眼睛受到激光辐射的
危险。
y激光参数
波长 449nm - 461nm ( 蓝色 )
操作模式 帧速率导致脉动
脉冲宽度 1.34ms
脉冲重复速率 120Hz
最大激光能量 0.698mJ
内部总功率 >100w
视源大小 >10mm,镜头停止时
发散 >100 mili 弧度
y激光指示
激光孔径
54

简体中文
散热须知
在排气口周围留出至少 50cm (19.7 英寸 ) 空间。确保 30cm (11.8 英寸 ) 范围内没有
任何物体挡住进风。
使出风口与其它投影机的进风口至少保持 1 m 的距离。
进气口
进气口
出气口
• 投影机可以任何角度安装。
55

简体中文
• 在排气口周围留出至少 50cm 空间。
最小 50cm
(19.69 英寸)
最小 50cm
(19.69 英寸)
最小 50cm
(19.69 英寸)
最小 50cm
(19.69 英寸)
最小 50cm
(19.69 英寸)
最小 10cm
(3.94 英寸)
最小 30cm
(11.81 英寸)
最小 50cm
(19.69 英寸)
• 确保进气口不会吸入排气口排出的热气。
• 在密闭空间内使用时,确保密闭空间周围的空气温度不超过投影机运行时的工作温度,
并且进气口和排气口不被阻塞。
所有机箱均通过经认证的热评估,确保投影机不会重复利用废气。因为这样可导致投影机关
闭,即使环境温度在可接受的工作范围内也是如此。
56

简体中文
产品信息
包装清单
规格
༁ᄯࢩ۷ս Ⴤರ
٢ᆑ VGA 3ሦVESAએBNC
投影系统 单片 D
固有分辨率 1920*1200 像
光源 激光二极管
功耗 700W(常
外形尺寸 470 x 220.5 x 519.5 mm
重量 24 kg(
٢֗ їኧቑௌ
LU9245
LP 0.67 WUXGA DMD
素,16:10
模式)/530W(省 电 模 式)
不含镜头)
注意 :
• 亮度由标准镜头提供,数值将取决于镜头。
• 亮度输出将有所不同,具体视各单元和实际使用情况而定。
• 请访问本地网站获取最新版用户手册。
57

简体中文
Terminals
MONITOR OUT
连接用于同时播放显示的其他显示设备。
HDB a seT
将来自 H
高清视频 (HD)、RS232 控制和 LAN 控制端口。
HDMI 1
连接 H
LAN
用于连接 R
影机。
3D SYNC OUT
连接 3
VIDEO
连接视频源。
RS-232 IN
标准 9
维护。
PC 2 (R/Pr, G/Y, B/Pb, H, V)
连接带 B
信号。
AUDIO OUT (L/R)
连接扬声器或耳机。.
WIRED REMOTE IN
连接有线遥控器。
12V TRIGGE R
3.5mm mini 耳 机 插 孔 ,采 用 2
12(+/-1.5)V 输出和短路保护。
DBaseT 发射器的太网线 (Cat5/Cat6) 连接到
DMI 源。
J45 Cat5/Cat6 以太网线以通过网络控制投
D 红外线同步信号发射器。
针 D-sub 接 口 ,用 于 连 接 PC 控制系统和投影机
NC 型输入端子的 RGB 或 YPbPr/YCbCr 输出
00mA 显示继电器以提供
PC
用于连接 RG
DVI-D
连接 DV
HDMI 2
连接 H
USB 1. 5A
支持 5
3D SYNC IN
连接来自计算机或已启用设备的 3D 同
SERVICE
维护专用端口,仅供授权维护人员使用。
RS-232 OUT
连接另一投影机(同一型号)进行 R
AUDIO IN (L/R)
通过音频或音频 L
AUDIO IN
通过音频线连接音频输入源。
WIRED REMOTE OUT
连接另一台投影机。
B、分 量 HD 源或 PC 的 15 针 VGA 端口。.
I 源。
DMI 源。
V/1. 5A 输出。
S-232 控制。
/R 线连接音频输入源。
步输入线。
警告 :
在插入有线遥控器之前确保此端口是有效的。插入到无效的端口中遥控器可能会损坏,如有线遥控器连接到触发
器输出。更多关于通过局域网升级固件的信息,请联系 BenQ 客户服务中心。
58

简体中文
遥控器
ON / OFF
在待机模式和运行模式之间切换投影机。
KEYSTONE+/KEYSTONE-
手动校正因投影角度而产生的扭曲图像。
VOLUME +/VOLUME -
增大 / 减
QUICK IN S TA LL
显示快速安装 O
MUTE
开启和关闭投 影 机音 频。
箭头键(▲ 向上、▼ 向下、◄ 向左、► 向右)
当显示屏显 (
和进行 调整。
ENTER
选择可用的图像设置模式。激活所选的屏幕显示 (
MENU
打开屏幕显示 (OSD) 菜单。返回到之前的 OSD 菜单,退出并保存菜单
设置。
EXIT
返回到之前的 OS
INPUT
选择显示的输入源。
PCITURE
按下可显示图片菜单。
NETWORK
将“ 网 络 显 示 器 ”选 作 输 入 信 号 源 。
AUTO SYNC
自动为所显示的图像确定最佳图像时序。
ASPECT
选择显示比例。
BLANK
用于隐藏屏幕图像。
小投 影 机音量。
SD 菜单。
OSD) 菜单时,箭头键用作方向箭头,可选择所需的菜单项
OSD) 菜单项。
D 菜单,退出并保存菜单设置。
59

简体中文
OVERSCAN
按下可选择过扫描模式。
FREEZE
冻结投影图像。
LAMP MODE
按下显示 OS
3D MODE
按下可显示 3D 设
INFO.
按下可显示信息菜单。
LIGHT
按下可打开遥控器背光。
CLEAR
清除分配给所有投影机的 ID 设
按住 CLEAR 和 ID SET 五秒。LED 闪 烁 三 下 ,之 后 ID 设置被 清除。
SHUTTER
在此投影机中没有这项功能。
ID SET
• 遥控 ID 设置(设置具体遥控代码)。
按下可设置遥控 ID。
按下 ID SET 3 秒。遥控器上的电源指示灯闪烁,之后按下
指定一个 ID。
D 菜单以选择所所需光源模式。
置菜单。
置。
01~99
注意 :
遥控号(遥控 ID)必 须 匹 配 投 影 机 ID 设置号才能精确控制。
• 清除遥控 ID 设置(将遥控代码设置为全部)
按住 CLEAR 和 ID SET 五秒。遥控上的电源指示灯闪烁一下将遥
控代码设置为全部,可以控制投影机而不管投影机 id 设置如何。
数字按钮
在网络设置中输入数字。
要求输入密码时,不能按数字按钮 1、2、3、4。
WIRE REMOTE 插孔
连接到投影机以实现有线遥控。
60

简体中文
安装
小心:
为避免损坏 DLP 芯片,请勿将大功率激光束对准投影镜头。
安装或卸下可选镜头
小心:
• 投影机和镜头组件包含有精密零件,请勿摇晃或用力按压。
• 卸下或安装镜头前,务必关闭投影机,等到散热风扇停止,然后关闭主电源开关。
• 卸下或安装镜头时,请勿触摸镜头表面。
• 使镜头表面不会粘上手印、灰尘或油污。请勿刮擦镜头表面。
• 下面垫一块软布,在水平表面上工作,以避免刮擦。
• 如果卸下和存放镜头,请给投影机装上镜头盖以避免灰尘和弄脏
y安装新镜头
从镜头卸下两个端盖。
注意 :
在 第 一 次 插 入 镜 头 前 ,卸 下 塑 料 主 体 盖 。
1. 调整镜头方向时,使贴于侧面的标签上的箭头朝上,并将镜头推入投影机镜头底座,直
至到达极限位置。
2. 顺时针转动镜头,直至感到其卡扣到位。
61

简体中文
y从投影机卸下现有镜头
1. 将镜头松开按钮按到解锁位置。
2. 抓紧镜头。
3. 逆时针旋转镜头。现有镜头将被分离。
4. 慢慢拉出现有镜头。
62

简体中文
镜头
型号 镜头类型 部件编号 投射比例 镜头位移
LS2ST3 宽固定 5J.JDH37.002
LS2ST1 宽变焦 5J.JDH37.011
LS2SD2 标准 5J.JEN37.001
LS2LT1 半长 5J.JDH37.032
LS2LT 2 长变焦 5J.JDH37.041
LS2ST2
LS2ST4
短投射
半投射
5A.JK337.001 WUXGA: 0.77-1.1
5A.JK337.011 WUXGA: 1.25-1.6
WUXGA: 0.778
WUXGA: 1.1-1.3
WUXGA: 1.54-1.93
WUXGA: 1.93-2.9
WUXGA: 3-5
垂直: -15%-55%
水平:-5%-5%
垂直: -15%-55%
水平:-5%-5%
垂直: -15%-55%
水平:-5%-5%
垂直: -15%-55%
水平:-5%-5%
垂直: -15%-55%
水平:-5%-5%
15%-55%
垂直:水平:-5%-5%
15%-55%
垂直:水平:-5%-5%
Projection table
• LU9245
屏幕宽高比为 16:10,投影图像为 16:10。
注意 :
为了优化投影质量,建议在没有灰度的区域投影图像。
镜头 宽变焦 (LS2ST1) 标准 (LS2SD2)
投射比例
( 英寸 )
O
(m)
( 英寸 )
)
对角线 图像宽度 图像高度
(m)
( 英寸 )
50 1.27 42 1.0 8 26 0.67 1.3 0.034 14.6 0.370 47 1.18 55 1.40 65 1.66 82 2.08
60 1.52 51 1.29 32 0.81 1.6 0.040 17.5 0.444 56 1.42 66 1.68 78 1.99 98 2.49
80 2.03 68 1.72 42 1.08 2.1 0.054 23.3 0.592 75 1.90 88 2.24 104 2.65 131 3.33
100 2 .54 85 2 .15 53 1.35 2.6 0.067 29.1 0.740 93 2.37 110 2.80 131 3.32 16 4 4.16
120 3.05 102 2.58 64 1.62 3.2 0.081 35.0 0.888 112 2.84 132 3.36 157 3.98 196 4.99
150 3. 81 127 3.23 79 2.02 4.0
180 4.57 153 3.88 95 2.42 4.8 0.121 52.5 1.333 168 4.26 198 5.04 235 5.97 295 7.48
200 5.08 170 4.31 106 2.69 5.3 0.135 58.3 1.481 187 4.74 220 5.60 261 6.63 327 8.31
250 6.35 212 5.38 132 3.37 6.6 0.16 8 72 .9 1.851 233 5.92 276 7. 0 0 326 8.29 409 10.39
300 7. 62 254 6.46 159 4.04 7.9 0.202 87.4 2 . 221 280 7.11 331 8.40 392 9.95 491 12 .47
350 8.89 297 7. 54 185 4 .71 9.3 0.236 102.0 2.591 326 8.29 386 9.8 0 457 11.61 573 14 .55
400 10.16 339 8.62 212 5.38 10.6 0.269 116. 6 2.962 373 9.48 441 11 . 2 0 522 13.27 655 16.63
500 12 .70 424 10.77 265 6.73 13.2 0.337 145.7 3.702 466 11. 8 5 551 14.00 653
( 英寸 )
(m)
( 英寸 )
偏移 (A
广角 / 长焦 广角 / 长焦 宽幅 远距 宽幅 远距
(m)
(m)
( 英寸 )
0.101 43.7 1. 111 140 3.55 165 4.20 196 4.98 245 6.24
1.1~1.3 1.54~1.93
距离 距离
(m)
( 英寸 )
(m)
(m)
( 英寸 )
16. 59 818 20.79
( 英寸 )
(m)
63

简体中文
镜头 半长 (L S2LT1) 长变焦 (LS2 LT 2)
投射比例
( 英寸 )
( 英寸 )
O
(m)
( 英寸 )
O
(m)
( 英寸 )
)
对角线 图像宽度 图像高度
(m)
( 英寸 )
50 1.27 42 1.0 8 26 0.67 1.3 0.034 14.6 0.370 82 2.08 123 3.12 127 3.23 212 5.38 33 0.84
60 1.52 51 1.29 32 0.81 1.6 0.040 17.5 0.444 98 2.49 148 3.75 153 3.88 254 6.46 40 1.01
80 2.03 68 1.72 42 1.08 2.1 0.054 23.3 0.592 131 3.33 197 5.00 204 5.17 339 8.62 53 1.34
100 2 .54 85 2 .15 53 1.35 2.6 0.067 29.1 0.740 16 4 4.16 246 6.25 254 6.46 424 10.77 66 1.68
120 3.05 102 2.58 64 1.62 3.2 0.081 35.0 0.888
150 3. 81 127 3.23 79 2.02 4.0 0.101 43.7 1.111 245 6.24 369 9.37 382 9.69 636 16.15 99 2 . 51
180 4.57 153 3.88 95 2.42 4.8 0.121 52.5 1.333 295 7.48 443 11. 24 458 11. 63 763 19. 39 119 3.02
200 5.08 170 4.31 106 2.69 5.3 0.135 58.3 1.481 327 8.31 492 12 .49 509 12.92 848 21.5 4 132 3.35
250 6.35 212 5.38 132 3.37 6.6 0.16 8 72 .9 1.851 409 10.39 615 15.62 636 16.15 1060 26.92 165 4.19
300 7. 62 254 6.46 159 4.04 7.9 0.202 87.4 2 . 221 491 12 .47 738 18.74 763 19. 39 1272 32.31 198 5.03
350 8.89 297 7. 54 185 4 .71 9.3 0.236 102.0 2.591 573 14.55 861 21.86 890 22.62 1484 37.6 9 231 5.87
400 10.16 339 8.62
500 12 .70 424 10.77 265 6.73 13.2 0.337 145.7 3.702 818 20.79 1230 31.23 1272 32 . 31 212 0 53.85 330 8.38
对角线 图像宽度 图像高度
(m)
( 英寸 )
50 1.27 42 1.0 8 26 0.67 1.3 0.034 14.6 0.370 33 0.83 47 1.18 53 1.35 68 1.72
60 1.52 51 1.29 32 0.81 1.6 0.040 17.5 0.444 39 1.00 56 1.42 64 1.62 81 2.07
80 2.03 68 1.72 42 1.08 2.1 0.054 23.3 0.592 52 1. 33 75 1.90 85 2 .15 109 2.76
100 2 .54 85 2 .15 53 1.35 2.6 0.067 29.1 0.740 65 1.66 93 2.37 106 2.69 136 3.45
120 3.05 102 2.58 64 1.62 3.2 0.081 35.0 0.888 78 1.99 112 2.84 127 3.23 163 4.14
150 3. 81 127 3.23 79 2.02 4.0
180 4.57 153 3.88 95 2.42 4.8 0.121 52.5 1.333 11 8 2.99 168 4.26 191 4.85 244 6.20
200 5.08 170 4.31 106 2.69 5.3 0.135 58.3 1.481 131 3.32 187 4.74 212 5.38 271 6.89
250 6.35 212 5.38 132 3.37 6.6 0.16 8 72 .9 1.851 163 4.15 233 5.92 265 6.73 339 8.62
300 7. 62 254 6.46 159 4.04 7.9 0.202 87.4 2 . 221 196 4.98 280 7.11 318 8.08 407 10.34
350 8.89 297 7. 54 185 4 .71 9.3 0.236 102.0 2.591 229 5.80 326 8.29 371 9.42 475 12 .06
400 10.16 339 8.62 212 5.38 10.6 0.269 116. 6 2.962 261 6.63 373 9.48 424 10.77 543 13.7 9
500 12 .70 424 10.77 265 6.73 13.2 0.337 145.7 3.702 326 8.29 466 11.8 5 530
( 英寸 )
( 英寸 )
(m)
( 英寸 )
212 5.38 10.6 0.269 116. 6 2.962 655 16.63 984 24.99 1018 25.85 1696 43.08 264 6.70
镜头 短投射 (LS2ST2) 半投射 (LS2ST4)
投射比例
(m)
( 英寸 )
偏移 (A
广角 / 长焦 广角 / 长焦 宽幅 远距 宽幅 远距
(m)
(m)
(m)
( 英寸 )
)
偏移 (A
广角 / 长焦 广角 / 长焦 宽幅 远距 宽幅 远距
(m)
( 英寸 )
0.101 43.7 1. 111 98 2.49 14 0 3.55 159 4.04 204 5 .17
1.93~2.9 3~5 0.778
距离 距离 距离
(m)
196 4.99 295 7. 50 305 7.75 509 12.92 79 2.01
0.77~1.1 1.25~1.60
距离 距离
(m)
( 英寸 )
( 英寸 )
(m)
(m)
(m)
( 英寸 )
(m)
( 英寸 )
13.46 678 17. 23
( 英寸 )
( 英寸 )
(m)
(m)
宽固定
(LS2ST3)
NA
( 英寸 )
(m)
注意 :
• 要获取更直观的说明,请访问 BenQ 计算器网站 http://projectorcalculator.benq.com/。
• 吊顶安装必须由具有资格的专业人员完成。请联系您的经销商获取更多信息。不建议自行安装投影机。
• 仅可在结实、水平的表面上使用投影机。如果投影机掉落,可能造成严重的人身伤害和损坏。
• 请勿在极端温度环境下使用投影机。投影机的使用温度范围必须在 41 华
氏 度( 5 摄 氏 度 )与 104 华氏度
(40 摄 氏 度 )之 间 。
• 如果投影机暴露在潮气、灰尘或烟雾环境下,屏幕会损坏。
• 请勿遮挡投影机通风孔。要求通风,以实现散热。如果通风孔被挡住,投影机会损坏。
64

简体中文
镜头位移范围
y镜头位移可调范围
镜头位移可调范围表如下,并受所列条件的约束。
• LU9245
桌面正投
垂直位移
最大 0.55V
1V
投影图像高度
正常投影位置
吊装正投
y吊顶安装
垂直位移
投影图像高度
垂直位移
垂直位移
最大 0.15V
1V
最大 0.55V
1H 0.05H0.05H
投影图像宽度
左移 右移
屏幕顶部
位移范围
屏幕中心
C = 镜头到屏幕的距离
65

简体中文
y台式安装
位移范围
注意 :
• 图纸仅适用于标准镜头。
• 镜头位移功能不 可用于 L
屏幕中心
S2ST3(固定镜头)。此镜头应用于“零度”/“ 无 偏 移 ”应 用 。见 下 文 :
仅适用于 LS2ST3(固定镜头)
屏幕中心
66

简体中文
LED 指示灯
系统信息
Power Temp 指示灯 过滤器 状态和说明
橙色 - - - 待机
绿色闪烁 - - - 打开电源
绿色 - - - 正常工作
橙色闪烁 - - - 正常关机散 热
红色 红色 红色 - 下载中
绿色 - 红色 - 色轮启动失败
绿色 - 红色闪烁 - 荧光粉色轮启动失败
红色闪烁 - - - Scaler 关闭失败
- 绿色 红色闪烁 - 镜头释放
- 绿色 红色 - 机壳打开
光源错误信息
Power Temp 指示灯 过滤器 状态和说明
- - 红色 - 光源在正常运行时发生错误
-- - 橙色闪烁 - 光源不亮
防尘网信息
Power Temp 指示灯 过滤器 状态和说明
绿色 - - 橙色 防尘网更换警告
67

简体中文
散热错误信息
Power Temp 指示灯 过滤器 状态和说明
红色 红色 - - 风扇 1 错误
红色 红色闪烁 - - 风扇 2 错误
红色 绿色 - - 风扇 3 错误
红色 绿色闪烁 - - 风扇 4 错误
红色闪烁 红色 - - 风扇 5 错误
红色闪烁 红色闪烁 - - 风扇 6 错误
红色闪烁 绿色 - - 风扇 7 错误
红色闪烁 绿色闪烁 - - 风扇 8 错误
红色 红色 - 绿色 风扇 9 错误
绿色 红色 - - 温度 1 错误
绿色 红色闪烁 - - 热传感器 1
绿色 绿色 - - 热传感器 1
绿色 绿色闪烁 - - 热 IC #1 I2C 连接错误
绿色闪烁 红色 - - 温度 2 错误
绿色闪烁 红色闪烁 - - 热传感器 2
绿色闪烁 绿色 - - 热传感器 2
绿色闪烁 绿色闪烁 - - 热 IC #2 I2C 连接错误
绿色闪烁 绿色 绿色 - 温度 3 错误
橙色 红色闪烁 - - 热传感器 3
橙色 绿色 - - 热传感器 3
橙色 绿色闪烁 - - 热 IC #3 I2C 连接错误
绿色闪烁 绿色 绿色闪烁 - 温度 4 错误
绿色闪烁 绿色闪烁 绿色 - 温度 5 错误
绿色 红色 红色 - 热突变警告
打开错误
短路错误
打开错误
短路错误
打开错误
短路错误
68

简体中文
投影机尺寸
69

简体中文
吊顶安装图
编号 BenQ 吊顶安装 CMG6 (5A.JHS10.001)
材料 钢
重量 10.5kg(23.1 磅)
尺寸(宽 x 高 x 深) 410 x 641 x 360 mm (16.14" x 25.24" x 14.17")
长度 491mm ~ 641mm
倾角 旋转: ±5°
垂直: +5° /-25
水平: ±5°
负荷 40kg(88 磅)
螺丝类型 M4, M5, M6, M8
尺寸和角度调整
°
70

简体中文
镜头尺寸
可选镜头(宽固定:LS2ST3) 可选镜头(宽变焦:LS2ST1)
可选镜头(标准:LS2SD2) 可选镜头(半长投射:LS2LT1)
可选镜头(长变焦:LS2LT2) 可选镜头(短投射:LS2ST2)
可选镜头(半投射:LS2ST4)
71

简体中文
RS232 命令
RS232 引脚分配
编号 串行 编号 串行
1 N.C 6 N.C
2 RXD 7 与引脚 8 短接
3 TXD 8 与引脚 7 短接
4 N.C 9 N.C
5 接地
RS232 串行端口(含交叉电缆)
功能 类型 操作 ASCII
Power Write Power On <CR>*pow=on#<CR>
Write Power Off <CR>*pow=off#<CR>
Read Power Status <CR>*pow=?#<CR>
Source Selection Write COMPUTER/YPbPr <CR>*sour=RGB#<CR>
Write COMPUTER 2/YPbPr2 <CR>*sour=RGB2#<CR>
Write DVI-D <CR>*sour=dvid#<CR>
Write HDMI (MHL) <CR>*sour=hdmi#<CR>
Write HDMI 2 (MHL2) <CR>*sour=hdmi2#<CR>
Write Composite <CR>*sour=vid#<CR>
Write HDBaseT <CR>*sour=hdbaset#<CR>
Read Current source <CR>*sour=?#<CR>
Audio Control Write Mute On <CR>*mute=on#<CR>
Write Mute Off <CR>*mute=off#<CR>
Read Mute Status <CR>*mute=?#<CR>
Write Volume + <CR>*vol=+#<CR>
Write Volume - <CR>*vol=-#<CR>
Write Volume level for customer <CR>*vol=value#<CR>
Read Volume Status <CR>*vol=?#<CR>
72

简体中文
功能 类型 操作 ASCII
Audio Source Select Write Audio pass Through off <CR>*audiosour=off#<CR>
Write Audio - Computer1 <CR>*audiosour=RGB#<CR>
Write Audio - Video/S-Video <CR>*audiosour=vid#<CR>
Write Audio - HDMI <CR>*audiosour=hdmi#<CR>
Write Audio - HDMI2 <CR>*audiosour=hdmi2#<CR>
Read Audio pass Status <CR>*audiosour=?#<CR>
Picture Mode Write Presentation <CR>*appmod=preset#<CR>
Write sRGB <CR>*appmod=srgb#<CR>
Write Bright <CR>*appmod=bright#<CR>
Write Cinema (Rec. 709) <CR>*appmod=cine#<CR>
Write DICOM <CR>*appmod=dicom#<CR>
Write Vivid <CR>*appmod=vivid#<CR>
Write User1 <CR>*appmod=user1#<CR>
Write User2 <CR>*appmod=user2#<CR>
Write 3D <CR>*appmod=threed#<CR>
Write HDR10 <CR>*appmod=hdr10<CR>
Write HLG <CR>*appmod=hlg<CR>
Read Picture Mode <CR>*appmod=?#<CR>
Picture Setting Write Contrast + <CR>*con=+#<CR>
Write Contrast - <CR>*con=-#<CR>
Write Set Contrast value <CR>*con=5#<CR>
Read Contrast value <CR>*con=?#<CR>
Write Brightness + <CR>*bri=+#<CR>
Write Brightness - <CR>*bri=-#<CR>
Write Set Brightness value <CR>*bri=5#<CR>
Read Brightness value <CR>*bri=?#<CR>
Write Color + <CR>*color=+#<CR>
Write Color - <CR>*color=-#<CR>
Write Set Color value <CR>*color=5#<CR>
Read Color value <CR>*color=?#<CR>
Write Sharpness + <CR>*sharp=+#<CR>
Write Sharpness - <CR>*sharp=-#<CR>
Write Set Sharpness value <CR>*sharp=5#<CR>
Read Sharpness value <CR>*sharp=?#<CR>
Write Color Temperature - Warm <CR>*ct=warm#<CR>
Write Color Temperature - Normal <CR>*ct=normal#<CR>
Write Color Temperature - Cool <CR>*ct=cool#<CR>
Read Color Temperature Status <CR>*ct=?#<CR>
Write Aspect 4:3 <CR>*asp=4:3#<CR>
Write Aspect 16:9 <CR>*asp=16:9#<CR>
Write Aspect 2.35:1 <CR>*asp=2.35#<CR>
Write Aspect 16:10 <CR>*asp=16:10#<CR>
73

简体中文
功能 类型 操作 ASCII
Picture Setting Write Aspect Auto <CR>*asp=AUTO#<CR>
Write Aspect Real <CR>*asp=REAL#<CR>
Read Aspect Status <CR>*asp=?#<CR>
Write Vertical Keystone + <CR>*vkeystone=+#<CR>
Write Vertical Keystone - <CR>*vkeystone=-#<CR>
Read Vertical Keystone value <CR>*vkeystone=?#<CR>
Write Horizontal Keystone + <CR>*hkeystone=+#<CR>
Write Horizontal Keystone - <CR>*hkeystone=-#<CR>
Read Horizontal Keystone value <CR>*hkeystone=?#<CR>
Write Overscan Adjustment + <CR>*overscan=+#<CR>
Write Overscan Adjustment - <CR>*overscan=-#<CR>
Read Overscan Adjustment value <CR>*overscan=?#<CR>
Write 4 Corners Top-Left - X Decrease <CR>*cornerfittlx=-#<CR>
Write 4 Corners Top-Left - X Increase <CR>*cornerfittlx=+#<CR>
Read 4 Corners Top-Left - X Status <CR>*cornerfittlx=?#<CR>
Write 4 Corners Top-Left - Y Decrease <CR>*cornerfittly=-#<CR>
Write 4 Corners Top-Left - Y Increase <CR>*cornerfittly=+#<CR>
Read 4 Corners Top-Left - Y Status <CR>*cornerfittly=?#<CR>
Write 4 Corners Top-Right - X Decrease <CR>*cornerfittrx=-#<CR>
Write 4 Corners Top-Right - X Increase <CR>*cornerfittrx=+#<CR>
Read 4 Corners Top-Right - X Status <CR>*cornerfittrx=?#<CR>
Write 4 Corners Top-Right - Y Decrease <CR>*cornerfittry=-#<CR>
Write 4 Corners Top-Right - Y Increase <CR>*cornerfittry=+#<CR>
Read 4 Corners Top-Right - Y Status <CR>*cornerfittry=?#<CR>
Write 4 Corners Bottom-Left - X Decrease <CR>*cornerfitblx=-#<CR>
Write 4 Corners Bottom-Left - X Increase <CR>*cornerfitblx=+#<CR>
Read 4 Corners Bottom-Left - X Status <CR>*cornerfitblx=?#<CR>
Write 4 Corners Bottom-Left - Y Decrease <CR>*cornerfitbly=-#<CR>
Write 4 Corners Bottom-Left - Y Increase <CR>*cornerfitbly=+#<CR>
Read 4 Corners Bottom-Left - Y Status <CR>*cornerfitbly=?#<CR>
Write 4 Corners Bottom-Right - X Decrease <CR>*cornerfitbrx=-#<CR>
Write 4 Corners Bottom-Right - X Increase <CR>*cornerfitbrx=+#<CR>
Read 4 Corners Bottom-Right - X Status <CR>*cornerfitbrx=?#<CR>
Write 4 Corners Bottom-Right - Y Decrease <CR>*cornerfitbry=-#<CR>
Write 4 Corners Bottom-Right - Y Increase <CR>*cornerfitbry=+#<CR>
Read 4 Corners Bottom-Right - Y Status <CR>*cornerfitbry=?#<CR>
Write Digital Zoom In <CR>*zoomI#<CR>
Write Digital Zoom out <CR>*zoomO#<CR>
Write Auto <CR>*auto#<CR>
Write Brilliant color on <CR>*BC=on#<CR>
Write Brilliant color off <CR>*BC=off#<CR>
Read Brilliant color status <CR>*BC=?#<CR>
74

简体中文
功能 类型 操作 ASCII
Picture Setting Write Reset current picture settings <CR>*rstcurpicsetting#<CR>
Write Reset picture settings <CR>*rstpicsetting#<CR>
Operation Settings Write Projector Position - Front Table <CR>*pp=FT#<CR>
Write Projector Position - Rear Table <CR>*pp=RE#<CR>
Write Projector Position - Rear Ceiling <CR>*pp=RC#<CR>
Write Projector Position - Front Ceiling <CR>*pp=FC#<CR>
Read Projector Position Status <CR>*pp=?#<CR>
Write Quick auto search <CR>*QAS=on#<CR>
Write Quick auto search <CR>*QAS=off#<CR>
Read Quick auto search status <CR>*QAS=?#<CR>
Write Menu Position - Center <CR>*menuposition=center#<CR>
Write Menu Position - Top-Left <CR>*menuposition=tl#<CR>
Write Menu Position - Top-Right <CR>*menuposition=tr#<CR>
Write Menu Position - Bottom-Right <CR>*menuposition=br#<CR>
Write Menu Position - Bottom-Left <CR>*menuposition=bl#<CR>
Read Menu Position Status <CR>*menuposition=?#<CR>
Write Direct Power On - on <CR>*directpower=on#<CR>
Write Direct Power On - off <CR>*directpower=off#<CR>
Read Direct Power On - Status <CR>*directpower=?#<CR>
Write Signal Power On - on <CR>*autopower=on#<CR>
Write Signal Power On - off <CR>*autopower=off#<CR>
Read Signal Power On - Status <CR>*autopower=?#<CR>
Baud Rate Write 2400 <CR>*baud=2400#<CR>
Write 4800 <CR>*baud=4800#<CR>
Write 9600 <CR>*baud=9600#<CR>
Write 14400 <CR>*baud=14400#<CR>
Write 19200 <CR>*baud=19200#<CR>
Write 38400 <CR>*baud=38400#<CR>
Write 57600 <CR>*baud=57600#<CR>
Write 115 20 0 <CR>*baud=115200#<CR>
Read Current Baud Rate <CR>*baud=?#<CR>
Lamp Control Read Lamp Hour <CR>*ltim=?#<CR>
Write Normal mode <CR>*lampm=lnor#<CR>
Write Eco mode <CR>*lampm=eco#<CR>
Write Dimming mode <CR>*lampm=dimming#<CR>
Write Custom mode <CR>*lampm=custom#<CR>
Write Light level for custom mode <CR>*lampcustom=value#<CR>
Read Light level status for custom mode <CR>*lampcustom=?#<CR>
Read Lamp Mode Status <CR>*lampm=?#<CR>
Miscellaneous Read Model Name <CR>*modelname=?#<CR>
Read System F/W Version <CR>*sysfwversion=?#<CR>
Read Scaler F/W Version
<CR>*scalerfwversion=?#<CR>
75

简体中文
功能 类型 操作 ASCII
Miscellaneous Read Lan F/W Version <CR>*lanfwversion=?#<CR>
Read MCU F/W Version <CR>*mcufwversion=?#<CR>
Write Blank On <CR>*blank=on#<CR>
Write Blank Off <CR>*blank=off#<CR>
Read Blank Status <CR>*blank=?#<CR>
Write Freeze On <CR>*freeze=on#<CR>
Write Freeze Off <CR>*freeze=off#<CR>
Read Freeze Status <CR>*freeze=?#<CR>
Write Menu On <CR>*menu=on#<CR>
Write Menu Off <CR>*menu=off#<CR>
Read Menu Status <CR>*menu=?#<CR>
Write Up <CR>*up#<CR>
Write Down <CR>*down#<CR>
Write Right <CR>*right#<CR>
Write Left <CR>*left#<CR>
Write Enter <CR>*enter#<CR>
Write Back <CR>*back#<CR>
Write Source Menu On <CR>*sourmenu=on#<CR>
Write Source Menu Off <CR>*sourmenu=off#<CR>
Read Source Menu Status <CR>*sourmenu=?#<CR>
Write 3D Sync Off <CR>*3d=off#<CR>
Write 3D Auto <CR>*3d=auto#<CR>
Write 3D Sync Top Bottom <CR>*3d=tb#<CR>
Write 3D Sync Frame Sequential <CR>*3d=fs#<CR>
Write 3D Frame packing <CR>*3d=fp#<CR>
Write 3D Side by side <CR>*3d=sbs#<CR>
Write 3D inverter disable <CR>*3d=da#<CR>
Write 3D inverter <CR>*3d=iv#<CR>
Write 3D nVIDIA <CR>*3d=nvidia#<CR>
Read 3D Sync Status <CR>*3d=?#<CR>
Write Remote Receiver-front+rear <CR>*rr=fr#<CR>
Write Remote Receiver-front <CR>*rr=f#<CR>
Write Remote Receiver-rear <CR>*rr=r#<CR>
Read Remote Receiver Status <CR>*rr=?#<CR>
Write AMX Device Discovery-on <CR>*amxdd=on#<CR>
Write AMX Device Discovery-off <CR>*amxdd=off#<CR>
Read AMX Device Discovery Status <CR>*amxdd=?#<CR>
Read Mac Address <CR>*macaddr=?#<CR>
Write High Altitude mode on <CR>*Highaltitude=on#<CR>
Write High Altitude mode off <CR>*Highaltitude=off#<CR>
Read High Altitude mode status <CR>*Highaltitude=?#<CR>
76

简体中文
功能 类型 操作 ASCII
Color Calibration Write Tint + <CR>*tint=+#<CR>
Write Tint - <CR>*tint=-#<CR>
Write Set Tint value <CR>*tint=value#<CR>
Read Get Tint value <CR>*tint=?#<CR>
Write Set gamma value <CR>*gamma=value#<CR>
Read Gamma value status <CR>*gamma=?#<CR>
Write Set HDR Brightness value <CR>*hdrbri=value#<CR>
Read Get HDR Brightness value <CR>*hdibri=?#<CR>
Write Red Gain + <CR>*RGain=+#<CR>
Write Red Gain - <CR>*RGain=-#<CR>
Write Set Red Gain value <CR>*RGain=value#<CR>
Read Get Red Gain value <CR>*RGain=?#<CR>
Write Green Gain + <CR>*GGain=+#<CR>
Write Green Gain - <CR>*GGain=-#<CR>
Write Set Green Gain value <CR>*GGain=value#<CR>
Read Get Green Gain value <CR>*GGain=?#<CR>
Write Blue Gain + <CR>*BGain=+#<CR>
Write Blue Gain - <CR>*BGain=-#<CR>
Write Set Blue Gain value <CR>*BGain=value#<CR>
Read Get Blue Gain value <CR>*BGain=?#<CR>
Write Red Offset + <CR>*ROffset=+#<CR>
Write Red Offset - <CR>*ROffset=-#<CR>
Write Set Red Offset value <CR>*ROffset=value#<CR>
Read Get Red Offset value <CR>*ROffset=?#<CR>
Write Green Offset + <CR>*GOffset=+#<CR>
Write Green Offset - <CR>*GOffset =-#<CR>
Write Set Green Offset value <CR>*GOffset=value#<CR>
Read Get Green Offset value <CR>*GOffset=?#<CR>
Write Blue Offset + <CR>*BOffset=+#<CR>
Write Blue Offset - <CR>*BOffset=-#<CR>
Write Set Blue Offset value <CR>*BOffset=value#<CR>
Read Get Blue Offset value <CR>*BOffset=?#<CR>
Write Primary Color <CR>*primcr=value#<CR>
Read Primary Color Status <CR>*primcr=?#<CR>
Write Hue + <CR>*hue=+#<CR>
Write Hue - <CR>*hue=-#<CR>
Write Set Hue value <CR>*hue=value#<CR>
Read Get Hue value <CR>*hue=?#<CR>
Write Saturation + <CR>*saturation=+#<CR>
Write Saturation - <CR>*saturation=-#<CR>
Write Set Saturation value <CR>*saturation=value#<CR>
Read Get Saturation value <CR>*saturation=?#<CR>
77

简体中文
功能 类型 操作 ASCII
Color Calibration Write Gain + <CR>*gain=+#<CR>
Write Gain - <CR>*gain=-#<CR>
Write Set Gain value <CR>*gain=value#<CR>
Read Get Gain value <CR>*gain=?#<CR>
Service Read Error Code report <CR>*error=report#<CR>
Read FAN 1 speed <CR>*fan1=?#<CR>
Read FAN 2 speed <CR>*fan2=?#<CR>
Read FAN 3 speed <CR>*fan3=?#<CR>
Read FAN 4 speed <CR>*fan4=?#<CR>
Read FAN 5 speed <CR>*fan5=?#<CR>
Read Temperature 1 <CR>*tmp1=?#<CR>
Read Temperature 2 <CR>*tmp2=?#<CR>
Read Temperature 3 <CR>*tmp3=?#<CR>
Read LED indicator <CR>*led=?#<CR>
注意 :
RS-232 波特率选项有 2400、4800、9600、1440 0、19200、38400、57600 和 1152 00(默认:115 20 0)。
78

Français
Table des matières
Notice
Informations sur le laser ........................................................................................... 80
Informations sur le refroidissement
................................................................................................. 80
......................................................................... 81
Contenu de l'emballage .................................................................... 83
Articles d'emballage standard .................................................................................. 83
Caractéristiques
Prise de contrôle
Télécommande
......................................................................................................... 83
........................................................................................................ 84
.......................................................................................................... 85
Installation ......................................................................................... 87
Installation et retrait de la lentille en option .......................................................... 87
Objectif
Projection table
Plage de décalage de l’objectif
....................................................................................................................... 89
.......................................................................................................... 89
.................................................................................. 91
Témoin ............................................................................................... 93
Messages système ...................................................................................................... 93
Message d'erreur de la source de lumière
............................................................... 93
Message de ltre
Messages d'erreur thermique
........................................................................................................ 93
................................................................................... 94
Dimensions du projecteur ................................................................ 95
Schéma d'installation au plafond
Réglage de la taille et de l’angle ............................................................................... 96
..................................................... 96
Dimension de la lentille .................................................................... 97
Commande RS232
Affectation des broches RS232 ................................................................................. 98
Port série RS232 avec un câble croisé
............................................................................ 98
..................................................................... 98
Veuillez consulter le site Web ci-dessous pour obtenir la dernière version du Manuel
d’utilisation/Guide d’installation.
http://business-display.benq.com/
V1.00
79

Français
Notice
Informations sur le laser
Ce symbole indique que le non respect des instructions entraîne un risque
Classe laser
y
(pour les États-Unis) Ce Produit Laser est désigné Classe 3R pendant toutes les
procédures de fonctionnement et respecte la norme IEC/EN 60825-1:2007.
(pour le monde entier) Ce Produit Laser est désigné Classe 1 pendant toutes les
procédures de fonctionnement et respecte la norme IEC/EN 60825-1:2014.
LUMIÈRE LASER - ÉVITEZ DE FIXER DIRECTEMENT LE LASER.
Ne pointez pas et ne dirigez pas le laser vers d'autres personnes ou objets
réfléchissants
La lumière directe ou diffusée peut être dangereuse pour les yeux et la peau.
Le non respect des instructions entraîne un risque potentiel d'exposition des yeux au
rayonnement laser.
Attention – l’utilisation de commandes, de réglages ou de procédures autres que celles
spécifiées dans le présent ma uel peut entraîner une exposition à des rayonnements
dangereux.
potentiel d'exposition des yeux au rayonnement laser.
Caractéristiques du laser
y
Longueur d'onde 449nm - 461nm (Bleu)
Mode de fonctionnement Impulsionnel, en raison de la fréquence d'images
Durée de l’impulsion 1,34ms
Taux de répétition des
impulsions
Énergie laser maximale 0,698mJ
Puissance interne totale >100w
Taille apparente de la source >10mm, à l'arrêt de la lentille
Divergence >100 mili Radian
Instructions pour la lumière laser
y
120Hz
80
Ouverture laser

Français
Informations sur le refroidissement
Prévoyez au moins 50 cm (19,7 po) de dégagement autour de la sortie de ventilation. Veillez à ce
qu'aucun objet ne bloque l'entrée d'air à moins de 30 cm (11,8 po).
La sortie doit être à au moins 1 m des entrées d'autres projecteurs.
Entrée d'air
Entrée d'air
Sortie d'air
• Le projecteur peut être installé à un angle quelconque.
81

Français
• Prévoyez au moins 50 cm de dégagement autour de la sortie de ventilation.
Minimum 50 cm
(19,69 po)
Minimum 50 cm
(19,69 po)
Minimum 50 cm
(19,69 po)
Minimum 50 cm
(19,69 po)
Minimum 10 cm
(3,94 po)
Minimum 50 cm
(19,69 po)
Minimum 30 cm
(11,81 po)
Minimum 50 cm
(19,69 po)
• Veillez à ce que les orifices d'entrée d'air ne ecyclent pas l'air chaud de la sortie de ventilation.
• Lors de l'utilisation dans un espace clos, assurez-vous que la température de l'air ambiant ne
dépasse pas la température de fonctionnement du projecteur et que les orifices d'entrée et de
sortie d'air ne soient pas obstrués.
Tous les espaces clos doivent être évalués thermiquement pour garantir que le projecteur ne
recycle pas l'air de sortie. Le recyclage de l'air peut provoquer l'arrêt du projecteur, même si la
température ambiante se trouve dans une plage de températures de fonctionnement acceptable.
82

Français
Contenu de l'emballage
Articles d'emballage standard
Projecteur avec capuchon
anti-poussière
Cordon d’alimentation Câble VGA
Télécommande
Piles Guide d'installation
Câble VESA 3 broches
vers BNC
Caractéristiques
LU9245
Système de projection DLP simple puce WUXGA DMD 0,67
Résolution native
1920*1200 pixels, 16:10
Source lumineuse Diodes laser
Consommation
Dimensions 470 x 220,5 x 519,5 mm
Poids 24 kg (sans objectif)
700 Watts (Mode Normal)/530 Watts (Mode Eco)
Remarque :
• La luminosité est fournie par l’objectif standard, la valeur dépend des objectifs.
• La sortie de luminosité varie en fonction de chaque appareil et de l’utilisation réelle.
• Veuillez accéder au dernier manuel d’utilisation sur le site Web local.
83

Français
Prise de contrôle
MONITOR OUT
Pour la connexion d’un autre appareil d'afchage en
simultanée.
HDB a seT
Connectez un câble Ethernet (Cat5/Cat6) depuis
l’émetteur HDBaseT avec vidéo haute dénition (HD),
contrôle RS232 et contrôle LAN.
HDMI 1
Connexion à une source HDMI.
LAN
Pour la connexion d’un câble RJ45 Cat5/Cat6 Ethernet
pour contrôler le projecteur via un réseau.
3D SYNC OUT
Connexion à un émetteur IR de synchronisation de
signaux 3D.
VIDEO
Connexion à une source vidéo.
RS-232 IN
Interface standard D-sub 9 broches pour la connexion
au système de contrôle d’un PC et la maintenance du
projec teur.
PC 2 (R/Pr, G/Y, B/Pb, H, V)
Connexion d’un signal de sortie RGB ou YPbPr/YCbCr
avec un connecteur d'entrée de type BNC.
AUDIO OUT (L/R)
Connexion d’un haut-parleur ou casque.
WIRED REMOTE IN
Connexion à une télécommande laire.
12V TRIGGE R
Mini sortie écouteur 3,5mm, utilise un relais d’afchage
200mA pour fournir une sortie 12 V (+/- 1,5) et une
protection contre les court-circuits.
PC
Port VGA 15 broches pour la connexion d’une source
RGB, composante HD ou PC.
DVI-D
Connexion à une source DVI.
HDMI 2
Connexion à une source HDMI.
USB 1,5A
Sortie 5V/1,5A.
3D SYNC IN
Connectez un câble d’entrée 3D-sync depuis un
ordinateur ou un appareil compatible.
SERVICE
Port de maintenance réservé uniquement au personnel
d'entretien.
RS-232 OUT
Se connecte à un autre projecteur (même modèle) pour
le contrôle RS-232.
AUDIO IN (L/R)
Connection to an audio input source via an audio or
audio L/R cable.
AUDIO IN
Connexion à une source d'entrée audio via un câble
audio.
WIRED REMOTE OUT
Connexion d’un autre projecteur.
84
Attention :
Assurez-vous que le port est valide avant de connecter une télécommande laire. La télécommande peut être
endommagée en cas d’utilisation d'un port non valide, ex. une télécommande laire connectée pour déclencher une
sortie. Pour plus d’informations sur la mise à niveau du rmware via Lan, veuillez contacter le service BenQ.

Français
Télécommande
ON / OFF
Permet de faire basculer le projecteur entre les modes veille et activé.
KEYSTONE+/KEYSTONE-
Permet de corriger manuellement la déformation des images due à l’angle
de projection.
VOLUME +/VOLUME -
Augmente/diminue le volume du projecteur.
QUICK IN S TA LL
Afche le menu OSD Installation rapide.
MUTE
Permet d’activer ou de désactiver l’audio du projecteur.
Touches de direction (▲ p, ▼ Bas, ◄ Gauche, ► Droite)
Lorsque le menu afchage à l'écran (OSD) est activé, les touches de
direction servent pour sélectionner des éléments de menu et effectuer
des réglages.
ENTER
Sélectionne un mode de conguration de l’image disponible. Active
l’élément sélectionné dans le menu à l’écran (OSD).
MENU
Permet d’activer l’afchage des menus à l’écran. Retourne au menu
précédent de l’afchage OSD, quitte et enregistre les paramètres de
menu.
EXIT
Retourne au menu précédent de l’afchage OSD, quitte et enregistre les
paramètres de menu.
INPUT
Sélectionne une source d’entrée pour l’écran.
PCITURE
Appuyez pour afcher le menu Image.
NETWORK
Sélectionne Afchage réseau en tant que source de signal d’entrée.
AUTO SYNC
Détermine automatiquement le meilleur paramétrage pour l’image
projetée.
ASPECT
Pour sélectionner le format d’afchage.
BLANK
Permet de masquer l’image à l’écran.
85

Français
OVERSCAN
Appuyez pour sélectionner le mode surbalayage.
FREEZE
Met en pause l’image projetée.
LAMP MODE
Appuyez pour afcher le menu OSD pour sélectionner le mode lumineux
souhaité.
3D MODE
Appuyez pour afcher le menu de conguration 3D.
INFO.
Appuyez sur pour afcher le menu INFORMATIONS.
LIGHT
Appuyez pour ouvrir le rétroéclairage de la télécommande.
CLEAR
Efface l’ID SET distant attribué à tous les projecteurs.
Maintenez appuyées CLEAR et ID SET pendant cinq secondes. La LED
clignote trois fois puis le paramétrage de l’identiant est effacé.
SHUTTER
Cette fonction n’est pas disponible sur ce projecteur.
ID SET
• ID SET de la télécommande (définir le code pa ticulier de commande
à distance)
Appuyez pour définir l’identifiant distan
Appuyez sur ID SET pendant trois secondes. L’indicateur
ALIMENTATION de la télécommande clignote, appuyez sur 01 à 99
pour désigner un identifiant
Remarque :
Le numéro de commande à distance (ID de télécommande) doit
correspondre à l'ID du projecteur pour un contrôle précis.
• Effacer l’ID SET de commande à distance (définir le code de
commande à distance pour tous)
Maintenez appuyées CLEAR et ID SET pendant cinq secondes.
Le témoin POWER de la télécommande clignote une seule fois pour
réinitialiser le code à distance pour tous, permet de contrôler le
projecteur indépendamment de l’id du projecteur.
Boutons numériques
Saisit des numéros dans les paramètres réseau.
Les touches numériques 1, 2, 3, 4 ne peuvent pas être appuyés quand on
demande d'entrer le mot de passe.
Port WIRE REMOTE
Connectez-vous au projecteur pour la télécommande laire.
86

Français
Installation
Attention :
Pour éviter d’endommager les puces DLP, ne dirigez jamais un rayon laser à haute puissance dans l’objectif de
projection.
Installation et retrait de la lentille en option
Attention :
• Ne secouez pas et n’exercez pas une pression excessive sur le projecteur ou les composants de lentilles car ils
contiennent des pièces de précision.
• Avant de retirer ou d’installer l’objectif, assurez-vous d’éteindre le projecteur, attendez que les ventilateurs de
refroidissement s’arrêtent et coupez l’interrupteur d’alimentation principale.
• Ne touchez pas la surface de l’objectif lors du retrait ou de l’installation de l’objectif.
• Maintenez la surface de l’objectif exempte de traces de doigts, de poussière ou d’huile. Ne rayez pas la surface de
l’objectif.
• Travaillez sur une surface horizontale avec un chiffon doux en dessous pour éviter de le rayer.
• Si vous retirez et stockez l’objectif, xez le couvercle de l’objectif au projecteur pour le protéger de la poussière
et de la saleté.
Installer le nouvel objectif
y
Retirez les deux couvercles d’extrémité de l’objectif.
Remarque :
Retrait du couvercle à corps en plastique avant d'insérer un objectif pour la première fois.
1. Orientez l’objectif de sorte que la flèche sur l’étiquette collée sur le côté soit orientée ers le
haut et poussez aussi loin que possible l’objectif dans le porte-objectif de l’appareil.
2. Tournez l’objectif dans le sens des aiguilles d’une montre jusqu’à ce que vous sentiez un déclic
une fois en place.
87

Français
Retirer l’objectif existant du projecteur
y
1. Poussez le bouton LIBÉRATION DE L’OBJECTIF jusqu’à la position déverrouillée.
2. Saisissez l’objectif.
3. Tournez l’objectif dans le sens inverse des aiguilles d’une montre. L’objectif existant est
désengagé.
4. Retirez lentement l’objectif existant.
88

Français
Objectif
Modèle Type de lentille Référence
Rapport de
projection
LS2ST3 Fixe grand angle 5J.JDH37.002 WUXGA: 0,778
LS2ST1 Zoom grand angle 5J.JDH37.011 WUXGA: 1,1-1,3
LS2SD2 Standard 5J.JEN37.001 WUXGA: 1,54-1,93
LS2LT1 Semi long 5J.JDH37.032 WUXGA: 1,93-2,9
LS2LT 2 Zoom long 5J.JDH37.041 WUXGA: 3-5
LS2ST2 Projection court 5A.JK337.001 WUXGA: 0,77-1,1
LS2ST4 Projection semi 5A.JK337.011 WUXGA: 1,25-1,6
Projection table
Décalage d'objectif
Vertical : -15%-55%
Horizontal : -5%-5%
Vertical : -15%-55%
Horizontal : -5%-5%
Vertical : -15%-55%
Horizontal : -5%-5%
Vertical : -15%-55%
Horizontal : -5%-5%
Vertical : -15%-55%
Horizontal : -5%-5%
Vertical : -15 %-55 %
Horizontal : -5 %-5 %
Vertical : -15 %-55 %
Horizontal : -5 %-5 %
• LU9245
Le rapport d’aspect est 16:10 est l’image projetée est en 16:10.
Remarque :
Pour optimiser la qualité de la projection, nous conseillons de projeter les images dans une zone sans échelle de gris.
Objectif Zoom grand angle (LS2ST1) Standard (LS2SD2)
Rapport de projection 1,1~1,3 1,54~1,93
Décalage (A) O Distance Distance
Large/Télé Large/Télé Large Télé Large Télé
(m)
(Pouces)
2,02 4,0 0,101 43,7 1,111 140 3,55 165 4,20 196 4,98 245 6,24
(m)
(Pouces)
(m)
(Pouces)
(m)
(Pouces)
(m)
(Pouces)
14,00 653 16,59 818 20,79
(m)
(Pouces)
(m)
(m)
Largeur de
l'image
(Pouces)
Diagonale
(Pouces)
50 1,27 42 1,08 26 0,67 1,3 0,034 14,6 0,370 47 1,18 55 1,40 65 1,66 82 2,08
60 1,52 51 1,29 32 0,81 1,6 0,040 17,5 0,444 56 1,42 66 1,68 78 1,99 98 2,49
80 2,03 68 1,72 42 1,08 2,1 0,054 23,3 0,592 75 1,90 88 2,24 104 2,65 131 3,33
100 2,54 85 2,15 53 1,35 2,6 0,067 29,1 0,740 93 2,37 110 2,80 131 3,32 164 4,16
120 3,05 102 2,58 64 1,62 3,2 0,081 35,0 0,888 112 2,84 132 3,36 157 3,98 196 4,99
150 3,81 127 3,23 79
180 4,57 153 3,88 95 2,42 4,8 0,121 52,5 1,333 168 4,26 198 5,04 235 5,97 295 7,48
200 5,08 170 4,31 106 2,69 5,3 0,135 58,3 1,481 187 4,74 220 5,60 261 6,63 327 8,31
250 6,35 212 5,38 132 3,37 6,6 0,168 72,9 1,851 233 5,92 276 7,00 326 8,29 409 10,39
300 7,62 254 6,46 159 4,04 7,9 0,202 87,4 2,221 280 7,11 331 8,40 392 9,95 491 12,47
350 8,89 297 7,54 185 4,71 9,3 0,236 102,0 2,591 326 8,29 386 9,80 457 11,61 573 14,55
400 10,16 339 8,62 212 5,38 10,6 0,269 116,6 2,962 373 9,48 441 11,20 522 13,27 655 16,63
500 12,70 424 10,77 265 6,73 13,2 0,337 145,7 3,702 466 11,85 551
(m)
Hauteur de
l'image
(Pouces)
89

Français
(m)
(m)
Fixe grand an-
gle (LS2ST3)
(Pouces)
Objectif Semi long (LS2LT1) Zoom long (LS2LT2)
Rapport de projection 1,93~2,9 3~5 0,778
Diagonale
(Pouces)
50 1,27 42 1,08 26 0,67 1,3 0,034 14,6 0,370 82 2,08 123 3,12 127 3,23 212 5,38 33 0,84
60 1,52 51 1,29 32 0,81 1,6 0,040 17,5 0,444 98 2,49 148 3,75 153 3,88 254 6,46 40 1,01
80 2,03 68 1,72 42 1,08 2,1 0,054 23,3 0,592 131 3,33 197 5,00 204 5,17 339 8,62 53 1,34
100 2,54 85 2,15 53 1,35 2,6 0,067 29,1 0,740 164 4,16 246 6,25 254 6,46 424 10,77 66 1,68
120 3,05 102 2,58 64 1,62 3,2
150 3,81 127 3,23 79 2,02 4,0 0,101 43,7 1,111 245 6,24 369 9,37 382 9,69 636 16,15 99 2,51
180 4,57 153 3,88 95 2,42 4,8 0,121 52,5 1,333 295 7,48 443 11,24 458 11,63 763 19,39 119 3,02
200 5,08 170 4,31 106 2,69 5,3 0,135 58,3 1,481 327 8,31 492 12,49 509 12,92 848 21,54 132 3,35
250 6,35 212 5,38 132 3,37 6,6 0,168 72,9 1,851 409 10,39 615 15,62 636 16,15 1060 26,92 165 4,19
300 7,62 254 6,46 159 4,04 7,9 0,202 87,4 2,221 491 12,47 738 18,74 763 19,39 1272 32,31 198 5,03
350 8,89 297 7,54 185 4,71 9,3 0,236 102,0 2,591 573 14,55 861 21,86 890 22,62 1484 37,69 231 5,87
400
500 12,70 424 10,77 265 6,73 13,2 0,337 145,7 3,702 818 20,79 1230 31,23 1272 32,31 2120 53,85 330 8,38
Diagonale
(Pouces)
50 1,27 42 1,08 26 0,67 1,3 0,034 14,6 0,370 33 0,83 47 1,18 53 1,35 68 1,72
60 1,52 51 1,29 32 0,81 1,6 0,040 17,5 0,444 39 1,00 56 1,42 64 1,62 81 2,07
80 2,03 68 1,72 42 1,08 2,1 0,054 23,3 0,592 52 1,33 75 1,90 85 2,15 109 2,76
100 2,54 85 2,15 53 1,35 2,6 0,067 29,1 0,740 65 1,66 93 2,37 106 2,69 136 3,45
120 3,05 102 2,58 64 1,62 3,2 0,081 35,0 0,888 78 1,99 112 2,84 127 3,23 163 4,14
150 3,81 127 3,23 79
180 4,57 153 3,88 95 2,42 4,8 0,121 52,5 1,333 118 2,99 168 4,26 191 4,85 244 6,20
200 5,08 170 4,31 106 2,69 5,3 0,135 58,3 1,481 131 3,32 187 4,74 212 5,38 271 6,89
250 6,35 212 5,38 132 3,37 6,6 0,168 72,9 1,851 163 4,15 233 5,92 265 6,73 339 8,62
300 7,62 254 6,46 159 4,04 7,9 0,202 87,4 2,221 196 4,98 280 7,11 318 8,08 407 10,34
350 8,89 297 7,54 185 4,71 9,3 0,236 102,0 2,591 229 5,80 326 8,29 371 9,42 475 12,06
400 10,16 339 8,62 212 5,38 10,6 0,269 116,6 2,962 261 6,63 373 9,48 424 10,77 543 13,79
500 12,70 424 10,77 265 6,73 13,2 0,337 145,7 3,702 326 8,29 466
Largeur de
l'image
(m)
(Pouces)
10,16 339 8,62 212 5,38 10,6 0,269 116,6 2,962 655 16,63 984 24,99 1018 25,85 1696 43,08 264 6,70
Largeur de
l'image
(m)
(Pouces)
Hauteur de
l'image
(m)
(Pouces)
Objectif Projection court (LS2ST2) Projection semi (LS2ST4)
Rapport de projection 0,77~1,1 1,25~1,60
Hauteur de
l'image
(m)
(Pouces)
Décalage (A) O Distance Distance Distance
Large/Télé Large/Télé Large Télé Large Télé NA
(m)
(Pouces)
(m)
2,02 4,0 0,101 43,7 1,111 98 2,49 140 3,55 159 4,04 204 5,17
(m)
(Pouces)
0,081 35,0 0,888 196 4,99 295 7,50 305 7,75 509 12,92 79 2,01
Décalage (A) O Distance Distance
Large/Télé Large/Télé Large Télé Large Télé
(Pouces)
(m)
(Pouces)
(m)
(m)
(Pouces)
(Pouces)
(m)
(m)
(Pouces)
(Pouces)
(m)
(Pouces)
(m)
11,85 530 13,46 678 17,23
(Pouces)
(m)
(Pouces)
(m)
(Pouces)
(m)
90
Remarque :
• Pour des instructions plus visualisées, veuillez accéder au site Web du calculateur BenQ http://projectorcalculator.
benq.com/.
• L’installation au plafond doit être réalisée par un professionnel qualié. Contactez votre revendeur pour plus
d’informations. Il n’est pas conseillé d’installer le projecteur vous-même.
• Utilisez uniquement le projecteur sur une surface plane et solide. Des blessures graves et des dommages peuvent
être causés par la chute du projecteur.
• N’utilisez pas le projecteur dans un environnement soumis à des températures extrêmes. Le projecteur doit être
utilisé à des températures comprises entre 41 degrés Fahrenheit (5 degrés Celsius) et 104 degrés Fahrenheit
(40 degrés Celsius).
• L’écran sera endommagé si le projecteur est exposé à l’humidité, à la poussière ou à la fumée.
• Ne couvrez pas les fentes d’aération du projecteur. Une ventilation appropriée est nécessaire pour dissiper la
chaleur. Le projecteur sera endommagé si les fentes d’aération sont couvertes.

Français
Plage de décalage de l’objectif
Plage réglable de décalage de l’objectif
y
La plage réglable pour le décalage de l’objectif est présentée dans le tableau ci-dessous et soumise
aux conditions indiquées.
• LU9245
Bureau-Projection avant
Décalage
vertical
Max 0,55V
1V
Hauteur de l’image projetée
Position normale de projection
Décalage vertical
Montage au plafond-Projection avant
Décalage vertical
Décalage vertical
Installation au plafond
y
Max 0,15V
Hauteur de l’image projetée
Max 0,55V
1V
Largeur de l’image projetée
Décalage vers
la gauche
1H 0,05H0,05H
Décalage vers
la droite
Haut de l’écran
Plage de
décalage
Centre de
l’écran
C = Distance de l’objectif à l’écran
91

Français
Installation sur bureau
y
Centre de
l’écran
Plage de
décalage
Remarque :
• Les illustrations s’appliquent uniquement à l’objectif standard.
• La fonction Décalage de l’objectif n’est pas disponible sur le LS2ST3 (Objectif xe). Cet objectif doit être utilisé
pour les applications « zéro degré »/« aucun décalage ». Voir ci-dessous :
POUR UNE UTILISATION AVEC LE LS2ST3
(OBJECTIF FIXE) UNIQUEMENT
Centre de
l’écran
92

Français
Témoin
Messages système
Alimentation TEMP Voyant Filtre Statut et description
Orange - - - Veille
Clignote vert - - - Mise en marche
Ver t - - - Fonctionnement normal
Clignote orange - - - Arrêt normal pour refroidissement
Rouge Rouge Rouge - Téléchargement en cours
Ver t - Rouge -
Ver t - Clignote rouge -
Clignote rouge - - -
- Vert Clignote rouge - Libération de la lentille
- Vert Rouge - Boîtier ouvert
Échec de démarrage de la roue des
couleurs.
Échec de démarrage du disque de
couleur uorescent.
Échec de l’arrêt du processeur de
mise à l’échelle
Message d'erreur de la source de lumière
Alimentation TEMP Voyant Filtre Statut et description
- - Rouge -
-- - Clignote orange - Source de lumière non allumée
Erreur de la source de lumière en
fonctionnement normal
Message de ltre
Alimentation TEMP Voyant Filtre Statut et description
Ver t - - Orange
Avertissement de remplacement de
ltre
93

Français
Messages d'erreur thermique
Alimentation TEMP Voyant Filtre Statut et description
Rouge Rouge - - Erreur ventilateur 1
Rouge Clignote rouge - - Erreur ventilateur 2
Rouge Vert - - Erreur ventilateur 3
Rouge Clignote vert - - Erreur ventilateur 4
Clignote rouge Rouge - - Erreur ventilateur 5
Clignote rouge Clignote rouge - - Erreur ventilateur 6
Clignote rouge Vert - - Erreur ventilateur 7
Clignote rouge Clignote vert - - Erreur ventilateur 8
Rouge Rouge - Vert Erreur ventilateur 9
Ver t Rouge - - Erreur température 1
Ver t Clignote rouge - -
Ver t Ver t - -
Ver t Clignote vert - -
Clignote vert Rouge - - Erreur température 2
Clignote vert Clignote rouge - -
Clignote vert Ver t - -
Clignote vert Clignote vert - -
Clignote vert Ver t Vert - Erreur température 3
Orange Clignote rouge - -
Orange Vert - -
Orange Clignote vert - -
Clignote vert Ver t Clignote vert - Erreur température 4
Clignote vert Clignote vert Vert - Erreur température 5
Ver t Rouge Rouge - Avertissement de coupure thermique
Erreur ouverture du capteur
thermique 1
Erreur court-circuit du capteur
thermique 1
Erreur connexion IC #1 I2C
thermique
Erreur ouverture du capteur
thermique 2
Erreur court-circuit du capteur
thermique 2
Erreur connexion IC #2 I2C
thermique
Erreur ouverture du capteur
thermique 3
Erreur court-circuit du capteur
thermique 3
Erreur connexion IC #3 I2C
thermique
94

Français
Dimensions du projecteur
95

Français
Schéma d'installation au plafond
N° Support de plafond BenQ CMG6 (5A.JHS10.001)
Matériau Acier
Poids
Dimensions (L x H x P) 410 x 641 x 360 mm (16,14" x 25,24" x 14,17")
Longueur 491 mm ~ 641 mm
Angle d’inclinaison Pivotement : ±5°
Charge 40 kg (88 lb)
Type de vis M4, M5, M6, M8
10,5 kg (23,1 lb)
Vertical : +5°/-25°
Horizontal : ±5°
Réglage de la taille et de l’angle
96

Français
Dimension de la lentille
Lentille en option (largeur xe : LS2ST3) Lentille en option (Zoom large : LS2ST1)
Lentille en option (Standard : LS2SD2) Lentille en option
(Projection semi-longue : LS2LT1)
Lentille en option (Zoom long : LS2LT2) Objectif en option
(Projection court : LS2ST2)
Objectif en option
(Projection semi : LS2ST4)
97

Français
Commande RS232
Affectation des broches RS232
N° Série N° Série
1 N.C 6 N.C
2 RXD 7 Court avec broche 8
3 TXD 8 Court avec broche 7
4 N.C 9 N.C
5 Te rr e
Port série RS232 avec un câble croisé
Function Type Operation ASCII
Power Write Power On <CR>*pow=on#<CR>
Write Power Off <CR>*pow=off#<CR>
Read Power Status <CR>*pow=?#<CR>
Source Selection Write COMPUTER/YPbPr <CR>*sour=RGB#<CR>
Write COMPUTER 2/YPbPr2 <CR>*sour=RGB2#<CR>
Write DVI-D <CR>*sour=dvid#<CR>
Write HDMI (MHL) <CR>*sour=hdmi#<CR>
Write HDMI 2 (MHL2) <CR>*sour=hdmi2#<CR>
Write Composite <CR>*sour=vid#<CR>
Write HDBaseT <CR>*sour=hdbaset#<CR>
Read Current source <CR>*sour=?#<CR>
Audio Control Write Mute On <CR>*mute=on#<CR>
Write Mute Off <CR>*mute=off#<CR>
Read Mute Status <CR>*mute=?#<CR>
Write Volume + <CR>*vol=+#<CR>
Write Volume - <CR>*vol=-#<CR>
Write Volume level for customer <CR>*vol=value#<CR>
Read Volume Status <CR>*vol=?#<CR>
98

Français
Function Type Operation ASCII
Audio Source Select Write Audio pass Through off <CR>*audiosour=off#<CR>
Write Audio - Computer1 <CR>*audiosour=RGB#<CR>
Write Audio - Video/S-Video <CR>*audiosour=vid#<CR>
Write Audio - HDMI <CR>*audiosour=hdmi#<CR>
Write Audio - HDMI2 <CR>*audiosour=hdmi2#<CR>
Read Audio pass Status <CR>*audiosour=?#<CR>
Picture Mode Write Presentation <CR>*appmod=preset#<CR>
Write sRGB <CR>*appmod=srgb#<CR>
Write Bright <CR>*appmod=bright#<CR>
Write Cinema (Rec. 709) <CR>*appmod=cine#<CR>
Write DICOM <CR>*appmod=dicom#<CR>
Write Vivid <CR>*appmod=vivid#<CR>
Write User1 <CR>*appmod=user1#<CR>
Write User2 <CR>*appmod=user2#<CR>
Write 3D <CR>*appmod=threed#<CR>
Write HDR10 <CR>*appmod=hdr10<CR>
Write HLG <CR>*appmod=hlg<CR>
Read Picture Mode <CR>*appmod=?#<CR>
Picture Setting Write Contrast + <CR>*con=+#<CR>
Write Contrast - <CR>*con=-#<CR>
Write Set Contrast value <CR>*con=5#<CR>
Read Contrast value <CR>*con=?#<CR>
Write Brightness + <CR>*bri=+#<CR>
Write Brightness - <CR>*bri=-#<CR>
Write Set Brightness value <CR>*bri=5#<CR>
Read Brightness value <CR>*bri=?#<CR>
Write Color + <CR>*color=+#<CR>
Write Color - <CR>*color=-#<CR>
Write Set Color value <CR>*color=5#<CR>
Read Color value <CR>*color=?#<CR>
Write Sharpness + <CR>*sharp=+#<CR>
Write Sharpness - <CR>*sharp=-#<CR>
Write Set Sharpness value <CR>*sharp=5#<CR>
Read Sharpness value <CR>*sharp=?#<CR>
Write Color Temperature - Warm <CR>*ct=warm#<CR>
Write Color Temperature - Normal <CR>*ct=normal#<CR>
Write Color Temperature - Cool <CR>*ct=cool#<CR>
Read Color Temperature Status <CR>*ct=?#<CR>
Write Aspect 4:3 <CR>*asp=4:3#<CR>
Write Aspect 16:9 <CR>*asp=16:9#<CR>
Write Aspect 2.35:1 <CR>*asp=2.35#<CR>
Write Aspect 16:10 <CR>*asp=16:10#<CR>
99
 Loading...