

Page 1

LU9235 / LX9215
Digital Projector
User Manual
V1.02
Page 2

English
Copyright and disclaimer
Copyright
Copyright 2015 BenQ Corporation. All rights reserved. No part of this publication may be
reproduced, transmitted, transcribed, stored in a retrieval system or translated into any language
or computer language, in any form or by any means, electronic, mechanical, magnetic, optical,
chemical, manual or otherwise, without the prior written permission of BenQ Corporation.
All other logos, products, or company names mentioned in this manual may be the registered
trademarks or copyrights of their respective companies, and are used for informational purposes
only.
Disclaimer
BenQ Corporation makes no representations or warranties, either expressed or implied, with
respect to the contents hereof and specically disclaims any warranties, merchantability or tness
for any particular purpose. Further, BenQ Corporation reserves the right to revise this publication
and to make changes from time to time in the contents hereof without obligation of BenQ
Corporation to notify any person of such revision or changes.
This user manual aims to provide the most updated and accurate information to customers, and
thus all contents may be modied from time to time without prior notice. Please visit http://www.
benq.com for the latest version of this manual.
Statement regarding hyperlinks and third-party websites
BenQ is not responsible for the content of the websites or of similar resources, which are
maintained and controlled by third parties, that may be linked from this product. Providing links
to those websites or to similar resources does not mean that BenQ makes any warranty or
representation to their content by expression or by implication.
Any third party content or service preinstalled in this product is provided "as is". BenQ does not,
by expression or by implication, make any warrant to the content or to the services provided by
third parties. BenQ does not warrant or guarantee that the content or services provided by third
parties are accurate, effective, most up-to-date, legal, or complete. Under no circumstances shall
BenQ be liable for the content or services provided by third parties including their negligence.
Services provided by third parties may be terminated temporarily or permanently. BenQ does
not warrant or guarantee that the any content or services provided by third parties are in good
condition at any time, and is not liable for the termination of the said content and services. In
addition, BenQ is not involved in any transactions you conduct in the websites or similar resources
maintained by third parties.
You should contact the content or service providers for any questions, concerns, or disputes.
2016/ 5/ 18
2
Page 3

Table of Contents
Copyright and disclaimer .............................................................. 2
Copyright ................................................................................................................................................. 2
Disclaimer ................................................................................................................................................ 2
Statement regarding hyperlinks and third-party websites ........................................................... 2
Important safety instructions ....................................................... 6
General safety instruction ............................................................................................ 6
Notice on laser ............................................................................................................... 7
Laser class ................................................................................................................................................ 7
Laser parameters ................................................................................................................................... 7
Label instruction .................................................................................................................................... 8
Laser light instruction ........................................................................................................................... 9
Prepare for installation ................................................................................................. 10
Caution for installation ......................................................................................................................... 10
Cooling notice ........................................................................................................................................ 11
Package contents ........................................................................... 13
Standard packing items ................................................................................................ 13
Lens information ............................................................................................................ 13
Introduction .................................................................................... 14
Projector exterior view ................................................................................................. 14
Front and upper side view ................................................................................................................... 14
Rear and upper side view ..................................................................................................................... 14
Controls and functions .................................................................................................. 15
Control panel .......................................................................................................................................... 15
Control terminal .................................................................................................................................... 16
Remote control ...................................................................................................................................... 17
Installation ...................................................................................... 21
Installing removing the optional lens .......................................................................... 21
Installing the new lens .................................................................................................. ......................... 21
Removing the existing lens from the projector .............................................................................. 22
Evaluate for distance by image size ............................................................................. 23
Obtaining a preferred projected image size .................................................................................... 23
Projection dimensions........................................................................................................................... 23
Lens dimension ....................................................................................................................................... 25
Adjusting by Lens shift .................................................................................................. 26
Adjusting the vertical image position ................................................................................................ 26
Adjusting the horizontal image position ........................................................................................... 26
Lens shift range diagram ....................................................................................................................... 27
Adjusting the Zoom/Focus .................................................................................................................. 28
Connection ..................................................................................................................... 29
Before connecting .................................................................................................................................. 29
Connecting with AV equipment ......................................................................................................... 31
Connecting with computer ................................................................................................................. 31
Connecting with HDBaseT transmitter ........................................................................................... 32
Page 4

Connecting with LAN........................................................................................................................... 32
Operations ...................................................................................... 33
Switch on/off the projector ........................................................................................... 33
Connecting the power cord ................................................................................................................ 33
Power indicator ...................................................................................................................................... 33
Switch on the projector ....................................................................................................................... 34
Switch off the projector ....................................................................................................................... 40
Using the menu .............................................................................. 41
Main menu ...................................................................................................................... 41
Display menu .................................................................................................................. 42
Corner Fit menu .................................................................................................................................... 44
3D menu .................................................................................................................................................. 44
Picture menu .................................................................................................................. 45
Color Temperature Fine Tuning menu ............................................................................................. 47
3D Color Management menu ............................................................................................................. 48
Source menu .................................................................................................................. 49
System setup : Basic menu ........................................................................................... 50
Menu Settings menu .............................................................................................................................. 51
Operation Settings menu ..................................................................................................................... 51
System setup : Advanced menu ................................................................................... 52
Audio Settings menu ............................................................................................................................. 53
Light Source Settings menu ................................................................................................................. 54
Security Settings menu ......................................................................................................................... 54
Closed Caption menu ........................................................................................................................... 55
Standby Settings menu .......................................................................................................................... 55
Network Settings menu ....................................................................................................................... 56
Information menu .......................................................................................................... 57
Menu structure .............................................................................................................. 58
Maintenance ................................................................................... 61
Before maintaining the projector ................................................................................ 61
Care of the projector ........................................................................................................................... 61
Clean the lens front surface ......................................................................................... 61
Clean the projector case ............................................................................................... 61
Filter maintenance ........................................................................................................ 62
Cleaning the lter .................................................................................................................................. 62
Replacing the side lter ........................................................................................................................ 63
Replacing the front lter ...................................................................................................................... 64
LED indicator ................................................................................................................. 65
System message ...................................................................................................................................... 65
Light source error message ................................................................................................................. 65
Filter message ......................................................................................................................................... 65
Thermal error message ........................................................................................................................ 66
Page 5

Troubleshooting ............................................................................. 67
Troubleshooting ............................................................................................................. 67
The projector does not turn on. ........................................................................................................ 67
No picture. .............................................................................................................................................. 67
Blurred image. ......................................................................................................................................... 67
Remote control does not work. ........................................................................................................ 67
The password is incorrect. .................................................................................................................. 67
Specications .................................................................................. 68
Specications ................................................................................................................. 68
Dimensions ..................................................................................................................... 69
Attaching for ceiling mount ................................................................................................................. 69
Appendix ......................................................................................... 70
Timing table ................................................................................................................... 70
Supported timing for PC & PC 2 input ............................................................................................. 70
Support timing for Component - YPbPr input ............................................................................... 71
Support timing for Video input .................................................................................................. ......... 72
Support timing for HDMI & DVI-D (HDCP) input ........................................................................ 72
Supporting timing for HDMI Video input ......................................................................................... 74
RS232 command control .............................................................................................. 75
PJLink .............................................................................................................................. 79
PJLink protocal........................................................................................................................................ 79
Control commands ................................................................................................................................ 79
Page 6

English
Important safety instructions
Your projector is designed and tested to meet the latest standards for safety of information
technology equipment. However, to ensure safe use of this product, it is important that you follow
the instructions mentioned in this manual and marked on the product.
General safety instruction
1. Do not look straight at the projector lens during operation. The intense light beam may
damage your eyes.
2. Always open the lens shutter or remove the lens cap when the projector light source is on.
3. In some countries, the line voltage is NOT stable. This projector is designed to operate safely
within a mains voltage between 100 to 240 volts AC, but could fail if power cuts or surges of
±10 volts occur. In areas where the mains voltage may uctuate or cut out, it is recommended
that you connect your projector through a power stabilizer, surge protector or uninterruptible
power supply (UPS).
4. Do not block the projection lens with any objects when the projector is under operation
as this could cause the objects to become heated and deformed or even cause a re. To
temporarily turn off the light source, press BLANK on the remote control.
5. Do not place this product on an unstable cart, stand, or table. The product may fall, sustaining
serious damage.
6. Do not attempt to disassemble this projector. There are dangerous high voltages inside which
may cause death if you should come into contact with live parts.
Under no circumstances should you ever undo or remove any other covers. Refer servicing
only to suitably qualied professional service personnel.
7. Do not place this projector in any of the following environments.
• Space that is poorly ventilated or conned. Allow at least 50 cm clearance from walls and
free ow of air around the projector.
• Locations where temperatures may become excessively high, such as the inside of a car
with all windows rolled up.
• Locations where excessive humidity, dust, or cigarette smoke may contaminate optical
components, shortening the projector's life span and darkening the image.
• Locations near re alarms
• Locations with an ambient temperature above 40°C / 104°F
• Locations where the altitudes are higher than 3000 m (10000 feet).
8. Do not block the ventilation holes.
• Do not place this projector on a blanket, bedding or any other soft surface.
• Do not cover this projector with a cloth or any other item.
• Do not place inammables near the projector.
If the ventilation holes are seriously obstructed, overheating inside the projector may result in
a re.
6
Page 7
9. Do not step on the projector or place any objects upon it. Besides probable physical damage
to the projector, doing so may result in accidents and possible injury.
10. Do not place liquids near or on the projector. Liquids spilled into the projector may cause it to
fail. If the projector does become wet, disconnect it from the power supply's wall socket and
call BenQ to have the projector serviced.
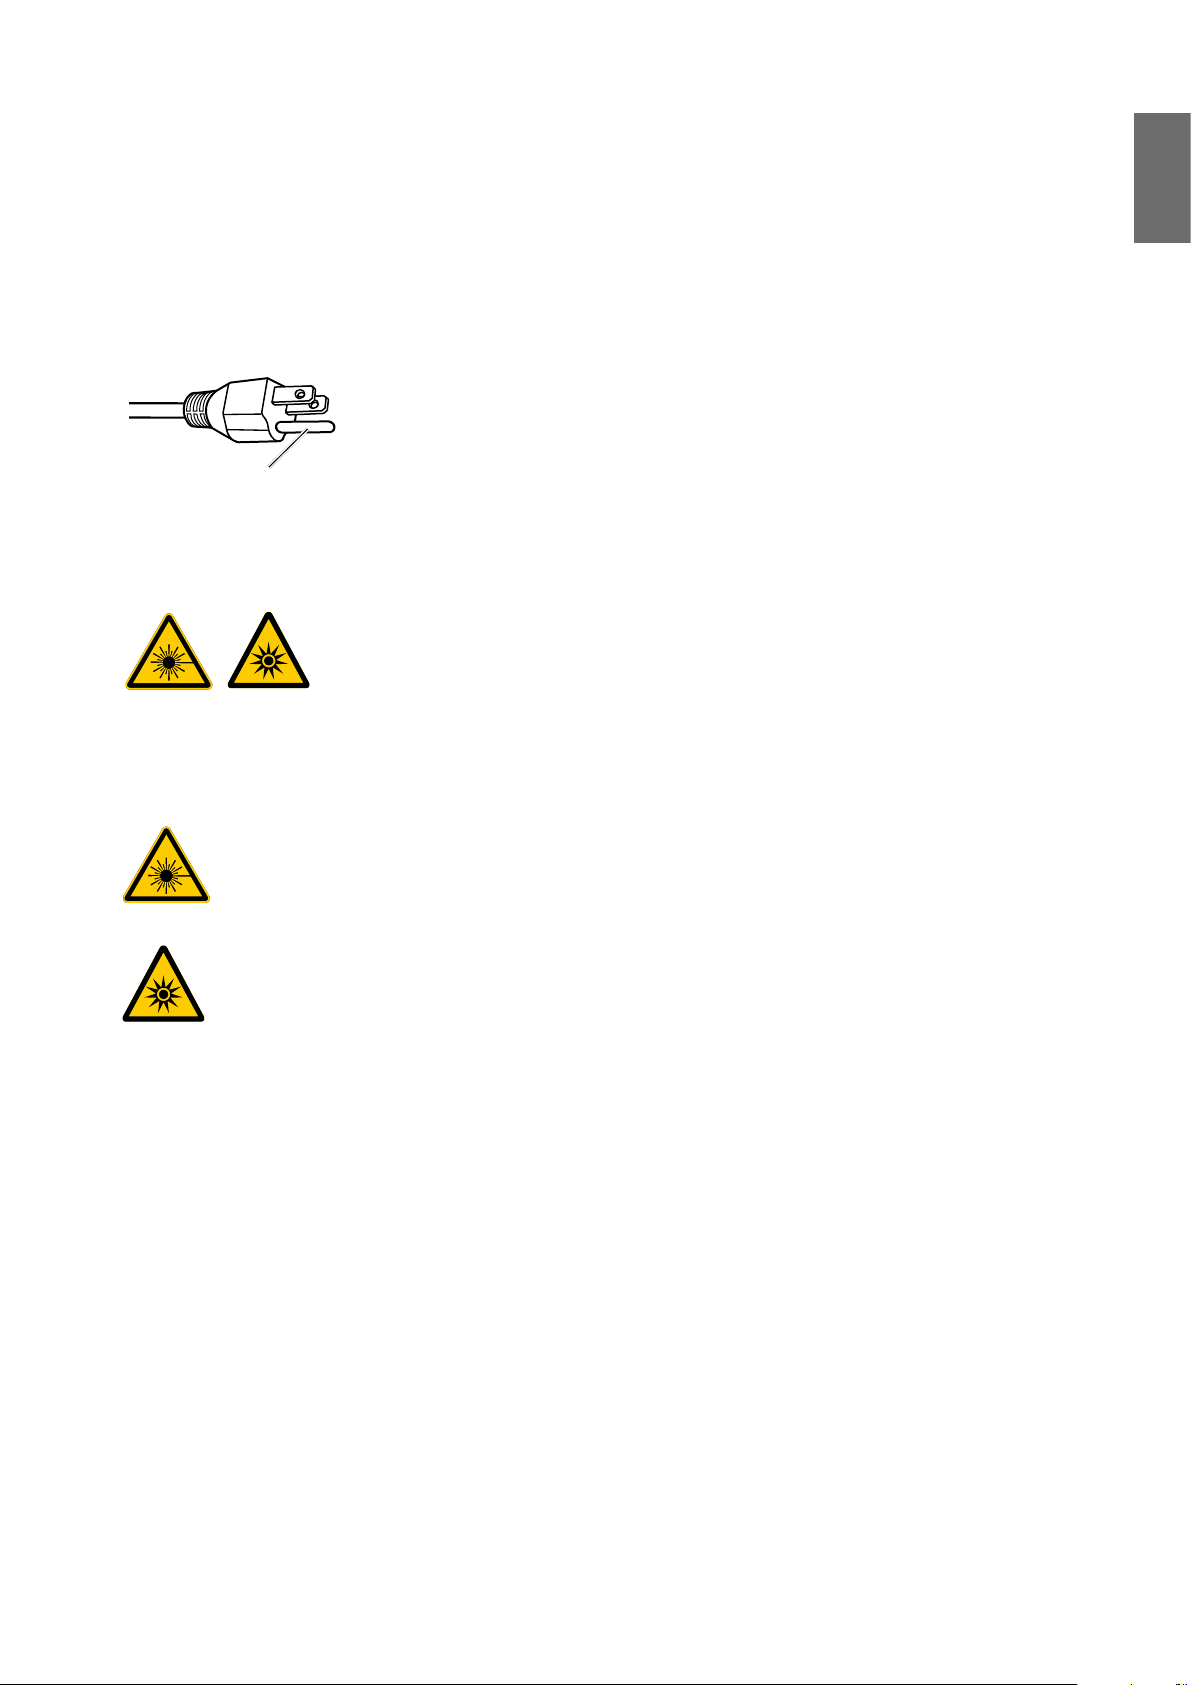
This equipment has a three-pin grounding-type power plug. Do not
remove the grounding pin. As a safety feature, this plug will only t a
grounding-type power outlet. If you are unable to t the plug into the
Do not remove
outlet, contact an electrician.
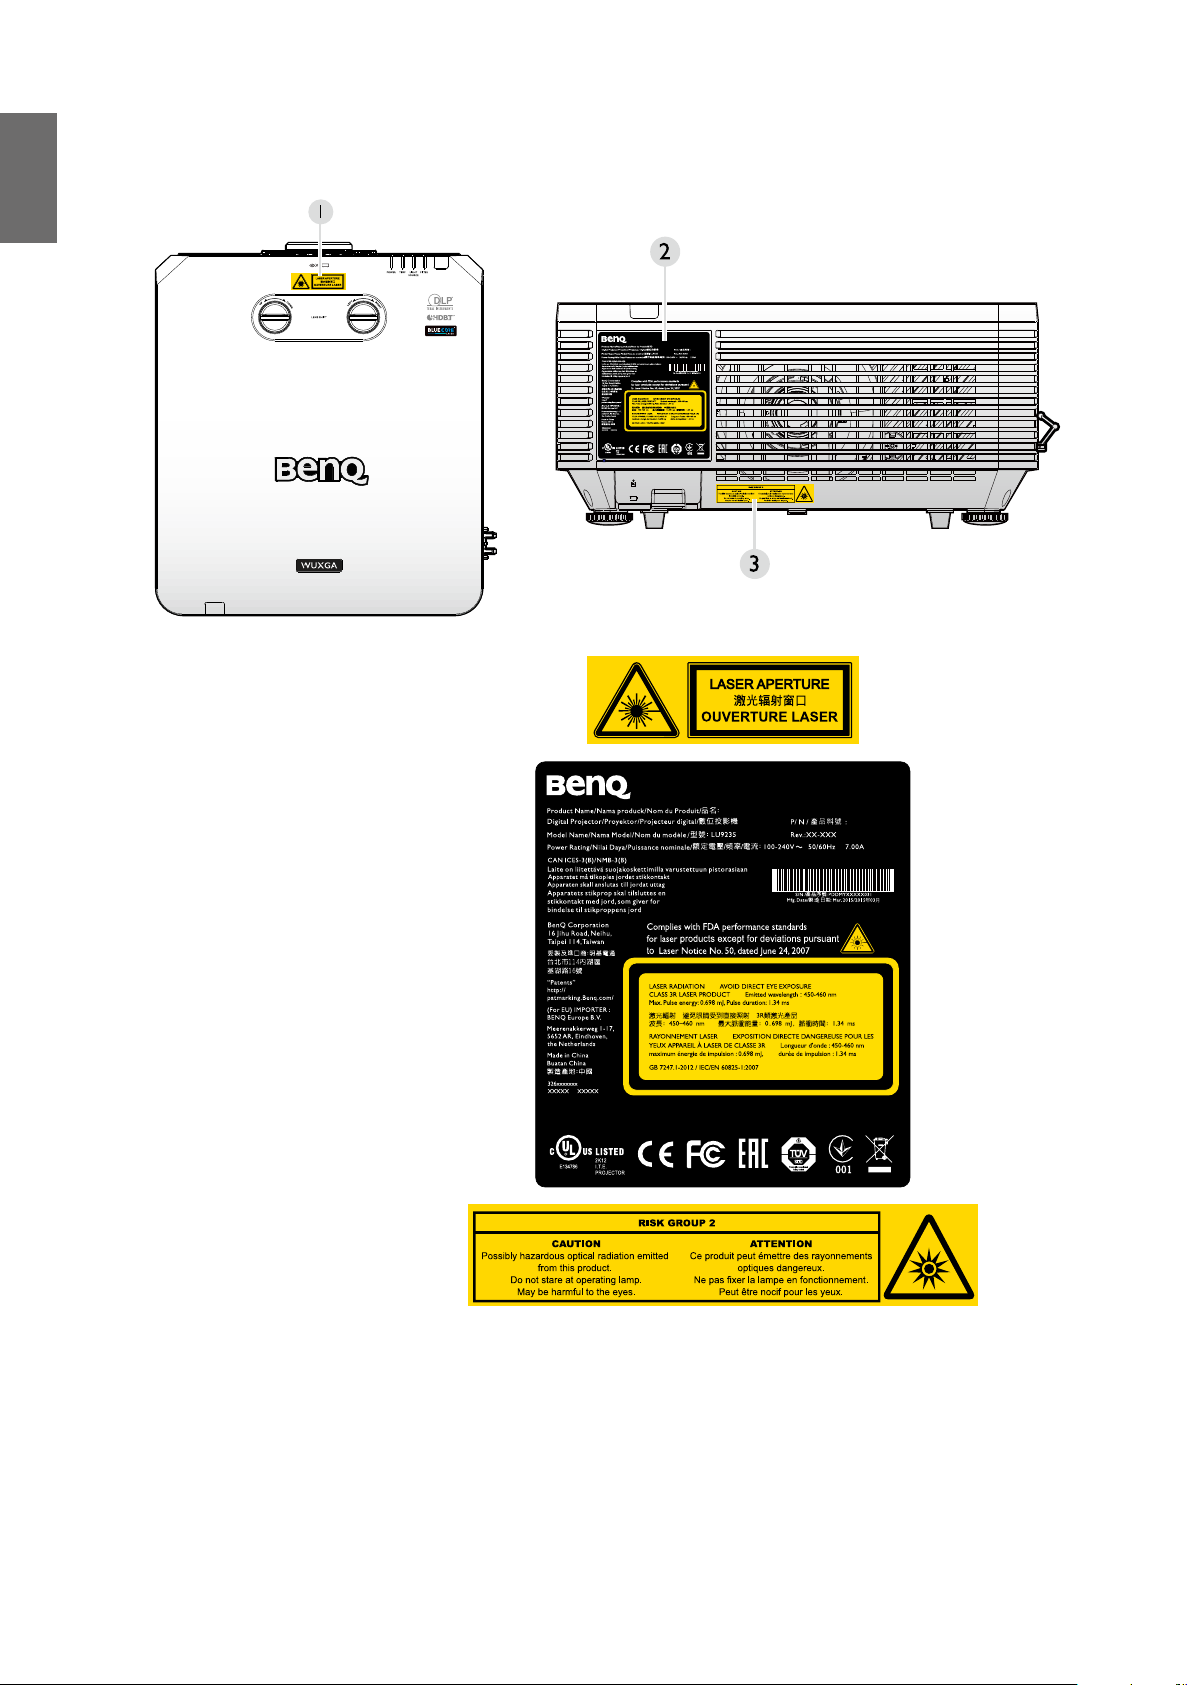
Notice on laser
This symbol indicates that there is a potential hazard of eye exposure to
laser radiation unless the instructions are closely followed.
English
Laser class
This Laser Product is designated as Class 3R during all procedures of operation.
LASER LIGHT - AVOID DIRECT EYE EXPOSURE.
Do not point laser or allow laser light to be directed or reected toward other
people or reective objects.
Direct or scattered light can be hazardous to eyes and skin.
There is a potential hazard of eye exposure to laser radiation if the included
instructions are not followed.
Caution – use of controls or adjustments or performance of procedures other than
those specied herein may result in hazardous radiation exposure.
Laser parameters
Wavelength 450nm - 460nm (Blue)
Mode of operation Pulsed, due to frame rate
Pulse width 1.34ms
Pulse repetition rate 120Hz
Maximum laser energy 0.698mJ
Total internal power >10 0 w
Apparent source size >10mm, at lens stop
Divergence >100 mili Radian
7
Page 8
English
Label instruction
Below drawing show the label’s location.
1. Laser warning label
2. Spec label
3. Explanatory Label
8
Page 9
Laser light instruction
Below drawing is the laser aperture location. Be careful not to let the eye see the light directly.
Laser aperture
Interlock switches
This machine has 2 (Top cover x 1, Lens x 1) Interlock switches to protect the laser light Leakage.
1. Will power-off the system individually when the top cover is removed.
2. Will power-off the system individually when the lens is removed or not install correctly.
English
Interlock
switches
Interlock
switches
9
Page 10
English
Prepare for installation
Caution for installation
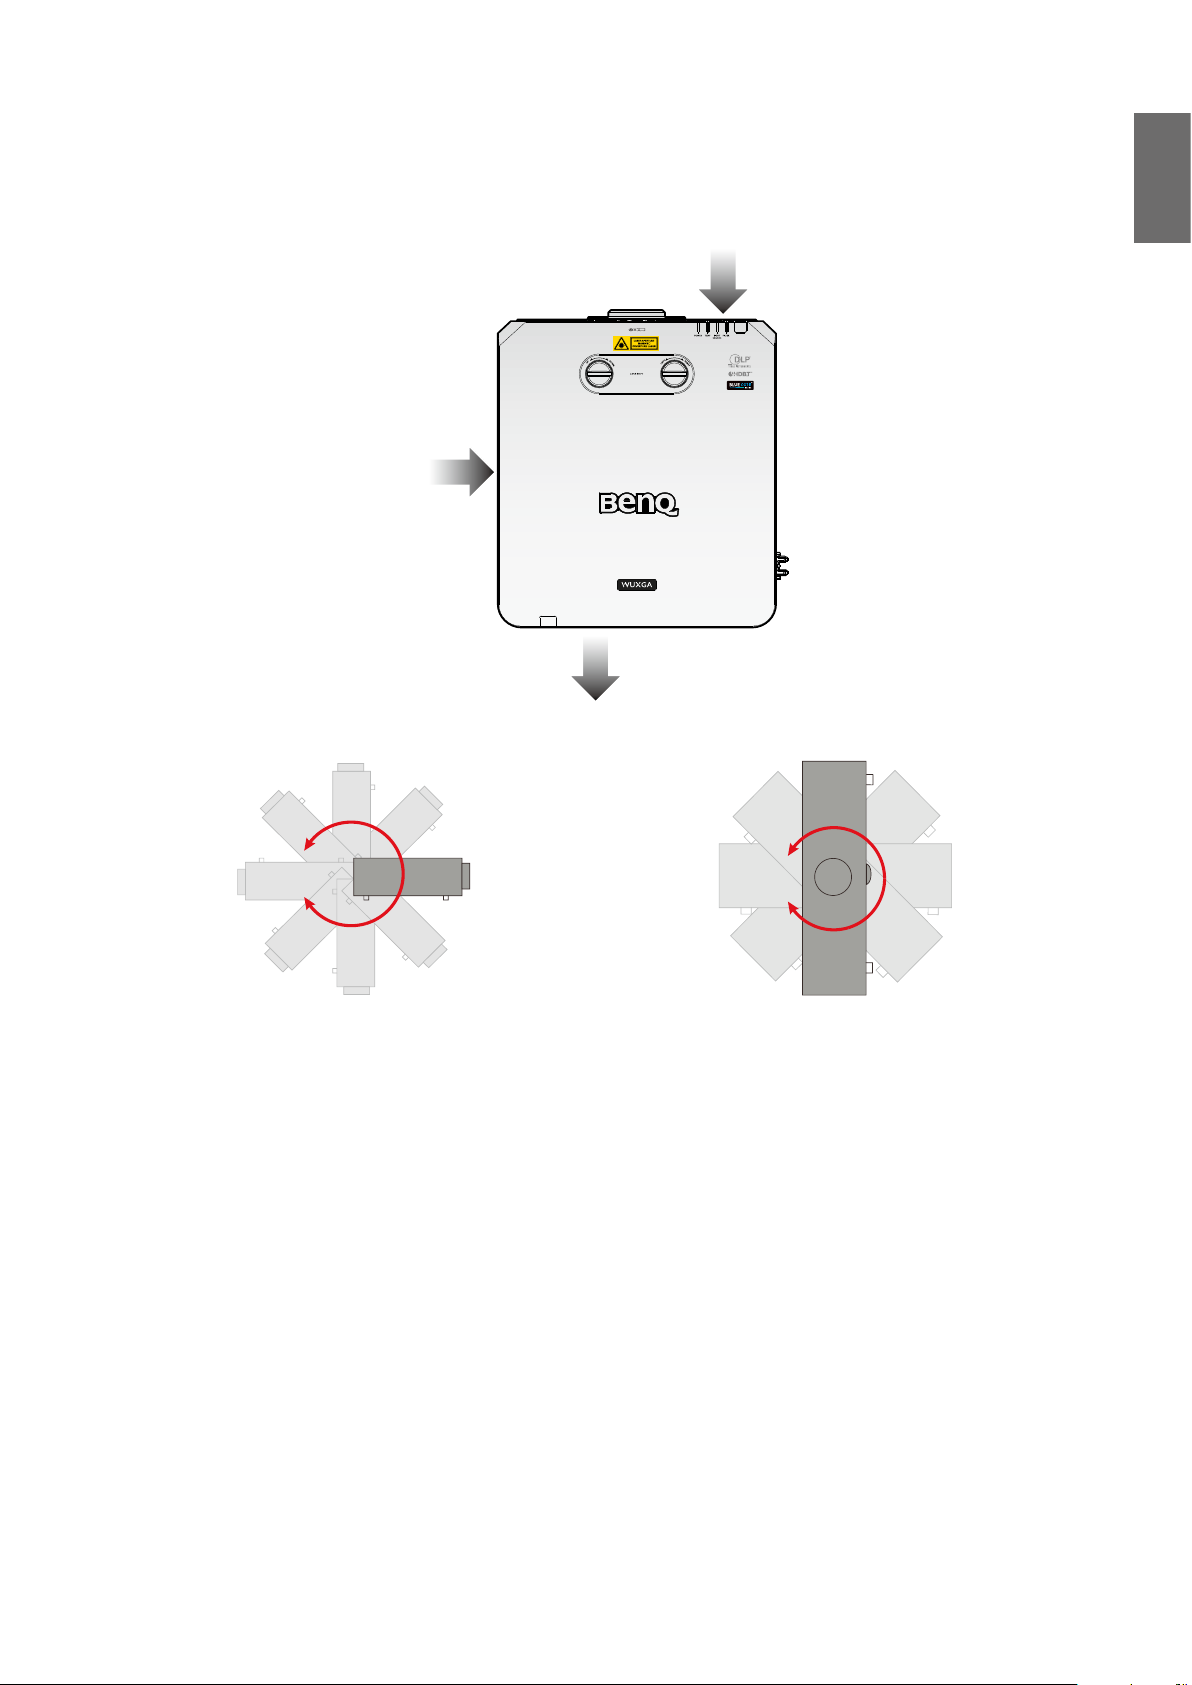
1. If the projector and lens were purchased separately, remove the anti-dust cap before use and
store it for future use. When transporting the projector, move the lens to the home position,
remove the lens, and attach the anti-dust cap.
Anti-dust cap
2. When the projector is not in use, attach the lens cover supplied with the projector or the
projection lens.
Lens cover
Focus adjustment
The high clarity projection lens is thermally affected by the light from the bulb; thus, the focus
is unstable for a short period immediately after the power is turned on. Please wait at least 15
minutes of continuous projection before adjusting the focus.
10
Page 11
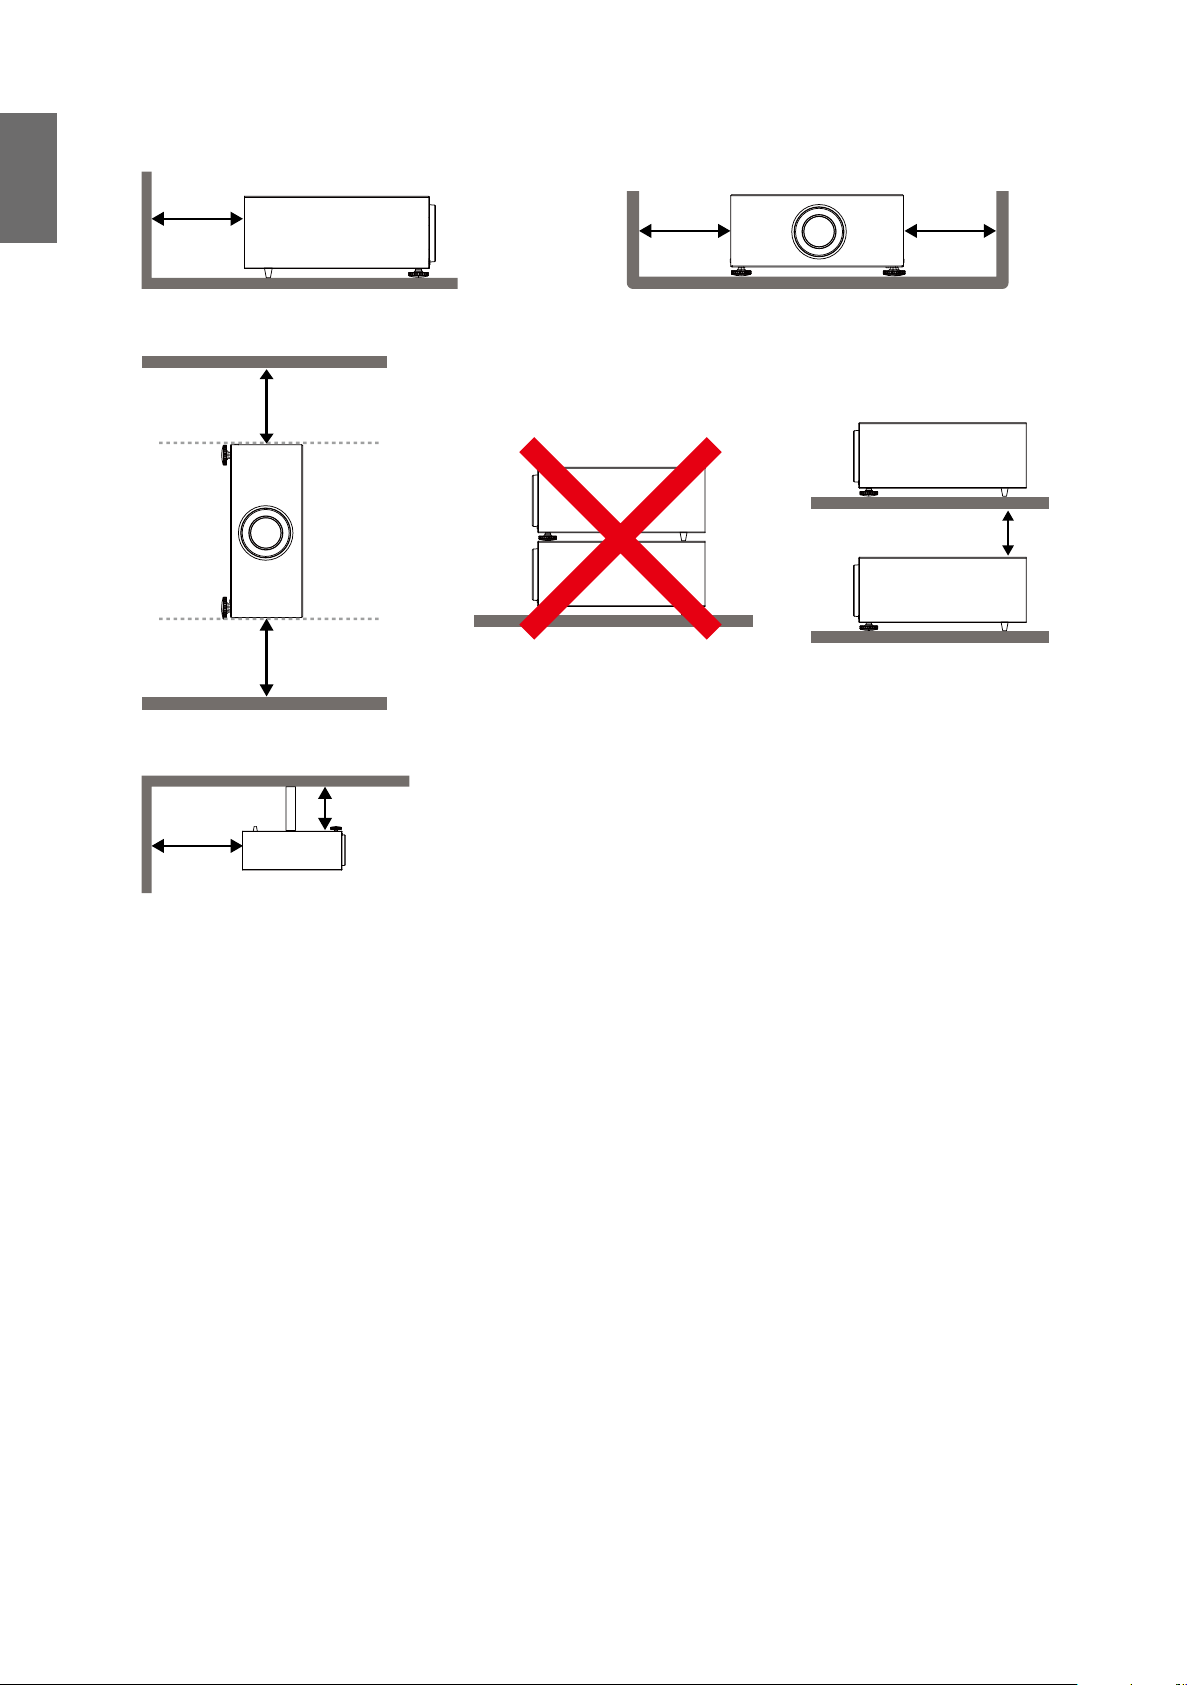
Cooling notice
Allow at least 500 mm (19.7 in) for clearance around the exhaust vent. Make sure no objects block
air input within 300 mm (11.8 in).
Keep the outlet at least 1 m away from the inlets of other projectors.
Air inlet
Air inlet
Air outlet
English
• The projector can be installed at any angle.
11
Page 12
English
• Allow at least 50 cm of clearance around the exhaust vent.
Minimum 500mm
(19.69 inch)
Minimum 500mm
(19.69 inch)
Minimum 500mm
(19.69 inch)
Minimum 500mm
(19.69 inch)
Minimum 500mm
(19.69 inch)
Minimum 100mm
(3.94 inch)
Minimum 300mm
(11.81 inch)
Minimum 500mm
(19.69 inch)
• Ensure that the air intake vents do not recycle hot air from the exhaust vent.
• When operating in an enclosed space, make sure that the surrounding air temperature does
not exceed the projector's operating temperature and that the air intake and exhaust vents are
unobstructed.
• All enclosures should pass a certied thermal evaluation to ensure that the projector does
not recycle exhaust air. Recycling exhaust air may cause the projector to shutdown even if the
ambient temperature is within the acceptable operating temperature range.
12
Page 13

Package contents
Standard packing items
English
Lens information
Model Lens Type
LS2ST3 Wide x 5J.JDH37.002
LS2ST1 Wide zoom 5J.JDH37.011
LS2SD2 Standard 5J.JEN37.001
LS2LT1 Semi long 5J.JDH37.032
LS2LT2 Long zoom 5J.JDH37.041
Part
Number
Throw Ratio Lens Shift
XGA: 0.81
WUXGA: 0.778
XGA: 1.14-1.347
WUXGA: 1.1-1.3
XGA: 1.6-2
WUXGA: 1.54-
1.93
XGA: 2-3
WUXGA: 1.93-2.9
XGA: 3.11-5.18
WUXGA: 3-5
Vertical: -15%-55% (WUXGA), -10%-50% (XGA)
Horizontal: -5%-5%
Vertical: -15%-55% (WUXGA), -10%-50% (XGA)
Horizontal: -5%-5%
Vertical: -15%-55% (WUXGA), -10%-50% (XGA)
Horizontal: -5%-5%
Vertical: -15%-55% (WUXGA), -10%-50% (XGA)
Horizontal: -5%-5%
Vertical: -15%-55% (WUXGA), -10%-50% (XGA)
Horizontal: -5%-5%
13
Page 14

English
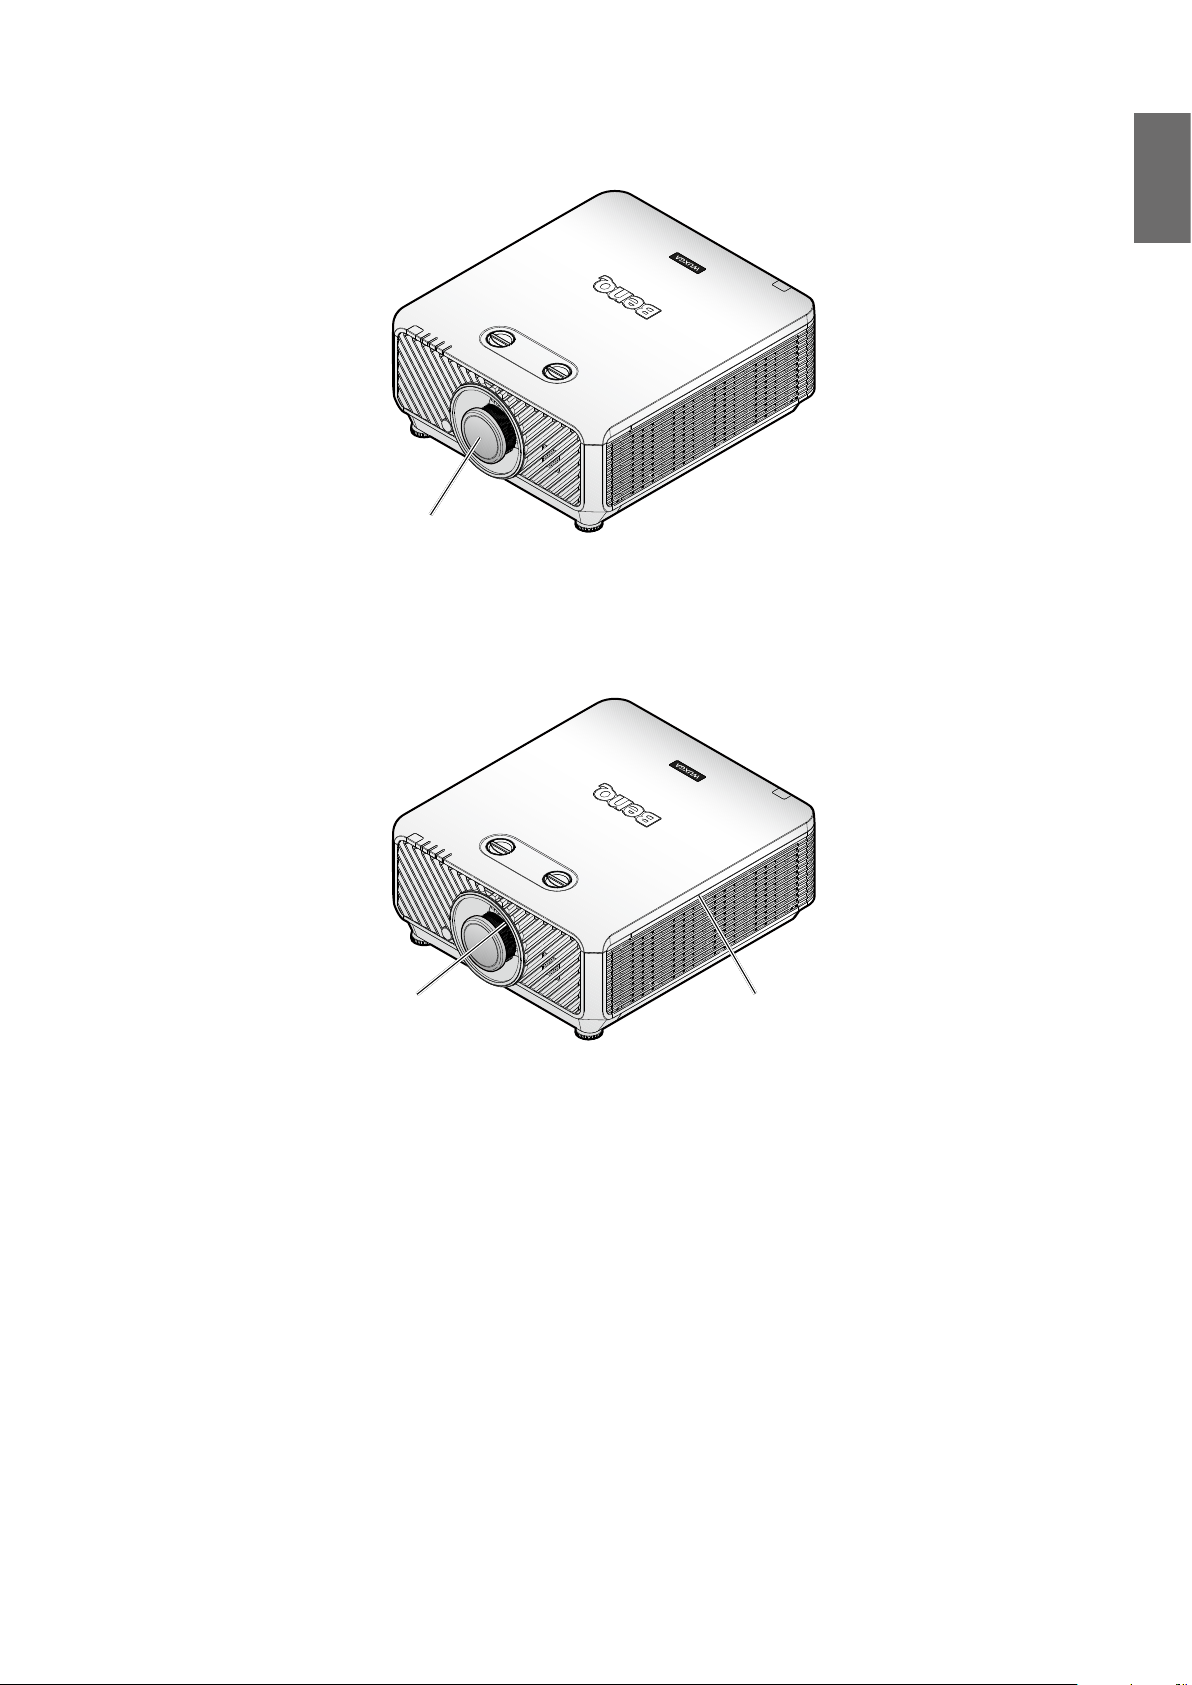
Introduction
Projector exterior view
Front and upper side view
1. Front IR remote sensor
2. FILTER indicator light
3. LIGHT SOURCE indicator light
4. TEMPerature indicator light
5. POWER indicator light
6. Front vent (cool air intake)
7. Front adjuster foots
8. LENS RELEASE button
9. Projection lens
10. Side vent (cool air intake)
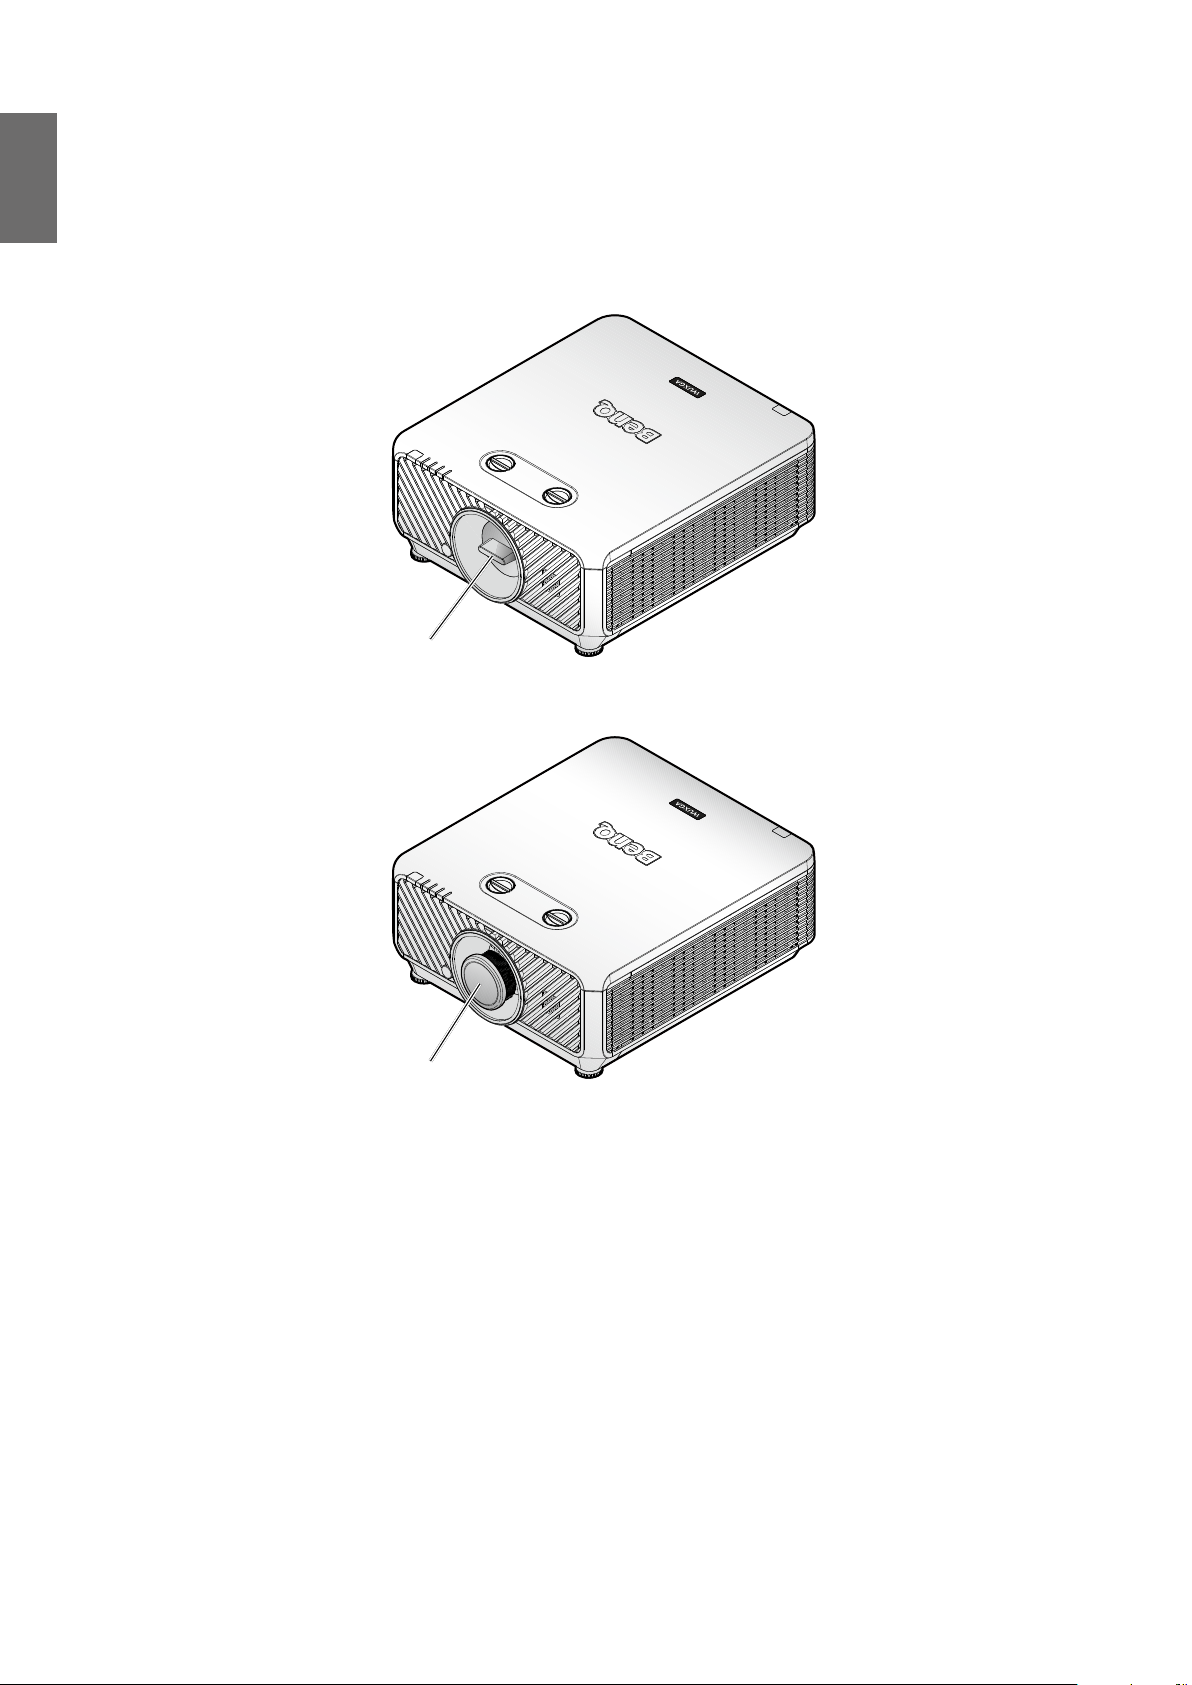
Rear and upper side view
11. Rear IR remote sensor
12. Vent (cool air outtake)
13. AC power cord inlet
14. Control terminals
15. Control panel
14
Page 15
Controls and functions
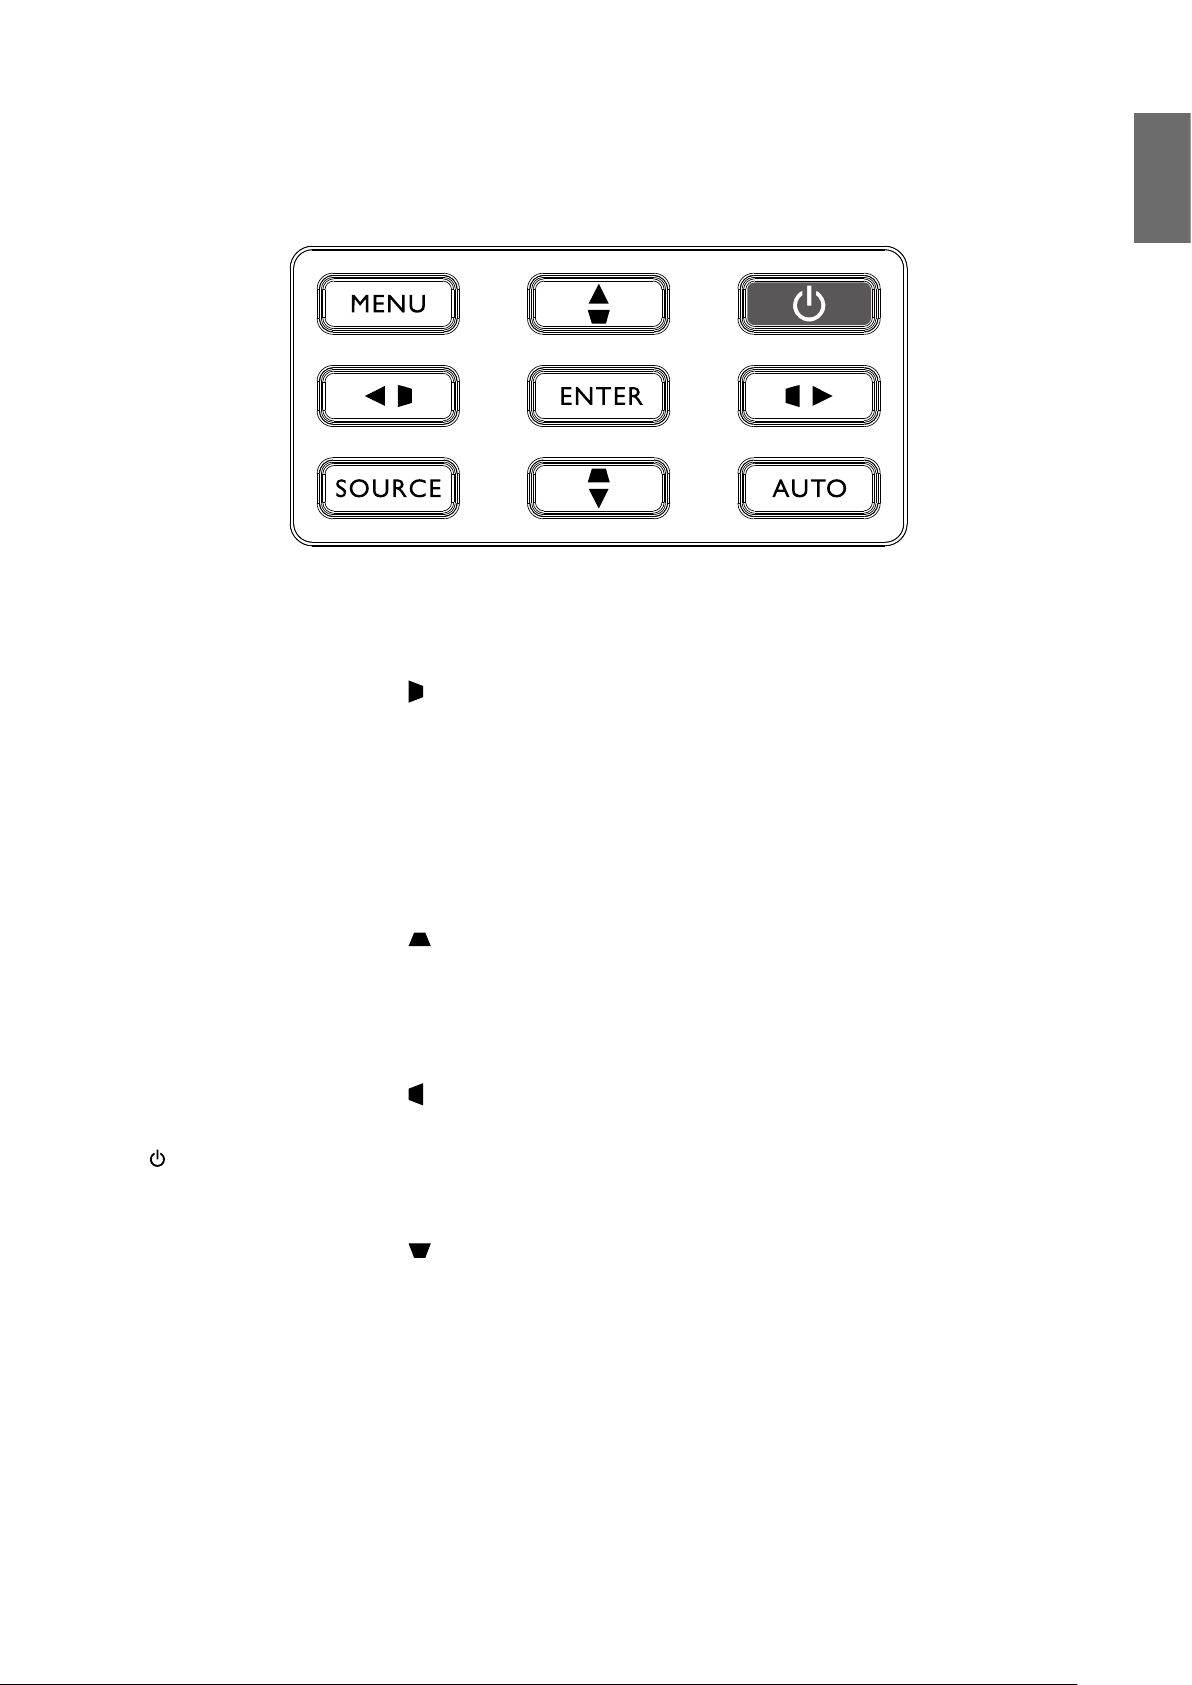
Control panel
• MENU
Turns on the On-Screen Display (OSD) menu. Goes back to previous OSD menu, exits and
saves menu settings. See "Using the menu" on page 41 for details.
English
• Keystone/Arrow keys (
Manually corrects distorted images resulting from an angled projection.
• SOURCE
Displays the source selection bar.
• ENTER
Selects an available picture setup mode.
Enacts the selected On-Screen Display (OSD) menu item. See "Using the menu" on page 41
for details.
• Keystone/Arrow keys (
Manually corrects distorted images resulting from an angled projection.
• AUTO
Automatically determines the best picture timings for the displayed image. See "Auto adjusting
the image" on page 39 for details.
• Keystone/Arrow keys (
Manually corrects distorted images resulting from an angled projection.
•
Power
Toggles the projector between standby mode and on. See "Switch on the projector" on
page 34 and "Switch off the projector" on page 40 for details.
• Keystone/Arrow keys (
When the On-Screen Display (OSD) menu is activated, the ▲, ▼, ◄, and ► keys are used as
directional arrows to select the desired menu items and to make adjustments. See "Using the
menu" on page 41 for details.
/◄ Left)
/▼ Down)
/► Right)
/▲ Up)
15
Page 16
English
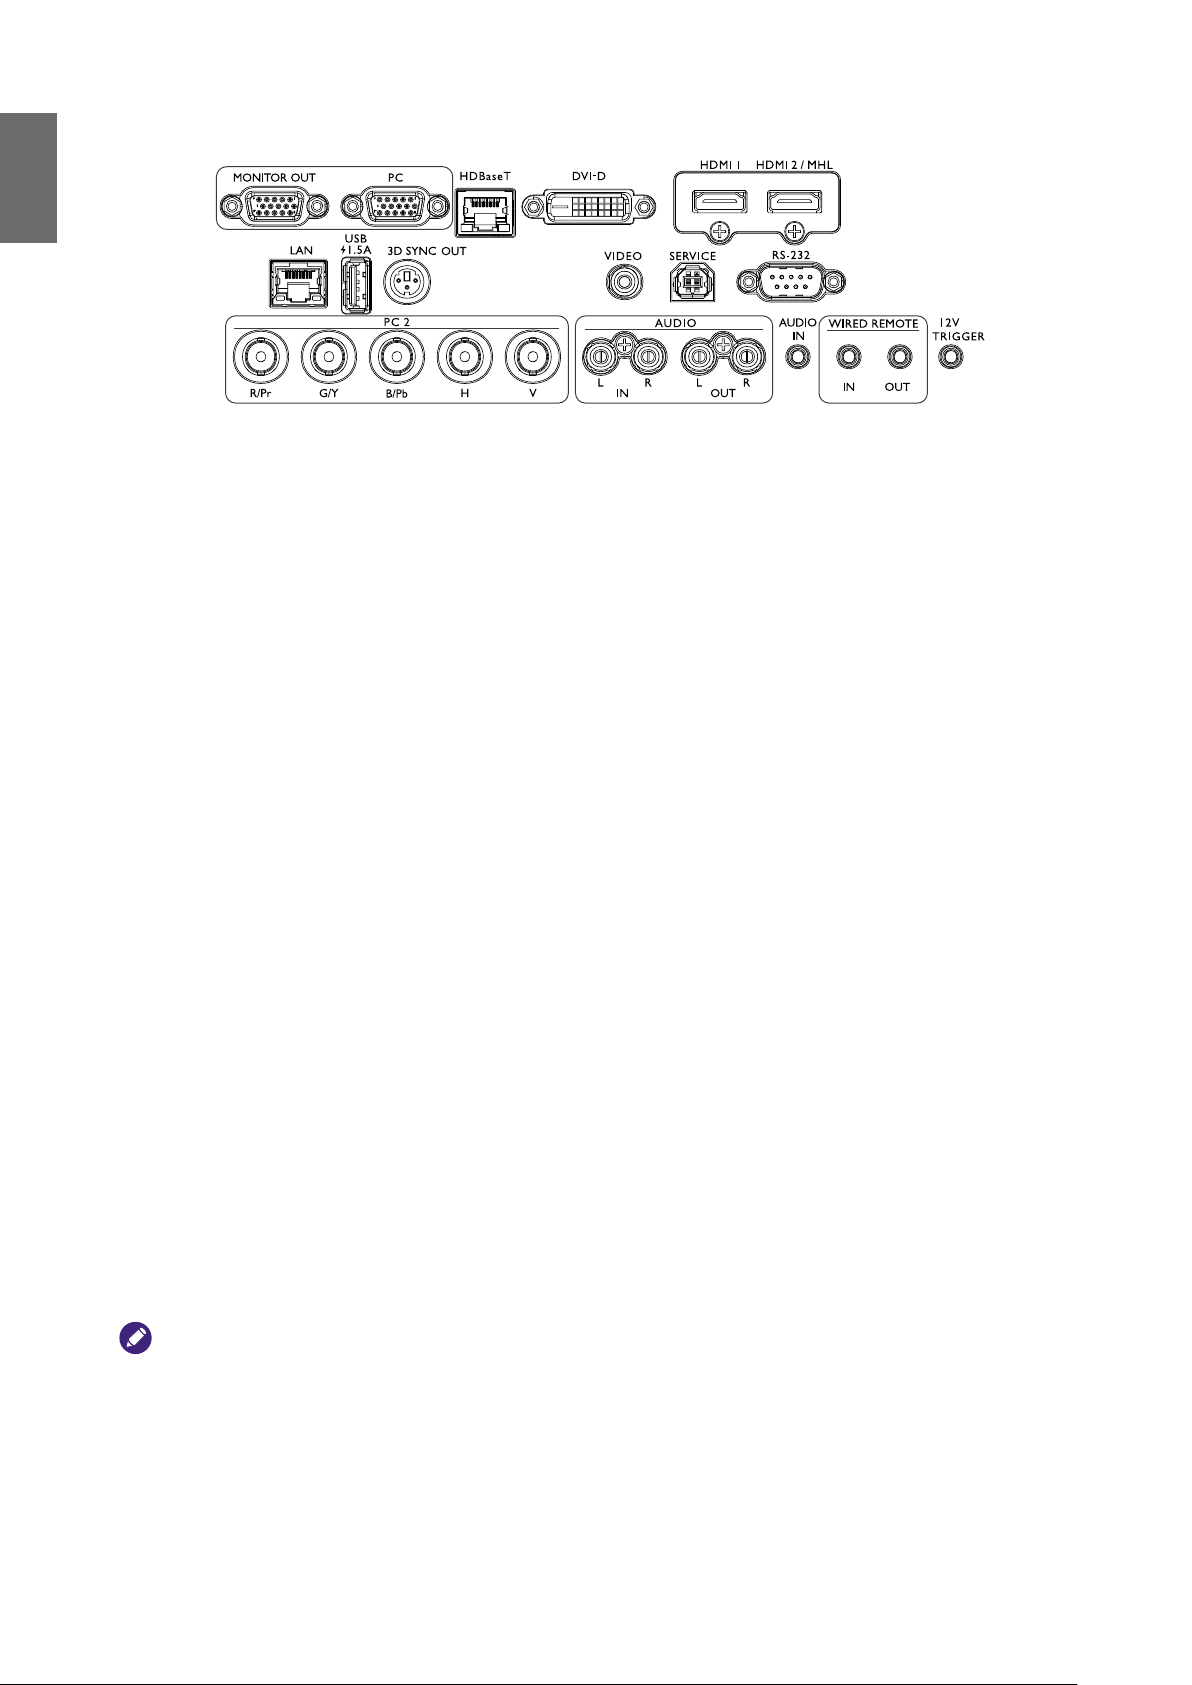
Control terminal
• MONITOR OUT
Connection to other display equipment for concurrent playback display.
• PC
15-pin VGA port for connection to RGB, component HD source, or PC.
• H DB as eT
For connection to RJ45 Cat5/Cat6 cable to input uncompressed high-denition video (HD).
• DVI-D
Connection to DVI source.
• HDMI 1
Connection to HDMI source.
• HDMI 2/MHL
Connection to HDMI or MHL source.
• LAN
For connection to RJ45 Cat5/Cat6 Ethernet cable to control the projector through a network.
• USB 1.5A
Support 5V/1.5A output.
• 3D SYNC OUT
Connection to 3D IR sync signal transmitter.
• VIDEO
Connection to a video source.
• SERVICE
Maintenance exclusive port for authorized maintenance personnel only.
• RS-232
Standard 9-pin D-sub interface for connection to PC control system and projector maintenance.
• PC 2 (R/Pr, G/Y, B/Pb, H, V)
Connection to RGB or YPbPr/YCbCr output signal with BNC type input terminal.
• AUDIO IN (L/R)
Connection to an audio input source via an audio or audio L/R cable.
• AUDIO OUT (L/R)
Connection to a speaker or headset.
• AUDIO IN
Connection to an audio input source via an audio cable.
• WIRED REMOTE IN
Connection to remote control for wire remote control.
Caution:
Make sure the port is valid before inserting a wired remote controller. The remote controller may be damaged in case
of an invalid port, e.g. a wired remote controller is connected to trigger output.
• WIRED REMOTE OUT
Connection to another projector.
• 12V TRIGGER
3.5mm mini earphone jack, employs 200mA display relay to provide 12(+/-1.5)V output and short
circuit protection.
16
Page 17
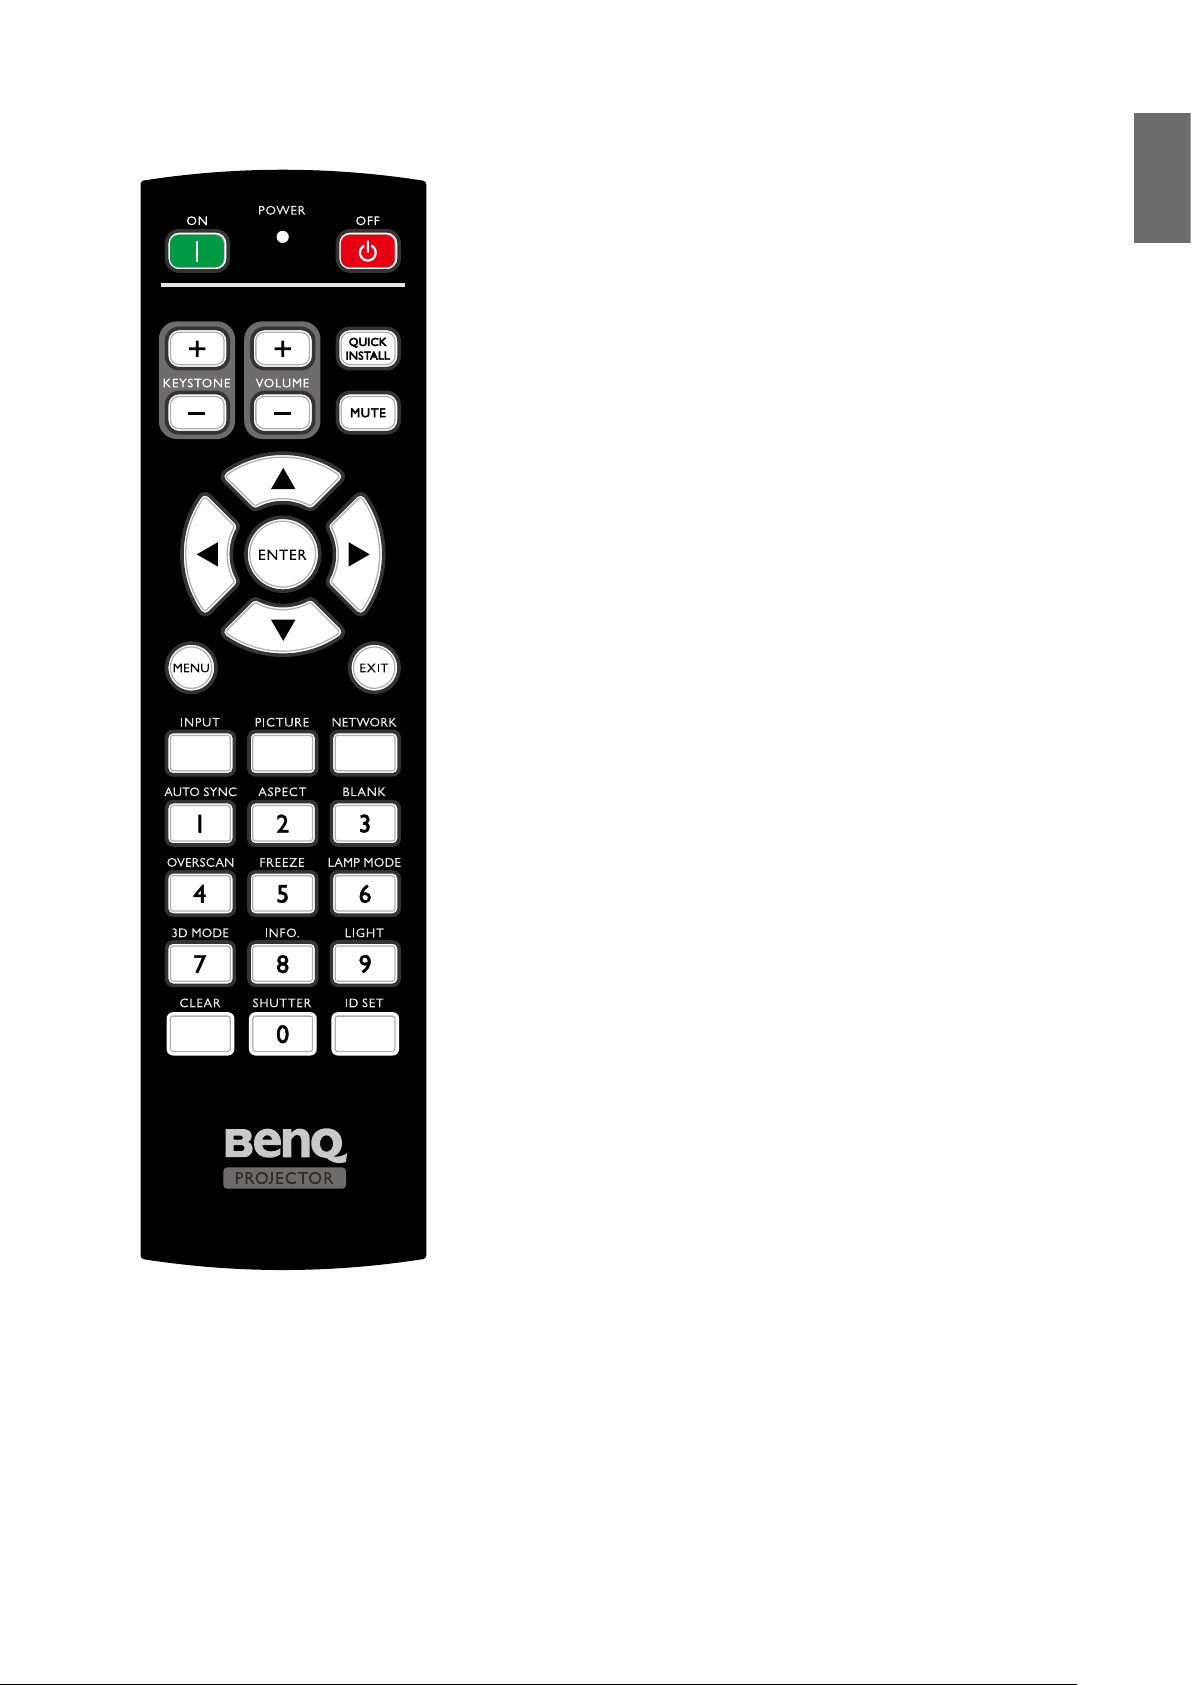
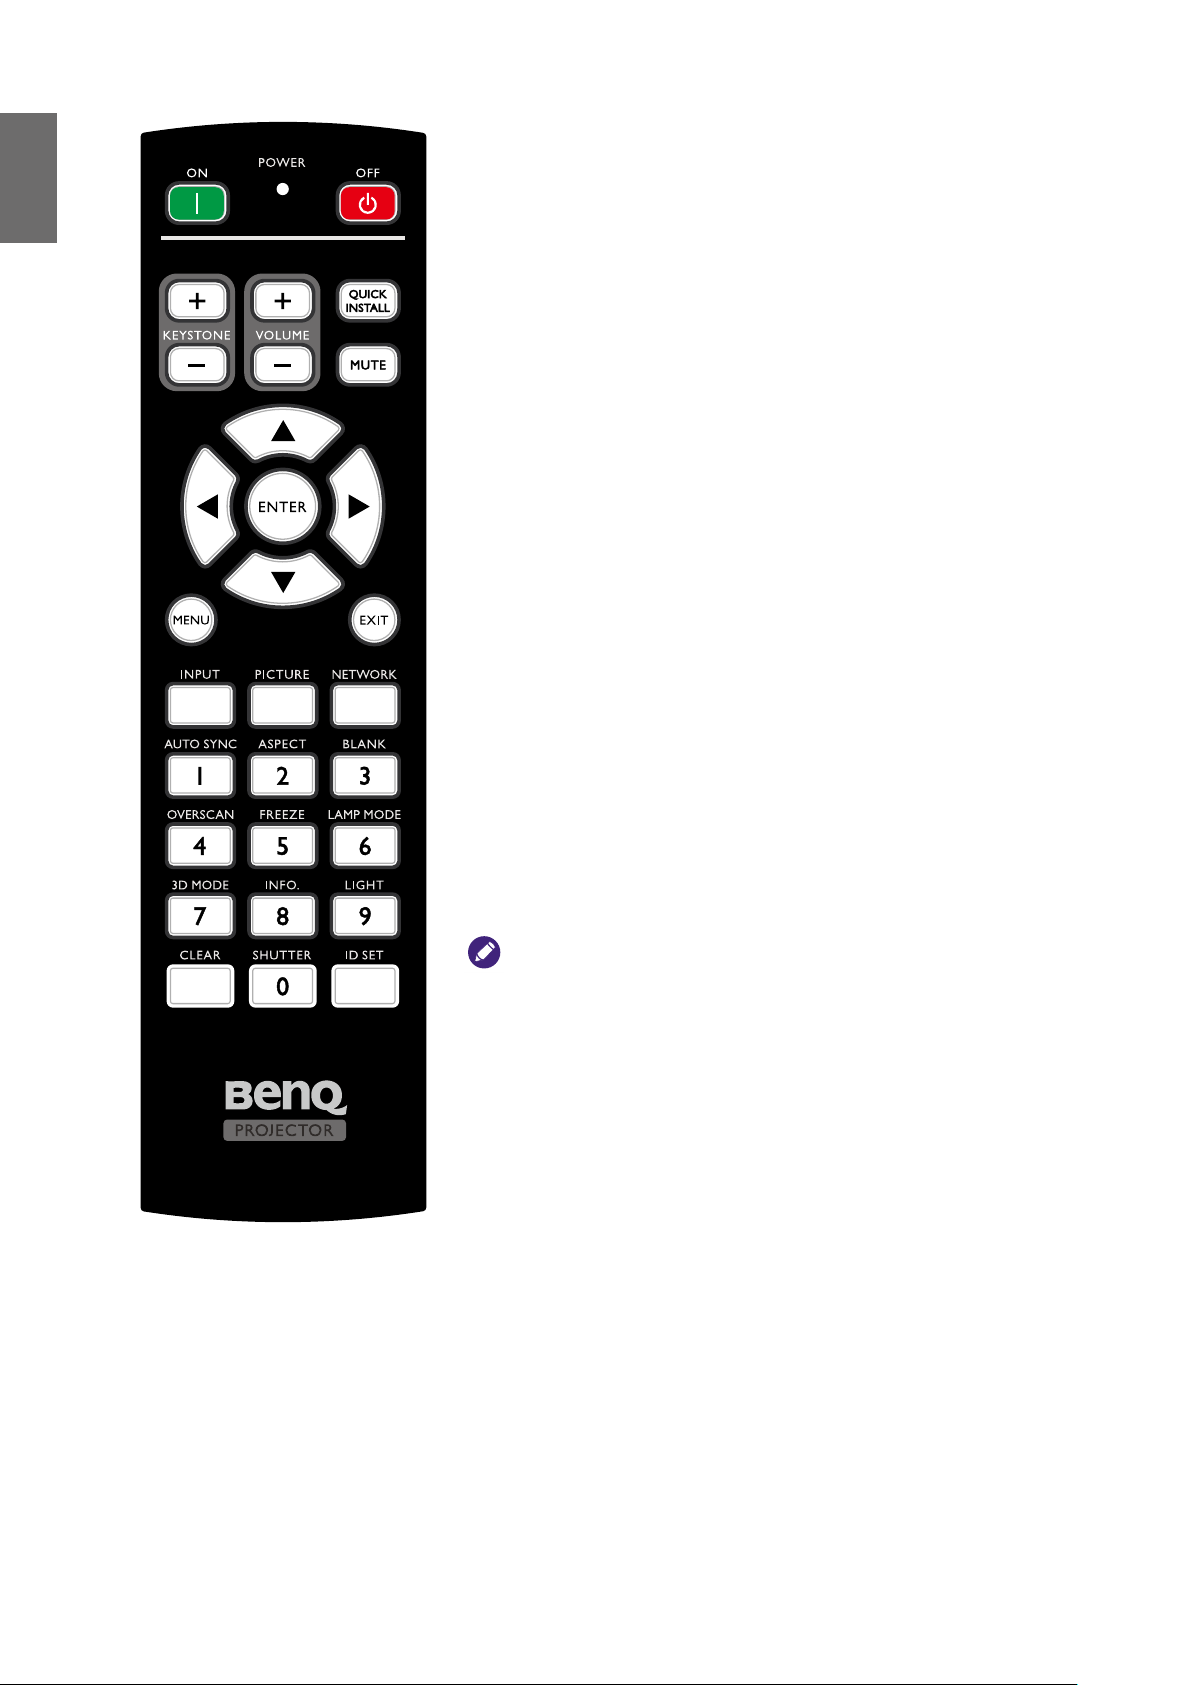
Remote control
English
• ON / OFF
Toggles the projector between standby mode and on.
• KEYSTONE+/KEYSTONE-
Manually corrects distorted images resulting from an
angled projection.
• VOLUME +/VOLUME -
Increases/decreases the projector volume.
• QUICK INSTALL
Displays the Quick Install OSD menu.
• MUTE
Toggles projector audio between on and off.
• Arrow keys (▲ Up, ▼ Down, ◄ Left, ► Right)
When the On-Screen Display (OSD) menu is activated,
the arrow keys are used as directional arrows to select
the desired menu items and to make adjustments. See
"Using the menu" on page 41 for details.
• ENTER
Selects an available picture setup mode. Activates the
selected On-Screen Display (OSD) menu item.
• MENU
Turns on the On-Screen Display (OSD) menu. Goes back
to previous OSD menu, exits and saves menu settings.
• EXIT
Goes back to previous OSD menu, exits and saves menu
settings.
• INPUT
Selects an input source for display.
• PCITURE
Press to display Picture menu.
• NETWORK
Selects Network Display as the input signal source.
• AUTO SYNC
Automatically determines the best picture timings for the
displayed image.
• ASPECT
Selects the display aspect ratio.
• BLANK
Used to hide the screen picture.
17
Page 18
English
• OVERSCAN
Press to select overscan mode.
• FREEZE
Freezes the projected image.
• LAMP MODE
Press to display OSD menu to select desired light source
mode.
• 3D MODE
Press to display 3D setup menu.
• INFO.
Press to display INFORMATION menu.
• LIGHT
Press to open backlight of remote controller.
• CLEAR
Clear remote ID SET assigned to all projectors.
Press CLEAR and ID SET for ve seconds. The LED
blinks three times then the ID setting is cleared.
• SHUTTER
The function is not available on this projector.
• ID SET
• Remote control ID SET (set the particular remote
code)
Press to set remote ID.
Press ID SET for three seconds. The POWER
indicator on the remote control blinks, then press
01~99 to designate an ID.
Note:
The remote control number (Remote control ID) must match the
Projector ID Setting number for accurate control.
• Clear Remote ID SET (set remote code to all)
Press CLEAR and ID SET for ve seconds. The
POWER indicator on the remote control blinks a
single instance to reset remote code to all, can control
projector no matter projector id setting.
• Numeric buttons
Enters numbers in network settings.
Numeric buttons 1, 2, 3, 4 cannot be pressed when asked
to enter password.
• WIRE REMOTE jack
Connect to projector for wire remote control.
18
Page 19
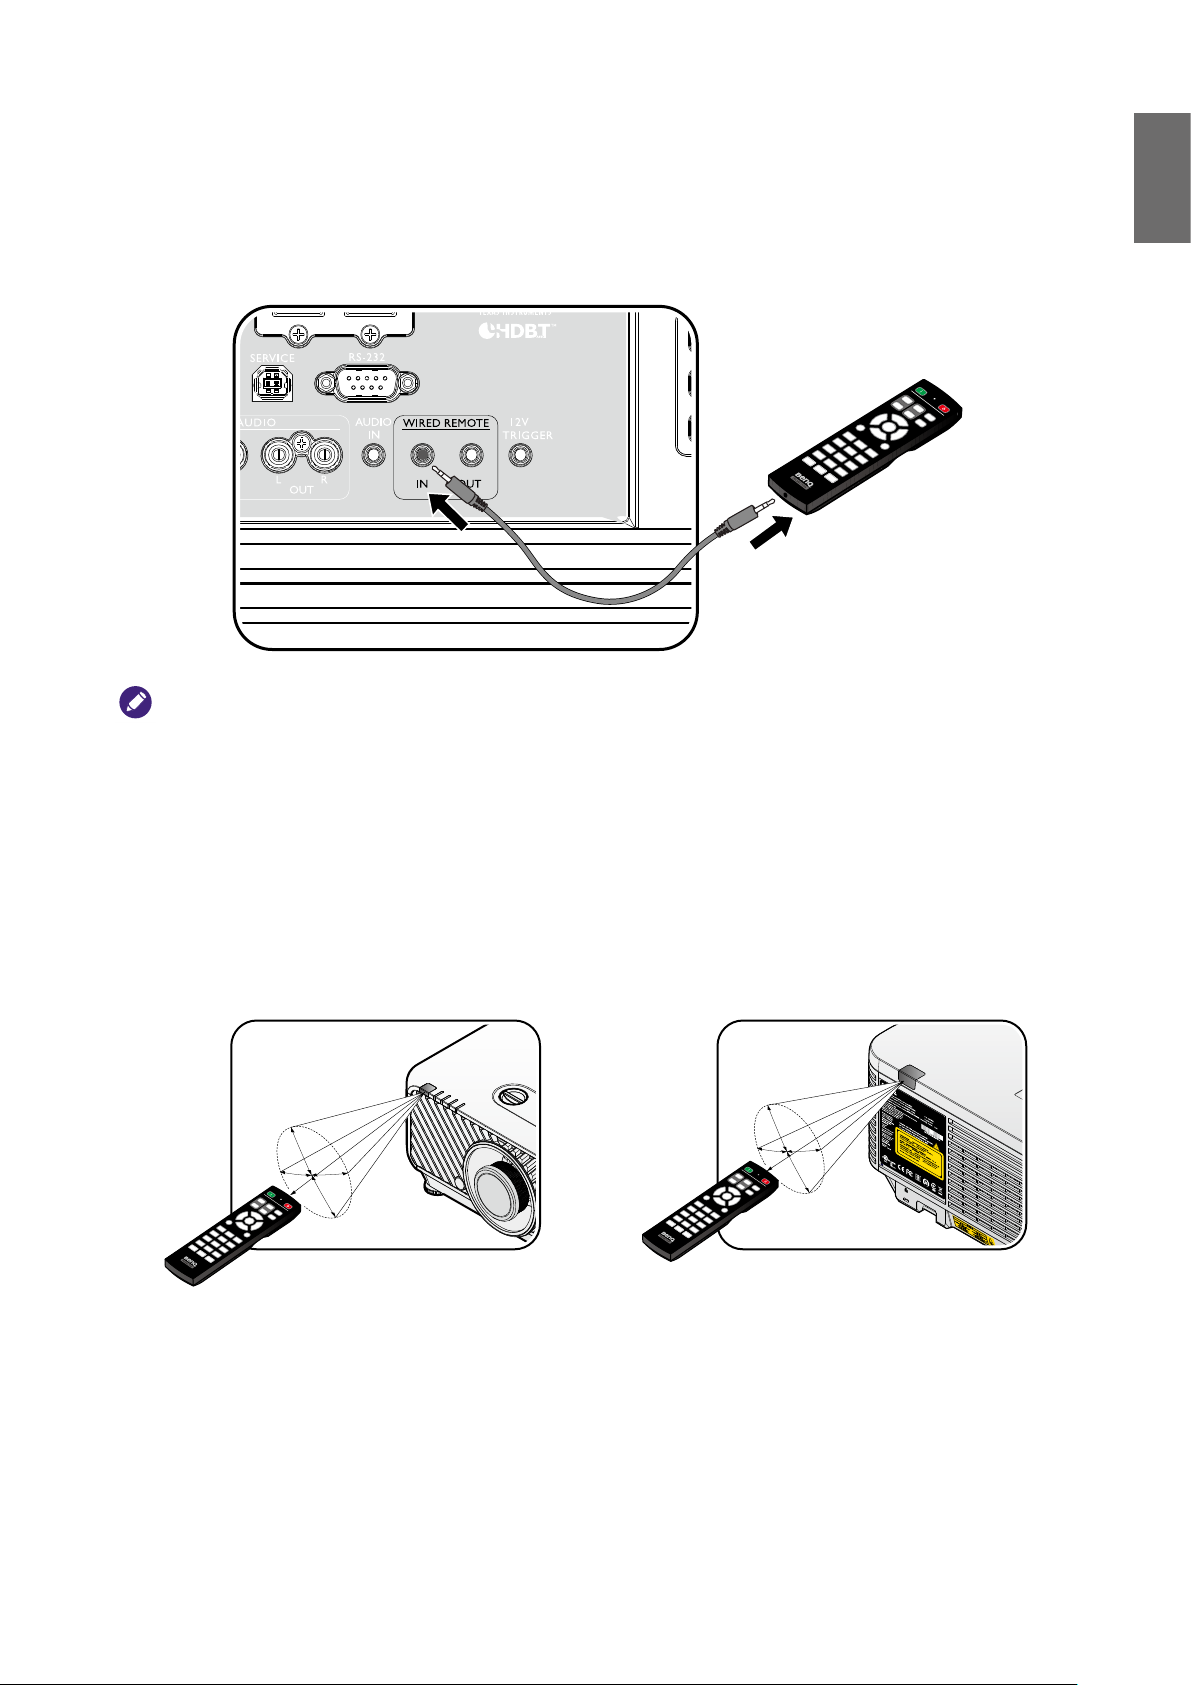
Connect with projector
When you use a system with multiple projectors, use commercially available M3 stereo mini jack
cables to connect the other projectors via the WIRED REMOTE IN/WIRED REMOTE OUT
terminals.
The remote control is effective even in places where obstacles stand in the light path or where
devices are susceptible to outside light.
English
Note:
Use two core shielded cables no longer than 15 m (49.2 ft). The remote control may not operate when the length of
the cable exceeds 15 m (49.2 ft) or when it is not properly shielded.
Remote control effective range
Infra-Red (IR) remote control sensor is located on the front and rear of the projector. The remote
control must be held at an angle within 30 degrees perpendicular to the projector's IR remote
control sensor to function correctly. The distance between the remote control and the sensor
should not exceed 8 meters (~ 26 feet).
Make sure that there are no obstacles between the remote control and the IR sensor on the
projector that might obstruct the infra-red beam.
Approx. ±30°
Approx. ±30°
19
Page 20
English
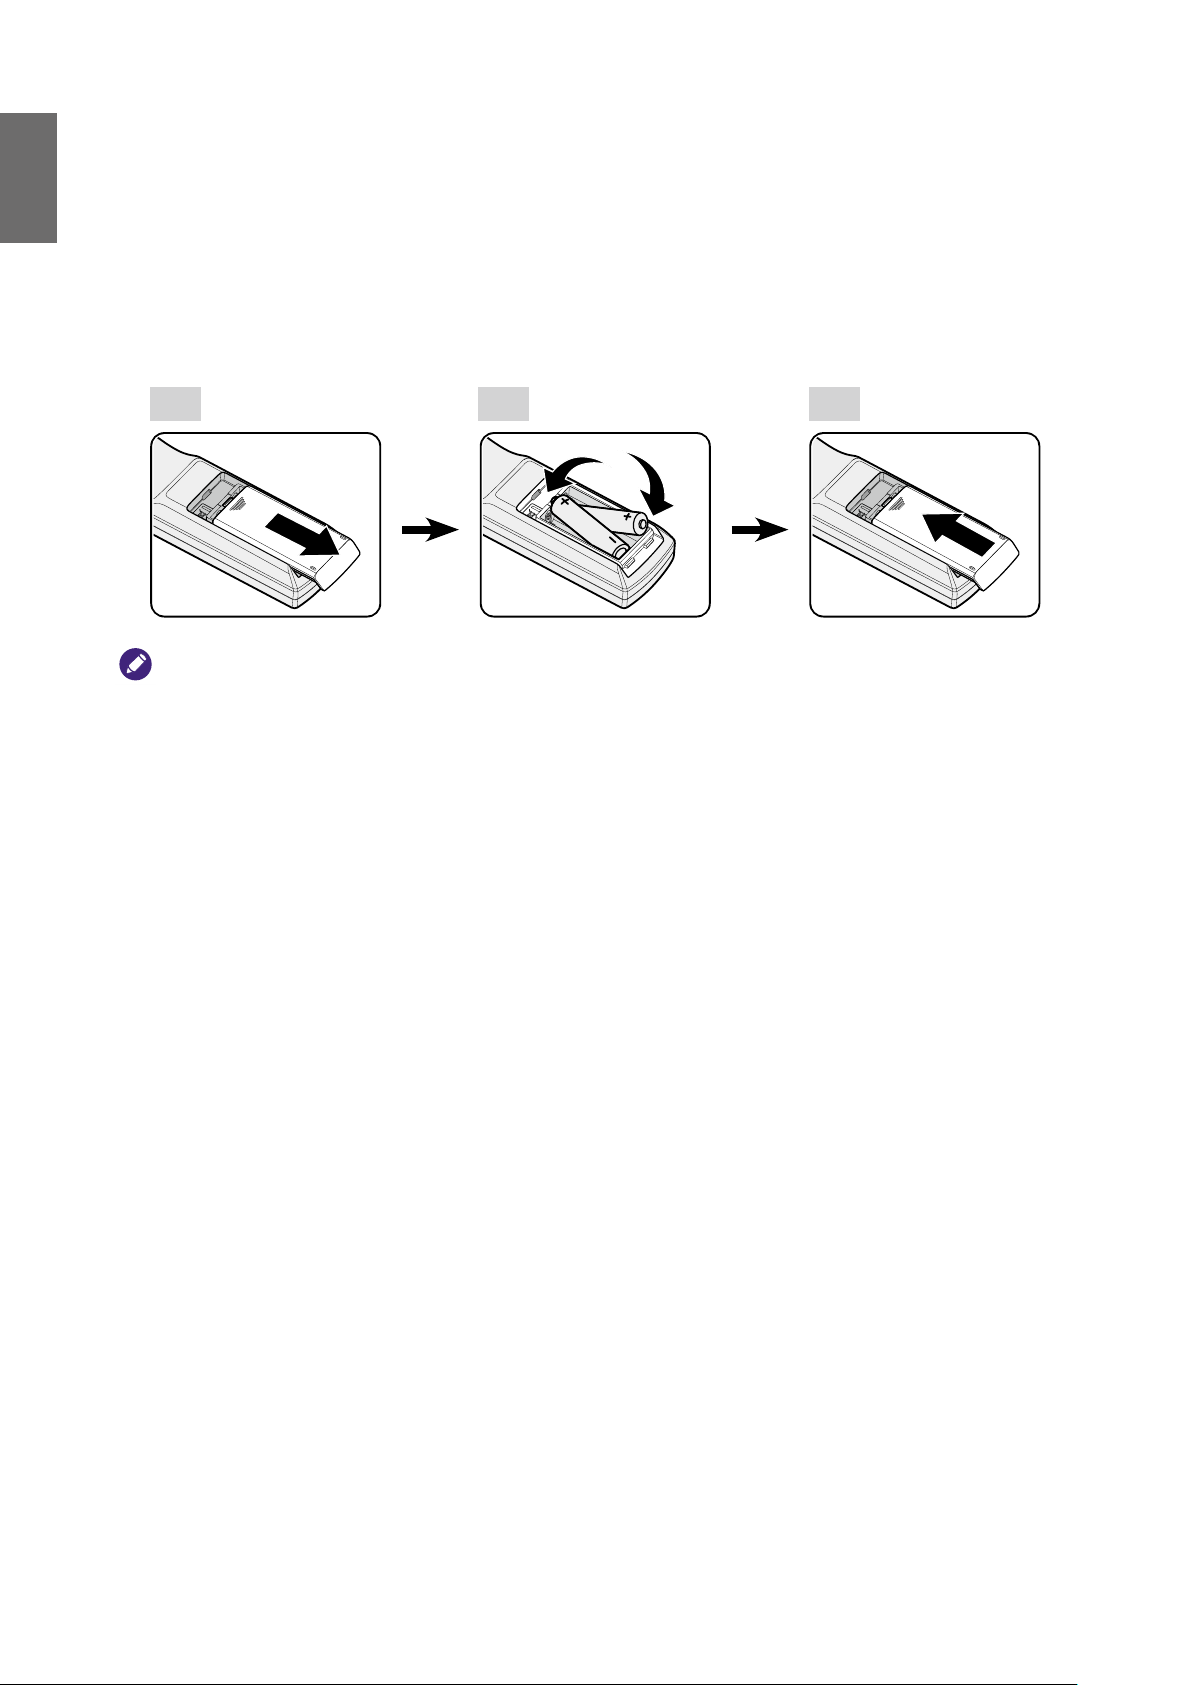
Replacing the remote control battery
1. To open the battery cover, turn the remote control over to view its back, push on the nger
grip on the cover and slide it up in the direction of the arrow as illustrated. The cover will slide
off.
2. Remove any existing batteries (if necessary) and install two AA batteries observing the battery
polarities as indicated in the base of the battery compartment. Positive (+) goes to positive and
negative (-) goes to negative.
3. Ret the cover by aligning it with the base and sliding it back down into position. Stop when it
clicks into place.
2 31
Caution:
• Avoid excessive heat and humidity.
• There may be battery damage if the battery is incorrectly replaced.
• Replace only with the same or equivalent type recommended by the battery manufacturer.
• Dispose of the used battery according to the battery manufacturer’s instructions.
• Never throw a battery into a re. There may be danger of an explosion.
• If the battery is dead or if you will not be using the remote control for a long time, remove the battery to prevent
damage to the remote control from possible battery leakage.
20
Page 21
Installation
Installing removing the optional lens
Caution:
• Do not shake or place excessive pressure on the projector or the lens components as the projector and lens
components contain precision parts.
• Before removing or installing the lens, be sure to turn off the projector, wait until the cooling fans stop, and turn off
the main power switch.
• Do not touch the lens surface when removing or installing the lens.
• Keep ngerprints, dust or oil off the lens surface. Do not scratch the lens surface.
• Work on a level surface with a soft cloth under it to avoid scratching.
• If you remove and store the lens, attach the lens cap to the projector to keep off dust and dirt.
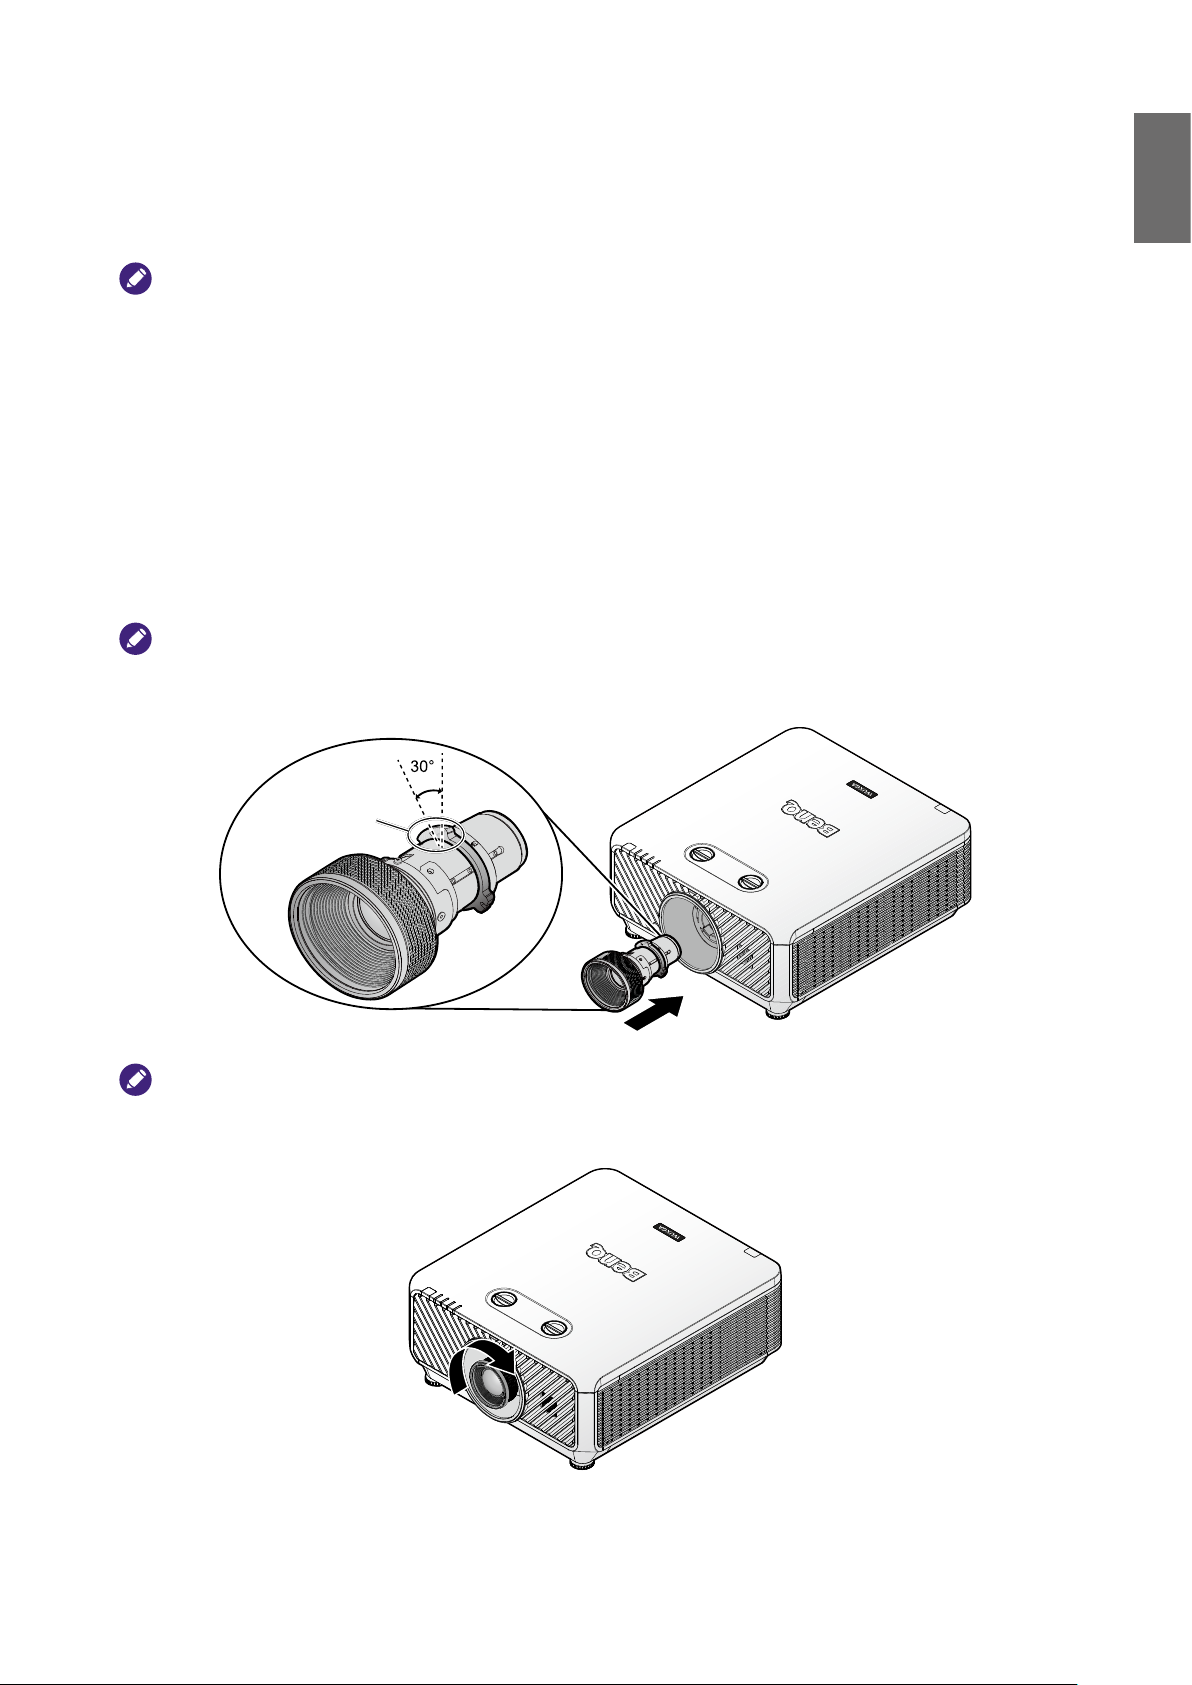
Installing the new lens
Remove both end caps from the lens.
Note:
Removal of the plastic body cap before inserting a lens for the rst time.
1. Align the ange and correctly position at the 11 o'clock position as shown in the picture.
English
Flange
Note:
Flange must be positioned at the 11 o'clock position, direction as shown in the picture.
2. Rotate the lens clockwise until you feel it click into place.
21
Page 22
English
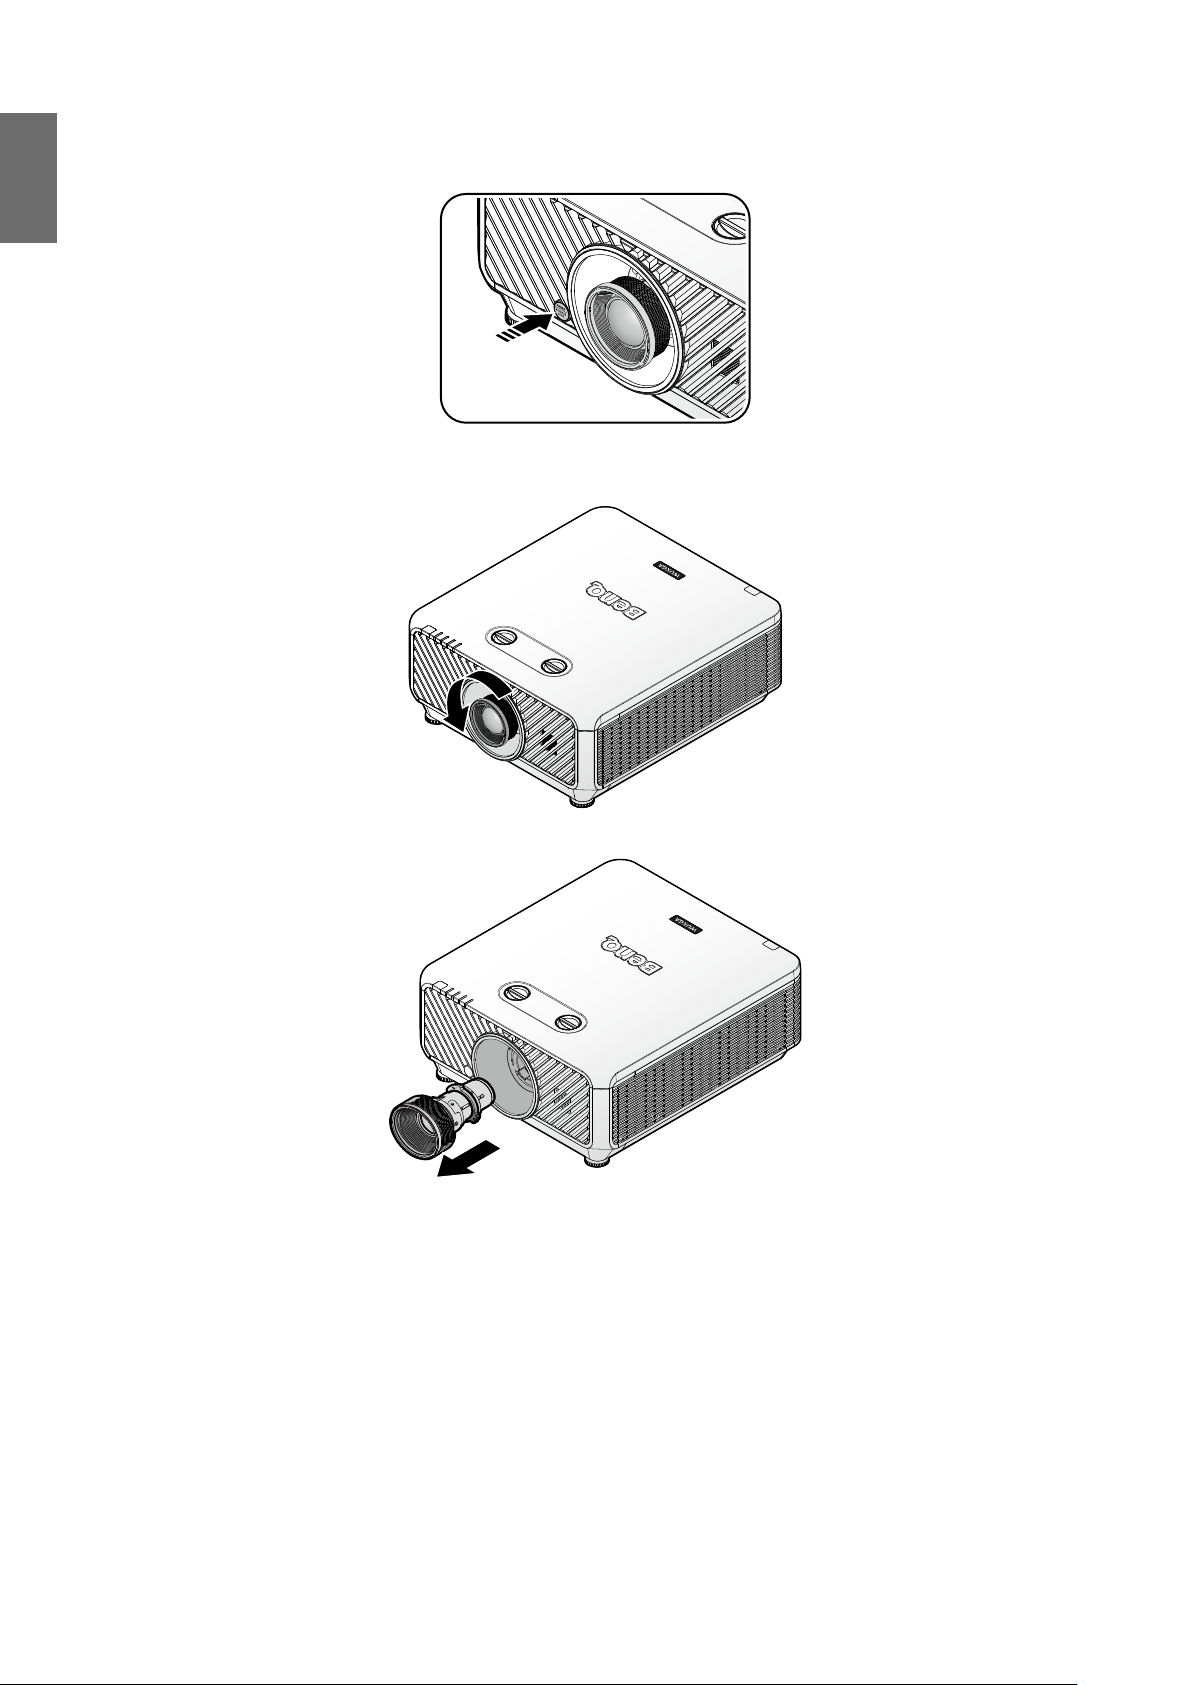
Removing the existing lens from the projector
1. Push the LENSE RELEASE button to the unlock position.
2. Grasp the lens.
3. Rotate the lens counterclockwise. The existing lens will be disengaged.
4. Pull out the existing lens slowly.
22
Page 23
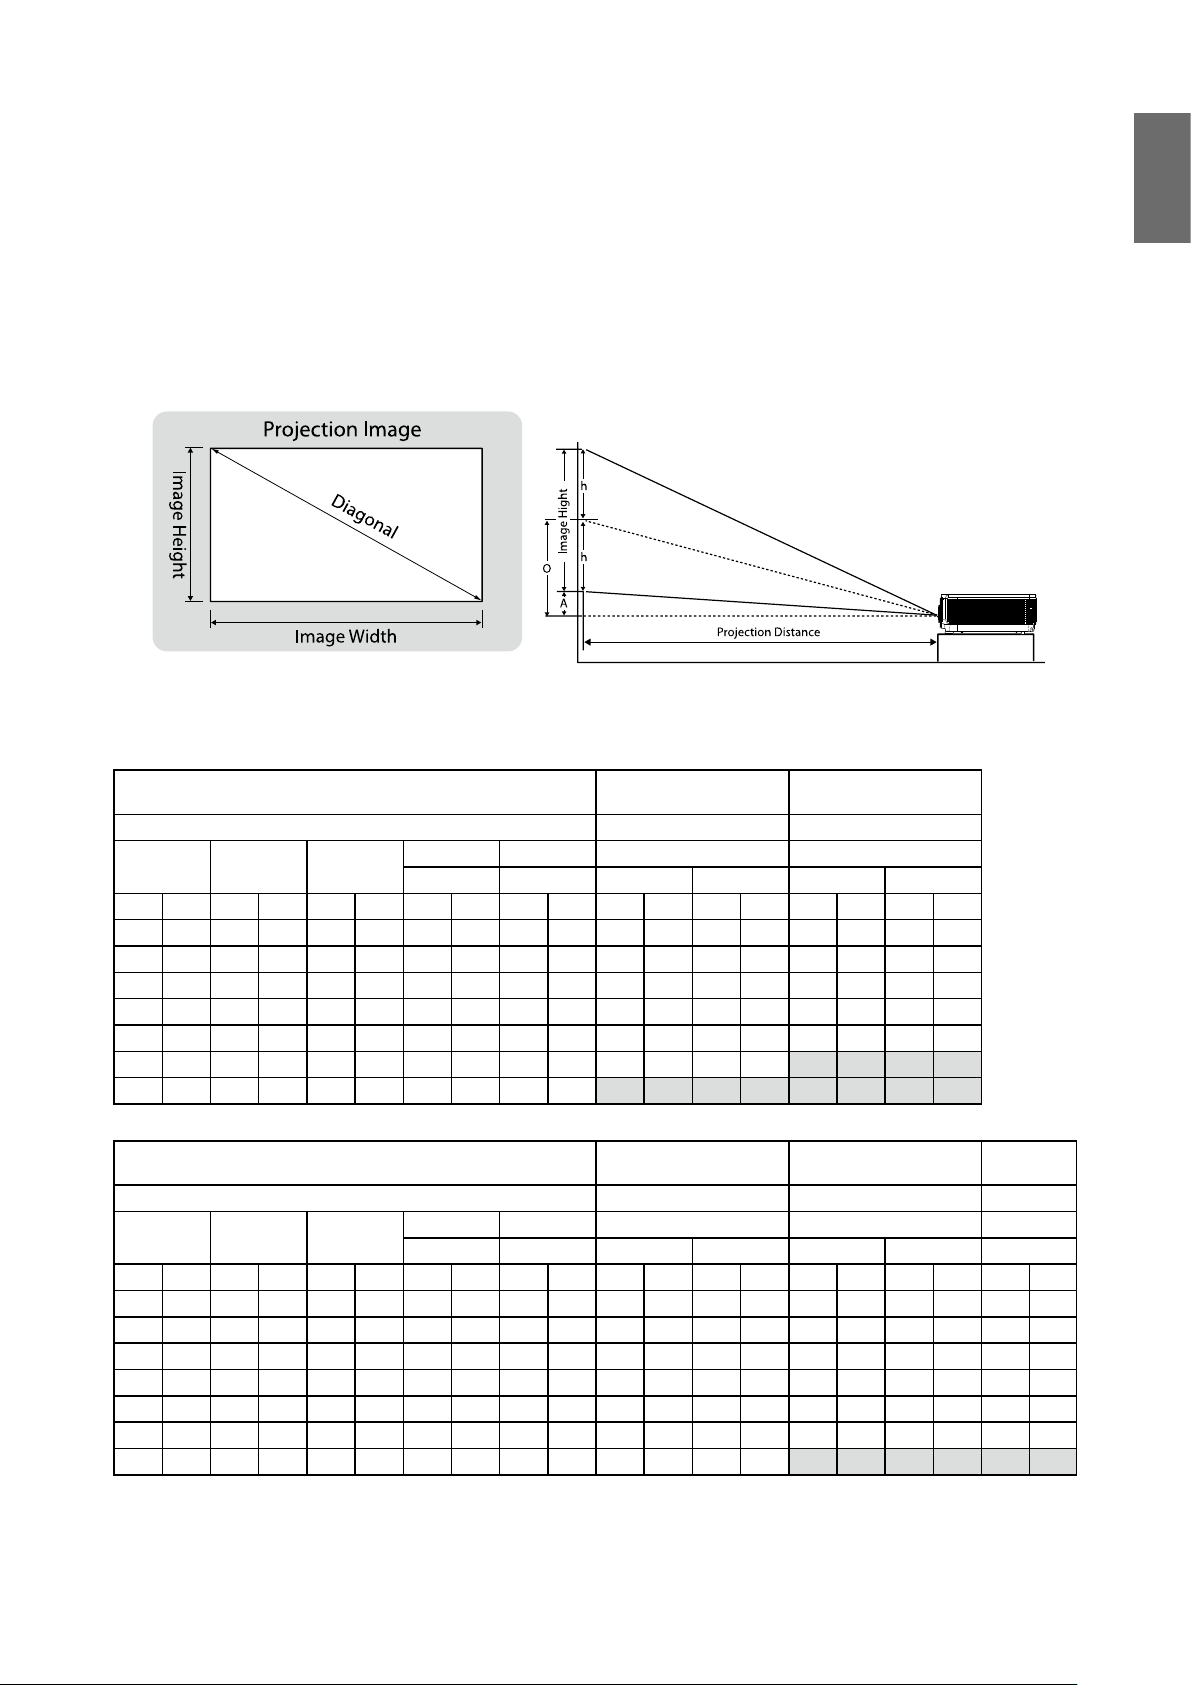
Evaluate for distance by image size
Obtaining a preferred projected image size
The distance from the projector lens to the screen, the zoom setting (if available), and the
video format each factors in the projected image size.
Projection dimensions
Refer to "Dimensions" on page 69 for the center of lens dimensions of this projector before
calculating the appropriate position.
English
LX9215
The screen aspect ratio is 4:3 and the projected picture is 4:3.
Lens
Throw ratio 1.14~1. 347 1.6~2
Diagonal Image Width Image Height
(Inch) (m) (Inch) (m) (I nch) (m) (Inch) (m) (Inch) (m) (Inch) (m) (Inch) (m) (Inch) (m) (Inch) (m)
80 2 .03 64 1.63 48 1.22 0.0 0.000 24.0 0.610 73 1.85 86 2.19 102 2.60 128 3.25
100 2.54 80 2.03 60 1.52 0.0 0.000 30.0 0.762 91 2.32 108 2.74 128 3.25 160 4.06
120 3.05 96 2.44 72 1.83 0.0 0.000 36.0 0.914 109 2.78 129 3.28 154 3.90 192 4.88
150 3.81 12 0 3.05 90 2.29 0.0 0.000 45.0 1.14 3 137 3.47 162 4 . 11 192 4.88 240 6.10
200 5.08 160 4.06 120 3.05 0.0 0.000 60.0 1.524 182 4.63 216 5.47 256 6. 50 320 8.13
300 7.62 240 6.10 18 0 4. 57 0.0 0.000 90.0 2.286 274 6.95 323 8 .21 - - - -
400 10 .16 320 8.13 240 6.10 0.0 0.000 120.0 3.048 - - - - - - - -
Lens
Throw ratio 2~3 3.11~5.18 0.81
Diagonal Image Width Image Height
(Inch) (m) (Inch) (m) (I nch) (m) (Inch) (m) (Inch) (m) (Inch) (m) (Inch) (m) (Inch) (m) (Inch) (m) (Inch) (m)
80 2 .03 64 1.63 48 1.22 0.0 0.000 24.0 0.610 12 8 3.25 192 4.88 199 5.06 332 8.42 52 1.32
100 2.54 80 2.03 60 1. 52 0.0 0.000 30.0 0.762 16 0 4.06 240 6.10 249 6.32 414 10.53 65 1.65
120 3.05 96 2.44 72 1.83 0.0 0.000 36.0 0 .914 192 4.88 288 7.32 299 7. 58 497 12. 63 78 1.98
150 3.81 12 0 3.05 90 2 .29 0.0 0.000 45.0 1.143 24 0 6 .10 360 9.14 373 9.48 622 15.7 9 97 2.47
200 5.08 160 4.06 120 3.05 0.0 0.000 60.0 1.524 320 8.13 480 12.19 498 12.64 829 21.05 130 3.29
300 7.62 240 6.10 18 0 4. 57 0.0 0.000 90.0 2.286 480 12 .19 720 18.29 74 6 18 .96 1243 31. 58 194 4.94
400 10 .16 320 8.13 240 6.10 0.0 0.000 120.0 3.048 640 16.26 960 24.38 - - - - - -
Offset (A) O Distance Distance
Wi de/ Tele Wid e/Tel e Wide Tel e Wide Tel e
Offset (A) O Distance Distance Distance
Wi de/ Tele Wid e/Tel e Wide Tel e Wide Tel e NA
Wide Zoom
(LS2ST1)
Semi Long
(L S 2LT1)
Standard
(LS2SD2)
Long Zoom
(L S 2LT2 )
Wide Fix
(LS2ST3)
23
Page 24
English
LU9235
The screen aspect ratio is 16:10 and the projected picture is 16:10.
Lens
Throw ratio 1.1~1.3 1.5 4~1.93
Diagonal Image Width Image Height
(Inch) (m) (Inch) (m) (I nch) (m) (Inch) (m) (Inch) (m) (Inch) (m) (Inch) (m) (Inch) (m) (Inch) (m)
80 2 .03 68 1.72 42 1.08 2.1 0.054 23.3 0.592 75 1.90 88 2. 24 104 2.65 131 3.33
100 2.54 85 2 .15 53 1. 35 2.6 0 .067 29.1 0. 740 93 2.37 11 0 2.80 131 3.32 164 4.16
120 3.05 102 2.58 64 1.62 3.2 0.081 35.0 0.888 112 2.84 132 3.36 157 3.98 196 4.99
150 3.81 127 3.23 79 2 .02 4.0 0.101 43.7 1. 111 140 3.55 165 4.20 19 6 4.98 245 6.24
200 5.08 17 0 4.31 106 2.69 5.3 0.135 58.3 1.481 187 4 .74 220 5.60 261 6.63 327 8.31
300 7.62 254 6.46 159 4.04 7.9 0.202 87.4 2 . 221 280 7. 11 331 8.4 0 - - - -
400 10 .16 339 8.62 212 5. 38 10.6 0.269 116.6 2.962 - - - - - - - -
Offset (A) O Distance Distance
Wi de/ Tele Wid e/Tel e Wide Wide Wide Wide
Wide Zoom
(LS2ST1)
Standard
(LS2SD2)
Lens
Throw ratio 1.93~2.9 3~5 0.778
Diagonal Image Width Image Height
(Inch) (m) (Inch) (m) (I nch) (m) (Inch) (m) (Inch) (m) (Inch) (m) (Inch) (m) (Inch) (m) (Inch) (m) (Inch) (m)
80 2 .03 68 1.72 42 1.08 2.1 0.054 23.3 0.592 131 3.33 197 5.0 0 204 5.17 339 8.62 53 1.34
100 2.54 85 2 .15 53 1. 35 2.6 0 .067 29.1 0. 740 164 4.16 246 6.25 254 6.46 424 10.7 7 66 1.68
120 3.05 102 2.58 64 1.62 3.2 0.081 35.0 0.888 196 4.99 295 7. 50 305 7. 75 509 12.92 79 2.01
150 3.81 127 3.23 79 2 .02 4.0 0.101 43.7 1. 111 245 6.24 369 9. 37 382 9. 69 636 16.15 99 2 . 51
200 5.08 17 0 4.31 106 2.69 5.3 0.135 58.3 1.481 327 8.31 492 12 .49 509 12 .92 848 21. 54 132 3.35
300 7.62 254 6.46 159 4.04 7.9 0.202 87.4 2 . 221 491 12.47 738 18.74 763 19.39 1272 32.31 - -
400 10 .16 339 8.62 212 5. 38 10.6 0.269 116.6 2.962 655 16 .63 984 24.9 9 - - - - - -
Offset (A) O Distance Distance Distance
Wi de/ Tele Wid e/Tel e Wide Wide Wide Wide NA
Semi Long
(L S 2LT1)
Long Zoom
(L S 2LT2 )
Wide Fix
(LS2ST3)
Note:
There is 5% tolerance among these numbers due to optical component variations. BenQ recommends that if you
intend to permanently install the projector, you should physically test the projection size and distance using the actual
projector before you permanently install it, so as to make allowance for this projector's optical characteristics. This will
help you determine the exact mounting position so that it best suits your installation location.
24
Page 25

Lens dimension
Wide Fix Lens
Wide Zoom Lens
Standard Lens
Semi Long Throw Lens
Long Zoom Lens
Optional Lens (Wide Fix: LS2ST3) Optional Lens (Wide Zoom: LS2ST1)
English
517.41 (20.37)
525.11 (20.67)
525.11 (20.67)
596.90 (23.5)
Optional Lens (Standard: LS2SD2) Optional Lens (Semi Long Throw: LS2LT1)
525.11 (20.67)
531.91 (20.94)
525.11 (20.67)
546.53 (21.51)
Optional Lens (Long Zoom: LS2LT2)
525.11 (20.67)
576.50 (22.69)
25
Page 26

English
Adjusting by Lens shift
Horizontal lens
shift lever
Vertical lens
shift lever
The Lens Shift function can be used to adjust the position of the projected image either
horizontally or vertically within the range detailed below.
Adjusting the vertical image position
The vertical image height can be adjusted between 50% and -10% for XGA, 55% and -15% for
WUXGA of offset position. Please consult the Lens Shift Range diagram below for further
clarication.
Adjusting the horizontal image position
With the lens in the center position the horizontal image position can be adjusted to the left or
right by up to a maximum of 5% of the image width. Please consult the Lens Shift Range diagram
below for further clarication.
26
Page 27

Lens shift range diagram
LX9215
Desk-Front Projection
Height of projected image
English
Normal projection position
Vertical shift
Max 0.5V
1V
Vertical shift
Ceiling Mount-Front Projection
Vertical shift
Height of projected image
Vertical shift
LU9235
Desk-Front Projection
Vertical shift
Max 0.1V
Max 0.5V
Max 0.55V
1H 0.05H0.05H
Width of projected image
1V
Shift to Left Shift to Right
Normal projection position
Height of projected image
Vertical shift
Ceiling Mount-Front Projection
Vertical shift
Height of projected image
Vertical shift
Max 0.15V
Max 0.55V
1V
1H 0.05H0.05H
Width of projected image
1V
Shift to Left Shift to Right
27
Page 28

English
Notice (when edge blending)
• To avoid the image shaking or some pixels in the display may be misaligned, do not use the
projector in the following location:
• In a building close to a construction site.
• In a room where an air conditioner unit is working and it vibrates.
• In a place where the temperature changes dramatically that may cause thermal contraction.
• Before making any adjustment, leave the projector lit for at least 45 minutes after its light
source is turned on. This allows he internal temperature of the projector to stabilize.
Adjusting the Zoom/Focus
You may turn the zoom ring to zoom in or out. To focus the image, rotate the focus ring until the
image is clear. The projector will focus at distances. See page 23.
Zoom ringFocus ring
28
Page 29

Connection
Before connecting
• Before connecting, carefully read the operating instructions for connecting the external device
• Turn off the power to all devices before connecting cables.
• Take note of the following before connecting cables. Failure to do so may result in
malfunctions.
• Before connecting a cable to the projector or to a device that is connected to the
projector, touch any nearby metallic objects to remove any static electricity from your
body.
• Do not use unnecessarily long cables to connect the projector or a device to the projector.
Using a longer cable that is wound makes it act like an antenna, making it more susceptible
to noise.
• When connecting cables, connect GND rst and then insert the connecting terminal of the
connecting device.
• Acquire any connection cables necessary to connect external devices to the system that are
not supplied.
• The images on the screen may wobble if the video signal contains too much jitter. In this case,
a time base corrector (TBC) must be connected.
English
• If synchronization signal outputs from computers or video equipment are disrupted due to
changes in the video output settings or any other reasons, the colors of projected images may
be temporarily disrupted.
• The projector accepts video signals, Y/C signals, YCBCR/YPBPR signals, analog RGB signals
(synchronization signals are TTL level), and digital signals.
• Some computer models are not compatible with the projector.
• Use a cable compensator when you connect devices to the projector with long cables. If a
cable compensator is not used, the image may not display properly.
PC
No. Serial No. Serial
1 R/PR 9 -
2 G/Y 10 GND
3 B/PB 11 GND
4 - 12 DDC data
5 GND 13 SYNC/HD
6 GND 14 VD
7 GND 15 DDC clock
8 GND
29
Page 30

English
16
1724
9
HDMI 1
No. Serial No. Serial
1 TMDS Data2+ 11 TMDS Clock Shield
2 TMDS Data2 Shield 12 TMDS Clock-
3 TMDS Data2- 13 CEC
4 TMDS Data1+ 14 Reserved (N.C. on device)
5 TMDS Data1 Shield 15 SCL
6 TMDS Data1- 16 SDA
7 TMDS Data0+ 17 DDC/CEC Ground
8 TMDS Data0 Shield 18 +5 V Power (max 50 mA)
9 TMDS Data0- 19 Hot Plug Detect
10 TMDS Clock+
DVI-D
No. Serial No. Serial
1 T.M.D.S data 2- 13 -
2 T.M.D.S data 2+ 14 -+5 V
3 T.M.D.S data 2/4 shield 15 GND
Even-numbered pins of 2 to 18
Odd-numbered pins of 1 to 19
4 - 16 Hot plug detection
5 - 17 T.M.D.S data 0-
6 DDC clock 18 T.M.D.S data 0+
7 DDC data 19 T.M.D.S data 0/5 shield
8 - 20 -
9 T.M.D.S data 1- 21 -
10 T.M.D.S clock1+ 22 T.M.D.S clock shield
11 T.M.D.S data 1/3 shield 23 T.M.D.S clock+
12 - 24 T.M.D.S clock-
8
30
Page 31

Connecting with AV equipment
VCR (with built-in TBC)
DVD player with HDMI
terminal (HDCP)
English
Blu-ray disc player
Connecting with computer
Monitor Control Computer Computer
31
Page 32

English
Connecting with HDBaseT transmitter
Projector connecting terminals
Connecting with LAN
32
Page 33

Operations
Switch on/off the projector
Connecting the power cord
Plug the power cord into the projector and into a wall socket. Turn on the wall socket switch
(where tted). Check that the POWER indicator light on the projector lights orange after power
has been applied.
English
Caution:
Please use the original accessories (e.g. power cable) only with the device to avoid possible dangers such as electric
shock and re.
Power indicator
Power Te mp Light Filter Status & Description
Orange - - - Stand-by
Green
Flashing
Green - - - Normal operation
Orange
Flashing
- - - Powering up
- - - Normal power down cooling
33
Page 34

English
Switch on the projector
Press POWER on the projector or ON on the remote control to start the projector and
a start up tone sounds. The POWER indicator light ashes green and stays green when the
projector is on.
The start up procedure takes about 30 seconds. In the later stage of start up, a startup logo is
projected.
(If necessary) Rotate the focus ring to adjust the image clearness.
34
Page 35

Select language
To use the OSD menus, please set them to your familiar language rst.
*After this process is done, this menu will not show up again after 1st time adjustment unless user
presses Reset All Settings.
1. Press ENTER on the projector or remote control to turn the OSD menu on.
English
35
Page 36

English
2. Use ◄/► to highlight the System Setup: Basic menu.
3. Press ▼ to highlight Language and press ENTER to select a preferred language.
4. Press ENTER twice* on the projector or remote control to leave and save the settings.
*The rst press leads you back to the main menu and the second press closes the OSD menu.
36
Page 37

Using the OSD
Choosing a location
Your projector is designed to be installed in one of four possible installation locations:
English
1. Front Table
Select this location with the projector
placed on a table in front of the screen. This
is the most common way to position the
projector for quick setup and portability.
3. Front Ceiling
Select this location with the projector
suspended upside-down from the ceiling in
front of the screen.
Purchase the BenQ Projector Ceiling
Mounting Kit from your dealer to mount
your projector on the ceiling.
*Set Front Ceiling in the SYSTEM
SETUP: Basic > Projector Installation
menu after you turn the projector on.
2. Rea r Ta ble
Select this location with the projector
placed on a table behind the screen.
Note that a special rear projection screen is
required.
*Set Re ar Tabl e in the SYSTEM
SETUP: Basic > Projector Installation
menu after you turn the projector on.
4. Rear Ceiling
Select this location with the projector
suspended upside-down from the ceiling
behind the screen.
Note that a special rear projection screen
and the BenQ Projector Ceiling Mounting
Kit are required for this installation
location.
*Set Rear Ceiling in the SYSTEM
SETUP: Basic > Projector Installation
menu after you turn the projector on.
Your room layout or personal preference will dictate which installation location you select. Take
into consideration the size and position of your screen, the location of a suitable power outlet, as
well as the location and distance between the projector and the rest of your equipment.
37
Page 38

English
Using test pattern
The projector is capable of displaying the grid test pattern. It can be used to assist you with the
adjustment of image size and focus, ensuring that the projected image is free from distortion.
To display the test pattern, open the OSD menu and go to the System Setup: Advanced >
Test Pattern and press ◄/► to select On.
Adjusting by corner t
Manually adjust four corners of the image by setting the horizontal and vertical values.
Using the OSD menu
1. Press MENU and then press ◄/► until the Display menu is highlighted.
2. Press ▼ to highlight Corner Fit and press ENTER. The Corner Fit page displays.
38
Page 39

3. Press ▲/▼/◄/► to select one of the four corners and press ENTER.
4. Press ▲/▼ to adjust vertical values from 0 to 60.
5. Press ◄/► to adjust horizontal values from 0 to 60.
English
Auto adjusting the image
In some cases, you may need to optimize the picture quality. To do this, press AUTO on the
projector or remote control. Within 3 seconds, the built-in Intelligent Auto Adjustment function
will re-adjust the values of Frequency and Clock to provide the best picture quality.
The current source information will be displayed in the upper left corner of the screen for 3
seconds.
Note:
• The screen will be blank while AUTO is functioning.
• This function is only available when PC signal (analog RGB) is selected.
39
Page 40

English
Fine turning the image size and clarity
1. Adjust the projected image to the size that you need using the ZOOM ring.
2. Sharpen the image by rotating the FOCUS ring.
Zoom ringFocus ring
Switch off the projector
1. Press POWER or OFF and a conrmation message will appear prompting you.
If you don't respond in a few seconds, the message will disappear.
2. Press POWER or OFF a second time. The POWER indicator light ashes orange, the
projection light source shuts down.
3. Once the cooling process nishes, a "Power Off Ring Tone" will be heard. The POWER
indicator light is a steady orange and fans stop. Disconnect the power cord from the power
outlet.
Caution:
• To protect the light source, the projector will not respond to any commands during the cooling process.
• Press
40
POWER or ON again to start the projector after the POWER indicator light turns orange.
Page 41

Using the menu
Main menu
The projector is equipped with On-Screen Display (OSD) menus for making various adjustments
and settings.
Below is the overview of the OSD menu.
Main menu icon
Main menu
English
Sub-menu
Current input
signal
Status
Press MENU to
the previous page
or to exit.
1. Display menu (see "Display menu" on page 42)
2. Picture menu (see "Picture menu" on page 45)
3. Source menu (see "Source menu" on page 49)
4. System Setup : Basic menu (see "System setup : Basic menu" on page 50)
5. System Setup : Advanced menu (see "System setup : Advanced menu" on page 52)
6. Information menu (see "Information menu" on page 57)
Available menu items may vary depending on the connected video sources or specied settings.
Menu items that are not available will become grayed out.
• Use the arrow keys (▲/▼/◄/►) on the projector or remote control to move through the
menu items.
• Use ENTER to conrm the selected menu item.
41
Page 42

English
Display menu
• Aspect Ratio
Press ◄/► to adjust the aspect of the projected image. The options are Auto, Real, 4:3, 16:9
and 16:10.
• Using the remote control
1. Press ASPECT to show the current setting.
2. Press ASPECT repeatedly to select an aspect ratio to suit the format of the video signal
and your display requirements.
1. Auto: Scales an image proportionally to
t the projector's native resolution in its
horizontal width. This is suitable for the
incoming image which is neither in 4:3 nor
16:9 and you want to make most use of the
screen without altering the image's aspect
ratio.
15:9 picture
3. 4:3: Scales an image so that it is displayed in
the center of the screen with a 4:3 aspect
ratio. This is most suitable for 4:3 images
like computer monitors, standard denition
TV and 4:3 images aspect DVD movies, as it
displays them without aspect alteration.
2. Real: The image is projected as its original
resolution, and resized to t within the
display area. For input signals with lower
resolutions, the projected image will display
smaller than if resized to full screen. You
could adjust the zoom setting or move the
projector away from the screen to increase
the image size if necessary. You may also
need to refocus the projector after making
these adjustments.
4:3 picture
16:9 picture
4:3 picture
42
Page 43

4. 16:9: Scales an image so that it is displayed
in the center of the screen with a 16:9
aspect ratio. This is most suitable for images
which are already in a 16:9 aspect, like high
denition TV, as it displays them without
5. 16:10: Scales an image so that it is displayed
in the center of the screen with a 16:10
aspect ratio. This is most suitable for images
which are already in a 16:10 aspect, as it
displays them without aspect alteration.
aspect alteration.
16:10 picture
16:9 picture
• 2D Keystone
Press ENTER and press ▲/▼/◄/► to adjust horizontal or vertical distortion brought by the
projection angle.
• Corner Fit
Press ENTER to enter the Corner Fit menu. See "Corner Fit menu" on page 44 for more
details.
• Position
Press ENTER and press ▲/▼/◄/► to adjust the position of the projectored picture.
English
• Phase
Press ◄/► to adjust Phase for the projectored picture.
• H. Size
Press ◄/► to adjust H. Size for the projectored picture.
• Digital Zoom
Press ◄/► to enlarge the projected image.
• Overscan
Press ◄/► to hide edge of the projected image to damage the noise appear.
• 3D
Press ENTER to enter the 3D menu. See "3D menu" on page 44 for more details.
43
Page 44

English
Corner Fit menu
• Top Le ft
Press ENTER and press ▲/▼/◄/► to correct the top left corner.
• Top R i gh t
Press ENTER and press ▲/▼/◄/► to correct the top right corner.
• Bottom Left
Press ENTER and press ▲/▼/◄/► to correct the bottom left corner.
• Bottom Right
Press ENTER and press ▲/▼/◄/► to correct the bottom right corner.
3D menu
• 3D Mode
Press ENTER to enter the 3D Mode menu. Press ▲/▼ to select the 3D format. The options
are Auto, Top Bottom, Frame Sequential, Frame Packing, Side by Side and Off.
• DLP Link
Press ◄/► to disable or enable DLP Link sync. The options are On and Off.
• 3D Sync Invert
Press ◄/► to enable or disable 3D Sync Invert.
• Save 3D Settings
Press ENTER to enter the Save 3D Settings menu. Press ▲/▼ and ENTER to save the
current 3D settings.
• Apply 3D Settings
Press ENTER to enter the Apply 3D Settings menu. Press ▲/▼ and ENTER to apply the
saved 3D settings.
44
Page 45

Picture menu
• Picture Mode
Press ◄/► to select a picture mode. The options are Bright, Presentation, sRGB, Cinema,
DICOM SIM, 3D, User 1 and User 2.
• Bright mode: Maximizes the brightness of the projected image. This mode is suitable for
environments where extra-high brightness is required, such as using the projector in well lit
rooms.
• Presentation mode: Is designed for presentation. The brightness is emphasized in this
mode to match PC and notebook coloring.
• sRGB mode: Maximizes the purity of RGB colors to provide true-to-life images regardless
of brightness setting. It is most suitable for viewing photos taken with an sRGB compatible
and properly calibrated camera, and for viewing PC graphic and drawing applications such
as AutoCAD.
• Cinema mode: Is appropriate for playing colorful movies, video clips from digital cameras
or DVs through the PC input for best viewing in a blackened (dimly lit) environment.
• DICOM SIM: This display mode simulates the grayscale/gamma performance of equipment
used for “Digital Imaging and Communications in Medicine” (DICOM).
Important: This mode should NEVER be used for medical diagnosis, it is for education/
training purposes only.
• 3D mode: Is appropriate for playing 3D images and 3D video clips.
• User 1/User 2 mode: Recalls the settings customized based on the current available
picture modes.
English
• Reference Mode
Press ◄/► to select a reference mode. The options are Bright, Presentation, sRGB, Cinema,
DICOM SIM and 3D.
• Brightness
Press ◄/► to adjust the brightness of the projected
image.
The higher the value, the brighter the image. And lower
the setting, darker the image. Adjust this control so the
black areas of the image appear just as black and that detail in the dark areas is visible.
45
Page 46

English
• Contrast
Press ◄/► to adjust the contrast of the projected
image.
The higher the value, the greater the contrast. Use this
to set the peak white level after you have previously
adjusted the Brightness setting to suit your selected input and viewing environment.
• Color
Press ◄/► to adjust the color saturation.
Lower setting produces less saturated colors. If the setting is too high, colors on the image will
be overpowering, which makes the image unrealistic.
• Tint
Press ◄/► to adjust the tint of the projected image.
The higher the value, the more reddish the picture becomes. The lower the value, the more
greenish the picture becomes.
• Sharpness
Press ◄/► to adjust the display sharpness of the projected image.
The higher the value, the sharper the picture becomes. The lower the value, the softer the
picture becomes.
• Brilliant Color
Press ◄/► to adjust the brilliant color of the projected image.
This feature utilizes a new color-processing algorithm and system level enhancements to enable
higher brightness while providing truer, more vibrant colors in picture. It enables a greater than
50% brightness increase in mid-tone images, which are common in video and natural scenes,
so the projector reproduces images in realistic and true colors. If you prefer images with that
quality, select On. If you don’t need it, select Off.
When Off is selected, the Color Temperature function is not available.
• Color Temperature
Press ◄/► to adjust the color temperature. The options are Cool, Normal and Warm.
• Cool: makes the image appear bluish white.
• Normal: Maintains normal colorings for white.
• Warm: Makes images appear reddish white.
• Color Temperature Fine Tuning
Press ENTER to enter the Color Temperature Fine Tuning menu. See "Color
Temperature Fine Tuning menu" on page 47 for more details.
• 3D Color Management
Press ENTER to enter the 3D Color Management menu. See "3D Color Management
menu" on page 48 for more details.
• Reset Picture Settings
Press ENTER to enter the Reset Picture Settings menu. Press ▲/▼ and press ENTER to
set to the default value.
• Current: Returns current picture mode to the factory preset settings.
• All: Returns all settings, except User 1/User 2 in the Picture menu to the factory preset
settings.
46
Page 47

Color Temperature Fine Tuning menu
• R Gain
Press ◄/► to adjust the Red Gain.
• G Gain
Press ◄/► to adjust the Green Gain.
• B Gain
Press ◄/► to adjust the Blue Gain.
• R Offset
Press ◄/► to adjust the Red Offset.
English
• G Offset
Press ◄/► to adjust the Green Offset.
• B Offset
Press ◄/► to adjust the Blue Offset.
To set a preferred color temperature:
1. Highlight Color Temperature and select Warm, Normal or Cool by pressing ◄/► on
the projector or remote control.
2. Press ▼ to highlight Color Temperature Fine Tuning and press ENTER. The Color
Temperature Fine Tuning page appears.
3. Press ▲/▼ to highlight the item you want to change and adjust the values by pressing ◄/►.
• R Gain/G Gain/B Gain: Adjusts the contrast levels of Red, Green, and Blue.
• R Offset/G Offset/B Offset: Adjusts the brightness levels of Red, Green, and Blue.
4. Press MENU to exit and save the settings.
47
Page 48

English
3D Color Management menu
• Primary Color
Press ENTER to enter the Primary Color menu. Press ▲/▼ to select the primary color.
The options are R, G, B, C, M and Y.
• Hue
Press ENTER to enter the Hue menu. Press ▲/▼/◄/► to adjust settings.
• Saturation
Press ENTER to enter the Saturation menu. Press ▲/▼/◄/► to adjust settings.
• Gain
Press ENTER to enter the Gain menu. Press ▲/▼/◄/► to adjust settings.
3D Color Management
In most installation situations, color management will not be necessary, such as in classroom,
meeting room, or lounge room situations where lights remain on, or where building external
windows allow daylight into the room.
Only in permanent installations with controlled lighting levels such as boardrooms, lecture
theaters, or home theaters, should color management be considered. Color management
provides ne color control adjustment to allow for more accurate color reproduction, should
you require it.
Proper color management can only be achieved under controlled and reproducible viewing
conditions. You will need to use a colorimeter (color light meter), and provide a set of
suitable source images to measure color reproduction. These tools are not provided with
the projector, however, your projector supplier should be able to provide you with suitable
guidance, or even an experienced professional installer.
The Color Management provides six sets (RGBCMY) of colors to be adjusted. When you
select each color, you can independently adjust its range and saturation according to your
preference.
If you have purchased a test disc which contains various
color test patterns and can be used to test the color
presentation on monitors, TVs, projectors, etc. You can
project any image from the disc on the screen and enter
the 3D Color Management menu to make adjustments.
To adjust the settings:
1. Go to the Picture menu and highlight 3D Color
Management.
2. Press ENTER and the 3D Color Management page
displays.
3. Highlight Primary color and press ◄/► to select a
color from among Red, Green, Blue, Cyan, Magenta
and Yellow.
4. Press ▼ to highlight Hue and press ◄/► to select its range. Increase in the range will
48
RED Yellow GREEN
CyanMagenta
BLUE
Page 49

include colors consisted of more proportions of its two adjacent colors.
Please refer to the illustration to the right for how the colors relate to each other.
For example, if you select Red and set its range at 0, only pure red in the projected picture
will be selected. Increasing its range will include red close to yellow and red close to
magenta.
5. Press ▼ to highlight Saturation and adjust its values to your preference by press ◄/►.
Every adjustment made will reect to the image immediately.
For example, if you select Red and set its value at 0, only the saturation of pure red will be
affected.
Source menu
English
• Quick Auto Search
Press ◄/► to enable or disable search the input source automatically.
• Color Space Conversion
Press ◄/► to select the color space. The options are Auto, RGB and YUV.
• Auto Sync
Press ◄/► to enable or disable auto sync function.
49
Page 50

English
System setup : Basic menu
• Language
Press ENTER to enter the Language menu. Press ▲/▼/◄/► to select the language of OSD
menu.
• Projector Installation
Press ◄/► to select the projector installation. The options are Front, Rear, Rear Celling and
Front Ceiling.
• Menu Settings
Press ENTER to enter the Menu Settings menu. See "Menu Settings menu" on page 51
for more details.
• Operation Settings
Press ENTER to enter the Operation Settings menu. See "Operation Settings menu" on
page 51 for more details.
• Remote Receiver
Press ◄/► to select the remote receiver. The options are Front, Rear and Front+Rear.
• Background Color
Press ◄/► to select the background color when no input signal. The options are BenQ, Black,
Blue and Purple.
• Splash Screen
Press ◄/► to select the start up patern when the projector turns on. The options are BenQ,
Black and Blue.
50
Page 51

Menu Settings menu
• Menu Display Time
Press ◄/► to select the menu display time period. The options are 5 sec, 10 sec, 20 sec, 30
sec and Always.
• Menu Position
Press ◄/► to select the menu display position. The options are Center, Top-Left, Top-Right,
Bottom-Right and Bottom-Left.
• Reminder Message
Press ◄/► to enable or disable reminder message displays.
English
Operation Settings menu
• Direct Power On
Press ◄/► to enable or disable automatically turning on the projector when the AC power is
connected.
• Signal Power On
Press ◄/► to enable or disable automatically turning on the projector when an input signal is
detected.
• Auto Power Off
Press ◄/► to enable or disable automatically turning off the projector when there is no input
signal.
• Blank Timer
Press ◄/► to set the length of time the image is blanked. The options are Disable, 3 mins, 10
mins, 15 mins, 20 mins, 25 mins and 30 mins.
• Sleep Timer
Press ◄/► to set the length of time before the projector is turned off. The options are
Disable, 5 mins, 10 mins, 15 mins, 20 mins, 25 mins and 30 mins.
• Reset Filter Timer
Press ENTER to reset the lter timer.
51
Page 52

English
System setup : Advanced menu
• High Altitude Mode
Press ◄/► to enable or disable High Altitude Mode. Enable this function when the operating
altitude is higher than 1500m or the ambient temperature is over 40°C.
• Audio Settings
Press ENTER to enter the Audio Settings menu. See "Audio Settings menu" on page 53
for more details.
• Light Source Settings
Press ENTER to enter the Light Source Settings menu. See "Light Source Settings menu"
on page 54 for more details.
• Security Settings
Press ENTER to enter the Security Settings menu. See "Security Settings menu" on
page 54 for more details.
• Baud Rate
Press ◄/► to select RS-232 baud rate. The options are 2400, 4800, 9600, 14400, 19200,
38400, 57600 and 1152000.
• Test Pattern
Press ◄/► to select the test pattern. The options are Off, Grid, White, Red, Green, Blue,
Black, RGB Ramps, Color Bar, Step Bars, CheckBoard, Horizental Lines, Vertical Lines,
Diagonal Lines, Horizontal Ramp and Vertical Ramps.
• Projector ID Setting
Press ◄/► to enable or disable the projector ID.
• Closed Caption
Press ENTER to enter the Closed Caption menu. See "Closed Caption menu" on page 55
for more details.
• 12 Tr ig ge r
Press ◄/► to enable or disable 12V trigger function.
• Standby Settings
Press ENTER to enter the Standby Settings menu. See "Standby Settings menu" on
page 55 for more details.
52
Page 53

• Network Settings
Press ENTER to enter the Network Settings menu. See "Network Settings menu" on
page 56 for more details.
• Reset All Settings
Press ENTER to reset all settings to default value.
Audio Settings menu
• Mute
Press ◄/► to enable or disable the mute function.
• Using the remote control
Press MUTE to temporarily turn off the sound. While the sound is off, the screen will
display in the upper right corner of the screen.
To restore the sound, press MUTE again.
• Using the OSD menu
1. Press MENU and then press ◄/► until the System Setup: Advanced menu is
highlighted.
2. Press ▼ to highlight Audio Settings and press ENTER. The Audio Settings page displays.
3. Highlight Mute and press ◄/► to select On.
4. To restore the sound, repeat steps 1-3 and press ◄/► to select Off.
English
• Volume
Press ◄/► to adjust the volume of the projector.
• Using the remote control
Press VOLUME+/VOLUME- to select a desired sound level.
• Using the OSD menu
1. Press MENU and then press ◄/► until the System Setup: Advanced menu is
highlighted.
2. Press ▼ to highlight Audio Settings and press ENTER. The Audio Settings page displays.
3. Press ▼ to highlight Volume and press ◄/► to select a desired sound level.
• Build-in speaker
Press ◄/► to enable or disable the built-in speaker.
• Power on/off Ring
Press ◄/► to enable or disable sound when the projector turns on or off.
Note:
The only way to change Power on/off ring tone is setting On or Off here. Setting the sound mute or changing the
sound level will not affect the Power on/off ring tone.
53
Page 54

English
Light Source Settings menu
• Light Source Mode
Press ◄/► to select the light source mode. The options are Normal, Economic, Dimming and
Custom.
• Custom Brightness
Press ◄/► to adjust the brightness of the projector.
• Reset Light Source Timer
Press ENTER to reset the light source timer.
• Light Source Information
Press ENTER to enter the Light Source Information menu.
Security Settings menu
• Change Password
Press ENTER to change the password.
• Change Security Settings
Press ENTER to change the security settings.
• Power On Lock
Press ◄/► to enable or disable the power on lock function. If the function is enabled, you
must enter the password every time the projector is turned on.
54
Page 55

Closed Caption menu
• Closed Caption Enable
Press ◄/► to enable or disable the closed caption function.
• Caption Version
Press ◄/► to select the closed captioning mode. The options are CC1, CC2, CC3 and CC4.
Standby Settings menu
English
• Network
Press ENTER to enable the network function when the projector is in standby mode.
• Monitor Out
Press ◄/► to enable or disable the monitor out function when the projector is in standby
mode.
• Audio Pass Through
Press ◄/► to enable the audio line-out function when the projector is in standby mode. The
options are Audio In, Audio L/R, HDMI 1, HDMI 2 / MHL and Off.
55
Page 56

English
Network Settings menu
• Wired LAN
Press ENTER to enter the Wired LAN menu to setup the IP address, subnet mask, default
gatway, DNS server and DHCP.
• AMX Device Discovery
Press ◄/► to enable or disable the AMX device discovery function. When the function is
enabled, the projector can be detected by an AMX controller.
• Mac Address
Displays the cureent MAC address of the projector.
56
Page 57

Information menu
• Source
Displays the current signal source.
English
• Picture Mode
Displays the current picture mode.
• Light Source Mode
Displays the current light source mode.
• Resolution
Displays the native resolution of the input source.
• 3D Format
Displays the current 3D mode. Only available when 3D Mode is enabled.
• Color System
Displays the input system format.
• Light Source Usage Time
Displays the number of hours the light source has been used.
• Projector ID
Displays the current projector ID.
• Firmware Version
Displays the rmware version of your projector.
57
Page 58

English
Menu structure
Main menu Sub-menu Options
Display Aspect Ratio Auto/ Real/ 4:3/ 16:9/ 16:10
2D Keystone
Corner Fit Top Left/ Top Right/ Bottom
Left/ Bottom Right
Position
Phase
H.size
Digital zoom PC: 1.0X~2.0X
Video: 1.0X~1.8X
Overscan Composite/S-Video: 0- 3
others: 0-3
3D 3D mode Auto/ Off/ Frame sequential/
Frame packing/ Top bottom/
Side by side
DLP Link On/ Off
3D Sync Invert Disable/ Invert
Save 3D Setting 3D Settings 1/ 3D Settings 2/
3D Settings 3
Apply 3D Setting 3D Settings 1/ 3D Settings 2/
3D Settings 3
Picture Picture Mode Bright/ Presentation/ sRGB/
Cinema/ DISCOM/ 3D/ User 1/
User 2
Reference Mode Bright/ Presentation/ sRGB/
Cinema/ DISCOM/ 3D
Brightness
Contrast
Color
Tint
Sharpness
Brilliant Color On/ Off
Color Temperature Cool/ Normal/ Warm
Color Temperature
Fine Tuning
3D Color
Management
Reset picture settings Current/ All/ Cancel
Source Quick Auto Search On/ Off
Color Space
Conversion
Auto Sync On/Off
Primary Color R/ G/ B/ C/ M/ Y
Hue
Saturation
Gain
R Gain/ G Gain/ B Gain/
R Offset/ G Offset/ B Offset
Auto/ RGB/ YUV
58
Page 59

Main menu Sub-menu Options
System Setup: Basic Language
Projector Installation Front/ Rear/ Rear Ceiling/ Front
Ceiling
Menu Setting Menu Display Time 5 sec/ 10 sec/ 20 sec/ 30 sec/
Always
Menu Position Center/ Top-Left/ Top-Right/
Bottom-Right/ Bottom-Left
Reminder Message On/ Off
Operation Setting Direct Power On On/ Off
Signal Power On On/ Off
Auto Power Off Disable/ 3 mins/ 10 mins/
15 mins/ 20 mins/ 25 mins/
30 mins
Blank Timer Disable/ 5 mins/ 10 mins/
15 mins/ 20 mins/ 25 mins/
30 mins
Sleep Timer Disable/ 30 mins/ 1 hr/ 2 hrs/
3 hrs/ 4 hrs/ 8 hrs/ 12 hrs
Reset Filter Timer Reset/ Cancel
Remote Receiver Front+Rear/ Front/ Rear
Background Color BenQ/ Black/ Blue/ Purple
Splash Screen BenQ/ Black/ Blue
System Setup:
Advanced
High Altitude Mode On/ Off
Audio Settings Mute On/ Off
Volume
Build-in speaker On/ Off
Power on/off Ring On/ Off
Light Source Settings Light Source Mode Normal / Economic/ Dimming/
Custom
Custom Brightness 25%-100%
Reset Light Source Timer Reset/ Cancel
Light Source Information Light Source Usage Time/
Normal Mode/ Economic
Mode/ Dimming Mode/
Custom Mode
Security Setting Change Password
Change Security Settings
Power On Lock On/ Off
Baud Rate 2400/ 4800/ 9600/ 14400/
19200/ 38400/ 57600/ 115200
English
59
Page 60

English
Main menu Sub-menu Options
System Setup:
Advanced
Information Current System Status • Source
Test Pattern Off/ Grid/ White/ Red/ Green/
Blue/ Black/ RGB Ramps/
Color Bar/ Step Bars/
CheckBoard/ Horizental Lines/
Vertical Lines/ Diagonal Lines/
Horizontal Ramp/
Vertical Ramps
Projector ID Setting Off/ 01~99
Closed Caption Closed Caption Enable On/ Off
Caption Version CC1/ CC2/ CC3/ CC4
12V Trigger On/ Off
Standby Settings Network Enable Network Standby Mode
Auto Disable Network Standby
Mode
Monitor Out On/ Off
Audio Pass Through Audio In/ Audio L/R/ HDMI 1/
HDMI 2/MHL/ Off
Network settings Wired LAN Status
DHCP
IP Address
Subnet Mask
Default Gateway
DNS Server
Apply
AMX Device Discovery On/ Off
Mac Address
Reset All Settings Reset/ Cancel
• Picture Mode
• Lightsource Mode
• Resolution
• 3D Format
• Color System
• Lightsource Usage Time
• Projector ID
• Firmware Version
60
Page 61

Maintenance
Before maintaining the projector
• Make sure to turn off the power before maintaining the projector.
• When switching off the projector, make sure to follow the procedures in "Switch off the
projector" on page 40.
Care of the projector
Your projector needs little maintenance. The only thing you need to do on a regular basis is to
keep the lens clean.
Never remove any parts of the projector. Contact your dealer if other parts need replacing.
Clean the lens front surface
Clean the lens whenever you notice dirt or dust on the surface.
• Use a canister of compressed air to remove dust.
• If there is dirt or smears, use lens-cleaning paper or moisten a soft cloth with lens cleaner and
gently wipe the lens surface.
English
Caution:
Never use any type of abrasive pad, alkaline/acid cleaner, scouring powder, or volatile solvent, such as alcohol, benzene,
thinner or insecticide. Using such materials or maintaining prolonged contact with rubber or vinyl materials may result
in damage to the projector surface and cabinet material.
Clean the projector case
Before you clean the case, turn the projector off using the proper shutdown procedure as
described in "Switch off the projector" on page 40 and unplug the power cord.
• To remove dirt or dust, wipe the case with a soft, lint-free cloth.
• To remove stubborn dirt or stains, moisten a soft cloth with water and a neutral pH detergent.
Then wipe the case.
Caution:
Never use wax, alcohol, benzene, thinner or other chemical detergents. These can damage the case.
61
Page 62

English
Filter maintenance
Cleaning the lter
The air lter prevents dust from accumulating on the surface of the optical elements inside the
projector. If the lter is dirty or clogged, your projector may overheat or degrading the projected
image quality.
1. Turn off the projector, and unplug the AC power cord from the AC outlet.
2. Cleaning the lter with a vacuum cleaner.
Caution:
Recommend avoiding dusty or smoky environments when you operate the projector, it may cause poor image quality. If
the lter is heavily clogged and unable to clean, replace a new lter.
Note:
Using a ladder is recommended to access the lter. Do not remove the projector from the wall mount.
62
Page 63

Replacing the side lter
English
1. Turn off the projector and unplug the power
cord from the outlet. Remove any dust on
the projector and around the air vents.
Loosen the two captive screws that secure
the lter cover.
2. Flip up the lter cover.
4. Align the holes on the new lter module
with the captive screws on the lter cover.
5. Replace the lter cover onto the projector
by pushing gently in the direction shown and
tighten the screws.
3. Remove the lter module from the
projector.
63
Page 64

English
Replacing the front lter
1. Turn off the projector and unplug the power
cord from the outlet. Remove any dust on
the projector and around the air vents.
Loosen the two captive screws that secure
the lter cover.
2. Remove the lter module from the
projector.
4. Replace the lter cover into the projector
by pushing gently in the direction shown.
5. Tighten the screws.
3. Replace the new lter module with the lter
cove r.
Note:
Do not wash the lter with the water or other liquid matter.
Resetting the lter timer
6. After the startup logo, open the On-Screen Display (OSD) menu. Go to the SYSTEM
SETUP: Basic > Operation Settings menu. Press ENTER. The Operation Settings page
displays. Highlight Reset Filter Timer. A warning message displays asking if you want to reset
the lter timer. Highlight Reset and press ENTER. The lter time will be reset to '0'.
64
Page 65

LED indicator
System message
Power Te mp Light Filter Status & Description
Orange - - - Stand-by
English
Green
Flashing
Green - - - Normal operation
Orange
Flashing
Red Red Red - Downloading
Green - Red - Color wheel start fail
Green -
Red
Flashing
Red - Red - Scaler reset fail
- Red - - LAN download fail
- Green - - LAN download processing
Green - Orange - Lightsource life exhausted
- Green
- - - Powering up
- - - Normal power down cooling
Red
Flashing
- - - Scaler shutdown fail
Red
Flashing
- Phosphor wheel start fail
- Lens release
- Green Red - Case open
Light source error message
Power Te mp Light Filter Status & Description
- - Red - Lightsource error in normal operation
-- -
Orange
Flashing
Red Lightsource is not lit up
Filter message
Power Te mp Light Filter Status & Description
Green - - Orange Filter replace warning
65
Page 66

English
Thermal error message
Power Te mp Light Filter Status & Description
Red Red - - Fan 1 error
Red
Red Green - - Fan 3 error
Red
Red
Flashing
Red
Flashing
Red
Flashing
Red
Flashing
Red Red - Green Fan 9 error
Green Red - - Temperature 1 error
Green
Green Green - - Thermal sensor 1 short error
Red
Flashing
Green
Flashing
Red - - Fan 5 error
Red
Flashing
Green - - Fan 7 error
Green
Flashing
Red
Flashing
- - Fan 2 error
- - Fan 4 error
- - Fan 6 error
- - Fan 8 error
- - Thermal sensor 1 open error
Green
Green
Flashing
Green
Flashing
Green
Flashing
Green
Flashing
Green
Flashing
Orange
Orange Green - - Thermal sensor 3 short error
Orange
Green
Flashing
Green
Flashing
Red - - Temperature 2 error
Red
Flashing
Green - - Thermal sensor 2 short error
Green
Flashing
Green Green - Temperature 3 error
Red
Flashing
Green
Flashing
Green
- - Thermal IC #1 I2C connection error
- - Thermal sensor 2 open error
- - Thermal IC #2 I2C connection error
- - Thermal sensor 3 open error
- - Thermal IC #3 I2C connection error
Green
Flashing
- Temperature 4 error
Green
Flashing
Green Red Red - Thermal break warning
66
Green
Flashing
Green - Temperature 5 error
Page 67

Troubleshooting
Troubleshooting
The projector does not turn on.
Cause Remedy
English
There is no power from the power
cable.
Attempting to turn the projector on
again during the cooling process.
Plug the power cord into the AC inlet on the projector, and
plug the power cord into the power outlet. If the power outlet
has a switch, make sure that it is switched on.
Wait until the cooling down process has completed.
No picture.
Cause Remedy
The video source is not turned on or
connected correctly.
The projector is not correctly
connected to the input signal device.
The input signal has not been correctly
selected.
Turn the video source on and check that the signal cable is
connected correctly.
Check the connection.
Select the correct input signal with the SOURCE key on the
projector or remote control.
Blurred image.
Cause Remedy
The projection lens is not correctly focused. Adjust the focus of the lens using the focus ring.
The projector and the screen are not
aligned properly.
The lens cover is still closed. Open the lens cover.
Adjust the projection angle and direction as well as the height
of the unit if necessary.
Remote control does not work.
Cause Remedy
The battery is out of power. Replace the battery with new one.
There is an obstacle between the
remote control and the projector.
You are too far away from the projector. Stand within 7 meters (23 feet) of the projector.
Remove the obstacle.
The password is incorrect.
Cause Remedy
You do not remember the password. 1. Press and hold AUTO on the projector or remote control for 3
seconds. The projector will display a coded number on the screen.
2. Write down the number and turn off your projector.
3. Seek help from the local BenQ service center to decode the number.
You may be required to provide proof of purchase documentation to
verify that you are an authorized user of the projector.
67
Page 68

English
Specications
Specications
Optical
Resolution
LX9215
1024 x 768
LU9235
1920 x 1200
Display system
Single-chip DLP™ system
Lens F/Number
STANDARD LS2SD2
F=2.0 to 2.09, f=22.84 to 28.61mm
WIDE FIX LS2ST3
F=2.54, f=11.46mm
WIDE ZOOM LS2ST1
F=2.5 to 3.1, f=28.5 to 42.75mm
SEMI LONG LS2LT1
F=2.05 to 2.27, f=16.64 to 19.5mm
LONG ZOOM1 LS2LT2
F=2.2 to 2.5, f=44.5 to 74.19mm
Light source
Laser diodes
Electrical
Power supply
AC100-240V
50/60 Hz (Automatic)
6.5A
Power consumption
650W (Max); < 0.5W (Standby)
Mechanical
Weight
52.8 lbs (24 Kg) (without lens)
Control
USB
Type - B x1
RS-232 serial control
9 pin x 1
IR receiver x 2
12V TRIGGER
12VDC (Max. 0.2 A) x 1
LAN control
RJ45 x 1
Wired Remote
PC audio jack x 1
Input terminals
Computer input
RGB input
D-Sub 15-pin (female) x 1
BNC x 5
Digital input
DVI-D x 1
Video signal input
COMPONENT
D-Sub 15-pin (female) x 1
BNC x 3
VIDEO
RCA jack x 1
SD/HDTV signal input
Digital - HDMI x 1
HDMI 2/MHL x 1
RJ45 x1 (HDBaseT)
Audio signal input
Audio in
PC audio jack x 1
RCA audio jack (L/R) x 1
Output terminals
Speaker
10 watt x 2 (peak to peak)
Audio signal output
RCA R/L jack x 1
Monitor Out
D-Sub 15-pin (female) x1
USB
TYPE-A (5V/1.5A)
3D SYNC OUT x 1
Wire Remote
PC audio jack x 1
Note:
All specications are subject to change without notice.
68
Environmental Requirements
Operating temperature
0°C–40°C at sea level
Operating relative humidity
10%–90% (without condensation)
Operating altitude
0–1499 m at 0°C–35°C
1500–3000 m at 0°C–30°C (with High
Altitude Mode on)
Storage temperature
-20°C–60°C
Storage humidity
10%–90% RH (without condensation)
Page 69

Dimensions
English
Attaching for ceiling mount
*Ceiling Mount Screws:
M6 (Max. L=12, Min. L=10)
69
Page 70

English
Appendix
Timing table
Supported timing for PC & PC 2 input
Resolution Mode
720 x 400 720 x 400_70 70.087 31.4 69 28.3221
VGA _60 59.940 31.4 69 25.175
640 x 480
800 x 600
1024 x 768
VGA _72 72.809 37.861 31.500
VGA _75 75.000 37.500 31.500
VGA _85 85.008 43.269 36.000
SVGA_60 60 . 317 37.879 40.000
SVGA_72 72.18 8 48.077 50.000
SVGA_75 75.000 46.875 49.500
SVGA_85 85.061 53.674 56.250
SVGA_120
(Reduce Blanking)
XGA _60 60.004 48.363 65.000
XGA _70 70.069 56.476 75.000
XGA _75 75.029 60.023 78.750
XGA _ 85 84.997 68.667 94.500
Refresh
Rate (Hz)
119. 854 77.4 2 5 83.000
H
Frequency
(kHz)
Clock
(MHz)
3D Frame
Sequential
◎ ◎ ◎
◎ ◎ ◎
◎
◎ ◎ ◎
3D Top
Bottom
3D side-
by-side
XGA_12 0
(Reduce Blanking)
1152 x 864 1152 x 864_75 75.000 67.500 108.000
1024 x 576 BenQ NB Timing 60.000 35.820 46.996
1024 x 600 BenQ NB Timing 64.995 41.467 51.419
1280 x 720 1280 x 720_60 60.000 45.000 74.250
1280 x 768 1280 x 768_60 59.870 47.776 79.500
WXGA _60 59.810 49.702 83.500
WXGA _75 74.934 62.795 106.500
1280 x 800
1280 x 1024
1280 x 960
WXGA _85 84.880 71.554 122.500
WXGA _120
(Reduce Blanking)
SXGA_60 60.020 63.981 108.000
SXGA_75 75.025 79.976 135.000
SXGA_85 85.024 91.14 6 157.500
1280 x 960_60 60.000 60.000 10 8
1280 x 960_85 85.002 85.938 148.500
119.9 8 9 97. 551 115.500
119.9 09 101.563 146.2 50
◎
◎ ◎ ◎
◎ ◎ ◎
◎ ◎ ◎
◎
◎ ◎
◎ ◎
1360 x 768 1360 x 768_60 6 0.015 47. 712 85.500
70
◎ ◎
Page 71

Resolution Mode
Refresh
Rate (Hz)
H
Frequency
(kHz)
Clock
(MHz)
3D Frame
Sequential
3D Top
Bottom
English
3D side-
by-side
1440 x 900 WXGA+_60 59.887 55.935 106.500
1400 x 1050 SXGA+_60 59.978 6 5 . 317 121.750
1600 x 1200 UXGA 60.000 75.000 162.000
1680 x 1050 1680 x 1050_60 59.954 65.290 146.25 0
*1920 x 1080
@60Hz
*1920 x 1200
@60Hz
640 x 480
@67Hz
832 x 624
@75Hz
1024 x 768
@75Hz
1152 x 870
@75Hz
1920 x 1080_60
(Reduce Blanking)
1920 x 1200_60
(Reduce Blanking)
MAC13 66.667 35.000 30.240
MAC16 74.546 49.722 57. 2 8 0
MAC19 74.930 60. 241 80.000
MAC21 75.060 68.68 100.000
60.000 67.500 148.500
59.950 74.038 154.000
Note:
◎ ◎
◎ ◎
◎ ◎
◎ ◎
There 3D timing showing depend the EDID le and VGA display card. It is possible that user cannot choose the above
3D timings on VGA display card.
*: No available in PC 2.
Support timing for Component - YPbPr input
Timing Resolution
480i 720 x 480 15.73 59.94 13.50
480p 720 x 480 31.47 59.94 27. 0 0
576i 720 x 576 15.63 50.00 13 . 50
576p 720 x 576 31. 25 50.00 27.0 0
720/50p 1280 x 720 37. 5 0 50.00 74.25
720/60p 1280 x 720 45.00 60.00 74.25
108 0/50i 1920 x 1080 28 .13 50.00 74.25
108 0/60i 1920 x 1080 33.75 60.00 74.25
108 0/24p 1920 x 1080 27. 0 0 24.00 74.25
108 0/25p 1920 x 1080 28.13 25.00 74.25
Horizontal
Frequency (KHz)
Ver tica l
Frequency (Hz)
Dot Clock
Frequency (MHz)
3D Frame
Sequential
◎
◎
◎
108 0/30p 1920 x 1080 33.75 30.00 74.25
108 0/50 p 1920 x 1080 56.25 50.00 14 8 . 50
108 0/60p 1920 x 1080 67. 50 60.00 148.50
71
Page 72

English
Support timing for Video input
Video Mode
NTSC 15.73 60 3.58
PAL 15. 63 50 4.43
SECAM 15.63 50 4.25 or 4.41
PAL- M 15.73 60 3.58
PAL-N 15.63 50 3.58
PAL- 60 15.73 60 4.43
NTSC4.43 15.73 60 4.43
Horizontal
Frequency (KHz)
Ver tica l
Frequency (Hz)
Frequency (MHz)
Support timing for HDMI & DVI-D (HDCP) input
H
Frequency
(kHz)
Clock
(MHz)
Resolution Mode
VGA _60 59.940 31.4 69 25.175
VGA _72 72.809 37.861 31.500
640 x 480
VGA _75 75.000 37.500 31.500
Refresh
Rate (Hz)
Sub-carrier
3D Frame
Sequential
◎ ◎ ◎
3D Frame
Sequential
3D Top
Bottom
◎
3D side-
by-side
VGA _85 85.008 43.269 36.000
720 x 400 720 x 400_70 70.087 31.4 69 28.3221
SVGA_60 60 . 317 37.879 40.000
SVGA_72 72.18 8 48.077 50.000
800 x 600
1024 x 768
1152 x 864 1152 x 864_75 75.000 67.500 108.000
1024 x 576
SVGA_75 75.000 46.875 49.500
SVGA_85 85.061 53.674 56.250
SVGA_120
(Reduce Blanking)
XGA _60 60.004 48.363 65.000
XGA _70 70.069 56.476 75.000
XGA _75 75.029 60.023 78.750
XGA _ 85 84.997 68.667 94.500
XGA_12 0
(Reduce Blanking)
BenQ Notebook
Timing
119. 854 77.4 2 5 83.000
119.9 8 9 97. 551 115.500
60.000 35.820 46.996
◎ ◎ ◎
◎
◎ ◎ ◎
◎
1024 x 600
1280 x 720 1280 x 720_60 60.000 45.000 74.250
1280 x 768 1280 x 768_60 59.870 47.776 79.5
72
BenQ Notebook
Timing
64.995 41.467 51.419
◎ ◎ ◎
◎ ◎ ◎
Page 73

Resolution Mode
Refresh
Rate (Hz)
H
Frequency
(kHz)
Clock
(MHz)
3D Frame
Sequential
3D Top
Bottom
English
3D side-
by-side
WXGA _60 59.810 49.702 83.500
WXGA _75 74.934 62.795 106.500
1280 x 800
1280 x 1024
1280 x 960
1360 x 768 1360 x 768_60 6 0.015 47. 712 85.500
1440 x 900 WXGA+_60 59.887 55.935 106.500
1400 x 1050 SXGA+_60 59.978 6 5 . 317 121.750
1600 x 1200 UXGA 60.000 75.000 162.000
1680 x 1050 1680 x 1050_60 59.954 65.290 146.25 0
1920 x 1080
@60Hz
WXGA _85 84.880 71.554 122.500
WXGA _120
(Reduce Blanking)
SXGA_60 60.020 63.981 108.000
SXGA_75 75.025 79.976 135.000
SXGA_85 85.024 91.14 6 157.500
1280 x 960_60 60.000 60.000 108.000
1280 x 960_85 85.002 85.938 148.500
1920 x 1080_60
(Reduce Blanking)
119.9 09 101.563 146.2 50
60.000 67.500 148.500
◎ ◎ ◎
◎
◎ ◎
◎ ◎
◎ ◎
◎ ◎
◎ ◎
◎
◎ ◎
1920 x 1200
@60Hz
640 x 480
@67Hz
832 x 624
@75Hz
1024 x 768
@75Hz
1152 x 870
@75Hz
1920 x 1200_60
(Reduce Blanking)
MAC13 66.667 35.000 30.240
MAC16 74.546 49.722 57. 2 8 0
MAC19 75.020 60.241 80.000
MAC21 75.060 68.680 100.000
59.950 74.038 154.000
Note:
There timing showing depend the EDID le and VGA graphic card limitation. It is possible that user cannot choose the
above timings on VGA display card.
73
Page 74

English
Supporting timing for HDMI Video input
Timing Resolution Horizontal
Frequency
(KHz)
480i 720 (1440) x 480 15.73 59.94 2 7. 0 0
480p 720 x 480 31.47 59.94 27.00
576i 720 (1440) x 576 15.63 50.00 27.0 0
576p 720 x 576 31.25 50.00 27.00
720/50p 1280 x 720 37. 50 50.00 74.25
720/60p 1280 x 720 45.00 60.00 74.25
108 0/24p 1920 x 1080 27.0 0 24.00 74.25
108 0/25p 1920 x 1080 28.13 25.00 74.25
108 0/30p 1920 x 1080 33.75 30.00 74.25
108 0/50i 1920 x 1080 28.13 50.00 74.25
108 0/60i 1920 x 1080 33.75 60.00 74.25
108 0/50 p 1920 x 1080 56.25 50.00 148.50
108 0/60p 1920 x 1080 67. 50 60.00 148.50
Ver tica l
Frequency
(Hz)
Dot Clock
Frequency
(MHz)
3D Frame
Sequential
◎
◎
◎ ◎ ◎ ◎
3D
Frame
Packing
◎ ◎ ◎
◎ ◎ ◎
3D Top
Bottom
◎ ◎
◎ ◎
3D
side-
by-side
◎
◎
74
Page 75

RS232 command control
Function Ty p e Operation ASCII
Write Power On <CR>*pow=on#<CR>
English
Power
Source
Selection
Audio
Control
Write Power off <CR>*pow=off#<CR>
Read Power Status <CR>*pow=?#<CR>
Write COMPUTER/YPbPr <CR>*sour=RGB#<CR>
Write COMPUTER 2/YPbPr2 <CR>*sour=RGB2#<CR>
Write DVI-D <CR>*sour=dvid#<CR>
Write HDMI1 <CR>*sour=hdmi#<CR>
Write HDMI 2/MHL2 <CR>*sour=hdmi2#<CR>
Write Composite <CR>*sour=vid#<CR>
Write H D b aseT <CR>*sour=hdbaset#<CR>
Read Current source <CR>*sour=?#<CR>
Write Mute On <CR>*mute=on#<CR>
Write Mute Off <CR>*mute=off#<CR>
Read Mute Status <CR>*mute=?#<CR>
Write Volume + <CR>*vol=+#<CR>
Write Volume - <CR>*vol=-#<CR>
Audio source
select
Picture Mode
Read Volume Status <CR>*vol=?#<CR>
Write Audio pass Through off <CR>*audiosour=off#<CR>
Write Audio-Computer1 <CR>*audiosour=RGB#<CR>
Write Audio-Computer2 <CR>*audiosour=RGB2#<CR>
Write Audio-Video <CR>*audiosour=vid#<CR>
Write Audio-Component <CR>*audiosour=ypbr#<CR>
Write Audio-HDMI <CR>*audiosour=hdmi#<CR>
Write Audio-HDMI2 <CR>*audiosour=hdmi2#<CR>
Read Audio pass Status <CR>*audiosour=?#<CR>
Write Presentation <CR>*appmod=preset#<CR>
Write sRGB <CR>*appmod=srgb#<CR>
Write Bright <CR>*appmod=bright#<CR>
Write Cinema <CR>*appmod=cine#<CR>
Write DICOM <CR>*appmod=dicom#<CR>
Write User1 <CR>*appmod=user1#<CR>
Write 3D <CR>*appmod=threed#<CR>
Read Picture Mode <CR>*appmod=?#<CR>
75
Page 76

English
Function Ty p e Operation ASCII
Write Contrast + <CR>*con=+#<CR>
Write Contrast - <CR>*con=-#<CR>
Read Contrast value <CR>*con=?#<CR>
Write Brightness + <CR>*bri=+#<CR>
Write Brightness - <CR>*bri=-#<CR>
Read Brightness value <CR>*bri=?#<CR>
Write Color + <CR>*color=+#<CR>
Write Color - <CR>*color=-#<CR>
Read Color value <CR>*color=?#<CR>
Write Sharpness + <CR>*sharp=+#<CR>
Write Sharpness - <CR>*sharp=-#<CR>
Read Sharpness value <CR>*sharp=?#<CR>
Write Color Temperature-Warm <CR>*ct=warm#<CR>
Picture
Setting
Write Color Temperature-Normal <CR>*ct=normal#<CR>
Write Color Temperature-Cool <CR>*ct=cool#<CR>
Read Color Temperature Status <CR>*ct=?#<CR>
Write Aspect 4:3 <CR>*asp=4:3#<CR>
Write Aspect 16:9 <CR>*asp=16:9#<CR>
Write Aspect 16:10 <CR>*asp=16:10#<CR>
Write Aspect Auto <CR>*asp=AUTO#<CR>
Write Aspect Real <CR>*asp=REAL#<CR>
Read Aspect Status <CR>*asp=?#<CR>
Write Digital Zoom In <CR>*zoomI#<CR>
Write Digital Zoom out <CR>*zoomO#<CR>
Write Auto <CR>*auto#<CR>
Write Brilliant color on <CR>*BC=on#<CR>
Write Brilliant color off <CR>*BC=off#<CR>
Read Brilliant color status <CR>*BC=?#<CR>
76
Operation
Settings
Write Projector Position-Front Table <CR>*pp=FT#<CR>
Write Projector Position-Rear Table <CR>*pp=RE#<CR>
Write Projector Position-Rear Ceiling <CR>*pp=RC#<CR>
Write Projector Position-Front Ceiling <CR>*pp=FC#<CR>
Write Quick auto search <CR>*QAS=on#<CR>
Write Quick auto search <CR>*QAS=off#<CR>
Read Quick auto search status <CR>*QAS=?#<CR>
Read Projector Position Status <CR>*pp=?#<CR>
Write Direct Power On-on <CR>*directpower=on#<CR>
Page 77

Function Ty p e Operation ASCII
Write Direct Power On-off <CR>*directpower=off#<CR>
Read Direct Power On-Status <CR>*directpower=?#<CR>
Write Signal Power On-on <CR>*autopower=on#<CR>
Write Signal Power On-off <CR>*autopower=off#<CR>
Read Signal Power On-Status <CR>*autopower=?#<CR>
Operation
Settings
Write Standby Settings-Network on <CR>*standbynet=on#<CR>
Write Standby Settings-Network off <CR>*standbynet=off#<CR>
Read Standby Settings-Network Status <CR>*standbynet=?#<CR>
Write Standby Settings-Monitor Out on <CR>*standbymnt=on#<CR>
Write Standby Settings-Monitor Out off <CR>*standbymnt=off#<CR>
Read Standby Settings-Monitor Out Status <CR>*standbymnt=?#<CR>
Write 2400 <CR>*baud=2400#<CR>
Write 4800 <CR>*baud=4800#<CR>
Write 9600 <CR>*baud=9600#<CR>
English
Baud Rate
Lamp Control
Write 14 4 0 0 <CR>*baud=14400#<CR>
Write 19200 <CR>*baud=19200#<CR>
Write 38400 <CR>*baud=38400#<CR>
Write 57600 <CR>*baud=57600#<CR>
Write 1152 00 <CR>*baud=115200#<CR>
Read Current Baud Rate <CR>*baud=?#<CR>
Read Lamp Hour <CR>*ltim=?#<CR>
Write Normal mode <CR>*lampm=lnor#<CR>
Write Eco mode <CR>*lampm=eco#<CR>
Write Dimming mode <CR>* lampm=dimming#<CR>
Write Custom mode <CR>* lampm=custom#<CR>
Read Lamp Mode Status <CR>*lampm=?#<CR>
Read Model Name <CR>*modelname=?#<CR>
Write Blank On <CR>*blank=on#<CR>
Write Blank Off <CR>*blank=off#<CR>
Miscellaneous
Read Blank Status <CR>*blank=?#<CR>
Write Freeze On <CR>*freeze=on#<CR>
Write Freeze Off <CR>*freeze=off#<CR>
Read Freeze Status <CR>*freeze=?#<CR>
Write Menu On <CR>*menu=on#<CR>
Write Menu Off <CR>*menu=off#<CR>
Write Up <CR>*up#<CR>
Write Down <CR>*down#<CR>
77
Page 78

English
Function Ty p e Operation ASCII
Write Right <CR>*right#<CR>
Write Left <CR>*left#<CR>
Write Enter <CR>*enter#<CR>
Write 3D Sync Off <CR>*3d=off#<CR>
Write 3D Auto <CR>*3d=auto#<CR>
Write 3D Sync Top Bottom <CR>*3d=tb#<CR>
Write 3D Sync Frame Sequential <CR>*3d=fs#<CR>
Write 3D Frame packing <CR>*3d=fp#<CR>
Write 3D Side by side <CR>*3d=sbs#<CR>
Write 3D inverter disable <CR>*3d=da#<CR>
Write 3D inverter <CR>*3d=iv#<CR>
Miscellaneous
Read 3D Sync Status <CR>*3d=?#<CR>
Write Remote Receiver-front+rear <CR>*rr=fr#<CR>
Write Remote Receiver-front <CR>*rr=f#<CR>
Write Remote Receiver-rear <CR>*rr=r#<CR>
Read Remote Receiver Status <CR>*rr=?#<CR>
Write AMX Device Discovery-on <CR>*amxdd=on#<CR>
Write AMX Device Discovery-off <CR>*amxdd=off#<CR>
Read AMX Device Discovery Status <CR>*amxdd=?#<CR>
Read Mac Address <CR>*macaddr=?#<CR>
Write High Altitude mode on <CR>*Highaltitude=on#<CR>
Write High Altitude mode off <CR>*Highaltitude=off#<CR>
Read High Altitude mode status <CR>*Highaltitude=?#<CR>
78
Page 79

PJLink
PJLink protocal
The network function of this projector support the PJLink class 1, and the PJLink protocal can be
used to perform projector setting and projector status query operations from a computer.
Control commands
The following table lists the PJLink protocal commands that can be used to control the projector.
• x characters in table are non-specic characters.
English
Command Control Details
POWR
POWR?
INPT Input selection 11 PC1 / YPbPr1
INPT?
AVMT Mute 11 Video mute On
AVMT? Mute query
Power supply
control
Power supply
status query
Input status
query
Parameter/
Return String
0 Standby
1 Power on
0 Standby
1 Power on
12 PC2 / YPbPr2
21 VIDEO
31 HDMI1
32 HDMI2/MHL
33 DVI-D
34 HDB a s eT
10 Video mute Off
21 Audio mute On
20 Audio mute Off
Remark
ERST?
LAMP?
INST?
Error status
query
Light source
status query
Input selection
list query
31 Video & Audio mute On
30 Video & Audio mute Off
1st byte
2nd byte
xxxxxx
xxxxxxxxxxxx 1st number (1-5 digitals): Light source 1 runtime
11 12 21 31 32
33 34
3rd byte
4th byte Return 0
5th byte Return 0
6th byte
LU9235 / LX9215
Indicates fan errors, and
returns 0 - 2
Indicates light source errors,
and returns 0 - 2
Indicates temperature errors,
and returns 0 - 2
Indicates other errors, and
returns 0 - 2
• 0=No error is
• 1=Warning
• 2=Error
detected
79
Page 80

English
Command Control Details
Parameter/
Return String
Remark
NAME?
INF1?
INF2?
INF0?
CLASS?
Projector name
query
Manufacturer
name query
Model name
query
Other
information
queries
Class information
query
xxxxx
BenQ Returns manufacturer name
LU9235 /
LX9215
xxxxx Returns information such as version number
1 Returns class for PJLink
Returns the name set in [PROJECTOR NAME] of [NETWORK
SETUP]
Returns moder name
80
 Loading...