

Page 1

Issued by/Publié par
BenQ Mobile GmbH & Co. OHG
Haidenauplatz 1
81667 Munich
Germany
Юридический адрес изготовителя:
"БенКью Мобайл ГбмХ & Ко ОХГ"
Хайденауплатц 1
81667 Мюнхен
Германия
© BenQ Mobile GmbH & Co. OHG 2006
All rights reserved. Subject to availability.
Right of modification reserved.
Tous droits réservés. Sous réserve de possibilités de
livraison et de modifications techniques.
www.BenQ-Siemens.com
Ref. No.: A31008-H7441-A101-2-4W19
(03/06)
i ii
§GB§ Car Kit Bluetooth® SIM (en) v
§D§ Car Kit Bluetooth® SIM (de) 20
§I§ Car Kit Bluetooth® SIM (it) 40
§F§ Car Kit Bluetooth SIM® (fr)
(Kit véhicule Bluetooth® SIM)
§E§ Car Kit Bluetooth® SIM (es) 80
§P§ Car Kit Bluetooth® SIM (pt) 100
Customer Care 120
European Directive 2002/96/EC 122
Federal Communication Commission (en) 127
FCC (Federal Communication Commission) (fr) 128
60
§GB§ Fold out to see exploded diagram
§D§ Bitte aufklappen zur Ansicht der Explosions-
zeichnung
§I§ Aprire per vedere l’esploso
§F§ Ouvrir pour afficher la vue éclatée
§E§ Abrir para ver el gráfico desarrollado
§P§ Favor desdobrar para ver a vista detalhada
*A5B00075797470*
Page 2
Car Kit Bluetooth® SIMiii iv
Car Kit Bluetooth® SIM (en)v vi
1
:
*
2
*
7
§G§
§H§
§G§
3
9
6
§E§
8
§F§
*
*
§A§
5
§B§ §C§ §D§
4
m
c
0
5
>
m
c
0
8
<
>1 m
Car Kit Bluetooth® SIM (en)
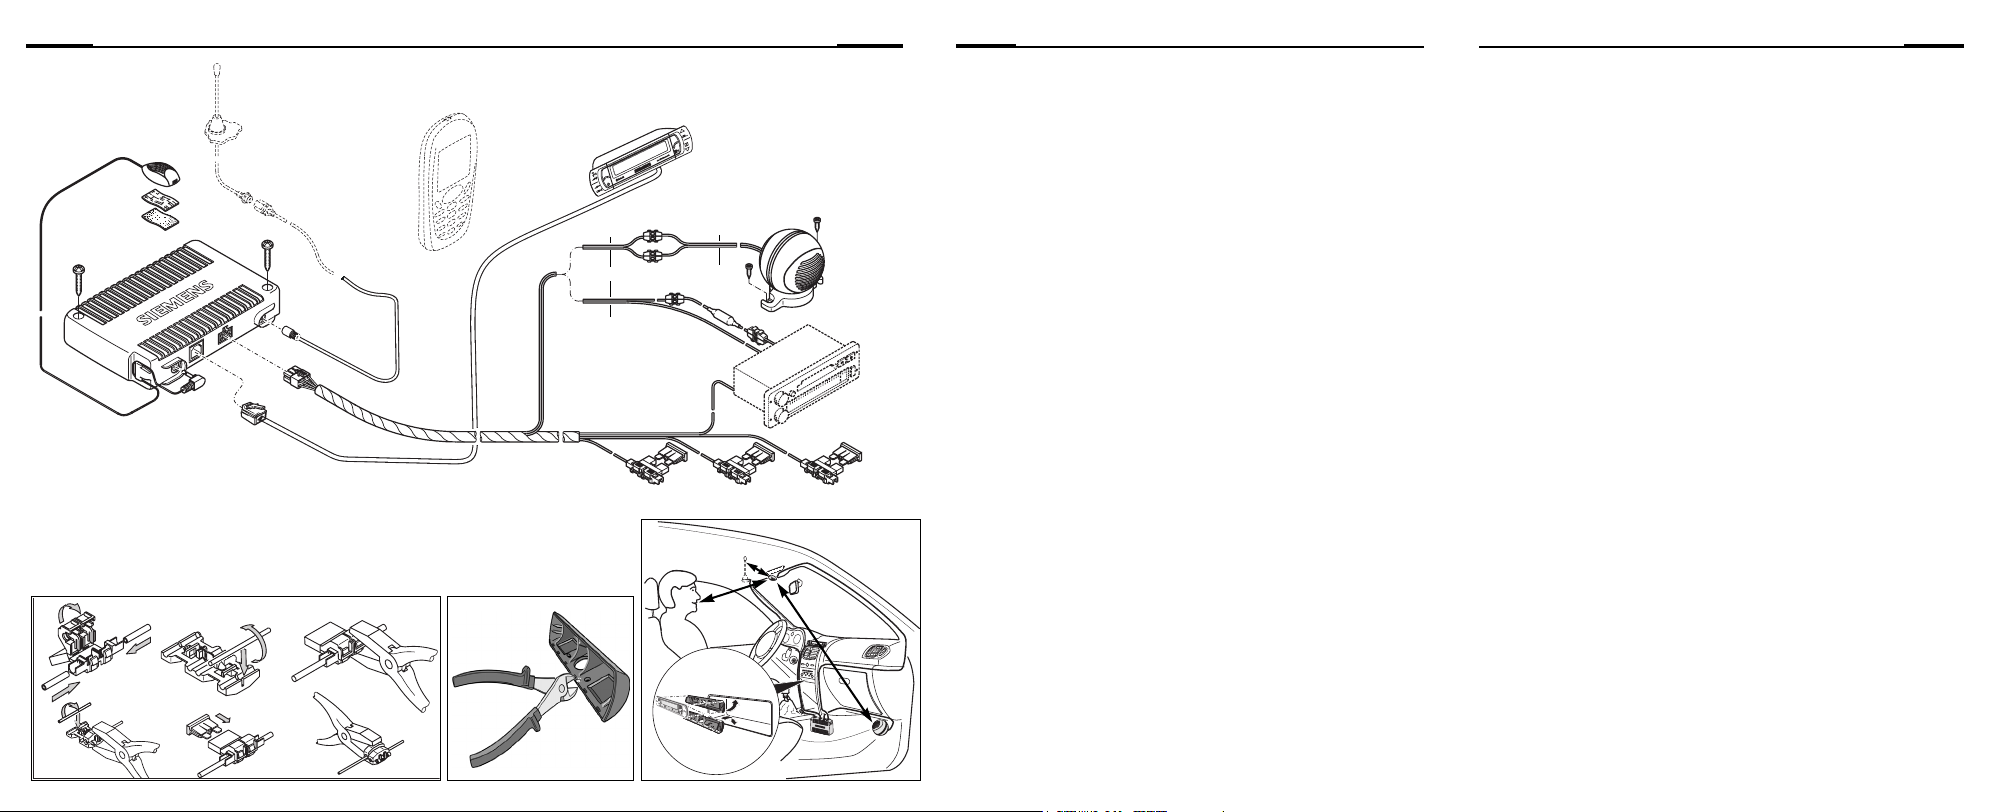
Included in delivery
1 Electronics box with connection
sockets for:
• Wiring loom
• Display
• Microphone
• Antenna*
2 Screws to secure the electronics
box
3 Wiring loom with loudspeaker
connection cables
•
§A§ Radio mute (black)
•
§B§ 12 V+ battery (red)
•
§C§ 12 V+/24 V+ car ignition
(violet)
•
§D§ Chassis (brown)
•
§E§ + loudspeaker connection
cable (green/black)
•
§F§ - loudspeaker connection
cable (green)
4 3 spade fuse connectors for the
wiring loom
5 3 spade fuses (3A violet) for the
spade fuse connectors
6 Display with adhesive pads
7 2 Display holders with adhesive
pads
8 Loudspeaker with connection
cable
•
§G§ + loudspeaker connection
cable (black/white)
•
§H§ - loudspeaker connection
cable (black)
(Screws to mount the device are
built into the base)
9 2 cable connectors for the loud-
speaker cables
: External microphone with
adhesive pad
* Not included in standard delivery.
Page 3
1Car Kit Bluetooth® SIM (en)
Compatibility
The handsfree Car Kit
Bluetooth® SIM (hereafter
referred to as "Car Kit") may be
used with the following phones:
• Mobile phones with a
Bluetooth interface (SIM
Access Profile) (see also the
compatibility information on
the packaging)
These installation instructions only
provide basic information. Since the
different car makes and car radio
connections require different
installations, assembly must be
performed in line with the individual
circumstances.
Safety precautions
Please read the user guide and safety
precautions carefully before use!
Remember to comply with
legal requirements and
local restrictions when
using the phone. These
may, for example, apply
while driving or in petrol
stations.
General and vehiclespecific guidelines for the
installation of add-on
devices must be observed ;
where applicable, professional assistance should
be sought (in the case of
electrical fusing, wiring,
contact with hot
components, contact with
fuel etc.).
The installation of the components must not impede:
• The driver's freedom of
movement, safety or line
of vision
• The function of display
elements
• The safety of any
passenger (especially in
the event of an accident)
• The vehicle’s safety
mechanisms (airbag,
seat belts, switch for
hazard warning lights
etc.)
Page 4
Car Kit Bluetooth® SIM (en)2
Take care during
installation! Young children
may choke on small parts.
The device is only suitable
for 12 V operation.
The device must not be
operated in surroundings
where there is the risk of
explosion.
If your car has metallised
windows, this may affect
your Car Kit's signal
quality. In this case, use an
antenna which is mounted
on the outside of the
vehicle.
Improper use and opening
the components
invalidates the warranty.
Important:
Dispose of used devices
and their accessories
according to the legal
regulations.
Use only original accessories. This will avoid potential risks to health or
property and ensure
compliance with all
relevant regulations.
®
Before using Bluetooth
mobile phones inside a vehicle, check
the vehicle user guide for any limita-
accessories or
tions on the use of these products.
For additional information please
consult your mobile phone's user
guide.
Manufactured by BenQ Mobile GmbH
& Co. OHG under trademark license
of Siemens AG.
Page 5
3Car Kit Bluetooth® SIM (en)
Assembly
Microphone, antenna*,
display, loudspeaker
See outline on page iii/iv of the
cover.
Please note the following during
installation:
• Distance from the microphone
to the loudspeaker
>1 m
• Distance from the microphone
microphone cable to the antenna*/antenna cable > 50 cm
• Distance from the microphone
to the user's mouth < 80 cm
• Avoid installing the microphone
directly in the air flow from the sunroof, window or ventilation system.
Run the cable for the
microphone, the antenna*,
the display
loudspeaker
the individual requirements of
your vehicle.
Avoid damaging, bending or
squashing the cables.
Microphone
First clean the area where you
want to attach the external
microphone
grease-dissolving cleaning
agent. The adhesive pad will
only remain affixed to a greasefree surface.
8 preferably
6 and the
8 correctly to suit
: using a suitable
:
:/
:
: external
Secure the external
microphone
the speaker at the required locations using the adhesive pads.
Antenna*
The Car Kit is designed to be
used with a dual band antenna*
(GSM 900/1800 MHz). Connect
the antenna cable to the
electronics box.
Display
Make sure you mount the
display
lows the driver optimum visual
contact and access.
You can attach the display
directly to the dashboard or fix it
with the help of a display
holder
: pointing towards
6 in a position that al-
6
7.
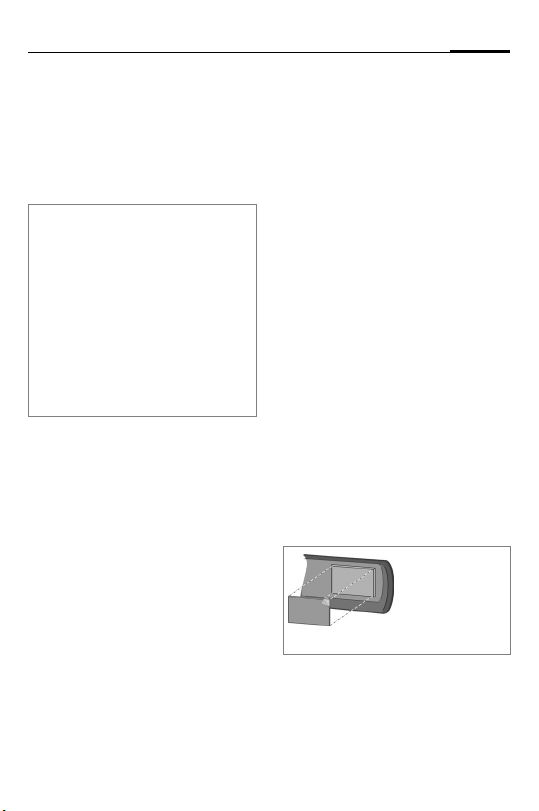
Stick the
adhesive pads to
the raised
mounting points.
* Not included in standard delivery.
Page 6

Car Kit Bluetooth® SIM (en)4
Direct installation of the display
First clean the area where you
want to attach the display
using a grease-dissolving cleaning agent. The adhesive pad will
only adhere permanently to a
grease-free surface.
Mount the display
adhesive pads.
Installation using the display holder
The display holder
to mount the display
various positions specified in the
diagram (see bottom right on
page iv).
The cable must be fed through
the display holder
propriate position. To this end,
notches must be cut into the
case edging at specific points
where the wall thickness is
recognisably thinner.
Mount the display holder
to the dashboard using the
adhesive pads supplied or the
appropriate screws*.
Then press the display
the opening on the display
holder
7 until it clicks into
place.
6
6 using the
7 allows you
6 in the
7 in the ap-
7 on-
6 into
Loudspeaker
The inclination and the rotation
of the loudspeaker
justed. Loosen the set screw in
the base, install the loud
speaker
8, and tighten the
screw.
Secure the loud speaker
appropriate location (e.g. the
passenger footwell).
The screws can be found in the
base of the loud speaker
8 can be ad-
8 in an
8.
Wiring loom
Electrical connections
When connecting the Car Kit to
the wiring loom
the functionality and operation
of other devices are not compromised (e.g. voltage drop).
Disconnect the car battery correctly before installing the wiring loom
box
1.
Connect the
to the positive terminal of the
car battery.
3, make sure
3 and the electronics
§B§ 12 V+ cable (red)
* Not included in standard delivery.
Page 7

5Car Kit Bluetooth® SIM (en)
Connect the
§D§ cable (brown) to
the negative terminal of the car
battery.
Connect the
§C§ cable (violet) to
the vehicle electrical system so
that 12 V+ or 24 V+ are applied
when the ignition is switched
on.
Only use spade fuse connectors
for connecting the cable and then insert the 3A spade fuses
spade fuse connectors 4.
4
5 into the
To safeguard the fuses for the wiring
loom professionally, the fuses must
be mounted between the end of the
wiring loom supplied and the
connector from the vehicle.
Connecting the loudspeaker cable to
the wiring loom
Connect the white/black
loudspeaker cable +
green/black
a cable connector
§G§ to the
§E§ connection using
9.
Connect the black loudspeaker
§H§ to the green
cable
loudspeaker cable
cable connector
§F§ using a
9.
Connecting the radio*
The Car Kit can be connected to
car's audio system via the
phone-in/line-in port of your car
radio. The audio system's loudspeakers are then used as a playback system for the Car Kit.
When connecting the Car Kit to the
radio's phone-in/line-in port, it may be
necessary to modify the Car Kit outputs to those of the radio phonein/line-in ports. You will find information on this on the following
homepage:
www.siemens.com/
phoneinadapter
Mute
Please refer to the car radio manufacturer's instructions and check
whether there is a mute port available
for the radio.
The radio signal can be switched
automatically to mute during
phone calls. Connect the radio
mute control cable to the radio
muting control cable
§A§ to the
mute input of the car radio.
* For vehicles with a phone-in/
line-in port.
The car radio is not included in the
standard delivery.
Page 8
Car Kit Bluetooth® SIM (en)6
Electronics box
Please make sure that the electronics
box
1 is not mounted on or between
metal objects. Only then can good
radio communication be ensured.
Make sure the electronics box
securely mounted.
Ensure that the ventilation slots on the
electronics box
least 2 cm space) and the installation
does not cause interference with any
other devices.
Do not place the connector cable behind the electronics box
around the electronics box
may lead to interference.
Insulate any unused cable ends with
insulating tape.
Carefully feed the cables of the
following components to the
electronics box
aging them and then connect
them to the electronics box
• Wiring loom
• Display
• External microphone
• Antenna*
Ensure the connectors are se-
curely clicked into position and
screw on the antenna port.
1 are not covered (at
1 without dam-
3,
6,
1 is
1 or wrap it
1 as this
1:
:,
To relieve strain, feed the cable
of the external microphone
around the clip provided (see
picture on p. iii).
Secure the electronics box
the passenger footwell (for example) with two screws
diagram on page iii.
Reconnect the car battery correctly following installation.
:
1 in
2, see
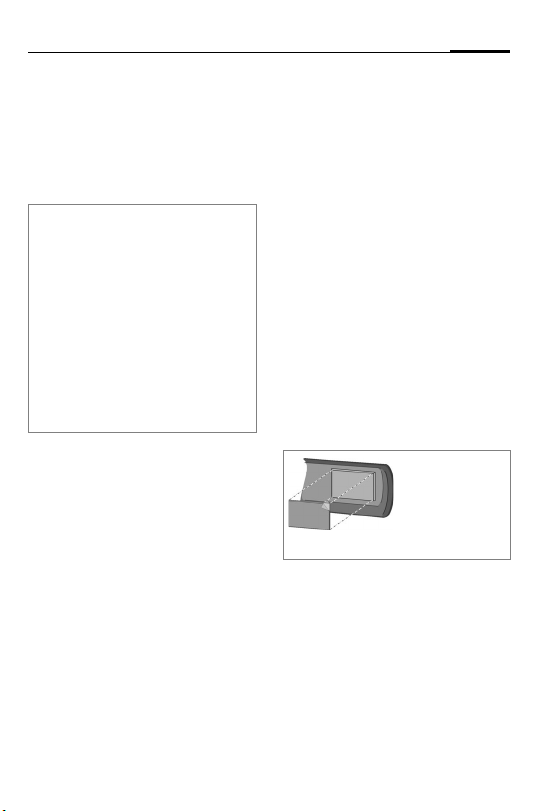
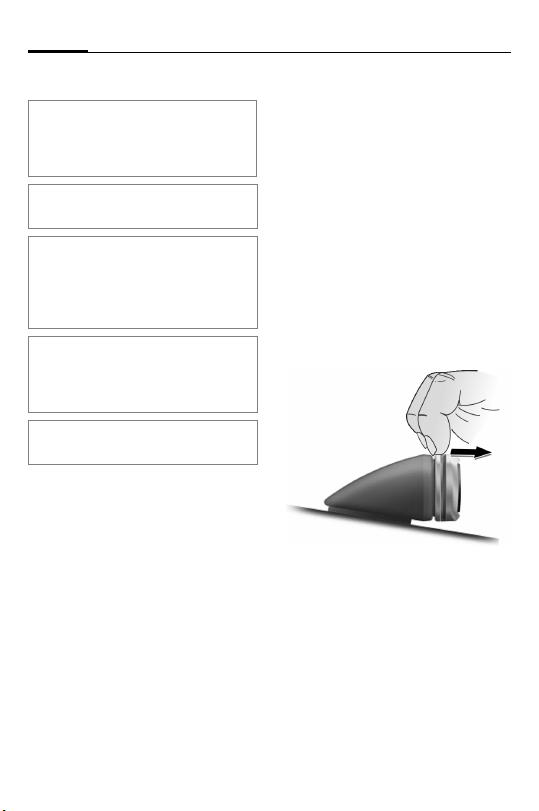
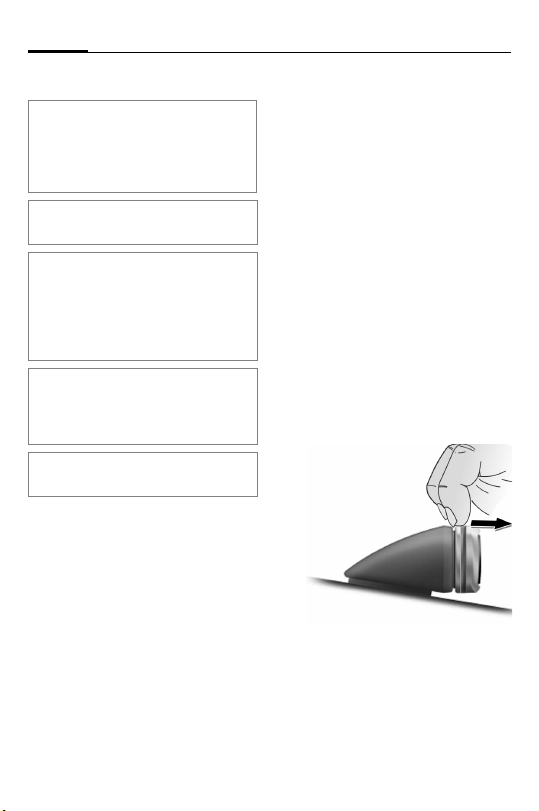
Dismantling the display
Detach the display 6 from the
display holder
the following diagram.
7 as shown in
* Not included in standard delivery.
Page 9

7Car Kit Bluetooth® SIM (en)
Features
With the Car Kit Bluetooth® SIM,
you can experience new dimensions of handsfree talking via
Bluetooth technology:
• Best possible reception
through an external
antenna port
• Phone cradle is a thing of the
past
• Long standby and talk times
for your phone
• Unique communication service through excellent audio
quality
• Excellent ease of use
®
Bluetooth
The Bluetooth® word mark and logos are
owned by the Bluetooth
use of such marks by BenQ Corp. is under
license. Other trademarks and trade names
are those of their respective owners.
The Car Kit communicates with
the phone via Bluetooth®, a
short range radio link. This
makes your Car Kit even easier
to use.
To enable communication between the Car Kit and the phone,
they must be linked to each
other (pairing). For more information please read "Establishing
the first connection with the
phone (pairing)", p. 8.
technology
®
SIG, Inc. and any
The Bluetooth connection can
be established with two profiles:
• SIM Access Profile
(standard setting)
The GSM module in the electronics box uses the external
antenna to establish a connection to the GSM network.
• Handsfree profile
In this mode, the phone automatically establishes a connection to the GSM network
(see also page 14).
Soft key functionality
Your Car Kit is operated using
the soft keys.
The symbols below represent
the six different actions:
c
a
g
h
Yes/accept
No/reject
Up/
Number selection
Down/
Addressbook/Phonebook
Page 10

Car Kit Bluetooth® SIM (en)8
S
f
When a long press is required,
the user guide will instruct you
to "press and hold"
In all other cases pressing the
key briefly will suffice.
Voice control (Push to
Speak, only in
handsfree profile)
Favourites
Getting started
Establishing the first
connection with the phone
(pairing)
For details of how to establish a Bluetooth connection, please consult your
phone's user guide.
• Switch off the Car Kit, see
page 9.
• Activate the Car Kit's login
mode by pressing and
holdingc.
• Activate your phone's
Bluetooth interface and start
searching for Bluetooth
activated devices within the
range of your phone.
• When the "HKW-720" Car Kit is
located, the phone will
request you to confirm the
connection by entering a PIN
number.
• The PIN number (a random
16 digit number) is shown on
the Car Kit's display. Enter this
number on your phone.
• Enter your phone's PIN
number (SIM PIN*) on the Car
Kit display (see "Dialling a
number", page 12)
• After the PIN has been entered, the phone ID is shown
on the Car Kit display (this
name can be changed in the
phone), which subsequently
switches to standby mode.
This procedure may take up to
1 minute. With phones from
other manufacturers, it may
be necessary to make a confirmation on the phone to allow
the Car Kit to switch to standby mode.
The Car Kit is now ready for use.
The Car Kit and the phone can
communicate with one another
and will recognise each other in
future.
* SIM PIN is the security code
you require to access your mobile
network.
Page 11

9Car Kit Bluetooth® SIM (en)
Connecting an additional
phone
• Switch on the Car Kit by
turning the ignition or by
pressing and holdinga.
• The Car Kit display shows the
phone that was used last. You
can use g/ h to scroll
through the list of phones displayed. In the list it is possible
to connect an additional
phone.
?j< X ># Select.
c
Then follow the steps described
in "Establishing the first connection with the phone (pairing)",
p. 8.
Confirm selection.
Recurring SIM PIN prompt
As described in the previous
chapter, the last entry in the list
allows you to set the Car Kit to
request the SIM PIN each time
you log on.
? GSM PIN >
c
g/ h Select one of the
Select.
Confirm selection.
following symbols:
GSM PIN Q Recur-
ring SIM PIN prompt
enabled.
GSM PIN [ ] Recur-
ring SIM PIN prompt
disabled.
c
or
a
Confirm selection.
Cancel.
Using multiple phones
The Car Kit can save the connection details of up to 4 phones,
each of which can be selected
for use.
When a fifth phone is connected, the entry details of the
phone that has not been connected for the longest period of
time are automatically deleted.
Ringtones
In SIM Access Profile, the Car Kit
plays its standard ringtone (see
p. 15).
Switching off the Car Kit
a
The Car Kit will switch off after a
set period of time if the car ignition is turned off.
Press and hold
switches off the
Car Kit.
Page 12

Car Kit Bluetooth® SIM (en)10
Functions
Valid for all functions unless
stated otherwise:
a
a
a
Switching on the Car Kit
• Switch on the Car Kit by turn-
• The Car Kit display shows the
g/h Select entry.
c
If you do not make any selection,
after approx. 5 seconds, the
phone which was used last will
be connected provided it is within range.
If this phone is not available, the
Car Kit switches to waiting
mode.
a
Press and hold: Car Kit
switches to standby
mode.
Press and hold (in
standby mode):
switches off the
Car Kit.
Press briefly: back one
level.
ing the ignition or by pressing
and holding a.
phone which was used last.
Confirm selection.
Press briefly: ends
standby mode.
You can now select a phone or
connect a different phone, see
"Connecting an additional
phone", p. 9.
Adding numbers from the
mobile phone
Following each activation of the
Car Kit, the phone's Addressbook/Phonebook is added to the
Car Kit. This procedure may take
several minutes. A total of
1000 entries can be saved.
During transfer of the numbers,
the phonebook symbol flashes
in the Car Kit display. During this
time you can use the Car Kit to
dial numbers that have already
been transferred, or use number
selection.
Settings
h
Select which data are to be
transferred:
j [] + SIM []
j [] Addessbook is used
Press and hold.
The Addressbook and
the Phonebook (SIM
card) of the phone are
used and saved on
the Car Kit, and
are updated
automatically.
and saved on the Car
Kit, and is updated
automatically.
Page 13

11Car Kit Bluetooth® SIM (en)
SIM []
Phonebook (SIM card)
is used and saved on
the Car Kit, and is updated automatically.
Standby mode
In standby mode the Car Kit offers the following functions:
c
c
a
Call lists
Press and hold: dials
the last number called
Press and hold:
switches off the
Car Kit.
h Addressbook
g Number selection
f
Favourites
Accepting a call
c
Accept call.
Rejecting a call
a
Reject call.
Ending a call
a
End call.
Making a call from the
Addressbook/Phonebook
h
Shows the first letter of the
Addressbook entries.
g/h Press briefly: switches
g/h Press and hold: scrolls
c
g/h Select entry.
c
Several numbers can be saved in
one Addressbook entry.
g/h Select a phone
c
Addressbook/Phonebook
press briefly.
to the next/previous
letter.
through the alphabet.
Confirms selected
letter and displays list
of entries.
Confirm entry.
number.
Start call.
Page 14

Car Kit Bluetooth® SIM (en)12
Making a call to a call list
entry
Call lists
c
Displays the phone's call lists.
There are 3 call lists to choose
from:
j X > Dialled numbers
X > O j Missed calls
X > j Accepted calls
A call list is only shown when it
has at least 1 entry. If no call lists
exist, }{ (Action not possible)
will appear briefly.
g/h Select a call list.
c
g/h Select entry.
c
Activate a call list.
Start call.
Favourites
You may select five phone
numbers from the Addressbook
which you can call quickly and
easily by using
h
f
f.
Call up the Addressbook and select the
desired entry.
Press and hold:
confirm entry.
From then on, when you
press f briefly in standby
mode, your list of Favourites
will be displayed.
If you save a sixth phone
number, the number you saved
first will be deleted.
Dialling a number
Number selection
g
Number selection is invoked and
the cursor flashes on the display.
g/h Switches to the next
c
c
a
a
number.
Select a number.
Press and hold:
number is dialled.
Deletes the last
number.
Press and hold:
deletes the entire
phone number.
During calls
S
f
c
Louder
Quieter
Hold call.
a End call.
Page 15

13Car Kit Bluetooth® SIM (en)
j
j
Second call
a
c
c
a
Microphone muting setting
c
DTMF tones
g
Send tone sequences (numbers), e. g. to access an answering machine remotely. These
numbers are directly transmitted
as DTMF tones (Dual Tone
Multiple Frequency).
End current call.
Hold current call and
accept waiting call.
Toggle between two
calls.
Press and hold: end all
calls.
Press and hold:
activates/deactivates
microphone muting.
Press briefly during a
call: activates DTMF
tones.
Display symbols
AB3 Signal strength of the
FHJ Charge level of the phone
?j< X ># Login mode (pairing)
# X Searching for phone
# L Connecting phone
W
}{ Action not possible
j Handsfree profile active (in
j X > Dialled numbers/
X > O j Missed calls/Engaged
X > j Accepted calls/
j < X >j Current call
X > j j X X j
phone (is shown in standby mode). The symbol
flashes to indicate there is
no network available.
(is shown in standby
mode)
Please wait
standby mode, is displayed alternately with signal strength).
Outgoing call
Incoming call
Current call/call waiting
X X j
Held call
< X > j j
Current call/
held call
Page 16

Car Kit Bluetooth® SIM (en)14
j
# ( p ( j
# ) p ) j
< X ? X > #
Interface error
= Selection from a list
o Private number
\ Office number
n Mobile number, private
m Mobile number, office
p
pq
pqq
P\/M\ Microphone muting
!<;! Reset to factory settings
[] Sending Address-
" Voice control active
uvw Receiving SMS
S Emergancy call
rst
rstq
rstqq
Volume
active/inactive
Transfer call to Car Kit
Transfer call to phone
book/Phonebook
Display illumination
Functions in
handsfree profile
f
In this mode, the phone automatically
establishes a connection to the GSM
network. The GSM module in the
electronics box is not used. This
means the benefits of SIM Access
are not used (e.g. antenna port, low
power consumption).
Transferring a call
c
This function is available with all
Bluetooth devices such as a
headset or phone.
g
Press and hold (in
standby mode):
switches to the
handsfree profile.
Accept current call via
the Car Kit.
Press and hold: Transfer current call to
phone (if supported
by the phone).
Page 17

15Car Kit Bluetooth® SIM (en)
Car Kit Profile
When the phone is connected to
the Car Kit in the handsfree profile, a particular profile is usually
activated in the phone. When
this profile is activated in
Siemens phones, there is, for example, an increase of the display
font-size. You can modify the
profile settings on the phone.
For information on how to do
this, please consult your phone's
user guide.
Ringtones
Depending on the phone type,
the Car Kit may be able to play
the phone's ringtones or
melodies. If this is not possible,
the Car Kit will play the standard
ringtone.
Data transmission
To transfer data from a notebook for example, please
register the notebook directly
with the phone via Bluetooth. To
do this, switch the Car Kit to the
handsfree profile.
Additional settings
To reset to factory settings
(when switched off)
a
SIEMENS HKW-720
S
!<;! Press and hold the
After reset to factory settings
the phone switches off
automatically.
This function deletes all the data
saved in the Car Kit, e.g. Addressbooks, call lists, paired phones etc..
Set the display illumination
(in standby mode)
S
g, h Set brightness lighter
To display the software version
(in standby mode)
h
Press and hold.
is displayed.
Press and hold down.
g
/
keys specified first
until the symbol adjacent stops flashing
and is permanently
displayed.
Press and hold, select
display illumination.
or darker.
/f Press and hold,
software version is
displayed.
Page 18

Car Kit Bluetooth® SIM (en)16
Set the volume level
(in standby mode)
The electronics box volume level
is designed for the supplied
loudspeaker (maximum level
setting).
If you use the radio's speakers as
a playback device and the radio's
phone-in/line-in port is too sensitive, you may reduce the
output level.
/S Press briefly.
g
/hSelect one of the
g
c
SOS call
(if no phone is connected and
the SOS icon is shown on the
display)
c
following symbols:
p maximum output
level.
pV reduced output
level.
Press briefly to con-
firm the selection.
Press briefly.
Troubleshooting
Car Kit does not work
• Check the cable connections
• No operating voltage, check
the cable connection
• Phone not switched on or connection to Car Kit not active
•Check fuses
• Operating voltage too high or
too low
Loud background noises at
recipient's end
• Microphone installed in the
air flow of the sunroof, window or ventilation system
• Distance between the microphone/microphone cable to
phone < 50 cm
Poor talk and audio quality
• Car Kit outside the permitted
operating temperature
• Volume too low (adjust the
volume via phone/Car Kit!)
• Radio connection (phonein/line-in mode):
phone/Car Kit volume too
high (reduce the volume via
the phone/Car Kit and then if
necessary, increase it via the
radio, see also p. 16.)
Page 19

17Car Kit Bluetooth® SIM (en)
Loud echo
• Distance between the microphone and loudspeaker < 1 m
Weak microphone signal (recipient
can barely hear you)
• Distance from microphone to
user's mouth > 80 cm
• Microphone not pointed at
speaker
Poor reception quality
• No network available
• Alter the phone's position (only applies to handsfree profile)
• If your car has metallised windows, this may affect the signal quality of your phone or
Car Kit. Observe the car manufacturer's recommendations
and install an appropriate
(external) antenna.
System-Reset
Press for 5 seconds:
•
a
Car Kit is switched off (dependent on the active mode)
Press for 10 seconds:
•
a
enforces reset
Phone cannot be located/ Bluetooth
connection problems
• Connecting to the phone for
the first time, see p. 8.
• Since the last time the phone
was used with the Car Kit, at
least 4 more phones have
been paired. Re-pair the
phone.
• Please make sure the electronics box is not mounted on
or between metal objects.
• Reduce the distance between
the electronics box and the
phone.
Car radio is permanently switched to
mute
• The radio mute connection
may be reversed with the
chassis.
Car Kit's automatic switch on/off
does not work/Car Kit does not
switch off itself
• Check whether the ignition
cable is connected to the
vehicle ignition.
Addressbook is not being updated
• Please make sure the phone is
in standby mode and the key
lock is not activated (this
restriction does not apply
when using a Siemens mobile
phone). Reconnect the phone
to the Car Kit, see page 10.
Page 20
Car Kit Bluetooth® SIM (en)18
Technical data and
approval
Power supply 10.8 V+ to 16 V+
Car ignition adapter
cable, optionally also
to 24 V
Current input max. 2 A /
Operating
temperature
Loudspeaker
output power
Weight (electronics box)
Housing dimensions
(electronics
box)
GSM module Dual band with 900
max. 1 mA
(idle current)
–20°C to +55°C
3 W
approx. 152 g
approx. 130 x 108 x
26 mm (LxWxH)
and 1800 MHz,
GPRS class 8,
supports SIM
Access Profile
Car Kit complies with the
following EU directives:
89/336/EEC "Electromagnetic
Compatibility
92/59/EEC "General Product
Safety Directive
E24
10R-020177
last amended by Directive
95/54/EU "Electromagnetic
Compatibility in Automobiles
"
"
Model approved in
accordance with
directive 72/245/EEC,
".
Declaration of conformity
CE
BenQ Mobile hereby declares
that the phone described in this
user guide is in compliance with
the essential requirements and
other relevant provisions of European Directive 1999/5/EC
(R&TTE). The relevant declaration of conformity (DoC) has
been signed. Please call the
company hotline if you require a
copy of the original:
www.BenQMobile.com/conformity
FCC
see p. 127
Page 21

Care
The product should be cleaned
with a soft cloth that is damp but
not wet.
An adhevise residue may remain
after removing the adhesive
pads. Only use cleaning agents
which are recommended by the
car manufacturer.
Do not use colorants or other
chemical substances.
Accessories
Products may be obtained in
specialist shops or visit our
online shop at:
Original Accessories
www.BenQMobile.com/
shop
Customer Care
see p. 120
19Car Kit Bluetooth® SIM (en)
Page 22

Car Kit Bluetooth® SIM (de)20
-
Car Kit Bluetooth® SIM (de)
(de)
Lieferumfang
1 Elektronikbox mit Anschluss-
buchsen für:
• Bordnetzkabel
• Display
• Mikrofon
• Antenne*
2 Schrauben zur Befestigung der
Elektronikbox
3 Bordnetzkabel mit Lautsprecher-
anschlüssen
•
§A§ Radiostummschaltung
(Radio Mute) (schwarz)
•
§B§ Batterie 12 V+ (rot)
•
§C§ Kfz-Zündung 12 V+/24 V+
(violett)
•
§D§ Masse (braun)
•
§E§ Lautsprecheranschluss +
(grün/schwarz)
•
§F§ Lautsprecheranschluss -
(grün)
6 Display mit Klebepads
7 2 Stück Display-Halterungen mit
8 Lautsprecher mit Anschlusskabel
9 2 Stück Kabelverbinder für die
: Externes Mikrofon mit Klebepad
4 3 Stück Sicherungsklemm-
verbinder für das Bordnetz
5 3 Stück Flachstecksicherungen
(3 A violett) für die Sicherungsklemmverbinder
Klebepads
•
§G§ Lautsprecheranschluss +
(weiß/schwarz)
•
§H§ Lautsprecheranschluss -
(schwarz)
(Schrauben zur Befestigung sind
im Sockel integriert)
Lautsprecherkabel
* Nicht im Standard Lieferumfang enthalten.
Page 23
21Car Kit Bluetooth® SIM (de)
Kompatibilität
Die Kfz-Freisprecheinrichtung
Car Kit Bluetooth® SIM (nachfolgend bezeichnet als „Car Kit“) ist
geeignet für folgende Telefone:
• Mobiltelefone mit BluetoothSchnittstelle (SIM AccessProfil) (siehe auch Kompatibilitätsangaben auf der
Verpackung)
Diese Installationsanleitung kann nur
die grundsätzlichen Informationen
vermitteln. Da die verschiedenen KfzFabrikate und Anschlüsse der Autoradios unterschiedliche Installationen
verlangen, ist die Montage nach
jeweiliger Gegebenheit
vorzunehmen.
Sicherheitshinweise
Lesen Sie vor Gebrauch die Bedienungsanleitung und die Sicherheitshinweise genau!
Beachten Sie bei der Benutzung des Telefons gesetzliche Vorschriften und
lokale Einschränkungen.
Diese können z. B. gelten
beim Autofahren oder an
Tankstellen.
Allgemein gültige und fahrzeugtypspezifische
Richtlinien für den Einbau
von Zusatzgeräten sind
einzuhalten; ggf. ist fachkundige Hilfe in Anspruch
zu nehmen (elektrische
Absicherung, Kabelverlegung, Berührung mit
heißen Teilen, Berührung
mit Kraftstoff etc.).
Durch den Einbau der
Komponenten dürfen nicht
beeinträchtigt werden:
• die Bewegungsfreiheit,
die Sicherheit und das
Sichtfeld des Fahrers
• die Funktionalität der
Bedienelemente
• die Sicherheit der
Fahrzeuginsassen
(auch bei Unfall)
• die Sicherheitsvorrichtungen im Kfz (Airbag,
Sicherheitsgurte,
Schalter der
Warnblinkanlage etc.)
Page 24

Car Kit Bluetooth® SIM (de)22
Vorsicht beim Einbau!
Kleinkinder könnten sich
Schaden zufügen.
Das Gerät ist nur für den
12 V-Betrieb bestimmt.
Das Gerät darf nicht in
explosionsgefährdeter
Umgebung betrieben
werden.
Wenn Ihr Auto mit einer
metallbedampften Verglasung ausgestattet ist, kann
das die Empfangsqualität
Ihres Car Kits beeinträchtigen. Verwenden Sie in
diesem Fall eine außerhalb des Fahrzeuges
montierbare Antenne.
Unsachgemäßer
Gebrauch und Öffnen der
Komponenten schließt
jegliche Gewährleistung
aus.
Bitte beachten:
Entsorgen Sie unbrauchbare Telefone und deren
Zubehör den gesetzlichen
Bestimmungen
entsprechend.
Verwenden Sie nur Original-Zubehör. So vermeiden Sie mögliche
Gesundheits- und Sachschäden und stellen sicher, dass alle relevanten
Bestimmungen eingehalten werden.
Überprüfen Sie vor Nutzung von
®
Bluetooth
Telefonen innerhalb eines Kraftfahrzeuges die Kfz-Bedienungsanleitung
auf eventuelle Einschränkungen bei der
Verwendung derartiger Produkte.
Weitere Hinweise entnehmen Sie
bitte der Bedienungsanleitung Ihres
Mobiltelefons.
-Zubehör oder Mobil-
Hergestellt von BenQ Mobile GmbH
& Co. OHG unter Lizenz der
Siemens AG.
Page 25
23Car Kit Bluetooth® SIM (de)
Montage
Mikrofon, Antenne*, Display,
Lautsprecher
Siehe Skizze auf Seite iii/iv des
Umschlags.
Bitte beachten Sie bei der Montage:
• Abstand Mikrofon
Lautsprecher 8 möglichst > 1 m
• Abstand Mikrofon
Mikrofonkabel – Antenne*/Antennenkabel > 50 cm
• Abstand Mikrofon
Benutzers < 80 cm
• Montage des Mikrofons im Luftstrom des Schiebedaches, des
Fensters oder der Lüftung
vermeiden.
Verlegen Sie die Kabel für das
externe Mikrofon
ne*, das Display
Lautsprecher
den Gegebenheiten Ihres
Fahrzeugs entsprechend.
Vermeiden Sie die Kabel zu beschädigen, zu knicken oder zu
quetschen.
Mikrofon
Reinigen Sie die Stelle, an der Sie
das externe Mikrofon
gen wollen, mit einem
geeigneten fettlösenden
Reinigungsmittel. Nur auf einer
fettfreien Oberfläche kann das
: –
:/
: – Mund des
:, die Anten-
6 und den
8 fachgerecht
: befesti-
Klebepad dauerhaft befestigt
werden.
Das externe Mikrofon
gewünschten Stelle mit Hilfe
des Klebepads in Richtung des
Sprechers befestigen.
Antenne*
Das Car Kit ist zum Betrieb mit
einer Dualband-Antenne*
(GSM 900/1800 MHz)
ausgelegt. Schließen Sie das
Antennenkabel an der
Elektronikbox an.
Display
Achten Sie darauf, das
Display
6 so anzubringen, dass
der Fahrer optimalen
Sichtkontakt und Zugriff darauf
hat.
Sie können das Display
an der Armatur anbringen oder
unter Zuhilfenahme einer
Display-Halterung
befestigen.
: an der
6 direkt
7
Kleben Sie die
Klebepads auf
die erhöhten
Befestigungsstellen.
* Nicht im Standard Lieferumfang
enthalten.
Page 26

Car Kit Bluetooth® SIM (de)24
Direkt-Montage des Displays
Reinigen Sie die Stelle, an der Sie
das Display
wollen, mit einem geeigneten
fettlösenden Reinigungsmittel.
Nur auf einer fettfreien
Oberfläche kann das Klebepad
dauerhaft befestigt werden.
Befestigen Sie dann das
Display
Klebepads.
Montage mittels Display-Halterung
Mit der Display-Halterung
können Sie das Display
schiedenen Positionen gemäß
Zeichnung (siehe Seite iv rechts
unten) anbringen.
Das Kabel muss an geeigneter
Position aus der DisplayHalterung
werden. Dazu müssen Kerben in
den Gehäuserand geschnitten
werden. Diese Stellen sind durch
dünnere Wandstärken kenntlich
gemacht.
Befestigen Sie die DisplayHalterung
den Klebepads oder geeigneten
Schrauben* an der Armatur.
Drücken Sie dann das Display
in die Öffnung der DisplayHalterung
6 befestigen
6 mit Hilfe der
7
6 in ver-
7 herausgeführt
7 mit den beiliegen-
6
7 bis es einrastet.
Lautsprecher
Die Neigung und der Drehwinkel
des Lautsprechers
stellbar. Dazu Einstellschraube
im Sockel lösen, Lautsprecher
einstellen, Schraube festziehen.
Den Lautsprecher
eigneten Stelle (z. B. im Beifahrerfußraum) anschrauben.
Die Schrauben befinden sich im
Sockel des Lautsprechers
8 sind ver-
8
8 an einer ge-
8.
Bordnetzkabel
Elektrische Anschlüsse
Achten Sie bei Anschluss des
Car Kits an das Bordnetz
darauf, dass die Funktion und
der Betrieb anderer Geräte
nicht beeinträchtigt wird
(z. B. Spannungsabfall).
Die Kfz-Batterie vor Beginn der
Montage des Bordnetzkabels
und der Elektronikbox
gerecht abklemmen.
Das Kabel
Pluspol der Autobatterie
verbinden.
§B§ (rot) 12 V+ mit dem
3
3
1 fach-
* Nicht im Standard Lieferumfang
enthalten.
Page 27
25Car Kit Bluetooth® SIM (de)
Das Kabel
§D§ (braun) mit dem
Minuspol der Autobatterie
verbinden.
Das Kabel
§C§ (violett) mit der
Fahrzeugelektrik verbinden, so
dass bei eingeschalteter Zündung 12 V+ oder 24 V+ anliegen.
Die Kabel ausschließlich mit den
Sicherungsklemmverbindern
verbinden und dann die 3A-Flachstecksicherungen
Sicherungsklemmverbinder 4
5 in die
4
einstecken.
Zur fachgerechten Absicherung
des Bordnetzkabels müssen die
Sicherungen zwischen dem Ende
des mitgelieferten Bordnetzkabels
und der Kfz-seitigen Anschlusstelle
angebracht werden.
Lautsprecherkabel an Bordnetzkabel anschließen
Lautsprecherkabel +
schwarz) und
§G§ (weiß-
§E§ (grün-schwarz)
unter Verwendung eines
Kabelverbinders
Lautsprecherkabel und
§F§ (grün) unter Verwendung
eines Kabelverbinders
9 verbinden.
§H§ (schwarz )
9
verbinden.
Verbindung zum Radio*
Das Car Kit kann über den
Phone-In-/Line-In-Eingang des
Autoradios an das Audiosystem
Ihres Autos angeschlossen werden. Dann werden die
Lautsprecher des Audiosystems
als Wiedergabegerät für das
Car Kit benutzt.
Zum Anschließen des Car Kits an
den Phone-In-/Line-In-Eingang des
Radios kann es erforderlich sein, die
Car Kit-Ausgänge und die Phone-In-/
Line-In-Eingänge des Radios
aufeinander abzustimmen. Sie finden
Informationen dazu auf folgender Homepage:
www.siemens.com/
phoneinadapter
Radiostummschaltung (Mute)
Bitte achten Sie auf die Angaben des
Autoradioherstellers und die Verfügbarkeit eines Radiomute-Eingangs.
Das Radiosignal kann während
des Telefonierens automatisch
stumm geschaltet werden. Dazu
verbinden Sie das Steuerkabel
der Radiostummschaltung mit
dem Mute-Eingang des
Autoradios.
§A§
* Falls ein Autoradio mit Phone-In-/
Line-In-Eingang vorhanden ist.
Das Autoradio ist nicht im Standard
Lieferumfang enthalten.
Page 28
Car Kit Bluetooth® SIM (de)26
Elektronikbox
Bitte achten Sie darauf, dass die
Elektronikbox
zwischen metallischen Gegenständen montiert wird. Nur so ist eine gute
Funkkommunikation gesichert.
Stellen Sie sicher, dass die
Elektronikbox
Achten Sie darauf, dass die Kühlschlitze der Elektronikbox
abgedeckt werden (mind. 2 cm
Freiraum) und dass die Montage
keine Störungen an anderen Geräten
verursacht.
Anschlusskabel bitte nicht hinter der
Elektronikbox
die Elektronikbox 1 wickeln, da dies
zu Störungen führen kann.
Alle Kabelenden, die nicht gebraucht
werden, mit Isolierband isolieren.
Führen Sie die Kabel folgender
Komponenten vorsichtig und
ohne Beschädigung zur
Elektronikbox
Sie sie mit der Elektronikbox
• Bordnetzkabel
• Display
•Externes Mikrofon
• Antenne*
1 nicht auf oder
1 sicher befestigt ist.
1 nicht
1 verlegen oder um
1 und verbinden
1:
3,
6,
:,
Lassen Sie die Steckverbinder
sicher einrasten und schrauben
Sie den Antennenanschluss an.
Führen Sie das Kabel des externen Mikrofons
tung um die dafür vorgesehene
Klemmnase (siehe Bild auf S iii).
Die Elektronikbox
Beifahrerfußraum mit
Schrauben
Bild auf Seite iii.
Schließen Sie die Kfz-Batterie
nach der Montage wieder
fachgerecht an.
: zur Zugentlas-
1 z. B. im
2 befestigen, siehe
Demontage Display
Heben Sie das Display 6 von d er
Display-Halterung
folgender Zeichnung ab.
7 gemäß
* Nicht im Standard Lieferumfang
enthalten.
Page 29

27Car Kit Bluetooth® SIM (de)
Leistungsmerkmale
Mit dem Car Kit Bluetooth® SIM
erleben Sie Freisprechen via
Bluetooth-Technologie in neuen
Dimensionen:
• bester Empfang durch
Anschluss einer externen
Antenne
• keine Telefonhalterung mehr
notwendig
• lange Erhaltung der Standbyund Gesprächszeiten des
Telefons
• einmaliges Kommunikationsgefühl durch hervorragende
Audio-Qualität
• bester Bedienkomfort
®
Bluetooth
Die Rechte an der Wortmarke Bluetooth®
sowie an den Bluetooth
sitz der Bluetooth
wendung dieser Marken durch die BenQ
Corp. ist Gegenstand einer LizenVereinbarung.
Die Rechte an sonstigen Markenzeichen
und Handelsnamen sind im Besitz ihrer jeweiligen Eigentümer.
Das Car Kit und das Telefon
kommunizieren mittels Bluetooth®, einer Kurzstreckenfunkverbindung. Dadurch wird
die Benutzung Ihres Car Kits
noch komfortabler.
Um diese Kommunikation zu ermöglichen, müssen Car Kit und
Telefon miteinander verbunden
-Technologie
®
Logos sind im Be-
®
SIG, Inc. Jedwede Ver-
(Pairing) werden. Lesen Sie
hierzu „Erste Verbindung mit
dem Telefon herstellen (Pairing)“, S. 28.
Die Bluetooth-Verbindung ist
mit zwei Profilen möglich:
• SIM Access-Profil
(Standardeinstellung)
Das GSM-Modul in der Elektronikbox sorgt für die
Verbindung über die externe
Antenne mit dem GSM-Netz.
• Handsfree-Profil
In diesem Modus stellt das
Telefon selbst die Verbindung
mit dem GSM-Netz her (siehe
auch S. 34).
Funktionalität der
Display-Tasten
Die Bedienerführung Ihres Car
Kits erfolgt über die Tasten des
Displays.
Nachfolgend werden Symbole
verwendet, um die sechs unterschiedlichen Aktionen
darzustellen:
c
a
g
h
ja/annehmen
nein/auflegen
nach oben/
Nummernwahl
nach unten/
Adressbuch/Telefonbuch
Page 30

Car Kit Bluetooth® SIM (de)28
S
f
Wenn langes Drücken erforder-
lich ist, steht in der Bedienungsanleitung „lang drücken“.
In allen anderen Fällen genügt
es, die Tasten kurz anzutippen.
Sprachsteuerung
(Push to Speak, nur
im Handsfree-Profil)
Favoriten
Inbetriebnahme
Erste Verbindung mit dem
Telefon herstellen (Pairing)
Details über die Herstellung einer
Bluetooth-Verbindung lesen Sie bitte
in der Bedienungsanleitung Ihres
Telefons nach.
• Schalten Sie das Car Kit aus,
siehe S. 29.
• Aktivieren Sie den Anmeldemodus vom Car Kit, indem Sie
lang drücken.
c
• Aktivieren Sie die BluetoothSchnittstelle Ihres Telefons
und starten Sie am Telefon
die Suche nach emfangsbereiten Bluetooth-Geräten
in der Umgebung.
• Wenn das Car Kit „HKW-720“
gefunden wird, fordert das Telefon Sie auf, die Verbindung
durch Eingabe einer
PIN-Nummer zu bestätigen.
• Die PIN-Nummer (16-stellige
Zufallszahl) wird im Display
des Car Kits angezeigt. Geben
Sie diese Nummer in das
Telefon ein.
• Geben Sie die PIN-Nummer
Ihres Telefons (SIM-PIN*)
über das Display des Car Kits
ein (siehe „Nummer wählen“,
S. 32).
• Nach der Bestätigung zeigt
das Car Kit die Identifikation
des Telefons im Display an
(Dieser Name kann im Telefon
geändert werden). Anschließend schaltet das Car Kit in
den Bereitschaftsmodus um.
Dieser Vorgang kann bis zu
1 Minute andauern. Bei Telefonen anderer Hersteller ist
möglicherweise eine
Bestätigung am Telefon notwendig, um in den Bereitschaftsmodus zu gelangen.
Ab diesem Moment ist das Car
Kit betriebsbereit. Das Car Kit
und das Telefon können miteinander kommunizieren und
werden sich künftig wieder
erkennen.
* SIM-PIN ist die Geheimzahl, welche
Sie benötigen, um sich in Ihrem
Mobilfunknetz einzubuchen.
Page 31

29Car Kit Bluetooth® SIM (de)
Weiteres Telefon verbinden
• Starten Sie das Car Kit, indem
Sie die Kfz-Zündung einschalten oder a lang drücken.
• Das Car Kit zeigt die zuletzt
benutzten Telefone im Display an. Mit g/ h kann
man durch die Liste der angezeigten Telefone blättern. In
der Liste finden Sie die Möglichkeit, ein weiteres Telefon
zu verbinden.
?j< X ># Auswählen.
c
Verfahren Sie anschließend wie
beschrieben unter „Erste Verbindung mit dem Telefon herstellen
(Pairing)“, S. 28.
Auswahl bestätigen.
Wiederkehrende
SIM-PIN-Abfrage
Gemäß der Beschreibung im vorhergehenden Kapitel finden Sie
an der letzten Position in der
Liste die Möglichkeit, die
SIM-PIN vom Car Kit bei jedem
Anmeldevorgang erneut
abfragen zu lassen.
? GSM PIN >
c
g/ h Wählen Sie eines der
Auswählen
Auswahl bestätigen
Symbole aus:
GSM PIN Q Wieder-
kehrende SIM-PIN-Abfrage aktiviert.
GSM PIN [ ] Wieder-
kehrende SIM-PIN-Abfrage deaktiviert.
c
oder
a
Auswahl bestätigen.
Abbrechen
Betrieb mit mehreren
Telefonen
Das Car Kit speichert die Telefondaten von insgesamt vier Telefonen, mit denen es wahlweise
betrieben werden kann.
Wenn ein fünftes Telefon verbunden wird, wird der Eintrag
für das Telefon gelöscht,
welches am längsten nicht mehr
in Verbindung mit dem Car Kit
genutzt wurde.
Klingeltöne
Im SIM Access-Profil wird der
Standard-Klingelton des Car Kits
wiedergegeben (siehe auch
S. 35).
Car Kit ausschalten
a
Das Car Kit wird automatisch
nach einer gewissen Zeitspanne
ausgeschaltet, wenn die KfzZündung ausgeschaltet ist.
Lang drücken: Car Kit
ausschalten.
Page 32

Car Kit Bluetooth® SIM (de)30
Funktionen
Wenn nicht anders beschrieben,
gilt für alle Funktionen:
a
a
a
Car Kit einschalten
• Starten Sie das Car Kit, indem
• Das Car Kit zeigt die zuletzt
g/ h Eintrag auswählen.
c
Erfolgt keine Auswahl, wird das
zuletzt benutzte Telefon nach
ca. 5 Sekunden verbunden, falls
dieses Telefon in Reichweite ist.
Wenn dieses Telefon nicht vorhanden ist, schaltet das Car Kit in
einen Wartezustand.
a
Lang drücken: Car Kit
wechselt in den
Bereitschaftsmodus.
Lang drücken (im
Bereitschaftsmodus):
Car Kit wird ausgeschaltet.
Kurz drücken: eine
Ebene zurück.
Sie die Kfz-Zündung einschalten oder a lang drücken.
benutzten Telefone im Display an.
Auswahl bestätigen.
Kurz drücken:
beendet den Wartezustand.
Sie können jetzt ein Telefon auswählen oder ein weiteres Telefon verbinden, siehe „Weiteres
Telefon verbinden“, S. 29.
Rufnummern vom
Mobiltelefon übernehmen
Das Adressbuch wird nach jeder
Aktivierung des Car Kits aus dem
Adressbuch/Telefonbuch (SIMKarte) des Mobiltelefons übernommen. Dieser Vorgang kann
mehrere Minuten dauern. Es
können insgesamt 1000 Einträge gespeichert werden.
Während der Übertragung der
Rufnummern blinkt das Telefonbuch-Symbol im Display des Car
Kits. Sie können in dieser Zeit bereits übertragene Nummern mit
dem Car Kit anwählen oder die
Nummernwahl benutzen.
Einstellungen
h
Wählen Sie aus, welche Daten
übernommen werden sollen:
j [] + SIM []
Lang drücken.
Das Adressbuch und
das Telefonbuch
(SIM-Karte) des Telefons werden verwendet und auf dem
Car Kit gespeichert
sowie automatisch
aktualisiert.
Page 33

31Car Kit Bluetooth® SIM (de)
j [] Adressbuch wird ver-
SIM []
wendet und auf dem
Car Kit gespeichert
sowie automatisch
aktualisiert.
Telefonbuch (SIMKarte) wird verwendet und auf dem Car
Kit gespeichert sowie
automatisch aktualisiert.
Bereitschaftsmodus
Das Car Kit verfügt im Bereitschaftsmodus über folgende
Funktionen:
c
c
a
Ruflisten
Lang drücken: die zu-
letzt gewählte Nummer wird gewählt.
Lang drücken: Das
Car Kit wird ausgeschaltet.
h Adressbuch
g Nummernwahl
f
Favoriten
Anruf annehmen
c
Anruf annehmen.
Anruf ablehnen
a
Anruf ablehnen.
Gespräch beenden
a
Gespräch beenden.
Anrufen aus dem
Adressbuch/Telefonbuch
h
Zeigt die Anfangsbuchstaben
vorhandener Adressbucheinträge an.
g/hKurz drücken: wech-
g/hLang drücken: scrollt
c
g/h Eintrag auswählen.
c
Ein Eintrag im Adressbuch kann
mehrere Rufnummern
gespeichert haben.
g/h Rufnummer
c
Adressbuch/Telefonbuch kurz drücken.
selt zum nächsten/
vorhergehenden
Buchstaben.
durch das Alphabet.
Bestätigt den gewähl-
ten Buchstaben und
zeigt die Liste der Einträge an.
Eintrag bestätigen.
auswählen.
Anruf starten.
Page 34

Car Kit Bluetooth® SIM (de)32
Anruf aus den Ruflisten
Ruflisten
c
Zeigt die Ruflisten des Telefons
an.
Es stehen drei Ruflisten zur
Auswahl:
j X > Gewählte Nummern
X > O j Entgangene Anrufe
X > j Angenommene
Die Ruflisten werden nur angezeigt, wenn jeweils mindestens
ein Eintrag darin enthalten ist.
Wenn keine Ruflisten vorhanden
sind, wird für einen kurzen Moment }{ (Aktion nicht möglich)
angezeigt.
g/hRufliste auswählen.
c
g/hEintrag auswählen.
c
Anrufe
Rufliste aktivieren.
Anruf starten.
Favoriten
Sie können fünf Telefonnummern aus dem Adressbuch auswählen, die Sie schnell und komfortabel über
können.
h
f
fanrufen
Rufen Sie das Adressbuch auf und wählen
Sie den gewünschten
Eintrag aus.
Lang drücken: Eintrag
bestätigen.
Wenn Sie künftig im Bereitschaftsmodus f kurz drücken,
wird Ihnen die Liste der
Favoriten angezeigt.
Wenn Sie die sechste Telefonnummer speichern, wird die
zuerst gespeicherte Nummer
gelöscht.
Nummer wählen
Nummernwahl
g
Die Nummernwahl wird eingeleitet und der Cursor blinkt im
Display.
g/h Wechselt zur nächs-
c
c
a
a
ten Ziffer.
Ziffer auswählen.
Lang drücken: Num-
mer wird gewählt.
Löscht die letzte
Ziffer.
Lang drücken: Löscht
die gesamte
Nummer.
Im Gespräch
S
f
c
Lauter.
Leiser.
Anruf halten.
a Anruf beenden.
Page 35

33Car Kit Bluetooth® SIM (de)
j
j
j
Zweiter Anruf
a
c
c
a
Mikrofonstummschaltung
c
DTMF-Töne
g
Senden Sie Tonfolgen (Ziffern),
z. B. zur Fernabfrage eines Anrufbeantworters. Diese Zifferneingaben werden direkt als
DTMF-Töne (Dual Tone Multiple
Frequency) übertragen.
Anruf ablehnen.
Aktives Gespräch hal-
ten und anklopfenden Anruf annehmen.
Zwischen zwei Gesprächen makeln.
Lang drücken: alle Gespräche beenden.
Lang drücken:
Mikrofonstummschaltung aktivieren/deaktivieren.
kurz drücken im Gespräch: aktiviert
DTMF-Töne.
Display-Symbole
AB3 Signalstärke des Telefons
FHJ Ladezustand Telefon (wird
?j< X ># Anmeldemodus (Pairing)
# X Telefon wird gesucht
# L Telefon wird verbunden
W
}{ Aktion nicht möglich
j Handsfree-Profil aktiv
j X > Gewählte Nummern/
X > O j Entgangene
X > j Angenommene Anrufe/
j < X >j Aktives Gespräch
X > j j X X j
(wird im Bereitschaftszustand angezeigt). Wenn
das Symbol blinkt, ist kein
Netz verfügbar.
im Bereitschaftszustand
angezeigt)
Bitte warten
(wird im Bereitschaftszustand im Wechsel mit der
Signalstärke angezeigt).
Abgehender Anruf
Anrufe/Besetzt
Eingehender Anruf
Aktives Gespräch/anklopfender Anruf
Gehaltenes Gespräch
X X j
< X > j j
Aktives Gespräch/
gehaltener Anruf
< X ? X > #
Schnittstellenfehler
Page 36

Car Kit Bluetooth® SIM (de)34
# ( p ( j
# ) p ) j
= Listenauswahl
o Telefonnummer privat
\ Telefonnummer Büro
n Telefonnummer Mobil,
m Telefonnummer Mobil,
p
pq
pqq
P\/M\ Mikrofonstummschaltung
!<;! In die Werkseinstellung zu-
[] Adressbuch/Telefonbuch
" Sprachsteuerung aktiv
uvw SMS-Empfang
S Notruf
rst
rstq
rstqq
privat
Büro
Lautstärke
aktiv/inaktiv
Anruf an Car Kit
übergeben
Anruf an Telefon
übergeben
rücksetzen
wird übertragen
Displaybeleuchtung
Funktionen im
Handsfree-Profil
f
In diesem Modus stellt das Telefon
selbst die Verbindung zum GSMNetz her. Das GSM-Modul in der
Elektronikbox wird nicht benutzt.
Damit werden die Vorteile von
SIM Access nicht genutzt. (z. B.
Antennenanschluss, geringer
Stromverbrauch).
Gesprächsübergabe
c
Diese Funktion ist auf allen
Bluetooth-Geräten verfügbar
wie z. B. Headset oder Telefon.
g Lang drücken: Aktives
Lang drücken (im
Bereitschaftsmodus):
schaltet in das
Handsfree-Profil um.
Aktives Gespräch
durch das Car Kit
übernehmen.
Gespräch an das Telefon übergeben (falls
vom Telefon unterstützt).
Page 37

35Car Kit Bluetooth® SIM (de)
Car Kit Profil
Wenn das Telefon im HandsfreeProfil mit dem Car Kit verbunden
wird, wird in der Regel ein bestimmtes Profil im Telefon aktiviert. Siemens-Telefone zeigen
nach Aktivierung dieses Profils
z. B. eine größere Schrift im
Display an. Die Einstellungen
des Profils können Sie im Telefon
modifizieren. Lesen Sie dazu
bitte die Bedienungsanleitung
Ihres Telefons.
Klingeltöne
Je nach Typ des Telefons können
über das Car Kit die eingestellten
Klingeltöne bzw. Melodien des
Telefons wiedergegeben
werden. Falls nicht möglich,
wird der Standard-Klingelton
des Car Kits wiedergegeben.
Datenübertragung
Zur Datenübertragung, von z. B.
einem Notebook, melden Sie
bitte das Notebook über
Bluetooth direkt am Telefon an.
Schalten Sie hierzu das Car Kit in
das Handsfree Profile um.
Weitere Einstellungen
In die Werkseinstellung zurücksetzen (im ausgeschalteten
Zustand)
a
SIEMENS HKW-720
S/g
!<;! Halten Sie die beiden
Das Gerät schaltet sich nach dem
Zurücksetzen in die Werkseinstellung selbstständig ab.
Diese Funktion löscht alle gespeicherten Daten im Car Kit, z. B.
Adressbücher, Ruflisten, gepairte
Telefone, etc.
Displaybeleuchtung einstellen
(im Bereitschaftsmodus)
S
g, h Heller bzw. dunkler
Lang drücken.
wird auf dem Display
angezeigt.
Dauerhaft gedrückt
halten.
zuerst genannten
Tasten gedrückt, bis
das nebenstehende
Symbol nicht mehr
blinkt und dauerhaft
dargestellt wird.
Lang drücken, Displaybeleuchtung
auswählen.
stellen.
Page 38

Car Kit Bluetooth® SIM (de)36
Software-Version anzeigen
(im Bereitschaftsmodus)
/f Lang drücken, Soft-
h
Lauststärkeausgangspegel einstellen (im Bereitschaftsmodus)
Der Lautstärkeausgangspegel
der Elektronikbox ist für den
mitgelieferten Lautsprecher
ausgelegt (maximale
Pegeleinstellung).
Wenn Sie die Lautsprecher des
Radios als Wiedergabegerät benutzen und der Phone-In-/LineIn-Eingang des Radios zu empfindlich ist, können Sie den
Ausgangspegel reduzieren.
g
g
c
SOS-Ruf
(wenn kein Telefon verbunden
ist und das SOS-Zeichen im
Display angezeigt wird)
c
ware-Version wird
angezeigt.
/ SKurz drücken.
/ hwählen Sie eines der
Symbole aus:
p maximaler
Ausgangspegel.
pV reduzierter
Ausgangspegel.
Kurz drücken, bestä-
tigt die Auswahl.
Kurz drücken.
Fehlerbehebung
Car Kit funktioniert nicht
• Kabelanschlüsse überprüfen
• Keine Betriebsspannung, Anschluss der Kabel überprüfen
• Telefon nicht eingeschaltet
oder Verbindung zum Car Kit
nicht aktiv
• Sicherungen überprüfen
• Betriebsspannung zu niedrig
bzw. zu hoch
Störgeräusche beim
Gesprächspartner
• Mikrofon im Luftstrom des
Schiebedaches, des Fensters
oder der Lüftung
•Abstand zwischen Mikrofon/Mikrofonkabel zum
Telefon < 50 cm
Schlechte Sprach- und Audioqualität
• Car Kit außerhalb zulässiger
Betriebstemperatur
• Lautstärke zu gering eingestellt (Lautstärke über
Telefon/Car Kit einstellen!)
•Verbindung zum Radio
(Phone-In/Line-In Betrieb):
Telefon-/Car Kit-Lautstärke zu
hoch eingestellt (Lautstärke
über Telefon/Car Kit geringer
einstellen und Lautstärke über
Radio ggf. erhöhen, siehe
auch S. 36).
Page 39

37Car Kit Bluetooth® SIM (de)
Starkes Echo
•Abstand zwischen Mikrofon
und Lautsprecher <1m
Schwaches Mikrofonsignal
(Gesprächspartner hört Sie nur
leise)
•Abstand zwischen Mikrofon
und Mund des Benutzers
>80cm
• Mikrofon nicht auf Sprecher
gerichtet
Schlechte Empfangsqualität
•Kein Netz verfügbar
• Position des Telefons verändern (nur im HandsfreeProfil relevant)
• Wenn Ihr Auto mit einer metallbedampften Verglasung
ausgestattet ist, kann das die
Empfangsqualität Ihres Telefons bzw. Car Kits beeinträchtigen. Empfehlungen des
Autoherstellers beachten und
entsprechende (Außen-)
Antenne installieren.
System-Reset
•
5 Sekunden drücken:
a
Das Car Kit wird ausgeschaltet
(unabhängig vom aktuellen
Modus)
•
10 Sekunden drücken:
a
erzwingt Reset
Telefon wird nicht gefunden/
Bluetooth-Verbindungsprobleme
• Erste Verbindung mit dem Telefon herstellen, siehe S. 28.
• Seit der letzten Benutzung des
Telefons mit dem Car Kit sind
mindestens vier weitere Telefone angemeldet worden.
Melden Sie das Telefon erneut
an.
• Stellen Sie sicher, dass die
Elektronikbox nicht auf oder
zwischen metallischen
Gegenständen montiert ist.
• Verringern Sie den Abstand
zwischen Elektronikbox und
Telefon.
Autoradio dauerhaft stumm
geschaltet
• Anschluss der Radiostummschaltung möglicherweise mit
Masse vertauscht
Automatisches Ein- und Ausschalten des Car Kits funktioniert nicht/
Car Kit schaltet sich nicht selbst aus
• Prüfen Sie, ob die Leitung
Zündung mit der Kfz-Zündung
verbunden ist
Adressbuch wird nicht aktualisiert
• Stellen Sie sicher, dass das Telefon im Bereitschaftsmodus
ist und keine Tastensperre aktiviert wurde (Bei der Verwendung eines Siemens
Mobiltelefons entfällt diese
Einschränkung). Verbinden
Page 40

Car Kit Bluetooth® SIM (de)38
Sie es erneut mit dem Car Kit,
siehe S. 30.
Technische Daten und
Zulassung
Spannungsversorgung
Stromaufnahme
Betriebstemperatur
Lautsprecherausgangsleistung
Gewicht
(Elektronikbox)
Gehäuseabmessungen
(Elektronikbox)
GSM-Modul Dualband mit 900
10,8 V+ bis 16 V+
Anschlusskabel Kfz-
Zündung wahlweise
auch an 24 V
max. 2 A /
max. 1 mA
(Ruhestrom)
–20°C bis +55°C
3 W
ca. 152 g
ca. 130 x 108 x
26 mm (LxBxH)
und 1800 MHz,
GPRS-Klasse 8,
unterstützt SIM
Access-Profile
Car Kit erfüllt folgende
EU-Richtlinien:
89/336/EWG „Elektromagnetische Verträglichkeit“
92/59/EWG „Richtlinie über die
allgemeine Produktsicherheit“
E24
10R-020177
geändert durch die Richtlinie
95/54/EG „Elektromagnetische
Verträglichkeit im
Kraftfahrzeug“.
Typengenehmigung
gemäß Richtlinie
72/245/EWG, zuletzt
Konformitätserklärung
CE
BenQ Mobile erklärt hiermit,
dass das im vorliegenden Handbuch beschriebene Mobiltelefon den wesentlichen Anforderungen und anderen
einschlägigen Bestimmungen
der Richtlinie 1999/5/EC (R&TTE)
entspricht. Die betreffende Konformitätserklärung (DoC) wurde
unterzeichnet. Falls erforderlich,
kann eine Kopie des Originals
über die Firmen-Hotline angefordert werden oder unter:
www.BenQMobile.com/conformity
FCC
Dieses Gerät ist konform mit
Teil 15 der FCC-Regeln. Voraussetzungen für den Betrieb des
Geräts: (1) das Gerät verursacht
keine gefährlichen Interferenzen und (2) wird von keinerlei
Page 41

39Car Kit Bluetooth® SIM (de)
Interferenzen beeinträchtigt,
auch wenn es sich um
Interferenzen handelt, die
unerwünschte Effekte haben
können.
Bei Änderungen und Umbauten,
die nicht ausdrücklich von der
für die Einhaltung verantwortlichen Partei genehmigt sind,
kann dem Benutzer die Betriebserlaubnis für das Gerät entzogen
werden.
Pflege
Das Produkt sollte mit einem
weichen, befeuchteten, jedoch
nicht nassen Tuch gereinigt
werden.
Beim Entfernen des Klebepads
können Kleberückstände zurückbleiben. Bitte benutzen Sie nur
Reinigungslösungen, die vom
Fahrzeughersteller empfohlen
werden.
Verwenden Sie bitte keine Farben oder andere chemische Substanzen.
Zubehör
Produkte erhältlich im Fachhandel oder besuchen Sie unseren
Online-Shop unter:
Original Accessories
www.BenQMobile.com/
shop
Kundenservice
(Customer Care)
siehe S. 120.
Page 42

Car Kit Bluetooth® SIM (it)40
to-
Car Kit Bluetooth® SIM (it)
t)
Contenuto della
fornitura
1 Centralina elettronica con
connettori per:
• Cavo rete di bordo
• Display
• Microfono
• Antenna*
2 Viti per il fissaggio della centralina
elettronica
3 Cavo rete di bordo con collega-
menti per altoparlanti
§A§ Commutazione mute della radio
(Radio Mute) (nero)
§B§ Batteria 12 V+ (rosso)
§C§ Accensione-auto 12 V+/24 V+
(violetto)
§D§ Massa (marrone)
§E§ Collegamento altoparlanti +
(verde/nero)
§F§ Collegamento altoparlanti -
(verde)
4 3 morsetti di sicurezza per la rete
di bordo
5 3 sicurezze ad attacco piatto (a
3 violetto) per il connettore di fissaggio di sicurezza
6 Display con cuscinetti adesivi
7 2 supporti display con cuscinetti
adesivi
8 Altoparlanti con cavo di
collegamento
§G§ Collegamento altoparlanti +
(bianco/nero)
§H§ Collegamento altoparlanti -
(nero)
(Le viti per il fissaggio sono
integrate nel supporto)
9 2 connettori cavo per cavo
altoparlanti
: Microfono esterno con cuscinetto
adesivo
* Non compresa nella confezione standard.
Page 43

41Car Kit Bluetooth® SIM (it)
Compatibilità
Il Car Kit Bluetooth® SIM (definito in seguito "kit auto") è compatibile con i seguenti telefoni:
• cellulari con interfaccia Bluetooth (profilo di accesso SIM)
(vedere anche le indicazioni di
compatibilità sulla
confezione).
Le presenti istruzioni di installazione
forniscono solo le informazioni di
base. Dato che i diversi prodotti per
automobile e i collegamenti delle
autoradio richiedono impianti di tipo
diverso, il montaggio deve essere
eseguito in base alle esigenze.
Istruzioni di sicurezza
Prima dell'utilizzo, leggere
attentamente il manuale d'uso e
di sicurezza.
Durante l'utilizzo del telefono, rispettare le normative
di legge e le limitazioni locali. Tra queste rientrano
ad esempio le limitazioni
previste per l'utilizzo durante la guida o presso le
stazioni di servizio.
Osservare le direttive generali e quelle specifiche
per il tipo di veicolo in material di installazione di dispositivi supplementari;
rivolgersi eventualmente a
personale specializzato
(sicurezza degli impianti
elettrici, della posa dei
cavi, del contatto con
elementi caldi, del contatto
con carburante ecc.).
Page 44

Car Kit Bluetooth® SIM (it)42
Il montaggio dei componenti non deve
compromettere:
• la libertà di movimento,
le condizioni di sicurezza
e il campo visivo del
conducente;
• il corretto funzionamento degli elementi di
comando;
• la sicurezza dei passeggeri (anche in caso di
incidente);
• il corretto funzionamento dei dispositivi di sicurezza all'interno del
veicolo (airbag, cinture di
sicurezza, interruttori
delle luci di emergenza
ecc).
Attenzione durante il montaggio! Pericolo per i
bambini.
L'apparecchio funziona
soltanto a 12 V.
L'apparecchio non deve
essere utilizzato in ambienti a rischio di
esplosione.
La presenza di vetri schermati sulla vettura può compromettere la qualità di
ricezione del kit auto. In
questo caso utilizzare
un'antenna esterna al
veicolo.
L'uso improprio e l'apertura
dei suoi componenti escludono qualsiasi garanzia.
Si prega di osservare:
I telefoni inutilizzabili e i relativi accessori devono essere smaltiti a norma di
legge.
Usare solo Accessori Originali. In questo modo si
evitano possibili danni alla
salute e agli oggetti garantendo il rispetto di tutte le
disposizioni in materia.
Prima di utilizzare gli accessori o i telefoni cellulari Bluetooth
consultare il manuale d'uso del veicolo
per eventuali limitazioni di utilizzo di
®
in un veicolo,
prodotti del genere.
Per ulteriori indicazioni consultare il
manuale d'uso del cellulare.
Prodotto da BenQ Mobile GmbH &
Co. OHG su licenza di Siemens AG.
Page 45

43Car Kit Bluetooth® SIM (it)
Montaggio
Microfono, antenna*, display,
altoparlanti
Vedere disegno a pagina iii/iv
della copertina.
Durante il montaggio, fare attenzione
a quanto segue:
• distanza microfono
te
8 possibilmente > 1 m;
• distanza microfono
fono – antenna*/cavo antenna >
50 cm;
• distanza microfono
dell'utente < 80 cm;
• Evitare il montaggio del microfono
in prossimità di corrente d'aria del
tettuccio apribile, del finestrino o
dell'impianto di ventilazione.
Posare correttamente i cavi
per il microfono esterno
l'antenna*, il display
parlante
tipologia del proprio veicolo.
Evitare di danneggiare, piegare
o schiacciare i cavi.
Microfono
Pulire il punto in cui si vuole fissare il microfono esterno
uno sgrassante adatto. Il cuscinetto adesivo può essere fissato
in modo permanente solo su una
superficie priva di grasso.
8 in conformità alla
: – altoparlan-
:/cavo micro-
: – bocca
:,
6 e l'alto-
: con
Fissare il microfono esterno
nel punto desiderato con l'ausilio del cuscinetto adesivo in direzione della persona che parla.
Antenna*
Il kit auto è predisposto per l'utilizzo con un'antenna dualband*
(GSM 900/1800 MHz). Collegare
il cavo dell'antenna alla
centralina elettronica.
Display
Assicurarsi di montare il
display
6 in modo da garantire
un controllo ottimale sia visivo
sia di accesso.
È possibile installare il display
direttamente sul cruscotto
oppure fissarlo con l'aiuto del
supporto
7.
Incollare il cuscinetto adesivo sui
punti di fissaggio
rialzati.
:
6
* Non compresa nella confezione
standard.
Page 46

Car Kit Bluetooth® SIM (it)44
Montaggio diretto del display
Pulire il punto in cui si desidera
fissare il display
sgrassante adatto. Il cuscinetto
adesivo può essere fissato in modo permanente solo su una
superficie priva di grasso.
Fissare il display
cuscinetto adesivo.
Montaggio tramite supporto display
Con il supporto display
sibile installare il display
verse posizioni secondo il
disegno (vedere a pagina iv in
basso a destra).
Estrarre il cavo nella posizione
adatta dal supporto display
tal fine è necessario creare degli
incavi sul bordo dell’alloggiamento. Questi punti sono
indicati da spessori della parete
più sottili.
Fissare il supporto display
il cuscinetto adesivo in dotazione oppure le viti adatte* sul
cruscotto.
Spingere il display
to display
6 con uno
6 con il
7 è pos-
6 in di-
7. A
7 con
6 nel suppor-
7 fino all'innesto.
Altoparlante
L'inclinazione e l'angolo di rotazione dell'altoparlante
regolabili. Allentare la vite di regolazione nella base, regolare
l’altoparlante
Avvitare l'altoparlante
punto adatto (ad esempio nella
zona accanto ai piedi
passeggero).
Le viti si trovano nella base
dell’altoparlante
8 e fissare la vite.
8 sono
8 in un
8.
Cavo rete di bordo
Collegamenti elettrici
Durante il collegamento del kit
auto alla rete di bordo
rarsi che non venga compromesso il funzionamento di altri
apparecchi (ad es. caduta di
tensione).
Staccare correttamente la batteria dell'automobile prima di
montare il cavo rete di bordo
e la centralina elettronica
Collegare il cavo
al polo positivo della batteria
dell'automobile.
3 assicu-
3
1.
§B§ (rosso) 12 V+
* Non compresa nella confezione
standard.
Page 47

45Car Kit Bluetooth® SIM (it)
Collegare il cavo
§D§ (marrone) al
polo negativo della batteria.
Collegare il cavo
§C§ (violetto)
all'impianto elettrico dell'automobile in modo che all'accensione si raggiungano i 12 V+ oppure 24 V+.
Collegare il cavo esclusivamente con
i morsetti di sicurezza
poi le sicurezze ad attacco piatto a
3A
5 nei morsetti di sicurezza4.
4 e inserire
Per l'installazione corretta del cavo
rete di bordo, è necessario applicare
le sicurezze tra l'estremità del cavo
rete di bordo in dotazione e il punto
di attacco del veicolo.
Collegamento del cavo altoparlante
al cavo rete di bordo
Collegare il cavo dell'altoparlante +
§G§ (bianco-nero) e §E§ (verde-
nero) utilizzando il
connettore
9.
Collegare il cavo altoparlante (nero) e
§F§ (verde) utilizzando il
connettore
9.
Collegamento alla radio*
Il kit auto può essere collegato
mediante l'ingresso phone-in-/line-in dell'autoradio al sistema
audio dell'automobile. In questo
caso gli altoparlanti del sistema
audio vengono utilizzati come
apparecchio di riproduzione del
kit auto.
Per collegare il kit auto all'ingresso
phone-in-/line-in della radio, può essere necessario sintonizzare le uscite
del kit auto e gli ingressi phone-in-/ line-in della radio. Per ulteriori informazioni a questo proposito, consultare
la seguente homepage:
www.siemens.com/
phoneinadapter
Commutazione mute della radio
(Mute)
Attenersi ai dati del produttore
dell'autoradio e alla presenza di un
§H§
ingresso mute della radio.
Durante la conversazione il
segnale radio può essere commutato automaticamente su
mute. Per attivare la funzione,
collegare il cavo di controllo
della commutazione mute con
l'ingresso mute dell'autoradio.
§A§
* In caso sia disponibile un'autoradio
con ingresso phone-in-/line-in.
L'autoradio non è compresa nella
confezione standard.
Page 48

Car Kit Bluetooth® SIM (it)46
Centralina elettronica
Prestare attenzione a non fissare la
centralina elettronica
getti metallici, per garantire una
buona comunicazione radio.
Assicurarsi che la centralina
elettronica
correttamente.
Accertarsi che le fessure di raffreddamento della centralina elettronica
non vengano coperte (almeno 2 cm di
spazio) e che il montaggio non
provochi disturbi ad altri apparecchi.
Non posizionare il cavo di collegamento dietro la centralina
elettronica
alla centralina 1 perché può causare
disturbi.
Isolare tutte le estremità dei cavi inutilizzate con nastro isolante.
Posare i cavi dei seguenti componenti con cautela e senza danneggiarli fino alla centralina
elettronica
essa
1:
• Cavo rete di bordo
• Display
• Microfono esterno
• Antenna*.
1 su o tra og-
1 sia fissata
1
1 né avvolgerlo intorno
1 e collegarli ad
3,
6,
:,
Innestare correttamente i connettori a innesto e avvitare il collegamento dell'antenna.
Posare il cavo del microfono
: nell'apposita linguet-
esterno
ta di bloccaggio per scaricare la
trazione (vedere figura a
pagina iii).
Fissare la centralina
elettronica
nella zona bassa vicino ai piedi
del passeggero con viti
vedere figura a pagina iii.
Dopo il montaggio, collegare di
nuovo accuratamente la batteria
dell'automobile.
1 ad esempio
2,
Smontaggio del display
Staccare il display 6 dal
supporto
nel disegno.
7 come indicato
* Non compresa nella confezione standard.
Page 49

47Car Kit Bluetooth® SIM (it)
Caratteristiche
Con il Car Kit Bluetooth® SIM si
vive l'esperienza del viva voce
grazie alla tecnologia Bluetooth
in nuove dimensioni:
• migliore ricezione tramite
collegamento di un'antenna
esterna;
• supporto telefono superfluo;
• lunga durata dei tempi in
stand-by e conversazione del
telefono;
• sensazione di comunicazione
unica grazie a una qualità
audio eccezionale;
• migliore comodità per
l'utente.
Tecnologia Bluetooth
Il marchio registrato ed il logo
®
sono di esclusiva titolarità di
Bluetooth
®
SIG, Inc. e l’uso degli stessi da
Bluetooth
parte di BenQ Corp. è soggetto a licenza.
Gli altri marchi e nomi commerciali utilizzati
sono di proprietà dei rispettivi titolari.
Il kit auto e il telefono
comunicano tramite
Bluetooth®, un collegamento
radio a distanza limitata che migliora ulterioremente l'uso del
kit auto.
Per rendere possibile questa comunicazione, collegare il kit auto con il telefono. Vedere "Primo
collegamento con il telefono
(pairing)", pag. 48.
®
Il collegamento Bluetooth è
possibile con due profili:
• Profilo di accesso SIM
(impostazione standard)
Il modulo GSM nella centralina elettronica consente il collegamento con la rete GSM
tramite l'antenna esterna.
• Profilo viva voce
In questa modalità il telefono
stesso crea il collegamento
con la rete GSM (v. pag. 54).
Funzionalità dei tasti
del display
La gestione del kit auto avviene
tramite i tasti del display.
In seguito vengono utilizzati
simboli che rappresentano le sei
diverse azioni:
c
a
g
h
sì/rispondere
no/terminare
in su/selezione
numero
in giù/rubrica
indirizzi/Rubrica
Page 50

Car Kit Bluetooth® SIM (it)48
S
f
Quando è necessario premere a
lungo, nel manuale viene specifi-
cato "a lungo".
In tutti gli altri casi, è sufficiente
premere brevemente.
Comando vocale
(Push to Speak, solo
nel profilo viva voce)
Preferiti
Messa in funzione
Primo collegamento con il
telefono (pairing)
Per ulteriori informazioni sul collegamento Bluetooth, leggere le sezioni
relative nel manuale d'uso del
telefono.
• Disattivare il kit auto, vedere
av. pag.49.
• Attivare la modalità login
del kit auto, premendo
a lungo.
c
• Attivare l'interfaccia Bluetooth del telefono e avviare nel
telefono la ricerca degli
apparecchi Bluetooth pronti
alla ricezione nei dintorni.
• Una volta individuato il kit
auto "HKW-720", il telefono
chiede di confermare il collegamento inserendo il numero
PIN.
• Il numero PIN (numero casuale di 16 cifre) viene visualizzato sul display del kit auto.
Inserire questo numero nel
telefono.
• Inserire il numero PIN del proprio telefono (SIM-PIN*) mediante il display del kit auto
(vedere “Selezione di un numero” a v. pag. 49).
• Dopo la conferma, viene visualizzata l'identificazione del
telefono sul display e e il kit
auto passa allo stand-by (questo nome può essere modificato nel telefono). Questa
procedura può durare fino a 1
minuto. Nel caso di telefoni di
altre marche potrebbe essere
necessario confermare l'identificazione prima di poter passare allo stand-by.
A partire da questo momento, il
kit auto è pronto al funzionamento. Il kit auto e il telefono
possono comunicare tra loro e
successivamente si
riconosceranno.
* In numero PIN della scheda SIM è il
numero segreto necessario per
registrarsi nella rete mobile.
Page 51

49Car Kit Bluetooth® SIM (it)
Collegamento di un altro
telefono
• Avviare il kit auto avviare
l'automobile oppure
premerea a lungo.
• Il kit auto visualizza gli ultimi
telefoni utilizzati sul display.
Le funzioni g/ h consentono di scorrere l'elenco dei
telegfoni visualizzati.
Nell'elenco è possibile collegare un altro telefono.
?j< X ># Selezionare.
c
Procedere quindi come descritto
nella sezione "Primo collegamento con il telefono (pairing)",
pag. 48.
Confermare la
selezione.
Richiesta ripetuta di PIN della
scheda SIM
In base alla descrizione riportata
nel capitolo precedente, la posizione 6 dell'elenco consente al
kit auto di richiedere il numero
PIN della scheda SIM a ogni
registrazione.
? GSM PIN >
c
g/ h Selezionare uno dei
Selezionare
Confermare la
selezione
simboli:
GSM PIN Q Richie-
sta ripetuta di PIN
della scheda SIM attivata.
GSM PIN [ ] Richiesta
ripetuta di PIN della
scheda SIM
disattivata.
c
oppure
a
Confermare la
selezione
Terminare.
Funzionamento con più
telefoni
Il kit auto memorizza i dati del telefono con quattro telefoni complessivi, con i quali può operare
a scelta.
Se viene collegato un quinto telefono, viene cancellata la voce
del telefono che per più tempo
non è stata collegata al kit auto.
Suonerie
Nel profilo di accesso SIM viene
riprodotta la suoneria standard
del kit auto (vedere a pag. 55).
Spegnimento del kit auto
a
Il kit auto si spegne dopo un determinato intervallo di tempo se
l'automobile è spenta.
Premendo a lungo: il kit
auto si spegne.
Page 52

Car Kit Bluetooth® SIM (it)50
Funzioni
Se non è indicato diversamente
per tutte le funzioni vale quanto
segue:
a
a
a
Accensione del kit auto
• Per avviare il kit auto accende-
• Il kit auto visualizza gli ultimi
g/ h Selezionare la voce.
c
Se non avviene alcuna selezione
dopo circa 5 secondi, viene collegato l'ultimo telefono
utilizzato, in caso il telefono sia
raggiungibile.
Se non è disponibile questo telefono, il kit auto passa in stato di
attesa.
a
Premendo a lungo: il
kit auto passa allo
stand-by.
Premendo a lungo (in
stand-by): il kit auto si
spegne.
Premendo brevemente:
indietro di un livello.
re l'automobile oppure
premere a a lungo.
telefoni utilizzati.
Confermare la
selezione.
Premendo brevemente:
termina lo stato di attesa.
Ora è possibile selezionare un telefono oppure collegare un altro
telefono, vedere "Collegamento
di un altro telefono", pag. 49.
Aggiunta dei numeri dal
telefono cellulare
In seguito all'attivazione, la Rubrica indirizzi/la Rubrica vengono aggiunte al kit auto. Questa
procedura può durare diversi minuti. Nel telefono possono
essere salvate fino a 1.000 voci.
Durante il trasferimento dei numeri, il simbolo della rubrica
lampeggia nel display del kit auto. In questo intervallo, il kit auto
può essere utilizzato per selezionare i numeri già trasferiti, oppure utilizzare la funzione di selezione dei numeri.
Impostazioni
h
Selezionare i dati da trasferire:
j [] + SIM []
Premere a lungo.
Le voci della Rubrica
indirizzi e della Rubrica (scheda SIM) del
telefono vengono utilizzate e salvate nel kit
auto e aggiornate automaticamente.
Page 53

51Car Kit Bluetooth® SIM (it)
j [] Le voci della Rubrica
SIM []
indirizzi vengono utilizzate e salvate nel kit
auto e sono aggiornate automaticamente.
La Rubrica (scheda
SIM) viene utilizzata e
salvata nel kit auto e
aggiornata automaticamente.
Modalità stand-by
In modalità stand-by, il kit auto
ha le funzioni seguenti:
c
c
a
Liste chiamate
Premendo a lungo:
viene selezionato
l'ultimo numero
composto
Premendo a lungo: il
kit auto si spegne
h Rubrica
g Selezione numero
f
Preferiti
Rispondere a una chiamata
c
Rispondere a una
chiamata.
Rifiutare una chiamata
a
Rifiutare una
chiamata.
Terminare una
conversazione
a
Terminare una
conversazione.
Chiamata dalla Rubrica
indirizzi/dalla Rubrica
h
Visualizza le lettere iniziali delle
voci di rubrica disponibili.
g/h Premendo brevemente:
g/h Premendo a lungo:
c
g/ h Selezionare la voce.
c
In una voce della rubrica si possono memorizzare diversi
numeri di telefono.
g/ h Selezionare un
c
Rubrica indirizzi/
Rubrica
premere brevemente
passa alle lettere
successive/
precedenti.
scorre l'alfabeto.
Conferma le lettere
selezionate e visualizza l'elenco delle voci.
Premendo a lungo
viene confermata la
voce.
numero di telefono.
Iniziare una chiamata.
Page 54

Car Kit Bluetooth® SIM (it)52
Chiamate dalle Liste
Liste chiamate
c
Visualizza le liste chiamate del
telefono.
Sono disponibili tre liste
chiamate:
j X > Numeri selezionati.
X > O j Chiamate perse.
X > j Chiamate ricevute.
Le liste chiamate vengono visualizzate solo se contengono almeno una voce. Se non sono disponibili liste chiamate, per un
breve momento viene visualizzato }{ (azione non possibile).
g/ h Selezionare la lista
c
g/ h Selezionare una voce.
c
chiamate.
Attivare la lista
chiamate.
Iniziare una chiamata.
Preferiti
Si possono scegliere cinque numeri di telefono dalla rubrica per
la chiamata rapida e comoda
mediante
h
f.
Richiamare la rubrica
e scegliere la voce
desiderata.
f Premendo a lungo:
Confermare la voce.
Se successivamente in stand-by
si preme f brevemente viene
visualizzata la lista dei preferiti.
Quando si salva il sesto numero
di telefono viene cancellato il
primo numero salvato.
Selezione dei numeri
Selezione numero
g
La selezione del numero inizia e
sul display lampeggia il cursore.
g/h Passa alla cifra
c
c
a
a
successiva.
Selezionare le cifre.
Premendo a lungo:
il numero viene
composto.
Cancella l'ultima cifra.
Premendo a lungo:
cancella l'intero
numero.
Durante una chiamata
S
f
c
a
Alzare il volume.
Abbassare il volume.
Tenere una chiamata.
Terminare la
chiamata.
Page 55

53Car Kit Bluetooth® SIM (it)
j
j
j
Seconda chiamata
a
c
c
a
Commutazione su mute del
microfono
c
Toni DTMF
g
Inviare la sequenza di toni (cifre), ad esempio per interrogare
a distanza una segreteria telefonica. Queste cifre vengono trasmesse direttamente come toni
DTMF (Dual Tone Multiple
Frequency).
Terminare la
chiamata attiva.
Tenere la conversazione attiva e rispondere alla chiamata in
entrata.
Alternare tra due
chiamate.
Premendo a lungo:
terminare tutte le
chiamate.
Premendo a lungo: attivare/disattivare la
commutazione su
mute del microfono.
Premere brevemente
durante una chiamata: si attivano i toni
DTMF.
Simboli display
AB3 Intensità di segnale del te-
FHJ Stato di carica del telefono
?j< X ># Modalità login (Pairing).
# X Il telefono viene cercato.
# L Il telefono viene collegato.
W
}{ Azione non disponibile.
j Profilo viva voce attivo (in
j X > Numeri selezionati/
X > O j Chiamate perse/occupato.
X > j Chiamate ricevute/
j < X >j Chiamata in corso
X > j j X X j
= Selezione lista
lefono (viene visualizzata
in stand-by). Se il simbolo
lampeggia, non è disponibile alcuna rete.
(viene visualizzato in
stand-by).
Attendere prego.
stand-by viene visualizzata
in alternanza con l'intensità di segnale).
chiamata in uscita.
chiamata in entrata.
Chiamata in corso/avviso
di chiamata.
Chiamata in attesa
X X j
< X > j j
Chiamata in corso/
chiamata in attesa
< X ? X > #
Anomalia interfaccia
Page 56

Car Kit Bluetooth® SIM (it)54
# ( p ( j
# ) p ) j
o Numero di telefono privato
\ Numero di telefono ufficio
n Numero di telefono
m Numero di telefono
p
pq
pqq
P\/M\ Commutazione mute mi-
!<;! Tornare alle impostazioni
[] Invio alla Rubrica indiriz-
" Comandi vocali attivi
uvw Ricezione SMS
S Chiamata di emergenza
rst
rstq
rstqq
cellulare, privato
cellulare, ufficio
Volume
crofono attivata/disattivata
Trasferire la chiamata
al kit auto
Trasferire la chiamata al
telefono
di fabbrica
zi/rubrica
Illuminazione del display
Funzioni nel profilo
viva voce
f
In questa modalità il telefono stesso
crea il collegamento con la rete GSM.
Il modulo GSM non viene utilizzato
nella centralina elettronica. In questo
modo non si sfruttano i vantaggi
dell'accesso SIM (ad es. il collegamento dell'antenna, il consumo di
corrente).
Trasferimento di chiamata
c
Questa funzione è disponibile su
tutti gli apparecchi Bluetooth, ad
es. la cuffia o il telefono.
g
Premendo a lungo (in
stand-by): passa al
profilo viva voce.
Rispondere alla chiamata attiva mediante
il kit auto.
Premendo a lungo: la
chiamata attuale viene trasferita al telefono (se supportato
dal telefono).
Page 57

55Car Kit Bluetooth® SIM (it)
Profilo kit auto
Se il telefono è collegato con il
kit auto nel profilo viva voce, di
norma viene attivato un determinato profilo nel telefono.
Dopo l'attivazione di questo profilo i telefoni Siemens visualizzano ad esempio una scritta più
grossa sul display. Le impostazioni del profilo possono essere
modificate nel telefono. A tal fine leggere il manuale d'uso del
proprio telefono.
Suonerie
A seconda del tipo di telefono è
possibile riprodurre mediante il
kit auto le suonerie impostate o
le melodie del telefono. Se non è
possibile, viene riprodotta la
suoneria standard del kit auto.
Trasmissione dati
Per la trasmissione, dati ad
esempio di un notebook, registrare il notebook mediante
Bluetooth direttamente sul telefono. A tal fine commutare il kit
auto nel profilo viva voce.
Altre impostazioni
Tornare alle impostazioni di fabbrica
(in condizione disattivata)
a
SIEMENS HKW-720
S
!<;! Tenere premuti i due
Dopo il ripristino delle impostazioni di fabbrica, il telefono si
spegne automaticamente.
Questa funzione cancella tutti i dati
salvati nel kit auto, ad esempio rubriche, liste chiamate, telefoni collegati
ecc.
Impostazione dell'illuminazione del
display (in modalità stand-by)
S Premere a lungo, sele-
g, h Impostarla più chiara
Visualizzazione della versione
software (in modalità stand-by)
h
Premere a lungo.
viene visualizzato.
Tenere premuto a
g
/
lungo.
tasti indicati prima fino a quando il simbolo accanto smette di
lampeggiare e rimane
fisso.
zionare l'illuminazione del display.
o più scura.
/f Premendo a lungo,
viene visualizzata la
versione software.
Page 58

Car Kit Bluetooth® SIM (it)56
Impostazione del livello del volume
(in modalità stand-by)
Il livello del volume della centra-
lina elettronica è predisposto per
l'altoparlante in dotazione (massima impostazione del livello).
Se si utilizzano gli altoparlanti
dell'autoradio come apparecchi
di riproduzione e l'ingresso phone-in-/line-in della radio è troppo
sensibile, è possibile ridurre il livello del volume.
/S Premere brevemente.
g
/hSelezionare uno dei
g
c
Chiamata SOS
(se non è collegato alcun telefono e viene visualizzato il simbolo
SOS sul display)
c
simboli:
p Livello di uscita
massimo.
pV Livello di uscita
ridotto.
Premendo brevemente,
si conferma la
selezione.
Premere brevemente.
Eliminazione delle
anomalie
Il kit auto non funziona
• Verificare i collegamenti dei
cavi.
• Assenza della tensione d'esercizio, verificare il
collegamento dei cavi.
• Telefono non acceso oppure
collegamento al kit auto non è
attivo.
• Verificare le sicurezze.
• Tensione di esercizio troppo
bassa o troppo alta.
Rumore di fondo avvertito
dall'interlocutore
• Microfono montato in prossimità di corrente d'aria proveniente dal tettuccio apribile,
dal finestrino o dall’impianto
di ventilazione.
• Distanza microfono/cavo microfono e telefono < 50 cm.
Cattiva qualità vocale e audio
• Temperatura del kit auto fuori
della temperatura di esercizio
ammessa.
• Volume troppo basso (regolare il volume con il telefono/il
kit auto!).
Page 59

57Car Kit Bluetooth® SIM (it)
• Collegamento con la radio
(funzionamento phone-in/line-in): volume telefono/kit
auto troppo alto (abbassare il
volume con il telefono/kit
auto ed eventualmente aumentarlo con la radio, vedere
anche pag. 56).
Forte eco
• Distanza tra microfono e
altoparlante < 1 m.
Segnale microfono debole
(l’interlocutore sente basso)
• Distanza tra il microfono e la
bocca dell'utente >80cm.
• Microfono non orientate
verso la fonte vocale.
Cattiva qualità di ricezione e del
kit auto
• Nessuna rete disponibile.
• Modificare la posizione del
telefono (importante solo nel
profilo viva voce).
• La presenza di vetri schermati
sulla vettura può compromettere la qualità di ricezione del
telefono. Attenersi ai consigli
del produttore dell'automobile e installare l'antenna
esterna corrispondente.
Reset del sistema
•
Premere per 5 secondi:
a
il kit auto si spegne (in base
alla modalità attiva).
Premere per 10 secondi:
•
a
applicazione del reset.
Non viene rilevato il telefono/
problemi di collegamento con
Bluetooth
• Per creare il primo collegamento con il telefono, vedere
pag. 48.
• Dall'ultimo uso del telefono
con il kit auto sono stati registrati altri quattro telefoni. Effettuare nuovamente il login
del telefono.
• Assicurarsi che la centralina
elettronica non sia fissata su o
tra oggetti metallici.
• Ridurre la distanza tra centralina elettronica e telefono.
Autoradio commutato su mute in
modo permanente
• Possibile errore di collegamento della commutazione
mute della radio con la massa.
L'attivazione/disattivazione automatica del kit auto non funziona/ il
kit auto non si spegne
automaticamente
• Assicurarsi che il cavo dell'accensione sia collegato con
quello dell'accensione auto.
Page 60

Car Kit Bluetooth® SIM (it)58
La rubrica degli indirizzi non viene
aggiornata
• Accertarsi che il telefono sia in
stand-by e che non sia stato
attivato alcun blocco tastiera.
(Questa limitazione decade se
si utilizza un cellulare
Siemens). Eseguire un nuovo
collegamento con il kit auto,
vedere v. pag. 50.
Dati tecnici e
omologazione
Tensione di
alimentazione
Potenzaassorbita
Temperatura
d'esercizio
Potenza di
uscitaaudio
Peso
(centralina
elettronica)
Dimensionitelaio (centralina
elettronica)
Modulo GSM Dualband con 900 e
da 10,8 V+ a 16 V+
Cavo di collegamen-
to accensione auto a
scelta anche su 24 V
max. 2 A /
max. 1 mA
(corrente di riposo)
da –20°C a +55°C
3 W
ca. 152 g
ca. 130 x 108 x
26 mm (LxPxA)
1800 MHz, classe
GPRS 8, supporta il
profilo di accesso
SIM
Il kit auto è conforme alle seguenti direttive UE:
89/336/CEE "Compatibilità elettromagnetica"
92/59/CEE "Direttiva sulla sicurezza generale dei prodotti"
E24
10R-020177
dificata dalla direttiva 95/54/CE
"Compatibilità elettromagnetica
nel veicolo a motore".
Approvazione del tipo basata sulla direttiva 72/245/CEE, mo-
Dichiarazione di conformità
CE
BenQ Mobile dichiara che il telefono descritto nel presente manuale è conforme alle principali
prescrizioni e alle altre fondamentali disposizioni della direttiva 1999/5/CE (R&TTE). La relativa dichiarazione di conformità
(DoC) è stata sottoscritta. La
stessa è disponibile su richiesta
presso la hotline oppure
all'indirizzo:
www.BenQMobile.com/conformity
FCC
Questo apparecchio è conforme
alla parte 15 delle regole FCC. Il
suo funzionamento è soggetto
alle condizioni seguenti: (1) non
deve causare interferenze pericolose e (2) deve accettare la
ricezione di qualsiasi interferenza, anche quelle che possono
comportare effetti indesiderati.
Page 61

59Car Kit Bluetooth® SIM (it)
In caso di modifiche o variazioni
strutturali non espressamente
autorizzate dalla parte responsabile nel rispetto delle condizioni,
può essere negato all'utente il
permesso di utilizzare
l'apparecchio.
Cura
Il prodotto deve essere pulito
con un panno morbido, umido,
ma non bagnato.
Dopo la rimozione dei cuscinetti
adesivi, potrebbero rimanere residui di colla nei punti di applicazione. Utilizzare soltanto soluzioni detergenti consigliate dal
produttore dell'automobile.
Non utilizzare coloranti o altre
sostanze chimiche
Accessori
I prodotti sono disponibili nei negozi specializzati oppure presso
il nostro Online-Shop al sito:
Original Accessories
www.BenQMobile.com/
shop
Servizio clienti
Vedere pag. 120
Page 62

Car Kit Bluetooth® SIM (fr)60
Car Kit Bluetooth SIM® (fr)
le
(Kit véhicule Bluetooth
®
SIM)
Détail des éléments
fournis
1 Boîtier électronique équipé de
connecteurs pour :
• Câble d'alimentation
• Ecran
• Microphone
• Antenne*
2 Vis de fixation du boîtier
électronique
3 Câble d'alimentation avec fiches
haut-parleur
•
§A§ Sourdine radio (Mute) (noir)
•
§B§ Batterie 12 V+ (rouge)
•
§C§ Allumage du véhicule
12 V+/24 V+ (violet)
•
§D§ Masse (marron)
•
§E§ Câble de connexion haut-
parleur + (vert/noir)
•
§F§ Câble de connexion haut-
parleur - (vert)
4 3 connecteurs de sécurité pour
l'alimentation
5 3 fusibles enfichables plats
(3 A violet) pour le connecteur
de sécurité
6 Ecran avec pattes de fixation ad-
hésives
7 2 support écran avec pattes de
fixation adhésives
8 Haut-parleur et câble de
connexion
•
§G§ Câble de connexion haut-
parleur + (blanc/noir)
•
§H§ Câble de connexion haut-
parleur - (noir)
(Vis de fixation intégrées au
socle)
9 2 connecteurs pour le câble haut-
parleur
: Microphone externe avec patte
de fixation adhésive
* Non fourni en standard.
Page 63

61Car Kit Bluetooth® SIM (fr)
Compatibilité
Le Kit véhicule mains-libres
Bluetooth® SIM ((désigné ciaprès par « Kit véhicule ») est
compatible avec les téléphones
suivants :
• Téléphones portables dotés
d'une interface Bluetooth
(SIM Access Profile) (voir aussi
les spécifications de compatibilité sur l'emballage)
Ces instructions d'installation fournissent uniquement les informations de
base. Les composants auto et connecteurs d'autoradio nécessitant des
installations différentes selon la
marque du véhicule, le montage
devra être adapté en fonction de la
situation.
Précautions d'usage
de l'appareil
Lisez attentivement le mode d'emploi
et les consignes de sécurité avant
utilisation !
Respectez les directives
légales et les restrictions
locales pour l'utilisation du
téléphone. Celles-ci peuvent par ex. s'appliquer
dans les avions, les stations service, les hôpitaux
ou en conduisant.
Les directives générales
valables pour le type de
véhicule sont à respecter
lors du montage
d'accessoires ; ne pas hésiter à faire appel, si nécessaire, à un spécialiste
(sécurité électrique, pose
des câbles, contact avec
des pièces portées à températures élevées, contact
avec le carburant, etc.).
Le montage des différents
éléments ne doit pas
entraver :
• la liberté de mouvement,
la sécurité et la visibilité
du conducteur,
• le fonctionnement des
éléments de commande,
• la sécurité des
passagers (également
en cas d'accident),
• le fonctionnement des
dispositifs de sécurité du
véhicule (airbag, ceintures de sécurité, commutateur des feux de
détresse, etc.).
Lors du montage, prendre
les précautions nécessaires afin d'éviter tout risque
pour les enfants.
L'appareil est conçu pour
fonctionner uniquement
en 12 V.
Page 64

Car Kit Bluetooth® SIM (fr)62
N’utilisez que des accessoires d’origine. Vous éviterez ainsi tout risque de
dommage matériel ou de
blessure et serez certain
de respecter tous les règlements en vigueur.
Compte tenu des connaissances scientifiques actuelles, l'Organisation
mondiale de la santé ne
voit pas la nécessité de
mesures préventives particulières lors de l'utilisation
d'appareils portables. En
revanche, si vous souhaitez tout de même réduire
votre exposition, vous pouvez toujours limiter la longueur de vos appels ou
utiliser un kit mains-libres
pour conserver votre téléphone portable à distance
de votre tête et de votre
corps.
De plus, éloignez le téléphone du ventre pour les
femmes enceintes ou du
bas ventre pour les adolescents.Il est recommandé
d'utiliser le téléphone dans
de bonnes conditions de
réception, pour diminuer la
quantité de rayonnement
reçus (notamment dans un
parking souterrain, lors de
déplacements en train ou
en voiture...)
Ne pas utiliser l'appareil
dans un environnement
présentant un risque
d'explosion.
Si votre véhicule est équipé d'un pare-brise athermique, cela peut influer
négativement sur la qualité
de réception de votre Kit
véhicule. Dans ce cas, il
est préférable d'utiliser une
antenne montée à l'extérieur du véhicule.
Une utilisation non conforme de l'appareil et l'ouverture des composants
excluent tout recours en
garantie.
Important :
Mettre au rebut les téléphones et leurs accessoires inutilisables
conformément à la législation en vigueur.
Vérifiez au moyen du mode d'emploi du
véhicule, avant l'emploi d'accessoires
®
Bluetooth
dans un véhicule, s'il y a des
restrictions d'utilisation.
Pour des instructions d'utilisation
supplémentaires, reportez-vous au
mode d'emploi de votre téléphone
portable.
ou de téléphones portables
Fabriqué par BenQ Mobile GmbH &
Co.OHG sous la licence de marque
déposée de Siemens AG.
Page 65

63Car Kit Bluetooth® SIM (fr)
Montage
Microphone, antenne*, écran,
haut-parleur
Voir les schémas page iii/iv du
document.
Eléments à prendre en compte lors
du montage :
• Distance microphone
parleur 8 si possible > 1 m
• Distance microphone
câble du microphone et l'antenne*/câble de l'antenne doit être >
50 cm
• Distance the microphone
che de l'utilisateur doit être < 80 cm
• Eviter de monter le microphone
dans le courant d'air du toit ouvrant,
de la fenêtre ou de la ventilation.
Placez le câble du microphone
externe
:, de l'antenne*, de
l'écran
6 et du haut-parleur 8
de manière adaptée en fonction
des conditions propres à votre
véhicule.
Evitez d'endommager, de plier
ou de coincer le câble.
Microphone
Nettoyez l'endroit où vous souhaitez fixer le microphone
terne à l'aide d'un produit dégraissant adapté. La patte de
fixation adhésive ne peut
adhérer de manière permanente
: – haut-
:/
: bou-
: ex-
que sur une surface parfaitement dégraissée.
Fixez ensuite le microphone
externe
: à l'endroit souhaité à
l'aide de la patte de fixation en
l'orientant vers le haut-parleur.
Antenne*
Le Kit véhicule doit être utilisé
avec une antenne bibande*
(GSM 900/1 800 MHz). Raccordez le câble de l'antenne au
boîtier électronique.
Ecran
Veillez à installer l'écran
manière optimale pour le conducteur du point de vue visuel et
de l'accès.
Vous pouvez fixer l'écran
directement sur le tableau de
bord ou à l'aide du support
écran
7.
6 de
6
Coller les pattes
de fixation adhésives à l'emplacement indiqué.
* Non fourni en standard.
Page 66

Car Kit Bluetooth® SIM (fr)64
Montage direct de l'écran
Nettoyez l'endroit où vous souhaitez installer l'écran
d'un produit dégraissant adapté.
La patte de fixation adhésive ne
peut adhérer de manière permanente que sur une surface
parfaitement dégraissée.
Fixez ensuite l'écran
des pattes de fixation adhésives.
Montage à l'aide du support écran
Le support écran
placer l'écran
positions, comme indiqué sur le
schéma (voir page iv en bas à
droite).
Faites sortir le câble du support
écran
7 de manière adaptée.
Pour ce faire, découpez des encoches sur le bord du boîtier.Les
emplacements du boîtier prévus
à cet effet sont plus minces pour
être facilement repérables.
Fixez le support écran
tableau de bord à l'aide des
pattes de fixation adhésives ou
des vis fournies*.
Enfoncez l'écran
ture du support écran
ce qu'il se mette en place.
6 à l'aide
6 à l'aide
7 permet de
6 dans différentes
7 sur le
6 dans l'ouver-
7 jusqu'à
Haut-parleur
L'inclinaison et l'angle de rotation du haut-parleur
ajustables. Pour ce faire, dévissez la vis de réglage du socle,
installez le haut-parleur
la vis.
Fixez le haut-parleur
une position adéquate (par ex.
au niveau des pieds du
passager).
Vous trouverez les vis dans le socle du haut-parleur
8 sont
8, fixez
8 dans
8.
Câble d'alimentation
Connexions électriques
Lorsque vous branchez le câble
d'alimentation
véhicule, veillez à ce que sa mise
sous tension et son utilisation
n'entravent pas le bon fonctionnement d'autres appareils (par
ex. risque de chute de tension).
Avant de procéder au montage
du câble d'alimentation
boîtier électronique
la batterie du véhicule.
Reliez le câble
la borne positive de la batterie
du véhicule.
3 sur le Kit
3 et du
1, coupez
§B§ 12 V+ (rouge) à
* Non fourni en standard.
Page 67

65Car Kit Bluetooth® SIM (fr)
Reliez le câble
§D§ (marron) à la
borne négative de la batterie du
véhicule.
Raccordez le câble
§C§ (violet) au
système électrique du véhicule
de manière à disposer d'une alimentation 12 V+ ou 24 V+ lorsque le contact est mis.
Utiliser exclusivement les
connecteurs de sécurité
corder les câbles et insérer les fusibles plats 3 A
connecteurs de sécurité 4.
Afin d'assurer une isolation électrique
correcte du câble d'alimentation du
véhicule, il est nécessaire de mettre
en place les fusibles entre l'extrémité
du câble d'alimentation fourni et le
connecteur côté véhicule.
4 pour rac-
5 dans les
Raccordement du câble du hautparleur au câble d'alimentation
Reliez les câbles du haut-parleur
+
§G§ (blanc-noir) et §E§ (vert-noir)
à l'aide d'un econnecteur
9.
Reliez les câbles du haut-parleur
§H§ (noir) et §F§ (vert) à l'aide d'un
connecteur
9.
Raccordement à la radio*
Vous pouvez brancher le Kit véhicule sur l'entrée Phone-In/Line-In de votre autoradio afin
de le raccorder au système audio
de votre véhicule. Le hautparleur du système audio du véhicule fait alors office de lecteur
pour le Kit véhicule.
Afin de brancher le Kit véhicule sur
l'entrée Phone-In/Line-In de la radio,
il peut être nécessaire de rechercher
un adaptateur commun aux sorties
du kit audio et aux entrées Phone-In/Line-In de la radio. Pour plus de précisions, reportez-vous à la page d'accueil suivante :
www.siemens.com/
phoneinadapter
Sourdine radio (Mute)
Reportez-vous aux instructions du
fabricant de l'autoradio pour vous assurer qu'une entrée sourdine radio
(mute) est disponible.
En cours de communication,
le signal radio peut être automatiquement désactivé. Pour ce
faire, reliez le câble de commande
§A§ de la mise en sourdine de
la radio à l'entrée Mute de
l'autoradio.
* Si vous disposez d'un autoradio avec
une entrée Phone-In/Line-In.
L'autoradio n'est pas fourni en
standard.
Page 68

Car Kit Bluetooth® SIM (fr)66
Boîtier électronique
Assurez-vous que le boîtier
électronique
ou entre des objets métalliques afin
de garantir une communication
radio optimale. C'est la seule manière
de garantir une bonne communication radio.
Vérifiez que le boîtier électronique
est correctement fixé.
Assurez-vous que les fentes de ventilation du boîtier électronique
bien dégagées (ménagez un espace
d'au moins 2 cm) et que le montage
du Kit ne perturbe pas le fonctionnement d'autres appareils.
Ne coincez pas le câble de connexion
derrière le boîtier électronique
veillez à ce qu'il ne soit pas entortillé
autour de ce dernier 1 pour éviter
tout dysfonctionnement.
Isolez les extrémités de tous les câbles inutilisés avec du ruban isolant.
Reliez les câbles des composants
suivants au boîtier
électronique
et sans endommager ce
dernier
• Câble d'alimentation
•Ecran
• Microphone externe
• Antenne*
* Non fourni en standard.
1 n'est pas monté sur
1
1 sont
1 et
1 avec précaution
1:
3,
6,
:,
Enclipsez les connecteurs et
vissez le raccordement d'antenne.
Faites passer le câble du microphone externe
de fixation autour de l'élément
de serrage prévu à cet effet (voir
figure, page iii).
Fixez le boîtier électronique
par ex. au niveau des pieds du
passager, à l'aide des vis
(voir figure page iii).
Après le montage, rebranchez la
batterie du véhicule comme il
se doit.
: dans le collier
1,
2
Démontage de l'écran
Retirez l'écran 6 du support
écran
7 comme indiqué sur le
schéma suivant.
Page 69

67Car Kit Bluetooth® SIM (fr)
Fonctionnalités
Avec le Kit véhicule Bluetooth®
SIM, la communication en mode
mains-libres via la technologie
Bluetooth prend de nouvelles
dimensions :
• meilleure réception grâce à
l'utilisation d'une antenne
externe,
• support de téléphone inutile,
• plus grande autonomie du téléphone en veille et en communication,
• communications exceptionnelles grâce à une qualité
audio incomparable,
• meilleur confort d'utilisation.
Technologie Bluetooth
Les logos et la marque Bluetooth® appartiennent a Bluetooth
Corp. utilise ces marques sous cette licence
uniquement.
Toutes les autres marques et noms deposes appartiennent a leurs proprietaires
respectifs.
Le Kit véhicule et le téléphone
communiquent par Bluetooth®,
une liaison radio de faible portée, pour un plus grand confort
d'utilisation du Kit véhicule.
Afin de permettre cette communication, il est nécessaire de
mettre en connexion le Kit véhicule et le téléphone (pairing).
Pour plus de précisions, reporPremière connexion avec le téléphone (Pairing)tez-vous à
«p.68», .
®
®
SIG, Inc. et BenQ
La connexion Bluetooth est possible avec deux profils :
• SIM Access Profile
(réglage par défaut)
Le module GSM du boîtier
électronique établit la connexion au réseau GSM via
l'antenne externe.
• Handsfree profile
Dans ce mode, le téléphone
établit lui-même la connexion
au réseau GSM (voir aussi
p. 74).
Fonction des touches
de l'écran
Pour naviguer dans les commandes de votre Kit véhicule, utilisez
les touches de l'écran.
Nous utiliserons ci-après les
symboles suivants pour représenter les six actions :
c
a
g
h
S
f
Oui/prendre l'appel
Non/raccrocher
Haut/
sélection du numéro
Bas/
Répertoire/Annnuaire
Commande vocale
(touche Push to
Speak, uniquement
en mode mainslibres)
Favoris
Page 70

Car Kit Bluetooth® SIM (fr)68
Lorsqu'un appui long sur une
touche est nécessaire, les mentions « maintenir enfoncé » ou
« appui long » sont utilisées dans
ce document.
Dans tous les autres cas, il suffit
d'appuyer brièvement sur les
touches.
Mise en service
Première connexion avec le
téléphone (Pairing)
Pour plus de précisions sur la connexion Bluetooth, veuillez vous reporter au mode d'emploi de votre
téléphone.
• Pour éteindre le Kit véhicule,
voir p. 69.
• Activez le mode connexion du
Kit véhicule, en maintenant la
touchec enfoncée.
• Activez l'interface
Bluetooth de votre téléphone
et lancez la recherche d'appareils Bluetooth accessibles en
réception à proximité.
• Si le Kit véhicule « HKW-720 »
est localisé, le téléphone vous
demande de valider la connexion à l'aide d'un code PIN.
• Le code PIN (numéro à
16 chiffres) s'affiche sur
l'écran du Kit véhicule. Entrez
ce numéro sur le téléphone.
• Entrez le code PIN de votre téléphone (code PIN de la carte
SIM*) sur l'écran du Kit véhicule (voir «Sélection d'un numéro», p. 72).
• Après validation, le Kit véhicule affiche l'identification du téléphone (ce nom peut être
modifié sur le téléphone) puis
active le mode veille. Cette
procédure peut durer jusqu'à
1 minute. Certains téléphones
fabriqués par des constructeurs tiers peuvent nécessiter
une validation sur le téléphone afin d'activer le mode
veille.
Dès cet instant, le Kit véhicule
est prêt à fonctionner. Le Kit
véhicule et le téléphone peuvent
communiquer et se reconnaîtront par la suite.
Connexion d'autres
téléphones
• Activez le Kit véhicule en mettant le contact de votre auto
ou en maintenant la
touche
a enfoncée
• Les derniers téléphones utilisés s'affichent sur l'écran du
Kit véhicule.
* Le code PIN de la carte SIM est le co-
de secret que vous devez entrer pour
vous connecter à votre réseau
mobile.
.
Page 71

69Car Kit Bluetooth® SIM (fr)
Appuyez sur g/ h pour
faire défiler la liste des téléphones utilisés. Vous avez la
possibilité d'ajouter un téléphone supplémentaire en
avant dernière position de
cette liste.
?j< X ># Sélectionner.
c
Continuez ensuite comme indiqué à la section « Première connexion avec le téléphone
(Pairing) », p. 68.
Confirmer la
sélection.
Saisie systématique du code
PIN de la carte SIM
Conformément à la procédure
décrite au chapitre précédent,
vous avez la possibilité, au bas
de la liste, de configurer le
Kit véhicule afin qu'il soit nécessaire d'entrer le code PIN de la
carte SIM lors de chaque nouvelle connexion.
? GSM PIN >
c
g/ h Sélection ner l'une des
Sélectionner.
Confirmer la
sélection.
icônes :
GSM PIN Saisie systé-
matique du code PIN
de la carte SIM
activée.
GSM PIN [] Saisie
systématique du code
PIN de la carte SIM
désactivée.
c
ou
a
Valider la sélection.
Annuler
Utilisation avec plusieurs
téléphones
Le Kit véhicule enregistre
les caractéristiques de quatre
téléphones maximum avec
lesquels il peut communiquer
alternativement.
Si vous connectez un cinquième
téléphone, l'entrée correspondant au téléphone qui est resté
le plus longtemps sans être connecté au Kit véhicule est effacée.
Sonneries
En mode SIM Access Profile, la
sonnerie standard du Kit véhicule (voir p. 75) retentit.
Arrêt du Kit véhicule
a
Au terme d'un laps de temps déterminé, le Kit véhicule est automatiquement désactivé, si vous
coupez le contact du véhicule.
Appui long : le Kit véhicule est éteint.
Page 72

Car Kit Bluetooth® SIM (fr)70
Fonctions
Sauf indication contraire, le
fonctionnement du Kit véhicule
est le suivant :
a
a
a
Mise en marche du Kit
véhicule
• Activez le Kit véhicule en met-
• Les derniers téléphones utili-
g/h Sélectionner l'entrée.
c
Si vous n'effectuez aucune sélection, une connexion avec le dernier téléphone utilisé est établie
au bout de 5 secondes environ,
s'il se trouve à portée du
Kit véhicule.
Si ce téléphone n'est pas à portée, le Kit véhicule se met en
attente.
Appui long : le Kit véhicule passe en mode
veille.
Appui long (en mode
veille) : le Kit véhicule
est désactivé.
Appui bref : revenir au
niveau précédent.
tant le contact de votre auto
ou en maintenant la touche
a enfoncée.
sés s'affichent sur l'écran du
Kit véhicule.
Valider la sélection.
a
Vous pouvez sélectionner un téléphone ou en connecter un
nouveau, voir «Connexion
d'autres téléphones», p. 68.
Appui bref : passer du
mode repos au mode
connexion.
Récupérer les numéros du
téléphone portable
Après chaque activation du Kit
véhicule, le Répertoire/l'Annuaire du téléphone est ajouté sur le
Kit véhicule. Cette opération
peut durer plusieurs minutes. Le
répertoire peut contenir jusqu'à
1 000 entrées.
Pendant le transfert des numéros de téléphone, l'icône du répertoire clignote sur l'écran du
Kit véhicule. Vous pouvez sélectionner sur le Kit véhicule des
numéros déjà transférés ou en
composer.
Réglages
h
Sélectionnez les données à
transférer :
j [] + SIM []
Appui long.
Le répertoire et
l'Annuaire (carte SIM)
du téléphone sont
utilisés, enregistrés
sur le Kit véhicule
et actualisés automatiquement.
Page 73

71Car Kit Bluetooth® SIM (fr)
j [] Le répertoire est utili-
SIM []
sé, enregistré sur le
Kit véhicule et actualisé automatiquement.
L'Annuaire (carte
SIM) est utilisé, enregistré sur le Kit véhicule et actualisé
automatiquement.
Mode veille
Le Kit véhicule dispose des fonctions suivantes en mode veille :
c
c
a
Journaux (Listes des
appels)
Appui long : le dernier
numéro composé est
sélectionné
Appui long : désactiver le Kit véhicule.
h Répertoire
g Sélection d'un
numéro
f
Favoris
Prise d’appel
c
Prendre un appel.
Refus d'appel
a
Refuser un appel.
Fin de la communication
a
Mettre fin à l'appel.
Composer un appel depuis le
Répertoire/l'Annuaire
h
Affiche la première lettre des
entrées du Répertoire.
g/h Appui bref : passer à la
g/h Appui long : faire
c
g/h Sélectionner l'entrée.
c
Chaque entrée du répertoire
peut comporter plusieurs
numéros.
g/h Sélectionner un nu-
c
Répertoire/Annuaire
appui bref.
lettre
suivante/précédente.
défiler l'alphabet.
Confirmer la lettre
sélectionnée et afficher la liste des entrées
correspondantes.
Confirmer l'entrée.
méro de téléphone.
Commencer l'appel.
Page 74

Car Kit Bluetooth® SIM (fr)72
Appel depuis les journaux
Journaux (Listes des appels)
c
Affiche les journaux du
téléphone.
Vous avez le choix entre trois
journaux :
j X > Appels émis
X > O j Appels manqués
X > j Appels reçus
Les journaux ne sont visibles que
s'ils contiennent au moins une
entrée. Si aucun journal n'est
disponible, }{ (action impossible) s'affiche pendant un court
instant.
g/h Sélectionner le
c
g/h Sélectionner l'entrée.
c
journal.
Activer le journal.
Commencer l'appel.
Favoris
Vous pouvez sélectionner cinq
numéros de téléphone du répertoire et les composer rapidement et en toute simplicité à
l'aide de
h
f
f.
Accéder au répertoire
et sélectionner l'entrée souhaitée.
Appui long : confirmer
l'entrée.
Par la suite, la liste des favoris
s'affiche lorsque vous appuyez
brièvement sur f en mode
veille.
Lorsque vous enregistrez un
sixième numéro de téléphone, le
premier numéro enregistré est
supprimé.
Sélection d'un numéro
Sélection d'un numéro
g
Vous pouvez commencer la sélection lorsque le curseur clignote sur l'écran.
g/h Passer au chiffre
c
c
a
a
suivant.
Sélectionner un
chiffre.
Appui long : composer
le numéro.
Effacer le dernier
chiffre.
Appui long :
supprimer le numéro
entier.
En communication
S
f
c
Plus fort.
Moins fort.
Mettre l'appel en
attente.
a Mettre fin à l'appel.
Page 75

73Car Kit Bluetooth® SIM (fr)
j
j
Deuxième appel
a
c
c
a
Sourdine du microphone
c
Tonalités DTMF
g
Utilisez des séquences de tonalités (chiffres), par ex. pour l'interrogation à distance d'un répondeur. Ces chiffres sont transmis
directement comme
tonalités DTMF (Dual Tone
Multiple Frequency).
Terminer l'appel en
cours.
Maintenir l'appel en
cours et accepter le signal d'appel.
Va et vient entre les
deux appels.
Appui long : terminer
tous les appels.
Appui long :
activer/désactiver la
sourdine du microphone.
Appui bref pendant un
appel : activer les tonalités DTMF.
Icônes écran
AB3 Puissance du signal du té-
FHJ Niveau de charge télépho-
?j< X ># Mode connexion (Pairing)
# X Recherche du téléphone
# L Connexion du téléphone
W
}{ Action impossible
j Mode mains-libres actif
j X > Numéros émis/
X > O j Appels perdus/Occupé
X > j Appels acceptés/
j < X >j Appel en cours
X > j j X X j
léphone (affiché en mode
veille). Lorsque l'icône clignote, aucun réseau n'est
disponible.
ne (affiché en mode veille)
Veuillez patienter
(affiché en mode veille alternativement avec la puissance du signal).
Appel sortant
Appel entrant
Appel en cours/Signal
d'appel
X X j
Appel en attente
< X > j j
Appel en cours/
appel en garde
Page 76

Car Kit Bluetooth® SIM (fr)74
j
# ( p ( j
# ) p ) j
< X ? X > #
Erreurs d'interface
= Sélection depuis une liste
o Numéro de téléphone
\ Numéro de téléphone
n Numéro de téléphone por-
m Numéro de téléphone por-
p
pq
pqq
P\/M\ Sourdine du microphone
!<;! Rétablissement de la con-
[] Envoi Répertoire/Annuaire
" Commande vocale active
uvw Réception de SMS
S SOS
rst
rstq
rstqq
privé
Bureau
table, privé
table, bureau
Volume
activée/désactivée
Transmission de l'appel au
Kit véhicule
Transmission de l'appel au
téléphone
figuration usine
Eclairage écran
Fonctionnement en
mode mains-libres
f
Dans ce mode, le téléphone établit
lui-même la connexion au
réseau GSM. Le module GSM du
boîtier électronique n'est pas utilisé.
Ainsi, les fonctionnalités du mode
SIM Access ne sont pas nécessaires
(par ex. raccordement d'antenne,
consommation d'électricité réduite).
Transfert d'appel
c
Cette fonction est disponible sur
tous les appareils Bluetooth (kit
piéton ou téléphone, par ex.).
g
Appui long (en mode
veille) : passer en
mode mode mains-libres.
Transférer l'appel
en cours sur le
Kit véhicule.
Appui long : transférer
l'appel en cours sur le
téléphone (si pris en
charge par le
téléphone).
Page 77

75Car Kit Bluetooth® SIM (fr)
Profil Kit véhicule
En mode mains-libres, lorsque le
téléphone est connecté au Kit
véhicule, un profil déterminé est
généralement activé sur le téléphone. Lorsque ce profil est activé, une police de taille supérieure s'affiche par exemple sur
l'écran des téléphones Siemens.
Vous pouvez modifier les paramètres du profil sur le téléphone. Pour ce faire, reportez-vous
au mode d'emploi de votre
téléphone.
Sonneries
En fonction du modèle du téléphone, les sonneries (ou les mélodies) définies sur ce dernier
peuvent être transférées sur le
Kit véhicule. Dans le cas contraire, la sonnerie standard du
Kit véhicule retentit.
Transfert de données
Pour le transfert de données,
d'un ordinateur portable par
exemple, connectez directement l'ordinateur au téléphone
via une connexion Bluetooth.
Activez le profil mains-libres sur
le Kit véhicule.
Autres réglages
Pour rétablir la configuration usine
(lorsque l'appareil est éteint)
a
SIEMENS HKW-720
S
!<;! Maintenez les deux
L´appareil s´éteint automatiquement après être revenu à la
configuration initiale.
Cette fonction efface toutes les données enregistrées dans le Kit véhicule (répertoires, journaux, téléphones
associés, etc.).
Régler l'éclairage de l'écran
(en mode veille)
S
g, h Augmenter ou dimi-
Maintenir enfoncé.
est affiché sur
l´écran.
Maintenir la touche
g
/
enfoncée.
touches ci-dessus enfoncées, jusqu'à ce
que l'icône ci-contre
s'affiche et cesse de
clignoter.
Appui long : sélectionner l'éclairage de
l'écran.
nuer l'éclairage.
Page 78

Car Kit Bluetooth® SIM (fr)76
Pour afficher la verison du logiciel
(en mode veille)
/f Appui long, la version
h
Régler le niveau de sortie du volume
(en mode veille)
Le niveau de sortie du volume du
boîtier électronique est configuré pour le haut-parleur fourni
avec l'appareil (réglage du
niveau maximal).
Si vous utilisez le haut-parleur de
la radio comme lecteur et que
l'entrée Phone-In-/Line-In de la
radio est trop sensible, vous pouvez réduire le niveau de sortie.
g
g
c
Appel d'urgence
(lorsque aucun téléphone n'est
connecté et que l'icône de SOS
s'affiche sur l'écran)
c
du logiciel s'affiche.
/ SAppui court.
/hSélectionner l'une des
icônes suivantes :
p niveau de sortie
maximal.
pV niveau de sortie
réduit.
Appui court : valider la
sélection.
Appui court.
Dépannage
Le Kit véhicule ne fonctionne pas
• Vérifier que les câbles sont
correctement branchés
• Aucune tension, vérifier que
les câbles sont correctement
branchés
• Le téléphone n'est pas activé
ou la connexion au Kit véhicule n'est pas active
• Vérifier les fusibles
• Tension trop faible ou trop
élevée
Interférences en cours de
communication
• Vérifier que le microphone
n'est pas dans le courant d'air
du toit ouvrant, de la fenêtre
ou de la ventilation
• La distance entre le microphone/câble du microphone et le
téléphone doit être < 50 cm
Qualité vocale et audio insuffisante
• Le Kit véhicule est en dehors
de la plage de températures
admise
• Le volume est trop faible (augmenter le volume du téléphone/Kit véhicule)
• Connexion radio (mode Phone-In/Line-In) :
le volume du téléphone/du Kit
véhicule est trop élevé (réduisez le volume via le télépho-
Page 79

ne/Kit véhicule puis, si
nécessaire, augmentez-le via
la radio, voir aussi p. 76.)
Echo fort
• La distance entre le microphone et le haut-parleur doit être
<1m
Signal du microphone faible (votre
correspondant vous entend mal)
• La distance entre le microphone et la bouche de l'utilisateur
doit être >80cm
• Le microphone n'est pas dirigé
vers l'utilisateur
Mauvaise réception
• Pas de réseau
• Modifier la position du téléphone (uniquement en mode
mains-libres)
• Si votre véhicule est équipé
d'un pare-brise athermique,
cela peut influer négativement sur la qualité de réception de votre téléphone ou du
Kit véhicule. Respecter les recommandations du constructeur et installer une antenne
(externe) adaptée.
Réinitialisation système
Appuyez pendant
•
a
5secondes:
le Kit véhicule s'éteint
(suivant le mode activé)
•
Appuyez pendant
a
10 secondes :
réinitialisation forcée
Téléphone non trouvé/ problèmes de
connexion Bluetooth
• Etablir une première connexion avec le téléphone,
voir p. 68.
• Depuis la dernière utilisation
du téléphone avec le Kit véhicule, au moins quatre téléphones supplémentaires ont
été entrés. Entrer à nouveau
le téléphone.
• S'assurer que le boîtier électronique n'est pas monté sur
ou entre des objets métalliques.
• Réduire la distance entre le
boîtier électronique et le téléphone.
Mise en sourdine permanente de
l'autoradio
• Intervertir si possible la connexion de la mise en sourdine
de la radio avec celle de la
masse.
Le dispositif d'arrêt/marche automatique du Kit véhicule ne fonctionne
pas/ arrêt automatique du Kit véhicule inopérant
• Vérifier si le cordon d'alimentation est raccordé à
l'allumage du véhicule.
77Car Kit Bluetooth® SIM (fr)
Page 80

Car Kit Bluetooth® SIM (fr)78
Le répertoire n'est pas actualisé
• S'assurer que le téléphone est
en mode veille et que le verrouillage clavier n'a pas été activé (cette restriction ne
s'applique pas avec les téléphones portables Siemens).
Se reconnecter avec le Kit véhicule, voir p. 70.
Caractéristiques
techniques et
homologation
Tension d'alimentation
Consommation
électrique
Température de
fonctionnement
Puissance de
sortie du hautparleur
Poids (boîtier
électronique)
Dimensions du
boîtier (boîtier
électronique)
Module GSM Bibande, 900 et
10,8 V+ à 16 V+
Câble de con-
nexion allumage du
véhicule 24 V au
choix
max. 2 A /
max. 1 mA
(veille)
–20 °C à +55 °C
3W
env. 152 g
env.
130x108x26mm
(LxlxH)
1800 MHz, classe
GPRS 8,
prend en charge le
SIM Access Profile
Le Kit véhicule respecte
les directives CE
suivantes :
89/336/CEE « Compatibilité
électromagnétique
92/59/CEE « Directive sur la sécurité générale des produits
E24
10R-020177
72/245/CEE, modifiée par la directive 95/54/CE « Compatibilité
électromagnétique véhicules
»
»
Homologation du type conformément à
la directive
».
Déclaration de conformité
CE
BenQ Mobile déclare par la présente que le Kit véhicule décrit
dans ce mode d'emploi répond
aux principales exigences et
autres dispositions respectives
de la directive européenne
1999/5/CE (R&TTE). La déclaration de conformité correspondante (DoC) a été signée. Si nécessaire, une copie de l'original
peut être obtenue auprès de
l'assistance téléphonique de
l'entreprise :
www.BenQMobile.com/conformity
FCC
voir p. 128
Page 81

Entretien
L'appareil peut être nettoyé à
l'aide d'un chiffon doux
légèrement humidifié.
Des résidus d'adhésif peuvent
subsister après le retrait des
coussinets adhésifs. Utiliser uniquement des produits de nettoyage recommandés par le
constructeur du véhicule.
Ne pas utiliser de colorants ou
d'autres substances chimiques.
Accessoires
Vous trouverez ces produits
dans les magasins spécialisés ou
dans notre boutique en ligne
à l'adressesuivante :
Accessoires d’origine
www.BenQMobile.com/
shop
Assistance clientèle
voir p. 120
79Car Kit Bluetooth® SIM (fr)
Page 82

Car Kit Bluetooth® SIM (es)80
too-
Car Kit Bluetooth® SIM (es)
)
Volumen de
suministro
1 Caja electrónica con conexiones
para:
• Cable de alimentación
• Display
• Micrófono
• Antena*
2 Tornillos de sujeción de la caja
electrónica
3 Cable de alimentación con co-
nexiones para altavoz
•
§A§ Conmutador de silenciado de
radio (”Mute” de radio) (negro)
•
§B§ Batería de 12 V+ (rojo)
•
§C§ Encendido del automóvil
12 V+/24 V+ (violeta)
•
§D§ Masa (marrón)
•
§E§ Conexión al altavoz +
(verde/negro)
•
§F§ Conexión al altavoz - (verde)
4 3 Conexiones de fijación de segu-
ridad para la distribución eléctrica
5 3 fijaciones enchufables planas
(3 A, violeta) para las conexiones
de fijación de seguridad
6 Display con adhesivos
7 2 soportes de display con
8 Altavoz con cable de conexión
9 2 fijaciones de cables para el cable
: Micrófono externo con adhesivo
adhesivos
•
§G§ Conexión al altavoz +
(blanco/negro)
•
§H§ Conexión al altavoz - (negro)
(Los tornillos de fijación vienen
integrados en el zócalo)
del altavoz
* No se incluye en el suministro estándar.
Page 83

81Car Kit Bluetooth® SIM (es)
Compatibilidad
La instalación del Car Kit Bluetooth® SIM manos libres para el
automóvil (denominado en adelante "Car Kit") es adecuada para
los siguientes teléfonos:
• Teléfonos móviles con interfaz Bluetooth (perfil de acceso
SIM) (véase también la información de compatibilidad
incluida en el paquete)
Estas instrucciones de instalación sólo ofrecen una información básica al
respecto. Debido a que los diferentes
productos para automóviles y conexiones de autoradio demandan
instalaciones diferentes, el montaje
debe realizarse según las
condiciones individuales.
Indicaciones de
seguridad
Antes de utilizar este producto, lea
atentamente el manual de instrucciones y las indicaciones de seguridad.
Al utilizar el teléfono, respete las disposiciones legales y las restricciones
locales que pueden afectar, p. ej., a autopistas o
gasolineras.
Para la instalación de los
accesorios se han observado las directrices generales aplicables y
específicas del tipo de vehículo; en caso necesario,
solicite asistencia especializada (protección eléctrica, contacto con
superficies calientes,
contacto con combustible,
etc.)
¡Tenga cuidado en la instalación! Los niños pequeños podrían infligirse
heridas.
Este aparato sólo funciona
con 12 voltios.
No utilice este aparato en
ambientes explosivos.
Page 84

Car Kit Bluetooth® SIM (es)82
El montaje de los componentes no debe afectar a:
• la libertad de movimiento, la seguridad y el campo de visión
del conductor
• la funcionalidad de los
elementos de control
• la seguridad de los pasajeros del vehículo (también en caso
de accidente)
• los dispositivos de seguridad del vehículo (airbag, cinturones de
seguridad, interruptor de
luces de emergencia,
etc.)
Si las lunas de su automóvil están metalizadas, puede verse afectada la
calidad de recepción. En
este caso, utilice una antena montada en el exterior
del automóvil.
El uso indebido o la apertura de los componentes
invalida la garantía de
calidad.
Tenga en cuenta:
Deseche los teléfonos inservibles y sus accesorios
respetando la normativa
establecida.
Utilice exclusivamente
accesorios originales. De
este modo evitará daños
materiales y personales, y
contará con la garantía del
cumplimiento de todas las
reglamentaciones pertinentes.
Antes de utilizar los accesorios
®
Bluetooth
vehículos de motor, compruebe en el
manual de instrucciones si existen
restricciones para el empleo de tales
productos.
Encontrará más indicaciones en el
manual de instrucciones de su
o el teléfono móvil dentro de
teléfono móvil.
Fabricado por BenQ Mobile GmbH &
Co. OHG. con Licencia de Uso de la
marca de Siemens AG .
Page 85

83Car Kit Bluetooth® SIM (es)
Montaje
Micrófono, antena*, display,
altavoz
Consulte los esquemas en la
página iii/iv de la cubierta.
Al realizar el montaje, tenga en
cuenta:
• Distancia entre el micrófono
altavoz
8 > 1 m
• Distancia entre el micrófono
cable del micrófono y la antena/cable de la antena > 50 cm.
• Distancia entre el micrófono
boca del usuario < 80 cm
• Evite instalar el micrófono expuesto
a las corrientes de aire del techo
solar, la ventana o la ventilación.
Coloque los cables del micrófono externo
display
do en cuenta las características
de su automóvil.
Evite dañar, retorcer o aplastar
los cables.
Micrófono
Limpie el lugar en el que va a colocar el micrófono externo
con un producto adecuado y que
disuelva la grasa. El adhesivo
sólo se sujetará de forma
duradera en una superficie no
grasa.
:, la antena*, el
6 y el altavoz 8 tenien-
: y el
:/
: y la
:
Fije el micrófono externo
el lugar deseado con ayuda del
adhesivo de forma que quede
mirando a la persona que hable.
Antena*
El kit para automóvil ha sido
diseñado para usarse con una
antena* de banda dual
(GSM 900/1800 MHz).
Conecte el cable de la antena
a la caja electrónica.
Display
Procure montar el display
forma que el conductor pueda
verlo bien y pueda acceder a él
fácilmente.
Puede montar el display
rectamente en el panel de instrumentos o con un soporte de
display
7.
: en
6 de
6 di-
Pegue los
adhesivos en las
muescas de
fijación.
* No se incluye en el suministro
estándar.
Page 86

Car Kit Bluetooth® SIM (es)84
Montaje directo del display
Limpie el lugar en el que vaya a
fijar el display
to adecuado que disuelva la grasa. El adhesivo sólo se sujetará
de forma duradera en una
superficie no grasa.
Fije a continuación el display
con ayuda de los adhesivos.
Montaje con el soporte del display
Gracias al soporte
talar el display
posiciones, según se indica en
en la ilustración (véase la parte
inferior derecha de la página iv).
El cable debe llevarse por la posición adecuada en el soporte
Para ello, encontrará unas muescas en el canto de la carcasa. Estos lugares se identifican por un
menor grosor de las paredes.
Fije el soporte del display
los adhesivos incluidos o mediante tornillos* en el panel de
instrumentos.
A continuación, empuje el
display
soporte
6 con un produc-
6
7, puede ins-
6 en diferentes
7.
7 con
6 en la abertura del
7 hasta que encaje.
Altavoz
La inclinación y el ángulo de giro
del altavoz
ello, afloje los tornillos del zócalo, instale el altavoz
los tornillos.
Instale el altavoz
adecuado (p. ej. junto a los pies
del acompañante del
conductor).
Los tornillos se encuentran en el
zócalo del altavoz
8 es adaptable. Para
8 y apriete
8 en un lugar
8.
Cable de alimentación
Conexiones eléctricas
Al conectar el Car Kit a la fuente
de alimentación
do de que esto no afecte al funcionamiento de otros aparatos
(p. ej. por una caída de voltaje).
Desconecte la batería del automóvil antes del montaje del
cable de alimentación
caja electrónica
Conecte el cable
12 V+ al polo positivo de la
batería del automóvil.
3, tenga cuida-
3 y de la
1.
§B§ (rojo) de
* No se incluye en el suministro
estándar.
Page 87

85Car Kit Bluetooth® SIM (es)
Conecte el cable
§D§ (marrón) al
polo negativo de la batería del
automóvil.
Conecte el cable
§C§ (violeta) a la
electrónica del automóvil de forma que puede ofrecer 12 V+ o
24 V+ con el encendido
conectado.
Conecte el cable únicamente con las
conexiones de fijación de
seguridad
necte las fijaciones enchufables planas 3A 5 en la conexión de fijación
de seguridad
Para proteger adecuadamente el cable de alimentación, conecte las fijaciones de seguridad que hay entre el
extremo del cable de alimentación
suministrado y las conexiones del
4 y, a continuación, co-
4.
automóvil.
Conectar el cable del altavoz al cable
de alimentación
Una el cable del altavoz +
(blanco y negro) y el
§G§
§E§ (verde
y negro) mediante un
sujetacables
Una el cable del altavoz
(negro) y el
un sujetacables
9.
§H§
§F§ (verde) mediante
9.
Conexión a la radio*
El kit se puede conectar a través
de la entrada para teléfono del
sistema de audio del automóvil.
De esta manera, se utiliza el altavoz del sistema de audio para la
reproducción.
Para conectar el Car Kit a la entrada
de teléfono de la radio, puede ser necesario alinear las salidas del Car Kit
y las entradas de línea de teléfono
(Line-In) de la radio. Encontrará más
información al respecto en la
siguiente página:
www.siemens.com/
phoneinadapter
Silenciado de la radio (Mute)
Tenga en cuenta las instrucciones del
fabricante de la radio y la
disponibilidad de una entrada de
silenciado de la radio.
La señal de radio se puede silenciar automáticamente cuando se
telefonea. Para ello, conecte el
cable de control
§A§ del silenciado
de la radio con la entrada de silenciado (Mute) de la radio del
automóvil.
* Si se trata de una radio con línea de
entrada para el teléfono.
La radio no se incluye en el
suministro estándar.
Page 88

Car Kit Bluetooth® SIM (es)86
Caja electrónica
Tenga en cuenta que la caja
electrónica
sobre o entre materiales metálicos.
Sólo de esta manera se asegura una
correcta comunicación de radio.
Asegúrese de fijar bien la caja
electrónica
Tenga cuidado de no bloquear las
ranuras de ventilación de la caja
electrónica
de espacio libre alrededor) y de que el
montaje no provoque perturbaciones
en otros dispositivos.
No coloque el cable de conexión por
detrás de la caja electrónica
enrolle alrededor de la caja
electrónica
provocar interferencias.
Los extremos de los cables que no se
utilicen se deben aislar con cinta
aislante.
Conecte los cables de los siguientes componentes a la caja
electrónica
no dañar ésta:
• Cable de alimentación
• Display
• Micrófono externo
•Antena*
1 no se puede montar
1.
1 (al menos deje 2 cm
1 ni lo
1, ya que esto podría
1, con cuidado de
3,
6,
:,
Encaje bien el conector y atornille la conexión de la antena.
Lleve el cable del micrófono
: al seguro de tirones
externo
previsto para ello (véase la
ilustración de la p. iii).
Fije la caja electrónica
en la zona de los pies del acompañante con tornillos
la ilustración de la página iii.
Vuelva a conectar la batería del
automóvil después del montaje.
1, p. ej
2, véase
Desmontaje del display
Levante el display 6 del
soporte
7 como se muestra en
la siguiente ilustración.
* No se incluye en el suministro estándar.
Page 89

87Car Kit Bluetooth® SIM (es)
Características
Con el Car Kit Bluetooth® SIM,
podrá disfrutar del modo manos
libres por Bluetooth como nunca
lo había hecho antes:
• mejor recepción mediante la
conexión a una antena
externa
• ya no se necesitan soportes
para el teléfono
• tiempos de disponibilidad y
conversación del teléfono
más largos.
• excepcional calidad de sonido
para una experiencia única en
sus comunicaciones
• mayor facilidad de uso
Tecnología Bluetooth
La marca y los logos de Bluetooth® son
propiedad de Bluetooth
cualquier uso que haga BenQ Corp. sera
con licencia.
Otras marcas y nombres comerciales son
las de sus respectivos propietarios.
El Car Kit y el teléfono se comunican a través de Bluetooth®, un
sistema de conexión de radio de
corto alcance. Esta tecnología
hace que el uso del Car Kit sea
aún más cómodo.
Para garantizar dicha comunicación, hay que conectar el Car Kit
y el teléfono (pairing). Lea al
respecto "Establecer la primera
conexión con el teléfono
(Pairing)", p. 88.
®
®
SIG, Inc. y
La conexión Bluetooth se puede
realizar con dos perfiles
diferentes:
• Perfil de acceso SIM
(configuración estándar)
El módulo GSM de la caja
electrónica se conecta a la red
GSM a través de la antena
externa.
• Perfil manos libres
En este modo, es el propio teléfono el que se conecta a la
red GSM (ver p. 94).
Funciones de las
teclas del display
El Car Kit se maneja con las teclas del display.
En lo sucesivo se utilizarán los siguientes símbolos para representar las seis diferentes
acciones:
c
a
g
h
sí/contestar
no/colgar
hacia arriba/
seleccionar número
hacia abajo/
agenda/guía
telefónica
Page 90

Car Kit Bluetooth® SIM (es)88
S
f
Si es necesario pulsar una tecla
prolongadamente, en las instrucciones de uso se indica "pulsar
prolongadamente".
En el resto de casos, basta con
una pulsación breve.
Control por voz, (Push
to Speak -pulsar y hablar- sólo en el perfil
manos libres)
Favoritos
Puesta en servicio
Establecer la primera
conexión con el teléfono
(Pairing)
Consulte la información detallada
acerca de cómo establecer una
conexión Bluetooth en el manual de
instrucciones del teléfono.
• Desconecte el Car Kit, véase la
p. 89.
• Active el modo de registro del
Car Kit pulsando la teclac.
prolongadamente.
• Active la interfaz Bluetooth de
su teléfono e inicie la
búsqueda de dispositivos
compatibles con Bluetooth
del entorno.
• Cuando se encuentre el Car
Kit "HKW-720", el teléfono solicitará la introducción de un
número PIN para confirmar la
conexión.
• El número PIN (número aleatorio de 16 dígitos) se muestra
en el display del Car Kit.
Introduzca este número en el
teléfono.
• Introduzca el número PIN de
su teléfono (PIN de SIM*) a
través del display del Car Kit
(véase “Marcar un número”,
p. 89 y p. 92).
• Tras la confirmación, el Car Kit
muestra la identificación del
teléfono en el display (este
nombre se puede cambiar en
el teléfono) y pasa al modo de
servicio. Este proceso puede
durar hasta 1 minuto. Con
teléfonos de otros
fabricantes también es
necesaria una confirmación
en el teléfono para pasar al
modo de servicio.
A partir de este momento, el Car
Kit ya está listo para funcionar.
El Car Kit y el teléfono pueden
comunicarse entre sí y podrán
reconocerse en el futuro.
* El PIN de la SIM es el número secreto
que necesita para darse de alta en la
red de telefonía móvil.
Page 91

89Car Kit Bluetooth® SIM (es)
Conectar otro teléfono
• Active el Car Kit conectándolo
al encendedor del vehículo o
pulsando la tecla a
prolongadamente.
• El Car Kit muestra en el display
los últimos teléfonos usados.
Con g/ h puede desplazarse por la lista de teléfonos
mostrados. Desde la lista,
puede conectar otro teléfono.
?j< X ># Seleccionar.
c
Proceda como se describe en "Establecer la primera conexión con
el teléfono (Pairing)", p. 88.
Confirmar la
selección.
Consultas de PIN de SIM
recurrentes
Según las instrucciones del capítulo anterior, en la última posición de la lista se le ofrece la posibilidad de hacer que se solicite
el PIN de la SIM del Car Kit cada
vez que se realice el proceso de
registro.
? GSM PIN >
c
g/ h Seleccione uno de los
Seleccionar.
Confirmar la
selección.
símbolos:
GSM PIN Q Consul-
ta de PIN de SIM recurrente desactivada.
GSM PIN [ ] Consulta
de PIN de SIM recurrente desactivada.
c
o bien
a
Confirmar la
selección.
Cancelar
Utilización con varios
teléfonos
El Car Kit tiene capacidad para
almacenar los datos de cuatro
teléfonos, que pueden utilizarse
cuando se desee.
Si se conecta un quinto teléfono,
se borrará la entrada correspondiente al teléfono que no se
haya conectado durante más
tiempo.
Tonos de timbre
En el perfil de acceso SIM, se
reproduce el tono del timbre
estándar del Car Kit
(véase la p. 95).
Apagar el Car Kit
a
El Car Kit se desconectará automáticamente tras un tiempo
ajustable si el encendido del
automóvil está apagado.
Pulsar prolongadamen-
te: apagar el Car Kit.
Page 92

Car Kit Bluetooth® SIM (es)90
Funciones
A no ser que se especifique lo
contrario, los métodos siguientes funcionan para todas las
funciones:
a
a
a
Conectar el Car Kit
• Active el Car Kit conectándolo
• El Car Kit muestra en el display
g/ h Seleccionar registro.
c
Si no selecciona nada, transcurridos unos 5 segundos se conectará el teléfono usado por última vez, siempre que éste se
encuentre al alcance.
Si este teléfono no estuviera
disponible, el Car Kit pasa al
modo de espera.
a
Pulsar prolongadamente: el Car Kit pasa al
modo de servicio.
Pulsar prolongadamen-
te (en el modo de servicio): se apaga el
Car Kit.
Pulsar brevemente:
retroceder un nivel.
al encendedor del vehículo
o pulsando la tecla a
prolongadamente.
los últimos teléfonos usados.
Confirmar la
selección.
Pulsar brevemente: finaliza el estado de
espera.
Ahora puede seleccionar un teléfono o conectar uno nuevo.
Véase "Conectar otro teléfono",
p. 89.
Añadir números del teléfono
móvil
Con cada activación del Car Kit,
se le transfiere el contenido de la
agenda/guía telefónica. Este
proceso puede durar. Se pueden
guardar 1000 registros en total.
Durante la transferencia de los
números, el símbolo de la guía
telefónica parpadea en el display
del Car Kit. Durante este tiempo
puede utilizar el Car Kit para llamar a cualquier número que ya
se haya transferido o utilizar la
selección de números.
Configuración
h
Seleccione los datos que desea
transferir:
j [] + SIM []
Pulsar
prolongadamente.
La guía y la agenda telefónica (tarjeta SIM)
del teléfono se usan y
guardan en el Car Kit
y se actualizan automáticamente.
Page 93

91Car Kit Bluetooth® SIM (es)
j [] La agenda telefónica
SIM []
La guía telefónica (tarjeta SIM)
se usa y guarda en el Car Kit y se
actualiza automáticamente.
se usa y guarda en el
Car Kit y se actualiza
automáticamente.
Modo de servicio
En el modo de servicio, el Car Kit
pone a disposición las siguientes
funciones:
c
c
a
Listas de llamadas
Pulsar prolongadamen-
te: se marca el último
número usado.
Pulsar prolongadamen-
te: el Car Kit se
desconecta.
h Agenda telefónica
g Selección de número
f
Favoritos
Responder a una llamada
c
Responder a una
llamada.
Rechazar la llamada
a
Rechazar la llamada.
Finalizar la comunicación
a
Finalizar la
comunicación.
Llamar desde la agenda/guía
telefónica
h
Agenda/guía telefónica
Pulsar brevemente.
Muestra las letras iniciales de los
registros disponibles en la agenda telefónica.
g/h Pulsar brevemente:
g/h Pulsar prolongadamen-
c
g/ h Seleccionar registro.
c
Un registro de la agenda telefónica puede incluir varios números de teléfono.
g/ h Seleccionar registro.
c
pasa a la letra
anterior/siguiente.
te: desplazarse por el
alfabeto.
Confirmar la letra seleccionada y mostrar
la lista de registros
correspondiente.
Confirmar registro.
Iniciar la llamada.
Page 94

Car Kit Bluetooth® SIM (es)92
Llamar desde las listas de
llamadas
Listas de llamadas
c
Muestra las listas de llamadas de
llamadas del teléfono.
Dispone de tres listas de
llamadas:
j X > Números marcados
X > O j Llamadas perdidas
X > j Llamadas contestadas
Las listas de llamadas sólo se
muestran si contienen, al menos, un registro. Si no hay disponible ninguna lista de llamadas,
se mostrará }{ (acción no posible) durante unos momentos.
g/h Seleccionar lista de
c
g/ h Seleccionar registro.
c
llamadas.
Activar lista de
llamadas.
Iniciar la llamada.
Favoritos
Puede seleccionar en la agenda
telefónica hasta cinco números
de teléfono a los que llamar de
forma rápida y cómoda
con
f.
h
Abra la agenda y seleccione el registro
que desee.
f
En lo sucesivo, cada vez que pulse f brevemente desde el modo de servicio, se mostrará la
lista de favoritos.
Si guarda un sexto número, se
borrará el que guardó por
primera vez.
Pulsar prolongadamen-
te: confirmar el
registro.
Marcar un número
Selección de número
g
El número se selecciona y el cursor parpadea en el display.
g/h Pasa al número
c
c
a
a
siguiente.
Seleccionar el
número.
Pulsar prolongadamen-
te: el número se
marca.
Borrar el último
número.
Pulsar prolongadamen-
te: borra el número
entero.
Durante la comunicación
S
f
c
a
Más alto.
Más bajo.
Retener llamada.
Finalizar llamada.
Page 95

93Car Kit Bluetooth® SIM (es)
j
j
j
Segunda llamada
a
c
c
a
Silenciado del micrófono
c
Tonos DTMF
g
Envíe secuencias de tonos (cifras) para, por ejemplo, consultar de forma remota un contestador automático. Estas cifras
introducidas se transmiten
directamente como tonos DTMF
(Dual Tone Multiple Frequency).
Finalizar la llamada
activa.
Finalizar la comunicación activa y aceptar
la nueva llamada en
espera.
Cambiar entre dos
comunicaciones.
Pulsar prolongadamen-
te: finalizar todas las
llamadas.
Pulsar prolongadamen-
te: activar/desactivar
silenciado del
micrófono.
Pulsar brevemente durante una llamada:
activar los tonos
DTMF.
Símbolos del display
AB3 Intensidad de la señal del
FHJ Teléfono en estado de car-
?j< X ># Modo de registro (Pairing)
# X Buscar el teléfono
# L El teléfono se conecta
W
}{
j Perfil de manos libres acti-
j X > Números marcados/
X > O j Llamadas perdidas/
X > j Llamadas contestadas/
j < X >j Comunicación activa
X > j j X X j
=
o
teléfono (se muestra en el
estado de servicio). Si el
símbolo parpadea, la red
no está disponible.
ga (se muestra en el
estado de servicio).
Espere
Acción no posible
vo (se muestra en el estado de servicio en el lugar
de lla intensidad de
recepción).
llamada saliente
ocupado
llamada entrante
Comunicación
activa/llamada en espera
X X j
Llamada retenida
< X > j j
Comunicación activa/
llamada retenida
< X ? X > #
Fallo de interfaz
Selección de listas
Número de teléfono
privado
Page 96

Car Kit Bluetooth® SIM (es)94
# ( p ( j
# ) p ) j
Número de teléfono de la
\
n
m
p
pq
pqq
P\/M\
!<;!
[]
" Control por voz activado
uvw
S
rst
rstq
rstqq
oficina
Número de teléfono móvil,
privado
Número de teléfono móvil,
oficina
Volumen
Silenciado de micrófono
activado/desactivado
Transferir llamada al
Car Kit
Transferir llamada al
teléfono
Volver a la configuración
de fábrica
Envío de agenda/
guía telefónica
Recepción de SMS
Llamada de emergencia
iluminación del display
Funciones del perfil
de manos libres
f
En este modo, el teléfono establece
automáticamente una conexión con
la red GSM. El módulo GSM de la caja electrónica no se utiliza. De esta
forma, no se aprovechan las ventajas
del acceso SIM (p. ej. la conexión de
la antena o el menor consumo
eléctrico).
Transferencia de la
conversación
c
Esta función está disponible en
todos los dispositivos Bluetooth,
como los auriculares o el
teléfono.
g
Pulsar prolongadamente (en el modo de ser-
vicio): cambia el perfil
manos libres.
Pasar la llamada
activa al Car Kit.
Pulsar prolongadamen-
te: transferir la llamada actual al teléfono
(si éste lo admite).
Page 97

95Car Kit Bluetooth® SIM (es)
Perfil del Car Kit
Cuando el teléfono se conecta al
Car Kit con el perfil de manos libres, por regla general se activa
un perfil determinado en el teléfono. Tras la activación de este
perfil, los teléfonos Siemens
muestran, por ejemplo, un tipo
de letra más grande en el display. Los ajustes del perfil se
pueden modificar en teléfono.
Consulte al respecto las instrucciones de uso de su teléfono.
Tonos de timbre
Según el tipo de teléfono,
pueden reproducirse los tonos
de timbre configurados en el Car
Kit o las melodías del teléfono. Si
no fuera posible, sonará el tono
estándar del Car Kit.
Transmisión de datos
Para la transmisión de datos desde, por ejemplo, un ordenador
portátil, registre éste directamente al teléfono mediante
Bluetooth. Para ello, ponga el
Car Kit en el modo de manos
libres.
Ajustes adicionales
Volver a la configuración de fábrica
(desde el estado apagado)
a
Pulsar
prolongadamente.
SIEMENS HKW-720
S
!<;! Mantenga pulsadas
El aparato se apaga automaticamente luego de volver a la configuración inicial.
Esta función borra todos los datos almacenados en el Car Kit, como las
libretas de direcciones, las listas de
llamadas, o el emparejamiento con
teléfonos.
Ajustar la iluminación del display
(en el modo de servicio)
es mostrado en la
pantalla.
g
Mantener pulsado.
/
las dos teclas anteriores hasta que símbolo
adyacente deje de
parpadear y quede
iluminado.
S Pulsar prolongadamen-
te, seleccionar el tipo
de iluminación.
g, h Más claro o más
Mostrar la versión del software
(en el modo de servicio)
h/f Pulsar prolongadamen-
oscuro.
te. Se muestra la
versión del software.
Page 98

Car Kit Bluetooth® SIM (es)96
Ajustar el nivel de salida del volumen (en el modo de servicio)
El nivel de salida del volumen de
la caja electrónica está ajustado
para el altavoz incluido
(nivel máximo).
Si utiliza el altavoz de la radio para la reproducción y la línea de
entrada Phone-In-/Line-In de la
radio es muy sensible, puede
reducir el nivel de salida.
/S Pulsar brevemente.
g
g/h
c
Llamada de emergencia
(si no hay ningún teléfono conectado y se muestra SOS en el
display)
c
Seleccionar uno de
los siguientes
símbolos:
p nivel de salida
máximo.
pV nivel de salida
reducido.
Pulsar brevemente,
confirmar la
selección.
Pulsar brevemente.
Solución de errores
El Car Kit no funciona
• Comprobar las conexiones de
los cables
• No hay tensión de servicio,
comprobar la conexión del
cable
• El teléfono está apagado o no
está activa la conexión con el
Car Kit
• Comprobar las fijaciones
• Tensión de servicio muy baja
o muy alta
El interlocutor escucha ruidos de
interferencia
• El micrófono se encuentra expuesto a la corriente de aire
del techo solar, la ventanilla
o la ventilación
• La distancia entre el micrófono/el cable del micrófono y el
teléfono es inferior a 50 cm
Mala calidad de voz y audio
• El Car Kit se encuentra fuera
de la temperatura de
funcionamiento adecuada
• El volumen ajustado es escaso
(ajústelo a través del teléfono
o el Car Kit)
• Conexión con la radio
(uso de Phone-In/Line-In):
el volumen del teléfono/
Car Kit está ajustado demasiado alto (reducir el volumen a
través del Teléfono/Car Kit y
elevarlo a través de la radio si
fuera necesario.) Véase
también la p. 96.
Fuerte eco
• La distancia entre el
micrófono y el altavoz
es inferior a 1 m.
Page 99

97Car Kit Bluetooth® SIM (es)
Señal del micrófono débil (su interlocutor le escucha muy bajo)
• La distancia entre el micrófono y la boca del usuario debe
ser superior a 80 cm
• El micrófono no está
orientado hacia el hablante
Mala calidad de recepción
•No hay red
• Cambiar la posición del
teléfono (sólo es relevante en
el perfil de manos libres)
• Si las lunas de su automóvil
están metalizadas, puede verse afectada la calidad de recepción del teléfono o el Car
Kit. Tenga en cuenta las recomendaciones del fabricante
del automóvil e instale la
antena (exterior) como se le
indique.
Restablecer el sistema
•
Pulsar durante 5 segun-
a
dos: el Car Kit se apaga (depende del modo activo).
Pulsar durante
•
a
10 segundos: el sistema se
restablece.
No se encuentra el teléfono/
problema de conexión Bluetooth
• Realizar la primera conexión
con el teléfono; véase la p. 88.
• Desde que se usó el teléfono
con el Car Kit por última vez,
se han registrado al menos
otros cuatro teléfonos. Vuelva
a registrar el teléfono.
• Asegúrese de que la caja electrónica no esté montada sobre o entre materiales
metálicos.
• Reduzca la distancia entre la
caja eléctrica y el teléfono.
La radio permanece silenciada
• Posiblemente el silenciado se
ve afectado por una masa
La conexión/desconexión automática del Car Kit no funciona/ Car Kit no
se desconecta solo
• Compruebe si está conectado
a la línea de encendido del
automóvil
La agenda telefónica no se actualiza
• Asegúrese de que el teléfono
se encuentra en modo de servicio y de que no se haya
activado ningún bloqueo de
teclas (con un teléfono móvil
Siemens esto no es necesario)
Vuelva a conectarlo al Car Kit;
véase la p. 90.
Page 100

Car Kit Bluetooth® SIM (es)98
Datos técnicos y
homologación
Fuente de
alimentación
Consumo de
corriente
Temperatura
de funcionamiento
Potencia de
salida de los
altavoces
Peso (caja
electrónica)
Medidas de la
carcasa (caja
electrónica)
Módulo GSM Banda dual con 900
10,8 V+ a 16 V+
El cable de conexión
del encendido del
automóvil también
puede utilizarse a
24 V
máx. 2 A /
máx. 1 mA
(circuito cerrado)
-20°C a +55°C
3 W
152 g aprox.
130 x 108 x 26 mm
(Alt. x Anch. x Grosor) aprox.
y 1800 MHz, GPRS
clase 8, perfil de
acceso protegido
por SIM
El Car Kit cumple con las
siguientes normativas de
la UE:
89/336/CEE "Compatibilidad
electromagnética"
92/59/CEE "Directivas sobre
seguridad general de los
productos"
E24
10R-020177
mente enmendada por la directiva 95/54/UE "Compatibilidad
electromagnética en vehículos
de motor".
Aprobación de tipos
según la directiva
72/245/CEE, final-
Declaración de conformidad
CE
BenQ Mobile declara que el teléfono móvil descrito en esta guía
del usuario cumple todos los requisitos básicos y otras regulaciones en el marco de la Directiva europea 1999/5/CE (R&TTE).
La declaración de conformidad
(DoC) relevante ha sido firmada
a los efectos. En caso necesario,
puede solicitarse una copia del
original a través del servicio de
atención al cliente de la
compañía:
www.BenQMobile.com/conformity
 Loading...