

Page 1

Cellular CDMA Q600
User’s Manual
Page 2

Copyright
Copyright © 2003 by BenQ Corporation. All rights reserved. No part of
this publication may be reproduced, transmitted, transcribed, stored in a
retrieval system or translated into any language or computer language, in
any form or by any means, electronic, mechanical, magnetic, optical,
chemical, manual or otherwise, without the prior written permission of
BenQ Corporation.
Disclaimer
BenQ Corporation makes no representations or warranties, either
expressed or implied, with respect to the contents hereof and specifically
disclaims any warranties, merchantability or fitness for any particular
purpose. Further, BenQ Corporation reserves the right to revise this publication and to make changes from time to time in the contents hereof
without obligation of BenQ Corporation to notify any person of such
revision or changes.
FCC RF EXPOSURE INFORMATION
WARNING! Read this information before using your
phone.
In August 1986 the Federal Communications Commission (FCC) of the
United States with its action in Report and Outer FCC 96-326 adopted an
updated safety standard for human exposure to radio frequency (RF) electromagnetic energy emitted by FCC regulated transmitters. Those guidelines are consistent with the safety standard previously set by both U.S.
and international standards bodies. The design of this phone complies
with the FCC guidelines and these international standards.
Use only the supplied or an approved antenna. Unauthorized antennas,
modifications, or attachments could impair call quality, damage the
phone, or result in violation of FCC regulations.
Page 3

Do not use the phone with a damaged antenna. If a damaged antenna
comes into contact with the skin, a minor burn may result. Please contact
your local dealer for replacement antenna.
Body-worn Operation
To comply with FCC RF exposure requirements, a minimum separation
distance of 0.6 inches (1.5cm) must be maintained between the user's
body and the back of the phone, including the antenna, whether extended
or retracted. Third-party belt-clips, holsters and similar accessories containing metallic components shall not be used. Body-worn accessories
that cannot maintain 0.6 inch (1.5cm) separation distance between the
user’s body and the back of the phone may not comply with FCC RF
exposure limits and should be avoided.
Q600 accessories: charger, data cable-optional; earphone-optional.
For more information about RF exposure, please visit the FCC website at
www.fcc.gov
Exposure to radio frequency signals
Your wireless handheld portable telephone is a low power radio transmitter and receiver. When it is ON, it receives and also sends out radio frequency (RF) signals.
In August, 1996, the Federal Communications Commissions (FCC)
adopted RF exposure guidelines with safety levels for hand-held wireless
phones. Those guidelines are consistent with the safety standards previously set by both U.S. and international standards bodies:
ANSIC95.1 (1992)'
NCRP Report 86 (1986)
ICIMIRP(1996)
Page 4

Those standards were based on comprehensive and periodic evaluations
of the relevant scientific literature. For example, over 120 scientists, engineers, and physicians from universities, government health agencies, and
industry reviewed the available body of research to develop the ANSI
Standard (C95.1). Nevertheless, we recommend that you use a handsfree
kit with your phone (such as an earpiece or headset) to avoid potential
exposure to RF energy.
The design of your phone complies with the FCC guidelines (and those
standards).
Antenna Care
Use only the supplied or an approved replacement antenna. Unauthorized
antennas, modifications, or attachments could damage the phone and
may violate FCC regulations.
Phone operation
NORMAL POSITION: Hold the phone as you would any other telephone
with the antenna pointed
up and over your shoulder.
TIPS ON EFFICIENT OPERATION: For your phone to operate most efficiently:
• Extend your antenna fully.
• Do not touch the antenna unnecessarily when the phone is in use. Contact with the antenna affects call quality and may cause the phone to
operate at a higher power level than otherwise needed.
Driving
Check the laws and regulations on the use of wireless telephones in the
areas where you drive. Always obey them. Also, if using your phone while
driving, please:
• Give full attention to driving - driving safely is your first responsibility;
Page 5

• Use hands-free operation, if available;
• Pull off the road and park before making or answering a call if driving
conditions so require.
Electronic devices
Most modern electronic equipment is shielded from RF signals. However,
certain electronic equipment may not be shielded against the RF signals
from your wireless phone.
Pacem akers
The Health Industry Manufacturers Association recommends that a minimum separation of six (6") inches be maintained between a handheld
wireless phone and a pacemaker to avoid potential interference with the
pacemaker. These recommendations are consistent with the independent
research by and recommendations of Wireless Technology Research.
Person s w ith pa cemakers:
• Should ALWAYS keep the phone more than six inches from their pacemaker when the phone is turned ON;
• Should not carry the phone in a breast pocket;
• Should use the ear opposite the pacemaker to minimize the potential for
interference.
• If you have any reason to suspect that interference is taking place, turn
your phone OFF immediately.
Hearing Aids
Some digital wireless phones may interfere with some hearing aids. In the
event of such interference, you may want to consult your service provider
or call the customer service line to discuss alternatives.
Page 6

Other Medical Devices
If you use any other personal medical device, consult the manufacturer of
your device to determine if they are adequately shielded from external RF
energy. Your physician may be able to assist you in obtaining this information.
Turn your phone OFF in health care facilities when any regulations posted
in these areas instruct you to do so. Hospitals or health care facilities may
be using equipment that could be sensitive to external RF energy.
Ve h i cl e s
RF signals may affect improperly installed or inadequately shielded electronic systems in motor vehicles. Check with the manufacturer or its representative regarding your vehicle. You should also consult the
manufacturer of any equipment that has been added to your vehicle.
Posted Facilities
Turn your phone OFF in any facility where posted notices require you to
do so.
FCC regulations prohibit using your phone while in the air. Switch OFF
your phone before boarding an aircraft.
Aircraft
To avoid interfering with blasting operations, turn your phone OFF when
in a "blasting area" or in areas posted: "Turn off two-way radio". Obey all
signs and instructions.
Page 7

Blasting areas
Turn your phone OFF when in any area with a potentially explosive atmosphere and obey all signs and instructions. Sparks in such areas could
cause an explosion or fire resulting in bodily injury or even death.
Potentially explosive atmospheres
Areas with a potentially explosive atmosphere are often but not always
clearly marked. They include fueling areas such as gasoline stations; below
deck on boats; fuel or chemical transfer or storage facilities; vehicles using
liquefied petroleum gas (such as propane or butane); areas where the air
contains chemicals or particles, such as grain, dust, or metal powders; and
any other area where you would normally be advised to turn off your
vehicle engine.
For Vehicles Equipped with an Air Bag
An air bag inflates with great force. DO NOT place objects, including both
installed or portable wireless equipment, in the area over the air bag or in
the air bag deployment area.
If in-vehicle wireless equipment is improperly installed and the air bag
inflates, serious injury could result.
FDA Consumer Update on Mobile Phone
FDA has been receiving inquiries about the safety of mobile phones,
including cellular phones and PCS phones. The following summarizes
what is known--and what remains unknown--about whether these products can pose a hazard to health, and what can be done to minimize any
potential risk. This information may be used to respond to questions.
Page 8

Why the concern?
Mobile phones emit low levels of radio frequency energy (i.e., radio frequency radiation) in the microwave range while being used. They also
emit very low levels of radio frequency energy (RF), considered non-significant, when in the stand-by mode. It is well known that high levels of
RF can produce biological damage through heating effects (this is how
your microwave oven is able to cook food). However, it is not known
whether, to what extent, or through what mechanism, lower levels of RF
might cause adverse health effects as well. Although some research has
been done to address these questions, no clear picture of the biological
effects of this type of radiation has emerged to date. Thus, the available
science does not allow us to conclude that mobile phones are absolutely
safe, or that they are unsafe. However, the available scientific evidence
demonstrate any adverse health effects associated with the use of
does not
mobile phones.
What kinds of phones are in question?
Questions have been raised about hand-held mobile phones, the kind that
have a built-in antenna that is positioned close to the user's head during
normal telephone conversation. These types of mobile phones are of concern because of the short distance between the phone's antenna--the primary source of the RF--and the person's head. The exposure to RF from
mobile phones in which the antenna is located at greater distances from
the user (on the outside of a car, for example) is drastically lower than that
from hand-held phones, because a person's RF exposure decreases rapidly
with distance from the source. The safety of so-called "cordless phones,"
which have a base unit connected to the telephone wiring in a house and
which operate at far lower power levels and frequencies, has not been
questioned.
How much evidence is there that hand-held mobile phones might be
harmful?
Page 9

Briefly, there is not enough evidence to know for sure, either way; however, research efforts are on-going.
The existing scientific evidence is conflicting and many of the studies that
have been done to date have suffered from flaws in their research methods.
Animal experiments investigating the effects of RF exposures characteristic of mobile phones have yielded conflicting results. A few animal studies,
however, have suggested that low levels of RF could accelerate the development of cancer in laboratory animals. In one study, mice genetically
altered to be predisposed to developing one type of cancer developed
more than twice as many such cancers when they were exposed to RF
energy compared to controls. There is much uncertainty among scientists
about whether results obtained from animal studies apply to the use of
mobile phones. First, it is uncertain how to apply the results obtained in
rats and mice to humans. Second, many of the studies that showed
increased tumor development used animals that had already been treated
with cancer-causing chemicals, and other studies exposed the animals to
the RF virtually continuously--up to 22 hours per day.
For the past five years in the United States, the mobile phone industry has
supported research into the safety of mobile phones. This research has
resulted in two findings in particular that merit additional study:
In a hospital-based, case-control study, researchers looked for an association between mobile phone use and either glioma (a type of brain
cancer) or acoustic neuroma (a benign tumor of the nerve sheath). No
statistically significant association was found between mobile phone
use and acoustic neuroma. There was also no association between
mobile phone use and gliomas when all types of types of gliomas were
considered together. It should be noted that the average length of
mobile phone exposure in this study was less than three years.
When 20 types of glioma were considered separately, however, an association was found between mobile phone use and one rare type of
Page 10

glioma, neuroepithelliomatous tumors. It is possible with multiple
comparisons of the same sample that this association occurred by
chance. Moreover, the risk did not increase with how often the mobile
phone was used, or the length of the calls. In fact, the risk actually
decreased
with cumulative hours of mobile phone use. Most cancer
causing agents increase risk with increased exposure. An ongoing
study of brain cancers by the National Cancer Institute is expected to
1
bear on the accuracy and repeatability of these results.
Researchers conducted a large battery of laboratory tests to assess the
effects of exposure to mobile phone RF on genetic material. These
included tests for several kinds of abnormalities, including mutations,
chromosomal aberrations, DNA strand breaks, and structural changes
in the genetic material of blood cells called lymphocytes. None of the
tests showed any effect of the RF except for the micronucleus assay,
which detects structural effects on the genetic material. The cells in
this assay showed changes after exposure to simulated cell phone radiation, but only after 24 hours of exposure. It is possible that exposing
the test cells to radiation for this long resulted in heating. Since this
assay is known to be sensitive to heating, heat alone could have caused
the abnormalities to occur. The data already in the literature on the
response of the micronucleus assay to RF are conflicting. Thus, follow-
2
up research is necessary.
FDA is currently working with government, industry, and academic
groups to ensure the proper follow-up to these industry-funded
research findings. Collaboration with the Cellular Telecommunications and Internet Association (CTIA) in particular is expected to lead
to FDA providing research recommendations and scientific oversight
of new CTIA-funded research based on such recommendations.
Two other studies of interest have been reported recently in the literature:
Page 11

Two groups of 18 people were exposed to simulated mobile phone signals under laboratory conditions while they performed cognitive
function tests. There were no changes in the subjects' ability to recall
words, numbers, or pictures, or in their spatial memory, but they were
able to make choices more quickly in one visual test when they were
exposed to simulated mobile phone signals. This was the only change
3
noted among more than 20 variables compared.
In a study of 209 brain tumor cases and 425 matched controls, there
was no increased risk of brain tumors associated with mobile phone
use. When tumors did exist in certain locations, however, they were
more likely to be on the side of the head where the mobile phone was
used. Because this occurred in only a small number of cases, the
4
increased likelihood was too small to be statistically significant.
In summary, we do not have enough information at this point to assure
the public that there are, or are not, any low incident health problems
associated with use of mobile phones. FDA continues to work with all parties, including other federal agencies and industry, to assure that research
is undertaken to provide the necessary answers to the outstanding questions about the safety of mobile phones.
What is known about cases of human cancer that have been reported in
users of hand-held mobile phones?
Some people who have used mobile phones have been diagnosed with
brain cancer. But it is important to understand that this type of cancer
also occurs among people who have not used mobile phones. In fact,
brain cancer occurs in the U.S. population at a rate of about 6 new cases
per 100,000 people each year. At that rate, assuming 80 million users of
mobile phones (a number increasing at a rate of about 1 million per
month), about 4800 cases of brain cancer would be expected each year
among those 80 million people, whether or not they used their phones.
Page 12

Thus it is not possible to tell whether any individual's cancer arose
because of the phone, or whether it would have happened anyway. A key
question is whether the risk of getting a particular form of cancer is
greater among people who use mobile phones than among the rest of the
population. One way to answer that question is to compare the usage of
mobile phones among people with brain cancer with the use of mobile
phones among appropriately matched people without brain cancer. This
is called a case-control study. The current case-control study of brain cancers by the National Cancer Institute, as well as the follow-up research to
be sponsored by industry, will begin to generate this type of information.
What is FDA's role concerning the safety of mobile phones?
Under the law, FDA does not review the safety of radiation-emitting consumer products such as mobile phones before marketing, as it does with
new drugs or medical devices. However, the agency has authority to take
action if mobile phones are shown to emit radiation at a level that is hazardous to the user. In such a case, FDA could require the manufacturers of
mobile phones to notify users of the health hazard and to repair, replace
or recall the phones so that the hazard no longer exists.
Although the existing scientific data does not justify FDA regulatory
actions at this time, FDA has urged the mobile phone industry to take a
number of steps to assure public safety. The agency has recommended
that the industry:
• support needed research into possible biological effects of RF of the
type emitted by mobile phones;
• design mobile phones in a way that minimizes any RF exposure to
the user that is not necessary for device function ; and
• cooperate in providing mobile phone users with the best possible
information on what is known about possible effects of mobile
phone use on human health.
Page 13

At the same time, FDA belongs to an interagency working group of the
federal agencies that have responsibility for different aspects of mobile
phone safety to ensure a coordinated effort at the federal level. These
agencies are:
• National Institute for Occupational Safety and Health
• Environmental Protection Agency
• Federal Communications Commission
• Occupational Health and Safety Administration
• National Telecommunications and Information Administration
The National Institutes of Health also participates in this group.
In the absence of conclusive information about any possible risk, what can
concerned individuals do?
If there is a risk from these products--and at this point we do not know
that there is--it is probably very small. But if people are concerned about
avoiding even potential risks, there are simple steps they can take to do so.
For example, time is a key factor in how much exposure a person receives.
Those persons who spend long periods of time on their hand-held mobile
phones could consider holding lengthy conversations on conventional
phones and reserving the hand-held models for shorter conversations or
for situations when other types of phones are not available.
People who must conduct extended conversations in their cars every day
could switch to a type of mobile phone that places more distance between
their bodies and the source of the RF, since the exposure level drops off
dramatically with distance. For example, they could switch to:
• a mobile phone in which the antenna is located outside the vehicle,
• a hand-held phone with a built-in antenna connected to a different
antenna mounted on the outside of the car or built into a separate
package, or
• a headset with a remote antenna to a mobile phone carried at the
waist.
Page 14

Again, the scientific data does not demonstrate that mobile phones are
harmful. But if people are concerned about the radiofrequency energy
from these products, taking the simple precautions outlined above can
reduce any possible risk.
Where can I find additional information?
For additional information, see the following websites:
Federal Communications Commission (FCC) RF Safety Program (select
"Information on Human Exposure to RF Fields from Cellular and PCS
Radio Transmitters"): http://www.fcc.gov/oet/rfsafety
World Health Organization (WHO) International Commission on NonIonizing Radiation Protection (select Qs & As): http://www.who.int/emf
United Kingdom, National Radiological Protection Board: http://
www.nrpb.org.uk
1. Muscat et al. Epidemiological Study of Cellular Telephone Use and
Malignant Brain Tumors. In: State of the Science Symposium;1999 June
20; Long Beach, California.
2. Tice et al. Tests of mobile phone signals for activity in genotoxicity and
other laboratory assays. In: Annual Meeting of the Environmental
Mutagen Society; March 29, 1999, Washington, D.C.; and personal communication, unpublished results.
3. Preece, AW, Iwi, G, Davies-Smith, A, Wesnes, K, Butler, S, Lim, E, and
Varey, A. Effect of a 915-MHz simulated mobile phone signal on cognitive
function in man. Int. J. Radiat. Biol., April 8, 1999.
4. Hardell, L, Nasman, A, Pahlson, A, Hallquist, A and Mild, KH. Use of
cellular telephones and the risk for brain tumors: a case-control study. Int.
J. Oncol., 15: 113-116, 1999.
Page 15

License note
Licensed by QUALCOMM Incorporated under one or more of the
following United States Patents and/or their counterparts in other
nations:
4,901,307 5,490,165 5,056,109 5,504,773 5,101,501
5,506,865 5,109,390 5,511,073 5,228,054 5,535,239
5,267,261 5,544,196 5,267,262 5,568,483 5,337,338
5,600,754 5,414,796 5,657,420 5,416,797 5,659569
5,710,784 5,778,38
Page 16

Page 17

TABLE OF CONTENTS
PREPARING YOUR PHONE FOR USE....................................... 1
Inserting your UIM card .........................................................1
Fitting and charging your battery ...........................................2
Turning on your phone...........................................................4
GETTING TO KNOW YOUR PHONE........................................ 5
Your phone at a glance ............................................................5
Idle display ...............................................................................8
Main display ...........................................................................................8
Icons in the status bar ....................................................................9
Using the keys ........................................................................10
Functional keys.............................................................................10
Alphanumeric keys.......................................................................14
Menu Navigation...................................................................16
Entering the main menu ..............................................................16
Main menu layout ........................................................................17
Submenu layout ...........................................................................17
USING YOUR PHONE ........................................................... 18
Making a phone call...............................................................18
Ending a phone call ...............................................................18
Answering a phone call..........................................................19
Rejecting an incoming call ....................................................19
Redialing the last number......................................................19
Making an emergency call .....................................................20
xvii Table of Contents
Page 18

Dialing an extension number................................................20
Your PhoneBook....................................................................21
Saving new contacts to your PhoneBook.................................... 21
Finding contacts in the PhoneBook ............................................23
Last missed, dialed, and received calls ..................................23
In-call menu...........................................................................24
The silent profile....................................................................25
Quick Access ..........................................................................26
INPUT MODES ..................................................................... 28
Changing the text input mode ..............................................28
iTAP........................................................................................28
ABC.........................................................................................30
SYM ........................................................................................31
123 ..........................................................................................31
MOBILE INTERNET*(OPTION)............................................. 32
Logging on to the Internet.....................................................32
Surfing the Internet ...............................................................33
Logging off the Internet.........................................................33
Using the browser menu .......................................................34
MENUS................................................................................. 38
Navigating the menus............................................................38
PhoneBook.............................................................................39
Find ...............................................................................................39
Add to UIM ..................................................................................39
Add to Phone................................................................................39
xviii Table of Contents
Page 19

Caller group ..................................................................................39
Speed Dial .....................................................................................40
Copy ..............................................................................................41
Erase ..............................................................................................42
Status.............................................................................................42
My number ...................................................................................42
Call Logs .................................................................................43
All ..................................................................................................43
Missed ...........................................................................................43
Received ........................................................................................43
Dialed ............................................................................................43
Call Timers....................................................................................43
Erase Logs .....................................................................................43
Messages .................................................................................44
Inbox .............................................................................................44
Compose .......................................................................................46
Outbox ..........................................................................................46
Quick Msg..................................................................................... 46
Draft ..............................................................................................47
Voicemail ......................................................................................47
Broadcasts .....................................................................................48
Erase All ........................................................................................49
Chat Room....................................................................................49
Tools .......................................................................................51
Browser .........................................................................................51
UIM Toolkit..................................................................................51
Alarm Clock.................................................................................. 51
Calculator......................................................................................52
Hour Reminder ............................................................................53
Currency Converter .....................................................................53
World Time ..................................................................................54
Stopwatch .....................................................................................54
xix Table of Contents
Page 20

Quick Key .....................................................................................54
Scratch Pad ...................................................................................54
Other Service ................................................................................54
Profiles....................................................................................56
Scheduler................................................................................58
View Calendar ..............................................................................58
View Event ....................................................................................58
Add Event .....................................................................................58
Erase All ........................................................................................58
Media Center..........................................................................59
Games............................................................................................59
Digital Camera.............................................................................. 64
Photo Album ................................................................................65
My Ringtone .................................................................................65
Melody Editor............................................................................... 65
Settings ...................................................................................69
Audio.............................................................................................69
Display ..........................................................................................69
Answer By .....................................................................................70
Auto Redial ...................................................................................70
Language .......................................................................................70
Date And Time .............................................................................70
Power On / Off Time ...................................................................71
Call Service....................................................................................71
Restore Default .............................................................................72
Security ...................................................................................73
Lock Status.................................................................................... 73
UIM Lock...................................................................................... 73
Change Code ................................................................................74
Call Restrict...................................................................................74
Emergency Numbers....................................................................74
xx Table of Contents
Page 21

WHAT TO DO IF... ............................................................... 75
xxi Table of Contents
Page 22

xxii Table of Contents
Page 23
PREPARING YOUR PHONE FOR USE
Inserting your UIM card
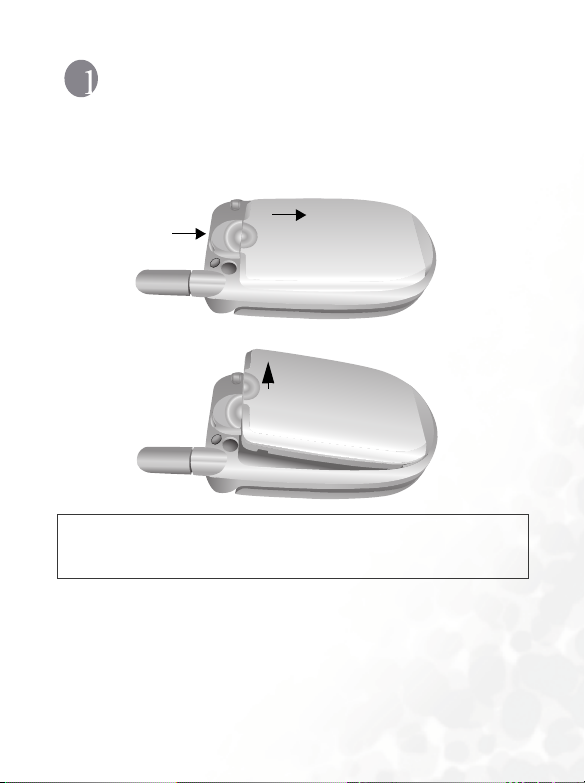
1. Hold your phone face down, and pull the battery catch backwards to
release the battery. Lift the battery off your phone.
Battery catch
Do not remove the battery when your phone is on: you may lose
all your personal settings stored either in your UIM card or in
,
the phone memory.
Preparing Your Phone for Use
1
Page 24
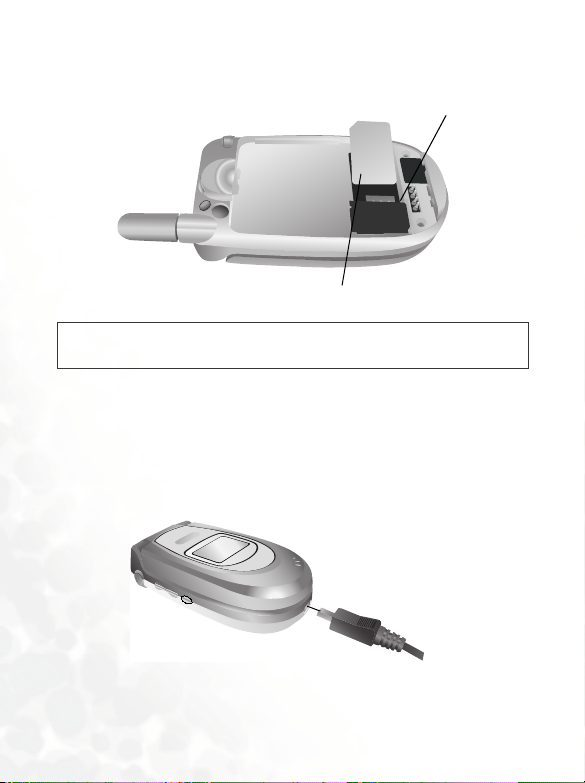
2. Slide the UIM card into the UIM card holder with the gold contacts
facing downwards, with the cut corner at the upper left.
Metal plate
UIM card
Scratches can easily damage the gold contacts of the UIM card.
,
Take care when handling and inserting the UIM card.
Fitting and charging your battery
1. Place the battery on the phone, with the battery’s contacts facing
downwards, and the teeth on the top edge of the battery in alignment
with the holes in the phone. Push the battery against the top of the
phone to insert the teeth into the holes, then press the battery down
gently to click it back into place.
2
Preparing Your Phone for Use
Page 25
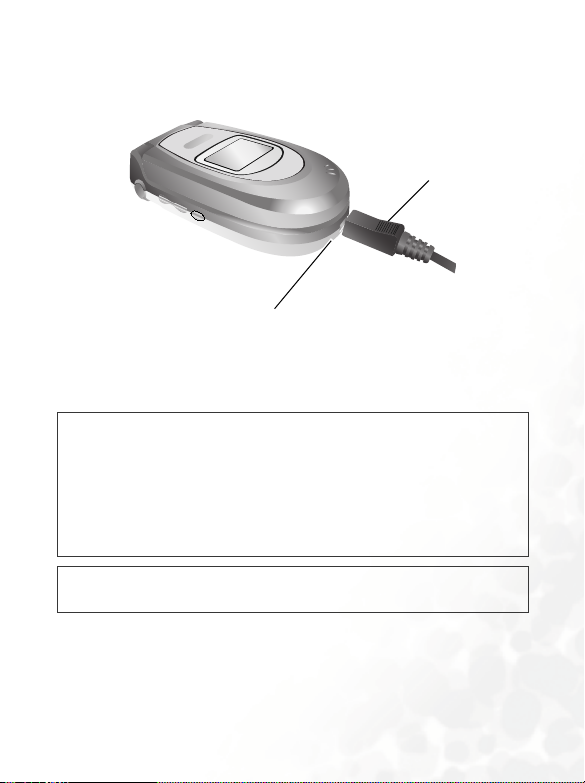
2. Insert the travel charger connector into the charger socket at the
bottom of your phone. Make sure you insert the connector with the
arrow sign on the top.
Charger socket
Charger connector
3. Plug the charger into a main outlet.
4. After your phone is fully charged, disconnect the charger from the
mains outlet and your phone.
• It takes 4 hours for the travel charger to fully charge a new
/
battery.
• When the battery is low, you will hear a warning tone, and
Battery Low will appear on the screen. When the battery is
running out of power,
to recharge immediately. Your phone will then power off
automatically.
You should never remove the battery from your phone while it is
,
being charged.
Battery Empty will appear to remind you
Preparing Your Phone for Use
3
Page 26

Turning on your phone
1. Open your phone’s flip.
2. Long press to turn your phone on. The greeting animation will
show on the screen.
3. When prompted, enter your PIN. If you type a wrong digit while
entering your PIN, press (Back) to delete. Long press to deletes
all digits entered. When you are done entering your PIN, press
(OK) to confirm.
4. Once your PIN is accepted, the phone goes to idle screen. On the top of
the main screen you will see Searching. It may take a few seconds for
the phone to pick up the network signal. After receiving the network
signal successfully, Searching will be replaced by the name of the
network you connect to. Now your phone is ready for use.
8 If network service is not available, no signal level will show on
the screen.
8 If you are connected to a network you do not have access to, you
will still see the signal strength, but you can only make
emergency calls.
4
Preparing Your Phone for Use
Page 27

GETTING TO KNOW YOUR PHONE
Your phone at a glance
The following illustrations show the major elements of your phone.
Front view 1
Antenna
External diaply
Speaker
Getting to Know Your Phone
5
Page 28

Front view 2
Earpiece
Main display
Soft keys
OK key
Send/answer key
UTK QKey
6
Getting to Know Your Phone
Scroll key/
Qkeys
Power on/off key
Alphanumeric keys
Microphone
Page 29
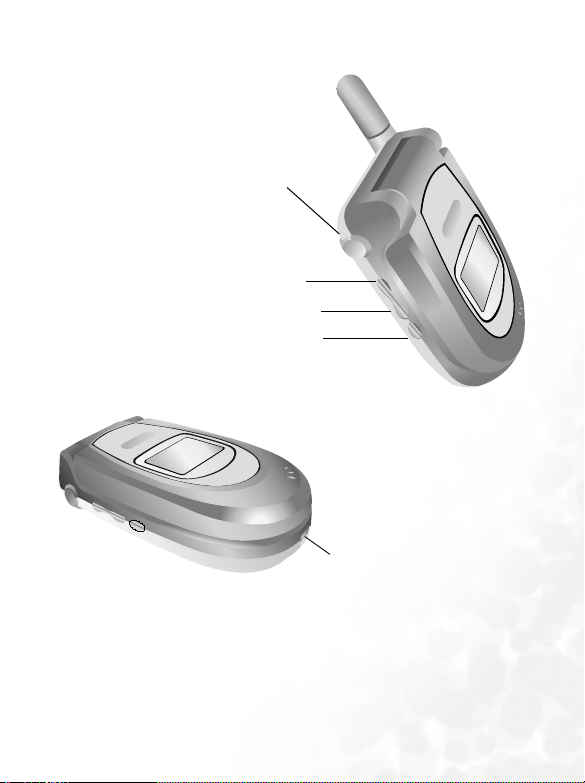
Bottom and top views
Digital camera\handsfree
headset/data cable jack
Volume up
Volumne down
Profile access
Charger socket
Getting to Know Your Phone
7
Page 30
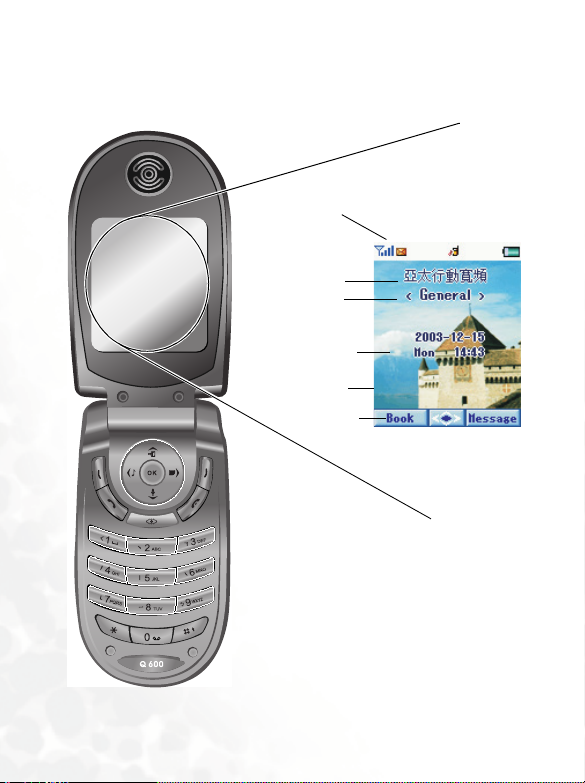
Idle display
Main display
Status bar
Operator’s
name
Profile
Time and date
Wallpaper
Soft key bar
8
Getting to Know Your Phone
Page 31

Icons in the status bar
Icons often shown on the status bar of the idle displays:
Icon Function Description
Signal strength
Short message
Mesage Full
Voice Mail
Battery status
Alarm clock
During a call You are on a phone call.
Roaming
Ring
Vibrate and ring
Vibrate
Vibrate then
ring
Ring off
Signal strength of the network. The more
the bars displayed, the stronger the signal.
Receiving a short text message or having
unread messages.
Message memory full. You need to delete
some messages to clear out space for new
ones to come in.
There is voice mail. Long press
access your voice mail box.
Battery power level: the longer the blue
color bar, the more the battery power. Full
blue color bar: full. No bars: Recharging
immediately. The icon scrolls during
charging until the battery is full.
The alarm clock is on. To set the alarm, go
to menu:
Tools → Alarm Clock
When your phone is connected to a foreign
network, this icon will appear.
Your phone will only ring when there’s an
incoming call.
Your phone will vibrate and ring when
there’s an incoming call.
Your phone will only vibrate when there’s an
incoming call.
Your phone will vibrate first and then ring as
well when there’s an incoming call.
Your phone stays mute when this icon
appears.
to
Getting to Know Your Phone
9
Page 32

Using the keys
8 In this user guide, “long press” means “pressing and holding a
key for about 2 seconds,” while “press” means “pressing and
releasing a key immediately.”
8 The lists below are intended to introduce the most commonly
used functions of each key. Refer to related sections of this
user's manual for information on other key commands.
Functional keys
Main keypad
The keys on the main keypad control how you use a great variety of your
phone’s features.
Your phone beeps with key presses on the keypad. To activate/
/
deactivate the keypad tone, go to menu:
Keypad tone.
From the idle display
Key Commands and functions
Power on/off key
•
Long press to switch your phone on/off.
• Press to reject incoming calls/cancel a call to be dialed.
Answer key
Press to send or answer a call.
•
• Long press and your phone will automatically call the
number last dialed.
• Press to access the list of last missed/dialed/received
calls.
Profiles/ Options to edit
10
Getting to Know Your Phone
Page 33

Key Commands and functions
OK key
Press to open up the main menu showing the first main
•
menu item.
• Long press and the main screen will black out as a
mirror.
Right soft key
•
Press to access your message (as Message shows).
• Press to go back to the previous directory. (as Back
shows).
• Press to delete digits entered one by one, long press to
delete all digits entered. (as
Erase shows).
Left soft key
Press to access the PhoneBook list menu (as Book
•
shows).
UTK QKey
Press to start APBW Extended Service.
•
Scroll Quick key
•
Scroll right to access Calendar.
• Scroll left to access Profiles menu.
• Scroll up to access QKey List.
• Scroll down to access Games.
Asterisk key
Press to enter “*”.
•
Voicem ail ke y
Long press to dial Voice Mail number (Default: 777.)
•
Alphanumeric keys
~
• Press to enter phone number digits.
• Personalized speed dial key: Long press to dial the
phone number the key represents.
Getting to Know Your Phone
11
Page 34

Key Commands and functions
Side up key
• Press to volume up and to volume down in idle
mode.
Side below key
Press to see current profile when flip is not open. When
•
profile shows on outer screen, you can use
(side up
key) to choose profiles and then press
confirm.
In the menus
Key Commands and functions
OK / Scroll key
•
Press to select the highlighted option/ activate the
desired feature.
• Scroll to control highlighted bar/cursor on screen.
• Executes various commands shown at the bottom left of
the display.
Left soft key
•
Press to choose options.
• Press to start editing text.
Right soft key
Press to go back to previous option.
•
12
Getting to Know Your Phone
again to
Page 35

Key Commands and functions
Alphanumeric keys
Press the key to highlight the desired option whose
•
position in the menu matches the number the key
represents.
~
• Long press the key to access the desired option whose
position matches the number the key represents.
• When viewing your PhoneBook, press the number key
that matches the first letter of the desired contact's
name the appropriate number of times to highlight the
contact.
During a call
Key Commands and functions
Powe r on/off key
•
Press to end a call.
• Press to return to the previous menu level while moving
around the in-call options.
Answer key
Press to hold an active call/resume a held call.
•
• Press to switch between active and held calls.
OK key
•
Press to select the desired in-call menu option.
Getting to Know Your Phone
13
Page 36

Input mode
Key Commands and functions
Powe r on/off key
•
Press to abort input and data entered and return to the
idle screen.
Right soft key
Press to delete digits.
•
• Long press to delete all digits at one time.
OK / Scroll key
•
Press to confirm text/data entered.
• Scroll to control the cursor on screen.
Pound key
Press to shift among input modes.
•
• In iTAP and ABC modes, long press to shift between
upper case and lower case.
Asterisk key
•
Press to have symbols menu. Scroll to select
the symbol you want, space included. Then press
(OK) again to insert your selection.
Alphanumeric keys
Following is a list of the alphanumeric keys and their corresponding
characters and symbols in the idle mode and ABC input:
<In idle mode>
Key Number Key Number/Symbol/Function
17
14
Getting to Know Your Phone
Page 37

Key Number Key Number/Symbol/Function
28
39
40. Long press to enter voice mail
5
6
# T (long press after entering a
*
phone number)
<ABC Input>
Press each of the following keys the appropriate number of times to get
the character you want.
Key Characters
1, space (long press)
A B C 2
D E F 3
G H I 4
J K L 5
M N O 6
P Q R S 7
T U V 8
W X Y Z 9
Getting to Know Your Phone
15
Page 38

Key Characters
0
symbol table, @ (long press)
shift input mode
Menu Navigation
A wide range of your phone’s features are arranged in menus and
submenus, using a common approach for selection, change and
cancellation.
8 For details of the usage of each menu item, please refer to
"Menus" on page 38.
Entering the main menu
To enter the main menu, first you must open the flip to show the idle
main display. Press to open the main icon menu.
16
Getting to Know Your Phone
Page 39

Main menu layout
Icon Menu
Left Soft Key
Submenu layout
Posi tion numb er.
OK Key
Name of the menu you
are in.
Indications of present
soft key commands.
Getting to Know Your Phone
Right Soft key
17
Page 40

USING YOUR PHONE
Making a phone call
To make a call using your phone, open up the flip and check your phone is
powered on showing the idle display. Dial the desired number using the
alphanumeric keys ~ . Press (Send) to send your call.
During a call, you can still use the side keys to scroll on your
/
PhoneBook list to find other contacts.
To delete a wrong digit, scroll to move the cursor to the right of the
digit and press (Erase). To remove all the digits you entered, long press
(Erase), or simply press to return to the idle display.
Ending a phone call
Press or close the flip to hang up an active call. The display shows the
total call time as well as the number or PhoneBook name of the person
you just spoke with, and returns to the idle mode.
8 The display will show the PhoneBook name of the person you
spoke with only if he or she is a contact stored in your
PhoneBook.
8 If you have more than one call on the phone (for example, one
active and one on hold), pressing or closing the flip.
18
Using Your Phone
Page 41

Answering a phone call
When a call arrives, your phone rings or vibrates with the display showing
the caller’s number or name (Network support dependent). The name is
displayed according to the data in your PhoneBook.
• If the caller is a member of a particular caller group, the
/
display will show the group's default image to help you
identify the caller.
• If you have assigned an image/photo to a contact in your
PhoneBook as her visual caller ID, the display will show the
contact’s image/photo when she calls you.
Depending on whether your phone’s flip is open or closed, you can do one
of the following to answer the call:
• If the flip is closed you can open up the flip to answer the incoming call.
8 Opening the flip won’t answer a call if the active flip feature is
disabled. To disable the active flip feature, go to the menu:
Settings → Answer By, and select Any Key or Send Key.
• If the flip is open press to answer. Alternatively, you can press
(Options), and select Answer to connect the call.
Rejecting an incoming call
If you receive an incoming call you do not want to answer and you are not
in another call, you can do one of the following:
• If the flip is open, simply press to reject the call.
Redialing the last number
Long press and the last number dialed will be listed on first of your
call logs. This feature allows you to call the lastest numbers you dialed
without keying in the whole number again.
Using Your Phone
19
Page 42

Making an emergency call
To call the emergency services, enter 112 (the international emergency
number) and press to make the call. You can make an emergency call
even if your phone is locked, cannot register to a network, or there is no
UIM card inserted as long as you are within the coverage of the type of
network used by your phone.
Dialing an extension number
After you enter the telephone number, long press and a “T” will
show after the number you just entered. Enter the extension number and
press to make the call.
20
Using Your Phone
Page 43

Your PhoneBook
Saving new contacts to your PhoneBook
1. From the idle display, enter the phone number you want to save and
press (Options) and choose 2 Save; then press (Ok). Yo u c an
save this new contact in UIM Book or PhoneBook.
2. In PhoneBook memory, scroll and press (Edit) to each item
then press (OK) edit the contact’s details.
3. Enter the contact’s details:
Contact’s Image
Contac’s Horoscope
Contact’s Name
Contact’s Home
Number
Contact’s Cellphone
Contact’s Blood Type
The contact’s image file: Assign an image/photo to the contact to
create a visual caller ID for the contact’s incoming calls. When
this item is highlighted, press (Edit) to make selections. Scroll
right and left to the image/photo you want and press
(OK) to save the image/photo.
When the contact’s call comes in, the display will show the
selected image/photo.
Using Your Phone
21
Page 44

The contact’s horoscope: Scroll right and left to choose a
horoscope and scroll down to move to next item or press
(OK) to save.
The contact’s blood type: Scroll right and left to choose a
horoscope and then scroll down to move to next item or
press (OK) to save.
The contact’s name: press (Edit) to enter contact’s name.
When finished, press to go back to next item.
The contact’s number: You can change the number by pressing
to enter and (change) to change, or pressing to select
the number’s type and then press again to go to the next
item.
Select a caller group for the contact: When this item is
highlighted, press (Edit) to choose the caller group.
When the contact’s call arrives--and no image/photo is set for the
contact as her visual caller ID--the display will show the default
image of the contact’s caller group.
4. Finally you must press (OK) save the contact to your PhoneBook.
22
Using Your Phone
Page 45

Finding contacts in the PhoneBook
From the idle display press (Book) and the display will display the
names of the contacts stored both in your PhoneBook and UIM card.
You can find the contact you want in two ways:
• Use to scroll through the names (listed in alphabetical order) until
the one you want is highlighted.
• Press the number key that matches the first letter of the name you want
the appropriate number of times. For instance, if the name starts with
“K” press twice for “K”. The names starting with “K” will appear
with the first one highlighted. Press to scroll to the name you want.
When the desired contact’s name is highlighted, you can do one of the
following:
• Press (Answer key)to dial the number.
• Press (Edit) to view the contact’s details.
Last missed, dialed, and received calls
There are two scenarios in which you can review the most recently missed,
answered and dialed phone numbers as well as the time and date
information associated with the calls:
1) If for any reason incoming calls were not answered, a missed call
message along with the number of calls will appear to remind you. Press
and the most recently missed calls are displayed first.
2) In idle mode, you can press (Send) to access the list of last missed/
dialed/received calls. Scroll through the list and highlight the call you
want.
8 is displayed next to a missed call, next to a dialed call
and next to a received call.
Using Your Phone
23
Page 46

When a missed/dialed/received call is highlighted, you can do the
following:
• Press (Answer Key) to redial the phone number.
• Press (OK) to display the date and time and frequencies of this call.
(If the number is already stored under a PhoneBook contact, the
contact’s name will be displayed as well.)
• Press (Option) and save the number to your PhoneBook in the same
way as described on page 21. Or to delete the number.
In-call menu
Your phone provides an in-call menu which is made up of a number of
control functions that you can use during a call. By pressing (Options)
during a call the following in-call menu will be available. Press up and
down to scroll the menu and press (OK) to access a highlighted
option; press to leave a selected option and return to the previous
menu.
Mute
Mutes the microphone so the person you are speaking with cannot hear
your voice. “Calls muted” appears when this mode is on. To unmute the
microphone, press (Options) to enter the in-call menu again, scroll to
highlight the Unmute option, and press .
Vo l u m e
Press to enter. Scroll up and down or press side key to control the
volume.
24
Using Your Phone
Page 47

Scheduler
Press (OK)to enter and check your events.
Scratch Pad
The number you entered during a call is stored here. You can choose to
save it to Phook Book.
The silent profile
You can press side below key to enter profiles options both in flip open
and off mode. Press several times to access the profile you want. When
there’s an incoming call, you can press (Right soft key) to activate the
silence profile to mute the ringtone.
Using Your Phone
25
Page 48

Quick Access
The Q.Acc (Quick Access) menu is a list of the most
commonly used features from the various menus in
your phone. You can use the Quick Access menu as a
shortcut to take you straight to these features.
1. From the idle main display scroll up (Q. Acc) to
display the Q.Access menu. The menu’s default
features are as follows:
No. Option Functionality
1 Profiles Selecting and setting profiles.
2 MissedCalls Displaying the list of missed calls.
3 Compose Msgs Composing a new message.
4 Find Record Displaying all call logs.
5 Alarm Clock Setting alarm clock.
6 Scheduler Editing your schedule.
7 Calculator Displaying calculator.
8 Games Accessing the games.
9 Quick Msg Listing ready messages.
8 The default Q.Access menu may vary from market to market.
2. Scroll (up and down) to access the menu and press (OK) to
reach a highlighted option. To exit from a Quick Access option or
operation, press (Back).
3. You can also use the alphanumeric keys ~ , and press to
enter the item or (Replace) to replace the options. Each of these 9
keys matches a particular function. Use the keys in two ways:
26
Using Your Phone
Page 49

a. Press a key to highlight the matching option, and press
to access the option.
b. Long press a key to access the matching option directly.
4. Scroll down to reach Games list.
5. Scroll right to access Canlendar.
6. Scroll left to Profiles options.
7. Press eye key to access WAP service.
8 You can also select profile simply by pressing side key .
Using Your Phone
27
Page 50

INPUT MODES
Your can select a text input method whenever you need to add or edit text,
for example:
• Write short messages.
• Store names and numbers in your PhoneBook.
• Jot down notes in the Calendar feature, etc.
Changing the text input mode
Your phone provides different text input modes that you can use in
combination or separately to enter text. Whenever the display displays a
text box where you can enter text, you will see a soft key label at upper
right of the display showing the text input mode you are in.
There are 2 ways to change the text input mode:
1. Press to switch input modes you are using.
2. Press to erase the errors of the text you don’t want.
For example, to change text input mode when you are writing a message,
press repeatedly until the label at the bottom center shows the mode
you want to use. Your phone is preset to enter your message using iTAP,
which is your phone's predictive text input mode, and enter numbers
using 123, which is a numeric mode to input numbers only.
iTAP
ITAP is the predictive input system which analyzes letters as they are being
typed to come up with the right words, making text entry quick and easy.
iTAP is an efficient alternative to the traditional multi-tapping input,
which requires you to press a key several times for an appropriate letter.
Features of iTAP
• Just one key press per letter; no multi-pressing for entering letters.
• Comprehensive word database including common names.
28
Input Modes
Page 51

• Widely used punctuation and symbols included.
Instructions for using iTAP
• Press the alphanumeric key once that relates to the first letter of the
word you want, without having to consider the order of the alphabets
shown on the key. Press the key that relates to the second letter of the
word and so on and so forth. Your phone then looks at the combination
of letters you have entered, and predicts what your word is. The word
that your phone predicts appears along the bottom left of the display.
Accordingly, the word changes as you type letters--disregard what's on
the display until you enter an entire word.
• If the word displayed is not the one you want when you have entered all
the letters in the word, scroll left and right through the other word
candidates until the one you want appears.
• Long press to shift between uppercase and lowercase.
• Press (OK) when the correct word is displayed at the bottom left.
The word will then appear in the text box followed by a space.
• In the text, scroll left and right to move the cursor to the insertion
point of the next/previous character.
8 If you only have one line of text, scroll (up and down) will
move the cursor to the beginning/end of the line.
• If you type a wrong letter, press to move the cursor to the right of
the letter and press to delete it; long pressing deletes all text.
• Press to confirm text you have entered. Alternatively, while
entering text you can press to abort anytime and return to the
previous page. All the text previously entered will then be lost.
8 If the word you want to enter ius too long, you can enter part of
this word and long press “0” and select the one word you need.
Input Modes
29
Page 52

Demo of iTAP
To enter “Come home.” on the message editor display:
1. Press to access the message editor display. iTAP Input appears as
the default text input mode.
2. Press for the upper case “C”. Then press
for lower case “o” “m” “e”.
3. Long press to put “Come” in the text box.
4. A space automatically appears following the word “Come”.
5. Press for “home”.
6. “good” isn't the word you want, so scroll right for the next
candidate “home”.
7. Press to put “home” inside the text box.
ABC
If iTAP doesn't provide the word you want, you can press to switch to
the ABC mode. In the ABC mode, each alphanumeric key has a number
of different characters assigned to it. When you press the same key several
times, you scroll through the assigned characters.
8 Please see "Alphanumeric keys" on page 14 for a listing of the
alphabets and symbols represented by each key in the
Input.
Tips on using ABC input:
• To enter a word you must press an appropriate key the correct number
of times to get the letter you want. Follow the order of the letters shown
on each key to enter letters. Press once to get the first letter shown on a
particular key, twice for the second letter, and so on and so forth.
ABC
30
Input Modes
Page 53

• When you have entered a letter and want to enter the next one, you can
wait for about two seconds until the cursor moves to the insertion point
of the next letter, or simply press a key immediately to enter it.
• Long press to shift between upper and lower cases.
• If you type a wrong letter, scroll to move the cursor to the right of
the letter and press to delete; long pressing deletes all text.
For example, to enter “Love”:
1. Press three times for “L”.
2. Long press to shift to lowercase.
3. Press three times for “o”.
4. Press three times for “v”.
5. Press twice for “e”.
SYM
This is an input mode to enter symbols only. Press to enter the SYM
input the punctuation and symbols will appear along the bottom of the
display. Scroll to highlight the symbol you want to insert and press
to confirm.
123
This is a numeric input mode that allows you to enter numbers using the
alphanumeric keys ~ .
8 Long press to insert “@” in any input mode.
Input Modes
31
Page 54

MOBILE INTERNET*(OPTION)
y
Your phone supports WAP (Wireless Application Protocol) technology
and enables you to log on to the mobile Internet on CDMA networks, so
you can browse various on-line services available from your service
provider, for example, financial, sport, travel, and entertainment
information.
Logging on to the Internet
You can launch your phone's browser and start a mobile Internet session
in two ways:
1. From the idle display press (Center QKey) to enter Extended
Service. Choose 1 Browser and press (OK)to enter.
When you first start the WAP browser, on the display
ou will see the greeting screen on the right:
32
Mobile Internet*(Option)
Page 55

Surfing the Internet
After you log on successfully, the homepage you connect to will appear on
the display. Use the following keys to navigate through web pages:
• Scroll up and down to move the highlight cursor on the web menu.
• Press (OK) or
• Press
• Press (abc) to choose input mode list. Scroll to make selection.
• Press
to scroll page up and down when a web page is longer than the
screen hight.
(Select) to enter the item you choose.
to return to the previous page.
8 The Internet service you subscribe to determines the layout and
information that appears on the display. Accordingly, actual
scenarios of Internet surfing may differ from the ones described
above.
Logging off the Internet
Long press to terminate your Internet connection and close the
browser.
Mobile Internet*(Option)
33
Page 56

Using the browser menu
When you browse web pages, long press to access the browser menu,
which contains the options below. Use the following ways to browse the
menu:
• Scroll using and press or (OK) to select, or simply press the
matching number key for the desired option.
• To return from the current browser menu to the previous screen or web
content, press .
The browser options are:
1 Home
Go back to the homepage. To specify a homepage, go to: 9 Settings → 1
Homepage.
2 Exit
Select to quit browser and log off the web services.
3 Bookmarks
You can open the bookmark list to choose a web bookmark.
3.1 View
View all the current bookmarks.
3.2 Mark Site
Bookmark the current website you are viewing.
4 Snapshots
Save the current webpage to handset for offline browsing.
5 Save Items
When your browse the pages containing a downloadable image, you can
select this option to save the image in your phone.
34
Mobile Internet*(Option)
Page 57

6 Go To URL
Key in the URL you want to go to, then scroll to GO and press (OK)
to access it.
7 Show URL
Show the URL of the page you are viewing.
8 Reload
Reload the current web page.
9 Settings
You can enter this menu to choose from the following settings:
8 Please contact your service provider for details of the following
settings.
9.1 Homepage
Specify a homepage. The homepage you specify is opened every time
you use WAP service or select Home from the browser menu.
However, some network service providers do not allow the user to
specify the homepage.
9.2 Scroll Mode
You can choose between two scroll modes: block or smooth.
• Block mode: as many of the words that fit in a line are shown for a
few seconds, then the next line is shown, then the next and so on.
• Smooth mode: the content scrolls smoothly on the display.
You can also adjust the scroll speed.
9.3 Send Referrer
You can turn on or off the http send referrer header.
Mobile Internet*(Option)
35
Page 58

9.4 Key Press Timeout
This option sets the amount of time the phone waits during text
entry, before automatically advancing the cursor to the next entry
position. As long as the same key is re-pressed within the Key Press
Timeout, the character cycles between all the choices for the key. The
Key Press Timeout is adjustable.
9.5 Set Proxy
Each proxy number represents the setting data of a WAP server. There
are three different WAP servers available in your phone. Here you can
select a proxy number that represents the server you want to activate
as the default server. Your phone connects to the default server during
an Internet session.
9.6 Circuit Prompt
The Circuit Prompt is a message displayed before each circuit data
call is made. It reads “Circuit is down. Start data call?”. You may
enable and disable it by selecting ON or OFF.
9.7 Security
9.7.1 Secure Prompt
The secure prompt message shows up before you leave a secure
area. It says “Entering a non-secure area. OK?” You may enable
and disable the option.
9.7.2 Current Certificate
Shows the current certificate.
9.7.3 CA Certificates
A certificate is a digital ID. It is issued by a trusted third party
known as certificate authority (CA). The phone uses CA
certificates to authenticate websites that send information to the
phone.
36
Mobile Internet*(Option)
Page 59

9.7.4 Authentication
You can decide whether your phone should remember your user
name and passwords for websites that require them. If you set
your phone to authenticate you automatically, you do not need
to re-enter your user name and password the next time you visit
the same website.
Mobile Internet*(Option)
37
Page 60

MENUS
Your phone's menus cover a wide variety of features. The main menu is
made up of 9 images. Each represents a specific menu consisting of related
submenus.
Navigating the menus
1. You can use the scroll key to move from one icon to another. Press
(OK) to enter the sub menu.
2. In the sub menu use the same way to choose and enter each function.
3. Press (Back)to abort a selection/operation and return to the
previous menu or screen.
For example, when you want to set Date And Time:
1. Press (OK) to enter main screen and scroll to
Settings icon .
2. In the Settings list scroll to 6.Date And Time and press (OK)
to enter.
3. There are four options here. Choose the one desired and press to
do further settings.
38
Menus
Page 61

PhoneBook
The PhoneBook menu allows you to view your PhoneBook. You
can also add and delete entries of PhoneBook contacts.
Find
Searches for a contact saved in your PhoneBook. Enter the full name or
just the first letter(s) of the contact you are looking for unsure of spelling
and press (OK).
Add to UIM
Adds a new contact to the UIM card. This information will be stored in
your UIM card memory. You can add a new contact’s entry in the same
way you edit the information of an existing contact in your PhoneBook..
Add to Phone
Adds a new contact to the PhoneBook. This information will be stored in
your Phone memory. You can add a new contact’s entry in the same way
you edit the information of an existing contact in your PhoneBook.
Caller group
A caller group is a group of phone settings that you can select to identify a
particular group of contacts, such as work colleagues, family members or
friends. For example you can choose a special ring tone for one group
which will sound when a member of that group calls.
Add New
You can add new caller group and name it here.
8 In each group you will see Membership, Light, LED, Voice Call,
Ringtones and Call Picture six features. Press to edit.
8 You can also see Family, Friend, Co-workers, Classmates,
Blacklist, Other six caller groups on this menu.
Menus
39
Page 62

Speed Dial
You can assign the number key ~ as a speed dial key for any
phone number stored in the PhoneBook. A long press on a speed dial key
from the idle screen will automatically dial the phone number that the key
represents. For example, if is set as a speed dial key, long press
to make the speed dial of the phone number which is linked to .
In this option you will see the list of entries 1~9, which represent keys
~ respectively. You can choose a number key as the speed dial
key for a phone number by selecting the entry that represents the number
key you want.
For example, If you want to choose as the speed dial key for a
particular phone number:
1. Scroll to highlight entry 2 and press (OK) in key assigning menu.
2. When in Name list menu, move the highlight to select the contact
desired and press (OK) to browse the record.
3. In theh record, move the highlight to the numbre you want and press
(Select) to assign it to entry 2. The list of entries will appear again
with entr y 2 showing the call ty pe and contact name of the selected
number, indicating that has been chosen as the speed dial key for
the number.
4. If you want to set up more speed dial keys, you can repeat the steps
above. If you want to change back to a general number key, select
entry 2 again and press (Erase). The entry where the number was
previously stored will become empty again.
5. When you have finished, press (BACK) to exit the entries menu.
Key Mapping
Enter the entry list of key mapping of speed dial.
40
Menus
Page 63

Activation
To activate or disactivate the speed dial function.
Copy
Your phone has two memories where you save details of PhoneBook
contacts: your UIM card memory and your phone memory. This feature
allows you to copy or move your PhoneBook contacts between UIM and
phone memories so that you can take them with you if you change phone.
You can copy your PhoneBook contacts to a different memory one entry
at a time or copy all the contacts stored in one memory to another
memory.
Phone to UIM
Copy or move PhoneBook entries from the phone memory into the UIM memory.
Single
Copy or move a single PhoneBook entry from the phone
memory to the UIM memory. You can choose to keep the
original file or simply move this file to UIM.
All
Copy or move all PhoneBook entries from the phone memory to
the UIM memory. You can choose to keep the original file or
simply move this file to UIM.
Menus
41
Page 64

UIM to phone
Copy or move PhoneBook entries from the UIM memory to the phone memory.
Single
Copy or move a single entry from the UIM memory to the phone memory.
All
Copy or move all PhoneBook entries from the UIM memory to
the phone memory.
8 If the target memory does not have enough capacity for
all of the entries to be copied, the screen will show the
number of available entries indicating only the displayed
number of entries can be copied. For example, if you
want to copy totally 40 entries to the phone memory
where only 32 entries are available, your phone will
show “32 available, copy?”. If you press (OK), your
phone will simply copy the first 32 entries to the phone
memory.
Erase
You can delete data of PhoneBook contacts
8 You can choose to Erase Single Record, All In UIM, or All In
Phone.
Status
You can check both your UIM and phone memory usage status here.
My number
You can input your phone number here as a reminder here. Your phone
can still function well without the input of your phone number.
42
Menus
Page 65

Call Logs
8 Network support dependent.
This menu contains lists of the calls you missed, sent and received, as well
as records of call cost and duration.
All
Displays all of the last missed/received/dialed calls. Scenarios are the same
as described in the section "Last missed, dialed, and received calls" on page
23.
Missed
Displays the last missed calls.
Scenarios are the same as described in the section "Last missed, dialed,
and received calls" on page 23.
Received
Displays the last received calls.
Scenarios are the same as described in the section "Last missed, dialed,
and received calls" on page 23.
Dialed
Displays the last dialed calls.
Scenarios are the same as described in the section "Last missed, dialed,
and received calls" on page 23.
Call Timers
Keeps records of your Last Call, Incoming Calls, Outgoing Calls All Calls,
and of course you can choose to Reset All.
Erase Logs
Here you can choose to erase Missed, Received, Dialed, or All calls.
Menus
43
Page 66

Messages
You can use the following message features to keep in touch when
you can’t make a voice call, or when you only want to convey a
short, simple message.
Inbox
Here you can view the messages you have received recently.
The screen will show entries of last received messages, each entry
displaying the respective sender’s phone number. (If the sender is a
contact saved in your PhoneBook, the screen will display the sender’s
PhoneBook name rather than the number). The icon to the left of a
message entry indicates whether the message has been read ( ) or not
( ). Scroll to highlight the message entry you want.
If you want to erase all of the received messages from your UIM
card, you can scroll down to the end of the message list and
/
select
Delete all to erase all the received messages.
Having read a message, press (Options) and choose from the following
options to handle the message:
Reply
Press to enter and compose reply message.
Forward
Press to enter and dial the number you want to forward or press
to choose the number from the PhoneBook. Then press
confirm and to send the message.
to
Save Address
You can choose to save this number in your UIM Book or
PhoneBook.
44
Menus
Page 67

Erase
You can choose to erase the message here.
8 For how to edit a message using the available input methods
in your phone, see "Input Modes" on page 28.
When you have finished a message, press (OK) and choose from
the following options:
Save
Press (OK) to save the message to the Draft.
8 When a new message arrives it is stored on your UIM
card. If your UIM card has no room available for storing
the message, will flash, and the network will hold the
message until you make space for it by deleting another
message from your UIM card.
Multi-Address
You can send the message to a group of people selected from
your PhoneBook and a new number at the same time.
Priority
You can set the priority of the message here.
Signature
You can edit your signature that will be attached in the last of
your outbox messages here.
Save Mode
You can choose to Auto Save, Prompt Save or Not Save to
determine the message to be deleted or not after they are sent
seccussfully and stored in Outbox.
Menus
45
Page 68

Compose
This feature allows you to write a new message. When you have finished
writing your new message, press (OK) to choose to send or save the
message. Options are the same as those for Edit in the Inbox menu. See
page 45.
Outbox
This feature allows you to read the messages you previously sent. Upon
entering this option, you will see the entries of the last saved messages.
The icon to the left of an message entry indicates whether an outgoing
message has been sent ( ) or not ( ). Scroll to highlight the message
entry you want.
When the desired entry is highlighted, press (VIEW) to read the
message. After you read the message, press (Option) to manage the
message using the options similar to those for Inbox.
Status
You can check the sending status of message here.
Send Again
You can send this message again here.
Erase
You can choose to erase the message here.
Quick Msg
You can write a message using the message templates (called Quick
Messages) stored in your phone memory.
• To write a message using the factory preset templates:
1. Press the up/down keys of to scroll to the message template you
want to use.
46
Menus
Page 69

2. Press (OK) to choose from the following:
Send: You can send the message template in the same way you send
a message. See options for Edit in the Inbox menu.
Edit Context: You can modify the message template into the
message that you want to send. When you have finished, press
(OK) and choose to send or save the message. Options are the same
as those for Edit in the Inbox menu.
Draft
The unsent messages you compose can be saved here. You can reedit it
before sending it.
Vo i c e m a i l
You can call the voice mailbox provided by your operator and listen to the
voicemail left by a caller.
8 Your network operator provides your voicemail box number as
well as the numbers for accessing other voicemail services they
have. Please check with your operator for details of their
voicemail services and see if you need to set up your voicemail
box by saving particular numbers to your phone.
8 Voicemail is to store the notification of the voicemail stored in
the operator server. “No Voice Messages” will pop up if there’s
no notification comes in. You can check the number of voice
message or dial to listen to them by pressing left soft key .
To listen to the voicemail simply press (Call) and your phone will
automatically dial your voicemail box number for you. Press (Back) to
return to the previous screen if you don’t want to call the voicemail box,
then the voicemail icon ( ) will appear on the screen.
You can also set up a number key as a speed dial key for your voicemail
box number. For how to set up a speed dial key, see Speed dial on page 40.
Menus
47
Page 70

Broadcasts
Cell broadcast messages are the general messages that your network
operator broadcasts to all phones in a particular area. These messages are
broadcast in numbered channels. For example, channel 014 might be for
local weather, 015 for traffic reports, 039 for information of local
hospitals, taxis, pharmacies, etc., and so on and so forth.
You can receive cell broadcast messages that your operator broadcasts to
you, and choose preferred subjects and languages.
8 Please contact your operator for a list of available channels and
the information they provide.
Settings
Activates, deactivates or only by selecting the cell broadcast service.
Service Table
Here you can view the services that you want your operator to
broadcast to you regularly. The name of the subject and the
information will be displayed on the screen.
Add Service
If no subjects have been saved before, you can enter a new subject
here. Enter the subject code which is available from your operator
followed by a name that you create for the subject. The name you
enter will serve as a reminder of what the subject is about. For
example, if the subject is about weather, you can enter “weather” for
the subject.
48
Menus
Page 71

Once the list has subjects stored in it, you can select a subject you
want from the list and press (Options) to choose to edit the
information of the selected subject, or remove the selected subject
from the list (Erase).
Erase All
You can choose to Erase All messages in one go here.
Chat Room.
You can engage in a peer-to-peer chat session by writing short messages to
another mobile phone user. This feature allows you to have a continuous
text conversation with someone without having to key in the number of
the recipient each time you have something new to say. The text
conversation is recorded so you can review what has been said in the chat
session.
Starting a chat session
There are two ways of initiating a chat session.
1. You can come to this SMS Chat menu and select Start Chat to open a
chat session. Follow the steps below to start a chat session:
a. Enter the nickname you want to use during a chat session.
b. Enter the phone number of the person you want to chat with.
Alternatively, when asked to enter the number, you can press
(Book)to select a PhoneBook contact as your chat partner. Scroll to
highlight the desired contact and press (OK) to access the
details of the contact. Scroll to highlight the number you want to
use and press (OK) to enter the number.
c. Write your message. When you have finished, press (OK) to
send the message to invite the recipient to a chat.
d. When the chat message has been sent your nickname followed by
the sent message will appear on the screen as “name>>message”.
Menus
49
Page 72

You can enter the next chat message and press (OK). The
message will automatically be sent to the person you sent the first
message to. Repeat the same process to send more messages to the
same person.
Receiving a reply to your chat message
When your phone receives a reply from your chat partner, the screen will
show your partner’s name and message, followed by the previous
message(s) you sent. You can now talk with your chat partner by entering
what you are going to say and press (OK).
Your words will automatically be sent back to your chat partner. You can
continue the chat session by repeating the same process. All of the text
conversation will be displayed on the screen.
Receiving a request for a new chat
When your phone receives a chat request from another person, a dialogue
box pops up on the screen asking if you want to join the chat. Follow the
steps below to reply to the chat message:
1. Press (OK) to view the chat message. The screen shows the name
of the sender followed by her message as “name>>message”.
2. Press (Options) and select “Reply” to join the chat. Enter your
nickname and message and press (OK) to sent your message. The
screen will show your name and message followed by your partner’s the
previous message.
Leaving a chat session
If you want to leave a chat session, press (Options) and select “End.” to
leave this session. This will take you back to the SMS Chat menu.
If you want start a new chat, go to the SMS Chat menu, and select Start
Chat.
50
Menus
Page 73

When you are interrupted by an incoming call during a chat session
1. Answer the call. Upon ending the call, the screen returns to the idle
mode. Then you may resume the chat session by selecting Continue
Chatting from the SMS Chat menu.
2. Reject the incoming call and continue the chat by selecting Continue
Chatting from the SMS Chat menu.
To o l s
This menu has the following features to bring convenience and enjoyment
to your wireless life, including the alarm, stopwatch, hour minder,
calculator, games, etc.
Browser
You can choose Start Browser and Set Homepage URL here.
UIM Toolkit
Your network operator provides this UIM Tool Kit menu. Depending on
your UIM card and the services provided, there will be several extra
options under this menu. However, if your network operator does not
offer UIM Tool Kit services, this menu will not be displayed on the screen.
For details, please contact your operator.
Alarm Clock
Sets the alarm to go off daily when the alarm time is reached, even if your
phone is powered off. You can choose to set the alarm Once, Daily,
We ek l y, or Off.
Menus
51
Page 74

Calculator
You can use your phone as a handy calculator.
Using the calculator feature
Follow the chart below to enter numbers and arithmetic symbols.
Key Number Key Number/Symbol/Function
19
20
3 Entering a decimal point
4
5
68
7
Clearing numbers or symbols/back
to previous screen.
scroll left: to multiply
scroll right: to divide
scroll up: to add
scroll down: to reduce
ok: (equation)
There are two scenarios in which you calculate numbers.
52
Menus
Page 75

If you calculate a formula consisting of only two numbers, say, 2x5:
1. Press and scroll left , and then press .
2. Press (=) to display the result as “10”.
3. Press (Clear) to continue next calculation.
Hour Reminder
Sets the hour reminder. After you activate this feature, the phone beeps
once an hour like a digital watch.
Currency Converter
Use this feature to convert currency values. Q600 provides 17 different
currencies and can choose the enter the current rate.
Local Currency
Scroll to choose your local currency.
Foreign Currency
Scroll to choose the foreign currency you might use, and then enter
the current rates to your local currency you just set.
Exchange
You can put in currency amount in either your local currency or
foreign currency to see the value in the other currency.
8 For example, if you want to see the money value among
GBP(Great Britain Pound), USD(United States Dollar), and
JPY(Japanese Yen), first you scroll to choose GBP in Local
Currency. Then you enter both USD and JPY currency rate to
GBP (Currency rates vary according to present stock market.)in
Foreign Currency. Last when you enter Exchange, you can
choose to enter local currency to convert to the other two foreign
currencies, or you can enter foreign currency amounts to
convert to local currency value.
Menus
53
Page 76

World Time
You can check out the world time by scrolling left and right or just
press (OK) to enter to check the time list.
Stopwatch
This option allows you to use your phone as a stopwatch. Press (OK)
to start/pause the stopwatch or press to reset/split the stopwatch.
Quick Key
You can reset a Qkey List of your own by choosing which features you
want readily available.
To reset your Qkey List, just scroll on one feature and press
(replace) to pick the desired one feature, then press (ok) to save
settings.Please refer to page 28
Scratch Pad
The number you entered during a call is stored here. You can choose to
save it to PhoneBook.
Other Service
CFB (Call Forward Busy)
Forwards your call to another number or to your voice mailbox when
you are busy.
CFD (Call Forward Default)
Default your incoming call to another number or to your voice mail
when no one answers.
54
Menus
Page 77

CFNA (Call Forward No Answer)
Forward your incoming call to another number or to your voice mail
when no one answers.
CFU (Call Forward Uncondition)
Forward your incoming call on any condition.
CW (Call Waiting)
Put your current call on hold when there’s another incoming call.
Menus
55
Page 78

Profiles
A profile is a group of settings that determine how your phone
works and sounds. A profile contains settings such as ring tone,
ring volume, vibration and alert tones. You can choose from five
different profiles and customize each profile to suit your circumstances.
By personalizing your phone you can ensure that it will alert you in a way
that best fits the environment you are in.
8 In this menu you will find five preset profiles: General, Silence,
Outdoor, Headset, and Beep Once, and three free choices of
personal ones. For each detail settings, press (Options) to
enter. Refer to the table below.
Profile Feature Options
Off
Standard
By Melody
30 preset
melodies
10 preset
message
alert
Activate
Select Ring
Type
Vol ume
Warni ng Tone
On
Off
General
Silence
Outdoor
Headset
Beep Once
Personal 1
Personal 2
Personal 3
Vibration
Ring Volume Level 1 to 4
Voice Call
Messages
Alarm Clock
Scheduler
Greeting Ring
Key Beep
Increasing Ring
56
Menus
Page 79

Profile Feature Options
By Melody
Scanning
Light
Rename
Progressing
Alternating
Blinking
Fireworks
Waterfall
Menus
57
Page 80

Scheduler
The Scheduler feature is designed to make it
easy for you to keep track of time and plan
your day. Your phone will work as a personal
secretary to remind you about the meetings or
appointments you have previously scheduled.
View Calendar
In this option the calendar screen appears, showing the current month,
year and weekday at the top. The current date is marked in the black box.
You can press or to jump to the previous or next month’s
calendar screen or by scrolling to move the black box horizontally or
vertically on the screen in order to select a date. When the date you want is
highlighted, press (Select) to see the event of the date:
8 You can also press (Go to) to go to some specific date.
8 You can press (OK)to view event list on a specific
date.
View Event
Here all events would show in a list. You can scroll to go to any of
your event to see or edit the details.
Add Event
Here you have four choices to assort your event: Meeting, Call, Birthday,
and Other. You can set the date on which the event, alarm or vibrator will
remind you of the things you have scheduled.
Erase All
You can erase all your events here.
58
Menus
Page 81

Media Center
Games
Your phone comes with a selection of fun and exciting games to challenge
and amuse you if you are feeling bored.
Scroll to highlight the game you want to play and press to select from
the following options:
• START: Selecting this option starts a new game.
• CONTINUE: Selecting this option resumes the previously
interrupted game.
• CONTROLS: You can read the instructions for the game. The
display will show how to play the game using particular keys.
• RANKING: Selecting this option shows the highest score on each
level of the game.
• OPTION: You can adjust such settings as volume and play time for
the game.
• EXIT: Exit from the game.
If you want to quit a game while playing, press or .
Menus
59
Page 82

Below are the instructions for playing each game:
LAST GUNNER
Last Gunner
Last gunner is a shooting game. Before the enemies attack, you must
clear all moving enemies using guns and bombs.
If you hit the enemy's truck in the game, You can get items like power
guns or extra bombs.
Keypad control
•Scroll to aim the
target
•Press to cancel
•Exit from the game
•Bomb
•Shoot/pick up the
power guns and
extra bombs
Instructions
Use to aim the enemy you wish to shoot, then press or
to shoot or bomb the enemy.
The bomb can destroy enemies in a wider range than the gun.
However, the number of the bombs you have is limited, while
you can shoot with the gun for unlimited times.
60
Menus
Page 83

If you succeed in attacking the enemy’s truck, you can usually get
extra bombs or guns that can shoot wider. When you see these
items on the display, use to target the items, and press
to pick them up.
Game display
•Enemy tank
•Enemy
•Numb er of the
bombs
•Aim
•Score
•Blood
Menus
61
Page 84

CHAMPION SOCCER
This game allows you to control one of the best 8 national soccer
teams to win the World Cup.
Keypad control
•Press to cancel the
game
•When playing offence,
use one of the three
keys to choose the
player you want to
pass the ball to.
•Press to shoot tackle
Instructions
Before you start the game, go to OPTION and you can set the
time length for the game (2, 3 or 4 minutes for half game). After
choosing START, you can choose World Cup Mode or Arcade
Mode.
Under World Cup Mode, you can pick your own team, but your
phone will pick out your opponent randomly. After you win a
game, you face the next opponent, again picked out by your
phone. Under Arcade Mode, you can pick your own team and
your opponent, and you only play a game once. After you decide
which mode to play, you will see FIRST HALF on the display.
Press
to start playing.
During the game, you need to control your three players on the
pitch, and your goalkeeper is controlled by the phone.
62
Menus
Page 85

• When playing offence, use ~ (except ) to move
the players, use ~ to pass the ball (you can see the
players’ numbers on the display). When getting close to the
goal, press to shoot.
• When playing defense, use ~ and (except
) to move the players, use ~ to choose which
players to move (you can see the players’ numbers on the
display). When getting close to the opponent with the ball,
press to tackle.
Game display
•Your tea m
•Yo ur go al s
•Opponent
•The opponent's
goals
•The number of your
player
•Timer
•Mini map
8 Champion Soccer has two modes. Arcode Mode and Worldcup
Mode. Only Worldcup Mode statistics and information can be
saved and scores be ranked.
Menus
63
Page 86

BUBBLE BURST
Move and line up five same bubbles in a straight line (horizontal,
vertical, and diagonal. Either would do.) and the bubbles will
disappear. According different level, the number and bubble will
increase. When the chessboard is filled with bubbles, game is over;
when you remove all the bubbles within time limit, you win.
Digital Camera
Q600 handset has optional external digital camera. Insert it to handset
camera jack and Q600 can be serve as a handy digital camera.
Preview Mode
In preview mode you can see every important function as illustrated
below.
Snap mode
Resolution
Total photo number
Preview screen
Light condition
There are two sub items in the Option menu: Resolution and Light
Condition. You can also switch between Normal and Self-Snap mode
by pressing pound key .
64
Menus
Page 87

Resolution
There are four kinds of resolution for user to select : 60*80 ,
120*160 , 240*320 , 480*640. DSC use resolution 60*80 as the
portrait of PhoneBook record . While receiving an incoming call
, Call control will display the record's portrait on the main panel
. And DSC use resolution 120*160 (and 120*160 only ) as
wallpaper . In Q600 , we can't preview any photo whose size is
larger than screen ( 128*160 ) , so user has to download these
files to PC through a data cable .
Light Condition
User can use this item to adjust light condition in different
situation .
Self-Snap
If user change to self-snap mode , the preview frame will become
upside down and user have to rotate the camera lens (toward
user) to get the correct image frame .
Photo Album
Photo Album will handle all the image operation including
preview , rename , delete , set to wallpaper and set to PhoneBook record .
The source of the images might be come from DSC or download (WAP or
PC) .
8 Photo album can only display photo image size smaller than
screen size 128*160.
My Ringtone
You can download from APBW and save up to 70 melodies here.
Melody Editor
You can create up to five chord melodies to serve as ringing tones for
incoming calls.
Menus
65
Page 88

A chord melody is made up of two or more different tones. This
melody composer feature allows you to create up to 3 different tones
and mix them up to produce a chord melody.
Steps for composing a chord melody
1.When you first enter the melody Editor, press (OK) Add New
Ringtone. You will see two channels available for you to choose
from. The upper one is for you to choose a main melody, and the
lower is for you to choose a accompany for the main melody. Scroll
up and down to highlight the channel you want and scroll
(OK) left and right to make the selections.
2.To compose a tone:
Main Melody Item
Accompany Style Item
Main menu is shown above. There are two sub items in this
menu: Main Melody and Accompany style item. Scroll to
highlight Main Melody. Scroll left and right to choose a melody
you like.
Scroll down to highlight Accompany style item. Scroll
left and right to find a accompany suits you. There are
three default accompany to choose: Jazz, Dance, and Sooca.
66
Menus
Page 89

With both melody selections above, you can press to enter
option menu to do further settings. In option menu you can
see three options as below:
Save Ring Tone
Timeb eat
the value, the faster the ringtone beat.
Change Instrument
Mus ic Box, Organ, Guita r
: You can save the main melody and name it here.
: You can change the beat from a range from 5 to 125. The larger
: There are five instrument for you to choose.
, and
Bird Tweet
. You can scroll up and
Piano
,
down then press
(OK)
to select it.
3.If you don’t like any of the default melody, you can also create one
for yourself. Just scroll right in Main Melody until Add New
Melody appears.
Pound Key
Asterisk Key
There are three sub items in this screen: Note Tempo, Main
Note Tempo Item
Main Melody Input
Screen
Chord Item
Melody Input and Chord Item.
Use keys below to create the melody you like.
Key Functions
Alphanumeric key 1~7
~
Alphanumeric key 8
Up
Note: C, D, E, F, G, A,
B.
Change octave.
Adjust note.()
Menus
67
Page 90

Key Functions
Down
Right
Left
Pound key
Asterisk key
Ok key
There are three sub-options in the menu:
Adjust note.()
Scroll screen from
left to right.
Scroll screen from
right to left.
Press to change
chord.
Press to change note
tempo.
Press to save
settings.
Play main melody: You can use this to play the melody you just
edited.
Save main melody: Press to save melody you just edited and
return to main menu.
Change instrument: Press to change melody play intrument.
8 There’ll be 20 music bars for each melody.
68
Menus
Page 91

Settings
This menu allows you to program your phone's various
settings as needed.
Audio
Profiles
Enter here to personalize your profile settings.
System Alert
You can choose to have handset alert in three modes: Svc Change,
Roaming, Minute Alert.
DTMF Setting
This item allows you to change DTMF function. Press (OK) to
enter and select your options. There are two options for you to
choose: DTMF Mute and Duration.
Display
You can personalize the way the idle screen is displayed.
LCD Contrast
You can scroll right and left to adjust control bar to adjust both
main panel and sub panel LCD contrast.
Backlight
You can choose your backlight duration here: 5, 10, 20, and 60
seconds. The screen goes black after your backlight duration to save
power, but will turn on whenever there’s incoming calls or any press
on the keys.
Menus
69
Page 92

Theme
You have five preset theme screen color: BenQ Purple, Melon Green,
Cheery Red, Sunny Orange, Sky blue and three custom choices: User
1, 2, and 3. Just scroll to select and press to confirm.
8 For custom settings, press (Edit) to enter advanced settings.
Wallpaper
You have seven preset wallpapers for different choices. Just scroll
left and right to preview and press press to confirm.
Answer By
You can choose to have the incoming calls answered by Send Key, Any Key,
or Flip ACTIVATE.
Auto Redial
If you make a call that is not answered, your phone will redial the number
continuously. You can choose to have the handset redial function Enable,
Prompt in 10 seconds, or Disable.
Language
You can select the language used to display information.
Date And Time
Display Time/Date
You can choose to display time, date, day, or not.
Date Format
You have three choices time display on the screen.
Time Format
There are 24-hour Format and 12-hour Format to choose.
70
Menus
Page 93

Set Time
Just enter the current time and date, and save the settings.
8 When system is available, system time is updated automatically.
Power On / Off Time
You can set when your handset turns on and off.
Call Service
This menu provides a number of options to manage your calls.
Limit Alert
On: Press (OK) to enter number you want your phone
to alert when you are on a call.
Off: Press
(OK) to cancel limit alert.
System Select
Home Only: Press (OK) to select service system only
when you are at home.
Automatic: Press
automatically.
(OK) to find the best service system
Voice Privacy
Use this function to activate your voice privacy. Scroll to select
and press (OK) to start activating “On” or “Off ” to deactivate.
Menus
71
Page 94

Phone Activation
With this function, you can activate your phone. Scroll to select
and press (OK) “On” or “Off ” to activate or deactivate your
phone.
Restore Default
You have to enter your phone code first and then press (OK) to
confirm. Your phone will then reset back to all default values.
72
Menus
Page 95

Security
This menu ensures the security of your phone by setting UIM check,
phone code, UIM lock etc., as well as limitations on particular outgoing
and incoming phone calls.
Lock Status
Enter to check both your UIM card and handset lock status.
Card PIN
You have to enter PIN code to activate UIM card lock function. This
function can protect your personal information saved in UIM card
from being accessed by other people.
8 PIN (Personal Identification Number) is a password provided by
your network provider. Once activated, your PIN protects your
UIM card from being used by unauthorized people, even if it is
inserted in another phone, unless the correct PIN is given when
the phone is switched on.
Phone Lock
You have to enter phone code to activate phone lock. Your phone can
be locked to prevent calls being made by unauthorized people, unless
the correct handset lock number is entered when your phone is
switched on. Your phone remains locked if a wrong code is entered,
even if your UIM card is removed and replaced with another one.
Only emergency calls can be made when your phone is locked. You
have to enter your phone lock code every time you turn your phone
on.
UIM Lock
Select On or Off to activate or disable UIM card security function. Enables
the UIM check. You must enter your UIM to enable the UIM check.
Menus
73
Page 96

Change Code
Your phone can be locked to prevent calls being made by unauthorized
people, unless the correct handset lock code is entered when your phone is
switched on. Your phone remains locked if a wrong code is entered, even if
your UIM card is removed and replaced with another one. Only
emergency calls can be made when your phone is locked.
Call Restrict
You can set up call barring limitations on your own to block Incoming,
outgoing, RoamIncoming, and RoamOutgoing calls.
Emergency Numbers
You can store three emergency numbers in the emergency number list.
When the phone is locked, only numbers that match the numbers in the
emergency number list can be dialed.
74
Menus
Page 97

WHAT TO DO IF...
If you encounter any problems using your mobile phone, please refer to
the following table. If the problem persists, please contact your dealer.
Problem Possible cause Solution
Poor signal
reception
Echo or noise
The standby
time becomes
short
You can’t
switch your
phone on
• You are using your mobile
phone in a location (e.g. in
the basement or building)
where signal is weak.
• You are using your mobile
phone in a call-crammed
time (e.g. the rush hour).
• You are too far from the
base station of your
network operator.
• The network trunk quality of
your network operator.
• Poor local telephone line
quality.
• The standby time depends
on the system settings of
your network operator.
• The battery needs to be
replaced.
• If the phone cannot get
connected to a network, it
will continue searching for
the signal from the base
station, which consumes
battery capacity.
• Battery has run out. Recharge the battery if
Move to a location where
signal can be received
properly.
Avoid using your mobile
phone in such time, or try
later.
You can ask your network
operator for a service
range map.
Hang up the phone and
dial again. You can be
switched to a betterquality network trunk or
line.
If you are in a location
where the signal is weak,
turn your phone off for the
time being.
Use a new battery.
Change your location or
turn off your phone
temporarily.
necessary.
What to Do If...
75
Page 98

Problem Possible cause Solution
UIM card error
You can’t
connect to the
network
You can’t
send
messages
You can’t
answer
incoming
calls.
Your PIN is
blocked
The battery
won’t charge
• UIM card is out of order. Send it to your network
• UIM card is not inserted
properly.
• UIM card contacts are dirty. Clean the UIM card
• UIM card is invalid. Contact your network
• You are away from the
service area.
• Poor signal. Move to an open space,
• Your network operator does
not support this service.
• You have asked the
operator to bar certain
types of incoming calls.
• You have entered a wrong
PIN three times in a row.
• The battery or charger is
out of order.
• The phone temperature
goes below 0°C or above
45°C.
• Poor connection. Check if the charger is
operator for test.
Insert UIM card correctly.
contacts using a soft, dry
cloth.
operator.
Check the service area
with your network
operator.
or if you are in a building,
move closer to a window.
Contact your network
operator.
Go to the menu:
→ Call Restrict.
Contact your network
operator, or use the PUK
code of the UIM card if
provided by your network
operator.
Contact your dealer.
Change the charging
environment.
properly connected.
Security
76
What to Do If...
Page 99

Problem Possible cause Solution
You can’t key
in data into
your Phone
Book
You are not
able to use
certain
functions
• Your PhoneBook memory is
full.
• Your network operator
doesn't support these
functions, or you do not
subscribe to them.
Delete some data from
your PhoneBook.
Contact your network
operator.
What to Do If...
77
Page 100

78
What to Do If...
 Loading...