

Page 1

Digital Projector
User Manual
Portable Series | GK100
V 1.02
Page 2

Copyright and disclaimer
Copyright
Copyright © 2021 by BenQ Corporation. All rights reserved. No part of this publication may be reproduced, transmitted, transcribed, stored in a
retrieval system or translated into any language or computer language, in any form or by any means, electronic, mechanical, magnetic, optical, chemical,
manual or otherwise, without the prior written permission of BenQ Corporation.
All other logos, products, or company names mentioned in this manual may be the registered trademarks or copyrights of their respective companies,
and are used for informational purposes only.
Android™ is a trademark of Google LLC.
The Bluetooth® word mark and logos are registered trademarks owned by Bluetooth SIG, Inc. and any use of such marks by BenQ Corporation is
under license.
iOS is a trademark or registered trademark of Cisco in the U.S. and other countries and is used under license.
macOS® is a trademark of Apple Inc., registered in the U.S. and other countries.
Disclaimer
BenQ Corporation makes no representations or warranties, either expressed or implied, with respect to the contents hereof and specifically disclaims
any warranties, merchantability or fitness for any particular purpose. Further, BenQ Corporation reserves the right to revise this publication and to
make changes from time to time in the contents hereof without obligation of BenQ Corporation to notify any person of such revision or changes. This
user manual aims to provide the most updated and accurate information to customers, and thus all contents may be modified from time to time
without prior notice. Please visit http://www.benq.com for the latest version of this manual.
Warranty
BenQ warrants this product against any defects in material and workmanship, under normal usage and storage.
Proof of purchase date will be required with any warranty claim. In the event this product is found to be defective within the warranty period, BenQ’s
only obligation and your exclusive remedy shall be replacement of any defective parts (labor included). To obtain warranty service, immediately notify
the dealer from which you purchased the product of any defects.
2
Page 3

Important: The above warranty shall be void if the customer fails to operate the product in accordance with BenQ’s written instructions, especially the
ambient humidity must be in-between 10% and 90%, temperature in-between 0°C and 40°C, altitude lower than 2000 meters, and avoiding to operate
the projector in a dusty environment. This warranty gives you specific legal rights, and you may have other rights which vary from country to country.
For other information, please visit www.BenQ.com.
Statement regarding hyperlinks and third-party websites
BenQ is not responsible for the content of the websites or of similar resources, which are maintained and controlled by third parties, that may be
linked from this product. Providing links to those websites or to similar resources does not mean that BenQ makes any warranty or representation to
their content by expression or by implication.
Any third party content or service preinstalled in this product is provided “as is”. BenQ does not, by expression or by implication, make any warrant
to the content or to the services provided by third parties. BenQ does not warrant or guarantee that the content or services provided by third parties
are accurate, effective, most up-to-date, legal, or complete. Under no circumstances shall BenQ be liable for the content or services provided by third
parties including their negligence.
Services provided by third parties may be terminated temporarily or permanently. BenQ does not warrant or guarantee that any content or services
provided by third parties are in good condition at any time, and is not liable for the termination of the said content and services.
In addition, BenQ is not involved in any transactions you conduct in the websites or similar resources maintained by third parties.
You should contact the content or service providers for any questions, concerns, or disputes.
3
Page 4

Product support
This document aims to provide the most updated and accurate information to customers, and thus all contents may be modified from time to time
without prior notice. Please visit the website for the latest version of this document and other product information. Available files vary by model.
1. Make sure your computer is connected to the Internet.
2. Visit the local website from Support.BenQ.com. The website layout and content may vary by region/country.
3. Search for your model’s user manual and related document.
Servicing
• If misuse or other accident occurs, contact qualified service personnel for servicing.
• Contact your place of purchase or visit the local website from Support.BenQ.com for more support.
4
Page 5

Table of contents
Copyright and disclaimer ...........................................................................................................................................................................2
Copyright....................................................................................................................................................................................................................2
Disclaimer...................................................................................................................................................................................................................2
Warranty ....................................................................................................................................................................................................................2
Statement regarding hyperlinks and third-party websites...............................................................................................................................3
Product support ...........................................................................................................................................................................................4
Servicing......................................................................................................................................................................................................................4
Package contents ....................................................................................................................................................................................... 12
Standard accessories............................................................................................................................................................................................. 12
Introduction ............................................................................................................................................................................................... 14
Projector exterior view ....................................................................................................................................................................................... 14
Front, top, and right side view..............................................................................................................................................................................................................14
Rear view................................................................................................................................................................................................................................................. 15
Ports ...........................................................................................................................................................................................................................................................16
LED indicators ...................................................................................................................................................................................................... 18
Remote control...................................................................................................................................................................................................... 20
Installing/Replacing the remote control batteries.......................................................................................................................................................................... 22
Remote control effective range.......................................................................................................................................................................................................... 23
Installation ................................................................................................................................................................................................... 24
5
Page 6

Choosing a location............................................................................................................................................................................................... 24
Obtaining a preferred projected image size..................................................................................................................................................... 24
Projection dimensions............................................................................................................................................................................................................................24
Operations ..................................................................................................................................................................................................26
Installing the wireless dongle...............................................................................................................................................................................26
Starting up the projector .................................................................................................................................................................................... 28
Shutting down the projector .............................................................................................................................................................................. 30
Adjusting the projected image ........................................................................................................................................................................... 31
Adjusting the projection angle ............................................................................................................................................................................................................. 31
Fine-tuning the image clarity................................................................................................................................................................................................................ 32
Vertical Adjustment (Keystoning) ...................................................................................................................................................................................................... 33
Side Projection.........................................................................................................................................................................................................................................33
BenQ Launcher ......................................................................................................................................................................................34
The BenQ Launcher home screen ................................................................................................................................................................................................. 34
Navigating the BenQ Launcher home screen .............................................................................................................................................................................. 35
Inputting text........................................................................................................................................................................................................................................... 36
Connections ................................................................................................................................................................................................37
Wireless Connections ......................................................................................................................................................................................... 39
Connecting the projector to a wireless network............................................................................................................................................................................ 39
Watching streaming content on your projector ............................................................................................................................................................................. 40
Wireless Projection for iOS & macOS®.......................................................................................................................................................................................... 41
Wireless Projection for Android™ or PCs..................................................................................................................................................................................... 42
Wired Connections...............................................................................................................................................................................................44
Connecting a device with HDMI or USB-C with DisplayPort...................................................................................................................................................... 44
Connecting a flash drive ........................................................................................................................................................................................................................ 45
Local MM Media Player ...................................................................................................................................................................................................................... 46
6
Page 7

Bluetooth Connections ....................................................................................................................................................................................... 47
Pairing/Connecting to a Bluetooth speaker or headphones..........................................................................................................................................................47
Using the Projector as a Bluetooth speaker ................................................................................................................................................................................... 49
Navigating the Settings menu .............................................................................................................................................................. 51
About the Settings menu .................................................................................................................................................................................. 51
Using the Settings menu.................................................................................................................................................................................... 52
Wireless................................................................................................................................................................................................................................................. 53
Wired LAN.......................................................................................................................................................................................................................................... 54
Sound........................................................................................................................................................................................................................................................54
Bluetooth.............................................................................................................................................................................................................................................. 55
Bluetooth Speaker Mode.............................................................................................................................................................................................................. 56
All Apps ...................................................................................................................................................................................................................................................56
About...................................................................................................................................................................................................................................................... 57
Picture.................................................................................................................................................................................................................................................... 58
Display Adjustment ...........................................................................................................................................................................................................................58
3D ............................................................................................................................................................................................................................................................. 59
HDR...........................................................................................................................................................................................................................................................59
More Settings...................................................................................................................................................................................................................................... 60
Light ..........................................................................................................................................................................................................................................................60
Home Screen...................................................................................................................................................................................................................................... 61
System Preference.............................................................................................................................................................................................................................61
Keyboard .................................................................................................................................................................................................................................................61
Installation............................................................................................................................................................................................................................................ 62
Start On/Off ..........................................................................................................................................................................................................................................62
Update .................................................................................................................................................................................................................. 63
Maintenance ............................................................................................................................................................................................... 64
Care of the projector........................................................................................................................................................................................... 64
Cleaning the lens......................................................................................................................................................................................................................................64
Storing the projector..............................................................................................................................................................................................................................64
Transporting the projector ...................................................................................................................................................................................................................65
7
Page 8

Extending LED life...................................................................................................................................................................................................................................65
Troubleshooting .........................................................................................................................................................................................66
Specifications ...............................................................................................................................................................................................69
Projector specifications ........................................................................................................................................................................................................................ 69
Dimensions .............................................................................................................................................................................................................................................. 71
Timing chart............................................................................................................................................................................................................................................. 72
Supported file formats .......................................................................................................................................................................................................................... 76
Channel settings for routers................................................................................................................................................................................................................ 77
6/24/2021
8
Page 9
Important safety instructions
Your projector is designed and tested to meet the latest standards for safety of information technology equipment. However, to ensure safe use of this
product, it is important that you follow the instructions mentioned in this manual and marked on the product.
1. Please read this user manual before you operate your projector.
Keep this manual in a safe place for future reference.
2. Always place the projector on a level, horizontal surface during
operation.
- Do not place the projector on an unstable cart, stand, or table as
it may fall and be damaged.
- Do not place inflammables near the projector.
- Do not use if tilted at an angle of more than 10 degrees left to
right, nor at angle of more than 15 degrees front to back.
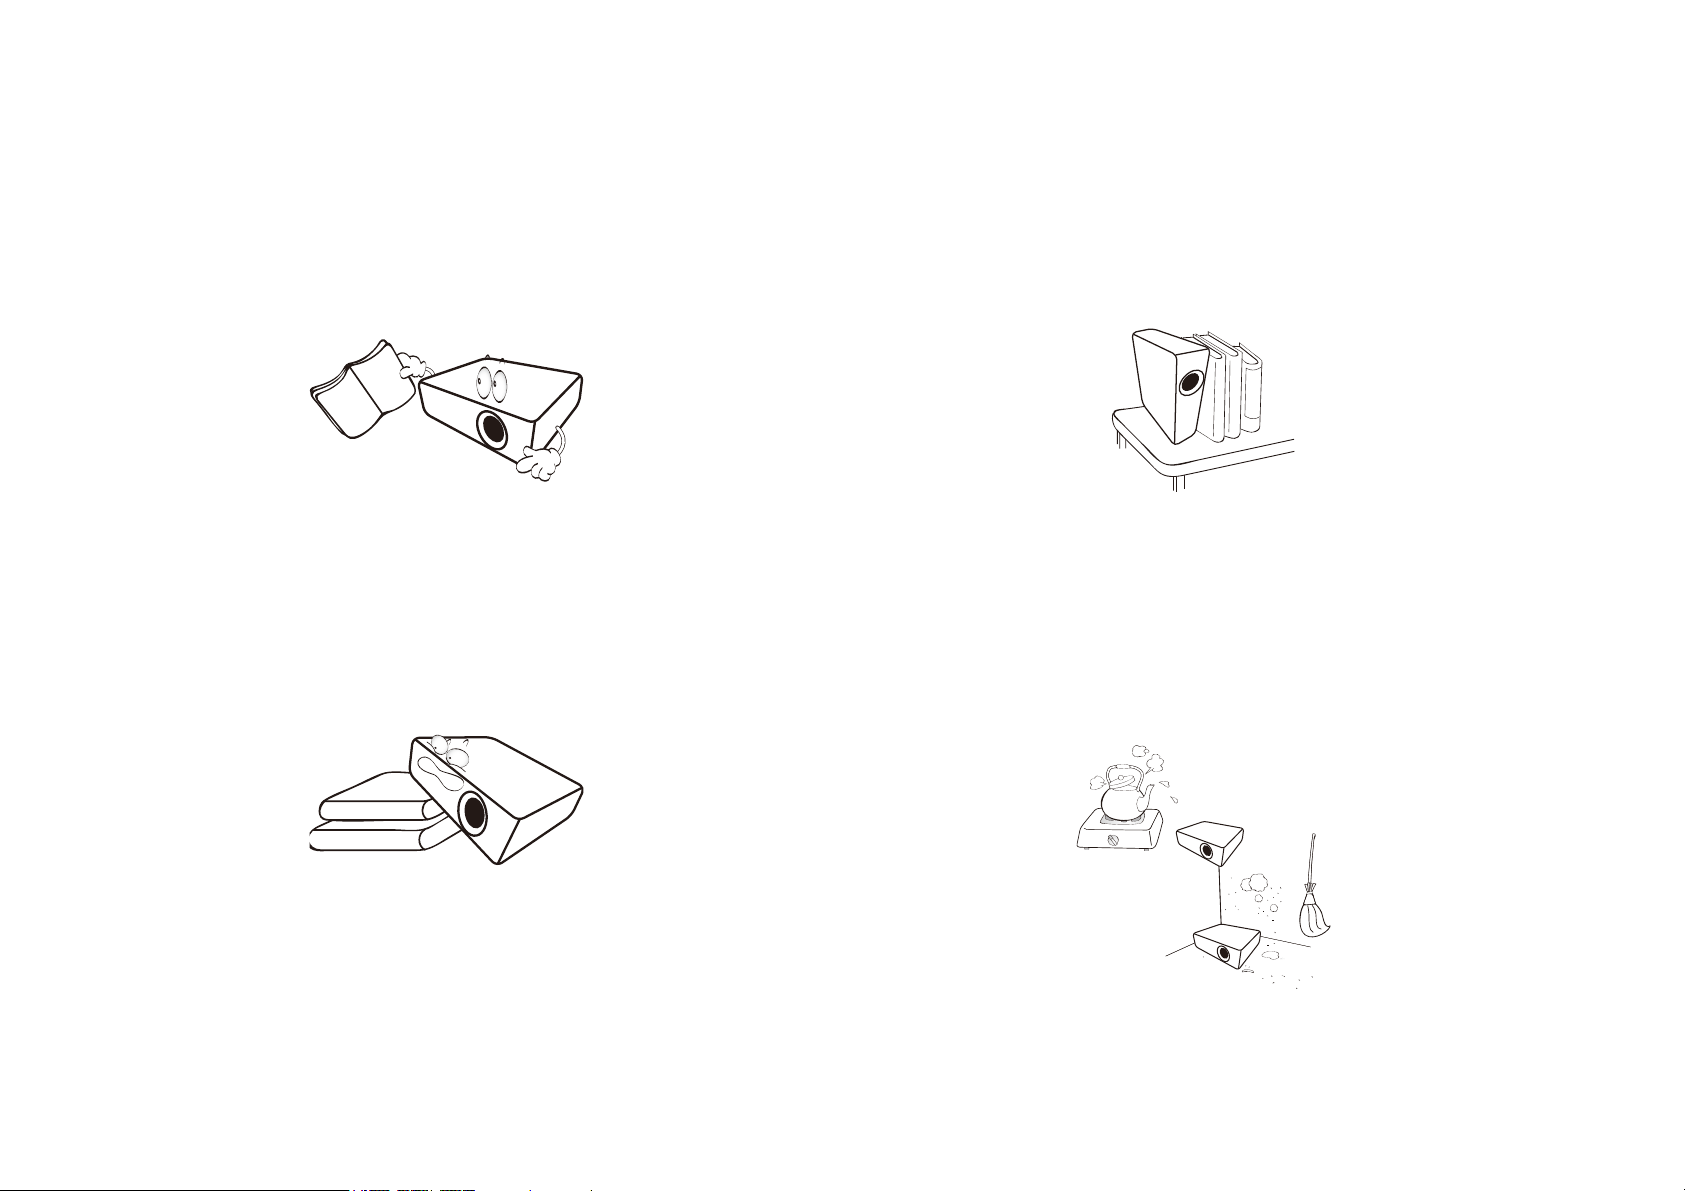
3. Do not store the projector on end vertically. Doing so may cause
the projector to fall over, causing injury or resulting in damage.
4. Do not place the projector in any of the following environments:
- Space that is poorly ventilated or confined. Allow at least 50 cm
clearance from walls and free flow of air around the projector.
- Locations where temperatures may become excessively high, such
as the inside of a car with all windows closed.
- Locations where excessive humidity, dust, or cigarette smoke may
contaminate optical components, shorten the projector’s lifespan
and darken the screen.
- Locations near fire alarms.
- Locations with an ambient temperature above 40°C/104°F.
9
Page 10

- Locations where the altitudes are higher than 2000 m (6562 feet).
5. Do not block the vents holes while the projector is on (even in
power-saving mode).
8. Do not place liquids near or on the projector. Liquids spilled into
the projector will void your warranty. If the projector does
become wet, disconnect it from the power point and call BenQ to
have the projector repaired.
- Do not cover the projector with any item.
- Do not place the projector on a blanket, bedding or any other soft
surface.
6. In areas where the mains power supply voltage may fluctuate by
±10 volts, it is recommended that you connect the projector
through a power stabilizer, surge protector or uninterruptible
power supply (UPS) as appropriate to your situation.
7. Do not step on the projector or place any objects upon it.
9. Do not look straight into the projector lens during operation. It
may harm your sight.
10. Do not operate the projector LED beyond the rated LED life.
Excessive operation of LEDs beyond the rated life could cause
LEDs to break on rare occasions.
11. The lamp becomes extremely hot during operation. Allow the
projector to cool for approximately 45 minutes prior to removing
the lamp assembly for replacement.
10
Page 11

12. This projector is capable of displaying inverted images for ceiling
installation.
13. Do not attempt to disassemble this projector. There are dangerous
high voltages inside which may cause death if you should come into
contact with live parts.
Under no circumstances should you ever undo or remove any
other covers. Refer servicing only to suitably qualified professional
service personnel.
Moisture condensation
Never operate the projector immediately after moving it from a cold
location to a hot location. When the projector is exposed to such a
change in temperature, moisture may condense on the crucial internal
parts. To prevent the projector from possible damage, do not use the
projector for at least 2 hours when there is a sudden change in
temperature.
Avoid volatile liquids
Do not use volatile liquids, such as insecticide or certain types of
cleaner, near the projector. Do not have rubber or plastic products
touching the projector for a long time. They will leave marks on the
finish. If cleaning with a chemically treated cloth, be sure to follow the
cleaning product’s safety instructions.
Disposal
This product contains the following materials which are harmful to
human bodies and environment.
Please keep the original packing for possible future shipment. If you need to pack
your projector after use, adjust the projection lens to an appropriate position,
put the lens cushion around the lens, and fit the lens cushion and projector
cushion together to prevent damage during transportation.
14. When you think service or repair is required, take the projector
only to a suitably qualified technician.
• Lead, which is contained in solder.
To dispose of the product, consult your local environment authorities
for regulations.
The illustrations and the images shown in this document are for your reference.
The actual content may vary by the product supplied for your region.
11
Page 12

Package contents
GK100 Projector
Wireless Dongle (WDR02U)
Remote Control
(with Two AA Batteries)
Adapter
Power Cord
Quick Start Guide
Carefully unpack and verify that you have the items below. Some of the items may not be available depending on your region of purchase. Please check
with your place of purchase.
Standard accessories
12
Page 13
• LED life results will vary depending on environmental conditions and usage. Actual product’s features and specifications are subject to change without notice.
Warranty Card
(varies by region)
V
Regulatory Statement
• Some of the accessories may vary from region to region.
• The warranty card is only supplied in some specific regions. Please consult your dealer for detailed information.
• For AC/DC adapter, the socket-outlet shall be installed near the equipment and shall be easily accessible.
• Use original accessories to ensure compatibility.
• Power cord plug type may change based on regional requirements.
13
Page 14

Introduction
1
2
3
4
5
6
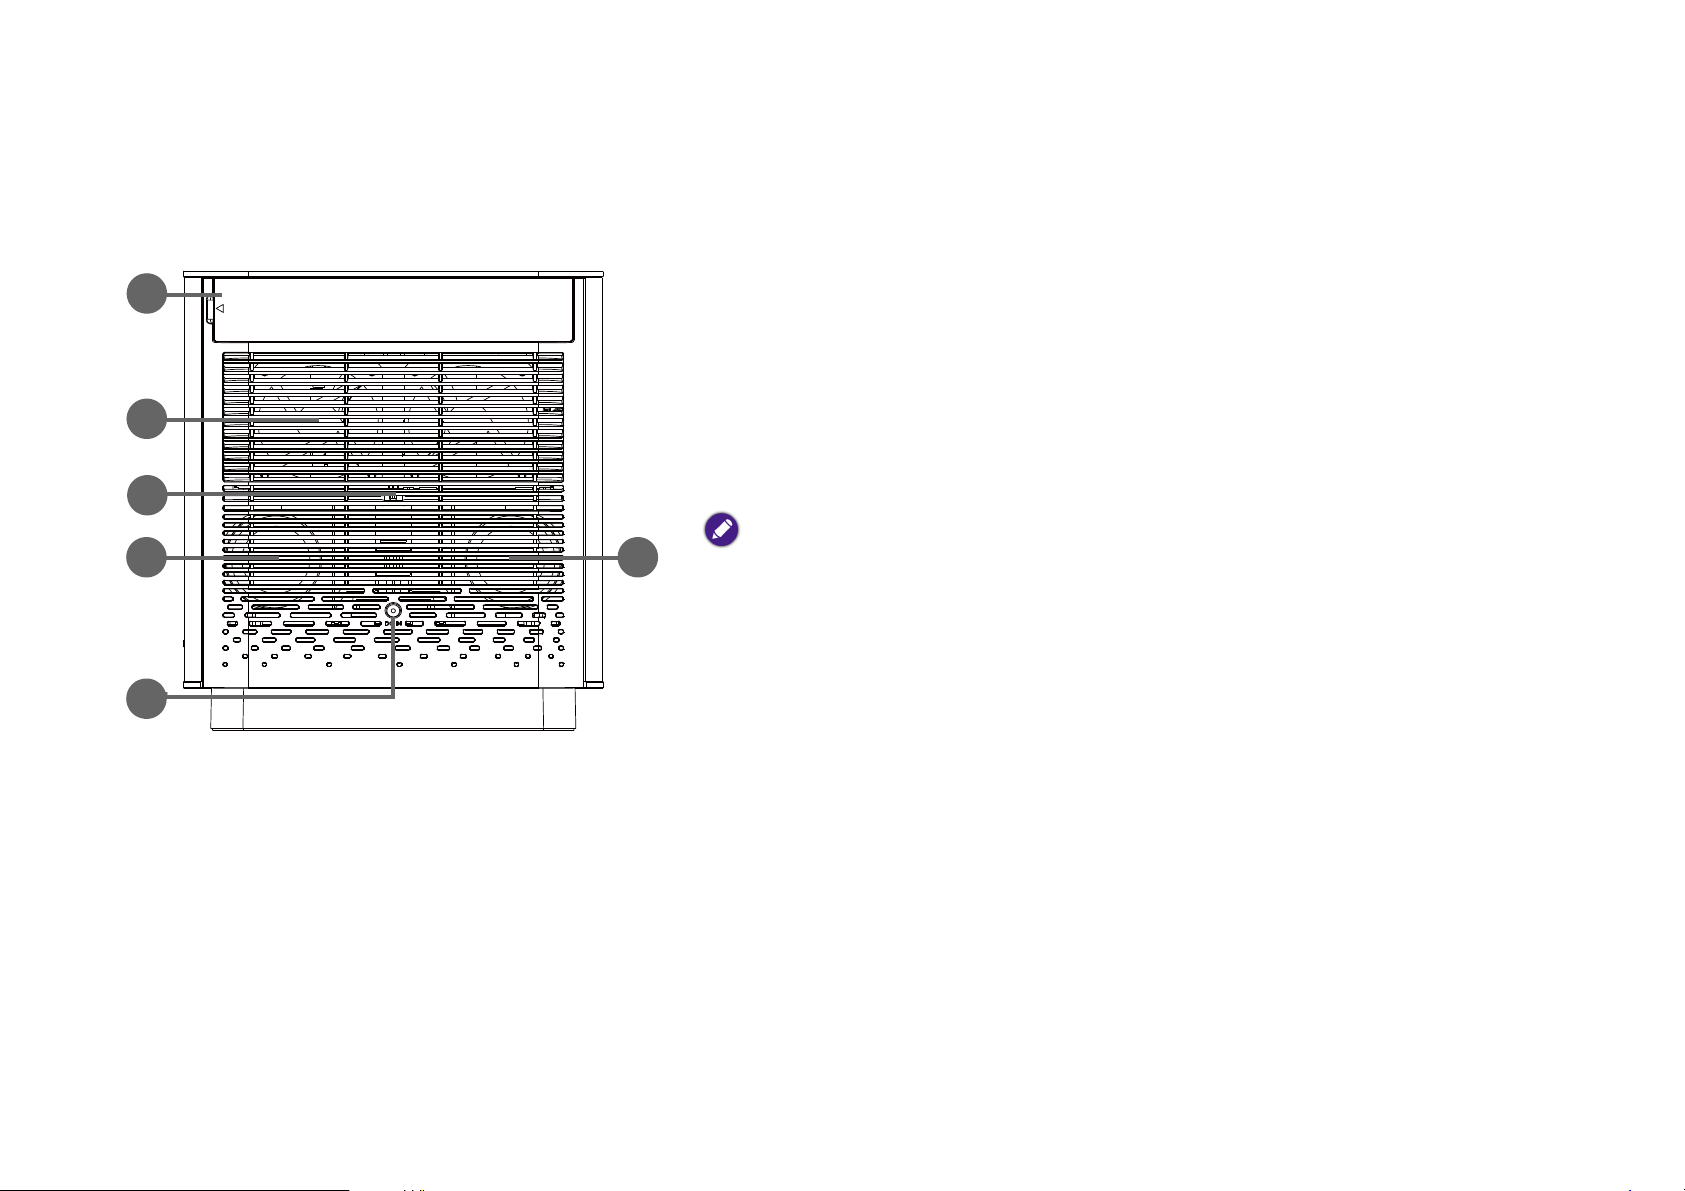
Projector exterior view
Front, top, and right side view
1. Bluetooth button and LED
Activates Bluetooth speaker mode. See Using the Projector as a Bluetooth
speaker on page 49 for more details. See LED indicators on page 18 for details on
the LED behavior.
2. Base light button
Turns on the light for the projector’s base.
3. Power button and LED
Turns the projector on and off. See Starting up the projector on page 28 for more
details. See LED indicators on page 18 for details on the LED behavior.
4. Projection lens
5. Front IR sensor and auto focus camera
6. Adjustable base
14
Page 15
Rear view
8
7
11
9
10 10
See Connections on page 37 for connection details.
7. IO cover (See Ports on page 16 for details.)
Flip open from the recess on the left side (indicated on the cover by an arrow) to
access the input/output ports.
8. Rear vent
9. Rear IR sensor
10. Speakers
11. Power adapter port
Please only use the supplied power adapter to avoid possible dangers such as electric shock and
fire.
15
Page 16
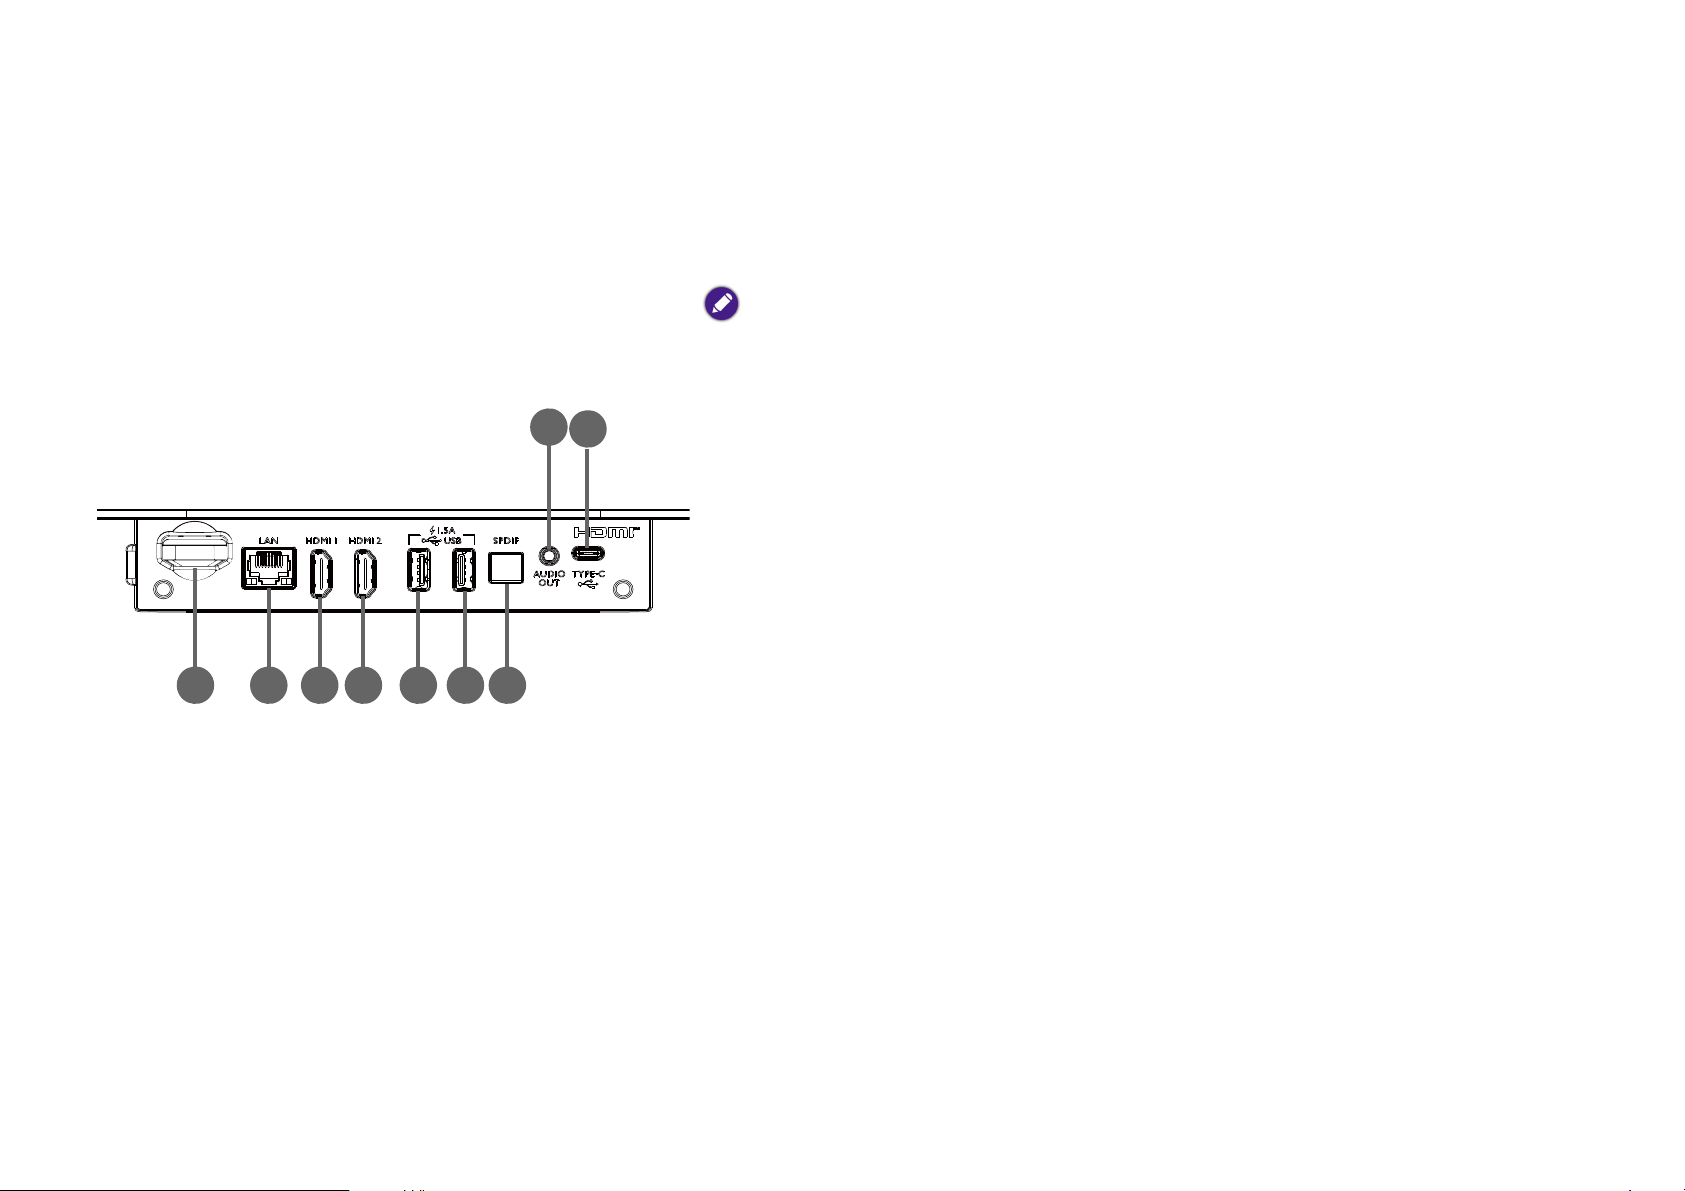
Ports
4 72 3 5 61
9
8
1. Wireless dongle port
Insert the provided USB wireless dongle to enable wireless and Bluetooth
connections. See Installing the wireless dongle on page 26 for details.
The projector only supports wireless and/or Bluetooth connections when the wireless dongle is
installed into this slot.
2. LAN port
Used to connect a router for Internet access.
3. HDMI 1 port (Version 2.0b) featuring ARC
Used to connect video sources that support the HDMI interface or speakers that
support Audio Return Channel (ARC) to broadcast audio.
4. HDMI 2 port (Version 2.0b)
Used to connect video sources that support the HDMI interface.
5. USB 2.0 port
Used to connect a USB-A storage device to project/broadcast media stored on the
device. You may also connect a wireless keyboard/mouse via this USB port.
6. USB 3.0 port
Used to connect a USB-A storage device to project/broadcast media stored on the
device. You may also connect a wireless keyboard/mouse via this USB port.
7. SPDIF port
Used to connect speakers or amplifiers to broadcast audio.
16
Page 17
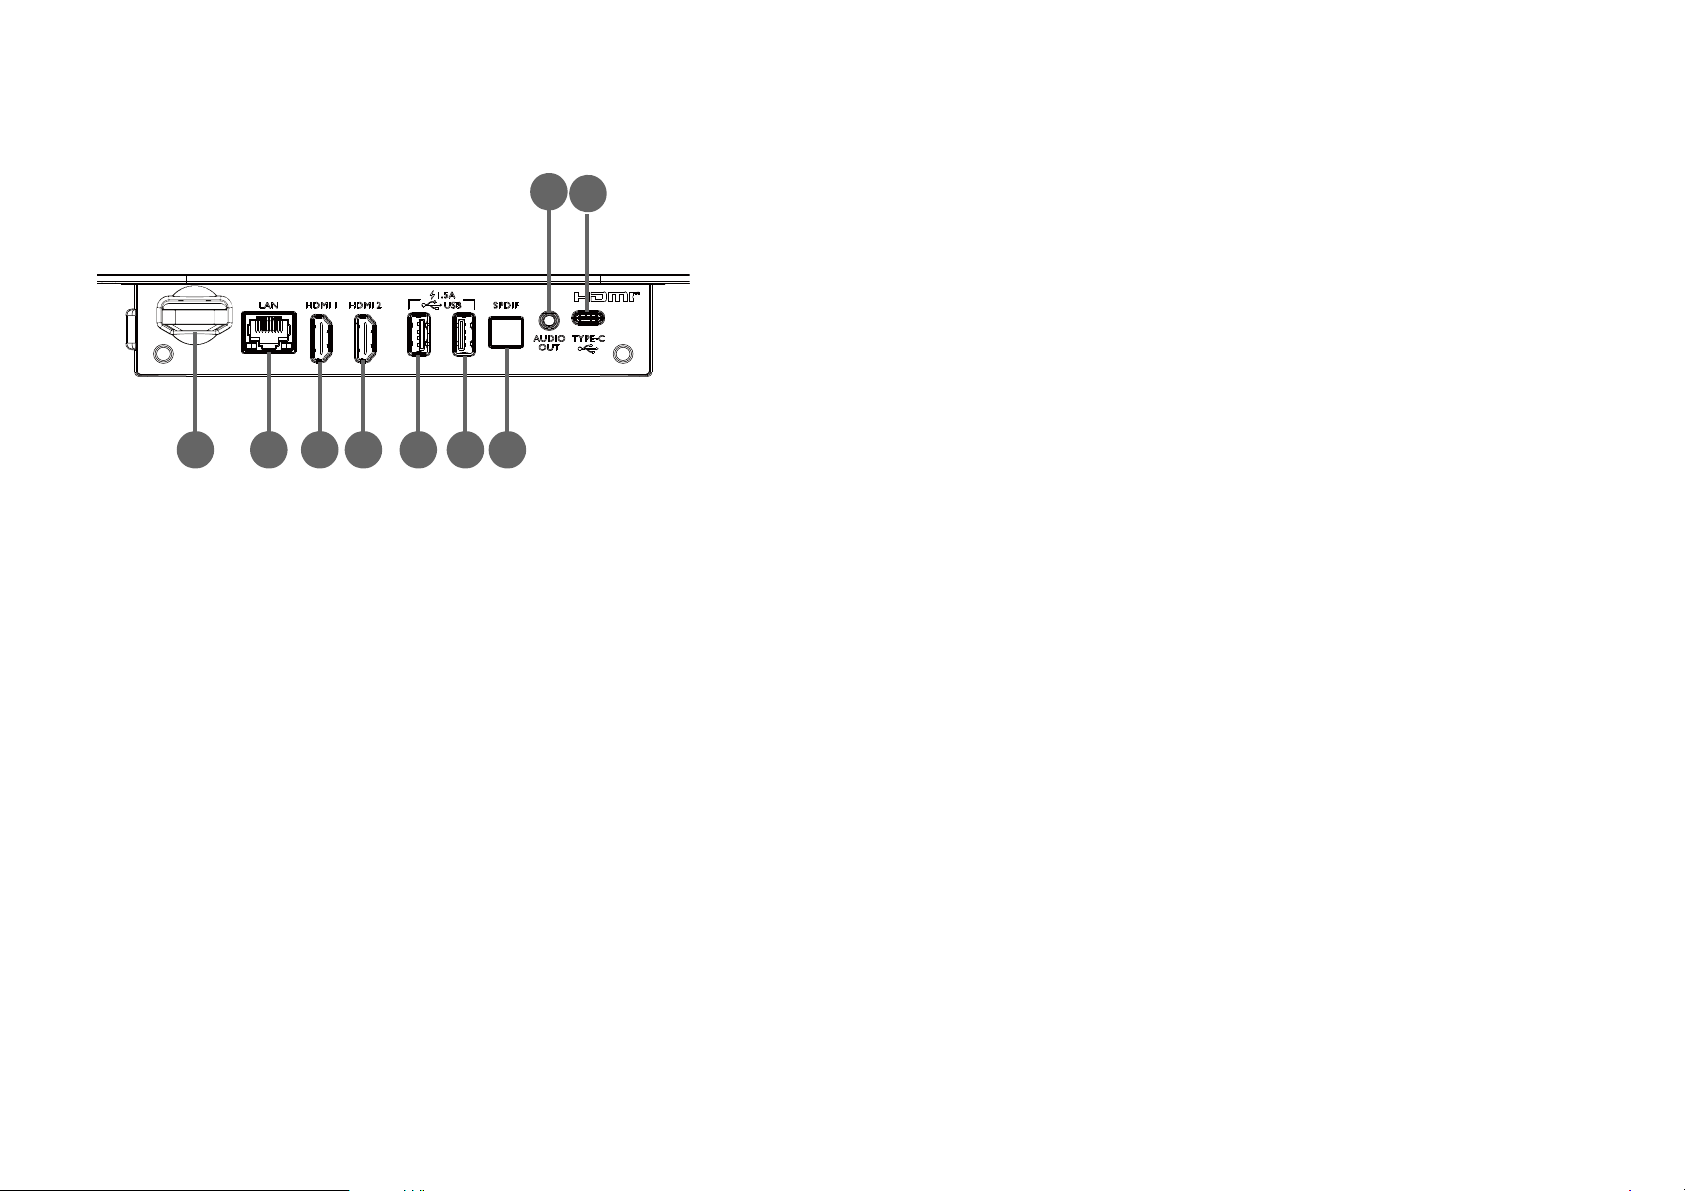
8. 3.5” audio output jack
4 72 3 5 61
9
8
Used to connect headphones, speakers, and other equipment to broadcast audio.
9. USB-C port
Used to connect devices with DisplayPort functionality to project video from the
device.
17
Page 18
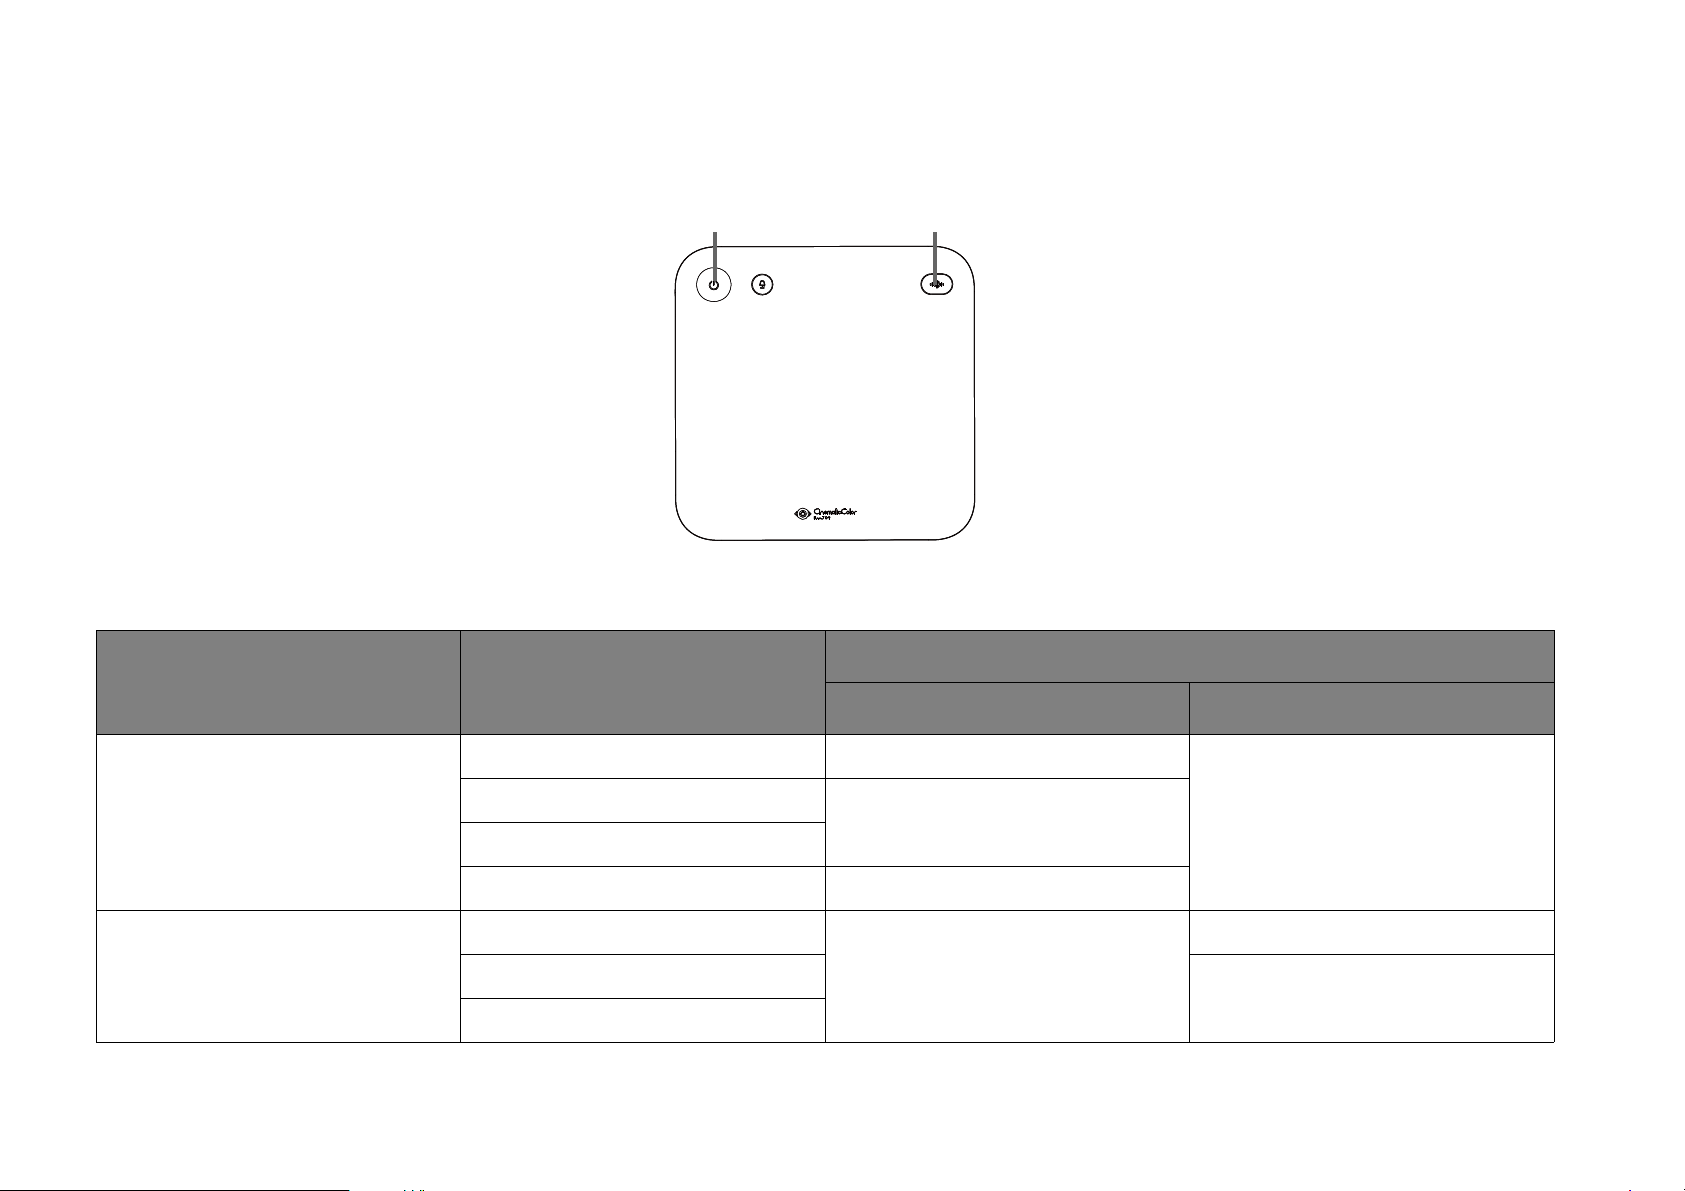
LED indicators
21
There is a blue/white power LED (1) and a white Bluetooth LED (2) at the top of the projector.
Refer to the table below for definitions of various LED behaviors.
Scenario Status
Power L ED Bluetooth LED
LED Behavior
Projector Mode
Bluetooth Speaker Mode
Standby mode (When powered off) Solid blue
Powering on
Solid white
Powered on and projecting
Powering off Solid blue
Pairing mode
Connected
Broadcasting Audio
Solid blue
18
Off
Flashing white
Solid white
Page 19

Scenario Status
LED Behavior
Power L ED Bluetooth LED
Android error
TI temperature error
Fan 1 error
Projector Error
Fan 2 error
System temperature error
System error
*Restart the projector if it does not respond to any commands.
Flashing red, green, pause, and then
repeat
Flashing green, blue, pause, and
then repeat
Flashing blue, red, pause, and then
repeat
Off
Flashing blue, green, pause, and
then repeat
Flashing green, blue, pause, blue,
and then repeat
Flashing green, red, pause, red, and
then repeat
19
Page 20
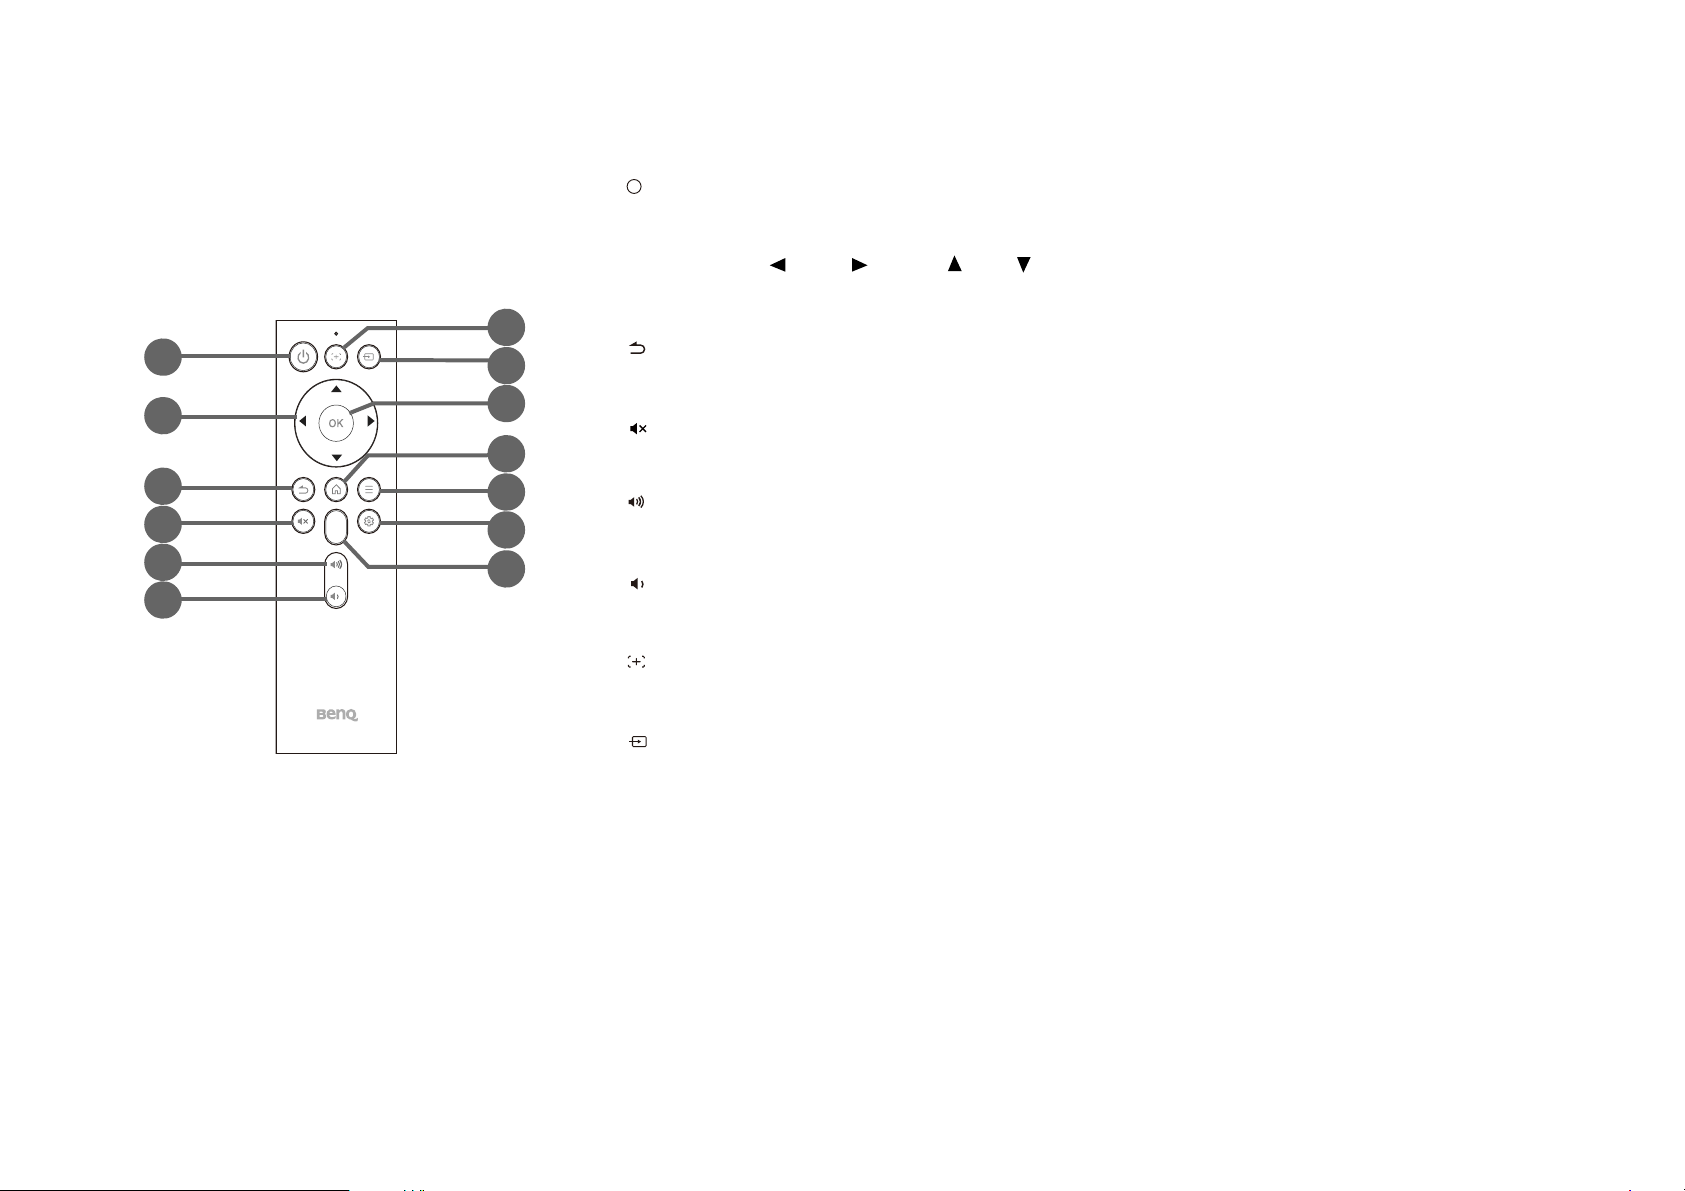
Remote control
9
12
1
2
3
4
5
8
7
6
11
13
10
I
I
1. Power
Turns the projector off and on.
2. Arrow keys ( Left, Right, Up, Down)
Used as navigation buttons to select the desired menu items and to make adjustments.
3. Back
Returns to the previous menu.
4. Mute
Mutes the projector’s audio.
5. Vo l u me Up
Increases the projector volume.
6. Volume Down
Decreases the projector volume.
7. Focus
Short press this key to start auto focus; long press to manually focus the projector.
8. Source
Launches the source menu.
9. OK
Used to confirm selections in BenQ Launcher.
20
Page 21
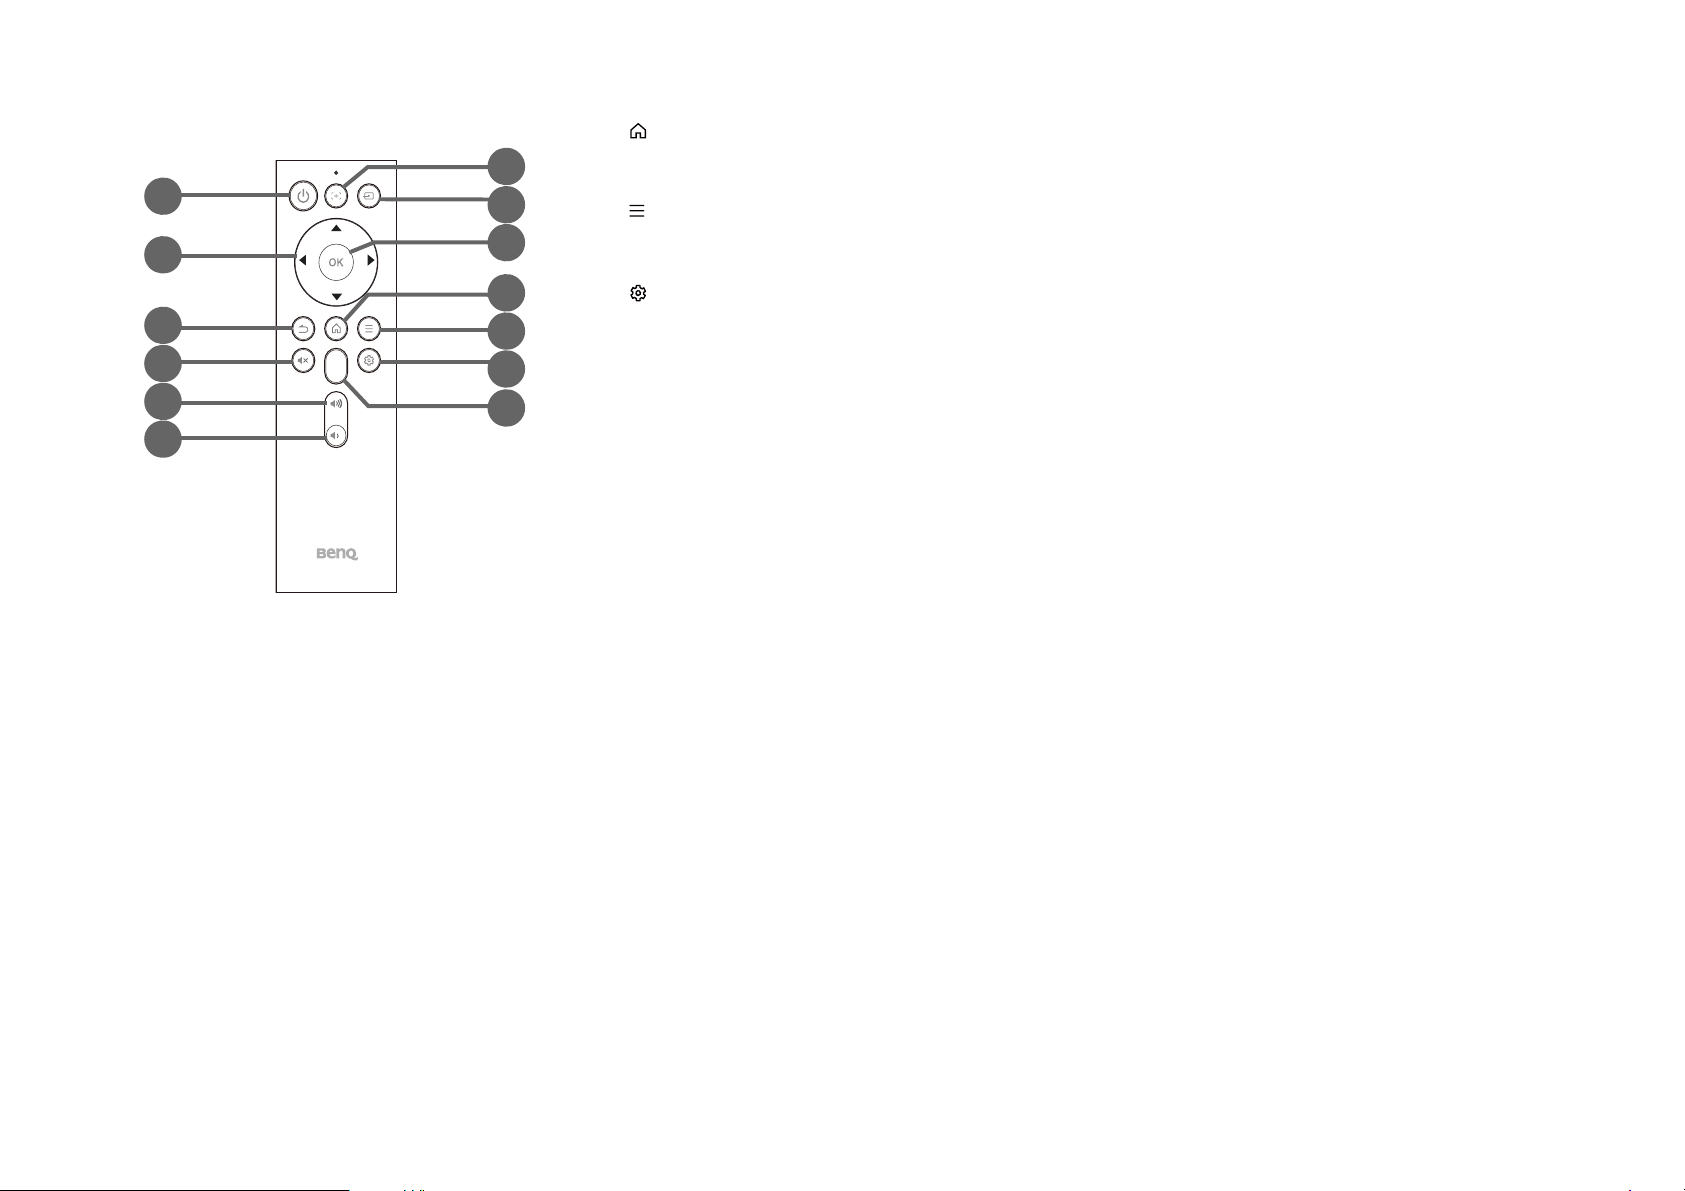
10. Home
9
12
1
2
3
4
5
8
7
6
11
13
10
Returns to the BenQ Launcher home menu.
11. Menu
Launches an app’s menu (only if the app supports this function).
12. Settings
Launches the projector’s settings menu.
13. App Hotkey
Long press this key to set which App to be launched when pressing the hotkey. After the
setup is completed, short press this key in the future to automatically launch the designated
App.
21
Page 22

Installing/Replacing the remote control batteries
Before you can begin to use the remote control, you must install the supplied batteries into the remote control.
1. Flip open the battery cover from the latch on the right side.
2. Insert the batteries in the orientation shown below.
3. Place the battery cover back onto the remote control.
Avoid leaving the remote control and battery in an excessively hot or humid environment like the kitchen, bathroom, sauna, sunroom or in a closed car.
22
Page 23
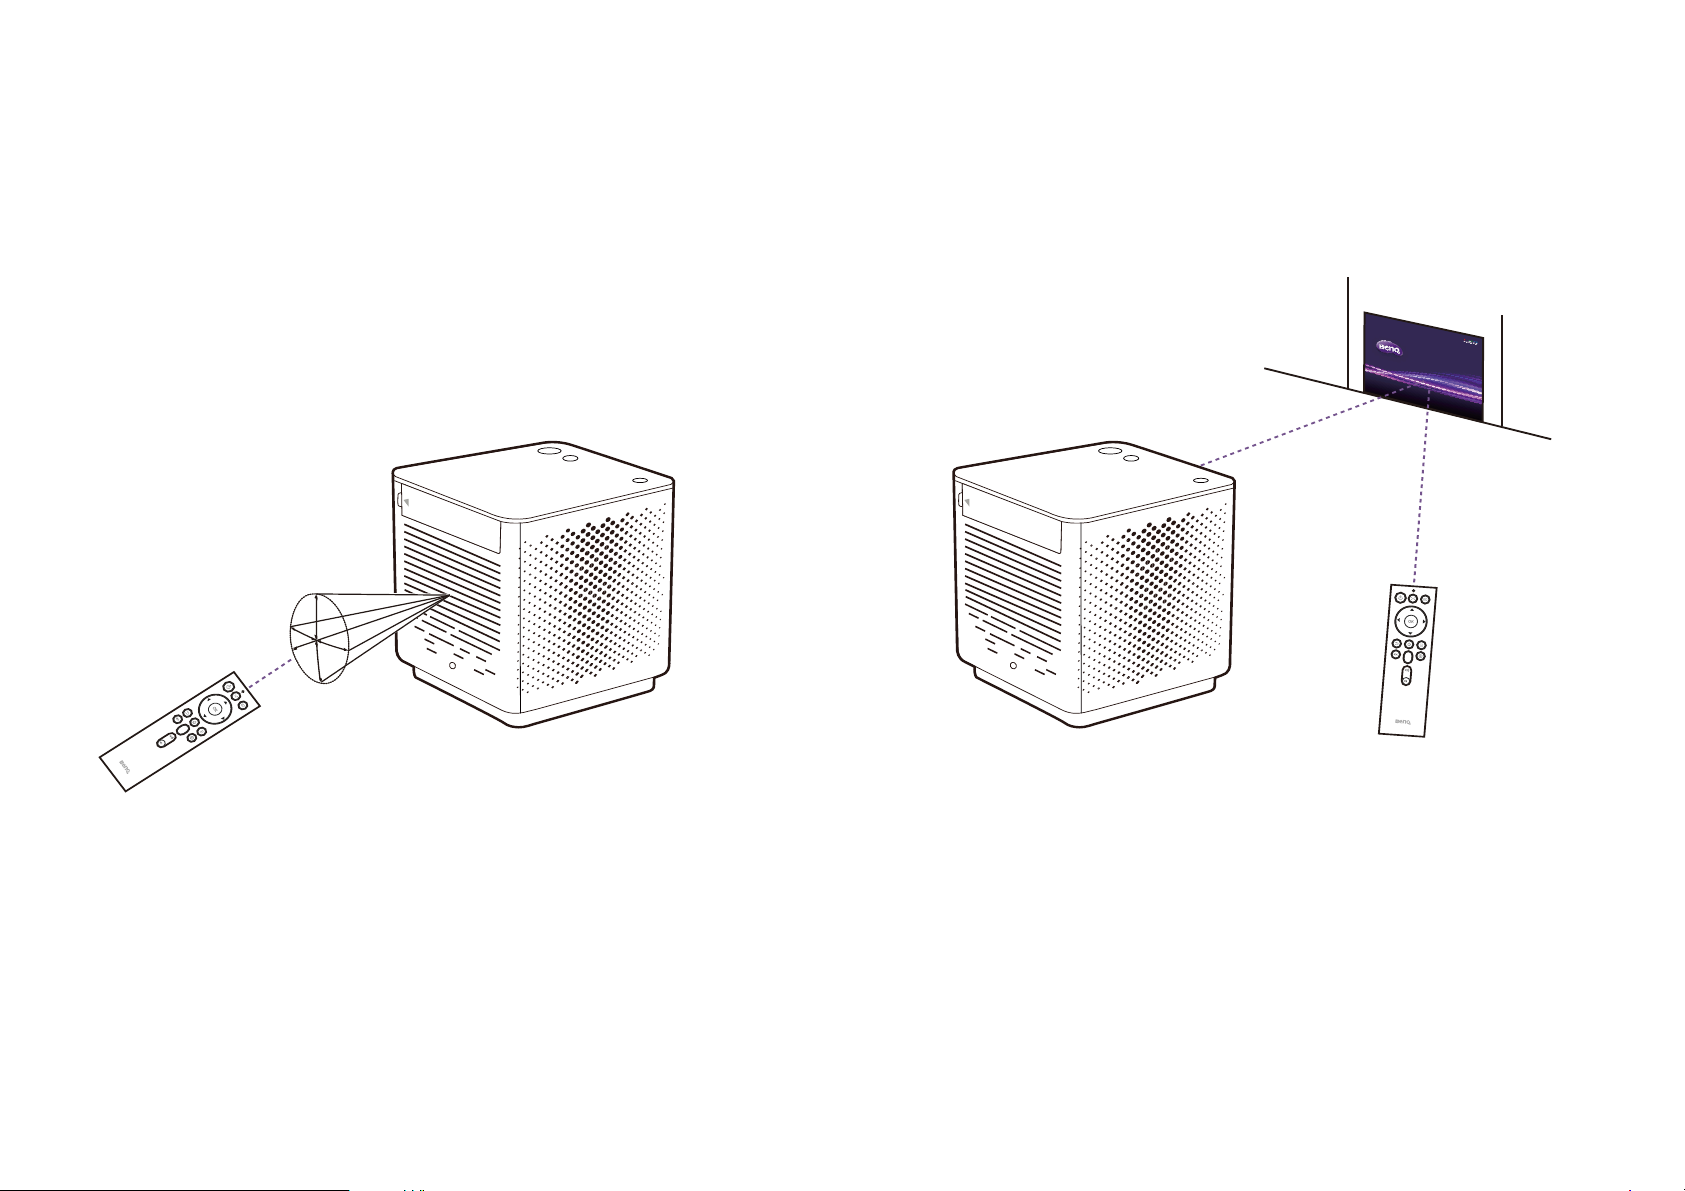
Remote control effective range
The projector has an IR remote control sensors located at the front and rear of the projector with a range of 8 meters (~26 feet) at an angle of
30-degrees. The remote control can be used either by pointing it directly at the IR sensor or by reflecting the IR signal off of a wall/screen.
Make sure that there are no obstacles between the remote control and the IR sensor on the projector.
23
Page 24
Installation
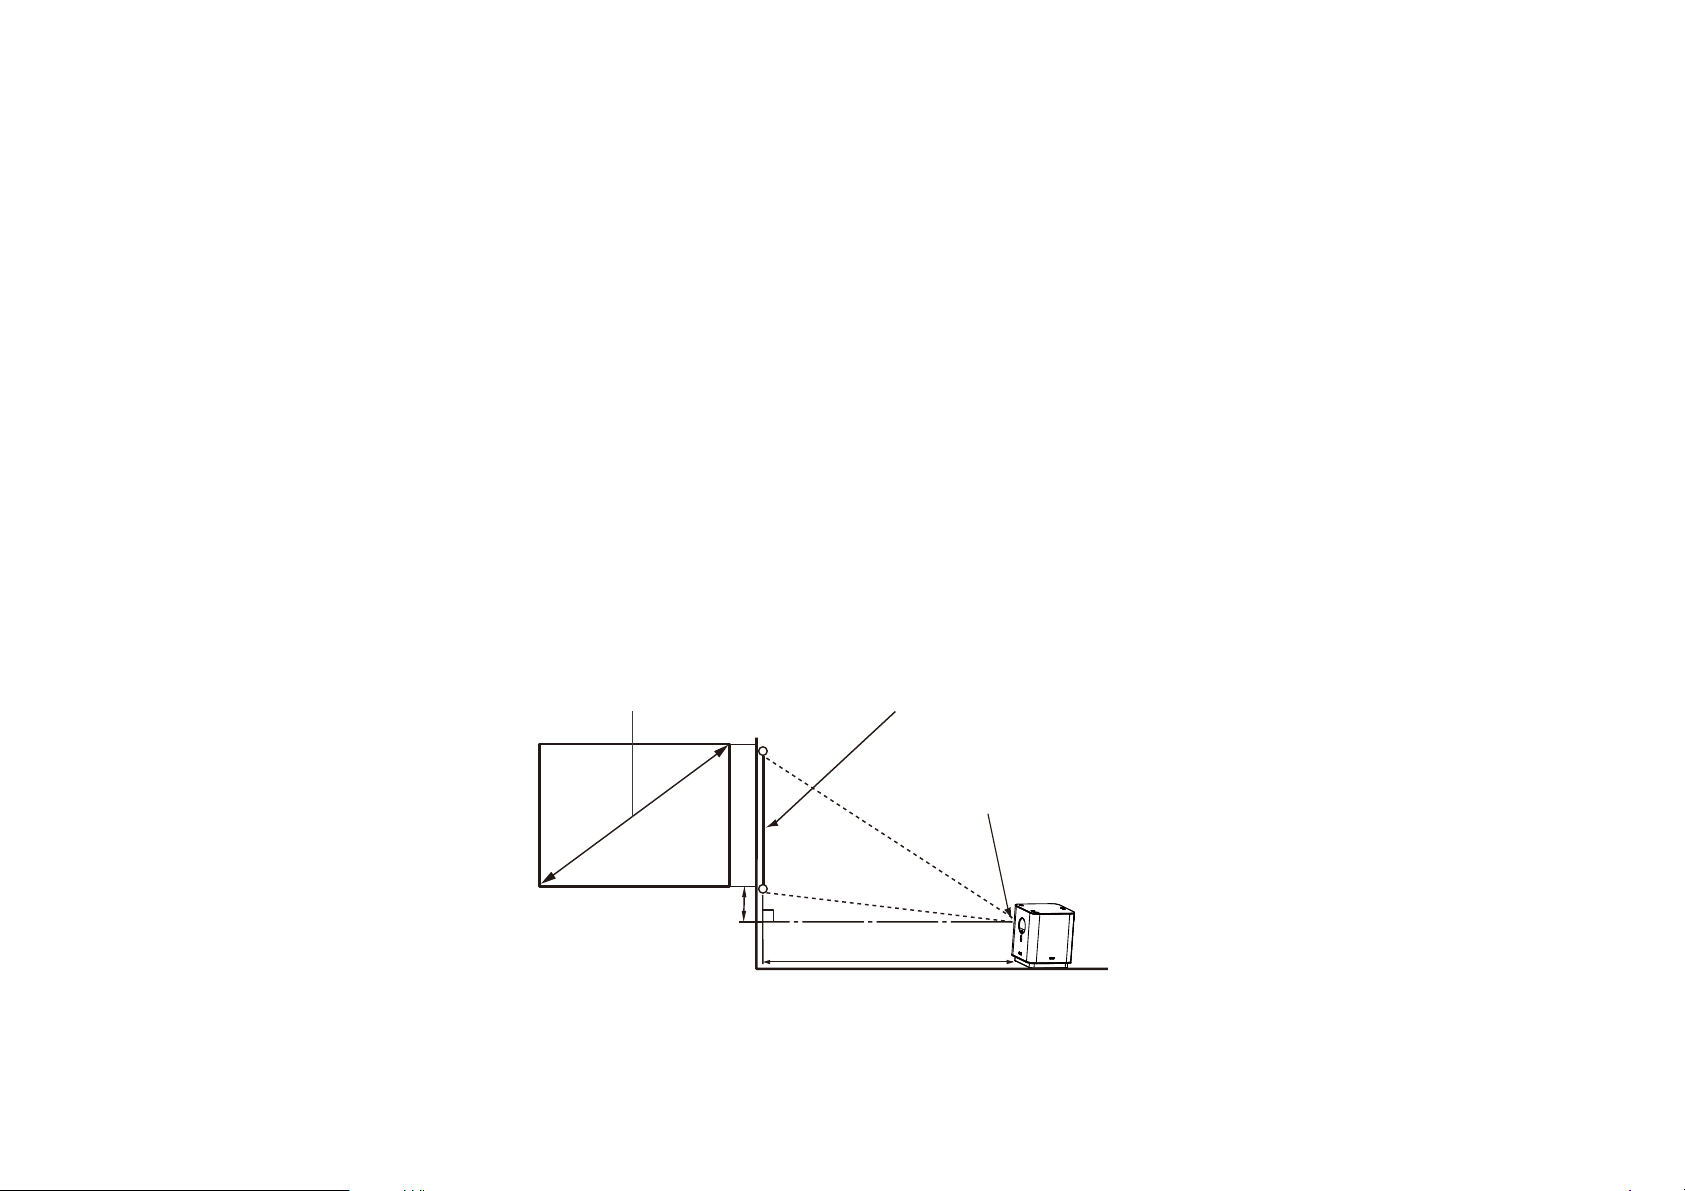
Screen Size Screen
Center of lens
Projection Distance
Vertical Offset
Choosing a location
Before choosing an installation location for your projector, take the following factors into consideration:
• Size and position of your screen
• Electrical outlet location
• Location and distance between the projector and the rest of your equipment
• Location and distance between the projector and the wireless access point, or if using a LAN cable, the internet hub
Obtaining a preferred projected image size
The projected image size is determined by the distance from the projector lens to the screen, and the video format. The data in the table below is
based on a normal projection method and not the result of adjusting the projection angle (1-8 degrees).
Projection dimensions
Use the illustration and tables below to help you determine the projection distance.
24
Page 25

Screen size
Projector distance (mm)Diagonal
H (mm) W (mm)
Inch mm
60 1524 747 1328 1063
70 1778 872 1550 1240
80 2032 996 1771 1417
90 2286 1121 1992 1594
95 2413 1183 2103 1682
100 2540 1245 2214 1771
120 3048 1494 2657 2125
130 3302 1619 2878 2302
140 3556 1743 3099 2479
150 3810 1868 3321 2657
160 4064 1992 3542 2834
All measurements are approximate and may vary from the actual sizes. If you want a permanent installation of the projector, we recommend that you use the actual
projector to physically test the projection size, distance, and the projector's optical characteristics prior to the installation. This helps you determine the exact mounting
position which best suits your installation.
25
Page 26

Operations
Installing the wireless dongle
1. Remove the cap from the provided wireless dongle.
2. Open the IO port cover.
3. Orient the dongle so that the BenQ logo is facing up and then insert the dongle into the wireless dongle port.
26
Page 27

4. Re-install the IO port cover so that the arrow on the cover points to the left.
27
Page 28

Starting up the projector
I
I
3 seconds
2
1
3
1. Install the provided wireless dongle into the wireless dongle port at the rear of the projector. See Installing the wireless dongle on page 26 for
details.
2. Connect the power cord to the power adapter.
3. Connect the adapter to the power adapter port.
4. Connect the power cord to a power outlet. The power LED will light up blue.
5. Press the power key on the projector or remote control for 3 seconds. The power LED will turn white.
When supplying power directly to the projector please use the supplied power cable to avoid possible dangers such as electric shock and fire.
6. The fans will start operating and a start-up image will be shown while the projector warms up. This process may take a few minutes. The
projector does not respond to further commands while it is warming up.
28
Page 29

7. If this is the first time starting up the projector, the setup wizard will appear to guide you through the initial setup, including selecting the system
language and connecting to a Wi-Fi network. Using your remote control, follow the on-screen instructions to finish the process.
The Setup Wizard screenshot above is for reference only and may differ from the actual design.
Once you’ve completed the setup wizard; you may connect a device to the projector to project video. See Connections on page 37 for more
information.
29
Page 30

Shutting down the projector
I
I
3
2
4
1
1. Press the power key on the projector or remote control. When the projector displays a shutdown confirmation message, press the power key
again.
2. The power LED will turn blue (see LED indicators on page 18). The fans may continue to run in order to cool the system.
If the projector will not be used for an extended period, unplug the power cable from the power outlet.
30
Page 31

Adjusting the projected image
8°
max
Adjusting the projection angle
The projector base allows you to adjust the image height and projection angle.
To adjust the projection angle, pivot the head upwards or downwards until the image is positioned as desired.
• The maximum angle of adjustment is 8 degrees.
• If the screen and the projector are not perpendicular to each other, the projected image becomes trapezoidal. To correct this, see Vertical Adjustment (Keystoning) on
page 33 for details.
31
Page 32

Fine-tuning the image clarity
To sharpen the picture, press the focus key on the remote control and the projector will automatically focus the image. To manually adjust the
focus, press and hold the focus key and follow the on-screen instructions.
• Do not look into the lens while the lamp is on. The strong light from the lamp may cause damage to your eyes.
• You may also allow the projector to automatically focus the image in BenQ Launcher. See More Settings on page 60 for more information.
32
Page 33

Vertical Adjustment (Keystoning)
Vertical adjustment, or keystoning, allows you to correct a situation where the projected image is noticeably wider at either the top or bottom. This
occurs when the projector is not perpendicular to the screen.
To configure vertical adjustment:
1. Navigate to the settings menus section on the home screen and select Settings. See The BenQ Launcher home screen on page 34 for details on
navigating the home screen.
2. Select Display Adjustment.
3. Disable Auto Vertical Adjustment.
4. Select Manual Vertical Adjustment.
5. Follow the on-screen instructions to correct the image.
You may only make these adjustments if Auto Vertical Adjustment is disabled in the Display Adjustment menu. See Display Adjustment on page 58 for details.
6. When you are done making the adjustments, press to save your changes and return to the previous menu.
Side Projection
Side projection allows you to correct a situation where the projected image is stretched or distorted along both axes due to the angle of the
projection.
To configure side projection:
1. Navigate to the settings menus section on the home screen and select Settings. See The BenQ Launcher home screen on page 34 for details on
navigating the home screen.
2. Select Display Adjustment.
3. Select Side Projection.
4. Follow the on-screen instructions to correct the image.
33
Page 34

BenQ Launcher
Wireless
Status
App
Source
Settings
Buttons
Projection
Menu
Shortcuts
Menu
Bar
Icons
BenQ Launcher is the projector’s operating system that allows you to project videos wirelessly, play media files or streaming apps, as well as adjust
projector settings.
The BenQ Launcher home screen
When the projector is not projecting an image from a connected source it will display BenQ Launcher by default. If the projector is projecting from
a source, you can return to BenQ Launcher mode by pressing on your remote control.
Actual screen may vary based on your BenQ Launcher firmware version.
34
Page 35

The BenQ Launcher home screen features five main sections:
• Status bar icons - Icons that display the date, time, wireless and Bluetooth status.
• Wireless projection buttons - Provides further instructions on how to project wirelessly via iOS/Android devices or a laptop/PC.
• Source menu - Allows you to select the video input source connected to the HDMI 1/2, USB-A, or USB-C ports for projection.
Only devices with DisplayPort (version 1.1 or above) functionality can project via the USB-C connection.
• App shortcuts - Quick access to the apps installed on the projector including the following pre-installed apps:
• Apps Store (Aptoide TV) - A marketplace for downloading multimedia and gaming apps.
• Files Manager - An app that allows you to browse, open, and manage files stored on the projector or a storage device.
• Local MM - A media player for viewing media files stored on the projector or a storage device.
You can customize the apps that appear in the app shortcut section. See Home Screen on page 61 for more details.
• Settings menus - Access to the main settings menu as well as shortcuts to the following menus:
• Settings - Accesses all settings on the projector.
• Wi-Fi - Allows you to configure your wireless settings. See Wireless on page 53 for more details.
• Clear Master - Allows you to clear the projector’s memory to improve performance.
• Notification - Displays app and system notifications.
• Home Screen - Allows you to customize the app shortcuts section of the home screen. See Home Screen on page 61 for more details
• Apps - Allows you to access all the apps installed on the projector.
• History - Allows you to view all your recently used apps.
Navigating the BenQ Launcher home screen
1. Press / on your remote control to navigate to the desired section.
2. Press / within the section and then OK to open the desired item.
3. Follow on-screen instructions for further operations.
35
Page 36

Inputting text
Various menus within the BenQ Launcher may require that you input text. To input text in a text field:
1. Select the text field where you want to input text.
2. Press OK on your remote control, and a full alphanumeric keyboard will appear on screen.
3. Press /// on your remote control to navigate the keyboard, and press OK to select the letter/key/symbol you want to enter into the
text field.
4. Press at anytime to exit out of the keyboard.
Actual keyboard types may vary based on your language preference setting. See Keyboard on page 61 for more information.
36
Page 37

Connections
You can connect your device to the projector in various ways to project video content.
Wireless Connection
• Smartphone, tablet, laptop/PC
Wired Connection (HDMI port)
• A/V device.
• Smartphone, tablet, laptop/PC
• Speakers featuring ARC capabilities (HDMI 1 port only)
Wired Connection (USB-A port)
• USB-A flash drive
Wired Connection (USB-C port)
• Smartphone, tablet, laptop/PC
• Devices connected via the USB-C port require a USB-C cable and must support DisplayPort (version 1.1 or above) functionality in order to project video.
• The projector will not charge or provide power to any devices connected to the USB-C port.
Furthermore, you can also connect the projector to Bluetooth speakers/headphones to broadcast audio through the speakers/headphones or connect
a mobile device to the projector via Bluetooth to broadcast audio through the projector’s speakers.
Before connecting a signal source to the projector, be sure to:
• Open the IO cover.
• Install the provided wireless dongle for wireless connection. See Installing the wireless dongle on page 26 for more details.
• Place the projector within range of the wireless AP you plan to connect it to.
• Use the correct cables for each source.
• Make sure the cables are firmly inserted.
37
Page 38

1
DisplayPort
Wireless AP
Devices with ‘
USB-C DisplayPort
A/V Devices
Speakers
Wireless
Dongle
Wireless Connections
Speaker
with ARC
The illustration above is for reference only.
38
Page 39

Wireless Connections
Connecting the projector to a wireless network
Before you can project wirelessly via the projector you must first connect the projector to a wireless network. To connect your projector to a wireless
network, or to switch wireless networks:
If you have already connected the projector to a wireless network during the setup wizard you may skip this section.
1. Install the provided wireless dongle into the wireless dongle port (see Installing the wireless dongle on page 26).
2. Power on the projector (see Starting up the projector on page 28).
3. On the home screen of the BenQ Launcher interface, select No Internet in the wireless projection buttons section.
4. Enable Wireless.
39
Page 40

5. Select the SSID for the wireless AP you want to connect to in the Network List.
Apps Store
Internet
• To connect to a hidden wireless network select Add Network and enter the SSID, security setting, and password for the network.
• The list of available wireless networks will be refreshed every 10 seconds. If the desired SSID is not listed please wait for refreshing to complete.
6. If you chose a secured SSID for the first time, enter the corresponding password.
The password will be stored in the projector’s memory. In the future, if you select the same SSID again, you will not be prompted to enter a password unless you delete the
SSID from the projector’s memory.
7. Once you have successfully connected to the wireless AP, a wireless connection icon will appear at the top right corner of the BenQ Launcher
interface. You can now connect your devices wirelessly to the projector to project videos.
Watching streaming content on your projector
Your product is embedded with the Aptoide TV app, which allows you to download tools or media apps for more streaming services, such as YouTube,
Netflix, etc. Go to Apps Store from the BenQ Launcher to access Aptoide TV. For apps provided and operated by parties external to BenQ,
service quality and technical support issues are subject to their respective app publishers.
40
Page 41

Wireless Projection for iOS & macOS
You can mirror your iOS or Mac device’s screen on your projector.
To connect an iOS device or Mac to the projector and mirror your screen via AirPlay:
1. On the home screen of the BenQ Launcher interface, select Wireless Projection for iOS or Wireless Projection for Mac in the wireless
projection buttons section.
®
2. On your iOS mobile device or Mac’s network menu connect to the wireless network shown on the screen.
3. Follow the on-screen instructions to project wirelessly.
Once you have finished projecting, disable AirPlay on your iOS device to end the connection.
41
Page 42

Wireless Projection for Android™ or PCs
To connect an Android™ device or PC to the projector and project video:
1. On the home screen of the BenQ Launcher interface, select Wireless Projection for Android or Wireless Projection for PC in the
wireless projection buttons section.
2. On your Android mobile device or PC’s network menu connect to the wireless network shown on the screen.
3. Based on the device you are using, choose one of the following:
• For Android devices: Scan the QR code shown on the screen to download and install the AirPinCast app.
• For PCs: Download and install the AirpinPCSender software from the URL shown on the screen.
The network your device is connected to must have access to the Internet in order to download the respective app/software.
42
Page 43

4. Follow the on-screen instructions to project wirelessly.
Once you have finished projecting, disable screencasting on your Android device to end the connection.
• To check if your Android device supports wireless casting, check support.google.com.
• Due to restrictions on subscription-based streaming platforms, mobile devices cannot mirror the content of some streaming services (Netflix, Amazon, Hulu, etc.).
43
Page 44

Wired Connections
Connecting a device with HDMI or USB-C with DisplayPort
Using an HDMI or USB-C Gen3.1 cable you can connect a device that is equipped with HDMI or DisplayPort capabilities to broadcast videos and
images on the projector.
Not all devices with a USB-C port have DisplayPort functionality. Check your device’s documentation for clarification.
To connect a device with HDMI or USB-C with DisplayPort:
1. Connect the device to the HDMI or USB-C port on the projector. A pop-up notification will appear indicating that a device is connected.
2. Confirm whether you want to project video from the device. The video from the device will be displayed once the signal from the device is
detected.
If no signal is detected or the signal is interrupted a message will appear.
3. Press to stop the broadcast and return to the previously displayed menu, or press to exit and go back to the BenQ Launcher home
screen.
4. If the device remains connected and you wish to project its video again, select the corresponding port in the source menu section of the BenQ
Launcher home screen.
• Some computers feature HDMI ports that do not transmit audio, in such cases a separate audio cable must be connected to the projector.
• Some laptops do not turn on their external video ports when connected to a projector. Usually a key combination like Fn + F3 or CRT/LCD key turns the external
display on/off. Locate a function key labeled CRT/LCD or a function key with a monitor symbol on the laptop. Press Fn and the labeled function key simultaneously.
Refer to your laptop’s documentation to discover your laptop’s key combination.
44
Page 45

Connecting a speaker with ARC
The HDMI port on the projector features Audio Return Channel (ARC) capabilities which allows it to output its audio to an ARC-compatible speaker
connected via an HDMI cable.
To connect an ARC-compatible speaker, you must first ensure that ARC is enabled in the Sound sub-menu of the settings menu. See Sound on page
54 for details.
Connecting a flash drive
Connect a USB-A flash drive to the USB 2.0 or USB 3.0 port on the projector to play media files stored on the flash drive.
To play media files stored on a flash drive:
1. Connect the flash drive to the USB 2.0 or USB 3.0 port. A pop-up notification will appear indicating that a storage device is connected.
2. Choose one of the following options:
• Select Video to choose a video file stored on the device to play
• Select All files to browse for other media files stored on the device.
3. Select the file you want to play.
4. Select either the pre-installed Local MM media player or another installed app to play the media file. For more information on viewing files on
Local MM see Local MM Media Player on page 46.
45
Page 46

Local MM Media Player
Local MM is the pre-installed app on the projector that allows you to project images, videos, and audio files stored on the projector or a USB-A flash
drive. You can launch it from the app shortcuts section of the BenQ Launcher home screen.
See Supported file formats on page 76 for a list of what file formats can be played on the projector.
Navigation
Once you have launched Local MM, select Local Disk Device and then either Internal Storage to access media files located on the projector’s
internal storage or USB1/USB2 to access media files located on any flash drives connected to the projector’s USB ports.
Use the All, Picture, Song, or Video buttons on the left side of the screen to filter the files shown in the navigation menu based on media type.
46
Page 47

Bluetooth Connections
The projector allows the following types of Bluetooth connections:
• Connect to a Bluetooth-enabled speaker or headphones to output audio directly for greater sound.
• Connect a mobile device to the projector to broadcast audio through the projector’s speakers.
Pairing/Connecting to a Bluetooth speaker or headphones
Pairing is the process by which your projector creates a connection to a Bluetooth speaker or headphones for the first time. Once both devices have
been successfully paired each device will have the corresponding device’s pairing information stored internally and both will be able to connect
automatically when they are within an ~8 meter range of each other and Bluetooth is enabled on the projector.
To pair your projector to a Bluetooth speaker or headphones:
1. Install the provided wireless dongle into the wireless dongle port (see Installing the wireless dongle on page 26).
2. Power on the projector (see Starting up the projector on page 28).
3. Navigate to the settings menus section on the home screen and select Settings.
4. Select Bluetooth.
5. Enable Bluetooth.
6. Activate Bluetooth-pairing mode on the speaker or headphones.
47
Page 48

7. Select the speaker or headphones from the Available List in the Bluetooth setting menu.
8. When the projector and speaker or headphones have successfully connected, the device will be labelled as Connected in the Bluetooth setting
menu. You can now output the audio from the projector to the speaker or headphone.
Ending the Bluetooth connection
In cases where you want to disconnect a speaker or headphones from the projector and connect to another speaker or headphones follow the steps
below:
1. Navigate to the settings menus section on the home screen and select Settings.
2. Select the already connected speaker or headphones from the Available List.
3. Confirm that you want to disconnect the speaker or headphones from the projector.
4. Activate Bluetooth-pairing mode on the new speaker or headphones.
5. Select the new speaker or headphones from the Available List.
Deactivating the Bluetooth speaker or headphones
To deactivate Bluetooth on the projector so that it no longer outputs its audio to a separate speaker or headphones:
1. Navigate to the settings menus section on the home screen and select Settings.
2. Select Bluetooth.
3. Disable Bluetooth.
48
Page 49

Using the Projector as a Bluetooth speaker
Before you can use your projector as a Bluetooth speaker you must first ensure that you have installed the provided wireless dongle into the wireless
dongle port (see Installing the wireless dongle on page 26). Once you have done so you can activate Bluetooth speaker mode using either the
Bluetooth button on the projector or the BenQ Launcher interface.
Activating the Bluetooth speaker via the Bluetooth button
Press the Bluetooth button on the top side of the projector. If your projector is on when you press the button, the projector will stop projecting
and switch over to Bluetooth speaker mode.
Activating the Bluetooth speaker via BenQ Launcher
1. Power on the projector (see Starting up the projector on page 28).
2. Navigate to the settings menus section on the home screen and select Settings.
3. Select Bluetooth Speaker Mode.
4. Select OK to change to speaker mode.
Once Bluetooth mode has been activated you can pair your external device to the projector. After you have successfully paired your mobile device
with the projector, pairing information will be stored on both devices and a connection will automatically be made when Bluetooth is enabled on both
devices and both devices are within range of each other.
49
Page 50

Ending the Bluetooth connection
In cases where you want to disconnect the mobile device from the projector, either:
• Disconnect from the projector in the Bluetooth menu of your mobile device.
•Press the power key on the projector or remote control to return the projector to projector mode.
50
Page 51

Navigating the Settings menu
About the Settings menu
To let you make various adjustments or settings on the projector, its wireless connections, and the projected image, BenQ Launcher provides a
Settings menu. To access the menu, either select Settings in the settings menus section of the BenQ Launcher home screen, or press the settings
button on the remote control.
51
Page 52

Under the settings menu there are three subcategories: General, Display, and Preference:
Using the Settings menu
To access the various settings menus:
• Use the arrow keys ( ///) to move through the main settings menus.
•Use OK to select the desired menu.
When configuring items within a menu:
• Use the up and down arrow keys ( / ) to move to the item you want to configure.
•Use OK to enable/disable options or select sub-menu options.
• Use left and right arrow keys (/) to toggle through the available options.
• Use the back button to return to the main settings menu.
• Use the home button to return to the BenQ Launcher home screen.
If the projector is not of the latest version of firmware, a red dot will appear on the About icon. In such a circumstance, users can go to the About menu and then select
Update > Check for Updates to start the firmware update. The red dot will disappear when the projector is updated with the latest version of firmware. See Update on
page 63 for more information.
52
Page 53

Wireless
The following table describes the items available in the Wireless menu:
Item Options and descriptions
Wireless
Enables/Disables wireless connection for the projector. See Connecting the projector to a wireless network on page 39 for
details.
Network Speed Tests the speed of the projector’s Internet connection.
Diagnose Diagnoses the status of the projector’s Internet connection.
Add Network
Allows you to add a specific network that may be hidden or undetected in the Networks List. Once selected you will be
prompted to enter the SSID and security settings for the network.
Refreshes the Networks List.
Refresh
The Networks List automatically refreshes itself every few seconds.
Lists the available wireless access points which the projector can connect to. See Connecting the projector to a wireless
network on page 39 for details.
Networks List
The Networks List is only available when Wireless is enabled.
53
Page 54

Wired LAN
The following table describes the items available in the Wired LAN menu:
Item Options and descriptions
Status Enables/Disables wired LAN connection for the projector.
IP Address Displays the projector’s IP address.
Wired LAN
MAC
Advanced
Displays the Media Access Control (MAC) address for the projector.
Sub-menu that allows you to enable/disable Dynamic Host Configuration Protocol (DHCP), which when disabled allows you to
further configure the IP Address, Subnet Mask, Gateway, and DNS settings.
Sound
The following table describes the items available in the Sound menu:
Item Options and descriptions
Utilizes sound enhancement technology, which incorporates Waves’ algorithms to deliver great bass and treble effects and
Sound Mode
Mute Disables/Enables the projector’s audio.
Volum e Adjusts the sound level for the projector.
Audio Return
(HDMI-1)
provide you with immersive cinematic audio experience. The following preset sound modes are provided: Standard, Cinema,
Music, Game, and Sport.
Enables/Disables the Audio Return Channel (ARC) function on the HDMI 1 port, which allows the projector to output its audio
to an ARC-compatible speaker connected to the port via an HDMI cable.
SPDIF Enables/Disables audio output via the projector’s Sony/Philips Digital Interface (SPDIF) port.
Reset Audio
Settings
Resets all the settings in the Sound menu to the factory defaults.
54
Page 55

Bluetooth
The following table describes the items available in the Bluetooth menu:
Item Options and descriptions
Bluetooth Enables/Disables Bluetooth for the projector, allowing the projector to output its audio to a Bluetooth speaker or headphones.
Refreshes the Available List.
Refresh
This function is only available when Bluetooth is enabled.
Bluetooth Info Displays the name of the projector as it appears in another device’s Bluetooth pairing/connections list.
Lists the all the Bluetooth devices which the projector has already been paired with and whose information is stored internally
Paired Device
List
Available List
for future automatic connections.
This function is only available when Bluetooth is enabled.
Lists the available Bluetooth devices which the projector can pair and connect to. See Pairing/Connecting to a Bluetooth speaker
or headphones on page 47 for details.
The Available List is only available when Bluetooth is enabled.
55
Page 56

Bluetooth Speaker Mode
Select OK to enable Bluetooth speaker mode. See Using the Projector as a Bluetooth speaker on page 49 for more details.
All Apps
Select the All Apps menu to access all the apps that have been installed on the projector.
• Select an app and press OK on the remote control to launch the app.
• Select an app and press the menu button ( ) on the remote control for more options including:
• Forcing the app to stop
• Uninstalling the app
• Checking the amount of storage used by the app
• Resetting the apps defaults
• Configuring the app’s permissions.
56
Page 57

About
The following table describes the items available in the About menu:
Item Options and descriptions
Allows you to update the software on the projector using one of the following options:
Update
Factory Reset Returns all settings to the factory preset values.
• Local Update: Updates the software via an update file stored on a USB drive.
• Check for Updates: Checks for and initiate any Over-The-Air (OTA) updates.
• Auto Update: Enables/Disables automatic OTA updates.
Accessibility
Service
System
Information
Projector
Information
Allows you to enable/disable Boot Wizard.
Displays hardware/software information for the projector including its device name, operating system version, memory, storage
capacity, and MAC addresses.
Displays information on the current status of the projector including the current Source, Picture Mode, Resolution, Color
System, Color Gamut, Light Usage Time, 3D Format, and Firmware Version.
Privacy Allows you to agree to or disagree with the BenQ privacy announcement.
A red dot at the top right of the About icon indicates that a newer version of the projector's firmware is available. In such circumstances, users can select Update to start
the firmware update. The red dot will disappear once the projector is updated with the latest version of firmware. See Update on page 63 for more information.
57
Page 58

Picture
The following table describes the items available in the Picture menu:
Item Options and descriptions
Picture Mode
Adjust Displays the following values for the selected Picture Mode: Brightness, Contrast, Color, Tint, and Sharpness.
Advanced
Reset Picture
Setting
Selects a preset picture mode to suit your operating environment. The preset picture modes include: Living Room, Cinema,
User, and Office.
Allows you to toggle more advanced picture settings including Gamma Selection, Color Temperature, Color
Management, Cinema Master, and Noise Reduction.
Resets all Picture settings to factory preset values.
Display Adjustment
The following table describes the items available in the Display Adjustment menu:
Item Options and descriptions
Auto Vertical
Adjustment
(Keystoning)
Manual Vertical
Adjustment
Enables/Disables the projector’s automatic keystone adjustment. See Vertical Adjustment (Keystoning) on page 33 for more
details.
Allows you to manually adjust the keystone settings for the projected image. See Vertical Adjustment (Keystoning) on page 33
for more details.
This function is only available when Auto Vertical Adjustment is disabled.
Side Projection
Allows you to adjust the four corners of the projected image to correct any stretching or distortion due to the angle of the
projection.
58
Page 59

3D
The following table describes the items available in the 3D menu:
Item Options and descriptions
3D Mode
3D Sync Invert Allows you to correct an inversion of the 3D image’s depth.
Allows you to choose the format used for 3D video. The options include: Auto, Frame Packing, Top-Bottom,
Side-by-Side, and Off.
HDR
The following table describes the items available in the HDR menu:
Item Options and descriptions
HDR Enables/Disables High Dynamic Range effects which allow a higher contrast of brightness and colors.
Allows you to adjust the brightness levels of your HDR image.
HDR Brightness
This function is only available when HDR is enabled and HDR content is detected.
59
Page 60

More Settings
The following table describes the items available in the More Settings menu:
Item Options and descriptions
Allows you to change the name of the HDMI 1 and HDMI 2 ports as they appear in the source menu section of the BenQ
Source Rename
Launcher home screen.
The source name must be 8 characters or under.
HDMI Setting
Default Lighting Enables/Disables the base light to automatically illuminate when the projector is powered on.
Auto Focus Enables/Disables auto focus for the projector.
Switches the HDMI EDID between Enhanced (HDMI 2.0) or Standard (HDMI 1.4) in order to solve compatibility issue with
certain old players.
Light
The following table describes the items available in the Light menu:
Item Options and descriptions
Light Mode
Light Usage
Time
Reset Light
Timer
Selects a preset light mode that adjusts the brightness of the light based on desired power consumption. The preset picture
modes include: Normal and Economic.
Displays the amount of time your projector has been projecting under each of the light modes (Normal Mode and Economic
Mode).
Resets the amount of time shown in the Light Usage Time fields.
60
Page 61

Home Screen
The following table describes the items available in the Home Screen menu:
Item Options and descriptions
Auto Sort
Shortcut
Setting
Enables/Disables the automatic sequencing of app shortcuts on the home screen. When enabled, the most recently installed app
will appear first in the row.
Allows you to manually arrange which app shortcuts will be displayed on the home screen and their sequence. Press OK to
check (show) or uncheck (hide) the shortcuts. The app that is selected first will appear as the first in the row.
System Preference
The following table describes the items available in the System Preference menu:
Item Options and descriptions
Language Sets the language for BenQ Launcher.
Date & Time
Allows you to configure the following options for the projector’s date and time: Time Zone, Format, and Use 24-Hour
Format.
Keyboard
The menu allows you to select the type/language of Keyboard used in BenQ Launcher.
61
Page 62

Installation
The following table describes the items available in the Installation menu:
Item Options and descriptions
Test Pattern
High Altitude
Mode
Displays the test pattern grid, which helps you adjust the image size and focus to check if the projected image is free of
distortion.
We recommend you use the High Altitude Mode when your environment is between 1500 m - 2000 m above sea level, and
ambient temperature is between 0˚C to 30˚C.
Operation under High Altitude Mode may cause a higher decibel operating noise level because of increased fan speed
necessary to improve overall system cooling and performance.
If you use this projector under other extreme conditions excluding the above, it may display auto shut-down symptoms, which is
designed to protect your projector from over-heating. In cases like this, you should switch to High Altitude Mode to solve
these symptoms. However, this is not to state that this projector can operate under any and all harsh or extreme conditions.
Do not use the High Altitude Mode if your altitude is between 0 m and 1500 m and ambient temperature is between 0˚C to 35˚C. The projector
will be over cooled, if you turn the mode on under such a condition.
Start On/Off
Allows you to set a timer for when the projector will automatically power off. The options include: Disable, 15 min, 30 min, 45 min, 60 min, 120
min, and 240 min
62
Page 63

Update
It is suggested that users regularly update their projector with the latest version of the firmware to optimize the user experience. The projector uses
Over-the-Air (OTA) updates to install the update file wirelessly.
When a new version is available on the BenQ OTA server, a message will pop up once the projector is connected to a wireless network. Follow the
on-screen instructions to update the firmware.
Once the download is completed, the projector will restart automatically. Do not turn off or unplug the projector before the projector is finished
updating and BenQ Launcher reappears on the screen.
If you select CANCEL when the system upgrade message appears, a red dot will appear at the top right of the About button in the Settings menu
as a reminder that a newer version of firmware is available on the BenQ OTA server. Users can use the Update function in the About menu to
update the system at any time.
63
Page 64

Maintenance
Care of the projector
Your projector needs little maintenance. The only thing you have to do on a regular basis is keep the lens clean.
Never remove any parts of the projector. Contact your dealer or local customer service center if the projector fails to operate as expected.
Cleaning the lens
Clean the lens whenever you notice dirt or dust on the surface.
Before cleaning any part of the projector, turn it off using the proper shutdown procedure (see Shutting down the projector on page 30), unplug the
power cable, and let it cool down completely.
• Use a canister of compressed air to remove dust.
• If there is dirt or smears, use lens-cleaning paper or moisten a soft cloth with lens cleaner and gently wipe the lens surface.
• Never use any type of abrasive pad, alkaline/acid cleaner, scouring powder, or volatile solvent, such as alcohol, benzene, thinner or insecticide.
Using such materials or maintaining prolonged contact with rubber or vinyl materials may result in damage to the projector surface and cabinet
material.
Never touch the lens with your finger or rub the lens with abrasive materials. Even paper towels can damage the lens coating. Only ever use a proper photographic lens
brush, cloth, and cleaning solution. Do not attempt to clean the lens while the projector is switched on or is still hot from previous use.
Storing the projector
To store the projector for an extended time:
• Make sure the temperature and humidity of the storage area are within the recommended range for the projector. Refer to Specifications or
consult your dealer about the range.
• Retract the adjuster feet.
• Pack the projector in its original packing or equivalent.
64
Page 65

Transporting the projector
It is recommended that you ship the projector with its original packing or equivalent.
Extending LED life
The LED headlight includes a bulb which features a light-source life far beyond traditional bulbs, yet it is still a consumable item. To keep the LED life as
long as possible, you can change the following settings via the settings menu.
To access the settings menu, see Using the Settings menu on page 52 for details.
Setting LED Mode
Set the projector Light Mode to Economic to extend the LED life.
LED mode Description
Normal 100% LED brightness.
Economic
1. Select Settings > Light > Light Mode.
2. Press ( / ) to move to your desired mode.
3. When done, press to your changes and exit.
This setting reduces system noise and power consumption by 30%. If Economic is selected, the light output
will be reduced and result in darker projected pictures.
Setting Auto Power Off
This function allows the projector to turn off automatically if no action is detected after a set period of time.
1. Select Settings > Start On/Off > Auto Off .
2. Press ( / ) to select a time period.
3. When done, press to save your changes and exit.
65
Page 66

Troubleshooting
If your problems remain after checking this manual, please contact your place of purchase or visit the local website from Support.BenQ.com for more
support and local customer service.
Problem Cause Remedy
Plug the power cable into the AC inlet on the rear of
The projector does not turn on. There is no power from the power cable.
the projector, and plug the power cable into to the
power outlet. If the power outlet has a switch, make
sure that it is switched on.
No Google Play.
The projector cannot project the screen on
mobile phones or laptops via USB-C cables.
The projector cannot connect with
Bluetooth speakers or headphones.
Aptoide, instead of Google Play, is
provided for streaming apps download.
The mobile phones or laptops do not have
DisplayPort functionality.
The USB-C cable is not compatible.
The Bluetooth function is not enabled. Make sure the Bluetooth function on both the
The Bluetooth device and the projector are
not within an 8 meter range of each other.
66
On the BenQ Launcher home screen, select the
Aptoide icon to access the app market and download
apps for streaming contents.
Make sure the USB-C port on the device has
DisplayPort functionality (with a DisplayPort IC
inside), supports DisplayPort version 1.1 (or above)
and timings as listed in Timing chart on page 72.
Use a USB-C Gen 3.1 cable to ensure sufficient
bandwidth for media data transmission.
Bluetooth device and the projector are enabled. See
Pairing/Connecting to a Bluetooth speaker or
headphones on page 47 for more details.
Page 67

Problem Cause Remedy
The projector cannot play files in storage
devices via USB-A ports.
Screen brightness is changed.
No input source.
The storage device is not connected to the
projector properly.
The projector does not support the file
formats.
Make sure your storage device is fully inserted into
one of the USB-A ports on the projector.
See Supported file formats on page 76 for more
information about file formats supported by the
projector.
The adapter is removed. The LED brightness is decreased in Economic to
support longer projection. If a brighter screen is
The adapter is not removed but the Light
Mode is switched to Economic.
The video source is not turned on or
connected correctly.
preferred, connect the power adapter to the projector
or change the Light Mode to Normal.
Turn the video source on and check that the signal
cable is connected correctly.
Check the connection.
The projector is not correctly connected to
the input source device.
If input source is the USB-C port, make sure the
source device supports DisplayPort and is connected
to the projector with a USB-C Gen 3.1 cable.
The video or audio file format is not
supported by the projector.
Make sure the supported file format as described in
Supported file formats on page 76 is being played, or
contact the customer service for assistance.
Image or audio is unstable.
The connection cables are not securely
connected to the projector or the signal
source.
The Internet bandwidth is limited or
over-occupied.
The projector is out of effective range of
Bluetooth connection.
67
Correctly connect the cables to the appropriate
terminals.
Connect to another wireless AP or to an Internet
channel of better speed.
Make sure the projector is within the effective range of
Bluetooth connection.
Make sure there is as less radio frequency interference
as possible when using a 2.4G network.
Page 68

Problem Cause Remedy
Picture is blurred.
Remote control does not work correctly.
The projector cannot find the desired SSID.
The projector cannot connect to the desired
SSID.
The projection lens is not correctly focused.
The projector and the screen are not
aligned properly.
Adjust the focus of the lens using focus key on the
remote control.
Adjust the projection angle and direction as well as the
height of this projector if necessary.
The batteries are out of power. Replace both of the batteries with new ones.
There is an obstacle between the remote
control and the projector.
Remove the obstacle.
You are too far away from the projector. Stand within 8 meters (26.2 feet) of the projector.
The radio frequency of the router is out of
range.
The handshaking between the projector and
the router does not follow IEEE 802.11
protocols.
Based on your country, make sure the router’s SSID is
set to a channel listed in Channel settings for routers
on page 77.
• For 2.4G frequency, make sure the wireless mode of
the router is configured as 802.11g/n or 802.11n.
• For 5G frequency, make sure the wireless mode of
the router is configured as 802.11n.
68
Page 69

Specifications
Projector specifications
All specifications are subject to change without notice.
Specifications
Projection System DLP
DMD Type 0.47
Native Resolution 4K UHD (3840 x 2160 pixels)
Brightness 1000 lm
Contrast Ratio (FOFO) 100,000:1
Display Color 1.07 Billion Colors
Aspect Ratio Native 16:9
Light Source LED
Light Source Life
Throw Ratio 0.8 (100” ±3%@1.77M)
Zoom Ratio Fixed
Keystone Correction 1D, Auto Vertical ± 40 degrees
Projection Offset 100% ± 5%
Projection Size (Clear Focus / Maximum) 60 to 160 inches
SoC MStar 838
(1)
20,000 hours
69
Page 70

OS Android 6.0
RAM 3G DDR3
Flash 16G EMMC
Specifications
WLAN
(2)
IEEE 802.11 a/b/g/n/ac, 2.4G/5G
Bluetooth 4.0
• USB-A (2.0/1.5A/Reader) x1
• USB-A (3.0/1.5A/Reader) x1
• USB-C (DisplayPort 1.2/5V 1.5A)
Interface
• HDMI 2.0b x2
• SPDIF port x1
• 3.5mm Audio Out x1
• RJ45 Lan port
• Wireless dongle port
(1)
•
: LED life results will vary depending on environmental conditions and usage.
(2)
•
: The wireless projection and Bluetooth features are supported by detachable BenQ Wireless Dongle, WDR02U.
(3)
•
: Maximum resolution: 4K UHD (3840 x 2160) 60Hz.
(3)
x1
70
Page 71

Dimensions
195
195
224
195 (W) x 224 (H) x 195 (D) mm
71
Page 72

Timing chart
Supported timing for video input
Timing Resolution H. Frequency (KHz) V. Frequency (KHz) Dot Clock Frequency (MHz)
480i 720 (1440) x 480 15.73 59.94 27
480p 720 x 480 31.47 59.94 27
576i 720 (1440) x 576 15.63 50 27
576p 720 x 576 31.25 50 27
720/50p 1280 x 720 37.5 50 74.25
720/60p 1280 x 720 45.00 60 74.25
1080/24p 1920 x 1080 27 24 74.25
1080/25p 1920 x 1080 28.13 25 74.25
1080/30p 1920 x 1080 33.75 30 74.25
1080/50i 1920 x 1080 28.13 50 74.25
1080/60i 1920 x 1080 33.75 60 74.25
1080/50p 1920 x 1080 56.25 50 148.5
1080/60p 1920 x 1080 67.5 60 148.5
2160/24p 3840 x 2160* 54 24 297
2160/25p 3840 x 2160* 56.25 25 297
2160/30p 3840 x 2160* 67.5 30 297
2160/50p 3840 x 2160* 112.5 50 594
2160/60p 3840 x 2160* 135 60 594
72
Page 73

Supported by HDMI 2.0 only.
Supported timing for PC input
Resolution Mode Refresh Rate (Hz) H. Frequency (KHz) Dot Clock Frequency (MHz)
640 x 480
720 x 400 720 x 400_70 70.087 31.469 28.322
SVGA_60 60.317 37.879 40.000
SVGA_72 72.188 48.077 50.000
VGA_60 59.940 31.469 25.175
VGA_72 72.809 37.861 31.500
VGA_75 75.000 37.500 31.500
VGA_85 85.008 43.269 36.000
800 x 600
1024 x 768
SVGA_75 75.000 46.875 49.500
SVGA_85 85.061 53.674 56.250
SVGA_120
(Reduce Blanking)
119.854 77.425 83.000
XGA_60 60.004 48.363 65.000
XGA_70 70.069 56.476 75.000
XGA_75 75.029 60.023 78.750
XGA_85 84.997 68.667 94.500
XGA_120
(Reduce Blanking)
119.989 97.551 115.500
73
Page 74

Resolution Mode Refresh Rate (Hz) H. Frequency (KHz) Dot Clock Frequency (MHz)
1152 x 864 1152 x 864_75 75.000 67.500 108.000
1024 x 576 BenQ Notebook Timing 60.000 35.820 46.996
1024 x 600 BenQ Notebook Timing 64.995 41.467 51.419
1280 x 720 1280 x 720_60 60.000 45.000 74.250
1280 x 768 1280 x 768_60 59.870 47.776 79.500
SVGA_60 59.810 49.702 83.500
SVGA_75 74.934 62.795 106.500
1280 x 800
XGA_85 84.880 71.554 122.500
XGA_120
(Reduce Blanking)
119.909 101.563 146.250
SXGA_60 60.020 63.981 108.000
1280 x 1024
SXGA_75 75.025 79.976 135.000
1280 x 960_60 60.000 60.000 108.000
1280 x 960
1280 x 960_85 85.002 85.938 148.500
1360 x 768 1360 x 768_60 60.015 47.712 85.500
1440 x 900 WXGA+_60 59.887 55.935 106.500
1440 x 1050 SXGA+_60 59.978 65.317 121.750
1680 x 1050 1680 x 1050_60 59.954 65.290 146.250
640 x 480@67 Hz MAC13 66.667 35.000 30.240
832 x 624@75 Hz MAC16 74.546 49.722 57.280
1024 x 768@75 Hz MAC19 75.020 60.241 80.000
74
Page 75

Resolution Mode Refresh Rate (Hz) H. Frequency (KHz) Dot Clock Frequency (MHz)
1152 x 870@75 Hz MAC21 75.060 68.680 100.000
1920 x 1080@60 Hz 1920 x 1080_60 60.000 67.500 148.500
1920 x 1200@60 Hz
1920 x 1280_60
(Reduce Blanking)
59.950 74.038 154.000
1920 x 1080_60
1920 x 1080 (VESA)
(Only available for
models with BenQ Media
59.963 67.158 173.000
Center)
1920 x 1080_120
1920 x 1080@120 Hz
(Only available for
models with BenQ Media
120.000 135.000 297.000
Center)
3840x2160_30 30 67.5 297
3840x2160
3840x2160_60 60 135 594
The timings showing above may not be supported for due to EDID file and VGA graphic card limitations. It is possible that some timings cannot be chosen.
75
Page 76

Supported file formats
File type File extension
Documents .txt
Photos JPG(.jpg, .jpeg), PNG(.png), BMP(.bmp)
Music MP3(.mp3), AAC(.aac)
Video
Subtitles N/A
Bit rate range: If the peak bit rate of a video file is larger than 10MB, it might cause video playback lag.
XVID(.avi)
MPEG-4(3gp, mp4)
H.263(3g2, .avi, .mkv, .webm, 3gp, mp4)
76
Page 77

Channel settings for routers
Country/Area 2.4G
Canada, USA, China, Russia, Australia, New
Zealand, India, South Korea, Saudi Arabia,
Singapore, Taiwan
EU, UK, Japan, UAE
Indonesia Ch. 1-13 Ch. 149, 153, 157, 161
5G
Band 1 Band 4
Ch. 149, 153, 157, 161, 165
Ch. 1-11 Ch. 36, 40, 44, 48
77
 Loading...