

Page 1

Digital Camera
User Manual
GH680 / GH680F
GH688 / GH688F
Page 2
Copyright
English
Copyright 2013 by BenQ Corporation. All rights reserved. No part of this publication may be
reproduced, transmitted, transcribed, stored in a retrieval system or translated into any language or
computer language, in any form or by any means, electronic, mechanical, magnetic, optical, chemical,
manual or otherwise, without the prior written permission of BenQ Corporation.
All other logos, products, or company names mentioned in this manual may be the registered
trademarks or copyrights of their respective companies, and are used for informational purposes only.
Fonts by Arphic, Copyright Arphic Technology. Co., LTD. All rights reserved.
Disclaimer
BenQ Corporation makes no representations or warranties, either expressed or implied, with respect
to the contents hereof and specifically disclaims any warranties, merchantability or fitness for any
particular purpose. Further, BenQ Corporation reserves the right to revise this publication and to
make changes from time to time in the contents hereof without obligation of BenQ Corporation to
notify any person of such revision or changes.
This user manual aims to provide the most updated and accurate information to customers, and thus
all contents may be modified from time to time without prior notice. Please visit http://www.benq.com
for the latest version of this manual.
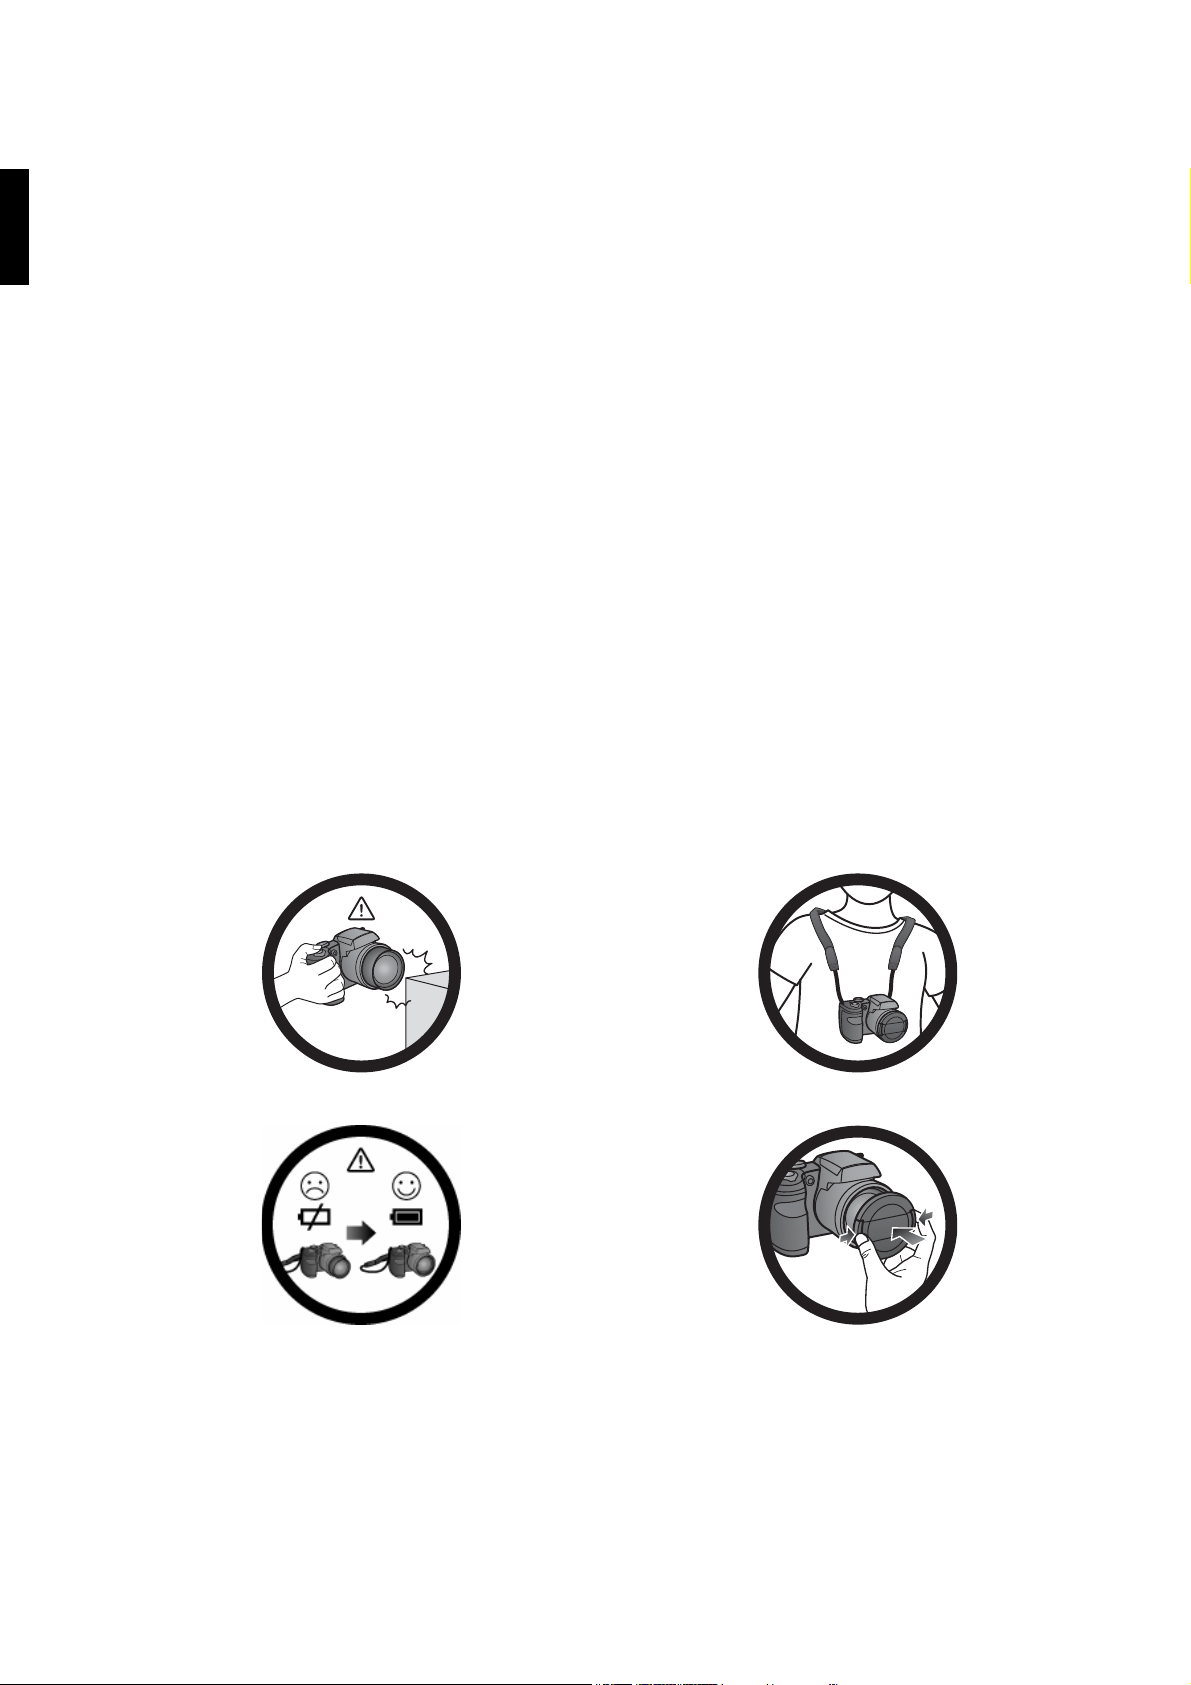
Do not hold the camera by excessive force. Plus, be sure to
protect the camera from strong impacts.
If the batteries suddenly depleted and caused the lens fail to
retract, please carefully protect the lens to avoid collision
and insert batteries with full power ASAP..
To avoid accidental falling, please attach the neck strap to
the camera and always put the camera around your neck.
When the camera is not in use, always turn the power off.
Plus, before storing the camera in its case, make sure the
lens has retracted successfully and you put the lens cover
back. If you do not intend to use the camera for a long
time, please remove the batteries from the camera and
store the batteries carefully.
Page 3

English
Keep your camera away from sharp objects and avoid
collision.
When the camera is not in use, please place it in the pouch
and a steady place. Plus, always keep your camera away
from pressure to avoid possible damage.
Federal communication commission interference
statement
This device complies with Part 15 of the FCC Rules. Operation is subject to the following two
conditions: (1) This device may not cause harmful interference, and (2) this device must accept any
interference received, including interference that may cause undesired operation.
This equipment has been tasted and found to comply with the limits for a Class B digital device,
pursuant to Part 15 of the FCC Rules. These limits are designed to provide reasonable protection
against harmful interference in a residential installation. This equipment generates, uses and can radiate
radio frequency energy and, if not installed and used in accordance with the instructions, may cause
harmful interference to radio communications. However, there is no guarantee that interference will
not occur in a particular installation. If this equipment does cause harmful interference to radio or
television reception, which can be determined by turning the equipment off and on, the user is
encouraged to try to correct the interference by one of the following measures:
• Reorient or relocate the receiving antenna.
• Increase the separation between the equipment and receiver.
• Connect the equipment into an outlet on a circuit different from that to which the receiver is
connected.
• consult the dealer or an experienced radio/TV technician for help.
FCC Caution: Any changes or modifications not expressly approved by the party responsible for
compliance could void the user’s authority to operate this equipment.
This transmitter must not be co-located or operating in conjunction with any other antenna or
transmitter.
Page 4

Radiation exposure statement
English
This product comply with the FCC portable RF exposure limits set forth for an uncontrolled
environment and are safe for intended operation as described in this manual. The further RF exposure
reduction can be achieved if the product can be kept as far as possible from the user body or set the
device to lower output power if such function is available.
BenQ ecoFACTS
BenQ has been dedicated to the design and development of greener product as part of its aspiration
to realize the ideal of the "Bringing Enjoyment 'N Quality to Life" corporate vision with the ultimate
goal to achieve a low-carbon society. Besides meeting international regulatory requirement and
standards pertaining to environmental management, BenQ has spared no efforts in pushing our
initiatives further to incorporate life cycle design in the aspects of material selection, manufacturing,
packaging, transportation, using and disposal of the products. BenQ ecoFACTS label lists key ecofriendly design highlights of each product, hoping to ensure that consumers make informed green
choices at purchase. Check out BenQ’s CSR Website at http://csr.BenQ.com/ for more details on
BenQ’s environmental commitments and achievements.
About this manual
In this user manual, the steps needed to reach a menu are shown in condensed form, for example:
[icon] > Settings > Display.
Words highlighted in blue contain hyper links to further explanations.
Page 5

Table of contents
Touring the camera .................................................................................................................... 7
Checking the package contents .................................................................................................................... 7
Camera ............................................................................................................................................................... 8
Front & back views ....................................................................................................................................................................... 8
Top & bottom views ....................................................................................................................................................................8
Right & left views .......................................................................................................................................................................... 9
4-way control and OK button ....................................................................................................................10
Preparing the camera before using .......................................................................................11
Attaching the strap ........................................................................................................................................11
Installing the battery ......................................................................................................................................12
Charging the battery ..................................................................................................................................... 13
Battery status .................................................................................................................................................. 13
Installing an SD card ...................................................................................................................................... 14
Turning on and off .........................................................................................................................................15
Setting the OSD language ............................................................................................................................15
Setting date and time ....................................................................................................................................15
Using the LCD screen ..................................................................................................................................16
Using the shutter ...........................................................................................................................................17
Opening the flash ...........................................................................................................................................17
Operating the camera ..............................................................................................................18
Capturing still images ....................................................................................................................................19
Mode dial ...................................................................................................................................................................................... 20
Self-timer ...................................................................................................................................................................................... 27
Focus .............................................................................................................................................................................................. 28
Flash ...............................................................................................................................................................................................28
EV ...................................................................................................................................................................................................29
Zoom framing assistant ............................................................................................................................................................. 30
Selections in function button ................................................................................................................................................... 30
Selections in menu button ........................................................................................................................................................35
Recording videos ...........................................................................................................................................39
Selections in menu button ........................................................................................................................................................40
Images and videos playback ......................................................................................................................... 42
Viewing still images ..................................................................................................................................................................... 42
Viewing videos ............................................................................................................................................................................. 43
Options for playback and editing ............................................................................................................................................ 43
Other settings ................................................................................................................................................ 51
Accessory: remote control (GH680F/GH688F only) ...........................................................................53
Accessory: lens hood ....................................................................................................................................54
Connection to the camera ......................................................................................................55
Wired connection .........................................................................................................................................55
Connecting the camera to a TV set ....................................................................................................................................... 55
Connecting the camera to a computer .................................................................................................................................55
Connecting the camera to a printer ...................................................................................................................................... 55
Wireless connection (GH680F/GH688F only) .......................................................................................58
Camera network settings ......................................................................................................................................................... 58
To smart devices......................................................................................................................................................................... 62
To your camera........................................................................................................................................................................... 66
Specifications & troubleshooting ...........................................................................................70
5
Page 6

Specification table ..........................................................................................................................................70
Troubleshooting and service information ................................................................................................71
Technical support ..........................................................................................................................................72
6
Page 7

Touring the camera
1
3
4
5
6
8
9
10
7
11
2
Checking the package contents
Carefully unpack your kit box and ensure that you have the following items.
1 Quick guide 6 Neck strap
2 Digital Camera 7 Lens hood (optional)
3 USB cable 8 Pouch (optional)
4 Li-Ion battery 9 Lens cover
5 Remote Control (GH680F/GH688F only) 10 Lens strap
11 USB adapter (The type of plug may vary
depending on the country or region.)
• All pictures, screen captures, and icons used in this manual are for illustration only. Actual and available
products, accessories, as well as their appearance may vary depending on sales region.
• If any of the items is missing or damaged, contact your dealer.
• Save the packaging for future shipment or storage.
• It is normal for the camera to become warm during operation because the camera casing might conduct heat.
7 Touring the camera
Page 8
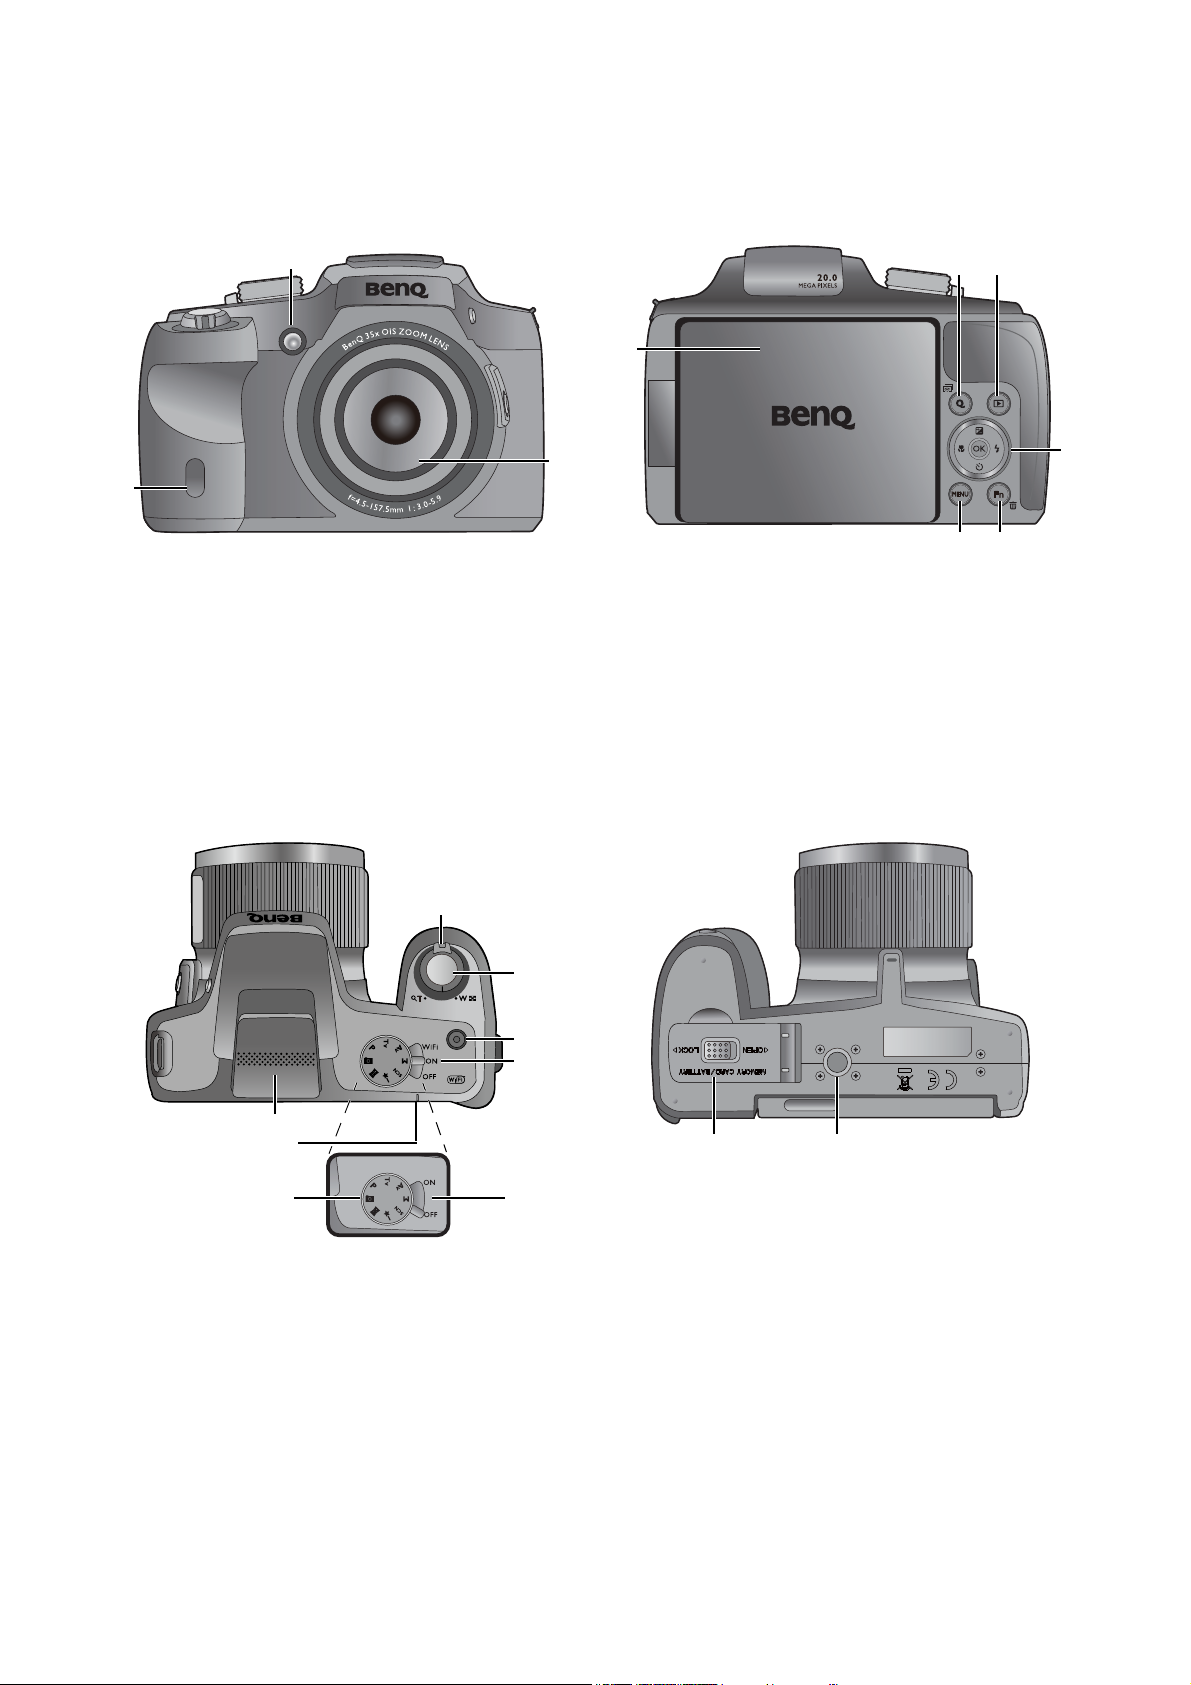
Camera
1
1
3
2
45
6
78
9
10
1415
16
11
12
13
17
18 19
Front & back views
1. AF Assist Lamp / Self-timer LED indicator
2. Lens
3. IR Receiver (GH680F & GH688F only)
Top & bottom views
4. Q key (Wi-Fi for GH680F / GH688F only)
5. Playback button
6. OK button / 4-way control
7. Function / Delete button
8. Menu button
9. Swivel LCD screen
10.Zoom lever
11.Shutter button
12.Movie record button
13.Power / Wi-Fi lever (GH680F & GH688F only)
14.Power lever (GH680 & GH688 only)
15.Mode dial
16.Status LED
17.Microphone
8 Touring the camera
18.Battery / card cover
19.Tripod mount
Page 9

Right & left views
20
23
22
21
23
24
20.Flash button
21.Zoom framing assistant button
23.Strap eyelet
24.USB / AV Out
22.Speaker
23.Strap eyelet
LED indicator light behavior
Indicator State Description
Self-timer LED Blinking red The self-timer function is activated.
Off The camera is off.
Status LED
As battery is charged, the blink frequency increases.
Solid green The battery is fully charged.
• The camera is updating firmware.
Blinking green
• The camera is charging battery.
9 Touring the camera
Page 10

4-way control and OK button
You can choose camera settings by pressing the 4-way control or button.
1. EV / Up:
• Changes EV settings.
• Navigates through the menu and submenu
selections.
2. Focus / Left:
• Scrolls through focus options.
• Views the previous image or video clip in
playback.
• Rewinds video playback.
• Exits a submenu or navigates through menu
selections.
4. OK:
• Confirms a chosen setting.
• Starts / Pause video playback.
• Pause when video recording.
• Enters a submenu or navigates through menu
selections.
3. Self-timer / Down:
• Scrolls through self-timer options.
• Stops video playback.
• Navigates through menu and submenu
selections.
5. Flash / Right:
• Scrolls through flash mode options.
• Views the next image or video clip in playback.
• Forwards video playback.
10 Touring the camera
Page 11
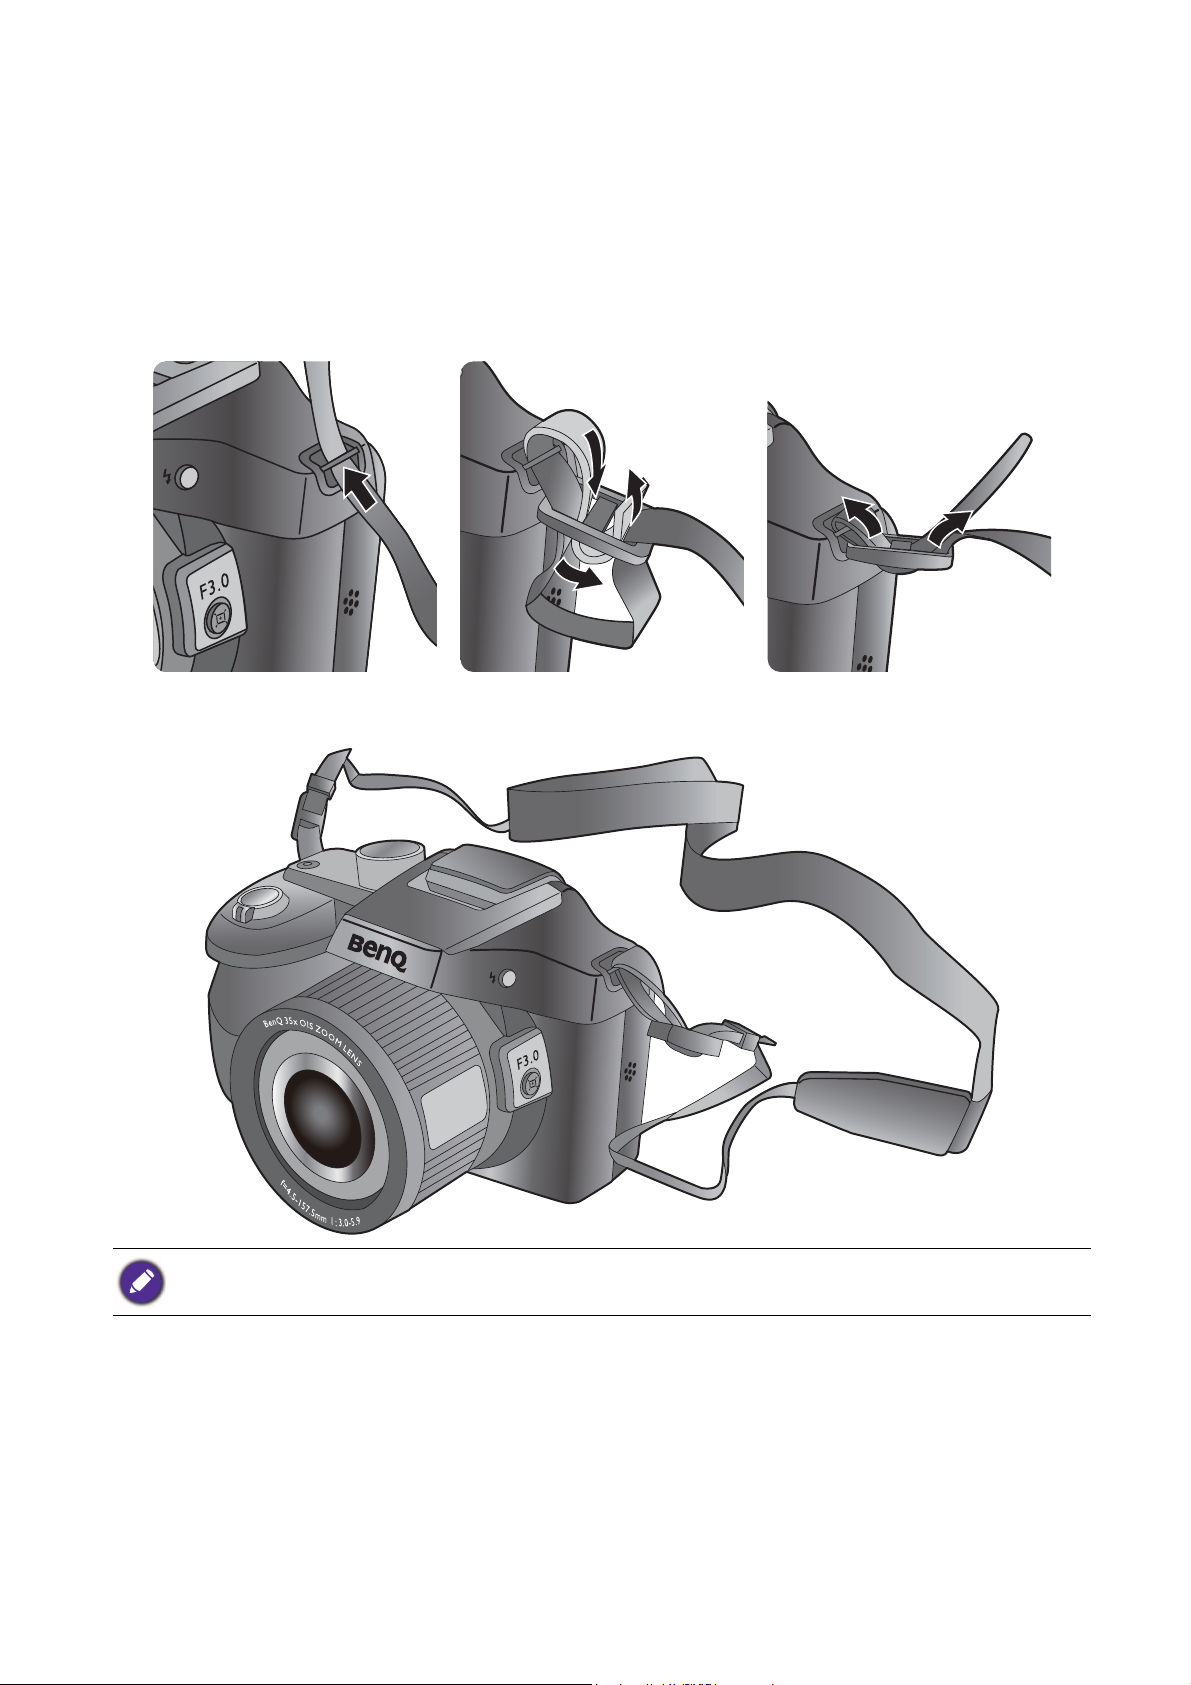
Preparing the camera before using
This section will guide you on how to prepare the camera before its initial use.
Attaching the strap
1. Follow the illustrations below left to right to attach the strap to the camera.
2. Apply the same steps on the other side of the strap eyelet, and you are done attaching the strap
to the camera.
• Wrapping the strap around your neck is dangerous. Refrain children from playing with the strap.
• Remove the lens cover before using the camera.
11 Preparing the camera before using
Page 12
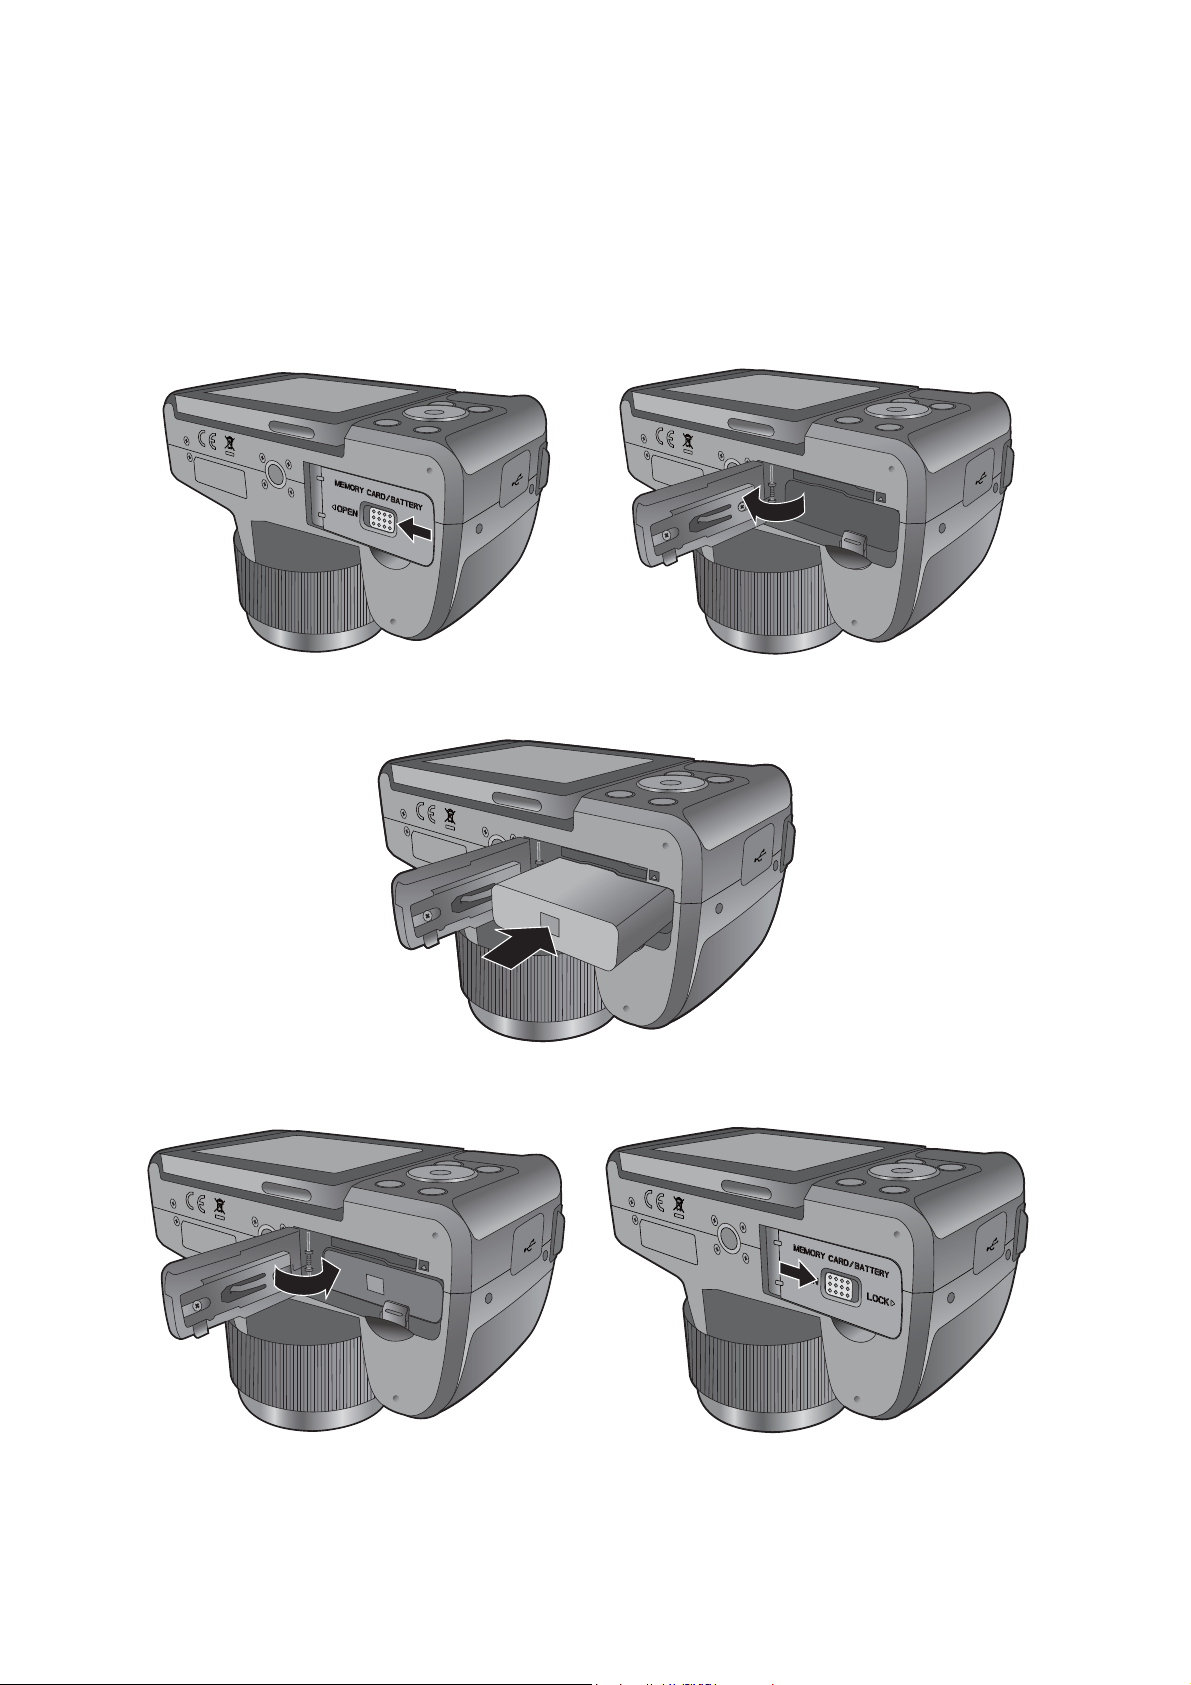
Installing the battery
Use only the specified battery for the camera, and always turn off the camera before removing the
battery.
To install the battery:
1. Unlock and open the battery/card cover.
2. Fully insert the battery in the correct direction by matching the polarity label on the battery slot.
3. Close and lock the battery/card cover.
12 Preparing the camera before using
Page 13
• Turn off the camera before removing the battery.
• Use only the specified battery type. Using other battery type may damage the camera and invalidate the
warranty.
• Ensure that the battery is inserted into the product with correct polarity. Incorrect polarity may damage the
camera or cause fire.
• Download all pictures and remove the battery from the camera if you are going to store the camera for a long
time.
• The battery may be warm after being used. This is normal and not a malfunction.
• When using the camera in a cold environment, keep the camera and its battery warm by holding it inside your
jacket or another warm protective environment.
Charging the battery
You must charge the battery before using the camera for the first time.
1. Open the USB / AV port cover.
2. Connect the end of the smaller plug of the USB cable to the camera.
3. Connect the other end of the USB cable to the USB adapter.
4. Plug the USB adapter to a wall outlet to start charging.
• Actual charging time depends on current battery capacity and charging conditions.
• You can also charge the battery via PC.
• Only use the supplied 5W adapter.
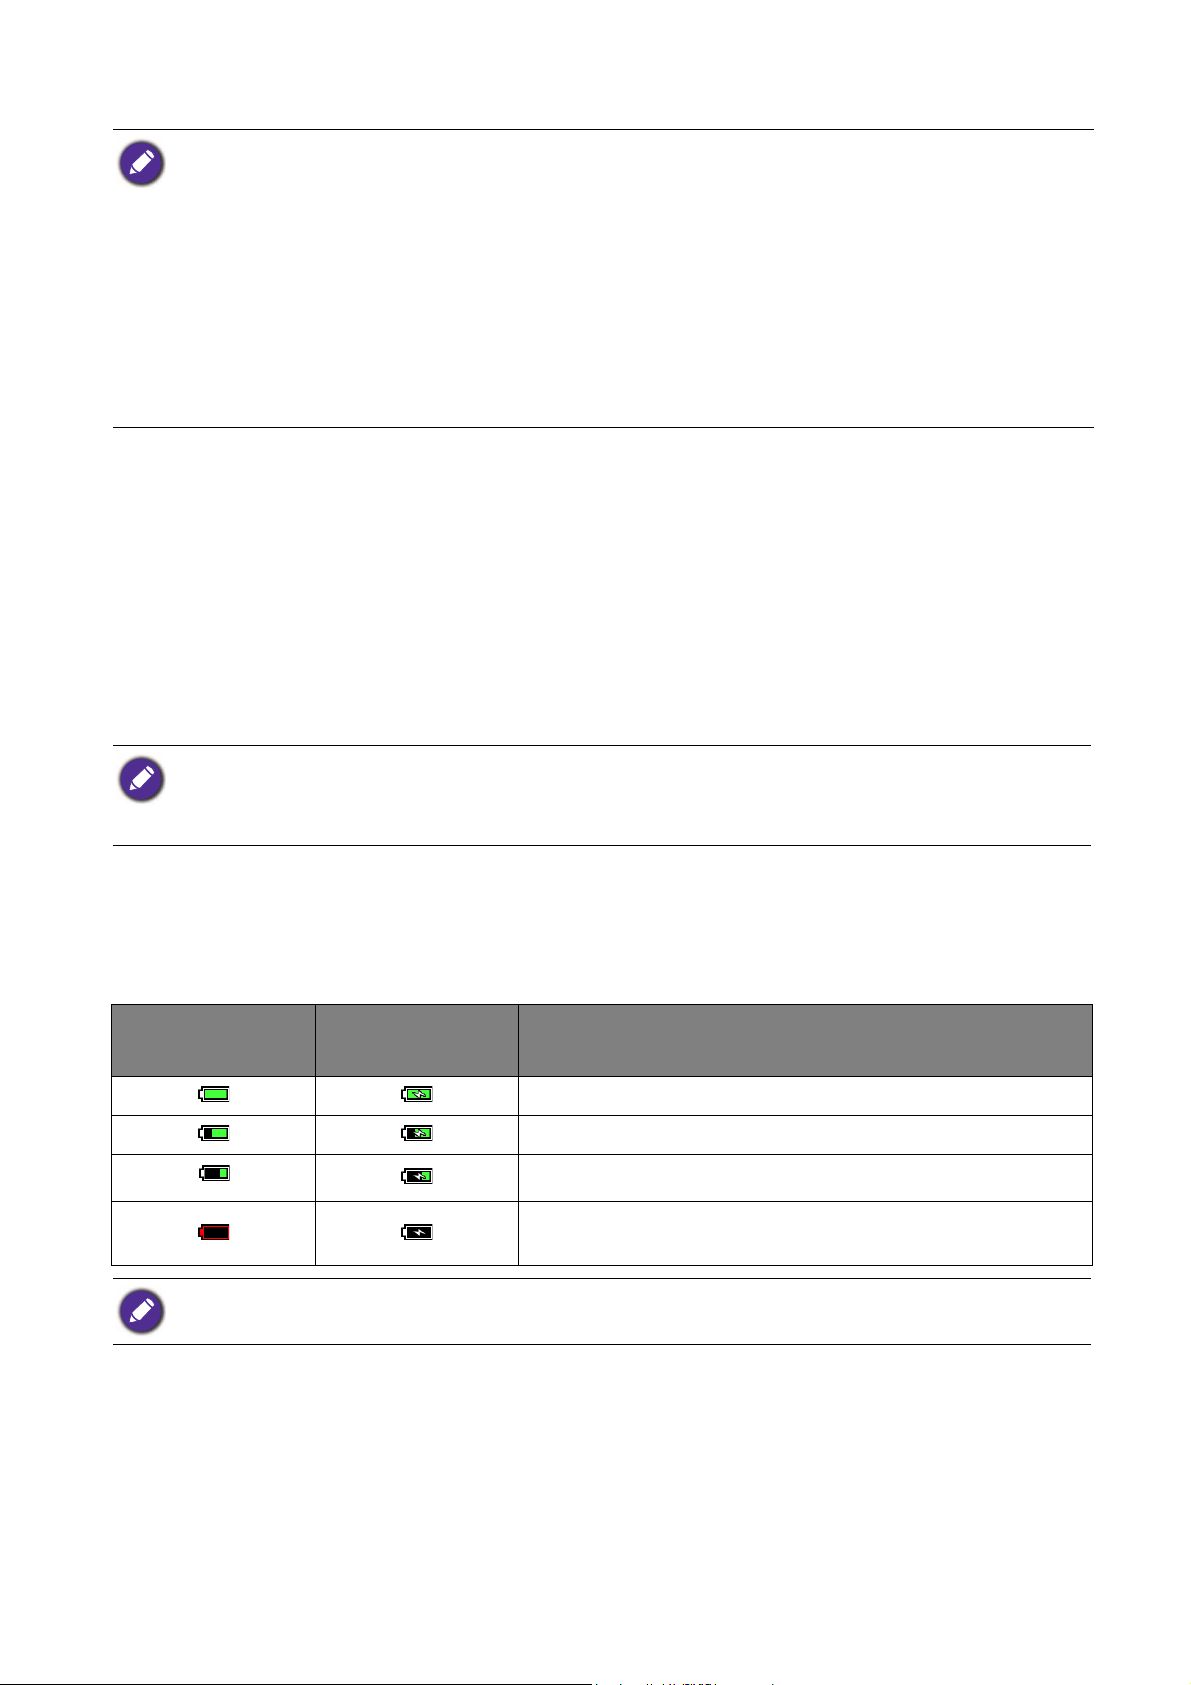
Battery status
You may check the battery status on LCD screen when turning on the camera.
Non-Charging
mode
Charging mode icons display only when the camera is turned on in playback mode before connecting charging
cable to the camera.
Charging mode Description
Battery power is full.
Battery power remains adequate.
Battery power is low.
Battery power is very low. You should replace the
battery.
13 Preparing the camera before using
Page 14

Installing an SD card
The camera comes with internal memory for storing captured images or video clips. You can also add
an SD card to store more files.
To install an SD card:
1. Unlock and open the battery / card cover.
2. Insert an SD card in the correct direction.
3. Close and lock the battery / card cover.
Before initial use of an SD card, please format the card first by pressing > > Format > / > Yes >
.
14 Preparing the camera before using
Page 15
To remove an SD card:
1. Unlock and open the battery / card cover.
2. Lightly press the edge of the memory card to eject.
3. Close and lock the battery / card cover.
Turning on and off
Before turning on the camera, be sure to remove the lens cover. Otherwise, the lens will not be extended and the
camera will beep for a few times.
• Switch the power lever by the mode dial to ON, and the camera is turned on in capture mode.
• Switch the power lever by the mode dial to OFF, and the camera is turned off.
You will be prompted to setup the OSD language and the date and time when the camera is turned
on for the first time.
Setting the OSD language
Selects the language to be shown on the screen.
To select a language:
1. Press > > Language .
2. Use 4-way control and press to locate and set the desired language.
Ignorance of the setting of language will lead OSD language to English as the default.
Setting date and time
When using the camera for the first time or when the battery has been removed from the camera
for a long time, you need to set the date and time. The date and time is recorded when a video or
image is captured.
To set date and time:
1. Press > > Date & Time.
2. Use 4-way control to move and select date, time, and date format. Press to set the date and
time.
Lack of the setting of date and time will stop the time and remain the date by default.
15 Preparing the camera before using
Page 16
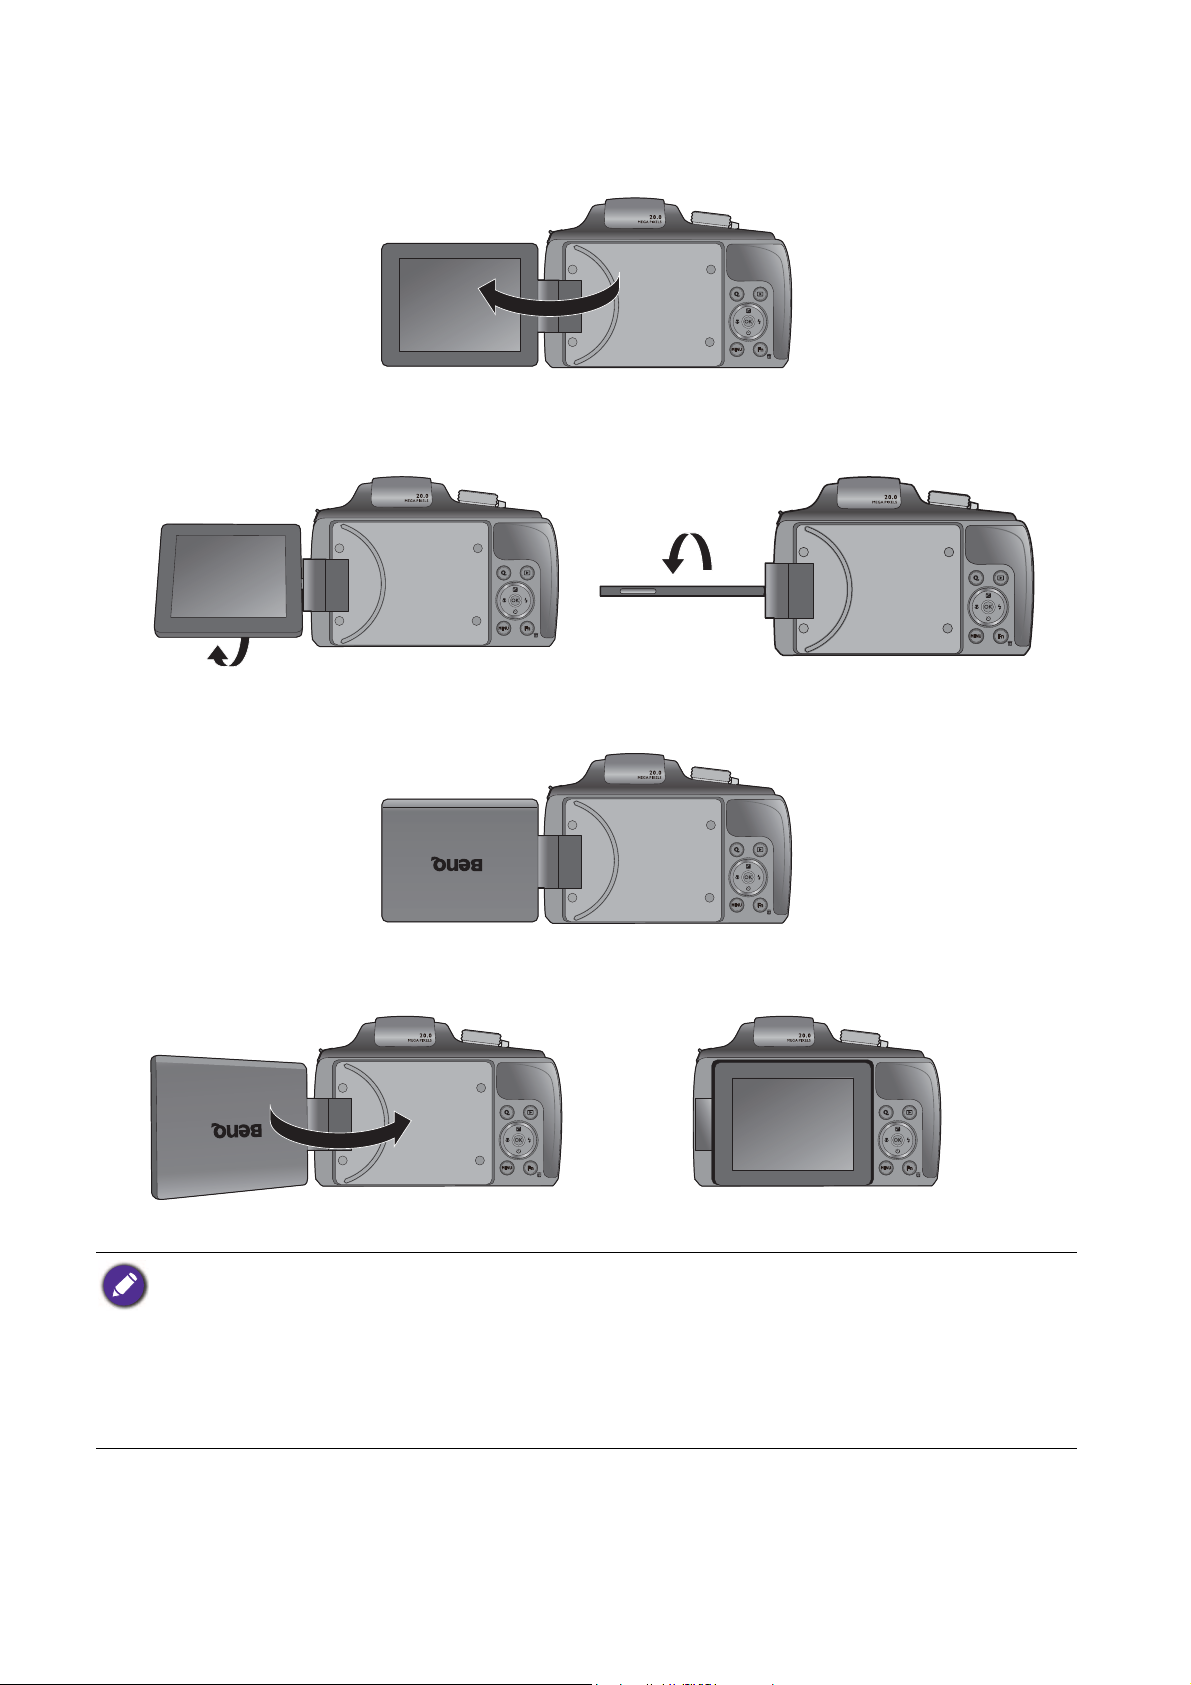
Using the LCD screen
Flip the LCD screen outwards 180° to fully open.
• For high- or low-angle photography, twist it down at the appropriate angle. You can rotate the
screen to a maximum of 90° downward.
• For self portrait, rotate it up at the appropriate angle. You can twist the screen to a maximum of
180° upward.
• In addition to flipping the LCD screen, you can rotate it 180° upward and fold it fully to the back of
camera to secure its position.
• To avoid damage to the screen hinge or LCD screen, do not twist the screen more than the angle allowed or
place excessive force on the hinge or screen.
• The LCD screen on this camera is manufactured with sophisticated technology, and more than 99.99% of the
pixels on the LCD screen meet standard specifications. Yet, it is possible that less than 0.01% of the pixels on
the LCD screen may have some light spots or show unusual colors. This is normal and does not indicate screen
malfunction, nor will this affect the pictures you take with the camera.
• The LCD monitor looks darker in strong sunlight or bright light. This is not a malfunction.
16 Preparing the camera before using
Page 17
Using the shutter
• Press the shutter halfway to automatically adjust focus and exposure.
• Once the focus is set, the focus frame color will turn from white (unfocused) to green
(focused).
• Press the shutter down fully to capture the image.
To prevent your images from being blurred, always hold the camera steadily while pressing the shutter. This is
especially important when you are shooting under low lighting conditions, under which your camera may reduce
the shutter speed to ensure your images are properly exposed.
Opening the flash
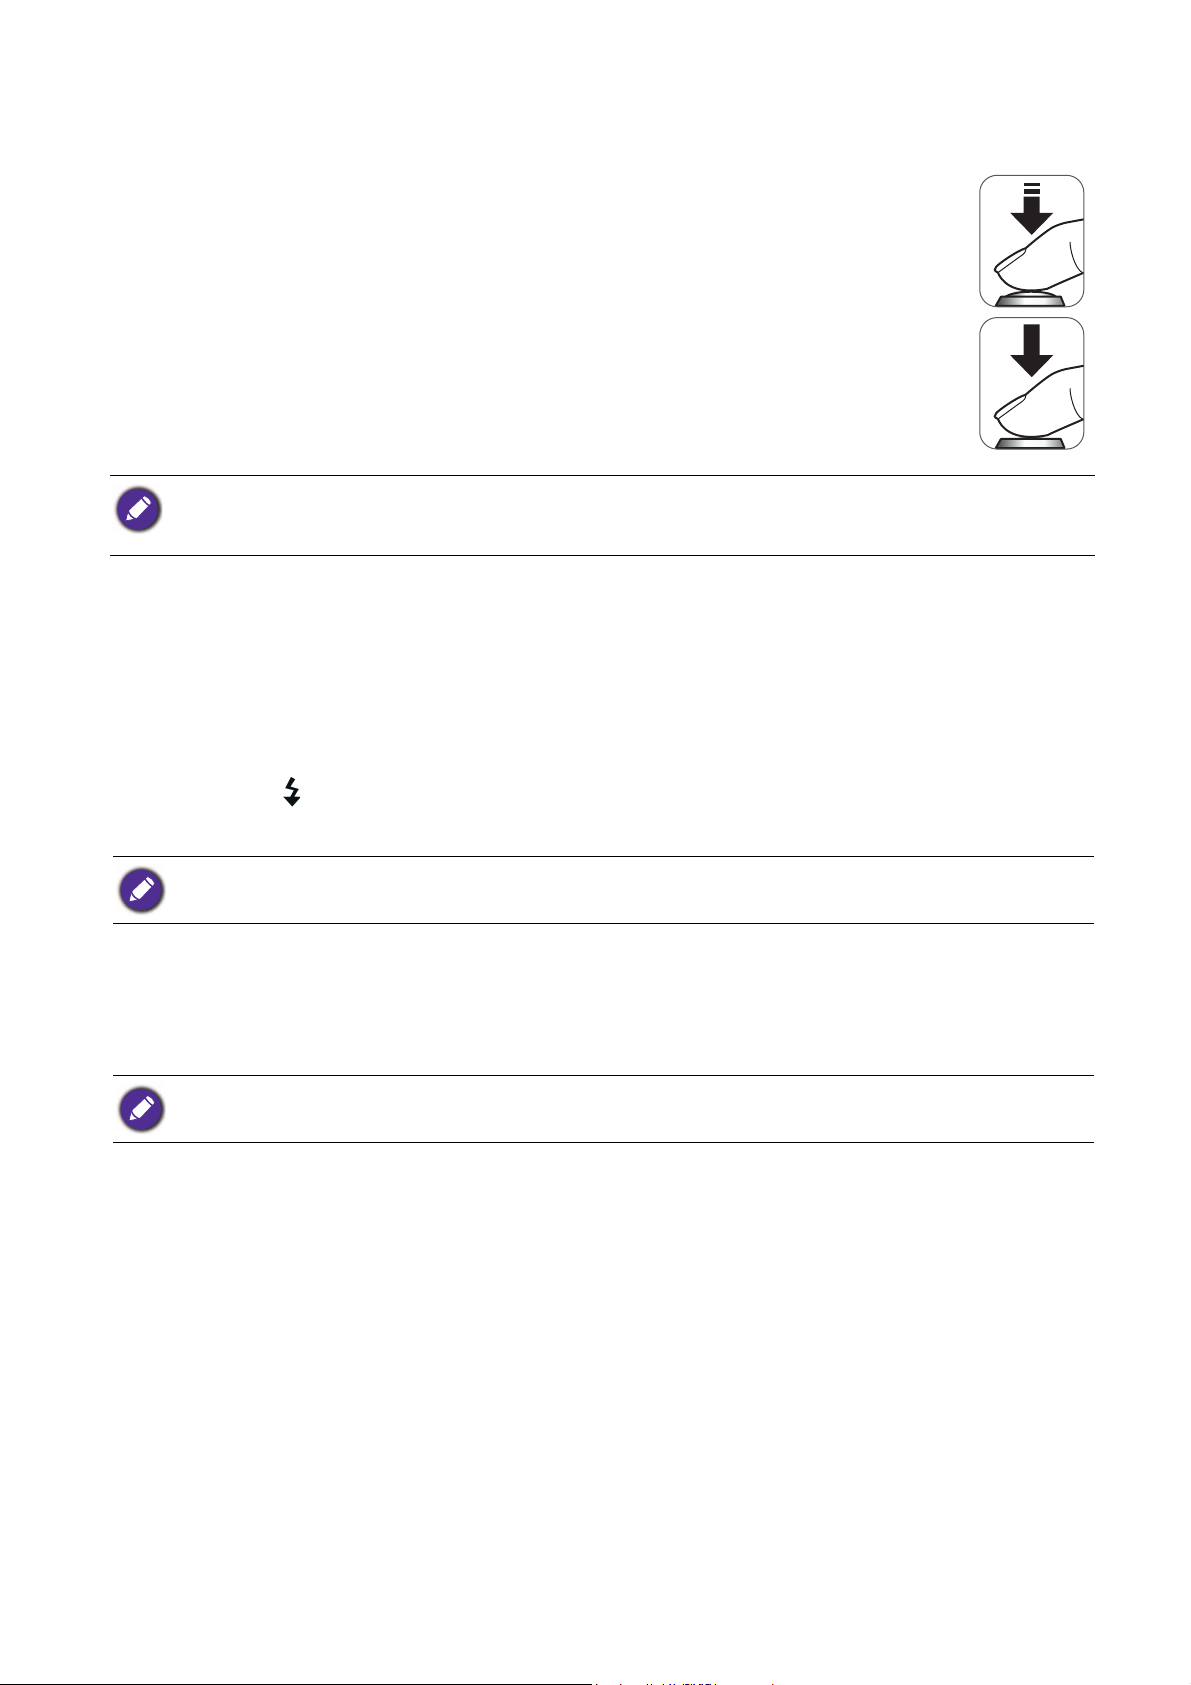
You need to manually open the flash before switching the flash mode.
To o p e n t h e f l a s h :
Press the button by the side of the flash to open it.
Do not use your hands to forcibly open the flash.
To c l o s e t h e f l a s h :
Push down the flash to close it.
When the flash is closed, flash mode is automatically set to flash off.
17 Preparing the camera before using
Page 18
Operating the camera
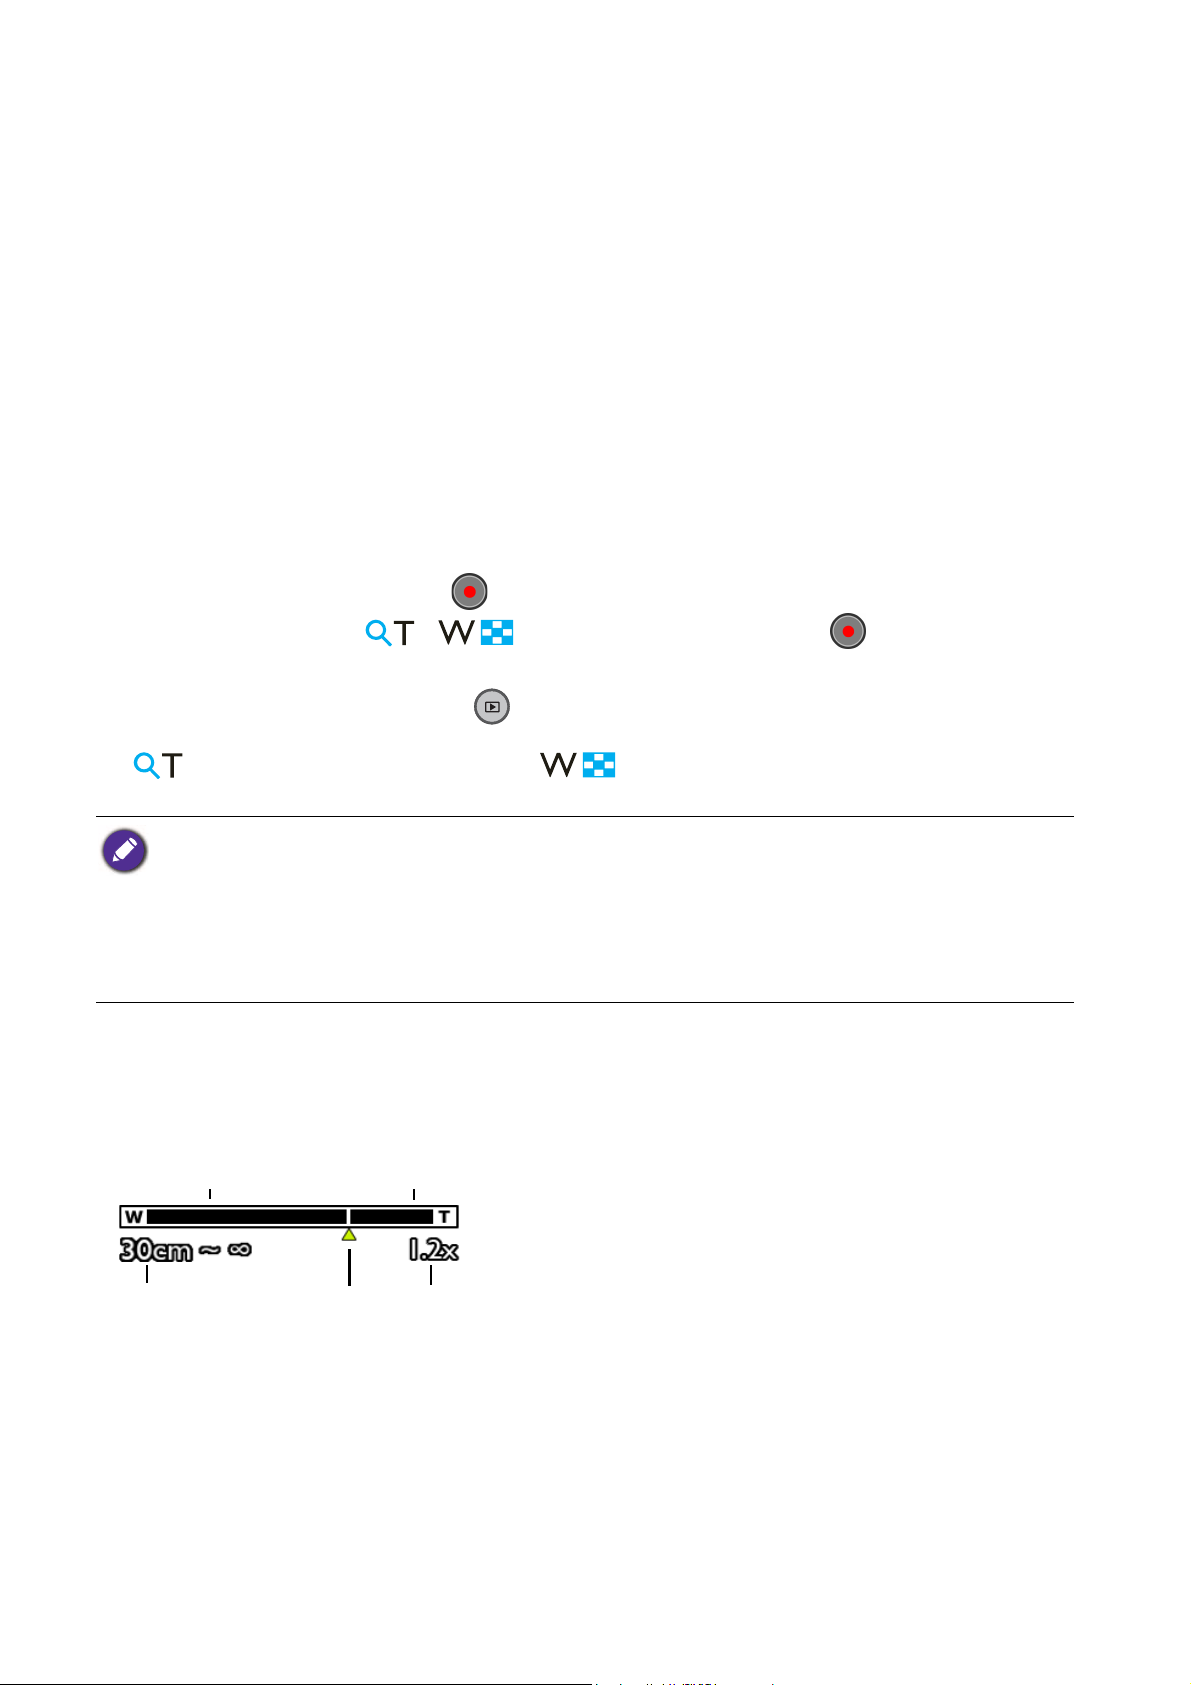
Optical Zoom
Focus
Range
Zoom
Ratio
Wise Zoom
Indicator
Digital / Wise Zoom
The procedure below is a general guideline for basic operation. It is particularly useful if you are new
to the camera.
1. Removed the lens cover.
2. Use the power lever to turn the power on. LCD screen displays a BenQ logo while turning off
the camera. Wait for the logo to disappear if you wish to turn on again.
3. Set the mode dial to desired shooting mode.
4. If you need to use the flash for shooting, press the flash button to open the flash.
5. Slide the zoom lever for zooms.
6. Press the shutter halfway to set automatic focus. Once the focus is set, the focus frame color will
turn from white (unfocused) to green (focused).
7. Press the shutter down fully to capture the image.
8. To switch to movie mode, press . The video recording automatically starts. While recording,
slide the zoom lever to / for zoom-ins/zoom-outs. Press again to stop video
recording.
9. To switch to playback mode, press . In playback mode, you can view captured images or
recorded videos. You can use 4-way control to view other images/videos. Slide the zoom lever to
to zoom-in on a captured image or to view images in 9-thumbnail, 36-thumbnail,
or calendar format on the screen.
• Flash is automatically turned off in the movie mode.
• In movie mode, the camera records both sound and video. The camera will automatically stop recording either
when the video file size reaches 4GB or the recording time is more than 29 minutes.
• At any time, you can use the power lever to turn off the camera.
• During zoom-in/out, there is a separator in the zoom bar between
recommended to use optical zoom only by keeping the magnification within
• Zoom Indication
The zoom operation can be activated by rotating the zoom lever.
When the camera is turned on, the zoom is at maximum wide-angle
position. When the camera is zoomed at maximum optical position,
slide and hold the zoom lever at T to active the digital zoom to 8x
under
Digital Zoom setting, to 3x under Wise Zoom setting.
• Focus Range
Whenever the zoom lever is slid, the focus range at the current zoom
point is displayed on the LCD screen.
• Wise Zoom Indicator
When
Wise Zoom is enabled, the resolution setting is to 20M in 4:3
aspect ratio. As zooming in passed wise zoom indicator, the
resolution will be reduced to maintain lucidity.
• Zoom Ratio
T and W. For best image quality, it is
W and the separator.
18 Operating the camera
While rotating and holding the zoom lever to exceed the maximum
optical position and enter the digital zoom, the zoom ratio is
displayed on the LCD Screen.
Page 19
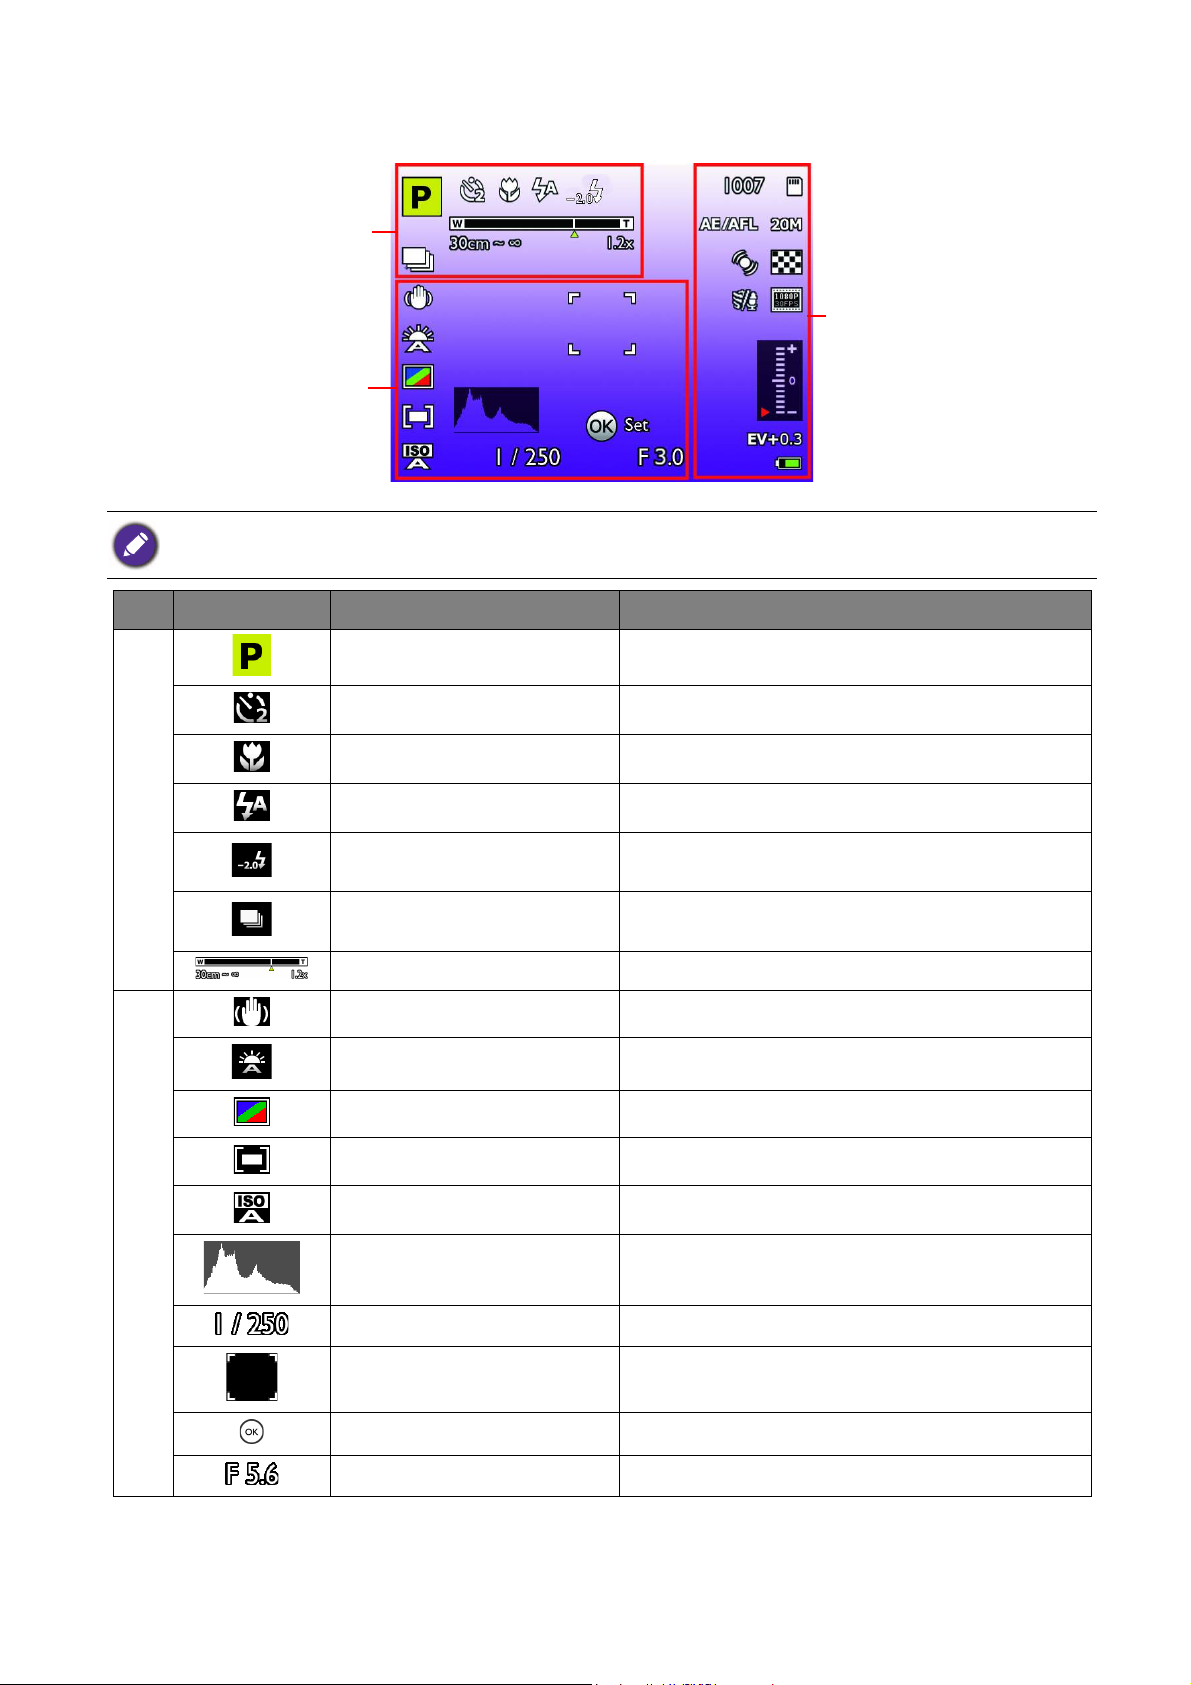
Capturing still images
A
B
C
LCD screen display examples. Actual display may vary.
Icon Item Description
Scene / Filter mode indicator Indicates the current mode.
Self-timer Indicates Self-timer settings.
A
B
Focus mode Indicates focus is enabled.
Flash mode Indicates flash settings.
Flash EV
AEB (Auto Exposure
Bracketing)
Zoom Indication Displays zoom.
O.I.S. Indicates stabilizer function is enabled.
White balance Displays white balance settings.
Color mode Indicates color mode settings.
Metering Displays metering settings.
ISO Displays ISO settings.
Histogram Graphic display of tonal distribution.
Shutter speed Displays shutter speed settings. (P/Av/TV/M)
Indicates the flash strength based on the EV
setting.
indicates burst mode/AEB settings.
Focus frame Indicates focus area.
OK Indicates to press the button. (Av/TV/M)
Aperture value Displays aperture settings. (P/Av/TV/M)
19 Operating the camera
Page 20
Icon Item Description
C
Mode dial
Number of recordable
images
Indicates the remaining shots available.
AE/AF Lock Indicates AE/AF Lock is enabled.
Motion detection Indicates motion detection is enabled.
Wind cut Reduces wind noise during movie recording.
Storage media Indicates external storage media in use.
Resolution Displays photo size settings.
Quality Displays quality settings.
Movie option Indicates movie size.
Exposure meter Displays Exposure bracketing settings. (M)
Exposure value Displays exposure compensation settings.
Battery Indicates battery level.
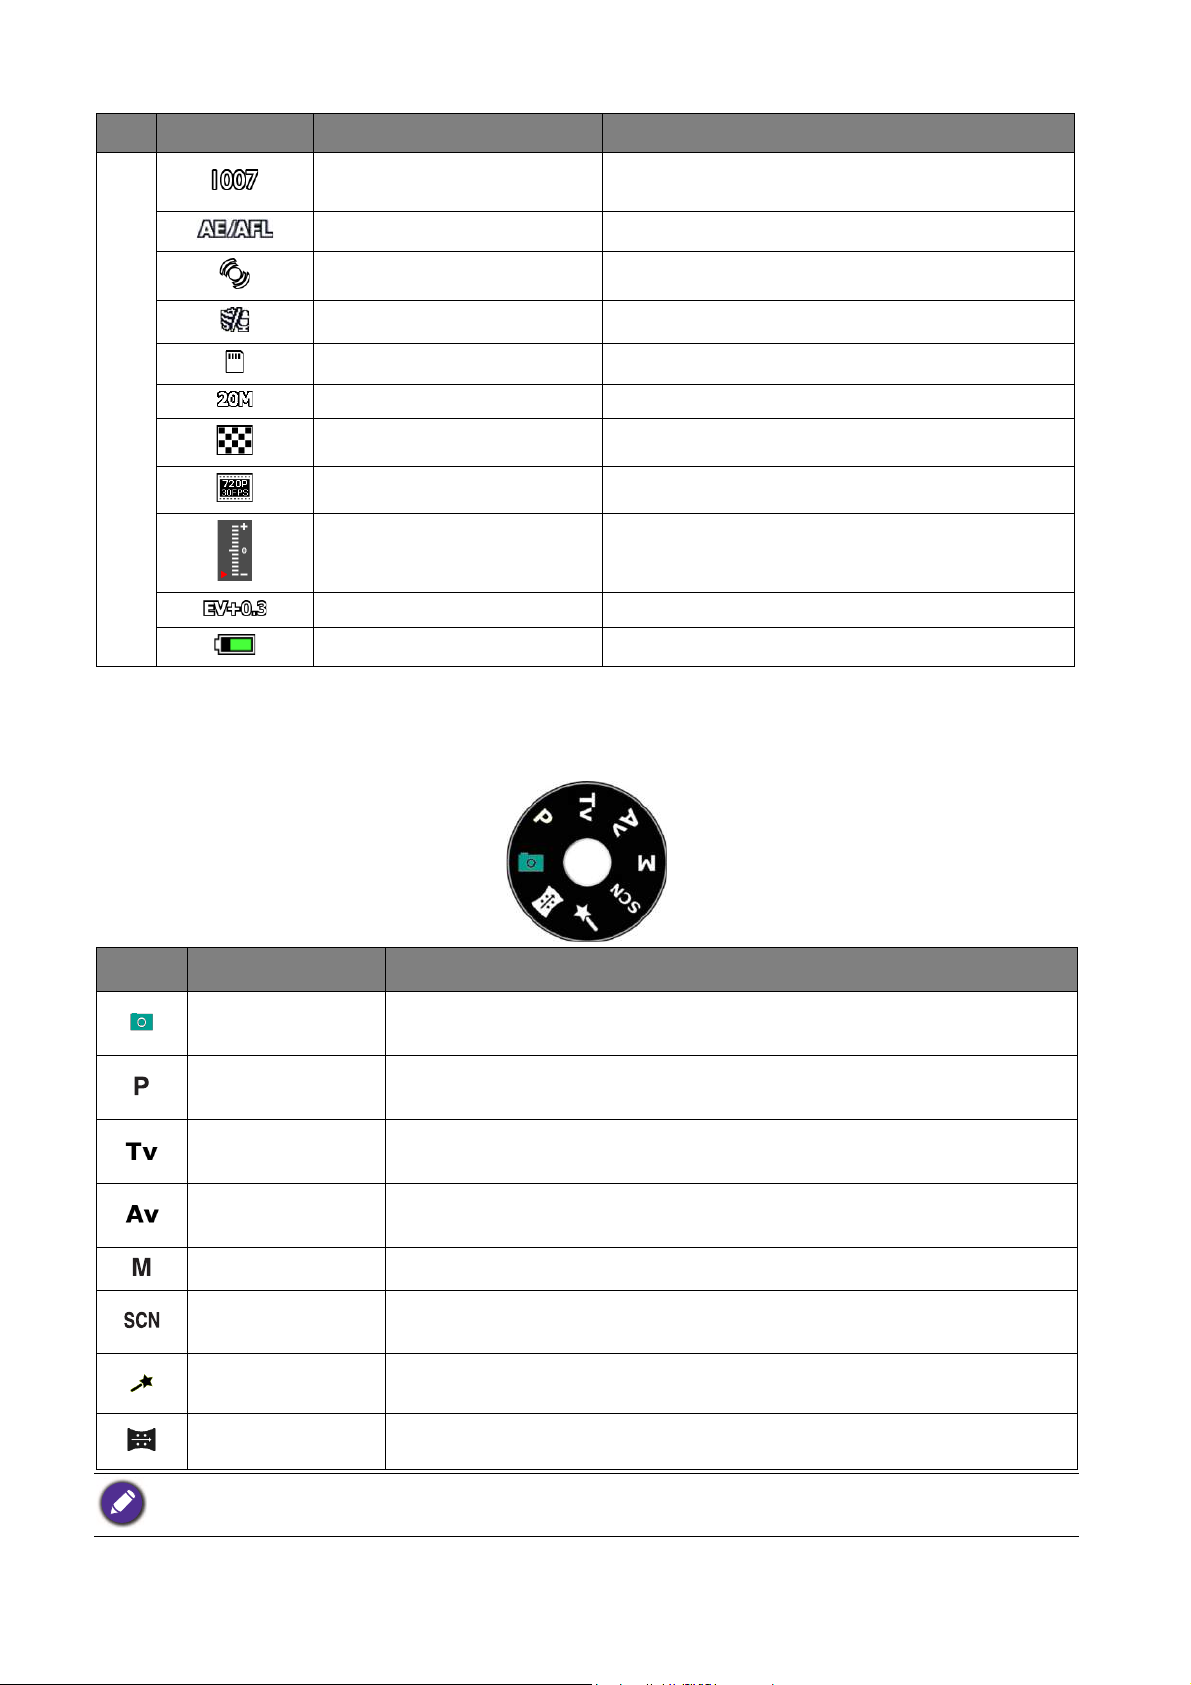
Slide the mode dial to select one of the eight shooting modes:
Icon Mode Description
Auto
Program
Shutter priority
Aperture priority
The camera automatically configures the appropriate settings, so you
can capture images with ease.
Shoots with automatic exposure adjustments and flexible parameter
settings.
You can choose a shutter speed, while the aperture value is
automatically determined by the lighting condition of the subject.
You can choose an aperture value, while the shutter speed is
automatically determined by the lighting condition of the subject.
Manual exposure Lets you set exposure values of aperture and shutter speed manually.
Scene
Lets you select the desired scene mode that suits your shooting
atmosphere.
Filter Lets you select the desired filter to apply to what you want to take.
Panorama Creates a panoramic photo by moving the camera.
Available menu options vary from input sources, functions, and setting. Grayed out when unavailable.
20 Operating the camera
Page 21

Auto
Use this mode to automatically configure appropriate settings, so you can capture images with ease.
Program
Use this mode to shoot with automatic exposure adjustments and flexible parameter settings.
Shutter priority
Shutter priority is often used when shooting moving subjects. In general, use a shorter shutter speed
to catch a fast-moving object.
To adjust values in shutter priority mode:
1. Set the mode dial to .
2. Press and use up / down of the 4-way control to adjust shutter speed.
Aperture priority
Aperture priority is often used when shooting static subjects or emphasizing the depth of field. In
general, use a smaller aperture if a greater depth of field is needed.
To adjust values in aperture priority mode:
1. Set the mode dial to .
2. Press and use left / right of the 4-way control to adjust aperture value.
3. Press shutter to capture an image.
Manual exposure
You can choose the aperture value and shutter speed in manual exposure mode.
To adjust values in manual exposure mode:
1. Set the mode dial to .
2. Press and use 4-way control to adjust aperture value and shutter speed.
3. Press shutter to capture an image.
Scene
Lets you select the desired scene mode that suits your shooting atmosphere.
To select a scene mode:
1. Set the mode dial to .
21 Operating the camera
Page 22

2. Press >
3. Use up / down of the 4-way control to select desired scene mode.
Icon Description Icon Description
Smart Scene Sunset
Beauty Enhancer Sports
Portrait Party
Love Portrait HDR
Self Portrait Background Defocus
Night Portrait Soft Flowing Water
Night Scene Pets & Kids
Landscape Backlight
Fireworks Zoom Exposure
Snow Text
• Slide the zoom lever to to view information on the selected scene mode.
4. Press to confirm the setting.
Smart scene
Automatically selects a scene mode based on the current shooting environment.
1. Set the mode dial to .
2. Press >
3. Use up / down of the 4-way control to select Smart
Scene
4. Press to confirm the setting.
5. Press shutter to capture an image.
• Press and use left / right of the 4-way control to select settings for RTAF (Full Time AF). Press to
apply the setting.
• Available settings for RTAF are:
On and Off.
().
22 Operating the camera
Page 23

Zoom exposure
Makes objects radiate with afterimages.
1. Set the mode dial to .
2. Press >
3. Use up / down of the 4-way control to select Zoom
Exposure
4. Press to confirm the setting.
5. Press shutter to capture an image.
• Takes pictures with a tripod for the best outcome.
• Press and use left / right of the 4-way control to select settings for shutter time and direction. Press
to apply the setting.
().
• Available settings for shutter time are:
• Available settings for direction are:
Auto, 1sec, 2sec, and 4sec.
Zoom In and Zoom Out.
Filter
Select one of the following filter modes to add into your shooting condition.
To select a filter mode:
1. Set the mode dial to .
2. Press >
3. Use up / down of the 4-way control to select a desired filter mode.
Icon Description Icon Description
Inklines Effect Lomo
Colored Pencil Cross Processing
Oil Painting Toy
Sketch Fisheye
Astral Mirroring
Color Accent Duplicate Characters
MagiQ
• Slide the zoom lever to to view information on the selected filter mode.
4. Press to confirm the setting.
23 Operating the camera
Page 24

Inklines effect
Emphasizes margins with ink.
1. Set the mode dial to .
2. Press >
3. Use up / down of the 4-way control to select
Effect
().
4. Press to confirm the setting.
5. Press shutter to capture an image.
Press and use left / right of the 4-way control to select settings for white balance and color mode. Press
to apply the setting.
Cross processing
Creates a cross processing image effect.
Inklines
1. Set the mode dial to .
2. Press >
3. Use up / down of the 4-way control to select Cross
Processing
().
4. Press to confirm the setting.
5. Press shutter to capture an image.
Press and use left / right of the 4-way control to select settings for white balance. Press to apply the
setting.
To y
Simulates a shallow depth of field by gradually blurring the top and bottom areas of a composition.
1. Set the mode dial to .
2. Press >
3. Use up / down of the 4-way control to select Toy ().
24 Operating the camera
4. Press to confirm the setting.
5. Press shutter to capture an image.
Page 25

• Once selected toy, there are two parallel lines displayed on screen indicating the area in between will not be
blurred but others will.
• Press and use left / right of the 4-way control to select area options and settings for saturation and
contrast. Press to apply the setting.
• Area options:
Area 6 ().
Area 1 (), Area 2 (), Area 3 (), Area 4 (), Area 5 (), and
Mirroring
Creates a mirror image effect.
1. Set the mode dial to .
2. Press >
3. Use up / down of the 4-way control to select
Mirroring ().
4. Press to confirm the setting.
5. Press shutter to capture an image.
• Press to switch the direction from up-down (default), left-right, down-up, or right-left.
• Focus frame does not appear under mirroring effect. Instead, an icon will be on the top right corner of the
screen for indication.
• Press and use left / right of the 4-way control to select settings for white balance and color mode. Press
to apply the setting.
25 Operating the camera
Page 26

Duplicate characters
Puts up to 4 of the identical subject in the same taken scene into one photo.
1. Set the mode dial to .
2. Press >
3. Use up / down of the 4-way control to select
Duplicate Characters ().
4. Press to confirm the setting.
5. Setting the camera on a tripod is strongly
recommended.
OK
6. Press shutter to begin the multi-exposed shot with the
first gesture.
7. Press shutter to take another shot with a different
gesture for up to 4 takes in total, or press to finish
and press to cancel. Do not have subjects too
close or overlap.
NG
• Takes pictures with a tripod for the best outcome.
• After the first photo is taken, the zoom ratio will be locked until the shooting finished.
• Only will the last taken subject remain if subjects are too close or overlapped.
• Press and use left / right of the 4-way control to select settings for direction, white balance, and color
mode. Press to apply the setting.
• Please follow the direction setting in
Left-to-Right / Right-to-Left while taking the multi-exposed shot.
Panorama
Use this mode to create a panoramic photo from multiple shots. You can combine several shots into
one single image quickly and easily.
• Scenes will be taken based on 1280 x 720 pixels, but its actual size depends on the panoramic angle and
stitching result.
• The actual size of stitched image varies from due to the panoramic angle and stitching result as well as the level
of camera shaking.
• The direction is automatically detected. Once detected, a direction icon (indicating the direction) and a yellow
line (for keeping moving straightly) appear. In addition, a shooting bar is displayed to indicate the shooting
position.
• Press and use left/right of the 4-way control to select metering setting and color modes. Press
apply the setting.
26 Operating the camera
to
Page 27

To create a panoramic image:
mmmmp
mmmmp
1. Set the mode dial to .
2. Fully press and hold the shutter to start shooting. The
shooting automatically saves the image when finished a
360 degrees take or released the shutter after a 30
degree take (when the icon is lit). When shooting
starts, a white-cross locates on the center and a yellow
line displays horizontally (or vertically) through the
screen. In addition, a shooting bar displays to present the
shooting position and the progress of the bar indicates
where has been taken.
3. If you move camera without keeping straight, the yellow
line will move with the moving scene.
4. When the progress of the bar goes to the end, the
camera would finish automatically and save the panorama
image.
Self-timer
This button allows you to set the self-timer setting.
Icon Mode Description
Automatically takes a picture after 2 or 10-second
/
10-Sec. / 2-Sec.
10+2 Sec.
Smile Catch
Off
To enable self-timer setting:
delay. This mode is useful when you want to be part of
the picture.
Performs delay and capture twice:
Performs a 10-second delay, then captures the image.
Performs another 2-second delay then captures the
image again.
Takes one picture at a time if the camera detects a
smiley face.
Takes one picture at a time.
1. Set the mode dial to the desired shooting mode.
2. Press and use left / right of the 4-way control to select your desired setting.
27 Operating the camera
Page 28

3. Press to confirm.
Not available for all shooting modes.
Focus
This button allows you to define the focus setting when capturing an image or a recording a video
clip.
Icon Mode Description
Auto Focus
Macro This mode is designed for close-up photography.
Object
Tracking
Face
Tracking
With auto focus, the camera will focus on the subject
automatically.
Focuses on the position of moving objects simultaneously.
Focuses on the position of faces simultaneously.
To select the focus setting:
1. Set the mode dial to the desired shooting mode.
2. Press of the 4-way control and use left / right of the 4-way control to select your desired
setting.
3. Press to confirm.
Not available for all shooting modes.
Flash
This button allows you to set the flash setting.
Icon Mode Description
Auto Flash
Auto Anti
Red-eye
Forced On
28 Operating the camera
The flash fires automatically based on the photographic
conditions.
Reduces the red-eye phenomenon when capturing naturallooking image in low-light conditions. Be sure to have the subject
look at the camera lens or get as close to the camera as possible.
The flash fires automatically based on the photographic
conditions.
The flash always fires regardless of the surrounding lighting
conditions. Select this mode when capturing images with high
contrast (backlighting) and deep shadows.
Page 29

Icon Mode Description
Fires the flash immediately at the beginning of exposure with a
Slow Sync
slow shutter speed, so ambient lighting of the foreground subject
and background scene can be balanced in a low-light environment.
The flash does not fire. Select this mode when flash photography
Forced Off
is prohibited, or when the distance to the subject is beyond the
effective range of the flash.
To select the flash setting:
1. Set the mode dial to the desired shooting mode.
2. Press the button by the side of the flash to open it.
3. Press of the 4-way control and use left / right of the 4-way control to select your desired
setting.
• The flash mode is not available in Continuous shooting modes.
• When the flash is closed, flash mode is automatically set to flash off.
EV
EV (Exposure Value) lightens or darkens the entire image. Adjust EV when the brightness between
the subject and the background is not balanced, or when the subject occupies only a small part of the
picture.
To a d j u s t e x p o s u r e v a l u e :
• Press and use up / down of the 4-way control to select your desired value. The value increases
or decreases at an interval of 1/3.
Under some circumstances, exposure value adjustment may not be applicable.
When turning mode dial to manual exposure mode, the exposure meter display the exposure in real-time. If it is
under or over exposed, i.e. exceeds +/- 2EV, the value is displayed -2.0EV (under -exposure) or +2.0 EV (over exposure) in red. If it is normally exposed, the value is displayed in white.
29 Operating the camera
Page 30

Zoom framing assistant
When composing telephotographs, pressing and holding the zoom framing assistant button at the left
side of the camera body will help you better flash back the image at a wide angle so that the subject
can be kept in center easily. Releasing the button will set the image back at the previous tele angle.
1. The subject is not in the center of the frame.
2. Press and hold the button of zoom framing assistant
to flash back the image at a wide angle for better
framing the subject in the center.
Selections in function button
Items selectable with are:
AEB (Auto Exposure
Bracketing)
White balance Color mode Contrast
ISO Continuous shooting RATF
3. Release the button to set the image back at the
previous tele angle with the subject centered.
Flash EV Saturation
Metering Sharpness
30 Operating the camera
Page 31

AEB (Auto Exposure Bracketing)
Automatically takes 3 pictures with slightly different exposures at the EV you set.
Icon Description Icon Description
Function is disabled.
Camera varies exposure by 0, –0.7,
and +0.7 for three shots.
Camera varies exposure by 0, –0.3,
and +0.3 for three shots.
Camera varies exposure by 0, –1.0,
and +1.0 for three shots.
To set AEB photography:
1. Press > AEB.
2. Use 4-way control to select an EV setting.
3. Press to confirm.
White balance
Compensates for color temperatures in different lighting conditions, so white and other colors can
be displayed properly when capturing images.
Icon Mode Description
Auto Adjusts white balance automatically.
Daylight Used in bright daylight conditions.
Cloudy Used in twilight or shady conditions.
Tungsten Used when subjects lit by tungsten (incandescent) lighting.
Fluorescent High
Adjusts for fluorescent lighting. Corrects the green hue of
fluorescent lighting. Ideal for indoor photos under fluorescent
Fluorescent Low
Flash Adjusts for flash conditions.
Manual
lighting without a flash.
Used when you want to manually adjust white balance in a
particular lighting condition.
To set white balance:
1. Press > White Balance.
2. Use up / down of the 4-way control to enter the submenu and press to select an option.
When selecting the Manual mode:
• Point the camera at a blank sheet of white paper or something similar.
• Use up / down of the 4-way control to select Adjust. The camera will automatically detect the
proper colors.
31 Operating the camera
Page 32

3. Press to confirm setting.
ISO
ISO configures the camera sensitivity to light. The higher the ISO value, the brighter picture you can
take in a low-light environment. Yet, you may see more noise in the picture as you increase the ISO
value.
Icon Description
Automatically sets the ISO value.
Automatically sets the ISO value within the range (maximum to ISO 1600) to
suit the recording environment.
Equivalent to color ISO 100/200 film. Used for fine weather condition or
/
portrait shooting.
/
//
Equivalent to color ISO 400/800 film. Used for cloudy or twilight shooting.
Equivalent to color ISO 1600/3200/6400 film. Used for night scene or sports
shooting.
To s e t I S O :
1. Press > ISO.
2. Use left / right of the 4-way control to select an ISO value.
3. Press to confirm setting.
Metering
Icon Mode Description
Center Weight
Matrix
Spot
Detects the exposure of the entire shooting screen with
emphasis around the center spot.
Detects the exposure based on multiple points in the
subject area.
Detects the exposure based on the center spot in the
subject area.
To set metering:
1. Press > Metering.
2. Use left / right of the 4-way control to select a metering option.
3. Press to confirm setting.
Flash EV
Adjusts the flash strength based on the EV setting.
32 Operating the camera
Page 33

To set flash EV:
1. Press > Flash EV.
2. Use left / right of the 4-way control to select a flash strength option.
3. Press to confirm setting.
Color mode
Adds color filter effects to the image or video you want to capture.
Icon Mode Description
Normal No effects are added.
Sepia
Black & White Adds an effect with monochromatic color tones.
Vivid Adds an effect with very clear and bright color tones.
Vivid Red The image becomes reddish.
Vivid Green The image becomes greenish.
Vivid Blue The image becomes bluish.
Adds an effect with reddish brown color tones, so the image or video
looks old-fashioned.
To s e t c o l o r m o d e :
1. Press > Color Mode.
2. Use left / right of the 4-way control to select a color mode option.
3. Press to confirm setting.
Continuous shooting
In this setting, you can take consecutive shots.
Icon Setting Description
Single Takes one picture at a time.
Continuously takes pictures as long as you keep pressing
Continuous
the shutter. Only will the first captured picture be autofocused, and the flash is forced off.
Continuously takes pictures at the speed up to 3fps as
Continuous Burst
long as you keep pressing the shutter. The first captured
picture needs to be auto-focus, and the resolution is
limited to 5M.
Speedy Burst 10
fps
Captures 10 shots instantly and the resolution is limited
to 3M.
33 Operating the camera
Page 34

To set continuous mode:
1. Press > Continuous Shooting.
2. Use left / right of the 4-way control to select a continuous shooting option.
3. Press to confirm setting.
Sharpness
This feature controls the sharpness of the image. Available options are Hard () / Standard () /
Soft ().
To set sharpness:
1. Press > Sharpness.
2. Use left / right of the 4-way control to select a option.
3. Press to confirm setting.
Saturation
This feature controls the saturation of the image. Available options are Hard () / Standard () /
Low ().
To set saturation:
1. Press > Saturation.
2. Use left / right of the 4-way control to select a option.
3. Press to confirm setting.
Contrast
This feature controls the contrast of the image. Available options are Hard () / Standard () /
Low ().
To s e t c o n t r a s t :
1. Press > Contrast.
2. Use left / right of the 4-way control to select a option.
3. Press to confirm setting.
RATF
This feature activates full time AF at previewing on the LCD screen.
34 Operating the camera
Page 35

To set RATF:
1. Press > RATF.
2. Use left / right of the 4-way control to select from On () / Off ()
3. Press to confirm setting.
This feature is available only when mode dial turns to auto mode or scene mode with setting to smart scene.
Selections in menu button
Items selectable with are:
Resolution Quality AF Area Digital zoom AF assist lamp
O.I.S. Date stamp Instant review Motion detection Q Key
Resolution
Icon Description Icon Description
20 megapixels (5152 x 3864) 2 megapixels (1600 x 1200)
14 megapixels (4288 x 3216) VGA (640 x 480)
10 megapixels (3600 x 2700) 3:2 12 megapixels (4288 x 2858)
8 megapixels (3264 x 2448) 16:9 9 megapixels (3968 x 2232)
5 megapixels (2592 x 1944) 16:9 2 megapixels (1920 x1080)
3 megapixels (2048 x 1536) 1:1 9 megapixels (2992 x 2992)
To set resolution:
1. Press > > Resolution.
2. Press or to enter the submenu and use up / down of the 4-way control to select an
option.
3. Press to confirm setting.
Available resolutions vary from each mode.
35 Operating the camera
Page 36

Quality
Icon Description Icon Description Icon Description
Super Fine Fine Normal
To set image quality:
1. Press > > Quality.
2. Press or to enter the submenu and use up / down of the 4-way control to select an
option.
3. Press to confirm setting.
AF Area
This feature controls the AF area while auto-focusing. Available setting are Multi and Single.
To s e t A F a r e a :
1. Press > > AF Area.
2. Press or to enter the preview.
3. Press to switch between Multi and Single.
•If Single, use 4-way control to select an area.
4. Press to confirm setting.
The default value is different depends on each capture mode.
Digital zoom
While digital zoom interpolates the result back up to the pixel dimensions of the original, wise zoom
reduces the resolution with ratio to maintain the image quality.
To set zoom control:
1. Press > > Digital Zoom.
2. Press or to enter the submenu and use up / down of the 4-way control to select from
Digital Zoom or Wise Zoom.
3. Press to confirm setting.
AF assist lamp
This function emits amber light allowing the camera to focus easily when half press the shutter
button.
36 Operating the camera
Page 37

To set AF assist lamp:
1. Press > > AF Assist Lamp.
2. Press or to enter the submenu and use up / down of the 4-way control to select from
Auto or Off.
3. Press to confirm setting.
O.I.S.
Reduces blur caused by camera vibration, and thus improves quality and clearness of both images and
videos.
To set the O.I.S. for capturing images:
1. Press > > O.I.S.
2. Press or to enter the submenu and use up / down of the 4-way control to select from
On or Off.
3. Press to confirm setting.
Date stamp
Imprints the date when a picture was taken on the picture itself.
To set the date stamp:
1. Press > > Date Stamp.
2. Press or to enter the submenu and use up / down of the 4-way control to select from
Date, Date & Time, or Off.
3. Press to confirm setting.
Instant review
This feature sets the just taken photo for an instant review on LCD screen for one second.
To s e t i n s t a n t r e v i e w :
1. Press > > Instant Review.
2. Press or to enter the submenu and use up / down of the 4-way control to select from
On or Off.
3. Press to confirm setting.
37 Operating the camera
Page 38

Motion detection
This feature automatically detects the motion of the subject.
To set motion detection:
1. Press > > Motion Detection.
2. Press or to enter the submenu and use up / down of the 4-way control to select from On
or Off.
3. Press to confirm setting.
• If Motion Detection is enabled and a moving object is detected, the Motion Detection icon is turned to yellow.
• This feature is not available when the flash fires or in some shooting modes.
Q Key
This feature helps to set up a shortcut for quick access to a certain function in capture mode.
Available shortcuts for Q key
AF Area ISO
Resolution Movie option
MWB
AE-L AF-L AE-L&AF-L
Color mode Metering Quality
To s e t :
1. Press > > Q key.
2. Press or to enter the submenu and use 4-way control to select a function.
3. Press to confirm setting
38 Operating the camera
Page 39

Recording videos
1
2
3
4
5
6
8
7
You can record video with this camera. Set the movie settings before you start recording a video.
• The camera will automatically stop recording either when the video file size reaches 4GB or the recording time
is more than 29 minutes.
• Video recording begins with Full-time AF. You may set for use with AE/AF-Lock.
To record the video clip:
1. Press to start recording.
2. Slide the zoom lever to zoom in/out on the subject.
3. Press to stop recording.
LCD screen display examples. Actual display may vary.
No. Item Description
1 Mode indicator Indicates that the camera is in recording mode.
2 Zoom Indication Displays zoom.
3 Elapsed time Indicates time elapsed since recording begins.
4 AE/AF Lock Indicates AE/AF Lock is enabled.
5 Battery Battery level.
6 Recording bar Indicates recording progress in available capacity.
7 Recording status Indicates recording status.
8 Shutter indicator (PIV) Indicates shutter is available while recording in progress.
Mode indicator (Recording)
This icon blinks until the recording session ends. When pause recording, this icon stops blinking.
39 Operating the camera
Page 40

Recording bar
OK
Displays the progress of current recording in available capacity based the storage media volume size.
Recording status
When press to pause / resume the recording, the icon appears/disappears at the bottom left.
Shutter indicator (PIV)
This camera is capable of storing still images by fully pressing the shutter button while shooting
movies. Numbers of photos can be stored while movie is recording vary from video resolutions. If
the maximum number of photos is not reached, the icon is displayed and photo taking is available.
Otherwise, the icon will NOT be displayed and photo taking is unavailable.
Using PIV function
During video recording, you can capture an image by pressing the shutter (the icon appearing on
the screen shows that you have taken one picture).
• Please note that the movie keeps recording even though the icon disappears.
• The feature PIV is applicable to video resolutions of 720p and VGA.
• The resolution of PIV picture is the same as the setting in the Resolution menu.
Selections in menu button
Items selectable with are:
MMovie option Autofocus mode Wind cut E.I.S.
Movie option
Icon Description Icon Description
640x480@30fps 640x480@15fps
1280x720p@30fps 1280x720p@15fps
To s e l e c t a m o v i e s i z e :
1. Press > >Movie Option.
2. Press to enter the submenu and use up / down of the 4-way control to select an option.
3. Press to confirm setting.
An external memory card with speed class 6 or above is required for 1280x720p recordings.
40 Operating the camera
Page 41

Autofocus mode
This feature controls the autofocus method in recording movies. Available options are Single AF
() / Full-time AF ().
To select an autofocus mode:
1. Press > >Autofocus Mode.
2. Press to enter the submenu and use up / down of the 4-way control select from Single
AF
/ Full-time AF.
3. Press to confirm setting.
Wind cut
Use this feature to reduce wind noise during video recording.
To enable Wind Cut:
1. Press > > Wind Cut.
2. Use up / down of the 4-way control to enter the submenu and select On or Off.
3. Press to confirm setting.
E.I.S.
Reduces blur caused by camera vibration, and thus improves quality and clearness of both images and
videos.
To set E.I.S. for recording movies:
1. Press > > E.I.S.
2. Press or to enter the submenu and use up / down of the 4-way control to select from On
or Off.
3. Press to confirm setting.
41 Operating the camera
Page 42

Images and videos playback
12 34
5
6
7
8
9
10
11
16 15 14 13 12
21
20
19
18
17
Press to switch to playback mode.
Viewing still images
LCD screen display examples. Actual display may vary.
No. Item Description
1 Mode indicator Indicates that the camera is in playback mode.
2 File / total number File number / total number of files on the storage media.
3 File folder / index File folder number / file number in the folder.
4 Storage media Storage media type.
5 Image size Resolution setting.
6 Quality Indicates the image quality.
7 White balance White balance setting used the image.
8 ISO Image ISO value.
9 Flash EV Image flash exposure value.
10 EV Image exposure value.
11 Battery Battery level.
12 Time Image taken time.
13 Date Image taken date.
14 Shutter speed &
aperture value
15 Histogram Graphical representation of tonal distribution in the image.
Shutter speed and aperture used with the image.
16 Play hint Indicates the file as a voice memo, a movie, or a panorama.
17 OK Indicates to press the button to play the file on the hint.
18 Scene mode Indicates the mode the file taken with.
19 DPOF Indicates the file is marked for printing.
42 Operating the camera
Page 43

No. Item Description
4
5
6
321
11
10
987
20 Voice memo Indicates this file has a voice memo.
21 Protect Indicates the file is protected from alteration.
Viewing videos
LCD screen display examples. Actual display may vary.
No. Item Description
1 Mode indicator Indicates that the camera is in playback mode.
2 File / total number File number / total number of files on the storage media.
3 File folder / index File folder number / file number in the folder.
4 Storage media Storage media type.
5 Video Quality Video resolution and frame rate.
6 Battery Battery level.
7 Time File taken time.
8 Date File taken date.
9 Play Hint Indicates the file as a movie.
10 OK Indicates to press the button to play the file on the hint.
11 Protect Indicates the file is protected from alteration.
Options for playback and editing
When the camera is in playback mode, use left / right of the 4-way control to view the next/previous
recorded files. You can also select any of the following options.
Enlarging an image
Magnifies an image, so more details can be seen.
43 Operating the camera
Page 44

To enlarge an image:
1. Press to switch to playback mode.
2. Use left / right of the 4-way control to select the image you want to enlarge.
3. Slide the zoom lever to to zoom-in or to zoom-out on a captured image.
4. Use 4-way control to move to the area you want to view.
Trimming
Crops part of an image file and saves it as another new file.
To trim an image:
1. Press to switch to playback mode.
2. Use left / right of the 4-way control to select the image you want to trim.
3. Slide the zoom lever to to zoom-in or to zoom-out on a captured image.
4. In zoom mode, slide the zoom lever to adjust the zoom ratio.
5. Use 4-way control to locate the area you want to trim.
6. Press and use up / down of the 4-way control to select and confirm to save the image file.
Viewing multiple files at a time
Shows up to 36 images at a time on the screen.
To view multiple files:
1. Press to switch to playback mode.
2. Slide the zoom lever to to view images in 9-thumbnail, 36-thumbnail, or calendar format
on the screen. Use 4-way control to select a file and press to view it in its normal viewing
size.
If there are 9 thumbnails or more, a scroll bar appears on the screen.
Playing back video clips
View recorded video clips in the playback mode.
To view a video clip:
1. Press to switch to playback mode.
2. Use left / right of the 4-way control to select the video clip you want to view.
3. Press to start playing the video clip.
44 Operating the camera
Page 45

4. Use 4-way control to stop, pause, or resume the video clip.
• During video playback, use right / left of the 4-way control to fast forward or rewind.
• While pausing video playback, use left / right of the 4-way control to view the video frame by frame. Press
right / left of the 4-way control to forward or rewind for one frame. Press and hold right / left of the 4-way
control to fast forward or rewind frame by frame continuously.
Adjusting the playback volume
Increases or decreases the volume of a video clip or voice memo during playback.
To adjust the playback volume:
1. Press to switch to playback mode.
2. Use left / right of the 4-way control to select a video clip or voice memo that you want to play.
3. Press to start playing.
4. Slide the zoom lever to adjust volume.
The volume can only be set during playback, but not during rewind, fast forward, or pause.
Slideshow
Sets the time interval for presenting a series of captured image and video files (first frame only).
To play a slideshow:
1. Press to switch to playback mode.
2. Press > Slideshow and press .
3. Use 4-way control to select Interval and Repeat.
4. Select Start and press to play the slideshow.:
To pause the slideshow, press . Press again to resume playback. To stop the slideshow, press .
Deleting files
Deletes selected or all files.
To delete a single file:
1. Press to switch to playback mode.
2. Press > .
3. Use up / down of the 4-way control to select Delete > Single and press .
4. Use left / right of the 4-way control to select and confirm the file that you want to delete.
45 Operating the camera
Page 46

5. Repeat steps 2~4 to delete other files.
You may also directly press for deleting an image quickly at anytime in playback mode.
To delete selected files:
1. Press to switch to playback mode.
2. Press > .
3. Use up / down of the 4-way control to select Delete > Select and press .
4. The images are displayed in thumbnail view.
5. Use 4-way control and to select and mark the files that you want to delete. A icon
appears on the marked files.
6. Press . A confirmation message appears on the screen. Use up / down of the 4-way control
to select Yes and press to confirm.
To delete all files:
1. Press to switch to playback mode.
2. Press > .
1. Use up / down of the 4-way control to select Delete > All and press .
2. A confirmation message appears on the screen. Use up / down of the 4-way control to select Yes
and press to confirm.
Protecting files
Prevents selected files from accidental removal.
To protect a single file:
1. Press to switch to playback mode.
2. Press .
3. Use up / down of the 4-way control to select Protect > Single and press .
4. Use left / right of the 4-way control to select and confirm the file that you want to lock.
5. Repeat steps 2~4 to protect other files.
• A icon appears on the protected file.
• To unlock a protected file, select
46 Operating the camera
Unlock.
Page 47

To protect multiple files:
1. Press to switch to playback mode.
2. Press .
3. Use up / down of the 4-way control to select Protect > Select and press .
4. The images are displayed in thumbnail view.
5. Use 4-way control and to select and mark the files that you want to delete. A icon
appears on the marked files.
6. press to confirm.
If the icon does not appear on the thumbnail images, this indicates the files are not protected.
To protect all files:
1. Press to switch to playback mode.
2. Press .
3. Use up / down of the 4-way control to select
Protect > Lock All and press .
4. The images are displayed in thumbnail view.
5. A confirmation message appears on the screen. Use up / down of the 4-way control to select
Yes and press to confirm.
You can remove the protection anytime by following the same procedure as shown above. Note that in Step 3
select
Unlock All to unlock all files.
Voice memo
Inserts a voice annotation to an image file.
To record a voice memo:
1. Press to switch to playback mode.
2. Use left / right of the 4-way control to select the image you want to add a voice memo.
3. Press .
4. Use 4-way control to select Voice Memo and press .
5. A confirmation message appears on the screen. Use up / down of the 4-way control to select
Start and press to start voice recording.
6. During recording, press to stop recording.
• The maximum audio recording time is 30 seconds.
• An icon appears on the file that is attached with voice memo.
47 Operating the camera
Page 48

To play a voice memo:
1. Press to switch to playback mode.
2. Use 4-way control to select the image with a voice memo.
3. Press to play the voice memo.
4. Press to stop the playback.
Slide the zoom lever to adjust volume during playback.
Startup image
Sets your favorite image as the startup image on LCD screen when turning on the camera.
To set startup image:
1. Press to switch to playback mode.
2. Press .
3. Use up / down of the 4-way control to select Startup and press .
4. Use left / right of the 4-way control to choose the photo and press .
• Default: use the default image as the startup image.
• My Photos: pick one of your captured photos in the camera as the startup image.
• Off: no startup image.
Copying images
Copies files between internal memory and memory card.
This feature is only available if an unlocked memory card is inserted into the camera.
To copy selected files:
1. Press to switch to playback mode.
2. Press .
3. Use 4-way control to select Copy and press .
4. Choose the target, and press .
• Copy to Card: copy files stored in camera into the memory card.
• Copy to Camera: copy files stored in the memory card into the camera’s internal memory.
5. Use up / down of the 4-way control to select Selected Images and press .
48 Operating the camera
Page 49

6. Use left / right of the 4-way control to select the file you want to copy and mark or unmark the
file for copying. Once marking is done, press .
7. Use 4-way control to select Yes and press .
8. A confirmation message appears on the screen. Use 4-way control to select Yes and press .
To copy all files:
1. Press to switch to playback mode.
2. Press .
3. Use up / down of the 4-way control to select Copy and press .
4. Choose the target, and press .
Copy to Card: copy files stored in camera into the memory card.
•
•
Copy to Camera: copy files stored in the memory card into the camera’s internal memory.
5. Use up / down of the 4-way control to select All Images and press .
6. A confirmation message appears on the screen. Use up / down of the 4-way control to select
Yes and press .
DPOF
The Digital Print Order Format (DPOF) setting allows you to select images on the memory card for
printing and specify the number of print copies in advance using the camera. This is extremely
convenient for sending the images to a photo developing service or for printing on a direct print
function compatible printer.
To s e t u p D P O F :
1. Press to switch to playback mode.
2. Press .
3. Use up / down of the 4-way control to select
4. Use up / down of the 4-way control to select Single or All and press .
5. Use left / right of the 4-way control to select the files that you want to mark for printing (if
Single selected) and specify the number of copies.
DPOF and press .
6. Press to set the DPOF setting.
To r e s e t D P O F :
1. Press to switch to playback mode.
2. Press .
49 Operating the camera
Page 50

3. Use up / down of the 4-way control to select DPOF and press .
4. Use up / down of the 4-way control to select
Reset and press .
5. A confirmation message appears on the screen. Use up / down of the 4-way control to select Yes
and press to confirm DPOF resetting.
Resizing an image
Changes an image file to a smaller size, and overwrites the image file or saves it as another new file.
To resize an image:
1. Press to switch to playback mode.
2. Use left / right of the 4-way control to select the image you want to resize.
3. Press .
4. Use up / down of the 4-way control to select Resize and press .
5. Use up / down of the 4-way control to select the target image size to which you want to resize
and press .
6. A confirmation message appears on the screen. Use up / down of the 4-way control to select
Save as and press to confirm the change and save the image file.
The resize image is saved as a new file.
Rotating an image
Changes the orientation of an image at each 90 degrees clockwise.
To rotate an image:
1. Press to switch to playback mode.
2. Use left / right of the 4-way control to select the image you want to rotate.
3. Press > .
4. Use 4-way control to select Rotate Image and press .
5. Use 4-way control to select a photo in a desired angle you want to keep.
6. Press to save the image file.
50 Operating the camera
Page 51

Other settings
Press > and then select an option.
Option Submenu Description
Display
Sounds
Power Saving
Hide Info
Electronic Level
Histogram
Guide Line
Movie Frame
Silent
Startup
Shutter
Sys. Volume
10 sec.
30 sec.
1 min.
3 min.
Off
Turns on or off information on LCD screen.
Turns on or off for electrical leveling assistance
of composition. Overrides histogram, guide
line, and movie frame when turned on.
Turns on or off for graphic display of tonal
distribution.
Turns on or off to assist photo composition.
Turns on or off to assist video composition.
Sets system sound on or off.
Sets startup sound on or off.
Sets shutter sound on or off.
Adjusts system sound volume.
For power conservation, the camera
automatically enters the standby mode after it
has been idle for a period of time. (Press any
key to resume.)
The camera remains on when idle.
LCD Brightness
Date & Time
Language
Create Folder
File no. Reset
Format
Auto Rotation
Auto
High
Normal
The LCD brightness is automatically set based
on the surrounding environment.
The LCD brightness is increased.
The LCD brightness remains at the default
value.
Sets the date and time. Refer to Setting date and time for detail.
Selects a language for display menus and other information. Refer to
Setting the OSD language for detail.
Serial
Monthly
Daily
Yes
Entitles created folders in serial numbers.
Entitles created folders by months.
Entitles created folders by days.
Resets file number counting.
Cancel
Yes
Cancel
On
Off
Formats the internal memory or the storage
media.
Switches orientation automatically when
rotating the LCD display.
Disables auto-rotation feature.
TV Setting
NTSC
Sets output television encoding system.
PAL
51 Operating the camera
Page 52

Option Submenu Description
Remote Control
Reset All
Firmware
On
Off
Yes
Cancel
Yes
Cancel
Enables IR receiver.
Disables IR receiver.
Resets the entire menu and button operation
settings to initial defaults except settings of
Date & Time, Language, TV, and Manual White
Balance
.
Updates camera firmware if a firmware file is
found on the memory card. Shows firmware
version only if no firmware file on the card.
Top-notch branded memory cards are
recommended. Formatting memory cards and
loading firmware onto cards before updating.
52 Operating the camera
Page 53

Accessory: remote control (GH680F/GH688F only)
• Remove the insulation spacer at the bottom back of the remote control before first using.
• Enable the camera IR receiver:
Switch the power lever by the mode dial to
Press to switch to playback mode.
> and use 4-way control to select Remote Control and press .
Press
ON.
Use 4-way control to select
• Please keep the remote control in line of sight to the camera IR receiver for optimal reception.
On and press .
Remote Control Buttons Preview Playback
Capture Not available
RATF ON: Start /
Stop recording
RATF OFF: Start
Not available
recording with one
time AF / Stop
recording
Not available
Not available
Zoom In
Zoom Out
Previous image / Rewind video / Left (when the
image is enlarged.)
Next image / Forward video / Right (when the
image is enlarged.)
3x enlarge single image view / Decrease thumbnail
view / Up (when the image is enlarged.)
Increase thumbnail view / Down (when the image
is enlarged.)
Not available
Set preview mode
to playback mode
Restore single image view/ Start / Stop video
playback
Set playback mode to preview mode
53 Operating the camera
Page 54

Accessory: lens hood
Button
Button
Using lens hood with your camera can effectively prevent stray light and thus enhance image clarity
and color restoration. Your camera comes with a lens hood, and you may apply it to the camera with
petals forward or backward for photography or temporary placement.
For photography:
1. Press and hold both buttons to release the
hook inside of the lens hood.
2. With one of the buttons directs to BenQ
logo, insert the lens hood to the camera
and release buttons as shown above.
Fail to direct to BenQ logo may interfere
compositions of photography.
For temporary placement:
1. Press and hold both buttons to release the
hook inside of the lens hood.
2. With one of the buttons directs to Zoom
framing assistant button, insert the lens
hood to the camera and release buttons as
shown above.
Fail to direct to Zoom framing assistant button
will not fit the lens hood into the camera.
54 Operating the camera
Page 55

Connection to the camera
Wired connection
Connecting the camera to a TV set
To connect the camera to a TV using AV cable:
1. Open the USB / AV port cover.
2. Connect the TV and camera.
•Connect the end of the smaller plug of an AV cable to the USB / AV port of the camera.
•Connect the yellow video plug and the white audio plug of the AV cable to a video-input jack and
an audio-input jack (left channel) on your TV.
3. Turn on the TV, and then switch the input source of the TV to “AV”.
4. Turn on the camera.
Follow the on-screen instructions to operate the camera via the TV.
Connecting the camera to a computer
You can connect the camera to a desktop or a laptop to transfer, view, print, or edit files.
To connect the camera to a computer:
1. Open the USB / AV port cover.
2. Connect the end of the smaller plug of the USB cable to the USB / AV port of the camera.
3. Turn on the camera.
4. Connect the other end of the USB cable to an available USB port on your computer.
5. On your computer, a removable disk icon appears. Click this icon to access the files in your
camera.
When connecting the camera to a computer, please use the original accessory of the USB cable to avoid possible
system conflicts and damage to the camera.
Connecting the camera to a printer
In addition to printing images via a computer’s printer or a photo center, you can choose to print
using a PictBridge-compatible printer.
Printing with PictBridge
You can directly print images by connecting your camera to a PictBridge-compatible printer without
using a computer.
To print images from a PictBridge-compatible printer:
1. Open the USB / AV port cover.
55 Connection to the camera
Page 56

2. Connect the end of the smaller plug of the USB cable to the USB / AV port of the camera.
3. Connect the other end of the USB cable to an available USB port on your printer.
4. Turn on the printer. Wait for a while until it finishes starting up and is ready to print.
5. Turn on the camera.
6. On the camera, use up / down of the 4-way control to select from Print One, Print All, Print
Index, and DPOF. Press to launch the copy setting.
• Print Select: to print selected images.
1. Use up / down of the 4-way control to select Print Select and press .
2. Press , and use left / right of 4-way control to select the image that you want to mark
for printing and use up / down of 4-way control to specify the number of copies. Press
when finished.
3. Use up / down of the 4-way control to select Paper Size and Quality, and use left / right of
the 4 way control to adjust settings.
4. After all settings are completed, use up / down of the 4-way control to select Print and
press to start printing.
• Print All: to print all images at a time.
1. Use up / down of the 4-way control to select Print All and press .
2. All images are marked for printing and the number of printing copies is automatically set to
1.
3. Use left / right of the 4-way control to view the files and use up / down of the 4-way
control to adjust the number of copies.
4. Use up / down of the 4-way control to select Paper Size and Quality, and use left / right of
the 4 way control to adjust settings.
5. After all settings are completed, use up / down of the 4-way control to select Print and
press to start printing.
Print Index: to print an index of all images.
•
1. Use up / down of the 4-way control to select Print Index and press .
2. Use up / down of the 4-way control to select Paper Size and Quality, and use left / right of
the 4 way control to adjust settings.
3. After all settings are completed, use up / down of the 4-way control to select
Print and
press to start printing.
• DPOF: to print only the images with DPOF tag.
1. Use up / down of the 4-way control to select DPOF and press .
2. Use left / right of the 4-way control to view the files and use up / down of the 4-way
control to adjust the number of copies.
3. Use 4-way control to select Paper Size and Quality.
56 Connection to the camera
Page 57

4. After all settings are completed, use up / down of the 4-way control to select Print and
press to start printing.
• The maximum number of copies is 99.
• The above procedure may vary depending on the printer type you are using.
• If you connect the camera to your printer while the printer is still starting up, the camera will be automatically
turned off.
• Failure to follow the above procedure will make the camera show an error message. Please disconnect the
camera and the camera will be automatically turned off.
57 Connection to the camera
Page 58

Wireless connection (GH680F/GH688F only)
Camera network settings
To configure your camera network settings:
1. On your camera, switch the power lever by the mode dial to Wi-Fi, and the LCD screen of the
camera is displayed as below.
2. Pressed , you shall see listed items including Wi-Fi ID, Q Key, Send Image Resolution,
Network, MAC Address, and Logout BenQ Cloud (exposed only when logged onto BenQ
Cloud).
3. Use 4-way control and press key to select desired item, or press to exit.
Wi-Fi ID
Wi-Fi ID is used for recognition when using smartphones to directly connect to the camera.
To s e t Wi-Fi ID:
1. Use 4-way control and press to enter Wi-Fi ID.
2. The SSID of the camera is displayed, and the SSID password can be changed at this time by
pressing .
3. A virtual keyboard will appear. Use 4-way control and press key to select a desired
character at a time.
4. Select DONE when password changing completed or press to go back to previous menu.
• Default SSID of the camera is “BenQ_Model Name_MAC address” with default password “12345678”.
• The MAC Address is six pairs of hexadecimal digits separated by colons in transmission order (e.g.
01:23:45:67:89:AB). The character A ~ F is in capital.
Q Key
Q Key is a convenience when a short cut is needed to reach a certain function when switched the
power lever to Wi-Fi and browsing photos in the camera.
58 Connection to the camera
Page 59

To s e t Q Key:
1. Use 4-way control and press to enter Q Key.
2. Use 4-way control and press to select desire function from Smart Device (Default), BenQ
Cloud
, QR Sharing, E-mail, Sina Weibo, Q-Zone, or Facebook to assign to Q Key.
Please switch to Playback mode and press for the assigned function.
Send Image Resolution
To s e t Send Image Resolution:
1. Use 4-way control and press to enter Send Image Resolution.
2. Choices of image resolution will be prompted as Original, Large, Medium, Small, and Basic.
Use 4-way control and press to select.
Actual size of photos varies from formats.
Network
To s e t Network:
Use 4-way control and press key to enter Network.
A list of SSIDs will be listed in Wi-Fi Network Select if
available. Use 4-way control and press key to
scroll and select Refresh for more SSIDs, your desired
SSID,
Add network, or WPS button connection.
• Refresh
Once selected, a progress bar of network searching is
prompted on the LCD screen. When finished
searching, you will be directed back to Wi-Fi Network
Select
.
59 Connection to the camera
Page 60

• Add network
Once selected, the Add network menu appears on LCD screen with items including SSID, Security,
and Network Password.
To add a network, at first, selected SSID, a virtual
keyboard will appear. Use 4-way control and press
key to select a desired character at a time. Select
DONE when completed or press to go back to
previous menu.
Next, selected Security, use 4-way control to scroll
and select security measures. Press to confirm.
Security measure here in WEP is unavailable with shared key
but open system.
Finally, select Network Password, again, a virtual
keyboard will appear. Use 4-way control and press
key to select a desired character at a time. press
to connect to the network or press to go back to
previous menu.
• WPS button connection
Once selected, a message is prompted on the LCD
screen to notify you to press the WPS button on your
wireless access point.
A warning message of connection time out will be prompted on the LCD screen if failed to initialize
connection in one minute.
60 Connection to the camera
Page 61

MAC Address
Use 4-way control and press key to enter MAC Address.
The MAC Address of this camera is prompted on the
LCD screen. Press to go back to Wi-Fi Menu.
Logout BenQ Cloud
Use 4-way control and press key to enter Logout BenQ Cloud.
Logout BenQ Cloud is available when having logged onto BenQ Cloud.
A status message to confirm logging out is prompted
on the LCD screen. Use 4-way control and press
key to confirm.
After logged out, Logout BenQ Cloud will be hidden
Wi-Fi Menu.
from
61 Connection to the camera
Page 62

To smart devices
To establish a direct connection between the camera and your smartphone:
1. Download the app “BenQ Camera” to your Android or iOS smartphones from respective application stores to establish the connection between the camera and the smartphone.
2. On your camera, switch the power lever by the mode dial to Wi-Fi, and the LCD screen of the
camera is displayed as below.
3. Use 4-way control to select Smart Device and press key. The camera will be standing by for
connection to your smartphone.
4. On your smartphone, use Wi-Fi settings to search for the SSID of the camera as displayed on
the LCD screen.
5. Tap on the icon of the app “BenQ Camera”, and the app should prompt a message of connection
in progress.
6. On the camera, use 4-way control and press key to confirm the connection request from
your smartphone. Now your camera is set for wireless connection with your smartphone.
• iOS users require manually connecting their smartphones to either the camera or Internet for social network
services.
• Android smartphones automatically prompt out selections for users to choose.
62 Connection to the camera
Page 63

Using as a remote controller
3
2
1
4
On your smartphone, tap Smart Control or the icon to use your smartphone as a remote
controller of the camera.
No. Item Description
Enabled only when the flash on the
camera opened. Shares the same
1Flash
2
Self-Timer
flash usage on the camera. Available
options are on ( ), auto ( ),
and off ( ).
Tap to select desired timer and tap
on the icon to begin counting
down to shot. Shares the same self-
timer usage on the camera. Available
options are 2 sec ( ), 10 sec
(), and off ().
3
Zoom Bar
Tap and drag left or right for
zoom in and out.
Tap to take a photo or use with
4
Shutter
then tap .
In the playback of smart control on smartphones, only will the last taken image be shown in iOS while all taken
images can be viewed by sliding in Android.
63 Connection to the camera
Page 64

Using as a photo viewer
On your smartphone, tap View photo in camera or the icon to use your smartphone as a photo
viewer of the camera.
Function Description
Viewing
single
photo
Tap the photo and the photo will begin to
be downloaded from the camera to your
smartphone.
First tap and then pick desired photos.
Tap to download photos from
Viewing
multiple
photos
the camera to your smartphone. You
should see progress bar for photos
downloading and waiting to be
downloaded. Once downloaded, you
should see View Photo by the icon of the
photo. Press View Photo to view in large
format.
Tap and follow prompted options
Sharing
on your smartphone for further
procedures.
• While viewing images on smartphones, deleting is unavailable in iOS but available for individual images in
Android.
• Images will be stored to “
a user specifiable path in Android.
Camera Roll” in iOS since the store path is not user specifiable and will be stored to
64 Connection to the camera
Page 65

Using as a GPS logger
On your smartphone, tap GPS recorder or the icon to use your smartphone as a GPS recorder
of the camera.
Function Description
GPS data
logging
Sending all
GPS logs
to camera
Tap the icon to begin GPS data logging.
Tap t h e i c o n f o r Sending all GPS
logs to the camera
logs.
Make sure of turning on GPS on your
smartphone and clocks are synchronized
between the camera and your smartphone
beforehand. Make certain to send all GPS logs
after capturing.
or Clean all GPS
• You may set GPS mode as Walk, Bike, Drive, or Manually by tapping the icon > GPS > Walk to select.
• GPX files cannot be saved on smartphones in iOS. The only way to export GPX files is to be attached to emails.
• GPX files can be saved in a fixed and unchangeable path on Android smartphones.
65 Connection to the camera
Page 66

To y o u r c a m e r a
Only by having completed your BenQ Cloud account setup, will you be able to experience the complete Wi-Fi
enjoyment at this camera.
Becoming a member of BenQ Cloud
1. Use the browser to log onto cloud.benq.com, and
click Signup Now.
You may also log onto BenQ Cloud by scanning the QR
code below.
2. Fill up all the required information by the order and
the direction of arrows.
3. Tick
4. Click
Privacy Policy.
New Member.
5. Click More Space.
6. Enter your authorized code as printed on the
promotion card, and click More space.
Now you have 5GB of storage space at BenQ Cloud free of charge for 2 years. A notice of your
service extension on BenQ Cloud will be issued before the expiration date.
66 Connection to the camera
Page 67

Tethering Social Network Service Settings with BenQ Cloud
1. When logged on to cloud.benq.com, click Social
Network Service Setting
2. Click enable of your desired social network
service.
3. You will be directed to the web page of the desired
social network service to authorize BenQ Cloud
and the service to be tethered together.
.
4. Once authorized, you should see the desired social
network service being colored.
Click disable and OK if you wish to untether BenQ
Cloud and the service.
Photo sharing via BenQ Cloud over Wi-Fi on your camera
Switch the power lever by the mode dial to Wi-Fi, and the Wi-Fi main menu of the camera is
prompted on the LCD screen.
Use 4-way control and press key to select
desired option.
• You will be prompted to confirm the current status of wireless connection.
• You will be asked to enter your BenQ Cloud ID and password. Tick Remember to save time on re-entering
ID and password.
67 Connection to the camera
Page 68

To share on BenQ Cloud:
1. Once selected BenQ Cloud, a BenQ Cloud member logging request will prompted. Use 4 way
control to select Next and press OK if you have logged in.
2. Next, you will be directed to the browse mode to select photos your wish to share.
3. Use 4-way control and press to select photos. Press to send.
4. A progress bar will be displayed for current delivery status.
5. Once all of selected photos have seen sent to BenQ Cloud, and a status message is prompted
on the LCD screen.
6. Press to go back to browse mode.
To share with QR Sharing:
1. Once selected QR Sharing, a BenQ Cloud member logging request will prompted. Use 4 way
control to select Next and press OK if you have logged in.
2. Next, you will be directed to the browse mode to select photos your wish to share.
3. Use 4-way control and press to select one photo. Press to send.
4. A progress bar will be displayed for current delivery status.
5. A QR code valid for 24 hours will be generated on the LCD screen. Now you can share the QR
code to people with smartphones scanning for it to get the photo you wish to share with them.
6. Press to go back to browse mode.
To s h a r e o n E - m a i l :
1. Once selected E-mail, a BenQ Cloud member logging request will prompted. Use 4 way control
to select Next and press OK if you have logged in.
2. You will be directed to entered e-mail addresses in the fields of the sender and the recipients.
Every entered address will be saved in the history automatically. Press to use addresses in the history. Press
to add a field for the next recipient, and press to remove unwanted recipients. Press to go to browse
mode to select photos to email with, or press to go back to the Wi-Fi main menu.
3. Use 4-way control and press to select photos. Press when done and selected photos
attached to an email is on its way to the recipients.
4. Use 4-way control and press to select photos. Press when done and selected photos
attached to an email is on its way to the recipients.
5. A status message of delivery is prompted on the LCD screen. Press to go back to browse
mode.
When Send Image Resolution is set to Original, suppose no image with size larger than 5 MB is selected, 5 images
at most can be attached to an email at a time. On the contrary, once an image with size larger than 5 MB is
selected, other images will be inaccessible and no more images can be attached.
68 Connection to the camera
Page 69

To share on Social Sharing:
1. Once selected Social Sharing, a BenQ Cloud member logging request will prompted. Use 4 way
control to select Next and press OK if you have logged in.
2. You will be directed to further select which of social networks to share photos with.
3. After selected you desired social network service, you will be directed to the browse mode to
select photos to share with.
4. Use 4-way control and press to select photos. Press .
5. A progress bar will be displayed for current delivery status. Next, a status message of delivery is
prompted on the LCD screen. Press to go back to browse mode.
• Available social network services depends on your tethering settings with BenQ Could. No service available is
no tethering setting. Refer to Tethering Social Network Service Settings with BenQ Cloud for more detail.
• While Facebook and QQ are available for text, Weibo is available for both text and emoji.
• Due to restrictions of each social network service, social sharing images will be compressed while sending even
Send Image Resolution
is set to original.
69 Connection to the camera
Page 70

Specifications & troubleshooting
Specification table
Sensor
Zoom
Lens
Focus Range
LCD
Image Resolution
Movie Mode
Shutter Speed
White Balance
Exposure
ISO
Flash
Drive Mode
Power Source
Storage Type
File Format
Dimensions / Weight
Interface
Wireless
(GH680F/GH688F only)
Accessories
Sony 20 Mega Pixels, 1/2.3 inch CCD
Optical: 35X
Digital: Up to 8X (Preview) / Up to 10X (Playback)
Wise: Up to 3X
f = 4.5 (W) ~ 157.5 (T) mm
F= 3.0 (W) ~ 5.9 (T)
(f = 25 ~ 875 mm, 35 mm equivalent)
Normal: W = 30 cm ~ Infinity; T = 200 cm ~ Infinity
Macro: W = 1 cm ~ 200 cm; T = 150 cm ~ Infinity
3.0” 460k pixels Swivel LCD
4:3 20M/ 14M / 10M / 8M /5M / 3M / 2M / VGA
16:9 9M / 2M
3:2 12M
1:1 9M 2992*2992
1280 x 720 / 640 x 480 with 30fps / 15fps
Continuous recording with sound
Auto: 1/2000 ~ 1 sec.
Manual mode: 1/2000 ~ 15 sec.
Auto / Tungsten / Fluorescent H / Fluorescent L / Daylight / Cloudy / Flash / Manual
-2.0 ~ +2.0 EV (1/3EV step)
Auto / 100 / 200 / 400 / 800 / 1600 / 3200 / 6400
Auto On / Off / Red-eye / Slow Sync
Off / 10 sec. / 2 sec. / 10+2 sec. / Smile
CIPA approximately 400 based on bundled Li-ion battery
Built-in approx. 70 MB
SD (up to 4GB) / SDHC (up to 32GB) / SDXC (> 64GB)
PQI WiFi card / Eye-Fi card compatible
Still Image: JPEG (EXIF 2.3 compatible)
Video: AVI
Audio: WAV
132.2 x 90.6 x 95.7 mm
500 g (w/o battery & SD card)
Digital output: USB 2.0 compatible
Audio / Video output (NTSC/PAL)
IR remote control (GH680F/GH688F only)
Built-in
Smart Device / BenQ Cloud / QR Sharing / E-mail / Social Sharing
USB Cable / Quick Guide / Neck Strap / Li-ion Battery / Lens Cover / Lens Strap / USB
/ Pouch (optional) / Lens Hood (optional) / Remote Control (GH680F/GH688F only)
Adapter
• Available accessories depend on the actual items shipped and may vary from the list above.
• All information, designs, and specifications are subject to change without prior notice.
70 Specifications & troubleshooting
Page 71

Troubleshooting and service information
If your camera cannot operate normally, see the frequently encountered problems and solutions
listed below. If the problem persists, contact your nearest service center or technical support.
Problem Cause Solution
The camera cannot
power up.
The battery power
is draining quickly.
The battery or
camera is warm.
The LCD screen is
black.
No image is
displayed on the
screen and the
camera beeped four
times.
There is no battery or the
battery is not inserted correctly.
The battery has no power. Replace the battery.
Battery type might be wrong. Use correct battery type.
Battery type setting on the
camera might be wrong.
The external temperature is
extremely low.
Many shots are being captured in
dark places, requiring a flash.
The camera or flash was used
continuously over a long period
of time.
The lens cover is on. Remove the lens cover.
The lens cover is on. Remove the lens cover.
Insert the battery correctly.
Select the correct battery type
setting on the camera.
--
--
--
I cannot adjust the
flash mode.
The flash does not
fire.
Even though the
flash fired, the image
is dark.
The image is too
bright or too dark.
I cannot format a
memory card.
I cannot download
images from the
camera to my
computer.
The flash is closed. Open the flash.
The camera flash is turned off. Set the flash to Auto Flash.
The light source is sufficient. --
The distance to the subject is
greater than the flash's effective
range.
The exposure is excessive or
inadequate.
The memory card is writeprotected.
End of the memory card life. Insert a new memory card.
The free space on the hard drive
of your computer is insufficient.
There is no power being supplied
to the camera.
Get closer to the subject and shoot.
Reset exposure compensation.
Remove the write protection.
Ensure there is enough space in your
hard drive capable of loading images
equal to or greater than the size of
the memory card in the camera.
Replace the battery.
71 Specifications & troubleshooting
Page 72

Problem Cause Solution
The battery is running low. Replace the battery.
The camera is not in Capture
mode.
The shutter was not pressed all
The camera does
not shoot even
when pressing the
shutter.
I cannot print
images with
PictBridgecompliant printers.
the way down.
The internal memory or
memory card runs out of space.
The flash is recharging.
The camera does not recognize
the memory card.
The camera is connected to the
printer when the camera is
powered off.
Technical support
Switch to Capture mode.
Press the shutter all the way down.
Insert a new card or delete unwanted
files.
Wait until the flash mode icon,
indicated on the screen, stops
flashing.
Format the memory card before the
initial use or before using with
another camera.
Connect the camera to the printer,
turn on the camera, and then select
Printer.
For technical assistance, free driver updates, product information, and news releases, visit our
website:
http://www.BenQ.com
72 Specifications & troubleshooting
 Loading...