

Page 1
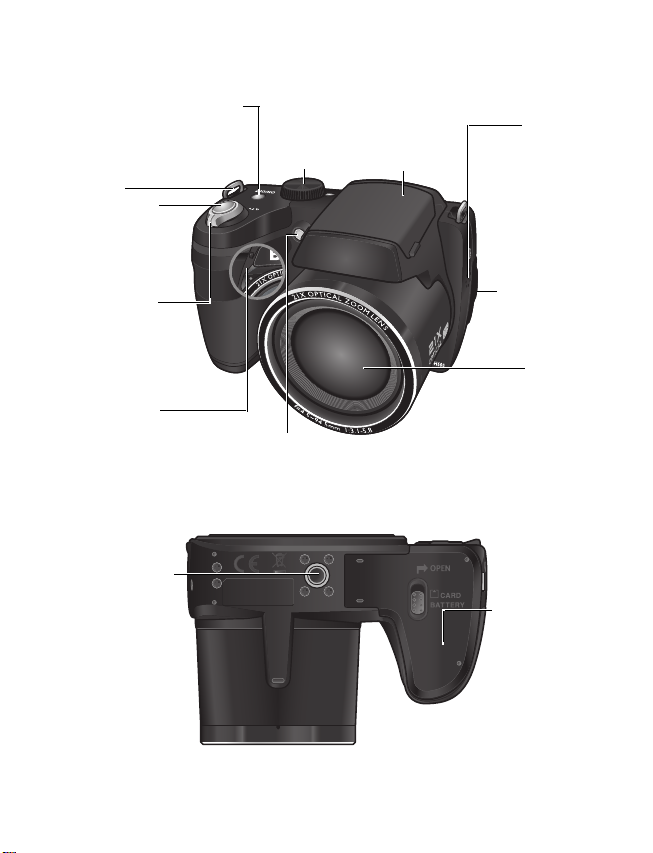
Front and bottom views
Strap eyelet
手提帶孔
手提带孔眼
Shutter button
快門按鍵
快门按钮
Power button
電源按鍵
电源按钮
Flash
閃光燈
闪光
Lens
鏡頭
镜头
Speaker
喇叭
扬声器
Battery / card cover
電池 / 記憶卡蓋
电池 / 卡仓盖
Tripod mount
三腳架孔
三角架安装槽
USB / AV port
USB / AV 埠
USB / AV 端口
Zoom lever
變焦桿
变焦杆
Mode dial
模式旋鈕
模式拨盘
AF Assist Lamp / Self-timer LED indicator
對焦輔助 / 自拍定時 LED 指示燈
自动对焦辅助灯 / 自拍 LED 指示灯
Microphone
麥克風
麦克风
Page 2
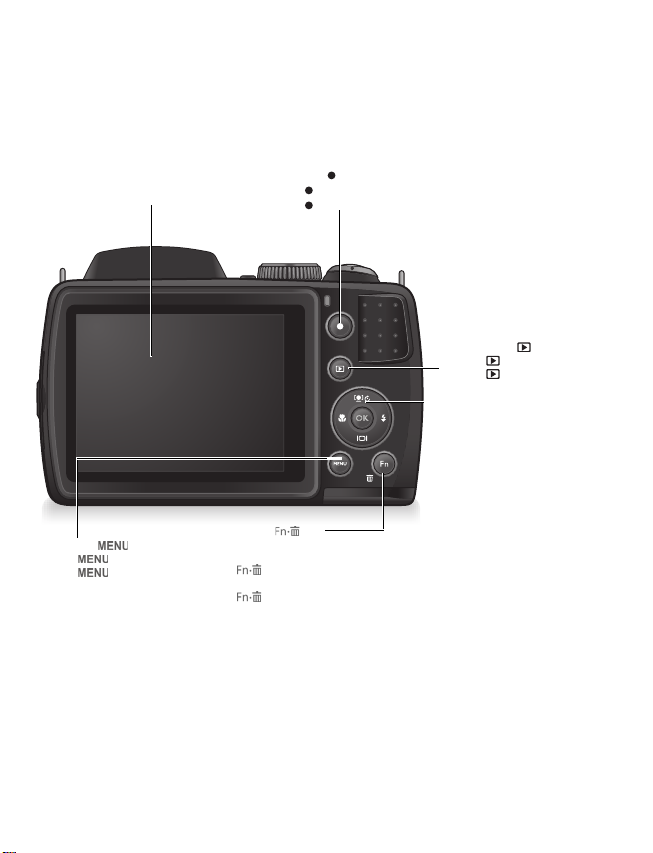
Rear view
MENU button
選單按鈕
菜单按钮
Function / Delete button Activates the function menu (Capture mode) or delete
photos (Playback mode)
功能 / 刪除按鈕 啟動功能選單 (照相模式)或刪除相片 (播放模式)
功能 / 删除按钮 激活功能菜单 (照相模式)或删除照片 (播放模式)
LCD display
LCD 顯示器
LCD 显示屏
Record button - Press to record a video clip
錄製按鈕 - 按下可錄製影片片段
录制按钮 - 按此按钮录制视频剪辑
Playback button
播放按鈕
播放按钮
Multifunctional buttons (including a
4-way control and an button)
多功能按鈕 (包括一個 4 向控制鈕和
一個 鈕)
多功能按钮 (包括一个 4 向控制和一
个 按钮)
OK
OK
OK
Page 3
Preparing the camera for use
This section will guide you on how to prepare the camera before its initial use.
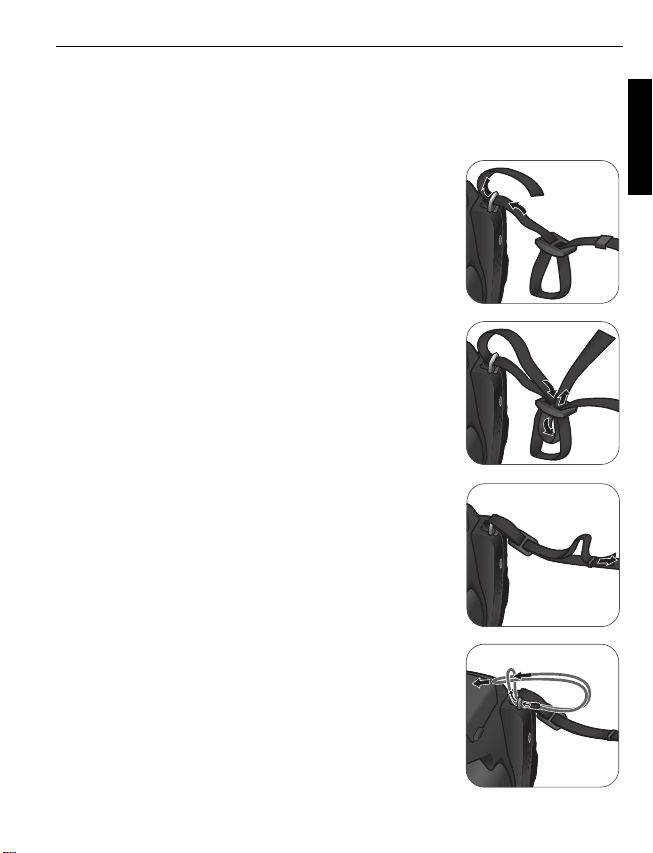
Attaching the strap
To attach the lens and neck straps to your camera, do the following:
1. Insert one end of the neck strap through the strap eyelet.
2. Route it through the buckle as the inner loop.
3. Route the other end of the neck strap to the other strap
buckle to secure it.
Follow the above steps to attach the other side of the
neck strap.
3
English
4. Insert one end of the lens strap through the strap eyelet.
Make a loop to secure it.
Page 4
4
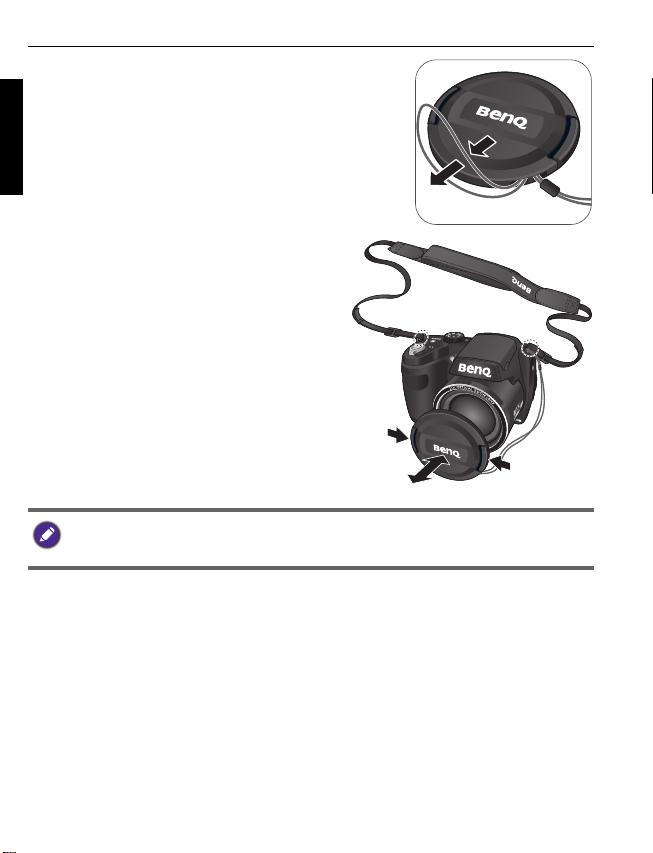
5. Attach the other end of the lens strap on the lens
cover.
English
6. Once complete, make sure the straps are
tight.
• Wrapping the strap around your neck is dangerous. Refrain children from playing with the
strap.
• Remove the lens cover before using the camera.
Page 5

Installing the batteries
Use only the specified batteries for the camera, and always turn off the camera before
removing the batteries.
• You can select the battery type that is used in the camera (Alkaline/NiMH/Lithium).
• High-capacity (such as 2500 mAh) rechargeable batteries are recommended.
• Carbon-zinc batteries are not recommended.
• Do not combine old and new batteries or batteries of different makes or types.
• The AA batteries that came with the camera are not rechargeable.
To install the batteries:
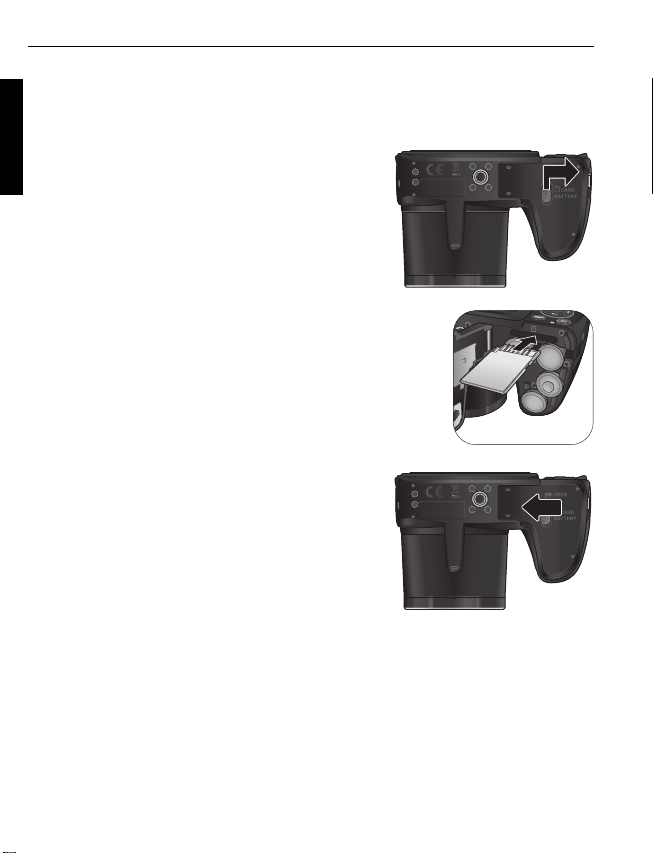
1. Push the button up and then slide the battery/card
cover to the right to release and open it.
2. Insert the batteries in the correct direction by
matching the + - label on the battery slot.
3. Close the battery/card cover and then slide it to
the left to lock it in place.
5
English
To remove the batteries:
1. Push the button up and then slide the battery/card cover
to the right to release and open it.
2. Remove the batteries.
3. Close the battery/card cover and then slide it to the left
to lock it in place.
Page 6
6
Installing an SD card
The camera comes with internal memory for storing captured images, video clips, or
audio files. You can also add an SD card to store more files.
English
To install an SD card:
1. Push the button up and then slide the battery/card
cover to the right to release and open it.
2. Insert an SD card in the correct direction.
3. Close the battery/card cover and then slide it to
the left to lock it in place.
To remove an SD card:
1. Push the button up and then slide the battery/card cover to the right to release and
open it.
2. Lightly press the edge of the memory card to eject.
3. Close the battery/card cover and then slide it to the left to lock it in place.
Page 7

Turning the Power On and Off
Before turning on the camera, be sure to remove the lens cover. Otherwise, the lens will not
be extended and the camera will beep three times.
There are two ways to turn on the camera:
• Press the Power button.
The zoom lens extends and the camera is turned on in Record mode.
• Press and hold .
The camera is turned on in Playback mode, and the lens is not extended.
Opening the Flash
You need to manually open the flash before switching the flash mode.
To open the flash:
Use hands to lift the flash to open it.
To c l o s e t h e f l a s h :
Push down the flash to close it.
7
English
When the flash is closed, flash mode is automatically set to flash off.
Page 8
8
OK
OK
OK
OK
Initial setting
You will be prompted to set up the language and the date and time when the camera is
English
turned on for the first time.
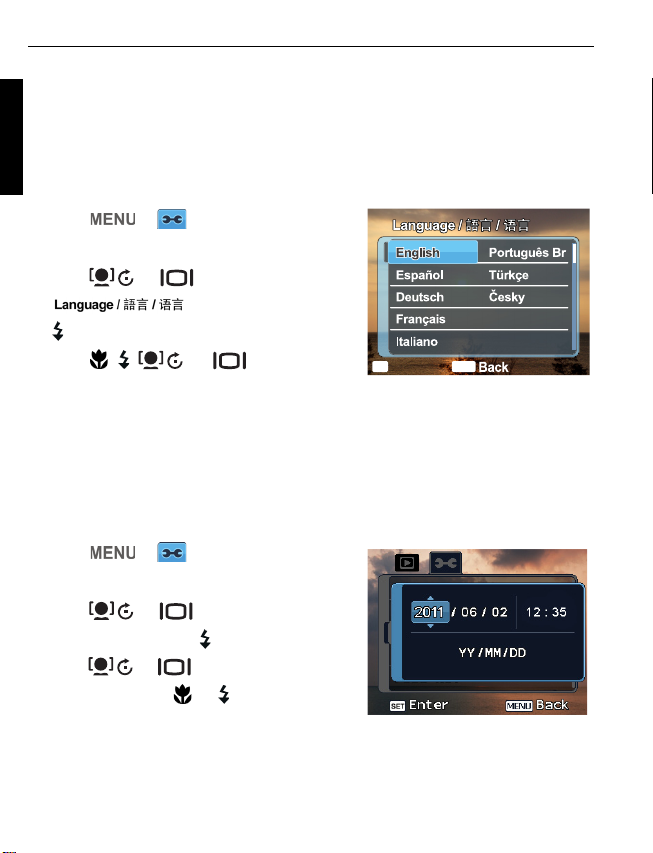
Setting language
Selects the language version shown on the screen.
To select a language:
1. Press > . (Step 1 is needed only
after the initial setting is complete.)
2. Press or to locate
, and then press or
.
3. Press , , , or to locate the
language you want.
SET
OK
4. Press to set the language.
Setting date and time
When using the camera for the first time or when the battery has been removed from
the camera for a long time, you need to set the date and time. The date and time is
recorded when a video or image is captured.
To set date and time:
1. Press > . (Step 1 is needed only
after the initial setting is complete.)
2. Press or to locate
and then press or .
3. Press or to select date, time and
date format. Press or to move to
another column as needed.
4. Press to set the date and time.
Date/Time,
Polski
Română
MENU
Page 9
Operating the camera
The procedure below is a general guideline for basic operation. It is particularly useful if
you are new to the camera.
1. Press the Power button to turn the power on.
Be sure that you have removed the lens cover before turning on the camera.
2. Set the mode dial to or other desired shooting mode. See "Selecting the Shooting
Mode" for details.
Remember to follow the on-screen display or slide the Zoom lever to for instructions
(wherever available). Next, press the corresponding buttons to access and set more options.
At any time, you can cancel the current operation by pressing to return to your
previous step.
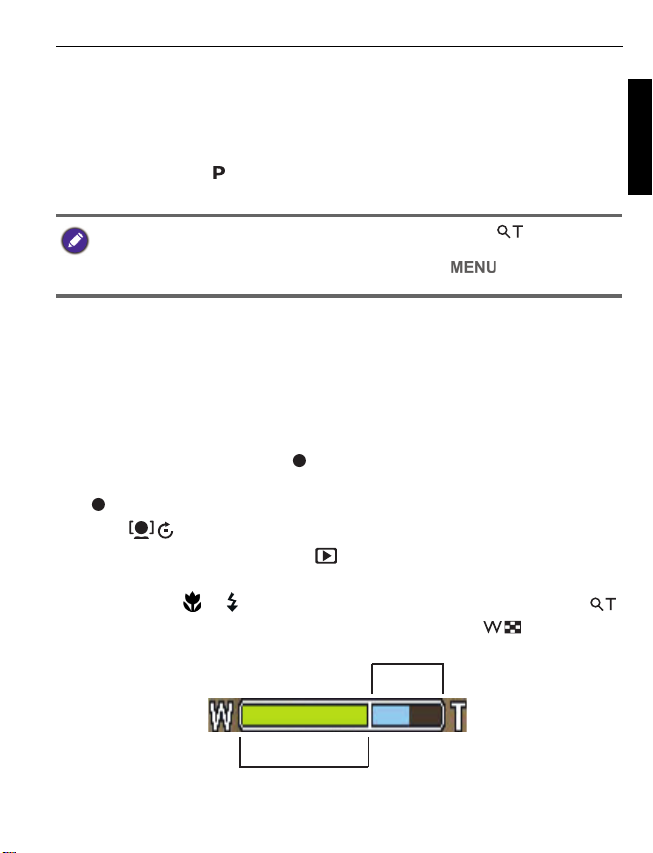
3. If you need to use the flash for shooting, open the flash.
4. Use the Zoom lever to zoom-in/zoom-out on the subject.
5. Press the Shutter button halfway to set automatic focus.
• Once the focus is set, the focus frame color will turn from white (unfocused) to
yellow-green (focused). If the focus frame color is red and you press the shutter
down, it might result in a blurred photo.
6. Press the Shutter button down fully to capture the image.
7. To switch to Movie mode, press . The video recording automatically starts.
• While recording, use the Zoom lever to zoom-in/zoom-out on the subject. Press
again to stop video recording.
• Press to pause/resume the video recording.
8. To switch to Playback mode, press . In Playback mode, you can view captured
images or recorded videos.
• You can press or to view other images/videos, slide the Zoom lever to
to zoom-in on a captured image, or slide the Zoom lever to side to view 9thumbnail images on the screen.
9
English
Page 10
10
100
-1. 0
A
9999
123 54678
917
16 15 1314 12 11 10
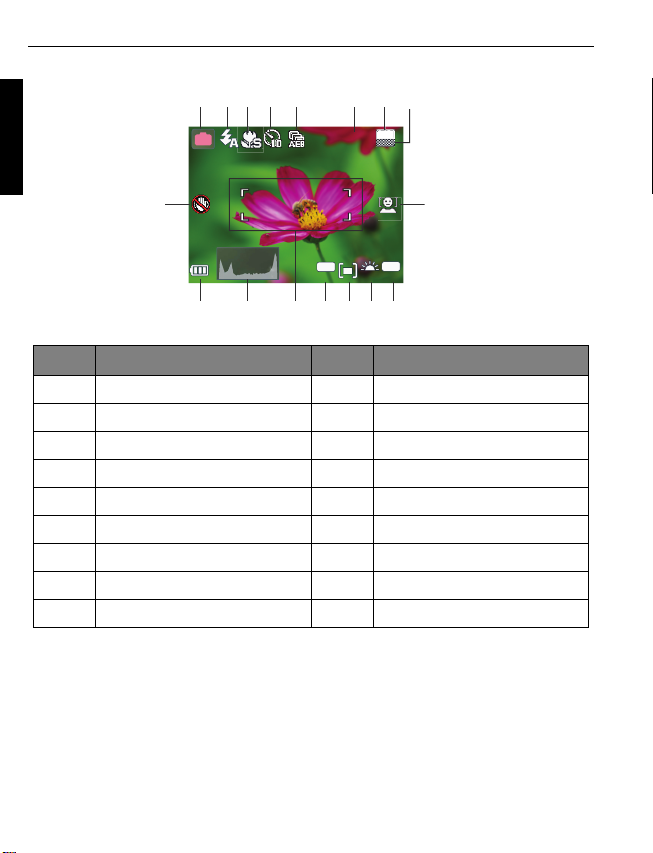
Capture mode
English
8M
P
9999
EV
ISO
100
Item Description Item Description
1Shooting mode 10ISO
2 Flash mode 11 White Balance
3 Focus mode 12 AE metering
4 Drive mode 13 Exposure value (EV)
5 AEB 14 AF area
6 Number of shots available 15 Histogram
7 Image size 16 Battery status
8 Image quality 17 Camera shake warning
9 Face Tracking
Page 11

Selecting the Shooting Mode
1
2
3
4
5
6
7
8
Rotate the mode dial to select one of the eight shooting modes:
No. Icon Mode Description
1. Program The camera automatically configures the appropriate
2. Shutter
Priority
3. Aperture
Priority
4. Manual Lets you set both aperture and shutter speed manually.
settings, so you can capture images with ease.
You can choose a shutter speed, while the aperture
value is automatically determined by the lighting
condition of the subject.
You can choose an aperture value, while the shutter
speed is automatically determined by the lighting
condition of the subject.
11
English
5. Continuous
Shooting
6. Panorama Lets you create a panoramic photo from three shots.
7. Scene Mode Lets you select the desired scene mode that suits your
8. Smart Scene The camera detects the shooting condition and
Lets you capture a series of shots with a single press of
the Shutter button.
shooting environment.
automatically switches to the appropriate scene mode.
Page 12
12
10/115
10/11501.15.200901.15.200901.15.2009
IMG 0064.JPGIMG 0064.JPG
1.25MB
1.25MB
1/200
1/200 F2.8F2.8
08:0508:0508:05
14M
EV
2.02.0
ISO
400
400
1
2
3
5
4
6
7
8
9
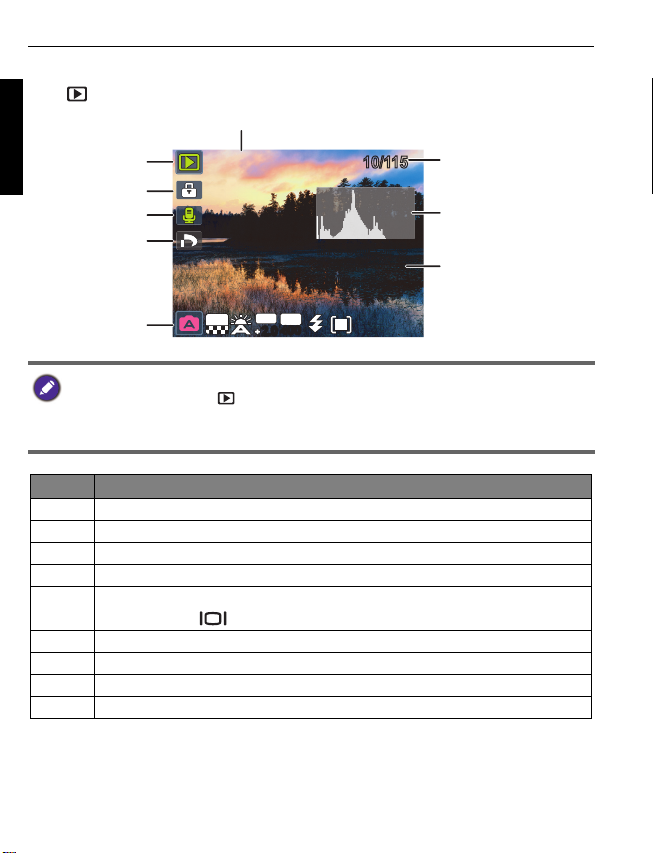
Playback mode
Press to switch to Playback mode.
English
• If the camera is turned off, you can directly switch to Playback mode by
pressing and holding .
• While pausing video playback, you can press the shutter to capture the video
frame as a still image in the VGA format.
Item Description
1 Indicates that the camera is in the Playback mode.
2 Indicates that the file is protected and cannot be deleted.
3 Indicates this file has a voice memo or the file is an audio file.
4 Indicates the file is marked for printing.
5 Displays the shooting parameters when you took the picture or playback
controls. Press to toggle between different displayed information.
6 Date and time when the file was created.
7 File number
8Histogram
9 File name, file size, shutter speed, and aperture value
For more information on this camera, see the user manual (in the PDF format) on the
accompanying CD.
Page 13

準備使用相機
本節將引導您完成初次使用前的相機準備工作。
繫上繩帶
若要將鏡頭帶及頸帶繫至相機,請執行下列操作:
1. 將頸帶的一端穿過繫帶孔。
2. 從扣環穿過,在內側繞一圈。
3. 將頸帶的另一端穿過另一個扣環,將其繫緊。
依上述步驟繫上頸帶的另一端。
13
繁體中文
4. 將鏡頭帶的一端穿過繫帶孔。將它繞一圈並繫緊。
Page 14

14
5. 鏡頭帶的另一端繫在鏡頭蓋上。
繁體中文
6. 完成後,確定繩帶有繫緊。
• 將繩帶繞過脖子屬於危險動作。避免兒童玩弄繩帶。
• 使用相機前請移除鏡頭蓋。
Page 15

安裝電池
僅限使用本相機專用的電池,而且在取出電池之前,務必關閉本相機的電源。
• 您可以選擇相機使用的電池類型 ( 鹼性 / 鎳氫 / 鋰電池 )。
• 建議使用高容量 (如 2500 mAh)可充電式電池。
• 不建議使用碳鋅電池。
• 請勿混合使用新舊電池或不同廠牌或類型的電時。
• 相機隨附的 AA 電池非可充電式電池。
要裝入電池:
1. 向上推動按鈕,將電池 / 記憶卡蓋推至右側,
鬆開並打開電池 / 記憶卡蓋。
2. 依據電池插槽上的 + - 標示,以正確方向裝入
電池。
3. 關上電池 / 記憶卡蓋,將其推至左側上鎖。
15
繁體中文
要取出電池:
1. 向上推動按鈕,將電池 / 記憶卡蓋推至右側,鬆開並
打開電池 / 記憶卡蓋。
2. 取出電池。
3. 關上電池 / 記憶卡蓋,將其推至左側上鎖。
Page 16

16
安裝 SD 記憶卡
本相機附有可儲存所拍攝影像、視訊片段或聲音檔案的內部記憶體。您也可以增
加 SD 記憶卡以儲存更多檔案。
要安裝 SD 記憶卡:
1. 向上推動按鈕,將電池 / 記憶卡蓋推至右側,
鬆開並打開電池 / 記憶卡蓋。
繁體中文
2. 依正確方向插入 SD 記憶卡。
3. 關上電池 / 記憶卡蓋,將其推至左側上鎖。
要取出 SD 記憶卡:
1. 向上推動按鈕,將電池 / 記憶卡蓋推至右側,鬆開並打開電池 / 記憶卡蓋。
2. 輕輕按下記憶卡的邊緣使其彈出。
3. 關上電池 / 記憶卡蓋,將其推至左側上鎖。
Page 17

開啟及關閉電源
在開啟相機前,務必先移除鏡頭蓋。否則,鏡頭將不會伸長,且相機將發出三次嗶聲。
有兩種方式可以開啟相機:
• 按下電源按鈕。
變焦鏡頭會伸長,相機會在錄影模式中開啟。
• 按住 。
相機會在播放模式中開啟,鏡頭不會伸長。
開啟閃光燈
在切換閃光燈模式前,您必須手動開啟閃光燈。
若要開啟閃光燈:
拉出並掀開閃光燈。
若要關閉閃光燈:
將閃光燈向下壓,即可關閉。
17
繁體中文
當閃光燈關閉時,閃光燈模式會自動設為關閉閃光。
Page 18

18
OK
OK
OK
OK
初始設定
當相機第一次開啟時,將要求您設定語言與日期和時間。
設定語言
選擇顯示在畫面上的語言版本。
要選擇語言:
1. 按下 > 。(步驟 1 僅於初始設
繁體中文
定完成後才需執行。)
2. 按下 或 尋找
,然後按 或 。
3. 按下 、、 或 尋找要使用的
語言。
SET
4. 按下 設定語言。
OK
設定日期和時間
第一次使用相機或長時間取出相機電池時,您必須設定日期和時間。拍攝影像或
視訊時,會紀錄日期與時間。
要設定日期和時間:
1. 按下 > 。(步驟 1 僅於初始設
定完成後才需執行。)
2. 按下 或 找到
後按 或 。
3. 按下 或 選擇日期和時間,以
及日期格式。視需要按下 或 以移到
另一個縱列。
4. 按下 設定日期和時間。
日期 / 時間,然
Polski
Română
MENU
Page 19

操作相機
數位變焦
光學變焦
以下的程序是基本操作的一般指示。這些指示在您尚未熟悉本相機的使用方法時
非常有用。
1. 按下電源鍵開啟相機電源。
在開啟相機前,請確定有移除鏡頭蓋。
2. 將模式旋鈕設為 或其他所需的情境模式。請參閱 " 選擇情境模式 "。
請記得依照螢幕功能選單操作或將變焦桿推至 取得說明 (適用時)。接著按相
應的按鈕使用和設定更多選項。您可以隨時按下 來返回上一個步驟以取消目
前的操作。
3. 若需要使用閃光燈進行拍攝,請開啟閃光燈。
4. 使用變焦桿放大 / 縮小拍攝主題。
5. 請半按快門按鈕設定自動對焦。
• 對焦設定完成後,對焦框顏色將由白色 (未對焦)轉為黃綠色 (已對焦)。
若您在對焦框顏色為紅色時按下快門,可能會照出模糊相片。
6. 將快門按鈕按到底以進行拍攝。
7. 若要切換至錄影模式,請按下 。視訊錄製會自動開始。
• 錄製時,使用變焦桿放大 / 縮小拍攝主題。再次按下 停止錄音。
• 按下 暫停 / 恢復視訊錄製。
8. 若要切換至播放模式,請按下 。在播放模式中,您可檢視已拍攝的影像或
已錄製的視訊。
• 您可按下 或 查看其他影像 / 視訊、將變焦桿推至 放大已拍攝的影
像,或將變焦桿推至 檢視螢幕上 9 張縮圖。
19
繁體中文
Page 20

20
ISO
100100
EV
-1. 0
A
99999999
P
8M
123 54678
917
16 15 1314 12 11 10
照相模式
繁體中文
項目 說明 項目 說明
1 情境模式
2 閃光燈模式
3 對焦模式
4 拍攝模式
5 包圍曝光
6 可拍攝張數
7 影像尺寸
8 照片品質
9 臉部對焦
10 ISO
11
白平衡
12
測光
13
曝光值 (EV)
14
自動對焦區域
15
亮度圖表
16
電池狀態
17
相機震動警告
Page 21

選擇情境模式
1
2
3
4
5
6
7
8
轉動模式旋鈕,從 8 種情境模式中選擇任何一種:
編號 圖示 模式 說明
1.
2.
3.
4.
程式 由相機自動設定合適的設定,讓您可以輕鬆地拍攝
快門先決 您可選擇一個快門速度,而光圈值是由拍攝主題的
光圈先決 您可選擇一個光圈值,而快門速度是由拍攝主題的
手動 讓您手動設定光圈與快門速度。
影像。
光線情況自動決定。
光線情況自動決定。
21
繁體中文
5.
6.
7.
8.
連拍
全景 從三張相片建立全景相片。
場景模式 可選擇適合拍攝環境的所需場景。
智慧情境 相機會偵測拍攝情況,自動切換至合適的場景模
只要按一下快門按鈕,便可連續拍攝相片。
式。
Page 22

22
10/115
10/11501.15.200901.15.200901.15.2009
IMG 0064.JPGIMG 0064.JPG
1.25MB
1.25MB
1/200
1/200 F2.8F2.8
08:0508:0508:05
14M
EV
2.02.0
ISO
400
400
1
2
3
5
4
6
7
8
9
播放模式
按下 切換至播放模式。
繁體中文
• 若相機關機,您可按住 直接切換至播放模式。
• 當暫停視訊播放時,您可按下快門鍵將影像儲存為 VGA 格式的靜態影像。
項目 說明
1 表示相機在播放模式中。
2 表示檔案受到保護且無法刪除。
3 表示此檔案有語音備忘錄或檔案是聲音檔案。
4 表示檔案已標示列印。
5
當您拍攝相片或播放控制時,顯示拍攝參數。按下 以切換不同的
顯示資訊。
6 建立檔案時的日期和時間。
7 檔案編號
8 亮度圖表
9 檔案名稱、檔案大小、快門速度和光圈值
更多本相機的相關資訊,請參閱隨附光碟中的使用者手冊 (PDF 格式)。
Page 23

准备使用相机
此部分向您介绍如何做好初次使用相机的准备。
连接挂绳和镜头绳
按照下列步骤将镜头绳和挂绳连接到相机上:
1. 将挂绳的一端穿过挂绳孔眼。
2. 将其穿过内环带扣。
3. 将挂绳另一端穿过另一个带扣,使其扣紧。
按照上述步骤连接另一侧的挂绳。
23
简体中文
4. 将镜头绳的一端穿过镜头绳孔眼。穿一个环,使其扣
紧。
Page 24

24
5. 将镜头绳的另一端连接到镜头盖上。
6. 完成后,确保挂绳扣紧。
简体中文
• 挂绳缠绕在颈部时存在危险。请勿让儿童玩耍挂绳。
• 在使用相机之前取下镜头盖。
Page 25

安装电池
仅使用为相机指定的电池,在取出电池之前务必关闭相机电源。
• 您可以选择相机中使用的电池类型 (氢氧电池 / 镍氢电池 / 锂电池)。
• 推荐使用大容量 (如 2500 mAh)充电电池。
• 不建议使用碳锌电池。
• 请勿混用新旧电池或者不同制造商或类型的电池。
• 相机附带的 AA 电池不能充电。
安装电池:
1. 向上推按钮,然后向右滑动电池 / 卡仓盖,将
其打开。
2. 参照电池槽上的 + - 标志以正确的方向装入电
池。
3. 盖上电池 / 卡仓盖,然后向左滑动仓盖,将其
锁定到位。
25
简体中文
取出电池:
1. 向上推按钮,然后向右滑动电池 / 卡仓盖,将其打
开。
2. 取出电池。
3. 盖上电池 / 卡仓盖,然后向左滑动仓盖,将其锁定到
位。
Page 26

26
安装 SD 卡
此相机配有内部存储器,用于存储拍摄的图像、视频剪辑或音频文件。此外,您
也可以加装 SD 卡以存储更多文件。
安装 SD 卡:
1. 向上推按钮,然后向右滑动电池 / 卡仓盖,将
其打开。
简体中文
2. 以正确方向插入 SD 卡。
3. 盖上电池 / 卡仓盖,然后向左滑动仓盖,将其
锁定到位。
取出 SD 卡:
1. 向上推按钮,然后向右滑动电池 / 卡仓盖,将其打开。
2. 轻按存储卡的边缘使其弹出。
3. 盖上电池 / 卡仓盖,然后向左滑动仓盖,将其锁定到位。
Page 27

打开和关闭电源
在打开相机电源前,务必取下镜头盖。否则,镜头不会伸出,相机将发出三次哔声。
此相机有两种开机方式:
• 按电源按钮。
变焦镜头伸出,相机开机并进入录制模式。
• 按住 。
相机开机并进入播放模式,镜头不伸出。
打开闪光灯
在切换闪光模式之前,您需要手动打开闪光灯。
打开闪光灯:
用手抬起并打开闪光灯。
关闭闪光灯:
按下可关闭闪光灯。
27
简体中文
闪光灯关闭时,闪光模式自动切换至关闭闪光。
Page 28

28
OK
OK
OK
OK
初次设置
相机第一次开机时,会提示您设置语言和日期时间。
设置语言
选择屏幕显示所使用的语言。
选择语言:
1. 按 > 。(仅在完成初始设置后
需要执行步骤 1。)
2. 按 或 找到
,然后按 或 。
3. 按 、、 或 找到所需的语
简体中文
言。
4. 按 设置语言。
SET
OK
设置日期和时间
第一次使用相机时或者相机中长时间没有装入电池时,您需要设置日期和时间。
在拍摄视频或图像时,会记录日期和时间。
设置日期和时间:
1. 按 > 。(仅在完成初始设置后
需要执行步骤 1。)
2. 按 或 找到
按 或 。
3. 按 或 选择日期、时间以及日
期格式。根据需要,按 或 移到另一
栏。
4. 按 设置日期和时间。
日期 / 时间,然后
Polski
Română
MENU
Page 29

29
数码变焦
光学变焦
使用相机
以下步骤是一般性基本操作。这在不熟悉此相机的情况下非常有用。
1. 按电源按钮打开相机的电源。
务必在打开相机电源前取下镜头盖。
2. 将模式拨盘设在 或所需的其他场景模式。参见 " 选择场景模式 " 了解详细
信息。
切记按照屏幕显示信息进行操作,或者将变焦杆拨到 了解相关说明 (若存在)。
接下来,按相应的按钮进入和设置更多选项。您可以随时按 返回上一步,以
取消当前操作。
3. 如需使用闪光灯进行拍摄,可以打开闪光灯。
4. 使用变焦杆来放大 / 缩小景物。
5. 将快门按钮按下一半以设置自动对焦。
• 对焦完毕后,对焦框颜色从白色 (未对焦)变成黃绿色 (已对焦)。如果在
对焦框颜色是红色时按下快门,可能导致照片模糊。
6. 将快门按钮完全按下以拍摄图像。
7. 如要切换到视频模式,请按 。视频录制自动开始。
• 录制时,可以使用变焦杆来放大 / 缩小景物。再按一次 可停止视频录制。
• 按 可暂停 / 继续视频录制。
8. 如要切换到播放模式,请按 。在播放模式下,您可以查看所拍摄的图像或
视频。
• 您 可以:按 或 查看其他图像 / 视频;将变焦杆拨到 放大所拍摄的
图像;将变焦杆拨到 一侧在屏幕上查看 9 个缩略图图像。
简体中文
Page 30

30
ISO
100100
EV
-1. 0
A
99999999
P
8M
123 54678
917
16 15 1314 12 11 10
照相模式
简体中文
项目 说明 项目 说明
1 场景模式
2 闪光模式
3 对焦模式
4 拍摄模式
5 包围曝光
6 可拍摄的照片数
7 图像尺寸
8 图像质量
9 面部捕捉
10 ISO
11
白平衡
12
自动曝光测光
13
曝光值 (EV)
14
自动对焦区域
15
直方图
16
电池状态
17
相机抖动警告
Page 31

选择场景模式
1
2
3
4
5
6
7
8
转动模式拨盘以选择八种场景模式之中的一种模式:
编号 图标 模式 说明
1.
程序 相机自动配置合适的设置,以便您轻松拍摄。
31
2.
3.
4.
5.
6.
7.
8.
快门优先 您可以选择一个快门速度,然后根据景物光线条件
光圈优先 您可以选择一个光圈值,然后根据景物光线条件自
手动 您可以手动设置光圈和快门速度。
连拍
全景 让您利用三张照片合成一张全景照片。
场景模式 让您根据拍摄环境选择合适的场景模式。
智能场景 相机检测拍摄情形,自动切换到合适的场景模式。
自动确定光圈值。
动确定快门速度。
让您按一下快门按钮拍摄多张照片。
简体中文
Page 32

32
10/115
10/11501.15.200901.15.200901.15.2009
IMG 0064.JPGIMG 0064.JPG
1.25MB
1.25MB
1/200
1/200 F2.8F2.8
08:0508:0508:05
14M
EV
2.02.0
ISO
400
400
1
2
3
5
4
6
7
8
9
播放模式
按 切换到播放模式。
简体中文
• 当相机处于关机状态时,可以按住 直接切换到播放模式。
• 当暂停视频播放时,可以按快门捕获视频画面并保存成 VGA 格式的静态图像。
项目 说明
1 表示相机处于播放模式。
2 表示文件受到保护而不能删除。
3 表示此文件有语音留言或者是一个音频文件。
4 表示文件已加上了打印标记。
5
显示拍照时的拍摄参数或播放控制。按 切换不同的显示信息。
6 文件的创建日期和时间。
7 文件编号
8 直方图
9 文件名称、文件大小、快门速度、以及光圈值
有关此相机的详细信息,请参见随机光盘中的用户手册 (PDF 格式)。
 Loading...