

Page 1

BH2401/BH2801/BH3501
BH3801/BH3801D/BH2801N
BH3801N
LCD Monitor
User Manual
Page 2

Disclaimer
BenQ Corporation makes no representations or warranties, either expressed or
implied, with respect to the contents of this document. BenQ Corporation reserves the
right to revise this publication and to make changes from time to time in the contents
thereof without obligation to notify any person of such revision or changes.
Copyright
Copyright 2019 BenQ Corporation. All rights reserved. No part of this publication may
be reproduced, transmitted, transcribed, stored in a retrieval system or translated into
any language or computer language, in any form or by any means, electronic, mechanical,
magnetic, optical, chemical, manual or otherwise, without the prior written permission
of BenQ Corporation.
Page 3

Product support 3
Product support
This document aims to provide the most updated and accurate information to
customers, and thus all contents may be modified from time to time without prior
notice. Please visit the website for the latest version of this document and other product
information. Available files vary by model.
1. Make sure your computer is connected to the Internet.
2. Visit the local website from www.BenQ.com. The website layout and content may
vary by region/country.
- User manual and related document: www.BenQ.com > Business > SUPPORT >
Downloads > model name > User Manual
- (EU only) Dismantled information: Available on the user manual download page.
This document is provided based on Regulation (EU) 2019/2021 to repair or
recycle your product. Always contact the local customer service for servicing
within the warranty period. If you wish to repair an out-of-warranty product, you
are recommended to go to a qualified service personnel and obtain repair parts
from BenQ to ensure compatibility. Do not disassemble the product unless you are
aware of the consequences. If you cannot find the dismantled information on your
product, contact the local customer service for assistance.
Page 4

Table of Contents4
Table of Contents
Product support................................................................... 3
Safety warnings and precautions...................................... 6
Important safety instructions............................................ 7
Notes on the LCD panel of this display .................................... 7
Safety notice for remote control ................................................ 8
BenQ ecoFACTS............................................................................. 9
Package contents ............................................................... 10
Setting up the display........................................................ 11
Mounting the display .................................................................... 11
Parts of the display and their functions........................ 13
Front panel ..................................................................................... 13
Rear panel....................................................................................... 13
Bottom panel ................................................................................. 13
Input/output terminals................................................................. 15
Remote control............................................................................. 16
Using the remote control ........................................................... 17
Connection ......................................................................... 18
Connecting audio/video signals.................................................. 18
Connecting the digital inputs...................................................... 18
Connecting the RS-232 input..................................................... 18
Connecting power........................................................................ 19
Basic operations................................................................. 20
Turning the display on or off...................................................... 20
Switching input signals.................................................................. 20
Adjusting audio volume level...................................................... 21
Operations in the OSD menu.................................................... 22
Initial setup ..................................................................................... 23
System Update............................................................................... 23
Multimedia buttons on the remote control ........................... 24
Android System Interface ........................................................... 25
Setting up the Internet connection........................................... 30
Menu operations................................................................ 32
Control Action.............................................................................. 32
Page 5

Table of Contents 5
Setting menu .................................................................................. 32
Input settings (Android).............................................................. 32
Input settings (HDMI).................................................................. 39
Product information.......................................................... 41
Specifications ................................................................................. 41
X-Sign content compatibility...................................................... 44
USB device compatibility ............................................................ 44
Dimensions .................................................................................... 47
Supported input signal resolution............................................. 57
Troubleshooting ................................................................. 58
2/26/21
Page 6
Safety warnings and precautions6
Safety warnings and precautions
THIS EQUIPMENT MUST BE
GROUNDED
To ensure safe operation, the three-pin
plug must be inserted only into a
standard three-pin power outlet which
is effectively grounded through normal
The lightning flash with arrowhead
symbol, within an equilateral triangle, is
intended to alert the user to the
presence of uninsulated "dangerous
voltage" within the product's enclosure
that may be of sufficient magnitude to
constitute a risk of electric shock to
persons.
The exclamation point within an
equilateral triangle is intended to alert
the user to the presence of important
operating and maintenance (servicing)
instructions in the literature
accompanying the appliance.
• The mains plug of the power supply cord shall remain readily operable. The AC
receptacle (mains socket outlet) shall be installed near the equipment and shall be easily
accessible. To completely disconnect this equipment from the AC mains, disconnect the
power cord plug from the AC receptacle.
• Do not place this display on an uneven, sloping or unstable surface (such as a trolley)
where it may fall and cause damage to itself or others.
• Do not place this display near water, like a spa or pool, or in a position which will allow
the splashing or spraying of water onto the display, like in front of an open window
where rain water may enter.
• Do not install this display in a confined space without proper ventilation and air
circulation, such as in a closed cabinet. Allow proper space around the display for
dissipating heat inside. Do not block any openings and vents on the display. Overheating
may result in hazards and electric shock.
• Installation of this display should only be performed by a qualified technician. Failure to
install this display properly may cause injuries and damages to the personnels and the
display itself. Check the installation regularly and maintain the display periodically to
ensure the best working condition.
• Use only the accessories approved or recommended by the manufacturer to mount this
display. Using wrong or unsuitable accessories may cause the display to fall and result in
serious personal injuries. Make sure that the surface and fixing points are strong enough
to sustain the weight of the display.
• To reduce the risk of electric shock, do not remove covers. No user serviceable parts
inside. Refer servicing to qualified service personnel.
• To prevent personal injuries, mounting the display or installing desktop stands is
required before use.
household wiring. Extension cords
used with the equipment must have
three cores and be correctly wired to
provide connection to the ground.
Wrongly wired extension cords are a
major cause of fatalities.
The fact that the equipment operates
satisfactorily does not imply that the
power outlet is grounded or that the
installation is completely safe. For your
safety, if you are in any doubt about
the effective grounding of the power
outlet, please consult a qualified
electrician.
Page 7

Important safety instructions 7
Important safety instructions
1. Read these instructions.
2. Keep these instructions.
3. Heed all warnings.
4. Follow all instructions.
5. Do not use this apparatus near water.
6. Clean only with dry cloth.
7. Do not block any ventilation openings. Install in accordance with the manufacturer's
instructions.
8. Do not install near any heat sources such as radiators, heat registers, stoves, or
other apparatus (including amplifiers) that produce heat.
9. Do not defeat the safety purpose of the polarized or grounding-type plug. A
polarized plug has two blades with one wider than the other. A grounding-type plug
has two blades and a third grounding prong. The wide blade or the third prong are
provided for your safety. If the provided plug does not fit into your outlet, consult an
electrician for replacement of the obsolete outlet.
10. Protect the power cord from being walked on or pinched particularly at plugs,
convenience receptacles, and the point where they exit from the apparatus.
11. Only use attachments/accessories specified by the manufacturer.
12. Use only with the cart, stand, tripod, bracket, or table specified by the
manufacturer, or sold with the apparatus. When a cart is used, use
caution when moving the cart/apparatus combination to avoid injury
from tip-over.
13. Unplug this apparatus during lightning storms or when unused for long
periods of time.
14. Refer all servicing to qualified service personnel. Servicing is required when the
apparatus has been damaged in any way, such as power-supply cord or plug is
damaged, liquid has been spilled or objects have fallen into the apparatus, the
apparatus has been exposed to rain or moisture, does not operate normally, or has
been dropped.
Notes on the LCD panel of this display
• The Liquid Crystal Display (LCD) panel of this display has a very thin protective layer of
glass which is liable to marking or scratching, and cracking if struck or pressured. The
liquid crystal substrate is also liable to damage under excessive force or extreme
temperatures. Please handle with care.
• The response time and brightness of the LCD panel may vary with the ambient
temperature.
• Avoid placing the display in direct sun or where direct sun or spot lighting will shine
onto the LCD panel, as the heat may damage the panel and the external casing of the
display, and the bright light will make viewing the display more difficult than necessary.
• The LCD panel consists of individual pixels to display images and is manufactured
according to the design specifications. While 99.9% of these pixels work normally,
0.01% of the pixels may remain constantly lit (in red, blue or green) or unlit. This is a
technical limitation of the LCD technology and is not a defect.
• LCD screens, like plasma (PDP) and conventional CRT (Cathode Ray Tube) screens, are
also susceptible to 'screen burn-in' or 'image retention' which can be found on the
Page 8

Important safety instructions8
screen as visible fixed lines and shades. To avoid such damage to the screen, avoid
displaying still images (like On-Screen Display menus, TV station logos, fixed/inactive
text or icons) for more than two hours. Change the aspect ratio from time to time. Fill
the entire screen with the image and eliminate the black bars whenever possible. Avoid
displaying images in 4:3 aspect ratio over a long period of time, otherwise there may be
visible burn marks on the screen as two vertical lines.
Note: Under certain circumstances, condensation may occur on the inner side of the
cover glass, it's a natural phenomenon and will not affect the operation of the display.
This condensation will usually disappear after around 30 minutes of normal operation.
• If display of a still image is required, it is recommended that the “Anti-Image Retention”
function is enabled under the Initial Setting menu.
Safety notice for remote control
• Do not put the remote control in the direct heat, humidity, and avoid fire.
• Do not drop the remote control.
• Do not expose the remote control to water or moisture. Failure to do so could result
in malfunction.
• Confirm there is no object between the remote control and the remote sensor of the
product.
• When the remote control will not be used for an extended period, remove the
batteries.
Page 9

Important safety instructions 9
BenQ ecoFACTS
BenQ has been dedicated to the design and development of greener product as part of
its aspiration to realize the ideal of the “Bringing Enjoyment 'N Quality to Life” corporate
vision with the ultimate goal to achieve a low-carbon society. Besides meeting
international regulatory requirement and standards pertaining to environmental
management, BenQ has spared no efforts in pushing our initiatives further to incorporate
life cycle design in the aspects of material selection, manufacturing, packaging,
transportation, using and disposal of the products. BenQ ecoFACTS label lists key ecofriendly design highlights of each product, hoping to ensure that consumers make
informed green choices at purchase. Check out BenQ's CSR Website at http://
csr.BenQ.com/ for more details on BenQ's environmental commitments and
achievements.
Page 10
Package contents10
BH2801/BH2801N
BH3801/BH3801D/BH3801N
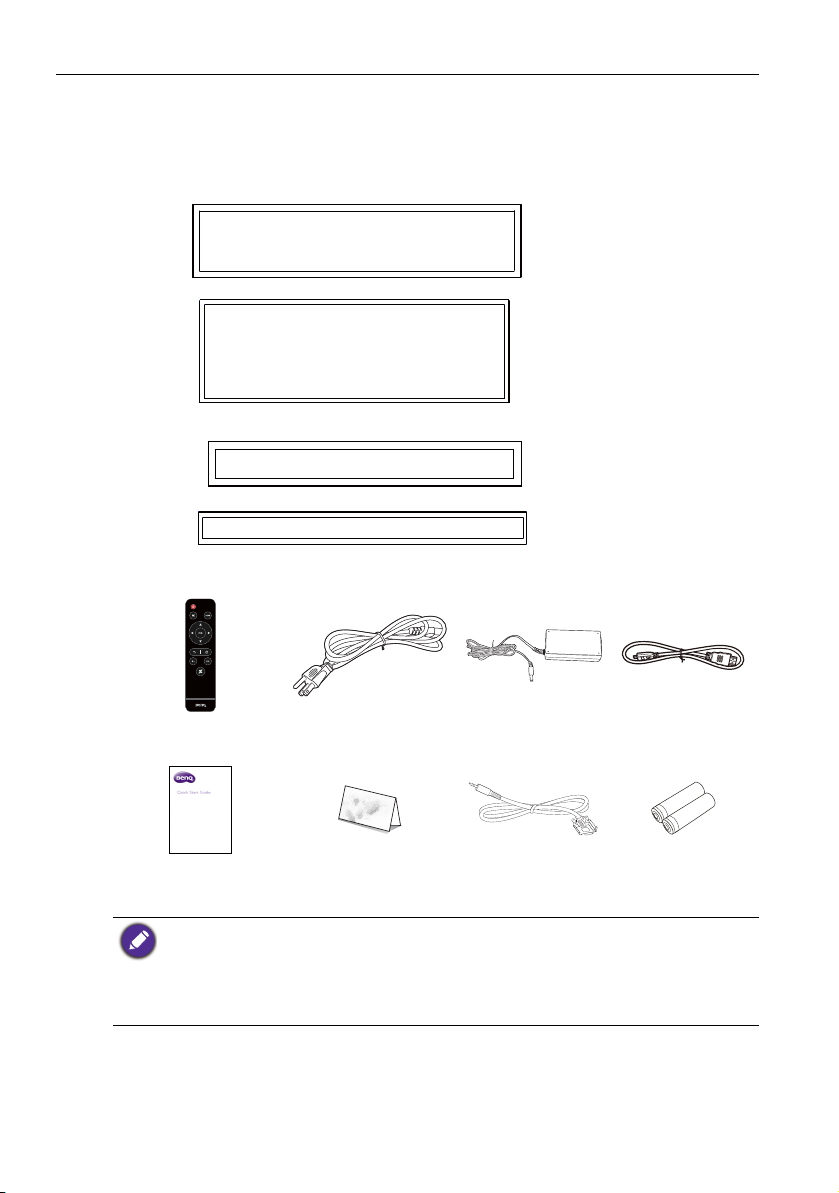
Package contents
Open the sales package and check the contents. If any item is missing or damaged, please
contact your dealer immediately.
BH2401
BH3501
LCD display
Remote control
Quick start guide
• The type of power cord supplied may differ from that illustrated depending on your region of
purchase.
• Before discarding the package, check that you haven't left any accessories inside the box.
• Dispose of packaging materials wisely. You can recycle the cardboard carton. Consider storing
the package (if possible) for future transport of the display.
• Do not leave plastic bags within reach of young children or babies.
Power cord
(By region)
Warranty Card
(By region)
Adapter HDMI cable
RS232 cable AAA battery x 2
Page 11

Setting up the display 11
$
%
:$//028176&5(:7+5($'
'(37+0/
*Screw type: M4*10L
Setting up the display
Mounting the display
You can install the display on a vertical surface with a suitable wall mounting bracket or
on a horizontal surface with the optional desktop stands. Please pay attention to the
following notes during installation:
• This display should be installed by at least two adult persons. Attempting to install this
display by only one person may result in danger and injuries.
• Refer the installation to qualified technicians. Improper installation may cause the
display to fall or malfunction.
Installing the display on a wall
1. Place a clean, dry and lint-free cloth on a flat, horizontal and object-free surface.
Make sure that the size of the cloth is larger than the display.
2. Gently lay the display on the cloth with the LCD screen facing down.
3. Remove the desktop stands from the display if installed.
4. Identify the wall mounting screw
holes on the back of the display
as shown in the illustration.
5. All models support both landscape and portrait installation.
BH2801/BH3801: 400mm (A) x 100mm (B)
BH2801N/BH3801N: 400mm (A) x 100mm (B)
BH2401/ BH3501: 430mm (A) x 60mm (B)
BH3801D
Please make sure the I/O side is facing down during landscape installation. Incorrect
installation may cause heat dissipation issue.
*Screw type: M6*12L
Page 12

Setting up the display12
Thickness of
the wall
mounting
bracket
12 mm
(0.47")
LCD display
10mm
(0.39")
6. Install the wall mounting bracket
on the display and attach the
display to the wall according to
the mounting bracket’s
instructions. The length of the
screw should exceed the
thickness of the wall mounting
bracket by at least 12 mm. Make
sure that all screws are
tightened and secured properly.
(Recommended torque: 9 10Kg•cm). The mounting means
should be strong enough to bear
the weight of the display.
• To maintain proper ventilation, keep at least 10 mm of
clear space from the back cover of the display to the
wall.
• Please consult a professional technician for wall mount
installations. The manufacturer accepts no liability for
installations not performed by a professional technician.
• The AC IN/OUT socket should be on the bottom of
the unit when rotating your display.
Page 13
Parts of the display and their functions 13
BH2801/BH2801N
BH3801/BH3801D/BH3801N
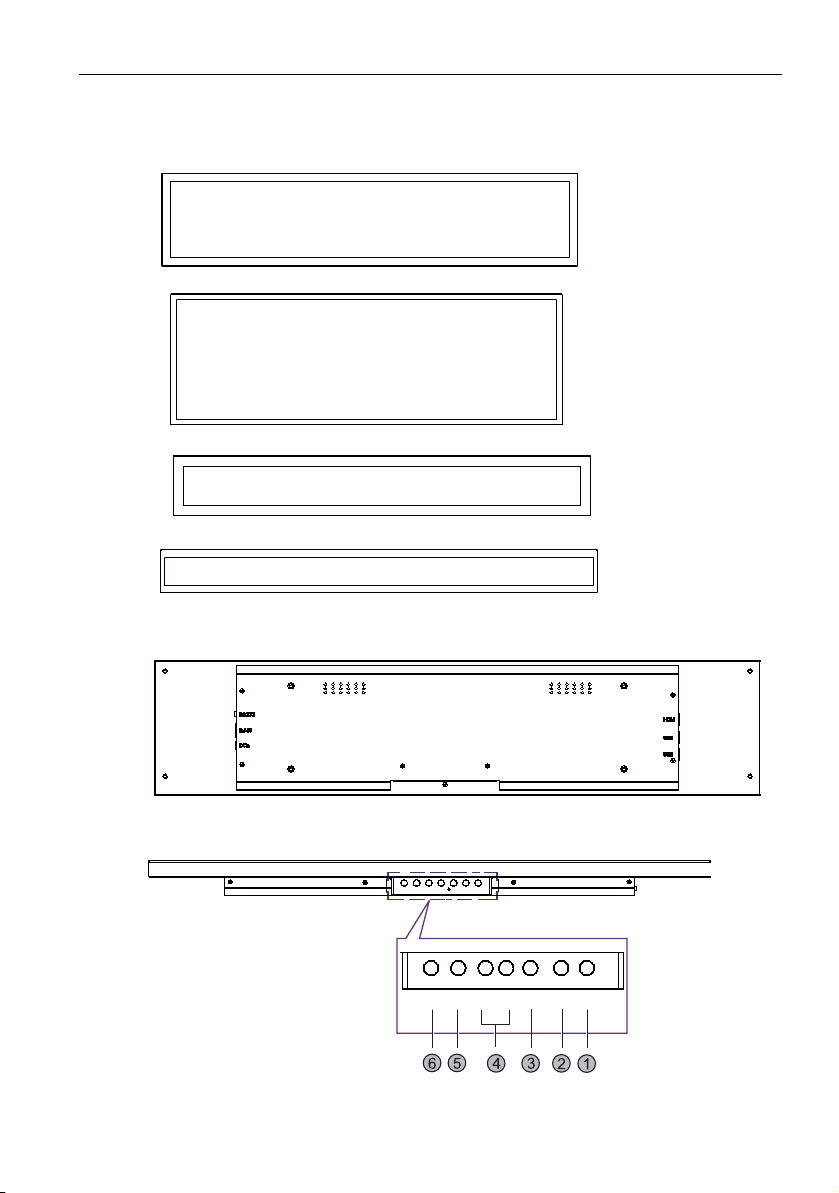
Parts of the display and their functions
Front panel
Rear panel
BH2401
BH3501
Bottom panel
Page 14

Parts of the display and their functions14
BH3801D
1
2
345
6
l
No. Name Default Function
Alternative Function
Power ON/OFF. Press for 5
Power
seconds to fully power off the
NA
display.
HOME OK. Enter the next level.
Home. Go back to main
launcher.
BACK Back. Return to the previous level. NA
Volume up/
Volume down
MENU Scroll up. Select different item.
INPUT Scroll down. Select different item.
Press INPUT for 10 seconds to switch between default and alternative key function.
Select Right/ Left. Select different
item.
Increase/ Decrease volume.
Menu. Open or close OSD
menu.
Input. Switch between input
sources.
Page 15

Input/output terminals
4
5
1
2
3
BH2401/ BH2801 /
BH3501 / BH3801 /
BH2801N / BH3801N
1 2
3
4
5
BH3801D
1
234
5
Parts of the display and their functions 15
No. Name Description
RS232 (3.5mm) Receives control signals from a computer or another display.
RJ45 Connects to the RJ-45 port on your Ethernet or router.
DC IN
USB (2.0) Accesses multimedia files on USB drives directly.
HDMI
Connects to a power outlet via the supplied power cord and
adapter.
Receives HDMI signals from an external device (such as a Blu-ray
disc player).
Page 16

Parts of the display and their functions16
1
2
3
4
5
6
8
7
1234567
8
Remote control
Volume +/-
Turns up/down the volume.
X-Sign
Opens the X-Sign app in Android.
Power button
Turn the display on or off.
INPUT
Selects an input source.
MENU
Opens or closes the OSD menu.
//// OK
Scrolls through settings and options in the
OSD menu when the OSD menu is on.
BACK
Return key.
HOME
Android system main screen button.
Page 17

Parts of the display and their functions 17
Using the remote control
Installing remote control batteries
1. Open the remote control battery compartment cover.
2. Insert the batteries ensuring that the positive
and negative marked battery terminals match
the (+) and (-) marks in the battery
compartment.
Batteries must be purchased separately as they are
not included in the display package.
3. Refit the battery compartment cover.
Remote control usage tips
• Point and aim the top front of the remote control directly at the display’s remote
control sensor window when you press the buttons.
• Do not let the remote control become wet or place it in humid environments (like
bathrooms).
• If the display’s remote control sensor window is exposed to direct sunlight or strong
light, the remote control may not operate properly. In this situation, change the light
source, readjust the angle of the display or operate the remote control from a location
closer to display’s remote control sensor window.
3m
Page 18

Connection18
HDMI cable
Computer
Computer
RS-232 cable
Connection
Connecting audio/video signals
Pay attention to the following notes when you connect cables:
• Please turn off all devices.
• Familiarize yourself with the audio/video ports on the display and the devices you want
to use. Be aware that incorrect connections may adversely affect picture quality.
• Do not remove cables from the ports by pulling the cable itself. Always grasp and pull
the connectors at the end of the cable.
• Ensure that all cables are fully inserted and firmly seated.
Connecting the digital inputs
1. Connect the HDMI output jack of a computer to the HDMI input jack on the display
using an HDMI cable.
2. To view images from this input, press the INPUT button on the remote control.
Connecting the RS-232 input
You can connect a computer to the display via the RS-232 to send commands from the
computer to the display.
• This connection is applicable to straight-through RS-232 direct cable only.
• After using serial port line to connect central control equipment and machine, certain function
of the machine can be controlled via central control equipment, such as: machine on/off, and
adjustment of sound volume, etc.
Page 19

Connection 19
RJ45
RS232
DC IN
Connecting power
1. Plug the adapter into the DC IN jack on the display.
2. Plug one end of the power cord into the adapter and the other end into an
appropriate power outlet (if the outlet is switched, turn on the switch).
3. The power indicator on the bottom panel of the display will light up red then green,
and the display will automatically power on.
4. BH3801D has two power cords. Please connect both of them for the double side
application.
• The supplied power cord is suitable for use with 100-240V AC power only.
• The power cord and outlet illustrated may differ from the ones used in your region.
• Only use an appropriate power cord for your region. Never use a power cord which appears
damaged or frayed, or change the plug type on the power cord.
• Be aware of the power loading when you use extension cords or multiple outlet power boards.
• There are no user serviceable parts in this display. Never unscrew or remove any covers.
There are dangerous voltages inside the display. Turn off the power and unplug the power cord
if you intend to move the display.
• Warning: For BH3801D, disconnect both supply cords before servicing.
Page 20

Basic operations20
HOME MENU INPUTPOWER BACK VOL+ VOL-
Basic operations
Turning the display on or off
To turn on the display, press the power button on the
display’s control panel or on the remote control.
The display’s standby mode still consumes power. To completely cut off power supply, disconnect
the power cord from the power outlet.
Switching input signals
Press the INPUT button on the remote control or the INPUT button on the control
panel to select an input signal.
If an input source has been previously selected, the display will automatically select that input
source when it is turned on.
Playing media files
There are three ways to play the content.
X-Sign
To play content from X-Sign app. Switch the input to Android system, and select X-Sign
app. The X-sign content must match the resolution of the display, and the video is
recommended to use H.265 in avi/ mkv/ mp4 format. Please refer to X-Sign content
compatibility on page 44 and X-sign user manual for detailed information.
USB drive
To play media files stored on a USB flash drive, insert the flash drive to the USB port
located on the rear panel, then press the INPUT button on the remote control or the
INPUT button on the control panel and select Android from the input menu. Play
picture/ song/ video via MultiMedia. Please make sure that the content resolution
matches the display resolution (refer to X-Sign content compatibility on page 44 for the
resolution table). For more information regarding Multimedia, please refer to Multimedia
on page 25.
HDMI
To play content from HDMI source, connect the HDMI cable to the source directly, or
switch HDMI input manually. In default 1:1 mode, it will display the upper section of the
input source. Please make sure the upper section of the input source matches the display
resolution (refer to X-Sign content compatibility on page 44 for the resolution table).
Page 21

Basic operations 21
The zoom mode is only for the scenario that the whole input source needs to be
displayed. The zoom mode can be changed in Setting > Device > Display.
• 1:1 mode: BH3801 only shows the upper section (1920x600) from the 1920x1080 source.
BH2801 only shows the upper section (1920x360) from the 1920x1080 source. BH2401 only
shows the upper section (1920x190) from the 1920x1080 source. BH3501 only shows the
upper section (1920x130) from the 1920x1080 source.
• FULL mode: It will size in the whole HDMI source screen into the display.
Adjusting audio volume level
• To adjust the audio volume level, press Volu m e + / - on the remote control or press
Volu m e u p / Volume down on the front panel of the display.
• Go to Setting
page 33 for more information.
> Audio to adjust the volume. Refer to Audio settings (Android) on
Page 22

Basic operations22
Operations in the OSD menu
Using the control panel buttons Using the remote control
1. Press MENU to open the OSD menu. 1. Press MENU to open the OSD menu.
2. Press or to select an item.
3. Press INPUT to confirm selections. 3. Press OK to confirm selections.
4. Press or to select a feature and press or to adjust settings. Press OK to
save changes.
5. Press Back to close the OSD menu. 5. Press MENU to close the OSD menu.
Page 23

Basic operations 23
Initial setup
After you have connected the display to the power, you are ready to power on the
display. The first time you power on the display, you will be guided through a series of
setup screens. Follow the on-screen instructions or the steps below to start up your
display and complete the initial setup.
1. Turn on the display. Wait for the display to boot up with the BenQ screen. This may
take a moment.
2. Tap Next on the screen to begin. Follow the on-screen instructions to set up the
language, date and time, and network. Or your can skip some of these steps and
complete the setup later.
System Update
Whenever a new version of software is available, the system will automatically detect the
update and will prompt you to download it every time you launch the system. For manual
update, go to System > About > System update. For more information about
System update, please see System settings (Android) on page 36.
Software update process may take some time to complete.sDuring the update process, do not
turn off the device/ disconnect the Internet/ remove USB drive. Any interruptions during the
software update process may permanently damage your display.
Page 24

Basic operations24
3
2
1
4
123
4
Multimedia buttons on the remote control
To operate the multimedia system, use the buttons on the remote control.
No. Name Description
MENU Switches to the OSD menu.
/// Directional buttons for selecting a desired item.
OK Selects/deselects a menu item.
BACK Goes back to the previous screen.
Page 25

Basic operations 25
Android System Interface
X-Sign
Switch the input to Android system, and select X-Sign app. For more information about
X-Sign, please refer to X-Sign user manual.
Multimedia
• Multimedia files such as images, audio files, and videos can be played by clicking on the
icon.
• Select all or the corresponding file type on the left side to see the file type you want to
play.
Page 26

Basic operations26
Picture
Select a file you want to show on the display and perform any of the functions shown on
the screen.
Icon Function
Play the previous image.
Play/pause the current playback.
Play the next image.
Magnify the current image.
Shrink the current image.
Rotate the current image counter-clockwise.
Rotate the current image clockwise.
See the information about the file name, creation time, file size, and the file
format.
Without function.
Playing settings.
• Animation effect is without function.
• You can select playing interval time.
Supported image format (max resolution):
• JPEG (base-line up to 8K x 8K, progressive up to 4K x 4K)
• PNG (8K x 8K)
• BMP (8K x 8K)
• GIF (4K x 4K)
Page 27

Basic operations 27
Song
Select an audio file you want to play and perform any of the functions shown on the
screen.
Icon Function
Play the previous audio file.
Play/pause the current playback.
Play the next audio file.
• Repeatedly play one audio file in the playlist.
• Repeatedly play the whole audio files in the playlist.
• Shuffle Play. The audio files play in a random order.
Check audio files in the playlist.
See the information about the file name, file duration, artist name, file format,
audio codec, and the file path.
Supported audio format (codec):
• wma (WMA/WMAPro: 128Kbps~320Kbps, 8KHz~48KHz sampling rate)
• mp3 (MPEG Layer 3: 32Kbps~320Kbps, 32KHz~48KHz sampling rate)
• wav (PCM: Max 320Kbps, Max 48kHz sampling rate / ADPCM: 384Kbps, 8KHz ~ 48Khz
sampling rate)
• m4a (ACC: 24kbps ~ 384kbps, 16KHz~48KHz sampling rate)
• ogg (Vorbis: Max 320Kbps, 8KHz~48KHz sampling rate)
Page 28

Basic operations28
Video
Select a video file you want to play on the display and perform any of the functions shown
on the screen.
Icon Function
Play the previous video file.
Fast rewind the current video.
Play/pause the current playback.
Fast forward the current video.
Play the next video file.
Playing progress.
Check video files in the playlist.
See the information about the file name, file duration, file size, file format,
audio codec, and video codec.
• Repeatedly play one video file in the playlist.
• Repeatedly play the whole video files in the playlist.
• Shuffle Play. The video files play in a random order.
Supported video format (codec) up to 4K resolution:
• 3gp (H.264 MP, HP@Level 4.1, H263, MPEG-4 SP@L0-3, ASP@L0-5)
• avi (MPEG-1, MPEG-2 MP@HL, MPEG-4 SP@L0-3, ASP@L0-5, H.264, MP, HP@Level 4.1,
H263, VP6, MJPEG)
• mkv (VP9, H.265)
• mov (MPEG-4 SP@L0-3, ASP@L0-5, MJPEG, H.264 MP, HP@Level 4.1, H265)
• mp4 (MPEG-4 SP@L0-3, ASP@L0-5, H.264 MP, HP@Level 4.1, H265)
• mpg, mpeg (MPEG-1, MPEG-2 MP@HL, H.264 MP, HP@Level 4.1)
• ts (MPEG-2 MP@HL, MPEG-4 SP@L0-3,ASP@L0-5, H.264 MP, HP@Level 4.1, VC1 AP, H265)
Page 29

Basic operations 29
File Manager
File Manager can only manage files. To play pictures, songs, or videos, use Multimedia.
MAC & SN
Check the MAC address and serial number.
Setting
Refer to Setting menu on page 32 for more information.
Page 30

Basic operations30
Setting up the Internet connection
Your display must be connected to a network to conduct OTA updates or surf the
Internet.
To find the MAC address in Android OS, please go to Setting > System > About > Status.
Network setting
Go to Network > Ethernet. If there is no IP address shown, please connect the display
to the ethernet cable.
Wireless connection
1. Go to Network > Wi-Fi.
2. Set the switcher to On. A list of available networks will show on the screen.
Page 31

Basic operations 31
3. Press /// on the remote control to select the network’s name and connect
to the network. The password is needed if it is your first time to use the network.
Key in the password and press Connect. The device is now connected to the
WLAN.
• Please make sure your Wi-Fi dongle is approved by BenQ.
• Ethernet will be disable automatically if Wi-Fi turn on and connect to network.
• For wireless connection, BenQ shipment does not include wireless dongles, therefore, you may
purchase it separately via the local dealer.
Proxy setting
1. Go to Network > Proxy.
2. Check the box of Proxy Switch to enable or disable the function.
3. Enter the proxy host name.
4. Enter the using channel.
Page 32

Menu operations32
1
2
3
Menu operations
Control Action
Action Description
1 Press OK on the remote control to set on or off.
2 Press / on the remote control to adjust.
3 Press OK on the remote control to shift.
Press BACK on the remote control to exit the menu.
Setting menu
Input settings (Android)
Press MENU on the remote control or MENU on the front panel to enter the General
menu. Select Android.
• Press/on the remote control and press OK to select a desired input source.
• Use the brightness bar to adjust the brightness for the display. Press OK on the sun/
moon icon to adjust max./ min. brightness.
Page 33

Audio settings (Android)
Go to Audio to enter the Audio menu.
Menu operations 33
Menu Description
Volu me Press / on the remote control to adjust the volume.
Balance Press / on the remote control to adjust the balance.
Sound mode Select a preset sound mode. Options are Standard, Class,
Meeting, Movie, or Custom.
The default value of Sound mode is Standard. The detail settings of
Sound mode can be modified only in Custom mode.
Treble Press / on the remote control to adjust the treble.
Bass Press / on the remote control to adjust the bass.
• The default value of Mute is Off. When mute is On, Sound mode and Balance are grayed
out. Adjust the volume to switch Mute to Off.
• Treble and Bass are only displayed in Custom mode.
Page 34

Menu operations34
Device settings (Android)
Go to Device to enter the Device menu.
Display
Go to Device > Display.
Menu Description
Sleep mode This feature only works on Android input.
• Select a time period (1, 5, 10, 20, 30, 40, 50 minutes) for the
display to turn off the panel back light.
• Set to Off to turn off the function.
Power save mode This feature only works on HDMI input.
• High: Power off the display five minutes later.
• Low: Turn off the panel back light five minutes later.
• Off: Turn off the function.
Rotation Switch the landscape and portrait mode.
Page 35

Menu operations 35
Change logo • Copy the boot logo file (JPG format, *.jpg, with resolution
supports the display) to USB drive under “benq” folder.
Rename the image to “logo.jpg”.
• Click Change logo to load the changed logo.
Restore logo Click Restore logo to restore the original logo.
Change animation • Copy animation zip file (<2MB) to USB drive under “benq”
folder. Rename the file to “bootanimation.zip”.
• Click Change animation to load the changed animation.
Restore animation Click Restore animation to restore the original animation.
Custom source name
You can change Custom source name. Enter a value within six characters long.
Advanced settings
Go to Device > Advanced settings.
Menu Description
Key lock Press OK on the remote control to enable or disable Key lock.
IR lock Press OK on the remote control to enable or disable IR lock.
Pixel shift Press OK on the remote control to set a pixel shift preventing
from image retention.
DCR Press OK on the remote control to enable or disable DCR.
USB auto play Press OK on the remote control to enable or disable USB auto
play.
Page 36

Menu operations36
• The Key lock and IR lock functions cannot be enabled at the same time.
• For image retention, please see Notes on the LCD panel of this display on page 7 for more
information.
System settings (Android)
Go to System to enter the System menu.
Options Description
Date & time Click to set date, time, and their formats in Android.
Language &
input
Startup &
Shutdown
Certification Click to check the acquired certification.
USB cloning Click to export/import the setting.
Factory data
reset
About Click to view software version and get System Update. Refer
Click to set Language and Input in Android.
Click to set Startup channel, Wake on Lan, Power off
reminder, and Add task. Refer to Startup & Shutdown on
page 38 for more information.
Select Factory data reset to erase all data from the display.
to About on page 37 for more information.
The amount of available storage space for the user varies according to the amount of pre-installed
apps and images occupying the total storage space.
Page 37

Menu operations 37
About
Go to About > System update, then you will see update information.
1. Update:
- The device will search for the update file while connecting to the Internet.
- If the auto update message does not show up, select Update to initiate manually.
2. USB Update:
- Copy the upgrade file to the root of a FAT32 format USB drive. Make sure the file
name is “update_signed.zip”.
- Insert the USB to the display, and the system will prompt a message for update
confirm. If the message does not show up, select USB Update to start update
detection.
- Select Start Update to initiate upgrade process.
Page 38

Menu operations38
Startup & Shutdown
Go to System > Startup & Shutdown.
Options Description
Startup channel Select a startup input after powering on the display.
Wake on Lan This feature allows computer to wake up display via LAN
connection.
Power off
reminder
Choose whether to display an alert message while powering off
the display.
Add task Setup a schedule to startup and shutdown the display periodically.
Schedules can be made by choosing the days of the week.
Page 39

Menu operations 39
Input settings (HDMI)
• Press MENU on the remote control or MENU on the front panel to enter the
General menu. Select HDMI. You can also switch to HDMI by directly connecting the
HDMI cable to the device.
• For more information about Audio settings (HDMI), please refer to Audio settings
(Android) on page 33.
For more information about Device settings (HDMI), please refer to System settings
(Android) on page 36.
Display settings (HDMI)
Use Zoom mode to adjust the image.
Menu Description
Zoom mode Options are Full / 1:1.
The default value of Zoom mode is Full.
Page 40

Menu operations40
Picture settings (HDMI)
Leave the android system and connect to HDMI. Select Picture.
Menu Description
Picture Mode Options are Standard, Bright, Soft, and Custom. You can
also adjust Brightness level, Contrast, Hue, Sharpness,
and Saturation.
The default value of Picture Mode is Standard. The detail settings of
Picture Mode can be modified only in Custom mode.
Color Options are Standard, Cold, or Warm.
Image Noise
Options are Off, Low, Middle, High.
Reduction
Page 41

Product information
Specifications
Item
Backlight E-LED E-LED
Panel size 28” 38”
Active Area (horizontal ×
vertical)(mm)
LCD panel
Input
Output
Audio
Power
Environment
Native resolution (pixels) 1920 x 360
Brightness (cd/m2)
(typical)
Contrast (typical) 3000:1
Aspect Ratio 16:3 16:5
Panel Bit 8 bits
Computer RJ45 x1
Video HDMI 1.3 x1
Audio NO
USB Type-A x 2
Control RS-232 IN (D-Sub 9-pin)
Computer/Video/Audio/
Control
Audio W (Amp) 1W x 2
Internal speaker O
AC power supply 100 - 240V AC, 50/60 Hz
Consumption (typical) 20W
Consumption (standby) ≤0.5W
Operating Temperature
Operating Humidity 20% - 80% RH Non-Condensing
Storage Temperature
Storage Humidity 20% - 80% RH Non-Condensing
Display Orientation Landscape/Portrait
Specifications
BH2801/BH2801N
BH2801: 699.4 x 133.0
BH2801N: 700.4 x 134.0
1000 nits
-25oC - 60oC
Product information 41
BH3801/BH3801D/
BH3801N
BH3801: 920.3 x 289.2
BH3801D: 920.3 x 288.0
BH3801N: 921.3 x 290.2
*New spec for 2020/Q4 or
later shipment: 924.5 x 288.0
1920 x 600
*New spec for 2020/Q4 or
later shipment: 1920 x 614
BH3801/BH3801N: 1000 nits
BH3801D: 700 nits
BH3801/BH3801N: 3000:1
BH3801D: 1000:1
*New spec for 2020/Q4 or
later shipment: 3000:1
NO
BH3801/BH3801N: 38W
BH3801D: 45W
o
0
C - 50oC
Page 42

Product information42
Mechanical
Weight (without packing /
with packing)
Dimensions
(W x H x D) (mm)
Bezel Dimension
- T/B/L/R (mm)
BH2801: 5.3 kg/8.1kg
BH2801N: 4.3kg/7.1kg
BH2801: 728.8 x 162.4 x
BH2801N: 725.8 x 159.4 x
BH2801: 14.7/4.7/14.7/ 14.7
BH2801N: 12.7/12.7/12.7/
45.5
43
12.7
BH3801: 11.0kg/14.4kg
BH3801D: 13.0kg/16.5kg
BH3801N: 8.5kg/11.9kg
*New spec for 2020/Q4 or
later shipment:
BH3801: 10.8kg/15.2kg
BH3801D: 14.6kg/20.5kg
BH3801N: 8.4kg/12.8kg
BH3801: 949.6 x 317.6 x 45.6
BH3801D: 965.0 x 332.0 x
BH3801N: 946.6 x 314.6 x 43
BH3801/BH3801D: 14.2/14.2/
BH3801N: 12.2/12.2/12.6/
*New spec for 2020/Q4 or
BH3801: 14.2/14.2/12.0/12.0
BH3801D: 21.5/21.5/19.3/19.3
BH3801N: 11.3/11.3/9.1/9.1
80.0
14.7/14.7
12.6
later shipment:
LCD panel
Input
Output
Audio
Power
Item
Backlight E-LED E-LED
Panel size 24” 35”
Active Area (horizontal ×
vertical)(mm)
Native resolution (pixels) 1920 x 190 1920 x 130
Brightness (cd/m2) (typical)
Contrast (typical) 3000:1
Aspect Ratio 16:1.6 16:1
Panel Bit 8 bits
Computer RJ45 x1
Video HDMI 1.3 x1
Audio NO
USB Typ e-A x 2
Control RS-232 IN (D-Sub 9-pin)
Computer/Video/Audio/
Control
Audio W (Amp) 1W x 2
Internal speaker O
AC power supply 100 - 240V AC, 50/60 Hz
Consumption (typical) 13W 18W
Consumption (standby) ≤0.5W
BH2401 BH3501
598.6 x 59.0 886.6 x 59.0
1000 nits
NO
Specifications
Page 43

Product information 43
Environment
Mechanical
Operating Temperature
Operating Humidity 20% - 80% RH Non-Condensing
Storage Temperature
Storage Humidity 20% - 80% RH Non-Condensing
Display Orientation Landscape/Portrait
Weight (without packing /
with packing)
Dimensions
(W x H x D) (mm)
Bezel Dimension
- T/B/L/R (mm)
Specifications and functions are subject to change without notice.
Item
BH2401/BH2801/BH3501/BH3801/BH3801D/BH2801N/
3.4kg/5.5kg 3.9kg/6.4kg
629.6x90.0x45.5 905.0x89.2x45.3
15.5/15.5/15.5/15.5 15.1/15.1/9.2/9.2
System
Memory
System
Storage 32GB
0oC - 50oC
-25oC - 60oC
BH3801N
2GB
OS Android 6.0
Page 44

Product information44
X-Sign content compatibility
BH3801/
BH3801N/
BH3801D
(2020/Q4 or
Model BH2401
BH2801/
BH2801N
BH3501
BH3801/
BH3801N/
BH3801D
later)
Video (avi/mkv/mp4)
Landscape
Resolution
Portrait
Resolution
Video Format
1920 x 190 1920 x 360 1920 x 130 1920 x 600 1920 x 614
190 x 1920 360 x 1920 130 x 1920 600 x 1920 614 x 1920
H.265
(HEVC)
H.265
(HEVC)
H.265
(HEVC)
H.265
(HEVC)
H.265
(HEVC)
Picture
JPG/PNG JPG/PNG JPG/PNG JPG/PNG JPG/PNG JPG/PNG
USB device compatibility
USB Video Formats
File
Extensions
Container
.dat
.mpg
MPG MPEG1 1080P 30 20
.mpeg
.dat
.mpg
MPEG MPEG2 1080P 30 20
.mpeg
.ts
.trp
.tp
TS
.m2ts
.vob MPEG2-PS MPEG2 1080P 30 20
.mp4 MP4
Video
Codec
MPEG2
H.264
MPEG4
H.264
Maximum
Resolution
Max. Frame
Rate (fps)
Rate (Mbps)
1080P 30 20
1080P 30 20
Max. Bit
MPEG-1
(L2 & L3)
AC3
AAC
L-PCM
MPEG-1
(L2 & L3)
AC3
AAC
L-PCM
MPEG-1
(L2 & L3)
AC3
AAC
MPEG-1
(L2 & L3)
AC3
L-PCM
MPEG-1
(L2 & L3)
AAC
Audio
Codec
Page 45

Product information 45
File
Extensions
Container
.mkv MKV
.avi AVI
Video
Codec
H.264
MPEG1
MPEG2
MPEG4
MPEG2
MPEG4
H.264
Maximum
Resolution
Max. Frame
Rate (fps)
1080P 30 20
1080P 30 20
Max. Bit
Rate (Mbps)
MPEG-1
(L2 & L3)
AC3
AAC
L-PCM
MPEG-1
(L2 & L3)
AC3
AAC
L-PCM
Motion
JPEG
.asf ASF
AVI, MOV JPEG 640x480 30 10
H.264
MPEG2
MPEG4
1080P 30 20
VC1
WMV3
MPEG-1
(L2 & L3)
AC3
WMA
L-PCM
.wmv ASF MPEG4 1080P 30 20 WMA
USB Audio Formats
File Extensions Audio Codec Bit Rate (Kbps) Sample Rate (Khz)
.mp3 MPEG1 Layer2 32 - 448 32 - 48
.mp3 MPEG1 Layer3 32 - 320 32 - 48
N/A (Works with
video files only)
.m4a
.AAC
.wma
.asf
N/A (Works with
video files only)
AC3 32 - 640 32, 44.1, 48
AAC, HEAAC 24 - 384 8 - 48
WMA 128 - 320 8 - 48
LPCM 64 - 1.5 8 - 48
Audio
Codec
USB Photo Formats
File Extensions Image Photo Resolution
.jpg JPEG
.png PNG
Base-line 15360x8640
Progressive 1024x768
non-interlace 4096x2160
interlace 1200x800
.bmp BMP 4096x2160
Page 46

Product information46
USB Video Internal Subtitle Formats (for subtitles, etc.)
File Extensions Container Subtitle Codec
.dat
.mpg
.mpeg
MPG
MPEG
DVD Subtitle
.vob
.ts
.trp
TS DVB Subtitle
.tp
.mp4 mp.4
DVB Subtitle
UTF-8 Plain Text
DVD Subtitle
UTF-8 Plain Text
.mkv .mkv
ASS
SSA
Universal Subtitle Format
Vo bS ub
.avi AVI XSUB
USB Video External Subtitle Formats (for subtitles, etc.)
File Extensions Container Notes
.srt SubRip
.ssa SubStation Alpha
.ass
.smi
SAMI
SubViewer
.sub
MicroDVD
DVDSubtitleSystem
SubViewer 1.0 & 2.0 only
Subldx (VobSub)
.txt TMPlayer
Page 47

Dimensions
Side view
Bottom view
Top view
Front view
Back view
BH2801
Product information 47
Unit: mm
Page 48

Product information48
BH3801 (1920x600)
Side view
Front view
Bottom view
Top view
Back view
Unit: mm
Page 49

BH3801 (1920x614) *2020/Q4 or later
Side view
Front view
287/,1(',0(16,21
*/$6623(1,1*
$&7,9($5($
Bottom view Top view
287/,1(',0(16,21
*/$6623(1,1*
$&7,9($5($
Product information 49
'($37+0PP
:$//028176&5(:7+5($'
Back view
Unit: mm
Page 50

Product information50
Side view
Front view
Bottom view
Top view
Back view
BH2401
Unit: mm
Page 51

BH3501
Side view
Front view
Bottom view
Top view
Back view
Product information 51
Unit: mm
Page 52

Product information52
Side view
Front/ Back view
Top view
Bottom view
Side view
BH3801D (1920x600)
Unit: mm
Page 53

BH3801D (1920x614) *2020/Q4 or later
287/,1(',0(16,21
287/,1(',0(16,21
0PP
0PP
$&7,9($5($
$&7,9($5($
%(=(/23(1,1*
%(=(/23(1,1*
0PP
0PP
Side view
Front/ Back view
Top view
Bottom view
Side view
Product information 53
Unit: mm
Page 54

Product information54
Side view
Front view
Back view
Bottom view
Top view
BH2801N
Unit: mm
Page 55

BH3801N (1920x600)
Product information 55
Side view
Front view
Top view
Bottom view
Back view
Unit: mm
Page 56

Product information56
BH3801N (1920x614) *2020/Q4 or later
Side view
Front view
287/,1(',0(16,21
%(=(/23(1,1*
$&7,9($5($
287/,1(',0(16,21
%(=(/23(1,1*
$&7,9($5($
Top view
'($37+0/
:$//028176&5(:7+5($'
Bottom view
Back view
Unit: mm
Page 57

Supported input signal resolution
Product information 57
Resolution
1920 x 360 @ 60Hz
1920 x 600 @60Hz
1920 x 614 @60Hz
1920 x 1080 @ 60Hz
720p (50Hz)
720p (60Hz)
1080i (50Hz)
1080i (60Hz)
1080p (24Hz)
1080p (25Hz)
1080p (30Hz)
1080p (50Hz)
1080p (60Hz)
• : supported
• Vacant: not supported
Input source
HDMI
Page 58

Troubleshooting58
Troubleshooting
Problem Solution
No picture Check the following:
• Is the display turned on? Check the power indicator of the
display.
• Is the signal source device turned on? Turn on the device
and try again.
• Are there any loose cable connections? Make sure that all
cables are connected firmly.
• Have you chosen an unsupported output resolution on
the computer? Refer to Supported input signal resolution
on page 57 to select a supported resolution and try again.
• Have you chosen an unsupported output resolution on
the DVD or Blu-ray disc player? Refer to Supported input
signal resolution on page 57 to select a supported
resolution and try again.
No sound Check the following:
• Have you turned on the mute function on the display or
the input source device? Turn off the mute function or
increase the audio volume level and try again.
• Are there any loose cable connections? Make sure that all
cables are connected firmly.
The computer input
image looks strange
The control panel
buttons do not work
The remote control does
not work
Have you chosen an unsupported output resolution on the
computer? Refer to Supported input signal resolution on
page 57 to select a supported resolution and try again.
Have you locked the control panel buttons? Unlock the
buttons and try again.
• Have you locked the remote control function? Unlock the
function and try again.
• Check for incorrect battery orientation.
• Check for dead batteries.
• Check your distance and angle from the display.
• Check whether remote control is properly being pointed
at the display’s remote control sensor window.
• Check for any obstacle between the remote control and
the remote control sensor window.
• Check that the remote control sensor window is not
under strong fluorescent lighting, or in direct sunlight.
• Check for any devices (computer or personal digital
assistant, PDA) nearby that transmit infrared signals which
may cause interference to signal transmission between the
remote control and the display. Turn off the infrared
function of these devices.
 Loading...