

Page 1

Managing Bookmark Folders
Managing Bookmark Folders
Managing Bookmark FoldersManaging Bookmark Folders
1. In the bookmark list, tap All
2. You can:
• Tap the Add
• Tap to select a folder on the list and then tap the Delete
• Tap the Rename
Browser Preferences
Browser Preferences
Browser PreferencesBrowser Preferences
The Internet browser allows you to change the way the browser
deal with the web page contents, security and Internet connections by setting up the preferences options.
To access the preferences options, tap Edit
and select Preferences
Basic Options
Basic Options
Basic OptionsBasic Options
• Homepage location
• WAP account
• Full screen on new page
• Vertical scroll bar
• Load images
• Play sound
Add button to create a new folder. Enter the name for
AddAdd
the new folder and then tap the Done
to delete the selected folder.
Rename button to rename selected folder. Enter a new
RenameRename
name and then tap the Done
Preferences.
PreferencesPreferences
Homepage location: you can specify a favorite page as the
Homepage locationHomepage location
default home page when opening the Internet browser by entering the complete address.
WAP account: Select the WAP account to be used when the
WAP acco u n tWAP acco u n t
home page is loaded.
Full screen on new page: Specify whether to switch to the full
Full screen on new pageFull screen on new page
screen view when viewing the new page.
Vertical scroll bar: Specify whether the vertical scroll bar will be
Vertical scroll barVertical scroll bar
displayed.
Load images: Select if the images will be loaded when opening a
Load imagesLoad images
page. If images are not loaded, the page will open faster.
Play sound: Select if sound should be played when opening a
Play soundPlay sound
page that contains it.
All and select Edit folders
AllAll
Done button.
DoneDone
Edit folders.
Edit foldersEdit folders
Done button.
DoneDone
Edit on the browser screen
EditEdit
Delete button
DeleteDelete
• Play animation
Play animation: Select if animations should be played when
Play animationPlay animation
opening a page that contains them.
Security Options
Security Options
Security OptionsSecurity Options
• Allow cookies
Allow cookies: Select if you want to receive cookies when brows-
Allow cookiesAllow cookies
ing.
Advanced Options
Advanced Options
Advanced OptionsAdvanced Options
• WAP Push settings
WAP Push settings: You can select if you want to receive the
WAP Push settingsWAP Push settings
Push messages from your network service provider (Enable
WAP Pu s h
WAP Push), if the URL should be opened automatically upon
WAP Pu s hWAP Pu s h
reception (Auto load URL
should be removed automatically (Auto delete expired
sound should be played when a Push message is received (Push
sound
sound).
soundsound
For more information about the availability of the WAP Push messages, please consult your network service provider.
• Cache size
Cache size: Cache is the space for storing the data of visited web
Cache sizeCache size
pages for faster loading the next time you visit it. Drag the slider
to adjust the size of cache space. To clear the data in cache, tap
Clear cache.
Clear cache. To clear the history record of visited web pages, tap
Clear cache. Clear cache.
Clear history
Clear history.
Clear historyClear history
Auto load URL), if the out-of-date Push messages
Auto load URLAuto load URL
Auto delete expired), and if
Auto delete expiredAuto delete expired
Enable
Enable Enable
Push
Push Push
Using the Application Programs 63
Page 2
Jotter
With the Jotter application program you can quickly and easily
jot down notes, whether in typed letters or freehand drawing. You
can also easily exchange them by sending them to different
devices.
Creating Notes
Creating Notes
Creating NotesCreating Notes
Method 1
Method 1
Method 1Method 1
1. In the Jotter screen, tap Jotter
2. Tap Unfiled
Unfiled and select a folder where you want to place the new
UnfiledUnfiled
note.
3. Enter the body of your note. You can tap the button to get
bold text, and the button to start a bullet list.
4. Tap to switch to the drawing tab for making a freehand
drawing. When drawing, tap the button to change stroke
color, the button to change stroke thickness, or the
button to activate the eraser.
5. Tap the button to save the note.
Method 2
Method 2
Method 2Method 2
1. Copy text from other application programs.
2. In the Jotter screen, tap Jotter
3. Tap Edit
Edit and select Paste
EditEdit
Managing Notes
Managing Notes
Managing NotesManaging Notes
Editing Notes
Editing Notes
Editing NotesEditing Notes
1. Tap to open a note on the Jotter screen.
Jotter and select New
JotterJotter
Jotter and select New
JotterJotter
Paste.
PastePaste
New.
NewNew
New.
NewNew
2. Make changes to the note.
3. Tap the button to save the note.
Deleting Notes
Deleting Notes
Deleting NotesDeleting Notes
1. Open a note on the Jotter screen.
2. Tap Jotter
Jotter and select Delete
JotterJotter
Sending Notes
Sending Notes
Sending NotesSending Notes
1. Open a note on the Jotter screen.
2. Tap Jotter
Jotter and select Send as
JotterJotter
3. Select from the following and then tap the Done
• SMS
SMS: Send the note to another mobile phone via an SMS mes-
SMSSMS
sage. Enter the number of the recipient and then tap the Send
button.
• MMS
MMS: Send the note to another mobile phone as an MMS
MMSMMS
attachment. The MMS message screen will follow for you to
compose the message.
• Bluetooth
Bluetooth: Send the note to other devices that support Blue-
BluetoothBluetooth
tooth technology. A box will appear showing found paired
devices. Tap to select a device and then tap the Send
• IR
IR: Send the note to other devices that support infrared connec-
IRIR
tion. Align the infrared port of your P31 with that of the device
and then tap the Send
Managing Note Folders
Managing Note Folders
Managing Note FoldersManaging Note Folders
1. In the Note screen, tap All
2. You can:
Delete note
note.
DeleteDelete
notenote
Send as.
Send asSend as
Send button.
SendSend
All and select Edit folders
AllAll
Done button:
DoneDone
Send button.
SendSend
Edit folders.
Edit foldersEdit folders
Send
SendSend
Using the Application Programs64
Page 3

• Tap the Add
Add button to create a new folder. You will then be
AddAdd
asked to enter a name for the new folder. When finished, tap the
Done
Done button.
DoneDone
• Tap to select a folder on the list and then tap the Delete
Delete button
DeleteDelete
to delete the selected folder.
• Tap the Edit
Edit button to edit selected folder. Make changes and
EditEdit
then tap the Done
Done button.
DoneDone
Using the Application Programs 65
Page 4
Message
With the Message application program, you can exchange and
manage the following types of messages:
• You need subscription to related services to your network service
provider.
• In order to use the Message functions, you may need to set up
message settings in advance. Please refer to "Messaging
Accounts" on page 52 and "Internet Accounts" on page 49.
SMS (Short Message Service) or EMS (Enhanced Message Ser-
SMS (Short Message Service) or EMS (Enhanced Message Ser-
SMS (Short Message Service) or EMS (Enhanced Message Ser-SMS (Short Message Service) or EMS (Enhanced Message Service) messages (indicated by the
vice) messages (indicated by the icon)
vice) messages (indicated by thevice) messages (indicated by the
An SMS message is a text message delivered from your P31 via
the message center of your service provider to the recipient. In
addition to text, an EMS message can contain pictures, sounds,
melodies and animations.
MMS (Multimedia Message Service) messages (represented by
MMS (Multimedia Message Service) messages (represented by
MMS (Multimedia Message Service) messages (represented byMMS (Multimedia Message Service) messages (represented by
the
the icon)
icon)
thethe
icon)icon)
An MMS message is a message that can contain text, pictures,
animations, audio clips and melodies.
Email messages (represented by the
Email messages (represented by the icon)
Email messages (represented by the Email messages (represented by the
Messages that support POP3, IMAP4, MIME and SMTP protocols and are the same as the ones you can send and receive using
your PC.
Creating and Sending Messages
Creating and Sending Messages
Creating and Sending MessagesCreating and Sending Messages
Creating and Sending an SMS (EMS) Message
Creating and Sending an SMS (EMS) Message
Creating and Sending an SMS (EMS) MessageCreating and Sending an SMS (EMS) Message
1. In the Message screen, tap SMS
2. Tap the New
New button, or tap Message
New New
icon)
icon)icon)
icon)
icon) icon)
SMS.
SMSSMS
Message and select New
MessageMessage
New.
NewNew
3. Enter the recipient’s phone number in the To:
also tap To:
To: to pick up one or multiple recipient from your
To : To:
contacts.
4. Enter the body text of the message. An SMS or EMS message
allows the entry of up to 160 characters (70 for non-latin characters) per message, and if the length of your message body
exceeds such limit, it will be split into several separate ones and
combined into one single message on the recipient’s phone (if
supported). You can tap located at the upper right corner
of the screen to get the information about current message
length information.
You can tap Edit and select the Cut, Copy, Paste and Select all
commands when editing text.
5. (Optional) Tap the button to switch between normal and
bold text types.
6. (Optional) Tap the button to change text size.
7. (Optional) Tap the button to insert a smiley into the message.
8. (Optional) Tap the button to insert an animation into the
message.
9. (Optional) Tap the button to insert sound into the message.
10. (Optional) Tap the button to view common used texts.
11. Tap the tab to determine if you want to receive a delivery
report for current message. Tap to select On
To: f ie ld . Yo u ca n
To :To :
On or Off
Off. If On
OffOff
On is
OnOn
OnOn
Using the Application Programs66
Page 5

selected, you will receive a report regarding the delivery status
when the message is sent.
12. Tap the Send
the message in the Draft
Send button to send the message. If you want to save
SendSend
Draft box for future editing, tap the
DraftDraft
button.
If for any reason the message can not be sent, it will be stored in
the Outbox.
Creating an MMS Message
Creating an MMS Message
Creating an MMS MessageCreating an MMS Message
1. In the Message screen, tap MMS
2. Tap the New
An MMS message comprises several slides and you can add text
and sounds to each slide. When the message is opened and
viewed on the recipient’s phone, the slides are automatically
played. The sound will also be played if the slide contains it.
New button, or tap Message
New New
3. Enter the recipient’s phone number in the To:
also tap To:
To: to pick up one or multiple recipient from your
To : To:
MMS.
MMSMMS
Message and select New
MessageMessage
New.
NewNew
To: field. You can
To :To :
contacts.
4. Enter the subject in the Subj:
Subj: field.
Subj: Subj:
5. Enter message body text.
6. (Optional) Tap the icon to browse and insert a picture into
current slide. To change or delete selected picture, tap the pic-
ture and select Select picture
Select picture or Delete picture
Select pictureSelect picture
Delete picture.
Delete pictureDelete picture
7. (Optional) Tap the icon to insert sounds into current slide.
8. (Optional) To add more slides, tap the icon, or tap Message
sage and then select New slide
sagesage
delete current slide, tap Message
New slide. To go to a slide, tap or . To
New slideNew slide
Message and then select Delete slide
MessageMessage
Mes-
Mes-Mes-
Delete slide.
Delete slideDelete slide
You can also tap to setup the duration of each slide.
9. To preview the slides, tap the icon.
10. Tap to go to the tab where you can select the carbon copy
and blind carbon copy recipients, and select a priority level for
the message.
11. Tap to go to the tab where you can attach an image, audio
recording, video clip, document or other files to current mes-
sage.
12. Tap the Send
the message in the Draft
Send button to send the message. If you want to save
SendSend
Draft box for future editing, tap the
DraftDraft
button.
If for any reason the message can not be sent, it will be stored in
the Outbox.
Creating an Email Message
Creating an Email Message
Creating an Email MessageCreating an Email Message
In order to use Email, you need to complete message settings in
advance. Please refer to "Messaging Accounts" on page 52.
1. In the Message screen, tap an Email account.
2. Tap the New
3. Enter the recipient’s Email address in the To:
New button, or tap Message
New New
tap To:
To: to pick up one or multiple recipient from your con-
To : To:
Message and select New
MessageMessage
New.
NewNew
To: field. You can also
To :To :
tacts.
4. Enter the subject in the Subj:
Subj: field.
Subj: Subj:
5. Enter the message body text.
6. (Optional) Tap the button to browse and add attachment
to the mail.
7. Tap the Send
Send button to send the Email. A dialog will pop up
SendSend
asking whether you want to send the message immediately or
Using the Application Programs 67
Page 6

save the message to Outbox for sending later. Tap to select an
appropriate option and then tap the Done
If for any reason the message can not be sent, it will be stored in
the Outbox.
Message Folders
Message Folders
Message FoldersMessage Folders
By default, each message account has 4 different message folders:
• Inbox
Inbox: Contains received messages.
InboxInbox
• Outbox
Outbox: Contains messages that are ready to be sent but not
OutboxOutbox
sent.
• Draft
Draft: Contains unfinished messages.
DraftDraft
• Sent
Sent: Contains a copy of the sent messages.
SentSent
You can tap a folder name at the upper right corner of each mail
account screen and tap to select a different folder.
Receiving and Viewing Messages
Receiving and Viewing Messages
Receiving and Viewing MessagesReceiving and Viewing Messages
Receiving and Viewing SMS, EMS and MMS Messages
Receiving and Viewing SMS, EMS and MMS Messages
Receiving and Viewing SMS, EMS and MMS MessagesReceiving and Viewing SMS, EMS and MMS Messages
When you have new unread SMS, EMS or MMS messages, the
notification icon ( for SMS/EMS, for MMS) will appear
on the Status bar. You can tap the icon to view the message.
When viewing messages, you can tap Message
form the following operations:
• New
New: Create a new message.
NewNew
• Reply
Reply: Reply to the sender.
ReplyReply
• Forward
Forward: Send the received message to other recipients.
ForwardForward
• Find
Find: Find a specific word in the message.
FindFind
• Find next
Find next: Find the word again.
Find nextFind next
• Call Sender
Call Sender: Make a call to the sender of the message.
Call SenderCall Sender
• Move to SIM Card
Move to SIM Card (available for SMS messages): Move current
Move to SIM Card Move to SIM Card
message to the memory on SIM card.
• Delete message
Delete message: Delete current message.
Delete messageDelete message
Done button.
DoneDone
Message and choose to per-
MessageMessage
You c an al so ta p t he Fro m :
ing actions:
• Call
Call: Call this number.
CallCall
• Send SMS
Send SMS: Send an SMS or EMS message to this number.
Send SMSSend SMS
• Send MMS
Send MMS: Send an MMS message to this number.
Send MMSSend MMS
• Save contact
Save contact: Save this number as a new contact.
Save contactSave contact
Receiving and Viewing Email
Receiving and Viewing Email
Receiving and Viewing EmailReceiving and Viewing Email
1. In the Message screen, tap an Email account.
2. Tap the Get&Send
In order to receive and view email, you need to set up Internet and
message settings in advance. Please refer to "Messaging
Accounts" on page 52 and "Internet Accounts" on page 49.
3. You will be connected to the Internet automatically, and P31
4. The received Email will appear on the screen. Tap an Email
When viewing messages, you can tap Message
form the following operations:
• New
New: Create a new Email.
NewNew
• Reply
Reply: Reply to the sender.
ReplyReply
• Reply to all
Reply to all: Reply to all recipients.
Reply to allReply to all
• Forward
Forward: Send the received Email to other recipients.
ForwardForward
• Send attachment
Send attachment: Send the attachment of current Email.
Send attachmentSend attachment
• Find
Find: Find a specific word in the Email.
FindFind
• Find next
Find next: Find the word again.
Find nextFind next
• Delete message
Delete message: Delete current Email.
Delete messageDelete message
• Disconnect
Disconnect: Break the connection to your mailbox.
DisconnectDisconnect
Get&Send button.
Get&Send Get&Send
will start receiving Email from your mailbox.
message to open and read it. If there are attachments in the
Email, you can tap to open and view them if they are supported by the application programs on P31.
From: field and select to perform the follow-
From:From:
Message and choose to per-
MessageMessage
Using the Application Programs68
Page 7

You can also tap the From:
From: field and select to perform the follow-
From:From:
ing actions:
• Send Email
Send Email: send an Email to this address.
Send EmailSend Email
• Send MMS
Send MMS: send an MMS message to this address.
Send MMSSend MMS
• Save contact
Save contact: save this address as a new contact.
Save contactSave contact
Using the Application Programs 69
Page 8

Music Player
With the Music player application program, you can play music
tracks/files in the following formats:
• AMR files (.amr)
• MP3 files (.mp3)
• WAV files (.wav)
• MIDI files (.mid)
Playing Music
Playing Music
Playing MusicPlaying Music
1. Tap the Music player
2. Tap All
3. The song list will appear in the screen.
• You can tap the button to choose icon view or list view.
• To sort songs on the song list, tap Thumbnails and then select
• It is recommended that you save music files on the memory card
• When copying music files to the phone memory/memory card,
You can also use the keys on the key pad to navigate the song list:
• Press the key to scroll the song list up.
• Press the key to scroll the song list down.
• Press the key to go to the fist song in the song list.
Music player application program icon in the Main
Music playerMusic player
screen.
All and select the location (folder) that contains the music
AllAll
files.
Sort by name, Sort by date or Sort by size.
to prevent phone memory from running low.
put them in the folder named "audio" in the "Media files" folder.
You can also create new sub-folders in the "audio" folder to store
music files.
• Press the key to go to the last song in the song list.
• Press the key to go to the previous page.
• Press the key to go to the last page.
Tap to check the songs you want to play in the song list and then
tap the button (or press the key) to start playing
them.
Operations When Playing Music
Operations When Playing Music
Operations When Playing MusicOperations When Playing Music
When playing music, you can:
• Tap the icon to enable random playback. Tap the icon again
to disable it.
• Tap the icon to enable repeat playback. Tap the icon again
to disable it.
• Tap the button (or press the key) to stop playing
music.
• Tap the button to pause playing current song. Tap the but-
ton again to resume normal playback.
• Tap the button (or press the key) to go to the
next song.
• Tap the button (or press the key) to go to the
previous song.
• Tap the button (or press the or key) to
adjust playback volume.
• Tap the button to view song information.
Using the Application Programs70
Page 9

• Tap the button (or press the key) to put the
music playing in the background.
Managing Songs
Managing Songs
Managing SongsManaging Songs
Renaming Songs
Renaming Songs
Renaming SongsRenaming Songs
1. Tap a song to select it on the song list screen.
2. Tap the button.
3. Enter the new name for the song and then tap OK
Sending Songs
Sending Songs
Sending SongsSending Songs
1. Tap a song to select it on the song list screen. You can select
multiple songs.
2. Tap the button.
3. Select from the following and then tap the Done
• Email
• Email: send the song(s) as Email attachments.
• Email• Email
• SMS
SMS: send the song(s) to another mobile phone via an SMS
SMSSMS
message. Enter the number of the recipient and then tap the
Send
Send button.
SendSend
• MMS
MMS: send the song(s) to another mobile phone as MMS
MMSMMS
attachments. The MMS message screen will follow for you to
compose the message.
• Bluetooth
Bluetooth: send the song(s) to other devices that support Blue-
BluetoothBluetooth
tooth technology. A box will appear showing found paired
devices. Tap to select a device and then tap the Send
• IR
IR: send the song(s) to other devices that support infrared con-
IRIR
nection. Align the infrared port of your P31 with that of the
device and then tap the Send
Copying Songs
Copying Songs
Copying SongsCopying Songs
1. Tap a song to select it on the song list screen.
Send button.
SendSend
OK.
OKOK
Done button:
DoneDone
Send button.
SendSend
2. Tap the button.
3. Tap to select a folder where the song will be copied from the
Folder
Folder drop-down list.
FolderFolder
4. If necessary, change the name of the song by entering a new
name in the Name
5. Tap Save
Moving Songs
Moving Songs
Moving SongsMoving Songs
1. Tap a song to select it on the song list screen.
2. Tap the button.
3. Tap to select a folder where the song will be moved from the
Folder
Folder drop-down list.
FolderFolder
4. If necessary, change the name of the song by entering a new
name in the Name
5. Tap Save
Deleting Songs
Deleting Songs
Deleting SongsDeleting Songs
1. Tap a song to select it on the song list screen.
2. Tap the button.
3. Tap OK
Managing Music Folders
Managing Music Folders
Managing Music FoldersManaging Music Folders
1. In the song list screen, tap All
2. You can:
• Tap the Add
the new folder and specify the storage location (phone storage
or memory card) and then tap the Done
Name field.
NameName
Save.
SaveSave
Name field.
NameName
Save.
SaveSave
OK.
OKOK
All and select Edit Folders
AllAll
Add button to create a new folder. Enter the name for
AddAdd
Edit Folders.
Edit FoldersEdit Folders
Done button.
DoneDone
Using the Application Programs 71
Page 10

• Tap to select a folder on the list and then tap the Delete
Delete button
DeleteDelete
to delete the selected folder.
• Tap the Edit
Edit button to rename selected folder. Enter a new name
EditEdit
and specify the storage location (phone storage or memory
card) and then tap the Done
It is recommended that when you finish using the Music player
application program, tap Music and select Exit to close it in order
to save memory space.
Done button.
DoneDone
Using the Application Programs72
Page 11

Online Services
Depending on your network service provider, you may be able to
subscribe for certain additional services, such as online banking
services or provision of weather or traffic information. Usually
the setting for accessing these services are programmed by your
network service provider on your SIM card so your P31 can identify them.
For more information on how to subscribe to these additional
online services and how to use them, please consult your network
service provider.
Using the Application Programs 73
Page 12
PhotoBase
PhotoBase is a powerful image management application program
that allows you to view, edit, organize pictures and add special
effects to pictures taken by your camera or downloaded/transferred from other locations.
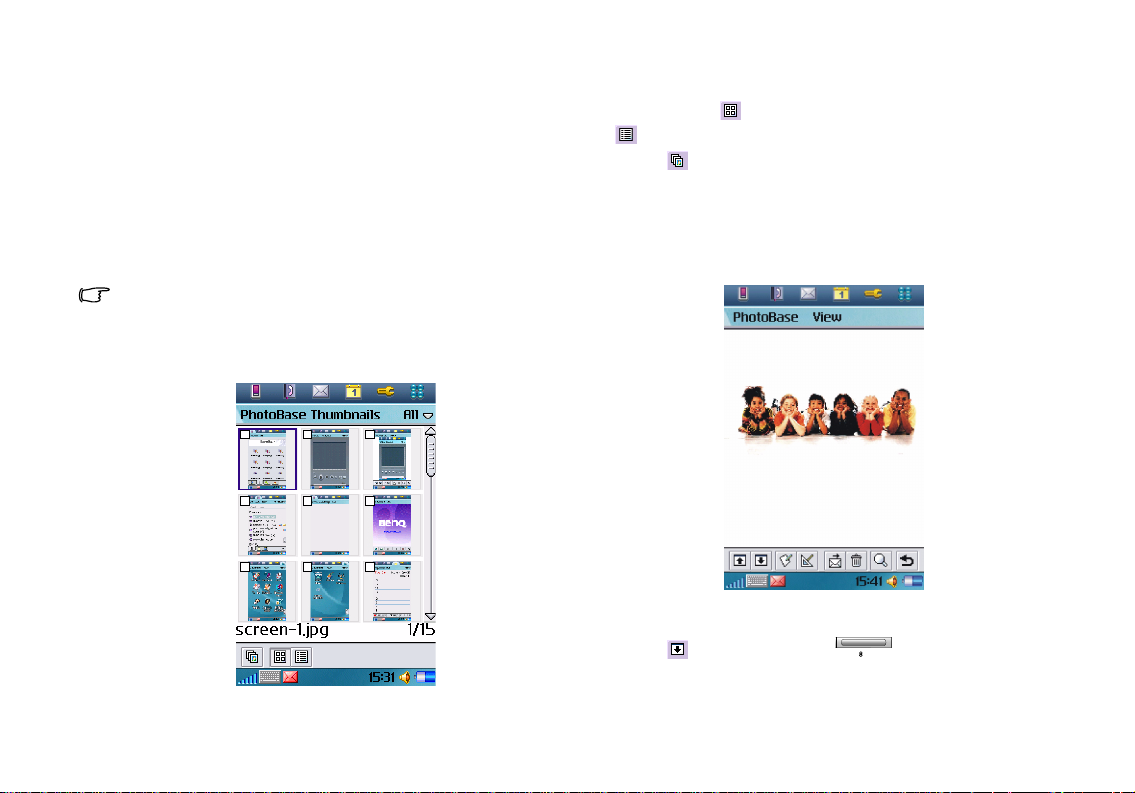
Viewing Images
Viewing Images
Viewing ImagesViewing Images
1. Tap the PhotoBase application program icon in the Main
screen.
2. In the PhotoBase screen, tap All
When copying image files to the phone memory/memory card, put
them in the folder named "image" in the "Media files" folder. You
can also create new sub-folders in the "image" folder to store
image files.
3. The images in the selected folder will appear.
All and select a folder.
AllAll
• You can tap the button to view images as thumbnails, or the
button to view images as a list.
• Tap the button to view images as slideshows.
• Tap Thumbnails
Thumbnails or List
ThumbnailsThumbnails
Sort by size
Sort by size to sort images according to different conditions.
Sort by sizeSort by size
4. Tap a thumbnail or an item in the list to open the image. The
image will appear in the image viewing screen.
Image viewing options
Image viewing options
Image viewing optionsImage viewing options
When viewing an image, you can:
• Tap the button (or press the key) to go to the next
image.
List and select Sort by name
ListList
Sort by name, Sort by date
Sort by nameSort by name
Sort by date or
Sort by dateSort by date
Using the Application Programs74
Page 13

• Tap the button (or press the key) to go to the previous image.
• Tap the button to open the image editing screen for editing
current image.
• Tap the button to open the image workshop screen for
applying special effects to current image.
• Tap the button to send current image.
• Tap the button to delete current image.
• Tap the button to enlarge or reduce the viewing size.
• Tap the button to return to the thumbnail or list view.
Organizing Images
Organizing Images
Organizing ImagesOrganizing Images
Managing Image Folders
Managing Image Folders
Managing Image FoldersManaging Image Folders
1. In the image thumbnail or list view, tap All
ers
ers.
ersers
2. You can:
• Tap the Add
• Tap to select a folder on the list and then tap the Delete
• Tap the Edit
Copying Images to a Different Folder
Copying Images to a Different Folder
Copying Images to a Different FolderCopying Images to a Different Folder
1. In the image thumbnail or list view, select images you want to
2. Tap PhotoBase
Add button to create a new folder. You will then be
AddAdd
asked to enter a name for the new folder. When finished, tap the
Done
Done button.
DoneDone
to delete the selected folder.
Edit button to edit selected folder. Make changes and
EditEdit
then tap the Done
copy by checking the checkboxes on image thumbnails or next
to image items.
Done button.
DoneDone
PhotoBase and select Copy ticked picture(s) to
PhotoBasePhotoBase
Copy ticked picture(s) to.
Copy ticked picture(s) toCopy ticked picture(s) to
All and select Edit fold-
AllAll
Edit fold-
Edit fold-Edit fold-
Delete button
DeleteDelete
3. Select a folder from the drop-down list and then tap the Copy
button.
Deleting Images
Deleting Images
Deleting ImagesDeleting Images
Method 1
Method 1
Method 1Method 1
1. In the image thumbnail or list view, select images you want to
delete by checking the checkboxes on image thumbnails or
next to image items.
2. Tap PhotoBase
PhotoBase and select Delete ticked picture(s)
PhotoBasePhotoBase
3. Tap the Yes
Method 2
Method 2
Method 2Method 2
1. Open an image from the thumbnail or list view.
2. Tap the button on the image viewing screen.
3. Tap the Yes
Sending Images
Sending Images
Sending ImagesSending Images
1. Open an image from the thumbnail or list view.
2. Tap the button on the image viewing screen.
3. Select from the following and then tap the Done
• Email
Email: send the image as Email attachment.
EmailEmail
• MMS
MMS: send the image to another mobile phone as an MMS
MMSMMS
• Bluetooth
Bluetooth: send the image to other devices that support Blue-
BluetoothBluetooth
• IR
IR: send the image to other devices that support infrared con-
IRIR
Yes button.
Ye sYe s
Yes button.
Ye sYe s
attachment. The MMS message screen will follow for you to
compose the message.
tooth technology. A box will appear showing found paired
devices. Tap to select a device and then tap the Send
nection. Align the infrared port of your P31 with that of the
device and then tap the Send
Delete ticked picture(s).
Delete ticked picture(s)Delete ticked picture(s)
Done button:
DoneDone
Send button.
SendSend
Send button.
SendSend
Using the Application Programs 75
Copy
CopyCopy
Page 14

Editing Images
Editing Images
Editing ImagesEditing Images
Rotating Images
Rotating Images
Rotating ImagesRotating Images
1. Open an image from the thumbnail or list view.
2. Tap the button to open the image editing screen.
3. Tap the button to rotate the image 90 degrees clockwise, or
the button to rotate the image 90 degrees counter-clockwise.
4. Tap the button and then tap Yes
Flipping Images
Flipping Images
Flipping ImagesFlipping Images
1. Open an image from the thumbnail or list view.
2. Tap the button to open the image editing screen.
3. Tap the button to flip the image horizontally, or the
button to flip the image vertically.
4. Tap the button and then tap Yes
Cropping Images
Cropping Images
Cropping ImagesCropping Images
1. Open an image from the thumbnail or list view.
2. Tap the button to open the image editing screen.
3. Tap the button and then tap Continue
appears.
4. Use the stylus to draw a cropping frame that encompasses the
area you want to crop from the original image.
Yes to save your changes.
Ye sYe s
Yes to save your changes.
Ye sYe s
Continue in the box that
ContinueContinue
5. If necessary, tap the crossed arrow at the center of the frame to
adjust its position on the original image. You can also tap the
small red dots at each corner of the frame to adjust its size.
6. Tap the button. The image will be cropped.
7. Tap the button and then tap Yes
Adding Special Effects to Images
Adding Special Effects to Images
Adding Special Effects to ImagesAdding Special Effects to Images
Adding Text to Images
Adding Text to Images
Adding Text to ImagesAdding Text to Images
1. Open an image from the thumbnail or list view.
2. Tap the button to open the image workshop screen.
3. Tap Add text
Add text.
Add textAdd text
4. Enter the text you want to add to the image and then tap OK
Yes to save your changes.
Ye sYe s
OK.
OKOK
Using the Application Programs76
Page 15

5. You will see a text frame on the image with the text you just
entered in it. If necessary, tap and drag the crossed arrow mark
at the center of the text frame to adjust its position on the
image, or tap and drag the small red dots at each corner of the
text frame to adjust its size.
6. If necessary, you can tap the button to change text color, or
the button to change text size. You can also tap the
button to add more text or edit the text in the text frame.
7. Tap the button and then tap Yes
Adding Clipart to Images
Adding Clipart to Images
Adding Clipart to ImagesAdding Clipart to Images
1. Open an image from the thumbnail or list view.
2. Tap the button to open the image workshop screen.
3. Tap Add clipart
Add clipart.
Add clipartAdd clipart
Yes to save your changes.
Ye sYe s
4. Tap Emotions
Emotions and select a clipart category.
EmotionsEmotions
5. Tap to select a clipart image. The clipart image will appear on
the original image.
6. If necessary, you can also do the following:
• Tap the button to add more clipart images to the original
image.
• Delete a clipart image by tapping it on the original image and
then tap the button.
• Adjust the position of the clipart image by tapping it on the
original image, tapping the button and then tap and drag
the clipart image.
• Adjust the size of the clipart image by tapping it on the original
image, tapping the button and then tap and drag the clipart
image.
Using the Application Programs 77
Page 16

• Rotate the clipart image by tapping it on the original image, tapping the button and then tap and drag the clipart image.
7. Tap the button and then tap Yes
Adding Frames
Adding Frames
Adding FramesAdding Frames
1. Open an image from the thumbnail or list view.
2. Tap the button to open the image workshop screen.
3. Tap Fun house
Fun house.
Fun houseFun house
4. Tap Bobble_heads
Bobble_heads and select a frame type.
Bobble_headsBobble_heads
5. Tap to select a frame. The frame will appear on the original
image.
6. If necessary, you can also do the following:
Yes to save your changes.
Ye sYe s
• Adjust the position of the original image by tapping the button and then tap and drag the original image.
• Adjust the size of the original image by tapping the button
and then tap and drag the dotted border of the original image.
• Rotate the original image by tapping the button and then
tap and drag the original image.
• Flip the original image vertically by tapping the button.
7. Tap the button and then tap Yes
Using Greeting Card Templates
Using Greeting Card Templates
Using Greeting Card TemplatesUsing Greeting Card Templates
1. Open an image from the thumbnail or list view.
2. Tap the button to open the image workshop screen.
3. Tap Greeting
Greeting.
GreetingGreeting
4. Tap to select a template type.
5. Tap to select a template. The template will appear on the origi-
nal image.
6. If necessary, you can also do the following:
• Adjust the position of the original image by tapping the button and then tap and drag the original image.
• Adjust the size of the original image by tapping the button
and then tap and drag the dotted border of the original image.
• Rotate the original image by tapping the button and then
tap and drag the original image.
• Flip the original image vertically by tapping the button.
7. Tap the button and then tap Yes
Yes to save your changes.
Ye sYe s
Yes to save your changes.
Ye sYe s
Using the Application Programs78
Page 17

Adding Warping Effects
Adding Warping Effects
Adding Warping EffectsAdding Warping Effects
1. Open an image from the thumbnail or list view.
2. Tap the button to open the image workshop screen.
3. Tap Warping
War pi ng .
War pi ngWa rpi n g
4. Tap Warp
Warp and select a pen size for warping: Large pen
War pWar p
pen
pen or Small pen
Small pen.
pen pen
Small pen Small pen
Large pen, Medium
Large penLarge pen
Medium
Medium Medium
5. Tap and drag the portions you want to create warping effect on
the original image. To clear all changes, tap Warp
select Undo all changes
Undo all changes.
Undo all changesUndo all changes
6. Tap the button and then tap Yes
It is recommended that when you finish using the Photo Base
application program, tap PhotoBase and select Exit PhotoBase to
close it in order to save memory space.
Yes to save your changes.
Ye sYe s
Warp and then
Wa rpWa r p
Using the Application Programs 79
Page 18

Time
The Time application program allows you to view and set time,
date and location information. Besides, you can also set 3 different alarms.
Viewing Current Time and Date
Viewing Current Time and Date
Viewing Current Time and DateViewing Current Time and Date
You can view current time and by tapping the icon on the Status bar, or open the Time application program in the Main
screen.
In the Time screen, you can:
Tap here to set
time and date
Tap here to
enable/disable
alarms
Tap here to
view time in different locations
Tap here to
set alarms
1. In the Time screen, tap Time
menu that appears.
2. In the Location
3. Tap the Numbers
4. Tap the Done
Setting Time and Date
Setting Time and Date
Setting Time and DateSetting Time and Date
Location tab, tap to set the country information.
LocationLocation
Numbers tab to set the number format.
NumbersNumbers
Done button.
DoneDone
Time and select Set location
TimeTime
Set location on the
Set location Set location
Setting Time and Date
Setting Time and Date
Setting Time and DateSetting Time and Date
Specifying Your Current Location
Specifying Your Current Location
Specifying Your Current LocationSpecifying Your Current Location
Before setting time and date, you must first select your current
location.
Using the Application Programs80
1. In the Time screen, tap Time
menu that appears.
2. In the Time & date
Time & date tab, enter current time and date.
Time & date Time & date
3. Tap the Format
Format tab and specify time and date format.
FormatFormat
Time and select Set time & date
TimeTime
Set time & date on the
Set time & date Set time & date
Page 19

4. Tap to go to the Workdays
5. Tap the Done
Setting Alarms
Setting Alarms
Setting AlarmsSetting Alarms
1. In the Time screen, tap one of the 3 alarm fields.
2. The alarm setting screen will appear.
Done button.
DoneDone
Workdays tab and set workdays in a week.
Wo rk d ay sWo r kd ay s
Operations When an Alarm Goes off
Operations When an Alarm Goes off
Operations When an Alarm Goes offOperations When an Alarm Goes off
When an alarm goes off, you can tap Snooze
alarm for 5 minutes, or Silence
off the alarm, tap Done
Silence to turn off alarm sound. To turn
SilenceSilence
Done (or press the key).
DoneDone
Snooze to postpone the
SnoozeSnooze
3. Complete necessary setup and then tap the Done
can set up to 3 alarms.
Activating/Deactivating Alarms
Activating/Deactivating Alarms
Activating/Deactivating AlarmsActivating/Deactivating Alarms
To enable or disable an alarm, check or uncheck the checkbox in
each alarm field on the Time screen.
Done button. You
DoneDone
Using the Application Programs 81
Page 20

To Do
The To do application program helps you to manage your todo
items and track the status. Besides, you can also exchange the To
do items with that of the Agenda application for easy planning of
your daily schedule.
Creating New Tasks
Creating New Tasks
Creating New TasksCreating New Tasks
1. In the To do screen, tap To do
2. Tap Unfiled
Unfiled and select a folder where you want to place the new
UnfiledUnfiled
task.
3. Enter a description of the task, and then specify the following:
• Completed
Completed: check the checkbox if the task is already completed.
CompletedCompleted
• Priority
Priority: select a priority for the task.
PriorityPriority
• Due date
Due date: if the task has a due date, you can tap to check this
Due dateDue date
checkbox, tap the date that appears and then select a date from
a calendar.
• Alarm
Alarm: to set alarm, tap to check this checkbox, tap the date and
AlarmAlarm
time that appear and then adjust alarm time.
• Private
Private: if this checkbox is checked, when you synchronize tasks
PrivatePrivate
with other devices, the private tasks will not be seen.
4. Tap the tab and write a note for the task.
5. Tap the button to save the new task.
Viewing Tasks
Viewing Tasks
Viewing TasksViewing Tasks
You can view your tasks on the To do screen. Overdue tasks will
turn into red. You can sort the tasks by tapping Edit
Sort on date
Sort on date or Sort on priority
Sort on dateSort on date
To view a task, tap a task item on the To do screen. The details of
the task will appear on the screen.
Sort on priority.
Sort on prioritySort on priority
To do and select New
To d o To do
New.
NewNew
Edit and select
EditEdit
Managing Tasks
Managing Tasks
Managing TasksManaging Tasks
Changing Task Status
Changing Task Status
Changing Task StatusChanging Task Status
If a task is completed, you can check the checkbox of each task on
the To do screen to mark the task as “completed”.
Finding a Task
Finding a Task
Finding a TaskFinding a Task
To find a specific task:
1. In the To do screen, tap To do
2. Enter the keyword and select where to search.
3. Tap the Find
4. The tasks that match your search keyword will appear on the
Editing a Task
Editing a Task
Editing a TaskEditing a Task
1. Open a task by tapping it on the To do screen.
2. Make changes to the task.
3. Tap the button to save your changes.
Deleting a Task
Deleting a Task
Deleting a TaskDeleting a Task
1. Open a task by tapping it on the To do screen.
2. Tap To do
3. Tap the Done
Deleting Completed Tasks
Deleting Completed Tasks
Deleting Completed TasksDeleting Completed Tasks
1. In the To do screen, tap To to and select Delete
Find button.
FindFind
screen. You can tap to select and open a task.
To do and select Delete to do
To d oTo do
Done button.
DoneDone
To do and select Find
To d oTo do
Delete to do.
Delete to doDelete to do
Find.
FindFind
Delete completed
completed.
DeleteDelete
completedcompleted
Using the Application Programs82
Page 21

2. Select whether to delete all completed tasks, or just the completed tasks in a specific folder.
3. Tap Yes
Yes to delete the tasks.
Ye sYe s
Moving Tasks to the Agenda Application Program
Moving Tasks to the Agenda Application Program
Moving Tasks to the Agenda Application ProgramMoving Tasks to the Agenda Application Program
1. Open a task by tapping it on the To do screen.
2. Tap To do
To do and select Move to Agenda
To d oTo do
3. Tap the Done
Pasting Tasks from the Agenda Application Program
Pasting Tasks from the Agenda Application Program
Pasting Tasks from the Agenda Application ProgramPasting Tasks from the Agenda Application Program
1. Cut or copy an agenda entry in the Agenda application pro-
2. In the To do screen, tap Edit
Sending Tasks
Sending Tasks
Sending TasksSending Tasks
1. Open a task on the To do screen.
2. Tap To do
3. Select from the following and then tap the Done
• SMS
SMS: send the task to another mobile phone via an SMS mes-
SMSSMS
• MMS
MMS: send the task to another mobile phone as an MMS
MMSMMS
• Bluetooth
Bluetooth: send the task to other devices that support Bluetooth
BluetoothBluetooth
• IR
IR: send the task to other devices that support infrared connec-
IRIR
Done button.
DoneDone
gram.
To do and select Send as
To d oTo do
sage. Enter the number of the recipient and then tap the Send
button.
attachment. The MMS message screen will follow for you to
compose the message.
technology. A box will appear showing found paired devices.
Tap to select a device and then tap the Send
tion. Align the infrared port of your P31 with that of the device
and then tap the Send
Move to Agenda.
Move to AgendaMove to Agenda
Edit and select Paste entry
EditEdit
Send as.
Send asSend as
Send button.
SendSend
Paste entry.
Paste entryPaste entry
Done button:
DoneDone
Send button.
SendSend
Send
SendSend
Managing Task Folders
Managing Task Folders
Managing Task FoldersManaging Task Folders
1. In the To do screen, tap All
2. You can:
• Tap the Add
• Tap to select a folder on the list and then tap the Delete
• Tap the Rename
To do Preferences
To do Preferences
To do PreferencesTo do Preferences
1. In the To do screen, tap Edit
2. Set the following items:
• Display due dates
• Display completed
• Alarm sound
• Alarm vibrator
Add button to create a new folder. Enter the name for
AddAdd
the new folder and then tap the Done
to delete the selected folder.
Rename button to rename selected folder. Enter a new
RenameRename
name and then tap the Done
Display due dates: if unchecked, the set due dates for each task
Display due datesDisplay due dates
will not appear on the To do screen.
Display completed: if unchecked, the completed tasks will not
Display completedDisplay completed
appear on the To do screen.
Alarm sound: tap to select a preferred alarm sound from the
Alarm soundAlarm sound
drop-down list.
Alarm vibrator: if checked, P31 will vibrate when the task alarm
Alarm vibratorAlarm vibrator
goes off.
All and select Edit folders
AllAll
Done button.
DoneDone
Edit and select Preferences
EditEdit
Edit folders.
Edit foldersEdit folders
Done button.
DoneDone
Preferences.
PreferencesPreferences
Delete button
DeleteDelete
Using the Application Programs 83
Page 22

Video Player
With Video player, you can view video clips captured by the camera or transferred from other devices. The Video player application program accepts video clips in the MPEG 4, 3GP format.
Viewing Video Clips Using Video Player
Viewing Video Clips Using Video Player
Viewing Video Clips Using Video PlayerViewing Video Clips Using Video Player
1. Tap the Video player
2. Tap All
3. The thumbnails and related time, date and length information
4. Tap to select a video clip you want to play and then tap the
When copying video files to the phone memory/memory card, put
them in the folder named "video" in the "Media files" folder. You
can also create new sub-folders in the "video" folder to store video
files.
Options When Viewing Video Clips
Options When Viewing Video Clips
Options When Viewing Video ClipsOptions When Viewing Video Clips
When viewing video clips, you can:
• Tap the icon or anywhere on the video image to switch
• Tap the button (or press the key) to pause the
• Tap the button (or press the key) to play the next
Video player application program icon in the Main
Video player Video player
screen.
All and select a folder. You can select to view the video clips
All All
in the phone memory, the memory card or both.
of the video clip files will appear.
button (or press the key). Video player will start
playing the video clip.
between the normal and full screen view modes.
video image.
video clip.
• Tap the button (or press the key) to play the pre-
vious video clip.
• Tap the button to open a dialog where you can adjust the
playback volume. Or you can directly press the or
key to adjust it.
• Tap the button to stop playing the video and return to the
file list screen.
• Tap the button (or press the key) to return to the
previous screen.
Managing Video Folders
Managing Video Folders
Managing Video FoldersManaging Video Folders
1. In the Video player screen, tap All
2. You can:
• Tap the Add
• Tap to select a folder on the list and then tap the Delete
• Tap the Rename
Managing Video Clips
Managing Video Clips
Managing Video ClipsManaging Video Clips
Deleting Video Clips
Deleting Video Clips
Deleting Video ClipsDeleting Video Clips
1. Tap All
2. Tap to select the video clip you want to delete.
3. Tap the button, and then tap Yes
Add button to create a new folder. Enter the name for
AddAdd
the new folder and then tap the Done
to delete the selected folder.
Rename button to rename selected folder. Enter a new
RenameRename
name and then tap the Done
All and select a folder that contains the video clip you want
AllAll
to delete.
All and select Edit folders
AllAll
Done button.
DoneDone
Done button.
DoneDone
Ye s .
Ye sYe s
Edit folders.
Edit foldersEdit folders
Delete button
DeleteDelete
Using the Application Programs84
Page 23

Renaming Video Clips
Renaming Video Clips
Renaming Video ClipsRenaming Video Clips
1. Tap All
All and select a folder that contains the video clip you want
AllAll
to rename.
2. Tap to select the video clip you want to delete.
3. Tap the button.
4. Enter the new name in the dialog that appears and then tap
OK
OK.
OKOK
Sending Video Clips
Sending Video Clips
Sending Video ClipsSending Video Clips
1. Tap All
All and select a folder that contains the video clip you want
AllAll
to send.
2. Tap to select the video clip you want to send.
3. Tap the button.
4. Select from the following and then tap the Done
• MMS
MMS: send the video clip to another mobile phone as an MMS
MMSMMS
Done button:
DoneDone
attachment. The MMS message screen will follow for you to
compose the message.
• Bluetooth
Bluetooth: send the video clip to other devices that support
BluetoothBluetooth
Bluetooth technology. A box will appear showing found paired
devices. Tap to select a device and then tap the Send
• IR
IR: send the video clip to other devices that support infrared
IRIR
Send button.
SendSend
connection. Align the infrared port of your P31 with that of the
device and then tap the Send
Viewing Video Clip Information
Viewing Video Clip Information
Viewing Video Clip InformationViewing Video Clip Information
1. Tap All
All and select a folder.
AllAll
Send button.
SendSend
2. Tap to select a video clip.
3. Tap the button. The information about the video clip will
appear on the screen.
You can also tap Options and use the commands.
It is recommended that when you finish using the Video player
application program, tap Video and select Exit to close it in order
to save memory space.
Using the Application Programs 85
Page 24

Vo ic e
You can use the Voice application program to record voice notes
and save them as sound clips. You can also send them via MMS
and Email, or use them as ring tones.
Creating a New Voice Note
Creating a New Voice Note
Creating a New Voice NoteCreating a New Voice Note
1. In the Voice screen, tap Voice
or tap the New
2. Tap the button to start recording.
3. To stop recording, tap the button. The recording will be
saved automatically with recording date and time. You can also
tap the button to play the voice note.
It is recommended that you keep the distance between the sound
source and the microphone of P31 within about 10 ~ 15 cm in order
to obtain better recording quality.
Playing Voice Notes
Playing Voice Notes
Playing Voice NotesPlaying Voice Notes
1. In the Voice screen, tap the or button to select a voice
note.
2. Tap the button to start playing the selected voice note.
3. To adjust playback volume, drag the volume slider
4. To pause playing the voice note, tap the button. To resume
normal playback, tap the button again.
New button.
NewNew
Voice and then select New Voice note
Vo ic eVo i c e
to the left or right.
New Voice note,
New Voice note New Voice note
Deleting Voice Notes
Deleting Voice Notes
Deleting Voice NotesDeleting Voice Notes
1. In the Voice screen, tap the or button to select the
voice note to delete.
2. Tap the Delete
Sending Voice Notes
Sending Voice Notes
Sending Voice NotesSending Voice Notes
1. In the Voice screen, tap the or button to select a voice
2. Tap Voice
3. Select from the following and then tap the Done
• MMS
MMS: send the voice note to another mobile phone as an MMS
MMSMMS
• Bluetooth
Bluetooth: send the voice note to other devices that support
BluetoothBluetooth
• IR
IR: send the voice note to other devices that support infrared
IRIR
Delete button.
DeleteDelete
note to send.
Voice and then select Send as
Vo i c eVo i c e
attachment. The MMS message screen will follow for you to
compose the message.
Bluetooth technology. A box will appear showing found paired
devices. Tap to select a device and then tap the Send
connection. Align the infrared port of your P31 with that of the
device and then tap the Send
Send as.
Send asSend as
Send button.
SendSend
Done button:
DoneDone
Send button.
SendSend
Using the Application Programs86
Page 25

Expanding the Capabilities of Your P31
Expanding the Capabilities of Your P31
Expanding the Capabilities of Your P31Expanding the Capabilities of Your P31
Installing Application Programs
The Symbian operating system adopted by your P31 is an open
system in the industry, and you can install various application
programs designed for it. These programs can be obtained from
the Internet, from Email attachments, on CDs, memory cards or
from other devices.
The installation files of the application programs are available in
the following formats:
• SIS (Symbian Standard Installation)
• JAR (Java Archive)
Application programs not officially approved and tested by BenQ
may result in malfunction or loss of data, and BenQ should not be
held responsible for these damages.
Installing Application Programs from the Internet
Installing Application Programs from the Internet
Installing Application Programs from the InternetInstalling Application Programs from the Internet
Usually when you download an application program from the
Internet, installation will start automatically after the file is completed saved to your P31. Follow the instructions of the installer
to complete the installation process.
Installing Application Programs from Installation
Installing Application Programs from Installation
Installing Application Programs from Installation Installing Application Programs from Installation
Files
Files
FilesFiles
Follow the steps below to install application programs from the
installation files on CDs, memory cards, Emails or received from
other devices.
1. Locate the installation file and save it to P31 or the memory
card.
2. In the Main screen, tap Launcher
Launcher and select Install
LauncherLauncher
Install.
InstallInstall
3. The available programs for installation will appear in the box.
Tap to select the program you want to install and then tap
Install
Install.
InstallInstall
Uninstalling Application Programs
Uninstalling Application Programs
Uninstalling Application ProgramsUninstalling Application Programs
To uninstall application programs from your P31:
1. In the Main screen, tap Launcher
2. Installed programs on your P31 will appear. Tap to select the
program you want to uninstall and then tap Uninstall
Launcher and select Uninstall
LauncherLauncher
Uninstall.
UninstallUninstall
Uninstall.
UninstallUninstall
Installing/Removing a Memory
Card
With additional memory cards you can easily expand the memory space of your P31 for storing more programs or files or
exchange them with other users. Your P31 accepts the following
types of memory cards:
• Standard or Mini (a memory card converter is required) SD
(Secure Digital)
• MMC (Multimedia Memory Card)
Close all running programs that use the memory card before
removing it. Otherwise data error or loss will occur, or the memory
card itself will be damaged.
Expanding the Capabilities of Your P31 87
Page 26

Installing a Standard Memory Card
Installing a Standard Memory Card
Installing a Standard Memory CardInstalling a Standard Memory Card
Installing a Mini SD Memory Card
Installing a Mini SD Memory Card
Installing a Mini SD Memory CardInstalling a Mini SD Memory Card
1. Open the protective cover
on the memory card slot
as shown.
2. Insert the memory card
all the way into the slot.
Pay attention to the
direction of the metal
contacts on the memory
card when inserting.
3. Close the protective cover.
Expanding the Capabilities of Your P3188
1. Insert the Mini SD memory card into the memory
card converter.
2. Open the protective cover
on the memory card slot
as shown.
3. Insert the memory card
converter all the way into
the slot. Pay attention to
the direction of the metal
contacts when inserting.
Page 27

Removing a Memory Card
Removing a Memory Card
Removing a Memory CardRemoving a Memory Card
1. Close all running programs that use the memory card.
2. Open the protective cover on the memory card slot.
3. Push the memory card
inward using your fingernail or the opposite side
of the stylus. The card will
pop up from the slot.
4. Remove the memory card from the slot.
5. Close the protective cover.
Formatting a Memory Card
Formatting a Memory Card
Formatting a Memory CardFormatting a Memory Card
• Formatting the memory card will cause all programs and file data
on the card to disappear.
• Make sure the write-protection switch on the memory card has
been moved to the write-enabled position.
1. Make sure that the power of P31 is sufficient and not too low.
2. In the Main screen, tap the Control panel
icon.
3. Tap Format disk
Format disk.
Format diskFormat disk
4. From the dialog that appears, tap to select the disk you want to
format.
5. Tap Format
Format. Your P31 will begin formatting the memory card.
FormatFormat
Control panel application program
Control panelControl panel
Do not remove the memory card while formatting. Otherwise the
card will be damaged.
Renaming a Memory Card
Renaming a Memory Card
Renaming a Memory CardRenaming a Memory Card
1. In the Main screen, tap the Control panel
2. Tap Format disk
Format disk.
Format diskFormat disk
3. From the dialog box that appears, tap to select the disk you
want to rename.
4. Tap Rename
Rename and enter the new name in the Name
RenameRename
5. Tap Done
Done.
DoneDone
Control panel program icon.
Control panelControl panel
Name field.
NameName
Expanding the Capabilities of Your P31 89
Page 28

Managing and Personalizing Your P31
Managing and Personalizing Your P31
Managing and Personalizing Your P31Managing and Personalizing Your P31
Managing Application Programs
Grouping Application Programs
Grouping Application Programs
Grouping Application ProgramsGrouping Application Programs
You can put application programs in different groups (folders)
for easier access.
1. In the Main screen, tap All
2. You can:
• Tap the Add
• Tap to select a folder on the list and then tap the Delete
• Tap the Rename
Setting Application Programs on the Application
Setting Application Programs on the Application
Setting Application Programs on the Application Setting Application Programs on the Application
Shortcut Bar
Shortcut Bar
Shortcut BarShortcut Bar
You can setup the application program shortcuts located on the
application shortcut bar by following the steps below:
1. In the Main screen, tap View
2. Tap to select the icon of the application program to be replaced
3. Tap Done
Add button to create a new folder. Enter the name for
AddAdd
the new folder and then tap the Done
to delete the selected folder.
Rename button to rename selected folder. Enter a new
RenameRename
name and then tap the Done
on the application shortcut bar in the dialog, and then tap the
Set shortcut
Set shortcut drop-down list to select a new application pro-
Set shortcutSet shortcut
gram.
Done.
DoneDone
All and select Edit folders
AllAll
Done button.
DoneDone
View and select Preferences
ViewView
Edit folders.
Edit foldersEdit folders
Done button.
DoneDone
Preferences.
PreferencesPreferences
Delete button
DeleteDelete
File Management
When connected to a PC that runs P31 Handset Manager, you
can manage the files in your P31 from PC easily.
For more information about how to install and configure P31 Handset Manager, please refer to "Installing BenQ P31 Handset Manager" on page 96.
1. Make sure that the power of your P31 is on and the connection
mode has been set to PC Connect
53).
2. Connect the USB connector on P31 to a USB port on the PC
using the supplied Data cable.
3. On your PC Desktop, double-click the icon.
4. The file browser window will appear.
PC Connect (See "USB Cable" on page
PC ConnectPC Connect
Managing and Personalizing Your P3190
Page 29

5. Double-click the icon.
6. The file directory in your P31 will appear. Now you can:
• Manage files on P31 as you would on your PC.
• Exchange files between PC and P31 using the cut, copy and
paste commands.
When exchanging files, make sure that you put the files in their
specific folders on the memory card, otherwise P31 may not be
able to recognize them correctly. For example, when copying
music files to the memory card, put them in the folder named
“audio” in the “Media files” folder. The folders will be created automatically when running their corresponding application programs.
For example, the “audio” folder will be created after you run the
Music player application program.
Personalizing Your P31
Customizing User Profiles
Customizing User Profiles
Customizing User ProfilesCustomizing User Profiles
You can personalize how your P31 looks and sounds by configuring and applying user profiles. A user profile is a combination of
user settings, including sound settings, display theme settings and
appearance settings. You can also setup different profiles for use
in different occasions.
To customize a user profile:
1. In the Main screen, tap the Control panel
icon to open Control panel.
2. Tap User Profiles
User Profiles.
User ProfilesUser Profiles
You can also enter the profile setup screen by tapping the icon
on the Status bar and then tap Setting in the dialog that appears.
3. Tap to select a profile from the Profiles
Control panel application program
Control panel Control panel
Profiles drop-down menu.
ProfilesProfiles
4. Specify the settings by selecting options in drop-down menus.
You can tap the icon to listen to the sound.
Changing Themes
Changing Themes
Changing ThemesChanging Themes
To select a display theme, tap Apply Theme
from the dialog box that follows and then tap Select
Changing Appearance
Changing Appearance
Changing AppearanceChanging Appearance
Apply Theme and select a theme
Apply Theme Apply Theme
Select.
SelectSelect
To select a different picture as the background image of the Main
screen, tap Apply Appearance
Background
Background drop-down menu. A new dialog box will follow
Background Background
Apply Appearance and then select Find image
Apply AppearanceApply Appearance
Find image in the
Find image Find image
allowing you to select an image. Tap to select a desired image and
then tap Select
You can also drag the slider beside the image to change its size on
the screen, or tap the Tile checkbox to tile smaller images on the
screen.
Select, Done
Done.
SelectSelect
Done Done
Managing and Personalizing Your P31 91
Page 30

5. Tap Save
Save to save, or Done
SaveSave
tings.
Selecting a User Profile
Selecting a User Profile
Selecting a User ProfileSelecting a User Profile
1. In the Main screen, tap the Control panel
icon to open Control panel.
2. Tap User Profiles
User Profiles.
User ProfilesUser Profiles
3. Tap to select a profile from the Profiles
4. Tap Done
Done.
DoneDone
Done to save and apply current profile set-
DoneDone
Control panel application program
Control panel Control panel
Profiles drop-down menu.
ProfilesProfiles
Managing and Personalizing Your P3192
Page 31

Getting Your P31 Connected and Synchronized
Getting Your P31 Connected and Synchronized
Getting Your P31 Connected and SynchronizedGetting Your P31 Connected and Synchronized
USB Connection
USB Connection
Connecting P31 to Other Devices
You can connect your P31 to other devices using the following
connections:
• Infrared connection
• Bluetooth connection
• USB connection
After a connection is established (except USB connection), you
can use the Send as
to send data to or receive data from the connected devices.
Infrared Connection
Infrared Connection
Infrared ConnectionInfrared Connection
1. Refer to the documentation of the device to enable its infrared
function.
2. On P31, tap the Control panel program icon in the Main
screen and select Infrared
3. Tap Done
4. Align the infrared port of your P31 with that on the device to
be connected. Make sure that the distance in between does not
exceed 1 meter (1 m) and there is no obstacles to obstruct
transmission.
5. Now you can use the Send as
gram to send data, or receive data sent from the connected
device. When data is received, you will be prompted to select
View
View to view the received data, or Done
ViewView
cific location of the application program.
Send as commands in various application programs
Send asSend as
Done.
DoneDone
Infrared, On
InfraredInfrared
On or On for 10 minutes
On for 10 minutes.
OnOn
On for 10 minutesOn for 10 minutes
Send as command of the application pro-
Send asSend as
Done to save data to the spe-
DoneDone
USB ConnectionUSB Connection
1. Refer to "Installing BenQ P31 Handset Manager" on page 96 to
install and configure P31 Handset Manager.
2. Make sure that the power of your P31 is on and the connection
mode has been set to PC Connect
53).
3. Connect the USB connector on P31 to a USB port on the PC
using the supplied Data cable.
4. When P31 is connected, the icon on the Windows status
area located at the lower right corner of the screen will change
to .
Bluetooth Connection
Bluetooth Connection
Bluetooth ConnectionBluetooth Connection
Bluetooth uses radio waves to enable wireless connections
between your P31 and other Bluetooth-enabled devices within a
range of approximately 10 metres. Typically, using Bluetooth you
can connect your P31 to a telephone headset or a PC.
Establishing Bluetooth Connection
Establishing Bluetooth Connection
Establishing Bluetooth ConnectionEstablishing Bluetooth Connection
Refer to the steps below for how to connect your P31 to a PC via
Bluetooth connection.
1. Tap Control panel
Control panel on the Main screen and then select Blue-
Control panelControl panel
tooth
tooth on the Connections
toothtooth
2. Check the Bluetooth on
other devices, and then select Yes
for other devices
for other devices.
for other devicesfor other devices
3. Set up Receiving items
Bluetooth on checkbox to become connectable to
Bluetooth on Bluetooth on
Receiving items as Always receive
Receiving itemsReceiving items
PC Connect (See "USB Cable" on page
PC ConnectPC Connect
Connections tab.
ConnectionsConnections
Yes or For 10 minutes
For 10 minutes in Visible
Ye sYe s
For 10 minutesFor 10 minutes
Always receive or Ask first
Always receive Always receive
Ask first.
Ask firstAsk first
Blue-
Blue-Blue-
Visible
Visible Visible
Getting Your P31 Connected and Synchronized 93
Page 32

4. If necessary, you can also enter a new name for your P31 in the
Name of my device
Name of my device box.
Name of my deviceName of my device
5. Make sure the Bluetooth connection of the device you want to
connect is activated.
6. Tap the Devices
Devices tab and then Add
DevicesDevices
Add. Your P31 searches for all
AddAdd
devices in the vicinity.
7. Tap to select the device you want your P31 to pair with and, if
necessary, enter a passkey. When the passkey is accepted, the
pairing process is complete.
8. On your PC (or other Bluetooth devices), a Bluetooth PIN
Code Required
Code Required bubble will pop up. Click the bubble, enter the
Code RequiredCode Required
passkey in the dialog that appears and then click OK
Bluetooth PIN
Bluetooth PIN Bluetooth PIN
OK. The pass-
OKOK
key entered here must match that entered in step 7.
• The Bluetooth PIN code is a set of code for pairing and identifying
Bluetooth devices. You can use any combination of numbers or
letters for the code. However, the code entered on your P31 and
the Bluetooth device must be identical.
• If you are using a Bluetooth headset, please check the documen-
tation that comes with the headset for the Bluetooth PIN code.
9. Double-click the My Bluetooth Places
select View devices in range
View devices in range. P31 icon will appear.
View devices in rangeView devices in range
My Bluetooth Places icon on the Desktop and
My Bluetooth PlacesMy Bluetooth Places
10. Double-click P31 icon and all available services will appear.
11. Double-click a service icon to use the service it represents:
• Audio gateway on P31
Audio gateway on P31: Allows you to transfer voice during a
Audio gateway on P31Audio gateway on P31
phone call from P31 to the speakers on your PC.
• Bluetooth Serial Port on P31
Bluetooth Serial Port on P31: Allows you to synchronize data
Bluetooth Serial Port on P31Bluetooth Serial Port on P31
between P31 and PC via Bluetooth connection.
• Dial-up Networking on P31
Dial-up Networking on P31: Allows you to use P31 as a modem
Dial-up Networking on P31Dial-up Networking on P31
to connect to the Internet (refer to "Setting up GPRS Modem
via Bluetooth Connection" on page 95 for more detailed
description).
Getting Your P31 Connected and Synchronized94
• Object Push on P31
Object Push on P31: Allows you to exchange entries (files, PIM
Object Push on P31Object Push on P31
data..., etc.) between P31 and PC.
Breaking Bluetooth Connection
Breaking Bluetooth Connection
Breaking Bluetooth ConnectionBreaking Bluetooth Connection
1. Tap Control panel
Control panel on the Main screen and then select Blue-
Control panelControl panel
tooth
tooth on the Connections
toothtooth
2. Uncheck the Bluetooth on
Connections tab.
ConnectionsConnections
Bluetooth on checkbox and then tap Done
Bluetooth on Bluetooth on
Done.
DoneDone
Blue-
Blue-Blue-
Using P31 as a GPRS Modem
Setting up GPRS Modem via USB Connection
Setting up GPRS Modem via USB Connection
Setting up GPRS Modem via USB ConnectionSetting up GPRS Modem via USB Connection
1. Install BenQ P31 Handset Manager.
• For more information about how to install and configure P31
Handset Manager, please refer to "Installing BenQ P31 Handset
Manager" on page 96.
• The steps below describe the setup procedure in Windows XP. If
you are using other Windows operating systems, please follow
similar steps.
2. Make sure that the power of your P31 is on and the connection
mode has been set to Modem
3. Connect the USB connector on P31 to a USB port on the PC
using the supplied Data cable.
4. On your PC, click the Start
click on My Computer
My Computer and select Properties
My ComputerMy Computer
5. Click the Hardware
Hardware tab and then click Device Manager
HardwareHardware
6. Double-click Modems
7. In the dialog that appears, click the Advanced
8. Enter the following string in the Extra initialization commands
box, and then click OK
Modem (See "USB Cable" on page 53).
ModemModem
Start button on Windows Taskbar, right-
StartStart
Modems, and then P31 Modem
ModemsModems
OK.
OKOK
+cgdcont=1,”ip”,”APN”
Properties.
PropertiesProperties
Device Manager.
Device ManagerDevice Manager
P31 Modem.
P31 ModemP31 Modem
Advanced tab.
AdvancedAdvanced
Extra initialization commands
Extra initialization commandsExtra initialization commands
Page 33

Consult your network service provider for the APN and replace the
APN in the string above with the actual one.
9. Click the Start
Connect to
Connect to, Show all connections
Connect toConnect to
10. Click Create a new connection
11. In the New Connection Wizard
12. Click Connect to the Internet
13. Click Set up my connection manually
14. Click Connect using a dial-up modem
15. In the dialog that follows, click to choose Modem - P31
16. In the dialog that follows, enter a connection name in the ISP
17. Enter *99#
18. Enter the user name and password in the dialog that follows
Consult your network service provider for the user name and password if required.
19. Click Finish
20. Click Configure
21. Click OK
Start button on Windows Taskbar and then select
StartStart
Show all connections.
Show all connectionsShow all connections
Create a new connection.
Create a new connectionCreate a new connection
New Connection Wizard dialog, click Next
New Connection WizardNew Connection Wizard
Connect to the Internet and then Next
Connect to the InternetConnect to the Internet
Set up my connection manually and then Next
Set up my connection manuallySet up my connection manually
Connect using a dial-up modem and then Next
Connect using a dial-up modemConnect using a dial-up modem
Modem
Modem and then click Next
ModemModem
name
name box, and then click Next
name name
*99# in Phone number
Phone number box in the dialog that follows
*99# *99#
and then click Next
and then click Next
that follows.
then click OK
Dial
Dial to start using P31 as a GPRS modem to connect to the
DialDial
Internet.
Phone numberPhone number
Finish, and then click Properties
FinishFinish
Configure, uncheck Enable hardware flow control
ConfigureConfigure
OK.
OKOK
OK to return to the Connect
OKOK
Next.
NextNext
Next.
NextNext
Next.
NextNext
Next.
NextNext
Properties in the Connect
PropertiesProperties
Enable hardware flow control and
Enable hardware flow controlEnable hardware flow control
Connect dialog. Now you can click
ConnectConnect
Next.
NextNext
Next.
NextNext
Next.
NextNext
Next.
NextNext
Modem - P31
Modem - P31 Modem - P31
Connect dialog
ConnectConnect
ISP
ISP ISP
Setting up GPRS Modem via Bluetooth Connec-
Setting up GPRS Modem via Bluetooth Connec-
Setting up GPRS Modem via Bluetooth Connec-Setting up GPRS Modem via Bluetooth Connection
tion
tiontion
1. Perform step 1 through 8 in "Establishing Bluetooth Connection" on page 93 to establish Bluetooth connection.
2. On your PC, click the Start
click on My Computer
My Computer and select Properties
My ComputerMy Computer
3. Click the Hardware
4. Double-click Modems
5. In the dialog that appears, click the Advanced
6. Enter the following string in the Extra initialization commands
box, and then click OK
Consult your network service provider for the APN and replace the
APN in the string above with the actual one.
7. Double-click the My Bluetooth Places
select View devices in range
8. Double-click the P31 icon and all available services will appear.
9. Double-click the Dial-up Networking on P31
10. Click Properties
11. Click Configure
12. Enter *99#
13. Now you can click Dial
Hardware tab and then click Device Manager
HardwareHardware
View devices in range. The P31 icon will appear.
View devices in rangeView devices in range
Properties in the Connect
PropertiesProperties
Configure, uncheck Enable hardware flow control
ConfigureConfigure
then click OK
the Connect
to connect to the Internet.
OK.
OKOK
*99# in Phone number
*99# *99#
Connect dialog.
ConnectConnect
Start button on Windows Taskbar, right-
StartStart
Modems, and then Bluetooth Modem
ModemsModems
OK.
OKOK
+cgdcont=1,”ip”,”APN”
My Bluetooth Places icon on the Desktop and
My Bluetooth PlacesMy Bluetooth Places
Dial-up Networking on P31 service icon.
Dial-up Networking on P31Dial-up Networking on P31
Connect dialog that follows.
ConnectConnect
Phone number box and click OK
Phone numberPhone number
Dial to start using P31 as a GPRS modem
DialDial
Properties.
PropertiesProperties
Device Manager.
Device ManagerDevice Manager
Bluetooth Modem.
Bluetooth ModemBluetooth Modem
Advanced tab.
AdvancedAdvanced
Extra initialization commands
Extra initialization commandsExtra initialization commands
Enable hardware flow control and
Enable hardware flow controlEnable hardware flow control
OK to return to
OKOK
Getting Your P31 Connected and Synchronized 95
Page 34

BenQ P31 Handset Manager
The BenQ P31 Handset Manager on the software CD is a useful
tool for getting your P31 connected to and synchronized with a
desktop or laptop PC running. With P31 Handset Manager, you
can:
• Perform synchronization of data between your P31 and desk-
top/laptop PC.
Program data
on P31
Contacts
Calendar • Microsoft Outlook
Tasks • Microsoft Outlook
Messages • Microsoft Outlook
• Back up data from P31 to PC or restore data from PC to P31.
• Manage files between P31 and PC
Can be synchronized with the data of
the following programs on your PC
• Microsoft Outlook
• Windows Address Book
Installing BenQ P31 Handset Manager
Installing BenQ P31 Handset Manager
Installing BenQ P31 Handset ManagerInstalling BenQ P31 Handset Manager
1. Insert the PC Synchronization Tool CD into
the CD-ROM drive of
your PC. The software
installation menu will
appear on the screen.
Click English
English.
EnglishEnglish
If the menu does not appear, run the file “P31Setup.exe“on the PC
Synchronization Tool CD.
2. Click P31 Handset
P31 Handset
P31 Handset P31 Handset
Manager
Manager.
ManagerManager
3. Click Install
Install.
Install Install
Getting Your P31 Connected and Synchronized96
Page 35

4. If this dialog appears,
click Continue any-
Continue any-
Continue any-Continue any-
way
way and follow the on-
wayway
screen instructions to
proceed.
5. Click to select the language you want to
install.
If the New Hardware Found dialog appears after P31 is connected,
follow below steps:
1. Click Install from a list or specific location, and then click Next.
2. Click Browse and select P31 Handset Manager CD directory.
3. Click Next, Continue anyway.
9. After your P31 is successfully detected by the PC,
the dialog box will appear
on the screen. Click Next
Next.
NextNext
6. Click Install the BenQ
Install the BenQ
Install the BenQ Install the BenQ
Handset Manager
Handset Manager.
Handset ManagerHandset Manager
7. Follow the on-screen instructions to complete installation.
8. Connect the USB connector on P31 to a USB port on the PC
using the supplied Data cable.
10. Click Next
Next.
NextNext
Getting Your P31 Connected and Synchronized 97
Page 36

11. Specify a name for your
P31 and click Next
12. Click Finish
13. Click OK
Finish.
FinishFinish
OK.
OKOK
Next.
NextNext
14. A window will follow.
Here you can configure
the settings for synchronizing the data between
your P31 and the PC.
The connection status is indicated by the icons on the Windows
status area located at the lower right corner of the screen:
: Connected and data transmission is in progress
: Disconnected
For more information on how to perform synchronization setup,
refer to the on-line help by clicking Help.
Synchronizing Data
Performing Local Synchronization Using BenQ
Performing Local Synchronization Using BenQ
Performing Local Synchronization Using BenQ Performing Local Synchronization Using BenQ
P31 Handset Manager
P31 Handset Manager
P31 Handset ManagerP31 Handset Manager
Using the supplied Data cable and the P31 Handset Manager software program, you can easily keep your P31 data synchronized
with the data on your PC.
• The synchronization setup must be completed before you can
perform synchronization.
• During the synchronization process, do not unplug the USB cable
or remove the battery of P31.
Getting Your P31 Connected and Synchronized98
Page 37

1. Make sure that the power of your P31 is on. Connect the USB
connector on P31 to a USB port on the PC using the supplied
Data cable.
2. On your PC, click the Start
select Programs
Programs, BenQ
ProgramsPrograms
Start button on Windows Taskbar and
StartStart
BenQ, Synchronise
Synchronise. Or, you can also right-
BenQBenQ
SynchroniseSynchronise
click the icon on the Windows status area located at the lower
right corner of the screen and select Synchronise
Synchronise.
SynchroniseSynchronise
3. The synchronization will start automatically.
You can also perform synchronization via infrared or Bluetooth
connection.
To perform synchronization via infrared connection:
1. Enable the infrared function of your PC.
2. Enable the infrared function of P31.
3. Right-click on the icon and select Properties.
4. Check the Infrared checkbox and click Close. If infrared connec-
tion is established and the icon changes to , you can start
the synchronization operation.
To perform synchronization via Bluetooth connection:
1. Refer to "Establishing Bluetooth Connection" on page 93 to
establish Bluetooth connection with the PC.
2. Right-click on the icon and select Properties.
3. Check the Bluetooth checkbox and click Close. If Bluetooth con-
nection is established and the icon changes to , you can
start the synchronization operation.
Performing Remote Synchronization with a Server
Performing Remote Synchronization with a Server
Performing Remote Synchronization with a ServerPerforming Remote Synchronization with a Server
If you are frequently on the move and need to keep your data
synchronized, remote sync will be an ideal choice. Remote synchronization requires support of the following from your network service provider:
• GPRS or dial-up data connection service
• A synchronization server
In order to perform remote synchronization, you need to cor-
rectly configure the remote synchronization settings.
Configuring Remote Synchronization Settings
Configuring Remote Synchronization Settings
Configuring Remote Synchronization SettingsConfiguring Remote Synchronization Settings
Consult your network service provider and obtain the following
information:
• Remote synchronization server address
• User name and password
Next, configure the remote synchronization settings following
the steps below.
1. In the Main screen, tap the Remote sync
2. Tap Edit
Edit and select Preferences
EditEdit
Remote sync program icon.
Remote syncRemote sync
Preferences.
PreferencesPreferences
3. According to the data obtained form your network service provider, complete the settings on the Server
4. Tap Done
Done.
DoneDone
Performing Remote Synchronization
Performing Remote Synchronization
Performing Remote SynchronizationPerforming Remote Synchronization
1. In the Main screen, tap the Remote sync
2. Tap Remote sync
Remote sync and select Start sync
Remote syncRemote sync
Server and Protocol
ServerServer
Remote sync program icon.
Remote syncRemote sync
Start sync.
Start syncStart sync
Protocol tabs.
ProtocolProtocol
Backing up and Restoring Data
In order to ensure the safety of your personal data, we recommend that you regularly back up the data on your P31 to PC.
Using P31 Handset Manager, you can perform data back up and
restoration easily.
Getting Your P31 Connected and Synchronized 99
Page 38

Backing up P31 Data to PC
Backing up P31 Data to PC
Backing up P31 Data to PCBacking up P31 Data to PC
1. Make sure that the power of your P31 is on. Connect the USB
connector on P31 to a USB port on the PC using the supplied
Data cable.
2. On your PC, click the Start
select Programs
Programs, BenQ
ProgramsPrograms
right-click the icon on the Windows status area located at the
lower right corner of the screen and select Backup and Restore
The following Backup and Restore program window will
appear.
3. Select a phone from the Phone drop-down list. This step can be
skipped if there is only one phone connected to your PC.
Start button on Windows Taskbar and
StartStart
BenQ, Backup and Restore
Backup and Restore. Or, you can also
BenQBenQ
Backup and RestoreBackup and Restore
Backup and Restore.
Backup and RestoreBackup and Restore
4. Click Backup
Backup. The following dialog box will appear.
BackupBackup
5. A message reminding you that during backup you will not be
able to make or receive phone calls will pop up. Click OK
6. The backup process starts and you will be notified when the
process is finished.
Restoring P31 Data from PC
Restoring P31 Data from PC
Restoring P31 Data from PCRestoring P31 Data from PC
1. Make sure that the power of your P31 is on. Connect the USB
connector on P31 to a USB port on the PC using the supplied
Data cable.
OK.
OKOK
Getting Your P31 Connected and Synchronized100
Page 39

2. On your PC, click the Start
select Programs
Programs, BenQ
ProgramsPrograms
Start button on Windows Taskbar and
StartStart
BenQ, Backup and Restore
Backup and Restore. Or, you can also
BenQBenQ
Backup and RestoreBackup and Restore
right-click the icon on the Windows status area located at the
lower right corner of the screen and select Backup and Restore
Backup and Restore.
Backup and RestoreBackup and Restore
The following Backup and Restore program window will
appear.
3. Select a phone from the Phone
Phone drop-down list. This step can be
PhonePhone
skipped if there is only one phone connected to your PC.
4. Click to select backup data on the left part of the window, and
then click Restore
• Do not perform backup or restoration when the storage space on
P31 is low. Try deleting unnecessary files to free some space.
• During the backup or restoration process, do not unplug the USB
cable or remove the battery of P31.
For more information about backing up and restoring P31 data
using the Backup and Restore program, click Help in the program
window and select Help topics.
Restore. The restore action will start immediately.
RestoreRestore
Getting Your P31 Connected and Synchronized 101
Page 40

Care and Maintenance
C
C
C
Care and Maintenance
Care and MaintenanceCare and Maintenance
Your P31 is a delicate electronic device and shall be used and handled carefully in compliance with the instructions below. Failure
to observe these instructions may cause your product warranty to
void.
• Do not use your P31 in dusty and humid areas. It is extremely
vulnerable to liquid, and sand grains can cause scratches on the
surface of your P31.
• Do not store your P31 in extremely hot or cold areas. Heat can
cause damage to both the outer case and inside components. In
an extremely cold area, moisture can build from inside of P31
after you turn it on and result in damages.
• Do not drop, shake or knock on your phone.
• Do not use strong detergents, thinners or other corrosive liquid
to clean your P31. Instead, use the supplied cloth to clean it. If
necessary, use mild detergents.
• Keep your P31, batteries and accessories away from reach of
small children.
• Use only supplied or BenQ original or approved accessories
with your P31.
• Follow your local regulations concerning the safety of mobile
phone usage.
• The battery should be used and charged under normal room
temperature. If the battery is charged in environments where
the temperature is higher than 45 (113 ) or lower than
0 (32 ), charging will be stopped automatically and will
not continue unless the temperature returns to the normal
range.
F
°
°
°
F
°
• Do not store the battery in locations where the temperature is
below -10 (14 ) or above 45 (113 ).
• Do not leave the P31 in a car or any vehicle.
°C°
F
°
F
°
Care and Maintenance102
Page 41

Troubleshooting Information
Troubleshooting Information
Troubleshooting InformationTroubleshooting Information
If you encounter problems when using your P31, please refer to
the troubleshooting information below to solve them. If the
problem still persists after you have tried the suggested solutions,
please contact your dealer or BenQ customer service for assistance.
Do not attempt to disassemble P31 by yourself. There are no user
serviceable parts inside.
Call Related Problems
Cannot make outgoing calls.
Cannot make outgoing calls.
Cannot make outgoing calls.Cannot make outgoing calls.
Check the following:
• Is your P31 in the Flight
so you can use the call related functions.
• Is there a SIM card in the phone? Install a valid SIM card.
• Is the signal strength strong enough? Try moving to a different
location to obtain better signal reception.
• Is the call barring feature activated? Deactivate the feature if
necessary.
• Is the fixed dial number feature activated? Deactivate the feature
if necessary.
Cannot answer incoming calls.
Cannot answer incoming calls.
Cannot answer incoming calls.Cannot answer incoming calls.
Check the following:
• Is your P31 in the Flight
so you can use the call related functions.
• Is there a SIM card in the phone? Install a valid SIM card.
• Is the signal strength strong enough? Try moving to a different
location to obtain better signal reception.
Flight mode? Change to the Phone on
FlightFlight
Flight mode? Change to the Phone on
FlightFlight
Phone on mode
Phone onPhone on
Phone on mode
Phone onPhone on
Can not use certain call functions (call waiting, call barring..,
Can not use certain call functions (call waiting, call barring..,
Can not use certain call functions (call waiting, call barring.., Can not use certain call functions (call waiting, call barring..,
etc).
etc).
etc).etc).
Depending on your network service provider, some call services
may require extra subscription. Please contact your network service provider for details.
There are noises during a call.
There are noises during a call.
There are noises during a call.There are noises during a call.
Check the following:
• Are you near a strong electromagnetic source (such as a TV or a
microwave oven..., etc.) during the call? Move to another location to reduce the interference effects.
• Check the status of signal reception. If necessary, move to
another location where reception is better.
Message Problems
Cannot send or receive text messages.
Cannot send or receive text messages.
Cannot send or receive text messages.Cannot send or receive text messages.
Check the following:
• Is the phone in the Flight
mode.
• Has the message center number been set? You have to configure
the message center number manually if it is not already programmed on the SIM card.
• Is the signal strength strong enough? Try moving to a different
location to obtain better signal reception.
Cannot send or receive multimedia messages.
Cannot send or receive multimedia messages.
Cannot send or receive multimedia messages.Cannot send or receive multimedia messages.
Check the following:
Flight mode? Switch it to the Phone on
FlightFlight
Phone on
Phone onPhone on
Troubleshooting Information 103
Page 42

• Is the phone in the Flight
mode.
• Have you subscribed the MMS service to your network service
provider? The MMS service may require extra subscription.
• Has the MMS setting been correctly configured? Check the setting with your network service provider.
• The status of phone memory. Is there enough space? Delete
some files if necessary.
Cannot send or receive Email.
Cannot send or receive Email.
Cannot send or receive Email.Cannot send or receive Email.
Check the following:
• Is the phone in the Flight
mode.
• Have you subscribed the dial-up or GPRS data service to your
network service provider? These services may require extra subscription.
• Has the Email setting been correctly configured? Check the setting with your Email service provider.
Flight mode? Switch it to the Phone on
FlightFlight
Flight mode? Switch it to the Phone on
FlightFlight
Phone on
Phone onPhone on
Phone on
Phone onPhone on
Remove the phone battery, put it back on and turn on the phone.
Cannot add new data (new contact, task or agenda entry..., etc.).
Cannot add new data (new contact, task or agenda entry..., etc.).
Cannot add new data (new contact, task or agenda entry..., etc.).Cannot add new data (new contact, task or agenda entry..., etc.).
Check the status of phone memory. Is there enough space? Delete
some files if necessary.
Error occurs when playing music files or video clips.
Error occurs when playing music files or video clips.
Error occurs when playing music files or video clips.Error occurs when playing music files or video clips.
• The music file or video clip format may not be compatible with
the Music Player. Check the file format or convert it to an
acceptable format on PC.
• When exchanging files, make sure that you put the files in their
specific folders in phone memory or on the memory card, otherwise P31 may not be able to recognize them correctly. For
example, when copying music files to the phone memory/memory card, put them in the folder named "audio" in the "Media
files" folder. The folders will be created automatically when
running their corresponding application programs. For example, the "audio" folder will be created after you run the Music
player application program.
Internet Problems
Cannot connect to the Internet.
Cannot connect to the Internet.
Cannot connect to the Internet.Cannot connect to the Internet.
• Is the phone in the Flight
mode.
• Have you subscribed the dial-up or GPRS data service to your
network service provider? These services may require extra subscription.
• Has the Internet setting been correctly set? Check with your
Internet service provider for correct setting.
Flight mode? Switch it to the Phone on
FlightFlight
Phone on
Phone onPhone on
Application Program Problems
The application program freezes.
The application program freezes.
The application program freezes.The application program freezes.
Troubleshooting Information104
Connection Problems
Cannot connect P31 to PC using the Data cable.
Cannot connect P31 to PC using the Data cable.
Cannot connect P31 to PC using the Data cable.Cannot connect P31 to PC using the Data cable.
Check the following:
• Is the power of P31 turned on?
• Has the USB connection mode on P31 been set to PC connect?
Cannot use P31 as a GPRS modem to connect to the Internet.
Cannot use P31 as a GPRS modem to connect to the Internet.
Cannot use P31 as a GPRS modem to connect to the Internet.Cannot use P31 as a GPRS modem to connect to the Internet.
Check the following:
• Is the power of P31 turned on?
• Has the USB connection mode on P31 been set to Modem?
• Is the APN setting correct?
Page 43

System Problems
Cannot turn on the phone.
Cannot turn on the phone.
Cannot turn on the phone.Cannot turn on the phone.
Check the following:
• Is the battery fully charged? Check the battery and fully charge it
if necessary.
• Are the battery contact terminals clean? Seek your dealer’s help
to clean the terminals.
What should I do if the "The storage of your P31 is running low"
What should I do if the "The storage of your P31 is running low"
What should I do if the "The storage of your P31 is running low" What should I do if the "The storage of your P31 is running low"
message appears?
message appears?
message appears?message appears?
Try to delete some unnecessary files from the phone memory, or
move them to the memory card. It is recommended that you use
P31 Handset Manager to back up your data regularly in order to
prevent loss of data.
What should I do if a “system is busy” message appears and I am
What should I do if a “system is busy” message appears and I am
What should I do if a “system is busy” message appears and I am What should I do if a “system is busy” message appears and I am
unable to open more application programs?
unable to open more application programs?
unable to open more application programs?unable to open more application programs?
• Please follow the instructions on the screen to remove the battery, re-install it on P31 and power on P31 again.
• When you finish using an application program, close it by tapping Exit
Exit or similar commands. This will help to free up system
ExitExit
memory space and prevent the problem from happening.
Troubleshooting Information 105
Page 44

Product Specifications
Product Specifications
Product SpecificationsProduct Specifications
General
General
GeneralGeneral
• Operating system: Symbian OS v7.0
• User interface: UIQ 2.1
• Dimension: 118x52x17mm
• Weight: 150g
• Tri-band: 900/1800/1900 MHz
• Speech coding: HR, FR, EFR
• GPRS class 10/ Class B
• GPRS coding scheme: CS-1, CS-2, CS-3, CS-4
• SIM card: 3V type of small plug-in card
• Additional memory card: standard SD/MMC card
Display
Display
DisplayDisplay
• TFT LCD
• 262K color (18-bit)
• Touch-sensitive screen
• 208x320 pixel
Connectivity
Connectivity
ConnectivityConnectivity
• GPRS Class B/ Class 10
• GSM Circuit Switched Data
• Bluetooth
• P31 Bluetooth is in compliance with the Bluetooth specification 1.1.
• Coverage: up to 10 meters.
• Infrared
• SIR (max data speed between P31 and other infrared devices
is up to 115,200bps)
• USB
• Built-in mini USB interface
Browser
Browser
BrowserBrowser
• WAP version
• WAP 2.0, WAP 1.2.1
• Content
• WML 1.x as WBXML
• WML 1.x as Plain text
• HTML 1.0
• HTML- Basic
• HTML-Mobile Profile
• HTML
• HTML 4.01
• WCSS
• Protocol
• WAP stack: WSP, WTP, WTLS, WDP
• HTTP stack: HTTP, TLS, SSL
• Scripting
• WML script
• Images support
• WBMP, GIF, GIF animations, JPEG, BMP, PNG
• Sound support
• AMR, i-Melody, MIDI, MP3, WAV
• Video support
• Mpeg4, 3GP
• Applet support
• Java Applets
• Security
• WTLS Class I, II, III
• SSL 3.0/ TLS 1.0
Product Specifications106
Page 45

Camcorder
Camcorder
CamcorderCamcorder
• Built-in VGA CMOS camera
• Self-taking mirror
• Picture size: 640x480, 320x240
• Video size: 176x144, 128x96
• Quality: user selectable 3 quality levels of image, audio, and
video
• Storage: user selectable phone memory or external memory
• Video recording size mode: user selectable 4 types of recording
size modes
Photobase
Photobase
PhotobasePhotobase
• Format: JPEG, BMP
• Sharing by: Infrared, Bluetooth, SD/MMC card, E-mail attachment, MMS, file transfer using P31 Handset Manager
Video player
Video player
Video player Video player
• Format: .MP4, .3GP
• Sharing by: Infrared, Bluetooth, SD/MMC card, E-mail attachment, MMS, file transfer using P31 Handset Manager
Music player
Music player
Music player Music player
• Format: .AMR, .MP3, .WAV, .MID, .AU
• Sharing by: Infrared, Bluetooth, SD/MMC card, E-mail attachment, MMS, file transfer using P31 Handset Manager
Picsel Viewer
Picsel Viewer
Picsel Viewer Picsel Viewer
• Document Format: Microsoft Word, Microsoft Excel, Microsoft
Powerpoint, Adobe Acrobat PDF, Plain text
• Picture Format: JPEG, BMP, GIF, animated GIF, PNG, WMF,
EMF
Specifications are subject to change without prior notice.
Product Specifications 107
Page 46

<Memo>
Product Specifications108
 Loading...