

Page 1

GPRS with WLAN PC Card
W10
User’s Manual
Version 1.0
April 2003
i
BENQ Corporation
Page 2

Notice I
Copyrig h t Statement
This manual cannot be reproduced in any form or by any means or used to make any
derivative such as translation, transformation, or adaptation without the prior written
permission of BenQ Corporati on.
BenQ Corporation reserves the right to change this manual and the specifications to
improve products without prior notice. So you can get the most recent software and
user documentation for all BenQ Wireless LAN products on our web site.
http://www.BenQ.com
Trademarks
Copyright © 2003 BenQ Corporation. All rights reserved.
Contents subject to change without prior notice. BenQ is a registered trademark of
BenQ Corporation. All other trademarks belong to their respective proprietors.
ii
BENQ Corporation
Page 3

The device has been SAR evaluated and authorized for use in laptop (notebook) only.
Notice II FCC Warning
Federal Communication Commission Interference Statement
This equipment has been tested and found to comply with the limits for a Class B digital device,
pursuant to Part 15 of the FCC Rules. These limits are designed to provide reasonable protection
against harmful interference in a residential installation. This equipment generates, uses and can
radiate radio frequency energy and, if not installed and used in accordance with the instructions,
may cause harmful interference to radio communications. However, there is no guarantee that
interference will not occur in a particular installation. If this equipment does cause harmful
interference to radio or television reception, which can be determined by turning the equipment off
and on, the user is encouraged to try to correct the interference by one of the following measures:
- Reorient or relocate the receiving antenna.
- Increase the separation between the equipment and receiver.
- Connect the equipment into an outlet on a circuit different from that to which the receiver is
connected.
- Consult the dealer or an experienced radio/TV technician for help.
FCC Caution: Any changes or modifications not expressly approved by the party responsible for
compliance could void the user's authority to operate this equipment.
This device complies with Part 15 of the FCC Rules. Operation is subject to the following two
conditions: (1) This device may not cause harmful interference, and (2) this device must accept any
interference received, including interference that may cause undesired operation.
IMPORTANT NOTE:
FCC Radiation Exposure Statement:
This equipment complies with FCC radiation exposure limits set forth for an uncontrolled
environment.
This device complies with FCC RF Exposure limits set forth for an uncontrolled environment,
under 47 CFR 2.1093 paragraph (d)(2).
This transmitter must not be co-located or operating in conjunction with any other antenna or
transmitter.
Note:
The W10 has been tested and found to comply with the limits for a Class B digital device and a low
power transmitter, pursuant to Part 15 of the FCC rules. These limits are designed to provide
reasonable protection against harmful interference when the e quipment is operated in a residential
environment. This equipment generates, uses, and can radiate radio frequency energy and, if not
installed and used in accordance with the instructions, may cause harmful interference to radio
communications. However, there is no guarantee that interference will not occur in a particular
installation.
iii
BENQ Corporation
Page 4

Table of Contents
Chapter 1. Introduction...................................................................... 1
1.1. Product Kit...........................................................................................2
1.2. System Requirements............................................................................. 2
1.3. Mechanical Description.......................................................................... 2
Chapter 2. Installation ........................................................................ 4
2.1. Installing your SIM card to W10..............................................................4
2.2. Removing your SIM card from W10........................................................6
2.3. Driver Installation .................................................................................6
2.4. Using and Removing your W10 from your laptop ...................................12
Chapter 3. W10 Wireless Settings.............................................. 14
3.1. UI Functions.......................................................................................14
3.1.1. System Tray...................................................................................................14
3.1.2. Main Function Bar.........................................................................................15
3.1.2.1. Network Configuration ........................................................................15
3.1.2.1.1. GSM connection........................................................................16
3.1.2.1.2 GPRS connection........................................................................17
3.1.2.1.2.1 GPRS Connection setting..........................................................18
First time User..................................................................................19
3.1.2.1.3. WLAN......................................................................................20
3.1.2.2. Phone.................................................................................................24
3.1.2.3. Short Message Service (SMS)................................................................. 25
3.1.2.4. Phone Book.........................................................................................27
3.1.2.5. Setting................................................................................................29
Chapter 4. Trouble Shooting.............................................................. 34
Chapter 5 Detail Specification ........................................................... 35
iv
BENQ Corporation
Page 5

Chapter 1. Introduction
Thank you for purchasing a BENQ W10 GPRS with WLAN PC Card. The W10 offers
GSM/GPRS tri-band 900/1800/1900 MHz and IEEE 802.11b WLAN 2.4GHz
connectivity in a single PC Card, ensuring that you can connect quickly and easily to
the Internet wherever you are in more than 160 countries on five continents. The W10
provides both data and voice communications, giving you the freedom to send and
receive e-mail and make voice calls with same device, and even simultaneously. The
W10 also includes a phone book, and SMS capabilities, providing the full
functionality of a cell phone on your laptop. The W10's specially designed
user-friendly utility helps you easily manage all functions. With the W10, you can save
thousands of messages and phone numbers on your laptop. The W10 is the best
solution for enterprises, SOHO users, and households that need to expand their
networking environments easily and that need to access the Internet anytime,
anywhere. With the W10, no matter where you are, you can stay in touch with
customers and other important people by phone or e-mail. In addition to allowing
you to enjoy the wonders of wireless networking, the W10 provides two operating
modes—ad-hoc mode (peer-to-peer) and infrastructure mode (station-to-AP)—to
meet to your varying needs at different purposes.
1
BENQ Corporation
Page 6

1.1. Product Kit
Before installation, make sure that you have the following items:
W10 GPRS with Wireless LAN PC Card
Hands-Free
Software CD containing user manual and utility
Quick Start Guide
Warranty card
1.2. System Requirements
Before using your W10, please check that you have the following required items:
Notebook PC with PCMCIA Type II slot and CD-ROM drive
Microsoft Windows 2000/XP operating system (recommend),
At least 64MB of memory.
A 300 MHz processor of higher.
1.3. Mechanical Description
Top panel of the PCMCIA
The following table provides an overview of each LED activity:
Ear Phone
Jack
Color Blue Blue Red
Power On Stable On Off On
Signal Searching Slow flash Fast flash Off
No Signal Off Off On
WLAN LED GPRS LED
WLAN LED
SIM card holder
GPRS LED
Data RF activity On On
2
BENQ Corporation
Page 7

Ring Tone NA On/switching flash
3
BENQ Corporation
Page 8
Chapter 2. Installation
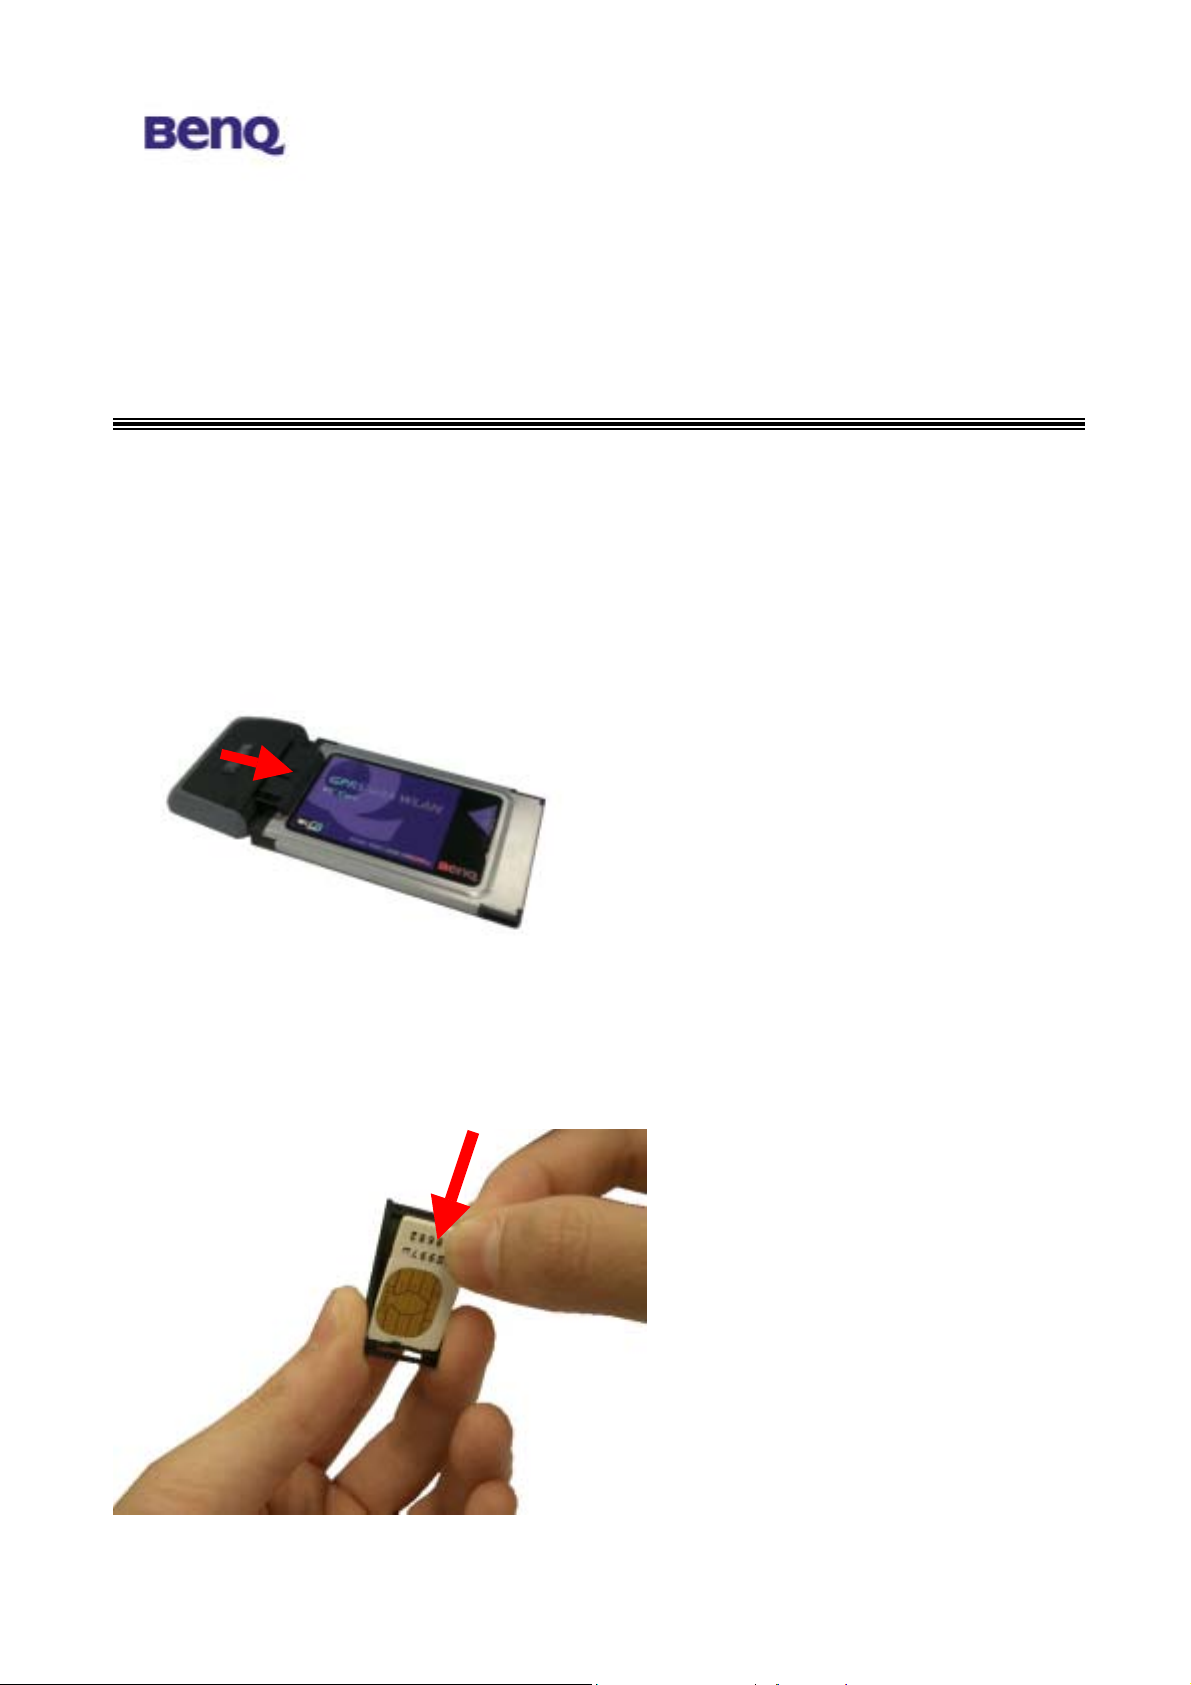
2.1. Installing your SIM card to W10
To successfully use your W10, you have to insert your SIM card supplied by your
network operator.
1. Push the SIM card holder out and slide it in the direction shown.
2. Place your SIM card to the W10 SIM card holder in the direction shown. Note that
the gold contact part of the SIM card faces outside.
4
BENQ Corporation
Page 9

3. Please make sure the SIM card is firmly fixed in the SIM card holder as below
shows.
4. Insert the SIM card holder (with the SIM card inside) back to W10 in the direction
shown. Then, you are ready to use full functions of W10.
5
BENQ Corporation
Page 10

2.2. Removing your SIM card from W10
Please follow the instructions below to remove your SIM card from W10 after using it.
1. Push the SIM card holder out and slide it in the direction shown.
2. Use your fingers to bend the middle part of the W10 SIM card holder as the follow
picture shows in order to remove your SIM card from the holder.
2.3. Driver Installation
6
BENQ Corporation
Page 11

Please insert the W10 auto-run installation CD into your CD-ROM Drive of your
laptop. The CD have installation program and operation manual. Please select “”
to start the installation. Then CD will start the installation process automatically.
Select a setup language you wish to install and press OK button.
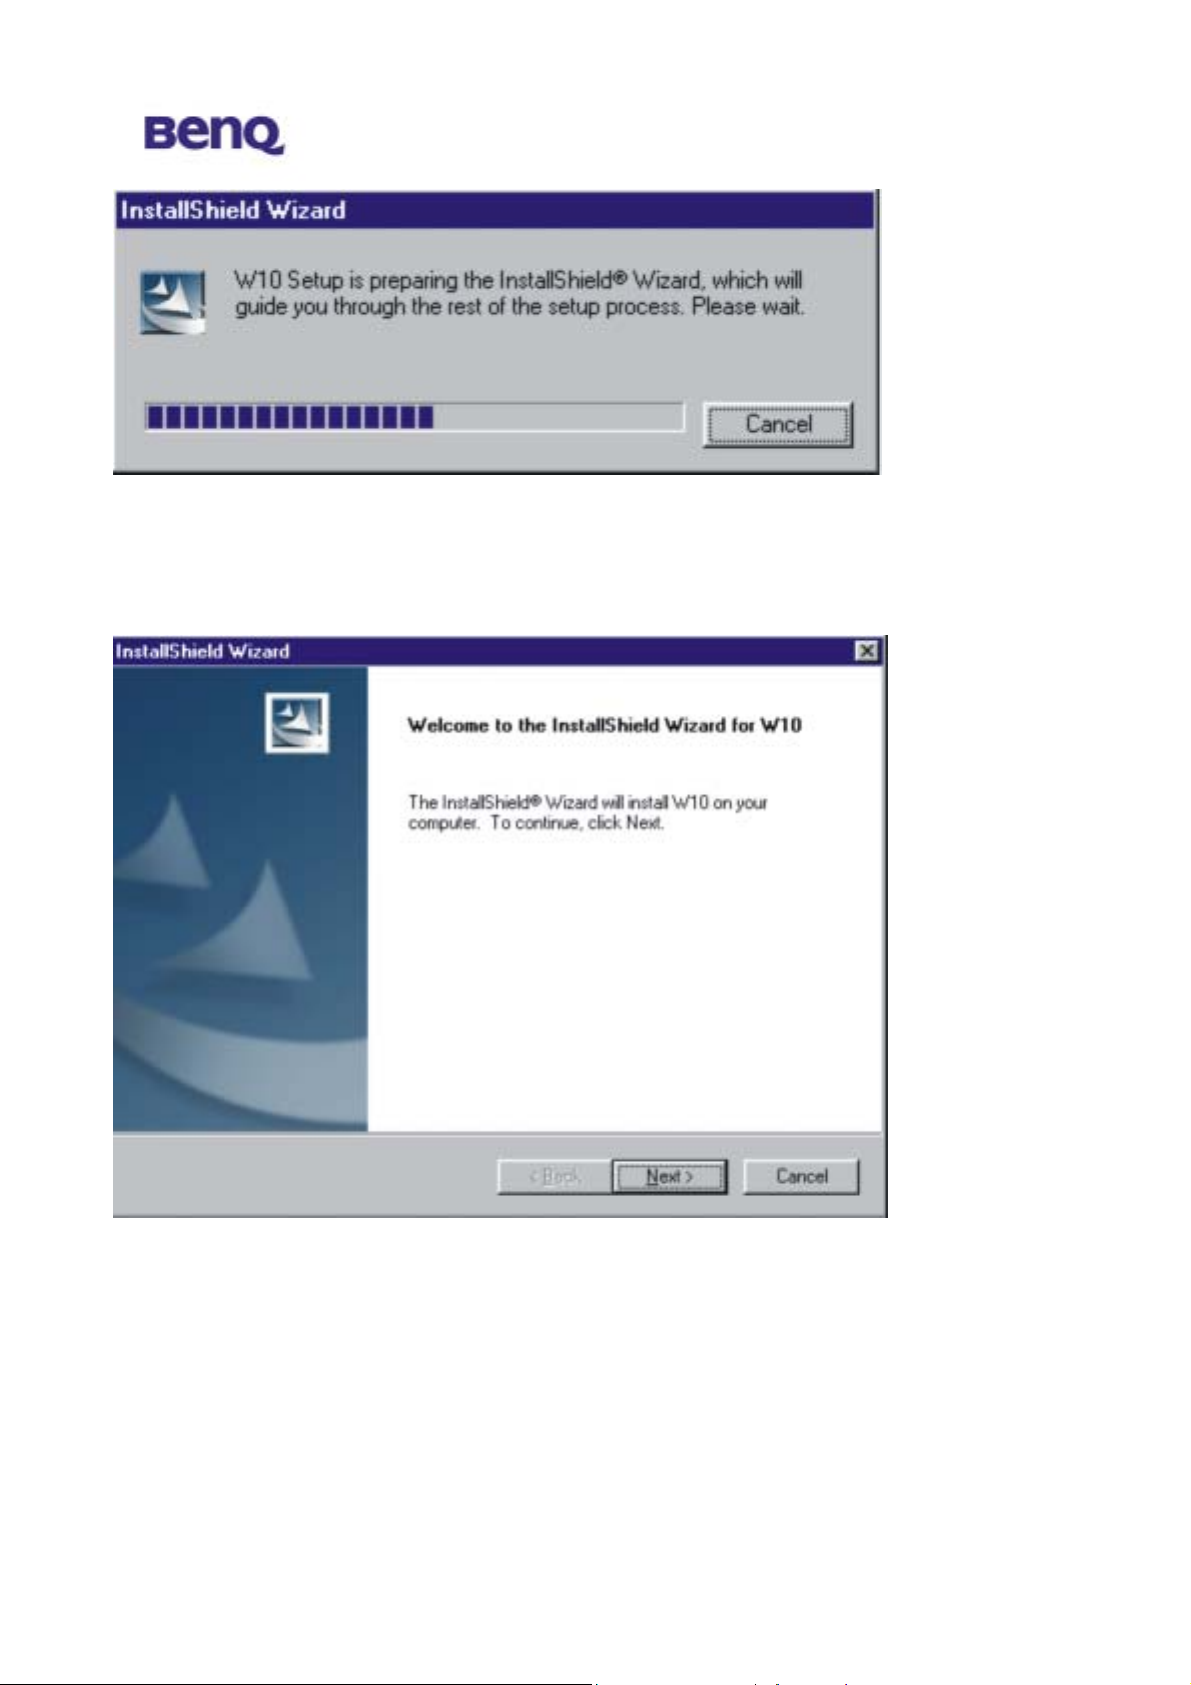
The W10 driver is activated to prepare the InstallShield Wizard. Please wait while
copying files.
7
BENQ Corporation
Page 12
Select a location to install W10 files. The default location is C:\Program Files\BENQ
Corporation\w10. To install W10 files to this folder, click Next. If you want to install
to another folder, click Browse and select another folder.
8
BENQ Corporation
Page 13

Please wait while installing files.
Press Yes and restart your computer.
9
BENQ Corporation
Page 14

After installing the W10 driver, please insert W10 PCMCIA Adapter into your
notebook. The system will show “Found New Hardware” message and start the
hardware configuration. (If your Operating System is Windows XP, the system will
ask if you are willing to continue the installation. Please click “Start to install”.)
10
BENQ Corporation
Page 15

The system will then show a warning message as follows. W10 has been tested in
stringent conditions. Please feel free and comfortable to click “Yes” to continue the
installation.
W10 provides dual module functions and the system will continue to find a new
hardware “GPRS+Wireless LAN Modem Primary”, please feel free to continue the
installation. (If your Operating System is Windows XP, the system will ask again if you
are willing to continue the installation. Please click “Yes” to start the installation
process.) The system will then show a warning message as follows. The reason is the
same as described above. Please feel comfortable to click “Yes” to continue the
installation.
11
BENQ Corporation
Page 16

The same message will appear again when finding the next new hardware
“GPRS+Wireless LAN Modem Secondary (1201)”. Please repeat all the procedure
illustrated above and click “Yes” to continue the installation.
The W10 installation is now completed and after finishing all these steps, you are able
to find the W10 Wireless Settings utility icon (as circled below) on the system tool bar.
This means the installation is done successfully.
Now you may start to enjoy your W10.
2.4. Using and Removing your W10 from your laptop
W10 has smart function “Plug & Play”. Once you plug your W10 into the laptop,
you can start using W10 right away. If you finish using W10, you may just directly
remove and no need to stop it. While you remove the card, Windows will pop-up a
warning saying that you didn’t remove your properly. Please feel comfortable and
select “OK”. (If you are using WinXP, there is no such warning.)
12
BENQ Corporation
Page 17

Warning:
1. DO NOT remove W10 while it is still operating any tasks. Please only remove it,
while it completes all the tasks.
2. DO NOT plug-in W10 before W10 utility installation. Please make sure you have
successfully installed W10 utility before plugging W10 into your CD ROM Drive.
13
BENQ Corporation
Page 18

Chapter 3. W10 Wireless Settings
When the 56W10 PC Card is inserted into PCMCIA slot, a small icon is shown on the
system tray to indicate the card insertion. After you click that icon with rig ht-button
of mouse, a menu will be shown.
“Main” is for the function selection region.
“Setting” is for settings of all cell phone supplemental functions.
“RF Function” is the key to active WLAN or GSM. Please
see the picture in the left. While “RF function” is not
checked, the GSM/GPRS functions will be activated and
“WLAN function will be turned off. And vice versus, while
“RF Function” is checked, the WLAN function is active and
GSM/GPRS functions will be turned off. But SMS, Phone
book, and Setting functions still function.
“About” is for the software version of each function.
“Exit” means that user quits using W10 user applications and he/she tries or
removes the card from slot.
When there is an either one network (WLAN or GSM) available, an icon will
come up with triangle in the system tray. When there are both WLAN and GSM
networks available, the icon in the system tray will show 2 triangles.
3.1. UI Functions
The UI functions are implemented in individual dialog box.
3.1.1. System Tray
When the 56W10 PC Card is inserted into PCMCIA slot, a small icon is shown on the
system tray to indicate the card insertion. After you click that icon with rig ht-button
14
BENQ Corporation
Page 19

of mouse, a menu will be shown. “Main” is for the function selection region, “Setting”
is for settings of all cell phone supplemental functions. “Exit” means that user quits
using W10 user applications and he tries or remove the card from slot. “About” is for
the software version of each functions. When there is a either one network (WLAN or
GSM) available, an icon will come up with triangle in the system tray. When there are
both WLAN and GSM networks available, the icon in the system tray will show 2
triangles.
3.1.2. Main Function Bar
When the Main Function Bar appears on the screen, users can have 5 choices.
1. WLAN/GPRS/GSM Network Configuration
2. Phone
3. Short Messages Service (SMS)
4. Phone Book
5. Phone Setting
When the mouse pointer crosses over the button, the color of button
will be changed to show which function has been selected. These
functions could not operate at the same time except thw phone
wizard.
3.1.2.1. Network Configuration
When users choose network configuration, a dialog box will be shown. User can edit some profiles
for their favorite operators. They only need to be set up once and users can use the profile record to
quickly access network configuration next time. There are modem settings for GSM/GPRS modems
and Wireless LAN configurations. The setting items are directly from Windows settings. Users can
get information of signal strength, ISP dial-up telephone number, and IP address allocated for
GSM/GPRS data service. Wireless LAN control panel includes connection state, configuration, and
15
BENQ Corporation
Page 20

site survey function.
3.1.2.1.1. GSM connection
When users choose network configuration, the submenu will
pop up. Left click the mouse on the GSM item and the GSM
control panel will pop up.
New (Setup a new connection)
When you setup a new GSM profile, a Windows dialup modem
setup page will show up. Please follow the regular dialup
modem setup process to setup the GSM internet connection.
Profile
The current
profile name and status of the GSM configurations
are displayed in this screen.
Connect
You may select one existing GSM setup, and press
“Connect” to connect Internet.
16
BENQ Corporation
Page 21

New
Pushing this button, you can add a new GSM internet connection. A Windows dialup modem setup
page will show up. Please follow the regular dialup modem setup process to setup the GSM
internet connection. (The dialup setup information, such as phone number, username and password,
are the same as 56K dialup modem setup. Please check your ISP provider for detail setup
information.)
Edit
Edit an existing setting you select in the dialup profile list.
Delete
Delete an existing setting you select in the dialup profile list.
Status
In this page, the Internet connection status will be shown up in this page.
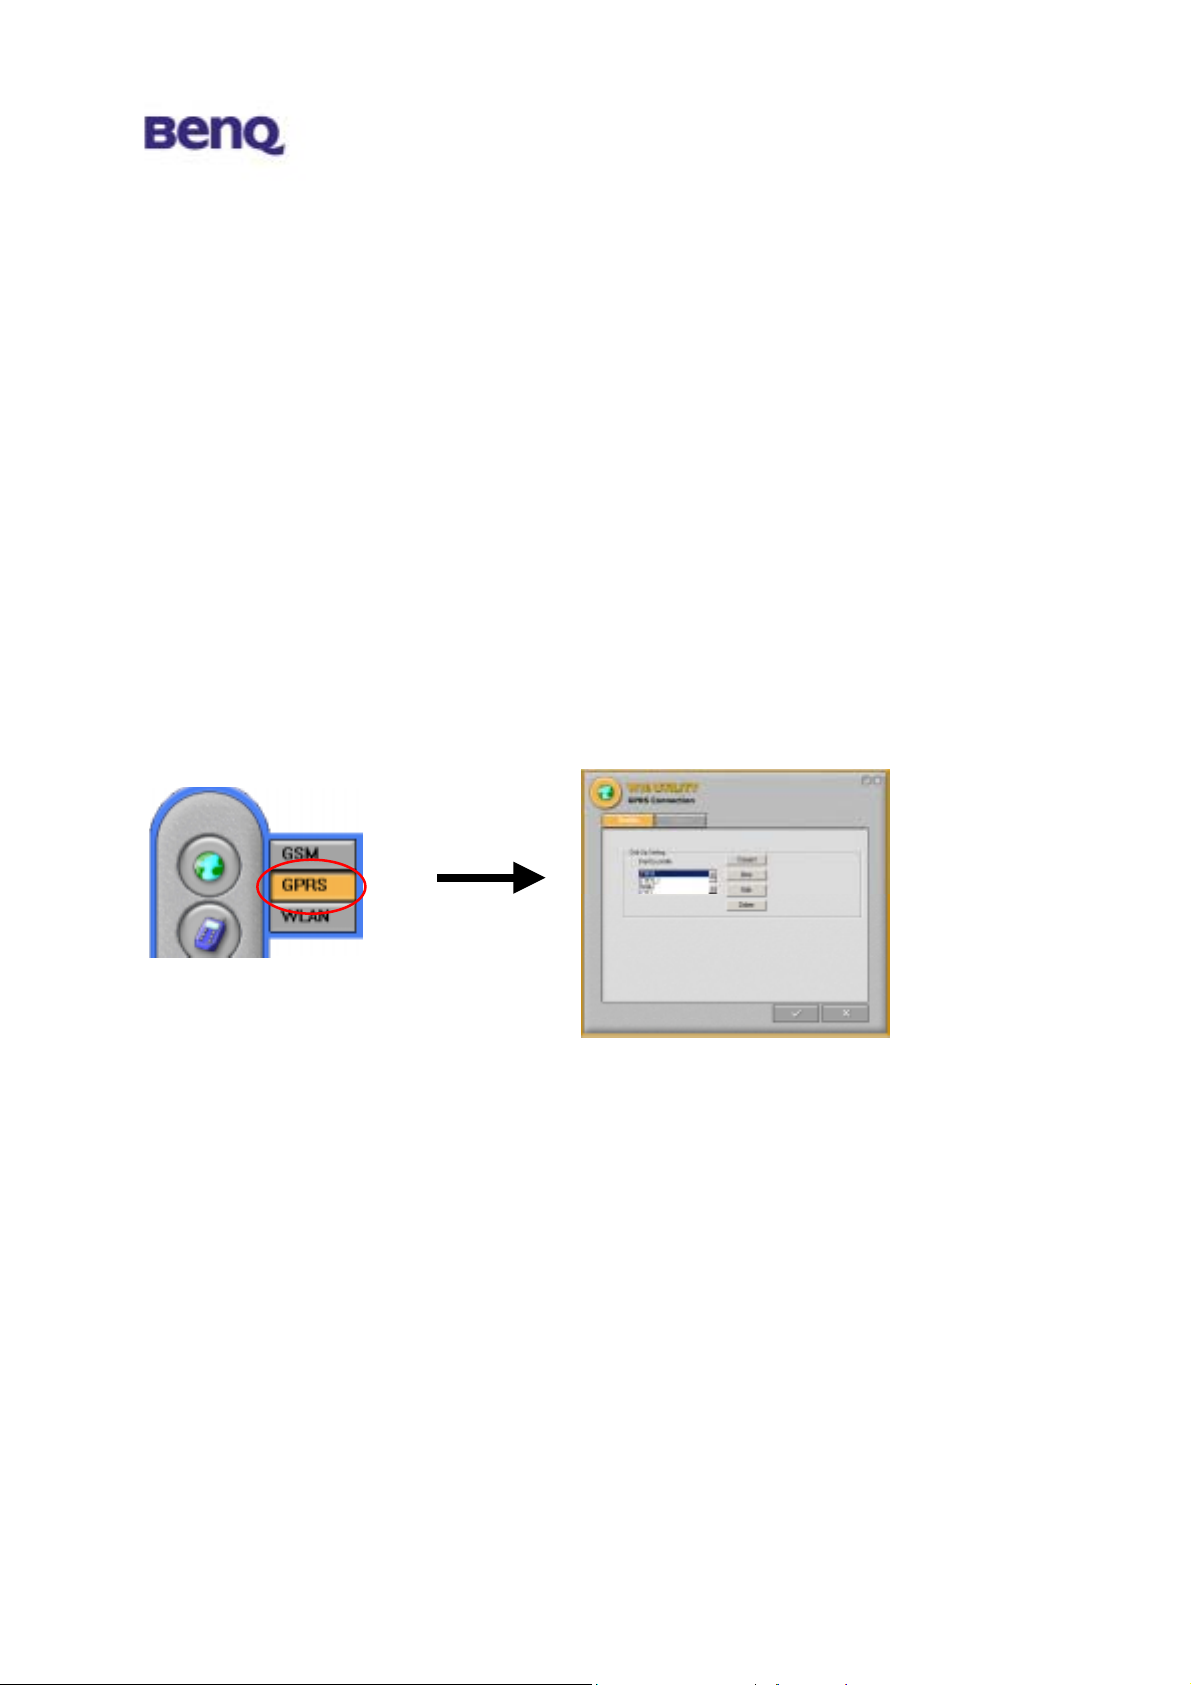
3.1.2.1.2 GPRS connection
When users choose network configuration, the submenu will pop up. Left click the
mouse on the GPRS item and the GPRS control panel will pop up. The current
profile name and status of the GPRS configuration is displayed in this screen.
Profile
New (Setup a new connection)
When you setup a new GPRS profile, one new GPRS
setup menu will pop up. Please kindly check with
your operator about GPRS setup.
17
BENQ Corporation
Page 22
Edit
Edit an existing setting you select in the dialup profile list.
Delete
Delete an existing setting you select in the dialup profile list.
Status
In this page, the Internet connection status will be shown up in this page.
3.1.2.1.2.1 GPRS Connection setting
Please select networking-> GPRS to bring up the GPRS Connection panel.
18
BENQ Corporation
Page 23

First time User
1. If this is the first time you using W10
connecting GPRS,you need to create
one new connection profile. Please
press “New” in the control panel of
GPRS connection.
2. After selecting “New”, the sub-menu
will pop-up. (Please inquire the
operator of your SIM card provider
about the GPRS configuration.)
a. Name your GPRS connection at
the Profile Name.
b. Input the APN number provided
by your GPRS operator, for
example you may put “internet”
at this box. And then select “OK”
to confirm the settings.
。
c. ID/ Password
Please input your ID and Password, if requested by your operator.
3. After complete the setting, the new profile name will show up at the Profile name list dialogue
box.
4. Select the profile name from the list and push “Connect” to connect to GPRS network.
5. If the connect to GPRS network successfully, the status of GPRS connection will be shown on
the system tray.
19
BENQ Corporation
Page 24

3.1.2.1.3. WLAN
When users choose network configuration, the submenu will pop up. Left click the
mouse on the WLAN item and the WLAN control panel will pop up.
Status
- Network Adapter
You can select from a list of supporting network adapter in
this field. (Please kindly select BenQ W10 GPRS with
WLAN PC Card
- State
The current state of the driver is displayed in this screen. If
the state reveals “Associated,“ it means that the normal
flow of operation is in Infrastructure mode. This shows
that the PC is already connected to access point and BSSID is also shown in the form of hex
digits. At the same time, the networking is available for the device.
In “Scanning ” state, it means that the node cannot detect the SSID to an access point within
range and is searching for an available access point. Also, if the driver failed to initiate for some
unknown reasons, this field will display an error message.
20
BENQ Corporation
Page 25

- Network Adapter
You can see the current operation mode, Infrastructure or Ad-Hoc mode.
- Channel
This field shows the current radio channel, which is being used for an active connection.
- Tx Rate
This field shows the current transmit rate, which is being used for an active connection.
- Security
This field tells if you have opened your WEP security.
- IP Address
The field shows the IP Address of the current Internet adapter.
- Signal Strength
The Signal Strength bar graph only becomes active, when the node is in Infrastructure Mode.
This bar graph shows normalized signal strength as reported by the radio, averaged over all
frames over 100 bytes long, which are received from the Access Point.
Status information about the radio link is displayed in this tab. Detailed description should be
placed in this field.
- Link Quality
This field reveals the quality of the
current connection. Only when the node
is in Infrastructure Mode does the Link
Quality bar graph become active. The
bar graph displays the link quality
between the node and its Access Point.
Over the bar graph, a label summarizes
the quality of the link. As a result, the
Link Quality is a very good indicator of
receiving and transmitting errors over the radio.
Configuration
In this page, you can configure your WLAN settings.
- New
21
BENQ Corporation
Page 26

In the beginning, there is no default settings. A new WLAN setting profile can be set up by
press “New” and one configuration menu will pop up.
- Modify
You could modify the existing WLAN setting profile by pressing the button. The configuration
menu of the existing profile will pop up.
- Remove
You may remove your existing profile anytime.
- Active
You may select different setting profile based on the different situations, or in environments.
After selecting, please press active to activate the profile or it will not effective.
Configuration menu
Profile Name
After selecting the profile, a profile menu
will pop up. In this “Profile Name” field,
please name you setting profile, ex
WLAN_home, WLAN_office, and etc.
SSID (Network Name)
This field shows the network name or
called SSID, which your W10 will be
associated with. If “ANY” is the name
showed, it means any network name
could be associated with.
Net work Type
You can select from a list of supporting network types in this field. The network types displayed
will have two values as following: “Infrastructure” and “Ad-Hoc”.
Channel
This field shows the current radio channel, which is being used for an active connection. In
“Ad-Hoc” mode, please select your channel responding to other WLAN adapters you would like
22
BENQ Corporation
Page 27

to associate with. This is a non-compliant mode, which will allow W10 cards to talk to one
another without an AP regardless any SSID.
WEP
Mode:
You could active or inactive your WEP security function by selecting “On” or “Off”.
Key Length:
According to WEP function select, this page allows the entry of four keys for 64-bit or
128-bit encryption key. Each key must consist of hex digits to be written to the driver and
registry. This means that only digit number 0-9 and letters A-F are valid entries. Therefore,
if entered incorrectly, the program will not write keys to a driver.
Key 1 – Key 4:
When you want to enter the keys manually, you may use these four fields. If you wish this
node to match keys in a different vendor’s product, this may be necessary.
Ke y ID:
You may select one from the 4 keys you have entered to match with the AP’s WEP key.
Apply:
This button becomes active only when one of the fields has been modified. Press this
button to apply the changed values to the driver and saves them to the registry.
Site Survey
- Rescan
This button will scan all available
Access Points in your neighborhood
23
BENQ Corporation
Page 28

and then list their SSID, channel, BSSID and signal respectively.
- Join
Select the SSID you want to be associated with, and then press this Join button to join this
network.
3.1.2.2. Phone
When user click phone service button in the W10 main menu bar, a phone-shaped dialog box will be
popped up. Users can use the keypad on this dialog as they use a normal mobile phone. Or they can
use keyboards on their notebook or PC to enter numbers or do other operations. Users can easily
access phone book records for the numbers they want dial. They also can retrieve call records from
this scenario, which facilitate quick redial or reply.
Phone (Use it as using a normal mobile phone)
Out calling: Users can either key-in the phone number on the keyboard and press “Enter” to
make a call or use mouse to click the number keypads on the phone-shaped dialog
box to dial and then click the “Send/Answer” key
Incoming call: Users can press “Enter” or use mouse to click the “Send/Answer” key on
the phone-shaped dialog box to answer the incoming call.
24
to make a call.
BENQ Corporation
Page 29

Phone book
Users can press the left soft key to access the Phone book. The Phone book contact list
menu will pop up and users can either search or edit the Phone book.
Adjusting the Ringing Volume
Users can press the “volume adjust” key to adjust the ringing volume.
3.1.2.3. Short Message Service (SMS)
When users choose “Short Message” service, a
Microsoft Outlook-shaped dialog box will be popped.
A full view for all received or sent short messages. If
users click some message item, you can see the
content in the below area. Users can edit, save, delete,
reply, and create messages in this scenario.
25
BENQ Corporation
Page 30

I. Inbox: Reading received messages.
Click the “Inbox” button and all the messages in the inbox will be listed on the
message dialogue box.
II. Outbox: Reading sent messages.
Click the “Outbox” button and all the messages in the outbox will be listed on the
message dialogue box.
III. Backup: Backing up messages.
Click the “Backup” button and all the messages stored in the backup will be listed on
the message dialogue box.
IV. Delete: Reading deleted messages.
All the deleted messages will be stored here.
I. Create New Short Message:
Click this button and the following frame appears, fill in the recipient’s phone
number in the “Tel No” column and enter the message text you desire to send. Then,
click the “Send Message”
button to send the message. In addition, users can
26
BENQ Corporation
Page 31

click the “Phone book” button to view phone book.
II. Forward Short Message:
Click this button to forward short messages.
III. Reply Short Message:
Click this button to reply short messages.
IV. Delete Short Message:
Click this button to delete short messages.
3.1.2.4. Phone Book
When users choose “Phone Book”, a full view of all phone book records are shown in the dialog box.
Users can create new records, edit or delete records. Users can search records for names too. It’s
convenient for users to dial a number, send a short message from the phone book scenario. When
users select one record on the list, and choose to send a short message, the “Short Message” service
dialog will be popped up for sending messages.
27
BENQ Corporation
Page 32

I. View or Add SIM Record:
With this item users can view or add phone records to SIM card.
II. View or Add PC Record:
With this item users can view or add phone records to PC.
II. View Call Logs:
This menu contains lists of the calls you missed, sent and received.
Phone Book Tool Bar :
1. Make a Call:
Users can select a number from the phone book record list and press the “Make a Call” key to make a
28
BENQ Corporation
Page 33

call.
2. Send SMS:
Users can select a number from the phone book record list and press the “Send SMS” key to send a
short message.
3. New:
Press this key to add a new record to the phone book list.
4. Edit:
Users can select a record from the phone book list and press the “Edit” key to revise the content of
the record.
5. Delete:
Users can select a record from the phone book list and press the “Delete” key to delete the record.
6. Find:
Press this key and a dialogue box will be popped up, users can search for the record from all range
(SIM page, PC page, Record page) by entering names or numbers.
3.1.2.5. Setting
The settings are phone related
settings, which include audio setting, call
related setting, network setting, and
security related settings. Users can
reach all dialog by click the tab.
29
BENQ Corporation
Page 34

Audio Setting
- Ringer typ e select ion
Users can customize their favorite ringers sound types. (The Host must have multimedia capability
or a sound output device built-in)
- SMS alert selection
Users can customize their favorite alert sound types. (The Host must have multimedia capability or
a sound output device built-in)
Call Setting
Users can query, activate, or cancel “Call
Divert”, “Call W aiting”, “Call Barring” settings.
- Call divert (Call Forward)
Users can choose from the following Call
Divert modes as needed.
Forward Unconditional:
Diverts incoming calls to a designated phone
number at all time.
When Busy:
Incoming calls are sent to a designated number when user’s phone is busy.
No Re ply:
30
BENQ Corporation
Page 35

When an incoming call is not replied, it will be send to a designated phone number.
Not Reachable:
When user’s phone is off or located outside the network service area, incoming calls will be sent to a
designated number.
- Call waiting
When users are speaking over their phones and another call comes in, an incoming call number and
a call-waiting message will appear to remi nd t hem . Choose to ac tiva te, deactivate or check the status
of this feature.
- Call Barring
Users can choose from the following Call Barring modes as needed.
All Outgoing:
Bars all outgoing calls from your phone.
Int’l:
Bars all outgoing international calls from your phone.
Int’l except Home Country:
Stops all outgoing international calls except local calls and those to your home country.
All Incoming:
Bars all incoming calls to your phone.
Incoming when Roaming:
Stops incoming calls to your phone when roaming (when you are traveling abroad).
- Network password change
In “Call Barring” setting, a network password is needed. So, network password is managed in the
dialog box. Any status changed due to
operation will be shown on the “Status” area
near the bottom of this dialog box.
Network Setting
- Current registered operator name
- Network registration style
User can select “Automatic” way when searching
31
BENQ Corporation
Page 36

the GSM network, or select “Customization” to select a specific operator from a neighboring
available operators.
Security Setting
- PIN1 check
PIN (Personal Identification Number) is a
password provided by your network operator.
Once activated, your PIN protects your SIM
card from being used by unauthorized people,
even if it is inserted in another phone, unless the
correct PIN is given when the phone is switched
on.
- Phone lock
Your phone can be locked to prevent calls being
made by unauthorized people, unless the correct handset lock code is entered when your phone is
switched on. Your phone remains locked if a wrong code is entered, even if your SIM card is
removed and replaced with another one. Only emergency calls can be made when your phone is
locked.
You must enter your phone lock code every time you power on your phone when the phone lock is
on (there is no limitation on the number of wrong attempts when you enter the phone code).
You can set the phone lock in the same way you set PIN check in Set PIN1.
- SIM lock
With this SIM lock feature, you can prevent unauthorized use of your phone with an unknown SIM
card.
When you have the SIM lock activated your phone will only work with the SIM card used to enable
the lock. If a new SIM card has been inserted into your phone, "Insert Correct SIM" will pop up after
you power on and enter the PIN. Press the left soft key and the SIM lock code will be
requested.
If the incorrect code is entered when a new SIM card has been inserted into your phone, "Insert
Correct SIM" will be displayed again, and the phone will not be enabled until the correct SIM lock
32
BENQ Corporation
Page 37

code is entered.
If the correct code is entered the SIM card will be recognized and you can use the phone as normal.
The next time your phone is switched on with this newly recognized SIM card, you will not be asked
to enter the SIM lock code again.
Your phone can recognize up to 3 different SIM cards.
To activate the SIM lock you need to key in and save a number only you know as the SIM lock code.
(There is no factory preset SIM lock code). The length of the code must be set between 8 to 12 digits.
To deactivate the SIM lock you also need to enter the SIM lock code that you previously saved in
your phone memory.
To change the SIM lock code you must firstly deactivate the SIM lock and then enter the new code
you want when activating the SIM lock again.
- Fixed dial number setting
Enables/disables the fixed dialling feature. You will be prompted to enter PIN2 when you
enable/disable fix dialling.
Fixed dial list
Before you can use fixed dialling, you must set up a fixed dialing list in this option. Enter PIN2 and
add numbers to your fixed dial list. Add names and numbers in the same way you would a phone
book entry.
You can then add, edit and delete entries of your fixed-dial numbers.
When you have fixed dialling activated your phone can only be used to call numbers on the fixed
dial list.
Change PIN2
To increase your phone's security you can change the preset PIN2 to a number only you know.
33
BENQ Corporation
Page 38

Chapter 4. Trouble Shooting
Question 1
What should the users do when the signal icon Cable Disconnected appeared right
after pressing the ReScan or Disable Radio button under Peer-to-Peer (Ad-hoc)
mode?
Answer 1
Please remove the BenQ W10 PC Card from the PCMCIA slot and re-insert the device
again, and then it will connect the user back on line.
Question 2
What if the user’s PC is unable to connect to the other PC right after switching the
network type from access point mode to Peer-to-Peer mode?
Answer 2
Please make sure the SSID for both PC are the same and the IP address are in the
same subnet. If both SSID and IP address are checked and the same, but the PC is still
in disconnection mode, then please remove the BenQ W10 PC Card from the
PCMCIA slot and re-insert the device again to connect back online.
Question 3
What if the users lost connection due to distance, but still unable to connect to each
other after move both devices closer under Peer-to-Peer (Ad-hoc) mode?
Answer 3
Please remove the BenQ W10 PC Card from the PCMCIA slot and re-insert the dev ice
again, and then it will connect the devices back on line.
Question 4
What if the user is unable to alliance with the new association after moving from one
AP service set to another under the Access Point (Infrastructure) mode?
Answer 4
Please ensure that the SSID is the same for both APs and PC. If the SSID is correct,
then please press the ReScan button in the Status menu, and then it should create new
association for the device with the AP.
34
BENQ Corporation
Page 39

p
d
h
Chapter 5 Detail Specification
Cellular General
Operating Frequency
Operating Systems Supported
Tri-band GSM 900/1800/1900 MHz (W10) Windows 2000/ Windows XP (supports NDIS5)
(Recommended)
Standards Compliance Host Interface
GPRS class 10, class B PCMCIA PC Card Type II
Data Rate Voltage Requirements
♦ Su
ports 4 download slots download and 2 uploa
DC 5V (+/- 5%)
slots, and up to 5 time slots simultaneously.
♦ Downloads at up to 85.6Kbps *
♦ Uploads at up to 42.8 Kbps* Link configuration for network join and
Management Utility
diagnostics
(*) Depends on the network service.
Application
♦ Transmission data rate and signal strength
♦ Cell phone-like dialup wizard, 64/128-bit WEP (Wired Equivalent Privacy)
Data Security
Customization function for tools and installation
encryption
♦ SMS and phone book
WLAN
Dimension
♦ 125mm (L)* 54mm (W) * 8.5mm (H)
Operating Channels
N. American—11 (2.4G~2.472Ghz)
Japan—14 (2.4G~2.497Ghz) Internal antenna supporting diversity
Europe (ETSI) —13 (2.4G~2.483Ghz)
France—4 (2.446~2.483Ghz) RF activity
Antenna
LED Indicator
Standards Compliance Operating Environment
IEEE 802.11b
Wi-Fi compliance to ensure the compatibility wit
°
C in storage
Temperature: -10 ~ +55
Humidity: <95%, non-condensing
°
C during operation; -20°C
all other Wi-Fi certified WLAN products.
Data Rate
11Mbps (CCK) / 5.5 Mbps (CCK) / 2 Mbps
(DQPSK) / 1 Mbps (DBPSK)
Range
Open space: 100m – 300m
Indoors: 30m –120m
Network Architecture
Supports Ad-Hoc Mode or Infrastructure Mode
Compliant with IEEE 802.11b standard
35
BENQ Corporation
 Loading...