

Page 1

BenQ A500
Mobile Phone User’s Manual
Page 2

Copyright
© 2004. BENQ Corporation. All rights reserved. No part of this
publication may be reproduced, transmitted, transcribed, stored in a
retrieval system or translated into any language or computer language, in
any form or by any means, electronic, mechanical, magnetic, optical,
chemical, manual or otherwise, without the prior written permission of
BENQ Corporation.
* This publication includes images from CorelDRAW® 9 which are
protected by the copyright laws of the U.S., Canada and elsewhere. Used
under license.
Disclaimer
BENQ Corporation makes no representations or warranties, either
expressed or implied, with respect to the contents hereof and specifically
disclaims any warranties, merchantability or fitness for any particular
purpose. Further, BENQ Corporation reserves the right to revise this
publication and to make changes from time to time in the contents hereof
without obligation of BENQ Corporation to notify any person of such
revision or changes.
Page 3
Safety Information
For your safety, please read the guidelines below carefully
before you use your phone:
Exposure to Radio Frequency Signals
Max. SAR measurement
EU: GSM900: 0.783 mW/g; DCS1800: 0.276 mW/g.
USA: PCS1900: 0.374 mW/g.
To avoid exceeding the FCC RF exposure limits, please do not wear
the phone in front of your chest.
SAR compliance for body-worn operations is restricted to belt-clips,
holsters or similar accessories that have no metallic component in the
assembly and must provide at least 1.5 cm separation between the device,
including its antenna, and the user's body.
Your wireless handheld portable telephone is a low power transmitter and
receiver. When it is ON, it receives and also sends out radio frequency
(RF) signals.
European and international agencies have set standards and
recommendations for the protection of public exposure to RF
electromagnetic energy.
• International Commission on Non-Ionizing Radiation Protection
(ICNIRP) 1996
• Verband Deutscher Elektringenieure (VDE) DIN- 0848
• Directives of the European Community, Directorate General V in
Matters of Radio Frequency Electromagnetic Energy
• National Radiological Protection Board of the United Kingdom, GS 11,
1988
• American National Standards Institute (ANSI) IEEE. C95.1- 1992
• National Council on Radiation Protection and Measurements (NCRP).
Report 86
Safety Information i
Page 4

• Department of Health and Welfare Canada. Safety Code 6
These standards are based on extensive scientific review. For example,
over 120 scientists, engineers and physicians from universities,
government health agencies and industry reviewed the available body of
research to develop the updated ANSI Standard.
The design of your phone complies with these standards when used
normally.
Specific Operating Restrictions
No metallic component allowed in body-worn accessories.
Antenna Care
Use only the supplied or approved replacement antenna. Unauthorized
antennas, modifications or attachments may damage the phone and
violate FCC regulations.
Phone Operation
Normal Position: Hold the phone as you would any other telephone with
the antenna pointed up and over your shoulder.
For your phone to operate most efficiently, do not touch the antenna
unnecessarily when the phone is in use. Contact with the antenna affects
call quality and may cause the phone to operate at higher power level than
otherwise needed.
Batteries
All batteries can cause property damage, injury or burns if a conductive
material such as jewelry, keys or beaded chains touches exposed terminals.
The material may complete electrical circuit and become quite hot. To
protect against such unwanted current drain, exercise care in handling any
charged battery, particularly when placing it inside your pocket, purse or
other container with metal objects. When battery is detached from the
phone, your batteries are packed with a protective battery cover; please
use this cover for storing your batteries when not in use.
ii Safety Information
Page 5

Driving
Check the laws and regulations on the use of wireless telephones in the
areas where you drive. Always obey them. Also, if using your phone while
driving, please:
• Give full attention to driving--driving safety is your first responsibility.
• Use hands-free operation, if available.
• Pull off the road and park before making or answering a call if driving
conditions so require.
Electronic Devices
Most modern electronic equipment is shielded from RF signals. However,
certain electronic equipment may not be shielded against the RF signals
from your wireless phone.
Pacemakers
The Health Industry Manufacturers Association recommends that a
minimum separation of six (6") inches be maintained between a handheld
wireless phone and a pacemaker to avoid potential interference with the
pacemaker. These recommendations are consistent with the independent
research by and recommendations of Wireless Technology Research.
Persons with pacemakers:
• Should ALWAYS keep the phone more than six inches from their
pacemaker when the phone is turned ON.
• Should not carry the phone in a breast pocket.
• Should use the ear opposite the pacemaker to minimize the potential for
interference.
If you have any reason to suspect that the interference is taking place, turn
your phone OFF immediately.
Hearing Aids
Some digital wireless phones may interfere with some hearing aids. In the
event of such interference you may want to consult your hearing aid
manufacturer to discuss alternatives.
Safety Information iii
Page 6

Other Medical Devices
If you use any other personal medical device, consult the manufacturer of
your device to determine if they are adequately shielded from external RF
energy. Your physician may be able to assist you in obtaining this
information.
Turn your phone OFF in health care facilities when any regulations posted
in these areas instruct you to do so. Hospitals or health care facilities may
be using equipment that could be sensitive to external RF energy.
Ve h i c l es
RF signals may affect improperly installed or inadequately shielded
electronic systems in motor vehicles. Check with the manufacturer or its
representative regarding your vehicle. You should also consult the
manufacturer of any equipment that has been added to your vehicle.
Posted Facilities
Turn your phone OFF in any facility where posted notice so requires.
Aircraft
FCC regulations prohibit using your phone while in the air. Switch OFF
your phone before boarding an aircraft.
Blasting Areas
To avoid interfering with blasting operations, turn your phone OFF when
in a “blasting area” or in area posted “TURN OFF TWO-WAY RADIO.”
Obey all signs and instructions.
Potentially Explosive Atmospheres
Turn your phone OFF and do not remove the battery when in any area
with a potentially explosive atmosphere and obey all signs and
instructions. Sparks, from your battery, in such areas could cause an
explosion or fire resulting in bodily injury or even death.
iv Safety Information
Page 7

Areas with a potentially explosive atmosphere are often, but not always
clearly marked. They include fueling areas such as gasoline stations; below
deck on boats; fuel or chemical transfer or storage facilities; vehicles using
liquefied petroleum gas (such as propane or butane); areas where the air
contains chemicals or particles, such as grain, dust, or metal powders; and
any other area where you would normally be advised to turn off your
vehicle engine.
For Vehicles Equipped with an Air Bag
An air bag inflates with great force. DO NOT place objects, including both
installed or portable wireless equipment, in the area over the air bag or in
the air bag deployment area. If in-vehicle wireless equipment is
improperly installed and the air bag inflates, serious injury could result.
Federal Communications Commission
This device complies with Part 15 of the FCC Rules. Operation is subject
to the following two conditions:
1. this device may not cause harmful interference, and
2. this device must accept any interference received, including
interference that may cause undesired operation.
This equipment has been tested and found to comply with the limits for a
Class B digital device, pursuant to Part 15 of the FCC Rules. These limits
are designed to provide reasonable protection against harmful
interference in a residential installation. This equipment generates, uses
and can radiated radio frequency energy and, if not installed and used in
accordance with the instructions, may cause harmful interference to radio
communications. However, there is no guarantee that interference will
not occur in a particular installation If this equipment does cause harmful
interference to radio or television reception, which can be determined by
turning the equipment off and on, the user is encouraged to try to correct
the interference by one or more of the following measures:
Safety Information v
Page 8

• Reorient or relocate the receiving antenna.
• Increase the separation between the equipment and receiver.
• Connect the equipment into an outlet on a circuit different from that to
which the receiver is connected.
• Consult the dealer or an experienced radio/TV technician for help.
Changes or modifications not expressly approved by the party responsible
for compliance could void the user's authority to operate the equipment.
European Union Directives Conformance Statement
This device complies with the OJ-Directive as below:
Electromagnetic Compatibility Directive (89/336/EEC), Low Voltage
Directive (73/23/EEC)
And R&TTE Directive (99/05/EEC).
And also complies with the standard:
3GPP TS 51.010-1
EN 301 511
EN 30360/ EN30361
ETSI EN 301 489-1/-7
EN 60950
vi Safety Information
Page 9

Table of Contents
1. Safety Information..........................................................i
2. Preparing Your Phone For Use................................... 1
Inserting a SIM Card ............................................................ 1
Installing a Battery and Charging the Phone ...................... 2
Turning the Phone On ......................................................... 5
3. Getting to Know Your Phone ..................................... 7
Your Phone at a Glance........................................................ 7
Active Flip Feature.............................................................. 11
Standby Screen.................................................................... 11
External Display .....................................................................11
Main Screen ............................................................................12
Icons in the Standby Screen's Status Bar...............................14
Using the Keys in the Standby Mode ....................................16
Menu Navigation................................................................ 21
Main menu .............................................................................21
Sub-menus..............................................................................23
Main menu map.....................................................................28
4. Using Your Phone ..................................................... 31
Making a Phone Call ..........................................................31
Ending a Phone Call ........................................................... 31
Answering a Phone Call .....................................................32
Rejecting an Incoming Call................................................ 33
Turning Off the Ring Tone
for an Incoming Call .......................................................... 33
viiTable of Contents
Page 10

Making an International Call............................................. 33
Making an Emergency Call ................................................ 34
Dialing an Extension Number ........................................... 34
Speed Dialing ...................................................................... 34
Listening to Voicemails...................................................... 35
Phone Book......................................................................... 37
Adding Contacts to the Phone Book..................................... 37
Finding Contacts in the Phone Book ....................................39
Last Missed, Dialed, and Received Calls............................ 41
Operations During a Call................................................... 42
Using the Silent Profile....................................................... 45
Taking a photo.................................................................... 46
Shooting a Video Clip ........................................................50
Quick Access Menu ............................................................ 53
Speed dialing....................................................................... 53
Message Menu .................................................................... 54
SMS .........................................................................................55
Editing and Seding a New Short Message..................................55
Receiving and Reading a Short Message....................................58
Managing Sent Items ..................................................................60
Managing Drafts ......................................................................... 61
Managing Archive.......................................................................62
Cleaning Up Messages ................................................................62
MMS........................................................................................64
SMS Chat ................................................................................70
Voicemail ................................................................................72
Cell Broadcast.........................................................................75
viii Table of Contents
Page 11

Input Modes ....................................................................... 78
Changing the Text Input Mode............................................. 78
Predictive Input Mode (iTap) ...............................................78
Letter Input Mode (ABC) ......................................................80
Numeric Input Mode (123)...................................................80
Symbol Input Mode ............................................................... 81
5. Menus.........................................................................82
Phone Book......................................................................... 82
View ........................................................................................82
Find .........................................................................................82
Add..........................................................................................82
Copy ........................................................................................83
SIM to Phone .............................................................................. 83
Phone to SIM .............................................................................. 83
Delete ......................................................................................84
Caller Group ...........................................................................84
Privacy Manager.....................................................................85
Speed Dial ...............................................................................86
Phone Information.................................................................87
Used Space...................................................................................87
Memory .......................................................................................87
Own Number ..............................................................................88
Call Records ........................................................................ 89
Missed Calls ............................................................................89
Received Calls .........................................................................89
Dialed Calls.............................................................................89
Delete Call List........................................................................89
Call Display.............................................................................90
ixTable of Contents
Page 12

Show Call Timer ......................................................................... 90
Show Call Cost ............................................................................90
Call Information.....................................................................90
Max cost ...................................................................................... 92
Message ...............................................................................92
Entertainment..................................................................... 93
Games......................................................................................93
JAVA .......................................................................................96
Melody Composer..................................................................98
Voice Ring Tone...................................................................102
Digital Camera.................................................................. 103
Media Center ....................................................................104
Images ................................................................................... 104
Video.....................................................................................109
Music.....................................................................................111
Memory Status .....................................................................111
Format...................................................................................111
Tools.................................................................................. 112
Alarm ....................................................................................112
World Clocks........................................................................114
Auto Time Zone ...................................................................115
Dictionary .............................................................................115
Calendar................................................................................116
Shortcuts ...............................................................................120
Calculator..............................................................................120
Currency Converter .............................................................121
Stopwatch .............................................................................121
Countdown Timer ...............................................................122
x Table of Contents
Page 13

Hour Minder ........................................................................122
Connection Service ..............................................................122
IrDA ......................................................................................123
Oper.Service...................................................................... 124
WAP ......................................................................................124
Activate ...................................................................................... 124
Settings....................................................................................... 131
About ... .....................................................................................132
STK Menu.............................................................................132
Connect Settings................................................................... 133
Settings .............................................................................. 135
Date & Time .........................................................................135
Set Time....................................................................................135
Time Format ............................................................................. 135
Set Date......................................................................................135
Date Format ..............................................................................135
Display Options ........................................................................ 135
Set Time Zone ...........................................................................136
Auto Power On/Off.............................................................. 136
Profile....................................................................................137
Display ..................................................................................139
Theme........................................................................................139
Wallpaper ..................................................................................139
Welcome Animation.................................................................141
Menu Style.................................................................................141
Contrast..................................................................................... 141
Backlight .................................................................................... 141
Call Settings ..........................................................................141
Answer Mode ............................................................................141
Connected Alert ........................................................................142
xiTable of Contents
Page 14

Minute Minder..........................................................................142
Show Number ...........................................................................142
Call Divert ................................................................................. 143
Call Waiting............................................................................... 144
Auto Redial................................................................................144
Network ................................................................................145
Automatic..................................................................................145
Manual....................................................................................... 145
Non-Network Mode ................................................................146
Security .................................................................................147
PIN Code................................................................................... 147
Phone Lock................................................................................147
SIM Lock ................................................................................... 148
Fixed Dialing Number..............................................................149
Call Barring ............................................................................... 149
Change Network Password ...................................................... 150
Power Saving Mode..............................................................151
Language ...............................................................................151
Input Mode...........................................................................151
Flight Mode ..........................................................................151
Restore ..................................................................................151
6. Care and Maintenance ............................................ 152
7. Troubleshooting...................................................... 153
xii Table of Contents
Page 15
Preparing Your Phone For Use
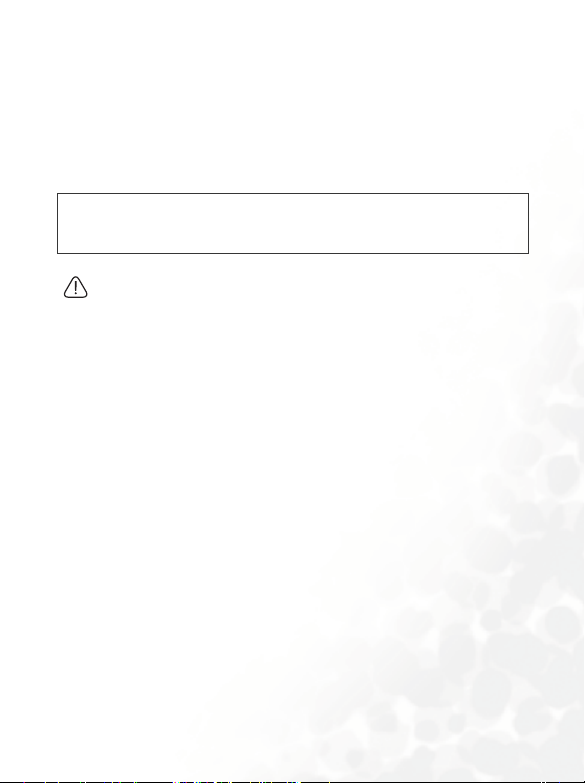
Inserting a SIM Card
1. Turn the phone over, and release the battery latch. Lift the battery off
the phone.
Battery latch
Do not remove the battery when the phone is on. Doing so could
cause you to lose personal settings or data stored either on your SIM
card or in the phone's memory.
2. Slide the SIM card in under the metal plate in the SIM card slot, with
the SIM card's metal contacts facing down and the cut corner at the
top right.
SIM card
Metal plate
A SIM card can be easily damaged if its metal contacts become
scratched. Therefore, take special care when holding or inserting it.
Preparing Your Phone For Use 1
Page 16
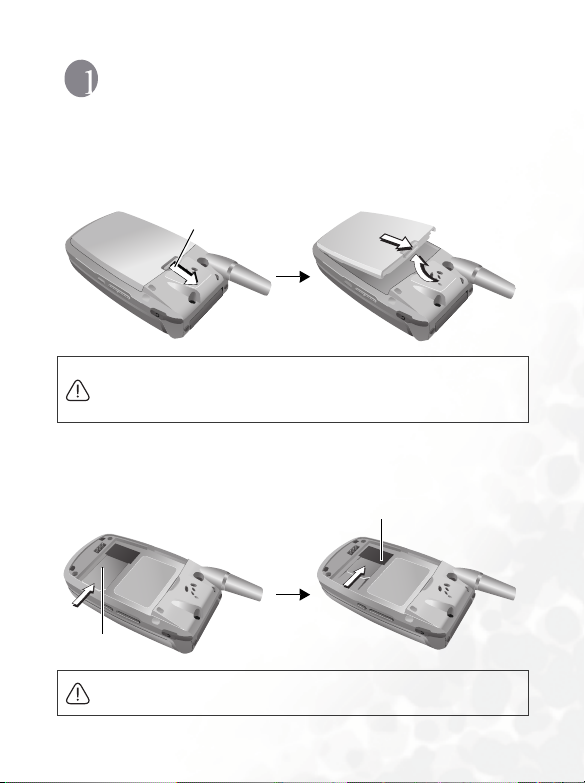
If you wish to remove the SIM card, you
must first press down the stay, then push
the SIM card out of the slot.
SIM card
Stay
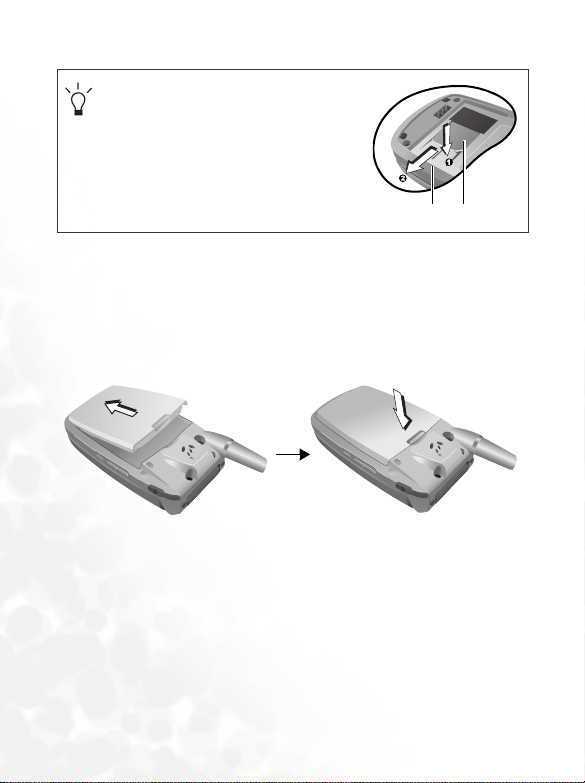
Installing a Battery and Charging the Phone
1. With the battery's metal contacts facing down, align the protruding
tabs on the end with the holes in the battery bay of the phone. Then
push the battery toward the end of the bay to insert the battery's tabs
into the holes. Press down to click the battery in place.
2 Preparing Your Phone For Use
Page 17
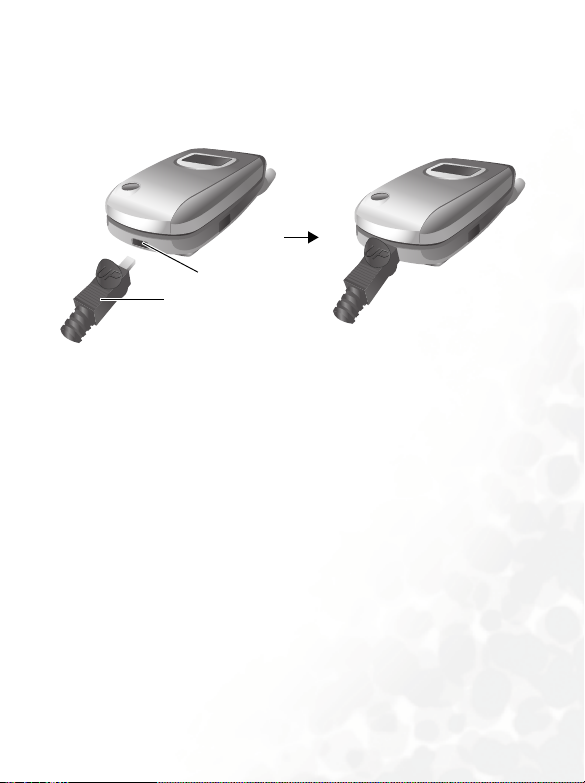
2. Insert the charger connector into the charger socket on the bottom of
the phone. Make sure that the connector is inserted in the correct
orientation (with the arrow pointing up).
Charger socket
Charger connector
3. Insert the charger into a power outlet.
4. Once the phone is fully charged, remove the charger from both the
power outlet and the phone.
Preparing Your Phone For Use 3
Page 18
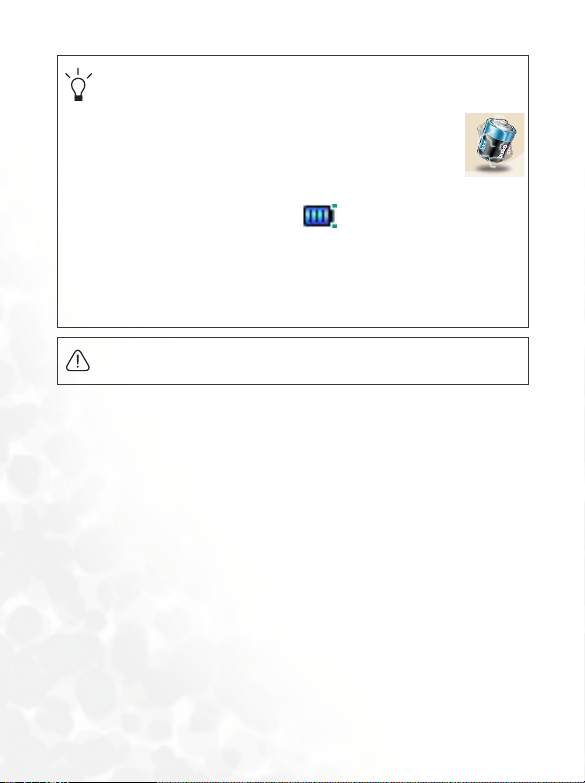
•
Charging requires approximately 4 hours.
• When charging the phone while it is turned off, the external
and main displays will be activated, showing the
animation. If the charging is performed while the phone is on,
the main display shows the icon. The lines showing the
battery power level will scroll until the battery is fully charged.
• When the battery is out of power, the phone will play an alert
sound to remind you to recharge it and then will automatically
turn off.
Do not remove the battery while the phone is charging.
4 Preparing Your Phone For Use
Page 19
Tur nin g t he P ho ne O n
1. Open the phone's flip.
2. Press and hold to turn the phone on. The phone will display the
welcome animation.
You can select and set a welcome animation. Go to the menu:
Settings > Display > Welcome Animation > Power On. For details,
please refer to page 141.
3. Enter your PIN1 number. If you enter the PIN1 number incorrectly,
press (Clear) to delete the incorrect numerals. Press and hold
to delete all numerals that have been entered. After completing
entry of your PIN1 number, press
The PIN (Personal Identification Number) is a password provided by
a network operator with a SIM card. You need this password in order
to use the SIM card.
If you enter the PIN incorrectly 3 times in a row, the SIM card will lock
down and no longer be usable. If this happens, you must enter the
PUK (Personal Unblocking Key) for that SIM card in order to unlock
it. Please contact your network operator to obtain a PUK.
To cancel PIN password authentication, go to the menu Settings >
Security, enter your PIN code, and select PIN Code > Disable. See
page 147.
4. When the PIN code entered has been accepted, the phone will
automatically search for the designated network. This search process
may take a few seconds.
(OK) or to confirm.
Preparing Your Phone For Use 5
Page 20

5. The standby screen will be displayed, as well as network signal
strength and the name of the network operator. You can now use the
phone.
If the phone cannot detect the network, the on-screen signal strength
meter will show no bars.
If the phone links to a network that you are not authorized to use, the
signal strength meter will show a level of zero. You will only be able to
make emergency calls.
6 Preparing Your Phone For Use
Page 21
Getting to Know Your Phone
Your Phone at a Glance
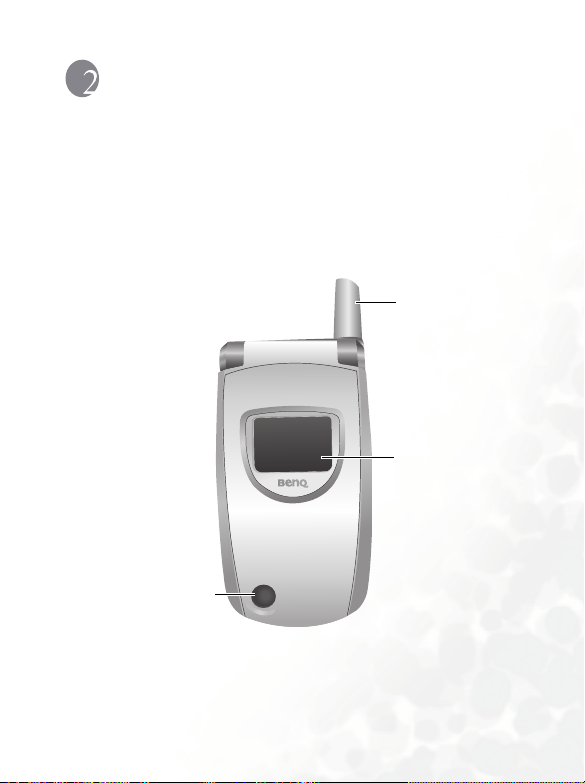
The figure below shows the main parts of your phone:
Front v iew 1
Antenna
External display
Camera lens
Getting to Know Your Phone 7
Page 22
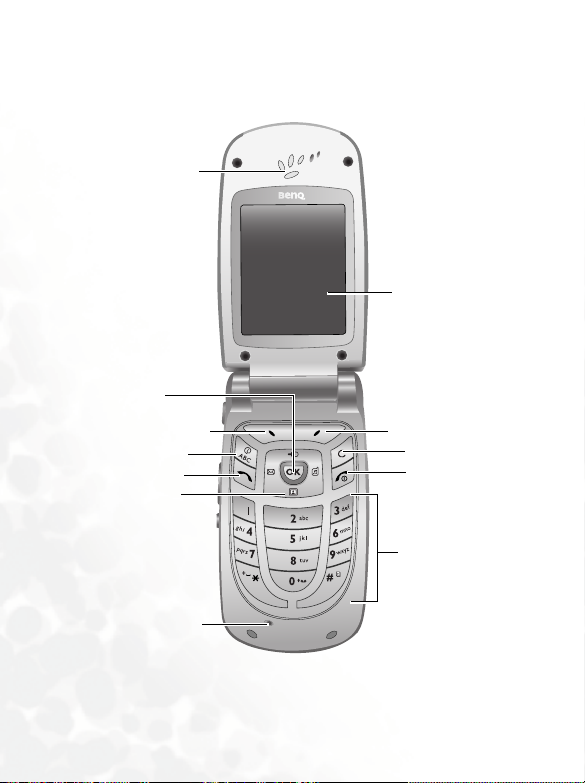
Front view 2
OK key
Earpiece
Main display
Left soft key
Input mode/WAP key
Dial/Answer key
Scroll key
Microphone
8 Getting to Know Your Phone
Right soft key
Clear key
Power on/off key
Alphanumeric keys
Page 23
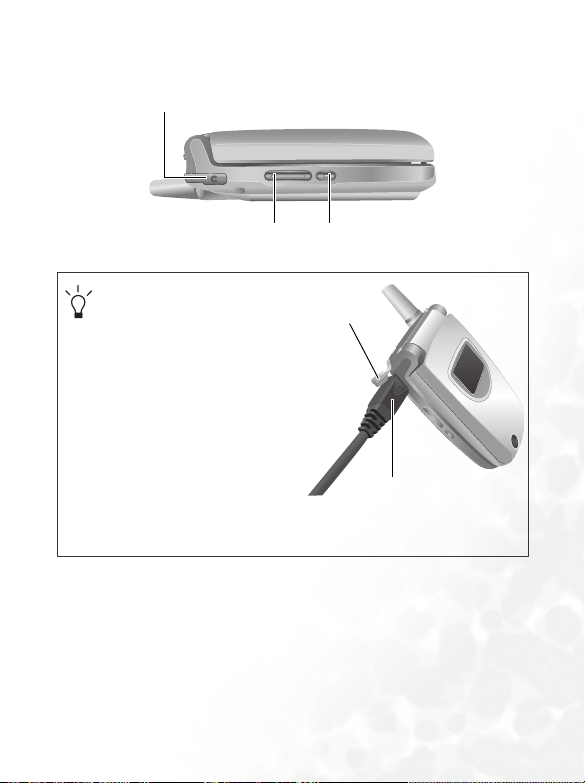
Side view
/
Hands-free headset/Data cable jack
Vol u m e ke y
Inserting handsfree headset
data cable
1. Lift off the lid which covers
the jack on the left side of
the phone.
2. Insert the handsfree hadeset/
data cable connecotr into the
jack. Be sure that the side
showing "UP" faces you
when inserting the
connector.
Getting to Know Your Phone 9
Side key
Lid
Data Cable connector
Page 24
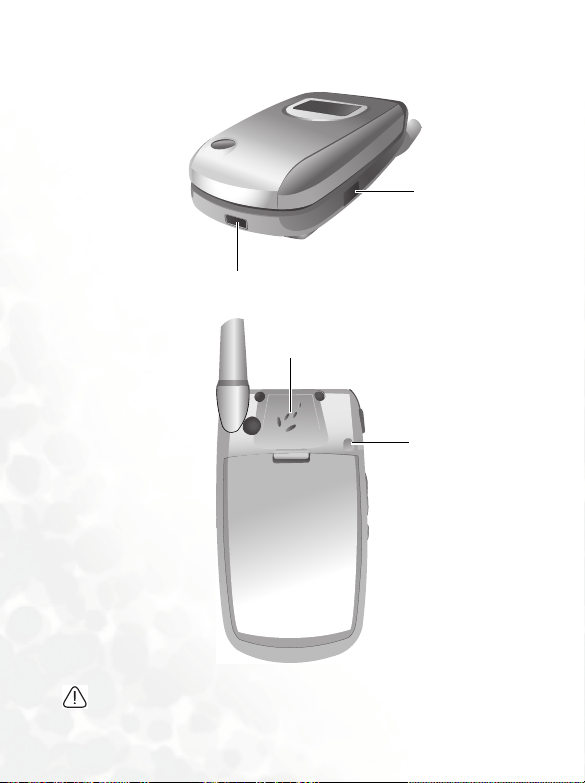
Bottom and back views
p
IrDA port
Charger socket
Speaker
Wris t st rap hol e
To avoid exceeding the FCC RF exposure limits, please do not wear
hone in front of your chest.
the
10 Getting to Know Your Phone
Page 25
Active Flip Feature
• Opening the flip turns on the main display and turns off the external
display; closing the flip wakes up the external display and turns off
the main display.
• Opening the flip allows you to answer an incoming call. Closing the
flip ends a call, cancels dialing, or rejects an incoming call.
To turn on/off the feature of answering/disconnecting calls by
opening/closing the flip. Go to the menu: Settings > Call Settings>
Answer Mode > Flip Open.
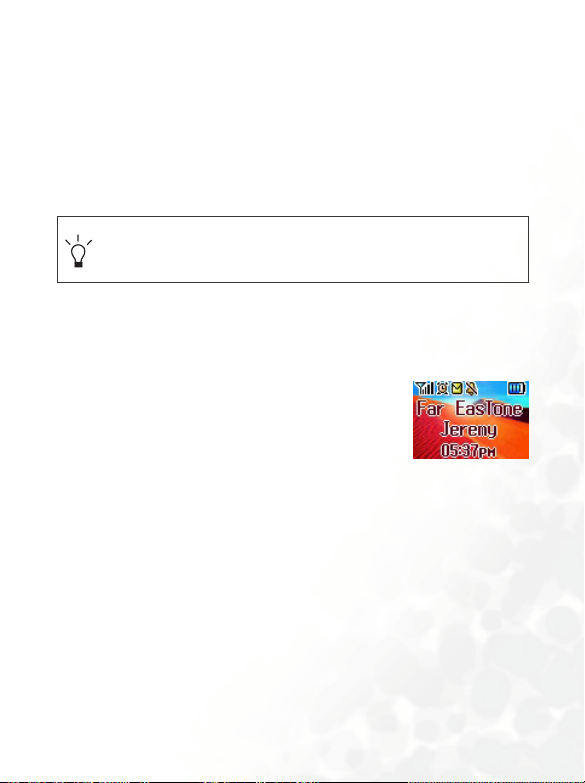
Standby Screen
External Display
After the phone is turned on, closing the flip will
wake up the external display, showing the
information such as the newtork operator's name
and current time; the status bar will show icons for
network signal strength, battery power, alarm (if
active), etc.
The external display can also alert you to incoming calls, messages, and
missed calls.
Getting to Know Your Phone 11
Page 26
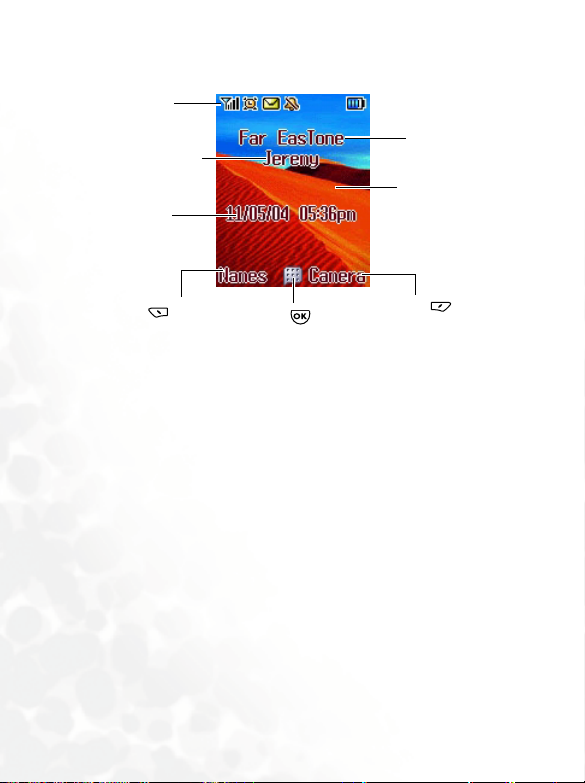
Main Screen
Status bar
User nam e
Time and date
Name of network
operator
Wallpaper
Press to enter
the Phone Book
Press to enter
the main menu.
12 Getting to Know Your Phone
Press to use the
camera function.
Page 27

•
You can set the animation or image you wish to use as the
main display's wallpaper by going to the menu Settings >
Display > Wal l p ap e r > Main LCD. Alternatively, you can go to
Media Center > Images to set the photo you wish to use as the
main display's wallpaper. See page 104 and page 139.
• To set the current time and date, as well as the format in which
they will be shown in the main display's standby screen, go to
the menu Settings > Date&Time. See page 135.
• If you want your own name to appear in the standby screen on
the main display, you can do so by using the menu: Phone
Book > Phone Information > Own Number. See page 88.
• After the standby screen remains for 10 seconds, the soft key
bar, time and date, as well as all the other information
currently displayed will automatically disappear, so that the
wallpaper can be dispalyed in full screen. You can also press
to display/hide the status bar and information normally
shown on the standby screen.
Getting to Know Your Phone 13
Page 28
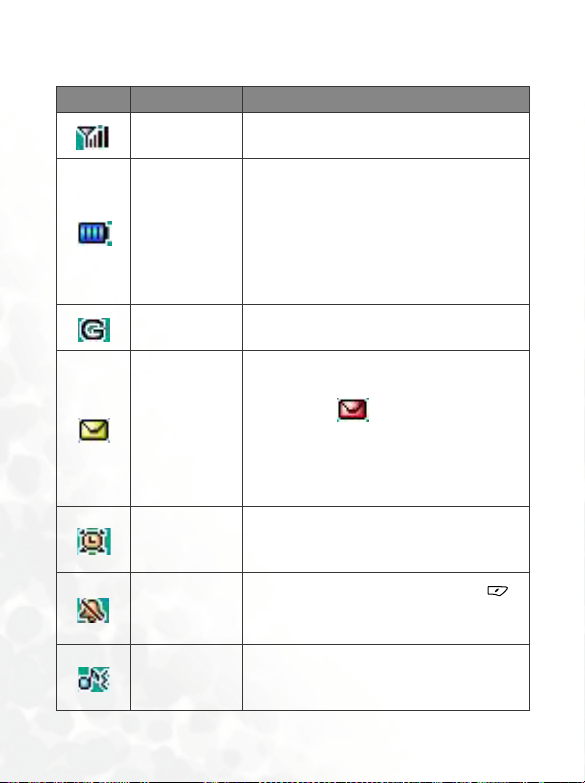
Icons in the Standby Screen's Status Bar
Icon Function Description
Signal strength
Battery status
GPRS network
Message
Alarm
Silent
Normal
Signal strength of the network. The more
bars indicated, the stronger the signal.
Shows the current level of battery power.
The more bars indicated, the more power
that remains. Four bars: fully charged. No
bars: immediate charging needed. When
charging the phone, the icon will scroll
through the bars until the battery is fully
charged.
GPRS services have been activated on your
SIM card.
Shows that an SMS/MMS message is being
received or that there are unread messages.
If the icon appears in red, this
indicates that the SIM card's message
memory is full. For information about the
message function, see page 54, "Message
Menu".
The alarm is turned on. To set the alarm, go
to the menu Tools > Alarm Clock. See
page 112.
In the standby screen, press and hold to
activate the silent profile. See page 45,
"Using the Silent Profile".
Shows that the Normal profile is in use. To
set the profile, go to the menu Settings >
Profile. See page 137.
14 Getting to Know Your Phone
Page 29

Icon Function Description
Meeting Shows that the Meeting profile is in use.
Outdoors Shows that the Outdoors profile is in use.
Personal Shows that the Personal profile is in use.
Handsfree Shows that the Handsfree profile is in use.
Roaming
Roaming has been activated (not your
regular network)
External
keylock
After you long press the side key to
activate the external keylock, this icon will
appear on the external display.
Getting to Know Your Phone 15
Page 30
Using the Keys in the Standby Mode
In this user manual, "long-press" means to press and hold down a key
for about two seconds before release. "Press" means to press a key
and release immediately.
The chart below is meant only to introduce the commands accessible
with keys when the phone is in standby mode. For information on
other key commands available in other operating modes, see the
pertinent sections in this user manual.
Function keys
• When any key is pressed, the phone will provide aural
feedback through keypad tones. To activate or cancel this aural
feedback, enter the menu Settings > Profiles. Scroll to the
profile currently in use and press (Set). Then select
Key pad To n e . See page 138.
• After turning the phone on, pressing any key will activate
keypad and display backlighting. To set the backlighting level,
go to Settings > Display > Backlight. See page 141.
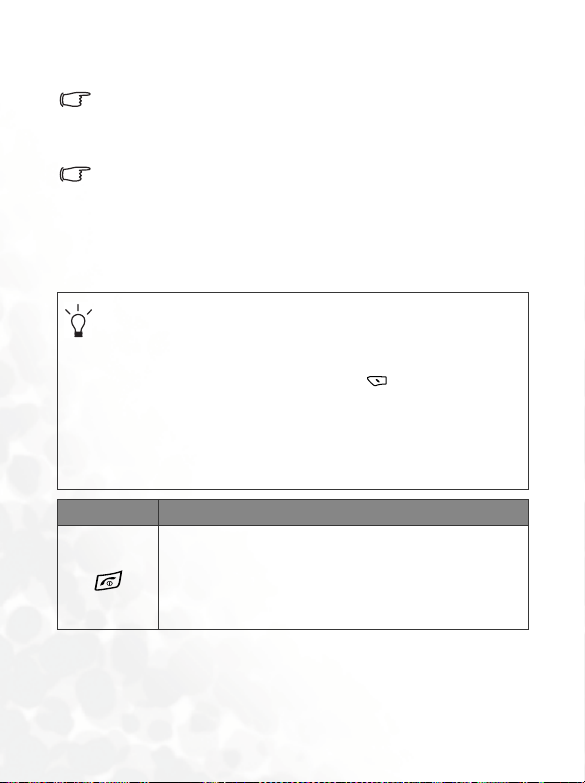
Key Commands and functions
Power on/off key
• Long-press to turn the phone on or off.
• Press this key to reject incoming calls or cancel a call
being dialed.
16 Getting to Know Your Phone
Page 31

Key Commands and functions
Send/Answer key
• Press to send or answer a call.
• Long-press and your phone will automatically call the
last number dialed.
• Press to access the list of last missed/dialed/received
calls.
OK key
• Press to open up the main menu.
Left soft key
• Press to access the Phone Book (when Names is
shown).
• Press to save the phone number keyed in from the
standby screen to the Phone Book (when Save is
shown).
Right soft key
• Press this key to use the camera function (when
Camera is shown).
• Press this key to delete all digits entered and return to
the standby screen.
• Long-press to turn the silent profile on or off.
Clear key
• Press this key to delete entered digits one by one; long-
press to delete all digits entered.
Getting to Know Your Phone 17
Page 32

Key Commands and functions
Scroll key
• Press to enter the Quick Access menu. For
information about the Quick Access menu, see page
53.
• Press to retrieve photos stored in the Album
menu.
• Press to enter the Messages menu. For a
description of the Messages menu, see page 54.
• Press to select the profile to activate.
Asterisk key
• Press this key to enter an asterisk " * ".
• To make an international call, long-press this key until
the display shows "+", Then enter the recipient's
country code, area code and phone number.
Voicemail key
• Long-press to dial your voicemail number.
# key
• Press to enter "#".
• For extensions: After entering a phone number, long-
press to enter a "P" and then enter the extension
number.
18 Getting to Know Your Phone
Page 33

Key Commands and functions
Alphanumeric keys
• Press to enter digits in a phone number.
~
• Shortcut key: Long-press a key to immediately access
the function, or dial the number, that it represents. See
page 53, "Quick Access Menu".
Wap/input mode key
• From the standby screen, pressing this key will launch
the browser to connect to the Internet.
• From the editing screen, pressing this key will change
the input mode currently in use.
Vol um e k ey
• When the phone's flip is closed, pressing the upper
portion of this key, located on the left side of the phone,
to show the calendar on the external display.
• When the phone's flip is open, press the upper or lower
portion of this key to adjust the ring tone volume. Press
the upper portion of this key or to increase the
volume. Press the lower portion of this key or to
decrease the volume.
When there is an incoming call, long-press the
upper portion of the volume key to reject the call;
long-press the lower portion to turn off the ring tone.
Getting to Know Your Phone 19
Page 34

Key Commands and functions
Side key
• When the phone's flip is closed, pressing this key will
display/hide the information shown on the external
display's standby screen.
• When the phone's flip is closed, long pressing this key
will activate the external keylock.
• Pressing the side key will closed the calendar shown
on the external display.
Alphanumeric keys
Key Digit Key Digit/Symbol/Function
17
28
39
40
5 * + (long-press)
6
Long-pressing an alphanumeric key will access the function it
represents, or dial the number that has been assigned to it (shortcut
function).
# P(long-press after entering
a phone number)
20 Getting to Know Your Phone
Page 35

Menu Navigation
y
s
When the phone is in standby mode, press to bring up the main
menu and highlight the first item in that menu: Phone Book.
For details on how to use the various functions listed in the menu, see
page 82
You can choose a display color for the menus by going to the menu
Settings > Display > Theme. See page 139.
Main menu
The main menu has two different modes--list mode and icon mode.
Icon mode
The menu icon to
which you have
scrolled using
will be displayed as
an animation.
The name of the
menu icon you
have scrolled to.
Press to enter the
highlighted menu.
To determine whether the main menu is displayed in the icon mode or list
mode, press (Option) to bring up a pop up menu, scroll to the mode
you wish to use, then press .
Each icon represent
a menu.
Pressing (Back)
will return the
display to the standb
screen.
Getting to Know Your Phone 21
Page 36

List mode
Press to scroll
up or down to an
item.
You can also go to the menu: Settings > Display > Menu Style, to
determine whether the main menu is displayed in the icon mode or
list mode.
The highlighted
row is the currently
selected menu.
22 Getting to Know Your Phone
Page 37

Sub-menus
to scroll up
Press
or down to an option.
The highlighted row is
the currently selected
item.
Press (Select) or to
access the highlighted option.
The name of the
current menu.
The highlighted row is
the currently selected
option.
Press (Back)
to return to the
previous menu or
The name of the
current menu.
Press (Edit)
to access the
highlighted item
for editing.
Press (Back)
to return to the
previous menu or
Press to activate/save the
highlighted function or
setting.
Getting to Know Your Phone 23
Page 38

Menu navigation example
The example given below demonstrates how to use menus to change the
language setting.
Regular access
1. In the standby mode, press
to open the main menu.
2. If the main menu is displayed
in the icon mode, press
to scroll to the Settings icon
and press to enter this
menu; if the main menu is
displayed in the list mode,
press to scroll to the
Settings option and press
to enter this menu.
24 Getting to Know Your Phone
Page 39

3. In the Settings menu, press
to scroll to Language,
then press to enter the
Language menu.
4. Press to scroll to the
language you wish to use.
Then press to confirm
your selection.
5. Press (Back) or
repeatedly, or press once
to return to the standby
screen.
Getting to Know Your Phone 25
Page 40

Access through number shortcuts
1. In the standby mode, press
to bring up the main
menu.
2. The location of items in the
main menu corresponds to
the position of the to
keys in the
alphanumeric keypad. Thus,
pressing will bring up
the Settings menu.
26 Getting to Know Your Phone
Page 41

3. In the Settings menu, the
alphanumeric keys to
represent menu
options 1 to 10. Since
Language is item number 8
in the Settings menu,
pressing will bring up
the Language sub-menu.
4. Press to scroll to the
language you wish to use.
Then press to confirm
your selection.
5. Press (Back) or key
repeatedly, or press once
to return to the standby
screen.
Getting to Know Your Phone 27
Page 42

Main menu map
Select To e n ter
Phone Book
Call Records
Messages
Entertainment
28 Getting to Know Your Phone
Page 43

Select To e n ter
Digital Camera
Media Center
Tools
Opers.Service
Getting to Know Your Phone 29
Page 44

Select To e n ter
Settings
30 Getting to Know Your Phone
Page 45

Using Your Phone
Making a Phone Call
Open the flip and make sure that the standby screen is shown on the
main display. Enter the desired number using the alphanumeric keys
to . Press to dial your call.
During a call, you can use the options. See page 45, "Using the Silent
Profile".
To modify a phone number that you have entered, press C key to delete
individual digits. Press (Back) or , or long press C key will
delete all digits entered and return to the standby screen.
Ending a Phone Call
Press or close the flip to end a call. The display will show the total
call time, and then return to the standby screen.
To cancel a call that is being dialed, press or close the flip.
If you also have a call waiting or on hold, after you press , the
display will show a menu to allow you to choose the call you wish to
end.
Using Your Phone 31
Page 46

Answering a Phone Call
When a call is received, your phone rings or vibrates, with the display
showing the caller's number (if supported by your network vendor). If
the caller is a contact stored in the Phone Book, the phone will show the
name recorded in the Phone Book.
• If the caller is a member of a caller group, the ring tone
assigned to this group will sound. The display will show the
animation or image that is associated with this group as well,
to help you identify the caller.
• For information on how to set up caller groups in the Phone
Book, see page 37, "Adding Contacts to the Phone Book".
1. If the flip is closed, opening it will allow you to answer the call.
If the flip function has not been activated, you cannot answer a call by
opening the flip. To activate or cancel the flip function, go to the menu
Settings > Call Settings > Answer Mode > Flip Open.
2. If the flip is already open, press to answer the call. Alternatively,
you can press (Option), and select Answer to connect the call.
If you wish to change the answering mode so that you can press any
key to answer a call, go the menu Settings > Call Settings > Answer
Mode > Any Key.
32 Using Your Phone
Page 47

Rejecting an Incoming Call
• When the flip is closed, you can reject an incoming call by long
pressing the upper portion of the side key on the left side of the
phone.
• When the flip is open, you can reject an incoming call by closing the
flip or pressing , or by pressing (End) to have the call
diverted to your Voicemailbox. Alternatively, you can press
(Options) and select Reject to reject the call, or select I am busy to
have the call diverted to your voicemail box.
Turning Off the Ring Tone
for an Incoming Call
When the flip is closed, you can temporarily mute the ring tone for an
incoming call by long pressing the lower portion of the side key on
the left side of the phone. After the ring tone has been turned off, you
can still open the flip to answer the call.
Making an International Call
1. Enter the outgoing international call code, or long-press until
"+" appears on the display.
2. Enter the recipient's country code, area code and phone number.
Dial the call by pressing .
Using Your Phone 33
Page 48

Making an Emergency Call
To call emergency services, enter 112 (the international emergency
number) and then press
emergency call even if your phone is locked or cannot access your
network, or there is no SIM card inserted, so long as you are within
range of a network of the type supported by your phone.
to dial the call. You can make an
Dialing an Extension Number
After you enter a telephone number, long-press , The phone
display will show "P". At this point, you can enter the desired extension
number, and then press to dial it.
Speed Dialing
You must assign a number key as the shortcut for a particular phone
number in order to use speed dialing for that phone number. For
information on how to set up a shortcut, see page 53, "Speed dialing".
After you have assigned a number key to serve as the shortcut key for a
particular phone number, you can long-press this key when the phone
is in the standby mode to dial the corresponding phone number. For
example, if you have selected as the shortcut key for a certain
phone number, long-pressing will dial this number.
34 Using Your Phone
Page 49

Listening to Voicemails
When your voicemail box receives a voicemail, your operator gives you
a call or sends you an SMS alert to remind you of the new voicemail.
Depending on how you are notified, there are two ways to access and
listen to the voicemail:
1. If your operator sends you an SMS alert to inform you of a new
voicemail, and the text of the SMS alert sent by your operator
matches the text of the SMS alert previously stored in your phone-this is called
as a reminder of the new voicemail. Press to dial the voicemail
box number to listen to the Voicemail.
Alert Match--your phone will recognize this SMS alert
The rationale of the
received an SMS alert from your operator saying that you have a
waiting voicemail, you can directly press to listen to the
voicemail, instead of having to return to the standby screen to dial
your voicemail box number individually.
To successfully use the Alert Match feature, you must first save your
operator's SMS alert. Please do so in the menu option:
Alert Match feature is that, once you have
Messages >
Vo i c e m a i l > Settings > Alert Match.
Using Your Phone 35
Page 50

2. If the text of the operator's SMS alert does not match the text of the
SMS alert stored in the
Alert Match option, long-press from the
standby screen to directly dial the voicemail phone number and listen
to your voicemails. Alternatively, you can go to the menu:
Message >
Vo i c e m a i l > Get Voicemail to make a voicemail call.
If the voicemail number is not stored on your SIM card or in the phone
itself, you will not be able to access your voicemail by long-pressing
,Generally speaking, network operators will store the voicemail
number on a SIM card before giving it to you. If so, you will be able to
dial your voicemail number by long-pressing when the phone is
in standby mode, without needing to first manually store this number.
If however your network vendor did not store the number on your SIM
card, you will need to do this yourself. To save or modify a voicemail
phone number, go to the menu Message > Vo ice mail > Settings >
Box Numbers.
36 Using Your Phone
Page 51

Phone Book
Adding Contacts to the Phone Book
The phone book in your phone's memory can store up to 500
contacts. The capacity of a phone book on your SIM card depends on
the particular service provided by your network vendor.
1. In the standby screen, enter the phone number that
you wish to store, then press (Save). The screen
will show the Phone Book data fields for a new
contact.
2. Press to scroll to the contact data field that you wish to edit.
Press (Edit) to enter and edit the currently selected field. After
completing data entry and settings, press to store the data for
this contact.
If you do not wish to save a modified Phone Book record, press
or (Back) to abort.
You can also add a new contact by going to the menu Phone Book >
Add.
The data fields for a new contact are as follows:
The contact's name.
The contact's mobile phone number.
The contact's office phone number.
Using Your Phone 37
Page 52

The contact's home phone number.
The contact's e-mail address.
Used to select a caller group for the contact. Press to select a
group and then press .
When there is an incoming call from this contact, the ring tone
assigned to this group will sound and the display will show the
animation/image associated with the group.
To set a ring tone and image for each caller group, go to the
menu Phone Book > Caller Group. See page 84.
You can also go the menu Phone Book > Caller Group to
set a caller group for a contact.
Used to set the image, photo, animation, or video that will appear on
the phone's display when there is an incoming call from the contact.
Press (Set) and then choose the photo or video for the contact.
The photo set in this field will replace the image associated
with the contact's caller group, if any.
Used to set a ring tone for the contact. When there is an incoming
call from the contact, the phone will play this ring tone. Press
(Set) and then choose the ring tone for the contact.
A ring tone set in this field will replace the one associated
with the contact's caller group, if any.
Used for notes about the contact.
38 Using Your Phone
Page 53

Finding Contacts in the Phone Book
In the standby mode, press (Names) to display
contacts stored in the Phone Book.
There are two ways to locate a specific contact in the Phone Book:
• Press to scroll through the names (listed in alphabetical order)
until the one you want is highlighted.
• Press the alphanumeric key that corresponds to the first letter of the
name you wish to locate the appropriate number of times. For
instance, if the name starts with "K", you would press twice for
"K". The names starting with "K" will appear, with the first one
highlighted. Press to scroll to the name you want.
You can also choose the menu Phone Book > View to access the
Phone Book.
You can choose the menu Phone Book > Find, and then enter the full
name or the first letter of the name to locate a contact.
When the desired contact's name is highlighted, you can do one of the
following:
• Press to dial the first phone number saved in that contact.
• Press (Option) and select Add to add a new contact; select Edit to
edit the current cotnact; select Delete to delete the current contact.
Using Your Phone 39
Page 54

•
Press to view the contact's data. You can then perform the tasks
below:
Scroll to highlight the phone number you want and press to
dial that number.
While viewing a contact's data, you can press to view the
next/previous contact's data.
will appear on the left of the contact's name if the contact is
stored in your SIM card's memory; will appear if the contact
is stored in your phone memory.
Press (Edit) to edit the Phone Book data for this contact. For
more information on editing, see page 37. When you have
finished editing the details of the selected contact you must press
twice until message "
Saved" appears on screen to save the
entries.
If you do not wish to save a modified Phone Book record, press
(Back) or to abort.
40 Using Your Phone
Page 55

Last Missed, Dialed, and Received Calls
There are two ways you can view the last missed, dialed, and received
calls on your phone, as well as information on their date and time:
1. If there have been any missed calls, the display will show a missed call
message along with the number of calls that were missed.
Press (Select), and then press to scroll to the desired phone
number.
2. In the standby mode, press to view the list
of the most recent missed, dialed, and received
calls. Press to scroll to the desired phone
number.
The icon will appear beside missed calls; the icon will
appear beside dialed calls; the will appear beside received calls.
If a phone number has already been stored in the information for a
contact in the Phone Book, the display will show the name of this
contact.
If your network operator is not able to display a certain call's number,
the list will show "No number" for the call.
When the number for a missed, dialed, or received call is highlighted,
you can perform the following tasks:
Using Your Phone 41
Page 56

Press to re-dial the number.
•
• If the phone number for the call has not been stored in the Phone
Book, press (Option) and select View to create a contact for this
number in the Phone Book. If this phone number is already stored
under a contact in the Phone Book, press (Edit) to edit the
information for this contact. For information about editing Phone
Book data, see page 37, "Adding Contacts to the Phone Book".
• Press (Option) and select Delete to delete the record of the call
from the list..
• Press to display the details on this call.
This name of the
contact for the call.
The phone number
for the call.
The date and time
this call was made.
Operations During a Call
The following options marked with an asterisk (*) are dependent on
network support and may require a subscription.
Adjusting the Earpiece Volume
During a call, you can press the volume key on the left side of the
phone to adjust call volume.
42 Using Your Phone
Page 57

Accessing the last dialed/received calls
When you are on a phone call, you can press for the list of last
received calls and press for the list of last dialed calls. For details on
how to handle dialed/received calls, page 41, "Last Missed, Dialed, and
Received Calls".
Phone Book
Press (Names) to access data in the Phone Book. For details, see
page 37, "Phone Book".
In-call Menu
Press (Option) to bring up the in-call menu. Press to scroll to
the desired item and then press to enter that item.
End Current
Ends the current call.
Mute/Unmute
Mutes the microphone so the person you are speaking with cannot
hear your voice.
DTMF On/Off
Main Menu
You can access the Phone Book, Call Records, and Messages menu
during a call.
Using Your Phone 43
Page 58

Putting a Call on Hold*
1. When the only call is active:
a. Press (Hold) to hold this call.
b. Press to end this call.
2. When the only call is on hold:
a. Press (Unhold) to resume the call.
b. Press to end this call.
3. When there is an active call and a call on hold.
a. Press (Swap) to resume the call that is on hold, and put
the active call on hold.
b. Press to show on the display a list of calls that you can
end.
Making a Second Call*
Enter a phone number, or select one from the phone number or call
record, and then press to dial it. The currently active call will
automatically be placed on hold. However, if there is already one active
call and another on hold, this action will fail.
44 Using Your Phone
Page 59

Call Waiting*
If there is an incoming call while you are on the phone, a tone will
sound through the earpiece and the display will show that a second call
is currently waiting. You can handle the waiting call and currently active
call in the following ways:
1. Answer the waiting call: Press The currently active call will
automatically be placed on hold. However, if there is already another
call on hold, a menu will appear on the display allowing you to select
a call to end and then answer the waiting call.
2. Reject the waiting call: Press or (End). Pressing (End)
will immediately reject the waiting call; pressing will bring up a
menu on the display that you can use to select a call to end.
Using the Silent Profile
From the standby screen, you can long-press to activate the Silent
profile. Once it is activated, the phone will alert you to an incoming call
by vibrating with no ring tone.
1. When you long-press to activate the Silent profile, the phone
will vibrate for one second. The icon will appear in the standby
screen's status bar to remind you that your phone is currently using
the Silent profile.
Using Your Phone 45
Page 60

2. To cancel the Silent profile and restore the previously active vibrant
and ring tone settings, long-press .
This feature is very convenient for switching to the Silent profile
during, say, a meeting to avoid the disruption caused by a ring tone.
To set and select a profile, please enter the main menu's Settings >
Profile. See page 137.
Tak ing a pho to
Your phone's embedded camera enables you to take photos to use as
wallpapers for the phone's external and main displays, photo caller ID
images, or send them through MMS.
1. From the standby screen, press (Camera), which will bring up
the view finder.
You can also use the camera by going to the menu: Digital Camera.
2. Press (Mode) to set the desired image size. Choose the last two
video options when you are recording a video.
• VGA 640 x 480: Select this mode to set the full image with
highest resolution.
• Wallpaper 128 x 160: Select this mode to make a wallpaper size
still image.
• MMS 128 x 128: Select this mode to send your still image
through MMS.
• Portrait 96 x 64: Select this mode to make a photo caller ID
image.
46 Using Your Phone
Page 61

Video 128 x 128: Select this mode to record a video clip.
•
Maximum length of the video is 160 seconds. See page 50,
"Shooting a Video Clip".
• Video 96 x 64: Select this mode to record a video caller ID.
Maximum length of the video is 5 seconds. See page 50,
"Shooting a Video Clip".
3. Press (Option) to make the following settings for the camera:
• Effect: Enables you to apply a special effect to your image to
create an artistic style.
• Quality: Set the quality (compression ratio).
High: Default settings. Lower compression rate.
Normal: Higher compression rate.
• Environment: Enables you to load preset settings for different
environmental conditions.
• Exposure: This setting allows you to lighten or darken the entire
image. Press to adjust the exposure value from -2.0 to +2.0.
• Contrast: This setting allows you to adjust the contrast from -3
to +3.
• Shot Tone: Press to select your desired shot tone.
• Go To Image: This is the image library where your photos are
placed. You can also choose the menu: Media Center > Image to
use this image library. See page 104 for information on the
options you can manage the images.
4. After you have completed necessary camera settings, press (Back)
to return to the view finder screen.
Using Your Phone 47
Page 62

•
Zoom: Press zoom in to enlarge the image. Press zoom out
to return to the normal magnification.
The chart below shows the zoom range for each image size
Image size Zoom range
VGA 640x480 0~5
Wallpaper 128x160 0~5
MMS 128x128 0~5
Portrait 96x64 0~8
• Brightness: Press to decrease the brightness level; press
to increase brightness level.
Image Size
Brightness
Level
Zoom
48 Using Your Phone
Page 63

5. When you are ready to take a photo, press the shutter button to
photograph the object. The photo will then show up on the main
display.
Please note the following while shooting photos
• When taking photos, do not block or touch the camera lens on the
back of the phone's flip.
• Always photograph your object with the source of light behind you.
• Do not shake the phone when taking photos.
• Please be sure that the lens is perfectly clean before taking photos.
Use a soft cloth to wipe the lens if it is not clean.
6. Press (Delete) if you do not wish to save the photo. Otherwise
the photo will be automatically saved in your image library. Press
(Option) you can manage this photo using the options below:
• Set Wallpaper: Uses this photo as the wallpaper for the main
display or for the external display.
• Send by MMS: This option enables you to send this photo to
others through MMS. See page 64 for details on MMS.
• Send by IrDA: This option enables you to transmit this photo
through the infrared port.
• Go To Image: See page 104 for information on the options you
can manage the images.
You can use the image library's Face Morph function to configure
expression effects for faces shown in the saved photos. See
page 104 for details.
Using Your Phone 49
Page 64

Rename: Give this photo a new file name.
•
A photo's name can't be left empty, nor can it share the same
name with another photo already stored in your phone.
Shooting a Video Clip
One most exciting feature about this phone is that you can use its video
recording function to shoot video clips for various purposes, such as
making a 5-second caller ID video which show on your external LCD
screen, or sending a video clip by MMS.
1. From the standby screen, press (Camera), which will bring up
the view finder.
2. Press (Mode) and choose the last two video options to record a
video.
• Video 128 x 128: Select this mode to record a video clip.
Maximum length of the video is 160 seconds.
• Video 96 x 64: Select this mode to record a video caller ID.
Maximum length of the video is 5 seconds.
3. Press (Option) to make the following settings for the video
recording:
• Quality: Sets the quality sharpness at which a video clip is shot.
• Contrast: This setting allows you to adjust the contrast from -3
to +3.
• Go To Video: This is the video library where your video clips are
placed. You can choose the menu: Media Center > Video to
access this video library as well. See page 109 for information on
the options you can manage the videos.
50 Using Your Phone
Page 65

4. After you have completed necessary camera settings, press (Back)
to return to the view finder screen.
• Zoom: Press zoom in to enlarge the image. Press zoom out
to return to the normal magnification.
• Brightness: Press to decrease the brightness level. Press
to increase brightness level.
5. When you are ready to shoot a video, press to start. Video will
then be timed and the length of the video will be shown at the upper
right corner of the screen. Press again to stop recording.
Image Size
When a recording is being interrupted by an incoming call or
message, the phone will stop and save the recording. When the
interruption ends, it will go to the playback mode.
If you press during recording, the phone will stop and save the
recording and return to the idle screen.
Brightness
Level
Recording Time
(Seconds)
Zoom
6. When you have stopped recording, press (Option) you can
manage this video using the options below:
• Play: To play the video.
Using Your Phone 51
Page 66

Rename: Give this video a new file name.
•
• Go To Video: This is the video library where your video clips are
placed. See page 109 for information on the options you can
manage the videos.
52 Using Your Phone
Page 67

Quick Access Menu
The Quick Access menu contains twelve commonly used functions and
menus represented by their respective images.
To set up the access menu, choose the menu Tools > Shortcuts.
See page 120.
1. From the standby screen, press
2. Press to scroll through the menu and press to access a
highlighted option.
3. You can also use the twelve alphanumberic keys to choose the desired
function or menu. There are two ways to access the desired function
or menu using the alphanumeric keys:
a. Press a corresponding key to move the selection box to the
desired function or menu, and press to access it.
b. Long press a corresponding key to access the desired function or
menu directly.
to enter the Quick Access menu.
Speed dialing
You can assign 9 alphanumeric keys as shortcuts to frequently dialed
numbers. To do so, choose the menu: Phone book
can then can long-press the key to from the standby screen
to dial the number it represents.
> Speed Dial. You
Using Your Phone 53
Page 68

Message Menu
Your phone supports various messaging services including SMS (Short
Messaging Service) and MMS (Multimedia Messaging service). SMS
allows you to insert simple animations and ring tones into your short
messages, while MMS enables you to send photos, colored images and
music through your phone. You must have a subscription that supports
MMS. Please contact your service provider for details.
From the standby screen, press to enter the Message menu. You
can also press when in the standby screen and then enter from the
main menu by selecting .
Additional information about messaging
• When a new message is received, or when there are unread messages
in the phone's memory, the icon will appear in the standby
screen's status bar to remind you that you have unread messages.
• If a red icon shows up, this means that the message memory is
full.
The items in the Message menu are as follows:
54 Using Your Phone
Page 69

SMS
You can use this SMS menu to read, edit and send SMS.
Editing and Seding a New Short Message
1. Go to menu: SMS > New to bring up the message editing screen
so you can write a new short message. Use the alphanumeric keys
to enter text.
For information on how to use the input methods provided by the
phone for writing messages, see page 78, "Input Modes".
If no text has been entered in the editing screen, press to
return to the standby screen; if some text has been entered,
pressing will bring up the prompt Exit?", to make sure you
wish to abort the message being edited. If you press (Yes ),
you will return to the standby screen; if you press (No), you
can continue writing the message.
2. When writing a message, press (Insert) to perform the
following tasks:
• Te m p l a t e : This is a list of templates that can be used instead of
entering all the characters individually. You can use the factory
default templates or templates of your own that you previously
saved to the list.
To create your own quick message templates, scroll down to
one of the blank templates, press (Edit) to enter the
desired text, and then press
To delete the saved template, scroll to the template you wish to
remove, and press (Delete).
to save it.
Using Your Phone 55
Page 70

Graphics: You can select a graphic icon from the graphics library
•
to insert into your message. Press to select the name of the
icon you wish to insert, and then press or (Select) to
insert the icon into your message. You can also scroll towards the
end of the icon library and choose from the last five icons that
you previously received and stored.
• Animation: You can select an animation from the animation
library to insert into your message. Press to select the name
of the animation you wish to insert, and then or (Select)
tto insert the animation into your message.
You can also scroll towards the end of the icon library and choose
from the last five animations that you previously received and
stored.
• Melody: You can select a ring tone from the melody library to
insert into your message. Scroll to ring tone you desire, and then
press to insert the ring tone into your message. The inserted
ring tone will be displayed as musical note within the message's
text.
3. After you have finished editing the message, press to
perform the following tasks:
56 Using Your Phone
Page 71

Send To
You can send the message to a single recipient. Enter the
recipient's phone number and press to send the message
directly.
Alternatively, you can press to access your phone book and
select a contact you want to send the message to. Scroll to
highlight the desired contact and press to display the
contact's phone book information. Scroll to highlight the
number you want to use and press to enter the number.
Press again to send the message.
Send by Name
You can send the message to the contacts chosen from your
phone book.
1. Scroll to the name of the contact, and then press to
select it. Repeat the step to select multiple contacts.
2. When finished selecting, press
contacts to your send list. To add a new contact to the list or
to delete a selected contact, press
Delete contacts.
3. When finished, press to send the message to the
selected contacts.
(Done) to save those
(Option) to Add or
Send by Group
You can send the message to the members you select from a
caller group.
1. Scroll to the caller group you want, press (
view the contacts in that group.
View) to
Using Your Phone 57
Page 72

2. Scroll the list of the contacts and press to choose the
contacts you want. Then press
(Done) to go back to call
group list.
The last row "Checked" shows how many contacts you
have chosen and the maximum numbers you can choose
3. Press to view the list of selected contacts, and then press
to send the message to them.
Save to Drafts
Press to save the message to Drafts. For details on the
Drafts option, see page 61.
Receiving and Reading a Short Message
1. When new messages are received, the icon will appear on the
external display, along with a text indicator of the number of
messages received. After you open the flip, the main display will
show the number of messages that have been received.
2. You can press to read the messages in the inbox. You can
also press (Exit) to return to the standby screen (The
icon will appear in the standby screen's status bar, indicating that
there are unread messages) and then enter the menu Messages
SMS > Inbox to read messages.
>
58 Using Your Phone
Page 73

3. Press to scroll to the message record you would like to view.
Then you can:
Scrolling down to the end of the list and selecting "Delete All"
will delete all messages.
• Press (Option), which will present the following choices:
Delete: Deletes the selected message.
Call Sender: You can use the phone number used to send
the message to call the sender.
SMS Chat: This feature allows you to start a chat session by
replying to the message. For how to start a chat session, see
page 70.
Reply : Allows you to write and send a reply message.
Forward: Allows you to edit the content of this message and
forward it to another person.
Edit: Allows you to edit the content of the message.
• Press to read the message's content.
If the message has a ring tone attached to it, the phone will
play the ring tone. You can also play the ring tone by scrolling
to the icon that represents the ring tone.
Then press (Option) to :
Reply : Allows you to write and send a reply message.
Delete: Deletes the selected message.
Call Sender: You can use the phone number used to send the
message to call the sender.
Using Your Phone 59
Page 74

SMS Chat:This feature allows you to start a chat session by
replying to the message. For how to start a chat session, see
page 70.
Forward: Allows you to edit the content of this message and
forward it to another person.
Edit: Allows you to edit the content of the message.
Extract Numbers: Displays the number(s) contained in the
received message. Scroll to highlight the needed number, and
press (
phone book. You can also press (
Save) to create an contact for this number in the
Call) to call that
number.
Save to Archive: Allows you to save this message to the
Backup Box.
Save to SIM: Allows you to save this message to your SIM
card.
Managing Sent Items
Go to menu: SMS > Sent Items. Sent Items preserve messages
previously edited and stored in the SIM card.
message, and then you can:
Scrolling down to the end of the list and selecting "Delete All" will
delete all messages.
• Press (Option) to delete messages, create a new folder, or to
move the message to a another folder.
• Press to read the message. After reading the message, you
can press (Option) to execute the following options:
Scroll to the desired
60 Using Your Phone
Page 75

Delete: Deletes the message.
Forward: Allows you to forward the message to others.
Edit: Allows you to edit the message.
Extract Numbers: Displays the number(s) contained in the
received message. Scroll to highlight the needed number, and
press (
phone book. You can also press (
Save) to create an contact for this number in the
Call) to call that
number.
Save to SIM: Save the message to your SIM card.
If you want to erase all of the outgoing messages, scroll down to the
end and select Delete All to erase all messages.
Managing Drafts
Go to menu: SMS > Drafts. This option allows you to preserve
message drafts that you have saved. Scroll to the desired message
record, and then you can:
Press (Option) to delete, create a new folder, or to move the
•
message to a new folder.
• Press to directly edit the contents of the message. Then you
can press (Option) to execute the tasks described above.
Using Your Phone 61
Page 76

Managing Archive
Go to menu: SMS > Archive. This option preserves messages saved
from the Inbox. Scroll to the desired message record, and then you
can:
Scrolling down to the end of the list and selecting "Delete All" will
delete all messages.
• Press (Option) to delete, create a new folder, or to move the
message to a new folder.
• Press to directly edit the contents of the message. Then you
can press (Option) to execute those tasks identical to reading
a message in the Inbox; see page 59.
Cleaning Up Messages
Go to menu: SMS > Delete. This option allows you to cleanup part
of or all of the messges. The options for cleanup includes Inbox, Sent
Items, Drafts, Archive, and All.
Settings
This menu item includes a number of options for adjusting
message settings:
Message Center
This feature allows you to save the message center's phone
number for sending your messages. The messages that you
send are sent to recipients through this message center.
Enter the message number provided by the network vendor.
After you are finished, press to confirm.
62 Using Your Phone
Page 77

Expiry
This sets the duration that an undeliverable SMS message that
you send can be stored at the message center. During this
period, the message center will continue to attempt to deliver
the message to the designated number.
Reply Type
You can request that your network operator convert your reply
to different types.
Reply Path
You can ask the network to set the route of the reply message
via your own message centre. If you set this function on and
then send a message to someone and the person replies, the
reply will follow the path of the previous message that you sent.
Delivery Report
After activating this function, the network vendor will report
to you when a message has been delivered.
Using Your Phone 63
Page 78

MMS
You can edit and send MMS messages using this menu.
Before you start to use MMS, you have to subscribe to both GPRS
and MMS services provided by your operator. Then you have to adjust
MMS settings in your phone to be able to use MMS.
Because MMS uses your operator's MMS server on a GPRS network
to send messages to phones, you need to adjust the following settings
correctly in order to use MMS:
Go to menu: Oper.Service > WAP >
want to use, then press (Edit) to adjust the settings below
Gateway Address For example, 10.1.1.1
Port Number For example, 9201
Go to menu: Oper.Service > Connect Settings, choose the GPRS setting
you want to use, then press (Edit) to adjust the settings below
APN Name For example, MMS
Go to menu: Message > MMS > MMS Setting
MMS Server: choose the MMS
server setting you want to use, and
press (Edit) to enter the web
address of the server.
You should contact your operator for details on MMS settings. Some
operators may adjust the settings for you after you subscribe to MMS.
Editing and sending MMS messages.
Settings, choose the setting you
:
:
For example, http://mms
64 Using Your Phone
Page 79

Editing and Sending MMS Messages
Go to menu: MMS > New MMS, and follow the steps below to edit and
send a new MMS message.
1. Go to menu:
Press (Option) to execute the following tasks:
• Insert: You can choose to insert images, videos, or auido files to
• Set Time Duration: To set the duration of each slide during
• Preview: Plays all the slides in sequence.
Each slide allows only one image and one audio file. If you try to
insert a second image or audio, an
up.
2. When you have completed editing the message, you can press
(Option) and select Send To to access your phonebook. Alternatively,
you can press and the following data fields required to send your
MMS message will appear.
or to fill in data.
• To : You can send your message to a recipient's phone or e-mail
MMS > New MMS > Create to bring up the MMS editor.
your message. For images and videos, scroll to the object you
desire and press (
Press (
Select) or to insert the object to your message. If
you wish to erase the inserted object, simply press the
delete them. To insert a second object, repeat the (Option) >
Insert process. To add a new page, go to (Option) > Insert >
New Pgae.
preview) to preview the image or video.
to
playing. For example, 30 means each slide will played for 30
seconds.
Out of range message will pop
Scroll to the data field and press (Edit)
address.
Using Your Phone 65
Page 80

Enter the recipient's phone number directly and press .
Alternatively, you can press (
Contact) to browse your
phone book and select the contacts you want to send the
message to. Scroll to highlight the desired contact and press
to select the contact. Press again to deselect. Press
(
Done) when you have finished selecting.
You can send an MMS message to a maximum of 5
recipients.
• Subject: press (Edit), enter the subject for the message, and
press .
• Send: Scroll to this option and then press to send this
message.
• Cc: You can send the message as a carbon copy to others. Enter
the carbon copy recipient's information as you do with main
copy recipients.
• Priority: press (Change) to set the priority for this message.
3. Scroll to Send and press (Select) or to send the message.
Downloading MMS messages
You can download an MMS message in 2 ways:
1. If you select
then when a MMS message arrives at the server, the operator will
send you a notification asking you whether to download the MMS
message or not. You can
• Press to start downloading. After downloading you can go to
Notify me first under MMS → Settings → No tify S etting,
Inbox to read the message.
66 Using Your Phone
Page 81

• If you press
will be stored in Notify Box. Later when you need to download the
MMS message, you can go to Notify Box and select the notification
that matches the MMS message. Press then the phone will start to
download the message.
to reject immediate download, the notification
2. If you have select Auto Dow nload under MMS→Settings→Not ify
Setting
, then when a MMS message arrives at the server, your phone
will start to download the message automatically.
Reading MMS messages
Having successfully downloaded the MMS message, the display will
automatically switch to
time, subject, and the sender's information. If the information contains
a telephone number, you can scroll to highlight the number and press
Save) to save the number to your phone book. Press
(
Content) to play the message. When the message is playing, you can do
(
the following:
• Press (Previous) and (Nex t) to display the previous/next
slide.
Press (Stop) to stop the display at the current slide. When the
•
display stops, press (
sender and subject.
• Press or to stop playing the message.
After reading the message, press to choose from the following:
• Play: Play the message again.
• Edit: Edit the content of the message.
• Forward: Forward the message to someone else.
Inbox, press to browse through the sending
Info) to check the information such as the
Using Your Phone 67
Page 82

: Reply to the sender.
• Reply
• Reply all: Reply to the sender and all the other recipients.
• Extract Numbers: Extract telephone numbers shown on the slide.
You can choose to save the numbers in your phone book.
• Save Image in this slide: Save the image shown on the slide to your
phone. After you save it, you can go to the menu:
Image to see it.
• Save audio in this slide: Save the audio file attached on the slide to
your phone. You can go to the menu:
Media Center> Music to listen
Media Center >
to the audio file.
MMS Settings
Before you start to use MMS, go to menu: MMS > Settings to adjust the
following settings:
MMS Server
Configure the web address of operator’s MMS server. Please following
the steps below:
1. Choose one from the three default server settings as your server
and press
2. Press (Edit) to enter the MMS server name and address. For
example, http://mms.
.
Notify Setting
Choose the way to download a MMS message:
• Auto Download: when the MMS server receives a new message,
your phone will display the operator’s notification first, and then
start to download the message.
68 Using Your Phone
Page 83

• Notify me first: when the MMS server receives a new message, the
phone will display the operator’s notification, then you can decide
whether to download the message immediately.
Delivery Setting
Here you can choose to get a delivery/read confirmation after you
send a MMS message to someone. Press (Mark) to mark the
following:
• Delivery Report: Asks the recipient to return a confirmation after
receiving your message.
• Read Report
reading your message.
: Asks the recipient to return a confirmation after
Message Life Time
Set the length of time your outgoing MMS messages stays on the
server before it reaches the recipient successfully.
Security Check
When you turn on this option, you can reject MMS messages from
certain senders. You should set up the Reject List first under the
MMS > Settings > Sender Reject List.
menu:
Sender Reject List
When you turn on Security Check, your phone will reject all MMS
messages from the senders you list here.
Using Your Phone 69
Page 84

SMS Chat
You can engage in a peer-to-peer chat session by writing short messages
to another mobile phone user. This feature allows you to have a
continuous text conversation with someone without having to enter the
number of the recipient each time you reply a message.
Starting a chat session
There are two ways to initiate a chat session.
Go to: SMS Chat → New Chat to start a new chat session. Follow
1.
the steps below to conduct the chat:
a. Enter the nickname for the chat session, and press .
b. Enter the phone number of the person you want to chat
with. Alternatively, when asked to enter a number, you can
press to go to the phone book, and select a contact as
your chat partner. Scroll to highlight the desired contact and
press to access the details of the contact. Scroll to
highlight the number you want to use and press to enter
the number.
c.Write your message. When you finish, press to send the
message to invite the recipient to a chat. The display shows
your nickname followed by your message as
“nickname>message”.
d.When the chat message is sent, you can press to enter the
next chat message. The message will automatically be sent to
the same recipient. Repeat the same process to send more
messages to the same person.
70 Using Your Phone
Page 85

2. Alternatively, to start a chat session, you can select a message from
Inbox, press , choose Chat, and press (Chat) or to
start a chat session with this message. This way you do have to
enter the recipient’s phone number before you send a chat
message.
Receiving a reply to your chat message
When your phone receives a reply from your chat partner, the display
will show your partner’s name and message, followed by the previous
message(s) you sent. You can now talk with your chat partner by
entering what you are going to say and press .
Your words will automatically get back to your chat partner. You can
continue the chat session by repeating the same process. All of the
text conversation will be displayed on the display.
Receiving a request for a new chat
When your phone receives a chat request from another person, a
dialogue box would pop up on the display asking if you want to join
the chat. Follow the steps below to reply to the chat message:
1. Press to view the chat message.
2. Press to join the chat. Enter your nickname and message, and
press to send your message. The display will show your name
and message followed by your partner’s previous message.
Leaving a chat session
If you want to leave a chat session, press or . This will take
you back to the SMS Chat menu. You phone will keep the records of
the last chat session. To review the previous chat session, scroll to
select Previous Chat. You can resume the previous chat session by
pressing (Chat) or .
Using Your Phone 71
Page 86

If you want start a new chat, go to: SMS Chat
→ New Chat.
When you are interrupted by an incoming call during a
chat session
1. Answer the call. Upon ending the call, the display returns to the
idle mode. Then you may resume the chat session by selecting
Previous Chat from the SMS Chat menu.
2.
Reject the incoming call and continue the chat by selecting
Previous Chat from the SMS Chat menu.
Vo i c e m a i l
Your network vendor will provide you with your voicemail inbox
number and a number for accessing any other voicemail services. For
detailed information about voicemail services, contact your network
operator to see if you need to save a specific phone number to your
phone in order to access your voicemail inbox.
To set up your voicemail box, go to Settings. See details on page 73.
Listening to a voicemail
When your voicemail box receives a voicemail, your operator gives you
a call or sends you an SMS alert to remind you of the waiting voicemail.
If the text of the SMS alert sent by your operator matches the text of the
SMS alert previously stored in your phone--this is called
your phone will recognize this SMS alert as a reminder of a new
voicemail and a prompt showing "New voicemail" will pop up.
Alert Match--
72 Using Your Phone
Page 87

To listen to the voicemail, simply press , and your phone will
automatically dial your voicemail box number for you.
To set up the Alert Match feature, you must save your operator's SMS
alert in advance. Please do so in
Match. See page 74.
Voi cema il > Settings > Alert
Alternatively, if the text of the operator's SMS does not match the text of
the SMS alert stored in the
Alert match option, or if your operator calls
you to inform you of a new voicemail, you can access your voicemail by
selecting
Vo i c e m a i l → Get Voicemail, or long press directly from
the idle display.
You can also set up a number key as a speed dial key for your voicemail
box number. For how to set up a speed dial key, see
Speed Dial on page
86.
Voicemail settings
You can use the following options in Voi c e m a i l > Settings to determine
how your voicemail box works:
Box Numbers
Here you can store your voicemail box number as well as the
numbers controlling the voicemail feature:
• Home Mbox: This is your voicemail box number that you
dial to listen to a voicemail.
• Roam Mbox: This is the number you dial to listen to a
voicemail when roaming on another network.
• Voi c e N o . : This is the number you dial to request the
operator to give you a call upon receiving a new voicemail.
Using Your Phone 73
Page 88

• Message No.
operator to send you an SMS alert upon receiving a
voicemail.
When these numbers have been set correctly, you can check your
voicemails, turn the voicemail feature on or off, or change the way
of the voicemail notification simply by selecting the respective
menu option. Your phone will automatically dial the number you
set up for each option to inform your operator of your choice.
: This is the number you dial to request the
Alert by Call
Here you can request your operator to inform you of a new
voicemail with a telephone call. Select this option and your phone
will automatically dial the number previously stored in
Numb ers
> Voi ce no ..
Box
Alert by SMS
Here you can request your operator to inform you of a new
voicemail with a SMS alert. Select this option and your phone will
automatically dial the number previously stored in
Message no..
Box numbers >
Alert Match
Here you can manually store the SMS alert to match the one sent by
your operator when a new voicemail is received. To do so turn the
voicemail feature on and set the alert mode to
ring your phone using another phone and leave yourself a voicemail
message. Your operator will then send an SMS alert saying that a
Alert by SMS, then
74 Using Your Phone
Page 89

new voicemail is waiting. Jot down the SMS alert and come to this
Alert Match option to enter and save the SMS alert. It is not
necessary to enter the whole message, just enough of it to provide a
reliable match for your phone to identify an SMS message as an
SMS alert for a new voicemail.
If the text of the SMS alert varies according to the number of
voicemails the network is holding for you--for example it may
sometimes read “1 new Voicemail” and at other times read “2 new
Voicemails”--you can set a wildcard in the
Alert match option by
inserting a “?”. And the SMS alert you enter will be like “? new voice
message.” Your phone can then use this saved message to identify
the SMS alert sent by your operator.
Cell Broadcast
Cell broadcast messages are general messages that your network
operator broadcasts to all phones within a particular area. These
messages are broadcast in numbered channels. For example, channel
030 might be for local weather, 060 for traffic reports, 080 for
information about local hospitals, taxis, pharmacies, and so forth.
You can receive cell broadcast messages that your network operator
broadcasts, and select your preferred topics and languages.
For more information about available channels and a list of the
information they provide, contact your network operator.
Set Status
Allows you to activate or de-activate the cell broadcast feature.
Read
Using Your Phone 75
Page 90

Here you can read the messages that you want your operator to
broadcast to you regularly. The name of the topic and
information will be shown on the display.
To select the messages that you would like to receive
regularly from your operator, go to the menu:
Create Topic.
To p i c s >
To p i c s
The topics listed in the Top i c s list represent the broadcast
information that you have selected to receive from your
network operator.
Create Topic
Here you can list all of the cell broadcast topics available
from your operator.
This is a twofold process:
If you have not previously saved any
topics, you can press (Option) and then select Add
option so that you can enter the desired range of topic
numbers (that is, the channel numbers). The upper and
lower limits of the range are the highest and lowest channel
numbers, respectively. The largest possible range is 0 to
65534. You are no longer limited to selecting only single
channels, but can specify a range.
serve as a reminder of what the subject is about. For
example, if the subject is about weather, you can enter
“weather” for the subject.
The name you enter will
Once you have a topics list, press (Option) to perform
the following tasks:
Add
Adds a new topic to the list.
Edit
Edits the details on the selected topic.
76 Using Your Phone
Page 91

Delete
Deletes the selected subject from the list.
Active Topic List
This is where you decide what broadcast information you
want from your operator. The topics on the Active List are
the ones that you have chosen to receive regularly from your
operator.
If the list is empty,
include the topic in the Active List.
to
press (Option) and then select Add
Language
You can limit the cell broadcast information that you receive
from your network operator to a specific language. Press
to highlight the language and press to select. To deselect
simply press again on the highlighted language. When
you are done with the selection of languages press (Done)
to save the setting.
Using Your Phone 77
Page 92

Input Modes
Changing the Text Input Mode
When the display shows the editing screen, you
will be able to see the name of the current text
input mode in the upper right corner of the
screen.
Press to change the input mode. Press
to switch to uppercase or lowercase
letters. press to open the symbols table.
The input mode icons (names) that may appear at the bottom of the
the screen represent the following input modes:
iTap (predictive input mode).
Letter input mode.
Numeric input mode.
To set the default input mode to the one you most frequently use,
choose the menu Settings > Default Input. See page 151.
Predictive Input Mode (iTap)
iTap analyzes letters as they being inputted, making intelligent
predictions about the words you are attempting to enter, and speeding
up text entry. Press to switch to uppercase or lowercase letters.
The text input mode
currently in use
78 Using Your Phone
Page 93

How to use iTap
1. Press once the alphanumeric key corresponding to the first letter of
the word you wish to enter without considering where that letter falls
in the sequence of characters available through that key. Then press
the key corresponding to the second letter, and so forth. The phone
will predict which word you wish to enter based on the set of keys
you have pressed.
Press C key to delete the letters you have entered.
2. The predicted words will be displayed and may change as you
continue to press other keys. There are two lines of predicted words:
a. The top line shows the same word you have currently highlighted
in the bottom line.
b. The bottom line shows a list of predicted prefixes or words.
Press to scroll to the desired one by highlighting it.
When you highlight a prefix press to choose the other
word with the same prefix that you desired to enter.
3. Once the correct word is displayed, press to enter this word. A
space will automatically be inserted after the word.
4. In the text, press to move the cursor left or right; press to
move the cursor up or down. Press
long-press C key to delete all entered text.
C key once to delete a character;
Using Your Phone 79
Page 94

Letter Input Mode (ABC)
Press the key containing the desired letter repeatedly to scroll through
the available characters in order until it is reached. Press to
switch to uppercase or lowercase letters.
How to use the letter input mode
• You must press the key corresponding to the desired letter the correct
number of times in order to enter the letter you want. Display letters
for entry according to the order shown on each key. Pressing a key
once will display the first letter listed on the key, while pressing it
twice will display the second letter, and so on.
• When you have entered a letter and wish to enter the next letter,
either wait for two seconds until the cursor moves to the next text
entry position, or immediately press the key for the next letter.
• Short press to enter a space before beginning a new word. Long
press
• While entering text, press to move the cursor left or right;
press to move the cursor up or down. Press once to delete a
character; long-press
to begin a new line.
to delete all entered content.
Numeric Input Mode (123)
The numeric input mode allows you to use the alphanumeric keys
to to enter numbers.
80 Using Your Phone
Page 95

Symbol Input Mode
When editing messages, press to open the symbols table. Use
to highlight the desired symbol and press to scroll page by
page. Press to place the symbol in the text.
Using Your Phone 81
Page 96

Menus
The phone's menus provide various features. The main menu consists
of 9 icons. Each icon represents a particular menu item, which is used to
access related sub-menus.
For information about navigating menus, see page 21, "Menu
Navigation".
Phone Book
View
You can either open up the Phone Book by pressing (Na mes) from
the standby screen, or by choosing this option from the Phone Book
menu.
Find
Used to locate a contact in the Phone Book. You can enter the full name
of the desired contact, or if you are not sure about the spelling of the
contact's name, simply enter the first letter, and then press . The
phone will locate all contacts whose names begin with this letter, and
you can scroll to the field containing the contact you want. For details
on what to do after locating the desired contact, see page 39, "Finding
Contacts in the Phone Book".
Add
Used to add a new contact to the Phone Book. You can follow the
procedure described on page 37, "Adding Contacts to the Phone Book".
82 Menus
Page 97

Copy
Your phone has two memories where you save data of phone book
contacts: your SIM card memory and your phone memory. This feature
allows you to copy and move your phone book contacts between the
two memories so that you can take them with you if you change phone.
SIM to Phone
Copies or moves phone book contacts saved on your SIM card to
your phone memory.
Keep Original
Copies contacts saved on your SIM card to your phone
memory, while the originals remain on the SIM card. Scroll to
highlight the contact to copy and press to select it; scrolling
to All and then pressing will select all of the contacts.
When the desired contacts have been marked, press
(Done) to copy them into the phone memory.
Delete Original
Moves contacts from your SIM Card to your phone memory
and delete the originals saved on your SIM card.
Phone to SIM
Copies or moves phone book contacts saved in your phone
memory to your SIM card. Options are the same as those for
Phone
.
SIM to
Menus 83
Page 98

Delete
Deletes contacts from the Phone Book.
SIM Record
Deletes contacts from the Phone Book stored in your SIM card's
memory.
1. Scroll to highlight the contact to delete and press to select it;
scrolling to All and then pressing will select all of the
contacts.
2. When the desired contacts have been marked, press (Done)
to delete them.
Phone Record
Deletes contacts from the Phone Book stored in the phone's
memory.
Caller Group
Caller groups are combinations of phone settings used to identify a
particular group of contacts, such as work colleagues, family members,
or friends. For example, you can associate a ring tone and animation
with one group, and when a member of that group calls, the phone will
use the group's ring tone and display its image.
The Phone provides six caller groups: Family, Friends, Bussiness,
Colleagues, VIP, Leisure, plus a group made up of contacts not assigned
to any of the caller groups.
After scrolling to highlight the caller group that you wish to configure,
you can perform the tasks below:
84 Menus
Page 99

1. Press (Option): Used to select the ring tone or image that
will help you identify the caller group to which a particular caller
belongs, or to rename the caller group.
2. Press : Allows you to view a list of all contacts that belong to
the caller group. Press to highlight the desired contact, and
then press (Option) to choose to add a contact to the caller
group, or delete the selected contact from the group.
Privacy Manager
This option allows you to set your phone to reject certain calls, or
alternatively, specify which calls to accept, rejecting all others.
1. First, create a list of calls that you wish to accept (Accept List) or a list
of calls that you wish to reject (Reject List), by scrolling to the
corresponding item. Then press (Select) and the names of the
contacts who are already on the selected list will be displayed.
2. If the list is empty, press (Option) to bring up the pop-up menu.
You can then perform the following tasks:
a. Add: This option allows you to choose contacts to include in the
list. Scroll to the contacts that you wish to add to the list, and
then press to select the contact. Press (Done) when you
have finished the selection. Alternatively, you can select All to
add all contacts to the list.
b. Advance: If you select Reject no number when setting up the
Reject List, calls with no number displayed on the screen will be
rejected. If you select Reject strange number, calls made by
people not listed in the phone book will be rejected by the
phone.
Menus 85
Page 100

When setting up the Accept List, on the other hand, selecting
Accept no number will set the phone to accept calls with no
number displayed on the screen; selecting Accept strange
number will set the phone to accept calls made by people not
listed in the phone book.
3. When you are finished setting up the list, press . The screen will
display the names of the contacts you have added to the list. If
needed, you can press (Option) to add or remove contacts.
When you have confirmed the list, press (Back) to return to the
Privacy Manager menu.
4. From the Privacy Manager menu, select Setup to decide whether to
activate the Accept List or the Reject List, or disable both.
If you choose to activate the Accept List, from now on your phone
will only be able to receive calls from contacts in the Accept List. If,
on the other hand, you choose to activate the Reject List, your phone
will not be able to receive calls from contacts in the Reject List.
The same contact can be included in both the Accept List and the
Reject List. Since only one list will be activated at a time.
Speed Dial
1. After selecting an entry that represents the number key to serve as the
shortcut key, press (Option) to bring up the pop-up menu and
select Add.
2. From the Phone Book, select a contact.
3. From the list of phone numbers for this contact, select the one that
you wish to access through the shortcut key.
86 Menus
 Loading...