

Page 1

BENNING SOLAR Manager
(D) Bedienungsanleitung
(GB) Operating manual
==========================================================
06/ 2018 - 1 -
Page 2

BENNING SOLAR Manager
Bedienungsanleitung
PC-Software „BENNING SOLAR Manager“
==========================================================
Inhaltsverzeichnis
1. Allgemeines
2. Installation
2.1 Systemvoraussetzungen
2.2 Installation der Anwendung
2.3 Freischaltung und Registrierung
3. Das Hauptfenster
3.1 Menüzeile
3.2 Registerkarte Dokument Explorer/Dokument Suche
4. Dokumentation mit dem BENNING SOLAR Manager
4.1 Erstellung einer I-U Kennlinie und Leistungskennlinie
4.1.1 Kennliniendaten aus einer csv-Datei importieren
4.1.2 Kennliniendaten aus dem BENNING PV 2 importieren
4.2 Erstellung eines Prüfberichts „PV-Generator-Erprobung“
4.2.1 Messdaten aus einer csv-Datei importieren
4.2.2 Messdaten aus dem BENNING PV 2 importieren
5. Verwendete Abkürzungen
06/ 2018 - 2 -
Page 3

BENNING SOLAR Manager
1. Allgemeines
Die PC-Software BENNING SOLAR Manager ermöglicht mit dem PV-Installationstester und Kennlinienmessgerät BENNING PV 2 die Prüfberichterstellung sowie die Dokumentation gemäß den Normen DIN EN 62446
(VDE 0126-23) und DIN EN 61829 (VDE 0126-24). Die ermittelten I-U Kennlinien und Leistungskennlinien
des BENNING PV 2 können auf STC-Bedingung umgerechnet und über eine integrierte PV-Moduldatenbank
mit den nominalen Herstellerangaben verglichen werden.
2. Installation
2.1 Systemvoraussetzungen
Der BENNING SOLAR Manager ist ein Windows Programm und benötigt mindestens folgende Systemvoraussetzungen:
• Prozessor: 1 GHz oder höher
• Microsoft Windows 7/ Windows 8/ Windows 10
• 32 Bit & 64 Bit Betriebssystem
• 1 GB RAM oder höher
• 50 MB freier Festplattenspeicher
• Farbmonitor mit 32 Bit Grafikkarte oder höher
2.2 Installation der Anwendung
Zur Installation der Anwendung legen Sie bitte die Installations-CD in Ihr Laufwerk und starten Sie im Verzeichnis „Programm-program“ die Datei „Solar_Manager_Installer_...exe“.
Am Ende der Installation werden sie ggf. aufgefordert den Rechner neu zu starten.
Zusätzlich steht auch die aktuellste Version des BENNING SOLAR Managers auf der Produktseite des
PV-Testers BENNING PV 2 im Bereich Software zum Download bereit.
2.3 Freischaltung und Registrierung
Der BENNING SOLAR Manager ist eine lizenzpflichtige Einzelplatzanwendung. Sie können die Anwendung
innerhalb der ersten 14 Tage kostenlos nutzen und entscheiden danach, ob Sie die Anwendung erwerben
möchten. Zum Erwerb der Anwendung beziehen Sie über den Fachhandel einen 16-stelligen Freischaltcode
für eine Einzelplatz-Lizenz des BENNING SOLAR Managers (Art. 050423). Der 16-stellige Freischaltcode
wird auf einer Karte im Scheckkartenformat zur Verfügung gestellt und aktiviert den BENNING SOLAR
Manager zeitlich unbegrenzt.
Nach der erfolgten Aktivierung des BENNING SOLAR Managers müssen Sie den BENNING SOLAR
Manager auf unserer Homepage registrierung.benning.de registrieren. Profitieren Sie durch die
Registrierung von unserem Informationsservice sowie unserer 24 Stunden Service-Hotline.
Tel. +49 (0) 2871/93 - 555
06/ 2018 - 3 -
Page 4

BENNING SOLAR Manager
3. Das Hauptfenster
Das Hauptfenster besteht aus einer Menüzeile mit den Registerkarten <Datei>, <Bearbeiten>, <Fenster> und
<Hilfe>. Zusätzlich befinden sich die Registerkarten <Dokument Explorer> und <Dokument-Suche> auf der
linken Seite sowie ein Dokumentenbereich auf der rechten Seite des Bildschirms.
3.1 Menüzeile
Die Menüzeile besteht aus den folgenden Registerkarten:
• Registerkarte Datei:
Über die Registerkarte <Datei> können Sie verschiedene Arten von Prüfberichte erstellen, ein Anlagenschema der PV-Anlage skizzieren sowie neue Kennliniendaten einlesen, bearbeiten und dokumentieren.
Nachdem Sie ein neues Dokument über die Registerkarte <Datei> angelegt haben, führen Sie einen
Doppelklick auf das Dokument aus, um es zu öffnen und zu bearbeiten.
06/ 2018 - 4 -
Page 5

BENNING SOLAR Manager
Prüfbericht Besichtigung Prüfbericht PV-Generator-Erprobung
Prüfbescheinigung Übergabe-Checkliste
06/ 2018 - 5 -
Page 6

BENNING SOLAR Manager
Prüfberichte, die Sie einmal bearbeitet haben, können Sie über die Schalfläche als Vorlage speichern
und bei der nächsten Berichtserstellung erneut verwenden.
Anlagenschema I-U Kennlinie und Leistungskennlinien
06/ 2018 - 6 -
Page 7

BENNING SOLAR Manager
• Registerkarte Bearbeiten
Über die Registerkarte <Bearbeiten>, <Einstellungen>, <Projektordner> können Sie einen Projektordner
bestimmen, unter denen alle Projekte des BENNING Solar Managers gespeichert werden sollen.
Über die Registerkarte <Bearbeiten>, <Einstellungen>, <Berichtsvorlagen> können Sie veränderte Berichtsvorlagen wieder auf den ursprünglichen Zustand zurücksetzen.
• Registerkarte Fenster
Über die Registerkarte <Fenster> können geöffnete Fenster nebeneinander oder überlappend angeordnet
werden und die Fensteranordnung kann zurückgesetzt werden.
06/ 2018 - 7 -
Page 8

BENNING SOLAR Manager
• Registerkarte Hilfe
Über die Schaltfläche <Über> erhalten Sie eine Information über die installierte Versions-Nr. des BENNING
SOLAR Managers. Über die Schaltfläche <Lizenz> wird der registrierte 16-stellige Freischaltcode angezeigt.
Die Schaltfläche <Bedienungsanleitung> öffnet die Bedienungsanleitung der PC-Software BENNING SOLAR
Manager als PDF-Dokument.
Über … Lizenz …
Bedienungsanleitung …
06/ 2018 - 8 -
Page 9

BENNING SOLAR Manager
3.2 Registerkarte Dokument Explorer und Dokument Suche
Zusätzlich stehen auf der linken Bildschirmseite folgende Registerkarten zur Verfügung:
• Registerkarte Dokument-Explorer
Im dem Dokument-Explorer können Sie, wie bei dem Windows-Explorer üblich, Ihre Projekte in Ordner und
Unterordner anlegen und verwalten. Den Speicherort der Projekte definieren Sie über die Registerkarte
<Bearbeiten>, <Einstellungen>, <Projektordner>.
• Registerkarte Dokument-Suche
Über die Registerkarte <Dokument-Suche> können Sie eine Datei über verschiedene Suchkriterien suchen.
Registerkarte Dokument-Explorer Registerkarte Dokument-Suche
06/ 2018 - 9 -
Page 10

BENNING SOLAR Manager
4.
Dokumentation mit dem BENNING SOLAR Manager
Der BENNING SOLAR Manager stellt für die Dokumentation einer PV-Anlage eine Auswahl unterschiedlicher
Berichtstypen zur Verfügung, wie sie in den Normen
DIN EN 61446-1 (VDE 0126-23-1)
Photovoltaik (PV) Systeme –
Anforderungen an Prüfung, Dokumentation und Instandhaltung –
Teil 1 Netzgekoppelte Systeme – Dokumentation, Inbetriebnahmeprüfung und Prüfanfordnung
und
DIN EN 61829 (VDE 0126-24)
Photovoltaische (PV) Modulgruppen –
Messen der Strom-Spannungskennlinie am Einsatzort
gefordert sind.
Darüber hinaus kann das Anlagenschema der PV-Anlage grob skizziert und dokumentiert werden.
Alle erstellten Berichtstypen aus dem BENNING SOLAR Manager und auch weitere Dokumente wie MS
Word-, MS Excel- und PDF-Dateien können objektbezogen in Ordner gespeichert und verwaltet werden.
Nachfolgend wird die Vorgehensweise beschrieben, wie Sie Kennliniendaten in den BENNING SOLAR
Manager importieren, Kennlinien dokumentieren und einen Prüfbericht PV-Generator anfertigen.
06/ 2018 - 10 -
Page 11

BENNING SOLAR Manager
4.1. Dokumentation einer I-U Kennlinie und Leistungskennlinie
Sie können Kennliniendaten direkt aus dem PV-Tester BENNING PV 2 oder aus einer gespeicherten
csv-Datei in den BENNING SOLAR Manager importieren.
4.1.1 Kennliniendaten aus einer csv-Datei importieren
1. Klicken Sie im BENNING SOLAR Manager über Registerkarte <Datei> auf <Neue Kennliniendaten>
und führen Sie einen Doppelklick auf den Dateinamen aus. Im Dokumentenbereich auf der rechten
Seite öffnet sich ein Kennliniendiagramm.
2. Klicken Sie auf die Schaltfläche , um die csv-Datei zu öffnen, dessen Kennliniendaten Sie
importieren möchten.
3. Die ausgewählte Datei erscheint rechts im Objektfenster. Klappen Sie über das „+“-Symbol die einzelnen PV-Stränge auf und strukturieren Sie im Bedarfsfall die PV-Anlage durch Einfügen (Rechtsklick) weiterer Zeilen, z.B. Wechselrichter 1, Wechselrichter 2, …
4. Die Kennlinien werden angezeigt, sobald Sie einen oder alle PV-Stränge markieren und die Schaltflächen der gewünschten Kennlinie aktivieren. z.B. Schaltfläche <Gem.> (= Gemessene Werte) oder
Schaltfläche <STC> (= Gemessene Werte auf STC-Bedingung berechnet).
Ein Rechtsklick auf eine Zeile (PV-Strang) ermöglicht u.a. die Anzeige der detaillierten Kennliniendaten, die Auswahl des PV-Modultyps, die Erstellung eines Prüfberichts PV-Generator - I-U Kennlinie,
den Export der Kennlinie als MS Excel-Datei und die Farbeinstellung der Kennlinien.
Zur Anzeige der nominalen Kennlinie (Schaltfläche <Nom.>) müssen Sie zuerst den PV-Modultyp und
die Anzahl der installierten PV-Module pro PV-Strang zuordnen. Die integrierte Moduldatenbank be-
inhaltet über 14.000 PV-Module. Häufig verwendete PV-Module können mit einem Stern als Favorit
markiert und schneller ausgewählt werden.
Der Moduldatenbank können neue Module hinzugefügt, oder auch bestehende Module kopiert, be-
arbeitet und unter einem neuen Namen gespeichert werden.
Die angezeigten Kennlinien können direkt ausgedruckt und als PDF-Datei oder als Bild (bmp-Datei)
exportiert werden.
06/ 2018 - 11 -
Page 12
BENNING SOLAR Manager
4.1.2 Kennliniendaten aus dem BENNING PV 2 importieren
1. Klicken Sie im BENNING SOLAR Manager über Registerkarte <Datei> auf <Neue Kennliniendaten> und führen Sie einen Doppelklick auf den Dateinamen aus. Im Dokumentenbereich auf der
rechten Seite öffnet sich ein Kennliniendiagramm.
2. Klicken Sie auf die Schaltfläche , um die Kennliniendaten aus dem BENNING PV 2 zu importieren.
3. Es öffnet sich die Anwendung BENNING Datalogger, die den Download der Messdaten durchführt.
Die Anwendung ist in der Taskleiste über das rote PV-Tester-Symbol zu erkennen.
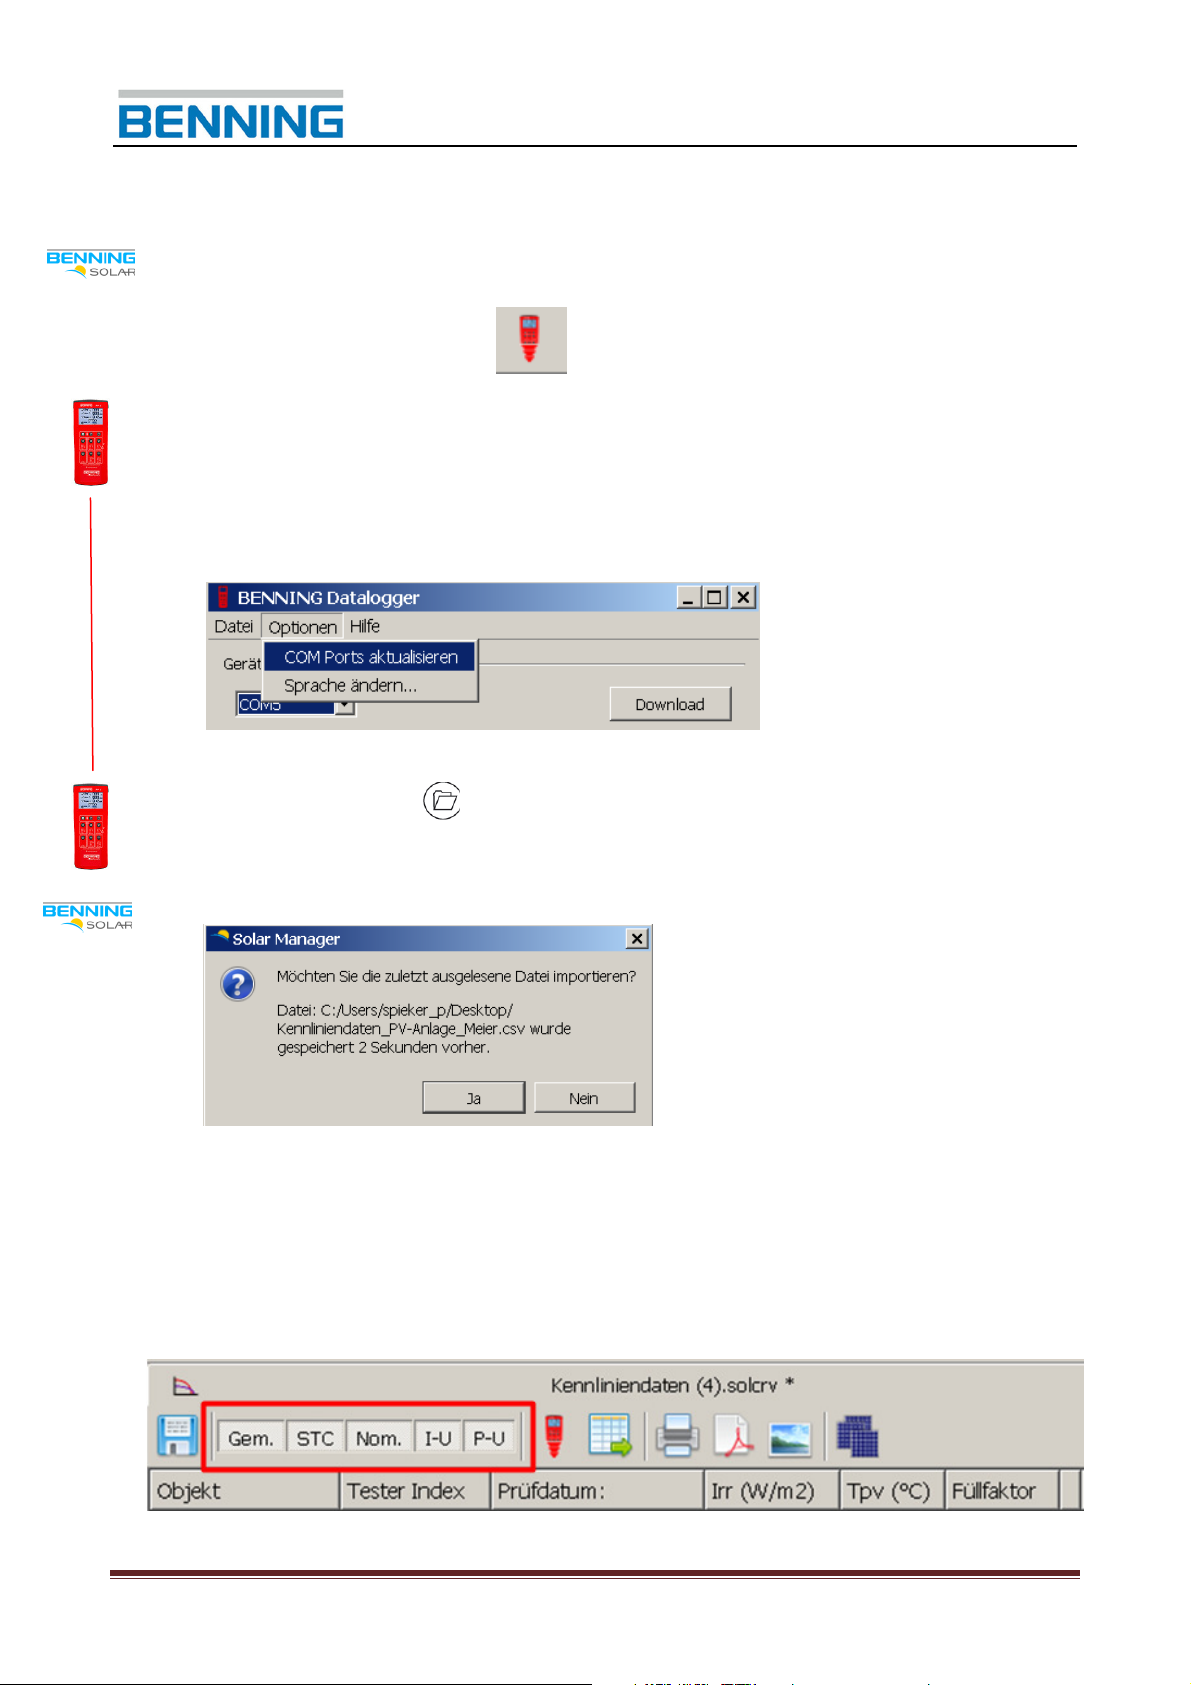
4. Verbinden Sie den PV-Tester über das USB-Schnittstellenkabel mit dem PC und schalten Sie den
PV-Tester ein. Klicken Sie im BENNING Datalogger auf die Registerkarte <Optionen>, <COM Ports
aktualisieren> und wählen Sie den verwendeten COM-Port aus.
5. Klicken Sie auf die Schaltfläche <Download> und starten Sie den Download am PV-Tester durch
Drücken und Halten der -Taste. Die Messwerte werden als csv-Datei gespeichert.
6. Beenden Sie den BENNING Datalogger über die Registerkarte <Datei>, <Beenden> und wechseln
Sie über die Taskleiste zurück zum BENNING SOLAR Manager.
7. Bestätigen Sie den Datenimport im BENNING SOLAR Manager.
8. Die importierte Datei erscheint rechts im Objektfenster. Klappen Sie über das „+“-Symbol die
einzelnen PV-Stränge auf und strukturieren Sie im Bedarfsfall die PV-Anlage durch Einfügen
(Rechtsklick) weiterer Zeilen, z.B. Wechselrichter 1, Wechselrichter 2, …
9. Die Kennlinien werden angezeigt, sobald Sie einen oder alle PV-Stränge markieren und die
Schaltflächen der gewünschten Kennlinie aktivieren, z.B. Schaltfläche <Gem.> (= Gemessene
Werte) oder Schaltfläche <STC> (= Gemessene Werte auf STC-Bedingung berechnet).
06/ 2018 - 12 -
Page 13

BENNING SOLAR Manager
10. Ein Rechtsklick auf eine Zeile (PV-Strang) ermöglicht u.a.
- die Anzeige der detaillierten Kennliniendaten,
- die Auswahl des PV-Modultyps,
- die Erstellung eines Prüfberichts PV-Generator - I-U Kennlinie als PDF-Dokument,
- den Export der Kennlinie als MS Excel-Datei und
- die Farbeinstellung der Kennlinien.
Zur Anzeige der nominalen Kennlinie (Schaltfläche <Nom.>) müssen Sie zuerst den PV-Modultyp und
die Anzahl der installierten PV-Module pro PV-Strang zuordnen. Die integrierte Moduldatenbank beinhaltet über 14.000 PV-Module. Häufig verwendete PV-Module können mit einem Stern als Favorit
markiert und schneller ausgewählt werden.
Der Moduldatenbank können neue Module hinzugefügt, oder auch bestehende Module kopiert, be-
arbeitet und unter einem neuen Namen gespeichert werden.
Die angezeigten Kennlinien können direkt ausgedruckt und als PDF-Datei oder als Bild (bmp-Datei)
exportiert werden.
06/ 2018 - 13 -
Page 14

Anzeige der I-U Kennlinie:
BENNING SOLAR Manager
Anzeige der I-U Kennlinie und Leistungskennlinie:
06/ 2018 - 14 -
Page 15

BENNING SOLAR Manager
PV-Generator - Prüfbericht I-U Kennlinie:
06/ 2018 - 15 -
Page 16

BENNING SOLAR Manager
4.2 Erstellung eines Prüfberichts „PV-Generator – Erprobung“
Der Prüfbericht „PV-Generator – Erprobung“ entspricht den Vorgaben der DIN EN 61446-1 (VDE 0126-23-1):
2016-12. Sie können die Messdaten direkt aus dem PV-Tester BENNING PV 2 oder aus einer gespeicherten
csv-Datei in den BENNING SOLAR Manager importieren.
Folgende Messdaten werden importiert:
Leerlaufspannung, Kurzschlussstrom, Isolationswiderstand, Einstrahlung und Temperatur mit Datum-/ Zeitstempel
4.2.1 Messdaten aus einer csv-Datei importieren
1. Klicken Sie über die Registerkarte <Datei> auf <Neuer Prüfbericht PV-Generator> und führen Sie einen Doppelklick auf den Dateinamen aus. Im Dokumentenbereich auf der rechten Seite wird der Prüfbericht angezeigt.
2. Klicken Sie auf die Schaltfläche , um eine csv-Datei zu öffnen, deren Messdaten Sie importieren möchten.
3. Markieren Sie die zu importierenden Messdaten zeilenweise und klicken Sie auf die Schaltfläche
<Zeile(n) importieren>, um die Messdaten in den Prüfbericht zu importieren
.
06/ 2018 - 16 -
Page 17

BENNING SOLAR Manager
4.2.2 Messdaten aus dem BENNING PV 2 importieren
1. Klicken Sie über die Registerkarte <Datei> auf <Neuer Prüfbericht PV-Generator> und führen Sie
einen Doppelklick auf den Dateinamen aus. Im Dokumentenbereich auf der rechten Seite wird der
Prüfbericht angezeigt.
2. Klicken Sie auf die Schaltfläche , um die Messdaten aus dem PV-Tester zu importieren.
3. Es öffnet sich die Anwendung BENNING Datalogger, die den Download der Messdaten durchführt.
Die Anwendung ist in der Taskleiste über das rote PV-Tester-Symbol zu erkennen.
4. Verbinden Sie den PV-Tester über das USB-Schnittstellenkabel mit dem PC und schalten Sie den
PV-Tester ein. Klicken Sie im BENNING Datalogger auf die Registerkarte <Optionen>, <COM Ports
aktualisieren> und wählen Sie den verwendeten COM-Port aus.
5. Klicken Sie auf die Schaltfläche <Download> und starten Sie den Download am PV-Tester durch
Drücken und Halten der Taste. Die Messwerte werden als csv-Datei gespeichert.
6. Beenden Sie die den BENNING Datalogger über die Registerkarte <Datei>, <Beenden> und
wechseln Sie über die Taskleiste zurück zum BENNING SOLAR Manager.
7. Bestätigen Sie den Datenimport, markieren Sie die zu importierenden Messdaten zeilenweise und
klicken Sie auf die Schaltfläche <Zeile(n) importieren>.
06/ 2018 - 17 -
Page 18

BENNING SOLAR Manager
5. Verwendete Abkürzungen
Abkürzungen zur Kennliniendarstellung:
Gem.: Kennlinie der gemessenen Werte
STC: Kennlinie der gemessenen Werte auf STC-Bedingung (STC: 1000 W/m2, 25 °C) berechnet
Nom.: Nominale Kennlinie gemäß Moduldatenblatt
I-U: Anzeige der Strom-Spannungs-Kennlinie
P-U: Anzeige der Leistungskennlinie
Irr (W/m2): Solare Einstrahlung in W/m2
Tpv (°C): Modultemperatur in °C
FF: Füllfaktor = (Vmpp x Impp) / (Voc x Isc)
06/ 2018 - 18 -
Page 19

BENNING SOLAR Manager
Abkürzungen der PV Modulparameter und STC-Berechnung:
Voc: Leerlaufspannung
Isc: Kurzschlussstrom
Vmpp: Spannung am MPP (Maximum Power Point)
Impp: Strom am MPP (Maximum Power Point)
Alpha: Temperaturkoeffizient (TK) des Kurzschlussstroms (leicht positiv), Eingabe in A/°C oder in %/C
Beta: Temperaturkoeffizient (TK) der Leerlaufspannung (negativ), Eingabe in V/°C oder in %/C
Rs: Serienwiderstand des PV-Moduls in Ω, typisch: 0,3 - 0,5 Ω
Delta: Delta-Koeffizient gemäß Anderson-Methode zur STC-Berechnung:
Monokristallin: 0,085, Multikristallin (Poly-): 0,110, Dünnschicht: 0,063
Falls der Delta-Wert nicht bekannt ist (Feld bleibt leer), verwendet das Programm den
voreingestellten Wert: 0,1, welcher typisch ist für die meisten PV-Module.
K: K-Koeffizient gemäß IEC 60891 Methode 1 zur STC-Berechnung: K = 0,0125
Quelle: Datenblatt oder Labor
Hinweis: Die weiß hinterlegten Eingabefelder der Einstrahlung, Modul- und Umgebungstemperatur, können
auch nachträglich eingetragen werden, wenn während der Messung der I-U Kennlinie keine Funkanbindung
zum Einstrahlung- und Temperaturmessgerät BENNING SUN 2 bestand.
06/ 2018 - 19 -
Page 20

BENNING SOLAR Manager
Operating manual
PC software “BENNING SOLAR Manager”
==========================================================
Table of contents
1. General information
2. Installation
2.1 System requirements
2.2 Installing the application
2.3 License activation and registration
3. Main window
3.1 Menu bar
3.2 Document Browser/Document Search tabs
4. Documentation by means of the BENNING SOLAR Manager
4.1 Creating an I-V curve and power curve
4.1.1 Importing curve data from a CSV file
4.1.2 Importing curve data from the BENNING PV 2
4.2 Creating a “PV array test report”
4.2.1 Importing measurement data from a CSV file
4.2.2 Importing measurement data from the BENNING PV 2
5. Abbreviations used
06/ 2018 - 20 -
Page 21

BENNING SOLAR Manager
1. General information
The PC software BENNING SOLAR Manager used with the PV installation tester and curve tracer
BENNING PV 2 allows the creation of test reports and documentation in compliance with the standards
DIN EN 62446 (VDE 0126-23) and DIN EN 61829 (VDE 0126-24). The measured I-V characteristics and
power characteristics of the BENNING PV 2 can be converted to standard test conditions (STC) and can be
compared with the manufacturer’s nominal specifications via an integrated PV module database.
2. Installation
2.1 System requirements
BENNING SOLAR Manager is a Windows program with the following minimum system requirements:
• Processor: 1 GHz or higher
• Microsoft Windows 7/ Windows 8/ Windows 10
• 32-bit & 64-bit operating system
• 1 GB RAM or higher
• 50 MB free hard disk space
• Color monitor with 32-bit graphics board or higher
2.2 Installing the application
To install the application, insert the installation CD into the corresponding drive of your PC and go to the
“Programm-program” directory to start the “Solar_Manager_Installer_...exe” file.
At the end of the installation process, you might be prompted to restart the PC.
In addition, the latest version of the BENNING SOLAR Manager is available for download in the “Software”
area at the product page of the BENNING PV 2 tester.
2.3 License activation and registration
BENNING SOLAR Manager is a single-user application subject to licensing. You can use the application free
of charge for 14 days and then decide whether you want to purchase it. To purchase the application, a 16-digit
product key for a single-user license of the BENNING SOLAR Manager (item no. 050423) is available via the
specialized trade. The 16-digit product key is provided on a card in credit card format and activates the
BENNING SOLAR Manager for an unlimited period of time.
After successful activation of the BENNING SOLAR Manager, you have to register the software at our website
registrierung.benning.de. After registration, you will benefit from our information service and our 24/7
service hotline.
Phone: +49 (0) 2871/93 - 555
06/ 2018 - 21 -
Page 22

BENNING SOLAR Manager
3. Main window
The main window consists of a menu bar containing the tabs <File>, <Edit>, <Window>, <Language> and
<Help>. Furthermore, you can find the tabs <Document Browser> and <Document Search> on the left as well
as a document pane on the right of the screen.
3.1 Menu bar
The menu bar consists of the following tabs:
• <File> tab:
Go to the <File> tab to create different types of test reports, sketch a PV installation diagram as well as read in,
edit and document curve data. After having created a new document via the <File> tab, double-click the
document to open or edit it.
06/ 2018 - 22 -
Page 23

BENNING SOLAR Manager
PV system inspection report PV array test report
PV system verification certificate Client handover pack checklist
06/ 2018 - 23 -
Page 24

BENNING SOLAR Manager
Test reports that have been edited can be saved as a template using the button and can be used
again for creating the next test report.
Installation diagram I-V curve and power curves
06/ 2018 - 24 -
Page 25

BENNING SOLAR Manager
• <Edit> tab
Go to <Edit>, <Settings>, <Projects Directory> to select a project directory where all projects of the
BENNING Solar Manager shall be stored.
Go to <Edit>, <Settings>, <Report Favourites> to reset report templates that have been changed to their
default state.
• <Window> tab
Go to the <Window> tab to arrange open windows next to each other (‘Tile’) or overlapping (‘Cascade’) and to
reset the window layout.
06/ 2018 - 25 -
Page 26

BENNING SOLAR Manager
• <Help> tab
Click <About> to get information in the installed version of the BENNING SOLAR Manager. Click <License> to
display the registered 16-digit product key.
Click <PDF Instruction Manual> to open the operating manual of the PC software
BENNING SOLAR Manager as PDF document.
About … License …
PDF Instruction Manual ...
06/ 2018 - 26 -
Page 27

BENNING SOLAR Manager
3.2 <Document Browser> and “Document Search” tabs
Moreover, the following tabs are available on the left of the screen:
• <Document Browser> tab
In the Document Browser, you can create and manage your projects in folders and subfolders as it is known
from the Windows Explorer. Go to <Edit>, <Settings>, <Projects Directory> to specify the storage location of
the projects.
• <Document Search> tab
Go to the <Document Search> tab to search for a file using different search criteria.
<Document Browser> tab <Document Search> tab
06/ 2018 - 27 -
Page 28

BENNING SOLAR Manager
4.
Documentation by means of the BENNING SOLAR Manager
For the documentation of a PV system, the BENNING SOLAR Manager offers a wide range of different report
types as required in the standards
DIN EN 61446-1 (VDE 0126-23-1)
Photovoltaic (PV) systems –
Requirements for testing, documentation and maintenance –
Part 1: Grid connected systems – Documentation, commissioning tests and inspection
and
DIN EN 61829 (VDE 0126-24)
Photovoltaic (PV) array –
On-site measurement of current-voltage characteristics
Moreover, it is possible to roughly sketch and document the installation diagram of the PV system.
All created report types from the BENNING SOLAR Manager as well as other documents such as MS Word,
MS Excel and PDF files can be stored and managed in an object-related way.
The following sections describe how to import curve data into the BENNING SOLAR Manager, how to
document curves and how to create a PV array test report.
06/ 2018 - 28 -
Page 29

BENNING SOLAR Manager
4.1 Documentation of an I-V curve and power curve
You can import curve data into the BENNING SOLAR Manager directly from the PV tester BENNING PV 2 or
from a stored CSV file.
4.1.1 Importing curve data from a CSV file
1. In the BENNING SOLAR Manager, go to the <File> tab, click <New Curve Data> and double-click the
file name. A curve diagram opens in the document pane on the right.
2. Click the button to open the CSV file from which you want to import curve data.
3. The selected file is displayed in the object window on the right. Click the “+” icon to unfold the
individual PV strings and structure the PV system by inserting (right-click) further lines such as e. g.
inverter 1, inverter 2, if required.
4. The curves are displayed as soon as you select one PV string or all PV strings and enable the buttons
of the desired curve, e. g. the <MEAS> button (= measured values) or the <STC> button (= measured
values converted to STC).
Right-click a line (PV string) e. g. to view details of the curve, to select a PV module type, to create a
PV array – I-V curve report, to export the curve as MS Excel file and to set the colors of the curves.
To display the nominal curve (<NOM> button), you first have to assign the PV module type and the
number of installed PV modules per PV string. The integrated module database contains more than
14,000 PV modules. Frequently used PV modules can be marked with a star for faster selection.
It is possible to add new modules to the module database and existing modules can be copied, edited
and renamed.
The displayed curves can be printed directly and exported as PDF file or as an image (BMP file).
06/ 2018 - 29 -
Page 30

BENNING SOLAR Manager
4.1.2 Importing curve data from the BENNING PV 2
1. In the BENNING SOLAR Manager, go to the <File> tab, click <New Curve Data> and double-click
the file name. A curve diagram opens in the document pane on the right.
2. Click the button to import the curve data from the BENNING PV 2.
3. The BENNING Datalogger application opens which downloads the measurement data. The
application can be recognized in the task bar by the red PV tester icon.
4. Connect the PV tester to the PC using the USB interface cable and switch on the PV tester. In the
BENNING Datalogger, go to <Tools>, <Refresh Ports> and select the COM port used.
5. Click the <Download> button and start the download at the PV tester by pressing and holding the
key. The measured values will be stored as a CSV file.
6. Click <File>, <Exit> to exit the BENNING Datalogger and use the task bar to go back to the
BENNING SOLAR Manager.
7. Confirm the data import in the BENNING SOLAR Manager.
8. The imported file is displayed in the object window on the right. Click the “+” icon to unfold the
individual PV strings and structure the PV system by inserting (right-click) further lines such as e. g.
inverter 1, inverter 2, if required.
9. The curves are displayed as soon as you select one PV string or all PV strings and enable the
buttons of the desired curve, e. g. the <MEAS> button (= measured values) or the <STC> button (=
measured values converted to STC).
06/ 2018 - 30 -
Page 31

BENNING SOLAR Manager
10. Right-click a line (PV string) e. g. to
- view details of the curve,
- select a PV module type,
- create a PV array – I-V curve report as PDF document,
- export the curve as MS Excel file or
- set the colors of the curves.
To display the nominal curve (<NOM> button), you first have to assign the PV module type and the
number of installed PV modules per PV string. The integrated module database contains more than
14,000 PV modules. Frequently used PV modules can be marked with a star for faster selection.
It is possible to add new modules to the module database and existing modules can be copied, edited
and renamed.
The displayed curves can be printed directly and exported as PDF file or as an image (BMP file).
06/ 2018 - 31 -
Page 32

BENNING SOLAR Manager
Displaying the I-V characteristic:
Displaying the I-V curve and the power curve:
06/ 2018 - 32 -
Page 33

PV array – I-V curve report:
BENNING SOLAR Manager
06/ 2018 - 33 -
Page 34

BENNING SOLAR Manager
4.2 Creating a “PV array test report”
The “PV array test report” complies with the specifications of DIN EN 61446-1 (VDE 0126-23-1): 2016-12.
You can import the measurement data into the BENNING SOLAR Manager directly from the PV tester
BENNING PV 2 or from a stored CSV file.
The following measurement data will be imported:
Open-circuit voltage, short-circuit current, insulating resistance, insolation and temperature with date / time
stamp.
4.2.1 Importing measurement data from a CSV file
1. Go to the <File> tab, click <New PV Array Test Report> and double-click the file name. The test report
is displayed in the document pane on the right.
2. Click the button to open the CSV file from which you want to import measurement data.
3. Select the measurement data to be imported line by line and click the <Import row(s)> button to
import the measurement data into the test report.
06/ 2018 - 34 -
Page 35

BENNING SOLAR Manager
4.2.2 Importing measurement data from the BENNING PV 2
1. Go to the <File> tab, click <New PV Array Test Report> and double-click the file name. The test
report is displayed in the document pane on the right.
2. Click the button to import the measurement data from the PV tester.
3. The BENNING Datalogger application opens which downloads the measurement data. The
application can be recognized in the task bar by the red PV tester icon.
4. Connect the PV tester to the PC using the USB interface cable and switch on the PV tester. In the
BENNING Datalogger, go to <Tools>, <Refresh Ports> and select the COM port used.
5. Click the <Download> button and start the download at the PV tester by pressing and holding the
key. The measured values will be stored as a CSV file.
6. Click <File>, <Exit> to exit the BENNING Datalogger and use the task bar to go back to the
BENNING SOLAR Manager.
7. Confirm the data import, select the measurement data to be imported line by line and click the <Import
row(s)> button.
06/ 2018 - 35 -
Page 36

BENNING SOLAR Manager
5. Abbreviations used
Abbreviations used for displaying the curves:
MEAS: Curve of the measured values
STC: Curve of the measured values converted to standard test conditions (STC: 1,000 W/m2, 25 °C)
NOM: Nominal curve according to module data sheet
I-V: Displaying the current-voltage curve
PWR: Displaying the power curve
Irr (W/m2): Irradiance (insolation) in W/m2
Tpv (°C): Cell (module) temperature in °C
FF: Filling factor = (Vmpp x Impp) / (Voc x Isc)
06/ 2018 - 36 -
Page 37

BENNING SOLAR Manager
Abbreviations used for PV module parameters and conversion to STC:
Voc: Open-circuit voltage
Isc: Short-circuit current
Vmpp: Voltage at the MPP (maximum power point)
Impp: Current at the MPP (maximum power point)
Alpha: Temperature coefficient of the short-circuit current (slightly positive), specified in A/°C or in %/C
Beta: Temperature coefficient of the open-circuit-voltage (negative), specified in V/°C or in %/C
Rs: Series resistance of the PV module in Ω, typically: 0.3 to 0.5 Ω
Delta: Delta coefficient according to Anderson method for conversion to STC:
Monocrystalline: 0.085, multicrystalline (poly-): 0.110, thin-film: 0.063
If the delta value is unknown (field remains empty), the program uses the default value (0.1) which
is typical of most PV modules.
K: K coefficient according to IEC 60891 method 1 for conversion to STC: K = 0.0125
Source: Data sheet or laboratory
Note: The input fields highlighted in white for insolation, module and ambient temperature can also be filled in
later if there was no radio connection to the insolation and temperature measuring instrument
BENNING SUN 2 when measuring the I-V curve.
06/ 2018 - 37 -
Page 38

BENNING SOLAR Manager
Elektrotechnik und Elektronik GmbH & Co. KG
Münsterstraße 135 - 137
D - 46397 Bocholt
Phone: +49 (0) 2871-93-0 • Fax: +49 (0) 2871-93-429
www.benning.de • E-mail: duspol@benning.de
06/ 2018 - 38 -
 Loading...