

Page 1

AUTO TAB CONTROL (ATC)
OWNER’S MANUAL &
INSTALLATION INSTRUCTIONS
IMPORTANT: This manual contains critical
information directly affecting the safe and efcient
operation of your boat. Please read thoroughly before
operating the Auto Tab Control system.
SAVE AND KEEP WITH
BOAT OWNER’S INFORMATION
Page 2
Congratulations!
You are the owner of the most sophisticated Trim Tab control
system in the world. Nothing will create a more efciently trimmed
boat than the ATC. It constantly monitors your boat’s position and
uses your trim tabs to maintain your optimal cruising attitude.
SECTION 1
A BASIC PRODUCT UNDERSTANDING
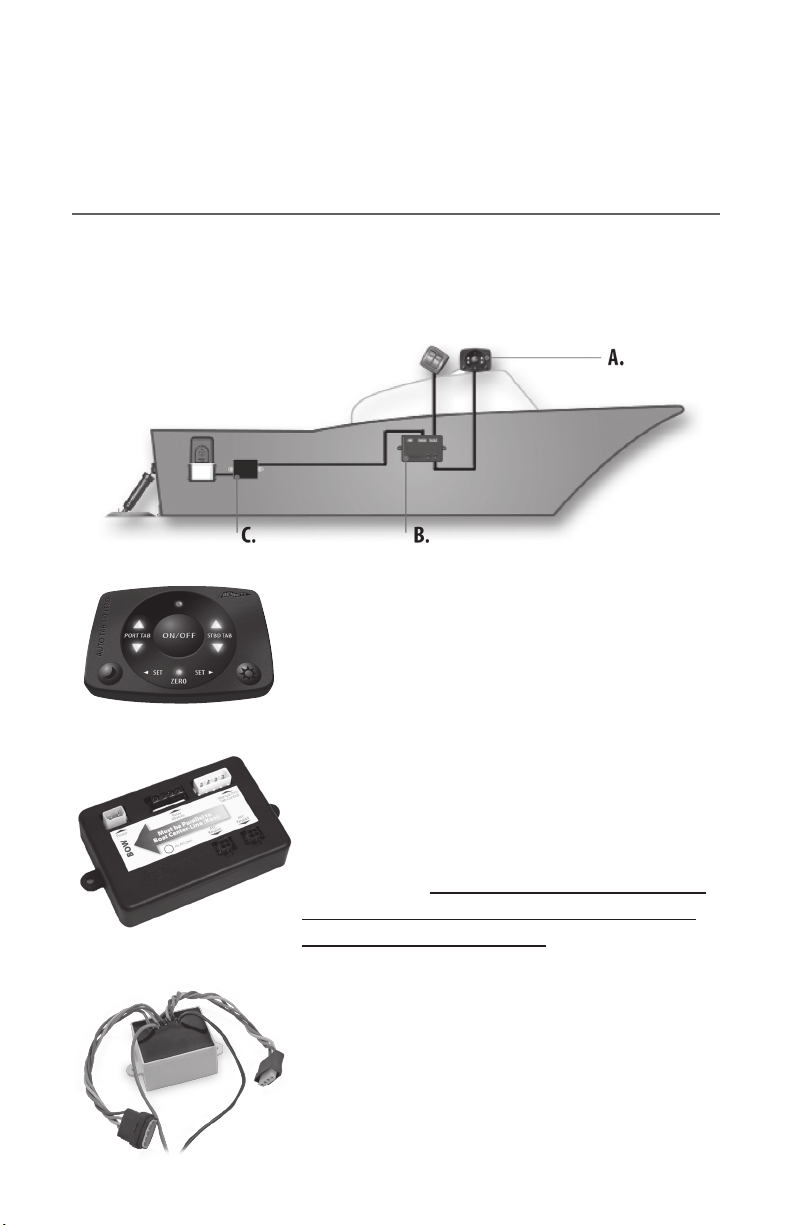
The Bennett ATC system is composed of three main components:
A: ATC Keypad — The ATC Keypad enables you to
turn the ATC system ON and OFF, and set the Zero
Point for your boat’s best running attitude. The up
and down arrows will ash showing trim tab adjustments.
B: ATC Control Unit — The ATC Control Unit is
a sophisticated processor and attitude sensor. It
analyzes and calculates attitude readings. It “learns”
and stores the characteristics of your boat in its
memory and uses this information for precise trim
tab corrections. Important: The ATC Control Unit
must be mounted correctly or the ATC system
will not function as it should.
C: Relay Module — The Relay Module Links
the Hydraulic Power Unit to the Auto Tab Control
system.
2
Page 3
SECTION 2
BLUE
POSITIVE
GREEN
YELLOW
RED
BEFORE INSTALLING THE AUTO TAB CONTROL, YOU MUST
CHECK THE TRIM TAB SYSTEM INSTALLATION
The ATC system interfaces with the boat’s trim tab system, and automatically
operates the trim tab Hydraulic Power Unit (HPU). Therefore before you install
and operate the ATC system it is critical you conrm that the HPU wiring and
hydraulic tubing is connected EXACTLY as described in items 1 and 2 below.
1. Hydraulic Tubing:
Tubing from the port actuator must be connected to the tting marked •
“P” (front left) on the HPU.
Tubing from the starboard actuator must be connected to the tting •
marked “S” (front right) on the HPU.
THE TUBING MUST NOT BE REVERSED
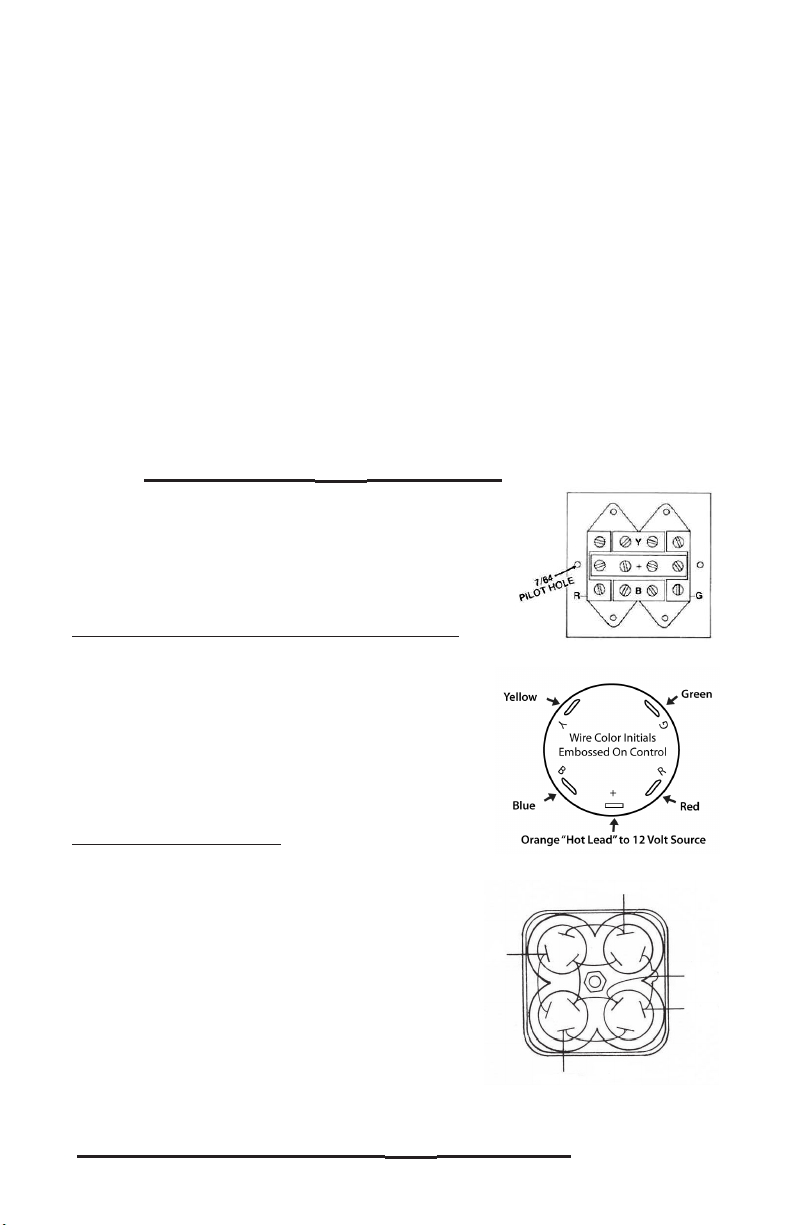
2. Helm Control Wiring:
Verify that the four-color wire harness leading to
the back of the trim tab helm control is wired as follows.
For Single Lever and Rocker Switch Controls
Notice the indented letters on the back of the control,
Rocker Switch Control
make sure connections are as follows:
• Red wire connects to “R”
• Green wire connects to “G”
• Blue wire connects to “B”
• Yellow wire connects to “Y”
For Racing Type Control
Facing the control, with the word BOW at the top,
Single Lever Control
turn the control over to the right (or left) and
inspect the control to ensure the wiring is
connected as follows:
• The blue wire is connected to the top two terminals
• The red wire is connected to the two left terminals
• The yellow wire is connected to the two bottom
terminals
• The green wire is connected to the two right
terminals
THE WIRING CONNECTIONS MUST NOT BE REVERSED
Racing Type Control
3
Page 4

For Boat Leveler Insta-Trim Systems
The Auto Tab Control installation instructions are based on Bennett Trim Tab wire
colors. If you are installing the Auto Tab Control on a Boat Leveler system, the
wire color conversion is as follows:
Bennett RED wire = Insta-Trim GREEN wire•
Bennett GREEN wire = Insta-Trim WHITE wire•
Bennett Blue wire = Insta-Trim RED wire •
Bennett YELLOW wire = Insta-Trim YELLOW wire•
FAILURE TO COMPLY WITH ITEMS 1 AND 2 ON PAGE THREE WILL CAUSE
THE AUTO TAB CONTROL TO FUNCTION IMPROPERLY
If you have any questions regarding items 1 and 2 contact Bennett Marine by
e-mail at info@BennettTrimTabs.com or call Bennett Marine Client Services at
(954) 427-1400 (8:00 a.m. - 5:00 p.m. Eastern time, Monday through Friday).
SECTION 3
USING THE AUTO TAB CONTROL FOR THE FIRST TIME
How to Set the Zero Point. IMPORTANT NOTE: The ATC won’t turn on or
function correctly until you’ve set the “Zero Point.” (If the Zero Point has not been
set, the blue Set Zero light will ash.)
Setting the Zero Point. After installing the system, take your boat for a test run.
When underway, use the manual trim tab control to get your boat running at the
best running attitude. Press and hold both “Set Zero” buttons (Sun and Moon
Buttons) on the ATC Keypad (about 4 seconds) until the blue LED ashes rapidly.
After the LED is ashing, release the buttons. Your boat’s attitude is now set in the
memory.
NOTE: The system automatically turns off as soon as you’ve set the Zero
Point and released the buttons.
TIP: If you cruise within a wide range of running speeds (Example: 20 to 40 mph)
you should set the Zero Point within the lower half of the running range.
4
Page 5
Turning the ATC on. Once you’ve set the Zero Point you can now press the
ON/OFF button for 2-3 seconds to turn your ATC on. It will now take control of
your trim tabs.
ATC Memory. Once the Zero Point is set, the ATC will retain this attitude in
memory permanently, or until it is reset. As long as the tabs are of correct size
and the speed adequate, the ATC will recreate the programmed attitude regardless of changes in speed, weight distribution, sea conditions, and other variables
that affect the boat’s attitude. If you want to reset the Zero Point, just follow the
same procedure as above.
Adjusting LED Intensity. You can adjust the brightness of the ATC LEDs using
the Sun and Moon buttons for different times of day or night. These buttons are
also used for setting the Zero Point.
HELPFUL HINT: Most boats “break over” (get on plane) at a
particular speed. This speed is determined by weight distribution,
water conditions, etc. Every boat has one particular attitude where
it runs most efciently. When you reach the best running attitude
for your boat, enter it as the Zero Point.
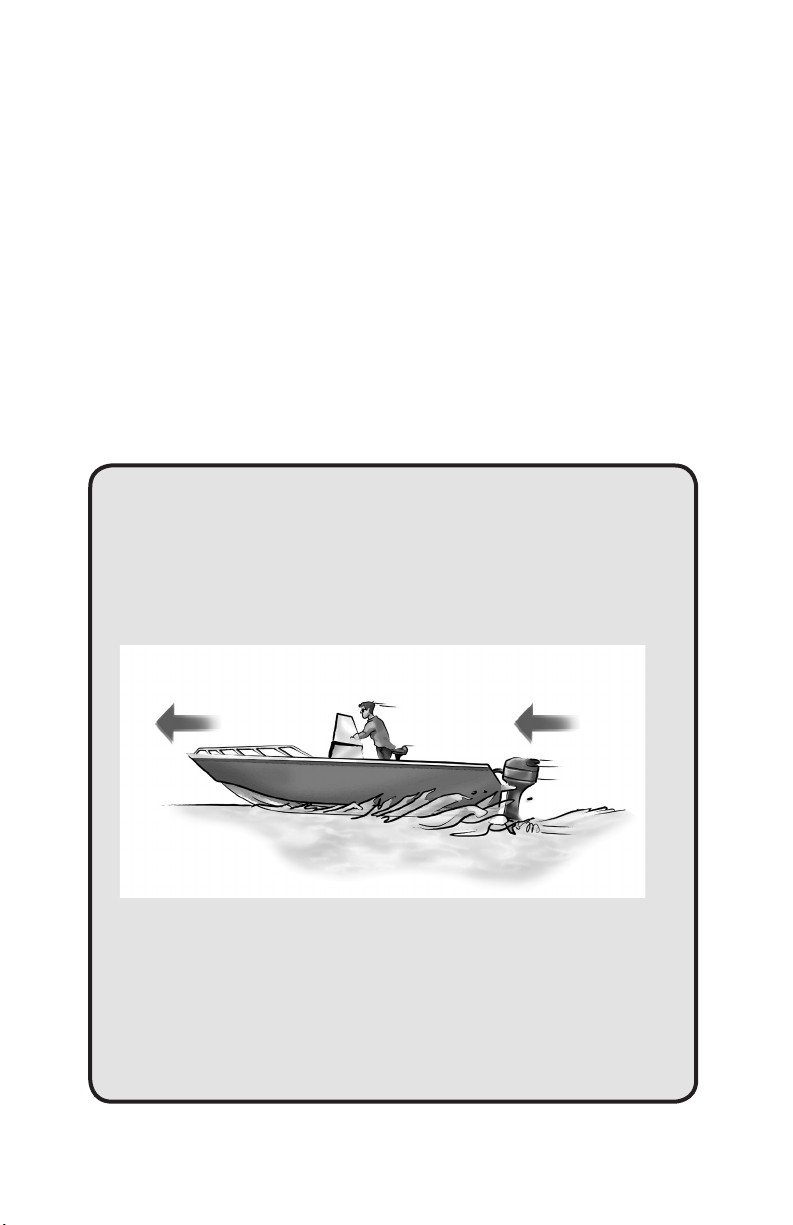
Optimal Running Attitude. A good way to reveal your boat’s
optimum attitude is to conduct a test by running lightly loaded at
full speed in at water. (This should be done in an open, no trafc
area.) You will conrm your boat’s ideal attitude by observing the
bow in relation to the horizon, reduced bow spray, and diminished
wake.
5
Page 6

SECTION 4
ACTIVATING AND DEACTIVATING THE AUTO TAB CONTROL
The ATC system is activated by pressing the ON/OFF button for 2-3 seconds.
When the button is released, the red ON/OFF LED lights up indicating the unit
is operating. Once activated, the ATC continuously analyzes and calculates the
attitude of your boat and directs messages to operate the trim tabs.
The ATC continues to make corrections as necessary until deactivated.
The yellow LED “arrows” on the Keypad ash, indicating direction of trim tab
movement. Example: When the bottom direction arrow marked PORT TAB
ashes, the port trim tab is deecting downward. Conversely, when the top
direction arrow ashes, the port trim tab is retracting. The same is true for the
starboard trim tab direction arrows.
When one or both of the ATC Keypad’s trim tab direction arrows remains in the
on mode, the ATC has determined one or more of the trim tabs has reached a
limit. Unit resumes operation once the boat’s attitude changes.
ONCE ACTIVATED, THE ATC SYSTEM ADJUSTS THE TRIM TABS
AUTOMATICALLY UNTIL YOU DEACTIVATE IT BY EITHER:
1. PRESSING THE ATC KEYPAD’S ON/OFF BUTTON (Recommended method)
2. PRESSING ANY POSITION OF THE TRIM TAB HELM CONTROL OR
3. CUTTING THE POWER SOURCE TO THE ATC SYSTEM
SECTION 5
SAFETY PRECAUTIONS AND INFORMATION
For bow high attitude, the ATC system should be deactivated and the trim •
tabs manually placed in the full-up position when running in a following sea.
For bow high attitude, the ATC system should be deactivated and the trim •
tabs manually placed in the full-up position when running an inlet.
The boat must be properly trimmed when the ATC Zero Point is set.•
The ATC system is programmed not to activate during sharp turns.•
Speed, load, and trim tab size may be such that the ATC and trim tabs are •
unable to trim the boat at certain speeds.
Occasionally check for loose or corroded wiring connections on the ATC •
system and trim tab system and lubricate when necessary.
To avoid component damage, when power is “ON” do not connect or disconnect any •
plugs connected into the Control Unit or any other component of the system.
Take immediate action to correct any malfunction or failure of your trim tabs.•
Improper use of the ATC system or trim tabs can cause an accident or injury. •
6
Page 7

BE PRUDENT — IF IT APPEARS THE ATC SYSTEM IS CAUSING YOUR BOAT
TO REACT IN AN UNDESIRABLE MANNER, STOP THE BOAT –
THEN INVESTIGATE THE PROBLEM.
Trim tabs and the ATC system have a signicant effect on the operation and
versatility of your boat, and nobody knows your boat better than you. The best
learning method is to spend time getting familiar with your boat’s reaction to the
trim tabs and ATC system. Always operate your boat with safety rst in mind.
SECTION 6
TROUBLESHOOTING THE SYSTEM
1. Activating the ATC system causes the boat to list (lean).
Trim tab tubing or wiring may be crossed. See the “Before Installing the •
Auto Tab Control” section of this manual.
ATC system Zero Point may be incorrectly set.•
2. The boat slows or is hard to steer.
It is likely that the boat is in an overtrimmed condition. The Zero Point
should be reset with the bow slightly higher.
3. All LEDs on the ATC Keypad ash simultaneously.
Control Unit signal is interrupted. Check Keypad cable for breaks and
check rmness of connection into ATC Control Unit.
4. “SET ZERO” light ashes.
No Zero Point has been set. Refer to Section 3 of this manual.
5. ATC system shuts off by itself.
Control Unit may be receiving low voltage (less than 7 volts).•
If the boat is in a severe list (greater than 26 degrees), the trim tabs will •
fully retract and the ATC system will automatically turn off.
6. The ATC attempts to make a particular attitude correction several times
and is unable to affect the boat’s attitude.
The boat may be going too slow or the trim tabs may be undersized.
NOTE: The ATC attempts to make a particular attitude correction
several times. It forces the trim tabs to remain in a particular
corrective position until the attitude changes. If it appears the trim
tabs frequently cannot correct an out-of-trim position, the trim tabs
may be undersized or boat speed too low.
7
Page 8

AUTO TAB CONTROL (ATC)
5($'),567
$OLJQWKHDUURZRQWKHWRSRIWKH
&RQWURO8QLWZLWKWKHGLUHFWLRQRIWKH
FHQWHUOLQH.HHORIWKHERDW'RQRW
DQJOHWRZDUGVWKHERZ0RXQWLQDGU\
ORFDWLRQRQDKRUL]RQWDOVXUIDFHIUHH
RIH[FHVVLYHYLEUDWLRQ
%2:
INSTALLATION INSTRUCTIONS
IMPORTANT: Plan how you will lay out the system.
Consider the wire runs from the Keypad to the Control Unit.
Make sure battery power
is disconnected!
For Non-Electronic Bennett Trim Tab Control Systems
(Rocker Switch Control, Single Lever Control and Racing Type Control)
(Refer to Diagram on Page 12)
Step 1: Mounting the Control Unit
NOTE: The Control Unit MUST be mounted properly for the system to work
correctly. Mount the Control Unit with the following guidelines:
Location:• Mount within 6 feet of the
ATC Keypad. (ATC Keypad Cable is 6' long.)
Minimum Vibration:• Mount on a
surface that is free of excessive vibration.
Dry Environment:• Mount the Control
Unit in a dry location.
Level Surface:• Mount the Control Unit
on a relatively level surface. It is not
necessary to mount the Control Unit on a
perfectly level surface, as setting the Zero
Point will account for some off-level
mounting. However, do not mount the
Control Unit at an angle, upside down or vertically.
Pointing Forward:• Align the arrow on the top of the Control Unit parallel with
the direction of the centerline (Keel) of the boat.
8
Page 9

Step 2: Mounting the ATC Keypad
Cut out the template from the last page of this manual.•
Tape the template to the dash where you intend to mount the Keypad. (Make •
sure it is within 6 feet of the Control Unit.) Check behind panel for wires or
obstruction.
Drill a 3/4" hole for the ATC Keypad cable and two 3/16th-inch holes for the •
mounting screws.
Connect the ATC Keypad Cable to the •
Keypad. Apply a thin bead of silicone sealant
around the perimeter of the Keypad back. Use
the two enclosed thumb nuts to secure the
Keypad to the dash.
Plug the ATC Keypad Cable into the Control Unit marked “ATC Keypad.” You •
can use either of the two ATC Keypad connectors. The extra connector is for an
additional Keypad for an upper station.
Step 3: Connecting the ATC Power Pigtail
Connect the orange wire to a 12 volt positive (+) power source that is •
switched “on” with the ignition.
Connect the black wire to ground (-).•
Do not plug the ATC Power Pigtail into the Control Unit yet.•
Step 4: Connecting the ATC Control Unit to the Trim Tab Manual Control
Remove your existing Manual Control from the dash. •
Disconnect the • Red, Green, Yellow and Blue wires from the back of
the Manual Control.
Do not disconnect the Orange power wire. • However, replace the
Orange wire in-line fuse and use the enclosed 1.5 amp fuse.
Trim the wires of the enclosed • 6-foot ATC 4-Color Wire Harness to length
and strip the wire ends.
Crimp the enclosed ring terminals to the ATC 4-color Wire Harness.•
Connect the wires to the back of the control — Red wire to “R,” Green wire •
to “G,” Yellow wire to “Y,” and Blue wire to “B.”
Reinstall the Manual Control.•
Plug the Wire Harness into the Control Unit connection marked •
“Manual Control.”
9
Page 10

Step 5: Connecting the Trim Tab Wire Harness to the ATC Control Unit
Cut the terminals off the ends of the •
existing 4-color Trim Tab Wire Harness.
Strip approximately 3/16ths of an inch on •
each wire.
Crimp the butt splices on the Pigtail for Wire •
Harness (PT109) onto the Trim Tab Wire Harness, matching color to color.
Plug the Pigtail for Wire Harness (PT109) into the Control Unit connection •
marked “Relay Module.”
Pigtail for Wire Harness (PT109)
Step 6: Mounting the Relay Module
The Relay Module is best located in a dry •
location close to the Hydraulic Power Unit.
Disconnect your Trim Tab Wire Harness from •
your Hydraulic Power Unit.
Plug the Hydraulic Power Unit Harness into the •
Relay Module Pigtail Connector.
Plug the Trim Tab Wire Harness • (already attached to the Control Unit in
Step 5 above) into the remaining Pigtail Connector coming out of the Relay
Module.
Attach the black wire of the Relay Module Power Connectors to ground (or •
to the ground stud on the back of the HPU motor) and the orange wire with the
in-line 20 amp fuse to a 12 volt positive source.
Step 7: System Check
Plug the ATC Power Pigtail connector into the Control Unit marked “Power •
Connection.”
Turn the boat power back on.•
Test the trim tabs using the Manual Control. Make sure the trim tabs are •
working correctly. If not, check the connections on the Control Unit, the Manual
Control and the Relay Module. (Remember, the right hand buttons on the
Rocker Control and Racing Control operate the port trim tab and vice versa.)
The ON/OFF ATC Keypad button will not activate the ATC system until the ini-•
tial Zero Point is set. If you turn on the ATC at this point, the blue Zero Set LED
light will ash. Refer to section 3, “Using the Auto Tab Control for the rst time.”
10
Page 11

Installation Instructions for
Electronic Indicator Control (EIC5000) Systems
IMPORTANT: If you did not purchase the Auto Tab Control set designed for the
Electronic Indicator Control (EIC) you will have to contact Bennett Marine for a
Wire Harness to run from the EIC Module to the ATC Control Unit.
Follow steps 1, 2 and 3 from the Non-Electronic Bennett Trim Tab Control
Systems Instructions.
(Refer to Diagram on Page 13)
Connecting the ATC Control Unit
to the EIC Relay Module
The EIC Relay Module has a •
special connector built in for the Auto
Tab Control. It is the shorter of the two
Wire Pigtails coming out of the module.
Connect the 25-foot Wire •
Harness (WH100025) to this shorter
Wire Pigtail.
Run the Wire Harness to the •
Control Unit at the helm. Trim the
Wire Harness to the desired length
and strip the wire ends. Strip
approximately 3/16ths of an inch on each wire.
Crimp the butt splices on the Pigtail for Wire Harness (PT109) onto the •
Wire Harness, matching color to color.
Plug the Pigtail for Wire Harness (PT109) into the Control Unit connection •
marked “Relay Module.”
System Check
Plug the ATC Power Pigtail connector into the Control Unit marked “Power •
Connection.”
Turn the boat power back on.•
Test the trim tabs using the control. Make sure your trim tabs are working •
correctly. If not, check the connections on the Control Unit, the EIC Control, and
the Relay Module.
The ON/OFF ATC Keypad button will not activate the ATC system until the ini-•
tial Zero Point is set. If you turn on the ATC at this point, the blue Zero Set LED
light will ash. Refer to section 3, “Using your Auto Tab Control for the rst time.”
11
Page 12

System Schematic and Parts List for
≈
Non-Electronic Trim Tab Controls
Description Part #
1 ATC Keypad AC3250
2 ATC 6' Keypad Cable AC32506
3 ATC Control Unit AC3400
4 ATC Power Pigtail AC3121
5 Pigtail for Wire Harness PT109
6 ATC 4-Color 6' Wire Harness WH3006
7 Relay Module - 12 or 24 Volt RM12 (or RM24)
8 ATC Hardware Bag AC3200
(not shown)
Hydraulic
Power Unit
(Existing)
+
-
Optional Upper Station
Description Part #
9 ATC Keypad AC3250
10 ATC 22' Keypad Cable AC325022
11 ATC Hardware Bridge AC3225
7
(not shown)
Wire Harness
(Existing)
5
-
+
6
4
3
2
1
10
Control
9
Optional Upper Station
12
(Existing)
Page 13

System Schematic and Parts List for
Bennett Electronic Indicator Control System
Description Part #
1 ATC Keypad AC3250
2 ATC 6' Keypad Cable AC32506
3 ATC Control Unit AC3400
4 ATC Power Pigtail AC3121
5 Pigtail for Wire Harness PT109
6 25' Wire Harness WH100025
7 ATC Hardware Bag AC3200
(not shown)
Hydraulic
Power Unit
(Existing)
EIC Relay Module (Existing)
+
-
Optional Upper Station
Description Part #
8 ATC Keypad AC3250
9 ATC 22' Keypad Cable AC325022
10 ATC Hardware Bridge AC3225
(not shown)
Existing Port Sensor Wire (Red)
Existing Starboard Sensor Wire
(Green)
6
5
≈
-
+
4
3
9
8
Optional Upper Station
EIC Wire Harness (Existing)
2
1
Electronic
Indicator Control
(Existing)
13
Page 14

If you have any questions regarding the installation of the
Bennett Auto Tab Control, please contact us at
Bennett Marine, Inc
550 Jim Moran Blvd.
Deereld Beach, FL 33442
Phone: 954-427-1400
Email: info@BennettTrimTabs.com
Web: www.BennettTrimTabs.com
14
Page 15

$7&.(<3$'02817,1*7(03/$7(
15
Page 16

P-ATC-X
ATC20
 Loading...