

Page 1

TWIG Web Finder
Free Introductory Service!
• For TWIG Discovery Pro and TWIG Locator (new
GPRS versions)
• Easy to use web service enabling you to follow locations of your TWIG handsets and tracking devices
internationally on a detailed street map display
• You can use the service from an Internet PC with
web browser.
1
GETTING STARTED IN THREE EASY
STEPS:
1. Activate your free TWIG Web Finder account
(If you already have a TWIG Web Finder account, go directly to Step 2.)
Go to TWIG eShop at
. Under
Shop
www.twigworld.com
Subscriptions and credits
Web Finder Introducto ry S ubscription for TWIG buyers
priced at 0 euro.
During the checkout process, you need to fill in the required information for activating your account. You do not
have to give any bank or PayPal information for this free
of charge purchase. After completing all the steps, you
will receive an E-mail with login information for your
TWIG Web Finder account.
2. Prepare your TWIG device
In addition to your new TWIG device, you also need a
GSM service subscription as well as SIM card with voice
and GPRS data from your mobile operator. Take the
TWIG device from sales box, insert the SIM card and battery and switch the device on. Next, configure communication settings to the TWIG device by using the provided
PC tool (see below for detailed instructions for TWIG Locator and TWIG Discovery Pro).
, buy
, select
Free TWIG
The
,
Page 2

The communication settings are delivered by your mobile
operator:
- Phone number (MSID, e.g. "+358400123456")
- GPRS APN (e.g. "internet")
- GPRS DNS, GPRS User name, and GPRS Password (often left empty)
3. Link your TWIG device with your TWIG Web Finder account
Launch the TWIG Web Finder service. You can access
the login screen from
>
Launch TWIG Intern et Services
ices
In TWIG Web Finder, add your new TWIG device to the
service:
From menu, select
and fill in the mobile phone number (without 00 or + in
front of the country code), the IMEI code (from sales box
or type label under battery), and the name by which you
wish the TWIG to appear in your service account (e.g.
MyPhone). Finally click
The TWIG device is now activated to work with TWIG
Web Finder and you are ready to start using the service!
www.twigworld.com
Device Management
Add device
.
.
>
>
The Serv-
Add Device
,
4. GPS and charging the battery
Devices using GPS need much power, so it is important
to always charge the device before taking it into use.
When not in use, switch off the device to save power.
When you have turned the TWIG device on, make sure it
gets GPS position before taking it into use. Usually this
means you need to go outdoors to open sky. Getting
GPS position can take several minutes.
Due to GPS satellite system, getting GPS position can be
difficult if there has been a longer period during which the
device hasn’t had an active GPS connection. This happens e.g. when getting position for the first time. You can
help the acquisition by keeping the device stationary.
USING TWIG WEB FINDER
Once your TWIG device is activated, you can start using
it together with the TWIG Web Finder service.
Locating TWIG mobiles
When you have made sure
your TWIG device has GPS
position, select it in the
TWIG Web Finder My
Friends list by checking its
box.
Locate
Then click
firm locating the selected
device. When the device is
located, its refreshed position information appears on
Current selection
and con-
field.
2
Page 3
By clicking
you will also see the
most recent position of
your device displayed
on the map screen. You
can zoom the map in
and out, as well as
measure distance by
using the measure.
Center Map
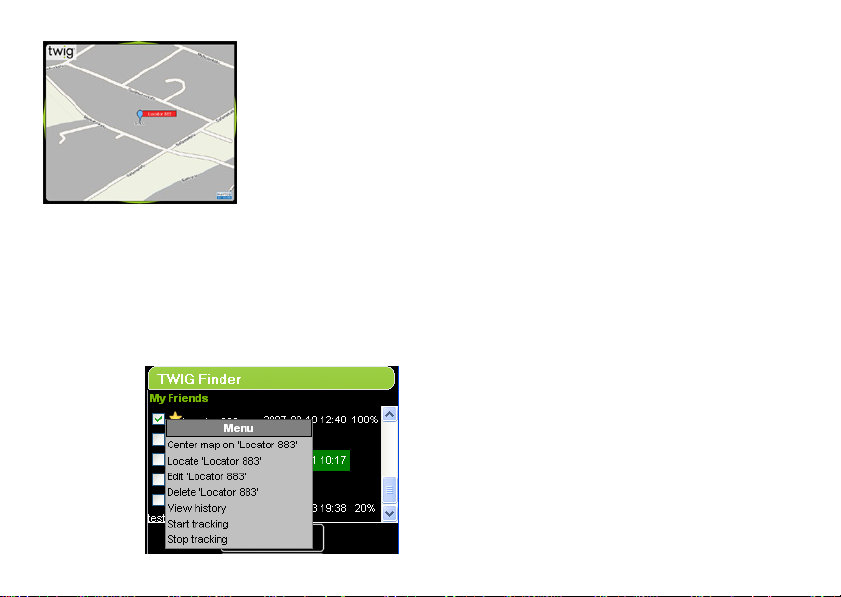
Tracking TWIG mobiles
Right click on the TWIG device in My Friends list and se-
Start Tracking
lect
in minutes. The position of the TWIG device will now be
continuously updated to TWIG Web Finder service.
Stop the tracking by right clicking on the device list and
selecting
3
. Then set the desired tracking interval
Stop Tracking
.
Alert notification
By pressing and holding down the Alert button of your
TWIG device, you can send a message to trigger an Alert
notification on TWIG Web Finder screen (requires that
the web application is running).
If you have activated alert forwarding in the TWIG Web
Finder service, you will receive the alert notification also
in your mobile phone and/or email.
Alert voice call
In case of an alert, TWIG device can dial phone numbers
to establish a voice call. The alert call is dialled to phone
number(s) which are pre-defined in the TWIG device.
To activate this feature, use the provided PC configuration tool to configure the desired phone number(s) in your
TWIG device.
Alert forwarding
If alert forwarding is activated in your TWIG Web Finder
account, the service forwards alerts to the specified
email address, and/or GSM mobile as SMS messages.
When receiving an alert message in your mobile phone
or email, you can check the location of the alerting TWIG
device in the TWIG Web Finder service.
To activate alert forwarding, click on
the device for which you wish activate the feature from
the device list, and add contact information in the field un-
TWIG Alerts
, select
Page 4

derneath. Give the phone number without 00 or + in front
of the country code.
Map coverage
TWIG Web Finder street maps initially cover Western
and Northern Europe, Russia, North America, Australia
and South Africa. Please note that map coverage and
map detail may vary from time to time and within regions
and countries.
Communication options
In TWIG Web Finder under
you can select for each TWIG mobile between us-
device,
ing GPRS only (default) or allowing SMS to be sent to
TWIG device when GPRS connection is not open. Allow-
Device management
>
Edit
ing SMS transmission may in some cases speed up communication but may also increase the cost of service (see
below).
Cost of using & How to pay
Each new TWIG device (new GPRS versions) comes
with a free trial connection to TWIG Web Finder, plus an
amount of free TWIG credits which are added to your account when the device is registered to the service.
TWIG credits on your account are automatically used for
paying extension for the service for any TWIG devices on
your account, as well as for sending SMS messages from
your account.
The default communication method between TWIG server and TWIG devices is GPRS, so the only communication fees are those charged by your mobile operator. If
you choose to sent SMS messages from your TWIG Web
Finder account, your TWIG credits are charged accordingly.
Please, visit TWIG eShop for the pricing of TWIG credits
and how many credits are charged for extending the
service for a TWIG device or sending a SMS message.
You can buy more credits to your TWIG Web Finder account from the TWIG eShop at any time.
4
Page 5

USING TWIG LOCATOR
Anchor alert
Emergency
Preparing device
Insert SIM card and battery. Close the cover and tighten
the screws with the provided hex tool. Charge the battery
using the provided charger.
5
On/Off
Configuring communication settings / Using the PC Configuration Tool
Install Locator USB drivers from CD. Connect Locator to
PC by using USB cable and open l2update.exe software.
Select proper COM port and connect to Locator.
Read the EEPROM values from the device. Fill in your
mobile operator's communication settings (see details
overleaf) under
ROM settings to Locator.
GPRS settings
. Finally, save the EEP-
Turning on, indicator lights
Turn the device on by pressing the power button . As a
sign of powering on, all three indicator lights turn on for a
moment. Thereafter the indicator lights blink according to
their status:
GSM
: 1 blink/sequence when having a network
GPS
: 1 blink/sequence, if the GPS has a valid posi-
tion fix that is not older than 5 minutes
GPS
: Continuously off, if previous position is older
that 5 minutes and a new position fix is not available
Acquiring GPS position
TWIG Locator GPS powers up directly whenever the device is powered up. Take the device outdoors to a place
with clear view of the sky. You have a GPS position when
GPS
indicator light starts blinking. This can take several
minutes.
Page 6

Alert function
By pressing the Alert button for 3 seconds you send off
a message triggering an Alert notification on TWIG Web
Finder screen.
In case of an alert, The TWIG Locator can also dial
phone numbers to establish a listen-in voice call. To activate this feature, configure the alert number(s) to be
called in your TWIG device, using the provided PC Configuration Tool. Please note that the receiving party can
listen to TWIG Locator, but cannot talk back.
Anchor Mode
In the Anchor Mode, the TWIG Locator alerts you if it is
moved outside a predefined radius of 250 meters. Applications for this feature include vehicle security and safety
of children and other persons in need of supervision.
To activate the Anchor Mode push the button for 5 seconds. As confirmation of activation, the 'Battery/Status'
indicator light starts blinking in 3 seconds interval, simultaneously with the 'GSM' and 'GPS' indicators. Blinking
GPS indicator light indicates that there is a GPS position
and the Anchor Mode can be activated.
Note that if conditions to calculate GPS position are not
suitable, it is also possible to get an alarm even when Locator is not moving. This is normal GPS behaviour and
not a sign of malfunction. To verify the movement, it is
recommended to request new position from Locator few
minutes after the alarm.
If the object/person carrying the TWIG Locator moves
outside the defined region, you will receive an alert notification to your TWIG Web Finder account.
The alert is forwarded to a GSM mobile as text message,
and/or to an email address, if you have activated alert forwarding in your TWIG Web Finder account. Upon receiving an alert message to your mobile phone or email, you
can check the location of the TWIG device in the TWIG
Web Finder service.
Power off
To turn TWIG Locator off push the button for at least
3 seconds, until all three indicators blink.
GPS and battery life
With default factory settings TWIG Locator searches
GPS position every 5 minutes to save battery. In this
mode the battery life is typically [20] hours. If Anchor
Mode is activated, GPS position is updated every minute
which reduces the battery operation time.
If you need maximum battery life, please configure GPS
off using the provided PC Configuration Tool. The GPS
will be automatically activated, if Alert button is pressed
or if the device location is requested from TWIG Web
Finder. In the power saving mode the TWIG Locator can
be typically located even after one week. It is recommended to leave the GPS max search time to 5 minutes
as otherwise it may be difficult or even impossible to get
GPS location when moving.
6
Page 7

For continuous operation in e.g. a vehicle, please connect TWIG Locator to external power source, using Vehicle Power Adapter [sales code YO3170] for 12-24 Volt dc
systems, or the supplied Mains Charger [sales code
ZE3005 (EU), ZE3006 (UK)] for 110-240 Volt ac systems. Consult your local value-added reseller or e.g. a
qualified car electrician.
USING TWIG DISCOVERY PRO
Preparing device
Insert SIM card and battery. Close the battery
cover. Charge the battery using the provided
charger.
Configuring communication settings
Install Twig Configurator. Create new GPRS
Settings file. Fill in the
mobile operator communication settings (see
details overleaf). Save
the file to PC and send it
to phone and reboot
phone. Note that the
7
phone must be on in normal idle mode during configuration.
Tur n ing o n
Turn the device on by pressing the power key.
Acquiring GPS position
TWIG Discovery Pro powers up with GPS off. Turn GPS
on to
Full Power
outdoors to a place with clear view of the sky. You have
a GPS position when GPS indicator turns green. This can
take several minutes.
from the
GPS
menu. Take the device
Alert function
By pressing the top TWIG Alert button for [3] seconds
you can send a message triggering an Alert notification
on TWIG Web Finder screen.
In case of an alert, The TWIG Discovery Pro can also dial
phone numbers to establish a voice call. To activate this
feature, configure the desired alert phone number(s) in
your TWIG device by using the provided TWIG Configurator PC tool.
GPS and battery life
With GPS in
GPS position every second. In this mode the battery life
is typically [16] hours or less, depending on the other usage of the device for talking, navigation etc.
Full Power
TWIG Discovery Pro updates
Page 8

If you need maximum battery life please set GPS to
GPS will be automatically activated, if Alert button is
pressed.
Note! TWIG Web Finder can locate a device with GPS off
if Alert button is pressed and the device is in clear view
of GPS satellites. Also location requests coming from authorized partners (e.g. partners which are configured to
the device with PC configuration tool) cause GPS to turn
on, and response message to be sent automatically.
off
MORE INFORMATION
This is a quick guide for using TWIG devices with the
TWIG Web Finder service. For more information, please
refer to the user manuals provided on the CD, and
www.twigworld.com
Should you have any problems,
please email to:
support@twigworld.com
.
.
.
Publication code: YZ3070
8
 Loading...