

Page 1
BENEFON
CONFIGURATOR
for the Benefon
Track One
All rights reserved.© Benefon Oyj, 2004.
Publication number:YZ2690-2
Page 2

NOTE: This manual is intended for guidance when making initial and major configurations for the Benefon Track One mobile
phones; however, it does not replace the phone´s own manual. Use this manual concurrently with the phone´s own manual.
Also note that separate M PTP doc ument wi th detail s is re quired fo r the rem ote op eration and con figurat ion of t he phone .
Information in this manual is subject to change without notice. BENEFON reserves the right to change or improve their products
and to make changes in the content without obligation to notify any person or organization of such changes or improvements.
BENEFON is not responsible for any loss of data, income or any consequential damage whatsoever caused.
Some of the features described in this ma nual are option al and intende d to be purch ased separately. For more info rmation, pl ease
contact your dealer.
Manufacturer: Benefon Oyj
P.O. Box 84
24101 Salo
FINLAND
Web site: www.benefon.com
2
Page 3
CONTENTS
CONFIGURING SETTINGS FOR THE
BENEFON TRACK ONE ...................................... 5
A: MPTP MESSAGES AND
REMOTE CONFIGURATION (OTA).................................... 5
B: THE BENEFON CONFIGURATOR
SOFTWARE AND LOCAL CONFIGURATION ..................... 6
Connecting the phone to the
Benefon Configurator software................................ 7
Loading settings from the phone
to the software ........................................................8
Saving settings in a computer disk .......................... 8
Changing default mobile phone ...............................9
Transferring settings from the
software to the phone .............................................. 9
Disconnecting the phone
from the software .................................................... 10
ACTIVATING NEW FEATURES......................................... 10
SIM FEATURES: SHORT MESSAGES ............................... 11
Reading and editing existing messages ................... 11
Deleting a short message ........................................ 11
Writing and sending a short message ...................... 12
SIM FEATURES: PHONE BOOKS ..................................... 13
Editing and adding an entry .....................................13
Deleting entries....................................................... 13
Moving and copying entries ..................................... 14
Arranging entries .................................................... 14
USER SETTINGS ............................................................ 15
Phone settings ........................................................ 16
LANGUAGE .................................................................................. 16
DATE AND TIME SETTINGS........................................................... 16
AUTOMATIC KEYLOCK.................................................................. 17
Power settings ........................................................ 17
SETTING POWER ON TIMER ......................................................... 17
SETTING POWER OFF TIMER........................................................ 17
Call settings............................................................ 18
REDIAL MEMORY ......................................................................... 18
AUTOMATIC ANSWER................................................................... 18
Message setup ........................................................ 18
SMS SERVICE NUMBER................................................................ 18
MESSAGE TYPE............................................................................ 18
MESSAGE VALIDITY TIME............................................................. 19
VOICE MAIL NUMBER................................................................... 19
ACCEPT BROADCAST MESSAGES................................................. 19
TELEMATICS: TELEMATIC SETTINGS............................. 20
About telematics ..................................................... 21
INITIAL ACTIVATION OF THE SERVICE.......................................... 21
ESSENTIAL NUMBERS ................................................................. 21
Service center number ............................................ 21
Service user-id........................................................ 21
Error reports .......................................................... 22
Assistance call ........................................................ 22
STORING VOICE CALL NUMBER FOR ASSISTANCE CALL .............. 22
STORING SMS NUMBER FOR ASSISTANCE CALL .......................... 22
Trace log................................................................. 23
TRACE LOG SETTINGS.................................................................. 23
TRANSFERRING TRACE LOG ........................................................ 24
OPENING AND PROCESSING REMOTELY SENT
LOG FILE (IN THE BENEFON CONFIGURATOR) ............................. 26
PROCESSING TRACE LOG BY USING SOME
3
Page 4
OTHER APPLICATION.................................................................... 26
Default behaviour for location request .................... 27
Position precision ................................................... 27
TELEMATICS: EMERGENCY SETTINGS ........................... 28
Basic emergency settings........................................ 29
SOS ACTIVATION .......................................................................... 29
NAMING EMERGENCY CALL.......................................................... 29
EMERGENCY CANCEL TIME .......................................................... 29
SELECTING EMERGENCY CALL CYCLE MODE............................... 30
SETTING EMERGENCY CALL CONNECTION
WAITING TIME .............................................................................. 30
SETTING EMERGENCY CONFIRMATION FOR
EMERGENCY MESSAGE DELIVERY ................................................ 30
EMERGENCY CENTER NUMBERS .................................................. 30
Making emergency cycle ......................................... 31
MAKING AN EMERGENCY CALL WHICH
INCLUDES BOTH CALL NUMBERS AND SMS NUMBERS ................ 32
CANCELLING EMERGENCY CYCLE ................................................ 32
TELEMATICS: EMERGENCY ENVIRONMENTS ................. 33
About emergency environments .............................. 34
Configuring emergency environments ..................... 34
TELEMATICS: GPS......................................................... 35
Setting GPS operating mode .................................... 36
GPS sleeping time (in economy mode) ..................... 36
NMEA output ........................................................... 37
GPS tuning .............................................................. 37
Assisted GPS ........................................................... 38
Poor satellite coverage ........................................... 38
TELEMATICS: POWER.................................................... 39
Settings for manual power on and off ...................... 40
Settings during battery charging ............................. 40
CHANGE GPS OPERATING MODE................................................... 40
NOTIFY SERVICE CENTER WHEN CHARGING................................. 40
Notify service center of battery status .....................40
WAYPOINT TRACKING.................................................... 41
Creating waypoints ..................................................42
Resetting the coordinates ........................................ 42
Marking all waypoints for activation/
deactivation at once ................................................. 42
SENSOR SETTINGS: VERTICAL SENSOR .........................43
Naming the sensor .................................................. 44
Specifying sensor usage ..........................................44
Polling interval ........................................................ 44
No-alarm duration ...................................................44
Pre-alarm duration..................................................44
Post-alarm interval ................................................. 45
Alert trigger ............................................................45
Missing sensor alert ................................................45
Vertical sensor alerts ..............................................45
ENCRYPTING MESSAGES ............................................... 46
Activating encryption ...............................................46
Generating keys.......................................................46
Selecting encryption options ....................................47
MENU LOCKS AND ACCESS CODES ................................47
Security code for telematics and GPS......................47
Changing security code ............................................47
Menu lock for phone settings ...................................48
User interface lock .................................................. 48
TROUBLESHOOTING ......................................... 48
"DUMMY QUESTIONS" ................................................... 48
4
Page 5

CONFIGURING SETTINGS FOR THE BENEFON TRACK ONE
CONFIGURING SETTINGS FOR THE
BENEFON TRACK ONE
There are several ways to configure settings for the
Benefon Track One:
•A: You can use the MPTP commands, and transfer
settings remotely, over the air by sending a proto
col message to the phone. The MPTP commands can
be sent as a command string or through a specific
software, such as the Benefon In Charge.
•B: You can use AT commands for configuring settings and transfer them to the phone locally, via the
BW data/NMEA cable. This can be easily done by
using the Benefon Configurator software. In
some cases the BW cable must be purchased sepa
rately, it might not be included in the sales package
of the phone.
•C: Limited set of features or purchased software
options may be available for configuration through
the phone´s own menu. This option also depends
on the phone model.
-
-
A: MPTP MESSAGES AND
REMOTE CONFIGURATION (OTA)
MPTP configuration commands are used when a remote update of the phone configuration is needed.
Update can include all telematics settings and phone
numbers, such as emergency numbers, assistance
call numbers, GPS tuning and GPS operating mode.
MPTP updates also include commands for daily usage,
such as location request and tracking commands.
The remote configuration can be used for transferring
the settings only in case the settings are coded as
MPTP messages.
For more information on MPTP messages, please
see the separate document: Mobile Phone
Telematics Protocol (MPTP), located at the
Web site: www.benefon.com.
To receive full documentation, please contact
your Benefon Partner.
A: MPTP MESSAGES AND REMOTE CONFIGURATION (OTA) 5
Page 6

CONFIGURING SETTINGS FOR THE BENEFON TRACK ONE
B: THE BENEFON CONFIGURATOR
SOFTWARE AND LOCAL CONFIGURATION
The Benefon Configurator software is intended for
configuring settings locally for the Benefon products,
e.g. Track One.
This configuration manual contains features available
for the Track One NT 2.0.
Since the Benefon Configurator is very easy to use, it
is advisable to make initial and other major configu
rations for the phone with this software.
When you are finished with editing the settings, you
can either transfer the settings back to the phone via
the BW cable immediately, or save them in a comput
er disk (as any normal file) for further use.
Another, slightly quicker way to transfer configurations made by Benefon Configurator is to use some
other application, e.g. the SetupLoad software. For
more information on it, please contact your dealer.
-
-
The Benefon Configurator application window is split
up in two sections:
•The Benetree structure is located on the left. It consists of two main nodes: My Benefon (on-line) and
My Computer (off-line). By clicking the main nodes,
you have access to their sub-nodes. The software
consists of several groups of settings mainly struc
tured as sub-nodes, such as: Short messages, Phone
books, User settings, Telematic settings and so on. By
clicking the sub-nodes, you have access to the cor
responding Benefon Configurator document files.
•The Document window is located on the right. The
setting groups may be divided up into interleaves
including several separate data fields, such as
Emergency environments, GPS, Power and so on.
-
-
6 B: THE BENEFON CONFIGURATOR SOFTWARE AND LOCAL CONFIGURATION
Page 7
CONFIGURING SETTINGS FOR THE BENEFON TRACK ONE
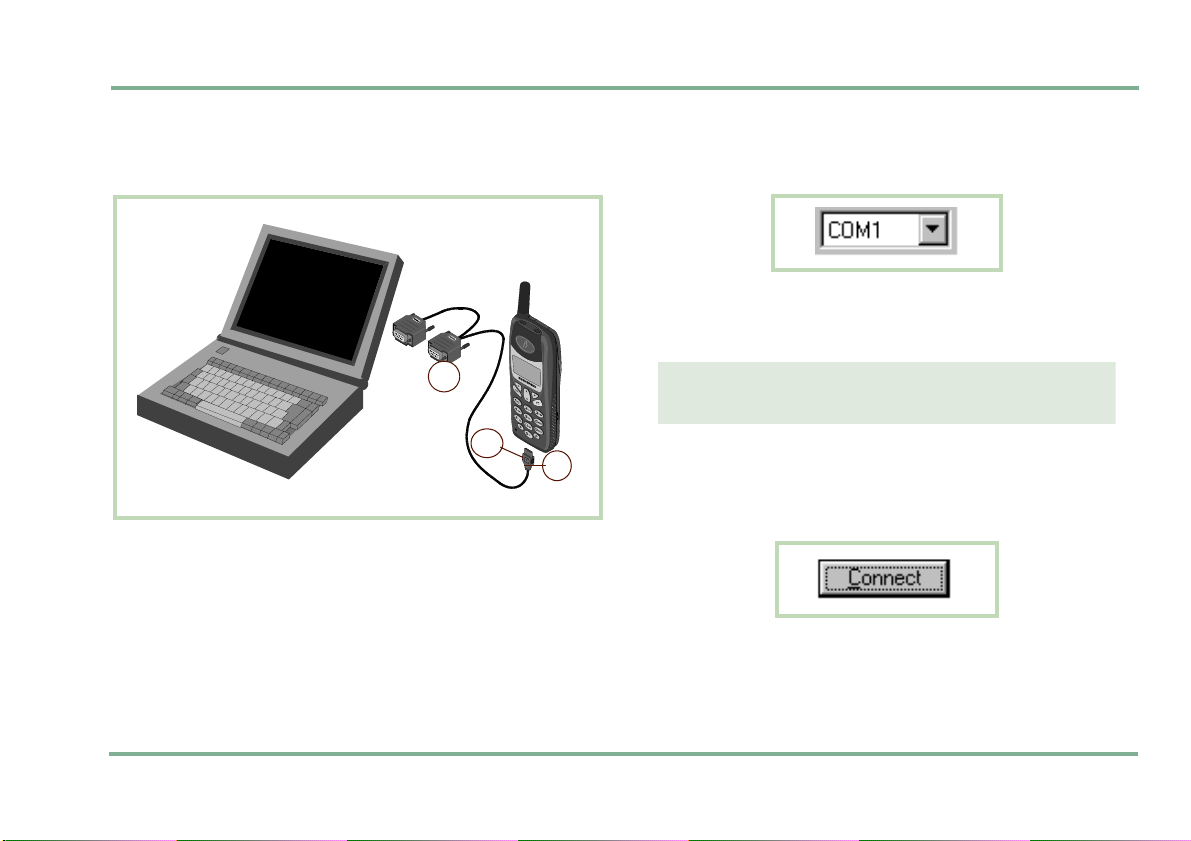
Connecting the phone to the
Benefon Configurator software
1
3
2
1. The BW cable may contain one or two square-end
adapters. Plug the data adapter (1) into a serial
port. Serial ports are located at the back panel of
your computer.
2. Plug the flat end of the BW cable (2) in the system
connector, located at the bottom of the phone.
Make sure the release button (3) is facing up.
3. Open the Benefon Configurator .
4. Choose the correct serial port from the toolbar:
Click the pop-up menu and highlight the desired
port.
Or, choose Settings from the Edit menu. Select the
Default communication port by clicking the check
box. Click Ok to exit the menu.
THE MAIN IDE A IS THAT THE PORT SE LECTED IN SOFTWARE
MATCHES WITH THE PORT, THE DATA ADAPTER IS PLUGGED IN.
5. Double-click the main node My Benefon. Or, double-click the phone icon. Or, choose Connect from
the Mobile menu. Or, click the button Connect lo
cated on the toolbar.
6. The software establishes a connection to the
phone and renames My Benefon node according to
the type and the model of the phone, e.g. Track
One.
-
B: THE BENEFON CONFIGURATOR SOFTWARE AND LOCAL CONFIGURATION 7
Page 8

CONFIGURING SETTINGS FOR THE BENEFON TRACK ONE
7. At the same time, the software reads data from the
phone and loads it in the display. The data con
tains currently existing settings and menus from
the phone. These settings and menus are shown as
sub-nodes, such as User settings, Telematic settings,
and Sensor settings.
8. If the software requests security code while loading the settings, you must key in the code and
press Ok. For more information on security code,
see
SECURITY CODE FOR TELEMATICS AND GPS ON PAGE 47.
9. Click the name label, e.g. Track One. The subnodes will be displayed as icons on the working ar
ea, i.e. the Document window, on the right.
10.You can select the desired sub-node/icon by clicking it. The data fields will be displayed.
-
-
Loading settings from the phone
to the software
As you connect the phone to the software, all current
settings in the phone are copied to the software.
To load only part of the settings to the software,
choose Configurator... from the Edit menu (before
pressing Connect button). Check the desired setting
groups - the groups are shown in the Mobile phone start
up tasks. Click Ok while the dialog box is displayed.
Unloaded settings can be loaded afterwards in the
same session by choosing Open NNsettings from the
Mobile menu.
Saving settings in a computer disk
If the phone is not currently connected to the software, you can still make configurations, save them
and transfer them to the phone afterwards. When
working in off-line, data fields are available for editing
via My computer node.
1. To save data in a computer disk, choose Save as...
from the File menu.
2. Select the destination drive and folder, and rename the file the way you like. Click Save. The software stores all data fields that the chosen node
contains.
8 B: THE BENEFON CONFIGURATOR SOFTWARE AND LOCAL CONFIGURATION
Page 9

CONFIGURING SETTINGS FOR THE BENEFON TRACK ONE
Changing default mobile phone
When any Benefon phone (or device) is connected to
the Benefon Configurator, the software identifies it
automatically, and offers you the correct data fields
for editing.
To make off-line configuration for some other Benefon
phone (e.g. Esc!) when the phone is currently unavail
able, you need to change the default mobile phone in
Benefon Configurator.
1. Change the default Benefon mobile phone by se-
lecting C onfigurator... from the Edit menu, or highlighting the desired phone model from the pop-up
menu, located on the toolbar.
2. Now the data fields of this "new" phone model are
available and can be opened from the My computer
node on the left.
3. Click the desired node, e.g. User settings, press the
mouse´s right button and select New >Ok.
4. Similarily, you can close the file which is not needed any more by clicking it, pressing the mouse´s
right button and selecting Close.
-
Transferring settings from the
software to the phone
While the Benefon Configurator software is connected
to the phone, you can save data in the phone.
1. First open the Benefon Configurator document
which content you want to save in the phone. To
recall settings previously stored in a computer
disk, select Open from the File menu, or press the
corresponding function icon on the toolbar.
2. Choose Save To Mobile from the File menu.
Or, click the function icon on the toolbar.
When transferring data to the phone, the previous
data is replaced with the new data.
B: THE BENEFON CONFIGURATOR SOFTWARE AND LOCAL CONFIGURATION 9
Page 10
CONFIGURING SETTINGS FOR THE BENEFON TRACK ONE
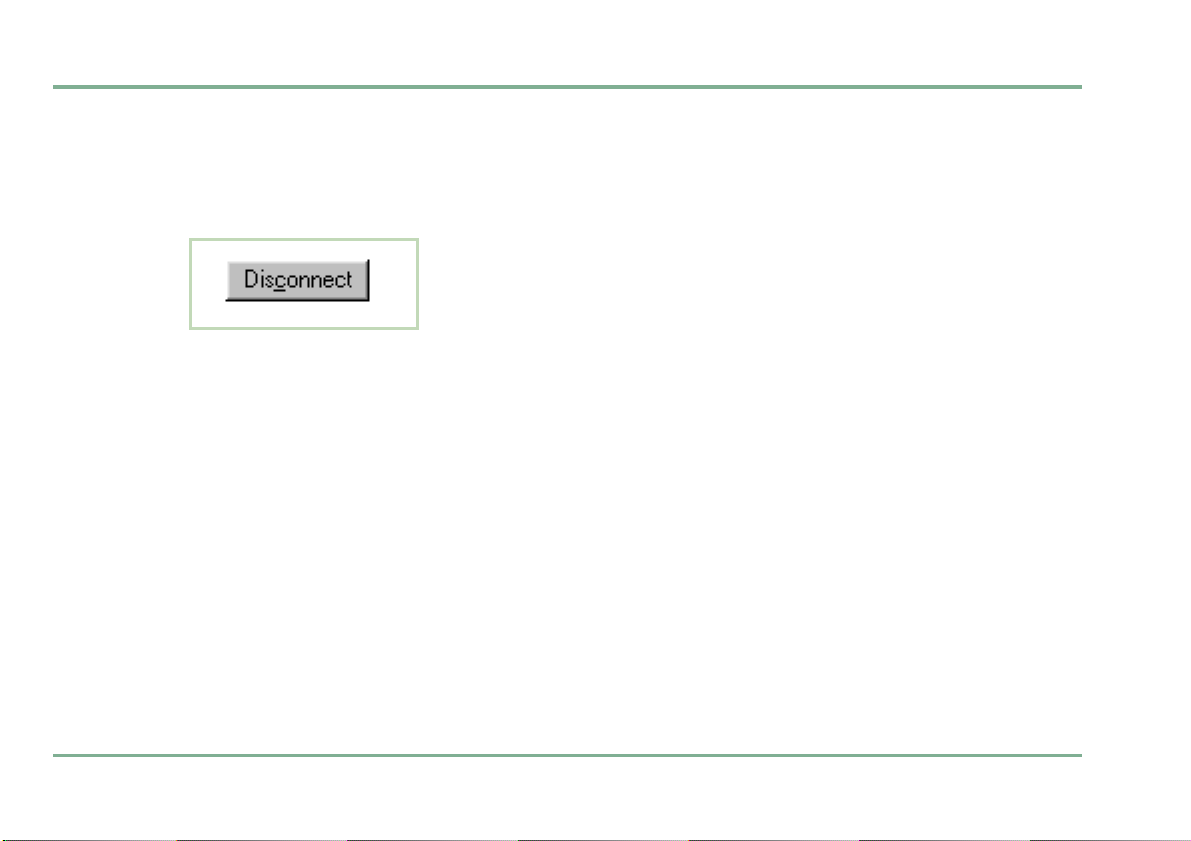
Disconnecting the phone
from the software
1. Choose Disconnect from the Mobile menu.
Or, click the button Disconnect on the toolbar.
2. Press and hold down the release button while removing the BW cable from the phone. (The release
button is located on the top of the flat end of the
BW cable.)
3. Gently pull the BW cable from the system connector (located at the bottom of the phone).
ACTIVATING NEW FEATURES
Some of the new features are sold separately, they
are not included in the basic NT 2.0 software package.
Such features are, e.g. Waypoint tracking, CSD trace
download, Encryption, Vertical sensor and Update of
an old software into the new NT 2.0 software.
When you purchase these new features, a Service acti-
vation key is provided to you by the dealer or the man-
ufacturer. The key is needed for activating the
features. Activation can be easily done with the Bene
fon Configurator.
1. First make sure, the phone has cable connection to
the Benefon Configurator.
2. Click Connect.
3. Select Save activation key from the Mobile menu.
4. Key in the Service activation key. (Note that when
updating the software, the phone may inform you
of the incorrect software version. You have then
less than 2 minutes time to key in the activation
key until the phone will power off itself. The key
can be stored while the software is still reading da
ta.)
5. Click Save.
6. Click Disconnect.
-
-
10 ACTIVATING NEW FEATURES
Page 11

CONFIGURING SETTINGS FOR THE BENEFON TRACK ONE
SIM FEATURES: SHORT MESSAGES
Reading and editing existing messages
1. Double-click the icon SMS messages.
2. Messages are listed and can be read.
3. Double-click the message you want to edit.
4. Edit text and other details in the SMS edit buffer.
5. Click Ok when ready.
Deleting a short message
To delete a short message, highlight the message and
choose Sms, Delete message from the Edit menu.
You can also select Delete by pressing the mouse´s
right button.
SIM FEATURES: SHORT MESSAGES 11
Page 12
CONFIGURING SETTINGS FOR THE BENEFON TRACK ONE
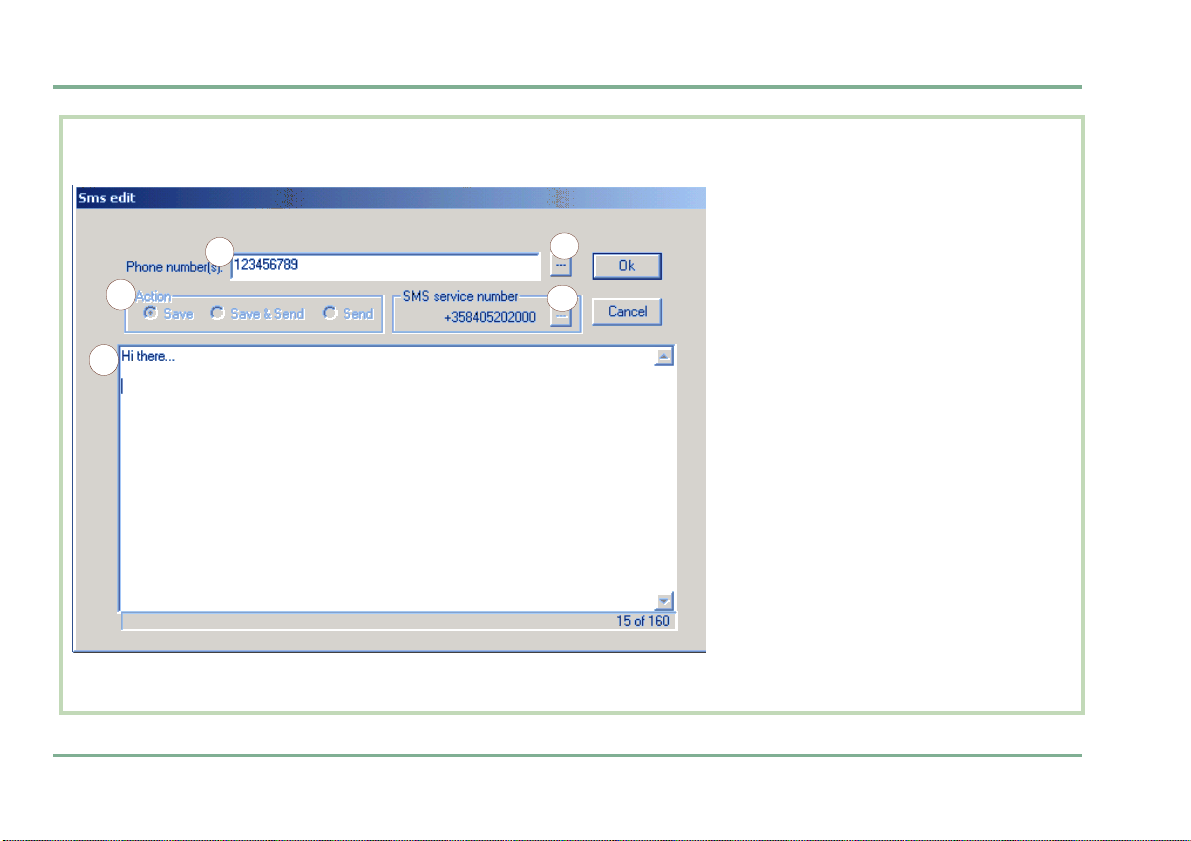
Writing and sending a short message
2
5
1
1. Choose Sms, Ne w message from the
Edit menu. The SMS edit buffer will be
displayed.
3
4
2. Key in the message text (1) and the
recipient´s number (2). By clicking
the square next to the number (3),
the recipient´s number can be
fetched from the Phone book, assuming the number is found on SIM.
3. Make sure, the Sms service number is
correct. The number can be changed
by clicking the square next to it (4).
By selecting the option SIM card de-
fault, the SMS service number will be
picked up from the SIM card. If the
SIM card does not contain the SMS
number, select the option Own and
key in the SMS service number.
4. Select the desired Saving/Sending
option by checking one of the Action
boxes (5).
5. Complete the message by pressing
Ok.
12 SIM FEATURES: SHORT MESSAGES
Page 13
CONFIGURING SETTINGS FOR THE BENEFON TRACK ONE
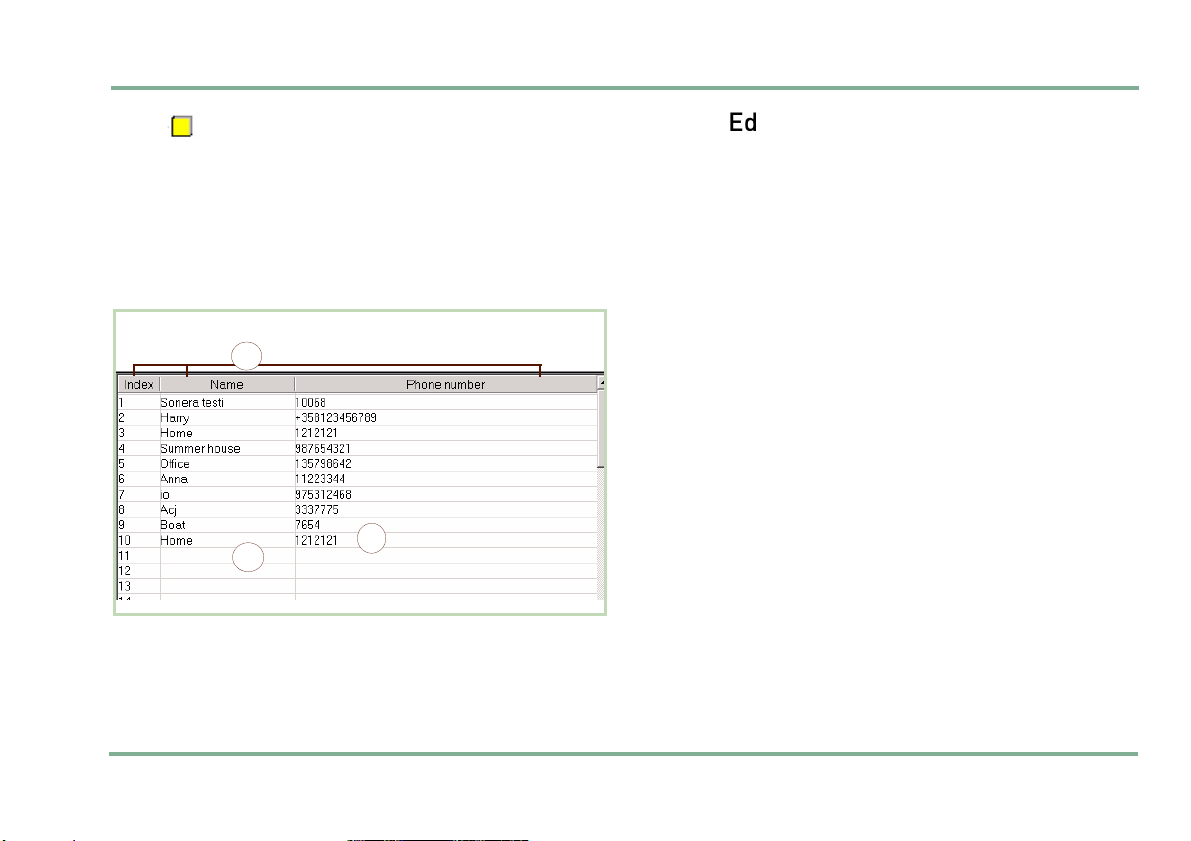
SIM FEATURES: PHONE BOOKS
As you open the Phone books, the memory entries
stored on the SIM card are listed and can be pro
cessed.
Index number stands for memory slot number.
3
2
1
-
Editing and adding an entry
1. To edit details of an entry, click the desired entry.
To add a new phone book entry, click a blank line
(1).
2. Key in the name and number (2).
3. By pressing Tab on the keyboard you can move
from a data field to another.
Deleting entries
1. To delete a phone book entry, click the desired entry.
2. Press Delete on the keyboard. You can also choose
the command Delete from the Edit menu, or by
clicking the mouse´s right button.
SIM FEATURES: PHONE BOOKS 13
Page 14
CONFIGURING SETTINGS FOR THE BENEFON TRACK ONE
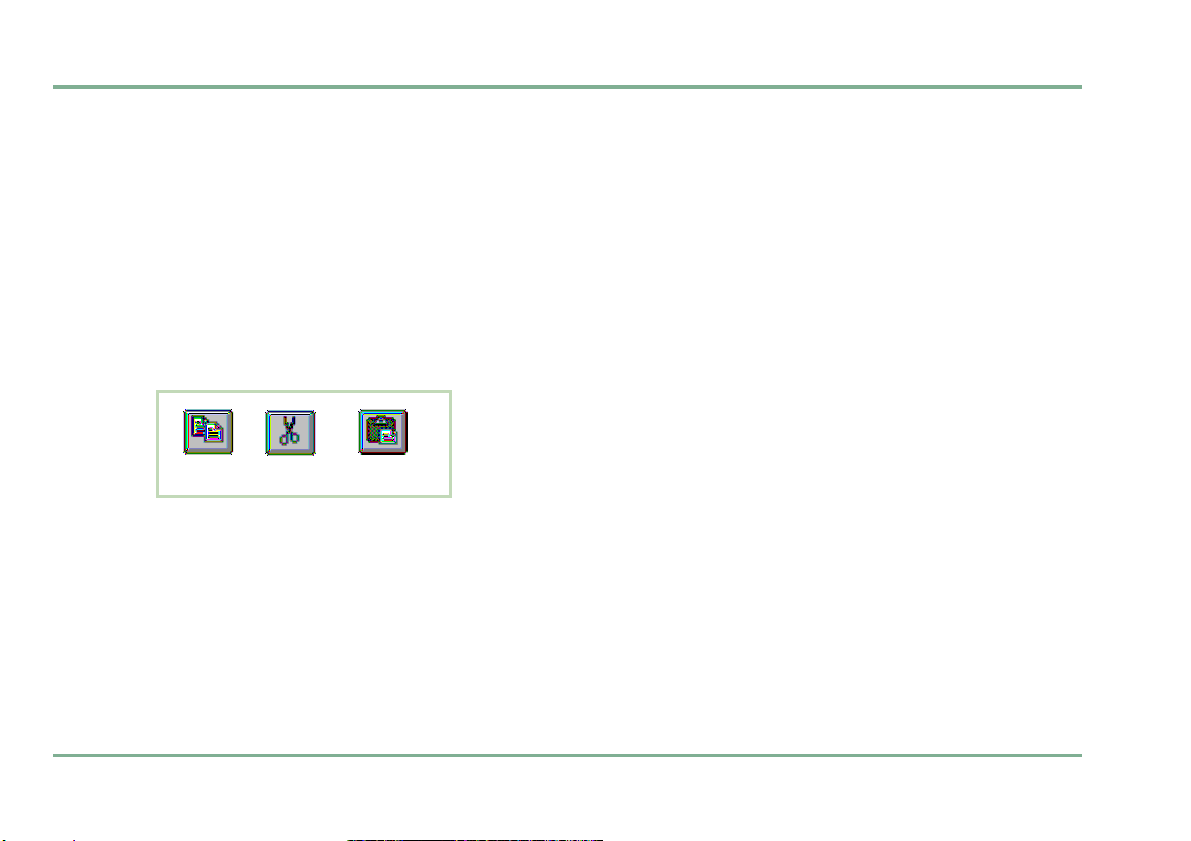
Moving and copying entries
1. To move or copy a phone book entry to another
slot, click the desired entry.
2. Press Ctrl+C (for copy) or Ctrl+X (for cut) on the
keyboard. Click the destination line and press
Ctrl+V (for paste) on the keyboard.
You can also choose the commands Copy, Cut and
Paste from the Edit menu, or by clicking the
mouse´s right button.
Or, you can click the corresponding function icons
on the toolbar.
Copy
3. If the destination line is reserved, you also need to
confirm, whether to overwrite the old information
or not.
- To overwrite the old information, click Yes in the
dialog box.
- To preserve the old information and transfer the
new information to another, free slot (Index num
ber), click No in the dialog box.
Cut
Paste
-
Arranging entries
Arrange the phone book by Index, Name, or Number (3)
either by
- clicking the title
- choosing the option from the Edit menu
- clicking the mouse´s right button.
•View by: This option rearranges the phone book
temporarily. When transferring the phone book data
back to the phone, the data will be arranged by the
old order.
•Sort by: This option rearranges the phone book per-
manently. When transferring the phone book data
back to the phone, the data will be arranged by the
new order.
14 SIM FEATURES: PHONE BOOKS
Page 15
CONFIGURING SETTINGS FOR THE BENEFON TRACK ONE
USER SETTINGS
1
2
3
4
5
6
a b
13
9
10
11
12
7
8
USER SETTINGS 15
Page 16

CONFIGURING SETTINGS FOR THE BENEFON TRACK ONE
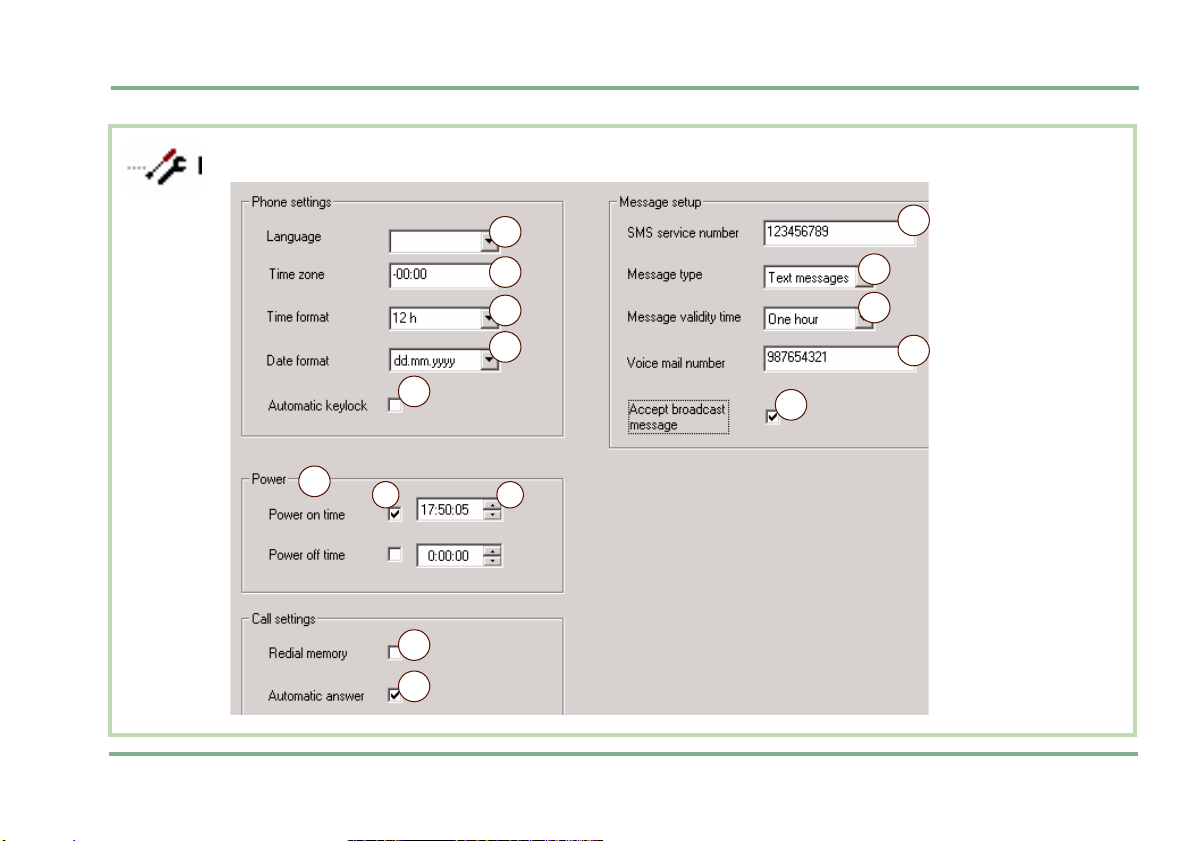
Phone settings
LANGUAGE
You can select the menu language, the phone uses.
Click the arrow and highlight the desired option (1).
DATE AND TIME SETTINGS
The time information determined here is used together with call logging, incoming messages as well as
alarm clock and timers.
When setting the date and time initially, the GPS
needs to be turned on and the position needs to be
read from a satellite.
Time zone
You can select the local time, your country uses. The
default time comes to your phone from a satellite and
it is called the standard Coordinated Universal Time
(UTC), i.e. "the Greenwich Time".
The standard time zone (UTC) shows here 00:00 and
you may need to correct it to match your local time
zone (2).
For example, the common time zone in Central and
Southern Europe and Scandinavia is +1:00. In East
ern Europe, Finland and Greece the common time
-
zone is +2:00. Key in your local time zone shift with
numeric keys.
If the daylight-saving time is in use in your country,
you need to change the time zone manually each
time, when shifting from winter time to summer time
and vice versa. E.g. in Finland time zone in winter is
+2:00 but time zone in summer is +3:00.
NOTE: Adjusting time zone only affects the time
shown in the phone display. The time accompanying
MPTP messages is always in UTC format.
Time format
You can determine whether the time will be displayed
as 24 hours or as 12 hours am/pm.
Click the arrow and highlight the desired option (3).
Date format
By selecting Date and time, you can determine in which
order the time, date and year are displayed. Click the
arrow and highlight the desired option (4).
•dd.mm.yyyy
•mm.dd.yyyy
•yyyy.mm.dd
16 USER SETTINGS
Page 17

CONFIGURING SETTINGS FOR THE BENEFON TRACK ONE
AUTOMATIC KEYLOCK
The keypad lock is used to prevent accidental key
strokes.
If the automatic keylock is turned on (5), the keypad
will be locked automatically if no key has been
pressed for a few seconds.
•To turn the automatic keylock on, check the box.
•To turn the automatic keylock off, leave the check
box blank.
Power settings
SETTING POWER ON TIMER
When the Power on timer is activated, the phone turns
itself on every day at the same time.
To activate the timer, check the box right next to it
(6a).
Select the time for power up by clicking the arrows, or
key in the desired time (6b).
SETTING POWER OFF TIMER
When the Power off timer is activated, the phone turns
itself off every day at the same time.
Set the power off timer functions the same way as the
power on timer.
USER SETTINGS 17
Page 18

CONFIGURING SETTINGS FOR THE BENEFON TRACK ONE
Call settings
REDIAL MEMORY
If redial memory is turned on, the last dialled numbers
are stored in memory.
Redial memory can be turned on by checking the box
(7).
AUTOMATIC ANSWER
The automatic answer function can be turned on or off
(8).
If the Automatic answer is turned on (the box is
checked), all incoming calls are answered automati
cally when the phone is connected to a car kit or portable hands free kit.
-
Message setup
SMS SERVICE NUMBER
You can store the SMS service number, which is needed for sending normal short messages and telematics
protocol messages (9).
The number must be set correctly, otherwise sending
short messages is not possible.
The SMS service number can be found e.g. in the
manual of your local network operator.
MESSAGE TYPE
You can determine what kind of a message you are
processing. You can choose the message type from
these: Text, Fax, X400, Email, Ermes, or Data.
When using the phone for normal or MPTP messaging,
click the arrow and highlight Text for message type
(10).
18 USER SETTINGS
Page 19

CONFIGURING SETTINGS FOR THE BENEFON TRACK ONE
MESSAGE VALIDITY TIME
You can select the length of validity for normal SMS
messages, i.e. for how long the SMS messages are
stored in the server of the operator.
You can choose the message validity from these: 1
hour, 6 hours, 24 hours, 1 week or Maximum time.
Click the arrow and highlight the desired option (11).
VOICE MAIL NUMBER
Voice mail service is a network service. If you have
subscribed the service, you need to store the voice
mail number to be able to listen to the voice messages
left for you.
Key in the voice mail number (12). The number is
supplied to you by the service provider.
ACCEPT BROADCAST MESSAGES
Cell broadcasts are general messages, which are
broadcast to all receivers within a particular region.
They may contain advertisements, local weather re
ports and information about road traffic, stock exchange and sport results. Cell broadcast service is a
network feature.
To accept broadcast messages, check the box (13).
-
USER SETTINGS 19
Page 20

CONFIGURING SETTINGS FOR THE BENEFON TRACK ONE
TELEMATICS: TELEMATIC SETTINGS
3
5
a
61
2
4
a b c ed
20 TELEMATICS: TELEMATIC SETTINGS
b
7
c
Page 21

CONFIGURING SETTINGS FOR THE BENEFON TRACK ONE
About telematics
Telematics is a kind of electric data transfer technique, which can also be used in wireless phone networks. Telematics can be used in several new services
and applications, such as in GPS-positioning (which
can be used e.g. in rescue operations) and in different
remote-controlled devices (which can be used e.g. in
medical equipment and emergency and service cen
ters).
INITIAL ACTIVATION OF THE SERVICE
In order to use telematic functions, such as Send position and Condition check, you must have a contract
with the service provider. The service center will then
supply you with a service user-id and initiate service by
sending an activation message to your phone. Since
initiation requires user identification, you need to store
the user-id in your phone as soon as it is supplied.
For some models activation of telematic functions may
have been done already when leaving the factory.
ESSENTIAL NUMBERS
Before you can start using telematics, also make sure
that required settings are done and essential numbers
stored in the phone. Such numbers are, e.g. service
user-id, service center number, SMS service number,
assistance call number(s), emergency center numbers
and desired SOS activation method.
-
Service center number
You can change and store the phone number, which is
used for sending telematics protocol messages to the
service center.
Key in the number of the service center (1).
Service user-id
Service user-id is needed for initial activation/deactivation of the service, and for user identification to the
service provider. You may have several phone num
bers but only one user-id number. The user-id number
is unique and supplied to you by the service provider
as the contract is made.
Key in the service user-id (2).
-
TELEMATICS: TELEMATIC SETTINGS 21
Page 22

CONFIGURING SETTINGS FOR THE BENEFON TRACK ONE
Error reports
You can set the phone to inform of errors occurred in
MPTP messaging (3). An error can be, e.g.
- Failure in message transmission: E.g. the phone
is unable to transfer trace log
- Misspelling: The phone detects that a command
string is uncorrect
- Errors in logic (illegal actions): You try to turn a
function on when, in fact, the function is already
turned on.
The phone will send error reports to authorized numbers, i.e. Service center number, Emergency center num-
bers, and Assistance call number(s).
NOTE: If sending of Trace log fails, the phone will inform of failure only under these circumstances:
-The Trace sms number is stored and
- Error reports data field shows Send error reports.
For more information, see TRACE LOG SETTINGS ON PAGE 23.
Assistance call
STORING VOICE CALL NUMBER FOR ASSISTANCE
CALL
Assistance call is an information call, which is made to
specific, pre-configured number. Since the call is nor
mal voice call, the destination number can be mobile
phone number as well as any normal phone number.
Key in the phone number for making assistance voice
calls (4a). To enable the voice call, check the Call on
box (4b). If the box is left blank, assistance voice calls
cannot be made.
STORING SMS NUMBER FOR ASSISTANCE CALL
Along with the voice call or instead of it, the phone
may send its position as a short message.
After sending position, the receiving party might call
back to the phone. The phone may answer this incom
ing call automatically.
Key in the SMS number for sending positions (4c). To
enable sending positions, check the SMS on box (4d).
If the box is left blank, positions (which are related to
assistance calls) cannot be sent. By checking the An
swer on box (4e), the phone will answer incoming as-
sistance calls automatically.
-
-
-
22 TELEMATICS: TELEMATIC SETTINGS
Page 23

CONFIGURING SETTINGS FOR THE BENEFON TRACK ONE
Trace log
TRACE LOG SETTINGS
The phone stores position data in the phone memory
automatically. Stored data contains position informa
tion and time stamp.
The maximum storage capacity is 1000 positions.
Once the log is full, the phone stacks the information
by dropping off irrelevant positions. When positions
cannot be dropped any more without losing important
information, there are two ways to proceed:
•Log overwrite: In case the log is not transferred at
all, the phone will automatically replace the oldest
positions with the new ones.
•Log transfer: There are several ways to transfer the
log from the phone:
- Locally, by using the Benefon Configurator and
data cable, or
- Remotely, "over the air" by sending a specific
MPTP message separately to the phone, or
-By using Automatic trace transfer. In this case the
setting is done in advance, via the Benefon Con
figurator, but the actual transfer will happen automatically and remotely.
-
-
Automatic trace transfer
By checking the box (5a), the trace log will be sent
automatically once the log is stacked full. The desti
nation number to which the log will be sent is the
trace data call number (see below).
By leaving the check box blank, trace log is automatically overwritten once the log is full. In this case the
log can be recalled only by sending a specific MPTP
message to the phone.
-
Trace data call number
Key in the trace data call number (5b). This number
is needed for transferring log remotely from the mo
bile phone. The receiving unit must include a phone,
modem and computer.
When the receiving phone is a normal phone, you can
store its normal phone number for the trace data call
number.
NOTE: If the receiving phone is a mobile phone, it
must contain a specific SIM card, which is equipped
with data feature. Data feature usually includes a sep
arate data call phone number (i.e. CSD number) for
data reception. In order to get this feature, please
contact your network operator.
-
-
TELEMATICS: TELEMATIC SETTINGS 23
Page 24

CONFIGURING SETTINGS FOR THE BENEFON TRACK ONE
SMS number
Key in the SMS number (5c). The number is needed
for informing the receiving party in case the data
transfer fails after three attempts. The receiving party
is normally one of the authorized numbers (service
center, emergency center or assistance call number).
Also make sure, the Error reports is set to Send error re-
ports. For more information, see ERROR REPORTS ON PAGE
22.
TRANSFERRING TRACE LOG
Local transfer
When the phone returns home, it is connected to the
Benefon Configurator by BW cable. The log will be
loaded from the phone to the software the same way
as other settings. For more information, see
ING THE PHONE TO THE BENEFON CONFIGURATOR SOFTWARE ON
PAGE 7 and LOADING SETTINGS FROM THE PHONE TO THE SOFTWARE ON PAGE 8.
CONNECT-
When the Benefon Configurator loads the log directly
from the phone, the trace log file appears automati
-
cally in the display in readable text format. The Trace
log icon is shown under the My Benefon node on the
left, and by clicking the icon the actual trace log file
will be shown in the Document window on the right.
Remote transfer
The phone sends the log to the service center remotely, as a trace data call, using Z-modem protocol.
Normal speed for data transfer in the GSM-network is
9600 baud. Since the Benefon phones support higher
speed, the transfer can be sped up to 14400 baud, in
case the higher speed is supported by the network
and SIM card, as well. Speed configuration can be
done by specific MPTP message.
The computer must contain a modem application
which supports Z-modem protocol (e.g. Windows Hy
perterminal). NOTE: Check the modem settings. Serial port must be correct, and transfer speed must be
set according to receiving phone. E.g. when using the
Benefon mobile phone as the receiving phone, trans
fer speed must be set to 19200 bits/second.
During the transfer, the receiving mobile phone must
be connected to the computer by a data cable/BW ca
ble.
In order to make the modem answer automatically incoming data calls, key in the command ats0=1 and
press Enter on the keyboard. The command is associ
ated with the receiving mobile phone. (the automatic
answer for data calls can be turned off by keying in
the command ats0=0)
24 TELEMATICS: TELEMATIC SETTINGS
Page 25

CONFIGURING SETTINGS FOR THE BENEFON TRACK ONE
The incoming log file will be found in your computer. Default destination directory depends on modem settings
and can be changed. In most cases the log file can be
located at the root directory of the modem application.
The binary-coded log file name contains U (or some other) letter and the phone´s serial number. The log file
identifier is .bin.
Sample case by using Windows Hyperterminal:
STEP1: CONFIGURING MODEM APPLICATION
FOR DATA RECEPTION
1. Connect the receiving mobile phone to the computer by
data cable and open the Windows Hyperterminal
modem application.
2. Open New connection (from the File menu if the dia-
log box is not displayed).
3. Name the connection -> Ok.
4. Select port for the connection (e.g. COM1) -> Ok.
5. Set transfer speed to 19200 Bits/Second ->Ok.
6. Open Receive file.. from the Transfer menu.
7. Click Browse and find the desired destination directory
->Ok.
8. Select Z-modem for Receiving protocol ->Receive.
When the modem configuration is done, you may save the
file by clicking Save as... from the File menu.
Close the connection by clicking Disconnect from the Call
menu.
From now on, whenever you need this connection, you can
use the profile just created by selecting Open... from the
File menu.
STEP2: RECEIVING REMOTELY SENT LOG FILE
Connect the receiving phone to the computer by data cable/BWcable and open the Windows Hyperterminal modem application.
To ensure the connection between mobile phone and the
modem, you may key in ATI on the screen and press Enter
-> the modem will identify the receiving mobile phone.
Key in ats0=1 and press Enter -> the mobile phone will
answer automatically to incoming CSD calls.
When the mobile phone starts alerting, the modem will display RING. When the mobile phone answers, the data
transfer dialog box appears on the screen. When the transfer is finished, the dialog box disappears and the connection can be switched off.
If you do not use the automatic answer, do as follows
(when the phone starts alerting): Press the Hook-up key on
the phone keypad OR key in ATA on the screen and press
Enter.
NOTES:
The Trace settings (Trace data call number, trace sms
number and the automatic trace transfer), as well as Service center number must be configured in the phone in advance. For more information, see
ON PAGE 21
Automatic answer setting of the receiving mobile phone is
for voice calls, not data calls and thus it must be turned
off.
and TRACE LOG SETTINGS ON PAGE 23.
SERVICE CENTER NUMBER
TELEMATICS: TELEMATIC SETTINGS 25
Page 26

CONFIGURING SETTINGS FOR THE BENEFON TRACK ONE
OPENING AND PROCESSING REMOTELY SENT LOG FILE (IN THE BENEFON CONFIGURATOR)
Start the Benefon Configurator and open the trace log
file as follows:
1. Highlight the Trace log icon shown on the left side
of the screen, under My computer node.
2. Choose Open from the File menu (or, click the
mouse´s right button and highlight Open).
3. Click the Files of type setting and highlight All Bene-
fon Configurator files.
4. Browse the directories and files until the destination directory and file is found. The file identifier is
.bin. Click Open.
Trace log file is originally in binary-coded format. As
the file is opened in Benefon Configurator, the soft
ware generates the file and displays it as a table in a
readable text format.
If you want open and process these .bin files in some
customized application other than Benefon Configura
tor, please ask directions from the Benefon Partner.
Saving the log file
To save the trace log in Benefon Configurator, choose
Save or Save as.. from the File menu. The trace log file
will be saved in readable text format (.log).
Deleting the log file
To delete the trace log in Benefon Configurator,
choose Delete trace log from Mobile menu.
NOTE: If you delete trace log from My Benefon node,
the log is lost once and for all. So, make sure the log
is stored in some place else in case you need to recall
the log information afterwards.
PROCESSING TRACE LOG BY USING SOME
OTHER APPLICATION
Trace log files cannot be edited in Benefon Configura-
tor. In order to modify or print the log file, do as follows:
1. First save the log in Benefon Configurator. The log
-
file identifier will become .log.
2. Open Windows Excel or Notepad. Make sure, the
Files of type shows All files.
3. Open the log file in the chosen application.
26 TELEMATICS: TELEMATIC SETTINGS
Page 27

CONFIGURING SETTINGS FOR THE BENEFON TRACK ONE
Default behaviour for location request
The phone may receive several different messages requesting location. Such messages can be, e.g. Location request (?LOC) messages, Location history
request (?HIS) messages. (For more information on
how to create location request messages, see the sep
arate MPTP document.)
You can define, which way the phone responds the location requests (6).
The message always includes a time stamp indicating
age of the position.
Choose from the options below by checking the corresponding box in the Benefon Configurator.
•Send last known position: When the phone receives
the location request, the phone immediately recalls
the latest position found in the memory and sends it
to the requesting number. The position can be quite
old. If the phone does not have a position at all, the
message will be sent without position.
•Attempt to acquire a fresh position for a while: When the
phone receives the location request, the phone
immediately switches the GPS on (if it is currently
off), updates position, sends it and switches the
GPS off. Then the phone returns to normal idle
mode. Only in case the position update is NOT pos
sible within 3-4 minutes, the phone will send the
-
-
latest position found in the memory to the request
ing number.
•Send last known position at once: When the phone
receives the location request, the phone immedi
ately recalls the latest position found in the memory
and sends it to the requesting number. In addition
to that, the phone tries to update the position for
3-4 minutes. If the position update succeeds, the
new position is sent to the requesting number, as
well.
Phone also checks if an AGPS can be retrieved and requests it automatically to speed up calculation. Using
the AGPS requires that the parameters for the AGPS
are configured in the phone. For more information on
AGPS settings, see
ASSISTED GPS ON PAGE 38.
-
-
Position precision
You can set the device to show precision of the coordinate calculation in protocol messages.
Precision of coordinates will be shown in meters until
precision exceeds 254 meters. This setting has an ef
fect on almost all protocol messages, which contain
position information, excluding emergency messages.
Click the arrow and highlight the desired option (7).
-
TELEMATICS: TELEMATIC SETTINGS 27
Page 28
CONFIGURING SETTINGS FOR THE BENEFON TRACK ONE
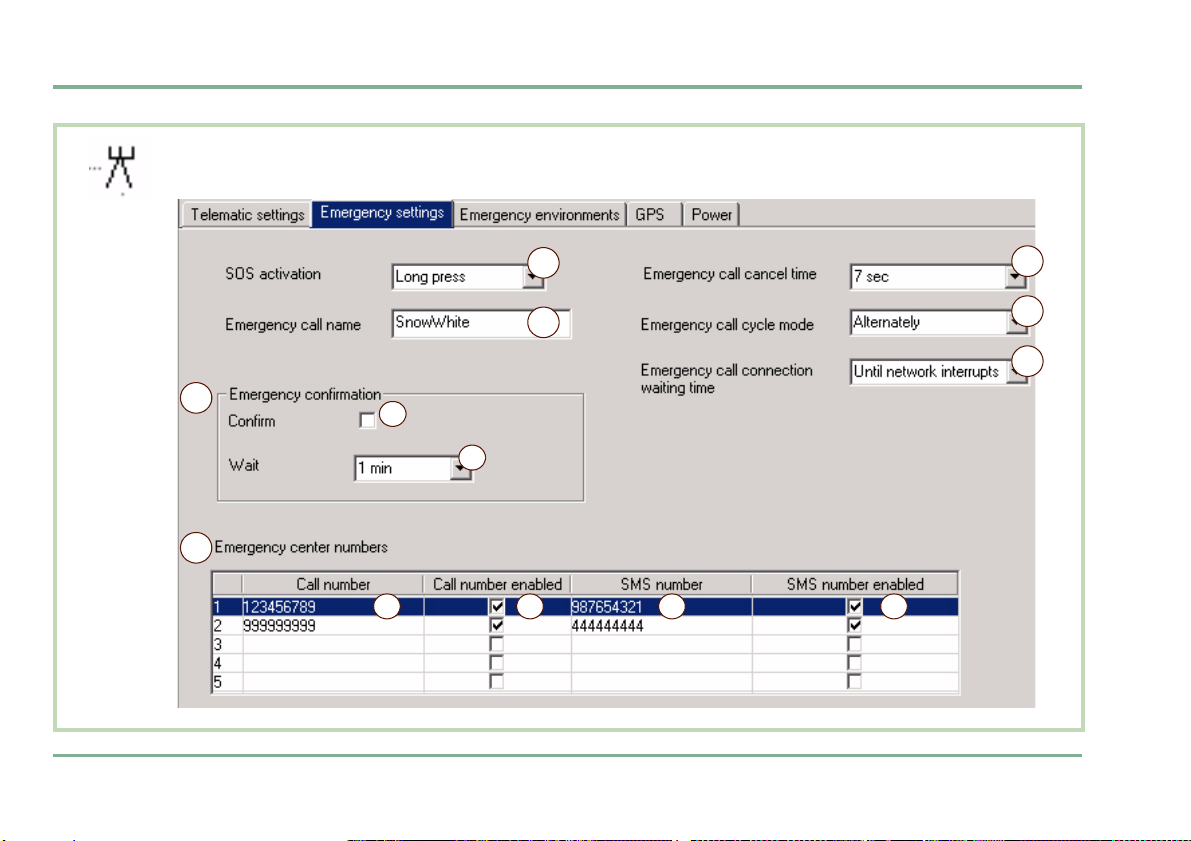
TELEMATICS: EMERGENCY SETTINGS
6
a
7
a
28 TELEMATICS: EMERGENCY SETTINGS
1
2
b
b ba
3
4
5
Page 29

CONFIGURING SETTINGS FOR THE BENEFON TRACK ONE
Basic emergency settings
SOS ACTIVATION
The BeneGuard (emergency) button is used for making an emergency cycle, i.e. making emergency calls
and sending emergency messages. You can determine
the way, the cycle will be started:
•Long press: By pressing and holding down the emer-
gency button for a few seconds once or
•Two presses: By pressing the button quickly twice
(in 5 secs).
Click the arrow (1) and highlight the desired option.
NAMING EMERGENCY CALL
You can name the emergency call as you like (2). This
is the way to mask the real phone number to which
you are calling.
The "nickname" will be displayed during the BeneGuard emergency call.
EMERGENCY CANCEL TIME
After pressing the emergency (SOS) button in order to
start an emergency cycle, the emergency cycle can
still be cancelled.
You can determine the time (in seconds), the cancellation needs to be done. This function is a kind of delay: A message will not be sent or a call will not be
made if it is cancelled in the pre-defined time.
Click the arrow (3) and select the desired option for
the time of delay.
When cancelling the emergency call or message,
press the Hook-up key during the time of delay
(e.g. in 7 seconds).
NOTE: If the cancelling time is set to zero, there is no
possibility to cancel the whole emergency cycle.
TELEMATICS: EMERGENCY SETTINGS 29
Page 30

CONFIGURING SETTINGS FOR THE BENEFON TRACK ONE
SELECTING EMERGENCY CALL CYCLE MODE
You can define order for making emergency (voice)
calls and sending emergency messages while the
emergency cycle is on. Click the arrow and highlight
the desired option (4).
You have two choices:
•First SMS, then calls: When the emergency cycle is
initiated, first the phone will send the emergency
messages, after which the voice calls will be made
starting from the top of the list of the emergency
numbers.
•Alternately: The phone will make a voice call and
send an SMS in pairs according to the list order,
starting from the top.
SETTING EMERGENCY CALL CONNECTION
WAITING TIME
You can define for how long a time the phone tries to
call a single emergency number before moving on to
the next number in the list of emergency numbers.
Click the arrow and highlight the desired option (5).
SETTING EMERGENCY CONFIRMATION FOR
EMERGENCY MESSAGE DELIVERY
By checking the Confirm box (6a), you can request a
confirmation just to make sure that someone has re
ceived an emergency message. The phone will resend
emergency messages until it receives a confirmation
of the successful delivery.
You can also specify the waiting time (6b), i.e. how
long a time the phone waits for the confirmation be
fore trying to reach some other emergency center
number.
NOTE: This feature is not supported by all control systems. Using this feature in a system which does not
support it can lead to massive resending of messages
and high charges.
-
-
EMERGENCY CENTER NUMBERS
The emergency (SOS) messages are sent and emergency calls are made to the numbers stored in the
emergency center list.
The numbers are in priority order, starting from the
top of the list. These numbers work as "a chain".
You can have two numbers (a phone number and an
SMS) associated with each emergency center number
(7a). Check the box to make sure, the corresponding
number is used during an emergency call (7b).
30 TELEMATICS: EMERGENCY SETTINGS
Page 31

CONFIGURING SETTINGS FOR THE BENEFON TRACK ONE
Making emergency cycle
Emergency cycle means making specific emergency
call to emergency center numbers. During the emer
gency cycle emergency environment settings (e.g.
tone and display settings) are automatically switched
on until the cycle is over. For more information, see
CONFIGURING EMERGENCY ENVIRONMENTS ON PAGE 34.
Depending on configuration, the emergency call can
contain both (voice) calls and messages. Calls can be
made to mobile phone numbers, or normal phone
numbers. Messages are protocol messages sent to
mobile phones via SMS. The emergency message con
tains both GPS coordinates and GSM network measurement report.
The emergency numbers are in priority order, starting
from the top of the list. These numbers work automat
ically, as "a chain", through the list. If the first number is unreachable (after two attempts), the phone
calls or sends the report to the second number. If it is
not answered either, the phone will go on to the third
number on the list and so on.
The phone tries to reach contact with the other numbers once before moving on to the next number on
the list. If there is still no answer after going through
the whole list, the calling procedure will be started all
over. The phone will make three call rounds at maxi
mum.
-
-
-
-
Emergency cycle is started by pressing the BeneGuard
button
button must be pressed the way it has been config
<, located on the top of the phone. The
-
ured: A long press or two quick presses. For more information, see SOS ACTIVATION ON PAGE 29.
The emergency cycle is over when the calls are made
and messages are sent (if the cycle is not interrupted,
or cancelled), and the phone returns to normal oper
-
ation.
In order to be able to cancel the emergency cycle, the
cancel time must be configured in the phone. For
more information, see
CIRCUMSTANCES WHICH MAY AFFECT ON EMERGENCY CYCLE
1. Being in a shadow area of the GSM network at the
time of the event.
2. Poor GPS coverage during emergency cycle may
cause the emergency cycle completion to slow
down.
3. Busy telephone line - applies to a voice call con-
nection.
4. Message transmission error caused by the carrier
of an SMS, i.e. the network operator.
EMERGENCY CANCEL TIME ON PAGE 29.
TELEMATICS: EMERGENCY SETTINGS 31
Page 32

CONFIGURING SETTINGS FOR THE BENEFON TRACK ONE
MAKING AN EMERGENCY CALL WHICH
INCLUDES BOTH CALL NUMBERS AND SMS
NUMBERS
1. Press <.
2. The phone sends the message including position
information. If current position coordinates are not
available, previous coordinates will be sent in
stead.
3. The phone alerts until the call is answered.
4. A voice call in progress.
-
CANCELLING EMERGENCY CYCLE
As a sign of cancellation period, you may hear the
cancellation tone. You may also see a timer indicating
time left for cancellation.
•To cancel the entire emergency cycle, press the c
key briefly during the cancellation period.
•When the emergency cycle has already started, it
cannot be cancelled entirely, but the rest of the
emergency calls and messages can be cancelled. In
order to do so, press the
for five (5) seconds.
When the cancellation is succeeded, the phone will return to normal operation.
c key and hold it down
32 TELEMATICS: EMERGENCY SETTINGS
Page 33

CONFIGURING SETTINGS FOR THE BENEFON TRACK ONE
TELEMATICS: EMERGENCY ENVIRONMENTS
1
2
a
b
TELEMATICS: EMERGENCY ENVIRONMENTS 33
Page 34

CONFIGURING SETTINGS FOR THE BENEFON TRACK ONE
About emergency environments
You can determine specific sound and display settings
which will be on during an emergency call.
You can configure two separate profiles for emergency
situations: Normal (2a) and Silent (2b).
You can activate the desired profile by checking either
one of the boxes Normal or Silent for Active environment
(1).
The phone switches the emergency environment on
automatically when the BeneGuard button is pressed.
The phone switches back to the normal environment
automatically when the emergency cycle is succesfully
put through, or if the emergency cycle is cancelled
correctly during the cancellation period.
Configuring emergency environments
•Tone: To select the desired melody for alert tone,
click the arrow and highlighting the desired option.
•Volume: To increase the volume, drag the tab rightwards - to decrease the volume, drag the tab leftwards.
•Increasing: To make the alert tone increasing, check
the box.
•Vibration: To attach vibration to the alert, check the
box.
•Hands free: To enable hands free operation, check
the box.
•Displays: To make the phone to display the emergency cycle notifications, check the box.
•Call mode: To select the call mode, click the arrow
and highlight the desired option: Audio both ways or
Audio to center.
•Change the name : To change the name of a profile,
key in a new name.
34 TELEMATICS: EMERGENCY ENVIRONMENTS
Page 35

CONFIGURING SETTINGS FOR THE BENEFON TRACK ONE
TELEMATICS: GPS
1
2
3
4
5
a
b
6
TELEMATICS: GPS 35
Page 36

CONFIGURING SETTINGS FOR THE BENEFON TRACK ONE
Setting GPS operating mode
The GPS receiver in the phone uses power saving options for ensuring maximum battery capacity.
Click the arrow and highlight the desired option (1).
The GPS receiver has three modes:
•Off
•Economy with the power saving option
- the time needed for position fix depends on
present circumstances. If the GPS unsucceeds in
calculating the position, it will fall asleep for a
while and retry to calculate the position later on
•Full power without the power saving option.
Operating mode depends on the way, the phone is
used. Autonomous system, i.e. a portable mobile
phone, normally uses either Economy or Off mode,
while a phone connected to constant power supply,
e.g. a car kit, uses Full Power mode.
GPS sleeping time (in economy mode)
As a default setting, the GPS economy mode calculates position approximately every 45 seconds. The
position interval consists of two things:
•An ideal sleeping time for the GPS and
•An actual time needed for searching satellites and
calculating position by the GPS.
The sleeping time is adjustable (2). In the Benefon
Configurator, key in the sleeping time in seconds. The
sleeping time should be rounded to tens, otherwise
the software does the rounding.
E.g. by entering 27, the ideal sleeping time will be
rounded to 30 seconds. Note that 20 seconds is the
minimum value.
NOTE: The time needed for searching and calculating
satellites depends on present circumstances, e.g. sat
ellite coverage, age of the latest position fix, distance
from the previous to the current position and so on.
-
36 TELEMATICS: GPS
Page 37

CONFIGURING SETTINGS FOR THE BENEFON TRACK ONE
NMEA output
The NMEA port output can be turned on or off. This
phone supports a subset of NMEA 0183 v2.0 output
protocol, which is used for transferring position data
between the phone and a navigation system, such as
a Search and Rescue application.
For the connection you also need a BW cable (an accessory).
Click the arrow and highlight the desired option (3).
•By selecting Off, you will turn the NMEA output port
off.
•By selecting a transferring speed you will turn the
NMEA output port on.
NOTE: When the NMEA output is turned on, the phone
will consume slightly more power.
GPS tuning
You can set tuning values for the GPS receiver. Depending on selected value, the GPS prioritizes precision over fastness or vice versa.
Set the value by clicking the arrow and highlighting
the desired option (4).
•Quick: The GPS is tuned for fast position fix. The
receiver can acquire position fix quite fast in moder
ate or good conditions. Position can be acquired
even in a bad satellite coverage, but the accuracy
might not be so good.
•Precise: The GPS is tuned for high accuracy. How-
ever, acquiring the position fix might take time and
can be problematic in a bad satellite coverage.
The GPS tuning values can also be set from the GPS
menu of the phone.
-
TELEMATICS: GPS 37
Page 38

CONFIGURING SETTINGS FOR THE BENEFON TRACK ONE
Assisted GPS
The phone has capability to receive assistance to the
GPS receiver in order to speed up the initial position
calculation. This is very useful feature if the phone is
in poor satellite coverage.
Assistance can be supplied over the Mobile Phone
Telematics Protocol in a binary coded protocol mes
sage. The message will contain ephemeric and almanac data which is based on a rough position calculated
by e.g. GSM network parameters (Cell-ID, CI-TA etc).
The assisted GPS is supplied from a third party station
server.
Using the AGPS does NOT affect the accuracy of the
position. If the last position fix is deemed to be too
old, and the AGPS is set, the AGPS feature is automat
ically used to speed up the position determination.
The cost of the AGPS service is determined on the
contract of the service provider.
You can specify settings for ordering assisted GPS information from a service provider.
•Number of satellites: Select the number of satellites
(5a). However, note that the more satellites
selected, the faster the service but the higher the
charge.
•SMS number: Key in the SMS number of the AGPS
service (5b).
-
-
Poor satellite coverage
Notify service center when satellite coverage drops: The
phone may notify the service center if the satellites
are suddenly dropped and position is lost, e.g. when
entering in a building.
When the phone loses the satellites, it will send only
one notification, despite of how long a time it stays in
the poor satellite coverage.
Key in the timeout in minutes (6). Note that this option will be activated only after the phone gets the
first position after this configuration.
The timeout indicates, for how long the phone is allowed to stay in a poor satellite coverage before sending a protocol message to the service center - the
smaller the number you set in here, the faster the
phone will react to lost satellites and the sooner the
notification will be sent.
38 TELEMATICS: GPS
Page 39

CONFIGURING SETTINGS FOR THE BENEFON TRACK ONE
TELEMATICS: POWER
1
a
b
c
2
a
b
3
TELEMATICS: POWER 39
Page 40

CONFIGURING SETTINGS FOR THE BENEFON TRACK ONE
Settings for manual power on and off
•No restrictions (1a) - The phone can be turned on and
off as usual. The service center will NOT be notified
of the power on/off.
•Notify service center (1b) - The service center will
always be notified when the phone is powered on or
off. Notifying means sending a protocol message to
the service center.
•No power-off (1c) - The phone cannot be powered off
normally (by pressing
powers off for some reason (e.g. Low battery), the
phone will send a protocol message to the service
center.
/). Moreover, if the phone
Settings during battery charging
CHANGE GPS OPERATING MODE
You can select, which one of the GPS power modes is
on while the phone is being charged.
Click the arrow and highlight the desired option (2a).
By selecting No change, the GPS mode remains in the
previously configured operating mode (i.e. its normal
operating mode).
Set the GPS Off in case
•the time reserved for charging is quite short, or
•GPS functions are not needed during charging process.
NOTIFY SERVICE CENTER WHEN CHARGING
By checking the box (2b), the phone will notify the
service center in case the phone is connected to a
charger or disconnected from it.
Notifying means sending a protocol message to the
service center, including the latest position.
Notify service center of battery status
By checking the box (3), the service center will be notified of some events occurred in battery status.
Notifying means sending a protocol message to the
service center, for example in these cases: Low bat
tery, temperature too warm/too cold for charging or
using battery, battery failure.
-
40 TELEMATICS: POWER
Page 41

CONFIGURING SETTINGS FOR THE BENEFON TRACK ONE
WAYPOINT TRACKING
5 321
4
Waypoint tracking is remotely controlled by the service center. Authorized numbers, such as assistance call and emergency center numbers, can control waypoints they have created while the
service center can control all waypoints. When the waypoint tracking is turned on, the alarm (incl.
position information) will be sent to the controlling number when the phone is moving out from or
in to the pre-defined area. The phone can also be configured to send the position information to
the service center whenever crossing the borderline - despite of the moving direction.
NOTE: When entering into the pre-defined area, the alarm will be sent when crossing radius. When
entering out from the pre-defined area, the alarm will be sent when crossing radius plus perimeter
of 100 meters.
TELEMATICS: POWER 41
Page 42

CONFIGURING SETTINGS FOR THE BENEFON TRACK ONE
Creating waypoints
•Name (1): You may key in the desired name for a
waypoint. You can define up to 30 separate, circular
areas: The areas are separated from each other by
an ID number and a name.
•Center point coordinates (2): The waypoint area is
defined by keying in Latitude and Longitude and a
Radius of an area in meters. The radius should be
rounded to tens, otherwise the software does the
rounding. E.g. by entering 67, the actual radius will
be rounded to 70 meters. 50 meters is the minimum
value.
•Alarm (3): After activating a waypoint, you can
select an alarm option for this waypoint. You have
three options: Alarm will be turned on when arriving
to a waypoint, departing from a waypoint, or when
ever crossing the borderline (both directions). Each
waypoint can have alarm option of its own.
•Activation of a wa ypoint (4): To activate a waypoint,
check the Active box (on the same row), to deacti
vate the waypoint, leave the check box blank.
NOTE: The waypoint tracking does not contain automatic switch off or duration options. The feature must
be separately deactivated when it is no longer need
ed.
-
-
-
Resetting the coordinates
To reset the coordinate values, click the latitude and
longitude data fields (the ones, you want to reset).
Marking all waypoints for activation/
deactivation at once
Click the Active box on the top row (5).
Note that activation/deactivation will actually take
place only after you have transferred the information
to the phone.
42 TELEMATICS: POWER
Page 43

CONFIGURING SETTINGS FOR THE BENEFON TRACK ONE
SENSOR SETTINGS: VERTICAL SENSOR
1
2
3
4
5
6
7
Sensor is an additional feature. The feature is
activated by an activation key supplied to you
by the manufacturer.
NOTE: The phone must also have specific battery which includes the sensor component,
and NT 2.0 software installed.
The sensor unit transmits signal, indicating its
status. The status can be, e.g. the orientation
of the phone: Vertical or horizontal.
Signalling of the sensor unit can cause the
phone to alert and send messages. When
alerting, the phone uses current emergency
environment settings. For more, see
ICS: EMERGENCY ENVIRONMENTS ON PAGE 33
that if the emergency environment option Dis-
plays is turned off, the various sensor notifica-
tions, such as Starting alert..., Alerting, and Alert
ended, are not shown at all.
Sensor status is not monitored while the
phone is connected to a charger.
Sensor can also be configured by MPTP over
the air.
SENSOR SETTINGS: VERTICAL SENSOR 43
TELEMAT-
. Also note
Page 44

CONFIGURING SETTINGS FOR THE BENEFON TRACK ONE
Naming the sensor
Key in the name for the sensor (1), e.g. Vertical sensor.
Specifying sensor usage
You can specify sensor usage (2).
The sensor can be turned on or off, and it can be defined to be or not to be shown and changeable in the
Quick menu of the phone.
Polling interval
The phone polls the signal sent by the sensor from
time to time. You can select, at which interval the
polling is done, i.e. how often the status of the sensor
is checked.
Set the polling interval (3) in seconds.
No-alarm duration
You can specify the time, for how long the phone is allowed to be in the wrong position (e.g. in horizontal
position) before any actions are taken.
Set the no-alarm duration (4) in seconds.
Pre-alarm duration
You can specify "cancellation period" for false alarms.
During the cancellation period, the user is alarmed
that the emergency cycle is about to start soon.
Set the pre-alarm duration (5), i.e. "the cancellation
period" in seconds.
During the cancellation period you will hear the prealarm tone. The tone can be muted by pressing the
phone´s left function key
vironment is set to Silent, you will hear no tone at all.
NOTE: If the pre-alarm duration value is set to zero
(0), there is no possibility to cancel the entire emer
gency cycle: The emergency cycle will start right
away.
In order to cancel the emergency cycle, the sensor
must regain normal signal during the cancellation pe
riod. An example: The vertical sensor starts alerting
after it has been knocked down for too long a time. To
cancel the emergency cycle, the phone must be lift up
to vertical position while the cancellation period is still
on.
Once the cancellation period is over, there is no possibility to prevent the emergency cycle to start. The
phone does not poll the sensor signal during the
emergency cycle.
QUIET. If the emergency en-
-
-
44 SENSOR SETTINGS: VERTICAL SENSOR
Page 45

CONFIGURING SETTINGS FOR THE BENEFON TRACK ONE
Post-alarm interval
After the emergency cycle ends, the phone will make
audible alarms at regular intervals. This is done to
help any rescuers in locating the person in emergen
cy. Also reception of phone calls is possible.
Key in the post-alarm interval (6) in seconds.
The phone polls the sensor signal during this phase.
In order to stop the post-alarm tone, the phone must
be lifted up to correct position.
-
Alert trigger
You can select alert trigger for the sensor (7). Click
the arrow and highlight the desired option.
E.g. by selecting Alerts when horizontal, you determine
that the sensor´s normal orientation is vertical, and
being horizontally orientated causes sensor to alert.
The phone is assumed to be incorrectly orientated
once the rotation angle exceeds 45°.
Missing sensor alert
If the special battery including the sensor unit is replaced by a normal battery, the phone becomes unable to detect the presence of a sensor. In this case,
the phone will proceed as follows:
1. The phone will make audible alarm and display no-
tification Not detected.
2. The phone will send an MPTP message to the service center. The message sent is a status message
with status code 112, containing the phone´s last
known position. For more information on this, see
the separate MPTP document.
3. The phone will repeat the procedure each time it is
powered up.
Vertical sensor alerts
To let the emergency cycle take place: Do nothing.
To cancel sensor alert and prevent emergency cycle
from starting, lift the phone up to vertical position. Do
it while the countdown timer is still shown.
To mute the audible alert tone, press the left soft key
..
SENSOR SETTINGS: VERTICAL SENSOR 45
Page 46

CONFIGURING SETTINGS FOR THE BENEFON TRACK ONE
ENCRYPTING MESSAGES
SMS and MPTP messages can be protected from outsiders by encrypting message contents. Encryption is
an additional feature. The feature is activated by an
activation key supplied to you by the manufacturer.
The whole procedure:
First activate the feature, next generate the keys,
then select the encryption options and finally save ev
erything in the mobile phone.
NOTE: The phone must be connected to the Benefon
Configurator software all the time during the proce
dure.
-
-
Activating encryption
To activate the feature, do as follows:
1. Connect the phone with the software.
2. Open Save activation key from the Mobile menu.
3. Key in the activation key and click Save in mobile.
Generating keys
You need two different keys for encryption.
•Message encryption k ey: The "long key" is needed for
encrypting message contents.
•Distribution key: The distribution key is needed for
encrypting the new message encryption key (while
it is sent over the air). I.e. the distribution key
secures the new message encryption key during
OTA transfer.
NOTE: If you generate the new message encryption
key and transfer it locally via the BW cable, the dis
tribution key is not needed.
To generate the keys, do as follows:
1. Open Encrypting>Encrypting keys from the Edit
menu.
2. Check the boxes and click Generate.
3. When generating the keys, the new keys will be
created into the files. Select the destination direc
tory, name the file and click Save. Name the other
key file and click Save once again.
4. Click Close.
-
-
46 ENCRYPTING MESSAGES
Page 47

CONFIGURING SETTINGS FOR THE BENEFON TRACK ONE
Selecting encryption options
1. Open Encrypting>Encrypting settings from the Mobile
menu.
2. Select the options by checking the boxes. See below:
Encrypting based on message type
- SMS and MPTP messages are NOT encrypted.
- Only MPTP messages are encrypted.
- Only SMS messages are encrypted.
- Both SMS and MPTP messages are encrypted.
Encrypting based on destination
- Messages to service center and authorized numbers are NOT encrypted.
- Messages to service center are encrypted.
- Messages to authorized numbers are encrypted.
- Messages to service center and authorized numbers are encrypted.
3. Check the boxes in the Save key in mobile phone.
4. Finally save all the options and the keys by clicking
the Save in mobile phone box in the bottom left.
Browse the directory, find the key file and click
Open (do it twice to save both keys).
5. You can also save the settings in a computer file
by clicking the box Save settings in file. Browse the
destination folder, key in the file name and click
Save box.
MENU LOCKS AND ACCESS CODES
Security code for telematics and GPS
You can lock telematics and GPS settings and functions with the security code. If the lock is on, the security code is requested each time when powering up
the system (software in connection with the phone) or
attempting to enter telematics or GPS menus.
To set the security code, do as follows:
1. Select Change security code from the Mobile menu.
2. Check the desired boxes on the left: These are the
functions which will be secured.
3. Key in the security code and click Ok.
Changing security code
You can change the security code as follows:
1. Select Change security code from the Mobile menu.
2. Click Change security code tile on the right.
3. Key in the old code, then key in the new code and
confirm it.
4. Finally click Ok.
MENU LOCKS AND ACCESS CODES 47
Page 48

TROUBLESHOOTING
Menu lock for phone settings
You can lock phone settings with the phone code. If
the lock is on, the phone code is requested each time
when attempting to enter these menus: Settings, Mes
sage settings, or Broadcast message settings.
To set the menu lock, do as follows:
1. Select Set menu lock from the Mobile menu.
2. Key in the phone code and click Ok.
3. Check the box and click Save in phone.
User interface lock
You can lock user interface with the security code.
When the user interface is locked, all the alphanumer
ic keys, special keys and lower side keys are locked.
The only thing which can be done when the lock is on
is to answer or drop an incoming call.
This lock has no effect on power key or BeneGuard
button on the top.
To lock the user interface, do as follows:
1. Select Set user interface lock from the Mobile menu.
2. Key in the security code, and click Ok.
3. Check the box and click Save in phone.
-
TROUBLESHOOTING
"DUMMY QUESTIONS"
-
BENEFON CONFIGURATOR
Question/Problem Answer/Check points
Today I have time to
make configurations
but the phone does not
arrive until tomorrow.
You can make the configurations in advance.
- To work in off-line, first select Benefon
Configurator
Benefon Track One NT 2.0 to be the default
Benefon mobile phone.
- Open a blank file by double-clicking the
desired icon under the
After making configuration, select
from the File menu.
- Select destination directory and name the
file. Click
mation, the node contains. Each node must be
stored separately.
- When the phone arrives, make the cable
connection and open the Benefon Configura
tor software. Click Connect. Select Open
from the
As the file is displayed, you can transfer set
tings to the phone by clicking Save to mobile.
from the Edit menu and set
My computer node.
Save as..
Save. The software stores the infor-
-
File menu and find the desired file.
-
48 "DUMMY QUESTIONS"
Page 49

TROUBLESHOOTING
INITIAL ACTIVATION OF THE SERVICE
Question/Problem Answer/Check points
I have just the basic
NT2.0 features in the
phone, but telematic
functions do not work.
Otherwise the phone
functions OK.
Have you activated telematics?
When you purchased the phone, you got a Ser-
vice user-id from the service provider. You
need to save this user-id in the phone. When
this is done, the service provider will send an
activation message to the phone.
- For details on initial activation and service
user-id, see
- For details on how to transfer data to the
phone, see
Tip: The service-id setting is available for saving in the phone´s own menu, as well.
Do the following: Press Menu >scroll and
select Settings > scroll and select Telematic
settings> scroll and change Service user-id.
Key in the id and press Ok.
PAGE 21.
PAGE 9.
NEW ADDITIONAL FEATURES
Question/Problem Answer/Check points
I have purchased
some new additional
features, but none of
them works.
Have you activated the new features?
When you purchased the features, you got a
Service activation key . You need to save the key
in order to activate additional features. See
PAGE 10.
SMS SERVICE NUMBER
Question/Problem Answer/Check points
SMS service number,
what is it used for?
- SMS service number is used for delivering
normal short messages, but it can be used for
delivering MPTP messages, as well. You get the
number from your local network operator. You
must store the number in the data field located
User settings. See PAGE 18 .
in the
ASSISTANCE CALL
Question/Problem Answer/Check points
Can I use both numbers (call and sms) in
the assistance call at
the same time?
- Yes. You can use only call, only sms, or both
call and sms numbers at the same time.
- The numbers can be same or different numbers, but since the sms number is used for
sending messages, it must be a mobile phone
number. Make sure to enable the number by
checking the corresponding
boxes. See
PAGE 20.
Call on/SMS on
"DUMMY QUESTIONS" 49
Page 50

TROUBLESHOOTING
TRACE LOG
Question/Problem Answer/Check points
The Benefon Configurator does not load
the Trace log in the
display.
- The phone must contain logged information
(positions).
- The Read trace log box must be checked in
the Benefon Configurator. You will find it as fol
lows: Open the Edit menu, select Configurator..
and go to the Mobile phone startup tasks to
check the box.
- To load the log from the phone later on in the
same session, select
Mobile menu.
EMERGENCY SETTINGS
Question/Problem Answer/Check points
I cannot send emergency messages.
Have I forgotten some
essential settings?
- Is there a valid SIM card inserted in the
phone?
- Have you stored Emergency center numbers
and enabled them? See
- Have you pressed the Beneguard button in
the same way,
ured? See PAGE 29.
- Have you stored SMS service number in the
phone? The number is the same which is used
with normal short messages. See
- Have you transferred these settings in the
phone? See
the SOS activation is config-
PAGE 9.
Read trace log from the
PAGE 30.
PAGE 18.
EMERGENCY CONDITIONS
Question/Problem Answer/Check points
Emergency settings
are correct but send
ing emergency message does not work.
-
- Is there enough charge in the battery? The
more bars in the battery indicator (
better charge. If the battery is low, charge it or
replace it with a charged battery. The phone can
also be configured to send notifications of
changes in battery status. See
- Is the message transmission working correctly? Deliveries of all messages, including
MPTP messages, are fully handled by and in the
responsibility of the GSM network operator and
services can vary substantially.
- The network might be busy at the very
moment. The phone will automatically try to
resend the message three times later on.
- Also make sure, the phone is not located in a
shadow area at the moment. In order to operate
correctly, there must be good GSM network sig
nal, and the GPS antenna must have an
obstructed view to sky (adequate satellite cov
erage).
;), the
PAGE 40.
-
-
50 "DUMMY QUESTIONS"
Page 51

TROUBLESHOOTING
EMERGENCY CYCLE VERTICAL SENSOR SETTINGS
Question/Problem Answer/Check points
How can I be sure that
someone received the
emergency message?
- Turn the Emergency confirmation setting
on. This way the phone will continue sending
the message until it gets acknowledgement
message. See
PAGE 30 .
NOTE: Do not turn this feature on if the feature is not supported by the control system.
The phone makes noise
while making emer
gency cycle. I want it to
be quiet.
What if I accidently
press the Beneguard
button; Is it possible to
cancel the emergency
cycle somehow?
- Check the box Silent for Active (emer-
-
gency) environment.
- Also make sure, volume level is set to
zero (volume tab located on the leftmost
Silent profile. See PAGE 33.
edge) in
- Set emergency cycle cancellation time for
e.g. 7 seconds. See
PAGE 29 . Then you can
cancel the whole emergency cycle by pressing c within 7 seconds.
- If you have set emergency tones and displays on, you will also hear the cancellation
tone and see the countdown timer in the dis
play. See PAGE 34.
What if it has already
started, is it possible to
cancel ongoing emer
gency cycle?
You cannot cancel the ongoing emergency
cycle entirely, but you can cancel the rest of
-
the emergency cycle by pressing
holding it down for about 5 seconds.
c and
Question/Problem Answer/Check points
Vertical sensor does
not work.
What does the sensor alert actually
mean - if I do not
cancel it, what is
going to happen
-
next?
I would like to use
the sensor as Hori
zontal sensor.
- When you purchased the feature, you got a
Service activation key. You need to save the key
in order to activate the feature. See
- The phone must have special battery including
the sensor component. Contact the dealer or
manufacturer to get such battery.
- Ensure that NT 2.0 software is installed in the
phone. Vertical sensor does not work with the
NT 1.0 software. For more information, contact
the dealer of manufacturer.
- The sensor feature must be turned on and
polling interval set. See
When the phone has been knocked down for too
long a time and the cancellation period has been
expired, the phone will make an emergency
cycle, i.e. send emergency messages (including
last known position) and make emergency calls.
The destination numbers are the same ones
used in Emergency cycle, i.e. the
center numbers
enabled correctly. See
Also check the settings below:
Sensor settings. See PAGE 43.
Emergency environments. See PAGE 33.
The Vertical sensor turns to be Horizontal sensor
as you set Alert trigger for
(instead of
Alerts when horizontal). See PAGE 45.
PAGE 43 and PAGE 44.
. Ensure that they are stored and
PAGE 30.
PAGE 10.
Emergency
Alerts when vertical
"DUMMY QUESTIONS" 51
Page 52

VERTICAL SENSOR ALERTS
Question/Problem Answer/Check points
What if I lose my balance and fall down
for just a few seconds
when walking on a
slippy road. Does the
sensor start alerting
right away?
Is there any way to
cancel the sensor
alert once this
allowed time (i.e.
alarm duration
passes by?
The sensor makes
annoying sounds dur
ing cancellation
period. Is there any
way to get it
silenced?
The emergency cycle
is over, and the sen
sor is still making
sounds - every other
minute. Is there any
way to get it muted?
You can set the sensor so that it allows some
time to pass before it reacts to this kind of
momentary tumble.
Key in a value to No-alarm duration. See
PAGE 44.
Yes. By keying in a value to Pre-alarm duration,
you can determine "cancellation period" for the
sensor alert. See
No-
When the sensor starts alerting, the countdown
timer shows the time, during which you can still
)
cancel the alert (by lifting the phone up). See
PAGE 45.
To silence the sensor tone permanently, set the
volume level to zero (volume tab located on the
leftmost edge) in the activated emergency envi
ronment. See PAGE 33.
To mute the sensor tone momentarily, press
the left soft key
Yes. Lift the phone to vertical position.
-
The phone will make sounds in order to help
rescuers to find you in case you are half-dead,
unable to move yourself or use your own voice.
You can also determine, how often the sound is
made by setting a value for
on PAGE 45.
PAGE 44.
..
TROUBLESHOOTING
-
Post-alarm interval
52 "DUMMY QUESTIONS"
 Loading...