

Page 1
Page 2

TABLE OF CONTENTS
Chapter 1
BeneCheck PLUS Multi-Monitoring System
1.1
Introduction
...............................................................................................................
1-2
1.2
Contents of the Kit
..........................................................................................
3-4
1.3
Labelling and Informations
..........................................................................
5
1.4
System Components
Meter
.........................................................................................................................
6-7
Test Strips
........................................................................................................
8-9
Code Strip
.............................................................................................................
10
Chapter 2
Setting-up the Meter
2.1
Installing/Replacing the Batteries
.................................................
11-12
2.2 Set the Year/Month/Day/Hour/Minute
.................................................
12
Set the Year/Month/Day
..................................................................
13
Set the Hour/Minute
.............................................................................
14
2.3 Coding the Meter
......................................................................................
15-17
2.4 Control Test
.................................................................................................
18-21
Page 3

Chapter 3
How to Perform a Test
3.1
Before Testing
.............................................................................................
22-24
3.2
Testing procedures for Blood Glucose
...............................................
25
3.3
Testing procedures for Blood Uric Acid
............................................
26
3.4
Testing procedures for Blood Total Cholesterol
.................
26-27
3.5
Care after the Test
..........................................................................................
28
Chapter 4
Meter Memory Function
................................................................................
29-30
Chapter 5
How to Set the Measurement Units
......................................................
31-32
Chapter 6
Storage and Handling of Meter and Strips
..............................................
33
Chapter 7
Icon and Alert Tones
..............................................................................................
34
Chapter 8
Error Message and Trouble Shooting
...................................................
35-36
Chapter 9
Specications
......................................................................................................
37-38
Chapter 10
Limitations
.............................................................................................................
39-46
Page 4

1
Chapter 1 BeneCheck PLUS Multi-Monitoring System
1.1 Introduction
Thank you for choosing BeneCheck PLUS Multi-Monitoring System. The BeneCheck
PLUS Multi-Monitoring System is designed by General Life Biotechnology Co., Ltd.
and marketed all over the world.
The BeneCheck PLUS Multi-Monitoring System provides you with accurate,
plasma-calibrated results based on electrochemical sensor technology. This
system includes blood glucose, uric acid and total cholesterol level tests, precisely
measured and displayed within 10, 15 and 30-40 seconds respectively.
Intended Use :
The BeneCheck PLUS Multi-Monitoring System is designed to measure the blood
glucose, uric acid or total cholesterol levels in whole blood. The test strips are
for self-testing outside the body (in vitro diagnostic use). It should be used only
for testing glucose, uric acid or total cholesterol with fresh capillary nger blood
samples. The system is suitable for users to monitor their blood glucose, uric
acid or total cholesterol at home by themselves and be used for clinical sites by
healthcare professionals to test the blood glucose, uric acid or total cholesterol
levels of patients.
Page 5

2
The BeneCheck PLUS Multi-Monitoring System includes glucose, uric acid, and
total cholesterol tests which are all calibrated by J&J DT60 Analyzer (Kodak
EKTACHEM DT60 Analyzer) using venous plasma. The DT60 Analyzer is calibrated
by VITROS DT calibrators which were referenced to the following standard and
method :
Test Standard Method
Glucose NIST SRM 917b AACC/CDC (Hexokinase/G6PDH)
Uric Acid NIST SRM 913a Uricase/UV
Total Cholesterol NIST SRM 911b Abell/Kendall
Please read the entire USER’S MANUAL carefully before using the BeneCheck PLUS
Multi-Monitoring system to test your blood glucose, uric acid or total cholesterol
levels. This USER’S MANUAL guides you through the operation procedures with
illustrated directions and help you nd the required information.
WARNING :
Please carefully read the instructions in this user’s manual and become familiar
with the test procedures before using the system to test blood glucose, uric acid
or total cholesterol levels. Users should consult with a healthcare professional
before going ahead important medical decision.
Page 6

3
1.2 Contents of the Kit
Please check the whole package for the BeneCheck PLUS Multi-Monitoring System.
The system includes the following items :
Item No. Description Quantity
PD-G001-1 BeneCheck PLUS Meter 1
PD-A041 BeneCheck PLUS Glucose Test Strip x (10pcs/vial) 1
PD-D001 BeneCheck PLUS Uric Acid Test Strip x (10pcs/vial) 1
PD-E001 BeneCheck PLUS Total Cholesterol Test Strip x (5pcs/vial) 1
PD-A020 Code Strip (Glucose x 1, Uric acid x 1, Total Cholesterol x 1) 1
PD-F004 Glucose Control Solution x 1 1
PP-E018 BeneCheck PLUS User’s Manual 1
PP-E019 BeneCheck PLUS Glucose Test Strip Instruction 1
PP-E020 BeneCheck PLUS Uric Acid Test Strip Instruction 1
PP-E021 BeneCheck PLUS Total Cholesterol Test Strip Instruction 1
PP-E023 Glucose Control Solution Instruction 1
PD-A006 Lithium Battery 3V (CR2032) 1
PD-A019 Kit Carrying Bag 1
PD-A015 Lancing Device 1
Page 7

4
Item No. Description Quantity
PD-A018
Lancets (pack)
(Manufacturers of Lancing Device and Lancet : For detail
information, please refer to inside package. )
1
Optional : ( not included in the standard kit package, please contact your
local distributor for ordering. )
BeneCheck PLUS Glucose Test Strip BKP-G-S001
BeneCheck PLUS Uric Acid Test Strip
BKP-U-S001
BeneCheck PLUS Total Cholesterol Test Strip
BKP-C-S001
Page 8
5
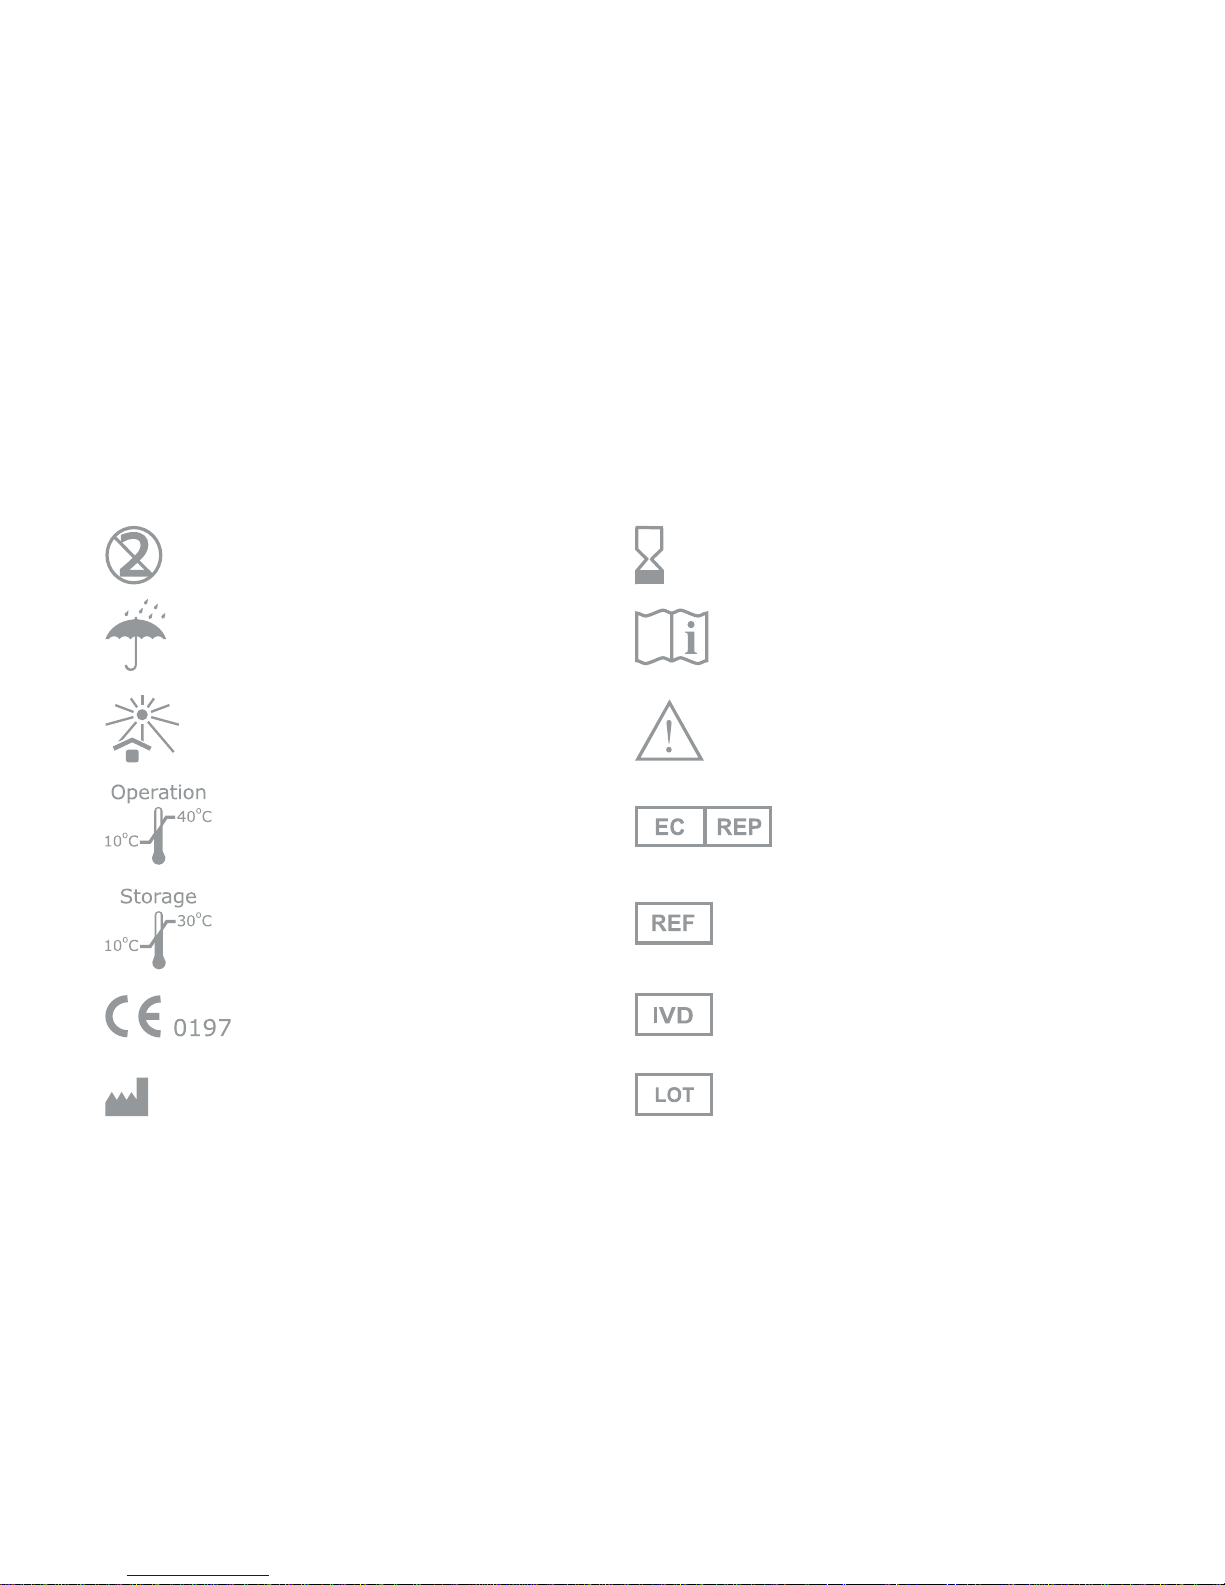
Caution, consult
accompanying documents
1.3 Labelling and Information
Do not re-use
Keep dry
Operation temperature
limitation
In-vitro diagnostic
Lot number
CE certication
Read instructions
Storage temperature
limitation
Use by
EU Representative
Catalogue number
(Product number)
Manufactured by
Keep away from sunlight
Page 9
6
1.4 System Components
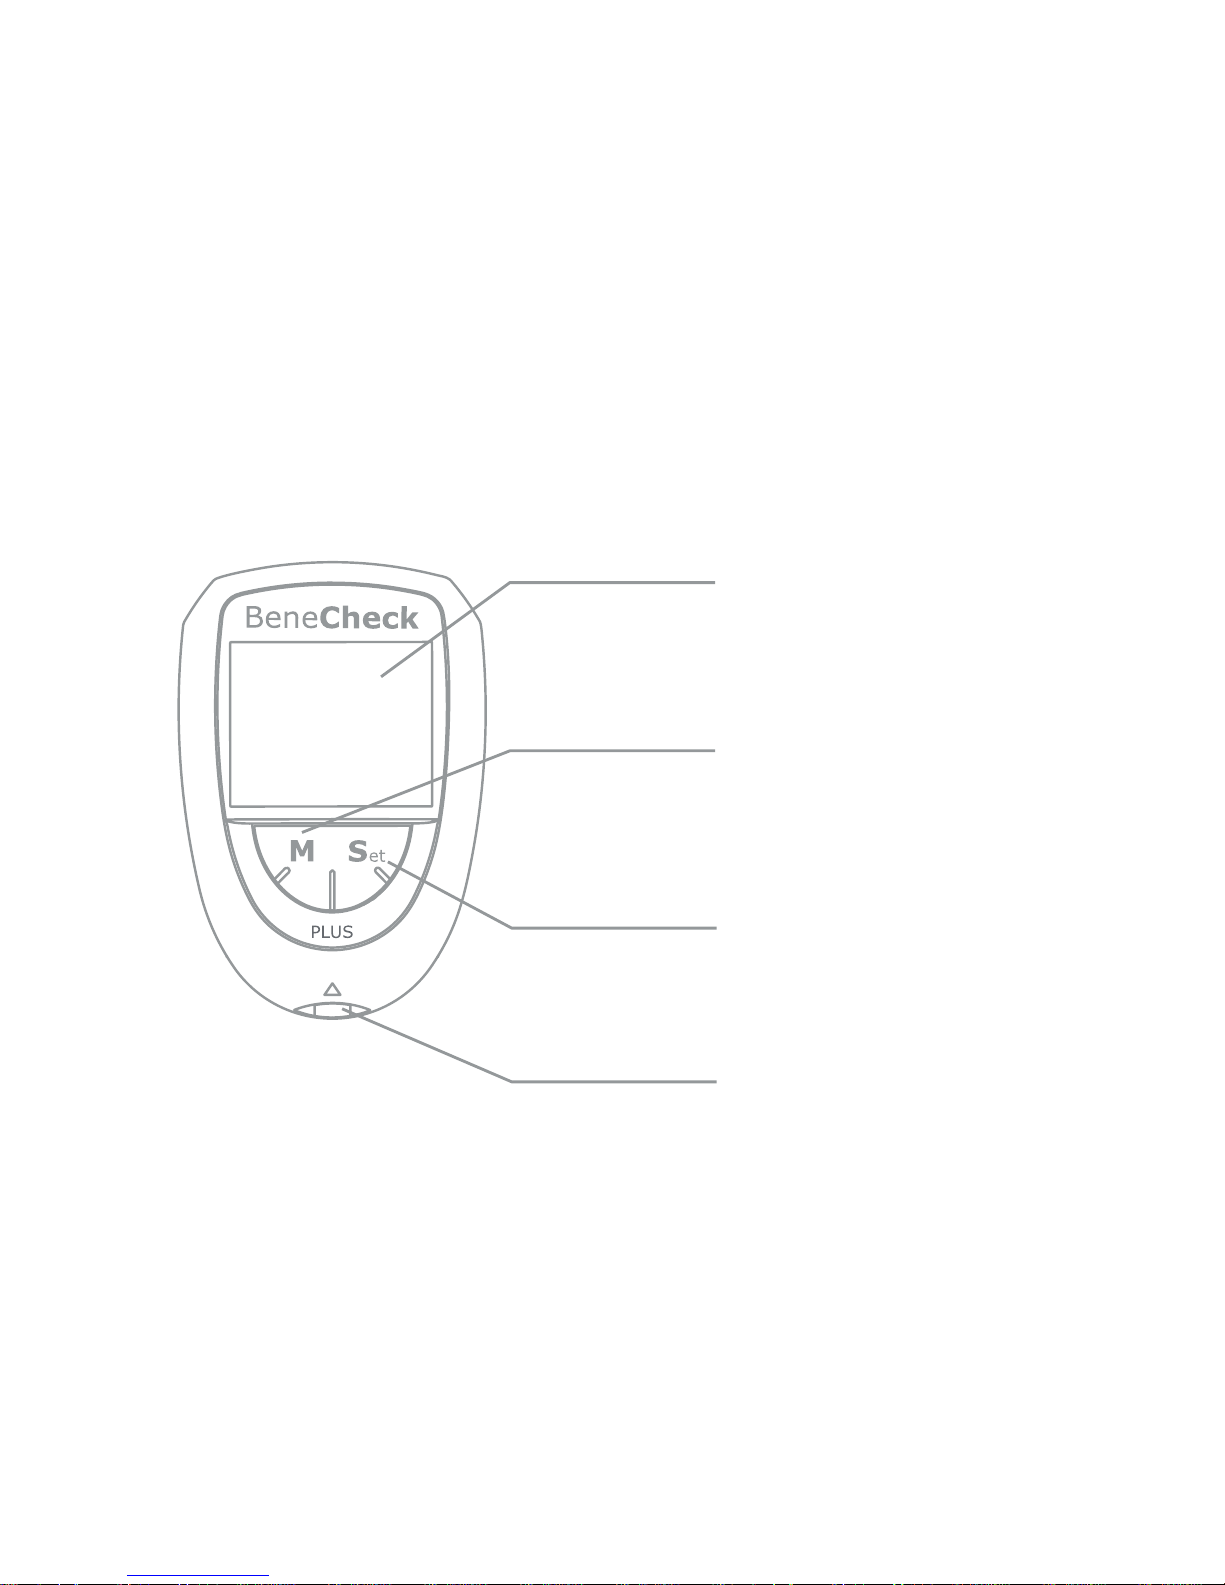
Meter (Front Side)
Right “Set” Button :
For on/off and setup mode
operation.
LCD Screen :
For display of operating
information and test results.
Test Port :
Where you insert the test strip
for testing.
Left “M” Button :
For memory mode operation.
Page 10
7
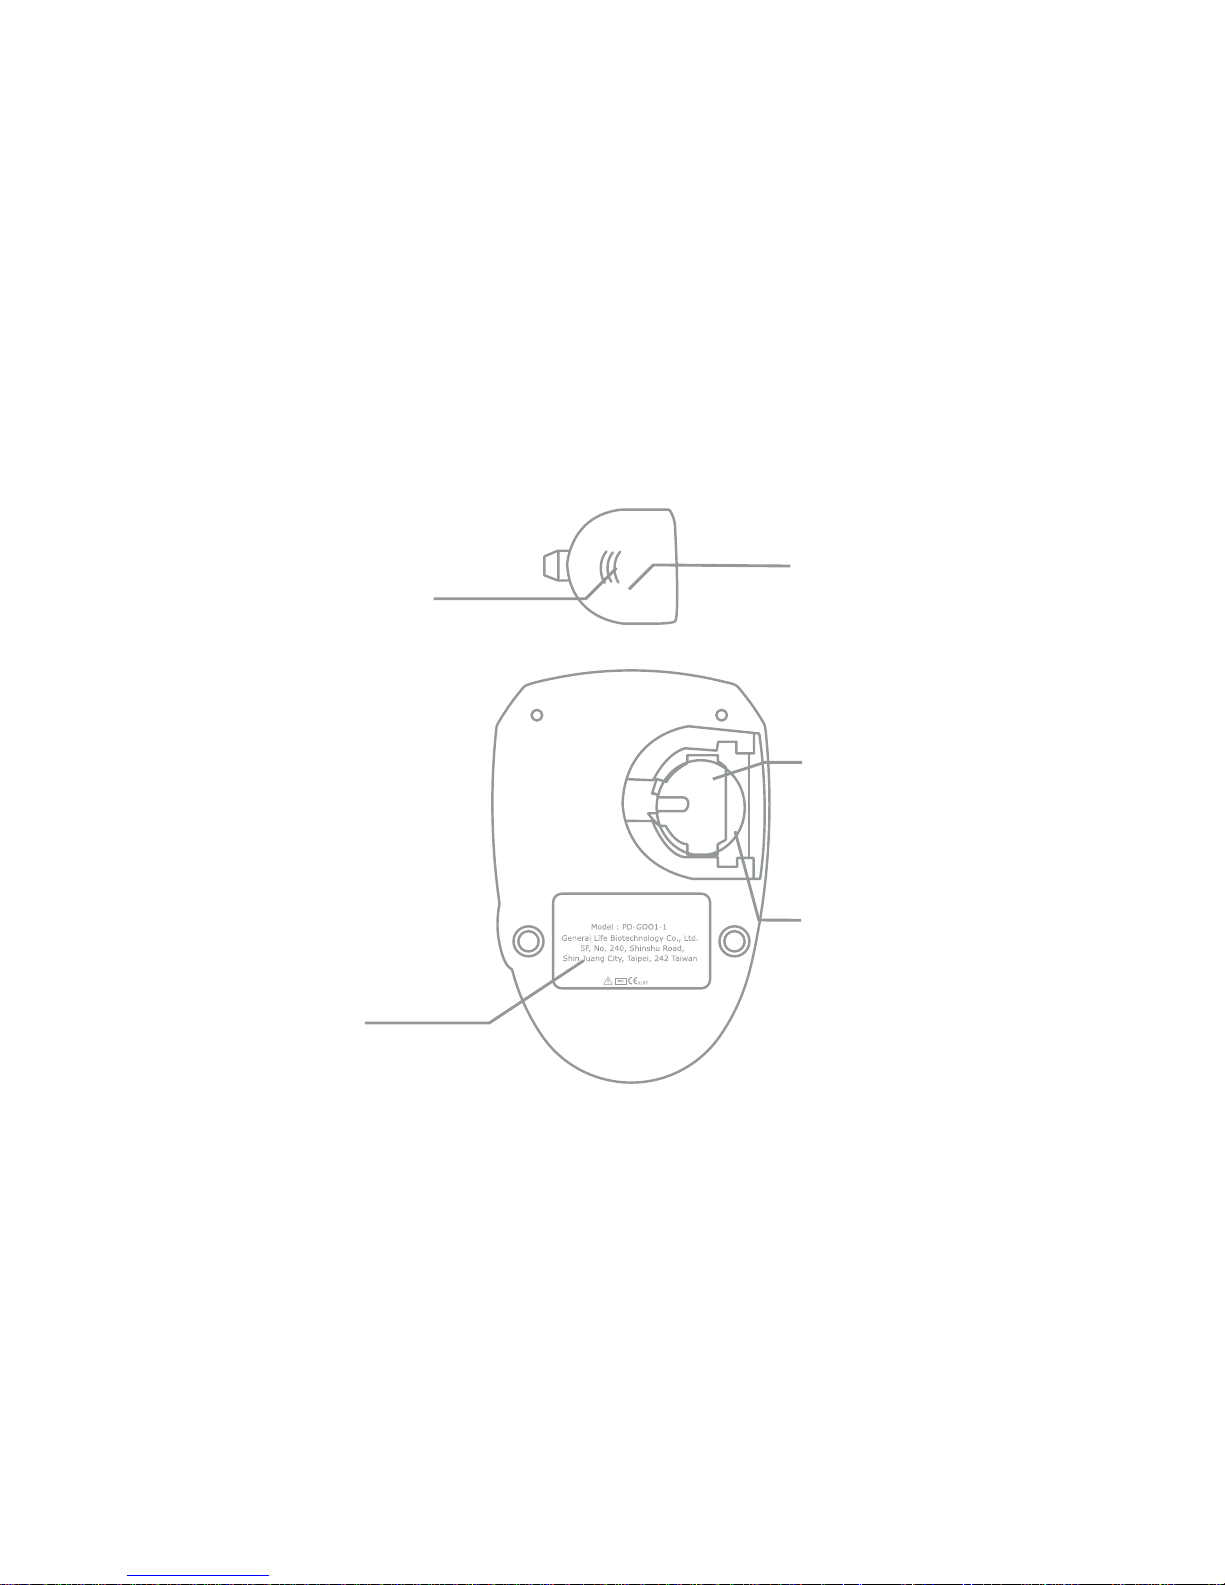
PLUS Multi-Monitoring System
.
Battery : One CR2032
BeneCheck
Battery Cover Lid :
Pull right ward to remove
the cover when replacing
battery
Battery Cover :
For covering the battery.
Battery :
3V lithium battery
(CR2032)
Battery Socket :
For holding a 3V-lithium
battery
Tag :
Display information
about the meter.
Meter (Back Side)
Page 11
8
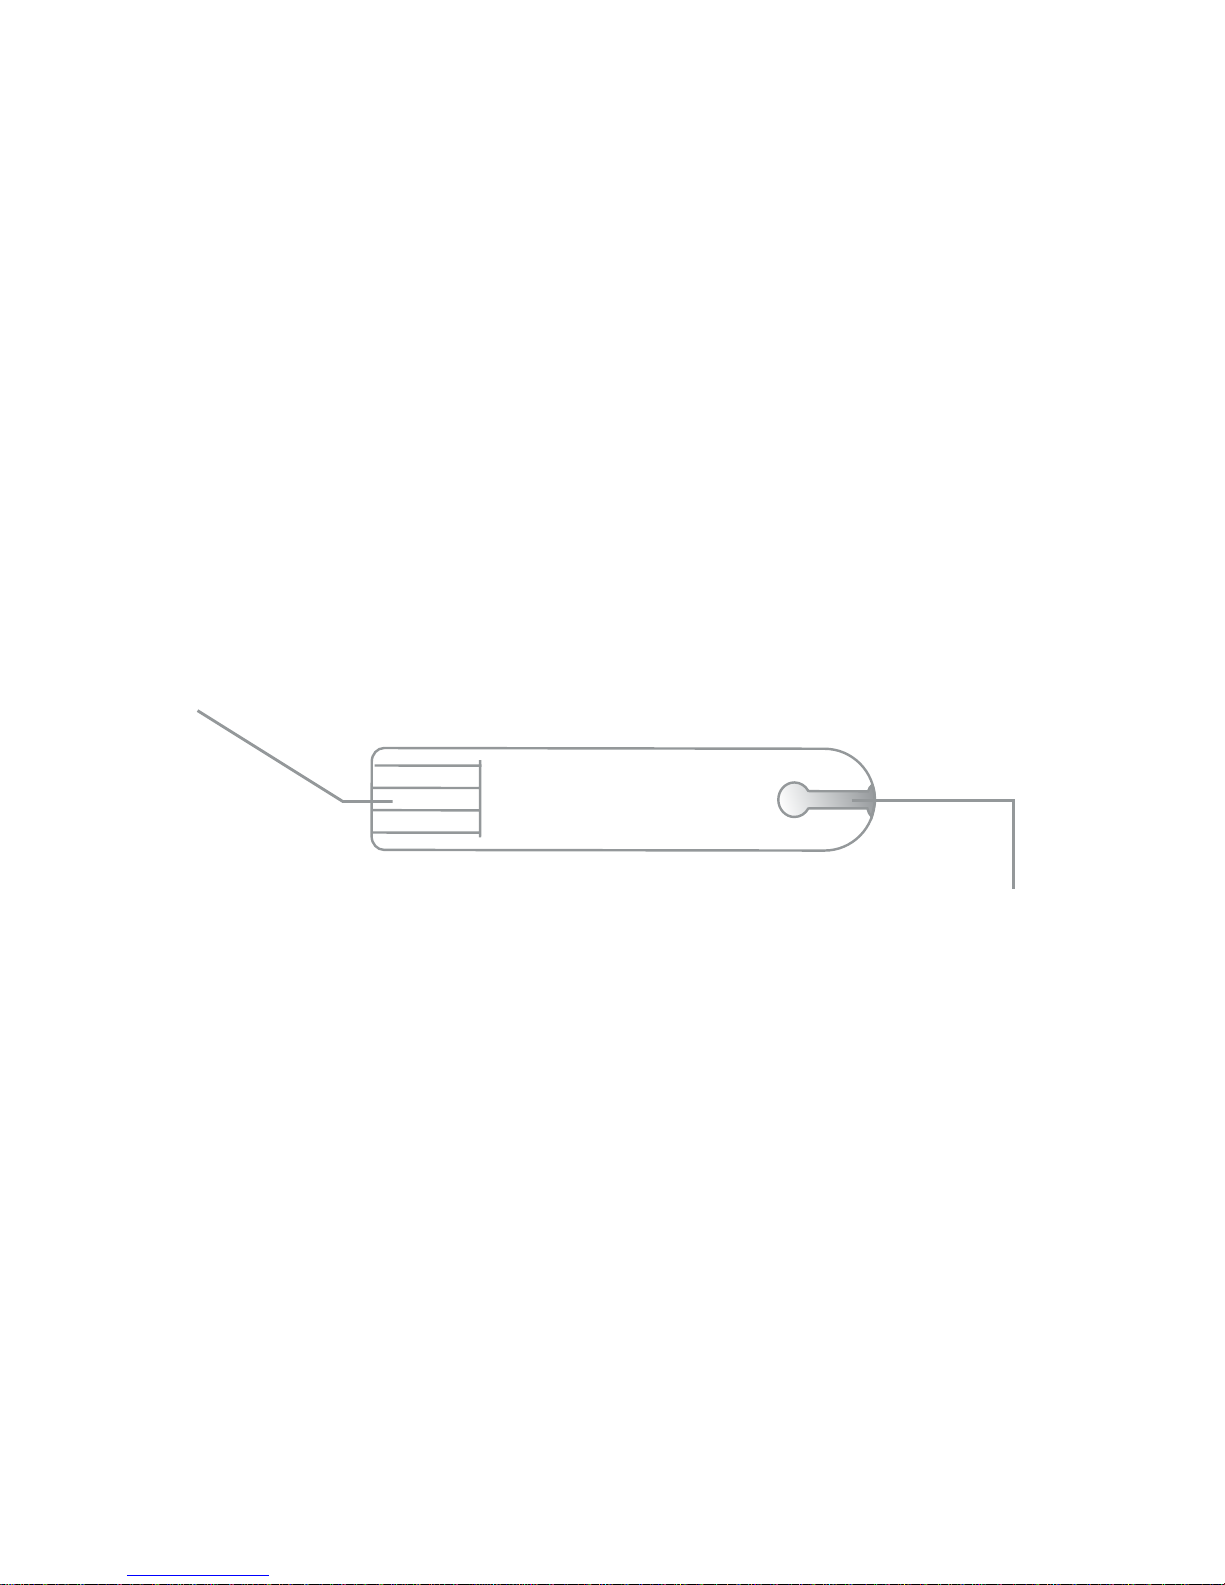
Electronic Contact Bar :
Insert Electronic Contact Bar of the
test strip into the Test Port of the
meter to activate it.
Sample Inlet :
The inlet where the whole blood or control solution is drawn
in. Touching a blood sample or control solution will result in
a capillary action automatically
Test Strip
Glucose & Uric Acid Strip
B
en
e
C
h
e
ck
Page 12
9
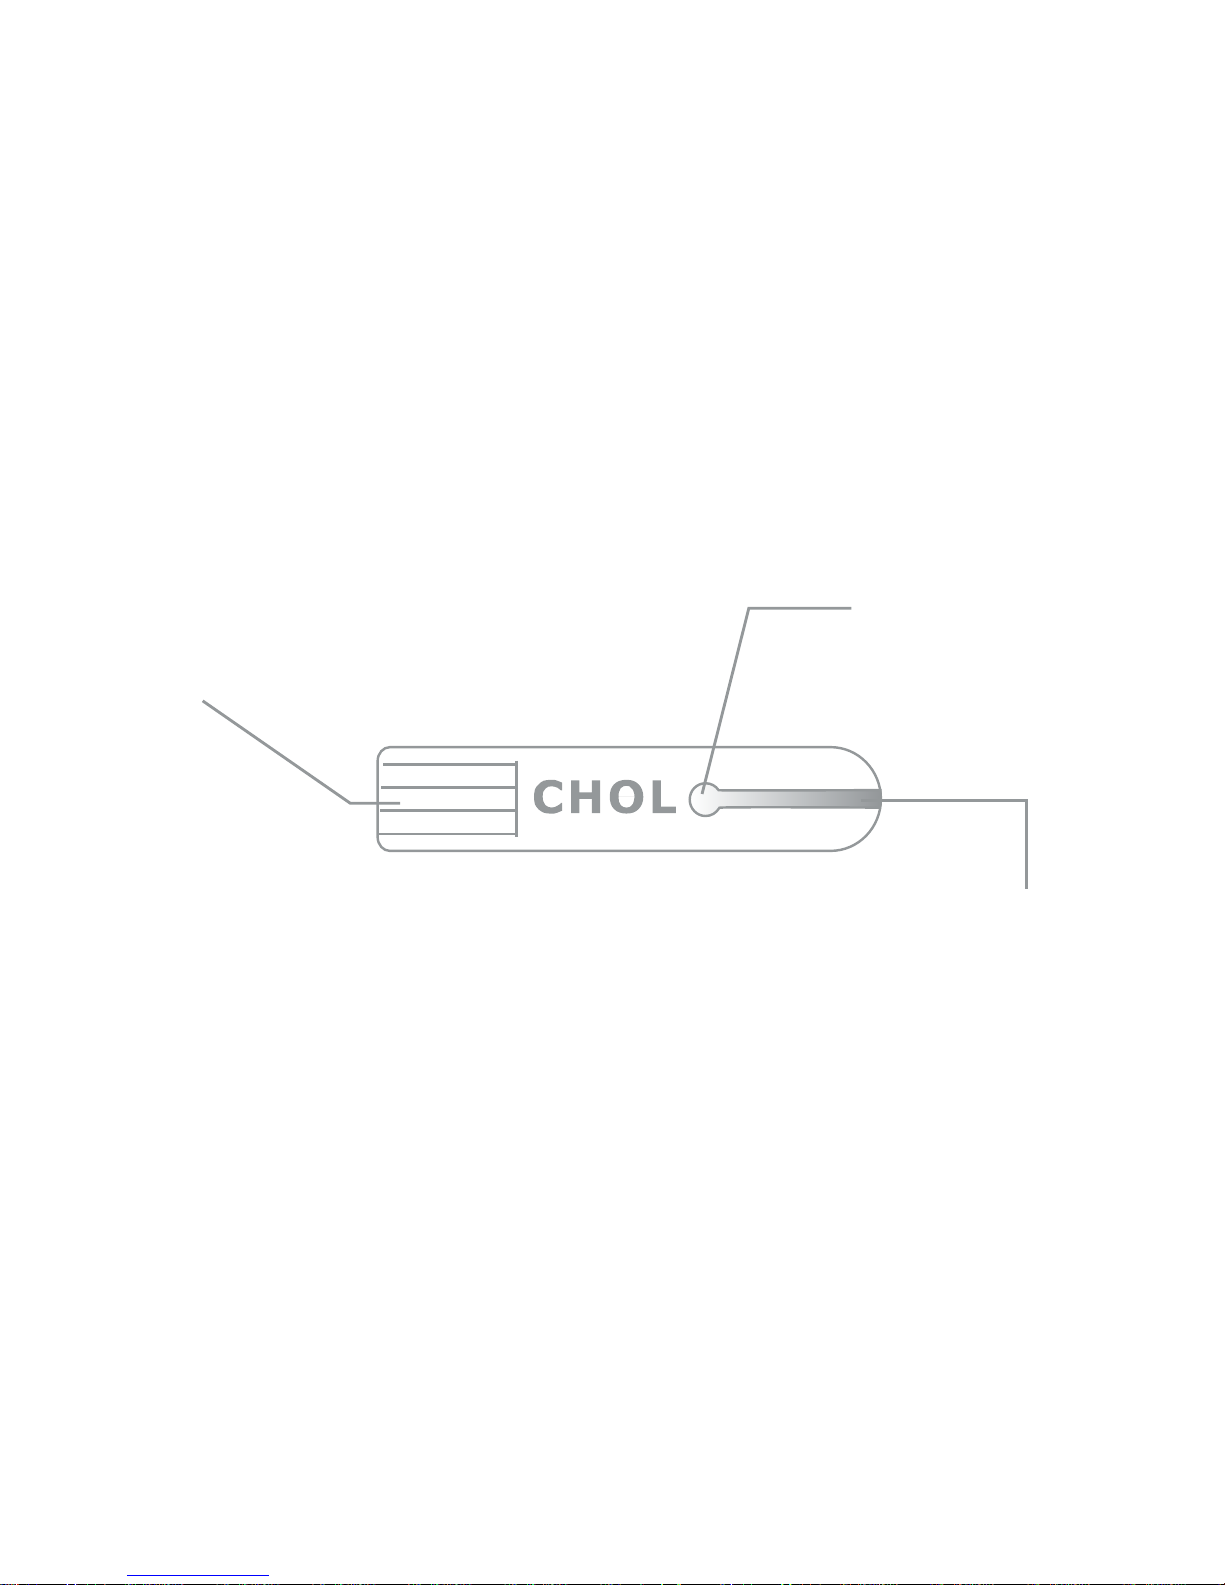
Total Cholesterol Strip
Electronic Contact Bar :
Insert Electronic Contact Bar of the
test strip into the Test Port of the
meter to activate it.
Sample Inlet :
The inlet where the whole blood or control solution is
drawn in. When a blood sample or control solution touches
this end, the sample will be sucked into the reaction zone
automatically. The reaction zone of total cholesterol strip
full of control solution or a blood sample at least 10 µL is
essential.
Reaction Zone :
Reaction zone of
Total Cholesterol
Page 13
10
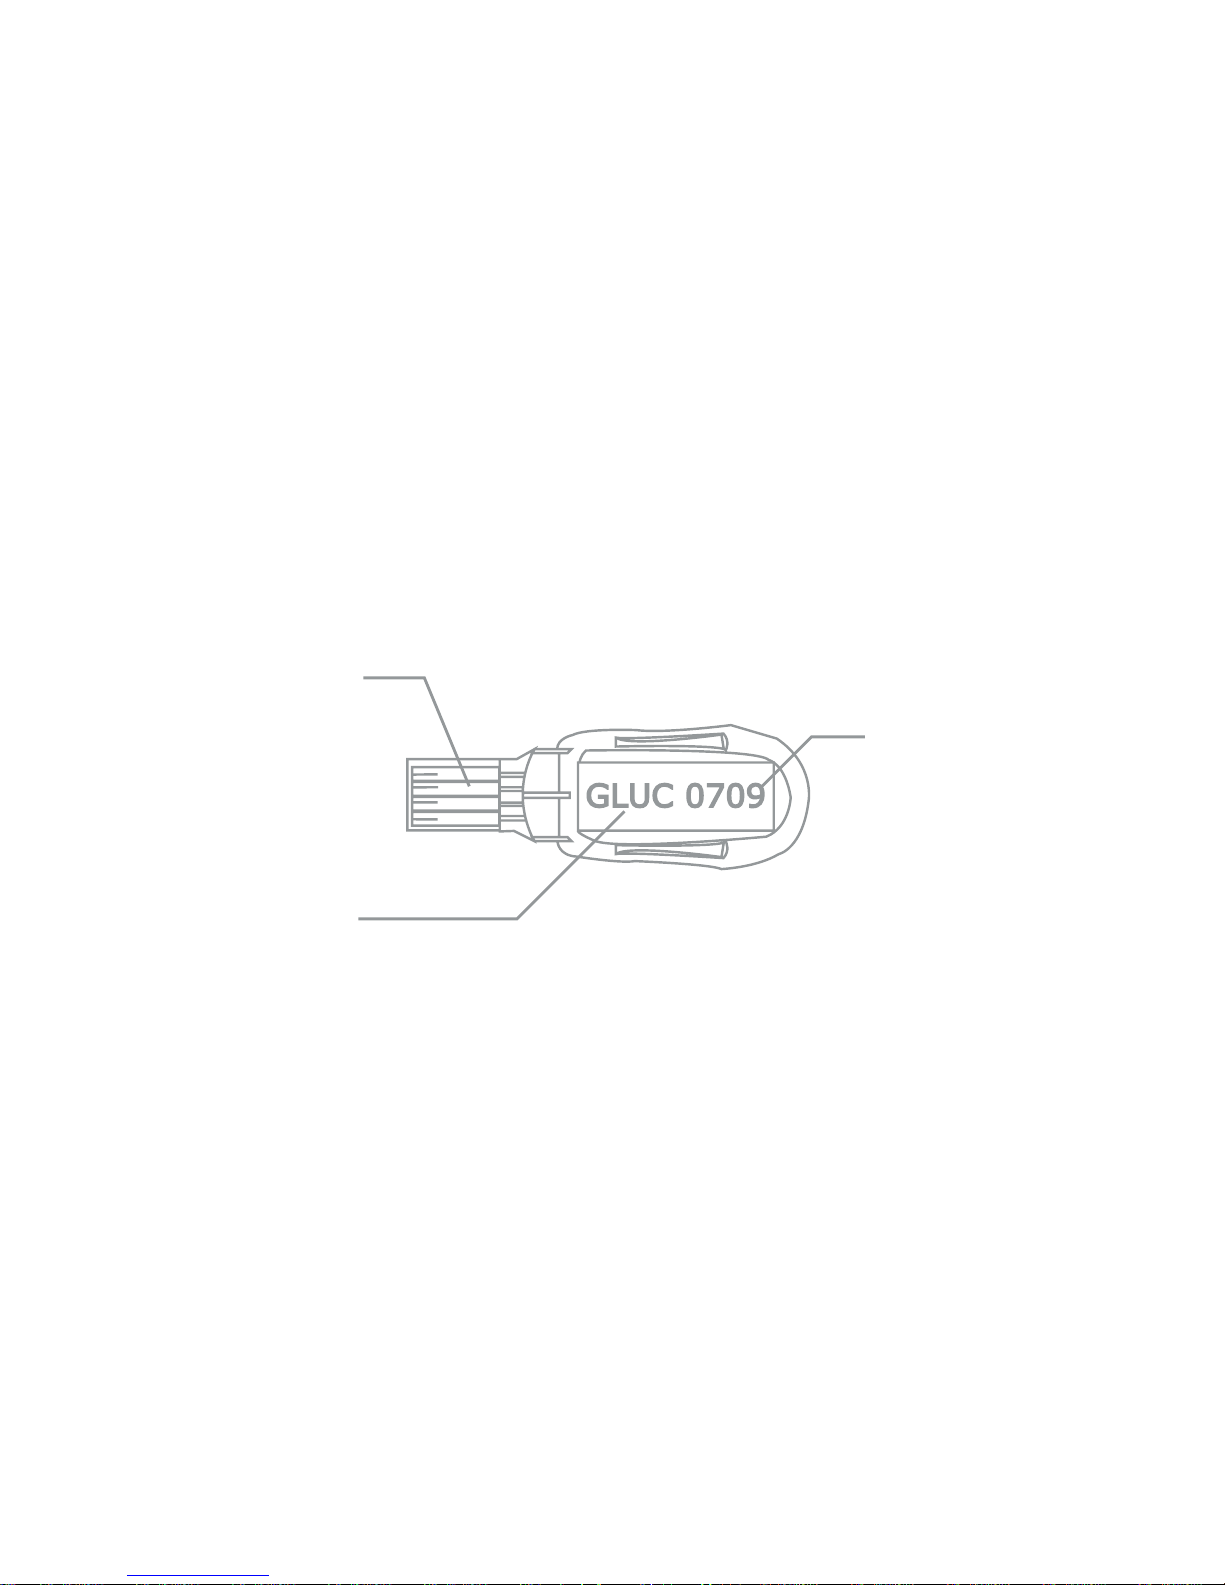
Code Strip ( Front View )
Contact Bar :
Insert this end into
the Test Port of the
meter.
Code Number
Test Mode :
GLUC - Glucose
UA - Uric Acid
CHOL - Total Cholesterol
Test Mode
Page 14

11
Chapter 2 Setting-up the Meter
2.1 Installing/Replacing the Battery
Battery is loaded inside the meter. Use only 3V lithium battery. Do not use or
replace the battery with different types of battery which will damage the
electronics of meter.
Instructions :
1.
Hold the meter with one hand, slightly pull right the back
cover to remove the back cover.
2.
Insert a new battery to the battery socket with the “+” side
facing up.
Page 15

12
3. Place back the battery cover onto the meter.
2.2 Set the Year/Month/Day/Hour/Minute
Press and hold the “Set” button for over two seconds, the meter will sound one
beep and enter the setting mode. Please follow the directions below to set the
meter.
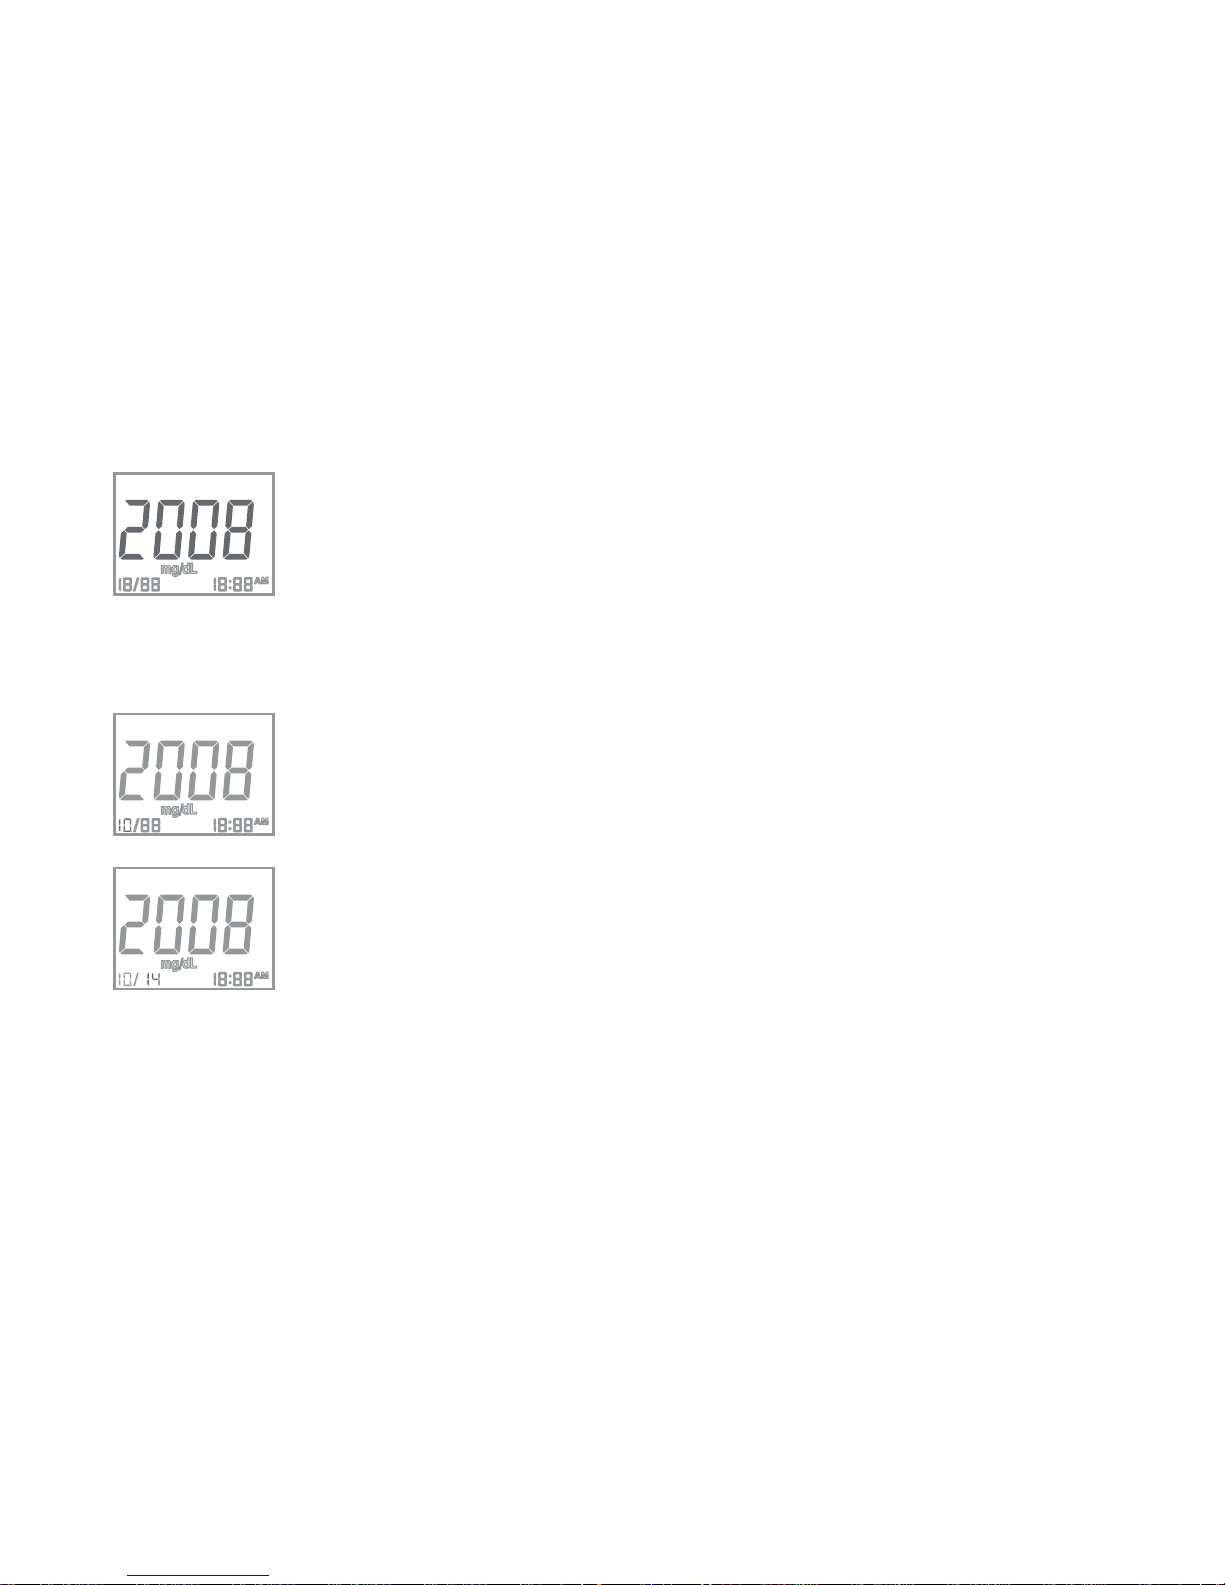
Under the setup mode, the LCD screen of the meter shows all setting items start
from a blinking year “200X” and the rest setting items are listed as follows:
Page 16
13
Set the Year
1. When the meter enter setting mode, the first item on the screen
such as “2008” will blink on screen, which means Year.
2. Click the left “M” button to advance one year until you get a correct
year number.
3. After you set the desired year number, click the “Set” button again
then the meter enters into month setting.
Set the Month
1. Click the left “M” button until the correct month appears.
2. Click the right “Set” button, and then day segment starts blinking.
Set the Day
1. Click left “M” button until the correct day appears.
2. Click the right “Set” button, and the hour segment will start blinking.
Page 17
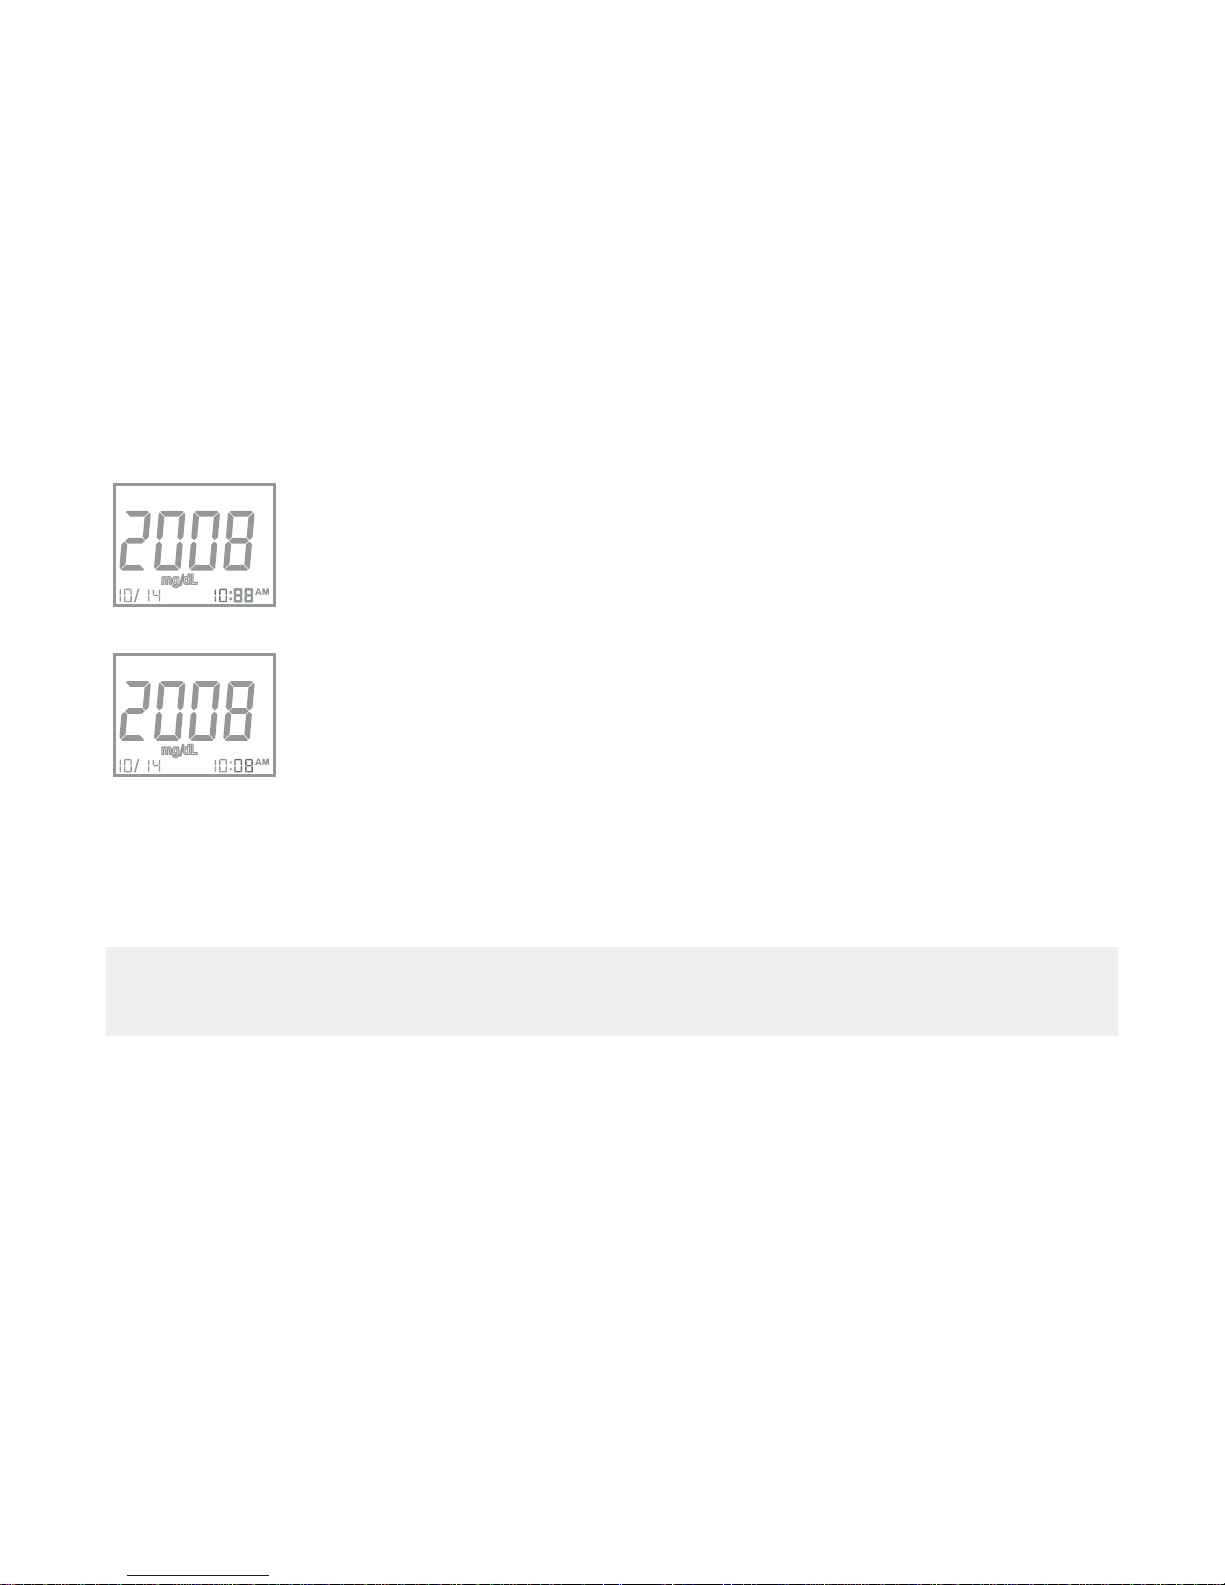
14
Set the Hour
1. Click left “M” button until the correct hour appears.
2. Click the right “Set” button, and the minute segment will start
blinking.
Set the Minute
1. Click left “M” button until the correct minute appears.
2. Click the right “Set” button then measurement unit segment starts
blinking.
After you nish setting the meter, press the right “Set” button, and the the meter
will show “OFF” on the screen and power-off.
Note :
Please refer to Chapter 5 for the measurement units setting procedure.
Page 18

15
2.3 Coding the Meter
The BeneCheck PLUS meter should be coded before testing with BeneCheck
PLUS test strips for the rst time, or every time a new box of BeneCheck PLUS
test strips are used. There are three kinds of test strips which can be used with
BeneCheck PLUS meter. Each vial of the test strips has assigned a code number
and test mode. The code strip is packaged with the test strip in order to calibrate/
code the meter. Every time a test strip is inserted, please check the code number
and test mode appearing on the Screen is the same as the code number and test
mode marked on the code strip and test strip vial.
Directions :
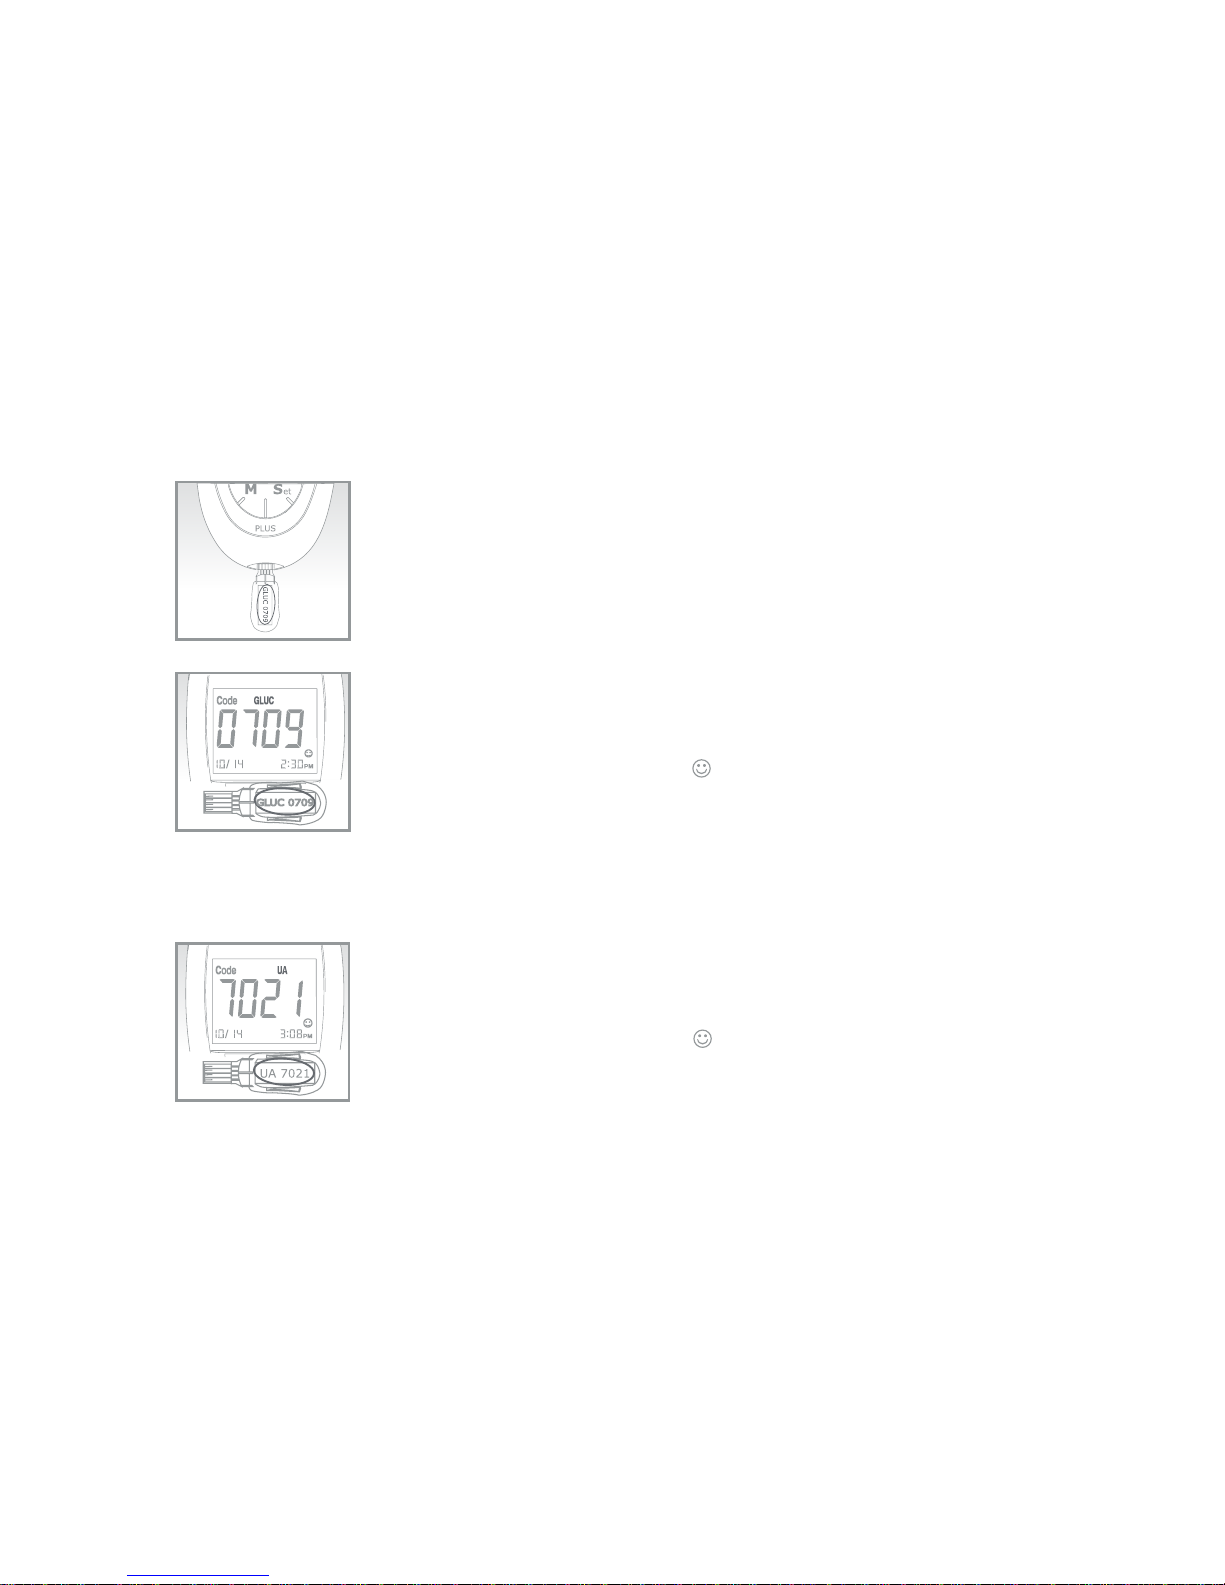
For Glucose Test Mode
1.
Check the code number and test mode on the code strip is
the same as the code number and test mode on the glucose
test strip vial, and check the test mode of the strip.
Page 19
16
2.
Insert a code strip into the test port of the meter.
Wait for the code number to appear on the screen.
3.
Make sure the code number on the screen is the same as
the code number on the code strip, and the test mode is
also the same as marked on the test vial.
Remove the code strip. “ ” should appear on the screen,
indicating that the meter has been successfully coded to
glucose test mode.
For Uric Acid Test Mode
Follow the same procedures of 1 to 3 described in glucose test mode .
4.
Make sure to check that the code number and test mode on
the code strip are the same as the code number and test
mode on the uric acid test strip vial.
Remove the code strip. “ ” should appear on the screen,
indicating that the meter has been successfully coded to uric
acid test mode.
Page 20
17
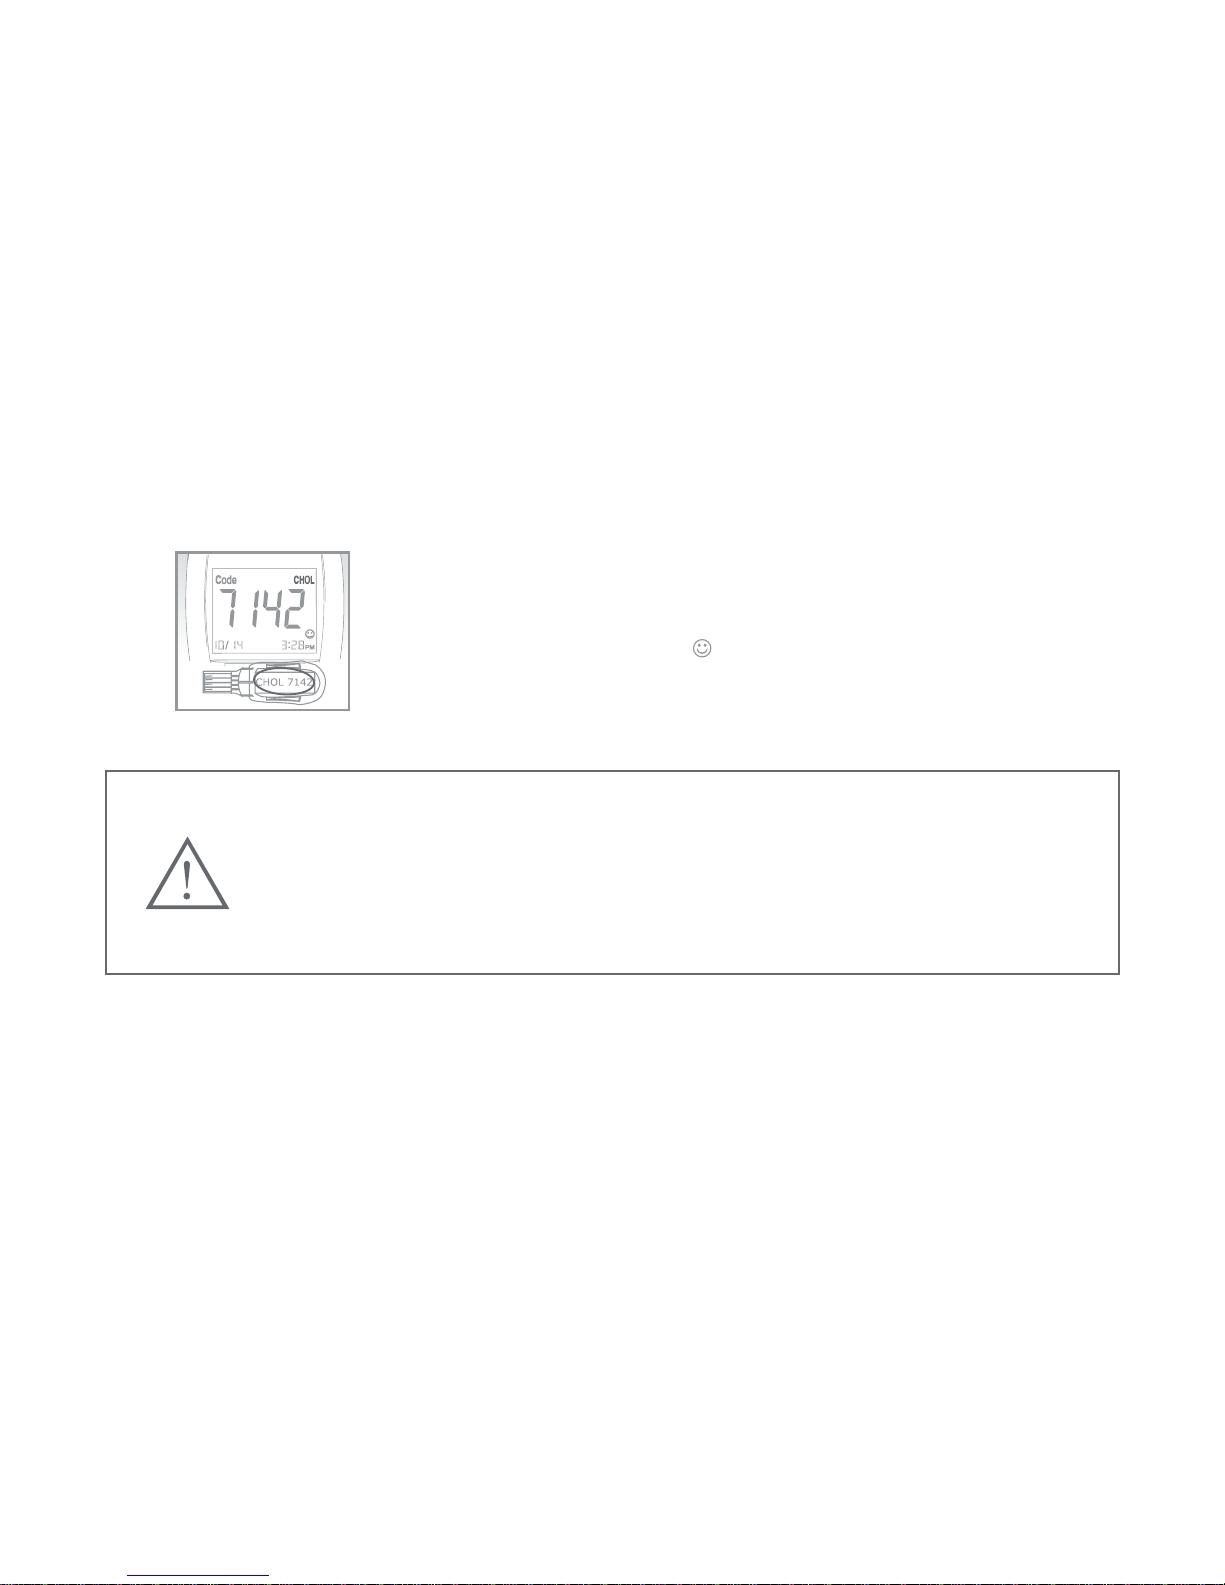
For Total Cholesterol Test Mode
Following the same procedures of 1 to 3 described in glucose test mode .
5.
Make sure to check the code number and test mode on the
code strip is the same as the code number and test mode on
the total cholesterol test strip vial.
Remove the code strip. “ ” should appear on the screen,
indicating that the meter has been successfully coded to
total cholesterol test mode.
Cautions :
If “E-E” appears on the Screen during coding procedure, there may
be a problem with the code strip or a wrong category code strip
may be misused. Perform the coding procedures again, and if “E-E”
continues to appear, please contact the authorized distributor for
service.
Page 21

18
2.4 Control Test
The purpose of control solution is used to check the performance of the BeneCheck
PLUS System. The system and strips perform adequately if the control test result
falls within the indicated control range listed on the test strip vial.
The system should be checked
● When you get your meter for the rst time or begin using a new box of test
strips.
● When you suspect that the meter or the test strips are not working properly.
● Any time you had repeated unexpected test results of the blood glucose, uric
acid or total cholesterol.
● Any time you drop or bump the meter.
● You can check system performance regularly or anytime by using control
solution when you suspect that test results are inaccurate.
Page 22
19
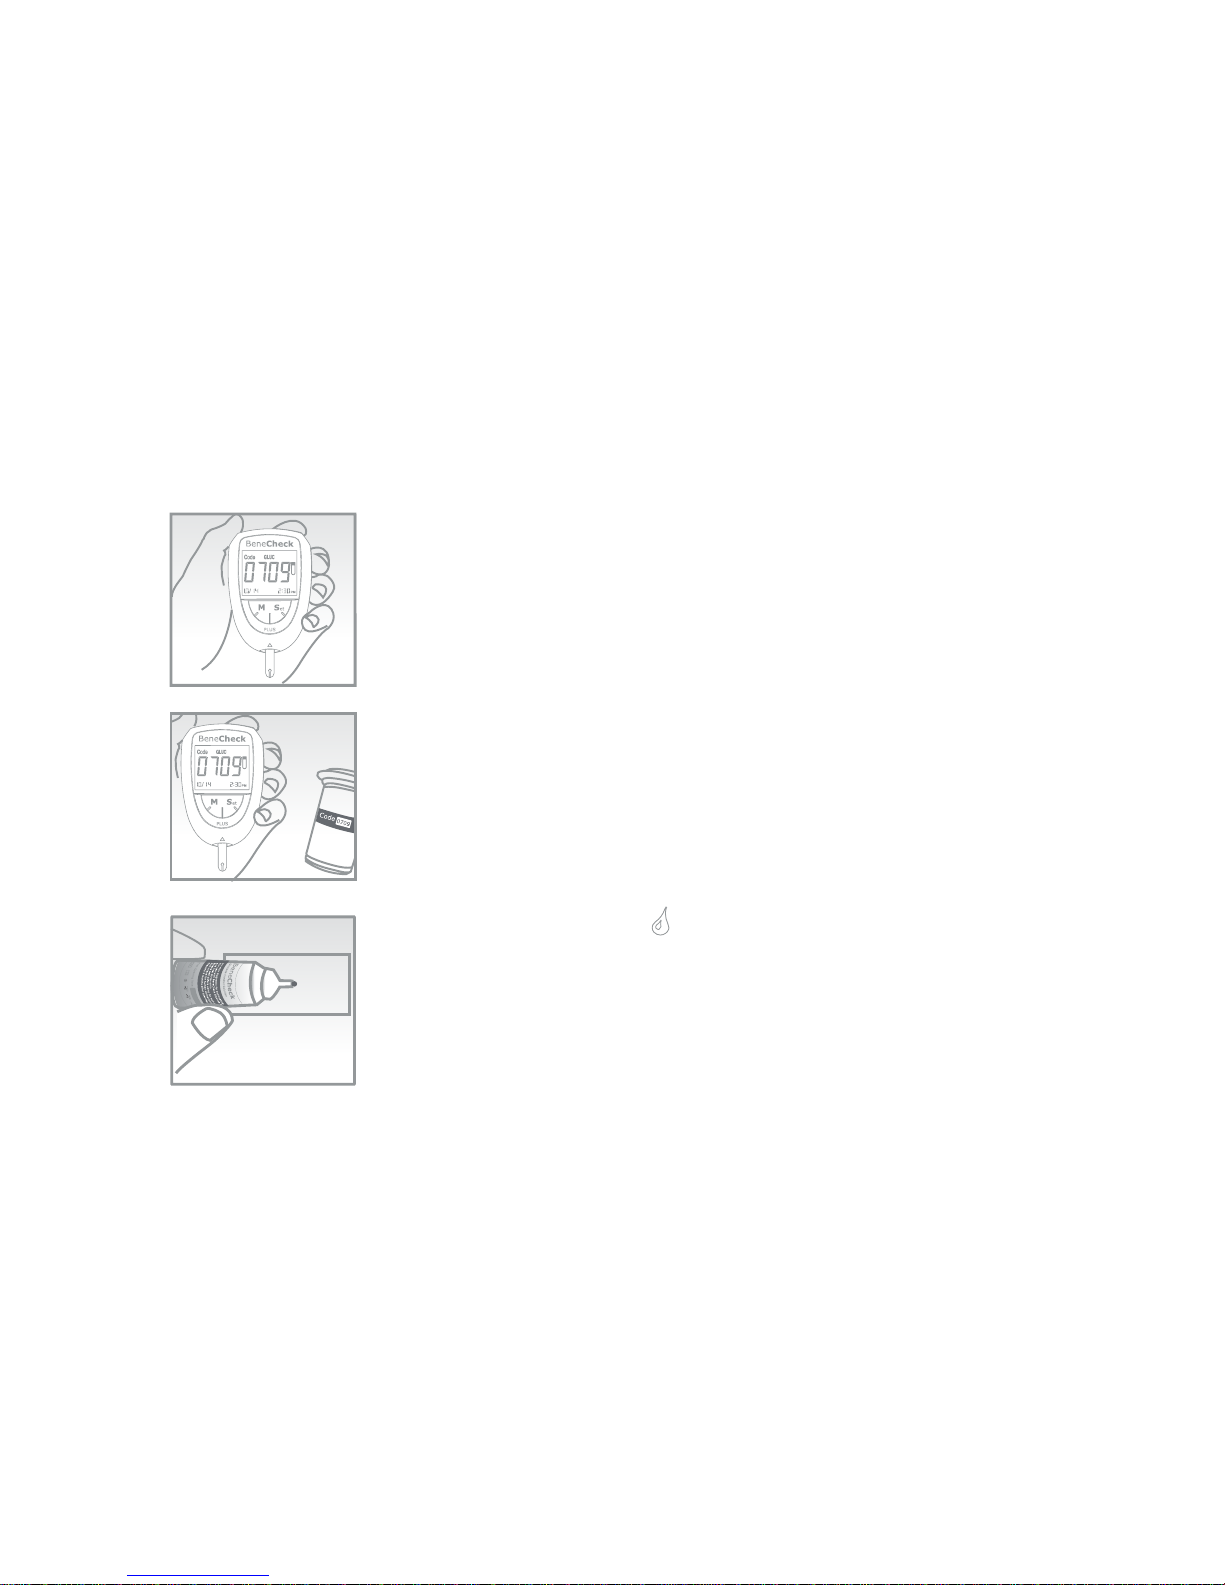
Directions :
1.
Insert a test strip into test port, the meter will turn on
automatically.
2.
The code number and test mode will be shown on the
screen. Be careful to make sure the code number and test
mode is the same as the code number marked on test strip
vial.
3.
A blood drop symbol “ ” blinking on the screen means the
system is ready for sample loading.
Shake the control solution vial vigorously, then open the cap
to discard the rst three drops, after wiping the dispense tip
and cleaning with tissue, then drop some control solution
onto a clean object such as transparency.
Page 23
20
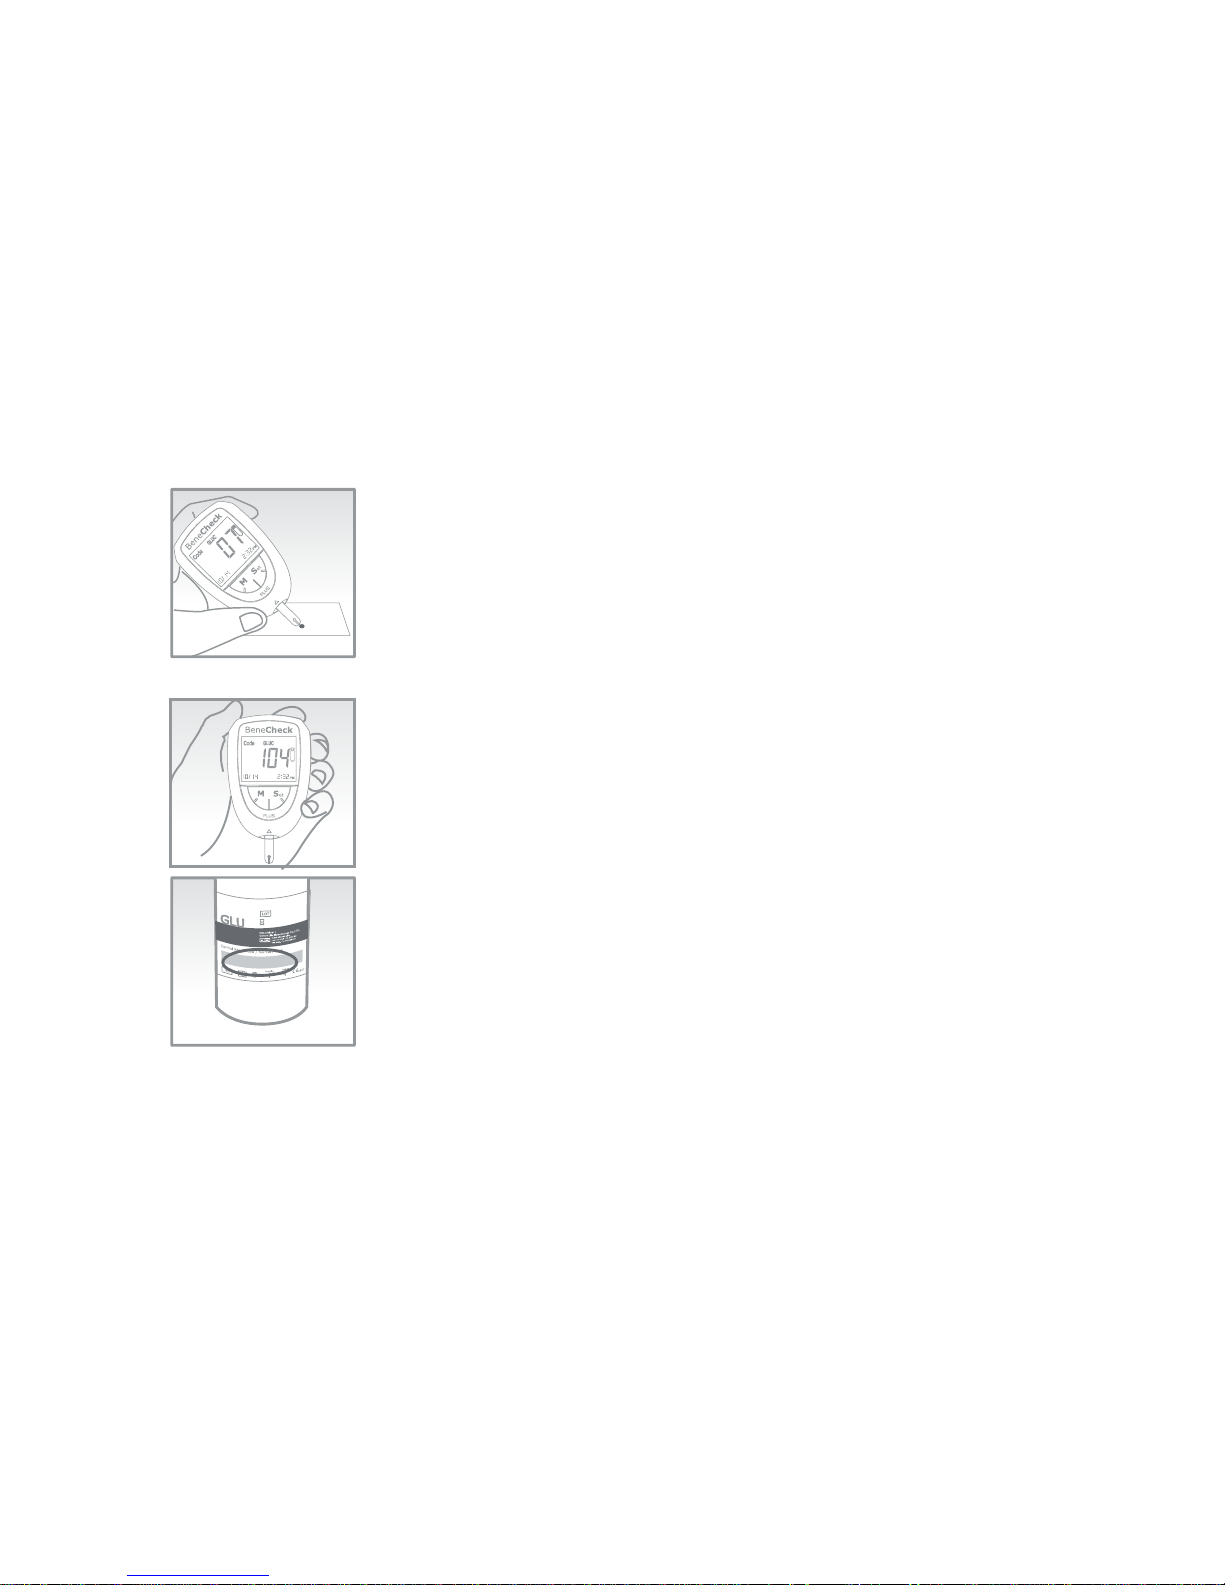
4.
Touch the sample inlet of the glucose, uric acid or total
cholesterol test strip to the drop of control solution until the
meter sounds a “beep”. The screen will display a countdown
from 10 seconds for glucose test strip, 15 seconds uric acid
test strip, and 26 seconds for total cholesterol test strip.
5.
7
8
-
1
1
7
4
.
3
-
6
.
5
After counting down, the screen will display the control
solutions test results. Compare the test results to the control
range listed on the test strip vial.
Page 24

21
Note :
● Please read this user’s manual and instructions for control solution test
carefully before use.
● Do not reuse the test strips and always close the cap of test strip vial tightly
after used.
● The rst three drops of control solution must be discarded and the vial should
be shaken well before use when the vial is newly opened.
● Newly opened vials of control solution and test strips must be marked with an
opening date.
● Do not use BeneCheck PLUS Multi-Monitoring System to do any test until you
can get the control test result to fall within the control range listed on the test
strip vial.
● The test results fall outside the control range, please reconrm and repeat the
test, if it still fall outside the range, please contact an authorized distributor
for help and service.
● Uric acid control solutions and total cholesterol control solutions are not
included. Please contact an authorized distributor for ordering.
Page 25

22
Chapter 3 How to perform a Test
3.1 Before Testing
Please follow the step-by-step instructions to ensure accurate test results.
Materials required to perform a blood glucose, uric acid or total cholesterol test
include :
● BeneCheck PLUS Meter
● BeneCheck PLUS Glucose, Uric Acid or Total Cholesterol Test Strip
● Lancing Device
● Lancet
● Tissue or cotton ball with 75% ethanol for wiping blood sampling area, or
washed with soap and water before and after test for disinfection.
Directions :
Load the lancing device with a lancet and adjust suitable penetration depth.
Use warm soap water to wash your hands. Rinse and dry thoroughly.
Page 26

23
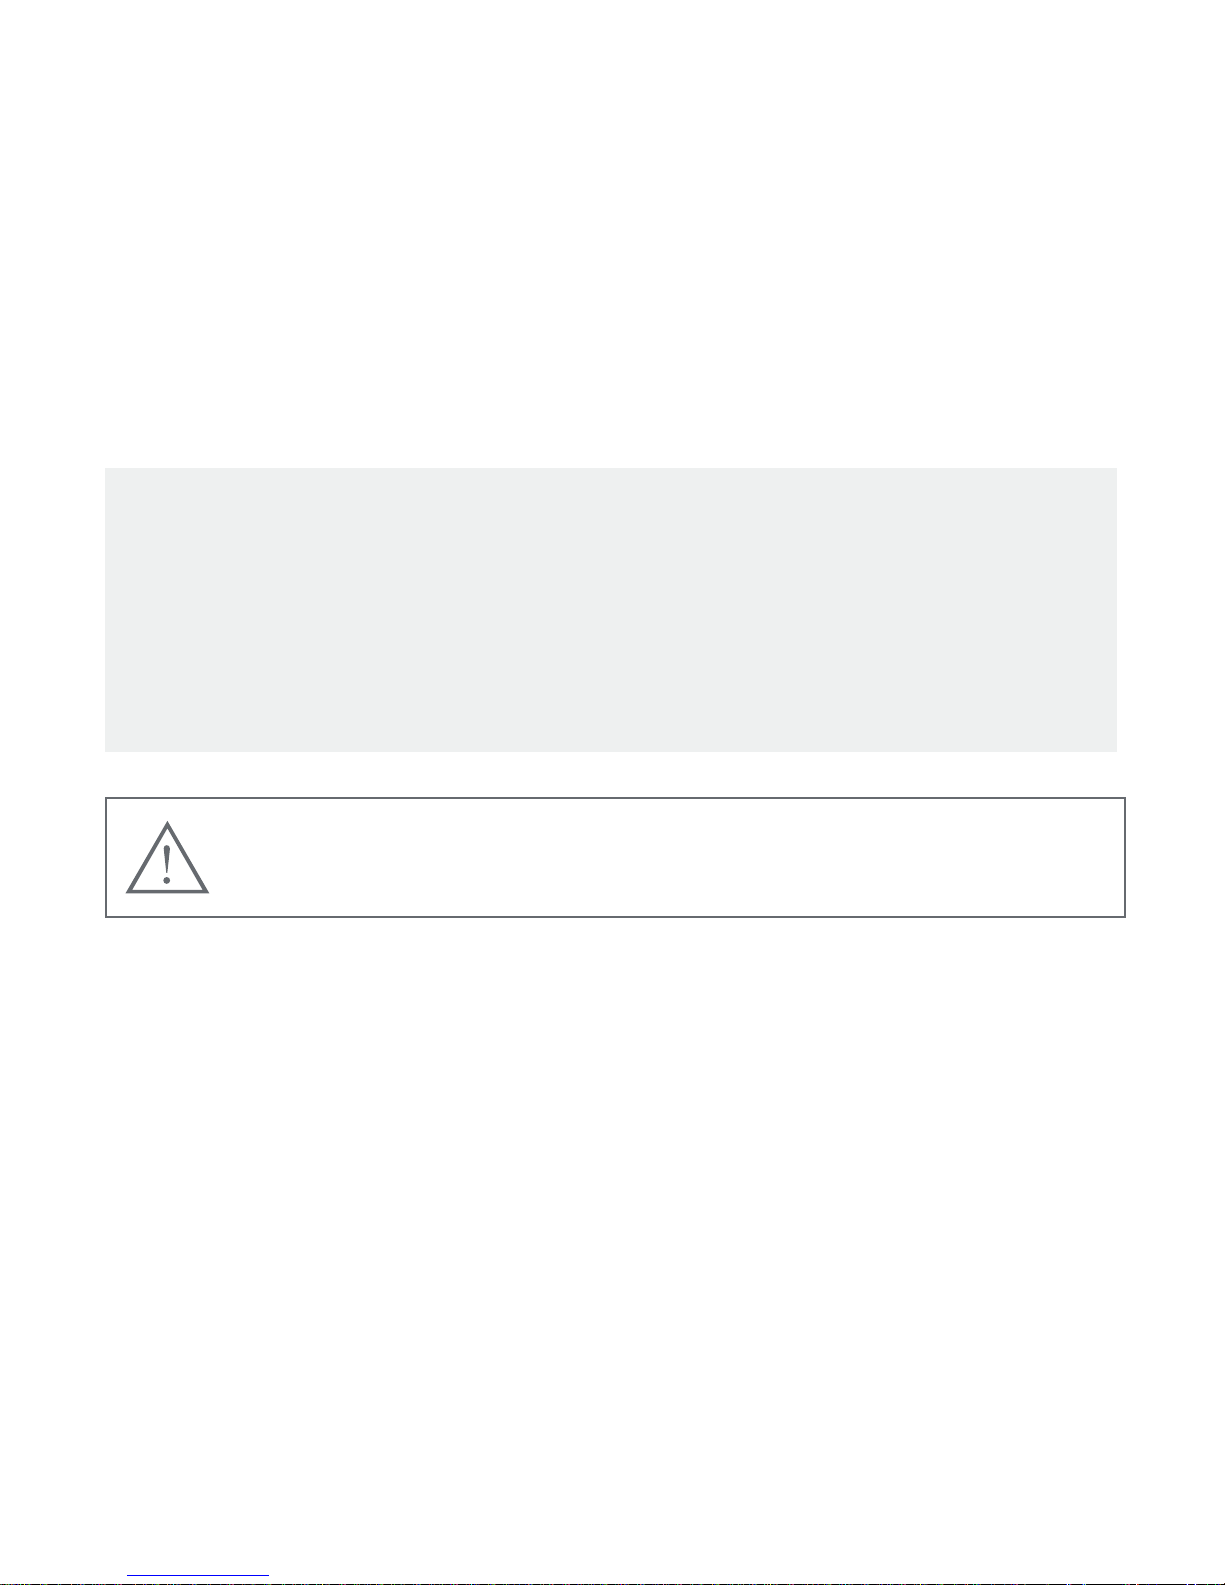
1.
In order to keep the test strips in dry preservation, please
put the lid immediately on the vial after you take test strip
out.
2.
Fully insert the contact bar of the test strip into the test port
of the meter. The meter will turn on automatically with test
mode display and code number appear on the Screen.
3.
Check the test mode and code number on the screen are
the same as the one on the test strip vial. Icon “GLUC”, “UA”
and “CHOL” indicate measuring mode of glucose, uric acid
and total cholesterol respectively. If not, remove the test
strip and recoding the meter is necessary as described in
Section2.3.
Page 27
24
Note :
● One measurement must be performed within 3 minutes, otherwise the meter
turn off automatically. Please, remove and re-insert the test strip to do the
measurement again.
● Do not reuse test strips. Warning Error message “E-U” will display on the
screen, if a used test strip is inserted.
● If the wrong end of the test strip is inserted, or if the test strip is inserted
backwards the meter will not activate.
Warning :
● Lancet, test strip cannot be reused.
● Please always use certied lancet to ensure safety.
3.2 Testing procedure for Blood Glucose
Directions :
Page 28

25
1.
Insert the BeneCheck PLUS Glucose Test Strip and take a
blood sample according to the instructions for lancing device
in the system.
2.
Touch the sample Inlet of the strip to the drop of blood
sample until the meter sounds a “beep”, which means the
sample has drawn into strip successfully.
3.
The screen will display a count down from 10 seconds. After
10 seconds the Screen will display the blood glucose results.
Note :
●
Be sure to wipe off the rst drop of blood to avoid body uid contamination.
Page 29

26
3.3 Testing procedure for Uric Acid
1. Insert the BeneCheck PLUS Uric Acid Test Strip and take a blood sample
according to the instructions for lancing device in the system.
2. Touch the sample inlet of the strip to the drop of blood sample until the
meter sounds a “beep” which means the sample has been drawn into strip
successfully.
3. The screen will display a count down from 15 seconds. After 15 seconds the
screen will display the blood uric acid results.
3.4 Testing procedures for Total Cholesterol
1. Insert the BeneCheck PLUS Total Cholesterol Test Strip and take a blood
sample according to the instructions for lancing device in the system.
2. Make sure to get enough blood sample volume.
3. Touch the sample inlet of the strip blood sample until the reaction zone has
been full of enough amount of blood sample after that a "beep" sound will be
heared accordingly.
4. The screen will display a count down from the required test 26 seconds. After
counting down the screen will display the blood total cholesterol result.
Page 30

27
Note :
● The BeneCheck PLUS Multi-Monitoring System includes glucose, uric acid and
total cholesterol test that are all plasma calibrated. The user does not have to
convert it into plasma result.
● Use the strips before the expired date, the strips can only be used within 3
months remaining shelf life after the rst opening of the vial.
● Apply the blood sample onto the correct position of the strip precisely,
follow the directions to familiar with correct operation.
● Prohibited applying the blood sample to the test strip twice, it will cause
inaccurate test results.
Special Messages :
Messages
Mode Lo Hi
Glucose < 20 mg/dL (1.11 mmol/L) > 600 mg/dL (33.3 mmol/L)
Uric Acid <
3 mg/dL (0.18 mmol/L) > 20 mg/dL (1.19 mmol/L)
Total Cholesterol < 100 mg/dL (2.59 mmol/L) > 400 mg/dL (10.35 mmol/L)
Page 31
28
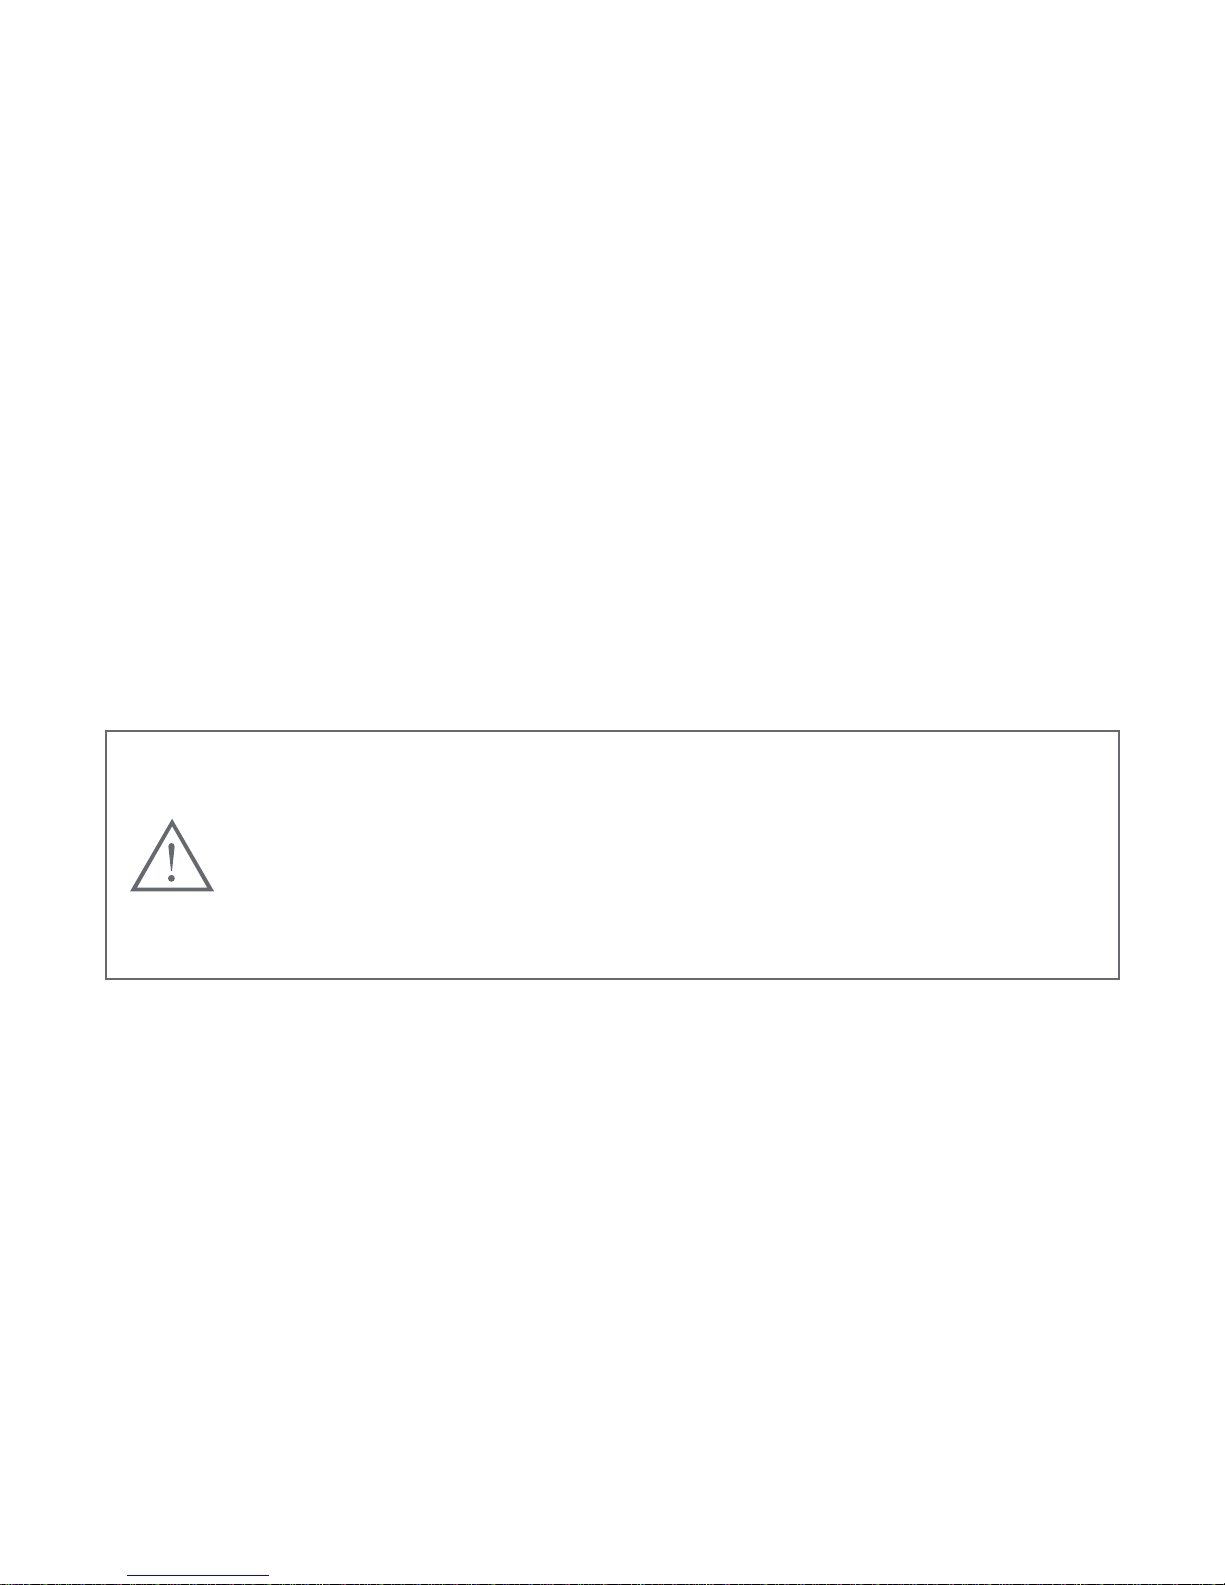
3.5 Care after the Test
Directions :
1. Improper usage of the meter, such as
dropping, bumping or other violent impact
may cause the meter damaged.
2. Please keep meter away by interferences of magnetic, electromagnetic, and
radioactive.
Warning :
● Do not disassemble the meter for any reason.
● Please follow local regulations to discard used test strips and lancets.
● Used test strips, lancets and any other materials that have come in
contact with blood should be treated as potential biohazards. If a
user has an infectious disease, used test strips and other materials
could be a sources of infection.
Page 32

29
Chapter 4 Meter Memory Function
The BeneCheck PLUS Meter automatically stores up to 460 test results, which
includes all the blood glucose 360, uric acid 50 and total cholesterol 50 test
results and control test results. It also provides you with 7-, 14-, 21- and 28-day
averages of the blood glucose test results. The memory counts up from M01
through M360 for glucose test, M01 through M50 for uric acid and total cholesterol
test, respectively. Please follow these directions to recall stored test results.
Directions :
1. Make sure that no test strip is inserted in the meter.
2. Press the left “M” button once to turn the Meter on. After a short “beep”
sound
a full display will appear on screen then the meter enters standby mode.
Note :
● The day average function can be applied to glucose test mode only, uric acid
and total cholesterol test mode do not have the day average function.
3. Press the left “M” button once again and the meter stays at memory mode. The
7-day average (7 DAY.A) will display on the Screen.
Page 33

30
4. Followed by 14, 21 and 28-day average when press the left “M” button
repeatedly.
5. After the 28day-average, the latest stored result M01 appears on the screen.
The memory number increases progressively each time the button is pressed
untill M360.
6. Press the left “M” button for over 3 seconds and the meter will turn off after
a long “beep” sound. Meter will also automatically shut down after 3 minutes
without any operation.
Note :
● If 360 test results are already stored and a new one is added, the oldest test
result is automatically overwrited. The newest result will be shown in M01.
Page 34
31
Chapter 5 How to Set the Measurement Units
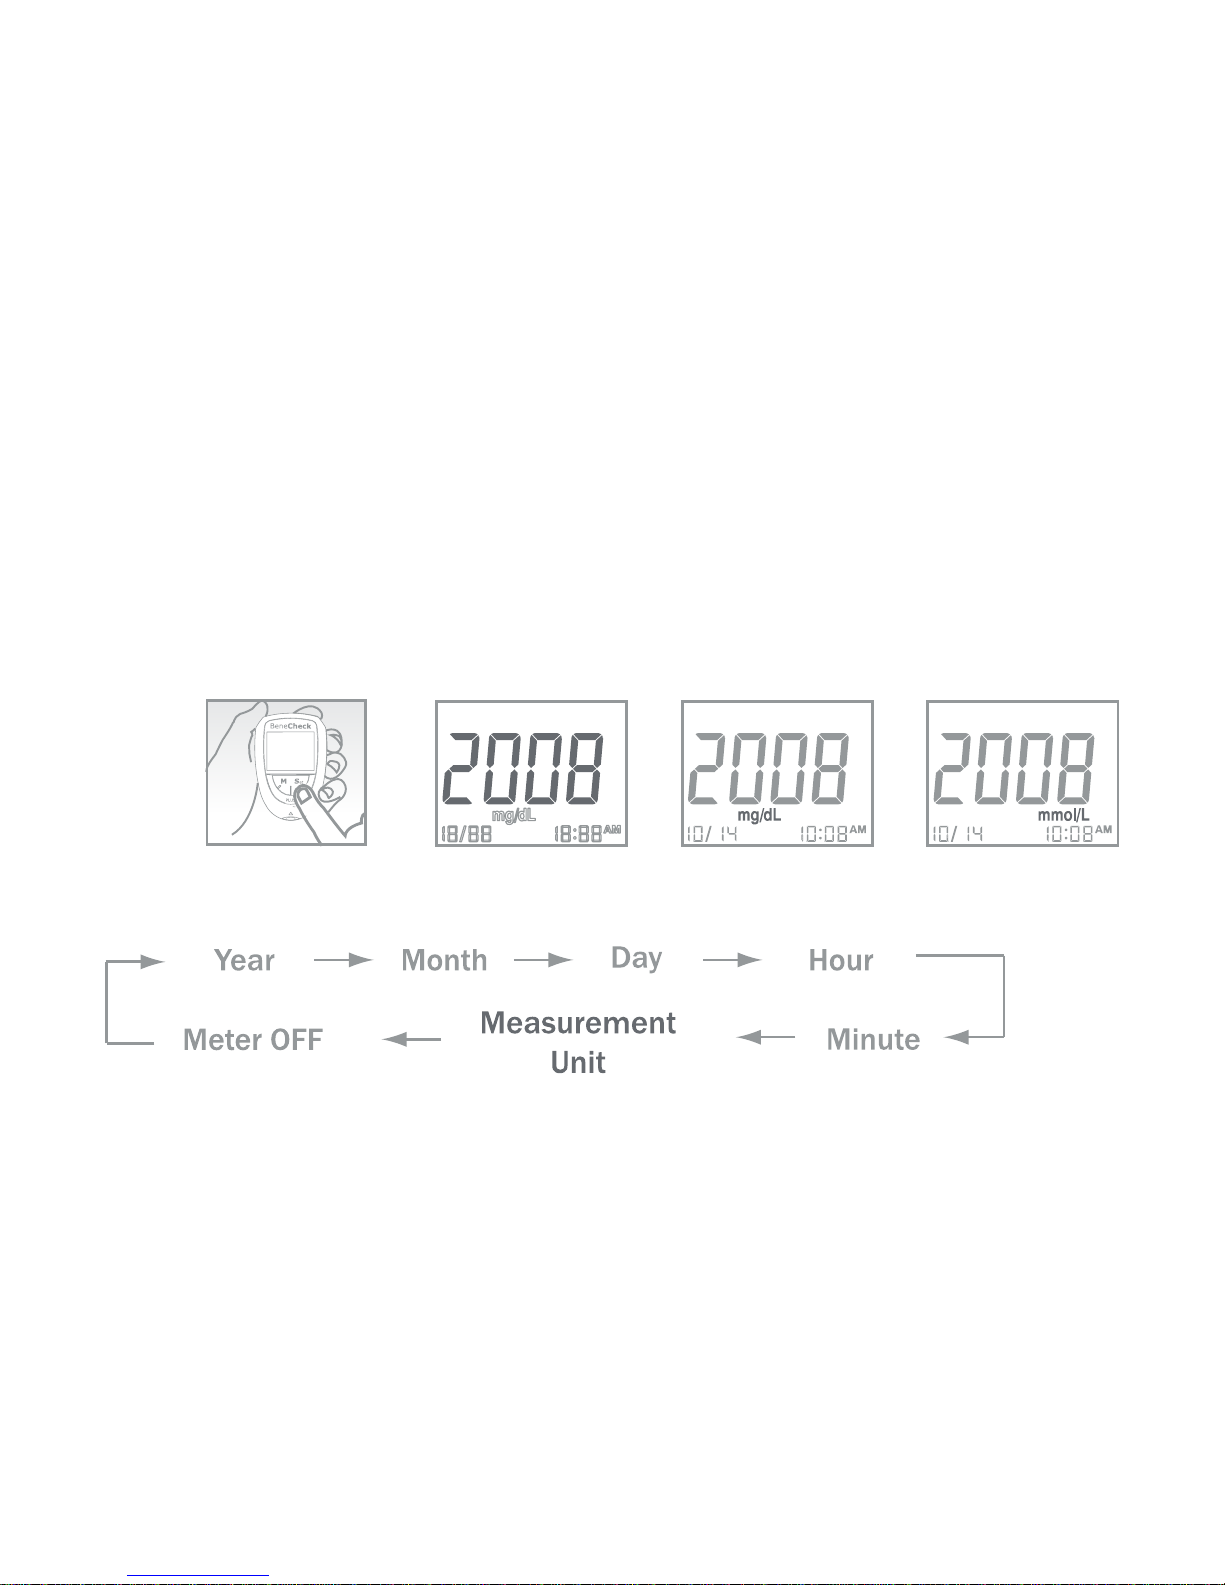
Directions :
1. Make sure that no test strip is inserted in the meter.
2. Press and hold the “Set” button for over 2 seconds, the meter will sound beep
(Fig. 1).
1 2
3 4
The sequence of the setup mode is indicated as below :
Page 35

32
3. Click the right "Set" button for six times, and a blinking "
mg/dL" will display on
the screen.
4. Pressing the “M” button will switch the unit of measure between "mg/dL" and
"mmol/L"
(See Fig.3&4)
5. Click the right “Set” button once again the meter will turn off.
Note :
● Before each test, please make sure correct unit of the measure is set up.
Page 36

33
Chapter 6 Storage and Handling of Meter and Strips
The performance of test strips may be affected by improper storage and handling.
Please store the test strips and meter carefully according to the specifications
listed in Chapter 9.
Note:
● Store the meter, code strip, test strips and control solution at 10-30°C.
● Do not store test strips in high humidity enviroment or dispose under direct sunlight.
●
Do not freeze or refrigerate the meter and strips.
●
Keep the meter clean by wiping the exterior appearance of the meter with a
tissues or lint-free cloth.
● Handle the strip with clean and dry hands; lancing site for the test should be
cleaned and dried thoroughly.
Page 37
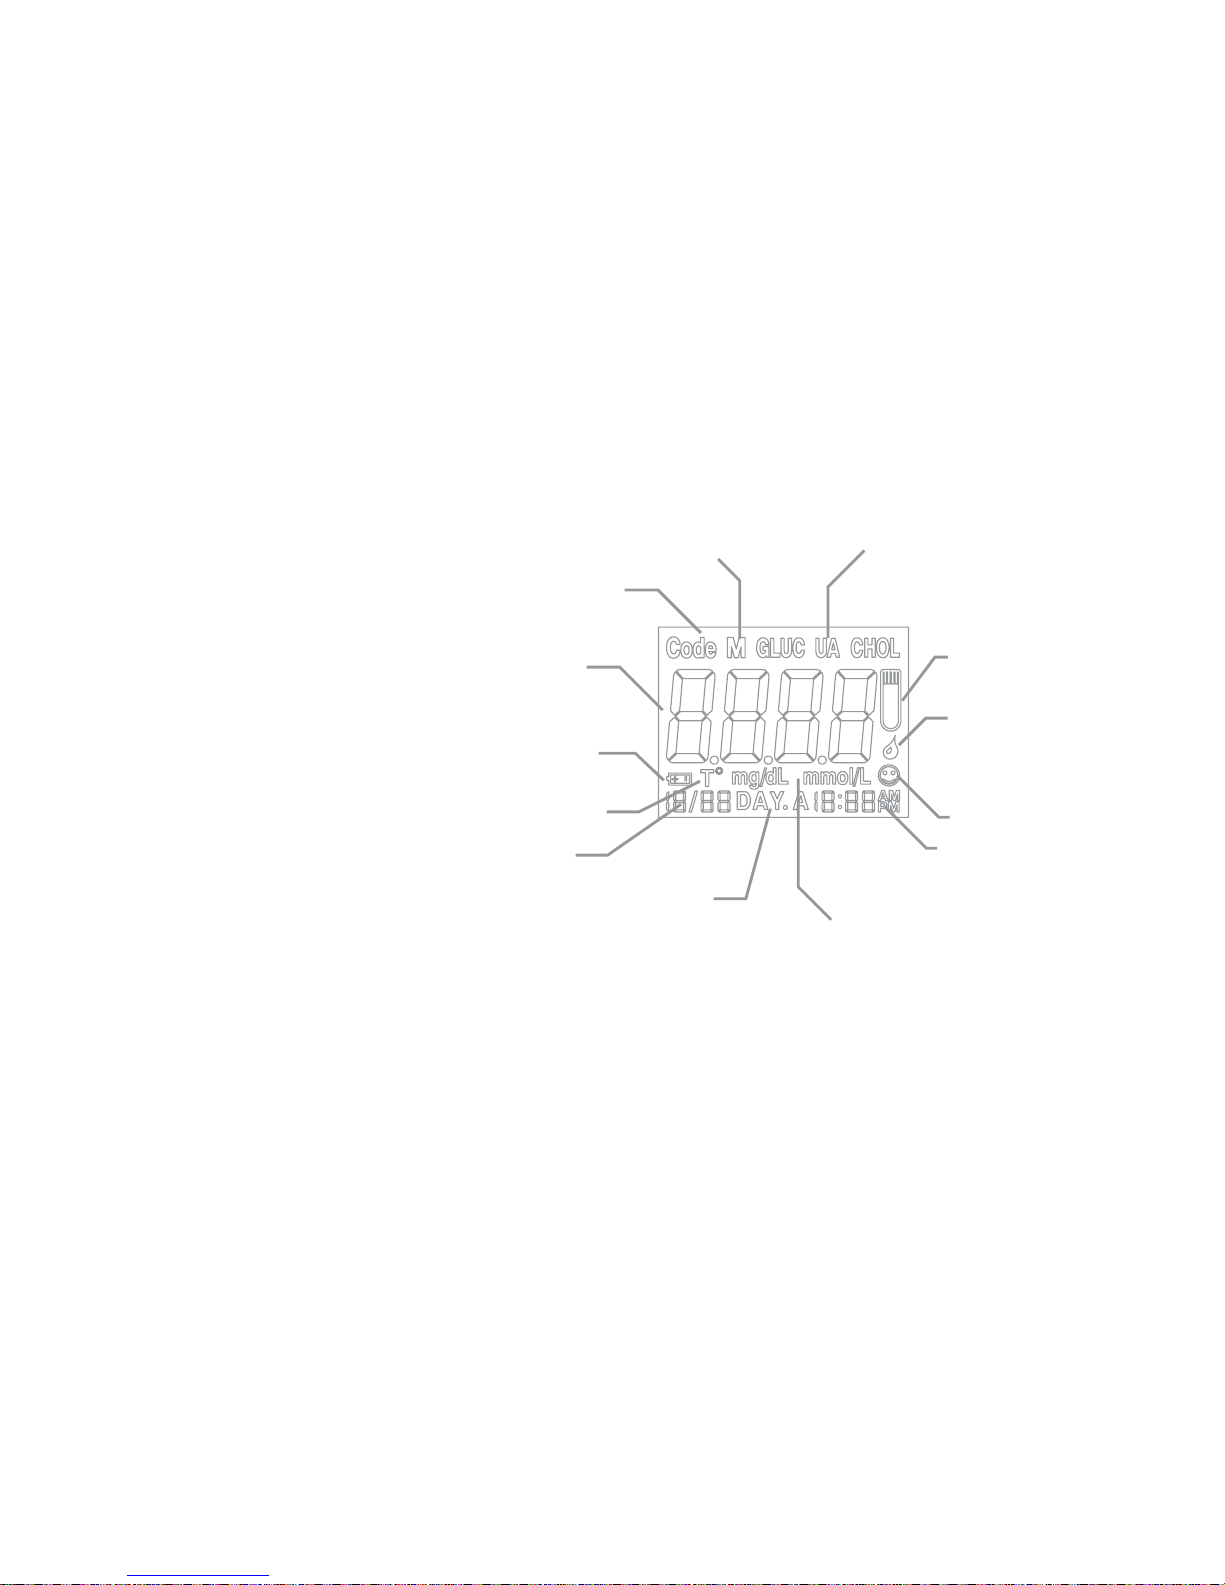
34
Chapter 7 Icon and Alert Tones
7.1 lcon on the Screen
The vivid and clear
information icons on the
Screen are helpful and
convenient, the icon
design are easy to understand.
7.2 Alert Tones
● Normal Alert Sound : a short “beep”
● Warning Alert Sound : 5 short “beeps”
● Turning On/Off Alert Sound : a long “beep”
Code Number lcon
System Check lcon
Result Area
Battery lcon
Date lcon
Strip Loading lcon
Memory Number lcon
Blood Loading lcon
Unit lcon
mode icon
DAY
Average lcon
Time lcon
Temperature lcon
Page 38

35
Chapter 8 Error Message and Trouble Shooting
Message Cause Solution
E-0
There will be a problem
with the test strip.
Repeat the test with a new test
strip. If the problem persists, please
contact the dealer for service.
E-b The power of the battery
is too low to run a test.
Replace the battery at once.
Err.3 The reference voltage or
other circuit is error.
Call local authorized distributor
for help and service.
E-E 1. There may be a problem
with self-check of the
meter.
2. Use of the wrong or
damaged code strip
or the code strip was
inserted improperly.
Power off then retry, if the error
appears again, contact the authorized
distributor for service.
Check that the code number on the
meter display matches the code
number on the test strip vial. Code
the meter or retest as necessary. If
the error message appears again,
please contact the dealer for service.
Page 39

36
Message Cause Solution
E-t &
Temperature
Icon Sign
The temperature is below
or above the system
operating range.
Repeat the test after the meter
and the test strip have reached at
temperature within the operating
range.
E-U It could be caused by
a used test strip or a
temporary or permanent
electronic problem.
Repeat the test with a new test strip.
If the error message appears again,
please contact the dealer for service.
Page 40

37
Chapter 9 Specications
System Accuracy
:
± 20% at Glucose level ≥75 mg/dL (4.17mmol/L)
±
20% at Uric Acid ≥ 5 mg/dL (0.30 mmol/L)
±
20% at Total Cholesterol ≥ 150 mg/dL
Principle
:
Glucose & Total Cholesterol - Electrochemical
Biosensor ,Uric Acid - Electrochemical Sensor
Calibration :
Plasma-equivalent
Test Sample
:
Fresh Capillary whole blood
Measuring Time
:
About 10 seconds (Glucose), 15 seconds (Uric Acid),
30 - 40 seconds (Total Cholesterol)
Measuring Range
:
Glucose 20 - 600 mg/dL (1.1 - 33.3 mmol/L)
Uric Acid 3 - 20 mg/dL (0.18 - 1.19 mmol/L)
Total Cholesterol 100 - 400 mg/dL (2.59 - 10.35 mmol/L)
Sample Volume
:
About 1 - 1.5 µL (Glucose & Uric Acid)
About 10 µL (Total Cholesterol)
Hematocrit Range
:
30 - 55% (for Glucose, Uric Acid)
35 - 50% (for Total Cholesterol)
Strip Storage Condition
:
10 - 30ºC (50 - 86ºF)
Page 41

38
Operation Temperature
:
10 - 40ºC (50 - 104ºF)
Relative Humidity
:
Less than 95%
Memory
:
460 test results
(360 for Glucose, 50 for Uric Acid, 50 for Total Cholesterol)
Battery Type
:
One 3V (CR2032) lithium battery
Battery Life
:
Approximately 1,000 tests
Dimensions
:
86*57*17 mm (Length, Width, Height)
Weight
:
About 48 g (with battery)
Page 42

39
Chapter 10 Limitations
Please observe the following limitations for obtaining accurate results of
BeneCheck PLUS Multi-Monitoring System :
1. For In-vitro diagnostic use only (External use only).
2. BeneCheck PLUS Test Strip is designed for one-time use only. Do not reuse.
3. Do not perform the test while a mobile phone is used beside; prevent the
electronic signal interference.
Page 43

40
10.1 Limitations of Glucose Test
BeneCheck PLUS Glucose Test Strips give accurate results when the following
limitations are observed :
● Hematocrit (Hct) percentage may affect test result. If Hct levels less than 30%
may cause incorrect high measurement results and Hct levels greater than 55%
may cause incorrect low measurement results. Please consult your medical
professionals if you do not know your Hct level.
● Do not use the test strips for the testing of newborns.
● The test strips react with only D-glucose and do not react with other sugars
which may be present in blood.
●
Use only fresh capillary nger whole blood. Do not use serum or plasma.
● BeneCheck PLUS Glucose Test Strips may be used at altitude up to 10,000 feet
without an effect on test results.
Page 44

41
Additional Information for Healthcare Professionals :
● When venous whole blood is used for the test, it can be collected into
heparin-containing test tubes winthin 30 minutes after drawing. The results may
be 7% lower than a capillary sample.
● Interferences : Acetaminophen, uric acid, ascorbic acid, dopamine,
gentistic acid, ibuprofen, methyl DOPA, salicylate, tetracycline, tolazamide,
tolbutamide (when at physiological or therapeutical levels) do not signicantly
affect the results.
●
Patients undergoing oxygen therapy may yield falsely low results.
● In situations of decreased peripheral blood ow, examples would include but are
not limited to severe dehydration, in shock, or in a hyperosmolar state (with or
without ketosis), hypertension, the test results may be falsely low.
● BeneCheck PLUS Glucose Test Strips are plasma calibrated, testing with serum
or plasma sample will give falsely high results.
● BeneCheck PLUS Glucose Test Strips have not been validated for testing with
Page 45

42
neonatal blood specimens.
● Lipemic samples : Cholesterol levels up to 400 mg/dL (10.35 mmoL/L),
and triglycerides up to 3000 mg/dL (34.88 mmoL/L) do not affect the results.
Grossly lipemic patient samples have not been tested and are not recommended
for testing with the BeneCheck Plus Glucose Test Strips.
● Critically ill patients should not be tested with blood glucose meters.
Page 46

43
10.2 Limitations of Uric Acid Test
BeneCheck PLUS Uric Acid Test Strips give accurate results when the following
limitations are observed :
● Hematocrit (Hct) percentage may affect test result. If Hct levels less than 30%
may cause incorrect high measurement results and Hct levels greater than 55%
may cause incorrect low measurement results. Please consult your medical
professionals if you do not know your Hct level.
● Use only fresh capillary nger whole blood. Do not use serum or plasma.
● BeneCheck PLUS Uric Acid Test Strips may be used at altitude up to 10,000 feet
without an effect on test results.
Additional Information for Healthcare Professionals :
● Interferences : Acetaminophen, allopurinol, amiloride, ascorbic acid, atenolol,
colchicine, diclofenac, dopamine, glibenclamide, ibuprofen, indomethacin,
ketoprofen, metfoemin, methyl DOPA, salicylate, tetracycline, tolazamide,
tolbutamide (when at physiological or therapeutical levels) do not signicantly
affect the results. Gentistic acid
at therapeutic levels (5 mg/dL) may give falsely
Page 47

44
high results of uric acid test.
● In situations of decreased peripheral blood ow, examples would include but
are not limited to severe dehydration, in shock, or in a hyperosmolar state (with
or without ketosis), hypertension, the test results may be falsely low.
● BeneCheck PLUS Uric Acid Test Strips are plasma calibrated, test with serum or
plasma sample will give falsely high results.
● Lipemic samples : Cholesterol levels up to 400 mg/dL (10.35 mmol/L) do not
affect the results. Triglycerides and grossly lipemic patient samples have not
been tested and are not recommended for testing with the BeneCheck PLUS
Uric Acid Test Strips.
Page 48

45
10.3 Limitations of Total Cholesterol Test
BeneCheck PLUS Total Cholesterol Test Strips give accurate results when the
following limitations are observed :
● Hematocrit (Hct) percentage may affect test result. If Hct levels less than 35%
may cause incorrect high measurement results and Hct levels greater than 50%
may cause incorrect low measurement results. Please consult your medical
professionals if you do not know your Hct level.
● Use only fresh capillary nger whole blood. Do not use serum or plasma.
● BeneCheck PLUS Total Cholesterol Test Strips may be used at altitude up to 8,000
feet without an effect on test results.
Additional Information for Healthcare Professionals :
● Interferences : Acetaminophen, uric acid, ascorbic acid, dopamine, gentistic acid,
ibuprofen, methyl DOPA, salicylate (when at physiological or therapeutical levels)
do not significantly affect the results. Hemoglobin at physiological levels ≤10 mg/dL.
Page 49

46
● In situations of decreased peripheral blood ow, examples would include but
are not limited to severe dehydration, in shock, or in a hyperosmolar state (with
or without ketosis), hypertension, the test results may be falsely low.
● BeneCheck PLUS Total Cholesterol Test Strips are plasma calibrated, tests with
serum or plasma sample will give falsely high results.
● Lipemic samples : Glucose levels up to 476 mg/dL (13.89 mmoL/L) do not
affect the results. Triglycerides and grossly lipemic patient sample have not
been tested and are not recommanded for testing with the BeneCheck PLUS
Total Cholesterol Test Stirps.
 Loading...