

Page 1
®
Bendix® A2LS™ Hydraulic Drum Brakes w/Parking
DIRT SHIELD
SD-20-6608
CROSS-OVER PIPE
RETAINING SPRING
WHEEL CYLINDER END
SHOE RETURN SPRING
EXPANDER END SHOE
RETURN SPRING
WHEEL CYLINDER
EXPANDER
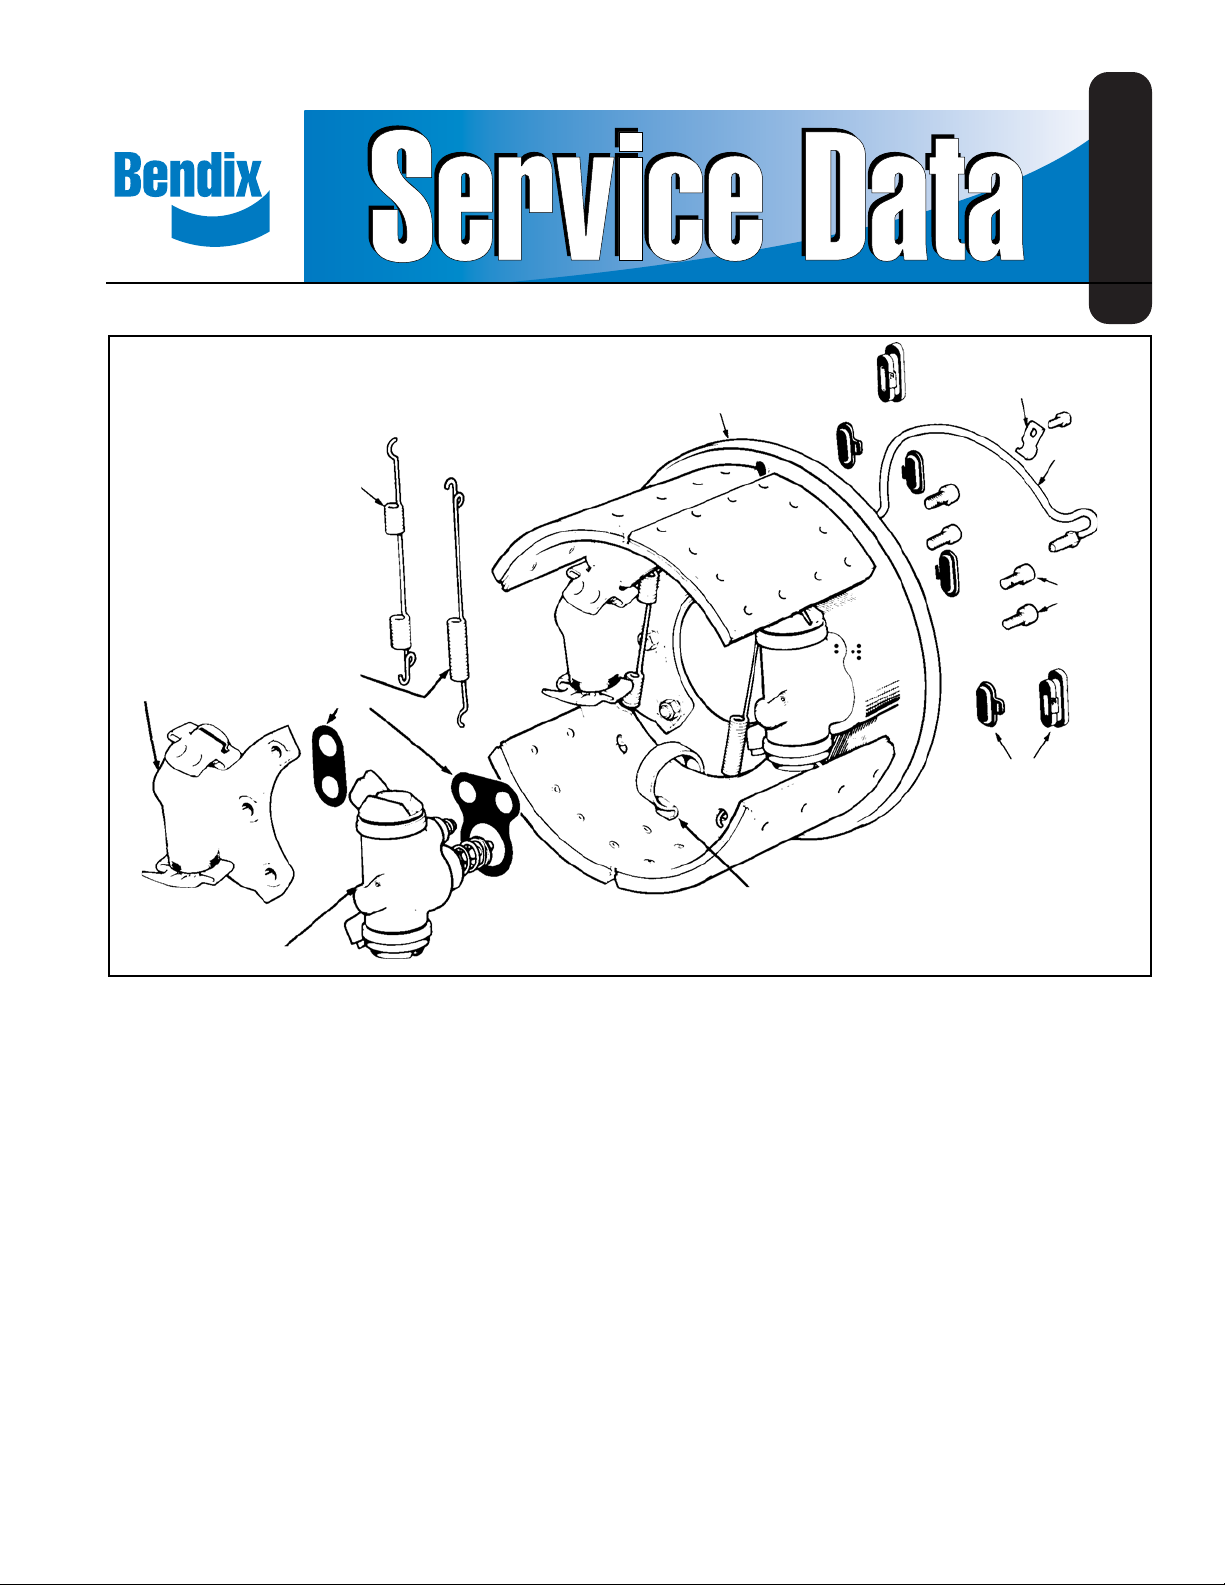
FIGURE 1 - A2LS™ AUT OMA TIC ADJUSTING TWO LEADING SHOE DRUM BRAKE
DESCRIPTION
The A2LS™ drum brake is a hydraulically operated duo-duplex
brake with an automatic adjustment and parking brake
feature. The A2LS™ drum brake (automatic adjust, two
leading shoes) provides two leading shoes in either direction
of drum rotation and an automatic adjustment of the brake
shoes to compensate for lining wear.
GASKET
SHOE HOLD-DOWN CLIP (NOT
FITTED TO EARLY BRAKES)
The single web brake shoes are located by slots in the wheel
cylinder tappet head, the expander input tappet/piston and
abutment tappet, and are retained by the shoe return springs.
As with all Bendix automatic adjusting brakes, provision is
made for manual override of the automatic adjuster. This
should only be needed for initial adjustment of the shoes to
a specific drum clearance, or to back off shoes to enable a
lipped drum to be removed.
CROSS-OVER
PIPE
CAP SCREWS
GROMMETS
Both the wheel cylinder unit and expander unit have cast
integral brake mounting lugs, each taking the brake torque
load. The wheel cylinder unit contains two single acting
hydraulic cylinders with automatic adjusters. The expander
unit contains a double acting hydraulic cylinder with a park
brake wedge expander . Wheel cylinder and expander units
have either a 1-5/8 inch (41,3mm) or 1-3/4 inch (44,5mm)
diameter bore depending upon vehicle brake requirements.
The units are hydraulically connected together with a bridge
pipe or crossover tube.
The brake assembly incorporates an integral backing plate
(dirtshield) to protect the brake from excessive water and
dirt intrusion. The backing plate (dirtshield) contains a steady
post for each brake shoe to insure that lining material is
kept parallel to the drum braking surface. Both brake shoes
are free to slide on their abutment faces against the backing
plate (dirtshield) and are therefore able to centralize
themselves to the drum. Lining material is 3/4 inch (19,1 1
mm) thick in the center of the shoe tapering to approximately
5/8 inch (15,9 mm) at each end. Lining inspection holes and
1
Page 2
manual override access holes are covered by rubber
grommets.
INPUT/
TAPPET
WHEEL
CYLINDER
PISTONS
PISTON
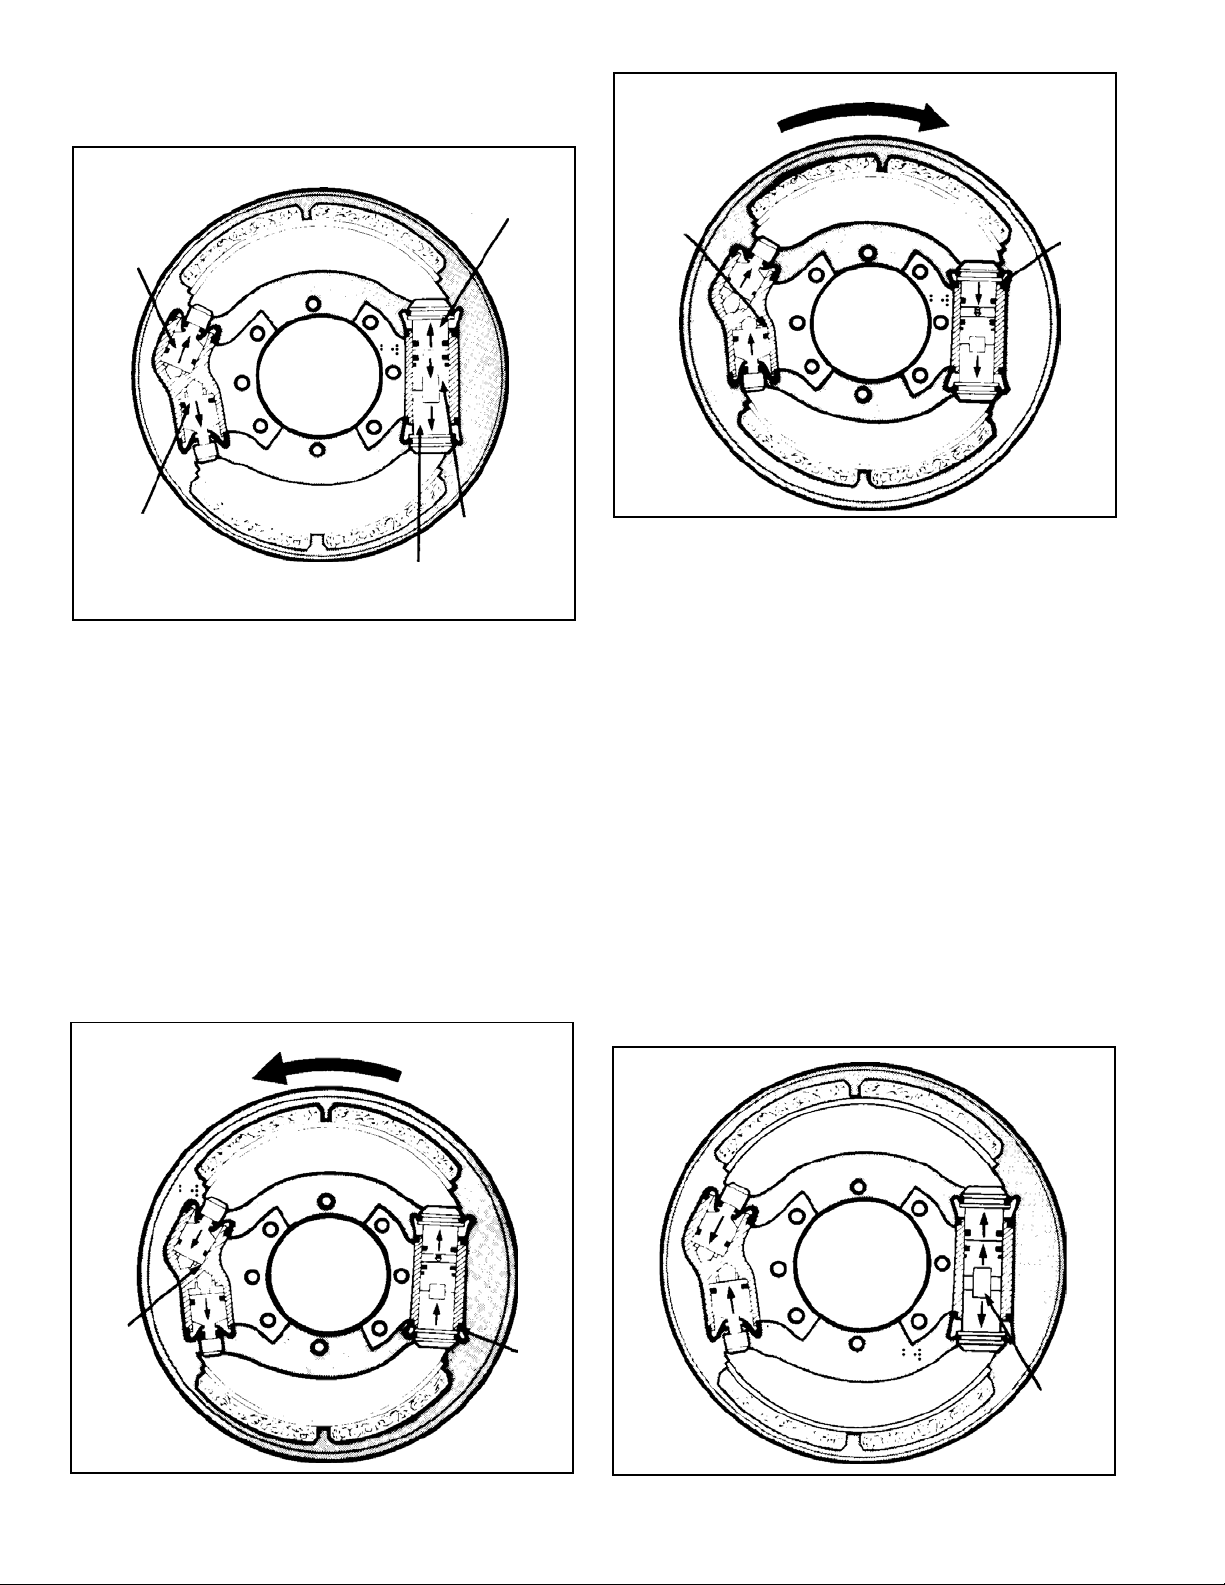
(ARROW INDICATES DIRECTION OF DRUM ROTATION)
TORQUE
LOAD
TORQUE
LOAD
WHEEL
CYLINDER
PISTONS
FIGURE 2 - SERVICE BRAKE APPLICA TION
ABUTMENT
ROLLER/TAPPET
PISTON
TAPPET
OPERATION
On brake pedal application, hydraulic fluid pressure is
delivered to the wheel cylinder and expander unit. This
hydraulic pressure forces the wheel cylinder pistons
outwards, Figure 2, moving the brake shoes against the
drum. At the same time hydraulic pressure also forces the
input tappet piston and abutment tappet in the expander
unit outward, moving the opposite end of the brake shoes
toward the drum. The expander input tappet/piston pushes
against one shoe, and the roller tappet/piston pushes on
the expander abutment tappet and through this to the other
shoe.
(ARROW INDICATES DIRECTION OF DRUM ROTATION)
FIGURE 4 - REVERSE DRUM ROTA TION
When the brake shoe lining contacts the drum the shoes
are forced around, sliding on the abutments, in the direction
Of drum rotation. In the forward direction, Figure 3, the torque
load from one shoe is taken by the wheel cylinder piston
bottoming in its bore in the wheel cylinder, and from the
opposite shoe by the expander abutment tappet resting
against the expander unit body. In the reverse direction,
Figure 4, the torque load from one shoe is taken by the
other wheel cylinder piston bottoming in its bore in the wheel
cylinder, and from the opposite shoe by the expander input
tappet/piston head resting against the expander body. In
this way, regardless of forward or reverse drum rotation,
the brake will always be a two leading shoe brake.
P ARKING BRAKE APPLICA TION
On application of the parking brake, the spring actuator
screwed into the back of the expander unit housing pushes
the wedge assembly forward. As the wedge assembly moves
TORQUE
LOAD
FIGURE 3 - FORWARD DRUM ROT A TION
2
TORQUE
LOAD
WEDGE
ASSEMBLY
FIGURE 5 - P ARKING BRAKE APPLICA TION
Page 3
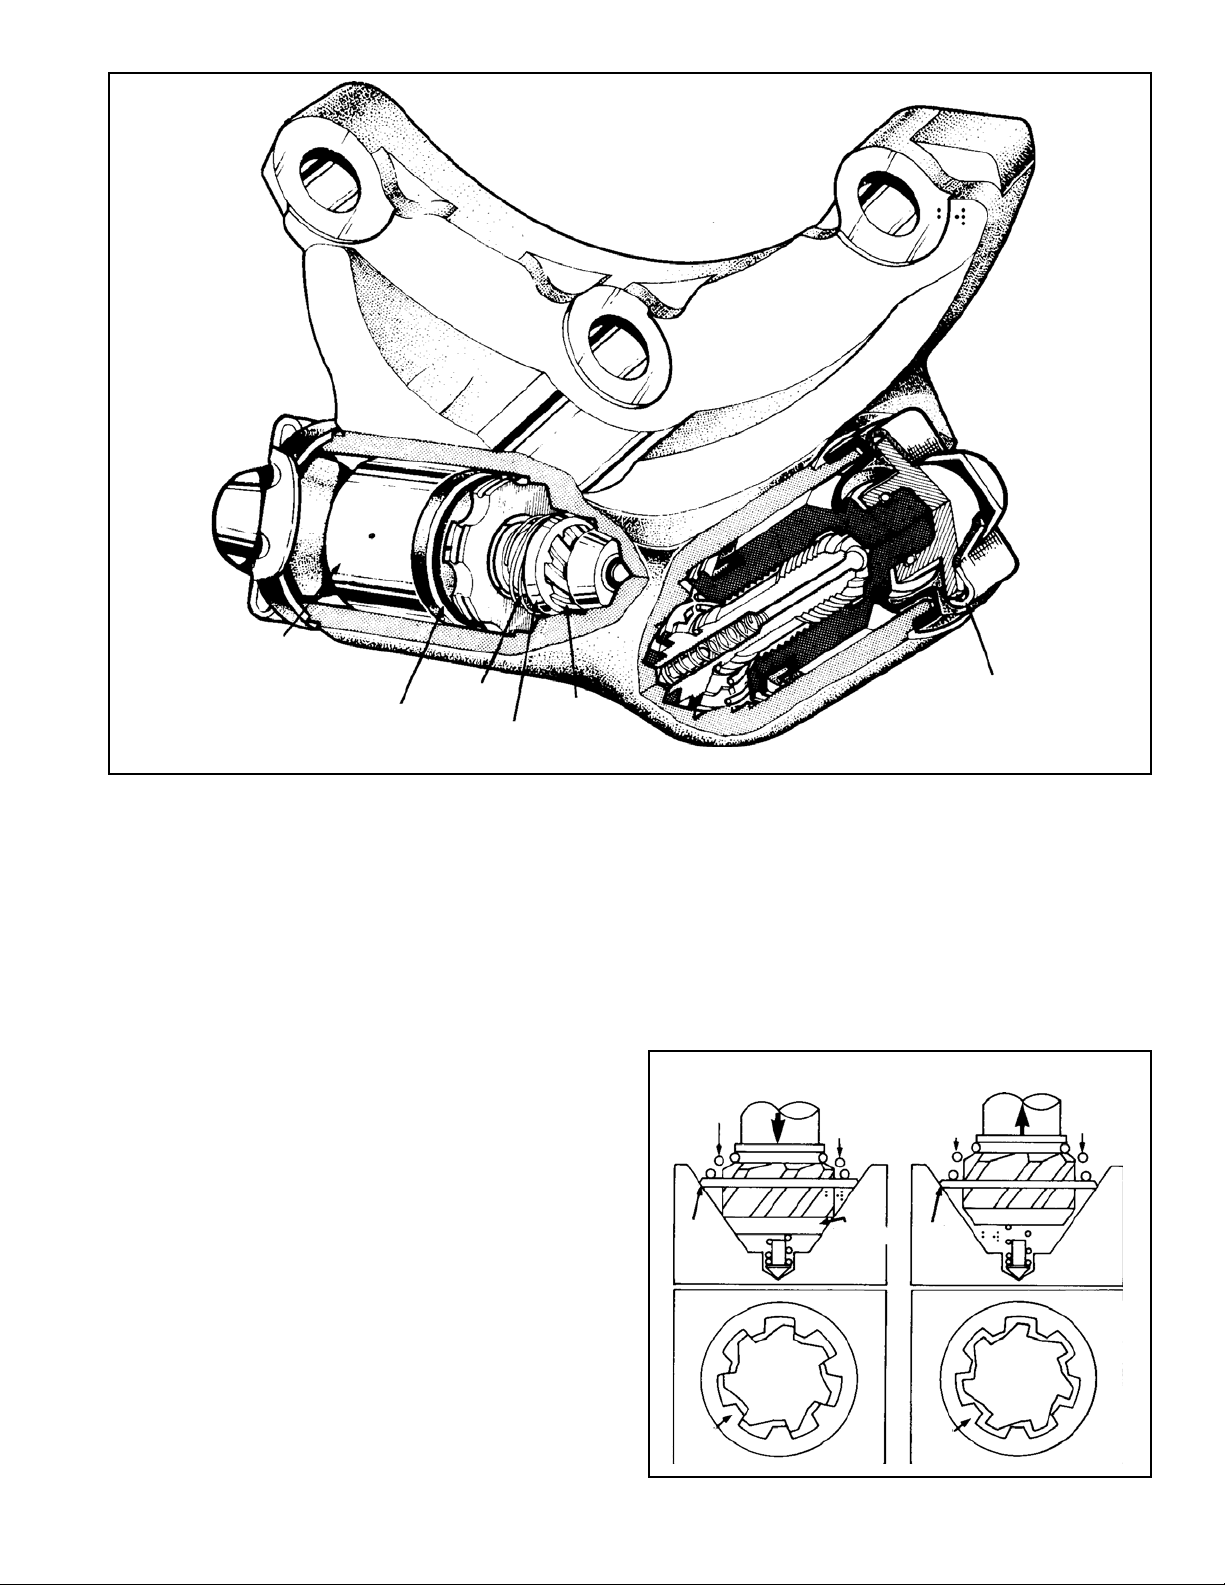
PISTON
DRIVE RING
SEAL
SPRING
ADJUSTER
ADJUSTER
SHAFT HELIX
DRIVE RING
FIGURE 6 - WHEEL CYLINDER ASSEMBL Y CUT -AW A Y
forward, the wedge rollers force the expander abutment tappet
and roller tappet/piston apart, Figure 5, and directly, or
through the expander input tappet/piston the brake shoes
are forced against the drum. In parking brake operation the
brake assembly is a one leading and one trailing shoe brake,
in either forward or reverse drum rotation.
AUTOMATIC ADJUSTMENT OF BRAKE SHOES
In the A2LS™ drum brakes, automatic adjustment is
controlled by the wheel cylinder units. Adjuster assemblies
within the wheel cylinder units control the clearance between
the drum and brake shoe by the back-lash built into each
adjuster mechanism. During braking application, when no
adjustment is required, brake shoe travel takes place within
the back-lash available. As the linings wear and the dist ance
between the lining and drum exceeds the predetermined
clearance, travel of the piston exceeds the back-lash available
and adjustment of the brake shoe is automatically made.
Each wheel cylinder piston has an adjuster mechanism
screwed into it (Figure 6). The rotation of this adjuster relative
to the piston adjusts the brake shoes according to the
amount of lining wear. The adjuster shaft has a fast helix
thread; onto this is mounted a drive ring having a
corresponding thread with an axial clearance (back-lash)
built in.
MANUAL OVERRIDE
WHEEL
The adjuster drive ring is held in light contact with its seat in
the cylinder body by the drive ring spring. The brake shoe
tip engaging in the piston tappet head, and a spring between
the adjuster shaft assembly and the face of the adjuster
bore, insure that a back-lash is maintained on the mating
threads of the adjuster shaft and piston.
When the brake pedal is applied, hydraulic fluid pressure
causes the piston to move outwards, lifting the adjuster shaft
AT REST
SHOE RETURN
SPRING LOAD
DRIVE
RING
SEATED
DRIVE
RING
ADJUSTER
SCREW
PISTON AND ADJUSTER
(SCREW MOVE OUT)
ADJUSTER
SCREW
SEATED
FIGURE 7 - ADJUSTER OPERA TION
NORMAL APPLICATION
(NO ADJUSTMENT REQUIRED)
SPRING LOAD
DRIVE
RING
SEATED
ADJUSTER
SCREW
DRIVE
RING
3
Page 4
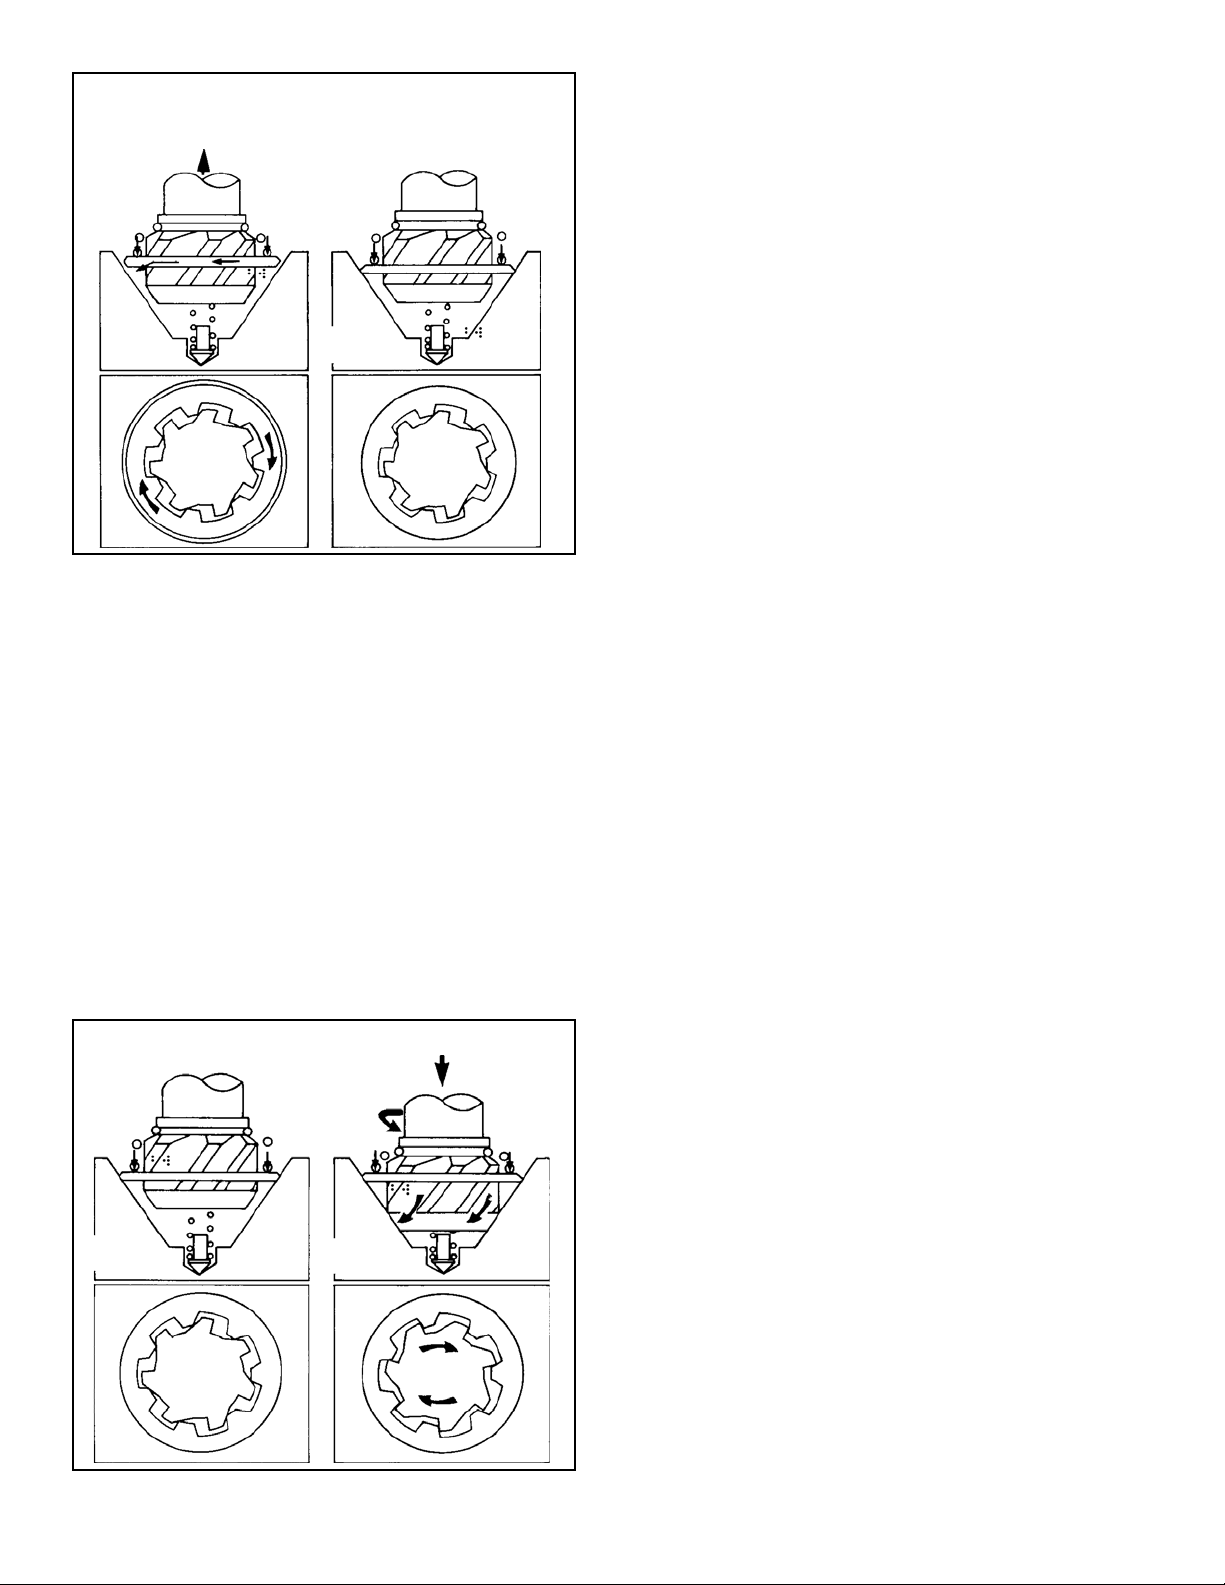
BRAKE APPLICATION
(ADJUSTMENT REQUIRED)
DRIVE RING-LIFTED OFF
SEATING-ROTATES RIDES
DOWN HELIX AND RE-SEATS
FIGURE 8 - ADJUSTER OPERA TION
BRAKES HELD ON (DRIVE RING
ALREADY SETTLED IN NEW
POSITION)
DRIVE RING
RE-SEATED
off its seat in the cylinder body. If the movement of the
adjuster shaft helix through the adjuster drive ring is less
than the axial clearance (back-lash), no rotation of the
adjuster shaft takes place. (Figure 7)
When the movement of the adjuster shaft helix through the
adjuster drive ring is greater than the axial clearance, rotation
of the drive ring relative to the adjuster shaft will occur . (Figure
8) As the adjuster shaf t helix passes through the drive ring,
the drive ring, lightly loaded by the drive ring spring, will
rotate in its seat in the cylinder body . As the brake pedal is
released, the brake shoe return springs cause the brake
shoe to push the piston and adjuster shaft assembly back
through the cylinder.
As the axial tolerance between the adjuster shaft helix and
adjuster drive ring is taken up, the load on the drive ring
helix forces it onto its seat. The resultant friction keeps it
from further rotation. As the piston and adjuster continue
through the cylinder, the adjuster shaft helix is forced to
rotate through the drive ring. (Figure 9) This rotation of the
adjuster shaft, relative to the piston, unscrews the adjuster
shaft from the piston, increasing the overall length of the
adjuster and piston assembly . This in turn reduces the brake
shoe lining to drum clearance.
The automatic adjustment rate is variable; each application
of the brake takes up only a percentage of the excess shoe
to drum clearance. This avoids over adjustment when the
drums get hot and expand.
Note: Due to manufacturing tolerances, it is unlikely that all
brake shoes will run at the same clearances. No
detrimental effect will result and no attempt should be
made to standardize these clearances.
MANUAL OVERRIDE MECHANISM
The manual override mechanism is used to override the
automatic adjuster to set the initial shoe to drum clearance.
This initial adjustment is made after new brake shoes have
been installed, or other maintenance work has been
performed requiring the removal of the brake drum. This
adjustment ‘is necessary to avoid excessive movement of
the wheel cylinder pistons and to achieve a correct and
stabilized running clearance.
The manual override is also used to un-adjust the brakes
when removing the drum when a lipped drum condition
exists.
IMPORT ANT! PLEASE READ:
BRAKES HELD ON (DRIVE RING
ALREADY SETTLED IN NEW POSITION)
SHOE RETURN
SPRING LOAD
DRIVE RING
RE-SEATED
FIGURE 9 - ADJUSTER OPERA TION
4
DRIVE RING
SEATED
RETURN STROKE
ADJUSTMENT COMPLETED
The manual override should not be used as an
alternative to the auto-adjuster. It is essential that the
auto-adjust mechanism be kept in good operating
condition to insure safe and reliable brake operation.
PREVENTIVE MAINTENANCE
The A2LS™ drum brakes normally do not require any service
except when new linings are being installed. The automatic
adjusters eliminate the need for any periodic adjustment of
the brakes. To insure safe operation of the brakes, the
following service checks should be performed.
The following is a recommended time table; the actual times
may vary depending upon the use of the vehicle and the
type of operation and condition the vehicle is exposed to.
LINE HAUL VEHICLES
Every 50,000 miles (80,000 km), six months, or 900
operating hours, whichever occurs first, perform the service
checks outlined in this manual.
Page 5
CITY DELIVERY
Every 15,000 miles (24,000 km), two months, or 300
operating hours, whichever occurs first, perform the service
checks outlined in this manual.
SERVICE CHECKS
With the vehicle on a level surface, block the wheels to
prevent movement of the vehicle.
1. Remove one or more of the lining inspection plugs.
Check the thickness of the brake linings.
2. Activate the brake pedal. Observe the brake shoes
through the inspection holes and make sure that the
brake shoes move against the drums smoothly and
promptly. Release the brake pedal and make sure the
brake shoes retract promptly and smoothly .
3. Apply the parking brake. Observe the brake shoes
through the inspection hole and make sure the brake
shoes engage the drum.
4. Check all hydraulic fittings and the surface of the
backing plate (dirtshield) for any evidence of hydraulic
fluid leakage.
5. Refer to the vehicle manual for service checks of other
brake related items.
WARNING!
When working on or around brake systems and
components, the following precautions must be
observed:
WARNING! PLEASE READ AND FOLLOW
THESE INSTRUCTIONS TO AVOID
PERSONAL INJURY OR DEATH:
When working on or around brake systems and
components, the following precautions must be
observed at all times:
1. Park the vehicle on a level surface, apply the
parking brakes, and always block the wheels.
When working around or under the vehicle, stop
the engine and remove the key from the ignition.
Always keep hands away from chambers as they
may apply as system pressure drops. Always wear
safety glasses.
2. When working in the engine compartment, the
engine should be shut off and the ignition key
should be removed. Where circumstances require
that the engine be in operation, extreme caution
should be used to prevent personal injury resulting
from contact with moving, rotating, leaking, heated
or electrically charged components.
3. Do not attempt to install, remove, disassemble or
assemble a component until you have read and
thoroughly understand the recommended
procedures. Use only the proper tools and observe
all precautions pertaining to the use of those tools.
4. Following the vehicle manufacturer’s
recommended procedures, deactivate the electrical
system in a manner that safely removes all
electrical power from the vehicle.
5. If the vehicle is equipped with an air over hydraulic
brake system or any auxiliary pressurized air
system, make certain to drain the air pressure from
all reservoirs before beginning ANY work on the
vehicle. If the vehicle is equipped with an AD-IS
air dryer system or a dryer reservoir module, be
sure to drain the purge reservoir.
6. Never connect or disconnect a hose or line
containing pressure; it may whip. Never remove a
component or pipe plug unless you are certain all
system pressure has been depleted.
7. Never exceed manufacturer’s recommended
pressure.
8. Never attempt to disassemble a component until
you have read and understand all recommended
procedures. Some components contain powerful
springs and injury can result if not properly
disassembled. Use only proper tools and observe
all precautions pertaining to use of those tools.
9. Use only genuine Bendix® replacement parts,
components and kits.
A. Use only components, devices and mounting
and attaching hardware specifically designed
for use in hydraulic brake systems.
B. All replacement hardware, tubing, hose,
fittings, etc. must be of equivalent size, type
and strength as the original equipment.
10. Components with stripped threads or damaged
parts should be replaced rather than repaired. Do
not attempt repairs requiring machining or welding
unless specifically stated and approved by the
vehicle and component manufacturer.
11. Prior to returning the vehicle to service, make
certain all components and systems are restored to
their proper operating condition.
ADJUSTMENT
OPENING
FIGURE 10 - REAR VIEW OF THE BACKING PLA TE
(DIRTSHIELD)
™
5
Page 6

REMOVAL
BRAKE SHOE REMOV AL
The removal, disassembly, cleaning and reassembly
instructions presented are primarily for reference.
Disassembly, particularly of the wheel cylinders and
expanders, should not be attempted without the proper
maintenance kits on hand. Damage to some parts may
occur as a result of disassembly. Maintenance kits are
available from your local authorized Bendix parts outlet.
1. Park the vehicle on a level surface and prevent vehicle
movement by a means other than with the parking brake.
Shut off engine.
2. Manually cage all hydraulic spring actuators, raise the
axle and remove the wheels and tires using the procedure
recommended by the vehicle manufacturer’s
maintenance manual.
3. Un-adjust the vehicle brake shoes as follows:
A. Remove the rubber grommets from the manual
override access holes marked “ADJ” in the backing
plate (dirtshield), and insert a blunt screwdriver , or
adjusting tool, until it engages the manual override
wheel. Refer to Figure 10.
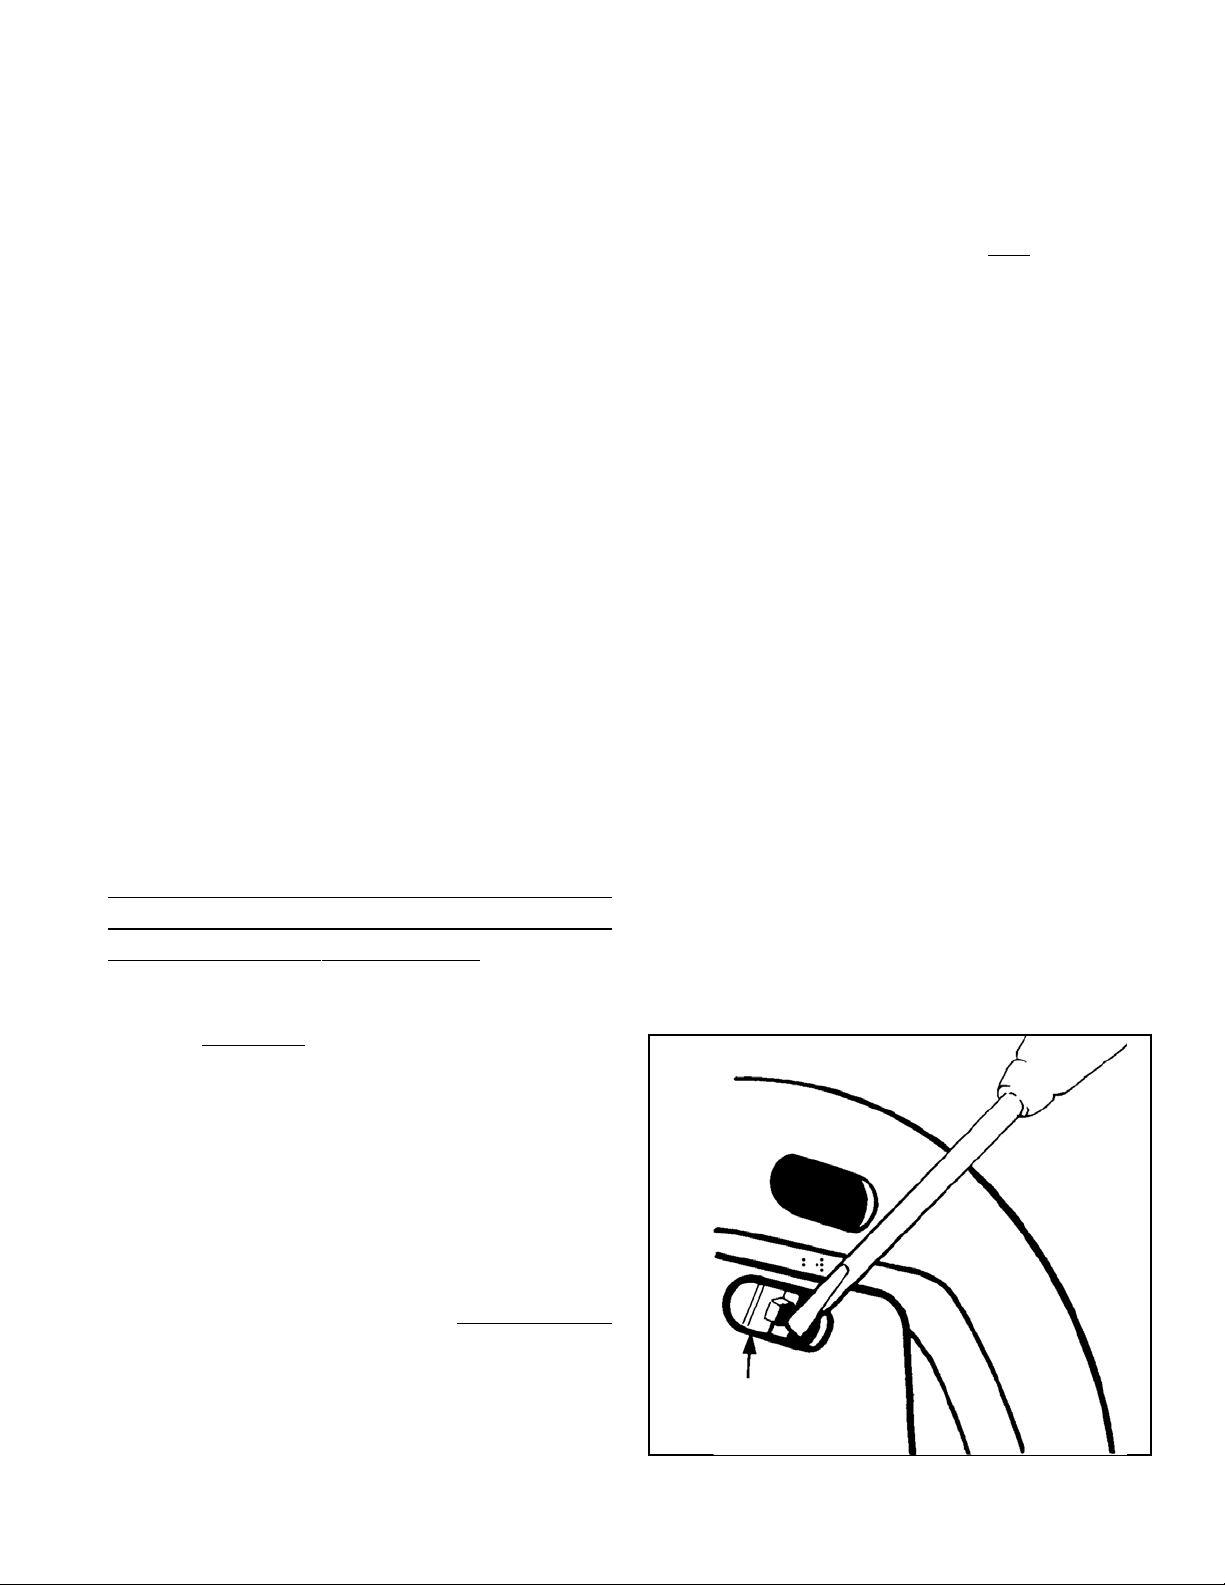
B. Using the backing plate (dirtshield) as a fulcrum,
Figure 1 1, turn the override wheel in a CLOCKWISE
direction, as viewed from the override wheel end until
the lining clears the lip in the drum. Watch the lining
through the lining inspection hole, Figure 26.
C. Repeat this procedure with the other brake shoe and
remove the drum. IMPORTANT: Do not apply
service or park brake after drums have been
removed.
DO NOT ALLOW SPRING END
TO ENGAGE INSIDE HOLE
FIGURE 12 - SHOE RETURN SPRING REMOVAL
SPRING REMOVAL TOOL MADE
FROM 0.375 IN. DIA. TOOL STEEL
COUNTER CLOCKWISE
TO ADJUST UP
CLOCKWISE TO
DE-ADJUST
FIGURE 11 - ADJUSTING ADJUSTER MECHANISM
6
A = 3/8 IN. (9.5 mm)
B = 1/2 IN. (12.7 mm)
C = 0.1 IN. (2.54 mm)
D = 0.15 IN. (3.8 mm)
E = 0.2 IN. (5 mm)
FIGURE 13
1 IN.
3/4 IN.
1/8 IN. THK.
A
1 IN.
D
C
B
3/8 IN. DIA.
E
Page 7

CLOCKWISE TO
DE-ADJUST
FIGURE 14 - DE-ADJUSTING ADJUSTER MECHANISM
PUSH DOWN
4. Place the recessed end of a 3/8 inch (9,53 mm) square
drive socket extension over the end of the wheel cylinder
end shoe return spring, Figure 12. Tap the end of the
socket extension until the hook end of the spring passes
through the brake shoe web.
5. Shape a length of drill rob, or equivalent tool steel, into a
tool as shown in Figure 13.
6. Insert the end of the tool into the loop on the end of the
shoe return spring. Using the expander unit body as a
fulcrum, unhook the spring from the brake shoe web,
Figure 25. Be careful not to damage the rubber dust
boot. Note: The brake shoe return spring is hooked into
the back side of the shoe web.
7. Ease the shoes from under the shoe hold down clips
(where fitted) and remove the back shoes.
8. Remove the tappet head and manual override assemblies
from the wheel cylinder units.
9. T o rapidly un-adjust the adjusters, fit a piece of 3/4 inch
(19,05 mm) heater hose inside a suitable 12 point socket,
Figure 14, on either a speedbrace or ratchet drive. Place
the heater hose over the piston neck and fully wind back
the adjusters as shown in Figure 14. A load must be
applied to the wheel cylinder piston while winding back
the adjusters.
Note: T o avoid locking the auto-adjuster mechanism in the
fully un-adjusted position, wind out each wheel cylinder
piston one complete turn after fully un-adjusting the
pistons.
10.Inspect the wheel cylinder unit and expander unit for
leaks. Lift the dust boots at their inner diameters from
the tappets and pistons. If fluid escapes when the dust
boots are lifted, the wheel cylinder or expander must be
removed for service. Follow the instructions in this
manual for wheel cylinder unit and expander unit removal
and service.
1 1. If there is no evidence of brake fluid leakage in the wheel
cylinder unit or expander unit, install new dust boots (if
necessary). Refit the tappet head and manual override
assembly to the wheel cylinder. Temporarily install an
elastic band around the wheel cylinder adjuster pistons
to prevent them form becoming displaced.
WHEEL CYLINDER AND EXPANDER
UNIT REMOVAL
1. Disconnect the hydraulic inlet hose and bridge pipe
from the wheel cylinder and expander unit.
2. If the expander unit is being removed at this time, remove
the parking brake chamber from the expander body
and backing plate (dirtshield). Refer to the vehicle
service manual.
3. Remove the fixing bolts that secure the wheel cylinder
and expander to the backing plate (dirtshield) and
remove the units.
4. Move the wheel cylinder and expander to a clean work
bench for service.
TAPPET HEAD AND
MANUAL OVERRIDE
WHEEL ASSEMBLY
DUST BOOT
PISTON
SEAL
ADJUSTER SHAFT
ASSEMBLY
SPRING & LOCATOR
ASSEMBLY
TAPPET HEAD
MANUAL
OVERRIDE
WHEEL
GASKET
FIGURE 15 - WHEEL CYLINDER
7
Page 8

FERRULE
FIGURE 16 - REMOV AL OF PIN FROM WEDGE
DUST BOOT
PIN
SPRING
DISASSEMBLY
BRAKE SHOES
Bendix brake shoes and linings are available as sets with
new factory lining installed. If the brake shoes are in good
condition, neither worn nor bent, new lining may be installed
on the old brake shoes. For lining installation procedures,
and brake shoe inspection procedures, refer to Bendix
publication; The Brake Block Manual Part 11, Form No.
BW-1257R.
WHEEL CYLINDER DISASSEMBLY
Before proceeding, clean the exterior of the wheel cylinder
and make sure the work area, tools, and hands are clean.
Place a clean sheet of paper on the work bench surface.
1. Clamp the wheel cylinder unit in a bench vise with padded
jaws.
INPUT TAPPET/
PISTON
SPRING & LOCATOR
HYDRAULIC SEALS
ROLLER TAPPET/
PISTON
TAPPET SEAL
HOUSING
STOP PIN
BLEED
SCREW
WASHER
RETURN SPRING
FERRULE
PIN
CIRCLIP (SNAP RING)
WEDGE SEAL- &
RETAINING RING
ASSEMBLY
WEDGE ASSEMBLY
ABUTMENT TAPPET
FIGURE 17 - EXP ANDER UNIT
8
GASKET
DUST BOOT
Page 9

2. Remove the tappet head and manual override assembly
from the wheel cylinder body , Figure 15. Sep arate the
tappet head from the manual override wheel.
3. Using a blunt screwdriver, pry the dust boots from the
housing and discard.
4. Carefully blow out both piston assemblies from the
cylinder housing using low pressure shop air. Remove
the small spring and locator assembly .
5. Unscrew the adjuster shaft assembly from the piston.
Note: Do not dismantle the adjuster shaft assembly.
6. Using a small screwdriver, with the end rounded and
polished, pry the seal from the piston, taking care not
to score the seal groove or piston surface.
EXPANDER DISASSEMBLY
Before proceeding, clean the exterior of the expander unit
and make sure the work area, tools, and hands are clean.
Place a clean sheet of paper on the work bench surface.
1. Place the expander unit in a bench vise with padded
jaws.
2. Compress the wedge return spring and remove the pin,
Figure 16. Slowly release the spring pressure and remove
spring along with the ferrule.
3. Use snap ring pliers to compress and remove the circlip
(snap ring), Figure 17.
4. Remove the dust boots from both ends of the expander
housing and discard. Note: The dust boots should not
be reused and must be replaced.
5. Remove the abutment tappet, input tappet/ piston and
stop pin from the housing.
6. Remove the wedge assembly, wedge seal, retaining ring
assembly and washer.
7. Push the roller tappet/piston from the housing in the
direction of the input tappet/piston, Figure 17. Note: Do
not slide the roller tappet/piston past the wedge turret.
8. Remove the bleed screw.
9. Using a small screwdriver, with the end rounded and
polished, pry the seals and o-ring from the input and
roller tappet/piston taking care not to score the seal
grooves or piston surface.
Clean all rubber parts that are to be reused with clean DOT
4 heavy duty brake fluid. Place on clean sheet of paper to
dry.
Inspect all of the parts that are to be reused as outlined
below. Replace those part s that are damaged or excessively
worn.
1. Wedge assembly. Check the wedge shaft and wedge
surfaces for scoring. Check the rollers for scoring, pits,
cracks, and flat spots. Check the roller cage for fatigue
cracks.
2. Abutment Tappet. Check the abutment tappet for any
nicks, burrs or corrosion. Check the brake shoe web
slot for any burrs or damage. Smooth with a fine emery
cloth or clean.
3. T appets/ Pistons. Check the outer surfaces for scoring,
pits, or nicks. Check the seal ring and o-ring grooves for
any nicks, burrs, or corrosion. Check the brake shoe
web slot of the expander input tappet/piston. Check the
inside of the piston for damaged threads. Smooth with a
fine emery cloth or clean as required.
DOT 4 FLUID
DOT 4 FLUID
DOT 4 FLUID
GREASE
GREASE
CLEANING AND INSPECTION
Discard all of the old parts that are to be replaced with
parts furnished in the repairs kits.
Clean all of the metal parts with unused DOT 4 brake fluid
or suitable solvent. Do not use gasoline or hot water solution
on metal parts.
GREASE
FIGURE 18 - EXP ANDER LUBRICATION POINTS
9
Page 10

TAPPETS LOCATED OVER WEDGE,
CAGE & ROLLER ASSY.
STOP PIN
FIGURE 19 - EXPANDER TAPPET LOCATION
Note: Normal wear pressure marks should not be mistaken
for scoring. Some discoloration of the piston diameter
may be apparent; this is a normal result of brake
actuation over a long period of operation and should
be ignored.
4. Adjuster Shaft Assembly. Check for damaged threads.
Check the helix for burrs, corrosion, or missing teeth.
Check that the adjustment shaft turns easily in the piston
for the full length of the threads. Smooth with a fine
emery cloth or clean as required.
5. Manual Override. Check the teeth of the manual override
for wear or damage.
6. Housings. Examine the cylinder bores for signs of
corrosion, ridges, or score marks.
Note: Provided the cylinder bore surfaces are in perfect
condition, new seals, and if necessary , new pistons
may be used to rebuild the existing housings. If there
is any doubt as to the condition of the cylinders, new
wheel cylinder and expander units must be installed.
INPUT TAPPET/PISTON
SEAL POSITION
O-RING
ROLLER TAPPET/
PISTON
ABUTMENT TAPPET
FIGURE 20 - EXP ANDER WEDGE
10
7. Backing Plate (dirtshield). Clean the backing plate with
a damp cloth and wire brush to remove any dirt or
corrosion from the surface of the backing plate.
IMPORT ANT! PLEASE READ:
Do not use an air hose to blow dust out of the backing
plate (dirtshield). Never inhale dust from asbestos
brake lining. Asbestos dust, when inhaled, can be
dangerous to your health. Use a vacuum with a filter
to remove dust carefully from the backing plate and
drum.
8. Brake Drum. Inspect the drum for scores and cracks.
Refer to the vehicle service manual for inspection and
resurfacing procedures. Wipe drum clean with a cloth
dampened in Bendix Metal Clene. Do not contaminate
the braking surface of the drum with grease or brake
fluid.
REASSEMBL Y
ASSEMBLE EXPANDER UNIT
Each Bendix drum brake repair kit contains a tube of
synthetic based grease that is recommended for all internal
expander parts (abutment tappet, roller tappet, piston, and
the wedge and roller assembly). This packaged grease, or
an approved substitute synthetic based grease, must be
used, and an adequate amount must be applied. Refer to
Figure 18 for identification of those parts being lubricated
with either the synthetic based grease or DOT 4 brake fluid
during assembly .
Use all of the parts supplied in the Bendix repair kit to replace
the old parts removed from the cylinders.
1. Clamp the expander housing in a bench vise with padded
jaws.
2. Thoroughly smear the wedge, cage, wedge seal and
roller assembly with the greased supplied. Fit the wedge
seal and retaining ring assembly as close to the cage
as possible.
3. Insert the wedge assembly into the expander housing
and retain with a new circlip.
4. Turn the expander housing in the vise to enable the
abutment tappet to be installed. Fit the dust boot to the
abutment tappet. Grease the inside of the dust boot and
the outside diameter and ramp face of the abutment
tappet with the grease supplied.
5. Insert the abutment tappet assembly into the housing
bore until it engages with the wedge cage and roller,
Figure 19. Install the dust boot to the end of the housing.
6. Smear the o-ring with the grease supplied and fit onto
the roller tappet/piston. Lubricate the piston seal with
new DOT 4 brake fluid and install the seal as shown in
Figure 20, with the lip of the seal facing outward toward
the pressure side. Liberally grease the ramp face and
Page 11

DUST BOOT
FIGURE 21 - WHEEL CYLINDER
SCREW ON FULLY AND UNSCREW ONE
PISTON
COMPLETE TURN
SEAL
12. Install the brake shoes following procedures under Brake
Shoe Installation in this manual. Refer to the vehicle
service manual for procedures to bleed the air from the
brake system. Af ter bleeding, manually readjust the brake
shoe to drum clearance as necessary. Refer to Brake
Shoe Adjustment in this manual.
ASSEMBLE WHEEL CYLINDER UNIT
Use all of the parts supplied in the Bendix repair kit to replace
the old parts removed from the cylinder .
1. Lubricate the piston seal, Figure 15, with new DOT 4
brake fluid and install the seal onto the piston with the
lip facing inwards, Figure 21.
Install the dust boot to the piston and smear the inside
of the dust boot with the grease furnished in the kit.
OVERRIDE
WHEEL
FIGURE 22 - PISTON ADJUSTER
insert the assembly into the bore of the housing until it
engages the wedge cage and rollers, Figure 16. Install
and tighten the stop pin to 16 ft. lbs. (23,3 N.m).
7. Fit the dust boot to the input tappet/piston, lubricate the
piston seal with new DOT 4 brake fluid and install the
seal onto the piston with the lip facing inward, Figure
20. Grease the inside of the dust boot with the grease
supplied and install the input tappet/piston assembly into
the housing bore until it rests on the roller tappet/piston.
Fit the dust boot to the end of the housing.
8. Turn the expander housing in the vise to enable the
wedge return spring to be installed. Locate the spring
ferrule on the spring and compress the spring over the
wedge stem until the pin can be inserted, Figure 16.
Release the spring carefully .
Note: Push in wedge assembly slightly and center it inside
the housing.
9. Install the bleed screw.
10. Install the expander to the backing plate (dirtshield) using
a new gasket, Figure 1, and secure in place with fixing
bolts.
1 1. Refer to the vehicle service manual and stall the parking
brake chamber. Install bridge pipe and hydraulic hose.
RETAINER
RING
GROOVE
IN PISTON
OLD STYLE
OVERRIDE WHEEL
RETAINER RING
GROOVE IN PISTON
HAS BEEN ELIMINATED
NEW STYLE
FIGURE 23 - NEW AND OLD STYLE PIST ON AND OVERRIDE
WHEEL
11
Page 12

LEFT HAND
BRAKE ASSEMBLY
GREEN ON LH
BRAKE YELLOW
ON RH BRAKE
FIGURE 24 - POSITION OF BRAKE SHOE RETURN SPRINGS
RED ON LH &
RH BRAKES
Note: A new design piston may be used to replace the piston
in older style brakes but the override wheel must also
be changed. Although it would be permissible to fit an
old style piston into a new style brake, it would be a
retro-grade step and is not recommended. Ensure that
the tappet head assemblies are located securely on
the piston necks.
IMPORT ANT : Do not turn the manual override wheel.
5. Repeat the above procedure for the other wheel cylinder.
6. Install the wheel cylinder unit to the backing plate
(dirtshield) using a new gasket, Figure 1, and secure in
place with fixing bolts. Install the bridge pipe and
hydraulic brake hose.
7. Install the brake shoes following procedures under Brake
Shoe Installation in this manual. Refer to the vehicle
service manual for procedures to bleed the air from the
brake system. After bleeding, manually readjust the
brake shoe to drum clearance as necessary. Refer to
Brake Shoe Adjustment in this manual.
BRAKE SHOE INSTALLATION
2. Lubricate the adjuster shaft with DOT 4 brake fluid and
screw the adjuster shaft fully into the piston assembly ,
then unscrew one full turn, Figure 22.
3. Install the spring and locator assembly into the adjuster
shaft assembly. Lubricate the piston assembly with new
DOT 4 brake fluid and install the piston assembly into
the cylinder housing. Fit the dust boot onto the housing.
4. Install a new retainer into the override wheel and install
the override wheel and tappet head onto the piston. On
old style A2LS™ drum brakes, the override wheel had an
internal retainer ring which also locates in a groove in
the neck of the piston, Figure 23. The latest override
wheel still uses the retainer ring but it is positioned further
up the override wheel. The groove in the piston neck has
been deleted.
High temperature grease should be used on those external
parts that require lubrication (slots on the pistons and
tappets, and on the steady posts).
Always install new brake shoes in axle sets. When installing
new brake shoes also install new shoe return springs.
1. Lightly smear the abutment ends of the brake shoes
and steady posts with high temperature grease. Keep
the grease away from all hydraulic components and
the shoe linings. Refer to Figure 24 for correct position
of the replacement brake shoes and shoe return springs.
Note: The color of the spring identifies its position in the
brake assembly .
FIGURE 25 - USING TOOL TO A TT ACH SPRING
12
LINING
INSPECTION
HOLE
SPRING TOOL
(REFER
FIGURE 13)
BRAKE LINING
FIGURE 26 - BRAKE SHOE INSPECTION HOLE
Page 13

RED - Park brake expander end on both LH and RH brakes.
GREEN - Wheel cylinder end on LH brakes.
YELLOW - Wheel cylinder end on RH brakes.
2. Remove the elastic bands from around the wheel cylinder
used to retain the pistons for assembly .
3. Push the abutment ends of the brake shoes into the
slots on the piston and tappets.
4. Attach the swan neck end, end opposite the loop in the
spring, of each return spring to the brake shoe web as
shown in Figure 25. Using the tool, Figure 13, hook the
other end of the return spring into the shoe web.
5. Install the brake drums.
6. Repeat with opposite wheel.
7. Ensure that the wedge stem is centralized.
8. Fit spring brake chambers to brakes per vehicle service
manual.
9. If new wheel cylinders or expander units were installed,
or the brake system drained, refer to the vehicle service
manual and bleed the brake system.
BRAKE SHOE ADJUSTMENT
1. Manually adjust both wheel cylinders through the
adjusting holes, Figure 10, until the shoe to drum
clearance is less than .76 mm (.030"). Check the shoe
to drum clearance by using a feeler gauge through the
lining inspection holes, Figure 26.
2. Apply the foot brake pedal to centralize the brake shoes
and release. Recheck the shoe to drum clearance; if
not 0.51 to 0.76 mm (0.020" to 0.030") manually adjust
the wheel cylinder until those dimensions are reached.
3. Replace all rubber grommets previously removed from
the backing plate (dirtshield).
Note: Due to manufacturing tolerances, it is unlikely that all
shoes on an axle will run at the same drum clearances.
No detrimental effects will result from this condition,
and no attempt should be made to standardize the
clearance.
4. Correct and full adjustment will only occur with the drum
rotating; i.e., with the vehicle moving. Pumping the brake
pedal with the vehicle stationary will not achieve proper
adjustment.
5. Refit road wheels.
6. Rotate each wheel to insure that the hydraulicsystem
has fully released parking brakes.
7. Apply parking brake and check that the wheels cannot
be rotated by hand.
8. Jack down vehicle. Run engine and release parking
brakes. Drive vehicle slowly and check service and
parking brakes, finally road test.
FINAL CHECK
IMPORT ANT! PLEASE READ:
Before test driving any vehicle, first check the hydraulic
fluid level in the master cylinder.
1. Check the hydraulic fluid level of the brake master
cylinder. If the fluid level is more than 1/4 inch (6,35 mm)
from the top of the reservoirs, fill the reservoirs with DOT
4 heavy duty hydraulic brake fluid.
2. Depress the brake pedal several times to seat the brake
shoes against the drums. Recheck the fluid level of the
master cylinder reservoirs.
3. Check the brake pedal travel by pushing the brake pedal
as far down as possible. If the brake pedal free play
exceeds recommended dimensions, or brake warning
light is lit, refer to the vehicle service manual.
4. With the vehicle on a level surface in a parking or service
area, start the engine and apply the parking brake; test
for operation.
5. With the vehicle moving at slow speed, make a series of
light snubs and follow with a series of normal service
stops before making a panic stop. Make sure the service
brakes stop the vehicle in an even and straight line,
without any pulling to either side.
6. Accelerate the vehicle to a speed of 20 mph (32 km/h)
then apply the service brakes. A 30 ft. (92,4 m) stop with
the service brake from 20 mph (32 km/h) is recognized
as being satisfactory .
IMPORT ANT : Run engine and release park brake. Wind
the park brake chamber spring release bolts in place
until they bottom firmly in the unit. They should be
torqued to the vehicle manufacturer’s
recommendations.
13
Page 14

DRUM BRAKE TROUBLESHOOTING
SYMPTOM CAUSE REMEDY
1. Low Pedal. 1. Excessive clearance between 1. Adjust brakes.
drums and linings.
2. Automatic adjusters not 2. Make several forward and
working. reverse stops; if pedal does not
come up, repair automatic
adjusters.
3. Bent or distorted brake shoes. 3. Replace shoes and linings in axle
sets.
4. Leak in hydraulic system. 4. Refer to vehicle service manual.
5. Air in hydraulic system. 5. Bleed system; refer to vehicle
service manual.
6. Low brake fluid. 6. Fill master cylinder. If
necessary , bleed system. Refer
to vehicle service manual.
7. Weak brake hoses. 7. Refer to vehicle service manual.
2. S pringy or spongy 1. Bent or distorted brake shoes. 1. Replace shoes and linings in
pedal. axle sets.
2. Shoes not centered in drums. 2. Make certain shoe webs are
seated in tappet or piston slots.
3. Cracked or thin drums. 3. Replace drums in axle sets.
4. Air in hydraulic systems. 4. Bleed system; refer to vehicle
service manual.
5. Weak brake hoses. 5. Refer to vehicle service manual.
6. Drums out of round. 6. Refinish, or replace if wear
exceeds limits.
3. Hard pedal. 1. Grease or brake fluid on linings. 1. Replace grease seal, wheel
cylinder, or exp ander as
necessary . Replace brake shoes
in axle sets.
2. Glazed linings. 2. Sand lining surfaces or replace
shoes and linings in axle sets.
3. Damaged or distorted shoes. 3. Replace brake shoes in axle sets.
4. Scored, barrel-shaped, or 4. Refinish or replace drums in
bell-mounted drums. axle sets.
5. Defective master cylinder or 5. Refer to vehicle service manual.
other brake system components.
4. Grabby brakes. 1. Incorrect or distorted shoes. 1. Replace with correct shoes in
axle sets.
2. Incorrect linings or lining loose 2. Replace with correct shoes
on shoes. in axle sets.
3. Grease or brake fluid on linings. 3. Repair grease seal, wheel
cylinder, or exp ander as
necessary . Replace brake shoes
in axle sets.
4. Shoes not centered in drums. 4. Adjust steady post.
5. Loose or distorted backing plate 5. Tighten or replace backing plate
(dirtshield). (dirtshield).
14
Page 15

DRUM BRAKE TROUBLESHOOTING
SYMPTOM CAUSE REMEDY
6. Scored, hard spotted or out of 6. Refinish or replace drums in
round drums. axle sets.
7. Rough or corroded master 7. Refer to vehicle service manual.
cylinder bore.
8. Binding brake pedal linkage. 8. Refer to vehicle service manual.
9. Faulty power brake unit. 9. Refer to vehicle service manual.
5. V ehicle pulls to one 1. Incorrect or distorted shoes. 1. Replace with correct shoes in
side. axle sets.
2. Incorrect linings or linings loose 2. Replace with correct shoes in
on shoes. axle sets.
3. Grease or brake fluid on linings. 3. Replace grease seal, wheel
cylinder or expander as
necessary . Replace brake shoes
in axle sets.
4. Shoes not centered in drums. 4. Adjust steady post.
5. Loose or distorted backing plate 5. Tighten or replace backing plate
(dirtshield). (dirtshield).
6. Scored, hard spotted, or out of 6. Refinish or replace drums in
round drums. axle sets.
7. Water on linings. 7. Apply brakes several times to
dry linings.
8. Sticking wheel cylinder piston. 8. Replace or repair wheel cylinder.
9. Faulty suspension parts. 9. Refer to vehicle service manual.
6. Noise and chatter . 1. Bent, damaged, or incorrect 1. Replace with correct shoes in
shoes. axle sets.
2. Worn linings. 2. Replace with correct shoes in
axle sets.
3. Broken shoe return spring. 3. Replace shoe return springs.
4. Rough, grooved, or dry shoe 4. Smooth shoe abutment surfaces
abutment surfaces or steady and steady post with emery
post on dirtshield. cloth and lubricate with brake
lubricant.
5. Cracked or threaded drums. 5. Replace drums in axle sets.
7. Pulsating brake 1. Out of round drums. 1. Refinish or replace drums in
pedal. axle sets.
2. Bent axle. 2. Refer to vehicle service manual.
3. Worn or damaged wheel 3. Refer to vehicle service manual.
bearings.
4. Defective master cylinder. 4. Refer to vehicle service manual.
5. Brakes overadjusting. 5. Adjust brake shoes and repair
automatic adjuster if necessary .
8. Decreasing pedal 1. Weak or broken shoe return 1. Replace shoe return springs.
travel. spring.
2. Sticking wheel cylinder piston. 2. Repair or replace defective wheel
cylinder.
15
Page 16

DRUM BRAKE TROUBLESHOOTING
SYMPTOM CAUSE REMEDY
9. One brake drags. 1. Weak or broken shoe return 1. Replace shoe return springs.
spring.
2. Improper brake shoe 2. Adjust brake shoes and repair
adjustment. automatic adjuster if necessary .
3. Defective wheel cylinder. 3. Repair or replace wheel cylinder .
4. Bent or distorted brake shoe. 4. Replace brake shoes in axle sets.
10. Parking brake will 1. Defective expander unit. 1. Repair or replace expander unit.
not engage.
2. Binding wedge assembly. 2. Repair or replace wedge.
3. Parking brake actuator not 3. Refer to vehicle service manual.
working.
16
BW1601 © 2004 Bendix Commercial Vehicle Systems LLC All rights reserved. 6/2004 Printed in U.S.A.
 Loading...