

Page 1

Technical Bulletin
Bulletin No: Effective Date: Cancels: Page: 1 of
Subject:
This bulletin is in reference to Bendix® BA-921® and BA-922® compressors installed on Detroit Diesel DD15™
and DD13™ engines. These compressors contain an Energy Saving System (ESS) within the cylinder head
that may require servicing while the compressor is still covered under warranty. The life expectancy of the
ESS varies according to the vehicle vocation and duty cycle. High air usage systems will result in reduced
life of the compressor ESS. In such cases, the ESS can be diagnosed for leakage and replaced if necessary .
This bulletin details the proper diagnostic and replacement procedures for the ESS. Failure to follow these
procedures may result in a denied warranty claim if the ESS portion of the compressor, submitted
for warranty consideration, is deemed causal. Note that if excessive carbon is present in the discharge
fi tting of the compressor, with a fi lm greater than 10% of the inside diameter, the entire compressor should
be replaced.
If the nature of the compressor issue, or complaint, is any of the following; the ESS is the likely source
(assuming that checks for other system malfunctions have been carried out).
(A) ESS leaking when pressurized (D) Compressor not unload
(B) Compressor safety valve popping off (E) System will not build air pressure
(C) Air dryer purge valve and compressor (F) System slow to build
cycling rapidly (G) Compressor leaking air
TCH-001-060
1-13-2011
ESS REPLACEMENT FOR BENDIX® BA-921® & BA-922® COMPRESSORS - REVISED
Closed Room Compressor Typical System
TCH-001-060 dated 12-2-2010
4
Governor Unloader
Por t
Governor
Reservoir Port
Compressor
DIAGNOSING THE UNLOADER SYSTEM FOR PROPER OPERATION AND PRESSURE SETTING
When performing any service, be sure to follow all safety guidelines outlined in the BA-921
compressor service data sheets, SD-01-690 or SD-01-700, or instruction sheet as applicable.
1. Using shop air, pressurize the unloader line to 120 psi and check for leaks in this line. Remove the air
pressure and ensure the unloader line is properly seated in the governor fi tting. Using shop air, check the
unloader line, again, for leaks. If there are no leaks, return the vehicle to service. If a leak is still present,
go to step 2.
2. Remove the compressor from the vehicle and closely inspect for any non-ESS related issues. If there are
non-ESS issues, submit the compressor for warranty consideration.
3. If there aren’t any obvious non-ESS related issues, service the ESS using the ESS service replacement
kit as outlined in this bulletin.
Air Dryer
Purge Valve
Cycling
Supply
Reservoir
®
or BA-922®
Continued...
Page 2
Bulletin No: Page: 2 of
TCH-001-060
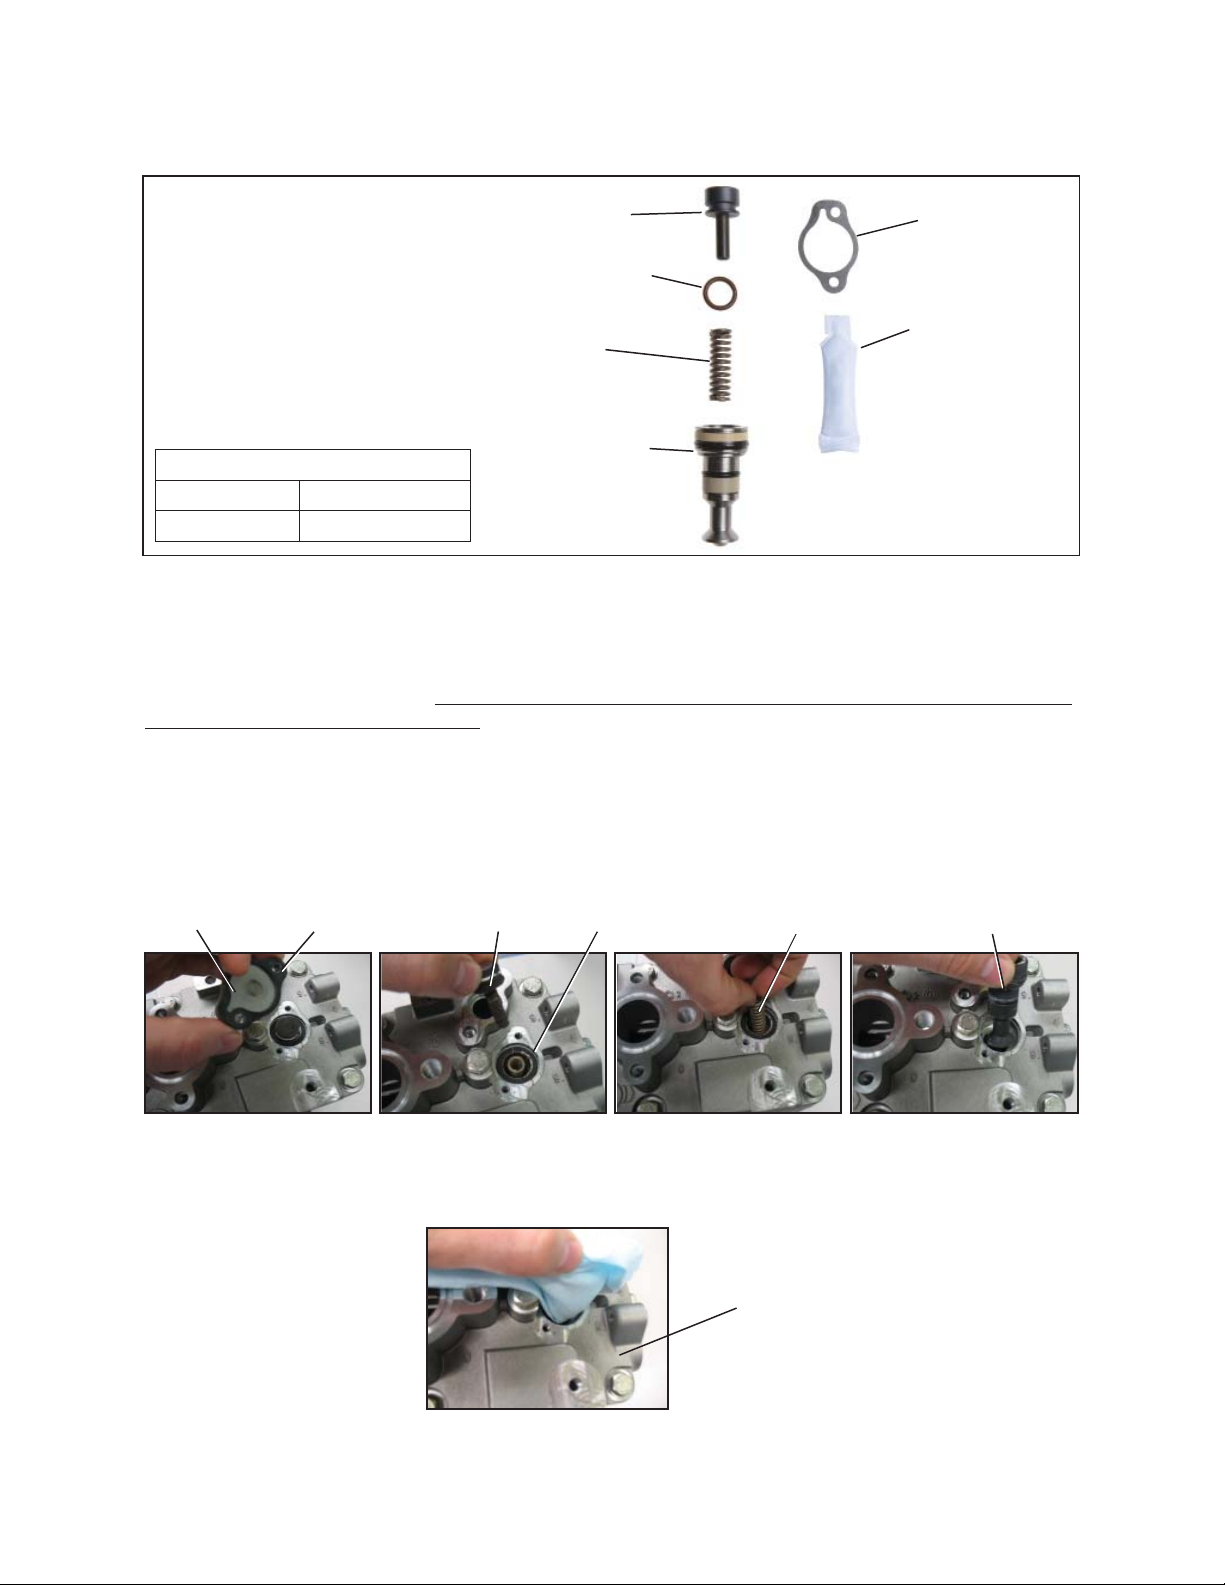
ESS SERVICE REPLACEMENT KIT CONTENTS
4
Balance Piston
Balance Piston O-ring
Spring
ESS Piston Assembly
Gasket
Lubricant
ESS Kit Part Nos
Bendix Detroit Diesel
K046477 A000 130 5819
THE FOLLOWING GUIDELINES ARE FOR REFERENCE. THE ESS SERVICE REPLACEMENT KIT
CONT AINS ADDITIONAL INSTRUCTIONS.
ESS REMOVAL AND CLEANING
Refer to the illustrations below. If the compressor being serviced is under warranty, retain the removed
components for warranty consideration.
Note: The Bendix
®
BA-922® compressor uses two ESS assemblies. Perform steps 1 through 3 for each
ESS assembly.
1. Using a T25 Torx head screwdriver, remove the ESS cover plate screws and ESS cover plate from the
compressor cylinder head.
2. Remove the balance piston, balance piston o-ring, spring, and ESS piston assembly from the cylinder
head.
Cover Plate
Gasket
Balance Piston
Balance Piston O-ring
Spring
ESS Piston Assembly
3. Thoroughly clean the cylinder head and ESS cover plate; removing all dirt, carbon, grease, gasket materials
and any foreign matter from the ESS piston cavity.
.
Cylinder Head
Page 3

Bulletin No: Page: 3 of
TCH-001-060
4
ESS INSTALLATION
Use the entire contents of this kit and only use the lubricant provided. Proper lubrication is extremely important
in the installation and the entire tube of lubricant must be used. Use the illustrations provided with each
step as a guide.
1. Lubricate the balance piston as shown. Be sure to thoroughly lubricate the o-ring groove.
Balance Piston
Balance Piston
Properly Lubricated
2. Lubricate the balance piston o-ring and install it on the balance piston. Be sure to not twist or tear the
o-ring during installation.
Balance Piston O-ring
3. Lubricate the entire ESS piston assembly as shown below.
ESS Piston Assembly
4. Insert the spring into the ESS piston assembly housing.
ESS Piston Assembly
O-ring Installed on the
Balance Piston
ESS Piston Assembly
Properly Lubricated
Spring
ESS Piston Assembly
with Spring
Page 4

Bulletin No: Page: 4 of
TCH-001-060
4
5. Slide the stem of the balance piston in the inside diameter of the spring as shown below.
Spring
Balance Piston
and O-ring
ESS Assembly
6. Install the ESS assembly into the compressor cylinder head as shown in the following illustrations. If
additional lubricant is available in the tube, add it to the outside of the ESS assembly before installation.
ESS Piston
Assemby
ESS Port
7. Install the new gasket on the boss of the ESS port, aligning the gasket with the boss contours and holes.
Place the cover plate over the gasket and secure it to the cylinder head with the two T25 Torx head screws
that were previously removed. While pushing down on the cover, tighten the screws manually with a
screw driver. Once the screws can’t be turned further, use a torque-meter to achieve the recommended
tightening torque of 7 ± 1.5 Nm.
Gasket
Torx Head
Screws
Cover Plate
8. If servicing a BA-922
®
compressor, repeat steps 1 through 7 for the installation of the second ESS assembly .
9. Reinstall the compressor on the vehicle. Refer to the service data sheet for additional guidelines and
compressor test procedures.
10. If the compressor is under warranty , submit the removed components for warranty consideration following
your normal warranty processes.
For additional assistance call
contact the Bendix Tech Team @
1-800-AIR-BRAKE
(1-800-247-2725)
or TechT eam@Bendix.com
© 2011 Bendix Commercial Vehicle Systems LLC, a member of the Knorr-Bremse Group • All rights reserved • 1/2011 Printed in U.S.A.
 Loading...