

Bender ISOMETER IRDH575 User Manual
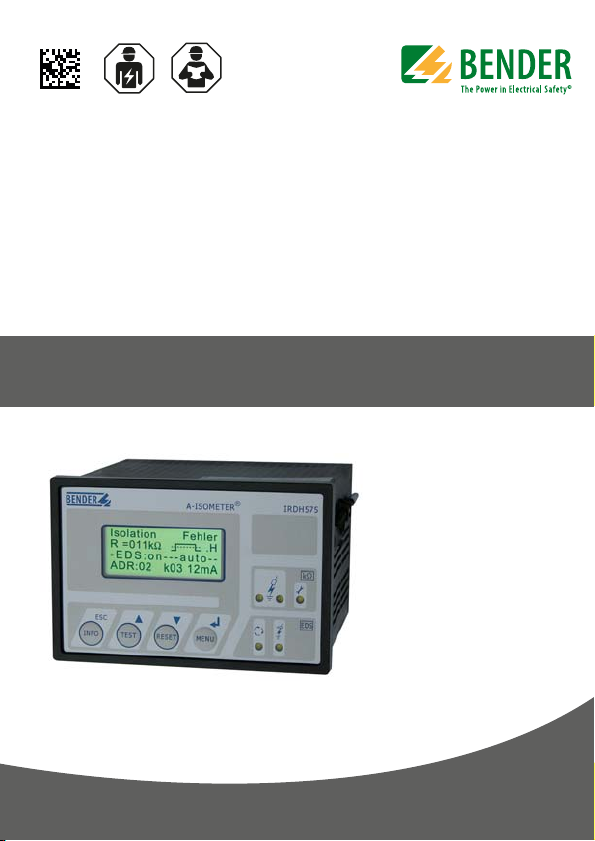
ISOMETER® IRDH575
Insulation monitoring device for IT AC and DC systems with integrated test generator and controller
for EDS46..., EDS47... and EDS49... systems
Software version: D0185 V1.80
IRDH575_D00089_05_M_XXEN/01.2020
Manual EN

Table of Contents
1. Important information .................................................................................... 8
1.1 How to use this manual ................................................................................. 8
1.2 Technical support: service and support ................................................... 9
1.2.1 First level support ............................................................................................. 9
1.2.2 Repair service ..................................................................................................... 9
1.2.3 Field service ..................................................................................................... 10
1.3 Training courses ............................................................................................. 10
1.4 Delivery conditions ....................................................................................... 10
1.5 Inspection, transport and storage ........................................................... 11
1.6 Warranty and liability ................................................................................... 11
1.7 Disposal ............................................................................................................ 12
2. Safety instructions ......................................................................................... 13
2.1 General safety instructions ........................................................................ 13
2.2 Work activities on electrical installations ............................................. 13
2.3 Device-specific safety information ......................................................... 14
2.4 Use for the intended purpose ................................................................... 16
3. Function ........................................................................................................... 17
3.1 General characteristics ................................................................................ 17
3.2 Essential functions of the ISOMETER® .................................................... 17
3.3 Essential functions of the Insulation fault location system (EDS) 18
3.4 Product description ...................................................................................... 18
3.5 Function ............................................................................................................ 19
3.5.1 Current output for external measuring instrument ......................... 20
3.5.2 Real-time clock ............................................................................................... 20
3.5.3 Insulation fault location .............................................................................. 20
3.5.4 Interconnected systems ............................................................................. 21
IRDH575_D00089_05_M_XXEN/01.2020
3

Table of Contents
3.5.5 Function input F1/F2 for connection or disconnection of IT systems
being monitored ........................................................................................... 22
3.5.6 ISOnet function for central control of the insulation monitoring
process when several IRDH575 are interconnected in IT systems ....
24
3.5.7 Self test .............................................................................................................. 26
3.5.8 Relay K3: device fault alarm and EDS common message ............... 28
4. Connection ..................................................................................................... 29
5. Commissioning flow chart ........................................................................... 33
5.1 Commissioning of the ISOMETER® function range (1) ..................... 33
5.2 Commissioning of the insulation fault location function (EDS) (1) ...
35
6. Operation and setting .................................................................................. 38
6.1 Operating features and displays IRDH575 ........................................... 38
6.1.1 Display in case of active EDS and detected fault ............................... 40
6.1.2 Display in the menu mode ......................................................................... 41
6.1.3 Function keys .................................................................................................. 41
6.2 Menu structure and menu mode ............................................................ 44
6.2.1 Diagram menu structure ............................................................................ 46
6.3 HISTORY INFO menu .................................................................................... 48
6.3.1 Diagram HISTORY INFO ............................................................................... 49
6.4 ISO SETUP menu: Setting of the basic ISOMETER® functions ........ 50
6.4.1 Response values Alarm 1 and Alarm 2 ................................................... 50
6.4.2 Starting the EDS system via the response values ALARM 1 and
ALARM 2 ........................................................................................................... 50
6.4.3 Operating principle of the alarm relays ................................................ 51
6.4.4 Memory setting (on/off) .............................................................................. 53
6.4.5 Current output for external measuring instruments ........................ 54
6.5 ISO ADVANCED menu: Setting of the extended functions ............ 55
6.5.1 External coupling device (AGH: no = factory setting) ..................... 55
6.5.2 Selecting the system leakage capacitance range .............................. 55
4
IRDH575_D00089_05_M_XXEN/01.2020

Table of Contents
6.5.3 Changing the measuring principle from AMP to DC
(Measure: AMP) .............................................................................................. 55
6.5.4 Setting the repetition time for automatic self tests
(Autotest: 24h) ................................................................................................ 55
6.5.5 Setting the real-time clock (Clock) .......................................................... 55
6.5.6 Setting the date (Date) ................................................................................ 56
6.5.7 Specifying the starting time of the automatic self test (Test) ....... 56
6.5.8 Diagram ISO ADVANCED ............................................................................ 57
6.6 EDS-SETUP menu: Settings for fault location ...................................... 58
6.6.1 EDS auto / on / off / pos / 1cycle ............................................................. 58
6.6.2 Diagram EDS-SETUP ..................................................................................... 59
6.6.3 System DC / 1 AC / 3 AC .............................................................................. 60
6.6.4 maxPuls 1 / 2.5 / 10 / 25 / 50 mA: ............................................................ 60
6.6.5 K3 alarm: ON ................................................................................................... 63
6.7 EDS460/490 menu ........................................................................................ 63
6.7.1 General .............................................................................................................. 63
6.7.2 Channel ............................................................................................................. 64
6.7.3 Relay ................................................................................................................... 67
6.7.4 EDS Test ............................................................................................................ 68
6.7.5 EDS Reset .......................................................................................................... 68
6.7.6 Diagram EDS46… /49… with Relay, EDS-Test and EDS-Reset ..... 69
6.8 EDS 470 menu ................................................................................................ 70
6.8.1 EDS Monitor .................................................................................................... 70
6.8.2 EDS Test ............................................................................................................ 70
6.8.3 EDS Reset .......................................................................................................... 70
6.8.4 Details about the menu points Relay, Memory and n-peak .......... 71
6.8.5 Diagram EDS 470 ........................................................................................... 72
6.8.6 Relay ................................................................................................................... 73
6.8.7 Memory ............................................................................................................ 73
6.8.8 CT Setup: .......................................................................................................... 73
6.8.9 n-peak: ............................................................................................................... 74
6.9 COM SETUP menu: Setting the BMS interface .................................... 75
IRDH575_D00089_05_M_XXEN/01.2020
5

Table of Contents
6.9.1 Bus address (Addr: ) ................................................................................... 75
6.9.2 ISO Monitor ...................................................................................................... 75
6.9.3 ISOnet ................................................................................................................ 76
6.9.4 Diagram COM SETUP ................................................................................... 76
6.10 PASSWORD menu ......................................................................................... 77
6.10.1 Activating and setting the password ..................................................... 77
6.10.2 Diagram PASSWORD .................................................................................... 77
6.11 Menu LANGUAGE ......................................................................................... 78
6.11.1 Setting the national language .................................................................. 78
6.11.2 Diagram Language ....................................................................................... 78
6.12 Menu SERVICE ................................................................................................. 79
6.13 Parameterization via Internet ................................................................... 79
7. Serial interfaces ............................................................................................. 80
7.1 RS-485 interface with BMS protocol ....................................................... 80
7.2 Topology RS-485 network .......................................................................... 81
7.2.1 Correct arrangement ................................................................................... 81
7.2.2 Wrong arrangement ..................................................................................... 81
7.2.3 Wiring ................................................................................................................ 81
7.3 BMS protocol (BMS) ...................................................................................... 82
7.3.1 BMS Master ...................................................................................................... 82
7.3.2 BMS-Slave ......................................................................................................... 83
7.3.3 BMS operation in the Standby mode ..................................................... 84
7.3.4 Combination with EDS46… devices ...................................................... 86
7.3.5 Commissioning of an RS-485 network with BMS protocol ............ 87
8. Factory settings ............................................................................................. 89
6
IRDH575_D00089_05_M_XXEN/01.2020

Table of Contents
9. Technical data IRDH575 ................................................................................ 91
9.1 Data in tabular form ..................................................................................... 91
9.2 Standards, approvals and certifications ................................................ 95
9.3 Characteristic curves .................................................................................... 96
9.3.1 Characteristic curves of the ISOMETER® ................................................ 96
9.3.2 Characteristic curves of the insulation fault locators EDS46… /
EDS49… .......................................................................................................... 100
9.3.3 Characteristic curves for the insulation fault location system
EDS470 ............................................................................................................ 102
9.4 Ordering details ........................................................................................... 111
9.4.1 Standard version ......................................................................................... 111
9.4.2 Protection against dust and moisture ................................................. 112
9.4.3 Adaptor for rail mounting ........................................................................ 112
9.4.4 Measuring instruments ............................................................................. 112
IRDH575_D00089_05_M_XXEN/01.2020
7
1. Important information
1.1 How to use this manual
This manual is intended for qualified personnel working in
electrical engineering and electronics!
Always keep this manual within easy reach for future reference.
To make it easier for you to understand and revisit certain sections in this manual, we have used symbols to identify important instructions and information.
The meaning of these symbols is explained below:
This signal word indicates that there is a high risk of danger
that will result in electrocution or serious injury if not
avoided.
This signal word indicates a medium risk of danger that
can lead to death or serious injury if not avoided.
This signal word indicates a medium risk of danger that
can lead to death or serious injury if not avoided.
This symbol denotes information intended to assist the user
in making optimum use of the product.
8
IRDH575_D00089_05_M_XXEN/01.2020

Important information
1.2 Technical support: service and support
For commissioning and troubleshooting Bender offers you:
1.2.1 First level support
Technical support by phone or e-mail for all Bender products
Questions concerning specific customer applications
Commissioning
Troubleshooting
Telephone: +49 6401 807-760*
Fax: +49 6401 807-259
In Germany only: 0700BenderHelp (Tel. and Fax)
E-mail: support@bender-service.de
1.2.2 Repair service
Repair, calibration, update and replacement service for Bender products
Repairing, calibrating, testing and analysing Bender products
Hardware and software update for Bender devices
Delivery of replacement devices in the event of faulty or incorrectly
delivered Bender devices
Extended guarantee for Bender devices, which includes an in-house
repair service or replacement devices at no extra cost
Telephone: +49 6401 807-780** (technical issues)
+49 6401 807-784**, -785** (sales)
Fax: +49 6401 807-789
E-mail: repair@bender-service.de
Please send the devices for repair to the following address:
Bender GmbH, Repair-Service,
Londorfer Str. 65,
35305 Grünberg
IRDH575_D00089_05_M_XXEN/01.2020
9

Important information
1.2.3 Field service
On-site service for all Bender products
Commissioning, configuring, maintenance, troubleshooting of Bender
products
Analysis of the electrical installation in the building (power quality test,
EMC test, thermography)
Training courses for customers
Telephone: +49 6401 807-752**, -762 **(technical issues)
+49 6401 807-753** (sales)
Fax: +49 6401 807-759
E-mail: fieldservice@bender-service.de
Internet: www.bender-de.com
*Available from 7.00 a.m. to 8.00 p.m. 365 days a year (CET/UTC+1)
**Mo-Thu 7.00 a.m. - 8.00 p.m., Fr 7.00 a.m. - 13.00 p.m
1.3 Training courses
Bender is happy to provide training regarding the use of test equipment.
The dates of training courses and workshops can be found on the Internet at
www.bender-de.com -> Know-how -> Seminars.
1.4 Delivery conditions
Bender sale and delivery conditions apply.
For software products the "Softwareklausel zur Überlassung von StandardSoftware als Teil von Lieferungen, Ergänzung und Änderung der Allgemeinen
Lieferbedingungen für Erzeugnisse und Leistungen der Elektroindustrie"
(software clause in respect of the licensing of standard software as part of deliveries, modifications and changes to general delivery conditions for products and services in the electrical industry) set out by the ZVEI (Zentralverband
Elektrotechnik- und Elektronikindustrie e. V.) (German Electrical and Electronic Manufacturer's Association) also applies.
10
IRDH575_D00089_05_M_XXEN/01.2020

Important information
Sale and delivery conditions can be obtained from Bender in printed or electronic format.
1.5 Inspection, transport and storage
Inspect the dispatch and equipment packaging for damage, and compare the
contents of the package with the delivery documents. In the event of damage
in transit, please contact Bender immediately.
The devices must only be stored in areas where they are protected from dust,
damp, and spray and dripping water, and in which the specified storage temperatures can be ensured.
1.6 Warranty and liability
Warranty and liability claims in the event of injury to persons or damage to
property are excluded if they can be attributed to one or more of the following causes:
Improper use of the device.
Incorrect mounting, commissioning, operation and maintenance of the
device.
Failure to observe the instructions in this operating manual regarding
transport, commissioning, operation and maintenance of the device.
Unauthorised changes to the device made by parties other than the
manufacturer.
Non-observance of technical data.
Repairs carried out incorrectly and the use of replacement parts or
accessories not approved by the manufacturer.
Catastrophes caused by external influences and force majeure.
Mounting and installation with device combinations not recom-
mended by the manufacturer.
This operating manual, especially the safety instructions, must be observed by
all personnel working on the device. Furthermore, the rules and regulations
that apply for accident prevention at the place of use must be observed.
IRDH575_D00089_05_M_XXEN/01.2020
11

Important information
1.7 Disposal
Abide by the national regulations and laws governing the disposal of this device. Ask your supplier if you are not sure how to dispose of the old equipment.
The directive on waste electrical and electronic equipment (WEEE directive)
and the directive on the restriction of certain hazardous substances in electrical and electronic equipment (RoHS directive) apply in the European Community. In Germany, these policies are implemented through the "Electrical and
Electronic Equipment Act" (ElektroG). According to this, the following applies:
Electrical and electronic equipment are not part of household waste.
Batteries and accumulators are not part of household waste and must
be disposed of in accordance with the regulations.
Old electrical and electronic equipment from users other than private
households which was introduced to the market after 13 August 2005
must be taken back by the manufacturer and disposed of properly.
For more information on the disposal of Bender devices, refer to our
homepage at www.bender-de.com -> Service & support.
12
IRDH575_D00089_05_M_XXEN/01.2020

2. Safety instructions
2.1 General safety instructions
Part of the device documentation in addition to this manual is the enclosed
"Safety instructions for Bender products".
2.2 Work activities on electrical installations
Only qualified personnel are permitted to carry out the
work necessary to install, commission and run a device or
system.
Risk of electrocution due to electric shock!
Touching live parts of the system carries the risk of:
An electric shock
Damage to the electrical installation
Destruction of the device
Before installing and connecting the device, make sure
that the installation has been de-energised. Observe the
rules for working on electrical installations.
If the device is used outside the Federal Republic of Germany, the applicable
local standards and regulations must be complied with. The European standard EN 50110 can be used as a guide.
IRDH575_D00089_05_M_XXEN/01.2020
13
2.3 Device-specific safety information
Children and unauthorised persons must not have access to
or contact with the ISOMETER®.
Make sure that the operating voltage is correct!
Prior to insulation and voltage tests, the ISOMETER® must be
disconnected from the IT system for the duration of the test.
In order to check the correct connection of the device, a
functional test has to be carried out before starting the
system.
Make sure that the basic settings meet the requirements of
the IT system.
In the event of an alarm message of the ISOMETER®, the
insulation fault should be eliminated as quickly as possible.
If the ISOMETER® is installed inside a control cabinet, the
insulation fault message must be audible and/or visible to
attract attention.
Safety instructions
14
IRDH575_D00089_05_M_XXEN/01.2020

Safety instructions
When using ISOMETER®s in IT systems, make sure that only
one active ISOMETER® is connected in each interconnected
system. If IT systems are interconnected via coupling
switches, make sure that ISOMETER®s not currently used are
disconnected from the IT system and deactivated. IT systems
coupled via diodes or capacitances may also influence the
insulation monitoring process so that a central control of the
different ISOMETER®s is required.
Prevent measurement errors!
When a monitored IT system contains galvanically coupled
DC circuits, an insulation fault can only be detected correctly
if the rectifier valves (e.g. rectifier diode, thyristors, IGBTs,
frequency inverters, …) carry a minimum current of > 10 mA.
Unspecified frequency range
When connecting to an IT system with frequency
components below the specified frequency range, the
response times and response values may differ from the
indicated technical data. However, depending on the
application and the selected measurement method,
continuous insulation monitoring is also possible in this
frequency range.
There is no influence on the insulation monitoring for IT
systems with frequency components above the specified
frequency range, e.g. within the range of typical switching
frequencies of frequency inverters (2…20 kHz).
IRDH575_D00089_05_M_XXEN/01.2020
15

Safety instructions
2.4 Use for the intended purpose
The ISOMETER® is exclusively intended for:
monitoring the insulation resistance of IT systems and
localization of insulation faults in combination with insulation fault
evaluators EDS4…
In order to meet the requirements of the applicable standards, customised parameter settings must be made on the equipment in order to adapt it to local
equipment and operating conditions. Please heed the limits of the range of
application indicated in the technical data.
Any use other than that described in this manual is regarded as improper.
16
IRDH575_D00089_05_M_XXEN/01.2020

3. Function
AMP
Plus
3.1 General characteristics
Four-line LC display
Automatic device self-test
Memory with real-time clock to store all alarm messages with date and
time stamp
RS-485 interface (BMS protocol) for data exchange with other Bender
devices (RS-485 electrically isolated)
Remote setting of certain parameters via the Internet (option;
FTC470XET additionally required)
Option "W":
Improved shock and vibration resistance for use in ships, on rolling
stock and in seismic environment.
3.2 Essential functions of the ISOMETER®
ISOMETER® for IT AC systems with galvanically connected rectifiers and
for IT DC systems (isolated power)
Automatic adaptation to the existing system leakage capacitances
measuring principle (European Patent: EP 0 654 673 B1)
Two adjustable response values in the range 1 kΩ …10 MΩ (Alarm 1/
Alarm 2)
Connection monitoring
Internal disconnection of the ISOMETER® from the IT system to be mon-
itored (using a control signal; terminals F1/F2) , e.g. if several
ISOMETER®s are interconnected.
Current output 0(4)…20 mA (galvanically separated) in relation to the
measured insulation value.
IRDH575_D00089_05_M_XXEN/01.2020
17

Function
3.3 Essential functions of the Insulation fault location system (EDS)
Generation of the test current necessary for selective insulation fault
location
Indication of the insulation faults selectively localized by the EDS4…
systems
Parameterization of EDS4… systems
Test function for EDS4… systems, incl. the connected measuring cur-
rent transformers.
3.4 Product description
The IRDH575 ISOMETER® monitors the insulation resistance of IT systems. It is
suitable for universal use in 3NAC, AC/DC and DC systems. AC systems may include extensive DC supplied loads, such as converters or thyristor-controlled
DC drives. The device automatically adapts itself to the existing system leakage capacitance.
The IRDH575 ISOMETER® is fitted into an enclosure for panel mounting,
144 x 96 mm (WxH). For protection against dust and moisture, a panel seal
(IP42) or a front-face transparent cover (IP65) are available as accessories, see
page 112.
The IRDH575 can be used in combination with a control and indicating device,
PRC1470 version 2 or higher, for example, on the BMS (BMS = Bender Measuring Device Interface) bus.
18
IRDH575_D00089_05_M_XXEN/01.2020

Function
AMP
Plus
3.5 Function
The IRDH575 ISOMETER® is connected between the unearthed system and the
protective conductor (PE).
The response values and other function parameters are set via the function keys.
The parameters are indicated on the LC display and are stored in a non-volatile memory (EEPROM) after the setting is completed.
A microprocessor-controlled pulsating AC measuring voltage is superimposed on the system ( measuring principle*). The measuring cycle
consists of positive and negative pulses of the same amplitude. The period depends on the respective system leakage capacitances and the insulation resistance of the system to be monitored.
An insulation fault between system and earth closes the measuring circuit.
From the measured current value, the microprocessor calculates the insulation resistance which is indicated on the LC display or the external kΩ measuring instrument.
Prevent measurement errors!
When an AC system includes galvanically connected DC
circuits, the following shall be considered:
Insulation faults in DC circuits can only be monitored
correctly when the rectifiers carry a continuous load of at
least 5…10 mA.
The measuring time is determined by the system leakage capacitances, the insulation resistance, and the system-related interference disturbances. System
leakage capacitances do not influence the measuring accuracy.
If the reading is below the selected response values ALARM1/ALARM2, the associated alarm relays respond and the alarm LEDs "ALARM1/2" light up and
the measuring value is indicated on the LC display (in the event of DC insulation faults, the faulty supply line is indicated). The fault indication can be
stored by bridging the terminals R1/R2 (external RESET button [NC contact])
or by setting the fault memory to "Memory:on" in the "ISO SETUP" menu.
Pressing the external or internal RESET button, resets the fault message, provided that the insulation resistance is at least 25 % above the preset value.
IRDH575_D00089_05_M_XXEN/01.2020
19

Function
AMP
Plus
R1/R2 bridged + Memory: on fault memory activated
R1/R2 bridged + Memory: off fault memory activated
R1/R2 not connected + Memory: on fault memory activated
R1/R2 not connected + Memory: off fault memory deactivated
*) measuring principle "adaptive measuring pulse", a measuring
principle developed by Bender.
3.5.1 Current output for external measuring instrument
The current output of IRDH575 provides 0(4)…20 mA. The current output is
electrically isolated from the device electronics and the RS-485 interface. The
ISO SETUP menu, on page 54, allows to switch over between 0…20 mA and
4…20 mA.
3.5.2 Real-time clock
The real-time clock serves as a time base for the historical memory and self
test function. At first the correct time and date must be set in the menu
"ISO ADVANCED". If time and date are not set, a "C" (clock) is flashing in the
standard display. In the event of a supply voltage failure, time and dat e will be
st ored for thir ty d ays. If t he 24 h se lf test is activated in the ISO ADVANCED menu, a special time of day can be selected for the execution of the self test in the
menu "TEST: 12:00". Then a self test will be started automatically once a day
exactly at the preset time. If the 1 h test has been selected, the self test is automatically carried out every full hour.
3.5.3 Insulation fault location
Another function of the IRDH575 is selective insulation fault location. If the value of the insulation resistance falls below the set response values ALARM 1
and ALARM 2, a certain test current is generated by the IRDH575. The maximum value of the test current is determined by the maxPuls parameter, see
page 60. In combination with an insulation fault evaluator EDS47…and the
associated measuring current transformers connected to it, the insulation
fault is selectively detected. The detected insulation fault is signalled to the
20
IRDH575_D00089_05_M_XXEN/01.2020

Function
IRDH575 via the RS-485 interface (BMS protocol) and is then indicated by an
alarm LED and indicated on the display. In the Master mode (Addr. 1), this
alarm message is indicated by the alarm relay K3 as common alarm.
During the insulation fault location process the insulation monitoring function is deactivated. If the test current falls below the value the EDS4… is capable of measuring, the insulation fault location process will be stopped by
IRDH575.
Risk of malfunctions due to excessive locating current
on sensitive system parts!
An excessive locating current flowing be tween the IT system
and earth may cause controller faults in sensitive system
parts, such as the PLC or the relay. Ensure that the level of
the locating current is compatible with the system to be
monitored.
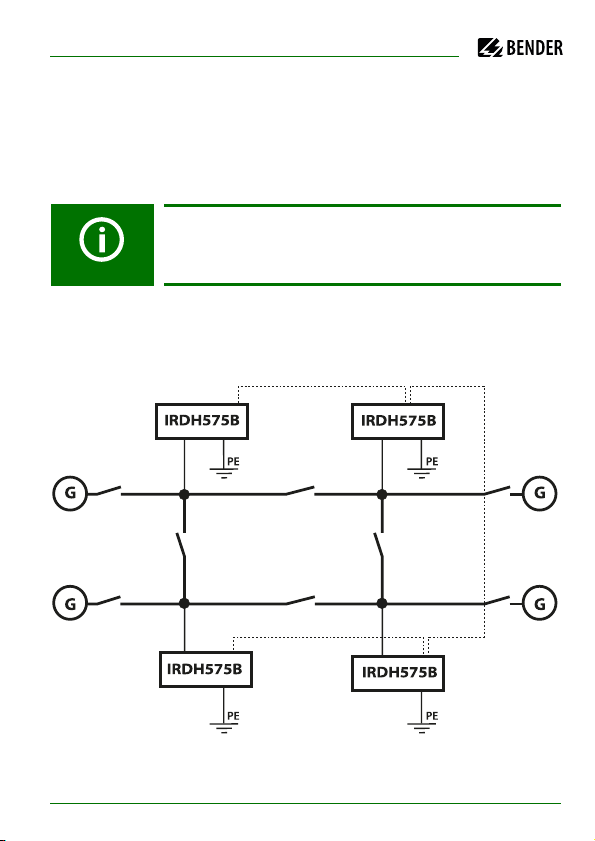
3.5.4 Interconnected systems
When using ISOMETER®s in IT systems care shall be taken that only one active
ISOMETER® is connected in each interconnected system. If IT systems are
interconnected via coupling switches, make sure that ISOMETER®s not currently used are disconnected and deactivated via a control system. IT systems
coupled via diodes or capacitances may also influence the insulation monitoring process. Hence, also in this case a central control of the different
ISOMETER®s is required.
IRDH575_D00089_05_M_XXEN/01.2020
21

Function
3.5.5 Function input F1/F2 for connection or disconnection of IT
systems being monitored
The ISOMETER® can be disconnected from the IT system and set to STANDBY
mode with the function input F1/F2. When the input F1/F2 is bridged, the terminals L1/L2 are isolated from the measuring circuit via internal coupling relays and terminal L3 remains c onnected to the measuring circuit via a resistor
of 10 MΩ. The measuring function is stopped and the message „STANDBY“ appears on the display. When using software version 1.4 or higher, the latest
measured insulation resistance is blanked and the value > 10 MΩ appears on
the display. Furthermore, the alarm relays and alarm LEDs no longer provide
alarm messages. Insulation faults already detected will be indicated by all
EDS4…devices.
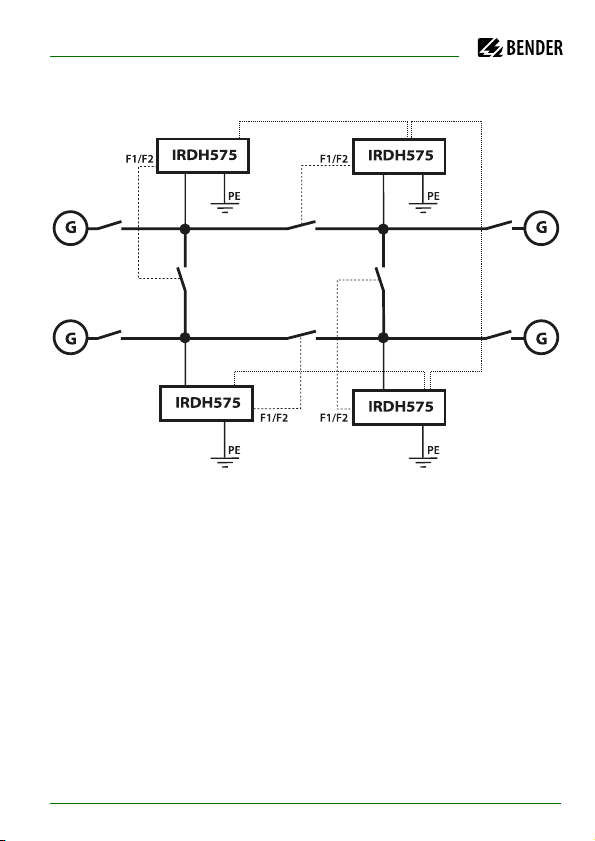
After opening the function input F1/F2, first of all the connection to the IT system will be restored and a completely new measuring cycle for insulation monitoring will be started. Using this function, selective disconnection of an
IRDH575 in interconnected IT systems can be carried out via auxiliary contacts
of the respective coupling switch. One coupling switch each in a line-type or
ring-type arrangement can deactivate a subsequent IRDH575. This arrangement guarantees that only one ISOMETER® is active in each galvanically connected IT system.
Theoretically speaking, in a ring-type arrangement with all coupling switches
closed, all ISOMETER®s would be deactivated. In order to prevent this, a BMS
Master (IRDH575 Adr1) monitors the condition of the function input F1/F2 of
all Slave ISOMETER®s.
When all Slave ISOMETER®s are in the STANDBY mode, the insulation monitoring function of the Master ISOMETER® remains active, that means, the input
F1/F2 of the Master is without function in this mode.
22
IRDH575_D00089_05_M_XXEN/01.2020
Function
BMS bus (A/B, RS485)
addr. 1 addr. 2
IT system 1
IT system 4 IT system 3
addr. 4 addr. 3
IT system 2
Example:
Let as assume, in the before-mentioned ring-type arrangement, the associated coupling switch of the Slave ISOMETER® 2 were open. The coupling switches of the BMS Master (Addr. 1) and of the Slaves 3 and 4 were closed. In this
case the ISOMETER® and EDS functions of the Master and the Slaves 3 and 4
would be deactivated. In spite of changing to the STANDBY mode, the Master
status of the device with address 1 would remain. That means, if a parameterization is necessary, it has to be carried out via the IRDH575 with BMS
address 1.
IRDH575_D00089_05_M_XXEN/01.2020
23

Function
3.5.6 ISOnet function for central control of the insulation
monitoring process when several IRDH575 are
interconnected in IT systems
Up to 30 ISOMETER® can communicate with each other i n an ISOnet network.
The ISOnet network can only be activated when a BMS bus is used for interconnection. A typical method with four devices is shown as an example. The
ISOnet function of all ISOMETER® in the ISOnet network must be activated in
the COM SETUP „ISOnet=ON“ menu, refer to page 76.
The BMS master (BMS address 1) with activated ISOnet function controls
the ISOnet slave devices via the BMS bus.
Address 1 must not be assigned to another BMS device on the respective BMS
bus.
When the master ISOMETER® has finished one measuring cycle, the authorization for insulation monitoring is passed on to the next higher BMS address.
This authorization is returned by the slave with the highest BMS address to the
BMS master after a cycle has been completed.
During the insulation monitoring process, all other ISOMETER®, are in the
STANDBY mode. In this way it is prevented that ISOMETER®s influence each
other in interconnected IT systems.
At f = 50Hz and C
12 s and then changes to the STANDBY mode. The maximum response time of
the ISOnet device that made the last measurement, will be extended by the
number of devices x 12s, in our example 48s.
When an insulation fault is detected by an ISOMETER®, the insulation fault location process is started. The device stays in the measuring mode during this
time. Only after completion of insulation fault location, the ISOnet device
stops the monitoring mode and passes the authorization for insulation monitoring on to the next device.
In the STANDBY mode, the ISOnet device displays the last measured insulation resistance.
= 1 µF, an ISOnet device stays in the measuring mode for
e
24
IRDH575_D00089_05_M_XXEN/01.2020
Function
Each ISOnet slave checks the network for an ISOnet master. If there is no master available, the display will show the fault message “ISOnet Master?“ after
approximately 1 hour. Additionally, the LED for device errors lights and the
Relay K3 switches. With the ISOnet function activated, the function input
F1/F2 is automatically deactivated.
All EDS devices in the IT systems being monitored must be
operated with activated fault memory.
In comparison to a solution with coupling switches and function input F1/F2,
the response time will be extended because the measurement is not permanently carried out.
BMS bus (A/B, RS485)
addr. 1 addr. 2
IT system 1
IT system 4 IT system 3
addr. 4 addr. 3
IRDH575_D00089_05_M_XXEN/01.2020
IT system 2
25

Function
This has the advantage that no auxiliary contacts of a coupling switch are required. Furthermore, this solution is recommended for IT systems coupled via
capacitances or diodes.
3.5.7 Self test
In order to guarantee high functional reliability, the ISOMETER® provides comprehensive self test functions. After switching the supply voltage on, all internal measuring functions, the components of the process control such as data
and parameter memory as well as system and earth connections are checked
using the self test functions. The progress of the self test is indicated on the
display by a bar graph. Depending on the system conditions, the duration of
the self test is 15… 20 seconds, then the device indicates "Test ok" for approximately 2 seconds. Then the device returns to normal measuring mode and
the current measuring value is displayed after the expiry of the reading time.
When a fault is found the message "!Error!" appears on the display, the device
fault relay K3 (31-32-34) drops, the device fault LED lights up and the respective error message (see table) is indicated. If such a device fault occurs, a self
test will be started every 60 seconds. If no more malfunction is detected, the
fault message will automatically be deleted, the device fault LED extinguishes
and the device fault relay K3 energizes again.
During operation, the self test function can be started by pressing the TEST
button (internal or external) or automatically every hour or every 24 hours by
selecting "ISO ADVANCED": Autotest:" in the menu. The alarm relays ALARM 1/
2 can only switch after starting the self test function by pressing the TEST button, that means if an automatic self test has been selected, the alarm relays do
not switch.
26
If the on/off switching of the s upply voltage is not possible for
technical reasons, a RESET of the device can be carried out by
pressing the "INFO", "RESET" and "MENU" key si multaneously.
IRDH575_D00089_05_M_XXEN/01.2020

Function
Behaviour of the analogue output
Setting Manual test Automatic test
0-20 mA 20 mA
while test procedure
4-20 mA 20 mA
while test procedure
0 mA
The current value depends
on the insulation value
4 mA
The current value depends
on the insulation value
Error
message
System
connection?
Connection
PE?
Device error x Internal device
IRDH575_D00089_05_M_XXEN/01.2020
Meaning Steps to taken
No low-resistance
connection of
terminals L1, L2, L3
to the system
No low-resistance
connection of the
terminals and
KE to earth (PE)
error
1. Check the wiring of terminal L1, L2, L3 to the system
2. Press the TEST button
3. Switch the supply voltage
on and off
4. Check the fuses
1. Check wiring of terminal
and KE to earth (PE)
2. Press the TEST button
3. Switch the supply voltage
on and off
1. Press the TEST button
2. Switch the supply voltage
on and off
3. Please contact Bender
27

Function
3.5.8 Relay K3: device fault alarm and EDS common message
Relay K3 is intended to signal device and connection errors of the
ISOMETER®. In the Master mode with bus address 1, EDS alarm messages can
be collectively indicated by the K3 relay as well as system fault messages. Collective indication of the EDS alarms by K3 can be disabled by selecting „K3
Alarm: off“ from the "EDS Setup" menu. Refer to page 63.
K3 is permanently set to N/C operation, with the contacts 31-34 normally
closed, that means when a fault occurs, the relay deenergizes (K3: 31-32 connected).
Further details are described in "Chapter 3.5.7 Self test". Even when a protocol
converter of the FTC470… series is installed in a BMS system which is temporarily taking over the Master function is, the function collective EDS message will remain. This function is directly dependent on BMS address 1, the
Master status is a secondary factor.
The settings for K3 are preset and cannot be adjusted.
28
IRDH575_D00089_05_M_XXEN/01.2020

4. Connection
Only qualified personnel are permitted to carry out the
work necessary to install, commission and run a device or
system.
Risk of electrocution due to electric shock!
Touching live parts of the system carries the risk of:
An electric shock
Damage to the electrical installation
Destruction of the device
Before installing and connecting the device, make sure
that the installation has been de-energised. Observe the
rules for working on electrical installations.
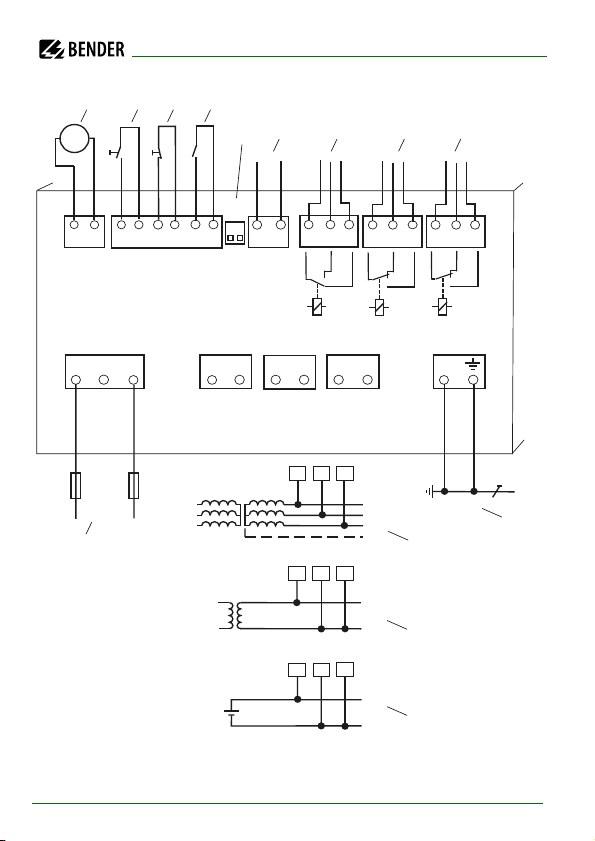
IRDH575 has plug-in terminals.
Connect the terminals A1/+ and A2/- to the supply voltage U
with IEC 60364-4-43. The connections to the supply voltage shall be provided
with protective devices to afford protection in the event of a short-circuit (a 6
A fuse is recommended).
For UL and CSA applications, the use of 5 A fuses is mandatory.
Devices for protection against short-circuit in conformity with
IEC 60364-4-43 for the IT system coupling L1/L2/L3 can be omitted if the wiring is carried out in such a manner as to reduce the risk of a short-circuited to
a minimum (a short-circuit-proof and earth-fault-proof wiring is recommended).
Use the accompanying terminal covers for terminal protection.
in accordance
S
29
IRDH575_D00089_05_M_XXEN/01.2020
Connection
Only one ISOMETER® may be connected to an external TEST or RESET button.
The TEST and RESET inputs of different insulation monitoring devices must
not be connected in parallel for collective testing.
Risk of property damage due to unprofessional
installation!
If more than one insulation monitoring device is connected
to a conductively connected system, the system can be
damaged. If several devices are connected, the device does
not function and does not signal insulation faults. Make
sure that only one insulation monitoring device is
connected in each conductively connected system.
Ensure disconnection from the IT system!
When insulation or voltage tests are to be carried out, the
device shall be isolated from the system for the test period.
Otherwise the device may be damaged.
IRDH575_D00089_05_M_XXEN/01.2020
30
Connection
31042
PE
6
1
5
L1
L2
L3
N
L+
L-
DC-System
L2L1
U
n
9
78
U
n
3(N) AC-System
L2L1
L1
L2
AC-System
L2L1
U
n
L3
L3
L3
mA
M+ M- T1 T2 R1 R2 F1 F2 A B 31 32 34 21 22 24 11 12 14
IRDH575
RS485
OFF
S2 S1
ON
K3
K2
K1
A1/+ A2/- L1 L2 L3 KE
6 A
11
12
13
14
31
IRDH575_D00089_05_M_XXEN/01.2020
 Loading...