

Bender ATICS-2-63A-ISO, ATICS-2-63A-ISO-ES, ATICS-2-63A-ISO-400, ATICS-2-80A-ISO, ATICS-2-80A-ISO-ES Quick Start Manual
...Page 1
EN
Quick start "Installation and connection"
1234
10
7
6
11
5
98
12
ATICS-2…-ISO Quick start
Automatic transfer switching devices with monitoring functions for unearthed safety power supplies Software version: D333 V1.2x, D334 V1.2x, D335 V1.0x, D308 V1.2x
This reference guide does not replace the operating manual. You will find the operating manual on the download section of our homepage. Make
sure that the personnel has read this manual and understood all instructions relating to safety.
1. Safety instructions
Danger: Risk of fatal injury from electric shock
Parts of the system are live. During installation and connection:
► Do not touch parts of the system.
► Make sure that the power supply has been disconnected and the
system is dead.
► Switch the ATICS® to manual mode and to switch position "0".
► Lock the changeover device with a padlock to prevent it starting
accidently.
Danger: Risk of fatal injury from electric shock
Connecting wires can come loose and fall out if the ferrules being used
are too short, the wire ends are tinned or the connection screws have
not been tightened enough.
► Consider a stripping length of 20 mm and do not use ferrules
when connecting lines 1, 2 and 3.
► Use a torque wrench to tighten the terminal screws. Check all
the screws on a regular basis to make sure they are seated
tightly.
Warning: Risk of destruction if mains voltage incorrect
► The permissible mains voltage is indicated on the nameplate.
Caution: Avoiding incorrect insulation measurements
Only one insulation monitoring device may exist in an IT system to prevent erroneous measurements. ATICS® includes an insulation monitoring device.
► Do not connect additional insulation monitoring devices.
Warning: Risk of destruction when insulation and voltage
tests are being carried out
► Disconnect the device from the mains for the duration of the
test.
2. Scope of delivery 3. Other system components required
ATICS® transfer switching device
• including connectors, bridge and terminal covers
• Current transformers STW2 and STW3
Documentation
• You can find the ATICS® manual and the manuals of other sys-
tem components under:
http://www.bender.de > Service & support >
Download > Operating manuals
• Quick reference guides and checklist
• IT system transformer with temperature monitoring
• Alarm indicator and test combination MK… or/and alarm indi-
cator and operator panel TM…
• Bypass switch (recommended)
• For screw mounting only: mounting screws M5
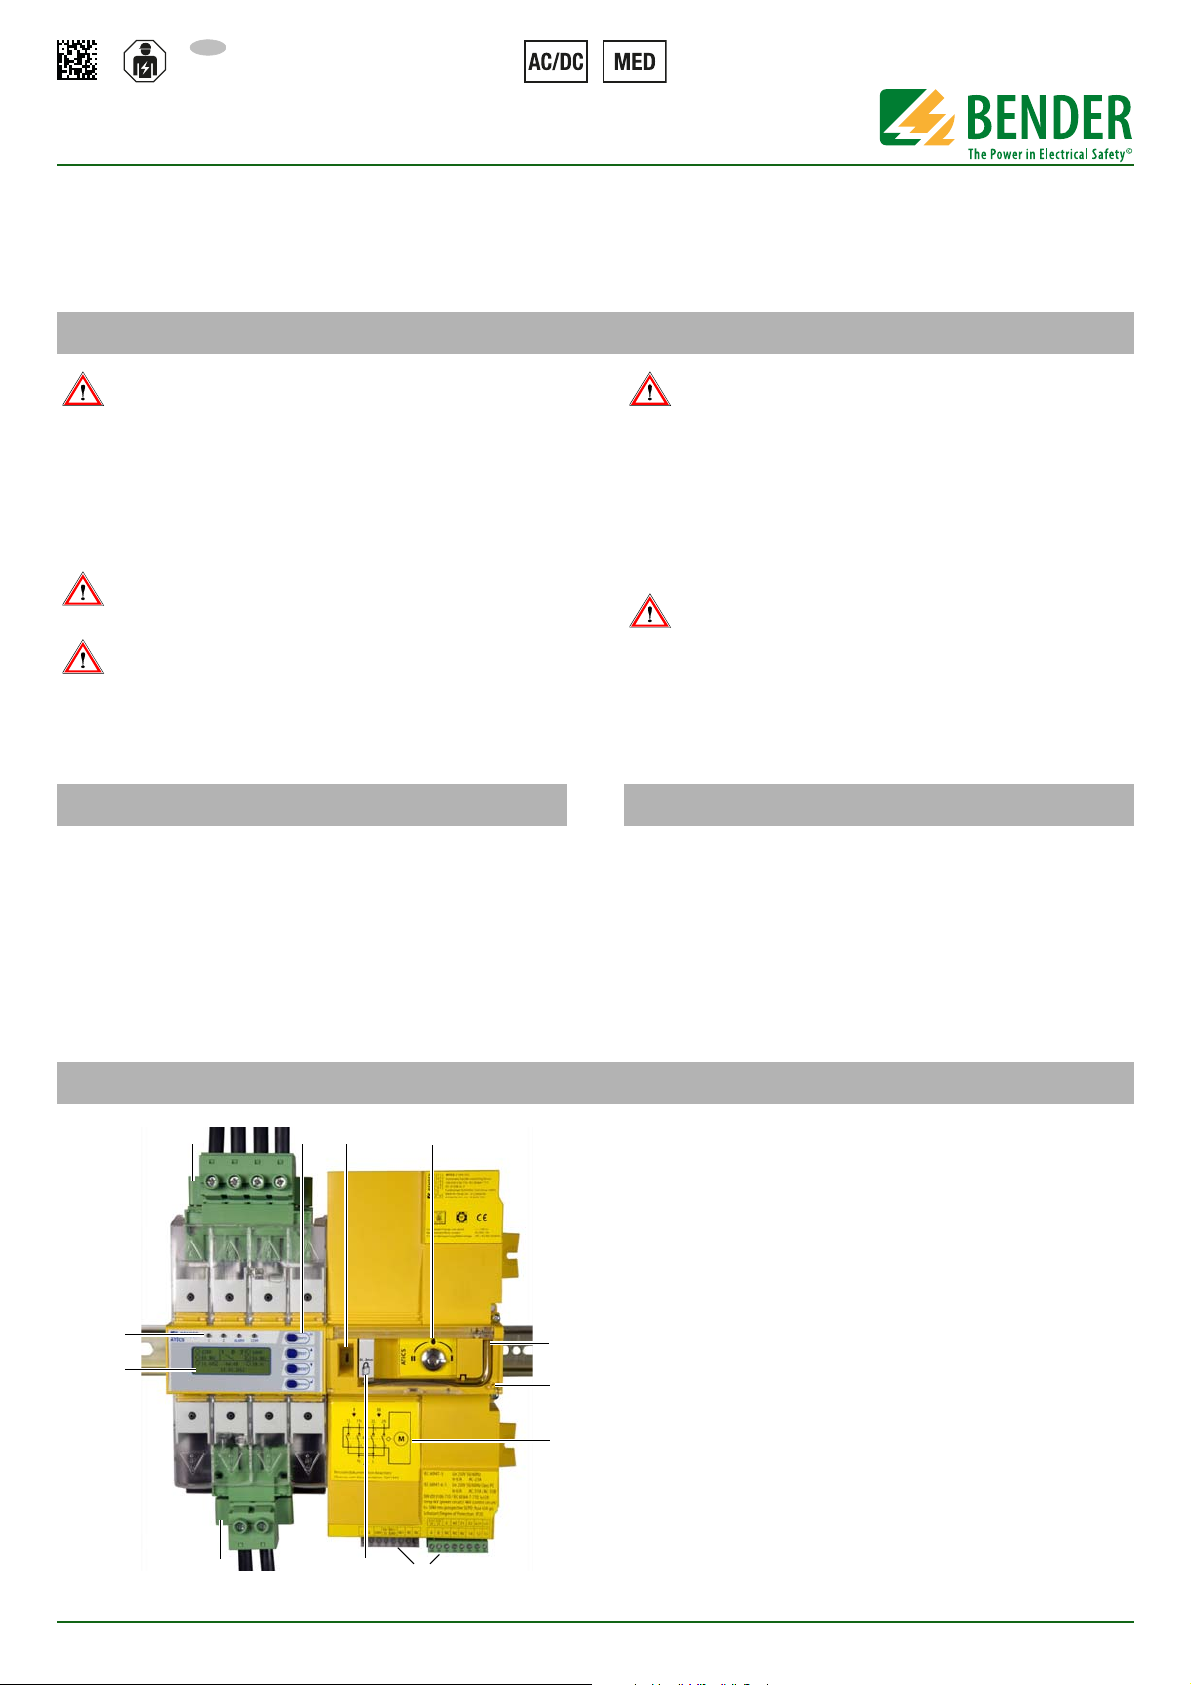
4. Device overview
ATICS-2-ISO_D00046_02_Q_XXEN/09.2016
1. Green plug device for Line 1 and Line 2
2. Control buttons
3. Inspection window for switch position
4. Selector switch for manual mode selection, also shows the
switch position.
5. Allen key for manual mode
6. Transparent cover for changeover switch (manual mode), sealable
7. Wiring diagram for lines 1, 2 and 3
8. Three coded connector plugs
9. Locking device for switch position 0
10. Green plug device for Line 3
11. LCD
12. Operating and alarm LEDs
1
Page 2
ATICS-2…-ISO Quick start
234
176
115,3
14,7
52
220
263
132
132
245
M5
18
46
73,5
52
45
222
47
*
**
***
***
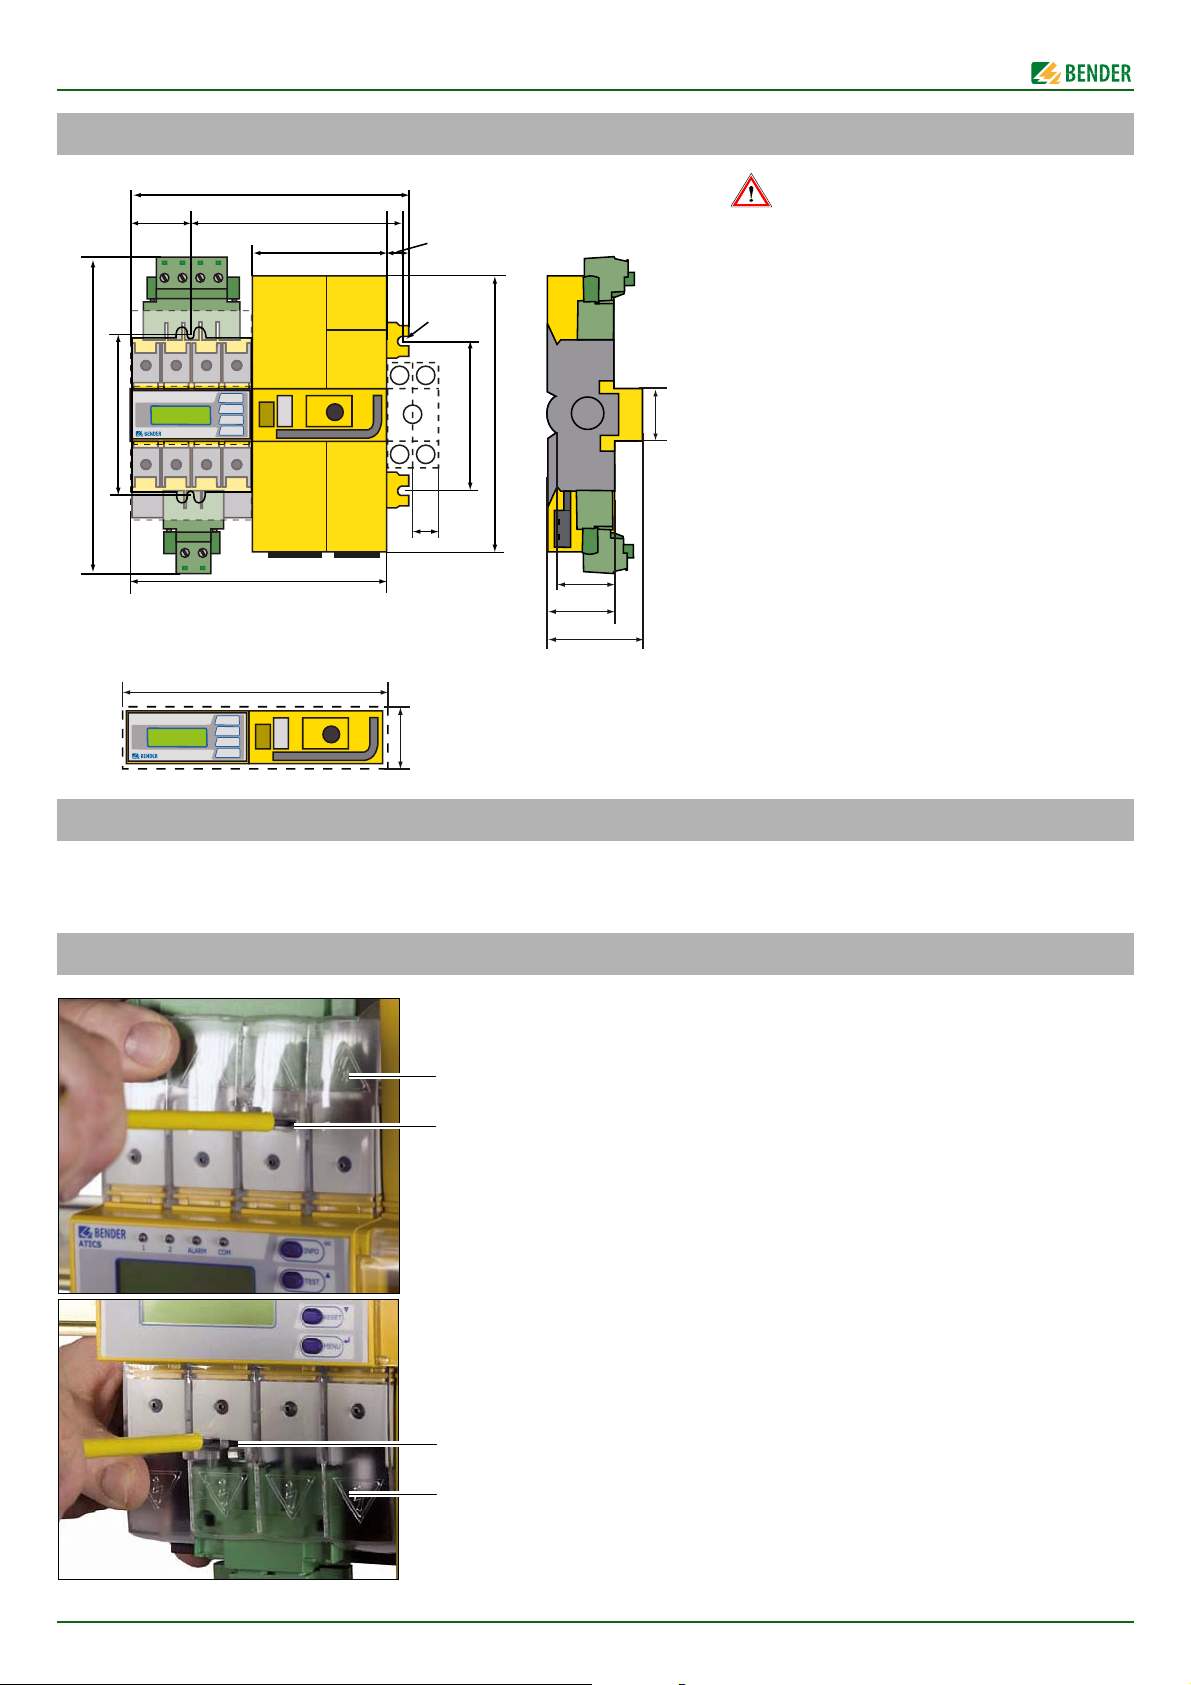
Caution: Risk of destruction by plastering
Liquid plaster may run into the device and the device
may jam.
► Do not seal the device with plaster.
ATICS® is suitable for DIN rail mounting or screw
mounting on plate. To guarantee the protection
against accidental contact, it is to be installed behind a plastic cover.
* Additional space required for the auxiliary con-
tact when using a bypass switch
** Adapt the cutout to the terminal cover
*** Dimensions for screw mounting on mounting
plate
A
B
A
B
5. Dimensions
6. Tools required
► We recommend to use the following tools for connecting the
power section and the control cables:
7. Removing the terminal covers
• Torx® screwdriver T20 or 6.5 x 1.2 mm
• Screwdriver 2.5 x 0.4 mm
• Allen key 4 mm
1. Push back the locking hook (B) in the middle of the top and
bottom terminal (A) cover by using a screwdriver.
2. Remove the terminal cover.
2
ATICS-2-ISO_D00046_02_Q_XXEN/09.2016
Page 3
8. Mounting the ATICS® on DIN rail
C
D
E
D
C
C
AB
ATICS-2…-ISO Quick start
1. Place the ATICS® on the top edge of the rail.
2. Use a screwdriver to pull down the lower yellow slide lock (C)
and snap the ATICS® into place with slight pressure. Check that
the slide lock is properly snapped into position by pulling
slightly the lower part of the enclosure.
3. Secure all terminals including the unused terminals with Allen
screws.
Tightening torque: 5 Nm.
4. Fasten the terminal covers.
Tighten the mounting screws (D) (PZ1, 8.8 lb-in, 1 Nm).
Caution: If the screws are not tightened, ATICS can be damaged
by the vibrations of the switch-over.
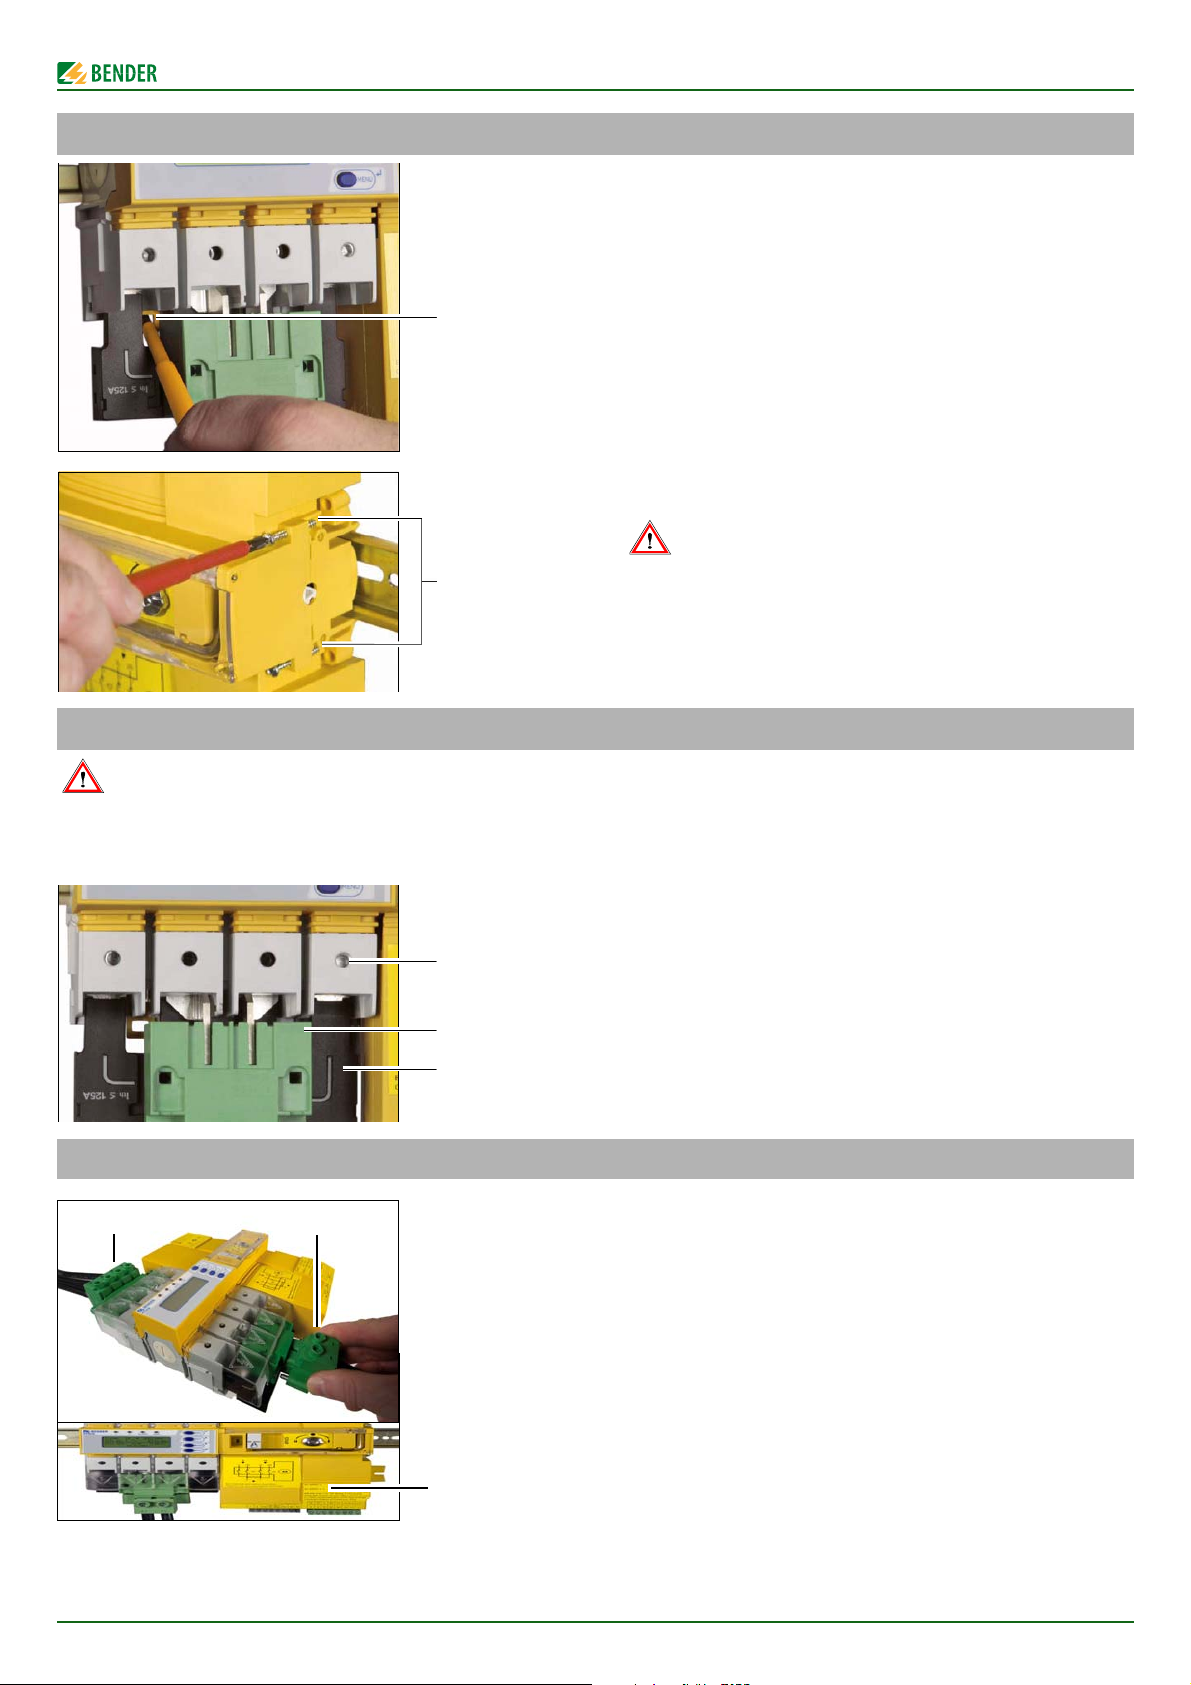
9. Mounting the ATICS® on mounting plate
Warning: Screw heads or washers reduce voltage clearance
Provide for sufficient clearance to live conductors (voltage clearance) by using mounting screws with flat screw heads and flat washers. If mounted on
electrically conductive material: the mounting plate has to be earthed and the area under the terminals has to be covered with insulating material. It is
the responsibility of the mounting staff to select the appropriate mounting plate and mounting screws and to keep the prescribed torque setting.
1. Undo the Allen screws of the terminals (C).
2. Remove the green connectors (D) top and bottom
3. Remove the black bridge (E) bottom
4. Fasten the ATICS® to the mounting plate with M5 (22 lb-in, 2.5
Nm) mounting screws (see dimension diagram).
5. Insert the black bridge (E), bottom
6. Plug in the green plug connectors (D) top and bottom
7. Tighten the Allen screws on the terminals (C).All terminals,
including the unused terminals must be fully tightened.
Tightening torque: 5 Nm.
8. Fasten the terminal covers.
10. Fastening, inserting and securing connections
Connect the terminals according to the wiring diagram to the plug
connectors (A, B) and the three connector plugs (C).
• Connect the lines 1, 2 and 3 to the plug connectors (A, B) with
a Torx® screwdriver T20 or a slotted screwdriver 6.5 x 1.2 mm.
Consider a stripping length of 20 mm and do not use ferrules.
Tightening torque: 2.5 Nm (≤ 25 mm²) or 4.5 Nm (≥ 25 mm²).
The connecting wires must be laid so that they are short-circuit and earth-fault proof!
• Connect the connector plugs (C) with a slotted screwdriver of
2.5 x 0.4 mm. Stripping length: 7 mm. Tightening torque:
0.22…0.25 Nm.
1. Insert bottom green plug connector (B) and secure with
mounting screws. After that, insert top green plug connector
(A) and secure with mounting screws.
2. Insert the other three connector plugs (C).
3. ATICS…400 only: Connect connector plug on the top of the
housing (opposite side of (C)).
ATICS-2-ISO_D00046_02_Q_XXEN/09.2016
3
Page 4

ATICS-2…-ISO Quick start
BENDER Group
11. Connection example basic configuration
Terminal Meaning
1, 3 Connection for Line 1 (input line) L, N
5, 7 Connection for Line 2 (input line) L, N
4, 6 Connection for Line 3 (output line) N, L
l, k Connection measuring current transformer T3 (STW3) for monitoring the load current downstream the transfer switching device
(short-circuit monitoring)
GND, En/Ex Connection must not be used. These terminals are solely intended for future extensions!
IN1/GND, IN1 Digital input, configurable, for example, for monitoring the switch position of the transfer switching device
NC not used
L1/IT, L2/IT Connection to the IT system. Monitoring the insulation resistance. When there are insulation faults: Locating current fed in for
insulation fault location. Bipolar protection via 6 A back-up fuse.
E, KE Connection of E and KE to two separate PE lines.
The terminals labelled GND must not be connected to PE.
Z1, Z2 Temperature monitoring for the IT system transformer
k/IT, l/IT
A, B BMS bus connection
NC not used
14, 12, 11 Alarm relay, programmable function
Alle Rechte vorbehalten. Nachdruck und Vervielfältigung nur mit
Genehmigung des Herausgebers. Änderungen vorbehalten!
© Bender GmbH & Co. KG
Fotos: Bender Archiv. Photos: Bender archives.
Bender GmbH & Co. KG
P.O. Box 1161 • 35301 Gruenberg • Germany
Londorfer Strasse 65 • 35305 Gruenberg • Germany
Tel.: +49 6401 807-0 • Fax: +49 6401 807-259
E-mail: info@bender.de • www.bender.de
Connection for measuring current transformer STW2 to monitor the load current downstream of the IT system transformer (overload monitoring)
All rights reserved. Reprinting and duplicating only with
permission of the publisher. Subject to change!
© Bender GmbH & Co. KG
4
ATICS-2-ISO_D00046_02_Q_XXEN/09.2016
Page 5

EN
Quick start "Commissioning and operation"
► Open the transparent
cover of the automatic
transfer switching device.
The display shows "Manual mode".
1 2 ALARM COM
1 2 543
9
8
7
6
Pos. LED/Button Meaning
1 LC graphical dis-
play
2 LED "1" lights up when Line 1 is ready
3 LED "2" lights up when Line 2 is ready
4 LED "ALARM" lights up when there is an alarm
message
5 LED "COM" flashes during communication via the
BMS bus
6"INFO"
"ESC"
Calls up standard information
Exits the menu function without changing parameters
7"TEST"
Up button
Calls up test menu
Parameter changes, scrolling
8 Taste "RESET“
Down button
Resets alarm and fault messages,
unlocks switching back interlocking
function
Parameter changes, scrolling
9 "MENU" button
Enter button
Toggles between the standard display,
alarm display and the "MENU"
Confirms parameter changes
ATICS-2…-ISO Quick start
Automatic transfer switching devices with monitoring functions for unearthed safety power supplies Software version: D333 V1.2x/D334 V1.2x, D335 V1.0x/D308 V1.2x
This reference guide does not replace the operating manual. You will find the operating manual on the download section of our homepage. Make
sure that the personnel has read this manual and understood all instructions relating to safety.
1. Safety instructions
Caution: Missing or false messages on the MK…, TM… or
COM460IP because of out-dated software.
► Replace or update older operating software of MK…, TM…,
FTC… or COM460IP
► Update TMK-SET configuration software.
The attached checklist includes both the factory defaults and installation-specific settings for the ATICS® transfer switching device. Please carry
out all the work outlined in the list and log each test step.
Keep the checklist with this manual in the vicinity of the device.
Note: Configure MK… resp. TM… in a meaningful way.
► In addition to the message, configure a short remark of what
needs to be done and who is to be informed.
2. Enabling manual mode 5. Operating and display elements
3. Configure MK… resp. TM…
MK… resp. TM… must display at least the following faults detected
by the ATICS®:
• Failure Line 1, failure Line 2
• Device error, device failure ATICS®
• Failure of the other MK… or TM…
• Insulation fault, overload, overtemperature
• Optional: EDS channels with circuit and/or room designation
• Device error with complete text or error code
4. Minimum parameter settings
The following minimum default settings have to be carried out:
• BMS bus address (see "Settings menu 9: Interface" in the operating manual)
• Load current according to the connected IT-System transformer (see "Settings menu 4: IT System" in the operating manual)
• Delay times (see chapter "Setting and testing according to the
checklist" in the operating manual)
By default, there is no password set on the ATICS®.
► For operation of the device, it is absolutely essential to enter
and enable a password (see "Settings menu 11: password" in
the operating manual).
ATICS-2-ISO_D00046_02_Q_XXEN/09.2016
1
Page 6

ATICS-2…-ISO Quick start
228V
50.0Hz
1 0 2 231V
50.0Hz
160kΩ 14:11
35 %
12.10.2010
213
654
Pos. Meaning
1 Line 1: Measured values of mains voltage and frequency
2 Switch position of the automatic transfer switching device
3 Line 2: Measured values of mains voltage and frequency
4 Display of the load in the IT system in %. The maximum load
current is adjustable.
5 Date and time
6 Measured value of insulation resistance
The device shows the alarm status for each measured value:
No alarm
Alarm
ALARM xx/yy
Undervoltage
0V
Addr.:3 Chan.:2
228V
50.0Hz
1 0 2
0.00V
0.00Hz
160k
Ω
14:11
35 %
Undervoltage
6. Enabling automatic mode
7. Display in error-free operation
There is no alarm message. Standard display:
► In order to enable automatic mode, close the transparent
cover of the automatic transfer switching device and seal it, if
necessary.
Alternate displays in the bottom line of the display
The device displays alarm messages in the bottom line of the display. Also shown there are: switching back interlocking function,
manual mode, countdown timer for return transfer time
8. Display during fault condition
There is an alarm message:
• The yellow LED "Alarm" lights up.
• Information about the message appears on the display in the bottom line.
Example: Line 2 has no voltage
►
Press the "↵" button to display the current alarm.
The alarm message consists of:
– Line 1: Alarm
xx = Serial number of the displayed alarm
yy = Number of pending messages
– Use the arrow buttons to select the previous or next mes-
sage.
– Line 2: Alarm status and alarm text
– Line 3: Measured value
– Line 4: Address and channel of device triggering message.
► If no button is pressed for a few seconds, the standard dis-
play reappears.
► Press the Enter button again, then the main menu will
appear.
9. Menu mode: Operation and configuration
► Press the "MENU" button to open the main menu.
– Use the arrow buttons to go up resp. down one menu level.
– Press the "↵ " button to confirm the selected menu item.
– Press the "ESC" button to leave the menu.
10. Menu overview
Main menu Meaning Submenu: Meaning/Setting
Exit Exit menu mode
2
ATICS-2-ISO_D00046_02_Q_XXEN/09.2016
Page 7

Main menu Meaning Submenu: Meaning/Setting
1. Alarm/meas. values
Displays current status messages, alarm messages and measured values
2. Changeover Displays information on the changeover function (number, test)
3. History/Logger Displays logger information 1. History
2. Data logger
Alarm messages of this device and tests which have been
performed: value and time
Displays the history of measured values: Line 1, Line 2, position, load current in the TN system I(3), insulation, transformer load
3. Config. Logger
4. Test logger
5. Service logger
4. Settings Various settings for this device 1. Changeover
Shows the history of the "Settings" menu: value and time
Displays the history of the tests of the changeover switch
carried out
Displays the history of the service activities carried out
Setting the date and time, system, switching back interlocking function, preferred supply, generator, test and service
interval
2. Voltage Delay times, voltage ranges, hysteresis
3. Current Short-circuit detection
4. IT system Response values insulation, transformer load, temperature,
fault location
5. Relay Mode of operation and relay mode
6. Digital input Mode of operation, function, delay
7. Data logger Modify, overwrite, delete
8. Language Deutsch, English, Francais
9. Interface Setting the BMS bus address of this device.
Allow the settings to be changed via the interface.
Allow a test to be run via interface.
10. Clock Set date format and date and time
11. Password Enable resp. set password for settings and test
12. Service Reserved for settings to be made by authorised Bender
Service personnel.
5. Control Run TEST and RESET for this device 1. TEST
Isometer, changeover, last changeover saved as a test, generator
2. RESET Reset alarm messages, cancel the switching back
interlocking function, change the alarm value for the max.
permissible number of changeover operations performed
and the max. permissible number of operating hours
6. Digital input Display voltage level of the digital input
7. Info Display information on device type and firmware versions
ATICS-2…-ISO Quick start
11. Troubleshooting
If a fault occurs,
proceed as follows:
Fault/message Description Remedy
Failure Line xx
(xx stands for: 1, 2, AV, SV, UPS,
BSV), undervoltage or overvoltage
Failure line 2 Generator deliveres no voltage within the set time t(GenMax)
Insulation fault IT system has insulation fault
Overload Current consumption too high
Overtemperature Temperature on the IT system transformer is too high
CT connection
CT short-circuit
ATICS-2-ISO_D00046_02_Q_XXEN/09.2016
1. Activate manual mode, if necessary.
2. Make a note of what happened prior to the fault: operator
inputs, device error messages, ambient conditions, etc.
Voltage is no longer available on Line 1 or Line 2
(Channel 1 = Line 1,
Channel 2 = Line 2)
Generator delivers no voltage within the set time. Short circuit or
interruption of the connection cable was detected: Measuring
current transformer STW2 (T4), isolating transformer load, channel 10.
3. Keep the device type and device serial number to hand.
4. Speak to Bender Service, describe the type of fault
→ Measure voltage on Line xx.
→ Check cause.
→ Eliminate fault on the system.
→ Check the setting for voltage and hysteresis.
→ Look for insulation fault.
→ Eliminate fault on the system.
→ Check setting for transformer load current.
→ Switch off any loads which are not urgently needed.
→
→ Check connecting wire of measuring current trans-
and quote the three-digit error code.
Switch off any loads which are not urgently needed.
former
3
Page 8

ATICS-2…-ISO Quick start
BENDER Group
Fault/message Description Remedy
Mains power connection Connection to the IT system interrupted or voltage in the system
Earth connection Connection to PE interrupted → Check that the E and KE are connected to the protec-
Device error + Errorcode For details about actions to be taken refer to table section "Error code/service code“. The message is on channel 6 of the BMS bus.
Short-circuit distribution board
Failure distribution board No voltage on Line 3, contact of the changeover switch defective
Overcurrent I(3) Short circuit or interruption of the connection cable was detected:
CT connection
CT short-circuit
No MASTER There is no device with master function available on the RS-485
Service: __ (date) Reminder for next service
Test: __ (date) Reminder for next test
being monitored below 150 V
Short-circuit detected → Eliminate short-circuit
Measuring current transformer STW3 (T3), channel 7
Measuring current transformer STW3 (T3), channel 7
interface
→ Check connection of ports L1/IT, L2/IT to the IT system.
Check voltage in the IT system.
tive earth conductor by two separate lines on.
→ Replace the ATICS®.
→ Eliminate the cause of overcurrent.
→ Eliminate any damage.
→ Check connecting wire of measuring current trans-
former
→ Check BMS bus connection cable.
→ Check whether master has failed or whether its ad-
dress has changed. If the device is operated without
BMS bus, the "Failure monitoring" must be switched
off (setting menu 8: interface).
→ Agree date with Bender Service
→ Plan date for test.
→ Carry out test.
Manual mode
Error during the changeover
process
Message "Manual mode" although manual mode has not been activated
When the test set-ups do not supply enough current for switching
the coils of the ATICS.
→ Check the connections of the digital input.
→ Only use test set-ups that provide the necessary peak
current of 17 A.
Error code/Service code Description Remedy
1.xx, 4.xx, 9.xx Fault message from the internal memory monitoring
3.11 Max. number of hours exceeded
3.12 Max. number of changeovers exceeded
3.13 Changeover due to overcurrent or shortcircuit detected. These
changeovers reduce the life of the device. Currents which are
measured in excess of 130 A are evaluated as overcurrents or shortcircuit currents.
3.5 Service has been carried out.
This is not a fault message. Display only on service logger.
6.xx, 7.xx, 8.1x
8.21 … 8.30
Device error. The internal self monitoring of the device has detected a
fault which could impair the safe operation of the device.
Fault Isometer or transformer monitoring
→ Contact Bender Service.
→ Plan device replacement
→ Plan device replacement
→ Have personnel assess the short-circuit load.
→ Contact Bender Service.
→ No action required
→ Replace the device immediately.
→ Reset, then execute test of the IT system
→ Check that the current firmware is installed.
→ When no fault is being displayed: OK. Otherwise re-
place the device.
→ Check that the bridge on the output side is properly in-
stalled.
8.22
8.51 … 8.52
Temperature sensor faulty or earth potential tainted.
Fault internal power supply unit.
→ Disconnect the temperature sensor (Z1/Z2). If no error
is displayed: replace temperature sensor or correct its
wiring.
→ RESET -> execute alarm, then test the changeover
function.
→ If fault persists: device replacement.
→ Only use test set-ups that can supply the necessary
peak current
8.61 … 8.66 Fault during changeover process.
Occurs when the voltage on the new line fails during the
changeover.
Also occurs when the test set-ups do not supply sufficient current for
switching the coils of the ATICS.
→ RESET -> execute alarm, then test the changeover
function.
→
If fault persists: replace the device.
→
Only use test set-ups that provide the necessary peak
current of 17 A.
→
In the settings menu 1: Select changeover t(0)≥160 ms.
Alle Rechte vorbehalten. Nachdruck und Vervielfältigung nur mit
Genehmigung des Herausgebers. Änderungen vorbehalten!
© Bender GmbH & Co. KG
All rights reserved. Reprinting and duplicating only with
permission of the publisher. Subject to change!
© Bender GmbH & Co. KG
Fotos: Bender Archiv. Photos: Bender archives.
Bender GmbH & Co. KG
P.O. Box 1161 • 35301 Gruenberg • Germany
Londorfer Strasse 65 • 35305 Gruenberg • Germany
Tel.: +49 6401 807-0 • Fax: +49 6401 807-259
E-mail: info@bender.de • www.bender.de
4
ATICS-2-ISO_D00046_02_Q_XXEN/09.2016
 Loading...