

Page 1
S.p.A.
OPERATION AND
MAINTENANCE MANUAL
SERIES
F 1900
POWER MOWER
07/12/99
Page 2

S.p.A.
F 1900
2
CONTENTS
♦ INTRODUCTION
♦ LIST OF MACHINE PARTS
♦ IDENTIFICATION AND TECHNICAL
CHARACTERISTICS
♦ PACKI N G AN D TRAN SPOR T
♦ SAFETY R U LES AN D LI MITS ON U SE
♦ STARTING AN D STOPPIN G THE MACH I N E
♦ SAFETY D EVI C E F OR STOPPIN G MOTOR
♦ OPERATING AND REGULATING THE MACHINE
♦ MAINTENANCE
♦ WARRANTY
♦ SAFETY TESTS AND C ER TIF I C ATION
INTRODUCTION
♦ Thank you f or hav ing s elec t ed our produc t . W e would like t o welcom e y ou among our many cust om ers .
♦ We are c ert ain t hat y ou will appreciat e t he perf ormance and t he operat ing eas e of this m ac hine.
♦ Our wide experience in t he sect or, the us e of top grade mat erials and the high quality product ion ensure the f lawless
eff iciency of t he m ac hine, which is des igned t o giv e many y ears of us e if operated and maint ained c orrec t ly .
♦ We hav e t heref ore compos ed this m anual to f amiliaris e y ou with t he use of the machine, its const ruction, operating
feat ures and applic at ions , which will also f acilitat e m aint enanc e.
♦ Pay s pec ial at t ent ion t o t he rules in t his m anual t hat are prec eded by the sy mbol below:
CAUTION
♦ This sy mbol indicat es t hat t he f ailure to com ply with t hes e rules m ay lead to personal injury .
LIST OF MACHINE PARTS:
1. Wheel engage lever
2. Accelerator hand lever
3. Handles
4. Fuel inlet
5. Motor ignition
6. Grass divider
7. Central cutting blade
8. Oil inlet
9. Wheel release lever
10. Blade engage-release lever
11. “Primer” pushbutton only motor B&S
Picture 1-
Page 3
S.p.A.
F 1900
3
IDENTIFICATIO N AND TE CHNICAL CHA RACTE RISTICS
Model: F1900
Weight: 57 kg
Motor: 4 str o kes, p etr o l
Make: BRIGGS & STRATTON
Model: 92900 375 SPR I N T
Swept volum e: 148 cc.
Max. po wer to d r i vi n g sh aft at 3200
revolutions per minute
CV: 3,75 (Kw 2, 75)
Model: F 1900 H
Weight: 57 K g .
Motor: 4 str o kes, p etr o l
Make: HONDA
Model: GC V 135
Swept volum e: 135 cc.
Max. po wer to d r i vi n g sh aft at
3600 revo l u ti o n s p er mi n u te
CV: 4,5 (Kw 3, 4)
Model: F 1900 B
Weight: 59 K g .
Motor: 4 str o kes, p etr o l
Make: BRIGGS & STRATTON
Model: X TL 55 diamond
Swept volum e: 190 cc.
Max. po wer to d r i vi n g sh aft at
3600 revo l u ti o n s p er mi n u te
CV:5,5(kw4)
•
Motor fuel: Petrol 95/98 Octane
•
Complete w ith self-w inding start-u p d evice
•
Safet y device on handles to stop machine
•
Dry air filter
•
Con sump tion a t 3600 r.p.m .: 0.8 Kg/hou r
•
MOTOR OIL: AGIP DIESEL S IGMA SAE 30
•
Oil qu a n tity in m otor: 0.6 l
•
Gearbo x: oil bath sing le gea r
•
GEAR B O X O IL: AGIP R O TRA MP SAE 8 0 W/9 0
•
Oil qu a n tity in gea rbo x : 0.5 Kg.
•
Manu a lly controlled w heel release an d cu ttin g b a r
•
Steering h a n d les m ou nted on vibration-da m p in g su pp orts
•
"Tractor" type rubber w heels 360 x 85
•
Central mowing unit wit h E.S.M. with 92 cm widt h or special bar with 82 cm width
•
Cl utch w ith belt ti ghtening pull ey.
•
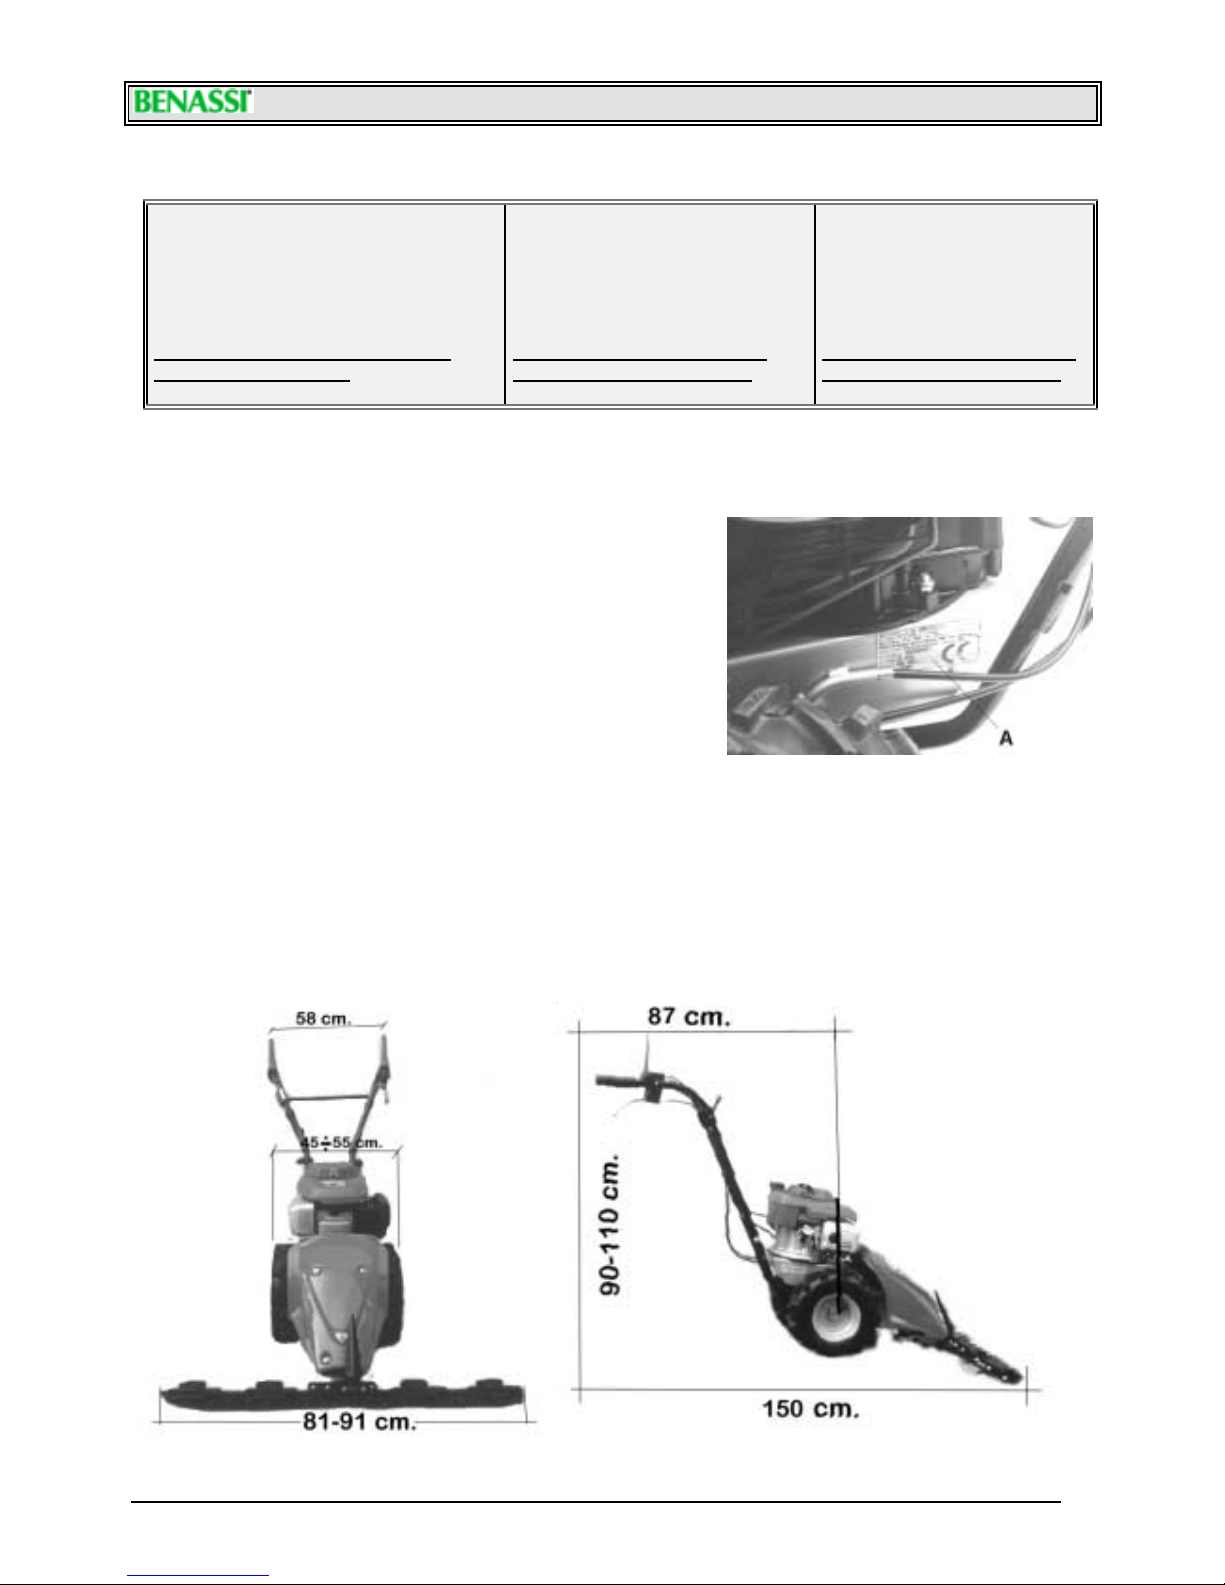
Fo r machine i dentif i catio n (ser ial nu mb e r, moto r , we i gh t, po we r ) r ef er to the data plate as shown in th e photo .
See Ref. "A in P icture 2
.
-Picture 3- -Pictu re 4-
-
Picture 2-
Page 4

S.p.A.
F 1900
4
PACKI NG AND TRAN SPO RT
◊ WIDTH: 100 cm
◊ DEPTH: 47 cm
◊ HEIGHT: 63 cm
⇒ Remove the pow er mow er from it s packing.
⇒⇒⇒⇒
Fix the handles to the handlebar support using the tw o screw s and tw o knobs pre-mounted on the handle.
Make su re to position the con trol cables correctly.
⇒⇒⇒⇒
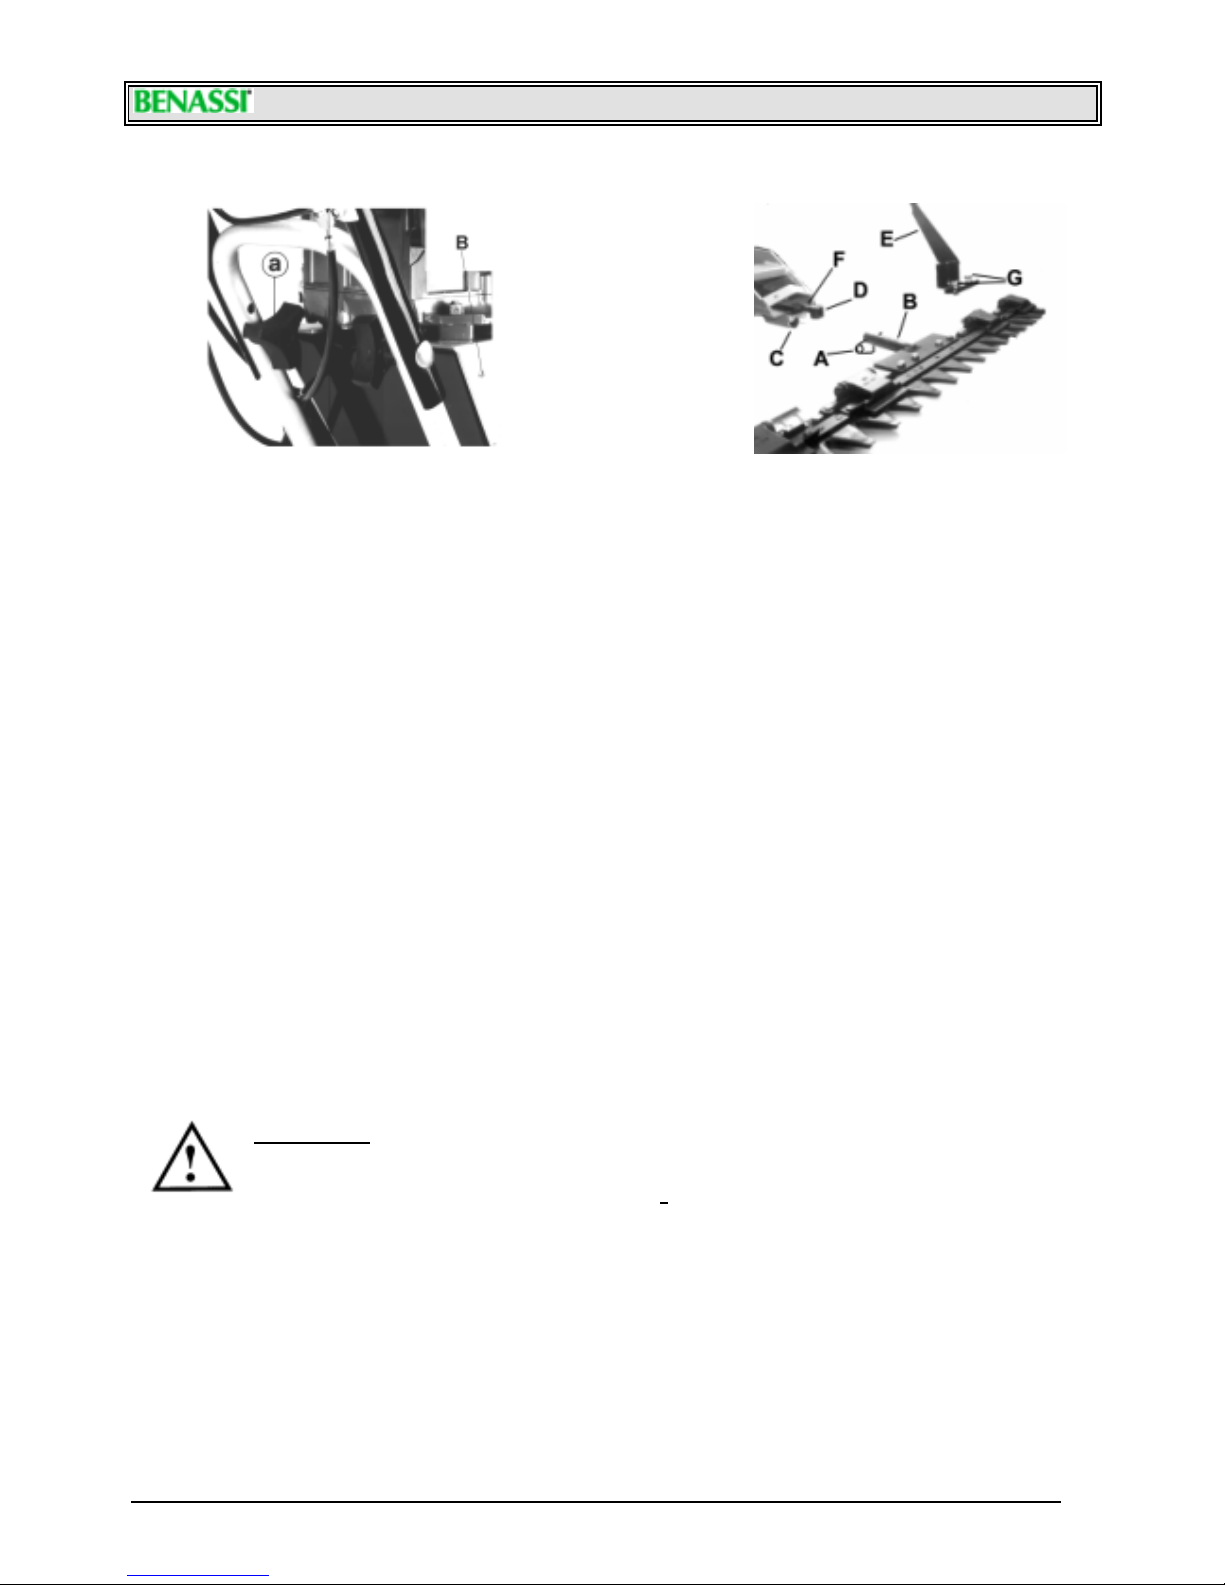
F ix th e bar to the machine, by un spitti ng the s pri ng ( Pic ture 9 Ref . A ) on th e pin R e f. B. Thr ead the pin in the cas i ng
Ref . C and th r ead th e sp ri ng again (R ef . A). Ta k e the l ittl e pl astic c yli nd e r ( Pic ture 9 Ref . D), thre at it i n th e gr as s
divider hea d R ef. E an d threa t all in the p in of the lever arm R e f. F, in the h oles on the h e ad a n d on the cylinder. F ix
the head Ref . E to the bar by scr ewing two s cr e ws Ref. G in th e threaded hol es o n the bar .
⇒⇒⇒⇒
If th e m ac hine is to be tra nspor te d, e mpty o ut th e petr ol tan k and alwa ys appl y the plas ti c pr otec tive s tr ip to
th e cu tting ba r bla de. If E.S.M. type, please read the sheet enclosed.
IMPORTANT: THE PACKED MACHINE IS SUPPLIED WITH THE MOTOR WITHOUT OIL OR PETROL.
SAFETY RU L ES
•
Rea d carefu lly the opera tion an d m a in tenan ce man ual enclosed w ith the m ach ine.
•
T h e use of th e m achin e is prohib ited to persons u n d er 16 years of age.
•
T h e op erator is liable for d am a ges since the m achin e is under h is con trol.
•
Those unfamiliar w ith the machine or w ho have never used it are obliged to read the operation and
maintenance manual before operat ion.
•
In cas e of tr ansp or t, disasse mb l e the bar an d empty the pe tro l out of the tank.
•
If the mac hine is lef t un attended, e nsure that it c an not s tar t up again.
•
Before runn in g the m a ch in e, the operator mu st h ave a 5 meter radius of free space arou nd h im.
•
D ry any petrol leaks .
•
Fill up the tan k w ith the m otor off. Fillin g the tank or transferrin g fu el mu st alw ays be pe rform ed o u tdoors, aw ay
from flames or heat sources. Do not smoke during t his operat ion.
•
When mowing in mount ainous areas or on slopes, mow horizontally and use non-skid equipment on shoes and
w heels.
•
If the blad e n eed s replacem en t, observe E.S.M. operation a n d m aintenan ce p rocedu res.
•
If the ba r su f fers im p a ct, ch eck the co n d i tion o f the ba r b ef ore re su m ing work.
•
Keep feet and hands far aw ay from the cutting bar and all rotating parts.
•
Do not run the motor w here exhaust containing carbon monox ide may accumulate.
•
Neve r use the mowe r i ncomple te or without its s afe ty devi ce .
•
Do not as s embl e/disasse mb l e or cl ean th e c utting bar or other equipment w ith th e motor run ning.
•
Cautio n! Whe n the cl utch is e ng age d th e cutting bar i s al wa ys i n m otio n.
•
Ca u tion! Do not mow areas w ith slopes exceedin g 5 0%.
•
We w ill not be held liab le for a ccidents caused by the fa ilu re to observe these rules.
STARTING AND STOPPING THE POWER MOWER
E ve r y time yo u ge t re ady to s tart the moto r, ma k e a car ef ul c heck of the fo ll owing :
• Make sure t hat fuel is in t he tank.
• Check t he mo tor oil lev e l: CAU TI ON: M A CHINE S OU T OF THE FACTORY DO N OT CONTAI N OI L I N THE MO TOR.
Mak e s ure to add oi l up to the l eve l on th e dips ti ck .
• CO NS ULT THE OP ERATION AND MAINT E NANC E MANUAL OF TH E MOT O R UNDER "B EFORE START- UP"
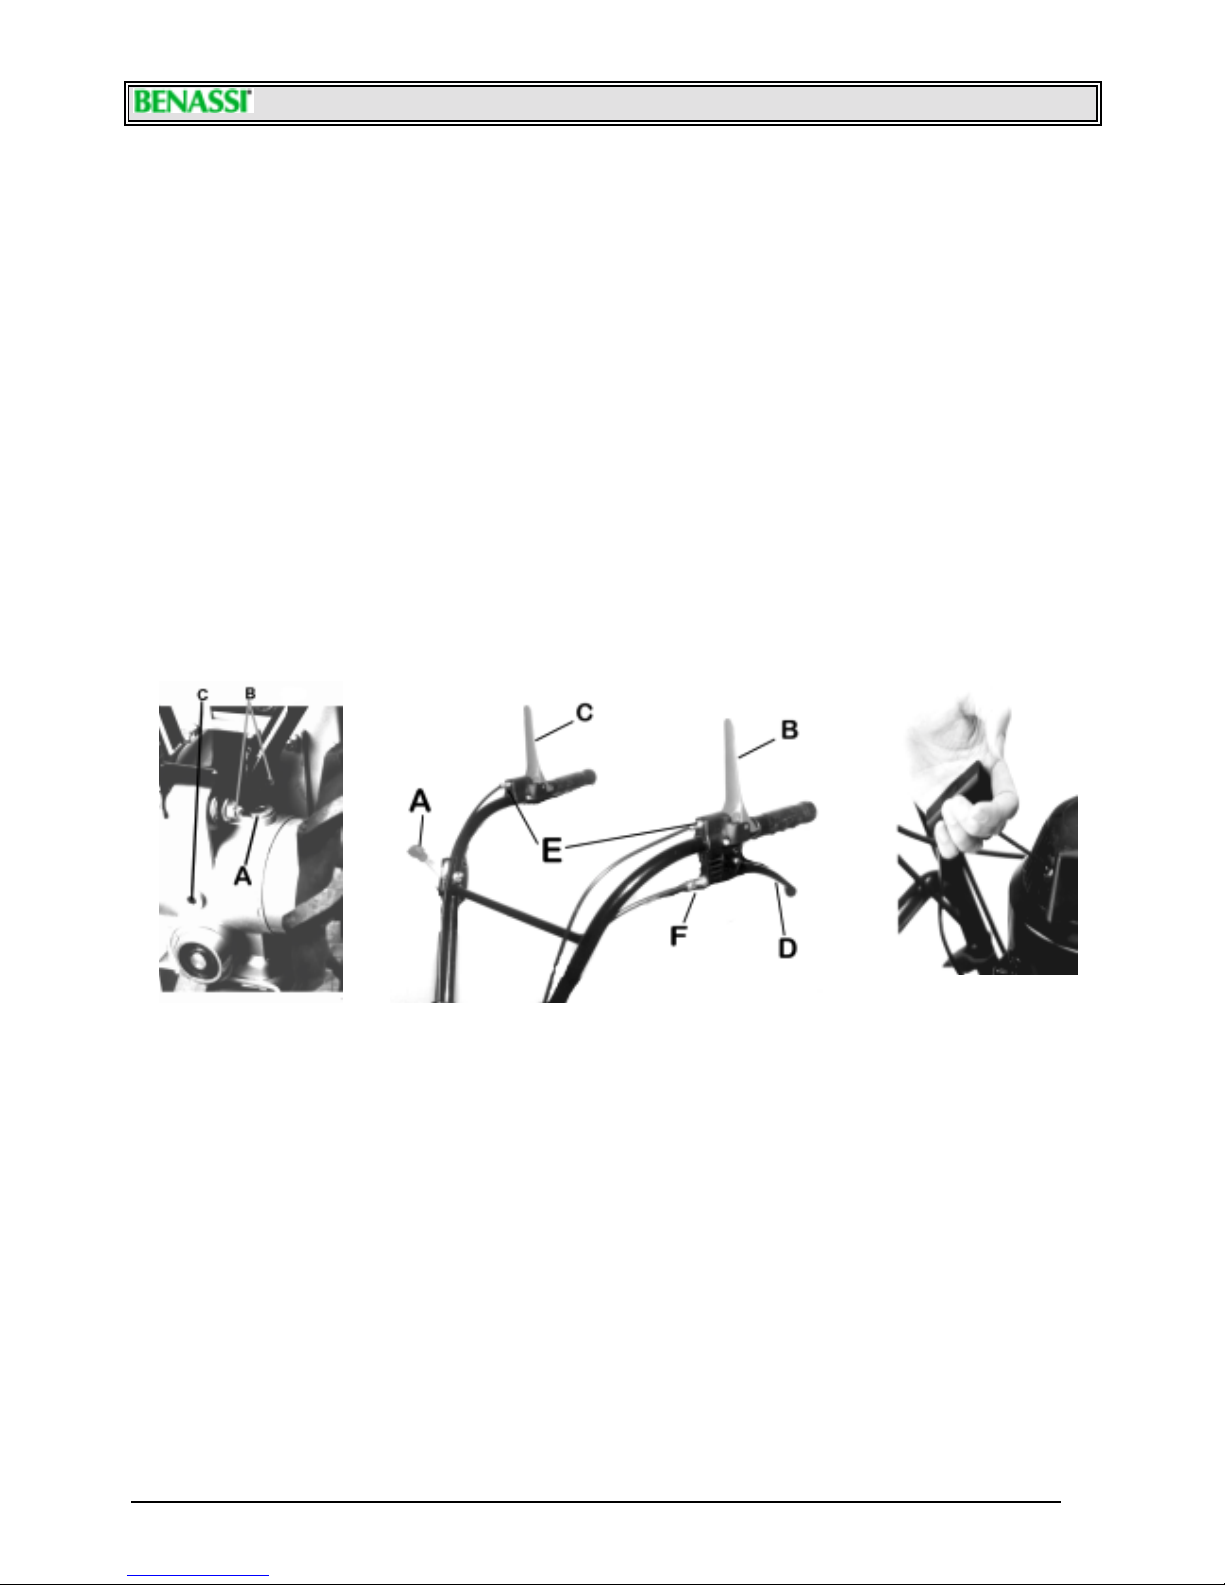
• Make su re oil is u p to th e level in the gea rb ox (Pictu re 5 R ef. A)
• Ch eck that all safety systems are released an d fu nctioning , especially the levers Ref. B an d R ef. C P icture 6
• Pr ess the "Pri mer " button th r ee times i n cas e o f s tar ting with the motor co ld ( Pic ture 1 R e f. 11 ) only vers i on B&S.
• Alwa ys s tart the moto r up outdoo rs .
• B ri ng th e acc el er ator hand l eve r (Pic ture 6 R e f. " A ”) to the " STA RT" positi on, g ras p the c or d h andle (Pic ture 7) and
pu ll it slightly un til you feel some resistance, then p u ll hard er. Make su re that th e cord d oes n ot return by itself -accomp an y it wi th yo ur ha nd.
Page 5
S.p.A.
F 1900
5
• For best start-up, read the operation an d maintenan ce manual on the motor under "ST ART -UP".
• With th e moto r run ning, br ing the acc el er ator l eve r (Pic ture 6) to the middl e pos i tion.
• T o make the ma ch in e go forw ard squ eeze the clu tch lever (Picture 6 Ref. B). Release it slow ly and the ma ch ine
w ill start operating , keepin g the "MOT OR STOP " lever pressed
• In order t o engage the bar, let t he bar clut ch lever dow n (Picture 6 Ref. C), by pressing it on the handle.
• T o move the m ow er freely forw ard or back, squeeze the w heel release lever (Pictu re 6 R ef. B) after squ eezin g
th e clu tch lever (Picture 6 R ef. D).
• T o sw itch off the en gine, move the a ccelerator lever (Ref. A Picture 6) to the "STOP " p osition .
• The main function of the lever Ref. "e" Fig. 6 is to turn off the motor when releasing your hands from the steering
hand l es . D o not e ver ti e the " M O TOR STOP" l eve r " e" to the hand l ebar k nob.
• Every time you get ready to start the motor, check that the button "f" Fig. 6 is pressed, keeping both the
"MOTOR STOP " lever and the clu tch lever blocked.
• B efo re yo u star t to mow, c hec k tha t the moto r s hu ts off wi th th e "STO P" l eve r r aised.
MOTOR S TOP : lever "e" is squ eezed ; MOTOR S TAR T : lever "e" is low ered
! To stop the a d vancem en t, release the lever Ref "B " P icture 6.
! To stop the mow ing b ar, release the lever Ref "C" P icture 6.
! Cau tion! Do no t non operate th e w heel en ga ge lever (Picture 6 R ef."B") and the w heel release lever (Picture 6
Re f."D") at th e sam e time.
-Picture 5- -Pictu re 6- - Picture 7-
OPERATIN G AN D REGULATING THE MACHINE
Before beginning to mow grease t he mov ing bar w ith oil. Then start up the engine follow ing the directions.
# Engaging the transmission to the wheels and the cutting bar by means of the clutch lever must be carried out
w ith the motor at a middle r.p.m. and by slow ly releasing the lever.
# Wh en sta r ting to mow, po s iti on th e acc el er ator l eve r at 3/4 or at "MA X" to e nsur e adequate power .
# When mow ing along a w all or the edge of a sidew alk, be careful to keep a safety distance so that the blade
d oes not suffe r i mp ac t. If not, the c utting bar ma y und e r go damage.
# I f t he belts are slipping, operat e on the adjust ment dev ices ( Ref "E" Picture 6) w hich are on t he clut ch lev ers .
Leave a gap of about 5 mm before the clutch engage. To adjust the w heel releasing cable, operate on the
ad ju stmen t device "F " (Picture 6)
# It is possible to adjust the handle vertically, by acting on the knobs that fix it to the handlebar support: two
different positions are available (Picture 8 Ref A).
# It' s possi b l e t o hav e a no t he r li ttle ve r t i c a l a djustme nt of the ha nd l e , b y r ota t i ng the ha nd l e b a r sup p o r t , after
having l oos e ned th e s cr ews that fi x it to the tr ansmi s s io n b ox. Th en scre w tigh t again. (Ref . "B" Pic ture 5)
# To r egulate the motor , r ead the manual on th e moto r un der " REGULA TIONS".
Page 6
S.p.A.
F 1900
6
-Picture 8- -Pictu re 9-
MAINTE NA NCE
• For cha n g ing the oil an d oth er ma in ten a n c e operation s on the motor (spark plug s, air filter, regula tions), refer to
the moto r ma nu al pr ovi ded.
• NB: To unscr ew the oi l drai n p l ug of the moto r , disasse mb l e the r ear co ver ( Fig . 8 Ref . B).
• Make a reg u la r ch eck of the oil level in the gea rbox w ith the ca p (Fig . 5 R ef. A) and toppin g u p if n ecessary.
• C h an g e th e oil completely every 200 hours. Empty the gearbox of oil by un screw ing the oil drain p lug (Fig. 5 Ref.
C)
• Let the oil drain completely. After screw ing back the cap tightly, fill to the correct level w ith new oil
recomm ended b y the ma n ufacturer. Fig. 5 R ef. "A".
• If t he grass is not cut in a satisfactory manner despite the adjustments, t he blade must be sharpened or
repla c ed . F or rep la c em e n t as follo ws :
1. Remove the ca b le of m otor spa rk plug .
2. Put on a pa ir of gloves.
3. Unsc re w th e g rass d i vide r (F i g .1 - Ref . “6 ”).
4. Loosen th e 4 knife holder.
5. Remove the b lad e and p u t the n ew or the sh arp en ed one, only after having g reased it.
6. Rescrew the kn ife h old er, adju sting them in such a way as the bla de ca n slide w ell.
7. Fasten the grass divider and rea pp ly the cab le of the spark plug
Fa sten the grass divider a n d rea pp ly the cab le of the spark plu g
• For an y mech a nica l repai r, especi a lly du rin g the warra n ty perio d , w e recom men d to go to a sp eci al ised rep a ir
shop of the dea ler.
• For transporting convenience, the handles can be disassembled by means of the two knobs (Fig. 8 Ref. A). The
same is recommended for the cut ting bar, w hich is easily disass embled by removing the special s plit pin on the
bar support (Fig. 9). Alw ays use gloves and apply the protective strip to the blade.
• Regularl y c heck tha t s c re ws are ti ght. Pay spec ial attentio n to the s c re ws fas te ning the bar to i ts s up por t
CAUTION
It is advised not to keep the motor running when the machine is not
being used for its specific purpose
.
WARRANTY
T h e mach ines an d a ccessories are guara n teed for 12 months, w ith the exception of electrical parts or parts in
rub ber. T he m anu fa cturer shall repla ce pieces recogn ised as defective free of charg e. Lab ou r and transport shall be
at the expen se of the p u rch a ser. Warranty requ ests m u st be m a de throu g h d ealers au thorised by the
manufacturer.
With re gar d to mater ial s not of our manu fac ture, wi th sp ec ial r ef er ence to the moto r , the rule s l aid down by the
respective m an ufacturers shall ap p ly. Any requ ests for repair sha ll therefore be directed to th e specific service
centres in th e respective areas.
For any problem or repair, contact the dealer w here the m ach ine w as purch ased.
Page 7
S.p.A.
F 1900
7
SAFETY TESTS AND CERTIFICATION
Decl ar ati o n o f C E co n fo r mi ty i n acco r d an ce wi th EEC d i r ecti ve 89/ 392 an d amen d men ts.
40010 San Matt eo della D ec im a BO I t aly Via Lam pedus a n° 1
We hereby dec lare that t he machine c onf orms with t he essent ial requirements f or health and saf et y in accordanc e with
EEC D irec t iv e 89/ 392 and am endm ent s .
POWER MOWER TYPE MODEL F 1900 – F 1900 H - F 1900 B
For v erification of the conf ormity wiith the above-mentioned Directives reference has been made to the following:
Standard PR EN 709/ 94 dat ed 16/ 06/ 94 f or power hoes and engine-driven cult iv at ors , doc um ent s N 67 C EN TC 144/ W G4
April '94 f or alternativ e and rotating power mowers PR EN 836/92 updat e 92 f or lawn mowers. For garden v acuum -bags,
referenc e EN 294
CHAIRMAN OF THE BOARD
S. Matt eo della D ec im a li
13/05/99
RESU L T AND TESTS
POWER MOWER TY PE MODEL F 1900 – F 1900 H - F 1900 B
Acous t ic pres s ure t o t he operat or: LAeq = 82 dB (A)
Testing c ondit ions at a height of 1. 6 m at handle m idpoint .
Vibration t o handles with weighting I SO. 5349 v alue 4, 9 m / s ec
2
Page 8

S.p.A.
F 1900
8
SpA
VIA LAMPEDUSA 1
40010 S. MATTEO DELLA DECIMA (BO) - ITALY
www.benassispa.it e-mail [email protected]
TEL. 051/820511 TELEFAX 051/682.61.64
Dealer stamp
 Loading...