

Page 1
HEALTH CARE™
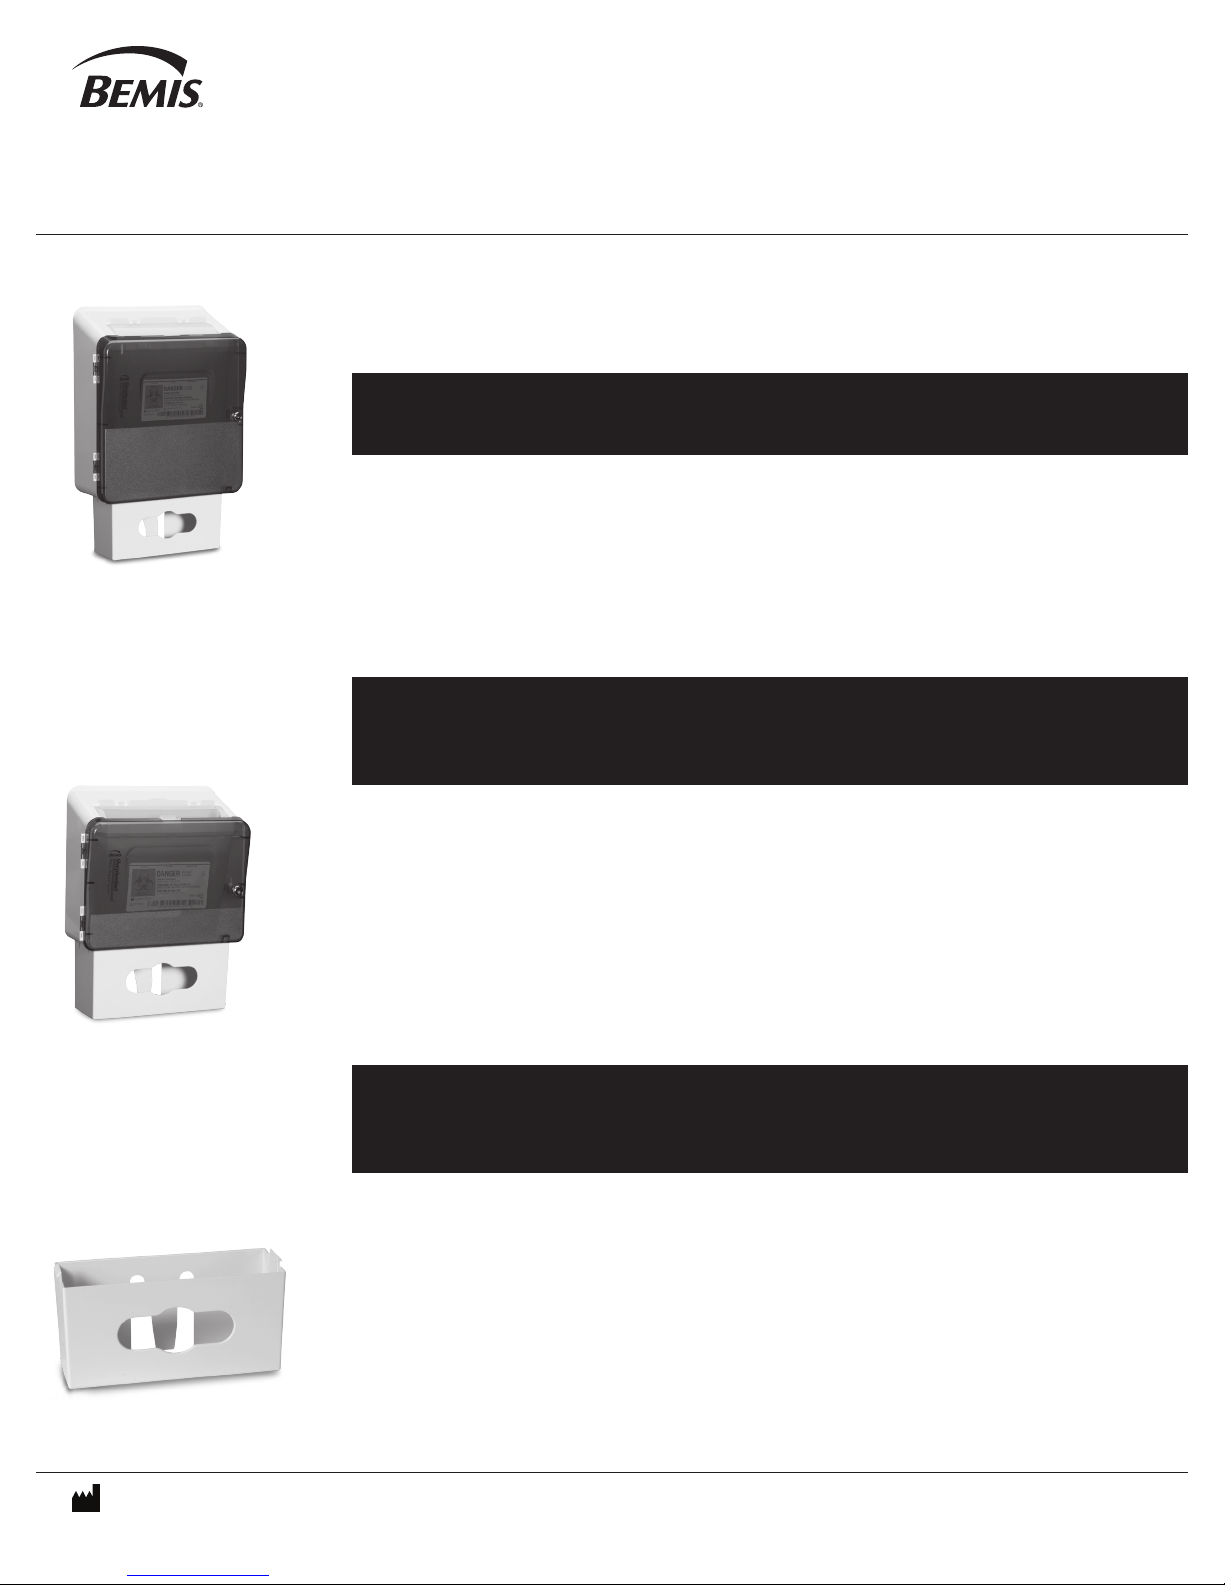
SharpSentinel® Wall Cabinet System
Installation Instructions / Directions for Use – Instrucciones de instalación / Instrucciones de uso – Instructions d’installation / Mode d’emploi
Model 1031 - 3 gallon / Model 1051 - 5 quart / Model 1041 - glove box holder
Modelo 1031 - 3 galones / Modelo 1051 - 5 galones / Modelo 1041 - Soporte para caja con guantes
Modèle 1031 - 11,5 L / Modèle 1051 - 4,8 L / Modèle 1041 - Support à boîte à gants
Read all precautions and instructions before installing and using the
SharpSentinel® Wall Cabinet System. Improper installation or use may result
in exposure to infectious materials and the potential of needlestick injuries.
PRECAUTIONS
■
Never place used sharps in empty cabinet
■
Cabinet should always be locked except when installing or removing sharps container.
■
#1031 3-Gallon with #1041 Glove Box
for use with #333 Sharps Containers
No. 1031 de 3 galones con caja
sellada con guantes No. 1041 para
utilizarse con los contenedores de
objetos punzocortantes No. 333
Armoire de 11,5 L (3 gal) no 1031
avec boîte à gants no 1041 à utiliser
avec les contenants d’objets piquants
et tranchants no 333
Use only with designated Bemis sharps containers.
■
Always close and permanently lock lid before removal of sharps container.
■
IMPORTANT! Do not allow sharps container to exceed recommended fill line.
Lea todas las precauciones e instrucciones antes de instalar y utilizar el sistema
de gabinete de pared SharpSentinel®. La instalación incorrecta o el uso indebido puede causar exposición a materiales infecciosos y el potencial de posibles
lesiones por pinchazos de aguja.
#1051 5-Quart with #1041 Glove Box
for use with #175 Sharps Containers
#1051 4.8 litros con #1041 Guantera para el
uso del #175 Contenedores de punzocortantes
#1051 5-Quart avec boîte à gants#1041
pour utilisation avec conteneurs pour objets
tranchants#175
#1041 Glove Box Holder
Soporte para caja sellada con guantes No. 1041
Support à boîte à gants no 1041
PRECAUCIONES
■
No ponga nunca objetos punzocortantes usados en el gabinete vacío.
■
El gabinete siempre debe estar cerrado con llave, excepto cuando se instale
o retire el contenedor de objetos punzocortantes.
■
Utilícelo únicamente con contenedores de objetos punzocortantes Bemis designados.
■
Cierre y bloquee siempre permanentemente la tapa antes de retirar el contenedor
de objetos punzocortantes.
■
¡IMPORTANTE! No deje que el contenedor de objetos punzocortantes exceda la línea
de llenado recomendada.
Lisez toutes le mises en garde et instructions avant d’installer et d’ utiliser
le système d’armoire murale SharpSentinel®. Une installation ou une
utilisation inadéquate peut avoir pour conséquence l’exposition à des substances
infectieuses et causer potentiellement des blessures par piqûres d’aiguille.
MISES EN GARDE
■
Ne placez jamais des objets piquants et tranchants déjà utilisés dans une armoire vide.
■
L’armoire doit toujours être verrouillée, sauf lors de l’installation ou du retrait du
contenant d’objects piquants et tranchants.
■
N’utilisez cette armoire qu’avec les contenants Bemis désignés.
■
Fermez et verrouillez toujours de maniére permanente le couvercle d’un contenant d’objets
piquants et tranchants avant de le retirer de l’armoire.
■
IMPORTANT! Ne dépassez pas le repère recommandé de remplissage du contenant
d’objets piquants et tranchants.
Bemis Manufacturing Co., 300 Mill Street, Sheboygan Falls, WI 53085
920-467-4621 • 800-558-7651 • Fax 800-499-8160
E-mail: HCG@BemisMfg.com • www.bemishealthcare.com
Rev. 2.0
©2017 599 6390
Page 2
INSTALLATION INSTRUCTIONS / DIRECTIONS FOR USE
SHARPSENTINEL
®
WALL CABINET SYSTEM
CLEANING INSTRUCTIONS FOR CABINET
Clean cabinet regularly to maintain appearance and function. Wipe exterior of
cabinet with damp cloth and mild soap or disinfectant. Never clean with solvents
such as acetone or alcohol. Do not attempt to clean interior of cabinet when sharps
container is installed. Clean interior of cabinet using mild soap or disinfectant.
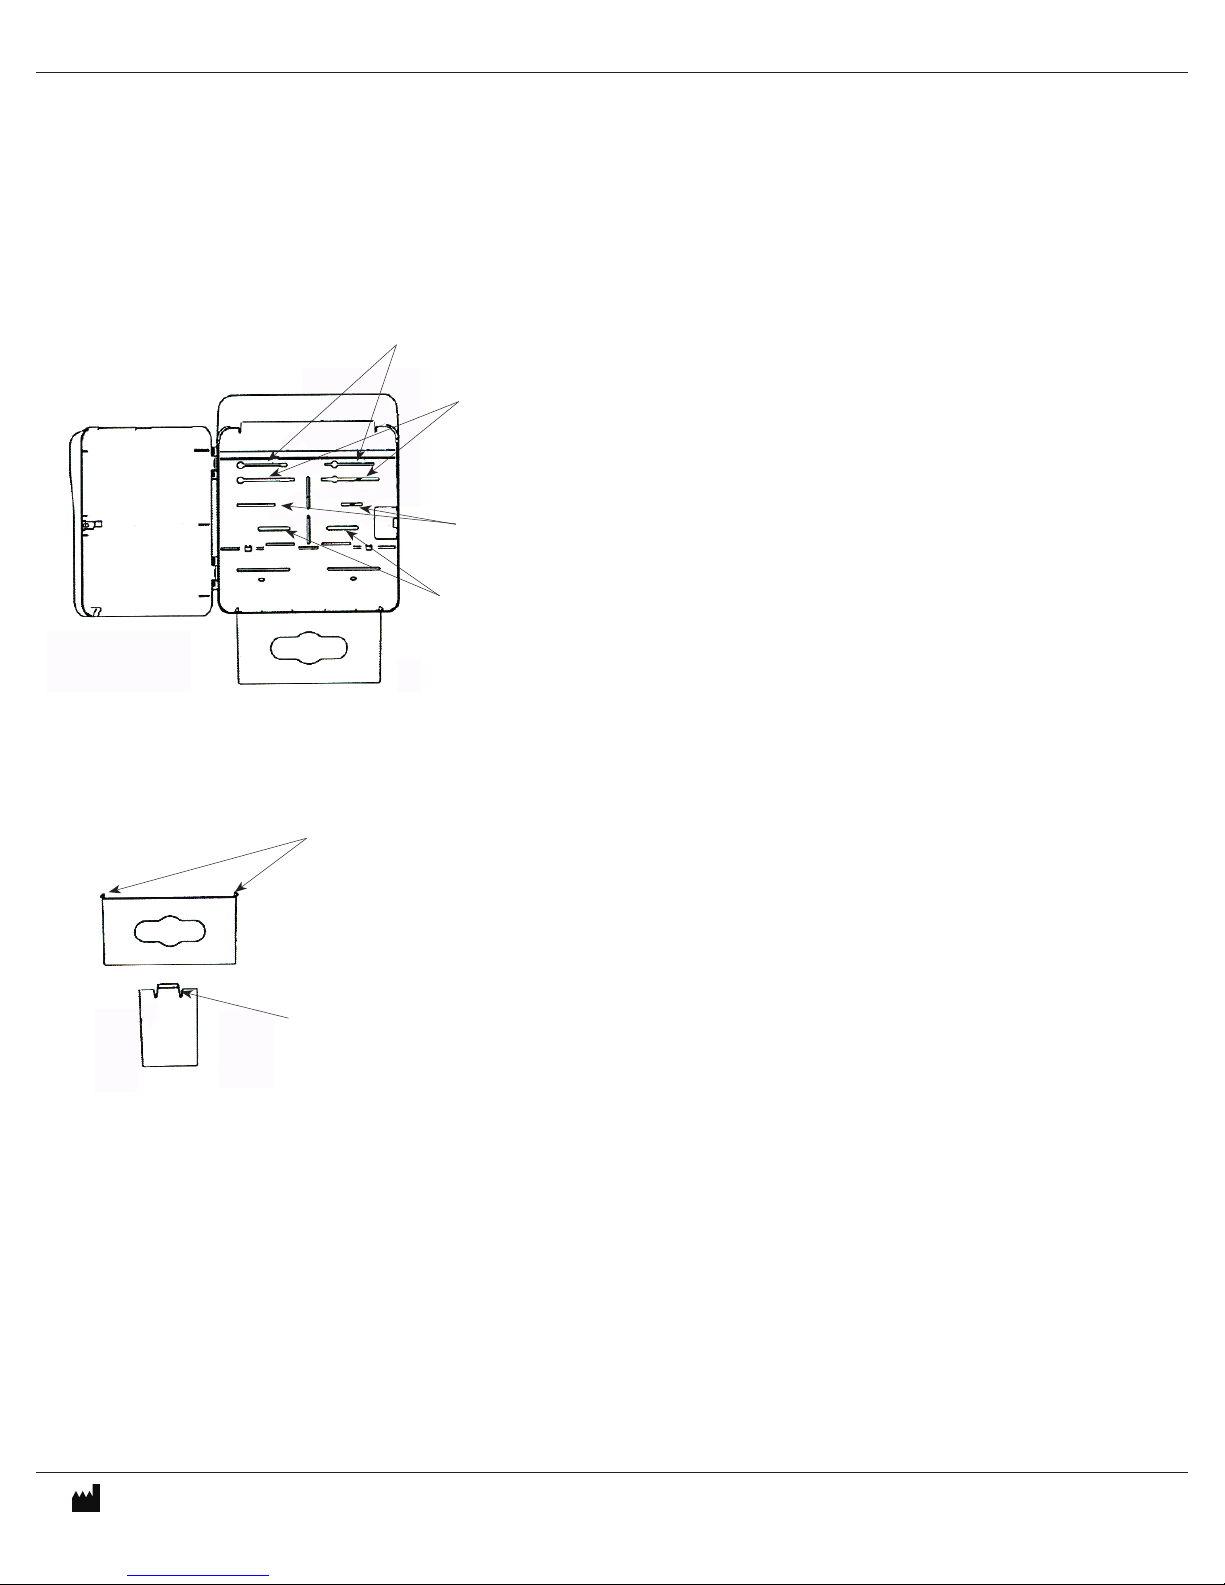
#1031 UNIT SHOWN
Tabs
FIG. 1
Installation Instructions
A
Cabinets can be installed using holes from existing units or on any new wall
B
C
D
surface. Install at a recommended height of 53"-56" from top of cabinet to floor.
Note: Hardware not included. Use appropriate fasteners for your wall construction.
TO INSTALL ON NEW WALL SURFACE (FIGURE 1):
Do not drill holes without first checking for plumbing or wiring behind wall. Using
back of cabinet as a template, mark hole locations with a pencil. Drilling at least
four holes is recommended using mounting slots A, B, C or D. Drill holes and secure
cabinet to wall using appropriate fasteners.
TO INSTALL USING EXISTING HOLES:
Loosen top fasteners left from existing bracket or cabinet and remove bottom fasteners.
Slide new cabinet into position on top fasteners using keyhole slots. Replace bottom
fasteners using any mounting slots C, D or below.
TO INSTALL OPTIONAL #1041 GLOVE BOX
HOLDER TO CABINET (FIGURE 2):
Insert tabs on left and right side of glove box into matching slots on bottom
of cabinet until it snaps into position.
TO REMOVE GLOVE BOX FROM CABINET:
Holding glove box with both hands, push in release tab on either left or right
side while pulling down until glove box is removed.
Release Tab
FIG. 2
SIDE VIEW
Bemis Manufacturing Co., 300 Mill Street, Sheboygan Falls, WI 53085
920-467-4621 • 800-558-7651 • Fax 800-499-8160
E-mail: HCG@BemisMfg.com • www.bemishealthcare.com
Directions for use
TO INSERT SHARPS CONTAINER IN CABINET:
1. With biohazard label facing front, slide container straight into cabinet.
2. Close and lock cabinet door.
TO REMOVE FULL SHARPS CONTAINER FROM CABINET:
1. Insert final disposal tabs into slots on lid of sharps container.
Push down and snap into place.
2. Unlock and open cabinet door.
3. Place both hands underneath handles and slide container out of cabinet.
Dispose of according to hospital policy.
4. Insert new sharps container into cabinet; close and lock door.
Rev. 2.0
©2017 599 6390
Page 3

INSTRUCCIONES DE INSTALACIÓN / INSTRUCCIONES DE USO
INSTRUCCIONES DE LIMPIEZA DEL GABINETE
Limpie periódicamente el gabinete para mantener su aspecto y función. Limpie el exterior
del gabinete con un paño húmedo y un jabón o desinfectante suave. No lo limpie nunca
con solventes tales como acetona o alcohol. No intente limpiar el interior del gabinete cuando
el contenedor para objetos punzocortantes esté instalado. Limpie el interior del gabinete
utilizando un jabón o desinfectante suave.
SHARPSENTINEL
®
WALL CABINET SYSTEM
SE MUESTRA LA UNIDAD NO. 1031
Lengüetas
FIG. 1
Instrucciones de instalación
A
B
C
D
Los gabinetes se pueden instalar utilizando los agujeros de las unidades existentes o en
cualquier superficie de pared nueva. Instálelos a una altura recomendada de 53 a 56 pulgadas
desde la parte de superior del gabinete hasta el piso. Nota: Herrajería no incluida. Utilice
sujetadores apropiados para la construcción de la pared.
PARA REALIZAR LA INSTALACIÓN EN
UNA SUPERFICIE DE PARED NUEVA (FIGURE 1):
No taladre los agujeros sin comprobar primero si hay tuberías de plomería o cables detrás
de la pared. Utilizando la parte trasera del gabinete como plantilla, marque las ubicaciones
de los agujeros con un lápiz. Se recomienda taladrar al menos cuatro agujeros utilizando las
ranuras de montaje A, B, C o D. Taladre los agujeros y sujete firmemente el gabinete a la pared
utilizando los sujetadores adecuados.
PARA REALIZAR LA INSTALACIÓN UTILIZANDO
LOS AGUJEROS EXISTENTES:
Afloje los sujetadores superiores del soporte o del gabinete existente y retire
los sujetadores inferiores. Deslice el gabinete nuevo hasta ubicarlo sobre
los sujetadores utilizando las ranuras de bocallave. Reinstale los sujetadores
inferiores utilizando cualquiera de las ranuras de montaje C, D o inferiores.
PARA INSTALAR EN EL GABINETE EL SOPORTE NO. 1041
OPCIONAL PARA LA CAJA SELLADA CON GUANTES (FIGURE 2):
Inserte las lengüetas ubicadas en los costados izquierdo y derecho de la caja sellada
con guantes en las ranuras correspondientes, ubicadas en la parte inferior del gabinete,
hasta que encajen en la posición correcta.
VISTA LATERAL
FIG. 2
PARA RETIRAR LA CAJA SELLADA CON GUANTES DEL GABINETE:
Sosteniendo la caja sellada con guantes con las dos manos, presione la lengüeta de liberación
ubicada en el costado izquierdo o derecho a la vez que empuja hacia abajo hasta que se haya
retirado la caja sellada con guantes.
Lengüeta de liberación
Instrucciones de uso
PARA INSERTAR EL CONTENEDOR DE OBJETOS
PUNZOCORTANTES EN EL GABINETE:
1. Con la etiqueta de riesgo biológico orientada hacia el frente,
deslice el contenedor directamente al interior del gabinete.
2. Cierre y bloquee la puerta del gabinete.
PARA RETIRAR DEL GABINETE UN CONTENEDOR
DE OBJETOS PUNZOCORTANTES LLENO:
1. Inserte las lengüetas para el desecho final en las ranuras de la tapa del contenedor
de objetos punzocortantes. Presione hacia abajo y encájelas en la posición correcta.
2. Desbloquee y abra la puerta del gabinete.
3. Ponga las dos manos debajo de los mangos y deslice el contenedor hacia fuera,
hasta retirarlo del gabinete. Deséchelo de acuerdo con las normas del hospital.
4. Inserte el contenedor de objetos punzocortantes nuevo en el gabinete
y cierre y bloquee la puerta.
Bemis Manufacturing Co., 300 Mill Street, Sheboygan Falls, WI 53085
920-467-4621 • 800-558-7651 • Fax 800-499-8160
E-mail: HCG@BemisMfg.com • www.bemishealthcare.com
Rev. 2.0
©2017 599 6390
Page 4

INSTRUCTIONS D’INSTALLATION / MODE D’EMPLOI
SHARPSENTINEL
®
WALL CABINET SYSTEM
INSTRUCTIONS DE NETTOYAGE DE L’ARMOIRE
Nettoyez l’armoire régulièrement pour en maintenir l’apparence et la fonction. Essuyez
l’extérieur de l’armoire avec un chiffon humide et un savon doux ou un désinfectant. Ne
nettoyez jamais l’armoire avec des solvants comme de l’acétone ou de l’alcool. Ne tentez jamais
de nettoyer l’intérieur de l’armoire lorsque que le contenant d’objets piquants et tranchants s’y
trouve. Nettoyez l’intérieur de l’armoire à l’aide d’un savon doux ou d’un désinfectant.
ARMOIRE NO 1031 ILLUSTRÉE
FIG. 1
Languettes
Instructions d’installation
A
B
C
D
Les armoires peuvent être installées en utilisant les trous d’unités installées auparavant ou sur
toute nouvelle surface d’un mur. Installez l’armoire à une hauteur recommandée de 132 à 142
cm (52 à 56 po), du sol au haut de l’armoire. Remarque: visserie non incluse. Utilisez des
ancrages qui conviennent au type de mur sur lequel vous installerez l’armoire.
POUR INSTALLER L’ARMOIRE SUR UNE NOUVELLE
SURFACE D’UN MUR (FIGURE 1):
Ne percez pas de trous sans avoir d’abord vérifié où sont les tuyaux et faisceaux de câblage
derrière lu mur. En utilisant l’arrière de l’armoire comme modèle, marquez l’emplacement des
trous avec un crayon. Il est recommandé de percer au moins quatre trous à l’aide des fentes de
montage A, B, C ou D. Percez des trous et fixez l’armoire au mur à l’aide d’ancrages appropriés.
POUR INSTALLER L’ARMOIRE EN UTILISANT
DES TROUS EXISTANTS:
Desserrez le fixations supérieures du support existant ou de l’armoire existante et enlevez les
fixations inférieures. Faites glisser la nouvelle armoire en position sur les fixations supérieures, à
l’aide des encoches en trou de serrure. Réinstallez les fixations inférieures à l’aide de fentes des
montage C, D ou d’une fente située plus bas.
POUR FIXER LE SUPPORT À BOÎTE GANTS NO 1041
(EN OPTION) À L’ARMOIRE (FIGURE 2) :
Insérez le languettes des côtés gauche et droit de la boîte à gants dans les fentes
correspondantes au bas de l’armoire, jusqu’à ce que le support à boîte à gants
s’enclenche en position.
VUE LATÉRALE
FIG. 2
POUR ENLEVER LA BOÎTE À GANTS DE L’ARMOIRE:
En tenant la boîte à gants à deux mains, poussez la languette de déverrouillage
à gauche ou à droite tout en tirant vers le bas, jusqu’à ce que la boîte se libère.
Mode d’emploi
Languette de déverrouillage
POUR INSÉRER LE CONTENANT D’OBJETS PIQUANTS ET
TRANCHANTS DANS L’ARMOIRE:
1. L’étiquette d’avertissement de danger biologique étant orientée vers l’avant,
faites glisser le contenant directement dans l’armoire.
2. Fermez la porte de l’armoire et verrouillez-la.
POUR RETIRER DE L’ARMOIRE UN CONTENANT D’OBJETS
PIQUANTS ET TRANCHANTS PLEIN:
1. Insérez les languettes de fermeture permanente dans les fentes du couvercle du contenant.
Exercez une pression vers le bas pour qu’il s’enclenche.
2. Déverrouillez et ouvrez la porte de l’armoire.
3. Placez les deux mains sous les poignées et faites glisser le contenant pour
le retirer de l’armoire. Mettez le contenant au rebut selon les directives de l’hôpital.
4. Insérez le nouveau contenant d’objets piquants et tranchants dans l’armoire;
fermez la porte de l’armoire et verrouillez-la.
Bemis Manufacturing Co., 300 Mill Street, Sheboygan Falls, WI 53085
920-467-4621 • 800-558-7651 • Fax 800-499-8160
E-mail: HCG@BemisMfg.com • www.bemishealthcare.com
Rev. 2.0
©2017 599 6390
 Loading...