

Page 1
HAVEN 2000
HV2000E | HV2000R
Page 2

TABLE OF CONTENTS
Important Safeguards ................3 - 4
Product Diagram ........................ 5
Parts & Hardware ....................... 6
Before Installation ......................7
Installation ..........................8 - 10
Water Connection .................11 - 14
Operation .........................15 - 16
Cleaning & Maintenance ..........17 - 20
Troubleshooting . . . . . . . . . . . . . . . . . . . . . . . .21
Specications. . . . . . . . . . . . . . . . . . . . . . . . . . . 22
Warranty ...............................23
2
Page 3

IMPORTANT SAFEGUARDS
PLEASE OBSERVE THE FOLLOWING PRECAUTIONS
AND INSTRUCTIONS BEFORE INSTALLATION AND USE.
DANGER - To reduce the risk of electrocution:
Do not place or store product where it can fall or be pulled into a tub or sink.
Do not place in or drop into water or other liquid.
Do not reach for a product that has fallen into water. Unplug immediately.
WARNING - To reduce the risk of burns, electrocution, fire, or injury to persons:
• This product must be connected to a GFCI receptacle (wall outlet). Do not
connect the power cord if it is damaged or broken. Do not plug the product
into a loose electric outlet.
It is recommended to operate this product on a separate circuit.
Sharing a circuit could cause the breaker to trip or lights to flicker.
Consult a qualified electrician or service person if you are not sure whether
the unit is properly grounded.
• Do not open this product for repair without authorization from the
manufacturer. Only qualified service personnel should service this product.
Do not use accessories not recommended by the manufacturer.
• Connect this product to a potable cold water supply line.
• Close supervision is necessary when this product is used by children, elderly,
or adults with sensitive skin. A low temperature burn may occur when the
skin has been in contact with an object at relatively low temperature for an
extended period of time.
• If using any chemical toilet bowl cleaner, be sure to wipe up any spills that
splash onto the bidet. Do not use benzene or any acid chemical detergent, as
they can cause discoloration. Only neutral detergents are permitted.
3
Page 4

IMPORTANT SAFEGUARDS (cont.)
• Do not plug in the power cord before connecting the water supply hose.
• Install in an area with adequate ventilation to avoid high levels of
humidity which can damage the electronic components.
• Do not touch the power cord with wet hands or reach for a product
that has fallen into water. Unplug immediately.
• Unplug the bidet seat when cleaning or detaching from the toilet bowl.
Do not plug in until plumbing work has been completed.
• Keep the power cord away from heated surfaces to prevent a fire hazard. Keep
any flammable materials away from this product at all times.
• Never block the air openings of the product or place it on a soft surface, such as
a bed or couch, where the air openings may be blocked. Keep the air openings
free of lint, hair, and the like.
• Never use while sleeping or drowsy.
• Never drop or insert any object into any opening or hose.
• Do not use outdoors or operate where aerosol (spray) products are being used
or where oxygen is being administered.
SAVE THESE INSTRUCTIONS
4
Page 5
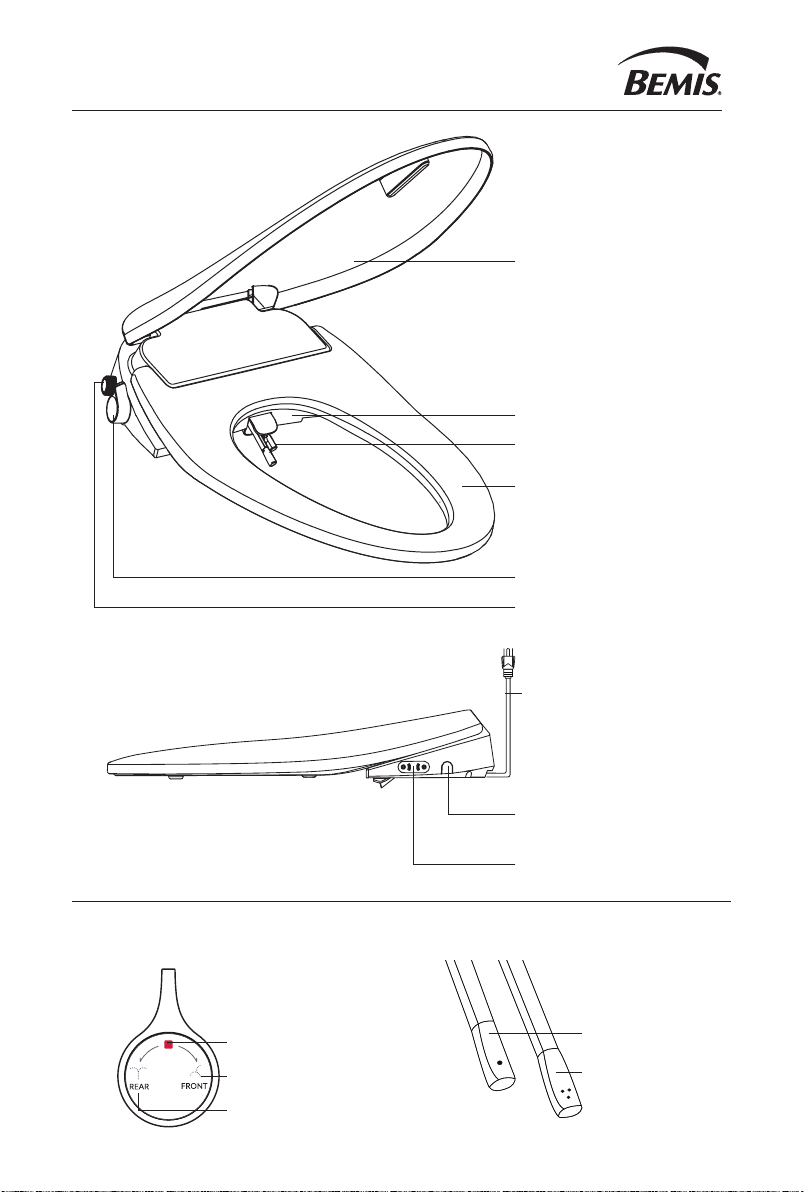
PRODUCT DIAGRAM
Lid
Warm Air Dryer
Dual Nozzles
Heated Seat
Control Knob
Water Inlet
Control Knob Dual Nozzles
Stop
Front Wash
Rear Wash
3.5 Ft Power Cord
Reset Button/
Quick Release
Adjustable Temps
Rear Wash
Front Wash
5
Page 6
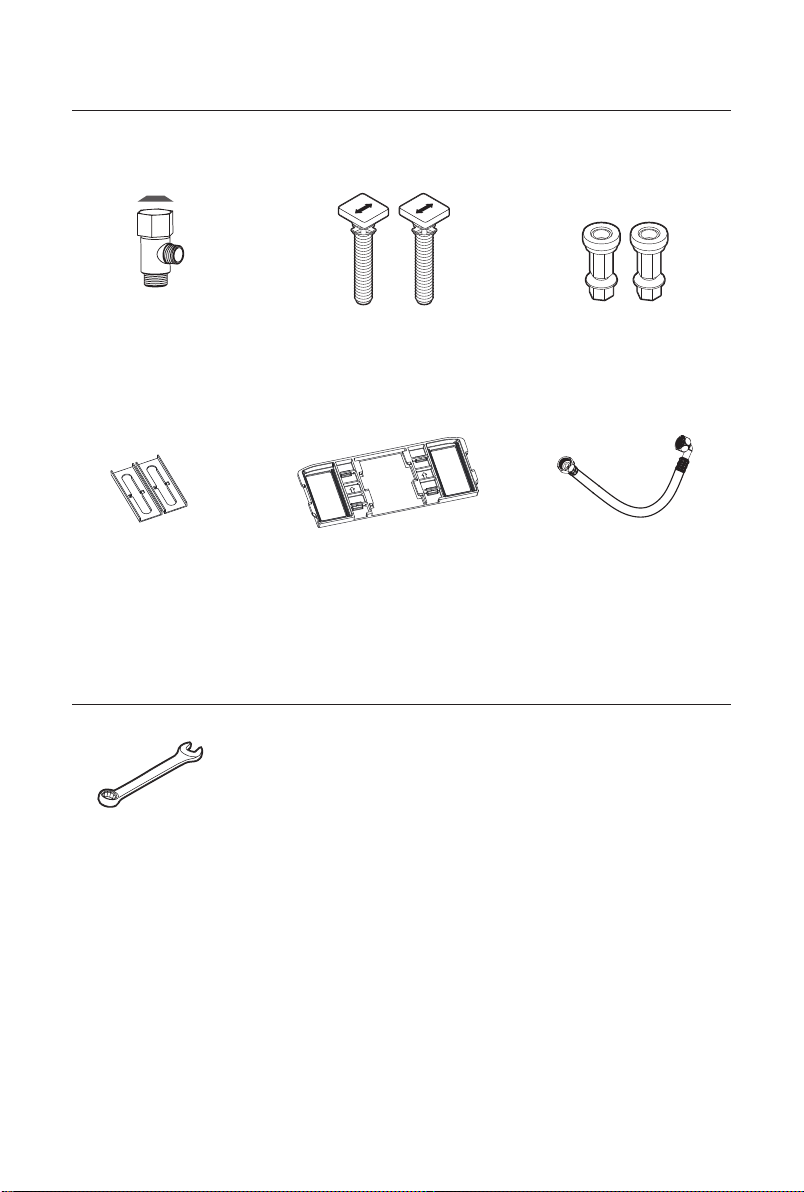
PARTS & HARDWARE
7/8"
1/2"
7/8"
T-Valve
*Cone washer inside
Stay·Tite® Bolts (2) Stay·Tite® Nuts (2)
RECOMMENDED INSTALLATION TOOL
5/8" Wrench
Bidet HoseMounting PlateMounting Brackets
6
Page 7
BEFORE INSTALLATION
Be sure that all parts are on hand before proceeding with the installation.
Residual moisture in the bidet at purchase ensures that your product was tested at
the factory with pure water to meet the highest quality standards and performance.
Check the line that connects the toilet tank to the water shut off valve. If it’s a rigid
line, you may need to purchase a flexible one to replace it before installation. The
length of the hose and the size of the connections will vary.
Water pressure limit is 10 - 110 PSI. Please use as instructed depending on your
water shutoff and toilet tank connections. Water shutoff valve should be near
installed product.
Please read installation instructions carefully.
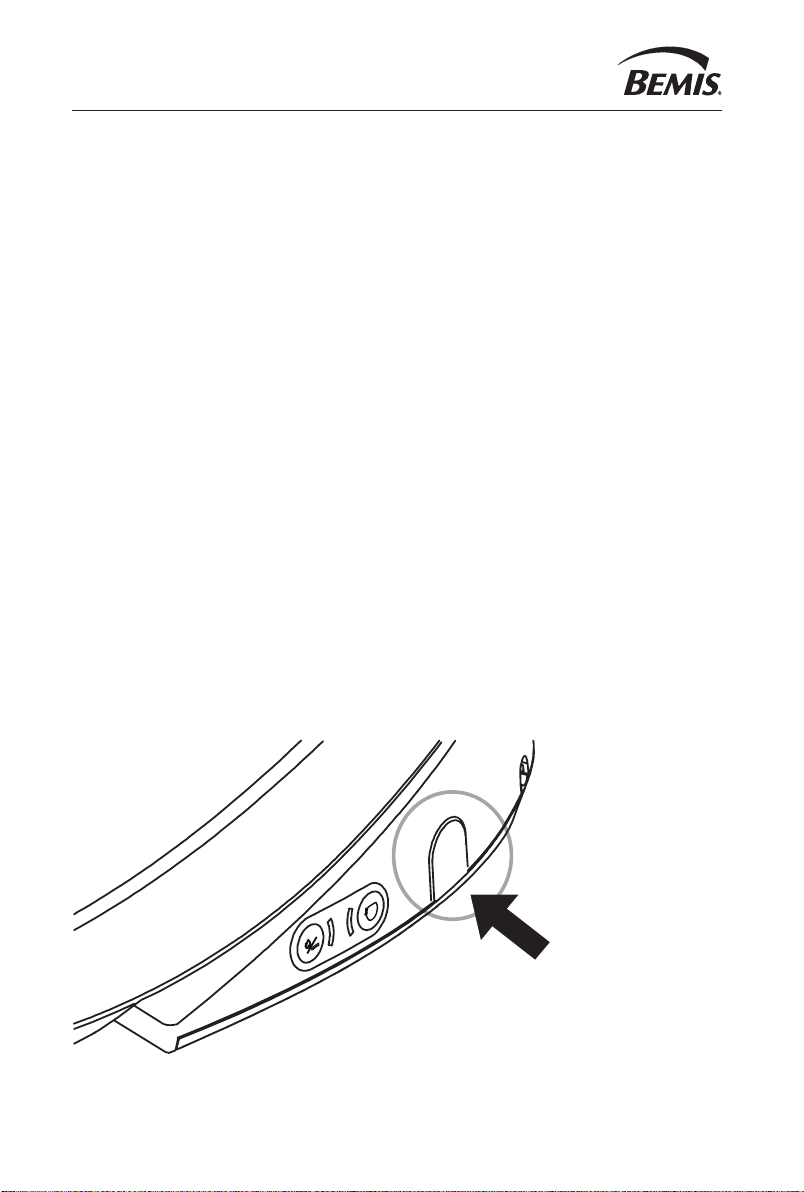
AFTER UNPACKING, PRESS AND HOLD THE RESET BUTTON FOR 2 SECONDS.
7
Page 8
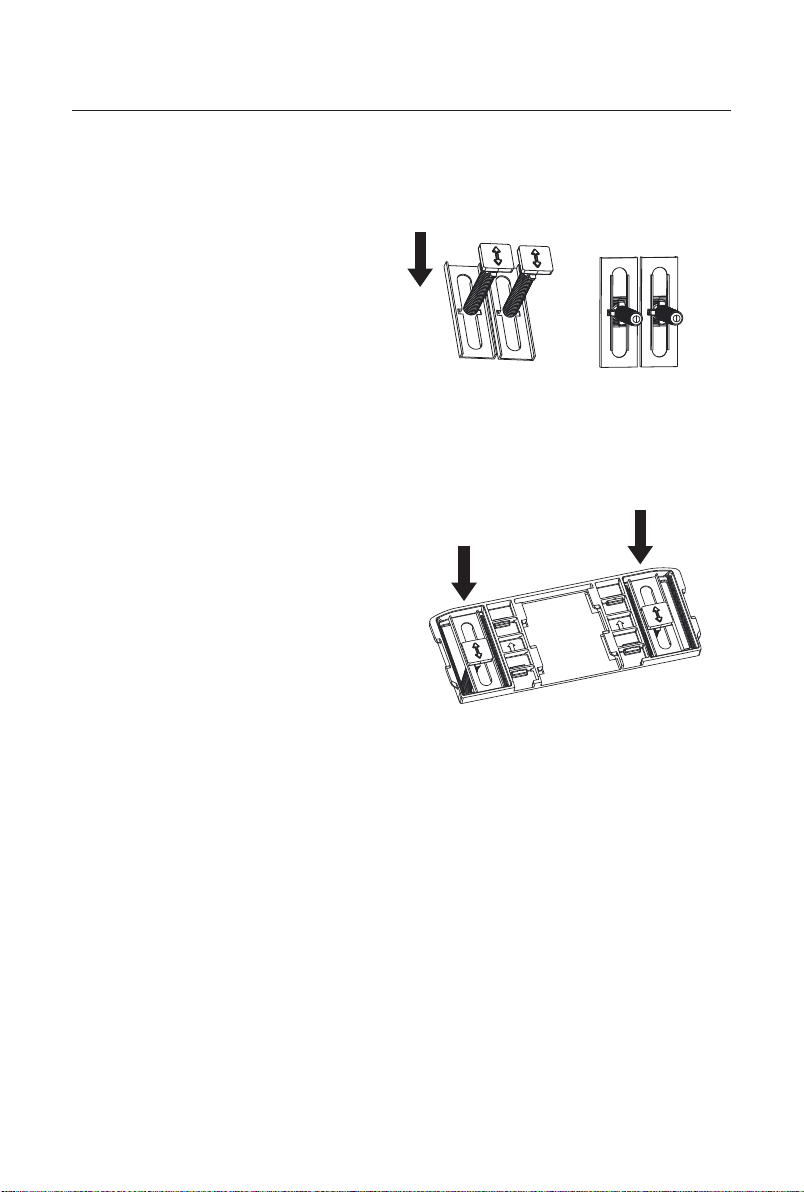
INSTALLATION
INSTALLATION
1. Insert bolts into metal mounting
brackets, aligning the teeth on
the bolt with the slots in the
mounting bracket.
2. Insert bolt with brackets into
mounting plate.
8
Page 9

INSTALLATION (cont.)
3. Slide mounting plate with bolts
into seat until it clicks.
4. Place bidet seat on bowl,
adjusting seat front-to-back
and side-to-side for proper fit.
9
Page 10
Open hinge caps.
Abra las cubiertas de las bisagras.
Ouvrir les couvercles de charnières.
4
Close hinge caps.
Cierre la tapa de las bisagras.
Fermer les couvercles de charnières.
6
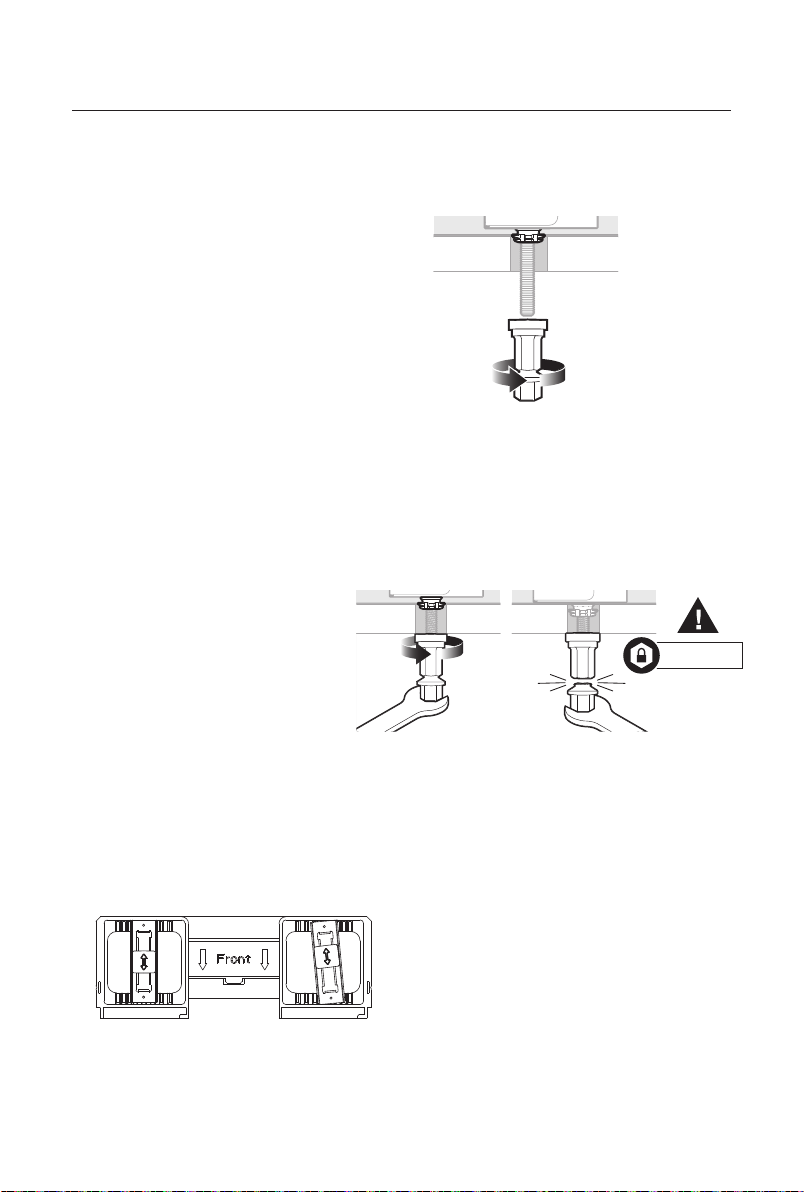
INSTALLATION (cont.)
5. Lightly finger tighten Stay·Tite®
nuts to the under side of the
bowl. Adjust seat if needed.
6. Holding seat centered on
bowl, tighten the Stay·Tite
nut until lower portions
SNAP OFF to prevent
over-tightening and will
NEVER LOOSEN.
On thinner toilets, nuts can be
further tightened if seat does
not feel secure after snapping
off the nuts.
10
®
IMPORTANT
NOTE: Slight distoron of the
bracket may occur due to the
strong clamping force of Stay·Tite
If bracket slightly shis during
ghtening, this will not aect the
rm hold of the seat in place.
®.
Page 11
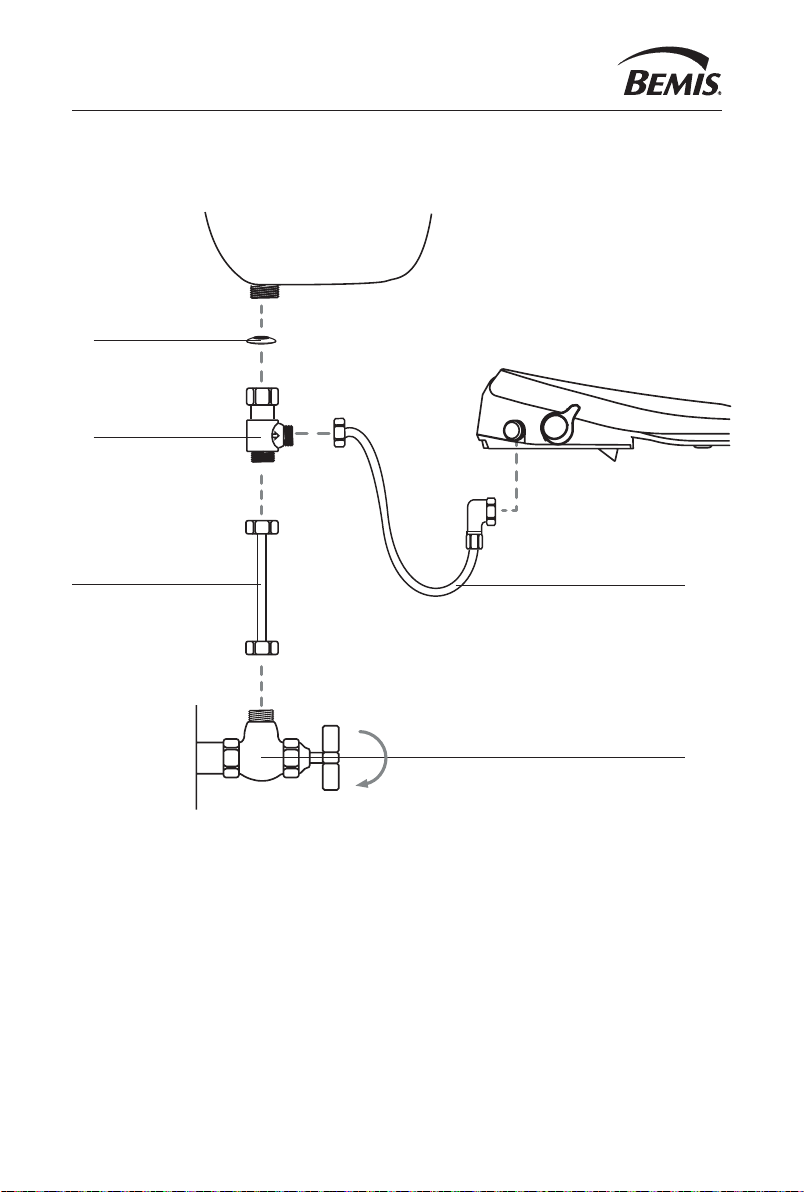
WATER CONNECTION
Toilet Tank
Cone Washer
*Inside T-valve
T-Valve
Water Supply Line
Bidet Hose
Water Supply Shut-Off Valve
11
Page 12
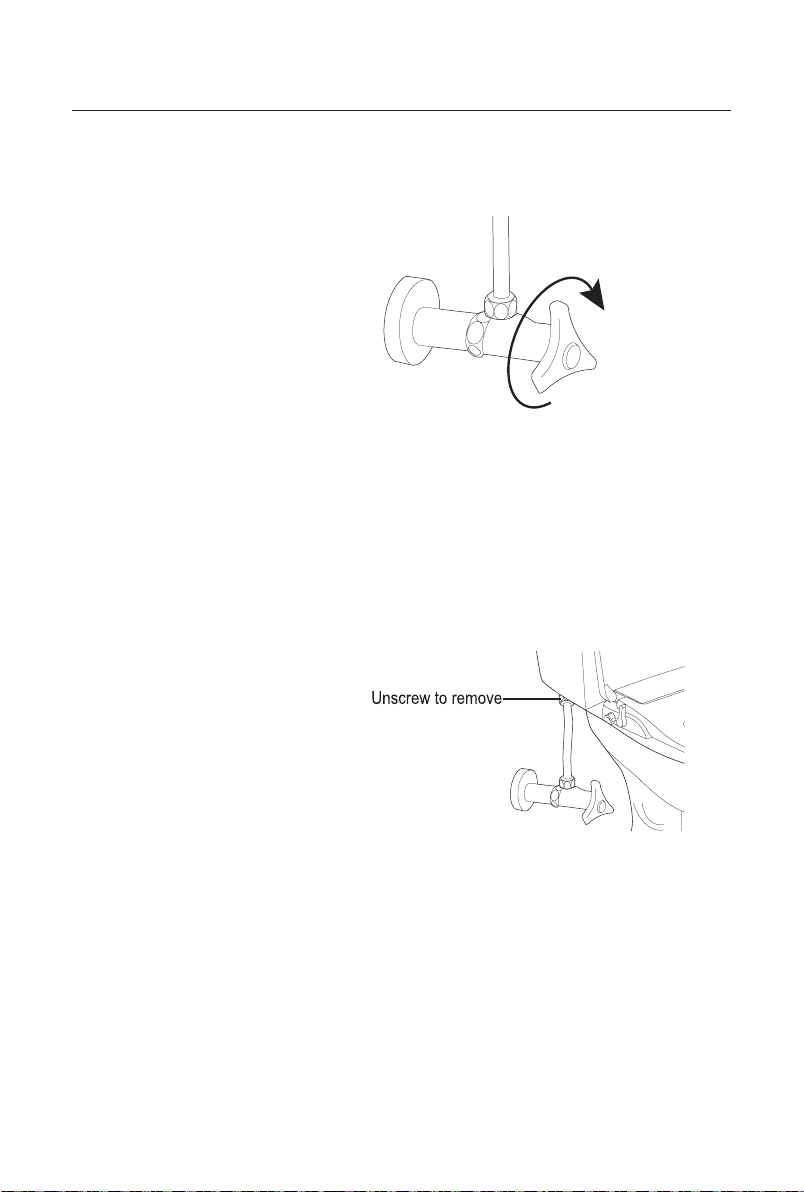
WATER CONNECTION (cont.)
1. Close water supply
valve. Flush toilet until
toilet tank is empty.
2. Place towel below tank
to catch dripping water.
Disconnect existing water
supply line from toilet tank.
12
Page 13
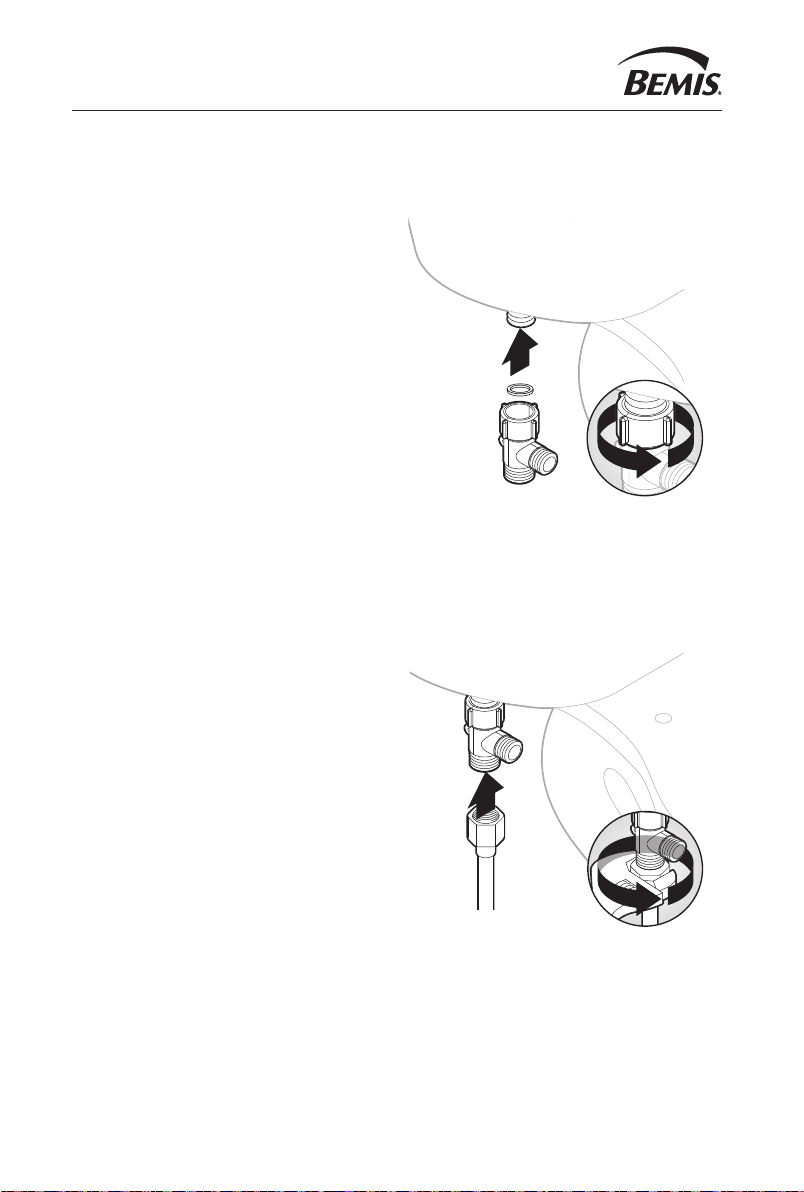
WATER CONNECTION (cont.)
3. Ensuring rubber gasket is
properly seated on top of
T-valve. Attach T-valve to toilet
TANK water supply fitting. Do
not hold fill valve inside tank.
IMPORTANT: T-VALVE
INSTALLS AT THE BOTTOM
OF TOILET TANK, NOT AT
THE WALL.
P
4. Connect water supply line
coming from the wall to
bottom of T-valve. Connect
cold water supply only. If your
water supply line is rigid, you
may need to replace with a
flexible hose line.
13
Page 14
WATER CONNECTION (cont.)
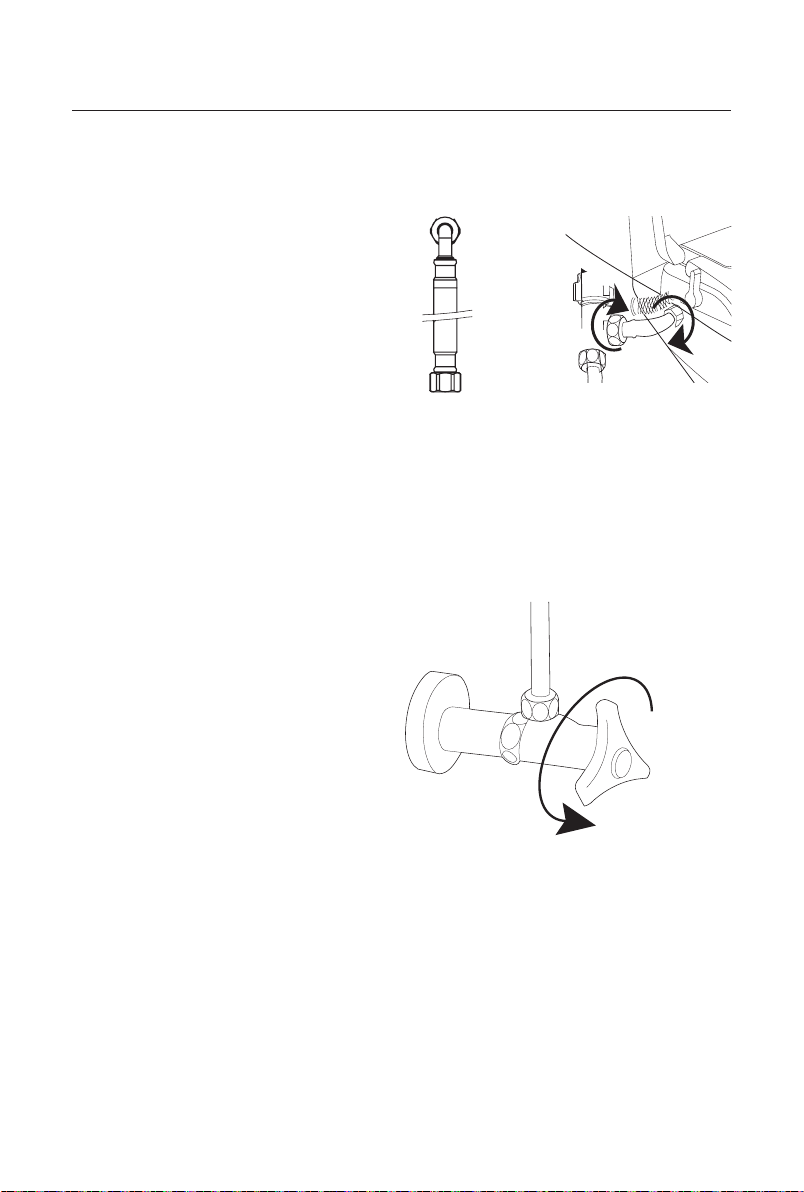
5. Connect bidet hose directly to
T-valve. Connect other end of bidet
hose to seat's metal inlet, making
sure it’s firmly connected. Do not
sharply bend or twist hose.
6. Slowly turn on water supply.
7. Wipe hoses and connectors thoroughly with a towel and carefully observe
for any leaks on all connections for at least 10 minutes.
Gently tighten connections until leakage stops. If any leaks continue, turn
off water supply and check older hoses for damaged or improperly seated
gaskets. Plumber’s tape may be used on connections to seal.
14
Page 15
OPERATION
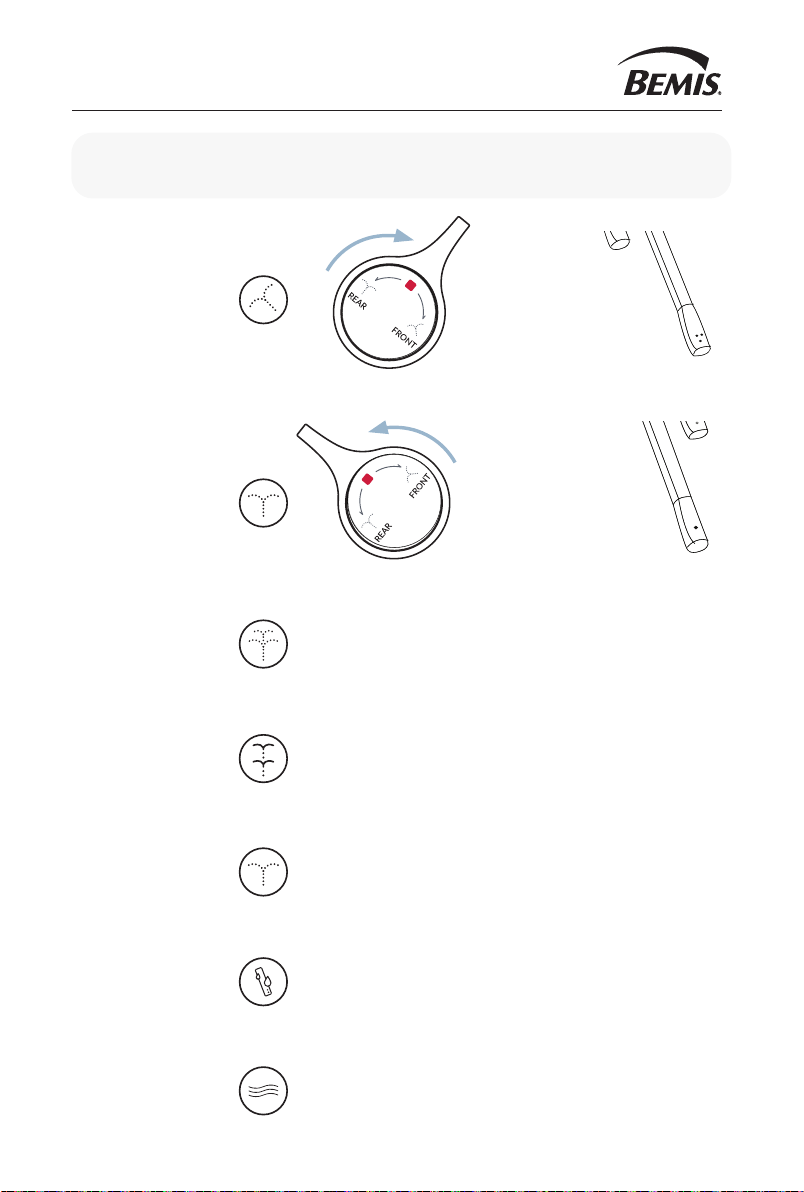
This product includes a built-in seat sensor to avoid any accidental sprays while
powered. Skin contact is required to activate any wash functions while powered.
Adjust water pressure
FRONT WASH
REAR WASH
by rotating the control
knob forward
Adjust water pressure
by rotating the control
knob backward
TURBO WASH
PULSE WASH
STANDARD WASH
SELF-CLEANING
WARM AIR DRYER
Press control knob button once while a wash is active to
activate a Turbo spray with increased water pressure.
Press control knob button a second time while a wash
is active to activate a pulse spray that alternates water
pressure to assist in stimulating bowel movements.
Press the control knob a third time while a wash is active
to switch back to a standard wash.
This product includes a self-cleaning function that rinses
the nozzles for 5 seconds before each use.
While seated and not using a wash function, press the control
knob button once to activate the warm air dryer. Press again
to stop. The dryer will automatically stop after 4 minutes.
15
Page 16
OPERATION (cont.)
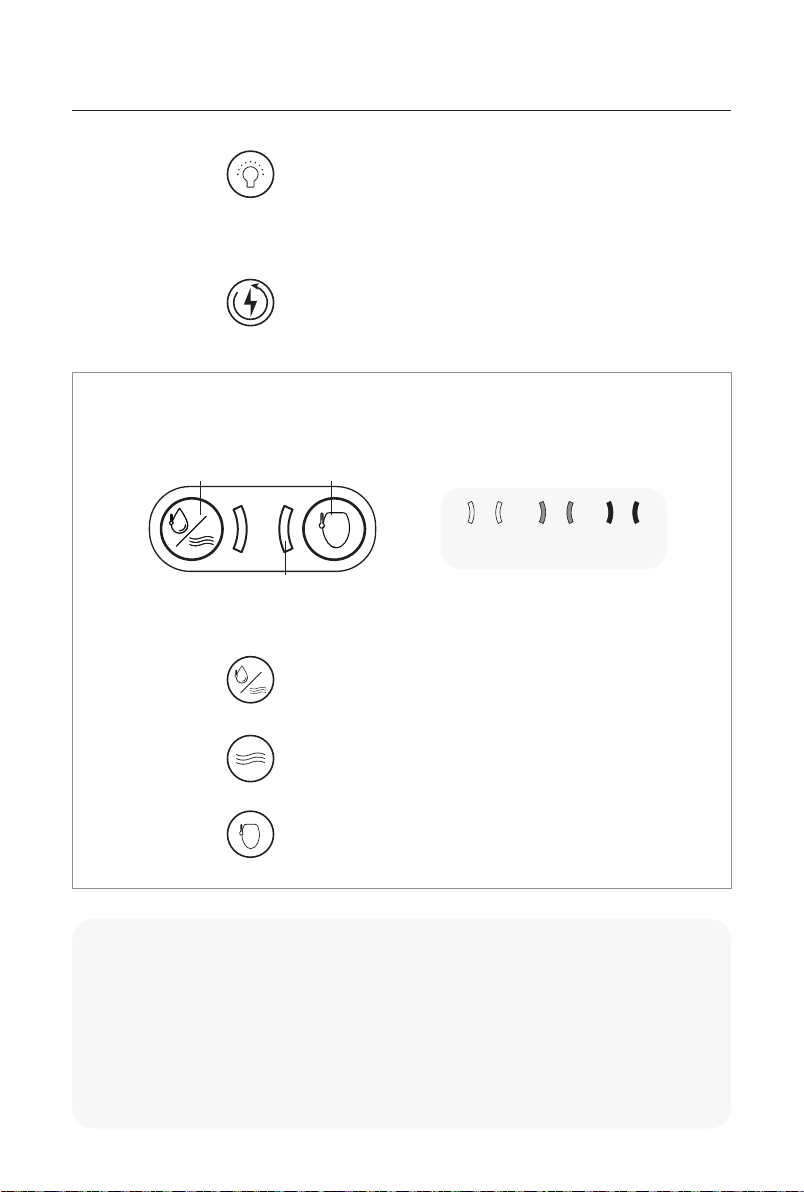
NIGHT LIGHT
BACKSIDE BACKUP
Water/Dryer Temp
WATER TEMP
While not seated, long press control knob button
to switch between night light settings.
• Mode 1 - Knob light on, bowl light off
• Mode 2 - Knob light off, bowl light on
• Mode 3 - Knob light off, bowl light off
During a power outage, wash functions can still be used with
ambient water temperature and pressure (if water pressure
is still present).
SIDE CONTROL BUTTONS
Seat Temp
Off Low High
LED Indicator
During a wash cycle, press the “Water/Dry” button
repeatedly to adjust water temperature.
DRYER TEMP
SEAT TEMP
During a dry cycle, press “Water/Dry” button repeatedly to
adjust the dryer temperature.
Press “Seat Temp” button repeatedly to adjust heated seat.
SAFETY FEATURES
• If the knob is not fully switched off after a wash, the unit will beep and will not allow
wash functions to be activated.
• When the water temp exceeds 109°F, it will not allow wash functions to be activated.
Unplug and replug the power cord to reset unit and resume operation.
• Seat Temperature Protection - After 5 minutes of occupying the seat, the seat temp
will automatically switch to ~84°F.
16
Page 17
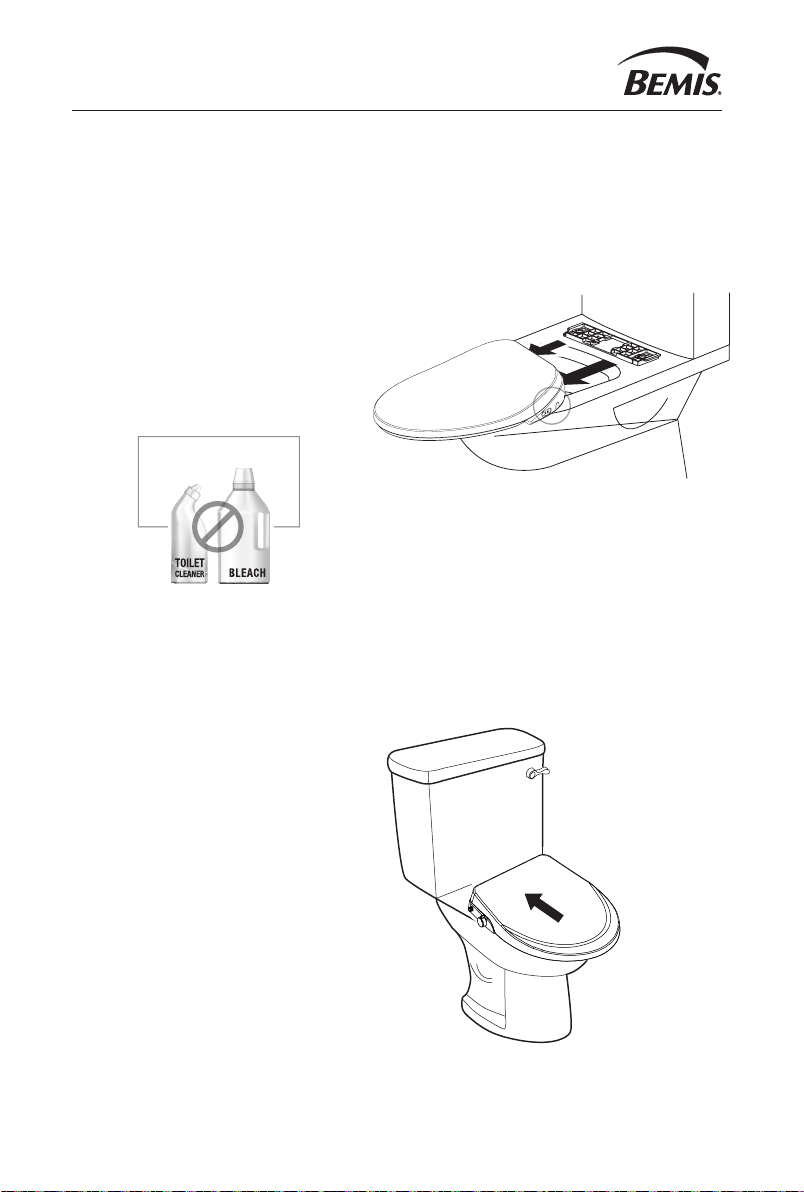
CLEANING & MAINTENANCE
EASY·CLEAN® REMOVAL & CLEANING
Close cover. Push and hold seat release
button, pulling seat forward to remove.
Clean only with mild cleaners using a
soft, damp cloth, & towel dry.
NO HARSH CHEMICALS
TOILET
BLEACH
CLEANER
After cleaning, slide closed seat back
onto the mounting plate to reinstall.
17
Page 18
CLEANING & MAINTENANCE (cont.)
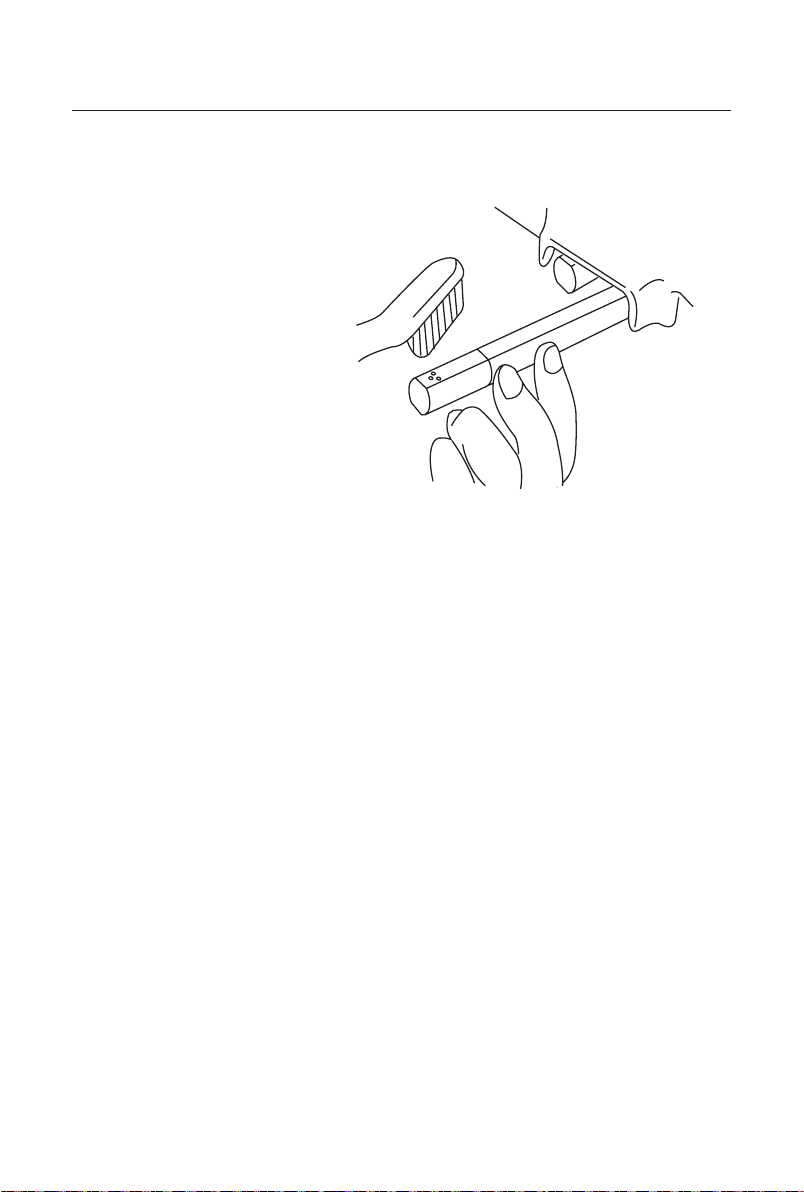
CLEAN SPRAY NOZZLES
Pull out nozzle softly and use a smooth
cloth, sponge or soft toothbrush to
clean nozzle.
USE DURING POWER FAILURE
During a power outage, it is not possible to adjust the water
and seat temperature. However, you can still use the bidet
functions with ambient water if you have water pressure.
Private wells will not maintain water pressure without power.
18
Page 19
CLEANING & MAINTENANCE (cont.)
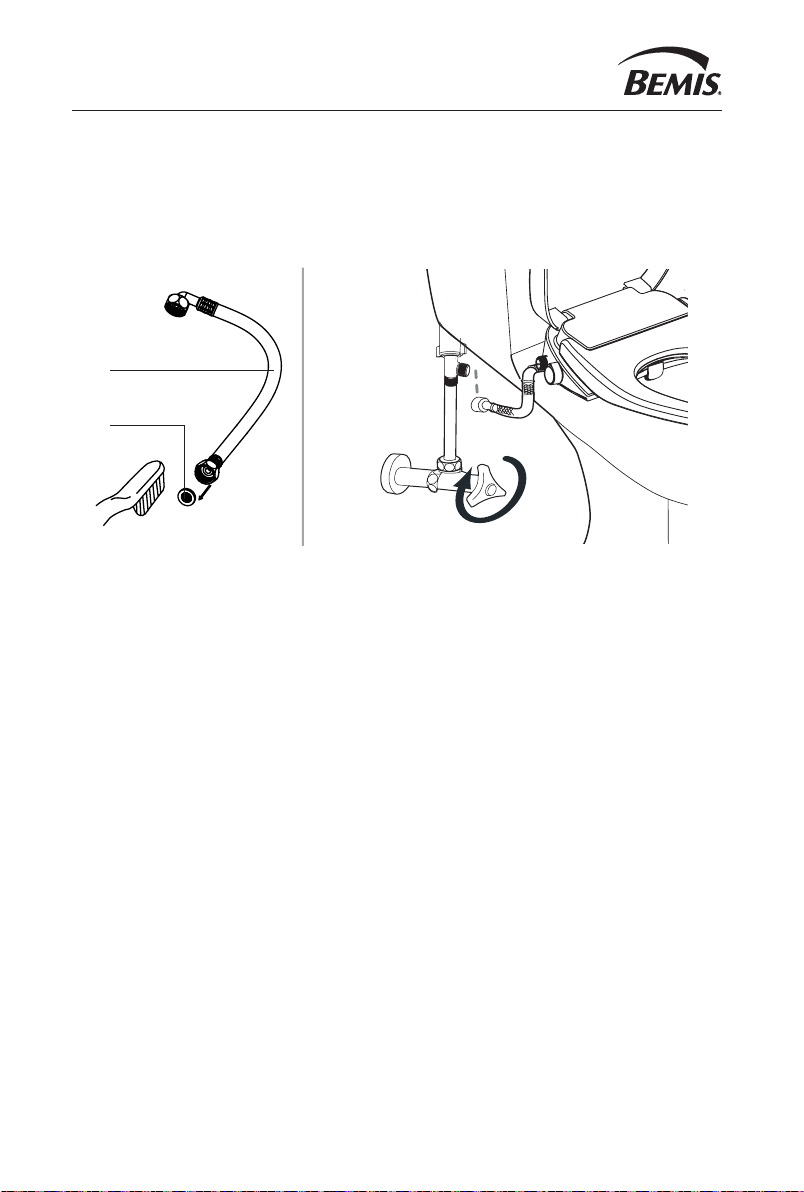
FILTER CLEANING
Bidet Hose
Filter Screen
This product will not operate properly if the filter screen is clogged.
Please clean the screen regularly.
1. Unplug power cord.
2. Close water shut-off valve.
3. Unscrew bidet hose from bidet seat.
4. Clean filter screen with a small brush.
5. Re-connect bidet hose.
6. Open water shut-off valve.
7. Plug power cord into GFCI outlet.
19
Page 20
CLEANING & MAINTENANCE (cont.)
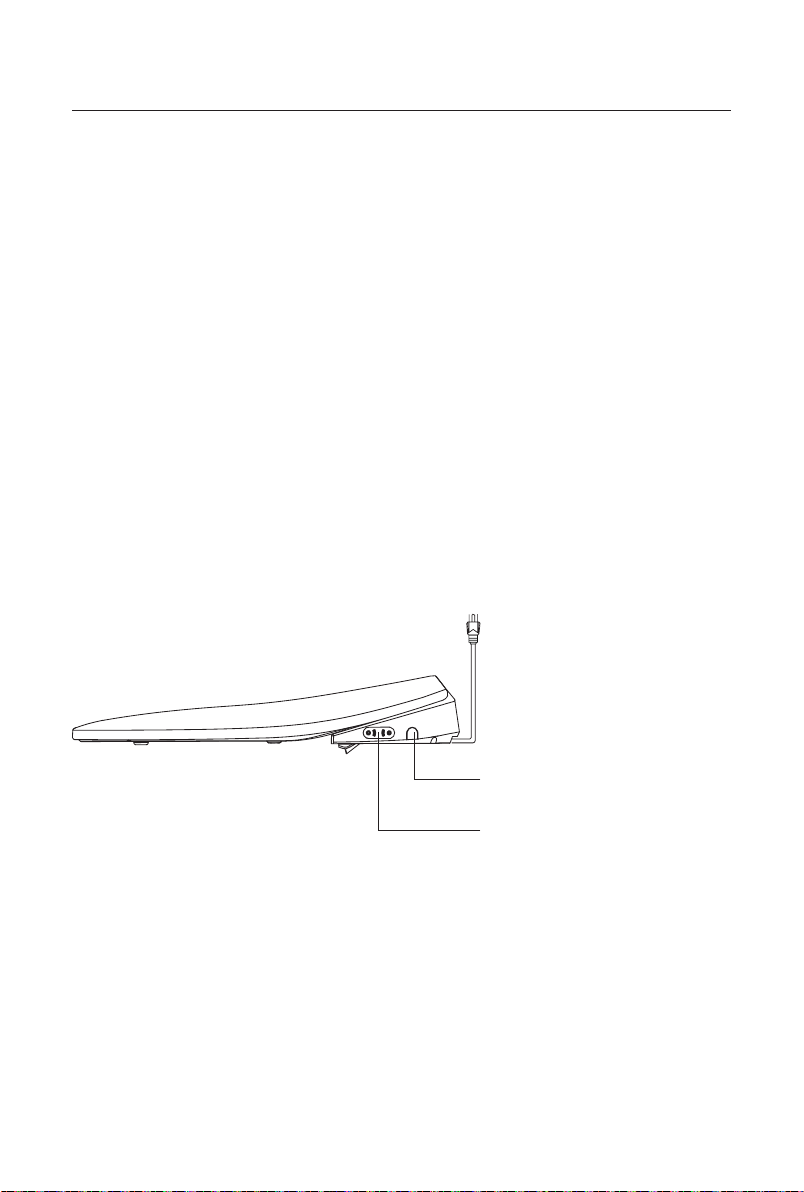
PERIODS OF NON-USE
If you do not intend to use this product for an extended period of time,
drain the water from the bidet seat
Before draining, unplug the power cord and wait 30 minutes until the
unit has cooled down. Do not insert your finger into the drain hole.
1. Disconnect power plug.
2. Close water shut-off valve.
3. Press drain button until the water is completely drained.
4. Open the water shut-off valve to resume usage.
20
Reset Button/
Quick Release
Adjustable Temps
Page 21
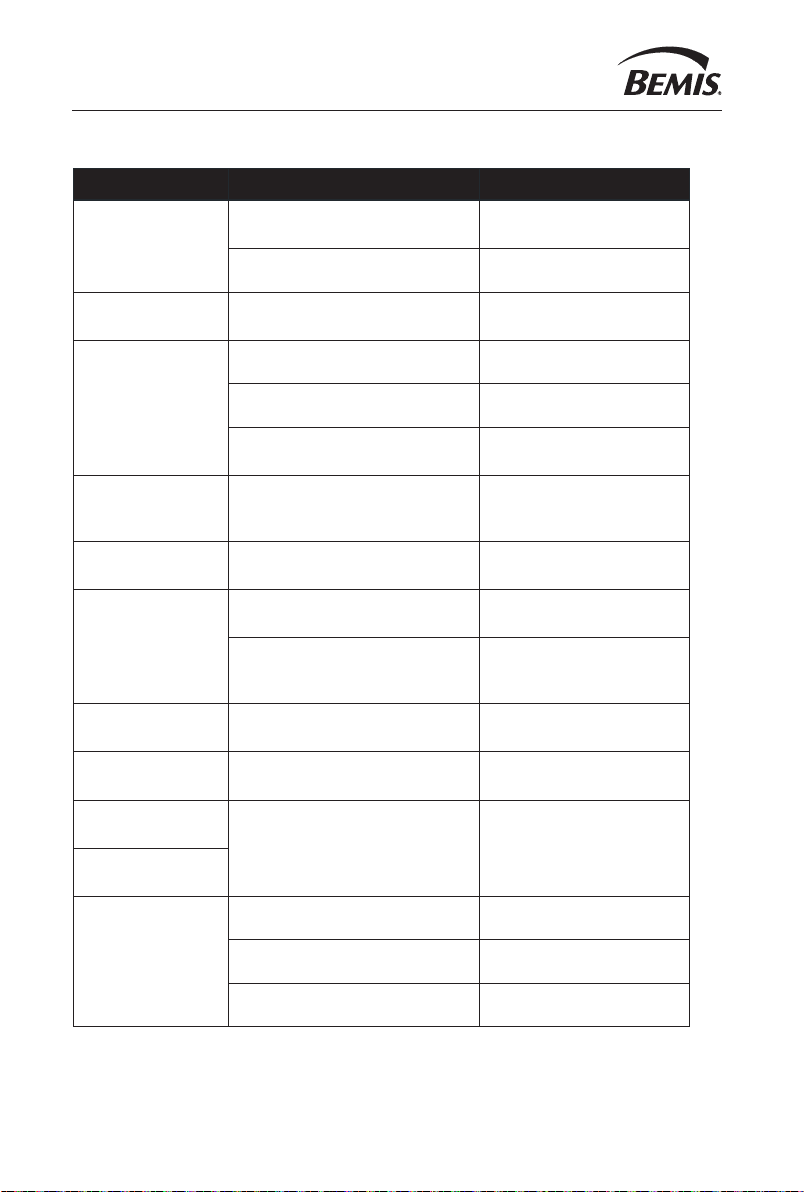
TROUBLESHOOTING
Problem Cause Solution
Inspect and
reattach bidet hose
Water does
not spray
Bidet hose has blockage
Shut-off valve is closed Open the shut-off valve
Water is leaking
(while not occupied)
Nozzle is not
extending
Nozzle is not
extending & toilet
bowl is filling up
Low water pressure Filter screen is blocked
No warm water
Heated seat is
not working
Seat temp drops
during wash function
Night light does
not turn on
Knob light does
not turn on
Knob is not completely
turned to “Stop”
The nozzle is in a self-clean cycle Wait a few seconds
Not in contact with seat sensor Occupy the seat before using
Water temp malfunction
Bidet hose blockage
Product is not connected
to a power supply
Product needs to be reset
Function is turned off Turn on and adjust the temp
Low-temp burn prevention
is turned on
Night/knob light malfunction
Turn the control
knob to "stop"
Unplug and replug the
power cord
Clean the filter screen inside
water inlet and check hose
for kinks
Clean filter screen inside
water inlet
Plug in the power cord
Unplug unit, press and hold
reset button for 2 seconds,
and plug unit back in
After a wash cycle, the seat
temp will slowly rise
Unplug and replug
power cord
Knob is
not working
Not in contact with seat sensor Occupy the seat before using
Dryer is not working Press the knob after cleaning
Dryer malfunction Contact customer support
21
Page 22

SPECIFICATIONS
Specifications HAVEN 2000
Power Rating 120Vac, 60Hz, 1050W
Water Inlet Pressure 0.1~ 0.74MPa (0.4 ~ 7.5 kgf/cm)
Power Cord 3.5 feet
Water Amount Regulation Stepless regulation
Water Temperature Regulation ~95/100°F /OFF
Wash
Device
Heated
Seat
Others
Heating Method Instant heating
Protective Device
Safety Device Double thermostat
Surface Temperature ~91.4/98.6 /OFF
Heater Power 50 W
Safety Device Thermostat & fuse
Air Temperature ~ 91.4-109.4°F
Heating Wire Power 180W
Safety Device Thermostat & fuse
Seat Temperature Protection Yes
Anti-siphon valve
+ anti-backflow valve
22
Page 23

WARRANTY
Bemis warrants that this product will be free of defects in material, workmanship,
and title for a period of two (2) years from the date of original purchase.
If you provide written notice of a defect to Bemis within the applicable warranty
period and provide adequate documentation or evidence that establishes a Product
defect to Bemis’s satisfaction, your sole remedy is the repair, replacement, or refund
of the Product’s purchase price (less shipping, if applicable), at Bemis’s option.
Bemis may, at its option, require the return of any Product for inspection and testing
before honoring any defect claim. This Limited Warranty excludes component parts
not specied by Bemis, and excludes costs related to shipping and labor, including
removal, disposal, repair, or replacement of the defective Product and installation
of replacement Product (if applicable). Products returned for a refund must be in
original packaging and in saleable condition, and may be subject to a restocking fee.
Discontinued colors or models, and custom or specially ordered Products cannot be
returned for a refund.
This Limited Warranty is void if: (a) the Product has not been installed, used,
or maintained according to any applicable written materials, including written
instructions, specications, packaging, and manuals; (b) the Product is not used for
the intended application, or (c) the Product has been modied or repaired without
Bemis’s express written permission.
THIS LIMITED WARRANTY IS PROVIDED IN LIEU OF ALL OTHER WARRANTIES,
EXPRESS OR IMPLIED, INCLUDING THE IMPLIED WARRANTIES OF
MERCHANTABILITY AND FITNESS FOR A PARTICULAR PURPOSE. BEMIS
EXPRESSLY DISCLAIMS LIABILITY FOR SPECIAL, PUNITIVE, EXEMPLARY,
CONSEQUENTIAL OR INCIDENTAL DAMAGES ASSOCIATED WITH THE
PRODUCT, INCLUDING LOST PROFITS OR BUSINESS INTERRUPTIONS. BEMIS’S
LIABILITY UNDER THESE TERMS AND CONDITIONS SHALL NOT EXCEED THE
PURCHASE PRICE OF THE PRODUCTS.
Please see BemisMfg.com/terms-and-conditions for complete warranty terms.
23
Page 24

Thank you
for your Bemis® bidet
seat purchase!
Bemis Manufacturing Co.
Sheboygan Falls, Wisconsin U.S.A.
888.722.6488 | [email protected]
ToiletSeats.com
012624
 Loading...