

Page 1
I N S T R U K C J A O B S Ł U G I PL,
Instrukcja w wersji elektronicznej dostępna jest na www.bemielectronics.com/manuals
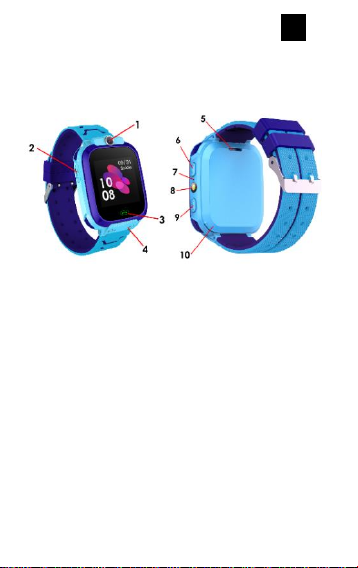
Elementy urządzenia
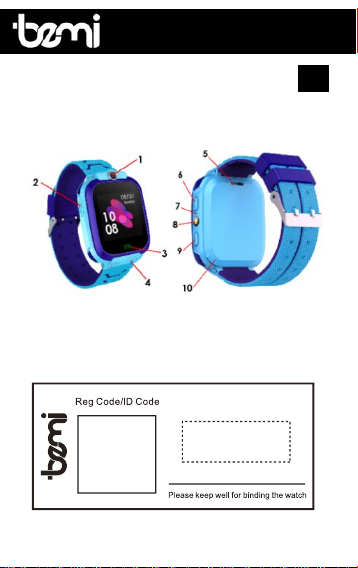
1 – kamera / 2 – port USB / 3 – odbieranie połączenia, powrót,
zmiana tapety / 4 – mikrofon / 5 – glośnik / 6 – odbieranie
połączenia, u ruchomienie latarki po dwukrotnym naciśnięciu,
wyłączenie po jednokrotnym naciśnięciu / 7 – reset / 8 – latarka
/ 9 – przycisk włącz / wyłącz, wzbudzenie ekranu. Przytrzymaj
aby uruchomić funkcje SOS / 10 – otwarcie pokrywy tylniej.
BEMI KID 2G IMEI
V:2.1
Kid – smartwatch
Page 2

Smartwatch Model: KID, w instrukcji nazwany “urządzenie”
Obowiązkowo zapoznaj się z tą instrukcją i kartą gwarancyjną
przed rozpoczęciem korzystania z urządzenia.
Zegarek dziecięcy jest urządzeniem telekomunikacyjnym
służącym do lokalizowania jego położenia i przesyłania danych.
Urządzenie w swoim działaniu opiera się na sieci komórkowej
GSM/GPRS.
W celu określenia lokalizacji urządzenie korzysta z sieci
operatora komórkowego (LBS).
Pozycjonowanie na podstawie stacji bazowej LBS polega na
obliczaniu lokalizacji telefonu komórkowego na p odstawie różnic
w wieżach komunikacji mobilnej i zależy to w dużej mierze od
gęstości zasięgu stacji bazowej w pobliżu. Jeśli jest wiele s tacji
bazowych, pozycjonowanie jest dokładne. Jeśli jest kilka stacji
bazowych, pozycjonowanie nie jest tak dobre. Ogólnie rzecz biorąc,
dokładność pozycjonowania wynosi 50-2000 metrów.
Uwaga!
Urządzenie wymaga instalacji karty micro SIM z aktywną usługą
wykonywania/odbierania połączeń z wyłączoną blokadą PIN.
Sugerowane jest wyłączenie poczty głosowej. Podczas przesyłania
informacji o lokalizacji zegarek będzie potrzebował dostępu do
mobilnego Internetu, dlatego warto wykupić pakiet minimum 1
GB. Podczas użytkowania zegarka mogą zostać naliczone opłaty za
korzystanie z sieci i połączenia zgodnie z taryfą operatora.
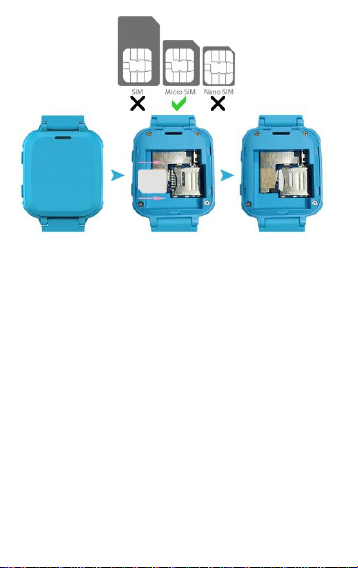
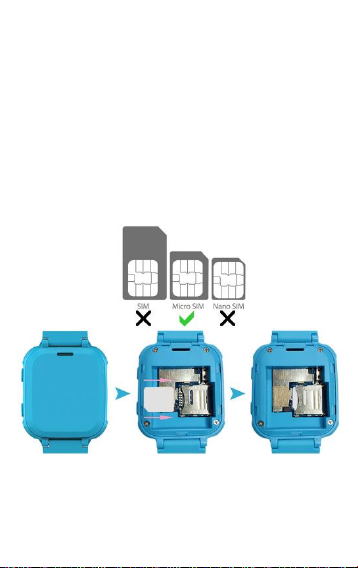
Urządzenie obsuguje karty micro SIM
Upewnij sie czy posiadasz właściwy rodzaj karty.
Page 3
Instalacja karty micro SIM
- Otwórz tylną klapkę zegarka delikatnie podważając ją w górnej
części oraz po bokach do momentu odpięcia zatrzasków.
Następnie wyjmij baterię zwracając uwagę, aby nie uszkodzić
przewodów baterii. Zapamiętaj jej ułożenie.
- Przed włożeniem lub wyjęciem karty SIM zawsze upewnij się,
że zegarek jest wyłączony. Nigdy nie wkładaj lub wyjmuj karty
SIM, gdy zegarek jest włączony.
- Otwórz zabezpieczenie karty micro sim przesuwając je delikatnie
w prawo a następnie włóż kartę SIM w slot w pozycji takiej aby chip
karty sim był zwrócony do góry do ekranu zegarka. Następnie
zamknij zabezpieczenie przesuwając w lewo.
- Umieść baterie w zegarku w pozycji pierwotnej, a następnie
zamknij tylną klapkę poprzez zaciśnięcie zatrzasków.
Pierwsze uruchomienie
- Po przeprowadzeniu instalacji karty SIM w zegarku oraz
uprzednim naładowaniu urządzenia możemy je uruchomić poprzez
naciśnięcie i przytrzymacie przycisku włącz po prawej stronie.
Page 4
- Po uruchomieniu zegarek połączy się z siecią komórkową.
Bezpieczeństwo użytkowania
Regularnie czyść urządzenie, zwłaszcza część przylegającą do
skóry. Dostosuj zaciśnięcie paska urządzenia tak aby zapewnić
cyrkulację powietrza. W miejscu, gdzie noszone jest urządzenie,
nie powinno się używać nadmiernych ilości produktów do
pielęgnacji skóry. Jeśli masz alergię skórną lub dyskomfort,
przestań nosić urządzenie. Nie narażaj urządzenia na działanie
środków czyszczących, środków żrących oraz innych środków
chemicznych. Nie narażaj urządzenia na działanie wysokich
(ponad +50°C) i niskich (poniżej -10°C) temperatur jak i na
nagrzewanie poprzez działanie na przykład promieni
słonecznych lub innego źródła ciepła. Może to spowodować
uszkodzenie urządzenia.
Uwaga: urządzenie nie jest wodoszczelne.
Ładowanie baterii
Przed rozpoczęciem
korzystania z urządzenia
należy upewnić się, że bateria
jest naładowana. Do
ładowania należy użyć
dostarczonego w zestawie
przewodu. Zaleca się użycie
zasilacza o napięciu 5 V i
natężeniu 1 A.
Zasilacz nie jest dołączony do
zestawu. Pełne naładowanie
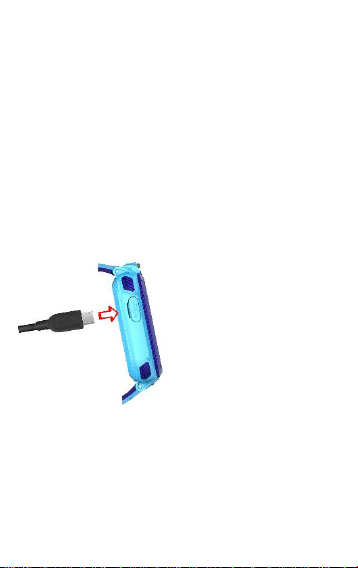
urządzenia zajmuje około 2 godziny. Otwórz zaślepkę chroniącą
port micro USB, a następnie podłącz kabel micro USB dołączony do
zestawu.
Uwaga! jeżeli urządzenie było całkowicie rozładowane grafika
ładowanie może wyświetlić się dopiero po kilku minutach.
Page 5
Obsługa urządzenia
Zegarek obsługujemy za pomocą ekranu dotykowego.
Przesuwając palcem po ekran ie przechodzimy pomiędzy
poszczególnymi funkcjami a daną funkcję wybieramy poprzez
dotknięcie ekranu.
Menu urządzenia
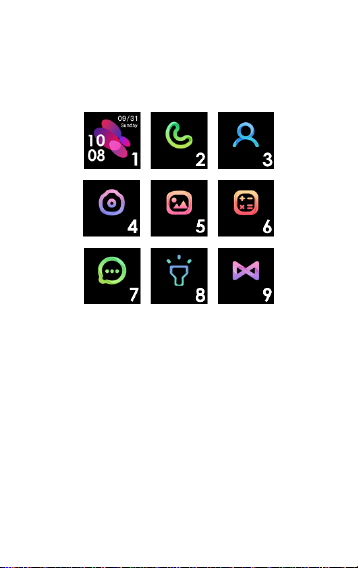
1. Ekran główny zegarka pokazujący aktualną datę i godzinę oraz
poziom naładowania baterii. Na tym ekranie widzimy również
ikonkę połączenia z siecią komórkową oraz ikonkę ilości
otrzymanych umownych nagród.
2. Umożliwia wykonanie połączenia telefonicznego poprzez ręczne
wprowadzenie numeru.
3. Książka telefoniczna daje dostęp do 10 zdefiniowanych za
pomocą aplikacji kontaktów.
4. Umożliwia zrobienie zdjęcia, które zostanie zapisane w albumie.
5. Dostęp do ostatnio wykonanego zdjęcia. Możliwość jego
podglądu, wysłania lub usunięcia. Każde kolejne zrobione zdjęcie
nadpisuje poprzednie.
6. Prosta gra matematyczna o trzech poziomach trudności.
7. Umożliwia wysyłanie i odbieranie wiadomości głosowych.
Page 6
8. Umożliwia uruchomienie latarki wbudowanej w zegarek.
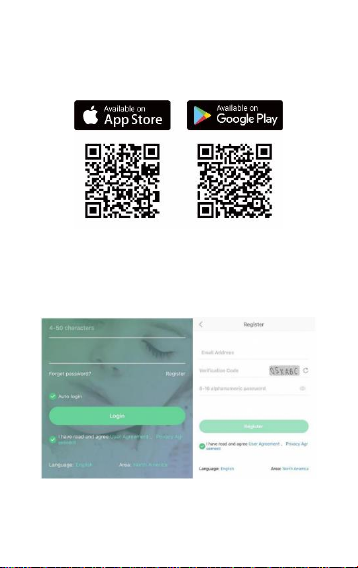
9. Umożliwia zeskanowanie kodu QR do aplikacji oraz
sprawdzenie kodu rejestracyjnego urzadzenia.
Aplikacja
Pobierz aplikację „SeTracker2” dla systemu iOS lub Android.
Rejestracja konta i zegarka
W oknie rejestracji wprowadź lub zeskanuj kod zegarka (REG
CODE) znajdujący się przy zegarku na początku niniejszej instrukcji
lub w urządzeniu w menu Urządzenie. Wprowadź swój adres email,
nazwę oraz hasło. Następnie wybierz język aplikacji oraz obszar
użytkowania zegarka.
Page 7
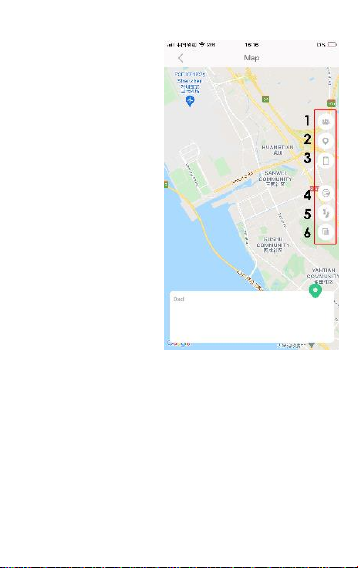
Główne funkcje aplikacji
Mapa
Pokazuje aktualną pozycję
zegarka na mapie.
Dostępne sa następujace
funkcje mapy:
1 – Wybór urządzenia,
przyciśnij , aby przełączyć
pomiędzy sparowanymi
zegarkami.
2 – Lokalizacja, przyciśnij,
aby odświeżyć lokalizację
zegarka.
3 – Lokalizacja telefon,
przyciśnij aby wykonać
lokalizację telefonu.
4 - Strefa bezpieczeństwa:
Kliknij znak + aby określić
strefę bezpieczeństwa.
Wpisz nazwę Twojej
strefy, kliknij na mapę, a
następnie wybierz rozmiar
wyznaczanej strefy w przedziale od 200m do 2000m. Po
przekroczeniu strefy przez zegarek otrzymasz powiadomienie.
5- Historia: Ustaw datę i godzinę dla której chcesz sprawdzić trasę
jaką przebył użytkownik zegarka w danym czasie.
6 – Tryb mapy, przyciśnij aby wybrać jeden z trzech trybów mapy.
Na górze głównego ekranu po lewej mozemy wybrać urządzenie
jeśli mamy podłaczone kilka zegarków do aplikacji. Po prawej
stronie naciśnij + aby dodać nowe urządzenie.
Poniżej dostępne są ikony skrótów do: ksiązki telefonicznej z
kontaktami, czatu z urządzeniem oraz dzwonienia.
Page 8
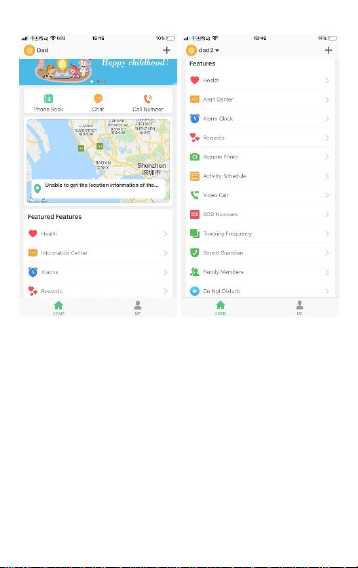
Pozostałe funkcje
Członkowie rodziny
Wyświetl liste członkow rodziny.
Wiadomości
W ty m miejscu otrzymujesz i masz podgląd do wszelkich
powiadomień i alarmów otrzymywanych z zegarka.
Tryby pracy
Wybierz jeden z trybów odświeżanie lokalizacji zegarka raz na
dziesięć minut, raz na godzinę lub raz na minutę.
SOS numer do rodziny
Kiedy użytkownik zegarka naciśnie i przytrzyma przycisk SOS,
zegarek wykonuj automatyczne połączenie alarmowe do trzech
Page 9

zdefiniowanych w tym miejscu kontaktów.
Nagrody
Wyślij odpowiednią ilość serc, która pojawi się na ekranie zegarka.
Ustal dowolne znaczenie każdej liczby i nagradzaj użytkownika
zegarka.
Tryb klasy/Nie przeszkadzaj
Wybierz czas w ciągu dnia w którym użytkownik zegarka nie będzie
otrzymywał połączeń telefonicznych.
Alarm /Budzik
Ustawienia budzika. Ustaw wybraną godzinę oraz częstotliwość
powtarzania.
Znajdź zegarek
Kliknij szukaj zegarka, aby odszukać go jeśli jest w Twoim pobliżu.
Zegarek będzie dzwonił informując o swoim położeniu.
Głos
Wpisz numer na jaki chcesz otrzymywać powiadomienia SMS o
zdarzeniach takich jak: n iski poziom baterii w zegarku,
uruchomienie alarmu SOS za pomocą przycisku zegarka.
Ustawienia alarmu SMS
Wpisz numer na jaki chcesz otrzymywać
powiadomienia SMS o zdarzeniach takich jak: niski poziom baterii
w zegarku, uruchomienie alarmu SOS za pomocą przycisku zegarka.
Zmień ustawienia
W tym miejscu mozesz włączyć lub wyłączyć funkcje wybierania
numeru w urządzeniu.
Page 10

Zdalny aparat
Wykonaj zdalnie zdjęcie używając aparatu zegarka i otrzymaj je na
swój telefon. Wykonane zdjęcie może pojawić się po pewnym
czasie oczekiwania w zależności od siły sygnału sieci komórkowej.
Numer nieznany
Blokada numerów spoza listy kontaktów.
Język i Strefa czasowa
Wybierz jeden z dostępnych języków zegarka. Ustaw Twoją strefę
czasową, aby zegarek pokazywał poprawną datę i godzinę na
ekranie.
Lokalizacja LBS
Włącz lub wyłącz lokalizację za p omocą anten operatorów
komórkowych.
Język i Strefa czasowa
Wybierz jeden z dostępnych języków zegarka. Ustaw Twoją strefę
czasową, aby zegarek pokazywał poprawną datę i godzinę na
ekranie.
Wyłącz, zresetuj zdalnie zegarek
Zegarek zostanie zdalnie wyłączony lub zresetowany.
Ja / Mój profil
- Dane osobiste: Ustawienia Twojego konta.
- Zmień hasło: Zmień hasło do Twojego konta.
- Lista urządzeń: Dodawaj, edytuj lub usuwaj powiązanie z
zegarkami.
- Usuń konto. Naciśnij aby usunąć konto.
Pomoc
Aplikacja nie przyjmuje komend i pokazuje informacje, że
zegarek nie jest w sieci.
Page 11

- Sprawdź czy sygnał GSM jest prawidłowy. Czy na wyświetlaczu
jest widoczny zasięg. Jeśli nie wyłącz urządzenie.
- Sprawdź czy karta SIM jest prawidłowo zainstalowana w
zegarku i czy obsługuje internet 2G. Sprawdz czy posiadasz
dostępny pakiet danych internetowych.
- Uruchom urządzenie i sprawdź czy na ekranie jest widoczny zasięg
sieci. Jeśli nadal nie ma zasięgu przejdź do kolejnego punktu.
Sprawdź czy pojawia sie ikona symbolizująca przesyłanie danych ,
jeśli nie należy ust awić APN (Access Point Name, konkretna sieć
pakietowa np. Internet)
Wyślij SMS z telefonu na numeru urządzenia o treści:
pw,123456,apn,internet,,,XXXXX#
znak X powyżej oznacza numer przypisany do konkretnego
operatora np:
26001 – Plus
26002 – T-Mobile
26003 – Orange
26006 – Play
Pozostałe kody operatorów dostępne są na www.mcc-mnc.com
Po wysłaniu SMS należy odczekać kilkanaście minut aż urządzenie
odbierze z sieci ustawienia. Jako potwierdzenie pojawią sie strzałki
przesyłu danych.
- Sprawdź czy parametry serwera zawierają prawidłowy numer
IP, port i ID. Parametry sprawdź wysyłając SMS z telefonu na nr
karty zainstalowanej w zegarku o treści:
pw,123456,ts#
W odpowiedzi urządzenie odeśle wiadomość z treścią zawierającą
numer IP, port oraz ID np. jak poniżej:
Ver:G36WS-YDE_V1.1_2021.06.01_11.15.20;
ID: 1234567890
Imei: 123456789012345;
Ip_url: 52.28.132.157;
Port: 8001;
Upload: 600S;
Page 12

Bat level: 80;
Language: 1;
Zone: 8.00;
Ec: 0;
NET: OK(73)
Sprawdź dane otrzymane w SMS z numerem urządzenia.
- Jeżeli numer ID/IMEI/REG CODE różni się od numeru z plakietki
przypiętej do zegarka, należy ustawić nowy numer IMEI.
Wyślij z telefonu na numer karty zainstalowanej w urządzeniu
SMS o treści:
pw,123456,imei,xxxxxxxxxxxxxxx#
- urządzenie po otrzymaniu SMSa z kodem odsyła w odpowiedzi
SMS z prawidłowym numerem IMEI na przykład: pw,123456,imei,
359614514986574#
Sprawdź w aplikacji, na liście urządzeń czy zarejestrowany numer
ID jest zgodny z ID zegarka.
- Jeśli IP_URL oraz PORT jest inny niż w przykładzie powyżej, wyślij
SMS z telefonu na nr karty SIM zainstalowanej w urządzeniu
o treści:
pw,123456,ip,52.28.132.157,8001#
- urządzenie w odpowiedzi odeśle smsa o treści
[surl,52.28132.157,port,8001#]
ok.! i po tej czynności będzie działać poprawnie.
-Wiersz GPRS/NET z przykładu powyżej powinien zawiera słowo OK
oraz siłę sygnału w nawiasie. Jeśli informacja za wiera słowo NO,
oznacza to, że urządzenie nie jest podłączone do sieci internet. W
tym wypadku należy wrócić do poczatku tego akapitu i postępować
zgodnie z wytycznymi.
Nie można zadzwonić na zegarek. Sygnał jest zajęty lub
abonent nie odpowiada
Powód: Urządzenie nie rozpoznaje numeru przychodzącego lub w
Page 13

aplikacji ustawiony jest tryb „nie przeszkadzać”.
- Sprawdź czy numer z którego dzwonisz nie jest zastrzeżony.
- Sprawdź czy w aplikacji ustawione są numery kontaktowe.
Zegarek odbiera tylko połączenia z numerów wcześniej
ustawionych w kontaktach aplikacji.
Zegarek nie pokazuje aktualnej godziny i daty
Powód: Urządzenie nie połączyło się z serwerem aplikacji w celu
aktualizacji czasu.
- Jeżeli zegarek pokazuje kilka godzin do tyłu, należy sprawdzić i
wybrać odpowiednią strefę czasową poprzez aplikację.
- Jeżeli powyższa czynność nie pomoże, należy wysłać ze swojego
telefonu na numer karty SIM zainstalowanej w urządzeniu
SMS o treści:
pw,123456,ntpservers,121.40.88.40,8089#
W odpowiedzi zegarek powinien wysłać SMS z podobną treścią
OK. Po tej czynności należy zrestartować zegarek.
- Dodatkowo można wysłać także SMS konfigurujący na
numer urządzenia o treści:
pw,123456,time,hour.minute.second,date,year.month.day#
na przykład podając aktualny czas:
pw,123456,time,11.45.00,date,2021.06.01#
Uwaga!
Przy pisaniu wiadomości SMS, prosimy zwracać u wagę na znaki
interpunkcyjne oraz spacje. Wpisanie błednej komendy
spowoduje brak odpowiedzi.
Podstawowe parametry: Typ ekranu: TFT 1,44 cala; panel
dotykowy, pojemność baterii: 400 mAh ; slot karty micro SIM,
Obsługa sieci 2G, kamera, latarka, głośnik, mikrofon.
Prawidłowa utylizacja produktu. Urządzenia nie należy
wyrzucać do zwykłych pojemników na odpady ko munalne. Aby
zapobiec potencjalnym zagrożeniom dla środowiska i zdrowia
Page 14
ludzkiego powodowanym nieprawidłową
utylizacją odpadów, należy obowiązkowo
przekazać zużyte urządzenie do wyznaczonego
punktu zbiórki sprzętu elektronicznego lub d o
miejsca zakupu urządzenia w celu recyklingu
odpadów powstałych ze sprzętu elektronicznego.
Ostrzeżenie: Bateria litowa w środku.
Niniejsze urządzenie, smartwatch mode l: KID
jest zgodne z Dyrektywą Parlamentu
Europejskiego i Rady 2014/53/EU. Kompletna
deklaracja zgodności jest dostępna online pod
linkiem: www.bemi-electronics.com/certificates
Niniejsza instrukcja obsługi nie jest objęta gwarancją, a wygląd
i/lub funkcjonalność oprogramowania zainstalowanego w
urządzeniu może odbiegać od opisanej. Gwarant zastrzega sobie
prawo do modyfikowania instrukcji obsługi w dowolnym
momencie bez uprzedniego powiadamiania.
Dane o maksymalnej mocy promieniowania w częstotliwości
radiowej:
Zakres
częstotliwości
GSM 900/1800
MHz
UMTS 900/2100
MHz
Max. moc
emitowana
32.51 / 30.44
dBm EIRP
22.77 / 22.87
dBm EIRP
Producent: Shenzhen Minrek Electronic Ltd.
Adres: 602, 6/F, Block C, Huafeng International Robotics Industry
Park, Huacheng Community Road, Xi'xiang, Bao'an, Shenzhen,
Chiny 518126
Upoważniony przedstawiciel producenta:
4cv Mobile Sp. z o.o. Sp. K.
Broniewskiego 28 , 01-771 Warszawa, Polska
Wyprodukowano w Chinach
Page 15
U S E R M A N U A L EN
Electronic version of this user guide is available on www.bemielectronics.com/manuals
Product outlook
1 - camera / 2 - USB port / 3 - answer a call, return, change
wallpaper / 4 - microphone / 5 - loudspeaker / 6 - answer a call,
turn on the flashlight after pressing twice, turn off after pressing
once / 7 - reset / 8 - flashlight / 9 - on / off button, wake up the
screen. Hold to start t he SOS function / 10 function - opening
the rear cover
Smartwatch Model: KID, is named in this user manual as
"device". It is mandatory to read this manual and the warranty
card before using the device.
This device is a telecommunications device f or locating and
transmitting data. The device is network-based in its operation
GSM / GPRS cellular.
The device uses the mobile operator's network (LBS) to determine
the location.
The positioning based on the LBS base station is to calculate the
location of the cell phone based on the differences in the mobile
communication towers and it depends largely on the coverage
Page 16
density of the base st ation nearby. If there are many base
stations, the positioning is accurate. If there a re several base
stations, the positioning is not so good. Overall, the positioning
accuracy is 50-2000 meters.
Attention!
The device requires the installation of a micro SIM card with an
active service make / receive calls with disabled PIN lock. It is
suggested to disable voicemail. When sending information about
location, the watch will need access to m obile Internet, so it is
worth buying a minimum 1 GB package. When using the watch,
network and connection fees may be charged in accordance with
the operator's tariff.
The device supports micro SIM cards
Make sure you have the correct type of card.
Installing a micro SIM card
- Open the back cover of the watch by gently prying it at the top
parts and sides until the latches are unfastened.
Page 17

Then remove the battery taking care not to da mage it battery
cables. Remember its position.
- Before inserting or removing the SIM card, always make sure that
the watch is turned off. Never insert or remove cards SIM when
watch is turned on.
- Open the micro sim card cover by sliding it gently clockwise and
then insert the SIM card into the slot in this position so that the sim
card chip is facing upwards to the watch face. Next close the lock
by sliding to the left.
- Place the batteries in the watch in their original position, then
close the back cover by pressing the latches.
First run
- After instal ling the SIM card in the watch p lease be sure the
device is charged. You can power on device by pressing and holding
the switch on button.
- After starting, the watch connects to the mobile network.
Maintaining Equipment
Clean the device regularly, especially part that close to the skin,
to keep it dry. Adjust the tightness of the device belt to ensure
air circulation. On wrist, where wearing device should not use
excessive skin care products. If you have skin allergy or
discomfort, please stop wearing device. Do not wear the device
during a hot bath or shower.
Note: The device is not waterproof.
Do not expose the device to cleaning agents, cau stic agents or
other chemicals. Do not expose the device to high (over + 50 °
C), low (below -10 ° C) temperatures or heat due to, for example,
sunlight or other heat source. It may damage the device.
Exposing the device to tougher conditions can d amage it. This
device is not intended for water sports, diving and swimming.
Page 18
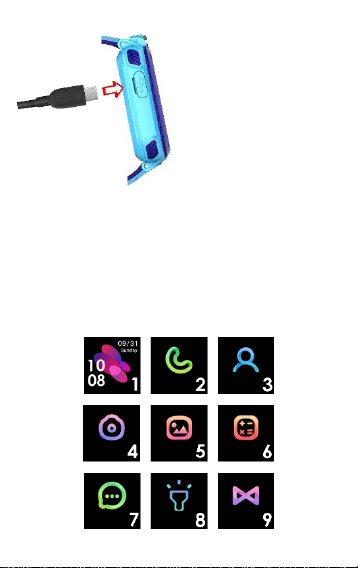
Battery charging
Before start using the
device, please make sure the
battery is charged. For
charging, please use the
provided charging cable. The
recommended power
adaptor current is 5V, 1A.
It takes about 2 hours to
fully charge device.
Open the cover that protects
the micro USB port, and then
connect the micro USB cable included in the set.
Note! if the device was completely discharged, charging graphics
may be displayed after a few minutes.
Device operation
We operate the watch via a touch screen. By sliding your finger on
the screen, you can switch between each of functions and the
function is selected by touching the screen.
Device menu
Page 19
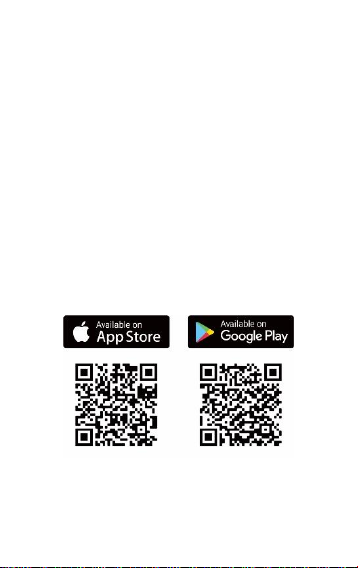
1. Watch home screen showing the current date and time and
battery level. We also see the icon on this screen connection to
the mobile network and the icon of the amount received
contractual awards.
2. Allows you to make a phone call by manual enter the number.
3. The phone book gives access to 10 defined with contacts
application.
4. Allows you to take a photo that will be saved in the album.
5. Access to the last photo album. The ability to preview it,
sent or deleted. Each subsequent photo taken overwrites
previous ones.
6. A simple math game with three difficulty levels.
7. Allows you to send and receive voice messages
text and voice messages.
8. Let you turn on the flashlight built into the watch.
9. Allows you to scan the QR code to the application and check
the registration code of the device.
Application
Download the application " SeTracker2 " for iOS or Android.
Account and watch registration
In the registration window, enter or scan the watch code (REG
CODE) located on label attached to your watch or at the beginning
Page 20
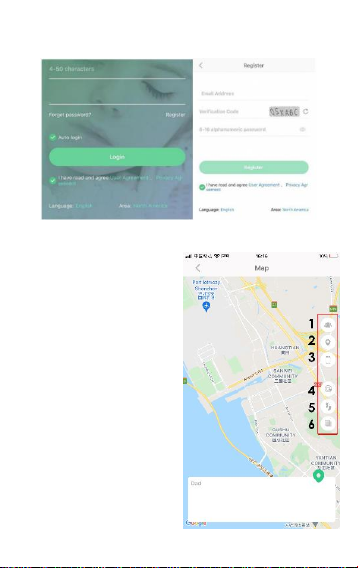
of this user manual as well as on the device in the Device menu.
Enter your email address, name and password. Then select the
language of the application and the area of use of the watch.
The main functions of the application
Map
Shows the current position of
the watch on the map.
The following map functions
are available:
1 - Device selection: tap to
switch between paired
watches.
2 – Location: press to refresh
the location of the watch.
3 - Phone location: press to
locate the phone.
4 - Safety zone: Click on the +
sign to define the safety zone.
Enter the name of your zone,
click on the map and then
select the size of the
designated zone in the range
Page 21
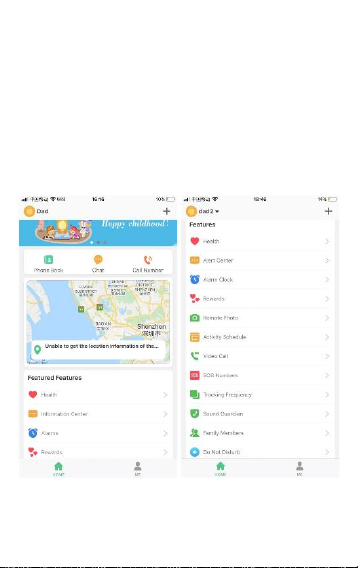
from 200m to 2000m. After the watch has crossed the zone, you
will receive notification.
5 - History: Set the date and time for which you want to check the
route which the user of the watch has traveled in a given time.
6 - Map mode: press to select one of the three map modes.
At the top of the main screen on the left, we can choose the device
if we have several watches connected to the application. On the
right, press + to add a new device. Below there a re shortcut icons
for: phone book with contacts, chat with the device and calling.
Other functions
Family Members
View a list of family members.
Page 22

Alert center
This is where you get an d preview to any notifications and alarms
received from the watch.
Tracking frequency
Choose one of the options to refresh location watch every ten
minutes, once every hour or once a minute.
SOS numbers
When the user of the watch press and hold SOS button, watch
make automatic emergency call up to three contacts defined here.
Rewards
Send the correct amount of hearts to appear on watch screen.
Determine any meaning of each number and reward the user of
the watch.
Do Not Disturb
Select the time during the day where you watch will not receive
calls.
Alarm clock
Alarm clock settings. Set the desired time and frequency of repeat.
Play sound on device
Click search to find watch. The watch will ring to inform you of its
location.
Sound Guardian
Enter the number you want to receive SMS notifications about
such events as: low battery level on the watch, activating the SOS
alarm with the button watch.
Page 23

SMS Alerts
Enter the number you want to receive SMS notifications about
such events as: low battery level on the watch, activating the SOS
alarm with the button watch.
Disable Functions
Here you can enable or disable the device's dialing function.
Remote photo
Remotely take a picture using the watch's camera and receive it on
your phone. The captured image may take some time to appear,
depending on the signal strength of the cellular network.
Reject unknown calls
Block numbers not included in your contact list.
Language and Time Zone
Select one of the available languages on your watch. Set your time
zone so that the watch shows correct date and time on the screen.
Location-based services (LBS)
Enable or disable location using antennas of cellular operators.
Remote Restart / Shutdown
You can remotely restart or turn watch off.
Me / My profile
- Personal info: Your account settings
- Change Password: Change the password for your account.
- Device List: Add, edit or remove the link to watches.
- Delete Account. Press to delete the account.
Help
The application does not accept commands and shows
information that the watch is not online.
Page 24

- Check if the GSM signal is correct. The range is visible on the
display. If not, turn off the device.
- Check that the SIM card is properly installed in watch and whether
it supports 2G internet. Check if you have an available internet data
package.
- Start the device and check if the network range is visible on the
screen. If there is still no coverage, go to the next step.
Check if the icon symbolizing the data transfer appears, if not you
need to set APN (Access Point Name, specific packet network, e.g.
Internet).
Send an SMS from the phone to the device number with the
following text:
pw,123456,apn,internet,,,XXXXX#
the X character above means the number assigned to a specific
operator, e.g.:
26001 - Plus
26002 - T-Mobile
26003 - Orange
26006 - Play
Other operator codes are available at www.mcc-mnc.com
After sending the SMS, wa it several minutes for the device to
receive the settings from the network. Data transfer arrows will
appear as confirmation.
- Check if the server parameters contain the correct number IP,
port and ID. Check the parameters by sending an SMS from the
phone to device phone number with the following content:
pw,123456,ts#
In response, the device will send a message with the content
containing IP address, port and ID, for example:
Ver:G36WS-YDE_V1.1_2021.06.01_11.15.20;
ID:1234567890
Imei:123456789012345;
Ip_url:52.28.132.157;
Port:8001;
Page 25

Upload:600S;
Bat level:80;
Language:1;
Zone:8.00;
Ec:0;
NET:OK(73)
Check the data received in the SMS with the device number.
- If the ID / IMEI / REG CODE number is different from the badge
on the watch, set a new IMEI number.
Send from the phone to the number of the card installed in the
device SMS with the following text:
pw,123456,imei,xxxxxxxxxxxxxxx#
- device after receiving the SMS with the code, it sends back in the
SMS reply with the correct IMEI number, for example:
pw,123456,imei,359614514986574#
Check in the application, on the device list, whether the registered
ID number matches the watch's ID.
- If IP_URL and PORT are different than in the example above, send
an SMS from the phone to the device number with following text:
pw,123456,ip,52.28.132.157,8001#
- the device in response sends a text message about the content
[surl,52.28132.157,port,8001#]Ok.!
After that it will work properly.
-The GPRS / NET line from the example above should contain the
word OK and the signal strength in parentheses. If the information
contains the word NO, it means that the device is not connected to
the internet. In that case, go back to the beginning of this
paragraph and follow the guidelines.
Page 26

Could not call watch. The signal is busy or subscriber does not
answer
Reason: The device does not recognize the incoming number or in
application is set to do not disturb mode.
- Check if the number you are calling from is unlisted.
- Check if contact numbers are set in the application.
The watch only receives calls from numbers previously set in the
contacts of the application.
The watch does not show the current time and date
Reason: The device failed to connect to the application server for
the purpose time update.
- If the watch shows several hours back, check and select the
appropriate time zone via the app.
- If the above does not help, please send SMS from phone to device
with the following content:
pw,123456,ntpservers,121.40.88.40,8089#
In response, the watch should send an SMS with similar content
OK. After that, restart your watch.
- Additionally, you can also send an SMS from phone to device
number with the following text:
pw,123456,time,hour.minute.second,date,year.month.day#
for example giving the current time: pw,123456,time,11.45.00,
date,2021.06.01#
Attention!
When writing an SMS, please pay attention to punctuation
marks and spaces. Entering a wrong command will result in no
response.
Basic parameters: Screen Type: TFT 1.44 inches, touch panel,
battery size: 400 mAh, micro SIM card slot, support 2G network,
camera, flashlight, speaker, microphone.
Page 27
Proper disposal of this product. The device cannot
be disposed of together with household waste. To
prevent potential threats to the environment and
human health due to improper disposal of waste,
it is mandatory to take used electronic equipment
to a designated collection point, or to the place
where the product was purchased for the purpose of recycling
electronic waste.
Warning: Lithium battery inside.
This device , smartwatch model KID, is in
compliance with Directive 2014/53/EU of the
European Parliament and of the Council. The
complete declaration of conformity is available
online at the following link www.bemi-electronics.com/certificates
This manual is not covered by the warranty, and the appearance
and/or functionality of the software installed on the device may
be different from the one described. The Guarantor reserves the
right to modify the instruction manual at any time without prior
notice.
Data on the maximum radiated power of the radio frequency
Frequency range
GSM 900/1800
MHz
UMTS 900/2100
MHz
Max. power
emitted
32.51 / 30.44
dBm EIRP
22.77 / 22.87
dBm EIRP
Manufacturer: Shenzhen Minrek Electronic Ltd.
Address: C602, 6/F, B lock C, Huafeng International Robotics
Industry Park, Huacheng Community Road, Xi'xiang, Bao'an,
Shenzhen, China 518126
Made in China
 Loading...