

Page 1
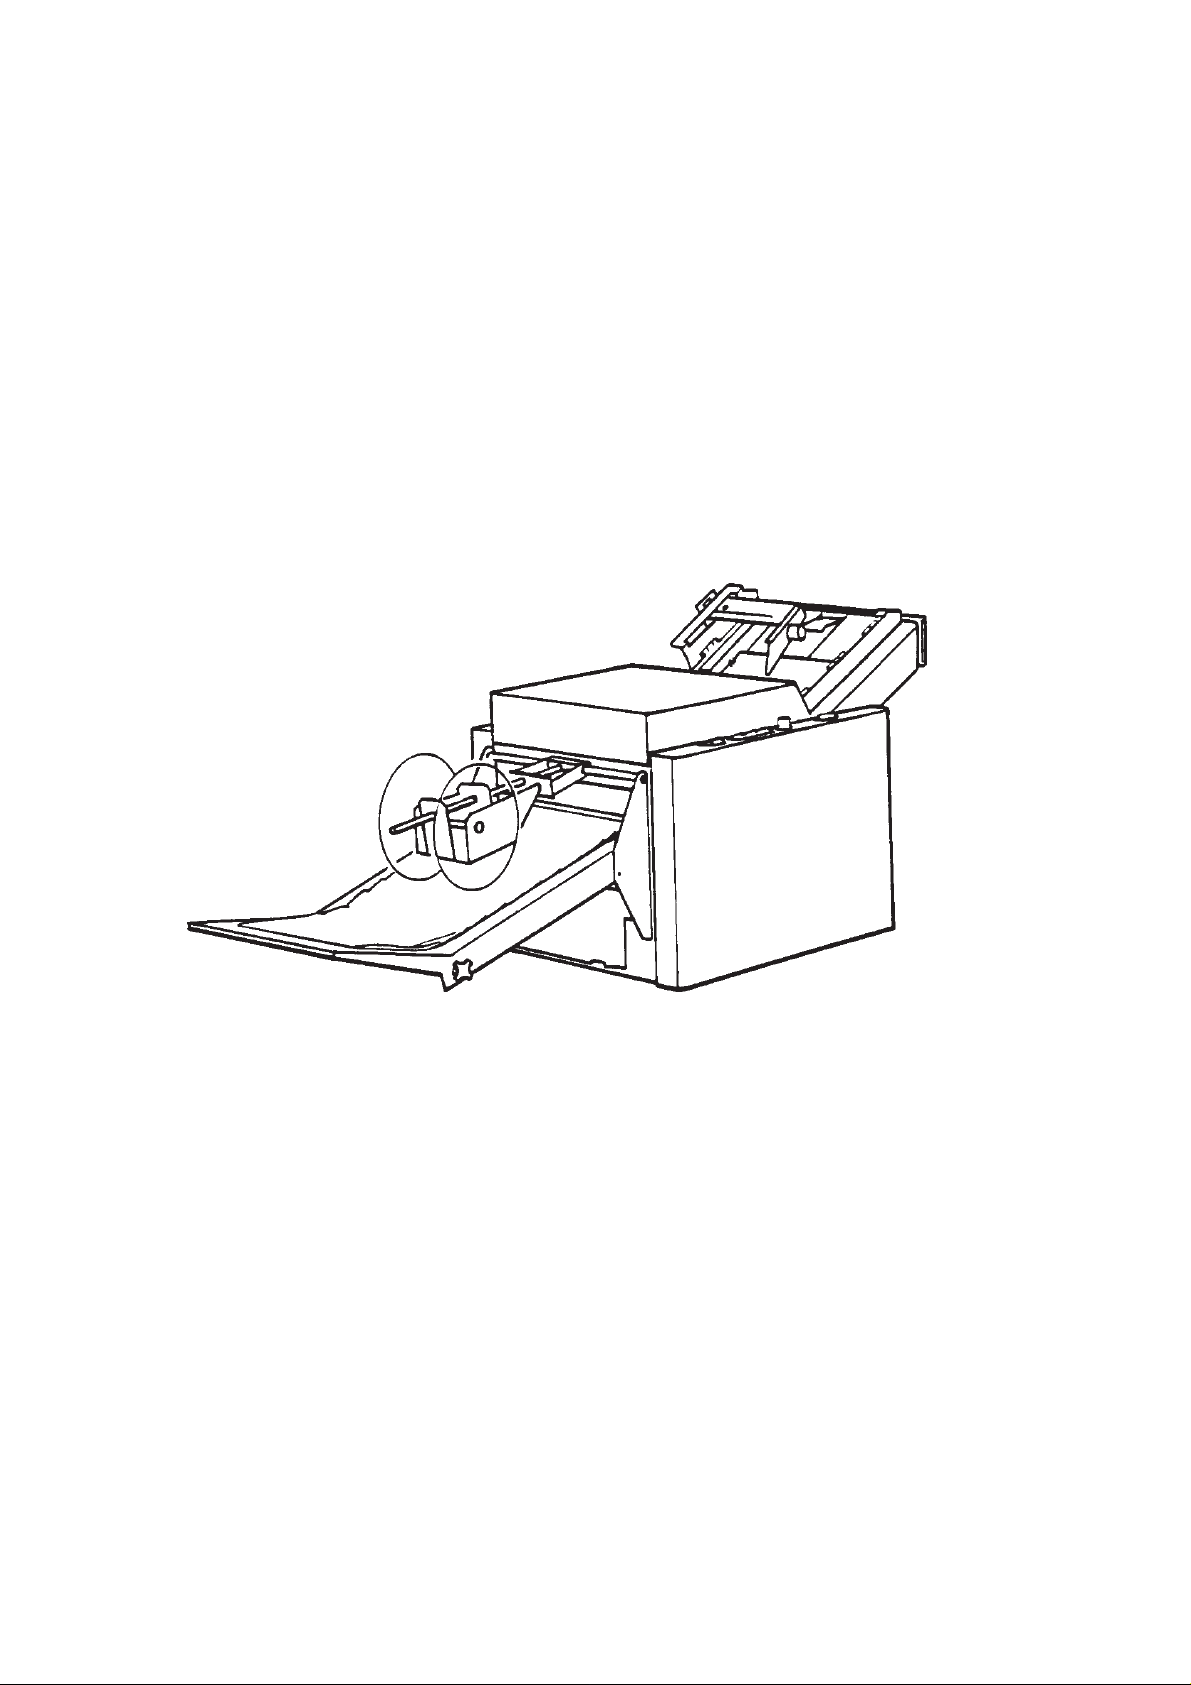
Stapler / Folder Model 61
Operator Manual
March 1994
Part No. 61086
The Belt Stacker shown
is optional
Page 2

1. Introduction
Table of contents
1-1 Introduction
2. Installation
2-1 Installation
3. Getting to know the Stapler / Folder
3.1 Main components
3.2 Infeed section, upper
3.3 Infeed section, collator side
3.4 Control panel
4 Operator instructions
4.1 Set up of stapler / folder (stapling-folding)
4.2 Set up of stapler / folder (foding only)
4.3 Set up of stapler / folder (stapling-folding / off-line)
4.4 Set up of stapler / folder (folding / off-line)
4.5 Set up of stapler / folder (block stapling / off-line
option 1)*
4.6 Set up of stapler / folder (block stapling / off-line
option 2)*
4.7 Operating the stapler / folder on-line
4.8 Operating the stapler / folder off-line
4.9 Set up for odd paper size
4.10 Reset to standard paper size
1-1
2-1
3-1
3-2
3-3
3-4
4-1
4-1
4-2
4-2
4-3
4-4
4-5
4-5
4-6
4-6
* Only OFF-line
5. Maintenance
5.1 Cleaning fold rollers
5.2 Cleaning of rear jogger rollers
6. Problem solving
6.1 Trouble shooting table
7. Specifications
7.1 Specification table
STAPLER / FOLDER MODEL 61 OPERATOR MANUAL
T10129 January 2002
5-1
5-2
6-2
7-1
i
Page 3

Introduction
1.1 Operational safety
Attention to the following notes ensures the continued safe operation of your equipment.
Always connect the equipment to a properly
grounded power source receptacle.In doubt,
have the receptacle checked by a qualified
electrician.
WARNING: Improper connection of the equipment grounding conductor can result in
electri-cal shock.
Always follow all warnings marked on, or
supplied with, the equipment.
Always locate the equipment on a solid support surface with adequate strength for the
weight of the machine.
Always exercise care in moving or relocating
the equipment.
Always keep magnets and all devices with
strong magnetic field away from the machine.
Never use a ground adapter plug to connect
the equipment to a power source receptacle
that lacks a ground connection terminal.
Never attempt any maintenance function that
is not specifically described in this
documentation.
Never remove the covers or guards that are
fastened with screws.
Never install the unit near a radiator or any
other heat source.
Never override or “cheat” electrical or mechanical interlock devices.
Never operate the equipment if you notice
unusual noises or odours. Disconnect the
power cord from the power source receptacle
and call your customer service engineer to
correct the problem.
STAPLER / FOLDER MODEL 61 OPERATOR MANUAL
T10129 January 2002
1-1
Page 4
2.1 Installation
2. Installation
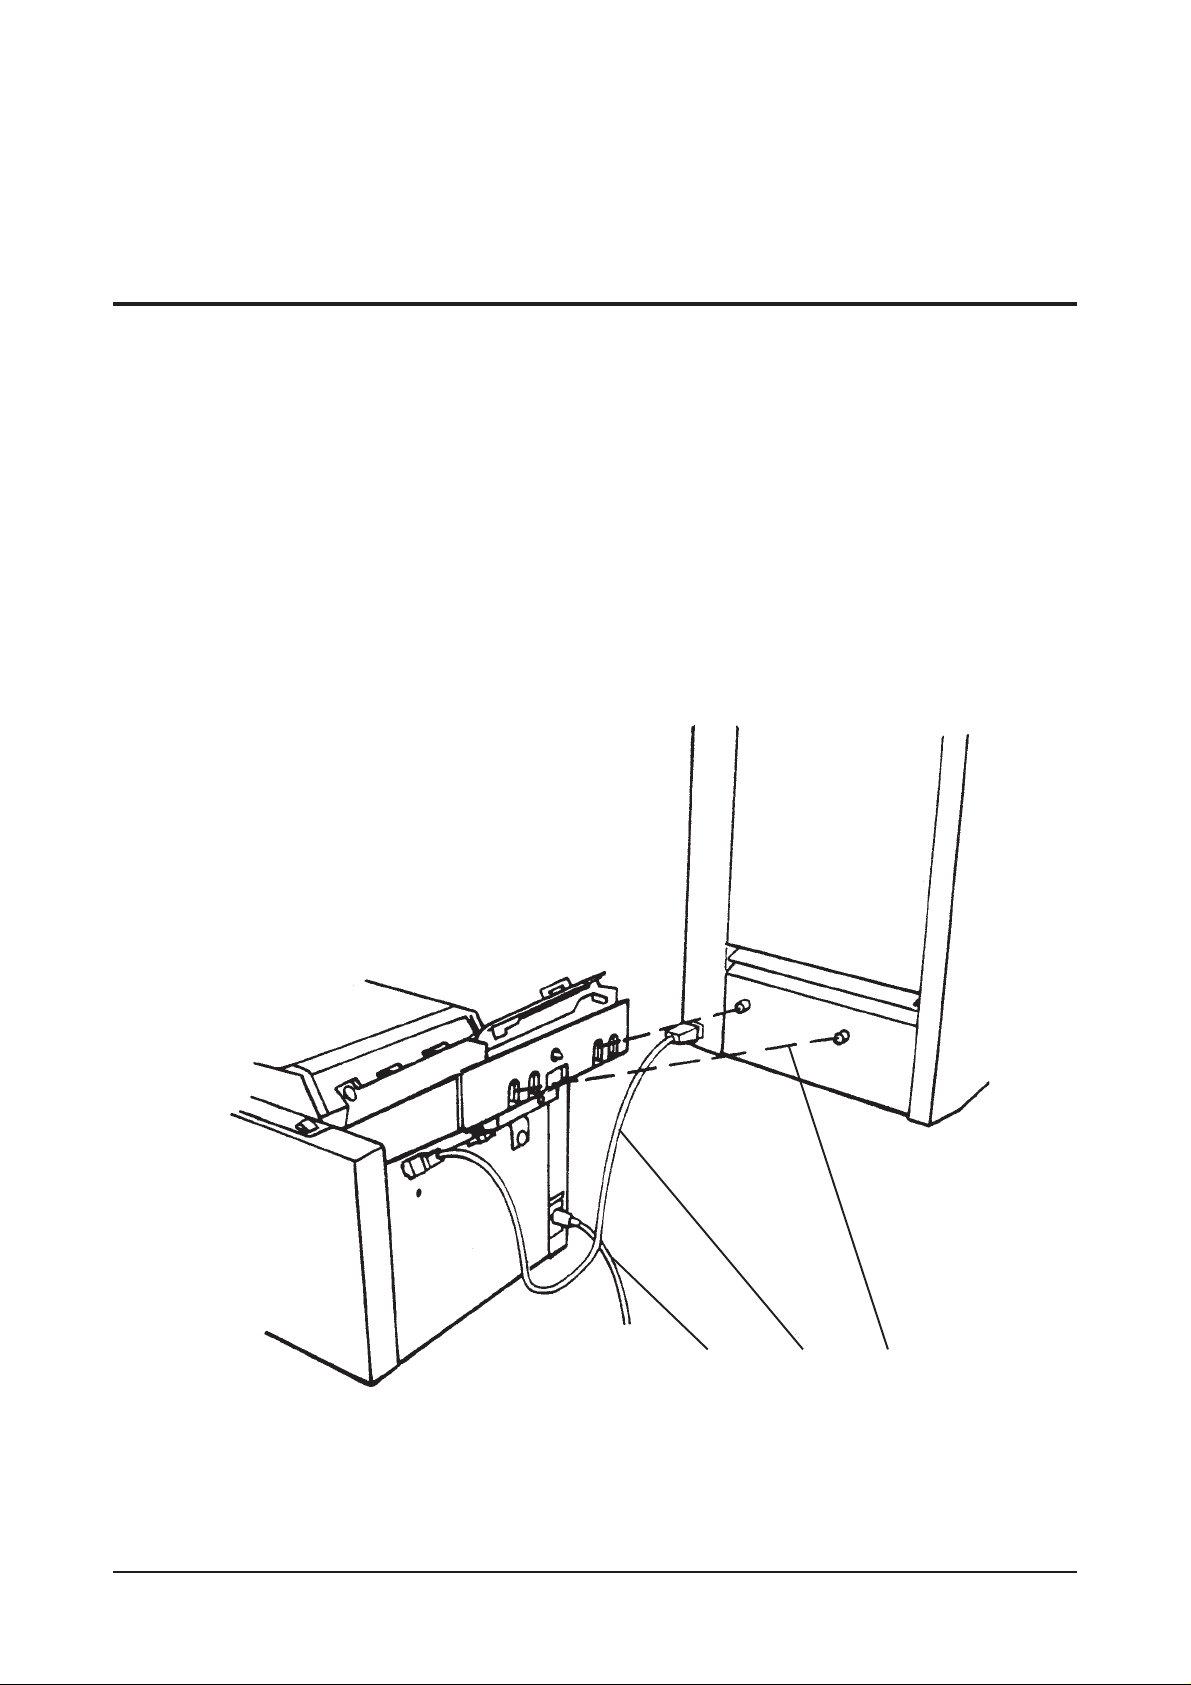
1. Attach the power cord to the St apler / Folder.
2. Attach the connection cable between the Stapler / Folder
and the Collator.
3. Roll the Stapler / Folder up against the Collator make
sure that the Collator studs enter the attachment bracket
on the Stapler / Folder for the correct paper size.
123
STAPLER / FOLDER MODEL 61 OPERATOR MANUAL
T10129 January 2002
2-1
Page 5
3. Getting to know the Corner Stapler
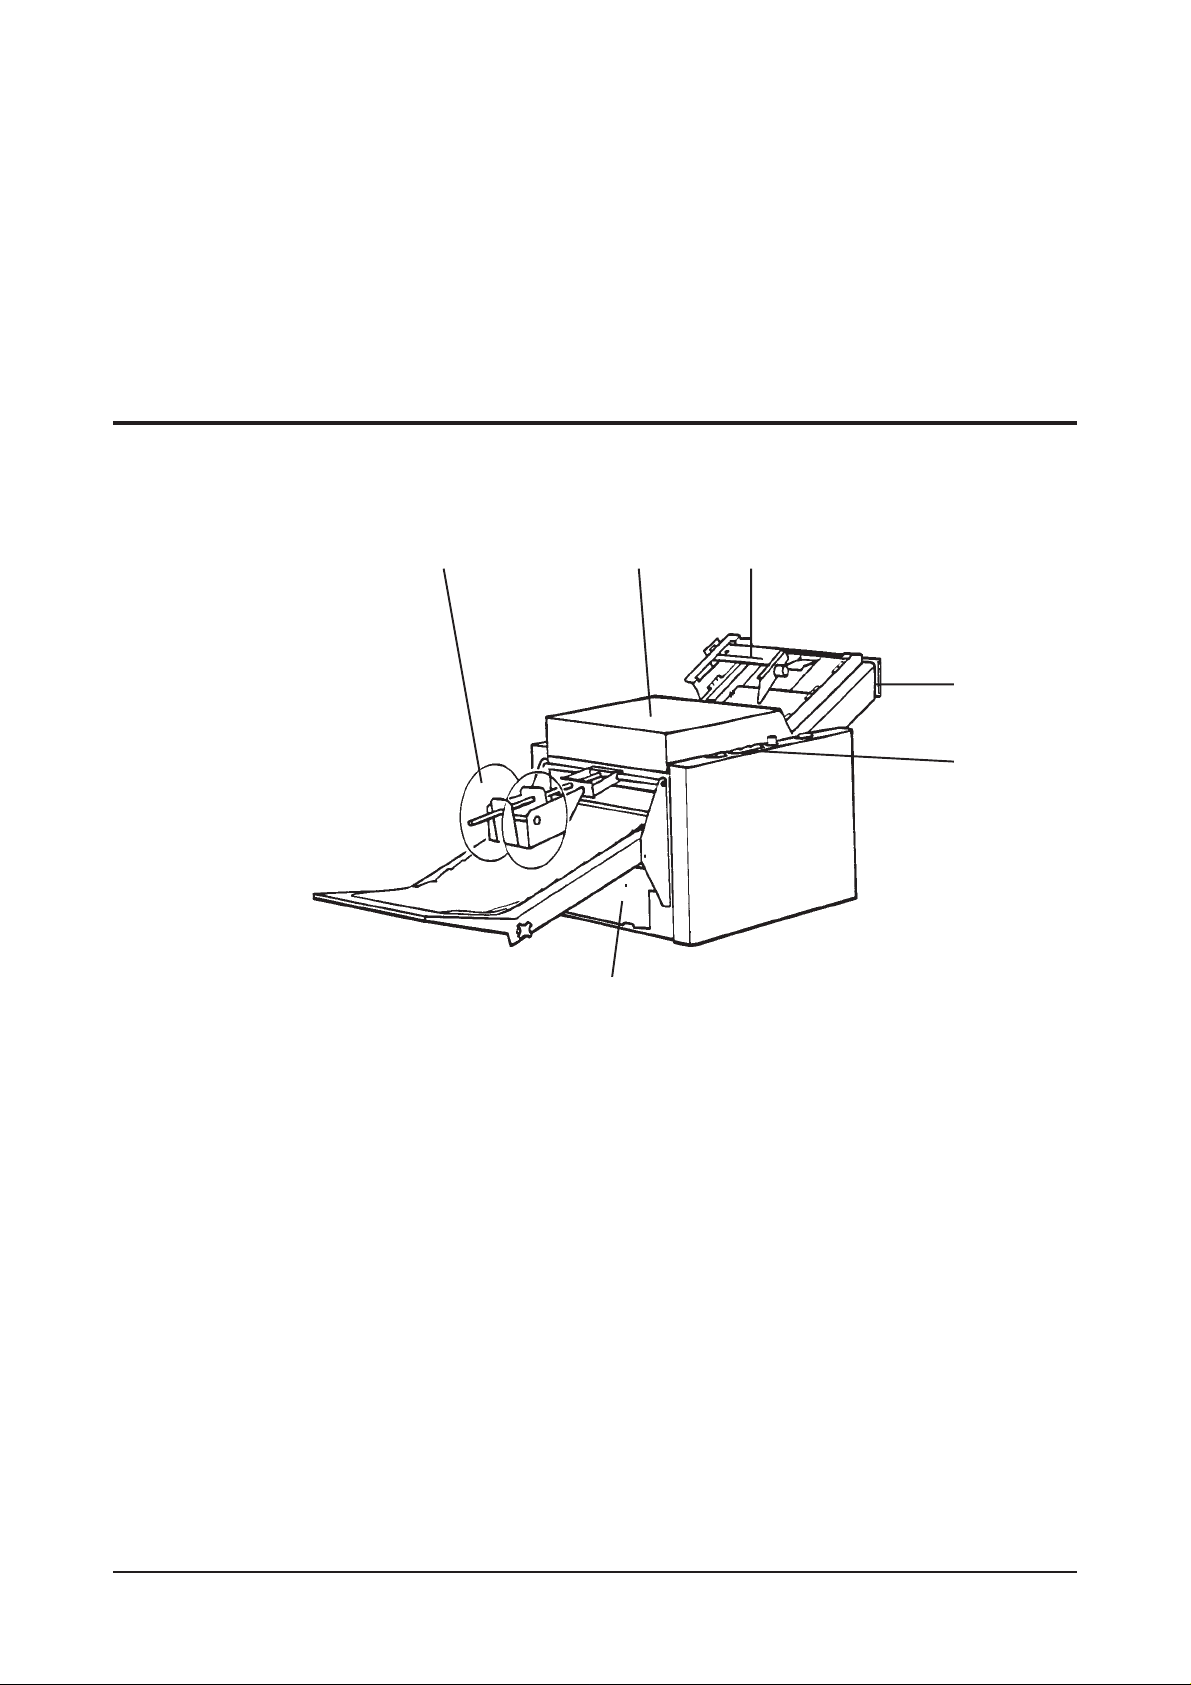
T ake a few minutes to become familiar with the main
components of the S tapler / Folder.
3.1 Main components
1. Stacker wheels
1
23
4
5
6
2. T op cover
3. Upper pressure roller assembly (Only used for ON-line operation to
Collator)
4. Press area, machine release (Press here and the
Stapler / Folder will be released from
the Collator and can be rolled away)
5. Control panel
6. Fold stop assembly
7. Belt stacker (Optional accesory)
STAPLER / FOLDER MODEL 61 OPERATOR MANUAL
T10129 January 2002
3-1
Page 6
3.2 Infeed section, upper
11
10
1423 5
9
6
7
8
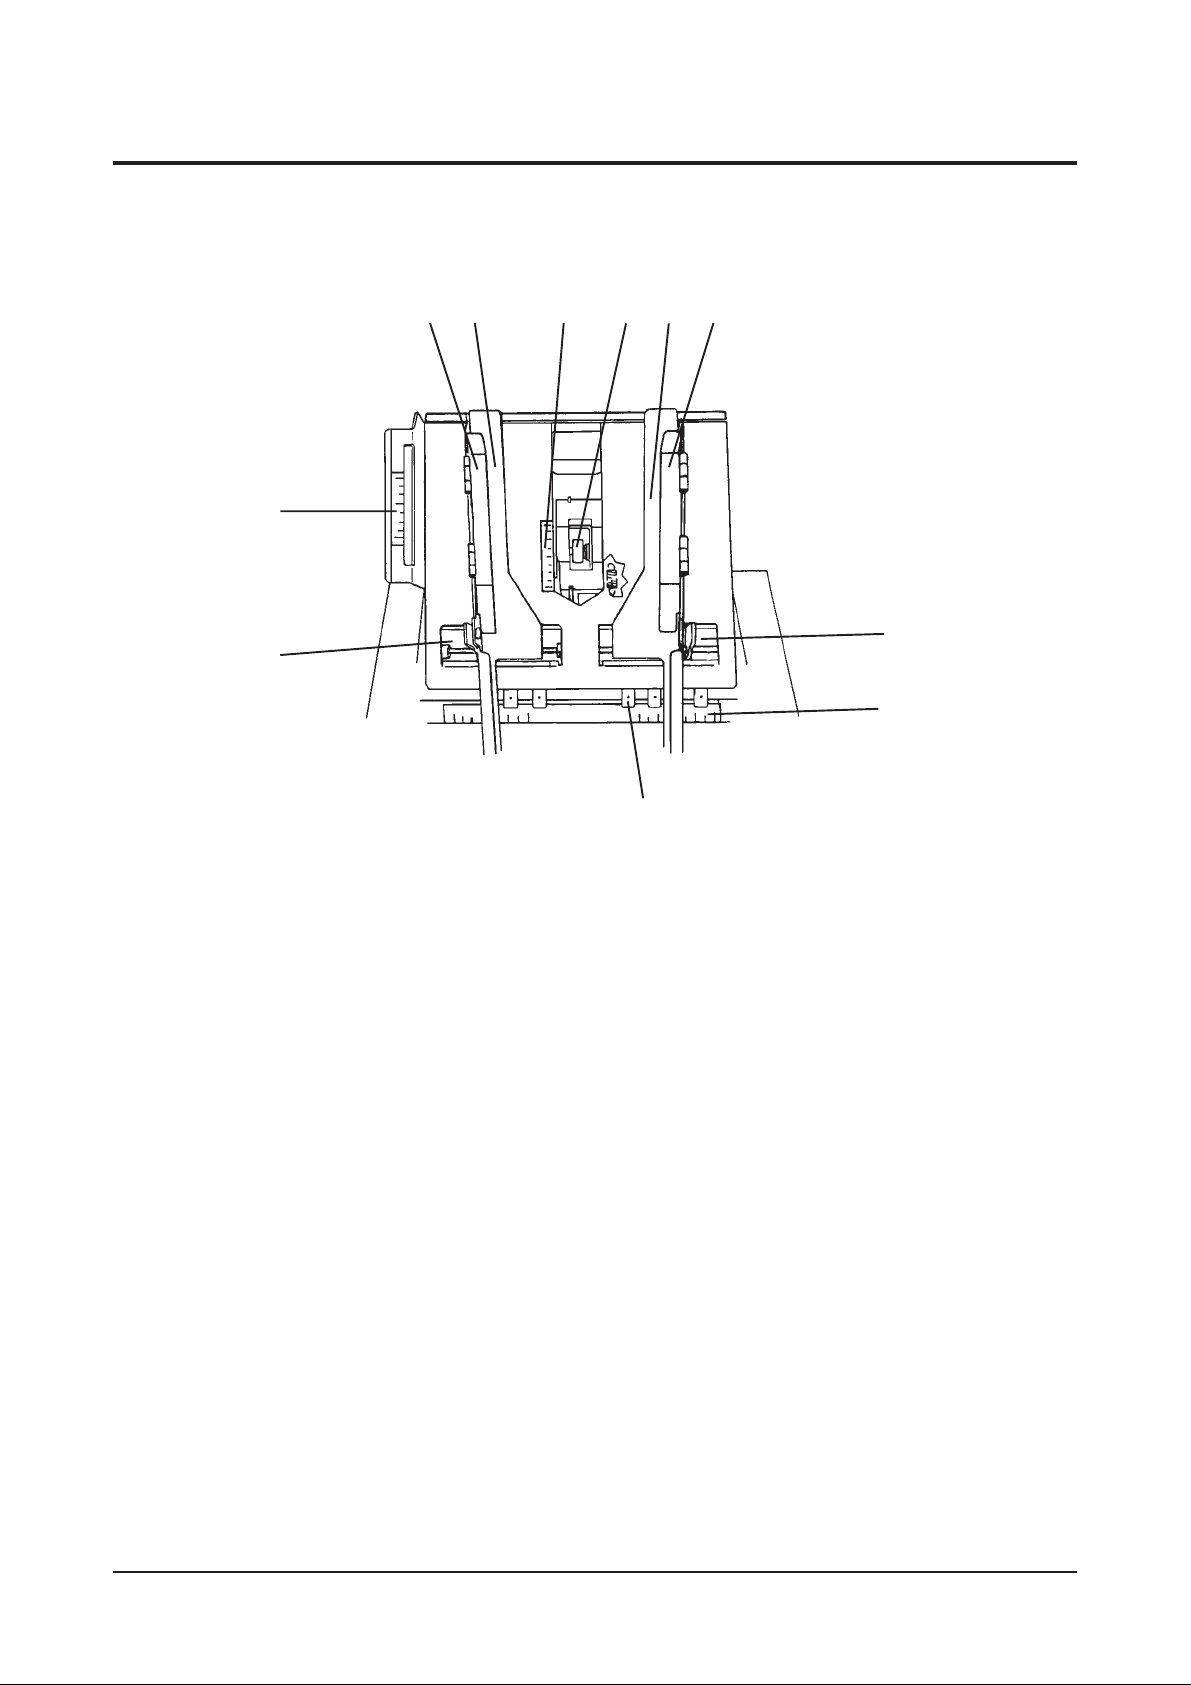
1. Upper guide, side jogger
2. Side jogger , rear
3. Scale, paper length
4. Rear jogger roller
5. Side jogger, front
6. Upper guide, side jogger
7. Release handle, side jogger
8. Scale, paper width
9. Anvil
10. Release handle, side jogger
1 1. Scale upper pressure roller assembly
STAPLER / FOLDER MODEL 61 OPERATOR MANUAL
T10129 January 2002
3-2
Page 7
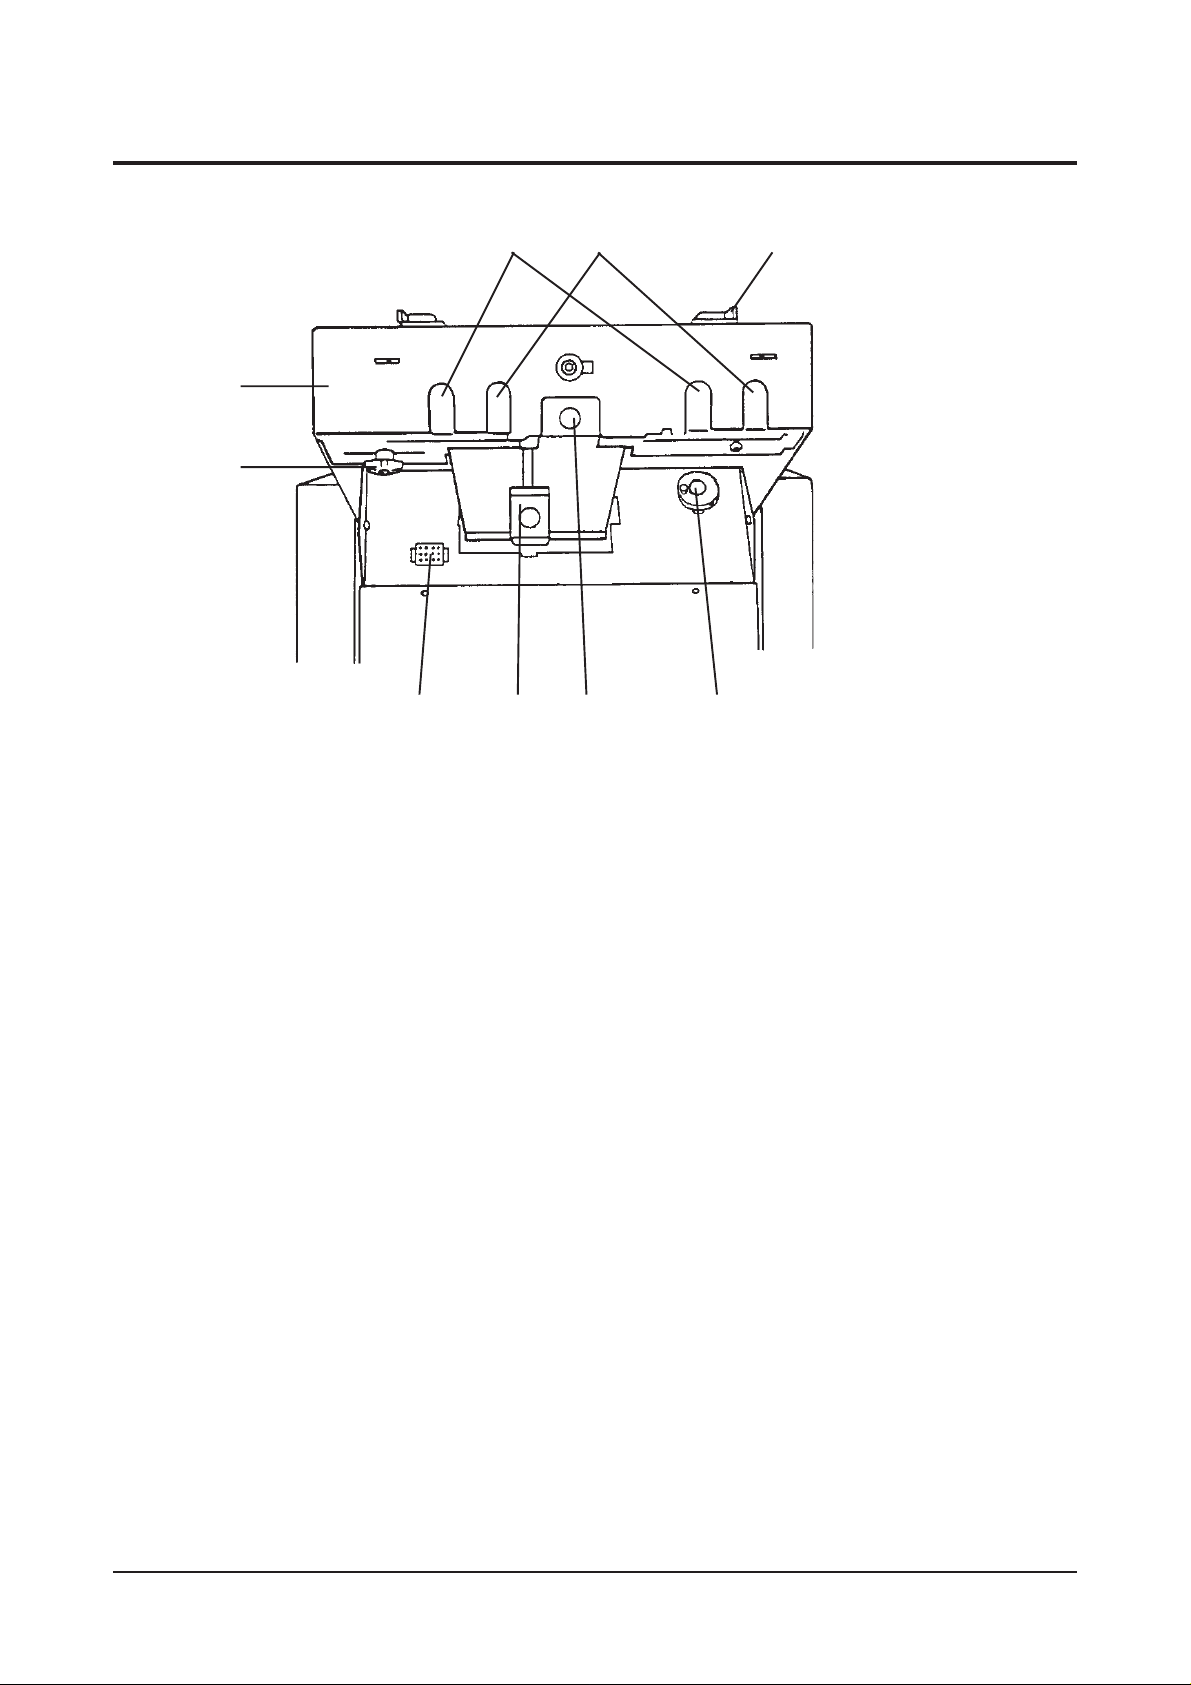
3.3 Infeed section, Collator side
12 3
9
8
4567
1. Positioning holes, small paper width (used for A4/8”1/2 paper widths or sizes nearby)
2. Positioning holes, large paper width (used for A3/1 1” paper widths or sizes nearby)
3. Positioning mark (green) (Shall correspond to the green mark on the
Collator)
4. Paper stop crank (used for adjustment to correct paper lenght)
5. Rear jogger latch (used to lower the rear jogger and enable Off-line
operation)
6. Rear jogger adjustment latch (used to position the rear jogger to the paper
length)
7. Receptacle, connection cable (The connection cable from the Collator connects
here)
8. Knob, adjustment for odd paper size (by loosening the knob the attachment bracket
can be individually positioned for odd paper
sizes)
9. Attachment bracket
STAPLER / FOLDER MODEL 61 OPERATOR MANUAL
T10129 January 2002
3-3
Page 8
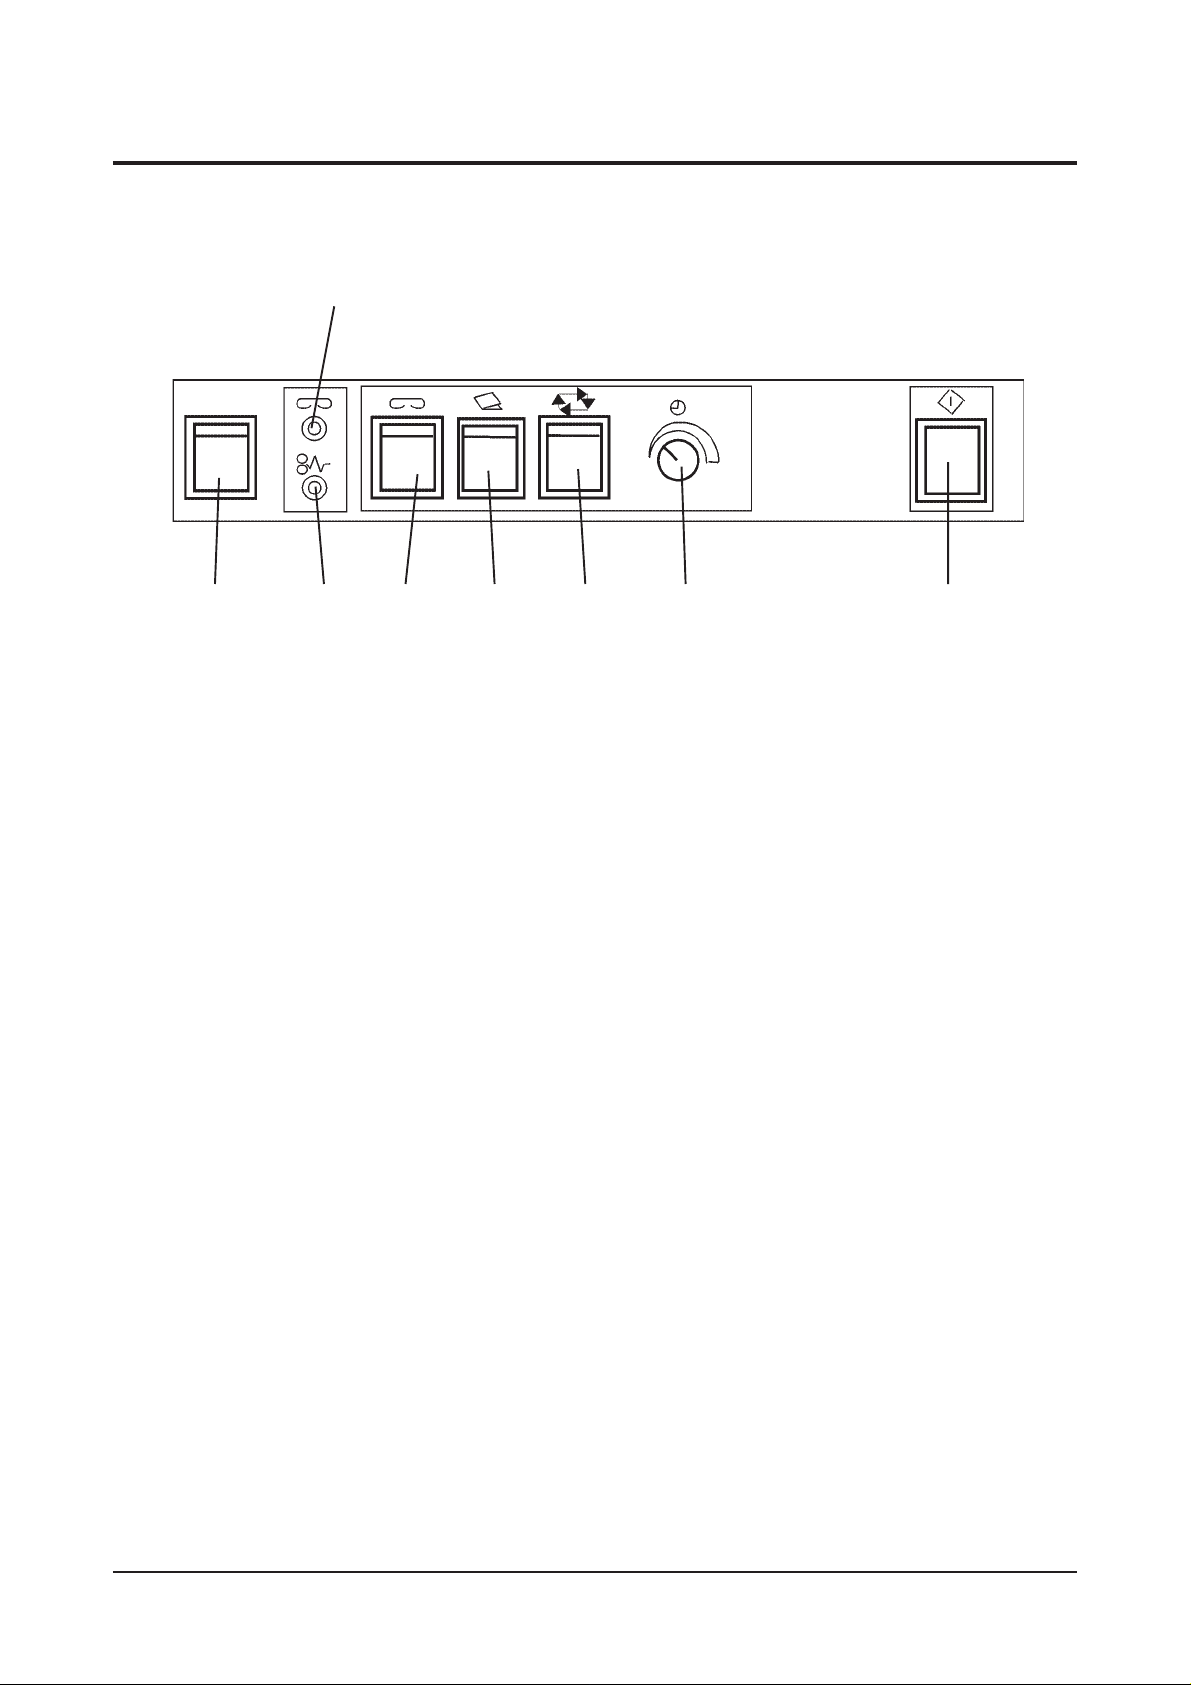
3.4 The control panel
2
134567 8
1. Power switch
2. Low staples indicator
3. Jam indicator *
4. Stapling ON / OFF
5. Folding ON / OFF
6. Automatic start ON / OFF (can only be used OFF-line)
7. Time delay (can only be used OFF-line)
8. Manual start button (can only be used OFF-line)
* Not included in the conversion kit.
STAPLER / FOLDER MODEL 61 OPERATOR MANUAL
T10129 January 2002
3-4
Page 9

4. Operator instruction
4.1 Set up of Stapler–Folder (stapling–folding)
1. Open the top cover.
2. Set the two side joggers to the correct paper size according to
the scale.
3. Insert a set to the stapling area.
4. Move the rear side jogger up against the paper to verify that the
side jogger aligns the sheets.
5. Turn the p aper stop crank until the trail edge of the set is in line
with the scale for paper length.
6. Move the rear jogger up against the trail edge of the set.
7. Remove the set.
8. Position the upper pressure roller to the scale.
9. Position the stapler heads over the anvils to be used.
10. Attach the stapler folder to the Collator and make sure that the
green mark on the attachment bracket aligns with the green
mark on the Collator.
1 1. Set the stapling switch to ON position.
12. Set the folding switch to ON position.
13. Close the top cover .
14. Set the power switch to ON position.
4.2 Set up of Stapler–Folder (folding only)
1. Same procedure as above with the exeption that on item # 1 1
the switch is set to OFF position and item #9 is not performed.
STAPLER / FOLDER MODEL 61 OPERATOR MANUAL
T10129 January 2002
4-1
Page 10

4.3 Set up of Stapler–Folder (stapling–folding/OFF-line)
1. Remove the upper pressure roller assemby.
2. Flip over the side jogger upper guides (both side joggers)
3. Lower the rear jogger unit by pressing the rear jogger unit
forward (green marked).
4. Open the top cover.
5. Set the side jogger to the correct paper size according to the
scale.
6. Insert a set into the stapling area.
7. Move the rear jogger up against the paper to verify that the side
jogger aligns the sheets.
8. Turn the paper stop crank until the trail edge of the set is in line
with the scale for paper lenght.
9. Remove the set.
10. Position the stapler heads over the correct anvils.
1 1. Set the stapling switch to ON position.
12. Set the folding switch to ON position.
13. Close the top cover.
14. Set the power switch to ON position.
4.4 Set up of Stapler–Folder (folding/OFF-line)
1. Same procedure as above with the exeption that on item # 1 1
the switch is set to OFF position and item #10 is not performed.
STAPLER / FOLDER MODEL 61 OPERATOR MANUAL
T10129 January 2002
4-2
Page 11

4.5 Set up of Stapler–Folder (Block stapling/OFF-line
option 1)
1. Lower the rear jogger by pressing the rear jogger unit forward
(green marked).
2. Remove the upper pressure roller assembly .
3. Flip over the side jogger upper guides (both side joggers)
4. Open the top cover.
5. Set the side jogger to the correct paper size according to the
scale.
6. Insert a set into the stapling area.
7. Move the rear jogger up against the paper to verify that the side
jogger aligns the sheets.
8. Turn the paper stop crank to position the set to the stapler .
9. Remove the set.
10. Position the stapler heads over the correct anvils.
1 1. Close the top cover.
12. Set the stapling switch to ON position.
13. Set the folding switch to OFF position.
14. Select manual or automatic start.
15. Flip down the fold stop to enable the sets to pass through the
machine.
16. Set the power switch to ON position.
Note: By using the adapter (optional) either the belt stacker or the delivery tray
can be used for stacking of stapled sets
STAPLER / FOLDER MODEL 61 OPERATOR MANUAL
T10129 January 2002
4-3
Page 12

4.6 Set up of Stapler–Folder (Block stapling/OFF-line
option 2)
1. Lower the rear jogger by pressing the rear jogger unit forward
(green marked).
2. Remove the upper pressure roller.
3. Flip over the side jogger upper guides (both side joggers)
4. Open the top cover.
5. Set the side jogger to the correct paper size according to the
scale.
6. Insert the two red pins in the holes in the side joggers. (The pins
are stored inside the machine over the fold rolls). These will stop
the set in the correct position (in this mode the set will not be
transported through the machine).
7. Insert set into the stapling area.
8. Move the rear side jogger up against the paper to verify that the
side jogger aligns the sheets.
9. Remove the set.
10. Position the stapler heads over the correct anvils.
1 1. Set the stapling switch to ON position.
12. Set the folding switch to OFF position.
13. Select manual start.
14. Close the top cover.
15. Set the power switch to ON position.
STAPLER / FOLDER MODEL 61 OPERATOR MANUAL
T10129 January 2002
4-4
Page 13

4.7 Operating the Stapler–Folder (ON-line)
1. V erify that the set up of the Stapler–Folder is completed.
2. Select “third party output” on the Collator.
3. Press “callibration” on the Collator.
The set will enter the Stapler–Folder and remain in the stapling
section unstapled.
4. Verify that the set is completed/correct press the Collator st art
button.
4.8 Operating the Stapler–Folder (OFF-line)
1. Select manual or automatic start.
1.1 manual start:
Make sure that the time delay is set to minimum.
Press the start button for each operation.
1.2 automatic start:
The set will automatically be stapled as it is inserted in the
St apler–Folder.
2. When operating, insert one set at a time. Align the set with your
finger tip. When automatic mode is selected, set time delay to
allowe careful alignment.
NOTE: The manual start button will light up when the next
set may be inserted
STAPLER / FOLDER MODEL 61 OPERATOR MANUAL
T10129 January 2002
4-5
Page 14

4.9 Set up for odd paper sizes
This procedure is to enable ON–line operation with paper sizes
that deviate from the standard A4 / A3 for 50 HZ machines and
8”1/2 / 1 1” width for 60 HZ machines.
1. Perform the setup of the Stapler–Folder for the paper size.
2. Attach the St apler–Folder to the Collator, using the positioning
holes on the Stapler–Folder that best matches the paper size.
(Green mark on rear side jogger as close as possible to the
attachment bracket.
3. Lossen the knob for adjustment to odd paper sizes on the attachment bracket.
Move the Stapler–Folder sidewise until the green mark on the
rear side jogger corresponds the green mark on the Collator.
4. Tighten the knob.
4.10 Reset to standard paper sizes
1. Disconnect the Stapler–Folder from the Collator by pressing the
attachment bracket (green marked side).
2. Lossen the knob for adjustment to odd paper sizes.
3. Slide the attachment bracket back to align it with the chassis in
the St apler–Folder, it will lock into place.
STAPLER / FOLDER MODEL 61 OPERATOR MANUAL
T10129 January 2002
4-6
Page 15

5.1 Cleaning of fold rollers
1. Clean these regularly with an alcoholic based cleaning liquid.
5.2 Cleaning of jogger rollers
1. Clean these regularly with an alcoholic based cleaning liquid.
5. Maintenance
STAPLER / FOLDER MODEL 61 OPERATOR MANUAL
T10129 January 2002
5-1
Page 16

6.1 Problem solving
MELBORPSESUACELBISSOPNOITCA
6. Problem solving
rellordlofnimajrepaP
noitces
majrelpatSslivnaotdengilatonrelpatSlivnaotsrelpatsngilA
edis-tnemngilateehsdaByltcerrocnisreggojediS
detsujda
ottnorf-tnemngilaeehsdaB
kcab
drihttcelesotelbissoptoN
rotalloCnotcejeytrap
sediugedisotnimajrepaPyltcerrocniredloF-relpatS
detsujda
dehcatta
noitisop
noitidnoc
detcelestongnidloF
denoitisopyltcerrocni
neporevocpoT
majniredloF-relpatS
lenaplotnocnognidloftceleS
thgitoottessreggojediS
ezisrepap
yltcerrocnireggojraeR
gnissimrellorerusserpreppU
rellorerusserpreppU
tonelbacnoitcennoC
FFOotteshctiwsrewoP
rotalloCotdenoitisop
tcerrocnignittesezisrepaP
reggojraertsujdA
revocpotesolC
ezisrepaptcerroceht
yltcerrocsreggojedistsujdA
ehtotreggojedistsujdA
rellorerusserprepputnuoM
erusserpreppuehtnoitisoP
ezisrepaptcerrocotrellor
elbacnoitcennochcattA
NOothctiwsrewopteS
redloF-relpatSnimajraelC
redloF-relpatSehtnoitisopeR
ezisrepaptcerrocehtrof
otsreggojedistsujdA
aeradeefninimajrepaPreggojedisnosediugreppU
dedlofnu
rellorerusserpreppU
denoitisopyltcerrocni
niderewoltinureggojraeR
edomenil-no
gnilpatsnigniniamerteS
noitces
relpatsrewoL
rotalloCnideefsiM
redloF-relpatSnimajrepaP
thgitoottesreggojediS
STAPLER / FOLDER MODEL 61 OPERATOR MANUAL
T10129 January 2002
sediugreppunwoddloF
rellorerusserpehtnoitisopeR
reggojraerehtesiaR
relpatsdaoL
rotalloCnimelborptcerroC
tratserdna
majrepapraelC
ehtotsreggojedisehttsujdA
ezisrepaptcerroc
6-1
Page 17

7.1 Specification table
7. Specification
)enil-NO(CT-16ledoM)enil-FFO(16ledoM
yticapaC
deepS
ezisrepaP
niM
xaM
)revoc.lcni(msg08steehs01
)revoc.lcni(dnobbl02steehs01
ruoh/stelkoobdezis5A0531
ruoh/stelkoobdezis4A0001
7
7,mm072x002
/8"01x5/8"
1
71x"21,mm044x503
daehrelpatS
noitcetedrelpatswoL
noitcetedmaJ
gniggoJ
thgieH
htdiW
5
/843("
12
11
03
/
55("
61
htpeD
thgieW
seY
seY
kcabdnaediS
5
/
8
7
/
8
mm005
5
91
/61"
gk85
bl821
msg08steehs22
dnobbl02steehs22
ro5A0081otpuelbatsujdA
ruoh/stelkoobdezis4A0531
/4"
tnioplesihccitamkcolP012
)esab.lcnimm088(mm055
)esab.lcni"
)rekcatStleB.lcnimm0241(mm087
)rekcatStleB.lcni"
egatloV
STAPLER / FOLDER MODEL 61 OPERATOR MANUAL
T10129 January 2002
zH06V511
zH05V042/032
7-1
Page 18

Note
 Loading...