

Page 1
Operator’s
Manual
Serial # W 06060001 - on
Gas
Fryer
Models
718LCG,
724CG,
If you accept the machine from the shipping
company, you are, in effect, saying that the
machine is in good condition, and you must
pay for the machine. Belshaw cannot pay for
shipping damage, because the freight company
has accepted the machine from Belshaw in good
condition, and is responsible for its safe delivery.
For your protection, inspect the machine to see
that no parts are bent, scratched, or otherwise
damaged. If any damage has occurred in
shipping, file a freight claim with the shipping
company immediately.
IMPORTANT
Keep this manual for future reference.
To unpack the fryer and transport it to the
workstation:
1. Use a fork lift to transport the shipping crate
to the work station.
and
734CG
2. Break down the shipping crate.
3. Remove all the packing materials from the
fryer. These include foam, tape, brown
paper, plastic, and white protective coating.
4. Position the fryer to allow sufficient space
on either end of the machine for any
equipment you plan to use with it.
Page 2

EQUIPMENT RECORD
Please provide the information below when you correspond with us about your machine.
Purchased by _____________________________________________________________________
Installed by ______________________________________________________________________
Date of Installation ________________________________________________________________
Model number ____________________________________________________________________
Serial number
0606
MN-1141EN
Belshaw Bros., Inc.
1750 22nd Avenue South
Seattle, WA 98144-4590 USA
Phone: (206) 322-5474 • Fax: (206) 322-5425
Toll Free: (800) 578-2547
E-mail: service@belshaw.com • http://www.belshaw.com
Page 3

Contents
Sections
1 Installation 1
Conforming to Codes 1
Selecting a Workstation 1
Unpacking the Fryer 2
Initial Cleaning 2
Assembling the Fryer 2
Installing the Fryer 3
Moving the Fryer 4
2 Operation 5
Taking Safety Precautions 5
Frying Donuts 5
3 Cleaning 8
Removing the Shortening 8
Washing 9
Rinsing 10
4 Maintenance 11
5 Troubleshooting 17
Appendixes
A Pilot Module A-1
Checkout A-1
Troubleshooting—General A-4
Troubleshooting the Ignition System A-4
Belshaw Bros., Inc. • 1750 22nd Ave. S. • Seattle, WA 98144 • Phone 206-322-5474 • Fax 206-322-5425
718LCG, 724CG, and 734CG Gas Fryers MN-1141EN iii
Page 4

B Donut-Making Helps B-1
Tips on Making Quality Cake Donuts B-1
Calculating Correct Water Temperature B-2
Ratios of Plunger Sizes to Donut Weights B-2
Temperature Conversion B-2
C Parts Lists C-1
Limited Warranty Insert
Page 5

Preface
The 718LCG, 724CG, and 734CG Gas Fryers are
designed to fry cake and yeast-raised donut
products. Each must be bolted to a flat, dry
floor. The operator should stand opposite the
flue stack.
The operator must work safely at all times and
read this manual and follow its instructions and
warnings. A thorough understanding of how to
install, maintain, and safely operate the fryer will
prevent production delays and injuries
Heed the following warnings and all other
warnings that appear in this manual:
• Make sure the machine is bolted
securely to the floor. Doing so will
prevent the machine from moving,
tipping, or falling, which could cause
serious injury.
• Never let water and hot shortening come
in contact with each other. Moisture
causes hot shortening to spatter, which
may cause serious burns.
• Do not overfill the kettle with
shortening. If shortening overflows the
kettle, it could cause serious burns or
could cause someone to slip on the floor
and be seriously injured.
• Hot shortening can cause serious burns.
Make sure that the system and the
shortening are cool before attempting
any cleaning, adjustment, disassembly,
or repair.
• To avoid electrocution or other injury,
unplug the machine before attempting
any cleaning, adjustment, disassembly,
or repair.
• To avoid damaging the machine, never
use force to assemble, disassemble,
operate, clean, or maintain it.
• Be careful never to get shortening,
water, or other materials on the floor. If
anything does get spilled on the floor,
mop it up immediately. Materials on the
floor can cause people to slip or fall,
resulting in serious injury or loss of life.
• To prevent unintentional startup and
possible fire, unplug the machine if there
is a local power outage. When the
power is restored, it is safe to plug the
machine in again.
• To avoid electrocution, make sure that
all electrical cords are not frayed or
cracked and that they do not pass
through any water or shortening.
• Make sure that all electrical cords are
routed so that no one will trip over them.
• Make sure you are aware of the
following:
This product contains chemicals known
to the State of California to cause birth
defects or other reproductive harm.
Operation, installation and servicing of
this product could expose you to carbon
monoxide if not adjusted properly.
Inhalation of carbon monoxide is known
to the State of California to cause birth
defects or other reproductive harm.
Maintenance and repairs shall only be
carried out by a factory representative or
qualified service personnel.
• LPG/LNG Conversion:
Belshaw Bros., Inc. • 1750 22nd Ave. S. • Seattle, WA 98144 • Phone 206-322-5474 • Fax 206-322-5425
718LCG, 724CG, and 734CG Gas Fryers MN-1141EN v
Page 6

Contact Belshaw Brothers at 1-800-5782547 to obtain necessary parts and
instructions.
Page 7

1 Installation
In a prominent location, post instructions to be
followed in the event the user smells gas. Obtain
this information by consulting your local gas
supplier.
FOR YOUR SAFETY
Do not store or use gasoline or other
flammable vapors or liquids in the vicinity
of this or any other appliance.
WARNING
Improper installation, adjustment,
alteration, service or maintenance can
cause property damage, injury or death.
Read the installation, operating and
maintenance instructions thoroughly
before installing or servicing this
equipment.
• The fryer must be isolated from the gas
supply piping system by closing its
individual manual shutoff valve during any
pressure testing of the gas supply piping
system at test pressures equal to or less than
1/2 psig (3.45 kPa).
The fryer, when installed, must be electrically
grounded in accordance with local codes, or in
the absence of local codes, with the National
Electrical Code, ANSI/NFPA 70, or with the
Canadian Electrical Code, CSA C22.1, as
applicable.
WARNING
Electrical Grounding Instructions
This appliance is equipped with a three-
prong (grounding) plug for your protection
against shock hazard and should be
plugged directly into a properly grounded
three-prong receptacle. Do not cut or
remove the grounding prong from this
plug.
Conforming to Codes
The installation of this fryer must conform with
local codes, or in the absence of local codes, with
the National Fuel Gas Code (ANSI Z223.1-
1992), with the Natural Gas Installation Code
(CAN/CGA-B149.1), or with the Propane
Installation Code (CAN/CGA-B149.2),
including:
• The fryer and its individual shutoff valve
must be disconnected from the gas supply
piping system during any pressure testing of
that system at test pressures in excess of 1/2
psig (3.45 kPa).
Belshaw Bros., Inc. • 1750 22nd Ave. S. • Seattle, WA 98144 • Phone 206-322-5474 • Fax 206-322-5425
718LCG, 724CG, and 734CG Gas Fryers MN-1141EN 1
Selecting a Workstation
The room in which the fryer is to be used should
provide enough air for combustion. A
ventilation hood with grease filters must be used
with the fryer. The hood must be installed and
operated in conformance with all applicable fire
codes and emissions standards.
Maintain these clearances between the sides and
back of the fryer to combustible materials:
• Sides—2 inches; and
• Back—2 inches.
Page 8
The workstation should allow at least 2”/5 cm
clearance between the machine and all
construction, whether combustible or
noncombustible. In addition, it should allow
access to the rear of the fryer for cleaning and
servicing.
Unpacking the Fryer
1. Use a fork lift to transport the shipping crate
to the work station.
2. Break down the shipping crate.
3. Remove all the packing materials from the
fryer. These include foam, tape, brown
paper, plastic, and white protective coating.
4. Position the fryer to allow sufficient space
on either end of the machine for any
equipment you plan to use with it.
Assembling the Fryer
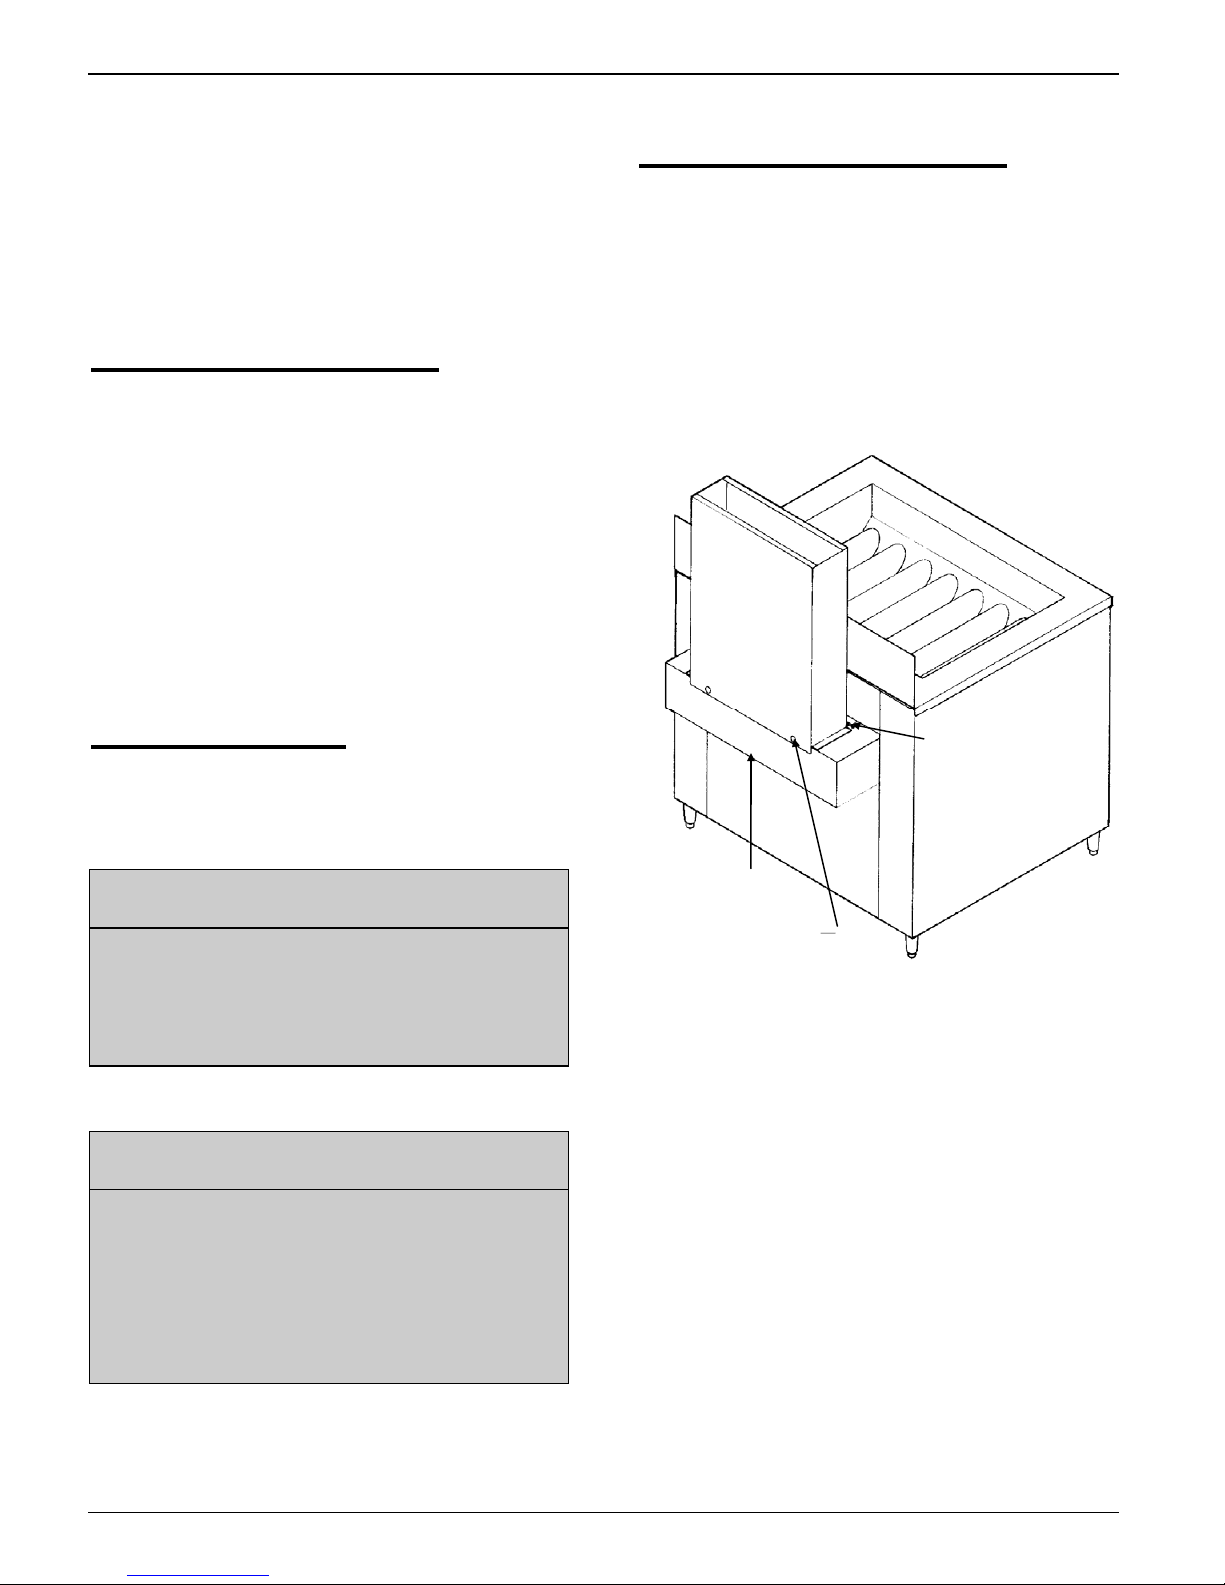
1. Install the flue stack as follows:
a. Slide the flange on the bottom of the flue
stack underneath the retaining strip on
the flue base. The mounting holes must
line up. (See Figure 1-1.)
b. Fasten the flue stack to the flue base
using the two pan-head sheet metal
screws provided.
flue
stack
Initial Cleaning
Clean your fryer before using it. Wipe the inside
of the kettle with a soft, damp cloth. Dry the
kettle thoroughly.
WARNING
To avoid electrocuting yourself or
damaging the machine, never allow water,
steam, cleaning solution, or other liquid to
enter the electrical box.
WARNING
Never let water and hot shortening come in
contact with each other. Moisture causes
hot shortening to spatter, which may cause
serious injury. Prior to use, make sure the
kettle and any other parts you have washed
are dry.
retaining
strip
flue base
pan-head sheet
metal screw
Figure 1-1. Installing the Flue Stack.
2. Attach the heat shield to the splash shield as
follows:
a. Slide the flanges on the sides of the heat
shield under the bent edges of the splash
shield. The mounting holes must line
up.
b. Fasten the heat shield to the splash shield
using the 10-24 x 3/8” hex-head screws,
lockwashers, and nuts provided. The
screws go through the front of the splash
shield; the lockwashers and nuts go on
the back of the heat shield.
Belshaw Bros., Inc. • 1750 22nd Ave. S. • Seattle, WA 98144 • Phone 206-322-5474 • Fax 206-322-5425
2 MN-1141EN 718LCG, 724CG, and 734CG Gas Fryers
Page 9

3. Put the heat shield and splash shield on the
fryer. They slide over the flue stack, and the
back of the kettle slides between the heat
shield and the splash shield. The mounting
holes in the heat shield and the fryer cabinet
must line up. See Figure 1-2.
heat
shield
splash
shield
10-24 x 3/8
hex-head
screw
hex-head
sheet metal
screws
4. Level the fryer. Follow these steps:
a. Check to see if the fryer is level. To do
so, place a level across the top of the
fryer cabinet.
b. If the fryer is not level, lift the fryer
using a fork lift or pallet jack, and turn
the legs to adjust them.
c. Using the fork lift or pallet jack, lower
the fryer to the floor. Be sure that all the
legs rest on the floor when the fryer is
level.
5. Bolt the fryer to the floor. The foot of each
leg has two holes in it for this purpose.
WARNING
To avoid serious burns, other injury, or
death, make sure the fryer is securely
fastened to the floor so it will not tip or fall
over.
6. If you want to perform pressure testing on
the building’s gas supply system at pressures
greater than 0.5 psig/3.45 kPa, do so now,
before you connect the fryer to the gas
supply.
Figure 1-2. Installing the Heat Shield and
Splash Shield.
4. Fasten the heat shield to the fryer cabinet
using the four hex-head tek screws provided.
To avoid damaging the fryer, do not
perform pressure testing on the building’s
gas supply system at pressures greater than
0.5 psig/3.45 kPa when the fryer is
connected to the that system.
CAUTION
Installing the Fryer
1. Make sure the power requirements of the
machine, found on the data plate, match
your power source.
2. Using a fork lift or pallet jack, lift the fryer
cabinet and screw each leg in as far as it will
go.
3. Set the fryer cabinet on a flat, dry floor.
Belshaw Bros., Inc. • 1750 22nd Ave. S. • Seattle, WA 98144 • Phone 206-322-5474 • Fax 206-322-5425
718LCG, 724CG, and 734CG Gas Fryers MN-1141EN 3
7. Connect the fryer to the gas supply, as
follows:
a. Make sure the gas line to the fryer is the
right size. If it is too small, the gas
pressure at the burner manifold will be
too low, resulting in slow heat recovery,
delayed ignition, and pilot outage. (The
Page 10

gas supply line on the fryer itself is
1/2”/1.3 cm I.P.S.)
b. Connect the fryer to the building’s gas
supply.
c. Seal all threaded joints between gas
pipes with pipe joint compound. You
must use a compound that resists the
action of liquefied petroleum (LP) gases.
d. Bleed the gas lines of all air.
e. Check all gas connections and fittings
for leaks using a gas leak detector, a
soap solution, or a similar substance.
When such a substance is applied to
connections and fittings, bubbles
indicate gas leaks.
WARNING
To avoid a fire or an explosion which
would cause serious burns or death, never
use an open flame to check connections for
gas leaks.
8. If you want to perform pressure testing on
the building’s gas supply system at pressures
at or below 0.5 psig/3.45 kPa, you may do so
now. Before testing, make sure the fryer’s
individual manual shutoff valve is closed.
9. Connect the fryer to a properly grounded
power source.
WARNING
This appliance is equipped with a three-
prong (grounding) plug for your protection
against shock hazard and should be
plugged directly into a properly grounded
three-prong receptacle. Do not cut or
remove the grounding prong from this
plug.
Moving the Fryer
If you ever want to move the fryer to a different
workstation, follow this procedure:
1. Turn off the fryer and disconnect it from the
power source.
2. Disconnect the machine from the gas supply.
3. Allow the machine and the shortening to
cool.
WARNING
Do not touch hot shortening. It can cause
serious burns.
4. Remove the shortening from the fryer as
explained in “Removing the Shortening” in
Section 3.
WARNING
To avoid burns, falls, other injury, or
death, never attempt to move the fryer
when it has shortening or other liquid in it.
WARNING
Thoroughly clean and dry the floor if
shortening is spilled. Materials on the floor
can cause people to slip or fall, resulting in
serious injury or loss of life.
5. Remove the bolts that secure the fryer to the
floor.
6. Using a fork lift, transport the machine to
the new workstation.
7. Level the fryer, bolt it to the floor, connect it
to the gas line, and connect it to the power
source, as explained in “Installing the Fryer”
above.
Belshaw Bros., Inc. • 1750 22nd Ave. S. • Seattle, WA 98144 • Phone 206-322-5474 • Fax 206-322-5425
4 MN-1141EN 718LCG, 724CG, and 734CG Gas Fryers
Page 11

Operation 2
Taking Safety Precautions
In a prominent location, post information about
what to do if there is a gas leak. Make sure that
all employees know what to do.
WARNING
To avoid the possibility of fire, explosion,
property damage, serious burns, and even
death, never store gasoline or any other
flammable liquid or vapor near the fryer.
WARNING
To avoid serious injury or death, if you
smell gas or suspect a gas leak, proceed as
follows: 1. Turn off the gas. 2. Evacuate
the building. 3. Do not touch any electrical
switch or telephone until you are sure no
spilled gas remains.
Frying Donuts
proofer or feed table manual for complete
installation and operation instructions.
2. Make sure the drain valve is closed.
3. Put enough shortening in the kettle to
completely cover the burner tubes,
thermocouple, and high-temperature limit
control probe.
Put shortening in the kettle using one of
these methods:
• If you have a Belshaw Shortening Melter
(FM) attached to the fryer, use the FM to
melt shortening and transfer it to the
kettle. See the FM manual.
WARNING
Hot shortening causes severe burns.
• Melt shortening in a pan on the stove
and pour it into the kettle.
• Put solid shortening into the kettle,
packing it tightly around the burner
tubes.
WARNING
To avoid serious injury or death, before
you begin working, make sure that there is
no combustible material in the area of the
fryer.
Read each step completely before doing what it
tells you to do.
1. If you are frying yeast-raised donuts, install
the proofer or feed table. Refer to the
Belshaw Bros., Inc. • 1750 22nd Ave. S. • Seattle, WA 98144 • Phone 206-322-5474 • Fax 206-322-5425
718LCG, 724CG, and 734CG Gas Fryers MN-1141EN 5
WARNING
Air spaces can cause the shortening to
overheat and catch on fire.
CAUTION
To avoid severe damage to the kettle, never
turn on the heat unless the heat tubes are
completely covered by liquid.
Page 12
4. Move the on/off switch to the OFF position.
5. Rotate the gas control knob counterclockwise to the ON position.
6. Move the on/off switch to the ON position.
The yellow pilot light near the on/off switch
and the red pilot light on the fryer cabinet
will both light up.
7. Push the
“SP1” will light up. This is the set point.
Push the up and down arrows to adjust the
convection heat set point. See Figure 4-4.
Push “R” button to return to operational
mode.
If the pilot fails to ignite within a certain
length of time, the gas system will go into
safety lock-out. If this happens, move the
on/off switch to OFF, wait at least one
minute, and then move the on/off switch to
ON again.
button on the digital controller,
WARNING
Use one of the following methods. For
safety reasons, we recommend the first
method, and discourage you from using any
other method.
• Use a Belshaw Shortening Melter (FM)
to melt shortening and transfer it to the
kettle. See the FM manual.
• Melt shortening in a pan on the stove
and pour it into the kettle.
• Very carefully put solid shortening into
the kettle.
WARNING
To avoid serious burns, be very careful not
to splatter hot shortening when you add
shortening to the kettle.
Because shortening expands as it increases
in temperature, put shortening in the kettle
gradually. Let the shortening in the kettle
heat up before you add more.
Failure to wait at least one minute for the
gas to dissipate could result in a fire or an
explosion when the pilot is lighted again.
If the shortening temperature exceeds
435°F/224°C, the high-temperature limit
control will break the circuit, and the
electrical and gas systems will shut off.
If this happens, follow these steps to reset
the system:
a. Move the on/off switch to the OFF
position.
b. Wait for the shortening to cool to
385°F/196°C or below. You will not be
able to ignite the pilot until the
shortening reaches this temperature.
c. Move the on/off switch to the ON
position.
8. Continue adding shortening to the kettle
until it reaches the proper depth for frying.
9. Wait for the shortening to reach the desired
temperature.
WARNING
To avoid serious burns, when the fryer is
operating, do not touch the flue, exhaust
manifold, stacks, gas burners, or any part
of the fryer that is in contact with hot
shortening. Keep clear from the area
above the flue outlet.
10. If you are frying cake or French donuts,
move the cutter into place over the fryer.
Refer to the cutter manual for complete
installation and operation instructions.
If you are frying yeast-raised donuts using a
feed table, load proofing cloths on the feed
table. Refer to the feed table manual for
complete installation and operation
instructions.
Belshaw Bros., Inc. • 1750 22nd Ave. S. • Seattle, WA 98144 • Phone 206-322-5474 • Fax 206-322-5425
6 MN-1141EN 718LCG, 724CG, and 734CG Gas Fryers
Page 13

CAUTION
To avoid damaging the machine, do not
operate the conveyor until all the
shortening has melted.
11. Continue supplying shortening to the kettle
as required. Keep the kettle filled up to the
“Oil Level” marks on the side.
12. When you are done frying donuts, move the
on/off switch to the OFF position.
Belshaw Bros., Inc. • 1750 22nd Ave. S. • Seattle, WA 98144 • Phone 206-322-5474 • Fax 206-322-5425
718LCG, 724CG, and 734CG Gas Fryers MN-1141EN 7
Page 14

3 Cleaning
For your safety, observe the following warnings
throughout the entire cleaning process.
WARNING
Thoroughly clean and dry the floor if
shortening, water, or other materials are
spilled. Materials spilled on the floor can
cause serious injury or loss of life.
WARNING
To avoid electrocuting yourself or
damaging the machine, never allow water,
steam, shortening, cleaning solution, or any
other liquid to enter the electrical box.
WARNING
To avoid serious burns while cleaning, do
not touch the flue, exhaust manifold,
stacks, gas burners, or any part of the fryer
that is in contact with hot liquids.
There are four basic steps to cleaning the fryer:
removing the shortening, washing, rinsing, and
drying. You must perform all four steps and
perform them in the order listed.
Removing the Shortening
WARNING
To avoid being burned or electrocuted,
disconnect the fryer from the power source
before cleaning it.
1. Disconnect the machine from the power
source.
2. Let the shortening cool to 100°F/38°C.
3. Place a Belshaw Shortening Filter or a large
metal container under the drain valve of the
fryer.
WARNING
Do not use a plastic container. If the
shortening is not cool enough, the container
will melt, possibly causing you to be
burned, and causing shortening to get on
the floor.
4. Open the drain valve by turning the drain
valve extension knob on the side of the fryer
cabinet. Allow all the shortening to drain
into the Shortening Filter or metal container.
5. If you are using a metal container, watch it
to make sure the shortening does not
overflow. If the container becomes full,
close the drain valve, put another metal
container under the drain valve, and open
the drain valve again.
Belshaw Bros., Inc. • 1750 22nd Ave. S. • Seattle, WA 98144 • Phone 206-322-5474 • Fax 206-322-5425
8 MN-1141EN 718LCG, 724CG, and 734CG Gas Fryers
Page 15

WARNING
Do not allow the shortening to overflow the
containers. Shortening will get on the
floor, and if the shortening is not cool
enough, you may be burned.
WARNING
Thoroughly clean and dry the floor if
shortening is spilled. Shortening on the
floor can cause serious injury or loss of life.
6. Using a non-abrasive, non-metallic spatula,
scrape the sediment and any remaining
shortening into the drain valve.
WARNING
To avoid fire, serious injury, and
equipment damage, do not attempt to burn
carbon off of the heat tubes.
2. Connect the fryer to the power source.
Move the on/off switch to ON. Set the
temperature control to 200°F/93°C. Keep
the cleaning solution at this temperature for
15-20 minutes.
3. Scrub the soiled parts while the solution is
hot. Do not use any abrasive cleaners or
scrapers.
WARNING
To avoid being burned, be very careful as
you work with hot cleaning solution. Never
put your hands in the solution. Wear
gloves and long sleeves in case any solution
splashes.
4. Move the on/off switch to OFF and
disconnect the fryer from the power source.
Allow the cleaning solution to cool to
100°F/38°C.
5. Place a large metal container under the drain
valve.
7. Close the drain valve.
8. If your fryer has a Belshaw Shortening
Melter (FM) connected to it, install the plug
into the reservoir nipple.
Washing
1. Pour hot water into the kettle, up to the
normal level of the shortening. Add
trisodium phosphate or another appropriate
cleaner.
CAUTION
To avoid severe damage to the kettle, never
turn on the heat unless the heat tubes are
completely covered by liquid.
WARNING
Do not use plastic containers. If the
cleaning solution is not cool enough, the
containers will melt; possibly causing you
to be burned, and causing cleaning solution
to get on the floor.
6. Open the drain valve and allow the cleaning
solution to drain into the container.
7. Watch the container to make sure the
cleaning solution does not overflow. If the
container becomes full, close the drain
valve, put another large metal container
under the drain valve, and open the drain
valve again.
Belshaw Bros., Inc. • 1750 22nd Ave. S. • Seattle, WA 98144 • Phone 206-322-5474 • Fax 206-322-5425
718LCG, 724CG, and 734CG Gas Fryers MN-1141EN 9
Page 16

WARNING
Do not allow the cleaning solution to
overflow the containers. Cleaning solution
will get on the floor, and if the solution is
not cool enough, you may be burned.
8. When the draining is complete, close the
drain valve.
9. Carefully carry the container(s) to the sink
and slowly pour the solution into the sink.
WARNING
Thoroughly clean and dry the floor if
cleaning solution is spilled. Liquid on the
floor can cause serious injury or loss of life.
Rinsing
1. Pour clean water into the kettle, up to the
normal level of the shortening. If the
cleaner you have used requires that you add
a neutralizer, do so now.
CAUTION
To avoid severe damage to the kettle, never
turn on the heat unless the heat tubes are
completely covered by liquid.
WARNING
Do not use plastic containers. If the water
is not cool enough, the containers will melt;
possibly causing you to be burned, and
causing cleaning solution to get on the
floor.
5. Open the drain valve and allow the water to
drain into the container.
6. Watch the container to make sure the water
does not overflow the container. If the
container becomes full, close the drain
valve, put another large metal container
under the drain valve, and open the drain
valve again.
WARNING
Do not allow the water to overflow the
containers. Water will get on the floor, and
if the water is not cool enough, you may be
burned.
7. When the draining is complete, close the
drain valve.
8. Carefully carry the container(s) to the sink
and slowly pour the water into the sink.
WARNING
2. Connect the machine to the power source.
Move the on/off switch to ON. Set the
temperature controls at 200°F/93°C. Leave
the water at this temperature for 5-10
minutes.
3. Move the on/off switch to OFF and
disconnect the machine from the power
source. Allow the water to cool to
100°F/38°C.
4. Place a large metal container under the drain
valve.
Belshaw Bros., Inc. • 1750 22nd Ave. S. • Seattle, WA 98144 • Phone 206-322-5474 • Fax 206-322-5425
10 MN-1141EN 718LCG, 724CG, and 734CG Gas Fryers
Thoroughly clean and dry the floor if water
is spilled. Water on the floor can cause
serious injury or loss of life.
9. Dry the kettle and burner tubes thoroughly.
WARNING
Dry the fryer thoroughly. Moisture causes
hot shortening to spatter, which may cause
serious injury.
Page 17

Maintenance 4
SB-0308 rev 3
AFFECTS: OPEN KETTLE FRYERS
PURPOSE: PROGRAMMING THE OGDEN ETR-9000 TEMPERATURE CONTROLLER
NOTE: Use Rev. 3 to correct existing open Kettle Fryer settings.
(SP1L set to 0 & PB set to 0)
Operator Interface:
The operator interface on the Ogden ETR-9000, Temperature Controller, consists of the following:
• A scroll key
• Up
• A reset key
and down arrow keys are used to increase or decrease the selected parameter.
used to select a parameter to be viewed or adjusted.
used to return to normal operation mode.
Figure 1 – Operator Interface Description
Belshaw Bros., Inc. • 1750 22nd Ave. S. • Seattle, WA 98144 • Phone 206-322-5474 • Fax 206-322-5425
718LCG, 724CG, and 734CG Gas Fryers MN-1141EN 11
Page 18

Menu Overview:
There are three main menus that contain parameters that require programming; they are User Menu,
Setup Menu, and Calibration Mode. The figure below (Figure 2) shows the sequence of operations
necessary to access the programming parameters in each menu.
Belshaw Bros., Inc. • 1750 22nd Ave. S. • Seattle, WA 98144 • Phone 206-322-5474 • Fax 206-322-5425
12 MN-1141EN 718LCG, 724CG, and 734CG Gas Fryers
Figure 2 - Menu Flow Chart
Page 19

Open Kettle Fryer Parameter Settings
Tables 1, 2 and 3 below list of the temperature controller default settings and the Belshaw Factory
settings. When installing a new controller 4 of the default setting must be changed to the Belshaw
Factory settings.
• Push and hold the scroll key
• Push the scroll key
• Push the Up
• Push the scroll key
change the settings listed in the Belshaw “Factory” column. (see tables 1, 2 and 3)
When finished setting parameters.
• Continue pushing the scroll key
• Push the Up
• Push the reset key
or down arrow keys to change “LocK” to “nonE”.
or down arrow keys to set “LocK” to “uSEr”.
once to access the “LocK” parameter.
to page through the settings and the Up or down arrow keys to
to return normal operation.
for 3 seconds, this will take you to the “SEt” menu.
until you are back to “LocK”.
Default Settings:
In the event that parameters have been modified without recording the modifications, change each
parameter to match those listed in Tables 1, 2 and 3 listed below (controller parameter default settings).
Then adjust SP1H, PB, OUT2 and the LocK parameters as listed in Belshaw “Factory” below. Then set
SP1 to 375ºF.
Belshaw Bros., Inc. • 1750 22nd Ave. S. • Seattle, WA 98144 • Phone 206-322-5474 • Fax 206-322-5425
718LCG, 724CG, and 734CG Gas Fryers MN-1141EN 13
Page 20

Table 1 - Parameter Descriptions
Set to
375ºF
set to
“uSEr”
after
setup
0ºF
410ºF
0ºF
Belshaw Bros., Inc. • 1750 22nd Ave. S. • Seattle, WA 98144 • Phone 206-322-5474 • Fax 206-322-5425
14 MN-1141EN 718LCG, 724CG, and 734CG Gas Fryers
Page 21

Table 2 - Parameter Descriptions
Set to
“nonE”
Belshaw Bros., Inc. • 1750 22nd Ave. S. • Seattle, WA 98144 • Phone 206-322-5474 • Fax 206-322-5425
718LCG, 724CG, and 734CG Gas Fryers MN-1141EN 15
Page 22

Table 3 - Parameter Descriptions
Set to
Belshaw Bros., Inc. • 1750 22nd Ave. S. • Seattle, WA 98144 • Phone 206-322-5474 • Fax 206-322-5425
16 MN-1141EN 718LCG, 724CG, and 734CG Gas Fryers
Page 23

5 Troubleshooting
If you have a problem with your fryer that you
cannot solve, call your dealer or another
qualified technician.
If your dealer cannot help you, please call
Belshaw Bros. at (206) 322-5474. When you
call, please specify the following:
• The model name of the machine.
• The serial number of the machine.
• The voltage, phase, and cycle of the
machine.
CAUTION
If you perform repairs yourself or have
them performed by anyone other than a
service technician authorized by Belshaw
Bros., you do so at your own risk.
WARNING
Disconnect the machine from the power
source before disassembling, repairing, or
wiring.
Belshaw Bros., Inc. • 1750 22nd Ave. S. • Seattle, WA 98144 • Phone 206-322-5474 • Fax 206-322-5425
718LCG, 724CG, and 734CG Gas Fryers MN-1141EN 17
Page 24

Page 25

A Pilot Module
This appendix contains supplemental information
about the Honeywell S8600 Intermittent Pilot
Module. The Belshaw 718LCG, 724CG, and
734CG gas fryers all use this module. Fryers
using natural gas use the S8600F-1000. Fryers
using propane use the S8600H-1014.
Belshaw provides this appendix as a courtesy to
our customers. We deny any liability for the use
of the information contained herein. All of the
procedures explained below should be performed
by qualified technicians.
Checkout
WARNING
To avoid fire or explosion, resulting in
property damage, injury, or loss of life, if
you smell gas or suspect a gas leak, turn off
the gas at the manual service valve and
evacuate the building. Do not try to light
any appliance or touch any electrical
switch or telephone in the building until
you are sure no spilled gas remains.
Step 1: Perform Visual
Inspection
1. Make sure the fryer’s on/off switch is in the
OFF position. Make sure all wiring
connections are clean and tight. If they are
not, correct them.
2. Move the on/off switch to ON.
3. Open the manual shutoff valves in the gas
line to the fryer.
4. If the piping has been disturbed, perform a
gas leak test ahead of the gas control, as
follows:
a. Paint the pipe joints with a rich solution
of soap and water. Bubbles in the
solution indicate gas leaks.
b. If there are leaks, tighten the joints.
c. Test again for leaks.
d. Repeat this procedure until no leaks
exist.
Step 2: Review the Normal
Operating Sequence
WARNING
To avoid fire or explosion, resulting in
property damage, injury, or loss of life,
perform gas leak tests as explained in Steps
1 and 5 below at the time of initial
installation and at any time work is done
involving the gas piping.
Belshaw Bros., Inc. • 1750 22nd Ave. S. • Seattle, WA 98144 • Phone 206-322-5474 • Fax 206-322-5425
718LCG, 724CG, and 734CG Gas Fryers MN-1141EN A-1
Figure A-1 summarizes this information.
Trial for Ignition
When the fryer’s thermostat calls for heat, the
module energizes the first main valve operator.
The first main valve opens, allowing gas to flow
to the pilot burner. At the same time, the
electronic spark generator in the module
produces a spark pulse output of over 10,000
volts. The voltage generates a spark at the
igniter-sensor that lights the pilot.
If the pilot does not light, or if the pilot flame
current is not at least 1.0 μA and steady, the
Page 26

module will not energize the second main valve,
and the main burner will not light. The S8600F,
which is used on natural gas fryers, will continue
to spark as long as the fryer’s thermostat calls for
heat or until the pilot lights.
The S8600H, which is used on propane fryers,
provides 100 percent shutoff and safety lockout.
Its ignition sparks only for a pre-set length of
time (15 or 90 seconds, as stamped on the
module). If the pilot does not light within the
timed trial for ignition period, the module goes
into safety lockout, de-energizing the first main
valve operator, closing the first main pilot valve
in the gas control, and stopping the flow of gas to
the pilot. You must then set the fryer’s
thermostat below 200°F/93°C, move the on/off
switch to OFF, and wait at least one minute
before trying again to light the pilot.
Main Burner Operation
When the pilot flame is established, a flame
rectification circuit is completed between the
sensor and the burner ground. The flame sensing
circuit in the module detects the flame current,
shuts off the spark generator, and energizes the
second main valve operator. The second main
valve opens and gas flows to the main burner,
where it is ignited by the pilot burner. On the
S8600H, the safety lockout timer is held in the
normal operating mode.
2. Set the fryer’s thermostat above
200°F/93°C.
Watch to see whether there is a spark at the
pilot burner immediately.
3. Time the spark from the time it starts to the
time it shuts off.
4. Compare this time with the shutoff time that
is stamped on the module. They should be
the same.
5. Open the manual gas cock and make sure
that no gas is flowing to the pilot or main
burner.
6. Set the fryer’s thermostat below 200°F/93°C
and wait at least one minute before
continuing.
When the thermostat no longer calls for heat,
both valve operators are de-energized, and both
valves in the gas control close.
Step 3: Reset the Module
1. Turn the thermostat to its lowest setting.
2. Wait at least one minute.
Step 4: Check Safety Shutoff
Operation
This step applies only to the S8600H, which is
used on propane fryers.
1. Turn the gas supply off.
Belshaw Bros., Inc. • 1750 22nd Ave. S. • Seattle, WA 98144 • Phone 206-322-5474 • Fax 206-322-5425
A-2 MN-1141EN 718LCG, 724CG, and 734CG Gas Fryers
Page 27

START
TRIAL FOR
IGNITION
Pilot burner lights.
Module senses flame current.
Thermostat calls for heat.
First main valve opens.
Gas flows to pilot burner.
Igniter-sensor sparks.
Pilot burner does not light, or
module does not sense flame current.
Module S8600H
Operator turns thermostat
below 200°F/93°C, moves
on/off s witch to OFF, and
waits at least one minute.
Module S8600F
Ignition spark continues.Syst em locks out.
After no more than 5 minutes,
operator turns thermostat
below 200°F/93°C, moves
on/off switch to OFF, a nd
waits at least one minute.
MAIN
BURNER
OPE RATION
Sparking stops.
Second main valve opens.
Module monitors pilot flame
current.
Pilot flame fails. Power is interrupted.
Mai n valve closes. Valves close.
System shuts off. (Restarts
when power is r esto red.)
Thermostat stops
calling for heat.
Burners shut off.
Figure A-1. Normal Operating Sequence.
Belshaw Bros., Inc. • 1750 22nd Ave. S. • Seattle, WA 98144 • Phone 206-322-5474 • Fax 206-322-5425
718LCG, 724CG, and 734CG Gas Fryers MN-1141EN A-3
Page 28

Step 5: Check Normal
Operation
1. Set the fryer’s thermostat above
200°F/93°C.
2. Watch to see whether the pilot lights
smoothly when the gas reaches the pilot
burner.
3. Watch to see whether the main burner lights
smoothly without flashback.
4. Watch to see whether the main burner
operates smoothly without floating, lifting,
flame rollout, or heat buildup.
5. If the gas line has been disturbed, perform a
gas leak test, as follows:
a. Paint the gas control gasket edges and all
pipe connections downstream of the gas
control, including pilot tubing
connections, with a rich solution of soap
and water. Bubbles in the solution
indicate gas leaks.
thermostat below 200°F/93°C for at least
one minute before continuing. On retry
models, wait for retry or reset at the
thermostat.
• If any component does not function
properly, make sure it is correctly
installed and wired before replacing it.
• The ignition module cannot be repaired.
If it malfunctions, it must be replaced.
• Only trained, experienced service
technicians should service intermittent
pilot systems.
As the first step in troubleshooting, perform the
checkout procedure. Then check the block
diagram. If you think there is an ignition
problem, see “Troubleshooting the Ignition
System” below to isolate and correct the
problem.
Following troubleshooting, perform the checkout
procedure again to be sure system is operating
normally.
b. If there are leaks, tighten the joints or
screws, or replace the component.
c. Test again for leaks.
d. Repeat this procedure until no leaks
exist.
6. Set the thermostat below 200°F/93°C.
Watch to see whether the main burner flame
and the pilot flame go out.
Troubleshooting—General
The following service procedures are provided as
a general guide. For electrical troubleshooting
refer to the diagrams included with this manual,
or to the wiring schematic on the inside of the
fryer door. Keep the following things in mind:
• On lockout and retry models, meter
readings between gas control and
ignition module must be taken within the
trial for ignition period. Once the
ignition module shuts off, lockout
models must be reset by setting the
Troubleshooting the
Ignition System
Step 1: Check Ignition Cable
1. Make sure the ignition cable does not run in
contact with any metal surfaces.
2. Make sure the ignition cable is no more than
36”/0.9 m long.
3. Make sure the connections to the ignition
module and to the igniter-sensor are clean
and tight.
4. Make sure the ignition cable provides good
electrical continuity.
Step 2: Check Ignition System
Grounding
Nuisance shutdowns are often caused by a poor
or erratic ground.
Belshaw Bros., Inc. • 1750 22nd Ave. S. • Seattle, WA 98144 • Phone 206-322-5474 • Fax 206-322-5425
A-4 MN-1141EN 718LCG, 724CG, and 734CG Gas Fryers
Page 29

A common ground, usually supplied by the pilot
burner bracket, is required for the module and
the pilot burner/igniter-sensor.
1. Check for good metal-to-metal contact
between the pilot burner bracket and the
main burner.
2. Check the ground lead from the GND
(BURNER) terminal on the module to the
pilot burner. Make sure the connections are
clean and tight. If the wire is damaged or
deteriorated, replace it with #14-18 gauge,
moisture-resistant, thermoplastic-insulated
wire with a 221°F/105°C minimum rating.
3. Check the ceramic flame rod insulator for
cracks or evidence of exposure to extreme
heat, which can permit leakage to the
ground. Replace the pilot burner/ignitersensor and provide a shield if necessary.
If the flame rod or the bracket are bent out
of position, restore them to the correct
position.
4. Pull the jumper slowly away from the
terminal and note the length of the gap when
sparking stops.
5. Check the table below.
Arc Length What To Do
No arc, or arc less
than 1/8"/3 mm
Arc 1/8"/3 mm or
longer.
Check external fuse, if
provided.
Verify power at
module input
terminal.
Replace module if
fuse and power are
okay.
Nothing. (Voltage
output is okay.)
Step 4: Check Pilot and Main
Step 3: Check Spark Ignition
Circuit
You will need a short jumper wire made from
ignition cable or other heavily insulated wire.
1. Close the manual gas valve.
2. Disconnect the ignition cable at the SPARK
terminal on the module.
WARNING
To avoid electric shock, when performing
the following steps, do not touch the
stripped end of the jumper or the SPARK
terminal. The ignition circuit generates
over 10,000 volts.
3. Energize the module and immediately touch
one end of the jumper firmly to the GND
terminal on the module. Move the free end
of the jumper slowly toward the SPARK
terminal until a spark is established.
Burner Lightoff
1. Set the thermostat above 200°F/93°C to call
for heat.
2. Watch the pilot burner during the ignition
sequence. Look for the following:
• The ignition spark continues after the
pilot is lit
• The pilot lights and the spark stops, but
the main burner does not light
• The pilot lights, the spark stops and the
main burner lights, but the system shuts
down (S8600H only)
3. If any of the these things happens, make sure
the flame current is adequate. Follow these
steps:
a. Turn off the fryer and disconnect it from
the power source.
b. Clean the flame rod with emery cloth.
Belshaw Bros., Inc. • 1750 22nd Ave. S. • Seattle, WA 98144 • Phone 206-322-5474 • Fax 206-322-5425
718LCG, 724CG, and 734CG Gas Fryers MN-1141EN A-5
Page 30

c. Make sure the electrical connections are
clean and tight. Replace damaged wire
with moisture-resistant #18 wire rated
for continuous duty up to 221°F/105°C.
d. Check to see if ceramic insulator is
cracked. A cracked insulator can cause a
short to ground. Replace the ignitersensor if necessary.
e. At the gas control, disconnect the main
valve wire from the TH or MV terminal.
f. Connect the fryer to the power source
and move the on/off switch to the ON
position.
g. Turn on the power and set thermostat
above 200°F/93°C to call for heat. The
pilot should light, but the main burner
will remain off because the main valve
actuator is disconnected.
h. Check the pilot flame. Make sure it is
blue, steady, and envelops 3/8-1/2”/
10-13 mm of the flame rod. See the
table below for possible flame problems
and their causes.
i. If necessary, adjust the pilot flame by
turning the pilot adjustment screw on the
gas control clockwise to decrease or
counterclockwise to increase the pilot
flame. Following adjustment, always
replace the pilot adjustment cover screw
and tighten it firmly to assure proper gas
control operation.
j. Set the thermostat below 200°F/93°C to
end the call for heat.
If the main burner does not light, check
for 24V AC across MV-MV/PV
terminals. If there is no voltage, replace
the module. Also, check the electrical
connections between the module and the
gas control. If they are okay, replace the
gas control or the gas control operator.
Appearance Cause
small blue flame lack of gas due to
clogged orifice filter
lack of gas due to
clogged pilot filter
low gas supply
pressure
pilot adjustment is at
minimum
lazy yellow flame lack of air due to large
orifice
pilot adjustment is at
minimum
waving blue flame excessive draft at pilot
location
products of
combustion are
recirculating
noisy lifting blowing
high gas pressure
flame
hard sharp flame high gas pressure
4. Recheck the ignition sequence as follows:
a. Reconnect the main valve wire.
b. Set the thermostat above 200°F/93°C to
call for heat.
c. Watch the ignition sequence at the
burner.
If the spark still does not stop after the
pilot lights, replace the ignition module.
Belshaw Bros., Inc. • 1750 22nd Ave. S. • Seattle, WA 98144 • Phone 206-322-5474 • Fax 206-322-5425
A-6 MN-1141EN 718LCG, 724CG, and 734CG Gas Fryers
orifice too small
Page 31

B Donut-Making Helps
Tips on Making Quality
Cake Donuts
• Use the correct batter temperature.
In general, the correct batter temperature is
75°-80°F/24°-27°C. Check the mix
manufacturer’s instructions, as the
recommended temperature range may vary.
If the batter is too warm, the donuts will lack
volume and may “ring out” or be misshapen.
If the batter is too cold, the donuts will stay
under the shortening too long, fry too
slowly, and crack open or ball up. They
may also absorb excess shortening and lose
volume.
• Use the correct floor time.
A floor time of 10 minutes between mixing
and cutting allows the baking powder to
react with the water. This helps the donuts
attain the proper volume the proper level of
shortening penetration.
If the floor time exceeds 30 minutes, the mix
will gas off, the donuts will lose volume and
shape and will absorb too much shortening.
If the shortening is too cold, the donuts will
spread too rapidly, will form large rings, will
tend to crack open, will be too light in
appearance, and will absorb too much
shortening.
• Maintain the proper shortening level. We
recommend a distance of 1 1/4” between the
cutter and the shortening.
If the shortening is too deep, the donuts may
not turn over when they reach the turner,
causing them to cook unevenly.
If the shortening is too shallow (too far
below the cutter), the donuts may not drop
flat, may turn over while submerging and
surfacing, and may become irregular,
cracked, or rough-crusted.
• Ensure that the donuts absorb the right
amount of shortening.
Donuts should absorb 1-1/2 to 3 oz/42 to 85
g of shortening per dozen, depending on
their weight. You can achieve proper
absorption by following tips 1-3.
• If the donuts do not absorb enough
shortening, they will not keep well.
• Use the correct frying temperature.
The correct shortening temperature for
frying is 370°-380°F/188°-193°C.
If the shortening is too hot, the donuts will
fry too quickly on the outside and will lose
volume. The donuts may also become dense
inside.
Belshaw Bros., Inc. • 1750 22nd Ave. S. • Seattle, WA 98144 • Phone 206-322-5474 • Fax 206-322-5425
718LCG, 724CG, and 734CG Gas Fryers MN-1141EN B-1
If they absorb too much shortening, they
will lose volume and may become
misshapen. If this happens, follow tips 1-3,
mix the batter a little longer than usual, turn
the donuts as soon as they become golden
brown, and turn the donuts only once.
Page 32

Calculating Correct Water
Temperature
The following is an example of how to calculate
the correct water temperature to use. You must
Cake Donuts Yeast-Raised Donuts
Room temperature 72 22.2 72 22.2
Dry mix temperature +70 +21.1 +70 +21.1
Total A
Desired batter temperature 75 23.9 80 26.7
x3
Total B
Total B
-Total A
Desired water temp. for cake donuts
Temperature increase during mixing (average: 30°F/17°C)
Desired water temperature for yeast-raised donuts
°F
142 43.3 142 43.3
225 71.7 240 80.1
225 71.7 240 80.1
-142
83°F
use your own room temperature, dry mix
temperature, desired batter temperature, and, if
you are making yeast-raised donuts, estimated
temperature increase during mixing.
x3 x3 x3
-43.3 -142 -43.3
Figure from above 98 36.8
°C
28.4°C
98 36.8
°F
↓
-30 -17
68°F
°C
↓
19.8°C
Ratios of Plunger Sizes to
Donut Weights
The weights given are for donuts without icings
or other toppings. They are provided for
reference only, as weights vary according to the
density of the batter.
Plunger Size Donut Weight per
Dozen
1” 5-8 oz/142-227 g
1 7/16” 10-17 oz/283-482 g
1 9/16” 14-21 oz/397-595 g
1 13/16” 19-23 oz/539-652 g
Temperature Conversion
To convert temperatures from Fahrenheit to
Celsius, subtract 32 from °F and divide the result
by 1.8. For example, 212°F-32/1.8 = 100°C.
To convert temperatures from Celsius to
Fahrenheit, multiply °C by 1.8 and add 32 to the
result. For example, (100°C x 1.8) + 32 = 212°F.
°F °C °F °C
55 12.8 340 171.1
60 15.6 345 173.9
65 18.3 350 176.7
70 21.2 355 179.4
75 23.9 360 182.2
80 26.7 365 185.0
325 162.8 370 187.8
330 165.6 375 190.6
335 168.3 380 193.3
Belshaw Bros., Inc. • 1750 22nd Ave. S. • Seattle, WA 98144 • Phone 206-322-5474 • Fax 206-322-5425
B-2 MN-1141EN 718LCG, 724CG, and 734CG Gas Fryers
Page 33

C Parts Lists
The following pages contain lists of the parts that
make up the 718LCG, 724CG, and 734CG Gas
Fryers. Each parts list refers to an explodedview assembly drawing.
You can use the parts lists and assembly
drawings to order replacement parts. When you
do, please provide electrical information about
your fryer. Some of the part numbers vary
according to the voltage, phase, and cycle of the
machine.
IMPORTANT
The parts lists and assembly drawings are
meant as guides. Because Belshaw
constantly improves its products, parts lists
and assembly drawings may not reflect the
most recent design changes.
Belshaw Bros., Inc. • 1750 22nd Ave. S. • Seattle, WA 98144 • Phone 206-322-5474 • Fax 206-322-5425
718LCG, 724CG, and 734CG Gas Fryers MN-1141EN C-1
Page 34

718LCG PARTS LIST.
ITEM
NUMBER
232 1 EA
#PLT-0001 1 EA CLEAR NEON PILOT LIG
#PLT-0002 1 EA CLEAR NEON PILOT LIG
618-0007A 2 EA
618-0096 8 EA RETAINING CLIP
618-0097 8 EA
618-0098 4 EA SCREEN HANDLE ROD
618-0513 4 EA SCREEN HANDLE
618-0513B 4 EA HANDLE WELDMENT
618L-0097 1 EA FORK
618L-0098 1 EA DRAIN VALVE KNOB,EXT
618L-0103 1 EA LABEL,DRAIN VALVE
618L-0105 1 EA WARNING LABEL
618L0116R 1 EA DRAIN TRAY MTG BRKT
618L-0124 1 EA
618L0127R 1 EA DRAIN TRAY MTG BRKT
618L-1058 2 EA
624-0038 1 EA
624-0039 1 EA
624-0170 1 EA CUTTER MOUNT CLAMP
624-0173 4 EA SS SPRING HANDLE 9-1
624-0174 1 EA DRAIN VALVE BALL 1-1
624-0181.A 1 EA
718LG0001 4 EA BURNER TUBE
718LG0003 1 EA KETTLE SIDE LH
718LG0016 1 EA FLUE BOX
718LG0031 1 EA EXTENSION ROD
718LG0038 1 EA
718LG0053 1 EA 1/4 GAS LINE (VALVE)
718LG0054 1 EA 1/4 GAS LINE (IGNITE)
718LG0056 1 EA SPARK PAN
718LG0059 1 EA HEAT SHIELD
QTY
PER UM DESCRIPTION-TRUNC.
POWER CORD, 18GA
SJO
PROOFING SCREEN
17X2
SPACER SCREEN
HANDLE
DRAIN TRAY SUPPORT
R
FRYING SCREEN
ASSEMBLY
SS DRAIN TRAY
SUPPORT
SS DRAIN TRAY
SUPPORT
WING HANDLE, BALL
VALVE
DRAIN TRAY HINGE
SHAFT
ITEM
NUMBER
718LG0060 1 EA KETTLE BACK SPLASH
718LG0304 1 EA DRAIN TRAY
718LG0501 1 EA FLUE BOX ASSEMBLY
718LG0519 1 EA
718LG0520 1 EA
718LG0521 1 EA RISER ASSEMBLY
718LG0528L 1 EA DOOR ASSEMBLY-LEFT
718LG0528R 1 EA
718LG0529 1 EA DRAIN TRAY ASSY
718LG0530 1 EA EXTENSION ROD ASSY
718LG1008 1 EA KETTLE ASSY
718LG1517-1 1 EA MANIFOLD PIPING ASSY
724G0037A 1 EA
724G-0045 2 EA MOUNTING COUPLING
724G-0063 1 EA CAP TUBE CLIP
724G0063L 1 EA CAP TUBE CLIP-LONG
724G-0068 1 EA DATA PLATE
724G-0069 2 EA
724G-0070 4 EA FLUE BOX CORNER
724G-0129 8 EA INNER TURBULATOR
724G-0130 8 EA OUTER TURBULATOR
724G-0131 4 EA CENTER TURBULATOR
724G-0140 2 EA
724G-0143 1 EA
724G-0144 1 EA THERMOCOUPLE
724G-0146 1 EA
724G0147-52 4 EA
724G-0152 1 EA IGNITER/SENSOR (NG)
724G-0152 1 EA IGNITER/SENSOR (NAT
724G-0156 1 EA GAS LINE TEE 1/8 FEM
724G-0170 4 EA DRAFT SHIELD
724G-0182 2 EA SPARK PAN SPACER
QTY
PER UM DESCRIPTION-TRUNC.
MANIFOLD PIPE
ASSEMB
CARRYOVER TUBE
ASSEM
DOOR ASSEMBLYRIGHT
TRANSFORMER; 38VA
24
FLUE BOX MOUNTING
BOX
MANIFOLD MOUNTING
BACK
HIGH TEMP LIMIT
CONTROL
PILOT LIGHT 25V
YELLOW
BURNER TIP ORIFICE
#52
Belshaw Bros., Inc. • 1750 22nd Ave. S. • Seattle, WA 98144 • Phone 206-322-5474 • Fax 206-322-5425
C-2 MN-1141EN 718LCG, 724CG, and 734CG Gas Fryers
Page 35

718LCG PARTS LIST (CONT’D)
ITEM
NUMBER
724G-0183 1 EA
724G-0186 2 EA DOOR MAGNET
724G-0188 2 EA HINGE PIN
724G-0200 1 EA
724G-0203 2 EA DOOR HANDLE
724G-0204 1 EA PILOT LIGHT LABEL
724G-0205 1 EA PILOT LIGHT RED 25V
724G-0205 1 EA PILOT LIGHT RED 25V
724G-0206 1 EA 2" PLUG BUTTON, NICK
724G-0207 4 EA 3/8" HOLE PLUG WHITE
724G-0209 1 EA
724G-0239 4 EA AIR SHUTTER
724G0269N 1 EA
724G-0273 1 EA GAS VALVE-NG
724G-0296 4 EA LEG STAND
724G-0297 4 EA LEG STAND ANGLE
724G-0298 4 EA ADJUSTABLE LEG
724G-0299 2 EA DOOR MGT BRACKET
724G-0309 1 EA FLUE BOX LABEL
724G-0313 2 EA HINGE SPACER
724G-0314 1 EA
724G-0315 1 EA KETTLE NIPPLE
724G-0381 1 EA ELEC BOX ENCL
724G-0521 4 EA
724G-0522 4 EA
724G-0539 4 EA
734G-0057 1 EA INLET GAS PIPE
C1200G0132 2 EA
C600G0130 1 EA
C600G0647-2 1 EA
DR42-0050 1 EA TOGGLE SWITCH SPST
DR420050A 1 EA SWITCH PLATE
DR42-0066 1 EA
EP18/240140 1 EA LABEL- BELSHAW
FM2000080A 1 EA
QTY
PER UM DESCRIPTION-TRUNC.
SHORTENING CAUTION
L
ELECTRICAL BOX
COVER
THERMOCOUPLE
FITTING
IGNITER-CONTROLLER
N
BLOCK DIAGM LABEL
CG
TURBULATOR
ASSEMBLY
BURNER ASSEMBLY
(NG)
ADJUSTABLE LEG
ASSY
FLUE BOX MOUNTING
ST
THERMOCOUPLE
COUPLING
IGNITOR WIRE
ASSEMBL
FUSEHOLDER 15
AMP/2
BUSS FUSE-TYPE MDA
5
ITEM
NUMBER
FM2000102 6 EA
FT1000063 2 EA SUPPORT BRACKET
H-0024 6 EA
MDD-0459 1 EA
P-0001 1 EA
P-0002 1 EA
RF-0012 1 EA KNOB
TJ-0184 1 EA
U-0008 2 EA DIAL SCREW COLLAR
QTY
PER UM DESCRIPTION-TRUNC.
FIBER WASHER 3/4OD
1
WASHER GREY FIBER
1/2
LABEL,WARNING HAZ
VO
FRYER BRACKET
CLAMP
BRKT PLATE,CUTTER
MO
TEMP CONTROL,1/16
DIAM
Belshaw Bros., Inc. • 1750 22nd Ave. S. • Seattle, WA 98144 • Phone 206-322-5474 • Fax 206-322-5425
718LCG, 724CG, and 734CG Gas Fryers MN-1141EN C-3
Page 36

724CG PARTS LIST.
ITEM
NUMBER
135 1 EA PLUG,BRASS 1/8 I.P.S
618L-0098 1 EA DRAIN VALVE KNOB,EXT
618L-0103 1 EA LABEL,DRAIN VALVE
618L-0105 2 EA WARNING LABEL
618L-0116R 1 EA DRAIN TRAY MTG BRKT
618L-0127R 1 EA DRAIN TRAY MTG BRKT
624-0037 1 EA
624-0038 1 EA
624-0039 1 EA
624-0170 1 EA
624-0174 1 EA DRAIN VALVE BALL 1-1/4
624-1058 2 EA FRYING SCREEN ASSY
718LG-0053 1 EA 1/4 GAS LINE (VALVE)
718LG-0054 1 EA 1/4 GAS LINE (IGNITE)
724G-0069 2 EA
724G-0071 1 EA
724G-0077 1 EA SPARK PAN
724G-0088 1 EA
724G-0128 1 EA
724G-0143 1 EA
724G-0144 1 EA THERMOCOUPLE
724G-0146 1 EA PILOT LIGHT 25V YELL
724G-014762 6 EA PLUG ORIFICE #62 LP
724G-0152 1 EA IGNITER/SENSOR (NG)
724G-0156 1 EA
724G-0166 1 EA HEAT SHIELD
724G-0167 1 EA KETTLE BACK SPLASH S
724G-0178 1 EA IGNITOR MTG BRACKET
724G-0179 1 EA
724G-0182 2 EA SPARK PAN SPACER
724G-0183 1 EA
724G-0186 2 EA DOOR MAGNET
724G-0200 1 EA
724G-0203 2 EA DOOR HANDLE
724G-0204 1 EA PILOT LIGHT LABEL
724G-0205 1 EA PILOT LIGHT RED 25V
QTY
PER UM DESCRIPTION-TRUNC.
DRAIN TRAY SUPPORT
ROD
SS DRAIN TRAY
SUPPORT
SS DRAIN TRAY
SUPPORT
CUTTER MOUNT CLAMP
BAR
FLUE BOX MOUNTING
BOLT
FLUE BOX BACKING
PLATE
DRAIN TRAY HINGE
SHAFT
CARRYOVER TUBE
WITH SPUD
HIGH TEMP LIMIT
CONTROL
GAS LINE TEE 1/8
FEMALE
IGNITER/SENSOR
PROPA
SHORTENING CAUTION
LABEL
ELECTRICAL BOX
COVER
ITEM
NUMBER
724G-0206 1 EA 2" PLUG BUTTON
724G-0207 4 EA 3/8" HOLE PLUG WHITE
724G-0225 1 EA
724G-0239 6 EA AIR SHUTTER
724G-0244A 1 EA ORIFICE .011 LP PILOT
724G-0296 4 EA LEG STAND
724G-0299 2 EA DOOR MGT BRACKET
724G-0313 2 EA HINGE SPACER
724G-0314 1 EA
724G-0379 1 EA GAS VALVE, LP
724G-0380 1 EA ADAPTER, GAS VALVE
724G-0381 1 EA ECR 7094; ELEC BOX
724G-0501 1 EA FLUE BOX ASSY
724G-0520 1 EA
724G-0522P 6 EA
724G-0524 1 EA RISER ASSEMBLY
724G-0525 1 EA
724G-0538L 1 EA DOOR ASSEMBLY-LEFT
724G-0538R 1 EA
724G-0540 1 EA DRAIN TRAY ASSY
724G-0556 1 EA
724G-1013 1 EA GAS VALVE ASSEMBLY,
734G-0057 1 EA INLET GAS PIPE
DR420050A 1 EA SWITCH PLATE
EP18/240081 2 EA CON'TN FITNG-IGNITER
FM200-0102 6 EA
MDD-0459 1 EA
P-0001 1 EA
P-0002 1 EA
U-0008 2 EA DIAL SCREW COLLAR
QTY
PER UM DESCRIPTION-TRUNC.
LP GAS CONVERSION
KIT
BLOCK DIAGM LABEL
CG
GAS MANIFOLD CG
MODE
ASSY; BURNER;
PROPANE
CARRYOVER TUBE
ASSY
DOOR ASSEMBLYRIGHT
EXTENSION ROD ASSY
W
FIBER WASHER 3/4OD
1/4 ID
LABEL,WARNING HAZ
VOLT
FRYER BRACKET
CLAMP
BRKT PLATE,CUTTER
MOUNT
Belshaw Bros., Inc. • 1750 22nd Ave. S. • Seattle, WA 98144 • Phone 206-322-5474 • Fax 206-322-5425
C-4 MN-1141EN 718LCG, 724CG, and 734CG Gas Fryers
Page 37

734CG PARTS LIST.
ITEM
NUMBER
232 1 EA
#PLT-0001 1 EA CLEAR NEON PILOT LIG
#PLT-0002 1 EA CLEAR NEON PILOT LIG
618L-0098 1 EA
618L-0105 1 EA WARNING LABEL
618L-0116R 1 EA
618L-0127R 1 EA DRAIN TRAY MTG BRKT
624-0038 1 EA
624-0039 1 EA
624-0170 1 EA
624-0174 1 EA DRAIN VALVE BALL 1-1
634-0013A 2 EA
634-0508 4 EA SCREEN HANDLE ASSY
634-1058 2 EA FRYING SCREEN ASSY
718LG-0053 1 EA 1/4 GAS LINE (VALVE0
718LG-0054 1 EA 1/4 GAS LINE (IGNITE
724G-0037A 1 EA
724G-0063 1 EA CAP TUBE CLIP
724G-0063L 1 EA CAP TUBE CLIP-LONG
724G-0068 1 EA DATA PLATE
724G-0069 2 EA
724G-0143 1 EA
724G-0144 1 EA THERMOCOUPLE
724G-0146 1 EA
724G-014752 8 EA
724G-0152 1 EA IGNITER/SENSOR (NAT)
724G-0156 1 EA GAS LINE TEE 1/8 FEM
724G-0182 2 EA SPARK PAN SPACER
724G-0183 1 EA
724G-0186 2 EA DOOR MAGNET
724G-0188 2 EA HINGE PIN
724G-0203 2 EA DOOR HANDLE
724G-0204 1 EA PILOT LIGHT LABEL
724G-0205 1 EA PILOT LIGHT RED 25V
724G-0206 1 EA 2" PLUG BUTTON, NICK
724G-0207 1 EA 3/8" HOLE PLUG WHITE
ITEM QTY UM DESCRIPTION-TRUNC.
QTY
PER UM DESCRIPTION-TRUNC.
POWER CORD, 18GA
SJO
DRAIN VALVE
KNOB,EXT
DRAIN TRAY MTG
BRKT-
SS DRAIN TRAY
SUPPOR
SS DRAIN TRAY
SUPPOR
CUTTER MOUNT
CLAMP B
PROOFING SCREEN 23
X 23
TRANSFORMER; 38VA
24
FLUE BOX MOUNTING
BOX
HIGH TEMP LIMIT
CONTROL
PILOT LIGHT 25V
YELLOW
BURNER TIP ORIFICE #
52
SHORTENING CAUTION
LABEL
NUMBER PER
724G-0239 8 EA AIR SHUTTER
INSTRUCTION LABEL
724G-0242 1 EA
724G-0269N 1 EA
724G-0273 1 EA GAS VALVE-NG
724G-0299 1 EA DOOR MGT BRACKET
724G-0312 1 EA LABEL; INSTALLATION
724G-0313 2 EA HINGE SPACER
724G-0314 1 EA
724G-0522 8 EA
724G-0539 4 EA
734G-0036 1 EA SPARK PAN
734G-0041 1 EA
734G-0044 1 EA
734G-0049 1 EA HEAT SHIELD
734G-0050 1 EA KETTLE BACK SPLASH
734G-0057 1 EA INLET GAS PIPE
734G-0501 1 EA FLUE BOX ASSY
734G-0516 1 EA GAS MANIFOLD
734G-0517 1 EA
734G-0518 1 EA RISER ASSEMBLY
734G-0528L 1 EA DOOR ASSY LH
734G-0528R 1 EA DOOR ASSY RH
734G-0529 1 EA DRAIN TRAY ASSY
734G-0532 1 EA
734G-1011 1 EA CABINET ASSY
734G-1013 1 EA KETTLE ASSY
734G-15171 1 EA
905-0620 1 EA HEYCO BUSHING 6P-4
990-0630 1 EA HEYCO BUSHING #2087
C600G-0130 1 EA
C600G0647-2 1 EA
DR42-0050 1 EA TOGGLE SWITCH SPST
DR420050A 1 EA SWITCH PLATE
DR42-0066 1 EA
EP18/240081 2 EA CON'TN FITNG-IGNITER
FM200- 1 EA BUSS FUSE-TYPE MDA
CG
IGNITER-CONTROLLER
NG
BLOCK DIAGM LABEL
CG
BURNER ASSEMBLY
(N.G.)
ADJUSTABLE LEG
ASSY
DRAIN TRAY HINGE
SHAFT
1/4 GAS LINE-GAS
VALVE
CARRYOVER TUBE
ASSY
CARRYOVER TUBE
ASSY
MANIFOLD PIPING
ASSY
THERMOCOUPLE
COUPLIN
IGNITOR WIRE
ASSEMBLE
FUSEHOLDER 15
AMP/2
Belshaw Bros., Inc. • 1750 22nd Ave. S. • Seattle, WA 98144 • Phone 206-322-5474 • Fax 206-322-5425
718LCG, 724CG, and 734CG Gas Fryers MN-1141EN C-5
Page 38

0080A 5
Belshaw Bros., Inc. • 1750 22nd Ave. S. • Seattle, WA 98144 • Phone 206-322-5474 • Fax 206-322-5425
C-6 MN-1141EN 718LCG, 724CG, and 734CG Gas Fryers
Page 39

734FG PARTS LIST
ITEM
NUMBER
FM200-0102 6 EA
FT100-0063 2 EA SUPPORT BRACKET
H-0024 6 EA
MDD-0459 1 EA
MK-0186 3 EA LABEL HOT
P-0001 1 EA
P-0002 1 EA
RF-0012 1 EA KNOB
TJ-0184 1 EA
U-0008 6 EA DIAL SCREW COLLAR
QTY
PER UM DESCRIPTION-TRUNC.
FIBER WASHER 3/4OD
1
WASHER GREY FIBER
1/16
LABEL,WARNING HAZ
VOLTS
FRYER BRACKET
CLAMP
BRKT PLATE,CUTTER
MOUNT
TEMP CONTROL,1/16
DIAG
Belshaw Bros., Inc. • 1750 22nd Ave. S. • Seattle, WA 98144 • Phone 206-322-5474 • Fax 206-322-5425
718LCG, 724CG, and 734CG Gas Fryers MN-1141EN C-7
Page 40

Page 41

US/Canada/Mexico Limited Warranty and Return Policy
Belshaw Brothers Inc. warrants parts of its manufacture and assembly of equipment to be free from
defects in workmanship and material which would result in product failure under normal use and
service. Belshaw’s entire liability under this Warranty is limited to either repairing or replacing at its
factory or; on user’s premises, at Belshaw’s option, any equipment or parts thereof, which shall be
determined by Belshaw to be defective. If necessary to return parts to the factory they must be shipped
transportation charges prepaid. This shall be purchaser’s sole and exclusive remedy.
Belshaw reserves the right to make changes in design; or add any improvement, at any time without
incurring any obligations to install, the same, on equipment previously sold.
This warranty is expressly in lieu of any and all other warranties express or implied, including:
implied warranties of merchantability and fitness for any particular purpose, and all other
obligations or liabilities what so ever on Belshaw’s part. All statutory or implied warranties,
other than title, are expressly nullified and excluded.
Belshaw neither assumes nor authorizes any person to assume for it any obligation or liability
in connection with the sale of Belshaw’s products or parts thereof.
Possession, use/or operation of equipment, or parts sold hereunder for any other than their designed
purpose, or use of equipment which is in poor repair, modified, improperly operated, or neglected is
done at the owner’s risk. Belshaw hereby disclaims any liability for these actions and shall not be liable
for defects in or for any damages or loss to the property sold which is attributable to such actions.
Under no circumstances shall Belshaw be liable for any indirect, special, incidental, or
consequential damages arising out of, or from the use of Belshaw’s product by buyer, it
assignees, employees, agents or customers.
Belshaw makes no express warranties except those contained in this Warranty concerning the product
sold hereunder. No modification or alteration of this Warranty shall be made except by Belshaw in
writing.
Warranty Period / Guidelines
This limited warranty shall extend for a period of one year from date of shipment and to the original
owner only. It covers parts (manufactured by Belshaw) and labor. This warranty covers only items sold
within the United States, Canada and Mexico. A pre-authorization must be obtained from Belshaw
before any warranty work is carried out, failure to do so may void the warranty of the product.
Limited Warranty
With respect to parts not manufactured by Belshaw, warranty coverage shall be limited to the original
part manufacturer’s warranty, or the Belshaw limited warranty, whichever is the lesser coverage period.
In no case will the warranty be in excess of 18 months after date of shipment of the equipment.
Replacement parts provided under the terms of this warranty are warranted for the remainder of the
original warranty period applicable to the product.
Belshaw Brothers Inc. 1750 22
Revised 04/04/2006 US/Canada/Mexico Limited Warranty Page 1
nd
Avenue S. Seattle, WA 98144-4590 Phone (206) 322-5474 Fax: (206) 322-5425
Page 42

Exclusions
This warranty excludes from its coverage and does not apply to: (a) solenoid and relay coils; (b) lamps;
(c) “O” rings; (d) belts; and (e) impellers. These items are excluded because (1) failure is usually due
to causes beyond our control; (2) it is not practical to accurately determine the failure cause; and (3) the
normal life of the parts is shorter than our warranty period.
Procedure for Return:
To speed up your credits for returned equipment, we have a return goods policy and procedure. Our
procedure starts with a phone call to (206) 322-5474 or Service Department for a return authorization.
When contacting Service Dept. you should be ready to give:
• Customer name, address, phone number and individual’s name, Invoice number and date,
Model number and serial number, reason for return, i.e. credit, exchange, warranty, or repair.
Description of item and problem.
When we get this information we will issue you a Return of Goods Authorization Number (RGA). This
number must be marked clearly on the outside of the package. If the package is not clearly marked
with the RGA#, then the package will be returned unopened to the sender. The RGA# will be open for
30 days, if returnable goods have not been received within the 30 days, then RGA# will be voided.
Return goods must be:
• Returned freight prepaid, packaged securely and carefully so that in-transit damage cannot occur.
• Marked so the package contains the RGA# in the first line of the address line, “Attn: RGA#” (the
number being the number given you by the Belshaw service department.)
Please note the following:
• If the returned goods were sent to you due to our mistake, then we will pay all freight charges via
our choice of carrier.
• If the returned goods failed while in service and are still covered by warranty, they need to be
returned freight prepaid by you. We will then replace the goods at no charge.
• When returning parts for re-stock: our minimum re-stocking charge is 20% of original invoice
amount or $20 (whichever is greater), providing the equipment is in new, never-been-used
condition. Restocking charges may be increased above the minimum, depending on how much
rework the returned goods need. Final determination will be made after factory inspection of goods.
• No RGA# will be issued if the item in question was invoiced anytime prior to 180 days of the
request
Following these guidelines will help expedite the processing of your return.
Belshaw Brothers Inc. 1750 22
Revised 04/04/2006 US/Canada/Mexico Limited Warranty Page 2
nd
Avenue S. Seattle, WA 98144-4590 Phone (206) 322-5474 Fax: (206) 322-5425
 Loading...