


Instruction manual for Belrobotics
robot lawnmowers
– 2013 models
B
BEELL
R
R
O
O
B
B
O
OTTII
C
CSS
EN Version 18/09/2013

2
BBEELLRROOBBOOTTIICCSS
CONTENTS
1. For your personal and collective safety ............................. 3
A. Safety of children and vulnerable people .................................................................... 3
B. Before using your robot ............................................................................................... 3
C. Using your robot .......................................................................................................... 3
D. Maintenance and storage ............................................................................................. 4
E. Liability ....................................................................................................................... 4
2. Safety recommendations & Warning symbols ................... 5
3. Description ........................................................................ 7
A. Overview ..................................................................................................................... 7
B. Diagram of BigMow parts ........................................................................................... 8
C. Diagram of ParcMow parts .......................................................................................... 9
D. Diagram of GreenMow parts ..................................................................................... 10
4. Technical Specifications .................................................. 11
5. Guide to Use .................................................................... 12
A. Mowing mode ............................................................................................................ 12
B. Mowing height ........................................................................................................... 12
C. Safety sensors ............................................................................................................ 12
6. Initial setup ...................................................................... 13
A. Batteries ..................................................................................................................... 13
B. Settings & options ..................................................................................................... 13
C. Switching the robot on/ off ........................................................................................ 13
7. Instructions for use .......................................................... 14
A. Using the control panel and display screen ............................................................... 14
B. Sending the robot back to the charging station.......................................................... 15
C. Visual and audio signals ............................................................................................ 15
D. Using the menu .......................................................................................................... 16
E. Using options ............................................................................................................. 19
8. Service ............................................................................. 22
A. Batteries ..................................................................................................................... 22
B. Cleaning ..................................................................................................................... 22
C. Charging ports ........................................................................................................... 22
D. Winter storage ............................................................................................................ 22
E. Cutting heads ............................................................................................................. 23
9. Installation ................................ ....................................... 23
10. Repairs ............................................................................. 24

3
BBEELLRROOBBOOTTIICCSS
1. FOR YOUR PERSONAL AND COLLECTIVE SAFETY
The Belrobotics
robot lawnmower is designed with user safety in mind. For example, the
cutting heads are covered by a special patent. If the lawnmower comes into contact with an
object, the heads retract automatically. This is one of the major advantages of the mower.
In addition, the mower can detect people or objects in the vicinity through its sonar system,
causing it to slow down instantly. If it comes into contact with an obstacle, it stops and
automatically changes direction.
Lifting sensors immediately stop the rotation of the cutting heads if the robot is raised while
in use.
Unlike traditional garden maintenance robots, the Belrobotics robot is a quiet and safe way
of maintaining your lawn. Nonetheless, you are advised to take certain precautions when
using the robot.
A. SAFETY OF CHILDREN AND VULNERABLE PEOPLE
- This appliance is not designed for use by children, people with physical, sensory or
mental disabilities, or anyone with a lack of experience and understanding of the
appliance, as their use of the appliance may put them at risk if left unsupervised or
without the guidance of a responsible adult who can instruct them and ensure that
the appliance is being used safely.
- Do not let children play with the robot or charging station.
- Keep children and animals at a safe distance from the robot when in use.
- Do not let children clean or perform maintenance works on the robot or charging
station unsupervised.
B. BEFORE USING YOUR ROBOT
- Read through this instruction manual carefully from start to finish.
- Make sure that physical barriers are in place where needed (access to a road,
swimming pool, pond etc.).
- Make sure that there are no objects lying on the lawn (toys, branches etc.).
- If you have automatic sprinklers on your lawn, programme your robot to return to the
charging station at least one hour before the sprinkler system is activated.
- Several people will be needed to transport/handle the robot.
C. USING YOUR ROBOT
- Even when you have read and fully understand the instructions for using the robot, you
are nonetheless advised to carry out some trial manoeuvres the first time you switch
on the robot to make sure you know exactly where the controls and main options are
located.
- Warning: never put your hands or feet underneath the robot when it is switched on,
especially in the area in front of the wheels.
- Switch the robot off safely and wait until the movement of the cutting heads has come
to a complete halt before lifting, moving or otherwise handling the robot.
- Never leave the robot on a slope.

4
BBEELLRROOBBOOTTIICCSS
These measures are crucial to ensuring your safety. However, the aforementioned
recommendations are not exhaustive: use your robot with care at all times.
- Never connect external electrical parts to the battery cable.
- Never remove the batteries from the robot to charge them: always use the charging
station.
- Never use other methods to charge the batteries (e.g. car battery chargers etc.).
These measures are vital to ensure the batteries function correctly and to keep your
warranty.
D. MAINTENANCE AND STORAGE
- Carry out maintenance on your robot as per the instructions: regular maintenance will
keep your robot in top condition, optimise its performance and extend its life.
- Disconnect the electricity supply before carrying out any maintenance work on the
charging station.
- Always make sure the robot’s main switch is in the OFF position before carrying out any
maintenance work on the robot.
- Check the tightness of the screws joining the main parts together on a regular basis.
- Your robot is an electrical appliance: never clean it with water.
- Wear protective gloves when carrying out maintenance work on the cutting heads.
- Always replace old parts with spare parts supplied by Belrobotics in order to maintain
the same level of effectiveness and safety.
Failure to adhere to these recommendations may result in damage to your robot or even
place you at risk of serious injury.
E. LIABILITY
- Belrobotics refuses all liability in cases where the robot is used in a way which is not
in accordance with the instructions provided.
- Do not modify your robot without prior agreement from Belrobotics. Any
unauthorised modification could render your robot dangerous and could lead to
serious injury when used.
- In addition to the risk to the user, the use of “generic” spare parts renders the
warranty null and void in the case of any damages which may occur as a result.
Belrobotics refuses all liability in case of accidents caused by the use of a “generic” spare
part.

5
BBEELLRROOBBOOTTIICCSS
2. SAFETY RECOMMENDATIONS & WARNING SYMBOLS
Read this instruction booklet carefully and familiarise yourself with the
content before using your robot for the first time.
This automatic lawnmower device could be dangerous if used
incorrectly. The instructions for use and safety recommendations must
be respected at all times so that the device can be used as effectively
and safely as possible.
Never put your feet or hands near the rotating blades or the underside
of the hood while the robot is in use. Do not put anything on top of the
robot.
Do not climb or sit on the robot.
Risk of flying objects.
Keep a safe distance from the robot when in use.
Never use your robot when there are children, animals or people who
are unaware of the device in the mowing area. Only switch on your
robot when the area is unoccupied.
Move/handle your robot with the assistance of at least one other person
and pick up the robot using the correct parts for easy transportation.
Make sure the robot is switched off during transportation (main switch
in the OFF position).
Do not spray the robot. Do not clean it with water. Do not wash the
robot with a high pressure cleaning device. Do not use the robot in
conjunction with an automatic sprinkler system.
Always use suitable protective gloves when carrying out maintenance on
your robot.
There are specific rules for the disposal of electrical and electronic
waste.
Contains Lithium.

6
BBEELLRROOBBOOTTIICCSS
BigMow
ParcMow
GreenMow
Station

7
BBEELLRROOBBOOTTIICCSS
3. DESCRIPTION
A. OVERVIEW
The Belrobotics robot is a fully automatic lawnmower. It can be used to maintain up to 2
hectares of lawn, providing the owner with a consistent and independent method of
maintaining their lawn.
The robot works independently in its mowing area, which is marked out by a boundary wire
buried underground. It moves in a random manner, adapting to its surroundings using its
sonar system and various other sensors to avoid obstacles. When the batteries need
recharging, the robot automatically returns to the charging station.
The robot has several sensors which optimise safety in case of user error.
It is also equipped with advanced technology. The electronic and computer systems process
the data recorded by the numerous sensors in real time, allowing the robot to run at
optimum level in all situations.

8
BBEELLRROOBBOOTTIICCSS
5
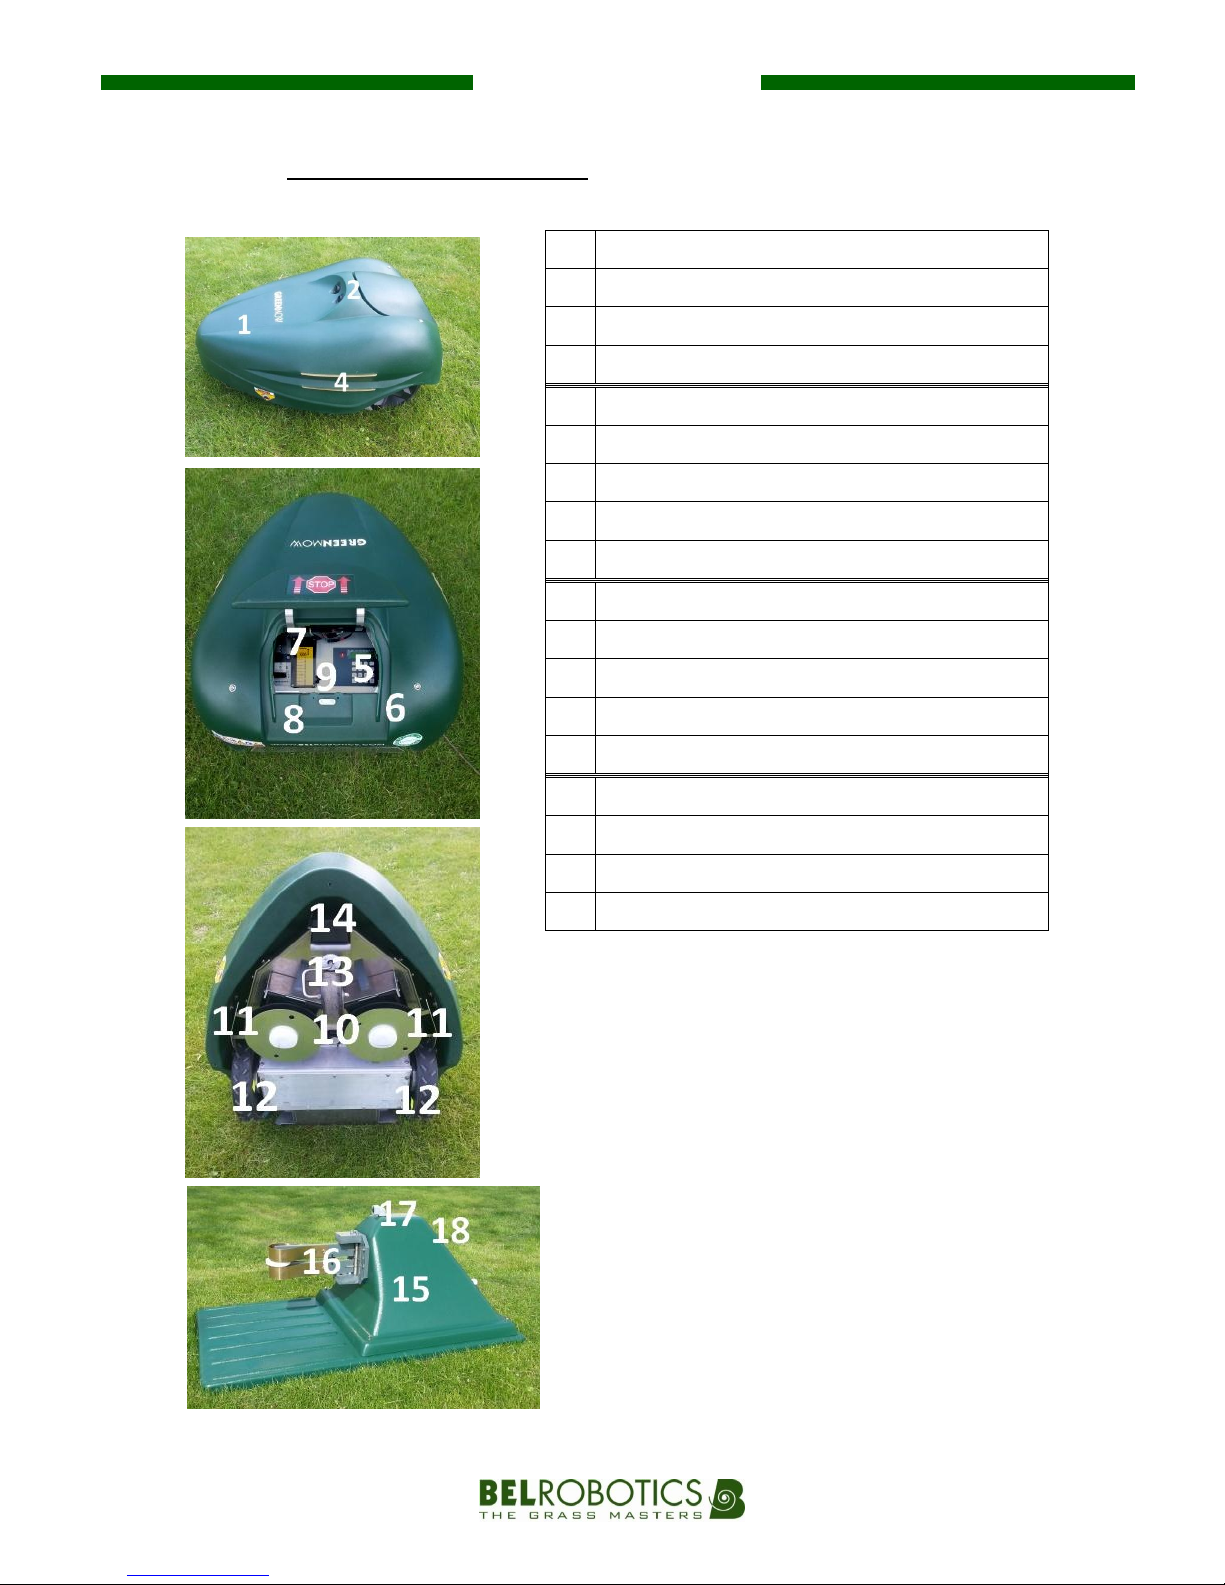
B. DIAGRAM OF BIGMOW PARTS
1
Bodywork
2
Sonar obstacle detection
3
Tactile bumper for obstacle detection
4
Charging port
5
Control panel and display
6
Main switch – robot ON/OFF
7
Mowing height regulator
8
Battery area
9
Case containing electronic motherboard
10
Cutting heads (x5)
11
Protective buffers
12
Drive wheels
13
Front wheels (x4)
14
Sensor to detect boundary wire signal
15
Charging station
16
Charging arm
17
Sonar station
18
LED for displaying signals
5

9
BBEELLRROOBBOOTTIICCSS
C. DIAGRAM OF PARCMOW PARTS
1
Bodywork
2
Sonar obstacle detection
3
Tactile bumper obstacle detection
4
Charging port
5
Control panel and display
6
Main switch – robot ON/OFF
7
Mowing height regulator
8
Battery area
9
Case containing electronic motherboard
10
Cutting heads (x3)
11
Protective buffers
12
Drive wheels
13
Front wheels (x2)
14
Sensor to detect boundary wire signal
15
Charging station
16
Charging arm
17
Sonar station
18
LED for displaying signals
10
BBEELLRROOBBOOTTIICCSS
5
D. DIAGRAM OF GREENMOW PARTS
1
Bodywork
2
Sonar obstacle detection
3 / 4
Charging port
5
Control panel and display
6
Main switch – robot ON/OFF
7
Mowing height regulator
8
Battery area
9
Case containing electronic motherboard
10
Cutting heads (x2)
11
Protective buffers
12
Drive wheels
13
Front wheels (x1)
14
Sensor to detect boundary wire signal
15
Charging station
16
Charging arm
17
Sonar station
18
LED for displaying signals
5

11
BBEELLRROOBBOOTTIICCSS
4. TECHNICAL SPECIFICATIONS
BigMow
ParcMow
GreenMow
Thrust
125W
2 wheels, φ45cm
92W
2 wheels, φ36cm
58W
2 wheels, φ26cm
Working speed
3.6 km/h
2.9 km/h
2.2 km/h
Maximum incline
30%
30%
30%
Battery type / capacity
Li-Ion / 15Ah
Li-Ion / 10Ah
Li-Ion / 10Ah
Max. energy
consumption of 1 robot
over a 9-month period
800 kWh
555 kWh
450 kWh
Bodywork
ABS
HD-PE
HD-PE
Decibel level (at 1m)
< 65 dB
< 65 dB
< 62 dB
Dimensions l x b x h
120 x 120 x 50cm
102 x 100 x 45cm
80 X 65 x 36cm
Weight
51 kg
36 kg
25 kg
Cutting width
105cm / 5 heads
65cm / 3 heads
44cm / 2 heads
Mowing height
11 positions
From 22 to 80mm
8 positions
From 22 to 65mm
8 positions
From 22 to 75mm
Mowing capacity
Up to 20,000 m²
Up to 10,000 m²
Up to 6,000 m²
Tactile sensor
Yes
Yes
No
Obstacle sensor
Yes
Yes
Yes
Lifting sensor
Yes
Yes
Yes
Watertight sonar system
Yes
Yes
Yes
Charging station
Voltage at entry/ exit
In: 230 Vac 50Hz / Out: 32Vdc
Energy consumption
3W (boundary signal), 320W (charge of robot)
Boundary signal
0.12A rms maximum
Weight
6kg
Dimensions
85 x 45 x 35cm
12
BBEELLRROOBBOOTTIICCSS
5. GUIDE TO USE
A. MOWING MODE
The Belrobotics robot uses a “random” mowing method. The random mode means that it
chooses its route in an unsystematic manner. When it comes across an obstacle or the
boundary wire, the onboard computer selects a new direction. Thus, the route and the
directions the robot takes will be different every time. By the end of the process, every
square metre of the lawn will have been mown. In areas where the lawn is denser, the robot
will automatically adapt its mowing mode by slowing down or mowing one square at a time.
When the batteries need to be recharged, the robot follows the boundary wire to its
charging station. After the batteries have been fully recharged, it automatically continues
the process.
If the lawn does not need to be mown, the robot detects this and waits at its charging
station for an extended period. It then starts mowing again at a later date. It only mows
when necessary.
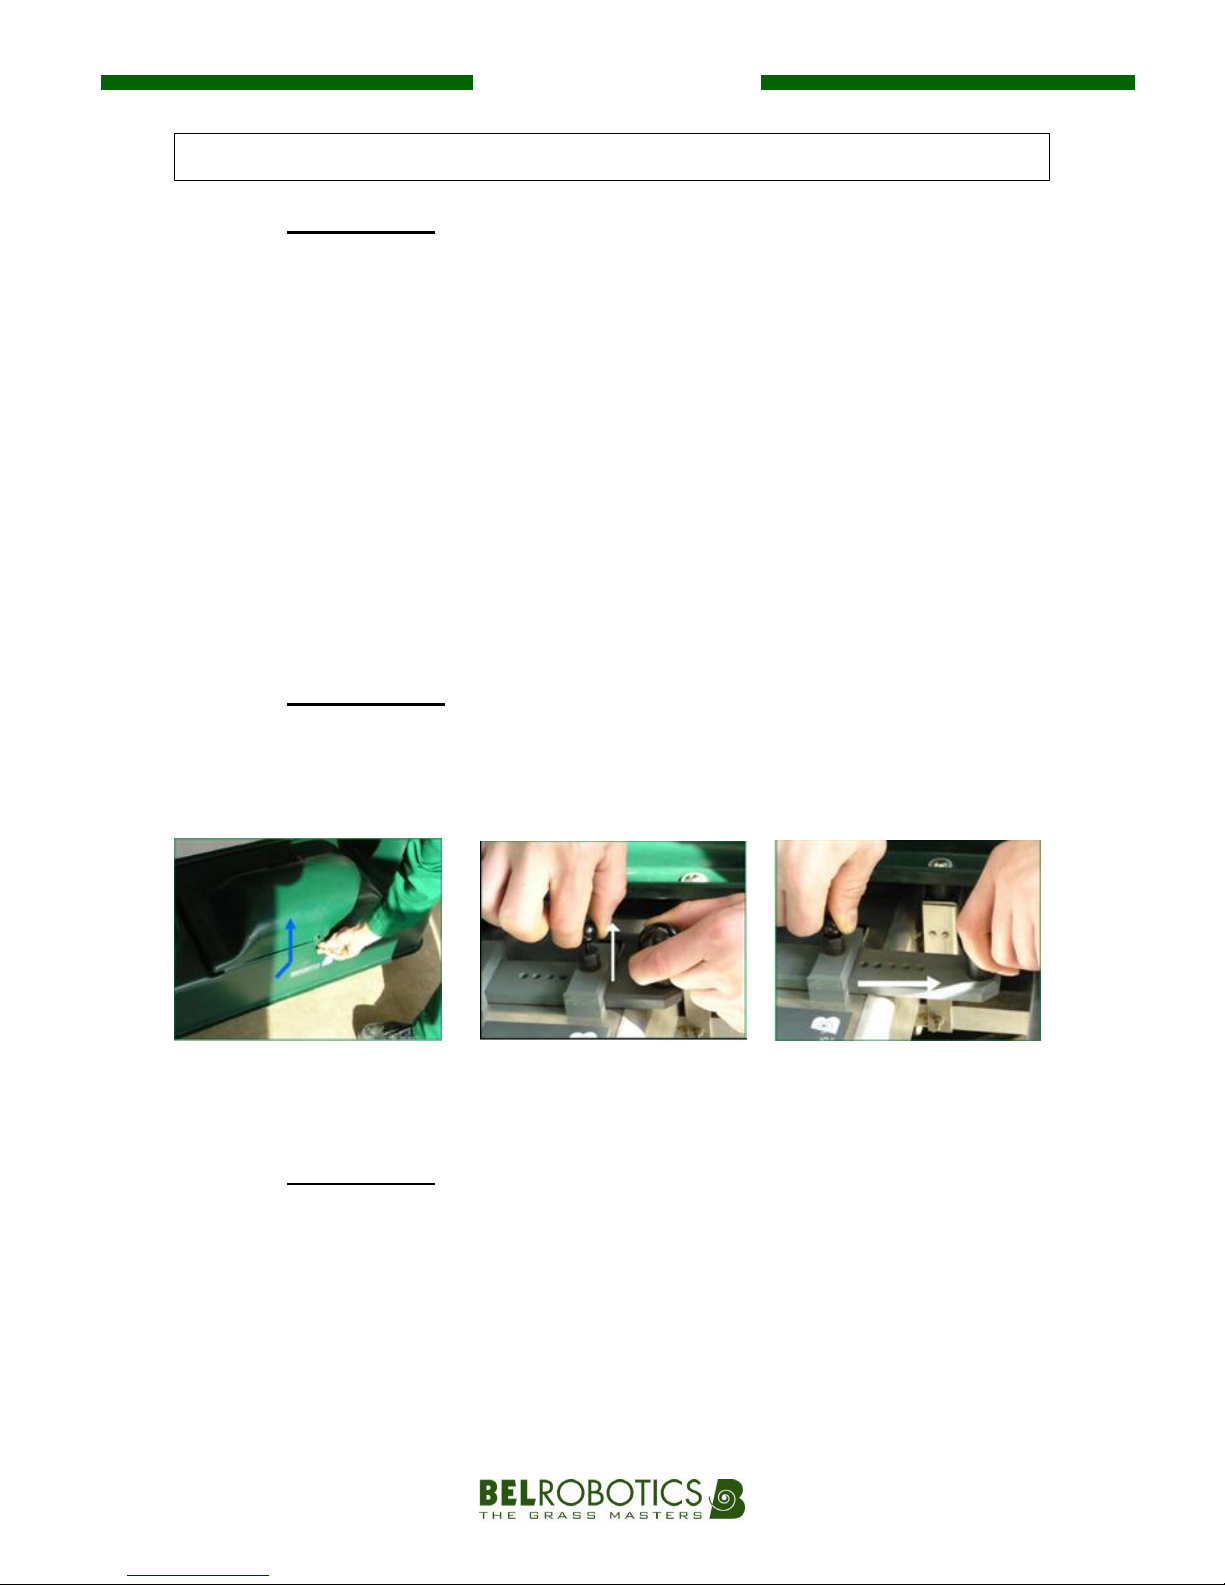
B. MOWING HEIGHT
I. How to set the mowing height
The mowing height can be set between ‘x’ mm and ‘y’ mm (see table on page 11) by setting
intermediary fixed values.
C. SAFETY SENSORS
The robot is equipped with a sonar system and several collision sensors, meaning that it can
slow down and change direction when it comes across an obstacle at least 50cm high and
10cm wide.
It is also equipped with a system which instantly stops the rotation of the cutting heads if it
detects it is being lifted.
a. Raise the hood
b. Lift the adjustment
valve
c. Slide along the
adjustment rod to the
desired height.

13
BBEELLRROOBBOOTTIICCSS
I. How often to adjust mowing height
When using the robot for the first time or after being switched off for several days, the grass
may be too dense or too high. At this point you are advised to increase the mowing height
for a few days before gradually reducing it again (one notch every 2 days).
If the grass height is irregular, the Belrobotics robot will mow the higher patches of grass
more slowly (leading to a better result). If the cutting resistance is too high, the robot will
mow one square at a time.
6. INITIAL SETUP
A. BATTERIES
The batteries of the Belrobotics robot should be sufficiently charged to allow your
authorised Belrobotics dealer to carry out the initial setup tests.
Once these tests have been completed, it is recommended that you send your robot back to
the station to fully charge before it starts to maintain your land.
B. SETTINGS & OPTIONS
When the robot leaves the factory it is set to default settings and options. Some of the
settings and options must be adjusted before you switch on your robot for the first time,
such as user language, the number of metres of boundary wire, the direction of return to the
station, rest ranges etc. By adjusting these options and settings correctly, your robot will be
able to provide optimum performance in accordance with the characteristics of the area you
wish to maintain.
Please ask your authorised Belrobotics dealer to help you configure your robot. You can also
consult the “Instructions for use” chapter.
C. SWITCHING THE ROBOT ON/OFF
I. Switching the robot on
Use the following procedure to switch on the robot:
a. Lift the access hood of the robot.
b. Move the main switch to "I".
c. Press the "I" key on the control panel. The screen will light up.
d. Press the "I" key on the control panel a second time. The screen will flash.
e. Close the access hood in the next 8 seconds. The robot will start.
II. Switching the robot off
To switch the robot off, simply raise its hood.
It will start working again only when you implement the procedure described above.

14
BBEELLRROOBBOOTTIICCSS
7. INSTRUCTIONS FOR USE
A. USING THE CONTROL PANEL AND DISPLAY SCREEN
The control panel has a total of 17 keys: 10 "Numbers” keys and 7 "Action" keys.
When it starts up, the display shows the time and date on the system, as well as the battery
voltage.
Keys
Actions
Switch on and start the robot.
F1
Bring the robot back to the charging station. When the battery is charged, the
robot will automatically continue its mowing programme.
F2
Navigate through the menu and sub-menus.
Bring the robot back to the charging station. The robot will remain at the
station even after the battery has been charged. The user will need to press
the key for the robot to continue its mowing programme.
F3
Navigate through the menu and sub-menus.
Show the “magnetic distance” of the robot from the boundary wire (instead of
the time). This function is for after-sales services.
#
- Access menu and sub-menus.
- (De)select an option.
C
Go back in menu and sub-menus.
Delete the robot’s alarm messages which are displayed on the screen.
*
- Enter a pin number or access code to change settings.
- (De)select rest days.
Menu Sa 04/05
27,2 09 :34

15
BBEELLRROOBBOOTTIICCSS
B. SENDING THE ROBOT BACK TO THE CHARGING STATION
I. For one cycle (Return to station, F1)
If you want the robot to continue mowing after it has recharged:
a. Stop the machine by raising the hood.
b. Press F1. The screen will display: “O01 GoToChge: √ “
c. Press to start the robot again.
d. Close the hood in the next 8 seconds.
II. For several cycles (Rest at station, F2)
If you want the robot to remain at the charging station until further notice:
a. Stop the machine by raising the hood
b. Press F2. The screen will display: “O02 Stay@Chge: √“
c. Press
to start the robot again.
d. Close the hood in the next 8 seconds.
If you want the robot to restart its mowing cycles after an “F2” rest period at the charging
station:
a. Raise the hood of the robot at the station.
b. Press
to start the robot again.
c. Close the hood in the next 8 seconds.
d. The robot will leave the station again once its batteries have been fully recharged.
C. VISUAL AND AUDIO SIGNALS
Your Belrobotics robot conveys messages about its status through beeps or information
displayed on the screen.
The station also conveys messages about its status through a two-coloured LED light.
ROBOT
CHARGING STATION
Beeps
LED
- 1 long beep: Stop robot or incorrect key
has been pressed
- 1 short beep: Key has been pressed
- 2 long beeps / 10 sec: Charge robot
- 2 short beeps / 1 sec: Cutting heads
starting up
- 1 short beep /2 sec: Alarm
- Blinking green light: OK, normal mode
- Blinking red light: boundary wire has
been cut or is too long (usually >
1200m)
- Continuous red light: failure of the
station’s electronic card or wire is
too short (usually < 200m)
- No colour: the station is not connected
to an electricity supply.
Charge
- FC: Fast Charge, normal mode
- SC: Slow Charge, rest mode
- WU: Wait User
- WT: Wait programmed Timers
- W.BH: Wait Battery too Hot
- W.FT: Wait Freezing ambient
Temperature

16
BBEELLRROOBBOOTTIICCSS
D. USING THE MENU
I. Infos
In this menu you will find basic information about your Belrobotics robot such as the series
number of the main electronic card, the programme version, statistics and the robot’s
events log.
See below for details of the 4 sub-menus under the “INFOS” menu.
a. STATISTICS
This table shows the codes for the different statistics categories and what they mean.
Statistics
S0
Working time in minutes
S1
Charging time in minutes
S2
Total number of cycles
S3
Left wheel: distance in metres
S4
Right wheel: distance in metres
S5
Latest charging capacity
S6
Latest discharging capacity
S7
Rest time in minutes
b. HISTORY
This table shows the codes for the events recorded by the robot and their meanings. The
robot’s memory can store nearly 1000 events. This sub-menu will mainly be used by your
supplier.
c. VERSION
This sub-menu provides information on the programme version of your robot.
d. SERIAL NUMBER
This sub-menu displays the serial number of the main electronic card.
History
S
begin Seeking station
Wc
begin Working/charged xx%
Cw
begin Charge/worked xx%
Rc
begin Rest on charge/charged xx%
U
panel opened by User
Go
Start to work
On
Switched on
- -
Switched off
Al
Alarm
NP
New Program (upgrade)

17
BBEELLRROOBBOOTTIICCSS
II. Settings
The “SETTINGS” menu and its 7 sub-menus allow you to adjust several settings in order to
adapt and configure your Belrobotics robot to your needs. Below you will find explanations
of the 7 sub-menus.
1. RESTS SETTINGS
This sub-menu allows you to programme up to 4 rest periods during which your robot will
not work. It will remain at the charging station instead.
1. Enter the time (in hours and minutes) at which you want the rest period to begin,
then the time at which you want the rest period to end using the 0 to 9 numeric keys.
Confirm by pressing #.
2. Use the F2 and F3 keys to move on to
the days of the week and to select
the days when you don’t want your
robot to work. Confirm by pressing #.
3. When "REST RANGE 2" is displayed,
repeat the steps described above as
necessary.
4. Once all of the rest periods have
been programmed, press C several
times to return to the "MENU" page.
Note: Rests settings during the night
In order to programme a rest period which spans across midnight (00:00) you must
programme two rest periods, as the rest range covers two separate days.
Example 1: The robot rests from 9pm on Monday and starts working again the following
day at 6am.
Example 2: A two-hour rest period every night during the week starting at 11pm because
an automatic sprinkler system is in use.
Rest range 1# : _ _ : _ _ → _ _ : _ _
□Mon□Tue□Wed□Thu□Fri□Sat□Sun
Rest range 2# : _ _ : _ _ → _ _ : _ _
□Mon□Tue□Wed□Thu□Fri□Sat□Sun
□Lu □Ma □Me □Je □Ve □Sa □Di
Rest range 3# : _ _ : _ _ → _ _ : _ _
□Mon□Tue□Wed□Thu□Fri□Sat□Sun
Rest range 4# : _ _ : _ _ → _ _ : _ _
□Mon□Tue□Wed□Thu□Fri□Sat□Sun
Rest range 1#: 2 1 : 0 0 → 0 0 : 0 0
□Mon □Tue □Wed □Thu □Fri □Sat □Sun
Rest range 2#: 0 0 : 0 0 → 0 6 : 0 0
□Mon □Tue □Wed □Thu □Fri □Sat □Sun
Rest range 1#: 2 3 : 0 0 → 0 0 : 0 0
□Mon □Tue □Wed □Thu □Fri □Sat □Sun
Rest range 2#: 0 0 : 0 0 → 0 1 : 0 0
□Mon □Tue □Wed □Thu □Fri □Sat □Sun

18
BBEELLRROOBBOOTTIICCSS
2. CLOCK
With this sub-menu users can set the time and date which are displayed on the screen of the
robot.
1. When "CLOCK" is displayed, press # once.
2. Enter the time in hours and minutes using the 0 to 9 numeric keys.
3. Once the time in hours and minutes has been programmed, the cursor will
automatically move on to the day. Use the 1 to 7 numeric keys to choose the day of
the week, from Monday to Sunday.
4. Press F3 to move on from the day of the week to the date, then use the 0 to 9
numeric keys to enter the current day, month and year. Confirm by pressing #.
5. After programming the date, press C several times to return to the "MENU" screen.
3. NEW CODE
You can lock your robot with a PIN code to increase security levels.
This sub-menu allows users to introduce, modify or cancel a code for the robot.
1. When "NEW CODE" is displayed, press # once.
2. The screen will display " # - - - - ". You can now enter your new 4-digit code, followed
by # to confirm.
3. The screen will now be showing "# DAYS: 030 ". The robot will ask you to enter the
code once every 30 days. To reduce or increase this frequency, use the 0 to 9 keys
and confirm by pressing #.
4. To change your code, press # once when " " is displayed.
5. The screen will display " * - - - - ". Enter your old code and press # to confirm.
6. The screen will now be showing " # - - - - ". Enter your new code, confirm by pressing
#, enter the number of days and confirm by pressing #.
7. To delete the PIN code, enter ‘0000’ as a new code.
4. LANGUAGE
This sub-menu allows users to select the menu language.
1. When “LANGUAGE" is displayed, press # once.
2. Use the F2 and/or F3 keys to choose the language and confirm by pressing #.
3. Press C several times to return to the "MENU" screen.
5. OPTIONS
See section E, "Using options" on page 19.

19
BBEELLRROOBBOOTTIICCSS
E. USING OPTIONS
This sub-menu contains 11 options. Options can be selected ' ' or deselected ' - ' with the #
key by your dealer to suit your mowing area.
Caution is advised when using this sub-menu as modifications can significantly alter the
effectiveness of the robot.
Option "O00 – MultiRobot":
The "MultiRobot" option must be selected if several robots are working in the same
area.
From the "OPTIONS" screen, press # - F2 and use the # again to select or deselect the
option.
O00 MultiRobot: " - ", the robot will charge at any charging station.
O00 MultiRobot: " ", the robot will only connect to one specific available station.
In practice, this option must only be selected for specific cases (e.g. Golf courses).
Option "O01 – GoToChge":
This option requires the robot to return immediately to its charging station. Once the
robot’s batteries have been recharged, it automatically starts working again.
From the "MENU" screen, press F1.
O01 GoToChge: " - ", the robot continues working normally.
O01 GoToChge: " ", the robot returns to its charging station immediately.
OPTIONS
DEFAULT
Option 00: Multiple robots
-
Option 01: Go charging
-
Option 02: Stay on charge
-
Option 03: Demo mode
-
Option 04: No beep in charge
-
Option 08: Signal Phase Inversion
-
Option 09: Heads rotation alternated
Option 10: Counter-clockwise dock seek
-
Option 11: Both sides docking
Option 13: Docking manoeuvre in U

20
BBEELLRROOBBOOTTIICCSS
Option "O02 – Stay@Chge ":
This option forces the robot to return to its charging station and stay there until further
instruction from the user.
From the "MENU" screen, press F2
O02 Stay@Chge: " - ", the robot continues working normally.
O02 Stay@Chge: " ", the robot returns to its station immediately and stays there.
To restart the recharged robot, open the access hood, press F2 - # - ON and close the
hood again within 8 seconds.
Option "O03 – DemoMode":
The demo mode allows the user to start up the robot, with or without a boundary
signal. The cutting heads will not be activated in this mode: the robot will move around
without mowing.
From the "OPTIONS" screen, press # – 3 and use the # key to select or deselect the
option.
O03 DemoMode: " - ", the robot works as normal, without a boundary signal.
O03 DemoMode: " ", the robot moves without mowing, with or without a boundary
signal.
Option "O04 – NoChgeBip":
When the robot is charging, it beeps twice every 10 seconds to show that it is still
connected to its station. However, it can be set to silent mode if the station is located
near a dwelling, patio etc.
From the "OPTIONS" screen, press # – 4 and use the # key to select or deselect the
option.
O04 NoChgeBip: " - ", the robot beeps twice every 10 seconds while its batteries are
charging.
O04 NoChgeBip: " ", the robot stays silent while its batteries are charging.
Option "O08 – PhiInv":
This option should only be used by your authorised dealer.
This option is used only the first time you switch on your robot, to choose the correct
phase in accordance with the installation of the boundary wire.
From the "OPTIONS" screen, press # – 8 and use the # key to select or deselect the
option.
O08 PhiInv : " - ", in accordance with the installation.
O08 PhiInv : " ", in accordance with the installation.
21
BBEELLRROOBBOOTTIICCSS
Option "O09 – HeadRotInv":
This option alternates the direction in which the cutting heads rotate after each
mowing cycle.
From the "OPTIONS" screen, press # – 9 and use the # key to select or deselect the
option.
O09 HeadRotInv: " - ", no alternation of direction in which cutting heads rotate.
O09 HeadRotInv: " ", cyclical alternation of direction in which cutting heads rotate.
Option "O10 – CCWSeek":
This option causes the robot to return to the charging station in a clockwise direction.
From the "OPTIONS" screen, press # – 9 – F3 and use the # key to select or deselect the
option.
O10 CCWSeek: " - ", return to the charging station in a clockwise direction.
O10 CCWSeek: " ", return to the charging station in an anticlockwise direction.
If option O11 is selected, option O10 will display the current choice being used by the
robot first, but can be overridden by the user.
Option "O11 – Chge2Sides":
This option allows the robot to return to the charging station in either direction.
From the "OPTIONS" screen, press # – 9 – F3 – F3 and use the # key to select or deselect
the option.
O11 Chge2Sides: " - ", return to charging station in one direction only, as defined by
option O010.
O11 Chge2Sides: " ", return to charging station in either direction.
Option "O13 – Udocking":
This option defines the manoeuvre for returning to the station.
In a “U” return, the robot passes in front of the station before performing a U-turn to
connect to the station.
In an “S” return, the robot returns to the station directly without passing in front of it
first.
From the "OPTIONS" screen, press # – 9 – F3 – F3 – F3 and use the # key to select or
deselect the option.
O13 Udocking: " - ", “S" return manoeuvre.
O13 Udocking: " ", "U" return manoeuvre.

22
BBEELLRROOBBOOTTIICCSS
8. SERVICE
To optimise the lifespan of your robot, we advise two service operations per year: a minor
maintenance check-up halfway through the year and a major check-up in winter.
A. BATTERIES
Belrobotics robot lawnmowers are equipped with the latest generation Li-Ion batteries. Their
capacities differ depending on the model of robot.
The battery lifespan is optimised when the robot is allowed to function automatically. Users
must therefore leave the robot to manage its own work cycles independently as often as
possible.
If the work cycles are unusually short, contact your supplier to check the condition of the
batteries.
B. CLEANING
A clean and well-maintained machine will always last longer. You are advised to clean your
robot weekly. Simply brush the underside of the robot and remove any grass blockages from
around the front and back wheels and the cutting heads as necessary.
Do not use a hosepipe or high pressure cleaning device.
C. CHARGING PORTS
The charging ports, both on the robot and on the station, are important parts as they ensure
that the batteries can be charged.
It is therefore highly advisable to clean the charging ports on the robot and the station with
sandpaper with a grit size of at least P180:
- during the mid-year check-up
- during the maintenance check-up at the start of the year
- if any problems with charging are observed.
Users are not at risk when carrying out this maintenance work as the robot and station
operate on Safety Extra Low Voltage level.
D. WINTER STORAGE
At the end of the mowing season, recharge your robot before storing it in a dry, sheltered
place away from freezing temperatures.
The main switch MUST remain in the OFF position throughout the winter storage period,
in order to protect the batteries from potential damage.
You are advised to switch off the outdoor electricity supply to the charging station (mains
plug, switchboard etc.) throughout the winter storage period.

23
BBEELLRROOBBOOTTIICCSS
E. CUTTING HEADS
The cutting heads are the main determiners of the mowing result. You are advised to check
them at least once a month and replace them when they are worn out. It is advisable to
change them at the beginning of the season and during the month of June.
Use the following procedure for changing the cutting heads:
1. Make sure the machine is switched OFF and wear protective gloves.
2. Lift the robot.
3. Place the disk opening opposite the top of the screw attaching the cutting head.
4. Unscrew the cutting head.
5. Remove the new part from its packaging.
6. Insert the new cutting head and screw it in.
If you have any doubts about this process or attaching one of your cutting heads, please
contact your supplier.
9. INSTALLATION
The installation of the boundary wire and the charging station are essential to ensuring your
robot can work effectively.
Furthermore, the electrical installation (connecting the charging station to the electricity
supply) must be carried out by a professional.
It is therefore highly recommended that an authorised professional carry out the
installation process from start to finish.

24
BBEELLRROOBBOOTTIICCSS
10. REPAIRS
The table below illustrates the most common problems encountered by users.
For all other problems or anomalies, contact your dealer immediately.
Situation
Explanation
Solution
1
Alarm message on
screen:
“Head…"
1
The grass which has been cut was
too high and has clogged up one or
more of the cutting heads.
Clean the cutting heads (the
user must wear protective
gloves).
2
Something is blocking one or more
of the cutting heads (e.g. a branch,
fruit etc.)
Unblock the cutting heads
(the user must wear
protective gloves).
2
Alarm message on
screen:
"Lifted"
1
Someone has lifted the robot while
it was working.
This alarm has been
activated for safety reasons.
Simply restart the robot.
2
The robot has sensed a difference in
height because of an anomaly on
the ground (e.g. deep hole, rut etc).
Fix the problem on the
ground so that the robot no
longer detects an anomaly.
3
Alarm message on
screen:
"Supply outage"
1
The robot was connected to its
charging station but has been
detached.
Restart the robot.
If you put the robot back on
charge manually, remember
to press the key so that it
continues working again
automatically once fully
charged.
2
The robot seems to be connected to
the charging port at the station.
Check whether the station is
connected to the electricity
supply and whether the
charging ports on the station
or robot have rusted.
See §8.C., p.22
4
Alarm message on
screen:
"Charge contact?"
1
Upon returning to the station, the
robot has manoeuvred to connect
to the charging port, but has not
detected a charge and has moved
away from the station.
Check whether the charging
ports on the station or robot
have rusted.
See §8.C., p.22

25
BBEELLRROOBBOOTTIICCSS
Situation
Explanation
Solution
5
The robot remains at
the station for a long
time and does not
move away.
1
Screen displays: SC
(see §7.C, p.15)
The grass in the mowing area has
been adequately cut. The robot is
now resting at the station to save
energy and avoid damaging the
ground unnecessarily.
This situation is normal.
The robot will continue its
work cycle again when
necessary.
2
Screen displays: WU
(see §7.C, p.15)
The robot has been manually
brought to the charging station by a
user and won’t start working again.
If you want the robot to
switch on automatically
after a manual charge,
please press .
3
Screen displays: WT
(see §7.C, p.15)
The robot is resting during a
programmed rest period.
This situation is normal.
The robot will continue its
work cycle again when
necessary.
4
Screen displays: W.BH or W.FT
(see §7.C, p.15)
The robot is not working as its
battery temperature is too high or
too low. This helps to avoid damage
to the batteries or the land being
maintained.
This situation is normal.
The robot will continue its
work cycle again when
necessary.
5
Option O02: "Stay@Chge" has been
selected.
To restart the robot, press
.
6
Alarm message on
screen:
"No wire signal"
1
The LED at the back of the station is
not switched on.
The station is not connected to a
power supply.
Check the status of the
electricity supply to the
station. If the LED still does
not light up, contact your
dealer.
2
The LED at the back of the station is
flashing red.
The boundary wire has been cut or
damaged.
Contact your dealer.
3
The LED at the back of the station is
flashing green.
The problem could be coming from
the robot or from the ground.
Contact your dealer.
 Loading...