

Bellwave X100SA User Manual

X100SA Phone
Owner’s Manual

Table of Contents
Safety Precautions .................................... 7
Unpacking ................................................. 9
Your Phone ............................................. 10
Your Phone’s Parts ...................................... 10
Display ..................................................... 13
Keypad Backlight ....................................... 15
Color LED .................................................. 16
Getting Started ........................................ 17
Installing a SIM Card .................................. 17
Charging the Battery .................................. 20
Switching the Phone On or Off ..................... 23
Your Phone’s Modes .................................... 25
Locking the Keys ........................................ 26
Using the Soft Keys ................................. 27
Call Functions .......................................... 31
Making a Call ............................................. 31
Making an International Call ........................ 32
Making a Call from Phonebook ..................... 32
Redialing the Last Number .......................... 33
Adjusting the Volume................................... 33
Answering a Call ........................................ 34
Viewing Missed Calls ................................... 35
Quickly Switching to Manner Mode ............... 36
Options During a Call .................................. 37
Using the Ear-microphone ........................... 42
Phonebook .............................................. 43
Storing a Phone Number in Phonebook ......... 44
Using Speed Dials ...................................... 48
Using Caller Groups .................................... 50
Searching for a Number in Phonebook .......... 50
Searching for DDD Numbers ........................ 51
Managing Phonebook .................................. 51
32

Table of Contents
5
Table of Contents
4
Call Record .............................................. 53
Viewing Dialed Numbers ............................. 53
Viewing Received Numbers .......................... 54
Viewing Missed Numbers ............................. 55
Messages ................................................ 56
Text Message ............................................. 56
Viewing a Incoming Message ....................... 56
Viewing an Outgoing Message ...................... 58
Creating and Sending a Message .................. 59
Multimedia Message .................................... 62
Viewing an Incoming Message ...................... 62
Creating and Sending a New Multimedia Message
.. 64
Info Message .............................................. 69
Call Voicemail ............................................. 70
Setting ...................................................... 71
Favorite ................................................... 71
Entering Text .......................................... 73
Changing the Text Input Mode ..................... 74
eZi Spanish Mode ....................................... 75
eZi English Mode ........................................ 75
ALPHABET Mode ......................................... 78
Symbol Mode ............................................. 80
All Mode .................................................... 80
Using the Menus ...................................... 81
Accessing a Menu Function by Scrolling ......... 81
Accessing a Menu Function by Using
Its Shortcut ............................................... 82
List of Menu Functions ................................ 83
Display .................................................... 87
Still Image (Menu 1-1) ............................... 87
Animation (Menu 1-2) ................................. 87
Clock (Menu 1-3) ....................................... 88
Calendar (Menu 1-4) .................................. 88
User Text (Menu 1-5) ................................ 88
Sub LCD (Menu 1-6) ................................... 88
PcSync Data(Menu 1-7) .............................. 88
Sound ...................................................... 89
Ring Volume (Menu 2-1) ............................. 89
Mode (Menu 2-2) ....................................... 89
Call Alert (Menu 2-3) .................................. 89
Alarm Alert (Menu 2-4) ............................... 90
Connect Alert (Menu 2-5) ............................ 90
Key Tone (Menu 2-6) .................................. 90
Voice Dial Tone (Menu 2-7) ......................... 90
Folder Tone (Menu 2-8) ............................... 91
Phone Set ................................................ 91
Time Set (Menu 3-1) .................................. 91
Date Set (Menu 3-2) .................................. 92
Alarm Set (Menu 3-3) ................................. 92
Key Back Light (Menu 3-4) .......................... 95
Language (Menu 3-5) ................................. 95
LED Color (Menu 3-6) ................................. 95
Sub LCD Contrast (Menu 3-7) ...................... 95
Screen Saver (Menu 3-8) ............................ 96
Factory Set (Menu 3-9) ............................... 96
File Manager (Menu 3-10) ............................ 97
Network Account (Menu 3-11) ..................... 97
Call Set .................................................... 98
Call Divert (Menu 4-1) ................................ 98
Call Barring (Menu 4-2) ............................. 101
Call Waiting (Menu 4-3) ............................ 103
Send My Caller ID (Menu 4-4) .................... 104
Network Select (Menu 4-5) ........................ 104
Setting (Menu 4-6) ................................... 105

7
Table of Contents
6
Application ............................................ 109
Scheduler (Menu 5-1) ............................... 109
Calculator (Menu 5-2) ............................... 114
Unit Converter (Menu 5-3) ......................... 115
World Time (Menu 5-4) ............................. 116
Bio Rhythm (Menu 5-5) ............................. 117
Melody Composer (Menu 5-6) .................... 118
Personal ................................................ 122
My Memo (Menu 6-1) ............................... 122
Call Time (Menu 6-2) ................................ 123
GPRS Counter (Menu 6-3) ......................... 124
PIN (Menu 6-4) ........................................ 125
Password (Menu 6-5) ................................ 126
Game ..................................................... 128
Camera .................................................. 128
Shooting (Menu 8-1) ................................. 131
Album (Menu 8-2) .................................... 131
Shutter (Menu 8-3) .................................. 132
Album Lock (Menu 8-4) ............................. 132
Internet ................................................. 133
Home (Menu 9-1) .................................... 134
Bookmarks (Menu 9-2) .............................. 135
Recent Pages (Menu 9-3) ........................... 136
Enter Address (Menu 9-4) ......................... 137
Resume (Menu 9-5) .................................. 137
Setting (Menu 9-6) ................................... 137
Reference Information .......................... 142
Access Codes ........................................... 142
Using the Batteries ................................... 145
Safety Information ................................... 147
Care and Maintenance ............................... 154
Glossary ................................................ 156
Safety Precautions
Read these simple guidelines. Failure to comply
with them may be dangerous or illegal. For more
detailed safety information, see “Reference
Information” on page 142.
Road safety comes first
Do not use a hand-held mobile phone while
driving; park the vehicle first. Remember that in
some countries, it is illegal to use a mobile
phone while driving.
Switch off when refueling
Do not use the phone at a refueling point
(service station) or near fuels or chemicals.
Switch off on aircraft
Mobile phones can cause interference. Using
them on aircraft is both illegal and dangerous.
Switch off in hospital
Follow any regulations or rules. Switch phone off
near medical equipment.
Respect special regulations
Follow any special regulations in force in any
area and always switch off your phone whenever
it is forbidden to use it, or when it may cause
interference or danger (in a hospital for
example).
Interference
All wireless phones may be subject to radio
interference, which may affect their performance.
Use qualified service
Only qualified service personnel must repair
equipment.
98
Safety Precautions
Use sensibly
Use only in the normal position (to the ear). Do
not touch the antenna unnecessarily when the
phone is switched on.
Accessories and batteries
Use only approved accessories and batteries.
Radio frequency exposure information
In August 1996, the Federal Communications
Commission (FCC) of the U.S. adopted an
updated safety standard for human exposure to
radio frequency electromagnetic energy emitted
by FCC regulated transmitters. These guidelines
are consistent with the safety standard
previously set by both U.S. and international
standards bodies. The design of this phone
complies with the FCC guidelines and these
international standards.
For body worn operation, this phone has been
tested and meets FCC RF exposure guidelines
when used with an accessory that contains no
metal and that positions the handset a minimum
of 15 mm from the body. Use of other
accessories may not ensure compliance with
FCC RF exposure guidelines.
* The shape of the plug varies according to each country’s
specification.
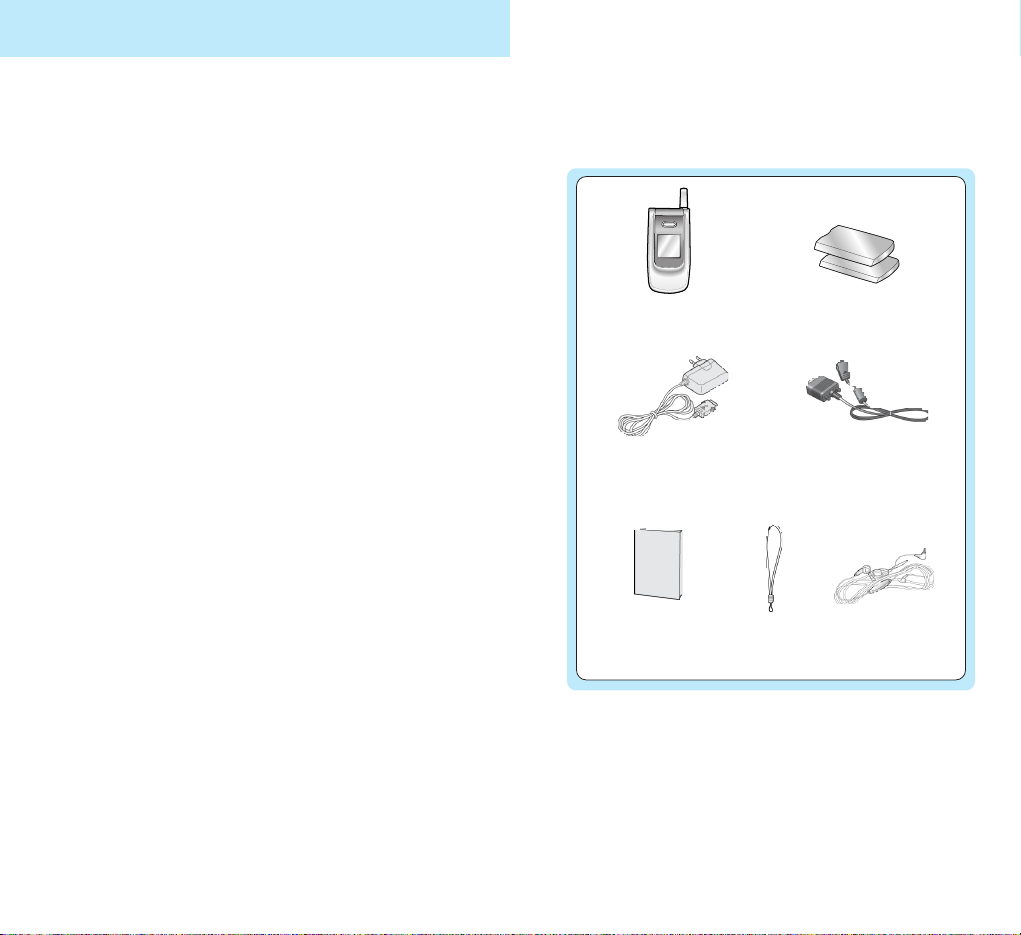
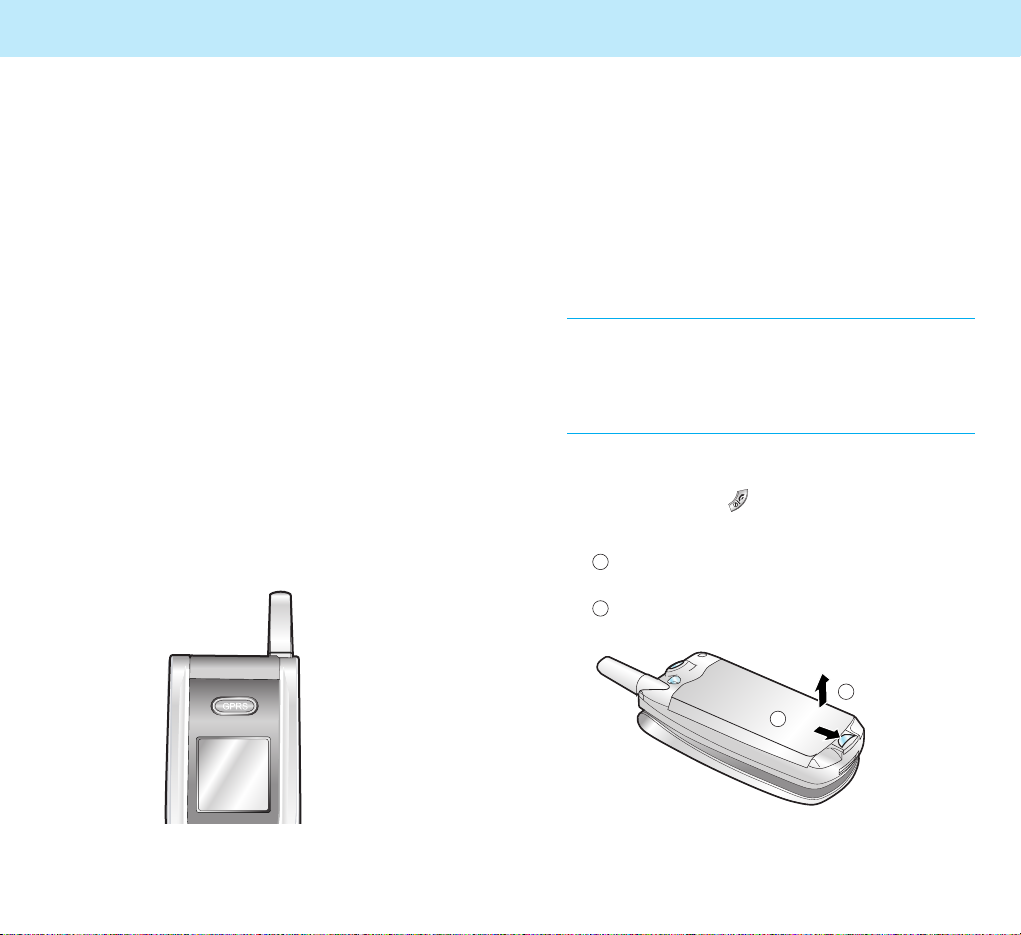
Unpacking
Your package contains the following items:
Phone
Battery
Cable
Tra vel
adapter*
Hand strap
Ear-microphone
Owner’s
manual
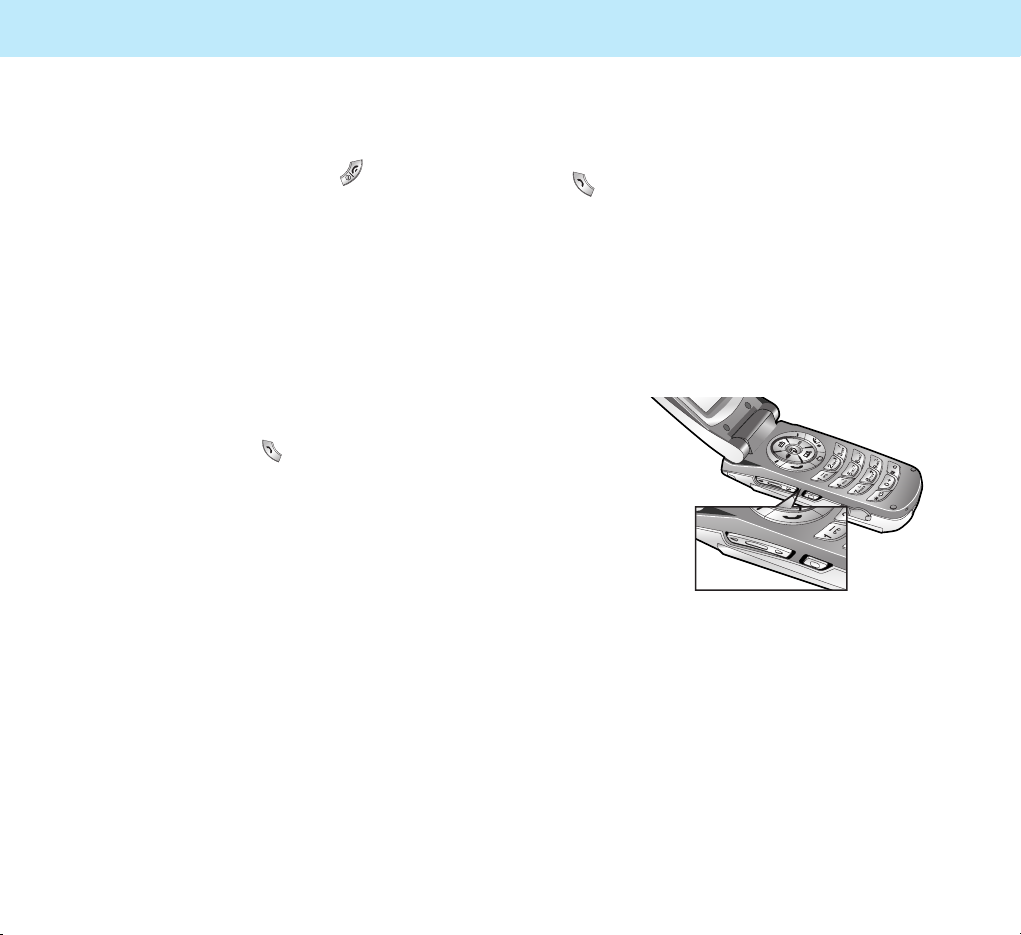
Your Phone
10 11
Earphone jack (on the upper side)
Antenna
Sub LCD
Battery terminals
SIM card socket
Battery Lock
Camera
Cable
connector slot
Hand strap hole
Microphone
Earpiece
Navigation/Hot keys
Right soft key
End/Power on-off key
Folder
Display
WAP browser/
Confirmation key
Left soft key
Volume keys
Send key
Camera key
Alphanumeric keys
Special function keys
Your Phone
Your Phone’s parts
The following illustrations show the main
elements of your phone:
Open View
Closed View
Rear view
Key(s) Description
Performs the functions indicated by
the text above them, on the bottom
line of the display.
In Standby Mode, this key can be used
to access the Internet browser. In some
features, this key also can be used as a
confirmation key or a soft key.
In Menu Mode, scrolls through the
menu options.
In Standby Mode, accesses the
following menus:
•
( ):
GAME
•
( ):
CALL RECORD
•
( )
: FAVORITE
•
( ):
MESSAGES
Makes or answers a call.
In Standby Mode, recalls the last
dialed number.
Ends a call. Also switches the phone
on and off when pressed and held.
In Menu Mode, cancels your input and
returns to Standby Mode.
Enters into the Camera mode. Press
the Camera key on the center of
keypad to directly access the shot
mode. Press the Camera key short to
display the option menu.
Enters numbers, letters and some
special characters.
In Standby Mode, the
1 key immediately
connects you to the Voice Mail server.
Use these keys for various special
functions.
Your Phone
13
Your Phone
12
~
Key(s) Description
(on the side of the phone)
During a call, adjusts the voice volume.
In Standby Mode, adjusts the key tone
volume.
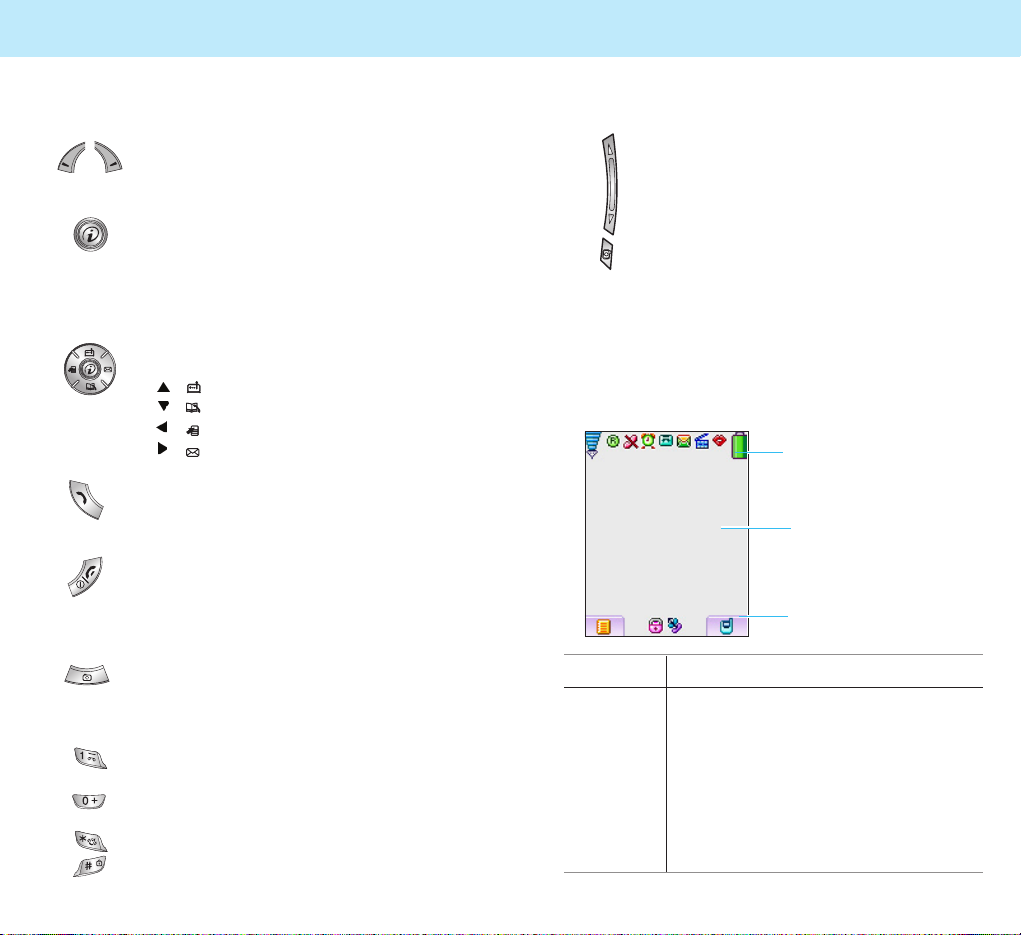
Area Description
Icons area Displays various icons (see page 14).
Text and Displays messages, instructions and
graphic any information that you enter
area (number to be dialed, for example)
Soft key Shows the functions currently
indications assigned to two soft keys.
area
Text and
graphic area
Soft key
indications area
Icons area
Display
The display has three areas.
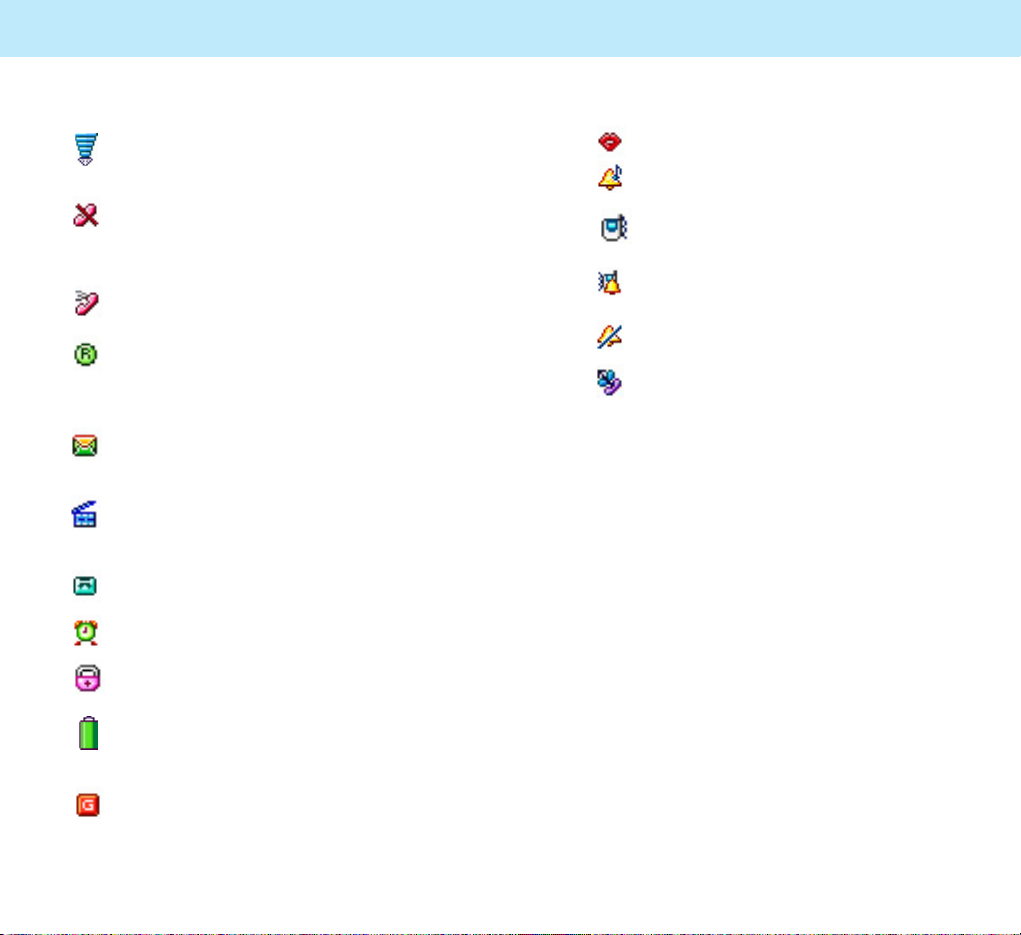
Icons
Signal Strength: Shows the received
signal strength. The greater the number
of bars, the stronger the signal.
No Service: Appears when you are
outside a service area. When it is
displayed, you cannot make or receive
calls.
Service: Appears when a call is in
progress.
Roaming: Appears when you are out of
your home area and have registered
onto a different network; for example,
when traveling in other countries.
New Text Message: Indicates that
there is a new message waiting to be
checked.
New MMS Icon: Indicates that there is
a new MMS message waiting to be
checked.
New Voice Mail: Indicates that there is
a new voice mail waiting to be checked.
Alarm: Appears when you set an alarm.
Key Lock: Indicates that the phone’s
keys are locked.
Battery Status: Shows the level of your
battery. The more black area you see,
the more power you have left.
GPRS: shows the status that data can
be received and sent using the packet.
Manner: Indicates that all tones are off.
Ring: The phone is set to ring when
a call comes in.
Vibrator: The phone is set to vibrate
when a call comes in.
Vib+Ring: The phone is set to ring and
vibrate when a call comes in.
Silent: The phone is set to blink LED
when a call comes in.
Call Divert: The call divert for calls is
set by user.
Sub LCD
Your phone has an external LCD screen on the
folder. When the folder is closed, it indicates that
you have an incoming call or message. It also
alerts you when you have set an alarm at the
specified time by flashing its backlight and
showing the corresponding icon on it.
Keypad Backlight
The backlight illuminates the display and keypad.
When you press a key or open the folder, the
backlight turns on. The keypad turns off if no key
is pressed within a given period of time,
depending on the Key Back Light menu option
under the PHONE SET menu.
To specify the length of time the phone waits
before the key backlight turns off, set the Key
Back Light menu option (Menu 3-4); see page
95 for further details.
1
2
3
4
5
7
8
9
10
11
12
13
14
15
16
Your Phone
15
Your Phone
14
6
17
17
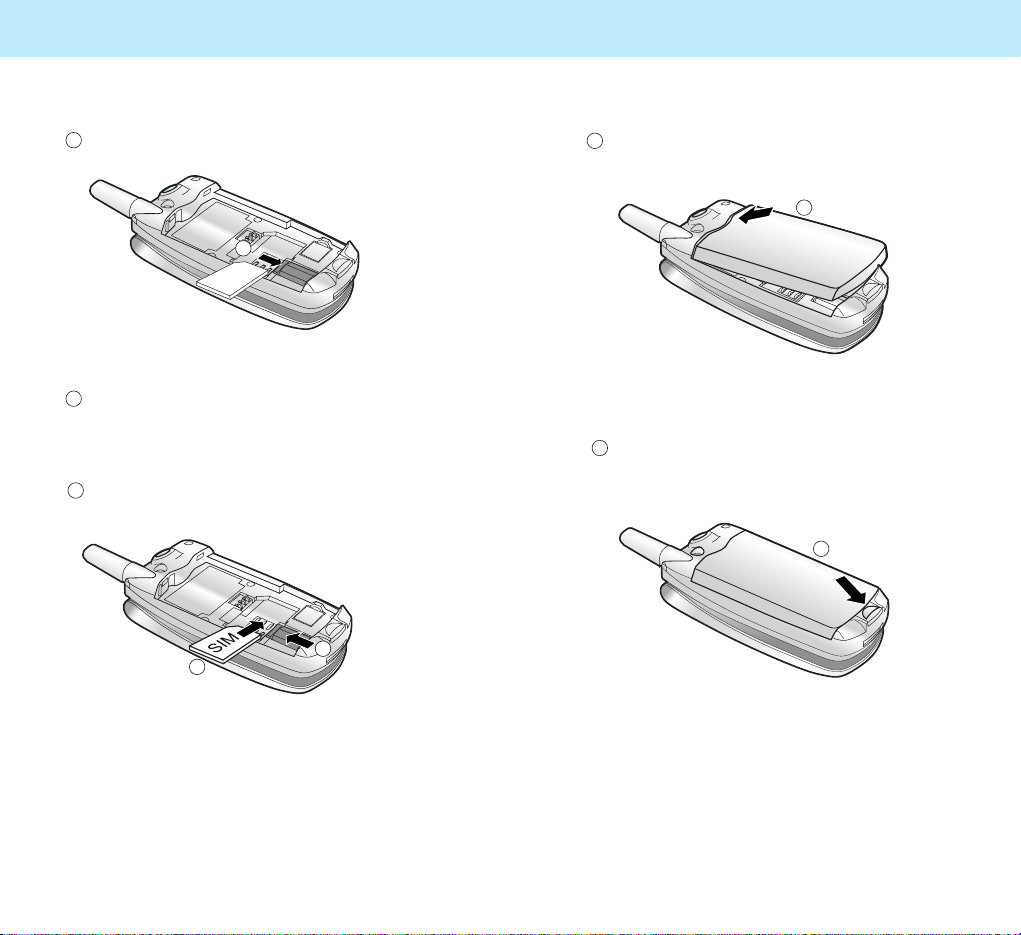
Getting Started
Installing a SIM Card
When you subscribe to a mobile network, you
are provided with a plug-in SIM card loaded with
your subscription details, such as PIN, optional
services available and so on.
Note: The plug-in SIM card and its contacts can be
easily damaged by scratches or bending, so be
careful when handling, inserting or removing the
card. Follow the instructions supplied with the
SIM card. Keep all SIM cards out of the reach of
small children.
1. If necessary, switch the phone off by pressing
and holding the key.
2. Remove the battery. To do so:
1 Pull the battery lock above the battery toward the
bottom of the phone and hold it.
2 Lift the battery away, as shown.
2
Your Phone
16
Color LED
Your phone has a unique color LED on the folder.
It flashes to indicate various phone’s status. The
LED blinks in the following colors depending on
the status:
When you connect the adapter to charge the
phone, the LED grows on red while it is charged,
and grows on blue once it is fully charged.
When you do not charge your phone, the LED
blinks red once every 8 seconds if it is in
Net-work No Service status, and blinks blue if it
is in Network Service status. The LED blinks
violet once every 5 seconds if there is a missed
call as you missed an incoming call.
It also blinks for a few seconds when you turn
the phone on or off.
You can specify if you want to use this LED or
not via the LED Color menu (Menu 3-6). You
can also change the color or pattern of lighting in
the menu. See page 95 for further details.
1
19
Getting Started
18
4. Reinstall the battery. To do so:
1 Place the battery so that the tabs on its end align
to the slots at the top of the phone.
2 Press the battery until it clicks into place. Make
sure that the battery is properly installed before
switching the phone on.
3. Install a SIM card. To do so:
1 Slide the metal lock as shown.
2 Insert the SIM card into the SIM card socket.
Make sure that the notched corner is at the top
right and the golden contact area on the card is
facing downwards.
3 Replace the metal lock so that it locks the card.
Getting Started
1
1
2
2
3

21
Getting Started
Charging the Battery with the
Travel Adapter
You can use the phone while charging the
battery attached to the phone.
1. With the battery in position on the phone,
plug the connector of the travel adapter into
the connector slot at the bottom of the phone.
2. Plug the adapter into a standard AC wall
outlet.
Getting Started
20
Charging the Battery
Your phone is powered by a rechargeable Li-ion
battery.
A travel adapter comes with your phone. Use
only approved batteries and chargers. Ask your
local dealer for further details.
Note: You must fully charge the battery before using
your phone for the first time. You can use the
phone while the battery is charging.
Getting Started

Selecting Functions and options
2322
Getting Started Getting Started
3. When charging is finished the LED turns to
blue unplug the adapter from the AC wall
outlet and from the phone. To remove the
adapter from the phone, press the buttons on
both sides of the connector (see 1 ) and pull
the adapter out (see 2 ).
Low Battery Indicator
When the battery charge level is low, a text
message and an empty battery status icon
appears at the top right of the display.
When the battery level gets too low, the phone
turns off automatically. Unfortunately, if this
happens, you lose whatever you are doing and
your phone call cuts off. Watch the battery status
icon and make sure your battery is adequately
charged.
1
1
2
Switching the Phone
On or Off
1. Open the folder.
2. Press and hold the key for more than one
second to switch the phone on.
If you switch the phone on without a SIM card,
the phone prompts you to insert the card. You
can only make emergency calls by pressing
the soft key.
3. When the PIN code of your SIM card is
enabled, your phone asks you to enter the PIN
(see page 143). Enter the code, and press the
soft key. Then your phone connects
to the GSM network.
The color LED on the folder of the phone
flashes and an alert sounds. When your phone
locates services, you can see the idle screens
on both the main and sub LCD.

Selecting Functions and options
25
24
Getting Started
Your Phone’s Modes
Standby Mode
Standby is the most basic state of your phone.
The phone goes into Standby Mode after you
turn it on, or whenever you briefly press the
key. When your phone is in Standby Mode, you
will typically see the current date and time. If
you enter a phone number, you can press the
key to dial it, or press the soft key to save
it in the internal Phonebook.
Press the key at any time to return to Standby
Mode. Be careful; if you are on a call when you
press the key, your phone disconnects the call
and returns to Standby Mode. Press the or
soft key several times or hold it down to
return to Standby Mode without ending
the call.
Talk Mode
You can place and answer calls only when your
phone is turned on. During a call, the phone is
in Talk Mode. While you are in the talk mode,
pressing the soft key gives you a list
of options. See page 37 for details.
Getting Started
If the phone is out of the service area, No
Service appears on the display and you
cannot place and receive calls. Wait a little
while for a better signal or move into an
open area to regain service.
4. When you wish to switch the phone off, hold
the key for more than two seconds.
WARNING!
Do not switch the phone on when mobile phone use is
prohibited or when it may cause interference or danger.
Note: Do not touch the antenna on the phone
unnecessarily when the phone is switched on.
Contact with the antenna affects the call quality
and may cause the phone to operate at a higher
power level than otherwise needed.

Locking the Keys
Use the Key Lock feature to make sure that the
keys are not pressed accidentally, such as when
the phone slips around inside a briefcase.
In Standby Mode, press and hold the key.
“Key Locked” appears on the display and the
keys are immediately locked. Note that you can
switch the phone off then on by pressing and
holding the key.
Once the keys are locked, the Key Lock icon
appears on the bottom of the screen.
To unlock the keys, press and hold the key
again. “Key Unlocked” appears on the display.
Selecting Functions and options
2726
Using the Soft
Keys
Your phone offers a set of functions that allows
you to customize it. These functions are
arranged in menus and sub-menus, accessed via
the two soft keys ( and ). Each menu and
sub-menu allows you to view and alter the
settings of a particular function.
The roles of the soft keys vary according to the
current context; the label on the bottom line of
the display just above each key indicates its
current role.
Example:
Press the right soft
key to enter the
Phonebook feature.
Press the left soft
key to enter Menu
Mode.
Getting Started
To view the various functions/options available
and select the one required:
1. Press the appropriate soft key.
2. To Press the
select the: soft key or the
• function displayed key.
or
• option highlighted
move up or down or key.
in the structure
move right or left or key
in the structure
move back up one soft key.
level in the structure
exit the structure key.
without changing
the settings
Selecting Functions and options
2928
Using the Soft KeysUsing the Soft Keys
Menu PBook
OK Back
Yes No
Reject
Stop
Read
Accept
Play
Exit
Up/down Up/down, right/left
Search
List Add
Clear Delete
Reset
Edit
Right/Left
Unit
Confirm Shoot
Save Option
OFF
Send
SOS
30
Using the Soft Keys
Example: Setting the
Display Language
1. When the idle screen displays, press the
soft key to enter Menu Mode.
2. Scroll through the menus until you reach the
PHONE SET menu, by pressing the or
key repeatedly.
3. To enter the PHONE SET menu, press the
soft key.
4. Scroll through the sub-menus until you reach
the Language sub-menu, by pressing or
key.
5. To view the languages available, press the
soft key. The display shows the current
setting.
6. Find the appropriate language by pressing the
or key.
7. Press the soft key to confirm your selection.
The phone returns to Standby Mode.
31
Call Functions
Making a Call
To make a call:
1. In Standby Mode, enter the area code and
phone number.
Note: While entering the number, pressing and holding
down the key inserts a pause, indicated by “P.”
The number after a pause is sent a few seconds
after dialing the first number.
2. Press the key. The phone places the call to
the entered number.
Note:: If you set the Auto Redial menu (Menu 4-6-3)
to On, the phone automatically retries to make
the call when no one answers or the line is busy.
For further details, see page 106.
Correcting the Number
To clear Press
the last digit the soft key
displayed
any other digit the or key until the
in the number cursor is to the right of the
digit to be cleared. Press the
soft key. You can also
insert a missing digit in the
cursor position simply by
pressing the appropriate key.
the whole display and hold down the soft
key for more than one
second.
Selecting Functions and options
3332
Ending a Call
If you want to end a call, press the key.
Or, simply close the folder to end a call.
Making an International
Call
1. Press and hold the 0 key for the international
prefix.
The + appears on the display.
2. Enter the country code, area code, and phone
number, then press the key to begin dialing.
Making a Call from
Phonebook
You can store the phone numbers that you use
regularly in called Phonebook.
Simply select a name to recall the associated
number to dial. For further details about the
Phonebook features, see page 43.
Call Functions Call Functions
Redialing the Last Number
To redial the last number you dialed, press the
key twice in Standby Mode.
Your phone stores up to 30 of the last numbers
you dialed in Call Records. To recall any of these
numbers, refer to “Dialed Numbers” on page 53.
Adjusting the Volume
During a call, if you want to adjust the voice
volume, use the volume keys on the left side of
the phone.
In Standby Mode, you can adjust the key tone
volume using the volume keys.
Selecting Functions and options
3534
Call Functions Call Functions
Answering a Call
When someone calls you, the phone alerts you
by ringing, blinking the color LED and displaying
the call alert screen.
If you are subscribed to the Caller Line
Identification service and the caller can be
identified, the caller’s phone number or name
and image if stored in your Phonebook, displays.
Contact your service provider for availability.
You can reject the call by pressing and holding
the volume keys before opening the folder.
1. If the
Answer Key menu (Menu 4-6-1) is
set to Any Key, open the folder or press any
key except the key and the soft key to
answer the call.
If the menu is set to Send Key, you must
press the key or the soft key to answer
the call.
To reject the call, press the key or the
soft key.
2. You may end the call by closing the folder or
pressing the key.
Note:
1. You can answer a call while using the Phonebook or
Menu features. The current operation stops.
2. You can see the name and image (if exist in your
phonebook) when incoming/outgoing call animation
started.
Viewing Missed Calls
If you are unable to answer a call for any reason,
you can find out who is calling you, if this service
is available so that you can call the person back.
Contact your service provider for availability.
The number of missed calls displays on the idle
screen immediately after the call was missed.
To view the missed call immediately:
1. If the folder is Then
closed look at the sub LCD
screen.
open press thesoft key.
The number corresponding to the most recent
missed call displays, if available.
2.
To Press the
scroll through the or key.
missed calls
call the number key.
displayed
save or delete a soft key.
missed call number

Selecting Functions and options
3736
Call Functions Call Functions
Options During a Call
Your phone provides a number of functions that
you can use during a call. As many of the
functions are network services, you may not be
able to use all of them at all times.
Putting a Call on Hold
You can place the current call on hold whenever
you want. By doing this, you can make or
receive another call while you have a call in
progress if your network supports this service.
To make a call while you have a call in progress:
1. During a call, press the key.
Or, press the soft key and press
the soft key when
Hold highlights.
2. The current call is put on hold.
3. If there is a waiting call, press the key to
answer the call.
If you want to make a call, dial the number in
the normal way.
Quickly Switching to
Manner Mode
You can quickly switch your phone to Manner
Mode with a touch of the key. In the manner
mode, all of the sounds of your phone are
deactivated and the phone alerts you to incoming
calls by vibrating the phone instead of ringing.
This feature is convenient when you are in a
hurry to mute the phone sounds as when in a
theater, for example.
Press and hold the key until the Manner icon
appears on the bottom of the display. Your
phone goes to the manner mode immediately.
To return to the normal mode, press and hold
the key again.
Selecting Functions and options
3938
Call Functions Call Functions
Disconnecting the Calls
When you have an active call and the call on
hold, you can disconnect both calls at one time.
1. Press the soft key to enter In-call Options.
2. Press the or key to scroll to
Disconnect and press the soft key.
3. Press the or key to scroll to call you
want to disconnect.
4. Press the soft key.
Muting the Microphone
You can temporarily switch your phone’s
microphone off so that the other person cannot
hear you.
Example: You wish to say something to another
person in the room but do not want the
other person to hear you.
To switch the microphone off temporarily:
1. During a call, press the soft key to enter
In-call Options.
2. Press the or key to scroll to Mute On.
3. Press the soft key.
The other person can no longer hear you.
To switch the microphone back on:
1. Press the soft key to enter In-call Options.
2. Press the or key to scroll to Mute Off.
3. Press the soft key.
The other person can hear you again.
Using the Scratch Pad
Your phone has a convenient feature for entering
a phone number while you are on a call as if it
were a note pad:
1. During a call, just key in a phone number
The phone number displays as you enter it.
2. Press the soft key to save the entered
number.
3. When the call ends, you can check the saved
number via the Scratch Pad option in PB
Manage of the Phonebook menus. See page 52.

Selecting Functions and options
4140
Call Functions Call Functions
Using the Message Service
Your phone receives an incoming message during
a call. You can read it immediately without
disconnecting the call. You can also send a
message during a call.
1. During a call, press the soft key.
2. Select the Message option and press the
soft key.
The phone enters the
Message menu. For
details about using the message service, see
page 56.
Sending DTMF Tones
Each time you press the keys, your phone sends
out DTMF (Dual Tone Multi-Frequency) which are
set at the factory. DTMF tones are required to
use electronic phone services, such as bank-byphone or voicemail.
If you do not want to annoy the other person by
DTMF tones when pressing the keys during a
call, take the following steps to mute them:
1. During a call, press the soft key.
2. Press the or key to scroll to DTMF Off.
3. Press the soft key.
To reactivate your DTMF tones:
1. During a call, press the soft key.
2. Press the or key to scroll to DTMF On.
3. Press the soft key.
Phonebook
42
When the phone rings, press and hold the button
on the ear-microphone for more than 1 second
to answer the call.
To end the call, press and hold the button for
more than 1 second.
Note: If you receive a second call during a call,
pressing and holding the button for more than 1
second will put the first call on hold and answer
the second call.
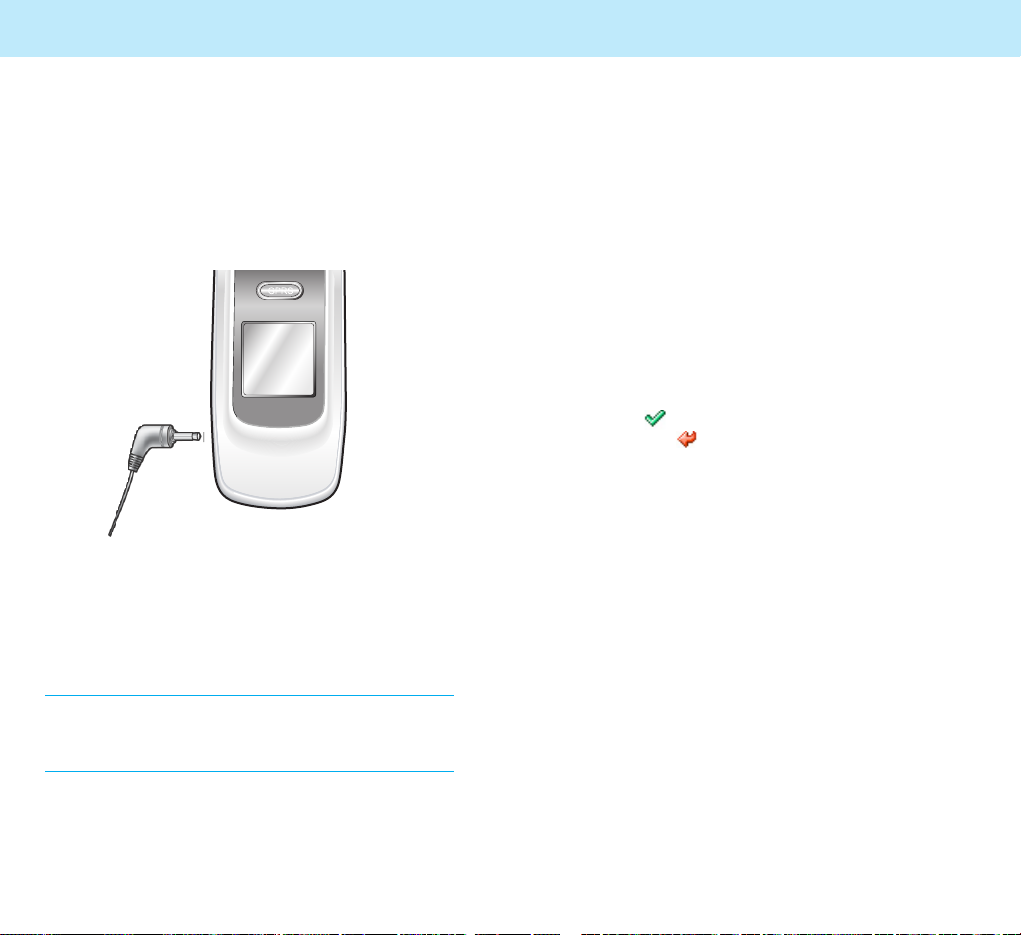
Using the Ear-microphone
Using the ear-microphone supplied with your
phone, you can answer an incoming call without
holding the phone.
Connect the ear-microphone to the jack on the
top of the phone.
Selecting Functions and options
43
Phonebook
You can store phone numbers and their corresponding names in the phone memory. You can
store up to 250 entries in the phone memory,
called Phonebook.
The phone number will be saved in the phone's
memory rather than SIM.
When you buy this phone and access the Phonebook menu for the first time, it will pop up the
message asking you whether you want to copy
all the phone numbers in the SIM to your phone.
Select the soft key if you want to copy all,
and select the soft key if you don't want to
copy all. When you select to copy all, an image
will appear, showing that all phone numbers are
copied to the phone. If there is a same phone
number in the phone memory, it will not be
copied to the phone.
When the phone finishes copying, it will display
the results of copy and access to the Phonebook
menu. The phone number of SIM will be saved in
the lowest(first) level number among the MultiAddress of the phone.
When you insert other SIM, it will operate in the
way same as indicated above.
That is, when the SIM is changed, it will ask
whether to copy the phone numbers in the SIM
to the phone's memory.
If the SIM is not changed, it will not ask whether
to copy.
You cannot save e-mail address only without
entering the phone number.
Call Functions

Selecting Functions and options
4544
PhonebookPhonebook
Press the key to go to the next Phone
Number field.
Repeat the steps shown above to save other
phone numbers including home phone, office
phone or mobile phone number.
6. Press the key to go to the E-mail field.
Press the key to activate the field and enter
the e-mail address.
7. Press the soft key. The Save popup window
appears and the number is auto-matically
saved in the first available location in the
phone, The phone automatically returns to
Standby mode.
To store a phone number by using the Phonebook
menu:
1. In Standby Mode, press the soft key. The
PHONEBOOK options display.
2. Press the or key to scroll to
Add Entry and press the soft key.
3. Press the or key to change to the image
you want.
4. Press the or key to move to the fields you
want such as Name field, Phone Number field
and E-mail Field.
To enter the name for the phone number you
entered, press the
key
to go to the Name
field.
Storing a Phone Number in
Phonebook
You can store a phone number in the internal
Phonebook in two different ways.
To store a phone number in Standby Mode without
accessing the Phonebook menu:
1. Enter the number you want to store.
2. Press the soft key to go to the Add Entry of
the Phonebook directly.
3. Press the or key to change to the image
you want.
4. Press the or key to move to the fields you
want such as Name field, Phone Number field
and E-mail Field.
To enter the name for the phone number you
entered, press the
key
to go to the Name
field.
Press the key to activate this field.
Enter the name and press the soft key.
For information about how to Enter the
name you want to store, see page 73.
5. Press the key to move to the next field.
3 Phone Number fields and 1 E-mail field are
available. Press the key to activate the
field. Press the soft key to delete the
number one by one and press the soft key
to save.

SIM Manage:
This option allows you to copy, copy all, delete,
or delete all the entries in the sim.
When you select the SIM Manager, the list of
phone number will appear.
Press the or to select the phone number you
want to manage.
You can copy the phone number saved in the
SIM to phone memory or delete it from the SIM.
You can can also copy all phone numbers saved
in the sim to phone memory or delete all from
the SIM.
The phone number is saved in the multi-address
when it is saved in the phone, and only one
number can be saved in the SIM. When you copy
the number saved in the phone to the SIM, you
can copy only one phone number saved in the
lowest level number among the Multi-Address
saved in the phone. It will search the phone
number from the first level and go to the next
level if there is no number in the first level, and
will save the phone number found first.
When you copy the phone numbers saved in the
phone to the SIM, they will be copied to the SIM.
If there is a same phone number in SIM, it will
not be copied to the SIM.
Selecting Functions and options
4746
PhonebookPhonebook
Press the key to activate this field. Enter
the name and press the soft key.
For information about how to enter text, see
page 73.
5. Press the key to move to the next field.
3 Phone Number fields and 1 E-mail field are
available.
Press the key to activate the field.
Press the soft key to delete the number
one by one and press the soft key to save.
Press the key to go to the next Phone
Number field.
Repeat the steps shown above to save other
phone numbers including home phone, office
phone or mobile phone number.
6. Press the key to go to the E-mail field.
Press the key to activate the field and
enter the e-mail address.
For more information about how to enter
e-mail address, see page 73.
7. Press the soft key. The Save popup window
appears and the number is automatically
saved in the first available location in the
phone.
 Loading...