

Page 1
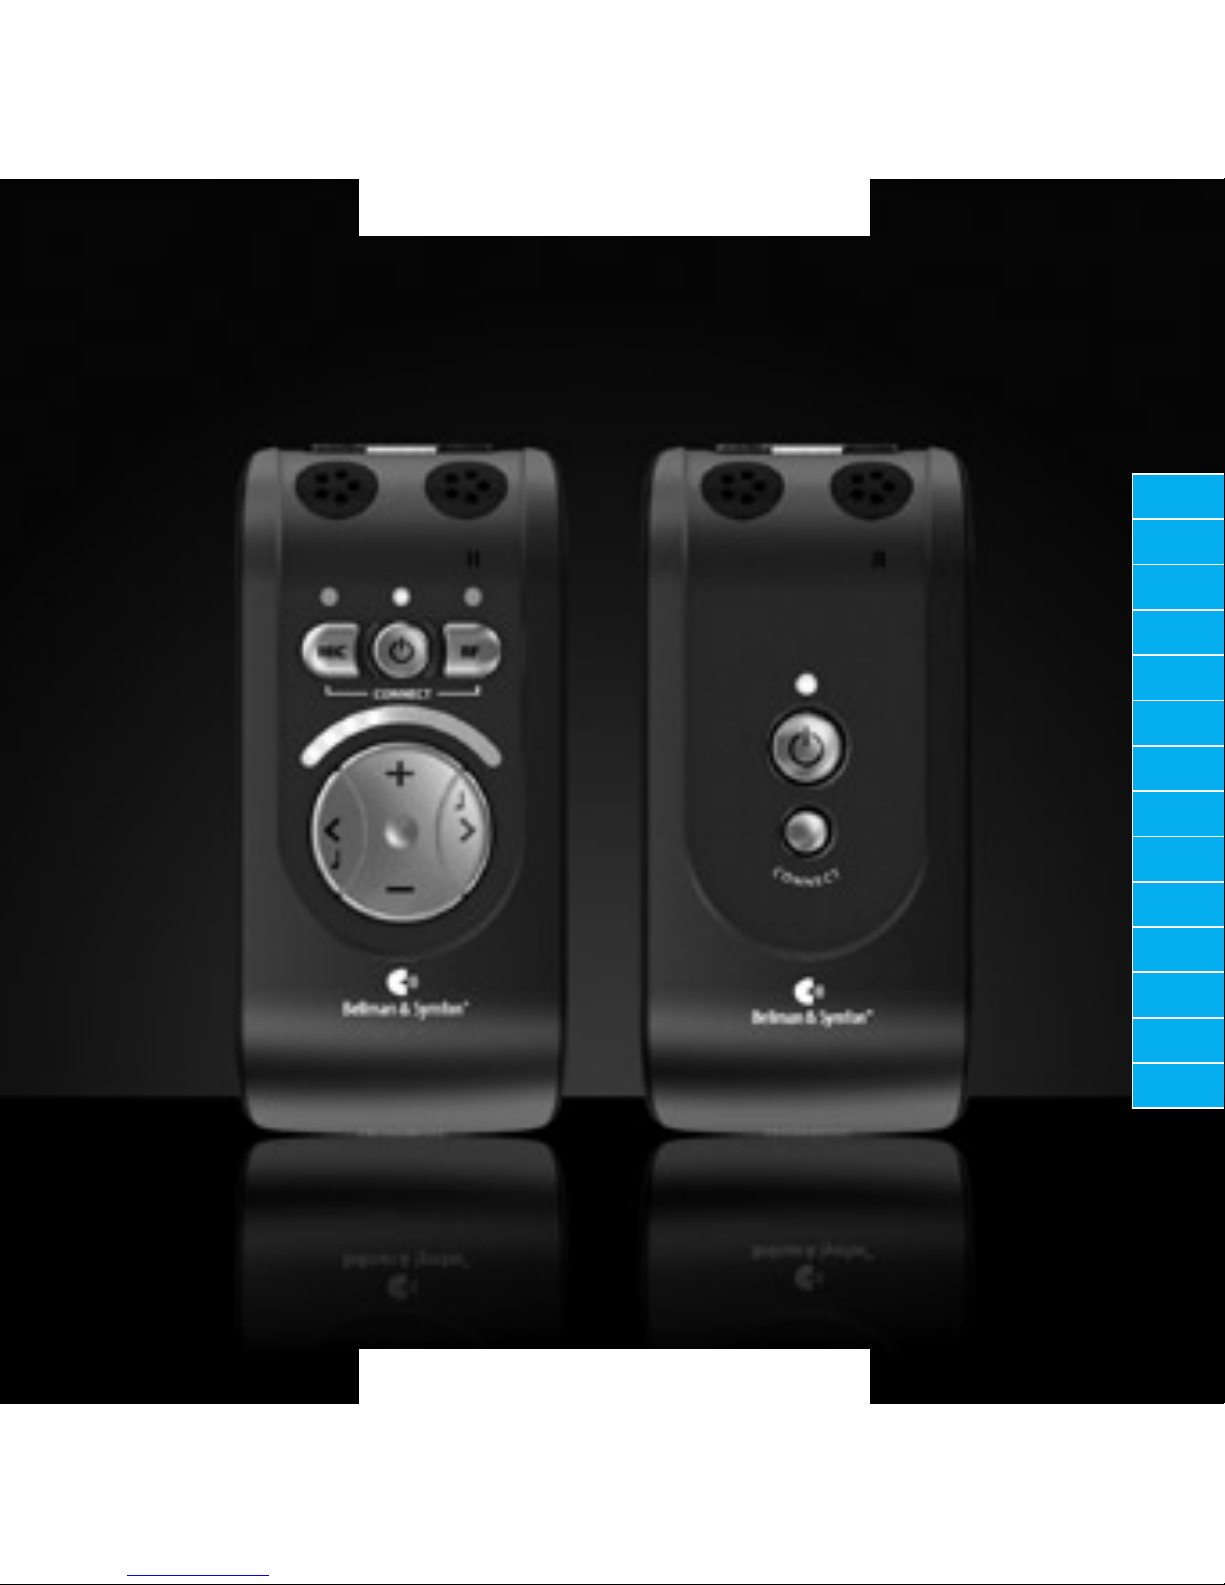
PERSONAL HEARING SYSTEM
BELLMAN AUDIO DOMINO
DE
DK
EN
ES
FI
FR
IT
JP
NL
PL
SE
SI-CN
TR-CN
APP
Page 2
Page 3
Page 4
Page 5
Page 6
Page 7

50
Contents
50 Contents
51 Introduction
52 Figure references
54 Getting started
54 Testing
55 Accessories
56 What is in the box?
57 How to use Bellman Audio
Domino
58 Symbols and indicators
59 Charging
60 Using the Receiver Unit
60 Switching on the Receiver Unit
60 Selecting the sound volume
61 Selecting the tone
61 Using the Transmitter Unit
61 Switching on the Transmitter Unit
62 Listening via the Transmitter Unit
62 Listening on the Receiver Unit’s
microphone again
63 Switching o
63 Choice of microphones
64 Choice of microphone on the
Receiver Unit
64 Choice of microphone on the
Transmitter Unit
65 External sound source
65 External microphone
66 Combined signal sources
67 Wireless digital transfer
68 Battery indicator
68 Establishing a temporary link
with another Transmitter Unit
70 Troubleshooting in brief
72 Safety regulations
314 Appendix
332 Areas of application
340 Warranty card
Page 8

51
DE
DK
EN
ES
FI
FR
IT
JP
NL
PL
SE
SI-CN
TR-CN
APP
Bellman Audio Domino
Personal Hearing System, BE2210/BE2230
Introduction
Thank you for choosing products from Bellman & Symfon.
Bellman Audio is an assistive listening system. The system consists of a number
of units which facilitate listening under dierent circumstances. Bellman Audio
products make everyday life easier for many people and give them the freedom to freely pursue their interests.
Bellman Audio Domino comprises easy-to-use wireless audio products which
have been specially developed to help in circumstances where listening is difcult. The use of the latest technology in digital signal processing, encryption
and wireless technology provides you with fantastic sound quality, secure and
reliable radio transmission and great exibility in how you use the system. The
radio solution used and the exible battery charging ensure that the products
can be used safely and easily throughout the world.
Read through the entire user manual before starting to use the product. Refer
to the diagrams showing the accessories and connection options.
Page 9

52
Figure references
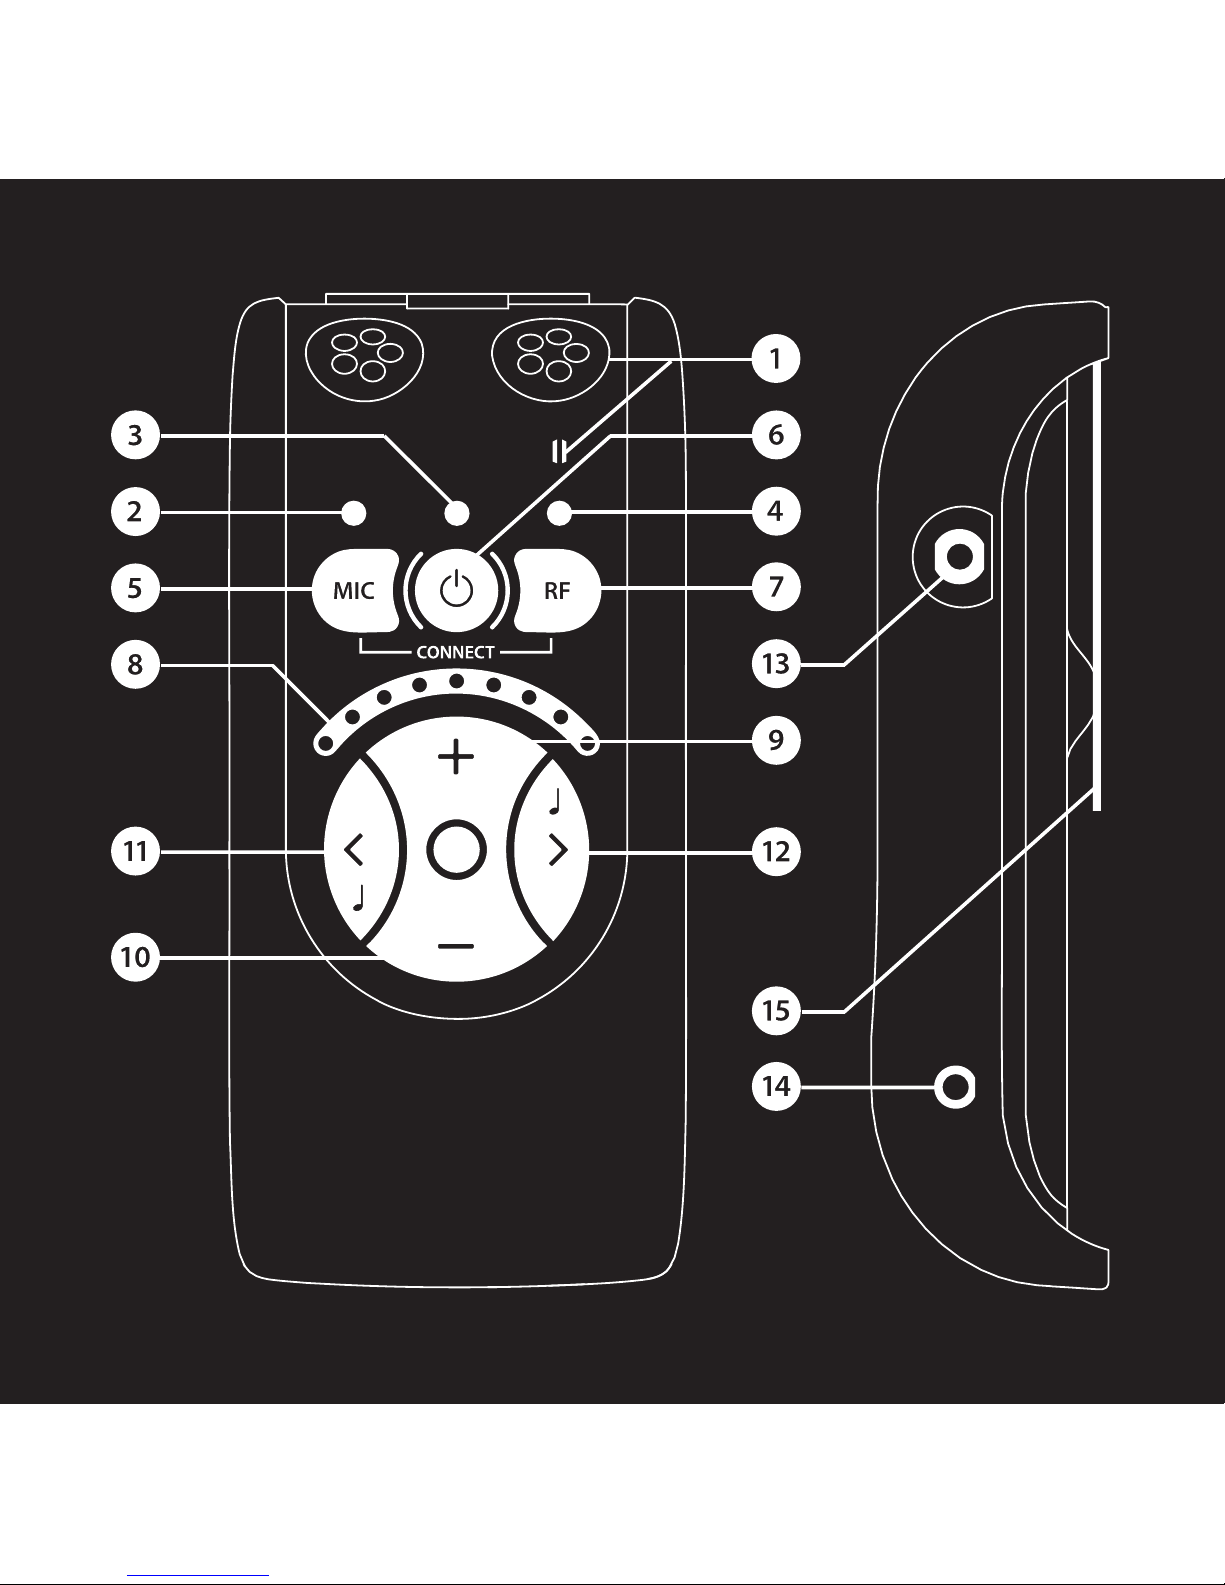
Receiver unit
1 Internal microphone for
Receiver Unit
2 Internal microphone setting LED
Green: Omnidirectional microphone
Orange: Directional microphone
3 Battery status LED
Green: Switched on with well
charged battery
Blinking Green: Switched on but the
battery charge is low
Blinking Orange: Switched on with
at battery - will soon switch itself
o
Orange: Charging
4 LED for listening via transmitter
Green: Omnidirectional microphone
Orange: Directional microphone
Orange and Green: Line in (external
sound source)
5 Button for selecting internal
microphone
6 On/o button
7 Button for selecting listening via
transmitter
8 Volume and Tone LED Indicator
9 Button for increasing sound level
10 Button for reducing sound level
11 Button for reducing treble
12 Button for increasing treble
Page 10

53
DE
DK
EN
ES
FI
FR
IT
JP
NL
PL
SE
SI-CN
TR-CN
APP
13 Headphone output 3.5 mm jack
plug
14 Charging socket
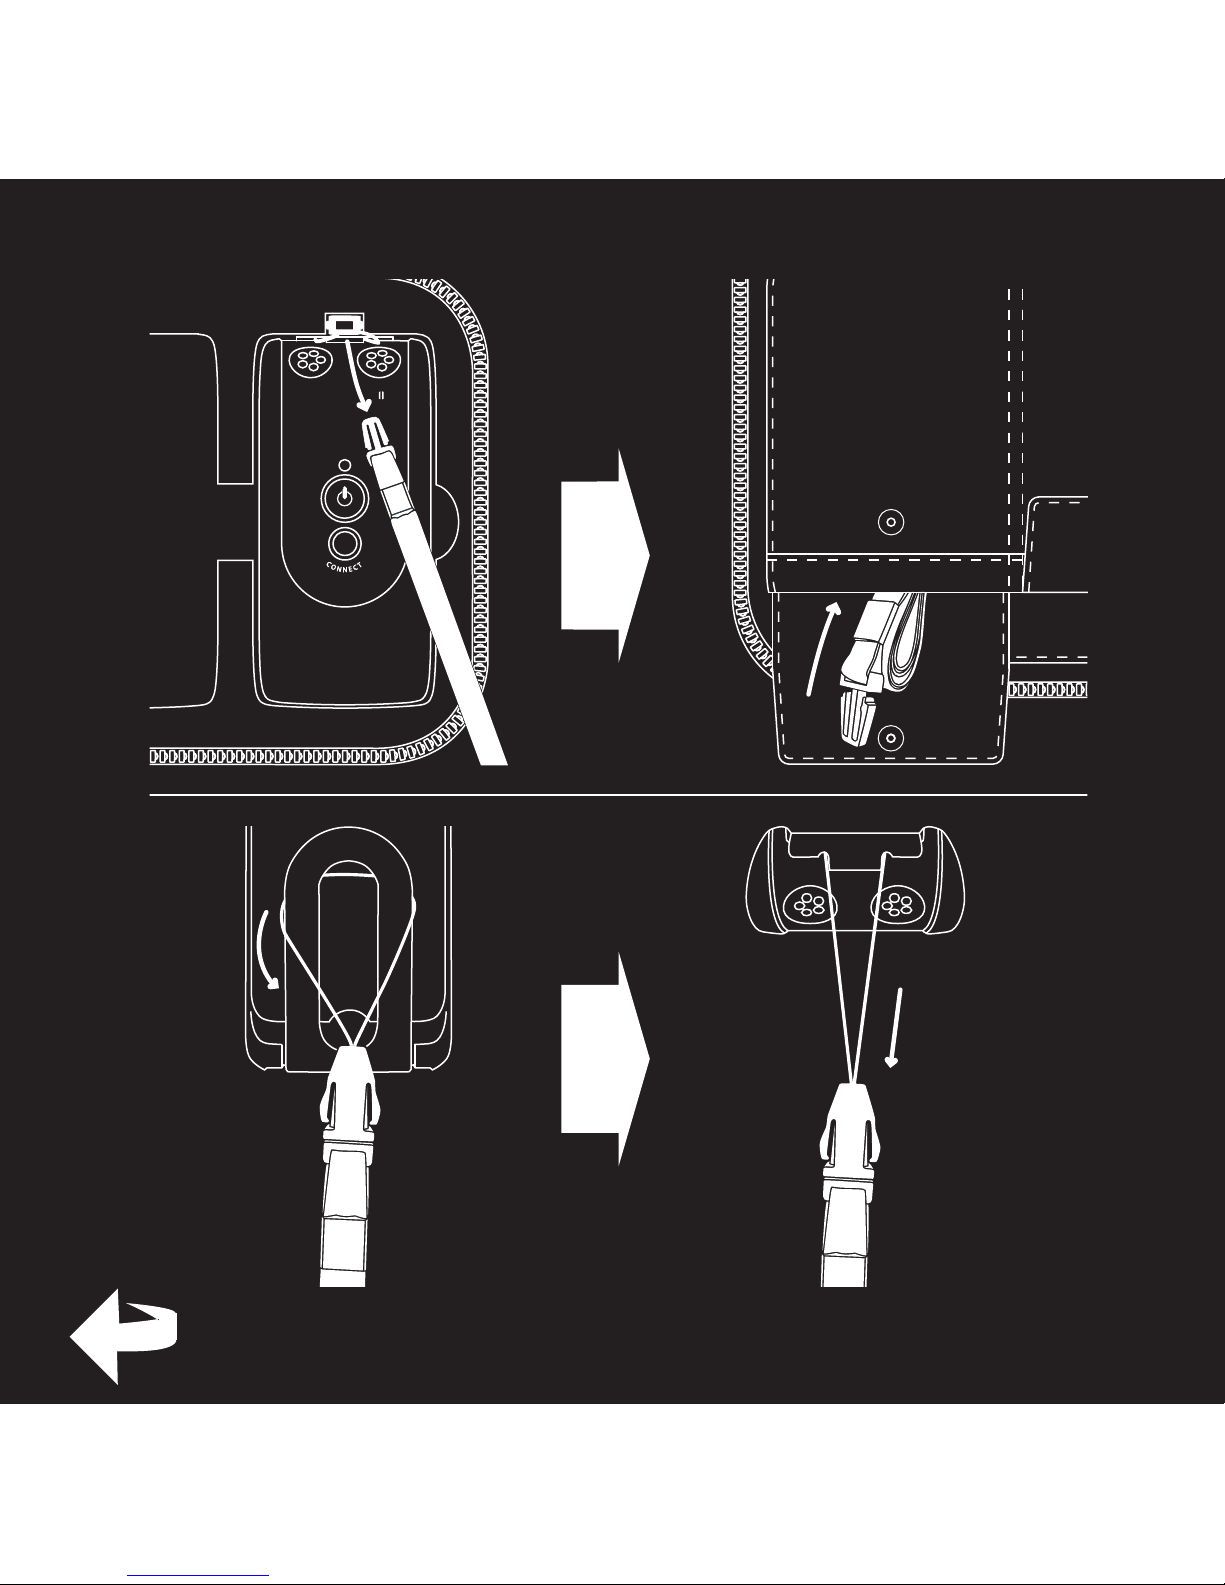
15 Clip
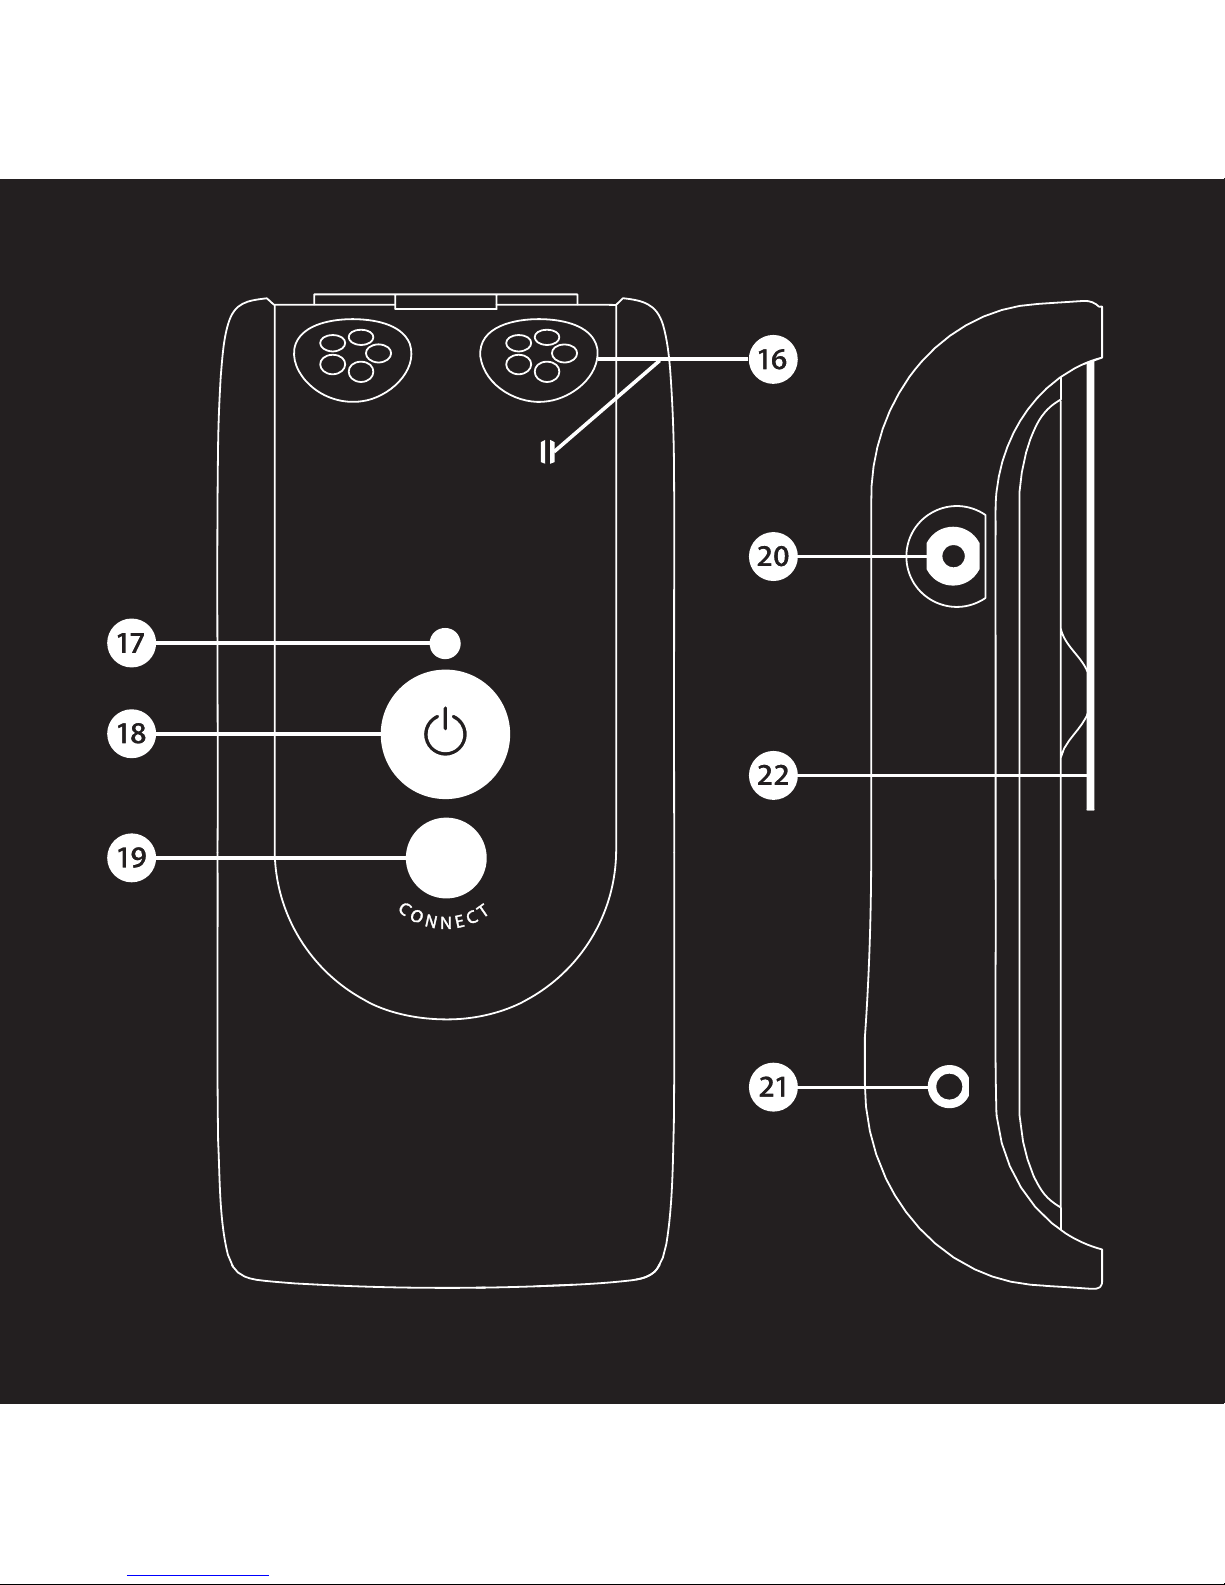
Transmitter unit
16 Internal microphone for Transmit-
ter Unit
17 Battery status LED
Green: Switched on with well
charged battery
Blinking Orange and Green several
times: An external sound source has
been connected
Blinking Green: Switched on but
the battery charge is low
Blinking Orange: Switched on with
at battery - will soon switch itself
o
Orange: Charging
18 On/o button
19 Button for pairing up Transmitter
Unit with Receiver Units
20 External sound source input
2.5 mm jack plug
21 Charging socket
22 Clip
Page 11

54
Getting started
Testing
1 Both the Transmitter and Receiver Units are supplied with built-in rechargeable
batteries. The batteries in both the Transmitter and Receiver Units must be fully
charged before using the products for the rst time. Please use the charger
supplied.
2 Connect the Headphones to the headphone output (13) and switch on the
Receiver Unit with the On/O button i (6). Listen to the Receiver Unit’s microphone and adjust the volume using the Volume Buttons + or - (9 or 10).
3 Switch on the Transmitter Unit using the On/O button i (18) and switch
over to listen via the Transmitter Unit’s microphone by pressing the external
sound button (7). If you connect the Transmitter Unit Sound Input (20) to the
headphone output on an external sound source, you can, for example, listen to
music via the Transmitter.
The Receiver Unit always starts with the internal microphone (1) selected as a
sound source. In addition, the volume control is always set to low volume to
avoid unpleasant sound levels.
The volume control adjusts the sound level. + (9) raises and - (10) lowers
Page 12

55
DE
DK
EN
ES
FI
FR
IT
JP
NL
PL
SE
SI-CN
TR-CN
APP
the volume while the Volume and Tone LED Indicator (8) shows the sound level.
The more LEDs that are lit the higher the volume. The LED indicator goes out 5
seconds after the sound volume has been set.
The tone control adjusts the sound quality. > (12) increases and < (11) reduces
the treble. The Volume and Tone LED Indicator (8) shows the tone setting. The
LED indicator goes out 5 seconds after the sound quality has been set.
When you have nished, you can switch o the Transmitter and Receiver Units
by pressing the On/O buttons i (6, 18) and holding them down until the Battery Status LEDs (3, 17) go out.
Accessories
The following accessories are available:
• BE9122 Stereo headphones
• BE9124 Ear phones
• BE9125 Stetoclips
• BE9126 Stereo Cable Kit, 5m (16 feet)
• BE9127 External microphone, 5m (16 feet)
• BE9128 Neck loop
• BE9143 USB car charger
• BE1360 Scart switch box
For all accessories and for more information about the latest accessories please
visit our website at http://www.bellman.com.
Page 13

56
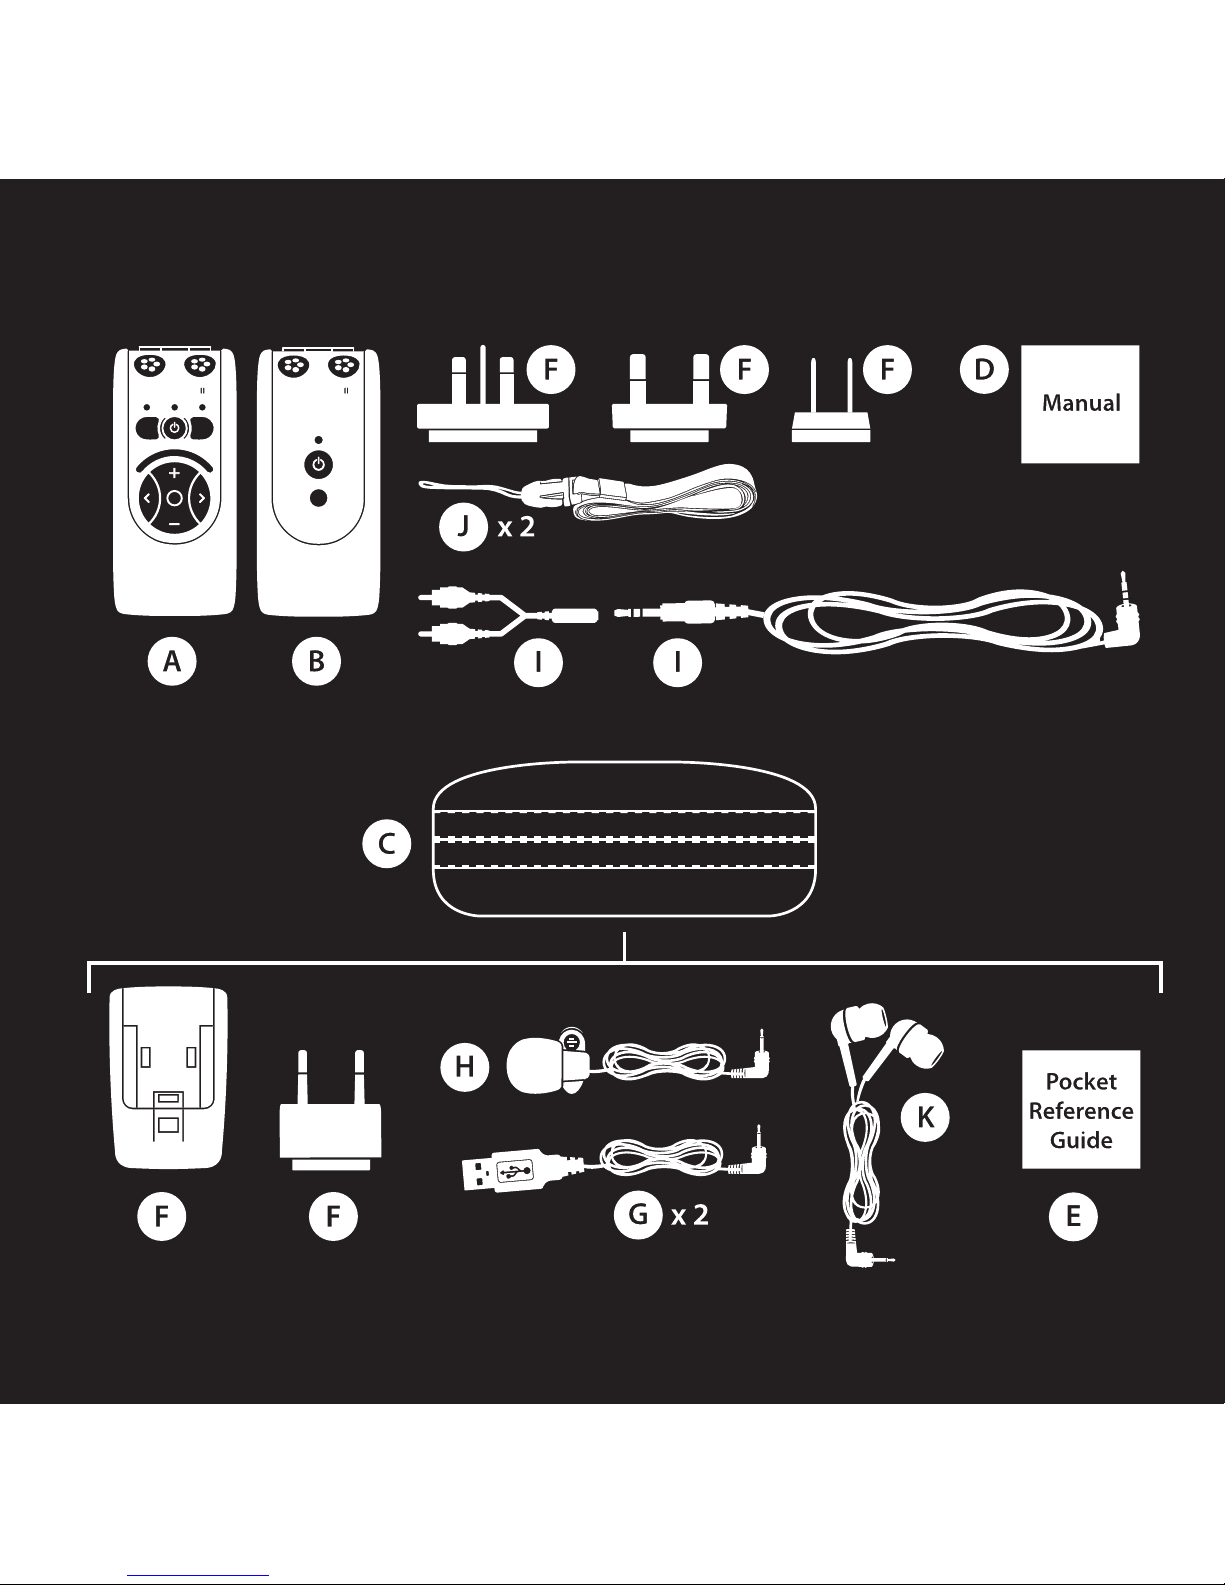
What is in the box?
The box contains everything you normally need in order to use Bellman
Audio Domino. There are storage areas in the lining of the box for accessories
supplied with the equipment. The box contains:
A BE2210 Receiver unit
B BE2230 Transmitter unit
C BE9141 Travel case
D User manual
E Pocket Reference Guide
F BE9142 Universal charger with 4 mains plugs
G BE9139 Charging cable, USB (2 o)
H BE9136 Microphone with clip
I B E 9 13 7 S t e r e o c a b l e , 1 . 5 m w i t h a d a p t e r f r o m 3 . 5 m m j a c k t o R C A ( p h o n o ) c o n n e c t o r s
J BE9135 Neck strap with safety clasp (2 o)
K BE9124 In-ear Phones
Page 14

57
DE
DK
EN
ES
FI
FR
IT
JP
NL
PL
SE
SI-CN
TR-CN
APP
How to use Bellman Audio Domino
The BE2210 and BE2230 Bellman Audio Domino Personal Hearing Systems are
personal hearing systems which have been specically developed to provide
an excellent sound experience even in demanding situations. Bellman Audio
Domino works extremely well for speech and music. You can use the built-in
microphones in the Receiver Unit and the Transmitter Unit or use an external
sound source. You can use the external microphone supplied as an external
sound source or connect the Stereo Cable Set supplied to a stereo sound
source.
Page 15
58
Symbols and indicators
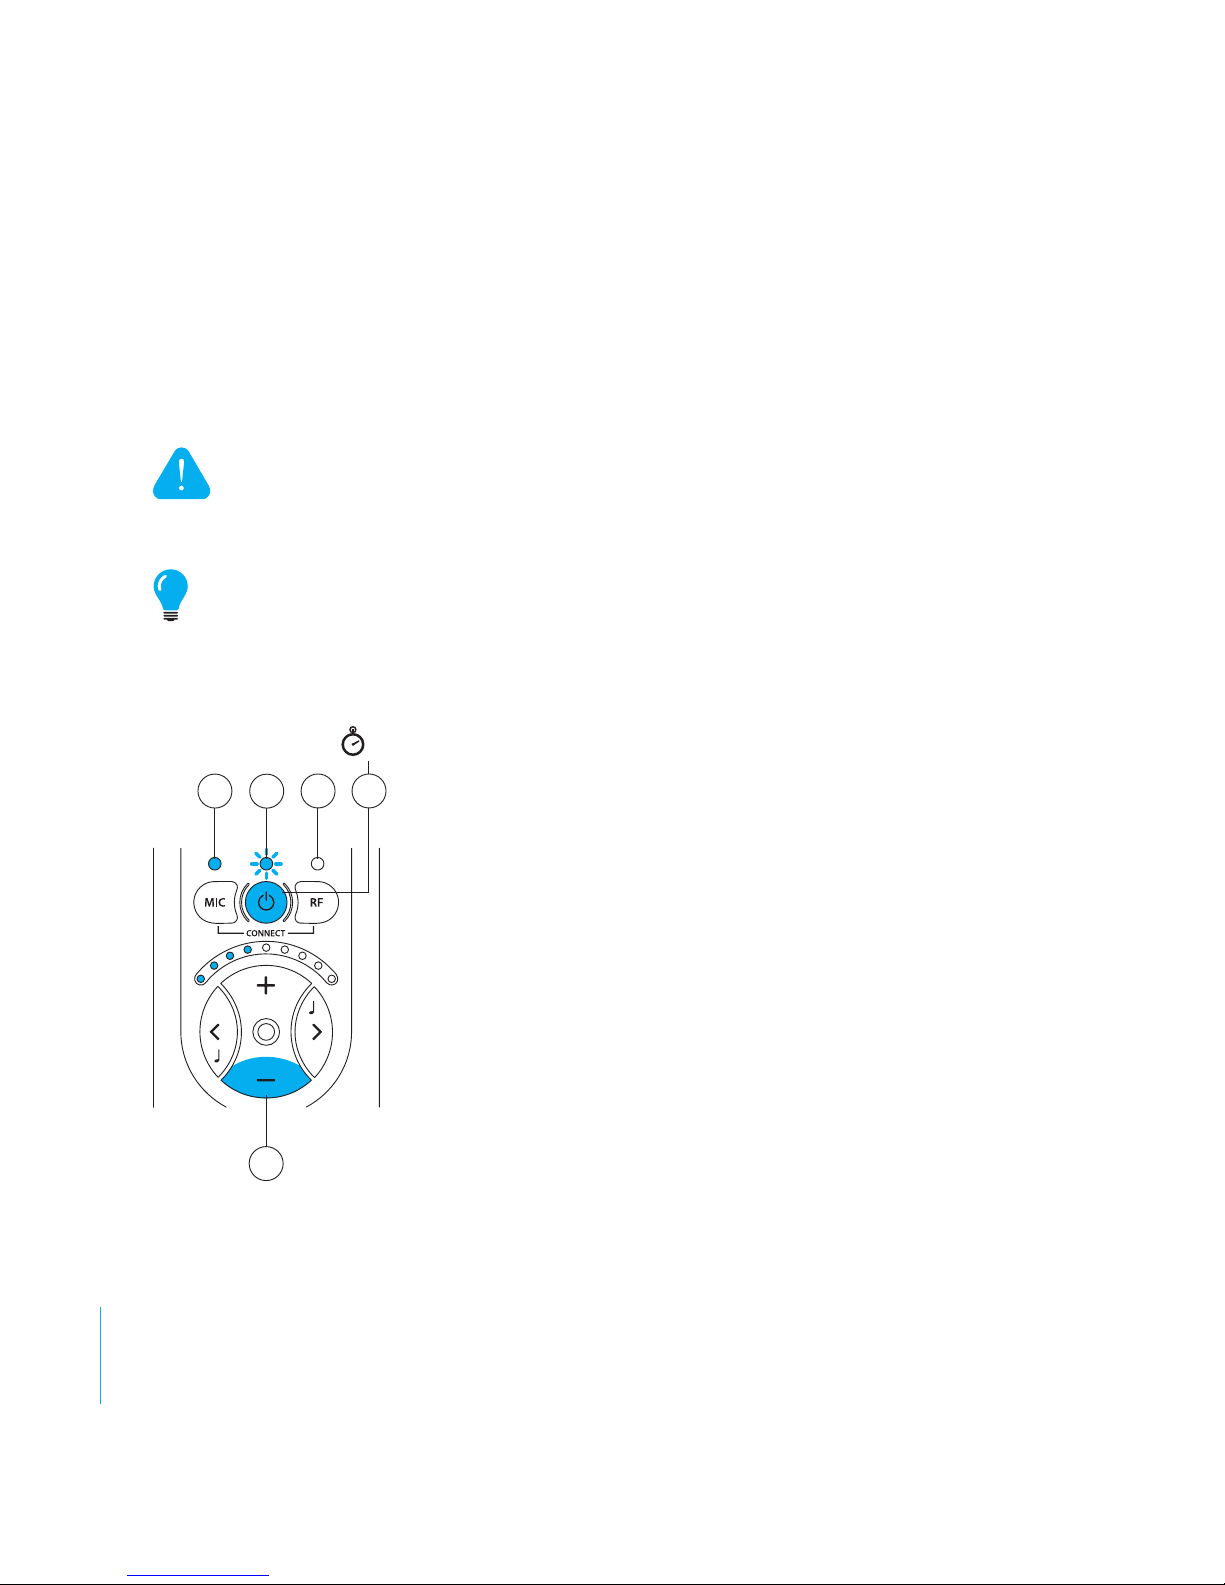
The following symbols are used in the user manual and can be explained as
follows:
The warning triangle indicates information which must be followed in order
to guarantee operation and also in some cases to ensure personal safety.
The light bulb (tip, note) indicates information which can be useful to help
you get the most out of the product.
I A permanently lit LED is indicated by a solid
indicator.
II A blinking LED is indicated by a sunlike solid
indicator.
III Indicators that are switched o are indicated by
an empty circle.
IV If a button must be held down for more than a
certain time, this is indicated by a blue button
and a stop watch symbol with a gure which
corresponds to the number of seconds that the
button must be held down for.
V Button presses are marked in blue on the speci-
ed button.
II
I
IIIVIV
5 s
Page 16

59
DE
DK
EN
ES
FI
FR
IT
JP
NL
PL
SE
SI-CN
TR-CN
APP
Charging
Both the Transmitter and Receiver Units are supplied with built-in rechargeable
batteries. The batteries in both the Transmitter and Receiver Units must be
charged before using the products for the rst time.
Bellman Audio Domino contains Lithium-Ion batteries and a universal charger
with plugs for the EU, United Kingdom, USA and Australia to suit the majority of
wall sockets used around the world.
Warning: The product may only be charged with the charger supplied or
using accessories from Bellman & Symfon.
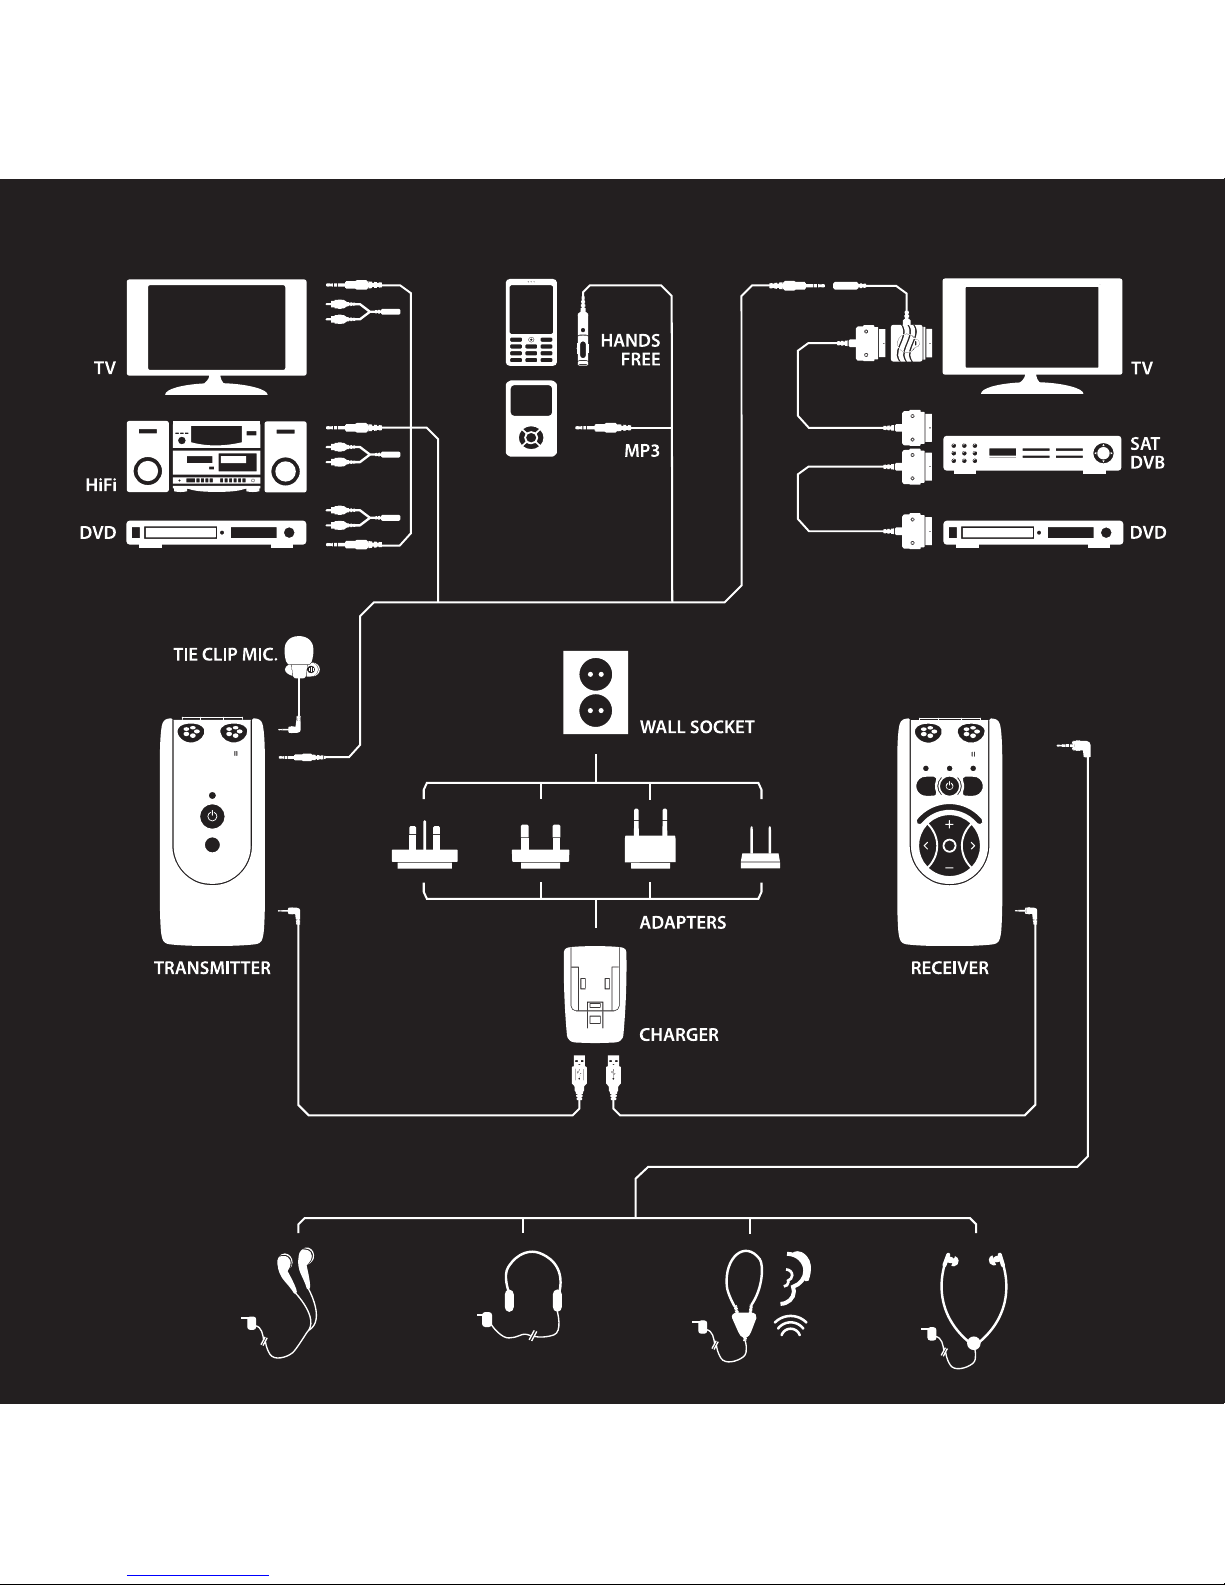
Connect the charger as illustrated in the fold-out section of the manual.
Select the mains plug for the appropriate region and check that it is locked
properly before it is connected to the wall socket. When the charging connectors are connected to the charger, the Transmitter Unit and the Receiver Unit,
the Battery Status LEDs (3 and 17) change from green to orange to indicate that
charging is taking place. When charging is nished, after about 2.5 h, the LEDs
turn green again. You can charge one unit at a time or two at the same time.
Page 17
60
Using the Receiver Unit
Connect BE9122 Bellman Stereo Headphones, BE9128 Bellman Neck Loop,
BE9125 Bellman Stetoclip, BE9124 Bellman In-ear Phones or another listening
product recommended by Bellman & Symfon to the headphone output (13) on
the right-hand side as illustrated in the fold-out section of the manual.
Switching on the Receiver Unit
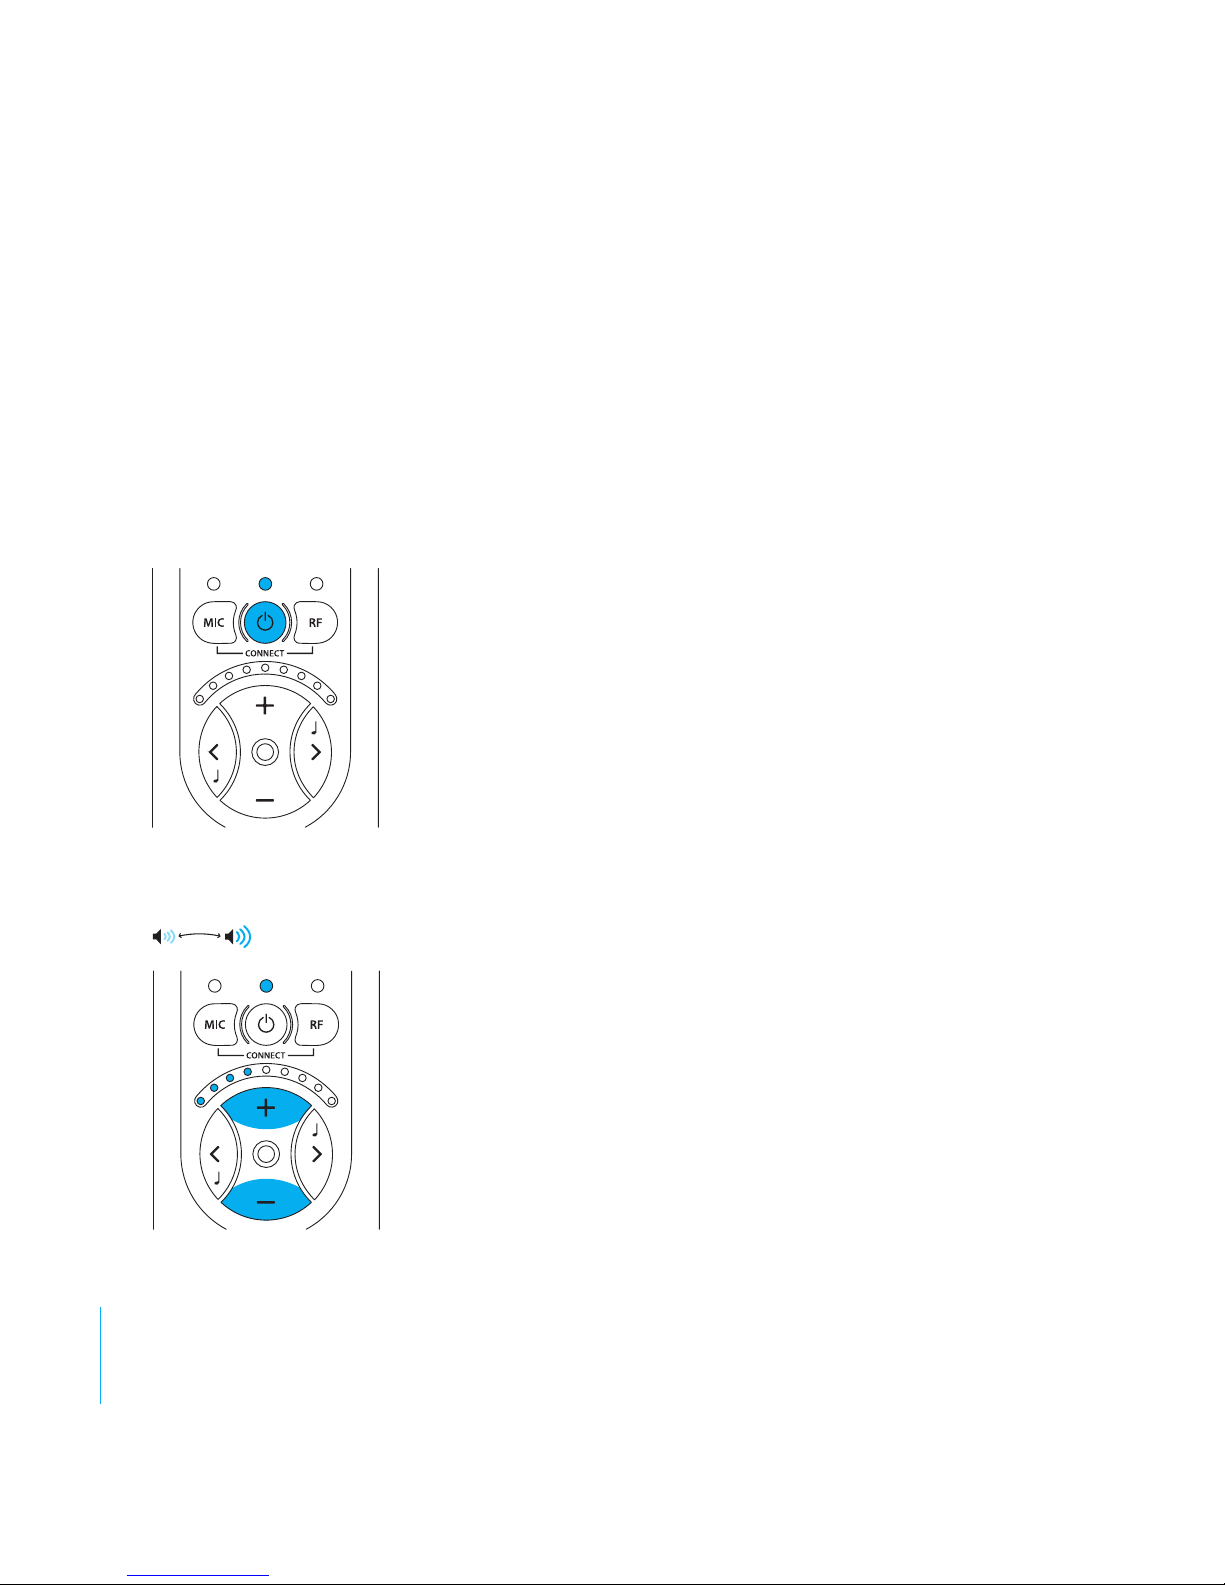
Press the On/O button i (6). The Battery Status LED
(3) starts to shine with a green light to indicate that the
unit is on.
The Receiver Unit always starts with the internal
microphone selected as the sound source. In addition,
the volume control is always set to low volume to avoid
unpleasant sound levels.
Selecting the sound volume
Use the volume control’s + button (9) to increase and
the - button (10) to decrease the sound level. The
Volume and Tone LED Indicator (8) shows the sound
level. The more LEDs that are lit the higher the volume.
The LED indicator goes out 5 seconds after the sound
volume has been set.
Page 18
61
DE
DK
EN
ES
FI
FR
IT
JP
NL
PL
SE
SI-CN
TR-CN
APP
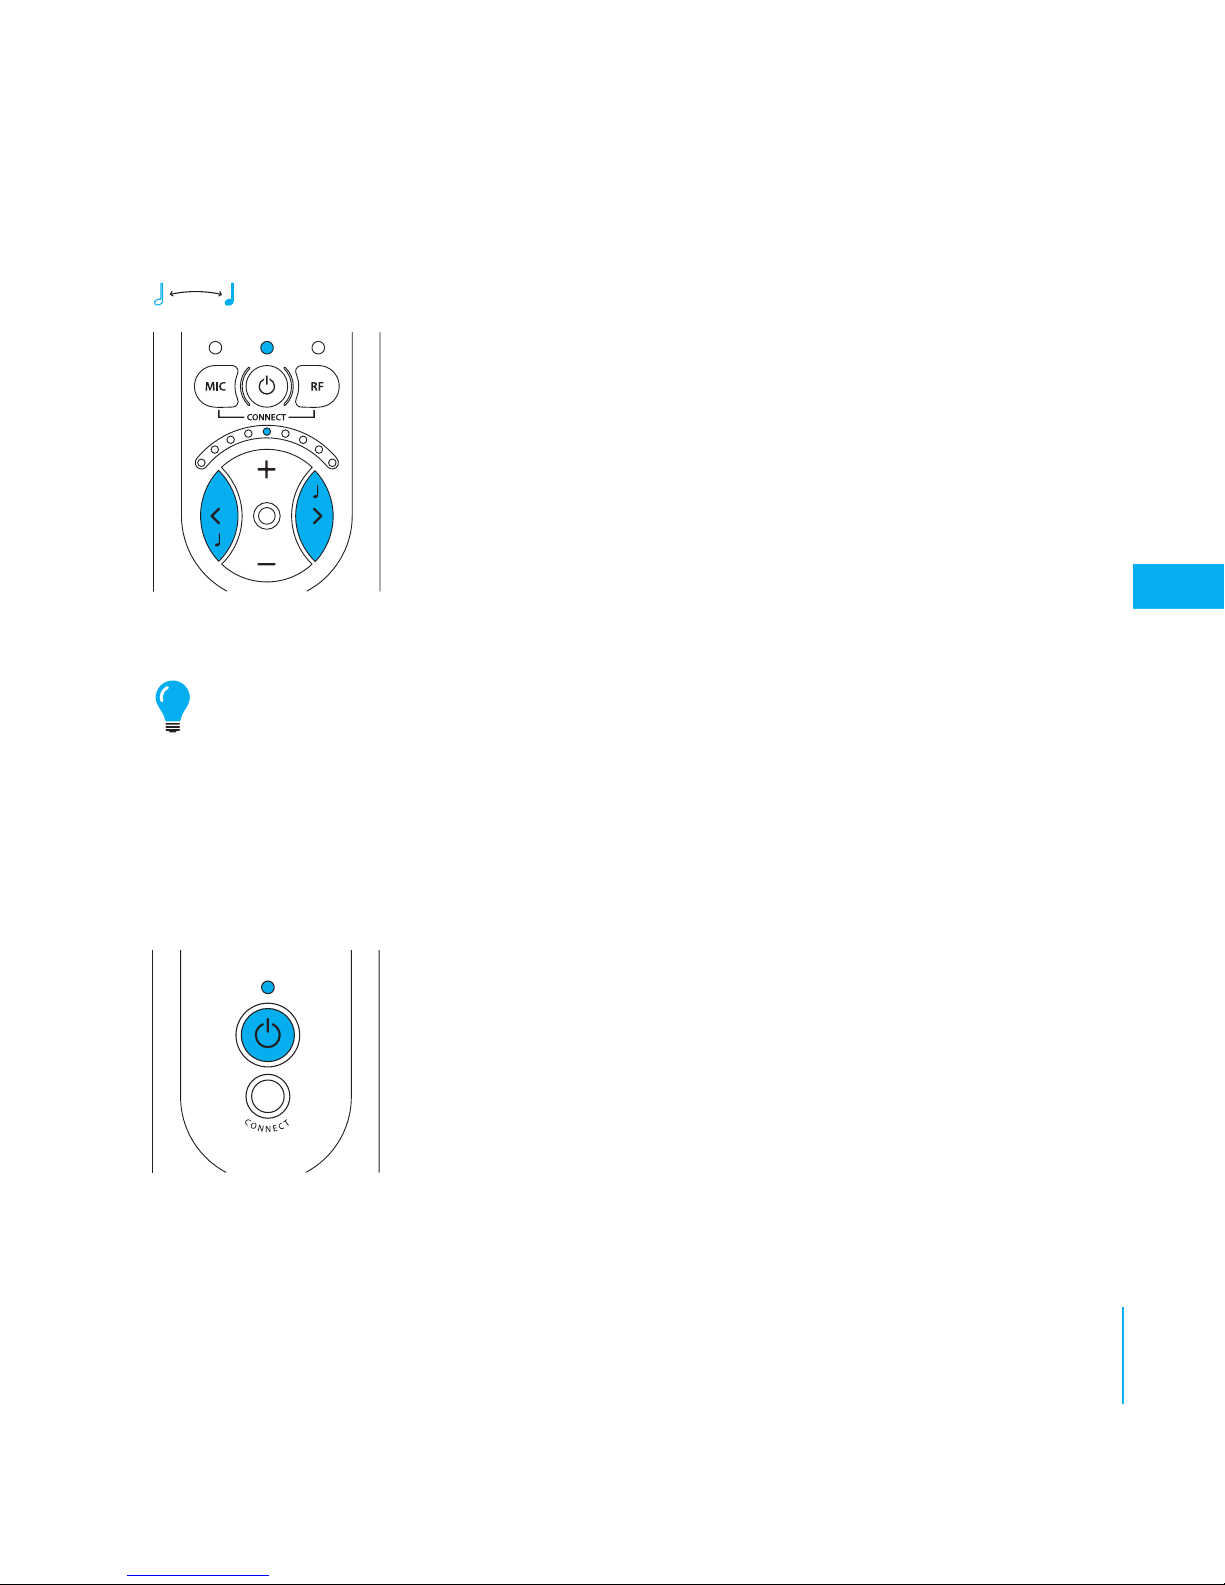
Selecting the tone
Use the tone control’s < button (11) to reduce and the
> button (12) to increase the treble in the tone. The
Volume and Tone LED Indicator (8) shows the selected
setting. The LED indicator goes out 5 seconds after the
sound quality has been set.
The Receiver Unit can be used as a small and adaptable self-contained call
amplier, but together with the Transmitter Unit it opens up a whole new
range of possibilities. You can achieve the greatest exi-bility when using the
Receiver Unit together with the Transmitter Unit.
Using the Transmitter Unit
Switching on the Transmitter Unit
Press the On/O button i (18). The Battery Status LED
(17) starts to shine with a green light to indicate that
the unit is on.
Page 19
62
Listening via the Transmitter Unit
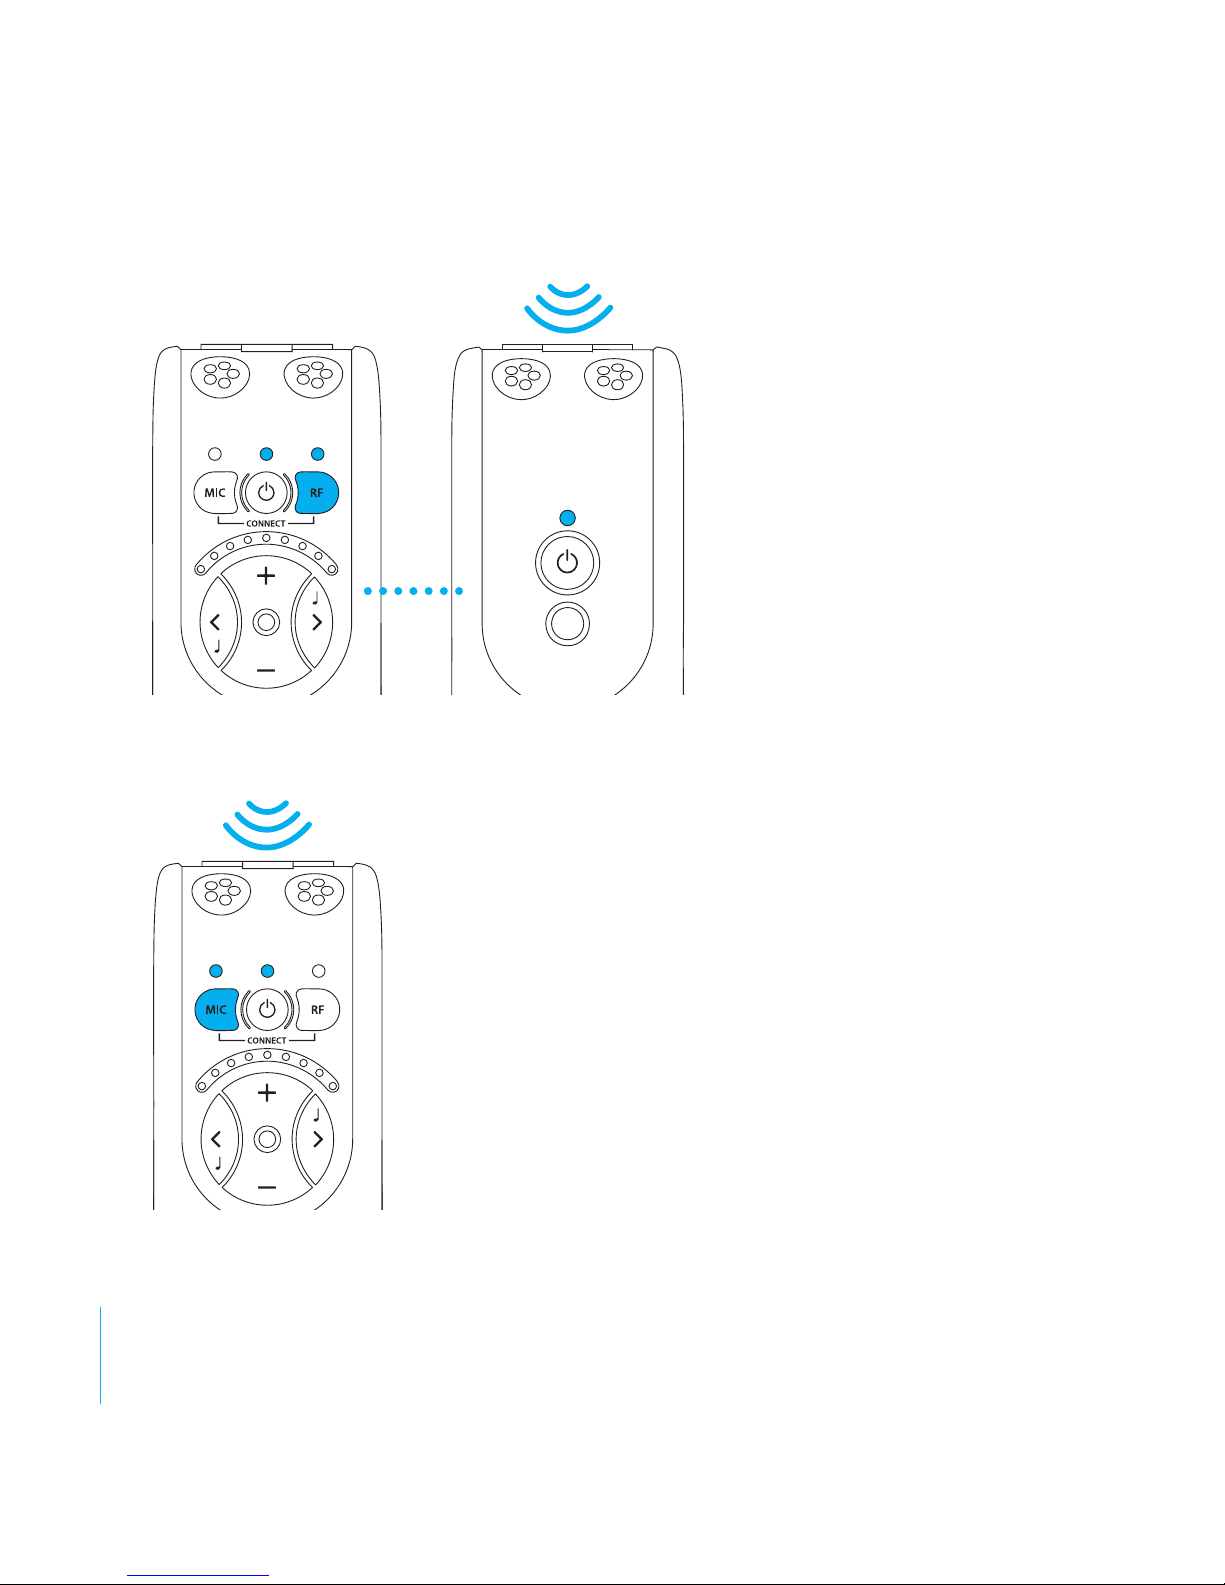
To listen on the microphone
in the Transmitter Unit press
the R button (7) on the
Receiver Unit. The external
sound LED (4) comes on
and the sound detected in
the Transmitter Unit is now
heard in the headphones.
Listening on the Receiver Unit’s microphone
again
If you want to switch back to the internal micro-phone,
give a short press on the M button (5). The internal
microphone LED (2) comes on and the sound now
heard in the headphones comes from the Internal
Microphone (1) again.
Page 20
63
DE
DK
EN
ES
FI
FR
IT
JP
NL
PL
SE
SI-CN
TR-CN
APP
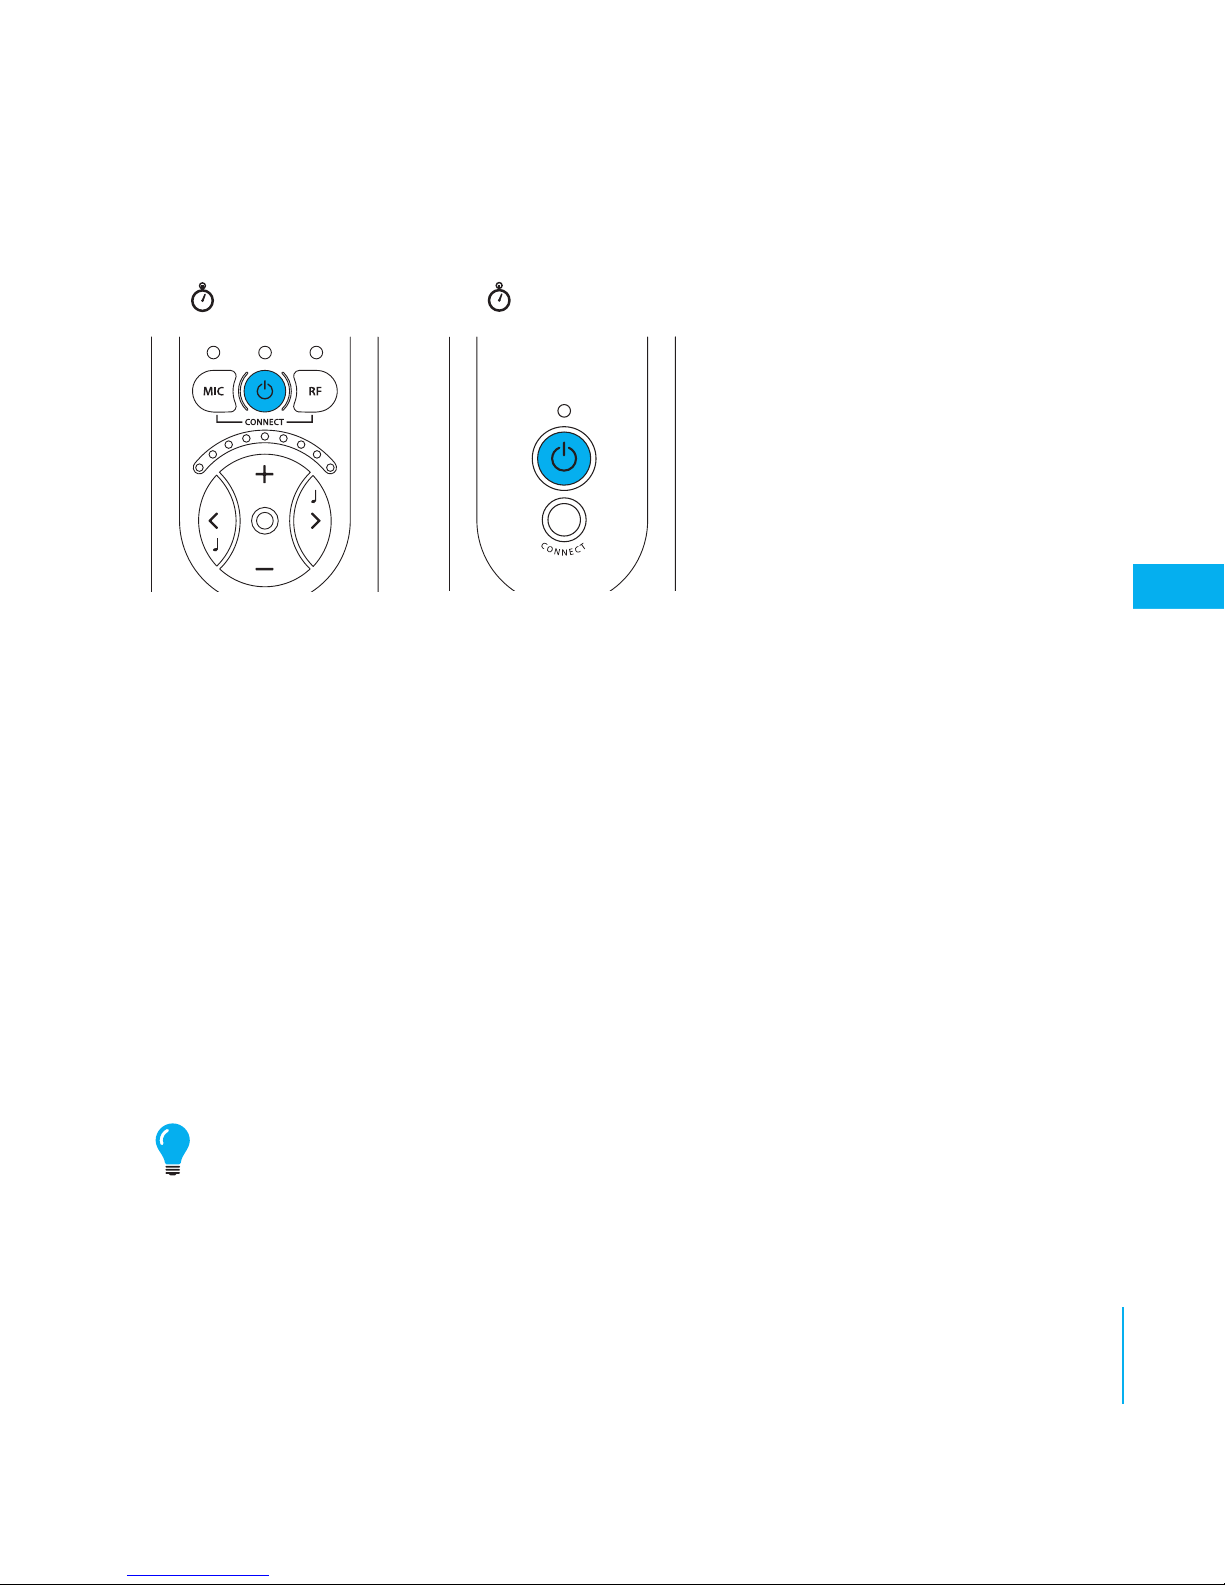
Switching o
When you have nished you
can switch o the Transmitter
and Receiver Units by pressing the On/O buttons i (6,
18) and holding them down
until the Battery Status LEDs
(3, 17) go out.
Choice of microphones
Bellman Audio Domino contains two microphone options so that you can easily switch between an omnidirectional and a directional microphone.
The microphones on both the Receiver Unit and Transmitter Unit have this
function.
The Receiver Unit remembers the previously selected microphone setting
if you switch between the internal microphone and the Transmitter Unit’s
microphone.
With the directional microphone you can ”point” towards the sound source
that you are interested in listening to while reducing sound from other
directions. This is particularly useful in dicult listening situations such as in
crowds or in very noisy environments.
OFF
1 s
OFF
1 s
Page 21
64
Choice of microphone on the Receiver Unit
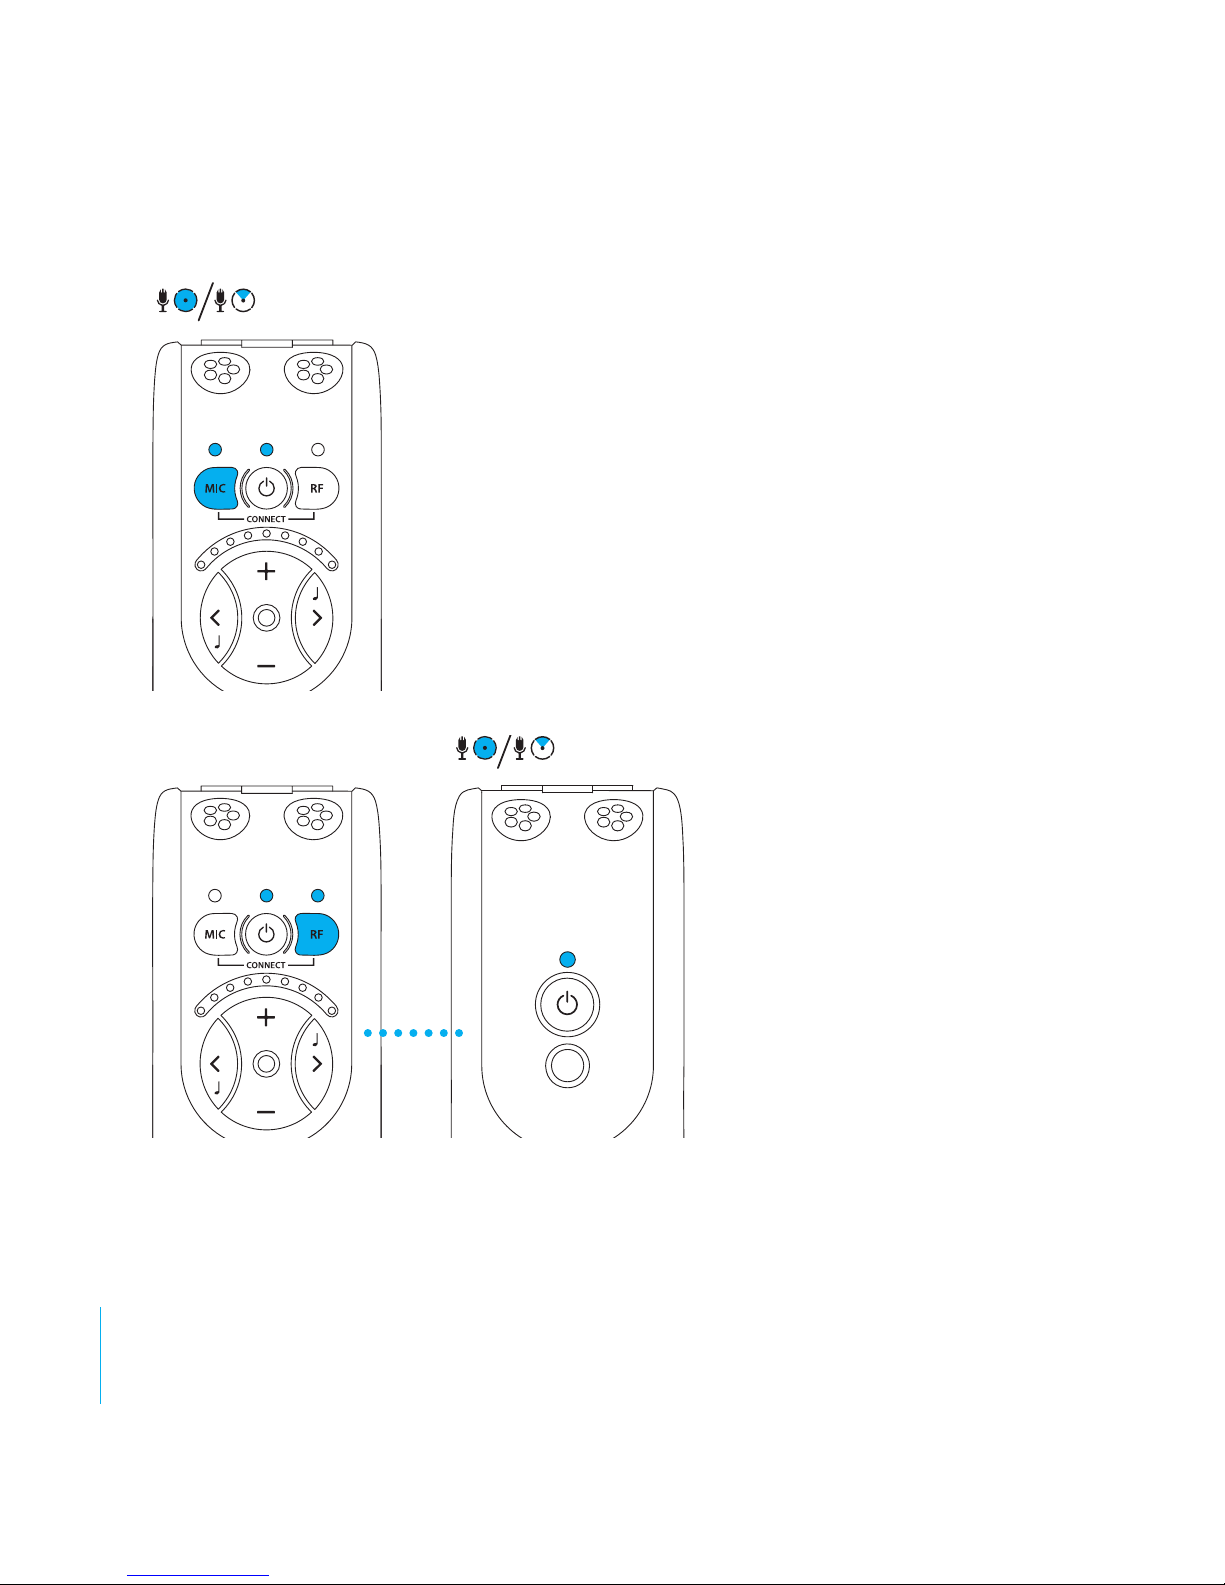
You can switch between omnidirectional and di-rectional microphone reception by pressing the M button (5). The omnidirectional microphone is indicated
by the Microphone LED (2) lighting up green and the
directional microphone by it lighting up orange.
Choice of microphone on
the Transmitter Unit
When you have chosen to
listen via the Transmitter
Unit by pressing the R
button (7), you can switch
between omnidirectional
and directional microphone
reception by pressing the
R button (7).
The omnidirectional micro-
phone is indicated by the
External Sound LED (4) lighting up green and the directional microphone by it
lighting up orange.
Page 22

65
DE
DK
EN
ES
FI
FR
IT
JP
NL
PL
SE
SI-CN
TR-CN
APP
External sound source
If the audio cable supplied, (which has a small 2.5 mm jack plug on one end), or
if the External Microphone is connected to the Transmitter Unit’s
external sound source input (20), the Transmitter Unit’s internal microphone
will be disconnected and the external sound source will be automatically
selected. The Battery Status LED blinks orange several times to conrm that
an external sound source has been connected. The External Sound LED (4) will
light up green and orange at the same time to indicate that the sound is coming from an external sound source.
If the audio cable is disconnected, the sound will be reconnected to the Transmitter Unit’s microphone again.
With the audio cable connected between a Transmitter Unit and a TV, hi-
equipment, MP3 player or similar sound source you can listen to absolutely rst
class stereo sound without being limited by cables.
The input sensitivity is automatically adjusted to suit dierent sound sources.
External microphone
You can connect an external microphone to the Transmitter’s 2.5 mm socket
(20). The Battery Status LED blinks orange several times to conrm that an external sound source has been connected. The External Sound LED (4) will light
up green and orange at the same time to indicate that the sound is coming
from an external sound source.
Page 23
66
In some cases it may, for example, be easier for a lecturer to have an external
microphone and a Transmitter Unit in his/her pocket than to speak in a loud
voice or carry a wired microphone.
A Transmitter Unit can transmit speech to one or more Receiver Units at the
same time.
The input sensitivity is automatically adjusted to a suitable amplication when
an external microphone is connected.
Please note that the Transmitter Unit’s Battery Status LED (17) blinks alternately green and orange several times when an external sound source is
connected.
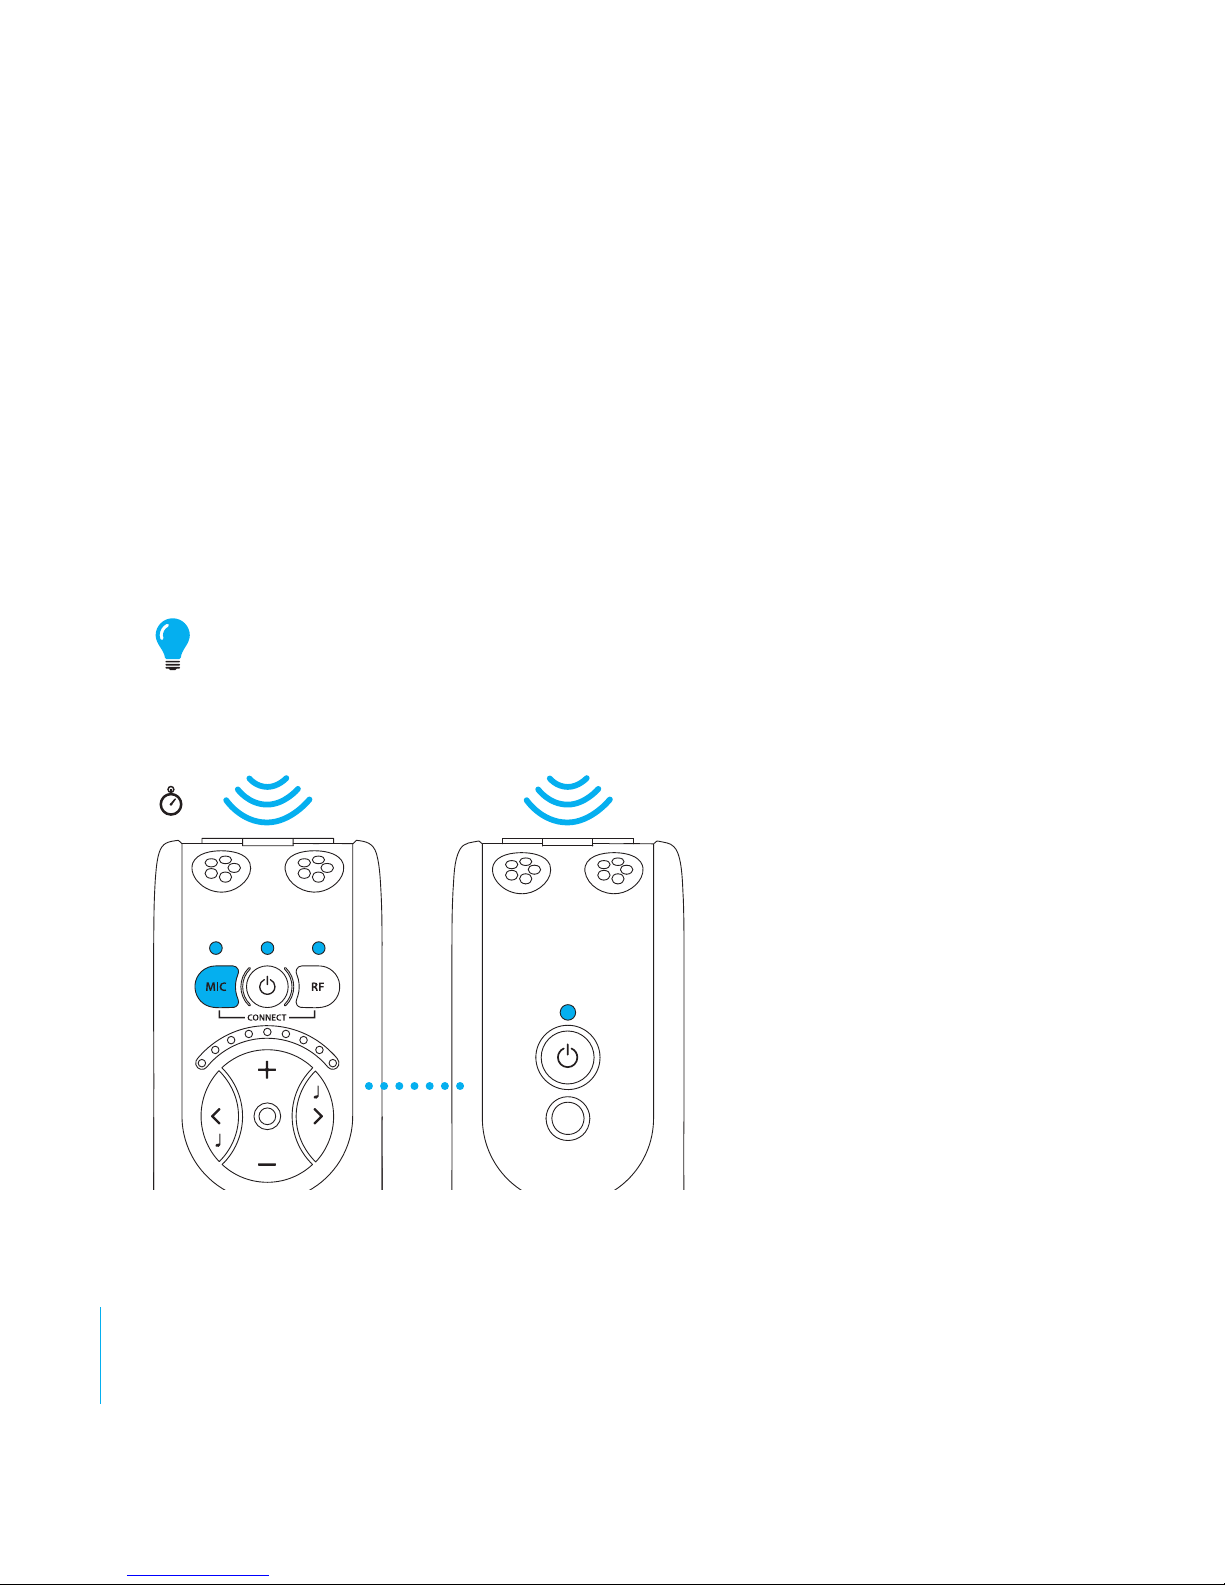
Combined signal
sources
When you are listening via
the Transmitter Unit’s microphone or an External Sound
Source, this sound can be
combined with the sound
that the internal microphone
in the Receiver Unit is receiving. Choose to listen on the
Transmitter Unit by pressing
the R button (7). Hold down
the M button (5) until both the MIC (2) and RF LEDs (4) light up.
2 s
Page 24
67
DE
DK
EN
ES
FI
FR
IT
JP
NL
PL
SE
SI-CN
TR-CN
APP
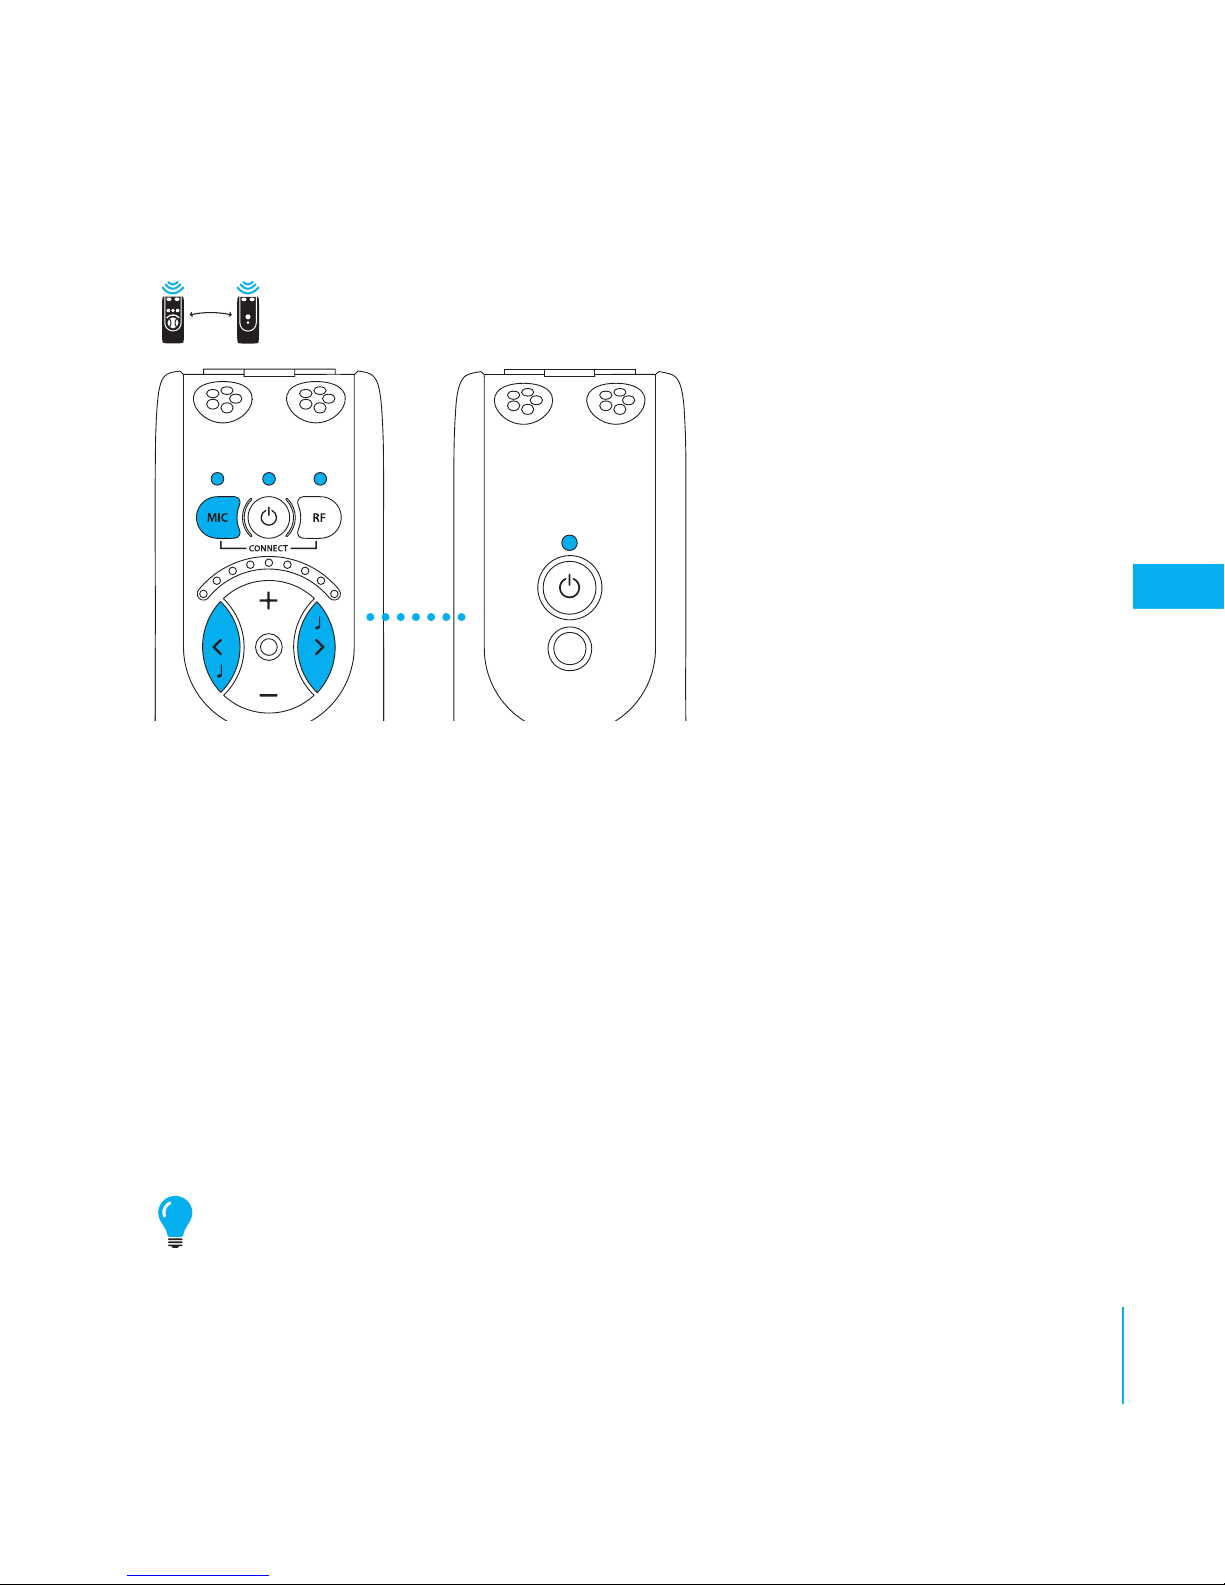
The sound from the Transmitter Unit is mixed with
the sound from the internal
microphone. You can adjust
the balance between the
Receiver Unit and the Transmitter Unit’s microphone
by holding down the M
button(5) at the same time as
setting the balance using the
< (11) or > buttons (12).
If you want to go back to listening on the Transmitter Unit, press the R-button
(7) and if you want to switch over to listening on the internal microphone, press
the M button (5) instead.
Wireless digital transfer
Bellman Audio Domino uses the latest radio communications technology to
digitally transfer sound with an exceptionally high sound quality in stereo.
The radio transmission is encrypted to ensure the highest level of security and
condentiality.
Radio communication takes place on 2.4 GHz which is a frequency range
whose use is permitted throughout the world.
Page 25

68
Battery indicator
The Battery Status LED (3, 17) normally lights up green. This indicates that the
unit is switched on and the battery level is satisfactory.
When the battery is low, the Battery Status LED (3, 17) blinks green until the
battery is almost completely at when it blinks orange instead. As soon as it
blinks green it is time to charge the unit again. If the unit is not charged, it is
switched o automatically.
Charging starts automatically when you connect a charger to the Charging
Socket (14, 21). Charging in progress is indicated on both the charger and
the units by an orange light. Once the battery is fully charged, the indicator
changes to green and the battery is continuously trickle charged until the
charger is disconnected.
Establishing a temporary link with another Transmitter Unit
The radio link between the Transmitter and Receiver Units in the Bellman Audio
Domino must be established in order for radio communication to operate. To
make it easier to get started, Receiver Units and Transmitter Units which are
supplied together are always paired up so that they will work together.
Whenever you want to listen on another Transmitter Unit you can establish a
temporary link with it. As soon as you switch o the Receiver Unit it returns to
working with the paired Transmitter Unit again.
Page 26
69
DE
DK
EN
ES
FI
FR
IT
JP
NL
PL
SE
SI-CN
TR-CN
APP
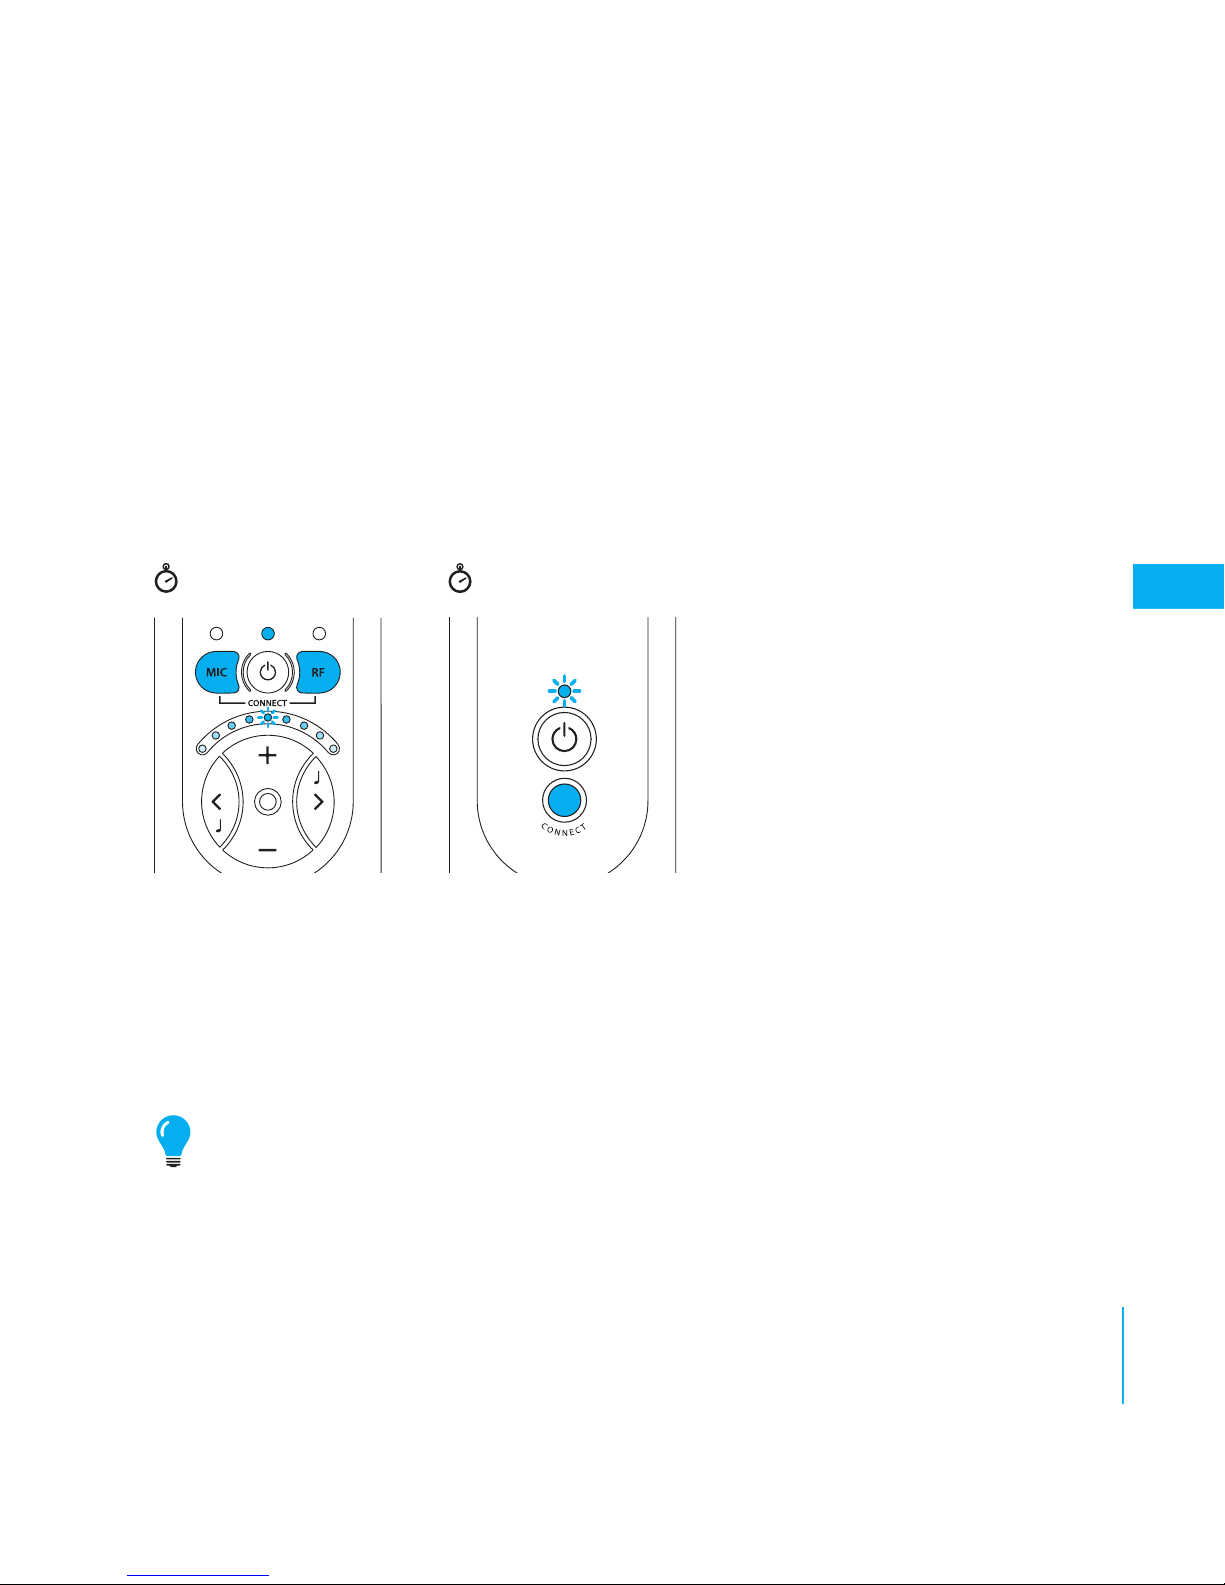
Proceed as follows to establish a temporary radio link between a transmitter
and a receiver:
• Start both the units with the On/O buttons i (6, 18).
• Hold down CONNECT (19) on the Transmitter Unit.
• Hold down both the M button (5) and the R button (7) on the Receiver Unit.
A ”running light” on the
Receiver Unit’s Volume
and Tone LED Indicator (8)
moving towards the centre
indicates that the link has
been established.
The link can only be established while the Transmitter Unit’s connection button
is pressed down - this is for safety reasons to prevent a Receiver from being
able to connect to another Transmitter unobserved.
Please note that it is possible to connect several Receiver Units to the same
Transmitter Unit by repeating the above procedure. There is, however, a risk
that the number of receivers may aect the performance of the system.
5 s
5 s
Page 27

70
Troubleshooting in brief
Problem Solution
Nothing happens when
you try to start the units.
Connect the charger and check that charging starts within
10 seconds.
Please note! If charging does not start within 10 seconds,
disconnect the charger immediately and contact the nearest
dealer!
No sound can be heard in
the headphones when the
Receiver Unit is switched
on.
Turn up the volume using the volume control (9).
Check that the internal microphone has been selected as
the signal source and that it works by gently scraping on
the microphones (1).
Check that the headphone plug is securely inserted in the
headphone output.
Connect the headphones to another sound source (with
a 3.5 mm head-phone output) to test whether the headphones are working.
No sound can be heard
n the headphones when
the Receiver Unit is
switched on and External
Sound is selected.
Check that the Transmitter Unit is switched on.
Check that the internal microphone has been selected as
the signal source and that it works by gently scraping on
the microphones (16).
Check that the Transmitter is within range.
Page 28

71
DE
DK
EN
ES
FI
FR
IT
JP
NL
PL
SE
SI-CN
TR-CN
APP
Problem Solution
Connect the radio link and check that the connection is
made without problems.
Check that the Transmitter Unit can
switch between the omnidirectional and directional
microphone position.
Check that the sound source is correctly connected to the
Transmitter if the stereo cable is connected to the External
Sound Source Input (20).
A high-pitched noise is
heard in the headphones.
Turn down the volume or increase the distance between
the micro-phone and headphones.
Direct the microphone away from you.
The sound breaks up or
comes and goes.
The Receiver Unit is too far away from the Transmitter
Unit. Move the units closer together.
More than one Receiver is connec-ted to the Transmitter and at least one Receiver is too far away from the
Transmitter.
Too many Receivers are connected to the same Transmitter.
There are too many transmitters on 2.4 GHz or too many
Domino systems nearby which aect one another.
Please note that walls, concrete panels and metal reduce the
range.
Page 29

72
Safety regulations
Please note: The BE2210 and BE2230 Bellman Audio Domino Personal Hearing Systems are not hearing instruments. Bellman & Symfon AB recommend
that anyone who is experiencing hearing loss should consult a doctor.
Warning! The BE2210 and BE2230 Bellman Audio Domino Personal Hearing
Systems have a very powerful amplier and the sound level can cause
discomfort or, in serious cases, endanger hearing if the product is used
carelessly. Always turn the volume down to a low level before putting on the
headphones!
Warning! The Bellman Audio Domino Personal Hearing System is
powered by rechargeable Lithium-Ion batteries. Do not expose the
batteries to re or to direct sunlight. The batteries must only be changed by
Bellman & Symfon sta and must only be replaced by batteries of the same
type. The batteries must be charged fully before using the products for the
rst time. Batteries should be charged in temperatures of between +5°C and
+40°C.
Warning! The Bellman Audio Domino Personal Hearing System must only
be charged by charging accessories recommended by Bellman & Symfon.
Page 30

73
DE
DK
EN
ES
FI
FR
IT
JP
NL
PL
SE
SI-CN
TR-CN
APP
Warning! For the safety of your children - Please be aware that this product
may include small parts. Ensure that the package and small parts are kept
out of reach of children.
This symbol indicates that integral electrical equipment must not be treated
as household waste. It should be taken to the relevant collection depot for
the recycling of electrical and electronic equipment. You can obtain more
detailed information about recycling of the product from your local authorities, from the nearest recycling station or from the shop you purchased the
product from.
Page 31

314
Appendix
Settings
Bellman Audio Domino has more settings than those you can access in user
mode. By going into the Settings Menu you can adjust settings that you do not
normally need to change or which are adjusted when rst used and never need
to be changed again.
Settings menu
Start the Receiver Unit with the On/O button i (6).
Hold down the On/O button i (6) and press the Volume Button - (10) within 1 second until the RF LED
(4) starts to blink. When the RF LED (4) starts to blink,
you can release both the buttons.
Press the R button (7) within 2 seconds of the moment the RF LED (4) starts to blink and hold down the
button until the RF LED (4) goes out. Release the R
button (7) immediately when the RF LED (4) has gone
out.
You are now in Balance Control mode.
Page 32
315
APP
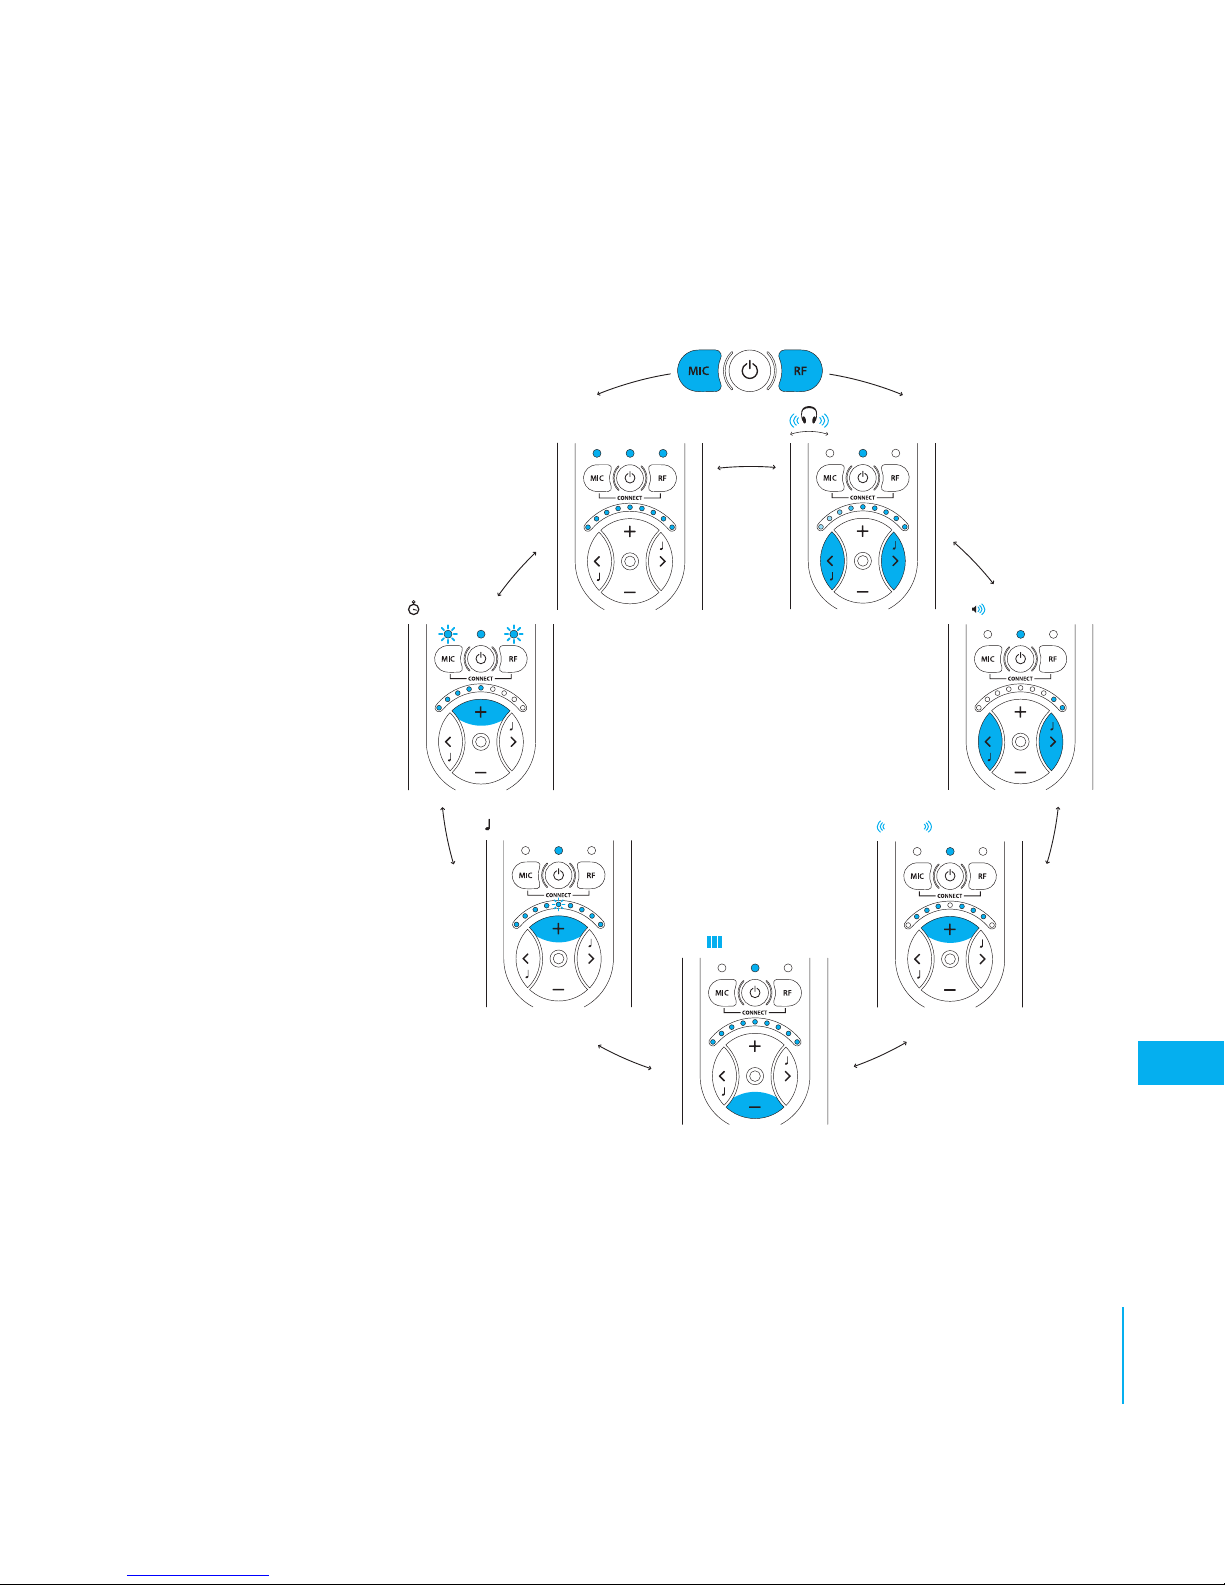
Overview of the Settings Menu
In the settings menu you can move
between the dierent settings
by pressing the R
button (7) or the M
button (5).
Each press on the
R button moves
you clockwise
on to the next
setting in the
list and the
M button
takes you
anti-clockwise
to the previous
setting in the list.
When you have
nished adjusting your
settings, give a short press on
the On/O button i (6) to return
to normal user mode.
MAX
STEREO
BASS
8 s
Page 33

316
Balance control
The balance between the right and left-hand channels can be set to compensate, for example, for a hearing loss in one ear.
Press the < button (11) to adjust the balance on
the left and the > button (12) to adjust the balance
on the right.
The standard setting is centred balance.
Basic attenuation
Dierent headphones have dierent sensitivity levels and you can
compensate for this with basic attenuation. What you actually set is the
attenuation you require at the maximum power output you want to have
(which is therefore 0 dB attenuation). This settings is useful when you want
to adjust the maximum volume in user mode for a pair of headphones or
in-ear phones with a higher sensitivity than the BE9122 Bellman Stereo
Headphones or, for example, if you want to limit the volume for a child.
Page 34
317
APP
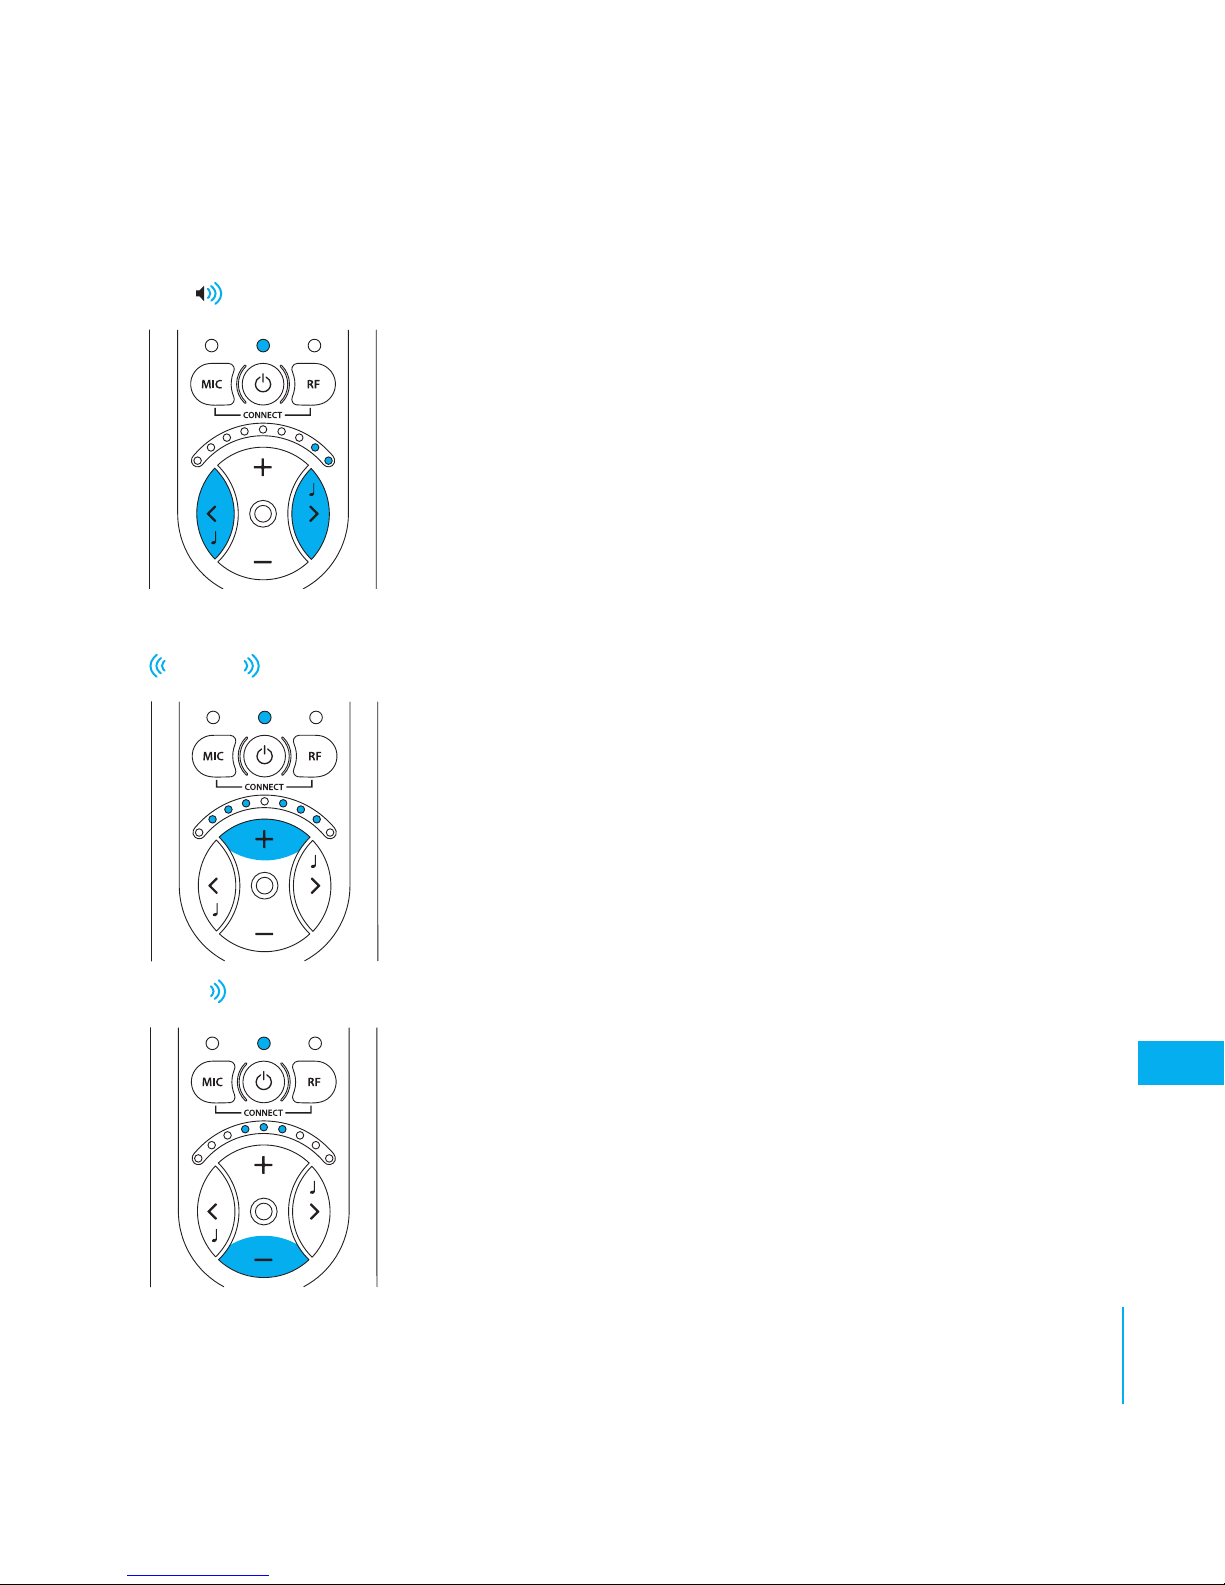
Press the - button to select Mono.
The standard setting is Stereo.
Stereo/Mono
The line-in signal can be rendered in either Stereo or
in Mono. The speech intelligibility can be increased in
certain listening situations such as when watching TV if
the signal is in Mono.
Press the + button to select Stereo.
Use the < button (11) to reduce the basic attenuation
(increase the volume) and the > button to increase
the basic attenuation (reduce the volume). The basic
attenuation is adjusted in increments of 3 dB.
The standard setting is 0 dB attenuation, which corresponds to the maximum output signal.
MAX
STEREO
MONO
Page 35

318
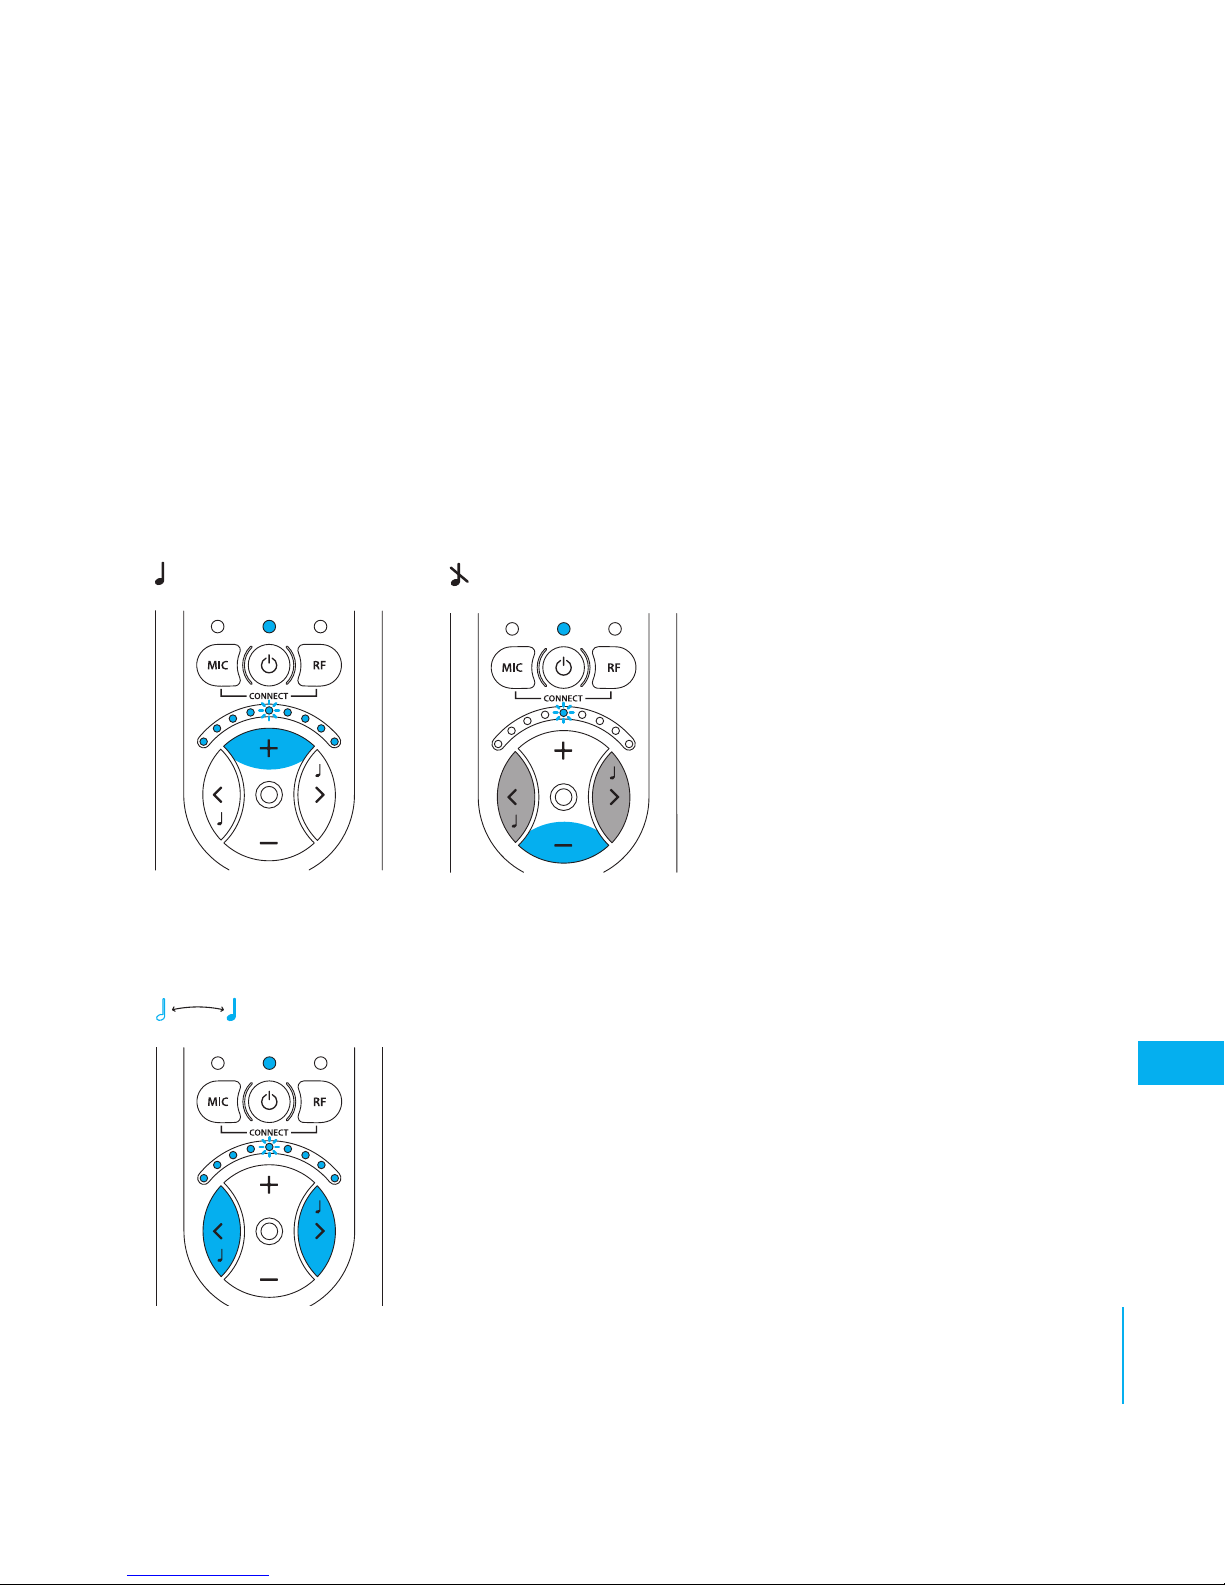
Bass reduction
Low-frequency interference such as fans and road noise can be tiring if you are
exposed to it for a long period. By activating bass reduction, low-frequency
interference and sounds are reduced.
BASS
BASS
Press the + button (9) to activate Bass Reduction.
Press the - button (10) to deactivate Bass Reduction
and get level frequency response.
The standard setting is deactivated Bass Reduction.
Page 36
319
APP
Adjusting the Tone Control
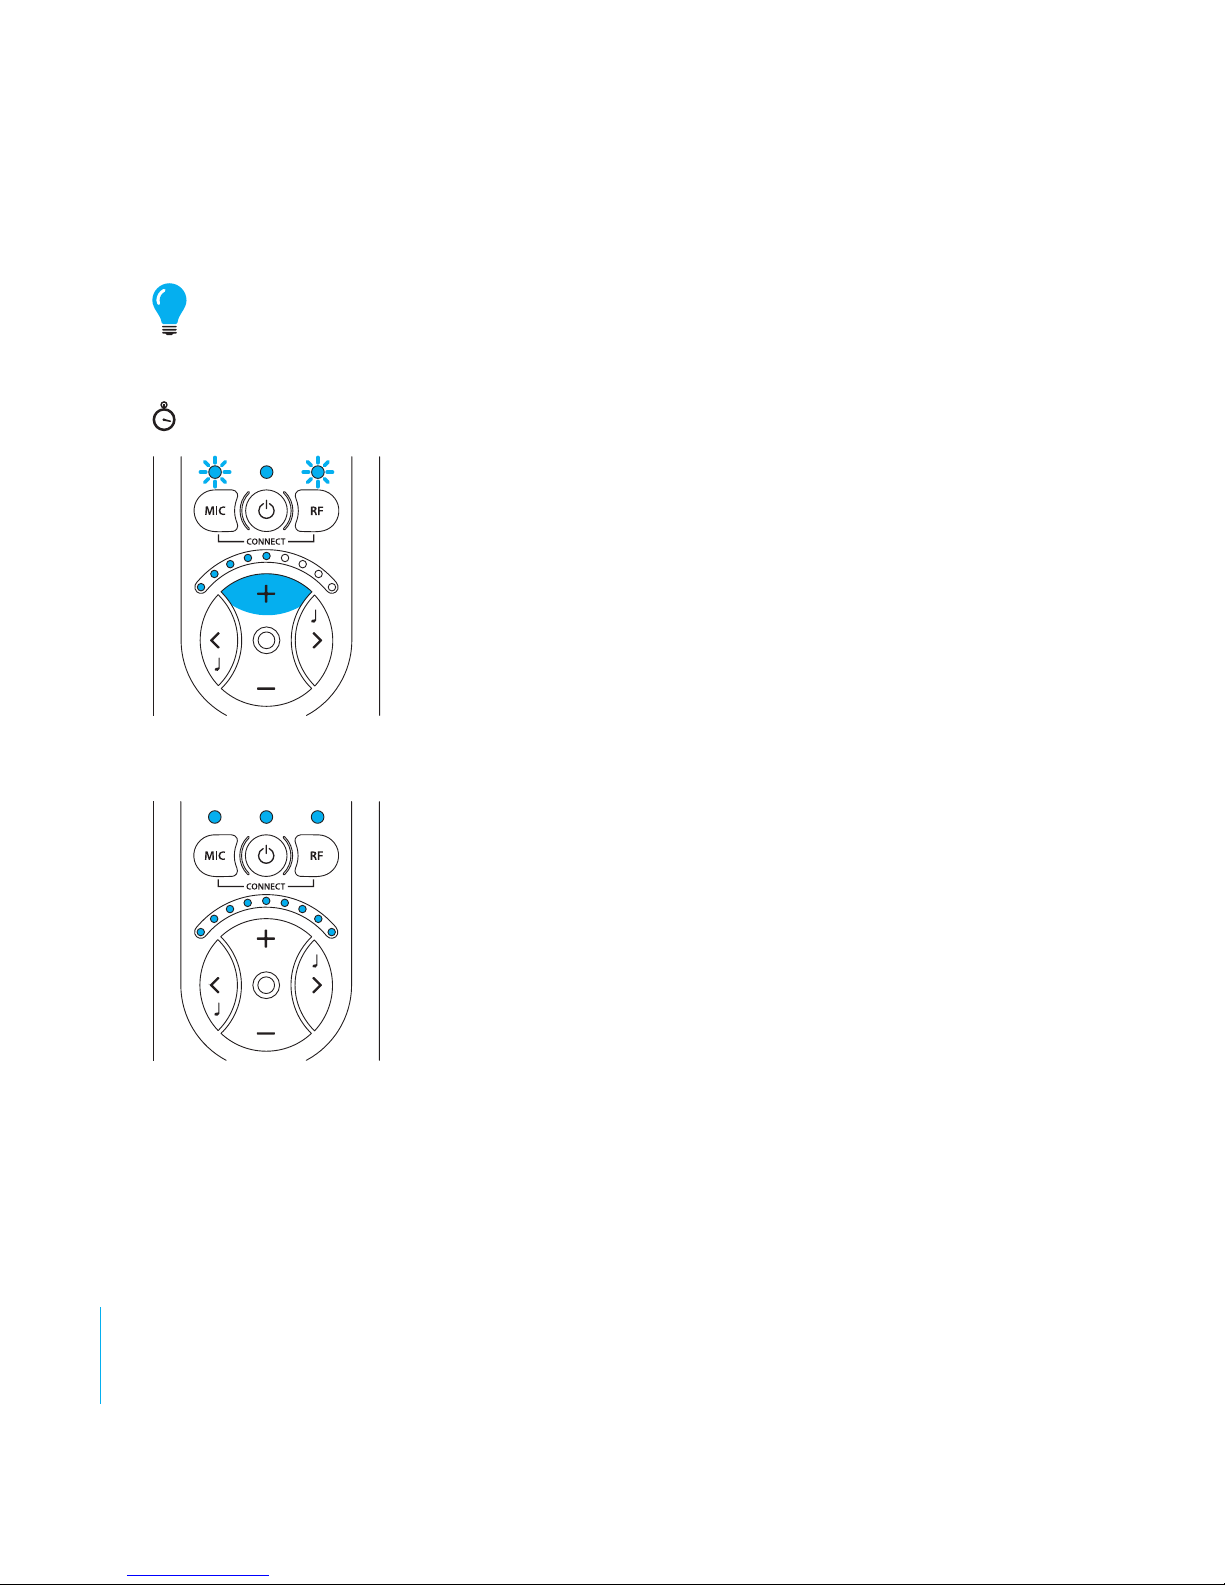
The Tone Control Blocking function has been developed in case you want to
make it easier for the user to use Bellman Audio Domino. This setting can be
used to choose whether the user should be able to adjust the tone control or
not. If you choose to switch o the tone control buttons, you can preset the
tone control that will be used in user mode.
Activating and deactivating Tone Control in User
Mode
Press the + button (9) to
activate the tone control buttons and the - button
(10) to deactivate them.
The standard setting is tone control activated.
Presetting the Tone Control
Press the < button (11) and the > button (12) to preset
the tone control to the level that will be used in user
mode.
The standard setting is Tone Control centred (level
frequency response)
Page 37
320
Please note that if the tone control is on, the preset value will be changed as
soon as the Tone Control is changed in user mode.
Resetting to the factory setting
You can use this to reset all settings to the
standard settings that the products were supplied
with from the factory.
Press and hold down the + button (9) until all the
LEDs on the display are lit. After resetting is completed, the display will blink for a short period.
Version information
The product version information is presented here
via a pattern of lit and blinking LEDs. This internal
information is only intended as an aid for servicing
and support.
8 s
Page 38
321
APP
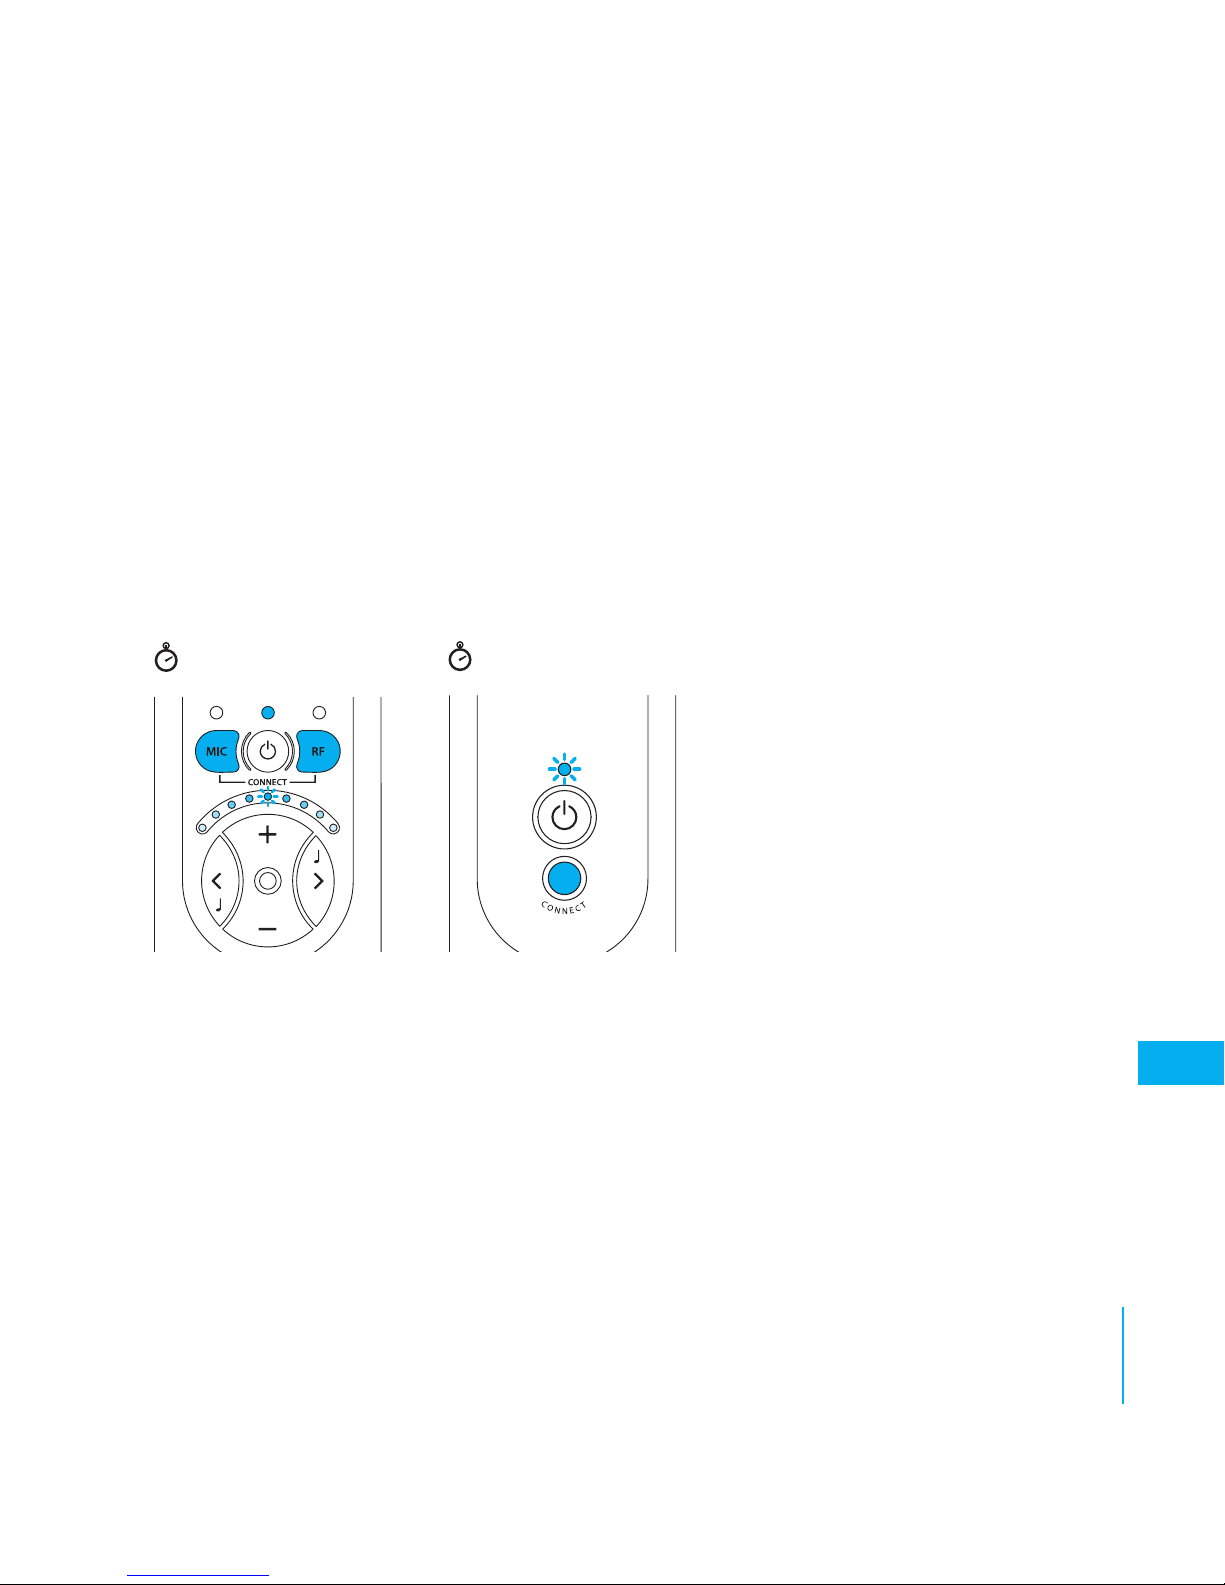
Pairing of units
The Transmitter and Receiver Units in the Bellman Audio Domino system must
have the radio link established in order for radio communication to operate.
To make it easier to get started, a Receiver Unit and a Transmitter Unit which
are paired together are always supplied so that they will work together. Where
you want to pair a Receiver Unit with a Transmitter Unit which is dierent from
the Receiver Unit it was originally supplied with, you can do this in the Settings
Menu. Proceed as follows to pair up the units:
• Start both the units with
the On/O buttons i
(6, 18).
• Go into the Settings Menu.
• Hold down the CONNECT
button (19) on the Trans-
mitter Unit.
• Hold down both the M
button (5) and the R but ton (7) on the Receiver
Unit.
A ”running light” on the Receiver Unit’s Volume and Tone LED Indicator (8)
moving towards the centre indicates that the link has been established.
5 s
5 s
Page 39

322
Please note! If you pair up a Transmitter Unit and a Receiver Unit in the
Settings Menu, this replaces the pairing carried out in the factory. This can
be useful when changing a Transmitter Unit under guarantee or if you want
to pair up several Receiver Units to a Transmitter Unit (e.g. in a conference
room).
Page 40

323
APP
Testing
It is easy to test the Bellman Audio Domino Personal Hearing System. If Bellman
Audio Domino does not operate as described below, you can carry out further
troubleshooting as instructed under Troubleshooting.
How to test
The testing of Bellman Audio Domino has been divided into three parts. One
part for the Receiver Unit for which only the Receiver Unit is required, one part
for the Transmitter Unit for which both units are required and nally one for
charging the two units.
Receiver Unit
• Switch on the unit and make sure that the Battery Status LED (3) lights up green.
• Connect the headphones to the Headphone Socket (13) and scrape carefully
on the round microphone (1) with your nger and check that there is a scraping
sound in the headphones.
• Press the M button (5) and make sure that the Microphone LED (2) changes
colour and lights up orange.
• Scrape carefully on the small microphone hole on the top (1) and the round
microphone (1) with your nger and check that there is a scraping sound in the
headphones.
• Press the buttons (9, 10, 11, 12) and check that the Volume and Tone Indicator
changes.
Page 41

324
Transmitter Unit
• Switch on the unit and make sure that the Battery Status LED (17) lights up
green.
• Press the R button (7) and make sure that the External Sound LED (4) lights up
green.
• Carefully scrape on the round microphone hole (16) on the top of the Transmit-
ter Unit with the nger and check that there is a scraping sound in the headphones.
• Press the R button (7) and make sure that the External Sound LED (4) changes
colour and lights up orange.
• Carefully scrape on the round microphone (16) on the Transmitter Unit with the
nger and check that there is a scraping sound in the headphones.
• Connect an external sound source to the External Sound Source Input (20) and
check that the sound from the sound source is heard in the headphones. The
external sound source input (20) can be tested, for example, by connecting a
CD player or a radio to the input via the audio cable supplied. The transmitter
unit automatically switches to an external sound source when a connector is
connected to the External Sound Source Input (20).
Page 42

325
APP
Charging
• Connect the charger to the mains socket and check that the LEDs on the
charger light up green.
• Connect the charging cables to both the charger and to the charging sockets
on the Receiver Unit and the Transmitter Unit (14, 21), see the fold-out section
of the manual.
• Check that the LEDs on the charger change from green to red.
• Check that the Battery Status LEDs on both the Transmitter Unit and Receiver
Unit light up orange.
Page 43

326
Troubleshooting
Problem Solution
The sound is louder in one ear
than in the other.
Adjust the Balance in the Settings
Menu.
The sound volume is low even
though the volume is set to max.
Adjust the Basic Attenuation in the
Settings Menu.
The sound is only in Mono even
though it is connected via a stereo
cable to a sound source which
provides stereo sound.
Change to Stereo in the Settings Menu.
The bass reproduction is weak. Switch o Bass Reduction in the
Settings Menu.
The Tone Control cannot be adjusted. Use the Settings Menu to activate the
Tone Control buttons or to adjust the
sound.
The Receiver Unit is behaving
strangely.
Reset the unit to the factory settings in
the Settings Menu.
Page 44

327
APP
Problem Solution
The Receiver Unit loses its link to
the Transmitter Unit when you switch
o the Receiver Unit.
Pair up the Receiver Unit and
Transmitter unit permanently in the
Settings Menu.
Humming occurs when connecting the stereo cable during charging.
Only use the charger supplied, BE9142.
Page 45

328
Technical information
Power supply
Battery power 3.7V Li-Ion battery
Operating time 8 hours (standard battery)
Transmitter charging time 2.5 hours (standard battery)
Receiver charging time 2.5 hours (standard battery)
Input signals
Microphone Built-in microphone (omnidirectional
or directional)
External sound source input 2.5 mm stereo jack plug
(0 dBV max input signal)
Output signals
Headphone socket 3.5 mm stereo jack plug
Distortion 0.05% THD (electrical)
Frequency range 40-10 000 Hz
Tone control +/- 10 dB, cut-o frequency 1.6 kHz
Output power 100 mW (16 Ω load)
Page 46

329
APP
Radio communication
Frequency 2.4 GHz, 3 channels
Range
The following may also aect the
performance:
25 metres, clear line of sight, indoors.
Walls, concrete and metal reduce the
range.
More than one Receiver is connected
to a Transmitter and at least one of
the Receivers is too far away from the
Transmit ter.
Too many Receivers are connected to
the same Transmitter.
Too many transmitters at 2.4 GHz or
too many Domino systems close to one
another.
Security Encrypted communication, automatic
channel searching, coexists with other
radio transmitters on 2.4 GHz
Page 47

330
Additional information
For indoor use only.
Dimensions WxHxD 48 x 99 x 22 (max) mm
Weight BE2210: 69 g, BE2230: 66 g
Colour Black/dark grey metallic with silver-
coloured buttons.
Regulatory requirements
CE, FCC, RoHS, WEEE,
Accessories
The following accessories are available:
• BE9122 Stereo headphones
• BE9124 Ear phones
• BE9125 Stetoclips
• BE9126 Stereo cable set, 5m (16 feet)
• BE9127 External microphone, 5m (16 feet)
• BE9128 Neck loop
• BE9143 USB car charger
• BE1360 Scart switch
Page 48
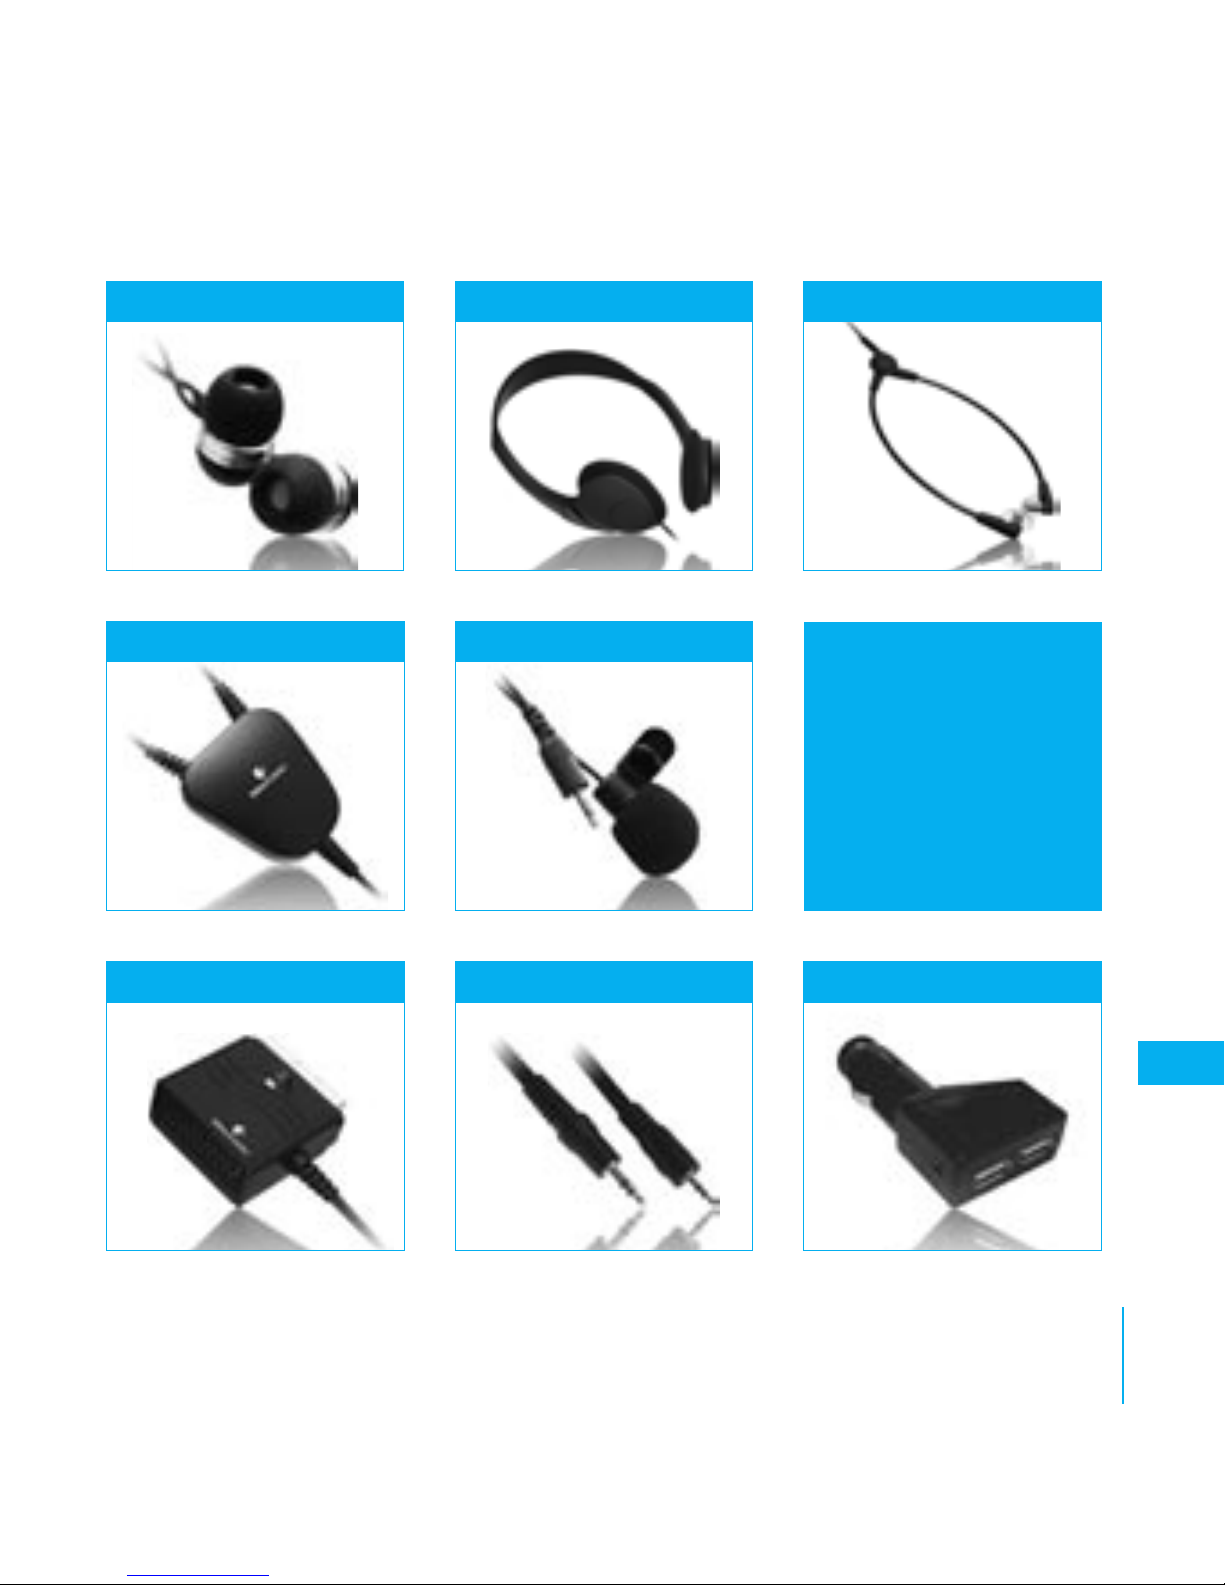
331
APP
EAR PHONES HEADPHONES STETOCLIPS
SCART SWITCH CABLE KIT, 16 FEET CAR CHARGER
NECK LOOP MICROPHONE
These original accessories are especially
developed to maximize
the performance of your
Domino. Contact your
nearest dealer or visit:
www.bellman.com
For Europe mainly
Page 49
Amendments for manual BE2210/BE2230,
version BE2210_017MAN004
Safety Regulations
Warning! The Bellman Audio Domino Personal Hearing System is
powered by rechargeable Lithium-Ion batteries. Do not expose the
batteries to fire or to direct sunlight. The batteries must only be changed
by Bellman & Symfon staff and must only be replaced by batteries of the
same type. Danger of explosion if the batteries are incorrectly replaced. The
batteries must be charged fully before using the products for the first time.
Batteries should be charged in temperatures of between +5°C and +40°C.
Warning! The AC/DC adaptor shall not be exposed to dripping or splashing
and that no objects filled with liquids, such as vases, shall be placed on apparatus. To completely disconnect the power input, the mains plug of AC/DC
adaptor shall be disconnected from the mains. The mains plug of AC/DC
adaptor should not be obstructed or should be easily accessed during intended use. The marking information is located at the bottom of AC/DC
ad aptor.
Technical information
Power supply
Battery power 3.7 V Li-Ion battery / 617 mAh, model NTA2617
BE2210_037MAN001
BE2210_037MAN001_extra safety info.indd 1 2009-09-15 10:14:50
Page 50
FCC compliance statement
This device complies with Part 15 of the FCC Rules. Operation is subject to the following two
conditions: (1) this device may not cause harmful interference, and (2) this device must accept
any interference received, including interference that may cause undesired operation.
Warning: Changes or modifications to this unit not expressly approved by the party
responsible for compliance could void the user’s authority to operate the equipment.
Note: This equipment has been tested and found to comply with the limits for a Class B
digital device, pursuant to Part 15 of the FCC Rules. These limits are designed to provide reasonable protection against harmful interference in a residential installation.
This equipment generates, uses and can radiate radio frequency energy and, if not
installed and used in accordance with the instructions, may cause harmful interference to radio communications. However, there is no guarantee that interference
will not occur in a particular installation. If this equipment does cause harmful
interference to radio or television reception, which can be determined by turning the
equipment off and on, the user is encouraged to try to correct the interference by one
or more of the following measures:
• Reorient or relocate the receiving antenna.
• Increase the separation between the equipment and receiver.
• Connect the equipment into an outlet on a circuit different from that to which the
receiver is connected.
• Consult the dealer or an experienced radio/TV technician for help.
Statement for Industry Canada
Le fonctionnement de cet équipement est soumis aux conditions suivantes:
(1 l’équipement concerné ne doit pas causer d’interférences, et (2) il doit accepter
toute interférence reçue, y compris les interférences risquant d’engendrer un fonctionnement indésirable.
BE2210_037MAN001_extra safety info.indd 2 2009-09-15 10:14:50
 Loading...